

Page 1

3PAR Service Processor User’s Guide
3PAR Inc.
4209 Technology Drive
Fremont, CA 94538 USA
Part No. 320-200247 Rev B
April 2011
Page 2

Revision Notice
This is the second release of this manual. A complete revision history is provided at the end of this document.
Changes
The material in this document is for information only and is subject to change without notice. While reasonable efforts have been
made in the preparation of this document to assure its accuracy, 3PAR Inc. assumes no liability resulting from errors or omissions in
this document or from the use of the information contained herein.
3PAR reserves the right to make changes in the product design without reservation and without notification to its users.
Updates to the Documentation at 3PAR Central
Any updates to this document, or to other 3PAR technical documents, can be found by logging in to 3PAR Central’s Document
Control System from 3PAR’s Support page at http://support.3PAR.com.
3PAR Technical Support and Services
Contact your local service provider for technical support and services at: http://www.3PAR.com/services.html.
Sales and Ordering Information
For sales and ordering information, contact:
3PAR Inc.
4209 Technology Drive
Fremont, CA 94538 USA
Telephone: 510-413-5999
Fax: 510-413-5699
Email: salesinfo@3PAR.com
Reader Comments and Suggestions
Please email your comments and suggestions about this document to ReaderComments@3PAR.com.
Copyrights
© 2010-2011 3PAR Inc. All rights reserved. No part of this publication may be reproduced, stored in a retrieval system, or transmitted
in any form or by any means, electronic, mechanical, photocopying, recording or otherwise, without the prior written consent of
3PAR Inc., 4245 Technology Drive, Fremont, CA 94538. By way of exception to the foregoing, the user may print one copy of
electronic material for personal use only.
Trademarks
3PAR, InServ, InForm, InSpire and Serving Information are registered trademarks of 3PAR Inc.
Intel and Pentium are registered trademarks of Intel Corporation.
Linux is a registered trademark of Linus Torvalds.
Citrix is a registered trademark of Citrix, Inc.
SuSE is a registered trademark of Novell, Inc.
Microsoft, Windows, and Windows NT are either registered trademarks or trademarks of Microsoft Corporation.
Oracle is a registered trademark of Oracle Corporation.
Sun, Solaris, and Java are trademarks of Sun Microsystems, Inc.
UNIX is a registered trademark of The Open Group.
All other trademarks and registered trademarks are owned by their respective owners.
Page 3

Table of Contents
1 Introduction
1.1 Supported Service Processors 1.2
1.2 Audience 1.2
1.3 Related Documentation 1.3
1.4 Organization 1.4
3PAR Service Processor User’s Guide
1.5 Typographical Conventions 1.4
1.6 Advisories 1.6
2Overview
2.1 Service Processor Connectivity 2.2
2.2 About SP Mode 2.2
2.3 About Secure Network Mode 2.3
2.4 SPMAINT 2.5
2.4.1 Accessing SPMAINT 2.5
2.4.2 The SPMAINT Interface 2.6
2.4.3 Accessing the Interactive CLI 2.6
2.5 CPMAINT 2.6
2.5.1 Accessing CPMAINT Interface 2.7
2.5.2 The CPMAINT Interface 2.7
Table of Contents
iii
Page 4

3PAR Service Processor User’s Guide
2.6 Policy Manager Overview 2.7
2.7 Secure Service Agent Overview 2.7
2.8 SPOCC Overview 2.8
3 SP Control Functions
3.1 Setting Up the Network for the Service Processor 3.2
3.2 Displaying Firewall Status or Altering Firewall Rules 3.2
3.3 Mounting or Unmounting a CD-ROM 3.4
3.4 Stopping/Starting InServ-Related Processes 3.4
3.5 Changing the SP Default Route 3.5
3.6 Changing the SP IP Address 3.5
2.8.1 Logging in to SPOCC 2.8
3.2.1 Displaying Firewall Status 3.2
3.2.2 Altering Firewall Rules 3.3
3.7 Changing the Service Processor Netmask 3.6
3.8 Changing the Service Processor Default Gateway 3.6
3.9 Changing Transfer Media Settings 3.7
3.9.1 Changing the Transfer Media 3.8
3.9.2 Changing the Remote Operations Transfer Media 3.8
3.10 Resetting the Quiesce State in Transfer Process 3.9
3.11 Administrating an SP File Transfer Trigger 3.9
3.12 Managing Date and Time Settings 3.10
3.12.1 Changing the Date 3.10
3.12.2 Changing the Time 3.10
3.12.3 Changing the Time Zone 3.11
3.13 Managing NTP Configuration 3.11
3.13.1 Displaying the NTP Configuration 3.12
3.13.2 Adding an External NTP Server 3.12
3.13.3 Removing an External NTP Server 3.12
3.14 Defining the Service Processor Process Control Parameters 3.13
iv
Table of Contents
Page 5

3PAR Service Processor User’s Guide
3.14.1 Editing File Transfer Processes 3.13
3.15 Running a SPLOR or an MSPLOR 3.16
3.16 Maintaining Service Processor Software 3.16
3.16.1 Updating Service Processor Software 3.17
3.16.2 Reverting to an Earlier Software Revision 3.17
3.16.3 Downloading a Software Revision 3.18
3.17 How to Maintain Service Processor Files 3.18
3.17.1 Displaying the Backup Control List 3.19
3.17.2 Editing the Backup Control List 3.19
3.17.3 Recovering a Previous Backup List 3.19
3.17.4 Backing Up Service Processor Rescue Data 3.20
4 Secure Service Agent Functions (CPMAINT)
4.1 Overview of the Secure Service Agent Menu (CPMAINT) 4.1
4.2 Changing Transport Mode 4.3
4.3 Displaying the 3PAR Secure Service Agent Configuration 4.3
4.4 Testing the Connection to the 3PAR Secure Service Policy Manager 4.3
4.5 Testing the Connection to the 3PAR Secure Service Collector Server 4.3
4.6 Querying Status of the Secure Service Agent 4.4
4.7 Reconfiguring the 3PAR Secure Service Policy Manager 4.4
4.8 Reconfiguring the 3PAR Secure Service Collector Server 4.4
4.9 Starting, Stopping, and Restarting the Secure Service Agent 4.5
5 3PAR Communication Settings
5.1 Introduction 5.1
5.2 Customer Controlled Access 5.2
5.2.1 Selecting the Settings 5.2
5.2.2 Changing the CCA Setting 5.3
5.3 Using the File Transfer Monitor 5.3
5.4 Managing Connection Portal Controls 5.4
Table of Contents
v
Page 6

3PAR Service Processor User’s Guide
6 Local Notification Service
6.1 Setting Up Local Notification 6.3
6.2 How to Use Notification Maintenance Utilities 6.5
6.3 How to Configure Sendmail 6.5
6.4 How to Edit the Sites Table 6.6
6.5 How to Editing Default Shifts and Exceptions 6.10
5.4.1 Activating Secure Network Mode 5.5
6.1.1 Enabling Local Notification Access 6.3
6.1.2 How to Configure Local Notification Settings During Initial Setup 6.4
6.4.1 How to add a Site 6.6
6.4.2 How to Edit the Product Table 6.6
6.4.3 How to Predefine Symptoms 6.8
6.5.1 How to Use the Global Default Shift Pattern 6.10
6.5.2 How to Use Prime Shift Patterns 6.11
6.5.3 How to Use Prime Shift Exceptions 6.11
vi
6.6 How to Enable and Disabling RAP Forwarding 6.13
6.7 How to Manage Notification Records and User Profiles 6.13
6.8 Managing User Profiles 6.14
6.8.1 Adding a User Profile 6.14
6.9 How to Manage Local Notification Records 6.15
6.9.1 How to Add a Notification Record 6.15
6.9.2 How to Edit a Notification Record 6.16
6.9.3 How to Delete a Notification Record 6.17
6.10 How to Disable Local Notification Access 6.17
A SP Process Rebuild Kit
RH Revision History
Table of Contents
Page 7

1
Introduction
In this chapter
1.2 Audience 1.2
1.3 Related Documentation 1.3
1.4 Organization 1.4
3PAR Service Processor User’s Guide
1.5 Typographical Conventions 1.4
1.6 Advisories 1.6
This guide describes how to administer the service processor that accompanies the InServ
Storage Server. The Service Processor (SP) offers two user interfaces that enable you to perform
various administrative and diagnostic tasks in support of both the InServ and the SP. This guide
explains the functions performed by the SP, shows you how to access both of its user interfaces,
and demonstrates how to perform administrative and diagnostic tasks using those interfaces.
Introduction
1.1
Page 8

3PAR Service Processor User’s Guide
1.1 Supported Service Processors
Use the following table for referring to Service Processor (SP) code version:
The following table lists supported SPs.
Table 1-1. Supported Service Processors
Part Number Description SP ID Range
F970-0017-01 Service Processor, 2U (Cal Digital) SP00001–SP00199
F970-0085-* Service Processor, 1U (DELL-650) SP00300–SP00399
F970-0088-* Service Processor, 1U (DELL-750) SP00400–SP00899
F975-0009-50-R5 Service Processor, 1U (WINTEC) SP00900–SP01999
F979-200051 Service Processor, 1U (SuperMicro) SP02000–SP02999
F975-200010 Service Processor, 1U (SuperMicro II) SP03000–SPxxxx
1.2 Audience
This user’s guide is intended for system and storage administrators who use the Service
Processor (SP) and InServ Storage Servers. The tasks described in this manual assume that the
administrator is familiar using an SP to access, monitor, and configure for communication with
3PAR headquarters.
1.2
Supported Service Processors
Page 9

1.3 Related Documentation
The following documents also provide information related to InServ Storage Servers and the
InForm Operating System:
For information about… Read the…
CLI commands and their usage InForm OS Command Line Interface Reference
3PAR Service Processor User’s Guide
Related Documentation
1.3
Page 10

3PAR Service Processor User’s Guide
1.4 Organization
This guide is organized as follows:
■ Chapter 1, Introduction (this chapter),
■ Chapter 2, Overview, provides and overview of the 3PAR Service Processor.
■ Chapter 3, SP Control Functions, explains SP control functions for configuring the Service
Processor.
■ Chapter 4, Secure Service Agent Functions (CPMAINT), explains Secure Service Agent
functions.
■ Chapter 5, 3PAR Communication Settings, explains how to set up communications settings
between the customer site and 3PAR HeadQuarters.
■ Chapter 6, Local Notification Service, explains how to set up and configure Local
Notification Service.
This guide also contains a revision history for your reference.
1.5 Typographical Conventions
This guide uses the following typographical conventions:
Typefac e Meaning Example
ABCDabcd Used for dialog
elements such as
titles, button
labels, and other
screen elements.
ABCDabcd Used for paths,
filenames, and
screen output.
1.4
Organization
When prompted, click Finish
to complete the installation.
Open the file
\os\windows\setup.exe
Page 11

Typefac e Meaning Example
3PAR Service Processor User’s Guide
ABCDabcd Used to
differentiate user
input from screen
output.
<ABCDabcd>
<ABCDabcd>
Used for variables
in filenames,
paths, and screen
output.
Used for variables
in user input.
# cd \opt\3par\console
Modify the content string by
adding the -P<x> option
after
-jar inform.jar
#.\java -jar inform.jar
-P<x>
Typographical Conventions
1.5
Page 12
3PAR Service Processor User’s Guide
1.6 Advisories
To avoid injury to people or damage to data and equipment, be sure to observe the cautions
and warnings in this guide. Always be careful when handling any electrical equipment.
NOTE: Notes are reminders, tips, or suggestions that supplement the procedures
included in this guide.
CAUTION: Cautions alert you to actions that can cause damage to equipment,
software, or data.
REQUIRED: Requirements signify procedures that must be followed as directed in
order to achieve a functional and supported implementation based on testing at
3PAR.
1.6
WARNING: Warnings alert you to actions that can cause injury to people or
irreversible damage to data or the operating system.
Advisories
Page 13

2
Overview
In this chapter
2.1 Service Processor Connectivity 2.2
2.2 About SP Mode 2.2
2.3 About Secure Network Mode 2.3
3PAR Service Processor User’s Guide
2.4 SPMAINT 2.5
2.4.1 Accessing SPMAINT 2.5
2.4.2 The SPMAINT Interface 2.6
2.4.3 Accessing the Interactive CLI 2.6
2.5 CPMAINT 2.6
2.5.1 Accessing CPMAINT Interface 2.7
2.5.2 The CPMAINT Interface 2.7
2.6 Policy Manager Overview 2.7
2.7 Secure Service Agent Overview 2.7
2.8 SPOCC Overview 2.8
2.8.1 Logging in to SPOCC 2.8
Overview
2.1
Page 14

3PAR Service Processor User’s Guide
The InServ Storage Server Service Processor (SP) is a hardware device mounted in the storage
server rack. It is designed to provide remote error detection and reporting, and to support
diagnostic and maintenance activities involving InServs. In general, only one SP is required per
operating site. However, additional SPs might be required depending on the number of
storage servers and the customer network topology.
The first storage server installed at the operating site includes an SP installed in the same
cabinet as the storage server controller nodes.
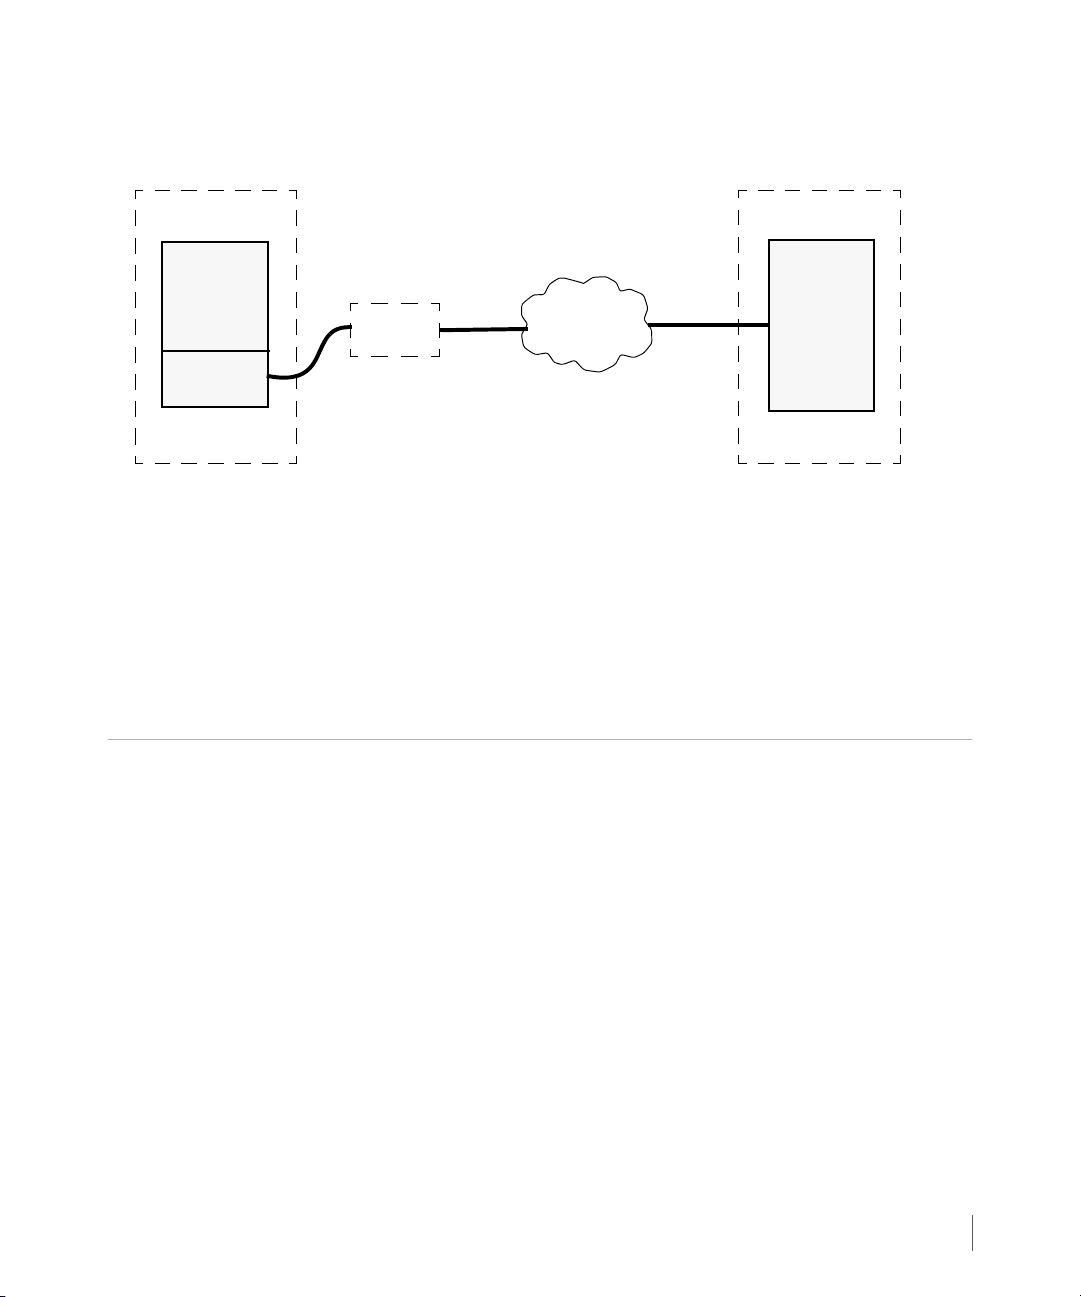
2.1 Service Processor Connectivity
The data collected by the Service Processor (SP) is used to maintain, troubleshoot, and upgrade
the SP and storages servers at the operating site. Depending on the SP’s connection mode, the
SP either communicates with a 3PAR Connection Portal or with the 3PAR Collector server.
During storage server setup, the SP can be setup in either SP mode or Secure Network mode. In
SP mode, the SP communicates with the 3PAR Connex server via a connection portal. In Secure
Network mode, the SP communicates with the 3PAR Collector server using 3PAR Secure Service
Agent software.
The connection between the SP and the connection portal can be made using either your
network and the Internet or a point-to-point connection with a modem. Connections that use
your network pass through your firewall, while connections that use a modem bypass the
firewall.
The 3PAR Secure Service Agent (SSA) is a server-based software feature that enables the SP to
communicate with the Collector server. Unlike direct SSH connections to your SP, with the SSA
it is not necessary to open additional ports on your firewall since communications are
performed with HTTPS.
SP mode and Secure Network mode are discussed further in the following sections.
2.2 About SP Mode
SP mode enables communication between an SP and the 3PAR Connex server located at 3PAR
Central using a connection portal. The Connex server provides software updates, Service
Processor Onsite Customer Care (SPOCC) service tools applications, and access to resources such
as the Document Control System (DCS). In SP mode, the Service Processor (SP) and any
connected InServ Storage Servers are supported and maintainted using the SPMAINT utility.
2.2
Service Processor Connectivity
Page 15
3PAR Service Processor User’s Guide
InServ
SP
3PAR
Connex
Server
Network
Customer Site
3PAR Central
Connection
Portal
The following figure illustrates the SP to 3PAR Central relationship in SP mode:
Figure 2-1. The SP to 3PAR Central Relationship in SP Mode
When a designated management workstation sits on the same network as the SP and is
configured to access theSP, you have the option of external communications at any time using
the Customer Controlled Access (CCA) feature, which is accessible via SPMAINT.
■ For information about SPMAINT, see 2.4 SPMAINT on page 2.5.
■ For information about SPOCC, see 2.8 SPOCC Overview on page 2.8.
2.3 About Secure Network Mode
In Secure Network mode, the SP communicates with the 3PAR Collector server using the 3PAR
Secure Service Agent (SSA). Like the Connex server, the Collector server provides software
updates, access to service tools applaications such as SPOCC, and access resources such as DCS.
Rather than using a connection portal to connect to 3PAR Central, an SP in Secure Network
mode requires the following for connection:
■ 3PAR Secure Service Agent - The 3PAR Secure Service Agent (SSA) facilitates communication
between the SP and Collector server. Communications are done with HTTPS. For additional
information about the SSA, see 2.7 Secure Service Agent Overview on page 2.7.
About Secure Network Mode
2.3
Page 16
3PAR Service Processor User’s Guide
InServ
SP
3PAR
Collector
Server
Network
Customer Site
3PAR Central
Host
running
3PAR
Policy Manager
running
3PAR SSA
■ Administered communication policies using either 3PAR Policy Manager or Customer
Controlled Access.
◆ 3PAR Policy Manager is a host application that admininsters the communication policies
between the SP and Collector server. For information about 3PAR Policy Manager, refer
to the 3PAR Secure Service Policy Manager User’s Guide.
◆ If you do not have Policy Manager, you can use the Customer Controlled Access feature,
which is accessible via SPMAINT to administer communication policies between the SP
and the 3PAR Collector server.
Secure Network mode provides access to both the SPMAINT and CPMAINT utilities. As with SP
mode, in Secure Network Mode, SPMAINT allows you to support and maintain the SP and any
connected InServs. CPMAINT allows you to support the SSA, the Collector server, and Policy
Manager.
The following figure illustrates the SP to 3PAR Central relationship in Secure Network mode:
2.4
Figure 2-2. The SP to 3PAR Central Relationship in Secure Network Mode
■ For information about SPMAINT, see 2.4 SPMAINT on page 2.5.
■ For information about CPMAINT, see 2.5 CPMAINT on page 2.6.
■ For information about SPOCC, see 2.8 SPOCC Overview on page 2.8.
About Secure Network Mode
Page 17

2.4 SPMAINT
The SPMAINT utility is the primary interface for the support (configuration, maintenance, and
firmware update) of both the InServ Storage Server and its SP. The features of this utility are
divided into the following major categories:
■ Control of the SP.
■ Communications with 3PAR Central or a local service provider.
■ Setup and administration of local notification.
2.4.1 Accessing SPMAINT
SPMAINT allows you to affect the current status and configuration of both the InServ Storage
Server and the service processor. For this reason, only one instance of SPMAINT can be run at a
time on a given storage server.
CAUTION: Many of the features and functions available through SPMAINT can
adversely affect a running InServ Storage Server. To prevent potential damage to
the system and irrecoverable loss of data, do not attempt the procedures
described in this manual until you have taken all necessary safeguards and
solicited customer involvement as appropriate.
3PAR Service Processor User’s Guide
NOTE: Because the Service Processor is designed to support connections to
multiple InServ Storage Servers simultaneously, when using the SPMAINT
interface you will encounter selection menus that allow you to select a particular
storage server on which to execute SPMAINT functions.
To access SPMAINT:
1 Initiate a Secure Shell (SSH) session to establish a connection to your SP.
2 Enter your user name and password.
SPMAINT
2.5
Page 18

3PAR Service Processor User’s Guide
2.4.2 The SPMAINT Interface
The SPMAINT terminal user interface is the primary user interface for the support of both the
InServ Storage Server and its Service Processor (SP).
The following information appears at the top of each SPMAINT menu:
■ SP serial number - The serial number uses the format SPXXXXX, where XXXXX is a 5-digit
integer.
■ Menu name - Menu names are not necessarily unique. Menus that are accessible from the
same menu often share the same name as the menu itself.
■ Vector key code - A vector key code identifies each menu, submenu, and many of the
screens available through SPMAINT. Use these codes to navigate quickly to a specific menu
or function.
■ Transfer media - The Transfer Media field indicates the current method for outbound
communications (for example, Ethernet).
■ Transfer status - The Transfer Status field indicates the status for the most recent data
transfer transaction.
2.4.3 Accessing the Interactive CLI
SPMAINT offers the interactive Command Line Interface (CLI) option, which enables you to
issue InForm CLI commands on a selected storage server, or execute commands directly on the
controller nodes.
To access the interactive CLI, enter 1.7 in the SPMAINT menu.
2.5 CPMAINT
The CPMAINT utility provides a range of administrative Secure Service Agent (SSA) functions
not available on the SPMAINT interface.
CPMAINT allows you to:
■ Change transport mode (Secure Network mode/SP mode).
■ Display the SSA configuration.
■ Test the connection to the 3PAR Policy Manager.
■ Test the onnection to the 3PAR Collector Server.
2.6
CPMAINT
Page 19

■ Query the status of the SSA.
■ Reconfigure the 3PAR Policy Manager.
■ Reconfigure the 3PAR Collector Server.
■ Start/stop/restart the SSA.
2.5.1 Accessing CPMAINT Interface
To access the CPMAINT interface:
1 Initiate a Secure Shell (SSH) session to establish a connection to your SP.
3PAR Service Processor User’s Guide
2 Enter the user name
cpmaint and your password.
2.5.2 The CPMAINT Interface
The CPMAINT terminal user interface is the primary user interface for the support of the 3PAR
Secure Service Agent, as well as a management interface for the 3PAR Policy Manager and
Collector server.
2.6 Policy Manager Overview
3PAR Secure Service Policy Manager is a host-based application, which allows you to set the
rules (policies) by which your Service Processor communicates with the 3PAR Collector server.
For complete information about Policy Manager, refer to the 3PAR Secure Service Policy
Manager User’s Guide.
2.7 Secure Service Agent Overview
The 3PAR Secure Service Agent (SSA) is a software application that resides on your Service
Processor (SP). SSA enables the communication between the SP and the 3PAR Collector server.
Unlike direct SSH connections to your SP, with the SSA there is no need to open additional
ports on your firewall since communications are done with HTTPS.
The 3PAR Secure Service Agent (SSA) is configured to communicate with the 3PAR Policy
Manager and one or more Service Processors within your network, as well as with Customer
Support at 3PAR Central. The Secure Service Agent serves as the centralized communication
point for all communications between your site and 3PAR Central. All diagnostic data transfers
and remote service connections established through the SSA are secure and controlled by your
Policy Manager Overview
2.7
Page 20

3PAR Service Processor User’s Guide
network administrators. The SSA is configured for encrypted communication through the
Secure Socket Layer/Transport Layer Security (SSL/TLS) protocols.
2.8 SPOCC Overview
Service Processor Onsite Customer Care (SPOCC) is a suite of service tools applications with a
Web-based graphical user interface that is available to you for support of the InServ Storage
Server and its service processor. SPOCC provides a vehicle to review logs and files, to store
various types of support documentation, and to manually record storage server configuration
details not directly available from the storage server itself. SPOCC offers you a Web-based
alternative to accessing most of the features and functionality available through SPMAINT.
One important feature offered by SPOCC, but not available through SPMAINT, is the ability to
create subscription-based local notification lists. Local notification is a feature designed
primarily for those who want to be automatically notified of specific events or symptoms from
a particular storage server or operating site. SPOCC allows you to enable or disable local
notification and to manage how and when you are notified of important system events.
Because the SPOCC is a Web-based interface, it is possible to have several active SPOCC sessions
running at the same time, regardless of user privilege levels.
There are many tasks that can be performed using either the SPMAINT interface or the SPOCC
interface. Because the SPMAINT interface is the primary user interface available for the
support of both the InServ and its Service Processor (SP), this guide focuses on performing tasks
through SPMAINT. When a task cannot be performed through the SPMAINT, this guide shows
you how to perform that task using the SPOCC.
2.8.1 Logging in to SPOCC
NOTE: It is also possible to access the SPOCC through a management workstation,
a machine that has been defined in the SP’s public firewall rules. One or more
management workstations are typically defined as part of the installation and
setup of the storage server and SP, as described in the 3PAR InServ Storage Server
Installation and Deinstallation Guides. See 3.2.2 Altering Firewall Rules on
page 3.3 for instructions on adding additional management workstation through
SPMAINT.
To log into SPOCC:
2.8
SPOCC Overview
Page 21

3PAR Service Processor User’s Guide
1 Type the IP address of the SP in the Web browser and then press ENTER; the Service
Processor Login menu appears
2 Press
ENTER.
The Enter Network Password dialog box appears
3 Type your user ID and password, then click OK.
SPOCC Overview
2.9
Page 22

3PAR Service Processor User’s Guide
2.10
SPOCC Overview
Page 23

3
SP Control Functions
In this chapter
3.1 Setting Up the Network for the Service Processor 3.2
3.2 Displaying Firewall Status or Altering Firewall Rules 3.2
3.3 Mounting or Unmounting a CD-ROM 3.4
3PAR Service Processor User’s Guide
3.4 Stopping/Starting InServ-Related Processes 3.4
3.5 Changing the SP Default Route 3.5
3.6 Changing the SP IP Address 3.5
3.7 Changing the Service Processor Netmask 3.6
3.8 Changing the Service Processor Default Gateway 3.6
3.9 Changing Transfer Media Settings 3.7
3.11 Administrating an SP File Transfer Trigger 3.9
3.12 Managing Date and Time Settings 3.10
3.13 Managing NTP Configuration 3.11
3.14 Defining the Service Processor Process Control Parameters 3.13
3.15 Running a SPLOR or an MSPLOR 3.16
3.16 Maintaining Service Processor Software 3.16
SP Control Functions
3.1
Page 24

3PAR Service Processor User’s Guide
3.17 How to Maintain Service Processor Files 3.18
3.1 Setting Up the Network for the Service Processor
The SP Network submenu allows you to manage the network and dialup settings for the
Service Processor.
To access the SP Network submenu, type the following menu options from the SP main menu:
1 Typ e 2 for Network Configuration and press
2 Typ e 4 for Change Public Network Interface Parameters and press
The current values are displayed along the right column. As you edit the values displayed in
this menu, the new values appear to the right of the current values. Modifications made with
this submenu are not permanent until they are saved or activated from this menu using menu
option A. The modifications are not retained if you quit this menu without saving or activating
them.
ENTER.
3.2 Displaying Firewall Status or Altering Firewall Rules
The SP Control FW (Firewall) submenu provides you with the ability to display and alter the
status of the Service Processor resident firewall.
3.2.1 Displaying Firewall Status
To access the SP Control FW submenu, select the following menu options from the SPMAINT
main menu:
1 Typ e 2 for Network Configuration and press
2 Typ e 3 for Firewall Manipulation and press
ENTER.
ENTER.
ENTER.
3.2
3 Typ e 1 for Display Firewall Status and press
Setting Up the Network for the Service Processor
ENTER.
Page 25

3.2.2 Altering Firewall Rules
It is also possible to use the SP Control FW submenu to add unique IP addresses to the two
logical network interfaces so it may access the Service Processor (SP). These defined
connections are nonvolatile and exist across restarts of the SP.
The two types of logical network interfaces are as follows:
◆ The public interface is connected to the customer’s network, and is where the InServ
Storage Servers are located. It is also the means of connecting with a gateway to the
Internet.
◆ The private interface is used by service providers for access to the SP.
There are two types of workstations that might need access to the Service Processor across the
firewall through these interfaces:
■ The management workstation is a host on the public network with a static IP address. This
management workstation is usually defined as part of the storage server installation and
setup, as described in the 3PAR InServ Storage Server Installation and Deinstallation Guides.
Management workstations enable you at the customer site to access the SP and storage
server from within the customer network.
3PAR Service Processor User’s Guide
■ The maintenance workstation is a host on the public network with a static IP address.
Maintenance workstations, when present, enable you to access the SPs and storage servers.
When adding additional management or maintenance workstations, the only protocols
allowed on these additional hosts are SSH and HTTP. Adding these hosts here opens ports 22
and 80 for connections from SSH and HTTP, respectively. These additions are persistent because
upon restart, they are automatically added to the firewall.
Displaying Firewall Status or Altering Firewall Rules
3.3
Page 26

3PAR Service Processor User’s Guide
3.3 Mounting or Unmounting a CD-ROM
When using a CD to deploy a software update or InForm installation via the Service Processor
(SP), the CD needs to be mounted and unmounted.
To mount a CD-ROM:
1 Insert a CD into the SP’s CD-ROM.
2 From the SPMAINT main menu, type 1 for SP Control/Status and press
3 Typ e 9 for Mount a CDROM from the SP main menu and press
4 When prompted, type y and press
■ To unmount a CD-ROM:
1 Typ e 10 for Unmount a CDROM and press
2 When prompted, type y and press
ENTER to mount the CD.
ENTER.
ENTER to unmount the CD.
3 Remove the CD from the CD-ROM.
3.4 Stopping/Starting InServ-Related Processes
This feature allows you to stop and start the spevent and spcollect processes to a
particular storage server (InServ). It may be useful as a diagnostic to stop and then start the
InServ-related processes if you are having problems with the Service Processor (SP)
communicating with the storage server.
Unlike maintenance mode, stopping InServ-related processes does not attempt to limit or
accept events that can occur while InServ-related processes are stopped. When the processes
are restarted manually or as a result of restarting the SP, all pending events are transferred to
3PAR Central or a local service provider.
ENTER.
ENTER.
3.4
To stop or start InServ-related processes:
1 From the SPMAINT main menu, type 1 for SP Control/Status and press
ENTER.
2 Typ e 4 for Stop InServ related Processes or 5 for Start InServ related Processes and
press
ENTER.
3 Select the InServ to stop or start related processes and press
Mounting or Unmounting a CD-ROM
ENTER.
Page 27

4 When prompted, confirm the stopping of InServ-related processes.
3.5 Changing the SP Default Route
Changing the Service Processor (SP) default route affects the network setting for handling
routing decisions to destinations not local to the Service Processor. The SP default route is the
communication link to a proxy host or the outside world. Typically, the same host is designated
as the gateway (see 3.8 Changing the Service Processor Default Gateway).
To change the SP route:
3PAR Service Processor User’s Guide
1 From the SPMAINT main menu, type 2 for Network Configuration and press
2 Typ e 4 for Change public network interface parameters and press
3 Typ e 2 for Change Default Route and press
4 Type a new default route and press
5 The SP Network submenu appears; the new Default Route appears to the right of the
current Default Route. Type A, and press
Route.
3.6 Changing the SP IP Address
To change the Service Processor’s IP address, select the following menu options from the
SPMAINT main menu:
1 From the SPMAINT main menu, type 2 for Network Configuration and press
2 Typ e 4 for Change public network interface parameters and press
3 Typ e 3 for Change IP Address and press
4 From the Modify SP IP menu, type a new IP address and press
ENTER.
ENTER.
ENTER.
ENTER.
ENTER to quit, save, and activate the new Default
ENTER.
ENTER.
ENTER.
ENTER.
5 The SP Network submenu appears, and the new IP address appears to the right of the
current IP address. Type A, and press
ENTER to quit, save, and activate the new IP address.
Changing the SP Default Route
3.5
Page 28

3PAR Service Processor User’s Guide
3.7 Changing the Service Processor Netmask
To change the Service Processor netmask, type the following menu options from the SPMAINT
main menu:
1 From the SPMAINT main menu, type 2 for Network Configuration and press
2 Typ e 4 for Change public network interface parameters and press
3 Typ e 4 for Change Netmask and press
ENTER.
4 The Modify Netmask menu appears, type a new netmask and press
3.8 Changing the Service Processor Default Gateway
The IP address of the device on the local (public) network segment (or subnet), acts as a route
to the rest of your network. Typically, the IP address of the device is the same address as the
default route (see 3.5 Changing the SP Default Route). However, for some networks, where
Routing Information Protocol (RIP) is disallowed, it may be necessary to define a separate
device for this function.
To change the Service Processor default gateway:
1 From the SPMAINT main menu, type 2 for Network Configuration and press
2 Typ e 4 for Change public network interface parameters and press
3 Typ e 5 for Change Gateway and press
4 Type a new gateway and press
ENTER.
ENTER.
ENTER.
ENTER.
ENTER.
ENTER.
ENTER.
3.6
5 The SP Network submenu appears, and the new default gateway address appears to the
right of the current gateway address. Type A and press
ENTER to quit, save, and activate the
new default gateway address.
Changing the Service Processor Netmask
Page 29

3.9 Changing Transfer Media Settings
Use the SP Transfer Medias submenu to alter the settings for the media the Service Processor
(SP) uses when communicating with its associated connection portal.
NOTE: You cannot change the Transfer Media Settings in Secure Network Mode.
The following settings can be found in the SP Transfer Medias submenu:
■ Data transfer involves external communications between the SP and the connection portal.
■ Remote operations include problem solving and diagnostics performed from a remote
location.
To access the SP Transfer Medias submenu:
3PAR Service Processor User’s Guide
1 From the SPMAINT main menu, type 2 for Network Configuration and press
ENTER.
2 Typ e 5 for Change Transfer Media/SP Phone Number from the Networks menu and
press
ENTER.
3 Typ e 1 for Data Transfer, and press
4 Typ e Ethernet, Modem, or Off and press
ENTER.
ENTER to change the method of data transfer.
The following subsections describe how to perform tasks related to each of the functions
available through the SP Transfer Medias submenu.
Changing Transfer Media Settings
3.7
Page 30

3PAR Service Processor User’s Guide
3.9.1 Changing the Transfer Media
Use this sub option to alter the media the Service Processor uses for sending an event or alert
data and related files to a connection portal.
To change the transfer media:
1 From the SP Transfer Medias submenu, type 1, Data Transfer and press
2 When the SP Transfer Medias Configuration menu appears, type E|e, M|m, or O|o and press
ENTER. The SP Transfer Medias submenu appears.
NOTE: The SP Transfer Medias submenu may show additional items. Changed
options appear to the right of the current values.
3 Make any additional changes to Service Processor phone number and dial-in prefix as
necessary.
4 When finished, type A and press ENTER to quit, save, and activate the new transfer media
settings.
3.9.2 Changing the Remote Operations Transfer Media
Use this sub option to alter the media the Service Processor (SP) uses when conducting
problem-solving activities and diagnostics performed from a remote location.
To change the remote operations transfer media:
1 From the SP Transfer Medias submenu, type 2 for Remote Operations and press
The SP Transfer Medias Configuration menu for remote operations appears
ENTER.
ENTER.
3.8
2 Typ e E|e for Ethernet,
The SP Transfer Medias submenu appears.
NOTE: The SP Transfer Medias submenu may show additional items. Changed
options appear to the right of the current values.
Changing Transfer Media Settings
M|m for modem, or O|o for off and press ENTER.
Page 31

3PAR Service Processor User’s Guide
3 Make any additional changes to the SP phone number and dial-in prefix, if applicable.
4 When task is complete, type A and press
operations transfer media settings.
ENTER to quit, save, and activate the new remote
3.10 Resetting the Quiesce State in Transfer Process
The transfer control process (SPtransfer) can quiesce itself for varying lengths of time because
of errors in transmission, a change in the state of the Customer Controlled Access, or for other
purposes. Use the Reset Quiesce state in Transfer process option on the SP Transfer Settings
menu to force the SPtransfer command to quit its quiesced state. This is mainly a diagnostic
operation.
To force the transfer process to reset:
1 From the SPMAINT main menu, type 1 for SP Control/Status and press
2 Typ e 8 for Reset Quiesce state in Transfer process and press
NOTE: This option does not display any menu output, even though the signal is
sent to the process. It is not necessary to confirm this action.
ENTER.
ENTER.
3.11 Administrating an SP File Transfer Trigger
Use the SP File Transfer Trigger option on the SP Control menu to force the logging function on
the Service Processor (SP) to switch to a new log and queue the old one for transfer to the
connection portal. This is done mainly for diagnostic purposes at the request of an authorized
3PAR service representative or a local service provider.
To force a transfer trigger:
1 From the SPMAINT main menu, type 1 for SP Control/Status and press
2 Typ e 7 for SP File Transfer Trigger from the File/Log Transfer menu and press ENTER.
3 Typ e 1 and press
To create a Service Processor Log Out Request (SPLOR) and transfer, type 19 and press
The SPLOR creates a diagnostic archive of data related to the SP state and configuration.
ENTER to confirm the transfer.
Resetting the Quiesce State in Transfer Process
ENTER.
ENTER.
3.9
Page 32

3PAR Service Processor User’s Guide
3.12 Managing Date and Time Settings
Use the SP System Date/Time submenu to alter the date, time, and time zone for the Service
Processor (SP).
CAUTION: If using an NTP server, do not change the time setting for the SP unless
the SP is not synchronized with the NTP server.
To access the SP System Date/Time submenu:
1 From the SPMAINT main menu, type 1 for SP Control/Status and press
2 Typ e 11 for SP Date/Time/Geographical Location maintenance and press
The following subsections describe how to perform tasks related to each of the functions
available through the SP System Date/Time/Geographical Location submenu.
3.12.1 Changing the Date
To change the Service Processor date:
1 From the SP System Date/Time submenu, type 1 for Change the Date and press
2 When prompted, type the new date in YYYY/MM/DD format and press
3 When prompted, type y and press
3.12.2 Changing the Time
To change the Service Processor time:
1 From the SP System Date/Time submenu, type 2 for Change the Time and press
2 When prompted, type the new time in 24-hour format (HH:MM) and press
3 When prompted, type y and press
ENTER.
ENTER.
ENTER.
ENTER.
ENTER to confirm the date change.
ENTER.
ENTER.
ENTER to confirm the time change.
3.10
Managing Date and Time Settings
Page 33

3.12.3 Changing the Time Zone
If altering the time zone setting for the Service Processor, answer the following guided menus
and press
■ Continent or ocean
■ Country
■ Time zone region
Verify or set the date and time before continuing.
To change the time zone setting:
ENTER to confirm the following information:
3PAR Service Processor User’s Guide
1 From the SP System Date/Time submenu, type 3 for Change the timezone and press
2 When prompted, type y and press
ENTER to launch the time zone configuration sequence.
3.13 Managing NTP Configuration
Use the Manage NTP Configuration (NTPCONF) submenu to manage the Service Processor
network time protocol (NTP) and NTP server configuration settings.
The SP serves the NTP for any attached InServ Storage Servers. This can be a closed time
domain (SP and storage servers), or the NTP can be a client of any number of customer NTP
servers.
To access the NTPCONF submenu:
1 From the SPMAINT main menu, type 1 for SP Control/Status and press
2 Typ e 12 for Manage NTP Configuration and press
The subsections that follow describe how to perform tasks related to each of the functions
available through the NTPCONF submenu.
ENTER.
ENTER.
ENTER.
Managing NTP Configuration
3.11
Page 34

3PAR Service Processor User’s Guide
3.13.1 Displaying the NTP Configuration
To display the current Service Processor (SP) NTP configuration:
1 From the NTPCONF submenu, type 1 for Display NTP Configuration and press
2 Press
ENTER to return to the NTPCONF submenu.
NOTE: The output displays the content of the NTP configuration ntp.conf file
that shows the running parameters for the active NTP instance on the SP.
3.13.2 Adding an External NTP Server
To add an external NTP server to the Service Processor NTP configuration settings:
1 From the NTPCONF submenu, type 2 for Add external NTP server and press
2 When the NEWNTP menu appears, type the IP address for the NTP server and press
3 When prompted, confirm the addition of the new NTP server.
3.13.3 Removing an External NTP Server
To remove an existing external NTP server from the Service Processor NTP configuration
settings:
1 From the NTPCONF submenu, type 3 for Remove external NTP server and press
2 Type the number corresponding to the external NTP server set to be deleted from the SP
configuration settings and press
ENTER.
ENTER.
ENTER.
ENTER.
ENTER.
3.12
3 When prompted, type y and press
Managing NTP Configuration
ENTER confirm the NTP server configuration removal.
Page 35

3PAR Service Processor User’s Guide
3.14 Defining the Service Processor Process Control Parameters
The SP Process Control Parameters function permits authorized users to view and alter the
content of some process control variables. These parameters control mainly the transferring
and handling of data destined for the connection portal.
To access the SP Process Control Parameters submenu:
1 From the SPMAINT main menu, type 1 for SP Control/Status and press
2 Typ e 15 for SP Process Control Parameters and press
ENTER.
ENTER.
3.14.1 Editing File Transfer Processes
Use the SP Process Control Parameters submenu to edit the file transfer processes parameters
for the Service Processor.
Table 3-1. Lists all parameters by ID number, provides their default values, and notes how they are
impacted by editing their values.
ID Default Value Notes
1 False Use Last In First Out (LIFO) when selecting next file to transfer
2 1 Perform transfer when this number of files are queued
3 15 Perform transfer at least every this number of days
4 1047527424 Maximum size, in Mbytes, of file queued for transfer via modem.
Larger file(s) are kept for 14 days
5 1047527424 Maximum size, in Mbytes, of file queued for transfer via ethernet.
Larger file(s) are kept for 14 days
6 Tru e Controls the breaking down of large files (see next four(4) parameters)
7 10485760 Maximum size, in Kbytes, of a file to transfer over modem
8 10485760 When file size exceeds modem max size, break in down in parts this
size, in Kbytes
9 52428800 Maximum size, in Kbytes, of a file to transfer over ethernet
Defining the Service Processor Process Control Parameters
3.13
Page 36

3PAR Service Processor User’s Guide
ID Default Value Notes
10 52428800 When file size exceeds ethernet max size, break in down in parts this
size, in Kbytes
11 True Controls whether or not files are transferred over modem when
Remote Operation is active
12 NONE File type(s), maximum 5, that should be transferred first (comma[,]
separated list.)
13 True Controls the grouping of small files for transfer
14 50 Maximum number of files that can be grouped together for transfer
15 60 Wait this number of seconds before closing the current file group
16 SPxfertest Upload directory on Connection Portal (Relative to logon directory ../
stapp/)
17 SPdownload Download directory on Connection Portal (Relative to logon directory
../stapp/)
18 300 Minimum time, in seconds, that SPtransfer will remain quiesced
19 7200 Maximum time, in seconds, that SPtransfer will remain quiesced
To edit the file transfer process parameters on the Service Processor:
1 From the SP Process Control submenu, type 1 for Alter Process Control Parms and press
ENTER.
The screen displays the current file transfer process settings.
2 Type the number corresponding to the process to reconfigure and press
3 Type the ID number corresponding to the parameter selected for editing and press
4 Type a new value for the parameter and press
5 You are prompted to
ENTER additional parameter IDs.
ENTER.
ENTER.
ENTER.
6 When finished editing parameters, type 0 and press ENTER.
3.14
Defining the Service Processor Process Control Parameters
Page 37

3PAR Service Processor User’s Guide
7 When prompted, type y and press ENTER to save and activate your changes.
Saving and activating your changes automatically returns to the SP Control submenu.
Defining the Service Processor Process Control Parameters
3.15
Page 38

3PAR Service Processor User’s Guide
3.15 Running a SPLOR or an MSPLOR
■ To collect data to diagnose SP issues, run a Service Processor Log Out Request (SPLOR).
■ To collect data to diagnose SP installation issues, run a Mini Service Processor Log Out
Request (MSPLOR).
To run a SPLOR:
1 From the SPMAINT main menu, type 1 for SP Control/Status and press
2 Typ e 19 for Take a SPLOR and press
3 Once finished, press
ENTER to continue.
ENTER.
To run an MSPLOR:
1 From the SPMAINT main menu, type 1 for SP Control/Status and press
2 Typ e 20 for Take an MSPLOR and press
3 Once finished, press
ENTER to continue.
ENTER.
3.16 Maintaining Service Processor Software
The Maintain SP Software functions provides access to an SP Control Functions submenu for
managing the Service Processor (SP) application software.
There are two update repositories on the SP, alternately pointed to as the current production
repository. If repository 1 is the current repository, repository 2 is cleared and loaded with the
new version of the software. The two repositories provides a quick regression to the previous
software release level if a problem occurs during the upgrade. When invoked, the feature
provides a choice of all the available levels currently saved on the SP or the ability to point to
the newest update stored on some available SP resource such as another directory or a CD
ROM.
ENTER.
ENTER.
3.16
To access the SP Control Functions submenu:
1 From the SPMAINT main menu, type 1 for SP Control/Status and press
2 Typ e 16 for Maintain SP Software and press
ENTER.
The following subsections describe how to perform tasks related to each of the functions
available through the SP Control Functions submenu.
Running a SPLOR or an MSPLOR
ENTER.
Page 39

3.16.1 Updating Service Processor Software
Authorized users can use the Update SP Software Revision function to apply updates to the
Service Processor (SP) software. Updates are always in the form of packaged distributions. The
deployed update can reside in the cache of the SP (displayed in the list), from a different
location on the SP (CD ROM, floppy disk, or other directory), or from a remote connection
portal.
To update the SP software:
3PAR Service Processor User’s Guide
1 From the SP Control submenu, type 1 for Update SP Software Revision and press
The SP Software Selection menu appears.
■ To update to a software version listed on the menu, type the number corresponding to the
menu item and press
■ To update to a software version on CD ROM, type the number corresponding to CDROM on
ENTER.
the menu and press ENTER.
2 To enter an alternate location, type 0 and press
ENTER.
3 When prompted, enter the full path name of the SP software update location and press
ENTER.
4 When prompted, confirm the list of RPM modules in the distribution. Type y and press
ENTER to proceed with the upgrade.
After confirming to proceed with the update, a list of the changed packages displays during
the progress of the update. Following the update, SPMAINT automatically restarts.
3.16.2 Reverting to an Earlier Software Revision
The Service Processor (SP) software revision level can also be reverted to the previously active
software level. This can be done multiple times. The number of REVERT levels of software is
maintained via the Manage Archive of SP Revisions function.
ENTER.
This menu option does not appear unless a previous software level is available.
To revert to an earlier revision of the SP software:
1 On the SP Control submenu, type 1 for Update SP Software Revision and press
A list of locally cached software levels appears.
2 Type the number that corresponds with the REVERT menu item and press ENTER.
Maintaining Service Processor Software
ENTER.
3.17
Page 40

3PAR Service Processor User’s Guide
A list of archived versions appears.
3 Type the number corresponding to the version and press
4 When prompted, confirm the list of RPM modules in the distribution. Type y and press
ENTER to proceed with the reversion.
After your confirmation, the reversion executes and a list of the changed packages displays.
The SPMAINT automatically restarts after the reversion completes.
3.16.3 Downloading a Software Revision
Use the Update SP Software Revision function and the SP Control Revision submenu to
download a software revision package for the purposes of staging an upgrade to be
performed at a later time.
To download a software revision package:
1 From the SP Control submenu, type 2 for Download/Stage SP/InServ Software Revision
and press
2 Enter the full path name of the SP software update location and press
After the package is downloaded and extracted, a list of RPM modules in the distribution
appears.
ENTER. The SP Update Unlisted Location screen appears.
ENTER.
ENTER.
3.18
3.17 How to Maintain Service Processor Files
SP File Maintenance functions enable you to administrate the Service Processor (SP) backup
and restore data function. The feature is only a partial backup for critical data files. The archive
is compressed and stored either locally or on the connection portal. The function is designed to
facilitate recovery of an SP setting to a workable state if the SP requires a re-image on site, or
replaced as a FRU. Refer to the documentation of the SP Rescue operation in the 3PAR Service
Processor Troubleshooting Guide and 3PAR Service Processor Software Rebuild Instructions for
more details.
To access the SP File Maintenance submenu, at the SP Control menu, type 17 and press ENTER.
1 From the SPMAINT main menu, type 1 for SP Control/Status and press
2 Typ e 17 for SP File Maintenance and press
appears.
How to Maintain Service Processor Files
ENTER. The SP File Maintenance submenu
ENTER.
Page 41

The following subsections describe how to perform tasks related to each of the functions
available through the SP File Maintenance submenu.
3.17.1 Displaying the Backup Control List
To display the list of items of the backup archive for the Service Processor from the SP File
Maintenance submenu, type 1 for Display SP backup control list and press
backup components appears.
3.17.2 Editing the Backup Control List
Authorized users can add or remove items from the backup control list. Choosing this option
permits direct editing of the list in a VI (1M) editing session. The VI editor is a screen-based
editor used by many Unix users.
To edit the backup control list:
3PAR Service Processor User’s Guide
ENTER. A list of
1 At the SP File Maintenance submenu, type 2 and press
appears.
2 Typ e y and press
3 After editing the backup control list, perform one of the following:
a Press ESC, type
b Press ESC, type
c The Edit Backup Control List confirmation screen appears. Type y, and press
promote the new list.
After the new list is promoted, the SP File Maintenance submenu reappears.
ENTER to start editing the backup control list with the VI editor.
: q !, and press ENTER to quit without saving your changes.
: w q, and press ENTER to write your changes and then quit
3.17.3 Recovering a Previous Backup List
A previous backup control list is recoverable by reverting a previous list. Only one level of
recovery is supported. In addition, this feature is only available to users who are authorized to
edit the backup control list.
To revert to the previous backup control list:
1 At the SP File Maintenance submenu, type 3 for Recover previous SP backup control
list and press
ENTER.
ENTER. A confirmation screen
ENTER to
2 After verifying the new list, press ENTER to continue.
How to Maintain Service Processor Files
3.19
Page 42

3PAR Service Processor User’s Guide
3 Typ e y and press ENTER to promote the new list.
After the new list is promoted, the SP File Maintenance submenu reappears.
3.17.4 Backing Up Service Processor Rescue Data
Authorized users can create an archive of a backup SP rescue data file at any point in time.
To initiate a manual SP backup:
1 At the SP File Maintenance submenu, type 4 for Backup SP rescue data and press
2 The SP Data Backup confirmation screen appears. Type y and press
backup.
After the backup completes, a confirmation message appears.
ENTER to initiate the
ENTER.
3.20
How to Maintain Service Processor Files
Page 43

4
Secure Service Agent
Functions (CPMAINT)
In this chapter
4.1 Overview of the Secure Service Agent Menu (CPMAINT) 4.1
4.2 Changing Transport Mode 4.3
3PAR Service Processor User’s Guide
4.3 Displaying the 3PAR Secure Service Agent Configuration 4.3
4.4 Testing the Connection to the 3PAR Secure Service Policy Manager 4.3
4.5 Testing the Connection to the 3PAR Secure Service Collector Server 4.3
4.6 Querying Status of the Secure Service Agent 4.4
4.7 Reconfiguring the 3PAR Secure Service Policy Manager 4.4
4.8 Reconfiguring the 3PAR Secure Service Collector Server 4.4
4.9 Starting, Stopping, and Restarting the Secure Service Agent 4.5
4.1 Overview of the Secure Service Agent Menu (CPMAINT)
The main menu screen of the Secure Service Maintenance Task (CPMAINT) appears after you
log into CPMAINT. Enter the number of the function you want from the main menu to access
the that function’s menu, and follow the on-screen instructions for each function. The
CPMAINT main menu is shown below.
Secure Service Agent Functions (CPMAINT)
4.1
Page 44

3PAR Service Processor User’s Guide
1 To access the CPMAINT utility, log in as user cpmaint.
2 From the
3PAR Secure Service Agent Maintenance Task - MP09114
Transfer media: ethernet Transfer status: Ok
Currently running with Secure Network Mode transport
Enter Control-C at any time to abort this process
What do you wish to do?
1 ==> Change transport mode (Secure Network/SP)
2 ==> Display 3PAR Secure Service Agent configuration
3 ==> Test connection to the 3PAR Secure Service Policy Manager
4 ==> Test connection to the 3PAR Secure Service Collector Server
5 ==> Query status of the SSAgent agent
6 ==> Reconfigure the 3PAR Secure Service Policy Manager
7 ==> Reconfigure the 3PAR Secure Service Collector Server
8 ==> start/stop/restart the SSAgent agent
cpmaint command prompt, type cpmaint.
4.2
X None of the above. Exit.
Please enter your selection:
NOTE: If you make an error while typing the information, you must use the
DELETE key to revise the invalid key entries. Using the BACKSPACE key will
result in errors.
Overview of the Secure Service Agent Menu (CPMAINT)
Page 45

3PAR Service Processor User’s Guide
4.2 Changing Transport Mode
This option allows you to change from Secure Network mode to SP mode.
From the CPMAINT main menu, select option 1, Change transport mode (Secure
Network/SP).
Follow the on-screen prompts to complete the mode change.
4.3 Displaying the 3PAR Secure Service Agent Configuration
This option displays the current configuration of the 3PAR Secure Service Agent, including the
Collector Server and Policy Manager.
From the CPMAINT main menu, select option 2, Display 3PAR Secure Service Agent
configuration.
4.4 Testing the Connection to the 3PAR Secure Service Policy Manager
This option verifies a connection between the Secure Service Agent and the Secure Service
Policy Manager, and displays the connection status.
From the CPMAINT main menu, select option 3, Test connection to the 3PAR Secure
Service Policy Manager.
4.5 Testing the Connection to the 3PAR Secure Service Collector Server
This option verifies a connection between the Secure Service Agent and the Secure Service
Collector server, and displays the connection status.
From the CPMAINT main menu, select option 4, Test connection to the 3PAR Secure
Service Collector Server.
Changing Transport Mode
4.3
Page 46

3PAR Service Processor User’s Guide
4.6 Querying Status of the Secure Service Agent
The option checks the current state of the Secure Service Agent agent.
From the CPMAINT main menu, select option 5, Query status of the SSAgent agent.
4.7 Reconfiguring the 3PAR Secure Service Policy Manager
This option allows you to add or reconfigure a Policy Manager to the Secure Service Agent.
1 From the CPMAINT main menu, select option 6, Reconfigure the 3PAR Secure Service
Policy Manager.
2 At the prompt, tpe yes or no if Policy Manager is to be used.
3 Enter the hostname or IP address of the Policy Manager.
4 Enter the port number (8080 is the default).
5 At the prompt, tpe yes or no if a proxy server is required to connect to the Policy Manager.
6 Typ e yes or no if the entered data is correct.
4.8 Reconfiguring the 3PAR Secure Service Collector Server
This option allows you to add or reconfigure a Secure Service Collector Server to the Secure
Service Agent.
1 From the CPMAINT main menu, select option 7, Reconfigure the 3PAR Secure Service
Collector Server.
2 Select the correct Secure Service Collector Server from the list.
3 At the prompt, tpe yes or no if a proxy server is required to connect to the Collector Server.
4 Typ e yes or no if the entered data is correct.
4.4
Querying Status of the Secure Service Agent
Page 47

3PAR Service Processor User’s Guide
4.9 Starting, Stopping, and Restarting the Secure Service Agent
This option allows you to start, stop, and restart the Secure Service Agent.
1 From the CPMAINT main menu, select option 8, start/stop/restart the SSAgent agent.
2 Select option 1 (STOP SAgent agent), 2 (START SSAgent agent), or 3 (RESTART
SSAgent agent).
The selected operation is performed.
Starting, Stopping, and Restarting the Secure Service Agent
4.5
Page 48

3PAR Service Processor User’s Guide
4.6
Starting, Stopping, and Restarting the Secure Service Agent
Page 49

5
3PAR Communication
Settings
In this chapter
5.1 Introduction 5.1
5.2 Customer Controlled Access 5.2
5.3 Using the File Transfer Monitor 5.3
3PAR Service Processor User’s Guide
5.4 Managing Connection Portal Controls 5.4
5.1 Introduction
This chapter provides an overview of the communication settings available through SPMAINT.
These settings enable you to control and monitor co mm un cations between the InServ
Storage Server and 3PAR Headquarters through the Service Processor (SP).
There are two methods for controlling communication between the InServ and 3PAR
HeadQuarters; Cu st mer Controlled Access and Policy Manager. Policy Manager is a optional
feature that requires a 3PAR Policy Manager license. See the 3PAR Secure Service Policy
Manager User’s Guide for information on using Policy Manager.
3PAR Communication Settings
5.1
Page 50

3PAR Service Processor User’s Guide
5.2 Customer Controlled Access
Customer Controlled Access (CCA), available through SPMAINT, allows you to limit the network
communication of external sources from or to the Service Processor (SP).
NOTE: To change CCA settings, you must be logged in as user cpmaint.
CCA has three settings:
■ BOTH (or bidirectional HQ communications) is the default position that allows SSH
communications outbound from the SP to transfer information back to the connection
portal, and inbound communications from the connection portal to SP ports 80 or 22,
enabling remote operations.
■ OUT (or outbound-only HQ communications) allows the SP to send data to the connection
portal through SSH, but blocks remote connectivity. Control sequences such as
acknowledgements are allowed in both directions in order to continue communication, but
incoming updates, patches, manually requested data, and so on are blocked.
■ OFF (or turn off HQ communications) blocks all communication between the SP and 3PAR
Central or a local service provider, both inbound and outbound.
CCA works the same whether the connection to 3PAR Central or a local service provider is
through the network or through a point-to-point modem connection. If the connection is set
up to go through the network and out through the Internet, you can also restrict or allow
transmissions with the network firewall.
5.2.1 Selecting the Settings
The default setting for CCA is BOTH. Using either of the other settings can limit maintenance
activities or possibly delay the resolution of problems. Consider the following trade-offs when
selecting a setting for the HQ Customer Controlled Access:
■ BOTH - This is the default setting. All transmissions between the Service Processor (SP)and
3PAR Central or a local service provider occur without operator intervention.
■ OUT -The SP can contact 3PAR Central or a local service provider to warn of problems, but
maintenance and troubleshooting must be handled by on-site technicians. Software
5.2
Customer Controlled Access
Page 51

upgrades and fixes must be performed manually by inserting a CD-ROM into the SP. The
meantime to recovery will likely increase.
■ OFF- The SP cannot contact 3PAR Central or a local service provider when it detects an
anomaly, and support technicians cannot operate the SP remotely or download software.
Troubleshooting and maintenance must be performed by onsite technicians. Any files that
need to be sent to 3PAR Central or a local service provider must be sent manually by FTP.
Any software upgrades must be performed manually by inserting a CD-ROM into the SP.
The meantime to recovery will likely increase.
5.2.2 Changing the CCA Setting
NOTE: To change Customer Controlled Access (CCA) settings, you must log into
SPMAINT in as user cpmaint.
To change the Customer Controlled Access (CCA) setting:
1 Log in to the SPMAINT utility.
3PAR Service Processor User’s Guide
2 From the SP Main menu, select option 2, Netork Configuration.
3 Select option 1, Customer Controlled Access.
4 Select option 1 (Turn off HQ communications), 2 (Set outbound only HQ
communications), or 3 (Set Bi-directional HQ Communications) to change the HQ
connectivity control setting (see 5.2.1 Selecting the Settings on page 5.2 for details).
5 Typ e S and press ENTER to save and apply the new setting.
5.3 Using the File Transfer Monitor
The HQ File Transfer Monitor feature displays information about the latest (or current) transfer
and latest prior transfer from the Service Processor to the connection portal. This feature is
interactive in nature, and after initiated must be stopped manually as described in this section.
To start the File Transfer Monitor:
1 Log in to the SPMAINT utility.
2 From the SP Main menu, select option 1, SP Control/Status and press ENTER.
Using the File Transfer Monitor
5.3
Page 52

3PAR Service Processor User’s Guide
3 Select option 6, File Transfer Monitor and press ENTER.
To stop the File Transfer Monitor, on the transfer monitor menu, type q.
5.4 Managing Connection Portal Controls
When in SP mode, there are several functions allow for management of the Connection Portal.
To change any of these functions:
1 Log in to the SPMAINT utility.
2 From the SP Main menu, select option 2, Network Configuration.
3 Select option 2, Connection Portal Control.
The following options are displayed, with their respective values displayed along the right
column. As you edit the values displayed in this menu, the new values appear to the right
of the current values.
◆ Current Connection Portal
◆ Connection Portal Public IP
◆ Host Route to Portal
◆ Proxy Service
◆ CP Phone number(s)
◆ Dialout prefix
◆ Ignore Dialtone
◆ Restore 3PAR defaults
◆ Active Secure Network Mode (See 5.4.1 Activating Secure Network Mode on page 5.5)
NOTE: Modifications made with this submenu are not permanent until they are
saved or activated from this menu using menu option S. The modifications are not
retained if you exit this menu without saving or activating them.
4 Typ e S and press ENTER to save changes.
5.4
Managing Connection Portal Controls
Page 53

5.4.1 Activating Secure Network Mode
1 Typ e A for Activate Secure Network Mode and press ENTER.
3PAR Service Processor Menu
Transfer media: ethernet Transfer status: Ok
Connection Portal Control
Enter Control-C at any time to abort this process
1 ==> Current Connection Portal (Default : )
2 ==> Connection Portal Public IP (Default : )
3 ==> Host Route to Portal (Default : )
4 ==> Proxy Service: (NOT CONFIGURED : )
Proxy Name ( : )
Proxy Address ( : )
Proxy Type ( : )
Proxy Port ( : )
5 ==> CP Phone number(s) (1-866-354-3089 : )
6 ==> Dialout prefix ( : )
3PAR Service Processor User’s Guide
S ==> Save changes
I ==> Ignore Dialtone: ( NO )
D ==> Restore 3PAR defaults
F ==> Force Key Exchange
A ==> Activate Secure Network Mode
X Return to previous menu without saving changes
A
Managing Connection Portal Controls
5.5
Page 54

3PAR Service Processor User’s Guide
2 Verify the following requirements message, type Y and press ENTER to continue.
1) Will the connection to the 3PAR Collector Server require a
proxy?
1a) If so,
I) Is the Proxy Server configured to allow us to
establish SSL sessions with the Collector Server, and
II) Do you know the name or address of the proxy, the
required authentication credentials?
1b) If no proxy is to be used for the Collector, has the
2) Will the Customer be using a Policy Manager?
2a) If so,
I) Is it installed and configured for use?
II) will it require a proxy for the SP to reach it,
III) Do you know the name/address of the Policy
2b) If not, what initial setting does the customer want for
type of proxy (socks or http), the port it listens on, and any
Customer network / firewall been provisioned to allow us to
establish outbound SSL connections to the Collector Server?
has it been configured to allow us to use it, and do you k now the
name/address,port, type, and authentication details for the
proxy?
Manager,and the port it listens on? Is it available for us to
connect to?
the CCA?
5.6
3) Will we use DNS?
3a) If so, do you know the addresses of one, or more, DNS
servers that we can query, as well as the domain name of the
customer's network?
If you do not know the anwers to any of these questions, you will
not be able to complete the configuration of Secure Network Mode.
Please do not attempt it if you do not know.
WARNING!
Once Secure Network Mode is configured, ONLY the customer has t he
authority level to deconfigure it.
Are you ready to configure Secure Network Mode?(y or n)
y
Managing Connection Portal Controls
Page 55

3PAR Service Processor User’s Guide
3 Type the static IPv4 address assigned to the domain server or none and press ENTER.
Please enter the IPv4 address (or blank separated list of addresses) of the
Domain Name Server(s)
or 'none' if there will not be any DNS support: [?]:
<static.ipv4.address> or none
4 Based upon the planning document(s), enter the specific confirmation to proceed with
allowing 3PAR Secure Service Policy Manager to communicate with 3PAR Secure Service
Collector.
Will a 3PAR Secure Service Policy Manager be used with this 3PAR Secure
Service Collector Server? (yes or no) [yes]:
no or yes
5 Typ e yes to allow remote access to the Service Processor (SP).
Remote access to this Service Processor would normally be controlled
by the 3PAR Secure Service Policy Manager. Since there will not be one,
the ability to
remotely access this SP will be controlled by a configuration setting
of the local SSAgent.
Will remote access to this Service Processor be allowed (yes or no)?
[yes]:
yes
6 Verify the data is correct and type yes to confirm.
3PAR Secure Service Policy Manager
- Name/address: none
- Remote access: Allowed
Is this data correct? (yes or no)? [yes]
yes
Managing Connection Portal Controls
5.7
Page 56

3PAR Service Processor User’s Guide
7 Typ e 1 to assign the type of 3PAR Secure Service Collector Server to connect with the Secure
Service Agent.
To which 3PAR Secure Service Collector Server should this SSAgent connect?
1 ==> Production
OTHER ==> 3PAR Internal testing (not for customer sites!)
Please enter your selection [1]:
1
8 Typ e no to not require a proxy server to connect to the 3PAR Secure Service Collector
Server.
Will a proxy server be required to connect to the 3PAR Secure Service
Collector Server? (yes or no) [no]:
no
5.8
Managing Connection Portal Controls
Page 57

3PAR Service Processor User’s Guide
9 Verify the data is correct and type yes to confirm.
The SP initializes communication with the 3PAR Secure Service Collector Server to complete
setting for communication access.
3PAR Secure Service Collector Server
- Name/address: Production
- Proxy: none
Is this data correct? (yes or no)? [yes]
yes
invoking config..
Stopping all SP tasks ...
No InSplore currently running
Disabling the firewall ...
Building skeletal SSAgent configuration file.
Applying and testing configuration values ...
AxedaAddManagedDevice:Added SP=SP09114, IP=127.0.0.1 to device file.
Ping of localhost successful.
Ping of public interface (10.112.132.184) successful.
Ping of gateway (10.112.128.1) successful.
There is no 3PAR Secure Service Policy Manager configured, test
bypassed.
Starting agent ping test.
Managing Connection Portal Controls
5.9
Page 58

3PAR Service Processor User’s Guide
10 When the system communications configuration is complete, the following message
appears:
Stopping all SP tasks ...
No InSplore currently running
Disabling the firewall ...
Building skeletal SSAgent configuration file.
Applying and testing configuration values ...
AxedaAddManagedDevice:Added SP=SP09114, IP=127.0.0.1 to device file.
Ping of localhost successful.
Ping of public interface (10.112.132.184) successful.
Ping of gateway (10.112.128.1) successful.
There is no 3PAR Secure Service Policy Manager configured, test
bypassed.
Starting agent ping test.
5.10
Managing Connection Portal Controls
Page 59

6
Local Notification Service
In this chapter
6.1 Setting Up Local Notification 6.3
6.1.1 Enabling Local Notification Access 6.3
6.1.2 How to Configure Local Notification Settings During Initial Setup 6.4
3PAR Service Processor User’s Guide
6.2 How to Use Notification Maintenance Utilities 6.5
6.3 How to Configure Sendmail 6.5
6.4 How to Edit the Sites Table 6.6
6.4.1 How to add a Site 6.6
6.4.2 How to Edit the Product Table 6.6
6.4.3 How to Predefine Symptoms 6.8
6.5 How to Editing Default Shifts and Exceptions 6.10
6.5.1 How to Use the Global Default Shift Pattern 6.10
6.5.2 How to Use Prime Shift Patterns 6.11
6.5.3 How to Use Prime Shift Exceptions 6.11
6.6 How to Enable and Disabling RAP Forwarding 6.13
6.7 How to Manage Notification Records and User Profiles 6.13
Local Notification Service
6.1
Page 60

3PAR Service Processor User’s Guide
6.8 Managing User Profiles 6.14
6.9 How to Manage Local Notification Records 6.15
6.9.1 How to Add a Notification Record 6.15
6.9.2 How to Edit a Notification Record 6.16
6.9.3 How to Delete a Notification Record 6.17
6.10 How to Disable Local Notification Access 6.17
This chapter describes how to set up and manage local notification, that requires you to use
the Service Processor Onsite Customer Care (SPOCC) interface. This chapter also includes
instructions on enabling local notification access, setting up local notification and managing
local notification records and user profiles. Some of these tasks, including managing local
notification records and user profiles, are not typically performed by service providers but are
described here because service providers have access to these tasks. You can direct other
administrative users to the 3PAR InForm OS Administrator’s Manuals for instructions on
managing local notification and user profiles.
The Service Processor’s local notification features enable you to request that they be notified
of important storage server events and alerts on a subscription basis. Notifications are sent
through Email to all subscribers, with each subscriber specifying up to three Email addresses.
When Real-time Alert Processing (RAP) forwarding is enabled, copies of all notification
messages sent to subscribers are automatically forwarded to 3PAR Central as well.
6.2
There are two types of local notification messages that you might receive: standard
notifications and grouped low urgency notifications.
■ Standard Notification Messages - A standard notification is a text-based Email message that
alerts you to an important event or alert generated by a storage server.
When you receive a standard notification Email message for a system event or alert, see the
3PAR InForm OS Messages and Operator’s Guide for information on understanding the
event or alert and for instructions regarding any corrective action that must be taken.
■ Grouped Low Urgency Notification Messages - A grouped low urgency notification is a text-
based Email message that informs you of noncritical events generated by a storage server.
Low urgency notification messages are informational and do not typically require any
corrective action be taken. When a situation or event reported in a low urgency
notification message becomes urgent, a standard notification message is issued to alert
subscribers.
Page 61

Before you can subscribe to local notification and receive notification Emails, local notification
access must be enabled. Enabling local notification access can only be done by an authorized
service provider. After local notification access is enabled, you can create and edit local
notification records and user profiles as described in the 3PAR InForm OS Administrator’s
Manuals.
6.1 Setting Up Local Notification
This section describes how to enable local notification access and then guides you through the
initial configuration process for local notification. During this initial configuration, you have
the option of configuring sendmail, enabling RAP forwarding, updating site information, and
creating profiles and site notification records for up to three users.
6.1.1 Enabling Local Notification Access
To enable local notification access:
1 Log in to the SPOCC.
2 In the SPOCC menu, click Setup.
3PAR Service Processor User’s Guide
3 Under Notification Maintenance Utilities, click Enable Local Notification Access.
At this point, your local notification access is enabled.
If this is the first time enabling local notification access for this Service Processor, a local
notification configuration wizard menu appears. The following sections describe how to
perform the following tasks:
■ Configure sendmail.
■ Enter site information.
■ Create user profiles for up to three users.
If this is not the first time to enable local notification access for this service processor, the
Service Processor Workbench menu appears. To edit local notification configuration
settings, use the options available through the Service Processor Workbench menu.
Setting Up Local Notification
6.3
Page 62

3PAR Service Processor User’s Guide
6.1.2 How to Configure Local Notification Settings During Initial Setup
The following instructions guide you through the initial configuration of local notification
settings using the menu that appears after enabling local notification access for the first time,
as described in 6.1.1 Enabling Local Notification Access.
To configure local notification settings later, see 6.2 How to Use Notification Maintenance
Utilities on page 6.5.
After enabling local notification access for the first time, you have the option of setting up
local notification from the Service Processor Enable/Disable Local Notification Access
menu as follows:
1 Under Configure Mailhost, provide the mailhost information as follows:
a Type a mailhost IP address in the Mailhost IP Address field. This is the mailhost that
the Service Processor (SP) uses to send notification messages to users defined with this
menu.
b Type a mailhost domain name in the Mailhost Domain Name field. This is the domain
name associated with the mailhost IP address (for example, 3pardata.com), not the
fully-qualified mailhost name (for example, mailhost.3pardata.com).
6.4
c (Optional) To enable RAP forwarding, click ON. When enabled, RAP forwarding
automatically sends copies of the notification Emails to 3PAR Central.
2 Under the Setup Reporting Site Info option, provide the site information as follows:
a In the Company/Site Name field, type the name of the company or customer site
name. If you do not provide a name, the name Customer is used by default.
b (Optional) In the Site Number field, type a site number. If you provide a 3PAR site
number at this time, it can help clarify reporting, especially for local service providers. If
you do not provide a site number, 1 is used by default.
c If necessary, use the Timezone list to select a time zone for the operating site. If you do
not specify a time zone, the time zone currently set on the SP is used by default.
3 Under User Profile/Site Notification Setup, create user profiles and notification records
as follows:
NOTE: User profiles and notification records can be added at any time.
Setting Up Local Notification
Page 63

3PAR Service Processor User’s Guide
a In the First Name and Last Name fields, type the first and last name of a user for the
purpose of creating a profile.
b In the Email Address field, type the Email address for the user profile.
c Use the Category list to select the type of user for this profile.
d In the Company field, type the name of the company for this user profile.
4 When finished, click Configure Local Notification to save the new settings and create
the new user profile and site notification record.
The Service Processor Onsite Customer Care screen appears.
5 On the SPOCC menu, click the Notify option to confirm that a site notification record
appears for each user profile you created.
NOTE: Email addresses can be updated or added by clicking the user name in the
notification record or by clicking the User Profiles button.
6.2 How to Use Notification Maintenance Utilities
After the local configuration has been enabled, any authorized user can edit or add
configuration information using the Notification Maintenance Utilities menu available on
the Service Processor Workbench menu. Use the features available through the
Notification Maintenance Utilities menu to add or edit configuration information that was
provided during the initial set up of local notification.
6.3 How to Configure Sendmail
To update the mail host information for local notification
1 On the SPOCC menu, click Setup.
2 Under Notification Maintenance Utilities, click the Config Sendmail option.
The Configure Sendmail screen appears.
3 On the Configure Sendmail menu, edit the IP Address and Mailhost Domain
Name fields as necessary.
How to Use Notification Maintenance Utilities
6.5
Page 64

3PAR Service Processor User’s Guide
4 Click Update Mailhost Configuration to apply the new settings.
5 Click Back to Menu to return to the Notification Maintenance Utilities menu.
6.4 How to Edit the Sites Table
The Sites table is a list of configured customer sites. This table shows the site name, site
number, and time zone for each site. Use the Editing Sites Table option on the Notification
Maintenance Utilities menu to edit information for currently defined sites or to add
additional sites to the table.
6.4.1 How to add a Site
To add a new site to the Sites table:
1 On the SPOCC menu, click the Setup option.
2 Under Notification Maintenance Utilities, click the Edit Sites Table option.
The Configured Sites for Local Notification screen appears
3 On the Configured Sites for Local Notification menu, click the Add Additional Site
option.
The Add Site Record screen appears.
4 On the Add Site Record menu, type a site number, site name, and choose a timezone
name from the list.
5 Click Add Site to configure the new site.
6 Click Back to Menu to return to the Notification Maintenance Utilities menu.
6.4.2 How to Edit the Product Table
The Product table is a list of installed storage servers at the operating site where the Service
Processor resides. During installation activities, new storage servers and other equipment are
automatically added to this table. However, they are not deleted automatically as part of a
deinstallation. Therefore, it is necessary to update this table after deinstalling a storage server
or service processor. Deleting an item from this table also deletes all notification records for
that system.
6.6
How to Edit the Sites Table
Page 65

3PAR Service Processor User’s Guide
6.4.2.1 Adding an Entry to the Product Table
Under normal circumstances it is not necessary to manually add an item to the Product table.
New storage servers and service processors are automatically added to the Product table when
they are installed.
To manually add a new item to the Product table:
1 On the SPOCC screen, click Setup.
2 Under Notification Maintenance Utilities, click the Edit Product Table option.
The List Products for Notification screen appears.
3 On the List Products for Notification screen, click the Add Product option.
The Add Product Record screen appears.
4 On the Add Product Record screen:
a Choose a site from the site list and a system type from the product list.
b Type the system serial number in the product serial field and description in the
description field.
c Click Add Record to add the new item.
5 Click Back to Menu to return to the Notification Maintenance Utilities menu.
6.4.2.2 Editing the Product Table Entries
To edit the site name, product serial number, or description for a currently installed storage
server or Service Processor:
1 On the SPOCC screen, click Setup.
2 Under Notification Maintenance Utilities, click the Edit Product Tab le option
The List Products for Notification screen appears.
3 On the List Products for Notification screen, click the Edit icon for the product record to
be edited.
The Update Product Record screen appears.
4 On the Update Product Record screen, edit the site, product serial, and descriptions
as necessary.
5 Click Update Record to apply the new settings.
How to Edit the Sites Table
6.7
Page 66

3PAR Service Processor User’s Guide
6 Click Back to Menu to return to the Notification Maintenance Utilities menu.
6.4.2.3 Deleting a product
It is necessary to manually delete an item from the Product table after deinstalling a storage
server or service processor.
CAUTION: Deleting a product record deletes all user notifications currently set for
that system.
To manually delete an item from the Product table:
1 On the SPOCC screen, click Setup.
2 Under Notification Maintenance Utilities, click Edit Product Tab l e.
The List Products for Notification screen appears.
3 On the List Products for Notification screen, click the Delete icon for the system to be
deleted.
4 When prompted, click OK to confirm.
5 Click Back to Menu to return to the Notification Maintenance Utilities menu.
6.4.3 How to Predefine Symptoms
Use the Predefine Symptoms table available through the Notification Maintenance
Utilities menu to add, update, or delete expressions that appear in the Predefined
Expressions list. This list is useful when creating symptom notification records. A symptom
notification record is for subscribers who want to be notified of a particular symptom
concerning a particular operating site or storage server.
6.4.3.1 Adding a Predefined Symptom
To add a new symptom to the list of predefined symptoms available for use in creating
symptom notification records:
1 On the SPOCC screen, click Setup.
2 Under Notification Maintenance Utilities, click the Predefine Symptoms option.
The Predefined Symptoms screen appears.
3 On the Predefined Symptoms screen, click the Add Record option.
6.8
How to Edit the Sites Table
Page 67

3PAR Service Processor User’s Guide
The Add Predefined Symptom screen appears
4 On the Add Predefined Symptom screen:
a Type a regular expression in the symptom field.
NOTE: Click the Regular expressions link to the right of the symptom field to
open a dialog box that enables you to test expressions.
b (Optional) Type a description for that symptom in the description field.
5 Click Add Record to add the new symptom.
6 Click Back to Menu to return to the Notification Maintenance Utilities menu.
6.4.3.2 Editing Predefined Symptoms
To edit the list of predefined symptoms available for use in creating a symptom notification
record:
1 On the SPOCC screen, click Setup.
2 Under Notification Maintenance Utilities, click the Predefine Symptoms option.
The Predefined Symptoms screen appears.
3 On the Predefined Symptoms screen, click the Edit icon for the symptom record to be
edited.
The Update Predefined Symptom screen appears.
4 On the Update Predefined Symptom screen, edit the symptom and description fields
as necessary.
5 Click Update Record to apply the new settings.
6 Click Back to Menu to return to the Notification Maintenance Utilities screen.
6.4.3.3 Deleting a Predefined Symptom
To delete a symptom from the list of predefined symptoms available for use in creating a
symptom notification record:
1 On the SPOCC screen, click Setup.
2 Under Notification Maintenance Utilities, click the Predefine Symptoms option.
How to Edit the Sites Table
6.9
Page 68

3PAR Service Processor User’s Guide
The Predefined Symptoms screen appears.
3 On the Predefined Symptoms screen, click the Delete icon for the symptom to be
deleted.
4 When prompted, click OK to confirm.
5 Click Back to Menu to return to the Notification Maintenance Utilities screen.
6.5 How to Editing Default Shifts and Exceptions
The Edit Default Shift and Shift Exceptions option available through the Notification
Maintenance Utilities menu enables you to manipulate the prime shift and prime shift
exception defaults.
Use the Edit Default Shift and Shift Exceptions option on the Notification Maintenance
Utilities menu to perform the following tasks:
■ Editing the global default shift pattern
■ Adding, editing, and deleting default prime shift exceptions for all user profiles
6.10
6.5.1 How to Use the Global Default Shift Pattern
The global default shift pattern is the default prime shift pattern that is applied whenever
your user profile does not have a specific prime shift pattern defined. For example, if you
delete all prime shift patterns associated with your user profile, the global default shift pattern
must be applied. You can edit the global default prime shift pattern but you cannot delete this
default or add additional defaults.
To edit the global default shift pattern that is applied when your user profile does not have
any prime shifts defined:
1 On the SPOCC screen, click Setup.
2 Under Notification Maintenance Utilities, click the Edit Default Shift and Shift
Exceptions option.
The Default Prime Shift Patterns for Local Notification screen appears.
3 On the Default Prime Shift Patterns for Local Notification screen, click the Edit icon
for the global default shift pattern,
The Update Primary Shift screen appears.
How to Editing Default Shifts and Exceptions
Page 69

4 On the Update Primary Shift screen:
a Edit the starting or ending dates for this shift record using the Starting Date and
Ending Date fields.
b Use the Start Time and End Time pull downs for each day of the week to update the
shift start and end times as necessary.
5 Click Update Default Prime Shift to apply the new settings.
6.5.2 How to Use Prime Shift Patterns
The prime shift pattern defines the normal work pattern for you as a local notification
subscriber, as recorded in your user profile. For example, your prime shift pattern might be
Monday through Friday, 8 a.m. to 5 p.m. Your prime shift pattern was defined when you
created your user profile.
6.5.3 How to Use Prime Shift Exceptions
A prime shift exception notes any deviations from your usual workday or workweek, as
defined by the prime shift. Prime shift exceptions for individual users override default prime
shift exceptions.
3PAR Service Processor User’s Guide
6.5.3.1 How to use Default Prime Shift Exceptions
Default prime shift exceptions are global overrides that modify prime shift patterns for all user
profiles. This feature might be useful for company holidays where no subscribers work a prime
shift. You can add as many default prime shift exceptions as needed. You can also edit and
delete these prime shift exceptions after creating them. However, because default prime shift
exceptions are automatically applied to all user profiles, both new and existing, in most cases it
is preferable to add prime shift exceptions to individual user profiles on a case-by-case basis, as
described in 6.5.3.2 Adding a Prime Shift Exception. Prime shift exceptions for individual users
override default prime shift exceptions.
6.5.3.2 Adding a Prime Shift Exception
Adding a default prime shift exception applies a new exception to prime shifts for all user
profiles. Prime shift exceptions for individual users override any default prime shift exceptions.
To add a default prime shift exception:
1 On the SPOCC screen, click Setup.
How to Editing Default Shifts and Exceptions
6.11
Page 70

3PAR Service Processor User’s Guide
2 Under Notification Maintenance Utilities, click the Edit Default Shift and Shift
Exceptions option.
The Default Prime Shift Patterns for Local Notification screen appears.
3 On the Default Prime Shift Patterns for Local Notification screen, click the Add
Default Shift EXCEPTION option.
The Add Default Shift Exception screen appears.
4 On the Add Default Shift Exception screen:
a In the Description field, type a description for this override or exception.
b On the Override Action list choose the on prime shift option to add days that are not
usually your prime shift (for example, for days when you are on call), or choose the off
prime shift option to denote days that are usually your prime shift (for example, for
company holidays that would normally be part of the work week).
5 In the Starting Date field, type a starting date for this exception.
6 In the Ending Date field, type an ending date for this exception.
7 Click Add Prime Shift Exception to add the new shift exception.
6.12
6.5.3.3 Editing Default Shift Exceptions
To edit a default shift exception:
1 On the SPOCC screen, click Setup.
2 Under Notification Maintenance Utilities, click the Edit Default Shift and Shift
Exceptions option.
The Default Prime Shift Patterns for Local Notification screen appears.
3 On the Default Prime Shift Patterns for Local Notification screen, click the Edit icon
for the prime shift exception to be edited.
The Update Default Shift Exception screen appears.
4 Edit the Update Default Shift Exception screen as necessary.
5 Click Update Prime Shift Exception to apply the new settings.
How to Editing Default Shifts and Exceptions
Page 71

6.5.3.4 Deleting a Prime Shift Exception
To delete a prime shift exception record:
1 On the SPOCC menu, click Setup.
2 Under Notification Maintenance Utilities, click the Edit Default Shift and Shift
Exceptions option.
The Default Prime Shift Patterns for Local Notification screen appears.
3 On the Default Prime Shift Patterns for Local Notification screen, click the Delete
icon for the prime shift exception to be deleted.
4 When prompted, click OK to confirm.
6.6 How to Enable and Disabling RAP Forwarding
When enabled, Real-time Alert Processing (RAP) forwarding automatically sends notification
Emails to 3PAR Central. Use the link on the Notification Maintenance Utilities menu to
toggle between Enabled and Disabled RAP forwarding settings.
3PAR Service Processor User’s Guide
To enable or disable RAP forwarding:
1 On the SPOCC screen, click Setup.
2 Under Notification Maintenance Utilities, click the RAP forwarding link to toggle
between enabled and disabled states. The Status field to the right of the link displays the
new state (Enabled or Disabled).
6.7 How to Manage Notification Records and User Profiles
Local notification is a subscription-based activity that requires a user profile and a notification
record for each subscriber.
■ Your user profile includes basic information about you such as you company name, working
hours, and email addresses.
■ The notification record contains information about the operating site, the storage server or
servers being monitored, and date ranges. You can have multiple notification records.
Together, your user profile and notification record define how and when you should be
notified of system events and alerts.
How to Enable and Disabling RAP Forwarding
6.13
Page 72

3PAR Service Processor User’s Guide
6.8 Managing User Profiles
Before you can create a notification record and receive local notification messages, it is
necessary to create at least one user profile. In most cases, your initial user profile is created
when the local notification access is first enabled and configured. Use the features available
through the Notify bezel on the SPOCC menu to create additional profiles and to edit or
delete existing ones.
6.8.1 Adding a User Profile
To create a new user profile:
1 On the SPOCC screen, click Notify.
The List Notification Records table appears.
2 At the bottom of the List Notifications Records table, click User Profiles.
The Local Notification: User Profiles table appears.
3 At the top of the Local Notification: User Profiles table, click Add User.
6.14
The Add ST_USER Record screen appears.
4 On the Add ST_USER Record screen, type your first name in the First Name field and
your last name in the Last Name field.
5 Type up to three Email addresses using the Email 1, Email 2, and Email 3 fields.
6 On the Category list, select the type of user you are.
7 In the Company field, type your company name or description.
8 (Optional) Edit the prime shift definition as needed. The prime shift definition establishes
the normal working days and hours that you should receive notifications. To edit the prime
shift definition:
a Click to select or deselect days from the calendar week. The calendar week begins with
Monday and ends with Sunday.
b On the Start Time list, click to select a start time for the workdays selected on the
calendar week.
c On the End Time list, click to select an end time for the workdays selected on the
calendar week.
Managing User Profiles
Page 73

9 When finished, click Add Record to add your new user profile.
The Update ST_USER Record screen appears. Then, a confirmation message appears at
the top of the screen to indicate that your user profile has been added.
10 Click Notification List to return to the List Notification Records table.
6.9 How to Manage Local Notification Records
After one or more user profiles have been defined, you can use those profiles to create local
notification records. Depending on how local notification was initially set up, one or more
notification records might already exist on the Service Processor. Use the features available
through the Notify bezel on the SPOCC screen to create additional notification records and to
edit or delete existing ones.
There are three types of local notification records:
■ Normal - This type of notification record is for when you want to be notified of events and
alerts concerning a particular operating site or storage server.
■ Symptom - This type of notification record is for when you want to be notified of a
particular symptom concerning a particular operating site or storage server.
3PAR Service Processor User’s Guide
■ Suppression - This type of notification record enables you to selectively suppress
notifications generated as a result of a specific symptom.
6.9.1 How to Add a Notification Record
To add a standard, or normal notification record
1 On the SPOCC screen, click Notify to display a list of all currently defined notification
records for the Service Processor.
2 On the List Notification Records screen, click the Add Record button; the Service
Processor - Select User screen appears.
3 On the Service Processor - Select User screen
a Choose a user profile from the User list.
b Choose a notification record type as follows:
■ To add a normal notification record, click Normal and continue to step 4.
How to Manage Local Notification Records
6.15
Page 74

3PAR Service Processor User’s Guide
■ To add a symptom notification record, a record that includes a specific symptom, click
Symptom.
■ To add a suppression notification record that suppresses notification for a specific
symptom, click Suppression.
4 Click Select.
5 On the Add Notification Record screen that appears, complete the following steps:
a Chose either a site name from the Site list or a storage server serial number from the
Product list. You cannot choose both.
b Type a starting date for the notification record in the Starting Date field and an
ending date for the notification record in the Ending Date field.
c For each Email address defined for this user profile, use the Prime/Off-Shift and High/
Low check boxes to define which types of system events trigger notifications while the
user is both on-shift and off-shift.
6 When finished, click Submit to create the new record and return to the List Notification
Records screen.
6.16
6.9.2 How to Edit a Notification Record
Edit normal, symptom, and suppression notification records as follows:
1 On the SPOCC screen, click Notify to display a list of all currently defined notification
records
2 On the Local Notification Records screen, click the Edit icon for the notification record
to be edited
3 In the Update Notification Record screen that appears, make changes as necessary.
4 When finished, click Submit to return to the List Notification Records screen.
How to Manage Local Notification Records
Page 75

6.9.3 How to Delete a Notification Record
To delete a notification record:
CAUTION: Deleting all local notification records effectively disables local
notification.
1 On the SPOCC screen, click Notify to display a list of all currently defined notification
records.
2 On the Local Notification Records screen, click the Delete icon for the notification
record to be deleted.
3 When prompted, click OK to confirm and return to the List Notification Records screen.
6.10 How to Disable Local Notification Access
Disabling notification access suspends notification for the user profiles and site notification
records defined in the SPOCC. Your user profiles and records are saved and automatically
recalled after local notification access is reenabled.
3PAR Service Processor User’s Guide
To disable local notification access:
1 Log in to the SPOCC.
2 On the SPOCC screen, click Setup.
3 Under Notification Maintenance Utilities, click Disable Local Notification Access;
local notification access is disabled.
How to Disable Local Notification Access
6.17
Page 76

3PAR Service Processor User’s Guide
6.18
How to Disable Local Notification Access
Page 77

A
SP Process Rebuild Kit
In this appendix
To replace the Service Processor (SP), use the following table to determine which rebuild kit is
needed. The rebuild kit includes the following software CDs:
■ An SP Base Image CD
3PAR Service Processor User’s Guide
■ An SP Software CD
Table A-1. Requirements for SP Software Rebuild
SP OS Version SP 2.2.4 SP 2.3.1 SP 2.4.1
SP Reimage
Software Kit
SP Base Image CD ■ CD version 3-1.3
■ F790-200013 ■ F790-200038 ■ TBA/update
■ P/N 780-1013-11
(For SP00300 or
higher)
■ CD version 3.1-3
(For SP00300 or
higher)
■ P/N 780-200048
■ TBA/update
SP Process Rebuild Kit
A.1
Page 78

3PAR Service Processor User’s Guide
Table A-1. Requirements for SP Software Rebuild
SP OS Version SP 2.2.4 SP 2.3.1 SP 2.4.1
SP Software CD ■ CD version 2.2.4
■ P/N 780-200031
(contains InForm OS
■ InForm OS Release
2.3.1 Software CD
■ P/N 780-200050
■ TBA/update
2.2.4 MU4)
InForm OS Level ■ 2.2.4.144 ■ 2.3.1.208 ■ TBA/update
A.2
Page 79

Revision History
Release level Revision summary
3PAR Service Processor User’s Guide
320-200247 Rev A
August 2010
320-200247 Rev B
April 2011
First release of the Service Processor User’s Guide for SP release
2.4.1.
Second release of the Service Processor User’s Guide for SP release
2.4.1 MU1.
Revision History
RH.1
Page 80

3PAR Service Processor User’s Guide
RH.2
 Loading...