

Page 1

HP iPAQ rx3000 series
Mobile Media Companion
How Do I...?
Look inside to find answers to
frequently asked questions
about product setup, features,
and more.
Page 2

© 2004 Hewlett-Packard Development Company, L.P.
HP, Hewlett Packard, and the Hewlett-Packard logo are trademarks of
Hewlett-Packard Company in the U.S. and other countries.
iPAQ is a trademark of Hewlett-Packard Development Company, L.P. in the
U.S. and other countries.
Microsoft, Windows, the Windows logo, Outlook, and ActiveSync are
trademarks of Microsoft Corporation in the U.S. and other countries.
HP iPAQ Mobile Media Companion is Powered by Microsoft®
Windows®.
TM
Windows Mobile
Nevo, NevoMedia, Nevo Backup, NevoEdit, the Nevo logo, and the Nevo
home screen are trademarks of Universal Electronics, Inc. in the U.S. and
other countries.
All other product names mentioned herein may be trademarks of their
respective companies.
Hewlett-Packard Company shall not be liable for technical or editorial
errors or omissions contained herein or for incidental or consequential
damages in connection with the furnishing, performance, or use of this
material. The information in this document is provided “as is” without
warranty of any kind, including, but not limited to, the implied warranties
of merchantability and fitness for a particular purpose, and is subject to
change without notice. The warranties for HP products are set forth in the
express limited warranty statements accompanying such products. Nothing
herein should be construed as constituting an additional warranty.
This document contains proprietary information that is protected by
copyright. No part of this document may be photocopied, reproduced, or
translated to another language without the prior written consent of
Hewlett-Packard.
2003 software for Pocket PCs
SD Logo is a trademark of Secure Digital.
WARNING: Text set off in this manner indicates that failure to
Å
follow directions could result in bodily harm or loss of life.
CAUTION: Text set off in this manner indicates that failure to follow
Ä
directions could result in damage to equipment or loss of information.
How Do I Guide
HP iPAQ rx3000 series Mobile Media Companion
Second Edition (August 2004)
Document Part Number: 364356-002
Page 3

Contents
How Do I Find My User’s Guide?. . . . . . . . . . . . . . . . . . . . 1
How Do I Synchronize Calendar, E-mail, Contact
Data and More between My HP iPAQ and PC
(installing Microsoft
ActiveSync and establishing Partnerships)? . . . . . . . . . . . . 3
How Do I Regain Functionality if My HP iPAQ Locks
Up or Runs Slowly (Perform a Soft “Normal” Reset)? . . . . 9
How Do I Switch from the Launch Page
to the Traditional Today Screen? . . . . . . . . . . . . . . . . . . . . 11
How Do I Maximize Battery Life? . . . . . . . . . . . . . . . . . . 12
How Do I View Pictures That I Have Already Taken? . . . 13
How Do I Turn Wi-Fi On or Off? . . . . . . . . . . . . . . . . . . . 14
How Do I Use Wi-Fi? . . . . . . . . . . . . . . . . . . . . . . . . . . . . 15
How Do I Connect to My Wireless Home Network? . . . . 16
How Do I Configure My Wireless Settings to Use iPAQ
Mobile Media? . . . . . . . . . . . . . . . . . . . . . . . . . . . . . . . . . . 21
How Do I Find the Media Servers and Media Players
that I Can Access with iPAQ Mobile Media? . . . . . . . . . . 25
How Do I Use Windows Media Player to Play
Copy-Protected Music and Video on My HP iPAQ?. . . . . 27
How Do I Protect My HP iPAQ
Screen and Camera Lens from Damage or Cracking? . . . . 31
How Do I Migrate Data from Palm Desktop to
Windows Mobile 2003? . . . . . . . . . . . . . . . . . . . . . . . . . . . 32
How Do I Print Wirelessly? . . . . . . . . . . . . . . . . . . . . . . . . 34
How Do I Restore My HP iPAQ Default Settings
and Erase All My Data (Perform a Hard “Full” Reset)? . . 37
How Do I Manage Available Storage? . . . . . . . . . . . . . . . 39
How Do I Back Up and Restore My Data? . . . . . . . . . . . . 43
How Do I Determine if the Battery is Charging? . . . . . . . 44
How Do I Check the Battery Level? . . . . . . . . . . . . . . . . . 45
Page 4

How Do I Transfer Files from My Personal Computer
to My HP iPAQ ? . . . . . . . . . . . . . . . . . . . . . . . . . . . . . . . . 46
How Do I Turn Bluetooth On and Off? . . . . . . . . . . . . . . . 48
How Do I Insert and Remove SD Cards from
Expansion Slot? . . . . . . . . . . . . . . . . . . . . . . . . . . . . . . . . . 49
How Do I Find the Product ID, Model ID and
Serial Number of My HP iPAQ? . . . . . . . . . . . . . . . . . . . . 51
How Do I Stop DockWare? . . . . . . . . . . . . . . . . . . . . . . . . 53
How Do I Find Information On Topics Not Covered
in This Booklet? . . . . . . . . . . . . . . . . . . . . . . . . . . . . . . . . . 54
Page 5

This document is intended to answer the most frequently asked
questions regarding the HP iPAQ rx3000 series Mobile Media
Companion. For complete setup and installation instructions,
refer to the Getting Started document in the box or the User’s
Guide located on the Companion CD. For further support, visit
www.hp.com/support to chat with an HP support specialist.
How Do I Find My User’s Guide?
To find your HP iPAQ rx3000 series Mobile Media Companion
User’s Guide, follow these steps:
1. Locate the Companion CD that came with your HP iPAQ.
2. Insert the Companion CD into your personal computer. (The
Introduction demo automatically starts.)
3. Click Skip Introduction to skip the Introduction demo.
1
Page 6

4. Click User’s Guide to open the printable document.
Note: In addition to the Companion CD, you also have the HP
Image Zone CD. The HP Image Zone application allows you to
view and edit image files that are stored on your HP iPAQ.
In addition to the User’s Guide, the Companion CD contains:
■ Bonus Software from HP
■ Microsoft ActiveSync 3.7.1
■ Microsoft Outlook 2002
■ Know Your Options (Accessories Information)
■ Link to Worldwide Telephone Numbers
http://www.hp.com/country/us/eng/wwcontact.html
■ Important Safety Information
Note: All of the documents located on the Companion CD are in
printable format, if you prefer a hard copy document.
All of the software is designed to be installed on your personal
computer or HP iPAQ to enhance your ability to use your Mobile
Media Companion to its fullest potential.
Note: It is recommended that you save the original package for
the Companion CD because the Microsoft product key for
installing Microsoft Outlook is located on the sticker on the CD
packaging. You will need that information if you ever want to
reinstall Outlook on your personal computer.
2
Page 7

How Do I Synchronize Calendar, E-mail, Contact Data and More between My HP iPAQ and PC (installing Microsoft ActiveSync and establishing Partnerships)?
Synchronizing your HP iPAQ and your desktop, notebook, or
laptop computer allows you to keep the same information (such
as calendar, contacts, and e-mail messages) in both places,
making it available when you work on your desktop, notebook, or
laptop computer or when you take your HP iPAQ on the go.
Microsoft ActiveSync, located on the Companion CD, is the
software that allows your HP iPAQ and your personal computer
to communicate with each other.
Before you connect your HP iPAQ to your computer, insert the
Companion CD into your computer and let the HP iPAQ Setup
Wizard guide you step-by-step in setting up your HP iPAQ and
computer.
Note: If the HP iPAQ Setup Wizard detects an earlier version
of ActiveSync or Outlook on your computer, it prompts you to
install the most recent version from the Companion CD. It is
recommended that you do so.
To run the HP iPAQ Setup Wizard and install Microsoft
ActiveSync:
1. Before you connect your HP iPAQ to your desktop, notebook,
or laptop computer with the desktop cradle or sync cable,
insert the Companion CD that came with your HP iPAQ into
the CD-ROM drive on your computer. The Companion CD
starts automatically.
3
Page 8

❏ If the CD doesn’t start automatically (auto run), click
Start > Run. Type D:\ (where D is the location of your
CD-ROM drive) in the Open: text box and click OK.
Double-click setup.exe to run the Setup program.
Note: The Experience HP iPAQ introduction demo automatically
starts after inserting the Companion CD into your personal
computer. This introduction demo highlights the things you can
do with your new HP iPAQ. To skip this introduction demo, click
Skip Introduction.
2. Select Start Here from the main menu and follow the
instructions on the screen.
To create an ActiveSync partnership between your HP iPAQ and
your personal computer, wait for the prompt.
3. When prompted, use the desktop cradle or sync cable to
connect your HP iPAQ and your personal computer as
follows:
❏ If you have an rx3700 series, connect the USB connector
to the USB port on your computer. Insert the HP iPAQ
into the desktop cradle. Connect the AC adapter to the
desktop cradle to charge it.
❏ If you have an rx3100 or rx3400 series, connect the sync
cable to the USB port on your computer and the other end
to the HP iPAQ. Connect the AC adapter to the sync cable
to charge it.
4
Page 9
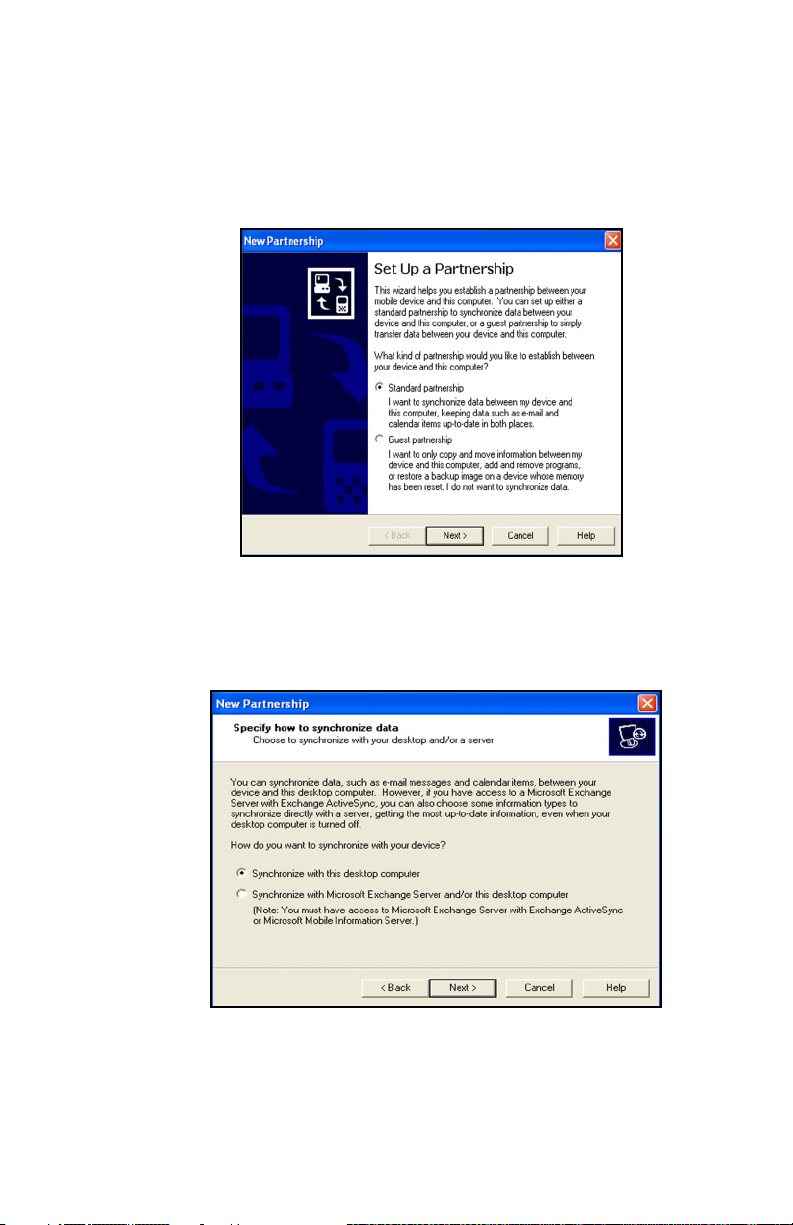
4. When the Set Up a Partnership screen is displayed, select
Standard Partnership and click Next.
5. When the New Partnership screen displays, select
Synchronize with this desktop computer, then click Next.
.
5
Page 10
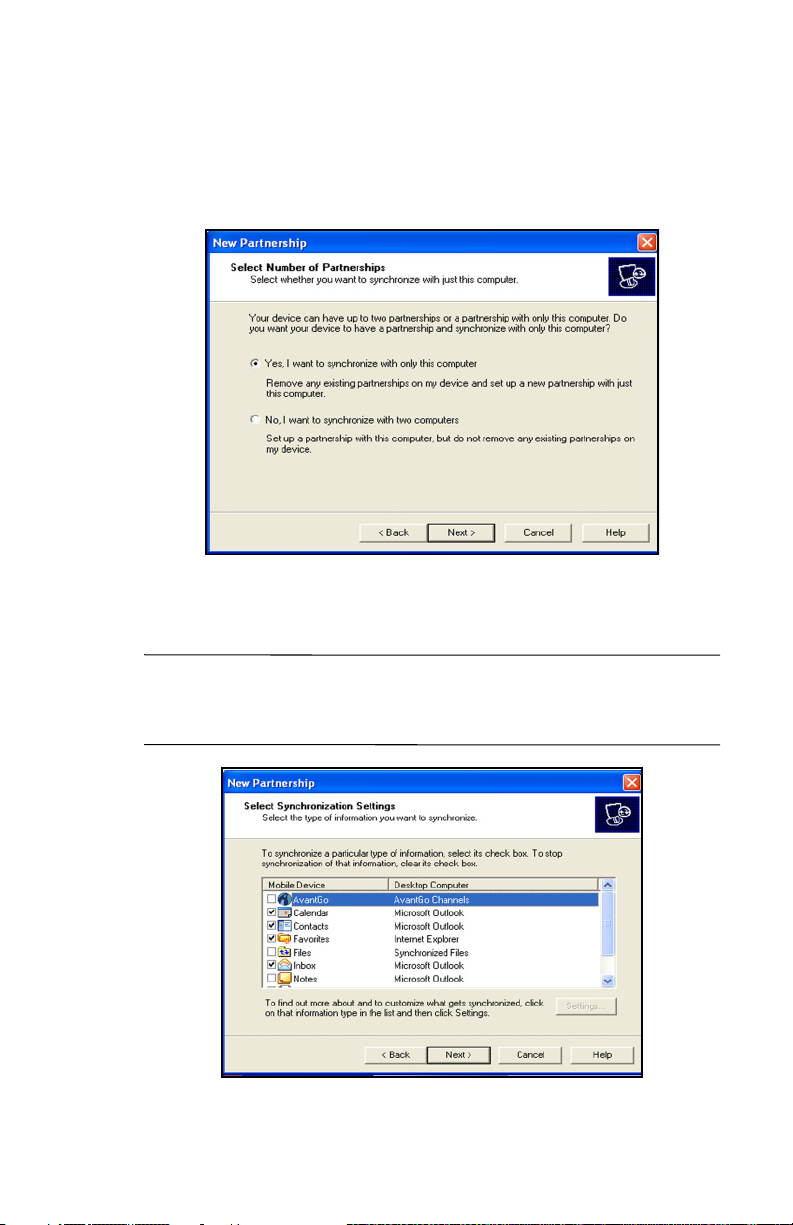
6. When the Select Number of Partnerships screen displays,
choose whether you want to synchronize with one computer
or two (e.g., home and office).
7. When the Select Synchronization Settings screen displays,
check the items you want to synchronize between your HP
iPAQ and your personal computer.
Note: Some of the synchronization settings can be customized. If
you select an item that can be customized, the Settings button is
enabled. Click the Settings button to modify an item.
6
Page 11

8. When the Setup Complete screen displays, click Next.
ActiveSync starts to synchronize.
Do you want to learn more about:
■ setting up a guest partnership?
■ setting up a partnership with a server?
■ setting up a partnership with two computers?
■ setting up a partnership for two handheld devices?
■ using an infrared connection?
■ using the Wireless LAN and a server?
For more information, refer to the User’s Guide on the
Companion CD.
For additional information, refer to the Microsoft Windows Mobile
2003 website at
www.microsoft.com/windowsmobile/resources/support/pocketpc
Fill in your region, your device, and your operating system; then
click the Get Support button. Under Support Topics on the left
side of the window, select ActiveSync.
Troubleshooting your Synchronization Settings
.
Note: If you must log onto a server such as your company’s
Virtual Private Network, you may receive a message from
ActiveSync telling you it is unable to synchronize. You must first
log onto the server in order for ActiveSync to synchronize.
Occasionally when attempting to synchronize to a personal
computer, you might receive an “Unable to Detect Device” error
message. This usually means your HP iPAQ is not properly
connected to the desktop cradle or sync cable.
7
Page 12

If you get this error:
1. Make sure the desktop cradle or sync cable USB connector is
securely connected to your personal computer.
2. Once the connection issue is resolved, ActiveSync begins
synchronizing automatically.
If ActiveSync does not begin synchronizing, start it manually. On
your personal computer, click Start > Programs > Microsoft
ActiveSync > Sync.
To find out how to resolve other error messages, see
“Troubleshooting,” in the User’s Guide located on the
Companion CD.
There are many error messages that can be received when
synchronizing. For the best answers to troubleshooting these
errors, refer to the Microsoft Pocket PC 2003 Web site at
www.microsoft.com/windowsmobile/resources/support/pocketpc.
Fill in your region, your device, and your operating system, then
click the Get Support button. Select the Support Topic that best
applies to the error message you received.
8
Page 13
How Do I Regain Functionality if My HP iPAQ Locks Up or Runs Slowly (Perform a Soft “Normal” Reset)?
A soft reset does not erase any programs or saved data. Before
performing a soft reset, be sure to save any unsaved data since
any unsaved data will be lost.
Perform a soft reset when:
■ You want to stop all running applications.
■ After installing a new application.
■ If your HP iPAQ “locks up.”
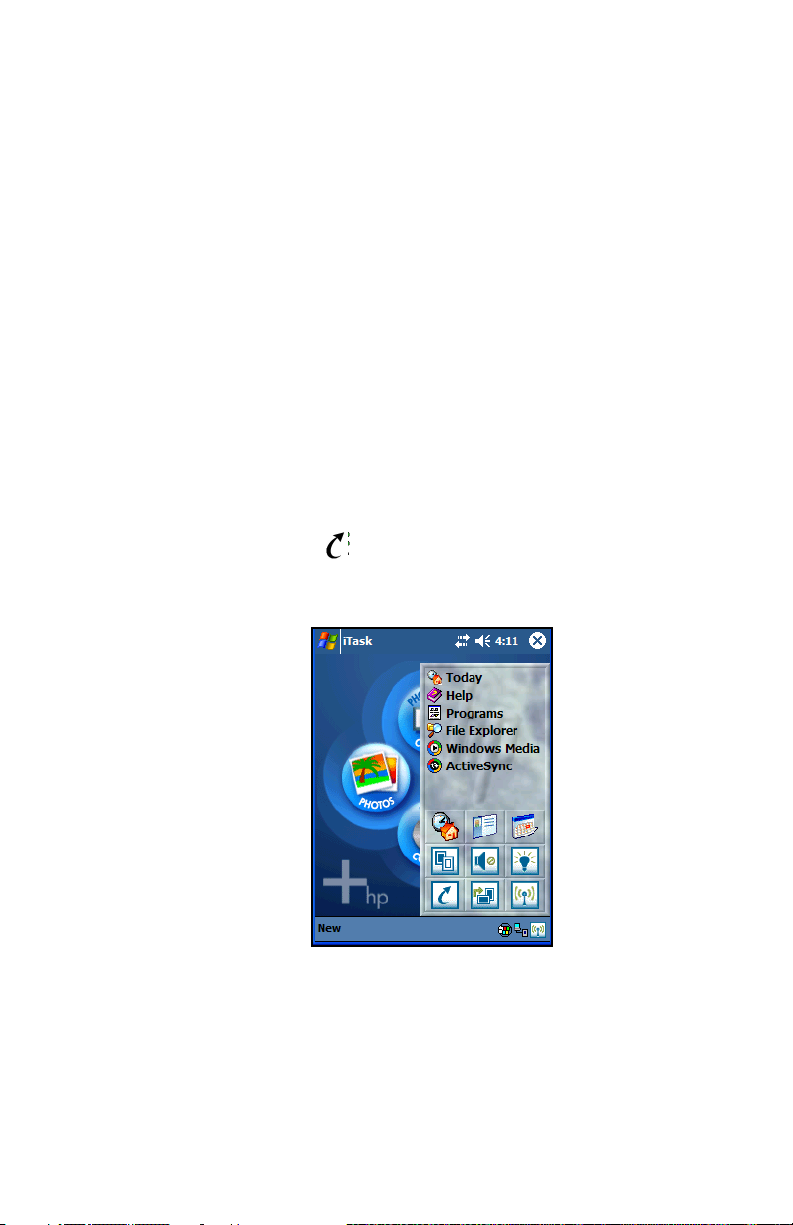
Follow these steps to save data and reset your HP iPAQ:
1. Press the iTask button.
2. Tap and hold on any application in the list.
3. Tap on Close All Tasks.
4. Locate the recessed Reset button on the bottom of your HP
iPAQ.
9
Page 14

5. Use the stylus to lightly press the Reset button. The HP
iPAQ restarts and displays the Launch Page or traditional
Today screen.
10
Page 15
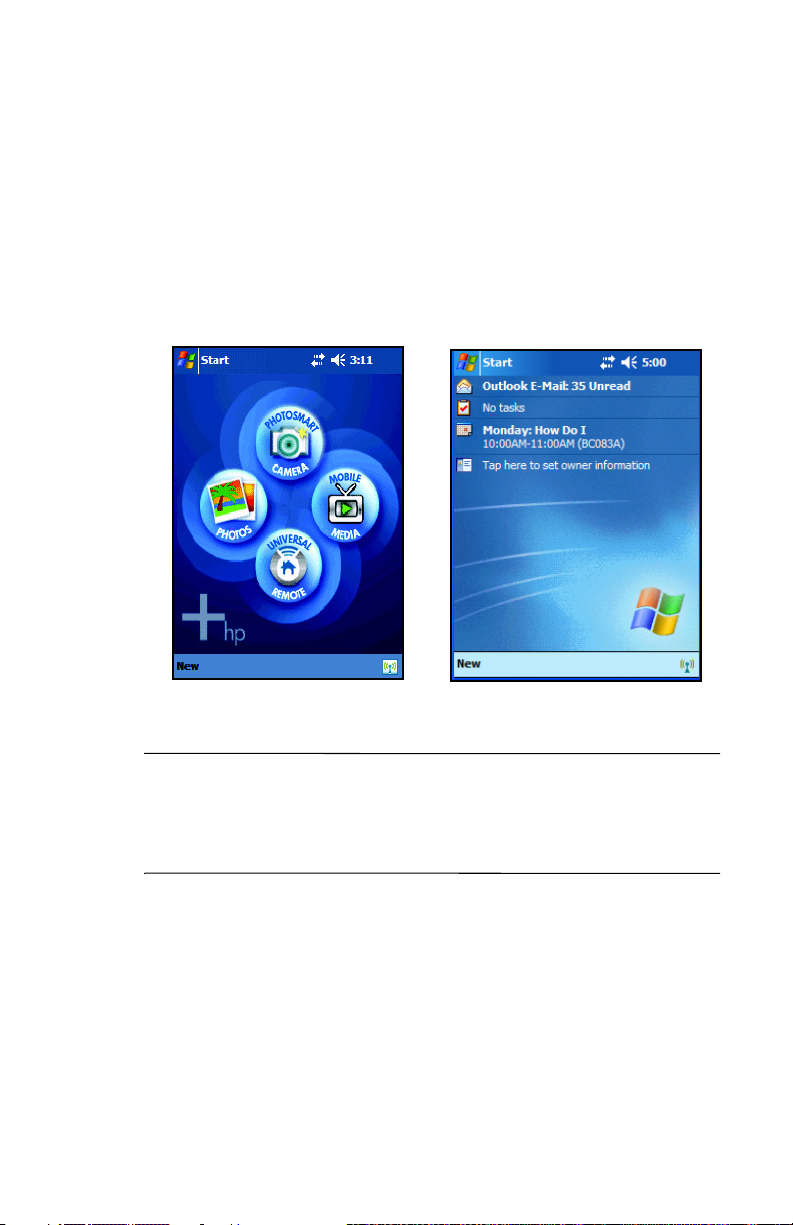
How Do I Switch from the Launch Page to the Traditional Today Screen?
You can switch from the Launch page to view the traditional
Today screen. To begin, on your HP iPAQ:
1. Tap Start > Settings>Today.
Launch Page Traditional Today Screen
Note: The built-in HP Photosmart camera is available only in
select HP iPAQ models. To upgrade your model, please refer to
the Accessories Brochure for information on the HP Photosmart
Mobile Camera.
2. In Settings, tap the Items tab and uncheck the iPAQ
Entertainment box to turn off the Launch page.
3. Under the Items tab, check the options you want to view on
the traditional Today screen.
4. Click OK to accept your selections. The traditional Today
screen displays.
11
Page 16

How Do I Maximize Battery Life?
There are a number of ways to make sure your battery lasts
as long as possible between charges. You can use as many as
necessary to maximize your battery life.
■ Tap Start > Settings > System tab > Power > Main tab, then
set the HP iPAQ to turn off after a short time, if it is not being
used.
■ Tap Start > Settings > System tab > Backlight, then set the
backlight to go off quickly after you stop using your HP
iPAQ.
■ Turn off Bluetooth power when not in use. To turn off
Bluetooth, tap the Wireless icon in the lower-right corner
of the Launch page or traditional Today screen, then tap
Bluetooth button.
■ Turn off Wi-Fi power when not in use. To turn off Wi-Fi, tap
the Wireless icon ( ) in the lower-right corner of the
Launch page or traditional To da y screen, then tap the Wi-Fi
button.
■ Leave your HP iPAQ connected to AC power at all times
when you’re not using it.
■ Tap Start > Settings > Connections tab > Beam, then
uncheck the “Receive all incoming beams” checkbox to
receive infrared beams manually.
■ To ensure you always have battery power available, invest
in a spare battery or optional Extended Battery. For more
information on purchasing optional batteries, visit the HP
Web site at www.hp.com/go/ipaqaccessories.
12
Page 17

How Do I View Pictures That I Have Already Taken?
To view pictures using your HP iPAQ, follow these steps:
1. From the Start menu, tap Programs > HP Image Zone.
2. Tap a thumbnail (i.e., a small representation of a larger
image) to select the picture. A preview of the picture and
information about it displays.
Note: By default, all photos taken with the built-in HP
Photosmart camera are stored in the My Documents/My Pictures
folder. The default filename for photos is “HPIM0001.” The
default filename for videos is “HPIM0001.”
If photos are moved to an SD card, they will be stored in
DCIM\100HPIPQ\ directory.
13
Page 18

Note: The built-in HP Photosmart camera is available only in
select HP iPAQ models. To upgrade your model, please refer to
the Accessories Brochure for information on the HP Photosmart
Mobile Camera.
To view images in a different folder:
1. Tap File > Open.
2. Select the desired folder.
3. Tap OK.
How Do I Turn Wi-Fi On or Off?
To turn on Wi-Fi from the Launch Page or traditional To da y
screen, tap the Wireless icon ( ), and then tap the Wi-Fi
button. When Wi-Fi is on, the Wireless LED (on the top-left
corner of your HP iPAQ) turns blue and the Wi-Fi button turns
amber. Once you connect to a wireless network, the Wi-Fi button
turns green.
Note: Before accessing your wireless network, you must turn on
Wi-Fi. When the blue Wireless LED is on and the arrows at the
top of the screen show connected ( ), your HP iPAQ is
connected to the wireless network.
14
Page 19

To turn off Wi-Fi, tap the Wi-Fi button again. When Wi-Fi is off,
the Wireless LED is no longer blue and the Wi-Fi button turns
gray.
Battery-Saving Tip: When you are not using Wi-Fi, turn it off.
When Wi-Fi is on, be sure one of the power-saving modes is
selected. Refer to the section on “Changing the Wireless LAN Power
saving Modes” in the User’s Guide located on the Companion CD.
How Do I Use Wi-Fi?
Wireless access eliminates the need to use cables to connect your
HP iPAQ to the Internet. However, to be able to use Wi-Fi, you
must have a Wireless Access Point. These access points transmit
data to and from your wireless device. Your HP iPAQ can connect
directly to your wireless network through Wi-Fi. With Wi-Fi, you
can:
■ Access the Internet
■ Send and receive e-mail
■ Use hotspots for wireless connectivity
Setting Information
Before connecting to a network, you need to set up your HP iPAQ
with the necessary setting information for your network. The type
of information necessary to set up a network connection depends
on the type of network you are connecting to.
Option A: Home Wireless Network
If you have a wireless network in your home, you need to
determine the information you need to connect to the network.
Use whatever settings you specified when you installed your
wireless network to set up your HP iPAQ to connect to it.
15
Page 20

Option B: Public Hotspots
If you want to connect to a wireless network at a public hotspot
(such as a library or coffee house), check with the establishment
to find out what setting information you need. Often there is a
brochure near the entrance that explains this information, but it is
also a good idea to check their Web site beforehand or call in
advance since you may need to set up a service account.
How Do I Connect to My Wireless Home Network?
To start using your HP iPAQ in your home as a wireless device,
you need to connect to your wireless network. To connect to your
wireless network, you must have the following information:
■ Name of your wireless home network also known as SSID.
Service Set Identifier (SSID) is a sequence of characters that
uniquely identifies your network. This ID number uses a
maximum of 32 characters and is case sensitive.
■ Any network data encryption setting, such as WEP.
Encryption is a conversion process that is used for protecting
data. Wired Equivalent (WEP) is a security protocol.
Automatically Connecting to a Network
1. To turn on Wi-Fi from the Launch Page or traditional Tod ay
screen, tap the Wireless icon (), and then tap the Wi-Fi
button.
2. If one or more networks are present, the Network indicator
icon ( ) appears in the Navigation bar. Tap the network you
want to connect to, then tap whether the network connects to
the Internet (does not use proxy settings) or Work (uses proxy
settings).
16
Page 21

3.
Note: To use iPAQ Mobile Media, you must select “Work” to use
the wireless network. For more information about the iPAQ
Mobile Media features, refer to the Special Features Guide.
17
Page 22

4. If you are prompted for a Network Key (WEP), enter the
security settings for your network and tap Connect.
Manually Connecting to a Wireless Network
Networks you have already configured are known as preferred
networks and are listed under Wireless Networks. If Wi-Fi is
turned on, tap the Settings button and your preferred networks
appear in the list. You can choose whether to connect only to
preferred networks or to have your HP iPAQ connect to any
available network whether it is preferred or not.
To set up a wireless network connection:
1. To turn on Wi-Fi from the Launch page or traditional Today
screen, tap the Wireless icon (), and then tap the Wi-Fi
button.
2. From the iPAQ Wireless screen, tap the Settings button. The
Configure Wireless Networks screen displays.
3. Review the list of networks, then tap your network name if it
is present. (If one or more networks are present, the Network
indicator icon ( ) appears in the Navigation bar.)
18
Page 23

Note: If your network name is not listed, you need to add it to
the preferred network lists. If Wi-Fi is turned on, tap the Settings
button then tap Add New... from the Configure Wireless
Networks list. Enter your network name, then choose if it
connects to Work or Internet.
19
Page 24

Note: To use iPAQ Mobile Media, you must select “Work” to use
the wireless network. For more information about the iPAQ
Mobile Media features, refer to the Special Features Guide.
4. Tap the Network Key tab, enter any data encryption settings.
5. Tap the 802.1x tab, enter any applicable data for your
wireless network.
20
Page 25

6. Tap OK. (Your new network is now available from the
Configure Wireless Networks list.)
7. Tap OK to exit the Configure Wireless Networks screen.
Connecting to Hotspots
Connecting to a hotspot in your local coffee shop, at the airport,
or other public places usually requires a contract with the hotspot
service provider. You can purchase a contract at the hotspot site
from your service provider or by accessing the service provider’s
Web site.
Once you have purchased this service, you will be able to connect
to their hotspots using your HP iPAQ. Some public places may
even provide free hotspot connection.
Note: If you experience problems connecting to the hotspot
location, you need to contact the service provider.
Do you want to learn more about:
■ setting up a proxy server?
■ connecting to a VPN server?
■ connecting to a corporate network?
Refer to “Using the Wireless LAN,” in the User’s Guide located
on the Companion CD. For more information on any of the
wireless screens, tap Start > Help from any screen to get help on
that screen.
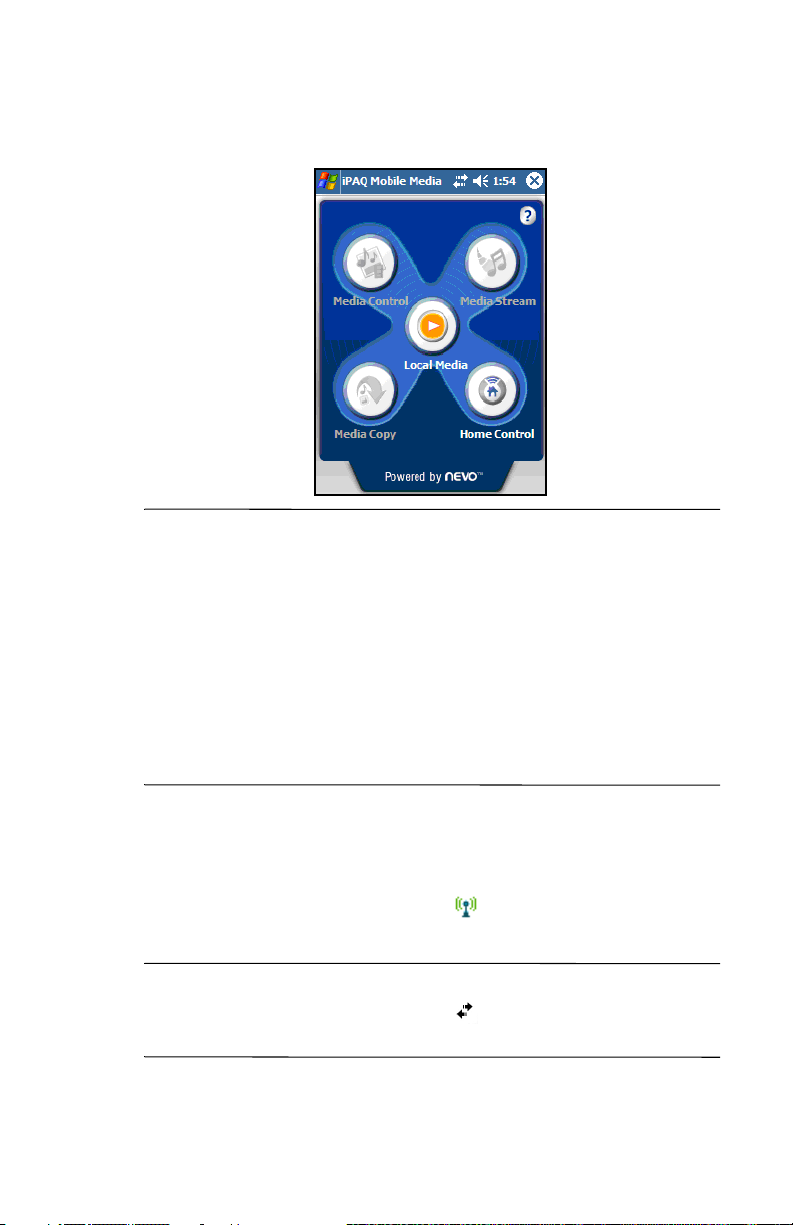
How Do I Configure My Wireless Settings to Use iPAQ Mobile Media?
The Media Control, Media Stream, and Media Copy features
of iPAQ Mobile Media can only be used within a wireless
network. Refer to the Special Features Guide to get specific
details about the iPAQ Mobile Media features.
21
Page 26

Your HP iPAQ comes with integrated Wi-Fi wireless networking.
However, to use the wireless features, you must also have a
working Wi-Fi wireless network.
The Media Control, Media Stream, and Media Copy modes in
iPAQ Mobile Media appear gray, when:
■ You do not have a wireless network.
■ You have not turned on the Wi-Fi networking feature of your
HP iPAQ.
■ Your wireless settings on your HP iPAQ are incorrectly
configured to connect to your network.
■ You are outside the range of your wireless network.
■ You have not installed the Mobile Media for PC components
onto the personal computers connected to your wireless
network or they are not currently running.
22
Page 27
Note: In addition to setting up a wireless network, you must
install the iPAQ Mobile Media for PC components on personal
computers connected to your wireless network. To install the
Mobile Media for PC components, insert the Companion CD that
came with your HP iPAQ into your personal computer. Select
Install Mobile Media for PC from the main menu. Mobile
Media for PC is only supported for personal computers running
Windows XP. It cannot be installed on personal computers
running Windows 2000, Windows ME, Windows 98 or
Windows 95.
To set up your HP iPAQ to correctly connect to your wireless
network, you will need to:
1. To turn on Wi-Fi from the Launch page or traditional Today
screen, tap the Wireless icon ( ), and then tap the Wi-Fi
button.
Note: When the blue Wireless LED is on and the arrows at the
top of the screen show connected ( ), your HP iPAQ is
connected to the wireless network.
23
Page 28

If this is the first time you are connecting to your network, please
review the “How Do I Use Wi-Fi?” in this document for help
connecting to your network.
2. Tap Start > Settings > Connections tab, Connections>
Advanced tab. Then tap Select Networks and verify that
your wireless network is set for Programs that
automatically connect to a private network should
connect using: My ISP.
24
Page 29

3. From previous screen, tap OK on Settings screen, then tap
OK on the Connections screen. Then tap the Network
Cards icon, choose your network name from the list and tap
on it. Verify that it connects to Wo rk.
4. Select OK until you are back at the Launch page. Select the
Mobile Media icon to launch iPAQ Mobile Media.
How Do I Find the Media Servers and Media Players that I Can Access with iPAQ Mobile Media?
When you launch iPAQ Mobile Media, it scans your wireless
network and identifies all the media servers and media players
that are available. When a new media server or player becomes
available, an icon is displayed in the Navigation bar. When you
click on this icon, the names of each media server or player
display. When a media server or player is shut down, you will
also be notified through this same icon in the Navigation bar.
Tapping this icon shows the media server or player that is no
longer available.
25
Page 30

Note: All media servers and players are not simultaneously
identified. It may take up to 30 seconds to identify available
media servers and players on your wireless network.
By selecting Refresh Servers and Players from the Wrench
menu, you can manually scan your wireless home network for
available media servers and players. In iPAQ Mobile Media, tap
any of the modes except Home Control to access the Wrench
menu.
26
Page 31

How Do I Use Windows Media Player to Play Copy-Protected Music and Video on My HP iPAQ?
Music and video files are typically copy-protected for two
reasons:
■ Music and videos purchased from various online stores are
encoded with copy protection (also known as digital rights
management or DRM). DRM is used to implement the
licensing agreement you purchased for each individual
media. This usually restricts how many times the media can
be copied or the number of devices the media can be played
on.
■ Using Windows Media Player, you can also add
copy-protection to music that you own (traditional music
CDs). For instance, you can add copy-protection to music
that is copied onto your personal computer in the Microsoft
.wma format.
27
Page 32

■ Just like the music that you purchase, this copy-protection
restricts how many devices that can play your media content.
By default, Windows Media Player will add copy-protection
to music that you copy to your personal computer.
Note: To transfer and play copy-protected music and videos on
your HP iPAQ, you must use Windows Media Player.
To transfer copy-protected files to your HP iPAQ, follow these
steps:
1. Place your HP iPAQ in its desktop cradle or connect it to the
sync cable.
2. Open Windows Media Player on your personal computer.
3. From the Media Guide view, select Copy to CD or Device
from left menu.
4. Select the music you want to copy from the Items to Copy
drop-down menu.
5. Find and select your device in the Items on Device
drop-down menu.
28
Page 33

6. Select Copy in the upper-right corner.
Note: You cannot use iPAQ Mobile Media to play
copy-protected media in any mode or use the Media Copy
feature with copy-protected media. To successfully copy any
copy-protected media to your HP iPAQ, you must use Windows
Media Player on your personal computer to copy the media to
your HP iPAQ. You then must use Windows Media Player on
your HP iPAQ to play copy-protected media.
29
Page 34

The following table lists the various media formats that you can
play with your HP iPAQ and the media players that can play
them.
iPAQ Mobile Media
Media
Format
Windows
Media
Player
Media
Control
Media
Stream
Media
Copy
Local
Play
HP
Image
Zone
Audio
.wma ✔✔✔✔✔
.wma
✔
(copy
protected)
.mp3 ✔✔ ✔✔
Video
.wmv ✔✔✔
.wmv
✔✔
1
(copy
✔✔
1
1
protected)
.mpg
.mpeg
.mpe
.m1v
.m1u
✔✔
(mpeg1)
.3gp
(mpeg4)
.mp4
.avi
2
✔
✔
(mjpeg)
Pictures
.bmp ✔✔✔✔✔
.jpeg ✔✔✔✔✔
.gif ✔✔✔✔✔
.png ✔✔✔✔✔
.2bp ✔
1 - If formatted for playback on Windows Mobile devices
2 - For rx3700 series only
Pocket
TV
30
Page 35

How Do I Protect My HP iPAQ Screen and Camera Lens from Damage or Cracking?
Note: The built-in HP Photosmart camera is available only in
select HP iPAQ models. To upgrade your model, please refer to
the Accessories Brochure for information on the HP Photosmart
Mobile Camera.
CAUTION: The screen and camera lens of your HP iPAQ is made of
Ä
glass and can be damaged or broken by drops, impacts, or pressure.
Note: HP is not responsible for damage that occurs as a result of
your failure to follow the instructions that came with the HP
branded product. Refer to the warranty document included with
your HP iPAQ for more information.
You should observe the following practices to protect the screen
and camera lens of your HP iPAQ from damage.
■ When transporting your HP iPAQ in a purse, pocket,
briefcase, etc., ensure the device does not get compressed,
bent, dropped, hit, or sat on.
■ When not in use, store your HP iPAQ in a case. You can
select from a wide variety of case options at
www.hp.com/go/ipaqaccessories.
■ Do not place anything on top of your HP iPAQ.
■ Do not bang your HP iPAQ against hard objects.
■ Never use any device other than the stylus that comes with
the HP iPAQ or an approved replacement to tap or write on
the screen. If you lose or break your stylus, you can order
extras at www.hp.com/go/ipaqaccessories.
31
Page 36

■ Clean your HP iPAQ by wiping the screen, the camera lens,
and the exterior with a soft, damp cloth lightly moistened
only with water.
CAUTION: To reduce the risk of damage to the internal components,
do not spray liquid directly on the screen or allow excess liquid to drip
Ä
inside your HP iPAQ. Using soap or other cleaning products on the
screen may discolor the finish and damage it.
How Do I Migrate Data from Palm Desktop to Windows Mobile 2003?
If you used a Palm Operating System (OS) based device before
purchasing your HP iPAQ, you will need to migrate your data
from the Palm Desktop software to Windows Mobile 2003.
Migrating your data from Palm software to Windows is a two-part
process. First, you will transfer the Palm data to Microsoft
Outlook. Then you will synchronize the Outlook data with your
HP iPAQ using ActiveSync.
Note: When using the desktop cradle or sync cable, do not
connect your HP iPAQ until you have installed ActiveSync and
are prompted to do so.
To migrate data from Palm Desktop to Windows Mobile 2003:
1. If you do not already have Microsoft Outlook 98 or higher
installed on your personal computer, install Outlook 2002
from the Companion CD as described in “How Do I
Synchronize Calendar, E-mail, Contact Data and More
between My HP iPAQ and PC (installing Microsoft
ActiveSync and establishing Partnerships)?” earlier in this
document.
32
Page 37

2. Insert the CD that came with your Palm device into your
computer’s CD-ROM drive.
Note: Microsoft Outlook must be set as your default e-mail
program to properly synchronize with the Palm Desktop
software. If you need to change your settings, open Microsoft
Outlook, then click Tools > Options > Other tab and check the
Make Outlook the default program for E-mail, Contacts, and
Calendar checkbox. Click Apply > OK, then restart your
personal computer.
3. Use the HotSync software located on the CD that came with
your Palm unit to synchronize your Palm information with
Outlook. Refer to the instructions that came with your Palm
unit for help installing or using Hotsync.
4. When Outlook is synchronized with your Palm device,
uninstall Hotsync from your personal computer. Click
Start > Control Panel > double-click Add or Remove
Programs. Select Palm Desktop, then click Remove. Follow
the on-screen instructions.
5. You will need to do the following tasks as described in “How
Do I Synchronize Calendar, E-mail, Contact Data and More
between My HP iPAQ and PC (installing Microsoft
ActiveSync and establishing Partnerships)?” in this
document:
❏ Install ActiveSync on your personal computer
❏ Create a partnership between your HP iPAQ and
your personal computer
❏ Synchronize your HP iPAQ with Outlook
33
Page 38

How Do I Print Wirelessly?
You can print only photos from your HP iPAQ using a Wi-Fi,
Bluetooth, or infrared printer.
Note: The HP Image Zone software installed on your handheld
supports the printing of photos. If you want to print e-mail
messages, Word documents, and more, install the full-version of
HP Mobile Printing for Pocket PC software from the Companion
CD onto your HP iPAQ.
1. Turn on Wi-Fi, Bluetooth or Infrared.
2. From the Launch page or traditional Today screen, tap
Start> Programs > HP Image Zone.
3. Tap the photo you want to print.
Note: If you want to print several photos, tap Tools > Select>
Range. Tap the first and last photo in the desired range. Once
selected for printing, a green “flag” appears on each photo.
4. Tap File > Print.
5. Choose HP Mobile Printing.
34
Page 39

6. Tap the Next button.
7. Select Configure, then tap Add.
8. Select the desired type of printer and tap Next.
9. Follow the instructions on the screen to complete the
configuration process for your printer. (You will be prompted
to enter specific details about your printer. For additional
information on configuring your printer, refer to the
on-screen Help for HP Image Zone.)
Note: You should only need to perform the above steps once for
each Bluetooth-enabled printer you want to use. You do not need
to install drivers once you add a printer to your list.
35
Page 40

Note: Use of dial-up and wireless Internet, e-mail, corporate
networks, and other wireless communications, such as
Bluetooth-enabled devices, may require separately purchased
additional hardware and other compatible equipment, in addition
to a standard Wireless Local Area Network (WLAN)
infrastructure and a separately purchased service contract. Check
with your service provider for availability and coverage in your
area. Not all Web content may be available. Some Web sites may
not be formatted to fit mobile device screens and may require
installation of additional software.
For more information on Bluetooth, refer to “Using Bluetooth” in
the User’s Guide located on the Companion CD or go to the HP
Web site and chat with an online agent. To receive instructions on
how to chat with an online agent, refer to the question ““How Do
I Find Information On Topics Not Covered in This Booklet?”
found at the end of this document.
36
Page 41

How Do I Restore My HP iPAQ Default Settings and Erase All My Data (Perform a Hard “Full” Reset)?
Perform a hard reset when:
■ You want to clear all programs and data from main memory
(where data and programs you have loaded are stored).
■ You want to restore default settings.
■ A problem with your HP iPAQ is not fixed after a soft reset.
Performing a hard reset on your HP iPAQ does not erase
programs that came with your HP iPAQ. The information that you
have entered into your HP iPAQ will be erased. This information
(or data) includes your Word, photos, music files, and other
settings.
For more information about saving your data files, refer to “How
Do I Back Up and Restore My Data?” described in this
document.
If the battery installed in your HP iPAQ discharges completely,
your HP iPAQ operates as if a hard reset had been performed once
the battery has been recharged. Refer to “How Do I Check the
Battery Level?” in this document for more information.
CAUTION: If you perform a hard reset, your HP iPAQ returns to its
Ä
default settings and loses all information (files, settings, etc.) that is
recorded in main memory. Information stored in iPAQ File Store will
not be lost. For more information on using iPAQ File Store, refer to
“Learning the Basics” in the User’s Guide located on the Companion
CD. You will also need to re-establish your partnerships. For more
information on re-establishing your partnerships, refer to “How Do I
Synchronize Calendar, E-mail, Contact Data and More between My
HP iPAQ and PC (installing Microsoft ActiveSync and establishing
Partnerships)?”
37
Page 42

To perform a hard reset:
1. Press and hold the iPAQ Mobile Media ( ) and iTask ()
buttons on your HP iPAQ.
2. While holding the iPAQ Mobile Media and iTask buttons,
use the stylus to lightly press the Reset button on the bottom
of your HP iPAQ for about three seconds or until the screen
begins to fade.
3. When the iPAQ screen begins to fade, release the iPAQ
Mobile Media and iTasks buttons then remove the stylus
from the Reset button. The HP iPAQ resets and powers on.
If the HP iPAQ does not power on after a reset, try the following:
■ Check the battery door to ensure it is locked. If not,
replace the battery door by matching the tabs on the cover
to the latches on the HP iPAQ and snap it into place. This
action locks the battery door. If the battery door is not
locked, the HP iPAQ does not power on. For more
information, refer to “Managing the Battery” in the
User’s Guide located on the Companion CD.
■ Perform a soft reset on your HP iPAQ. Refer to “How Do
I Regain Functionality if My HP iPAQ Locks Up or Runs
Slowly (Perform a Soft “Normal” Reset)?” described in
this document.
38
Page 43

How Do I Manage Available Storage?
Your HP iPAQ normally manages main memory (default
location) as available space back and forth between storage
memory (memory used to store data and document files) and
program memory (memory used to run programs) as needed.
Main memory is any type of memory, except storage cards or
iPAQ File Store. If the battery in your HP iPAQ completely
discharges, all of the files in main memory are lost. However, any
files that are stored on Secure Digital (SD), SDIO (Secure Digital
IO), or MultiMedia (MMC) cards or in the iPAQ File Store are
not lost.
If you have an iPAQ rx3700 series, the iPAQ File Store is
available for saving your files. By saving most of your files in
iPAQ File Store, you can take full advantage of the memory
capacity of your HP iPAQ. You can also store your data files on
storage cards.
If you have an iPAQ rx3100 or rx3400 series, it is recommended
that you save most of your files on SD or MMC cards to
maximize the main memory. By saving your data files to storage
cards, the iPAQ rx3100 or rx3400 series can use its main memory
to run programs.
However, there are a variety of ways you can manage storage
space yourself to maximize the memory capacity of your HP
iPAQ. You can choose any or all of the options below.
Option A: Using Main Memory
Main memory is any type of memory, except SD and MMC
storage cards or iPAQ File Store. The preinstalled applications on
your HP iPAQ use the main memory. Also, many of your data
files are stored in main memory.
To check the amount of main memory on your HP iPAQ, click
Start > Settings > Memory.
39
Page 44

Option B: Using iPAQ File Store
Files that are stored in iPAQ File Store are not deleted if the
battery dies or if you perform a full (hard) reset.
Note: The size of iPAQ File Store depends on the model of your
HP iPAQ. Refer to the information below to determine the size of
iPAQ File Store for your HP iPAQ.
To store files in iPAQ File Store:
1. Browse for programs and files in your HP iPAQ by tapping
Start > Programs > File Explorer.
2. Copy the programs or files you want to store:
❏ To select one file to copy, tap and hold to highlight the
file.
❏ To select several files to copy, tap and drag to highlight
the files; then tap and hold the files.
3. In the pop-up menu, tap Copy.
4. Open iPAQ File Store by tapping Start > Programs > File
Explorer > My Documents > My Device > iPAQ File
Store.
5. At the bottom of the screen, tap Edit > Paste.
To view available memory in iPAQ File Store:
1. Tap Start > Settings > System tab >Memory > Storage
Card tab.
2. Select iPAQ File Store from the drop-down list.
40
Page 45

Option C: Using Optional Storage Expansion Cards
There are a variety of storage expansion cards available for
purchase, such as Secure Digital (SD) cards or MultiMedia
(MMC) cards. These cards can be installed in the Expansion Slot
on the top of your HP iPAQ.
For more information on purchasing expansion cards, visit the
HP Web site at www.hp.com/go/ipaqaccessories.
Managing Storage Space
Option A: Changing Storage Settings Manually
To temporarily change the storage settings manually:
1. On your HP iPAQ, tap Start > Settings > System tab >
Memory.
2. Use the stylus to slide the Storage/Programs bar as
necessary.
3. Tap OK to save your changes.
Option B: Stopping Running Programs
To stop programs that are running in the background:
1. Tap Start > Settings > System tab > Memory > Running
Programs tab.
2. Select one or more of the programs in the Running
Programs List.
3. Tap Stop.
41
Page 46

Option C: Removing Unused Programs
To permanently uninstall programs you have installed yourself:
1. Tap Start > Settings > System tab > Remove Programs.
2. Select a program to remove.
3. Tap Remove.
Do you want to learn more about:
■ what you can do with optional expansion cards?
■ using expansion cards in your HP iPAQ?
Refer to “Expansion Cards,” in the User’s Guide located on the
Companion CD.
42
Page 47

How Do I Back Up and Restore My Data?
It is good practice to regularly back up the data in your HP iPAQ
onto on your personal computer. This reduces the chance of
having to re-enter lost information into your HP iPAQ.
Because you already have a partnership between your HP iPAQ
and your personal computer, it is easy to set ActiveSync to create
a backup of your data each time you connect the two to
synchronize.
To create a backup file of the contents of your HP iPAQ,
1. Connect your HP iPAQ to your personal computer with the
sync cable.
2. On your personal computer, click Start > Programs >
Microsoft ActiveSync > Tools > Backup/Restore... >
Backup tab.
❏ To let ActiveSync automatically create a backup file
called Backup.stg (the .stg stands for “storage”), click
OK.
❏ To use a different filename for the backup file, click
Change and type the new filename.
3. Click Automatically back up each time the device
connects and click OK.
CAUTION: The restore process removes all information from your
Pocket PC and replaces it with the information in the backup file. Once
Ä
started, you cannot cancel the restore process.
To use your backup file in your personal computer to restore the
contents of your HP iPAQ:
1. On your HP iPAQ, close all applications and connect it to
your personal computer.
2. On your personal computer, open Microsoft ActiveSync by
going to Start > Programs > Microsoft ActiveSync.
43
Page 48

3. In the ActiveSync Tools > Backup/Restore... > Restore tab.
4. Locate the backup file and click OK.
How Do I Determine if the Battery is Charging?
If the battery is charging, the Power Indicator on the front of your
HP iPAQ flashes amber.
If the amber light is not on:
■ Try disconnecting the AC Adapter from the HP iPAQ and
reconnecting it to make sure the connection is not loose.
■ Take the HP iPAQ out of the desktop cradle or disconnect it
from the sync cable, then reinsert or reconnect it.
■ Perform a soft reset on the HP iPAQ. To perform a soft reset
on your HP iPAQ, see “How Do I Regain Functionality if My
HP iPAQ Locks Up or Runs Slowly (Perform a Soft
“Normal” Reset)?” described later in this document.
Another way to check whether the battery is charging is to tap
Start > Settings > System tab > Power. If the battery is charging,
the Main Battery indicator moves from left to right and State:
reads “Charging.”
44
Page 49

How Do I Check the Battery Level?
To check the battery level, tap Start > Settings > System tab >
Power > Main tab. You can view the amount of battery power
remaining for both the main battery and the backup battery.
If the battery charge level is low, connect to AC power using
the desktop cradle or the sync cable, or change the battery. For
information on purchasing a spare battery or Extended Battery,
visit the HP Web site at www.hp.com/go/ipaqaccessories.
CAUTION: It is recommended that you not allow the battery
Ä
installed in your HP iPAQ to discharge completely. Doing so will not
harm your HP iPAQ or battery, but you lose all data that is not stored
in main memory. Discharging the battery completely is similar to
performing a hard reset. Refer to “How Do I Restore My HP iPAQ
Default Settings and Erase All My Data (Perform a Hard “Full”
Reset)?” in this document for more information.
45
Page 50

How Do I Transfer Files from My Personal Computer to My HP iPAQ ?
You may want to take files you create on your personal computer
with you on your HP iPAQ. To do this:
1. On your personal computer, click Start > Programs >
Microsoft ActiveSync.
2. In ActiveSync, click Tools > Options.
3. Under the Sync Options tab, check the Files checkbox.
4. A message displays stating that a Synchronized Files folder
will be created on your personal computer desktop. Click
OK.
5. Click OK to save your changes, then click File > Close to
close ActiveSync.
46
Page 51

6. If your HP iPAQ is in the desktop cradle or attached to the
sync cable, synchronization begins automatically, and a
folder is created on your desktop which is named after the
name you gave your HP iPAQ when you set up your
partnership (for example, Pocket_PC My Documents).
If your HP iPAQ is not in the desktop cradle or connected to
the sync cable, synchronization begins and the folder is
created when you place your HP iPAQ in the desktop cradle
or connect it to the sync cable.
Note: If synchronization does not begin automatically, on your
personal computer open ActiveSync and click File > Options >
Schedule tab. Under Desktop schedule, select either
Continuously or On connection from the drop-down list box,
then click OK to save the changes.
7. Copy any files you want to transfer to your HP iPAQ to
the Synchronized Files folder for transfer during
synchronization.
8. To verify that the files were transferred successfully, on your
HP iPAQ, tap Start > Programs > File Explorer > My
Documents folder.
47
Page 52

How Do I Turn Bluetooth On and Off?
Tap th e Wireless icon () on the Launch Page or traditional
Today Screen, and then tap the Bluetooth button. When
Bluetooth is on, the Wireless LED on the top of your HP iPAQ
turns blue. Within iPAQ Wireless, the Bluetooth button turns
green when it is on.
Note: You must turn on Bluetooth before you can select the
Manager or Settings boxes.
Now that you have turned on Bluetooth you are ready to transfer
files, connect to a Bluetooth printer, synchronize with your
computer, and more.
To turn off Bluetooth, tap the Bluetooth button again. When
Bluetooth is off, the Bluetooth Wireless LED turns off. The
Bluetooth button also turns gray.
Battery Saving Tip: Turn Bluetooth off when you are not
using it.
Note: If you want other Bluetooth-enabled devices to be able
to connect to your device (all devices or only paired devices),
check the All other devices to connect checkbox. If you uncheck
this option, no devices are able to discover or connect to your HP
iPAQ. For more detailed information on Bluetooth, refer to
“Using Bluetooth” in the User’s Guide located on the
Companion CD.
48
Page 53

How Do I Insert and Remove SD Cards from Expansion Slot?
To install a Secure Digital (SD) card into the expansion slot on
the HP iPAQ:
1. Locate the slot on the top of the HP iPAQ.
2. Remove the protective plastic card.
3. Insert the expansion card into the expansion slot and push the
connection edge of the card firmly into the expansion slot.
Note: If your expansion card is not recognized, follow the card
manufacturer’s instructions to install it.
To remove a Secure Digital (SD) expansion card from the
expansion slot on the HP iPAQ:
1. Close all applications that are using the expansion card.
2. Remove a card from the Secure Digital expansion slot by
slightly pushing down on the card 1 to unlock it.
3. When the card disengages and pops up 2, pull it from the
expansion slot.
49
Page 54

CAUTION: SD cards must first be unlocked before removal. Do not try
Ä
to pull SD cards out of the expansion slot. Be sure to unlock the SD cards
before removal. Failure to do so may damage the expansion slot.
Note: Expansion cards must be purchased separately and are not
included with your HP iPAQ.
To locate information about expansion cards, go to the following
HP Web site: www.hp.com/go/ipaqaccessories.
50
Page 55

How Do I Find the Product ID, Model ID and Serial Number of My HP iPAQ?
The Model ID and Serial Number for your HP iPAQ can be found
on the label under the battery or in the Asset Viewer program. It is
recommended that you have this information available before
contacting HP Customer Support, particularly if you are calling
for in-warranty support.
Option A: Locating the Model ID and Serial Number in HP Asset Viewer
To use Asset Viewer to locate the Model ID and Serial Number:
1. Tap Start > Settings > System tab > Asset Viewer.
2. To locate the Model ID, tap System.
3. To locate the Serial Number, tap Identity.
Note: You can also use Asset Viewer to obtain your HP iPAQ
ROM version information.
Option B: Viewing the label
To find the label under the battery to locate the Model ID and
Serial Number:
1. Push up on the latch located on the back of the device.1.
2. Pull the side of the battery away from the device 2.
51
Page 56

.
Note: The product may or may not appear as it does in the
illustration.
3. Lift the battery up and out of the device. The label containing
the Model ID and the Serial Number is beneath the battery.
52
Page 57

CAUTION: Because most of the applications and data you install on
Ä
your HP iPAQ are held in main memory, you need to reinstall them if
the battery completely discharges or if the battery is removed from
the unit for extended periods of time. The backup battery in your HP
iPAQ lasts approximately 10 minutes or less.
You do not need to reinstall applications and data installed in the
iPAQ File Store folder.
How Do I Stop DockWare?
DockWare is a personalized desk clock, calendar, and screensaver
for your HP iPAQ. You can select preinstalled pictures to be used
as a slideshow in the background or you can add your own
personal pictures. For more information about DockWare, refer to
the Special Features Guide or the DockWare help found on your
HP iPAQ.
Note: The DockWare program settings are turned on by default
and start after 5 minutes of inactivity on the HP iPAQ.
The application stops as soon as you touch the screen or push any
button on the HP iPAQ, with the exception of scrolling up or
down to view a picture. Also DockWare stops running if an alarm
or any other popup window appears.
Be aware of the following:
■ If your HP iPAQ is running on battery power, this application
does not automatically start.
■ If DockWare is running and you take your HP iPAQ out of the
desktop cradle, the application continues to run on battery
power until you turn off your device or DockWare.
To disable DockWare, tap and hold anywhere on the screen, and
then uncheck Start Automatically from the popup menu. This
menu item acts as a toggle switch to start and stop the DockWare
software program. Therefore, if you want to start DockWare
again, you need to select this option again.
53
Page 58

How Do I Find Information On Topics Not Covered in This Booklet?
For complete setup and installation instructions, refer to the
Getting Started document in the box or the User’s Guide located
on the Companion CD. The User’s Guide is in a printable format,
if you prefer a hard copy document. Refer to the Special Features
Guide for information about HP Photosmart Camera and iPAQ
Mobile Media features.
Note: The built-in HP Photosmart camera is available only in
select HP iPAQ models. To upgrade your model, please refer to
the Accessories Brochure for information on the HP Photosmart
Mobile Camera.
If you have questions on using your HP iPAQ that have not been
covered in this booklet or in the Getting Started or User’s Guide,
refer to the iPAQ Handheld Forum (a message board) at
www.hp.com/support/ipaqforums.
To find the latest drivers and software updates for your product,
go to www.hp.com/support. Select your country, then select
Download drivers and software and select your product. You
can also enroll in Subscriber’s Choice to receive automatic
updates. To do so, after selecting your country, click Sign up:
driver & support alerts/notifications under Additional
resources on the right side of the screen.
To receive support from an HP-qualified technical support
specialist, visit the HP support Web site at www.hp.com/support.
To find information on the support Web site for your specific
product, be sure to have your model ID or product name
available. To chat with a support specialist online, select the HP
Instant Support icon.
To access the HP Instant Support icon:
1. On your personal computer, open your web browser (for
example, Internet Explorer) and type the URL
www.hp.com/support.
54
Page 59

2. Select your country or region.
3. Select See support and troubleshooting information, then
type your Model ID in the box. If you do not know your
Model ID, refer to “How Do I Find the Product ID, Model ID
and Serial Number of My HP iPAQ?” in this document
for more information.
4. Click the >> button.
5. Select your specific product from the list.
6. The Technical Support page for your HP iPAQ is displayed.
The HP Instant Support icon is located on the right side.
55
Page 60

© 2004 Hewlett-Packard Development Company, L.P.
Microsoft, Windows, the Windows logo, Outlook and ActiveSync are trademarks of
Microsoft Corporation in the U.S, and other countries.
Windows Mobile™ 2003 software for Pocket PC
Second Edition, August 2004.
364356-002
 Loading...