

Page 1
hp digital copier 610
printing and software
guide
Page 2

© Copyright Hewlett-Packard Company 2002
All rights are reserved. No part of the document may be
photocopied, reproduced, or translated to another language
without the prior written consent of Hewlett-Packard
Company.
Portion s Cop y r ight © 19 8 9-2001 Palomar Softwar e In c. T he
HP Digital Copier Series includes printer driver technology
licensed from Palomar Software, Inc. www.palomar.com
Publication number: C8372-90101
First edition: June 2002
Printed in U.S.A., Mexico, Germany, Singapore, or China
®
Windows
and Windows 2000
Microsoft Corporation.
Intel® and Pentium® are registered trademarks of Intel
Corporation.
, Windows NT®, Windows Me®, Windows XP®,
®
are U.S.-registered trademarks of
notice
The information contained in this document is subject to
change without notice and should not be construed as a
commitment by the Hewlett-Packard Company.
Hewlett-Packard assumes no responsibility for
any error s that may appear in this document , nor
does it make expressed or implied warranty of
any kind with regard to this material, including,
but not limited to, the implied warranties of
merchantability and fitness for a particular
purpose.
The Hewlett-Packard Company shall not be liable for
incidental or co nsequential damages in connection with, or
arising out of the furnishing, performance, or use of this
document and the program material which it describes.
Note: Regulatory information can also be found in the
Technical Information chapters of this manual and the HP
Digital Copier 510/610 Reference Guide.
It is not lawful in many places to make copies of the following
items. When in doubt, check with a legal representative first.
• Governmental paper or documents:
-Passports
- Immigration papers
- Selective service papers
- Identification badges, cards, or insignias
• Governmental stamps:
- Postage stamps
- Food stamps
• Checks or drafts drawn on Governmental agencies
• Paper currency, traveler’s checks, or money orders
• Certificates of deposit
•Copyrighted works
safety information
Warning! To
preven t fir e or shoc k
hazard, do not
expose this product
to rain or any type of
moisture.
Always follow basic s afety preca utions when using this
product to reduce risk of injury from fire or electric shock.
WARNING: potential shock hazard
1 Read and unde rs tan d all i nstr u cti ons in the set up p os ter.
2 Use only a grounded electrical outlet when connecting
the unit to a power s o urce. If you do n ot know whether
the outlet is grounded, check wi th a qualified electric ian.
3 Observe all warnings and instructions marked on the
product.
4 Unplug this product from wall outlets before cleaning.
5 Do not install or use this product near water or when you
are wet.
6 Install the product securely on a stable surface.
7 Install the product in a protected location wh ere no o ne
can step on or trip over the line cord , and where the line
cord will not be damaged.
8 If the product does not operate normally, see the online
Troubleshooting help.
9 No operat or-servi ceable parts inside. Refer se rvicing to
qualified service personnel.
10 Use in a well-ventilated area.
Page 3

contents
1 get started . . . . . . . . . . . . . . . . . . . . . . . . . . . . . . . . . . . . . 1
about this guide. . . . . . . . . . . . . . . . . . . . . . . . . . . . . . . . . . . . . . . . 1
load paper . . . . . . . . . . . . . . . . . . . . . . . . . . . . . . . . . . . . . . . . . . . 1
load envelopes . . . . . . . . . . . . . . . . . . . . . . . . . . . . . . . . . . . . . . . . 3
adjust paper settings for printing . . . . . . . . . . . . . . . . . . . . . . . . . . . . 4
2 set up printing . . . . . . . . . . . . . . . . . . . . . . . . . . . . . . . . . . 5
install your hp digital copier software. . . . . . . . . . . . . . . . . . . . . . . . . 5
uninstall and reinstall software. . . . . . . . . . . . . . . . . . . . . . . . . . . . . 12
3 use printing features. . . . . . . . . . . . . . . . . . . . . . . . . . . . . 13
make the hp digital copier the default printer. . . . . . . . . . . . . . . . . . . 13
change print settings . . . . . . . . . . . . . . . . . . . . . . . . . . . . . . . . . . . 14
use the setup tab . . . . . . . . . . . . . . . . . . . . . . . . . . . . . . . . . . . . . . 15
use the features tab . . . . . . . . . . . . . . . . . . . . . . . . . . . . . . . . . . . . 20
use the color tab . . . . . . . . . . . . . . . . . . . . . . . . . . . . . . . . . . . . . . 24
use the services tab . . . . . . . . . . . . . . . . . . . . . . . . . . . . . . . . . . . . 24
perform special print jobs . . . . . . . . . . . . . . . . . . . . . . . . . . . . . . . . 26
stop a print job . . . . . . . . . . . . . . . . . . . . . . . . . . . . . . . . . . . . . . . 28
4 troubleshooting tips . . . . . . . . . . . . . . . . . . . . . . . . . . . . . 29
printing problems. . . . . . . . . . . . . . . . . . . . . . . . . . . . . . . . . . . . . . 29
printing is too slow. . . . . . . . . . . . . . . . . . . . . . . . . . . . . . . . . . . . . 30
two-sided printing problems . . . . . . . . . . . . . . . . . . . . . . . . . . . . . . 31
USB connection problems . . . . . . . . . . . . . . . . . . . . . . . . . . . . . . . . 32
communication problems . . . . . . . . . . . . . . . . . . . . . . . . . . . . . . . . 33
problems uninstalling or reinstalling software. . . . . . . . . . . . . . . . . . . 33
get help . . . . . . . . . . . . . . . . . . . . . . . . . . . . . . . . . . . . . . . . . . . . 34
contents
i
Page 4

hp digital copier 610 printing and software guide
5 technical information . . . . . . . . . . . . . . . . . . . . . . . . . . . . 35
system requirements . . . . . . . . . . . . . . . . . . . . . . . . . . . . . . . . . . . . 35
print specifications . . . . . . . . . . . . . . . . . . . . . . . . . . . . . . . . . . . . . 36
paper specifications . . . . . . . . . . . . . . . . . . . . . . . . . . . . . . . . . . . . 37
regulatory information . . . . . . . . . . . . . . . . . . . . . . . . . . . . . . . . . . 38
declaration of conformity . . . . . . . . . . . . . . . . . . . . . . . . . . . . . . . . 39
ii
Page 5

get started
about this guide
1
This chapter contains the following topics:
• about this guide
• load paper
• load envelopes
• adjust paper setti n gs f o r printing
This HP Digital Copier 610 Printing and Software Guide contains the
information yo u need to connec t you r new HP Digital Copier to a comput er
rather than using the unit as a stand-alone copier. This connected option
allows you to use your unit as a copier/printer with a wide range of settings
and print functions.
Before you use this guide, be sure to thoroughly read and understan d the
HP Digital Copier 510/610 Reference Guide, which contains information
that you need to know a bout your copier/printer before installing the
software.
load paper
about thi s guide
Follo wing is the basic procedure for loading paper and the guidelines for
loading specialty papers for pr inting only. F or mor e informati on on loading
standard paper, see Load Paper and Load Originals in the HP Digital
Copier 510/610 Reference Guide.
For best r esults, adjust the paper settings each time y ou change paper types
and size s. For more information, see adjust paper settings for printing on
page 4 and select paper type and size on page 18.
1
Page 6
hp digital copier 610 printing and software guide
load specialty
paper for
printing
Follow ing are guidelines for loading certain types of paper for pr inting only .
paper tips
Labels
(only works with
printing function)
Continuous
(banner) paper
(only works with
printing function)
• Always use letter-size or A4-size label sheets
designed for use with HP Inkjet products (like
Avery Inkjet Labels), and make sure that the
labels are not more than two years old.
• Fan the stack of labels to make sure none of the
sheets are sticki ng together.
• Place a stack o f label sheets on top of standard
paper in the upper paper tray, print-side down.
Do not insert labels one sheet at a time.
Continuous banner paper is also known as computer
or Z-fold paper.
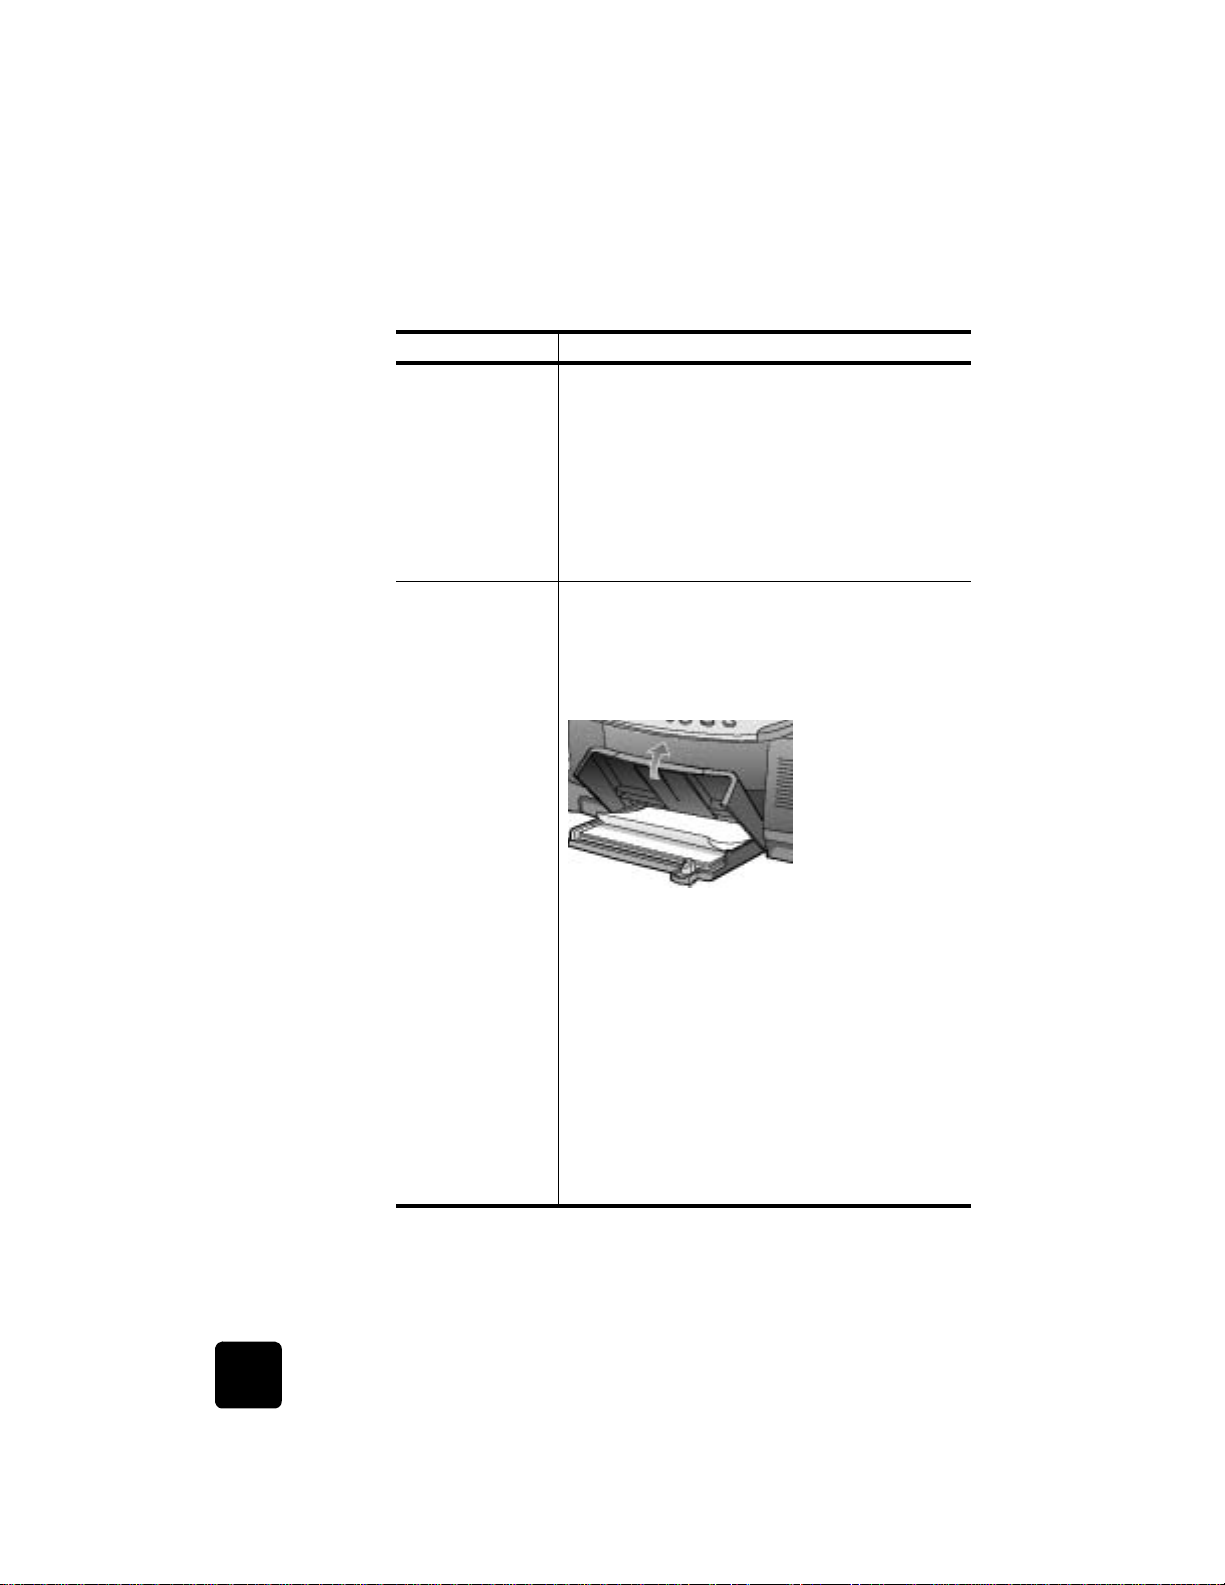
• Before loading banner paper, remove all other
paper from the upper paper tray, and then raise
the output tray above the catch on the right side.
Raise the
output tray
above the
catch on the
right side.
• If you use non-HP banner paper, use 20-lb.
paper and fan the paper before loading it.
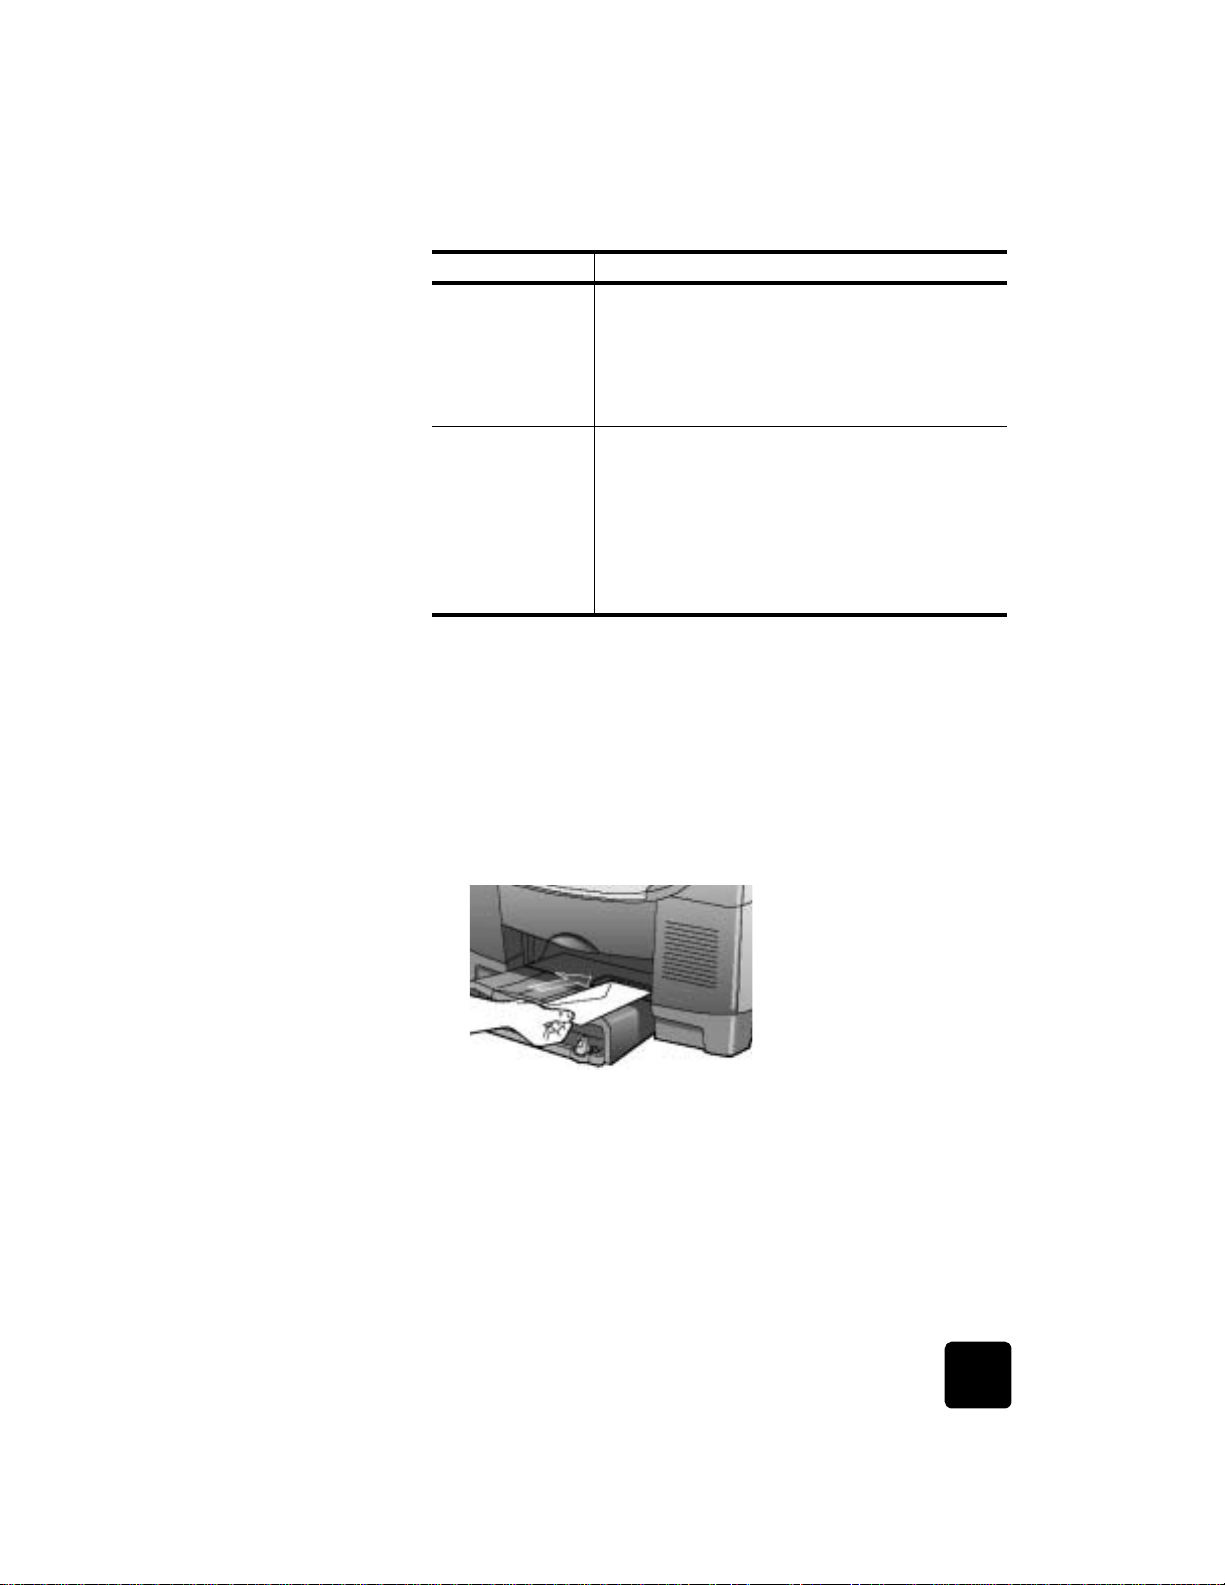
• Verify that the stack of banner paper contains at
least five pages.
• Care fully tear off the perforated edge strips from
both sides of the paper s tack, then unfold and
refold the paper to make sure the pages do not
stick together.
• Put the paper in the upper paper tray so that the
unattached edge is at the top of the stack t o war d
the back of the copier/printer. You should see a
folded edge closest to you at the top of the stack
in the upper paper tray.
2
get started
Page 7
paper tips
hp digital copier 610 printing and software guide
load envelopes
Postcards
(only works with
printing function)
4” x 6” photo
paper (only works
with printing
function from the
upper paper tray)
Envelopes must be loaded differently depending on whether you are
printing one en velope or multiple e nv elopes. Do not us e shiny or e mbossed
envelopes, or envelopes that have clasps or windows.
to print one envelope
In the upper paper tray, insert a stack of postcards
with the print-side down until it stops. Line up the
postcards on the right side of the upper paper tray,
slide the paper-width guide up against the left side
of the cards, and slide the paper-length guide in until
it stops.
In the upper paper tray, insert the photo paper with
the print-side down until it stops . Place the long edge
of the photo paper against the right si de of the upper
paper tray, slide the paper-width guide up against
the long edge of the photo paper, and slide the
paper-length guide in until it stops. If the photo paper
has perforated tabs, load the paper so that the tabs
are closest to you.
1 Slide the en v elope into the en v elope slot , whi c h is located on the right
side toward the back of the output tray.
2 Insert the envelope with the flap up and on the left, as shown.
load envelopes
3 Slide the envelope in until it stops.
to print multiple envelopes
1 Remove all paper from the upper paper tr ay.
2 Slide a s tack of e nv elopes into the tr ay, w ith the en ve lope flaps up and
on the left (print-side down), until they stop.
3 Adjust the paper-width and paper-length guides against the
envelopes, being careful not to bend the envelopes, as shown.
3
Page 8
hp digital copier 610 printing and software guide
4 Make sure the env elopes fit within the tray. Do not overload it.
Tip! Consult the help files in your word processing software
for details on how to format text for printing envelopes.
adjust paper settings for printing
Following are the guidelines for setting paper size and paper type for
printing only . W e r ecommend that you ch ange these settings whene ver y ou
load different paper or film to ens ure the best print quality.
The paper settings for copying may differ from the paper settings for
printing. For copying information, see Cha nge Paper Settings for Copying
in the HP Digital Copier 510/610 Reference Guide.
Y our HP Digital Copier automatically giv es you great pr inting results with an
optical sensor that detects the paper type and size of mos t popular papers
and films. Howev er , y ou can also manually select paper settings, as follows.
paper type paper size setting print quality setting
Banner papers Banner (Letter or A4) Normal
Cards User-Defined Paper Size, if listed sizes are
not appropriate
Copier paper/letterhead Letter, legal, or A4 Normal
Custom-size papers User-Defined Paper Size Best or Normal
Envelopes Appropriate listed envelope size Normal
Greeting card papers Letter or A4 Normal
Inkjet papers Letter, legal, or A4 Normal
Iron-on T-shirt transfers Letter or A4 Normal
Labels/stickers Letter or A4 Normal
Photo papers Letter or A4 Best
4” x 6” photo paper 4x6 Pho to Paper Best
Transparency films Letter or A4 Normal
4
Best or Normal
get started
Page 9

set up printing
This chapter contains the following topics:
• install your hp digital copier softwar e
• uninstall and reinstall software
install your hp digital copier software
Your HP Digital Copier may come with a universal serial bus (USB) cable.
Y ou can use the USB cable to connect your copier/printer to your computer
if your computer is running Windows 98, Me, 2000, or XP. This USB
connection turns y our st and-alone copier into a c opi er/printer that lets you
print from your computer.
2
before you
install the
software
install your hp digital copier software
Connecting to your HP Digital Copier with the USB cable is very simple.
1 Bef ore connecting your copier/printer with the USB cable, follow the
instructions on the Digital Copier Setup Poster that came with the
copier/printer, and make a test copy.
2 Close all virus protection programs and other software running on
your computer.
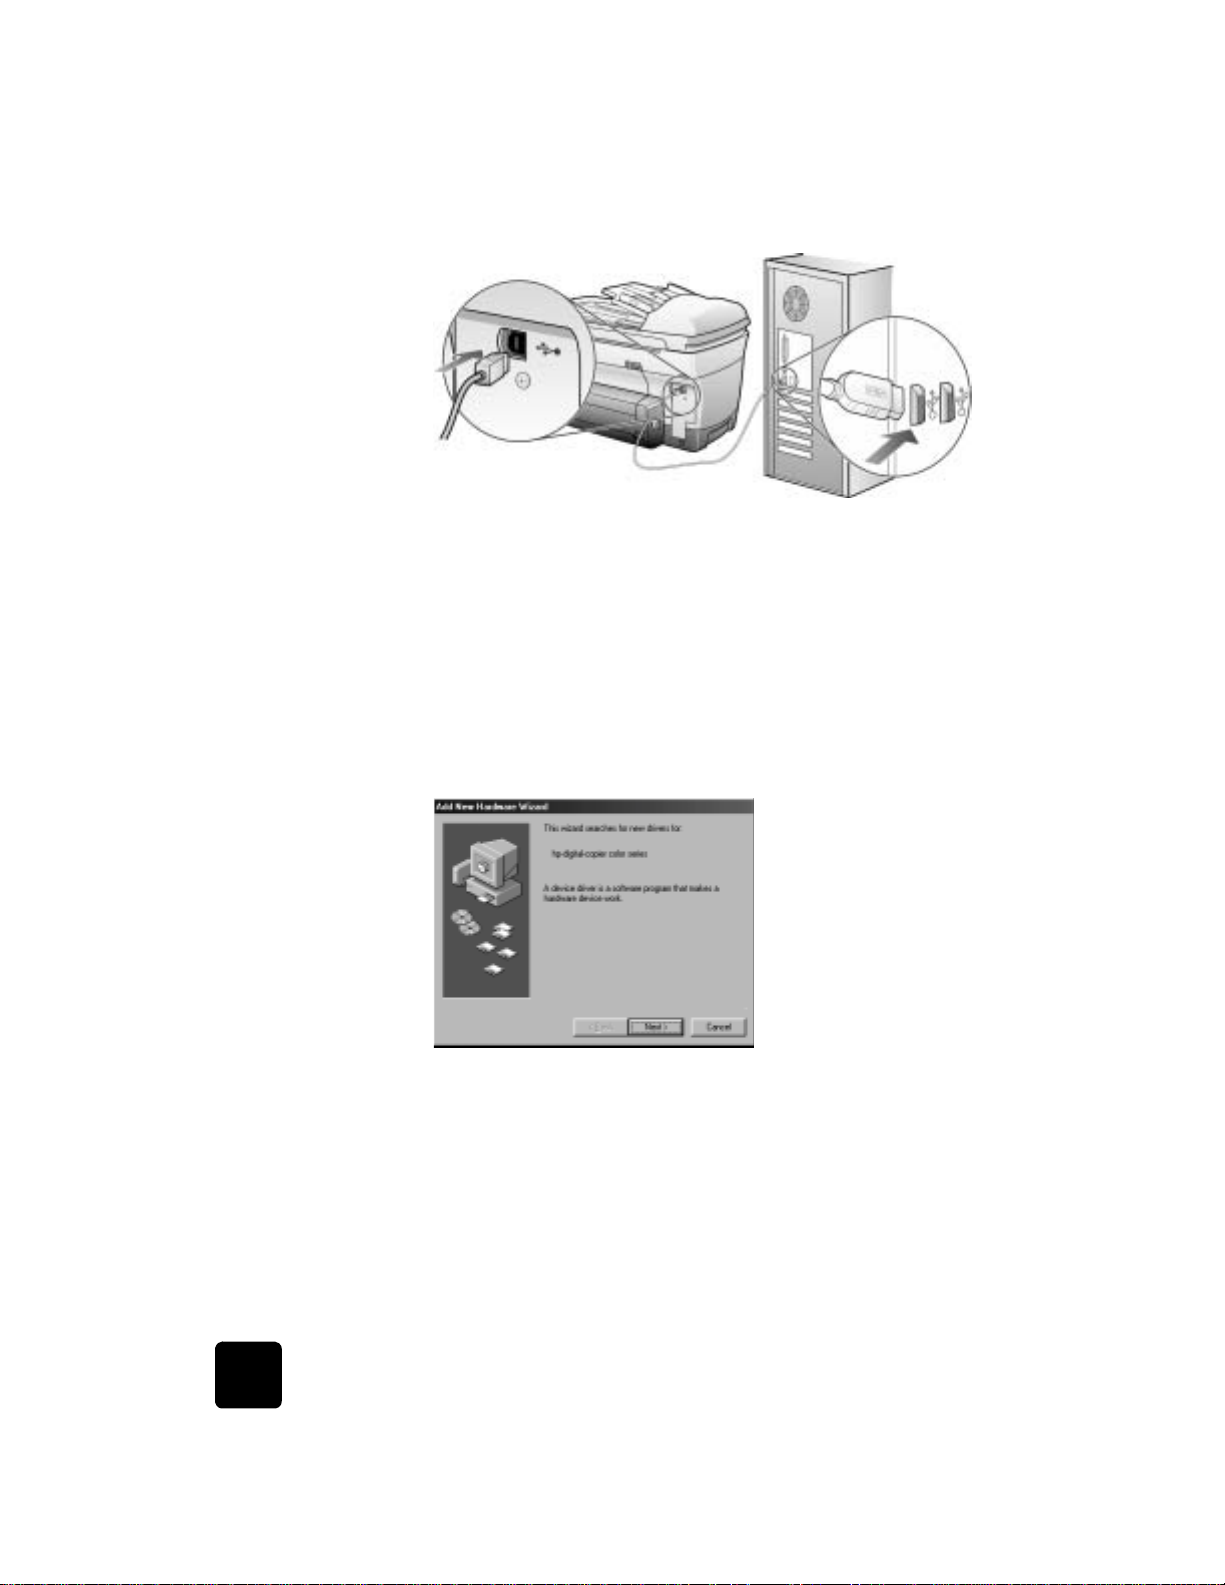
3 With your copier/printer powered on, connect your copier/printer to
your computer by plugging in the USB cable.
what works what does not work
Plugging into the USB port on
your computer
Plugging into a power ed hub that
is connected to the USB port on
your computer
Plugging into the USB port
located on the keyboard
Plugging into a non-powered USB
hub
5
Page 10
hp digital copier 610 printing and software guide
Tip! The ends of the USB cable are n ot identical. One end w ill
fit into your com puter or hub and the other end will only fit
into the HP Digital Copier.
4 The New Hardware Wizard appears. Depending on your operating
system, proceed with eith er install on Windows 98/Me on page 6,
install on Windows 2000 on page 8, or install on Windows XP on
page 10.
install on
Windows 98/
Me
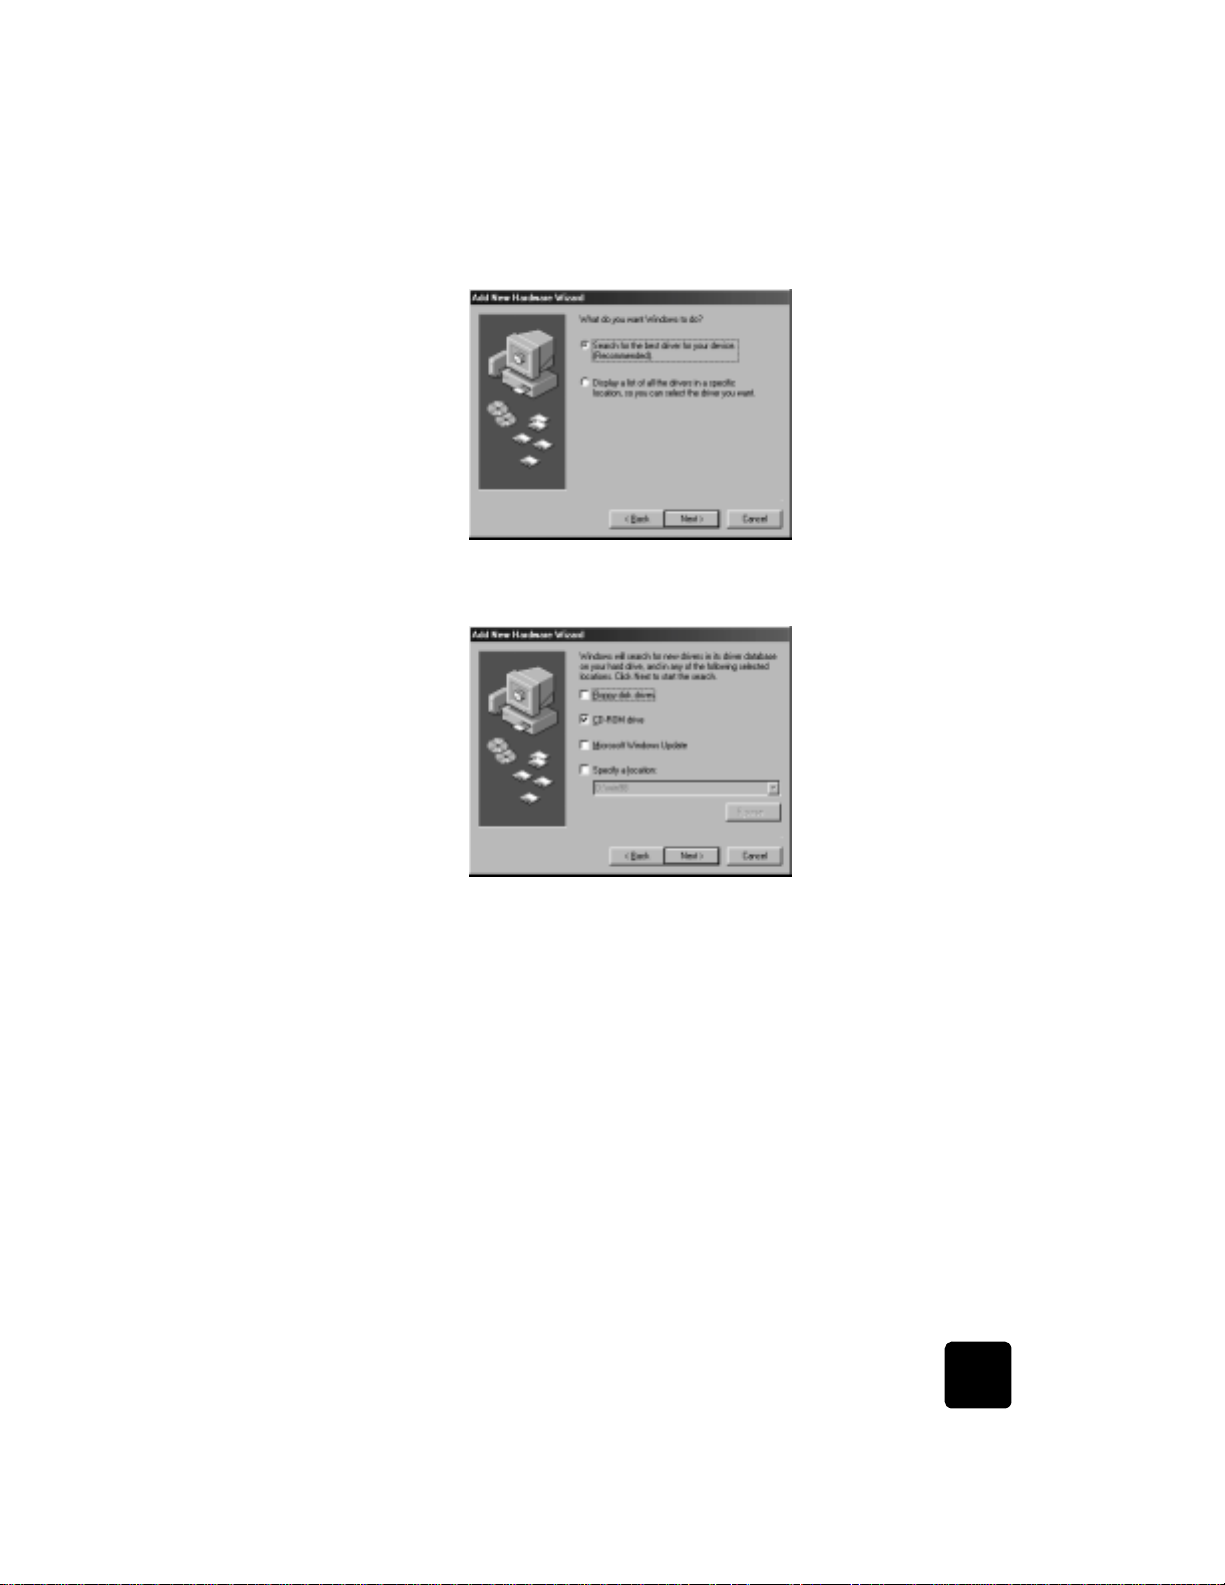
After you perfor m steps 1 through 4 in before you install the software on
page 5, the Add New Hardware Wizard dialog box appears if y our
computer is running Windows 98 or Me.
1 Insert the CD that came w ith your copier/prin ter into your computer’s
CD-ROM drive.
2 Click Next in the Add New Hardwar e Wizard dialog box.
6
set up printing
Page 11
hp digital copier 610 printing and software guide
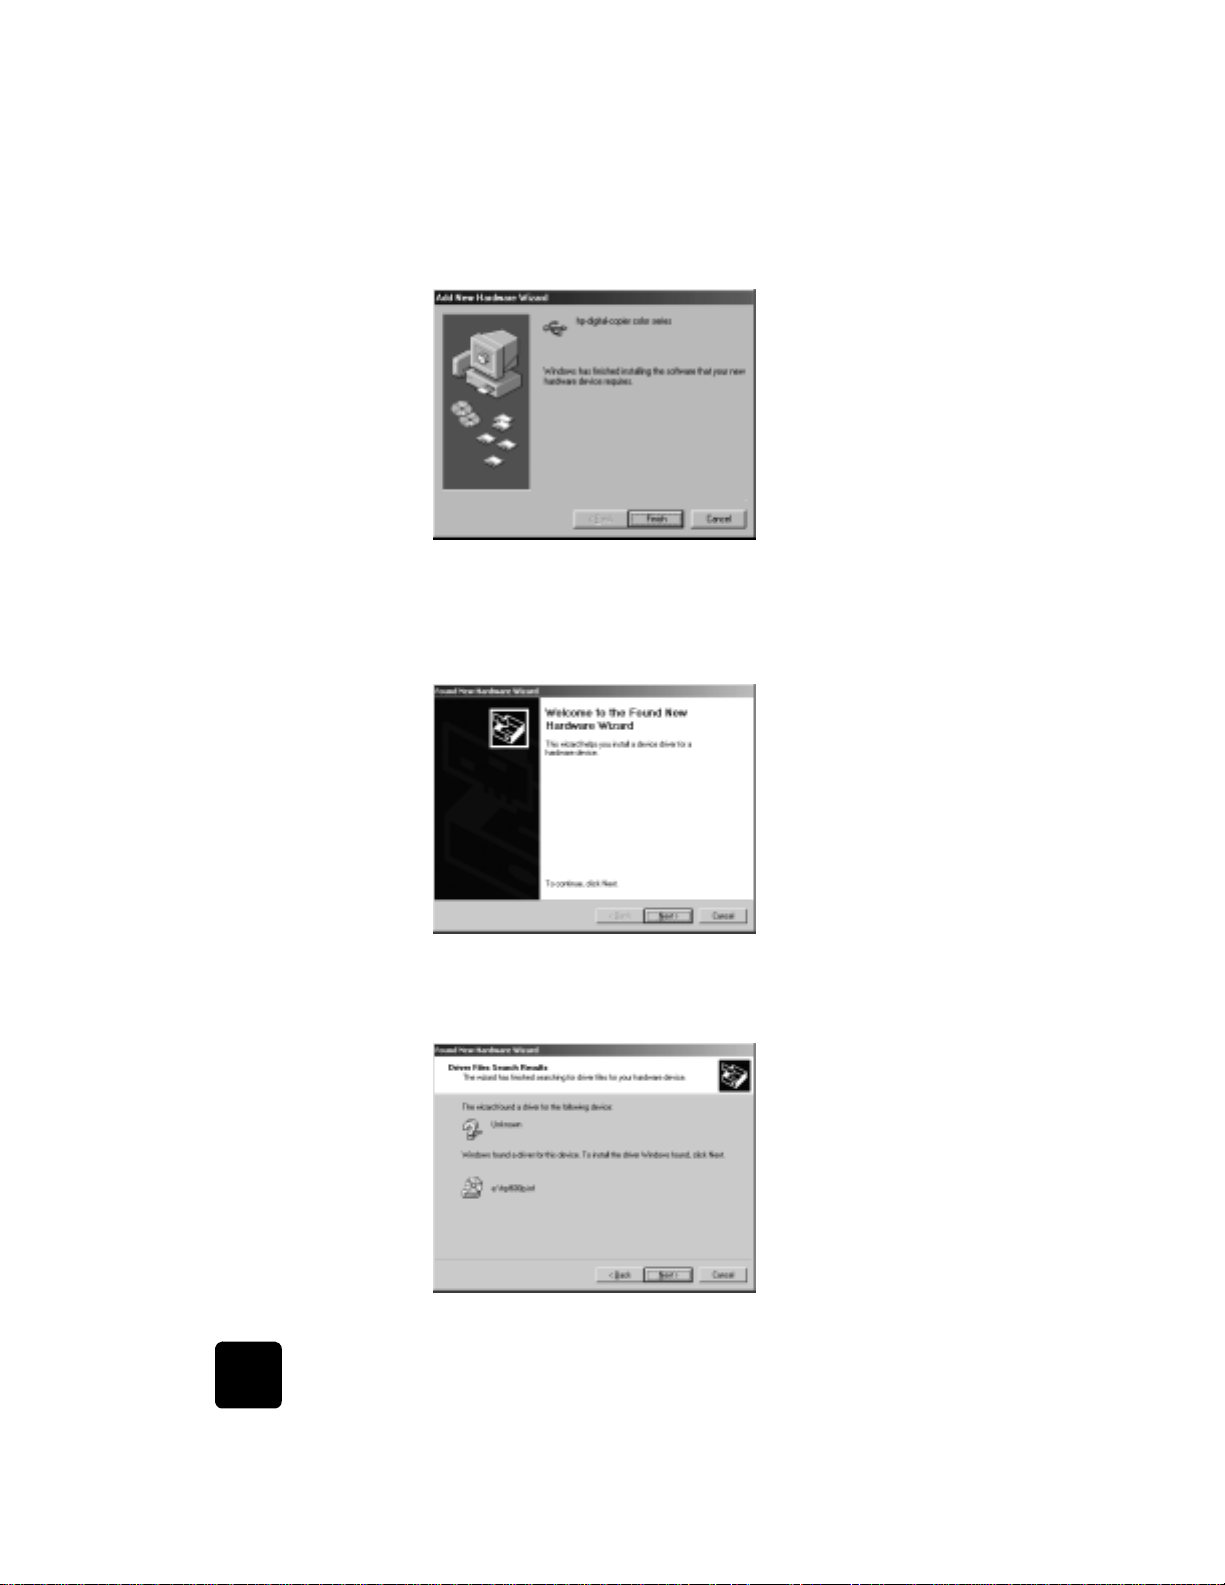
3 Select Search for the best driver for your device and click Next.
4 Select CD-ROM drive, and clear all other options.
5 Click Next.
Windows asks you to wait while it searches for files.
6 When the hpz600b.inf file is located, click Next to start the
installation.
Wait while Windows copies additional f iles. This may take a few
minutes.
Caution! The installation is not complete until the HP Digit al
Copier Color Series icon appears in the lower right corner of
your computer screen. This may take several minutes. During
this time, the computer may not appear to be working.
However, the installation will fail if you try to use the copier/
printer or turn it off before the installation is complete.
install your hp digital copier software
7
Page 12
hp digital copier 610 printing and software guide
7 Click Finish.
You are now ready to print from your computer to your HP Digital Copier.
install on
Windows 2000
After you perfor m steps 1 through 4 in before you install the software on
page 5, the following Found Ne w Hardware W iz ard dialog box appears if
your computer is running Windows 2000.
1 Insert the CD that came w ith your copier/prin ter into your computer’s
CD-ROM drive.
2 Click Next in the Found New Hardware Wizard dialog box.
8
set up printing
Page 13
hp digital copier 610 printing and software guide
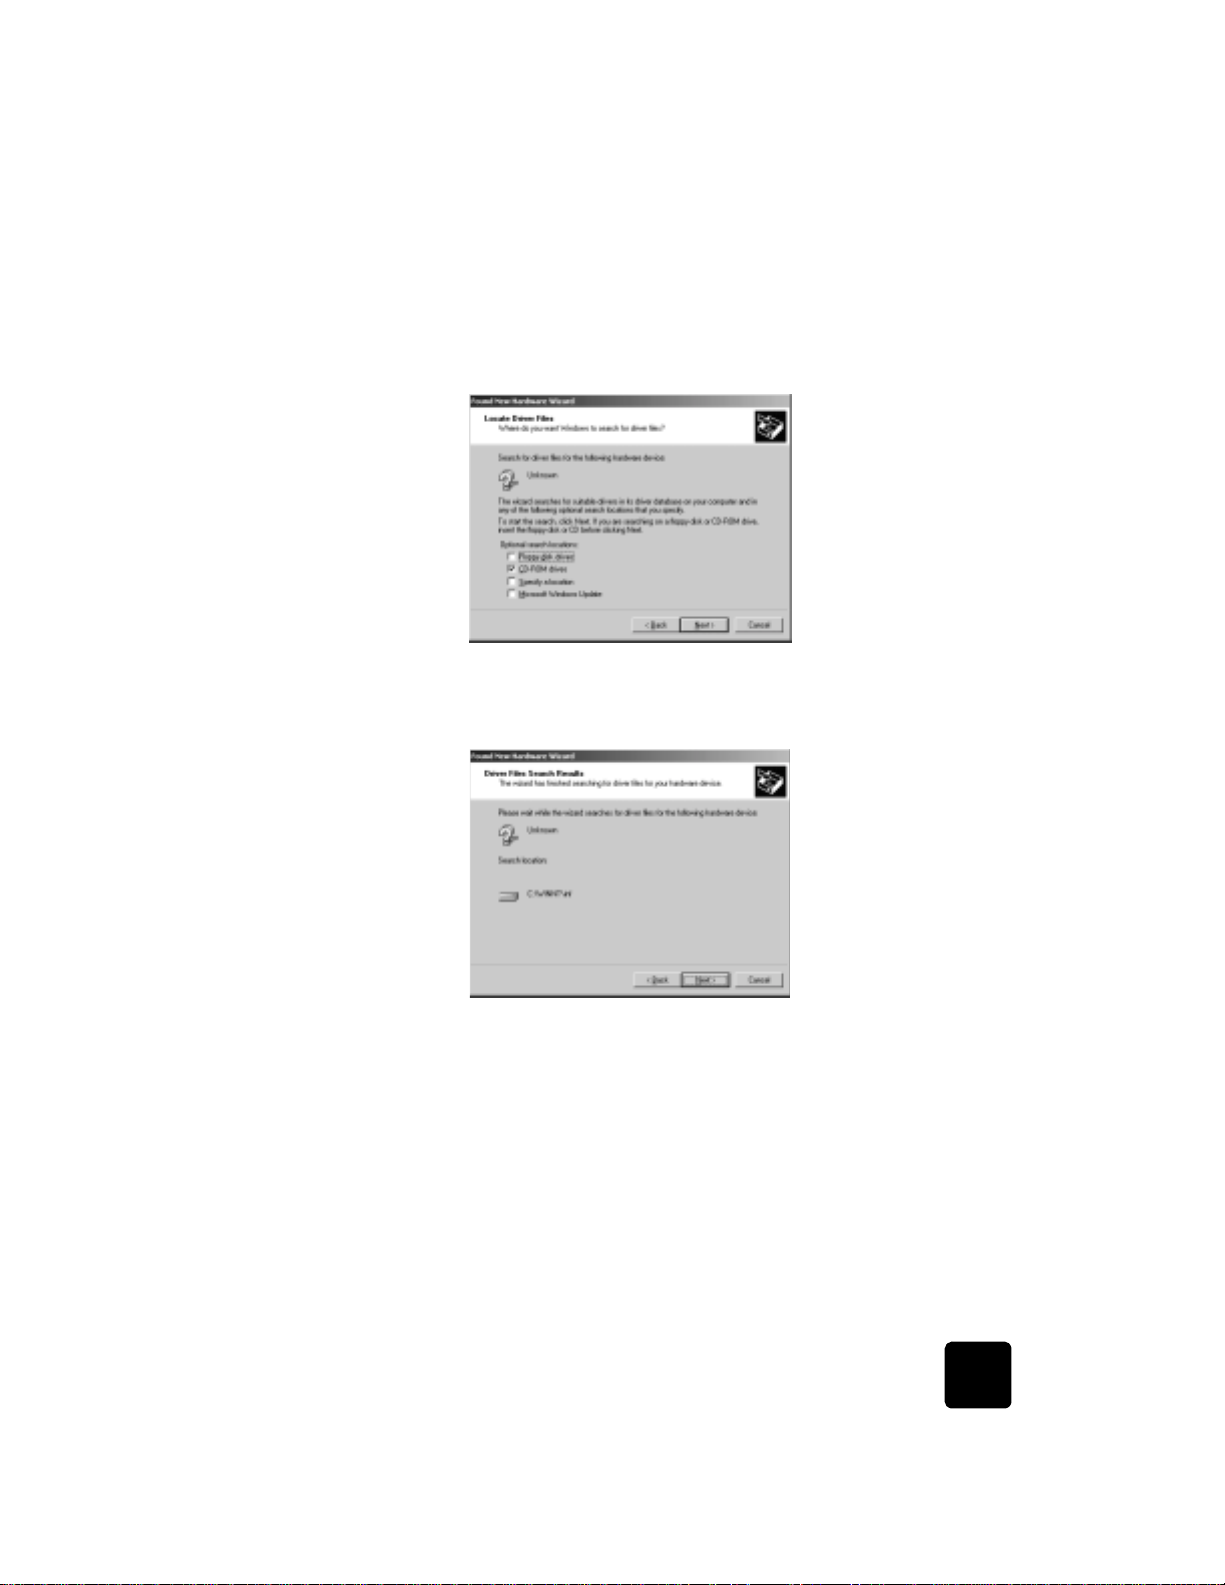
The Wizard may identify the HP Digital Copier Color Ser i es by name,
or it may identify the device as “Unknown.” This does not affect the
success of the inst a l l a tio n.
3 Select Search for a suitab le driver for my device, and click Next.
4 Select CD-ROM drives, and clear all other options.
5 Click Next.
Windows searches until it locates the hpf600p.inf file on your CD.
This may take a few minutes.
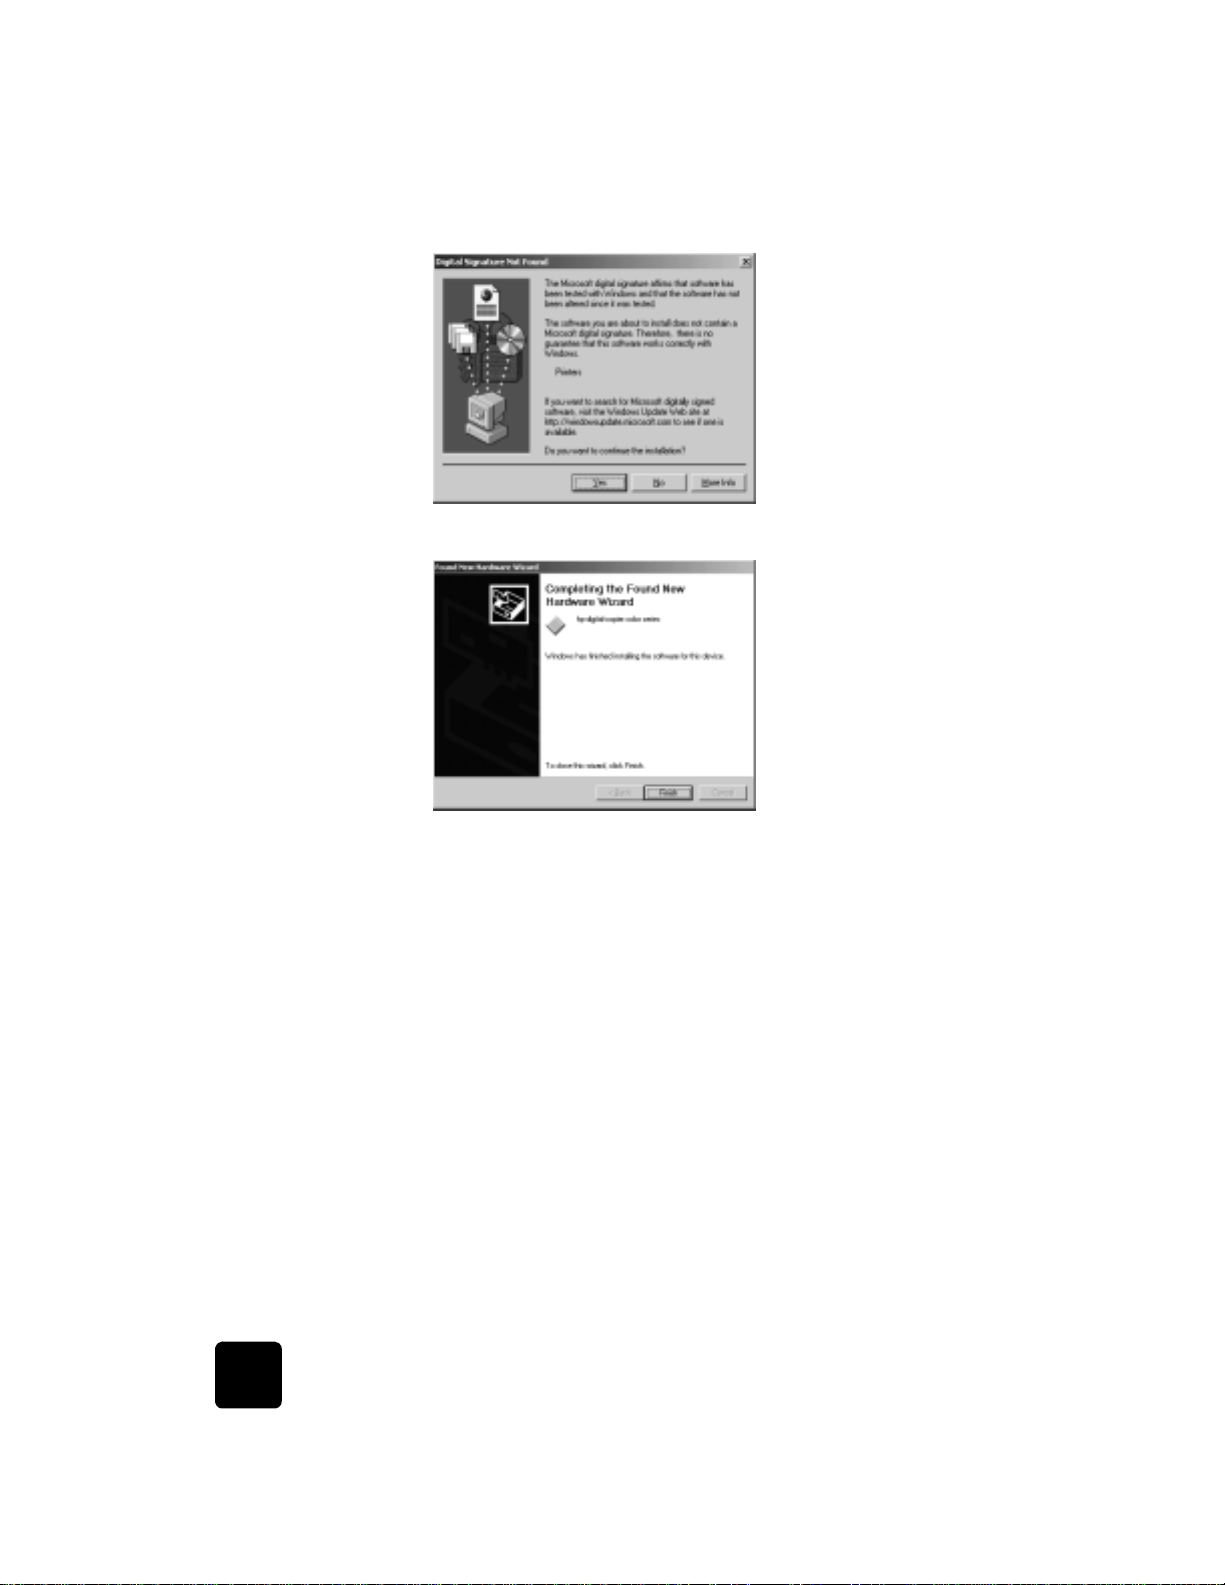
6 Click Next.
7 If the Digital Signature Not Found dialog box appears, click Yes to
continue the installation. Files are copied to your computer.
install your hp digital copier software
9
Page 14
hp digital copier 610 printing and software guide
8 Click Finish.
install on
Windows XP
10
Wait while Windows copies additional f iles. This may take a few
minutes.
Caution! The installation is not complete until the HP Digit al
Copier Color Series icon appears in the lower right corner of
your computer screen. During this time, the computer may not
appear to be working. Ho we ver, do not try to use the copier/
printer or turn it off before the installation is complete.
You are now ready to print from your computer to your HP Digital Copier.
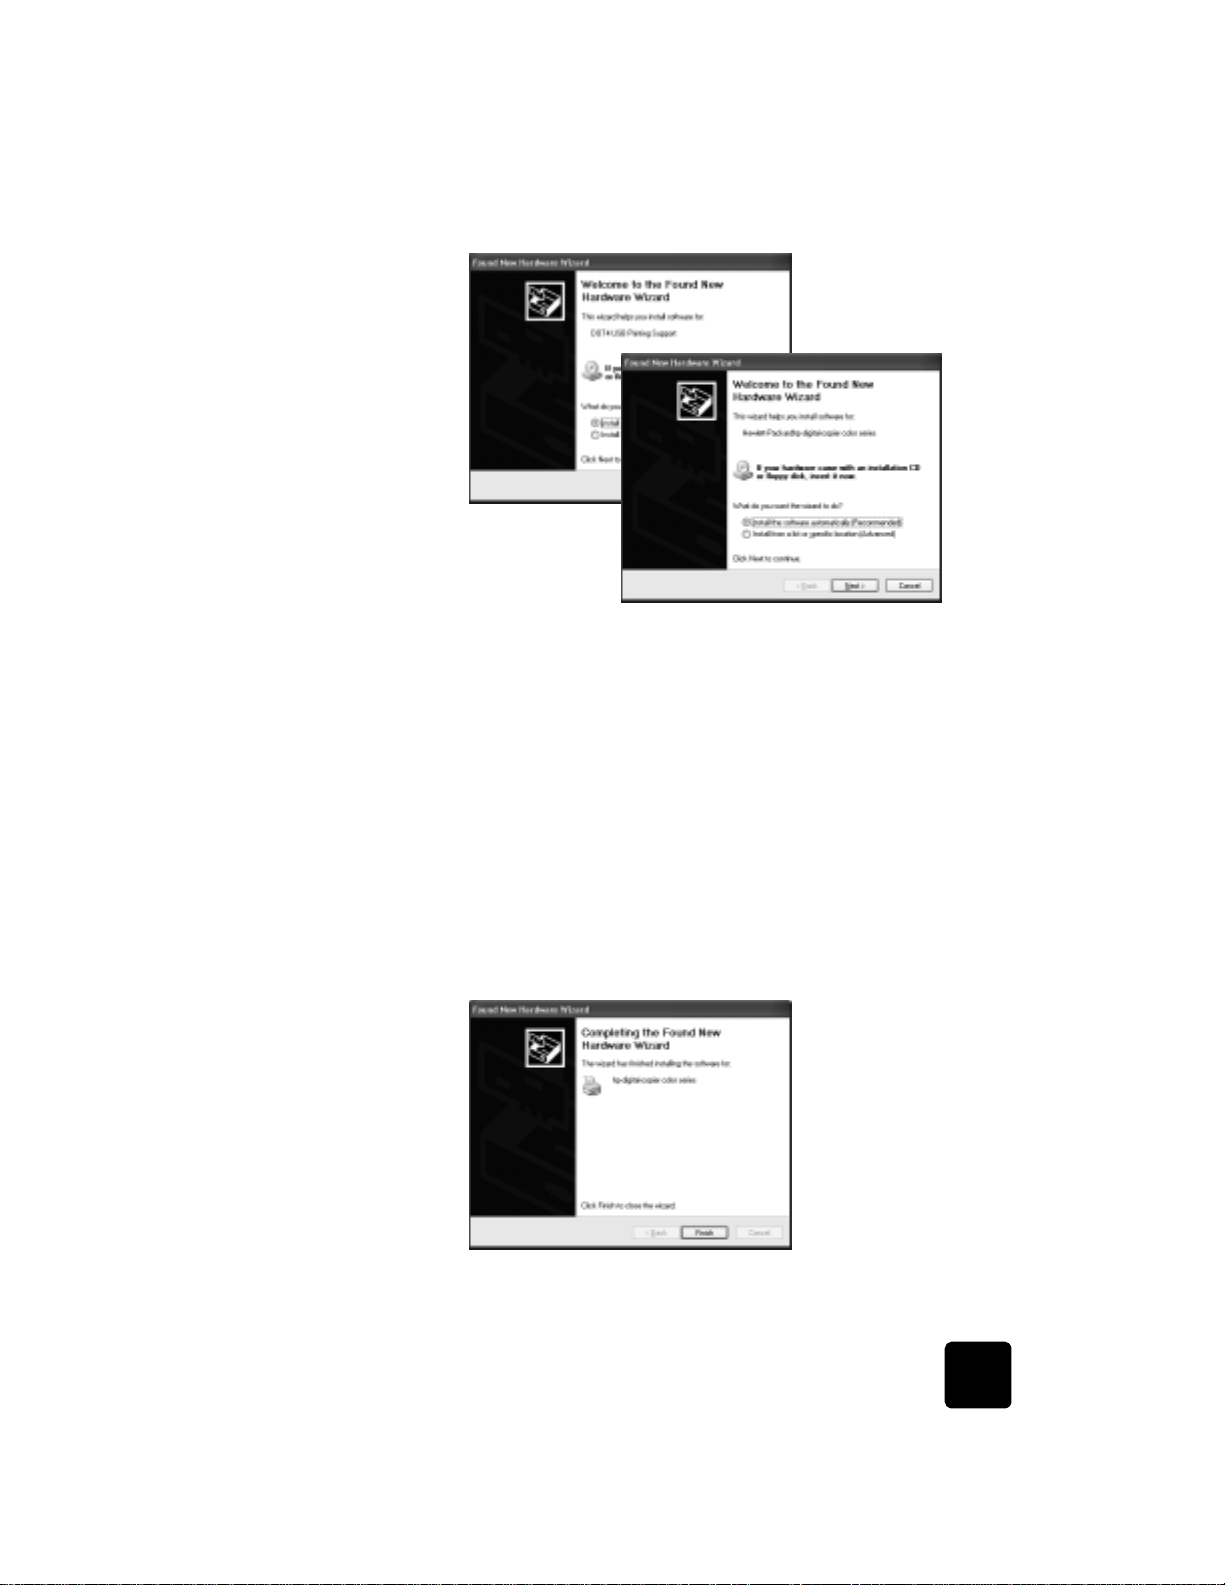
After you perfor m steps 1 through 4 in before you install the software on
page 5, one of the following Ne w Hardwar e Wiz ard dialog box es appears
if your computer is running Windows XP.
Note that the only diffe rence betw een the scr eens is that th e first one in stalls
the “DOT 4 USB Printing Support” and the other installs the “He wlettPac kard digital-copier color ser ies. ” The fi rst screen only appears i f you have
never installed a USB device on your computer. Your installation process
may skip the first screen completely.
set up printing
Page 15
hp digital copier 610 printing and software guide
1 Insert the CD that came w ith your copier/prin ter into your computer’s
CD-ROM drive.
2 Select Install the software automatically, and click Next.
Windows searches for the correct files.
Caution! It may take seve ral minutes for W indows XP to in stall
the software . Du ring this time, the compu ter may not appear
to be working. However, do not interrupt the installation
process.
3 One of the following events occur:
– If you have been installing the DOT 4 USB Printing Support,
another New Hardw a re Wizard dialog box automatically
appears for the installation of the HP Digital Copi er. Repeat the
procedure starting at step 2.
– If you have been installi ng the He w lett-P ac k ar d digital-c opie r color
series, go t o step 4.
4 Click Finish.
install your hp digital copier software
11
Page 16

hp digital copier 610 printing and software guide
Wait while Windows copies additional f iles. This may take a few
minutes.
The installation is finished when one of the f ollowing occur:
– A taskbar message lets you know that the copier/print er is ready.
– A new printer icon appears in the lower right corner of your
computer screen.
You are now ready to print from your computer to your HP Digital Copier.
uninstall and reinstall software
Caution! This is the only way to completely remov e the HP
Digital Copier software from your computer. Using any other
method may fail. The following procedure may be repeated
as necessary.
Tip! If you are performing this uninstall procedure on a
computer that has both an HP CP1160 (DeskJet) and an HP
Digital Copier installed, follow this uninstall process and
reinstall only the printer program you want to keep.
The follo wing step s uninstall then r einstall the HP Di gital Copi er softwar e on
your computer:
1 Disconnect the USB cable from your HP Digital Copier.
2 Close all virus protection programs and other software running on
your computer.
3 Insert the CD that came w ith your copier/prin ter into your computer’s
CD-ROM drive.
4 Navigate to Start, Run, then Browse.
5 Navigate to your CD- ROM drive, then locate and double-click the file
labeled uninstall_dc600.bat.
6 When the uninstall feature finishes, restart your computer.
12
Tip! This step tak es s e ver al m inut es to com plete , e v en thou gh
your system may look like it is idle and the cursor is ready. The
uninstall process occurs in the background after restart. Do
not interrupt the process or reconnect the HP Digital Copier
for a minimum of five minutes.
7 After a minim um of five minu tes, reconnect your HP Digital Copier to
your computer with the USB cable.
The New Hardware Wizard appears.
8 Reinstall the software according to the instructions for your oper ating
system in install on Windows 98/Me on page 6, install on Windows
2000 on page 8, or install on Windows XP on page 10.
set up printing
Page 17

use printing features
The printing feature s described in this chapter are available only if you
connect your HP Digital Copier to your computer and install the softw are
prov ided. The software allows you to easily manage all of your print
settings.
When your HP Digital Copier is connected, most print settings are
automatically handled by the program you are printing from or by HP’s
ColorSmart technology. The automatic media sensor selects the paper type
and tray for most of your print jobs. You only need to change the settings
manually when you want to change print quality, print on specific types of
paper or film, or use special features.
This chapter contains the following topics:
• make the hp digital copier the default printer
• change print settin gs
• use the setup tab
• use the featu re s tab
• use the color tab
• use the services tab
• perform special print jobs
• stop a print job
3
make the hp digital copier the default printer
Y ou can set your HP Digital Copier as the default printer to u se f or all your
print jobs, regardless of the program you use for printing.
1 Choose one of the following methods, depending on your system:
– On the Windows taskbar, click Start, point to Settings, and then
choose Printers.
– For Windows XP, navigate from the Start menu to Printers and
Faxes.
2 Right-click hp digital copier color series, and select Set as default.
make the hp digital c o pie r the default printe r
13
Page 18

hp digital copier 610 printing and software guide
change print settings
Y ou can change print settings tempor aril y for a cur r ent job or change them
to become the new default settings for all future print jobs.
to change the print setting s f o r a cur rent print job
1 Open the file you want to print.
2 Depending on the software program you are using, use one of the
following paths to select the Printer Properties dialog box:
–Click File, Print, select hp digital copier color series, then select
Properties.
–Click File, Print Setup, select hp digital copier color series, then
select Properties.
–Click File, Print, Setup, select hp digital copier color series, then
select Properties.
The Printer Properties dialog box appears.
14
3 Change the settings you want, and click OK to print the job.
to change the print settings for all future jobs
1 Choose one of the following methods:
–Click Start, point to Settings, and then choose Printers.
– For Windows XP, navigate from the Start menu to Printers and
Faxes.
– If you have a printer icon i n the lower right corner of your
computer screen, right-click the icon and select Change Default
Print Settings, then skip to step 3 .
2 Right-click hp digital copier color series, and select Properties or
Printing Preferences.
3 Mak e changes as desired, and click OK to save all your ch anges as
the new default settings for future print jobs.
The following topics provide more information about using the Printer
Properties dialog box to adjust print settings.
use printing features
Page 19

use the setup tab
hp digital copier 610 printing and software guide
The Setup tab allows you to adjust the following print settings:
• increase print speed or quality
• change the page orientation
• reverse an image for iron-on transfers
• use different paper settings for the first page
• select the paper tray
• select paper type and size
• print a photo on photo paper
• print using 2400 dpi
• scale a document or change its size
• restore factory defaults
Whenev er yo u mak e a ch ange in p r int se ttings in this tab , y o u can conf ir m
the effect of your change by viewing the image in the right corner.
increase print
speed or quality
Y our HP Digital Copier allows y ou to customi ze the speed and quality of the
print process by selecting from the following options:
• Best produces the highest quality printing on all papers and eliminates
the banding effect that sometimes occurs in solid areas. We
recommend that you use this setting to print color graphics. The Best
setting prints more slowly than the Norm al setting.
• Normal deliver s high-quality output and is the recommended setting
for most of your jobs. Normal is the default setting for most paper
types.
• Draft produces output faster than the Normal setting and delivers
comparable output for te xt. Using Draft also cuts down on the
frequency of replacing your ink cartridges because it uses less ink. You
may not want to use this setting when printing graphics.
You also have the option to print at 2400 dpi, which produces the highest
quality resolution for your photos. For more information, see print using
2400 dpi on page 19.
The HP Digital Copie r automatic ally sets the pri nt quality depending on the
paper type setting. For more information, see adjust paper settings for
printing on page 4.
1 To incr ease print speed or print quality for the current j o b, select File,
Print, select hp digital copier color series, then click Properties.
2 Click the Setup tab.
3 In the Print Quality area, do one of the fo llowing:
– Select Best to increase print quality.
– Select Normal for most print jobs.
– Select Draft to increase print speed .
use the setup tab
15
Page 20

hp digital copier 610 printing and software guide
4 Click OK.
Tip! Regardles s of the settings, y our print quality wi ll improv e
on a high-quality paper such as HP Premium Photo.
change the page
orientation
reverse an
image for ironon transfers
Use this procedure if you want to change the direction of your printed
document or if you cannot set the page orientation from your software
program.
1 To change the page orientation for the current print j ob, select File,
Print, select hp digital copier color series, then click Properties.
2 Click the Setup tab.
3 In the Orientation area, choos e either Portrait or Landscape, and then
click OK.
This feature reverses an image so you can use it for iron-on transf ers. This
feature is also useful for transparencies if you want to make notations on the
back and erase them later without scratching the original.
1 To re verse an image, select File, Print, select
hp digital copier color series, then click Properties.
2 Click the Setup tab.
3 In the Orientation area, select the Mirr or Imag e check box.
4 For paper type, select Automatic or in Special Papers area, select hp
iron-on transfers.
5 For print quality, select Normal or Best.
6 For paper size, select A4 or Letter.
7 Click OK to close the dialog box.
For information about loading iron-on transfers, see load specialty
paper for printing on page 2.
use different
paper settings
for the first page
16
If you want to use a different paper type or paper tray for printing the firs t
page of your document, change this option in the Print Settings dialog box .
use printing features
Page 21

hp digital copier 610 printing and software guide
1 To change paper settings for the first page of the current jo b, select
File, Print, select hp digital copier color series, then click Properties.
2 Click the Setup tab.
3 Select Use different fi rst page.
The All Pages tab changes to First Page and displays a new tab for
Other Pages settings.
4 Choose the desired P a per T ype, Paper Size, and Paper Source for the
first page.
5 Click the Other Pages tab.
6 Choose the desired P a per T ype and Paper Tray for the remaining
pages.
Tip! Y ou cannot change the paper siz e f or additional pages.
The paper siz e for additional pages must alway s be the same
size as the first page.
select the paper
tray
use the setup tab
7 Click OK.
Use this feature to specify a paper tray. The lower tray option refers to the
optional 25 0-sheet plain paper tra y. This paper tray is standard e quipment
with some models and can be purchased as an accessory for all other
models.
To us e the opti onal 250-sheet plain paper tray, you must also have the twosided printing accessory installed . F or mo re i nform ation about acces sori es ,
see the HP Digital Copier 510/610 Reference Guide.
1 T o select the paper tr ay fo r the cu rrent pr int job , se lect File, Print, select
hp digital copier color series, then click Properties.
2 Click the Setup tab.
17
Page 22

hp digital copier 610 printing and software guide
3 Select one of the following from the Paper Tray list:
– Upper Tray: This tray must be used for specialty papers (e.g.,
photo paper), but it can also hold plain paper.
– Lower Tray: This is the optional 250-sheet plain paper tray. The
additional paper tray signals the HP Digital Copie r to select paper
from this tray first. This tray only supports plain paper.
– Automatic: By default , the program attempts to feed f rom the
optional 250-sheet plain paper tray first. If this tray has run out of
paper , the copi er/printer selects paper fr om the upper paper tray.
If no 250-sheet plain paper tra y is pre sent , the upper paper tr a y is
used regardless of the paper tray selection.
select paper
type and size
print a photo on
photo paper
The HP Digital Copier’s automatic media sensor automatically s elects paper
type and siz e for y our print j ob, but y ou can also set y our o wn print s ettings.
• In Paper Type, select the paper type you want for your print job.
• In Paper Size, select the paper size you want for your print job.
For more information, see adjust paper settings for printing on page 4.
For high quality photo printing, we recommend that you use HP photo
papers with your HP Digital Copier.
Y ou can use 2 400 dpi resolution t o print y our photos. F or more inf ormation,
see print using 2400 dpi on page 19.
1 To print on photo paper for the current print job, remove all paper
from the upper paper tray, and then load the photo paper.
For more information, see load paper on page 1.
2 Select File, Print, select hp digital copier color series, then click
Properties.
3 Click the Setup tab.
18
4 In the Paper Type list, point to Photo Papers, then select the
appropriate photo paper.
Your HP Digital Copier au tomatically sets the Print Quality to Best.
use printing features
Page 23

hp digital copier 610 printing and software guide
For more information, see adjust paper settings for printing on
page 4.
5 In the Paper Size list, choose the appropriate paper size.
6 Click OK.
print using 2400
dpi
scale a
document or
change its size
Print at 2 400 dpi to get the best pri nt quality when you are printing on phot o
paper . With this setting, the HP Digital Copier prints significantly slo wer and
temporarily uses a large amount of disk space (400 MB or more).
to use 2400 dpi for the current print job
1 To use 2400 dpi for the current print job, select File, Print, sele ct
hp digital copier color series, then click Properties.
2 Click the Setup tab.
3 In the Paper Type list, point to Photo Papers, then select the
appropriate photo paper.
Your HP Digital Copie r automatically sets the Print Quality to Best.
For more information, see adjust paper settings for printing on
page 4.
4 In the Paper Size list, choose the appropriate paper size.
5 Select 2400 x1200dpi.
6 Click OK to confirm the setting, click OK to close the dialog box, and
then click OK in your program’s Print dialog box.
This feature allows you to scale a document to fit on a different paper size.
1 To scale a document for the c urrent print job, select File, Print, select
hp digital copier color series, then click Properties.
2 Click the Setup tab.
3 Click the Scale to Fit button.
4 In the Scale to Fit dialog box, choose one of the following options:
– To reduce the size of the document, selec t Resize to, and then
select a percentage relative to the size of the original and then
select the original paper size.
– To scale the document to fit on a specific paper size, select Scale
to fit paper in device. Choose a paper siz e that corr e sponds to the
current size of the document in your program, then choose the
paper size for the paper that is loaded in the paper tray.
use the setup tab
5 Click OK to close the Scale to Fit dialog box .
19
Page 24

hp digital copier 610 printing and software guide
6 Click OK to close the Print Settings dialog box.
restore factory
defaults
Use the Factory Settings function to restore the ori gi nal default settings
related to the Setup tab.
use the features tab
The Features tab allows you to adjust the following printer settings:
• print on both sides of the page
• adjust the ink volume and dry time
• print multiple pages on a single sheet
• print a pos te r
• print a wa te rmark
• print last page first
• enable the h p preview feature
• set the number of copies
Whenev er you mak e a ch ange in p r int se ttings in this ta b , y o u can con fi rm
your change by v iew ing the image in the right corner o r by enabling the HP
Preview feature. F or more information, see enable the hp preview feature on
page 23.
print on both
sides of the page
Y o u ca n pr int tw o-side d pag es wi th your HP Digital Copi er. When print ing
two-sided pages, make sure to use paper that is thick enough so the images
do not show through to the other side. Some paper types, such as
transparencies and photo papers, have only one printing surface and
should not be used for two-sided printing.
20
Tip! To automatically print on both sides of the page, you
must have a two-sided printing accessory installed and
activated. The two-sided printing accessory is standard
equipment on some models. It can be purchased as an
accessory for all other models. For more information about
the accessory , see the HP Digital Copier 510/610 Re ference
Guide.
1 If you are using Windows 2000 or XP, make sure that the Automatic
Two-Sided Printing Module option is activated. For more information,
see use the configurat ion tab on page 26.
Tip! If you have a tw o-sided printing accessory, the Automatic
option is selected by default. If you do not have a two-sided
printing accessory, the option is not available.
2 Select File, Print, select hp digital copier color series, then click
Properties.
3 Click the Features tab.
use printing features
Page 25

hp digital copier 610 printing and software guide
4 Select Two-Sided Pr i nt i ng.
A dialog box appears.
5 Make your margin selection by choosing either:
– Do not reduce content size
– Reduce content size to fit smaller area
6 Click OK to close the dialog box.
7 Select Book or Tablet.
– For binding on the side, select Book.
–For binding on the top, select Tablet.
8 Click OK to close the dialog box.
Y our HP Digital Copier begins printing . If you do not have a tw o-sided
printing accessory or if Automatic is not selected, a dialog box
displays instructions on the screen when it is time to pr ocess the
second side of your job.
Caution! Do not remove any of the printed pages from the
output tray until all the odd-numbered pages are printed.
adjust the ink
volume and dry
time
use the features tab
Tip! If you do not have the two-sided printing accessory
installed, follow the instructions that appear on your scr een to
complete your pri nt job.
Ink volume is the amount of ink used on the page; drying time is the amount
of time that passes befor e the ne xt pr int job can begin. Both are adju stable .
The dry time feature is only enabled whe n you are do ing two-sided printing
and if you have selected Two-Sided Printing and Automatic in the Advanced
Features area of the Features tab.
1 To adjust ink volume and drying time for the current print job, s elect
File, Print, select hp digital copier color series, then click Properties.
2 Click the Features tab.
3 Click the Advanced Features button.
4 Use the slide r to adju st the ink v olume (lighter i nk vo lume means f ast er
drying time).
5 Use the slider to adjust the drying time.
21
Page 26

hp digital copier 610 printing and software guide
6 Click OK.
print multiple
pages on a
single sheet
You can print several pages on a single sheet of paper.
1 To make the change for the current print job, select File, Print, select
hp digital copier color series, then click Properties.
2 Click the Features tab.
3 In the Pages per Sheet list, select 1, 2, 4, 6, 8, 9, or 16 pages per
sheet.
4 To print a border around each page image, select the Draw Page
Border chec k box.
5 To select the page order, click the Page Order list box and choose
Right then Do w n, D o wn then R igh t, Left then D ow n , o r Down then Left.
6 Click OK to close the dialog box.
print a poster You can create a poster by printing a single document on multiple pages.
The HP Digital Copi er prints dotted lin es to indicate where to trim the page s
before taping them together.
Tip! Your HP Digital Copier also provides a way to create a
poster with th e copie r f eatur es . F or mor e inf or mation , s ee the
HP Digital Copier 510/610 Reference Guide.
1 To print a pos ter, select File, Print, select hp digital copier color series,
then click Properties.
2 Click the Features tab.
3 Select the Poster Printing check box, and choose either 2x2, 3x3, or
4x4.
This selection tells your HP Digital Copier how to enlar ge your
document to fit on 4, 9, or 16 sheets of paper.
Each page of your original will beco me a separate 2x2, 3x3, or 4x4
poster. For example, if you have a one-page original and you select
3x3, you will get 9 pages; if you select 3x3 for a two-paged original,
18 pages will print.
22
use printing features
Page 27

hp digital copier 610 printing and software guide
4 Click OK to close the dialog box.
print a
watermark
print last page
first
enable the hp
preview feature
set the number
of copies
Your HP Digital Copier allows you to add a watermark to your printouts.
Water marks can be useful when distributing draft documents or confi dential
documents. You can also customize your watermarks.
1 To print a watermark on your current print job, select File, Print, select
hp digital copier color series, then click Properties.
2 Click the Features tab.
3 In the Watermark area, select a water mark from the list.
4 For a watermark on all pages, clear the First Page Only option.
You can also edit an existing watermark or add a new one with the Edit
option in the Watermark area.
Use the Start Printing fr om Last P age option to r everse the page order of your
print job so you will not be required to reorder your printouts. With this
option selected, the last page of your doc ument will be at the bottom of your
printouts. This feature is not available with two-sided printing.
You can previe w the effect of your changed print settings before you print.
With this option selected , a pre view is produced w he n y ou c li c k OK. Click
OK again in the preview to finish your print jo b.
You can set the number of copies to print using the Properties dialog box.
1 To set the number of copies for the current print job, select File, Print,
select hp digital copier color series, then click Properties.
2 Click the Features tab.
3 In the Copies box, type or select the number of copies you want to
print.
4 Click OK.
use the features tab
23
Page 28

hp digital copier 610 printing and software guide
use the color tab
The Color tab allows you to adjust the characteristics that affect the
appearance of your print job. You can choose to:
•Print in grayscale
• Change the saturation, brightness, or color tone
Whenev er you mak e a ch ange in p r int se ttings in this ta b , y o u can con fi rm
your change by viewing the image in the right corner, or by enabling the
HP Preview feature. For more information, see enable the hp preview fea ture
on page 23.
use the services tab
The Services tab contains an icon for the HP Toolbox, which contains a
number of useful tools to maintain the efficiency of your copier/printer. The
availability of the HP Toolbo x tabs and features depends on y our operating
system.
All of the following tools in the Services tab (with the exception of the
Configuration tab) can also be accessed from the front panel of your
copier/printer:
• display the toolbox
• calibrat e your printer
• clean the printheads
• print a test page
• check ink levels
• use the configu ration tab
24
use printing features
Page 29

hp digital copier 610 printing and software guide
display the
toolbox
calibrate your
printer
clean the
printheads
Use one of the following methods to open the Toolbox:
•Click Start, point to Programs or All Programs, point to Hewlett-
Packard, point to hp digital copier, then click Open the HP Toolbox.
• Right-click the taskbar icon, if available, then select Open Toolbox.
• In an open document, select File, Print, then Properties. In the
Properties dialog box, select the Services tab then click Open the HP
Toolbo x.
This option automatically aligns the pr intheads in your copier/printer.
1 In the Services tab, click Open the HP Toolbox.
2 In the Device Services tab, click Calibrate the Device.
3 Click Calibrate to start the calibration process.
Use this feature when the Self- T es t Report, w hich is gene rated fr om the fr ont
panel, shows streaking or white lines through any of the colored bars. Do
not clean printheads unnecessarily; this wastes ink and shortens the life of
your printheads.
use the services tab
Tip! Although this featur e is av ailable in the Serv ices tab , w e
recommend that you use the fro nt panel instead.
1 In the Services tab, click the Open the HP Toolbox icon.
2 In the Device Services tab, click Clean the Printheads.
3 On the next screen, click Clean.
A dialog box will appear with the options Immediate Clean or Done.
– If the print quality on the test page is poor, click Im m ed i at e Clean.
– If the print quality on the test page is good, click Done.
If you select Immediate Clean, a new test page will print and a new
screen will appear with the options, Prime or Done.
– If the print quality if poor, click Prime.
– If the print quality on the test page is good, click Done.
If you select Prime, a new test page will print and a new screen will
appear with the options Clean Again or Done. Select Clean Again if
further clea ning is needed or click Done.
4 When you are finish ed, click Close.
25
Page 30

hp digital copier 610 printing and software guide
print a test page This tool allows you to confir m that the con nection between your copier/
printer and your computer are working properly. This test page is different
than the Self-Test Report that you can print from the front panel.
1 In the Services tab, click the Open the Toolbox icon.
2 Click Print a Test Page.
The report is generated as long as your connection is working properly.
check ink levels You can easily check the ink supply level to determine how soon you may
need to replace an ink cartridge. This tab is not available to users of
Windows 98 and Me.
The Estimated Ink Level tab displays the following:
• Approximate ink level for each ink cartridge
• Ordering information
For more pre ci se ink lev e l infor mation , pri nt a Self- Test Report from the front
panel.
use the
configuration
tab
Use the Config uration tab to activate the following optional function s. This
tab in not always available to users of Windows 98 and Me since some
configurations run these features automatically, without user activation .
• Automatic Two-Sided Print Module: Use to activate or deactivate the
two-sided printing accessory that allows you to print two-sided copies.
• Display Print Settings Confirmation: Use to activate or set system
messages.
perform special print jobs
In addition to supporting standard print jobs, your HP Digital Copier
supports the following special printing jobs:
• print a banner
• print a presentation on transparency film
• print a group of addresses on labels or envelopes
print a banner For best re sults, we recommend that you use HP banner paper with your HP
Digital Copier.
1 Remove all paper from both paper trays, and then load the banner
paper.
2 Raise the output tray above the catch on the right side of the HP
Digital Cop ier.
For more information, see load specialty paper for printing on
page 2.
3 In the program you are printing from, display the print settings, and
click the Setup tab.
26
use printing features
Page 31

hp digital copier 610 printing and software guide
4 In the All Pages tab, Paper Type section, select Special Papers, then
select HP Banner Paper.
Your HP Digital Copie r automatically sets the Paper Size to Banner.
5 Verify that the Paper Size is set correctly.
Your HP Digital Copier supports both letter-size and A4-size banner
paper.
6 Click OK to close the dialog box, and then click OK to prin t the
banner.
After the banner is printed, a message indicates that the job is
complete.
7 Tear off and remove any unused paper from the input tray.
8 Press Enter on the front panel to eject any additional paper.
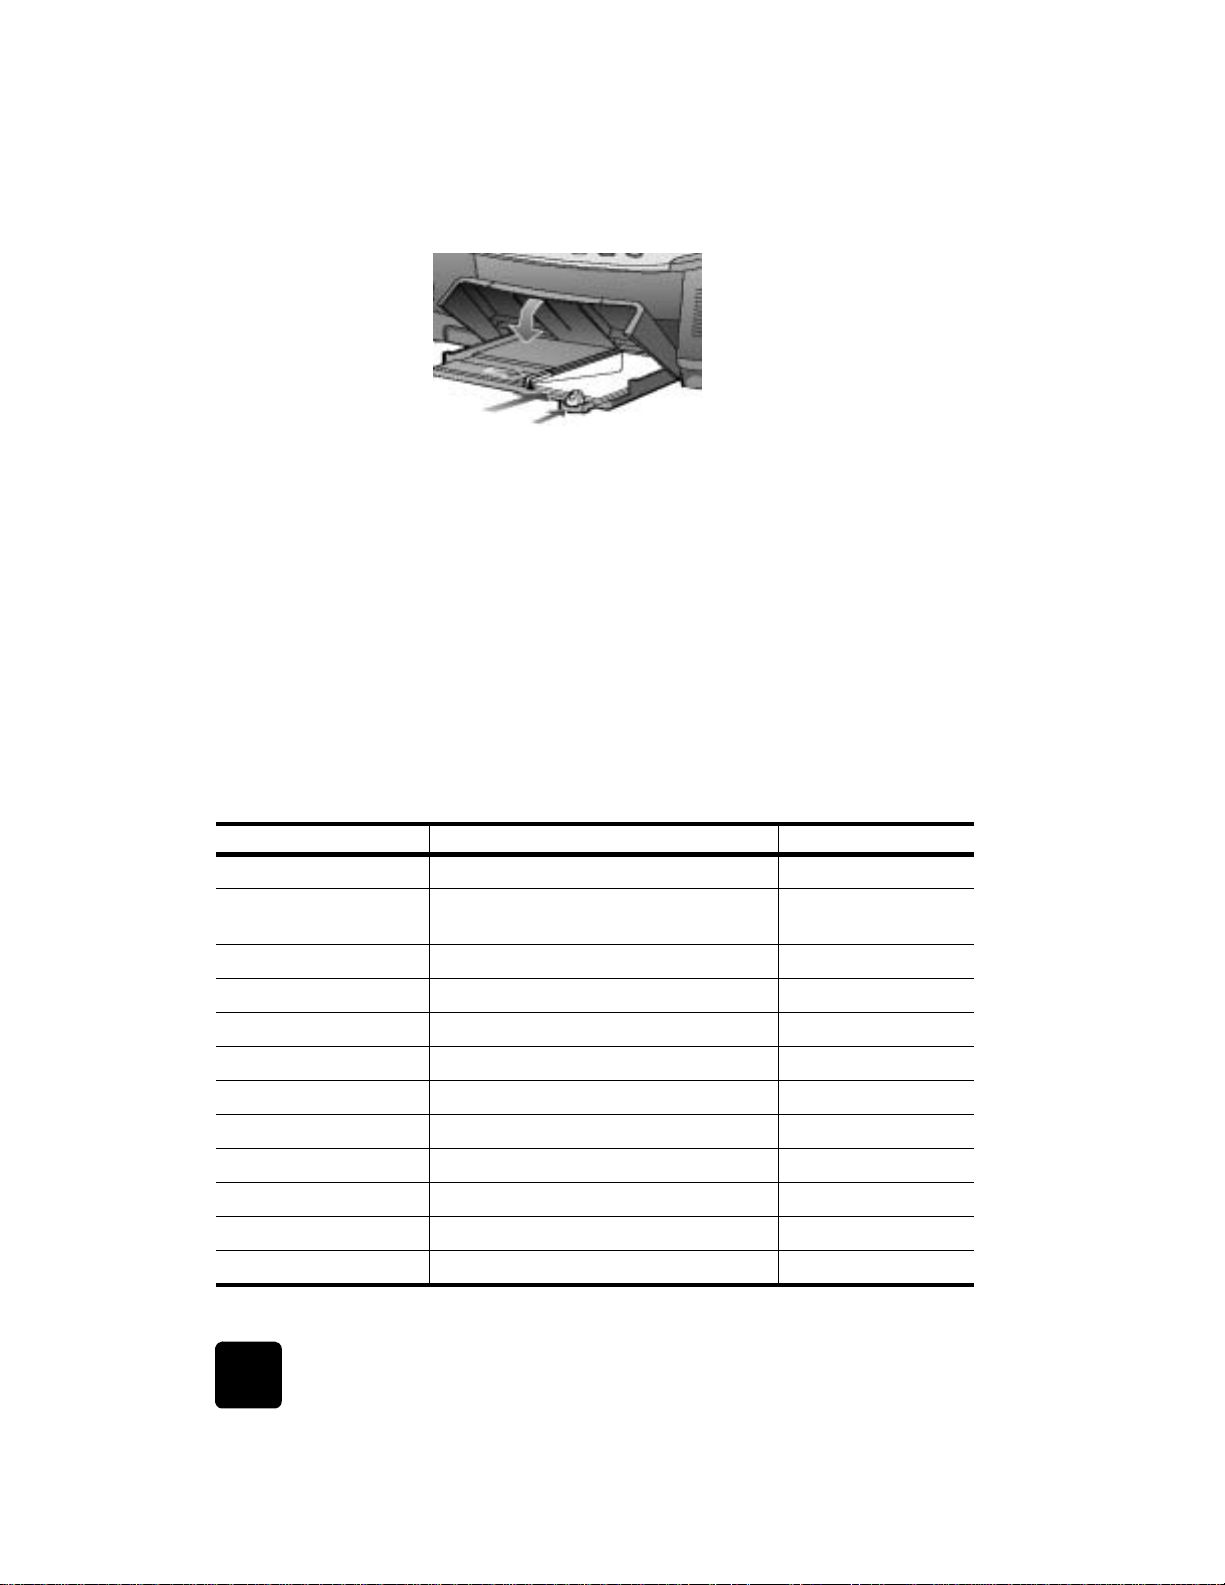
9 Remove your banner from the output tray, and lower the output tray
back into its standard position.
10 Re load the regular paper.
print a
presentation on
transparency
film
print a group of
addresses on
labels or
envelopes
For best re sults, w e recommend that y ou use HP transpar ency fi lm products
with your HP Digital Copier.
1 L oad the transparency film into the paper tray.
2 Select File, Print, select hp digital copier color series, then Properties.
3 Click the Setup tab.
4 In the Paper Type list, point to Transparency Films, then clic k the
transparency type.
For more information, see adjust paper settings for printing on
page 4.
5 If you want to make notations on the back of the transparencies and
erase them later without scratching the original, click the Setup tab,
and select the Mirror Image check box.
For more information, see reverse an image for iron-on transfers on
page 16.
6 Click OK to close the dialog box.
Your HP Digital Copier automatically waits for transparencies to dry
before releasing them. Ink dries more slowly on film. Be sure to allow
enough time for the ink to dry before handling the transparency.
With your HP Digital Cop ier, you can print on a single envelope , grou ps of
envelopes, or label sheets designed for inkjet printers.
perform special print jobs
27
Page 32

hp digital copier 610 printing and software guide
1 Print a s ample page on plain paper to confirm the accuracy of your
format.
– Place the test page on top of the label sheet, and then hold both
pages up to the light.
– Check your label spac ing to s ee ho w well eac h block o f te xt aligns
with each label. Make adjustments as needed.
2 L o ad th e labels or envelopes into the pa per tray.
For more information, see load envelopes on page 3.
3 From the File menu, select Print.
If you are pr inti ng labels , skip to s te p 7; if you are printing e n v elope s,
select h p digital copier color series, then Properties.
4 Click the Setup tab.
5 In the Paper Size list, choose the appropriate envelope size.
6 Click OK to close the dialog box.
7 Click OK in the Print dialog box.
stop a print job
Whenever y ou cancel a pr int job, your HP Digital C opi er pr i nts any pages
it has already started pr inting and the n cancels the r est of the job . T his ca n
take a few minutes.
cancel from the
front panel
cancel from the
computer
28
! Press Cancel.
Look for the Print cancelled message on your front panel display. If it
does not appear, press Cancel again.
Although we recommend that you stop print jobs from the front panel, you
can also cancel print jobs in the Pr in ters folder.
1 Choose one of the following:
– On the Windows taskbar, click Start, point to Settings, and then
choose Printers.
– For Windows XP, navigate from the Start menu to Printers and
Faxes.
– Double-click the printer icon in the lower right taskbar.
2 Double-click hp digital copier color series.
3 Select the job you want to cancel.
4 In the Document menu, choose Cancel Prin ti ng or Cancel, or press the
Delete key on your keyboard.
It may take a few minutes to cancel your print job.
If these procedur es do n ot cancel your print job, consult the instruction s f or
canceling background printing in the online help for your program.
use printing features
Page 33

troubleshooting tips
This chapter pro vid es tips f or solv ing problems and impr ov ing the quality of
your printing . L ook for y our pr oblem in th e follo w ing tr ou bleshooting top ics:
• printing problems
• printing is too slow
• two-sided pri nting proble m s
• USB connection problems
• communication problems
• problems uninstalling or reinstalling software
• get help
For mor e information , also see the T rou bleshooting chapter in the HP Digital
Copier 510/610 Reference Guide.
printing problems
Use the following topics to solve problems that are related to the printing
functions of your HP Digital Copier.
If your HP Digital Copier is not printing, first verify the fo llowing:
• The printer is connected to the power source.
• The cable connections are secure.
• The printer is turned on.
• The media is correctly placed in the paper tray.
• The copier/printer ink cartridge door is closed.
• The two-sided printing accessory or rear access door is attached.
4
printing problems
29
Page 34

hp digital copier 610 printing and software guide
If your problem persists although all of the conditions above ar e met, refer
to the following solutions.
problem solution
Power lig ht is blin king If the On light is blinking, the pr inter is in the
process of printing . No acti on is needed . Your HP
Digital Copier will pr oce ss the pr int job as qui c kly
as it can.
Ink cartridges need to
be replaced
Printheads need t o be
replaced
If none of the soluti ons above solve the problem, y o u may want to uninstall
and reinstall the printer s oftw a re. For more information, see uninstall and
reinstall software on page 12.
printing is too slow
Several v ariables can slo w printing performance. F or more inf ormation, see
the Troubleshooting chapter in the HP Digital Copier 510/610 Reference
Guide.
problem solution
Multiple software
programs are open
Complex documents,
graphics, or
photographs are
printing
If an ink cartridge expires or runs out of ink, it
needs to be replaced. For more information, see
Replacing Ink Cartridges in the HP Digital Copier
510/610 Reference Guide.
If multiple printheads fail, the printer may st op
printing. For instructions on replacing printheads,
see Replacing Pri ntheads in the HP Digital Copier
510/610 Reference Guide.
If too many software programs are open, the
copier/printer cannot print at its normal speed.
Close all unnecessary software programs, then
print the document again.
Documents that contain graphics or photographs
print slower than text documents. To print faster,
open the Properties dialog box , then select one of
the following:
• In the Setup tab, select PhotoREt for photo
paper printing.
• In the Color tab, select Low Memory Mode.
30
troubleshooting tips
Page 35

hp digital copier 610 printing and software guide
problem solution
Automatic paper type
option is enabled
Two-sided printing
does not seem to work
Printer software is
outdated
Computer does not
meet system
requirements
Printhead is failing A failing, but usable, printhead might slow print er
When the Automatic paper type option is
enabled, it tak es a few seconds for the printer to
determine the appropr iate paper type. T o incre ase
the print speed, specify a paper type. For more
information, see adjust paper settings for printing
on page 4.
Allow more time to print two-sided documents than
to print single-sided docume nts.
Download the most recent software updates for
the printer at:
www.hp.com/go/copiers
• Check the computer’s RAM and processor
speed. Fo r more infor mation, see system
requirements on page 35.
• Increase the space on your hard drive. If your
computer has less than 100 MB available on
the hard drive, the printer will require more
time to process printing jobs.
performance. Pr int a Self-T est Report fr om the fro nt
panel to check whether a printhead is failing . F or
more information, see Self-Test Report in the HP
Digital Copier 510/610 Reference Guide.
two-sided printing problems
Several issues may occur when you try to print a two-sided document. For
more information, also see Troubleshooting in the HP Digital Copier 510/
610 Reference Guide.
problem solution
The option for two-sided
printing cannot be selected
Paper size changes when the
two-sided printing option is
selected
two-sided printing problems
In the Setup tab, ver ify that the paper type
and size y ou have selected are supported
by the two-sided printing accessory . For a
list of supported paper types, see load
specialty paper for printing on page 2.
This means that the paper siz e selected in
the Setup tab of the Prope rties dialog box
is not supported by the two-sided printing
accessory. S elect a supported paper type
and size.
31
Page 36

hp digital copier 610 printing and software guide
problem solution
The binding margin is in the
wrong place
Only one side prints although
the two-sided printing option is
selected
USB connection problems
The follo w ing er r or s ma y occ ur if a proble m e x ists w ith the USB connecti on
between your HP Digital Copier and your computer.
problem solution
there was an
error writ ing
to <name of
USB port>
You may have selected an incorrect
paper orientation (Book or Tablet). On
the Features tab of the Properties dialog
box, verify that your selection places the
binding along the side (Book) or the top
(Tablet) of yo ur paper.
Use the following solutions:
• Print the document using the manual
two-sided printing feature.
• Use a paper type supported by the
two-sided printing accessory.
• Use a paper si ze supported by the
two-sided printing accessory.
This error mes sage appears if the copier/printer is not
receivi ng corr e ct data from another USB device or the hu b .
Connect the copier/printer directly to the USB port on the
computer.
32
conflicting
USB cable
connections
no plug-andplay event
occurs,
preventing
the software
installation
A printing conflict may arise when the copier/pr inter and
several USB devices are attached to a hub. Use one of the
following methods to solve the conflict:
• Connect your copier/printer directly to your computer
with the USB cable; do not use a hub.
• If the copier/printer is attached to a hub, do not use
other USB devices attached to the hub while printing.
Y our computer should detect y our copie r/printer and allo w
you to proceed thr ough the softwa r e installati on proce ss as
soon as you plug your copier/printer into the computer. If
you experience problems, do the following:
• Verify that the USB cable if firmly connected to your
copier/printer and to your computer.
• Verify that the On button on the front panel is lit.
• V er ify that your oper ating s ys tem comp lies w ith the list o f
supported systems i n system requirements on page 35.
troubleshooting tips
Page 37

hp digital copier 610 printing and software guide
If you still exper i ence diff iculties, contact HP Support and Serv ice s as li st ed
in the HP Digital Copier 510/610 Reference Guide.
communication problems
If the copier/pri nter encounter s a communication problem, do the f ollow ing:
1 Verify that all cables are firmly attached to your copier/printer and
your computer.
2 Press Cancel to cancel the print job.
3 Resend your document.
problems uninstalling or reinstalling software
If you have difficulties uninstalling or reinstalling the HP DIgital Copier
software, do the following:
problem solution
You cannot remove the
HP Digital Copier
software from your
computer
You cannot reinstall the
HP Digital Copier
software
The New Hardware
Wiz ard does n ot identify
the HP Digital Copier by
name, but displays
“Device Unknown”
You have both an HP
CP1160 (DeskJet) and an
HP Digital Copier
installed on your
computer, and y ou cannot
remove one of the
printers.
See uninstall and reinstall software on
page 12.
See uninstall and reinstall software on
page 12.
Disregard the notice and continue the
installation.
• In the New Hardware Wizard select CD-
ROM, then Next to start the search for the
driver file hpf600p.inf.
• If the installation fails, locate and doubleclick this fi le directly from the CD.
• If none of these steps work, follow the
procedure in uninstall and reinstall software
on page 12.
Follow the procedure in uninstall and reinstall
software on page 12, then reinstall only the
printer program you want to keep.
communication problems
33
Page 38

hp digital copier 610 printing and software guide
get help
Help is always available when you need it.
help description
Setup Poster The Setup Poster provides instructions for setting up
Reference Guide The printed Reference Guide contains everything you
and configuring your HP Digital Copier as a standalone copier.
need to know about the copy functions of your
HP Digital Copier. The Reference Guide includes
troubleshooting assistance, instructions for ordering
supplies and accessories , technical specific ations, and
information regarding support and warranty.
Printing and
Software Guide
Internet help and
technical support
Printer help Clicking Help in a dialog box displays information
This guide contains everything you need to know to
connect your HP Digital Co pier to your computer so
you can print from your computer. This guide also
includes information about print functi ons and
information about installing and uninstallling the
software.
If you have Internet access, you can get help from the
HP website at:
www.hp.com/go/copiers
The website also pr ov ides ans we rs to fr equently-ask ed
questions.
about options and settings within the dialog box.
34
troubleshooting tips
Page 39

technical information
system requirements
The following specifications are subject to change without notice. The specifications
in this section only apply to the printing functions of the HP Digital Copier. For all
other specifications, see the HP Digital Copier 510/610 Reference Guide.
component minimum
Processo r Intel P entium II® or Celeron pr ocessor or higher (P entium III or hi gher
Operating system
RAM 64MB (128MB or higher recommended)
Disk space needed for
installation
Media 2X CD-ROM drive
Monitor 800 x 600 SVGA monitor (24-bit color recommended)
Internet access Recommended
Internet browser Internet Explorer 5.0 or higher or Netscape Navigator 4.6 or higher
Sound card Recommended
I/O Standard with a USB port. Requires a USB port on the PC for a local
* For Windows XP availability and system requirements, see www.hp.com/go/
windowsxp.
5
recommended)
• Windows 98
• Windows 98SE
• Windows Millennium
• Windows 2000 Professional (requires service pack 2 or higher)
• Windows XP
400MB availabl e on hard disk
connection.
*
additional
information
system requirements
• Universal serial bus (USB) cable is included o n sel ected models.
• Windows 95, Windows 3.1, and DOS are not supported.
• M acintosh is not supported.
• HP JetDirect print server connector is not suppor ted.
35
Page 40

hp digital copier 610 printing and software guide
print specifications
• Uses HP PhotoREt color layering technology
• Up to 24 00 x 1200 dpi compos ite black (photo paper only)
• Up to 2400 x 1200 dpi color (photo paper only)
• Method: modular pen and ink system
• Langu ag e : HP PCL3 (En h anc e d)
• Print speeds vary according to the complexity of t he document
• Duty cycle: 1000 printed pages per month (avera ge)
• Duty cycle: 5000 printed pages per month (maximum)
maximum printing resolution
mode maximum printing resolution (dpi)
2400 x 1200 Black 2400 x 1200
Color 2400 x 1200
Best Black 1200 x 600 (1200 x 1200*)
Color 1200 x 600 (1200 x 1200
Normal Black 1200 x 600 (1200 x 1200
Color 1200 x 600 (1200 x 1200
Draft Black 600 x 600
Color 600 x 600
* Using premium photo paper
*
*
*
)
*
)
*
)
black TrueType™ text resolution
mode black TrueType™ text resolution (dpi)
Best 1200 x 600
Normal 1200 x 600
Draft 600 x 300
* Plain paper only.
*
maximum print speed
mode maximum print speed (ppm)
2400 x 1200 Black up to 0.6* (4 x 6 image)
†
Color up to 0.5
Best Black up to 4.0
Color up to 4.0
Normal Black up to 8.0
Color up to 7.0
36
(4 x 6 image)
*
†
*
†
technical information
Page 41

hp digital copier 610 printing and software guide
maximum print speed
mode maximum print speed (ppm)
Draft Black up to 19
Color up to 16.8
*Black text document.
† Document with mixed text and color graphics.
*
†
paper specifications
The HP Di gital Cop ier supp orts the pap er spec ificat ions lis ted in the HP Digital Copier
510/610 Reference Guide in addition to the following specifications for printing.
paper weight and paper tray capacities
type paper weight input tray
upper paper tray
Envelopes 20 to 24 lb.
Envelope slot 20 to 24 lb.
Banners 16 to 24 lb.
Custom media 9 lb.
Labels N/A 30 sheets
Transparencies/Photo
media
(75 to 90 gsm)
(75 to 90 gsm)
(60 to 90 gsm)
(34 gsm)
N/A 30 sheets 30 sheets
250-sheet plain paper tray (available as an optional accessory on some models)
Plain paper 16 to 28 lb.
* Maximum capacity.
† Output tray capacity is affected by the type of paper and the amount of ink you are using. HP recommends
emptying the tray frequently.
(60 to 105 gsm)
*
22 envelopes 10 envelopes
N/A N/A
250 sheets N/A
output tray
†
paper sizes
upper paper tray
paper specifications
type size
Banner Letter: 8.5 x 11 in. (215.9 x 279.4 mm)
*
Envelopes
Envelope slot
†
A4: 210 x 297 mm
U.S. #10: 4.125 x 9.5 in. (104.8 x 241.3 mm)
A2: 4.37 x 5.75 in. (111 x 146 mm)
DL: 4.33 x 8.66 in. (110 x 220 mm)
C6: 4.49 x 6.38 in. (114 x 162 mm)
U.S. #10: 4.125 x 9.5 in. (104.8 x 241.3 mm)
DL: 4.33 x 8.66 in. (110 x 220 mm)
37
Page 42

hp digital copier 610 printing and software guide
paper sizes
type size
Transparency films Letter: 8.5 x 11 in. (215.9 x 279.4 mm)
Labels Letter: 8.5 x 11 in. (215.9 x 279.4 mm)
Custom media 3 x 3 in. up to 8.5 x 14 in. (76.2 x 76.2 up to 216 x 356 mm)
* Landscape printing only on envelopes over 216 mm in length.
† Landscape printing only.
A4: 210 x 297 mm
A4: 210 x 297 mm
regulatory information
The following sections are statements from various regulatory agencies.
FCC statement The United States Federal Communications Commission (in 47 CFR 15.105) has
specified that the followi ng notice be brought to the attention of users of this product .
Declaration of Conformity: This equipment has been tested and found to comply with
the limits for a Class B digital device, pursuant to part 15 of the FCC Rules. Operation
is subject to the following two conditions: (1) this device may not cause harmful
interference, and (2) this device must accept any interference received, including
interference that may cause undesired operation. Class B limits are designed to
provide reasonable protection against harmful interference in a residential
installation. This equipment generates , uses, and can radiate radio frequency energy ,
and, if not installed and used in accordance with the instructions, may cause harmful
interference to radio communications. However, there is no guarantee that
interference will not occur in a particular installation. If this equipment does cause
harmful interference to radio or television reception , which can be determined by
turning the equipment off and on, the user is encouraged to try to correct the
interference by one or more of the following measures:
• Reorient the receiving antenna.
• Increase the separation between the equipment and the receiver.
• Connect the equipment into an outlet on a circuit different from that to which
the receiver is conne cted.
• Consult the dealer or an experienced radio/TV technician for help.
Product Regulations Manage r, Hewlett-Packard Com pany, San Diego, (858) 655-
4100.
The user may find the following booklet prepared by the Federal Communications
Commission helpful: How to Identify and Resolve Radio-TV Interference Problems. This
booklet is available from the U.S. Government Printing Office, Washington DC,
20402. Stock No. 004-000-00345-4.
Caution! Pursuant to Part 15.21 of the FCC Rules, any changes or
modifications to this equipment not expressly approved by the
Hewlett-Packard C ompany , may cause harmful interference and void
the FCC authorization to operate this equipment.
38
technical information
Page 43

hp digital copier 610 printing and software guide
doc statement /
déclaration de
conformité
(Canada)
Le présent appareil numérique n'émet pas de bruit radioélectrique dépassant les
limites applicables aux appareils numériques de la classe B prescrites dans le
Règlement sur le brouillage radioélectrique édicté par le ministère des
Communications du Canada.
This digital apparatus does not exceed the Class B limits for radio noise emissions
from digital apparatus set out in the Radio Interference Regulations of the Canadian
Department of Communications.
declaration of conformity
Manufacturer’s Name and Address :
Hewlett-Packard Company, 16399 West Bernardo Drive, San Diego, CA 92127-1899, USA
declares that the product
Product name: hp officejet d series
Model(s): d125xi (C8373A), d135 (C837 5A), d135xi (C8374A), d145 (C8377A), d155xi (C8378A),
Product options: C7309A, C7310A, and C6437A
Conforms to the following product specifications:
Safety: IEC60950:1991 +A1, +A2, +A3 +A4/EN60950:1992 +A1, +A2, +A3, +A4, +A11
EMC: CISPR22:1997/ EN55022:1998, Class B
Telecom: TBR21:1998 Note: does not apply to model numbers d125xi and cc610.
Supplementary Information:
The Product herewith complies with the requirements of the Low Voltage Directive 73/23/EEC, the EMC Directive 89 /336/
EEC Directive 89/336/EEC, the R&TTE Directive 99/5/EC (ANNEX II), and carries the CE marking accordingly. Models
d125xi and cc610 are not covered by the R&TTE Directive.
European Contact for regulatory topics only: Department HQ-TRE, Herrenberger Strasse 130, D-71034 Böblingen, Germany
(FAX + 49-7031-14-3143)
and cc610 (C8372A). Note: Models d125xi and cc 610 do not include a fax feature.
IEC 60825-1:1993 +A1/EN 60825-1:1994 +A11 Class 1 (Laser/LED)
UL1950/CSA 22.2 N o. 950, 3rd Edn: 1995
NOM-019-SCFI-1993
CISPR24:1997/EN55024:1998
IEC 61000-3-2:1995 / EN61000-3-2:1995
IEC 61000-3-3:1994 / EN61000-3-3:1995
AZ/ NCS 3548: 1992
Taiwan CNS13438
FCC Part 15-Class B / ICES-003, Issue 2 / VCCI-2
declaration of conformity
39
Page 44

hp digital copier 610 printing and software guide
40
technical information
Page 45

index
A
addresses, print multiple 27
B
banner paper, load 2
banners, print 26
brightness 24
C
calibrate printer 25
cancel print job 28
check ink levels 26
clean printheads 25
color tab 24
communication problems 33
continuous paper, load 2
copies, number of 23
D
dry time 21
E
envelopes, load 3
F
features tab 20–23
G
grayscale 24
H
help, sources of 34
I
ink levels 26
ink volume 21
install software 5–12
See also uninstall software, reinstall software
Windows 2000
Windows 98/Me 6
Windows XP 10
iron-on trans f ers 16
8
L
labels, load 2
load
envelopes
paper 1
specialty paper 2
lower paper tray 18
3
O
operating minimums 35
P
paper
adjust paper settings
load 1
orientation 16
photo paper 3, 18
specialty 2
specifications 37
trays 17
postcards, load 3
posters 22
print
2400 dpi
banners 26
different first page 16
grayscale 24
group of addresses 27
19
4
index
41
Page 46

hp digital copier 610 printing and software guide
multiple pages on one sheet
number of copies 23
posters 22
reverse image 16
reverse print order 23
scaled documents 19
settings 14
specifications 36
speed 36
test page 26
transparencies 27
troubleshooting 29
two-sided pages 20
watermarks 23
printer
calibrate
default 13
increa se s peed and qual it y 15
printheads, clean 25
25
Q
quality, increase 15
R
regulatory information 38
reinstall so ftware 12, 33
resolution 36
reverse image 16
reverse print order 23
S
saturation 24
scale documents 19
services tab 24–26
setup tab 15–20
software
5–12
install
uninstall and reinstall 12, 33
specialty paper, load 2
22
specifications 36
speed
increase
maximum 36
problems with 30
stop print job 28
streaking 25
system requirements 35
15
T
technical information 35
technical support 34
test page 26
Toolbox 24–26
transparencies, print 27
trays, sele c t 17
troubleshooting
communicat ion problems
printing pr obl ems 29
slow printing 30
two-sided printing 31
USB connection problems 32
two-sided printing 20, 31
U
unin stall software 12, 33
uninstalldc600.bat 12
upper paper tra y 18
USB
5
cable
connection problems 32
W
watermarks 23
Z
z-fold paper, load 2
33
42
index
Page 47

Page 48

visit the hp digital copier information center
It has everything you need to get the most value from your HP Digital Copier.
• Technical Support
• Supplies and Ordering Information
•Project Tips
•Ways to Enhance Your Product
www.hp.com/go/copiers
© 2002 Hewlett-Packard Company
Printed in the U.S.A., Mexico, Germany, Singapore, or China.
*C8372-90101*
*C8372-90101*
C8372-90101
 Loading...