

Page 1

®
QMS 4060 Print System Reference
1800465-001C
Page 2

Trademarks
The following are trademarks or registe red tradem arks of their respective owners. Other
product names mentio ned in this manua l may also be trademar ks or re gistered
trademarks of their respective owners. Registered trademarks are registered in the
United States Patent and Trademark Office; some trademarks may also be registered in
other countries. QMS and the QM S logo, Courageous, Crown, and the Cr own seal are
registered trademar ks of QMS, Inc., and ImageSe rver, QFORM, and PS Executive
Series are trademark s of QMS, Inc. PostScript is a tradem ark of Adob e Systems
Incorporated for a page d escription lan guage and may be registered in cer tain
jurisdictions. Througho ut this manual, “PostScript Level 2” is used to refer to a set of
capabilities defined by Adobe Systems for its PostScript Level 2 page description
language. These capabilitie s, among oth ers, are imple mented in this produc t through a
QMS-developed emulation that is com patible with Adobe's PostScript Level 2 langua ge.
Adobe/Adobe Systems Inc orpora ted. 3Com, 3+Open /3Com Cor poration. Aldu s, Aldus
PageMaker, Aldus FreeHand/Aldus Corporation. Apple, AppleTalk, EtherTalk,
LaserWriter, LocalTalk, Macintosh, TrueType/Apple Computer, Inc. VINES/Banyan.
CompuServe /H & R Block. D EC, DECnet, VMS/Digital Equ ipment Cor poration.
PhoneNET/Farallon Computing, Inc. Hewlett-Packard, HP, PCL, HP-GL, LaserJet/
Hewlett-Packard Co. IBM PC, IBM 3270/5250A, Token-Ring/Inter national Business
Machines Corporation. Intel/Intel C orporation. Mic rosoft, MS-DOS/Microsoft
Corporation. Novell and NetWare/Novell, Inc. QuarkXPress/Quark, Inc. TOPS/Sun
Microsystems, Inc. UNIX/UNIX Systems Laboratories.
Proprietary Statement
The digitally encoded software included with your Courageous Print System is
Copyrighted © 1998 by QMS, Inc. All Rights Reserved. This software may not be
reproduced, modified, d isplayed, transferred, or copi ed in any for m or in any man ner or
on any media, in whole or in par t, withou t the express written per miss ion of QMS, Inc.
Copyright Notice
This manual is Copyrighted © 1998 by QMS, Inc., One Magnum Pass, Mobile, AL
36618. All Rights Reser ved. This manual may not be cop ied in whole or in part, no r
transferred to any other media or languag e, without the express written permission o f
QMS, Inc.
Page 3

Contents
1 Introduction
Introduction .................................................................................. 1-2
About This Manual .......................................................................1-2
Typographic Conventions 1-3
2 Print Media
Introduction .................................................................................. 2-2
Media Sizes and Imageable Areas ..............................................2-2
Imageable Area 2-2
Page Margins 2-4
Media Types and Weights ...........................................................2-4
Labels 2-4
Paper 2-4
Transparencies 2-5
Page 4

Media Storage .............................................................................. 2-5
3 Professional Printing
Introduction ................................... ...... ............. ............. ............. .. 3-2
About Typefaces and Fonts ....................................................... 3-2
Typeface Classification 3-3
Typography Terms 3-4
Resident Fonts, Typefaces, and Symbol Sets .......................... 3-7
Resident PostScript Fonts 3-7
Resident HP PCL 5e Fonts 3-9
PCL 5e Symbol Sets 3-12
Resident HP-GL Symbol Sets 3-13
Optional Fonts ........................................................................... 3-14
4 Printer Configuration
Introduction ................................... ...... ............. ............. ............. .. 4-2
Methods of Configuration ........................................................... 4-2
Using an Application 4-2
Using QMS Document Option Commands 4-3
Using the Control Panel 4-3
Using a Remote Console 4-3
Using the Local Console Port 4-4
Configuration Menu ..................................................................... 4-4
Accessing the Configuration Menu 4-5
Selecting Configuration Menu Options 4-6
Changing Character Information 4-8
Saving Configuration Changes 4-12
Canceling Configuration Changes 4-13
Setting the Message Window Language 4-13
Restoring the Factory Default Configuration 4-14
Working with Custom Configurations 4-14
Rebooting the System 4-15
Operator Control Menu ...................... ....................................... 4-16
Copies 4-17
QMS 4060 Print System Referenceii
Page 5

Duplexing 4-17
Offset Stacking 4-18
Face-Up Order 4-18
Collation 4-18
Orientation 4-21
Input 4-21
Paper Output 4-24
Chaining Paper Inputbins 4-25
Setting Up Chaining Options 4-26
Custom Input Bins 4-28
Consumables 4-29
Crown Accounting 4-29
Copy Accounting Files to Host 4-44
Administration Menu ................................ ....... ...... ....... ...... ...... .4 -46
Communications ....................................... ................................. 4-46
Setting Timeouts 4-47
Setting Parallel Interface Parameters 4-49
Emulation 4-50
Setting Network 2 Options 4-54
Emulations ....................... .......................... ................................ . 4-56
Setting ESP Default Parameters 4-56
Setting PostScript Parameters 4-57
Setting PCL 5e Parameters 4-58
Setting HP-GL Parameters 4-64
Setting Line Printer Parameters 4-69
Special Pages ............ ............................................. ....... ...... ...... .4-73
Working with Status Pages 4-74
Printing a Calibration Page 4-74
Working with Header Pages 4-75
Working with Trailer Pages 4-76
Printer Start-Up Options ............................................................4-77
Enabling/Disabling the Start-Up Page 4-77
Enabling/Disabling the SYS\START File 4-78
Loading the PostScript Error Handler 4-79
Memory ......................................................................................4-79
Manual Configuration Menu 4-80
Engine ......................................................................................... 4-86
Adjusting the Image Alignment 4-86
Setting Default Paper 4-87
Contents iii
Page 6

Setting Inputbin x Name 4-88
Setting Outputbin x Name 4-88
Specifying Page Recovery Action 4-89
Setting Toner Low Action 4-89
Setting Energy Cons ervation 4-89
Setting Default Resolution 4-90
Setting Toner Density 4-91
Rotate Simplex 4-91
Letterhead 4-92
Print Quality 4-92
Consumables ............................................................................. 4-92
Changing the Developer 4-93
Replacing the Drum 4-95
Replacing the Fuser 4-95
Replacing the Pick-Up Rollers 4-96
Miscellaneous ............................................................................ 4-98
Save Defaults 4-98
Restoring the Factory Default Configuration 4-99
Working with Custom Configurations 4-99
Reboot System 4-99
New System Image 4-100
Capture Printjob 4-100
Setting the Message Window Language 4-101
Clock Operations 4-101
Hard Disks ................................................................................ 4-102
Formatting a Hard Disk 4-103
Backing up a Hard Disk 4-103
Restore Disk 4-104
Installation Menu ............. ...... ....... ...... ..................................... 4-104
Operator Password 4-104
Use Operator Password 4-105
Admin Password 4-105
Use Admin Password 4-106
Using Passwords 4-106
Configuring Optional Features ............................................... 4-107
QMS 4060 Print System Referenceiv
Page 7

5 Additional Technical
Information
Introduction .................................................................................. 5-2
Printer-Host Communication ......................................................5-2
Interface 5-2
Simultaneous Interface Operation (SIO) 5-2
ESP Technology 5-2
Communication Modes 5-3
Halftones ................................. ................................ ...................... 5-4
A Special Note for QuarkXPress Users 5-6
Memory .........................................................................................5-7
QMS Memory Management 5-8
Memory Terms 5-8
Evaluation of Your Printing Environment 5-11
Memory Clients 5-13
Hard Disk Management 5-19
End Job Mode ...................................... ...... ....... ...... ....... ...... ...... .5-20
Common Reasons to Use End Job Mode 5-21
Using the EOD Commands 5-22
Setting the End Job Mode for the Serial and Parallel Protocols 5-22
Setting the End Job Mode via the Control Panel 5-23
Adding an EOD Command to Your File 5-25
Creating a Network Job Separator 5-26
Parallel Interface Modes ............................................................5-27
Byte Mode 5-27
Compatibility Mode 5-27
ECP (Enhanced Compatibility Port) Mode 5-28
EPP (Enhanced Parallel Port) Mode 5-28
Nibble Mode 5-28
PS Protocol Option ....................................................................5-28
Options 5-30
Advantages 5-31
Implementation 5-31
HP-GL Color Encoding ....................................................... .......5-32
Contents v
Page 8

A QMS Customer Support
Sources of Support ...................................................... ....... ...... ..A-2
Your QMS Vendor A-2
Your Application Vendor A-2
Q-FAX A-2
CompuServe A-3
Internet A-3
QMS Customer Response Center (CRC) A-3
QMS World-wide Offices .............................................................A-5
B Technical Specifications
Print Engine Specifications ...................... ................................B-10
Print Speed B-10
Physical Specifi ca tio ns B-11
Electrical Specifi ca tions B-12
Environmental Specifications B-12
Controller Specifications ..........................................................B-14
Print Media .................................................................................B-15
Print Media SIzes B-17
Consumable Supplies ...............................................................B-18
Regulatory .............................. ....................................... ............. B-19
PC Cable Pinouts .......................... ...... ....... ................................B-20
Centronics/IEEE 1284 Parallel B-20
Serial B-22
LocalTalk (Optional Interface) B-24
Macintosh to Serial B-24
Ethernet B-25
Printer Options ..........................................................................B-26
Warranty Considerations ..........................................................B-28
Consumables and Your Warranty B-28
Electrostatic Discha rge and Your Warranty B-28
QMS 4060 Print System Referencevi
Page 9

C Document Option
Commands
Introduction ................................................................................. C-2
Supported QMS DOCs ................................................................ C-2
Header/Trailer Page Commands C-2
HP-GL Emulation Commands C-2
HP PCL 5e Emulation Commands C-3
Lineprinter Emulation Commands C-3
CCITT Groups 3 and 4 Commands C-3
Document Formatting C-4
Sessions Command C-4
LN03 Commands C-4
D Notices
Manual Notice .............................................................................. D-2
FCC Compliance Statement ....................................................... D-2
Canadian Users Notice ............................................................... D-3
Europe RFI Statement ................................................................. D-3
Acoustics ................................ ..................................................... D-4
Data Communications (United Kingdom only) ......................... D-4
Safety Standards and General Considerations ........................ D-5
Laser Safety ................................................................................. D-5
Power Cord .................................................................................. D-6
Colophon ..................................................................................... D-6
Contents vii
Page 10

E Configuration
Menu
Introduction ................................... ...... ............. ............. ............. ..E-2
Menu Chart Conventions E-2
Installation Menu E-3
Operator Control Menu E-4
Administration Menu E-5
Index
v
QMS 4060 Print System Referenceviii
Page 11

1
Introduction
In This Chapter . . .
n “About This Manual” on page 1-2
n “Typographic Conventions” on page 1-3
Page 12

Introduction
Introduction
This manual provides detailed instructions and technical information
for your QMS 4060 Print System. Use this guide in conjunction with
your other printer documentation.
This chapter gives you a brief overview of this manual.
About This Manual
The information in this manual is divided into the following sections:
n Chapter 1—Introduction
Provides an overview of the manual.
n Chapter 2—Print Media
Lists print media sizes, margins, and imageable areas and provides media storage information.
n Chapter 3—Professional Printing
Discusses typefaces and fonts, typographic terms, displays the
printer’s typefaces, and provides some page design tips.
n Chapter 4—Printer Configuration
Explains the methods of configuring the prin ter, demonstrates
how to use printer control panel, and provides a detailed discussion of the configuration menu.
n Chapter 5—Additional Technical Information
Defines ESP and SIO, communication modes, halftones, and
memory. Discusses end job mode, IEEE 1284 bidirectional parallel interface modes, PS Protocol and HP-GL color encoding.
QMS 4060 Print System Reference1-2
Page 13

n Appendix A—QMS Customer Support
Provides world-wide product sales and support telephone numbers and describes how to communicate with QMS through CompuServe, the Internet, and Q-FAX.
n Appendix B—Technical Specifications
Provides technical specifications for the printer and lists available
supplies and replacement parts.
n Appendix C—Document Option Commands
Lists printer-supported Document Option Commands (DOCs).
n Appendix D—Notices
Lists manual and legal notices.
n Appendix E—Configuration Menu
Provides a view of the printer’s configuration menu.
Typographic Conventions
About This
Manual
The following typographic conventions are used in this manual:
Mixed-Case
Courier
Mixed-Case
Italic Courier
UPPERCASE
COURIER
lowercase bold PostScript operators and DOS commands
lowercase italic
UPPERCASE File and utility names
↵ Press the Enter key (PC) or Return key
Introduction
Text you type, and messages and information
displayed on the screen
Variable text you type; replace the italicized
word(s) with information specific to your printer
or computer
Information displayed in the printer message
window
Variable information in text
(Macintosh)
1-3
Page 14

About This
Manual
^ Press and hold down the Ctrl key (PC)
In Adobe Acrobat PDF versions of the manual,
click to play a QuickTime video clip of the
procedure described in the text.
» Note:
Notes contain tips, extra information, or important information
that deserves emphasis or reiteration.
▲ Caution:
Cautions present information that you need to know to avoid
equipment damage, process failure, or extreme annoyance.
M WARNING!
Warnings indicate the possibility of personal injury if a
specific procedure is not performed exactly as described in the
manual.
ACHTUNG!
Bitte halten Sie sich exakt an die im Handbuch
beschriebene Vorgenhenswei se , da sonst Verletzungsgefahr
bestehen könnte.
v
QMS 4060 Print System Reference1-4
Page 15

2
Print Media
In This Chapter . . .
n “Media Sizes and Imageable Areas” on page 2-2
n “Media Types and Weights” on page 2-4
n “Media Storage” on page 2-5
Page 16

Introduction
Introduction
This chapter lists the media sizes and imageable areas supported by
the QMS 4060 Print System, and then provides information on selecting and storing media.
Media Sizes and Imageable Areas
Your printer supports media in a number of sizes. Each media size
has a certain imageable area, the maximum area on which the printer
can print. This area is subject to both hardware limits (the physical
media size and the margins required by the printer) and software constraints (the amount of memory available for the full-page frame
buffer).
» Note:
Ensure that the media size matches the tray size (for example,
letter/A4 media must be loaded only when the tray is set to letter/A4
size). Since the media tray sends a media size signal to the printer
controller, using a wrong size media will cause your image to be
positioned incorrectly on the page or clipped and can result in paper
jams.
Imageable Area
The imageable area is the area on which the printer is guaranteed to
print clearly and without distortion. This area is subject to both hardware limits (the physical media size and the margins required by the
printer) and software constraints (the amount of memory available f or
the full-page frame buffer).
QMS 4060 Print System Reference2-2
Page 17
Media Sizes and
Imageable
Areas
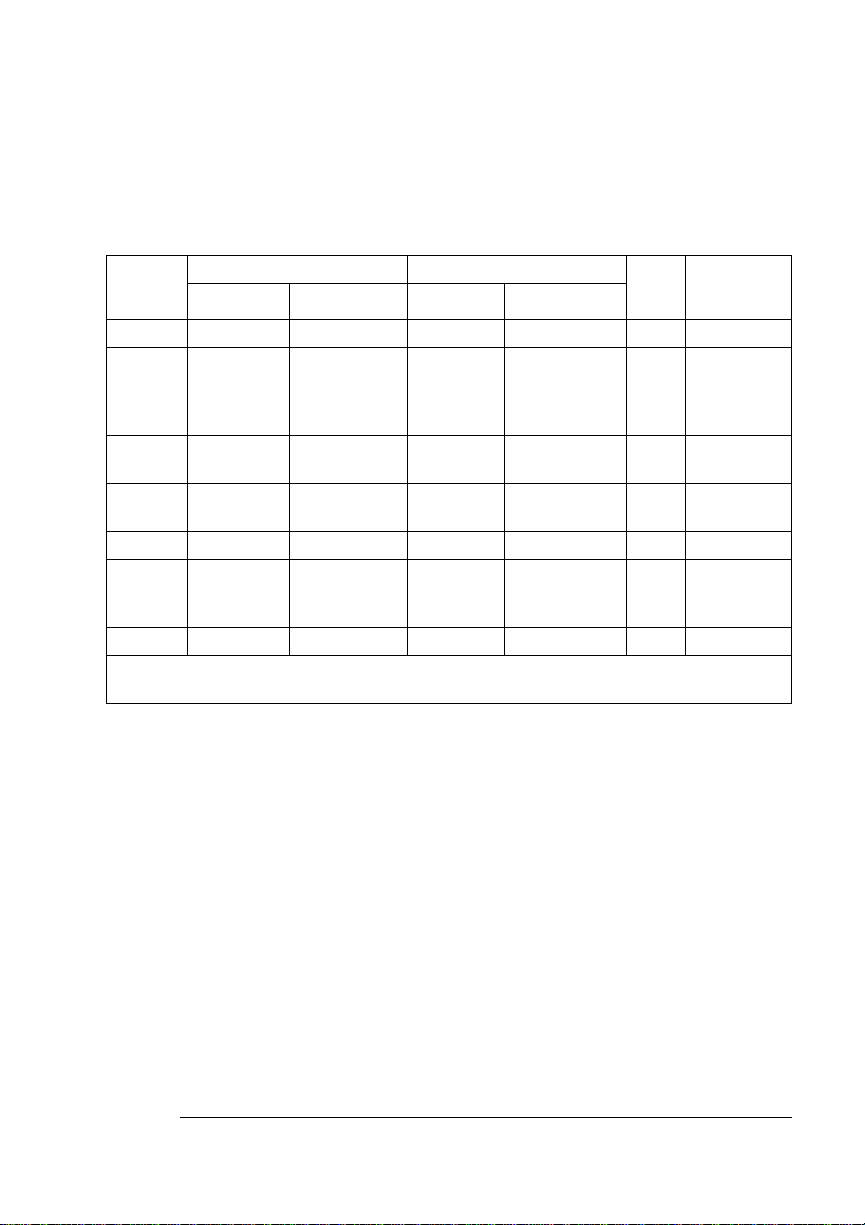
The following table lists the size, imageable area, and feed edge (the
edge of the media drawn into the printer first) of all supported media
as well as information about their input, output, and finishing options:
Media Media Size Imageable Area Feed
Inches Millimeters Inches Millimeters
11x17 11.00x17.00 279.4x431.8 10.67x16.67 270.93x423.38 Short D, L, M, P, U
A3
A4
A5
B4 (JIS)
B5 (JIS)
B4 (ISO)
B5 (ISO)
Executive 7.25x10.50 184.20x266.70 6.92x10.20 175.73x259.13 Short D, M, P
Legal
Letter
Statement 5.50x8.50 139.7x 215.9 5.16x8.17 131.06x207.48 Short C, D, P
D=Duplexer, F=Large-Capacity Input Feeder, L=Lower tray, M=Middle tray, U=Upper tray,
*
P=Large-Capacity Output Stacker, C=Custom tray
11.69x16.54
11.69x8.27
5.85x8.27
10.12x14.33
7.17x10.12
9.84x13.90
6.93x9.84
8.5x14.0
11.00x8.5
297.0x420.0
297.0x210.0
148x210.0
257.0x364.0
182.0x257.0
250x353
176x250
215.9x355.6
279.40x215.90
11.35x16.20
7.93x11.35
5.48x7.94
9.77x13.998
6.87x9.78
9.50x13.57
6.59x9.51
8.16x13.67
8.17x10.67
288.21x411.48
201.51x288.21
139.12x201.55
248.24x355.56
173.40x248.50
241.47x344.55
167.30x241.55
207.26x347.18
207.48x270.93
Short
Long
Short
Short
Short
Short
Short
Short
Long
Edge
Input/
Output
D, L, M, P, U,
D, F, L, M, U
P D, D, L, M
U, P
D, L, M, P, U
D, L, M, P, U
C, D, P,
C, D, P
D, L, M, P, U
D, F, L, M, P
U
Working Within the Imageable Area
The imageable areas for print media on your QMS 4060 Print System
may vary
tolerances. You can adjust the alignment of the image in several different ways:
1
/16" (1.6 mm). This is normal mechanical engine alignment
n Adjust the margins or page size through your application.
n Use the printer’s control panel (Administration/Engine/Image
Alignment menu).
n Use the PostScript translate and scale operators to reduce
image size and change its placement on the page.
Print Media
2-3
Page 18

Media Types and Weights
Page Margins
Margins are set through your application. Some applications allow
you to set custom page sizes and margins while others have only
standard page sizes and margins from which to choose. If you choose
a standard format, you may lose part of your image (due to imageable
area constraints). If you can custom-size your page, use those sizes
given for the imageable area for optimum results.
Media Types and Weights
Your printer supports envelopes, labels, paper, postcards, and transparencies in a number of sizes. The following information provides
media types and weights that your printer supports.
Labels
Type
See appendix B, “Technical Specifications,” for information on typical
types of labels.
Weight
The printer supports 31-36 lb (120-139 g/m2) labels.
Paper
Type
Use paper recommended for laser printers, such as Hammermill
Laser Print. See appendix B, “Technical Specifications,” for information on typical types of paper.
QMS 4060 Print System Reference2-4
Page 19

Media Storage
Weight
The printer supports the following weights of paper:
n Paper trays—17-36 lb (64-139 g/m
n Large-Capacity Input Feeder—17-36 lb (64-139 g/m
2
)
2
)
Transparencies
Type
See appendix B, “Technical Specifications,” for information on typical
types of transparencies.
Heat Tolerance
The printer supports transparencies able to withstand the heat generated by the fuser (190° C/374° F), without transformation.
Media Storage
Improperly stored media increases the chance of paper jams during
printing and can drastically affect the print quality of the printed page.
Keep media in good condition by storing it
n In its wrapper
n On a flat surface
n In a closed cabinet
n In a cool, dry area
See appendix B, “Technical Specifications,” for information on storage conditions for media.
v
Print Media
2-5
Page 20

Page 21

3
Professional Printing
In This Chapter . . .
n “About Typefaces and Fonts” on page 3-2
n “Resident Fonts, Typefaces, and Symbol Sets” on page 3-7
n “Optional Fonts” on page 3-14
Page 22
Introduction
Introduction
This chapter defines common terms used in the descripti on of fonts
and typefaces, and displays the printer’s resident typefaces.
About Typefaces and Fonts
Many of the terms and phrases used in desktop publishing are
derived from the language of professional printers and typesetters.
This section explains common words and phrases used when discussing typefaces.
Typeface
A named design of a set of
printed characters, such as
Times, that has a specified
obliqueness (degree of slant)
and stroke weight (thickness of
stroke). It does not define a
particular size.
Font
A set of characters of the same
typeface (such as Times), style
italic
(such as
(such as bold), and point size
(such as 10). Although you hear
the term “font” used more
generally, as if referring to a
typeface, it’s really only a
member of a typeface family.
), stroke weight
Typeface Family
A group of similar typefaces.
For example, the Times
typeface family consists of four
typefaces: Times Roman, Times
Bold, Times Italic, and Times
Bold Italic.
Character Set
A collection of symbols
designed for various printing
applications. Many character
sets are composed of the
letters (uppercase and
lowercase A-Z), digits (0-9),
and any symbol (such as blank
space, dollar sign, and
ampersand). Other character
sets are composed entirely of
symbols.
QMS 4060 Print System Reference3-2
Page 23

About
Typefaces and
Fonts
Typeface Classification
One way of classifying the different typefaces is to group them into
the following categories:
Serif
A serif is a decorative line or tail on the ends of the strokes of a letter.
Serifs, usually on the lower half of a letter, have also been
referred to as feet or curlicues.
Times Roman
and Times are serif typefaces. In the example shown, all the letters
except “e” and “o” have serifs.
Sans Serif
Sans serif (“sans” is French for
“without”) indicates a typeface
without any of these small tails. A
sans serif typeface is decorative by the shape and styling of its letters
but has less detail than a serif typeface. Helvetica, Helvetica
Condensed, Helvetica Narrow, and ITC Avant Garde Gothic are all
sans serif typefaces. In the example shown above, the slight curving
at the bottom of the letters “t” and “a” is not a serif. It is part of the line
forming the letter rather than a decorative line added on.
Courier, ITC Bookman, New
Century Schoo lb ook, Palatino,
Helvetica
Script
Script typefaces simulate handwriting or brush lettering. Ea ch let ter is
connected visually, if not
Zapf Chancery
Professional Printing
physically . ITC Zapf Chancery is a
script typeface.
3-3
Page 24

About
Typefaces and
Fonts
Pi or Symbol
Pi or symbol typefaces are
collections of assorted specialpurpose characters (for example,
decorative, graphic, math, or
monetary characters). They are especially useful for highlighting items
in lists, providing graphics, and displaying symbols that might
otherwise have to be drawn in by hand. Many typefaces today include
a complement of the more commonly used pi characters. Symbol and
ITC Zapf Dingbats are pi typefaces.
Typography Terms
Monospacing
The terms “monospaced” and “fixed-pitch” refer to a typeface whose
characters all have uniform and equal spacing. These typefaces are
useful for spreadsheets and other documents with columnar data.
Monospacing is the opposite of proportional spacing.
Σψµβολ
Proportional Spacing
The term “proportionally spaced” refers to a typeface in which the
width of each character varies. For example, the letter “i” is thinner
than the letter “m” and therefore takes up less space. Proportional
spacing saves page space and is easier on the eye. This manual’s
text uses the Helvetica font, a proportionally spaced typeface.
Because proportionally spaced type-
alphabet
alphabet
between a monospaced typeface (Courier) and a proportional
typeface (Times).
QMS 4060 Print System Reference3-4
faces place each character according
to its individual size, they increase
legibility and readability. This example shows the difference
Page 25

About
Typefaces and
Fonts
Bitmapped Font
A bitmapped font is a one in which each
character is represented by a set of dot
patterns. Each font size requires a different
set of dot patterns.
Scalable Font
A scalable font is one in which each character’s dot pattern (bitmap) is
generated from a mathematical representation (or outline) of the
character. Scalable fonts eliminate the need to store many different
font sizes.
Point Size
Point size ref ers to the height of a proportionally spaced typeface. A
point is a unit of measure equal to
size, the larger the letter. The following example shows characters in
8, 10, 12, 24, and 36 point sizes:
A B C D E
1
/72". Therefore, the larger the point
Pitch
Pitch refers to the number of characters per horizontal inch (cpi) in a
monospaced typeface. Therefore, the larger the pitch, the smaller the
letter. For example, a ten-pitch typeface
prints ten characters per inch (or 10 cpi)
while a twelve-pitch typeface prints
twelve characters per inch (or 12 cpi).
The example shows ten-pitch and twelvepitch Courier.
Professional Printing
mathematic
0
mathematical
0
1
1
3-5
Page 26

About
Typefaces and
Fonts
Stroke Weight
P
a
l
a
t
i
n
o
Pa
l
a
Stoke weight (light/medium/bold) is the
width (thickness) of the lines (strokes) that
make up a character. The example at left
shows the medium and bold weights of
t
i
Palatino.
n
o
Italic and Oblique Forms
Italic was originally developed in
the early sixteenth century as a
typeface based on cursive
handwriting. T oday’ s italics are still
individually crafted typefaces
designed to blend with a specific roman (upright) typeface.
ITC Avant Garde Roman
ITC Avant Garde Oblique
individually but are mechanically slanted versions of the roman form
from which they derive.
Times Roman
Times Italic
Oblique (or slanted) type
forms, however, are not
designed and crafted
Orientation
Orientation is the direction of the print or image on a page. Portrait
orientation reads from left to right, across the narrower dimension of
the page. Landscape orientation also reads from left to right but
places the print across the wider dimension of the page. Spreadsheet
and table applications commonly use landscape printing. Both terms
QMS 4060 Print System Reference3-6
Page 27
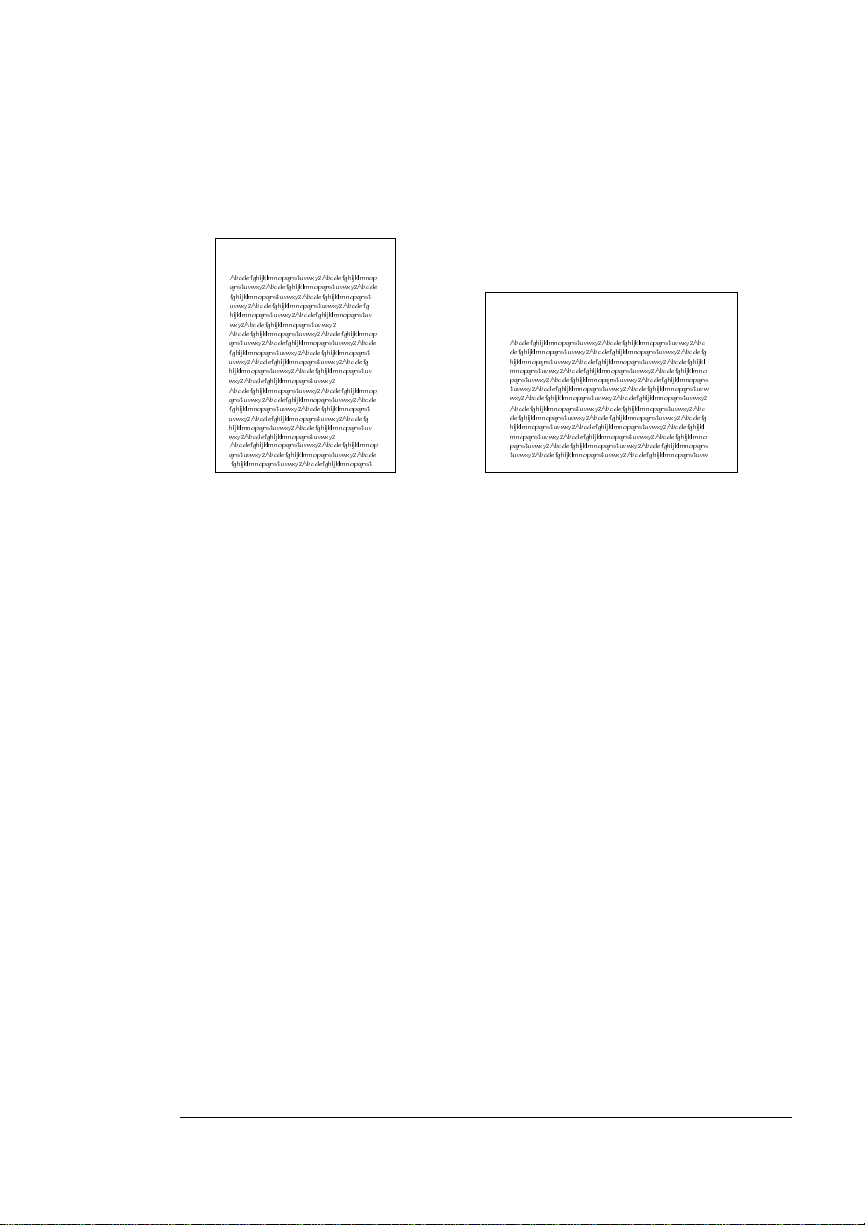
Resident Fonts, Typefaces, and Symbol Sets
derive from painting; a portrait is usually a vertical view while a landscape is usually a horizo ntal view.
Portrait
AbcdefghijklmnopqrstuvwxyzAbcdefghijklmnop
qrstuvwxyzAbcdefghijklmnopqrstuvwx yzAbcde
fghijklmnopqrstuvwxyzAbcdefghijklmnopqrst
uvwxyzAbcdefghijklmnopqrstuvwxyzAbcdef g
hijklmnopqrstuvwxyzAbcdefghijklmnopqrstuv
wxyzAbcdefghijklmnopqrstuvwxyz
AbcdefghijklmnopqrstuvwxyzAbcdefghijklmnop
qrstuvwxyzAbcdefghijklmnopqrstuvw xyzAbcde
fghijklmnopqrstuvwxyzAbcdefghijklmnopqrst
uvwxyzAbcdefghijklmnopqrstuvwxyzAb cdefg
hijklmnopqrstuvwxyzAbcdefghijklmnopqrstuv
wxyzAbcdefghijklmnopqrstuvwxyz
AbcdefghijklmnopqrstuvwxyzAbcdefghijklmnop
qrstuvwxyzAbcdefghijklmnopqrstuvw xyzAbcde
fghijklmnopqrstuvwxyzAbcdefghijklmnopqrst
uvwxyzAbcdefghijklmnopqrstuvwxyzAb cdefg
hijklmnopqrstuvwxyzAbcdefghijklmnopqrstuv
wxyzAbcdefghijklmnopqrstuvwxyz
AbcdefghijklmnopqrstuvwxyzAbcdefghijklmnop
qrstuvwxyzAbcdefghijklmnopqrstuvw xyzAbcde
fghijklmnopqrstuvwxyzAbcdefghijklmnopqrst
Landscape
AbcdefghijklmnopqrstuvwxyzAbcdefghijklmnopqrstuvw xyzAbc
defghijklmnopqrstuvwxyzAbcdefghijklmnopqrstuvwxy zAbcdefg
hijklmnopqrstuvwxyzAbcdefghijklmnopqrstuvwxyz Abcdefghijkl
mnopqrstuvwxyzAbcdefghijklmnopqrstuvwx yzAbcdefghijklmno
pqrstuvwxyzAbcdefghijklmnopqrstuvwx yzAbcdefghijklmnopqrs
tuvwxyzAbcdefghijklmnopqrstuvwxyzAb cdefghijklmnopqrstuvw
wxyzAbcdefghijklmnopqrstuvwxyzAb cdefghijklmnopqrstuvwxyz
AbcdefghijklmnopqrstuvwxyzAbcdefghijklmnopqrstuvw xyzAbc
defghijklmnopqrstuvwxyzAbcdefghijklmnopqrstuvwxy zAbcdefg
hijklmnopqrstuvwxyzAbcdefghijklmnopqrstuvwxy zAbcdefghijkl
mnopqrstuvwxyzAbcdefghijklmnopqrstuvw xyzAbcdefghijklmno
pqrstuvwxyzAbcdefghijklmnopqrstuvw xyzAbcdefghijklmnopqrs
tuvwxyzAbcdefghijklmnopqrstuvwxyz Abcdefghijklmnopqrstuvw
Resident Fonts, Typefaces,
and Symbol Sets
Resident PostScript Fonts
The following 42 PostScript fonts are resident in your printer. See your
QMS vendor if you are interested in expanding your printer's typeface
families.
All of these typeface families are authentic: they are licensed, they
carry the true name, and they have multilingual character sets.
Professional Printing
3-7
Page 28

Resident Fonts,
Typefaces, and
Symbol Sets
Serif Fonts
ITC Bookman Light
ITC Bookman Lig ht It al i c
ITC Bo okman Demibold
ITC Bookman Demibold Italic
Palatino Roman
Palatino Italic
Palatino Bold
Palatino Bold Italic
New Century Schoolbook Roman
New Century Schoolbook Italic
New Century Schoolbook Bold
New Century Schoolbook Bold
Italic
Courier
Courier Oblique
Courier Bold
Courier Bold Oblique
Sans Serif Fonts
ITC Avant Garde Gothic Book
ITC Avant Garde Gothic Book Oblique
ITC Avant Garde Gothic Demibold
ITC Avant Garde Gothic Demibold
Oblique
Helvetica
Helvetica Oblique
Helvetica Bold
Helvetica Bold Oblique
Script Font
Times Roman
Times Italic
Times Bold
Times Bold Italic
Helvetica Condensed
Helvetica Condensed Oblique
Helvetica Condensed Bold
Helvetica Condensed Bold Oblique
Helvetica Narrow
Helvetica Narrow Oblique
Helvetica Narrow Bold
Helvetica Narrow Bold Oblique
ITC Zapf Chancery Medium Italic
Pi or Symbol Fonts
Σψµβολ (Symbol)
✤❉■❇❂❁▼▲ (ITC Zapf Dingbats)
QMS 4060 Print System Reference3-8
Page 29
Resident Fonts,
Typefaces, and
Symbol Sets
Other Fonts
OCR-B
PC US ASCII
PC Multilingual
Resident HP PCL 5e Fonts
Your printer has resident HP PCL 5e fonts. This gives the QMS 4060
the ability to emulate the HP LaserJet 5Si. All fonts can be automatically rotated to landsca pe or ientation.
» Note:
300/600 dpi switching is available.
This table is a complete list of the fonts av ailable f or PCL 5e. They can
be automatically rotated to landscape orientat ion . All fonts are scalable and available in 32 symbol sets unless otherwise noted.
Font Pi/
Symbol
Adobe Symbol Medium (1 symbol
set)
Albertus Se mi Bold
Albertus Extra Bold
Antique Olive Medium
Antique Olive Italic Medium
Antique Olive Bold
Arial
Arial Bold
Arial Italic
Arial Bold Italic
Clarendon Condensed Bold ü
Coronet Italic Medium ü
ü
Sans
Serif
ü
ü
ü
ü
ü
ü
ü
ü
ü
Script Serif
Professional Printing
3-9
Page 30
Resident Fonts,
Typefaces, and
Symbol Sets
Font Pi/
Symbol
Courier Medium
Courier Italic Medium
Courier Bold
Courier Bold Italic
Garamond (Stempel) Medium
Garamond (Stempel) Italic Medium
Garamond (Stempel) Bold
Garamond (Stempel) Italic Bold
Letter Gothic Medium
Letter Gothic Italic Mediu m
Letter Gothic Bold
Line Printer Legal Medium (8.5
points, 25 symbol sets )
Line Printer PC-850 Medium (8.5
points, 25 symbol sets )
Line Printer PC-8 D/N Medium (8.5
points, 25 symbol sets)
Line Printer PC-8 Medium (8.5
points, 25 symbol sets)
Line Printer Roman-8 Medium (8.5
points, 25 symbol sets)
Line Printer ECMA-94 Latin 1
(ISO8859/1) (8.5 points, 25
symbol sets)
Sans
Serif
ü
ü
ü
ü
ü
ü
ü
ü
ü
Script Serif
ü
ü
ü
ü
ü
ü
ü
ü
Merigold ü
Omega Medium
Omega Italic Medium
Omega Bold
Omega Italic Bold
QMS 4060 Print System Reference3-10
ü
ü
ü
ü
Page 31

Resident Fonts,
Typefaces, and
Symbol Sets
Font Pi/
Symbol
Times Medium
Times Italic Medium
Times Bold
Times Italic Bold
Times Roman Medium
Times Roman Italic Medium
Times Roman Bold
Times Roman Italic Bold
Univers Medium
Univers Italic Medium
Univers Bold
Univers Italic Bold
Univers Condensed Medium
Univers Condensed Italic Medium
Univers Condensed Bold
Univers Condensed Italic Bold
Wingdings (1 symbol set) ü
Sans
Serif
ü
ü
ü
ü
ü
ü
ü
ü
Script Serif
ü
ü
ü
ü
ü
ü
ü
ü
Professional Printing
3-11
Page 32

Resident Fonts,
Typefaces, and
Symbol Sets
PCL 5e Symbol Sets
This table lists all of the PCL 5e symbol sets that are supported on
the QMS 4060 Print System.
Roman - 8
PC - 850
PC8 - US
PC8 - DN
Legal
ISO - 4 (UK)
ISO - 6 (ASCII)
ISO -11 (SWED)
ISO - 15 (ITAL)
ISO - 17 (SPAN)
ISO - 21 (GERM)
ISO - 60 (NORW)
ISO -69 (FREN)
Desktop
PS - Math
Math - 8
Microsoft - Pub
Pi - font
PS - Text
Ventura - Intl
Ventura - Math
Ventura - US
Windows 3.0 (LATIN 1)
ISO - Latin - 1
ISO - Latin - 2
ISO - Latin - 5
PC - 852 (Latin 2)
PC - 8tk
Windows 3.1 1-1 (Latin 1)
Windows 3.1 1-2 (Latin 2)
Windows 3.1 1-3 (Latin 3)
MC - Text
QMS 4060 Print System Reference3-12
Page 33

Resident Fonts,
Typefaces, and
Symbol Sets
Resident HP-GL Symbol Sets
Your printer has the following resident HP-GL symbol sets. All come
in both fixed- and variable-spaced versions, and all are scalable.
Fixed space ANSI ASCII
Fixed space 9825 Character
Set
Fixed spaceFrench/German
Fixed space Scandinavian
Fixed space Spanish/Latin
American
Fixed space Special symbols
Fixed space JIS ASCII
Fixed space Roman
extensions
Fixed space Katakana
Fixed space ISO IRV
Variable space ANSI ASCII
Variable space 9825
Character set
Variable space French/
German
Variable space Scandinavian
Variable space Spanish/Latin
American
Variable space Special
symbols
Variable space ASCII
Variable space Roman
extensions
Variable space Katakana
Variable space ISO IRV
Fixed space ISO Swedish
Fixed space ISO Swedish for
names
Fixed space ISO Norway
version 1
Fixed space ISO German
Fixed space French
Fixed space United Kingdom
Fixed space Italian
Fixed space Spanish
Fixed space Portuguese
Fixed space Norway version 2
Variable space ISO Swedish
Variable space ISO Swedish
for names
Variable space ISO Norway
version 1
Variable space German
Variable space French
Variable space United
Kingdom
Variable space Italian
Variable space Spanish
Variable space Portuguese
Variable space Norway
version 2
Professional Printing
3-13
Page 34

Optional Fonts
Optional Fonts
Your printer supports the following optional fonts:
n A disk containing typefaces (fonts), such as the ProCollection for
the HP emulations on your printer or other special fonts.
n A SIMM containing 65 ProCollection fonts for the HP emulation
on your printer.
n A Kanji Option Kit that contains either a pre-formatted external
hard disk with Kanji fonts and other files or a Kanji SIMM.
Contact QMS or your printer vendor for availability of these fonts.
QMS also provides logos, signatures, and other form services. See
appendix A, “QMS Customer Suppor t , ” for locations and telephone
numbers.
v
QMS 4060 Print System Reference3-14
Page 35

4
Printer Configuration
In This Chapter . . .
n “Methods of Configuration” on page 4-2
n “Configuration Menu” on page 4-4
n “Operator Control Menu” on page 4-16
n “Administration Menu” on page 4-46
n “Installation Menu” on page 4-104
Page 36

Introduction
Introduction
This chapter begins by listing and describing the different ways you
can configure your printer to meet your special printing needs.
The next section describes how to use the printer control panel to
access the configuration menu and how to make configuration
changes.
The rest of the chapter provides basic printer configuration information about some of the configuration menu options. The
Net Interface System Administrator’s Guide
Utilities
information for the Ethernet interface. In both guides, menu features
are grouped according to task. Each feature is introduced, then a
table describes the feature’s location in the configuration menu, the
available choices for that feature, and the factory default (the value
set at the factory).
CD-ROM) contains the CrownNet submenu configuration
(on the
QMS Crown-
QMS Software
Methods of Configuration
You have five ways to configure your printer to meet your printing
needs:
n Through an application
n Through printer commands
n Through the printer control panel
n Through a remote console (for network users)
n Through a local console
Using an Application
Using your application is the best way to control your printer since
most printing is done on a per-job basis. This helps prevent confusion
in network environments and saves you from making changes at the
QMS 4060 Print System Reference4-2
Page 37

Methods of
Configuration
printer control panel. Your application documentation explains how to
control your printer settings: probably by choosing options from a
printing menu.
Applications use printer drivers to send appropriate commands to the
printer for requested tasks. If your application doesn’t have a QMS
4060 Print System driver, you can select a comparable PostScript
driver, such as the QMS Level 2 Windows driver or a LaserWriter
driver. However, comparable drivers may not allow you to access all
of your printer's features, such as 600x600 dpi printing, duplexing, or
collating.
Using QMS Document Option Commands
QMS Document Option Commands (DOCs) can enable job-specific
features your application or page description language can’t access.
See your
QMS Software Utilities
mands. See appendix C, “Document Option Commands,” of this manual for a list of DOCs this printer supports.
QMS Crown Document Option Commands
CD-ROM for information on the DOC com-
manual on the
Using the Control Panel
Your printer is configured at the factory for most typical printing environments, so most users don’t have to use the control panel often.
However, if you do need to change a printer setting for all print jobs
(not just on a per-job basis), you can do so through the control panel.
If you’re working in a shared printing environment, your system
administrator should be the only person to make changes through the
printer’s control panel.
» Note:
The menu navigation button functions appear on the display
panel only when the printer is off line.
Using a Remote Console
Many of the configuration choices that can be made at the control
panel can also be made via a Remote Console session from
CrownAdmin. You can run Remote Console via Telnet a TCP/IP envi-
Printer Configuration
4-3
Page 38

Configuration Menu
ronment. To avoid confusion in a shared printing environment, only
the system administrator should make configuration changes. See
the QMS CrownAdmin on-line help for information on using Remote
Console.
» Note:
If a remote console has the printer off line, pressing the Online
button will not take effect until the console puts the printer back on
line.
Using the Local Console Port
The Local Console port can also allow you to make configuration
choices that are normally made at the control panel. See chapter 6,
“Local and Remote Console,” of the
information.
» Note:
If a local console has the printer off line, pressing the Online
button will not take effect until the console puts the printer back on
line.
Operations
Configuration Menu
The printer’s configuration menu allows you to change the default
printer configuration settings. Any changes made to the configuration
will reside as new default settings and affect all subsequent print jobs.
The options in the configuration menu are organized under three
main menus:
manual for more
n Operator Control Menu
Use this menu to select document processing options such as
copy count, choosing input and output paper bins, chaining input
bins, and duplexing (if a duplexing unit is installed). Document
processing options are usually specified within individua l jobs
since each job has its own requirements. However, if there’s no
way of specifying these options within an application, use the
control panel to change options, send the job, and then change
the defaults back.
QMS 4060 Print System Reference4-4
Page 39

Configuration
Menu
» Note:
n Administration Menu
» Note:
nn Installation Menu
Defining document processing options for a particular job
through the control panel is not recommended in a shared
environment. When many systems are using the same printer,
there’s no way of making sure that no other jobs are sent to the
printer while the defaults are changed. The Operator Control
menu may be password-protected with an optional security key if
the system administrator does not want users changing defaults.
Use this menu to maintain printer-host communication information, and for selecting and configuring printer emulations, configuring special pages, printing engine calibration, and configuring
hard disks (if installed).
For information on printer-host communication using the
Ethernet interface or any of the Administration/Communications/
Network/CrownNet options, see chapter 2, “Printer
Configuration,” in the QMS CrownNet System Administrator’s
Guide on the QMS Software Utilities CD-ROM. The
Administration menu may be password protected with an optional
security key if the system administrator does not want users
changing defaults.
Use this menu to establish passwords for the Operator Control
and Administration menus. This menu displays only when an
optional security key is installed.
Accessing the Configuration Menu
To access the configuration menu, make sure the printer is idle (IDLE
displays in the message window), then press the Online button to
take the printer off line (the Online button function changes to Offline),
and finally press the Menu button.
Example
The following table shows how to use control panel buttons to access
the printer configuration menu. Press the control panel buttons in the
Printer Configuration
4-5
Page 40

Configuration
Menu
order shown. The printer responds by displaying a status message or
configuration menu in the message wind ow.
» Note:
You may need to press the Next button more than one time to
advance through the list of options.
Press
this
button
Online
to... The message wind ow
reads...
Take the printer off line and ready
IDLE
the printer for configuration.
Menu
Access the configuration menu. CONFIGURATION
OPERATOR CONTROL
The printer must be off line and idle before you can access the configuration menu.
Selecting Configuration Menu Options
Once you access the configuration menu, you use the control panel
buttons to move through the menu. Use the following buttons:
Press this
button
Next Advance to the next option or submenu within a
to...
menu.
Previous Return to the previous option or submenu within a
menu.
Select Select an option or enter a submenu.
QMS 4060 Print System Reference4-6
Page 41

Configuration
Menu
Example
To change the default printer emulation from ESP to PostScript, press
the control panel buttons in the order shown in the following table.
» Note:
You may need to press the Next button more than once to
advance through the list of selections or options.
Press this
button
Online
to... The message
Turn off the Online indicator and
ready the printer for
configuration.
Menu
Next
Access the configuration menu. CONFIGURATION
Advance to the Operator Control/
Administration menu.
Select
Select
Access the Administration menu ADMINISTRATION
Access the Communications
menu.
Next
Advance to the
Communications/Parallel menu.
Select
Access the Parallel menu. PARALLEL
window reads...
IDLE
OPERATOR
CONTROL
CONFIGURATION
ADMINISTRATION
COMMUNICATIONS
COMMUNICATIONS
TIMEOUTS
COMMUNICATIONS
PARALLEL
MODE
Next
Advance to the Parallel/
Emulation menu.
Select
Previous
Access the Emulation menu. EMULATION
Advance to the Emulation/
PostScript menu.
Printer Configuration
PARALLEL
EMULATION
ESP
EMULATION
POSTSCRIPT
4-7
Page 42

Configuration
Menu
Select
Offline or
Menu
Select PostScript as the default
emulation.
After 3 seconds you are returned
to the Parallel/Emulation menu.
Exit from the menu (Offline) or
return to the previous menu
POSTSCRIPT
IS SELECTED
PARALLEL
EMULATION
SAVE CHANGES?
NO
(Menu). You are prompted to
save your change(s).
Next
Select
Advance to the Save Changes?/
Yes option.
Select YES. The printer finishes
SAVE CHANGES?
YES
IDLE
printing any print jobs in process,
saves your change, and returns
to idle.
Changing Character Information
Sometimes, rather than selecting an option, you need to enter character information. A character is any letter, digit, or symbol. A field is a
group of characters that have meaning. Use the printer control panel
to enter character information in the message window during printer
configuration. The maximum length of the message window is 16
characters.
Entering character information through the control panel is similar to
setting the time and date on a digital watch. You enter one character
QMS 4060 Print System Reference4-8
Page 43

Configuration
Menu
at a time. The current input character flashes. Use the following buttons to change the current input character:
Press this
button
Next
to...
Advance to the next choice for the current input
character.
Previous
Return to the previous choice for the current input
character.
Once you have changed the current input character, use the f ollowing
buttons to move the cursor to another input character:
Press this
button
Select
Menu
to...
Advance the cursor to the next character.
Return the cursor to the previous character.
To exit from the character selection process, move the cursor to the
last character of the input field (the character farthest to the right) and
press the Select button, or move to the first character of the input field
(the character farthest to the left) and press the Menu button.
When you exit, the printer verifies character information and confirms
it in the message window. If character info rmation is valid, you’re
returned to the previous menu; if it’s invalid, you’re returned to the
input field. Press the Menu button to cancel any changes to the character information.
If the current character information is longer than the value that you
need to enter, replace each extra character with a space. The printer
interprets a space at the end of character information as a blank.
Example
To change the HP-GL emulation scaling percent, press the control
panel buttons in the order shown in the following table. The printer
Printer Configuration
4-9
Page 44

Configuration
Menu
responds by displaying a status message or configuration menu in the
message window. An underline indicates the current input character
in the message window.
» Note:
You may need to press the Next button more than one time to
advance through the list of selections or options.
Press
this
button
Online
to... The message window
Turn off the Online indicator and
ready the printer for
configuration.
Menu
Next
Access the configuration menu. CONFIGURATION
Advance to the Administration
menu.
Select
Next
Select
Access the Administration menu ADMINISTRATION
Advance to the Emulation menu. ADMINISTRATION
Access the Emulations menu. EMULATIONS
reads...
IDLE
OPERATOR
CONTROL
CONFIGURATION
ADMINISTRATION
COMMUNICATIONS
EMULATIONS
ESP DEFAULT
EMUL
Next
Select
Next
Advance to the Emulations/HPGL menu.
EMULATIONS
HP-GL
Access the HP-GL menu. HP-GL
PLOTTER
Advance to the HP-GL/Scaling
Percent menu.
HP-GL
SCALING PERCENT
QMS 4060 Print System Reference4-10
Page 45

Configuration
Menu
Select
Previous
Select
Next
(5 times)
Select
Select
Offline
or Menu
Access the Scaling Percent
menu.
SCALING PERCENT
00
1
Lower the current character to 0. SCALING PERCENT
00
0
Select 0 and move the current
character to the next 0.
SCALING PERCENT
0
00
Advance the current character to 5.SCALING PERCENT
0
05
Select 5 and move the current
character to the last 0.
Select 50 as the default scaling
percent.
After 3 seconds you are returned
to the HP-GL/Scaling Percent
SCALING PERCENT
050
50
IS SELECTED
HP-GL
SCALING PERCENT
menu.
Exit from the menu (Online) or
return to the previous menu
SAVE CHANGES?
NO
(Menu). You are prompted to
save your change(s).
Next
Advance to the Save Changes?/
Yes option.
Select
Select Yes. The printer finishes
printing any print jobs in process,
saves your change, and returns
to idle.
Printer Configuration
SAVE CHANGES?
YES
IDLE
4-11
Page 46

Configuration
Menu
Saving Configuration Changes
Before the printer can accept print jobs with configuration changes,
the changes must be saved.
Example
To save your configuration changes, press the control panel buttons
in the order shown in the following table. The printer responds by displaying a status message in the message window.
Press
this
button
Offline or
Menu
to... The message
window reads...
Exit from the menu (Online) or
return to the previous menu
(Menu). You are prompted to save
SAVE
CHANGES?
NO
your change(s).
Next
Advance to the Save Changes?/
Yes option.
SAVE
CHANGES?
YES
Select
Select Yes. The printer finishes
IDLE
printing any print jobs in process,
saves your change, and returns to
idle.
Offline
Turn the printer on-line and ready
IDLE
the printer to accept and print
jobs.
» Note:
The printer may need to be restarted before certain changes to
the Administration menu take effect. Some changes restart the printer
automatically while others display the message REBOOT NOW? in the
control panel message window. If this message appears, select YES
to restart the printer and have the change(s) take effect immediately,
or select NO to wait until you manually restart the printer for changes
to take effect.
QMS 4060 Print System Reference4-12
Page 47

Configuration
Menu
Canceling Configuration Changes
If you change a configuration option and then decide to cancel that
change, you can do so when exiting the configuration menu.
Example
To cancel your configuration changes, press the control panel buttons
in the order shown in the following table. The printer responds by displaying a status message in the message window.
Press
this
button
Offline
or
Menu
to... The message
window reads...
Exit from the menu (Offline) or
return to the previous menu (Menu)
and be prompted to save your
SAVE
CHANGES?
NO
change.
Select
Select No. The printer finishes
IDLE
printing any print jobs in process,
does not save your changes, and
returns to idle.
Offline
Turn the printer on-line and ready
IDLE
the printer to accept print jobs.
Setting the Message Window Language
Status messages and configuration menus can be displayed in the
message window in English, French, German, or Spanish. If you
need to change the message window language, use the Keypad Language option in the Administration/Miscellaneous menu.
Menu
Administration/Miscellaneous/Keypad Language
Choices
English, French, German, Spanish
Printer Configuration
4-13
Page 48

Configuration
Menu
Default
Notes
English
The printer must be restarted for changes to the
Keypad Language menu to take effect. You can either
let the printer restart automatically after you save the
change and exit from the Configuration menu, or you
can wait for the change to take effect the next time
you manually turn on the printer.
Restoring the Factory Default Configuration
If you need to cancel all of the configuration changes you have made,
you can reset all of the configuration settings to their factory defaults.
Menu Administration/Miscellaneous/Restore Defaults
Purpose Allows you to cancel all of the configuration changes you’ve
made and reset all of the configuration settings to their factory
defaults
Choices Yes, No
Default No
Notes This process takes a few minutes to complete.
Working with Custom Configurations
Saving a Default Custom Configuration
Menu Administration/Miscellaneous/Save Defaults
Purpose Saves the current printer config ur ati on as a custom default.
Choices Yes—Save the current configuration settings as a custom
default.
No—Don’t save the current configuration s et tings as a custom
default .
Default No
Notes Y ou can sav e onl y one c onfigur ation; h ow ev er, you can change
the saved configuration at any time.
QMS 4060 Print System Reference4-14
Page 49

Configuration
Menu
Restoring a Default Custom Configuration
Menu Administration/Miscellaneous/Restore Defaults/Saved Defaults
Purpose Reconfigures the printer by using the default custom
configuration.
Choices Yes, No
Default No
Notes To resto re the sa ved def ault s, ac cess t he me nu ite m and select
Yes.
Rebooting the System
Use this option to restart the system after making a group of configuration menu changes. Before making configuration changes an
advanced status page should be printed. After changing any option
that requires a system restart, you are prompted to REBOOT NOW? If
you want to make other configuration changes choose no. After you
make all configuration changes choose Y es to restart the system and
have all configuration menu changes take effect at once.
Menu
Choices
Administration/Miscellaneous/Reboot System
Yes—Reboots the system.
No—Does not reboot the system.
Default
Notes
» Note:
No
This process takes a few mi nutes to comple te.
If you save a change and for some reason want to return to the
previous state, use the advanced status page as a reference.
Printer Configuration
4-15
Page 50

Operator Control Menu
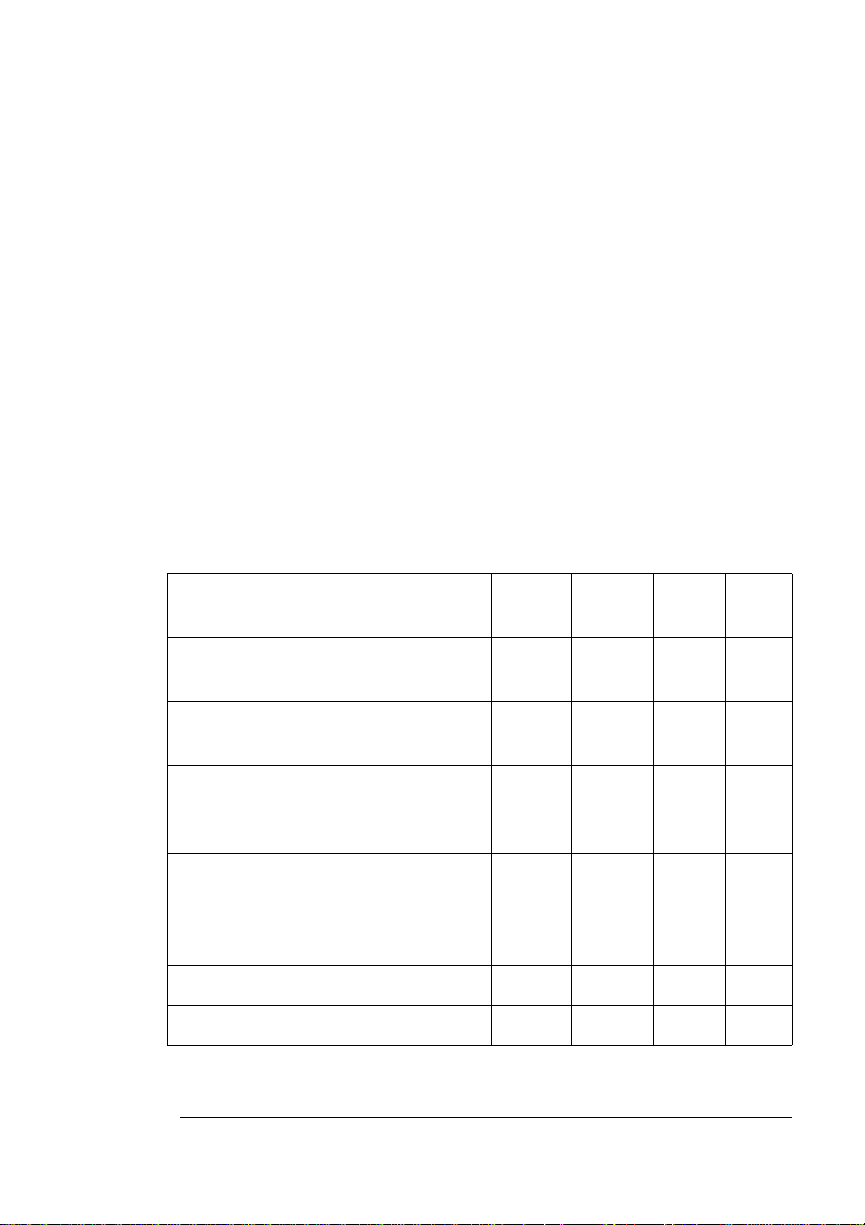
Operator Control Menu
The Operator Control menu contains the following selections:
Selection See this section...
Copies “Copies” on page 4-17
Duplex “Duplexing” on page 4-17
Offset Stacking “Offset Stacking” on page 4-18
Face-Up Order “Face-Up Order” on page 4-18
Collation “Collation” on page 4-18
Orientation “Orientation” on page 4-21
Inputbin “Input” on page 4-21
Outputbin “Selecting a Paper Outputbin” on page 4-24
Chain
Inputbins
LCIT, Lower,
Middle, Upper
Chaining
Custom Input
Tray
Consumables “Consumables” on page 4-29
Accounting “Accounting Menu” on page 4-30
“Chaining Paper Inputbins” on page 4-25
“Setting Up Chaining Options” on page 4-26
“Custom Input Bins” on page 4-28
QMS 4060 Print System Reference4-16
Page 51

Operator Control
Menu
Copies
While it is preferable to use your application to select the number of
copies to print, you can change the default number of copies for all
print jobs through the printer control panel.
Menu
Choices
Default
Notes
Operator Control/Copies
001-999
001
Sets the default number of copies for all subsequent
print jobs. When power is turned off and then back on
again, the number of copies is restored to the default
setting of 001.
Duplexing
The Duplex option allows you to print on both sides of the paper.
Menu
Choices
Default
Operator Control/ Duplex
Off, On
Off—Prints simplex pages.
On—Duplexes each page of each job.
Tumble—Prints jobs so they can be bound at the top
edge (flip-chart style).
Off
Notes
Printer Configuration
If you want to print individual jobs duplex, leave the
printer set to Off and choose duplex through your
application.
4-17
Page 52

Operator Control
Menu
Offset Stacking
This option offsets each job as they are stacked in the optional LCOS.
Menu
Choices
Default
Operator Control/Offset Stacking
Off, On
Off—Jobs stack normally.
On—Each job is offset in the LCOS output tray.
Off
Face-Up Order
This option allows you to choose stacking your print job in normal
face-down order or reverse order.
Menu
Choices
Default
Notes
Operator Control/Face-Up Order
Normal, Reverse
Normal—Order of printing is first page of the job
printed first.
Reverse—Order of printing is last page of the job is
printed first.
Normal
Reverse face-up order is not supported when printing
duplex jobs.
Collation
Collation is one of your printer’s features. It is the printing of sets of
multiple copies of a document in numeric order. Your printer is capable of delivering multiple copies of your files in collated order to the
QMS 4060 Print System Reference4-18
Page 53

Operator Control
Menu
output tray. The following figure shows the collated and uncollated
stacking for two copies of a four-page file.
4
3
2
1
4
3
2
1
2
1
1
3
2
4
4
3
Collated
The main advantage of collation is convenience and the time savings
derived from not having to separate and sort individual copies of a
document. Each copy of the document exists as a whole unless
chunk collation has occurred.
Uncollated
Enabling/Disabling Collation
Menu
Choices
Default
Operator Control/Collation
On—Enable collation.
Off—Disable collation.
Off
Working with Chunk Collation
For a multiple copy document with collation On, there must be
enough display list memory to hold the display list blocks for a ll pages
in the collation range. See the “Memory” section in chapter 5
more information on the Display List compressed blocks. If there is
not enough memory, then a chunk collation boundary is forced after
the last compiled page of the collation range.
» Note:
Under normal condition s with 32 MB of RAM and the int ernal
hard disk for virtual memory, your QMS 4060 should have enough
memory to prevent chunk collation from occurring.
,
for
Printer Configuration
4-19
Page 54

Operator Control
Menu
Chunk Collation
This mechanism of introducing a forced boundary is known as chunk
collation. Chunk collation breaks a document into several smaller,
more manageable sets. For example, in the following illustration, copies “a” and “b” of each set must be manually combined to create one
collated document. The order of printing is copy 1(a), copy 2(a), copy
3(a), copy 4(a), copy 1(b), copy 2(b), copy 3(b), and copy 4(b).
» Note:
The order of output on your QMS 4060 Print System is from
first to last page.
To improve collation performance, which allows you to collate longer
and more complex print jobs on the QMS 4060 Print System, you can
do one of the following:
n Add more printer memory, which automatically increases the Dis-
play List client’s memory settings.
n Take any memory, if av ailable and not being used by other clients,
and add it to the Administration/Memory/K Mem Display memory
setting.
▲ Caution:
This option should be used only by individuals who are
familiar with adjusting memory clients’ values. Incorrect use of
this option could cause your system to operate inco rrectly.
QMS 4060 Print System Reference4-20
Page 55

Operator Control
Menu
» Note:
Collating through your application is more time consuming
than collating through the printer. The application sends the
complete job the requested number of times rather than sending
it once and holding data in printer memory.
Orientation
While you can usually specify the orientation of a print job in your
application, if you consistently use a certain paper orientation, you
can set this in the Operator Control/Orientation menu.
Menu
Choices
Default
Operator Control/Orientation
Portrait—Vertical.
Landscape—Horizontal.
Portrait
Input
Your QMS 4060 Print System comes standard with three 500-sheet
paper trays. Using the control panel, you can select a default paper
input source, chain these input sou rce s, and name them.
Selecting a Paper Inputbin
Your printer has the following inputbins:
Upper Tray
Middle Tray
Lower Tray
Printer Configuration
Holds approximately 500 sheets of letter/A4 to
A3/11" x 17" paper.
Holds approximately 500 sheets of letter/A4 to
A3/11" x 17" paper.
Holds approximately 500 sheets of letter/A4 to
A3/11" x 17" paper.
4-21
Page 56

Operator Control
y
Menu
Optional Custom
Paper Tray (used in
place of one of the
other trays)
Optional LargeCapacity Input
Feeder (LCIF)
Holds approximately 500 sheets of letter/A4 to
11''x17''/A3 paper, statement, B4 (ISO), and B5
(ISO).
Two models—one holds 3000 sheets of lettersize paper and the other holds 3000 sheets of
A4-size paper.
The following illustration shows the locations of these bins.
Large
Capacit
Input
Upper Tray
Feeder
Middle Tray
Lower Tray
The input trays support several types and sizes of paper . See chapter
2, “Media Types and Weights,” of this manual, for information on the
types and weights of paper. The optional large-capacity input feeder
expands the printer’s paper capacity to approximately 4500 sheets of
paper (500 sheets for the upper, middle, and lower trays, and 3000
sheets for the input feeder).
The Operator Control/Inputbin menu allows you to select the default
tray or tray (inputbin ) from which pape r is drawn into the printer.
Menu
Choices
Operator Control/Inputbin
Upper—Upper tray
Middle—Middle tray
Lower—Lower tray
Optional—Large-capacity inp ut feeder
Default
Upper
QMS 4060 Print System Reference4-22
Page 57

Operator Control
Menu
Naming Paper Inputbins
Options in the Ad mini str at ion /Engin e m en u al lo w you to give each
inputbin a more descriptive name. These names are d isplayed in the
printer message wind o w, where appropriate. You can also use the
descriptive names with Do cument Option Command s. (See the
Crown Document Opt ion Comm ands
manual on the QMS Software
QMS
Utilities CD-ROM for complete information on Document Opti on
Commands.)
Inputbin 1
Inputbin 1 is the upper paper tray.
Menu
Choices
Default
Administration/Engine/Inputbin 1 Name
Up to 16 characters
upper
Inputbin 2
Inputbin 2 is the middle paper tray.
Menu
Choices
Default
Administration/Engine/Inputbin 2 Name
Up to 16 characters
middle
Inputbin 3
Inputbin 3 is the lower paper tray.
Menu
Choices
Default
Administration/Engine/Inputbin 3 Name
Up to 16 characters
lower
Printer Configuration
4-23
Page 58

Operator Control
Menu
Inputbin 5
Inputbin 5 is the optional large-capacity paper feeder.
Menu
Choices
Default
Administration/Engine/Inputbin 4 Name
Up to 16 characters
LCIF
Paper Output
Selecting a Paper Outputbin
An option in the Operator Control menu allows you to select the default
outputbin (tray).
Menu
Choices
Default
Naming the Paper Outputbin
Operator Control/Outputbin
Upper
Face-Up Stack—optional (appears only if unit is
installed)
Face-Down Stack—optional (appears only if unit is
installed)
Upper
The Administration/Engine/Outputbin menu is used to name output
bins. You can also use this name with DOC commands. (See the
QMS Crown Document Option Commands
Menu
Choices
Default
Administration/Engine/Outputbin 1 Name
Up to 16 characters
upper
QMS 4060 Print System Reference4-24
manual for information.)
Page 59

Operator Control
Menu
Menu
Choices
Default
Menu
Choices
Default
Administration/Engine/Outputbin 2 Name
Up to 16 characters
face up stack
Administration/Engine/Outputbin 3 Name
Up to 16 characters
face down stack
Chaining Paper Inputbins
An option in the Operator Control menu allows you to “chain” inputbins (trays) so that when the first inputbin empties, the printer will
automatically draw paper from another inputbin with either the same
or any size and type of paper (dependent on the choice selected).
Menu
Choices
Operator Control/Chain Inputbins
On—Switch to the next inputbin with the same size
and type of paper when the default inputbin is
empty.
» Note:
Make sure the three trays use the same
size paper.
Off—Don’t switch inputbins; use only the default
inputbin.
On Any—Switch to the next inputbin with similar size
of paper when the default inputbin is empty.
Printer Configuration
4-25
Page 60

Operator Control
Menu
Default
Notes
On
Use the Operator Control/Inputbin menu to set the
default inputbin. Make sure that the three inputbins
use the same size paper.
When chaining "on any" and duplexing, the printer will
chain to a similar size paper (for example, letter to A4)
but not to the large paper sizes—11"x17" and A3.
This is because these large sizes are fed through the
printer in a different printing order than the smaller
sizes. When these restrictions occur on chaining on
any, the printer will prompt you to add the default
paper size to any tray. The custom tray chaining
"on any" for large format- paper will not occur unless
there is another custom tray with the same paper size
or a standard tray with A3 or 11"x17" paper.
Setting Up Chaining Options
Options in the Operator Control menu allow you to configure whether
or not an inputbin will be available for chaining from another inputbin.
Large-Capacity Input Feeder (LCIF)
Use the Operator Control/Chain Option/LCIT Chaining to chain to the
optional tray.
Menu
Choices
Operator Control/Chain Option/LCIT Chaining
On—Allow media to be pulled from the large-capacity
input tray.
Off—Don’t allow media to be pulled from the large-
capacity input tray.
QMS 4060 Print System Reference4-26
Page 61

Operator Control
Menu
Default
Notes
On
The Operator Control/Chain Option menu must be set
to On before the setting in this menu takes effect.
»Note:
When making this selection, you may use
"LCIF," "LCIT," or "Optional" even though your printer
menu only displays "Optional."
Lower Inputbin
Use the Operator Control/Chain Option/Lower Chaining to chain to
the lower inputbin.
Menu
Choices
Default
Notes
Operator Control/Chain Option/Lower Chaining
On—Allow media to be pulled from the lower inputbin
if necessary.
Off—Don’t allow media to be pulled from the lower
inputbin.
On
The Operator Control/Chain Option menu must be set
to On before the setting in this menu takes effect.
Middle Inputbin
Use the Operator Control/Chain Option/Middle Chaining to chain to
the middle inputbin.
Menu
Choices
Printer Configuration
Operator Control/Chain Option/Middle Chaining
On—Allow media to be pulled from the middle
inputbin if necessary.
Off—Don’t allow media to be pulled from the middle
inputbin.
4-27
Page 62

Operator Control
Menu
Default
Notes
On
The Operator Control/Chain Option menu must be set
to On before the setting in this menu takes effect.
Upper Inputbin
Use the Operator Control/Chain Option/Upper Chaining menu to
chain to the upper inputbin.
Menu
Choices
Operator Control/Chain Option/Upper Chaining
On—Allow media to be pulled from the upper inputbin
if necessary.
Off—Don’t allow media to be pulled from the upper
inputbin.
Default
Notes
On
The Operator Control/Chain Option menu must be set
to On before the setting in this menu takes effect.
Custom Input Bins
This option allows y o u to set up the pa per size for the optional custom
input tray. Since the tray can be installed in the upper, middle, or lower
tray positions there are three options under this menu—one for each
tray position.
Menu
Choices
Default
Notes
Operator Control/Custom Input Bin
Upper, Middle, or Lower
The default setting for each tray position is letter
paper size.
The choices for each tray position are letter, legal,
executive, A3, A4, A5, B4, B5, B4 (ISO), B5 (ISO),
11 x 17, Statement.
QMS 4060 Print System Reference4-28
Page 63

Operator Control
Menu
Consumables
These options help you monitor your printer’s consumables.
Printing a Consumables Statistics Page
Menu Operator Control/Consumables/Print Statistics
Purpose Prints a consumables statistics page
Choices No, Yes
Default No
Notes The consumables statistics page allows you to check the
amount of usage for printer consumables and other printer
statistics , suc h as the n u mber of sheets, faces, and planes
printed as well as the average coverage of each color toner.
» Note:
The number of sheets/faces printed statistics differ
from the number of s heets p rinted s tati stics on the pri nter’s
start-up and status pages, which refer to the total number
of sheets/faces of media printed during the life of the
printer.
Crown Accounting
Crown accounting, a tool to help you keep track of the use of printer
resources, is available on your QMS 4060 Print System with a hard
disk installed, with or without a network connection.
Paper use is the most commonly monitored resource. However,
Crown accounting also allows you to monitor
n Paper use per user
n Time consumed serving each user’s jobs
n Connectivity options
n Frequency of jams
n Times of peak use
n Number, complexity, and average size of jobs per user
n Commonly used features, such as duplexing or finishing
Printer Configuration
4-29
Page 64

Operator Control
Menu
» Note:
If you are connected to a network via TCP/IP, you have a
choice of using Crown accounting or the standard TCP/IP accounting
through your UNIX host software. See the TCP/IP Protocol Option
User’s Guide for more information on TCP/IP accounting.
As jobs are printed on your QMS printer, the system collects information about different job parameters in relation to the jobs. When each
job completes, the printer stores an entry for the job in the Job
Accounting file(s).
▲
Caution: Do not turn the printer off while the disk is being accessed.
Doing so may cause inconsistencies in the information stored.
Accounting Menu
The Accounting menu includes five submenus, allowing you to enable
or disable job accounting, allocate disk space when accounting is
enabled, reset accounting, store job accounting information in a single job file or in multiple files, and copy the accounting information.
Job accounting information may be stored in a single file if it can be
retrieved via FTP on your host. Otherwise, the selected job accounting file should be spread into several files.
Setting the Accounting Mode
The Accounting Mode option enables or disables job accounting.
Choices are Enabled or Disabled with a default of Disabled. In order
for the accounting process to run on your system, you must enable
accounting via the in control panel or via remote console. When
accounting is disabled any files containing data remain untouched.
However, empty files are removed to save disk space.
Allocating Disk Space
The Operator Control/Accounting/Disk Space option allocates disk
space for job accounting files. The range of values is 51200 (50 KB)
to 10240 (10 MB) with a default value of 01024 KB (1 MB).
QMS 4060 Print System Reference4-30
Page 65

Operator Control
Menu
The amount of space required for each job can vary between 200 and
250 bytes, so each 1 MB in the job accounting file will store information on 4,000 to 5,000 jobs.
If the selected value is greater than the current va lue, the file size is
increased to reserve the extra space. If the value is smaller than the
current file size, any empty job accounting files are moved. If only one
file is used and it is not empty, it cannot be shrunk.
Resetaccounting
The Resetaccounting option erases the Accounting files and recreates them using the current file size. If this operation is selected when
accounting is disabled, the files are removed but not recreated, thus
saving disk space. The range of values is Yes and No. The default
value is No.
This operation is also available as the resetaccount command for the
admin user at a remote console. See the
documentation
When job files are more than 80% full but less than 100% full, the following message displays on the control panel and remote console:
for more information on the resetaccount command.
Remote Console User’s Guide
xxxxxxxx
(
xxx%
is the percentage full, reported as 80%, 85%, 90%, or 95%.)
This is an appropriate time to copy these files to floppies or to transfer
them to your host computer using ftp if it is available to you. Then use
the option to reset the accounting files to empty after they are copied
to a floppy or to a host.
When the file is 100% full, the
xxx
message displays.
Printer Configuration
FILE
xxx%
FILE IS FULL
FULL
4-31
Page 66

Operator Control
Menu
» Note:
When accounting is enabled and the Job Accounting file s are
100% full, no further print jobs are accepted by the printer until
Resetaccounting is selected or until Accounting is disabled. If you
disable Accounting at this time, no job information is stored. You can
retrieve your accounting files while they are full and then do the
Resetaccounting operation. However, to avoid delaying jobs being
sent to the printer, it is advisable to perform the retrieve/reset
operations before the job accounting files fill up.
Segmenting the Accounting Job File
The Job File Segment menu allows you to decide whether accounting
information is stored in the printer in a single file or in multiple files.
Choices are Single and Multiple, with Multiple as the default. Although
it is convenient to store accounting data in a single file, the multiple
file option is useful if you must transfer your files to your host via
floppy disk.
If a single file is used, its size equals the Disk Space value described
earlier in this section. The file name will be ACC1.JOB.
If multiple files are selected, their combined size equals the File Size
value described earlier in this section. Each file will be 1 MB, except
the last file, which includes the remaining dedicated space. That is, if
you dedicate 10 MB to accounting and select multiple files, the printer
creates 10 files of 1 MB each. If you dedicate 5.5 MB to accounting,
the printer creates 5 files of 1 MB each and one of 500 KB. The Job
file names will be ACC1.JOB, ACC2.JOB, and so on.
Accounting Files
» Note:
You can also access these accounting files with the Windowsbased QMS Crown Printer Auditor (CPA) utility on the QMS Software
Utilities CD-ROM. Refer to the CPA on-line help for more information.
The following accounting files are stored in ASCII format on SYS, the
printer’s hard disk, in the SYS:/ADMIN directory:
n Job Accounting File (ACC
This is the main accounting file. When each job completes, the
printer stores an entry for the job in this file. The job accounting
QMS 4060 Print System Reference4-32
x
.JOB)
Page 67

Operator Control
Menu
file may be a single file or multiple files, with
when multiple files are used. Information in this file is kept intact
after the printer is turned off and back on again.
n Paper Accounting File (ACC.PAP)
This file contains descriptions of the paper types supported on
the QMS 4060 Print System.
n Status Accounting File (ACC.STA)
This file stores configuration information about accounting.
n Dictionary File (ACC.DIC)
This file contains documentation about accounting and a description of the fields used in the other accounting files
▲
Caution: All the accounting files are stored in ASCII format to make it
x
as the file number
simpler to use the information in different environments after it is
retrieved from the printer's hard disk.
Accounting File Format Description
Accounting files are recorded in ASCII format in a series of tagged
fields.
New fields can be added without losing backward compatibility,
because each field is tagged. A version field is included in the
ACC.STA file to identify the supported fields as the system evolves.
» Note:
Field 45 in the Job Accounting File example on page 4-35
illustrates that new fields can be added to the series but used where
logical, in this case between fields 6 and 7. Field 45, which provides
information about the interface used, was added in response to a
customer request.
Conventions
The following conventions are the same for job, paper, and status
files:
Printer Configuration
4-33
Page 68

Operator Control
Menu
n Tag Identifiers
These three-digit numbers are used to identify fields. The threedigit number is used instead of a name to minimize use of disk
space. The Dictionary file (ACC.DIC) provides the field names
associated with each tag identifier.
n String Information
String information for record field values is stored inside braces
(for example, {this is a string}). This allows spaces within strings
and stores only the necessary characters of a string value. String
fields for which no value is specified are stored as {}, instead of
using blanks or the maximum field size.
n New Records
New records are separated by a <CR> character to increase
readability.
n Separators
A typical record in any of the accounting files is a sequence of
pairs of tag identifiers and field values separated by commas. The
tag identifier and field value are separated by a colon.
Example
The following is an example of the format of an accounting file record:
1: 3, 2:{this is a string}, <CR>
In this example, the record has fields identified by tags 1 and 2. Since
these values don't use 3 digits for the tag identifier, spaces are stored
instead, to provide consistency and simplicity while using only a small
amount of extra space. In this example, the value for the field tagged
1 is the integer 3 and the value for the field tagged 2 is a string. The
<CR> represents the carriage return character.
Accounting Files Description of Fields
This section includes examples of a job accounting file, a paper
accounting file, and a status accounting file. Each example is followed
QMS 4060 Print System Reference4-34
Page 69

Operator Control
Menu
by a chart explaining the various fields, using data from the example
to help clarify the fields.
Job Accounting File Record Example
This is a sample record extracted from an actual job accounting file:
0: 6, 1: 1, 2:{ 8h 5m52}, 3:{ 7/ 7/1998},
4:3, 5:{lsmith}, 6:{}, 45:{ IF 1 Ethernet},
7:{Microsoft Word - WW6083WO.DOC}, 8:{}, 9:
2794, 10: 15414, 11: 1, 12: 0, 13: 2, 14: 3,
15: 0, 16:0, 17: 1, 18: 0, 19: 1, 46: 0,
47: 0, 48: 0, 49: 5,<CR> 20:3,
21: 2
Job Accounting File Record Description
Field IDDescription Example Explanation
0:
The Job ID field is the document’s
number. The number sequence
restarts whenever the printer is
turned off and on again.
1:
This field is the document’s
internally assigned priority.
2:
This field indicates the time a
document arrived in the printer by
hour, minute, and second.
3:
This field indi cates the date a
document arrived in the printer.
4:
This field is the document’s
completion code:
0 User aborted document
1 Printer aborted document
2 Emulation aborted document
3 Successful ly printed document
0: 6 This is the sixth
job since the
printer was
restarted
1:1 Priority 1, the
highest, has
been assigned
to this job
2: {8h5m52} Printer received
job at 8:05:52
3: { 7/ 7/1998} Printer received
job on July 7,
1998
4: 3 Job printed
successfully
Printer Configuration
4-35
Page 70

Operator Control
Menu
Field IDDescription Example Explanation
5:
The User Name field corresponds
to the %%For DOC .
6:
The Host Name field corresponds
to the %%Host DOC.
45:
The Connection field indicates the
I/O port in which the job arrived.
7:
The File Name f ield corres ponds to
the %%Title DOC.
8:
The Charge Number field
corresponds to the %%Charge
Number DOC. This field identifies
the account.
9:
The Compile Time field is the
processor time in milli seconds
(1/
1000
the page description language.
Typically, it also includes minimal
other system activity.
10
The Print Time field represents the
total elapsed time i n milliseconds(
1000
since its first page started printing
until its last page cleared the
printer.
11:
The Header Count field indicates
how many images comprise the
document header pag e(s ) su bjo b.
An image equals one page face.
12:
The Error Count field indica tes how
many images comprise the
document error page(s ) subjob . An
image equals one page face.
second) spent translating
second) used by the doc ument
5: {lsmith} L Smith sent job
6: {} No host name
assigned
45:IF 1
Ethernet
7: {Microsoft
Word WW6083WO.D
OC}
This job arrived
via Ethernet
QMS DOC was
used to assign
the title
Microsoft Wo rd WW6083WO .
DOC
8: {} No charge
number
assigned
9: 2794 Processor spent
2.794 seconds
compiling the
page
10: 15414 Jo b took 15.414
1
/
seconds from
the start of the
first page to the
end of the last
page
11: 1 There is one
header page
12: 0 No error pages
QMS 4060 Print System Reference4-36
Page 71

Operator Control
Menu
Field IDDescription Example Explanation
13:
The Body Count field represents
the number of images in the actual
document, excluding multiple
copies. An image equals one page
face.
14:
The Simplex Count field is number
of the page f ac es prin ted, inclu din g
body and header p ages and taking
into considera tio n m ulti pl e copies.
15:
The Duplex Count field represents
the shee t count of duplex page s
printed, taking into consideration
multiple copies.
16:
The Finishing Options field is a
number formed by adding the
codes for the dif ferent options:
0None
2Offset Stacking
13: 2 Two pages in
the document
14: 3 Three page
faces printed
15: 0 No duplex
pages
16: 0 No finishing
options
17:
The Chunk Count field represents
the number of collated chunks for
this job. If the complete document
does not fit in memory, chunk
collation is activated. A value of 1
for this field indicates no partial
collation was necessary.
18:
The Jam field indicates how many
times the printer jammed while
printing the document.
Printer Configuration
17: 1 Entire job
printing in one
collated unit
18: 0 No jams during
this document
4-37
Page 72

Operator Control
Menu
Field IDDescription Example Explanation
19:
The Paper Types Count field
indicates how many different types
of paper were used in the
document and repres ents the
number of separate in dex entries
that follow the ma in record for the
document in the Job Accounting
file. A <CR> fo llows this fie ld befo re
the index entries.
46:
The Cyan Count field is always 0
on monochrome printers.
47:
The Magenta Count field is always
0 on monochrome printers.
48:
The Y ellow Count field is always 0
on monochrome printers.
49:
The Black Coun t fiel d ind ic ates the
amount of toner (in square
centimeters) used for the entire
print job.
20:
The Index Count field represents
the number of sheets of paper of a
specific type used by the
document. The actual description
of the paper is in the Paper
Accounting file.
21:
The Index field represents the
record number in the Paper
Accounting file that contains the
description for the preceding paper
count. A <CR> fo llows each
occurrence of this field.
19: 1 One type of
paper used in
this job
46: 0 There is no cyan
toner in the
printable area.
47: 0 There is no
magenta toner
in the printable
area.
48: 0 There is no
yellow toner in
the printable
area.
49: 5 There are 5
square
centimeters of
toner in the
entire print job.
20: 3 Job used three
sheets of paper
21: 2 A description of
the paper type is
in Paper
Accounting file
number 2
QMS 4060 Print System Reference4-38
Page 73

Operator Control
Menu
Paper Accounting File Record Example
The following example shows a Paper Accounting file:
22: 8268, 23: 11693, 24: 75, 25:{ white}, 26:{
plain}, 27:{ },
22: 8500, 23: 11000, 24: 75, 25:{ white}, 26:{
plain}, 27:{ },
22: 7165, 23: 10118, 24: 75, 25:{ white}, 26:{
plain}, 27:{ },
22: 14000, 23: 8500, 24: 75, 25:{ white}, 26:{
plain}, 27:{ },
22: 16535, 23: 11693, 24: 75, 25:{ white}, 26:{
plain}, 27:{ },
22: 14331, 23: 10118, 24: 75, 25:{ white}, 26:{
plain}, 27:{ },
22: 17000, 23: 11000, 24: 75, 25:{ white}, 26:{
plain}, 27:{ },
22: 7500, 23: 10500, 24: 75, 25:{ white}, 26:{
plain}, 27:{ },
22: 8268, 23: 5827, 24: 75, 25:{ white}, 26:{
plain}, 27:{ },
Paper Accounting File Record Description
The Paper Accounting file has one record for each of the nine possible paper sizes. Field 21 refers to a specific record in the Paper
Accounting file. In the example above, Field 21 indicates that the
paper is of the second type. Therefore, the second record from the
Printer Configuration
4-39
Page 74

Operator Control
Menu
Paper Accounting file describes the paper used. The second record
tells you:
Field IDDescription Example Explanation
22:
The Paper Width field contains the
paper width in mils (
23:
The Pa per Heig ht field conta ins th e
paper height in mils (
24:
The Paper Weight represents the
weight per surfac e squ are units (g/
m2)
25:
The Color field indicates the color
of the paper.
26:
The Type field indicates additional
properties of the paper.
27:
The Label field represents a name
for the paper type.
1
/
1000
1
/
1000
").
").
22: 8500 The paper is
8500 mils or
8.5" wide
23: 11000 Paper is 11000
mils or 11” high
24: 75 Paper weighs 75
g/m
2
25: white Paper is white
26: plain Paper is plain
27: { } No paper type
name
» Note:
enhancements to the accounting capabilities.
Fields 24, 25, 26, and 27 are designed primarily for future
QMS 4060 Print System Reference4-40
Page 75

Operator Control
Menu
Status Accounting File Record Example
The following is an example of the Status Accounting file:
28: 1, 29: 9, 30: 1048576, 31: 1048576, 32: 74993,
33: 74993, 34: 1, 35: 1, 36: 309, 37:2, 38:1, 39:0,
40:0, 41:31, 42:23, 43:31, 44:31
Status Accounting File Record Description
Field IDDescription Example Explanation
28:
The Version field indicates the
accounting file’s version number.
The initial version is 1.
29:
The Number of Paper Types field
indicates how many records are in
the Paper Accounting file.
30:
The Job Accounting File Size field
indicates how many bytes are
dedicated to accounting files.
Maximum is 10 MB.
31:
The Last Job File Size field
indicates the size of the last file. In
the multiple -file co nfigur at ion, eac h
file is 1 MB except the last, which
holds any remaining space.
32:
The Job File Usage field indicates
in bytes the total current use in all
the job files.
33:
The Current Job Fil e Usage field
indicates in bytes the current level
of use in the current Job
Accounting file.
28: 1 This is the first
version of the
file
29: 9 The paper
accounting file
has 9 records
30: 1048576 1048576 bytes,
or 1 MB, is
dedicated to
accounting
31:
1048576
32: 74993 All accounting
33: 74993 The accounting
1048576 byte s ,
or 1 MB, is in the
last file
files total 74993
bytes
file which is
currently
receiving data
totals 74993
bytes
Printer Configuration
4-41
Page 76

Operator Control
Menu
Field IDDescription Example Explanation
34:
The Maximum Number of Job Files
field indicates the maximum
number of job files. For example,
even if your system is configured
for multiple files, if only 1 MB is
dedicated to accounting, the
maximum number of fi les is 1. If 5.5
MB is dedicated to accounting, the
maximum number of files is 6.
35:
The Current Job File field indicates
which file has been used most
recently. By comparing this with
Field 33, you can determine which
file is current and ho w m uc h spa ce
is left in it.
36:
The Number of Jobs field in dicates
how many documents are
accounted for in the Job
Accounting file( s). A value of 0 can
mean that no jobs have been
printed or that accounting is
disabled.
37:
The Multifile fie ld has a v a lue of 1 i f
a single f ile i s used and a v alue of 2
if multiple fil es are us ed to store job
information.
38:
The Enabled field indicates
whether accounting is currently
enabled or disabled.
1—Enabled
0—Disabled
34: 1 There can be
only 1 job
accounting file.
Although the
printer is
configured for
multiple files
(see field 37)
there is only on e
because only 1
MB is dedic ate d
to accounting
35: 1 The most
recently used
file is File 1
36: 309 Current Job
Accounting fil es
hold data on
309 jobs
37: 2 J ob Accounting
is set for
multiple files
38: 1 Accounting is
currently
enabled
QMS 4060 Print System Reference4-42
Page 77

Operator Control
Menu
Field IDDescription Example Explanation
39:
The Job File Full flag indicates
whether the Job Accounting file is
full.
1 File is full;
Resetaccounting should be
performed
0 Job accounting file is not full
40:
The Pape r Account ing File Ful l flag
indicates whether the Paper
Accounting file is full.
1 File is full; Resetaccounting
should be performed
0Job accounting file is not ful l
41:
The User field indicates the
maximum character length of the
User Name field in the Job
Accounting file. User names are
assigned with QMS DOC .
42:
The Host field indicates the
maximum character length of the
Host Name field in the Job
Accounting file. Host names are
assigned with QMS DOC .
43:
The File field indicates the
maximum character length of the
File Name field in the Job
Accounting file . Fil e names are
assigned with QMS DOC .
44:
The Charge field indicates the
maximum character length of the
Charge Number field in the Job
Accounting file. Charge numbers
are assigned with QMS DOC .
39: 0 Accounting files
are not full
40: 0 T he Paper
Accounting fil e
is not full
41: 31 The User name
can be up to 31
characters
42: 23 The Host name
can be up to 23
characters
43: 31 The File Name
can be up to 31
characters
44: 31 The Charge field
can be up to 31
characters
Printer Configuration
4-43
Page 78

Operator Control
Menu
Copy Accounting Files to Host
Accounting files should be transferred to your host computer periodically to keep the printer from being overloaded with data and to allow
you easy analysis of data.
Using the QMS Crown Printer Auditor (CPA) Utility
You can access the accounting files with the Windows-based QMS
Crown Printer Auditor (CPA) utility on the
ROM. Refer to the CPA on-line help for more information.
Using the File Transfer Protocol (FTP)
QMS Software Utilities
CD-
» Note:
FTP works only when the printer is off line and the message
window displays IDLE. Use the ls command in the SYS:/admin
directory to see which accounting files you are going to retrieve. The
ls command is issued from a remote console. If multiple Job
Accounting files are used, each of the ACCx.JOB files should be
copied. (x is the number of each subsequent Job Accounting file.)
Use File Transfer Protocol (FTP) on the host, if a TCP/IP connection
is available to the printer, to copy the files from the printer’s hard disk
to the host as follows:
1 Type ftp
IP address of the printer or its corresponding host name).
2 If your printer has a DECnet-TCP/IP interface, follow these
steps. Otherwise go to step 3.
a When prompted for a user id, enter admin as the user name
and give the appropriate password, if required.
b At the ftp> prompt, type bin↵ to use binary mode for the
download procedure.
printer-name
(where
printer-name
is either the
QMS 4060 Print System Reference4-44
Page 79

cType
get SYS:/admin/acc1.job acc1.job↵
get SYS:/admin/acc.pap acc.pap↵
get SYS:/admin/acc.sta acc.sta↵
Operator Control
Menu
» Note:
If multiple Job Accounting files are used, each of the
ACCx.JOB files should be copied. (x is the number of each
subsequent Job Accounting file.)
d Continue at step 4.
3 If your printer has a CrownNet interface, follow these steps:
a When prompted for a user id, enter root as the user name
and give the default password (pass).
b At the ftp> prompt, type bin↵ to use binary mode for the
download procedure.
cType
get SYS:/admin/acc1.job acc1.job↵
get SYS:/admin/acc.pap acc.pap↵
get SYS:/admin/acc.sta acc.sta↵
» Note:
If multiple Job Accounting files are used, each of the
ACCx.JOB files should be copied. (x is the number of each
subsequent Job Accounting file.)
4 Exit ftp.
Type quit↵
Processing Accounting Information on the Host
After the accounting files are stored on your host, you can create your
own filters (programs) based on your specific requirements using the
file and record descriptions shown earlier in this chapter.
Printer Configuration
4-45
Page 80

Administration Menu
Administration Menu
The Administration menu contains the following submenus:
Selection See this section...
Communications “Communications” on page 4-46
Emulations “Emulations” on page 4-56
Special Pages “Special Pages” on page 4-73
Startup Options “Printer Start-Up Options” on page 4-77
Memory “Memory” on page 4-79
Engine “Engine” on page 4-86
Consumables “Consumab le s” on pag e 4-92
Miscellaneous “Resetting All Consumables Statistics Counters” on
page 4-98
Disk Operations “Hard Disks” on page 4-102
Communications
This menu contains several options that allow you to configure the
printers communication parameters to match the host and application
parameters.
» Note:
This section contains information on the Timeouts, Parallel,
and Network2 menus. For information on printer-host communication
using the Ethernet interface or any options located under the
CrownNet submenu (Administration/Communications/Network2/
CrownNet), see chapter 2, “Printer Configuration,” of the QMS
CrownNet System Administrator’s Guide
optional serial and LocalTalk interfaces, see the Options manual.
QMS 4060 Print System Reference4-46
.
For information on the
Page 81

Communications
Setting Timeouts
The Timeouts options limit the amount of time the printer waits on
transmission from the host for various types of data.
Setting a PostScript Emulation Timeout
The PostScript emulation timeout is the maximum number of seconds
the PostScript emulation waits for incoming data.
Menu
Choices
Default
Notes
Administration/Communications/Timeouts/PS Wait
Timeout
00000-99999
00030 (30 sec.)
A value of 00000 is the same as infinity (no timeout).
The job is closed and the next job in the queue begins
if all of the following occur:
n No additional data is received during the
specified period of time.
n The interface didn’t time out.
n An EOD (end-of-document commands)
was not seen.
When a print job is sent from a Macintosh, the PS
Wait timeout is automatically changed to 00300 (5
min.).
Large print jobs, such as those generated by graphics
or computer-aided design applications, require
timeouts of 00300 (5 min.).
Printer Configuration
4-47
Page 82

Communications
Setting an Emulation Timeout
The emulation timeout is the maximum number of seconds emulations other than PostScript (such as HP-GL, HP PCL5e, and Lineprinter) wait for incoming data.
Menu
Administration/Communications/Timeouts/Emul
Timeout
Choices
Default
Notes
00000-99999
00005 (5 sec.)
A value of 000 is the same as infinity (no timeout).
Setting a Print Job Timeout
The print job timeout is the maximum number of seconds the printer
processes a print job before it ends the job.
Menu
Administration/Communications/Timeouts/Job
Timeout
Choices
Default
Notes
00000-99999
00000 (infinity, no timeout)
A value of 000 is the same as infinity (no timeout).
Setting an ESP Timeout
The ESP timeout is t he max i mu m n u mb er o f se con ds the prin t er waits
to match an emulation before printing the job in the default emulation.
Menu
Choices
Administration/Communications/Timeouts/ESP
Timeout
00000-99999
QMS 4060 Print System Reference4-48
Page 83

Communications
Default
Notes
00003 (3 sec.)
A value of 00000 is the same as infinity (no timeout).
Setting Parallel Interface Parameters
Use the Administration/Communications/Parallel menu to set the parallel interface values used for printer-host communications.
Mode
The parallel interface supports Centronics parallel communication as
well as IEEE 1284 bidirectional parallel communication.
Menu
Choices
Default
Administration/Communications/Parallel/Mode
Interactive—Establish two-way communication
between the host and the printer.
Noninteractive—Establish one-way communication
from the host to the printer.
Disabled—Turn off parallel communication with the
host. The printer stops accepting print jobs over the
parallel interface.
Noninteractive
Notes
Printer Configuration
The printer must be restarted for changes to the
menu to take effect. You can either let the printer
restart automatically after you save the change and
exit from the Configuration menu, or you can wait for
the change to take effect the next time you manually
turn on the printer. See chapter 5, “Additional
Technical Information,” for a discussion of the
different modes.
4-49
Page 84

Communications
Emulation
Sets the parallel interface emulation.
Menu
Choices
Administration/Communications/Parallel/Emulation
ESP, Hexdump , PostScript, PCL5e, HPGL,
Lineprinter
» Note:
Other optional emulations, such as
LN03+, QUIC, TIFF, CALS, CCITT, and CGM,
also appear, if installed.
Default
ESP
Minimum Number of Kilobytes for Spooling
Sets the minimum number of kilobytes of system memory allocated to
the parallel interface.
Menu
Choices
Default
Notes
Administration/Communications/Parallel/Min K Spool
00000-99999
00015
This value must be less than K Mem For Spool in the
administration/memory submenu.
A 00000 value does not turn off the spooling buffer for
the parallel interface. If the value is set to 00000, the
printer calculates the Min K Spool automatically at
initialization.
The printer must be restarted for changes to the Min
K Spool menu to take effect. You can either let the
printer restart automatically after you save the change
and exit the configuration menu, or you can wait for
the change to take effect the next time you manually
turn on the printer.
QMS 4060 Print System Reference4-50
Page 85

Communications
Spooling Timeout
Sets the number of seconds the interface waits for data from the host
before terminating a spooled print job.
Menu
Administration/Communications/Parallel/Spool
Timeout
Choices
Default
00000-99999
00030
Data Bits
Sets the number of data bits transmitted per character.
Menu
Choices
Default
Administration/Communications/Parallel/Data Bits
7, 8
8
End Job Mode
Enables (and identifies an end-of-job sequence) or disables data
stream sensing for the end-of-document (EOD) command.
Menu
Choices
Administration/Communications/Parallel/End Job
Mode
None—The printer recognizes only the PostScript ^D
command.
QMS EOD—The printer recognizes only the QMS
%%EndOfDocument command.
HP EOD—The printer recognizes only the HP
<ESC>%12345X comma nd.
Printer Configuration
4-51
Page 86

Communications
Default
Notes
None
See chapter 5, “Additional Technical Information,” for
details on how to implement this feature on your QMS
4060 Print System.
Default Job Priority
Allows you to specify which jobs are printed first, according to the
interface through which they are received, when jobs are received
simultaneously.
Menu
Choices
Default
Notes
Administration/Communications/Parallel/Def Job Pr io
001-100 (highest-lowest priority)
001 (highest priority)
For example, you can give jobs received via the
parallel interface priority over jobs received via the
Ethernet interface.
QMS 4060 Print System Reference4-52
Page 87

Communications
PS Protocol
Sets the binary communications protocol (BCP) for communicating
over a parallel interface to a PostScr ipt pr i nter.
Menu
Choices
Default
Administration/Communications/Parallel/PS Protocol
Normal—Enables standard, ASCII (7-bit) hex
protocol. Data is sent and received in ASCII format.
This mode is recommended if you do not print binary
data. It was designed for data in the printable ASCII
range. Print jobs can change this setting through
PostScript operators.
Normal Fixed—Enables standard, ASCII (7-bit) hex
protocol. Print jobs cannot change this setting
through PostScript operators.
Binary—Enables binary communications protocol
(BCP). Print jobs can change this setting through
PostScript operators. Data in the printable ASCII
range also prints.
Binary Fixed—Enables binary communications
protocol (BCP). Print jobs cannot alter change this
setting through PostScript operators. Data in the
printable ASCII range also prints.
Normal
Notes
See chapter 5, “Additional Technical Information,” for
a full discussion of PS Protocol.
Printer Configuration
4-53
Page 88

Communications
Setting Network 2 Options
CrownNet
For information on options and defaults found in this menu, see chapter 2, “Printer Configuration,” in the
trator’s Guide
PS Protocol
Sets the binary communications protocol (BCP) for communicating
over a CrownNet interface to a PostScript printer.
.
QMS CrownNet System Adminis-
Menu
Choices
Administration/Communications/Networ k 2/PS
Protocol
Normal—Enables standard, ASCII (7-bit) hex protocol.
Data is sent and received in ASCII format. This mode
is recommended if you do not print binary data. It was
designed for data in the printable ASCII range. Print
jobs can change this setting through PostScript
operators.
Normal Fixed—Enables standard, ASCII (7-bit) hex
protocol. Print jobs cannot change this setting through
PostScript operators.
Binary—Enables quoted binary communications
protocol (BCP). Print jobs can change this setting
through PostScript operators. Data in the printable
ASCII range also prints.
QMS 4060 Print System Reference4-54
Page 89

Communications
Binary Fixed—Enables binary communications
protocol (BCP). Print jobs cannot change this setting
through PostScript operators. Data in the printable
ASCII range also prints.
QBinary (Quoted Binary)—Enables quoted binary
communications protocol. Print jobs can change this
setting through PostScript operators. Data in the
printable ASCII range also prints. Use the special
quoting mechanism (see the following section) for the
special characters and ^D (EOF).
QBinary (Quoted Binary) Fixed—Enables binary
communications protocol (BCP). Print jobs cannot
alter change this setting through PostScript operators.
Data in the printable ASCII range also prints. Use the
special quoting mechanism (see the following section)
for the special characters and ^D (EOF).
Default
Notes
Normal
See chapter 5, “Additional T echnical Information,” for a
full discussion of PS Protocol.
Default Job Priority
Allows you to specify which jobs are printed first, according to the
interface through which they are received, when jobs are received
simultaneously.
Menu
Choices
Printer Configuration
Administration/Communications/Network 2/Def Job
Prio
001-100 (highest-lowest priority)
4-55
Page 90

Emulations
Default
Notes
001 (highest priority)
For example, you can give jobs received via the
Ethernet interface priority over jobs received via the
parallel and serial interfaces.
Emulations
Use the Administration/Emulations menu to set the parameters for the
available printer emulations. Optional printing emulations appear only
if installed.
» Note:
Setting ESP Default Parameters
To choose an emulation or ESP for a particular interface, use
the appropriate interface menu in the Administration/Communications
menu.
The ESP Default Emul sets the ESP default emulation used when
ESP is unable to identify the language of a print job. This allows the
system administrator to select alternate default emulations.
Menu
Choices
Default
Administration/Emulations/ESP Default
HPGL, Lineprinter, PCL5e, PostScript
» Note:
PCL5e
Other optional emulations; such as
LN03+, QUIC, TIFF, CALS, CCITT, and CGM,
also appear, if installed.
QMS 4060 Print System Reference4-56
Page 91

Emulations
Setting PostScript Parameters
The PostScript menu allows you to select halftone type and intensity.
Halftone Type
Sets the halftone type.
Menu
Choices
Default
These options allow you to customize the smoothness of the printed
image according to the number of grayscales it uses. The numb er of
gray levels increases by increasing the halftone type and the printer
resolution.
See the "Halftones," section in chapter 5, “Additional Technical Information,” for more detailed information on halftones and how to
change their characteristics via the printer configuration menu.
Administration/Emulations/PostScript/Halftone Type
Basic
Standard
Advanced
Standard
Intensity
Sets the intensity for PostScript printing.
Menu
Choices
Default
Administration/Emulations/PostScript/Intensity
Darkest, Darker, Nominal, Lighter, Lightest
Nominal
Notes
Printer Configuration
Intensity uses the PostScript settransfer operator’s
functionality to make the print lighter or darker while
maintaining the linearity of the grayscale.
4-57
Page 92

Emulations
Setting PCL 5e Parameters
The PCL 5e menu maintains PCL 5e emulation attributes such as
default font, symbol set, and point size. The re are ten configurati on
settings.
Default Font
Sets the printer’s default font.
Menu
Choices
Default
Notes
Administration/Emulations/PCL 5E/Default Font
Courier12*, Courier12bold*, Courier12italic*,
Courier10*, Courier10bold*, Courier10italic*,
Lineprinter, Times*, Times*Itali c, Times* Bol d,
Times*BldItalic, Univ* , Univ* Ital ic, Univ*B old ,
Univ*BldItalic, Univcond*, Univcond*Italic,
Univcond*Bold, Univcond*BldItlc, Select By Index
Courier12*
Fonts with an asterisk “*” in their names are scalable.
Their default point size is set by the Point Size x100
option. Choosing Select By Index as the default font
selects the font by the index number printed on the
advanced status page and is set through the Default
Font Index option.
» Note:
You must use the Select By Index value
to select an Intellifont.
All lineprinter fonts are bitmap fonts, so they have a
fixed point size. Selecting a bound, bitmap font
overrides the default settings for symbol set and point
size. An unbound font uses the specified default
symbol set if possible, and a scalable font uses the
default font size.
Symbol Set
Selects the default symbol set for the emulation. Not all symbol sets
are available with certain resident fonts. In particular, the Desktop, PS
QMS 4060 Print System Reference4-58
Page 93

Emulations
Math, Math 8, Microsoft Pub, Pi Font, PS Text, Ventura Intl, Ventura
Math, Ventura US, and Windows symbol sets cannot be used with the
resident lineprinter bitmap fonts.
Menu
Choices
Administration/Emulations/PCL 5E/Symbol Set
Roman-8, PC-850, PC8-US, PC8-DN, Legal, ISO-4,
ISO-6, ISO-11, ISO-15, ISO-17, ISO-21, ISO-60,
ISO-69, Desktop, PS Math, Math 8, Microsoft-Pub, Pifont, PS-T e xt, V entura-Intl, V entura-Math, V entura-US,
Windows, ISO-Latin-1, ISO-Latin-2, ISO-Latin-5, PC852, PC-8tk, Windows 3.1-1, Windows 3.1-2,
Windows 3.1-3, MC-Text
Default
Notes
Roman-8
If a mismatch between symbol set and fonts occurs,
the standard PCL font selection mechanism is used to
locate a font that matches the selected symbol set.
With the standard set of fonts distributed for your
printer, this matches the Times* font, but other userinstalled fonts could change this result.
Lines Per Inch
Sets the default lines printed per inch in PCL jobs, regardless of page
size.
Menu
Administration/Emulations/PCL 5E/Lines/Inch x100
Choices
Default
Notes
100 to 4800
0600
You must enter the number of lines per inch times
100. For example, 6 lines per inch is entered as 0600;
6.6 lines per inch is entered as 0660.
Printer Configuration
4-59
Page 94

Emulations
Line Termination
Indicates the default line termination mode. This setting specifies the
treatment of line feeds and carriage returns. (See Appendix C, “Document Option Commands,” for more information on line termination).
Menu
Choices
Administration/Emulations/PCL 5E/Line Te rmination
CR=CR LF=LF
CR=CR+LF LF=LF
CR=CR LF=CR+LF
CR or LF=CR+LF
Default
CR=CR LF=LF
Point Size x100
Sets the point size for scalable default fonts in units of hundreths of a
point. For example, a 24 point default point size is selected by entering 2400. The smallest increment allowed in point size is .25 point (for
example, 8.5 point and 8.75 point fonts are allowed, but 8.6 point is
not).
Menu
Choices
Default
Notes
Administration/Emulations/PCL 5E/Point Size x100
00025-99975 (0.25-999.75 points)
01200 (12 points)
If a nonscalable bitmap font is specified, the setting is
ignored.
QMS 4060 Print System Reference4-60
Page 95

Emulations
Retain Temporary
Allows you to control the PCL 5e print environment across print jobs.
Menu
Choices
Administration/Emulations/PCL 5E/Retain Temporary
Off, On, On Compatibility
Off—Resets PCL to its default state at the end of
each PCL print job, executes an implicit <ESC>E
at the start and end of the job, and deletes any
temporary fonts, macros, and patterns.
On—Resets PCL to its default state at the end of
each PCL print job. Temporary fonts, macros, and
patterns from previous PCL jobs are retained in
memory after the print job has completed. Y ou can
recall these downloaded fonts, macros, or patterns
from within your PCL file without having to
download them again.
On Compatibility—Retains the entire state of PCL as
well as the temporary macros, fonts, and patterns
from previous PCL jobs.
Printer Configuration
4-61
Page 96

Emulations
Default
Notes
Off
A retained state is cleared if you do any of the
following:
n Explicitly clear the PCL state by sending an
<ESC>E or Printer Job Language.
n T urn off the printer. (Note that if Retain Tempo-
rary is set to On or On Compatibility and power
is turned off and back on again, all temporary
objects on the disk’s standard resource will
become permanent. RAM-based temporary
objects are lost).
n Change any PCL front panel option.
n Send any PCL-specific DOC commands (except
the DOC emulation command).
n S end a PCL job from a different communications
port. For example, the state set up by a PCL job
using the parallel port is cleared if a subsequent
PCL job arrives at the serial port)
.
Default Font Index
Sets the Default Font Index when the Default Font is set to
selectbyindex.
Menu
Choices
Default
Note
Administration/Emulations/PCL E/Default Font Idx
0 to 32767
00000
The index number can be obtained by the listing
printed on the advanced status page. See “Printing a
Status Page” on page 4-74, for status page details.
QMS 4060 Print System Reference4-62
Page 97

Emulations
Monochrome GL/2
Allows your printer to emulate a monochrome or color plotter.
Menu
Choices
Default
Administration/Emulations/PCL 5E/
Monochrome GL 2
On, Off
On—Sets the printer to monochrome (2 pen).
Off—Sets the printer to color (8 pen). Since a
monochrome print system has two pen colors only
(black and white), grayscale patterns are substituted
for other colors.
The printer maps each pen to its assigned color, then
converts the color to a grayscale using the National
Television System Committee (NTSC) color standard
for luminosity coefficients (Additive System):
Y = .3R + .59G + .11B
Examples on How to Use the Color Standard Formula
White Y = [(1*0.3) + (1*0.59) + (1*0.11)]—100% gray
Black Y = [(0*0.3) + (0*0.59) + (0*0.11)]—0% gray
Red Y = [(1*0.3) + (0*0.59) + (0*0.11)]—30% gray
Green Y = [(0*0.3) + (1*0.59) + (0*0.11)]—59% gray
Yellow Y = [(1*0.3) + (1*0.59) + (0*0.11)]—89% gray
Blue Y = [(0*0.3) + (0*0.59) + (1*0.11)]—11% gray
MagentaY = [(1*0.3) + (0*0.59) + (1*0.11)]—41% gray
Cyan Y = [(0*0.3) + (1*0.59) + (1*0.11)]—70% gray
On
Pen Color Defaults:
Pe n 0 = White
Pe n 1 = Black
Pen 2 = Red
Pen 3 = Green
Pen 4 = Yellow
Pe n 5 = Blue
Pen 6 = Magenta
Pen 7 = Cyan
Printer Configuration
4-63
Page 98

Emulations
Download Location
Controls the default storage location of PCL objects (fonts, macros,
and patterns) when it is not otherwise specified through DOC commands.
Menu
Choices
Default
Notes
Administration/Emulations/PCL 5E/Downld Location
Disk—All downloaded PCL objects are stored in the
default disk resource, if present.
Memory—All downloaded PCL objects are stored in
temporary storage in RAM.
Memory
If this is set to memory , before downloading any fonts,
macros, or patterns, ensure that the printer has
enough memory to do the download. See chapter 2,
the “Downloading Disk Fonts” section, for information
on increasing printer memory when downloading
fonts.
DOC commands specifying resources override this
option on a per-job basis.
If the printer has a large amount of memory, setting
this option to Memor y enh ances pri nter perfor man ce.
Setting HP-GL Parameters
This section contains the configuration choices available under Emulations/HP-GL.
QMS 4060 Print System Reference4-64
Page 99

Plotter
Identifies the HP-GL plotter type.
Emulations
Menu
Choices
Administration/Emulations/HPGL/Plotter
7475A—
7470A—
Colorpro—
7550A—
DraftMaster—Supports architectural and engineering
paper sizes (for example, A to E and Arch A to Arch
E). These paper sizes describe a mapping to the
physical paper. This mapping is a scaling factor (or a
size ratio) between the chosen paper size and the
physical paper size in the default inputbin. For
example if A3 is selected (size 11.69'' x 16.54'') for
paper size and the physical paper size in the default
inputbin is A4 (8.27'' x 11.69''), then the plot is scaled
by a factor of 2.
Default
7550A
Scaling Percent
Identifies the percentage to reduce or enlarge an image.
Menu
Administration/Emulations/HPGL/Scaling Percent
Choices
Default
» Note:
001-150 (1-150%)
100 (100%)
To scale plots, select the paper size originally used for the plot
in the Paper Type menu and then enter the reduction or enlargement
needed to fit the plot on the new page in the Scaling Percent menu.
Printer Configuration
4-65
Page 100

Emulations
Enhanced Mode
Increases the resolution of the grid for downloaded characters. The
HP-GL UC (User-defined Character) command allows you to download and draw characters using an encoding scheme consisting of
sequences of pen control movements and coordinate sequences.
The characters are drawn on a grid that is superimposed on the character plot cell.
Menu
Choices
Administration/Emulations/HPGL/Enhanced Mode
On—Standard resolution for fixed- and variable-
spaced fonts (4x8 grid).
Off—Enhanced resolution for variable-spaced fonts
(26x36 grid).
Default
Off
Expand Mode
Defines a larger imageable area which affects the default placement
of the scaling points P1 and P2.
Menu
Choices
Administration/Emulati ons/HP GL/E xp and Mod e
On—Turn on expand mode
Off—Use default scaling points, plotting range, and
plotting area.
QMS 4060 Print System Reference4-66
 Loading...