

Page 1

HP Photosmart M440/M540/
M630 series
English
Page 2
Legal and notice information
© Copyright 2007 Hewlett-Packard Development Company, L.P.
The information contained herein is subject to change without notice. The
only warranties for HP products and services are set forth in the express
warranty statements accompanying such products and services. Nothing
herein should be construed as constituting an additional warranty. HP shall
not be liable for technical or editorial errors or omissions contained herein.
English
Windows® is a U.S. registered trademark of Microsoft Corporation.
SD Logo is a trademark of its proprietor.
Disposal of waste equipment by users in private households
in the European Union
This symbol on the product or on its packaging indicates that this
product must not be disposed of with your other household waste.
Instead, it is your responsibility to dispose of your waste equipment by
handing it over to a designated collection point for the recycling of waste
electrical and electronic equipment. The separate collection and recycling
of your waste equipment at the time of disposal will help to conserve
natural resources and ensure that it is recycled in a manner that protects
human health and the environment. For more information about where you
can drop off your waste equipment for recycling, please contact your local
city office, your household waste disposal service or the shop where you
purchased the product.
For future reference, enter the following information:
Model number: _________
•
Serial number: _________
•
Purchase date: _________
•
Page 3

Contents
1 Getting started
Viewing the electronic User Guide ..........................4
Camera top and back ..............................................6
Camera front, side, and bottom ...............................7
2 Setting up your camera
Install the batteries ..................................................8
Turn on the camera .................................................9
Choose the language ..............................................9
Set the region ..........................................................9
Set the date and time ..............................................9
Install and format an optional memory card ..........10
Install the software ................................................11
Windows ..........................................................11
Macintosh ........................................................12
3 Taking pictures and recording video clips
Take a picture ........................................................13
Record a video clip ................................................13
4 Reviewing and deleting images and video clips
Review images and video clips .............................15
Delete an image ....................................................15
5 Transferring and printing images
Transfer images ....................................................16
Print images from the camera ...............................16
6 Camera quick reference ......................................18
English
3
Page 4
1 Getting started
This printed Quick Start Guide provides the information
you need to get started using the essential features of
your camera. For detailed information about camera
features, see the electronic User Guide (see Viewing the
English
electronic User Guide on page 4).
Quick Start Guide
This printed guide will help
you to:
• Start using your
camera quickly
• Install the HP
Photosmart Software
• Become familiar with
your camera's basic
features
Electronic User Guide
The electronic User Guide
includes:
• Descriptions of all the
camera features
• Battery information,
including:
• Extending battery
life
• Supported battery
types
• A description of the
power indicator
icons
• Getting assistance
from HP
• Troubleshooting
• Camera specifications
Viewing the electronic User Guide
The electronic User Guide is on the HP Photosmart
Software CD.
4 HP Photosmart M440/M540/M630 series
Page 5

To view the User Guide:
1. Insert the HP Photosmart Software CD into the CD
drive of your computer.
2. Click View User Guide on the main page of the
installation screen.
The electronic User Guide is also copied to your computer
when you install the HP Photosmart Software. To view the
User Guide after it has been installed on your computer:
• On Windows: Open the HP Solution Center and
click help.
• On Macintosh: Open the HP Device Manager and
select Camera User Guide from the Information and
Settings pop-up menu.
Getting assistance
• For tips and tools to help you use your camera more
effectively, visit www.hp.com. From here, click on
Learn About: Digital Photography (English only).
• For product support, including firmware, software, and
driver updates, visit www.hp.com/support.
• For help with the HP Photosmart Software, see the
software's online help.
English
Getting started 5
Page 6

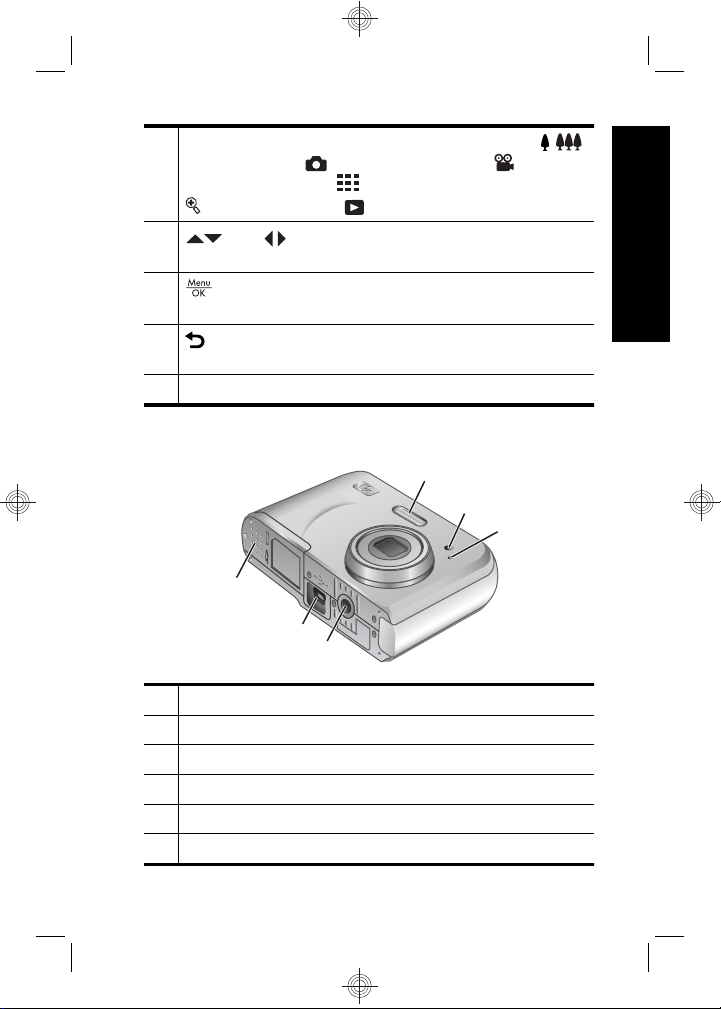
Camera top and back
English
4 5 6
321
7
8
11 10
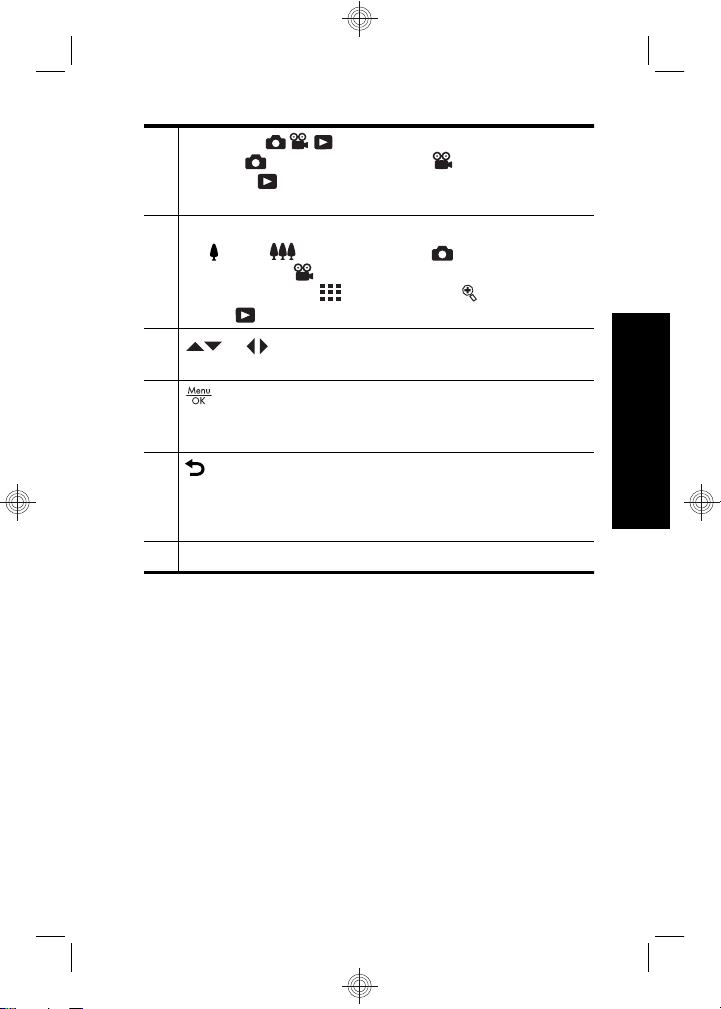
1 Power light.
2 button.
3 Shutter button.
4
Delete button—Accesses the Delete function
while in
5 Flash button—Accesses the flash settings while
in
Flash On, Flash Off.
6 selector—Switches between Picture
Capture,
Picture Capture, Video Record, and Playback on
page 18).
6 HP Photosmart M440/M540/M630 series
Playback.
Picture Capture. Settings are Auto, Red-Eye,
Video Record, and Playback (see
9
Page 7
7
Zoom lever (Digital and Optical)—Accesses /
Zoom while in Picture Capture or Video
Record; accesses
Magnify while in Playback
8
9
10 Back button—Returns you to a previous menu
11 Image Display.
and buttons—Scroll through menus and
images.
button—Displays camera menus, selects
options, and confirms actions.
or view. Press and hold to back out of all menus.
Thumbnails and
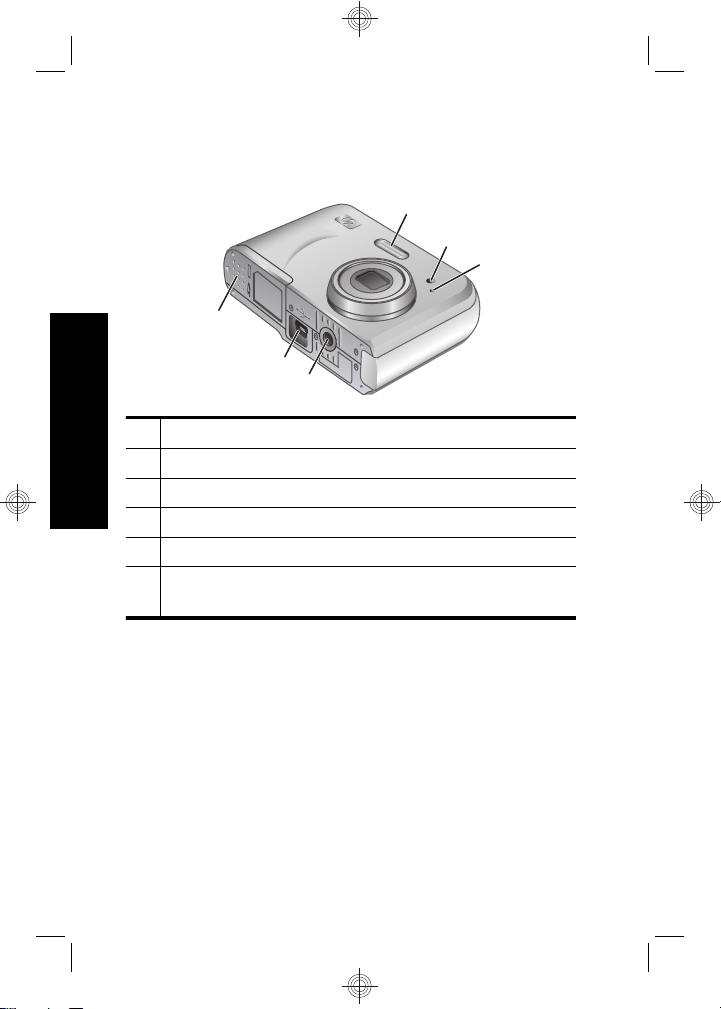
Camera front, side, and bottom
1
2
3
6
5
4
1 Flash.
2 Self-Timer light.
3 Microphone.
4 Tripod mount.
5 Dock/USB connector.
6 Battery/Memory Card door.
English
Getting started 7
Page 8
2 Setting up your camera
Install the batteries
1. Open the Battery/Memory Card door
English
by sliding the door latch as indicated
on the Battery/Memory Card door.
2. Insert the two AA batteries.
3. Close the Battery/Memory Card door.
NOTE: If using rechargeable NiMH batteries, fully
charge the batteries before using them the first time.
Turn off the camera before removing the batteries.
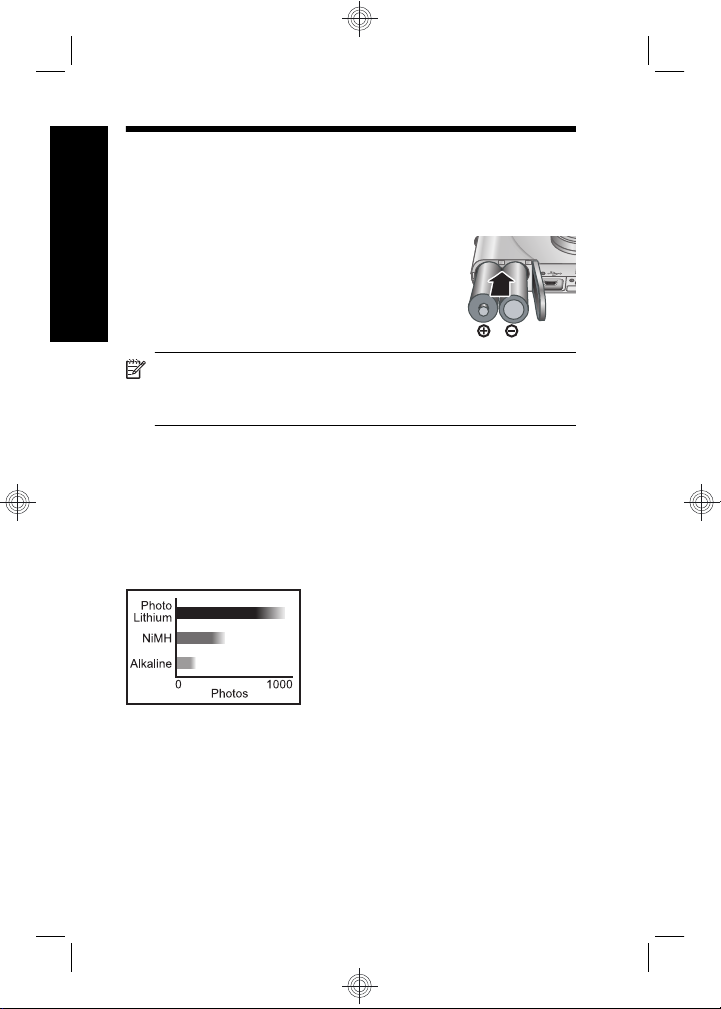
The batteries shipped with your camera are AA alkaline.
These have a short life and are intended to let you begin
using your camera immediately. When the camera warns
that the battery charge is low, HP recommends replacing
them with Photo Lithium or rechargeable NiMH batteries
for longer battery life.
This graph shows the approximate average number of
pictures you can take using Photo Lithium, NiMH, and
Alkaline batteries. Actual performance may vary based on
usage, battery type, and battery manufacturer. Many
additional factors affect the actual number of pictures you
can take (see Extending battery life on page 21).
8 HP Photosmart M440/M540/M630 series
Page 9

Turn on the camera
To turn on the camera, press the button.
Choose the language
Use to choose the
language you want, then press
.
Set the region
Along with the language setting,
the region setting determines the
default date format.
Use
you want, then press
to choose the region
.
Set the date and time
Accurately setting the date and time will help you locate
images once you have transferred them to your computer,
and will ensure that images are accurately marked if you
use the date and time imprint feature.
1.
Use
highlighted value.
2. Use
selections and repeat Step 1
until the date and time are set
correctly.
3.
Press
to adjust the
to move to the other
when the date,
English
Setting up your camera 9
Page 10

time, and format settings are correct, then press
again to confirm.
Install and format an optional
memory card
This camera supports standard, high speed, and high
English
capacity Secure Digital (SD and SDHC) memory cards,
32MB to 8GB.
1. Turn off the camera and open the
Battery/Memory Card door.
2. Insert the optional memory card in
the smaller slot as shown. Make
sure the memory card snaps into
place.
3. Close the Battery/Memory Card
door and turn on the camera.
NOTE: When you turn on your camera with a
memory card installed, the camera indicates the
number of images you can store on the memory card
at the current Image Quality setting. This camera
supports storing a maximum of 2000 images on a
memory card.
Always format new memory cards before first use.
Formatting removes all images from the memory card, so
make sure to transfer existing images before formatting.
1. With the camera turned on, slide
2.
Press
3.
Use
menu, then press
4.
Use
card.
.
to select Format Card from the Delete
.
to select Yes, then press to format the
to .
10 HP Photosmart M440/M540/M630 series
Page 11

Once you install a memory card, all new images and video
clips are stored on the card, rather than in internal
memory.
To use internal memory and view images stored there,
turn off the camera then remove the memory card.
Install the software
The HP Photosmart Software provides features for
transferring images and video clips to your computer, as
well as features for modifying stored images (remove red
eyes, rotate, crop, resize, and more).
To install the HP Photosmart Software, your computer
must meet the system requirements as stated on the
camera packaging. To learn about Windows Vista support
for your camera, see www.hp.com/go/windowsvista
(English only).
If you have trouble installing or using the HP Photosmart
Software, see the Hewlett-Packard Technical Support
website for more information: www.hp.com/support.
Windows
1. Close all programs and temporarily disable any virus
protection software.
2. Insert the HP Photosmart Software CD into the CD
drive and follow the on-screen instructions. If the
installation window does not appear, click Start, click
Run, type D:\Setup.exe, where D is the letter of your
CD drive, then click OK.
3. When the software has finished installing, re-enable
virus protection software.
English
Setting up your camera 11
Page 12

Macintosh
1. Insert the HP Photosmart Software CD into the CD
drive.
2. Double-click the CD icon on the computer desktop.
3. Double-click the installer icon, then follow the on-
English
screen instructions.
Once installation is complete and you have restarted your
computer, System Preferences automatically opens to
the HP Photosmart Camera settings. You may change
settings so the HP Photosmart Software starts
automatically when you connect your camera to your
Macintosh (for more information, click the help button on
the HP Photosmart Camera settings dialog).
12 HP Photosmart M440/M540/M630 series
Page 13

3 Taking pictures and
recording video clips
Slide to either to take pictures or to to
record video clips.
Take a picture
You can take a picture when you are in
Picture Capture.
1. Slide
2. Frame the subject in the Image
Display.
3. Press the Shutter button halfway
down to measure and lock the
focus and exposure. The focus brackets in the Image
Display turn solid green when focus is locked.
4. Press the Shutter button all the way down to take the
picture.
After you have taken a picture, the camera displays it
briefly in the Image Display.
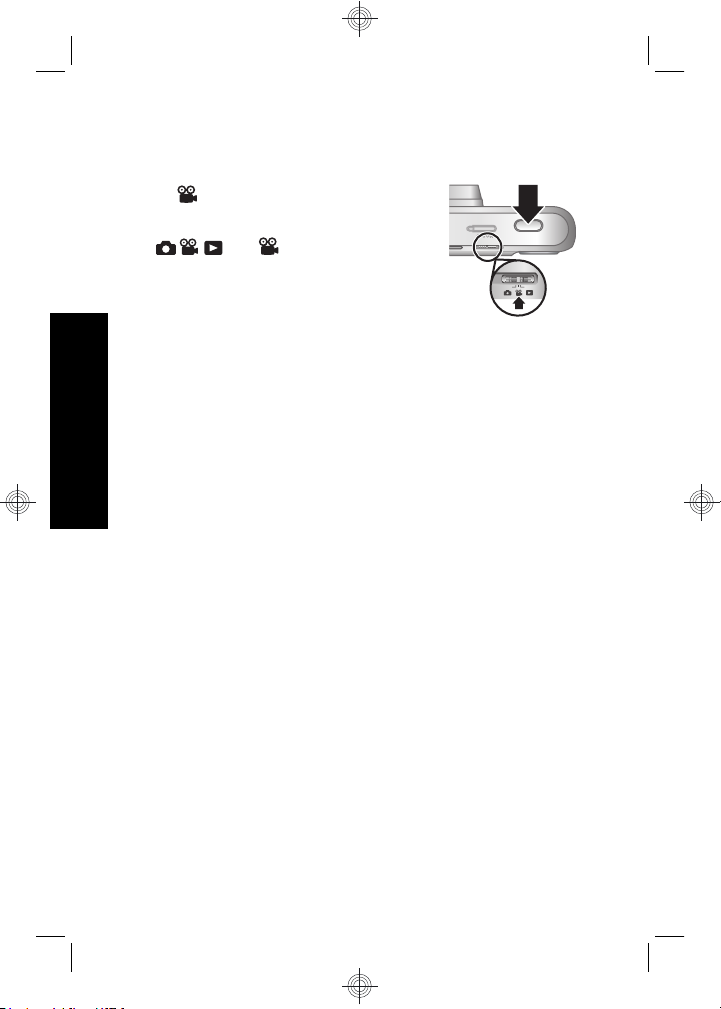
Record a video clip
You can record a video when you are in
Video Record.
1. Slide
2. Frame the subject in the Image
Display.
3. Press the Shutter button halfway
down to measure and lock the
focus. The focus brackets in the Image Display turn
solid green when focus is locked.
to .
to .
English
Taking pictures and recording video clips 13
Page 14

4. Press the Shutter button all the way down to start
recording.
5. To stop recording video, press and release the
Shutter button again.
After you have recorded a video clip, the camera displays
it briefly in the Image Display.
English
14 HP Photosmart M440/M540/M630 series
Page 15

4 Reviewing and deleting
images and video clips
Review images and video clips
You can review images and video clips in Playback.
1. Slide
2. Use
To play a video clip, press
the clip appears on the Image Display.
NOTE: To hear audio associated with video clips,
transfer them to your computer.
Delete an image
You can delete individual images during Playback:
1. Slide
2. Use
3.
Press
4.
Use
menu, then press
to .
to scroll through your images and video clips.
once the first screen of
to .
to select an image or video clip.
.
to select This Image from the Delete
.
English
Reviewing and deleting images and video clips 15
Page 16
5 Transferring and printing
images
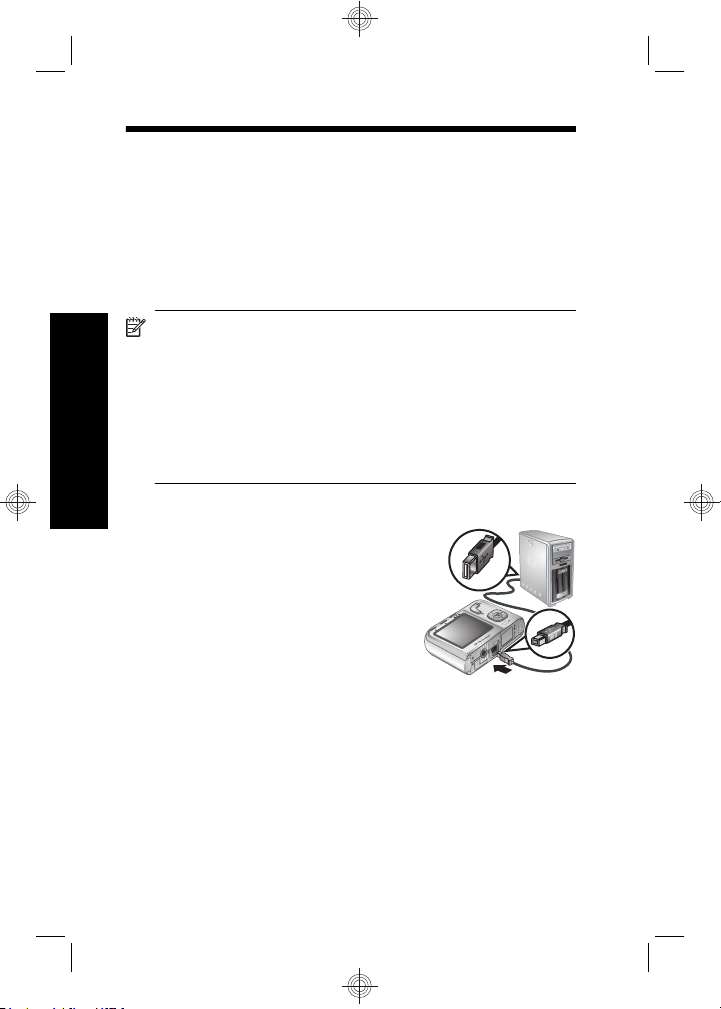
Transfer images
English
Use this procedure to transfer images and video clips to
your computer.
NOTE: Transferring a large number of high-
resolution images from a memory card to your
computer may take up to two hours. When transferring
a large number of images, be sure your camera
batteries are fully charged or use an optional
HP Photosmart dock or memory card reader.
1. Turn off the camera.
2. Connect the camera and
computer using the USB cable
that came with your camera.
3. Turn on the camera. When the
Image Display indicates that the
camera is connected to the
computer, follow the instructions
on the computer screen to
transfer the images. If you have installed the HP
Photosmart Software and need more information, see
the Help feature in the HP Photosmart Software.
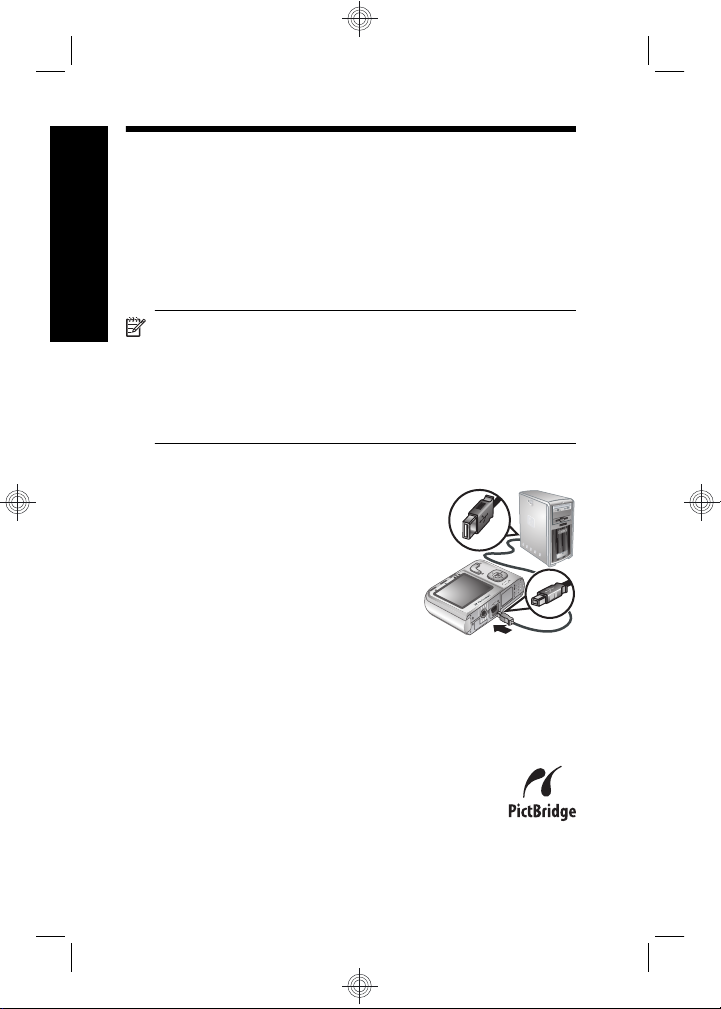
Print images from the camera
You can connect the camera to any PictBridgecertified printer to print images.
1. Check that the printer is turned on, there is
paper in the printer, and there are no printer
error messages.
16 HP Photosmart M440/M540/M630 series
Page 17

2. Turn off the camera,
connect the camera and
printer using the USB
cable that came with
your camera, then turn
on the camera.
3. When the camera is
connected to the printer,
the Image Display shows
an image. Use
to select the image you want to
print.
4.
Press
.
5. In the Print Options menu, select Print This Image
Now and press
to begin printing.
displays on the selected image in the Image
Display to indicate that the image is being printed.
6. After the printer has printed the image, disconnect the
camera from the printer.
To learn about other printing options, see either the
electronic User Guide or
Camera Help located in any
menu.
English
Transferring and printing images 17
Page 18

6 Camera quick reference
Use this chapter as a quick reference to camera features.
To learn more about these camera features, refer to the
electronic User Guide or on-camera Help.
English
Picture Capture, Video Record, and Playback
•
Picture Capture allows you to frame pictures in
the Image Display and take pictures. To activate
Picture Capture, slide to .
Video Record allows you to frame videos in the
•
Image Display and record videos. To activate
Video Record, slide to .
Playback allows you review and delete images
•
and video clips. To activate
Camera Menus
Menus allow you to adjust camera settings, work with
images, and access camera Help.
•
Within a menu, use
selections.
• To exit the menu, press
Picture Capture Menu—Allows you to adjust camera
settings that affect the characteristics of future images you
capture with your camera. To access this menu, slide
following options:
• Shooting Mode (Auto, Close-up, Steady Photo,
Theatre, Landscape, Portrait, Action, Night Portrait,
Sunset)
•Self-Timer
to .
to , then press . You can select from the
Playback, slide
to move to specific
at any time.
18 HP Photosmart M440/M540/M630 series
Page 19

• Image Quality
•Burst
• Color (M440 series)
• Date & Time Imprint
• Camera Setup
• Camera Help
Video Record Menu—Allows you to adjust camera
settings that affect the characteristics of future video clips
you record with your camera. To access this menu, slide
to , then press . You can select from the
following options:
•Self-Timer
• Camera Setup
• Camera Help
Playback Menu—Allows you to work with images. To
access this menu, slide
to , then press .
You can select from the following options:
• Remove Red Eyes
• Rotate (M440 series)
• Crop (M440 series)
• Design Gallery (Modify Color, Add Borders, Rotate,
Crop) (M540/M630 series)
• Photosmart Express (Print, Share, Buy Prints Online)
• Favorites
• View Slideshow
• Move Images to Card
• Camera Setup
• Camera Help
English
Camera quick reference 19
Page 20

Camera Setup Menu—Allows you to change the
camera's behavior. To access this menu, press
, , or , then select Camera Setup. You can
select from the following options:
• Display Brightness
• Camera Sounds
English
• Date & Time
• USB Configuration
• Language
Camera Help Menu—Provides descriptions of camera
features and picture-taking tips. To access this menu,
press
from , , or , then select Camera
Help. You can select from the following options:
• Top Ten Tips
• Camera Accessories
• Camera Buttons
• Using Shooting Modes
• Using Design Gallery (M540/M630 series)
• Using Photosmart Express
• Printing Images
• Recording Video Clips
• Reviewing Pictures and Video
• Tagging Favorites
• Deleting Images
• Transferring Images
• Managing Batteries
• Getting Assistance
• Tour Camera Features
• Camera Shortcuts
from
20 HP Photosmart M440/M540/M630 series
Page 21

• About
Extending battery life
To conserve battery power, the Image Display turns off
after a period of inactivity. Pressing any button wakes up
the camera. After five minutes of inactivity, the camera
turns off.
To further extend battery life:
•Set
Display Brightness to Low (see the
electronic User Guide for details).
• Set your camera to
Auto Flash (see the electronic
User Guide for details).
• Use optical zoom, video recording, and Image Display
sparingly.
• If you are turning on the camera only to view images,
slide
in
Playback without extending the lens.
to , then turn on the camera to start
• When transferring or printing images, place your
camera in an optional HP Photosmart dock connected
to AC power.
For more information about batteries, go to www.hp.com/
support and search on the code AA-400 or see Appendix
A in the electronic User Guide.
English
Camera quick reference 21
Page 22

English
22 HP Photosmart M440/M540/M630 series
Page 23
HP Photosmart séries M440/
M540/M630
Français
Page 24
Informations légales et remarques
© Copyright 2007 Hewlett-Packard Development Company, L.P.
Les informations contenues dans le présent document sont sujettes à
modification sans préavis. Les seules garanties pour les produits et
services HP sont énoncées dans les déclarations de garantie expresse
accompagnant lesdits produits et services. Aucun élément du présent
document ne saurait être interprété comme constituant une garantie
supplémentaire. HP ne saurait être tenu pour responsable d'éventuelles
erreurs ou omissions techniques ou rédactionnelles contenues dans le
présent document.
Windows® est une marque déposée de Microsoft Corporation aux EtatsUnis.
Le logo SD est une marque de son propriétaire.
Mise au rebut des équipements usagés par les particuliers
résidant au sein de l'Union européenne
Figurant sur le produit ou sur son emballage, ce symbole indique
Français
que vous ne devez pas jeter le produit avec vos déchets
ménagers. Il vous incombe de déposer votre équipement usagé dans un
centre de récupération des déchets spécialisé dans le recyclage des
appareils électriques et électroniques. Le tri et le recyclage sélectifs de
vos déchets contribuent à préserver les ressources naturelles et sont
effectués de telle sorte que ni la santé de l'homme, ni l'environnement ne
soient affectés. Pour plus d'informations sur les sites où vous pouvez
déposer vos équipements usagés à des fins de recyclage, renseignezvous auprès du service concerné à la mairie de votre lieu de résidence,
du service de voirie ou du magasin où vous avez acheté votre produit.
Notez les informations suivantes pour référence ultérieure :
Numéro de modèle : _________
•
Numéro de série : _________
•
Date d'achat : _________
•
Page 25

Sommaire
1 Mise en route
Consultation du Guide électronique de
l'utilisateur ................................................................5
Dessus et arrière de l'appareil photo .......................6
Avant, côté et dessous de l'appareil photo ..............7
2 Installation de l'appareil photo
Installation des piles ................................................9
Mise sous tension de l'appareil photo ...................10
Sélection de la langue ...........................................10
Réglage de la région .............................................10
Réglage de la date et de l'heure ............................10
Installation et formatage d'une carte mémoire
en option ................................................................11
Installation du logiciel ............................................12
Windows ..........................................................13
Macintosh ........................................................13
3 Prise de photos et enregistrement de clips vidéo
Prise de photos .....................................................15
Enregistrement de clips vidéo ...............................16
4 Visualisation et suppression d'images et de
clips vidéo
Visualisation d'images et de clips vidéo ................17
Suppression d'une image ......................................17
5 Transfert et impression d'images
Transfert d'images .................................................18
Impression d'images à partir de l'appareil
photo .....................................................................19
Français
6 Aide-mémoire de l'appareil photo ......................20
3
Page 26
1 Mise en route
Ce Guide de mise en route rapide imprimé contient toutes
les informations dont vous avez besoin pour être prêt à
utiliser les fonctions essentielles de votre appareil photo.
Pour plus d'informations sur les fonctions de cet appareil,
reportez-vous au Guide électronique de l'utilisateur (voir
Consultation du Guide électronique de l'utilisateur,
page 5).
Guide de mise en route
rapide
Ce guide imprimé vous
aidera à :
Français
• Etre rapidement prêt à
utiliser votre appareil
photo
• Installer le logiciel
HP Photosmart
• Vous familiariser avec
les fonctions de votre
appareil photo
4 HP Photosmart séries M440/M540/M630
Guide électronique de
l'utilisateur
Le Guide électronique de
l'utilisateur comprend :
• Une description de
l'ensemble des
fonctions de l'appareil
photo
• Des informations sur
les piles, y compris :
• Extension de la
durée de vie des
piles
• Types de batteries
prises en charge
• Une description
des icônes
d'indication de
charge
• Des informations sur
l'accès au support HP
• Dépannage
Page 27

• Les spécifications de
l'appareil photo
Consultation du Guide
électronique de l'utilisateur
Le Guide électronique de l'utilisateur est disponible
sur le CD du logiciel HP Photosmart.
Pour consulter le Guide de l'utilisateur :
1. Insérez le CD du logiciel HP Photosmart dans le
lecteur de CD de votre ordinateur.
2. Cliquez sur Consulter le Guide de l'utilisateur sur
la page principale de l'écran d'installation.
Le Guide électronique de l'utilisateur électronique est
également copié sur votre ordinateur lors de l'installation
du logiciel HP Photosmart. Pour le consulter après son
installation sur l'ordinateur :
• Sur Windows : ouvrez le Centre de solutions HP et
cliquez sur Aide.
• Sur Macintosh : ouvrez le Gestionnaire de
périphériques HP et sélectionnez Guide de
l'utilisateur de l'appareil photo dans le menu
contextuel Informations et réglage.
Accès au support
• Pour obtenir des conseils et des outils permettant
d'optimiser l'utilisation de votre appareil photo,
consultez le site www.hp.com. Cliquez ensuite sur
Learn About: Digital Photography (en anglais
uniquement).
• Pour le support produit, y compris les mises à jour des
pilotes, logiciels et microprogrammes, visitez le site
www.hp.com/support.
Français
Mise en route 5
Page 28

• Pour obtenir de l'aide sur le logiciel HP Photosmart,
utilisez l'aide en ligne du logiciel.
Dessus et arrière de l'appareil
photo
321
4 5 6
Français
7
8
11 10
1 Voyant d'alimentation.
2 Bouton .
3 Déclencheur.
4
Bouton Supprimer : permet d'accéder à la
fonction Supprimer à partir du mode
5 Bouton Flash : permet d'accéder aux paramètres
du flash en mode
paramètres disponibles sont Flash auto, Anti-yeux
rouges, Flash activé, Flash désactivé.
6 HP Photosmart séries M440/M540/M630
Capture d'images. Les
9
Lecture.
Page 29
6 Sélecteur : permet de basculer entre les
modes
vidéo et
Capture d'images, Enregistrement
Lecture (voir Capture d'images,
Enregistrement vidéo et Lecture, page 20).
7 Bouton Zoom (numérique et optique) : donne accès
au
et au Zoom en mode Capture
d'images ou
qu'aux fonctions
mode
8
et : permettent de naviguer dans les menus
Enregistrement vidéo, ainsi
Miniatures et Agrandir en
Lecture
et les images.
9
: permet d'afficher les menus de l'appareil
photo, de sélectionner les options et de confirmer
les actions.
10 Bouton Retour : revient au menu ou à la vue qui
précède. Appuyez et maintenez la pression sur ce
bouton pour remonter tous les niveaux de menu et
les quitter.
11 Ecran.
Français
Mise en route 7
Page 30
Avant, côté et dessous de
l'appareil photo
1
6
5
4
1 Flash.
Français
2 Voyant du retardateur.
3 Micro.
4 Filetage pour trépied.
5 Connecteur de station d'accueil/USB.
6 Volet du compartiment des piles/de la carte
mémoire.
2
3
8 HP Photosmart séries M440/M540/M630
Page 31

2 Installation de l'appareil
photo
Installation des piles
1. Ouvrez le volet du compartiment des
piles/de la carte mémoire en faisant
glisser le loquet correspondant
comme indiqué sur le volet.
2. Insérez les deux piles AA.
3. Refermez le volet du compartiment
des piles/de la carte mémoire.
Remarque Si vous utilisez des piles rechargeables
NiMH, chargez-les complètement avant de les utiliser
pour la première fois. Mettez l'appareil photo hors
tension avant d'enlever les piles.
Les piles fournies avec votre appareil photo sont de type
alcaline AA. Elles ont une durée de vie réduite et sont
uniquement destinées à vous permettre de commencer à
utiliser immédiatement votre appareil photo.
HP recommande, dès que l'appareil photo indique un
faible niveau de charge, de remplacer les piles par des
piles photo rechargeables lithium ou NiMH.
3KRWR
OLWKLXP
1L0+
$ONDOLQH
Français
Le graphique suivant présente le nombre approximatif
moyen de photos que vous pouvez prendre avec des piles
Installation de l'appareil photo 9
Page 32

photo lithium, NiMH et alcalines. Les performances
réelles varient en fonction de l'utilisation, ainsi que du type
et du fabricant de la pile. De nombreux autres critères
déterminent le nombre réel de photos que vous pouvez
prendre (voir Extension de la durée de vie des piles,
page 23).
Mise sous tension de l'appareil
photo
Pour mettre l'appareil photo sous tension, appuyez sur le
bouton
.
Sélection de la langue
Utilisez les boutons et
Français
pour sélectionner la langue,
puis appuyez sur le bouton
.
Réglage de la région
De même que le paramètre de
langue, le paramètre de région
détermine le format de date par
défaut.
Utilisez les boutons
sélectionner la région, puis
appuyez sur le bouton
pour
.
Réglage de la date et de l'heure
La définition correcte de la date et de l'heure permettra de
trouver plus facilement les images une fois celles-ci
transférées sur votre ordinateur. Elle garantira le
10 HP Photosmart séries M440/M540/M630
Page 33

marquage correct des images si vous utilisez la fonction
d'inclusion de la date et de l'heure.
1.
Utilisez les boutons
régler la valeur sélectionnée.
2. Utilisez les boutons
passer aux autres sélections
et répétez l'étape 1 jusqu'à ce
que la date et l'heure soient
correctes.
3.
Appuyez sur le bouton
et le format sont corrects, puis à nouveau sur le
bouton
pour valider l'opération.
pour
pour
une fois que la date, l'heure
Installation et formatage d'une
carte mémoire en option
Cet appareil photo prend en charge les cartes mémoire
Secure Digital (SD et SDHC) de 32 Mo à 8 Go (standard,
haute vitesse et haute capacité).
1. Mettez l'appareil photo hors
tension et ouvrez le volet du
compartiment des piles/de la
carte mémoire.
2. Insérez la carte mémoire en
option dans le logement le plus
petit, comme indiqué. Vérifiez que
la carte mémoire est bien
enclenchée.
3. Fermez le volet du compartiment des piles/de la carte
mémoire, puis mettez l'appareil photo sous tension.
Français
Installation de l'appareil photo 11
Page 34
Remarque Lorsque vous mettez l'appareil photo
sous tension alors qu'une carte mémoire est installée,
l'appareil indique le nombre d'images pouvant être
stockées sur la carte en fonction du paramètre
Qualité d'image en cours. L'appareil permet de
stocker jusqu'à 2 000 images sur une carte mémoire.
Formatez toujours les cartes mémoire avant leur première
utilisation. Le formatage supprime toutes les images de la
carte mémoire. Assurez-vous donc que vous avez bien
transféré les images existantes avant le formatage.
1. L'appareil photo étant sous tension, positionnez le
sélecteur
2.
Appuyez sur le bouton
Français
3.
Utilisez les
carte dans le menu
le
.
4.
Utilisez les boutons
appuyez sur le bouton
Lorsque vous installez une carte mémoire, les photos et
les clips vidéo sont enregistrés sur cette carte et non dans
la mémoire interne.
Pour utiliser la mémoire interne et visionner les images
qui y sont stockées, éteignez l'appareil photo et retirez la
carte mémoire.
sur .
.
pour sélectionner Formater la
Supprimer, puis appuyez sur
pour sélectionner Oui, puis
pour formater la carte.
Installation du logiciel
Le logiciel HP Photosmart permet non seulement de
transférer des photos et des clips vidéo sur votre
ordinateur, mais aussi de modifier les images stockées
(correction de l'effet yeux rouges, rotation, recadrage,
redimensionnement, etc.).
12 HP Photosmart séries M440/M540/M630
Page 35

Pour l'installation du logiciel HP Photosmart, votre
ordinateur doit respecter la configuration requise décrite
sur l'emballage de l'appareil photo. Pour connaître les
conditions de prise en charge de votre appareil photo
sous Windows Vista, rendez-vous sur le site
www.hp.com/go/windowsvista (en anglais
uniquement).
Si vous avez des difficultés à installer ou à utiliser le
logiciel HP Photosmart, consultez le site Web
d'assistance technique HP pour obtenir des informations
complémentaires : www.hp.com/support.
Windows
1. Fermez tous les programmes et désactivez
temporairement tout programme de protection
antivirus.
2. Insérez le CD du logiciel HP Photosmart dans le
lecteur de CD et suivez les instructions à l'écran. Si la
fenêtre d'installation n'apparaît pas, cliquez sur
Démarrer, puis sur Exécuter et tapez D:\Setup.exe
(D correspondant à la lettre désignant votre lecteur de
CD). Cliquez ensuite sur OK.
3. Une fois le logiciel installé, réactivez votre protection
antivirus.
Macintosh
1. Insérez le CD du logiciel HP Photosmart dans votre
lecteur de CD.
2. Double-cliquez sur l'icône du CD située sur le bureau.
3. Double-cliquez sur l'icône du programme
d'installation et suivez les instructions à l'écran.
Français
Installation de l'appareil photo 13
Page 36

L'installation terminée, votre ordinateur ayant redémarré,
la fenêtre Préférences système s'ouvre
automatiquement sur les paramètres de l'appareil photo
HP Photosmart. Vous pouvez modifier les paramètres de
sorte que le logiciel HP Photosmart s'ouvre
automatiquement dès que vous connectez l'appareil
photo à votre Macintosh (pour plus d'informations, cliquez
sur le bouton Aide dans la boîte de dialogue des
paramètres de l'appareil photo HP Photosmart).
Français
14 HP Photosmart séries M440/M540/M630
Page 37

3 Prise de photos et
enregistrement de
clips vidéo
Positionnez le sélecteur sur pour effectuer
des prises de vue ou sur
vidéo.
Prise de photos
Vous pouvez prendre une photo alors
que vous vous trouvez en mode
Capture d'images.
1. Positionnez le sélecteur
sur .
2. Cadrez le sujet à l'écran.
3. Appuyez sur le bouton
Déclencheur jusqu'à mi-course pour mesurer et
verrouiller la mise au point et l'exposition. Les
crochets de mise au point de l'écran deviennent verts
en continu une fois la mise au point verrouillée.
4. Appuyez à fond sur le déclencheur pour prendre la
photo.
La prise de vue effectuée, l'appareil affiche brièvement la
photo à l'écran.
pour enregistrer des clips
Français
Prise de photos et enregistrement de clips vidéo 15
Page 38
Enregistrement de clips vidéo
Vous pouvez enregistrer une vidéo en
mode
1. Positionnez le sélecteur
2. Cadrez le sujet à l'écran.
3. Appuyez sur le déclencheur
4. Enfoncez entièrement le déclencheur pour
Français
5. Pour mettre fin à l'enregistrement vidéo, appuyez de
L'enregistrement de la vidéo effectué, l'appareil affiche
brièvement celle-ci à l'écran.
Enregistrement vidéo.
sur .
jusqu'à mi-course pour mesurer et
verrouiller la mise au point. Les crochets de mise au
point de l'écran deviennent verts en continu une fois
la mise au point verrouillée.
commencer l'enregistrement.
nouveau sur le déclencheur, puis relâchez-le.
16 HP Photosmart séries M440/M540/M630
Page 39

4 Visualisation et
suppression d'images et
de clips vidéo
Visualisation d'images et de clips
vidéo
Vous pouvez visualiser les images et les clips vidéo en
mode
1. Positionnez le sélecteur
2. Utilisez les boutons
Lecture.
sur .
pour parcourir vos photos et
clips vidéo. Pour lire un clip vidéo, utilisez la touche
dès que la première image du clip apparaît à
l'écran.
Remarque Pour écouter le son associé aux clips
vidéo, transférez ceux-ci sur votre ordinateur.
Suppression d'une image
Vous pouvez supprimer des images en mode
Lecture :
1. Positionnez le sélecteur
2. Utilisez les
vidéo.
3.
Appuyez sur le bouton
4.
Utilisez les
image dans le menu
le bouton
Visualisation et suppression d'images et de clips
pour sélectionner une image ou un clip
.
pour sélectionner l'option Cette
Supprimer, puis appuyez sur
.
sur .
vidéo
Français
17
Page 40
5 Transfert et impression
d'images
Transfert d'images
Pour transférer des images et des clips vidéo sur votre
ordinateur, procédez comme suit.
Remarque Le transfert d'un grand nombre d'images
à résolution élevée entre une carte mémoire et votre
ordinateur peut prendre jusqu'à deux heures. Lors du
transfert d'un grand nombre d'images, assurez-vous
que les batteries de l'appareil photo sont entièrement
Français
rechargées ; vous pouvez également utiliser une
station d'accueil HP Photosmart ou un lecteur de
cartes mémoire (accessoires en option).
1. Mettez l'appareil photo hors tension.
2. Connectez l'appareil à
l'ordinateur à l'aide du
câble USB livré avec votre
appareil photo.
3. Mettez l'appareil photo sous
tension. Lorsque l'écran de
l'appareil indique que l'appareil
est connecté à l'ordinateur,
suivez les instructions à l'écran de l'ordinateur pour
transférer les images. Si vous avez installé le logiciel
HP Photosmart et que vous avez besoin
d'informations supplémentaires, consultez l'aide du
logiciel.
18 HP Photosmart séries M440/M540/M630
Page 41

Impression d'images à partir de
l'appareil photo
Vous pouvez connecter l'appareil photo à une
imprimante compatible PictBridge pour
imprimer des photos.
1. Vérifiez que l'imprimante est sous tension,
qu'elle contient du papier et qu'aucun message
d'erreur ne s'affiche.
2. Mettez l'appareil photo
hors tension, connectezle à l'imprimante à l'aide
du câble USB livré avec
l'appareil, puis mettez-le
sous tension.
3. Lorsque l'appareil photo
est connecté à
l'imprimante, une image
s'affiche à l'écran. Utilisez les boutons
sélectionner l'image à imprimer.
4.
Appuyez sur le bouton
5. Dans le menu Options d'impression, sélectionnez
Imprimer cette image maintenant et appuyez sur
pour lancer l'impression.
L'icône
l'écran : elle indique que l'impression de l'image est
en cours.
6. Une fois l'impression de l'image terminée,
déconnectez l'appareil photo de l'imprimante.
Pour en savoir plus sur les autres options d'impression,
consultez le Guide électronique de l'utilisateur ou
l'Aide
s'affiche sur l'image sélectionnée à
accessible via tous les menus.
.
pour
Français
Transfert et impression d'images 19
Page 42

6 Aide-mémoire de
l'appareil photo
Utilisez ce chapitre comme un aide-mémoire des
fonctions de l'appareil photo. Pour en savoir plus sur ces
fonctions, reportez-vous au Guide électronique de
l'utilisateur ou à l'aide disponible sur l'appareil photo.
Capture d'images, Enregistrement vidéo et Lecture
•
Capture d'images permet de cadrer des images
à l'écran et de prendre des photos. Pour activer la
fonction
Enregistrement vidéo permet de cadrer des
•
Français
vidéos à l'écran et d'enregistrer des clips vidéo. Pour
activer la fonction
positionnez-vous
Lecture permet de visualiser et de supprimer les
•
images et les clips vidéo. Pour activer la
positionnez-vous
Menus de l'appareil
Les menus vous permettent d'effectuer les réglages de
l'appareil, de modifier les images et d'accéder à l'aide sur
l'appareil photo.
•
Dans un menu, utilisez les boutons
sélectionner des paramètres spécifiques.
• Pour quitter ce menu, appuyez sur le bouton
moment de votre choix.
Menu Capture d'images : permet de régler les
paramètres qui affectent les caractéristiques des photos
prises avec l'appareil. Pour accéder à ce menu,
positionnez le sélecteur
Capture d'images, positionnez-vous
sur .
Enregistrement vidéo,
sur .
sur .
pour
sur , puis appuyez
Lecture,
au
20 HP Photosmart séries M440/M540/M630
Page 43

sur le bouton . Vous pouvez choisir l'une de ces
options :
• Mode de prise de vues (Mode Auto, Macro, Anti-flou,
Théâtre, Paysage, Portrait, Action, Portrait nuit,
Coucher de soleil)
• Retardateur
• Qualité d'image
• Rafale
• Couleur (série M440)
• Inclure date/heure
• Configuration
•Aide
Menu Enregistrement vidéo : permet de régler les
paramètres de l'appareil photo qui affectent les
caractéristiques des enregistrements vidéo effectués
avec cet appareil. Pour accéder à ce menu, positionnez
le sélecteur
sur , puis appuyez sur le bouton
. Vous pouvez choisir l'une de ces options :
• Retardateur
• Configuration
•Aide
Menu Lecture : permet de travailler avec les images.
Pour accéder à ce menu, positionnez le sélecteur
sur , puis appuyez sur le bouton . Vous
pouvez choisir l'une de ces options :
• Correction yeux rouges
• Rotation (série M440)
• Recadrer (série M440)
• Galerie créative (Modifier couleur, Ajout bordures,
Recadrer, Rotation) (séries M540/M630)
Français
Aide-mémoire de l'appareil photo 21
Page 44

• Photosmart Express (imprimer, partager, commander
tirages en ligne)
• Favoris
• Voir diaporama
• Dépl. images sur carte
• Configuration
•Aide
Menu Configuration : permet de configurer vos
préférences de fonctionnement pour l'appareil photo.
Pour accéder à ce menu, appuyez sur
à partir de
, ou , puis sélectionnez l'option
Configuration. Vous pouvez choisir l'une de ces
options :
Français
• Luminosité écran
• Sons de l'appareil
• Date/heure
• Configuration USB
• Langue
Menu Aide : décrit les fonctions de l'appareil photo et
fournit des conseils sur la prise de vue. Pour accéder à
ce menu, appuyez sur le bouton
à partir de , ou
, puis sélectionnez l'option Aide. Vous pouvez
choisir l'une de ces options :
• 10 conseils
• Accessoires de l'appareil
• Boutons de l'appareil
• Modes de prise de vue
• Utilisation de la galerie créative (séries M540/M630)
• Utilisation de Photosmart Express
22 HP Photosmart séries M440/M540/M630
Page 45

• Impression d'images
• Enregistrement de clips vidéo
• Visualisation images et vidéos
• Étiquetage des favoris
• Suppression d'images
• Transfert d'images
• Gestion des batteries
• Obtenir de l'assistance
• Aperçu des fonctions de l'appareil
• Raccourcis de l'appareil photo
• A propos de
Extension de la durée de vie des piles
Pour économiser les piles, l'écran s'éteint après une
période d'inactivité. Appuyez sur un bouton pour le
réactiver. Au bout de cinq minutes d'inactivité, l'appareil
photo s'éteint.
Pour prolonger davantage la durée de vie des piles :
• Définissez la
Luminosité écran sur Faible (voir
le Guide électronique de l'utilisateur pour plus de
détails).
• Réglez votre appareil photo sur le mode
Flash
auto (voir le Guide électronique de l'utilisateur pour
plus de détails).
• Utilisez le zoom optique, l'enregistrement vidéo et
l'écran avec parcimonie.
• Si vous mettez l'appareil photo sous tension
seulement pour visualiser des images, positionnez le
sélecteur
photo afin de le démarrer en mode
sur , puis allumez l'appareil
Lecture sans
déployer l'objectif.
Français
Aide-mémoire de l'appareil photo 23
Page 46

• Lors du transfert ou de l'impression d'images, installez
l'appareil dans une station d'accueil HP Photosmart
optionnelle reliée au secteur.
Pour plus d'informations sur les piles, accédez au site
www.hp.com/support et recherchez le code AA-400, ou
consultez l'annexe A du Guide électronique de
l'utilisateur.
Français
24 HP Photosmart séries M440/M540/M630
Page 47

HP Photosmart M440/M540/
M630 series
Italiano
Page 48

Note legali
© Copyright 2007 Hewlett-Packard Development Company, L.P.
Le informazioni contenute in questo documento sono soggette a modifica
senza preavviso. Le uniche garanzie per i prodotti e i servizi HP sono
definite nelle dichiarazioni di garanzia esplicita che accompagnano tali
prodotti e servizi. Nulla di quanto dichiarato nel presente documento
costituisce una garanzia aggiuntiva. HP non sarà ritenuta responsabile di
eventuali omissioni o errori tecnici o editoriali qui contenuti.
Windows® è un marchio registrato di Microsoft Corporation negli Stati
Uniti.
Il logo SD è un marchio del rispettivo titolare.
Smaltimento di apparecchiature dismesse da parte dei
cittadini dell'Unione Europea
La presenza di questo simbolo sul prodotto o sulla sua confezione
indica che il prodotto non può essere smaltito tra i rifiuti generici.
È responsabilità di ogni singolo cittadino smaltire il prodotto
consegnandolo al centro di raccolta autorizzato più vicino a scopo di
riciclo. La raccolta differenziata di apparecchiature elettriche ed
elettroniche dismesse e il loro smaltimento a scopo di riciclo costituiscono
una efficace misura di salvaguardia della salute e dell'ambiente. Per
ulteriori informazioni sullo smaltimento/riciclo di tali apparecchiature,
rivolgersi al proprio rivenditore o all'ente locale preposto.
Per riferimento in futuro, inserire le seguenti informazioni:
Numero di modello: _________
•
Numero di serie: _________
•
Data di acquisto: _________
•
Italiano
Page 49

Sommario
1 Informazioni preliminari
Visualizzazione del Manuale dell'utente in
formato elettronico ...................................................5
Viste posteriore e dall'alto della fotocamera ............6
Viste anteriore, laterale e inferiore della
fotocamera ..............................................................7
2 Configurazione della fotocamera
Installazione delle batterie .......................................9
Accensione della fotocamera ................................10
Scelta della lingua .................................................10
Configurazione della regione .................................10
Configurazione della data e dell'ora ......................11
Installazione e formattazione di una scheda di
memoria opzionale ................................................11
Installazione del software ......................................12
Windows ..........................................................13
Macintosh ........................................................13
3 Foto e videoclip
Scatto delle foto .....................................................15
Registrazione di un videoclip .................................15
4 Revisione ed eliminazione di immagini e
videoclip
Revisione di immagini e videoclip .........................17
Eliminazione di un'immagine .................................17
5 Trasferimento e stampa di immagini
Trasferimento di immagini .....................................18
Stampa di immagini dalla fotocamera ...................19
Italiano
6 Riferimento rapido della fotocamera .................20
3
Page 50

1 Informazioni preliminari
La copia cartacea di questa Guida rapida fornisce le
informazioni necessarie per iniziare a utilizzare le funzioni
essenziali della fotocamera. Per informazioni dettagliate
sulle funzioni della fotocamera, vedere il Manuale
dell'utente in formato elettronico (vedere Visualizzazione
del Manuale dell'utente in formato elettronico
a pagina 5).
Guida rapida
La copia cartacea di questa
guida consente di:
• Iniziare a utilizzare
rapidamente la
fotocamera
• Installare il software
HP Photosmart
• Imparare a conoscere
le funzioni di base della
fotocamera
Italiano
4 HP Photosmart M440/M540/M630 series
Manuale dell'utente in
formato elettronico
Il Manuale dell'utente in
formato elettronico
comprende:
• Descrizioni di tutte le
funzioni della
fotocamera
• Informazioni sulle
batterie, tra cui:
• Prolungamento
della durata delle
batterie
• Tipi di batteria
supportati
• Descrizione delle
icone di indicazione
dell'alimentazione
• Assistenza da HP
• Risoluzione dei
problemi
• Specifiche della
fotocamera
Page 51

Visualizzazione del Manuale
dell'utente in formato elettronico
Il Manuale dell'utente in formato elettronico si trova
sul CD del software HP Photosmart.
Per visualizzare la Guida per l'utente:
1. Inserire il CD del software HP Photosmart nell'unità
CD del computer.
2. Fare clic su Visualizza la Guida d'uso nella pagina
principale della schermata di installazione.
Il Manuale dell'utente in formato elettronico viene anche
copiato sul computer quando si installa il software HP
Photosmart. Per visualizzare la Guida per l'utente dopo
che è stata installata sul computer:
• In Windows: Aprire Centro soluzioni HP e fare clic
su Guida.
• In Macintosh: Aprire HP Device Manager e
selezionare Guida d'uso della fotocamera dal menu
a comparsa Informazioni e impostazioni.
Assistenza
• Per suggerimenti e strumenti che aiutino a utilizzare
la fotocamera in modo più efficiente, visitare il sito
all'indirizzo www.hp.com. Qui, fare clic su Learn
About: Digital Photography (solo in inglese).
• Per il supporto relativo al prodotto, compresi
aggiornamenti firmware, software e driver, visitare il
sito all'indirizzo www.hp.com/support.
• Per assistenza con il software HP Photosmart, vedere
la guida in linea del software.
Italiano
Informazioni preliminari 5
Page 52

Viste posteriore e dall'alto della
fotocamera
321
4 5 6
7
8
11 10
1 Spia di accensione.
2 Pulsante .
Italiano
3 Pulsante Otturatore.
4
Pulsante Elimina: consente di accedere alla
funzione Elimina quando si è in modalità
Riproduzione.
5 Pulsante del flash: consente di accedere alle
impostazioni del flash mentre è attiva la modalità di
Scatto. Le impostazioni disponibili sono Auto,
Occhi rossi, Flash On, Flash Off.
6 HP Photosmart M440/M540/M630 series
9
Page 53

6 Selettore : consente di attivare
alternativamente le modalità
Scatto,
Registrazione e Riproduzione (vedere Scatto,
Registrazione, Riproduzione a pagina 20).
7 Leva dello zoom (digitale e ottico): consente di
accedere alla funzione
la modalità
Scatto o Registrazione;
consente di accedere alla funzione
e
Ingrandisci quando è attiva la modalità
/ Zoom quando è attiva
Anteprime
Riproduzione
8
Pulsanti e : consentono di scorrere tra i
menu e le immagini.
9
Pulsante : consente di visualizzare i menu della
fotocamera, selezionare le opzioni e confermare le
azioni.
10 Pulsante Indietro: consente di ritornare ad una
vista o un menu precedente. Tenerlo premuto per
uscire da tutti i menu aperti in sequenza.
11 Display LCD.
Italiano
Informazioni preliminari 7
Page 54

Viste anteriore, laterale e inferiore
della fotocamera
1
2
3
6
5
4
1 Flash.
2 Spia dell'autoscatto.
3 Microfono.
4 Attacco treppiede.
5 Connettore alloggiamento/USB.
6 Sportello del vano batteria/scheda di memoria.
Italiano
8 HP Photosmart M440/M540/M630 series
Page 55

2 Configurazione della
fotocamera
Installazione delle batterie
1. Aprire lo sportello del vano batteria/
scheda di memoria facendo scorrere
il fermo dello sportello, come indicato
sullo sportello stesso.
2. Inserire due batterie AA.
3. Chiudere lo sportello del vano
batteria/scheda di memoria.
Nota Se si utilizzano batterie ricaricabili al nichel
(NiMH), caricarle completamente prima di utilizzarle
per la prima volta. Spegnere la fotocamera prima di
rimuovere le batterie.
Le batterie fornite con la fotocamera sono alcaline AA.
Queste batterie hanno una durata breve e sono fornite
solo per poter iniziare ad utilizzare la fotocamera
immediatamente. Quando sulla fotocamera compare un
messaggio che informa che la carica delle batterie è
insufficiente, HP consiglia di sostituirle con batterie
fotografiche agli ioni di litio o ricaricabili NiMH in modo che
possano durare più a lungo.
Italiano
Configurazione della fotocamera 9
Page 56

Il grafico mostra il numero medio approssimativo di foto
che si possono scattare utilizzando le batterie fotografiche
agli ioni di litio, NiMH e alcaline. Le prestazioni effettive
potrebbero variare in base all'utilizzo, al tipo di batteria e
al produttore della batteria. Vi sono numerosi altri fattori
che influiscono sul numero effettivo di foto che si possono
scattare (vedere Prolungamento della durata delle
batterie a pagina 23).
Accensione della fotocamera
Per accendere la fotocamera, premere il pulsante
.
Scelta della lingua
Per scegliere la lingua
desiderata, utilizzare i pulsanti
, quindi premere il
pulsante
.
Configurazione della regione
Insieme all'impostazione di
Italiano
Lingua, l'impostazione di
Regione determina il formato
predefinito per la data.
Utilizzare i pulsanti
scegliere la regione desiderata,
quindi premere il pulsante
10 HP Photosmart M440/M540/M630 series
per
.
Page 57

Configurazione della data e
dell'ora
Impostando con precisione data e ora, sarà più semplice
individuare le immagini una volta caricate sul computer e,
se si utilizza la funzione Inserimento di data e ora, le
immagini risulteranno contrassegnate correttamente.
1.
Utilizzare i pulsanti
regolare il valore evidenziato.
2. Per spostarsi sulle altre
selezioni, utilizzare i pulsanti
e ripetere il passaggio 1
fino a quando la data e l'ora
configurate non sono
corrette.
3. Quando le impostazioni di data, ora e formato sono
corrette, premere il pulsante
nuovamente il pulsante
per
, quindi premere
per confermare.
Installazione e formattazione di
una scheda di memoria opzionale
Questa fotocamera supporta schede di memoria ad alta
capacità Secure Digital (SD e SDHC), sia standard che
ad alta velocità, da 32 MB a 8 GB.
1. Spegnere la fotocamera e aprire
lo sportello del vano batteria/
scheda di memoria.
2. Inserire la scheda di memoria
opzionale nell'alloggiamento più
piccolo, come indicato. Accertarsi
che la scheda di memoria scatti in
posizione.
Italiano
Configurazione della fotocamera 11
Page 58

3. Chiudere lo sportello del vano batteria/scheda di
memoria e accendere la fotocamera.
Nota Se si accende la fotocamera quando al suo
interno è installata una scheda di memoria, la
fotocamera indica il numero di immagini che è
possibile memorizzare sulla scheda utilizzando
l'impostazione corrente di Qualità immag. Con
questa fotocamera è possibile memorizzare su una
scheda un massimo di 2000 immagini.
Formattare sempre le nuove schede di memoria prima del
primo utilizzo. La formattazione rimuove tutte le immagini
dalla scheda di memoria, pertanto accertarsi che siano
state trasferite prima di procedere con la formattazione.
1. Quando la fotocamera è accesa, spostare
.
2.
Premere il pulsante
3.
Utilizzare i pulsanti
scheda dal menu
pulsante
4.
Utilizzare i pulsanti
premere il pulsante
Italiano
Una volta installata una scheda di memoria, tutte le nuove
immagini e i videoclip vengono memorizzati sulla scheda
anziché nella memoria interna.
Per utilizzare la memoria interna e visualizzare le
immagini ivi memorizzate, spegnere la fotocamera e poi
rimuovere la scheda di memoria.
.
.
per selezionare Formatta
Elimina, quindi premere il
per selezionare Sì, quindi
.
su
Installazione del software
Il software HP Photosmart fornisce le funzioni per
trasferire immagini e videoclip nel computer, nonché
12 HP Photosmart M440/M540/M630 series
Page 59

funzioni per modificare le immagini memorizzate
(eliminare gli occhi rossi, ruotare, ritagliare e
ridimensionare la foto e tanto altro ancora).
Per installare il software HP Photosmart, il computer deve
soddisfare i requisiti di sistema indicati sulla confezione
della fotocamera. Per maggiori informazioni sul supporto
di Windows Vista per la fotocamera, vedere
www.hp.com/go/windowsvista (solo in inglese).
In caso di problemi durante l'installazione o l'uso del
software HP Photosmart, visitare il sito Web per il
supporto tecnico Hewlett-Packard per ottenere ulteriori
informazioni: www.hp.com/support.
Windows
1. Chiudere tutti i programmi e disattivare
temporaneamente il software antivirus.
2. Inserire il CD del software HP Photosmart nell'unità
CD e seguire le istruzioni visualizzate sullo schermo.
Se non viene visualizzata la finestra di installazione,
fare clic su Start, Esegui, digitare D:\Setup.exe,
dove D è la lettera dell'unità CD, quindi fare clic su
OK.
3. Al termine dell'installazione del software, riattivare il
software antivirus.
Macintosh
1. Inserire il CD del software HP Photosmart nell'unità
CD.
2. Fare doppio clic sull'icona del CD sulla scrivania del
computer.
3. Fare doppio clic sull'icona del programma di
installazione, quindi seguire le istruzioni visualizzate
sullo schermo.
Italiano
Configurazione della fotocamera 13
Page 60

Una volta completata l'installazione e riavviato il
computer, Preferenze di Sistema si apre
automaticamente sulle impostazioni di HP Photosmart.
È possibile modificare le impostazioni in modo che il
software HP Photosmart si avvii automaticamente
quando si collega la fotocamera al computer Macintosh
(per maggiori informazioni, fare clic sul pulsante Aiuto
nella finestra di dialogo per le impostazioni di HP
Photosmart Camera).
Italiano
14 HP Photosmart M440/M540/M630 series
Page 61

3 Foto e videoclip
Spostare su per scattare le foto oppure su
per registrare i videoclip.
Scatto delle foto
È possibile scattare le foto quando è
attiva la modalità
1. Spostare
2. Inquadrare il soggetto nel display
LCD.
3. Premere a metà il pulsante
otturatore per misurare e bloccare
la messa a fuoco e l'esposizione. Il quadro di messa
a fuoco sul display LCD diventa verde fisso quando la
messa a fuoco è bloccata.
4. Per scattare la foto, premere completamente il
pulsante otturatore.
Dopo lo scatto, la foto compare brevemente sul display
LCD della fotocamera.
Registrazione di un videoclip
È possibile registrare un video quando
è attiva la modalità
1. Spostare
2. Inquadrare il soggetto nel display
LCD.
3. Premere a metà il pulsante
otturatore per misurare e bloccare
la messa a fuoco e l'esposizione. Il quadro di messa
a fuoco sul display LCD diventa verde fisso quando la
Scatto.
su .
Registrazione.
su .
Italiano
Foto e videoclip 15
Page 62

messa a fuoco è bloccata.
4. Premere completamente il pulsante otturatore per
iniziare la registrazione.
5. Per interrompere la registrazione, premere e
rilasciare il pulsante otturatore.
Terminata la registrazione, il video compare brevemente
sul display LCD della fotocamera.
Italiano
16 HP Photosmart M440/M540/M630 series
Page 63

4 Revisione ed eliminazione
di immagini e videoclip
Revisione di immagini e videoclip
In modalità Riproduzione è possibile rivedere le
immagini e i videoclip.
1. Spostare
2. Per scorrere le immagini e i videoclip, utilizzare i
pulsanti
pulsante
compare il primo fotogramma del video.
Nota Per ascoltare l'audio associato ai videoclip,
trasferirli sul computer.
Eliminazione di un'immagine
In modalità Riproduzione è possibile eliminare
singole immagini:
1. Spostare
2. Per selezionare un'immagine o un videoclip, utilizzare
i pulsanti
3.
Premere il pulsante
4.
Utilizzare i pulsanti
menu
Elimina, quindi premere il pulsante .
su .
. Per riprodurre un videoclip, premere il
solo una volta quando sul display LCD
su .
.
.
per selezionare Corrente dal
Italiano
Revisione ed eliminazione di immagini e
videoclip
17
Page 64

5 Trasferimento e stampa di
immagini
Trasferimento di immagini
Utilizzare questa procedura per trasferire immagini e
videoclip su un computer.
Nota Il trasferimento di un numero notevole di
immagini ad alta risoluzione da una scheda di
memoria al computer potrebbe durare anche due ore.
Quando si trasferisce un numero notevole di
immagini, verificare che le batterie nella fotocamera
siano cariche oppure utilizzare un lettore per schede
di memoria o un alloggiamento HP Photosmart
opzionale.
1. Spegnere la fotocamera.
2. Collegare la fotocamera e il
computer utilizzando il cavo
USB in dotazione con la
fotocamera.
3. Accendere la fotocamera.
Italiano
Quando il display LCD della
fotocamera indica che la
fotocamera è collegata al
computer, seguire le istruzioni visualizzate sullo
schermo del computer per trasferire le immagini. Se
è stato installato il software HP Photosmart e si ha
bisogno di maggiori informazioni, vedere la guida del
software HP Photosmart.
18 HP Photosmart M440/M540/M630 series
Page 65

Stampa di immagini dalla
fotocamera
Per stampare foto, è possibile collegare la
fotocamera a qualsiasi stampante certificata
PictBridge.
1. Controllare che la stampante sia accesa,
che contenga carta e che non siano presenti
messaggi di errore.
2. Spegnere la fotocamera,
collegare la fotocamera
e la stampante
utilizzando il cavo USB in
dotazione alla
fotocamera, quindi
accendere la
fotocamera.
3. Quando la fotocamera è
collegata alla stampante, sul display LCD compare
un'immagine. Utilizzare i pulsanti
l'immagine che si desidera stampare.
4.
Premere
5. Nel menu Opzioni di stampa, selezionare Stampa
questa immagine, quindi premere
stampare.
L'icona
display LCD per indicare che è in corso la stampa di
quell'immagine.
6. Dopo aver stampato l'immagine, scollegare la
fotocamera dalla stampante.
Per maggiori informazioni sulle opzioni di stampa, vedere
il Manuale dell'utente in formato elettronico o selezionare
Guida in un qualsiasi menu della fotocamera.
.
compare sull'immagine selezionata nel
per selezionare
per iniziare a
Italiano
Trasferimento e stampa di immagini 19
Page 66

6 Riferimento rapido della
fotocamera
Questo capitolo fornisce un riferimento rapido per le
funzioni della fotocamera. Per maggiori informazioni su
queste funzioni della fotocamera, consultare il Manuale
dell'utente in formato elettronico o la guida sulla
fotocamera.
Scatto, Registrazione, Riproduzione
• Il pulsante
inquadrando il soggetto nel display LCD. Per attivare
Scatto, spostare su .
Registrazione consente di registrare i video
•
inquadrando il soggetto nel display LCD. Per attivare
Registrazione, spostare su .
• La modalità
ed eliminare le immagini e i videoclip. Per attivare
Riproduzione, spostare su .
Menu della fotocamera
I menu consentono di regolare le impostazioni della
fotocamera, manipolare le immagini e accedere alla guida
Italiano
della fotocamera.
•
All'interno di un menu, utilizzare i pulsanti
spostarsi sulle voci desiderate.
• Per uscire dal menu, premere
momento.
Menu Scatto: consente di regolare le impostazioni
della fotocamera che avranno effetto sulle foto che
verranno scattate in un momento successivo. Per
Scatto consente di scattare le foto
Riproduzione consente di esaminare
in qualsiasi
per
20 HP Photosmart M440/M540/M630 series
Page 67

accedere a questo menu, spostare su , quindi
premere
. È possibile scegliere tra le seguenti opzioni:
• Mod. scatto (Mod. automatica, Primo piano, Scatto
stabile, Teatro, Panorama, Ritratto, Azione, Ritratto
notturno, Tramonto)
• Autoscatto
• Qualità immag.
• Scatto continuo
• Colore (M440 series)
• Inserimento di data e ora
• Configurazione
• Guida
Menu Registrazione: consente di regolare le
impostazioni della fotocamera che avranno effetto sui
videoclip che verranno registrati in un momento
successivo. Per accedere a questo menu, spostare
su , quindi premere . È possibile scegliere
tra le seguenti opzioni:
• Autoscatto
• Configurazione
• Guida
Menu Riproduzione: consente di manipolare e
lavorare con le immagini. Per accedere a questo menu,
spostare
su , quindi premere . È possibile
scegliere tra le seguenti opzioni:
• Elimina occhi rossi
• Ruota (M440 series)
• Ritaglia (M440 series)
• Galleria degli effetti (Modifica colore, Aggiungi
contorni, Ritaglia, Ruota) (M540/M630 series)
Italiano
Riferimento rapido della fotocamera 21
Page 68

• Photosmart Express (Stampa, Condividi, Acquisto
stampe online)
• Preferiti
• Visualizza presentazione
• Sposta imm. su scheda
• Configurazione
•Guida
Menu Configurazione: consente di modificare il
comportamento della fotocamera. Per accedere a questo
menu, premere
selezionare
in modalità , o , quindi
Configurazione. È possibile scegliere tra
le seguenti opzioni:
• Lumin. display
• Suoni fotocamera
• Data e ora
• Configurazione USB
• Lingua
Menu ?: fornisce le descrizioni delle funzioni della
fotocamera e suggerimenti per scattare le foto. Per
accedere a questo menu, premere
o , quindi selezionare Guida. È possibile
Italiano
scegliere tra le seguenti opzioni:
in modalità ,
• 10 utili suggerimenti
• Accessori
• Pulsanti fotocamera
• Uso delle modalità di scatto
• Utilizzo della galleria degli effetti (M540/M630 series)
• Uso di Photosmart Express
• Stampa immagini
22 HP Photosmart M440/M540/M630 series
Page 69

• Registrazione videoclip
• Revisione foto e video
• Assegnazione dei tag agli elementi preferiti
• Cancellazione immagini
• Trasferimento immagini
• Manutenzione batterie
•Assistenza
• Demo delle funzioni della fotocamera
• Accesso rapido
• Info su
Prolungamento della durata delle batterie
Per conservare la carica delle batterie, il display LCD si
spegne dopo un periodo di inattività. Premere qualsiasi
pulsante della fotocamera per riattivarla. Dopo cinque
minuti di inattività la fotocamera si spegne.
Per ottimizzare ulteriormente la durata delle batterie:
• Impostare
Lumin. display su Bassa (per ulteriori
dettagli vedere il Manuale dell'utente in formato
elettronico).
• Impostare la fotocamera su
Auto Flash (per
ulteriori dettagli vedere il Manuale dell'utente in
formato elettronico).
• Usare lo zoom ottico, la registrazione video e il display
LCD il minimo indispensabile.
• Se si accende la fotocamera solo per visualizzare le
immagini, spostare
su e solo dopo
accendere la fotocamera per avviare la modalità
Riproduzione senza estendere l'obiettivo.
Italiano
Riferimento rapido della fotocamera 23
Page 70

• Quando si trasferiscono o si stampano le immagini,
posizionare la fotocamera nell'alloggiamento
opzionale HP Photosmart collegato all'alimentazione
CA.
Per ulteriori informazioni sulle batterie, visitare il
sito all'indirizzo www.hp.com/support ed eseguire una
ricerca del codice AA-400 o consultare l'Appendice A nel
Manuale dell'utente in formato elettronico.
Italiano
24 HP Photosmart M440/M540/M630 series
Page 71

HP Photosmart M440/M540/
M630 series
Deutsch
Page 72
Rechtliche Hinweise
© Copyright 2007 Hewlett-Packard Development Company, L.P.
Die Informationen in diesem Dokument können ohne vorherige
Ankündigung geändert werden. Für HP Produkte und Dienste gelten nur
die Gewährleistungen, die in den ausdrücklichen
Gewährleistungserklärungen des jeweiligen Produkts bzw. Diensts
aufgeführt sind. Dieses Dokument gibt keine weiteren Gewährleistungen.
HP haftet nicht für technische oder redaktionelle Fehler oder
Auslassungen in diesem Dokument.
Windows® ist eine in den USA eingetragene Marke der Microsoft
Corporation.
Das SD-Logo ist eine Marke des entsprechenden Eigentümers.
Entsorgung von Altgeräten durch Benutzer in
Privathaushalten in der EU
Dieses Symbol auf dem Produkt oder seiner Verpackung weist
darauf hin, dass dieses Produkt nicht mit dem Hausmüll entsorgt
werden darf. Sie sind stattdessen dafür verantwortlich, Altgeräte bei der
zuständigen Sammelstelle zum Recycling von Elektrogeräten und
Elektronikzubehör abzugeben. Mülltrennung und das Recycling von
Altgeräten schonen die natürlichen Ressourcen und stellen sicher, dass
die Geräte in einer Art und Weise wiederverwertet werden, die die
Gesundheit von Menschen und die Umwelt schützt. Weitere Informationen
zu den Sammelstellen für Ihre Altgeräte zum Recycling erhalten Sie bei
der zuständigen Stelle der Stadtverwaltung, beim
Entsorgungsunternehmen für Ihren Hausmüll oder in dem Geschäft, in
dem das Produkt gekauft wurde.
Notieren Sie für zukünftige Nachfragen die folgenden Daten:
Modellnummer: _________
•
Seriennummer: _________
•
Kaufdatum: _________
•
Deutsch
Page 73

Inhalt
1 Erste Schritte
Anzeigen des elektronischen
Benutzerhandbuchs ................................................5
Ober- und Rückseite der Kamera ............................6
Vorderseite, Seite und Unterseite der
Kamera ....................................................................7
2 Einrichten der Kamera
Einsetzen der Batterien ...........................................9
Einschalten der Kamera ........................................10
Auswählen der Sprache ........................................10
Einstellen der Region ............................................10
Einstellen von Datum und Uhrzeit .........................11
Einsetzen und Formatieren einer optionalen
Speicherkarte ........................................................11
Installieren der Software ........................................13
Windows ..........................................................13
Macintosh ........................................................14
3 Aufnehmen von Bildern und Videoclips
Aufnehmen eines Bilds ..........................................15
Aufnehmen eines Videoclips .................................16
4 Anzeigen und Löschen von Bildern und
Videoclips
Anzeigen von Bildern und Videoclips ....................17
Löschen von Bildern ..............................................17
5 Übertragen und Drucken von Bildern
Übertragen von Bildern .........................................18
Drucken von Bildern über die Kamera ..................19
6 Kurzreferenz zur Kamera ....................................21
3
Deutsch
Page 74

1 Erste Schritte
Diese gedruckte Kurzübersicht enthält die Informationen,
die Sie für die ersten Schritte bei der Verwendung der
Grundfunktionen Ihrer Kamera benötigen. Detaillierte
Informationen zu den Kamerafunktionen finden Sie im
elektronischen Benutzerhandbuch (siehe „Anzeigen des
elektronischen Benutzerhandbuchs“ auf Seite 5).
Kurzanleitung
Dieses gedruckte
Handbuch enthält nützliche
Informationen zu
folgenden Themen:
• Sofortiger Einsatz der
Kamera
• Installieren der
HP PhotosmartSoftware
• Grundlegende
Funktionen der
Kamera
Deutsch
4 HP Photosmart M440/M540/M630 series
Elektronisches
Benutzerhandbuch
Das elektronische
Benutzerhandbuch enthält
Informationen zu
folgenden Themen:
• Beschreibungen aller
Kamerafunktionen
• Batterieinformationen,
einschließlich:
• Verlängern der
Batteriebetriebsdauer
• Unterstützte
Batterietypen
• Beschreibung der
Symbole für die
Stromversorgungsanzeige
• Unterstützung durch
HP
• Fehlerbehebung
• Kameraspezifikationen
Page 75

Anzeigen des elektronischen
Benutzerhandbuchs
Das elektronische Benutzerhandbuch befindet sich
auf der CD mit der HP Photosmart-Software.
So zeigen Sie das Benutzerhandbuch an:
1. Legen Sie die CD mit der HP Photosmart-Software in
das CD-Laufwerk Ihres Computers ein.
2. Klicken Sie auf der Hauptseite des
Installationsbildschirms auf Benutzerhandbuch
anzeigen.
Das elektronische Benutzerhandbuch wird bei der
Installation der HP Photosmart-Software auf Ihren
Computer kopiert. So zeigen Sie das Benutzerhandbuch
nach der Installation auf Ihrem Computer an:
• Unter Windows: Öffnen Sie das HP Solution
Center, und klicken Sie auf Hilfe.
• Unter Macintosh: Öffnen Sie den
HP Gerätemanager, und wählen Sie im Popup-Menü
Benutzerhandbuch die Option Informationen und
Einstellungen aus.
Unterstützung
• Weitere Tipps und Tools zur effektiveren Nutzung der
Kamera finden Sie unter www.hp.com. Klicken Sie
auf dieser Website auf Learn About: Digital
Photography (nur in englischer Sprache).
• Produkt-Support, einschließlich Firmware-, Softwareund Treiber-Updates erhalten Sie unter
www.hp.com/support.
• Hilfe zur HP Photosmart-Software erhalten Sie in der
Onlinehilfe der Software.
Erste Schritte 5
Deutsch
Page 76
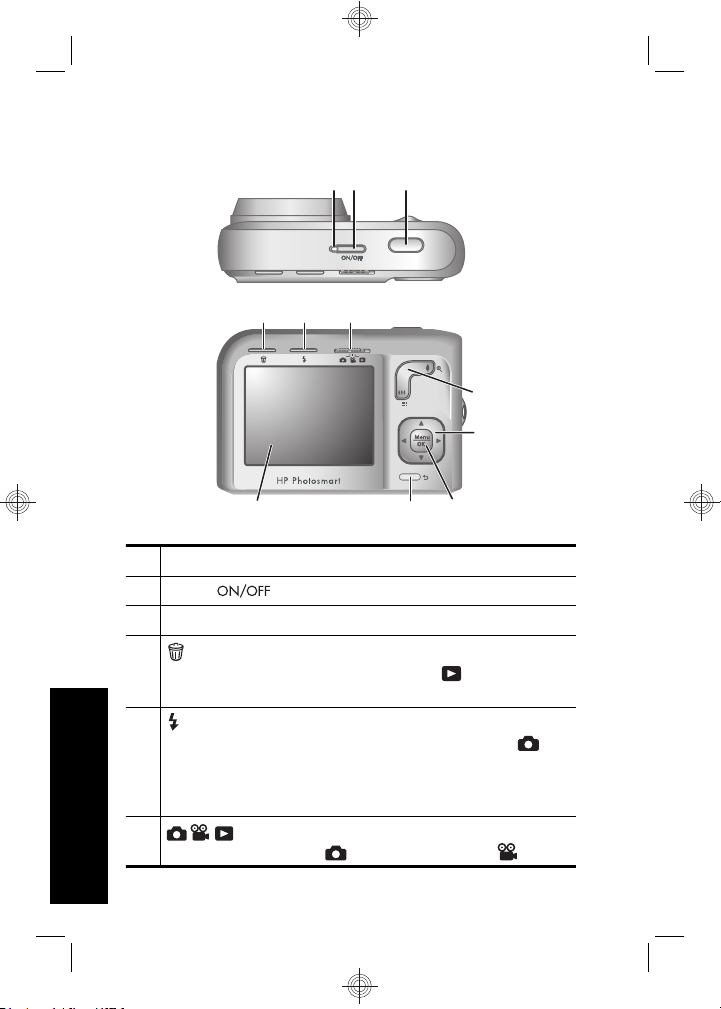
Ober- und Rückseite der Kamera
321
4 5 6
7
8
11 10
1 Netzkontrollleuchte
2 Taste
3 Auslöser
4
Taste Löschen – Greift auf die Funktion
Löschen zu, wenn Sie sich in der
befinden.
5 Taste Blitz – Dient zum Zugreifen auf die
Blitzeinstellungen, wenn Sie sich im Modus
Bildaufnahme befinden. Folgende Einstellungen
sind möglich: Autom. Blitz, Rote Augen, Blitz ein
Deutsch
und Blitz aus.
6 Wahlschalter – Dient zum Wechseln
zwischen den Modi
6 HP Photosmart M440/M540/M630 series
Bild aufnehmen, Video
9
Wiedergabe
Page 77

aufnehmen und Wiedergabe (siehe
„Bildaufnahme, Videoaufnahme und Wiedergabe“
auf Seite 21).
7 Zoom-Hebel (Digital und Optisch) – Lässt Sie auf
die Optionen
sich im Modus
/ , Zoom zugreifen, während Sie
Bildaufnahme oder
Videoaufnahme befinden; lässt Sie außerdem
auf die Schaltflächen
Miniaturansichten und
Vergrößern zugreifen, während Sie sich im
Modus
8
Tasten und – Dienen zum Blättern durch
Wiedergabe befinden.
Menüs und Bilder.
9
Taste – Zeigt Kameramenüs an, wählt Optionen
aus und bestätigt Aktionen.
10 Taste Zurück – Dient zum Zurückkehren zum
vorherigen Menü bzw. zur vorherigen Anzeige.
Halten Sie die Taste gedrückt, um alle Menüs zu
verlassen.
11 Bildanzeige
Erste Schritte 7
Deutsch
Page 78

Vorderseite, Seite und Unterseite
der Kamera
1
2
3
6
5
4
1 Blitz
2 Kontrollleuchte für Selbstauslöser
3 Mikrofon
4 Stativhalterung
5 Docking/USB-Anschluss
6 Klappe des Batterie-/Speicherkartenfachs
Deutsch
8 HP Photosmart M440/M540/M630 series
Page 79

2 Einrichten der Kamera
Einsetzen der Batterien
1. Öffnen Sie die Klappe des Batterie-/
Speicherkartenfachs, indem Sie die
Verriegelung der Klappe wie
abgebildet lösen.
2. Setzen Sie die beiden
Mignonbatterien ein.
3. Schließen Sie die Klappe des Batterie-/
Speicherkartenfachs.
Hinweis Wenn Sie wiederaufladbare NiMH-
Batterien verwenden, müssen Sie diese vor der ersten
Verwendung vollständig aufladen. Schalten Sie die
Kamera aus, bevor Sie die Batterien entnehmen.
Bei den mit der Kamera gelieferten Batterien handelt es
sich um Alkali-Mignonbatterien (AA). Diese Batterien
haben eine kurze Lebensdauer und sollen es Ihnen
ermöglichen, die Kamera sofort zu verwenden. Sobald die
Kamera eine Warnung in Bezug auf einen niedrigen
Ladezustand der Batterien anzeigt, empfiehlt HP, die
Batterien durch Foto-Lithium-Batterien oder aufladbare
NiMH-Akkus zu ersetzen, die eine längere Betriebsdauer
bieten.
)RWR
/LWKLXP
1L0+
$ONDOL
)RWRV
Deutsch
Einrichten der Kamera 9
Page 80

In diesem Diagramm ist die durchschnittliche Anzahl von
Fotos aufgeführt, die Sie mit Foto-Lithium-, NiMH- und
Alkalibatterien aufnehmen können. Die tatsächliche
Leistung variiert dabei je nach Einsatz, Batterietyp und
Batteriehersteller. Die tatsächliche Anzahl der
aufnehmbaren Fotos kann durch viele zusätzliche
Faktoren beeinflusst werden (siehe „Verlängern der
Batteriebetriebsdauer“ auf Seite 24).
Einschalten der Kamera
Zum Einschalten der Kamera drücken Sie die Taste
.
Auswählen der Sprache
Stellen Sie mit den Tasten
die gewünschte Sprache ein,
und drücken Sie dann die Taste
.
Einstellen der Region
Das Standarddatumsformat wird
neben der Einstellung für die
Sprache auch durch die
Einstellung für die Region
festgelegt.
Stellen Sie mit den Tasten
die gewünschte Region ein,
und drücken Sie dann die Taste
.
Deutsch
10 HP Photosmart M440/M540/M630 series
Page 81

Einstellen von Datum und Uhrzeit
Eine genaue Einstellung des Datums und der Uhrzeit hilft
Ihnen später, Bilder wieder zu finden, nachdem diese auf
Ihren Computer übertragen wurden. Darüber hinaus wird
so sichergestellt, dass die Bilder richtig gekennzeichnet
werden, wenn Sie die Funktion „Datums-/Zeitstempel“
verwenden.
1. Wählen Sie mit den Tasten
den markierten Wert
aus.
2. Wechseln Sie mit den Tasten
zu den anderen Optionen,
und wiederholen Sie Schritt 1,
bis Datum und Uhrzeit richtig
eingestellt sind.
3.
Drücken Sie die Taste
Datum, Uhrzeit und Format richtig sind, und drücken
Sie dann die Taste
, wenn die Einstellungen für
zur Bestätigung erneut.
Einsetzen und Formatieren einer
optionalen Speicherkarte
Diese Kamera unterstützt Secure Digital (SD und SDHC)
Speicherkarten (Standard, High Speed und High
Capacity) mit 32 MB bis hin zu 8 GB.
1. Schalten Sie die Kamera aus, und
öffnen Sie die Klappe des
Batterie-/Speicherkartenfachs.
2. Setzen Sie die optionale
Speicherkarte wie abgebildet in
den kleineren Steckplatz ein.
Achten Sie darauf, dass die
Speicherkarte einrastet.
Einrichten der Kamera 11
Deutsch
Page 82

3. Schließen Sie die Klappe des Batterie-/
Speicherkartenfachs, und schalten Sie die Kamera
ein.
Hinweis Wenn beim Einschalten der Kamera eine
Speicherkarte eingesetzt ist, zeigt die Kamera an, wie
viele Fotos sich bei der aktuellen Einstellung für die
Bildqualität auf der Speicherkarte speichern lassen.
Bei dieser Kamera können Sie maximal 2000 Bilder
auf einer Speicherkarte speichern.
Formatieren Sie neue Speicherkarten stets vor dem
ersten Einsatz. Durch die Formatierung werden alle Bilder
von der Speicherkarte entfernt. Später müssen Sie vor
der Formatierung zunächst die vorhandenen Bilder
übertragen.
1. Verschieben Sie bei eingeschalteter Kamera den
Schalter
2.
Drücken Sie die Taste
3.
Wählen Sie mit den Tasten
in die Position .
.
im Löschen die
Option Speicherk. formatieren aus und drücken Sie
dann die Taste
4.
Wählen Sie mit den Tasten
und drücken Sie dann die Taste
.
die Option Ja aus,
, um die Karte zu
formatieren.
Wenn Sie eine Speicherkarte einsetzen, werden alle
neuen Bilder und Videoclips nicht im internen Speicher,
sondern auf der Karte gespeichert.
Wenn Sie den internen Speicher verwenden und die dort
gespeicherten Bilder anzeigen möchten, müssen Sie die
Kamera ausschalten und dann die Speicherkarte
herausnehmen.
Deutsch
12 HP Photosmart M440/M540/M630 series
Page 83

Installieren der Software
Die HP Photosmart-Software bietet Funktionen zum
Übertragen von Bildern und Videoclips auf Ihren
Computer sowie zum Bearbeiten gespeicherter Bilder (u.
a. Rote Augen entfernen, Drehen, Zuschneiden und
Größe ändern).
Ihr Computer muss die Systemvoraussetzungen erfüllen,
die auf der Verpackung der Kamera angegeben sind,
damit die HP Photosmart-Software installiert werden
kann. Weitere Informationen zur Unterstützung Ihrer
Kamera durch Windows Vista finden Sie unter
www.hp.com/go/windowsvista (nur in englischer
Sprache).
Bei Problemen mit der Installation oder der Verwendung
der HP Photosmart-Software finden Sie weitere
Informationen auf der Website des technischen Supports
von Hewlett-Packard unter: www.hp.com/support.
Windows
1. Schließen Sie alle Programme, und deaktivieren Sie
ggf. vorübergehend die Virenschutzsoftware.
2. Legen Sie die CD mit der HP Photosmart-Software in
das CD-Laufwerk ein, und befolgen Sie die
Anweisungen auf dem Bildschirm. Wenn das
Installationsfenster nicht angezeigt wird, klicken Sie
auf Start und dann auf Ausführen. Geben Sie D:
\Setup.exe ein (wobei D für den Buchstaben Ihres
CD-Laufwerks steht), und klicken Sie dann auf OK.
3. Wenn die Installation der Software abgeschlossen ist,
aktivieren Sie die Virenschutzsoftware wieder.
Einrichten der Kamera 13
Deutsch
Page 84

Macintosh
1. Legen Sie die CD mit der HP Photosmart-Software in
das CD-Laufwerk ein.
2. Doppelklicken Sie auf dem Desktop auf das CDSymbol.
3. Doppelklicken Sie auf das Installationssymbol, und
befolgen Sie dann die Anweisungen auf dem
Bildschirm.
Nach Abschluss der Installation und Neustart des
Computers wird automatisch das Fenster
Systemeinstellungen angezeigt. Dieses Fenster enthält
die Einstellungen für die HP Photosmart-Kamera. Sie
können die Einstellungen so ändern, dass die HP
Photosmart-Software automatisch gestartet wird, wenn
Sie Ihre Kamera an den Macintosh anschließen. (Klicken
Sie für weitere Informationen zu diesem Thema im
Dialogfenster mit den Einstellungen für die
HP Photosmart-Kamera auf die Schaltfläche Hilfe.)
Deutsch
14 HP Photosmart M440/M540/M630 series
Page 85

3 Aufnehmen von Bildern
und Videoclips
Bringen Sie den Schalter entweder in die
Position
, um Videoclips aufzunehmen.
Aufnehmen eines Bilds
Sie können ein Bild aufnehmen, wenn
Sie sich im Modus
befinden.
1. Bringen Sie den Schalter
2. Erfassen Sie das Motiv in der
Bildanzeige.
3. Drücken Sie den Auslöser halb herunter, um Fokus
und Belichtung zu ermitteln und zu sperren.
Die Fokusklammern in der Bildanzeige leuchten
durchgängig grün, wenn der Fokus gesperrt ist.
4. Drücken Sie den Auslöser ganz herunter, um das
Bild aufzunehmen.
Nach Aufnahme eines Bilds erscheint dieses kurz in der
Bildanzeige der Kamera.
, um Bilder aufzunehmen, oder in die Position
Bildaufnahme
in die Position .
Aufnehmen von Bildern und Videoclips 15
Deutsch
Page 86

Aufnehmen eines Videoclips
Sie können einen Videoclip
aufnehmen, wenn Sie sich im Modus
Videoaufnahme befinden.
1. Bringen Sie den Schalter
in die Position .
2. Erfassen Sie das Motiv in der
Bildanzeige.
3. Drücken Sie den Auslöser halb herunter, um den
Fokus zu ermitteln und zu sperren.
Die Fokusklammern in der Bildanzeige leuchten
durchgängig grün, wenn der Fokus gesperrt ist.
4. Drücken Sie den Auslöser ganz herunter, um mit der
Aufnahme zu beginnen.
5. Drücken Sie erneut auf den Auslöser, und lassen sie
ihn wieder los, um die Videoaufnahme anzuhalten.
Nach Aufnahme eines Videoclips erscheint dieser kurz in
der Bildanzeige der Kamera.
Deutsch
16 HP Photosmart M440/M540/M630 series
Page 87

4 Anzeigen und Löschen
von Bildern und
Videoclips
Anzeigen von Bildern und
Videoclips
In der Wiedergabe können Sie Bilder und Videoclips
anzeigen und löschen.
1. Bringen Sie den Schalter
2. Blättern Sie mit den Tasten
Videoclips. Drücken Sie die Taste
erste Einzelbild eines Videoclips in der Bildanzeige
erscheint, um den jeweiligen Videoclip abzuspielen.
Hinweis Wenn Sie auch den Ton von Videoclips
hören möchten, übertragen Sie die Videoclips auf
Ihren Computer.
Löschen von Bildern
Während der Wiedergabe können Sie einzelne Bilder
löschen:
1. Bringen Sie den Schalter
2. Wählen Sie mit den Tasten
Videoclip aus.
3.
Drücken Sie die Taste
4.
Wählen Sie mit den Tasten
Option Dieses Bild aus und drücken Sie dann die
Taste
.
.
in die Position .
durch Ihre Bilder und
, sobald das
in die Position .
ein Bild oder einen
im Löschen die
Anzeigen und Löschen von Bildern und
Videoclips
Deutsch
17
Page 88

5 Übertragen und Drucken
von Bildern
Übertragen von Bildern
Führen Sie diese Arbeitsschritte aus, um Bilder und
Videoclips auf Ihren Computer zu übertragen.
Hinweis Wenn Sie eine große Anzahl an Bildern mit
einer hohen Auflösung von einer Speicherkarte auf
den Computer übertragen, kann dies bis zu zwei
Stunden dauern. Wenn Sie viele Bilder übertragen,
müssen die Batterien der Kamera vollständig
aufgeladen sein. Alternativ dazu können Sie auch
eine optionale HP Photosmart-Dockingstation oder
ein Speicherkartenlesegerät verwenden.
1. Schalten Sie die Kamera aus.
2. Schließen Sie die Kamera über
das im Lieferumfang der
Kamera enthaltene USB-Kabel
an den Computer an.
3. Schalten Sie die Kamera ein.
Wenn auf der Bildanzeige
angezeigt wird, dass die Kamera
an den Computer
angeschlossen ist, befolgen Sie die Anweisungen auf
dem Computerbildschirm, um die Bilder zu
übertragen. Wenn die HP Photosmart-Software
installiert ist und Sie weitere Informationen benötigen,
verwenden Sie die Hilfefunktion der HP PhotosmartSoftware.
Deutsch
18 HP Photosmart M440/M540/M630 series
Page 89
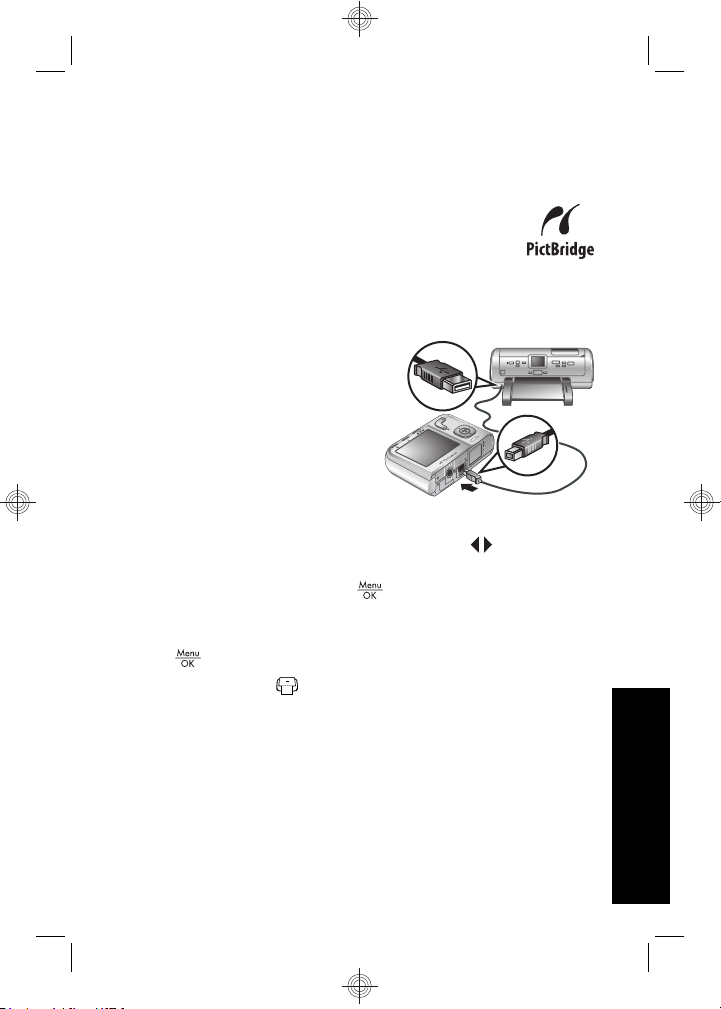
Drucken von Bildern über die
Kamera
Sie können die Kamera zum Drucken von
Bildern an einen beliebigen PictBridgekompatiblen Drucker anschließen.
1. Überprüfen Sie, ob der Drucker
eingeschaltet ist, ob Papier eingelegt wurde und keine
Fehlermeldungen vorliegen.
2. Schalten Sie die Kamera
aus. Schließen Sie die
Kamera über das im
Lieferumfang enthaltene
USB-Kabel an den
Drucker an, und schalten
Sie die Kamera wieder
ein.
3. Wenn die Kamera mit
dem Drucker verbunden ist, erscheint ein Bild in der
Bildanzeige. Drücken Sie die Tasten
druckende Bild auszuwählen.
4.
Drücken Sie die Taste
5. Markieren Sie im Menü Druckoptionen die Option
Dieses Bild jetzt drucken, und drücken Sie die Taste
, um mit dem Drucken zu beginnen.
Das Symbol
ausgewählten Bild. Dies zeigt an, dass das Bild
gerade gedruckt wird.
6. Nach Drucken des Bilds lösen Sie die Kamera wieder
vom Drucker.
erscheint in der Bildanzeige auf dem
.
, um das zu
Übertragen und Drucken von Bildern 19
Deutsch
Page 90

Weitere Informationen zu den Druckoptionen finden Sie
im elektronischen Benutzerhandbuch oder in der
Kamerahilfe, auf die Sie über alle Menüs zugreifen
können.
Deutsch
20 HP Photosmart M440/M540/M630 series
Page 91
6 Kurzreferenz zur Kamera
Verwenden Sie dieses Kapitel als Kurzreferenz für die
Kamerafunktionen. Weitere Informationen zu den
aufgeführten Kamerafunktionen finden Sie im
elektronischen Benutzerhandbuch oder in der Onlinehilfe
der Kamera.
Bildaufnahme, Videoaufnahme und Wiedergabe
•Die
•Die
• In der
Kameramenüs
Die Menüs ermöglichen Ihnen, Kameraeinstellungen
anzupassen, mit Bildern zu arbeiten und auf die
Kamerahilfe zuzugreifen.
• Innerhalb eines Menüs können Sie mit den Tasten
• Wenn Sie das Menü verlassen möchten, können Sie
Menü „Bild aufnehmen“ – Ermöglicht es Ihnen, die
Kameraeinstellungen anzupassen, die sich auf die
Eigenschaften von Bildern auswirken, die später mit Ihrer
Bildaufnahme ermöglicht es, Bilder in der
Bildanzeige anzuzeigen und aufzunehmen. Um die
Bildaufnahme zu aktivieren, schieben Sie den
Schalter
Videoaufnahme ermöglicht es Ihnen, Videos
in der Bildanzeige anzuzeigen und Videos
aufzuzeichnen. Um die
aktivieren, schieben Sie den Schalter
.
Wiedergabe können Sie Bilder und
Videoclips anzeigen und löschen. Bringen Sie zum
Aktivieren der
in die Position .
zur gewünschten Option wechseln.
jederzeit die Taste
auf .
Videoaufnahme zu
auf
Wiedergabe den Schalter
drücken.
Kurzreferenz zur Kamera 21
Deutsch
Page 92

Kamera aufgenommen werden. Bringen Sie zum
Zugreifen auf dieses Menü den Schalter
Position
, und drücken Sie die Taste . Sie können
eine der folgenden Einstellungen auswählen:
• Aufnahmemodus (Autom., Nahaufnahme, Stabile
Aufnahme, Theater, Landschaft, Portrait, Action,
Nachtportrait, Sonnenuntergang)
• Selbstauslöser
• Bildqualität
•Burst
• Farbe (M440 series)
• Datums-/Zeitstempel
• Kameraeinstellungen
• Kamerahilfe
Menü „Video aufnehmen“ – Ermöglicht Ihnen, die
Kameraeinstellungen anzupassen, die sich auf die
Eigenschaften von Videoclips auswirken, die später mit
Ihrer Kamera aufgenommen werden. Bringen Sie zum
Zugreifen auf dieses Menü den Schalter
Position
, und drücken Sie die Taste . Sie können
eine der folgenden Einstellungen auswählen:
• Selbstauslöser
• Kameraeinstellungen
• Kamerahilfe
Menü „Wiedergabe“ – Ermöglicht Ihnen, mit Bildern
zu arbeiten. Bringen Sie zum Zugreifen auf dieses Menü
den Schalter
die Taste
Einstellungen auswählen:
Deutsch
. Sie können eine der folgenden
in die Position , und drücken Sie
• Rote Augen entfernen
in die
in die
22 HP Photosmart M440/M540/M630 series
Page 93

• Drehen (M440 series)
• Zuschneiden (M440 series)
• Design-Galerie (Farbe ändern, Ränder hinzufügen,
Zuschneiden, Drehen) (M540/M630 series)
• Photosmart Express (Drucken, Share, Abzüge online
kaufen)
• Favoriten
• Anzeigen einer Diashow
• Bilder a. Karte versch.
• Kameraeinstellungen
• Kamerahilfe
Menü „Kameraeinstellungen“ – Ermöglicht Ihnen,
die Funktionsweise der Kamera zu ändern. Drücken Sie
zum Zugreifen auf dieses Menü die Taste
im Modus
, oder . Wählen Sie anschließend die Option
Kameraeinstellungen aus. Sie können eine der
folgenden Einstellungen auswählen:
• Anzeigehelligkeit
• Kameratöne
• Datum & Uhrzeit
• USB-Konfiguration
• Sprache
Menü „Kamerahilfe“ – Enthält Beschreibungen der
Kamerafunktionen und Tipps zum Aufnehmen von
Bildern. Drücken Sie zum Zugreifen auf dieses Menü die
Taste
anschließend die Option
im Modus , oder . Wählen Sie
Kamerahilfe aus. Sie können
eine der folgenden Einstellungen auswählen:
• Top Ten-Tipps
• Kamerazubehör
Kurzreferenz zur Kamera 23
Deutsch
Page 94
• Kameratasten
• Aufnahmemodi verwenden
• Design-Galerie verwenden (M540/M630 series)
• Photosmart Express verwenden
• Bilder drucken
• Videoclips aufnehmen
• Bilder und Videos anzeigen
• Favoriten markieren
• Bilder löschen
• Bilder übertragen
• Batterie-Management
• Unterstützung
• Kamerafunktionen kennen lernen
• Kamera-Kurztasten
•Info
Verlängern der Batteriebetriebsdauer
Zur Verlängerung der Batteriebetriebsdauer wird die
Bildanzeige bei Inaktivität nach einigen Minuten
ausgeschaltet. Wenn Sie eine beliebige Taste drücken,
wird die Kamera wieder aktiviert. Nach einer Inaktivität
von mehr als 5 Minuten wird die Kamera ausgeschaltet.
So verlängern Sie die Batteriebetriebsdauer noch weiter:
• Stellen Sie die
Anzeigehelligkeit auf Gering ein
(Einzelheiten finden Sie im elektronischen
Benutzerhandbuch).
• Stellen Sie die Kamera auf
Autom. Blitz ein (siehe
Anweisungen im elektronischen Benutzerhandbuch).
Deutsch
• Verwenden Sie den optischen Zoom, die
Videoaufnahme und die Bildanzeige nur selten.
24 HP Photosmart M440/M540/M630 series
Page 95

• Wenn Sie die Kamera nur zum Anzeigen von Bildern
einschalten, bringen Sie den Schalter
Position
diese Weise wird der Modus
. Schalten Sie danach die Kamera ein. Auf
Wiedergabe
in die
gestartet, ohne das Objektiv auszufahren.
• Setzen Sie die Kamera in eine optionale HP
Photosmart-Dockingstation ein, die mit Netzstrom
versorgt wird, wenn Sie Bilder übertragen oder
drucken.
Weitere Informationen zu Batterien finden Sie unter
www.hp.com/support. Suchen Sie nach dem Code
AA-400 oder lesen Sie im Anhang A des elektronischen
Benutzerhandbuchs nach.
Kurzreferenz zur Kamera 25
Deutsch
Page 96

Deutsch
26 HP Photosmart M440/M540/M630 series
Page 97

HP Photosmart M440/M540/
M630 series
Español
Page 98

Información legal y advertencias
© Copyright 2007 Hewlett-Packard Development Company, L.P.
La información que aparece en este documento está sujeta a cambios sin
previo aviso. Las únicas garantías de los productos y servicios de HP se
detallan en las declaraciones de garantía expresa que acompañan a
dichos productos y servicios. Nada de lo que aquí se incluya se
considerará como garantía adicional. HP no se hará responsable de los
Español
errores u omisiones técnicos o editoriales aquí contenidos.
Windows® es una marca comercial registrada de Microsoft Corporation
en EE.UU.
El logotipo SD es una marca comercial de su propietario.
Eliminación de desechos de equipamiento por parte de
usuarios en domicilios particulares dentro de la Unión
Europea
Este símbolo en el producto o en su embalaje indica que no debe
desecharlo con el resto de la basura de su domicilio. Bajo su
responsabilidad, deberá deshacerse de los desechos de equipamiento
llevándolos a un punto de reciclaje de material eléctrico y equipos
electrónicos. La recolección y reciclaje por separado de los desechos de
equipamiento ayudará a conservar los recursos naturales y asegurará que
se recicle de forma que se proteja la salud y el medio ambiente. Para
obtener más información acerca de dónde puede reciclar estos desechos,
póngase en contacto con su ayuntamiento, con el servicio de eliminación
de desechos o recogida de basuras, o con la tienda donde adquirió el
producto.
Introduzca la siguiente información para referencias futuras:
Número de modelo: _________
•
Número de serie: _________
•
Fecha de compra: _________
•
Page 99

Contenido
1 Introducción
Visualización de la Guía de usuario
electrónica ...............................................................5
Partes superior y posterior de la cámara ................6
Partes frontal, lateral e inferior de la cámara ..........7
2 Configuración de la cámara
Colocación de las pilas ............................................9
Encendido de la cámara ........................................10
Selección del idioma .............................................10
Configuración de la región ....................................10
Ajuste de la fecha y la hora ...................................10
Instalación y formateo de una tarjeta de
memoria opcional ..................................................11
Instalación del software .........................................12
Windows ..........................................................13
Macintosh ........................................................13
3 Toma de imágenes y grabación de videoclips
Captura de una imagen .........................................15
Grabación de un videoclip .....................................15
4 Revisión y eliminación de imágenes y videoclips
Revisión de imágenes y videoclips .......................17
Eliminación de una imagen ...................................17
5 Transferencia e impresión de imágenes
Transferencia de imágenes ...................................18
Impresión de imágenes desde la cámara .............19
6 Referencia rápida de la cámara .........................20
Español
3
Page 100

1 Introducción
Esta guía impresa de inicio rápido ofrece la información
necesaria para comenzar a utilizar las funciones básicas
de la cámara. Para obtener información detallada sobre
las funciones de la cámara, consulte la Guía de usuario
Español
electrónica (consulte Visualización de la Guía de usuario
electrónica en la página 5).
Guía de inicio rápido
Esta guía impresa le
ayudará a:
• Comenzar a utilizar la
cámara rápidamente.
• Instalar el software
HP Photosmart.
• Conocer las funciones
básicas de su cámara.
4 HP Photosmart M440/M540/M630 series
Guía de usuario
electrónica
La Guía de usuario
electrónica incluye:
• Descripciones de todas
las funciones de la
cámara.
• Información sobre las
pilas, además de:
• Duración de las
pilas ampliable.
• Tipos de pilas
compatibles.
• Una descripción de
los iconos
indicadores de
encendido.
• Asistencia de HP.
• Solución de
problemas.
• Especificaciones de la
cámara.
 Loading...