

Page 1

HPE Enterprise G2 Series Racks User
Guide
Abstract
This document provides guidance for using HPE Enterprise G2 Series racks.
Part Number: 878359-001
Published: March 2017
Edition: 1
Page 2

©
2017, Hewlett Packard Enterprise Development LP
Notices
The information contained herein is subject to change without notice. The only warranties for Hewlett Packard
Enterprise products and services are set forth in the express warranty statements accompanying such
products and services. Nothing herein should be construed as constituting an additional warranty. Hewlett
Packard Enterprise shall not be liable for technical or editorial errors or omissions contained herein.
Confidential computer software. Valid license from Hewlett Packard Enterprise required for possession, use,
or copying. Consistent with FAR 12.211 and 12.212, Commercial Computer Software, Computer Software
Documentation, and Technical Data for Commercial Items are licensed to the U.S. Government under
vendor's standard commercial license.
Links to third-party websites take you outside the Hewlett Packard Enterprise website. Hewlett Packard
Enterprise has no control over and is not responsible for information outside the Hewlett Packard Enterprise
website.
Acknowledgments
Intel®, Itanium®, Pentium®, Intel Inside®, and the Intel Inside logo are trademarks of Intel Corporation in the
United States and other countries.
Microsoft® and Windows® are either registered trademarks or trademarks of Microsoft Corporation in the
United States and/or other countries.
Adobe® and Acrobat® are trademarks of Adobe Systems Incorporated.
Java® and Oracle® are registered trademarks of Oracle and/or its affiliates.
UNIX® is a registered trademark of The Open Group.
Page 3

Contents
Configuration factors.................................................................................. 5
Preparing the rack for component installation......................................... 7
Rack configuration software................................................................................................................ 5
HPE eCo-Enterprise Configurator............................................................................................ 5
Optimum environment......................................................................................................................... 5
Space requirements..................................................................................................................5
Power requirements..................................................................................................................5
Temperature requirements........................................................................................................5
Airflow requirements.................................................................................................................6
Blanking panels........................................................................................................................ 6
Warning labels.....................................................................................................................................7
Checking the hardware........................................................................................................................8
Hardware kit contents...............................................................................................................8
Required tools...........................................................................................................................8
Removing the rack doors.....................................................................................................................8
Removing the front door........................................................................................................... 9
Removing the rear doors.......................................................................................................... 9
Removing the side panels................................................................................................................. 10
Stabilizing requirements.................................................................................................................... 11
Rack Tie-down Option kit........................................................................................................12
Installing components...............................................................................13
Installing components in a rack......................................................................................................... 13
Installing the cage nuts......................................................................................................................13
Installing the 1/4 turn hook-and-loop cabling strap clips....................................................................14
Rack options.............................................................................................. 16
Ordering rack options........................................................................................................................ 16
HPE Rack Baying kit options.............................................................................................................19
HPE Enterprise G2 Series rack specifications........................................20
Support and other resources................................................................... 23
Accessing Hewlett Packard Enterprise Support................................................................................23
Accessing updates............................................................................................................................ 23
Websites............................................................................................................................................23
Customer self repair.......................................................................................................................... 24
Documentation feedback...................................................................................................................24
Regulatory information............................................................................. 25
Turkey RoHS material content declaration........................................................................................25
Ukraine RoHS material content declaration...................................................................................... 25
Contents 3
Page 4

Warranty information......................................................................................................................... 25
4 Contents
Page 5

Configuration factors
Rack configuration software
To help you plan your rack configuration more efficiently, Hewlett Packard Enterprise provides eCo-Enterprise
Configurator, a powerful web-based service that enables you to build, store, and export end-to-end rack
configurations. Hewlett Packard Enterprise strongly recommends that you configure the rack using the eCoEnterprise Configurator, which provides factory default racking. The latest version of the software is available
on the
HPE eCo-Enterprise Configurator
The eCo-Enterprise Configurator provides factory default racking for Hewlett Packard Enterprise hardware.
This approach is aligned with the strategic direction to meet the needs and expectations of valued customers.
If you require a custom rack configuration, contact the Hewlett Packard Enterprise Customer Business Center
or an authorized partner for assistance.
If you require factory default racking for the Hewlett Packard Enterprise hardware portfolio, you can use the
HPE eCo-Enterprise Configurator, which is available on the Hewlett Packard Enterprise website.
Optimum environment
Specific requirements for space, power, temperature, and airflow must be met to provide optimum
performance with minimum maintenance for your rack environment.
Hewlett Packard Enterprise website.
For additional information, refer to the Best Practices document on the Hewlett Packard Enterprise website.
Space requirements
When deciding where to place your rack:
• At least 1219 mm (48 in) of clearance is needed all the way around the pallet and above the rack to enable
the removal of the packing material.
• At least 1219 mm (48 in) of clearance is needed in front of the rack to enable the door to open completely.
• At least 762 mm (30 in) of clearance is needed in the rear of the rack to provide access to components.
• At least 380 mm (15 in) of clearance is needed around a power supply to facilitate servicing.
Power requirements
When planning for power distribution requirements for your rack configuration:
• The power load must be balanced between available AC supply branch circuits.
• The overall system AC current load must not exceed 80% of the branch circuit AC current rating.
• If a UPS is used, the load should not exceed 80% of the marked electrical current rating for the UPS.
This equipment must be installed in accordance with local and regional electrical regulations governing the
installation of information technology equipment by licensed electricians. This equipment is designed to
operate in installations covered by the Nation Electric Code (ANSI/NFPA-70, 1993) and the code for
protection of Electronic Computer/Data Processing Equipment (NFPA-75, 1992).
For electrical power ratings on options, refer to the products rating label or user documentation supplied with
that option.
Temperature requirements
To ensure continued safe and reliable equipment operation, install or position the rack in a well-ventilated,
climate-controlled environment.
Configuration factors 5
Page 6

The operating temperature inside the rack is always higher than the room temperature and is dependent on
the configuration of equipment in the rack. Check the TMRA for each piece of equipment before installation.
CAUTION:
To reduce the risk of damage to the equipment when installing third-party options:
• Do not permit optional equipment to impede airflow around the component or to increase the internal rack
temperature beyond the maximum allowable limits.
• Do not exceed the manufacturer’s TMRA.
Airflow requirements
Hewlett Packard Enterprise rack-mountable products typically draw in cool air through the front and exhaust
warm air out through the rear of the rack. The front door of the rack, therefore, must be adequately ventilated
to enable ambient room air to enter the rack, and the rear door must be adequately ventilated to enable the
warm air to escape the rack. Do not block the ventilation apertures.
Blanking panels
If the front of the rack is not completely filled with components, the remaining gaps between the components
can cause changes in the airflow, which can adversely affect cooling within the rack. Cover these gaps with
blanking panels.
6 Airflow requirements
Page 7
Preparing the rack for component installation
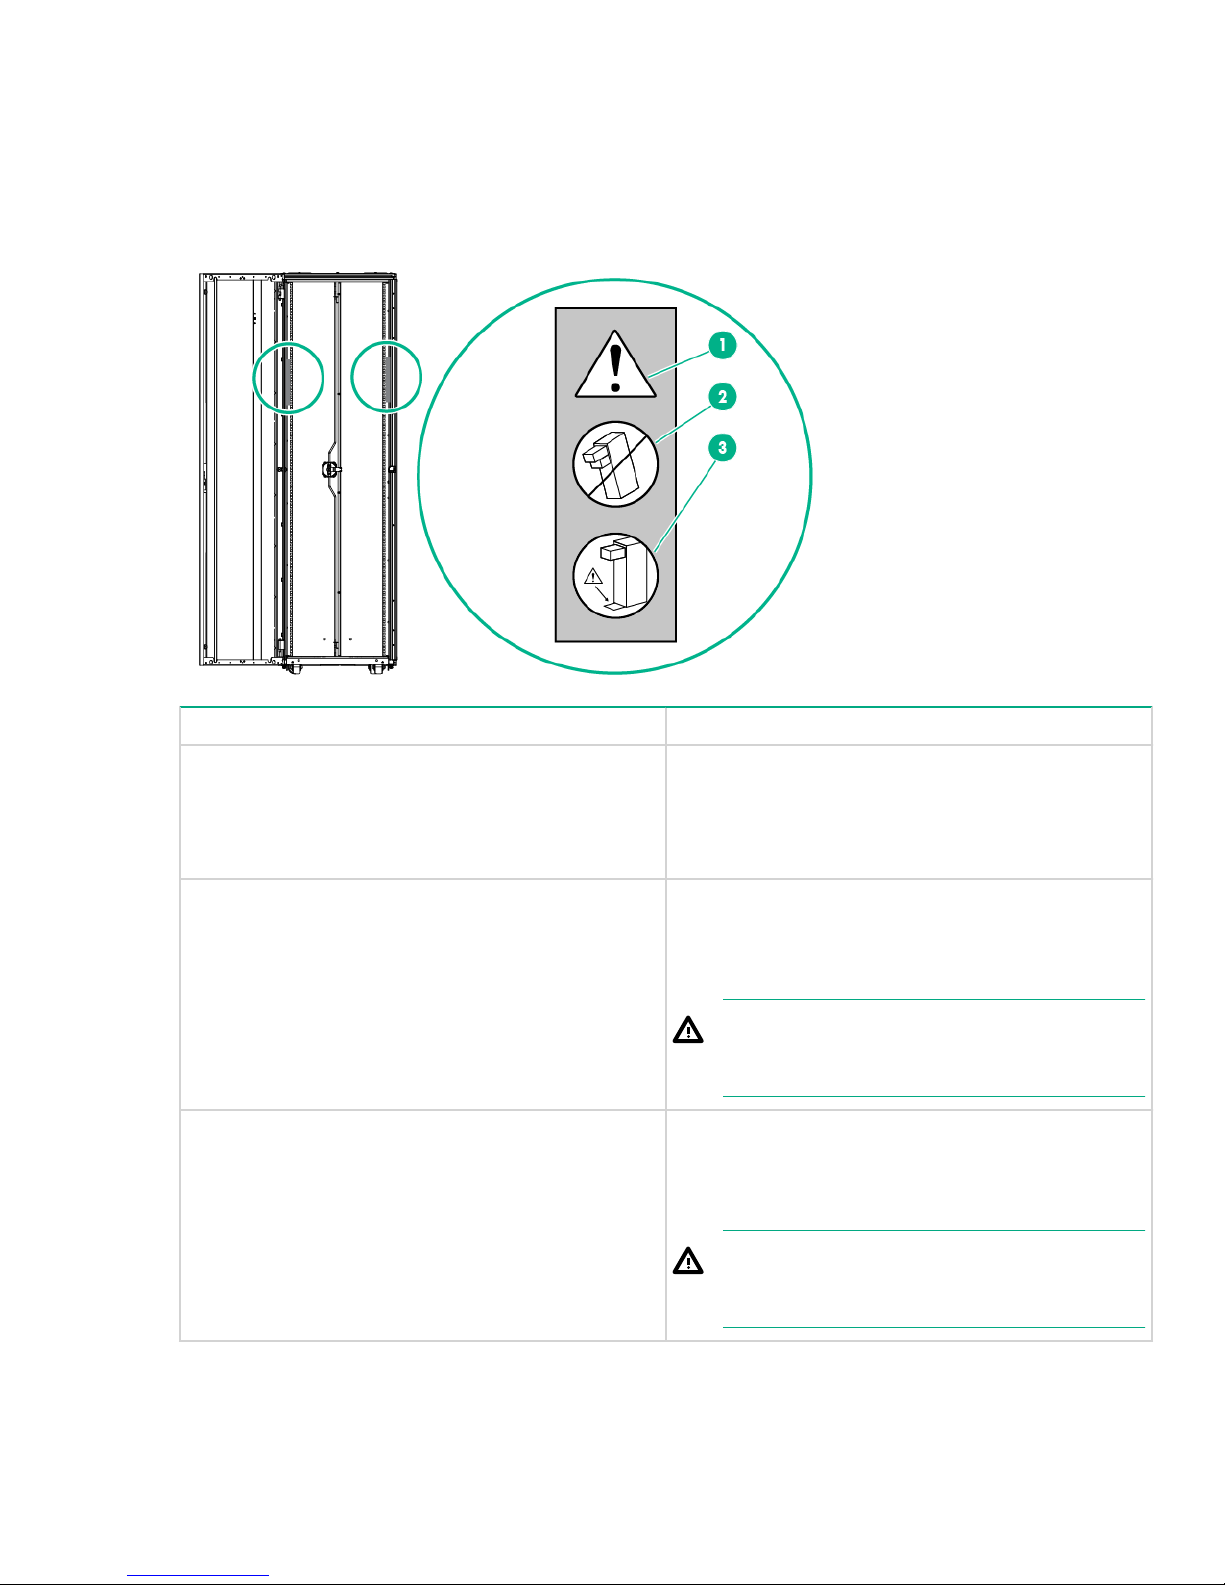
Warning labels
The following warning labels are located on the rack.
Item Description
1 This symbol in conjunction with any of the following
symbols indicates the presence of a potential hazard.
The potential for injury exists if warnings are not
observed. Consult your documentation for specific
details.
2
3
This symbol indicates the presence of risk of
personal injury as the rack may become unstable if
more than one component within the rack is
extended for any reason.
WARNING:
To reduce the risk of injury, only extend one
component at a time.
This symbol is to ensure that the rack is adequately
stabilized before extending a component outside of
the rack. Consult your documentation for specific
details on how to stabilize the rack.
WARNING:
To reduce the risk of injury, verify the rack is
stabilized.
Preparing the rack for component installation 7
Page 8

Checking the hardware
2
1
3
After unpacking the component to be installed, locate the documentation that was shipped with that
component. Verify that you received all of the listed hardware pieces.
You will typically have extra fasteners after completing your component installation.
IMPORTANT:
Retain the extra fasteners for future use.
Hardware kit contents
If any of the following items are missing or damaged, contact your Hewlett Packard Enterprise authorized
reseller.
Item Description Quantity
1 Door/side panel key 2
2 Leveling pads 4
3 Baying bracket, 24" 4
4 Baying bracket, 6mm 4
Required tools
The following tools are required for installation:
• Flathead screwdriver
• T-25 Torx driver
• T-30 Torx driver
• Adjustable wrench
• Cage nut insertion tool
For comfort and efficiency while setting up your rack, use power tools where applicable.
Removing the rack doors
To provide access to all sides of the rack while you are installing the various components, first remove the
rack doors. If your rack has side panels, also remove them before installing mounting brackets and other
hardware.
8 Checking the hardware
Page 9

Removing the front door
Procedure
1. Unlock the door and open it.
2. Lift the top hinge pin up, and then tilt the door away from the rack.
3. Lift the door up to remove it from the bottom hinge. Store the door in an upright position, taking care to
protect it from damage.
Removing the rear doors
1. Unlock the doors, and then open them.
Removing the front door 9
Page 10

1
2
2. Open the hinge brackets by pulling up on the top hinge pin and pulling down on the bottom hinge pin for
1
2
each door.
3. Lift the rear doors off of the hinge brackets (1), and remove them from the rack (2). Store the doors in an
upright position, taking care to protect them from damage.
Removing the side panels
Procedure
1. Unlock the top side panel.
2. Tilt the panel at a 45 degree angle and slide it away from the rack.
10 Removing the side panels
Page 11

1
3
2
3. Repeat steps 1 and 2 for the bottom side panel.
1
3
2
4. Store the panels in an upright position, taking care to protect them from damage.
To replace the side panels, reverse this procedure.
Stabilizing requirements
Rack stability is important when equipment is routinely installed, removed, or accessed within the rack.
Stabilization can be achieved through the use of the Rack Tie-Down Option Kit.
The stabilizer kit is either required or recommended, depending on your rack configuration. There are four
stabilizer kit options.
• The standard 600-mm (23.6 in) or 800-mm (31.5 in) front foot is required with deployments of stand-alone
racks. Rack rows with four or more bayed racks, without a single rack-mountable component exceeding
99.8 kg (220 lb), do not need a stabilizer kit installed.
• The heavy duty 600-mm (23.6 in) front foot is required when a single rack-mountable component weighing
99.8 kg (220 lb) or more is installed in a stand-alone rack or in a rack belonging to a rack row of three or
fewer bayed racks.
Observe the following guidelines when using multiple-rack configurations:
Stabilizing requirements 11
Page 12

• A stabilizer kit is required or recommended, depending on your rack configuration.
1
2
3
4
• The side feet are required for standalone racks.
• The number of baying kits needed is one less than the total number of racks in a row.
• Position and install the baying option kit before populating the racks with components.
• The weight of the rack must rest on the leveling feet.
Rack Tie-down Option kit
The Rack Tie-Down Option kit is used to secure racks to the floor.
Hewlett Packard Enterprise recommends having the building structural engineer drill the holes. Secure the
rack to the floor with approved bolts and washers.
For more information, see the rack options installation guide for HPE Advanced and Enterprise G2 Series
Racks.
12 Rack Tie-down Option kit
Page 13

Installing components
Installing components in a rack
The following steps outline the sequence for installing rack-mountable components in a rack.
IMPORTANT:
These installation instructions are for standard installations. For specific installation instructions, refer to
the documentation included with the component.
Hewlett Packard Enterprise strongly recommends installing a stabilizer foot before any other component.
Install 0U devices first, such as PDUs, console switches, and so on.
Procedure
1. Install the cage nuts into the rack (if required).
2. Prepare and install the rails into the rack.
3. Prepare and install the component into the rack and secure it.
4. Attach the cable management arm to the rack and then to the component.
5. Attach any cables and power cords. Be sure to adhere to all cautions and warnings contained in the
individual component installation instructions.
6. Remove the cable access panel and route the cables.
Installing the cage nuts
Use the cage nut insertion tool to install the cage nuts on the inside of the mounting rails.
Procedure
1. Hook the bottom lip of the cage nut in the square-rail perforation.
2. Insert the tip of the insertion tool through the perforation and hook the top lip of the cage nut.
3. Use the insertion tool to pull the cage nut through the hole until the top lip snaps into position.
Installing components 13
Page 14

Installing the 1/4 turn hook-and-loop cabling strap clips
Procedure
1. Route and secure your cables with the hook-and-loop cabling strap clips.
2. Turn the hook-and-loop cabling strap clip at a slight angle to align the square nut with the square hole on
the rack.
3. Insert the square nut into the square hole on the rack, and then turn it at a 45 degree angle to lock it into
place.
4. Bundle rack cables as required.
14 Installing the 1/4 turn hook-and-loop cabling strap clips
Page 15

Installing components 15
Page 16

Rack options
Ordering rack options
Hewlett Packard Enterprise provides several rack option kits to complement or complete your rack solution.
The following table lists the available rack option kits.
For information about ordering rack option kits, see the
nearest authorized reseller.
HPE Advanced and Enterprise G2 Series racks
Rack option kit Part number Description
Rack Tie-down kit
100 Kilo Sliding Shelf kit 234672-B21 This kit enables easy access to
1U Universal Filler Panel
Airflow Optimization kit BW930A The Airflow Optimization kit
Ballast kit 120672-B21 The Ballast kit provides additional
AF076A (600mm)
--or--
BW927A (800mm)
BW928A (10pk)
--or--
BW929A (100pk)
Hewlett Packard Enterprise website, or contact your
Seismic anchoring of rack (IBC
zone 4 complaint)
various rack components.
This kit ensures proper airflow
within the rack.
Improves rack airflow of your rack
by preventing hot air recirculation
to the front of the rack
stability and support when heavy
equipment is installed, removed,
or accessed within the rack.
Baying kit P9L12A The Baying kit joins multiple racks
Offset baying kit
16 Rack options
BW941A
--or--
BW952A
of the same series, height, and
depth.
This kit comes standard with HPE
Advanced G2 Series racks.
The Offset Baying kit enables you
to connect multiple racks of
different depths.
To determine which Offset baying
kit to use for your rack pair, see
Baying kit options.
Table Continued
Page 17

Rack option kit Part number Description
Cable Management Bracket kit AF099A
Cable Management Ring 168233-B21
Cable Management tray kit
383982-B21 (600mm)
--or--
383983-B21 (800mm)
--or--
383984-B21 (Rack top cable
management transfer tray)
The Cable Management Bracket
kit enables you to manage your
cable configurations.
This kit includes a 1U and 2U front
cable entry panel with brush
inserts, 2x crossover cable
brackets, 10x D-rings, 10x hook
and loop straps (8 in), 10x hook
and loop straps (10 in), and
mounting hardware.
The Cable Management Ring kit
allows cables to be routed and
organized within the rack.
This kit includes 10 "D" rings.
The HPE Rack Top Cable
Management Tray connects two
aisles of racks with HPE Rack Top
Cable trays to run overhead
cables.
Hook-and-loop Cabling Strap Clip
kit
379820-B21 Hook-and-loop Cabling Strap kits
enable you to manage your cable
configurations.
1/4 Turn Hook and Loop Cabling
Strap kit
BW963A (10 PK)
--or--
Hook-and-loop Cabling Strap kits
enable you to manage your cable
configurations.
BW964A (100 PK)
Custom Door Branding kit BW935A The Custom Door Branding kit
enables you to add your own
brand name label to the rack
Ground Bonding kit P9L11A
The Rack Grounding kit can be
used to reduce the level of
electromagnetic emissions outside
of the rack.
This kit includes (3) 6" grounding
straps, (3) 14.5" grounding straps,
(6) 6" grounding straps with
connectors, and (6) 14.5"
grounding straps with connectors.
LED light kit BW939A The LED light kit enables you to
add LED lighting to the rack
Rack Hardware kit H6J85A Mounting hardware kit
Table Continued
Rack options 17
Page 18

Rack option kit Part number Description
Roof Mount Fan kit
257413-B21 (110V)
The Roof Mount fan kit enhances
natural convection cooling within
--or--
the rack
257414-B21 (220V)
Server/utility shelf kit 253449-B21 The Server/utility Shelf kit holds
rack components inside of the
rack.
Side Panel kit
P9L15A (42U, 1075mm)
--or--
P9L16A (42U, 1200mm)
The Side Panel kit provides
enclosures for the sides of a rack.
This kit comes standard with HPE
Advanced G2 Series racks.
--or--
P9L17A (48U, 1075mm)
--or--
P9L18A (48U, 1200mm)
Stabilizer kit
BW932A (600mm)
Anti-tip stabilizer kits provide
stability and support when
--or--
BW933A (800mm)
equipment is installed, removed,
or accessed within the rack. Heavy
duty Stabilizer kits should be used
when a single racked component
exceeds 200lbs.
Heavy Duty V2 Stabilizer kit BW961A (600mm)
Anti-tip stabilizer kits provide
stability and support when
equipment is installed, removed,
or accessed within the rack. Heavy
duty Stabilizer kits should be used
when a single racked component
exceeds 200lbs.
This kit is only available for
600mm wide racks.
Depth Adjustable Fixed Rail kit 332558-B21 This kit contains two - 48.26cm (19
inches) to 78.74cm (31 inches) depth adjustable rails that mount
rack-mountable servers, storage
boxes, UPSs, and networking
products in third party racks. It
also allows for most third-party
rack-mountable products to be
mounted in racks.
2U Universal Locking Drawer 361591-B21 This locking drawer is used to
store instruction manuals, CD,
tools or other items that is required
frequently used at the rack and
requires safekeeping. Kit includes
sliding rails and lock with keys.
18 Rack options
Page 19

HPE Rack Baying kit options
Not all baying kits fit with all 42u x 600mm racks. Use the table below to determine which baying kit to use
based on how the racks are set up in your data center. For example, if you want to connect a 42u x 600mm x
1200mm legacy rack to a 42u x 600mm x 1075mm HPE Advanced G2 series rack, using the table below, you
can determine that an Offset baying kit (BW941A) is needed to connect the two racks.
NOTE:
The term "legacy" refers to any rack older than the HPE Advanced and Enterprise G2 Series racks.
Legacy rack
42u x 600mm x
1000mm
Legacy rack
42u x 600mm x
1075mm
Legacy rack
42u x 600mm x
1200mm
HPE Advanced &
Enterprise G2 racks
42u x 600mm x
1075mm
Legacy rack
42u x 600mm
x 1000mm
Baying kit
(P9L12A)
Offset baying
kit (BW952A)
N/A Offset baying
N/A Baying kit
Legacy rack
42u x 600mm
x 1075mm
Offset baying
kit (BW952A)
Baying kit
(P9L12A)
kit (BW941A)
(P9L12A)
Legacy rack
42u x 600mm
x 1200mm
N/A N/A N/A
Offset baying
kit (BW941A)
Baying kit
(P9L12A)
Offset baying
kit (BW941A)
HPE Advanced
& Enterprise
G2 racks
42u x 600mm x
1075mm
Baying kit
(P9L12A)
Offset baying kit
(BW941A)
Baying kit
(P9L12A)
HPE Advanced
& Enterprise
G2 racks
42u x 600mm x
1200mm
N/A
Baying kit
(P9L12A)
N/A
HPE Advanced &
Enterprise G2 racks
42u x 600mm x
1200mm
N/A N/A Baying kit
(P9L12A)
N/A Baying kit
(P9L12A)
HPE Rack Baying kit options 19
Page 20

HPE Enterprise G2 Series rack specifications
HPE 42U 600x1075mm Enterprise G2 Pallet rack
Part
Number
P9K37A 42U 597.92 mm
HPE 42U 600x1075 Enterprise G2 Shock rack
Part
Number
P9K38A 42U 597.92 mm
HPE 42U 600x1200mm Enterprise G2 Pallet rack
Part
Number
P9K39A 42U 597.92 mm
HPE 42U 600x1200mm Enterprise G2 Shock rack
U height Width Depth Dynamic CTO load
1,125.22 mm
(23.54 in)
U height Width Depth Dynamic CTO load
(23.54 in)
U height Width Depth Dynamic CTO load
(23.54 in)
(44.30 in)
1,125.22 mm
(44.30 in)
1,300.20 mm
(51.29 in)
Static Load
(gross)
— 1,131.61 kg
(3,000 lb)
Static Load
(gross)
1,133.98 kg
(2,500 lb)
(gross)
— 1,131.61 kg
1,131.61 kg
(3,000 lb)
Static Load
(3,000 lb)
Part
Number
P9K40A 42U 597.92 mm
HPE 42U 800x1075mm Enterprise G2 Pallet rack
Part
Number
P9K41A 42U 797.80 mm
HPE 42U 800x1075mm Enterprise G2 Shock rack
Part
Number
P9K42A 42U 797.80 mm
HPE 42U 800x1075mm Enterprise G2 Network Pallet rack
U height Width Depth Dynamic CTO load
1,300.20 mm
(23.54 in)
U height Width Depth Dynamic CTO load
(31.41 in)
U height Width Depth Dynamic CTO load
(31.41 in)
(51.29 in)
1,125.22 mm
(44.30 in)
1,125.22 mm
(44.30 in)
Static Load
(gross)
1,133.98 kg
(2,500 lb)
(gross)
— 1,131.61 kg
(gross)
1,133.98 kg
(2,500 lb)
1,131.61 kg
(3,000 lb)
Static Load
(3,000 lb)
Static Load
1,131.61 kg
(3,000 lb)
20 HPE Enterprise G2 Series rack specifications
Page 21

Part
Number
U height Width Depth Dynamic CTO load
(gross)
Static Load
P9K43A 42U 797.80 mm
(31.41 in)
1,125.22 mm
(44.30 in)
HPE 42U 800x1200mm Enterprise G2 Pallet rack
Part
U height Width Depth Dynamic CTO load
Number
P9K45A 42U 797.80 mm
(31.41 in)
1,300.20 mm
(51.19 in)
HPE 42U 800x1200mm Enterprise G2 Shock rack
Part
U height Width Depth Dynamic CTO load
Number
P9K46A 42U 797.80 mm
(31.41 in)
1,300.20 mm
(51.19 in)
HPE 42U 800x1200mm Enterprise G2 Network Shock rack
Part
U height Width Depth Dynamic CTO load
Number
— 1,131.61 kg
(3,000 lb)
Static Load
(gross)
— 1,131.61 kg
(3,000 lb)
Static Load
(gross)
1,133.98 kg
(2,500 lb)
1,131.61 kg
(3,000 lb)
Static Load
(gross)
P9K48A 42U 797.80 mm
(31.41 in)
1,300.20 mm
(51.19 in)
HPE 48U 600x1075mm Enterprise G2 Shock rack
Part
U height Width Depth Dynamic CTO load
Number
P9K50A 48U 597.92 mm
(23.54 in)
1,125.22 mm
(44.30 in)
HPE 48U 600x1200mm Enterprise G2 Pallet rack
Part
U height Width Depth Dynamic CTO load
Number
P9K51A 48U 597.92 mm
(23.54 in)
1,300.20 mm
(51.19 in)
HPE 48U 600x1200mm Enterprise G2 Shock rack
Part
U height Width Depth Dynamic CTO load
Number
1,133.98 kg
(2,500 lb)
1,131.61 kg
(3,000 lb)
Static Load
(gross)
1,133.98 kg
(2,500 lb)
1,131.61 kg
(3,000 lb)
Static Load
(gross)
— 1,131.61 kg
(3,000 lb)
Static Load
(gross)
P9K52A 48U 597.92 mm
(23.54 in)
1,300.20 mm
(51.19 in)
1,133.98 kg
(2,500 lb)
1,131.61 kg
(3,000 lb)
HPE Enterprise G2 Series rack specifications 21
Page 22

HPE 48U 800x1075mm Enterprise G2 Shock rack
Part
U height Width Depth Dynamic CTO load
Number
P9K54A 48U 797.80 mm
(31.41 in)
1,125.22 mm
(44.30 in)
HPE 48U 800x1075mm Enterprise G2 Network Pallet rack
Part
U height Width Depth Dynamic CTO load
Number
P9K55A 48U 797.80 mm
(31.41 in)
1,125.22 mm
(44.30 in)
HPE 48U 800x1200mm Enterprise G2 Pallet rack
Part
U height Width Depth Dynamic CTO load
Number
P9K57A 48U 797.80 mm
(31.41 in)
1,300.20 mm
(51.19 in)
HPE 48U 800x1200 Enterprise G2 Shock rack
Static Load
(gross)
1,133.98 kg
(2,500 lb)
1,131.61 kg
(3,000 lb)
Static Load
(gross)
— 1,131.61 kg
(3,000 lb)
Static Load
(gross)
1,133.98 kg
(2,500 lb)
1,131.61 kg
(3,000 lb)
Part
U height Width Depth Dynamic CTO load
Number
P9K58A 48U 797.80 mm
(31.41 in)
1,300.20 mm
(51.19 in)
HPE 48U 800x1200 Enterprise G2 Network Shock rack
Part
U height Width Depth Dynamic CTO load
Number
P9K60A 48U 797.80 mm
(31.41 in)
1,300.20 mm
(51.19 in)
(gross)
1,133.98 kg
(2,500 lb)
(gross)
1,133.98 kg
(2,500 lb)
Static Load
1,131.61 kg
(3,000 lb)
Static Load
1,131.61 kg
(3,000 lb)
22 HPE Enterprise G2 Series rack specifications
Page 23

Support and other resources
Accessing Hewlett Packard Enterprise Support
• For live assistance, go to the Contact Hewlett Packard Enterprise Worldwide website:
http://www.hpe.com/assistance
• To access documentation and support services, go to the Hewlett Packard Enterprise Support Center
website:
http://www.hpe.com/support/hpesc
Information to collect
• Technical support registration number (if applicable)
• Product name, model or version, and serial number
• Operating system name and version
• Firmware version
• Error messages
• Product-specific reports and logs
• Add-on products or components
• Third-party products or components
Accessing updates
• Some software products provide a mechanism for accessing software updates through the product
interface. Review your product documentation to identify the recommended software update method.
• To download product updates:
Hewlett Packard Enterprise Support Center www.hpe.com/support/hpesc
Hewlett Packard Enterprise Support Center: Software
downloads
Software Depot www.hpe.com/support/softwaredepot
• To subscribe to eNewsletters and alerts:
www.hpe.com/support/e-updates
• To view and update your entitlements, and to link your contracts and warranties with your profile, go to the
Hewlett Packard Enterprise Support Center More Information on Access to Support Materials page:
www.hpe.com/support/AccessToSupportMaterials
IMPORTANT:
Access to some updates might require product entitlement when accessed through the Hewlett Packard
Enterprise Support Center. You must have an HPE Passport set up with relevant entitlements.
Websites
www.hpe.com/support/downloads
General websites
Hewlett Packard Enterprise Information Library www.hpe.com/info/EIL
Support and other resources 23
Page 24

Hewlett Packard Enterprise Support Center
www.hpe.com/support/hpesc
Contact Hewlett Packard Enterprise Worldwide
Subscription Service/Support Alerts
Software Depot
Customer Self Repair
Insight Remote Support
Serviceguard Solutions for HP-UX
Single Point of Connectivity Knowledge (SPOCK)
Storage compatibility matrix
Storage white papers and analyst reports www.hpe.com/storage/whitepapers
For additional websites, see Support and other resources.
Customer self repair
Hewlett Packard Enterprise customer self repair (CSR) programs allow you to repair your product. If a CSR
part needs to be replaced, it will be shipped directly to you so that you can install it at your convenience.
Some parts do not qualify for CSR. Your Hewlett Packard Enterprise authorized service provider will
determine whether a repair can be accomplished by CSR.
www.hpe.com/assistance
www.hpe.com/support/e-updates
www.hpe.com/support/softwaredepot
www.hpe.com/support/selfrepair
www.hpe.com/info/insightremotesupport/docs
www.hpe.com/info/hpux-serviceguard-docs
www.hpe.com/storage/spock
For more information about CSR, contact your local service provider or go to the CSR website:
http://www.hpe.com/support/selfrepair
Documentation feedback
Hewlett Packard Enterprise is committed to providing documentation that meets your needs. To help us
improve the documentation, send any errors, suggestions, or comments to Documentation Feedback
(docsfeedback@hpe.com). When submitting your feedback, include the document title, part number, edition,
and publication date located on the front cover of the document. For online help content, include the product
name, product version, help edition, and publication date located on the legal notices page.
24 Customer self repair
Page 25

Regulatory information
To view the regulatory information for your product, view the Safety and Compliance Information for Server,
Storage, Power, Networking, and Rack Products, available at the Hewlett Packard Enterprise Support Center:
www.hpe.com/support/Safety-Compliance-EnterpriseProducts
Additional regulatory information
Hewlett Packard Enterprise is committed to providing our customers with information about the chemical
substances in our products as needed to comply with legal requirements such as REACH (Regulation EC No
1907/2006 of the European Parliament and the Council). A chemical information report for this product can be
found at:
www.hpe.com/info/reach
For Hewlett Packard Enterprise product environmental and safety information and compliance data, including
RoHS and REACH, see:
www.hpe.com/info/ecodata
For Hewlett Packard Enterprise environmental information, including company programs, product recycling,
and energy efficiency, see:
www.hpe.com/info/environment
Turkey RoHS material content declaration
Ukraine RoHS material content declaration
Warranty information
To view the warranty for your product, see the Safety and Compliance Information for Server, Storage, Power,
Networking, and Rack Products document, available at the Hewlett Packard Enterprise Support Center:
www.hpe.com/support/Safety-Compliance-EnterpriseProducts
Additional warranty information
HPE ProLiant and x86 Servers and Options www.hpe.com/support/ProLiantServers-Warranties
HPE Enterprise Servers www.hpe.com/support/EnterpriseServers-Warranties
HPE Storage Products www.hpe.com/support/Storage-Warranties
HPE Networking Products www.hpe.com/support/Networking-Warranties
Regulatory information 25
 Loading...