

Page 1
www.hp.com/go/pcaccessories
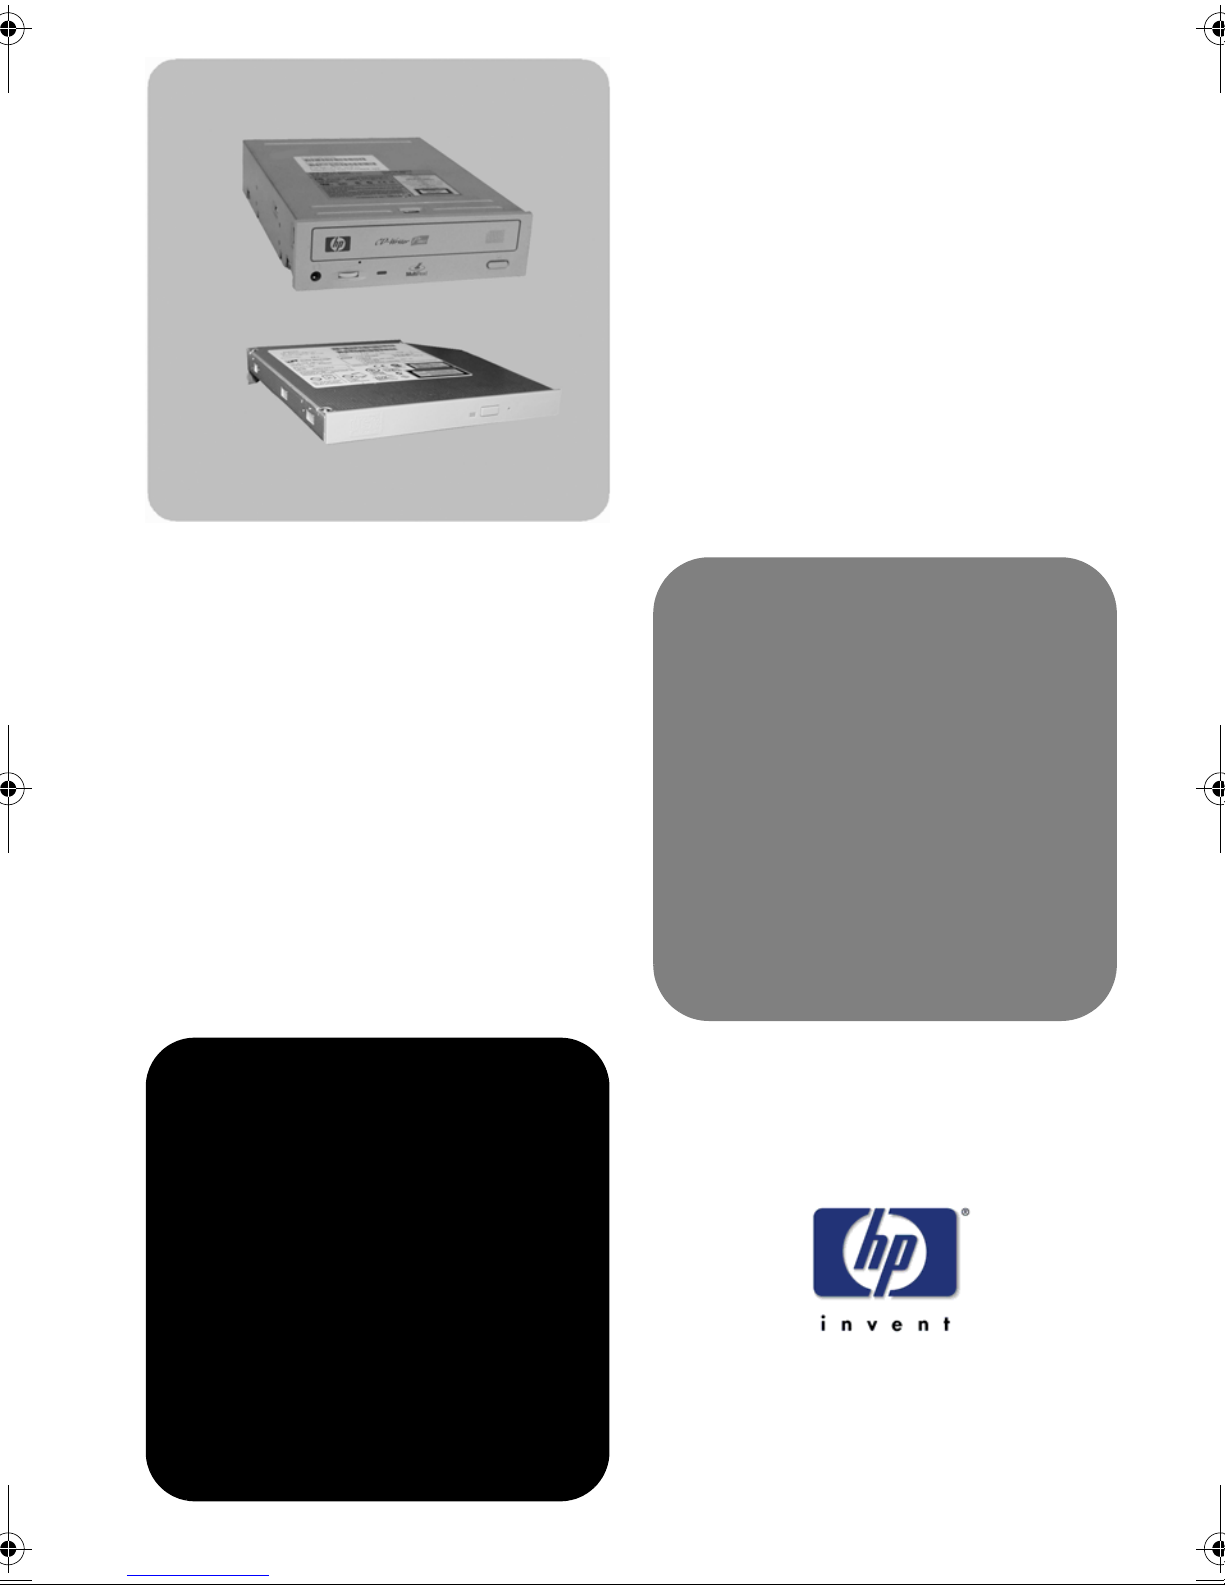
hp 24x 10x 40x max
ide cd-rw drive
p1543b
hp slim 8x 8x 24x max
ide cd-rw drive
p5092a
installation guide
installationshanbuch
guide d’installation
guía de instalación
léase este primero
guida di installazione
Page 2

Notice
The information contained in this document is subject to change without notice.
Hewlett-Packard makes no warranty of any kind with regard to this material, including, but not limited to, the
implied warranties of merchantability and fitness for a particular purpose. Hewlett-Packard shall not be liable
for errors contained herein or for incidental or consequential damages in connection with the furnishing,
performance, or use of this material. Hewlett-Packard assumes no responsibility for the use or reliability of its
hardware or software on equipment that is not furnished by Hewlett-Packard or equipment for which it is not
intended. This document contains proprietary information that is protected by copyright. All rights are
reserved. No part of this document may be photocopied, reproduced, or translated to another language.
MyCD™ is a trademark of VERITAS Software. Microsoft®, MS®, MS-DOS®, Windows®, and Windows NT®
are U.S. registered trademark of Microsoft Corporation.
Hinweis
Inhaltliche Änderungen vorbehalten.
Hewlett-Packard übernimmt keine Garantie welcher Art auch immer für diese Ausrüstung, einschließlich der
(doch nicht begrenzt auf die) Qualitätsgarantie und die Garantie bezüglich Eignung für einen bestimmten
Zweck. Hewlett-Packard haftet nicht für in dieser Dokumentation enthaltene Fehler oder für unbeabsichtigte
oder indirekte Schäden in Verbindung mit der Lieferung, der Leistung oder der Benutzung der Ausrüstung.
Hewlett-Packard übernimmt keine Haftung fur den Betrieb oder die Zuverlässigkeit seiner Software, wenn
diese auf Hardware benutzt wird, die nicht von Hewlett-Packard geliefert wurde. Dieses Dokument enthält
proprietäre Informationen, die durch das Urheberrecht geschützt sind. Alle Rechte vorbehalten. Dieses
Dokument darf ohne vorherige schriftliche Genehmigung der Hewlett-Packard Company weder ganz noch
teilweise fotokopiert, reproduziert oder übersetzt werden. MyCD™ ist ein Warenzeichen von VERITAS
Software. Microsoft®, MS®, MS-DOS®, Windows®, und Windows NT® sind in den USA eingetragene
Warenzeichen der Microsoft Corporation.
Avertissement
Les informations contenues dans ce document peuvent être modifiées sans préavis.
Hewlett-Packard ne donne aucune garantie de quelque sorte que ce soit concernant, sans que ce soit limitatif,
les garanties implicites de qualité commerciale de ce matériel, ou la bonne adaptation de celui-ci à un usage
particulier. Hewlett-Packard n’est pas responsable des erreurs pouvant apparaître dans ce manuel et n’est pas
non plus responsable des dommages directs ou indirects résultant de l’équipement, des performances et de
l’utilisation de ce matériel. Hewlett-Packard ne saurait être tenu pour responsable de l’utilisation et de la
fiabilité de ce matériel et de son logiciel sur des matériels non fournis par Hewlett-Packard ou non prévus pour
leur utilisation. Les informations contenues dans ce document sont la propriété de Hewlett-Packard et sont
protégées par les lois relatives au copyright. Tous droits réservés. Toute copie, reproduction ou traduction
dans d’autres langues est interdite.
MyCD™ est une marque commerciale de VERITAS Software. Microsoft®, MS®, MS-DOS®, Windows® et
Windows NT® sont des marques déposées aux Etats-Unis de Microsoft Corporation.
Aviso
La información contenida en este documento está sujeta a modificación sin previo aviso.
Hewlett-Packard no ofrece garantía alguna con respecto a este material, incluyendo, aunque sin limitarse a, las
garantías implícitas de comerciabilidad e idoneidad para fines específicos. Hewlett-Packard no se hace
responsable de los errores que pueda contener este documento ni de los daños accidentales o circunstanciales
derivados del suministro, interpretación o uso de este material. Hewlett-Packard no asume ninguna
responsabilidad por el uso o fiabilidad de su hardware o software en equipos que no hayan sido proporcionados por
Hewlett-Packard o en equipos para los que no se haya diseñado.Este documento contiene información propiedad
de HP que se encuentra protegida por copyright. Reservados todos los derechos. Se prohibe la fotocopia,
reproducción o traducción a otro idioma de cualquier parte de este documento. MyCD™ es una marca
comercial de VERITAS Software. Microsoft®, MS®, MS-DOS®, Windows® y Windows NT® son marcas
comerciales registradas en EE.UU. de Microsoft Corporation.
Avviso
Le informazioni contenute in questo documento sono soggette a cambiamento senza preavviso.
Hewlett-Packard non rilascia garanzie di alcun tipo riguardo a questo materiale, comprese le garanzie implicite
di commerciabilità e di idoneità per uno scopo particolare. Hewlett-Packard non sarà ritenuta responsabile per
errori contenuti in questo documento, né per danni accidentali o conseguenti alla fornitura, alle prestazioni o
all’uso di questo materiale. Hewlett-Packard non si assume alcuna responsabilità riguardo all’uso o
all’affidabilità del proprio software su apparecchiature di altri produttori. Questo documento contiene
informazioni di proprietà protette da copyright. Tutti i diritti sono riservati. Nessuna parte di questo
documento può essere fotocopiata, riprodotta o tradotta in un’altra lingua. MyCD™ è un marchio depositato
del software VERITAS. Microsoft®, MS®, MS-DOS®, Windows® e Windows NT® sono marchi di Microsoft
Corporation depositati negli Stati Uniti.
HP France, 38053 Grenoble, Cedex 9 France
© 2001 Hewlett-Packard Company
Page 3

English...................................................................... 1
Deutsch .................................................................... 2
Français.................................................................... 3
Español..................................................................... 4
Italiano...................................................................... 5
gh
Page 4
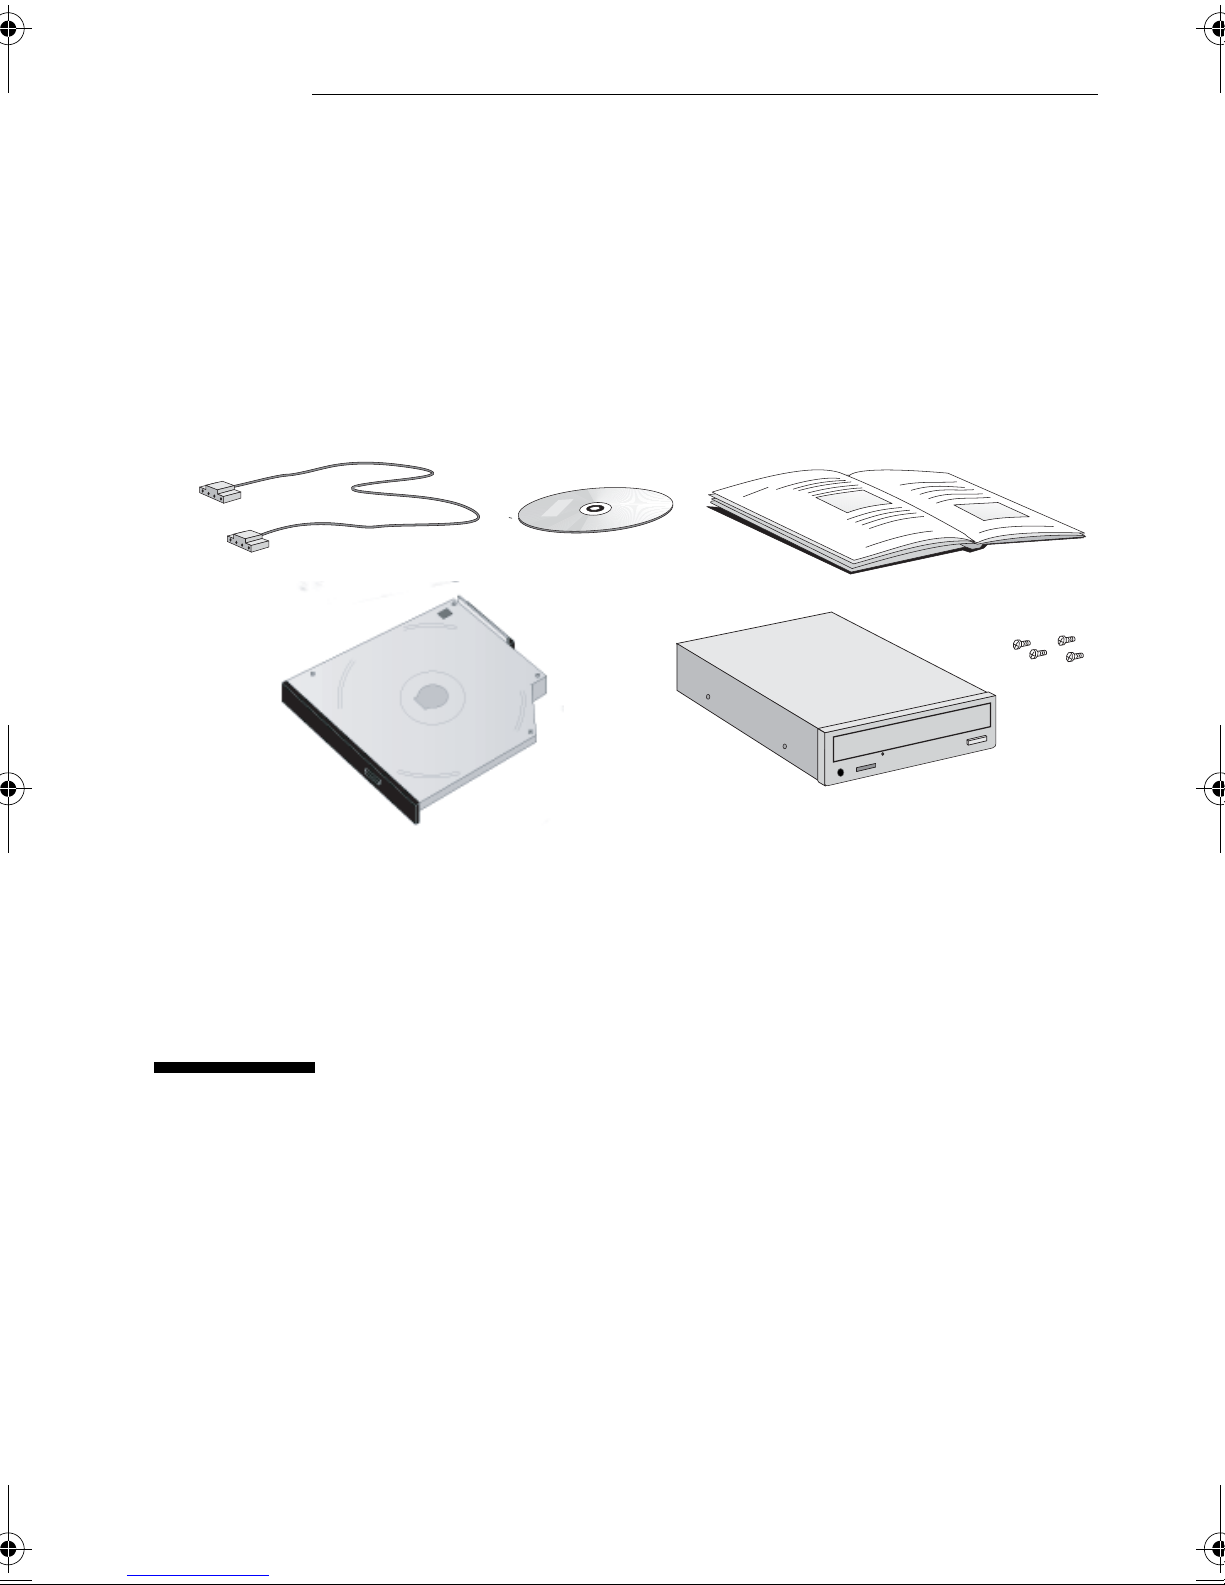
1
Audio cable Installation Guide
Slim CD-RW drive (no screws required)
Software CD-ROM
CD-RW drive and screws
Installing Your CD-RW Drive
Page 5

Before You Install
Congratulations on purchasing an HP IDE CD-RW drive. Your
computer will be able to read the information stored on a wide
range of compact discs and write to both CD-R (Compact Disc
Recordable, also known as write-once discs) and CD-RW (Compact
Disc ReWritable) discs.
There are many uses for CD-RW and CD-R discs. For example, you
can use CD-RW discs to copy your important files each week, free
up disk space on your hard drive, transport files to and from work,
or hold large complex files as you develop them. On CD-R discs you
can permanently save large project files or store home records,
share memories with family and friends, or copy your music onto
CD for personal use.
WARNING
For your safety, never remove the PC’s cover without first removing
the power cord from the power outlet and any connection to a
telecommunication network. Always replace the cover before
switching on again. To avoid electric shock and harm to your eyes
by laser light, do not open the laser module. The laser module
should be serviced by service personnel only. Do not attempt to
make any adjustment to the laser unit. This product is a class 1 laser
product.
Supported Platforms
This manual describes how to install the IDE CD-RW drive and its
setup procedure for the following operating systems supported by
HP:
Windows XP
•
Windows 2000 RTM (SP1)
•
Windows 98 (Retail) and Windows 98 Second Edition
•
Windows NT 4.0 (Service Pack 3, 4, 5 or 6)
•
To find out on which PCs you can install an HP IDE CD-RW drive go
to the following Web site:
2 English
www.hp.com/go/pcaccessories
Page 6

Installing the 5.25-inch CD-RW Drive
Installing the 5.25-inch CD-RW Drive
NOTE These instructions are given as a guide. For more detailed
instructions, refer to your PC’s documentation. If you do not have
this documentation available, you can download it from the HP
Support Web site for your PC model (refer to “HP Support Services”
on page 16).
To install the CD-RW drive, you may need a flat-headed screwdriver
(not supplied with the drive kit).
Switch off the monitor and PC, disconnect all power cords and
1
any telecommunications cables.
Remove the PC’s cover (refer to your PC documentation).
2
Select a power connector and an IDE data connector for
3
connecting the CD-RW drive (refer to your PC documentation).
Select an empty drive shelf for installing the CD-RW drive. The
4
shelf must have front access.
5
For PCs that have a drive tray or removable drive
bay unit: Remove the drive tray or the drive bay unit (refer to
your PC documentation).
For other PCs:
Remove the RFI metal filler plate from the chosen shelf (refer to
your PC documentation).
6
For PCs that have a drive tray or removable drive bay
unit: Attach the CD-RW drive to the drive bay or drive tray (refer
to your PC documentation).
7
For PCs that have a drive tray or removable drive
bay unit: Insert the drive bay unit or drive tray into the
computer (refer to your PC documentation).
For other PCs:
Slide the CD-RW drive into the chosen drive shelf then, using
the screws, fasten it into place (refer to your PC
documentation).
If necessary, remove the bezel from the PC’s cover (refer to your
8
PC documentation).
Attach the data and power connectors to the rear of the CD-RW
9
drive.
English 3
Page 7
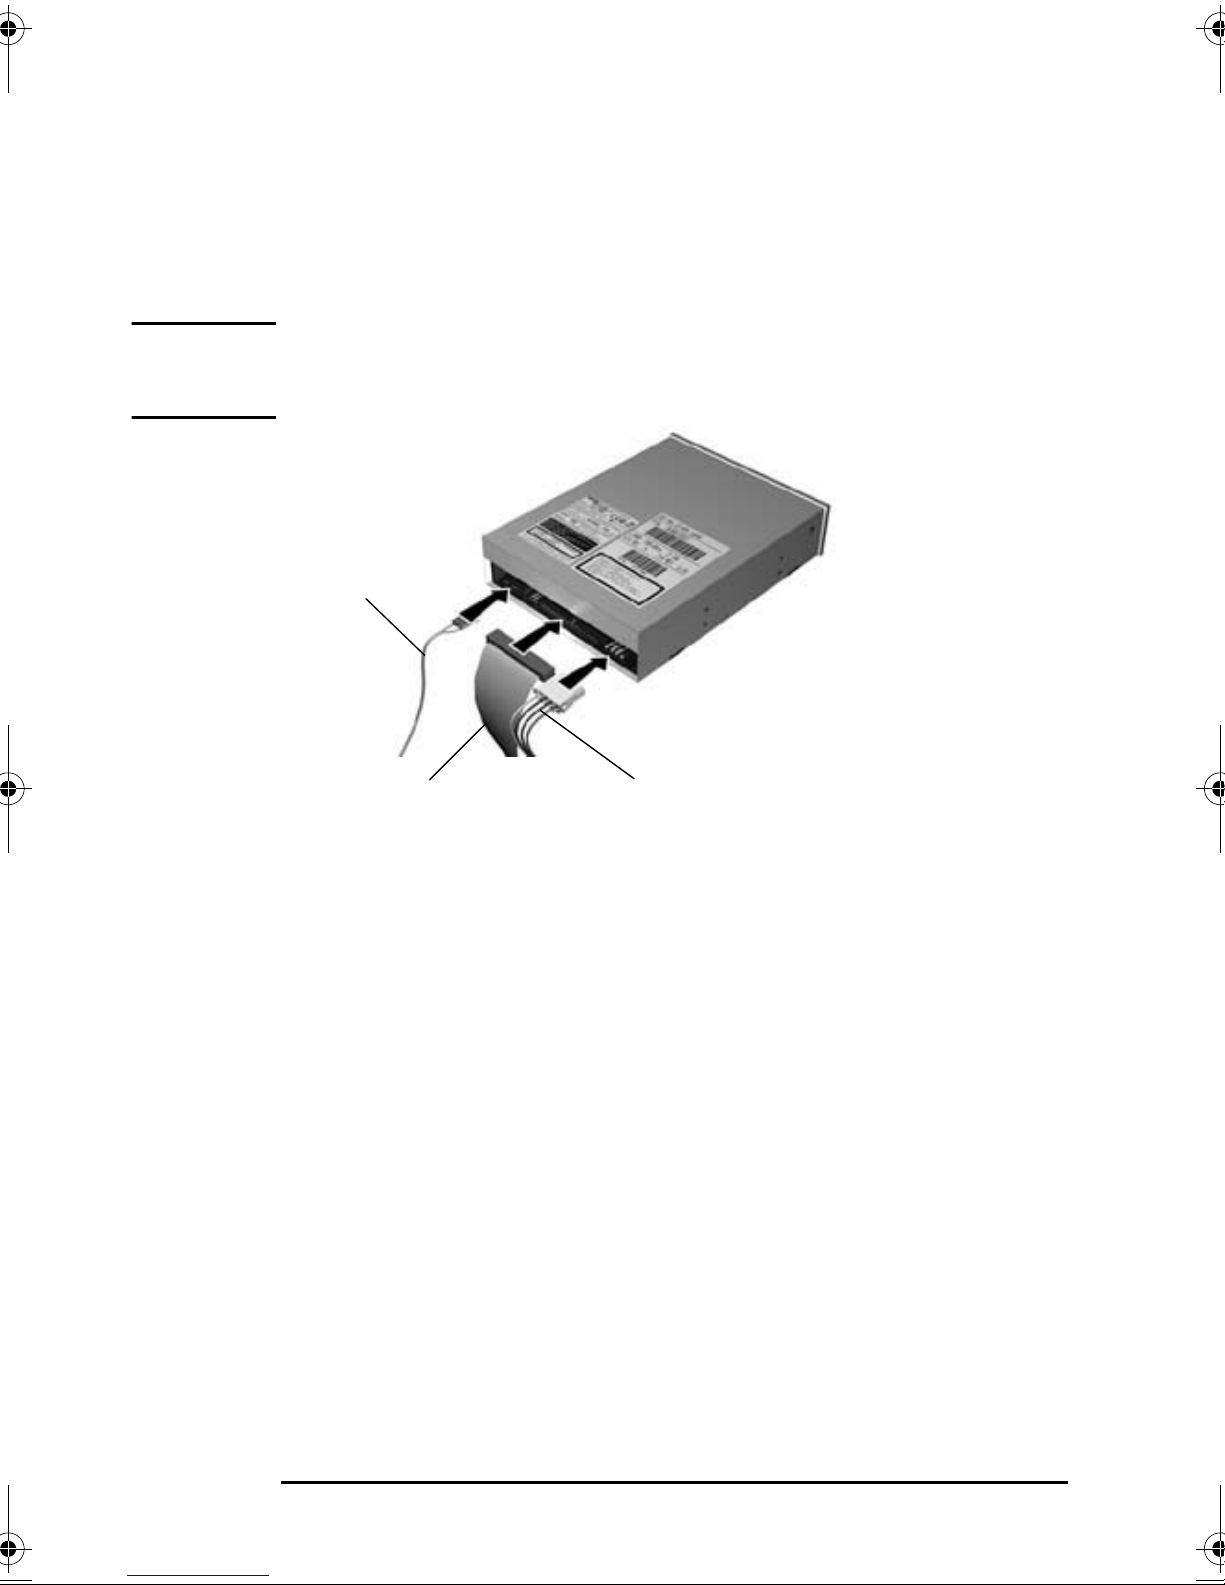
Installing the 5.25-inch CD-RW Drive
If your PC is equipped with integrated audio or a sound card,
10
attach the audio cable to the connector at the back of the CD-RW
drive and to the connector on the motherboard or sound card, as
appropriate. Refer to your sound card’s installation
documentation or PC documentation for more information.
NOTE If your PC is also equipped with a standard CD-ROM drive, you may
only be able to connect either the CD-RW drive or the
CD-ROM drive to the sound card.
audio cable
data cable
Replace the computer’s cover (refer to your PC documentation).
11
Reconnect the computer’s power supply cable and any
12
power cable
telecommunications cables.
4 English
Page 8
Installing the Slim CD-RW Drive
Installing the Slim CD-RW Drive
NOTE These instructions are given as a guide. For more detailed
instructions, refer to your PC’s documentation. If you do not have
this documentation available, you can download it from the HP
Support Web site for your PC model (refer to “HP Support Services”
on page 16).
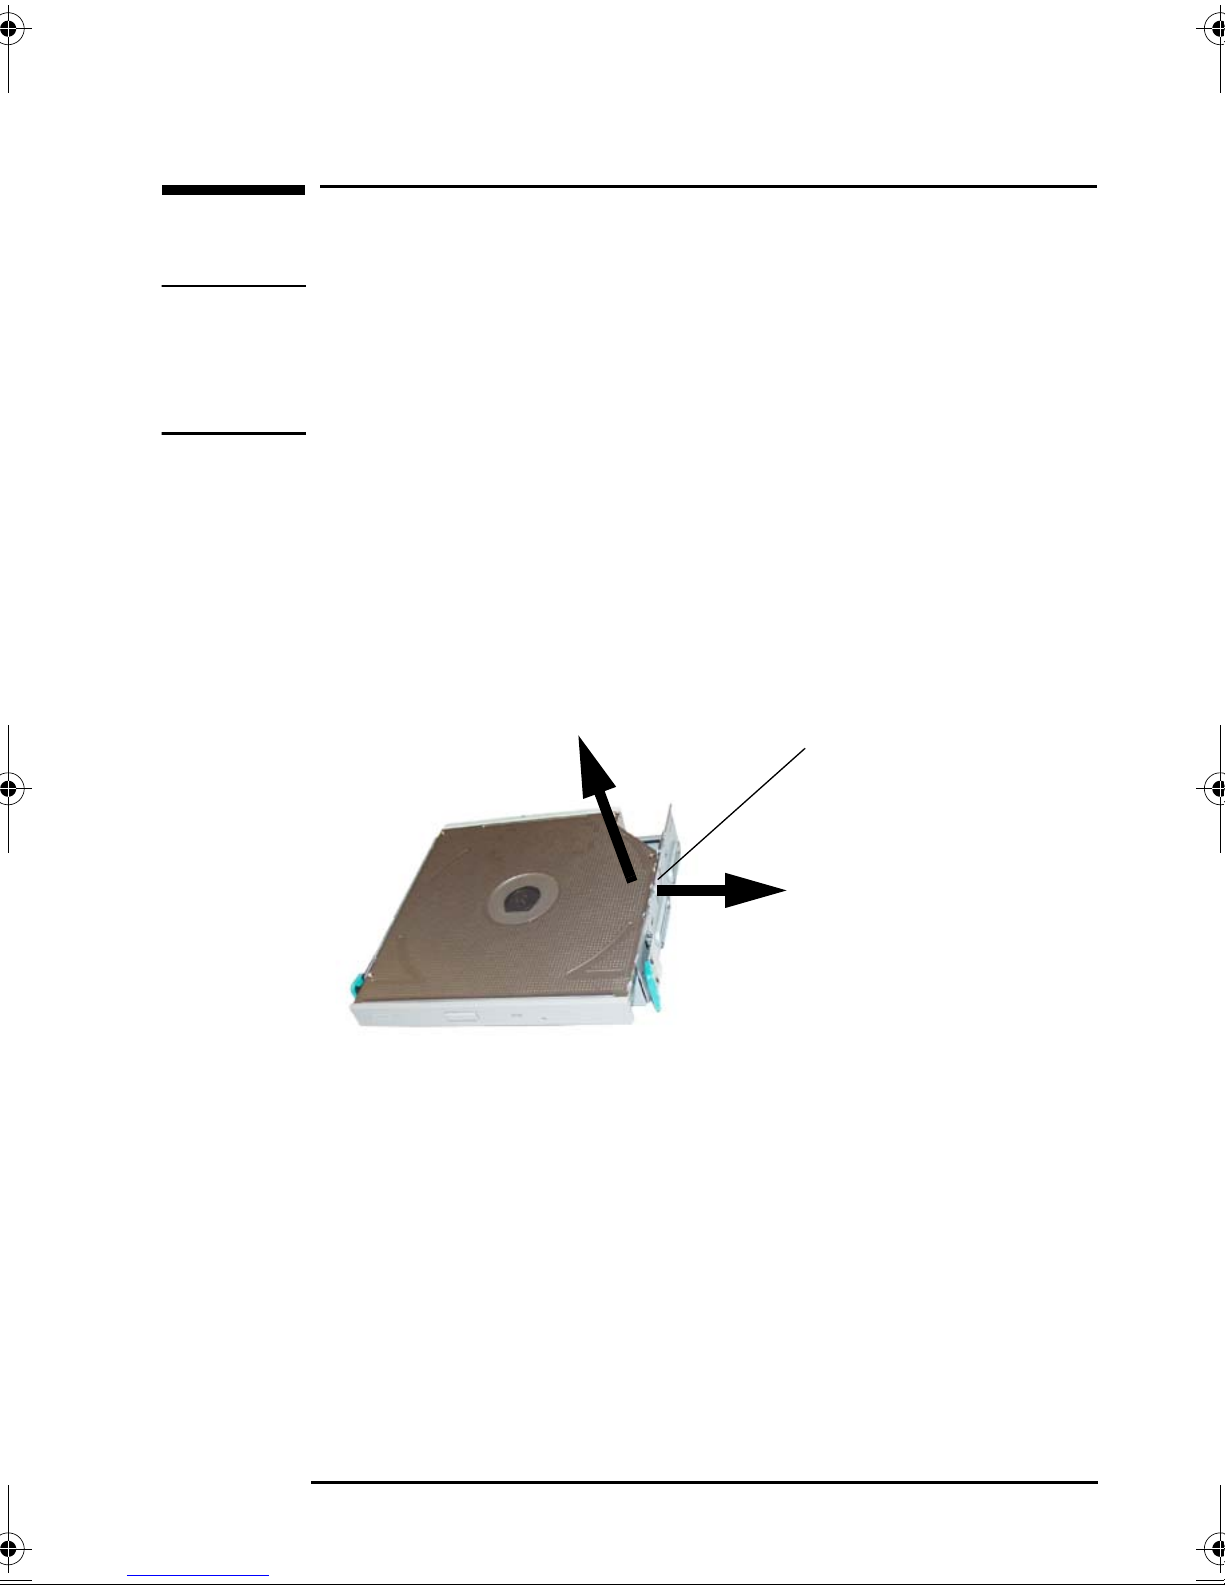
Switch off the PC and remove the PC’s cover and front panel.
1
Detach the three connectors from the rear of the drive (refer to
2
your PC documentation)
Slide out the drive tray (refer to your PC documentation).
3
Pull back the retaining clip and remove the old drive from the
4
tray.
retaining clip
English 5
Page 9

Installing the Slim CD-RW Drive
Fit the two guide pins into the holes in the drive, then push on
5
the top of the drive until the drive is securely held in place by the
retaining clip.
guide pins
Slide the drive tray back into the PC until it clicks into place.
6
Attach the data, power and audio cables.
7
Replace the PC’s cover (refer to your PC documentation).
8
Configuring Your Operating System
The detection of the CD-RW drive, the configuration of the
operating system, and the loading of the drivers is, in most cases,
automatic. Once you have physically installed the CD-RW drive in
your computer, all you have to do is turn on the PC and use the new
drive for reading CDs. In order to write to CDs, you must first install
the CD recording software on the CD-ROM provided with this
product.
NOTE In Windows 98, Windows 2000, Windows XP and Windows NT 4.0,
there are no special icons for CD-RW Drives. The drive is identified
in the same way as a standard CD-ROM drive and uses the same icon.
If your system does not recognize the CD-RW drive (for example,
there is no CD-ROM icon in the Windows Explorer), you might need
to enable the drive in your PC’s Setup program. Restart the
computer and press F2 when
Setup=F2
appears.
6 English
Page 10

Installing the Slim CD-RW Drive
Installing the CD Recording Software
To make the most of your CD recording software, it is recommended
that you download the latest drivers (IDE, audio, video etc.) for your
PC. You can find these on the HP Support web site for your particular
PC model (refer to “HP Support Services” on page 16).
Insert the software CD-ROM for your operating system in the
CD-RW drive. The software installation program will start
automatically. If the software installation does not start
automatically, double-click on the setup.exe file on the software
CD-ROM.
Your CD-RW drive is supplied with two software packages.
VERITAS MyCD is ideal for creating both audio and data CD-R
discs. To copy data or audio tracks to a CD, simply create a CD
layout with the files or audio tracks that you want, then click the
record button.
VERITAS DLA lets you copy data to your CD-RW drive in the same
way as a floppy disk using Windows Explorer to “drag and drop”
files directly on to a CD.
English 7
Page 11

Using Your CD-RW Drive
Using Your CD-RW Drive
HP 24x 10x 40x Max IDE CD-RW Drive
NOTE: Your CD-RW drive layout may
vary slightly from the one shown
Door. Protects the CD-RW drive from dust
contamination and accidental damage.
Headphones Socket. If you use
this socket, you can listen to audio
CDs by connecting headphones
directly to the CD-RW drive using
a stereo mini-jack. This does not
cut out your external computer
speakers. Adjust the volume using
the Volume Control next to the
socket (audio software does not
affect the volume).
Volume Control. Adjusts
the volume of music
played through
headphones connected to
the CD-RW drive.
Open/Close button. Opens or closes the CD-RW drawer.
Place the disc, label side facing up, in the recess in the
drawer. Make sure the disc sits snugly in the drawer.
Emergency Eject.
Used to open the
drive mechanically
when the power
supply is off.
Operation Indicator.
Glows bright when
the drive is active.
8 English
Page 12

HP Slim 8x 8x 24x Max IDE CD-RW Drive
Using Your CD-RW Drive
Door
Protects the Slim
CD-RW drive from dust
contamination and accidental
damage.
NOTE: Your CD-RW drive
layout may vary slightly
from the one shown
Loading a CD
Press the Open/Close button to open the CD drawer.
1
Place the CD, label side facing up, in the drawer.
2
Open/Push to Close button
This opens and closes the Slim CD-RW drawer. Place the CD, label
side facing up, in the recess in the drawer. Make sure the CD sits
snugly in the drawer by pressing the CD firmly in place.
Emergency Eject
Busy Indicator
Glows bright when
the drive is active.
Used to open the Slim CD-RW drive
mechanically when the power supply is off.
Press the Open/Close button to close the drawer. The drawer can
3
also be closed by gently pushing the drawer back
into the drive.
Reading a CD
To verify that the CD-RW drive is correctly installed, view the
contents of a disc using Windows Explorer. If an error message
appears on the screen, refer to “Error Messages” on page 12 for
additional information.
Ejecting a CD Automatically
To remove a CD, press the Open/Close button to open the drawer.
Remove the CD, then press the Open/Close button to close the
drawer.
English 9
Page 13

Using Your CD-RW Drive
Ejecting a CD Manually
If the Open/Close button is disabled by software or a power failure:
Turn off the PC.
1
Insert a straight rod (for example, a straightened paper clip) into
2
the manual eject hole next to the Open/Close button. The drawer
should eject by about 15 mm (0.6 inches).
Pull out the drawer by hand, and remove the CD.
3
(The CD-RW
drive layout may
vary slightly)
Insert a straight rod
Pull the drawer out
Push the drawer gently back into the drive.
4
10 English
Page 14

Solving Problems
Solving Problems
This section describes how to solve problems that may occur with
your IDE CD-RW drive.
CD-RW drive not
recognized
Audio function
not working
As a general rule, when diagnosing and solving problems, the first
thing to do is to check that the CD-RW driver
1
and application
software are correctly installed and the system correctly configured
before doing anything else. Also, check that the CD is correctly
inserted. Do this before removing your computer’s cover to check
the CD-RW cable connections and jumper settings.
If your system does not seem to recognize the CD-RW drive at all—
for example, there is no CD-ROM icon in My Computer—you need to
enable the drive in your Setup program.
Restart the computer and press F2 when
1
Enable the CD-RW drive in the PC’s Setup program.
2
<Setup=F2>
appears.
If you are having problems reading an audio CD:
Check that the Windows audio driver is correctly installed.
•
If you are using headphones, check that the volume control on
•
the CD-RW drive’s front panel is not set to minimum.
Check that the disc in the CD-RW drive is an audio disc and not
•
a Photo CD, data CD-ROM or other non-audio CD media.
If using headphones or external speakers, check that they are
•
properly connected.
If using a sound card, check that the audio cable is correctly
•
connected between the CD-RW drive and the sound card.
1. The CD-RW drive uses the standard CD-ROM driver.
English 11
Page 15

Solving Problems
Error Messages
The following table shows some common error messages that may
appear on the screen and possible ways of solving the problem. If
you experience errors when using the CD Recording software, refer
to the application’s online help.
Error Message Suggested Action
or
D:\
The device is not ready.
is not accessible.
E:\
1 Check disc is correctly inserted in the drive and
that the disc drawer is closed. Press Retry.
2 The disc may be dirty or damaged. Try another
disc.
3 Check drive cable connections and ensure
drive is correctly installed.
No CD-RW found 1 If the CD-RW drive is connected to your PC by
the same cable as your primary IDE hard disk,
check that the jumper on the rear of the drive
is set to the SLAVE position.
2 If the CD-RW drive is connected to your PC by
the secondary IDE cable, check that the
jumper on the rear of the CD-RW drive is set
to the MASTER (no other device on same
cable) or SLAVE (other device on cable
configured as MASTER) position.
3 Check the CD-RW data cable and power cable
connections.
There is no disk in the drive “n”,
insert a disk and try again
Access denied Check that the disc is not already being used by
Invalid drive specification 1 Check that the CD-RW is enabled in the PC’s
12 English
Check that the disc in the CD-RW drive is correctly
inserted.
another application at the same time.
Setup program (refer to page 11).
2 Check that you have selected the correct drive
letter that identifies the CD-RW to your
computer.
Page 16

Solving Problems
Error Message Suggested Action
No valid CD-RW device drivers
selected
Check that the correct CD-RW device driver is
installed.
Insufficient memory Delete any TSR (terminate and stay resident)
programs from memory and edit the
AUTOEXEC.BAT file to remove statements
referring to these TSR programs. In addition, use a
memory manager program to make better use of
memory.
No valid drive/disk found Check that there is a disc in the CD-RW drive
Check that the Windows audio driver is installed
correctly.
English 13
Page 17

Solving Problems
Technical Specifications
HP 24x 10x 40x Max IDE CD-RW Drive
Data Transfer Rate
(1 KB=2
10
byte=1,024
bytes)
(1 MB=2
20
byte=
1,048,576 bytes)
Sustained Data Transfer Rate
Reading - 40x = 6,000 KB/s (Max)
Writing - 24x = 3,600 KB/s (Max)
(CD-R: 3,600 KB/s, CD-RW: 1,500 KB/s)
Burst Data Transfer Rate
1
PIO Mode 4: 16.7 MB/sec (max.)
DMA Mode 2: 16.7 MB/sec (max.)
Buffer Size 2 MB
Access Time Average Random Access Time: 95 ms (typical)
Full Stroke Access Time: 180 ms (typical)
Rotational Speed Variable (approx. 5,400 rpm max.)
Interface IDE/ATA-2 MMC Compliant
Power Requirements +5V and +12V
12.4W max.
Supported
CD-ROM discs
(120mm and 80mm discs)
CD-ROM Mode-1 data disc
CD-ROM Mode-2 data disc
CD-ROM XA
CD Audio disc
Video CD
Recording Formats
(120mm and 80mm discs
ISO 9660
UDF 1.5
for CD-R, 120mm only for
CD-RW)
1. Depends on drive specification.
14 English
CD-I, CD-I Ready, CD-I Bridge
CD-WO
Enhanced Music CD (CD Plus)
Photo CD Multi-session
CD-DA
Page 18

HP Slim 8x 8x 24x Max IDE CD-RW Drive
Data Transfer Rate
(1 KB=2
10
byte=1,024
bytes)
(1 MB=2
20
byte=
1,048,576 bytes)
Sustained Data Transfer Rate
1
Reading - 24x = 3,600 KB/s (Max)
Writing - 8x = 1,200 KB/s (Max)
(CD-R: 1,200 KB/s, CD-RW: 1,200
KB/s)
Burst Data Transfer Rate
PIO Mode 4: 16.7 MB/sec (max.)
DMA Mode 2: 16.7 MB/sec
(max.)
Buffer Size 2 MB
Access Time Average Random Access Time: 140 ms (typical)
Full Stroke Access Time: 200 ms (typical)
Rotational Speed Variable (approx. 5,000 rpm max.)
Interface IDE/ATA-2 MMC Compliant
Power Requirements +5V and +12V
12.4W max.
Supported
CD-ROM discs
(120mm and 80mm discs)
CD-ROM Mode-1 data disc
CD-ROM Mode-2 data disc
CD-ROM XA
CD Audio disc
Video CD
Recording Formats
(120mm and 80mm discs
ISO 9660
UDF 1.5
for CD-R, 120mm only for
CD-RW)
1. Depends on drive specification.
CD-I, CD-I Ready, CD-I Bridge
CD-WO
Enhanced Music CD (CD Plus)
Photo CD Single and Multi-session
CD-DA
fhf
Page 19

HP Support Services
Various service and support options are provided from HewlettPackard’s Electronic Support Center:
For HP Vectra PCs
For HP Brio PCs
For HP Kayak PC Workstations
www.hp.com/go/vectrasupport
www.hp.com/go/briosupport
www.hp.com/go/kayaksupport
Regulatory Information
Notice for the USA: FCC Statement
Federal Communications Commission (FCC) Radio Frequency Interference
Statement Warning:
This equipment has been tested and found to comply with the limits for a Class B
digital device, pursuant to Part 15 of the FCC Rules. These limits are designed to
provide reasonable protection against harmful interference in a residential
installation.
This equipment generates, uses, and can radiate radio frequency energy and, if not
installed and used in accordance with the instructions, may cause harmful
interference to radio communications. However, there is no guarantee that
interference will not occur in a particular installation. If this equipment does cause
harmful interference to radio or television reception, which can be determined by
turning the equipment off and on, the user is encouraged to correct the interference
by one or more of the following measures:
•
Reorient or relocate the receiving antenna
•
Increase the separation between the equipment and the receiver
•
Connect the equipment into an outlet on a circuit different from that to which the
receiver is connected
•
Consult the dealer or an experienced radio/TV technician for help.
Hewlett-Packard's FCC Compliance Tests were conducted with HP-supported peripheral devices
and HP shielded cables, such as those you receive with your system. Changes or modifications
not expressly approved by Hewlett-Packard could void the user's authority to operate the
equipment.
Notice for Canada
This Class B digital apparatus complies with the Canadian ICES-003.
Cet appareil numérique de la Class B est conforme à la norme, NMB-003 du Canada.
Page 20

Hardware Warranty
Hardware Warranty
This HP accessory is covered by a limited hardware warranty for a period of
one year from the date of purchase by the original end-user. The type of
service provided is return to an HP or repair-authorized reseller servicecenter. At Hewlett-Packard's discretion, a defective accessory will be
repaired or replaced by a new unit, either of the same type or of an
equivalent model.
If this accessory is purchased and used together with an HP PC, it will be
covered by the warranty of the PC, under the same conditions of service
and duration.
Please, refer to the warranty statement provided with your HP PC for
warranty limitations, customer responsibilities and other terms and
conditions.
FOR CONSUMER TRANSACTIONS IN AUSTRALIA AND NEW ZEALAND:
THE WARRANTY TERMS CONTAINED IN THIS STATEMENT, EXCEPT
TO THE EXTENT LAWFULLY PERMITTED, DO NOT EXCLUDE,
RESTRICT OR MODIFY AND ARE IN ADDITION TO THE MANDATORY
STATUTORY RIGHTS APPLICABLE TO THE SALE OF THIS PRODUCT
TO YOU.
English 17
Page 21

HP Software Warranty
HP Software Warranty
THIS WARRANTY STATEMENT TAKES PRECEDENCE OVER ANY OTHER
SOFTWARE WARRANTY STATEMENT INCLUDED WITH THIS PRODUCT
Ninety-Day Limited Software Warranty
HP warrants for a period of NINETY (90) DAYS from the date of the purchase that
the software product will execute its programming instructions when all files are
properly installed. HP does not warrant that the software will be uninterrupted or
error free. HP does not warrant to the performance of usefulness of any software
provided with your computer product. Unless otherwise expressly provided by HP, it
is your own responsibility to obtain the latest version of any software and support
directly from the software owner or authorized distributor. In the event that this
software product fails to execute its programming instructions during the warranty
period, Customer’s remedy shall be a refund or repair. Should HP be unable to
replace the media within a reasonable amount of time, Customer’s alternate remedy
shall be a refund of the purchase price upon return of the product and all copies
Removable Media (If supplied)
HP warrants the removable media, if supplied, upon which this product is recorded
to be free from defects in materials and workmanship under normal use for a period
of NINETY (90) DAYS from the date of purchase. In the event the media proves to be
defective during the warranty period, Customer’s remedy shall be to return the
media to HP for replacement. Should HP be unable to replace the media within a
reasonable amount of time, Customer’s alternate remedy shall be a refund of the
purchase price upon return of the product and destruction of all other
non-removable media copies of the software product.
Notice of Warranty Claims
Customer must notify HP in writing of any warranty claim not later than thirty (30)
days after the expiration of the warranty period.
The above warranty shall not apply to defects resulting from: misuse; unauthorized
modification; operation or storage outside the environmental specifications for the
product; in-transit damage; improper maintenance; or defects resulting from use of
non-HP software, accessories, media, supplies, consumables, or such items not
designed for use with the product.
HP MAKES NO OTHER EXPRESS WARRANTY, WHETHER WRITTEN OR ORAL
WITH RESPECT TO THIS PRODUCT. ANY IMPLIED WARRANTY OF
MERCHANTABILITY OR FITNESS FOR A PARTICULAR PURPOSE IS LIMITED TO
THE DURATION OF THE EXPRESS WARRANTY SET FORTH ABOVE. SOME
STATES OR PROVINCES DO NOT ALLOW LIMITATIONS ON HOW LONG AN
IMPLIED WARRANTY LASTS, SO THE ABOVE LIMITATIONS OR EXCLUSION
MAY NOT APPLY TO YOU.
Limitation of Liability and Remedies
THE REMEDIES PROVIDED ABOVE ARE CUSTOMER’S SOLE AND EXCLUSIVE
REMEDIES. IN NO EVENT SHALL HP BE LIABLE FOR ANY DIRECT, INDIRECT,
SPECIAL, INCIDENTAL OR CONSEQUENTIAL DAMAGES (INCLUDING LOST
PROFIT) WHETHER BASED ON WARRANTY, CONTRACT, TORT OR ANY OTHER
LEGAL THEORY. Some states or provinces do not allow the exclusion or limitation of
incidental or consequential damages, so the above limitation or exclusion may not
apply to you.
FOR CONSUMER TRANSACTIONS IN AUSTRALIA AND NEW ZEALAND: THE WARRANTY TERMS
CONTAINED IN THIS STATEMENT, EXCEPT TO THE EXTENT LAWFULLY PERMITTED, DO NOT EXCLUDE,
RESTRICT OR MODIFY AND ARE IN ADDITION TO THE MANDATORY STATUTORY RIGHTS APPLICABLE TO
THE SALE OF THIS PRODUCT TO YOU.
18 English
Page 22

HP Software Warranty
HP Software License Agreement
CAREFULLY READ THIS LICENSE AGREEMENT BEFORE PROCEEDING TO OPERATE THE
HP ACCESSORY. RIGHTS IN THE SOFTWARE ARE OFFERED ONLY ON THE CONDITION
THAT THE CUSTOMER AGREES TO ALL TERMS AND CONDITIONS OF THIS LICENSE
AGREEMENT. PROCEEDING TO INSTALLING AND USING THE ACCESSORY INDICATES
YOUR ACCEPTANCE OF THESE TERMS AND CONDITIONS. IF YOU DO NOT AGREE TO THE
LICENSE AGREEMENT, YOU MUST NOW DESTROY ANY MASTER DISKETTES OR CD-ROMS,
OR RETURN THE COMPLETE ACCESSORY AND SOFTWARE FOR A FULL REFUND.
UNLESS OTHERWISE STATED BELOW, THIS HP SOFTWARE PRODUCT LICENSE
AGREEMENT SHALL GOVERN THE USE OF ALL SOFTWARE THAT IS PROVIDED TO YOU,
THE CUSTOMER, AS PART OF THE HP ACCESSORY. IT SHALL SUPERSEDE ANY NON-HP
SOFTWARE LICENSE TERMS THAT MAY BE FOUND ON-LINE, OR IN ANY DOCUMENTATION
OR OTHER MATERIALS CONTAINED IN THE ACCESSORY PRODUCT PACKAGING.
Note: Operating System Software by Microsoft is licensed to you under the Microsoft End User
License Agreement (EULA) contained in the Microsoft documentation.
The following License Terms govern the use of the software:
USE. Customer may use the software on any one computer. Customer may not network the
software or otherwise use it on more than one computer. Customer may not reverse assemble or
decompile the software unless authorized by law.
COPIES AND ADAPTATIONS. Customer may make copies or adaptations of the software (a) for
archival purposes or (b) when copying or adaptation is an essential step in the use of the
software with a computer so long as the copies and adaptations are used in no other manner.
OWNERSHIP. Customer agrees that he/she does not have any title or ownership of the software,
other than ownership of the physical media. Customer acknowledges and agrees that the
software is copyrighted and protected under the copyright laws. Customer acknowledges and
agrees that the software may have been developed by a third party software supplier named in
the copyright notices included with the software, who shall be authorized to hold the Customer
responsible for any copyright infringement or violation of this Agreement.
TRANSFER OF RIGHTS IN SOFTWARE. Customer may transfer rights in the software to a third
party only as part of the transfer of all rights and only if Customer obtains the prior agreement of
the third party to be bound by the terms of this License Agreement. Upon such a transfer,
Customer agrees that his/her rights in the software are terminated and that he/she will either
destroy his/her copies and adaptations or deliver them to the third party.
SUBLICENSING AND DISTRIBUTION. Customer may not lease, sublicense the software or
distribute copies or adaptations of the software to anyone in physical media or by
telecommunication without the prior written consent of Hewlett-Packard.
TERMINATION. Hewlett-Packard may terminate this software license for failure to comply with
any of these terms provided Hewlett-Packard has requested Customer to cure the failure and
Customer has failed to do so within thirty (30) days of such notice.
UPDATES AND UPGRADES. Customer agrees that the software does not include updates and
upgrades which may be available from Hewlett-Packard under a separate support agreement.
EXPORT CLAUSE. Customer agrees not to export or re-export the software or any copy or
adaptation in violation of the U.S. Export Administration regulations or other applicable
regulation.
U.S. GOVERNMENT RESTRICTED RIGHTS. Use, duplication, or disclosure by the U.S. Government is subject to restrictions as set forth in subparagraph (c)(1)(ii) of the Rights in Technical
Data and Computer Software clause in DFARS 252.227-7013. Hewlett-Packard Company. 3000
Hanover Street, Palo Alto, CA 94304 U.S.A. Rights for non-DOD U.S. Government Departments
and Agencies are as set forth in FAR 52.227-19(c)(1,2).
Use, duplication or disclosure is subject to HP standard commercial license terms and for nonDOD Departments and Agencies of the U.S. Government, the restrictions set forth in FAR 52.22719(c)(1-2)(June 1987)
Palo Alto, CA 94303 U.S.A.
Copyright (c) 2000 Hewlett-Packard Company. All Rights Reserved
Hewlett-Packard Company
3000 Hanover Street
English 19
Page 23

HP Software Warranty
20 English
Page 24

Part Number: 5971-1418
Printed: 12/01
Paper not bleached with chlorine
 Loading...