

Page 1

hp e-commerce/
xml server
accelerator
user guide
sa7150
Page 2

© Copyright 2001 Hewlett-Packard Company. All rights reserved.
Hewlett-Packard Com pany
3000 Hanover Street
Palo Alto, CA 94304-1185
Publication Number
5971-3006
March 2001
Disclaimer
The information contained in this document is subject to change without notice.
HEWLETT-PACKARD COMPANY MAKES NO WARRANTY OF ANY
KIND WITH REGARD TO THIS MATERIAL, INCLUDING, BUT NOT
LIMITED TO, THE IMPLIED WARRANTIES OF MERCHANTABILITY
AND FITNESS FOR A PARTICULAR PURPOSE. Hewlett-Packard shall not
be liable for errors contained herein or for incide ntal or consequential damages
in connection with the furnishing, performance, or use of this material.
Hewlett-Packard assumes no responsibility for the use or reliabili ty of its
software on equipment that is not furnished by Hewlett-P ackard.
Warranty
A copy of the specific warranty terms applicable to your Hewlett-Packard
products and replacement parts can be obtained from http://www.hp.com/
serverappliances/support.
*Other brands and names are the property of their respective owne rs.
Page 3

Table of Contents
Chapter 1: Introduction
Introduction to the SA7150. . . . . . . . . . . . . . . . . . . . . . . . . . . . . . . . . . . . . . . . . . . . . . 1
Assumptions . . . . . . . . . . . . . . . . . . . . . . . . . . . . . . . . . . . . . . . . . . . . . . . . . . . . . . . . . 2
Benefits . . . . . . . . . . . . . . . . . . . . . . . . . . . . . . . . . . . . . . . . . . . . . . . . . . . . . . . . . . 2
Specifications . . . . . . . . . . . . . . . . . . . . . . . . . . . . . . . . . . . . . . . . . . . . . . . . . . . . . . . . 3
Typographic Conventions. . . . . . . . . . . . . . . . . . . . . . . . . . . . . . . . . . . . . . . . . . . . . . . 5
Chapter 2: Installation and Initial Configuration
Parts Checklist . . . . . . . . . . . . . . . . . . . . . . . . . . . . . . . . . . . . . . . . . . . . . . . . . . . . . . . 7
Additional Requirements . . . . . . . . . . . . . . . . . . . . . . . . . . . . . . . . . . . . . . . . . . . . . . . 8
Physical Installation . . . . . . . . . . . . . . . . . . . . . . . . . . . . . . . . . . . . . . . . . . . . . . . . . . . 9
Rack Installation . . . . . . . . . . . . . . . . . . . . . . . . . . . . . . . . . . . . . . . . . . . . . . . . . . . 9
Free-Standing Installation . . . . . . . . . . . . . . . . . . . . . . . . . . . . . . . . . . . . . . . . . . . 10
Network Connections. . . . . . . . . . . . . . . . . . . . . . . . . . . . . . . . . . . . . . . . . . . . . . . 10
Page 4

C O N T E N T S HP e-Commerce/XML Server Accelerator SA7150 User Guide
Console Connection. . . . . . . . . . . . . . . . . . . . . . . . . . . . . . . . . . . . . . . . . . . . . . . . 11
Using HyperTerminal* . . . . . . . . . . . . . . . . . . . . . . . . . . . . . . . . . . . . . . . . . . . . . 12
Fail-through Switch . . . . . . . . . . . . . . . . . . . . . . . . . . . . . . . . . . . . . . . . . . . . . . . . 12
Accessing the Command Prompt . . . . . . . . . . . . . . . . . . . . . . . . . . . . . . . . . . . . . 13
Chapter 3: Theory of Operation
XML Operations. . . . . . . . . . . . . . . . . . . . . . . . . . . . . . . . . . . . . . . . . . . . . . . . . . . . . 15
General Considerations. . . . . . . . . . . . . . . . . . . . . . . . . . . . . . . . . . . . . . . . . . . 17
Server Mappings . . . . . . . . . . . . . . . . . . . . . . . . . . . . . . . . . . . . . . . . . . . . . . . . 17
XML Data Model . . . . . . . . . . . . . . . . . . . . . . . . . . . . . . . . . . . . . . . . . . . . . . . 18
URI expressions in XML Patterns . . . . . . . . . . . . . . . . . . . . . . . . . . . . . . . . . . 19
Invalid URI Expressions . . . . . . . . . . . . . . . . . . . . . . . . . . . . . . . . . . . . . . . . . . 19
Negation Operator. . . . . . . . . . . . . . . . . . . . . . . . . . . . . . . . . . . . . . . . . . . . . . . 20
Operators. . . . . . . . . . . . . . . . . . . . . . . . . . . . . . . . . . . . . . . . . . . . . . . . . . . . . . 20
Attributes. . . . . . . . . . . . . . . . . . . . . . . . . . . . . . . . . . . . . . . . . . . . . . . . . . . . . . 22
Filters. . . . . . . . . . . . . . . . . . . . . . . . . . . . . . . . . . . . . . . . . . . . . . . . . . . . . . . . . 23
Boolean Operators. . . . . . . . . . . . . . . . . . . . . . . . . . . . . . . . . . . . . . . . . . . . . . . 24
Function Calls . . . . . . . . . . . . . . . . . . . . . . . . . . . . . . . . . . . . . . . . . . . . . . . . . . 24
Values . . . . . . . . . . . . . . . . . . . . . . . . . . . . . . . . . . . . . . . . . . . . . . . . . . . . . . . . 26
XML Pattern Creation. . . . . . . . . . . . . . . . . . . . . . . . . . . . . . . . . . . . . . . . . . . . 27
Mapped Server . . . . . . . . . . . . . . . . . . . . . . . . . . . . . . . . . . . . . . . . . . . . . . . . . 28
Default Keyword. . . . . . . . . . . . . . . . . . . . . . . . . . . . . . . . . . . . . . . . . . . . . . . . 29
XML Pattern Matching . . . . . . . . . . . . . . . . . . . . . . . . . . . . . . . . . . . . . . . . . . . 29
XML “Well-formed” Check . . . . . . . . . . . . . . . . . . . . . . . . . . . . . . . . . . . . . . . 30
Network Configurations . . . . . . . . . . . . . . . . . . . . . . . . . . . . . . . . . . . . . . . . . . . . . . . 31
Single Server . . . . . . . . . . . . . . . . . . . . . . . . . . . . . . . . . . . . . . . . . . . . . . . . . . . . . 31
Multiple Servers. . . . . . . . . . . . . . . . . . . . . . . . . . . . . . . . . . . . . . . . . . . . . . . . . . . 31
Multiple SA7150s and Cascading . . . . . . . . . . . . . . . . . . . . . . . . . . . . . . . . . . . . . 32
Scalability and Cascading . . . . . . . . . . . . . . . . . . . . . . . . . . . . . . . . . . . . . . . . . 32
Spilling and Throttling . . . . . . . . . . . . . . . . . . . . . . . . . . . . . . . . . . . . . . . . . . . 32
Availability . . . . . . . . . . . . . . . . . . . . . . . . . . . . . . . . . . . . . . . . . . . . . . . . . . . . 32
SSL Operations. . . . . . . . . . . . . . . . . . . . . . . . . . . . . . . . . . . . . . . . . . . . . . . . . . . . . . 33
Keys and Certificates . . . . . . . . . . . . . . . . . . . . . . . . . . . . . . . . . . . . . . . . . . . . . . . 33
Cutting and Pasting with HyperTerminal* . . . . . . . . . . . . . . . . . . . . . . . . . . . . 33
Obtaining a Certificate from VeriSign* or Other Authority . . . . . . . . . . . . . . . . . 34
Procedure. . . . . . . . . . . . . . . . . . . . . . . . . . . . . . . . . . . . . . . . . . . . . . . . . . . . . . 34
Using an Existing Key/Certificate . . . . . . . . . . . . . . . . . . . . . . . . . . . . . . . . . . . . . 37
iv
Page 5

Table of Contents
Exporting a Key/Certificate from a Server . . . . . . . . . . . . . . . . . . . . . . . . . . . . 37
Apache Interface to Open SSL* (mod_ssl). . . . . . . . . . . . . . . . . . . . . . . . . . . . 37
Apache SSL*. . . . . . . . . . . . . . . . . . . . . . . . . . . . . . . . . . . . . . . . . . . . . . . . . . . 38
Stronghold*. . . . . . . . . . . . . . . . . . . . . . . . . . . . . . . . . . . . . . . . . . . . . . . . . . . . 38
Importing into the SA7150 . . . . . . . . . . . . . . . . . . . . . . . . . . . . . . . . . . . . . . . . 38
Creating a new Key/Certificate on the SA7150. . . . . . . . . . . . . . . . . . . . . . . . . . . 40
Procedure. . . . . . . . . . . . . . . . . . . . . . . . . . . . . . . . . . . . . . . . . . . . . . . . . . . . . . 40
Global Site Certificates . . . . . . . . . . . . . . . . . . . . . . . . . . . . . . . . . . . . . . . . . . . . . 41
Overview. . . . . . . . . . . . . . . . . . . . . . . . . . . . . . . . . . . . . . . . . . . . . . . . . . . . . . 41
Global Site Certificate Paste Procedure . . . . . . . . . . . . . . . . . . . . . . . . . . . . . . 42
Redirection: Clients and Unsupported Ciphers . . . . . . . . . . . . . . . . . . . . . . . . . . . . . 43
Client Authentication . . . . . . . . . . . . . . . . . . . . . . . . . . . . . . . . . . . . . . . . . . . . . . . . . 44
Creating a Client CA Certificate using OpenSSL* . . . . . . . . . . . . . . . . . . . . . . . . 45
SSL Processing . . . . . . . . . . . . . . . . . . . . . . . . . . . . . . . . . . . . . . . . . . . . . . . . . . . . . . 46
Mapping. . . . . . . . . . . . . . . . . . . . . . . . . . . . . . . . . . . . . . . . . . . . . . . . . . . . . . . . . 46
Automapping. . . . . . . . . . . . . . . . . . . . . . . . . . . . . . . . . . . . . . . . . . . . . . . . . . . 47
Automapping with user-specified key and certificate. . . . . . . . . . . . . . . . . . . . 47
Automapping with multiple port combinations . . . . . . . . . . . . . . . . . . . . . . . . 47
Deleting automapping entries . . . . . . . . . . . . . . . . . . . . . . . . . . . . . . . . . . . . . . 47
Manual mapping . . . . . . . . . . . . . . . . . . . . . . . . . . . . . . . . . . . . . . . . . . . . . . . . 48
Combining automapping and manual mapping . . . . . . . . . . . . . . . . . . . . . . . . 48
Blocking. . . . . . . . . . . . . . . . . . . . . . . . . . . . . . . . . . . . . . . . . . . . . . . . . . . . . . . . . 48
Specific IP, Specific Port . . . . . . . . . . . . . . . . . . . . . . . . . . . . . . . . . . . . . . . . . 48
Subnet, Specific Port. . . . . . . . . . . . . . . . . . . . . . . . . . . . . . . . . . . . . . . . . . . . . 49
All IPs, Specific Port. . . . . . . . . . . . . . . . . . . . . . . . . . . . . . . . . . . . . . . . . . . . . 50
Delete a Block. . . . . . . . . . . . . . . . . . . . . . . . . . . . . . . . . . . . . . . . . . . . . . . . . . 51
Failure Conditions, Fail-safe, and Fail-through . . . . . . . . . . . . . . . . . . . . . . . . . . . . . 51
Chapter 4: Scenarios
Scenario 1—Basic XML Operation . . . . . . . . . . . . . . . . . . . . . . . . . . . . . . . . . . . . . . 54
Procedure for Scenario 1 . . . . . . . . . . . . . . . . . . . . . . . . . . . . . . . . . . . . . . . . . . . . 55
Scenario 2—Single Server Configuration . . . . . . . . . . . . . . . . . . . . . . . . . . . . . . . . . 59
Procedure for Scenario 2 . . . . . . . . . . . . . . . . . . . . . . . . . . . . . . . . . . . . . . . . . . . . 59
Automapping. . . . . . . . . . . . . . . . . . . . . . . . . . . . . . . . . . . . . . . . . . . . . . . . . . . 59
Manual Configuration. . . . . . . . . . . . . . . . . . . . . . . . . . . . . . . . . . . . . . . . . . . . 59
Scenario 3—Multiple Server Configuration (SSL) . . . . . . . . . . . . . . . . . . . . . . . . . . 61
Procedure for Scenario 3 . . . . . . . . . . . . . . . . . . . . . . . . . . . . . . . . . . . . . . . . . . . . 61
v
Page 6

C O N T E N T S HP e-Commerce/XML Server Accelerator SA7150 User Guide
Scenario 4—Cascaded SA7150s. . . . . . . . . . . . . . . . . . . . . . . . . . . . . . . . . . . . . . . . . 63
Initial Configuration. . . . . . . . . . . . . . . . . . . . . . . . . . . . . . . . . . . . . . . . . . . . . . . . 63
Procedure for Scenario 4 . . . . . . . . . . . . . . . . . . . . . . . . . . . . . . . . . . . . . . . . . . . . 64
Scenario 5—Different Ingress and Egress Routers . . . . . . . . . . . . . . . . . . . . . . . . . . 66
Procedure for Scenario 5 . . . . . . . . . . . . . . . . . . . . . . . . . . . . . . . . . . . . . . . . . . . . 66
Scenario 6—Configuring a Firewall. . . . . . . . . . . . . . . . . . . . . . . . . . . . . . . . . . . . . . 67
Server Configuration . . . . . . . . . . . . . . . . . . . . . . . . . . . . . . . . . . . . . . . . . . . . . . . 67
SA7150 Configuration . . . . . . . . . . . . . . . . . . . . . . . . . . . . . . . . . . . . . . . . . . . 68
Chapter 5: Command Reference
Online Help . . . . . . . . . . . . . . . . . . . . . . . . . . . . . . . . . . . . . . . . . . . . . . . . . . . . . . . . 71
Command Line Interface . . . . . . . . . . . . . . . . . . . . . . . . . . . . . . . . . . . . . . . . . . . . . . 72
User Authentication . . . . . . . . . . . . . . . . . . . . . . . . . . . . . . . . . . . . . . . . . . . . . . . . 72
Command Line Prompt . . . . . . . . . . . . . . . . . . . . . . . . . . . . . . . . . . . . . . . . . . . . . 72
Abbreviation to Uniqueness. . . . . . . . . . . . . . . . . . . . . . . . . . . . . . . . . . . . . . . . . . 72
Input Editing Commands . . . . . . . . . . . . . . . . . . . . . . . . . . . . . . . . . . . . . . . . . . . . . . 73
Moving the Insertion Point . . . . . . . . . . . . . . . . . . . . . . . . . . . . . . . . . . . . . . . . . . 73
Command History . . . . . . . . . . . . . . . . . . . . . . . . . . . . . . . . . . . . . . . . . . . . . . . . . 73
Cut and Paste . . . . . . . . . . . . . . . . . . . . . . . . . . . . . . . . . . . . . . . . . . . . . . . . . . . . . 74
Command Summary. . . . . . . . . . . . . . . . . . . . . . . . . . . . . . . . . . . . . . . . . . . . . . . . . . 75
Command Reference. . . . . . . . . . . . . . . . . . . . . . . . . . . . . . . . . . . . . . . . . . . . . . . . . . 80
Help Commands. . . . . . . . . . . . . . . . . . . . . . . . . . . . . . . . . . . . . . . . . . . . . . . . . . . 80
Status Command . . . . . . . . . . . . . . . . . . . . . . . . . . . . . . . . . . . . . . . . . . . . . . . . . . 80
XML Commands . . . . . . . . . . . . . . . . . . . . . . . . . . . . . . . . . . . . . . . . . . . . . . . . . . 81
Port Mapping Commands . . . . . . . . . . . . . . . . . . . . . . . . . . . . . . . . . . . . . . . . . . . 88
Operational Commands . . . . . . . . . . . . . . . . . . . . . . . . . . . . . . . . . . . . . . . . . . . . . 91
Remote Management Commands . . . . . . . . . . . . . . . . . . . . . . . . . . . . . . . . . . . . . 93
Alarms and Monitoring Commands. . . . . . . . . . . . . . . . . . . . . . . . . . . . . . . . . . . 100
Configuration Commands . . . . . . . . . . . . . . . . . . . . . . . . . . . . . . . . . . . . . . . . . . 103
Administration Commands
Logging Commands. . . . . . . . . . . . . . . . . . . . . . . . . . . . . . . . . . . . . . . . . . . . . . . 108
Chapter 6: Remote Management
Overview. . . . . . . . . . . . . . . . . . . . . . . . . . . . . . . . . . . . . . . . . . . . . . . . . . . . . . . . . . 113
Limitations. . . . . . . . . . . . . . . . . . . . . . . . . . . . . . . . . . . . . . . . . . . . . . . . . . . . . . 114
Remote Management CLI Commands. . . . . . . . . . . . . . . . . . . . . . . . . . . . . . . . . 114
Remote Telnet Sessions . . . . . . . . . . . . . . . . . . . . . . . . . . . . . . . . . . . . . . . . . . . . . . 116
vi
Page 7

Table of Contents
Telnet and Windows 2000 . . . . . . . . . . . . . . . . . . . . . . . . . . . . . . . . . . . . . . . . . . 116
Local Serial Console . . . . . . . . . . . . . . . . . . . . . . . . . . . . . . . . . . . . . . . . . . . . . . 116
Remote Console, Telnet. . . . . . . . . . . . . . . . . . . . . . . . . . . . . . . . . . . . . . . . . . . . 117
Changing the Telnet Port . . . . . . . . . . . . . . . . . . . . . . . . . . . . . . . . . . . . . . . . . . . 118
Disabling Telnet. . . . . . . . . . . . . . . . . . . . . . . . . . . . . . . . . . . . . . . . . . . . . . . . . . 118
Remote SSH Sessions. . . . . . . . . . . . . . . . . . . . . . . . . . . . . . . . . . . . . . . . . . . . . . . . 119
Local Serial Console . . . . . . . . . . . . . . . . . . . . . . . . . . . . . . . . . . . . . . . . . . . . . . 119
Remote Console, SSH . . . . . . . . . . . . . . . . . . . . . . . . . . . . . . . . . . . . . . . . . . . . . 120
Changing the SSH Port . . . . . . . . . . . . . . . . . . . . . . . . . . . . . . . . . . . . . . . . . . . . 120
Disabling SSH . . . . . . . . . . . . . . . . . . . . . . . . . . . . . . . . . . . . . . . . . . . . . . . . . . . 121
SNMP . . . . . . . . . . . . . . . . . . . . . . . . . . . . . . . . . . . . . . . . . . . . . . . . . . . . . . . . . . . . 121
Starting SNMP. . . . . . . . . . . . . . . . . . . . . . . . . . . . . . . . . . . . . . . . . . . . . . . . . . . 122
Standards Compliance . . . . . . . . . . . . . . . . . . . . . . . . . . . . . . . . . . . . . . . . . . . . . 122
HP MIB Tree . . . . . . . . . . . . . . . . . . . . . . . . . . . . . . . . . . . . . . . . . . . . . . . . . . . . 123
Supported MIB . . . . . . . . . . . . . . . . . . . . . . . . . . . . . . . . . . . . . . . . . . . . . . . . 124
Where to find the MIB File. . . . . . . . . . . . . . . . . . . . . . . . . . . . . . . . . . . . . . . 124
Trap Summary . . . . . . . . . . . . . . . . . . . . . . . . . . . . . . . . . . . . . . . . . . . . . . . . . . . 124
Standard SNMP Traps. . . . . . . . . . . . . . . . . . . . . . . . . . . . . . . . . . . . . . . . . . . 124
Traps in the HP Private MIB. . . . . . . . . . . . . . . . . . . . . . . . . . . . . . . . . . . . . . 124
Enabling SNMP . . . . . . . . . . . . . . . . . . . . . . . . . . . . . . . . . . . . . . . . . . . . . . . . . . 126
Specifying SNMP Information . . . . . . . . . . . . . . . . . . . . . . . . . . . . . . . . . . . . 126
Community String. . . . . . . . . . . . . . . . . . . . . . . . . . . . . . . . . . . . . . . . . . . . . . 127
Trap Community String . . . . . . . . . . . . . . . . . . . . . . . . . . . . . . . . . . . . . . . . . 128
Access Control . . . . . . . . . . . . . . . . . . . . . . . . . . . . . . . . . . . . . . . . . . . . . . . . . . . . . 128
Chapter 7: Alarms and Monitoring
Overview. . . . . . . . . . . . . . . . . . . . . . . . . . . . . . . . . . . . . . . . . . . . . . . . . . . . . . . . . . 131
Alarm Types . . . . . . . . . . . . . . . . . . . . . . . . . . . . . . . . . . . . . . . . . . . . . . . . . . . . . . . 133
ESC: Encryption Status Change Alarm . . . . . . . . . . . . . . . . . . . . . . . . . . . . . . . 133
Alarm Modifiers and Messages. . . . . . . . . . . . . . . . . . . . . . . . . . . . . . . . . . . . 133
RSC: Refused SSL Connections . . . . . . . . . . . . . . . . . . . . . . . . . . . . . . . . . . . . . 134
Alarm Modifiers and Messages. . . . . . . . . . . . . . . . . . . . . . . . . . . . . . . . . . . . 134
Extended Data . . . . . . . . . . . . . . . . . . . . . . . . . . . . . . . . . . . . . . . . . . . . . . . . . 134
RSC Alarm CLI Commands . . . . . . . . . . . . . . . . . . . . . . . . . . . . . . . . . . . . . . 134
UTL: Utilization Threshold Alarm . . . . . . . . . . . . . . . . . . . . . . . . . . . . . . . . . . . 135
Alarm Modifiers and Messages. . . . . . . . . . . . . . . . . . . . . . . . . . . . . . . . . . . . 135
Extended Data . . . . . . . . . . . . . . . . . . . . . . . . . . . . . . . . . . . . . . . . . . . . . . . . . 135
vii
Page 8

C O N T E N T S HP e-Commerce/XML Server Accelerator SA7150 User Guide
UTL Alarm CLI commands . . . . . . . . . . . . . . . . . . . . . . . . . . . . . . . . . . . . . . 136
OVL: Overload Alarm . . . . . . . . . . . . . . . . . . . . . . . . . . . . . . . . . . . . . . . . . . . . 137
Alarm Modifiers and Messages. . . . . . . . . . . . . . . . . . . . . . . . . . . . . . . . . . . . 137
Extended Data . . . . . . . . . . . . . . . . . . . . . . . . . . . . . . . . . . . . . . . . . . . . . . . . . 137
OVL Alarm CLI Commands. . . . . . . . . . . . . . . . . . . . . . . . . . . . . . . . . . . . . . 137
NLS: Network Link Status Alarm . . . . . . . . . . . . . . . . . . . . . . . . . . . . . . . . . . . 138
Alarm Modifiers and Messages. . . . . . . . . . . . . . . . . . . . . . . . . . . . . . . . . . . . 138
Extended Data . . . . . . . . . . . . . . . . . . . . . . . . . . . . . . . . . . . . . . . . . . . . . . . . . 138
Alarm Logging . . . . . . . . . . . . . . . . . . . . . . . . . . . . . . . . . . . . . . . . . . . . . . . . . . . . . 138
Monitoring . . . . . . . . . . . . . . . . . . . . . . . . . . . . . . . . . . . . . . . . . . . . . . . . . . . . . . . . 142
Monitoring Reports . . . . . . . . . . . . . . . . . . . . . . . . . . . . . . . . . . . . . . . . . . . . . . . 142
Console Configuration. . . . . . . . . . . . . . . . . . . . . . . . . . . . . . . . . . . . . . . . . . . . . 142
Report Configuration . . . . . . . . . . . . . . . . . . . . . . . . . . . . . . . . . . . . . . . . . . . . . . 142
Monitoring Reports CLI Commands. . . . . . . . . . . . . . . . . . . . . . . . . . . . . . . . 143
Chapter 8: Software Updates
Using HyperTerminal* . . . . . . . . . . . . . . . . . . . . . . . . . . . . . . . . . . . . . . . . . . . . . . . 146
Chapter 9: Troubleshooting
Appendix A: Front Panel
Buttons and Switches . . . . . . . . . . . . . . . . . . . . . . . . . . . . . . . . . . . . . . . . . . . . . . . . 154
Front Panel LEDs . . . . . . . . . . . . . . . . . . . . . . . . . . . . . . . . . . . . . . . . . . . . . . . . . . . 154
Connectors . . . . . . . . . . . . . . . . . . . . . . . . . . . . . . . . . . . . . . . . . . . . . . . . . . . . . . . . 156
Appendix B: Failure/Bypass Modes
Bypass Button. . . . . . . . . . . . . . . . . . . . . . . . . . . . . . . . . . . . . . . . . . . . . . . . . . . . . . 158
Fail-through Switch (Security Level) . . . . . . . . . . . . . . . . . . . . . . . . . . . . . . . . . . . . 158
Appendix C: Supported Ciphers
Cipher Strength. . . . . . . . . . . . . . . . . . . . . . . . . . . . . . . . . . . . . . . . . . . . . . . . . . . . . 161
SSL Version Level . . . . . . . . . . . . . . . . . . . . . . . . . . . . . . . . . . . . . . . . . . . . . . . . . . 162
viii
Page 9

Table of Contents
Appendix D: Regulatory Information
Taiwan Class A EMI Statement . . . . . . . . . . . . . . . . . . . . . . . . . . . . . . . . . . . . . . . . 165
VCCI Statement . . . . . . . . . . . . . . . . . . . . . . . . . . . . . . . . . . . . . . . . . . . . . . . . . . . . 166
FCC Part 15 Compliance Statement. . . . . . . . . . . . . . . . . . . . . . . . . . . . . . . . . . . . . 166
Canada Compliance Statement (Industry Canada). . . . . . . . . . . . . . . . . . . . . . . . . . 167
CE Compliance Statement . . . . . . . . . . . . . . . . . . . . . . . . . . . . . . . . . . . . . . . . . . . . 167
CISPR 22 Statement . . . . . . . . . . . . . . . . . . . . . . . . . . . . . . . . . . . . . . . . . . . . . . . . . 167
VCCI Class A (Japan). . . . . . . . . . . . . . . . . . . . . . . . . . . . . . . . . . . . . . . . . . . . . . . . 168
Australia . . . . . . . . . . . . . . . . . . . . . . . . . . . . . . . . . . . . . . . . . . . . . . . . . . . . . . . . . . 168
WARNING. . . . . . . . . . . . . . . . . . . . . . . . . . . . . . . . . . . . . . . . . . . . . . . . . . . . . . . . 168
AVERTISSEMENT . . . . . . . . . . . . . . . . . . . . . . . . . . . . . . . . . . . . . . . . . . . . . . . . . 169
WARNUNG . . . . . . . . . . . . . . . . . . . . . . . . . . . . . . . . . . . . . . . . . . . . . . . . . . . . . . . 169
AVVERTENZA . . . . . . . . . . . . . . . . . . . . . . . . . . . . . . . . . . . . . . . . . . . . . . . . . . . . 170
ADVERTENCIAS . . . . . . . . . . . . . . . . . . . . . . . . . . . . . . . . . . . . . . . . . . . . . . . . . . 171
Wichtige Sicherheitshinweise. . . . . . . . . . . . . . . . . . . . . . . . . . . . . . . . . . . . . . . . . . 172
Appendix E: Software License Agreement
Mozilla* and expat* License Information . . . . . . . . . . . . . . . . . . . . . . . . . . . . . . . . 178
MOZILLA PUBLIC LICENSE, Version 1.1 . . . . . . . . . . . . . . . . . . . . . . . . . . . 178
Appendix F: Support Services
Support for your SA7150 . . . . . . . . . . . . . . . . . . . . . . . . . . . . . . . . . . . . . . . . . . . . . 191
U.S. and Canada. . . . . . . . . . . . . . . . . . . . . . . . . . . . . . . . . . . . . . . . . . . . . . . . . . 191
Europe . . . . . . . . . . . . . . . . . . . . . . . . . . . . . . . . . . . . . . . . . . . . . . . . . . . . . . . . . 192
Asia . . . . . . . . . . . . . . . . . . . . . . . . . . . . . . . . . . . . . . . . . . . . . . . . . . . . . . . . . . . 193
Latin America . . . . . . . . . . . . . . . . . . . . . . . . . . . . . . . . . . . . . . . . . . . . . . . . . . . 193
Other Countries . . . . . . . . . . . . . . . . . . . . . . . . . . . . . . . . . . . . . . . . . . . . . . . . . . 194
Glossary
Index
ix
Page 10

C O N T E N T S HP e-Commerce/XML Server Accelerator SA7150 User Guide
Notes
x
Page 11

Introduction
Introduction to the SA7150
The HP e-Commerce/XML Ser ver Accelerat or SA7150 pr ovides th e
flexibility to analyze Extensible Markup Language (XML) traffic
according to content and distribute it according to user-defined
parameters. The SA7150 is positioned in the network in front of
business-to-business (B2B) XML servers, where it detects and parses
XML messages or transaction data. It sends client data to the m ost
appropriate server, based on rul es pre-configured for each server. The
most common application is a B2B environment where the client is
often another server or application.
Page 12

C H A P T E R 1 HP e-Commerce/XML Server Accelerator SA7150 User Guide
Assumptions
It is assumed that you are a network administrato r and that you have
at least a basic understanding of the following:
• XML usage and syntax
• Networking concepts and terminology
• Network topologies
• Networks and IP routing
Benefits
The SA7150 offload s Secure Socket L ayer (SSL) processin g for your
e-Commerce site, web site, or Intranet . The SA7150 i s the best XML
processing solution available.
Feature Benefits
Patent-pending rules engine
allows classification of XML
transactions for example, by:
•
Trading partner name
• Trading partner type
• Transaction quantity
• Transaction value
• Time of day
• Time zone
Business priorities e asily configured:
• If the request is from Vendor A, then send to Server
1
• If transaction value is above $100,000, then send to
Server 2
NOTE: The above items are examples.
You can define any number of
classifications according to your
business needs.
Multi-variable classification,
including AND, OR
Allows complex business priorities to be addressed.
Handles up to 600 secure
transactions per second
2
Security with continued transaction sp eed
SA7150 Features
Page 13

C H A P T E R 1 Specifications
Feature Benefits
Offloads XML distribution
decisions from e-Business
servers
Easy, drop-in insta llation betwe en
router and server
Specifications
Specification Description
Servers supported
Most Web servers (Apache*, Microsoft*, Netscape*, etc.)
Most operating systems (UNIX*, Solaris*, Windows NT*, BSD*/
BSDI*, AIX*, etc.)
Most server hardware (SUN*, HP*, IBM*, Compaq*, SGI*,
Intel*-based platforms)
Helps maximize server investment
No additional hardware or software needed
SA7150 Features
XML Dialects supported
System administration
Performance
Supports up to 1000 servers
Supports most XML dialects and e-Business standards, such as
SOAP*, Microsoft’s Biztalk*, Ariba’s cXML*, Commerce One’s
CBL*, and the emerging ebXML standard via HTTP and HTTPS
transport protocols
Command line interface
SNMP monitoring (MIB II and Private MIB)
Dynamic configuration thro ugh password-protected serial consol e,
Telnet, SSH v1, and SSH v2
Rated up to 1700 HTTP connections per second and 450 HTTPS
connections per second (1K data)
Patent-pending technology offloads all cryptographic processing
from server
Specifications
3
Page 14

C H A P T E R 1 HP e-Commerce/XML Server Accelerator SA7150 User Guide
Specification Description
Dimensions
Weight
Interface connections
Patent pending XML
routing
Security algorithms
supported
Mounting: Standard 19-inch rack mount
Height: 1.75 inches (4.45 cm)
Width: 16.73 inches (46.99 cm)
Depth: 18.5 inches (4.45 cm)
8 pounds (3.64 kg)
10/100 Ethernet
TTY Serial - console
XML patterns: Defined by URI and XML expressions, in the
form:
URI Expression: */order.asp
XML Expression:
//From[id=”acme”]
Blowfish, CAST , CAST5, DES, 3DES, DSA, IDEA MD5, MDC2,
RC2, RC4, RSA, RMD-160, SHA, SHA-1
SSH for secure Command Line Interface (up to 168 bit encryption )
Serial port logon
Specifications
4
Page 15

C H A P T E R 1 Typographic Conventions
Typographic Conventions
The following typograp hic conventions are used throughout this User
Guide:
NOTE: This is an
example of a note.
CAUTION: This is an
example of a caution.
WARNING: This is an
example of a warning.
NOTES clarify a point, emphasize vital information, or describe
options, alternatives, or shortcuts. Except for those within tables,
notes are always found in the left margin.
CAUTIONS are designed to prevent mistakes that could result in
injury or equipment damage. Except for those within tables, cautions
are always found in the left margin.
WARNINGS alert you t o potential haz ards to life or limb. Except for
those within tables, warnings are always found in the left margin.
NUMBERED LISTS indicate step-by-st ep procedures th at you must
follow in numeric order, as shown below:
1. This is the first step.
2. This is the second step.
3. This is the third step, etc.
BULLETED LISTS indicate options or features available to you, as
shown below:
• The first feature or option
• The second feature or option
• The third feature or option, etc.
ITALICS are used for emphasis or to indicate onscreen controls, as
shown in this example:
4. To edit the configuration settings, press the Configure tab.
COMMANDS are shown in the following ways:
• Any command or command response text that appears on the
terminal is presented in the
• Any text that you need to type at the command line appears in
bold courier, for example:
HP SA7150> create gold
courier font.
5
Page 16

C H A P T E R 1 HP e-Commerce/XML Server Accelerator SA7150 User Guide
Notes
6
Page 17

Parts Checklist
Installation and Initial
Configuration
Ensure that the items listed below are inclu ded in the shipping box:
• HP e-Commerce/XML Server Accelerator SA7150
• HP e-Commerce/XML Server Accelerator SA7150 Quick Start
Guide
• HP e-Commerce/XML Server Accelerator SA7150 User Guide
(this document)
• HP e-Commerce/XML Server Accelerator SA7150 Release Notes
• AC power cord
• Serial cable
• Rack mounting bracke ts with Phillips mounting screws
Page 18

C H A P T E R 2 HP e-Commerce/XML Server Accelerator SA7150 User Guide
Additional Requirements
Before you begin installation, acquire or prepare the following:
• IP address for SA7150 (Only if you intend to use the SA7150’s
Remote Management capabilities. Please see Chapter 6 for
details.)
• IP addresses and port numbers of servers.
• Keys/certificates. (Only if you anticipate supporting secure
transactions. See Chapter 3 for information on obtaining keys
and certificates.)
NOTE: Network cables
are not provided wit h the
SA7150.
• Network cables, such as straight-through and/or crossover
cables. (Procedures in the section “Network Connecti ons” in this
chapter will identify the types of cables you must use.)
If you are installing the SA7150 in a rack, you will also need:
• Phillips screwdrive r (not provided)
• Rack-mounting screws
8
Page 19

C H A P T E R 2 Physical Installation
Physical Installation
WARNING: Do not
remove the device’s
cover. There are no userserviceable parts inside.
Rack
Installation
The SA7150 is physically installed in either of two ways:
• In a standard 19” rack, cantilevered fr o m the provided mounting
brackets
• Free-standing on a flat surface with sufficient space for air-flow
(1” on all sides)
Rack mounting requires the use of t he mounting brackets, and all four
of the included Phillips screws.
Mounting Bracket Installation
1. Locate the two mounting brackets and the four screws. (Two
screws for each bracket.)
2. Attach a mounting bracket to each side of t he SA715 0, using t wo
of the provided screws for each bracket. Use the holes near the
front of the SA7150’s sides. The brackets have both round and
oval holes; the flange with round holes attaches to the SA7150,
the one with oval holes attaches to the rack.
3. Position the SA7150 in the desired space of your 19” rack and
attach the front flange of each mounting bracket to the rack with
two screws each. (Rack-mounting screws are not provided.)
9
Page 20

C H A P T E R 2 HP e-Commerce/XML Server Accelerator SA7150 User Guide
Free-Standing
Installation
Network
Connections
1. Attach the provided self-adhesive rubber feet to the SA7150’s
bottom.
2. Place the SA7150 on a flat surface and make sure that there is
adequate airflow surrounding the unit (allow at least one inch of
air space on all sides).
1. Use the table below to select and install the appropriate network
cables (Category 5 UTP or better):
SA7150’s network
connector
Workstation or Server Crossover cable Straight-through cable
Switch or Hub Straight-through cable Crossover cable
Router Crossover cable Not recommended
SA7150 network
connector*
SA7150 server
connector*
N/A Straight-through cable
Straight-through cable N/A
SA7150’s server
connector
NOTE: Never connect
both of the SA7150’s
network ports to the same
switch, hub, or router.
Doing so creates a
feedback loop that
adversely effects network
bandwidth.
* Applicable only to multiple, cascaded units
2. Connect the provided power cabl e to the bac k of the unit . (Ther e
is no power switch.) Under normal circumstances, the SA7150
requires approximately 30 seconds to boot. When the boot is
complete, the unit’s Power LED is steadily illuminated. (If the
Power LED is not steadily illuminated, see Cha pter 9,
“Troubleshooting,” to rectify before proceeding to Step 3.)
3. The Inline LED should be either steadily illuminated or blinking
(to indicate Inline mode). If it is not, press the Bypass switch on
the device’s front panel to enable Inline mode.
10
Page 21
C H A P T E R 2 Physical Installation
4. At this point both the Network and Server LEDs should be
steadily illuminated. If not, please see Chapter 9,
“Troubleshooting.”
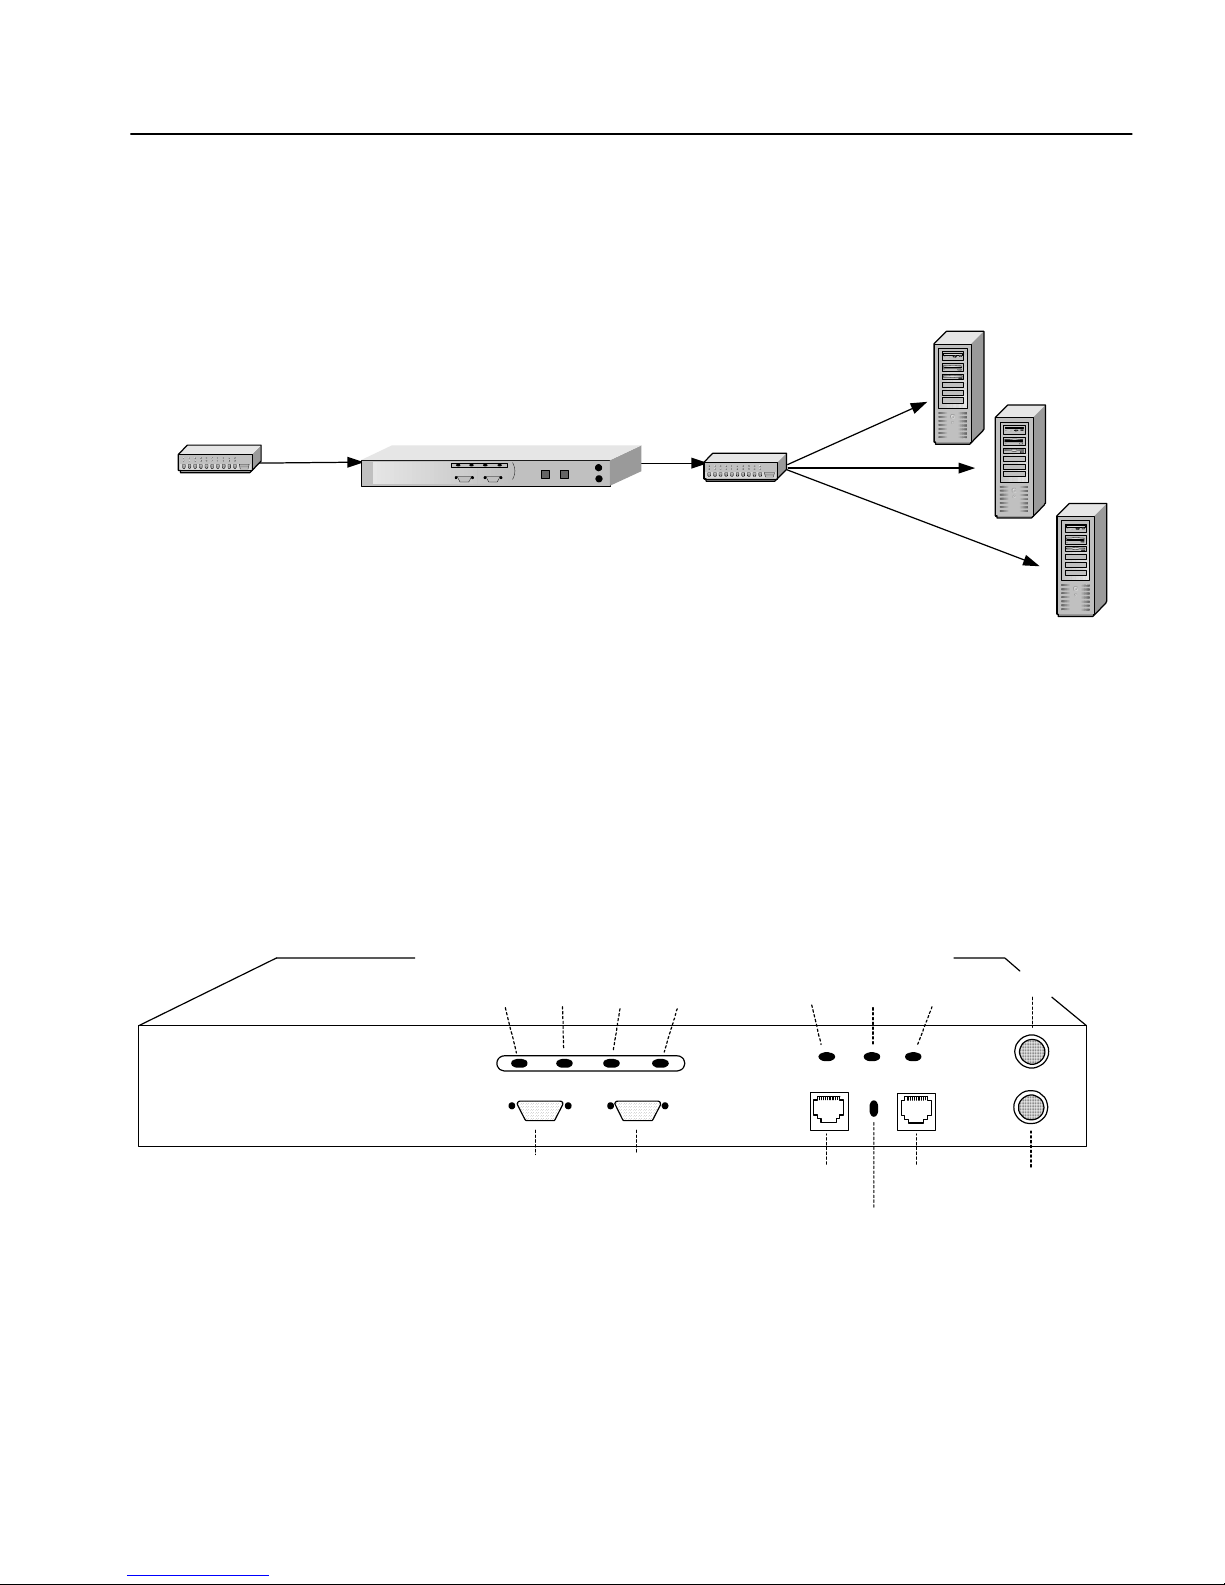
XML Server 1
XML Server 2
hub/switch
Console
Connection
hub/switch
HP e-Commerce/XML Ser v er
Accelerator SA7150
Default Serv er
Wiring Connections
Run HyperTerminal* or a simila r terminal emulator on yo ur PC. The
steps below assume HyperTerminal* is used. Other terminals will
require different procedures.
1. Use the serial cable provided with the SA7150 to connect the
device’s serial port (the left-hand serial port labeled “Console”)
to the serial port of any terminal.
Power
(green)
Error
(red)
LEDs
Overload
(amber)
Activity
(green)
Network
(green)
LEDs
Inline
(green)
Server
(green)
Reset
Console
(CLI)
Aux Console
(Diagnostics)
Network Link
(RJ45)
Fail-through switch
Server Lin k
(RJ45)
Bypass
Front Panel Connectors and LEDs
2. Type an appropriate name in the Name field of the Connection
Description window (e.g., “Configuration”), and then click the
OK button. The Phone Number panel appears.
3. In the Connect Using… field specify “COM1” (or the serial port
through which the PC is connected to the SA7150 if different
from COM1).
11
Page 22

C H A P T E R 2 HP e-Commerce/XML Server Accelerator SA7150 User Guide
4. Click the OK button. The COM1 Properties panel appears. Set
the values displayed here to 9600, 8, none, 1, and none.
5. Click the OK button.
Using
HyperTerm inal*
Fail-through
Switch
If you’re using HyperTerminal* you must make the following
configuration change:
1. In the File menu, click Properties.
2. Click the Settings tab.
3. Click the ASCII Setup butto n.
4. Change the values of Line and Character delay from 0 to at least
1 millisecond.
5. Click OK to exit ASCII Setup.
6. Click OK to exit Connection Properties.
The Fail-through switch allows you to choose between two options in
the event of a failure. It is located in the opening between the Network
and Server connectors. Use a small screwdriver or paper clip to
operate the switch. The two options are:
• Allow traffic to flow through the SA7150 unprocessed. (Fail-
through mode, indicated by a steadily illuminated Inline LED.
Fail-through switch in DOWN position.)
12
• Block traffic f l ow t hroug h t he S A7150 entirely. (Fail-safe mode,
indicated by a blinking Inline LED. Fail-through switch in UP
position.)
Please see Appendix B for a description of LED display.
Page 23

C H A P T E R 2 Physical Installation
Accessing the
Command
Prompt
NOTE: The password is
not echoed on the
command line.
After the SA7150 boots up, the password prompt appears.
1. Type admin at the password prompt and press Enter to access
the prompt:
Password: admin (password is not echoed at prompt)
Current date: 2000 11/0 1 05:01
HP SA7150>
You are now ready for operations at the Command Line Interface
(CLI) of the SA7150. The following is a typical way to begin:
2. Change your password from admin to another of your choice.
Use the password command.
HP SA7150> password
3. Use set date to correct the date/time, if necessary. The date
and time affect the validity of the certificate.
HP SA7150> set date
4. Use the help command to list available command (or refer to the
Command Reference in Chapter 5 of the User Guide).
HP SA7150> help
5. Configure XML servers and patterns as appropriate for your
business needs. (See Chapter 3 of the Use r Guide for details.)
6. If your operational model includes SSL traffic, configure the
appropriate keys and certificates. (See Chapter 3 of the User
Guide for details.)
13
Page 24

C H A P T E R 2 HP e-Commerce/XML Server Accelerator SA7150 User Guide
Notes
14
Page 25

Theory of Operation
This chapter discusses the general operating principles for the HP eCommerce/XML Server Accelerator SA7150. For details about the
SA7150 command set, please see Chapter 5. For information about
completing typical, specific tasks, please see Chapter 4.
XML Operations
The HP e-Commerce/XML Server Accelerator SA7150 provides a
powerful means of using XML technology to facilitate Business-toBusiness transactions. In addi tion to its XML capabi lity, the SA7150
provides SSL acceleration (discussed later in this chapter).
The SA7150 employs user-created rules to evaluate the content
transmitted in XML documents and to distribute this inf ormation
among the appropriate data center resources. XML functionality is
enabled or disabled for each user-specified “map” (i.e., a triad
consisting of an IP address, network port, and server port.)
XML functionality is controlled by way of the Command Line
Interface (CLI—detailed in Chapter 5). The SA7150 manages XML
traffic using “XML patterns,” pairs of “URI expressions” and “XML
expressions.” URI expressions serve as “coarse” filters, allowing the
system to determine whether a HTTP POST request i s t arge ted at an
XML-enabled server—if no URI match is found, t he SA7150 doesn’t
Page 26
C H A P T E R 3 HP e-Commerce/XML Server Accelerator SA7150 User Guide
bother to examine the document for XML content, but simply passes
the document to the “mapped” server (i.e., the one with the IP address
and network port of the i ncoming message). XML expressions are the
“fine” filters—those to be applied to the content and context of the
XML data embedded in the HTTP POST request. XML patterns are
assigned to servers (identified by IP address and server port), and
when a match between a pattern and an incoming request o ccurs, the
SA7150 sends data to the appropriate server.
XML Server 1
Router
HP e-Commerce/XML Ser v er
Accelerator SA7150
Basic SA7150 Operating Configuration
Multiple SA7150s can be connected in series, or “cascaded,” to
multiply your site’s XML processing and availability capabilities,
(and also its SSL processing ca pability, should you use it.)
HP e-Commerce/XML Server
Accelerator SA7150
hub/switchRouter
HP e-Commerce/XML S erver
Accelerator SA7150
XML Server 2
XML Server 3
XML Server 1
XML Server 2
hub/switch
Before you configure the SA7150 for XML operations, you should
first answer the following:
• Which of the several co m mon formats or varieties of XM L will
16
XML Server 3
Cascaded SA7150s
be used in the client application?
Page 27

C H A P T E R 3 XML Operations
• Which XML elemen ts, attributes, or text and HTTP fulfillment
locations contained or identified in the anticipated XML traffic
should be used for XML pattern matching?
• Which servers will be a ssigned the XML patterns that you
create?
• Do you intend to use the SA7150’s SSL capabilities?
General Considerations
Some general facts to keep in mind concerning XML o perations with
the current ve rsion of the S A7150 are liste d below. These fac ts do not
apply to SSL operations.
• The SA7150 uses an abbreviated version of the XPATH syntax.
• The SA7150 works with any XML appli cation the support s XML
1.0 and that is transported via HTTP or HTTPS POST request
methods.
• Transport protocols other than HTTP and HTTPS such as FTP
and SMTP are not supported.
• Content of incoming documents must be of type “text.”
• URL encoding is supported.
• Base64 encoding is not supported.
• The complete XML data stream must be encapsulated in the
body of the HTTP(S) POST request.
• Multi-part MIME messages are not supported.
• The first character of the POST request’s body must be the “less
than” (<) character; the final character must be the “grea ter tha n”
(>) character.
Server Mappings
Because the SA7150’s purpose is to send XML messages with
specific content to speci fic servers, it must be configured to recogn ize
these servers. This configuration is managed through the use of
“server mappings.” A server mapping consists of three items:
• A server’s IP address
• Network port
• Server port
17
Page 28

C H A P T E R 3 HP e-Commerce/XML Server Accelerator SA7150 User Guide
Server mappings are created using the create map command.
Typically, a map specifies a Key ID for SSL encryption and
decryption, as in the example following.
HP SA7150> create map
Server IP [0.0.0.0]: x.x.x.x
Network port [443]:
Cleartext (server) port [80]:
KeyID to use for map ping: default
HP SA7150>
If your operations invol ve processing only unencrypted XML tr affic,
you should use a “clear text map,” i.e., a map with no Key ID. The
example below illustrates the creation of a clear text map:
NOTE: In the example
opposite, the prompt for a
KeyID is ignored. Keys,
certificates and related
matters are discussed in
this chapter under “SSL
Operations.”
HP SA7150> create map
Server IP [0.0.0.0]: x.x.x.x
Network port [443]:
Cleartext (server) port [80]:
KeyID to use for map ping:
Cleartext map for XML only? [n]: y
HP SA7150>
XML Data Model
XML data consists of three hierarchical components:
• Elements (data types)
• Attributes (subcategories of a data type or element)
• Text (specific data such as names, addresses, and quantities
contained within elements or attributes)
The content of an XML document is defined within these three
components, as illustrated below. The example shows a block of
incoming XML text as received by the SA7150 in an HTTP POST
request.
NOTE: XML examples
here are indented for e ase
of reading—the leading
spaces or tabs are not
significant with regard to
SA7150 operations.
18
<employee>
<name lastNam e="Smith" firstName="John"
initial="K"/>
<address>
<street>132 80 Evening Creek Dr</street>
<city>San Diego</city>
<state>California</state>
<zip>92128</zip>
</address>
</employee>
Page 29

C H A P T E R 3 XML Operations
Where:
• employee, name, address, street, city, state,
and zip are the elements of the XML docume nt.
• lastName, firstName, and initial are the attributes of the
element,
• 13280 Evening Creek Dr, San Diego, California,
name.
and 92128 are the text components of the elements, street,
city, state,
• “Smith,” and “John,” and “K” are the text components of the
lastName, firstName, and initial attributes of the name
element.
XML expressions configured in the SA7150 are matched against
XML data which is then sent fo r fulfillment to server assignm e nts
defined in XML patterns.
and zip , respectively.
URI expressions in XML Patterns
XML configurations use URI expressions to assign particular classes
of URLs to particular servers for fulfillment. Applicable expressions
are listed below:
• File type expressions, such as *.asp
• Path expressions, such as /PurchaseOrder/*
• Unique file expressions, such as /purchase.cgi
• Wildcard expression, such as *
• Negation expressions, such as !*.asp or !*/purchase.cgi
Invalid URI Expressions
The following may not be used in URI expressions:
• Text on either side of the asterisk, such as /order*.asp
• Expressions containing more than one asterisk, such as
/order*.*
• Expressions containing one or more spaces or the dollar sign ($)
character
• Expressions containing a vertical bar ( | ) or a carat (^)
19
Page 30

C H A P T E R 3 HP e-Commerce/XML Server Accelerator SA7150 User Guide
Negation Operator
The “*” and “!” operators are allowed in URI expressions, but they
can exist only at the beginning or end of an expression. Also, a
positive expression must appear after a not (!) expression, otherwise
the (!) expression has no effect.
The order of URI expressions is significant only when the “not” (!)
operator is used.
Expression Yields
NOTE: The SA7150 uses
a subset of the XPath
Language standard.
!*.asp
!*/PurchaseOrder
!/Buy.cgi
All non-ASP requests
All non-PurchaseOrder requests
All non-Buy.cgi requests
Use of the Negation Operator
Operators
XML expressions consist of sequences of one or more XML ele ments
or attributes combined with various “operators.” “St ep operators” tell
the SA7150 where in the XML data tree to look, while “comparison
operators” tell the SA7150 what to look for. In typical XML
expressions, elements are separated by step operators—single or
double slashes (/ or //). These are used to sel ect elements according to
their location (“node”) in the XML data tree. Step operators are
described in the table above. Comparison operators are the familiar
“equal to,” “not equ al to,” “greater tha n,” “less than,”and other such
symbols. These form the bases upon which the SA7150 compares
incoming XML data t o its own XML patterns to decide where t o send
each XML documen t for fulfillment.
20
Page 31

C H A P T E R 3 XML Operations
An XML expression’s first element must be preceded by a step
operator.
Step
Operator
/
//
Name Description
Child
Selects all immediate children of the context node
operator
Descendant
Selects elements at any level under the context node
operator
XML Step Operators
The node to the left of t he last step operat or in an XML e xpression is
the “context node,” i.e., the node that establishes the level within the
XML data tree’s hierarchy at which the SA7150 searches for a match
when comparing XML data to XML expressi ons. The “root node” is
the top level of the XML data tree, and by implication is to the left of
an XML expression’s left-most step op erator. So me ex ampl es of th e
effects of step operators are:
• //address Tells the SA7150 to search for the <address>
element anywhere in the XML data tree.
• //employee//state Tells the SA7150 to search anywhere
under the <employee> element node for the <state>
element.
• //employee/address Tells the SA7150 to search one level
below the <employee> node for the <address> element.
You can specify an ele ment as “*”, which selects any element relative
to the context node. You can al so specify a n option al filt er at the end
of a path to further refine parsing of the XML data stream.
21
Page 32

C H A P T E R 3 HP e-Commerce/XML Server Accelerator SA7150 User Guide
Comparison operators allow the SA7150 to look for specific values
in the XML data tree and compa re them with corresponding values in
your preconfigured XML patterns. An XML pattern might look like
this:
URI Expression: */hr.asp
XML Expres si on: //address[zip > 90000]
Because the server to which the XML pattern belongs is configured
for zip codes greater than 90000 (as defined in the XML expression
component of the XML pattern), and John K. Smith’s zip code is
92128, the SA7150 sends his employee data to that server. The
following table contains the available comparison operators
Comparison
Operator
=
!=
<
<=
>
>=
Name Description
Equal to Returns true if any values of the nodes specified in the pattern
equals given value
Not equal to Returns true if at least one value of the nodes specified in the
patterns does not equal given value
Less than Returns true if at least one value of the nodes specified in the
patterns is less than the specified value
Less than or
equal to
Returns true if at least one value of the nodes specified in the
patterns is less than or equal to the specified value
Greater than Returns true if at least one value of the nodes specified in the
patterns is greater than the specified value
Greater than
or equal to
Returns true if at least one value of the nodes specified in the
patterns is greater than or equal to the specified value
XML Comparison Operators
Attributes
Attributes are identified by the “at” sign (@). You can specify an
attribute as
relative to the c on text node.
22
@<AttributeName>, or use @* to select any attribute
Page 33

C H A P T E R 3 XML Operations
Filters
Filters are identified by a FilterExpression enclosed within square
brackets, [ ]. These defin e a p attern within a pattern following this
general structure:
( (’/’ | ’//’) Element )? [ FilterExpression
]
Filter expressions are applied to every element returned by the
preceding path pa ttern. They return a matc h if the server is a valid
choice according to the filter expression.
The operative component of a FilterExpression is a comparison
expression or any Functi onCall expression that r eturns a string value,
which compares either an element or an attribute against a specified
value. An element in a FilterExp ression refers to the child el ement of
the context node, while an attribute refers to the attribute of the
context node.
Comparison expression syntax:
(Element | Attr ibute | FunctionCall)
ComparisonOperator Value
FunctionCall expression syntax:
FunctionName ’(’ (Argument (’,’ Argument)*)?
’)’
You can combine comparison expressions and the FunctionCall
expression with Boolean operators and parentheses to create complex
filter expressions.
Sample Pattern Description
//PurchaseOrder
[Amount > 10000]
//PurchaseOrder
[@CustomerID > 9000]
//PurchaseOrder
[Amount > 10000 and
@CustomerID > 9000]
Matches a PurchaseOrder element with a child element Amount
value greater than 10000
Matches a PurchaseOrder element with an attribute
CustomerID value greater than 9000
Matches a PurchaseOrder element with a child element Amount
value greater than 10000 and wi th an att ri but e
greater than 9000
CustomerID value
Comparison Expression Samples
23
Page 34

C H A P T E R 3 HP e-Commerce/XML Server Accelerator SA7150 User Guide
Boolean Operators
Boolean operators are logical operators between expressions. These
operators are used in the PathExpression an d the FilterExpression, as
shown below.
• PathExpression BooleanOperator PathExpression
• FilterExpression BooleanOperator FilterExpression
Operator Name Description
and
or
Logical AND operator Performs a logical AND operation
Logical OR operator Performs a logical OR operation
Boolean Operators
Sample Pattern Description
//restaurant[@genre and
Food_Rating]
Matches if there is a restaurant element, a genre attribute, and a
Food_Rating child element. genre and Food_Rating are associate d
with the restaurant element.
//restaurant[@genre or
Food_Rating]
Matches if there is a restaurant element, a genre attribute, or a
Food_Rating child element. genre and Food_Rating are associate d
with the restaurant element.
//restaurant or //theater
Matches if there is a restaurant element or a theater element
anywhere in the XML data tree.
Boolean Operator Examples
Function Calls
NOTE: FunctionCalls
can only be specified
within FilterExpressions.
24
Function calls allow you to specify partial patterns within
FilterExpressions. FunctionCall expressions are evaluated by using
the FunctionName to identify a supporte d functi on, eval uati ng each
of the arguments if needed, and calling the function passing the
Page 35

C H A P T E R 3 XML Operations
required arguments. Wrong numbers of arguments or argume nts no t
of the required type result in errors. The result of the FunctionCall
expression is the resu lt returned by the func tion.
Function Description
starts-with(value,
substring)
contains(value,
substring)
translate(value,
fromString,
toString)
The starts-with function tests whether the string value of value starts the
specified substring. value can be either an element, attribute, or function
call that returns a string value. substring must be a literal value enclosed
in single or double quotes.
The contains function tests whether value contains the specified
substring. value can be either an element, attribute, or function call that
returns a string value. substring must be a literal value enclosed in single
or double quotes.
The translate function replaces characters in the value string if they
appear in the fromString with the corresponding characters in the
toString. If a character appears in fromString but not in the co rre spond ing
position in toString, the character will be dropped from the value string.
The result string is returned. value can be either an element, attribute, or
function call that returns a string value. Both fromString and toString
have to be a literal value enclosed in single or double quotes.
Function Calls
.
Sample Pattern Description
//Order[starts-with
(PartNumber, “001”)]
//Part[contains
(@PartNumber, ‘12345’)]
//Part[contains(translate
(@Description,’abcdefg
hijklmnopqrstuvwxyz’,
‘ABCDEFGHIJKLMNOP
QRSTUVWXYZ’),
‘ENGINE’)]
Matches if there is an Order element with a value of a PartNumber
child element starting with “001.”
Matches if there is a Part element with the value of a PartNumber
attribute containing “12345.”
Matches if there is a Part element with the value of a Description
attribute containing “ENGINE.” All characters in the Description
attribute are converted to uppercase before being passed to the
contains function.
Function Call Examples
25
Page 36

C H A P T E R 3 HP e-Commerce/XML Server Accelerator SA7150 User Guide
Values
Values are used to specify the right operand of a comparison
expression, and can be either liter als (e.g., a string) or numeric values.
Literals must be enclosed in either single or double quotes. If the
literal string conta ins singl e quo tes, double quotes should be used to
enclose the string. Conversely, if the literal string contains double
quotes, it should be enclosed in single quotes. Character references
(both decimal and hexadecimal format) and predefined entities as
described in the XML specification can be used within the literal
string.
The string value of the left operand is obtained for literal equality
comparisons. If an element is specified for the left operand, only
elements without a chi ld element should be used. Although the upper
level elements are not supported, this generally is not a problem,
since in most cases only the lowest level element contains text values.
A number can be either a decimal value or an integer. Numbers
should not be enclosed in quotes. (Numbers within quotes are treated
as literals.) Numbers are signed by preceding them with the plus (+)
or minus (-) sign. Decimal values must contain a decimal point with
at least one digit to the right of it.
A numeric comparison is either an equality comparison with a
numeric right operand or a non-equality comparison. Both the value
of the left and right operands, if necessa ry, are con vert ed to numeri c
values before a numeric comparison is made. If the value cannot be
converted to a number, the comparison returns false.
26
Page 37

C H A P T E R 3 XML Operations
XML Pattern Creation
XML patterns are created with the create pattern command.
Because each pattern is assig ned to a sp ecific server, the command’s
syntax requires that a server be specified.
HP SA7150> create pattern <server name>
After entering the command and a serv er name, th e SA7150 prompt s
you for a URI expression.
HP SA7150> create pattern gold
URI Expressio n: /PurchaseOrder
Each time a new URI expression is entered, the system performs a
“validity check” (a test for syntactical correctness). If the expression
is invalid, the SA7150 displ ays an error message and prompts you to
begin again.
NOTE: The validity
warning opposite is an
example for illustrative
purposes only. Actual
messages will vary
depending on the error.
Improper use of ’*’ character in URI
Expression
Enter another pattern? [n]: y
After you enter a valid URI expression, the system prompts for an
XML expression.
XML Expressio n: //order [amount>1000]
Enter another pattern? [n]:
HP SA7150>
As with the URI expressions, the SA7150 performs a validity check
on each XML expression when entered and displays an error message
if there is a problem. After you enter a valid XML expression, the
SA7150 performs a “duplicate check,” (i.e., verifies that the newly
entered pattern does not already exist). If the pattern already exists,
the following message appears:
A pattern with th is URI and XML expression
already exists
Enter another pattern? [n]:
When the above steps are complete, the SA7150 asks if you want to
create another XML pattern.
The SA7150 stores each XML patt ern in a list on the server specified
during the patte rn’s creation and assigns each a un ique index number
within each server list. You can d isplay all server l i sts at th e con sol e
by typing the show pattern command.
27
Page 38

C H A P T E R 3 HP e-Commerce/XML Server Accelerator SA7150 User Guide
HP SA7150> show pattern
Server: std
Pattern ID Pattern
========== ==== =====
1 * & //std
Server: gold
Pattern ID Pattern
========== ==== =====
1 * & //gold
2 * & //order [amount> 1000]
Server: silver
Pattern ID Pattern
========== ==== =====
1 * & //silver
You can display the list for a singl e server by usi ng the show pattern
command with the name of t he server wh ose pat ter n l is t y ou wi sh t o
view included as an argument.
HP SA7150> show pattern gold
Server: gold
Pattern ID Pattern
========== ==== =====
1 * & //gold
2 * & //order [amount> 1000]
HP SA7150>
Mapped Server
For the purpose of discussing SA7150 operations, the “mapped
server” is a server for which a map has been configur ed (see “Server
Mappings” on page 17). This is the server to whic h the SA7150 sends
messages for which no XML expression match is found among the
active XML patterns, including any that contain the keyword
“default” in their XML expression component. (Please see next
section, “Default Keyword. ”)
28
Page 39

C H A P T E R 3 XML Operations
Default Keyword
The keyword default can be used as an XML pattern’s XML
expression component to catch cases not covered by active XML
patterns with specific XML expressions. To illustrate, imagine you
have a number of active XML patterns assigned to different servers,
each with the same URI expression (orders.asp) but with different
XML expressions.
orders.asp & // company[name=”GM”]
orders.asp & // company[name=”Ford”]
orders.asp & // company[name=”Chrysler”]
orders.asp & de fault
For example, incoming XML messages aimed at the URI
“orders.asp” and containing the company names “Chevrolet,”
“BMW,” or “Honda” would not result in exact matches with any of
the first three XML pat terns in the example above. However the XML
pattern containing default would catch all of these messages, because
the URI expression is an exact match and default in the XML
expression doesn’t match “GM,” “Ford,” or “Chrysler.”
NOTE: Multiple XML
patterns can use the
default keyword, but th ey
must have different URI
expressions.
Below is an example of the CLI input to create an XML pattern
containing the default keyword.
HP SA7150> create pattern gold
URI Expressio n: orders.asp
XML Expressio n: default
Enter another pattern? [n]:
HP SA7150>
XML Pattern Matching
The SA7150 looks first for URI expression matches. If matches for
URI expression are found, then the SA7150 looks for XML
expression matches.
• If both the URI and XML expressions match, the SA7150 sends
the message to the server to which the matching XML pattern is
assigned.
• If only the URI expression matches, the SA7150 sends the
message to the default XML server, if one is specified, or if not,
to the mapped server.
• If the URI expression does not match, the XML expression is
ignored and the message goes to the mapped server.
29
Page 40

C H A P T E R 3 HP e-Commerce/XML Server Accelerator SA7150 User Guide
The table below illustrat es ways in which XML messages are handled
depending on which compon ent of XML patte rns match and whether
a default XML server is configured.
URI Match, no XML
Match
XML Match, no URI
Match
URI and XM L Ma t ch
Default XML Server
Configured
Default XML Server
Not Configured
Default XML Server Mapped Server
Mapped Server Mapped Server
Server to which matching pattern
is assigned
Server to which matching
pattern is assigned
XML Message Destinations
XML “Well-formed” Check
If the SA7150 detects a URI expression match in the XML data
stream, it checks it for syntactical errors, and, if it detects any, by
default sends an e rror message to t he requesting cli ent. Alternately, i t
can be configured to send an incoming XML data stream to the
mapped server when it detects punctuation or syntax errors. In all
such cases the XML expression is ignored for normal processing
purposes.
• If the xml_well_formed command is set to enable, when
• If xml_well_formed is se t to disable, when malformed XML
30
malformed XML data is found in an incoming request the
SA7150 terminates the connect ion and returns HTTP Error 403 to
the client with the message, “XML data is not well-formed.”
data is found in an incoming request it is sent to the mapped
server.
Page 41

C H A P T E R 3 Network Configurations
Network Configurations
Single Server
Router
The HP e-Commerce/XML Server Accelerator SA7150 is typically
used with multiple servers although it can support multiple
applications running on separate ports of a single server. In single
server configurations the SA7150 is connected to the network
between the router and the server.
Ideally, the SA7150 is installed in the network in such a way as to
minimize network latency.
App1
App 2
App 3
HP e-Commerce/XML Server Accelerator SA7150
Single Server
SA7150 in Single Server Configuration
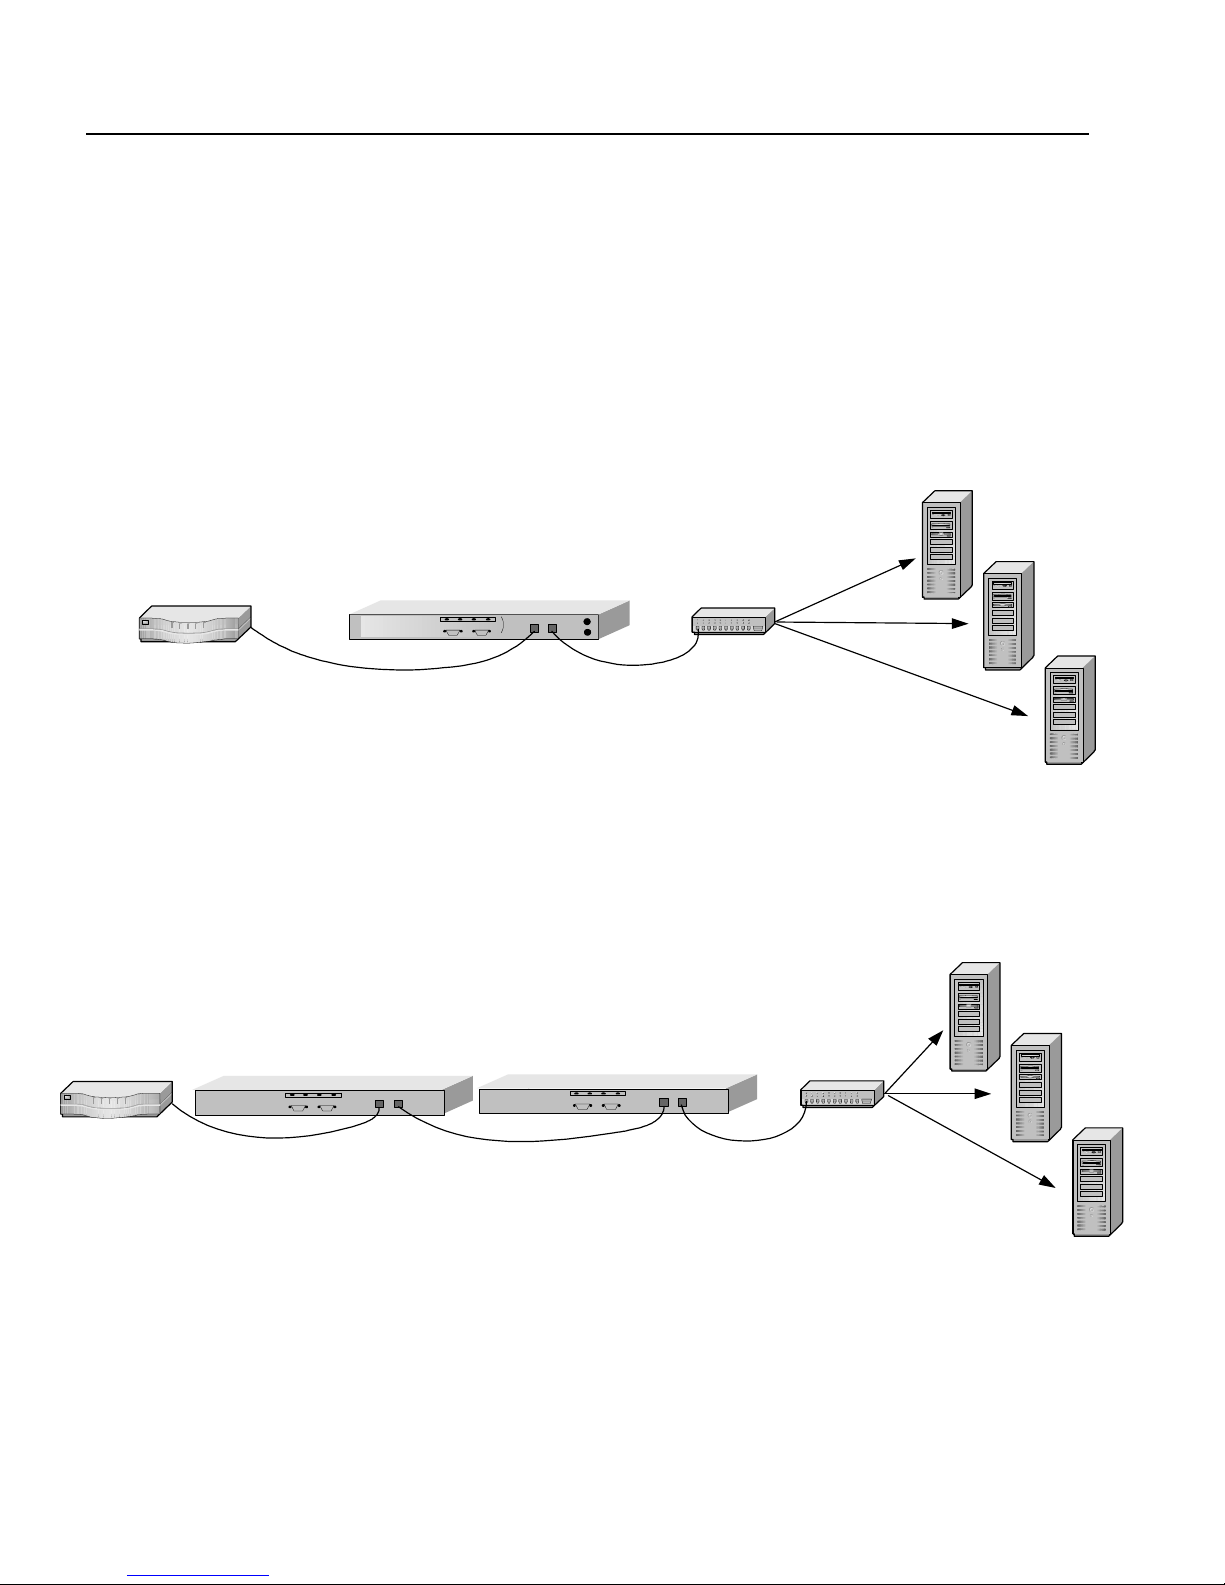
Multiple
Servers
In the more common multiple server configuration, the SA7150 sits
between the router and the switch. XML traffic is intercepted,
decrypted (if SSL-encrypt ed), processed, and sent to an XML server.
XML Server 1
XML Server 2
HP e-Commerce/XML Server
Accelerator SA7150
hub/switchRouter
XML Server 3
SA7150 in Multiple Server Configuration
31
Page 42

C H A P T E R 3 HP e-Commerce/XML Server Accelerator SA7150 User Guide
Multiple
SA7150s and
Cascading
HP e-Commerce/XML Server
Router
Accelerator S A7150
Scalability and Cascading
The SA7150’s capabilities are scalable by chaining, or “cascading,”
multiple SA7150s together. In such co nfigurations, each unit’s server
side connector is wired to the network side connector of the next
SA7150 in line. The last SA7150 in lin e is connected to the server or
switch.
XML Server 1
XML Server 2
HP e-Commerce/X ML Server
Accelerator SA7150
hub/switch
XML Server 3
Cascaded SA7150s
Spilling and Throttling
NOTE: The SA7150
restarts when spill is
enabled. Depending on
the size of the current
configuration file, it can
require from 30 seconds
to seven minutes to return
to operations.
When the SA7150’s “spill” option is enabled, if a given SA7150
cannot process a request within a specified interval, the request is
passed on to the next SA7 150 i n l ine. T he l ast SA71 50 on the server
side can also be enable d to spill to the server. Spilling is performed
dynamically on a connection-by-connection basis. (See spill
command, Chapter 5, “Command Reference.”) If spill is disabled, the
SA7150 “throttles,” that is, does not accept incoming requests when
it becomes overloaded.
Availability
When a SA7150 fails or is set to Bypass mode while Fail-through is
enabled, the SA7150’s network sid e and server side network adapters
are directly connected, allowing traffic to pass through to the next
device until the failed unit is brought back into service. This feature
eliminates a single point of failure and provides a high level of
availability, shoul d there be a failure. Se e “Failure/Bypass Modes” in
Appendix B for more information.
32
Page 43

C H A P T E R 3SSL Operations
SSL Operations
Keys and
Certificates
CAUTION: The SA7150
comes with default keys
and certificates for test
purposes. Certificates fo r
production use should be
obtained from a
recognized certificate
authority.
In addition to its XML processing capabil ities, th e SA7150 prov ides
powerful SSL (Secure Socket Layer) decryption and encryption
processing. When secure maps are used it becomes necessary to
configure keys and certificates. A key is a set of numbers used to
encrypt or decrypt data. A certificate is a “form” that identifi es a
server or user. The certificate contains information about your
company as well as information from a third party that verifies your
identity.
There are three ways to obtain keys and certificates:
• Obtaining a certificate from VeriSign* or other certificate
authority
• Using an existing k ey/certificate
• Creating a new key/certificate on the SA7150
Cutting and Pasting with HyperTerminal*
Cutting and pasting is an integral pa rt of the next sever al procedur es.
Below are procedures for cutting and pasting in HyperTerminal*. If
you use some other terminal program, consult that product’s
documentation for appropriate procedures.
To copy an item (key, certificate signing request, etc.) from
HyperTerminal*:
1. Open the HyperTerminal* window.
2. Click and drag to select the item.
3. After the item is selected, open the Edit menu and click Copy (or
type <ctrl-c>).
4. Open the window where you will paste the data, and posit io n the
cursor at the appropriate point.
5. In the Edit menu, click Paste (or type <ctrl-v>).
33
Page 44

C H A P T E R 3 HP e-Commerce/XML Server Accelerator SA7150 User Guide
To paste an item (key, certificate signing request, etc.) into
HyperTerminal*:
1. Display the ite m in the appropriate application window, then
click and drag to select the item.
2. Once the item is selected, click the Edit menu and select Copy
(or type <ctrl-c>).
3. Move to the HyperTerminal* window, and position the cursor at
the appropriate point.
4. Pull down the Edit menu, and select Paste to Host (or type
<ctrl-v>).
Obtaining a
Certificate
from VeriSign*
or Other
Authority
Use the create key command to create your key and t he create si gn
command to create a signi ng reque st to be sent to Ver iSign* o r other
certificate authority for authentication. The certificate authority will
return it in approximately one to five days. After you have received
the certificate, use the import cert command to import it into the
SA7150.
The fields input to create a signing request are called collectively a
Distinguished Name (DN). For optimal security, one or more fields
must be modified to make the DN unique.
Procedure
Create a key.
1. Type the create key command at the prompt.
HP SA7150> create key
Key strength (5 12/1024) [512]:
New keyID [001] : 002
Keypair was created for keyID: 002
2. Create a Certificate Signing Request.
34
HP SA7150> create sign 002
You are about to be as ked to enter
information that will be incorporated into
your certific ate request. The "common name"
must be unique. For other fields, you could
use default val ues.
Page 45

C H A P T E R 3SSL Operations
Certifying author ities have specific guide lines on how to answer each
of the questions. These guidelines may vary by certifying authority.
Please ref er to the g uideline s of the cer tify ing au thorit y to who m you
submit your Certificate Signing Request (CSR). Please keep the
following in mind when entering the information that will be
incorporated into your certificate request.
• Country code: This is the two-letter ISO abbreviation for your
country (for example, US for the United States).
• State or Province: This is the name of the state or province
where your organiza ti on’s head office is located. Please enter the
full name of the state or province. Do not abbreviate.
• Locality: This is usually the name of the city where your
organization’s head office is located.
• Organization: This should be the organization that owns the
domain name. The organization name (corporation, limited
partnership, university, or government agency) must be
registered with some authority at the national, state, or city level.
Use the legal name under which your organization is registered.
Please do not abb reviate your or ganizat ion’s name and do not use
any of the following characters: < > ~ ! @ # $ % ^ * / \ ( ) ?.
• Organizational unit: This is normally th e name of the
department or group that will use the certificate.
• Common name: The common name is the “fully qualified
domain name,” (or FQDN) used for DNS lookups of your server
(for example, www.mysite.com). Browsers use this information
to identify your Web site. Some browsers will refuse to establish
a secure connection with your site if the server name does not
match the common name in the certificate. Please do not include
the protocol specifier “http://” or any port nu mbers or pat h names
in the common name. Do not use wildcard c haracters such as * or
?, and do not use an IP address.
• E-mail address: This should be the e-mail address of the
administrator responsible for the certificate.
3. Export the Certificate Signing Request (CSR).
35
Page 46

C H A P T E R 3 HP e-Commerce/XML Server Accelerator SA7150 User Guide
In this example, xmod em i s used t o se nd the CSR to a PC connected
to the console port.
HP SA7150> export sign mywebserver
Export protoc ol: (xmodem, ascii)
[ascii]:xmodem
Use Ctrl-x to kill transmission
Beginning export...
Export successful!
HP SA7150>
To submit the CSR to a certifying authority, paste it into the field
provided in the authority’s online request form. Remember to include
the “-----BEGIN CERT IFICATE REQUEST-----” and “-----END
CERTIFICATE REQ U EST-----” lines.
Typically, the CSR will look something like this:
-----BEGIN CE RTIFICATE REQUEST----MIIBnDCCAQUACQAwXjELMAkGA1UEBhMCQ0ExEDOABgNV
BAgTB09udGFayW8xEDAOBgNVBAcTB01vbnRyYWwxDDAK
BgNVBAoTA0tGQzEdMBsGA1UEAxMUd3d3Lmlsb3ZlY2hp
Y2tlbi5jb20wgZ0wDQYJKoZIhvcNAQEBBQADgYsAMIGH
AoGBALmJA2FLSGJ9iCF8uwfPW2AKkyyKoe9aHnnwLLw8
WWjhl[ww9pLietwX3bp6Do87mwV3jrgQ1OIwarj9iKML
T6cSdeZ0OTNn7vvJaNv1iCBWGNypQv3kVMMzzjEtOl2u
Gl8VOyeE7jImYj4HlMa+R168AmXT82ubDR2ivqQwl7Ag
EDoAAwDQYJKoZIhvcNAQEEBQADgYEAn8BTcPg4OwohGI
MU2m39FVvh0M86ZBkANQCEHxMzzrnydXnvRMKPSE208x
3Bgh5cGBC47YghGZzdvxYJAT1vbkfCSBVR9GBxef6ytk
uJ9YnK84Q8x+pS2bEBDnw0D2MwdOSF1sBb1bcFfkmbpj
N2N+hqrrvA0mcNpAgk8nU=
-----END CERT IFICATE REQUEST-----
4. When the certificate authority returns the certificate, import it
NOTE: It is possible to
import multiple
certificates in a single
file. The size of files
containing combined
certificates must not
exceed 20KB.
36
into the SA7150. Use the import cert command, with the
KeyID. As with the import key, choose an import protocol for
importing the key. Use p for paste. After the paste is finished, add
three periods to d isplay the command line.
HP SA7150> import cert mywebserver
keyid is mywebs erver;
Import protocol: (paste, xmodem) [paste]:
Type or paste in date, end with ... alone on
line
Page 47

C H A P T E R 3SSL Operations
-----BEGIN CE RTIFICATE----MIIDKDCCAtKgAwIBAgIBADANBgkqhkiG9w0BAQQFADCB
nDELMAkGA1UEBhMCVVMxCzAJBgNVBAgTAkNBMQ4wDAYD
VQQHEwVQb3dheTEaMBgGA1UEChMRQ29tbWVyY2Ug
.
.
.
-----END CERT IFICATE----- <Enter>
... <Enter>
Import successful!
HP SA7150>
5. Create mapping for Server 1. Use the create map command to
specify the server IP address, ports, and keyID.
HP SA7150> create map
Server IP (0.0.0.0): 10.1.1.30
Network port [443]:
Cleartext (se rver) port [80]:
KeyID to use for ma pping: mywebserver
Using an
Existing Key/
Certificate
NOTE: Currently there
is no published method
for extracting private
keys from Microsoft* IIS
or Netscape* servers.
6. Save the configuration when the server has been mapped.
HP SA7150> config save
Saving configuration to flash...
Configuration saved to flash
HP SA7150>
Exporting a Key/Certificate from a Server
This method is used whe n it is important that the ex isting keys and
certificates are used.
Consult your server software do cumentation for detai led instructions
on how to export keys and certificates. Once you have exported the
keys and certificates, use the import key and import cert commands
to paste the keys and certificates into your SA7150. Some general
instructions are provided below for the Apache Web Server.
Apache Interface to Open SSL* (mod_ssl)
For key:
1. Look in $APACHEROOT/conf/httpd.conf for location of *.key
file.
2. Copy and paste the key file.
37
Page 48

C H A P T E R 3 HP e-Commerce/XML Server Accelerator SA7150 User Guide
For certificate:
1. Look in $APACHEROOT/conf/httpd.conf for location of *.crt
file (certificate).
2. Copy and paste the certificate file.
Apache SSL*
For key:
1. Look in $APACHESSLROOT/conf/httpd.conf for location of
*.key file.
2. Copy and paste the key file.
For certificate:
1. Look in $APACHESSLROOT/conf/httpd.conf for location of
*.cert file.
2. Copy and paste the certificate file.
Stronghold*
For key:
1. Look in $STRONGHOLDROOT/conf/httpd.conf for location of
*.key file.
2. Copy and paste the key file.
For certificate:
1. Look in $STRONGHOLDROOT/conf/httpd.conf for location of
*.cert file.
2. Copy and paste the certificate file.
Importing into the SA7150
1. Use the import key command with the keyID, and choose an
import protocol for impor ting th e key. In this case, use the def ault
to “paste.” When the paste is finished, add a line break followed
by three periods to display the command line.
38
HP SA7150> import key mywebserver
Import protocol: (paste, xmodem) [paste]:
Type or paste in date, end with ... alone on
line
Page 49

C H A P T E R 3SSL Operations
-----BEGIN RS A PRIVATE KEY----MIIBOgIBAAJBALGOlBH14vIdtfuA+UnyRIoKya13ey8m
j3GDQakdwoDJALu+jtcC
.
.
.
S9dPdwp6zctsZeztn/ewPeNamz3q8QoEhY8CawEA
-----END RSA PR IVATE KEY-----<Enter>
... <Enter>
Import successful!
HP SA7150>
2. Use the import cert command with the keyID. As with import
key, choose an import protocol for importing the key. Use the
default to “paste.” When the paste is finished, add a line break
followed by three periods to display the command line.
HP SA7150> import cert mywebserver
keyid is mywebs erver;
Import protocol: (paste, xmodem) [paste]:
Type or paste in date, end with ... alone on
line
-----BEGIN CE RTIFICATE----MIIDKDCCAtKgAwIBAgIBADANBgkqhkiG9w0BAQQFADCB
nDELMAkGA1UEBhMCVVMxCzAJBgNVBAgTAkNBMQ4wDAYD
VQQHEwVQb3dheTEaMBgGA1UEChMRQ29tbWVyY2Ug
.
.
.
-----END CERT IFICATE----- <Enter>
... <Enter>
Import successful!
HP SA7150>
3. Create a server mapping. Use the create map command to
specify the server IP address, ports, and keyID.
HP SA7150> create map
Server IP (0.0.0.0): 10.1.1.30
SSL (network) port [443]:
Cleartext (se rver) port [80]:
KeyID to use for ma pping: mywebserver
39
Page 50

C H A P T E R 3 HP e-Commerce/XML Server Accelerator SA7150 User Guide
4. Save the configuration when the server has been mapped.
HP SA7150> config save
Saving configuration to flash...
Configuration saved to flash
HP SA7150>
Creating a new
Key/Certificate
on the SA7150
Use the create key and cre ate cert commands to create new keys and
certificates for SA7150 operation. This procedure can be used when
there are no existing keys and certificates on the server. The
advantage is that this method is very fast, but a certificate authority
has not signed the certificates.
The fields input to create a certificate are called a Distinguished
Name (DN). For optimal security, one or more fields must be
modified to make the DN unique.
Procedure
1. Create a key.
HP SA7150> create key
Enter the key strength [512,1024]: 512
New keyID [001] : mywebserver
Keypair was created for keyID: mywebserver
2. Enter the create cert command with the keyID.
HP SA7150> create cert mywebserver
You are about to be as ked to enter
information…
Enter the information for the certificate, as prompt ed.
40
• Country
• State
• Locality
• Organization
• Organization unit
• Common name (for example, www.myserver.com)
• E-mail address.
Page 51

C H A P T E R 3SSL Operations
3. Create a server mapping. Use the create map command to
specify the server IP address, ports, and keyID.
HP SA7150> create map
Server IP (0.0.0.0): 10.1.1.30
SSL (network) port [443]:
Cleartext (se rver) port [80]:
KeyID to use for ma pping: mywebserver
4. Save the configuration when the server has been mapped.
HP SA7150> config save
Saving configuration to flash...
Configuration saved to flash
HP SA7150>
Global Site
Certificates
Overview
Four types of certificates are involved in the following discussion:
• Root Certificate. The certificate of a trusted Certificat e Authority
(CA) such as VeriSign*.
• Server Certificate. Loaded on the server. Can be either self-
generated or received from a certificate authority such as
VeriSign*. Interacts with requesting browser’s root certificate to
establish encryption level.
• Global Site Certificate. An extended server certificate. Allows
128-bit encryption for expo rt-r est rict ed browser s.
• Intermediate CA certificate. A certificate “signed,” that is,
authenticated, by a recognized CA such as VeriSign*, and used to
validate a global site certificate. Called an “intermediate CA
certificate” in the following discussion.
Export versions of In ternet Explo rer* and Net scape* Communi cator
use 40-bit encryption to initiate connections to SSL servers. Upon
receiving a client request, the server responds by sending a digital
certificate. If this certificate is a conventional server certificate (that
is, not a global site certificate), b rowser and server complet e the SSL
handshake and use a 40-bit key to encrypt application data. If the
server responds to a requ esting browser with a gl obal site c ertif icate ,
the client automatically renegotiates the connection to use 128-bit
encryption.
A global site certificate is val idated by an accompanying intermediate
CA certificate. (Such pairs are called “chained certificates.”)
Examples of intermediate CA certificates include Microsoft SGC
41
Page 52

C H A P T E R 3 HP e-Commerce/XML Server Accelerator SA7150 User Guide
Root* and VeriSign Class 3*. When a requesting browser receives a
global site certificate along with an intermediate CA certificate, the
browser’s root certificate is used to validate the intermediate CA
certificate, which in turn is used to validate the global site certificate,
thus letting the bro wser know that it can renegotiate the connecti on to
use 128-bit encryption.
Global Site Certificate Paste Procedure
If you wish to use a global site certificate, you must import both the
global site certificate and its accompanying intermediate CA
certificate. Both certificates must be chained together in a single file.
NOTE: The size of the
file containing both
certificates must not
exceed 20KB.
NOTE: There must be no
white space before,
between, or after
certificates, and the
“Begin...” headers and
“End...” trailers must all
be retained.
Use the
import cert command to import either single or chained
certificates. In the latter case, past e the server’s global sit e certificate
first, followed by the intermediate CA certificate. Follow the
intermediate CA certificate by typing three periods on a new line.
Example:
HP SA7150> import cert <keyID>
Import protocol: (paste, xmodem) [paste]:
Type or paste in data, end with ... alone on
line
-----BEGIN CE RTIFICATE----MIIFZTCCBM6gAwIBAgIQCTN2wvQH2CK+rgZKcTrNBzAN
BgkqhkiG9w0BAQQFADCBujEfMB0GA1UEChMWVmVyaVNp
Z24gVHJ1c3QgTmV0d29yazEXMBUGA1UECxMOVmVyaVNp
Z24sIEluYy4xMzAxBgNVBAsTKlZlcmlTaWduIEludGVy
bmF0aW9uYWwgU2Vy
:
dmVyIENBIC0gQ2xhc3MgMzFJMEcGA1UECxNAd3d3LnZl
cmlzaWduLmNvbS9DUFMg
SW5jb3JwLmJ5IFJlZi4gTElBQklMSVRZIExURC4oYyk5
NyBWZXJpU2lnbjAeFw05
OTExMTEwMDAwMDBaFw0wMDExMTAyMzU5NTlaMIHHMQsw
CQYDVQQGEwJVUzETMBEG
-----END CERT IFICATE-----
-----BEGIN CE RTIFICATE----MIIEMTCCA5qgAwIBAgIQI2yXHivGDQv5dGDe8QjDwzAN
BgkqhkiG9w0BAQIFADBfMQswCQYDVQQGEwJVUzEXMBUG
A1UEChMOVmVyaVNpZ24sIEluYy4xNzA1BgNVBAsTLkNs
YXNzIDMgUHVibGljIFByaW1hcnkgQ2VydGlmaWNhdGlv
biBBdXRob3JpdHkwHhcNOTcwNDE3MDAwMDAwWhcN
:
OTk3IFZlcmlTaWduMA0GCSqGSIb3DQEBAgUAA4GBALiM
42
Page 53

C H A P T E R 3 Redirection: Clients and Unsupported Ciphers
mMMrSPVyzWgNGrN0Y7uxWLaYRSLsEY3HTjOLYlohJGya
wEK0Rak6+2fwkb4YH9VIGZNrjcs3S4bmfZv9jHiZ/
4PC/
NlVBp4xZkZ9G3hg9FXUbFXIaWJwfE22iQYFm8hDjswMK
NXRjM1GUOMxlmaSESQeSltLZl5lVR5fN5qu
-----END CERT IFICATE-----<Enter>
...<Enter>
Import successful!
HP SA7150>
Redirection: Clients and Unsupported Ciphers
NOTE: The user must
provide the redirect URL
and ensure that it is
available, as well as
define the content of the
redirect page.
WARNING: If the
redirect URL causes a
client to access the same
SA7150 mapping that
invoked the redirection
an infinite loop condition
will occur.
When a client that d oes not support the selecte d cipher suite at tempts
to connect to the SA7150, the default be havior is to reject th e
connection, resul ting in the client syst em reporting a fatal error.
However, the SA7150 allows you to specify a “redirect address”
where you can provide clients with additional information. The set
redirect command allows you to specify a redirect Web address for
any Map ID. The show redirect command displays any redirect
addresses currently configured.
If you are using a clear text map, the following three parameters are
not applicable:
• Cipher Suite
• Redirect URL
• Client Authenti cation
HP SA7150> list maps
Map Net Ser Cipher Re- Client well
ID KeyID Server IP Port Port Suites direct Auth XML form
== ===== ========= ===== ==== ====== ===== ===== === ====
1 default Any 443 80 all(v2+v3) n n n N/A
HP SA7150> set redirect 2
Enter a redirect URL at following prompt
e.g. http://www.e-comm_site.com/browser.html
Enter redirect URL []:http://www.e-comm_site.com/
cipher_info.html
HP SA7150> list maps
Map Net Ser Cipher Re- Client well
ID KeyID Server IP Port Port Suites direct Auth XML form
== ===== ========= ===== ==== ====== ===== ===== === ====
1 default Any 443 80 all(v2+v3) n n n N/A
HP SA7150> show redirect 2
Redirect URL for map 2 is set: http://www.e-comm_site.com/
cipher_info.html
43
Page 54

C H A P T E R 3 HP e-Commerce/XML Server Accelerator SA7150 User Guide
To disable a redirect URL for a mapping:
HP SA7150> set redirect 2 no ne
HP SA7150> show redirect 2
Redirect URL fo r map 2 is not set
Client Authentication
The SA7150 supports only one root CA certificate per mapping.
However, multiple in te rmediate CA certificates per single mapping
are supported.
First, use the list map command to display the current map IDs and
their configurations including Client Authentication, enabled (y) or
disabled (n).
HP SA7150> list map
Map Net Ser Cipher Re- Client well
ID KeyID Server IP Port Port Suites direct Auth XML form
== ===== ========= ===== ==== ====== ===== ===== === ====
1 default Any 443 80 all(v2+v3) n n n N/A
2 sample 10.1.2.57 443 80 med(v2+v3) n n n N/A
HP SA7150>
Next, import the client CA certificate for Map ID 2.
HP SA7150> import client_ca 2
Import protocol: (paste, xmodem) [paste]:
Type or paste in data, end with ... alone on
line
-----BEGIN CE RTIFICATE----MIIDxzCCAzCgAwIBAgIBADANBgkqhkiG9w0BAQQFADCB
pDELMAkGA1UEBhMCVVMxEzARBgNVBAgTCkNhbGlmb3Ju
aWExEjAQBgNVBAcTCVNhbiBEaWVnbzEUMBIGA1UE
.
.
.XcCabZcfBRuYcZeUoNrGUl8tD80jp2YNG1vidgLEaD1
YCli5I9/mNrcB25mSfdAR
/08ROTMxm4VKOSA=
-----END CERT IFICATE-----<Enter>
...<Enter>
44
Page 55

C H A P T E R 3 Client Authentication
Verify the import by usi ng the list map comman d again. Note that the
Client Auth column now shows client authentication for Map ID 2
enabled.
HP SA7150> list map
Map Net Ser Cipher Re- Client well
ID KeyID Server IP Port Port Suites direct Auth XML form
== ===== ========= ===== ==== ====== ===== ===== === ====
1 default Any 443 80 all(v2+v3) n n n N/A
2 sample 10.1.2.57 443 80 med(v2+v3) n y n N/A
HP SA7150>
Clients connecting to “map 2” are required to present a client
certificate signed by the CA whose certificate was imported above. If
they do not present a properly signed certificate, their connection
attempt is refused.
Creating a
Client CA
Certificate
using
OpenSSL*
NOTE: To acquire a
copy of OpenSSL* for
your environment, acce ss
the OpenSSL* Web sit e at
www.openssl.org.
NOTE: In this example,
ca_cert.pem is your
trusted CA and signing
certificate.
Software packages are available that handle the details of client
certificate generation. However, you can also implement them
manually. The following example illustrates the appropriate steps
using OpenSSL*.
1. Generate the key pair for the client CA.
openssl genrsa -out ca_key.pem 1024
2. Create another private key by typing this command.
openssl genrsa -out ca_key.pem 1024
3. Generate the client CA certificate.
openssl req -new -x509 -config hp.cnf -key
ca_key.pem -d ays 365 -out ca_cert.pem
4. Use the import client_ ca command to import ca_cert.pem for
each client.
1. Generate a key pair.
openssl genrsa -out key.pem 1024
2. Generate a certificate signing request.
openssl req -new -confi g hp.cnf -days 365 key key.pem -ou t csr.pem
3. Sign the client certificate request by typing this command.
openssl X509 -req -Cacreatserial -Cakey
ca_key.pem -C A ca_cert.pem -in csr.pem -out
cert.pem
45
Page 56

C H A P T E R 3 HP e-Commerce/XML Server Accelerator SA7150 User Guide
4. Combine the key.pem and cert.pem keys into one file by
typing this command.
cat key.pem cert.pem > all.pem
5. Convert to p12 format by typing this command.
openssl pkcs12 -export -in all.pem -out
<file>.p12 - na me “MY NAME”
The output file <file>.p12 will be imported into the browser as a
personal certificate.
SSL Processing
The HP e-Commerce/XML Server Accelerator SA7150 handles
several SSL protocols, for example, HTTPS (which is the default).
For security purposes, you can block access to specified IPs or ports
(see “Blocking” section in this chapter). Traffic that is not mapped or
blocked flows through transparently (see “Failure Conditions”
section at the end of this chapter). Supported protocols are listed
below. (Ports listed are “well-known” port assignments. Any
available port may be used.)
Mapping
NOTE: The SA7150
supports a maximum of
1000 mappings.
• HTTPS 443 (default)
• IMAPS 993
• POP3S 995
• SMTPS 465
• NNTPS 563
• LDAPS 636
Keypairs and their associated certificates are referenced by a keyID.
A server is identified by a unique combination of server IP and
network port. Mapping is the process of associating a keyID with a
server (using server IP, network port, and server port). The SA7150
supports two types of mapping:
• Automapping
• Manual mapping
46
Page 57

C H A P T E R 3 SSL Processing
Automapping
NOTE: Remember to
save the configuration
(with the config save
command) after making
mapping changes.
Automapped entries are identified by a server IP address of zero
(0.0.0.0). When a server IP address of zero is specified, the SA7150
intercepts packets to any server IP address with the matching network
ports. As with any mapping entry, the combination of server IP
address and network port must be unique.
The initial configuration for the SA7150 provides an automapping
entry for net work port 443 and se rver port 80. This i s associated with
the internally generated default keypair and certificate with th e keyID
of “default.” Under this ini tial conf iguratio n, automappi ng occurs o n
any server with this n etwork port (443) when traffic is rout ed through
the SA7150.
Automapping with user-specified key and
certificate
When a user-specified key and certificate are to be automapped, the
user can repla ce the initial auto mapping entry w ith the create map
command. By specifying the same unique identifier (server IP of
0.0.0.0, and network port of 443 with a user-generated keyID), the
user can overwrite the initial automapping entry. (The key and
certificate may be obtained through any of the methods described
previously in this chapter.)
Automapping with multiple port combinations
The user can specify multiple automapping entries when the network
port is unique. For example, a user might specify, in addition to the
initial network (443) and server (80) port combination, a co mbination
of network (8010) and server (80) port.
Deleting automapping entries
Any automapping entry can be deleted, but if the initia l automapping
is deleted and no other mapping entry is specified, the SA7150
automatically recr e ates the initial automa pping entry. Either r eplace
the initial automapping entr y or create another mapping/automapping
entry and then de lete the initial aut omapping entry using the delete
map command.
47
Page 58

C H A P T E R 3 HP e-Commerce/XML Server Accelerator SA7150 User Guide
Manual mapping
The user can create (with the create map command) one or more
mapping entries for i ndividual servers. This i s the only way to specify
unique keyIDs for each server. Normally, when manual mapping is
performed, the initial automapping entry is deleted , but this is not a
requirement.
Combining automapping and manual mapping
NOTE: If both manual
mappings and applic able
automappings are
available, the SA7150
always uses the manual
mapping.
Blocking
NOTE: Blocking is
always performed before
mapping.
Any combination of automapp ing and manual mappi ng entries, up to
a total of 1000, can be used provided the server IP address and
network port combinations are unique. Several of the scenarios in
Chapter 4 include step-by-step mapping procedures.
For security purposes, the SA7150 allows the blocking of particular
IP addresses and ports. IP/port combinations can be blocked on the
basis of:
• Specific IP, specific port
• Subnet, specific port
• All IPs, specific port
Specific IP, Specific Port
To block a specific server IP and specific port combination:
1. Type the create block command.
2. Type the IP address.
3. Press Enter to accept the default IP mask
4. Type the specific port.
5. Press Enter to accept the default port mask.
48
Page 59

C H A P T E R 3 SSL Processing
Example:
HP SA7150> create block
Client IP to block [0.0.0.0]: 10.1.2.1
Client IP mask [0.0.0.0]: 255.255.255.255
Server IP to block [0.0.0.0]: 20.1.2.1
Server IP mask [0.0.0.0]: 255.255.2 55.255
Server Port to block: 80
Server Port mask [0xffff]:
Use the show block command to verify.
HP SA7150> show block
(1) block 10.1. 2.1 255.255.255.255 20.1.2.1
255.255.255.255 80 0xffff
Subnet, Specific Port
To block a subnet and port combination:
1. Specify a subnet, using 0 as the final octet. (In the example
below, all IPs from “10.1.x.x” to “20.1.x.x” are blocked on port
80.)
2. Type the subnet mask, with 0 indicating the portion of the IP
address to be ignored.
3. Type the specific port.
4. Press Enter to accept the default port mask.
Example:
HP SA7150> create block
Client IP to bloc k [0.0.0.0]: 10.1.2.1
Client IP mask [0.0.0.0]: 255.255.0.0
Server IP to bloc k [0.0.0.0]: 20.1.2.1
Server IP mask [0.0.0.0]: 255.255.0.0
Server Port to block: 80
Server Port mask [0xffff]:
49
Page 60

C H A P T E R 3 HP e-Commerce/XML Server Accelerator SA7150 User Guide
Use show block to verify.
HP SA7150> show block
-----------
blocks :
----------(1) block 10.1.2.1 255. 255.0.0 20.1.2.1
255.255.0.0 80 0xffff
-----------
All IPs, Specific Port
To block a specific port on all IP addresses:
1. Type all zeroes as the IP address to be blocked.
2. Type all zeroes as the IP wildcard mask to be blocked.
3. Type the specific port.
4. Press Enter to accept the default port mask.
Example:
HP SA7150> create block
Client IP to block [0.0.0.0]:
Client IP mask [0.0.0.0]:
Server IP to block [0.0.0.0]:
Server IP mask [0.0.0.0]:
Server Port to block: 80
Server Port mask [0xffff]:
5. Use the show block command to confirm the block.
HP SA7150> show block
-----------
blocks :
----------(1) block
0.0.0.0 0.0.0.0 0.0.0.0 0.0.0.0 80 0xffff
50
-----------
Page 61

C H A P T E R 3 Failure Conditions, Fail-safe, and Fail-through
Delete a Block
The example below il lustrates how to del ete a su bnet block. Type the
delete block command with th e block ID (block ID is 1 in the
example).
1. Use the show block command to i dent if y th e bl ock t o b e del et ed.
HP SA7150> show block
-----------
blocks :
----------(1) block 10.1. 2.1 255.255.255.255 20.1.2.1
255.255.255.255 80 0xffff
-----------
2. Use the delete block command followed by the block ID to
delete the block.
HP SA7150> delete block 1
Failure Conditions, Fail-safe, and Fail-through
During a failure condition unprocessed data can either pass through
the SA7150 or not, depending on whether Fail-safe or Fail-through
mode is enabled. The F ail-through switch is by default in Fail-safe
mode, meaning that during a failure no data packets will pass from
one side of the SA7150 to the ot her. For details, see “Failure/Bypass
Modes” in Appendix B.
51
Page 62

C H A P T E R 3 HP e-Commerce/XML Server Accelerator SA7150 User Guide
Notes
52
Page 63

Scenarios
This section contains scenarios illustrating examples of HP eCommerce/XML Server Accelerator SA7150 configurations:
• Scenario 1: Basic XML Operation
• Scenario 2: Single Server Configuration
• Scenario 3: Multiple Server Configuration (SSL)
• Scenario 4: Cascaded SA7150s
• Scenario 5: Different Ingress and Egress Routers
• Scenario 6: Configuring a Firewall
Page 64

C H A P T E R 4 HP e-Commerce/XML Server Accelerator SA7150 User Guide
Scenario 1—Basic XML Operation
As discussed in Chapter 3, the SA7150 parses XML content , searches
it for user-configured pat terns and distri butes XML traffic to vari ous
servers according to user-established rules embodied in XML
patterns reflecting the user’s business needs.
This scenario illust r a tes steps in a hypothetic al situation in which
you:
• Expect to receive purchase orders from three companies
• Want to categorize these purchase orders according to dollar
amount of order, method of payment and client’s zip code
• Want to send these different dollar amount categor i es to sepa ra te
servers for processing
The illustration below shows the network diagram for Scenario 1.
Though the illust r ation shows only three servers, the principles
demonstrated here could be applied to up to 1000 servers.
HP e-Commerce/XML Server Acc el erator SA7150
Network Diagram for Scenario 1
Note that Servers 1 and 3 use clear text maps, suitable when the
anticipated XML t r aff ic i s kn own to be unencryp ted . S er ver 2 uses a
normal map (i.e., one specifyin g a Key ID) to enable SSL encryptio n
and decryption for XML data.
XML Server 1
XML Server 2
hub/switchRouter
XML Server 3
54
Page 65

C H A P T E R 4 Scenario 1—Basic XML Operation
Procedure for
Scenario 1
1. Create Server 1:
HP SA7150> create server
Name: Server1
Server IP: 1.1.1.1
Cleartext (se rver) port [80]:
Server MAC Address:00:a0:c9:fc:84:ab
HP SA7150>
2. Create Server 2:
HP SA7150> create server
Name: Server2
Server IP: 1.1.1.2
Cleartext (se rver) port [80]:
Server MAC Address:00:a0:d9:fc:84:ab
HP SA7150>
3. Create Server 3:
HP SA7150> create server
Name: Server3
Server IP: 1.1.1.3
Cleartext (se rver) port [80]:
Server MAC Address:00:a0:e9:fc:84:ab
HP SA7150>
4. Create map for Server 1:
HP SA7150> create map
Server IP [0.0.0.0]: 1.1.1.1
Network port [443]:
Cleartext (se rver) port [80]:
KeyID to use for ma pping:
Cleartext map for XML only? [n]: y
HP SA7150>
5. Create map for Server 2 :
HP SA7150> create map
Server IP [0.0.0.0]: 1.1.1.2
Network port [443]:
Cleartext (se rver) port [80]:
KeyID to use for ma pping: 001
HP SA7150>
6. Create map for Server 3:
HP SA7150> create map
Server IP [0.0.0.0]: 1.1.1.3
Network port [443]:
Cleartext (se rver) port [80]:
KeyID to use for ma pping:
55
Page 66

C H A P T E R 4 HP e-Commerce/XML Server Accelerator SA7150 User Guide
Cleartext map for XML only? [n]: y
HP SA7150>
Verify creation of maps:
Map Net Ser Cipher Re- Client well
ID KeyID Server IP Port Port Suites direct Auth XML form
== ===== ========= ===== ==== ======== ===== ===== === ====
1 N/A 1.1.1.1 443 80 N/A N/A N/A n N/A
2 001 1.1.1.2 443 80 all(v2+v3) n n n N/A
3 N/A 1.1.1.3 443 80 N/A N/A N/A n N/A
7. Enable XML for each mapping with the set xml command:
HP SA7150> set xml 1 enable
HP SA7150> set xml 2 enable
HP SA7150> set xml 3 enable
8. Create XML patterns for Server 1:
HP SA7150> create pattern server1
URI Expressio n: */order.asp
XML Expressio n: //From[id = “Acme”]
Enter another pattern? [n]: y
URI Expressio n: */order.asp
XML Expressio n: //Amount[Value >= 10000]
Enter another pattern? [n]: y
URI Expressio n: */order.asp
XML Expressio n: default
Enter another pattern? [n]:
9. Create XML patterns for Server 2:
HP SA7150> create pattern server2
URI Expressio n: */order.asp
XML Expressio n: //From[id = “Widgets.com”]
Enter another pattern? [n]: y
URI Expressio n: */order.asp
XML Expressio n: //Amount[Value < 10000]
Enter another pattern? [n]: y
URI Expressio n: */order.asp
XML Expressio n: //Order[@type = "debit
card"]
Enter another pattern? [n]:
56
Page 67

C H A P T E R 4 Scenario 1—Basic XML Operation
10.Create XML patterns for Server 3:
HP SA7150> create pattern server3
URI Expressio n: */order.asp
XML Expressio n: //Amount[Value > 5000 and
Value < 10000]
Enter another pattern? [n]: y
URI Expressio n: */order.asp
XML Expressio n: //
Enter another pattern? [n]: y
URI Expressio n: */order.asp
XML Expressio n: //Order[@type = "debit
card"]
Enter another pattern? [n]:
Address[zipcode < 9000]
The table below contains examples of XML pat terns programmed in
the SA7150 for each of the three servers in Scenario 1.
Server URI Expression XML Expression
*/order.asp //From[id = “Acme”]
1
*/order.asp //Amount[Value >= 10000]
*/order.asp default
*/order.asp //From[id = “Widgets.com”]
2
*/order.asp //Amount[Value < 10000]
*/order.asp //Order[@type = “debit card”]
*/order.asp //Amount[Value > 5000 and Value < 10000]
3
*/order.asp //Address[zipcode < 9000]
*/order.asp //Order[@type= “debit card”]
XML Patterns for Sc enario 1
57
Page 68

C H A P T E R 4 HP e-Commerce/XML Server Accelerator SA7150 User Guide
The table below shows the SA7150’s responses to incoming XML
data with URI expression */order.asp.
Incoming XML Data SA7150 Response
company name is Acme Sends to Server 1
company name is Widgets.com Sends to Server 2
company name is YourCo.com Sends to Server 3
purchase amount is $13,280 Sends to Server 1
Sends to Server 2 (Though the value satisfies patterns for
purchase amount is $7,280
both Servers 2 and 3, patterns are applied in order of server
map ID. Server 2 is the first with a matching p a ttern.)
purchase amount is $713 Sends to Server 2
order is paid for with a debit card Sends to Server 2
customer’s zip code is 92128 Sends to Server 3
customer’s zip code is 27513 Sends to Server 1 due to the default setting
order is paid for with a credit card Sends to Server 1 due to the default setting
SA7150 Responses to incoming XML traffic
58
Page 69

C H A P T E R 4 Scenario 2—Single Server Configuration
Scenario 2—Single Server Configuration
NOTE: This
configuratio n is i nte nded
primarily for use with
SSL-intensive
operations—it is not
optimal for XML
environments.
Router
This scenario describes a typical config uration of a SA7150 wi th one
server, using either automapping or manual configuration/mapping.
This scenario describes the fastest way to get up and running with a
SA7150.
HP e-Commerce/XML Server Accelerator SA7150
Single Server
Single SA7150, Single Server Installation
Procedure for
Scenario 2
NOTE: XML is by
default disabled for each
map. You must
specifically enable a map
to process XML requests.
See set xml command in
Chapter 5.
Automapping
1. Physically connect the SA7150 to the router and to one server.
2. Initiate HTTPS traffic to the serv er. The SA 7150 moni tors tr af fic
and uses the initial mapping (with associated default key and
certificate) to decrypt HTTPS traffic and pass clear text HTTP
traffic to the server.
Manual Configuration
1. Perform the installation as described in Chapter 2. Access the
SA7150 command prompt.
2. Acquire the appropriate keys and certificates following the
procedure in the “Keys and Certificates” section in Chapter 3.
59
Page 70

C H A P T E R 4 HP e-Commerce/XML Server Accelerator SA7150 User Guide
3. Create a mapping for the server with the create map command:
HP SA7150> create map
Server IP [0.0.0.0]: 1.1.1.30
Network port [443]:
Cleartext (server) port [80]:
KeyID to use for map ping: default
HP SA7150>
4. After you have manuall y cr eated the ma pping, you can del ete th e
default mapping. In this case, delete MapID number 1. The
SA7150 automatically sorts MapIDs as they are created and
deleted, thus MapID number 2 becomes MapID number 1 when
the default is deleted.
HP SA7150> delete map 1
HP SA7150> list maps
Map Net Ser Cipher Re- Client well
ID KeyID Server IP Port Port Suites direct Auth XML form
== ===== ========= ===== ==== ======== ===== ===== === ====
1 default 1.1.1.30 443 80 all(v2+v3)n n n N/A
HP SA7150>
5. Save the configuration when the server has been mapped.
HP SA7150>config save
Saving configuration to flash...
Configuration saved to flash
HP SA7150>
60
Page 71

C H A P T E R 4 Scenario 3—Multiple Server Configuration (SSL)
Scenario 3—Multiple Server Configuration (SSL)
This scenario shows how to configure two or more servers.
Router
Procedure for
Scenario 3
HP e-Commerce/XML Server
Accelerator SA7150
Hub/switch
Single SA7150, Multiple Server Installation
1. Perform the installation as described in Chapter 2. Access the
SA7150 command prompt.
2. Acquire the appropriate keys and certificates following the
procedure in the Keys and Certificates section in Chapter 3.
3. Create a mapping for Server 1 with the create map command.
HP SA7150> create map
Server IP [0.0.0.0]: 1.1.1.30
Network port [443]:
Cleartext (se rver) port [80]:
KeyID to use for ma pping: default
HP SA7150>
Server 1
10.1.1.30
Server 2
10.1.1.31
4. Create a mapping for Server 2. As in the previous step, use the
create map command to specify the parameters as prompted.
HP SA7150> create map
Server IP [0.0.0.0]: 1.1.1.31
Network port [443]:
Cleartext (se rver) port [80]:
KeyID to use for ma pping: default
HP SA7150>
61
Page 72

C H A P T E R 4 HP e-Commerce/XML Server Accelerator SA7150 User Guide
5. Use the list map command to view the mapping. (Multiple keys
and certificates can also be imported and each mapped to
individual servers. If you do this, at least one field in the
certificate information—usually the common name—must be
unique.)
HP SA7150> list map
Map Net Ser Cipher Re- Client well
ID KeyID Server IP Port Port Suites direct Auth XML form
== ===== ========= ===== ==== ======== ===== ===== === ====
1 default Any 443 80 all(v2+v3) n n n N/A
2 default 1.1.1.30 443 80 all(v2+v3) n n n N/A
3 default 1.1.1.31 443 80 all(v2+v3) n n n N/A
HP SA7150>
6. After you have manua lly c reate d a mappi ng, the defau lt mapp ing
can be deleted. In this case, delete MapID nu m ber 1. MapID
number 2 becomes MapID number 1 when the default is deleted.
HP SA7150> delete map 1
HP SA7150> list map
Map Net Ser Cipher Re- Client well
ID KeyID Server IP Port Port Suites direct Auth XML form
== ===== ========= ===== ==== ======== ===== ===== === ====
1 default 1.1.1.30 443 80 all(v2+v3) n n n N/A
2 default 1.1.1.31 443 80 all(v2+v3) n n n N/A
HP SA7150>
To configure a thi rd or fourth web server to operate with the SA715 0,
repeat the steps above, specifying a different IP address for each
server.
7. Save the configuration when mapping is completed for the
server(s).
HP SA7150> config save
Saving configuration to flash...
Configuration saved to flash
HP SA7150>
62
Page 73

C H A P T E R 4 Scenario 4—Cascaded SA7150s
Scenario 4—Cascaded SA7150s
This scenario shows how to cascade SA7150s for additional
performance and availability. The same procedures apply that were
performed in Scenario 3. In addition, the comple te configuration of
the first SA7150 is exported to the second SA7150 in line.
Initial
Configuration
HP e-Commerce/XML Server
Router
Accelerator SA7150
• Two or more SA7150s must be physically installed on the same
network. To cascade multiple SA7150s, connect from the server
port of the first SA7150 to the network port of the next SA7150
in line, and then again connect from the server port to the
network port of the next SA7150 in line, or to the server. (See
Chapter 2: Insta llation and Initial C on figuration, for more
information.)
• The first SA7150 should be fully conf igured; any necessary keys,
certificates, or maps must exist. The complete configuration is
exported from the first, then imported to the next SA7150 in line.
This procedure is repeated for any additional SA7150s in line.
XML Server 1
XML Server 2
HP e-Commerce/X M L Se rver
Accelerator SA7150
hub/switch
XML Server 3
Multiple (Cascaded) SA7150s
63
Page 74

C H A P T E R 4 HP e-Commerce/XML Server Accelerator SA7150 User Guide
Procedure for
Scenario 4
NOTE: The SA7150
restarts when spill is
enabled. Depending on
the size of the current
configuration file, it can
require from 30 seconds
to seven minutes to return
to operations.
1. Configure the SA7150 farthest from the server as described in
any of the preceding scenarios. Remain connected to that speci fic
SA7150 for the export configuration procedure.
2. At the command prompt, t ype the set spill e nable command.
This allows overflow traffic to be transferred to the second
SA7150 for processing.
3. Save the configuration.
HP SA7150> config save
Saving configuration to flash...
Configuration saved to flash
HP SA7150>
4. Export the configuration. Use the export config command.
Choose xmodem mode (x) to export.
HP SA7150> export config
Export protoc ol: (xmodem, ascii) [ascii]: x
Beginning export...
5. Select Receive from the HyperTermin a l* Transfer menu.
6. T ype or use the Browse button to specify the dir ectory wher e you
wish to place the received file.
7. Select xmodem as the receiving protocol.
8. Click the Receive button.
9. Specify a filename for the received file and click OK. The
operation concludes and the normal prompt reappears.
Use Ctrl-X to kill transmission
Export successful!
HP SA7150>
10. Connect to the second SA7150, either through the console
connection or another window (if both are connected to the same
PC).
11. Import the configuration. Use the import config command to
begin the process. Select xmodem (x) and press Enter to begin
the import process.
HP SA7150> import config
Import protocol: (paste, xmodem) [paste]: x
Use Ctl-X to canc el upload
12. Select Send from the HyperTerminal* Transfer menu.
13. Type or use the Browse button to specify the file to send.
64
Page 75

C H A P T E R 4 Scenario 4—Cascaded SA7150s
14. Select xmodem as the sending protocol.
15. Click the Send button. The transfer completes and then you are
prompted to ver ify that you wish to install this configuration.
Do you want to install this config ? [y]: y
16. After verification (y) or refusal (n), the prompt reappears.
HP SA7150>
17. Save the configuration.
HP SA7150> config save
Saving configuration to flash...
Configuration saved to flash
HP SA7150>
18. Repeat steps 11-17 for any additional SA7150s. On the last
SA7150 in the chain, disable spilling with the set spill disable
command.
65
Page 76

C H A P T E R 4 HP e-Commerce/XML Server Accelerator SA7150 User Guide
Scenario 5—Different Ingress and Egress
Routers
This scenario describes the configuration of a SA7150 when the
ingress and egress traffic paths are different. This scenario includes:
• One or more servers
• One or more cascaded SA7150s
• One or more ingress routers
• One egress router
HP e-Commerce/XML Server
Accelerator SA7150
Client
Ingress Router
Egress Route r
Switch
Procedure for
Scenario 5
NOTE: Execute an “arp
–a” (or equivalent
command for your OS) on
the server to display the
MAC address of the
default gateway. This is
the address you should
use.
Server
Installation with Ingress and Egress Routers
1. Configure your SA7150 (as described in any of the previous scenarios).
2. Determine the MAC address of the egress router you wish to
route outbound traffic through.
3. At the CLI prompt, enter the default egress router.
HP SA7150> set egress_ma c 00:11:22:33:4 4:55
Egress MAC set to 00:11:22:33:44:55
HP SA7150> config save
Saving configuration to flash...
Configuration saved to flash
HP SA7150>
4. To reverse this process:
HP SA7150> set egress_ma c none
66
Page 77

C H A P T E R 4 Scenario 6—Configuring a Firewall
Scenario 6—Configuring a Firewall
This scenario describes the recommended network configuration to
allow a SA7150 to provide SSL services for a single server that also
serves plain-text HTTP documents. Actual procedures for adjusting
the firewall and server configurations vary widely depending upon
the products used, so the steps outlined here are necessarily
approximations and must be adjusted as requir ed by the partic ulars of
your environment. Please consult your server and firewall
documentation for additional information.
HP e-Commerce/XML Server Accelerator SA7150
Firewall
Single SA7150 configured with single server and firewall
Server
Configuration
Server
Servers providing both HTTP and HTTPS services typically have
two instances of the Web Server process configured:
• One listening on the standard HTTP port of 80, providing
unencrypted access to non-sensitive information, and
• Another listening on port 443 prov iding access to SSL encrypt ed
sensitive information.
Port Number Connection Type Content Served
80 HTTP Non-sensitive
443 HTTPS Sensitive
67
Page 78

C H A P T E R 4 HP e-Commerce/XML Server Accelerator SA7150 User Guide
For the SA7150 to provide SSL services, the web server process
providing port 443 services requires two modifications.
• First, because the SA7150 performs all of the SSL processing,
the web server process must be configured to expect only
standard HTTP (une ncrypted) connecti on s , e ven for sensitive
content.
• Second, the web server process must be configured to listen for
these HTTP connections on a port other than the standard
HTTPS port (443). In this scenario we configure the port 443
service to listen on port 81.
Port Number Connection Type Content Served
80 HTTP Non-sensitive
81 HTTP Sensitive
SA7150 Configuration
The SA7150 must be config ured t o inter cept HT TPS co nnections o n
port 443 and forward them t o the serve r. In the preced ing section, we
configured the serv er to provide a ccess to sensitiv e data throug h port
81, so that should be the clear text port when creating a server
assignment (or “map”) on the SA7150. Perform the following steps
to create the server assignment:
1. Perform the installation as described in Chapter 2 and access the
command line prompt.
2. Acquire the appropriate keys and certificates following the
procedure in the “Keys and Certificates” section in Chapter 3.
3. Create a mapping for the server . Use the create ma p command to
specify the server IP address, ports, and keyID.
HP SA7150> create map
Server IP (0.0.0.0): 1.1.1.3
SSL (network) port [443]:
Cleartext (server) port [80]: 81
KeyID to use for map ping: serv1
68
Page 79

C H A P T E R 4 Scenario 6—Configuring a Firewall
NOTE: The device
automatically adj ust s the
list of MapIDs a s they are
created and deleted, thu s
MapID 2 becomes MapID
1 when the default (the
original MapID 1) is
deleted.
4. Once a user-created server assignment exists, the default
mapping can be deleted. In this example, delete MapID
number 1.
HP SA7150> list map
Map Net Ser Cipher Re- Client well
ID KeyID Server IP Port Port Suites direct Auth XML form
== ===== ========= ===== ==== ======== ===== ===== === ====
1 default 1.1.1.3 443 81 all(v2+v3) n n n N/A
5. Save the configuration.
HP SA7150> config sa ve
Saving configuration to flash...
Configuration saved to flash
HP SA7150>
Firewall Configuration
Absent a firewall, outside cl ients would be able to connec t to services
on the web server and possibly ga in access to sensitive da ta—on port
80 using HTTP to access non-sensitive data, on port 443 using
HTTPS to access sensitive data, and on p ort 81 using HTTP t o access
that same sensitive data. Obviously, allowing access to sensitive data
over an unencrypted connection on port 81 is not desirable.
Consequently a firewall should be configured to prevent such access.
NOTE: In this
configuration, the
firewall may occasionally
report the blocking of
outbound packets from
the Server on port 81.
This is normal—a sideeffect of the varying
latencies characteristic of
Internet traffic—and does
not indicate a problem
with the configuration.
Port Access
80 Allowed
443 Allowed
All Others Denied
69
Page 80

C H A P T E R 4 HP e-Commerce/XML Server Accelerator SA7150 User Guide
Notes
70
Page 81

Online Help
Command Reference
The HP e-Commerce/XML Server Accelerator SA7150 is fully
configurable through the Command Line Interface (CLI). The CLI is
accessible through both the console and aux console RS232 ports or
remotely via Te lnet and SSH.
The SA7150 provides online help with the following options:
• Type help to display a summary of commands.
• Type help <com mand> (or ? <command>) for a description
of a specific command or, if relevant, a l ist of subc ommands you
can enter from within <command>.
• Type help usage (or ? usag e)to display all commands and
their usage.
• Type tty_char to display a list of special terminal editing
characters.
Page 82

C H A P T E R 5 HP e-Commerce/XML Server Accelerator SA7150 User Guide
Command Line Interface
The CLI handles all user interactions on the console and auxiliary
console RS232 ports. One instance per port runs at all times.
User
Authentication
Command Line
Prompt
Abbreviation
to Uniqueness
To gain access to the CLI, the user must first be authenticated by
providing a password at the lo gon banner prompt. The logon banne r
provides build version information an d the serial number.
The standard command line prompt for the SA7150 is:
HP SA7150>
The prompt can be changed with the set prompt command.
It is not always necessary to ty pe the entire command. CLI commands
can be abbreviated to uniqueness. For example, “del” as show below
is sufficient to represent the delete command:
HP SA7150> del
Usage: delete item [arg]
block blockID
cert keyID
client_ca mapID
key keyID
logs logID|all
map mapID
patch
pattern serverName patternID
permit permitID
server serverName
sign keyID
snmp_community
trap_community
72
Page 83

C H A P T E R 5 Input Editing Commands
However, “sh” as show n below, i s not a n abbrevi ati on to uniq ueness
in that it does not d istinguish between show and showsnmp.
HP SA7150> sh
The solitary letter “e” in the context of the next example, (i.e.,
preceded by “ssh”), uniquely indicates ssh enable.
HP SA7150> set ssh e
SSH Service sta rted.
Input Editing Commands
Moving the
Insertion Point
Command Description
ctrl-b
ctrl-f
ctrl-a
ctrl-e
ctrl-l
Command
Move back one character.
Move forward one character.
Move to the start of the current line.
Move to the end of the line.
Redraw the current line.
A history of recently executed commands i s stored in a buffer and can
be accessed with the following commands:
History
Command Description
ctrl-p
ctrl-n
ctrl-r
Move “up” through the history list
Move “down” through the history list
(Reverse-search history) Search backward starting at the current
line and moving up incrementally through the command history.
ctrl-s
(Forward-search history) Search forward starting at the current
line and moving down incrementally through the command
history.
73
Page 84

C H A P T E R 5 HP e-Commerce/XML Server Accelerator SA7150 User Guide
Cut and Paste
Command Description
ctrl-d
ctrl-k
ctrl-u
ctrl-w
ctrl-y
backspace/del
Delete the character underneath the cursor.
Delete the text from the current cursor pos ition to the end of the
line.
Delete backward from the cursor to the beginning of the current
line.
Delete the word behind the cursor, using white space as a word
boundary.
Copy text that has been deleted.
Delete the character to the left of the cursor.
74
Page 85

C H A P T E R 5 Command Summary
Command Summary
This section contains a high-level view of the SA7150’s command
structure. Details appear in the next section, Command Reference.
Command Command Options
bypass
config
create
delete
default
compare
reset
save
block
cert <keyID>
key <keyID>
map
pattern <serverName>
permit
server
sign <keyID>
block <blockID>
cert <keyID>
client_ca <mapID>
key <keyID>
logs<logID | all>
map <mapID>
patch
pattern <serverName> <patternID>
permit <permitID>
server <serverName>
sign <keyID>
snmp_community
trap_community
exit
export
N/A
key <keyID>
cert <keyID>
sign <keyID>
log <logID>
config
75
Page 86

C H A P T E R 5 HP e-Commerce/XML Server Accelerator SA7150 User Guide
Command Command Options
factory_default
help
import
inline
insert
list
N/A
help
help <command>
help usage
cert <keyID>
client_ca <mapID>
config
key <keyID>
patch
upgrade
N/A
server <ServerID>
blocks
filters (shows blocks and permits)
keys
logs
maps
permits
monitoring
procs
snmp_community
system
trap_community
nic
password
reboot
76
N/A
N/A
N/A
Page 87

C H A P T E R 5 Command Summary
Command Command Options
set
alarms <all, esc, rsc, utl, ovl, nls>
cache <enable | disable>
ciphers <mapID>
ciphers <mapID> default
client_tmo <seconds>
date
defcert
egress_mac x:x:x:x:x:x
egress_mac none
ether
idleto <timeou t>
ip <ip> <netmask>
kstrength
max_remote_sessions <0-5>
monitoring <enable | disable>
monitoring_interval <seconds>
monitoring_fields
more
ovl_window <seconds>
prompt
redirect <mapID>
redirect <mapID> none
route x.x.x.x
rsc_window <seconds>
serial
server_tmo <seconds>
ssh <enable | disable>
ssh_port <port>
spill <enable | disable>
telnet <enable | disable>
telnet_po r t <port>
utl_highwater <percentage>
utl_lowwater <percentage>
utl_window <seconds>
xml_well_formed <mapID> <enable | disable>
xml <mapID> <enable | disable>
77
Page 88

C H A P T E R 5 HP e-Commerce/XML Server Accelerator SA7150 User Guide
Command Command Options
show
78
alarm
blocks
cache
ciphers <mapID>
cert <keyID>
client_ca <mapID>
client_tmo
config
config de fault
config saved
date
defcert
egress_mac
ether
filters
idleto
info
ip
key <keyID>
kstrength
logs
map
max_remote_sessions
monitoring
monitoring_interval
monitoring_fields
more
patch
ovl_window
pattern <serverName>
pattern
permits
rsc_window
redirect <mapID>
route
serial
server
server_tmo
ssh
ssh_port
sign <keyID>
spill
status <arg>
telnet
Page 89

C H A P T E R 5 Command Summary
Command Command Options
show
setsnmp
showsnmp
telnet_port
utl_highwater
utl_lowwater
utl_window
snmp <enable | disable>
snmp_community
snmp_port <port>
snmp_info
sys_contact
sys_location
sys_name
trap_authen <enable | disable>
trap_community
trap_port <port>
snmp
snmp_community
snmp_port
snmp_info
sys_contact
sys_location
sys_name
trap_authen
trap_community
trap_port
status
tty_char
line
realtime
alarms
<log>
N/A
79
Page 90

C H A P T E R 5 HP e-Commerce/XML Server Accelerator SA7150 User Guide
Command Reference
Help
Commands
Command Description
help
help <command>
help usage
tty_char
Display the list of available commands.
Display usage for a single command.
Display all commands and their usage.
View the available list of keyboard shortcut commands.
Status
Command
Command Description
status
Display device statistics. Several modes are available, as described
below. (Default: realtime.)
Syntax:
HP SA7150> status <line | realtime | alarms |
<log> >
where:
<line> specifies a line-oriented display of statistics.
<realtime> specifies that statistics be displayed in realtime.
<alarms> shows current alarm events.
<log> shows statistics and alarm events in a specified log file.
80
Page 91

C H A P T E R 5 Command Reference
XML
Commands
Command Description
create server
delete server
Specify an XML server. Prompts for a unique name, a unique IP
address/port pair , and the co rrect MAC address to identify a serve r
to fulfill XML requests.
NOTE: Server names are case insensitive.
Example:
HP SA7150> create server
Server Name: Standard
Server IP: 10.1.1.2
Cleartext (server) port [80]: 8080
Server MAC Ad dr ess:00:a0:c9:fc:84:ab
HP SA7150>
Delete the specified XML server name from the system.
NOTE: Use the show server command to identify existing servers.
Syntax:
HP SA7150> delete server <serverName>
81
Page 92

C H A P T E R 5 HP e-Commerce/XML Server Accelerator SA7150 User Guide
Command Description
insert server
XML servers exist in a numeric hierarchy reflecting the order in
which they were created with the cr eate server command . The
system assigns a server index number to each server as it is
created, incrementing the number with each n ew server. This order
is relevant to XML operations—in cases in which a document has
a match with two XML patterns of two different servers, the
message is sent to the server with the lower index number. This
command allows you to alter the order within that hierarchy by
assigning an index number to a server.
NOTE: Before using this command, execute the show server
command to view the current hierarchy of server index numbers.
Syntax:
HP SA7150> insert server <ServerID>
Example:
insert server 2
Name: Gold
Server IP: 10.1.1.6
Cleartext (server) port [80]: 8080
Server MAC Ad dr ess: 22:33:44:55:66:77
show server
Display the list of XML servers along with Server names, IDs, IP
addresses, and ports.
Example:
HP SA7150> show server
Server ID Ser ver IP Po rt MAC Addr ess Ser ver N ame
========= ========= ===== ====== ===========
==========
1 10.1.1.2 80 00:a0:c9:fc:84 :a b St an da rd
2 10.1.1.4 80 01:a9:bw:cf:69 :c d Pr em ie r
82
Page 93

C H A P T E R 5 Command Reference
Command Description
create pattern
Create an XML pattern for a specified server. Patterns associated
with a given server are uniquely identified by a system-generated
numeric pattern ID. After you execute the command, you are
prompted to enter the URI expression followed by the XML
expression. After a pattern is created the system prompts the user
to enter another pattern.
Syntax:
HP SA7150> create pattern <serverName>
HP SA7150> create pattern Standard
URI Expression: */purchase.asp
XML Expression: //From[Id=’acme’]
Enter another pattern? [n]: n
URI Expression is the string identifying the target of the HTTP
POST (wildcards can be used).
XML Expression is the string to which incoming XML data is
compared. Documents containing strings matching a pattern are
sent to the server associated with the matched pattern.
The SA7150 checks each expression for syntactical correctness as
it’s entered. If it detects an error during this check it presents a
message similar to the one b elow. (Messages vary depending o n the
nature of the error.)
Improper use of ’*’ character in URI
Expression
After both the URI and XML expressions have been entered, the
SA7150 checks for “duplicate patterns,” i.e., it verifies that the
newly created pattern hasn’t already been defined. If it detects a
duplicate it displays the following message:
A pattern wit h th is URI and XML expres sion
already exists
83
Page 94

C H A P T E R 5 HP e-Commerce/XML Server Accelerator SA7150 User Guide
Command Description
delete pattern
Delete an XML pattern specified by server and pattern ID.
NOTE: Use the show pattern command to identify existing
patterns.
Syntax:
HP SA7150> delete pattern <serverName>
<patternID>
Example:
HP SA7150> delete pattern Standard 1
84
Page 95

C H A P T E R 5 Command Reference
Command Description
show pattern
Display the list of XML patterns for:
• all servers, or
• a specified server
When executed without the server name parameter, the command
displays all patterns defi ned fo r a ll ser vers. W hen a server name is
specified the command displays only the patterns defined for that
server. Pattern IDs appear in the left column, the content of the
pattern appears to th e right. Note that in the “Pattern” column the
URI expression and XML e xpression compo nents ar e separated b y
the ampersand character (&) with a space on either side.
Example (single, specified server):
HP SA7150> sho w pat te rn Standard
Server: Stan da rd
Pattern ID Patter n
========== =========
1 * & //gold
2 * & //order
Example (all servers):
HP SA7150> sho w pat te rn
Server: Stan da rd
Pattern ID Patter n
========== =========
1 * & //std
Server: gold
Pattern ID Patter n
========== =========
1 * & //gold
2 * & //order [amount>1000]
Server: silv er
Pattern ID Patter n
========== =========
1 * & //silver
85
Page 96

C H A P T E R 5 HP e-Commerce/XML Server Accelerator SA7150 User Guide
Command Description
set xml
Enables processing based on the XML patterns defined for a
specified map. Default: disabled.
NOTE: Setting the co mma nd t o “enable” has no effect if no X ML
servers are defined.
NOTE: Enabling xml automatically enables xml_well_formed
(see below) for the specified map, while disabling xml
automatically disables xml_well_formed (assuming it has not
previously been manually disabled).
Syntax:
HP SA7150> set xml <mapID> enable
Where <mapID> is the index of the map whose defined XML
patterns you wish to enable.
Example:
HP SA7150> set xml 1 enable
86
Page 97

C H A P T E R 5 Command Reference
Command Description
set xml_well_formed
Enables or disables the SA7150’s featur e for th e detection of
malformed XML data coming in via HTTP POST.
xml_well_formed normally works in paralle l with the xml
command (see above), that is, it is automatically enabled for a
specified map when xml is enabled for th at map, and automatically
disabled (for a specified map) when xml is disabled (for that map).
(Thus the only indep endent control options are to disable
xml_well_formed when xml is enabled and to re-enabl e it without
having disabled xml.)
xml_well_formed functions as follows:
• If xml_well_formed is enabled, when malformed XML data is
found in an incoming request the
SA7150 terminates the
connection and re turns HTTP Error 403 to the client with the
message, “XML data is not well-formed.”
• If xml_well_formed is disabled, when malformed XML data is
found in an incoming request the default server is used.
Syntax:
HP SA7150> se t xm l_well_formed <mapID>
<enable | disable>
Where <mapID> is the identifier of the map for which yo u wish
to enable the xml-well-formed check.
Example:
HP SA7150> set xml_well_formed 1 disable
87
Page 98

C H A P T E R 5 HP e-Commerce/XML Server Accelerator SA7150 User Guide
Port Mapping
These commands are used to execute the operations described in
Chapter 3’s Mapping and Blocking sections.
Commands
Command Definition
create block
delete block
Create a block to preclude access to specified IP addresses or
through specified ports. A single IP, a single port, or all ports can
be blocked. If fewer than all ports are to be blocked, you must
repeat the create blo ck command for each one.
Example:
HP SA7150> create block
Client IP to block [0.0.0.0]: 10 .1.2.1
Client IP mask [0.0.0.0]: 255.255.0.0
Server IP to block [0.0.0.0]: 20 .1.2.1
Server IP mask [0.0.0.0]: 255.255.0.0
Server Port to block: 80
Server Port ma sk [0xffff]:
HP SA7150>
Delete a block specified by index number. Use show block (see
below) to correlate existing blocks with their numbers.
show block
Example:
HP SA7150> delete block 1
Display all existing blocks.
Example:
HP SA7150> show block
-------blocks :
--------(1) block 10.1 .2.1 255.255.0.0 20.1.2.1
255.255.0. 0 80 0xffff
----------
88
Page 99

C H A P T E R 5 Command Reference
Command Definition
create permit
delete permit
show permit
Create a configuration allowing a specified user acce ss to specified
servers and ports, and/or denying the specified user access to
specified servers and ports.
Example:
HP SA7150> create permit
Client IP to permit [0.0.0.0]:10.1.2.1
Client IP mask [0.0.0.0]:255.255.0.0
Server IP to permit [0.0.0.0]:20.1.2.1
Server IP mask [0.0.0.0]:255.255.0.0
Server Port to permit: 443
Server Port ma sk [0xffff]:
HP SA7150>
Delete a permit specified by index number. Use show permit (see
below) to correlate e xisting permits with their numbers.
Example:
HP SA7150> delete permit 1
Display permits currently in force.
Example:
HP SA7150> show permit
-------permits :
--------(1) permit 10.1.2.1 255.255.0.0 20.1.2.1
255.255.0. 0 443 0xffff
---------HP SA7150>
89
Page 100

C H A P T E R 5 HP e-Commerce/XML Server Accelerator SA7150 User Guide
Command Definition
create map
Create a mapping that associates server IP, SSL port, and Key ID,
and clear text port (clear text maps only).
Example 1 (for SSL operation):
HP SA7150> create map
Server IP [0.0.0.0]: 1.1.1.1
Network port [443]: 443
Cleartext (server) port [80]: 8080
KeyID to use fo r map ping: 4
NOTE: The Key ID (SSL operations only—not applicable to clear
text maps) used with a new mapping must exist prior to executing
create map. Use create key to create a new Key ID. Also, a
certificate must be associated with the key ID prior to using the
mapping. (See Chapter 3 for details.)
Example 2 (clear text map for unencrypted XML processing):
HP SA7150> create map
Server IP [0.0.0.0]: 1.1.1.1
Network port [443]:
Cleartext (server) port [80]:
KeyID to use fo r map ping:
Cleartext map for XML only? [n]: y
NOTE: Do not specify a KeyID when creating a clear text map.
delete map <mapID>
Delete a mapping.
NOTE: All MapIDs of a higher number than the one specified for
deletion are decremented by one when this command is executed.
Syntax:
HP SA7150> delete map <n>
where <n> is the Map ID of the mapping you wish to delete.
show map
90
Display all mappings. (Same as list maps.)
 Loading...