

Page 1

LASERJET PROFESSIONAL P1100/P1560/P1600
SERIES PRINTERS
Software Technical Reference
Additional product information:
www.hp.com/support/ljp1100series
www.hp.com/support/ljp1560series
www.hp.com/support/ljp1600series
Page 2

Page 3

HP LaserJet Professional P1100/P1560/
P1600 Series Printer
Software Technical Reference
Page 4

Copyright and license
Trademark Credits
©2010 Copyright Hewlett-Packard
Development Company, L.P.
Reproduction, adaptation or translation
without prior written permission is prohibited,
except as allowed under the copyright laws.
The information contained herein is subject
to change without notice.
The only warranties for HP products and
services are set forth in the express warranty
statements accompanying such products
and services. Nothing herein should be
construed as constituting an additional
warranty. HP shall not be liable for technical
or editorial errors or omissions contained
herein.
Edition 1, 3/2010
Adobe®, Acrobat® and PostScript® are
trademarks of Adobe Systems Incorporated.
Corel® is a trademark or registered
trademark of Corel Corporation or Corel
Corporation Limited.
Microsoft®, Windows® and Windows NT®
are U.S. registered trademarks of Microsoft
Corporation.
Windows Vista™ is either a registered
trademark or trademark of Microsoft
Corporation in the United States and/or other
countries.
ENERGY STAR® and the ENERGY STAR
logo® are U.S. registered marks of the
United States Enviromental Protection
Agency.
Page 5

Table of contents
1 Purpose and scope ......................................................................................................................................... 1
Introduction ........................................................................................................................................... 2
Product comparison ............................................................................................................................. 3
Product features ................................................................................................................................... 5
Product views ....................................................................................................................................... 7
Front and left side view ........................................................................................................ 7
Back view ........................................................................................................................... 10
Serial number and product number location ...................................................................... 11
Control-panel layout ........................................................................................................... 12
Printing-system software .................................................................................................................... 14
Operating-system support ................................................................................................ 14
Supported operating systems for Windows ....................................................... 15
Supported printer drivers for Windows .............................................................. 15
HP Universal Print Driver (UPD) ....................................................................... 15
UPD installation modes .................................................................... 16
Supported utilities for Windows ......................................................................... 16
HP Embedded Web Server .............................................................. 16
Supported operating systems for Macintosh ..................................................... 16
Supported printer drivers for Macintosh ............................................................ 16
Supported utilities for Macintosh ....................................................................... 17
HP LaserJet Utility ............................................................................ 17
Embedded Web Server .................................................................... 17
Availability and localization ............................................................................................... 17
Software component availability for Windows and Macintosh .......................... 18
Printing-system software on the Web ............................................................... 18
In-box printing-system software CD .................................................................. 19
Printing-system software CD ............................................................ 19
CD Versions ..................................................................................... 19
Documentation ................................................................................................................................... 23
Printing-system software CD ............................................................................................. 24
Main CD browser screen ................................................................................... 24
User Documentation ......................................................................................... 25
HP LaserJet Help Navigation ........................................................... 25
User Guide ....................................................................................... 34
ENWW iii
Page 6

More Information .............................................................................. 35
2 Software description .................................................................................................................................... 37
Windows printing-system software ..................................................................................................... 38
Supported operating systems for Windows ....................................................................... 38
Windows operating system requirements .......................................................................... 38
Macintosh system requirements ........................................................................................ 39
Printer driver ...................................................................................................................... 39
Select the correct printer driver for Windows ..................................................................... 39
Priority for print settings ..................................................................................................... 40
Change printer-driver settings for Windows ....................................................................... 40
Printing system and installer .............................................................................................. 41
HP Smart Install ................................................................................................ 41
Printing-system software CD for Windows systems .......................................... 41
Driver version numbers for Windows operating systems ................................................... 43
Embedded Web Server ...................................................................................................................... 44
3 Install Windows printing-system components .......................................................................................... 45
Supported operating systems for Windows ........................................................................................ 46
Windows operating system requirements .......................................................................................... 46
Install overview ................................................................................................................................... 46
Software installation types for Windows ............................................................................................. 47
Installation options .............................................................................................................................. 47
Microsoft Windows general installation overview ............................................................................... 48
HP LaserJet Professional P1100/P1560/P1600 Series Printer printing-system software
for Windows systems ......................................................................................................... 48
HP Smart Install ................................................................................................ 48
CD installation ................................................................................................... 48
Install the print driver using the Microsoft Add Printer Wizard .......................... 49
Use an existing port for a direct connection ..................................... 51
Create a new TCP/IP port for a direct connection ............................ 56
Print server connection ..................................................................... 59
Detailed MS Windows installation instructions ................................................................................... 63
Install the Host-based driver using HP Smart Install ......................................................... 63
Install the print driver for USB and wired network connected products ............. 63
Install the print driver for wireless connected network products ........................ 67
Install the product on a secure wireless network .............................. 67
Install the print driver on a non-secured wireless network ................ 97
EWS Smart Install (network products) ............................................................ 104
Install the Host-based driver from the CD ........................................................................ 109
Install the print driver from the CD for USB connected products .................... 109
Install the print driver from the CD for wired network connected products ...... 115
iv ENWW
Page 7

Install the print driver from the CD for wireless network connected
products .......................................................................................................... 124
Install the product on a secure wireless network ............................ 124
Install the print driver on a non-secure network .............................. 158
Install the print driver from the CD to print to a previously configured wireless
network printer ................................................................................................ 167
Install the HP LaserJet Professional P1100/P1560/P1600 Series Printer XPS driver ..... 177
New driver install ............................................................................................. 177
Existing driver install ....................................................................................... 185
Additional installation information .................................................................................... 194
Use the Back, Next, Finish, and Cancel buttons ............................................................. 195
Set a default printer ......................................................................................................... 196
Uninstall software ............................................................................................................................. 197
Uninstall the Host-based driver ........................................................................................ 197
Use the HP Uninstall utility (recommended) ................................................... 197
Use Windows Add or Remove Programs feature ........................................... 197
Uninstall the XPS driver ................................................................................................... 198
4 HP Host-based print driver for Windows .................................................................................................. 199
Introduction ....................................................................................................................................... 199
Gain access to print drivers .............................................................................................................. 200
Printing Preferences driver tabs ...................................................................................... 200
Properties driver tabs ....................................................................................................... 201
Help system ...................................................................................................................................... 202
“What's this?” Help ........................................................................................................... 202
Incompatible Print Settings messages ............................................................................. 202
Advanced tab features ..................................................................................................................... 203
Print Tasks Quick Sets .................................................................................................... 203
Copies .............................................................................................................................. 204
Copies ............................................................................................................. 204
Printer Features ............................................................................................................... 204
Document preview image ................................................................................................ 204
Paper/Quality tab features ................................................................................................................ 206
Print Tasks Quick Sets .................................................................................................... 206
Paper Options .................................................................................................................. 207
Size is .............................................................................................................. 207
Custom Paper Size ......................................................................................... 208
Name .............................................................................................. 208
Size ................................................................................................. 209
Units ............................................................................................... 209
Custom width and height control limits ........................................... 209
Show important instructions for printing on short media (P1100
base model only) ............................................................................ 209
Use Different Paper/Covers ............................................................................ 209
ENWW v
Page 8

Source is ......................................................................................................... 210
Type Is ............................................................................................................ 211
Document preview image ................................................................................................ 211
Print Quality ..................................................................................................................... 212
Print Quality drop-down menu ......................................................................... 212
EconoMode check box .................................................................................... 212
Effects tab features .......................................................................................................................... 213
Print Tasks Quick Sets .................................................................................................... 213
Resizing Options .............................................................................................................. 214
Actual size ....................................................................................................... 214
Print document on .......................................................................................... 214
Scale to fit ....................................................................................................... 214
% of normal size .............................................................................................. 215
Document preview image ................................................................................................ 215
Watermarks ..................................................................................................................... 216
Watermark Details ........................................................................................... 217
Current Watermarks ....................................................................... 217
Watermark Message ...................................................................... 218
Message Angle ............................................................................... 218
Font Attributes ................................................................................ 218
Default watermark settings ............................................................. 219
Finishing tab features ....................................................................................................................... 220
Print Tasks Quick Sets .................................................................................................... 220
Document Options ........................................................................................................... 221
Print On Both Sides ......................................................................................... 221
Print on both sides manually .......................................................... 222
Print on both side automatically (P1600 series products) .............. 224
Flip pages up ................................................................................................... 225
Booklet Printing ............................................................................................... 225
Book and booklet printing ............................................................... 225
Pages per sheet .............................................................................................. 226
Print page borders ........................................................................................... 226
Page order ...................................................................................................... 226
Document preview image ................................................................................................ 227
Orientation ....................................................................................................................... 227
Services tab features ........................................................................................................................ 228
Internet Services .............................................................................................................. 2 28
Print Information Pages ................................................................................................... 229
Device Settings ................................................................................................................................ 230
Jam Recovery .................................................................................................................. 232
Status Messages ............................................................................................................. 232
Cleaning Page ................................................................................................................. 233
Quiet Mode (P1560/P1600 series only) ........................................................................... 233
Duplex Mode .................................................................................................................... 2 3 3
vi ENWW
Page 9

Print Density .................................................................................................................... 233
Auto-Off Console ............................................................................................................. 233
5 Macintosh software and utilities ............................................................................................................... 235
Introduction ....................................................................................................................................... 235
Supported operating systems for Macintosh .................................................................................... 236
Macintosh system requirements ...................................................................................... 236
Hardware requirements ................................................................................... 236
Supported printer drivers for Mac .................................................................................... 236
Change printer-driver settings for Mac ............................................................................ 236
Printing-system software .................................................................................................................. 236
PDEs ................................................................................................................................ 237
HP Embedded Web Server ............................................................................................. 237
Install notes ...................................................................................................................... 237
Online help ....................................................................................................................... 237
Screen fonts ..................................................................................................................... 237
Macintosh installation instructions .................................................................................................... 238
HP LaserJet software CD, Macintosh partition ................................................................ 238
Install the HP LaserJet printing-system software for the Macintosh OS .......................... 238
General installation instructions ...................................................................... 238
Mac OS X installation ...................................................................................... 239
Main Install dialog box sequence ................................................... 239
Setup instructions ............................................................................................ 244
Wireless setup ................................................................................ 244
Troubleshooting the product setup ................................................. 245
Remove the printing-system software from Macintosh operating systems ...................................... 245
6 Engineering Details .................................................................................................................................... 247
Introduction ....................................................................................................................................... 247
Remote firmware update ................................................................................................................. 248
Determining the current level of firmware ....................................................................... 248
Download the firmware update utility from the HP Web site ............................................ 248
Run the firmware update utility ........................................................................................ 249
Media attributes ................................................................................................................................ 250
Paper sources and destinations ...................................................................................... 250
Paper-source commands ................................................................................................. 250
Driver-supported paper sizes ........................................................................................... 250
Driver-supported paper types .......................................................................................... 252
Custom paper sizes ......................................................................................................... 253
Paper-type commands (HP LaserJet Professional P1600 Series Printer only) ............... 253
Supported routers for wireless products that support automatic configuration. ............................... 254
Index ................................................................................................................................................................. 259
ENWW vii
Page 10

viii ENWW
Page 11

List of tables
Table 1-1 HP LaserJet Professional P1100 Series Printer ................................................................................ 7
Table 1-2 HP LaserJet Professional P1560 Series Printer ................................................................................ 8
Table 1-3 HP LaserJet Professional P1100 Series Printer .............................................................................. 12
Table 1-4 HP LaserJet Professional P1560 Series Printer .............................................................................. 12
Table 1-5 UPD installation modes .................................................................................................................... 16
Table 1-6 HP Printer Utility features ................................................................................................................. 17
Table 1-7 Software component availability ...................................................................................................... 18
Table 1-8 Supported printing-system components (AR-ET) ............................................................................ 20
Table 1-9 Supported printing-system components (FI-LT) ............................................................................... 21
Table 1-10 Supported printing-system components (LV-SL) ........................................................................... 21
Table 1-11 Supported printing-system components (SR-ZHT) ........................................................................ 22
Table 1-12 Status-light legend ......................................................................................................................... 27
Table 1-13 Control-panel light patterns ............................................................................................................ 27
Table 1-14 Status-light legend ......................................................................................................................... 30
Table 1-15 Control-panel lights ........................................................................................................................ 31
Table 4-1 Host-based driver custom paper sizes ........................................................................................... 209
Table 4-2 Font Attribute settings for new and preset watermarks ................................................................ 219
Table 4-3 Page orientation ............................................................................................................................. 225
Table 6-1 HP LaserJet Professional P1100/P1560/P1600 Series Printer paper sources and
destinations ...................................................................................................................................................... 250
Table 6-2 Paper-source commands ............................................................................................................... 250
Table 6-3 Supported paper and print media sizes ......................................................................................... 251
Table 6-4 Supported envelopes and postcards ............................................................................................. 251
Table 6-5 HP PCL 5 print driver custom paper sizes ..................................................................................... 253
Table 6-6 paper-type commands ................................................................................................................... 253
ENWW ix
Page 12

x ENWW
Page 13

List of figures
Figure 1-1 HP LaserJet Professional P1100 Series Printer ............................................................................... 7
Figure 1-2 HP LaserJet Professional P1100 Series Printer (wireless) ............................................................... 8
Figure 1-3 HP LaserJet Professional P1560 Series Printer/HP LaserJet Professional P1600 Series
Printer ................................................................................................................................................................... 8
Figure 1-4 HP LaserJet Professional P1100 Series Printer ............................................................................. 10
Figure 1-5 HP LaserJet Professional P1560 Series Printer/HP LaserJet Professional P1600 Series
Printer ................................................................................................................................................................. 10
Figure 1-6 HP LaserJet Professional P1100/P1560/P1600 Series Printer ..................................................... 11
Figure 1-7 HP LaserJet Professional P1100 Series Printer ............................................................................. 12
Figure 1-8 HP LaserJet Professional P1100 Series Printer (wireless) ............................................................. 12
Figure 1-9 HP LaserJet Professional P1560 Series Printer/HP LaserJet Professional P1600 Series
Printer ................................................................................................................................................................. 13
Figure 1-10 Printing-system software CD – main browser screen ................................................................... 24
Figure 1-11 View User Guide screen .............................................................................................................. 25
Figure 1-12 More Information screen ............................................................................................................. 35
Figure 2-1 Welcome to HP Smart Install screen .............................................................................................. 41
Figure 2-2 Installation software CD Browser .................................................................................................... 42
Figure 3-1 CD Browser – Main screen ............................................................................................................. 49
Figure 3-2 Add Printer Wizard – Local or Network Printer screen ................................................................... 50
Figure 3-3 Add Printer Wizard — Select a Printer Port screen ........................................................................ 51
Figure 3-4 Add Printer Wizard — Install Printer Software screen .................................................................... 52
Figure 3-5 Add Printer Wizard — Install from Disk screen ............................................................................... 52
Figure 3-6 Add Printer Wizard — Install Printer Software, screen 2 ................................................................ 53
Figure 3-7 Add Printer Wizard — Name Your Printer screen ........................................................................... 54
Figure 3-8 Add Printer Wizard — Printer Sharing screen ................................................................................ 55
Figure 3-9 Add Printer Wizard — Print Test Page screen ................................................................................ 55
Figure 3-10 Select a Printer Port screen .......................................................................................................... 56
Figure 3-11 Add Advanced TCP/IP Printer Port screen ................................................................................... 57
Figure 3-12 Add Port screen ............................................................................................................................ 58
Figure 3-13 Add Printer Wizard — Local or Network Printer screen ................................................................ 59
Figure 3-14 Add Printer Wizard — Specify A Printer screen ............................................................................ 60
Figure 3-15 Add Printer Wizard — Find Printers screen .................................................................................. 61
Figure 3-16 Add Printer Wizard — Default Printer screen ............................................................................... 61
Figure 3-17 Add Printer Wizard — Browse for Printer screen .......................................................................... 62
Figure 3-18 Welcome to HP Smart Install screen ............................................................................................ 63
ENWW xi
Page 14

Figure 3-19 Printer Connections screen ........................................................................................................... 64
Figure 3-20 Network Connect Successful screen ............................................................................................ 65
Figure 3-21 Congratulations! Software installation complete ........................................................................... 66
Figure 3-22 Links to additional software screen ............................................................................................... 67
Figure 3-23 Welcome to HP Smart Install screen ............................................................................................ 68
Figure 3-24 Printer Connections screen ........................................................................................................... 69
Figure 3-25 Wireless Discovery Method screen ............................................................................................... 70
Figure 3-26 Networks Discovered screen ........................................................................................................ 71
Figure 3-27 ...................................................................................................................................................... 72
Figure 3-28 Wireless Credentials screen with login details hidden ............................................................... 73
Figure 3-29 Wireless Credentials screen with WPA details displayed .......................................................... 74
Figure 3-30 Wireless Credentials screen with WEP details displayed .......................................................... 75
Figure 3-31 Wireless Credentials screen with no security enabled on the router/access point ..................... 76
Figure 3-32 Network Connection Successful screen ....................................................................................... 77
Figure 3-33 Wireless Connection Failure screen ............................................................................................. 78
Figure 3-34 Wireless Connection Failure screen ............................................................................................. 79
Figure 3-35 Software installation complete screen (part 1) .............................................................................. 80
Figure 3-36 Software installation complete screen (part 2) .............................................................................. 81
Figure 3-37 Welcome to HP Smart Install screen ............................................................................................ 82
Figure 3-38 Printer Connections screen ........................................................................................................... 83
Figure 3-39 Wireless Discovery Method screen ............................................................................................... 84
Figure 3-40 Networks Discovered screen — select SSID ................................................................................ 85
Figure 3-41 Networks Discovered screen — manual entry of SSID ................................................................ 86
Figure 3-42 WiFi Protected Setup screen ........................................................................................................ 87
Figure 3-43 Wireless Connection Failure screen ............................................................................................. 88
Figure 3-44 Wireless Configuration Failed screen ........................................................................................... 89
Figure 3-45 Wireless Credentials screen with login details hidden ............................................................... 90
Figure 3-46 Wireless Credentials screen with WPA details displayed .......................................................... 91
Figure 3-47 Wireless Credentials screen with WEP details displayed .......................................................... 92
Figure 3-48 Wireless Credentials screen with no security enabled on the router .......................................... 93
Figure 3-49 Networks Discovered screen ........................................................................................................ 94
Figure 3-50 Network Connection Successful screen ....................................................................................... 95
Figure 3-51 Software installation complete screen (part 1) .............................................................................. 96
Figure 3-52 Software installation complete screen (part 2) .............................................................................. 97
Figure 3-53 Welcome to HP Smart Install screen ............................................................................................ 98
Figure 3-54 Printer Connections screen ........................................................................................................... 99
Figure 3-55 Wireless Discovery Method screen ............................................................................................. 100
Figure 3-56 Networks Discovered screen ...................................................................................................... 101
Figure 3-57 Network Connection Successful screen ..................................................................................... 102
Figure 3-58 Software installation complete screen (part 1) ............................................................................ 103
Figure 3-59 Software installation complete screen (part 2) ............................................................................ 104
Figure 3-60 Software Installation — Initial screen ..................................................................................... 110
Figure 3-61 Choose Easy Install or Advanced Install screen ......................................................................... 111
Figure 3-62 Select Printer screen ................................................................................................................... 112
xii ENWW
Page 15

Figure 3-63 Configure to print using USB screen (part 1) .............................................................................. 113
Figure 3-64 Configure to print using USB screen (part 2) .............................................................................. 113
Figure 3-65 Software installation complete screen (part 1) ............................................................................ 114
Figure 3-66 Software installation complete screen (part 2) ............................................................................ 115
Figure 3-67 Software Installation — Initial screen ..................................................................................... 116
Figure 3-68 Choose Easy Install or Advanced Install screen ......................................................................... 117
Figure 3-69 Select Printer screen ................................................................................................................... 118
Figure 3-70 Printer Connections screen ......................................................................................................... 119
Figure 3-71 Software installation complete screen (part 1) ............................................................................ 123
Figure 3-72 Software installation complete screen (part 2) ............................................................................ 124
Figure 3-73 Software Installation — Initial screen ..................................................................................... 125
Figure 3-74 Choose Easy Install or Advanced Install screen ......................................................................... 126
Figure 3-75 Select Printer .............................................................................................................................. 127
Figure 3-76 Printer Connections screen ......................................................................................................... 128
Figure 3-77 Wireless Discovery Method screen ............................................................................................. 129
Figure 3-78 Networks Discovered screen ...................................................................................................... 130
Figure 3-79 .................................................................................................................................................... 131
Figure 3-80 Wireless Credentials screen with login details hidden ............................................................. 132
Figure 3-81 Wireless Credentials screen with WPA details displayed ........................................................ 133
Figure 3-82 Wireless Credentials screen with WEP details displayed ........................................................ 134
Figure 3-83 Wireless Credentials screen with no security enabled on the router/access point ................... 135
Figure 3-84 Network Connection Successful screen ..................................................................................... 136
Figure 3-85 Wireless Connection Failure screen ........................................................................................... 137
Figure 3-86 Wireless Connection Failure screen ........................................................................................... 138
Figure 3-87 Software installation complete screen (part 1) ............................................................................ 139
Figure 3-88 Software installation complete screen (part 2) ............................................................................ 140
Figure 3-89 Software Installation — Initial screen ..................................................................................... 141
Figure 3-90 Choose Easy Install or Advanced Install screen ......................................................................... 142
Figure 3-91 Select Printer .............................................................................................................................. 143
Figure 3-92 Printer Connections screen ......................................................................................................... 144
Figure 3-93 Wireless Discovery Method screen ............................................................................................. 145
Figure 3-94 Networks Discovered screen — select SSID .............................................................................. 146
Figure 3-95 Networks Discovered screen — manual entry of SSID .............................................................. 147
Figure 3-96 WiFi Protected Setup screen ...................................................................................................... 148
Figure 3-97 Wireless Connection Failure screen ........................................................................................... 149
Figure 3-98 Wireless Configuration Failed screen ......................................................................................... 150
Figure 3-99 Wireless Credentials screen with login details hidden ............................................................. 151
Figure 3-100 Wireless Credentials screen with WPA details displayed ...................................................... 152
Figure 3-101 Wireless Credentials screen with WEP details displayed ...................................................... 153
Figure 3-102 Wireless Credentials screen with no security enabled on the router ...................................... 154
Figure 3-103 Networks Discovered screen .................................................................................................... 155
Figure 3-104 Network Connection Successful screen ................................................................................... 156
Figure 3-105 Software installation complete screen (part 1) .......................................................................... 157
Figure 3-106 Software installation complete screen (part 2) .......................................................................... 158
ENWW x
iii
Page 16

Figure 3-107 Software Installation — Initial screen ................................................................................... 159
Figure 3-108 Choose Easy Install or Advanced Install screen ....................................................................... 160
Figure 3-109 Select Printer ............................................................................................................................ 161
Figure 3-110 Printer Connections screen ...................................................................................................... 162
Figure 3-111 Wireless Discovery Method screen ........................................................................................... 163
Figure 3-112 Networks Discovered screen .................................................................................................... 164
Figure 3-113 Network Connection Successful screen ................................................................................... 165
Figure 3-114 Software installation complete screen (part 1) .......................................................................... 166
Figure 3-115 Software installation complete screen (part 2) .......................................................................... 167
Figure 3-116 Software Installation — Initial screen ................................................................................... 168
Figure 3-117 Choose Easy Install or Advanced Install screen ....................................................................... 169
Figure 3-118 Select Printer screen ................................................................................................................. 170
Figure 3-119 Printer Connections screen ...................................................................................................... 171
Figure 3-120 Identify Printer screen ............................................................................................................... 172
Figure 3-121 Specify Printer screen ............................................................................................................... 173
Figure 3-122 Printer Found screen ................................................................................................................ 174
Figure 3-123 Confirm Network Settings screen ............................................................................................. 175
Figure 3-124 Software installation complete screen (part 1) .......................................................................... 176
Figure 3-125 Software installation complete screen (part 2) .......................................................................... 177
Figure 3-126 Welcome to the HP Smart Install Utility screen ........................................................................ 178
Figure 3-127 HP Smart Install Printer Configuration screen .......................................................................... 179
Figure 3-128 HP Smart Install currently Enabled screen ............................................................................... 179
Figure 3-129 HP Smart Install currently Disabled screen .............................................................................. 180
Figure 3-130 Welcome to the Found New Hardware Wizard screen ......................................................... 181
Figure 3-131 Locate File dialog window ......................................................................................................... 184
Figure 3-132 Add Printer Wizard .................................................................................................................... 186
Figure 3-133 Local or Network Port screen .................................................................................................... 187
Figure 3-134 Select a Printer Port screen ...................................................................................................... 188
Figure 3-135 Install Printer Software screen .................................................................................................. 189
Figure 3-136 .................................................................................................................................................. 190
Figure 3-137 Use Existing Driver screen ........................................................................................................ 191
Figure 3-138 Name Your Printer screen ........................................................................................................ 192
Figure 3-139 Completing the Add Printer Wizard screen ............................................................................... 193
Figure 3-140 CD Re-launch Pad screen ........................................................................................................ 194
Figure 3-141 Installation Cancellation dialog box ....................................................................................... 196
Figure 3-142 Uninstall .................................................................................................................................... 198
Figure 4-1 An Incompatible Print Settings message .................................................................................. 202
Figure 4-2 The default appearance of the Advanced tab ............................................................................. 203
Figure 4-3 Paper/Quality tab ........................................................................................................................ 206
Figure 4-4 Paper Options group box ........................................................................................................... 207
Figure 4-5 Custom Paper Size dialog box ................................................................................................... 208
Figure 4-6 Effects tab ................................................................................................................................... 213
Figure 4-7 Preview images – Legal on Letter;
Figure 4-8 Watermark Details dialog box .................................................................................................... 217
Scale to Fit off
t) and on (right) ........................................ 215
(lef
xiv ENWW
Page 17

Figure 4-9 Finishing tab ............................................................................................................................... 220
Figure 4-10 Print on Both Sides Instructions dialog box ............................................................................ 223
Figure 4-11 Print on Both Sides Instructions dialog box ............................................................................ 224
Figure 4-12 Page-order preview images ....................................................................................................... 226
Figure 4-13 Services tab ............................................................................................................................... 228
Figure 4-14 Device Settings tab - P1102w model shown .............................................................................. 230
Figure 4-15 Device Settings tab - P1606dn model shown ............................................................................. 231
Figure 4-16 FRONT DOOR IS OPEN status message .................................................................................. 232
Figure 5-1 Mac installer opening screen ........................................................................................................ 239
Figure 5-2 Mac installer Introduction dialog ................................................................................................... 240
Figure 5-3 Mac installer License dialog .......................................................................................................... 240
Figure 5-4 Mac installer license agreement dialog ......................................................................................... 241
Figure 5-5 Mac installer Select a Destination dialog ................................................................................... 241
Figure 5-6 Mac installer Installation dialog .................................................................................................... 243
Figure 5-7 Mac installer Summary dialog ....................................................................................................... 244
Figure 6-1 Firmware Update Utility. List of available printers shown screen. ................................................ 249
Figure 6-2 Firmware update successful screen. ............................................................................................ 249
ENWW xv
Page 18

xvi ENWW
Page 19

1 Purpose and scope
ENWW 1
Page 20

Introduction
This software technical reference (STR) provides information about and troubleshooting tips for the
printing-system software for the product.
This STR is prepared in an electronic format to serve as a quick-reference tool for Customer Care Center
(CCC) agents, support engineers, system administrators, management information systems (MIS)
personnel, and end users, as appropriate.
NOTE: This STR describes drivers that are available from the product firmware and shipped on the
printing-system software CD that comes with the product. This STR does not describe drivers that will
become available on the Web.
The following information is included in this STR:
Descriptions of drivers, operating systems, and system environments
●
Procedures for installing and uninstalling the printing-system software components
●
For information about the location of information within chapters, see the table of contents. An index is
also provided in this STR.
Additional detailed information about the printing-system software is published in an addendum to this
STR. The following information is available in the addendum:
Lists of installed files
●
System-modification information, such as files added or modified
●
2 Chapter 1 Purpose and scope ENWW
Page 21

Product comparison
HP LaserJet Professional P1100 Series Printer printer
(base model)
HP LaserJet Professional P1100 Series Printer printer
(wireless)
Speed: Up to 18 A4 pages per minute
●
(ppm), 19 letter-size ppm
Tray: 150-sheet input tray
●
Connectivity: Hi-Speed USB 2.0
●
port
Duplexing: Manual duplexing (using
●
the printer driver)
Has the same features as the HP LaserJet
Professional P1100 Series Printer, with the
following additions.
10 page priority input tray
●
Connectivity: 802.11b/g wireless
●
networking
ENWW Product comparison 3
Page 22
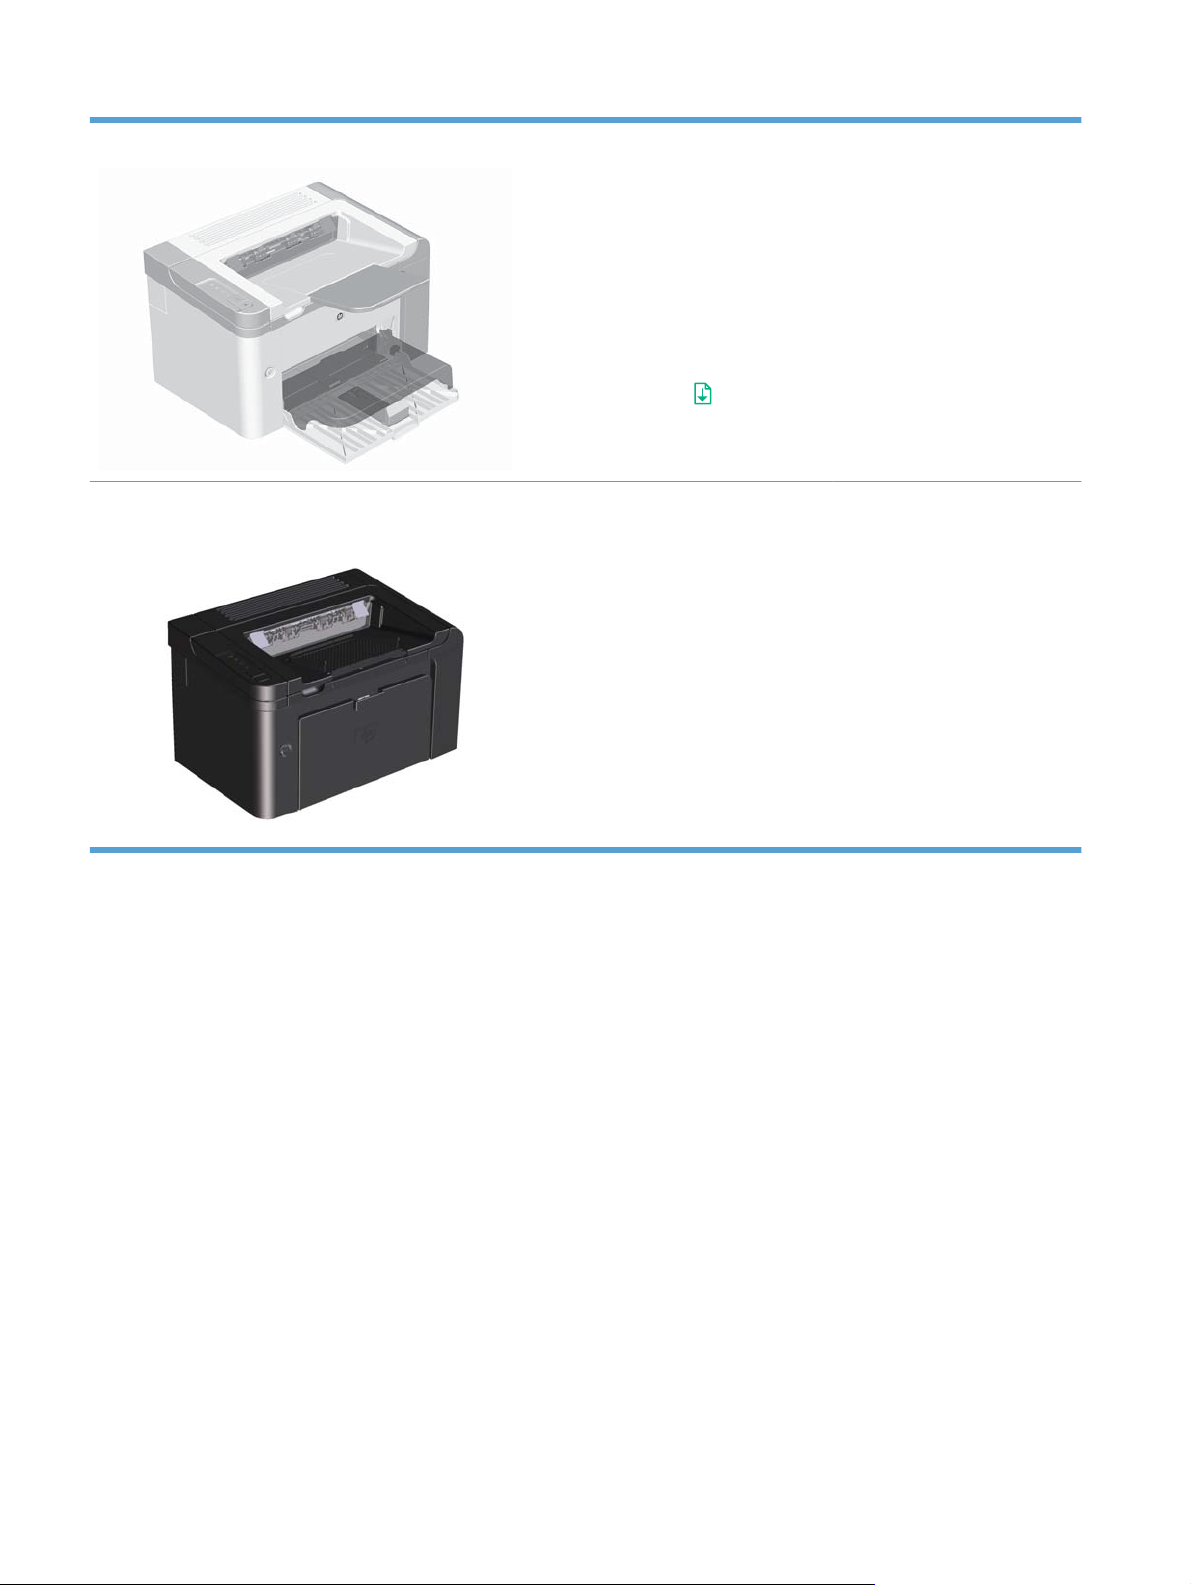
HP LaserJet Professional P1560 Series Printer printer (Lite)
Speed: 22 A4 pages per minute
●
(ppm), 23 letter-size ppm
Trays: Priority input slot (10-sheet)
●
and a main-input tray (250-sheet)
Output bin: 125-sheets
●
Connectivity: Hi-Speed USB 2.0
●
port
Two-sided printing: Manual
●
duplexing (using the printer driver
and the go button
panel)
on the control-
HP LaserJet Professional P1600 Series Printer printer
(10/100 network)
Speed: 25 A4 ppm, 26 letter-size
●
ppm
Trays: Priority input slot (10-sheet)
●
and a main-input tray (250-sheet)
Output bin: 125-sheets
●
Connectivity: Hi-Speed USB 2.0
●
port and on-board networking
Two-sided printing: Automatic
●
duplexing
4 Chapter 1 Purpose and scope ENWW
Page 23

Product features
Benefit Supporting features
Excellent print quality
Supported operating
systems
Ease of use
Flexible paper handling
Genuine HP print cartridge.
●
FastRes 600 setting (P1100 series) and 600 dots per inch (dpi) setting (P1560/P1600 series)
●
effective print quality. FastRes 1200 setting provides 1,200 dpi effective print quality.
Adjustable settings to optimize print quality.
●
Windows Vista (32-bit and 64-bit)
●
Windows XP (32-bit and 64-bit)
●
Windows 7 (32-bit and 64-bit)
●
Windows Server 2003 (32-bit and 64-bit)
●
Windows Server 2008 (32-bit and 64-bit)
●
Mac OS X v10.4, v10.5, v10.6
●
HP Smart Install feature installs product software when you connect a USB cable between
●
the product and a Windows computer or connect to the product via the Embedded Web Server
(EWS).
The print cartridge is easy to install.
●
Convenient access to the print cartridge and to the paper path through the print-cartridge door.
●
Paper tray can be adjusted with one hand.
●
A 10-sheet priority input slot (P1102w, P1566, P1606dn models)
●
Interface connections
Energy savings
Economical printing
Supplies management
A 150-sheet (75 g/m2 (20 lb) paper) input tray (P1100 series).
●
A 250-sheet (75 g/m2 (20 lb) paper) input tray (P1560/P1600 series).
●
A 125-sheet (75 g/m2 (20 lb) paper) output bin.
●
Manual duplexing (two-sided printing).
●
Automatic duplexing (P1600 series)
●
Hi-Speed USB 2.0 port
●
802.11b/g wireless networking (wireless models only)
●
10/100 network connection (P1600 series)
●
After a user-specified time, the Auto-Off feature automatically conserves electricity by
●
substantially reducing power consumption when the product is not printing.
N-up printing (printing more than one page on a sheet) and the manual two-sided printing
●
features save paper.
EconoMode printer driver feature saves toner.
●
Authentication for genuine HP print cartridges.
●
Easy ordering for replacement supplies.
●
Supplies status page shows estimated toner level in the print cartridge. Not available for non-
●
HP supplies.
ENWW Product features 5
Page 24

Benefit Supporting features
Accessibility
Security
The online user guide is compatible with text screen-readers.
●
All doors and covers can be opened by using one hand.
●
Kensington lock receptacle on the back of the product.
●
6 Chapter 1 Purpose and scope ENWW
Page 25

Product views
Front and left side view
Figure 1-1 HP LaserJet Professional P1100 Series Printer
7
6
1
2
3
5
Table 1-1 HP LaserJet Professional P1100 Series Printer
1 Output bin
2 Foldable output tray extension
3 Input tray
4 Short media extender tool
5 Power button
6 Print-cartridge door lift-tab
7 Control panel
4
ENWW Product views 7
Page 26
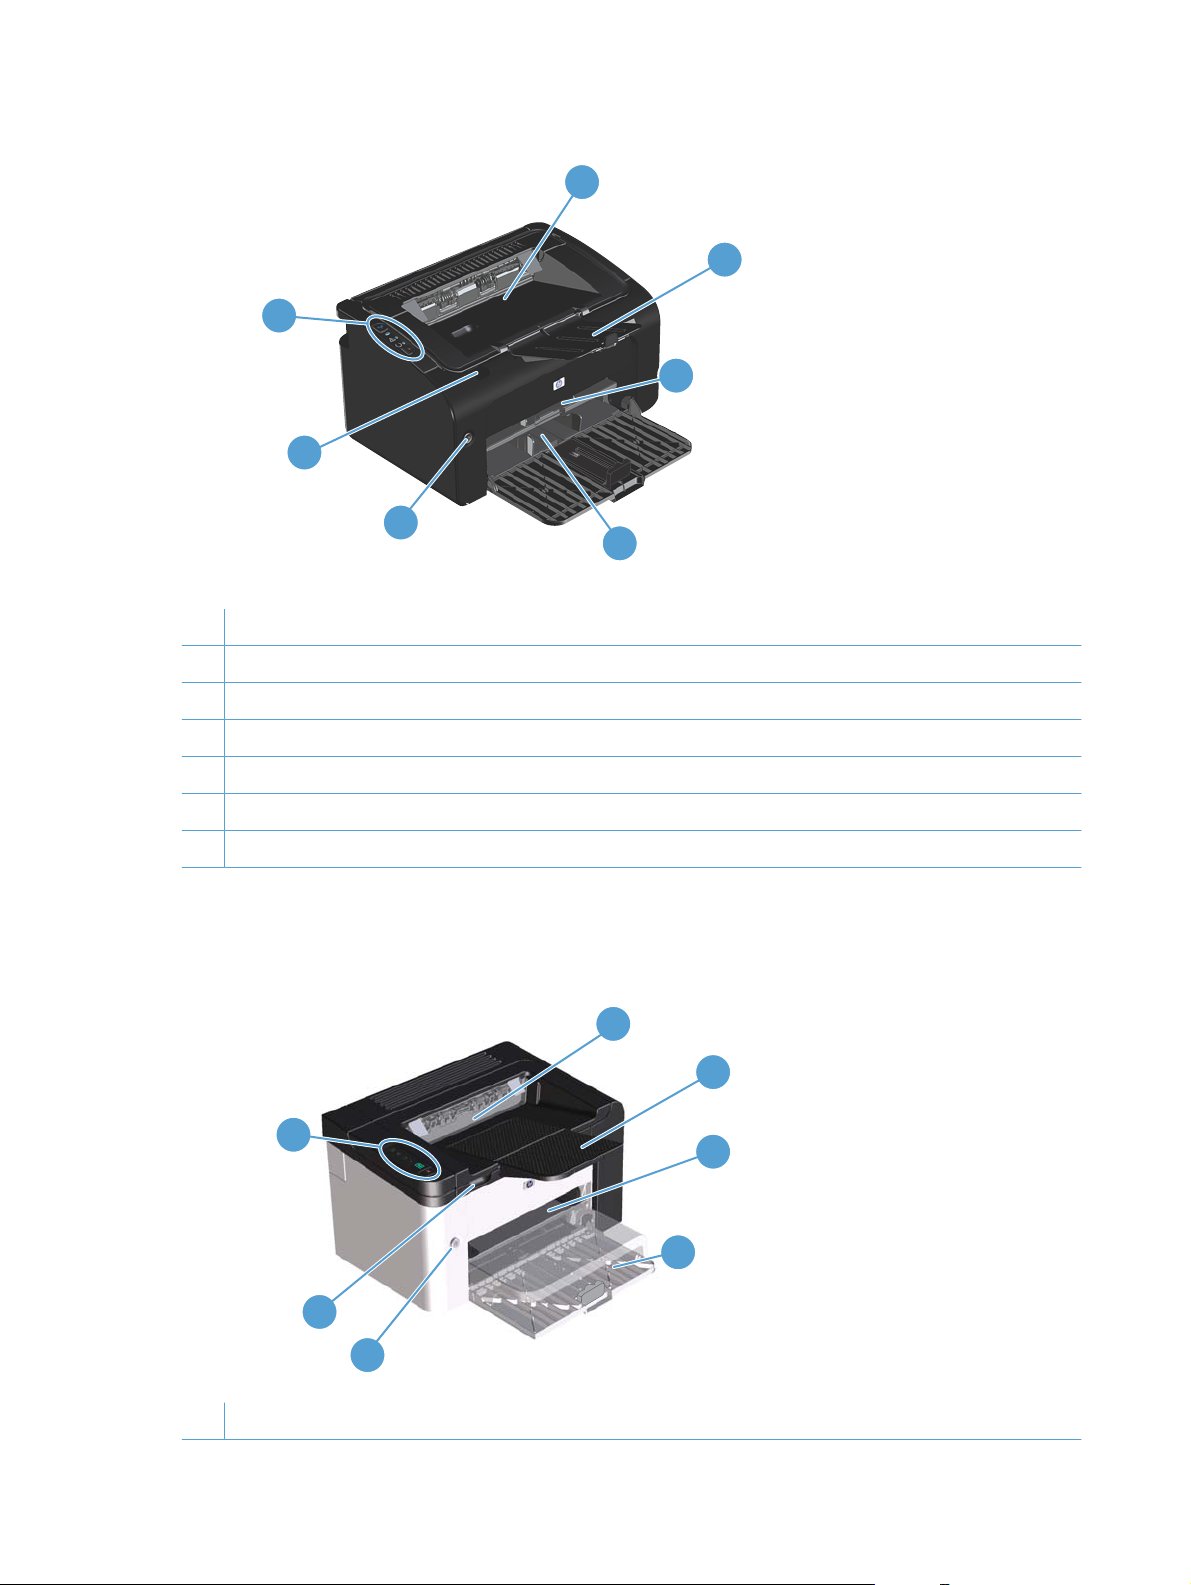
Figure 1-2 HP LaserJet Professional P1100 Series Printer (wireless)
1
2
7
3
6
5
4
Table 1-2 HP LaserJet Professional P1560 Series Printer
1 Output bin
2 Foldable output tray extension
3 Priority input slot
4 Main input tray
5 Power button
6 Print-cartridge door lift-tab
7 Control panel
Figure 1-3 HP LaserJet Professional P1560 Series Printer/HP LaserJet Professional P1600 Series
Printer
1
2
7
3
4
6
5
1 Output bin
8 Chapter 1 Purpose and scope ENWW
Page 27

2 Output tray extension
3 Priority input slot
4 Main-input tray
5 Power button
6 Cartridge door lift-tab
7 Control panel
ENWW Product views 9
Page 28
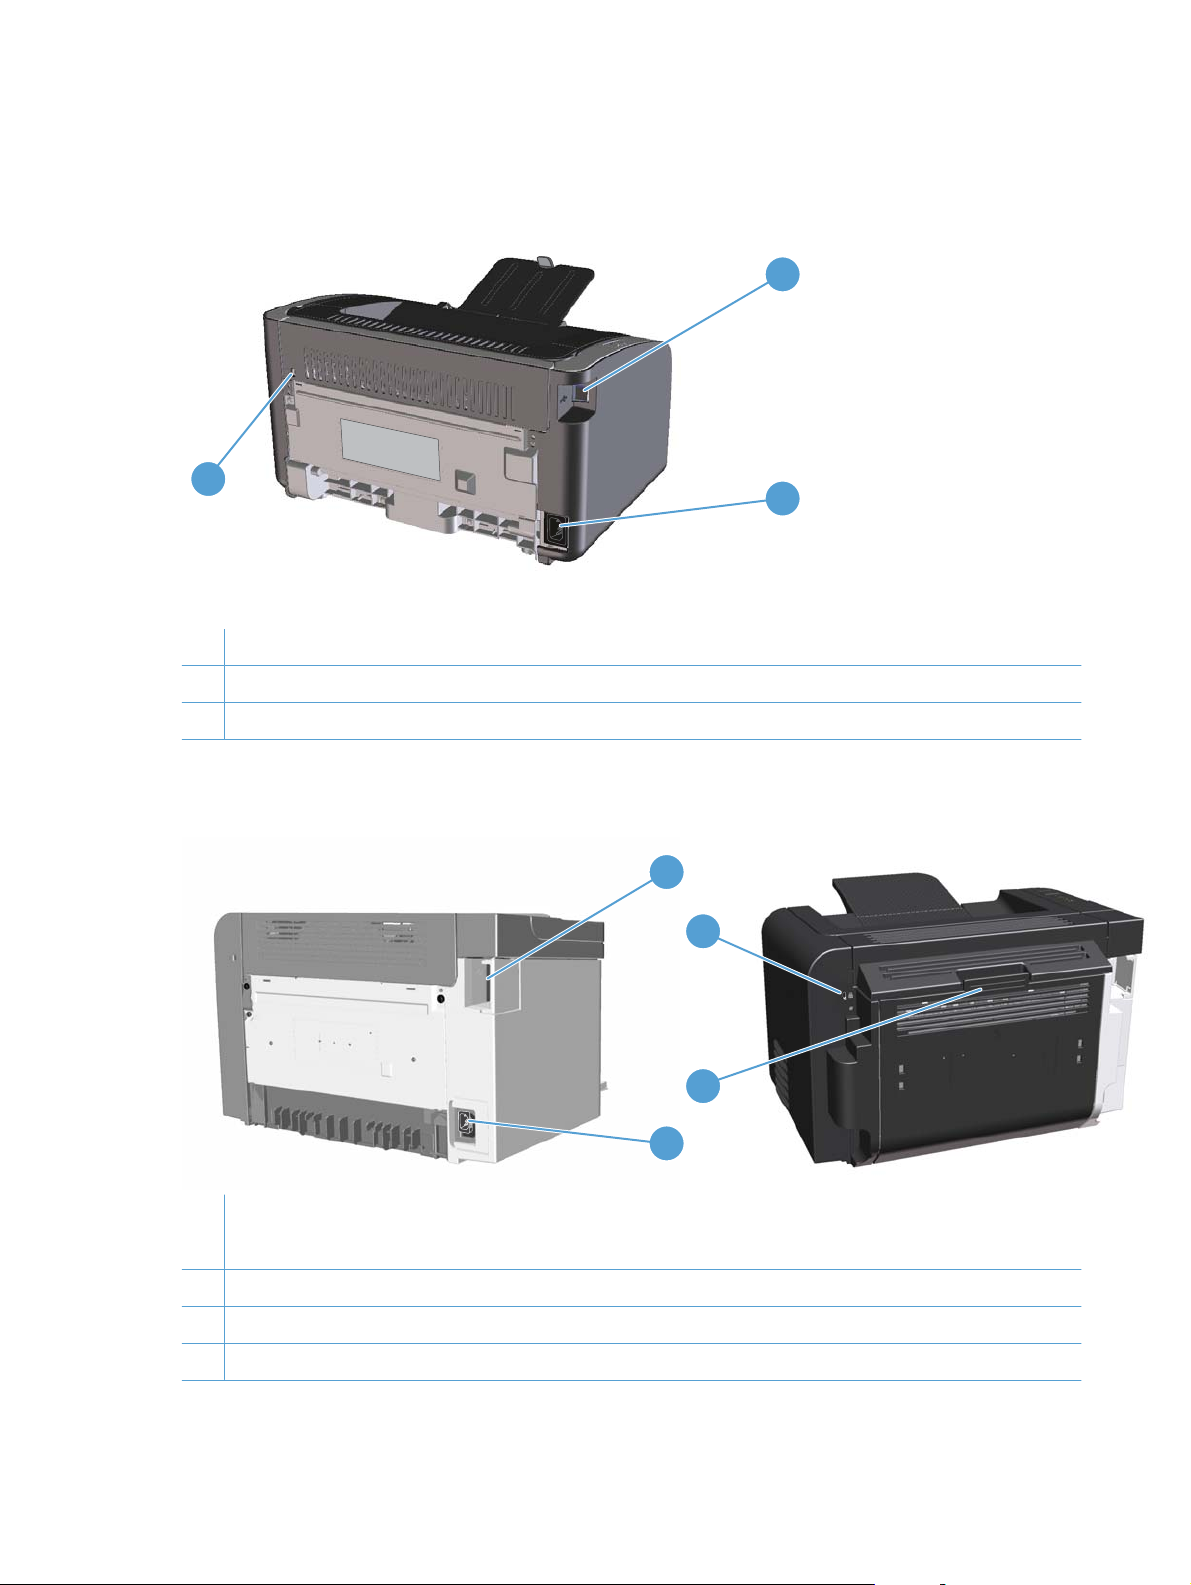
Back view
Figure 1-4 HP LaserJet Professional P1100 Series Printer
1
3
2
1 USB port
2 Power connector
3 Kensington lock
Figure 1-5 HP LaserJet Professional P1560 Series Printer/HP LaserJet Professional P1600 Series
Printer
1
3
4
2
1 USB port
HP internal network port (HP LaserJet Professional P1560 Series Printer only)
2 Power receptacle
3 Kensington lock
4 Duplexer and rear jam-access door (HP LaserJet Professional P1600 Series Printer series only)
10 Chapter 1 Purpose and scope ENWW
Page 29

Serial number and product number location
The label that contains the product number and serial number is on the rear of the product.
Figure 1-6 HP LaserJet Professional P1100/P1560/P1600 Series Printer
ENWW Product views 11
Page 30

Control-panel layout
Figure 1-7 HP LaserJet Professional P1100 Series Printer
1
2
Table 1-3 HP LaserJet Professional P1100 Series Printer
1 Attention light: Indicates that the print cartridge door is open or other errors exist.
2 Ready light: When the product is ready to print, the ready light is on. When the product is processing data, the ready
light blinks.
Figure 1-8 HP LaserJet Professional P1100 Series Printer (wireless)
1
2
3
4
5
Table 1-4 HP LaserJet Professional P1560 Series Printer
1 Wireless button: To detect wireless networks, press the wireless button. Press and hold this button for five or more
seconds to enable or disable the wireless feature.
2 Wireless light: When the product is searching for a network, the wireless light blinks. When the product is connected to
a wireless network, the wireless light is on.
3 Attention light: Indicates that the print cartridge door is open or other errors exist.
4 Ready light: When the product is ready to print, the ready light is on. When the product is processing data, the ready
light blinks.
5 Cancel button: To cancel the print job, press the cancel button. Press and hold the button for 5 seconds to print a
configuration page.
12 Chapter 1 Purpose and scope ENWW
Page 31

Figure 1-9 HP LaserJet Professional P1560 Series Printer/HP LaserJet Professional P1600 Series
Printer
1
2
3
4
5
6
1
Toner light : When the print cartridge is low, the toner light illuminates. When the print cartridge is out of the
product, the toner light
2
Attention light : Indicates that the print-cartridge door is open or other errors exist.
3
Ready light : When the product is ready to print, the ready light is on. When the product is processing data, the
ready light
blinks.
blinks.
4
Go light : Indicates that there is a continuable error (along with the attention light ).
5
Go button : To print a configuration page, press and hold the go button for five seconds or longer. To print a demo
page, press the go button
6 Cancel button : To cancel the print job, press the cancel button .
for less than five seconds.
ENWW Product views 13
Page 32

Printing-system software
Operating-system support
●
Availability and localization
●
Operating-system support
Windows operating systems provide full-featured support for the product. Operating systems that are
not described in this STR provide varying levels of functionality.
Throughout this document, Windows XP is used to denote Windows XP Home Edition and Windows
XP Professional, unless noted otherwise.
Information relating to networking functions is specific to products that have network capabilities.
The printing-system software has not been tested with and is not supported in the following operating
systems:
Windows 3.1x
●
Windows 95
●
Windows 98
●
Windows Millennium Edition (Me)
●
Windows 2000
●
Windows NT® 4.0
●
IA-64-bit operating systems
●
Printer drivers for these operating systems are not included in the product firmware, on the printingsystem software CD, and are not available on the Web. Other printer drivers might work with the product,
but some print-driver features and functions might not be available.
For more information about the product, go to the following Web sites:
www.hp.com/support/ljp1100series
www.hp.com/support/ljp1560series or www.hp.com/go/ljp1600series
Supported operating systems for Windows
●
Supported printer drivers for Windows
●
HP Universal Print Driver (UPD)
●
Supported utilities for Windows
●
Supported operating systems for Macintosh
●
Supported printer drivers for Macintosh
●
Supported utilities for Macintosh
●
14 Chapter 1 Purpose and scope ENWW
Page 33

Supported operating systems for Windows
The product comes with software for the following Windows® operating systems:
Windows Vista (32-bit and 64-bit)
●
Windows XP (32-bit and 64-bit)
●
Windows 7 (32-bit and 64-bit)
●
Windows Server 2003 (32-bit and 64-bit)
●
For more information about upgrading from Windows 2000 Server to Windows Server 2003, using
Windows Server 2003 Point and Print, or using Windows Server 2003 Terminal Services and
Printing, go to
Windows Server 2008 (32-bit and 64-bit)
●
www.microsoft.com.
Supported printer drivers for Windows
HP LaserJet Professional P1100/P1560/P1600 Series Printer Host-based print driver
●
HP Universal Printing PCL5e driver (P1600 series)
●
HP LaserJet Professional P1100/P1560/P1600 Series Printer XPS print driver
●
The printer drivers include online Help that has instructions for common printing tasks and also describes
the buttons, check boxes, and drop-down lists that are in the printer driver.
NOTE: The host-based driver is the only printer driver that is included with this product; it is included
in the product firmware and on the printing-system CD.
The PCL5e and XPS drivers are available by Web download only at www.hp.com/support/
ljp1100series and www.hp.com/support/ljp1560series or www.hp.com/go/ljp1600series.
NOTE: For more information about the UPD, see www.hp.com/go/upd.
HP Universal Print Driver (UPD)
Each HP Universal Print Driver (UPD) for Windows is a single driver that gives you instant access to
virtually any HP LaserJet product, from any location, without downloading separate drivers. It is built on
proven HP print driver technology and has been tested thoroughly and used with many software
programs. It is a powerful solution that performs consistently over time.
The HP UPD communicates directly with each HP product, gathers configuration information, and then
customizes the user interface to show the product’s unique, available features. It automatically enables
features that are available for the product, such as two-sided printing and stapling, so you do not need
to enable them manually.
For more information, go to
When you download and install a UPD from the product support Web page,
ljp1600series, there will be some variations in the installation process and results depending on the
driver that you select.
www.hp.com/go/upd.
www.hp.com/go/
From the support page, click on the Download Drivers and Software link. After you select the printer
model and operating system, there will be several selections on the download page. You can download
drivers from the “Driver” section and from the “Driver - Universal Print Driver” section.
ENWW Printing-system software 15
Page 34

Drivers downloaded from the “Driver” section are wrapped with the HP DIU (Driver Installation Utility)
and produce a “named” driver when installed. A named driver has the printer model number in the driver
print queue name. These drivers always install in Traditional mode.
Drivers downloaded from the “Driver-Universal Print Driver” section includes the UPD installer. For these
drivers, the driver print queue shows a non-product-specific name. When installing these drivers, you
have a choice between Traditional or Dynamic mode as described below.
UPD installation modes
Table 1-5 UPD installation modes
Traditional mode
Dynamic mode
Supported utilities for Windows
HP Embedded Web Server
P1100 series (wireless models) and P1600 series models are equipped with the HP Embedded Web
Server (HP EWS), which provides access to information about product and network activities. This
information appears in a Web browser, such as Microsoft Internet Explorer, Apple® Safari, or Firefox.
The HP EWS resides on the product. It is not loaded on a network server.
The HP EWS provides an interface to the product that anyone who has a network-connected computer
and a standard Web browser can use. No special software is installed or configured, but you must have
a supported Web browser on the computer. To gain access to the HP EWS, type the IP address for the
product in the address line of the browser.
Use this mode if you are installing the driver from a CD for a single computer.
●
When installed with this mode, UPD operates like traditional printer drivers.
●
If you use this mode, you must install UPD separately for each printer.
●
Use this mode if you are installing the driver for a mobile computer, so you can
●
discover and print to HP products in any location.
Use this mode if you are installing UPD for a workgroup.
●
To use this mode, download UPD from the Internet. See
●
upd.
www.hp.com/go/
For a complete explanation of the features and functionality of the HP EWS, see the HP LaserJet P1100/
P1560/P1600 Printer Series User Guide, which is available on the printing system software CD.
Supported operating systems for Macintosh
The product supports the following Macintosh operating systems:
Mac OS X V10.4, V10.5, and V10.6
●
NOTE: PPC and Intel® Core Processor Macs are supported.
Supported printer drivers for Macintosh
The HP LaserJet software installer provides PostScript® Printer Description (PPD) files, a CUPS driver,
and the HP Printer Utilities for Mac OS X. The HP printer PPD file, in combination with the CUPS driver,
provides full printing functionality and access to specific HP printer features.
16 Chapter 1 Purpose and scope ENWW
Page 35

Supported utilities for Macintosh
The following additional software is available for Macintosh for use with the HP LaserJet Professional
P1100/P1560/P1600 Series Printer printer.
HP LaserJet Utility
Use the HP LaserJet Utility to set up product features that are not available in the printer driver.
You can use the HP LaserJet Utility when the product is connected with a universal serial bus (USB)
cable.
Open the HP LaserJet Utility
From the Printer menu, click Printer Utility, or
●
From the Print Queue, click the Utility icon.
●
HP LaserJet Utility features
The HP Printer Utility consists of pages that you open by clicking in the Configuration Settings list.
The following table describes the tasks that you can perform from these pages.
Table 1-6 HP Printer Utility features
Item Description
Print information Pages Allows you to print the following information pages.
Quiet Mode Enable or disable Quiet Mode (P1560/P1600 series only).
Auto-Off mode Auto-Off is an energy-saving feature of this product. After a user-specified time period, the
HTML Config... Open the EWS for the product (LJP1102w and P1600 series only).
Embedded Web Server
LJP1102w and P1600 series are equipped with the HP EWS, which provides access to information
about product and network activities.
Cleaning Page
●
Demo Page
●
Configuration Page
●
Supply Status Page
●
product automatically reduces its power consumption (Auto-Off). The product returns to
the ready state when a button is pressed or a print job is received. When the product is in
Auto-Off mode, all of the control-panel LEDs and the power button backlight LED are off.
Although the product lights are off in Auto-Off mode, the product will work normally when
it receives a print job.
Availability and localization
Download the printing-system software from the Web, or order it on a CD from HP fulfillment centers.
ENWW Printing-system software 17
Page 36

NOTE: This STR describes drivers that are included in the product firmware and are also shipped with
the printing-system software CD. This document does not describe any drivers that might be released
by support personnel.
Software component availability for Windows and Macintosh
●
Printing-system software on the Web
●
In-box printing-system software CD
●
Software component availability for Windows and Macintosh
The following table lists the availability of printing-system software components for Windows and
Macintosh computers.
Table 1-7 Software component availability
Component Windows Macintosh
HP Smart Install x
Mac Installer
Windows Print Driver x
Mac OS X V10.4 (or greater) Print Driver x
32–bit PCL5e UPD (link) x
64–bit PCL5e UPD (link) x
32 bit XPS (link) x
64–bit XPS (link) x
Print Dialog Extensions x
User Guide (CHM) x
User Guide (PDF) x
SW Install Notes x
HP LaserJet Help Navigation x
Web Registration (link) x
Supplies (link) x
Product Information (link) x
HP.com (link) x
x
CD Browser x
Printing-system software on the Web
All software that is contained in the product firmware and on the installation CD is also available on the
Web.
Web deployment is the preferred method for obtaining the latest software. The HP Web site offers an
option for automatic e-mail notification about new software releases. See the HP Proactive support link
on the Download Drivers and Software page.
18 Chapter 1 Purpose and scope ENWW
Page 37

The printing-system software is available for download at the following Web sites:
www.hp.com/support/ljp1100series
www.hp.com/support/ljp1560series or www.hp.com/go/ljp1600series
The PCL 5e Universal Print Driver (P1600 series only) is available for download at the following Web
site:
hp.com/go/upd
In-box printing-system software CD
One CD is included in-box with the product. The printing-system software CD contains the following
components:
Software installer
●
User guide
●
Install notes
●
Support information
●
Each CD has two partitions, one each for Windows and Macintosh computers.
The files in each partition of the printing-system software CD include documentation files and files that
are required to install and uninstall the printing-system software components.
Printing-system software CD
The root directory in the Windows partition of the printing-system software CD contains the HpSetup.exe
file, the setup.exe file, support files, and language specific directories.
To view the files, insert the printing-system software CD into the CD-ROM drive, right-click Start, click
Explore, and then select the CD-ROM drive.
CD Versions
The printing-system software CD is available in one version and contains the printing-system software
in all supported languages as follows:
CD – supported languages
AR = Arabic
●
BG = Bulgarian
●
CA = Catalan (Català)
●
CS = Czech (Cesky)
●
DA = Danish (Dansk)
●
DE = German (Deutsch)
●
EL = Greek
●
EN = English
●
ES = Spanish (Español)
●
ENWW Printing-system software 19
Page 38

ET = Estonian (Eesti)
●
FI = Finnish (Suomi)
●
FR = French (Français)
●
HE = Hebrew
●
HR = Croatian (Hrvatski)
●
HU = Hungarian (Magyar)
●
ID = Indonesia (Bahasa)
●
IT = Italian (Italiano)
●
KK = Kazakh
●
KO = Korean
●
LT = Lithuanian
●
LV = Latvian
●
NL = Dutch (Nederland)
●
NO = Norwegian (Norsk)
●
PL = Polish (Polski)
●
PT = Brazilian Portuguese (Português)
●
RO = Romanian
●
RU = Russian (Russ)
●
SK = Slovak
●
SL = Slovenian
●
SR = Serbian
●
SV = Swedish (Svenska)
●
TH = Thai
●
TR = Turkish (Turkçe)
●
UK = Ukranian
●
VI = Vietnamese
●
ZHCN = Simplified
●
ZHTW = Traditional Chinese
●
Table 1-8 Supported printing-system components (AR-ET)
Component AR BG CA CS DA DE EL EN ES ET
User CD x x x x x x x x x x
CD Browser xxxxxx xxxx
20 Chapter 1 Purpose and scope ENWW
Page 39

Table 1-8 Supported printing-system components (AR-ET) (continued)
Component AR BG CA CS DA DE EL EN ES ET
HP Smart Install x x x x x x x x x x
Mac Installer x x x x
Mac OS X PS Driver (PPD
and PDEs)
Install Notes – Windows
(HTML)
Printer Driver (Mac) x x x x
HP LaserJet Utility (Mac) x x x x
User Guide (CHM, PDF) x x x x x x x x x x
HP LaserJet Help
Navigation
Web Registration x x x x
x x x x x x x x x x
x x x x x x x x x x
x x x x
Table 1-9 Supported printing-system components (FI-LT)
Component FI FR HE HR HU ID IT KK KO LT
User CD x x x x x x x x x x
CD Browser x x x x x x x x x x
HP Smart Install x x x x x x x x x x
Mac Installer x x x x
Mac OS X PS Driver (PPD
and PDEs)
Install Notes – Windows
(HTML)
Printer Driver (Mac) x x x x
HP LaserJet Utility (Mac) x x x x
User Guide (CHM, PDF) x x x x x x x x x x
HP LaserJet Help
Navigation
Web Registration x x x
x x x x
x x x x x x x x x x
x x x x x x x x x x
Table 1-10 Supported printing-system components (LV-SL)
Component LV NL NO PL PT RO RU SK SL
User CD x x x x x x x x x
CD Browser x x x x x x x x x
HP Smart Install xxxxxxxx x
ENWW Printing-system software 21
Page 40

Table 1-10 Supported printing-system components (LV-SL) (continued)
Component LV NL NO PL PT RO RU SK SL
Mac Installer x x x
Mac OS X PS Driver (PPD
and PDEs)
Install Notes – Windows
(HTML)
Printer Driver (Mac) x x x
HP LaserJet Utility (Mac) x x x
User Guide (CHM, PDF) x x x x x x x x x
HP LaserJet Help Navigation x x x x x x x x x
Web Registration x x x x x
x x x x x x x x x
x x x
Table 1-11 Supported printing-system components (SR-ZHT)
Component SR SV TH TR UK VI ZHC ZHT
User CD x x x x x x x x
CD Browser x x x x x x x x
HP Smart Install x x x x x x x x
Mac Installer x x x
Mac OS X PS Driver (PPD and
PDEs)
Install Notes – Windows (HTML) x x x x x x x x
Printer Driver (Mac)
HP LaserJet Utility (Mac) x x x
User Guide (CHM, PDF) x x x x x x x x
HP LaserJet Help Navigation x x x x x x x x
Web Registration x x x x
x x x
x x x
22 Chapter 1 Purpose and scope ENWW
Page 41

Documentation
The printing-system software CD that is included with the product contains documentation.
Access to the documents depends on the document type and location as follows:
Some documents can be opened from the CD Browser.
●
Some documents appear on the CD and can only be opened by navigating to the folder where they
●
reside.
Some documents are available on the Web through links in the CD Browser or CD folders.
●
Documents are available in the following file formats:
Portable document format (.PDF)
●
Hypertext markup (.HTM). When you click a documentation link to an .HTM document, a Web
●
browser opens the file on the computer screen.
Microsoft Compiled HTML Help (.CHM)
●
ENWW Documentation 23
Page 42

Printing-system software CD
Main CD browser screen
●
User Documentation
●
Main CD browser screen
To view documentation and use links to HP support on the printing-system software CD, insert the CD
into the into the CD-ROM drive. The main screen of the CD Browser opens. Move the cursor over each
option to see a description of the option in the right panel.
Figure 1-10 Printing-system software CD – main browser screen
24 Chapter 1 Purpose and scope ENWW
Page 43

User Documentation
On the main screen of the printing-system software CD Browser, click View User Guide to open the
View User Guide screen. Move the cursor over each option to see a description of the option in the
right panel.
Figure 1-11 View User Guide screen
HP LaserJet Help Navigation
●
User Guide
●
More Information
●
HP LaserJet Help Navigation
General instructions
Click either the P1100 Series button or the P1560/P1600 Series button to open the HP LaserJet Help
Navigation application.
The HP LaserJet Help Navigation application provides links to the HP LaserJet Professional P1100/
P1560/P1600 Series Printer user guides, shortcuts to frequently used sections of the user guides, links
to support and supplies, and animated help for printer light patterns.
ENWW Documentation 25
Page 44

Click Browse User Guide to gain access to the product user guide.
If the product software is installed by a direct USB connection and not from the CD, the user guide
●
is not installed locally on your computer as part of the installation. Click the Open the latest version
on the web link to download and view the user guide from www.hp.com.
If the product software is installed from the CD, click Open the user guide on my computer to
●
open the locally installed version of the user guide. Click the Open the latest version on the
web link to download and view the user guide from www.hp.com.
NOTE: The product user guide is distributed in .CHM format only for Windows operating system
installations and .PDF format only for Mac OS X operating system installations.
HP LaserJet Help Navigation provides the following links to HP support sites.
Web support — the main support site for your product.
●
HP SureSupply — shop for and purchase genuine HP printing supplies
●
HP.com — HP's main Web site
●
HP LaserJet Help Navigation provides the following shortcut links to commonly used sections of the
user guide.
Product specifications
●
Replace the print cartridge
●
Clear a paper jam
●
Print on heavy paper
●
Get the IP address of a printer on a network
●
Click the Everyday Jobs button to gain quick access to the following sections of the user guide.
Paper and print media
●
Load paper trays
◦
Print tasks
●
Cancel a print job
◦
Open the printer driver
◦
Get help for any print option
◦
Select a page size
◦
Print on both sides (duplex)
◦
Print multiple pages per sheet
◦
Select page orientation
◦
Set paper and quality options
◦
Create a booklet
◦
Scale a document to fit page size
◦
26 Chapter 1 Purpose and scope ENWW
Page 45

Print on pre-printed letterhead or forms
◦
Print on special paper
◦
Print the first or last page on different paper
◦
Click the Manage & Maintain button to gain quick access to the following sections of the user guide.
Print information pages
●
Replace a print cartridge
●
Print a cleaning page
●
Change energy settings
●
Click the Solve a Problem button to gain quick access to the following sections of the user guide.
Clear paper jams
●
Reduce steam or vapor
●
Interpret printer light patterns
●
Solve image quality problems
●
Wireless troubleshooting
●
Control panel light patterns
Control panel light patterns communicate different product states.
HP LaserJet Professional P1100 Series Printer
Table 1-12 Status-light legend
Symbol for "light off"
Symbol for "light on"
Symbol for "light blinking"
Table 1-13 Control-panel light patterns
Light status State of the product Action
All lights are off. The product is in Auto-Off mode or is
turned off.
Press the power button to deactivate the
Auto-Off mode or to turn on the product.
ENWW Documentation 27
Page 46

Table 1-13 Control-panel light patterns (continued)
Light status State of the product Action
Status lights cycle The status lights cycle during the
formatter initialization period or when the
product is processing a cleaning page.
Ready light is on, and attention light is
off.
Ready light is blinking, and attention
light is off.
The product is in the ready state. No action is required. The product is
The product is receiving or processing
data.
No action is required. Wait for the
initialization period to end. The product
enters the ready state when the
initialization period is finished.
ready to receive a print job.
No action is required. The product is
receiving or processing a print job.
Attention light is blinking, and ready
light is off.
The product has experienced an error that
can be corrected at the product, such as
a jam, an open door, the absence of a
print cartridge, or the absence of paper in
the proper tray.
Inspect the product, determine the error,
and then correct the error. If the error is
the absence of paper in the proper tray or
the product is in a manual feed mode, put
the proper paper in the tray and follow the
on-screen instructions, or open and close
the print-cartridge door to resume
printing.
28 Chapter 1 Purpose and scope ENWW
Page 47

Table 1-13 Control-panel light patterns (continued)
Light status State of the product Action
Attention light is blinking, and ready
light is on.
The attention and ready lights are on. The product has experienced a fatal error
The wireless light is blinking. The product is attempting to locate a
The product has experienced a continual
error from which it can recover on its own.
from which it cannot recover.
wireless network.
If the recovery is successful, the product
continues to the processing data state
and completes the job.
If the recovery is unsuccessful, the
product continues to the continuable
error state. Try removing any paper from
the paper path and turning the product
power off, and then on again.
1. Turn off the product or disconnect
the power cord from the product.
2. Wait 30 seconds, and then turn on
the product or reconnect the power
cord to the product.
3. Wait for the product to initialize.
4. If the error persists, contact
customer support for more
information.
No action is required.
ENWW Documentation 29
Page 48

Table 1-13 Control-panel light patterns (continued)
Light status State of the product Action
The wireless light is on. The product is connected to a wireless
network.
The wireless light is off. The product is not connected to a
network, and the wireless unit in the
product might be turned off.
No action is required.
If the light is off, the product is not
connected to the network and the
wireless unit in the product might be off.
Press the wireless button to try
connecting to the network, or run the
Wireless Configuration utility to configure
the product. See the product user guide.
To verify that the product finds the
network, print a configuration page. The
product should have an IP address
assigned to it.
For information about connecting
wirelessly to a network, see the product
user guide.
If the product remains unable to connect
to the network, uninstall and then reinstall
the product. If the error persists, contact
a network administrator or see the user
manual of the wireless router or access
point.
HP LaserJet Professional P1560 Series Printer and HP LaserJet Professional P1600 Series Printer series
printers.
Table 1-14 Status-light legend
Symbol for “light off”
30 Chapter 1 Purpose and scope ENWW
Page 49

Table 1-14 Status-light legend (continued)
Symbol for “light on”
Symbol for “light blinking”
Table 1-15 Control-panel lights
Light status Light pattern State of the product Action
All lights are off
NOTE: The power button backlight
is off.
All lights are off
NOTE: The power button backlight
is on.
The product is in
Auto-Off mode or is
turned off.
The formatter is not
connected to the
product correctly.
Press the power
button to deactivate
the Auto-Off mode or
turn on the product
1. Turn off the
product.
2. Wait
30 seconds, and
then turn on the
product.
3. Wait for the
product to
initialize.
Contact HP customer
support.
ENWW Documentation 31
Page 50

Table 1-15 Control-panel lights (continued)
Light status Light pattern State of the product Action
Attention , ready , and go
lights cycle. Toner light is off.
NOTE: The power button backlight
is on.
All lights cycle.
NOTE: The power button backlight
is on.
The formatter is
initializing.
The product is
processing a cleaning
page.
No action required.
Wait for the
initialization period to
end. The product
enters the Ready
state when the
initialization period is
finished.
No action required.
Wait for the cleaning
process to end. The
product enters the
Ready state when the
cleaning process is
finished.
Ready light is on, and all other
lights are off.
NOTE: The power button backlight
is on.
Ready light is blinking, and all
other lights are off.
NOTE: The power button backlight
is on.
The product is in the
Ready state.
The product is
receiving or
processing data.
No action required.
The product is ready
to receive a print job.
No action required.
The product is
receiving or
processing a print
job.
To cancel the current
job, press the cancel
button
.
32 Chapter 1 Purpose and scope ENWW
Page 51

Table 1-15 Control-panel lights (continued)
Light status Light pattern State of the product Action
Attention light is blinking, and all
other lights are off.
NOTE: The power button backlight
is on.
Attention light is blinking, ready
light
is on, and other lights are off.
NOTE: The power button backlight
is on.
The product has
experienced an error
that can be corrected
at the product, such
as a jam, an open
door, or the absence
of paper in the proper
tray.
The product has
experienced a
continual error from
which it will recover
on its own.
Inspect the product,
determine the error,
and then correct the
error. If the error is
the absence of paper
in the proper tray or
the product is in a
manual feed mode,
put the proper paper
in the tray and follow
the onscreen
instructions, or open
and close the printcartridge door to
resume printing.
To recover from the
error and print the
available data, press
the go button
If the recovery is
successful, the
product continues to
the processing data
state and completes
the job.
If the recovery is
unsuccessful, the
product continues to
the continuable error
state. Try removing
any media from the
media path and
turning the product
power off, and then
on again.
.
The attention , ready , and go
lights are on. Toner light is off.
NOTE: The power button backlight
is on.
The product has
experienced a fatal
error from which it
cannot recover.
1. Turn off the
product.
2. Wait
30 seconds, and
then turn on the
product.
3. Wait for the
product to
initialize.
If the error persists,
contact HP customer
support.
ENWW Documentation 33
Page 52

Table 1-15 Control-panel lights (continued)
Light status Light pattern State of the product Action
The ready and toner lights are
on.
NOTE: The power button backlight
is on.
Toner light is blinking.
NOTE: The power button backlight
is on.
The print cartridge is
near the estimated
end of life.
The print cartridge
has been removed
from the product.
Order a new print
cartridge and have it
ready.
Reinsert the print
cartridge in the
product.
User Guide
The HP LaserJet Professional P1100/P1560/P1600 Series Printer User Guide describes basic product
features.
The user guide is available on the CD in .CHM format only for Windows and .PDF format only for Mac
OS X.
Open the .CHM version of the guide from the printing-system software CD Browser as follows:
1. On the main screen of the printing-system software CD Browser, click User Documentation.
2. Click User Guide (Interactive).
The guide opens as a Windows Help file (.CHM file). This readable, onscreen version of the guide is
provided in accordance with the Americans with Disabilities Act (ADA).
Open the .CHM file (Windows) from the printing-system software CD directory as follows:
1. Insert the printing-system software CD into the CD-ROM drive.
2. Navigate to the Language\<Manuals> folder.
3. Open the following file:
LJP1100_use_xxww.chm
NOTE: For information about which languages are supported, see Tables 8-11 in this chapter.
34 Chapter 1 Purpose and scope ENWW
Page 53

NOTE: The "xx" in the file name corresponds to the language. For French, the file name is
LJP1100_use_frww.CHM.
Open the .PDF file (Mac) from the printing-system software CD directory as follows:
1. Insert the printing-system software CD into the CD-ROM drive.
2. Double-click the Documentation folder.
3. Open either of the following files.
LJP1100_use_xxww.pdf or LJP1560-LJP1600_use_xxww.pdf
NOTE: For information about which languages are supported, see Tables 8-11 in this chapter.
NOTE: The "XX" in the file name corresponds to the language. For French, the file name is
LJP1100_use_frww.pdf.
4. When the file is open, click File, and then click Save As... to save a copy of the file to another
location.
More Information
Click More Information to view the printing system install notes and to access the product support Web
site.
Figure 1-12 More Information screen
ENWW Documentation 35
Page 54

Install Notes
The HP LaserJet Professional P1100/P1560/P1600 Series Printer Printing-System Install Notes (.HTM)
contains important information about device features, instructions for installing the printing-system
software, and technical assistance.
Open the install notes from the printing-system software CD Browser as follows:
1. On the main screen of the CD Browser, click More Information.
2. Click Install Notes.
Open the .HTM file directly:
1. Insert the printing-system software CD into the CD-ROM drive.
2. Navigate to the <language>\MANUALS folder.
3. Open the following file:
1100SeriesInstallNotes.htm
Product Support Website
Visit the product support Web site to gain quick access to online support pages, software updates, FAQs,
and more.
36 Chapter 1 Purpose and scope ENWW
Page 55

2 Software description
Windows printing-system software
●
Embedded Web Server
●
ENWW 37
Page 56

Windows printing-system software
Supported operating systems for Windows
●
Windows operating system requirements
●
Macintosh system requirements
●
Printer driver
●
Select the correct printer driver for Windows
●
Priority for print settings
●
Change printer-driver settings for Windows
●
Printing system and installer
●
Driver version numbers for Windows operating systems
●
Supported operating systems for Windows
The product supports the following Windows operating systems:
Windows XP (32-bit and 64-bit)
●
Windows Server 2003 (32-bit and 64-bit)
●
Windows Vista (32-bit and 64-bit)
●
Windows Server 2008 (32-bit and 64-bit)
●
Windows 7 (32-bit and 64-bit)
●
Windows operating system requirements
The HP printing-system software has the following minimum system requirements for the following
Windows operating systems:
Windows Vista (32-bit and 64-bit)
●
512 MB RAM
◦
350 MB HD free space
◦
CD-ROM drive
◦
USB
◦
Windows XP, Server 2003, Server 2008 (32-bit and 64-bit)
●
512 MB RAM
◦
350 MB HD free space
◦
38 Chapter 2 Software description ENWW
Page 57

CD-ROM drive
◦
USB
◦
Windows 7 (32-bit and 64-bit)
●
1 GB RAM
◦
350 MB HD free space
◦
CD-ROM drive
◦
USB
◦
Macintosh system requirements
The HP printing-system software has the following minimum system requirements for the Mac OS X
V10.4, V10.5, and V10.6.
256 MB RAM
●
150 MB HD free space
●
CD-ROM
●
USB
●
NOTE: PPC and Intel® Core Processor Macs are supported.
Printer driver
Printer drivers provide access to product features, such as printing on custom-sized paper, resizing
documents, and inserting watermarks.
NOTE: The most recent drivers are available at www.hp.com/support/ljp1100series and www.hp.com/
support/ljp1560series or www.hp.com/go/ljp1600series.
Select the correct printer driver for Windows
Printer drivers provide access to the product features and allow the computer to communicate with the
product (by using a printer language).
HP LaserJet Professional P1100/P1560/P1600 Series Printer Host-based print driver
The recommended print driver for most Windows applications. The Host-based driver is installed
●
by default and recommended for most users.
HP PCL 5e Universal Print Driver description (P1600 series models only)
Recommended for general office printing in Windows environments
●
Compatible with previous PCL versions and older HP LaserJet products
●
The best choice for printing from third-party or custom software programs
●
HP LaserJet Professional P1100/P1560/P1600 Series Printer XPS print driver
Recommended for capturing and printing screen output exactly as it is rendered on the screen.
●
ENWW Windows printing-system software 39
Page 58

Priority for print settings
Changes to print settings are prioritized depending on where the changes are made.
NOTE: The names of commands and dialog boxes might vary depending on your software program.
Page Setup dialog box: Click Page Setup or a similar command on the File menu of the program
●
you are working in to open this dialog box. Settings changed here override settings changed
anywhere else.
Print dialog box: Click Print, Print Setup, or a similar command on the File menu of the program
●
you are working in to open this dialog box. Settings changed in the Print dialog box have a lower
priority and do not override changes made in the Page Setup dialog box.
Printer Properties dialog box (printer driver): Click Properties in the Print dialog box to open
●
the printer driver. Settings changed in the Printer Properties dialog box do not override settings
anywhere else in the printing software.
Default printer driver settings: The default printer driver settings determine the settings used in
●
all print jobs, unless settings are changed in the Page Setup, Print or Printer Properties dialog
boxes.
Printer control-panel settings: Settings changed at the printer control panel have a lower priority
●
than changes made anywhere else.
Change printer-driver settings for Windows
Change the settings for all print jobs
until the software program is closed
1. On the File menu in the software
program, click Print.
2. Select the driver, and then click
Properties or Preferences.
The steps can vary; this procedure is
most common.
Change the default settings for all
print jobs
1. Windows Vista and Windows 7:
Click Start, click Control Panel,
and then in the category for
Hardware and Sound click
Printer.
-or-
Windows XP, Windows Server
2003, and Windows Server 2008
(using the default Start menu
view): Click Start, and then click
Printers and Faxes.
-or-
Windows XP, Windows Server
2003, and Windows Server 2008
(using the Classic Start menu
view): Click Start, click Settings,
and then click Printers.
2. Right-click the driver icon, and then
select Printing Preferences.
Change the product configuration
settings
1. Windows Vista and Windows 7:
Click Start, click Control Panel,
and then in the category for
Hardware and Sound click
Printer.
-or-
Windows XP, Windows Server
2003, and Windows Server 2008
(using the default Start menu
view): Click Start, and then click
Printers and Faxes.
-or-
Windows XP, Windows Server
2003, and Windows Server 2008
(using the Classic Start menu
view): Click Start, click Settings,
and then click Printers.
2. Right-click the driver icon, and then
select Properties.
3. Click the Device Settings tab.
40 Chapter 2 Software description ENWW
Page 59

Printing system and installer
The printing-system files and installers come in both the product firmware and on CD. The recommended
installation method for the printing-system files is via a direct USB connection between the product and
computer using HP Smart Install.
HP Smart Install
●
Printing-system software CD for Windows systems
●
HP Smart Install
The HP LaserJet Professional P1100/P1560/P1600 Series Printer products come with HP Smart Install
loaded in their firmware. HP Smart Install starts automatically when the product is connected to a
computer via USB. HP Smart Install install the Host-based print driver.
Figure 2-1 Welcome to HP Smart Install screen
NOTE: If HP Smart Install does not start automatically, AutoPlay might be disabled on your computer.
Browse My Computer and double-click the HP Smart Install CD drive. Double-click the SISetup.exe file
to run the program to install the product. If you cannot find the HP Smart Install CD drive, use the software
CD to install the product.
Printing-system software CD for Windows systems
The HP LaserJet Professional P1100/P1560/P1600 Series Printer products come with a printing-system
CD. The printing-system CD includes product drivers and related components but is not required for the
installation of drivers. The recommended driver installation is via direct USB connection to the product.
ENWW Windows printing-system software 41
Page 60

In supported Windows operating systems, insert the printing-system CD in the CD-ROM drive to open
an interactive CD Browser. Use the CD Browser to install the drivers and related components and to
gain access to online user documentation, a customization utility, and optional HP software.
Figure 2-2 Installation software CD Browser
If the screen does not appear when you insert the printing-system CD into the CD-ROM drive, follow
these steps to open the CD Browser:
1. Click Start.
2. Click Run.
3. Click Browse… and navigate to the root directory of the software CD.
4. Double-click the SETUP.EXE file to start the installer.
The main screen of the CD Browser contains installation and documentation options in the left panel.
Move the cursor over each option to see a description of the option in the right panel.
NOTE: The options available for each product might differ from those in the figure.
Install. Opens the CD installer. The CD installer installs the HP LaserJet Professional P1100/P1560/
P1600 Series Printer Host-based print driver, the recommended driver.
View User Guide. Provides access to the HP Laserjet Help Navigation application.
More Information. This option provides access to the Install Notes, and to the Product Support Website.
Click Back to return to the main CD Browser screen.
42 Chapter 2 Software description ENWW
Page 61

Driver version numbers for Windows operating systems
Access to driver version numbers varies, depending on the operating system in which the printing system
is installed.
NOTE: For a list of product drivers, updated HP printing-system software, and product-support
information, go to:
www.hp.com/support/ljp1100series
www.hp.com/support/ljp1560series or www.hp.com/go/ljp1600series
In supported Windows operating systems, follow these steps to find driver-version information:
1. Click Start, and then do one of the following:
Windows XP: Click Control Panel, and then double-click the Printers and Other Hardware icon.
-or-
Windows Server 2003 and Windows XP Professional: Select Settings, and then select Printers
and Faxes.
-or-
Windows Vista: Click Control Panel, click Hardware and Sound, and then click Printers.
-or-
Windows Server 2008: Click Start, click Control Panel, and then open the Printers folder.
-or-
Windows 7: Click Control Panel, and then click Devices and Printers.
2. Right-click the product driver icon.
3. Click Properties.
4. Click the About tab.
ENWW Windows printing-system software 43
Page 62

Embedded Web Server
LJP1102w and P1606 series are equipped with the HP Embedded Web Server (HP EWS), which
provides access to information about product and network activities. This information appears in a Web
browser, such as Microsoft Internet Explorer, Apple Safari, or Firefox.
The HP EWS resides on the product. It is not loaded on a network server.
The HP EWS provides an interface to the product that anyone who has a network-connected computer
and a standard Web browser can use. No special software is installed or configured, but you must have
a supported Web browser on the computer. To gain access to the HP EWS, type the IP address for the
product in the address line of the browser.
For a complete explanation of the features and functionality of the HP EWS, see the user guide for your
product.
44 Chapter 2 Software description ENWW
Page 63

3 Install Windows printing-system
components
The HP LaserJet Professional P1100/P1560/P1600 Series Printer comes with software and installers
for Microsoft Windows and Apple Macintosh systems. For information about Macintosh software, see
Macintosh software and utilities on page 235 This chapter provides procedures for installing and
uninstalling the HP LaserJet Professional P1100/P1560/P1600 Series Printer printing-system software
for Windows operating systems.
Supported operating systems for Windows
●
Windows operating system requirements
●
Install overview
●
Software installation types for Windows
●
Installation options
●
Microsoft Windows general installation overview
●
Detailed MS Windows installation instructions
●
Uninstall software
●
ENWW 45
Page 64

Supported operating systems for Windows
The HP LaserJet Professional P1100/P1560/P1600 Series Printer printer supports the following
Windows operating systems:
Windows XP (32-bit and 64-bit)
●
Windows Server 2003 (32-bit and 64-bit)
●
Windows Vista (32-bit and 64-bit)
●
Windows Server 2008 (32-bit and 64-bit)
●
Windows 7 (32-bit and 64-bit)
●
Windows operating system requirements
The HP printing-system software has the following minimum system requirements for the following
Windows operating systems:
Windows Vista (32-bit and 64-bit)
●
512 MB RAM
◦
350 MB HD free space
◦
CD-ROM drive
◦
USB
◦
Windows XP, Server 2003, Server 2008 (32-bit and 64-bit)
●
512 MB RAM
◦
350 MB HD free space
◦
CD-ROM drive
◦
USB
◦
Windows 7 (32-bit and 64-bit)
●
1 GB RAM
◦
350 MB HD free space
◦
CD-ROM drive
◦
USB
◦
Install overview
The software for the HP LaserJet Professional P1100/P1560/P1600 Series Printer product is available
from the product firmware or from the printing-system software CD. HP Smart Install installs the
HP LaserJet Professional P1100/P1560/P1600 Series Printer printing-system software from the
product firmware onto the hard disk and updates Windows files. HP Smart Install is the recommended
installation method.
46 Chapter 3 Install Windows printing-system components ENWW
Page 65

For all supported operating systems, each install option presents a series of screens that guide you
through the installation process.
Software installation types for Windows
The HP LaserJet Professional P1100/P1560/P1600 Series Printer printing-system software can be
installed in the following ways:
HP Smart Install: Recommended, included in the product firmware. HP Smart Install starts
●
automatically when the product is connected to a computer by USB. HP Smart Install can also be
started from the product's EWS for network capable products.
NOTE: If HP Smart Install does not start automatically, AutoPlay might be disabled on your
computer. Browse My Computer and double-click the HP Smart Install CD drive. Double-click the
SISetup.exe file to run the program to install the product. If you cannot find the HP Smart Install
CD drive, use the software CD to install the product.
CD install: Optional installation method.
●
Installation options
The HP LaserJet Professional P1100/P1560/P1600 Series Printer printing-system software can be
installed when the product is connected to the computer in the following configurations:
Directly connected via a USB port
●
Connected to a wireless network (P1102w)
●
Connected to a wired network (P1606dn)
●
ENWW Software installation types for Windows 47
Page 66

Microsoft Windows general installation overview
HP LaserJet Professional P1100/P1560/P1600 Series Printer printingsystem software for Windows systems
HP LaserJet Professional P1100/P1560/P1600 Series Printer printing-system software can be installed
either via a direct USB connection to the product or from the printing-system software CD
HP Smart Install
NOTE: This installation type is supported for Windows only.
The HP Smart Install allows you to install the product driver and software by connecting the product to
a computer through a USB cable.
NOTE: The installation CD is not required during a HP Smart Install. Do not insert the software
installation CD into the computer CD drive.
1. Turn the product on.
2. Connect the USB cable.
3. The HP Smart Install program should start automatically. Follow the onscreen instructions to install
the software.
If the HP Smart Install program does not start automatically, AutoPlay might be disabled on
●
the computer. Browse the computer and double-click the HP Smart Install drive to run the
program. If you cannot find the HP Smart Install drive, use the product installation CD to install
the software.
●
CD installation
In supported Windows environments (Windows 7, Windows Server 2003, Windows Server 2008,
Windows XP, and Windows Vista), insert the printing-system software CD in the CD-ROM drive to open
an interactive CD Browser. Use the CD Browser to install the drivers and related components, and to
gain access to online user documentation and optional HP software.
If the installation screen does not appear when you insert the printing-system software CD into the CDROM drive, follow these steps to open the CD Browser:
1. On the Start menu, click the Run option.
2. Type the following: X:\SETUP.EXE (where X is the letter of the CD-ROM drive).
3. Click the OK button.
The main screen of the software CD Browser contains installation and documentation options in the left
panel. Move the cursor over each option to see a description of the option in the right panel. The following
If the program prompts you to select a connection type, select the connection type you will
use to print to the product after installation.
48 Chapter 3 Install Windows printing-system components ENWW
Page 67

figure shows the main screen of the HP LaserJet Professional P1100/P1560/P1600 Series Printer
printing-system software CD.
Figure 3-1 CD Browser – Main screen
Click Install to start the CD installer. By default, the CD installer installs the HP LaserJet Professional
P1100/P1560/P1600 Series Printer Host-based print driver, the driver recommended for most users.
NOTE: For more information about HP LaserJet Professional P1100/P1560/P1600 Series Printer
printer drivers, see
HP Host-based print driver for Windows on page 199.
Install the print driver using the Microsoft Add Printer Wizard
NOTE: You can return to the previous screen by clicking the < Back button, or exit the Add Printer
Wizard by clicking the Cancel button.
Select one of the following three options to install the print driver using the Microsoft Add Printer Wizard:
Use an existing port for a direct connection: The product is connected to the computer using a
●
USB cable or is connected via the network without using a print server and the printer port already
exists.
ENWW Microsoft Windows general installation overview 49
Page 68

Follow these instructions to select the correct connection option:
1. On the Start menu, click the Settings option, and then perform one of the following:
Windows XP Home: Click the Printers and Other Hardware Devices option.
Windows XP Professional, Windows Server 2003, and Windows 2008: Click the Printers
and Faxes option.
Windows Vista: Under the Hardware and Sound category, click the Printer option.
Windows 7: Click the Devices and Printers option.
2. Click the Add a printer option. The Add Printer Wizard opens.
3. Click the Next button on the Add Printer Wizard welcome dialog box.
4. If the product is connected to the computer using a USB cable or is connected via the network
without using a print server, select the Local printer attached to this computer option, and
then click the Next > button.
NOTE: If you select the Automatically detect an install my Plug and Play printer check
box prior to clicking the Next > button, the computer will automatically install the print driver.
NOTE: If the product is connected via the network using a print server, select the A network
printer, or a printer attached to another computer option (Point and Print installation), and
then click the Next > button. For detailed installation instructions, see
Print server
connection on page 59.
Figure 3-2 Add Printer Wizard – Local or Network Printer screen
Create a new TCP/IP port for a direct connection: The product is connected via the network
●
without using a print server and the printer port does not exist.
Print server connection: The product is connected via the network using a print server.
●
50 Chapter 3 Install Windows printing-system components ENWW
Page 69

Use an existing port for a direct connection
Use these instructions when the product is connected to the computer using a USB cable or when
printing via the network without using a print server.
1. If the product is connected to the computer using a USB cable or is connected via the network
without using a print server and the printer port already exists, select the Use the following port
option, select the product name, print path, or IP address of the product from the Use the following
port drop-down list, and then click the Next > button.
NOTE: If the printer port does not appear in the Use the following port drop-down list, see
Create a new TCP/IP port for a direct connection on page 56. If the product is connected via the
network using a print server, see
Figure 3-3 Add Printer Wizard — Select a Printer Port screen
Print server connection on page 59.
ENWW Microsoft Windows general installation overview 51
Page 70

2. (Optional) Click the Windows Update button to display a list of drivers that can be downloaded
from the Microsoft Windows Update Web site.
If the appropriate model of HP LaserJet Professional P1100/P1560/P1600 Series Printer is already
listed, select it and click the Next > button. If the product is not listed, click the Have Disk button
to continue to the Install From Disk screen.
Figure 3-4 Add Printer Wizard — Install Printer Software screen
3. If the correct path to the CD-ROM drive is listed in the Copy manufacturer's files from text box,
click the OK button. If not, click the Browse button to continue to the Locate File screen.
Figure 3-5 Add Printer Wizard — Install from Disk screen
4. Navigate to your CD-ROM drive, and then select the .INF file for your product.
5. Click the OK button to continue to the Install Printer Software screen.
52 Chapter 3 Install Windows printing-system components ENWW
Page 71

6. Select the appropriate model of HP LaserJet Professional P1100/P1560/P1600 Series Printer from
the list and click the Next > button to continue to the Name Your Printer screen.
Figure 3-6 Add Printer Wizard — Install Printer Software, screen 2
ENWW Microsoft Windows general installation overview 53
Page 72

7. You can either type a name for the product in the Printer name text box or use the default name
provided.
Select the Yes option to use this printer as the default printer or select the No option to keep the
existing product as the default printer.
Click the Next > button to continue to the Printer Sharing screen.
Figure 3-7 Add Printer Wizard — Name Your Printer screen
54 Chapter 3 Install Windows printing-system components ENWW
Page 73

8. Select either the Do not share this printer option, or select the Share name: option and type
share name, and then click the Next > button to continue to the Print Test Page screen.
Figure 3-8 Add Printer Wizard — Printer Sharing screen
9. Select the Yes option if you want to print a test page after the software is installed. Select the No
option if you do not want to print a test page after the software is installed.
Click the Next > button to continue to the Completing the Add Printer Wizard screen.
Figure 3-9 Add Printer Wizard — Print Test Page screen
10. Review the installation details, and then click the Finish button to complete the Add Printer Wizard.
ENWW Microsoft Windows general installation overview 55
Page 74

Create a new TCP/IP port for a direct connection
Perform the following when the product is connected via the network without using a print server and a
printer port does not exist:
1. If the printer port does not appear in the Use the following port drop-down list, select the Create
a new port option.
If the Advanced TCP/IP Port Monitor option appears in the Type of port drop-down list,
●
select this option, and then click the Next button. The Welcome to the Add Standard TCP/
IP Printer Port Wizard dialog box appears.
If the Advanced TCP/IP Port Monitor option does not appear in the Type of port drop-down
●
list, select the Standard TCP/IP Port option from the Type of port drop-down list, and then
click the Next button. The Welcome to the Add Standard TCP/IP Printer Port Wizard dialog
box appears.
NOTE: If the printer port already appears in the Use the following port drop-down list, see Use
an existing port for a direct connection on page 51. If the product is connected via the network
using a print server, see
Print server connection on page 59.
Figure 3-10 Select a Printer Port screen
56 Chapter 3 Install Windows printing-system components ENWW
Page 75

2. Click the Next > button.
Figure 3-11 Add Advanced TCP/IP Printer Port screen
ENWW Microsoft Windows general installation overview 57
Page 76

3. Type the product's IP address or host name in the Printer Name or IP Address text box, and then
click the Next button.
NOTE: The default port name is the name that you typed in the Printer Name or IP Address
text box. You can change this name by typing a new name in the Port Name text box.
NOTE: The Always print to this device, even if its IP address changes check box is only
available if you select the Advanced TCP/IP Port Monitor option from the Select a Printer Port
dialog box. This feature allows the computer to communicate with the product using the MAC
address of the network card rather than the IP address.
Figure 3-12 Add Port screen
4. Review the installation details, and then click the Finish button to complete the Add Printer Wizard.
58 Chapter 3 Install Windows printing-system components ENWW
Page 77

Print server connection
Perform the following when the product is connected via the network using a print server:
1. If the product is connected via the network using a print server, select the A network printer, or
a printer attached to another computer option, and then click the Next > button.
NOTE: If the product is connected to the computer using a USB cable, or is connected via the
network without using a print server, select the Local printer attached to this computer option,
and then click the Next > button. You can also select the Automatically detect and install my
Plug and Play printer check box prior to clicking the Next > button to have the computer
automatically install the print driver. For detailed installation instructions, see either
port for a direct connection on page 51 or see Create a new TCP/IP port for a direct connection
on page 56.
Figure 3-13 Add Printer Wizard — Local or Network Printer screen
Use an existing
ENWW Microsoft Windows general installation overview 59
Page 78

2. Select either the Find a printer in the directory option, the Connect to this printer (or to browse
for a printer, select this option and click Next) option, or the Connect to a printer on the
Internet or on a home or office network option, and then click the Next > button.
Figure 3-14 Add Printer Wizard — Specify A Printer screen
If you select the Find a printer in the directory option and then click the Next > button, you will
continue to the Find Printers dialog box.
If you select the Connect to this printer (or to browse for a printer, select this option and click
Next) option and then click the Next > button, you will continue to the Browse for Printer dialog
box.
If you select the Connect to a printer on the Internet or on a home or office network option
and then click the Next > button, you will continue to the Completing the Add Printer Wizard
dialog box.
60 Chapter 3 Install Windows printing-system components ENWW
Page 79

Select one of the following options:
a. (Find a printer in the directory option only)
Specify search attributes to find your product on the network, and then click the Find Now
button to search the specified location for your product. Once the search has completed, select
the product, and then click the OK button to continue to the Default Printer dialog box.
Figure 3-15 Add Printer Wizard — Find Printers screen
Select either the Yes option to use this printer as the default printer, or select the No option
to keep the existing product as the default printer, and then click the Next > button to continue
to the Completing the Add Printer Wizard dialog box.
Figure 3-16 Add Printer Wizard — Default Printer screen
ENWW Microsoft Windows general installation overview 61
Page 80

b. (Connect to this printer (or to browse for a printer, select this option and click Next)
option only)
Specify the print path for the product and then click the Next > button. The computer will
search the network for shared products. Select the product from the list and then click the
Next > button to continue to the Completing the Add Printer Wizard dialog box.
Figure 3-17 Add Printer Wizard — Browse for Printer screen
c. (Connect to a printer on the Internet or on a home or office network option only)
Type the URL for the product, and then click the Next > button. Follow the onscreen
instructions to connect to the product, and then you will continue to the Completing the Add
Printer Wizard dialog box.
3. Review the installation details, and then click the Finish button to complete the Add Printer Wizard.
62 Chapter 3 Install Windows printing-system components ENWW
Page 81

Detailed MS Windows installation instructions
The dialog boxes shown here appear in the Windows XP Professional installation sequence. The order
and appearance of dialog boxes can vary among operating systems.
Install the Host-based driver using HP Smart Install
Install the print driver for USB and wired network connected products
●
Install the print driver for wireless connected network products
●
EWS Smart Install (network products)
●
NOTE: If HP Smart Install does not start automatically, AutoPlay might be disabled on your computer.
Browse My Computer and double-click the HP Smart Install CD drive. Double-click the SISetup.exe file
to run the program to install the product. If you cannot find the HP Smart Install CD drive, use the software
CD to install the product.
Install the print driver for USB and wired network connected products
1. Connect the product to the computer using a USB cable. The Welcome to HP Smart Install screen
appears. Select whether to accept, or review before accepting, the software End User License
Agreement, and the click the Install button.
Figure 3-18 Welcome to HP Smart Install screen
ENWW Detailed MS Windows installation instructions 63
Page 82

2. On the Printer Connections screen, select Configure to print over the Network or Configure
to print using USB. Click the Next button.
Figure 3-19 Printer Connections screen
For product installations configured to print over the network, follow these steps.
▲
i. Connect your product to the network if not already connected.
64 Chapter 3 Install Windows printing-system components ENWW
Page 83

ii. The Network Connection Successful screen appears. Disconnect the USB cable from
the product and then click the Next button.
Figure 3-20 Network Connect Successful screen
ENWW Detailed MS Windows installation instructions 65
Page 84

3. The Congratulations! Software installation complete screen appears. Click the Next button to
register your product and print a test page. Deselect Register your product or Print Test Page
to continue without registering your product or printing a test page.
Figure 3-21 Congratulations! Software installation complete
66 Chapter 3 Install Windows printing-system components ENWW
Page 85

4. The Links to additional software screen appears.
Figure 3-22 Links to additional software screen
Use the links on this screen to download any of the following software for your product.
HP Smart Web Printing
●
XPS driver
●
PCL5e driver (P1600 series models only)
●
5. Click the Finish button to complete the installation.
6. The HP LaserJet Help Navigation application appears after the installation is complete.
Install the print driver for wireless connected network products
Install the product on a secure wireless network
Automatic install
●
Advanced install
●
Automatic install
The Wireless Configuration Utility (WCU) guides the user through the setup process. The WCU will
attempt to automatically configure the wireless settings. The WCU will silently navigate the embedded
web server for the user's router/access point to obtain the wireless network configuration settings, using
the default username and password for the router/access point.
If the WCU cannot gain access to the user’s router/access point, it will guide the user through configuring
the printer via Wi-Fi Protected Setup (WPS) or manual configuration.
ENWW Detailed MS Windows installation instructions 67
Page 86

NOTE: Silent configuration of wireless settings is supported on the wireless router/access points listed
in
Supported routers for wireless products that support automatic configuration. on page 254
A series of dialog boxes appear during installation of the HP LaserJet Professional P1100/P1560/P1600
Series Printer printing-system software in Windows environments.
NOTE: You can return to the previous dialog box by clicking Back or exit the HP LaserJet Professional
P1100/P1560/P1600 Series Printer printing-system software installation by clicking Cancel wherever
these options appear in the installation sequence.
1. Connect the product to the computer using a USB cable. The Welcome to HP Smart Install screen
appears. Select whether to accept, or review before accepting, the software End User License
Agreement, and the click the Install button.
Figure 3-23 Welcome to HP Smart Install screen
68 Chapter 3 Install Windows printing-system components ENWW
Page 87

2. Select Configure to Print over the Wireless Network and then click the Next button.
Figure 3-24 Printer Connections screen
ENWW Detailed MS Windows installation instructions 69
Page 88

3. On the Wireless Discovery Method dialog, select the Automatic (Recommended) option and
then click the Next button.
Figure 3-25 Wireless Discovery Method screen
4. The installer attempts to locate a wireless router/access point on a wireless network that the product
is capable of accessing.
a. If the installer locates a single router/access point on the wireless network that the product is
capable of accessing, a Wireless Credentials screen appears. The appearance of this
screen will vary depending on the security mode configured on the wireless router/access
point. Continue to Step
5.
70 Chapter 3 Install Windows printing-system components ENWW
Page 89

b. If the installer locates more than one wireless router/access point on the wireless network that
the product is capable of accessing, the Networks Discovered screen appears. Select the
wireless router/access point (Network Name (SSID)) to connect to on the Networks
Discovered screen and then click the Next button to continue to Step
5.
Figure 3-26 Networks Discovered screen
ENWW Detailed MS Windows installation instructions 71
Page 90

c. If the installer cannot locate a wireless router/access point on the wireless network that the
product is capable of accessing, the following message appears. Click the OK button to
proceed. The installation mode automatically changes to the Advanced mode. See Step
4 of
Advanced install on page 81 to proceed.
Figure 3-27
d. If the installer locates one or more wireless router/access points, but cannot log in to them,
the installation mode automatically changes to Advanced mode. See Step
4 of Advanced
install on page 81 to proceed.
72 Chapter 3 Install Windows printing-system components ENWW
Page 91

5. The Wireless Credentials screen appears in the following forms depending on the security mode
configured on the wireless router/access point.
With the wireless credentials for the router/access point hidden.
●
Figure 3-28 Wireless Credentials screen with login details hidden
ENWW Detailed MS Windows installation instructions 73
Page 92

With WPA wireless credentials details displayed.
●
Figure 3-29 Wireless Credentials screen with WPA details displayed
74 Chapter 3 Install Windows printing-system components ENWW
Page 93

With WEP wireless credentials details displayed.
●
Figure 3-30 Wireless Credentials screen with WEP details displayed
ENWW Detailed MS Windows installation instructions 75
Page 94

With no security enabled on the router/access point.
●
Figure 3-31 Wireless Credentials screen with no security enabled on the router/access
point
6. Enter any credential information, if required, on the Wireless Credentials screen that appears for
your installation type and then click the Next button.
76 Chapter 3 Install Windows printing-system components ENWW
Page 95

7. If the connection is successful, the Network Connection Successful screen appears. Disconnect
the USB cable between the computer and the product and click the Next button to proceed to Step
8.
Figure 3-32 Network Connection Successful screen
ENWW Detailed MS Windows installation instructions 77
Page 96

If the connection is not successful, one of the following error message screens appears. Click the
Back button on either error message screen to return to one of the Wireless Credentials screens
listed in Step
If the product is connected on the network but cannot communicate with the computer, the
●
5 to configure the wireless credentials again.
following error message appears with the instructions to make sure the computer and the
product are on the same network.
Figure 3-33 Wireless Connection Failure screen
78 Chapter 3 Install Windows printing-system components ENWW
Page 97

If wireless credentials are used that the product cannot connect with, the following error
●
message appears.
Figure 3-34 Wireless Connection Failure screen
ENWW Detailed MS Windows installation instructions 79
Page 98

8. The Congratulations! Software installation complete screen appears upon successful
installation of the driver.
Figure 3-35 Software installation complete screen (part 1)
9. Select Register your product and Print Test Page, and then click the Next button. A Web browser
opens to the HP Product Registration page, and a test page prints at the product.
80 Chapter 3 Install Windows printing-system components ENWW
Page 99

10. The Congratulations! Software installation complete screen appears with links to download HP
Smart Web Printing and the XPS driver.
Figure 3-36 Software installation complete screen (part 2)
NOTE: For P1600 series models, the option to download the PCL5e driver appears on this
screen.
11. Click the Finish button.
12. The HP LaserJet Help Navigation application opens.
Advanced install
The Wireless Configuration Utility (WCU) guides the user through the setup process. The WCU will
attempt to automatically configure the wireless settings. The WCU will silently navigate the embedded
web server for the user's router/access point to obtain the wireless network configuration settings, using
the default username and password for the router/access point.
If the WCU cannot gain access to the user’s router/access point, it will guide the user through configuring
the printer via Wi-Fi Protected Setup (WPS) or manual configuration.
NOTE: Silent configuration of wireless settings is supported on the wireless routers listed in Supported
routers for wireless products that support automatic configuration. on page 254
A series of dialog boxes appear during installation of the HP LaserJet Professional P1100/P1560/P1600
Series Printer printing-system software in Windows environments.
ENWW Detailed MS Windows installation instructions 81
Page 100

NOTE: You can return to the previous dialog box by clicking Back or exit the HP LaserJet Professional
P1100/P1560/P1600 Series Printer printing-system software installation by clicking Cancel wherever
these options appear in the installation sequence.
1. Connect the product to the computer using a USB cable. The Welcome to HP Smart Install screen
appears. Select whether to accept, or review before accepting, the software End User License
Agreement, and the click the Install button.
Figure 3-37 Welcome to HP Smart Install screen
82 Chapter 3 Install Windows printing-system components ENWW
 Loading...