

Page 1

User’s Guide
CRT Monitor p1230
Document Part Number: 346682-001
October 2003
Page 2

© Copyright 2003 Hewlett-Packard Development Company, L.P.
The information contained herein is subject to change without notice.
Microsoft, MS-DOS, Windows, and Windows NT are trademarks of
Microsoft Corporation in the U.S. and other countries.
The only warranties for HP products and services are set forth in the
express warranty statements accompanying such products and services.
Nothing herein should be construed as constituting an additional warranty.
HP shall not be liable for technical or editorial errors or omissions
contained herein.
This document contains proprietary information that is protected by
copyright. No part of this document may be photocopied, reproduced, or
translated to another language without the prior written consent of
Hewlett-Packard Company.
WARNING: Text set off in this manner indicates that failure to
Å
follow directions could result in bodily harm or loss of life.
CAUTION: Text set off in this manner indicates that failure to follow
Ä
directions could result in damage to equipment or loss of information.
User’s Guide
CRT Monitor p1230
First Edition (October 2003)
Document Part Number: 346682-001
Page 3

Contents
1 Product Features
2 Safety and Maintenance Guidelines
Important Safety Information. . . . . . . . . . . . . . . . . . . . . . 2–1
Maintenance Guidelines. . . . . . . . . . . . . . . . . . . . . . . . . . 2–2
Cleaning the Monitor. . . . . . . . . . . . . . . . . . . . . . . . . 2–3
Shipping the Monitor. . . . . . . . . . . . . . . . . . . . . . . . . 2–3
3 Setting Up the Monitor
4 Operating the Monitor
Installing the Information Files . . . . . . . . . . . . . . . . . . . . 4–1
Front Panel Components . . . . . . . . . . . . . . . . . . . . . . . . . 4–2
Adjusting Monitor Settings . . . . . . . . . . . . . . . . . . . . . . . 4–3
Identifying Special OSD Messages . . . . . . . . . . . . . . . . . 4–7
A Troubleshooting
Solving Common Problems . . . . . . . . . . . . . . . . . . . . . . . A–1
Using the Worldwide Web. . . . . . . . . . . . . . . . . . . . . . . . A–4
Preparing to call Technical Support. . . . . . . . . . . . . . . . . A–4
B Specifications
CRT Monitor p1230. . . . . . . . . . . . . . . . . . . . . . . . . . . . . B–1
Recognizing Preset Display Resolutions. . . . . . . . . . B–2
Entering User Modes . . . . . . . . . . . . . . . . . . . . . . . . . B–4
User’s Guide iii
Page 4

Contents
Using the Energy Saver Feature . . . . . . . . . . . . . . . . B–4
C Agency Regulatory Notices
Federal Communications Commission Notice. . . . . . . . . C–1
Modifications. . . . . . . . . . . . . . . . . . . . . . . . . . . . . . . C–2
Cables . . . . . . . . . . . . . . . . . . . . . . . . . . . . . . . . . . . . C–2
Declaration of Conformity for Products
Marked with FCC Logo, United States Only. . . . . . . . . . C–2
Canadian Notice . . . . . . . . . . . . . . . . . . . . . . . . . . . . C–3
Avis Canadien . . . . . . . . . . . . . . . . . . . . . . . . . . . . . . C–3
European Notice . . . . . . . . . . . . . . . . . . . . . . . . . . . . C–3
Japanese Notice . . . . . . . . . . . . . . . . . . . . . . . . . . . . . C–4
Korean Notice . . . . . . . . . . . . . . . . . . . . . . . . . . . . . . C–4
EPA Energy Star Compliance . . . . . . . . . . . . . . . . . . C–4
Power Cord Set Requirements . . . . . . . . . . . . . . . . . . . . . C–5
HP Recycling Program . . . . . . . . . . . . . . . . . . . . . . . C–6
iv User’s Guide
Page 5

Product Features
The CRT monitor p1230 features include:
■ Large 20-inch (51 cm) viewable area display.
■ 1600 × 1200 or 1280 x 1024 @85 Hz are recommended
resolutions.
■ Flat aperture grille CRT delivers an unparalleled viewing
experience with a virtually flat image, eliminating distortion
and reducing glare so that what you see on-screen is what you
get on your printed output. The striped phosphor alignment of
the CRT delivers superior vertical definition with improved
brightness for a more uniform image.
■ Screen surface reduces reflection and glare and increases
contrast without sacrificing focus level, clarity or brightness.
Along with the flat square technology CRT, a high contrast
screen with 0.24 mm grille pitch delivers crisp, clean text and
graphics.
1
■ Dual dynamic beam focus provides precise, continuous focus
adjustments of the electron beams resulting in optimum
image quality, even to the far edges of the screen.
■ Color control system allows you to change between five color
settings on your display to match your personal preference.
■ Tilt and swivel base.
■ Multiple frequency technology automatically adjusts monitor
to the display card’s scanning frequency.
User’s Guide www.hp.com 1–1
Page 6

Product Features
■ Full scan capability allows you to use the entire screen area in
most resolutions, significantly expanding image size.
■ Corner purity control resulting from the monitor’s unique
design automatically eliminates picture impurities that may
result from stray magnetic fields and allows you to easily
adjust impurities in the four corners of your monitor.
■ Convergence control allows you to adjust the horizontal and
vertical convergence to ensure that the screen image is as
crisp and clear as possible.
■ Auto adjust automatically adjusts horizontal and vertical size
and position settings.
■ Constant brightness, when activated, calibrates the brightness
and screen color levels over the normal life of the monitor.
■ SB (super brightness) mode optimizes screen brightness for
different applications.
❏ Super Bright Mode OFF: for text based images (normal
use)
❏ Super Bright Mode-1 ON (Picture): for picture images.
❏ Super Bright Mode-2 ON (Movie): for moving images
such as DVD movies.
■ Dual VGA analog video input.
■ VGA analog signal cable included.
■ Plug and play capability if supported by your system.
■ On-Screen Display (OSD) adjustments in English, French,
German, Italian, Spanish, and Japanese for ease of set-up and
screen optimization; allows you to adjust all elements of your
screen image by simple to use on-screen menus.
■ Software and Reference Library CD includes an information
file (INF), Image Color Matching file (ICM), and product
documentation.
1–2 www.hp.com User’s Guide
Page 7

Product Features
■ Energy Saver feature for Energy Star compliance.
■ AssetControl
■ Compliant with the following regulated specifications:
❏ EPA ENERGY STAR
❏ European Union CE Directives
❏ Swedish MPR II 1990
❏ Swedish TCO ‘03 Requirements
User’s Guide www.hp.com 1–3
Page 8

Safety and Maintenance
Guidelines
Important Safety Information
A power cord is included with your monitor. If another cord is
used, use only a power source and connection appropriate for this
monitor. For information on the correct power cord set to use with
your monitor, refer to the “Power Cord Set Requirements” section
in Appendix C.
WARNING: To reduce the risk of electric shock or damage to your
Å
equipment, do not disable the power cord grounding feature. This
equipment is designed to be connected to a grounded (earthed)
power outlet that is easily accessible to the operator. The grounding
plug is an important safety feature.
WARNING: For your safety, be sure that the power outlet you plug
Å
the power cord into is easily accessible and located as close to the
equipment as possible. When you need to disconnect the power to
the equipment, unplug the power cord from the power outlet by
grasping the plug firmly. Never pull on the cord.
2
User’s Guide 2–1
Page 9

Safety and Maintenance Guidelines
CAUTION: For the protection of your monitor, as well as your
Ä
computer, connect all power cords for your computer and its
peripheral devices (such as a monitor, printer, scanner) to some form
of surge protection device such as a power strip or Uninterruptible
Power Supply (UPS). Not all power strips provide surge protection;
the power strips must be specifically labeled as having this ability.
Use a power strip whose manufacturer offers a Damage Replacement
Policy so you can replace your equipment if surge protection fails.
Maintenance Guidelines
To enhance the performance and extend the life of your monitor:
■ Do not open your monitor cabinet or attempt to service this
product yourself. Adjust only those controls that are covered
in the operating instructions. If your monitor is not operating
properly or has been dropped or damaged, contact your HP
authorized dealer, reseller, or service provider.
■ Use only a power source and connection appropriate for this
monitor, as indicated on the label/back plate of the monitor.
■ Be sure the total ampere rating of the products connected to
the outlet does not exceed the current rating of the electrical
outlet, and the total ampere rating of the products connected
to the cord does not exceed the rating of the cord. Look on the
power label to determine the ampere rating (AMPS or A) for
each device.
■ Install your monitor near an outlet that you can easily reach.
Disconnect the monitor by grasping the plug firmly and
pulling it from the outlet. Never disconnect the monitor by
pulling the cord.
■ Turn your monitor off when not in use. You can substantially
increase the life expectancy of your monitor by using a screen
saver program and turning off the monitor when not in use.
2–2 User’s Guide
Page 10

■ Unplug your monitor from the wall outlet before cleaning.
Do not use liquid cleaners or aerosol cleaners. Use a damp
cloth for cleaning. If the screen requires additional cleaning,
use an antistatic screen cleaner.
■ Slots and openings in the cabinet are provided for ventilation.
These openings must not be blocked or covered. Never push
objects of any kind into cabinet slots or other openings.
■ Do not drop your monitor or place it on an unstable surface.
■ Do not allow anything to rest on the power cord. Do not walk
on the cord.
■ Keep your monitor in a well-ventilated area, away from
excessive light, heat or moisture.
Cleaning the Monitor
To clean the monitor, follow these steps:
1. Turn off the monitor and the computer.
2. Dust the monitor by wiping the screen and the cabinet with a
soft, clean cloth.
Safety and Maintenance Guidelines
If the screen requires additional cleaning, use a clean, damp cloth.
CAUTION: Do not use alcohol, benzene, thinner, ammonia, or any
Ä
other volatile substances to clean your monitor or the screen. These
chemicals may damage the cabinet finish as well as the screen.
Shipping the Monitor
Keep the original packing box in a storage area. You may need it
later if you move or ship your monitor.
User’s Guide 2–3
Page 11
3
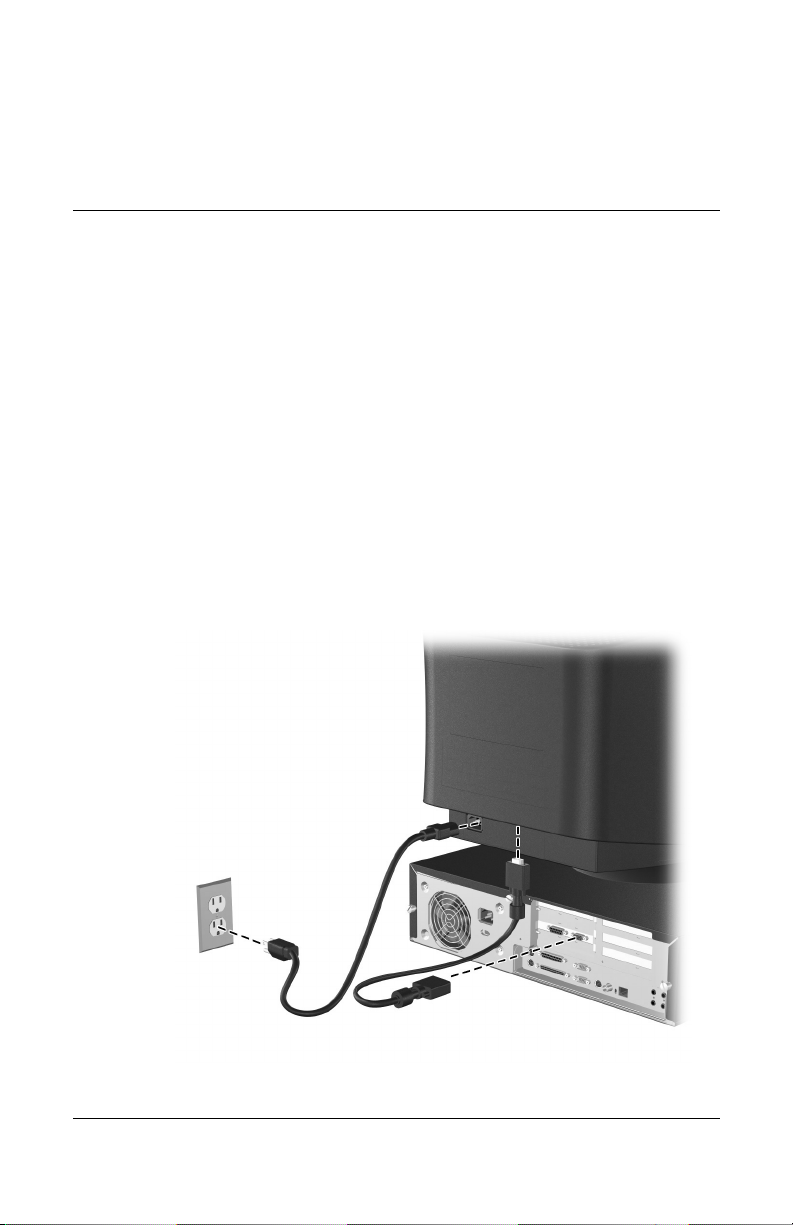
Setting Up the Monitor
To set up the monitor, ensure that the power is turned off to the
monitor, computer system, and other attached devices, then
follow these steps:
1. Place the monitor in a convenient, well-ventilated location
near your computer.
2. Connect one end of the monitor signal cable to the video
connector on the rear panel of the computer, and the other end
to either video input connector on the back of the monitor.
3. Connect the power cable to the back of the monitor, and the
other end of the power cable to an electrical wall outlet.
User’s Guide www.hp.com 3–1
Page 12

Setting Up the Monitor
CAUTION: To reduce the risk of electric shock or damage to your
equipment: Do not disable the power cord grounding plug. The
grounding plug is an important safety feature.
Plug the power cord into a grounded (earthed) electrical outlet that is
easily accessible at all times.
Disconnect power from the monitor by unplugging the power cord
from the electrical outlet.
Do not place anything on power cords or cables. Arrange them so
that no one may accidentally step on or trip over them. Do not pull on
a cord or cable. When unplugging from the electrical outlet, grasp
the cord by the plug.
WARNING: Burn-in image damage may occur on monitors that
Å
display the same static image on screen for a prolonged period of
time. To avoid burn-in image damage on your monitor screen, you
should always activate a screen saver application or turn off the
monitor when it is not in use for a prolonged period of time.
3–2 www.hp.com User’s Guide
Page 13

Operating the Monitor
Installing the Information Files
The instructions in the following section are for Microsoft
✎
Windows based operating systems.
The CD-ROM included with this monitor contains two
information files to be installed onto your computer; an .INF file
and an .ICM file.
■ The .INF file defines monitor resources and provides
specifications used by most operating systems to install
support software for certain hardware devices. The .INF file
ensures monitor compatibility and optimization with your
computer’s graphics adapter. INF files are also downloadable
by clicking on:
desired monitor.
http://www.hp.com/support and selecting the
4
■ The .ICM file provides color matching consistency from
monitor screen to printer and is activated from within
graphics programs that have this feature.
To install these files on your computer, insert the Software and
Reference Library CD in your computer CD-ROM drive. When
the CD menu launches, select “Install INF and ICM Files” and
follow the on-screen instructions.
User’s Guide www.hp.com 4–1
Page 14

Operating the Monitor
Front Panel Components
No. Icon Control Function
1 EXIT
menu
2 Left/right
3 Adjustment
4–2 www.hp.com User’s Guide
EXIT/menu
button
controls
buttons
Exits the OSD menu
Launches the On-Screen Display
(OSD) menu when the OSD is
turned off.
Moves the highlighted OSD item
left or right to select one of the
sub-menu items
When the OSD menu is off, it can
function as a Hot key for
Brightness
Decreases or increases OSD
adjustments
When the OSD menu is off, it can
function as a Hot key for Image
Contrast
Page 15

Operating the Monitor
No. Icon Control Function
4 SELECT
sb mode
5 RESET
input 1
<>2
*The first time this key is pressed, the current SB mode is indicated. If the key is
selected within 3 seconds, the monitor will change to the next SB mode.
SuperBright Opens OSD sub-menu
When the OSD is off, acts as the
SuperBright (SB) function key.*
Resets all the controls within the
highlighted menu to the factory
setting. When RESET is pressed in
the main and sub-menu, a
warning window will appear
allowing you to select the reset
function.
When the OSD menu is off, it
functions as a Hot key for signal
input connector.
Adjusting Monitor Settings
Press the exit/menu button on the front panel of the monitor to
view the On Screen Display (OSD) Menu. The main menu
window is displayed and you can make adjustments to your
monitor’s various features. Use the left, right, up, and down arrow
keys to make your adjustments within the menu.
User’s Guide www.hp.com 4–3
Page 16

Operating the Monitor
The following table shows the menus and their functions at each
level:
Menu Level 1 Menu Level 2 Menu Level 3
OSD Menu Levels
Brightness/
Brightness
Contrast
Contrast
Degauss
Constant Brightness
Size and Position Auto Adjust
Left/Right
Down/Up
Narrow/Wide
Short/Tall
4–4 www.hp.com User’s Guide
Page 17

Operating the Monitor
OSD Menu Levels
Menu Level 1 Menu Level 2 Menu Level 3
Color Control System 1 - 9300 K Color temperature
Red, Green, Blue
2 - 8300 K Color temperature
Red, Green, Blue
3 - 7500 K Color temperature
Red, Green, Blue
sRGB (6500 K)
5 - 5000 K Color temperature
Red, Green, Blue
Geometry Controls In/Out (pincushion)
Left/Right (pincushion
balance)
Tilt (parallelogram)
Align (trapezoidal)
Rotate (raster
rotation)
Top Corner
Correction
Top Balance
Bottom Corner
Correction
Bottom Balance
Tools Moire Canceler
Convergence
Horizontal
Convergence Vertical
Convergence Vertical
Top
User’s Guide www.hp.com 4–5
Page 18

Operating the Monitor
Menu Level 1 Menu Level 2 Menu Level 3
Tools 2 Language English
OSD Menu Levels
Convergence Vertical
Bottom
Linearity Vertical
Linearity Vertical
Balance
Corner Purity (Top
Left)
Corner Purity (Top
Right)
Corner Purity (Bottom
Left)
Corner Purity (Bottom
Right)
Purity (Left/Right)
German
French
Spanish
Italian
Japanese
OSD Position
OSD Turn Off
OSD Lock Out
Off Mode
Clamp Pulse Position
Control
Hot Key
4–6 www.hp.com User’s Guide
Page 19

Operating the Monitor
OSD Menu Levels
Menu Level 1 Menu Level 2 Menu Level 3
Factory Preset
Information Display Mode
Monitor Info
Identifying Special OSD Messages
Special OSD messages appear on the monitor screen when
identifying the following monitor conditions:
■ Attention, Signal Frequency is out of range—indicates the
monitor is unable to display the current input signal
resolution.
■ Power Save—Indicates the screen display is entering a sleep
mode.
User’s Guide www.hp.com 4–7
Page 20

Troubleshooting
Solving Common Problems
The following table lists possible problems, the possible cause of
each problem, and the recommended solutions.
Problem Possible Cause Solution
No picture.
Power switch is turned
off.
Turn on the power.
A
Video cable is
improperly connected.
Bent pins on the signal
connector.
Display card is loose in
slot.
Image is scrolling or
unstable.
LED on monitor is not
lit.
Picture is fuzzy or
color looks blotchy.
User’s Guide A–1
Signal cable is loose. Reconnect the signal cable.
Power switch is turned
off.
Moire Canceler,
Brightness, Contrast,
Degauss, or Corner
Purity controls are set
incorrectly.
Connect the video cable
properly. Refer to Chapter 3,
Setting Up the Monitor, for
more information.
Check connector for bent or
pushed-in pins.
Re-seat the display card.
Turn on the power.
Access the All Reset (Factory
Preset) through OSD controls
and activate it to restore
factory presets.
Page 21

Troubleshooting
Problem Possible Cause Solution
If picture is fuzzy, adjust the
Moire Canceler control.
If color is blotchy, adjust the
Brightness, Contrast, or
Corner Purity controls.
Use the Clamp Pulse Position
control to change modes.
Access the Degauss control
through OSD controls and
activate it.
To achieve optimal
✎
degauss, a
minimum interval of
20 minutes should
elapse before the
Degauss Control is
used a second time.
Picture bounces or a
wavy pattern is
present in the
picture.
Electrical interference. Move electrical devices that
may be causing electrical
interference away from the
monitor.
A–2 User’s Guide
Page 22

Problem Possible Cause Solution
Troubleshooting
Edges of the display
image are not
square.
Thin horizontal lines
appear on your
screen.
Black vertical lines
are visible on the
screen.
Geometry settings are
not adjusted correctly.
Thin horizontal lines are
normal for an aperture
grille CRT and are not a
malfunction. These are
shadows from the
damper wires used to
stabilize the aperture
grille and are most
noticeable when the
screen’s background is
light (usually white).
Grille element overlap
occurred during
shipping.
Use the OSD Geometry
Controls to straighten the
edges.
If possible, position the front
of the monitor facing east.
No action needed.
Position an open white
window over the affected
area of the screen and
maximize the brightness and
contrast controls for a few
minutes. Readjust the
brightness and contrast
controls back to the normal
viewing level after this
procedure.
User’s Guide A–3
Page 23

Troubleshooting
Using the Worldwide Web
Before contacting customer services, refer to the support Web site
http://www.hp.com/support
at:
Preparing to call Technical Support
If you cannot solve a problem using the troubleshooting tips in
this section, you may need to call technical support. Have the
following information available when you call:
■ The monitor
■ Monitor model number (on front and back panel)
■ Serial number for the monitor (on back panel)
■ Purchase date on invoice
■ Conditions under which the problem occurred
■ Error messages received
■ Hardware configuration (found on Windows Control Panel)
■ Hardware and software you are using
A–4 User’s Guide
Page 24

CRT Monitor p1230
Display
Type
Viewable Image Size 20-inch diagonal 51 cm
Specifications
22 inches
Aperture Grille CRT
55 cm
B
Maximum Weight
(Unpacked)
Dimensions
(includes pedestal)
Height
Depth
Width
Maximum Graphics
Resolution
Recommended Text Modes 1600 x 1200 or
Stripe Pitch 0.24 mm
Horizontal Frequency 30 to 140 kHz
Vertical Refresh Rate 50 to 160 Hz
Environmental Requirements
Temperature
Operating Temperature
Non-operating Temperature
66.1 lbs. 30 kg
19.1 inches
18.8 inches
19.5 inches
2048 x 1536 (85 Hz)
1280 x 1024 at 85 Hz
41 to 90
-4 to +140
o
F
o
F
48.6 mm
47. 7 mm
49.5 mm
o
5 to 35
-20 to +60
C
o
C
User’s Guide B–1
Page 25

Specifications
CRT Monitor p1230
Relative Humidity
Operating
Non-Operating
Altitude (Operating) Up to 7,200 ft./2,195 meters
Power Source 100-120/220-240 VAC, 50/60 Hz
Power Consumption <135 watts
Dual Video Input Terminals 15-pin D-type connector
Color Display Values
CIE* Chromaticity Coordinates (Typical)
Red 0.627 0.341
Blue 0.149 0.072
Green 0.292 0.605
White Chromaticity (6500
K)
(9300 K)
10 to 90%
10 to 90%
0.313
0.283
0.329
0.297
Gamma: 2.2
* Commission International d’Eclairage, 1931 Standard.
Recognizing Preset Display Resolutions
The display resolutions listed below are the most commonly used
modes and are set as factory defaults. This monitor automatically
recognizes these preset modes and they will appear properly sized
and centered on the screen.
B–2 User’s Guide
Page 26

Specifications
Factory Preset Display Modes
Horz
Pixel
Preset
1* 640 x 480 31.5 60.0 25.2 VGA
2 640 x 480 43.3 85.0 36.0 VESA
3* 720 x 400 31.5 70.0 28.3 VGA
4 800 x 600 46.9 75.0 49.5 VESA
5* 800 x 600 53.7 85.0 56.3 VESA
6 1024 x 768 60.0 75.0 65.0 VESA
7* 1024.768 68.7 85.0 94.5 VESA
8 1152 x 870 68.7 75 MAC 100.0 MAC
9 1280 x 1024 64.0 60.0 108.0 VESA
10* 1280 x 1024 80.0 75.0 135.0 VESA
11* 1280 x 1024 91.2 85.0 157.5 VESA
12* 1600 x 1200 93.8 75.0 202.5 VESA
Format
Freq
(kHz)
Vert
Freq
(Hz)
Video
Clock
(MHz) Notes
13*
Primary
14 1792 x 1344 83.6 60.0 204.8 VESA
15* 1792 x 1344 106.3 75.0 261.0 VESA
16 1920 x 1440 90.0 60.0 234.0 VESA
17* 1920 x 1440 112.5 75.0 297.0 VESA
18 2048 x 1536 137.0 85.0 388.0 GTF
* Indicates pre-set timing mode
User’s Guide B–3
1600 x 1200 106.3 85.0 229.5 VESA
Page 27

Specifications
Entering User Modes
The video controller signal may occasionally call for a mode that
is not preset if:
■ You are not using a Hewlett Packard standard graphics
adapter.
■ You are not using a preset mode.
If this occurs, you may need to readjust the parameters of the
monitor screen by using the on-screen display. Your changes can
be made to any or all of these modes and saved in memory. The
monitor automatically stores the new setting, then recognizes the
new mode just as it does a preset mode. In addition to the 10
factory preset modes, there are 15 user modes that can be entered
and stored.
Using the Energy Saver Feature
When the monitor is in its normal operating mode, the monitor
uses approximately 135 watts of power and the Power light is
green.
The monitor also supports a reduced power state. The reduced
power state will be entered into if the monitor detects the absence
of either the horizontal sync signal and/or the vertical sync signal.
Upon detecting the absence of these signals, the monitor screen is
blanked, the backlight is turned off, and the Power light is turned
amber. When the monitor is in the reduced power state, the
monitor utilizes less than 2 watts of power and the Power light is
amber. There is a brief warm up period before the monitor will
return to its normal operating mode. When the monitor is in the
off mode, it utilizes less than 0.2 watts of power and the Power
light is unlit.
Refer to your computer manual for instructions on setting energy
saver features (sometimes called power management features).
B–4 User’s Guide
Page 28

The above energy saver feature only works when connected to
✎
computers that have energy saver features.
By selecting settings in the Microsoft Windows Energy Saver
utility, you can also program the monitor to enter into the reduced
power state at a predetermined time. When the monitor’s Energy
Saver utility causes the monitor to enter the reduced power state,
the Power light illuminates amber.
Specifications
User’s Guide B–5
Page 29

C
Agency Regulatory Notices
Federal Communications Commission Notice
This equipment has been tested and found to comply with the
limits for a Class B digital device, pursuant to Part 15 of the FCC
Rules. These limits are designed to provide reasonable protection
against harmful interference in a residential installation. This
equipment generates, uses, and can radiate radio frequency
energy and, if not installed and used in accordance with the
instructions, may cause harmful interference to radio
communications. However, there is no guarantee that interference
will not occur in a particular installation. If this equipment does
cause harmful interference to radio or television reception, which
can be determined by turning the equipment off and on, the user
is encouraged to try to correct the interference by one or more of
the following measures:
■ Reorient or relocate the receiving antenna.
■ Increase the separation between the equipment and the
receiver.
■ Connect the equipment into an outlet on a circuit different
from that to which the receiver is connected.
■ Consult the dealer or an experienced radio or television
technician for help.
User’s Guide C–1
Page 30

Agency Regulatory Notices
Modifications
The FCC requires the user to be notified that any changes or
modifications made to this device that are not expressly approved
by Hewlett Packard may void the user's authority to operate the
equipment.
Cables
Connections to this device must be made with shielded cables
with metallic RFI/EMI connector hoods to maintain compliance
with FCC Rules and Regulations.
Declaration of Conformity for Products Marked with FCC Logo, United States Only
This device complies with Part 15 of the FCC Rules. Operation is
subject to the following two conditions: (1) this device may not
cause harmful interference, and (2) this device must accept any
interference received, including interference that may cause
undesired operation.
For questions regarding your product, contact:
Hewlett Packard
P. O. Box 692000, Mail Stop 530113
Houston, Texas 77269-2000
Or, call - 1-800- 652-6672 (1-800-OK COMPAQ)
For questions regarding this FCC declaration, contact:
Hewlett Packard
P. O. Box 692000, Mail Stop 510101
Houston, Texas 77269-2000
Or, call - (281) 514-3333
C–2 User’s Guide
Page 31

To identify this product, refer to the Part, Series, or Model
number found on the product.
Canadian Notice
This Class B digital apparatus meets all requirements of the
Canadian Interference-Causing Equipment Regulations.
Avis Canadien
Cet appareil numérique de la classe B respecte toutes les
exigences du Règlement sur le matériel brouilleur du Canada.
European Notice
Products with the CE Marking comply with both the EMC
Directive (89/336/EEC) and the Low Voltage Directive
(73/23/EEC) issued by the Commission of the European
Community.
Compliance with these directives implies conformity to the
following European Norms (in brackets are the equivalent
international standards):
Agency Regulatory Notices
■ EN55022 (CISPR 22) - Electromagnetic Interference
■ EN55024 (IEC61000-4-2,3,4,5,6,8,11) - Electromagnetic
Immunity
■ EN61000-3-2 (IEC61000-3-2) – Power Line Harmonics
■ EN61000-3-3 (IEC61000-3-3) – Power Line Flicker
■ EN60950 (IEC950) - Product Safety
User’s Guide C–3
Page 32

Agency Regulatory Notices
Japanese Notice
Korean Notice
EPA Energy Star Compliance
Monitors that are marked with the Energy Star Logo meet the
requirements of the EPA Energy Star program. As an Energy Star
Partner, Hewlett Packard has determined that this product meets
the Energy Star guidelines for energy efficiency. Specific details
on using the Energy Saving features can be found in the energy
saver or power management section of the computer manual.
C–4 User’s Guide
Page 33

Agency Regulatory Notices
Power Cord Set Requirements
The monitor power supply is provided with Automatic Line
Switching (ALS). This feature allows the monitor to operate on
input voltages between 100-120V or 200-240V.
The power cord set (flexible cord or wall plug) received with the
monitor meets the requirements for use in the country where you
purchased the equipment.
If you need to obtain a power cord for a different country, you
should purchase a power cord that is approved for use in that
country.
The power cord must be rated for the product and for the voltage
and current marked on the product's electrical ratings label. The
voltage and current rating of the cord should be greater than the
voltage and current rating marked on the product. In addition, the
cross-sectional area of the wire must be a minimum of 0.75 mm²
or 18AWG, and the length of the cord must be between 6 feet
(1.8 m) and 12 feet (3.6 m). If you have questions about the type
of power cord to use, contact your HP authorized service
provider.
A power cord should be routed so that it is not likely to be walked
on or pinched by items placed upon it or against it. Particular
attention should be paid to the plug, electrical outlet, and the
point where the cord exits from the product.
User’s Guide C–5
Page 34

Agency Regulatory Notices
HP Recycling Program
HP offers product end-of-life return programs for HP and other
manufacturers’ hardware in several geographic areas.
The terms and availability of these programs vary by geography
because of differences in regulatory requirements and local
customer demand. For information on the HP recycling program,
refer to the HP Web site at:
http://www.hp.com/hpinfo/globalcitizenship/environment/
recycle/hardware.html.
C–6 User’s Guide
 Loading...