

Page 1
Please complete the following for future reference.
HP OfficeJet R Series:
Serial Number:
Date of Purchase:
Place of Purchase:
Address:
Phone Number:
Service Contract Number:
Date of Contract Expiration:
Adobe PhotoDeluxe Business Edition Serial Number:
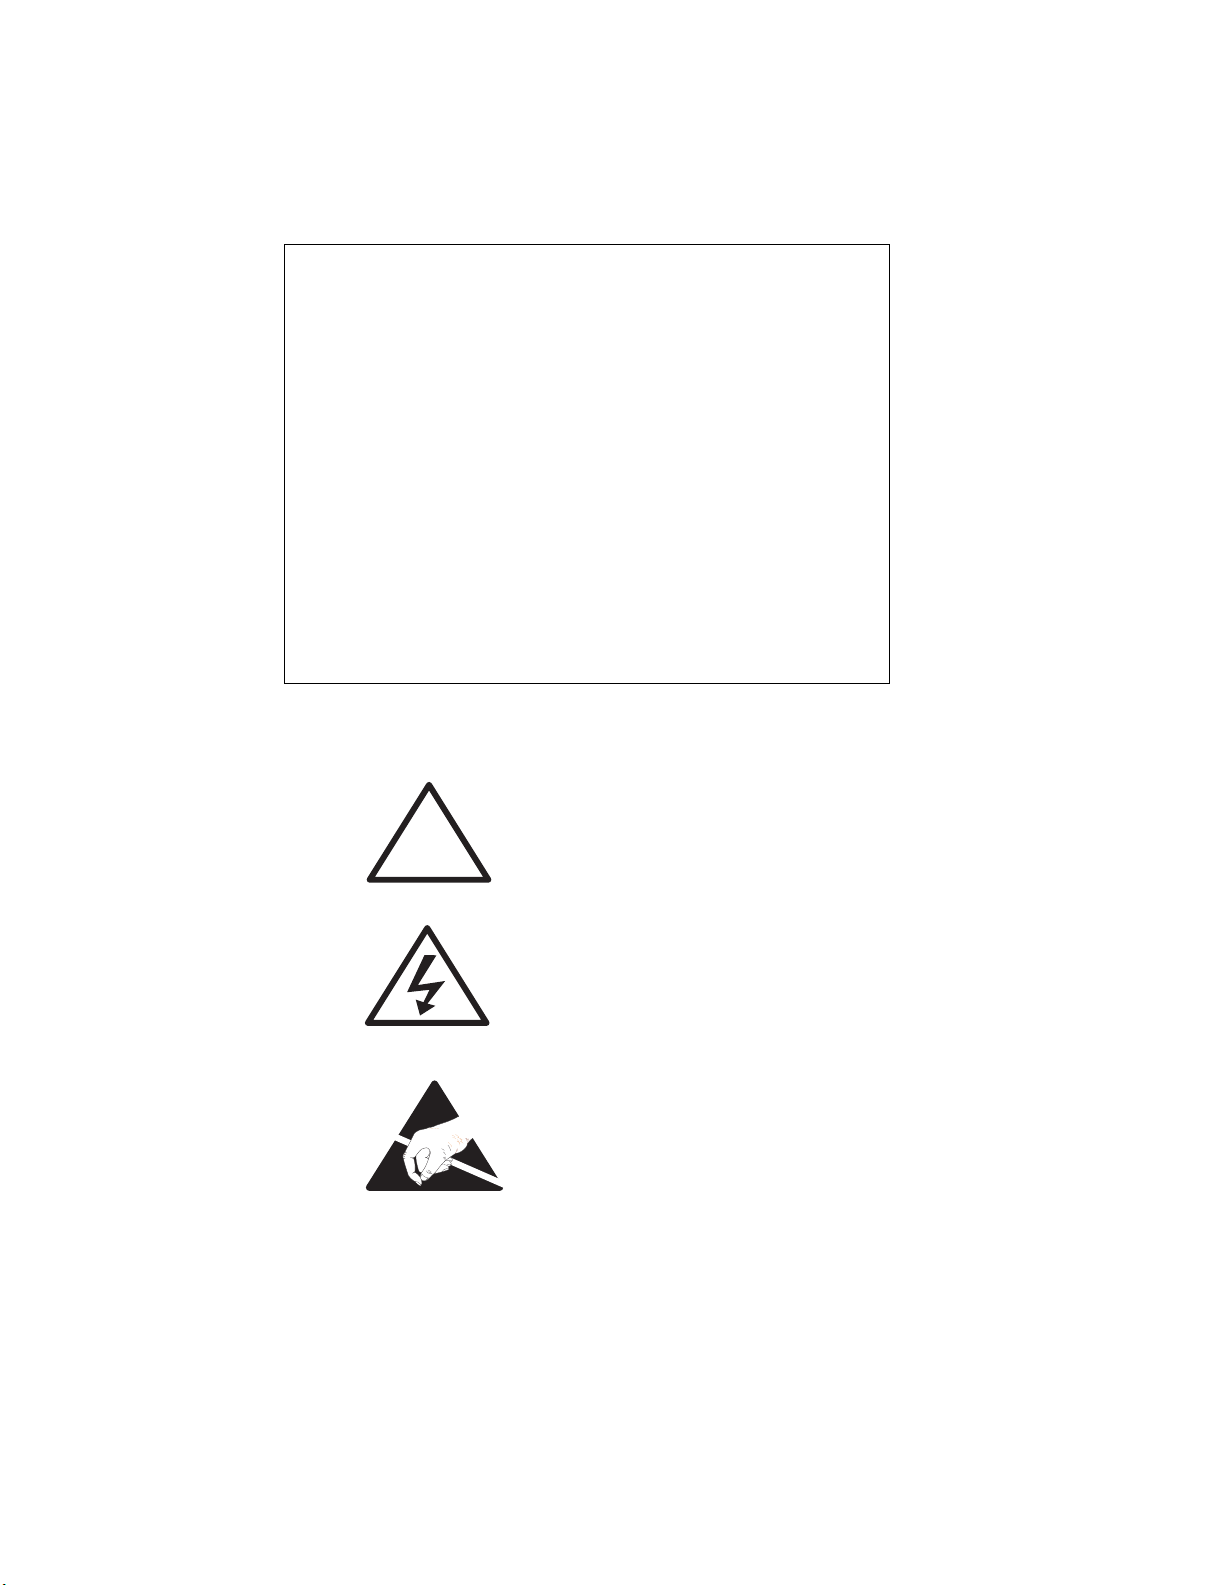
Safety Symbols
Owner’s Information
If present, this symbol is placed on the
HP OfficeJet where it is necessary for
you to refer to the manual to
understand a hazard.
!
If present, this symbol is placed on the
HP OfficeJet within the area where
hazardous voltage is present. Only
trained service persons should perform
work in this area.
If present, this symbol is placed on the
HP OfficeJet within the area where
electrostatic discharge (ESD) may
occur. ESD can damage the
HP OfficeJet’s electronic components.
Avoid touching electronic components
or circuit paths. Use proper grounding
devices when circuits are open to
outside areas.
Page 2

HP OfficeJet R80 Setup Guide and
Faxing Operation
HP OfficeJet R Series
Page 3

©Copyright Hewlett-Packard Company 1999
g
y
guag
y
y
g
y
j
g
g
j
y
y
y
g
g
g
g
g
g
g
g
g
g
All ri
hts are reserved. No part of the
document ma
or translated to another lan
be photocopied, reproduced,
e without the
prior written consent of Hewlett-Packard
Compan
.
Publication number: C6680-90177
First edition: March 1999
Printed in U.S.A., German
, or Singapore
Acknowledgments
AGaramond, Garamond, Adobe™ and
Adobe PhotoDeluxe Business Edition are
re
istered trademarks of Adobe Systems,
Incorporated, which ma
certain
urisdictions.
be registered in
MS-DOS®, Windows®, and Internet
Explorer are re
istered trademarks of
Microsoft Corporation.
Intel® and Pentium® are re
istered
trademarks of Intel Corporation.
Notice
The information contained in this document
ect to change without notice and
is sub
should not be construed as a commitment b
the Hewlett-Packard Compan
.
Hewlett-Packard assumes no
responsibility for any errors that may
appear in this document, nor does it
make expressed or implied warranty
of any kind with regard to this
material, including, but not limited to,
the implied warranties of
merchantability and fitness for a
particular purpose.
Compan
consequential dama
arisin
use of this document and the pro
material which it describes.
shall not be liable for incidental or
out of the furnishing, performance, or
The Hewlett-Packard
es in connection with, or
ram
Note
: Regulatory information can be found in
Chapter 3 of this
uide and Chapter 6 of the
OfficeJet R Series Customer Care Guide
It is not lawful in many places to make copies
of the followin
with a le
◆
Governmental paper or documents:
- Passports
- Immi
- Selective service papers
- Identification bad
◆
Governmental stamps:
-Posta
- Food stamps
◆
Checks or drafts drawn on Governmental
encies
a
◆
Paper currency, traveler’s checks, or money
orders
◆
Certificates of deposit
◆
Copyrighted works
items. When in doubt, check
al representative first.
ration papers
es, cards, or insignias
e stamps
HP
.
Page 4

contents
HP OfficeJet R80 Setup Guide and Faxing Operation
iii
About This Guide . . . . . . . . . . . . . . . . . . . . . . . . . . . . . . . . . . . . . . . . . . . . . . . . . . . . . . . . . . . . v
Conventions Used . . . . . . . . . . . . . . . . . . . . . . . . . . . . . . . . . . . . . . . . . . . . . . . . . . . . . . . v
Chapter 1 — Setting Up Your New HP OfficeJet R Series
Determining Your Computer’s Parallel Port Mode . . . . . . . . . . . . . . . . . . . . . . . . . . . . . . . . 1-1
Setting Up Your HP OfficeJet . . . . . . . . . . . . . . . . . . . . . . . . . . . . . . . . . . . . . . . . . . . . . . . . 1-2
Step 1 — Unpack Your HP OfficeJet . . . . . . . . . . . . . . . . . . . . . . . . . . . . . . . . . . . . . . . . . . 1-2
Step 2 — Attach the Front-Panel Overlay . . . . . . . . . . . . . . . . . . . . . . . . . . . . . . . . . . . . . . . 1-4
Step 3 — Load Paper in Your HP OfficeJet . . . . . . . . . . . . . . . . . . . . . . . . . . . . . . . . . . . . . 1-5
Step 4 — Install Print Cartridges . . . . . . . . . . . . . . . . . . . . . . . . . . . . . . . . . . . . . . . . . . . . . . 1-6
Step 5 — Connect the Printer Cable and Power Cord . . . . . . . . . . . . . . . . . . . . . . . . . . . . . . 1-9
Connecting the Printer Cable . . . . . . . . . . . . . . . . . . . . . . . . . . . . . . . . . . . . . . . . . . . . . 1-9
Connecting the Power Cord . . . . . . . . . . . . . . . . . . . . . . . . . . . . . . . . . . . . . . . . . . . . . . 1-9
Step 6 — Install the HP OfficeJet Software . . . . . . . . . . . . . . . . . . . . . . . . . . . . . . . . . . . . 1-11
Installing the HP OfficeJet R Series Software . . . . . . . . . . . . . . . . . . . . . . . . . . . . . . . 1-12
Registering Your HP OfficeJet . . . . . . . . . . . . . . . . . . . . . . . . . . . . . . . . . . . . . . . . . . 1-15
Installing Third-Party Programs . . . . . . . . . . . . . . . . . . . . . . . . . . . . . . . . . . . . . . . . . 1-16
Step 7 — Align Your Print Cartridges . . . . . . . . . . . . . . . . . . . . . . . . . . . . . . . . . . . . . . . . . 1-16
Step 8 — Set Up for Faxing . . . . . . . . . . . . . . . . . . . . . . . . . . . . . . . . . . . . . . . . . . . . . . . . . 1-17
Installing Adobe PhotoDeluxe Business Edition . . . . . . . . . . . . . . . . . . . . . . . . . 1-16
Changing the Front-Panel Language . . . . . . . . . . . . . . . . . . . . . . . . . . . . . . . . . . . . . . 1-17
Reviewing the Fax Panel . . . . . . . . . . . . . . . . . . . . . . . . . . . . . . . . . . . . . . . . . . . . . . . 1-17
Checking the Line Connector . . . . . . . . . . . . . . . . . . . . . . . . . . . . . . . . . . . . . . . . . . . 1-18
Connecting Your Office Equipment . . . . . . . . . . . . . . . . . . . . . . . . . . . . . . . . . . . . . . 1-18
Are you using the same phone line to receive voice and fax calls? . . . . . . . . . . . 1-18
Do you have distinctive ringing? . . . . . . . . . . . . . . . . . . . . . . . . . . . . . . . . . . . . . 1-19
Do you have an answering machine or other
device that takes messages for you when you cannot answer the phone? . . . . . . 1-20
Do you use voice mail from the phone company? . . . . . . . . . . . . . . . . . . . . . . . . 1-20
Is your answering machine or PC modem
located in the same room as your HP OfficeJet? . . . . . . . . . . . . . . . . . . . . . . . . . 1-21
My answering machine or PC modem is not
available for connection through my HP OfficeJet. . . . . . . . . . . . . . . . . . . . . . . 1-22
Setting Your Basic Fax Settings . . . . . . . . . . . . . . . . . . . . . . . . . . . . . . . . . . . . . . . . . 1-22
Setting the Date and Time . . . . . . . . . . . . . . . . . . . . . . . . . . . . . . . . . . . . . . . . . . 1-22
Setting the Fax Header . . . . . . . . . . . . . . . . . . . . . . . . . . . . . . . . . . . . . . . . . . . . . 1-23
Setting the Dial Mode . . . . . . . . . . . . . . . . . . . . . . . . . . . . . . . . . . . . . . . . . . . . . 1-24
Setting the Rings to Answer Setting . . . . . . . . . . . . . . . . . . . . . . . . . . . . . . . . . . 1-24
Testing Your Fax Features . . . . . . . . . . . . . . . . . . . . . . . . . . . . . . . . . . . . . . . . . . . . . . 1-24
Chapter 2 — Using the Fax and Legal-Size Copy Features
Sending Faxes . . . . . . . . . . . . . . . . . . . . . . . . . . . . . . . . . . . . . . . . . . . . . . . . . . . . . . . . . . . . 2-1
Processing Letter-Size Originals Exclusively . . . . . . . . . . . . . . . . . . . . . . . . . . . . . . . . 2-2
Processing Legal-Size or Legal- and Letter-Size Originals . . . . . . . . . . . . . . . . . . . . . . 2-3
Sending a Fax to One Number or Speed Dial . . . . . . . . . . . . . . . . . . . . . . . . . . . . . . . . 2-4
Broadcasting a Fax to One Group or Ten Numbers . . . . . . . . . . . . . . . . . . . . . . . . . . . 2-4
Sending a Fax Later Using Scheduled Send . . . . . . . . . . . . . . . . . . . . . . . . . . . . . . . . . 2-5
Cancelling a Scheduled-Send Fax . . . . . . . . . . . . . . . . . . . . . . . . . . . . . . . . . . . . . 2-5
Page 5

iv Contents
Receiving Faxes . . . . . . . . . . . . . . . . . . . . . . . . . . . . . . . . . . . . . . . . . . . . . . . . . . . . . . . . . . . 2-5
Setting Automatic Reduction . . . . . . . . . . . . . . . . . . . . . . . . . . . . . . . . . . . . . . . . . . . . . 2-6
Using Fax-Back Features . . . . . . . . . . . . . . . . . . . . . . . . . . . . . . . . . . . . . . . . . . . . . . . . 2-6
Controlling How Faxes Look When Sent to a Recipient . . . . . . . . . . . . . . . . . . . . . . . . . . . . 2-6
Changing Resolution . . . . . . . . . . . . . . . . . . . . . . . . . . . . . . . . . . . . . . . . . . . . . . . . . . . 2-6
Changing Contrast . . . . . . . . . . . . . . . . . . . . . . . . . . . . . . . . . . . . . . . . . . . . . . . . . . . . . 2-7
Using the Advanced Send Settings . . . . . . . . . . . . . . . . . . . . . . . . . . . . . . . . . . . . . . . . . . . . 2-7
Faxing an Image from the Glass . . . . . . . . . . . . . . . . . . . . . . . . . . . . . . . . . . . . . . . . . . 2-7
Using Off-Hook Dialing to Use a Credit or Calling Card . . . . . . . . . . . . . . . . . . . . . . . 2-7
Redialing a Busy Number Automatically . . . . . . . . . . . . . . . . . . . . . . . . . . . . . . . . . . . 2-8
Redialing an Unanswered Number Automatically . . . . . . . . . . . . . . . . . . . . . . . . . . . . 2-8
Setting Up Speed Dialing . . . . . . . . . . . . . . . . . . . . . . . . . . . . . . . . . . . . . . . . . . . . . . . 2-8
Creating Individual Speed-Dial Settings . . . . . . . . . . . . . . . . . . . . . . . . . . . . . . . . 2-9
Creating Group Speed-Dial Settings . . . . . . . . . . . . . . . . . . . . . . . . . . . . . . . . . . . 2-9
Editing Existing Groups . . . . . . . . . . . . . . . . . . . . . . . . . . . . . . . . . . . . . . . . . . . . 2-10
Deleting Speed-Dial Settings . . . . . . . . . . . . . . . . . . . . . . . . . . . . . . . . . . . . . . . . 2-10
Using Error Correction Mode (ECM) . . . . . . . . . . . . . . . . . . . . . . . . . . . . . . . . . . . . . 2-11
Using the Advanced Receive Settings . . . . . . . . . . . . . . . . . . . . . . . . . . . . . . . . . . . . . . . . . 2-11
Enabling Silent Detection . . . . . . . . . . . . . . . . . . . . . . . . . . . . . . . . . . . . . . . . . . . . . . 2-11
Using Remote Reception . . . . . . . . . . . . . . . . . . . . . . . . . . . . . . . . . . . . . . . . . . . . . . . 2-12
Using Backup Receive . . . . . . . . . . . . . . . . . . . . . . . . . . . . . . . . . . . . . . . . . . . . . . . . . 2-12
Printing Fax Reports . . . . . . . . . . . . . . . . . . . . . . . . . . . . . . . . . . . . . . . . . . . . . . . . . . . . . . 2-12
Generating Automated Reports . . . . . . . . . . . . . . . . . . . . . . . . . . . . . . . . . . . . . . . . . . 2-12
Generating Manual Reports . . . . . . . . . . . . . . . . . . . . . . . . . . . . . . . . . . . . . . . . . . . . . 2-13
Adjusting Sound Volumes . . . . . . . . . . . . . . . . . . . . . . . . . . . . . . . . . . . . . . . . . . . . . . . . . . 2-13
Entering Text . . . . . . . . . . . . . . . . . . . . . . . . . . . . . . . . . . . . . . . . . . . . . . . . . . . . . . . . . . . . 2-14
Returning the Fax Settings to the Default Factory Settings . . . . . . . . . . . . . . . . . . . . . . . . . 2-14
Using the Copy Features for Legal-Size Paper . . . . . . . . . . . . . . . . . . . . . . . . . . . . . . . . . . 2-15
Copying Legal-Size Originals . . . . . . . . . . . . . . . . . . . . . . . . . . . . . . . . . . . . . . . . . . . 2-15
Changing the Paper Size . . . . . . . . . . . . . . . . . . . . . . . . . . . . . . . . . . . . . . . . . . . . . . . 2-15
Chapter 3 — Fax Customer-Care Information
Fax-Specific Troubleshooting . . . . . . . . . . . . . . . . . . . . . . . . . . . . . . . . . . . . . . . . . . . . . . . . 3-1
Cleaning the ADF Document-Lid Backing . . . . . . . . . . . . . . . . . . . . . . . . . . . . . . . . . . 3-1
A Blank Page Came Out or Output is Faded . . . . . . . . . . . . . . . . . . . . . . . . . . . . . . . . . 3-2
Fax-Specific Front-Panel Messages . . . . . . . . . . . . . . . . . . . . . . . . . . . . . . . . . . . . . . . 3-2
Other Fax-Specific Information . . . . . . . . . . . . . . . . . . . . . . . . . . . . . . . . . . . . . . . . . . . . . . . 3-4
Faxing Specifications . . . . . . . . . . . . . . . . . . . . . . . . . . . . . . . . . . . . . . . . . . . . . . . . . . . 3-4
Fax Resolution . . . . . . . . . . . . . . . . . . . . . . . . . . . . . . . . . . . . . . . . . . . . . . . . . . . . . . . . 3-5
Copy Margins . . . . . . . . . . . . . . . . . . . . . . . . . . . . . . . . . . . . . . . . . . . . . . . . . . . . . . . . 3-5
Regulatory Information . . . . . . . . . . . . . . . . . . . . . . . . . . . . . . . . . . . . . . . . . . . . . . . . . . . . . 3-5
Notice to Users of the U.S. Telephone Network: FCC Requirements . . . . . . . . . . . . . 3-5
Electromagnetic or Radio Frequency Interference: FCC Requirements . . . . . . . . . . . . 3-6
Declaration of Conformity . . . . . . . . . . . . . . . . . . . . . . . . . . . . . . . . . . . . . . . . . . . . . . . . . . . 3-6
Manufacturer’s Declaration for Class B Certified PC Peripherals . . . . . . . . . . . . . . . . 3-6
Chapter 4 — Sharing HP OfficeJet on a Network
Understanding Point-and-Print and Peer-to-Peer Networks . . . . . . . . . . . . . . . . . . . . . . . . . 4-1
Local Area Network (LAN) Access . . . . . . . . . . . . . . . . . . . . . . . . . . . . . . . . . . . . . . . 4-1
Minimum System Requirements . . . . . . . . . . . . . . . . . . . . . . . . . . . . . . . . . . . . . . . . . . 4-1
Setting Up the Server . . . . . . . . . . . . . . . . . . . . . . . . . . . . . . . . . . . . . . . . . . . . . . . . . . . . . . . 4-2
Setting Up a Point-and-Print Client . . . . . . . . . . . . . . . . . . . . . . . . . . . . . . . . . . . . . . . . . . . . 4-3
Setting Up a Peer-to-Peer Client (95/98 server to NT 4.0 client) . . . . . . . . . . . . . . . . . . . . . 4-3
Page 6

HP OfficeJet R80 Setup Guide and Faxing Operation
v
About This Guide
This guide will help you get started and show you how to perform the most
y
g
y
y
y
Conventions Used
y
y
y
y
g
y
y
y
IMPORTANT
NOTE
y
TIP
y
jury
y
common tasks with
versions within the HP OfficeJet R Series product line, some of the
information provided and
product that
ou need additional information, use the HP OfficeJet R Series Toolbox on
If
our desktop. For late-breaking updates, visit our Web site at:
http://www.hp.com/go/all-in-one
Throughout this guide, we use specific conventions to help you quickly
identif
information:
our HP OfficeJet. Because it supports several product
raphics shown may or may not apply to the
ou purchased.
boldface Bold t
CAUTION
WARNING
command
This label calls attention to an operating procedure,
practice, or the like, which, if not correctl
performed or adhered to, could result in dama
destruction of part or all of the product or
Do not proceed be
full
conditions.
This label identifies significant information.
This label identifies information you should know
before
This label precedes helpful hints.
This label calls attention to a procedure, practice, or
the like, which, if not correctl
to, could result in personal in
ond a Warning label until you fully understand
be
and have met the indicated conditions.
peface identifies a specific button name or
ou need to enter.
e to or
our data.
ond a Caution label until you
understand and have met the indicated
ou continue.
performed or adhered
. Do not proceed
Page 7

vi
Page 8

HP OfficeJet R80 Setup Guide and Faxing Operation
1-1
Setting Up Your New
HP OfficeJet R Series
1
Determining Your Computer’s Parallel Port Mode
g
NOTE
HP recommends using ECP mode if your computer has this capability.
g
g
y
g
g
y
g
Before you start, review the following important information about your
computer’s parallel port mode. After that, do the steps in the order listed.
To scan using your HP OfficeJet, you must set your computer’s parallel port
to one of the followin
modes:
ECP (Extended Capabilities Port)
Bi-Directional
Most computers have a setup, CMOS, hardware configuration, or other
screen that can be accessed durin
computer’s current settin
If
ou need more information about changing parallel port mode in your
computer, see the user
refer to the Read about ECP document located on the HP OfficeJet R Series
CD-ROM or in the HP OfficeJet R Series pro
after
ou install your software.
s, including parallel port mode.
uide that came with your computer. You can also
Available in recently manufactured
computers. This mode ensures the fastest
scannin
Allows communication between your
computer and the HP OfficeJet. Scanning
is slower than with ECP mode.
the boot process. This screen shows your
speed.
ram folder, which is available
Page 9

1-2
Setting Up Your New HP OfficeJet R Series
Setting Up Your HP OfficeJet
Follow the steps in the order shown.
IMPORTANT
Do not turn on your HP OfficeJet until you are instructed to do so
.
Step 1 —
Unpack Your HP OfficeJet
1
2
3
a
b
c
d
e
f
g
h
i
y
y
Remove the cardboard tray containing the accessory items.
Rest the box on its side, and pull out your HP OfficeJet.
Verify that the following items are included with your HP OfficeJet:
Fax/phone line connector (attached to the back of the HP OfficeJet)
Legal-size paper-tray extension
Bi-directional parallel, IEEE 1284-compliant printer cable with
1284-C connector
Power supply (AC/DC adapter) with attached cord
(HP part number 0950-2880)
Power cord
Front-panel overlay with text on it
One black and one color print cartridge
CD-ROM disks
Three manuals: HP OfficeJet R80 Setup Guide and Faxing
Operation (this guide), HP OfficeJet R Series Basic Operations
Guide, and HP OfficeJet R Series Customer Care Guide
In addition to the above items, a sticker with the HP Web site address is
included. Put this sticker some place where
ou need support services.
ou can quickly refer to it if
Page 10

HP OfficeJet R80 Setup Guide and Faxing Operation
1-3
If any of the items are missing or damaged, contact the dealer from whom
y
4
y
g
g
y
g
ou purchased your HP OfficeJet.
a
1
2
4
3
Menu
5
7
Speed Dial
6
8
#
0
b
FAX
9
ABC
1
DEF
Redial/
Answer Mode
2
Pause
GHI
3
*
4
JKL
Stop
MNO
Copy
5
PQRS
6
TUV
7
Start
WXYZ
8
Symbols
9
*
Space
0
#
c
d
e
f
h
i
Choose a location and environment for your HP OfficeJet.
Use your HP OfficeJet only within normal office temperature and
◆
humidit
Specifications” in Chapter 6 of the HP OfficeJet R Series Customer
Care Guide.
Avoid direct sunlight or locations where a quick change in
◆
temperature mi
Make sure the location is well ventilated. Dust, gases, or fumes
◆
(such as ammonia or paint thinner) can dama
Choose a site that is level, flat, and stable. The HP OfficeJet vibrates
◆
and needs to be on a sturd
Be sure a grounded outlet is nearby and easily accessible.
◆
Make sure that you can open the lid all the way by placing your
◆
HP OfficeJet at least 9 inches (230 mm) from the wall.
ranges. For recommended ranges, see “Environmental
ht cause condensation inside the unit.
e the unit.
surface.
Page 11

1-4
Setting Up Your New HP OfficeJet R Series
5
Remove the packaging materials (plastic wrap, cardboard insert, and
g
6
Step 2 — Attach the Front-Panel Overlay
1
2
y
packin
Remove the packaging materials from the ADF lid.
tape) from the outside of the unit.
Align the front-panel overlay with the front panel buttons.
Push straight down firmly on both ends and the middle to snap the
overla
into place.
Page 12

HP OfficeJet R80 Setup Guide and Faxing Operation
1-5
Step 3 —
Load Paper in Your HP OfficeJet
1
Remove the packaging materials from the HP OfficeJet, if you have not
y
2
y
3
4
5
y
alread
done so.
Slide the paper width and length adjusters to their outermost positions.
As
ou pull the paper length adjuster out, the bottom (IN) tray also slides
out.
Insert paper into the IN tray, print side down, until it stops.
Slide the paper width and length adjusters in until they stop at the edges
of the paper.
Push the IN tray back toward the unit until it stops, and lower the top
(OUT) tra
if you raised it before inserting paper.
Page 13

1-6
Setting Up Your New HP OfficeJet R Series
For information about loading specific paper types, see Chapter 2, “All
y
Step 4 — Install Print Cartridges
1
j
2
y
3
TIP
g
g
g
4
5
g
g
CAUTION
Do not touch the gold-colored contacts.
About Paper,” of the HP OfficeJet R Series Basic Operations Guide.
For information about paper tra
Information,” of the HP OfficeJet R Series Customer Care Guide.
Locate the print-cartridge access door on the front of the HP OfficeJet,
ust above the OUT tray.
Pull the latch on the print-cartridge access door toward you and raise it
up until it is full
Remove the cardboard insert from the inside of the unit.
Save the packaging materials in case you ever need to move or
ship your HP OfficeJet.
The print-cartrid
carria
e contains two slots designed to hold one color print cartridge and
one black print cartrid
cartridge with your new HP OfficeJet.
Raise both latches on the carriage.
Remove the color print cartridge (the thicker one) from its packaging
and, bein
reen pull tab and blue tape covering the nozzles.
extended.
e carriage will be in the middle of the access area. The
e. You should have received one of each type of
careful to touch only the black plastic, gently remove both the
capacities, see Chapter 6, “Technical
Page 14

HP OfficeJet R80 Setup Guide and Faxing Operation
1-7
6
Push the color print cartridge firmly down into the slot on the left.
NOTE
The print-cartridge label should be facing you after the cartridge is inserted.
7
g
g
8
Remove the black print cartridge (the thinner one) from its packaging
and, bein
reen pull tab and blue tape covering the nozzles.
careful to touch only the black plastic, gently remove both the
Push the black print cartridge firmly down into the slot on the right.
Page 15

1-8
Setting Up Your New HP OfficeJet R Series
9
Lower each print-cartridge latch down onto the top of the cartridge, and
y
10
NOTE
Both print cartridges must be correctly installed (with the green tab and blue tape
removed) for your HP OfficeJet to work.
Make sure that the following things are done
before continuing:
•
Cartridges are pushed firmly into their slots.
•
Cartridge labels are facing toward you.
•
Both print-cartridge latches are down and locked.
•
Print-cartridge access door is closed and latched.
•
IN tray is pushed in completely.
•
Paper length adjuster is pushed firmly against the paper stack.
•
OUT tray is fully down.
push down until the latch locks firml
Close the print-cartridge access door.
into place.
Page 16

HP OfficeJet R80 Setup Guide and Faxing Operation
1-9
Step 5 — Connect the
Printer Cable and
Power Cord
NOTE
Use the printer cable that was shipped with your unit. It is a special bi-directional
parallel, IEEE 1284-compliant printer cable with a 1284-C connector that is necessary
for the proper functioning of your HP OfficeJet. If you choose to buy a longer cable,
make sure it is an IEEE 1284-compliant parallel cable with a 1284-C connector.
Connecting the Printer Cable
1
Connect the printer cable to the HP OfficeJet.
2
CAUTION
Do not connect your HP OfficeJet to a switch box or the pass-through port of another
parallel product, such as a scanner, tape drive, or CD-ROM drive. Doing so can cause
erratic behavior of both products and the possible loss of information.
Connecting the Power Cord
WARNING
Choose a power outlet that is easy to access. This allows you to shut off power
quickly.
Power is present in the product even if the white power button on the left side of the
unit’s front panel was used to turn the unit off. To shut off power completely,
disconnect the power cord.
For safe operation, use the power cord with a properly grounded outlet.
Use only the power supply (HP part number 0950-2880) that came with your
HP OfficeJet.
Using another adapter may be hazardous.
y
g
y
The cable connector is located on the back of the unit, in the middle.
Plug the other end of the cable into your computer’s parallel port.
The HP OfficeJet comes with a power supply adapter, to which an output
cord is permanentl
it is shipped. If the plu
contact
our dealer or local HP Sales and Support Office.
attached, and a main power cord for the country to which
on the main power cord does not look familiar,
Page 17

1-10
Setting Up Your New HP OfficeJet R Series
1
Plug the power supply output cord into the back of the HP OfficeJet.
y
2
3
IMPORTANT
Do not turn on your HP OfficeJet until you are instructed to do so
.
The power suppl
of the printer-cable connector.
Plug the adapter end of the main power cord into the power supply
adapter.
connector is located on the back of the unit, to the left
Plug the power outlet end of the separate power cord into the power
outlet.
Page 18

HP OfficeJet R80 Setup Guide and Faxing Operation
1-11
4
If the ADF lid cord is not already attached, connect the cord securely to
g
NOTE
Make sure that the cord is securely attached; otherwise, it may not work.
Step 6 — Install the HP OfficeJet Software
g
NOTE
You must install both the printing and scanning software to use the scan feature.
If you are installing the software on a Windows NT 4.0 computer, you must have
Service Pack 3 or higher installed.
If you are using a dual-boot Windows 95/98 and NT 4.0 computer, see the Readme
file on the HP OfficeJet R Series CD-ROM for important information.
the back of the HP OfficeJet.
The lid cord is located on the back of the unit, to the ri
cable connector.
ADF lid cord
Now you need to install software so that the HP OfficeJet can work with your
computer for printin
and scanning.
ht of the printer-
Page 19

1-12
Setting Up Your New HP OfficeJet R Series
Installing the HP OfficeJet RSeries Software
1
Turn on your computer, but do not turn on your HP OfficeJet.
2
y
CAUTION
HP strongly recommends using only the installation procedures in this setup guide to
install the HP OfficeJet software for the first time. For more installation information,
see the readme file.
3
y
g
a
b
If you are a Windows 95/98 user and one of the following windows
appears on
Insert the HP OfficeJet R Series CD-ROM into your computer’s
CD-ROM drive.
The HP OfficeJet R Series software installation menu should appear
automaticall
followin
On the Windows taskbar, click Start, and then choose Run.
In the Run dialog box, type z:\setup.exe (substitute your CD-ROM
drive letter for the “z”).
An HP OfficeJet R Series software installation menu similar to the one
below appears.
our screen, click Cancel or press Esc on your keyboard.
(in less than a minute). If the menu does not appear, do the
:
Page 20

HP OfficeJet R80 Setup Guide and Faxing Operation
1-13
4
Click Install HP OfficeJet R Series Software.
5
6
7
y
y
y
y
NOTE
For now, ignore any messages that appear on the front-panel display. As we continue
through the setup process, you will perform steps that address these messages.
8
g
9
TIP
After the Welcome window appears, click Next.
In the Software License Agreement window, click
After the message appears that instructs you to turn on the unit, press the
white power button on the left side of the front panel.
Yes
.
When
appears in the front-panel displa
power cord connections from the back of the unit to the power-suppl
adapter and from the power-suppl
After turning on your HP OfficeJet, click OK on your computer screen
to close the Information messa
The Select HP Software window appears.
our HP OfficeJet is on, a light appears on the front panel, and text
. If you do not see these, check the
adapter to the power outlet.
e.
Click Next to continue.
Click Browse to select a different destination folder for the
HP OfficeJet software, if desired.
Page 21

1-14
Setting Up Your New HP OfficeJet R Series
A progress window appears on your screen as the HP OfficeJet printing
g
g
y
10
g
ging
11
and scannin
The followin
connection between
Determine the results of the cable connection test.
If the test succeeds, skip to step 11.
◆
If the test fails and the Communications Test - Failed window
◆
appears, follow the instructions in the window, and then click Retry.
If the test fails a
After the Setup Complete and Product Tour window appears with the
option to view the product tour selected, click Finish.
program files are copied to your computer.
message appears while the program tests the cable
our computer and the HP OfficeJet.
ain, do the following:
Click Continue to finish installing the HP OfficeJet
a
software.
Set the front-panel language and page size manually.
b
Follow the instructions provided later in this chapter under
“Chan
After installing your software, see “Addressing
c
Communication Tests and Cable-Connection Issues” in the
Readme file. To access the Readme file, click the Start
button, point to Programs, point to HP OfficeJet
R Series, and then click Readme.
the Front-Panel Language.”
Page 22

HP OfficeJet R80 Setup Guide and Faxing Operation
1-15
12
In the product tour window, click any topic to learn more about that
13
14
y
g
y
1
2
g
TIP
Registering Your HP OfficeJet
y
y
topic.
After you are finished, click Quit to exit the tour.
If prompted to do so, restart your computer.
This completes installation of the HP OfficeJet R Series software. Now
can install the third-party programs included with your HP OfficeJet. For
more information, see “Installin
To take the tour at an
Insert the HP OfficeJet R Series CD-ROM into your computer’s
CD-ROM drive.
In the HP OfficeJet R Series software installation menu, click Run
Product Tour.
For an example of this menu, see “Installin
Software,” earlier in this chapter.
You can also access the tour from the Welcome tab on the toolbox.
time in the future, do the following:
Third-Party Programs.”
the HP OfficeJet R Series
ou
The first time you restart your computer after installing the HP OfficeJet R
Series software,
information
our products.
ou will be invited to register your unit electronically. The
ou provide to HP is confidential and is used to help us improve
Page 23

1-16
Setting Up Your New HP OfficeJet R Series
Installing Third-Party Programs
Your HP OfficeJet may or may not include additional third-party programs.
y
g
g
1
2
y
g
3
Installing Adobe PhotoDeluxe Business Edition
NOTE
Most of the third-party programs are located on the HP OfficeJet R Series CD-ROM.
PhotoDeluxe is included on its own CD-ROM. You can view Adobe contact and
support information on the HP CD-ROM, but PhotoDeluxe must be installed from the
Adobe CD-ROM.
1
2
Step 7
— Align Your Print Cartridges
g
y
g
g
1
y
g
g
g
2
If
our HP OfficeJet includes third-party programs, installing them will
enhance its capabilities. You can install these pro
install now, do the followin
Insert the HP OfficeJet R Series CD-ROM into your computer’s CDROM drive.
In the HP OfficeJet R Series software installation menu, click the name
of the third-part
A brief description of each pro
information appears.
Follow the on-screen instructions to begin and complete installation.
Insert the Adobe CD-ROM into your computer’s CD-ROM drive.
Follow the on-screen instructions to install the program.
Before you start using your HP OfficeJet, you need to align the print
cartrid
After
messa
Cartrid
es to ensure the best copy and print quality.
ou turn on your HP OfficeJet for the first time, you will see the
e “Initializing,” followed by the message “Press Resume to Align
es” on the front-panel display.
If “Press Resume to Align Cartridges” appears on the front-panel display
of
our HP OfficeJet, press the Select/Resume button on the front panel
of the unit.
The HP OfficeJet prints a pa
of numbered, horizontal lines appears at the top of the pa
of vertical lines, each with a unique letter, appear in the middle and at the
bottom of the pa
Follow the instructions on the page above each set of paired lines.
:
program you want to install.
ram and customer support contact
e with three sets of paired lines on it. A set
e.
rams now or later. To
e, and two sets
Page 24

HP OfficeJet R80 Setup Guide and Faxing Operation
1-17
Changing the Front-Panel Language
NOTE
The HP OfficeJet product that contains the fax feature only supports English.
To switch to a different language, do the following:
1
guag
2
guag
guag
g
3
y
4
y
5
Step 8 — Set Up for Faxing
Reviewing the Fax Panel
g
g
y
y
y
While holding down the Select/Resume button, press the Color
Intensity button, and then release both buttons.
The current lan
Press the minus (–) or plus (+) button to scroll through the available
lan
The available lan
Italiano, Portu
Press Select/Resume to choose the displayed language.
The current paper size appears on the front-panel displa
Press the minus (–) or plus (+) button until the desired paper size
appears on the displa
Press Select/Resume to choose the displayed paper size.
You are now ready to configure your HP OfficeJet to send and receive faxes.
The following diagram highlights the main sections of the fax panel.
Access various fax settings
e appears on the front-panel display.
es until the language you need appears on the display.
es include: English, Español, Deutsch, Français,
ués, Nederlands, Dansk, Norsk, Svenska, and Suomi.
.
.
Scroll through fax-setting options
Select or save a displa
ed entr
1
4
7
#
O
One-touch speed dialing
(“Settin
Up Speed Dialing”
in Chapter 2)
FAX
Enter/
2
3
5
6
8
9
0
n
e
*
-
T
o
u
c
h
S
p
e
e
d
D
i
Fax
Save
Menu
Fax
Fax
Speed
Dial
Contrast
Redial/
Pause
Resolution
a
l
s
1
GHI
4
PQRS
7
Symbols
*
ABC
2
JKL
5
TUV
8
0
Dial fax numbers or enter text (“Sending
DEF
MNO
WXYZ
Space
Auto Answer
3
Stop Fax
6
Start Fax
9
#
Auto
Answer
ht
li
Stop a fax or
exit the menu
stem
subs
Start a fax
Faxes” or “Entering Text” in Chapter 2)
Page 25

1-18
Setting Up Your New HP OfficeJet R Series
Checking the Line Connector
1
Verify that the fax/phone line connector is securely inserted into the back
2
Connecting Your Office Equipment
g
y
g
y
y
NOTE
As you connect your office equipment you will select certain fax settings for use with
your HP OfficeJet. For a detailed map of the various settings that are available and
how to get to them, see the chart on the inside of the back cover of this guide.
You can press Stop Fax any time to exit a menu or start over.
Are you using the same phone line to receive voice and fax calls?
Yes
No
1
g
2
g
of the HP OfficeJet lid and that the phone connector is inserted in the top
slot of the line connector.
Plug the other end of the phone cord into the telephone wall jack that you
will use for your fax line.
Notice the two ports on the back of the fax/phone line connector labeled “To
Phone, Answerin
these device t
Your telephone line(s), answerin
determine whether
manuall
. Answer these questions to determine how you can receive faxes.
Machine or Modem.” Use either port to connect any of
pes; the two ports are interchangeable.
machine, modem, and/or voice mail
ou can receive faxes automatically or must receive them
Skip to the next section, “Do you have distinctive ringing?”
On the fax panel, verify that Auto Answer is enabled.
ht next to Auto Answer is on when the feature is enabled. Press
The li
the Auto Answer button to turn it on or off.
Skip to and complete the steps outlined later under “Setting Your Basic
Fax Settin
s.”
Page 26

HP OfficeJet R80 Setup Guide and Faxing Operation
1-19
Do you have distinctive ringing?
This phone-company feature (usually offered for an additional fee) allows
y
g
y
No
g
Yes
1
g
2
3
4
5
TIP
6
g
g
y
7
g
y
8
y
y
9
g
ou to have several phone numbers on the same line. Each number has a
specific rin
phone probabl
Skip to the next section, “Do you have an answering machine or other device
that takes messa
On the fax panel, verify that Auto Answer is enabled.
The li
the Auto Answer button to turn it on or off.
Press Fax Menu.
Press 5 and then press 4.
Press f to scroll through these options: All Rings, Single Rings, Double
Rings, Triple Rings, and Double & Triple.
After the ring pattern that the phone company established for this number
appears, press Enter/Save.
We recommend that you use the Double Rings or Triple Rings option.
If you have an answering machine on this phone line (on any phone
number), set the answerin
You want HP OfficeJet to answer before the answerin
otherwise, HP OfficeJet will not receive fax calls. HP OfficeJet is
automaticall
If you want to change the number of rings after which HP OfficeJet
answers, do the followin
◆
◆
◆
If you have a modem on this phone line, turn off the setting in the
modem’s software that automaticall
otherwise, HP OfficeJet will not receive faxes properl
Skip to and complete the steps outlined later under “Setting Your Basic
Fax Settin
pattern. If you do not know what distinctive ringing is, your
does not use it.
es for you when you cannot answer the phone?”
ht next to Auto Answer is on when the feature is enabled. Press
machine to answer after four or more rings.
machine;
set to answer after one ring.
:
Press Fax Menu, press 4 and then press 6.
Press f to select a number of rings that is fewer than the number you
set on
After the number of rings you want appears, press Enter/Save.
our answering machine in step 6.
receives faxes to your PC;
.
s.”
Page 27

1-20
Setting Up Your New HP OfficeJet R Series
Do you have an answering machine or other device that takes
messages for you when you cannot answer the phone?
Yes
Skip to the next section, “Do you use voice mail from the phone company?”
No
1
g
g
g
g
y
y
y
y
y
y
2
g
Do you use voice mail from the phone company?
No
y
Yes
y
1
y
g
y
y
g
Choose one of the following:
If you want HP OfficeJet to respond automatically whenever you
◆
answer the phone and hear fax tones, verify that Auto Answer is
enabled. (The li
enabled. Press the Auto Answer button to turn it on or off.)
Chan
e the Rings to Answer setting (the default setting is 1) ,
described later under “Settin
enou
h to allow you time to answer the phone before HP OfficeJet
connects.
If Auto Answer is enabled and
phone, the caller will alwa
use this option onl
answer the phone. If
on the line until HP OfficeJet connects, and then hang up.
If you do not enable Auto Answer and you answer a phone and hear
◆
fax tones, press 123 on
Answer off,
otherwise, HP OfficeJet cannot receive faxes.
Skip to and complete the steps outlined later under “Setting Your Basic
Fax Settin
s.”
ht next to Auto Answer is on when the feature is
the Rings to Answer Setting,” high
ou are not available to answer the
s hear fax tones. We recommend that you
when you are expecting a fax or are available to
ou pick up the phone and hear fax tones, stay
our phone to accept the fax. With Auto
ou must be available to respond to the incoming call;
Skip to the next section, “Is your answering machine or PC modem located in
the same room as
If you use voice mail (that is, you dial a phone number and press buttons on
our phone to hear messages), you must be available to respond to incoming
fax calls, unless you subscribe to a distinctive-ring service.
Choose one of the following:
If you want HP OfficeJet to respond automatically whenever you
◆
answer the phone and hear fax tones, verif
enabled. (The li
enabled. Press the Auto Answer button to turn it on or off.) If
pick up the phone and hear fax tones, sta
HP OfficeJet connects, and then han
our HP OfficeJet?”
that Auto Answer is
ht next to Auto Answer is on when the feature is
ou
on the line until
up.
Page 28

HP OfficeJet R80 Setup Guide and Faxing Operation
1-21
Set the HP OfficeJet Rings to Answer setting (the default setting
g
g
y
y
y
2
Is your answering machine or PC modem located in the same
room as your HP OfficeJet?
No
g
Yes
y
y
gh y
1
g
g
g
g
IMPORTANT
If you do not plug the answering machine or modem into the back of your
HP OfficeJet, the fax may not be able to receive faxes properly.
2
g
3
g
4
is 1) , described later under “Settin
higher than the number of rin
This allows
If you do not enable Auto Answer and you answer a phone and hear
◆
fax tones, press 123 on
Answer off,
otherwise, HP OfficeJet cannot receive faxes.
Skip to and complete the steps outlined later under “Setting Your Basic
Fax Settings.”
Skip to the next section, “My answering machine or PC modem is not
available for connection throu
If you use an answering machine or PC modem (that is, you press buttons on
a separate machine to hear
our computer and use software to listen to them) and they are available for
connection throu
Choose one of the following:
If you are only using an answering machine, plug the phone into the
◆
back of the answerin
into the back of HP OfficeJet.
If you are only using a modem, connect the phone to the back of
◆
HP OfficeJet, and plu
the back of HP OfficeJet.
If you use both an answering machine and a modem, plug the phone
◆
into the back of the answerin
machine and modem into HP OfficeJet. Also, in the modem
software, turn off the voice-call answerin
that allows it to receive faxes.
our voice mail system to answer your voice calls.
our phone to accept the fax. With Auto
ou must be available to respond to the incoming call;
h my HP OfficeJet.”
our phone messages or you receive messages on
our HP OfficeJet, follow these steps.
machine, and plug the answering machine
the modem into the remaining connector on
the Rings to Answer Setting,”
s selected for your voice mail system.
machine, and plug the answering
feature and the feature
Make sure the greeting on your answering machine or modem software
is lon
er than 10 seconds and shorter than 30.
On the fax panel, verify that Auto Answer is enabled.
The li
ht next to Auto Answer is on when the feature is enabled. Press
the Auto Answer button to turn it on or off.
Set your answering machine or modem software to answer after four or
fewer rings.
Page 29

1-22
Setting Up Your New HP OfficeJet R Series
5
To set the number of rings on HP OfficeJet, press Fax Menu, press 4 and
6
y
7
g
g
y
8
g
My answering machine or PC modem is not available for
connection through my HP OfficeJet.
y
y
gh y
1
g
y
2
Setting Your Basic Fax Settings
NOTE
As you configure the fax date/time and header settings, be aware that HP OfficeJet
reverts to the original settings if the new ones are not saved within two minutes.
You can press Stop Fax any time to exit a menu or start over.
Setting the Date and Time
1
2
y
then press 6.
Press f to select a number of rings that is higher than the number you
set in step 4.
For example, if
set HP OfficeJet to answer in five.
After the number of rings you want is displayed, press Enter/Save.
Your answerin
of rings you set. HP OfficeJet will monitor the call during the greeting.
If HP OfficeJet detects fax tones, it will cut off the answerin
voice modem and receive the fax.
If
ou answer the phone first, stay on the line until HP OfficeJet answers
the call.
Skip to and complete the steps outlined later under “Setting Your Basic
Fax Settin
If you use an answering machine or PC modem (that is, you press buttons on
a separate machine to hear
our computer and use software to listen to them) and they are not available
for connection throu
On the fax panel, verify that Auto Answer is disabled.
The li
ht next to Auto Answer is off when the feature is disabled. Press
the Auto Answer button to turn it on or off.
If
ou answer a phone and hear fax tones, press 123 on your phone.
With Auto Answer off, you must be available to respond to the incoming
call; otherwise, HP OfficeJet cannot receive faxes.
Complete the steps outlined under “Setting Your Basic Fax Settings.”
ou set your answering machine to answer in four rings,
machine or modem will answer the call after the number
machine or
s.”
our phone messages or you receive messages on
our HP OfficeJet, follow these steps.
On the fax panel, press Fax Menu.
Press 4.
“4. Basic Setup” appears briefl
, followed by “1. Set Date/Time.”
Page 30

HP OfficeJet R80 Setup Guide and Faxing Operation
1-23
3
After “1. Set Date/Time” appears, press Enter/Save.
NOTE
HP OfficeJet only supports a 12-hour clock format.
4
g
NOTE
HP OfficeJet meets year 2000 (Y2K) requirements. For more information, see
Chapter 5 of your
HP OfficeJet R Series Customer Care Guide
.
Setting the Fax Header
1
2
3
y
TIP
4
5
A
A series of prompts asks for the date and time.
Make each entry from the telephone keypad (that is, the set of numbers
on the right side of the lid) usin
Press Enter/Save after completing each prompt.
◆
Use only the last two digits for the year.
◆
After you are done, the date and time appear on the display.
Federal Communications Commission (FCC) regulations require that you
enter header information.
On the fax panel, press Fax Menu.
Press 4 and then press 2.
Enter your name using the following guidelines:
Press the keypad numbers that correspond to the letters of your
◆
name.
the following guidelines:
DEF
3
Press a button multiple times to see its letters first in lowercase and
◆
then in uppercase.
BC
2
After the correct letter appears, press f, and then press the number
◆
that corresponds to the next letter in your name. Again, press
multiple times until the correct letter appears.
After you finish entering your first name, press Space (#) to insert a
◆
space before
If you make a mistake, press e to clear it, and then make the correct entry.
After you finish entering your name, press Enter/Save.
Using the keypad, enter your fax number.
These letters correspond
to this number, etc.
To get this character: a b c A B C 2
Press 2 this many times:1234567
our last name.
Page 31

1-24
Setting Up Your New HP OfficeJet R Series
TIP
To enter a symbol, such as a hyphen or parenthesis, press Symbols (*) to
6
Setting the Dial Mode
1
2
3
4
Setting the Rings to Answer Setting
NOTE
If you already configured this setting as part of the earlier portion of the setup process,
skip to the next section, “Testing Your Fax Features.”
To use this feature, Auto Answer must be enabled. The light next to Auto Answer is
on when the feature is enabled. Press the Auto Answer button to turn it on or off.
1
2
3
4
Testing Your Fax Features
y
NOTE
If desired, you can connect a single-line phone to the HP OfficeJet.
scroll through a list of symbols.
After you finish entering your fax number, press Enter/Save.
Press Fax Menu.
Press 4 and then press 5.
Press f to toggle between Tone and Pulse.
After the mode that you want appears, press Enter/Save.
Press Fax Menu.
Press 4 and then press 6.
Press f to select the number of rings after which HP OfficeJet should
answer.
After the number of rings you want appears, press Enter/Save.
To make sure that your fax features are configured correctly, we recommend
that
ou ask someone to send you a sample fax and that you send that person
a fax.
Page 32

HP OfficeJet R80 Setup Guide and Faxing Operation
2-1
Using the Fax and
Legal-Size Copy
Features
2
ging
g
ying
NOTE
When you change settings or send or receive a fax, watch the front-panel display for
the appropriate messages.
You can press Stop Fax any time to exit a menu or start over.
Sending Faxes
g
g
g
This chapter provides instructions for sending and receiving faxes and for
chan
le
cop
HP OfficeJet lets you work with letter (A), A4, and legal-size originals.
◆
◆
various fax settings. It also contains information about copying
al-size documents. For information on the printing, scanning, and other
features, see your HP OfficeJet R Series Basic Operations Guide.
If your current task only uses letter (A) or A4-size originals, begin by
followin
If your current task uses legal-size originals or a mixture of legal- and
letter-size ori
Size or Le
the steps in “Processing Letter-Size Originals Exclusively.”
inals, begin by following the steps in “Processing Legal-
al- and Letter-Size Originals.”
Page 33

2-2
Using the Fax and Legal-Size Copy Features
Processing Letter-Size Originals Exclusively
1
Place your originals in the automatic document feeder (ADF) with the
g
g
j
y
y
NOTE
For more information about the types of paper you can use in the ADF, see Chapter 2
in your
HP OfficeJet R Series Basic Operations Guide
.
2
g
g
g
g
g
g
g
printed side facin
n the paper with the right side of the ADF. Use only full-sized pages
Ali
in the ADF, and ad
As
ou load the originals, the message “Document loaded” appears
briefl
on the front-panel display.
toward the back and with the top to the right.
ust the page guide to the length of the originals.
1
2
4
3
5
Menu
7
6
Speed Dial
8
#
0
FAX
9
1
ABC
Redial/
DEF
Answer Mode
Pause
2
GHI
3
*
4
JKL
Stop
Copy
MNO
5
PQRS
6
TUV
Start
7
WXYZ
8
Symbols
9
*
Space
0
#
Insert only letter-size
originals sideways,
even if the le
al- size
tray is attached.
If processin
legalsize originals, follow
the instructions
provided later under
“Processin
Size or Le
Legal-
al- and
Letter-Size Originals.”
Choose one of the following:
To send a fax to one number or speed dial, follow the steps in
◆
“Sendin
To broadcast a fax to one group or ten numbers, follow the steps in
◆
“Broadcastin
To schedule a fax for later delivery, follow the steps in “Sending a
◆
Fax Later Usin
a Fax to One Number or Speed Dial.”
a Fax to One Group or Ten Numbers.”
Scheduled Send.”
Page 34

HP OfficeJet R80 Setup Guide and Faxing Operation
2-3
Processing Legal-Size or Legal- and Letter-Size
Originals
HP OfficeJet lets you work with both letter-size and legal-size originals. If
y
g
1
2
g
g
y
y
g
g
g
g
ou intend to work with legal-size originals, follow these instructions for
installin
and using the legal-size tray.
Slide the legal-size tray onto the front paper-tray extender located on the
automatic document feeder (ADF) lid.
Place all originals in the legal-size tray with the printed side facing
toward the back and with the top of the document pointin
Ali
n the paper with the left side of the legal-size tray.
As
ou load the originals, the message “Document loaded” appears
briefl
on the front-panel display.
down.
Insert legal-size or mix
al- and letter-size
of le
originals vertically.
1
2
4
3
5
Menu
7
6
Speed Dial
8
#
0
FAX
9
1
ABC
Redial/
DEF
Answer Mode
Pause
2
GHI
3
*
4
JKL
Stop
Copy
MNO
5
PQRS
6
TUV
Start
7
WXYZ
8
Symbols
9
*
Space
0
#
If processin
size ori
instructions provided
only letter-
inals, follow the
earlier under
“Processin
Letter-Size
Originals Exclusively.”
Page 35

2-4
Using the Fax and Legal-Size Copy Features
NOTE
When working with originals in vertical orientation, you may notice that part of the
original temporarily sticks out from under the lid and a short delay occurs. This is
normal behavior.
To send a fax to one number or speed dial, follow the steps in
g
g
g
Sending a Fax to One Number or Speed Dial
y
TIP
1
y
2
Broadcasting a Fax to One Group or Ten Numbers
g
g
TIP
1
y
g
y
g
2
◆
“Sendin
To broadcast a fax to one group or ten numbers, follow the steps in
◆
“Broadcastin
To schedule a fax for later delivery, follow the steps in “Sending a
◆
Fax Later Usin
a Fax to One Number or Speed Dial.”
a Fax to One Group or Ten Numbers.”
Scheduled Send.”
These steps help you send a fax using the traditional method of dialing the
entire fax number or, if
ou have set up speed dialing, using the shortcuts.
For more speed-dialing information, see “Setting Up Speed Dialing.”
Choose one of the following:
T o use a regular number, dial the fax number. Enter all the numbers
◆
ou would enter if you were dialing the number from a phone.
T o use an individual or group speed-dial code, press Speed Dial and
◆
enter the code, or, if it is one of the first 12, press the corresponding
button on the one-touch pad located on the left side of the fax panel.
Press Start Fax.
Broadcasting lets you send a fax to up to ten individual numbers or individual
speed-dial codes. You can also broadcast to one
broadcastin
, the fax must fit into HP OfficeJet memory; otherwise, an error
roup code. To use
occurs.
For more speed-dialing information, see “Setting Up Speed Dialing.”
Choose one of the following or a combination of the first two:
T o use regular numbers, dial the fax number. Enter all the digits you
◆
would enter if
enterin
the first number, press Enter/Save. Enter the second
ou were dialing the number from a phone. After
number, press Enter/Save, and repeat this process until all desired
numbers are entered.
To use individual speed-dial codes, press Speed Dial and enter the
◆
code. Press Enter/Save to select the displa
ed code. To enter the
next code, press Speed Dial, enter the code, and press Enter/Save.
Repeat this process until all desired codes are entered.
T o use a group speed-dial code, press Speed Dial and enter the code,
◆
or, if the code is one of the first 12, press the correspondin
button
on the one-touch pad located on the left side of the fax panel.
Press Start Fax.
Page 36

HP OfficeJet R80 Setup Guide and Faxing Operation
2-5
Sending a Fax Later Using Scheduled Send
Scheduled Send lets you send one fax at a predefined time.
1
2
y
3
4
5
y
6
7
8
g
y
Cancelling a Scheduled-Send Fax
g
g
g
Receiving Faxes
y
NOTE
Before receiving a fax, we recommend that you remove any originals from the ADF.
If you receive a legal-size fax and HP OfficeJet is not currently set to use legal-size
paper, the unit automatically reduces the fax so that it fits on the paper that is loaded.
y
y
g
y
Press Fax Menu.
Press 2.
“2. Fax Functions” appears briefl
After “1. Scheduled Send” appears, press Enter/Save.
Enter the fax number of the recipient, and press Enter/Save.
If desired, enter additional fax numbers, pressing Enter/Save after each
entr
.
After you are done entering fax numbers, press Start Fax.
After the “Enter/Save = another number, Start Fax = continue” message
appears, press Start Fax.
Change the applicable information when the corresponding prompts
appear on the display, and press Start Fax.
HP OfficeJet scans the ori
specified deliver
You can cancel a fax stored in memory or one that is currently in progress.
To cancel a fax from memory, press Fax Menu, press 2, and then press
◆
2 a
ain. After “Cancel Sched Send at <time>?” appears, press 1 for Yes.
To cancel a fax that is in progress, press Stop Fax. If the fax was
◆
scheduled to
appear and press Stop Fax a
that the fax was scheduled to be sent to.
time, at which time it faxes it to the selected recipients.
o to multiple numbers, wait for the next fax number to
, followed by “1. Scheduled Send.”
inal into memory and retains it until the
ain. Repeat this process for each number
Depending on how you set up HP OfficeJet, you will either receive faxes
automaticall
To let HP OfficeJet monitor all calls, verify that Auto Answer is
◆
enabled. (The light next to Auto Answer is on when the feature is
enabled. Press the Auto Answer button to turn it on or off.) If
up the phone and hear fax tones, sta
connects, and then han
If you do not enable Auto Answer and you answer a phone and hear fax
◆
tones, press 123 on
or manually.
ou pick
on the line until HP OfficeJet
up.
our phone to accept the fax.
Page 37

2-6
Using the Fax and Legal-Size Copy Features
Setting Automatic Reduction
This setting determines what HP OfficeJet does if it receives a fax too large
g
g
g
1
2
3
4
Using Fax-Back Features
y
y
Controlling How Faxes Look When Sent to a Recipient
y
NOTE
The copy settings do not affect faxing, and the fax settings do not affect copying.
Changing Resolution
1
2
NOTE
HP OfficeJet only faxes at the highest resolution supported by the receiving fax.
Standard resolution is the default. If you choose one of the higher resolutions, Fine or
Superfine, be aware that the faxing process takes longer to complete. When faxing
photographs, we recommend that you choose one of these higher resolutions.
3
for the default paper size. With this settin
reduced so that it fits on one pa
will not fit on the first pa
Press Fax Menu.
Press 5 and then press 5 again.
Press f to toggle between “Off” and “On.”
After the state that you want appears, press Enter/Save.
Some companies offer a fax-back service that allows you to call a number and
automaticall
a phone connected to the back of HP OfficeJet. Follow the individual
compan
HP OfficeJet lets you change the resolution and contrast of documents that
ou are sending. Your changes remain in effect until you change them again.
receive a fax in return. To use this feature, you must dial using
’s instructions for requesting a fax back.
e. With this feature off, the information that
e is printed on a second page.
on (the default), the image is
Resolution affects the transmission speed and quality of faxed documents.
Press Fax Resolution.
Press f to scroll through these options: “Standard,” “Fine,” and
“Superfine.”
After the resolution that you want appears, press Enter/Save.
Page 38

HP OfficeJet R80 Setup Guide and Faxing Operation
2-7
Changing Contrast
Change this setting if you want the fax to be darker or lighter than the original.
g
1
2
g
3
Using the Advanced Send Settings
NOTE
During setup, you defined your basic fax settings. If you need help changing any of
these settings, refer to “Setting Your Basic Fax Settings” in Chapter 1.
Faxing an Image from the Glass
y
1
2
3
g
4
Using Off-Hook Dialing to Use a Credit or Calling Card
1
2
3
y
4
y
g y
5
y
(The default settin
Press Fax Contrast.
Press f to scroll through these options: “Normal,” “Darken,” and
“Li
hten.”
After the contrast that you want appears, press Enter/Save.
HP OfficeJet offers several advanced settings for sending faxes.
You can fax a single image, such as a photograph, book, or other odd-sized
document, directl
On the fax panel, dial the fax number.
Press Start Fax.
After “Load document then press Start Fax” appears on the display, lift
the lid and place the ori
Lower the lid, and press Start Fax.
is Normal.)
from the glass instead of using the ADF.
inal on the glass.
Off-hook dialing lets you charge a fax to your phone credit or calling card.
Place the original in the ADF or on the glass.
Press Start Fax.
If you placed the original on the glass, press Start Fax again after “Load
the document then press Start Fax” appears on the displa
After “Off hook” appears, use the fax panel to dial the phone number.
Enter all the numbers
from a phone usin
Follow the voice prompts.
Five seconds after
ou would enter if you were dialing the number
our credit or calling card.
ou are done entering numbers, faxing begins.
.
Page 39

2-8
Using the Fax and Legal-Size Copy Features
Redialing a Busy Number Automatically
If a busy signal is encountered, HP OfficeJet automatically redials the
NOTE
This option does not work for off-hook dialing.
For international calls, we recommend that you enable the feature that redials a
number that is not answered, as explained in the next section, “Redialing an
Unanswered Number Automatically.”
1
2
3
4
TIP
Redialing an Unanswered Number Automatically
g
NOTE
This option does not work for off-hook dialing.
1
2
3
4
TIP
Setting Up Speed Dialing
y
y
number until a connection is made.
Press Fax Menu.
Press 5 and then press 2.
Press f to toggle between “Off” and “On.”
After the state that you want appears, press Enter/Save.
To redial the last fax number immediately, press Redial/Pause.
You can set HP OfficeJet to redial an unanswered number automatically.
(The default settin
Press Fax Menu.
Press 5 and then press 3.
Press f to toggle between “Off” and “On.”
After the state that you want appears, press Enter/Save.
To redial the last fax number immediately, press Redial/Pause.
is Off.)
You can assign codes to frequently used fax numbers. This lets you dial those
numbers quickl
You can create up to 100 individual and group codes.
The first 12 speed-dial numbers are also automaticall
touch speed-dial buttons on the left side of the fax panel. Use a pencil or felttip pen to label each button.
using the Speed Dial button and a one- or two-digit code.
assigned to the one-
Page 40

HP OfficeJet R80 Setup Guide and Faxing Operation
2-9
Creating Individual Speed-Dial Settings
Use this setting to enter fax numbers that you will reuse frequently. You can
g
1
y
2
y
3
TIP
4
TIP
5
g
6
Creating Group Speed-Dial Settings
y
g
NOTE
To use a number in a group code, it must already be assigned an individual code.
Only individual codes can be used; a group cannot be assigned to a group.
1
2
3
g
4
5
g
g
create up to 100 codes (individual and
Press Fax Menu and then press 3.
“3. Set Speed Dial” appears briefl
After “1. Individual” appears, press Enter/Save.
The first speed-dial code appears on the displa
Enter the code to which you want to assign a number, and then press
Enter/Save.
You can also press f to scroll through the codes until you find the
first unassigned code.
Enter the fax number to assign to that code, and press Enter/Save.
To enter a two-second pause within a number sequence, press
Redial/Pause.
Enter the person’s or company’s name, and press Enter/Save.
For more help, see “Enterin
After “Add Another” appears, press 1 for Yes if you want to set up
another code or press 2 for No to exit.
This feature lets you create a distribution list of up to 25 individual speed-dial
codes so that
create up to 100 codes (individual and
ou can send a fax to all of them at the same time. You can
roup).
, followed by “1. Individual.”
.
Text” later in this chapter.
roup).
Press Fax Menu.
Press 3 and then press 2.
Choose one of the following:
If this is your first group, the first unassigned code appears. Press
◆
Enter/Save to select it.
If this is not your first group, “1=New 2=Edit” appears. Press 1 to
◆
create a new
Save to select it.
After “Add #1” appears, press Speed Dial.
Enter the two-digit code that corresponds to the fax number you want to
include in the
The selected code and correspondin
roup. The first unassigned code appears. Press Enter/
roup.
name appear on the display.
Page 41

2-10
Using the Fax and Legal-Size Copy Features
6
Choose one of the following:
g
7
g
8
g
g
9
10
g
Editing Existing Groups
1
2
3
4
g
5
6
g
g
g
Deleting Speed-Dial Settings
1
2
3
If the displayed code is correct, press Enter/Save to add it to the
◆
roup.
To select a different code, press f or e until the appropriate code
◆
appears, and then press Enter/Save to select it.
After “Add Another” appears, press 1 for Yes if you want to add another
individual code to the
After you are done selecting individual codes and you press 2 for No,
enter a name for the
For more help, see “Enterin
Press Enter/Save to save the group.
After “Add Another” appears, press 1 for Yes if you want to create
another
You can add or remove an individual code to or from an existing group.
Press Fax Menu.
Press 3 and then press 2.
After “1=New 2=Edit” appears, press 2.
Press f until the group that you want to edit appears, and then press
Enter/Save.
The first individual speed-dial code in that
For each number in the group, press 1 to delete it or 2 to keep it.
After “Add Another” appears, choose one of the following:
◆
◆
roup or press 2 for No to exit.
If you want add new individual codes to the group, press 1 and
complete steps 4 throu
Speed-Dial Settin
If you do not want to add any additional individual codes, press 2 to
edit the
roup name or press Enter/Save to save it as is.
roup or press 2 for No.
roup.
Text” later in this chapter.
roup appears.
h 7 in the previous section, “Creating Group
s.”
Follow these steps to delete an individual or group speed-dial code.
Press Fax Menu.
Press 3 and then press 3 again.
Press f until the individual or group code that you want to delete
appears, and then press Enter/Save.
Page 42

HP OfficeJet R80 Setup Guide and Faxing Operation
2-11
Using Error Correction Mode (ECM)
ECM reduces data lost due to poor phone lines by detecting errors that occur
g
g
g
g
g
g
1
2
3
4
Using the Advanced Receive Settings
NOTE
During setup, you defined your basic fax settings. If you need help changing any of
these settings, refer to “Setting Your Basic Fax Settings” in Chapter 1.
Enabling Silent Detection
g
g
1
2
3
4
durin
transmission and automatically requesting retransmission of the
erroneous portion. Phone char
ood phone lines. On poor phone lines, ECM increases sending time and
phone char
default settin
are willin
Press Fax Menu.
Press 5 and then press 8.
Press f to toggle between “Off” and “On.”
After the state that you want appears, press Enter/Save.
HP OfficeJet offers several more advanced settings for receiving faxes.
This feature controls whether you can receive faxes from older fax machines
that do not emit a fax si
fax machines in use.
Leave this settin
You are having trouble receiving a fax from an older machine,
◆
Your answering machine is connected directly to HP OfficeJet, and
◆
Auto Answer is enabled (the light on the fax panel is on).
◆
Press Fax Menu.
Press 5 and then press 6.
Press f to toggle between “Off” and “On.”
After the state that you want appears, press Enter/Save.
es, but sends the data much more reliably. Turn ECM off (the
is on) only if it increases phone charges substantially and you
to accept poorer quality in exchange for reduced charges.
off unless all of the following are true:
es are unaffected, or may even be reduced, on
nal. These silent models represent less than 5% of
Page 43

2-12
Using the Fax and Legal-Size Copy Features
Using Remote Reception
This feature, which is automatically enabled in HP OfficeJet, allows you to
y
y
gh y
g
y
1
2
3
4
5
g
TIP
Using Backup Receive
g
y
1
2
3
4
Printing Fax Reports
y
Generating Automated Reports
y
1
y
2
enter a code (the default is 1 2 3) when
circuit as the HP OfficeJet but that is not directl
code tells HP OfficeJet to take the call even thou
Follow these steps to turn this feature on or off or to chan
We recommend that you change this code only if it conflicts with the remote
code for
Backup Receive, which is automatically enabled in HP OfficeJet, allows
HP OfficeJet to receive a fax call even if there is a potential problem, such as
the unit is out of paper. As lon
in the unit’s memor
our answering machine.
Press Fax Menu.
Press 5 and then press 7.
Press f to toggle between “Off” and “On.”
After the state that you want appears, press Enter/Save.
If you chose “On,” choose one of the following after “Enter Code”
appears:
To use the default code, press Enter/Save.
◆
T o change the code, press e to erase the 1 2 3, enter your new three-
◆
di
it code, and then press Enter/Save.
You can use * or # as part of your three-digit code.
and printed later. To turn this feature on or off:
Press Fax Menu.
Press 4 and then press 7.
Press f to toggle between “Off” and “On.”
After the state that you want appears, press Enter/Save.
as power is not interrupted, the fax is stored
ou answer a phone that is on the same
connected to the unit. The
ou answered the phone.
e the default code.
HP OfficeJet includes reports that you set to print automatically and reports
that
This setting lets you configure HP OfficeJet so that it automatically prints, if
applicable, a specific report after the last fax. “Ever
selected.
ou can print manually, as they are needed.
Error” is automatically
Press Fax Menu and then press 5.
“5. Advanced Setup” appears briefl
After “1. Auto Report” appears, press Enter/Save.
, followed by “1. Auto Report.”
Page 44

HP OfficeJet R80 Setup Guide and Faxing Operation
2-13
3
Press f to scroll through the following report types:
4
Generating Manual Reports
1
2
3
y
TIP
4
Adjusting Sound Volumes
g
y
g
1
2
3
4
“Every Error,” which prints whenever there is any kind of fax error.
◆
“Send Error,” which prints whenever there is a transmission error.
◆
“Recv Error,” which prints whenever there is a receiving error.
◆
“Every Fax,” which confirms every time a fax is sent or received.
◆
“Send Only,” which prints every time a fax is sent.
◆
“Off,” which does not print fax reports.
◆
After the condition that you want appears, press Enter/Save.
HP OfficeJet offers several printed reports.
Press Fax Menu.
After “1. Print Reports” appears, press Enter/Save.
Press f to scroll through the following report types:
“1. Last Fax,” which indicates the status of the last fax sent.
◆
“2. History Log,” which lists approximately the last 40 faxes sent
◆
and received.
“3. Speed Dials,” which lists your individual and group codes.
◆
“4. Menu Settings,” which lists in outline form the entire menu
◆
s
stem and indicates the current and default settings.
For a detailed map of the various settings that are available and
how to get to them, see the chart on the inside of the back cover of
this guide.
After the report that you want appears, press Enter/Save.
HP OfficeJet provides four levels for adjusting the ring and speaker volumes.
The rin
level of ever
settin
volume is the level of the phone rings. The speaker volume is the
thing else, such as the dial and fax tones. Normal is the default
for both volumes.
Press Fax Menu.
Press 4 and then press 3 (for Ring Volume) or 4 (for Speaker Volume).
Press f to scroll through the levels: “Soft,” “Normal,” “Loud,” and
“Off.”
After the level that you want appears, press Enter/Save.
Page 45

2-14
Using the Fax and Legal-Size Copy Features
Entering Text
The following list provides tips for entering text using the fax-panel keypad.
g
g
Returning the Fax Settings to the Default Factory Settings
y
NOTE
This procedure is for restoring only the original fax settings. It does not affect the
settings for the copy feature nor does it erase any speed-dial codes that you created.
1
1
2
DEF
y
Press the keypad numbers that correspond to the letters of a name.
◆
These letters correspond
3
Press a button multiple times to see its letters first in lowercase and then
◆
to this number, etc.
in uppercase.
ABC
2
After the correct letter appears, press f, and then press the number that
◆
corresponds to the next letter in the name. A
To get this character: a b c A B C 2
Press 2 this man
times:1234567
ain, press multiple times
until the correct letter appears.
To insert a space, press Space (#).
◆
To enter a symbol, such as a hyphen or parenthesis, press Symbols (*) to
◆
scroll throu
If you make a mistake, press e to clear it, and then make the correct
◆
h a list of symbols.
entry.
After you are done entering text, press Enter/Save to store your entries.
◆
HP OfficeJet lets you restore the original fax settings to what they were when
ou purchased your unit.
Press Fax Menu.
Press 6 and then press 3.
After “Restore Factory Settings” appears, press 1 for Yes or 2 for No.
Page 46

HP OfficeJet R80 Setup Guide and Faxing Operation
2-15
Using the Copy Features for Legal-Size Paper
In addition to the settings described in Chapter 5 of your HP OfficeJet
y
Copying Legal-Size Originals
NOTE
When working with legal-size originals, you can only make black-and-white copies
and you can only make one set of copies at a time. The digital copy features (Auto Fit,
Poster, and Clone) and enlargements are also not available. Reduction is allowed.
1
TIP
2
y
g
3
NOTE
When working with originals in vertical orientation, you may notice that part of the
original temporarily sticks out from under the lid and a short delay occurs. This is
normal behavior.
Changing the Paper Size
y
g
1
2
y
3
4
R Series Basic Operations Guide, the HP OfficeJet that includes the fax
feature lets
HP OfficeJet lets you copy legal-size originals to legal- or letter-size paper.
Load the originals in the ADF.
Choose one of the following:
◆
◆
Press the Black button to make black-and-white copies
ou copy to and from legal-size paper.
For more help, see “Processing Legal-Size or Legal- and LetterSize Originals” earlier in this chapter.
T o make legal-size copies, make sure that legal-size paper is loaded
in the IN tra
next section for more information).
To make letter-size copies, press Reduce/Enlarge until
“Le
al->Ltr” appears on the display. Press Select/Resume.
and that the default paper size is set to Legal (see the
HP OfficeJet lets you change the paper size. Your change applies to both
cop
and fax tasks and remains in effect until you change it again. To switch
to a different paper size, do the followin
On the front panel, press Menu until “Paper Size” appears.
Be sure to press Menu on the front panel, not Fax Menu on the fax panel.
Press Select/Resume.
The current paper size appears on the displa
Press the minus (–) or plus (+) button until the desired paper size
appears.
Press Select/Resume to choose the displayed paper size.
:
.
Page 47

2-16
Using the Fax and Legal-Size Copy Features
Page 48

HP OfficeJet R80 Setup Guide and Faxing Operation
3-1
Fax Customer-Care
Information
3
y
g
Fax-Specific Troubleshooting
g
y
y
g
Cleaning the ADF Document-Lid Backing
y
WARNING
Turn off HP OfficeJet and unplug the power cord before cleaning. Even though
HP OfficeJet is off, power is still being supplied if the cord is plugged in.
1
2
3
4
CAUTION
Do
not
use paper-based wipes as these may scratch the backing.
5
g
y
This chapter provides instructions for keeping the automatic document feeder
(ADF) of
fax-specific messa
address them.
To keep your HP OfficeJet performing at its best, make sure that you keep the
lass clean. Dirty glass (fingerprints, smudges, and so on) slows down
performance b
actuall
cleanin
Care Guide.
Minor debris can also accumulate on the white document-backing located
underneath the HP OfficeJet lid. Keep this backing clean so that it does not
process the debris as part of a cop
our HP OfficeJet in top working condition. It also lists some of the
es that may appear on the front-panel display and ways to
as much as half a minute. This is because the scanner is
processing the smudges on the glass. Keep the glass clean. For
instructions, see Chapter 3 of your HP OfficeJet R Series Customer
or fax job.
To clean the ADF:
Turn off HP OfficeJet, unplug the power cord, and raise the lid.
Clean the white document-backing with a soft cloth or sponge slightly
moistened with a mild soap and warm water.
Wash the backing gently to loosen debris; do
Dry the backing with a chamois or soft cloth.
If this does not clean the backing well enough, repeat the previous steps
usin
isopropyl (rubbing) alcohol, and wipe the backing thoroughly with
a damp cloth to remove an
residual alcohol.
not
scrub the backing.
Page 49

3-2
Fax Customer-Care Information
A Blank Page Came Out or Output is Faded
The following list identifies some of the common reasons for pages coming
g
y
g
g
y
y
g
g
Fax-Specific Front-Panel Messages
j
y
g
g
y
y
g
y
g
y
g
g
g
g
y
g
g
y
g
g
g
y
g
g
g
out blank or faded.
The black print cartridges is low on ink. Whenever quality noticeably
◆
decreases, clean the cartrid
our HP OfficeJet Customer Care Guide.
The black print cartridge is out of ink. Print a self-test page to verify this.
◆
If the black sample is missin
information on printin
Chapter 3 in
The person sending you a fax placed the originals backwards in the fax
◆
machine. Check the Histor
the sender to send the fax a
For more information about printin
Reports” in Chapter 2.
our HP OfficeJet Customer Care Guide.
es. For more information, see Chapter 3 in
, replace the cartridge. For more
a self-test page or replacing cartridges, see
Log to determine who sent the fax, and ask
ain, after you have corrected the problem.
this report, see “Generating Manual
Message What You Should Do
Automatic Document
Feeder Jam. Clear
press Resume.
Dialed Fax Bus
xx sec
Fax Send Failed An error occurred durin
For better results next time,
turn ori
feeder. Press Resume to
continue.
Group full You tried to add another individual speed-dial code to a
Le
black cop
allowed. Press Resume to
continue.
inal sideways in
al size supports one
, reduction
am then
- Redial in
our originals get caught in the ADF, remove them and
If
send the fax a
ADF. For more information on clearin
Chapter 3 in
While trying to send a fax, HP OfficeJet encountered a busy
nal. For more information, see “Redialing a Busy Number
si
Automaticall
determine the reason that the fax failed, and then tr
the fax a
“Printin
You copied or faxed letter-size ori
verticall
Letter-Size Ori
roup that already contains the maximum 25 assignments.
You must remove one of the individual codes currentl
assi
ned to the group before you can add another. For more
information, see “Editin
You tried to select invalid settin
ori
inals. For more information, see “Using the Copy
Features for Le
ain. Do not drop or force the originals into the
an ADF jam, see
our HP OfficeJet Customer Care Guide.
” in Chapter 2.
faxing. Use one of the reports to
sending
ain, if appropriate. For more information, see
Fax Reports” in Chapter 2.
inals that were placed
in the ADF. For more information, see “Processing
inals Exclusively” in Chapter 2.
Existing Groups” in Chapter 2.
s for copying legal-size
al-Size Paper” in Chapter 2.
Page 50

HP OfficeJet R80 Setup Guide and Faxing Operation
3-3
g
g
g
g
g
y
g
g
g
g
g
g
y
y
y
y
j
g
g
y
g
g
g
y
y
y
g
g
y
g
y
y
y
Fax-Specific Front-Panel Messages (Continued)
Message What You Should Do
Load document then press
Start Fax
Must be unassi
Next time place ori
same direction in feeder.
Press Resume to continue.
No fax answered - Redial in
xx sec
No LIU connected The fax/phone line connector has been removed from the
Off hook You pressed Start Fax, which
ned You tried to create a new group for a code that already has
inals in
You have specified that you want to begin sending a fax, but
there is no document loaded. Load the ori
place it on the
an individual or
unused code, or remove the assi
ou originally wanted to use. For more information, see
“Settin
You copied or faxed a mixture of legal- and letter-size
ori
ADF. For more information, see “Processin
Le
There were no answerin
machine, or the phone cord is not properl
If the recipient needs to receive faxes manuall
recipient that
Verif
HP OfficeJet and the wall
back of HP OfficeJet. For more information, see “Checkin
the Line Connector” in Chapter 1.
the fax number to send a fax usin
method. For more information, see “Usin
Dialin
Up Speed Dialing” in Chapter 2.
inals that were placed horizontally and vertically in the
al- and Letter-Size Originals” in Chapter 2.
that the phone cord is properly inserted to both the
ou can begin real-time dialing to send a fax. Begin dialing
to Use a Credit or Calling Card” in Chapter 2.
lass, and then press Start Fax.
roup assigned to it. Either select a new,
nment from the code that
fax tones at the receiving fax
ou are sending a fax.
ack.
ives you a dial tone so that
inal in the ADF or
Legal-Size or
connected.
, notify the
the real-time dialing
Off-Hook
Out of memor
Paper too narrow. Replace
paper then press Resume.
Phone off hook You lifted the receiver of a phone that is attached directl
HP OfficeJet’s document memory is full. This can occur if
there are too man
happen if the unit is out of paper, or if the fax you are
ma
attemptin
printin
smaller batches.
The IN tra
current task (such as envelopes). Replace the paper with
letter- or le
HP OfficeJet, and
phone or fax call at an
to send is too long to be stored in memory. Try
the unprinted faxes or sending the applicable fax in
unprinted faxes in the memory, which
contains paper that is not wide enough for the
al-size paper, and then press Resume.
ou have a dial tone. Begin dialing a
time.
to
Page 51

3-4
Fax Customer-Care Information
Other Fax-Specific Information
Faxing Specifications
g
g
g
g
y
y
g
y
y
y
g
g
y
g
g
g
y
g
ging
y
y
Fax-Specific Front-Panel Messages (Continued)
Message What You Should Do
Receive failed While you were receiving a fax, a communication error
occurred between HP OfficeJet and the transmittin
machine. Failed transmissions are frequentl
fax
caused by
noise on the phone line.
If
ou know who is sending the fax, ask the person to send it
a
ain.
Redial in xx sec You tried to send a fax that was unsuccessful. The next redial
will occur after the indicated number of seconds.
ou prefer not to wait, press Redial/Pause now.
If
Speed dial empt
You tried to add an unassigned speed-dial code to a group
speed-dial code. Choose a code to which
assi
ned a fax number.
ou have already
xx:unused. Press Enter to set You tried to dial a speed-dial code or pressed a one-touch
ned
Letter (A) size paper
detected. Paper size set to
Letter (A). Press Resume to
continue.
speed-dial button that does not have a fax number assi
to it. Enter a code to which
number. For more information, see “Settin
” in Chapter 2.
Dialin
The paper-size settin
loaded in the IN tra
the settin
to match the size of the paper detected. For more
so HP OfficeJet automatically changed
information, see “Chan
You ma
send
have lost part of the first page. Ask the sender to
ou the first page again.
ou have already assigned a fax
Up Speed
did not match the size of the paper
the Paper Size” in Chapter 2.
For additional specification information, see Chapter 6 of the HP OfficeJet R
Series Customer Care Guide.
The following specifications are subject to change without notice.
◆
100 speed dials with 12 one-touch keys including 25 location groups
◆
R80xi is up to 70-page memory; R80 is up to 100-page memory (based on ITU-T Test
Image #1 at standard resolution. More complicated pages or higher resolution will take
lon
◆
◆
◆
◆
◆
◆
◆
◆
er and use more memory.)
30-page (letter) or 15-page (legal) automatic document feeder
Automatic redial (up to 5 times)
Confirmation and activity reports
CCITT/ITU Group 3 fax with Error Correction Mode
6 seconds/page at 14.4 Kbps (based on ITU-T Test Image #1 at standard resolution. More
complicated pages or higher resolution will take longer and use more memory.)
Broadcast to 25 locations
Ring detect with automatic fax/answering machine switchin
Delayed faxin
Page 52

HP OfficeJet R80 Setup Guide and Faxing Operation
3-5
Fax Resolution
Copy Margins
Regulatory Information
Notice to Users of the U.S. Telephone Network: FCC Requirements
Resolution
Standard 203 x 98 dpi
Fine 203 x 196 dpi,
Superfine 300 x 300 dpi or
256 levels of gray
203 x 392 dpi,
256 levels of gray
U.S. Legal Top Bottom Left Right
Copy at 100% and
Clone
Reductions/
Enlargements
and Special Modes
2 on 1 .9 in. (22.86 mm) .9 in. (22.86 mm) .3 in. (7.62 mm) .3 in. (7.62 mm)
The following sections describe the product requirements from the Federal Communications Commission (FCC, U.S.
only).
This equipment complies with FCC rules, Part 68. On this equipment is a label that contains, among other information,
the FCC Registration Number and Ringer Equivalent Number (REN) for this equipment. If requested, provide this
information to your telephone company.
An FCC compliant telephone cord and modular plug is provided with this equipment. This equipment is designed to be
connected to the telephone network or premises wiring using a compatible modular jack which is Part 68 compliant.
This equipment connects to the telephone network through the following standard network interface jack: USOC RJ11C.
The REN is useful to determine the quantity of devices you may connect to your telephone line and still have all of those
devices ring when your number is called. Too many devices on one line may result in failure to ring in response to an
incoming call. In most, but not all, areas the sum of the RENs of all devices should not exceed five (5). To be certain
of the number of devices you may connect to your line, as determined by the REN, you should call your local telephone
company to determine the maximum REN for your calling area.
If this equipment causes harm to the telephone network, your telephone company may discontinue your service
temporarily. If possible, they will notify you in advance. If advance notice is not practical, you will be notified as soon
as possible. You will also be advised of your right to file a complaint with the FCC. Your telephone company may make
changes in its facilities, equipment, operations, or procedures that could affect the proper operation of your equipment.
If they do, you will be given advance notice so you will have the opportunity to maintain uninterrupted service.
If you experience trouble with this equipment, please contact the manufacturer, or look elsewhere in this manual, for
warranty or repair information. Your telephone company may ask you to disconnect this equipment from the network
until the problem has been corrected or until you are sure that the equipment is not malfunctioning.
This equipment may not be used on coin service provided by the telephone company. Connection to party lines is
subject to state tariffs. Contact your state's public utility commission, public service commission, or corporation
commission for more information.
This equipment includes automatic dialing capability. When programming and/or making test calls to emergency
numbers:
Remain on the line and explain to the dispatcher the reason for the call.
◆
Perform such activities in the off-peak hours, such as early morning or late evening.
◆
Notice: The FCC hearing aid compatibility rules for telephones are not applicable to this equipment.
The Telephone Consumer Protection Act of 1991 makes it unlawful for any person to use a computer or other electronic
device, including fax machines, to send any message unless such message clearly contains in a margin at the top or
bottom of each transmitted page or on the first page of transmission, the date and time it is sent and an identification of
the business, other entity, or other individual sending the message and the telephone number of the sending machine or
.04 in. (1.0 mm) .46 in. (11.7 mm) .25 in. (6.4 mm) .25 in. (6.4 mm)
.46 in. (11.7 mm) .46 in. (11.7 mm) .38 in. (9.65 mm) .38 in. (9.65 mm)
Page 53

3-6
Fax Customer-Care Information
such business, other entity, or individual. (The telephone number provided may not be a 900 number or any other
Electromagnetic or Radio Frequency Interference: FCC Requirements
CAUTION
Changes or modifications not expressly approved by Hewlett-Packard for compliance could
void the user's authority to use the equipment.
Users should not attempt to make such connections themselves, but should contact the
appropriate electric inspection authority, or electrician, as appropriate.
Declaration of Conformity
Manufacturer’s Declaration for Class B Certified PC Peripherals
number for which charges exceed local or long-distance transmission charges.) In order to program this information
into your fax machine, you should complete the steps described in the software.
This equipment generates and uses radio frequency energy and may cause interference to radio and television reception.
Your facsimile complies with the specifications of Part 15 of the Federal Communications Commission rules for a Class
B digital device. These specifications provide reasonable protection against such interference in residential installation.
However, there is no guarantee that interference will not occur in a particular installation. If the facsimile does cause
interference to radio or television reception, which can be determined by turning the facsimile off and on, you can try
to eliminate the interference problem by doing one or more of the following.
Reorient the receiving antenna.
◆
Reorient the position of the facsimile with respect to the receiver.
◆
Move the facsimile away from the receiver.
◆
Plug the facsimile into a different outlet so that the facsimile and the receiver are on different branch circuits.
◆
If necessary, consult an authorized HP service agency or an experienced radio/television technician for additional
suggestions. You may find the following booklet, prepared by the Federal Communications Commission, to be helpful:
“How to Identify and Resolve Radio/TV Interference Problems.” This booklet is available from the US Government
Printing Office, Washington DC 20402, Stock No. 004-000-00345-4.
Notice: The Ringer Equivalence Number (REN) assigned to each terminal device provides an indication of the
maximum number of terminals allowed to be connected to a telephone interface. The termination on an interface may
consist of any combination of devices subject only to the requirement that the sum of the Ringer Equivalence Numbers
of all the devices does not exceed 5.
The REN for this product is 1.3B, based on FCC Part 68 test results.
Manufacturer’s Name and Address:
Hewlett-Packard Company, 16399 West Bernardo Drive, San Diego, CA 92127-1899, USA
declares, that the product
Product Name: OfficeJet R40, R65 & R80 series
Model Number(s): C668xA, where x=0,1,2,3,4,7,8 or 9
Product Options: OfficeJet R65 includes ADF HP part # C6681-60020
conforms to the following Product Specifications:
EMC: FCC CFR 47, Part 15 – Class B
US Contact Information: Hewlett-Packard, 16399 W. Bernardo Dr. San Diego, CA 92127-1899, (619) 655-4100
NVLAP Certification # 20038-1
C669yA, where y=2,3 or 4
HP Color Copier 170, 270, 160, 260
C668xA, where x=5 or 6
C669yA, where y=0 or 1
OfficeJet R80 includes ADF/FAX HP part # C6682-60040
HP Color Copier 270 & 260 includes ADF HP part # C6681-60020
Page 54

HP OfficeJet R80 Setup Guide and Faxing Operation
4-1
Sharing HP OfficeJet
on a Network
4
g
NOTE
Your computers must already be networked to use this procedure. HP does not
provide support for networks. See your Windows Help system for assistance.
HP OfficeJet does not support scanning over a network. The Jet Direct 170X Print
Server may or may not provide network printing and limited scanning capabilities. For
more information, see the HP Web site at: http://www.hp.com/go/all-in-one.
Understanding Point-and-Print and Peer-to-Peer Networks
y
y
y
y
Local Area Network (LAN) Access
Minimum System Requirements
This chapter explains how to set up the HP OfficeJet and your computers for
network printin
on a point-and-print or peer-to-peer network.
For purposes of discussion in this guide, point-and-print network refers to an
environment where two or more computers (Windows 95/98 or NT 4.0)
equall
share a single resource, such as the HP OfficeJet, and the server
computer automatically downloads the required software to the client
computer. If
Windows NT 4.0 clients,
instead. A peer-to-peer network is the same except that the software must be
manuall
using Windows 95/98 or NT 4.0 or a combination of the two
our network uses a Windows 95/98 computer as the server with
ou must use a
installed on each Windows NT 4.0 client.
peer-to-peer
network configuration
Before you can set up printer sharing, a network must already exist.
Each computer must meet the minimum system requirements for connection
to a LAN. A computer that meets these requirements is one that:
Contains a properly configured network card.
◆
Is a client or server for Microsoft networks.
◆
Has basic network services and protocols.
◆
Has the proper network adapter.
◆
Has LAN access.
◆
Page 55

4-2
Sharing HP OfficeJet on a Network
Setting Up the Server
This section provides instructions for setting up the server.
IMPORTANT
If you are using Windows NT 4.0, you must have administrative rights for your
computer to set up an NT 4.0 server for network printing. For more information, see
Windows NT 4.0 Help or your system administrator.
1
g
2
g
a
b
c
d
g
3
4
g
5
6
g
g
7
8
TIP
9
a
b
c
10
Install the HP OfficeJet R Series software on the server, as described in
Chapter 1 under “Installin
If you are using Windows 95/98 as your server, perform the following
steps before continuin
On the Windows desktop, right-click Network Neighborhood, and
choose Properties.
On the Configuration tab, click File and Print Sharing.
Select the check box for the sharing options you want.
Click OK to store your changes, and then click OK again to exit the
File and Print Sharin
Restart the computer.
If an Electronic Registration window appears, follow the on-screen
instructions to re
On the Windows taskbar, click Start, point to Settings, and choose
Printers.
Right-click the HP OfficeJet R Series icon, and choose Sharing.
The HP OfficeJet R Series Properties dialo
Sharin
Click the Shared (Windows NT 4.0) or Shared As (Windows 95/98)
option.
In the Share Name field, type a name for the HP OfficeJet if you do not
want to use the default name, HPOffice.
Note the share name of the HP OfficeJet. You will need it to set up client
computers.
If you are setting up a Windows NT 4.0 server that supports
Windows 95/98 clients, complete the following steps before continuing.
Click OK to close the dialog box and store your changes.
tab visible.
Click Alternate drivers, and then click Windows 95.
After the message instructing you to insert the floppy disk appears,
click OK and insert the HP OfficeJet R Series CD-ROM.
In the Printer Drivers for Windows 95 dialog box, click Browse,
open the AddPrinter folder, open the w9x folder, and double-click
the hpm95wa.inf file.
This allows the Windows NT 4.0 server to download the correct
driver to a Windows 95/98 client.
ister your HP OfficeJet.
the HP OfficeJet R Series Software.”
.
dialog box.
box appears, with the
Page 56

HP OfficeJet R80 Setup Guide and Faxing Operation
4-3
Setting Up a Point-and-Print Client
Follow these steps to install the printing software on each client for either of
g
NOTE
A Windows 95/98 server cannot automatically download the software to a Windows
NT 4.0 client. For this configuration, follow the steps in “Setting Up a Peer-to-Peer
Client (95/98 server to NT 4.0 client).”
1
2
g
3
4
and
g
Setting Up a Peer-to-Peer Client (95/98 server to NT 4.0 client)
g
1
2
3
the followin
Windows 95/98 server with only Windows 95/98 clients.
◆
Windows NT 4.0 server with Windows 95/98 and/or NT 4.0 clients.
◆
On the Windows desktop, double-click Network Neighborhood.
Find the name of the server that the HP OfficeJet is directly connected to,
and double-click its icon.
The server window appears showin
name of the HP OfficeJet.
Double-click the HP OfficeJet’s share name.
After the setup message “Before you can use the printer...” appears, click
Yes
a connection to the HP OfficeJet.
After connectin
window appears.
configurations:
shared devices, including the share
then wait several moments while the client computer establishes
to the shared HP OfficeJet, the HP OfficeJet R Series
If you are using a configuration that includes a 95/98 server with an NT 4.0
client, follow these steps to install the printin
Set up the server by following the steps outlined earlier under “Setting
Up the Server.”
In the first Add Printer Wizard dialog box, select My Computer, and
click Next.
In the next dialog box, click New Port.
software on each NT 4.0 client.
Page 57

4-4
Sharing HP OfficeJet on a Network
4
In the Printer Ports dialog box, choose Local Port, and click New Port.
5
g
6
g
7
8
9
10
In the Port Name dialog box, type in the name of the server to which the
HP OfficeJet is connected and the share name assi
Click OK to close the Port Name dialog box and store your changes, and
then click Close on the Printer Ports dialo
In the Available ports list, verify that the newly created port exists, and
then click Next.
Click Have Disk, and insert the HP OfficeJet R Series software CD.
If the HP OfficeJet R Series software installation menu appears, click
Quit.
Change the name of the drive letter to point to your CD-ROM drive, and
click Browse.
ned to the printer.
box.
Page 58

HP OfficeJet R80 Setup Guide and Faxing Operation
4-5
11
In the Locate File dialog box, open the AddPrinter folder, open the
12
13
14
15
16
17
18
wNT folder, and double-click the hpmntwa.inf file.
In the Install From Disk dialog box, click OK.
If another message appears, point to the same location on the CD, and
click OK.
Select HP OfficeJet R Series, click Next, and click Next again.
To set the HP OfficeJet as your default printer, click Yes and then click
Next.
Select Not shared, and click Next.
Select Yes to print a test page, and click Finish.
If your test page printed correctly, click Yes.
Page 59

4-6
Sharing HP OfficeJet on a Network
Page 60

HP OfficeJet R80 Setup Guide and Faxing Operation
I-1
index
A
AC/DC adapter 1-9
Adobe PhotoDeluxe, installing
advanced
fax receive settings
fax send settings
aligning print cartridges
answering machine
Automatic Reduction setting
1-21
2-7
1-16
2-11
1-16
2-6
B
Backup Receive setting 2-12
bi-directional mode
broadcasting
Busy Redial setting
2-4
1-1
2-8
C
Cancel Sched Send setting 2-5
cartridges, print
changing paper size
cleaning the lid backing
confirming receipt of fax
connecting
contrast, changing for faxes
copying legal-size originals
1-16
aligning
installing
answering machine or modem
power cord
printer cable
1-6
2-15
3-1
2-13
1-9
1-9
2-7
2-15
D
declaration of conformity 3-6
default settings
2-14
fax
language
paper size
deleting speed-dial settings
distinctive ringing
1-17
1-17
1-19
2-10
E
environment 1-3
Error Correction Mode (ECM)
error messages, front panel
extended capabilities port (ECP) mode
2-11
3-2
F
fax panel 1-17
faxing
advanced receive settings
advanced send settings
answer another phone
Automatic Reduction
basic settings
1-22
2-12
2-6
2-7
2-11
1-21
1-1
2-5
3-2
2-5
2-7
2-6
2-7
2-13
1-19
1-23, 2-14
2-7
2-12, 2-13
2-7
2-5
2-8
2-12
1-24
2-5
1-24
1-23
3-4
3-1
1-17
1-4
1-18
2-6
2-14
1-22
2-12
2-8
2-6
2-11
2-12
cancel scheduled
changing contrast
changing resolution
charge to card
checking the line connector
confirming receipt
connecting equipment
distinctive ringing
enabling silent detection
entering text
Error Correction Mode (ECM)
from the glass
generating reports
mixture of legal- and letter-size originals
off-hook dialing
receiving faxes
redial fax number
reduce size of output
Remote Reception
restore factory settings
rings to answer
same phone line as voice calls
Scheduled Send
send later
sending legal-size originals
sending letter-size originals
1-17
set up
setting dial mode
setting the header
setting time and date
setting up speed dialing
2-13
sound
specifications
to one number or speed dial
to ten numbers or one group
troubleshoot
using Backup Receive
using fax-back features
using Remote Reception
2-13
volume
front panel
language, changing
messages
overlay, attaching
G
group speed dials 2-9, 2-10
I
individual speed dials 2-9
installing
HP software
PhotoDeluxe
print cartridges
third-party software
1-11
1-16
1-6
1-16
1-18
2-3
2-2
2-4
2-4
2-11
1-18
2-3
Page 61

I-2
Index
L
language, changing 1-17
legal-size originals
line connector for faxing
loading paper
copying
faxing
2-15
2-3
1-5
1-18
M
maintenance, cleaning the lid backing 3-1
messages
changing the language used
front panel
mode
bi-directional
ECP
error correction
parallel port
modem
multimedia tour
1-21
3-2
1-1
1-1
1-15
1-1
2-11
1-17
N
network printing
No Answer Redial setting
overview
setting up the clients for peer-to-peer
setting up the clients for point-and-print
setting up the server
4-1
4-2
2-8
P
paper
changing size
loading
size
parallel port mode
PC modem
peer-to-peer network
overview
setting up the clients
setting up the server
phone line
multiple numbers
using same number for voice and fax calls
PhotoDeluxe, installing
point-and-print network
overview
setting up the clients
setting up the server
power cord
adapter
connecting
print cartridges
aligning
installing
printer cable
connecting
type to use
1-17
1-21
1-5
1-9
1-16
4-1
4-1
1-6
2-15
1-1
4-3
4-2
1-19
1-16
4-3
4-2
1-9
1-9
1-9
problems
product tour
3-1
1-15
R
receiving faxes 2-5, 2-11
registering your HP OfficeJet
regulatory information
Remote Reception setting
reports, generating for fax
resolution, changing for faxes
restoring default fax settings
ring volume
rings to answer
2-13
1-24
3-5
1-15
2-12
2-12, 2-13
2-6
2-14
S
Scheduled Send setting 2-5
sending faxes
settings
4-3
4-3
Silent Detect setting
software
speaker volume
specifications, fax
1-18
speed dialing
switch box
2-1, 2-7
2-12
1-24
2-5
2-10
2-5
2-8
2-12
2-7
2-6
1-16
2-11
1-16
2-11
2-9
2-10
advanced receive for fax
advanced send for fax
Automatic Reduction
Backup Receive
basic fax
Busy Redial
Cancel Sched Send
dial mode
Error Correction Mode (ECM)
fax header
No Answer Redial
Remote Reception
rings to answer
Scheduled Send
Silent Detect
speed dial
time and date
installing HP
installing PhotoDeluxe
installing third-party
creating group speed-dial settings
creating individual speed-dial settings
deleting settings
editing group speed-dial settings
1-9
1-22
2-8
1-24
1-23
2-11
2-8
1-22
2-11
1-11
2-13
3-4
2-8
2-9
T
telephone line
multiple numbers
using same number for voice and fax calls
tone or pulse, setting for fax
1-15
tour
troubleshooting
1-19
1-24
3-1
1-18
V
voice mail 1-20
Page 62

Page 63

9LVLWXVRQWKH:RUOG:LGH:HE
KWWSZZZKSFRPJRDOOLQRQH
8SGDWHG'ULYHUV
8VHU)RUXPV
3URGXFW,QIRUPDWLRQ
)UHTXHQWO\$VNHG4XHVWLRQV
3URGXFWLYLW\7RROV
3ULQWHGRQUHF\FOHGSDSHU
&RS\ULJKW
+HZOHWW3DFNDUG&R
3ULQWHGLQWKH86$
*HUPDQ\RU6LQJDSRUH
*C6680-90177*
*C6680-90177*
C6680-90177
 Loading...