

Page 1

HP Officejet Pro K850 Series
User Guide
Page 2

Page 3

HP Officejet Pro K850/K850dn Color Printer
User Guide
Page 4

Copyright Information
© 2005 Copyright Hewlett-Packard
Development Company, L.P.
Edition 1, 5/2005
Reproduction, adaptation or translation
without prior written permission is
prohibited, except as allowed under the
copyright laws.
The information contained herein is subject
to change without notice.
The only warranties for HP products and
services are set forth in the express
warranty statements accompanying such
products and services. Nothing herein
should be construed as constituting an
additional warranty. HP shall not be liable
for technical or editorial errors or omissions
contained herein.
Acknowledgements
®
Microsoft
MS-DOS
, Windows®, Windows NT®, and
®
are U.S. registered trademarks
of Microsoft Corporation.
®
Novell
and NetWare® are registered
trademarks of Novell Corporation.
®
and Acrobat® are registered
Adobe
trademarks of Adobe Systems Incorporate.
®
Pentium
is a registered trademark of Intel
Corporation.
Safety Information
Always follow basic safety precautions
when using this product to reduce risk of
injury from fire or electric shock.
1. Read and understand all instructions in
the documentation that comes with the
printer.
2. Use only a grounded electrical outlet
when connecting this product to a power
source. If you do not know whether the
outlet is grounded, check with a qualified
electrician.
3. Observe all warnings and instructions
marked on the product.
4. Unplug this product from wall outlets
before cleaning.
5. Do not install or use this product near
water, or when you are wet.
6. Install the product securely on a stable
surface.
7. Install the product in a protected location
where no one can step on or trip over the
line cord, and the line cord cannot be
damaged.
8. If the product does not operate normally,
see
Maintaining and troubleshooting.
9. There are no user-serviceable parts
inside. Refer servicing to qualified service
personnel.
Page 5

Table of contents
1 Getting started
Finding other resources for the product .................................................................................................2
Accessibility.............................................................................................................................................4
Understanding the printer parts...............................................................................................................5
Front view................................................................................................................................5
Control panel...........................................................................................................................5
Back view................................................................................................................................6
Installing other software ..........................................................................................................................8
2 Installing accessories
Installing the automatic two-sided printing accessory...........................................................................10
3 Using the printer
Selecting print media.............................................................................................................................12
Tips for selecting and using print media...............................................................................12
Understanding specifications for supported media..............................................................13
Setting minimum margins.....................................................................................................20
Loading media.......................................................................................................................................21
Loading small media..............................................................................................................................23
Changing print settings..........................................................................................................................25
Canceling a print job..............................................................................................................................26
Printing with the front or rear manual feed slot.....................................................................................27
Changing the software settings............................................................................................27
Loading the front manual feed slot.......................................................................................27
Loading the rear manual feed slot........................................................................................28
Printing on both sides (duplexing).........................................................................................................30
Guidelines for duplexing.......................................................................................................30
Duplexing (Windows)............................................................................................................30
Duplexing (Mac OS)..............................................................................................................31
Printing on special and custom-size media...........................................................................................32
4 Configuring and managing the printer
Managing the printer..............................................................................................................................34
Overview of printer management tasks................................................................................34
Monitor the printer.................................................................................................................35
Administer the printer............................................................................................................36
Configure network options....................................................................................................37
Overview of printer management tools.................................................................................38
Toolbox (Windows)..............................................................................................38
ENWW iii
Page 6

HP Printer Utility (Mac OS)..................................................................................39
Embedded Web server (EWS).............................................................................40
HP Web Jetadmin software.................................................................................41
myPrintMileage....................................................................................................41
HP Instant Support...............................................................................................42
HP Network Printer Setup Utility (Mac OS).........................................................44
HP Deskjet Control Panel (HP DJCP).................................................................44
Understanding and printing the configuration page..............................................................................45
Understanding a configuration page.....................................................................................45
Printing a configuration page................................................................................................47
Configuring the printer (Windows) ........................................................................................................48
Direct connection .................................................................................................................48
Network connection..............................................................................................................50
Configuring the printer (Mac OS) .........................................................................................................53
Installing the software for network or direct connection.......................................................53
Sharing the printer on a locally shared network...................................................................53
Uninstalling the printer software............................................................................................................55
Uninstalling the printer software (Windows).........................................................................55
Uninstalling the printer software (Mac OS)...........................................................................55
5 Maintaining and troubleshooting
Replacing the ink cartridges..................................................................................................................58
Maintaining the printheads....................................................................................................................60
To check printhead health....................................................................................................60
To align the printheads.........................................................................................................60
To clean printheads automatically........................................................................................61
To clean the printhead contacts manually............................................................................62
Replacing the printheads.......................................................................................................................66
Diagnosing the print quality...................................................................................................................71
Testing the paper feed...........................................................................................................................72
Testing media skew...............................................................................................................................73
Calibrating the color...............................................................................................................................74
Troubleshooting.....................................................................................................................................75
Troubleshooting tips and resources.....................................................................................75
General troubleshooting tips.................................................................................................75
Resolving printing problems.................................................................................................76
Poor print quality and unexpected printouts.........................................................................79
Resolving paper-feed problems............................................................................................83
Embedded Web server (EWS) cannot be opened...............................................................84
Troubleshooting installation issues.......................................................................................85
Clearing jams........................................................................................................................86
6 HP supplies and accessories
Ordering printing supplies online...........................................................................................................92
System requirements for ordering printing supplies.............................................................92
To order printing supplies.....................................................................................................92
Accessories...........................................................................................................................................93
Accessories and cables........................................................................................................93
Print servers..........................................................................................................................93
Supplies.................................................................................................................................................94
iv ENWW
Page 7

Ink supplies...........................................................................................................................94
HP media..............................................................................................................................94
7 Support and warranty
Obtaining electronic support..................................................................................................................96
Obtaining HP telephone support...........................................................................................................97
Before you call......................................................................................................................97
HP Total Care phone numbers.............................................................................................97
Hewlett-Packard limited warranty statement.......................................................................................101
8 Printer lights reference
9 Printer specifications
Physical specifications.........................................................................................................................112
Product features and capacities..........................................................................................................113
Processor and memory specifications.................................................................................................114
Operating system and network protocol specifications.......................................................................115
Functional specifications.....................................................................................................................118
Environmental specifications...............................................................................................................120
Electrical specifications.......................................................................................................................121
10 Regulatory information
FCC statement.....................................................................................................................................124
EMI statement (Korea) .......................................................................................................................125
VCCI statement (Japan) .....................................................................................................................126
Regulatory model number...................................................................................................................127
Power cord statement..........................................................................................................................128
Declaration of conformity.....................................................................................................................129
Environmental sustainability program.................................................................................................130
Reduction and elimination..................................................................................................130
Power consumption............................................................................................................130
Material safety data sheets.................................................................................................130
Recycling............................................................................................................................131
Index....................................................................................................................................................................133
ENWW v
Page 8

vi ENWW
Page 9

1 Getting started
Thank you for buying the printer. This guide provides details about how to use the printer and to
resolve printer and printing problems.
ENWW 1
Page 10

Finding other resources for the product
You can obtain product information and further troubleshooting resources that are not included in this
guide from the following resources:
Resource Description Location
Setup poster
Getting started guide
Readme file and release notes
Printer-driver onscreen Help (Windows)
Toolbox (Microsoft® Windows®)
HP Printer Utility (Mac OS)
Provides illustrated setup information. A printed version of this document is
Provides instructions for setting up the
printer and information about the
warranty and safety issues.
Provide late-breaking information and
troubleshooting tips.
Provides an explanation of the features
in the printer driver.
Provides information about printhead
health and access to printer
maintenance services. See
(Windows).
The HP Printer Utility contains tools to
configure print settings, calibrate the
printer, clean the printheads, print
configuration and test pages, order
supplies online, and find support
information from the website. You can
also configure settings for wireless
printing. See
HP Printer Utility (Mac OS).
Toolbox
provided with the printer.
Included as a printed guide in the box
with the printer. Also, an electronic
version is available at
support/officejetprok850.
Included on the Starter CD.
Available from the printer driver.
Available if you choose an installation
option that includes the Toolbox.
The HP Printer Utility is normally
installed with the printer software.
www.hp.com/
Embedded Web server (network
connection)
Control panel Provides status, error, and warning
HP Instant Support Helps you quickly identify, diagnose,
Configuration page Provides information about the printer
Allows you to view status information,
change settings, and manage the
printer from any computer on the
network. See
(EWS).
information about printer operation.
and resolve printing problems. See
Instant Support.
hardware (such as the firmware
version and model number), printer
settings, and accessories that are
installed. If the printer is connected to a
network, an additional network
configuration page is available.
Embedded Web server
HP
Available through any standard Web
browser.
See Printer lights reference.
Available through any standard Web
browser or through the Toolbox
(Windows), embedded Web server, or
HP Printer Utility (Mac OS).
See Understanding and printing the
configuration page.
2 Chapter 1 Getting started ENWW
Page 11

Resource Description Location
System tests and printouts (such as
the print-quality analysis printout and
paper-path test)
HP websites Provides the latest printer software,
HP Total Care telephone support Lists information to contact HP. During
Provides information to help diagnose
problems in the print mechanism and
paper path.
product, and support information.
the warranty period, this support is
often free of charge.
See Administer the printer.
www.hp.com/support/officejetprok850
www.hp.com/support
See HP Total Care phone numbers.
ENWW Finding other resources for the product 3
Page 12

Accessibility
Your HP printer provides a number of features that make it accessible for people with disabilities.
Visual
The printer software is accessible for users with visual impairments or low vision through the use of
your operating system’s accessibility options and features. It also supports most assistive technology
such as screen readers, Braille readers, and voice-to-text applications. For users who are color blind,
colored buttons and tabs used in the software and on the HP printer have simple text or icon labels
that convey the appropriate action.
Mobility
For users with mobility impairments, the printer software functions can be executed through
keyboard commands. The software also supports Windows accessibility options such as StickyKeys,
ToggleKeys, FilterKeys, and MouseKeys. The printer doors, buttons, paper trays, and paper guides
can be operated by users with limited strength and reach.
Support
For more details about the accessibility of this product and HP's commitment to product accessibility,
visit HP's Web site at
http://www.hp.com/accessibility.
For accessibility information for Macintosh operating systems, visit the Apple web site at
http://www.apple.com/disability.
4 Chapter 1 Getting started ENWW
Page 13
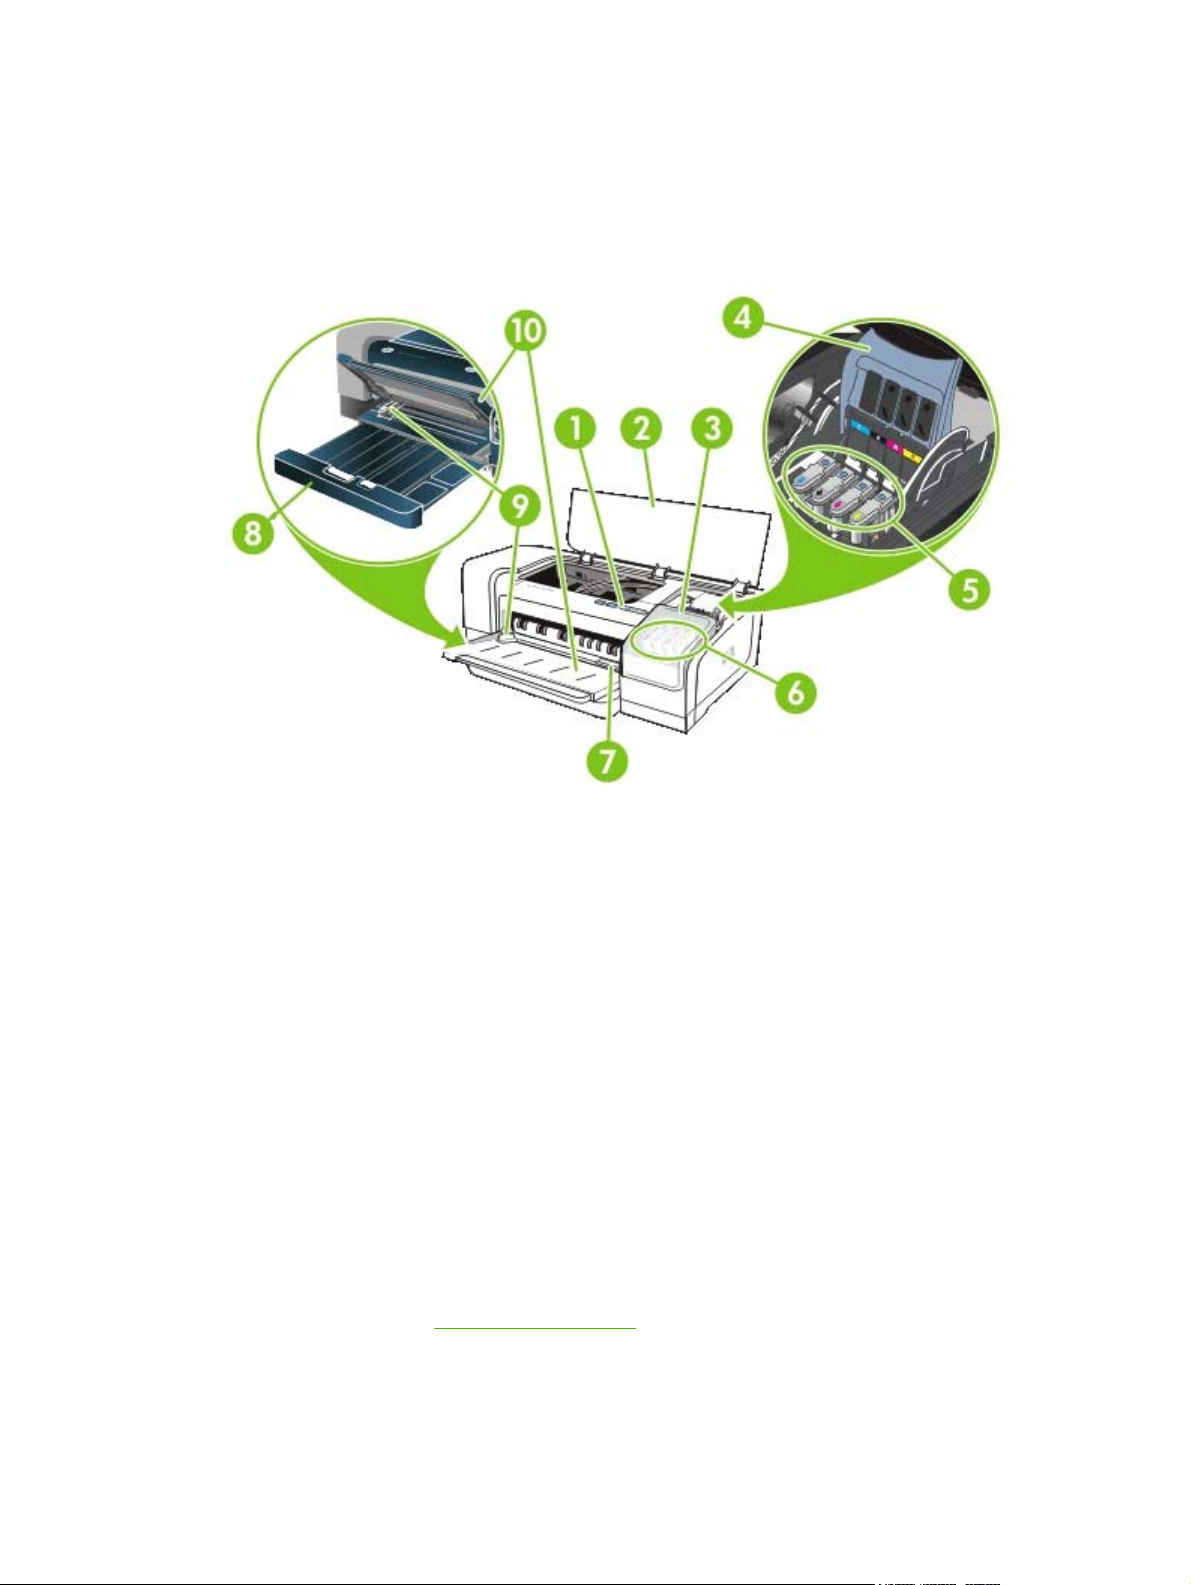
Understanding the printer parts
Front view
1
Control panel
2
Top cover
3
Ink cartridge cover
4
Printhead latch
5
Printheads
6
Ink cartridges
7
Front manual feed slot
8
Input tray
9
Paper guides
10
Output tray
Control panel
For more information, see Printer lights reference.
ENWW Understanding the printer parts 5
Page 14
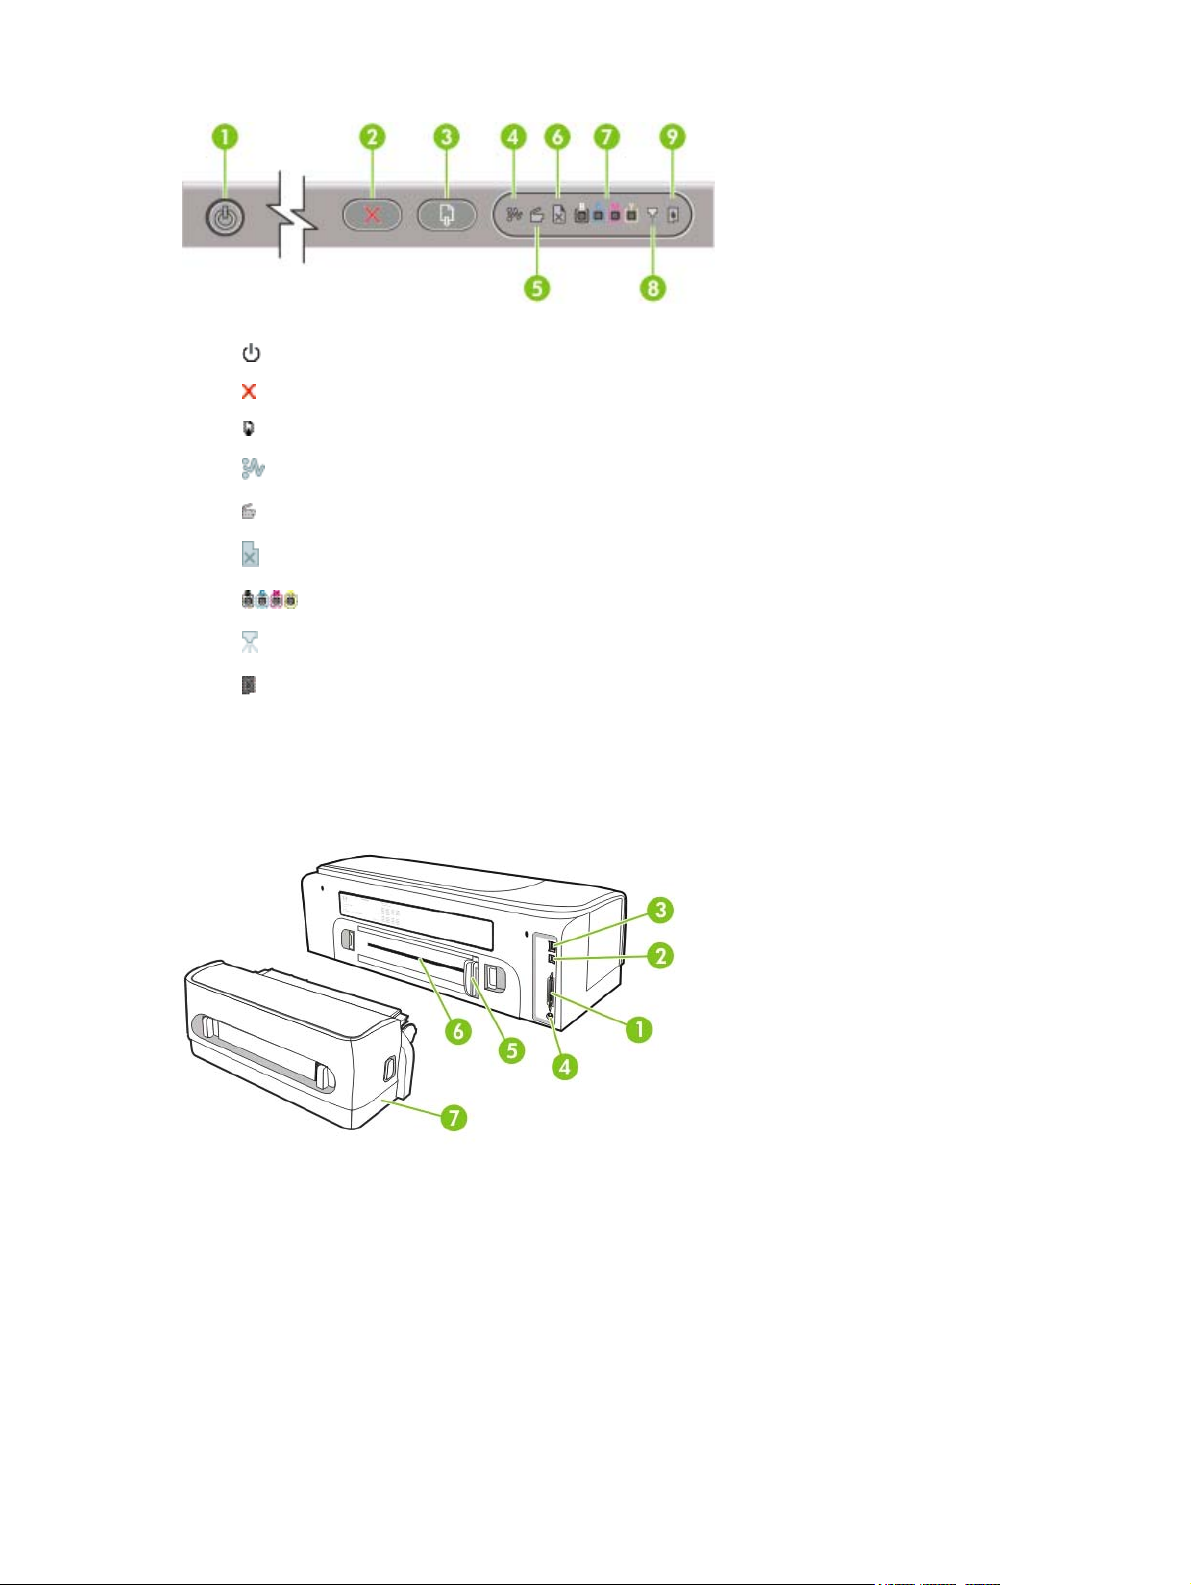
1
(Power button and light)
2
3
4
5
6
7
8
9
(Cancel button)
(Resume button and light)
(Paper Jam light)
(Door Open light)
(Out of Paper light)
(Color indicator lights)
(Printhead light)
(Ink Cartridge light)
Back view
1
Parallel (IEEE 1284) connector
2
USB connector
3
Network connector (HP Officejet Pro K850dn Color Printer only)
4
Power input
5
Paper guide
6 Chapter 1 Getting started ENWW
Page 15

6
Rear manual feed slot
7 Automatic two-sided printing accessory (duplex unit) Included with the HP Officejet Pro K850dn Color Printer. To
order separately, see
HP supplies and accessories for information about ordering accessories.
ENWW Understanding the printer parts 7
Page 16

Installing other software
The following drivers and optional software are also available for installation on the printer.
HP Web Jetadmin: This is a Web browser-based network printer management tool. A link to the
●
HP Web Jetadmin website is included on the Starter CD. For more information about using this
tool, see
HP Web Jetadmin software.
●
Linux driver: Available at
printers, see
If you are using Windows NT 4.0, Windows 2000, or Windows XP, you must have administrator
privileges to install a printer driver.
hpinkjet.sourceforge.net.
www.hp.com/support. For more information about using Linux with HP
8 Chapter 1 Getting started ENWW
Page 17

2
Installing accessories
See HP supplies and accessories for information about ordering accessories.
ENWW 9
Page 18

Installing the automatic two-sided printing accessory
You can print on both sides of a sheet of paper automatically when the automatic two-sided printing
accessory (duplex unit) is installed on the printer. The duplex unit comes with the HP Officejet Pro
K850dn Color Printer. It can also be ordered separately. See
information on using the duplex unit, see
To install the duplex unit
1. Push the buttons on both sides of the rear-access panel.
2. Remove the panel from the printer.
3. Slide the duplex unit into the printer until the unit locks into place.
NOTE Do not press the buttons on either side of the duplex unit when installing; use
them only for removing the unit from the printer.
Printing on both sides (duplexing).
HP supplies and accessories. For
10 Chapter 2 Installing accessories ENWW
Page 19

3 Using the printer
This section provides information on media usage for the printer, changing print settings, and
performing basic printing tasks.
ENWW 11
Page 20

Selecting print media
The printer is designed to work well with most types of office paper. It is best to test a variety of print
media types before buying large quantities. Use HP media for optimum print quality. See
and accessories. For more information about HP media, see www.hp.com.
Tips for selecting and using print media
For the best results, observe the following guidelines.
HP supplies
Always use media that conforms to the printer specifications. See
●
for supported media.
Select the appropriate media type and size from the printer driver. See
●
Load only one type of media at a time into a tray.
●
● For the input tray, load media print-side down and aligned against the right and back edges of
the tray. See
Do not overload the tray. See
●
To prevent jams, poor print quality, and other printer problems, avoid the following media:
●
Multipart forms
●
Media that is damaged, curled, or wrinkled
●
Media with cutouts or perforations
●
● Media that is heavily textured, embossed, or does not accept ink well
Media that is too lightweight or stretches easily
●
If using recycled media, you might need to lower the ink volume in the printer software to prevent
●
smeared ink. However, if you lower the ink volume too much, the output might appear washed out.
● If using recycled media, you might need to use another media type to prevent paper jams.
Loading media.
Understanding specifications for supported media.
Understanding specifications
Changing print settings.
Cards and envelopes
● Avoid envelopes that have a very slick finish, self-stick adhesives, clasps, or windows. Also avoid
cards and envelopes with thick, irregular, or curled edges, or areas that are wrinkled, torn, or
otherwise damaged.
Use tightly constructed envelopes, and make sure the folds are sharply creased.
●
Load envelopes into the printer according to the icon on the tray.
●
Photo paper
Use the Best mode to print photographs. Note that in this mode, printing takes longer and more
●
memory is required from your computer.
Remove each sheet as it prints and set it aside to dry. Allowing wet media to stack up might
●
cause smearing.
12 Chapter 3 Using the printer ENWW
Page 21

Transparencies
Insert transparencies with the rough side down and the adhesive strip pointing towards the back
●
of the printer.
Use the Best mode to print transparencies. This mode provides longer drying time and ensures
●
that the ink dries completely before the next page is delivered to the output tray. Allowing wet
media to stack up might cause smearing.
Custom-size media
Use only custom-size media supported by the printer.
●
If your application supports custom-size media, set the media size in the application before
●
printing the document. If not, set the size in the printer driver. You might need to reformat
existing documents to print them correctly on custom-size media.
Understanding specifications for supported media
This section provides information regarding the sizes, types, and weights of media that the printer
supports. It also provides information on the tray capacity.
NOTE An automatic two-sided printing accessory (duplex unit) comes with the HP Officejet
Pro K850dn Color Printer.
Supported media sizes
Media size Input tray Front manual
feed slot
Standard paper sizes
U.S. Letter
(215.9 by 279.4
mm; 8.5 by 11
inches)
Legal
(215.9 by 355.6
mm; 8.5 by 14
inches)
Super B
(330 by 483 mm;
13 by 19 inches)
A4
(210 by 297 mm;
8.3 by 11.69
inches)
Rear manual
feed slot
Auto duplex
(duplex unit)
Manual duplex
Executive
(184.15 by 266.7
mm; 7.25 by 10.5
inches)
ENWW Selecting print media 13
Page 22

Media size Input tray Front manual
feed slot
Rear manual
feed slot
Auto duplex
(duplex unit)
Manual duplex
Statement
(140 by 216 mm;
5.5 by 8.5 inches)
A5
(148 by 210 mm;
5.83 by 8.27
inches)
A6
(105 by 148 mm;
4.13 by 5.83
inches)
B4
(257 by 364 mm;
10.1 by 14.3
inches)
B5 (JIS)
(182 by 257 mm;
7.2 by 10.1 inches)
Tabloid
(279.4 by 431.8
mm; 11 by 17
inches)
A3
(297 by 420 mm;
11.7 by 16.5
inches)
A3+
(330 by 483 mm;
13.0 by 19.0
inches)
Banner A3
(297 by 420 mm;
11.7 by 16.5
inches)
Banner A4
(210 by 297 mm;
8.3 by 11.69
inches)
Banner Letter
(215.9 by 279.4
mm; 8.5 by 11
inches)
14 Chapter 3 Using the printer ENWW
Page 23

Media size Input tray Front manual
feed slot
Rear manual
feed slot
Auto duplex
(duplex unit)
Manual duplex
Banner Tabloid
(279.4 by 431.8
mm; 11 by 17
inches)
Panorama A4
(210 by 594 mm;
8.27 by 23.39
inches)
Panorama
(101.6 by 254
mm; 4 by 10
inches)
Panorama
(101.6 by 279.4
mm; 4 by 11
inches)
Panorama
(101.6 by 304.8
mm; 4 by 12
inches)
Envelopes
Envelope #10
(104.9 by 241.3
mm; 4.13 by 9.5
inches)
Envelope Monarch
(98.5 by 190.5
mm; 3.88 by 7.5
inches)
HP Greeting Card
Envelope
(111.25 by 152.4
mm; 4.38 by 6
inches)
Envelope A2
(111 by 146 mm;
4.37 by 5.75
inches)
Envelope DL
(110 by 220 mm;
4.33 by 8.66
inches)
ENWW Selecting print media 15
Page 24

Media size Input tray Front manual
feed slot
Rear manual
feed slot
Auto duplex
(duplex unit)
Manual duplex
Envelope C5
(162 by 229 mm;
6.38 by 9.02
inches)
Envelope C6
(114 by 162 mm;
4.49 by 6.38
inches)
Envelope Kaku #2
(240 by 332 mm;
9.4 by 13.1 inches)
Japanese
Envelope Chou #3
(120 by 235 mm;
4.7 by 9.3 inches)
Japanese
Envelope Chou #4
(90 by 205 mm;
3.5 by 8.1 inches)
Cards
Index card
(76.2 by 127 mm;
3 by 5 inches)
Index card
(101.6 by 152.4
mm; 4 by 6 inches)
Index card
(127 by 203.2
mm; 5 by 8 inches)
Hagaki
(100 by 148 mm;
3.9 by 5.8 inches)
Ofuku Hagaki
(148 by 200 mm;
5.8 by 7.9 inches)
Photo media
Photo L
(89 by 127 mm;
3.5 by 5 inches)
16 Chapter 3 Using the printer ENWW
Page 25

Media size Input tray Front manual
feed slot
Rear manual
feed slot
Auto duplex
(duplex unit)
Manual duplex
Photo L with tab
(89 by 127 mm;
3.5 by 5 inches)
Photo
(101.6 by 152.4
mm; 4 by 6 inches)
Photo with tab
(101.6 by 152.4
mm; 4 by 6 inches)
Photo with tab
(127 by 177.8
mm; 5 by 7 inches)
Photo
(203.2 by 254
mm; 8 by 10
inches)
Photo
(279.4 by 355.6
mm; 11 by 14
inches)
Photo
(304.8 by 304.8
mm; 12 by 12
inches)
Photo 10 by 15 cm
(100 by 150 mm;
4 by 6 inches)
Photo 10 by 15
cm with tab
(100 by 150 mm;
4 by 6 inches)
Other media
Custom
Supported media types
The following table lists the types of media you can use.
Media size Input tray and front and
rear manual feed slots
Manual duplex Auto duplex (duplex unit)
Standard paper
ENWW Selecting print media 17
Page 26

Media size Input tray and front and
rear manual feed slots
Plain paper
Thick plain paper
HP Bright White Paper
HP Premium Paper
HP Premium Presentation
Paper
HP Photo and Project Paper
Other inkjet papers
Photo papers
NOTE Photo media supports up to 4800 x 1200 optimized dpi for color printing and 1200 input dpi. This setting
might temporarily use a large amount of hard disk space (400 MB or more) and will result in slower printing.
Manual duplex Auto duplex (duplex unit)
HP Photo Paper
Other photo papers
Transparencies
HP transparencies
Other transparency films
Specialty papers
HP Banner Paper
HP iron-on transfers
HP labels
HP note cards
HP holiday photo cards
Other specialty papers
Greeting cards
18 Chapter 3 Using the printer ENWW
Page 27
Media size Input tray and front and
rear manual feed slots
HP greeting cards
HP photo greeting cards
Other greeting cards
Brochure papers
HP brochure papers
Other brochure papers
Manual duplex Auto duplex (duplex unit)
Supported media weights and capacities
Tray Type Weight Capacity
Input tray Paper
Envelopes Up to 15
Cards Up to 30
Transparencies or labels Up to 30
Front manual feed slot Paper
Envelopes Up to 5
Cards Up to 5
Transparencies or labels Up to 8
Rear manual feed slot Paper, envelopes, cards
Transparencies or labels One at a time
60 to 135 g/m2 (16 to 36 lb
bond)
65 to 135 g/m2 (17 to 36 lb
bond)
Up to 280 g/m2 (74 lb bond)
Up to 19 mm (0.75 inches)
or up to 150 sheets plain
paper
Up to 10 sheets
One at a time; thick media
(up to 0.3 mm)
Duplex unit Paper
(Does not support banners,
index cards, or envelopes)
Output tray All supported media Up to 100 sheets
Up to 135 g/m2 (36 lb bond)
ENWW Selecting print media 19
Page 28

Tray Type Weight Capacity
Setting minimum margins
The document margins must match (or exceed) these minimum margin settings in portrait orientation.
Media Left and right margins Top margin Bottom margin
A3, A3+, B5, Legal, Super
B, Tabloid
A4, A5, A6, B4, Letter,
Executive, Statement
Cards 3.2 mm (0.13 inch) 3.0 mm (0.12 inch) 11.7 mm (0.46 inch)
Envelopes 3.2 mm (0.13 inch) 11.7 mm (0.46 inch) 11.7 mm (0.46 inch)
Photo 127 by 177.8 mm (5
by 7 inches); 203.2 by 254
mm (8 by 10 inches)
Photo L; 101.6 by 152.4 mm
(4 by 6 inches); 10 by 15 cm
(3.9 by 5.9 inches)
Photo with tab: L; 101.6 by
152.4 mm (4 by 6 inches);
10 by 15 cm (3.9 by 5.9
inches)
Photo 10 by 15 cm (3.9 by
5.9 inches)
5.1 mm (0.2 inch) 3.0 mm (0.12 inch) 11.7 mm (0.46 inch)
3.3 mm (0.13 inch) 3.0 mm (0.12 inch) 11.7 mm (0.46 inch)
3.2 mm (0.13 inch) 3.1 mm (0.12 inch) 11.7 mm (0.46 inch)
3.1 mm (0.12 inch) 3.1 mm (0.12 inch) 11.7 mm (0.46 inch)
3.1 mm (0.12 inch) 3.1 mm (0.12 inch) 3.1 mm (0.12 inch)
5.0 mm (0.2 inch) 3.1 mm (0.12 inch) 11.7 mm (0.46 inch)
20 Chapter 3 Using the printer ENWW
Page 29

Loading media
This section explains how to load plain paper and standard media sizes and types into the input tray.
Following are general guidelines for loading media into the tray:
If you are printing on thick paper (such as cardstock), you can use the rear manual feed slot. See
●
Printing with the front or rear manual feed slot.
If you are printing cards or envelopes, see
●
If you are printing one or just a few envelopes or sheets of paper, you can use the front manual
●
feed slot and leave your regular media in the input tray. See
feed slot.
To load media in the input tray
1. Raise the output tray. If the output tray is extended, close the tray.
2. Press the input tray lock and extend the input tray.
NOTE If the small media guide is in its open position, close it by moving it 90?
counterclockwise.
3. Press the button on top of the paper guide and slide the guide to the left to its outermost position.
Printing on special and custom-size media.
Printing with the front or rear manual
4. Insert a stack of media that does not exceed the height of the paper guide, print-side down along
the right side of the input tray until it stops.
ENWW Loading media 21
Page 30

5. Press the button on top of the paper guide and slide the guide to the right until it stops at the
edge of the media.
6. Press the input tray lock and retract the tray until it stops at the edge of the media.
NOTE When 215.9 x 279.4 mm (8.5 x 11 inch) paper is loaded in the input tray, the tray
extension will close to the edge of the paper and leave a slight gap between the extension
and the tray. The tray extends further to accommodate larger-sized media.
7. Lower the output tray.
8. Extend the output tray if necessary.
22 Chapter 3 Using the printer ENWW
Page 31

Loading small media
To load small media in the input tray
NOTE You can also use the front manual feed slot. If you are printing on thick paper (such
as cardstock), you can use the rear manual feed slot. See
manual feed slot.
1. Raise the output tray and remove any media from the input tray.
2. Insert a stack of media that does not exceed the height of the paper guide, print-side down along
the right side of the input tray until it stops.
Printing with the front or rear
3. Open the small media guide by moving it 90 degrees clockwise from start to end position.
4. Press the button on top of the paper guide and slide the guide to the right until it stops at the
edge of the media.
ENWW Loading small media 23
Page 32

5. Press the input tray lock and slide the tray in until the small media guide stops at the edge of the
media. As you slide the tray, the small media guide extends until it touches the edge of the media.
6. Lower the output tray.
7. When printing, select the appropriate media type and size from the printer driver. See
print settings.
Changing
24 Chapter 3 Using the printer ENWW
Page 33

Changing print settings
You can change print settings (such as media size or type) from an application or the printer driver.
Changes made from an application take precedence over changes made from the printer driver.
However, after the application is closed, the settings return to the defaults configured in the printer
driver.
NOTE To set print settings for all print jobs, make the changes in the printer driver. For more
information about printer driver features in Windows, see the printer driver online help. For
more information about printing from a specific application, see the documentation for that
application.
To change settings from an application for current jobs (Windows)
1. Open the document you want to print.
2. On the File menu, click Print, and then click Setup or Properties. (Specific options may vary
depending on the application you are using.)
3. Change any other desired settings and click OK, Print, or a similar command.
To change default settings for all future jobs (Windows)
1. From the Windows desktop, click Start, point to Settings, and then click Printers. Or, click
Start, click Control Panel, and then click Printers and Faxes or Printers (depending on the
operating system).
2. Right-click the printer icon, and then choose Properties, Document Defaults, or Printing
Preferences.
3. Change any other desired settings and click OK.
To change settings (Mac OS)
1. On the File menu, click Page Setup.
2. Change any desired settings and click OK.
3. On the File menu, click Print.
4. Change any desired settings and click Print.
ENWW Changing print settings 25
Page 34

Canceling a print job
You can cancel a print job using one of the following methods:
Control panel
▲
Press
affect jobs waiting to be processed.
Windows
▲
Double-click the printer icon that appears in the lower right corner of the computer screen. Select
the print job, and then press the Delete key on the keyboard.
Mac OS X
▲
Click the Print Center or Printer Setup Utility icon, and then double-click the printer icon.
Select the print job and click Delete.
(Cancel button). This will clear the job that the printer is currently processing. It does not
26 Chapter 3 Using the printer ENWW
Page 35

Printing with the front or rear manual feed slot
If you are printing one or just a few photos, envelopes, or sheets of paper, you can use the front
manual feed slot and leave your regular media in the input tray.
The rear manual feed slot uses a straight paper path and is designed for printing single sheets of
thick paper (up to 280 g/m
For information on media types and sizes supported by the manual feed slots, see
specifications for supported media.
Printing from the manual feed slots is performed in two stages: 1) changing the software settings,
and 2) loading the media. The following sections contain procedures for performing each stage.
NOTE If the duplex unit is installed and you want to print using the rear manual feed slot,
replace the duplex unit with the rear-access panel.
2
) such as cardstock.
Understanding
Changing the software settings
Windows
1. Open the printer driver.
2. Click the Paper/Quality tab.
3. Select the manual feed option from the Source is drop-down list.
4. Change any other desired settings, and then click OK.
5. Print your document.
Mac OS
1. Click File, and then click Page Setup.
2. Select the media size, and then click OK.
3. Click File, and then click Print.
4. Open the Paper Type/Quality panel.
5. In the Paper panel, select the source.
6. Change any other desired settings, and then click Print.
Loading the front manual feed slot
NOTE If there are any printouts on the output tray, remove them before using the front
manual feed slot.
1. Extend the output tray.
2. Slide the paper guide to the left to its outermost position.
3. Lift the clear plastic flap and insert the media into the narrow opening between the output tray
and the plastic flap. Insert up to 10 sheets of paper or 5 cards or envelopes, print-side down into
ENWW Printing with the front or rear manual feed slot 27
Page 36

the right side of the slot until the media stops. Insert envelopes with the flaps facing up and to the
right.
4. Slide the paper guide to the right until it stops at the edge of the paper.
5. Press (Resume button) to proceed with printing.
To resume printing from the input tray, remove the paper from the front manual feed slot.
Loading the rear manual feed slot
1. If the duplex unit is installed, replace it with the rear-access panel.
28 Chapter 3 Using the printer ENWW
Page 37

2. Slide the paper guide to the required media width.
3. Insert a sheet of media print-side up into the left side of the slot until the printer grips the media.
4. Press
(Resume button) to print.
5. If you are printing more than one page, press
sheet.
(Resume button) to print after inserting each
ENWW Printing with the front or rear manual feed slot 29
Page 38

Printing on both sides (duplexing)
You can print on both sides of a sheet of media, either automatically by using the duplex unit or
manually by turning the media over and feeding it into the printer again.
Guidelines for duplexing
Always use media that conforms to the printer specifications. See
●
for supported media.
Specify duplex options in your application or in the printer driver.
●
Do not print on both sides of transparencies, envelopes, photo paper, or glossy media. Jams
●
might occur with these media types.
●
Do not print on both sides of paper lighter than 16 lb bond (60 g/m
(135 g/m
Several kinds of media require a specific orientation when you print on both sides of a page,
●
such as letterhead, preprinted paper, paper with watermarks, and paper with prepunched holes.
When you print from a computer running Windows, the printer prints the first side of the media
first. When you print from a computer using the Mac OS, the printer prints the second side first.
Load the media with the front side facing down.
When printing finishes on one side of the media, the printer holds the media and pauses while
●
the ink dries. Once the ink dries, the media is pulled back into the printer and the second side is
printed. When printing is complete, the media is dropped onto the output tray. Do not grab it
before printing is complete.
● You can print on both sides of supported custom-size media by using the printer's manual duplex
capabilities. For a list of supported custom sizes, see
media.
2
). Jams might occur with these media types.
Understanding specifications for supported
Understanding specifications
2
) or heavier than 36 lb bond
Duplexing (Windows)
NOTE For automatic duplexing, ensure the duplex unit is properly installed. If the rear-
access panel is installed, the printer will print on one side (simplex).
To perform duplexing in Windows
1. Load the appropriate media. See
2. With a document open, on the File menu, click Print, and then choose Properties, Document
Defaults, or Printing Preferences.
3. Click the Finishing tab.
4. Select the Print on Both Sides check box.
5. For automatic duplexing, ensure that Use auto-duplex unit is selected. For manual duplexing,
ensure the option is cleared. See
6. To automatically resize each page to match the document's onscreen layout, ensure Preserve
Layout is selected. Clearing this option may result in unwanted page breaks.
Guidelines for duplexing and Loading media.
Guidelines for duplexing.
30 Chapter 3 Using the printer ENWW
Page 39

7. Select or clear the Flip Pages Up check box depending on which way you want the binding. See
the graphics in the printer driver for examples.
8. Choose a booklet layout from the Booklet Layouts drop-down list, if desired.
9. Change any other desired settings, and then click OK.
10.Print your document.
NOTE If you are using a computer running Windows NT 4.0, click Continue in the dialog
box that appears to print the document. Otherwise, the printer does not start printing.
11.For manual duplexing, after the first side of the document is printed, follow the onscreen
instructions and reload the paper into the tray (blank-side down) or the front manual feed (blankside up) to complete printing.
Duplexing (Mac OS)
NOTE For automatic duplexing, ensure the duplex unit is properly installed. If the rear-
access panel is installed, the printer will print on one side (simplex).
To perform automatic duplexing in Mac OS
1. Load the appropriate media. See
2. On the File menu, click Print.
3. Open the Layout panel.
4. Select the option to print on both sides.
5. Select the desired binding orientation by clicking the appropriate icon.
6. Change any other desired settings, and then click OK or Print.
Guidelines for duplexing and Loading media.
ENWW Printing on both sides (duplexing) 31
Page 40

Printing on special and custom-size media
This section provides information on how to print on media such as envelopes, photo paper,
postcards, and transparencies, as well as custom-size media.
To print on special and custom-size media (Windows)
1. Load the appropriate media. See
2. With a document open, on the File menu, click Print, and then click Setup or Properties.
3. Click the Paper/Quality tab.
4. Select the media type from the Type is drop-down list.
5. Select the media size from the Size is drop-down list.
-Or-
Click Custom, enter the dimensions of the media, and then click OK.
6. Change any other desired settings, and then click OK.
7. Print your document.
To print on special and custom-size media (Mac OS)
1. Load the appropriate media. See
2. On the File menu, click Page Setup.
3. Select the media size.
4. To set a custom media size, complete the following steps:
Loading media.
Loading media.
a. Click Custom Paper Size in the Settings pull-down menu.
b. Click New, and then type a name for the size in the Paper Size Name box.
c. In the Width and Height boxes, type the dimensions and set the margins.
d. Click Done or OK, and then click Save.
5. On the File menu, click Page Setup, and then select the new custom size.
6. Click OK.
7. On the File menu, click Print.
8. Open the Color panel.
9. Click the Paper tab, and then select the media type.
10.Change any other desired settings, and then click Print.
32 Chapter 3 Using the printer ENWW
Page 41

4 Configuring and managing the printer
This section provides information on managing the printer, configuring the printer in Windows or the
Mac OS, and using the configuration page.
ENWW 33
Page 42

Managing the printer
Overview of printer management tasks
The following table lists the printer tools that can be used to manage the printer.
For more information about the administrator tools listed in the table, see
Overview of printer
management tools.
NOTE Windows users can use the printer driver, Toolbox, EWS, control panel, HP Web
Jetadmin, and myPrintMileage. Mac OS users can use the printer driver, HP Printer Utility,
EWS, and control panel.
For information about the HP Web Jetadmin software, open the HP Web Jetadmin software and see
its documentation. For more information about myPrintMileage, go to the MyPrintMileage website
and follow the onscreen instructions.
Task Tools
Printer driver Toolbox
Monitor the printer.
Operation
and status
Media and
supplies
Jobs and
printer usage
(Windows)
HP Printer
Utility
(Mac OS)
Embedded
Web server
(EWS)
Printer lights
reference
HP Web
Jetadmin
software
myPrintMile
age
Administer the printer
Printer
security
Configure jobaccounting
options
Set language
Set up alerts
and
notifications
Upgrade
firmware on
the printer
Perform
printer
maintenance
tasks
34 Chapter 4 Configuring and managing the printer ENWW
Page 43

Task Tools
Configure network options
Configure
network
parameters
Monitor the printer
NOTE For information about opening and using specific management tools, see Overview of
printer management tools.
Tool Information
Toolbox (Windows)
HP Printer Utility (Mac OS)
Operation and status
Click the Printer Status tab.
▲
Media and supplies
Ink cartridge status: The ink-level information appears
▲
on the Printer Status tab. Click Cartridge Information
for information about replacement ink cartridges and
expiration dates.
Media and supplies
Open Information And Support, and then click
▲
Supplies Status.
Embedded Web server (EWS)
Control panel Status of jobs that are being processed, the operating status
Operation and status
▲ Printer status information: Click the Information tab,
and then click an option available on the left pane.
Media and supplies
Ink cartridge and printhead status: Click the
▲
Information tab, and then click Ink Supplies in the left
pane.
Jobs and printer usage
● Accumulated ink and media usage: Click the
Information tab, and then click Usage in the left pane.
Job accounting: Click the Settings tab, and then click
●
Job Accounting in the left pane.
of the printer, and the status of ink cartridges and printheads.
For more information, see Understanding and printing the
configuration page.
ENWW Managing the printer 35
Page 44

Tool Information
HP Web Jetadmin software
myPrintMileage
Supplies operation status and media and supplies
information. See
Supplies media and supplies information. See
HP Web Jetadmin software.
myPrintMileage.
Administer the printer
This section contains information about administering the printer and modifying printer settings.
NOTE For information about opening and using specific management tools, see Overview of
printer management tools.
Tool Task
Printer driver
Toolbox (Windows)
Perform printer maintenance tasks
Align printheads: Click the Services tab, click Service
●
this device, and then follow the onscreen instructions.
Clean printheads: Click the Services tab, click Service
●
this device, and then follow the onscreen instructions.
Perform printer maintenance tasks
Align printheads: Click the Printer Services tab, click
●
Align Printheads, and then follow the onscreen
instructions.
HP Printer Utility (Mac OS)
Embedded Web server (EWS)
Clean printheads: Click the Printer Services tab, click
●
Clean Printheads, and then follow the onscreen
instructions.
Perform printer maintenance tasks
Align printheads: Open Information And Support, click
●
Align, and then follow the onscreen instructions.
Clean printheads: Open Information And Support,
●
click Clean, and then follow the onscreen instructions.
Printer security
Modify the administrator password: Click the Settings
▲
tab, and then click Security in the left pane.
Set language
Set the language in EWS: Click the Information tab,
▲
and then click Language in the left pane.
Perform printer maintenance tasks
Align printheads: Click the Settings tab, click
●
Maintenance in the left pane, and then in the Printhead
section click Align printheads in the drop-down list.
Clean printheads: Click the Settings tab, click
●
Maintenance in the left pane, and then in the Printhead
36 Chapter 4 Configuring and managing the printer ENWW
Page 45

Tool Task
section click the appropriate cleaning level in the dropdown list.
Control panel Perform printer maintenance tasks
HP Web Jetadmin softwarealerts
myPrintMileage
●
Align printheads: Hold down
then press
Clean printheads: See
●
For more information, see
Supplies security information and set up alerts and
notifications. See
Supplies set up alerts and notifications. See
(Resume button) two times.
Printer lights reference.
HP Web Jetadmin software.
(Power button), and
To clean printheads automatically.
myPrintMileage.
Configure network options
This section contains information about configuring the printer's network settings.
For information about opening and using specific management tools, see
management tools. For a list of current settings, print a configuration page. See Understanding and
printing the configuration page.
By factory default, all supported network protocols are turned on. However, turning off unused
protocols can provide such benefits as decreasing network traffic that the printer generates and
preventing unauthorized users from printing to the printer.
Tool Task
Overview of printer
Embedded Web server (EWS)
HP Web Jetadmin software
Configure network parameters
Set a static IP address: Click the Networking tab, select
▲
Manual IP from the IP Address Configuration option,
enter the static IP address in the Manual IP Address
box, enter the Manual Subnet Mask and Manual Default
Gateway, if needed, and then click Apply.
NOTE It is not recommended that you assign
a static IP address to the printer. However, a
static IP address might resolve certain setup
and printing problems, such as a conflict with a
personal firewall.
Supplies information about configuring network parameters.
HP Web Jetadmin software.
See
ENWW Managing the printer 37
Page 46

Overview of printer management tools
Toolbox (Windows)
The Toolbox provides status and maintenance information about the printer. It also provides links to
this guide for help in performing basic printing tasks and solving problems.
NOTE If the Toolbox was not installed with the other printer software components, you can
install it using the installation program on the Starter CD.
To monitor a printer on a shared port (for example, \\portname\printername) from a client
machine, the Toolbox must be running on the server machine as well as on the client machine.
To open the Toolbox
1. From the Start menu at your computer, point to Programs.
2. Point to HP, point to the printer name, and then click the Toolbox icon.
The Toolbox contains tabs that you can use to view product information.
For more detailed information about the options on these tabs, right-click each option in the Toolbox
window.
Printer Status tab
Selected printers: Displays a list of installed printers that are supported by the Toolbox.
●
Ink Level Information: Shows estimated ink levels for each cartridge.
●
Order Supplies: Provides access to a website where you can order printing supplies for the
●
printer online.
● Cartridge Information: Shows order numbers and expiration dates for the installed ink cartridges.
Preferences: Gives you the ability to set advanced Toolbox settings, such as selecting which
●
printer error messages appear, specifying whether you want to be notified by an audio alert when
an error occurs, as well as the types of error messages that you want to see.
Information tab
Printer Information: Provides links to myPrintMileage and shows the printer hardware and
●
printhead health information. For more information, see
Help Information: Provides links to HP Instant Support and HP Total Care, as well as to this
●
guide for help in performing tasks and troubleshooting. It also provides instructions that guide
you through registering the printer onscreen. For more information, see
myPrintMileage.
HP Instant Support.
38 Chapter 4 Configuring and managing the printer ENWW
Page 47

Printer Services tab
The Printer Services tab provides utilities that help you maintain and test your printer. You can align
and clean your print cartridges, or print a demo page.
Diagnose Print Quality: Click this button to open a dialog box, where you can print a page to
●
help you decide if you need to run any printer maintenance tools to improve print quality.
Test Paper Feed: Click this button to open a dialog box, where you can have the printer print 20
●
blank pages to ensure that the print path is free of obstructions and working properly.
Test Paper Skew: Click this button to open a dialog box, where you can print a page to help you
●
decide if the printer has a problem with paper skew.
Print Configuration Page: Click this button to print a printer configuration page. For more
●
information, see
Understanding and printing the configuration page.
● Align Printheads: Click this button to align the printheads. For more information, see
the printheads.
Clean Printheads: Click this button to automatically clean the printheads. For more information,
●
To clean printheads automatically.
see
Calibrate Color: Click this button to balance color tints on printed pages. For more information,
●
Calibrating the color.
see
Configure Output Ramp: Click this button to open a dialog box, where you can turn on the
●
output ramp for printing in Fast Normal mode. Doing this might help prevent ink smears on
printouts.
To align
HP Printer Utility (Mac OS)
The HP Printer Utility contains tools to configure print settings, calibrate the printer, clean the
printheads, print configuration and test pages, order supplies online, and find website support
information; for example, tools to complete printer maintenance tasks such as printer calibration.
To open the HP Printer Utility
1. From the Finder, select Computer from the Go menu.
2. Click Library, and then click Printers.
3. Click hp, click Utilities, and then click HP Printer Selector.
4. Select the printer, and then click Launch Utility.
HP Printer Utility panels
The utility contains the following panels:
Information And Support
Supplies Status: Displays ink levels and information for the print cartridges.
●
Device Information: Prints a configuration page that provides information about the printer.
●
Print Quality Diagnostics: Prints a diagnostics page.
●
Test Paper Feed: Prints 20 blank pages to ensure paper path is clear.
●
ENWW Managing the printer 39
Page 48

Test Paper Skew: Checks for paper skew.
●
Clean: Cleans the printheads.
●
Align: Aligns the printheads for best possible print quality.
●
Calibrate Color: Adjusts color to correct problems with tint.
●
HP Support: Provides access to the HP website where you can register the printer, find support
●
for the printer, and find information about returning and recycling used printing supplies.
Printer Settings
Network Settings: Configure IP settings.
●
Additional Settings: Opens the Embedded Web Server.
●
Embedded Web server (EWS)
When the printer is connected to a network, you can use the printer's EWS to view status
information, change settings, and manage the printer at your computer.
NOTE For a list of system requirements for the EWS, see Printer specifications. Some
settings might be restricted by the requirement for an EWS password. You can open and use
the EWS without being connected to the Internet. However, some features will not be available.
Opening the EWS
NOTE To open the EWS from the Toolbox (Windows) or the HP Printer Utility (Mac OS), the
printer must be on a network and must have an IP address.
To open from a Web browser
▲ In a supported Web browser on your computer, type the IP address that has been assigned to
the printer. For example, if the IP address is 123.123.123.123, type the following address into the
Web browser:
http://123.123.123.123
The IP address for the printer is listed on the configuration page; see
the configuration page.
To open from the Toolbox (Windows)
Open the Toolbox. For instructions, see
●
Click the Information tab, and then click Launch EWS.
●
To open from the HP Printer Utility (Mac OS)
Open Printer Settings, click Additional Settings, and then click Open Embedded Web Server.
▲
Toolbox (Windows).
Understanding and printing
After you open the EWS, you can bookmark it so that you can return to it quickly in the future.
▲
40 Chapter 4 Configuring and managing the printer ENWW
Page 49

EWS pages
The EWS contains pages that you can use to view product information and change printer settings.
The pages also contain links to other e-services.
Pages Contents
Information
Settings Shows the settings that have been configured for the printer
Networking Shows network status and the network settings that have
Other Links
Shows status information about the printer, its ink supplies
and usage, and a log of printer events (such as errors).
and gives you the ability to change these settings.
been configured for the printer. These pages only appear if
the printer is connected to a network. For more information,
Configure network options.
see
Connects you to other resources, including e-services, such
as HP Instant Support, myPrintMileage, and online ordering
of supplies. For more information, see
myPrintMileage.
and
You can also add or customize a link to the website of your
choice. This link appears on the left pane throughout the
EWS pages.
HP Instant Support
HP Web Jetadmin software
The HP Web Jetadmin software is a Web-based management solution for remotely installing,
configuring (both individually or in batch mode), monitoring status (including levels for supplies),
conducting remote diagnostics, and troubleshooting a wide variety of HP and non-HP network
peripherals.
After the HP Web Jetadmin software has been installed, you can gain access to it from anywhere
within your intranet by using a standard Web browser.
For more information or to download the software, see
www.hp.com/go/webjetadmin.
myPrintMileage
myPrintMileage is a service that HP provides to help you keep track of your device usage to help you
forecast device usage and plan the purchase of supplies. It consists of the myPrintMileage website.
To use myPrintMileage, you must have the following:
Internet connection
●
Device connected
●
NOTE HP recommends that you enable myPrintMileage to send data for three to six months
to allow a meaningful amount of data to accumulate on the myPrintMileage website. To use
the print accounting features, you must register for the service through the myPrintMileage site.
ENWW Managing the printer 41
Page 50

On the myPrintMileage website, you can see the following items:
Print analysis, such as the amount of ink you have used, whether you use more black or color
●
ink, and the estimated number of pages you can print with the remaining amount of ink.
Print accounting, which allows you to generate reports showing usage data, cost per page, or
●
cost per job for a specific time period; export this data as Microsoft Excel spreadsheet files; and
configure the e-mail alerts and notifications to receive print accounting reports.
Gaining access to myPrintMileage
Toolbox (Windows)
●
On the Information tab, click myPrintMileage, and then follow the onscreen instructions.
Embedded Web server
●
Click myPrintMileage in the Other Links section.
Windows taskbar
●
Right-click the Toolbox icon in the Windows taskbar, click myPrintMileage, and then select
View my print usage.
NOTE Do not bookmark the Web pages that are used to open myPrintMileage. If you
bookmark the site and connect to it by using the bookmark, the pages will not contain the
current information.
HP Instant Support
HP Instant Support is a suite of Web-based troubleshooting tools that help you quickly identify,
diagnose, and resolve printing problems.
It provides the following information about your device:
Easy access to troubleshooting tips
●
Provides tips that are customized for your device.
● Resolution of specific device errors
Provides immediate access to information that can help you resolve error messages specific to
your device.
To see a description of the problem, as well as recommendations for solving or preventing the
problem, click the link within the message. To see a list of past device errors, click Alerts on the
left side of the HP Instant Support page.
Notification of device driver and firmware updates
●
Alerts you when there is a firmware or driver update, a message appears on the HP Instant
Support home page. Click the link within the message to go directly to the download section of
the HP website.
Obtaining support services
●
Provides a list of the support services that are available for your device.
42 Chapter 4 Configuring and managing the printer ENWW
Page 51

Managing ink and media usage (myPrintMileage)
●
Helps you manage and forecast printer supplies usage.
Self diagnostic testing for your device
●
Runs a diagnostic test of your device. Select Printer on the Self Help menu on the Instant
Support page to start diagnosing the devices. HP Instant Support checks the computer, and a list
of configured devices appears. When you select the device that you want to diagnose, HP
Instant Support can help you with such tasks as making sure that you have the latest device
driver available and gaining access to reports about the device status and detailed devicediagnostic information.
If any errors are detected during this process, you are given the option to perform updates to the
device drivers or Jetdriver firmware or to perform detailed diagnostic tests on the device.
● HP expert help online (Active Chat)
Provides personalized help from an HP Total Care Representative over the Web at any time.
Simply submit a question or a description of your problem. Your recent device history, system
configuration, and any actions that you have attempted are automatically forwarded to HP (upon
your approval) so that you will not need to describe the problem again. An HP Total Care
Representative will respond online to solve your problem through a real-time Web chat.
Knowledge database
●
Use the HP knowledge database to quickly find answers to your questions.
Security and privacy
When you use HP Instant Support, detailed device information, such as the serial number, error
conditions, and status, is sent to HP. HP respects your privacy and manages this information
according to the guidelines that are outlined in the HP Online Privacy Statement. See
country/us/eng/privacy.htm.
NOTE To view all the data that is sent to HP, select Source (for Internet Explorer and
Opera) or Page Source (for Netscape, Mozilla Firefox, or Safari) from the View menu in your
Web browser.
Gaining access to HP Instant Support
Toolbox (Windows)
●
Click the Information tab, and then click HP Instant Support.
Embedded Web server
●
In a Web browser, type the IP address assigned to the device. This information is listed on the
configuration page; see
In the Other Links section of the Information or Settings tab, click HP Instant Support.
NOTE Do not bookmark the Web pages that are used to open HP Instant Support. If you
bookmark the site and connect to it by using the bookmark, the pages will not contain the
current information.
Understanding and printing the configuration page.
www.hp.com/
ENWW Managing the printer 43
Page 52

HP Network Printer Setup Utility (Mac OS)
The HP Network Printer Setup Utility allows you to configure network settings for the printer. You can
configure settings such as network location name, and settings such as TCP/IP address, router, and
subnet mask.
To open the HP Printer Network Setup Tool
1. From the Finder, select Computer from the Go menu.
2. Select Library, and then select Printers.
3. Select hp, select Utilities, and then select HP Printer Network Setup Tool.
4. Follow the onscreen instructions to configure network settings for the printer.
HP Deskjet Control Panel (HP DJCP)
The HP Deskjet Control Panel (HP DJCP) allows you to gain access to useful printer features when
you are printing from MS-DOS. The HP DJCP utility allows you to do the following tasks:
Adjust print settings. (Printing using special features is not supported.)
●
Specify the default printer from your MS-DOS program.
●
Set the symbol set for the language you are using in a document.
●
NOTE Changes made to settings in your MS-DOS program might override changes made to
the same settings in the HP DJCP.
For more information or to download the utility, see www.hp.com/support/officejetprok850.
44 Chapter 4 Configuring and managing the printer ENWW
Page 53

Understanding and printing the configuration page
Use the configuration page to:
View current printer settings, ink supply status, and printhead health.
●
Help troubleshoot printer problems.
●
The configuration page also contains a log of recent events. If the printer is connected to a network,
an additional network configuration page prints; this page shows the network settings for the printer.
For more information on HP Ink Supplies, see
HP supplies and accessories.
Understanding a configuration page
If you need to call HP, it is often useful to print the configuration page before calling.
Configuration page
1 Printer Information: Shows general printer information, such as the firmware version number, model name, and
amount of memory that is installed.
2
ENWW Understanding and printing the configuration page 45
Ink Cartridge Status: Shows the estimated ink levels (represented in graphical form as gauges).
Page 54

3
Printhead Status: Shows the printhead health status and whether the printhead needs to be replaced.
4
Event Log: Shows a log of recent events that have occurred.
Network configuration page
46 Chapter 4 Configuring and managing the printer ENWW
Page 55

5 General Information: Shows information about the current status and connection type of the network, and other
information, such as the URL of the embedded Web server and the hardware address of the printer.
Network Status: This setting can be Ready or Offline. When the setting is Offline, it implies either that the IP is
being assigned or negotiated by the DNS server, or that the AutoIP or the network is not available.
6 TCP/IP: Shows information on how the printer is configured, such as the hostname, IP address, subnet mask,
7 802.3 Wired: Shows information about the network connection.
8 Miscellaneous: Shows information, such as the total, unicast, broadcast packets transmitted and received, and
default gateway, server, and service name. Also contains a Config By field, which shows AutoIP if the printer is
connected to a peer-to-peer network, and DHCP if the printer is assigned an IP address or is configured by a
DHCP server.
the administrator details.
Admin Password: Shows Not Set if the administrator password for embedded Web server is disabled; otherwise, it
shows Set.
Printing a configuration page
Printer driver
●
On the Services tab, click the Print Configuration Page button.
Toolbox (Windows)
●
On the Printer Services tab, click Print Configuration Page, and then click Print.
HP Printer Utility (Mac OS)
●
Open Information And Support. Click Device Information, and then click Print Configuration
Page.
Control panel
●
Press and hold
one time.
(Power button). While holding down the Power button, press (Cancel button)
ENWW Understanding and printing the configuration page 47
Page 56

Configuring the printer (Windows)
You can connect the printer directly to a computer, or you can share the printer among other users
on a network.
NOTE You must have administrator privileges to install a printer driver in Windows 2000 or
Windows XP.
Direct connection
You can connect the printer directly to your computer using a USB cable or an IEEE 1284-compliant
bidirectional parallel cable.
NOTE Windows NT 4.0 does not support USB. Do not connect a USB and a parallel cable to
the printer at the same time. If you install the printer software and connect a printer to a
computer running Windows, you can connect additional printers to the same computer with
USB cables without reinstalling the printer software.
Installing printer software and sharing the printer
When setting up the printer, HP recommends that you connect the printer after installing the
software because the installation program is designed to provide you with the easiest setup
experience.
However, if you have connected the printer first, see
software.
Connecting the printer before installing the
Installing the software before connecting the printer (recommended)
To install the software before connecting the printer (recommended)
If your computer meets the system requirements, it is recommended that you install the Toolbox by
selecting the full installation option. The Toolbox provides status and maintenance information about
your printer. It also provides access to documentation and online help tools for solving printer
problems. Without the Toolbox, you will not see printer error messages on your computer screen,
and will not have access to the myPrintMileage website. For more information, see
1. Close any running applications.
2. Insert the Starter CD into the CD drive. The CD menu runs automatically.
If the CD menu does not start automatically, click Start, and then click Run. Browse to the CDROM drive for the computer, click Setup.exe, and then click Open. In the Run dialog box, click OK.
3. On the CD menu, click Install.
4. Follow the onscreen instructions to complete the installation.
5. When prompted, connect the USB or parallel cable to the computer and the printer. The Found
New Hardware wizard appears on the computer screen and the printer icon is created in the
Printers folder.
Toolbox (Windows).
NOTE You can connect the USB cable at a later time when you need to use the printer.
You can also share the printer with other computers using a simple form of networking
known as locally shared networking. See
48 Chapter 4 Configuring and managing the printer ENWW
Sharing the printer on a locally shared network.
Page 57

Connecting the printer before installing the software
To connect the printer before installing the software
If you connected the printer to the computer before installing the printer software, the Found New
Hardware wizard appeared on the computer screen.
NOTE If you have turned on the printer, do not turn off the printer or unplug the cable from
the printer while the installation program is running. If you do so, the installation program will
not finish.
1. In the Found New Hardware dialog box that provides the option for selecting a method to locate
the driver, select the advanced option and click Next.
NOTE Do not allow the Found New Hardware wizard to perform an automatic search for
the driver.
2. Select the check box for specifying the driver location, and then ensure that the other check
boxes are clear.
3. Insert the Starter CD into the CD-ROM drive. If the CD menu appears, close the CD menu.
4. Browse to locate the root directory on the Starter CD (for example, D:), and then click OK.
5. Click Next, and then follow the onscreen instructions.
6. Click Finish to close the Found New Hardware wizard. The wizard automatically starts the
installation program (this might take a short time). For Windows 98 and Windows Me, you must
complete the installation program if you wish to install a non-English driver.
7. Complete the installation process.
NOTE The setup program provides options to install non-driver components such as the
Toolbox, which you are recommended to install. For instructions about installing these
components, see
can also share the printer with other computers using a simple form of networking known as
locally shared networking. See
Installing the software before connecting the printer (recommended). You
Sharing the printer on a locally shared network.
Sharing the printer on a locally shared network
To share the printer on a locally shared network
In a locally shared network, the printer is connected directly to the USB or parallel connector of a
selected computer (known as the server) and is shared by other computers (clients).
ENWW Configuring the printer (Windows) 49
Page 58

NOTE When sharing a directly connected printer, use the computer with the newest
operating system as the server. For example, if you have a computer running Windows 2000
and another computer running an older version of Windows, use the computer running
Windows 2000 as the server. Use this configuration only in small groups or when usage is
low. The computer that is connected to the printer is slowed down when many users print to
the printer.
1. From the Windows desktop, click Start, point to Settings, and then click Printers. Or, click
Start, click Control Panel, and then click Printers and Faxes or Printers (depending on the
operating system).
2. Right-click the printer icon, click Properties, and then click the Sharing tab.
3. Click the option to share the printer, and then give the printer a share name.
4. If you are sharing the printer with client computers that use other versions of Windows, you can
click Additional Drivers to install their drivers as a convenience to them. This optional step
requires you to have the Starter CD in your CD drive.
Network connection
If the printer has network capability, the printer can be shared in a network environment by
connecting it directly to the network. This type of connection offers the ability to manage the printer
using the embedded Web server from any computer on the network.
Installing printer software and sharing the printer
Choose the installation option for the type of network you have:
Client/server network: If your network has a computer acting as a dedicated print server, install
●
the printer software on the server (
install the printer software on the client computers (
computers).
Peer-to-peer network: If you have a peer-to-peer network (a network without a dedicated print
●
server), install the software on the computers that will be using the printer (
software for a network printer).
In addition, you can connect to a network printer in both types of networks using the Add Printer
wizard in Windows (
Installing the printer driver using Add Printer).
Installing the printer software for a network printer), and then
Installing the printer software on client
Installing the printer
Installing the printer software for a network printer
Use the following steps to install the printer software in the following networking scenarios:
Your network has a computer acting as a dedicated print server
●
You have a peer-to-peer network (a network without a dedicated print server)
●
To install the printer software for a network printer
1. Connect the printer to the network.
2. Close any programs that are open.
3. Insert the Starter CD into the CD-ROM drive. The CD menu starts automatically.
50 Chapter 4 Configuring and managing the printer ENWW
Page 59

If the CD menu does not start automatically, click Start, and then click Run. Browse to the CDROM drive for the computer, click Setup.exe, and then click Open. In the Run dialog box, click OK.
4. Click Install and follow the onscreen instructions to complete the installation.
5. If you are going to share this printer with other computers on the network, follow these steps:
a. From the Windows desktop, click Start, point to Settings, and then click Printers. Or, click
Start, click Control Panel, and then click Printers and Faxes or Printers (depending on the
operating system).
b. Right-click the printer icon, click Properties , and then click the Sharing tab.
c. Click the option to share the printer, and then enter a share name for the printer.
d. If you are sharing the printer with client computers that use other versions of Windows, click
Additional Drivers.
e. In the Additional Drivers window, click the applicable operating systems, and then follow
the onscreen instructions.
6. To share the printer with other computers on the network, see
client computers.
Installing the printer software on
Installing the printer software on client computers
After the printer drivers have been installed on the computer that is acting as the print server, the
printing functionality can be shared. Individual Windows users who want to use the network printer
must install the software on their computers (clients).
A client computer can connect to the printer in the following ways:
In the Printers folder, double-click the Add Printer icon and follow the instructions for a network
●
installation. (See
On the network, browse to the printer and drag it to your Printers folder.
●
Add the printer and install the software from the INF file on your network.
●
On the Starter CD, the INF files are stored in folders that use the following format: <CD drive>:
\Drivers\<operating system>\<language>.
For example, if your CD drive letter is D, then D:\Drivers\Win2k_XP\English would contain the
English INF file for Windows 2000, Windows Server 2003, and Windows XP.
Installing the printer driver using Add Printer.)
Installing the printer driver using Add Printer
NOTE If the printer server computer is running Windows NT 4.0 and the client computer is
running Windows 2000 or XP, you must create a locally shared port on the client computer.
See “To create a locally shared port” below.
ENWW Configuring the printer (Windows) 51
Page 60

To install the printer driver using Add Printer
1. From the Windows desktop, click Start, point to Settings, and then click Printers. Or, click
Start, click Control Panel, and then click Printers and Faxes or Printers (depending on the
operating system).
2. Double-click Add Printer, and then click Next.
3. Select Network Printer or Network Printer Server.
4. Click Next.
5. Do one of the following:
Type in the network path or queue name of the shared printer, and then click Next. Click
●
Have Disk when prompted to select the printer model.
● Click Next, and then locate the printer in the Shared printers list.
6. Click Next, and then follow the onscreen instructions to complete the installation.
To create a locally shared port
1. From the Windows desktop, click Start, point to Settings, and then click Printers. Or, click
Start, click Control Panel, and then click Printers and Faxes or Printers (depending on the
operating system).
2. Right-click the printer icon, click Properties, and then click the Ports tab.
3. Click Add Port, click Local Port, and then click New Port.
4. Enter a name for the new port, then click OK, and then click Close.
5. Click Close again.
52 Chapter 4 Configuring and managing the printer ENWW
Page 61

Configuring the printer (Mac OS)
You can use the printer with a single Macintosh computer using a USB cable, or you can share the
printer among other users on a network.
Installing the software for network or direct connection
To install the software for network or direct connection
1. Connect the printer to the computer with the USB cable or to the network with a network cable.
2. Insert the Starter CD into the CD-ROM drive.
3. Click Install Driver and follow the onscreen instructions.
4. Select your connection type, click Done, and then follow the onscreen instructions.
5. If open, close the Print Center or Printer Setup Utility.
6. If necessary, share the printer with other Macintosh computer users.
Direct connection: Share the printer with the other Macintosh computer users. For more
●
information, see
Network connection: Individual Macintosh computer users who want to use the network
●
printer must install the printer software on their computers.
Sharing the printer on a locally shared network.
Sharing the printer on a locally shared network
When you connect the printer directly, you can still share the printer with other computers using a
simple form of networking known as locally shared networking. Use this configuration only in small
groups or when usage is low. The computer that is connected to the printer is slowed down when
many users print to the printer.
Basic requirements for sharing in a Macintosh environment include the following items:
The Macintosh computers must be communicating on the network using TCP/IP, and the
●
Macintosh computers must have IP addresses. (AppleTalk is not supported.)
The printer that is being shared must be connected to a built-in USB port on the host Macintosh
●
computer.
Both the host Macintosh computer and the client Macintosh computers that are using the shared
●
printer must have printer-sharing software installed and the printer driver or PPD for the printer
that is installed. (You can run the installation program to install the printer sharing software and
associated Help files.)
The client Macintosh computers should have the appropriate HP printer drivers installed.
●
The client Macintosh computers must be PowerMac computers.
●
For more information about USB printer sharing, see the support information that is available on the
Apple website (
www.apple.com) or the Mac Help on the computer.
ENWW Configuring the printer (Mac OS) 53
Page 62

To share among computers with the same operating system
1. Turn on printer sharing on the Macintosh computer (the host) that is connected to the printer:
Open System Preferences, click Sharing, click Services, and then select the Printer Sharing
check box.
2. To print from the other Macintosh computers (the clients) on the network, preselect the printer in
Sharing. Then, choose the neighborhood where the printer is shared and select the printer.
54 Chapter 4 Configuring and managing the printer ENWW
Page 63

Uninstalling the printer software
Uninstalling the printer software (Windows)
If you are using Windows 2000 or Windows XP, you must have administrator privileges to uninstall
the printer software.
To uninstall the printer software
1. If the computer is connected directly to the computer using a USB cable, disconnect the printer.
2. Close any applications that are running.
3. From the Windows desktop, click Start, and then click Control Panel.
4. Double-click Add/Remove Programs.
5. Select the printer software that you wish to remove, and then click the button for adding or
removing software.
6. Follow the onscreen instructions to remove the software.
NOTE If the uninstall process fails, restart the computer and complete the steps above
to uninstall the software.
If the software was not successfully installed or the installation program could not be
found, complete the following steps to run the uninstaller utility. (The uninstaller utility is
not available for computers running Windows NT 4.0.)
7. Disconnect the printer from the computer.
8. On the computer, restart Windows.
9. Insert the Starter CD in the CD drive, click Utilities, and then click the Uninstaller.
Uninstalling the printer software (Mac OS)
To uninstall the printer software
1. If the computer is connected directly to the computer using a USB cable, disconnect the printer.
2. Restart the computer.
NOTE If you do not restart the computer before you uninstall the software, some files
are not removed from your computer when you run the Uninstall option.
3. Insert the Starter CD into the CD drive.
4. Double-click the CD icon on the desktop.
5. Double-click the setup icon and follow the onscreen instructions.
6. When the Main Installation dialog box appears, select Uninstall from the drop-down list located
in the upper-left part of the dialog box.
7. Follow the onscreen instructions to remove the printer software.
ENWW Uninstalling the printer software 55
Page 64

56 Chapter 4 Configuring and managing the printer ENWW
Page 65

5 Maintaining and troubleshooting
This section provides information on maintaining ink cartridges and printheads, calibrating color and
line feed, using the configuration page, and troubleshooting various problems.
ENWW 57
Page 66

Replacing the ink cartridges
You can check the ink levels from the Toolbox (Windows) or the embedded Web server. For
information about using these tools, see
After removing a cartridge from its package, install it right away. Do not remove a cartridge from the
printer for long periods of time.
CAUTION HP recognizes customer's choice, but cannot guarantee the quality or reliability of
non-HP ink cartridges. Printer services or repairs required as a result of using non-HP or
refilled ink cartridges is not covered under warranty.
NOTE To find out which ink cartridges work with your printer, see HP supplies and
accessories.
To replace an ink cartridge
1. Press and release to open the ink cartridge cover.
Overview of printer management tools.
58 Chapter 5 Maintaining and troubleshooting ENWW
Page 67

2. Remove the ink cartridge that requires replacement by grasping it between your thumb and
forefinger and pulling it firmly toward you.
3. Remove the new ink cartridge from its package.
4. Insert the cartridge into its own color-coded slot. Press down firmly on the cartridge to ensure
proper contact.
5. Close the ink cartridge cover.
ENWW Replacing the ink cartridges 59
Page 68

Maintaining the printheads
If printed characters are incomplete, or dots or lines are missing from printouts, this might be caused
by clogged ink nozzles and you might need to clean the printheads. To find out which printheads
work with your printer, see
When the quality of printouts deteriorates, complete the following:
HP supplies and accessories.
Check the health of the printheads. See
●
Align the printheads. See
●
Initiate the automatic printhead cleaning process. See
●
Manually clean the printhead contacts. See
●
Replace the printheads, if the problems persist after cleaning. See
●
CAUTION HP is not responsible for damage to the printer that results from modifying the
printheads.
To align the printheads.
To check printhead health.
To clean printheads automatically.
To clean the printhead contacts manually.
Replacing the printheads.
To check printhead health
Use the following means to check the printhead health. If the status of any printhead is bad, clean or
replace the printhead.
Toolbox (Windows)
Open the Toolbox. Click the Information tab, and then click Printhead Health.
Embedded Web server
Open the embedded Web server. Click the Information tab, and then click Ink Supplies in the left
pane.
Configuration page
From the control panel, print a printer configuration page by holding down
pressing
Check the message in the Printhead health line of the Printhead Status section of the configuration
page. See
(Cancel button) once, and then releasing the Power button.
Understanding and printing the configuration page.
(Power button),
To align the printheads
Whenever you replace a printhead, the printer automatically aligns the printheads to ensure the best
print quality. However, if the appearance of your printed pages indicates that the printheads are
misaligned, you can align them manually.
Printer driver
● In Windows 2000 or XP, click the Services tab, click Service this device, and then follow the
onscreen instructions.
In Windows 98, click the Services tab, click Align Printheads, and then follow the onscreen
●
instructions.
60 Chapter 5 Maintaining and troubleshooting ENWW
Page 69

Toolbox (Windows)
▲ Click the Printer Services tab, and then click Align Printheads.
HP Printer Utility (Mac OS)
▲ Open Information And Support , click Align, and then follow the onscreen instructions.
Embedded Web server
1. Open the embedded Web server.
2. Click the Settings tab.
3. Click Maintenance in the left pane.
4. In the Printhead section, click Align printheadsin the drop-down list.
Control panel
1.
Hold down
(Power button).
2. Press
(Resume button) two times.
To clean printheads automatically
NOTE Clean the printheads only when necessary; cleaning uses ink and shortens the life of
the printheads. There are three levels of cleaning available. After one level of cleaning,
perform the next level of cleaning only if the results are not satisfactory.
Printer driver
In Windows 2000 or XP, click the Services tab, click Service this device, and then follow the
●
onscreen instructions.
In Windows 98, click the Services tab, click Clean Printheads, and then follow the onscreen
●
instructions.
Toolbox (Windows)
▲ Click the Printer Services tab, and then click Clean Printheads
HP Printer Utility (Mac OS)
Open Information And Support, click Clean, and then follow the onscreen instructions.
▲
Embedded Web server
1. Open the embedded Web server.
2. Click the Settings tab.
3. Click Maintenance in the left pane, and then click the appropriate cleaning level in the drop-
down list in the Printhead section.
ENWW Maintaining the printheads 61
Page 70

Control panel
1.
Press and hold
2. While holding down the button, do one of the following.
NOTE Perform the next level of cleaning only if results from the previous level are not
satisfactory.
a. For level 1 cleaning: Press (Resume button) five times.
(Power button).
b. For level 2 cleaning: Press
c. For level 3 cleaning: Press
3.
Release
(Power button). The printer begins the cleaning process.
(Resume button) six times.
(Resume button) seven times.
To clean the printhead contacts manually
CAUTION Manually clean the printhead contacts only after you have attempted to clean the
printheads automatically. See
sensitive electronic components that can be damaged easily.
1. Open the top cover.
2. Make sure the printer is turned on.
3. Wait two or three seconds and unplug the printer power cord.
NOTE Do not turn the printer off by pressing (Power button). This causes the print
carriage to move out of reach.
4. Lift to open the printhead latch.
To clean printheads automatically. Printhead contacts contain
62 Chapter 5 Maintaining and troubleshooting ENWW
Page 71

5. Lift the handle of a printhead and use it to pull the printhead out of its slot.
ENWW Maintaining the printheads 63
Page 72

6. Carefully remove any ink from the contact pads on the printhead using a dry cotton swab or a
soft, dry, lint-free cloth that will not come apart or leave fibers behind.
CAUTION Only wipe the contact pads. Wiping the nozzles (located on the underside of
the printhead) can cause severe damage to the printhead.
7. If some residue remains, slightly moisten the swab with distilled, filtered, or bottled water, and
continue wiping until the contacts are clean.
CAUTION Avoid using drinking water or alcohol, which could damage the printheads.
8. After cleaning, place the printhead on a sheet of paper or paper towel.
9. Clean the contact points in the printhead slot inside the printer with a dampened cotton swab.
Before re-inserting the printheads, make sure all the electrical contacts have had at least five
minutes to dry.
10.Plug in the power cord and turn on the printer. The control panel should still indicate that a
printhead is missing.
11.Insert the printhead into its color-coded slot. Press down firmly on the printhead to ensure proper
contact.
NOTE If you are installing a new printhead, remove the new printhead from its package,
and then remove its protective tape.
12.Pull the printhead latch all the way forward, and then press down to ensure that the latch is
properly engaged. You might have to apply some pressure to engage the latch.
64 Chapter 5 Maintaining and troubleshooting ENWW
Page 73

13.Close the top cover.
14.Where necessary, repeat the above steps for the remaining printheads.
15.If you installed a new printhead, wait while the printer initializes it and prints an alignment page. If
you removed and reinserted printheads but did not install a new printhead, print an alignment
page manually. See
If the alignment page does not print, make sure the printhead latch and all covers are securely
closed.
To align the printheads.
ENWW Maintaining the printheads 65
Page 74

Replacing the printheads
NOTE To find out which printheads are compatible with your printer, see HP supplies and
accessories.
NOTE Only replace printheads after you have attempted to clean the printheads. See To
clean printheads automatically and To clean the printhead contacts manually.
1. Open the top cover.
2. Lift to open the printhead latch.
66 Chapter 5 Maintaining and troubleshooting ENWW
Page 75

3. Lift the handle of a printhead and use it to pull the printhead out of its slot.
ENWW Replacing the printheads 67
Page 76

4. Remove the new printhead from its package, and then remove the protective tape.
68 Chapter 5 Maintaining and troubleshooting ENWW
Page 77

5. Insert the printhead into its color-coded slot. Press down firmly on the printhead to ensure proper
contact.
ENWW Replacing the printheads 69
Page 78

6. Pull the printhead latch all the way forward, and then press down to ensure that the latch is
properly engaged. You might have to apply some pressure to engage the latch.
7. Close the top cover, and then wait while the printer initializes the printheads and prints the
alignment pages.
70 Chapter 5 Maintaining and troubleshooting ENWW
Page 79

Diagnosing the print quality
To verify the print quality of the printer, you can perform print quality diagnostics, which involves
printing of test patterns. This will help you decide whether to run any maintenance tools to improve
the print quality of your printouts.
Printer driver
In Windows 2000 or XP, click the Services tab, click Service this device, and then follow the
●
onscreen instructions.
In Windows 98, click the Services tab, click PQ (print quality) diagnostic page, and then follow
●
the onscreen instructions.
Toolbox (Windows)
Click the Printer Services tab, click PQ (print quality) diagnostic page, and then follow the
▲
onscreen instructions.
HP Printer Utility (Mac OS)
Open Information And Support, click Print Quality Diagnostics, and then follow the onscreen
▲
instructions.
ENWW Diagnosing the print quality 71
Page 80

Testing the paper feed
If you encounter frequent jams, perform a paper feed test to ensure that the paper path of the tray or
duplex unit is clear. The process will feed 20 blank pages.
Printer driver
●
Click the Services tab, click Service this device, and then follow the onscreen instructions.
Toolbox (Windows)
●
Click the Printer Services tab, click Test Paper Feed, and then follow the onscreen instructions.
HP Printer Utility (Mac OS)
●
Open Information And Support, click Test Paper Feed, and then follow the onscreen
instructions.
72 Chapter 5 Maintaining and troubleshooting ENWW
Page 81

Testing media skew
If information on the printed pages is consistently slanted, perform a paper skew test and check if the
skew is within the acceptable range for the printer.
Printer driver
●
Click the Services tab, click Service this device, and then follow the onscreen instructions.
Toolbox (Windows)
●
Click the Printer Services tab, click Test Paper Skew, and then follow the onscreen instructions.
HP Printer Utility (Mac OS)
●
Open Information And Support, click Test Paper Skew, and then follow the onscreen
instructions.
ENWW Testing media skew 73
Page 82

Calibrating the color
Whenever you replace a printhead, the printer automatically calibrates the colors to ensure the best
print quality. If you are not satisfied with the appearance of the colors, you can calibrate colors
manually.
Printer driver
●
In Windows 2000 or XP, click the Services tab, click Service this device, and then follow the
onscreen instructions.
In Windows 98, click the Services tab, click Calibrate Color, and then follow the onscreen
instructions.
Toolbox (Windows)
●
Click the Printer Services tab, click Calibrate Color, and then follow the onscreen instructions.
HP Printer Utility (Mac OS)
●
Open Information And Support, click Calibrate Color, and then follow the onscreen instructions.
74 Chapter 5 Maintaining and troubleshooting ENWW
Page 83

Troubleshooting
Troubleshooting tips and resources
For a paper jam problem, see
●
For paper-feed problems, such as the paper skew, see
●
Some printer problems can be resolved by resetting the printer.
To reset the printer
1.
Press
2. Disconnect the power cord from the printer.
3. Wait about 10 seconds, and then reconnect the power cord.
4.
Press
(Power button) to turn off the printer.
(Power button) to turn on the printer.
Clearing jams.
Resolving paper-feed problems.
General troubleshooting tips
Ensure the following:
Power light is on and not blinking. When the printer is first turned on, it takes approximately 45
●
seconds to start up.
● No error messages appear on the computer screen.
No lights on the control panel are on or blinking. See
●
Printer lights reference.
Power cord and other cables are working and firmly connected to the printer. Make sure the
●
printer is connected firmly to a functioning alternating current (AC) power outlet and is turned on.
Printer specifications for voltage requirements.
See
● Media is loaded correctly in the tray and is not jammed in the printer. See
Printheads and ink cartridges are properly installed in their correct color-coded slots. Press down
●
firmly on each one to ensure proper contact. Ensure you have removed the tape from each
printhead.
Printhead latch and all covers are closed.
●
Rear-access panel or automatic two-sided printing accessory (duplex unit) is locked into place.
●
All packing tapes and materials are removed from the printer.
●
Printer can print a configuration page. See
●
The printer is set as the current or default printer. For Windows, set the printer as the default in
●
the Printers folder. For Mac OS, set the printer as the default in the Print Center or Printer Setup
Utility. For more information, see your computer's documentation.
Pause Printing or Use printer offline is not selected if you are using a computer running
●
Windows.
You are not running too many programs when you are performing a task. Close programs that
●
you are not using or restart the computer before attempting the task again.
Understanding and printing the configuration page.
Loading media.
ENWW Troubleshooting 75
Page 84

If the printer is connected directly to a computer, it is set up to point to the correct port.
●
If the printer is connected to a network, the correct IP address is used.
●
Resolving printing problems
Printer shuts down unexpectedly
Check power and power connections.
Make sure the printer is connected firmly to a functioning alternating current (AC) power outlet. See
Printer specifications for voltage requirements.
All printer lights are blinking
A non-recoverable error has occurred.
Reset the printer. See
If the problem persists, contact HP. See
Troubleshooting.
Support and warranty.
Printer is not responding (nothing prints)
Check printer setup
General troubleshooting tips.
See
Check the printhead initialization
When new printheads are installed, the printer automatically prints two alignment pages to align the
printheads. This process takes about eight minutes. Once the process starts you cannot print until
the automatic alignment pages have been printed.
When printheads are removed and then reinserted in the printer, the alignment pages do not print
automatically. See
Check the printer software installation
If the printer is turned off when printing, an alert message should appear on your computer screen;
otherwise, the printer software might not be installed correctly. To resolve this, uninstall the software
completely, and then reinstall the printer software. See
Check cable connections
To align the printheads.
Uninstalling the printer software.
Make sure both ends of the cable (USB, parallel, or network) are secure.
●
If the printer is connected to a network, check the following:
●
Verify that the Link light on the back of the printer is on.
●
Make sure you are not using a phone cord to connect the printer.
●
The network hub, switch, or router is on and working properly.
●
76 Chapter 5 Maintaining and troubleshooting ENWW
Page 85

Check printer setup for network environment
Ensure the correct printer software and printer software port are being used. For more information
about network connections, see
or the documentation provided by your network vendors.
Check any personal firewall software installed on the computer
The personal software firewall is a security program that protects a computer from intrusion.
However, the firewall might block communication between the computer and the printer. If there is a
problem communicating with the printer, try temporarily disabling the firewall. If the problem persists,
the firewall is not the source of the communication problem. Re-enable the firewall.
If disabling the firewall allows you to communicate with the printer, you might want to assign the
printer a static IP address and re-enable the firewall. See
Configuring the printer (Windows), Configuring the printer (Mac OS),
Configure network options.
Printer does not accept printhead
Inspect the printhead
Remove the printhead and make sure the protective tape has been removed completely from the
printhead.
Clean the printhead
Complete the printhead cleaning procedure. See
Turn off the printer after removing the printhead
After removing the printhead, turn the printer off, and then turn on the printer without the printhead
installed. After the printer has restarted, reinsert the printhead.
To clean printheads automatically.
Printer takes a long time to print
Check the system configuration
Make sure the computer meets the minimum system requirements for the printer. See
specifications.
Check the port setting
The port setting configuration in your system might not be set to ECP.
See the documentation that came with the computer for information on how to change the port
setting, or contact the computer manufacturer.
Check the printer software settings
The printer prints slower when Best or Maximum dpi is selected as the print quality. To increase the
print speed, select different print settings in the printer software. See
Changing print settings.
Printer
NOTE The recommended print quality setting for printing photos is Best.
Blank page printed
ENWW Troubleshooting 77
Page 86

Check media settings
Make sure the page settings in the printer software matches the width and length of media loaded in
the tray. See
Check the parallel port on your computer
If you are using a parallel cable, make sure the printer is connected directly to the parallel port. Avoid
sharing the port with other devices, such as a Zip drive or other printers.
Changing print settings.
Placement of the text or graphics is wrong
Check how the media is loaded
Make sure the paper guides fit snugly against the edges of the stack of media, and make sure the
tray is not overloaded. See
Check the media size
Content on a page might be cut off if the document size is larger than the media that you are
●
using.
Make sure the media size selected in the printer driver matches the size of media loaded in the
●
tray.
Loading media.
If you are using a computer running Windows, select Emulate LaserJet Margins in the printer
●
driver to print a LaserJet formatted document.
Check margin settings
If the text or graphics are cut off at the edges of the page, make sure the margin settings for the
document do not exceed the printable area of your printer. See
Check the page-orientation setting
Make sure the media size and page orientation selected in the application match the settings in the
printer driver.
Check the Preserve Layout setting (Windows)
If you are using a duplex unit to do automatic duplex printing, ensure Preserve Layout is selected in
the printer driver. Clearing this option might result in unwanted page breaks. See
sides (duplexing).
Check the printer location and length of USB cable
High electromagnetic fields (such as those generated by USB cables) can sometimes cause slight
distortions to printouts. Move the printer away from the source of the electromagnetic fields. Also, it is
recommended that you use a USB cable that is less than 3 meters (9.8 feet) long to minimize the
effects of these electromagnetic fields.
Setting minimum margins.
Printing on both
If the solutions do not work, the problem might be caused by the inability of the application to
interpret print settings properly. See the release notes for known software conflicts; or refer to the
application's documentation, or contact the software manufacturer for specific help.
78 Chapter 5 Maintaining and troubleshooting ENWW
Page 87

Poor print quality and unexpected printouts
Check the printheads and ink cartridges
Replace any clogged or worn printheads or low ink cartridges (see Maintaining the printheads), and
try to print again.
Check the paper quality
The paper might be too moist or too rough. Make sure the media used meets HP specifications (see
Selecting print media), and try to print again.
Check the type of media loaded in the printer
Make sure the tray supports the type of media you have loaded. See
●
specifications for supported media.
Make sure you have selected the tray in the printer driver that contains the media you want to
●
use. See
Changing print settings.
Understanding
Check the printer location and length of USB cable
See Check the printer location and length of USB cable.
Meaningless characters print
If an interruption occurs to a job that is printing, the printer might not recognize the rest of the job.
Cancel the print job and wait for the printer to return to the ready state. If the printer does not return
to the ready state, cancel all jobs, and wait again. When the printer is ready, resend the job. If
prompted by the computer to retry the job, click Cancel.
Check cable connections
If the printer and computer are connected with a USB or parallel cable, the problem might be due to
a poor cable connection or a cable that is not in working condition.
Make sure the cable connections at both ends are secure. If the problem persists, turn off the printer,
disconnect the cable from the printer, turn on the printer without connecting the cable, and delete any
remaining jobs from the print queue. When the Power light is on and not flashing, reconnect the cable.
Check the document file
The document file might be damaged. If you can print other documents from the same application,
try printing a backup copy of your document, if available.
Check the symbol set
If you are using MS-DOS, use the HP DJCP to set the appropriate symbol set for the language of
your document. See
HP Deskjet Control Panel (HP DJCP).
Ink is smearing
ENWW Troubleshooting 79
Page 88

Check print settings
When you print documents that use a large quantity of ink, allow more time to dry before
●
handling the printouts. This is especially true for transparencies. In the printer software, select
the Best print quality. Also increase the ink drying time and reduce the ink saturation using an
ink slider in conjunction with drying time under Advanced Printing Features (Windows) or Ink
Features (Mac OS) in the printer software. However, note that decreasing ink saturation might
give printouts a "washed-out" quality.
Color documents that have rich, blended colors can wrinkle or smear when printed using the
●
Best print quality. Try using the other print mode to reduce ink, or use HP Premium Paper
designed for printing vivid color documents. See
Changing print settings.
Check the media type
When using recycled media, you might need to lower the ink volume in the printer software.
●
However, if you lower the ink volume too much, the output might appear washed out.
Some types of media do not accept ink well; ink will dry more slowly and smearing might occur.
●
Selecting print media.
See
Check the margin settings
If you are using a computer running Windows, make sure the option to minimize margins is not
selected.
Clean the inside of the automatic two-sided printing accessory
After extensive printing, ink might be deposited on the inside of the duplex unit causing ink to smear
when printing on both sides of the paper. To remove the deposited ink, use a lint free cloth to clean
the inside of the duplex unit.
80 Chapter 5 Maintaining and troubleshooting ENWW
Page 89

Clean the print zone of the printer
After extensive printing, ink might be deposited on the print zone of the printer, causing ink to smear
on the non-printed side of the media or the edge of a stack of printed media. To remove the
deposited ink, use a lint free cloth to clean the print zone, including the plastic ridges.
Enable the printer's output ramp
When printing in Fast Normal (default) print mode, the printer does not use the output ramp to hold
each printed page before releasing it onto the output tray. If the printer starts printing the next page
while the printed page is still drying on the output tray, the newly printed page might rub against the
printed page on the output tray, causing ink to smear. Severity of smearing depends on the amount
of ink used on each printed page.
To prevent the printed pages from rubbing against each other, print using the Normal or Best print
mode.
Alternatively, in the Toolbox, turn on the output ramp for printing in Fast Normal mode. Click the
Printer Services tab, and then click Configure Output Ramp. See
Toolbox (Windows).
ENWW Troubleshooting 81
Page 90

Ink is not filling the text or graphics completely
Check the ink cartridges
Ink cartridges might have run out of ink. Replace any empty cartridge. Or try removing and
reinstalling the cartridges, make sure they snap firmly into place. See
Check the media type
Replacing the ink cartridges.
Some media types are not suitable for use with the printer. See
Selecting print media.
Output is faded or dull colored
Check the print mode
The Fast Normal printer mode allows you to print at a faster rate. It is good for printing drafts. For
better results, select Normal or Best. See
Check the paper type setting
When printing on transparencies or other special media, select the corresponding media type in the
printer driver. See
Check the ink cartridges
If lines in the text or image are broken or do not print properly, one or more of the ink cartridges
might have run out of ink or are defective. Replace these cartridges with new ones.
Printing on special and custom-size media.
Changing print settings.
Colors are printing as black and white
Make sure Print in Grayscale is not selected in the printer driver.
Wrong colors are printing
Check print settings
Make sure Print in Grayscale is not selected in the printer driver.
Check the printheads
Whenever print quality noticeably decreases, you might need to clean the printheads. See
Maintaining the printheads.
Printout shows bleeding colors
Check print settings
Some media type settings (such as Transparency Films and Photo Papers) and print quality
settings (such as Best) require more ink than others. When you choose different print settings in the
printer driver, make sure you select the correct media type. See
82 Chapter 5 Maintaining and troubleshooting ENWW
Changing print settings.
Page 91

Check ink cartridges
Make sure ink cartridges have not been tampered with. Refilling processes and the use of
incompatible inks can disrupt the intricate printing system and result in reduced print quality and
damage to the printer. HP does not guarantee or support refilled ink cartridges. For ordering
information, see
HP supplies and accessories.
Colors do not line up properly
Check printheads
The printheads are not automatically aligned when a printhead is replaced. However, you might
notice improvement in the print quality by performing the alignment procedure yourself. See
Maintaining the printheads.
Check graphics placement
Use the zoom or print preview feature of your software to check for gaps in the placement of
graphics on the page.
Lines or dots are missing from text or graphics
The printheads or printhead contact pads might need cleaning. See Maintaining the printheads.
Resolving paper-feed problems
For information on resolving jams, see Clearing jams.
Media is not supported for the printer or tray
Use only media that is supported for the printer and the tray being used. See Understanding
specifications for supported media.
Media is not picked up from the tray
Make sure the paper guides are set to the correct markings in the tray for the media size you are
●
loading. Also make sure the guides are snug, but not tight, against the stack.
Make sure media in the tray is not curled. Uncurl paper by bending it in the opposite direction of
●
the curl. Also, check the ink saturation. To increase the ink drying time and reduce the ink
saturation, use an ink slider in conjunction with drying time under Advanced Printing Features
(Windows) or Ink Features (Mac OS) in the printer software. However, note that decreasing ink
saturation might give printouts a "washed-out" quality.
Media is not coming out correctly
Make sure the output tray extension is extended, otherwise, printed pages might fall off the printer.
●
Remove excess media from the output tray. There is a limit to the number of sheets the tray can
●
hold.
ENWW Troubleshooting 83
Page 92

Pages are skewing
Make sure the paper guides in the tray are adjusted snugly against the media, but do not crinkle
●
or bend it.
Avoid loading media of different types or sizes in the tray.
●
Make sure media in the tray is not curled. Uncurl paper by bending it in the opposite direction of
●
the curl.
Run a media skew test in the Toolbox. See
●
Testing media skew.
Multiple pages are being picked up
Make sure the paper guides are set to the correct markings in the tray for the media size you are
●
loading. Also make sure the guides are snug, but not tight, against the stack.
Make sure that the tray is not overloaded with paper.
●
When you load paper, avoid fanning the stack. Fanning paper can cause static electricity to build
●
up and intensify multiple-pick problems.
Embedded Web server (EWS) cannot be opened
Check your network setup
Make sure you are not using a phone cord to connect the printer to the network.
●
Make sure the network cable is securely connected to the printer.
●
Make sure the network hub, switch, or router is on and working properly.
●
Check the computer
Make sure the computer that you are using is connected to the network.
Check your Web browser
Make sure the Web browser meets the minimum system requirements. See Operating system and
network protocol specifications.
Check the printer IP address
● Print a configuration page, and then locate the printer's IP address on the second page. See
Understanding and printing the configuration page.
Ping the printer from an MS-DOS prompt (Windows) or Terminal (Mac OS) using the IP address.
●
For example, if the IP address is 123.123.123.123, type the following at the command prompt
and then press the Enter key:
ping 123.123.123.123
If a reply appears, the IP address is correct.
84 Chapter 5 Maintaining and troubleshooting ENWW
Page 93

Troubleshooting installation issues
Problems printing alignment page
When new printheads are installed, the printer automatically prints two alignment pages to align the
printheads. This process takes about eight minutes. Do not open any covers or push any buttons
until the alignment pages have printed. The alignment pages may be discarded after they are
printed. If the printer does not print the pages, then see
printheads manually (see
To align the printheads).
Problems installing software
Verify the computer requirements
General troubleshooting tips or align the
Make sure the computer meets the system requirements. See
protocol specifications.
Verify installation preliminaries
The computer meets the system requirements. See
●
specifications.
Before installing software on a Windows computer, ensure all other programs are closed.
●
If the computer does not recognize the path to the CD drive that you type, ensure you are
●
specifying the correct drive letter.
If the computer cannot recognize the Starter CD in the CD drive, inspect the CD for damage. You
●
can download the printer driver from
Reinstall the printer software
If you are using Windows and the computer cannot detect the printer, insert the Starter CD, click
Utilities, and then click Uninstaller to perform a clean printer driver uninstallation. Restart your
computer, and re-install the printer driver. See
www.hp.com/support/officejetprok850.
Uninstalling the printer software.
Operating system and network
Operating system and network protocol
Problems connecting to a network
NOTE After correcting any of the following, run the setup program again.
General network troubleshooting
If you are unable to install the printer software on the computer, verify that:
All cable connections to the computer and the printer are secure.
●
The network is operational and the network hub is turned on.
●
If the Link light on the network connector does not turn on, make sure that all of the
●
Troubleshooting tips and resources conditions are met.
● All applications, including virus protection programs and personal firewalls, are closed or
temporarily disabled.
ENWW Troubleshooting 85
Page 94

Make sure the printer is installed on the same subnet as the computers that will be using the
●
printer.
If the installation program cannot discover the printer, print the configuration page and enter the
●
IP address manually in the installation program. See
configuration page.
Ping the printer from an MS-DOS prompt (Windows) or Terminal (Mac OS) using the IP address.
●
For example, if the IP address is 123.123.123.123, type the following at the command prompt
and then press the Enter key:
ping 123.123.123.123
If a reply appears, the IP address is correct.
If you are using a computer running Windows, make sure that the network ports created in the printer
driver match the printer IP address:
Understanding and printing the
1. Print a configuration page. See
2. From the Windows desktop, click Start, point to Settings, and then click Printers. Or, click
Start, click Control Panel, and then click Printers and Faxes or Printers (depending on the
operating system).
3. Right-click the printer icon, click Properties, and then click the Ports tab.
4. Select the TCP/IP port for the printer, and then click Configure Port.
5. Compare the IP address listed in the dialog box and make sure it matches the IP address listed
on the configuration page. If the IP addresses are different, change the IP address in the dialog
box to match the address on the configuration page.
6. Click OK twice to save the settings and close the dialog boxes.
Though it is not recommended that you assign the printer a static IP address, you might resolve
some installation problems (such as a conflict with a personal firewall) by assigning the printer a
static IP address. For more information, see
Resetting printer network settings
If the printer is unable to communicate with the network, reset the printer network settings:
While holding down
(Power button).
(Power button), press (Resume button) three times, and then release
Understanding and printing the configuration page.
Configure network options.
Uninstall and then re-install the printer driver.
NOTE For late-breaking information, visit the product support website at www.hp.com/
support/officejetprok850.
Clearing jams
To clear a jam
1. Remove all media from the output tray.
86 Chapter 5 Maintaining and troubleshooting ENWW
Page 95

2. Check the rear-access panel or the duplex unit.
a. Push the button on either side of the rear-access panel or the duplex unit and remove it.
b. Locate any jammed media inside the printer, grasp it with both hands and pull it towards you.
c. If the jam is in the duplex unit, push the buttons in front of the duplex unit and remove the
cover. If the jam is inside, carefully remove it. Close the cover.
d. Reinsert the rear-access panel or the duplex unit into the printer.
3. If you cannot locate the jam, raise the output tray, and then check for a jam in the input tray. If
media is jammed in the tray, do the following:
a. Extend the input tray.
ENWW Troubleshooting 87
Page 96

b. Pull the paper towards you.
c. Ensure the media is properly aligned in the tray, and then lower the output tray.
4. If you have not found the jam, open the top cover. If there is paper remaining inside the printer,
ensure the carriage has moved to the right of the printer, free any paper scraps or wrinkled
media and pull the media towards you through the top of the printer.
WARNING! Do not reach into the printer when the printer is on and the carriage is stuck.
When you open the top cover, the carriage should return to its position on the right side of
the printer. If it does not move to the right, turn off the printer before you remove any jam.
5. After clearing the jam, close all covers, turn on the printer (if you turned it off), and then press
(Resume button) to continue printing.
The printer will continue printing the next page. You will need to resend any page that was jammed in
the printer.
To avoid jams
Make sure the printer is placed on a flat surface.
●
Make sure that nothing is blocking the paper path.
●
Do not overload the tray. See
●
Load paper properly. See
●
Understanding specifications for supported media.
Loading media.
Do not use media that is curled or crumpled.
●
88 Chapter 5 Maintaining and troubleshooting ENWW
Page 97

Always use media that conforms with specifications. See
●
Selecting print media.
If using recycled media, try another type of media. See
●
Make sure the output tray is not overly full when you send a job to print.
●
Make sure media is aligned against the right side of the tray.
●
Make sure the paper guides are adjusted snugly against the media, but do not crinkle or bend it.
●
Selecting print media.
ENWW Troubleshooting 89
Page 98

90 Chapter 5 Maintaining and troubleshooting ENWW
Page 99

6 HP supplies and accessories
This section provides information on HP supplies and accessories for the printer. The information is
subject to change; visit the HP website (
make purchases through the website.
www.hpshopping.com) for the latest updates. You can also
ENWW 91
Page 100

Ordering printing supplies online
Besides the HP website, you may order printing supplies through the embedded Web server (EWS)
or the Toolbox (Windows).
System requirements for ordering printing supplies
To use the Toolbox, ensure you have the following:
Internet access
●
Printer connected to your computer using a USB or parallel cable, or connected to the network
●
● Toolbox installed on your computer (supported for Windows only)
To use the EWS, ensure you have the following:
Printer connected to the network
●
Web browser installed on your computer (either Microsoft Internet Explorer 5.5, Netscape 7.0,
●
Opera 7.54, Mozilla Firefox 1.0, or Safari 1.2, or later)
To order printing supplies
Toolbox (Windows)
●
On the Printer Status tab, click Order Supplies. Your default Web browser starts and displays
a website.
HP Printer Utility (Mac)
●
Open Information And Support, click Supplies Status, and then click Order HP Supplies.
Embedded Web server
●
In the Other Links section, click Order Supplies. Follow the instructions on the website to select
and order printing supplies.
92 Chapter 6 HP supplies and accessories ENWW
 Loading...