

Page 1

HP 14-in-1 Media Card Reader
User Guide
Page 2

© 2013 Hewlett-Packard Development
Company, L.P.
Microsoft and Windows are either
trademarks or registered trademarks of
Microsoft Corporation in the United States
and/or other countries.
All other product names mentioned herein
may be trademarks of their respective
companies.
Hewlett-Packard Company shall not be
liable for technical or editorial errors or
omissions contained herein or for incidental
or consequential damages in connection
with the furnishing, performance, or use of
this material. The information in this
document is provided “as is” without
warranty of any kind, including, but not
limited to, the implied warranties of
merchantability and fitness for a particular
purpose, and is subject to change without
notice. The warranties for Hewlett-Packard
products are set forth in the express limited
warranty statements accompanying such
products. Nothing herein should be
construed as constituting an additional
warranty.
This document contains proprietary
information that is protected by copyright.
No part of this document may be
photocopied, reproduced, or translated to
another language without the prior written
consent of Hewlett-Packard Company.
First Edition (August 2013)
Document Part Number: 739474–001
Page 3

About This Guide
This guide provides information on setting up and using the HP 14-in-1 Media Card Reader.
WARNING! Text set off in this manner indicates that failure to follow directions could result in bodily
harm or loss of life.
CAUTION: Text set off in this manner indicates that failure to follow directions could result in
damage to equipment or loss of information.
NOTE: Text set off in this manner provides important supplemental information.
iii
Page 4

iv About This Guide
Page 5

Table of contents
1 Product Features ............................................................................................................................................ 1
HP 14-in-1 Media Card Reader ............................................................................................................ 1
HP 14-in-1 (USB) Media Card Reader Kit Contents ............................................................................ 1
Installing the Media Reader 13.3-cm (5.25-inch) Adapter Kit ............................................................... 2
2 Installing the Media Card Reader .................................................................................................................. 3
Accessing the Internal Components of the Computer .......................................................................... 3
Connecting the Media Card Reader (USB 3.0 Only) ............................................................................ 5
Connecting the Media Card Reader (USB 2.0 Only) ............................................................................ 6
Reassembling the Computer ................................................................................................................ 6
3 Identifying Media Slots ................................................................................................................................... 7
Front Panel Components ..................................................................................................................... 7
Compatible Media Cards ...................................................................................................................... 7
Appendix A Troubleshooting ............................................................................................................................ 8
Solving Common Problems .................................................................................................................. 8
Using the Worldwide Web .................................................................................................................... 9
Preparing to Call Technical Support ..................................................................................................... 9
v
Page 6

vi
Page 7
1 Product Features
HP 14-in-1 Media Card Reader
The HP 14-in-1 Media Card Reader reads and writes files from your computer to different types of
media. Files can be copied, edited, stored and transferred. The media card reader:
Reads/Writes up to 14 different industry standard media types
●
● Capable of using USB 3.0 (4.8Gbps) or USB 2.0 (480Mbps) to provide superior performance to
transfer pictures, music, video and data between flash memory cards and the computer
Fits conveniently in the 8.9-cm (3.5-inch) or 13.3-cm (5.25-inch) drive bay (with included 13.3-cm
●
(5.25-inch) accessory kit)
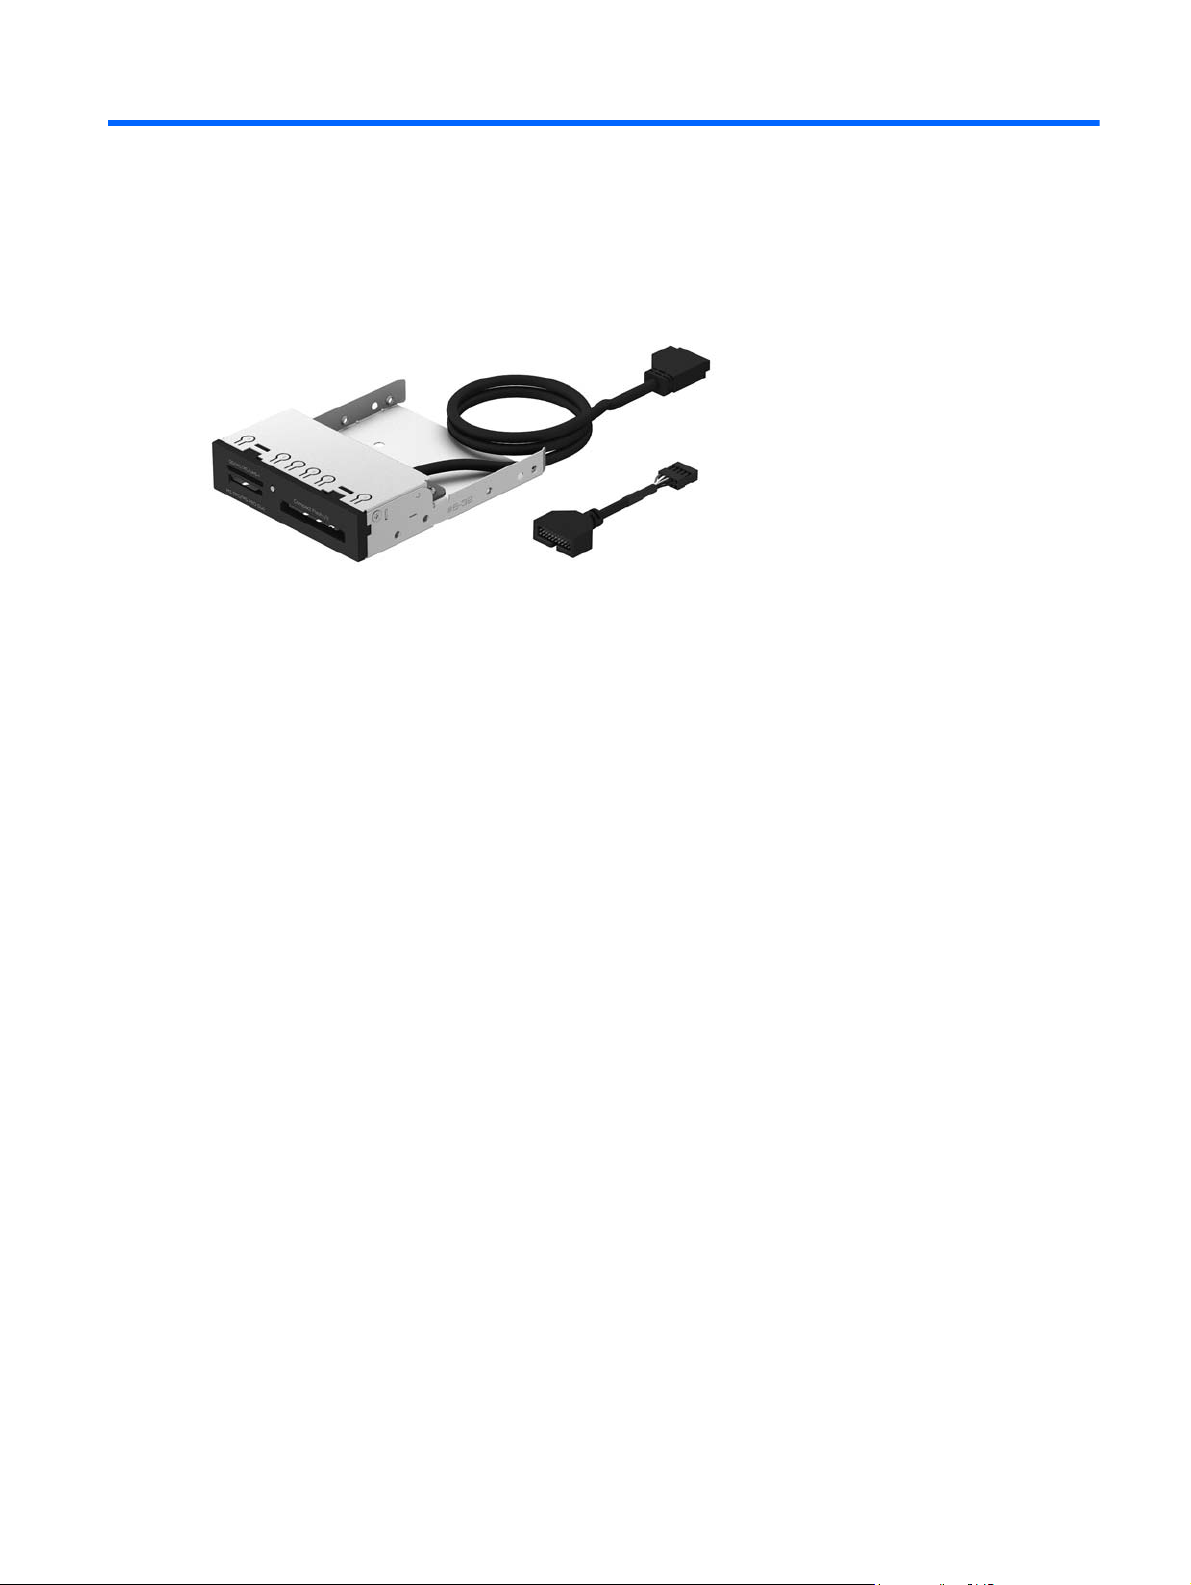
HP 14-in-1 (USB) Media Card Reader Kit Contents
The HP 14-in-1 Media Card Reader with USB kit includes:
8.9-cm (3.5-inch) media card reader with integrated USB 3.0 cable
●
USB 3.0 to USB 2.0 cable adapter to allow use of the media card reader on computers with USB
●
2.0 technology.
Media Reader 8.9-cm (3.5-inch) to 13.3-cm (5.25-inch) accessory kit for 13.3-cm (5.25-inch)
●
drive bays
Product Notices document containing regulatory and safety notices for your product
●
HP 14-in-1 Media Card Reader 1
Page 8
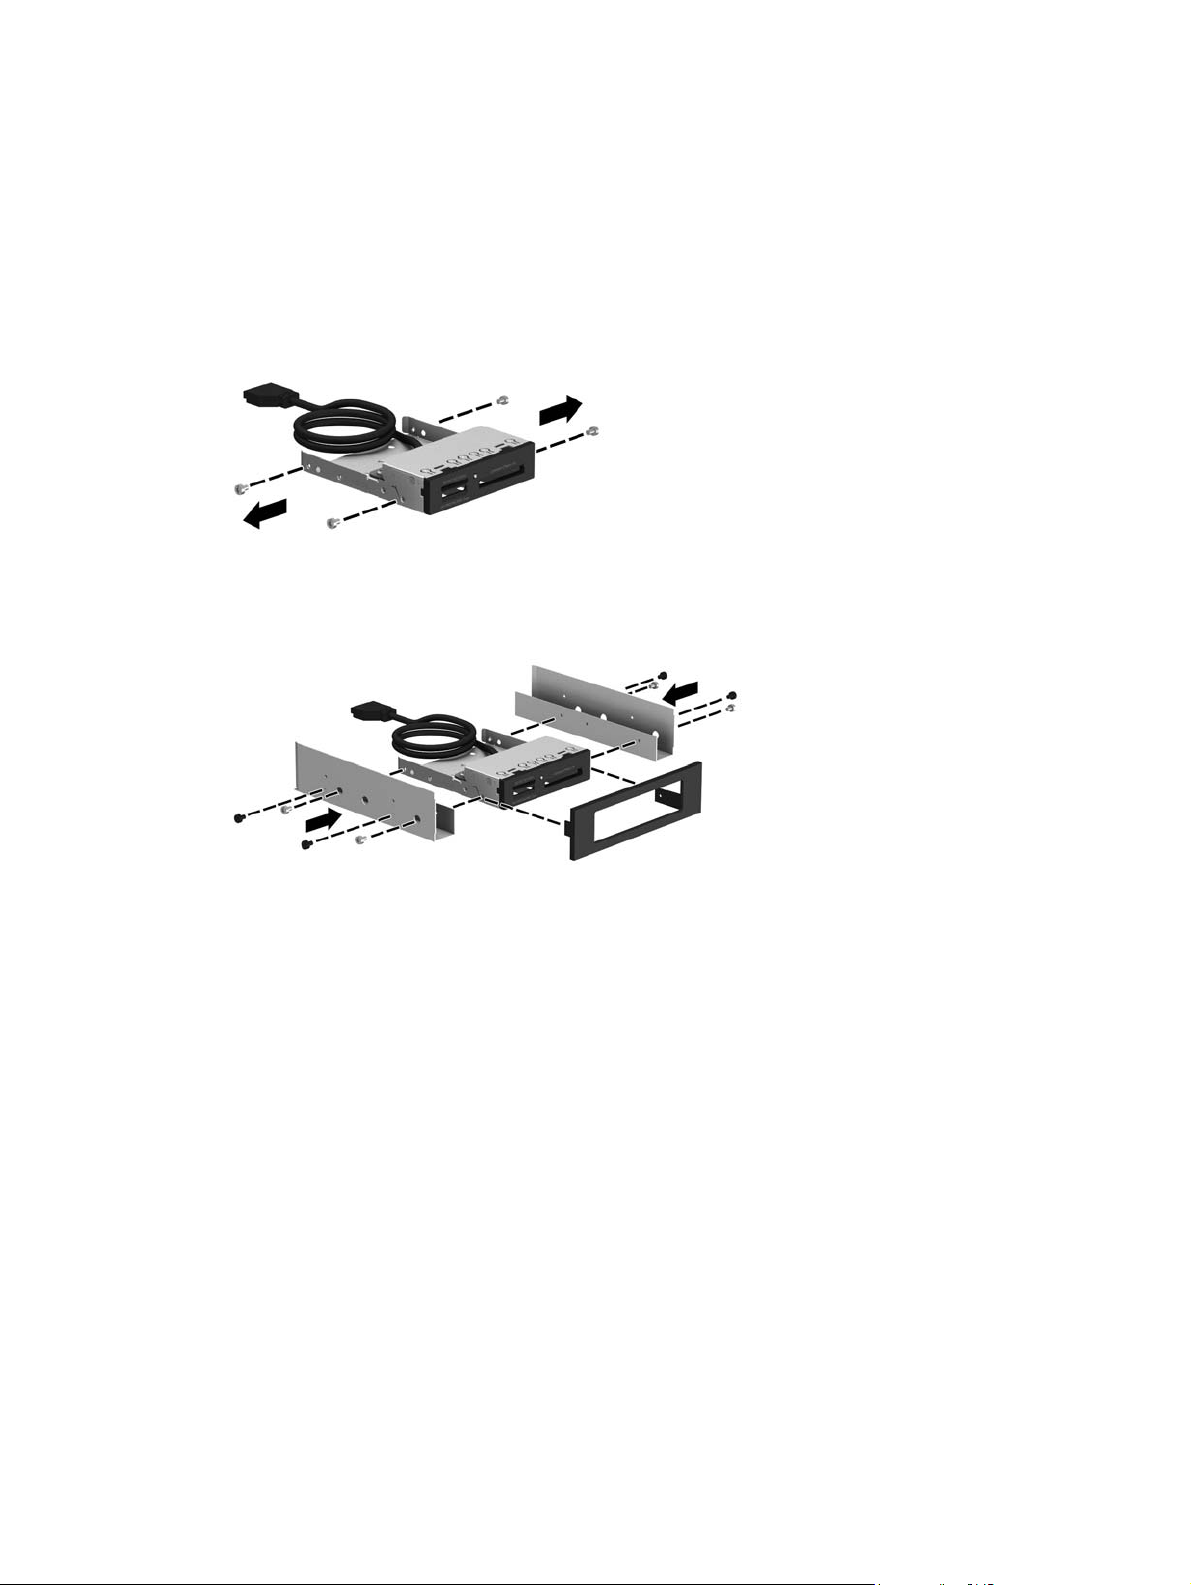
Installing the Media Reader 13.3-cm (5.25-inch) Adapter Kit
The Media Card Reader can be installed in a 8.9-cm (3.5-inch) or 13.3-cm (5.25-inch) computer drive
bay. If installing the 8.9-cm (3.5-inch) media card reader into a 13.3-cm (5.25-inch) drive bay, you
must first install the 13.3-cm (5.25-inch) accessory kit to the reader.
1. Remove the four screws (two on each side) from the media card reader.
Figure 1-1 Removing screws from Media Card Reader
2. Assemble the rails and bezel and attach to the media card reader with the four screws removed
in step 1.
Figure 1-2 Attaching Rails and Bezel
2 Chapter 1 Product Features
Page 9

2 Installing the Media Card Reader
Accessing the Internal Components of the Computer
CAUTION: Static electricity can damage the electronic components of the computer or optional
equipment. Before beginning these procedures, ensure that you are discharged of static electricity by
briefly touching a grounded metal object. Refer to the documentation included with your computer for
additional information on preventing electrostatic discharge.
CAUTION: When the computer is plugged into an AC power source, voltage is always applied to
the system board. You must disconnect the power cord from the power source before opening the
computer to prevent system board damage.
WARNING! To reduce the risk of personal injury from electrical shock and/or hot surfaces, be sure
to disconnect the power cord on the computer from the wall outlet and allow the internal system
components to cool before touching.
To prepare the computer for installation of the HP 14-in-1 Media Card Reader, refer to the
documentation included with your computer for detailed instructions to:
1. Power off and unplug the computer from the power source.
2. Remove the computer cover or access panel.
3. Remove the front bezel.
Figure 2-1 Accessing the Internal Components
Accessing the Internal Components of the Computer 3
Page 10

4. Remove the 8.9-cm (3.5-inch) or 13.3-cm (5.25-inch) bezel blank cover from the computer’s
drive bay (or remove the 8.9-cm (3.5-inch) or 13.3-cm (5.25-inch) drive from the bay if you are
replacing a drive with the media card reader and do not have an empty drive bay).
NOTE: Some computer models may require that the screws on the sides of the media card
reader be removed before inserting the reader into the drive bay. The screws are then
reinstalled after the reader is inserted. Refer to your computer documentation for installing
additional drives in the drive bays.
5. Install the media card reader according to the instructions from your computer model’s
documentation on installing a drive into a 8.9-cm (3.5-inch) or 13.3-cm (5.25-inch) drive bay.
Figure 2-2 Installing in a 8.9-cm (3.5-inch) Drive Bay
Figure 2-3 Installing in a 13.3-cm (5.25-inch) Drive Bay
6. Be sure to use the proper guide screws, if appropriate, to ensure the media card reader will line
up correctly in the drive cage and lock in place. Refer to your computer documentation for guide
screws usage.
NOTE: Documentation for each computer model can be found at http://www.hp.com/support.
4 Chapter 2 Installing the Media Card Reader
Page 11

Connecting the Media Card Reader (USB 3.0 Only)
Connect the USB cable from the media card reader directly into the USB connector on the system
board.
Figure 2-4 Connecting to the USB 3.0 System Board
CAUTION: Some system boards do not have an available USB connector. If you unplug the USB
cable that is connected to the system board to free up a connector for the HP Media Card Reader,
the front USB ports on the computer will not function.
Connecting the Media Card Reader (USB 3.0 Only) 5
Page 12

Connecting the Media Card Reader (USB 2.0 Only)
The Media Reader includes a USB 3.0 to 2.0 adapter for use with computers using USB 2.0
technology.
Connect the USB cable from the media card reader to the USB adapter (1) and then connect the
adapter to the USB 2.0 connector on the system board (2).
CAUTION: Some system boards do not have an available USB connector. If you unplug the USB
cable that is connected to the system board to free up a connector for the HP Media Card Reader,
the front USB ports on the computer will not function.
Figure 2-5 Installing the USB 2.0/3.0 Adapter
Reassembling the Computer
After installing the HP Media Card Reader:
1. Replace the front bezel.
2. Replace the computer cover or access panel.
3. Plug in and power on the computer.
The HP Media Card Reader should now be ready for use. If you encounter problems, refer to
Appendix A,
Solving Common Problems on page 8.
6 Chapter 2 Installing the Media Card Reader
Page 13

3 Identifying Media Slots
Front Panel Components
The media slots accept the following cards.
Figure 3-1 HP 14-in-1 USB Media Card Reader
Table 3-1 Front Panel Components
No. Slot Media
1 SD/HC/XC/UHS-1 ● Secure Digital
2 Media Card Reader
Activity Light
3 MS PRO/MS PRO
Duo
4 Compact Flash I/II ● CompactFlash
Compatible Media Cards
To find information on compatible media cards for this product, go to http://www.hp.com/go/
quickspecs/. Select your region/country, and then enter the product name in Search for a product
field.
Memory Card
(SD)
Memory Stick
●
(MS)
Menory Stick
●
Select
Memory Stick
●
PRO (MS PRO)
Card Type 1
● Secure Digital
High Capacity
Memory Card
(SDHC)
Memory Stick
●
MagicGate
Memory Stick
●
Duo (MS Duo)
Memory Stick
●
PRO Duo (MS
PRO Duo)
● CompactFlash
Card Type 2
● Secure Digital
Extended
Capacity Memory
Card (SDXC)
Memory Stick
●
MagicGate Duo
Memory Stick
●
PRO-HG Duo
● MicroDrive
Front Panel Components 7
Page 14

A Troubleshooting
Solving Common Problems
The following table lists possible problems, the possible cause of each problem, and the
recommended solutions.
Table A-1 Solving Common Problems
Problem Possible Cause Solution
No available USB connector
on the system board.
Media card will not work in a
digital camera after formatting
it in Microsoft Windows XP.
A write-protected or locked
error occurs when attempting
to write to the media card.
Cannot write to the media
card.
Unable to access data on the
media card after inserting it
into a slot.
Do not know how to remove a
media card correctly.
All USB ports on the computer
are used or none are
available.
By default, Windows XP will
format any media card with a
capacity greater than 32MB
with the FAT32 format. Most
digital cameras use the FAT
(FAT16 & FAT12) format and
can not operate with a FAT32
formatted card.
Media card is locked. Locking
the media card is a safety
feature that prevents writing to
and deleting from an SD/
Memory Stick/PRO card.
The media card is a read-only
memory (ROM) card.
The media card is not inserted
properly, is inserted in the
wrong slot, or is not supported.
The computer’s software is
used to safely eject the card.
Purchase and install a USB expansion card with an
internal USB 3.0 or USB 2.0 port(s) that is appropriate for
your system.
Either format the media card in the digital camera or
select FAT file system to format the media card in a
computer with Windows XP.
If using an SD card, make sure that the lock tab located
on the right of the SD card is not in the locked position. If
using a Memory Stick/PRO card, make sure that the lock
tab located on the bottom of the Memory Stick/PRO card
is not in the locked position.
Check the manufacturer’s documentation included with
your card to see if it writable.
Ensure that the card is inserted properly with the gold
contact on the correct side. The green LED will light if
inserted properly.
Open “My Computer,” right-click on the corresponding
drive icon, and select “Eject.” Then pull the card out of
the slot. Note: Never remove the card when the green
LED is flashing.
After installing the media card
reader and booting to
Windows, the reader and the
inserted cards are not
recognized by the computer.
After inserting a media card in
the reader, the computer
attempts to boot from the
media card.
After installing the media card
reader, the front USB ports on
the computer do not work.
8 Appendix A Troubleshooting
The operating system needs
time to recognize the device if
the reader was just installed
into the computer and you are
turning the PC on for the first
time.
The inserted media card has
boot capability.
The USB cable for the front
USB ports was disconnected
so that the system board
connector could be used for
the reader.
Wait a few seconds so that the operating system can
recognize the reader and the available ports, and then
recognize whatever media is inserted in the reader.
If you do not want to boot from the media card, remove it
during boot or do not select the option to boot from the
inserted media card during the boot process.
Reconnect the cable for the front USB ports. Connect the
media reader to an available USB connector on the
system board.
Page 15

Using the Worldwide Web
For the online access to technical support information, self-solve tools, online assistance, community
forums or IT experts, broad multivendor knowledge base, monitoring and diagnostic tools, go to
http://www.hp.com/support.
Preparing to Call Technical Support
If you can not solve a problem using the troubleshooting tips in this section, you can contact
Technical Support. For U.S. support, go to
go to
http://welcome.hp.com/country/us/en/wwcontact_us.html. Have the following information
available when you log in:
Serial number of the computer in which the accessory is installed.
●
Purchase date on invoice.
●
Condition under which the problem occurred.
●
● Error messages received.
Hardware configuration.
●
Hardware and software you are using.
●
http://www.hp.com/go/contactHP. For worldwide support
Using the Worldwide Web 9
 Loading...