

Page 1

Managing MC/ServiceGuard NFS
A.11.11.03 and A.11.23.02
Edition 6
Manufacturing Part Number: B5140-90020
E0604
United States
© Copyright 2004 Hewlett-Packard Development Company L. P. All rights reserved.
Page 2

Legal Notices
The information in this document is subject to change without notice.
Hewlett-Packard makes no warranty of any kind with regard to this
manual, including, but not limited to, the implied warranties of
merchantability and fitness for a particular purpose. Hewlett-Packard
shall not be held liable for errors contained herein or direct, indirect,
special, incidental or consequential damages in connection with the
furnishing, performance, or use of this material.
Warranty
A copy of the specific warranty terms applicable to your Hewlett-Packard
product and replacement parts can be obtained from your local Sales and
Service Office.
U.S. Government License
Proprietary computer software. Valid license from HP required for
possession, use or copying. Consistent with FAR 12.211 and 12.212,
Commercial Computer Software, Computer Software Documentation,
and Technical Data for Commercial Items are licensed to the U.S.
Government under vendor's standard commercial license.
Copyright Notice
Copyright 2004 Hewlett-Packard Development Company L.P. All
rights reserved. Reproduction, adaptation, or translation of this
document without prior written permission is prohibited, except as
allowed under the copyright laws.
Copyright 1986-1996 Sun Microsystems, Inc.
Trademark Notices
MC/ServiceGuard® is a registered trademark of Hewlett-Packard
Company.
NFS® is a registered trademark of Sun Microsystems, Inc.
NIS™ is a trademark of Sun Microsystems, Inc.
UNIX® is a registered trademark of The Open Group.
2
Page 3

1. Overview of MC/ServiceGuard NFS
Limitations of MC/ServiceGuard NFS . . . . . . . . . . . . . . . . . . . . . . . . . . . . . . . . . . . . . . . 9
Overview of the NFS File Lock Migration Feature . . . . . . . . . . . . . . . . . . . . . . . . . . . . 10
Supported Configurations . . . . . . . . . . . . . . . . . . . . . . . . . . . . . . . . . . . . . . . . . . . . . . . . 12
Simple Failover to an Idle NFS Server . . . . . . . . . . . . . . . . . . . . . . . . . . . . . . . . . . . . 13
Failover from One Active NFS Server to Another . . . . . . . . . . . . . . . . . . . . . . . . . . . 14
A Host Configured as Adoptive Node for Multiple Packages . . . . . . . . . . . . . . . . . . . 15
Cascading Failover with Three Adoptive Nodes . . . . . . . . . . . . . . . . . . . . . . . . . . . . . 16
Server-to-Server Cross Mounting . . . . . . . . . . . . . . . . . . . . . . . . . . . . . . . . . . . . . . . . 17
How the Control and Monitor Scripts Work. . . . . . . . . . . . . . . . . . . . . . . . . . . . . . . . . . 19
Starting the NFS Services . . . . . . . . . . . . . . . . . . . . . . . . . . . . . . . . . . . . . . . . . . . . . . 19
Starting File Lock Migration . . . . . . . . . . . . . . . . . . . . . . . . . . . . . . . . . . . . . . . . . . . . 19
Halting the NFS Services. . . . . . . . . . . . . . . . . . . . . . . . . . . . . . . . . . . . . . . . . . . . . . . 20
Monitoring the NFS Services . . . . . . . . . . . . . . . . . . . . . . . . . . . . . . . . . . . . . . . . . . . . 21
On the Client Side . . . . . . . . . . . . . . . . . . . . . . . . . . . . . . . . . . . . . . . . . . . . . . . . . . . . 22
2. Installing and Configuring MC/ServiceGuard NFS
Installing MC/ServiceGuard NFS. . . . . . . . . . . . . . . . . . . . . . . . . . . . . . . . . . . . . . . . . . 25
Monitoring NFS/TCP Services with MC/ ServiceGuard NFS Toolkit. . . . . . . . . . . . . . 27
Before Creating an MC/ServiceGuard NFS Package. . . . . . . . . . . . . . . . . . . . . . . . . . . 29
Configuring an MC/ServiceGuard NFS Package . . . . . . . . . . . . . . . . . . . . . . . . . . . . . . 33
Copying the Template Files . . . . . . . . . . . . . . . . . . . . . . . . . . . . . . . . . . . . . . . . . . . . . 34
Editing the Control Script (nfs.cntl) . . . . . . . . . . . . . . . . . . . . . . . . . . . . . . . . . . . . . . 35
Editing the NFS Control Script (hanfs.sh) . . . . . . . . . . . . . . . . . . . . . . . . . . . . . . . . . 41
Editing the File Lock Migration Script (nfs.flm). . . . . . . . . . . . . . . . . . . . . . . . . . . . . 43
Editing the NFS Monitor Script (nfs.mon) . . . . . . . . . . . . . . . . . . . . . . . . . . . . . . . . . 45
Editing the Package Configuration File (nfs.conf) . . . . . . . . . . . . . . . . . . . . . . . . . . . 46
Configuring Server-to-Server Cross-Mounts (Optional). . . . . . . . . . . . . . . . . . . . . . . 48
Creating the Cluster Configuration File and Bringing Up the Cluster. . . . . . . . . . . 51
Contents
3. Sample Configurations
Example One - Three-Server Mutual Takeover . . . . . . . . . . . . . . . . . . . . . . . . . . . . . . . 55
Cluster Configuration File for Three-Server Mutual Takeover . . . . . . . . . . . . . . . . . 57
Package Configuration File for pkg01 . . . . . . . . . . . . . . . . . . . . . . . . . . . . . . . . . . . . . 58
NFS Control Scripts for pkg01. . . . . . . . . . . . . . . . . . . . . . . . . . . . . . . . . . . . . . . . . . . 59
Package Configuration File for pkg02 . . . . . . . . . . . . . . . . . . . . . . . . . . . . . . . . . . . . . 60
NFS Control Scripts for pkg02. . . . . . . . . . . . . . . . . . . . . . . . . . . . . . . . . . . . . . . . . . . 61
Package Configuration File for pkg03 . . . . . . . . . . . . . . . . . . . . . . . . . . . . . . . . . . . . . 62
3
Page 4

Contents
NFS Control Scripts for pkg03. . . . . . . . . . . . . . . . . . . . . . . . . . . . . . . . . . . . . . . . . . . 63
Example Two - One Adoptive Node for Two Packages with File Lock Migration . . . . 64
Cluster Configuration File for Adoptive Node for Two Packages with File Lock
Migration. . . . . . . . . . . . . . . . . . . . . . . . . . . . . . . . . . . . . . . . . . . . . . . . . . . . . . . . . . . .66
Package Configuration File for pkg01 . . . . . . . . . . . . . . . . . . . . . . . . . . . . . . . . . . . . . 67
NFS Control Scripts for pkg01. . . . . . . . . . . . . . . . . . . . . . . . . . . . . . . . . . . . . . . . . . . 68
NFS File Lock Migration and Monitor Scripts for pkg01. . . . . . . . . . . . . . . . . . . . . . 70
Package Configuration File for pkg02 . . . . . . . . . . . . . . . . . . . . . . . . . . . . . . . . . . . . . 71
NFS Control Scripts for pkg02. . . . . . . . . . . . . . . . . . . . . . . . . . . . . . . . . . . . . . . . . . . 72
NFS File Lock Migration and Monitor Scripts for pkg02. . . . . . . . . . . . . . . . . . . . . . 74
Example Three - Three-Server Cascading Failover. . . . . . . . . . . . . . . . . . . . . . . . . . . . 75
Cluster Configuration File for Three-Server Cascading Failover . . . . . . . . . . . . . . . 77
Package Configuration File for pkg01 . . . . . . . . . . . . . . . . . . . . . . . . . . . . . . . . . . . . . 78
NFS Control Scripts for pkg01. . . . . . . . . . . . . . . . . . . . . . . . . . . . . . . . . . . . . . . . . . . 79
Package Configuration File for pkg02 . . . . . . . . . . . . . . . . . . . . . . . . . . . . . . . . . . . . . 80
NFS Control Scripts for pkg02. . . . . . . . . . . . . . . . . . . . . . . . . . . . . . . . . . . . . . . . . . . 81
Example Four - Two Servers with NFS Cross-Mounts . . . . . . . . . . . . . . . . . . . . . . . . . 82
Cluster Configuration File for Two-Server NFS Cross-Mount. . . . . . . . . . . . . . . . . . 84
Package Configuration File for pkg01 . . . . . . . . . . . . . . . . . . . . . . . . . . . . . . . . . . . . . 85
NFS Control Scripts for pkg01. . . . . . . . . . . . . . . . . . . . . . . . . . . . . . . . . . . . . . . . . . . 86
Package Configuration File for pkg02 . . . . . . . . . . . . . . . . . . . . . . . . . . . . . . . . . . . . . 88
NFS Control Scripts for pkg02. . . . . . . . . . . . . . . . . . . . . . . . . . . . . . . . . . . . . . . . . . . 89
Index . . . . . . . . . . . . . . . . . . . . . . . . . . . . . . . . . . . . . . . . . . . . . . . . . . . . . . . . . . . 91
4
Page 5

Figures
Figure 1-1. Simple Failover to an Idle NFS Server . . . . . . . . . . . . . . . . . . . . . . . . . . 13
Figure 1-2. Failover from One Active NFS Server to Another. . . . . . . . . . . . . . . . . . 14
Figure 1-3. A Host Configured as Adoptive Node for Multiple Packages . . . . . . . . . 15
Figure 1-4. Cascading Failover with Three Adoptive Nodes . . . . . . . . . . . . . . . . . . . 16
Figure 1-5. Server-to-Server Cross Mounting. . . . . . . . . . . . . . . . . . . . . . . . . . . . . . . 17
Figure 2-1. Server-to-Server Cross-Mounting . . . . . . . . . . . . . . . . . . . . . . . . . . . . . . 48
Figure 3-1. Three-Server Mutual Takeover . . . . . . . . . . . . . . . . . . . . . . . . . . . . . . . . 55
Figure 3-2. Three-Server Mutual Takeover after One Server Fails . . . . . . . . . . . . . 56
Figure 3-3. One Adoptive Node for Two Packages . . . . . . . . . . . . . . . . . . . . . . . . . . . 64
Figure 3-4. One Adoptive Node for Two Packages after One Server Fails . . . . . . . . 65
Figure 3-5. Cascading Failover with Three Servers. . . . . . . . . . . . . . . . . . . . . . . . . . 75
Figure 3-6. Cascading Failover with Three Servers after One Server Fails. . . . . . . 76
Figure 3-7. Two Servers with NFS Cross-Mounts . . . . . . . . . . . . . . . . . . . . . . . . . . . 82
Figure 3-8. Two Servers with NFS Cross-Mounts after One Server Fails . . . . . . . . 83
5
Page 6

Figures
6
Page 7

1 Overview of MC/ServiceGuard
NFS
Chapter 1 7
Page 8

Overview of MC/ServiceGuard NFS
MC/ServiceGuard NFS is a tool kit that enables you to use
MC/ServiceGuard to set up highly available NFS servers.
You must set up an MC/ServiceGuard cluster before you can set up
Highly Available NFS. For instructions on setting up an
MC/ServiceGuard cluster, see the Managing MC/ServiceGuard manual.
MC/ServiceGuard NFS is a separately purchased set of configuration
files and control scripts, which you customize for your specific needs.
These files, once installed, are located in /opt/cmcluster/nfs.
MC/ServiceGuard allows you to create high availability clusters of HP
9000 Series 800 computers. A high availability computer system allows
applications to continue in spite of a hardware or software failure.
MC/ServiceGuard systems protect users from software failures as well as
from failure of a system processing unit (SPU) or local area network
(LAN) component. In the event that one component fails, the redundant
component takes over, and MC/ServiceGuard coordinates the transfer
between components.
An NFS server is a host that “exports” its local directories (makes them
available for client hosts to mount using NFS). On the NFS client, these
mounted directories look to users like part of the client’s local file system.
With MC/ServiceGuard NFS, the NFS server package containing the
exported file systems can move to a different node in the cluster in the
event of failure. After MC/ServiceGuard starts the NFS package on the
adoptive node, the NFS file systems are re-exported from the adoptive
node with minimum disruption of service to users. The client side hangs
until the NFS server package comes up on the adoptive node. When the
service returns, the user can continue access to the file. You do not need
to restart the client.
Chapter 18
Page 9

Overview of MC/ServiceGuard NFS
Limitations of MC/ServiceGuard NFS
Limitations of MC/ServiceGuard NFS
The following limitations apply to MC/ServiceGuard NFS:
• Applications lose their file locks when an NFS server package moves
to a new node. Therefore, any application that uses file locking must
reclaim its locks after an NFS server package fails over.
An application that loses its file lock due to an NFS package failover
does not receive any notification. If the server is also an NFS client,
it loses the NFS file locks obtained by client-side processes.
NOTE With MC/ServiceGuard NFS A.11.11.03 and A.11.23.02, you can
address this limitation by enabling the File Lock Migration feature
(see “Overview of the NFS File Lock Migration Feature” on page 10).
To ensure that the File Lock Migration feature functions properly,
install HP-UX 11i v1 NFS General Release and Performance Patch,
PHNE_26388 (or a superseding patch). For HP-UX 11i v2, the
feature functions properly without a patch.
• If a server is configured to use NFS over TCP and the client is the
same machine as the server, which results in a loopback NFS mount,
the client may hang for about 5 minutes if the package is moved to
another node. The solution is to use NFS over UDP between
NFS-HA-server cross mounts.
NOTE You cannot use MC/ServiceGuard NFS for an NFS diskless cluster
server.
Chapter 1 9
Page 10

Overview of MC/ServiceGuard NFS
Overview of the NFS File Lock Migration Feature
Overview of the NFS File Lock Migration
Feature
MC/ServiceGuard NFS includes a new feature - File Lock Migration. The
detailed information on this feature is as follows:
• Each HA/NFS package designates a unique holding directory located
in one of the filesystems associated with the package. In other words,
an empty directory is created in one of the filesystems that moves
between servers as part of the package. This holding directory is a
configurable parameter and must be dedicated to hold the Status
Monitor (SM) entries only.
• A new script, nfs.flm, periodically (default value is five seconds; you
can change this value by modifying the PROPAGATE_INTERVAL
parameter in the nfs.flm script) copies SM entries from the
/var/statmon/sm directory into the package holding directory. To
edit the nfs.flm script, see “Editing the File Lock Migration Script
(nfs.flm)” on page 43.
• Upon package failover, the holding directory transitions from the
primary node to the adoptive node, because it resides in one of the
filesystems configured as part of the HA/NFS package.
Once the holding directory is on the adoptive node, the SM entries
residing in the holding directory are copied to the /var/statmon/sm
directory on the adoptive node. This populates the new server’s SM
directory with the entries from the primary server.
• After failover, the HA/NFS package IP address is configured on the
adoptive node, and rpc.statd and rpc.lockd are killed and
restarted. This killing and restarting of the daemons triggers a crash
recovery notification event, whereby rpc.statd sends crash
notification messages to all the clients listed in the
/var/statmon/sm directory.
These crash recovery notification messages contain the relocatable
hostname of the HA/NFS package that was previously running on
the primary node and is currently running on the adoptive node.
Chapter 110
Page 11

Overview of MC/ServiceGuard NFS
Overview of the NFS File Lock Migration Feature
• Any client that holds NFS file locks against files residing in the
HA/NFS package (transitioned between servers) sends reclaim
requests to the adoptive node (where the exported filesystems
currently reside) and reclaims its locks.
• After rpc.statd sends the crash recovery notification messages, the
SM entries in the package holding directory are removed, and the
nfs.flm script is started on the adoptive node. The script once again
copies each /var/statmon/sm file on the HA/NFS server into the
holding directory, every five seconds. Each file residing in the
/var/statmon/sm directory on the adoptive node following the
package migration represents a client that either reclaimed its locks
after failover or has established new locks after failover.
NOTE To enable the File Lock Migration feature, you need MC/ServiceGuard
version A.11.15.
To ensure that the File Lock Migration feature functions properly, install
HP-UX 11i v1 NFS General Release and Performance Patch,
PHNE_26388 (or a superseding patch). For HP-UX 11i v2, the feature
functions properly without a patch.
Chapter 1 11
Page 12

Overview of MC/ServiceGuard NFS
Supported Configurations
Supported Configurations
MC/ServiceGuard NFS supports the following configurations:
• Simple failover from an active NFS server node to an idle NFS server
node.
• Failover from one active NFS server node to another active NFS
server node, where the adoptive node supports more than one NFS
package after the failover.
• A host configured as an adoptive node for more than one NFS
package. The host may also be prevented from adopting more than
one failed package at a time.
• Cascading failover, where a package may have up to three adoptive
nodes.
• Server-to-server cross mounting, where one server may mount
another server’s file systems, and the mounts are not interrupted
when one server fails.
These configurations are illustrated in the following sections.
Chapter 112
Page 13
Simple Failover to an Idle NFS Server
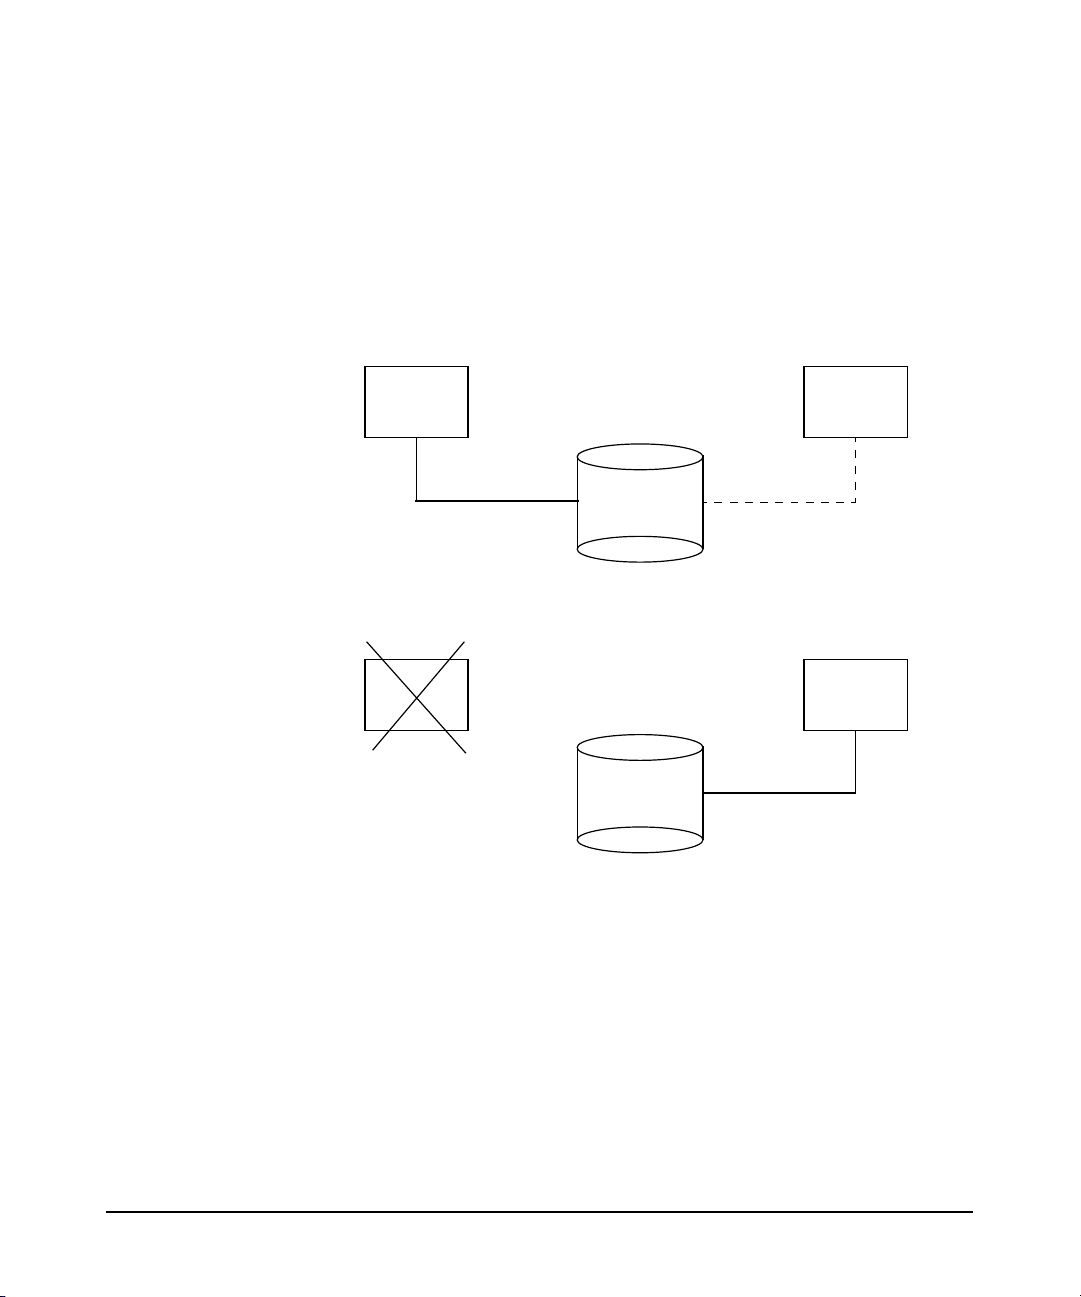
Figure 1-1 shows a simple failover from an active NFS server node to an
idle NFS server node.
Figure 1-1 Simple Failover to an Idle NFS Server
Before Failover:
Overview of MC/ServiceGuard NFS
Supported Configurations
Node_A
Node_B
Pkg_1
disks
After Failover:
Node_A Node_B
Pkg_1
disks
Node_A is the primary node for NFS server package Pkg_1. When Node_A
fails, Node_B adopts Pkg_1. This means that Node_B locally mounts the
file systems associated with Pkg_1 and exports them. Both Node_A and
Node_B must have access to the disks that hold the file systems for
Pkg_1.
Chapter 1 13
Page 14
Overview of MC/ServiceGuard NFS
Supported Configurations
Failover from One Active NFS Server to Another
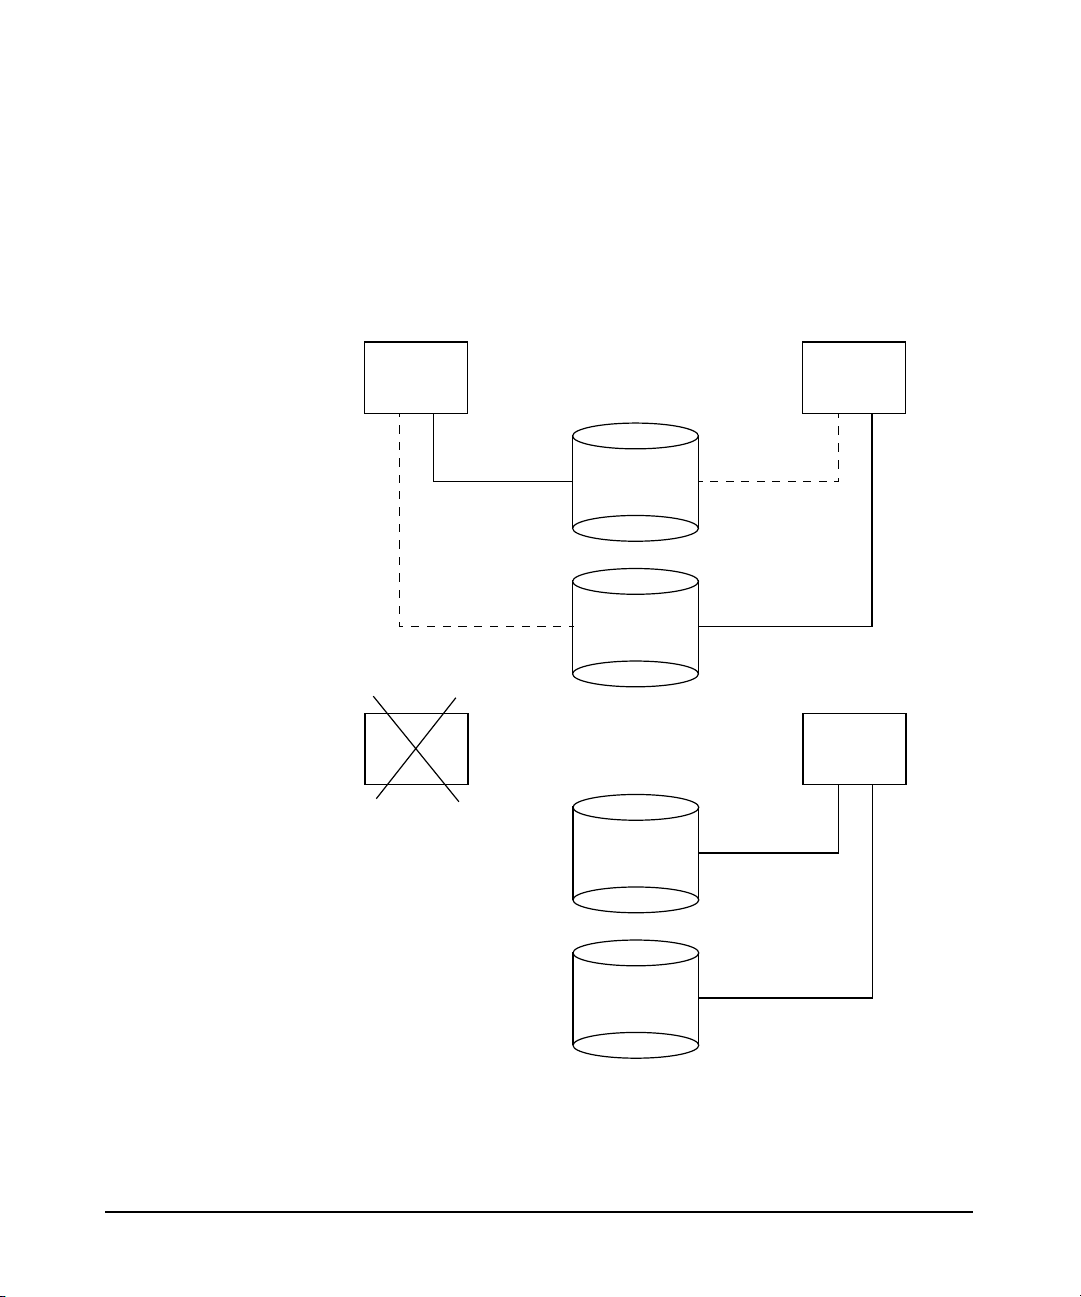
Figure 1-2 shows a failover from one active NFS server node to another
active NFS server node.
Figure 1-2 Failover from One Active NFS Server to Another
Before Failover:
Node_A Node_B
Pkg_1
disks
Pkg_2
disks
After Failover:
Node_A Node_B
Pkg_1
disks
Pkg_2
disks
In Figure 1-2, Node_A is the primary node for Pkg_1, and Node_B is the
primary node for Pkg_2. When Node_A fails, Node_B adopts Pkg_1 and
becomes the server for both Pkg_1 and Pkg_2.
Chapter 114
Page 15

Overview of MC/ServiceGuard NFS
Supported Configurations
A Host Configured as Adoptive Node for Multiple
Packages
Figure 1-3 shows a three-node configuration where one node is the
adoptive node for packages on both of the other nodes. If either Node_A or
Node_C fails, Node_B adopts the NFS server package from that node.
Figure 1-3 A Host Configured as Adoptive Node for Multiple Packages
Before Failover:
Node_A Node_B
Pkg_1
disks
After Failover:
Node_A Node_B
Pkg_1
disks
When Node_A fails, Node_B becomes the server for Pkg_1.IfNode_C fails,
Node_B will become the server for Pkg_2. Alternatively, you can set the
package control option in the control script, nfs.cntl, to prevent Node_B
from adopting more than one package at a time. With the package
control option, Node_B may adopt the package of the first node that fails,
but if the second node fails, Node_B will not adopt its package. The
package control option prevents a node from becoming overloaded by
adopting too many packages. If an adoptive node becomes overloaded, it
can fail.
Node_C
Pkg_2
disks
Node_C
Pkg_2
disks
Chapter 1 15
Page 16
Overview of MC/ServiceGuard NFS
Supported Configurations
Cascading Failover with Three Adoptive Nodes
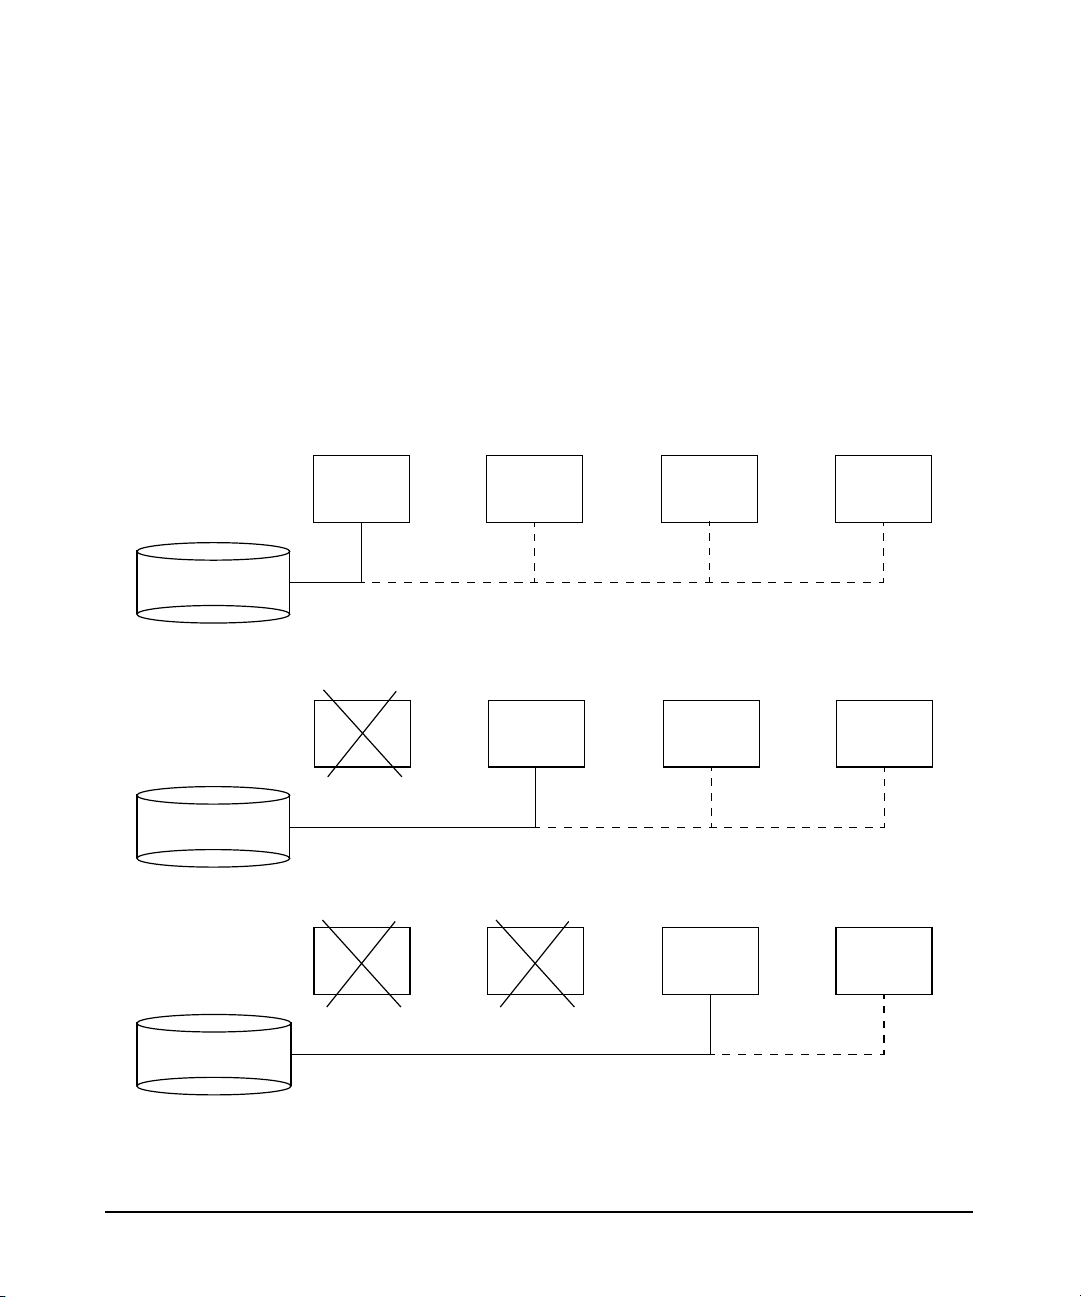
A package may be configured with up to three adoptive nodes. Figure 1-4
shows this configuration. If Node_A fails, Pkg_1 is adopted by Node_B.
However, if Node_B is down, Pkg_1 is adopted by Node_C, and if Node_C is
down, Pkg_1 is adopted by Node_D. The adoptive nodes are listed in the
package configuration file, /etc/cmcluster/nfs/nfs.conf, in the order
in which they will be tried. Note that all four nodes must have access to
the disks for the Pkg_1 file systems.
Figure 1-4 Cascading Failover with Three Adoptive Nodes
Before Failover:
Node_A Node_B Node_DNode_C
Pkg_1 disks
After Failover of Node_A:
Node_A Node_B Node_DNode_C
Pkg_1 disks
After Failover of Node_B:
Node_A Node_B Node_DNode_C
Pkg_1 disks
Chapter 116
Page 17
Server-to-Server Cross Mounting
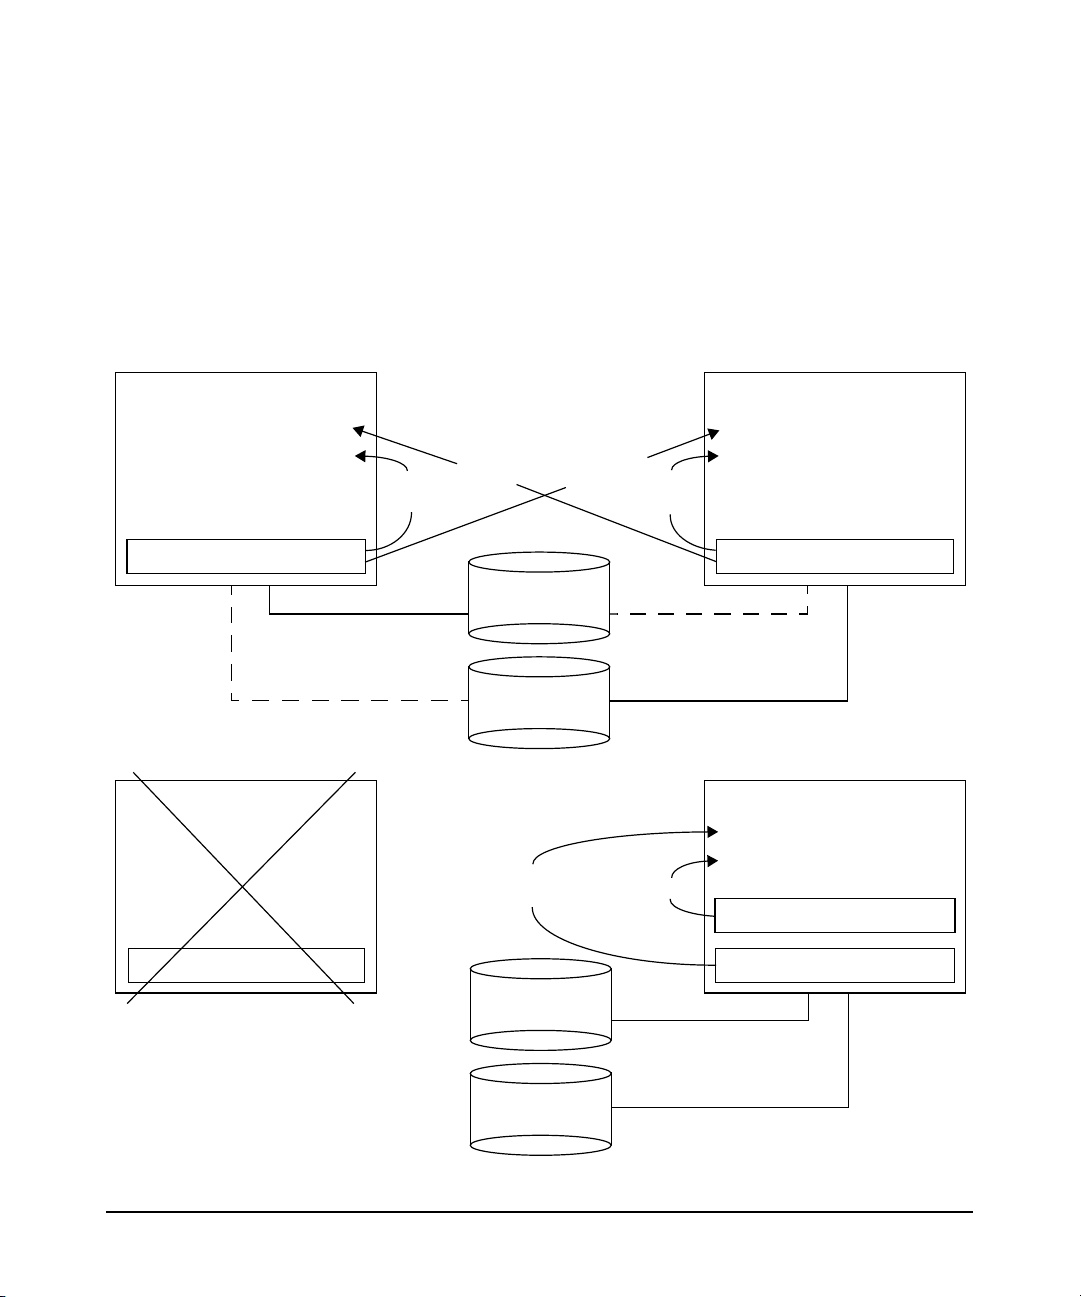
Two NFS server nodes may NFS-mount each other’s file systems and
still act as adoptive nodes for each other’s NFS server packages.
Figure 1-5 illustrates this configuration.
Figure 1-5 Server-to-Server Cross Mounting
Before Failover:
Overview of MC/ServiceGuard NFS
Supported Configurations
Node_A
/Pkg_2/NFS/mountpoint
/Pkg_1/NFS/mountpoint
/Pkg_1/local/mountpoint
After Failover:
Node_A
/Pkg_2/NFS/mountpoint
/Pkg_1/NFS/mountpoint
/Pkg_1/local/mountpoint
NFS
mount
NFS
mount
Pkg_1 disks
Pkg_2 disks
NFS
mount
NFS
mount
NFS
mount
Node_B
/Pkg_1/NFS/mountpoint
/Pkg_2/NFS/mountpoint
NFS
mount
/Pkg_2/local/mountpoint
Node_B
/Pkg_1/NFS/mountpoint
/Pkg_2/NFS/mountpoint
/Pkg_2/local/mountpoint
/Pkg_1/local/mountpoint
Pkg_1 disks
Pkg_2 disks
Chapter 1 17
Page 18

Overview of MC/ServiceGuard NFS
Supported Configurations
The advantage of server-to-server cross-mounting is that every server
has an identical view of the file systems. The disadvantage is that, on the
node where a file system is locally mounted, the file system is accessed
through an NFS mount, which has poorer performance than a local
mount.
Each node NFS-mounts the file systems for both packages. If Node_A
fails, Node_B mounts the filesystem for Pkg_1, and the NFS mounts are
not interrupted.
Chapter 118
Page 19

Overview of MC/ServiceGuard NFS
How the Control and Monitor Scripts Work
How the Control and Monitor Scripts Work
As with all ServiceGuard packages, the control script starts and stops
the NFS package and determines how the package operates when it is
available on a particular node. The 11i v1 and 11i v2 control script
(hanfs.sh) contains three sets of code that operate depending on the
parameter - start, stop,orfile_lock_migration - with which you call
the script. On 11.0, there are two sets of code that you can call with the
start or stop parameter.
Starting the NFS Services
When called with the start parameter, the control script does the
following:
• Activates the volume group or volume groups associated with the
package.
• Mounts each file system associated with the package.
• Initiates the NFS monitor script to check periodically on the health
of NFS services, if you have configured your NFS package to use the
monitor script.
• Exports each file system associated with the package so that it can
later be NFS-mounted by clients.
• Assigns a package IP address to the LAN card on the current node.
After this sequence, the NFS server is active, and clients can NFS-mount
the exported file systems associated with the package.
Starting File Lock Migration
If you call the control script with the file_lock_migration parameter
after enabling the File Lock Migration feature, the control script does the
following:
• Populates the /var/statmon/sm directory with the Status Monitor
entries from the configured holding directory of the package, and
subsequently removes the entries from the holding directory.
• Kills any running copy of the NFS File Lock Recovery
synchronization script.
Chapter 1 19
Page 20

Overview of MC/ServiceGuard NFS
How the Control and Monitor Scripts Work
• Halts the rpc.statd and rpc.lockd daemons to release file locks so
that file systems can be unmounted. If the server is also an NFS
client, it loses the NFS file locks obtained by client-side processes
when these daemons are killed.
• Restarts the rpc.statd and rpc.lockd daemons so that these
daemons can manage file locks for other NFS packages running on
the server. Restarting these daemons also triggers a crash recovery
notification event, whereby rpc.statd sends crash notification
messages to all clients listed in the /var/statmon/sm directory.
• Starts the File Lock Migration synchronization script, which
periodically copies the /var/statmon/sm directory entries to the
holding directory.
Halting the NFS Services
When called with the stop parameter, the control script does the
following:
• Removes the package IP address from the LAN card on the current
node.
• Un-exports all file systems associated with the package so that they
can no longer be NFS-mounted by clients.
• Halts the monitor process.
• Halts the File Lock Migration synchronization script if you enable
the File Lock Migration feature (available on 11i v1 and 11i v2).
• Halts the rpc.statd and rpc.lockd daemons to release file locks so
that file systems can be unmounted. If the server is also an NFS
client, it loses the NFS file locks obtained by client-side processes
when these daemons are killed.
• Restarts the rpc.statd and rpc.lockd daemons so that these
daemons can manage file locks for other NFS packages running on
the server.
• Unmounts each file system associated with the package.
• Deactivates each volume group associated with the package.
After this sequence, the NFS package is inactive on the current node and
may start up on an alternate node or be restarted later on the same node.
Chapter 120
Page 21

Overview of MC/ServiceGuard NFS
How the Control and Monitor Scripts Work
Monitoring the NFS Services
The monitor script /etc/cmcluster/nfs/nfs.mon works by periodically
checking the status of NFS services using the rpcinfo command. If any
service fails to respond, the script exits, causing a switch to an adoptive
node. The monitor script provides the ability to monitor the rpc.statd,
rpc.lockd, nfsd, rpc.mountd, rpc.pcnfsd, and nfs.flm processes. You
can monitor any or all of these processes as follows:
• To monitor the rpc.statd, rpc.lockd, and nfsd processes, you must
set the NFS_SERVER variable to 1 in the /etc/rc.config.d/nfsconf
file. If one nfsd process dies or is killed, the package fails over, even
if other nfsd processes are running.
• To monitor the rpc.mountd process, you must set the START_MOUNTD
variable to 1 in the /etc/rc.config.d/nfsconf file. To monitor the
rpc.mountd process, you must start it when the system boots up, not
by inetd.
• To monitor the rpc.pcnfsd process, you must set the PCNFS_SERVER
variable to 1 in the /etc/rc.config.d/nfsconf file.
• To monitor the nfs.flm process, you must enable the File Lock
Migration feature. Monitor this process with the ps command, not
with the rpcinfo command. If you enable the File Lock Migration
feature, ensure that the monitor script name is unique for each
package (for example, nfs1.mon).
The default NFS control script, hanfs.sh, does not invoke the monitor
script. You do not have to run the NFS monitor script to use
MC/ServiceGuard NFS. If the NFS package configuration file specifies
AUTO_RUN YES and LOCAL_LAN_FAILOVER YES (the defaults), the
package switches to the next adoptive node or to a standby network
interface in the event of a node or network failure. However, if one of the
NFS services goes down while the node and network remain up, you need
the NFS monitor script to detect the problem and to switch the package
to an adoptive node.
Whenever the monitor script detects an event, it logs the event. Each
NFS package has its own log file. This log file is named according to the
NFS control script, nfs.cntl, by adding a .log extension. For example,
if your control script is called /etc/cmcluster/nfs/nfs1.cntl, the log
file is called /etc/cmcluster/nfs/nfs1.cntl.log.
Chapter 1 21
Page 22

Overview of MC/ServiceGuard NFS
How the Control and Monitor Scripts Work
TIP You can specify the number of retry attempts for all these processes in
the nfs.mon file.
On the Client Side
The client should NFS-mount a file system using the package name in
the mount command. The package name is associated with the package’s
relocatable IP address. On client systems, be sure to use a hard mount
and set the proper retry values for the mount. Alternatively, set the
proper timeout for automounter. The timeout should be greater than the
total end-to-end recovery time for the MC/ServiceGuard NFS
package—that is, running fsck, mounting file systems, and exporting
file systems on the new node. (With journalled file systems, this time
should be between one and two minutes.) Setting the timeout to a value
greater than the recovery time allows clients to reconnect to the file
system after it returns to the cluster on the new node.
Chapter 122
Page 23

2 Installing and Configuring
MC/ServiceGuard NFS
Chapter 2 23
Page 24

Installing and Configuring MC/ServiceGuard NFS
This chapter explains how to configure MC/ServiceGuard NFS. You must
set up your MC/ServiceGuard cluster before you can configure
MC/ServiceGuard NFS. For instructions on setting up an
MC/ServiceGuard cluster, see the Managing MC/ServiceGuard manual.
This chapter contains the following sections:
• “Installing MC/ServiceGuard NFS”
• “Monitoring NFS/TCP Services with MC/ ServiceGuard NFS Toolkit”
• “Before Creating an MC/ServiceGuard NFS Package”
• “Configuring an MC/ServiceGuard NFS Package”
Chapter 224
Page 25

Installing and Configuring MC/ServiceGuard NFS
Installing MC/ServiceGuard NFS
Installing MC/ServiceGuard NFS
NOTE MC/ServiceGuard NFS Toolkit requires MC/ServiceGuard A.11.13 (or
above). To enable the File Lock Migration feature (available with 11i v1
and 11i v2), you need MC/ServiceGuard A.11.15.
To ensure that the File Lock Migration feature functions properly, install
HP-UX 11i v1 NFS General Release and Performance Patch,
PHNE_26388 (or a superseding patch). For HP-UX 11i v2, the feature
functions properly without a patch.
Use the HP-UX Software Distributor (SD) to install the MC/SG NFS file
set. The following command starts the SD swinstall utility:
/usr/sbin/swinstall
The Software Distributor is documented in Managing HP-UX Software
with SD-UX.
The files are installed in the /opt/cmcluster/nfs directory.
The following files are part of the toolkit:
README Description of the toolkit contents
hanfs.sh The NFS specific control script
nfs.mon The monitor script
nfs_xmnt A script for handling cross-mounted NFS server
packages
nfs.flm The file lock migration script (available with 11i v1 and
11i v2)
NOTE If the MC/ServiceGuard NFS package has previously been installed, the
files are in /opt/cmcluster/nfs. Use swremove to remove these files
before installing the latest version of MC/ServiceGuard NFS.
Chapter 2 25
Page 26

Installing and Configuring MC/ServiceGuard NFS
Installing MC/ServiceGuard NFS
To run the toolkit, you need the following files, which are part of
MC/ServiceGuard:
nfs.cntl The control script that runs and halts the package
nfs.conf The package configuration file
You can create these two files by running the cmmakepkg command.
Perform the following steps to set up the directory for configuring
MC/ServiceGuard NFS:
NOTE You may want to save any existing MC/ServiceGuard NFS configuration
file before executing these steps.
1. Run the following command to create the package configuration
template file:
cmmakepkg -p /opt/cmcluster/nfs/nfs.conf
2. Run the following command to create the package control template
file:
cmmakepkg -s /opt/cmcluster/nfs/nfs.cntl
3. Create a directory, /etc/cmcluster/nfs.
4. Run the following command to copy the MC/ServiceGuard NFS
template files to the newly created /etc/cmcluster/nfs directory:
cp /opt/cmcluster/nfs/* /etc/cmcluster/nfs
Chapter 226
Page 27

Installing and Configuring MC/ServiceGuard NFS
Monitoring NFS/TCP Services with MC/ ServiceGuard NFS Toolkit
Monitoring NFS/TCP Services with MC/
ServiceGuard NFS Toolkit
In addition to monitoring NFS/UDP services, you can monitor NFS/TCP
services with MC/ServiceGuard NFS Toolkit on HP-UX 11.x. For HP-UX
11.0, you need at least MC/ServiceGuard NFS Toolkit A.11.00.03 to
monitor NFS/TCP services. All versions of MC/ServiceGuard NFS
Toolkit for HP-UX 11i v1 and v2 can monitor NFS/TCP services.
IMPORTANT You must enable NFS/TCP on HP-UX 11.0 for both client and server.
TCP is the default transport mode on HP-UX 11i v1 and 11i v2 and thus
does not need to be enabled on those systems.
Use the following steps to enable NFS/TCP on HP-UX 11.0:
Step 1. Run the configuration command /usr/sbin/setoncenv NFS_TCP 1
Step 2. Stop the NFS client with /sbin/init.d/nfs.client stop
Step 3. Stop the NFS server with /sbin/init.d/nfs.server stop
Step 4. Start the NFS server with /sbin/init.d/nfs.server start
Step 5. Start the NFS client with /sbin/init.d/nfs.client start
From the NFS client, use the mount -o proto=tcp command to
establish a TCP only connection. The mount fails if TCP is not available
on the NFS server.
From the NFS client, use the mount -o proto=udp to command to
establish a UDP only connection. The mount fails if UDP is not available
on the NFS server.
To verify you are monitoring NFS/TCP services, run nfsstat -m. A
return of proto=tcp means you are monitoring NFS/TCP services. A
return of proto=udp means you are monitoring NFS/UDP services.
Use the following steps to disable NFS/TCP functionality on HP-UX 11.0:
Step 1. Enter /usr/sbin/setoncenv NFS_TCP 0 at the command line to sets
the NFS_TCP variable in the /etc/rc.config.d/nfsconf to 0.
Chapter 2 27
Page 28

Installing and Configuring MC/ServiceGuard NFS
Monitoring NFS/TCP Services with MC/ ServiceGuard NFS Toolkit
Step 2. Stop the NFS client with /sbin/init.d/nfs.client stop
Step 3. Stop the NFS server with /sbin/init.d/nfs.server stop
Step 4. Start the NFS server with /sbin/init.d/nfs.server start
Step 5. Start the NFS client with /sbin/init.d/nfs.client start
After completing the preceding procedure, NFS will establish only UDP
connections on HP-UX 11.0.
Chapter 228
Page 29

Installing and Configuring MC/ServiceGuard NFS
Before Creating an MC/ServiceGuard NFS Package
Before Creating an MC/ServiceGuard NFS
Package
Before creating an MC/ServiceGuard NFS package, perform the
following tasks:
1. Set up your MC/ServiceGuard cluster according to the instructions in
the Managing MC/ServiceGuard manual.
2. On the primary node and all adoptive nodes for the NFS package, set
the NFS_SERVER variable to 1 in the /etc/rc.config.d/nfsconf
file.
NFS_SERVER=1
Do not configure the exported directories in the /etc/exports file.
When an NFS server boots up, it attempts to export all file systems
in its /etc/exports file. If those file systems are not currently
present on the NFS server node, the node cannot boot properly. This
happens if the server is an adoptive node for a file system, and the
file system is available on the server only after failover of the
primary node.
3. If your NFS servers must serve PC clients, set the PCNFS_SERVER
variable to 1 in the /etc/rc.config.d/nfsconf file on the primary
node and each adoptive node.
PCNFS_SERVER=1
If you run the NFS monitor script, setting the PCNFS_SERVER
variable to 1 will cause the monitor script to monitor the pcnfsd
daemon. Then, if the pcnfsd daemon fails, your NFS package will
fail over to an adoptive node. If you do not want to monitor pcnfsd,
do not run the NFS monitor script, or set the PCNFS_SERVER variable
to 0 and run pcnfsd manually from the command line.
4. If your NFS servers will also be NFS clients, set the START_MOUNTD
variable to 1 in the /etc/rc.config.d/nfsconf file on the primary
node and each adoptive node.
START_MOUNTD=1
If you configure rpc.mountd in the /etc/inetd.conf file, set the
START_MOUNTD variable to 0. If the START_MOUNTD variable is set to 0,
the NFS monitor script will not monitor the rpc.mountd process. If
Chapter 2 29
Page 30

Installing and Configuring MC/ServiceGuard NFS
Before Creating an MC/ServiceGuard NFS Package
the START_MOUNTD variable is set to 1, and you run the NFS monitor
script, your NFS package will fail over to an adoptive node if
rpc.mountd fails.
5. On the primary node and all adoptive nodes for the NFS package, set
the NUM_NFSD variable in the /etc/rc.config.d/nfsconf file to the
number of nfsd daemons required to support all the NFS packages
that could run on that node at once. It is better to run too many nfsd
processes than too few. In general, you should configure a minimum
of four nfsd processes and at least two nfsd processes for each
exported file system. So, for example, if a node is the primary node
for a package containing two exported file systems, and it is an
adoptive node for another package containing three exported file
systems, you should configure it to run at least 10 nfsd processes.
NUM_NFSD=10
6. Issue the following command on the primary node and all adoptive
nodes to start the NFS server processes.
/sbin/init.d/nfs.server start
7. Configure the disk hardware for high availability. Disks must be
protected using HP’s MirrorDisk/UX product or an HP High
Availability Disk Array with PV links. Data disks associated with
MC/ServiceGuard NFS must be external disks. All the nodes that
support the MC/ServiceGuard NFS package must have access to the
external disks. For most disks, this means that the disks must be
attached to a shared bus that is connected to all nodes that support
the package. For information on configuring disks, see the Managing
MC/ServiceGuard manual.
8. Use SAM or LVM commands to set up volume groups, logical
volumes, and file systems as needed for the data that will be
exported to clients.
The names of the volume groups must be unique within the cluster,
and the major and minor numbers associated with the volume
groups must be the same on all nodes. In addition, the mounting
points and exported file system names must be the same on all
nodes.
The preceding requirements exist because NFS uses the major
number, minor number, inode number, and exported directory as part
of a file handle to uniquely identify each NFS file. If differences exist
Chapter 230
Page 31

Installing and Configuring MC/ServiceGuard NFS
Before Creating an MC/ServiceGuard NFS Package
between the primary and adoptive nodes, the client’s file handle
would no longer point to the correct file location after movement of
the package to a different node.
It is recommended that filesystems used for NFS be created as
journalled file systems (FStype vxfs). This ensures the fastest
recovery time in the event of a package switch to another node.
9. Make sure the user IDs and group IDs of those who access the
MC/ServiceGuard NFS file system are the same on all nodes that can
run the package. Make sure the /etc/passwd and /etc/group files
are the same on the primary node and all adoptive nodes, or use NIS
to manage the passwd and group databases. For information on
configuring NIS, see the Installing and Administering NFS Services
manual.
10. Create an entry for the name of the package in the DNS or NIS name
resolution files, or in /etc/hosts, so that users will mount the
exported file systems from the correct node. This entry maps the
package name to the package’s relocatable IP address.
11. Decide whether to place executables locally on each client or on the
NFS server. There are a number of trade-offs to be aware of
regarding the location of executables with MC/ServiceGuard NFS.
The advantages of keeping executables local to each client are as
follows:
• No failover time. If the executables are local to the client, there is
no delay if the NFS server fails.
• Faster access to the executables than accessing them through the
network.
The advantage of putting the executables on the NFS server is as
follows:
• Executable management. If the executables are located in one
centralized location, the administrator must update only one
copy when changes are made.
If executables are placed on the NFS server, you need to ensure that
interrupts are handled correctly in a MC/ServiceGuard environment.
The client must mount the filesystem using the nointr option. This
mount option will ensure that the executable continues running
correctly on the client after a failover of the server occurs. For
example, enter the following command on the NFS client:
Chapter 2 31
Page 32

Installing and Configuring MC/ServiceGuard NFS
Before Creating an MC/ServiceGuard NFS Package
mount -o nointr
where
/usr/src represents the mount points of the server and the client,
respectively.
Without the nointr option, if an interrupt (or a SIGKILL, SIGHUP,
SIGINT, SIGQUIT, SIGTERM, or SIGALRM signal) is sent to an
executable while the NFS server is failing over, NFS will terminate
the executable. This is a standard feature of NFS that allows
interrupts such as ˆC to kill a “hung” client executable if the NFS
server is down. Specifying the nointr option resolves this problem.
See the mount_nfs(1M) man page for more information.
relocatable_ip
relocatable_ip
is the IP address of the package, and
:/usr/src /usr/src
Chapter 232
Page 33

Installing and Configuring MC/ServiceGuard NFS
Configuring an MC/ServiceGuard NFS Package
Configuring an MC/ServiceGuard NFS
Package
To configure a MC/ServiceGuard NFS package, complete the following
tasks, included in this section:
• “Copying the Template Files”
• “Editing the Control Script (nfs.cntl)”
• “Editing the NFS Control Script (hanfs.sh)”
• “Editing the File Lock Migration Script (nfs.flm)”
• “Editing the NFS Monitor Script (nfs.mon)”
• “Editing the Package Configuration File (nfs.conf)”
• “Configuring Server-to-Server Cross-Mounts (Optional)”
• “Creating the Cluster Configuration File and Bringing Up the
Cluster”
Chapter 2 33
Page 34

Installing and Configuring MC/ServiceGuard NFS
Configuring an MC/ServiceGuard NFS Package
Copying the Template Files
If you will run only one MC/ServiceGuard NFS package in your
MC/ServiceGuard cluster, you do not have to copy the template files.
However, if you will run multiple MC/ServiceGuard NFS packages, each
package must have its own package configuration file and control script.
NOTE MC/ServiceGuard NFS Toolkit requires MC/ServiceGuard A.11.13 (or
above). To enable the File Lock Migration feature (available with 11i v1
and 11i v2), you need MC/ServiceGuard A.11.15.
To ensure that the File Lock Migration feature functions properly, install
HP-UX 11i v1 NFS General Release and Performance Patch,
PHNE_26388 (or a superseding patch). For HP-UX 11i v2, the feature
functions properly without a patch.
There is an additional NFS specific control script, hanfs.sh, which is
delivered along with the MC/ServiceGuard NFS Toolkit product. All of
the NFS specific functions and variables have been extracted from the
original MC/ServiceGuard package control script to this control script.
You must configure this control script, too.
For each MC/ServiceGuard NFS package, create a copy of the following
scripts with a unique name. For example:
cd /etc/cmcluster/nfs
cp nfs.conf nfs1.conf
cp nfs.conf nfs2.conf
cp nfs.cntl nfs1.cntl
cp nfs.cntl nfs2.cntl
cp hanfs.sh hanfs1.sh
cp hanfs.sh hanfs2.sh
cp nfs.flm nfs1.flm
cp nfs.flm nfs2.flm
NOTE The nfs.flm script is available on 11i v1 and 11i v2.
Chapter 234
Page 35

Installing and Configuring MC/ServiceGuard NFS
Configuring an MC/ServiceGuard NFS Package
Editing the Control Script (nfs.cntl)
The control script, nfs.cntl, is different as of the A.11.11.02 and
A.11.00.05 releases. For MC/ServiceGuard NFS Toolkit A.11.00.04 or
lower for HP-UX 11.0 or MC/ServiceGuard NFS Toolkit A.11.11.01 or
lower for HP-UX 11i v1 using MC/ServiceGuard A.11.09 (or below)
framework, see “Editing nfs.cntl for NFS Toolkit A.11.00.04 and
A.11.11.01 (or lower)” on page 37 to edit the control script, nfs.cntl.
Editing nfs.cntl for NFS Toolkit A.11.00.05 and A.11.11.02 (and above).
Starting with MC/ServiceGuard A.11.13, a package can have LVM
volume groups, CVM disk groups and VxVM disk groups.
Example steps:
1. Create a separate VG[n] variable for each LVM volume group that is
used by the package:
VG[0]=/dev/vg01
VG[1]=/dev/vg02
...
2. Create a separate VXVM_DG[n] variable for each VxVM disk group
that is used by the package:
VXVM_DG[0]=dg01
VXVM_DG[1]=dg02
...
3. Create a separate LV[n] and FS[n] variable for each volume
group/disk group and file system that will be mounted on the server:
For the LVM example, if this package uses the file systems pkg1a
and pkg1b, which are mounted on the logical volumes lvol1 and lvol2
with read and write options enter:
LV[0]=/dev/vg01/lvol1; FS[0]=/pkg1a;
FS_MOUNT_OPT[0]="-o rw"
LV[1]=/dev/vg01/lvol2; FS[1]=/pkg1b;
FS_MOUNT_OPT[1]="-o rw"
For the VxVM example, if this package uses the file systems pkg1a
and pkg1b, which are mounted on the volumes lvol1 and lvol2 with
read and write options enter:
Chapter 2 35
Page 36

Installing and Configuring MC/ServiceGuard NFS
Configuring an MC/ServiceGuard NFS Package
LV[0]="/dev/vx/dsk/dg01/vol01"; FS[0]="/pkg1a"; FS_M
OUNT_OPT[0]="-o rw"
LV[1]="/dev/vx/dsk/dg01/vol02"; FS[1]="/pkg1b"; FS_M
OUNT_OPT[1]="-o rw"
4. Specify the IP address for the package and the address of the subnet
to which the IP address belongs:
IP[0]=15.13.114.243
SUBNET[0]=15.13.112.0
The IP address you specify is the relocatable IP address for the
package. NFS clients that mount the file systems in the package will
use this IP address to identify the server. You should configure a
name for this address in the DNS or NIS database, or in the
/etc/hosts file.
5. If two packages have the same adoptive node, and you want to
prevent the adoptive node from adopting both packages at once,
specify the cmmodpkg command with the package control option (-d)
in the customer_defined_run_cmds:
function customer_defined_run_cmds
{
cmmodpkg -d -n ‘hostname‘ pkg02 &
}
The package control option can prevent an adoptive node from
becoming overloaded when multiple packages fail over. If an adoptive
node becomes overloaded, it can fail.
In this example, if a host is an adoptive node for both pkg01 and pkg02,
the above cmmodpkg -d command, in the control script for pkg01, would
prevent the host that is running pkg01 from adopting pkg02. A similar
line in the control script for pkg02 could prevent the host that is running
pkg02 from adopting pkg01. The ampersand (&) causes the cmmodpkg
command to run in the background. It must run in the background to
allow the control script to finish bringing up the package. The cmmodpkg
command will hang until the package is up, so it must run in the
background to allow the control script to complete.
There is a short time, after one package has failed over but before the
cmmodpkg command has executed, when the other package can fail over
and the host will adopt it. In other words, if two packages fail over at
approximately the same time, a host may adopt both packages, even
though the package control option is specified.
Chapter 236
Page 37

Installing and Configuring MC/ServiceGuard NFS
Configuring an MC/ServiceGuard NFS Package
See “Example Two - One Adoptive Node for Two Packages with File Lock
Migration” on page 64 for a sample configuration using the package
control option.
NOTE The NFS specific variables have been moved to NFS specific control
script in MC/ServiceGuard NFS Toolkit with the A.11.11.02 and
A.11.00.05 releases. See section “Editing the NFS Control Script
(hanfs.sh)” on page 41 for the details.
Editing nfs.cntl for NFS Toolkit A.11.00.04 and A.11.11.01 (or lower)
For MC/ServiceGuard NFS Toolkit A.11.00.04 or lower for HP-UX 11.0
or MC/ServiceGuard NFS Toolkit A.11.11.01 or lower for HP-UX 11i v1
using MC/ServiceGuard A.11.09 (or below) framework.
Example steps:
1. Create a separate VG[n] variable for each volume group.
VG[0]=/dev/vg01
VG[1]=/dev/vg02
...
2. Create a separate LV[n] and FS[n] variable for each volume group
and file system that will be mounted on the server:.
LV[0]=/dev/vg01/lvol1;FS[0]=/ha_root
LV[1]=/dev/vg01/lvol2;FS[1]=/users/scaf
LV[2]=/dev/vg02/lvol1;FS[2]=/ha_data
3. Create a separate XFS[n] variable for each NFS directory to be
exported. Specify the directory name and any export options.
XFS[0]=”/ha_root”
XFS[1]=”/users/scaf”
XFS[2]=”-o ro /ha_data”
Do not configure these exported directories in the /etc/exports file.
When an NFS server boots up, it attempts to export all file systems
in its /etc/exports file. If those file systems are not currently
present on the NFS server node, the node cannot boot properly. This
Chapter 2 37
Page 38

Installing and Configuring MC/ServiceGuard NFS
Configuring an MC/ServiceGuard NFS Package
happens if the server is an adoptive node for a file system, and the
file system is available on the server only after failover of the
primary node.
4. Specify the IP address for the package and the address of the subnet
to which the IP address belongs.
IP[0]=15.13.114.243
SUBNET[0]=15.13.112.0
The IP address you specify is the relocatable IP address for the
package. NFS clients that mount the file systems in the package will
use this IP address to identify the server. You should configure a
name for this address in the DNS or NIS database, or in the
/etc/hosts file.
5. If you want to run the NFS monitor script , set the
NFS_SERVICE_NAME variable to the value of the SERVICE_NAME
variable in the package configuration file. Each package must have a
unique service name.
NFS_SERVICE_NAME[0]=nfs1.monitor
If you do not want to run the NFS monitor script, comment out the
NFS_SERVICE_NAME and NFS_SERVICE_CMD variables:
# NFS_SERVICE_NAME[0]=nfs.monitor
# NFS_SERVICE_CMD[0]=/etc/cmcluster/nfs/nfs.mon
By default, the NFS_SERVICE_NAME and NFS_SERVICE_CMD variables
are commented out, and the NFS monitor script is not run.
You do not have to run the NFS monitor script. If your NFS package
configuration file specifies PKG_SWITCHING_ENABLED YES and
NET_SWITCHING_ENABLED YES (the defaults), the package will switch
to the next adoptive node or to a standby network interface in the
event of a node or network failure. The NFS monitor script causes
the package failover if any of the monitored NFS services fails.
6. If you run the NFS monitor script, set the NFS_SERVICE_CMD
variable to the full path name of the NFS monitor script.
NFS_SERVICE_CMD[0]=/etc/cmcluster/nfs/nfs.mon
Chapter 238
Page 39

Installing and Configuring MC/ServiceGuard NFS
Configuring an MC/ServiceGuard NFS Package
The path name for the executable script does not have to be unique to
each package. Every package can use the same script. Multiple
instances of the monitor script can run on the same node without any
problems, and if a package fails over, only the instance associated
with that package is killed.
If you do not want to run the NFS monitor script, comment out the
NFS_SERVICE_NAME and NFS_SERVICE_CMD variables:
# NFS_SERVICE_NAME[0]=nfs.monitor
# NFS_SERVICE_CMD[0]=/etc/cmcluster/nfs/nfs.mon
By default, the NFS_SERVICE_NAME and NFS_SERVICE_CMD variables
are commented out, and the NFS monitor script is not run.
7. If two packages have the same adoptive node, and you want to
prevent the adoptive node from adopting both packages at once,
specify the cmmodpkg command with the package control option (-d)
in the customer_defined_run_cmds.
function customer_defined_run_cmds
{
cmmodpkg -d -n ‘hostname‘ pkg02 &
}
The package control option can prevent an adoptive node from
becoming overloaded when multiple packages fail over. If an adoptive
node becomes overloaded, it can fail.
In this example, if a host is an adoptive node for both pkg01 and pkg02,
the above cmmodpkg -d command, in the control script for pkg01, would
prevent the host that is running pkg01 from adopting pkg02. A similar
line in the control script for pkg02 could prevent the host that is running
pkg02 from adopting pkg01. The ampersand (&) causes the cmmodpkg
command to run in the background. It must run in the background to
allow the control script to finish bringing up the package. The cmmodpkg
command will hang until the package is up, so it must run in the
background to allow the control script to complete.
There is a short time, after one package has failed over but before the
cmmodpkg command has executed, when the other package can fail over
and the host will adopt it. In other words, if two packages fail over at
approximately the same time, a host may adopt both packages, even
though the package control option is specified.
Chapter 2 39
Page 40

Installing and Configuring MC/ServiceGuard NFS
Configuring an MC/ServiceGuard NFS Package
See “Example Two - One Adoptive Node for Two Packages with File Lock
Migration” on page 64 for a sample configuration using the package
control option.
Chapter 240
Page 41

Installing and Configuring MC/ServiceGuard NFS
Configuring an MC/ServiceGuard NFS Package
Editing the NFS Control Script (hanfs.sh)
The hanfs.sh control script contains NFS specific control variables and
functions. The sample steps are as follows:
1. Create a separate XFS[n] variable for each NFS directory to be
exported. Specify the directory name and any export options. The
directories must be defined in the above mounted file system FS list.
XFS[0]="-o ro /pkg1a"
XFS[1]="-o rw /pkg1b"
Do notconfigure these exported directories in the /etc/exports file.
When an NFS server boots up, it attempts to export all file systems
in its /etc/exports file. If those file systems are not currently
present on the NFS server node, the node cannot boot properly. This
happens if the server is an adoptive node for a file system, and the
file system is available on the server only after failover of the
primary node.
2. If you wish to monitor NFS services (by running the NFS monitor
script), set the NFS_SERVICE_NAME and NFS_SERVICE_CMD variables;
see the following example:
NFS_SERVICE_NAME[0]=nfs1.monitor
NFS_SERVICE_CMD[0]=/etc/cmcluster/nfs/nfs.mon
If you enable the File Lock Migration feature, ensure that the
monitor script name is unique for each package (for example,
nfs1.mon). If the File Lock Migration feature is disabled, the
monitor script name does not have to be unique to each package (for
example, nfs.mon). Multiple instances of the monitor script can run
on the same node without any problem. If a package fails over, only
the instance associated with that package is killed.
3. You do not have to run the NFS monitor script. If your NFS package
configuration file specifies AUTO_RUN YES and
LOCAL_LAN_FAILOVER_ALLOWED YES (the defaults), the package
switches to the next adoptive node or to a standby network interface
in the event of a node or network failure. The NFS monitor script
causes the package failover if any of the monitored NFS services
fails.
If you do not want to run the NFS monitor script, comment out the
NFS_SERVICE_NAME and NFS_SERVICE_CMD variables:
Chapter 2 41
Page 42

Installing and Configuring MC/ServiceGuard NFS
Configuring an MC/ServiceGuard NFS Package
# NFS_SERVICE_NAME[0]=nfs.monitor
# NFS_SERVICE_CMD[0]=/etc/cmcluster/nfs/nfs.mon
By default, the NFS_SERVICE_NAME and NFS_SERVICE_CMD variables
are commented out, and the NFS monitor script is not run.
NOTE The MC/ServiceGuard A.11.13 configuration file includes the
following changes:
• AUTO_RUN replaces obsolete PKG_SWITCHING_ENABLED.
• LOCAL_LAN_FAILOVER_ALLOWED replaces obsolete
NET_SWITCHING_ENABLED.
4. To enable File Lock Migration (available on 11i v1 and 11i v2), set
the NFS_FILE_LOCK_MIGRATION variable to 1:
NFS_FILE_LOCK_MIGRATION=1
By default, this variable is set to 0 (disabled). The NFS_FLM_SCRIPT
variable is the name of the script that manages synchronization of
the file lock status entries for the primary and adoptive nodes
associated with this HA/NFS package. By default, this is set to
nfs.flm. You must assign a unique name to this script in every
HA/NFS package in the cluster (for example, nfs1.flm, nfs2.flm, and
so on):
NFS_FLM_SCRIPT="${0%/*}/nfs1.flm"
If you wish to monitor the File Lock Migration script, then you must
also set the NFS_FILE_LOCK_MIGRATION and NFS_FLM_SCRIPT
variables in the NFS monitor script.
If you enable File Lock Migration, then you can configure the File
Lock Migration script (see “Editing the File Lock Migration Script
(nfs.flm)” on page 43).
Chapter 242
Page 43

Installing and Configuring MC/ServiceGuard NFS
Configuring an MC/ServiceGuard NFS Package
Editing the File Lock Migration Script (nfs.flm)
The File Lock Migration script, nfs.flm, handles the majority of the
work involved in maintaining file lock integrity that follows an HA/NFS
failover. The nfs.flm script includes the following configurable
parameters:
• NFS_FLM_HOLDING_DIR - Name of a unique directory created in one of
the shared volumes associated with this package. This directory
holds copies of the /var/statmon/sm files for this package. You must
create this directory in one of the shared volumes associated with
this package so that it can migrate with the package (from the
primary server to the adoptive server).
You must dedicate this directory for holding SM entries only. In
addition, you must keep it empty. This directory should not have
other files or subdirectories when starting the cluster. All files in this
directory are deleted after a failover.
An example for this parameter is as follows:
NFS_FLM_HOLDING_DIR="/pkg1a/sm"
• PROPAGATE_INTERVAL - Number of seconds between the attempts of
the script to copy files from the /var/statmon/sm directory into the
holding directory, specified by NFS_FLM_HOLDING_DIR. The default
value of this parameter is five seconds.
An example for this parameter is as follows:
PROPAGATE_INTERVAL=5
NOTE If you enable the File Lock Migration feature, an NFS client (or
group of clients) may hit a corner case of requesting a file lock on the
HA/NFS server and not receiving a crash recovery notification
message when the HA/NFS package migrates to an adoptive node.
This occurs only when the NFS client sends its initial lock request to
the HA/NFS server and then the HA/NFS package moves to an
adoptive node before the FLM script copies the /var/statmon/sm
entry for this client to the package holding directory.
The probability of hitting this corner-case problem is not very high,
because the SM file copy interval is very short (by default, five
seconds). The chances of an NFS client (or group of NFS clients)
sending its initial lock request (it must be the initial request, since
Chapter 2 43
Page 44

Installing and Configuring MC/ServiceGuard NFS
Configuring an MC/ServiceGuard NFS Package
this request generates the /var/statmon/sm file) to the HA/NFS
server and having the package migrate within this same five seconds
window are extremely unlikely.
If you repeatedly experience a problem with this corner-case
scenario, reduce the copy time interval by setting the
PROPAGATE_INTERVAL parameter to a lower value.
Chapter 244
Page 45

Installing and Configuring MC/ServiceGuard NFS
Configuring an MC/ServiceGuard NFS Package
Editing the NFS Monitor Script (nfs.mon)
The NFS monitor script, nfs.mon, contains NFS-specific monitor
variables and functions. The nfs.mon script is an optional component of
HA/NFS. The hanfs.sh file specifies whether the NFS monitor script is
used. The following steps describe how to configure the NFS monitor
script:
1. To monitor the File Lock Migration script (nfs.flm), set the
NFS_FILE_LOCK_MIGRATION variable to 1, and set the
NFS_FLM_SCRIPT name to match the hanfs.sh script value for this
variable:
NFS_FILE_LOCK_MIGRATION=1
NFS_FLM_SCRIPT="${0%/*}nfs1.flm"
NOTE The file name of the NFS_FLM_SCRIPT script must be limited to 14
characters or fewer.
2. You can call the nfs.mon script with the following optional
arguments:
• Interval - the time (in seconds) between the attempts for
checking if NFS processes are up and running. The default is 10
seconds.
• Lockd Retry - the number of attempts to ping rpc.lockd before
exiting. The default is 4 attempts.
• Retry - the number of attempts to ping the rpc.statd,
rpc.mountd, nfsd, rpc.pcnfsd, and nfs.flm processes before
exiting. The default is 4 attempts.
These arguments are passed using the NFS_SERVICE_CMD line in the
hanfs.sh file.
Chapter 2 45
Page 46

Installing and Configuring MC/ServiceGuard NFS
Configuring an MC/ServiceGuard NFS Package
Editing the Package Configuration File (nfs.conf)
1. Set the PACKAGE_NAME variable.
PACKAGE_NAME pkg01
You can use the default package name if you will run only one
MC/ServiceGuard NFS package on your MC/ServiceGuard cluster.
Each package must have a unique name.
2. Create a NODE_NAME variable for each node that will run the package.
The first NODE_NAME should specify the primary node. All the
NODE_NAME variables following the primary node should specify the
adoptive nodes, in the order in which they will be tried.
NODE_NAME thyme
NODE_NAME basil
NODE_NAME sage
3. Set the RUN_SCRIPT and HALT_SCRIPT variables to the full path
name of the control script (/etc/cmcluster/nfs/nfs.cntl or
whatever you have renamed it). You do not have to specify a timeout
for either script.
RUN_SCRIPT /etc/cmcluster/nfs/nfs1.cntl
RUN_SCRIPT_TIMEOUT NO_TIMEOUT
HALT_SCRIPT /etc/cmcluster/nfs/nfs1.cntl
HALT_SCRIPT_TIMEOUT NO_TIMEOUT
4. If you want to run the NFS monitor script, set the SERVICE_NAME
variable to indicate the NFS monitor script:
SERVICE_NAME nfs1.monitor
Each package must have a unique service name. The SERVICE_NAME
variable in the package configuration file must match the
NFS_SERVICE_NAME variable in the NFS control script.
If you do not want to run the NFS monitor script, comment out the
SERVICE_NAME variable:
# SERVICE_NAME nfs.monitor
5. Set the SUBNET variable to the subnet that will be monitored for the
package.
SUBNET 15.13.112.0
Chapter 246
Page 47

Installing and Configuring MC/ServiceGuard NFS
Configuring an MC/ServiceGuard NFS Package
You can use the default values for the rest of the variables in the package
configuration file, or you can change them as needed. For instructions on
modifying the default values, see the Managing MC/ServiceGuard
manual, or read the comments in the /opt/cmcluster/nfs/nfs.conf
template file.
Chapter 2 47
Page 48

Installing and Configuring MC/ServiceGuard NFS
Configuring an MC/ServiceGuard NFS Package
Configuring Server-to-Server Cross-Mounts
(Optional)
Two NFS server nodes may NFS-mount each other’s file systems and
still act as adoptive nodes for each other’s NFS server packages.
Figure 2-1 illustrates this configuration.
Figure 2-1 Server-to-Server Cross-Mounting
Before Failover:
Node_A
/Pkg_2/NFS/mountpoint
/Pkg_1/NFS/mountpoint
/Pkg_1/local/mountpoint
After Failover:
Node_A
/Pkg_2/NFS/mountpoint
/Pkg_1/NFS/mountpoint
/Pkg_1/local/mountpoint
NFS
mount
NFS
mount
Pkg_1 disks
Pkg_2 disks
NFS
mount
NFS
mount
NFS
mount
Node_B
/Pkg_1/NFS/mountpoint
/Pkg_2/NFS/mountpoint
NFS
mount
/Pkg_2/local/mountpoint
Node_B
/Pkg_1/NFS/mountpoint
/Pkg_2/NFS/mountpoint
/Pkg_2/local/mountpoint
/Pkg_1/local/mountpoint
Pkg_1 disks
Pkg_2 disks
Chapter 248
Page 49

Installing and Configuring MC/ServiceGuard NFS
Configuring an MC/ServiceGuard NFS Package
The advantage of server-to-server cross-mounting is that every server
has an identical view of the file systems. The disadvantage is that, on the
node where a file system is locally mounted, the file system is accessed
through an NFS mount, which has poorer performance than a local
mount.
In order to make a MC/ServiceGuard file system available to all servers,
all servers must NFS-mount the file system. That way, access to the file
system is not interrupted when the package fails over to an adoptive
node. An adoptive node cannot access the file system through the local
mount, because it would have to unmount the NFS-mounted file system
before it could mount it locally. And in order to unmount the
NFS-mounted file system, it would have to kill all processes using the file
system.
Follow these steps to set up an NFS package with file systems that are
NFS-mounted by MC/ServiceGuard NFS servers:
1. Make a copy of the /etc/cmcluster/nfs/nfs_xmnt script.
cd /etc/cmcluster/nfs
cp nfs_xmnt nfs1_xmnt
2. In the copy of the nfs_xmnt script, create an SNFS[n] and CNFS[
variable for each file system in the package that will be
NFS-mounted by servers. The SNFS[n] variable is the server location
of the file system, and the CNFS[n] variable is the client mount point
of the file system.
SNFS[0]=”nfs1:/hanfs/nfsu011”;CNFS[0]=”/nfs/nfsu011”
In this example, “nfs1” is the name that maps to the package’s
relocatable IP address. It must be configured in the name service
used by the server (DNS, NIS, or the /etc/hosts file).
If a server for the package will NFS-mount the package’s file
systems, the client mount point (CNFS) must be different from the
server location (SNFS).
3. Copy the script you have just modified to all the servers that will
NFS-mount the file systems in the package.
4. After the package is active on the primary node, execute the
nfs_xmnt script on each server that will NFS-mount the file systems.
/etc/cmcluster/nfs/nfs1_xmnt start
Chapter 2 49
n
]
Page 50

Installing and Configuring MC/ServiceGuard NFS
Configuring an MC/ServiceGuard NFS Package
Hewlett-Packard recommends that you execute the nfs_xmnt script
from the command line after the package is active on the primary
node. However, you can configure the nfs_xmnt script to be executed
by the NFS control script in the customer_defined_run_cmds
function.
function customer_defined_run_cmds
{
/etc/cmcluster/nfs/nfs1_xmnt start
remsh sage /etc/cmcluster/nfs/nfs1_xmnt start
}
The second line in the function invokes remsh to run the nfs_xmnt
script on remote host sage.
Running the nfs_xmnt script from the NFS control script guarantees
that the package is active before the mount command executes. It
prevents cross-mounted servers from becoming deadlocked while
each server hangs on the mount command, waiting for the other
server’s package to become active. However, if the package fails to
activate, or if the remsh command fails, the file systems will not be
mounted, and no error will be returned. The only way to be sure the
file systems are mounted successfully is to run the nfs_xmnt script
manually on each host where the file systems should be mounted.
For an example of a configuration with cross-mounted servers, see
“Example Four - Two Servers with NFS Cross-Mounts” on page 82.
Chapter 250
Page 51

Installing and Configuring MC/ServiceGuard NFS
Configuring an MC/ServiceGuard NFS Package
Creating the Cluster Configuration File and Bringing
Up the Cluster
To create the cluster configuration file, verify the cluster and package
configuration files, and run the cluster, perform the following steps:
1. Use the cmquerycl command in the following manner to create the
cluster configuration file from your package configuration files. You
must run this command on all nodes in the cluster:
cmquerycl -v -C /etc/cmcluster/nfs/cluster.conf -n basil
-n sage -n thyme
2. Set the FIRST_CLUSTER_LOCK_VG and
MAX_CONFIGURED_PACKAGES variables in the cluster.conf
script on each node.
3. Verify the cluster and package configuration files on each node using
the following command:
cmcheckconf -k -v -C /etc/cmcluster/nfs/cluster.conf -P
/etc/cmcluster/nfs/nfs1.conf -P
/etc/cmcluster/nfs/nfs2.conf ...
4. Activate the cluster lock volume group (corresponding to the
FIRST_CLUSTER_LOCK_VG value) on one node using the following
command:
vgchange -a y /dev/vg_nfsu01
5. Verify and apply the cluster and package configuration files using the
following command:
cmapplyconf -v -C /etc/cmcluster/nfs/cluster.conf -P
/etc/cmcluster/nfs/nfs1.conf -P
/etc/cmcluster/nfs/nfs2.conf ...
6. Deactivate the cluster lock volume group using the following
command:
vgchange -a n /dev/vg_nfsu01
7. Run the cluster using the following command:
cmruncl -v -f
Chapter 2 51
Page 52

Installing and Configuring MC/ServiceGuard NFS
Configuring an MC/ServiceGuard NFS Package
Chapter 252
Page 53

3 Sample Configurations
Chapter 3 53
Page 54

Sample Configurations
This chapter gives sample cluster configuration files, package
configuration files, and control scripts for the following configurations:
• Example One - Three-Server Mutual Takeover: This
configuration has three servers and three MC/ServiceGuard NFS
packages. Each server is the primary node for one package and an
adoptive node for the other two packages.
• Example Two - One Adoptive Node for Two Packages with
File Lock Migration: This configuration has two packages, each
owned by a different server. A third server is the adoptive node for
both packages. This sample configuration uses the package control
option, which prevents the adoptive node from adopting more than
one package at a time. This sample configuration also enables the
File Lock Migration feature.
• Example Three - Three-Server Cascading Failover: This
configuration has three servers and two packages. One server is the
primary node for both packages, and the other two servers are
adoptive nodes for both packages.
• Example Four - Two Servers with NFS Cross-Mounts: This
configuration has two servers and two packages. The primary node
for each package NFS-mounts the file systems from its own package
and the other package.
The sample configuration files in this chapter show only the configured
values. Most of the comments are omitted.
Chapter 354
Page 55

Example One - Three-Server Mutual Takeover
This configuration has three servers and three MC/ServiceGuard NFS
packages. Each server is the primary node for one package and an
adoptive node for the other two packages. Figure 3-1 illustrates this
configuration. Dotted lines indicate which servers are adoptive nodes for
the packages.
Figure 3-1 Three-Server Mutual Takeover
pkg01
IP = 15.13.114.243
VG[0] = nfsu01
LV[0] = /dev/nfsu01/lvol1
FS[0] = /hanfs/nfsu011
XFS[0] = /hanfs/nfsu011
Sample Configurations
Example One - Three-Server Mutual Takeover
basilthyme sage
pkg02
IP = 15.13.114.244
VG[0] = nfsu02
LV[0] = /dev/nfsu02/lvol1
FS[0] = /hanfs/nfsu021
XFS[0] = /hanfs/nfsu021
pkg03
IP = 15.13.114.245
VG[0] = nfsu03
LV[0] = /dev/nfsu03/lvol1
FS[0] = /hanfs/nfsu031
XFS[0] = /hanfs/nfsu031
Chapter 3 55
Page 56

Sample Configurations
Example One - Three-Server Mutual Takeover
Figure 3-2 shows the three-server mutual takeover configuration after
host basil has failed and host sage has adopted pkg02. Dotted lines
indicate which servers are adoptive nodes for the packages.
Figure 3-2 Three-Server Mutual Takeover after One Server Fails
basilthyme sage
pkg01
IP = 15.13.114.243
VG[0] = nfsu01
LV[0] = /dev/nfsu01/lvol1
FS[0] = /hanfs/nfsu011
XFS[0] = /hanfs/nfsu011
pkg02
IP = 15.13.114.244
VG[0] = nfsu02
LV[0] = /dev/nfsu02/lvol1
FS[0] = /hanfs/nfsu021
XFS[0] = /hanfs/nfsu021
pkg03
IP = 15.13.114.245
VG[0] = nfsu03
LV[0] = /dev/nfsu03/lvol1
FS[0] = /hanfs/nfsu031
XFS[0] = /hanfs/nfsu031
Chapter 356
Page 57

Sample Configurations
Example One - Three-Server Mutual Takeover
Cluster Configuration File for Three-Server Mutual
Takeover
This section shows the cluster configuration file (cluster.conf) for this
configuration example. The comments are not shown.
CLUSTER_NAME MutTakOvr
FIRST_CLUSTER_LOCK_VG /dev/nfsu01
NODE_NAME thyme
NETWORK_INTERFACE lan0
HEARTBEAT_IP 15.13.119.146
NETWORK_INTERFACE lan1
FIRST_CLUSTER_LOCK_PV /dev/dsk/c0t1d0
NODE_NAME basil
NETWORK_INTERFACE lan0
HEARTBEAT_IP 15.13.113.168
FIRST_CLUSTER_LOCK_PV /dev/dsk/c1t1d0
NODE_NAME sage
NETWORK_INTERFACE lan0
HEARTBEAT_IP 15.13.115.184
NETWORK_INTERFACE lan1
NETWORK_INTERFACE lan2
NETWORK_INTERFACE lan3
FIRST_CLUSTER_LOCK_PV /dev/dsk/c0t1d0
HEARTBEAT_INTERVAL 1000000
NODE_TIMEOUT 2000000
AUTO_START_TIMEOUT 600000000
NETWORK_POLLING_INTERVAL 2000000
MAX_CONFIGURED_PACKAGES 3
VOLUME_GROUP /dev/nfsu01
VOLUME_GROUP /dev/nfsu02
VOLUME_GROUP /dev/nfsu03
Chapter 3 57
Page 58

Sample Configurations
Example One - Three-Server Mutual Takeover
Package Configuration File for pkg01
This section shows the package configuration file (nfs1.conf) for the
package pkg01 in this sample configuration. The comments are not
shown.
PACKAGE_NAME pkg01
PACKAGE_TYPE FAILOVER
FAILOVER_POLICY CONFIGURED_NODE
FAILBACK_POLICY MANUAL
NODE_NAME thyme
NODE_NAME basil
NODE_NAME sage
AUTO_RUN YES
LOCAL_LAN_FAILOVER_ALLOWED YES
NODE_FAIL_FAST_ENABLED NO
RUN_SCRIPT /etc/cmcluster/nfs/nfs1.cntl
RUN_SCRIPT_TIMEOUT NO_TIMEOUT
HALT_SCRIPT /etc/cmcluster/nfs/nfs1.cntl
HALT_SCRIPT_TIMEOUT NO_TIMEOUT
SERVICE_NAME nfs1.monitor
SERVICE_FAIL_FAST_ENABLED NO
SERVICE_HALT_TIMEOUT 300
SUBNET 15.13.112.0
Chapter 358
Page 59

Sample Configurations
Example One - Three-Server Mutual Takeover
NFS Control Scripts for pkg01
The nfs.cntl Control Script
This section shows the NFS control script (nfs1.cntl) for the pkg01
package in this sample configuration. Only the user-configured part of
the script is shown; the executable part of the script and most of the
comments are omitted.
PATH=/sbin:/usr/bin:/usr/sbin:/etc:/bin
VGCHANGE=”vgchange -a e” # Default
CVM_ACTIVATION_CMD="vxdg -g \$DiskGroup set activation=
exclusivewrite"
VG[0]=nfsu01
LV[0]=/dev/nfsu01/lvol1; FS[0]=/hanfs/nfsu011; FS_MOUNT
_OPT[0]="-o rw"
VXVOL="vxvol -g \$DiskGroup startall" #Default
FS_UMOUNT_COUNT=1
FS_MOUNT_RETRY_COUNT=0
IP[0]=15.13.114.243
SUBNET[0]=15.13.112.0
The hanfs.sh Control Script
This section shows the NFS control script (hanfs1.sh) for the pkg01
package in this sample configuration. This example includes only the
user-configured part of the script; the executable part of the script and
most of the comments are omitted. This example does not enable the File
Lock Migration feature.
XFS[0]=/hanfs/nfsu011
NFS_SERVICE_NAME[0]="nfs1.monitor"
NFS_SERVICE_CMD[0]="/etc/cmcluster/nfs/nfs.mon"
NFS_FILE_LOCK_MIGRATION=0
NFS_FLM_SCRIPT="${0%/*}/nfs.flm"
Chapter 3 59
Page 60

Sample Configurations
Example One - Three-Server Mutual Takeover
Package Configuration File for pkg02
This section shows the package configuration file (nfs2.conf) for the
package pkg02 in this sample configuration. The comments are not
shown.
PACKAGE_NAME pkg02
PACKAGE_TYPE FAILOVER
FAILOVER_POLICY CONFIGURED_NODE
FAILBACK_POLICY MANUAL
NODE_NAME basil
NODE_NAME sage
NODE_NAME thyme
AUTO_RUN YES
LOCAL_LAN_FAILOVER_ALLOWED YES
NODE_FAIL_FAST_ENABLED NO
RUN_SCRIPT /etc/cmcluster/nfs/nfs2.cntl
RUN_SCRIPT_TIMEOUT NO_TIMEOUT
HALT_SCRIPT /etc/cmcluster/nfs/nfs2.cntl
HALT_SCRIPT_TIMEOUT NO_TIMEOUT
SERVICE_NAME nfs2.monitor
SERVICE_FAIL_FAST_ENABLED NO
SERVICE_HALT_TIMEOUT 300
SUBNET 15.13.112.0
Chapter 360
Page 61

Sample Configurations
Example One - Three-Server Mutual Takeover
NFS Control Scripts for pkg02
The nfs.cntl Control Script
This section shows the NFS control script (nfs2.cntl) for the pkg02
package in this sample configuration. Only the user-configured part of
the script is shown; the executable part of the script and most of the
comments are omitted.
PATH=/sbin:/usr/bin:/usr/sbin:/etc:/bin
VGCHANGE=”vgchange -a e” # Default
CVM_ACTIVATION_CMD="vxdg -g \$DiskGroup set activation=
exclusivewrite"
VG[0]=nfsu02
LV[0]=/dev/nfsu02/lvol1; FS[0]=/hanfs/nfsu021; FS_MOUNT
_OPT[0]="-o rw"
VXVOL="vxvol -g \$DiskGroup startall" #Default
FS_UMOUNT_COUNT=1
FS_MOUNT_RETRY_COUNT=0
IP[0]=15.13.112.244
SUBNET[0]=15.13.112.0
The hanfs.sh Control Script
This section shows the NFS control script (hanfs2.sh) for the pkg02
package in this sample configuration. This example includes only the
user-configured part of the script; the executable part of the script and
most of the comments are omitted. This example does not enable the File
Lock Migration feature.
XFS[0]=/hanfs/nfsu021
NFS_SERVICE_NAME[0]="nfs2.monitor"
NFS_SERVICE_CMD[0]="/etc/cmcluster/nfs/nfs.mon"
NFS_FILE_LOCK_MIGRATION=0
NFS_FLM_SCRIPT="${0%/*}/nfs.flm"
Chapter 3 61
Page 62

Sample Configurations
Example One - Three-Server Mutual Takeover
Package Configuration File for pkg03
This section shows the package configuration file (nfs3.conf) for the
package pkg03 in this sample configuration. The comments are not
shown.
PACKAGE_NAME pkg03
PACKAGE_TYPE FAILOVER
FAILOVER_POLICY CONFIGURED_NODE
FAILBACK_POLICY MANUAL
NODE_NAME sage
NODE_NAME thyme
NODE_NAME basil
AUTO_RUN YES
LOCAL_LAN_FAILOVER_ALLOWED YES
NODE_FAIL_FAST_ENABLED NO
RUN_SCRIPT /etc/cmcluster/nfs/nfs3.cntl
RUN_SCRIPT_TIMEOUT NO_TIMEOUT
HALT_SCRIPT /etc/cmcluster/nfs/nfs3.cntl
HALT_SCRIPT_TIMEOUT NO_TIMEOUT
SERVICE_NAME nfs3.monitor
SERVICE_FAIL_FAST_ENABLED NO
SERVICE_HALT_TIMEOUT 300
SUBNET 15.13.112.0
Chapter 362
Page 63

Sample Configurations
Example One - Three-Server Mutual Takeover
NFS Control Scripts for pkg03
The nfs.cntl Control Script
This section shows the NFS control script (nfs3.cntl) for the pkg03
package in this sample configuration. Only the user-configured part of
the script is shown; the executable part of the script and most of the
comments are omitted.
PATH=/sbin:/usr/bin:/usr/sbin:/etc:/bin
VGCHANGE=”vgchange -a e” # Default
CVM_ACTIVATION_CMD="vxdg -g \$DiskGroup set activation=
exclusivewrite"
VG[0]=nfsu03
LV[0]=/dev/nfsu03/lvol1; FS[0]=/hanfs/nfsu031; FS_MOUNT
_OPT[0]="-o rw"
VXVOL="vxvol -g \$DiskGroup startall" #Default
FS_UMOUNT_COUNT=1
FS_MOUNT_RETRY_COUNT=0
IP[0]=15.13.114.245
SUBNET[0]=15.13.112.0
The hanfs.sh Control Script
This section shows the NFS control script (hanfs3.sh) for the pkg03
package in this sample configuration. This example includes only the
user-configured part of the script; the executable part of the script and
most of the comments are omitted. This example does not enable the File
Lock Migration feature.
XFS[0]=/hanfs/nfsu031
NFS_SERVICE_NAME[0]="nfs3.monitor"
NFS_SERVICE_CMD[0]="/etc/cmcluster/nfs/nfs.mon"
NFS_FILE_LOCK_MIGRATION=0
NFS_FLM_SCRIPT="${0%/*}/nfs.flm"
Chapter 3 63
Page 64

Sample Configurations
Example Two - One Adoptive Node for Two Packages with File Lock Migration
Example Two - One Adoptive Node for Two
Packages with File Lock Migration
This configuration has two packages, each owned by a different server.
The adoptive node for both packages is the same host. This sample
configuration uses the package control option, which prevents the
adoptive node from adopting another package if it has already adopted
one. Figure 3-3 illustrates this configuration.
Figure 3-3 One Adoptive Node for Two Packages
sagethyme basil
pkg01
IP = 15.13.114.243
VG[0] = nfsu01
LV[0] = /dev/nfsu01/lvol1
FS[0] = /hanfs/nfsu011
XFS[0] = /hanfs/nfsu011
pkg02
IP = 15.13.114.244
VG[0] = nfsu02
LV[0] = /dev/nfsu02/lvol1
FS[0] = /hanfs/nfsu021
XFS[0] = /hanfs/nfsu021
Chapter 364
Page 65

Sample Configurations
Example Two - One Adoptive Node for Two Packages with File Lock Migration
Figure 3-4 shows this sample configuration after host basil has failed.
Host sage has adopted pkg02. The package control option prevents host
sage from adopting another package, so host sage is no longer an
adoptive node for pkg01.
Figure 3-4 One Adoptive Node for Two Packages after One Server Fails
sagethyme basil
pkg01
IP = 15.13.113.243
VG[0] = nfsu01
LV[0] = /dev/nfsu01/lvol1
FS[0] = /hanfs/nfsu011
XFS[0] = /hanfs/nfsu011
This sample configuration also enables the File Lock Migration feature.
Chapter 3 65
pkg02
IP = 15.13.114.244
VG[0] = nfsu02
LV[0] = /dev/nfsu02/lvol1
FS[0] = /hanfs/nfsu021
XFS[0] = /hanfs/nfsu021
Page 66

Sample Configurations
Example Two - One Adoptive Node for Two Packages with File Lock Migration
Cluster Configuration File for Adoptive Node for Two
Packages with File Lock Migration
This section shows the cluster configuration file (cluster.conf) for this
configuration example. The comments are not shown.
CLUSTER_NAME PkgCtrl
FIRST_CLUSTER_LOCK_VG /dev/nfsu01
NODE_NAME thyme
NETWORK_INTERFACE lan0
HEARTBEAT_IP 15.13.119.146
NETWORK_INTERFACE lan1
FIRST_CLUSTER_LOCK_PV /dev/dsk/c0t1d0
NODE_NAME basil
NETWORK_INTERFACE lan0
HEARTBEAT_IP 15.13.113.168
FIRST_CLUSTER_LOCK_PV /dev/dsk/c1t1d0
NODE_NAME sage
NETWORK_INTERFACE lan0
HEARTBEAT_IP 15.13.115.184
NETWORK_INTERFACE lan1
NETWORK_INTERFACE lan2
NETWORK_INTERFACE lan3
FIRST_CLUSTER_LOCK_PV /dev/dsk/c0t1d0
HEARTBEAT_INTERVAL 1000000
NODE_TIMEOUT 2000000
AUTO_START_TIMEOUT 600000000
NETWORK_POLLING_INTERVAL 2000000
MAX_CONFIGURED_PACKAGES 2
VOLUME_GROUP /dev/nfsu01
VOLUME_GROUP /dev/nfsu02
Chapter 366
Page 67

Sample Configurations
Example Two - One Adoptive Node for Two Packages with File Lock Migration
Package Configuration File for pkg01
This section shows the package configuration file (nfs1.conf) for the
package pkg01 in this sample configuration. The comments are not
shown.
PACKAGE_NAME pkg01
PACKAGE_TYPE FAILOVER
FAILOVER_POLICY CONFIGURED_NODE
FAILBACK_POLICY MANUAL
NODE_NAME thyme
NODE_NAME sage
AUTO_RUN YES
LOCAL_LAN_FAILOVER_ALLOWED YES
NODE_FAIL_FAST_ENABLED NO
RUN_SCRIPT /etc/cmcluster/nfs/nfs1.cntl
RUN_SCRIPT_TIMEOUT NO_TIMEOUT
HALT_SCRIPT /etc/cmcluster/nfs/nfs1.cntl
HALT_SCRIPT_TIMEOUT NO_TIMEOUT
SERVICE_NAME nfs1.monitor
SERVICE_FAIL_FAST_ENABLED NO
SERVICE_HALT_TIMEOUT 300
SUBNET 15.13.112.0
Chapter 3 67
Page 68

Sample Configurations
Example Two - One Adoptive Node for Two Packages with File Lock Migration
NFS Control Scripts for pkg01
The nfs.cntl Control Script
This section shows the NFS control script (nfs1.cntl) for the pkg01
package in this sample configuration. Only the user-configured part of
the script is shown; the executable part of the script and most of the
comments are omitted.
PATH=/sbin:/usr/bin:/usr/sbin:/etc:/bin
VGCHANGE=”vgchange -a e” # Default
CVM_ACTIVATION_CMD="vxdg -g \$DiskGroup set activation=
exclusivewrite"
VG[0]=nfsu01
LV[0]=/dev/nfsu01/lvol1; FS[0]=/hanfs/nfsu011; FS_MOUNT
_OPT[0]="-o rw"
VXVOL="vxvol -g \$DiskGroup startall" #Default
FS_UMOUNT_COUNT=1
FS_MOUNT_RETRY_COUNT=0
IP[0]=15.13.114.243
SUBNET[0]=15.13.112.0
function customer_defined_run_cmds
{
cmmodpkg -d -n ‘hostname‘ pkg02 &
}
The function customer_defined_run_cmds calls the cmmodpkg
command with the package control option (-d). This command prevents
the host that is running pkg01 from adopting pkg02. The ampersand (&)
causes the cmmodpkg command to run in the background. It must run in
the background to allow the control script to complete.
There is a short time, after one primary node has failed but before the
cmmodpkg command has executed, when the other primary node can fail
and the adoptive node will adopt its package. In other words, if both
thyme and basil fail at approximately the same time, host sage may
adopt two packages, even though the package control option is specified.
Chapter 368
Page 69

Sample Configurations
Example Two - One Adoptive Node for Two Packages with File Lock Migration
If you omit the cmmodpkg -d command from the NFS control script, host
sage can adopt both pkg01 and pkg02 if their primary nodes fail.
The hanfs.sh Control Script
This section shows the NFS control script (hanfs1.sh) for the pkg01
package in this sample configuration. This example includes only the
user-configured part of the script; the executable part of the script and
most of the comments are omitted. This example enables the File Lock
Migration feature.
XFS[0]=/hanfs/nfsu011
NFS_SERVICE_NAME[0]="nfs1.monitor"
NFS_SERVICE_CMD[0]="/etc/cmcluster/nfs/nfs1.mon"
NFS_FILE_LOCK_MIGRATION=1
NFS_FLM_SCRIPT="${0%/*}/nfs1.flm"
Chapter 3 69
Page 70

Sample Configurations
Example Two - One Adoptive Node for Two Packages with File Lock Migration
NFS File Lock Migration and Monitor Scripts for pkg01
The nfs.flm Script
This section shows the NFS File Lock Migration (nfs1.flm) script for
the pkg01 package in this sample configuration. This example includes
only the user-configured part of the script; the executable part of the
script and comments are omitted.
NFS_FLM_HOLDING_DIR="/hanfs/nfsu011/sm"
PROPAGATE_INTERVAL=5
The nfs.mon Script
This section shows the NFS Monitor (nfs1.mon) script for the pkg01
package in this sample configuration. This example includes only the file
lock migration related part of the script; the remaining script is omitted.
NFS_FILE_LOCK_MIGRATION=1
NFS_FLM_SCRIPT="${0%/*}/nfs1.flm"
Chapter 370
Page 71

Sample Configurations
Example Two - One Adoptive Node for Two Packages with File Lock Migration
Package Configuration File for pkg02
This section shows the package configuration file (nfs2.conf) for the
package pkg02 in this sample configuration. The comments are not
shown.
PACKAGE_NAME pkg02
PACKAGE_TYPE FAILOVER
FAILOVER_POLICY CONFIGURED_NODE
FAILBACK_POLICY MANUAL
NODE_NAME basil
NODE_NAME sage
AUTO_RUN YES
LOCAL_LAN_FAILOVER_ALLOWED YES
NODE_FAIL_FAST_ENABLED NO
RUN_SCRIPT /etc/cmcluster/nfs/nfs2.cntl
RUN_SCRIPT_TIMEOUT NO_TIMEOUT
HALT_SCRIPT /etc/cmcluster/nfs/nfs2.cntl
HALT_SCRIPT_TIMEOUT NO_TIMEOUT
SERVICE_NAME nfs2.monitor
SERVICE_FAIL_FAST_ENABLED NO
SERVICE_HALT_TIMEOUT 300
SUBNET 15.13.112.0
Chapter 3 71
Page 72

Sample Configurations
Example Two - One Adoptive Node for Two Packages with File Lock Migration
NFS Control Scripts for pkg02
The nfs.cntl Control Script
This section shows the NFS control script (nfs2.cntl) for the pkg02
package in this sample configuration. Only the user-configured part of
the script is shown; the executable part of the script and most of the
comments are omitted.
PATH=/sbin:/usr/bin:/usr/sbin:/etc:/bin
VGCHANGE=”vgchange -a e” # Default
CVM_ACTIVATION_CMD="vxdg -g \$DiskGroup set activation=
exclusivewrite"
VG[0]=nfsu02
LV[0]=/dev/nfsu02/lvol1; FS[0]=/hanfs/nfsu021
VXVOL="vxvol -g \$DiskGroup startall" #Default
FS_UMOUNT_COUNT=1
FS_MOUNT_RETRY_COUNT=0
IP[0]=15.13.114.244
SUBNET[0]=15.13.112.0
function customer_defined_run_cmds
{
cmmodpkg -d -n ‘hostname‘ pkg01 &
}
The function customer_defined_run_cmds calls the cmmodpkg
command with the package control option (-d). This command prevents
the host that is running pkg02 from adopting pkg01. The ampersand (&)
causes the cmmodpkg command to run in the background. It must run in
the background to allow the control script to complete.
There is a short time, after one primary node has failed but before the
cmmodpkg command has executed, when the other primary node can fail
and the adoptive node will adopt its package. In other words, if both
thyme and basil fail at approximately the same time, host sage may
adopt two packages, even though the package control option is specified.
Chapter 372
Page 73

Sample Configurations
Example Two - One Adoptive Node for Two Packages with File Lock Migration
If you omit the cmmodpkg -d command from the NFS control script, host
sage can adopt both pkg01 and pkg02 if their primary nodes fail.
The hanfs.sh Control Script
This section shows the NFS control script (hanfs2.sh) for the pkg02
package in this sample configuration. This example includes only the
user-configured part of the script; the executable part of the script and
most of the comments are omitted. This example enables the File Lock
Migration feature.
XFS[0]=/hanfs/nfsu021
NFS_SERVICE_NAME[0]="nfs2.monitor"
NFS_SERVICE_CMD[0]="/etc/cmcluster/nfs/nfs2.mon"
NFS_FILE_LOCK_MIGRATION=1
NFS_FLM_SCRIPT="${0%/*}/nfs2.flm"
Chapter 3 73
Page 74

Sample Configurations
Example Two - One Adoptive Node for Two Packages with File Lock Migration
NFS File Lock Migration and Monitor Scripts for pkg02
The nfs.flm Script
This section shows the NFS File Lock Migration (nfs2.flm) script for
the pkg02 package in this sample configuration. This example includes
only the user-configured part of the script; the executable part of the
script and comments are omitted.
NFS_FLM_HOLDING_DIR="/hanfs/nfsu021/sm"
PROPAGATE_INTERVAL=5
The nfs.mon Script
This section shows the NFS Monitor (nfs2.mon) script for the pkg02
package in this sample configuration. This example includes only the file
lock migration related part of the script; the remaining script is omitted.
NFS_FILE_LOCK_MIGRATION=1
NFS_FLM_SCRIPT="${0%/*}/nfs2.flm"
Chapter 374
Page 75

Example Three - Three-Server Cascading Failover
Example Three - Three-Server Cascading
Failover
This configuration has two packages and three servers. One server is the
primary node for both packages. The other servers are adoptive nodes for
the two packages. Figure 3-5 illustrates this configuration. Dotted lines
indicate which servers are adoptive nodes for the packages.
Figure 3-5 Cascading Failover with Three Servers
Sample Configurations
pkg01
IP = 15.13.114.243
VG[0] = nfsu01
LV[0] = /dev/nfsu01/lvol1
FS[0] = /hanfs/nfsu011
XFS[0] = /hanfs/nfsu011
pkg02
IP = 15.13.114.244
VG[0] = nfsu02
LV[0] = /dev/nfsu02/lvol1
FS[0] = /hanfs/nfsu021
XFS[0] = /hanfs/nfsu021
thyme sage
basil
Chapter 3 75
Page 76

Sample Configurations
Example Three - Three-Server Cascading Failover
Figure 3-6 shows the cascading failover configuration after host thyme
has failed. Host basil is the first adoptive node configured for pkg01,
and host sage is the first adoptive node configured for pkg02.
Figure 3-6 Cascading Failover with Three Servers after One Server Fails
pkg01
IP = 15.13.114.243
VG[0] = nfsu01
LV[0] = /dev/nfsu01/lvol1
FS[0] = /hanfs/nfsu011
XFS[0] = /hanfs/nfsu011
pkg02
IP = 15.13.114.244
VG[0] = nfsu02
LV[0] = /dev/nfsu02/lvol1
FS[0] = /hanfs/nfsu021
XFS[0] = /hanfs/nfsu021
thyme sage
basil
Chapter 376
Page 77

Sample Configurations
Example Three - Three-Server Cascading Failover
Cluster Configuration File for Three-Server
Cascading Failover
This section shows the cluster configuration file (cluster.conf) for this
configuration example. The comments are not shown.
CLUSTER_NAME Cascading
FIRST_CLUSTER_LOCK_VG /dev/nfsu01
NODE_NAME thyme
NETWORK_INTERFACE lan0
HEARTBEAT_IP 15.13.119.146
NETWORK_INTERFACE lan1
FIRST_CLUSTER_LOCK_PV /dev/dsk/c0t1d0
NODE_NAME basil
NETWORK_INTERFACE lan0
HEARTBEAT_IP 15.13.113.168
FIRST_CLUSTER_LOCK_PV /dev/dsk/c1t1d0
NODE_NAME sage
NETWORK_INTERFACE lan0
HEARTBEAT_IP 15.13.115.184
NETWORK_INTERFACE lan1
NETWORK_INTERFACE lan2
NETWORK_INTERFACE lan3
FIRST_CLUSTER_LOCK_PV /dev/dsk/c0t1d0
HEARTBEAT_INTERVAL 1000000
NODE_TIMEOUT 2000000
AUTO_START_TIMEOUT 600000000
NETWORK_POLLING_INTERVAL 2000000
MAX_CONFIGURED_PACKAGES 2
VOLUME_GROUP /dev/nfsu01
VOLUME_GROUP /dev/nfsu02
Chapter 3 77
Page 78

Sample Configurations
Example Three - Three-Server Cascading Failover
Package Configuration File for pkg01
This section shows the package configuration file (nfs1.conf) for the
package pkg01 in this sample configuration. The comments are not
shown.
PACKAGE_NAME pkg01
PACKAGE_TYPE FAILOVER
FAILOVER_POLICY CONFIGURED_NODE
FAILBACK_POLICY MANUAL
NODE_NAME thyme
NODE_NAME basil
NODE_NAME sage
AUTO_RUN YES
LOCAL_LAN_FAILOVER_ALLOWED YES
NODE_FAIL_FAST_ENABLED NO
RUN_SCRIPT /etc/cmcluster/nfs/nfs1.cntl
RUN_SCRIPT_TIMEOUT NO_TIMEOUT
HALT_SCRIPT /etc/cmcluster/nfs/nfs1.cntl
HALT_SCRIPT_TIMEOUT NO_TIMEOUT
SERVICE_NAME nfs1.monitor
SERVICE_FAIL_FAST_ENABLED NO
SERVICE_HALT_TIMEOUT 300
SUBNET 15.13.112.0
Chapter 378
Page 79

Sample Configurations
Example Three - Three-Server Cascading Failover
NFS Control Scripts for pkg01
The nfs.cntl Control Script
This section shows the NFS control script (nfs1.cntl) for the pkg01
package in this sample configuration. Only the user-configured part of
the script is shown; the executable part of the script and most of the
comments are omitted.
PATH=/sbin:/usr/bin:/usr/sbin:/etc:/bin
VGCHANGE=”vgchange -a e” # Default
CVM_ACTIVATION_CMD="vxdg -g \$DiskGroup set activation=
exclusivewrite"
VG[0]=nfsu01
LV[0]=/dev/nfsu01/lvol1; FS[0]=/hanfs/nfsu011; FS_MOUNT
_OPT[0]="-o rw"
VXVOL="vxvol -g \$DiskGroup startall" #Default
FS_UMOUNT_COUNT=1
FS_MOUNT_RETRY_COUNT=0
IP[0]=15.13.114.243
SUBNET[0]=15.13.112.0
The hanfs.sh Control Script
This section shows the NFS control script (hanfs1.sh) for the pkg01
package in this sample configuration. This example includes only the
user-configured part of the script; the executable part of the script and
most of the comments are omitted. This example does not enable the File
Lock Migration feature.
XFS[0]=/hanfs/nfsu011
NFS_SERVICE_NAME[0]="nfs1.monitor"
NFS_SERVICE_CMD[0]="/etc/cmcluster/nfs/nfs.mon"
NFS_FILE_LOCK_MIGRATION=0
NFS_FLM_SCRIPT="${0%/*}/nfs.flm"
Chapter 3 79
Page 80

Sample Configurations
Example Three - Three-Server Cascading Failover
Package Configuration File for pkg02
This section shows the package configuration file (nfs2.conf) for the
package pkg02 in this sample configuration. The comments are not
shown.
PACKAGE_NAME pkg02
PACKAGE_TYPE FAILOVER
FAILOVER_POLICY CONFIGURED_NODE
FAILBACK_POLICY MANUAL
NODE_NAME thyme
NODE_NAME sage
NODE_NAME basil
AUTO_RUN YES
LOCAL_LAN_FAILOVER_ALLOWED YES
NODE_FAIL_FAST_ENABLED NO
RUN_SCRIPT /etc/cmcluster/nfs/nfs2.cntl
RUN_SCRIPT_TIMEOUT NO_TIMEOUT
HALT_SCRIPT /etc/cmcluster/nfs/nfs2.cntl
HALT_SCRIPT_TIMEOUT NO_TIMEOUT
SERVICE_NAME nfs2.monitor
SERVICE_FAIL_FAST_ENABLED NO
SERVICE_HALT_TIMEOUT 300
SUBNET 15.13.112.0
Chapter 380
Page 81

Sample Configurations
Example Three - Three-Server Cascading Failover
NFS Control Scripts for pkg02
The nfs.cntl Control Script
This section shows the NFS control script (nfs2.cntl) for the pkg02
package in this sample configuration. Only the user-configured part of
the script is shown; the executable part of the script and most of the
comments are omitted.
PATH=/sbin:/usr/bin:/usr/sbin:/etc:/bin
VGCHANGE=”vgchange -a e” # Default
CVM_ACTIVATION_CMD="vxdg -g \$DiskGroup set activation=
exclusivewrite"
VG[0]=nfsu02
LV[0]=/dev/nfsu02/lvol1; FS[0]=/hanfs/nfsu021; FS_MOUNT
_OPT[0]="-o rw"
VXVOL="vxvol -g \$DiskGroup startall" #Default
FS_UMOUNT_COUNT=1
FS_MOUNT_RETRY_COUNT=0
IP[0]=15.13.114.244
SUBNET[0]=15.13.112.0
The hanfs.sh Control Script
This section shows the NFS control script (hanfs2.sh) for the pkg02
package in this sample configuration. This example includes only the
user-configured part of the script; the executable part of the script and
most of the comments are omitted. This example does not enable the File
Lock Migration feature.
XFS[0]=/hanfs/nfsu021
NFS_SERVICE_NAME[0]="nfs2.monitor"
NFS_SERVICE_CMD[0]="/etc/cmcluster/nfs/nfs.mon"
NFS_FILE_LOCK_MIGRATION=0
NFS_FLM_SCRIPT="${0%/*}/nfs.flm"
Chapter 3 81
Page 82

Sample Configurations
Example Four - Two Servers with NFS Cross-Mounts
Example Four - Two Servers with NFS
Cross-Mounts
This configuration has two servers and two packages. The primary node
for each package NFS-mounts the file systems from its own package and
the other package. Figure 3-7 illustrates this configuration. If one server
fails, the other server adopts its package. The NFS mounts are not
interrupted when a package fails over.
Figure 3-7 Two Servers with NFS Cross-Mounts
thyme
/nfs/nfsu021
/nfs/nfsu011
NFS
mount
NFS
mount
NFS
mount
basil
/nfs/nfsu011
/nfs/nfsu021
NFS
mount
/hanfs/nfsu011
/hanfs/nfsu021
pkg01
IP = 15.13.114.243
VG[0] = nfsu01
LV[0] = /dev/nfsu01/lvol1
FS[0] = /hanfs/nfsu011
XFS[0] = /hanfs/nfsu011
pkg02
IP = 15.13.114.244
VG[0] = nfsu02
LV[0] = /dev/nfsu02/lvol1
FS[0] = /hanfs/nfsu021
XFS[0] = /hanfs/nfsu021
Chapter 382
Page 83

Sample Configurations
Example Four - Two Servers with NFS Cross-Mounts
Figure 3-8 shows two servers with NFS cross-mounted file systems after
server thyme has failed. The NFS mounts on server basil are not
interrupted.
Figure 3-8 Two Servers with NFS Cross-Mounts after One Server Fails
thyme
/nfs/nfsu021
/nfs/nfsu011
/hanfs/nfsu011
NFS
mount
NFS mount
pkg01
IP = 15.13.114.243
VG[0] = nfsu01
LV[0] = /dev/nfsu01/lvol1
FS[0] = /hanfs/nfsu011
XFS[0] = /hanfs/nfsu011
pkg02
IP = 15.13.114.244
VG[0] = nfsu02
LV[0] = /dev/nfsu02/lvol1
FS[0] = /hanfs/nfsu021
XFS[0] = /hanfs/nfsu021
basil
/nfs/nfsu011
/nfs/nfsu021
/hanfs/nfsu021
/hanfs/nfsu011
Chapter 3 83
Page 84

Sample Configurations
Example Four - Two Servers with NFS Cross-Mounts
Cluster Configuration File for Two-Server NFS
Cross-Mount
This section shows the cluster configuration file (cluster.conf) for this
configuration example. The comments are not shown.
CLUSTER_NAME XMnt
FIRST_CLUSTER_LOCK_VG /dev/nfsu01
NODE_NAME thyme
NETWORK_INTERFACE lan0
HEARTBEAT_IP 15.13.119.146
NETWORK_INTERFACE lan1
FIRST_CLUSTER_LOCK_PV /dev/dsk/c0t1d0
NODE_NAME basil
NETWORK_INTERFACE lan0
HEARTBEAT_IP 15.13.113.168
FIRST_CLUSTER_LOCK_PV /dev/dsk/c1t1d0
HEARTBEAT_INTERVAL 1000000
NODE_TIMEOUT 2000000
AUTO_START_TIMEOUT 600000000
NETWORK_POLLING_INTERVAL 2000000
MAX_CONFIGURED_PACKAGES 2
VOLUME_GROUP /dev/nfsu01
VOLUME_GROUP /dev/nfsu02
Chapter 384
Page 85

Sample Configurations
Example Four - Two Servers with NFS Cross-Mounts
Package Configuration File for pkg01
This section shows the package configuration file (nfs1.conf) for the
package pkg01 in this sample configuration. The comments are not
shown.
PACKAGE_NAME pkg01
PACKAGE_TYPE FAILOVER
FAILOVER_POLICY CONFIGURED_NODE
FAILBACK_POLICY MANUAL
NODE_NAME thyme
NODE_NAME basil
AUTO_RUN YES
LOCAL_LAN_FAILOVER_ALLOWED YES
NODE_FAIL_FAST_ENABLED NO
RUN_SCRIPT /etc/cmcluster/nfs/nfs1.cntl
RUN_SCRIPT_TIMEOUT NO_TIMEOUT
HALT_SCRIPT /etc/cmcluster/nfs/nfs1.cntl
HALT_SCRIPT_TIMEOUT NO_TIMEOUT
SERVICE_NAME nfs1.monitor
SERVICE_FAIL_FAST_ENABLED NO
SERVICE_HALT_TIMEOUT 300
SUBNET 15.13.112.0
Chapter 3 85
Page 86

Sample Configurations
Example Four - Two Servers with NFS Cross-Mounts
NFS Control Scripts for pkg01
The nfs.cntl Control Script
This section shows the NFS control script (nfs1.cntl) for the pkg01
package in this sample configuration. Only the user-configured part of
the script is shown; the executable part of the script and most of the
comments are omitted.
PATH=/sbin:/usr/bin:/usr/sbin:/etc:/bin
VGCHANGE=”vgchange -a e” # Default
CVM_ACTIVATION_CMD="vxdg -g \$DiskGroup set activation=
exclusivewrite"
VG[0]=nfsu01
LV[0]=/dev/nfsu01/lvol1; FS[0]=/hanfs/nfsu011; FS_MOUNT
_OPT[0]="-o rw"
VXVOL="vxvol -g \$DiskGroup startall" #Default
FS_UMOUNT_COUNT=1
FS_MOUNT_RETRY_COUNT=0
IP[0]=15.13.114.243
SUBNET[0]=15.13.112.0
function customer_defined_run_cmds
{
/etc/cmcluster/nfs/nfs1_xmnt start
remsh basil /etc/cmcluster/nfs/nfs1_xmnt start
}
The function customer_defined_run_cmds calls a script called
nfs1_xmnt. This script NFS-mounts the file system exported by the
package pkg01. If you configured the file system in the /etc/fstab file,
the package might not be active yet when the servers tried to mount the
file system at system boot. By configuring the NFS control script to
NFS-mount the file system, you ensure that the package is active before
the mount command is invoked.
Chapter 386
Page 87

Sample Configurations
Example Four - Two Servers with NFS Cross-Mounts
The first line in the customer_defined_run_cmds function executes the
nfs1_xmnt script locally on host thyme (the primary node for pkg01). The
second line, beginning with remsh, executes the nfs1_xmnt script
remotely on host basil.
If pkg01 fails to come up, or if the remsh to host basil fails, the file
system will not be mounted, and no error will be returned. The only way
to be sure the file system was mounted successfully is to run the
nfs1_xmnt script manually on both host thyme and host basil.
The only user-configurable values in the nfs1_xmnt script are the
SNFS[
n
] and CNFS[n] variables. These specify the server location of the
file system and the client mount point for the file system. The following
line is the from the nfs1_xmnt script in this example configuration:
SNFS[0]=”nfs1:/hanfs/nfsu011”; CNFS[0]=”/nfs/nfsu011”
In the SNFS[0] variable, “nfs1” is the name that maps to the relocatable
IP address of pkg01. It must be configured in the name service the host is
using (DNS, NIS, or the /etc/hosts file). If you do not want to configure
a name for the package, you can just specify the IP address in the
SNFS[0] variable, as follows:
SNFS[0]=”15.13.114.243:/hanfs/nfsu011”;
CNFS[0]=”/nfs/nfsu011”
The client mount point, specified in the CNFS[0] variable, must be
different from the location of the file system on the server (SNFS[0]).
The hanfs.sh Control Script
This section shows the NFS control script (hanfs1.sh) for the pkg01
package in this sample configuration. This example includes only the
user-configured part of the script; the executable part of the script and
most of the comments are omitted. This example does not enable the File
Lock Migration feature.
XFS[0]=/hanfs/nfsu011
NFS_SERVICE_NAME[0]="nfs1.monitor
NFS_SERVICE_CMD[0]="/etc/cmcluster/nfs/nfs.mon"
NFS_FILE_LOCK_MIGRATION=0
NFS_FLM_SCRIPT="${0%/*}/nfs.flm"
Chapter 3 87
Page 88

Sample Configurations
Example Four - Two Servers with NFS Cross-Mounts
Package Configuration File for pkg02
This section shows the package configuration file (nfs2.conf) for the
package pkg02 in this sample configuration. The comments are not
shown.
PACKAGE_NAME pkg02
PACKAGE_TYPE FAILOVER
FAILOVER_POLICY CONFIGURED_NODE
FAILBACK_POLICY MANUAL
NODE_NAME basil
NODE_NAME thyme
AUTO_RUN YES
LOCAL_LAN_FAILOVER_ALLOWED YES
NODE_FAIL_FAST_ENABLED NO
RUN_SCRIPT /etc/cmcluster/nfs/nfs2.cntl
RUN_SCRIPT_TIMEOUT NO_TIMEOUT
HALT_SCRIPT /etc/cmcluster/nfs/nfs2.cntl
HALT_SCRIPT_TIMEOUT NO_TIMEOUT
SERVICE_NAME nfs2.monitor
SERVICE_FAIL_FAST_ENABLED NO
SERVICE_HALT_TIMEOUT 300
SUBNET 15.13.112.0
Chapter 388
Page 89

Sample Configurations
Example Four - Two Servers with NFS Cross-Mounts
NFS Control Scripts for pkg02
The nfs.cntl Control Script
This section shows the NFS control script (nfs2.cntl) for the pkg02
package in this sample configuration. Only the user-configured part of
the script is shown; the executable part of the script and most of the
comments are omitted.
PATH=/sbin:/usr/bin:/usr/sbin:/etc:/bin
VGCHANGE=”vgchange -a e” # Default
CVM_ACTIVATION_CMD="vxdg -g \$DiskGroup set activation=
exclusivewrite"
VG[0]=nfsu02
LV[0]=/dev/nfsu02/lvol1; FS[0]=/hanfs/nfsu021; FS_MOUNT
_OPT[0]="-o rw"
VXVOL="vxvol -g \$DiskGroup startall"#Default
FS_UMOUNT_COUNT=1
FS_MOUNT_RETRY_COUNT=0
IP[0]=15.13.114.244
SUBNET[0]=15.13.112.0
function customer_defined_run_cmds
{
/etc/cmcluster/nfs/nfs2_xmnt start
remsh thyme /etc/cmcluster/nfs/nfs2_xmnt start
}
The function customer_defined_run_cmds calls a script called
nfs2_xmnt. This script NFS-mounts the file system exported by the
package pkg02. If you configured the file system in the /etc/fstab file,
the package might not be active yet when the servers tried to mount the
file system at system boot. By configuring the NFS control script to
NFS-mount the file system, you ensure that the package is active before
the mount command is invoked.
Chapter 3 89
Page 90

Sample Configurations
Example Four - Two Servers with NFS Cross-Mounts
The first line in the customer_defined_run_cmds function executes the
nfs2_xmnt script locally on host basil (the primary node for pkg02). The
second line, beginning with remsh, executes the nfs2_xmnt script
remotely on host thyme.
If pkg02 fails to come up, or if the remsh to host thyme fails, the file
system will not be mounted, and no error will be returned. The only way
to be sure the file system was mounted successfully is to run the
nfs2_xmnt script manually on both host basil and host thyme.
The only user-configurable values in the nfs2_xmnt script are the
SNFS[
n
] and CNFS[n] variables. These specify the server location of the
file system and the client mount point for the file system. The following
line is the from the nfs2_xmnt script in this example configuration:
SNFS[0]=”nfs2:/hanfs/nfsu021”; CNFS[0]=”/nfs/nfsu021”
In the SNFS[0] variable, “nfs2” is the name that maps to the relocatable
IP address of pkg02. It must be configured in the name service the host is
using (DNS, NIS, or the /etc/hosts file). If you do not want to configure
a name for the package, you can just specify the IP address in the
SNFS[0] variable, as follows:
SNFS[0]=”15.13.114.244:/hanfs/nfsu021”; CNFS[0]=”/nfs/n
fsu021”
The client mount point, specified in the CNFS[0] variable, must be
different from the location of the file system on the server (SNFS[0]).
The hanfs.sh Control Script
This section shows the NFS control script (hanfs2.sh) for the pkg02
package in this sample configuration. This example includes only the
user-configured part of the script; the executable part of the script and
most of the comments are omitted. This example does not enable the File
Lock Migration feature.
XFS[0]=/hanfs/nfsu021
NFS_SERVICE_NAME[0]="nfs2.monitor"
NFS_SERVICE_CMD[0]="/etc/cmcluster/nfs/nfs.mon"
NFS_FILE_LOCK_MIGRATION=0
NFS_FLM_SCRIPT="${0%/*}/nfs.flm"
Chapter 390
Page 91

Index
A
adoptive nodes, 12
configuring, 46
example of package control option, 64
for multiple packages, 12, 15, 36, 39
illustration of cascading failover, 16
automounter timeout, 22
C
cascading failover, 12
example configuration, 75
illustration of, 16
client behavior, 8, 22
cluster configuration file (cluster.conf)
example, 57, 66, 77, 84
cmmodpkg -d (package control option), 36,
39, 68, 72
CNFS variable, in nfs_xmnt script, 49, 87, 90
configuration
control script (hansf.sh), 41
control script (nfs.cntl), 35, 37
cross-mounted servers, 48
disks, 30
examples, 54
illustrations of supported, 13
prerequisites, 29
volume groups and logical volumes, 30
configuration files, 8
default values, 47
location of, 25
configurations supported, 12
control script (hansf.sh), 41
control script (nfs.cntl), 19, 35, 37
example, 59, 61, 63, 68, 72, 79, 81, 86, 89
specified in nfs.conf, 46
cross-mounted NFS servers
configuration example, 82
customer_defined_run_cmds, in nfs.cntl, 49,
68, 72, 86, 89
CVM disk groups, 35
D
-d option, cmmodpkg, 36, 39, 68, 72
diskless NFS, 9
disks, configuring, 30
DNS, 31, 36, 38, 49, 87, 90
documentation
MC/ServiceGuard, 29
Software Distributor (SD-UX), 25
E
/etc/cmcluster/nfs directory, 26
/etc/exports file, 29, 38, 41
/etc/fstab file, 86, 89
/etc/group file, 31
/etc/hosts file, 31, 36, 38, 49, 87, 90
/etc/passwd file, 31
/etc/rc.config.d/nfsconf file, 21, 29
executables, where to locate, 31
exported file systems, 19, 29
definition of, 8
naming, 30
specifying in nfs.cntl, 35, 37
F
file locking, during package failover, 9
file systems
journalled (xvfs), 31
mounting, 19
specifying in nfs.cntl, 35, 37
unmounting, 20
FS variable, in nfs.cntl file, 35, 37
G
group IDs, 31
H
HALT_SCRIPT, in nfs.conf, 46
HALT_SCRIPT_TIMEOUT, in nfs.conf, 46
hanfs.sh
description, 25
editing NFS Control Script, 41
hansf.sh (control script), 41
Highly Available NFS
control script, 19
definition of, 8
hansf.sh, 25
installation, 25
limitations, 9
location of installed files, 8
monitor script, 21
prerequisites for configuration, 29
sample configurations, 54
supported configurations, 12
hung client, 8, 32
I
inetd, starting rpc.mountd, 29
installation, 25
91
Page 92

Index
internet address, for package, 19, 20, 36, 38
mapping to logical name, 31
interruptible NFS mounts, 31
IP address, for package, 19, 20, 36, 38
mapping to logical name, 31
IP variable, in hanfs.sh script, 36
IP variable, in nfs.cntl script, 38
J
journalled file systems (xvfs), 31
L
lockd
monitoring, 21
restarting, 20
stopping, 20
locked files, during package failover, 9
logging, NFS monitor script, 21
logical volumes
configuration, 30
specifying in nfs.cntl, 35, 37
LV variable, in nfs.cntl script, 35, 37
LVM volume groups, 35
M
MC/ServiceGuard documentation, 29
monitor script (nfs.mon), 21
logging, 21
specified in hanfs.sh, 41
specified in nfs.cntl, 38
specified in nfs.conf, 46
starting, 19
stopping, 20
unconfiguring, 38, 46
mount points, 30
mount retry, 22
mountd, starting, 29
mounting file systems, 19
mutual takeover
sample configuration, 55
N
NET_SWITCHING_ENABLED, 38, 42
NFS client behavior, 8, 22
NFS control script (hansf.sh), 41
NFS control script (nfs.cntl), 19, 35, 37
example, 59, 61, 63, 68, 72, 79, 81, 86, 89
specified in nfs.conf, 46
NFS diskless, 9
NFS monitor script (nfs.mon), 21
logging, 21
specified in hanfs.sh, 41
specified in nfs.cntl, 38
specified in nfs.conf, 46
starting, 19
stopping, 20
unconfiguring, 38, 46
NFS mount points, 30
NFS servers
cross-mounting NFS file systems, 12, 17,
48, 49, 82
definition of, 8
diskless, 9
multiple active, 12, 55
starting, 30
NFS specific variables, 37
nfs.cntl (control script), 19, 35, 37
example, 59, 61, 63, 68, 72, 79, 81, 86, 89
specified in nfs.conf, 46
nfs.cntl.log file, 21
nfs.conf package configuration file
default values, 47
example, 58, 60, 62, 67, 71, 78, 80, 85, 88
nfs.mon (monitor script), 21
logging, 21
specified in nfs.cntl, 38, 41
specified in nfs.conf, 46
unconfiguring, 38, 46
nfs.server script, 30
NFS_SERVER variable, 29
NFS_SERVICE_CMD, in nfs.cntl, 38, 41
NFS_SERVICE_NAME, in hanfs.sh, 41
NFS_SERVICE_NAME, in nfs.cntl, 38, 41
nfs_xmnt script, 49, 86, 89
nfsconf file, 21, 29
nfsd daemons, number of, 30
NFS-mounted file systems
cross-mounted servers, 82
interruptible, 31
on highly available servers, 12, 17, 48, 49
NIS, 31, 36, 38, 49, 87, 90
NODE_NAME, in nfs.conf, 46
nointr option, mount, 31
NUM_NFSD variable, 30
O
/opt/cmcluster/nfs directory, 26
92
Page 93

Index
P
package configuration file (nfs.conf)
default values, 47
example, 58, 60, 62, 67, 71, 78, 80, 85, 88
package control option (cmmodpkg -d), 36,
39, 68, 72
package name, 31
PACKAGE_NAME, in nfs.conf, 46
PCNFS_SERVER variable, 29
pcnfsd, 21, 29
PKG_SWITCHING_ENABLED, 38, 42
R
retry option, mount command, 22
rpc.lockd
monitoring, 21
restarting, 20
stopping, 20
rpc.mountd, starting, 29
rpc.statd
monitoring, 21
restarting, 20
stopping, 20
rpcinfo command, 21
RUN_SCRIPT, in nfs.conf, 46
RUN_SCRIPT_TIMEOUT, in nfs.conf, 46
S
sample configurations, 54
SD-UX (Software Distributor), 25
servers, multiple active, 12, 55
SERVICE_NAME, in nfs.conf, 46
SNFS variable, in nfs_xmnt script, 49, 87, 90
Software Distributor (SD-UX), 25
start parameter, control script, 19
START_MOUNTD variable, 29
statd
monitoring, 21
restarting, 20
stopping, 20
stop parameter, control script, 20
SUBNET variable
in hanfs.sh, 36
in nfs.cntl, 38
in nfs.conf, 46
swinstall command, 25
U
unexporting file systems, 20
unmounting file systems, 20
user IDs, 31
V
VG variable, in hansf.sh script, 41
VG variable, in nfs.cntl script, 35, 37
volume groups
activating, 19
configuring, 30
deactivating, 20
major and minor numbers, 30
specifying in hansf.sh, 41
specifying in nfs.cntl, 35, 37
VxVM disk groups, 35
X
XFS variable, in nfs.cntl script, 35, 37
xvfs (journalled file systems), 31
T
timeout, automounter, 22
93
 Loading...