

Page 1

Getting Started
Updated Information
Printed in
Page 2

The only warranties for Hewlett-Packard products and services are set forth in the express
statements accompanying such products and services. Nothing herein should be construed as
constituting an additional warranty. HP shall not be liable for technical or editorial errors or
omissions contained herein.
HP assumes no responsibility for the use or reliability of its software on equipment that is not
furnished by HP.
This document contains proprietary information that is protected by copyright. No part of this
document may be photocopied, reproduced, or translated to another language without the prior
written consent of HP.
Hewlett-Packard Company
P.O. Box 4010
Cupertino, CA 95015-4010
USA
Copyright © 2007 Hewlett-Packard Development Company, L.P.
This product incorporates copyright protection technology that is protected by U.S. patents and
other intellectual property rights. Use of this copyright protection technology must be authorized by
Macrovision, and is intended for home and other limited pay-per-view viewing uses only unless
otherwise authorized by Macrovision. Reverse engineering or disassembly is prohibited.
Microsoft and Windows Vista are U.S. registered trademarks of Microsoft Corporation.
The Windows logo and Windows Vista are trademarks or registered trademarks of Microsoft
Corporation in the United States and/or other countries/regions.
HP supports lawful use of technology and does not endorse or encourage the use of our products
for purposes other than those permitted by copyright law.
The information in this document is subject to change without notice.
Page 3

Table of Contents iii
Table of Contents
Getting Started Updated Information .......................................................1
Using Antivirus Software .........................................................................................1
Using Blu-ray Disc Drives.........................................................................................3
Using DVD Play to Play DVDs, Videos, High-Definition DVDs, and Blu-ray DVDs............. 4
Creating Movies by Using muvee autoProducer 6.0....................................................6
Using muvee autoProducer ......................................................................................8
Using the Device-Storage and Cable-Routing Features...............................................22
Connecting Speakers or a Microphone ................................................................... 22
Configuring Speaker and Sound Options ................................................................ 31
Page 4

iv Getting Started Updated Information
Page 5

Getting Started Updated Information 1
Getting Started Updated Information
This document contains updated information that replaces the information in the Getting
Started guide. Keep this with your other computer documentation.
Using Antivirus Software
When you use the computer for e-mail, network, or Internet access, you expose it to
computer viruses. Computer viruses can disable or damage your operating system,
software programs, or computer utilities.
Antivirus software can detect most viruses, remove them, and, in most cases, repair any
damage that they have caused. To provide ongoing protection against newly discovered
viruses, you must keep antivirus software up to date.
Norton Internet Security, an antivirus software program, is preinstalled on your computer
and includes a free trial subscription of protection updates. You can enable Symantec’s
LiveUpdate™ to obtain updates automatically whenever you are online. Hewlett-Packard
strongly recommends that you protect the computer against new viruses beyond the trial
period by purchasing an extended update service.
Configuring and registering Norton Internet
Security software
When you first set up the computer, Norton Internet Security helps you to configure and
register your copy of Norton Internet Security.
Ensure that you set up Norton Internet Security before you start using the Internet.
1 Double-click the Norton Internet Security icon on the desktop.
Or
Click the Windows Start Button
®
on the taskbar, All Programs,
Norton Internet Security, and then click Norton Internet Security.
2 Click Next, and follow any onscreen instructions.
For information about using and updating the Norton Internet Security software, open
Norton Internet Security, and then click Help under Quick Links.
Page 6

2 Getting Started Updated Information
Manually running a scan
To select and run a scan:
1 Double-click the Norton Internet Security icon on the desktop.
2 Click the Norton Internet Security tab.
3 Click the Tasks & Scans bar.
4 Click Run a Scan.
5 Select Run Full System Scan to scan your entire hard disk drives for viruses and
security risks. Depending on the number of files on your computer, this will take
several minutes.
6 When the scan is complete, click Finish.
Setting a Full System scan time
To change the time for a Norton Internet Security Full System scan:
1 Double-click the Norton Internet Security icon on the desktop.
2 Click the Norton Internet Security tab.
3 Click the Tasks & Scans bar.
4 Click Configure a Scan.
5 Click Schedule Full System Scan.
6 Set the frequency and time that you want the scan to run.
7 When you are done, click OK.
Setting up a Custom Scan time
To create a custom scan for specific files, folders, and drives:
1 Double-click the Norton Internet Security icon on the desktop.
2 Click the Norton Internet Security tab.
3 Click the Tasks & Scans bar.
4 Click Configure a Scan.
5 Click Manage Custom Scans.
NOTE: If the computer is in sleep mode, the Norton Internet Security program does not
perform a scheduled antivirus scan.
NOTE: Performing an antivirus scan during a scheduled Windows Media Center
recording can result in a failed TV recording. Recording a TV program requires a TV tuner,
which is included with select models only.
Page 7

Getting Started Updated Information 3
6 Click Create Custom Scan, and then Next.
7 Click Add Folders or Add Files. Place a check mark next to the files and folders
that you want to scan, and then click Add.
8 Type a name for your customized scan, and then click Finish.
9 Click Schedule next to the customized scan that you just created.
10 Click New.
11 Set the frequency and time that you want the scan to run.
12 When you are done, click OK.
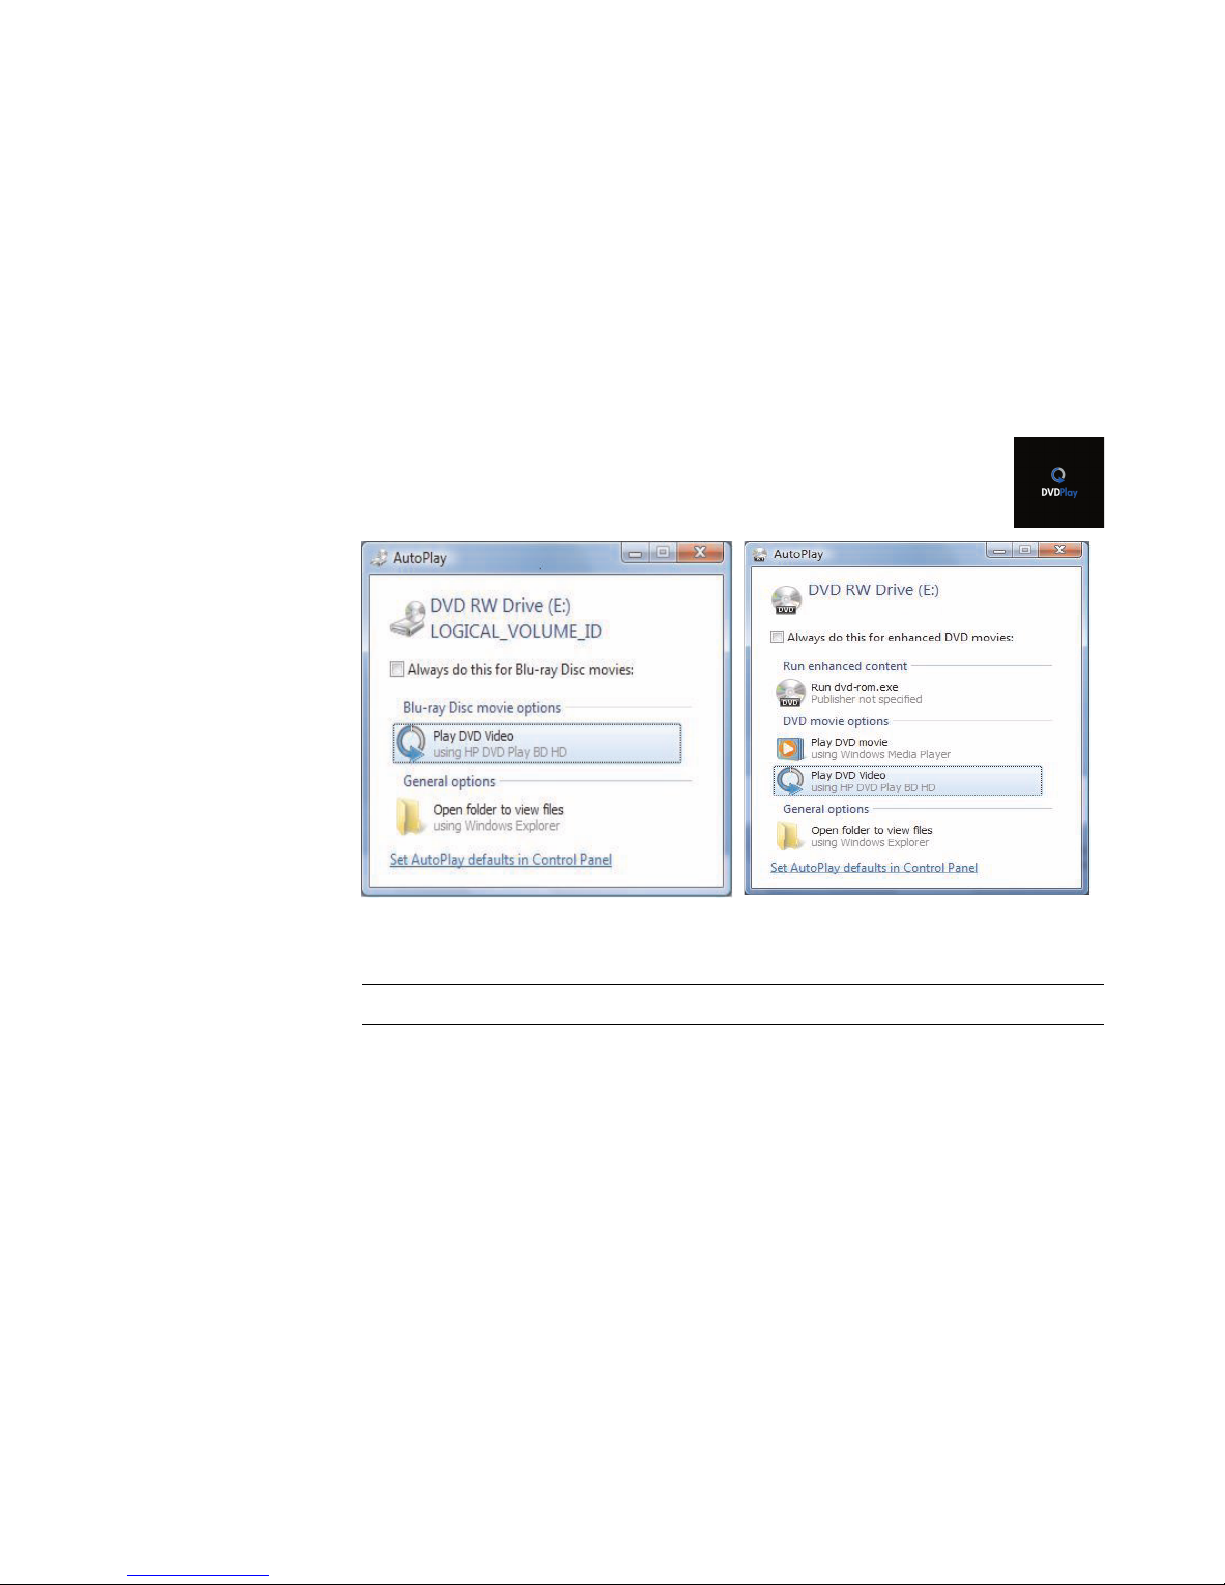
Using Blu-ray Disc Drives
If your computer came with a Blu-ray (BR) disc drive, there are three programs that are
designed specifically for use with this drive:
DVD Play plays Blu-ray, High-Definition (HD) DVD, and regular commercial DVD discs.
PowerProducer is a video editing program for creating Blu-ray or DVD discs.
PowerToGo is a Blu-ray disc recording (burning) program for different types of data
storage, such as video, music, pictures, and other data. This program enables you to
record data to Blu-ray, HD DVD, and other recordable DVD discs.
To access these programs:
1 Click the Windows Start Button on the taskbar.
2 Click All Programs.
3 Click DVD Play (or DVD Play HD, DVD Play BD HD), PowerProducer, or
PowerToGo.
NOTE: If the computer is in sleep mode, the Norton Internet Security program does not
perform a scheduled antivirus scan.
NOTE: Performing an antivirus scan during a scheduled Windows Media Center
recording can result in a failed TV recording. Recording a TV program requires a TV tuner,
which is included with select models only.
NOTE: The AACS key that DVD Play uses must be updated every seventeen months in
order for it to play DVD titles. For more information about playing your video clips, click
the ? (Help) button in the DVD Play control bar.
Page 8
4 Getting Started Updated Information
Using DVD Play to Play DVDs, Videos,
High-Definition DVDs, and Blu-ray DVDs
Depending on the type of DVD drive included with your computer, you can play DVDs, HD
DVDs, or Blu-ray discs. The front of the drive is labeled with the type of discs the DVD drive
can play.
To play a DVD, you must have a DVD drive.
1 Insert the DVD into your DVD drive.
The default DVD program opens. If the DVD wizard window opens,
choose the program that you want to use from the list. You may have to
scroll down the window to see all available programs.
2 Use the controls in the DVD program to play the DVD.
NOTE: To use the DVD Play controls, you must use the mouse.
Page 9

Getting Started Updated Information 5
Using Windows Media Center to Play DVDs
1 Click the Windows Start Button on the taskbar.
2 Click Windows Media Center to open Windows Media Center.
3 Scroll to TV+ Movies, and then click HP DVD Play.
4 Use the mouse to operate the media controls to control the movie.
5 To play the DVD in full-screen mode, double-click anywhere in the DVD Play window.
Blu-ray Drive Quick Reference Table
Optical drive can: Blu-ray DVD+RW/+R
Read CDs, CD-Rs, and CD-RWs. Yes
Read DVDs. Yes
Read data on CDs. Yes
Play music. Yes
Record data or music to discs for
storage or backup.
Yes
View DVD movies. Yes
Record DVD movies. Yes
Play games. Yes
Create LightScribe labels. No
Page 10

6 Getting Started Updated Information
Creating Movies by Using muvee autoProducer 6.0
(Select models only)
Creating personalized and professional-looking video movies is simple with
muvee autoProducer, a software program installed on your computer. The
6.0 version of muvee autoProducer includes features such as video capture
and disc recording.
Basic steps for making a movie
The basic steps for producing a movie with muvee autoProducer are:
1 Capture digital video: Capture live or recorded video to your hard disk drive
directly from a compatible digital video (DV) camera.
2 Add videos and pictures: Select video and still image (picture) files from your
computer folders. You can easily add videos and still images to your movie
production.
You can use the following video and picture file types in your movie project:
File
Extension
File Type
.dv-avi Digital Video
.avi Audio Video Interleaved
.mpeg-1 Motion Picture Experts Group video playback
.mpeg-2 MPEG for DVD video playback
.MP4 MPEG for high-quality video format (Web streaming, wireless
devices, and so on)
.mov QuickTime Movie
.wmv Windows Media AV file (movie video)
.asf Windows Media file (Advanced Streaming Format)
.jpg, .jpeg Joint Photographic Experts Group, still image
.gif Graphics Interchange Format, still image
.png Portable Network Graphics, still image
.tif Tagged Image File Format, still image
.bmp Bitmap, still image
NOTE: If you upgrade muvee autoProducer, you can use the DivX video format. See
“Upgrading muvee autoProducer” on page 21.
Page 11

Getting Started Updated Information 7
3 Add music: Select music files on your computer to add to your movie soundtrack.
You can use the following music file types in your movie project:
4 Select a style: Apply a movie style editing template for different effects and picture
transitions in your movie.
5 Add captions: Personalize your movie with an opening title and closing credits.
6 Make the movie: Automatically analyze the videos, pictures, music, movie style,
and captions that you added to your project, and save your project to your computer
hard disk drive before recording it to disc.
7 Modify the movie: Make final changes to the movie before saving it.
8 Burn to disc: You can record the movie to DVD, VCD, or SVCD.
The following sections provide detailed instructions for each of these steps.
File Extension File Type
.aac Advanced Audio Coding
.mp3 MPEG Layer 3
.m4a MPEG-4 Audio layer (unprotected AAC)
.wav Windows Audio
.wma Windows Media Audio
Page 12
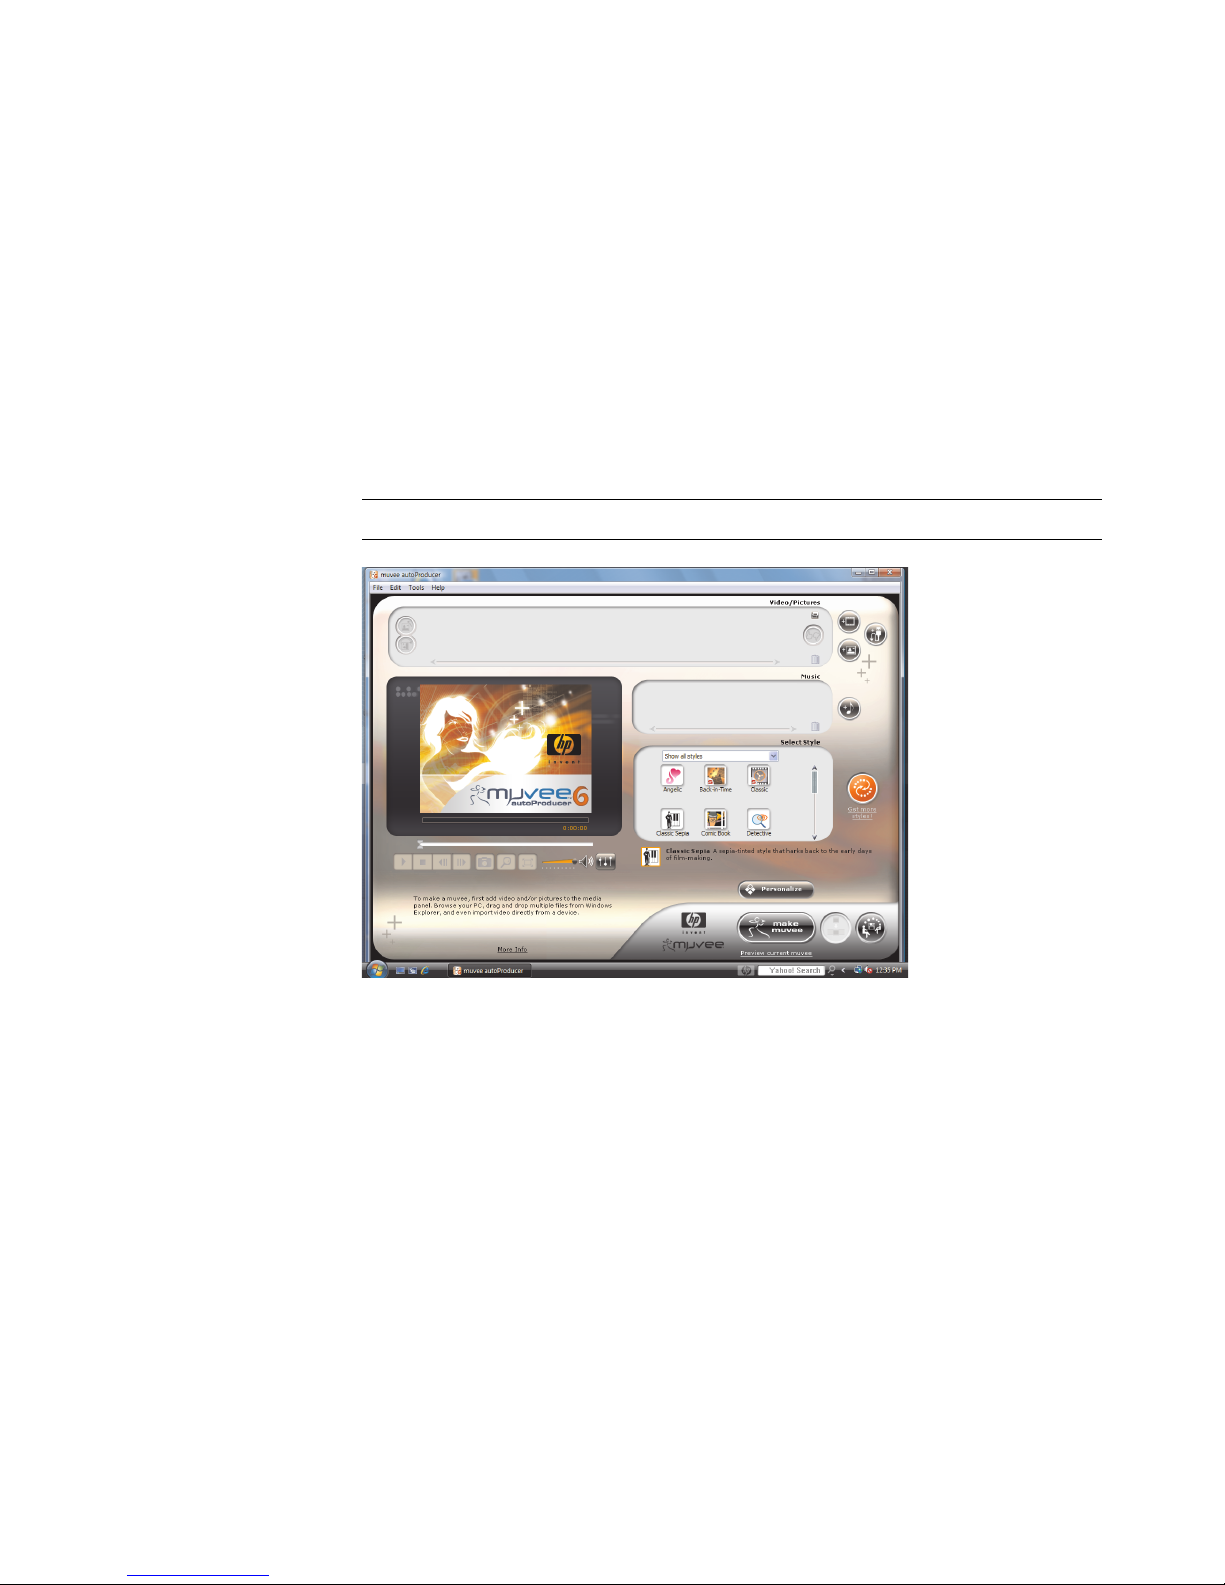
8 Getting Started Updated Information
Using muvee autoProducer
Getting started
To open muvee autoProducer (select models only):
1 Click the Windows Start Button on the taskbar.
2 Click All Programs, muvee autoProducer, Home movies made easy!, and
then click Launch muvee autoProducer 6 to open muvee autoProducer.
3 On the File menu, select either New Project to start a new project, or
Open Project to open an existing project.
NOTE: By default, muvee autoProducer opens ready to start a new project.
Page 13
Getting Started Updated Information 9
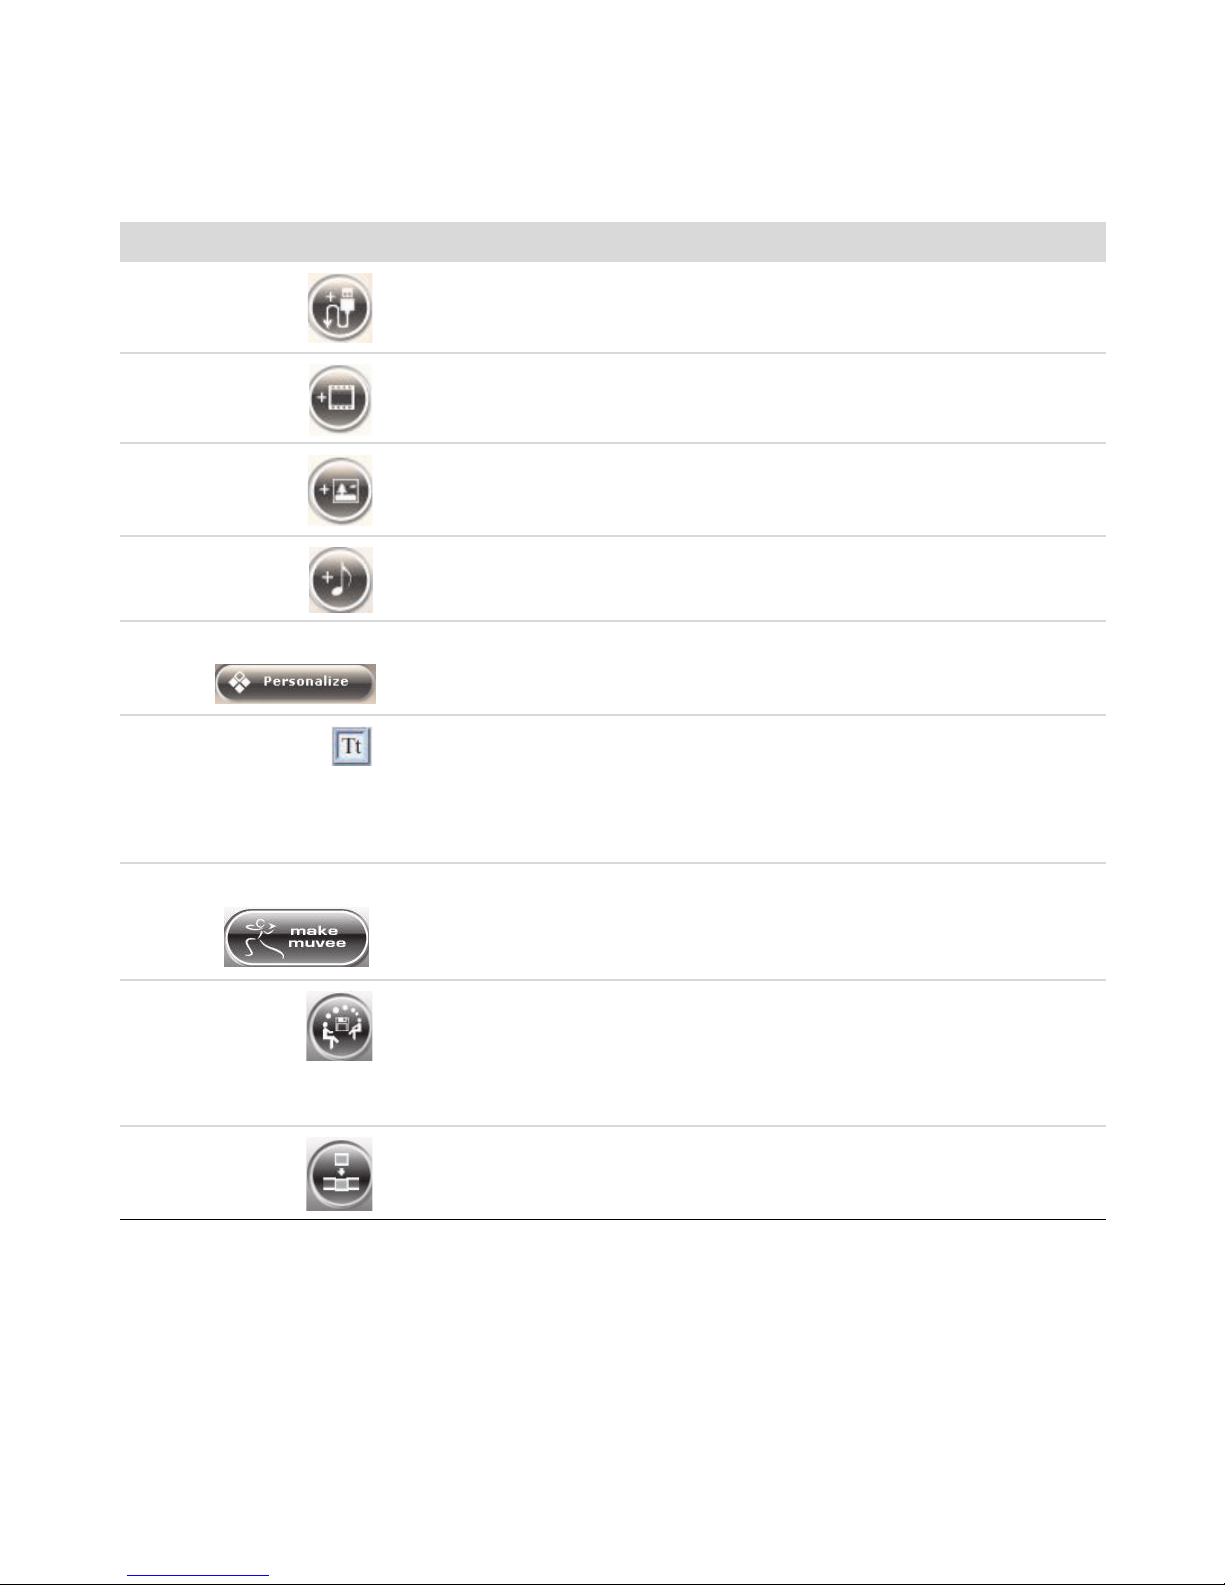
4 Select one of the buttons:
Button Enables you to: See
Get Video from
Camera
Open the muvee Video Capture window to
capture (copy) live or recorded video.
“Capturing video from a
digital video camera” on
page 10.
Add Video Open the Add Video window to add existing
video files to your project.
“Adding videos” on page 11.
Add Pictures Open the Add Pictures window to add existing
still-image files to your project.
“Adding pictures” on
page 13.
Add Music Open the Add Music window to add existing
music files to your project.
“Adding music” on page 14.
Personalize Open the muvee Personalize Settings window
to adjust audio and video production settings
for your movie.
“Changing the settings” on
page 15.
Title/Credits Open the muvee Title and Credits window to
enter an opening title and closing credits to
your movie.
NOTE: You must open the Personalize window
to access the Title/Credits button.
“Changing the settings” on
page 15.
Make muvee Open the Make muvee window to create and
preview the movie automatically.
“Making the movie” on
page 16.
Save and share
your muvee
Open the Listed muvee Files window to save
the finished movie to your computer hard disk
drive, or to record the finished movie to a disc.
“Saving the movie
project” on page 19.
“Recording the movie
project to disc” on
page 20.
Tweak muvee Make quick final changes to your movie before
saving it.
“Modifying the movie” on
page 17.
Page 14

10 Getting Started Updated Information
Capturing video from a digital video camera
You can use muvee autoProducer to capture (copy) digital video files to your hard disk
drive in either of the following ways:
Live (known as camera mode), by using a compatible digital video (DV) camera. See
“Capturing live video from a DV camera” on page 10.
Recorded (known as VCR mode), by using a recorded tape in your DV camera. See
“Capturing recorded video from a DV camera” on page 11.
Captured video files are automatically added to your movie project. To remove a file
from your movie project, select it in the list of captured video files, and then click the
trash can icon.
When capturing video, it is important to be aware of the amount of available free space
on your computer hard disk drive. Capturing video can use a large amount of disk space.
The amount of free disk space is displayed in the Capture Video window while you are
capturing video.
Capturing live video from a DV camera
Capturing live video in camera mode enables you to create a video file without even
having a tape in the camera.
To capture live video to your hard disk drive by using muvee autoProducer:
1 Connect your DV camera to the FireWire
®
(IEEE 1394) port on your computer.
2 Turn on the camera and set it to VCR mode. Refer to the instructions in the
manufacturer’s documentation.
3 Click the Import video/pictures from a device button.
4 Select From My Camcorder.
5 Browse to your camera, and then click Open. Your video appears in the
Video/Pictures area.
6 Click Import Now to start capturing the live image directly to your hard disk drive.
7 Click Filename to specify a file name for the captured video file.
8 Click Done to add a captured video file automatically to your movie project.
Capturing pictures from a DV camera
To transfer pictures to your hard disk drive by using muvee autoProducer:
1 Connect your DV camera to the FireWire (IEEE 1394) port on your computer.
2 Turn on the camera. Refer to the instructions in the manufacturer’s documentation.
3 Click the Import video/pictures from a device button.
4 Select From My Camera/Device.
5 Under Import my pictures/video, select your camera in the drop-down list.
6 Click Media Screen.
Page 15

Getting Started Updated Information 11
7 Click Browse to select a place to save your files, and then click OK.
8 Click Filename to specify a file name for the captured video file.
9 Click Done to add the captured video file automatically to your movie project.
Capturing recorded video from a DV camera
For best results when using muvee autoProducer, capture only video footage that you are
most interested in using in your movie project.
To capture recorded video to your hard disk drive:
1 Connect your DV camera to the FireWire (IEEE 1394) port on your computer.
2 Turn on the camera and set it to VCR mode. Refer to the instructions in the
manufacturer’s documentation.
3 Click the Import Video/Pictures from a device button.
4 Select From My Camcorder.
5 Click the Play button to start viewing the video.
6 Click Start Capture when you see the start of the video footage that you want to use
in your movie project.
7 Click Stop Capture to stop capturing.
8 Repeat steps 5 and 6 to capture additional sections of video footage.
9 Click Capture Folder to specify a folder for the captured video file.
10 Click Filename to specify a file name for the captured video file.
11 Click Done to automatically add the captured video files to your movie project.
Adding videos
To add video files to your movie project:
1 Click the Add video button in the Video/Pictures area. The Add Video
window opens.
2 Browse the folders on your hard disk drive to select existing video files for
your movie:
Add up to three video files.
Select multiple video files by pressing and holding the Ctrl key on your keyboard
while you select the files.
3 Adjust the order of the video files by dragging and dropping the files.
NOTE: To remove a clip from the project, select it, and then click the trash can icon.
Page 16

12 Getting Started Updated Information
4 You can use the magicMoments feature in muvee autoProducer to mark specific scenes
in a video clip that you want to include in, or leave out of, your final movie:
a Select a video file in the Select Video/Pictures window, and then click the
magicMoments button. The magicMoments window opens.
b Click the Play button to start viewing the video.
c Use the magicMoment controls to mark the video scenes to include and exclude:
Click and hold down the green thumbs-up button to mark scenes that must
be included in the movie.
Click and hold down the red thumbs-down button to mark scenes that
must be left out of the movie.
Click and hold down the gray thumb button to unmark one second of a
selected scene.
Click and hold down the arrow buttons to navigate backward and forward
through the video footage.
Video footage left unmarked is still analyzed when you make the movie, and you
can decide at that time whether to include it in the final version of the movie.
For best results when using the magicMoment feature:
Keep each magicMoment to less than 10 seconds.
Keep the total duration of magicMoments to less than 50 percent of the
duration of your movie. It is recommended that you select only a few scenes.
d When you are done marking scenes, click OK. The window closes. Note that the
video clip is marked on the lower-left side.
NOTE: Press the Shift key on the keyboard, and then click the scene to undo
scenes that were marked with the thumbs-up or thumbs-down buttons.
Page 17

Getting Started Updated Information 13
Adding pictures
To add still-image picture files to your movie project:
1 Click the Add pictures button in the Video/Pictures area. The Add Pictures
window opens.
2 Browse the folders on your hard disk drive to select existing still-image files
for your movie:
Add up to 50 picture files.
Select multiple picture files by pressing and holding the Ctrl key on your keyboard
while you select the files.
Click Open to add pictures to your Video/Pictures area.
3 Adjust the order of the picture files by dragging and dropping them.
4 Click the Rotate Image Clockwise button to rotate a picture.
5 You can use the magicSpot feature in muvee autoProducer to control the pan
and zoom motion that is applied to your picture:
a Click the magicSpot button to open the magicSpot window.
b Click the Manual button to display two overlapping frames over your
picture.
c Move the frames around to set the start and end points for motion. The arrow in
the frames shows the direction of motion.
d When you are done, click OK.
NOTE: To remove a picture from the project, select it, and then click the
trash can icon.
Page 18

14 Getting Started Updated Information
Adding music
To add music files to your movie project as a soundtrack:
1 Click the Add music button in the Music area. The Add Music window
opens.
2 Browse the folders on your hard disk drive to select existing music files for
your movie:
Add up to three music files.
Select multiple music files by pressing and holding the Ctrl key on your keyboard
while selecting the files.
Click Open to add the music files to your Music area.
3 Adjust the order of the music files by dragging and dropping the files.
Selecting the style
The muvee autoProducer program comes with a set of style templates for setting the pace,
scene transition effects, and caption fonts. The style that you use also affects how
muvee autoProducer combines the video, picture, and music files in your movie project to
produce the final movie.
For example, using the Back-in-Time style results in a movie that is in a scratchy sepia to
black-and-white format.
To select a style, simply click it in the list. A sample of the style is displayed in the Select
Style window.
NOTE: To remove music from the project, select it, and then click the
trash can icon.
Page 19

Getting Started Updated Information 15
Changing the settings
To adjust the audio and video project settings for your movie:
1 Click the Personalize button. The Personalize window opens.
2 Click the Duration tab to set preferences for the length of your video production.
Click one of the following settings:
Fit to music: The produced version may reuse or drop some video and pictures.
This option automatically selects material from your video and pictures to fit the
total duration of your music track(s).
Best fit for videos and pictures: The produced version may repeat or trim
music. This option uses as much of your material as possible.
User Defined: Use this option to select the duration for each picture (2, 3, 4, 5,
or 6 seconds).
3 Click the Video/Pictures tab to set preferences for the video and still images
(pictures). Click one of the following settings:
Style default: Select this style to sequence still images and video clips.
Keep shots in sequence: Select this style to use the sequence of still images
and video clips as they appear in the Add Video/Pictures area.
Shuffle settings: Select this style to determine the frequency of sequencing still
images and video clips by moving the slider bar.
Place a check in the Interleave pictures check box to blend still images
with video clips at intervals.
Place a check in the Use every picture once check box to prevent pictures
from being dropped.
4 Click the Audio tab to set the sound preferences. Click one of the following settings:
Use every music track: Select this style to use the sequence of sound files in
the Add Music window.
Seamlessly transition between multiple music tracks: Select this style to
automatically remove silence between music tracks.
Sound check: Select this style to automatically adjust audio playback volume to
the same level.
5 Click the Superstyle tab to customize the style that you selected in the main muvee
autoProducer window. You can select the following settings:
Response to music
Cutting rate
Film color
IMPORTANT: Each time that you make a change to a movie project, you must click the
make muvee button again to add that change to your movie.
Page 20

16 Getting Started Updated Information
6 Click the Title tab to type in your movie title.
Select the animation style of your title.
Choose the background color or image style. Click the Use image button to
browse for an image that you want to use with your title.
Type in your title. Select Use Font, and then click the Use Font button to open
the Font window. Select a font, and then click OK.
7 Click the Credits tab to type in your movie credits.
Select the animation style of your credits.
Choose the background color or image style. Click the Use image button to
browse for an image that you want to use with your credits.
Type your credits. Select Use Font and then click the Use Font button to open
the Font window. Select your font, and then click OK.
8 When you are done adjusting the settings for your movie project, click OK.
Or
Click Cancel to undo any settings.
Making the movie
After you have added at least one video or picture file to your movie project, you can have
muvee autoProducer make the movie.
The muvee autoProducer program makes a movie by combining the video, picture, and
music files that you have selected, along with the style of movie, to produce a professionallooking movie in just a few steps.
1 Click the make muvee button.
2 Click OK as required.
3 After making a movie, you can preview it in the muvee autoProducer Preview window.
Use the controls in the Preview window to play, pause, and stop the movie preview.
You can revise and preview the movie as often as you want, to experiment with
different styles and with the content of the movie.
IMPORTANT: Each time that you make a change to a movie project, you must click
the make muvee button again to add that change to your movie.
Page 21

Getting Started Updated Information 17
Previewing the movie
After you have made the movie, you can preview how it looks and sounds, and take
snapshots of frames in the movie.
1 Click the Start Playback button. The movie starts playing.
2 Use the Stop and Previous Frame/Next Frame buttons to navigate
through the movie.
3 Click the Take a Snapshot button to save the current frame as a picture file
(.jpeg, .bmp, or .gif format).
4 Click the Go to the source of the segment button to open the
magicSpot window. For more information about using magicMoments,
see “Adding videos” on page 11.
5 Click the Full-screen preview button to view the movie in the
full-screen mode.
6 Click the Audio mix button to adjust sound levels for your movie.
Modifying the movie
After you have created the movie, muvee autoProducer enables you to make some quick
final changes to your project before you save it. You can also have muvee autoProducer
replace pictures or videos with other similar or contrasting ones. Alternatively, you can
manually choose your replacement shots.
To modify a movie:
1 Click the tweak muvee button. The Tweak muvee window opens.
2 Click the Start Playback button. The movie starts playing.
3 Click the Pause Playback button to stop the movie at any time.
4 You can also click on the seek bar or drag the slider to move to a particular point in
the movie.
Page 22

18 Getting Started Updated Information
5 Use the controls in the Tweak muvee window to modify the movie project:
Click the Auto-replace with similar button to automatically
replace a picture or video segment with another similar picture
or video segment.
Click the Auto-replace with different button to automatically
replace a picture or video segment with a completely different
picture or video segment.
Click the Manually replace the selected segment button
to replace a picture or video segment with a picture or video
segment of your choice.
Click the Start recording voiceover button to record your
voice-over content. When you are finished recording, click the
Stop recording voiceover button.
You can click the Remove voiceover button to delete voice
from a segment of your movie.
Click the Undo or Redo button as needed.
6 When you are done modifying the movie project, click OK to save your
changes and close the Tweak muvee window.
Or
To close the Tweak muvee window without saving your changes, click Cancel.
7 Click the make muvee button to save the changes to your movie.
NOTE: In the Tweak muvee window, you can replace a video segment only with
another video segment from the original footage; likewise you can replace pictures
only with other pictures. You cannot expand the duration of the selected clip or the
replacement clip.
Page 23

Getting Started Updated Information 19
Saving the movie project
After you are satisfied with the look of your movie project, you are ready to save the movie
as a file on your hard disk drive:
1 Click the muveeShare button. The Listed muvee Files window opens,
with all your muvee files listed.
2 Remove the check mark next to any muvee files that you do not want
to save.
3 Edit the muvee files before saving them:
Click the Rename button to change the name of the selected muvee file.
Click the Move up or Move down button to change the
order of the selected muvee file in the list.
Press the Select all or Deselect all button to save all
muvee files or to save none of them.
Click the trash can icon to delete the selected file.
4 The TV System area shows the current TV format (NTSC or PAL). To change the format,
click the name of the current format, and then select the correct format in the window
that opens.
5 Click Save Now. The muveeShare window opens.
6 Choose where you want to save the movie (disc, e-mail, Web streaming, PC, or
Mobile Device) by clicking one of the icons at the top of the window, then select
your settings.
7 When you are done, click Close.
Or
Click Open output to see where your files are saved.
Or
Click Play muvees.
8 When you are done, click Close.
Page 24

20 Getting Started Updated Information
Recording the movie project to disc
To create a DVD, VCD, or SVCD disc of your movie project:
1 Click the muveeShare button. The Listed muvee files window opens with
all your muvee files listed.
2 Remove the check mark next to any muvee files that you do not want
to save.
3 Edit the muvee files before saving them:
Click the Rename button to change the name of the selected muvee file.
Click the Move up or Move down button to change the
order of the selected muvee file in the list.
Click the Select all or Deselect all button to save all
muvee files or to save none of the muvee files.
Click the trash can icon to delete the selected file.
4 Click the disc icon to create copies of all of the picture and video files used to
create the muvee file.
5 The TV System area shows the current TV format (NTSC or PAL). To change the
format, click the name of the current format, and then select the correct format in the
window that opens.
6 Under Disc title, type a title for your disc.
7 Select the disc menu theme in the drop-down list. You can preview the different themes
in the window.
8 Select the CD or DVD burner drive in the drop-down list.
9 Click Burn Now.
10 Select the type of video disc that you want to create: DVD, VCD, or SVCD. The
window shows the disc capacity, disc capacity used, and available disc space.
11 If you want to create more than one disc of the same muvee file:
a Click a number next to Number of copies, and then click OK.
b Select the number of copies to record, and then click OK.
12 Insert a disc into your DVD recording drive.
13 Click Burn Now to start recording your movie to disc.
Or
To save the current settings for future use, click Burn Later.
14 When the recording is complete, click OK.
15 Click Close.
NOTE: For best disc quality, it is recommended that you not perform other computer
tasks while your movie is being recorded to disc.
Page 25

Getting Started Updated Information 21
Upgrading muvee autoProducer
You can purchase an upgraded version of muvee autoProducer. The upgraded version
enables you to use unlimited video clips, audio clips, and still images in your movie
project. It also includes support for DivX file types, so that you can import or create
DivX-format movies. (Purchasing DivX videos from DivX services may require a
subscription.)
To see muvee autoProducer offers for HP customers:
1 At the top of the muvee autoProducer window, click Help.
2 Click Check for updates. The program accesses the Internet and displays muvee
autoProducer offers.
Supported muvee autoProducer output file types
The supported muvee autoProducer file types are:
File Extension File Type
.dv-avi Digital Video
.avi Audio Video Interleaved
.mpeg-1 Motion Picture Experts Group video playback
.mpeg-2 MPEG for DVD video playback
.wmv Windows Media AV file (movie video)
Page 26

22 Getting Started Updated Information
Using the Device-Storage and Cable-Routing
Features
Some models of HP computers include device-storage and cable-routing features on the top
of the computer.
1 Use the rubber base on the top of the computer to secure and store your devices, such
as digital cameras, portable music players with docking stations, and small printers.
2 Thread the cables of these devices through the slots on the cable-routing feature to
keep them organized while they are attached to the back of the computer.
3 Close the cable-routing cover.
Connecting Speakers or a Microphone
Speakers are included with the monitor (select models only), or they are sold separately.
For details about connecting stereo speakers to the computer, see the setup poster.
If your computer has multichannel audio speaker capacity (select models only), you can
connect four channels for four-speaker output, or six channels for 5.1 speaker output.
Connect your speaker system to the computer, and then configure the audio software for
sound output.
NOTE: For product information on the HP Support Web site, go to:
http://www.hp.com/support
NOTE: Speakers may be passive (no power button or power cord) or active (power button
or power cord). Your computer supports only active (powered) speaker systems; the
speaker system must have its own power cord.
A stereo speaker set is a left-right, two-channel speaker system. A multichannel audio
speaker system is a system with more than two channels, and it may include a subwoofer.
For example, 5.1 channels, referred to as six-speaker mode, uses two front speakers
(left-right), two rear speakers (left-right), a center speaker, and a subwoofer.
Page 27

Getting Started Updated Information 23
Sound Connector Types
Your model may include one of three analog sound connector types on the back of
the computer:
Three connectors
Six connectors
Sound card
The connectors are 3.5 mm (1/8-inch) stereo mini-jacks that connect from the back of the
computer to speakers and microphones.
Your system may also have a separate Digital Out connector (select models only).
Software configuration is different for each connector type, as noted in the instructions.
Sound Connector Illustration Type
Three
connectors
Your computer model may include three
sound connectors. You can connect up to
a 5.1 audio system to the computer.
3
Six connectors Your computer model may include six
sound connectors on the back of your
computer. You can connect up to a 7.1
audio system to the computer.
6
Sound card
connector
Your computer may include a sound card.
You can connect up to a 5.1 audio system
(7.1 audio system for select models) or
digital speakers to the sound card on
the computer.
See the following
illustrations.
S
NOTE:
Type 3 has three connectors.
Type 6 has six connectors.
Type S has sound card.
OPTICAL OUT
3
2
1
OPTICAL IN
OPTICAL OUT
3
2
1
OPTICAL IN
Page 28

24 Getting Started Updated Information
When installing cables, use the sound connectors that match your computer model, as
shown in the installation procedure steps.
The following table shows the sound connectors on the back panel of computer systems.
Sound connector
DescriptionType 3 Type 6 Type S
Line Side (gray) connects to side left and right analog
speakers in an eight-speaker system (7.1).
Line C/Sub (gold) connects to front center/subwoofer
speakers in a multichannel audio configuration.
Line Rear (black) connects to rear left and right analog
speakers in a multichannel audio configuration.
Line Out (lime green) connects to front left and right
analog speakers.
Mic (pink) connects to a microphone.
(Type 3 also functions as center/subwoofer Line Out
when a multichannel audio configuration is enabled.)
Line In (light blue) connects to an analog audio device
such as a CD player for input into computer.
(Type 3 also functions as rear Line Out when a
multichannel audio configuration is enabled.)
Digital Audio Out (orange) connects to a digital
audio device with digital input (such as a home audio
receiver/amplifier) or to digital speakers
(select models only).
FlexiJack (pink) connects to analog Line In devices
or a microphone.
The FlexiJack supports two functions. You must select the
function in the Creative Console Launcher. See
“Configuring the FlexiJack connector” on page 35.
2
3
1
Page 29

Getting Started Updated Information 25
Connecting 7.1 (Seven Speakers and a
Subwoofer) Audio Speakers
(Select models only)
To connect two front speakers, two side speakers, two rear speakers, a center speaker,
and a subwoofer for eight-channel (7.1 speaker) output:
1 Turn off the computer.
2 Connect the front speaker cable to the lime green Audio Line Out connector on the
back of your computer.
FlexiJack (blue) connects to analog Line In devices or
a microphone.
The FlexiJack supports two functions. You must select the
function in the Creative Console Launcher. See
“Configuring the FlexiJack connector” on page 35.
Optical In (optical SPDIF input) connects recording
devices, such as a mini disc recorder, digital audio tape
recorder, or external hard disk recorder.
Optical Out (optical SPDIF output) connects playback
devices such as a mini disc player, digital audio tape
player, or DVD player.
NOTE:
Type 3 has three connectors.
Type 6 has six connectors.
Type S has sound card.
Sound connector (continued)
DescriptionType 3 Type 6 Type S
OPTICAL IN
OPTICAL OUT
Page 30

26 Getting Started Updated Information
3 Connect the rear speaker cable to the black Audio Line Rear connector on the back of
your computer.
4 For type 6 connectors only, connect the side speaker cable to the gray Audio Line Side
connector on the back of your computer.
5 Connect the center speaker and subwoofer speaker cable to the gold Audio
Line C/ Sub connector on the back of your computer.
6 Connect the cables to the audio system.
7 Connect the front, rear, side, and center speakers to the subwoofer. Refer to the
speaker documentation.
8 Turn on the computer.
9 Connect the speaker system to the power.
10 Turn on the speaker system.
11 After the speakers are connected to the computer, configure the audio software for
sound output for your computer model.
Type 6 — multistreaming: See “Configuring Multistreaming Audio” on page 40.
NOTE: Always turn on the computer before the speaker system.
Page 31

Getting Started Updated Information 27
The following diagram shows a typical 7.1 audio installation:
Y adapter cables
Most home receiver/amplifiers have RCA-type input connectors. You must connect Y
adapter cables between your computer and your receiver/amplifier. Y adapter cables
have one 3.5 mm (1/8-inch) stereo mini-jack on one end, and two RCA connectors on the
other. These cables are purchased separately.
The number of Y adapter cables that you need to connect to your home stereo system
depends on the number of speakers that you install:
2/2.1 speaker system: One Y adapter cable
4/4.1 speaker system: Two Y adapter cables
Color Description
1 Lime Green Front audio input
2 Black Rear audio input
3 Orange Center/subwoofer audio input
4 Gray Side audio input (not shown)
Page 32

28 Getting Started Updated Information
6/5.1 speaker system: Three Y adapter cables
8/7.1 speaker system: Four Y adapter cables
Connecting a home stereo system to a computer requires audio cables that are long
enough to reach from the computer to the stereo. You also must purchase Y adapter or
mini-extension cables.
7.1 home audio installation
The following diagram shows a typical advanced home theater system with an
eight-channel 8/7.1 speaker installation that requires multichannel inputs on a receiver/
amplifier.
This is only a suggested configuration. Your system may be different.
Computer to 7.1 multichannel audio system connection
A Computer back-panel connectors (type 3, type 6, or type S)
B Y adapter cables
C Receiver/amplifier (audio input jacks)
D Subwoofer
E Center speaker
F Front speakers (left and right)
G Rear speakers (left and right)
NOTE: Y adapter and mini-extension cables are purchased separately.
OUT
IN
Surr. Back
Front
Center
Sub
A
B
C
D
E
F
G
C
Page 33

Getting Started Updated Information 29
7.1 home audio installation procedure
To connect an eight-channel (7.1 speaker) home audio system to the computer:
1 Turn off the computer.
2 Turn off the receiver/amplifier.
3 Connect the front stereo mini-jack end of a Y adapter cable into the lime green Audio
Line Out connector on the back of your computer.
Connect the left and right ends of the Y adapter cable into the front left (L) and right (R)
inputs on the back of the receiver/amplifier.
4 If you have rear speakers, connect the rear stereo mini-jack end of a Y adapter cable
into the Audio Line In (blue) or the Rear Speaker Out (black) connector on the back of
your computer.
Connect the left and right ends of the Y adapter cable into the rear left (L) and right (R)
inputs on the back of the receiver/amplifier.
5 If you have a center/subwoofer speaker, connect the stereo mini-jack of a Y adapter
cable into the microphone (pink) connector or the center speaker/subwoofer (gold)
connector on the back of your computer.
Connect the left and right ends of the Y adapter cable into the center/subwoofer
inputs on the back of the receiver/amplifier (8/7.1 or higher-channel system).
Connect the Y adapter cable to the subwoofer connector on the back of the receiver,
even if you are not using a subwoofer.
NOTE:
Type 3 has three connectors.
Type 6 has six connectors.
Type S has sound card.
NOTE: Receiver/amplifier input connectors may be labeled Surround, 7.1 Channel
inputs, 6 Channel inputs, CD, DVD, or DVD In.
3
6
S
3
6
S
3
6
S
Page 34

30 Getting Started Updated Information
6 Turn on the receiver/amplifier.
7 Select the receiver/amplifier input that the Y adapter cables are connected to.
8 Turn on the computer.
9 After the audio system is connected to the computer, configure the audio software for
sound output for your computer model. See “Configuring Speaker and Sound
Options” on page 31.
Type 3: See “Configuring Speakers with Realtek HD Audio Manager” on
page 36.
Type 6: See “Configuring Speakers with Realtek HD Audio Manager” on
page 36.
Type S (sound card): See “Using the Creative Sound Blaster X-Fi Sound Card” on
page 34.
Connecting Digital Audio
(Select models only)
If you have a sound card and you are connecting your home stereo AV receiver via digital
out, connect the 3.5 mm (1/8 in) stereo plug to the Digital Out connector on the sound
card. Connect the red RCA stereo plug on the 3.5 mm (1/8 in) Y adapter cable to the AV
receiver’s digital input connector on the AV Receiver. If the red RCA stereo plug does not
work, try the white stereo plug. One of the connectors is not used.
To connect digital audio, your computer must include a Digital Audio Out connector on
either the sound card or the back panel. You must connect multichannel speaker outputs if
you connect the digital output.
To connect digital audio speakers:
1 Turn off the computer.
2 Connect the orange Digital Audio Out connector on the back panel of your
computer to the digital input (S/PDIF) on the digital speakers or a digital
audio system.
3 Turn on the computer.
4 Connect the speaker system to the power.
5 Turn on the speaker system.
NOTE: Always turn on the computer before the speaker system.
Page 35

Getting Started Updated Information 31
6 After the speakers are connected to the computer, configure the audio software for
sound output for your computer model. See “Configuring Speaker and Sound
Options” on page 31.
Audio card with digital output and type 3 connectors: See “Configuring Speakers
with Realtek HD Audio Manager” on page 36. Follow the instructions to enable
digital audio output.
Audio card with digital output and type 6 connectors: See “Configuring Speakers
with Realtek HD Audio Manager” on page 36. By default, digital audio output is
already enabled.
Sound card: See “Using the Creative Sound Blaster X-Fi Sound Card” on
page 34. Follow the instructions to enable digital audio output.
Configuring Speaker and Sound Options
Speakers are included with the monitor (select models only), or they are sold separately.
For details about connecting stereo speakers to the computer, see the setup poster. For
details about connecting multichannel speakers, see “Connecting Speakers or a
Microphone” on page 22.
If your computer has multichannel audio speaker capacity (select models only), you can
connect four channels for four-speaker output, or six channels for 5.1 speaker output.
Your model may include one of three analog sound connector types on the back of
the computer:
Three connectors (Realtek Audio)
Six connectors (Realtek Audio)
Sound card (Creative SoundBlaster)
Your system may also have a separate Digital Out connector (select models only).
For sound connector types, and to connect your speaker system to the computer, see
“Connecting Speakers or a Microphone” on page 22, and then configure the audio
software for sound output as described in this section.
NOTE: Speakers may be passive (no power button or power cord) or active (power button
or power cord). Your computer supports only active (powered) speaker systems; the
speaker system must have its own power cord.
A stereo speaker set is a left-right, two-channel speaker system. A multichannel audio
speaker system is a system with more than two channels, and it may include a subwoofer.
For example, 5.1 channels, referred to as six-speaker mode, uses two front speakers (leftright), two rear speakers (left-right), a center speaker, and a subwoofer.
Page 36

32 Getting Started Updated Information
Adjusting speaker volume
Use the Volume icon on the taskbar to set speaker volume. Then, you can adjust the volume
by using:
The Volume knob or buttons on the keyboard (select models only).
The Volume knob on the speakers (select models only).
There are two ways to use the Volume icon:
1 Click the orange Realtek HD Audio Manager Volume icon on the
taskbar.
2 Select a tab, such as Digital Output and then adjust the volume by clicking the
slider and moving it.
3 When you are satisfied with the sound level, click outside the Volume window to
close it.
Or
1 Right-click the white Microsoft Volume icon on the taskbar, and then click
Open Volume Mixer. The Volume Control settings window opens.
2 Adjust the volume by clicking the slider and moving it.
3 When you are satisfied with the sound level, click the Close box (the X in the
upper-right corner) to close this window.
Page 37

Getting Started Updated Information 33
Selecting a Microphone
Your computer comes with one microphone connector on the back of the computer. Some
models have a second microphone connector on the front of the computer. Only one
microphone connector works at a time, and the back connector is ready to use unless you
have the multichannel audio speakers option. For computers with the multichannel audio
speakers option, the microphone connector on the front of the computer, if it is present, it is
ready to use.
To use a microphone connected to the front of your computer (select models only), select
the working microphone:
1 Right-click the white Microsoft Volume icon on the taskbar, and then click
Recording Devices. The Sound window opens.
2 Select the Recording tab.
3 Double-click Microphone, and select the General tab.
4 Click the microphone connector that you want to use, and then click Apply.
5 Click OK.
Adjusting Microphone Volume
To adjust the volume of the microphone:
1 Right-click the orange Realtek HD Audio Manager Volume icon on the
taskbar, and then click Audio Devices.
2 Click the Recording tab.
3 Double-click Microphone, and then click the General tab.
4 Click the microphone connector that you want to use.
5 Click the Levels tab.
6 Adjust the volume for the microphone by clicking the slider and moving it.
7 Click OK.
8 Click OK.
Configuring Audio Output
You can configure your speaker audio output by using the following software. Use the
software that applies to your computer model:
Creative Sound Blaster X-Fi Speaker Settings Configuration (sound card)
Realtek HD Audio Manager (multistreaming audio)
Windows Media Center (all systems)
NOTE: If you connect your microphone to the back of your computer, you do not need to
perform this procedure.
Page 38

34 Getting Started Updated Information
Using the Creative Sound Blaster X-Fi Sound Card
This section provides an overview of configuring and recording with the Creative Sound
Blaster X-Fi sound card (select models).
Configuring the sound card software
After you have installed and connected your speakers, follow these steps to configure
multichannel audio output for computers:
1 Click the Windows Start Button on the taskbar.
2 Point to All Programs.
3 Click Creative, SoundBlaster X-Fi, and then click Creative Console
Launcher.
4 The Entertainment Mode window opens. If a different mode displays, click the Mode
button, and then select Entertainment Mode.
5 Click the Windows Start Button, All Programs, Creative, and then Creative
Console Launcher.
6 Click the Speakers button.
7 Click Auto Detect. Creative automatically detects the type of speakers that
are connected to your system.
8 Close the window.
Now that you have configured the sound card software, you must configure audio output
for your media software program. The procedure is different for each program. Refer to
the instructions that came with the media software program.
NOTE: Three modes are available; Entertainment Mode is selected here. For information
about the other modes, see “Sound Blaster X-Fi configuration modes” on page 35.
Page 39

Getting Started Updated Information 35
Configuring the FlexiJack connector
Your audio device may have a FlexiJack connector that supports both microphone and Line
input. If so, you can change the FlexiJack mode if necessary. To do this, you must select the
function in the Creative Console Launcher after you connect the audio cable to the
FlexiJack connector on the sound card.
1 Connect your audio cable to the FlexiJack connector on the sound card.
2 Click the Windows Start Button, All Programs, Creative, and then Creative
Console Launcher.
3 Click the Jacks button.
4 Under FlexiJack Mode, select either Digital I/O or Mic-In/Line-In.
5 Close the window.
Sound Blaster X-Fi configuration modes
The Sound Blaster X-Fi sound card includes three modes: Audio Creation Mode,
Entertainment Mode, and Game Mode.
The main functions, such as speaker configuration, equalizer, and volume control, are
available in all three modes. However, each mode optimizes the sound card resources to
provide the best audio performance for different activities.
Audio Creation Mode
Optimizes the sound card for advanced recording functions.
Available features:
Recording from several audio sources
Applying studio-quality effects
Mixer settings
Equalizer settings
NOTE: If you are using the FlexiJack as your Digital In connection, and you want to
connect digital speakers as your output device, you need a special connector from
Creative.
Page 40

36 Getting Started Updated Information
Entertainment Mode
Optimizes the sound card for playing movies and music.
Available features:
Configuring speakers and headphones
Configuring surround sound, DTS, and THX
Volume, bass, and treble controls
Mixer settings
Game Mode
Optimizes the sound card for playing games.
Available features:
Volume, bass, and treble controls
Mixer settings
Configuring speakers and headphones
Configuring surround sound
More information
For more information about configuring and using the sound card, go to the Creative
Sound Blaster X-Fi documentation:
1 Click the Windows Start Button on the taskbar.
2 Point to All Programs.
3 Click Creative, SoundBlaster X-Fi, and then click Documentation.
4 Click Online Manual.
Configuring Speakers with Realtek HD Audio
Manager
After you have installed and connected your speakers, complete the following steps if your
computer model has type 6 connectors and is capable of multistreaming audio:
1 Click the Windows Start Button on the taskbar.
2 Click Control Panel.
3 Click Hardware and Sound.
4 Click Realtek HD Audio Manager. The window opens.
NOTE: You must have your speakers connected for Realtek to display the
Speakers tab.
Page 41

Getting Started Updated Information 37
5 Click the Speakers tab to open that control screen.
6 Click the Speaker Configuration tab.
7 Select your type of speakers from the drop-down menu.
8 Click OK.
The Realtek HD Audio Manager control screens
Digital Output: Enables you to select the Environment and Equalizer settings. You
can select an environment, such as Stone Room or Auditorium. Under Equalizer,
you can either click a preset button, such as Pop or Live, or manually adjust the
settings and then save them for easy selection later.
Speakers: Enables you to select the number of speakers, view whether the plugs are
analog or digital, and select the digital audio output and digital audio input devices.
Only speakers that are currently being used are displayed.
Page 42

38 Getting Started Updated Information
Microphone: Enables fine control over the recording volume and playback volume
of the microphone. Includes buttons for noise suppression and acoustic echo
cancellation.
Line In (Digital Input): Enables control over volume, playback, mute, recording,
and multistreaming audio.
Page 43

Getting Started Updated Information 39
HDMI Output: Enables you to select the Environment and Equalizer settings. You
can select an environment, such as Stone Room or Auditorium. Under Equalizer,
you can either click a preset button, such as Pop or Live, or manually adjust the
settings and then save them for easy selection later.
Configuring sound for recording with the
Realtek HD Audio Manager
The microphone connector is ready to use for recording sound. If you want to use another
connector for recording, such as the Digital Audio In connector, complete the following
steps to select it:
1 Click the Windows Start Button on the taskbar.
2 Click Control Panel.
3 Click Hardware and Sound, and then Realtek HD Audio Manager.
4 Click the Line In tab.
5 Click Digital In tab, and then select Set Default Device.
6 Click OK to close the window.
Retasking front panel audio connectors
You can retask the Line In, Mic In, Headphone, and Front Speaker Out connectors on the
front of the computer, as necessary.
1 Click the Windows Start Button on the taskbar.
2 Click Control Panel.
NOTE: You can retask the front pink, blue, and green connectors to perform other audio
functions; see “Retasking front panel audio connectors” on page 39.
Page 44

40 Getting Started Updated Information
3 Click Hardware and Sound, and then Realtek HD Audio Manager.
4 Click a front connector icon that you want to retask.
5 Place a check in the device check box you want to select, and then click OK.
You can now use the front connectors as either input or output devices.
Configuring Multistreaming Audio
The Realtek HD Audio Manager software enables you to listen to two different audio
sources on two different speaker sets.
For example, you can hear one audio source through a rear-panel speaker connection,
and a second source through a front-panel headphone or speaker connection. You must
configure multistreaming audio for your system if you want to hear two audio sources on
separate speakers.
NOTE: Only the connectors that are not dimmed are able to be retasked.
Page 45

Getting Started Updated Information 41
Audio output overview
The front-panel audio output is the green stereo headphone connector only.
The rear-panel outputs are the speaker connectors that can be set up as multichannel out
from stereo (2.0) to 7.1 (select models only) configurations. Refer to your user
documentation for information about setting up powered speakers or your AV receiver.
Audio input overview
You can select two of the following audio sources to play through front-panel headphone
and rear-panel speaker connectors:
1 From an externally connected device source, such as:
A microphone with cable connected to Mic In (pink)
An MP3 player with cable connected to Line In (blue)
2 From an internal source inside, or directly connected to, the computer, audio files may
reside on: hard disk drives, DVDs, CDs, USB drives, HP Personal Media Drives, or
any connected device. Play internal media files through programs such as:
Microsoft Windows Media Player
Other installed media player software
When to use multi-streaming audio
You may multistream two audio sources as described in the following typical examples:
1 For online gaming:
You hear 5.1 game sound on your AV receiver or powered speakers
You also hear gaming conversation on your headset.
See “Example 1: For online gaming” on page 42.
2 For digital home entertainment:
You hear DVD sound on your living room TV/display or AV receiver from the
rear-speaker connections.
You also hear sound on your computer or powered speakers that are connected to
the front-panel green headphone jack, from one of the following external
computer audio sources:
a Front-panel Line In
b Internal source residing on a hard disk drive, DVD, CD, USB drive, or other
external device
See “Example 2: For digital home entertainment” on page 42.
NOTE: Digital Audio In cannot be multistreamed.
Page 46

42 Getting Started Updated Information
Setting up multi-streaming audio
Example 1: For online gaming
To configure multistreaming audio output for online gaming with Realtek HD Audio
Manager, you must enable Voice-over-IP software (software used to converse over the
Internet). Other players hear your voice from the microphone via the Internet, and you hear
the game audio from the rear speakers.
1 Connect the audio input and output connectors as follows:
A headphone set to the front Headphone Out (green) connector
A microphone to the front Mic In (pink) connector for online conversation
A set of powered stereo 5.1 or 7.1 speakers to the rear Speaker Out connectors
for gaming sound output
2 Click the Realtek HD Audio Manager icon on the taskbar to open the
Realtek HD Audio Manager window.
3 Click the Device Advanced Settings button.
4 Select Make front and rear output devices playback two different audio
streams simultaneously.
5 Place a check in the Output Mic In/Line In to front panel check box, and
click OK.
Or
Place a check in the Output Mic In/Line In to rear panel check box, and
click OK.
Example 2: For digital home entertainment
To configure multi-streaming audio output for digital home entertainment with Realtek HD
Audio Manager:
1 Connect the audio output connectors as follows:
A headphone set or powered speakers to the front Headphone Out (green)
connector for stereo music playback
A set of powered stereo, 5.1, or 7.1 speakers to the rear Speaker Out connectors
for DVD playback sound output
2 Click the Realtek HD Audio Manager icon on the taskbar to open the
Realtek HD Audio Manager window.
3 Click the Device Advanced Settings button.
4 Select Make front and rear output devices playback two different audio
streams simultaneously.
5 Place a check in the Output Mic In/Line In to front panel check box, and then
click OK.
Or
Place a check in the Output Mic In/Line In to rear panel check box, and
click OK.
Page 47

Getting Started Updated Information 43
Configuring Audio for Windows Media Center
After you have installed, connected, and configured your speakers, follow these steps to
configure multichannel audio output for Windows Media Center:
1 Click the Windows Start Button on the taskbar.
2 Click Windows Media Center.
3 Under Task s, click settings, General, and then click Windows Media
Center Setup.
4 Click Set Up Your Speakers. The Welcome to Speaker Setup window opens.
5 Click Next.
6 Choose the speaker connection type, and then click Next.
7 Select the number of speakers, and then click Next.
8 Click Test to test your speakers.
9 Click Finish.
Using Headphones
Your computer includes a headphone connector (lime green) on the front of the
computer. The headphone connector is labeled with a headphones icon.
You can also connect headphones to the Line Out connector (lime green) on the
back of your computer.
Using a 2.1 speaker system with headphones
For select models that include a 2.1 speaker system, look for the headphone connector on
the right side of the main speaker. When headphones are plugged in, the sound to the
speakers and the subwoofer is muted.
Using a 5.1 to 7.1 speaker system with
headphones
For select models that include a 5.1 or higher speaker system, a headphones connector is
located on the right side of the control tower.
If the control tower displays HP (for headphones), the headphones are enabled, and the
sound to the speakers and the subwoofer is muted.
Press and hold the On button on the control tower for several seconds to enable sound
from the speakers.
Press the On button briefly to enable the sound from the headphones.
Page 48

44 Getting Started Updated Information
Selecting Recording Devices
(Type 6 connectors only)
To select a sound recording device:
1 Click the Windows Start Button on the taskbar.
2 Click Control Panel.
3 Click Sounds and Audio Devices (or Sounds, Speech and Audio Devices).
The Sounds and Audio Devices window opens.
4 Click the Audio tab.
5 Under Sound Recording, select a recording device, such as Realtek HD Front
Pink Jack.
6 Click OK.
7 Close the window.
Resolving Sound Issues
If you do not have sound from your speakers, try the following:
Check the volume and mute settings. See “Using Headphones” on page 43.
Use active (powered) speakers, or speakers with an amplifier.
Check the sound cable connections.
Ensure that the software program and sound software are properly configured.
Some software programs may result in low volume, even when the Volume is turned to
the maximum value. If this is the case, click the Volu me icon on the taskbar, and
increase the system volume.
Reconfigure the sound software for surround sound.
Reinstall the sound card drivers by using application reinstallation program; refer to
your Troubleshooting and Maintenance Guide that came with your computer.
 Loading...