

Page 1
Color LaserJet Enterprise M651
User Guide
M651dn
M651xhM651n
www.hp.com/support/colorljM651
Page 2

Page 3

HP Color LaserJet Enterprise M651
User Guide
Page 4

Copyright and License
© Copyright 2015 HP Development Company,
L.P.
Reproduction, adaptation, or translation
without prior written permission is prohibited,
except as allowed under the copyright laws.
The information contained herein is subject to
change without notice.
The only warranties for HP products and
services are set forth in the express warranty
statements accompanying such products and
services. Nothing herein should be construed
as constituting an additional warranty. HP shall
not be liable for technical or editorial errors or
omissions contained herein.
Edition 1, 11/2015
Trademark Credits
®
, Adobe Photoshop®, Acrobat®, and
Adobe
PostScript
®
are trademarks of Adobe Systems
Incorporated.
Apple and the Apple logo are trademarks of
Apple Computer, Inc., registered in the U.S. and
other countries. iPod is a trademark of Apple
Computer, Inc. iPod is for legal or rightholderauthorized copying only. Don't steal music.
Microsoft®, Windows®, Windows® XP, and
Windows Vista® are U.S. registered trademarks
of Microsoft Corporation.
®
is a registered trademark of The Open
UNIX
Group.
Page 5

Table of contents
1 Product introduction ..................................................................................................................................... 1
Product comparison .............................................................................................................................................. 2
Product views ........................................................................................................................................................ 5
Product front view ............................................................................................................................... 5
Product back view ............................................................................................................................... 6
Interface ports ..................................................................................................................................... 7
Control-panel view .............................................................................................................................. 8
Product hardware setup and software installation ............................................................................................ 10
2 Paper trays ................................................................................................................................................. 11
Load Tray 1 .......................................................................................................................................................... 12
Load Tray 2 and the 500-sheet trays .................................................................................................................. 17
Load the 1,500-sheet high-capacity input tray .................................................................................................. 21
3 Parts, supplies, and accessories ................................................................................................................... 23
Order parts, accessories, and supplies ............................................................................................................... 24
Ordering ............................................................................................................................................. 24
Parts and supplies ............................................................................................................................. 24
Accessories ........................................................................................................................................ 25
Replace the toner cartridges ............................................................................................................................... 26
Replace the toner collection unit ........................................................................................................................ 30
4 Print ........................................................................................................................................................... 33
Print tasks (Windows) .......................................................................................................................................... 34
How to print (Windows) ..................................................................................................................... 34
Automatically print on both sides (Windows) .................................................................................. 35
Manually print on both sides (Windows) .......................................................................................... 35
Print multiple pages per sheet (Windows) ....................................................................................... 36
Select the paper type (Windows) ...................................................................................................... 36
Additional print tasks ........................................................................................................................ 37
Print tasks (Mac OS X) .......................................................................................................................................... 38
ENWW iii
Page 6

How to print (Mac OS X) ..................................................................................................................... 38
Automatically print on both sides (Mac OS X) .................................................................................. 38
Manually print on both sides (Mac OS X) .......................................................................................... 38
Print multiple pages per sheet (Mac OS X) ....................................................................................... 38
Select the paper type (Mac OS X) ...................................................................................................... 39
Additional print tasks ........................................................................................................................ 39
Store print jobs on the product to print later ...................................................................................................... 40
Create a stored job (Windows) .......................................................................................................... 40
Create a stored job (Mac OS X) .......................................................................................................... 41
Print a stored job ............................................................................................................................... 42
Delete a stored job ............................................................................................................................ 42
Mobile printing ..................................................................................................................................................... 43
HP Wireless Direct and NFC Printing ................................................................................................. 43
HP ePrint via email ............................................................................................................................ 44
HP ePrint software ............................................................................................................................ 44
AirPrint ............................................................................................................................................... 45
Print from the USB port ....................................................................................................................................... 46
Enable the USB port for printing ....................................................................................................... 46
Print USB documents ........................................................................................................................ 46
5 Manage the product ..................................................................................................................................... 47
Configure IP network settings ............................................................................................................................. 48
Printer sharing disclaimer ................................................................................................................. 48
View or change network settings ..................................................................................................... 48
Rename the product on a network ................................................................................................... 48
Manually configure IPv4 TCP/IP parameters from the control panel .............................................. 49
Manually configure IPv6 TCP/IP parameters from the control panel .............................................. 49
HP Utility for Mac OS X ......................................................................................................................................... 51
Open HP Utility .................................................................................................................................. 51
HP Utility features ............................................................................................................................. 51
HP Embedded Web Server ................................................................................................................................... 53
How to access the HP Embedded Web Server (EWS) ........................................................................ 53
HP Embedded Web Server features .................................................................................................. 53
Information tab ............................................................................................................... 54
General tab ...................................................................................................................... 54
Print tab or Copy/Print tab ............................................................................................. 55
Scan/Digital Send tab (MFP models only) ...................................................................... 56
Fax tab (MFP models only) ............................................................................................. 57
Troubleshooting tab ....................................................................................................... 57
Security tab ..................................................................................................................... 58
HP Web Services tab ....................................................................................................... 58
iv ENWW
Page 7

Networking tab ............................................................................................................... 58
Other Links list ................................................................................................................ 60
HP Web Jetadmin ................................................................................................................................................. 61
Product security features .................................................................................................................................... 62
Security statements .......................................................................................................................... 62
IP Security .......................................................................................................................................... 62
Sign in to the product ........................................................................................................................ 62
Assign a system password ................................................................................................................ 62
Encryption support: HP High Performance Secure Hard Disks ........................................................ 63
Lock the formatter ............................................................................................................................ 63
Economy settings ................................................................................................................................................ 64
Optimize speed or energy usage ...................................................................................................... 64
Set Sleep mode ................................................................................................................................. 64
Set the Sleep Schedule ...................................................................................................................... 64
Software and firmware updates ......................................................................................................................... 66
6 Solve general problems ............................................................................................................................... 67
Customer support ................................................................................................................................................ 68
Control panel help system .................................................................................................................................. 69
Restore factory-set defaults ............................................................................................................................... 70
A “Cartridge is low” or “Cartridge is very low” message displays on the product control panel ...................... 71
Change the “Very Low” settings ....................................................................................................... 71
For products with fax capability ..................................................................................... 71
Order supplies ................................................................................................................................... 72
Product does not pick up paper or misfeeds ...................................................................................................... 73
The product does not pick up paper ................................................................................................. 73
The product picks up multiple sheets of paper ................................................................................ 73
The document feeder jams, skews, or picks up multiple sheets of paper ...................................... 73
Clear jams ............................................................................................................................................................ 75
Jam locations .................................................................................................................................... 75
Auto-navigation for clearing jams .................................................................................................... 75
Experiencing frequent or recurring paper jams? .............................................................................. 75
Clear jams in Tray 1 ........................................................................................................................... 77
Clear jams in Tray 2 and the 500-sheet trays .................................................................................. 79
Clear jams in the 1,500-sheet high-capacity input tray and the lower-right door ......................... 84
Clear jams in the lower-right door .................................................................................................... 88
Clear jams in the right door and the fuser area ................................................................................ 89
Clear jams in the output bin .............................................................................................................. 92
Improve print quality ........................................................................................................................................... 93
Print from a different software program ......................................................................................... 93
Check the paper-type setting for the print job ................................................................................. 93
ENWW v
Page 8

Check the paper type setting (Windows) ....................................................................... 93
Check the paper type setting (Mac OS X) ........................................................................ 93
Check toner-cartridge status ............................................................................................................ 94
Clean the product .............................................................................................................................. 94
Print a cleaning page ...................................................................................................... 94
Visually inspect the toner cartridge .................................................................................................. 95
Check paper and the printing environment ...................................................................................... 95
Step one: Use paper that meets HP specifications ........................................................ 95
Step two: Check the environment .................................................................................. 95
Step three: Set the individual tray alignment ................................................................ 96
Calibrate the product to align the colors .......................................................................................... 96
Check other print job settings ........................................................................................................... 96
Adjust color settings (Windows) ..................................................................................... 96
Try a different print driver ................................................................................................................ 98
Solve wired network problems ........................................................................................................................... 99
Poor physical connection .................................................................................................................. 99
The computer is using the incorrect IP address for the product ...................................................... 99
The computer is unable to communicate with the product ............................................................. 99
The product is using incorrect link and duplex settings for the network ...................................... 100
New software programs might be causing compatibility problems ............................................. 100
The computer or workstation might be set up incorrectly ............................................................ 100
The product is disabled, or other network settings are incorrect ................................................. 100
Index ........................................................................................................................................................... 101
vi ENWW
Page 9

1 Product introduction
●
Product comparison
●
Product views
●
Product hardware setup and software installation
For more information:
In the US, go to
Outside the US, go to
product name, and then select Search.
HP's all-inclusive help for your product includes the following information:
●
Install and configure
●
Learn and use
●
Solve problems
●
Download software updates
●
Join support forums
●
Find warranty and regulatory information
www.hp.com/support/colorljM651.
www.hp.com/support. Select your country/region. Click Troubleshooting. Enter the
ENWW 1
Page 10

Product comparison
Model name
Model number
Paper handling Tray 1 (100-sheet capacity)
Tray 2 (500-sheet capacity)
1x500-sheet paper feeder with
2,500-sheet high-capacity feeder Optional Optional
1x500-sheet feeder Optional Optional
Postcard media tray-insert for
Automatic duplex printing
Connectivity 10/100/1000 Ethernet LAN
Easy-access USB port for printing
HP NFC and Wireless Direct
M651n
CZ255A
Optional Optional
storage cabinet
Optional Optional Optional
printing small-size paper
connection with IPv4 and IPv6
without a computer and upgrading
the firmware
Optional Optional Optional
accessory for printing from mobile
devices
M651dn
CZ256A
M651xh
CZ257A
Storage 320 GB HP High-Performance
Control-panel display and input Touchscreen control panel
Print Prints 43 pages per minute (ppm)
Easy-access USB printing (no
Mobile printing solutions
For more information about Mobile
printing solutions see:
www.hp.com/go/mobileprinting
www.hpconnected.com
www.hp.com/go/
LaserJetMobilePrinting (English
only)
www.hp.com/go/eprintsoftware
www.hp.com/go/eprintenterprise
www.google.com/cloudprint/learn
Secure Hard Disk
on A4 and 45 ppm on letter-size
paper
computer required)
●
HP ePrint via email
●
HP ePrint software
●
HP ePrint app
●
ePrint Enterprise app
●
HP ePrint Home & Biz
●
Google Cloud Print
●
AirPrint
●
Android Printing
1
www.hp.com/go/airprint
2 Chapter 1 Product introduction ENWW
Page 11

Model name
M651n
M651dn
M651xh
Model number
2
,
3
Windows XP SP3 or later, 32-bit
Supported operating systems
and 64-bit
NOTE: The software installer
does not support the 64-bit
version, but the print driver
supports it.
NOTE: Microsoft retired
mainstream support for Windows
XP in April 2009. HP will continue
to provide best-effort support for
the discontinued XP operating
system.
Windows Vista, 32-bit and 64-bit
NOTE: Windows Vista Starter is
not supported by the software
installer or the print driver.
Windows 7 SP1 or later, 32-bit and
64-bit
Windows 8, 32-bit and 64-bit
Windows 8.1, 32-bit and 64-bit
Windows 2003 Server SP2 or later,
32-bit and 64-bit
CZ255A
CZ256A
CZ257A
NOTE: The software installer
does not support the 64-bit
version, but the print driver
supports it.
NOTE: Microsoft retired
mainstream support for Windows
Server 2003 in July 2010. HP will
continue to provide best-effort
support for the discontinued
Server 2003 operating system.
Windows Server 2008, 32-bit and
64-bit
Windows Server 2008 R2, 64-bit
Windows Server 2012, 64-bit
ENWW Product comparison 3
Page 12

Model name
M651n
M651dn
M651xh
Model number
Mac OS X 10.6, OS X 10.7 Lion, OS X
10.8 Mountain Lion, and OS X 10.9
Mavericks
1
The HP ePrint Software supports the following operating systems: Windows Vista® (32-bit and 64-bit); Windows 7 SP 1 or later (32bit and 64-bit); Windows 8 (32-bit and 64-bit); Windows 8.1 (32-bit and 64-bit); and Mac OS X versions 10.6, 10.7 Lion, 10.8 Mountain
Lion, and 10.9 Mavericks.
2
The list of supported operating systems applies to the Windows PCL 6, UPD PCL 6, UPD PS, and Mac print drivers and to the in-box
software installation CD. For a current list of supported operating systems, go to
inclusive help for your product. If you are located outside the US, go to
Enter a product name or number. In the Download Options area, click Drivers, Software & Firmware.
3
The HP Software Installer CD installs the HP PCL 6 driver for Windows operating systems along with other optional software. Mac
installer software is not included on the CD. The CD provides steps to download the Mac installer software from
steps to download the Mac installer software are as follows: Go to
Drivers & Software. Enter a product name or number. In the Download Options area, click Drivers, Software & Firmware. Click the
operating system version, and then click the Download button.
NOTE: UPD PCL 5 is not supported. For additional details on client and server operating systems for the HP
UPD, go to
www.hp.com/go/upd and click the Specifications tab.
CZ255A
CZ256A
CZ257A
www.hp.com/support/colorljM651 for HP's all-
www.hp.com/support, and then click Drivers & Software.
www.hp.com. The
www.hp.com/support, select the country/region, and then click
4 Chapter 1 Product introduction ENWW
Page 13
Product views
●
Product front view
●
Product back view
●
Interface ports
●
Control-panel view
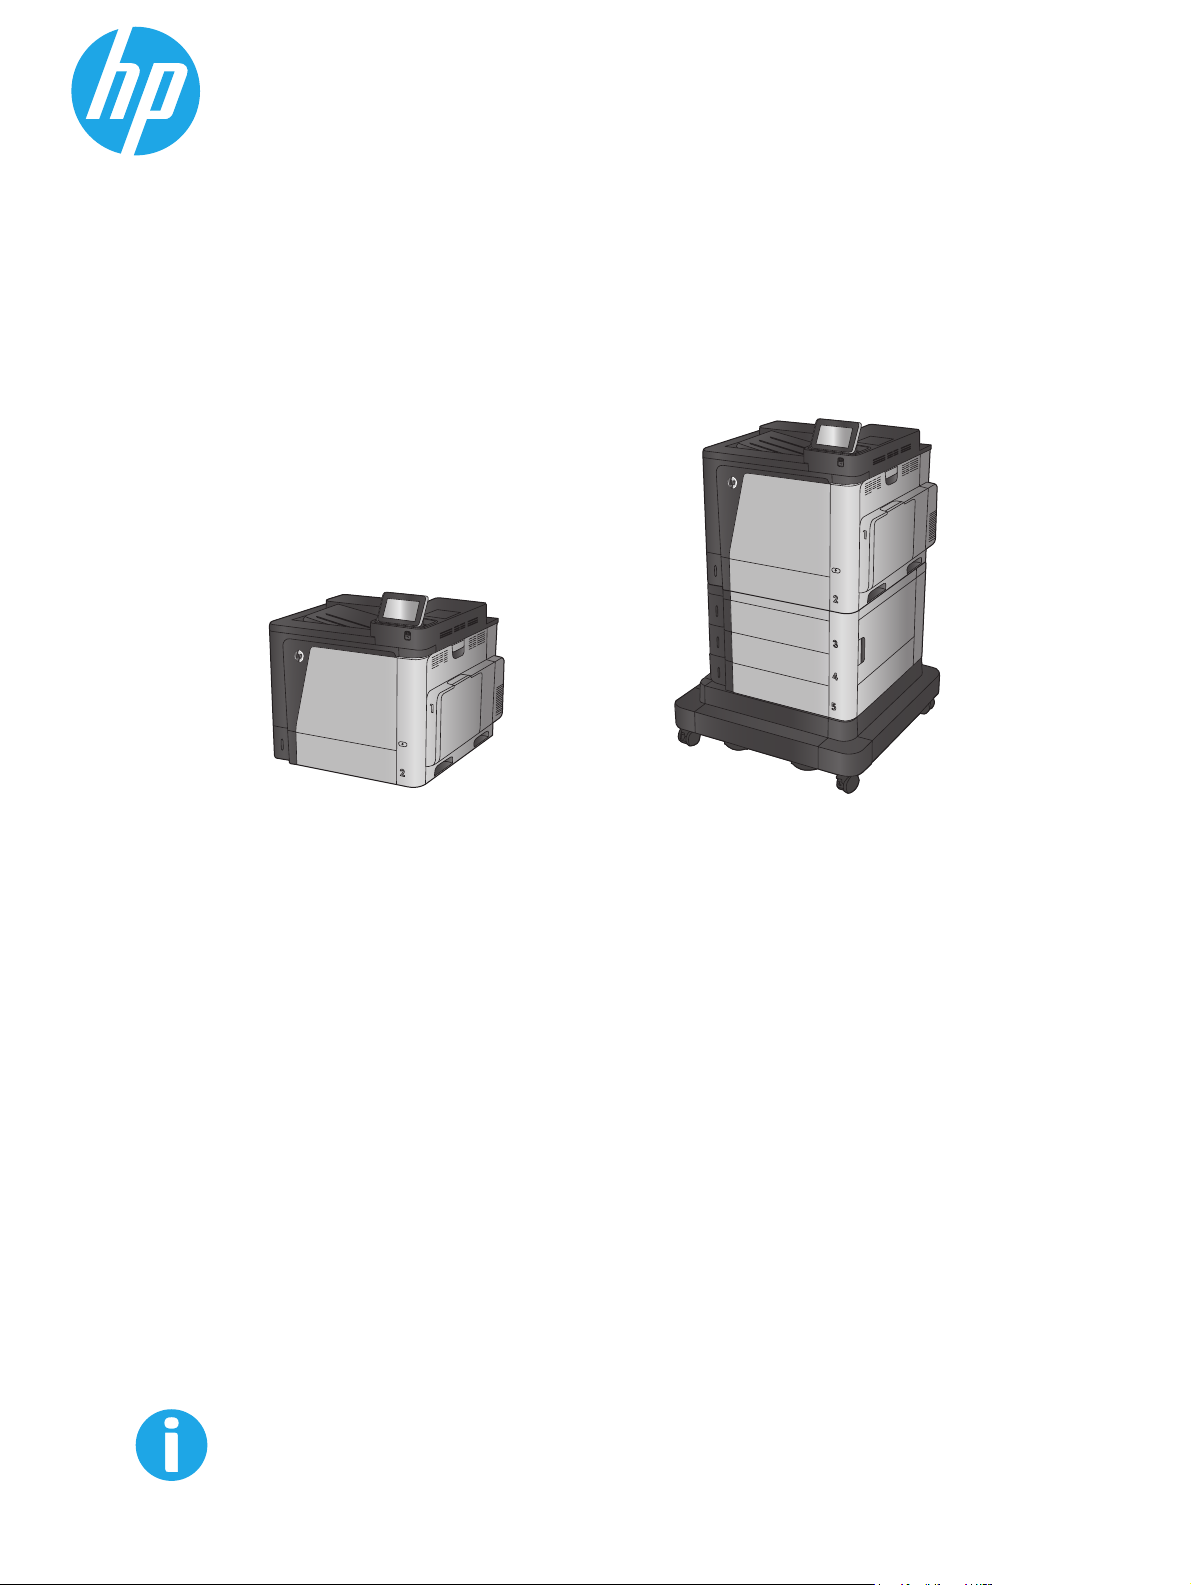
Product front view
1
2
3
4
10
11
5
6
9
7
8
M651dn
1 Output bin
2 Control panel with color touchscreen display (tilts up for easier viewing)
3 Easy-access USB port (for printing without a computer)
NOTE: An administrator must enable this port before use.
4 Hardware integration pocket (for connecting accessory and third-party devices)
5 Right-side door (access for clearing jams)
6Tray 1
12
M651xhM651n
7 On/off button
8 Model name
9Tray 2
10 Front door (access to the toner cartridges)
11 2x500-sheet trays and 1,500-sheet high-capacity input tray
12 Lower-right door (access for clearing jams)
ENWW Product views 5
Page 14
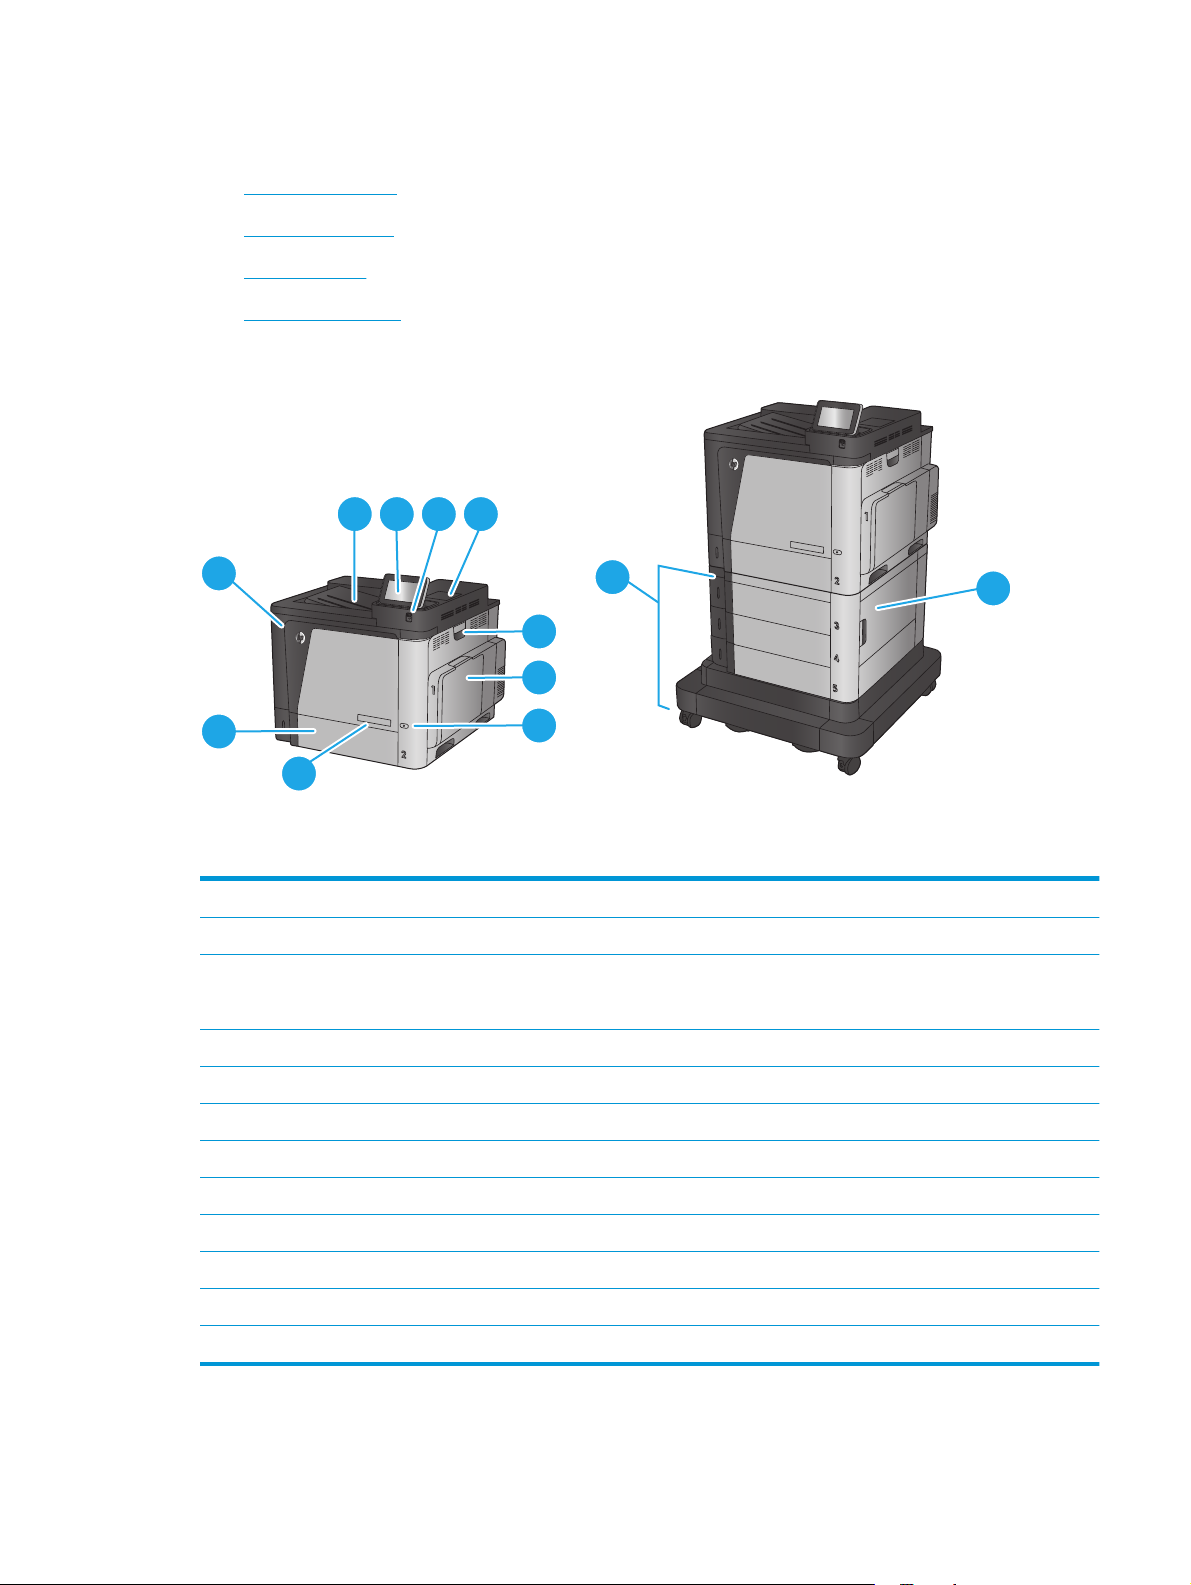
Product back view
1
2
1 Formatter (contains the interface ports)
2 Power connection
3 Model and serial number label
3
6 Chapter 1 Product introduction ENWW
Page 15
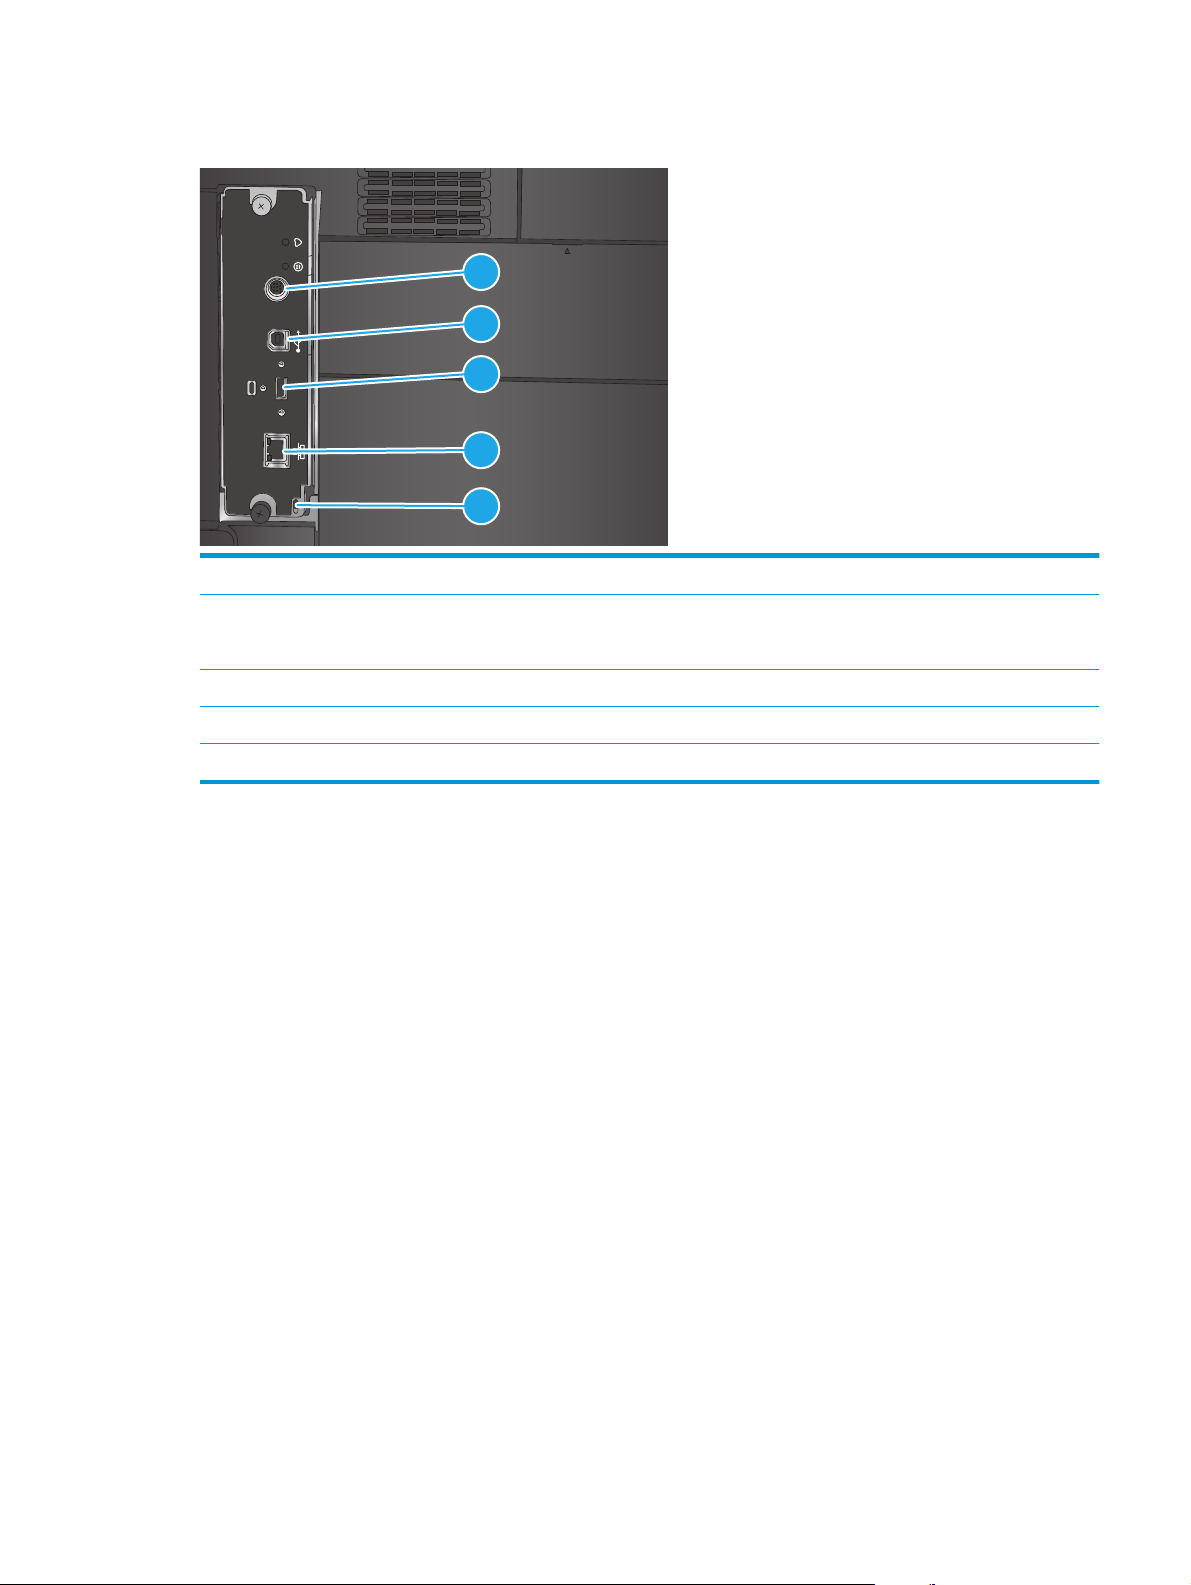
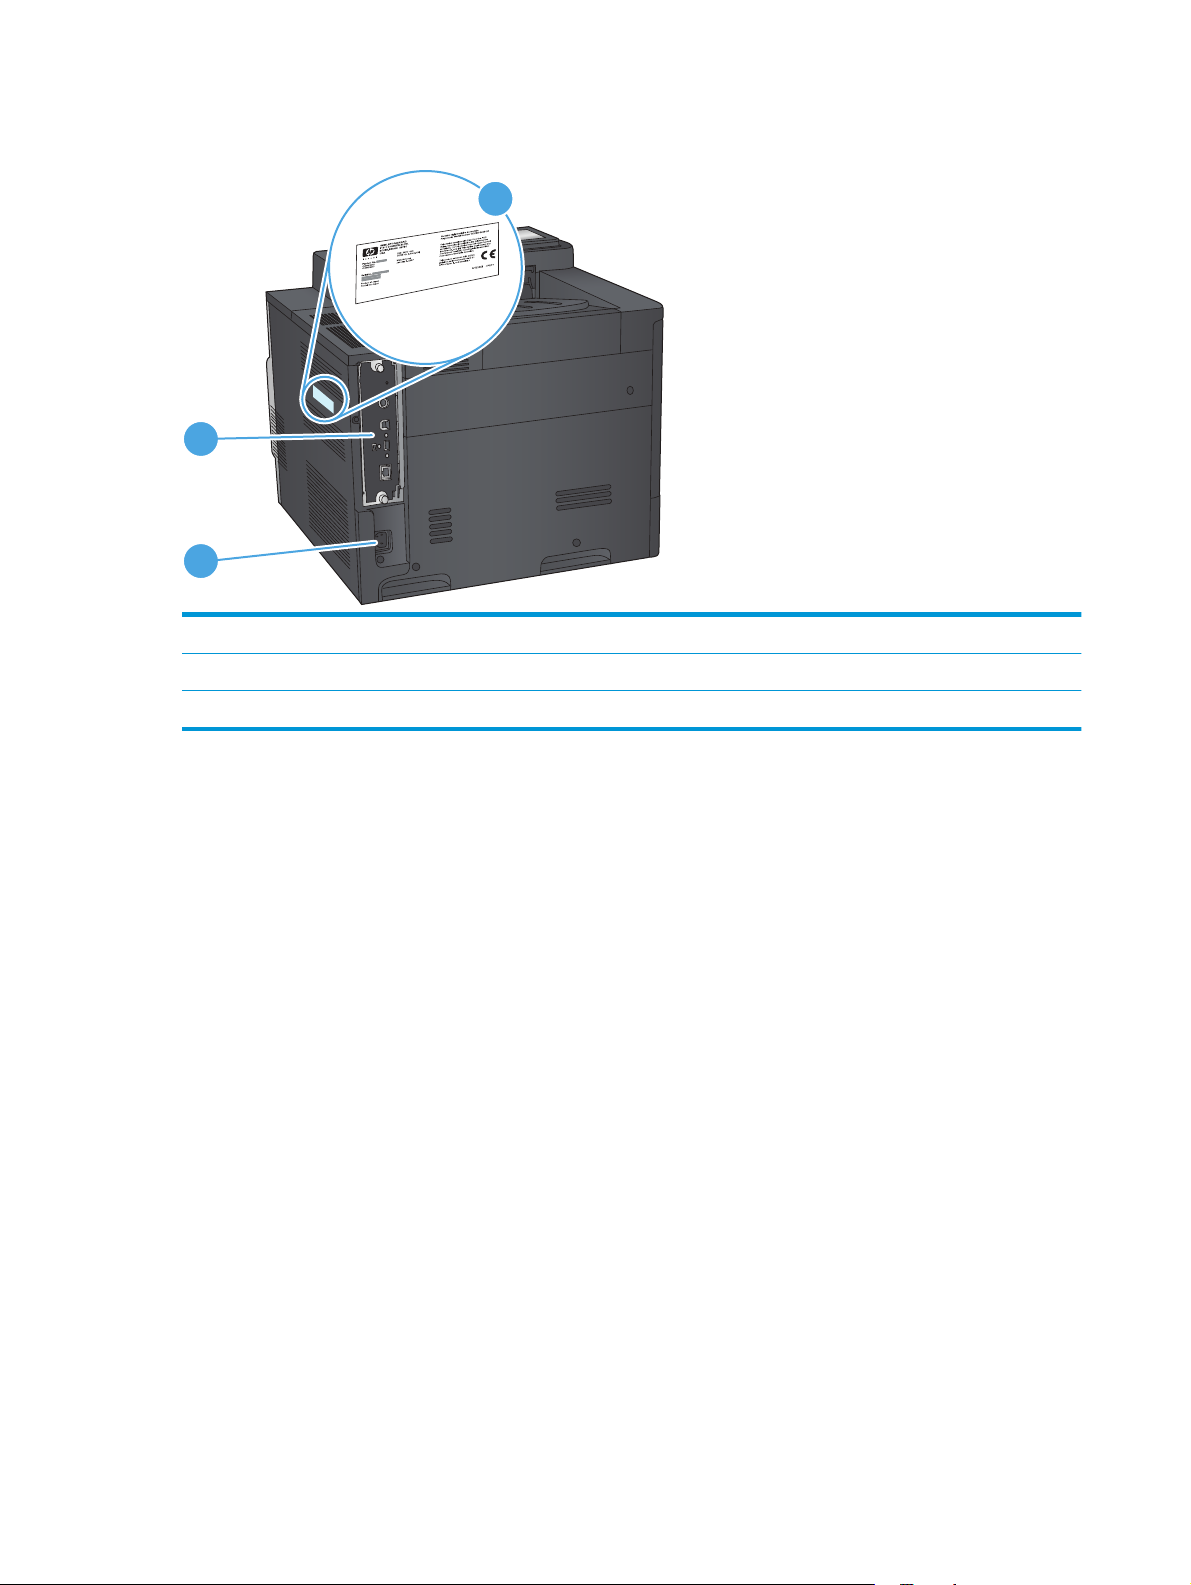
Interface ports
FIH
1
2
3
4
5
1 Foreign interface harness (for connecting third-party devices)
2 Hi-Speed USB 2.0 printing port
NOTE: For Easy-access USB printing, use the USB port near the control panel.
3 USB port for connecting external USB devices (this port might be covered)
4 Local area network (LAN) Ethernet (RJ-45) network port
5 Slot for a cable-type security lock
ENWW Product views 7
Page 16
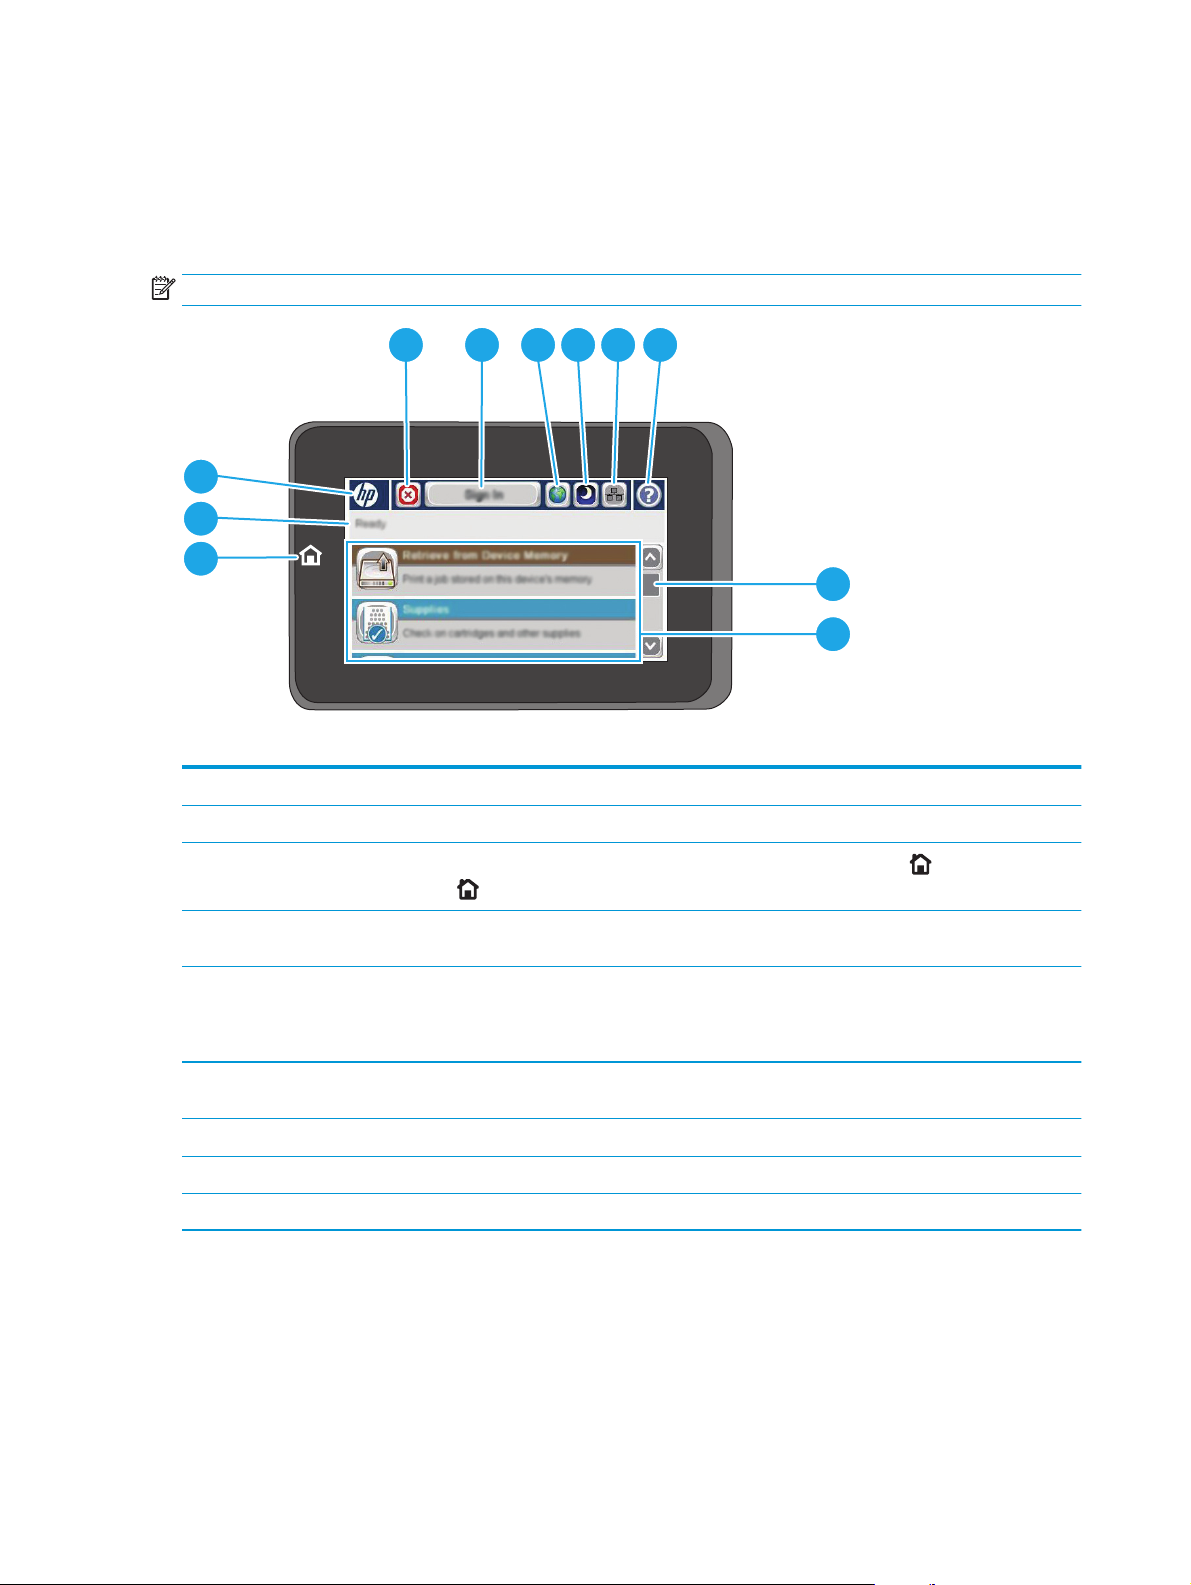
Control-panel view
The Home screen provides access to the product features and indicates the current status of the product.
Return to the Home screen at any time by touching the Home button on the left side of the product control
panel, or touch the Home button in the upper-left corner of most screens.
NOTE: The features that appear on the Home screen can vary, depending on the product configuration.
3
2
1
4 5 6 7 8 9
10
11
1 Home button and light Touch to return to the product Home screen at any time.
2 Product status The status line provides information about the overall product status.
3 HP logo or Home button
4 Stop button Touch the Stop button to pause the current job. The Job Status screen opens, and then you can
5 Sign In or Sign Out
button
6 Language Selection
button
7 Sleep button Touch the Sleep button to put the product into Sleep mode.
8 Network button Touch the Network button to find information about the network connection.
9 Help button Touch the Help button to open the embedded help system.
On any screen other than the Home screen, the HP logo changes to a Home
Home
cancel or continue the job.
Touch the Sign In button to access secured features.
Touch the Sign Out button to sign out of the product if you have signed in for access to secured
features. After you sign out, the product restores all options to the default settings.
Touch the Language Selection button to select the language for the control-panel display.
button to return to the Home screen.
button. Touch the
8 Chapter 1 Product introduction ENWW
Page 17

10 Scroll bar Touch the up or down arrows on the scroll bar to see the complete list of available features.
11 Features Depending on the product configuration, the features that appear in this area can include any of the
following items:
●
Quick Sets
●
Retrieve from USB
●
Retrieve from Device Memory
●
Job Status
●
Supplies
●
Trays
●
Administration
●
Device Maintenance
ENWW Product views 9
Page 18

Product hardware setup and software installation
For basic setup instructions, see the Hardware Installation Guide that came with the product. For additional
instructions, go to HP support on the Web.
In the US, go to
Outside the US, follow these steps:
1. Go to
2. Select your country/region.
3. Click Troubleshooting.
4. Enter the product name (HP Color LaserJet Enterprise M651), and then select Search.
Find the following support:
●
Install and configure
●
Learn and use
●
Solve problems
●
Download software updates
●
Join support forums
●
Find warranty and regulatory information
www.hp.com/support/colorljM651 for HP's all-inclusive help for your product.
www.hp.com/support.
10 Chapter 1 Product introduction ENWW
Page 19

2 Paper trays
●
Load Tray 1
●
Load Tray 2 and the 500-sheet trays
●
Load the 1,500-sheet high-capacity input tray
For more information:
In the US, go to
Outside the US, go to
product name, and then select Search.
HP's all-inclusive help for your product includes the following information:
●
Install and configure
●
Learn and use
●
Solve problems
●
Download software updates
●
Join support forums
●
Find warranty and regulatory information
www.hp.com/support/colorljM651.
www.hp.com/support. Select your country/region. Click Troubleshooting. Enter the
ENWW 11
Page 20
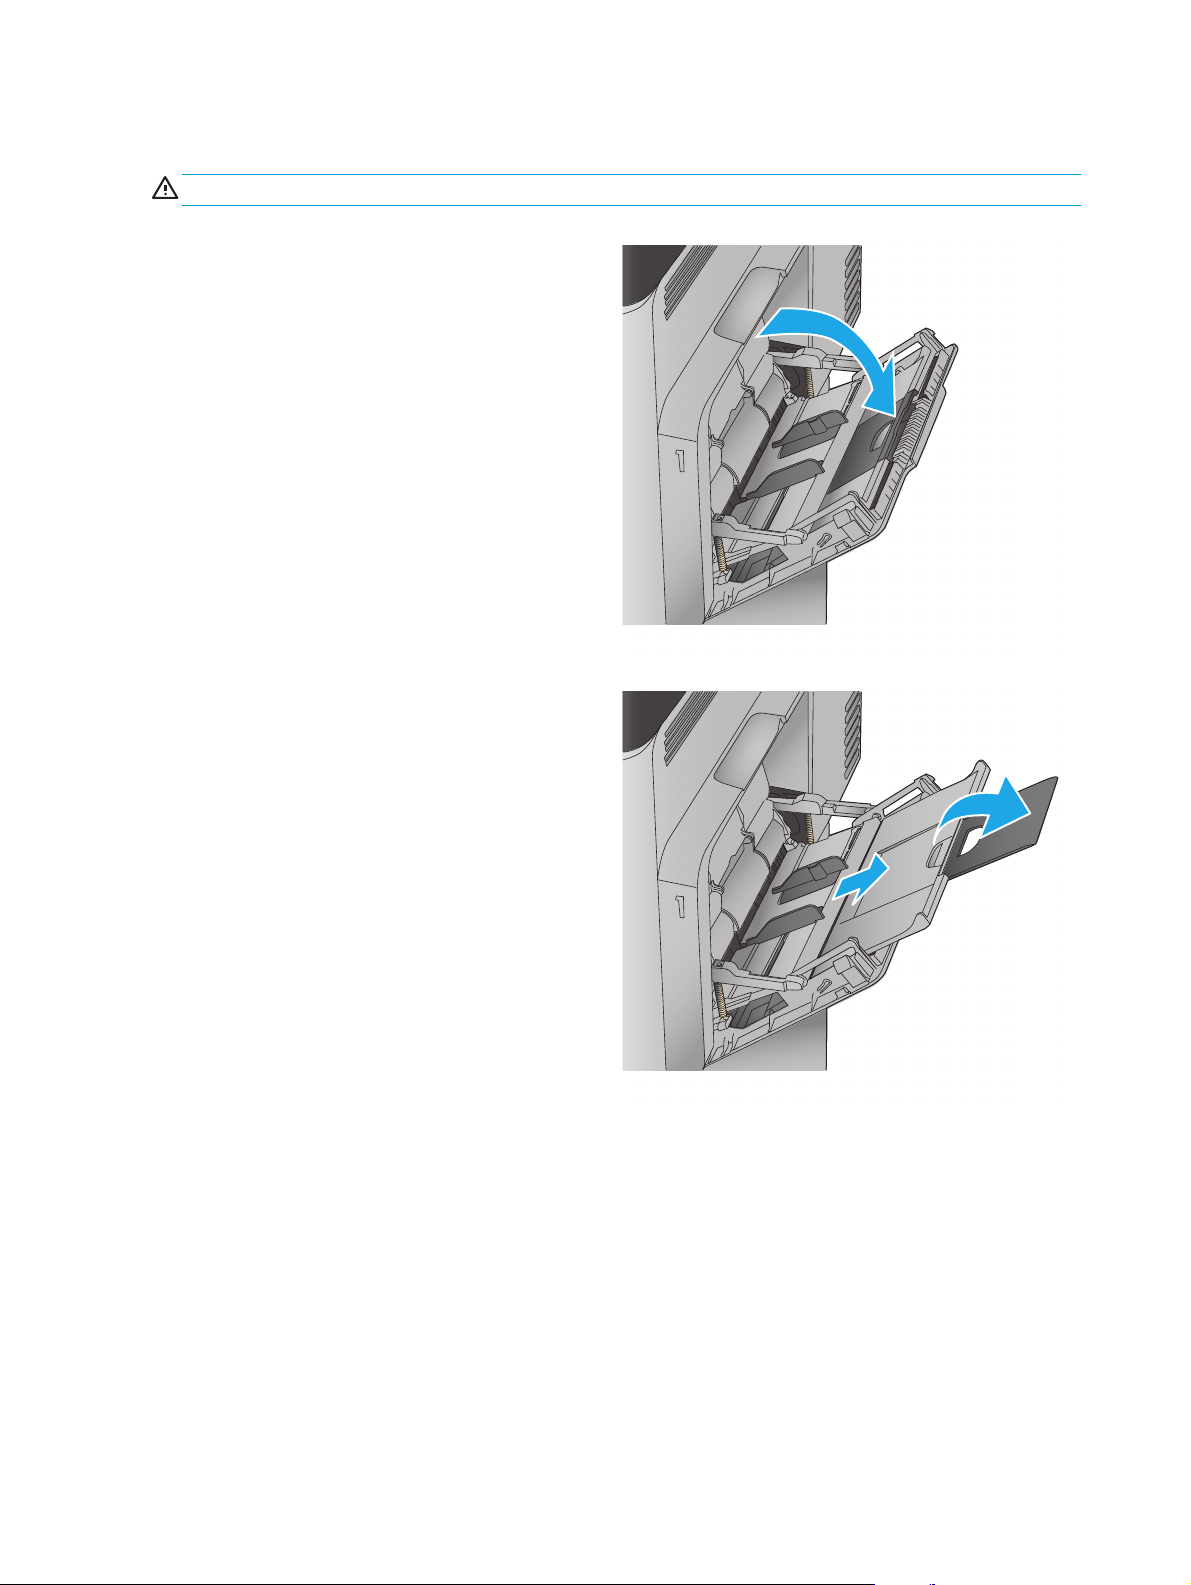
Load Tray 1
CAUTION: To avoid jams, never add or remove paper from Tray 1 during printing.
1. Open Tray 1.
2. Pull out the tray extension to support the paper.
12 Chapter 2 Paper trays ENWW
Page 21
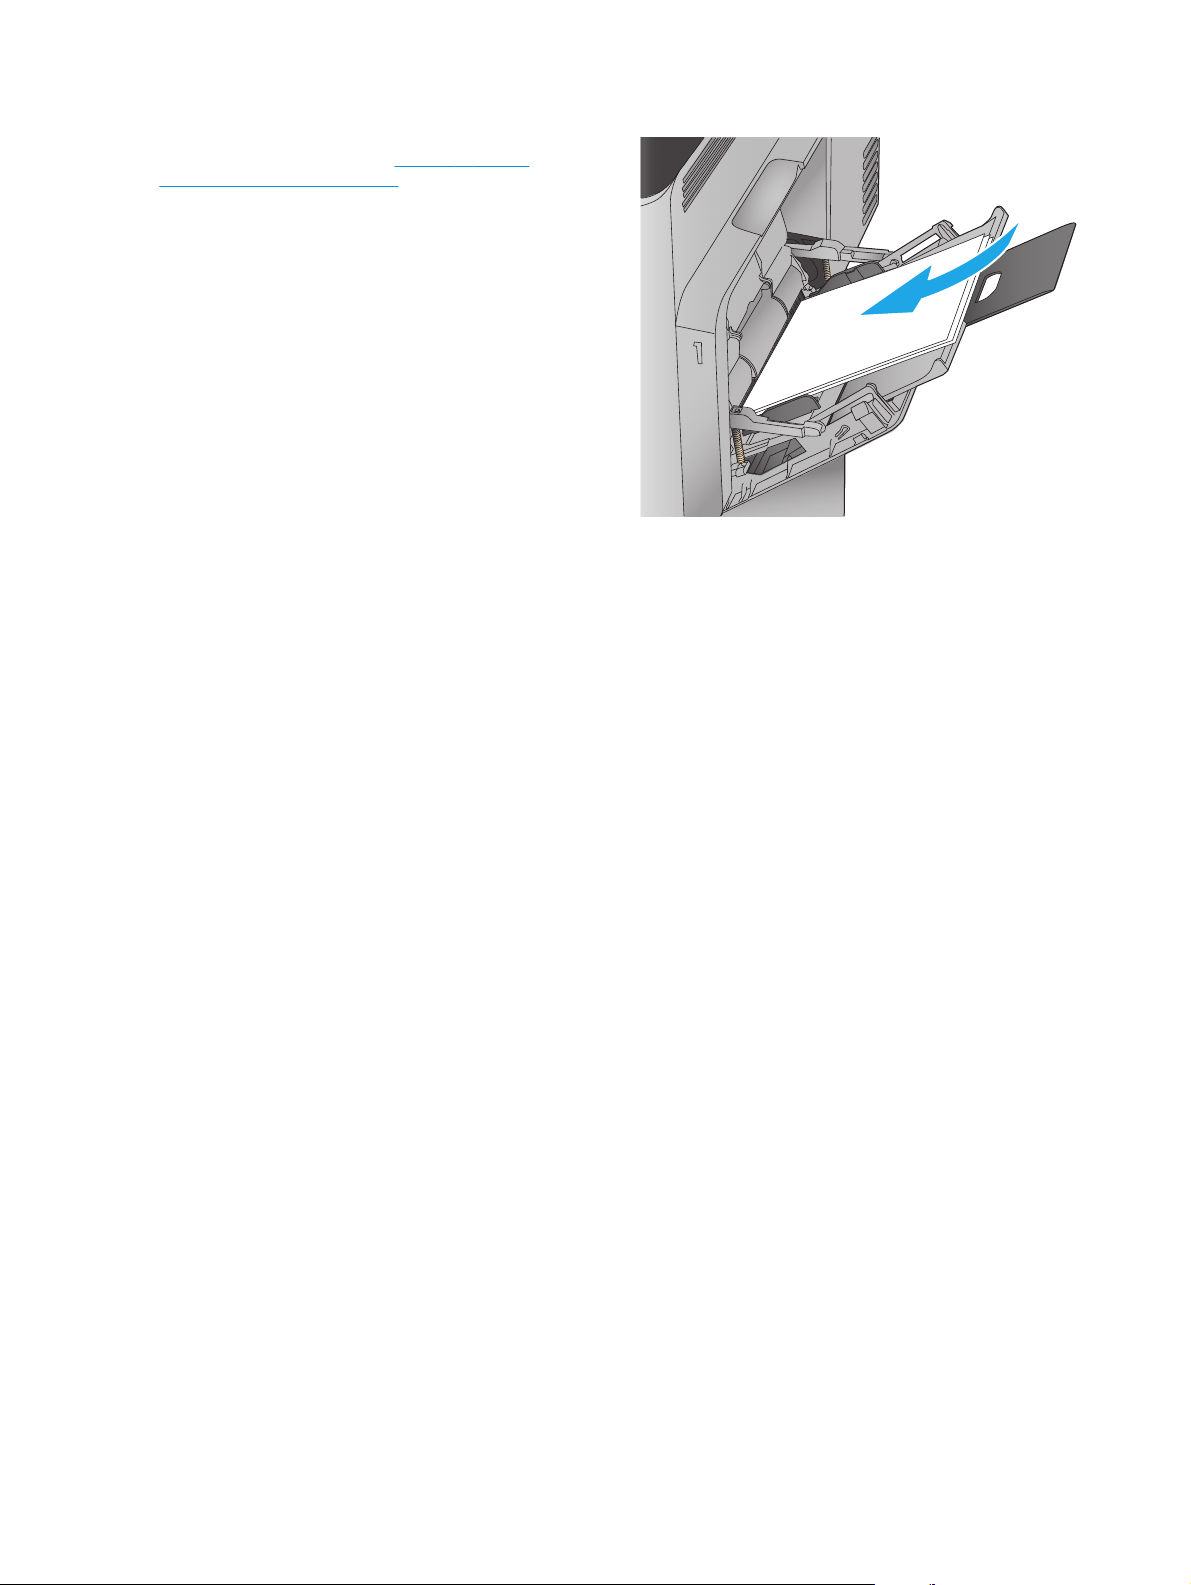
3. Load paper in the tray. For information about
how to orient the paper, see
paper orientation on page 15.
Table 2-1 Tray 1
ENWW Load Tray 1 13
Page 22
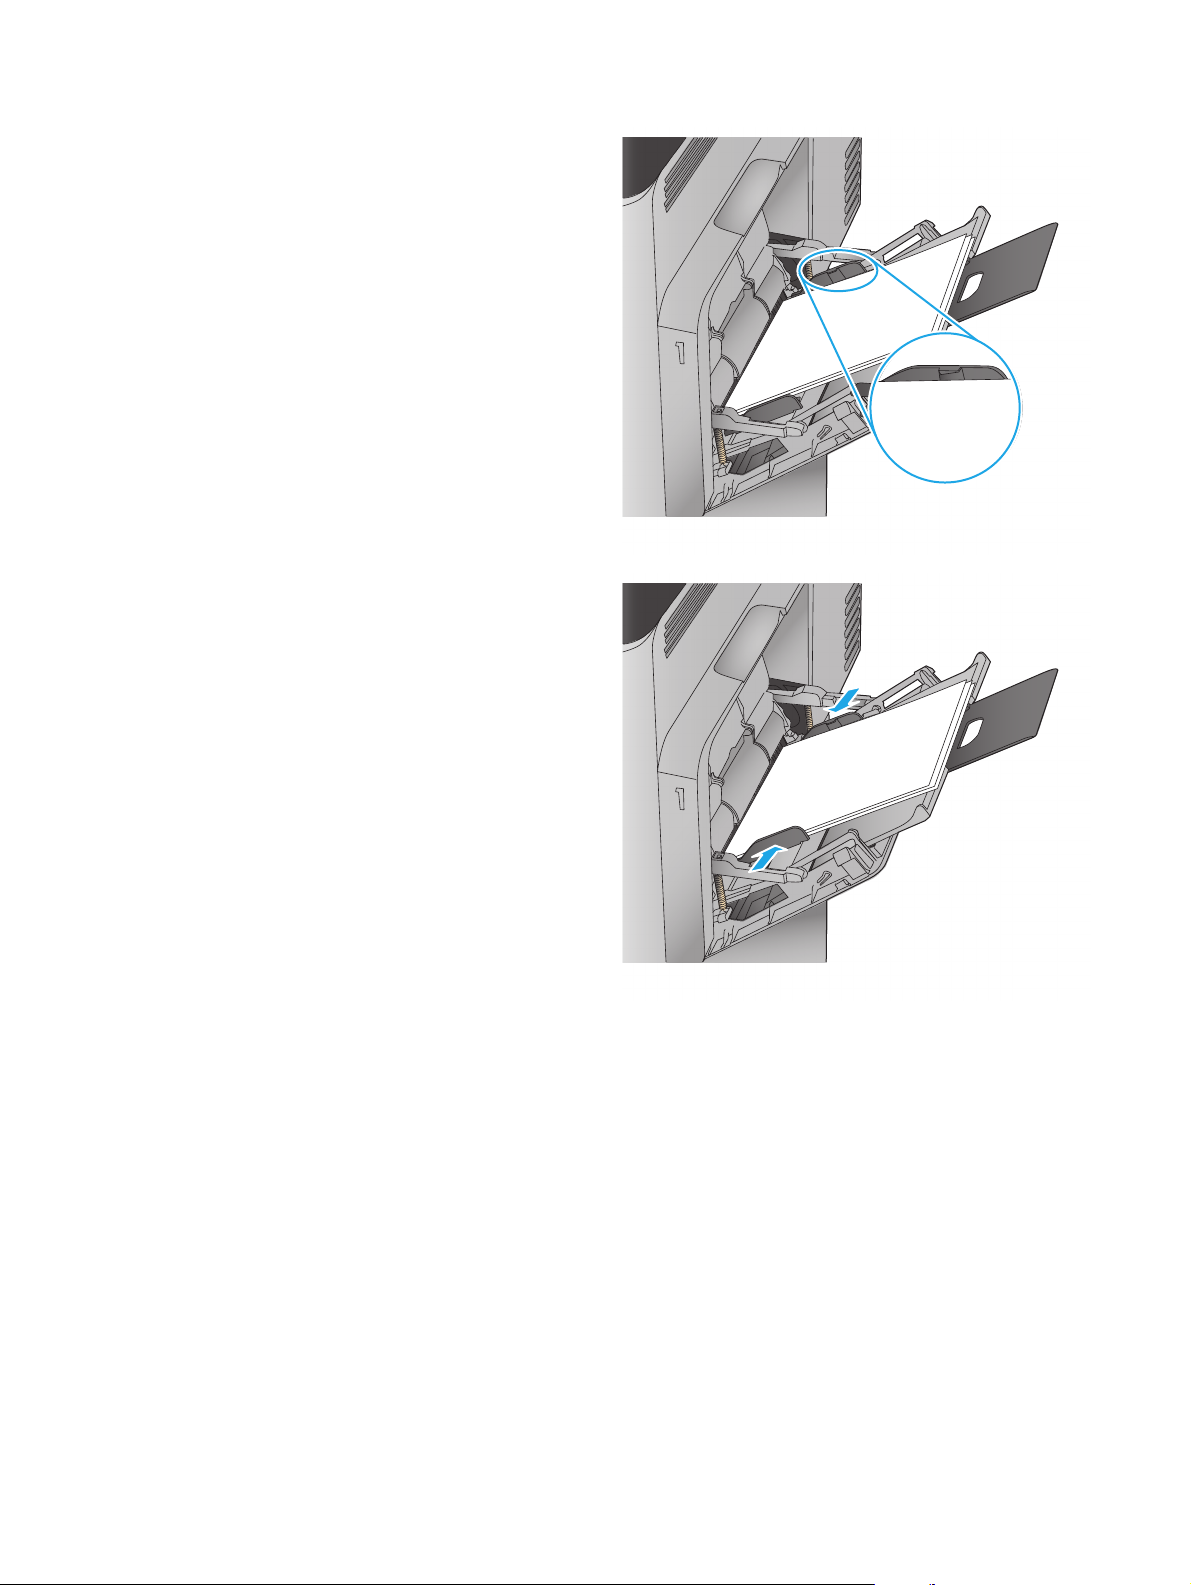
4. Make sure that the paper fits under the fill line on
the paper guides.
5. Adjust the side guides so that they lightly touch
the paper stack, but do not bend it.
14 Chapter 2 Paper trays ENWW
Page 23
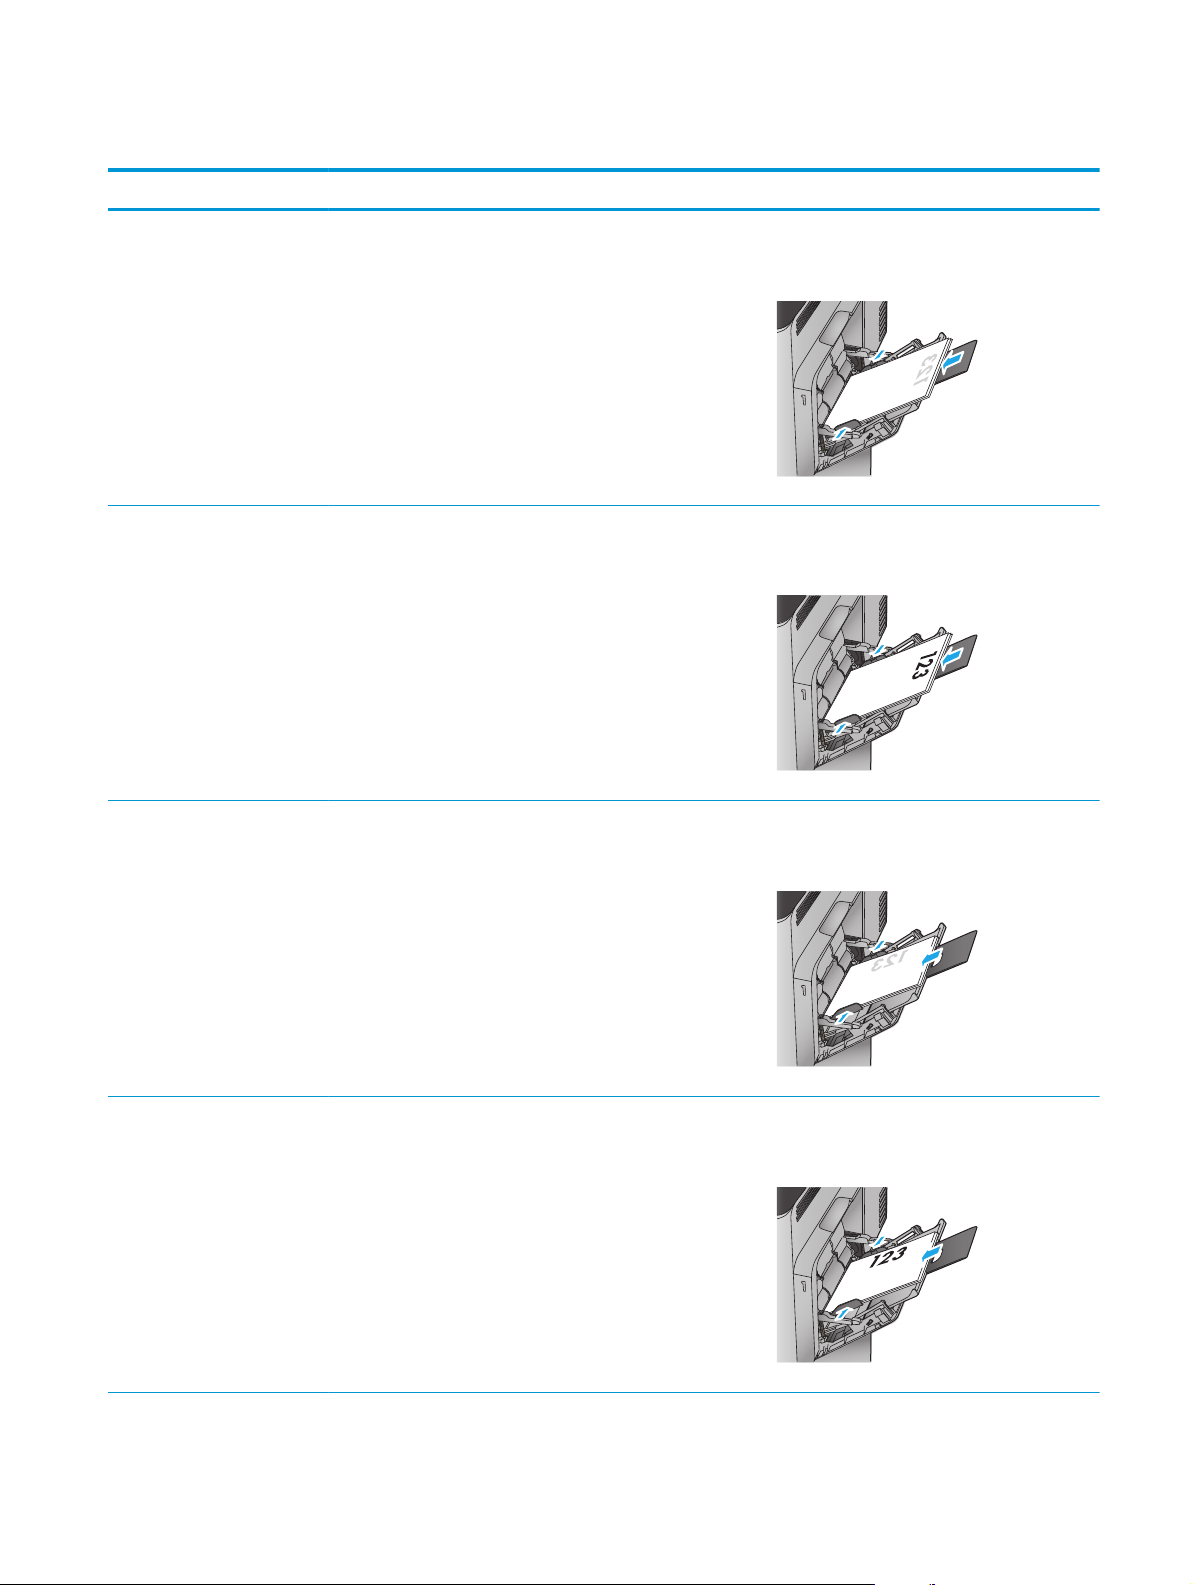
Table 2-1 Tray 1 paper orientation
Paper type Image orientation Duplex mode How to load paper
Preprinted or letterhead Portrait 1-sided printing Face-down
Bottom edge leading into the product
Automatic 2-sided printing Face-up
Bottom edge leading into the product
Landscape 1-sided printing Face-down
Top edge toward the back of the product
Automatic 2-sided printing Face-up
Top edge toward the back of the product
ENWW Load Tray 1 15
Page 24
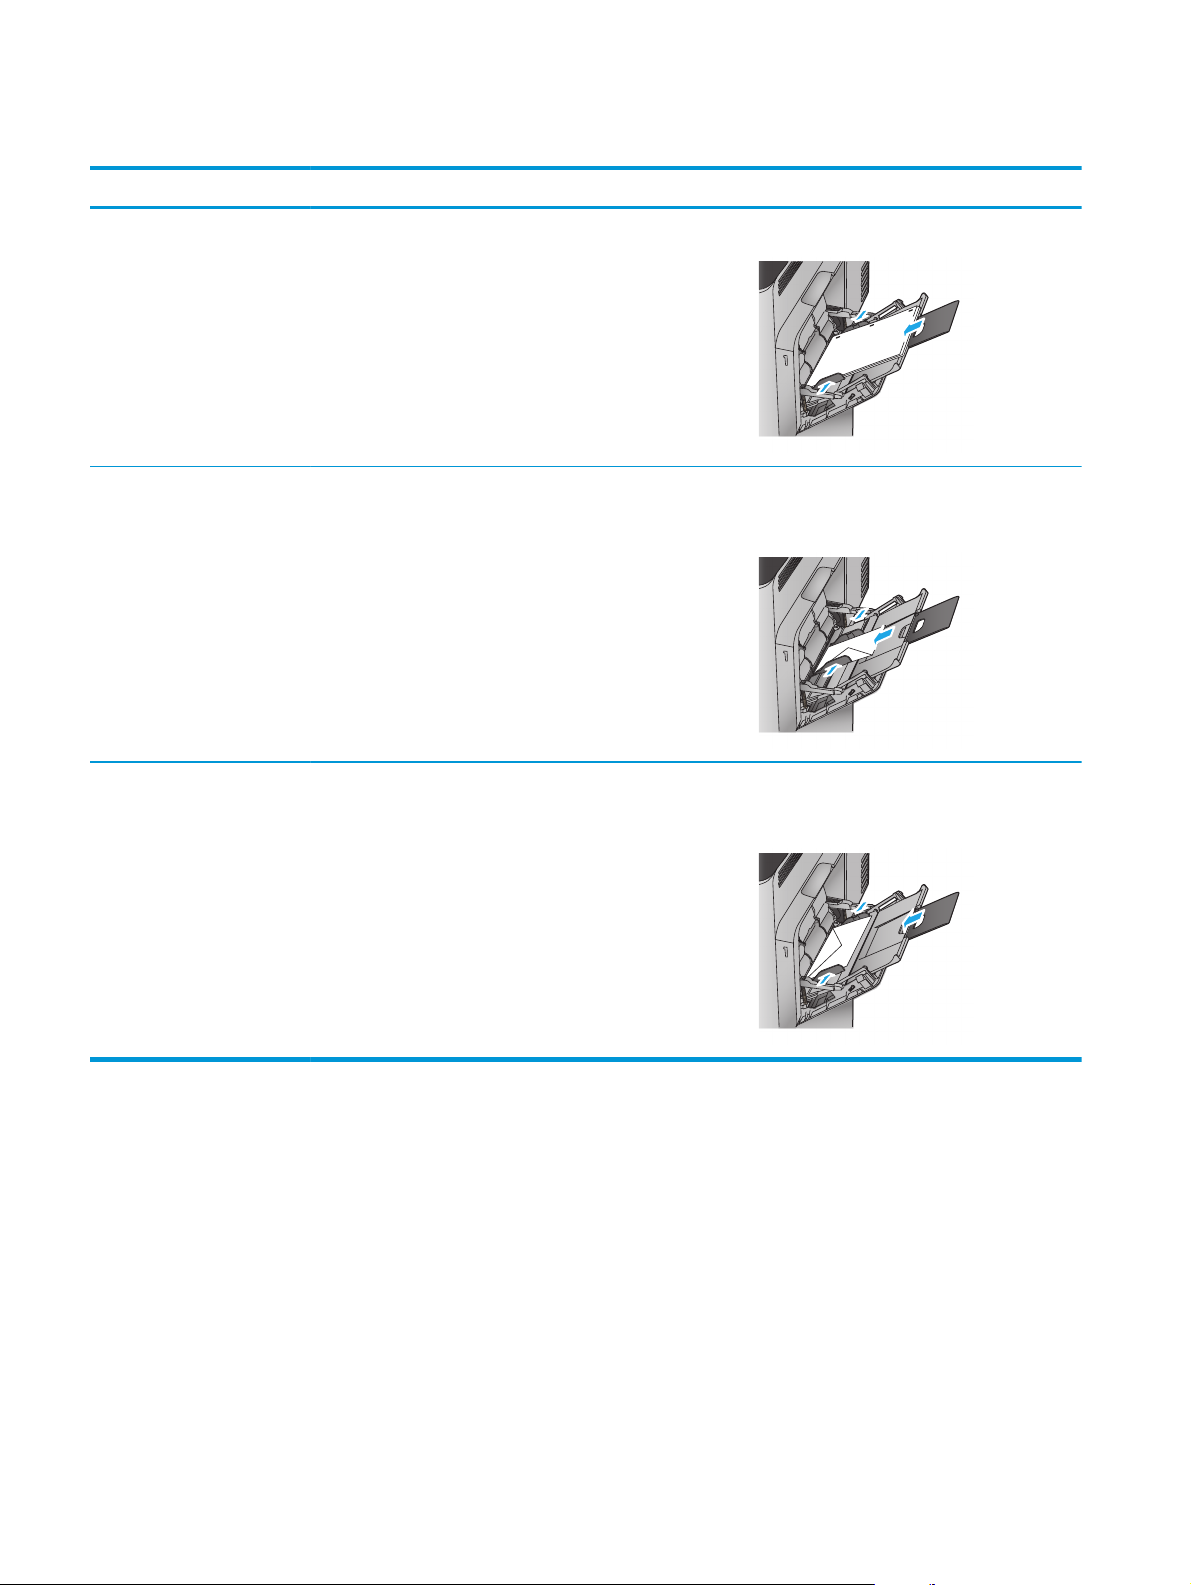
Table 2-1 Tray 1 paper orientation (continued)
Paper type Image orientation Duplex mode How to load paper
Prepunched Portrait or landscape 1- or 2-sided printing Holes toward the back of the product
Envelopes Landscape
Short edge of the envelope
feeding into the product
Portrait
Long edge of the envelope
feeding into the product
1-sided printing Face-down
Top edge toward the front of the product
1-sided printing Face-down
Top edge leading into the product
16 Chapter 2 Paper trays ENWW
Page 25

Load Tray 2 and the 500-sheet trays
NOTE: The procedure to load paper for the 500-sheet trays is the same as for Tray 2. Only Tray 2 is shown
here.
1. Open the tray.
NOTE: Do not open this tray while it is in use.
2. Adjust the paper-length and paper-width guides
by squeezing the adjustment latches and sliding
the guides to the size of the paper being used.
ENWW Load Tray 2 and the 500-sheet trays 17
Page 26
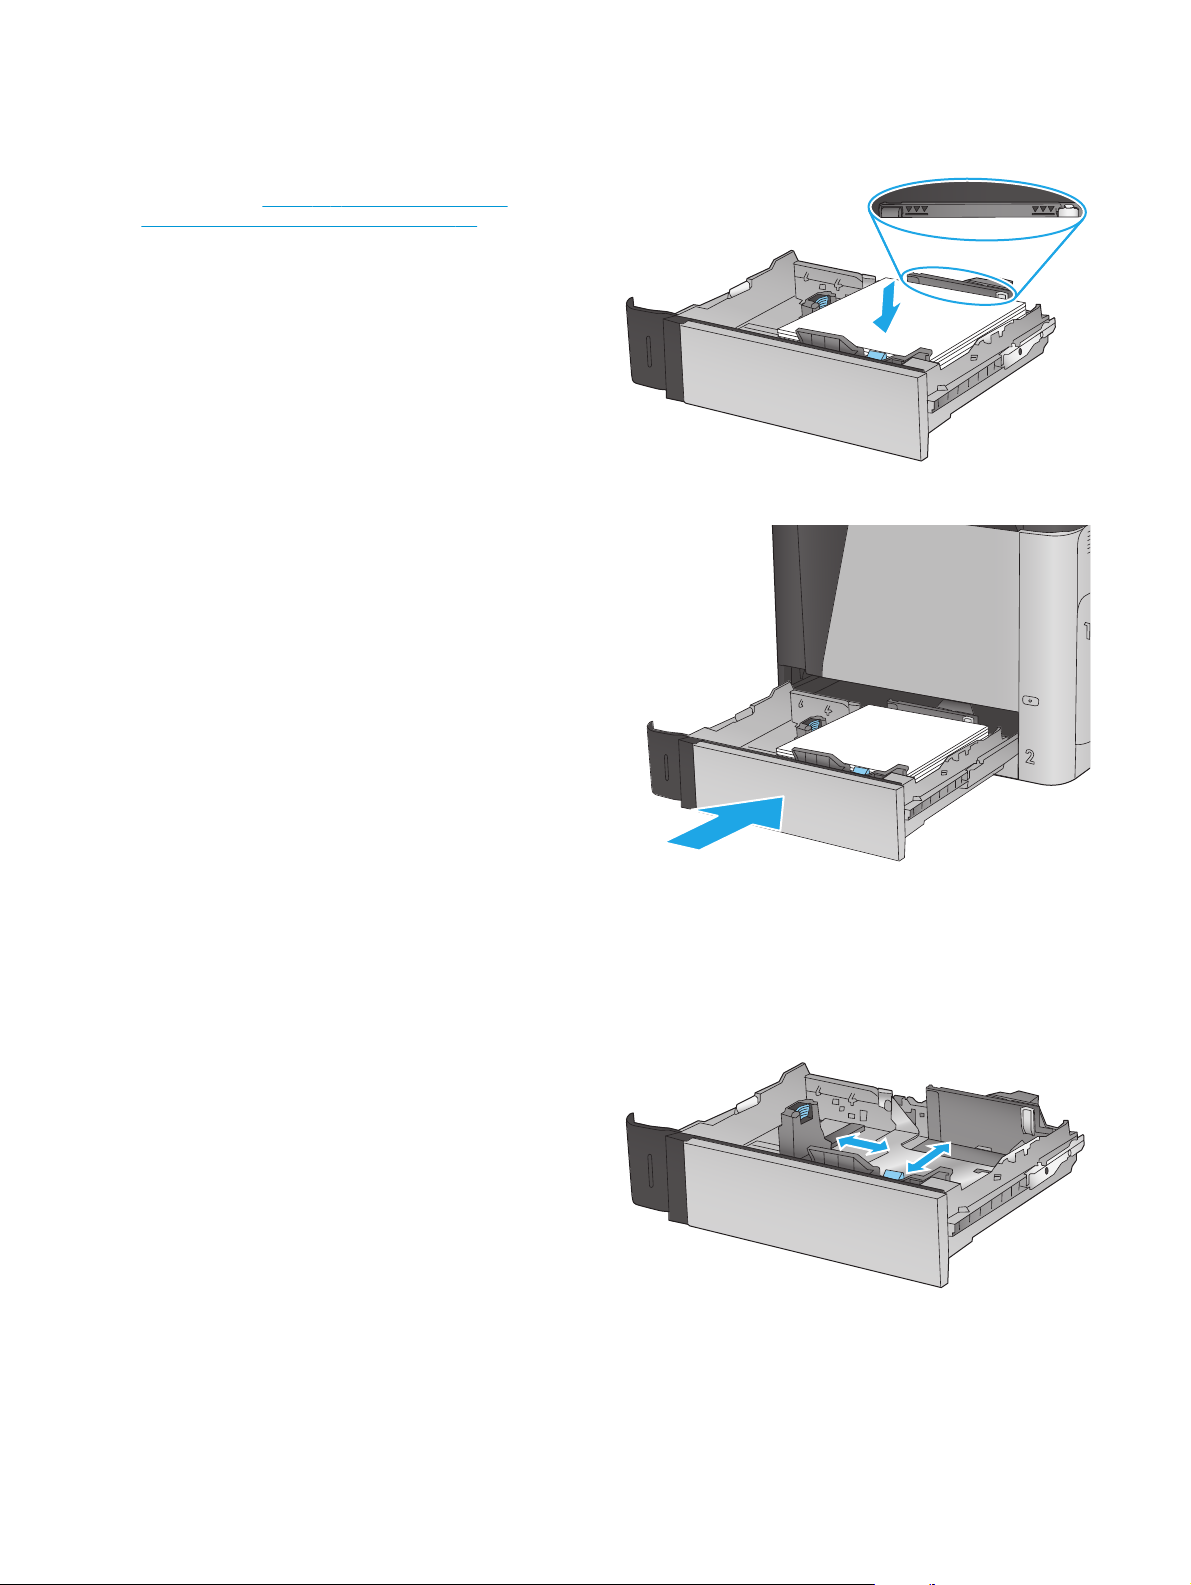
3. Load paper into the tray. Check the paper to
Y
X
verify the guides lightly touch the stack, but do
not bend it. For information about how to orient
the paper, see
sheet trays paper orientation on page 19.
NOTE: To prevent jams, do not overfill the tray.
Be sure that the top of the stack is below the tray
full indicator.
NOTE: If the tray is not adjusted correctly, an
error message might appear during printing or
the paper might jam.
4. Close the tray.
Table 2-2 Tray 2 and the 500-
5. The tray configuration message displays on the
product control panel.
6. Touch the OK button to accept the detected type
and size, or touch the Modify button to choose a
different paper size or type.
For custom-size paper, you need to specify the X
and Y dimensions for the paper when the prompt
displays on the product control panel.
7. Select the correct type and size, and then touch
the OK button.
18 Chapter 2 Paper trays ENWW
Page 27
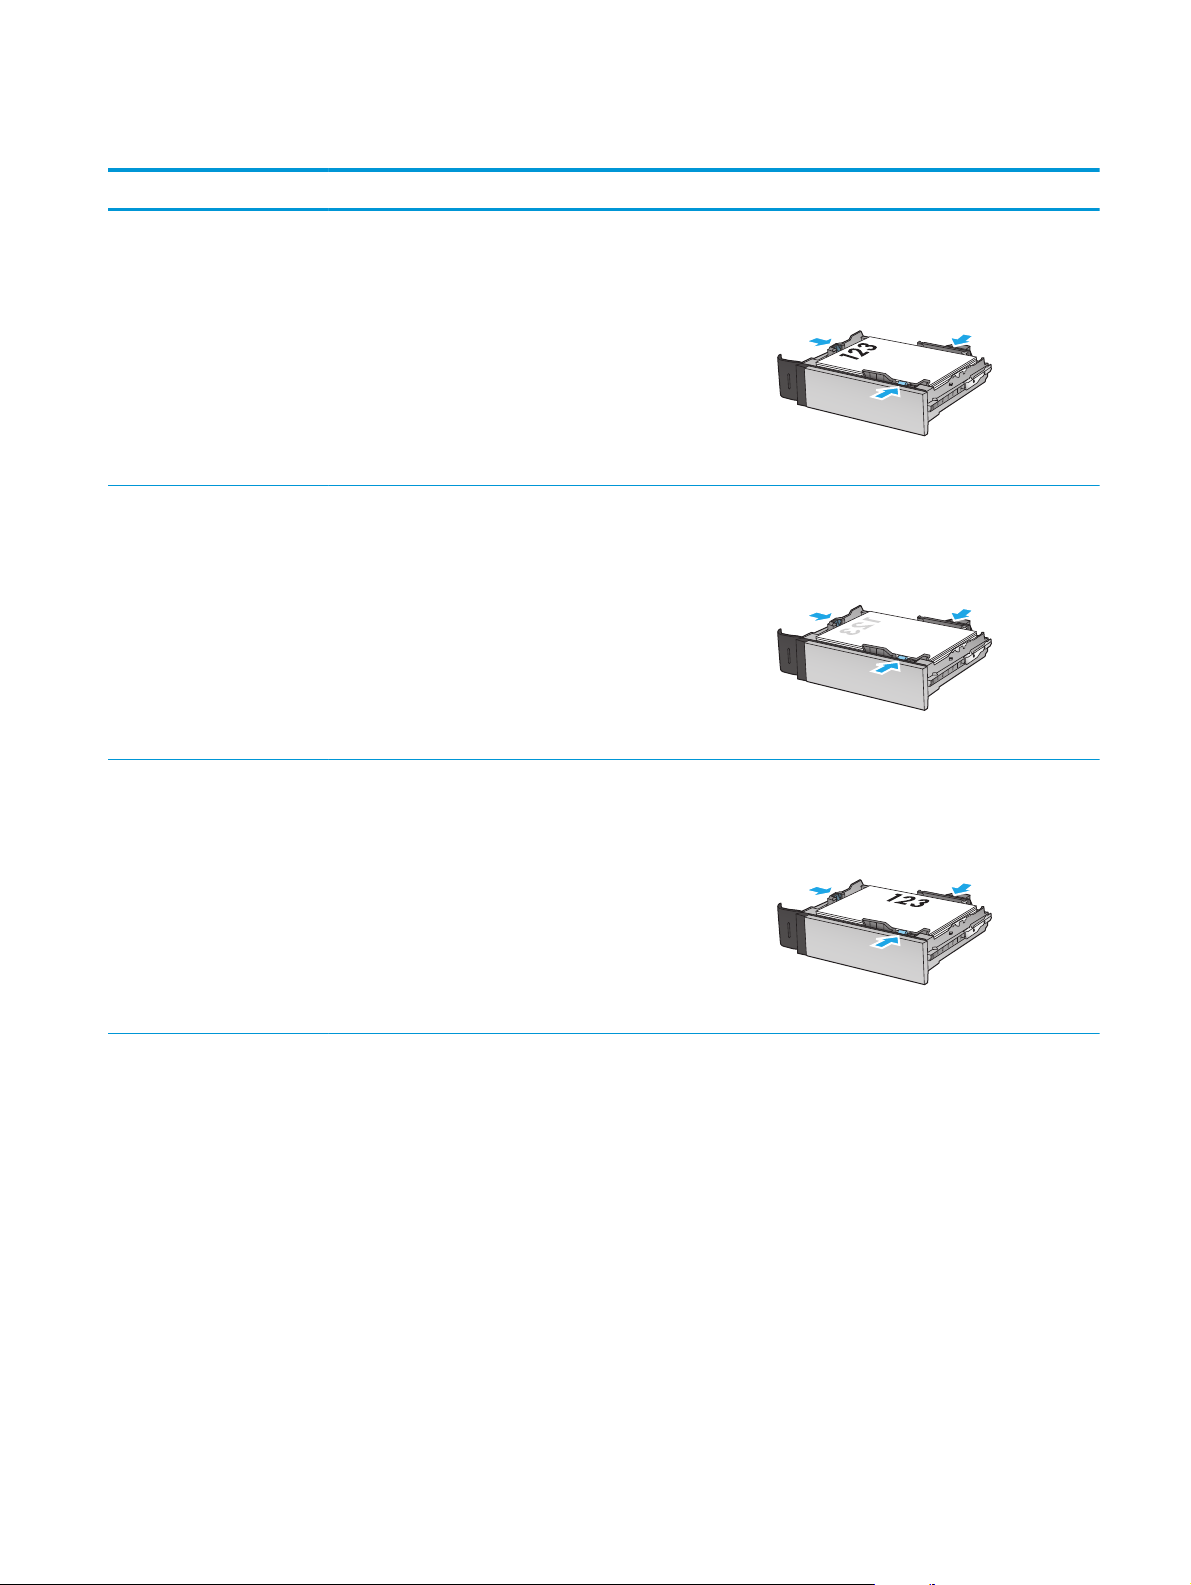
Table 2-2 Tray 2 and the 500-sheet trays paper orientation
Paper type Image orientation Duplex mode How to load paper
Preprinted or letterhead Portrait 1-sided printing Face-up
Top edge at the left side of the tray
Automatic 2-sided printing Face-down
Top edge at the left side of the tray
Landscape 1-sided printing Face-up
Top edge toward the back of the tray
ENWW Load Tray 2 and the 500-sheet trays 19
Page 28
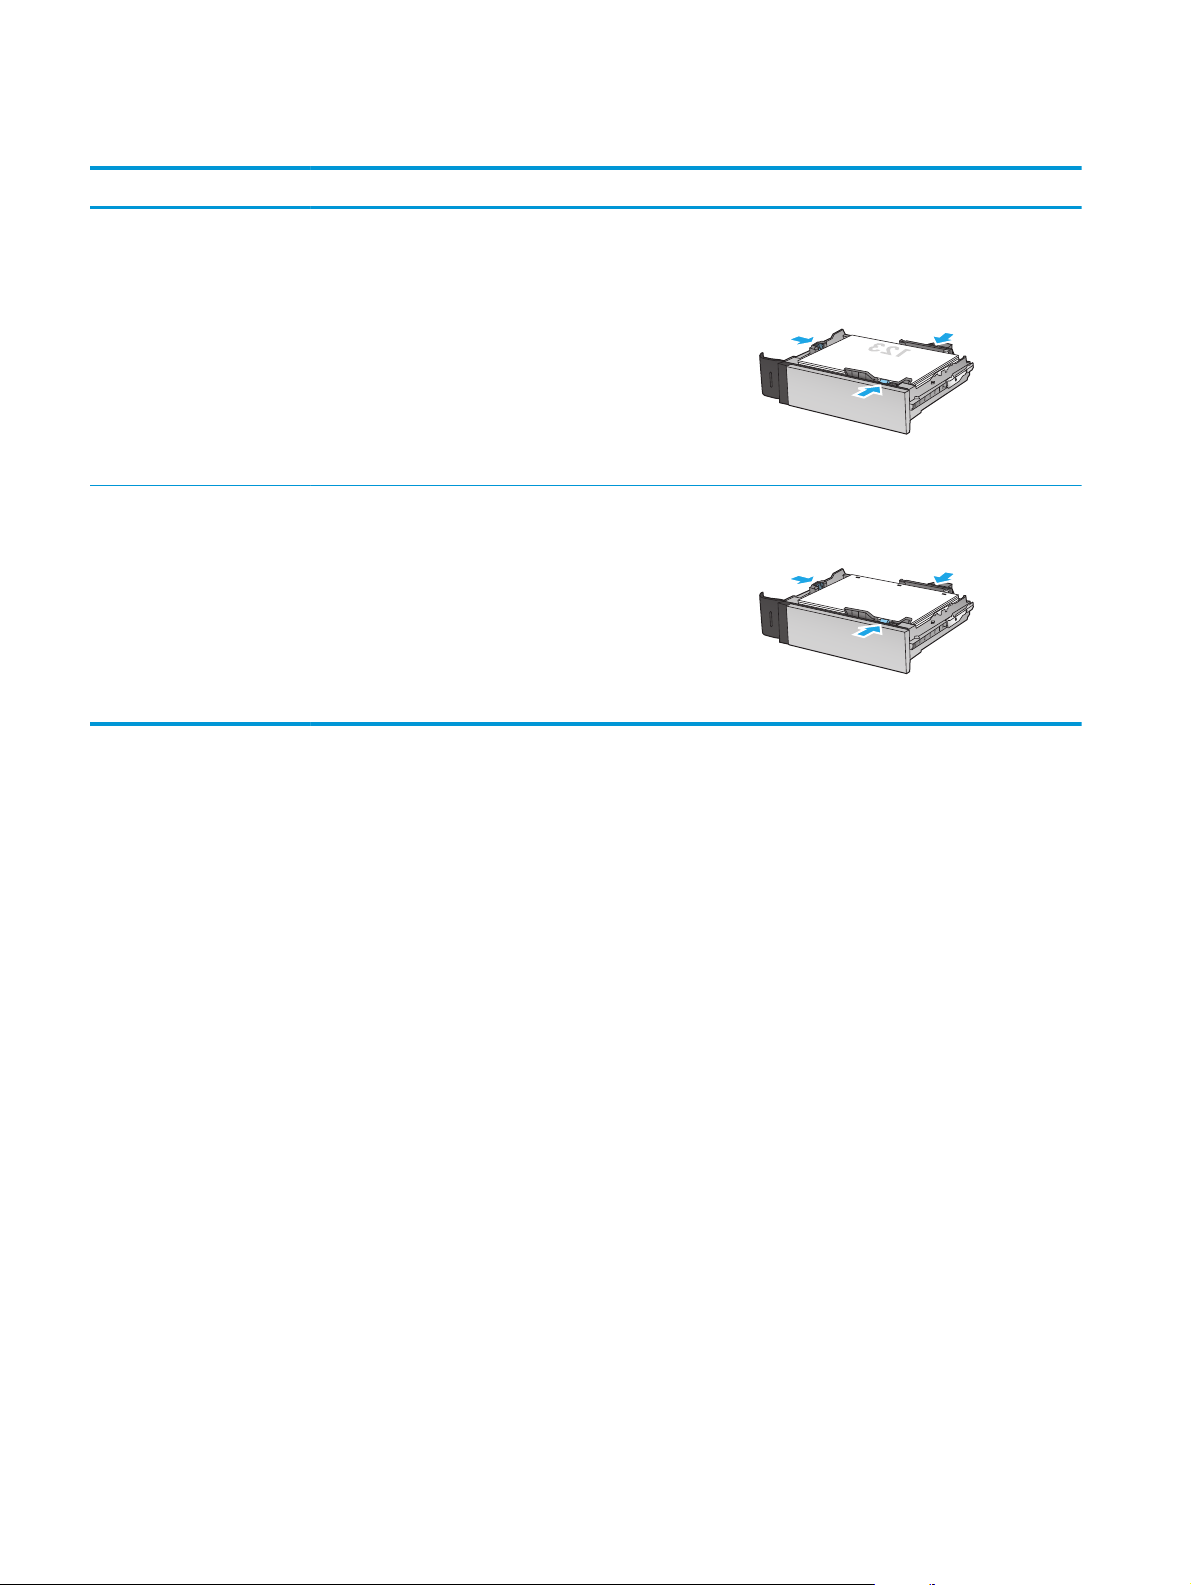
Table 2-2 Tray 2 and the 500-sheet trays paper orientation (continued)
Paper type Image orientation Duplex mode How to load paper
Automatic 2-sided printing Face-down
Top edge toward the back of the tray
Prepunched Portrait or landscape 1- or 2-sided printing Holes toward the back of the tray
20 Chapter 2 Paper trays ENWW
Page 29
Load the 1,500-sheet high-capacity input tray
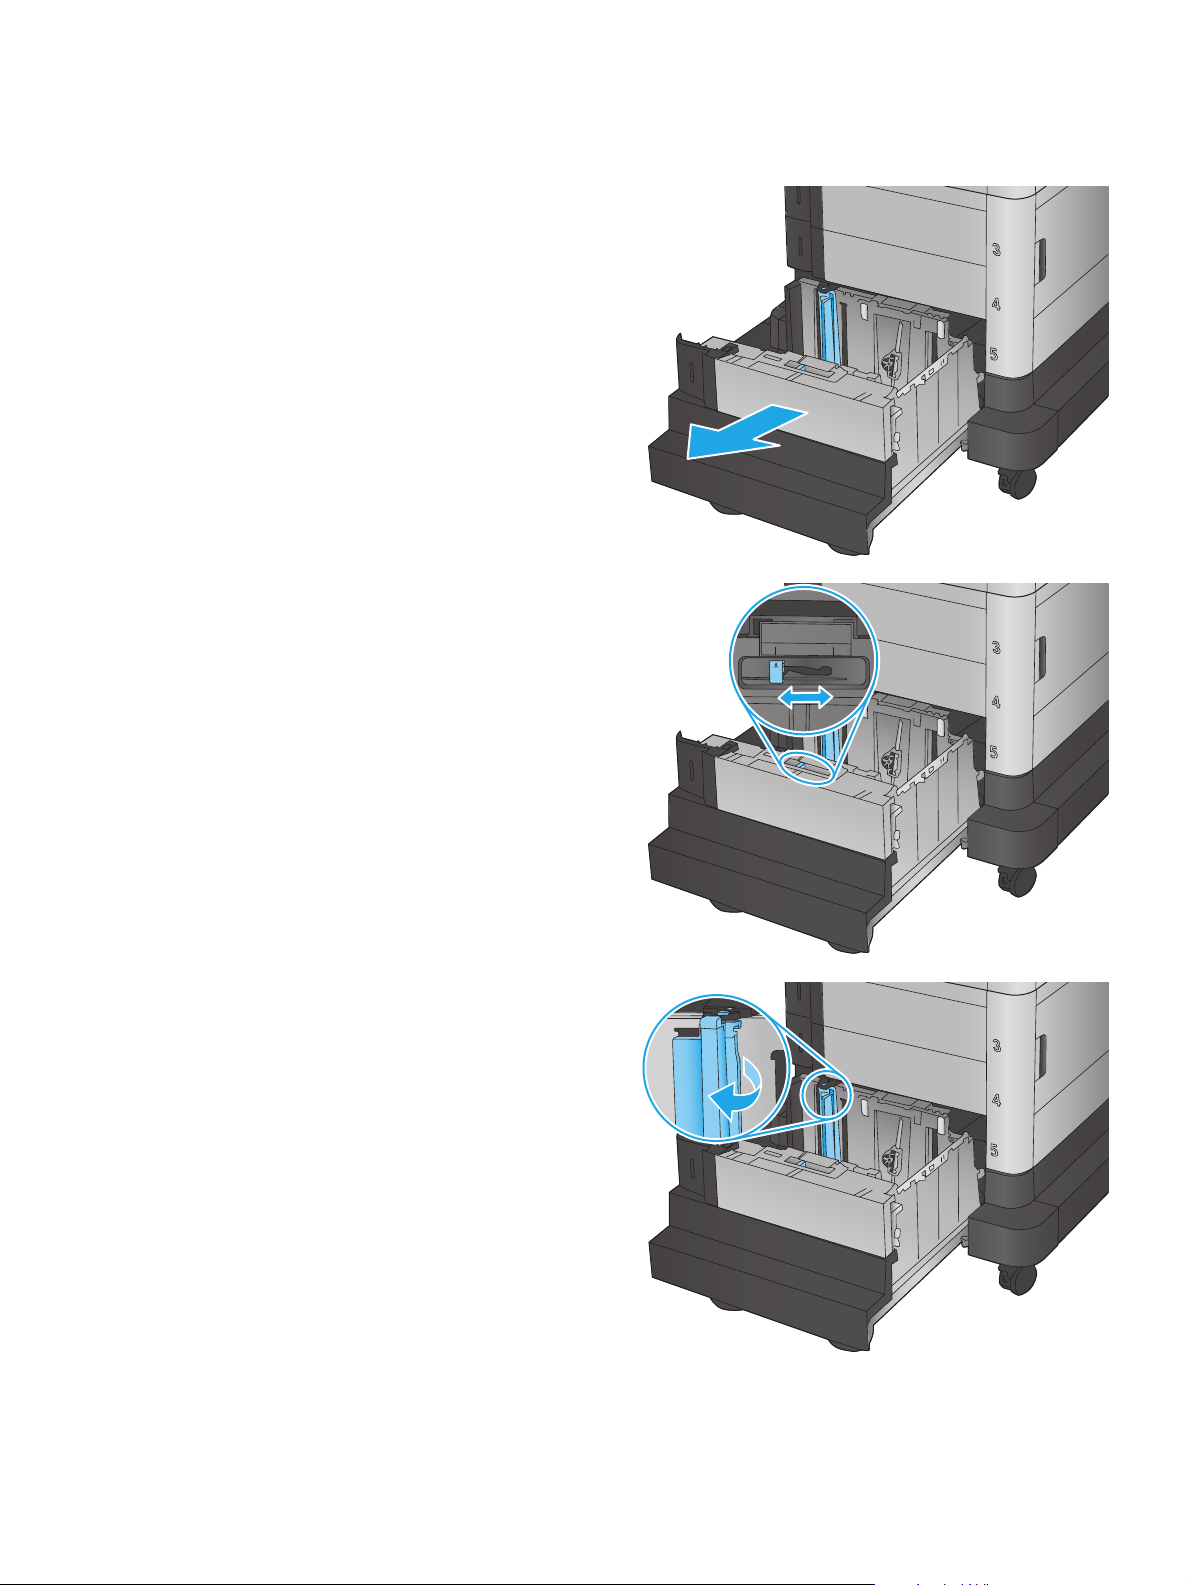
1. Open the tray.
NOTE: Do not open this tray while it is in use.
2. Adjust the paper-width guide to the correct
position for the paper you are using.
LGL LTR
A4
3. Rotate the paper-stop lever to the correct
position for the paper you are using.
ENWW Load the 1,500-sheet high-capacity input tray 21
Page 30
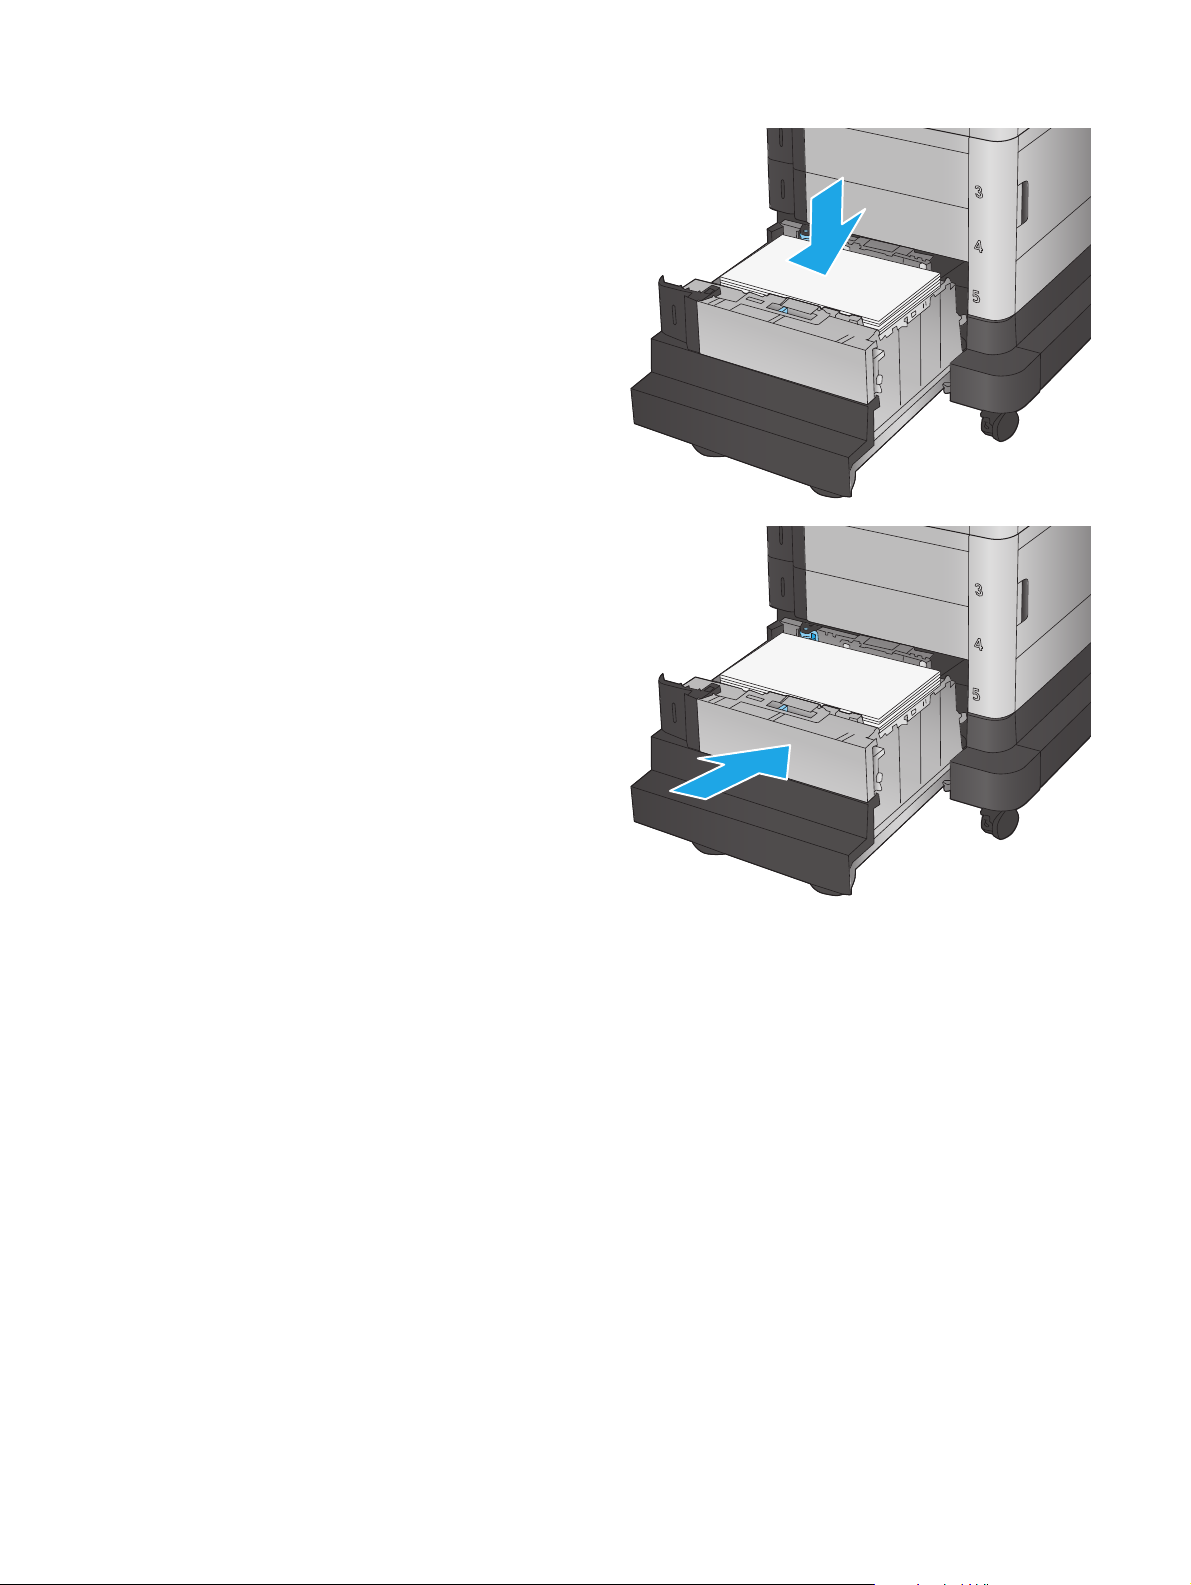
4. Load paper into the tray. Check the paper to
verify the guides lightly touch the stack, but do
not bend it.
NOTE: To prevent jams, do not overfill the tray.
Be sure that the top of the stack is below the tray
full indicator.
NOTE: If the tray is not adjusted correctly, an
error message might appear during printing or
the paper might jam.
5. Close the tray.
6. The tray configuration message displays on the
product control panel.
7. Touch the OK button to accept the detected type
and size, or touch the Modify button to choose a
different paper size or type.
8. Select the correct type and size, and then touch
the OK button.
22 Chapter 2 Paper trays ENWW
Page 31

3 Parts, supplies, and accessories
●
Order parts, accessories, and supplies
●
Replace the toner cartridges
●
Replace the toner collection unit
For more information:
In the US, go to
Outside the US, go to
product name, and then select Search.
HP's all-inclusive help for your product includes the following information:
●
Install and configure
●
Learn and use
●
Solve problems
●
Download software updates
●
Join support forums
●
Find warranty and regulatory information
www.hp.com/support/colorljM651.
www.hp.com/support. Select your country/region. Click Troubleshooting. Enter the
ENWW 23
Page 32

Order parts, accessories, and supplies
Ordering
Order supplies and paper www.hp.com/go/suresupply
Order genuine HP parts or accessories
Order through service or support providers Contact an HP-authorized service or support provider.
Order using the HP Embedded Web Server (EWS) To access, in a supported Web browser on your computer, enter
www.hp.com/buy/parts
the product IP address or host name in the address/URL field. The
EWS contains a link to the HP SureSupply Web site, which
provides options for purchasing Original HP supplies.
Parts and supplies
The following parts are available for the product.
●
Parts listed as Mandatory self-replacement are to be installed by customers, unless you are willing to
pay HP service personnel to perform the repair. For these parts, on-site or return-to-depot support is
not provided under the HP product warranty.
●
Parts listed as Optional self-replacement can be installed by HP service personnel at your request for
no additional charge during the product warranty period.
Item Description Self-replacement options Part number
Maintenance/Fuser Kit 110V Replacement 110 Volt fuser Mandatory CE246A
Maintenance/Fuser Kit 220V Replacement 220 Volt fuser Mandatory CE247A
Image transfer kit Replacement image transfer belt and
Toner collection unit Replacement toner collection unit Mandatory CE265A
HP 654X Black LaserJet Toner Cartridge,
high capacity 19.5k yield
HP 652A Black LaserJet Toner Cartridge,
11k yield
HP 654A Cyan LaserJet Toner Cartridge,
15k yield
HP 654A Yellow LaserJet Toner Cartridge,
15k yield
HP 654A Magenta LaserJet Toner
Cartridge, 15k yield
HP LaserJet Postcard Media Insert Tray Replacement postcard media insert tray Mandatory CC497A
roller
Replacement high-capacity toner
cartridge
Replacement toner cartridge Mandatory CF320A
Replacement toner cartridge Mandatory CF331A
Replacement toner cartridge Mandatory CF332A
Replacement toner cartridge Mandatory CF333A
Mandatory CE249A
Mandatory CF330X
24 Chapter 3 Parts, supplies, and accessories ENWW
Page 33

Accessories
Item Description Part number
500-sheet paper tray Input tray accessory CZ261
500-sheet paper feeder and cabinet Input tray and storage cabinet accessory CZ262
2x500-sheet, 1,500-sheet high-capacity input feeder,
and stand
HP LaserJet Postcard Media Insert Tray Tray insert for printing small-size paper CC497A
HP Jetdirect 2800w NFC & Wireless Direct Accessory Wireless direct accessory for “touch” printing from
2,500-sheet feeder accessory CZ263
J8029A
mobile devices
ENWW Order parts, accessories, and supplies 25
Page 34

Replace the toner cartridges
The product uses four colors and has a different toner cartridge for each color: yellow (Y), magenta (M), cyan
(C), and black (K). The toner cartridges are inside the front door.
This product indicates when the toner cartridge level is low. The actual toner cartridge life remaining can
vary. The toner cartridge does not need to be replaced at this time. Consider having a replacement cartridge
available to install when print quality is no longer acceptable.
The following illustration shows the toner-cartridge components.
1
3
2
1 Plastic shield
2 Imaging drum
3 Memory chip
CAUTION: If toner gets on clothing, wipe it off by using a dry cloth and wash the clothes in cold water. Hot
water sets toner into fabric.
NOTE: Information about recycling used toner cartridges is on the toner cartridge box.
26 Chapter 3 Parts, supplies, and accessories ENWW
Page 35

1. Open the front door.
Y
M
Y
C
M
K
C
K
2. Grasp the handle of the used toner cartridge and
pull out to remove it.
3. Remove the new toner cartridge from its
protective bag.
Y
M
Y
C
M
K
C
K
K
K
ENWW Replace the toner cartridges 27
Page 36

4. Hold both ends of the toner cartridge and rock it
5-6 times.
K
5. Remove the protective shield from the toner
cartridge.
K
28 Chapter 3 Parts, supplies, and accessories ENWW
Page 37

6. Align the toner cartridge with its slot, and then
insert the toner cartridge into the product.
7. Close the front door.
Y
M
Y
C
M
K
C
K
Y
M
Y
M
K
C
K
C
K
ENWW Replace the toner cartridges 29
Page 38

Replace the toner collection unit
Replace the toner collection unit when the control panel prompts you.
NOTE: The toner collection unit is designed for a single use. Do not attempt to empty the toner collection
unit and reuse it. Doing so could lead to toner being spilled inside the product, which could result in reduced
print quality. After use, return the toner collection unit to HP’s Planet Partners program for recycling.
CAUTION: If toner gets on clothing, wipe it off by using a dry cloth and wash the clothes in cold water. Hot
water sets toner into fabric.
1. Open the front door.
Y
M
Y
C
M
C
K
K
2. Grasp the top of the toner collection unit and
remove it from the product.
Y
M
Y
C
M
C
K
K
30 Chapter 3 Parts, supplies, and accessories ENWW
Page 39

3. Place the attached cap over the opening at the
top of the unit.
4. Remove the new toner collection unit from its
packaging.
ENWW Replace the toner collection unit 31
Page 40

5. Insert the bottom of the new unit into the
product first and then push the top of the unit
until it clicks into place.
Y
M
Y
C
M
C
K
K
6. Close the front door.
NOTE: If the toner collection unit is not
installed correctly, the front door does not close
completely.
To recycle the used toner collection unit, follow
the instructions included with the new toner
collection unit.
Y
M
Y
C
M
C
K
K
32 Chapter 3 Parts, supplies, and accessories ENWW
Page 41

4Print
●
Print tasks (Windows)
●
Print tasks (Mac OS X)
●
Store print jobs on the product to print later
●
Mobile printing
●
Print from the USB port
For more information:
In the US, go to
Outside the US, go to
product name, and then select Search.
HP's all-inclusive help for your product includes the following information:
●
Install and configure
●
Learn and use
●
Solve problems
●
Download software updates
●
Join support forums
●
Find warranty and regulatory information
www.hp.com/support/colorljM651.
www.hp.com/support. Select your country/region. Click Troubleshooting. Enter the
ENWW 33
Page 42

Print tasks (Windows)
How to print (Windows)
The following procedure describes the basic printing process for Windows.
1. From the software program, select the Print option.
2. Select the product from the list of printers. To change settings, click or tap the Properties or
Preferences button to open the print driver.
NOTE: The name of the button varies for different software programs.
3. Click or tap the tabs in the print driver to configure the available options. For example, set the paper
orientation on the Finishing tab, and set the paper source, paper type, paper size, and quality settings
on the Paper/Quality tab.
4. Click or tap the OK button to return to the Print dialog box. Select the number of copies to print from
this screen.
5. Click or tap the OK button to print the job.
34 Chapter 4 Print ENWW
Page 43

Automatically print on both sides (Windows)
Use this procedure for products that have an automatic duplexer installed. If the product does not have an
automatic duplexer installed, or to print on paper types that the duplexer does not support, you can print on
both sides manually.
1. From the software program, select the Print option.
2. Select the product from the list of printers, and then click or tap the Properties or Preferences button
to open the print driver.
NOTE: The name of the button varies for different software programs.
3. Click or tap the Finishing tab.
4. Select the Print on both sides check box. Click the OK button to close the Document Properties dialog
box.
5. In the Print dialog box, click the OK button to print the job.
Manually print on both sides (Windows)
Use this procedure for products that do not have an automatic duplexer installed or to print on paper that the
duplexer does not support.
1. From the software program, select the Print option.
2. Select the product from the list of printers, and then click or tap the Properties or Preferences button
to open the print driver.
NOTE: The name of the button varies for different software programs.
3. Click or tap the Finishing tab.
4. Select the Print on both sides (manually) check box. Click the OK button to print the first side of the
job.
5. Retrieve the printed stack from the output bin, and place it in Tray 1.
6. If prompted, touch the appropriate control panel button to continue.
ENWW Print tasks (Windows) 35
Page 44

Print multiple pages per sheet (Windows)
1. From the software program, select the Print option.
2. Select the product from the list of printers, and then click or tap the Properties or Preferences button
to open the print driver.
NOTE: The name of the button varies for different software programs.
3. Click or tap the Finishing tab.
4. Select the number of pages per sheet from the Pages per sheet drop-down list.
5. Select the correct Print page borders, Page order, and Orientation options. Click the OK button to close
the Document Properties dialog box.
6. In the Print dialog box, click the OK button to print the job.
Select the paper type (Windows)
1. From the software program, select the Print option.
2. Select the product from the list of printers, and then click or tap the Properties or Preferences button
to open the print driver.
NOTE: The name of the button varies for different software programs.
3. Click or tap the Paper/Quality tab.
4. From the Paper type drop-down list, click the More... option.
5. Expand the list of Type is: options.
6. Expand the category of paper types that best describes your paper.
7. Select the option for the type of paper you are using, and then click the OK button.
8. Click the OK button to close the Document Properties dialog box. In the Print dialog box, click the OK
button to print the job.
If the tray needs to be configured, a tray configuration message displays on the product control panel.
9. Load the tray with the specified type and size of paper, and then close the tray.
10. Touch the OK button to accept the detected type and size, or touch the Modify button to choose a
different paper size or type.
11. Select the correct type and size, and then touch the OK button.
36 Chapter 4 Print ENWW
Page 45

Additional print tasks
In the US, go to www.hp.com/support/colorljM651.
Outside the US, go to
product name, and then select Search.
Instructions are available for performing specific print tasks, such as the following:
●
Create and use printing shortcuts or presets
●
Select the paper size, or use a custom paper size
●
Select the page orientation
●
Create a booklet
●
Scale a document to fit a specific paper size
●
Print the first or last pages of the document on different paper
●
Print watermarks on a document
www.hp.com/support. Select your country/region. Click Troubleshooting. Enter the
ENWW Print tasks (Windows) 37
Page 46

Print tasks (Mac OS X)
How to print (Mac OS X)
The following procedure describes the basic printing process for Mac OS X.
1. Click the File menu, and then click the Print option.
2. In the Printer menu, select the product.
3. Open the menus drop-down list or click Show Details, and then select other menus to adjust the print
settings.
4. Click the Print button.
Automatically print on both sides (Mac OS X)
NOTE: This feature is available if you install the HP print driver. It might not be available if you are using
AirPrint.
1. Click the File menu, and then click the Print option.
2. In the Printer menu, select the product.
3. Open the menus drop-down list or click Show Details, and then click the Layout menu.
4. Select a binding option from the Two-Sided drop-down list.
5. Click the Print button.
Manually print on both sides (Mac OS X)
NOTE: This feature is available if you install the HP print driver. It might not be available if you are using
AirPrint.
1. Click the File menu, and then click the Print option.
2. In the Printer menu, select this product.
3. Open the menus drop-down list or click Show Details, and then click the Manual Duplex menu.
4. Click the Manual Duplex box, and select a binding option.
5. Click the Print button.
6. Go to the product, and remove any blank paper that is in Tray 1.
7. Retrieve the printed stack from the output bin and place it with the printed-side facing down in the input
tray.
8. If prompted, touch the appropriate control panel button to continue.
Print multiple pages per sheet (Mac OS X)
1. Click the File menu, and then click the Print option.
2. In the Printer menu, select the product.
38 Chapter 4 Print ENWW
Page 47

3. Open the menus drop-down list or click Show Details, and then click the Layout menu.
4. From the Pages per Sheet drop-down list, select the number of pages that you want to print on each
sheet.
5. In the Layout Direction area, select the order and placement of the pages on the sheet.
6. From the Borders menu, select the type of border to print around each page on the sheet.
7. Click the Print button.
Select the paper type (Mac OS X)
1. Click the File menu, and then click the Print option.
2. In the Printer menu, select the product.
3. Open the menus drop-down list or click Show Details, and then click the Finishing menu.
4. Select a type from the Media-type drop-down list.
5. Click the Print button.
Additional print tasks
In the US, go to www.hp.com/support/colorljM651.
Outside the US, go to
product name, and then select Search.
Instructions are available for performing specific print tasks, such as the following:
●
Create and use printing shortcuts or presets
●
Select the paper size, or use a custom paper size
●
Select the page orientation
●
Create a booklet
●
Scale a document to fit a specific paper size
●
Print the first or last pages of the document on different paper
●
Print watermarks on a document
www.hp.com/support. Select your country/region. Click Troubleshooting. Enter the
ENWW Print tasks (Mac OS X) 39
Page 48

Store print jobs on the product to print later
●
Create a stored job (Windows)
●
Create a stored job (Mac OS X)
●
Print a stored job
●
Delete a stored job
Create a stored job (Windows)
You can store jobs on the product so you can print them at any time.
NOTE: Your print driver might look different than what is shown here, but the steps are the same.
1. From the software program, select the Print
option.
2. Select the product from the list of printers, and
then select Properties or Preferences (the name
varies for different software programs).
3. Click the Job Storage tab.
40 Chapter 4 Print ENWW
Page 49

4. Select a Job Storage Mode option.
●
Proof and Hold: Print and proof one copy of
a job, and then print more copies.
●
Personal Job: The job does not print until
you request it at the product control panel.
For this job-storage mode, you can select
one of the Make Job Private/Secure options.
If you assign a personal identification
number (PIN) to the job, you must provide
the required PIN at the control panel. If you
encrypt the job, you must provide the
required password at the control panel.
●
Quick Copy: Print the requested number of
copies of a job and store a copy of the job in
the product memory so you can print it again
later.
●
Stored Job: Store a job on the product and
allow other users to print the job at any time.
For this job-storage mode, you can select
one of the Make Job Private/Secure options.
If you assign a personal identification
number (PIN) to the job, the person who
prints the job must provide the required PIN
at the control panel. If you encrypt the job,
the person who prints the job must provide
the required password at the control panel.
5. To use a custom user name or job name, click the
Custom button, and then enter the user name or
the job name.
Select which option to use if another stored job
already has that name:
●
Use Job Name + (1-99): Append a unique
number to the end of the job name.
●
Replace Existing File: Overwrite the existing
stored job with the new one.
6. Click the OK button to close the Document
Properties dialog box. In the Print dialog box,
click the OK button to print the job.
Create a stored job (Mac OS X)
You can store jobs on the product so you can print them at any time.
1. Click the File menu, and then click the Print option.
2. In the Printer menu, select the product.
3. By default, the print driver displays the Copies & Pages menu. Open the menus drop-down list, and then
click the Job Storage menu.
4. In the Mode drop-down list, select the type of stored job.
ENWW Store print jobs on the product to print later 41
Page 50

●
Proof and Hold: Print and proof one copy of a job, and then print more copies.
●
Personal Job: The job does not print until you request it at the product control panel. If you assign
a personal identification number (PIN) to the job, you must provide the required PIN at the control
panel.
●
Quick Copy: Print the requested number of copies of a job and store a copy of the job in the
product memory so you can print it again later.
●
Stored Job: Store a job on the product and allow other users to print the job at any time. If you
assign a personal identification number (PIN) to the job, the person who prints the job must
provide the required PIN at the control panel.
5. To use a custom user name or job name, click the Custom button, and then enter the user name or the
job name.
Select which option to use if another stored job already has that name.
●
Use Job Name + (1-99): Append a unique number to the end of the job name.
●
Replace Existing File: Overwrite the existing stored job with the new one.
6. If you selected the Stored Job or Personal Job option in step 3, you can protect the job with a PIN. Type
a 4-digit number in the Use PIN to Print field. When other people attempt to print this job, the product
prompts them to enter this PIN number.
7. Click the Print button to process the job.
Print a stored job
Use the following procedure to print a job that is stored in the product memory.
1. From the Home screen on the product control panel, scroll to and touch the Retrieve from Device
Memory button.
2. Select the name of the folder where the job is stored.
3. Select the name of the job. If the job is private or encrypted, enter the PIN or password.
4. Adjust the number of copies, and then touch the Start
Delete a stored job
When you send a stored job to the product memory, the product overwrites any previous jobs with the same
user and job name. If a job is not already stored under the same user and job name, and the product needs
additional space, the product might delete other stored jobs starting with the oldest. You can change the
number of jobs that the product can store from the General Settings menu on the product control panel.
Use this procedure to delete a job that is stored in the product memory.
1. From the Home screen on the product control panel, scroll to and touch the Retrieve from Device
Memory button.
2. Select the name of the folder where the job is stored.
button to print the job.
3. Select the name of the job, and then touch the Delete button.
4. If the job is private or encrypted, enter the PIN or the password, and then touch the Delete button.
42 Chapter 4 Print ENWW
Page 51

Mobile printing
HP offers multiple Mobile and ePrint solutions to enable wireless printing to an HP printer from a laptop,
tablet, smartphone, or other mobile device. To determine the best choice, go to
LaserJetMobilePrinting (English only).
●
HP Wireless Direct and NFC Printing
●
HP ePrint via email
●
HP ePrint software
●
AirPrint
HP Wireless Direct and NFC Printing
HP provides HP Wireless Direct and NFC (Near Field Communication) printing for printers with the HP Jetdirect
2800w NFC & Wireless Direct Accessory (part number: J8029A) as well as certain other HP LaserJet printers
(check the printer’s documentation). See
Jetdirect 2800w NFC & Wireless Direct Accessory.
Use HP Wireless Direct to print wirelessly from the following devices:
●
iPhone, iPad, or iPod touch using Apple AirPrint or the HP ePrint app
●
Android mobile devices using the HP ePrint App or the Android embedded print solution
www.hp.com/go/
www.hp.com/go/jd2800wSupport for more information on the HP
●
Symbian mobile devices using the HP ePrint Home & Biz App
●
PC and Mac devices using the HP ePrint Software
For more information on HP Wireless Direct printing, go to
HP Wireless Direct on the left navigation bar.
NFC and HP Wireless Direct capabilities can be enabled or disabled from the printer’s control panel.
1. From the Home screen on the product control panel, scroll to and touch the Administration menu.
2. Open the following menus:
●
Network Settings
●
Wireless Menu
●
Wireless Direct
3. Touch the On menu item.
NOTE: In environments where more than one model of the same product is installed, it might be helpful to
provide each product a more unique SSID for easier product identification for HP Wireless Direct printing. The
SSID (Service Set Identifier) is also available on the How to Connect Page by touching the Network
from the Home screen on the product control panel.
Follow this procedure to change the product SSID:
www.hp.com/go/wirelessprinting, and then click
button
1. From the Home screen on the product control panel, scroll to and touch the Administration menu.
2. Open the following menus:
ENWW Mobile printing 43
Page 52

●
Network Settings
●
Wireless Menu
●
Wireless Direct
●
SSID
3. Touch the SSID name area.
4. Use the keyboard to change the name.
5. Touch OK.
HP ePrint via email
Use HP ePrint to print documents by sending them as an email attachment to the product's email address
from any email enabled device.
NOTE: The product might require a firmware update to use this feature.
To use HP ePrint, the product must meet these requirements:
●
The product must be connected to a wired or wireless network and have Internet access.
●
HP Web Services must be enabled on the product, and the product must be registered with
HP Connected.
Follow this procedure to enable HP Web Services and register with HP Connected:
1. Open the HP Embedded Web Server (EWS):
a. From the Home screen on the product control panel, touch the Network
address or host name.
b. Open a Web browser, and in the address line, type the IP address or host name exactly as it
displays on the product control panel. Press the Enter key on the computer keyboard. The EWS
opens.
2. Click the HP Web Services tab.
3. Select the option to enable Web Services.
NOTE: Enabling Web Services might take several minutes.
4. Go to www.hpconnected.com to create an HP ePrint account and complete the setup process.
HP ePrint software
The HP ePrint software makes it easy to print from a Windows or Mac desktop or laptop computer to any HP
ePrint-capable product. This software makes it easy to find HP ePrint-enabled products that are registered to
your HP Connected account. The target HP printer can be located in the office or at locations across the
globe.
button to display the IP
44 Chapter 4 Print ENWW
Page 53

AirPrint
●
Windows: After installing the software, open the Print option from within your application, and then
select HP ePrint from the installed printers list. Click the Properties button to configure print options.
●
Mac: After installing the software, select File, Print, and then select the arrow next to PDF (in the
bottom left of the driver screen). Select HP ePrint.
For Windows, the HP ePrint software supports TCP/IP printing to local network printers on the network (LAN
or WAN) to products that support UPD PostScript®.
Windows and Mac both support IPP printing to LAN or WAN network-connected products that support ePCL.
Windows and Mac also both support printing PDF documents to public print locations and printing using HP
ePrint via email through the cloud.
www.hp.com/go/eprintsoftware for drivers and information.
Go to
NOTE: The HP ePrint software is a PDF workflow utility for Mac, and is not technically a print driver.
NOTE: HP ePrint Software does not support USB printing.
Direct printing using Apple’s AirPrint is supported for iOS 4.2 or later. Use AirPrint to print directly to the
product from an iPad, iPhone (3GS or later), or iPod touch (third generation or later) in the following
applications:
●
Mail
●
Photos
●
Safari
●
iBooks
●
Select third-party applications
To use AirPrint, the product must be connected to the same wireless network as the Apple device. For more
information about using AirPrint and about which HP products are compatible with AirPrint, go to the support
Web site for this product:
●
In the US, go to
●
Outside the US, go to
the product name, and then select Search.
NOTE: AirPrint does not support USB connections.
www.hp.com/support/colorljM651.
www.hp.com/support. Select your country/region. Click Troubleshooting. Enter
ENWW Mobile printing 45
Page 54

Print from the USB port
This product features easy-access USB printing, so you can quickly print files without sending them from a
computer. The product accepts standard USB flash drives in the USB port on the front of the product. You can
print the following types of files:
●
.pdf
●
.prn
●
.pcl
●
.ps
●
.cht
Enable the USB port for printing
Before you can use this feature, you must enable the USB port. Use the following procedure to enable the
port from the product control-panel menus:
1. From the Home screen on the product control panel, scroll to and touch the Administration button.
2. Open the following menus:
●
General Settings
●
Enable Retrieve from USB
3. Select the Enable option, and then touch the Save button.
Print USB documents
1. Insert the USB flash drive into the easy-access USB port.
NOTE: You might need to remove the cover from the USB port. Pull the cover straight out to remove it.
2. The product detects the USB flash drive. Touch the OK button to access the drive, or, if prompted, select
the Retrieve from USB option from the list of available applications. The Retrieve from USB screen
opens.
3. Select the name of the document that you want to print.
NOTE: The document might be in a folder. Open folders as necessary.
4. To adjust the number of copies, touch the Copies field, and then use the keypad to select the number of
copies.
5. Touch the Start
button to print the document.
46 Chapter 4 Print ENWW
Page 55

5 Manage the product
●
Configure IP network settings
●
HP Utility for Mac OS X
●
HP Embedded Web Server
●
HP Web Jetadmin
●
Product security features
●
Economy settings
●
Software and firmware updates
For more information:
In the US, go to
Outside the US, go to
product name, and then select Search.
HP's all-inclusive help for your product includes the following information:
●
Install and configure
●
Learn and use
●
Solve problems
●
Download software updates
●
Join support forums
●
Find warranty and regulatory information
www.hp.com/support/colorljM651.
www.hp.com/support. Select your country/region. Click Troubleshooting. Enter the
ENWW 47
Page 56

Configure IP network settings
●
Printer sharing disclaimer
●
View or change network settings
●
Rename the product on a network
●
Manually configure IPv4 TCP/IP parameters from the control panel
●
Manually configure IPv6 TCP/IP parameters from the control panel
Printer sharing disclaimer
HP does not support peer-to-peer networking, as the feature is a function of Microsoft operating systems
and not of the HP printer drivers. Go to Microsoft at
View or change network settings
Use the HP Embedded Web Server to view or change IP configuration settings.
1. Open the HP Embedded Web Server (EWS):
www.microsoft.com.
a. From the Home screen on the product control panel, touch the Network
address or host name.
b. Open a Web browser, and in the address line, type the IP address or host name exactly as it
displays on the product control panel. Press the Enter key on the computer keyboard. The EWS
opens.
2. Click the Networking tab to obtain network information. You can change settings as needed.
Rename the product on a network
If you want to rename the product on a network so that it can be uniquely identified, use the HP Embedded
Web Server.
1. Open the HP Embedded Web Server (EWS):
a. From the Home screen on the product control panel, touch the Network
address or host name.
b. Open a Web browser, and in the address line, type the IP address or host name exactly as it
displays on the product control panel. Press the Enter key on the computer keyboard. The EWS
opens.
button to display the IP
button to display the IP
2. Open the General tab.
3. On the Device Information page, the default product name is in the Device Name field. You can change
this name to uniquely identify this product.
48 Chapter 5 Manage the product ENWW
Page 57

NOTE: Completing the other fields on this page is optional.
4. Click the Apply button to save the changes.
Manually configure IPv4 TCP/IP parameters from the control panel
Use the control-panel Administration menus to manually set an IPv4 address, subnet mask, and default
gateway.
1. From the Home screen on the product control panel, scroll to and touch the Administration button.
2. Open the following menus:
●
Network Settings
●
Jetdirect Menu
●
TCP/IP
●
IPV 4 Settings
●
Config Method
3. Select the Manual option, and then touch the Save button.
4. Open the Manual Settings menu.
5. Touch the IP Address, Subnet Mask, or Default Gateway option.
6. Touch the first field to open a keypad. Enter the correct digits for the field, and then touch the OK
button.
Repeat the process for each field, and then touch the Save button.
Manually configure IPv6 TCP/IP parameters from the control panel
Use the control-panel Administration menus to manually set an IPv6 address.
1. From the Home screen on the product control panel, scroll to and touch the Administration button.
2. To enable manual configuration, open the following menus:
●
Network Settings
●
Jetdirect Menu
●
TCP/IP
●
IPV6 Settings
●
Address
●
Manual Settings
●
Enable
Select the On option, and then touch the Save button.
3. To configure the address, touch the Address button and then touch the field to open a keypad.
ENWW Configure IP network settings 49
Page 58

4. Use the keypad to enter the address, and then touch the OK button.
5. Touch the Save button.
50 Chapter 5 Manage the product ENWW
Page 59

HP Utility for Mac OS X
Use the HP Utility for Mac OS X to check product status or to view or change product settings from your
computer.
You can use the HP Utility when the product is connected with a USB cable or is connected to a TCP/IP-based
network.
Open HP Utility
From the Finder, click Applications, click Hewlett-Packard, and then click HP Utility.
If HP Utility is not included in the Utilities list, use the following procedure to open it:
1. At the computer, open the Apple
& Fax icon or the Print & Scan icon.
2. Select the product in the left side of the window.
3. Click the Options & Supplies button.
4. Click the Utility tab.
5. Click the Open Printer Utility button.
HP Utility features
The HP Utility toolbar is at the top of every page. It includes these items:
●
Devices: Click this button to show or hide Mac products found by the HP Utility in the Printers pane at
the left side of the screen.
●
All Settings: Click this button to return to the HP Utility main page.
●
Applications: Click this button to manage which HP tools or utilities appear in the Dock.
●
HP Support: Click this button to open a browser and go to the HP support Web site for the product.
●
Supplies: Click this button to open the HP SureSupply Web site.
●
Registration: Click this button to open the HP registration Web site.
menu, click the System Preferences menu, and then click the Print
●
Recycling: Click this button to open the HP Planet Partners Recycling Program Web site.
HP Utility consists of pages that you open by clicking in the All Settings list. The following table describes the
tasks that you can perform with HP Utility.
Menu Item Description
Information and Support Supplies Status Shows the product supplies status and provides links for ordering
Device Information Shows information about the currently selected product.
File Upload Transfers files from the computer to the product.
Upload Fonts Transfers font files from the computer to the product.
HP Connected Accesses the HP Connected Web site.
ENWW HP Utility for Mac OS X 51
supplies online.
Page 60

Menu Item Description
Update Firmware Transfers a firmware update file to the product.
NOTE: This option is available only after you open the View menu and
select the Show Advanced Options item.
Commands Sends special characters or print commands to the product after the print
Printer Settings Supplies Management Configures how the product should behave when supplies are nearing the
Trays Configuration Changes the default tray settings.
Output Devices Manages settings for optional output accessories.
Duplex Mode Turns on the automatic two-sided printing mode.
Protect Direct Ports Disables printing over USB or parallel ports.
Stored Jobs Manages print jobs that are stored on the product hard disk.
Network Settings Configures the network settings, such as the IPv4 and IPv6 settings.
Additional Settings Provides access to the HP Embedded Web Server.
Scan Settings Scan to E-mail Opens the HP Embedded Web Server page for configuring settings for
Scan to Network Folder Opens the HP Embedded Web Server page for configuring settings for
job.
NOTE: This option is available only after you open the View menu and
select the Show Advanced Options item.
end of their estimated life.
scanning to email.
NOTE: USB connections are not supported.
scanning to a network folder.
NOTE: USB connections are not supported.
52 Chapter 5 Manage the product ENWW
Page 61

HP Embedded Web Server
●
How to access the HP Embedded Web Server (EWS)
●
HP Embedded Web Server features
Use the HP Embedded Web Server to manage printing functions from a computer instead of the product
control panel.
●
View product status information
●
Determine the remaining life for all supplies and order new ones
●
View and change tray configurations
●
View and change the product control-panel menu configuration
●
View and print internal pages
●
Receive notification of product and supplies events
●
View and change network configuration
The HP Embedded Web Server works when the product is connected to an IP-based network. The HP
Embedded Web Server does not support IPX-based product connections. Internet access is not needed to
open and use the HP Embedded Web Server.
When the product is connected to the network, the HP Embedded Web Server is automatically available.
NOTE: The HP Embedded Web Server is not accessible beyond the network firewall.
How to access the HP Embedded Web Server (EWS)
1. From the Home screen on the product control panel, touch the Network button to display the IP
address or host name.
2. Open a Web browser, and in the address line, type the IP address or host name exactly as it displays on
the product control panel. Press the Enter key on the computer keyboard. The EWS opens.
To use the HP Embedded Web Server, the browser must meet the following requirements:
●
Windows: Microsoft Internet Explorer 5.01 or later or Netscape 6.2 or later
●
Mac OS X: Safari or Firefox using Bonjour or an IP address
●
Linux: Netscape Navigator only
●
HP-UX 10 and HP-UX 11: Netscape Navigator 4.7
HP Embedded Web Server features
●
Information tab
●
General tab
●
Print tab or Copy/Print tab
ENWW HP Embedded Web Server 53
Page 62

●
Scan/Digital Send tab (MFP models only)
●
Fax tab (MFP models only)
●
Troubleshooting tab
●
Security tab
●
HP Web Services tab
●
Networking tab
●
Other Links list
Information tab
Table 5-1 HP Embedded Web Server Information tab
Menu Description
Device Status Shows the product status and shows the estimated life remaining of HP supplies. The
Job Log Shows a summary of all jobs the product has processed.
Configuration Page Shows the information found on the configuration page.
Supplies Status Page Shows the status of the supplies for the product.
Event Log Page Shows a list of all product events and errors. Use the HP Instant Support link (in the
Usage Page Shows a summary of the number of pages the product has printed, grouped by size,
Device Information Shows the product network name, address, and model information. To customize these
Control Panel Snapshot Shows an image of the current screen on the control panel display.
Print Upload a print-ready file from the computer to print. The product uses the default print
Printable Reports and Pages Lists the internal reports and pages for the product. Select one or more items to print or
page also shows the type and size of paper set for each tray. To change the default
settings, click the Change Settings link.
Other Links area on all HP Embedded Web Server pages) to connect to a set of dynamic
Web pages that help solve problems. These pages also show additional services
available for the product.
type, and paper print path.
entries, click the Device Information menu on the General tab.
settings to print the file.
view.
General tab
Table 5-2 HP Embedded Web Server General tab
Menu Description
Control Panel Customization Reorder, show, or hide features on the control-panel display.
Change the default display language.
Quick Sets Setup Configure jobs that are available in the Quick Sets area of the Home screen on the
Alerts Setup email alerts for various product and supplies events.
54 Chapter 5 Manage the product ENWW
product control panel.
Page 63

Table 5-2 HP Embedded Web Server General tab (continued)
Menu Description
Control Panel Administration Menu Shows the menu structure of the Administration menu on the control panel.
NOTE: Configure settings on this screen, or the HP Embedded Web Server provides
more advanced configuration options than are available through the Administration
menu.
AutoSend Configure the product to send automated emails regarding product configuration and
Edit Other Links Add or customize a link to another Web site. This link displays in the Other Links area on
Ordering Information Enter information about ordering replacement toner cartridges. This information
Device Information Name the product and assign an asset number to it. Enter the name of the primary
Language Set the language in which to display the HP Embedded Web Server information.
Date and Time Set the date and time or synchronize with a network time server.
Energy Settings Set or edit a wake time, sleep time, and sleep delay for the product. Set a different
Backup and Restore Create a backup file that contains product and user data. If necessary, use this file to
Restore Factory Settings Restore product settings to the factory defaults.
Solution Installer Install third-party software programs that can enhance the product functionality.
Firmware Upgrade Download and install product firmware upgrade files.
Quota and Statistics Services Provides connection information about third-party job-statistics services.
supplies to specific email addresses.
all HP Embedded Web Server pages.
displays on the supplies status page.
contact who will receive information about the product.
schedule for each day of the week and for holidays.
Set which interactions with the product cause it to wake from sleep mode.
restore data to the product.
Print tab or Copy/Print tab
NOTE: The tab is named Copy/Print for MFP models.
Table 5-3 HP Embedded Web Server Copy/Print tab
Menu Description
Retrieve from USB Setup Enable or disable the Retrieve from USB menu on the control panel.
Manage Stored Jobs Enable or disable the ability to store jobs in the product memory.
Configure job-storage options.
Adjust Paper Types Override the factory-default mode settings if print quality problems occur when using a
specific paper type.
Restrict Color Permit or restrict color printing and copying.
Specify permissions for individual users or for jobs that are sent from specific software
programs.
General Print Settings Configure settings for all print jobs, including copy jobs or received faxes.
ENWW HP Embedded Web Server 55
Page 64

Table 5-3 HP Embedded Web Server Copy/Print tab (continued)
Menu Description
Copy Settings (MFP models only) Configure the default options for copy jobs.
Manage Trays Configure settings for paper trays.
Scan/Digital Send tab (MFP models only)
Table 5-4 HP Embedded Web Server Scan/Digital Send tab
Menu Description
E-mail and Save to Network Folder Quick
Setup Wizards
Address Book Manage the address book, including the following:
E-mail Setup Configure the default email settings for digital sending, including the following:
Save to Network Folder Setup Configure the network folder settings for digital sending, including the following:
Configure the product to send scanned images as email attachments.
Configure the product to save scanned images to network-folder Quick Sets. Quicks Sets
provide easy access to files saved on the network.
●
Add email addresses into the product one at a time.
●
Use the Import/Export tab to load a large list of frequently-used email addresses
on to the product all at once, rather than adding them one at a time.
●
Edit email addresses that have already been saved in the product.
●
Settings for the outgoing mail (SMTP) server
●
Default settings for E-mail Quick Sets jobs
●
Default message settings, such as the "From" address and the subject line
●
Settings for digital signatures and encryption
●
Settings for email notifications
●
Default scan settings for email jobs
●
Default file settings for email jobs
●
Default settings for Quick Sets jobs saved in a network folder
●
Settings for notifications
●
Default scan settings for jobs saved in a network folder
●
Default file settings for for jobs saved in a network folder
Save to USB Setup Configure the USB settings for digital sending, including the following:
●
Default settings for Quick Sets jobs saved on a USB flash drive
●
Settings for notifications
●
Default scan settings for jobs saved on a USB flash drive
●
Default file settings for for jobs saved on a USB flash drive
56 Chapter 5 Manage the product ENWW
Page 65

Table 5-4 HP Embedded Web Server Scan/Digital Send tab (continued)
Menu Description
OXPd: Workflow Use third-party workflow tools.
Digital Sending Software Setup Configure settings related to using optional Digital Sending software.
Fax tab (MFP models only)
Table 5-5 HP Embedded Web Server Fax tab
Menu Description
Fax Send Setup Configure settings for sending faxes, including the following:
Speed Dials Manage speed dial numbers, including the following:
●
Default settings for outgoing faxes
●
Default setting for sending faxes using the internal fax modem
●
Settings for using a LAN fax service
●
Settings for using an Internet fax service
●
Import .CSV files containing email addresses, fax numbers, or user records, so that
they can be accessed on this product.
Fax Receive Setup Configure default print options for incoming faxes, and set up a fax printing schedule.
Fax Archive and Forwarding Enable or disable fax archiving and fax forwarding, and configure basic settings for each:
Fax Activity Log Contains a list of the faxes that have been sent from or received by this product.
Troubleshooting tab
Table 5-6 HP Embedded Web Server Troubleshooting tab
Menu Description
General Troubleshooting Select from a variety of reports and tests to help solve problems with the product.
Retrieve Diagnostic Data
NOTE: This item is available only if an
administrator password is set from the
Security tab.
●
Export email, fax, or user records from the product into a file on the computer to
use as a data backup, or import the records onto another HP product.
●
Fax archiving is a method to send a copy of all incoming and outgoing faxes to an
email address.
●
Fax forwarding is a method to forward incoming faxes to a different fax device.
Export product information to a file that can be useful for detailed problem analysis.
Calibration/Cleaning Enable the automatic cleaning feature, create and print the cleaning page, and select an
Firmware Upgrade Download and install product firmware upgrade files.
Restore Factory Settings Restore product settings to factory defaults.
option to calibrate the product immediately.
ENWW HP Embedded Web Server 57
Page 66

Security tab
Table 5-7 HP Embedded Web Server Security tab
Menu Description
General Security Settings for general security, including the following:
●
Configure an administrator password to restrict access to certain features on the
product.
●
Set PJL password for processing PJL commands.
●
Set file system access and firmware upgrade security.
●
Enable or disable the Host USB port on the control panel or the USB connectivity
port on the formatter for printing directly from a computer.
●
View the status of all security settings.
Access Control Configure access to product functions for specific individuals or groups, and select the
Protect Stored Data Configure and manage the internal hard drive for the product. This product includes an
Certificate Management Install and manage security certificates for access to the product and the network.
Web Service Security Allow resources on this product to be accessed by web pages from different domains. If
Self Test Verify that the security functions are running according to expected system parameters.
HP Web Services tab
Use the HP Web Services tab to configure and enable HP Web Services for this product. It is necessary to
Enable HP Web Services to use the HP ePrint feature.
Table 5-8 HP Embedded Web Server Networking tab
Menu Description
Web Services Setup Connect this product to HP's ePrintCenter on the Web by enabling HP Web Services.
Web Proxy Configure a proxy server if there are issues enabling HP Web Services or connecting the
method individuals use to sign in to the product.
encrypted hard drive for maximum security.
Configure settings for jobs that are stored on the product hard drive.
no sites are added to the list, then all sites are trusted.
product to the Internet.
Networking tab
Use the Networking tab to configure and secure network settings for the product when it is connected to an
IP-based network. This tab does not display if the product is connected to other types of networks.
Table 5-9 HP Embedded Web Server Networking tab
Menu Description
TCP/IP Setting Configure TCP/IP settings for IPv4 and IPv6 networks.
NOTE: The configuration options available depend on the print server model.
58 Chapter 5 Manage the product ENWW
Page 67

Table 5-9 HP Embedded Web Server Networking tab (continued)
Menu Description
Network Settings Configure IPX/SPX, AppleTalk, DLC/LLC, and SNMP settings, depending on the print
server model.
Other Settings Configure general printing protocols and services supported by the print server. The
available options depend on the print server model, but can include firmware update,
LPD queues, USB settings, support information, and refresh rate.
AirPrint Enable, set up, or disable network printing from Apple supported products.
Select Language Change the language displayed by the HP Embedded Web Server. This page displays if
the Web pages support multiple languages. Optionally, select supported languages
through language-preference settings in the browser.
Settings View and restore current security settings to factory-default values.
Configure security settings using the Security Configuration Wizard.
NOTE: Do not use the Security Configuration Wizard to configure security settings
using network-management applications, such as HP Web Jetadmin.
Authorization Control configuration management and use of this product, including the following:
●
Set or change the administrator password to control access to configuration
parameters.
●
Request, install, and manage digital certificates on the HP Jetdirect print server.
●
Limit host access to this product through an Access Control List (ACL) (for selected
print servers on IPv4 networks only).
Mgmt. Protocols Configure and manage security protocols for this product, including the following:
●
Set the security management level for the HP Embedded Web Server, and control
traffic over HTTP and HTTPS.
●
Configure the SNMP (Simple Network Management Protocol) operation. Enable or
disable the SNMP v1/v2c or SNMP v3 agents on the print server.
●
Control access through protocols that may not be secure, such as printing
protocols, print services, discovery protocols, name resolution services, and
configuration-management protocols.
802.1X Authentication Configure 802.1X authentication settings on the Jetdirect print server as required for
IPsec/Firewall View or configure a Firewall policy or an IPsec/Firewall policy (for selected HP Jetdirect
Announcement Agent Enable or disable the HP Device Announcement Agent, set the configuration server, and
Network Statistics Display network statistics that are collected and stored on the HP Jetdirect print server.
client authentication on the network, and reset the 802.1X authentication settings to
factory-default values.
CAUTION: When changing the 802.1X authentication settings; the product might lose
its connection. To reconnect, it might be necessary to reset the print server to a factorydefault state and reinstall the product.
models only).
configure mutual authentication using certificates.
Protocol Info View a list of network-configuration settings on the HP Jetdirect print server for each
Configuration Page View the HP Jetdirect configuration page, which contains status and configuration
protocol.
information.
ENWW HP Embedded Web Server 59
Page 68

Other Links list
NOTE: Configure which links display in the Other Links list by using the Edit Other Links menu on the
General tab. The following are the default links.
Table 5-10 HP Embedded Web Server Other Links list
Menu Description
Product Support Connect to the support site for the product to search for help on various topics.
Shop for Supplies Connect to the HP SureSupply Web site for information on purchasing original HP
HP Instant Support Connect to the HP Web site to find solutions to product problems.
supplies, such as toner cartridges and paper.
60 Chapter 5 Manage the product ENWW
Page 69

HP Web Jetadmin
HP Web Jetadmin is an award-winning, industry-leading tool for efficiently managing a wide variety of
networked HP products, including printers, multifunction products, and digital senders. This single solution
allows you to remotely install, monitor, maintain, troubleshoot, and secure your printing and imaging
environment — ultimately increasing business productivity by helping you save time, control costs, and
protect your investment.
HP Web Jetadmin upgrades are periodically made available to provide support for specific product features.
Go to
www.hp.com/go/webjetadmin and click the Self Help and Documentation link to learn more about
upgrades.
ENWW HP Web Jetadmin 61
Page 70

Product security features
●
Security statements
●
IP Security
●
Sign in to the product
●
Assign a system password
●
Encryption support: HP High Performance Secure Hard Disks
●
Lock the formatter
Security statements
The product supports security standards and recommended protocols that help you keep the product secure,
protect critical information on your network, and simplify the way you monitor and maintain the product.
For in-depth information about HP's secure imaging and printing solutions, visit
secureprinting. The site provides links to white papers and FAQ documents about security features.
IP Security
IP Security (IPsec) is a set of protocols that control IP-based network traffic to and from the product. IPsec
provides host-to-host authentication, data integrity, and encryption of network communications.
For products that are connected to the network and have an HP Jetdirect print server, you can configure IPsec
by using the Networking tab in the HP Embedded Web Server.
Sign in to the product
Some features on the product control panel can be secured so that unauthorized people cannot use them.
When a feature is secured, the product prompts you to sign in before you can use it. You can also sign in
without waiting for a prompt by touching the Sign In button on the Home screen.
Typically, you use the same user name and password that you use to sign in to your computer on the
network. Consult the network administrator for this product if you have questions about which credentials to
use.
After you have signed in to the product, a Sign Out button displays on the control panel. To maintain security
for the product, touch the Sign Out button when you have finished using the product.
Assign a system password
www.hp.com/go/
Assign an administrator password for access to the product and the HP Embedded Web Server so that
unauthorized users cannot change the product settings.
1. Open the HP Embedded Web Server (EWS):
a. From the Home screen on the product control panel, touch the Network
address or host name.
62 Chapter 5 Manage the product ENWW
button to display the IP
Page 71

b. Open a Web browser, and in the address line, type the IP address or host name exactly as it
displays on the product control panel. Press the Enter key on the computer keyboard. The EWS
opens.
2. Click the Security tab.
3. Open the General Security menu.
4. In the Username field, enter the name to associate with the password.
5. Enter the password in the New Password field, and then enter it again in the Verify Password field.
NOTE: If you are changing an existing password, you must first enter the existing password in the Old
Password field.
6. Click the Apply button. Make note of the password and store it in a safe place.
Encryption support: HP High Performance Secure Hard Disks
The hard disk provides hardware-based encryption so you can securely store sensitive data without
impacting product performance. This hard disk uses the latest Advanced Encryption Standard (AES) and has
versatile time-saving features and robust functionality.
Use the Security menu in the HP Embedded Web Server to configure the disk.
Lock the formatter
The formatter has a slot that you can use to attach a security cable. Locking the formatter prevents someone
from removing valuable components from it.
ENWW Product security features 63
Page 72

Economy settings
●
Optimize speed or energy usage
●
Set Sleep mode
●
Set the Sleep Schedule
Optimize speed or energy usage
By default the product stays warm between jobs to optimize speed and print the first page of jobs faster. To
conserve energy, set the product to cool between jobs. The product has four incremental settings to optimize
for speed or energy usage.
1. From the Home screen on the product control panel, scroll to and touch the Administration button.
2. Open the following menus:
●
General Settings
●
Energy Settings
●
Optimum Speed/Energy Usage
3. Select the option that you want to use, and then touch the Save button.
NOTE: The default setting is Faster first page.
Set Sleep mode
1. From the Home screen on the product control panel, scroll to and touch the Administration button.
2. Open the following menus:
●
General Settings
●
Energy Settings
●
Sleep Timer Settings
3. Touch Sleep/Auto Off After to select the option.
4. Select the appropriate time period, and then touch the Save button.
NOTE: The sleep-mode default time is 15 minutes.
Set the Sleep Schedule
NOTE: You must configure the date and time settings before you can use the Sleep Schedule feature.
1. From the Home screen on the product control panel, scroll to and touch the Administration button.
2. Open the following menus:
●
General Settings
●
Date/Time Settings
64 Chapter 5 Manage the product ENWW
Page 73

3. Open the Date/Time Format menu and configure the following settings:
●
Date Format
●
Time Format
4. Touch the Save button.
5. Open the Date/Time menu and configure the following settings:
●
Date/Time
●
Time Zone
If you are in an area that uses daylight savings time, select the Adjust for Daylight Savings box.
6. Touch the Save button.
7. Touch the back-arrow button to return to the Administration screen.
8. Open the following menus:
●
General Settings
●
Energy Settings
●
Sleep Schedule
9. Touch the Add
button, and then select the type of event to schedule: Wake or Sleep.
10. Configure the following settings:
●
Time
●
Event Days
11. Touch the OK button, and then touch the Save button.
ENWW Economy settings 65
Page 74

Software and firmware updates
HP regularly updates features that are available in the product firmware. To take advantage of the most
current features, update the product firmware. Download the most recent firmware update file from the
Web:
In the US, go to
Outside the US, follow these steps:
1. Go to
2. Select your country/region.
3. Click Drivers & Software.
4. Enter the product name (HP Color LaserJet Enterprise M651), and then select Search.
www.hp.com/support/colorljM651. Click Drivers & Software.
www.hp.com/support.
66 Chapter 5 Manage the product ENWW
Page 75

6 Solve general problems
●
Customer support
●
Control panel help system
●
Restore factory-set defaults
●
A “Cartridge is low” or “Cartridge is very low” message displays on the product control panel
●
Product does not pick up paper or misfeeds
●
Clear jams
●
Improve print quality
●
Solve wired network problems
For more information:
In the US, go to
Outside the US, go to
product name, and then select Search.
HP's all-inclusive help for your product includes the following information:
●
Install and configure
●
Learn and use
●
Solve problems
●
Download software updates
●
Join support forums
●
Find warranty and regulatory information
www.hp.com/support/colorljM651.
www.hp.com/support. Select your country/region. Click Troubleshooting. Enter the
ENWW 67
Page 76

Customer support
Get telephone support for your country/region
Have the product name, serial number, date of purchase, and
problem description ready.
Get 24-hour Internet support
Download software utilities, drivers, and electronic information
Order additional HP service or maintenance agreements
Register your product
Country/region phone numbers are on the flyer that was in the
box with your product or at
●
In the US, go to
●
Outside the US, go to
country/region. Click Troubleshooting. Enter the product
name, and then select Search.
●
In the US, go to
Drivers & Software.
●
Outside the US, go to
country/region. Click Drivers & Software. Enter the product
name (for example, “LaserJet M575”), and then select
Search.
www.hp.com/go/carepack
www.register.hp.com
www.hp.com/support/.
www.hp.com/support/colorljM651.
www.hp.com/support. Select your
www.hp.com/support/colorljM651. Click
www.hp.com/support. Select your
68 Chapter 6 Solve general problems ENWW
Page 77

Control panel help system
The product has a built-in Help system that explains how to use each screen. To open the Help system, touch
the Help
For some screens, the Help opens to a global menu where you can search for specific topics. You can browse
through the menu structure by touching the buttons in the menu.
Some Help screens include animations that guide you through procedures, such as clearing jams.
For screens that contain settings for individual jobs, the Help opens to a topic that explains the options for
that screen.
button in the upper-right corner of the screen.
If the product alerts you of an error or warning, touch the Help
the problem. The message also contains instructions to help solve the problem.
button to open a message that describes
ENWW Control panel help system 69
Page 78

Restore factory-set defaults
1. From the Home screen on the product control panel, scroll to and touch the Administration button.
2. Open the following menus:
●
General Settings
●
Restore Factory Settings
3. A verification message advises that completing the reset function might result in loss of data. Touch the
Reset button to complete the process.
NOTE: The product restarts automatically after the reset operation completes.
70 Chapter 6 Solve general problems ENWW
Page 79

A “Cartridge is low” or “Cartridge is very low” message displays on the product control panel
Cartridge is low: The product indicates when a toner cartridge level is low. Actual toner cartridge life
remaining may vary. Consider having a replacement available to install when print quality is no longer
acceptable. The toner cartridge does not need to be replaced now.
Cartridge is very low: The product indicates when the toner cartridge level is very low. Actual toner cartridge
life remaining may vary. Consider having a replacement available to install when print quality is no longer
acceptable. The toner cartridge does not need to be replaced now unless the print quality is no longer
acceptable.
Once an HP toner cartridge has reached Very Low, HP’s Premium Protection Warranty on that toner cartridge
has ended.
Change the “Very Low” settings
You can change the way the product reacts when supplies reach the Very Low state. You do not have to reestablish these settings when you install a new toner cartridge.
1. From the Home screen on the product control panel, scroll to and touch Supplies.
2. Open the following menus:
●
Manage Supplies
●
Supply Settings
●
Black Cartridge or Color Cartridges
●
Very Low Settings
3. Select one of the following options:
●
Select the Stop option to set the product to stop printing when the cartridge reaches the Very Low
threshold.
●
Select the Prompt to continue option to set the product to stop printing when the cartridge
reaches the Very Low threshold. You can acknowledge the prompt or replace the cartridge to
resume printing.
●
Select the Continue option to set the product to alert you that the cartridge is very low, and to
continue printing beyond the Very Low setting without interaction. This can result in
unsatisfactory print quality.
For products with fax capability
When the product is set to the Stop or Prompt to continue option, there is some risk that faxes will not print
when the product resumes printing. This can occur if the product has received more faxes than the memory
can hold while the product is waiting.
The product can print faxes without interruption when it passes the Very Low threshold if you select the
Continue option for the toner cartridge, but print quality might degrade.
ENWW A “Cartridge is low” or “Cartridge is very low” message displays on the product control panel 71
Page 80

Order supplies
Order supplies and paper www.hp.com/go/suresupply
Order through service or support providers Contact an HP-authorized service or support provider.
Order using the HP Embedded Web Server (EWS) To access, in a supported Web browser on your computer, enter
the product IP address or host name in the address/URL field. The
EWS contains a link to the HP SureSupply Web site, which
provides options for purchasing Original HP supplies.
72 Chapter 6 Solve general problems ENWW
Page 81

Product does not pick up paper or misfeeds
●
The product does not pick up paper
●
The product picks up multiple sheets of paper
●
The document feeder jams, skews, or picks up multiple sheets of paper
The product does not pick up paper
If the product does not pick up paper from the tray, try these solutions.
1. Open the product and remove any jammed sheets of paper.
2. Load the tray with the correct size of paper for your job.
3. Make sure the paper size and type are set correctly on the product control panel.
4. Make sure the paper guides in the tray are adjusted correctly for the size of paper. Adjust the guides to
the appropriate indentation in the tray.
5. Check the product control panel to see if the product is waiting for you to acknowledge a prompt to feed
the paper manually. Load paper, and continue.
6. The rollers above the tray might be contaminated. Clean the rollers with a lint-free cloth dampened
with warm water.
The product picks up multiple sheets of paper
If the product picks up multiple sheets of paper from the tray, try these solutions.
1. Remove the stack of paper from the tray and flex it, rotate it 180 degrees, and flip it over. Do not fan
the paper. Return the stack of paper to the tray.
2. Use only paper that meets HP specifications for this product.
3. Use paper that is not wrinkled, folded, or damaged. If necessary, use paper from a different package.
4. Make sure the tray is not overfilled. If it is, remove the entire stack of paper from the tray, straighten
the stack, and then return some of the paper to the tray.
5. Make sure the paper guides in the tray are adjusted correctly for the size of paper. Adjust the guides to
the appropriate indentation in the tray.
6. Make sure the printing environment is within recommended specifications.
The document feeder jams, skews, or picks up multiple sheets of paper
NOTE: This information applies to MFP products only.
●
The original might have something on it, such as staples or self-adhesive notes, that must be removed.
●
Check that all rollers are in place and that the roller-access cover inside the document feeder is closed.
●
Make sure that the top document-feeder cover is closed.
●
The pages might not be placed correctly. Straighten the pages and adjust the paper guides to center the
stack.
ENWW Product does not pick up paper or misfeeds 73
Page 82

●
The paper guides must be touching the sides of the paper stack to work correctly. Make sure that the
paper stack is straight and the guides are against the paper stack.
●
The document feeder input tray or output bin might contain more than the maximum number of pages.
Make sure the paper stack fits below the guides in the input tray, and remove pages from the output
bin.
●
Verify that there are no pieces of paper, staples, paper clips, or other debris in the paper path.
●
Clean the document-feeder rollers and the separation pad. Use compressed air or a clean, lint-free cloth
moistened with warm water. If misfeeds still occur, replace the rollers.
●
From the Home screen on the product control panel, scroll to and touch the Supplies button. Check the
status of the document-feeder kit, and replace it if necessary.
74 Chapter 6 Solve general problems ENWW
Page 83

Clear jams
Jam locations
1
4
2
3
5
4
M651xhM651n
M651dn
1 Output bin See Clear jams in the output bin on page 92.
2 Right door and fuser area See
3 Tray 1 See
4 Tray 2 and the 500-sheet trays See
5 1,500-sheet high-capacity input tray See
6 Lower-right door See
Clear jams in the right door and the fuser area
on page 89.
Clear jams in Tray 1 on page 77.
Clear jams in Tray 2 and the 500-sheet trays
on page 79.
Clear jams in the 1,500-sheet high-capacity input tray
and the lower-right door on page 84.
Clear jams in the lower-right door on page 88.
6
Auto-navigation for clearing jams
The auto-navigation feature assists you in clearing jams by providing step-by-step instructions on the
control panel. When you complete a step, the product displays instructions for the next step until you have
completed all steps in the procedure.
Experiencing frequent or recurring paper jams?
To reduce the number of paper jams, try these solutions.
1. Use only paper that meets HP specifications for this product.
2. Use paper that is not wrinkled, folded, or damaged. If necessary, use paper from a different package.
3. Use paper that has not previously been printed or copied on.
ENWW Clear jams 75
Page 84

4. Make sure the tray is not overfilled. If it is, remove the entire stack of paper from the tray, straighten
the stack, and then return some of the paper to the tray.
5. Make sure the paper guides in the tray are adjusted correctly for the size of paper. Adjust the guides so
they are touching the paper stack without bending it.
6. Make sure that the tray is fully inserted in the product.
7. If you are printing on heavy, embossed, or perforated paper, use the manual feed feature and feed
sheets one at a time.
8. From the Home screen on the product control panel, scroll to and touch the Trays button. Verify that the
tray is configured correctly for the paper type and size.
9. Make sure the printing environment is within recommended specifications.
76 Chapter 6 Solve general problems ENWW
Page 85

Clear jams in Tray 1
When a jam occurs, the control panel displays an animation that assists in clearing the jam.
1. If jammed paper is visible in Tray 1, clear the jam
by gently pulling the paper straight out. Touch
the OK button to clear the message.
2. If you cannot remove the paper, or if no jammed
paper is visible in Tray 1, close Tray 1 and open
the right door.
ENWW Clear jams 77
Page 86

3. Gently pull the paper out of the pick up area.
4. Close the right door.
78 Chapter 6 Solve general problems ENWW
Page 87

Clear jams in Tray 2 and the 500-sheet trays
Use the following procedure to check for paper in all possible jam locations related to Tray 2 and the 500sheet trays. When a jam occurs, the control panel displays an animation that assists in clearing the jam.
1. Pull the tray completely out of the product by
pulling and lifting it up slightly.
2. Remove any jammed or damaged sheets of
paper.
3. Remove any paper from the feed rollers inside
the product.
ENWW Clear jams 79
Page 88

4. Reinsert and close the tray.
5. Open the lower-right door.
6. Gently pull out any jammed paper.
80 Chapter 6 Solve general problems ENWW
Page 89

7. Close the lower-right door.
8. Open the right door.
9. Gently pull out any jammed paper.
ENWW Clear jams 81
Page 90

10. If paper is visible entering the bottom of the
fuser, gently pull downward to remove it.
CAUTION: Do not touch the rollers on the
transfer roller. Contaminants can affect print
quality.
11. If paper is jammed as it enters the output bin,
remove the fuser and gently pull the paper
downward to remove it.
12. Paper could be jammed inside the fuser where it
would not be visible. Grasp the fuser handles, lift
up slightly, and then pull straight out to remove
the fuser.
CAUTION: The fuser can be hot while the
product is in use. Wait for the fuser to cool before
handling it.
82 Chapter 6 Solve general problems ENWW
Page 91

13. Open the jam-access door. If paper is jammed
inside the fuser, gently pull it straight up to
remove it. If the paper tears, remove all paper
fragments.
CAUTION: Even if the body of the fuser has
cooled, the rollers that are inside could still be
hot. Do not touch the fuser rollers until they have
cooled.
14. Close the jam-access door, and push the fuser
completely into the product.
15. Close the right door.
ENWW Clear jams 83
Page 92

Clear jams in the 1,500-sheet high-capacity input tray and the lower-right door
Use the following procedure to check for paper in all possible jam locations related to the 1,500-sheet highcapacity tray. When a jam occurs, the control panel displays an animation that assists in clearing the jam.
1. Open the 1,500-sheet high-capacity input tray.
2. Remove and discard any damaged sheets.
3. Remove the paper from the tray.
84 Chapter 6 Solve general problems ENWW
Page 93

4. Lift the tray up and then pull it straight out to
remove it.
5. If jammed paper is in the feed area, pull it down
to remove it.
6. Reinstall the tray, and then load full reams of
paper into the tray. The tray holds 1,500 sheets
of paper.
NOTE: For best results, load full reams of
paper. Avoid dividing reams into smaller sections.
ENWW Clear jams 85
Page 94

7. Close the tray.
8. Open the lower-right door.
86 Chapter 6 Solve general problems ENWW
Page 95

9. Remove any jammed paper.
10. Close the lower-right door.
NOTE: If after clearing the jam the product
control panel displays a message that there is no
paper in the tray or the tray is over filled, remove
the tray and look behind it for any remaining
paper.
ENWW Clear jams 87
Page 96

Clear jams in the lower-right door
Use the following procedure to check for paper in the lower-right door. When a jam occurs, the control panel
displays an animation that assists in clearing the jam.
1. Open the lower-right door.
2. Remove any jammed paper.
3. Close the lower-right door.
88 Chapter 6 Solve general problems ENWW
Page 97

Clear jams in the right door and the fuser area
Use the following procedure to check for paper in all possible jam locations inside the right door. When a jam
occurs, the control panel displays an animation that assists in clearing the jam.
CAUTION: The fuser can be hot while the product is in use. Wait for the fuser to cool before handling it.
1. Open the right door.
2. Gently pull out any jammed paper.
ENWW Clear jams 89
Page 98

3. If paper is visible entering the bottom of the
fuser, gently pull downward to remove it.
CAUTION: Do not touch the rollers on the
transfer roller. Contaminants can affect print
quality.
4. If paper is jammed as it enters the output bin,
remove the fuser and gently pull the paper
downward to remove it.
5. Paper could be jammed inside the fuser where it
would not be visible. Grasp the fuser handles, lift
up slightly, and then pull straight out to remove
the fuser.
CAUTION: The fuser can be hot while the
product is in use. Wait for the fuser to cool before
handling it.
90 Chapter 6 Solve general problems ENWW
Page 99

6. Open the jam-access door. If paper is jammed
inside the fuser, gently pull it straight up to
remove it. If the paper tears, remove all paper
fragments.
CAUTION: Even if the body of the fuser has
cooled, the rollers that are inside could still be
hot. Do not touch the fuser rollers until they have
cooled.
7. Close the jam-access door, and push the fuser
completely into the product.
8. Close the right door.
ENWW Clear jams 91
Page 100

Clear jams in the output bin
Use the following procedure to clear jams in the output bin. When a jam occurs, the control panel displays an
animation that assists in clearing the jam.
1. If paper is visible in the output bin, grasp the
leading edge and remove it.
92 Chapter 6 Solve general problems ENWW
 Loading...