

Page 1

hp LaserJet family
quick reference
service guide
May 2001
edition,
volume III
Page 2

Page 3

HP LaserJet Family
Quick Reference
Serv ice Guide
Volume III
Page 4

© Copyright Hewlett-Packard
Company, 2001
All Rights Reserved. Reproduction,
adaptation, or translation without prior
written permission is prohibited, except
as allowed under the copyright laws.
Publication number
5961-0953
First edition, May 2001
Warranty
The information contained in this
document is subject to change without
notice.
Hewlett-Packard makes no warranty of
any kind with respect to this
information. HEWLETT-PACKARD
SPECIFICALLY DISCLAIMS THE
IMPLIED WARRANTY OF
MERCHANTABILITY AND FITNESS
FOR A PARTICULAR PURPOSE.
Hewlett-Packard shall not be liable for
any direct, indirect, incidental,
consequential, or other damage
alleged in connection with the
furnishing or use of this information.
Trademark credits
®
Microsoft
and MS Windows
trademark of Microsoft Corporation.
Lotus
trademarks of Lotus Development
, MS-DOS®, and Windows®
®
are U.S . re gi st e re d
®
1-2-3® are U.S. registered
Corporation.
®
Lotus
Symphony® are U.S. registered
trademarks of Lotus Development
Corporation.
Hewlett-Packard Company
11311 Chinden Boulevard
Boise, Idaho 83714 U.S.A.
Page 5

Contents
1 Control-panel messages. . . . . . . . . . . . . . . . . . . . . . . . . . . . . . . 7
Error listings, descriptions, and recommended actions
2 Service mode. . . . . . . . . . . . . . . . . . . . . . . . . . . . . . . . . . . . . . . 85
How to gain access to service mode and related functions
3 Power su pply . . . . . . . . . . . . . . . . . . . . . . . . . . . . . . . . . . . . . . 129
DC voltages, test points, and t ools
4 Input/output (I/ O). . . . . . . . . . . . . . . . . . . . . . . . . . . . . . . . . . . 141
Printer interface and cabling information
5 Media specificati ons . . . . . . . . . . . . . . . . . . . . . . . . . . . . . . . . 149
Supported sizes and specifications for paper and special media
6 Toner cartridge information . . . . . . . . . . . . . . . . . . . . . . . . . . 165
Cartridge weights and capacities, and potential service issues
7 Printer options and repl a c eable parts. . . . . . . . . . . . . . . . . . 175
Support matrix and par t numbers for accessories
8 Printer parts. . . . . . . . . . . . . . . . . . . . . . . . . . . . . . . . . . . . . . . 185
Selected high-usage replacement parts
9 Image quality. . . . . . . . . . . . . . . . . . . . . . . . . . . . . . . . . . . . . . 235
Image defect samples, suspect causes, and remedies
10 Diagrams . . . . . . . . . . . . . . . . . . . . . . . . . . . . . . . . . . . . . . . . . 271
Main wiring schematics and paper paths
11 Services and support: resources and training. . . . . . . . . . . 287
How and where to get training, support, and materials
A Acronyms and abbreviations. . . . . . . . . . . . . . . . . . . . . . . . . 291
Index. . . . . . . . . . . . . . . . . . . . . . . . . . . . . . . . . . . . . . . . . . . . . 295
EN Contents 3
Page 6

Ordering other manuals
The HP LaserJet Quick Reference Service Guide, volume III, provides
support for newer monochrome printers (see the following page for a
complete list of supported printers). It has been created to help the
HP LaserJet service engineer quickly troubleshoot common printer
problems.
For older monochrome printers, see the HP LaserJ et Quick Reference
Service Guide, volume II. It provides support for the following printers:
LJ Companion, LJ 1100, LJ 1100XI, LJ 1100SE, LJ 1100A,
LJ 1100AXI, LJ 1100ASE, LJ 2100, LJ 2100M, LJ 2100TN, LJ 3100,
LJ 4000, LJ 4000T, LJ 4000N, LJ 4000TN, LJ 4050, LJ 4050T,
LJ 4050N, LJ 4050TN, LJ 5000, LJ 5000N, LJ 5000GN, LJ8000,
LJ 8000N, LJ 8000DN, LJ 8100, LJ 8100N, LJ 8100DN.
Or, see the HP LaserJet Quick Reference Service Guide, volume I. It
provides support for the following printers:
LJ 6L, LJ 5Si Mopier, LJ 5Si, LJ 5Si MX, LJ 5L, LJ 6P, LJ 6MP, LJ 5P,
LJ 5MP, LJ 5, LJ 5M, LJ 5N, LJ 4V, LJ 4MV, LJ 4P, LJ 4MP, LJ 4L,
LJ 4ML, LJ 4+, LJ 4M+, LJ4, LJ 4M, LJ 4Si, LJ 4Si MX, LJ IIISi, LJ IIIP,
LJ IIP+, LJ IIP, LJ IIID, LJ III, LJ IID, LJ II, LJ 2686D, LJ 2686A.
To obtain service support for HP LaserJet 240 and 320 Mopiers, see
the HP Mopier Family Quick Reference Service Guide.
While the quick reference guides are intended to provide all the
information the service engineer will need for onsite repair of
HP products, they are not intended to replace the service manual for
any HP LaserJet product. For detailed information about the
HP LaserJet products described in this guide, see the user guide or
service manual for that product.
Service manuals for HP LaserJet products are available from
Hewlett-Packard. The phone number for the Service Parts Order
Desk is:
(800) 227-8164 (U.S. only)
If you are located outside of the U.S., contact your local HP Sales and
Service office.
4 Ordering other manuals EN
Page 7
Supported products
Reference name
used in this
guide
LJ 1200
LJ 1200SE
LJ 1200N
LJ 1220
LJ 1220SE
LJ 2200D
LJ 2200DT
LJ 2200DN
LJ 2200DTN
LJ 2200DSE
LJ 3100
LJ 3150
LJ 3200
LJ 3200SE
LJ 3200M
LJ 4100
LJ 4100N
LJ 4100TN
LJ 4100DTN
Model numb e r Maximum
C7044A
C7047A
C7048A
C7045A
C7049A
C7058A
C7059A
C7063A
C7061A
C7062A
C3948A
C4256A
C7052A
C7053A
C7055A
C8049A
C8050A
C8051A
C8052A
pages per
month
(printer)
10 K C7044-90906
40 K C7058-90936
6 K C4256-90954
10 K C7052-90930
150 K C8049-90925
Service manual
part number
Note
This guide is updated on a regular basis as the service needs change,
as new products are introduced, and as additional information
becomes available.
EN Supported products 5
Page 8

6 Supported products EN
Page 9

Control-panel
1
Chapter contents
Overview of printer messages ............................................................. 8
LaserJet 1200 Series printer control-panel light messages................. 9
Fatal error secondary messages ............................................ 12
LaserJet 2200 Series printer control-panel light messages............... 15
Alphabetical messages......................................................................33
Numerical messages .........................................................................67
messages
EN Chapter contents 7
Page 10

Overview of printer messages
This chapter provides information about the control-panel lights for the
HP LaserJet 1200 and 2200 Series printers.
This chapter also lists control-panel messages for these HP LaserJet
printers:
• LJ 3100 series
• LJ 3150 series
• LJ 3200 series
• LJ 4100 series
Alphabetical messages are listed first, followed by numerical
messages. Control-panel messages that are self-explanatory are not
included.
If you need more detailed information, see the service manual for the
printer you are servicing.
8 Chapter 1 – Control-panel messages EN
Page 11
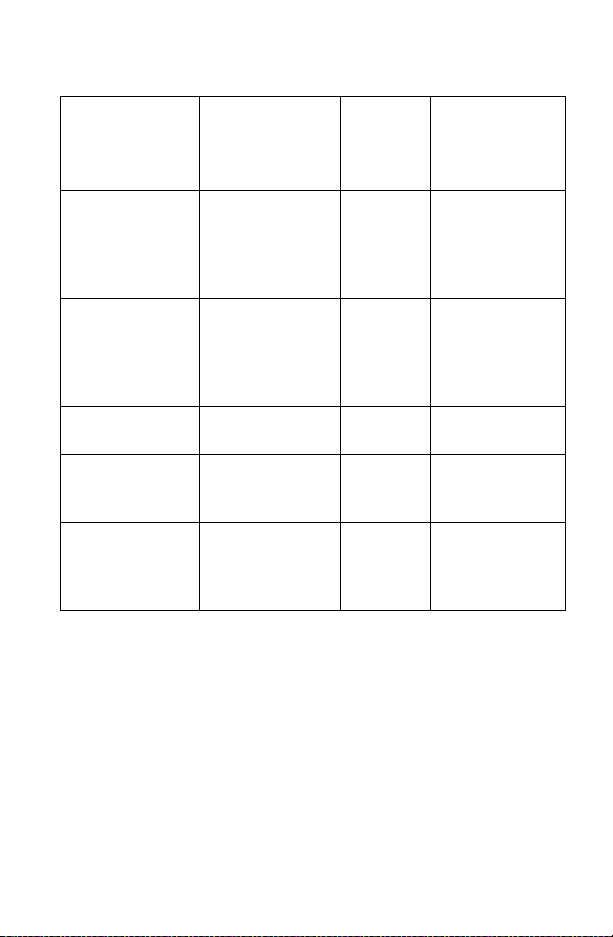
LaserJet 1200 Series printer control-panel light messages
Each control-panel light message is listed, along with possible causes
and steps to resolve identified errors.
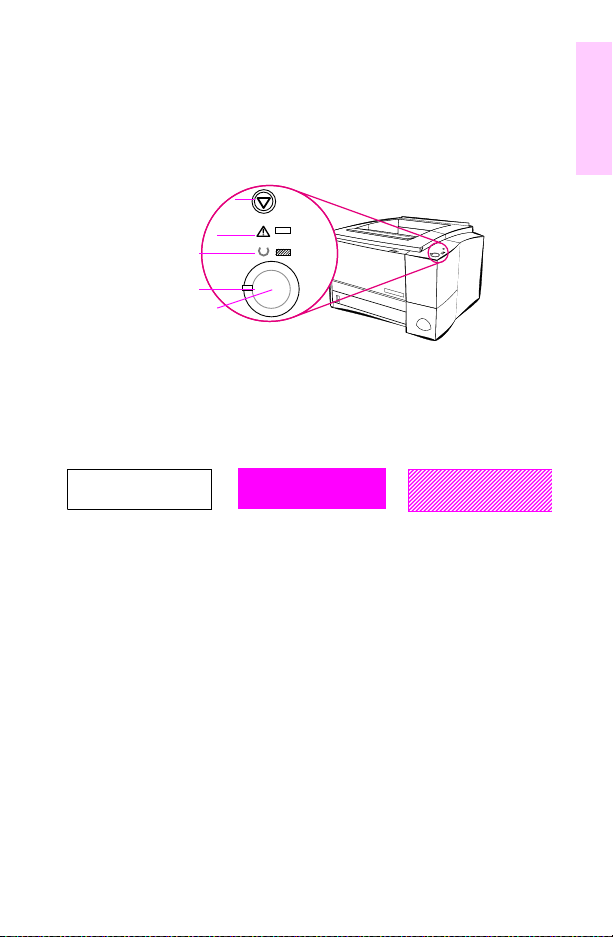
Figure 1 Control panel location
Control-panel lights legend
Light symbol Meaning of symbol
Light off
1
Light on
Light blinking
EN LaserJet 1200 Series printer control-panel light messages 9
Page 12
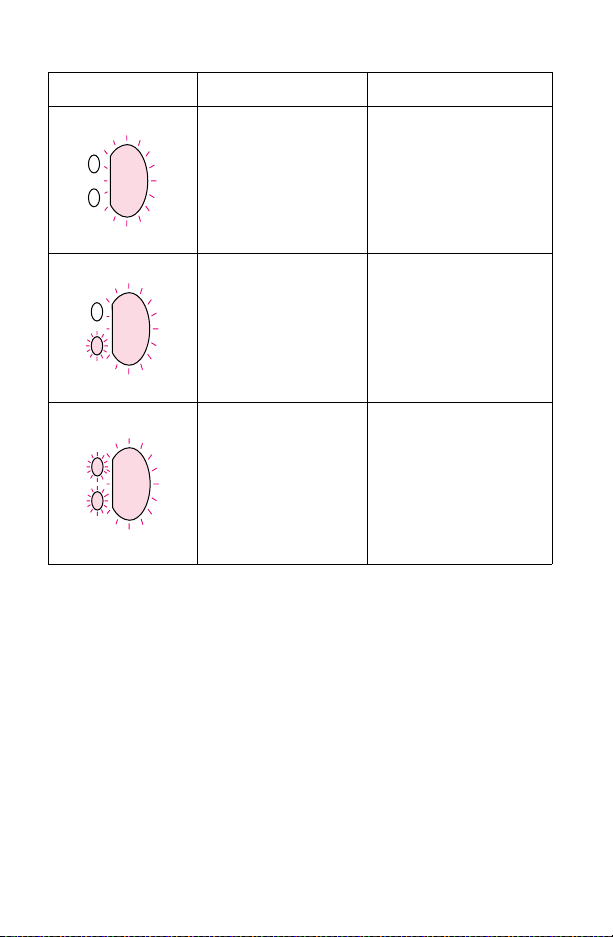
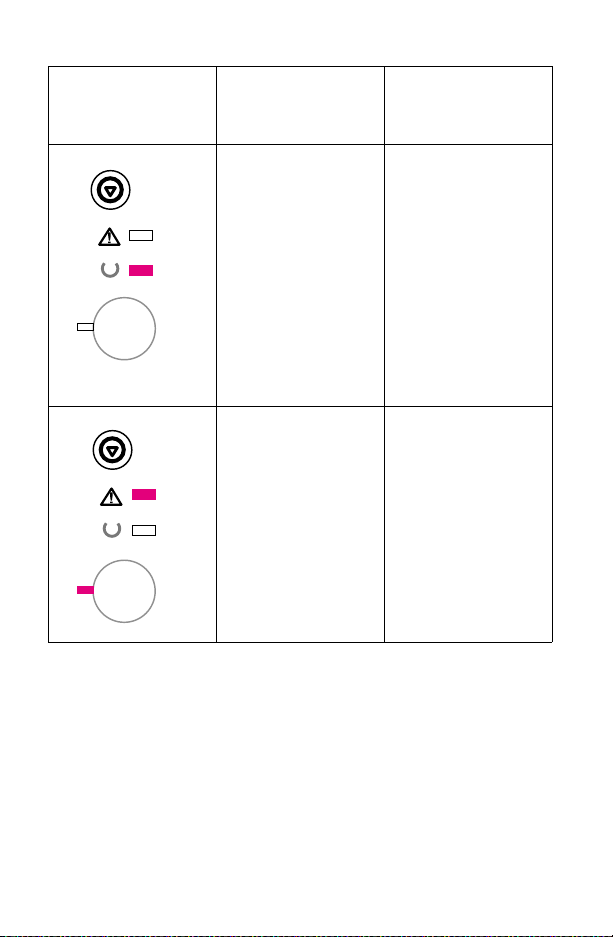
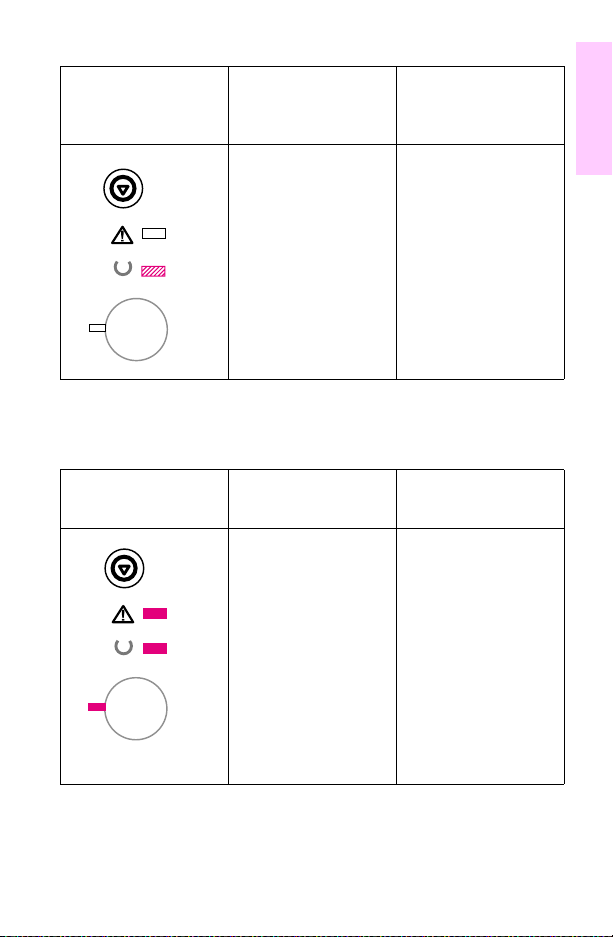
Control-panel light messages
Message Possible causes Solutions
The printer is ready to
print.
The printer is receiving or
processing data.
The printer is in manual
feed mode.
The printer is out of
memory.
No action is needed.
To print a self-test page,
press and release the G
button on the control
panel.
Wait for the job to print.
To turn off the manual
feed mode, change the
printer property setting.
1. The page currently
printing might be too
complex for the printer
memory. To continue
printing, press and
release the
The printer might print a
partial page , or the qua lit y
might be lower than
normal.
2. Print at a lower
resolution.
3. Add more memory.
GO button.
O
10 Chapter 1 – Control-panel messages EN
Page 13

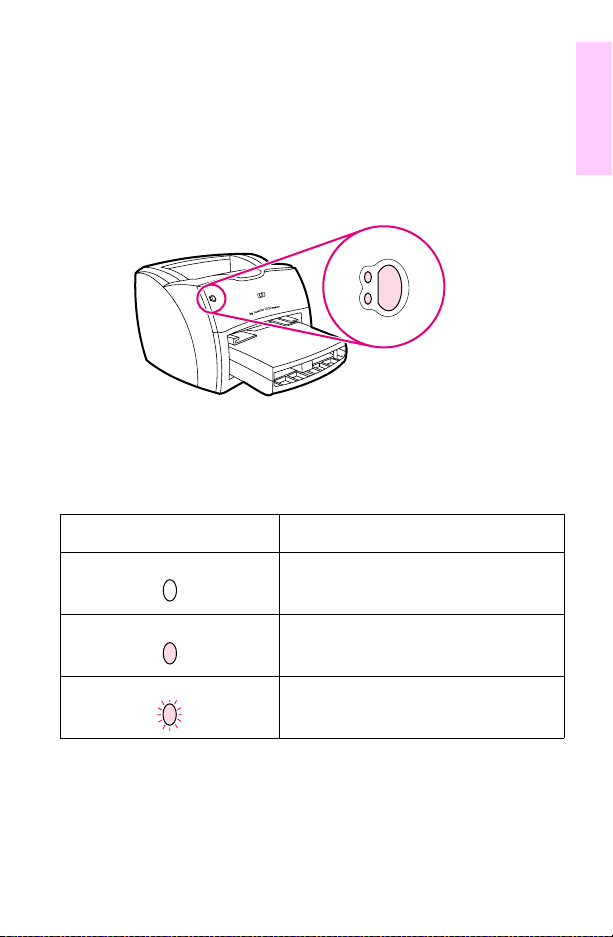
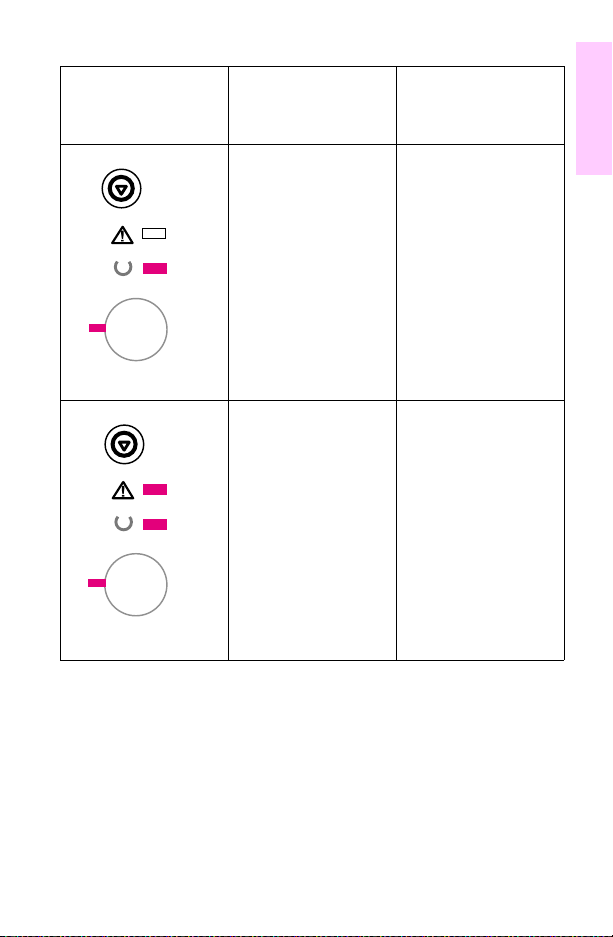
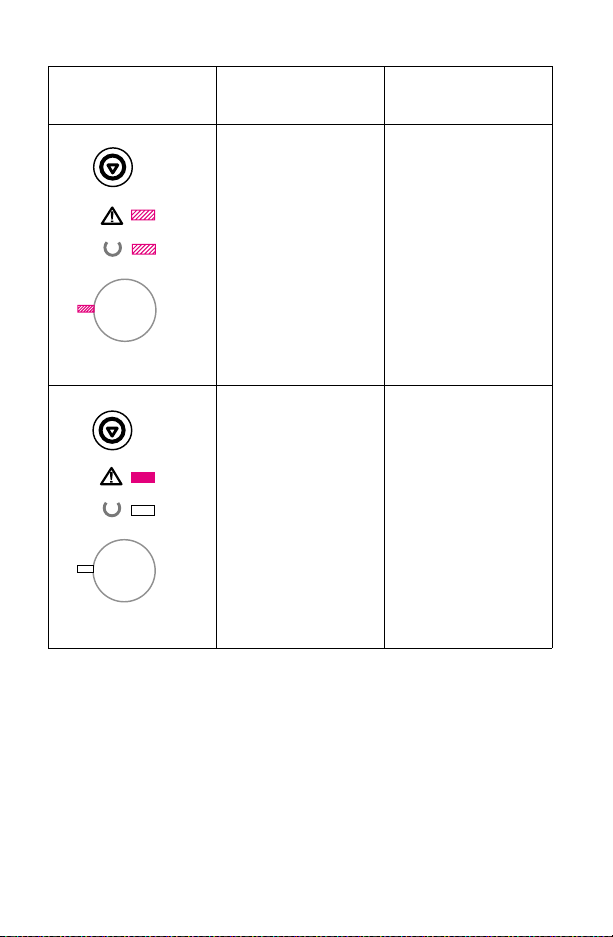
Control-panel light messages (continued)
Message Possible causes Solutions
The printer has an error.
The door is open, the
media is out, the toner
cartridge is installed
incorrectl y, or the medi a is
jammed.
1. Check that the toner
cartridge doo r is
completely closed.
2. Load media into the
correct input tray.
3. Check that the toner
cartridge is correc tly
installed in the printer.
4. Clear any jam.
5. Check that the door
and toner cartridge
interlocks are operating
correctly.
1
A printer initialization is
taking place. All lights
blink for a half second or
longer in a sequence for
one of the following
reasons:
• The printing is
initializing.
No action is necessary.
• All previously sent print
jobs are being deleted
from the printer
memory.
• A cleaning page is
printing.
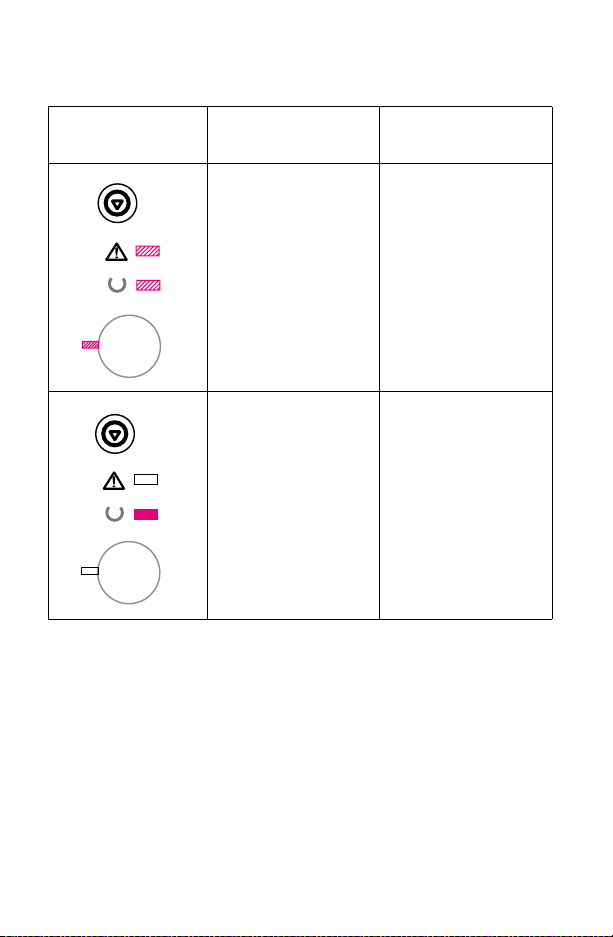
The printer has a fatal
error. All lights are on.
EN LaserJet 1200 Series printer control-panel light messages 11
1. Turn the printer off and
back on.
2. Unplug the printer for 5
minutes, plug it back in,
and turn it on.
3. If the printer still has an
error, press the
button.
GO
Page 14
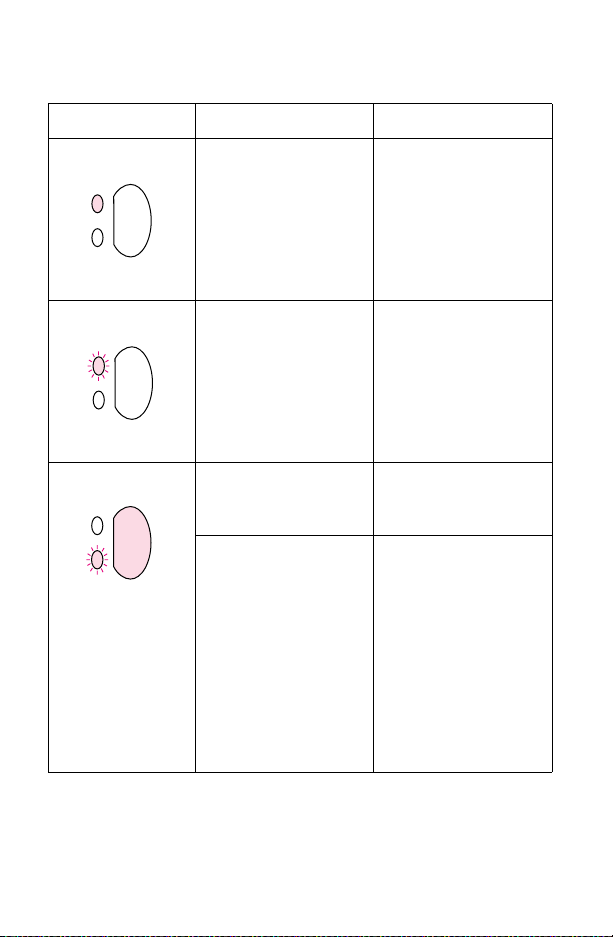
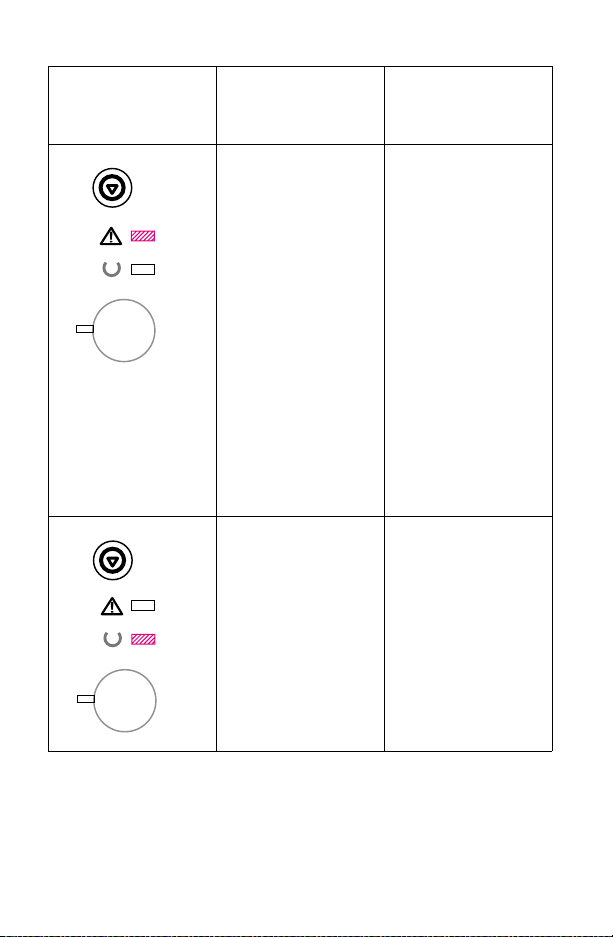
Control-panel light messages (continued)
Message Possible causes Solutions
The printer has an
accessory error. All lights
are blinking.
1. Remove the DIMM and
reseat it.
2. If the printer still has an
error, replace the DIMM.
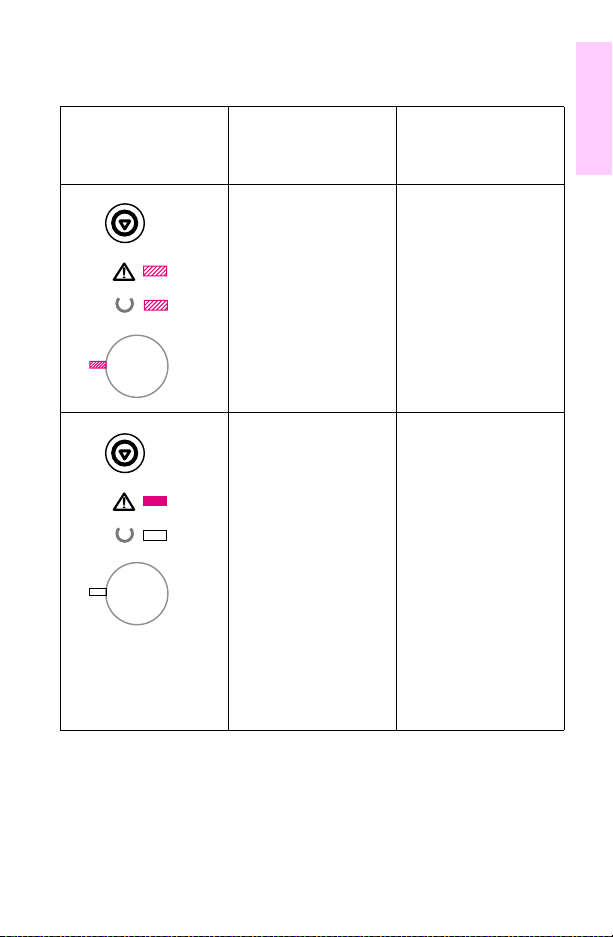
Fatal error secondary messages
If the printer has a fatal error, press and hold the GO button to see the
secondary error message.
Fatal error secondary messages
Message Cause Solution
Engine error. The
formatter and engine are
not communicating.
Beam error. 1. Check the laser/scanner
1. Unplug the printer and
plug it back in.
2. Reseat the formatter-toECU cable.
3. Replace the formatter
PCA.
4. Replace the ECU.
cable connections.
2. Replace the laser/
scanner.
12 Chapter 1 – Control-panel messages EN
Page 15

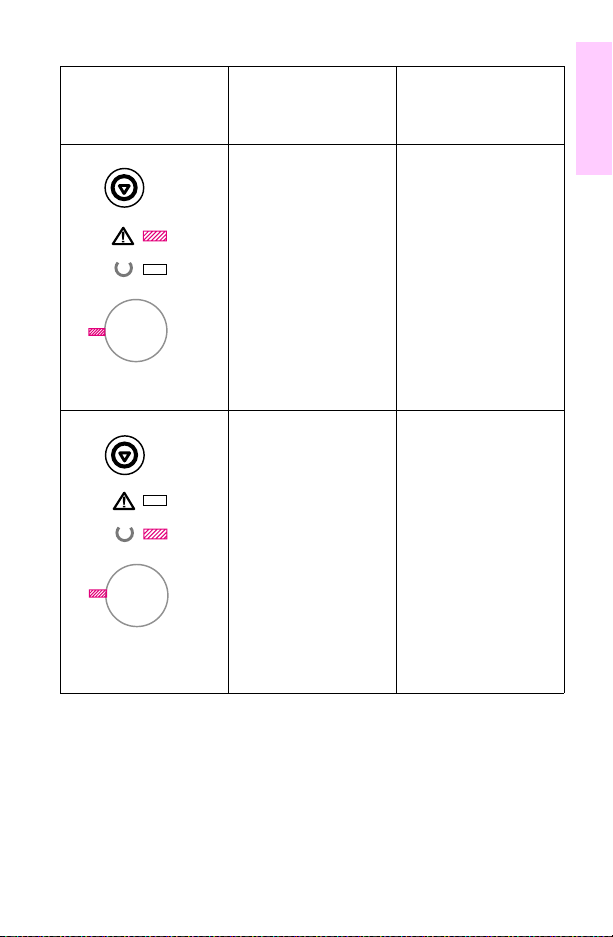
Fatal error secondary messages (continued)
Message Cause Solution
Laser/scanner/beam
detect error.
1. Check the ribbon
connector and four wire
connector at the top of the
formatter PCA.
2. Replace the laser/
scanner.
3. Replace the formatter
PCA.
1
Fuser error. The fuser
has a malfunction.
Formatter internal RAM
or ROM error. The RAM
or ROM has an error.
EN LaserJet 1200 Series printer control-panel light messages 13
1. Unplug the printer and
do not plug it back in for at
least ten minutes.
2. Verify that the fuser
connector and the
thermistor connector are
both firmly seated in the
ECU.
3. Perform a heatingelement resistance check.
4. If the resistance
readings are correct and
the error persists, replace
the fuser.
1. Unplug the printer and
plug it back in.
2. Unplug the printer,
remove any optional
memory, and turn the
printer back on.
3.Check the formatter
cable connections.
3. Replace the formatter
PCA.
Page 16
Fatal error secondary messages (continued)
Message Cause Solution
Scan buffer error. 1. Unplug the printer,
Miscellaneous interface
error.
General fatal error. 1. Unplug the printer and
remove and reattach the
optional copier/scanner,
and then plug the printer
back in.
2. Replace the optional
copier/scanner.
1. Unplug the printer,
remove and reattach the
optional copier/scanner,
and then plug the printer
back in.
2. Replace the optional
copier/scanner.
plug it back in.
2. Disco nnec t the I/O cab l e
and print a self-test page. If
the self-test is successful,
reconnect the I/O cable.
3. If the error persists,
replace the formatter PCA.
14 Chapter 1 – Control-panel messages EN
Page 17
LaserJet 2200 Series printer control-panel light messages
Figure 2 Control panel layout
Light patterns provide status and error messages. The lights can be in
any one of the following states:
Off On Blinking
Figure 3 Light states
The following control-panel light patterns indicate various conditions of
the printer in preparation for, or during, printing. If the Attention light is
blinking, the printer is experiencing an error. The messages are
grouped according to error type: status, attendance, continuable, fatal,
and accessory errors. In many cases, the error provides specific
information about the defective c omponent.
If the printer lights indicate a continuable, fatal, or accessory error,
press G
information. The lights flash briefly to indicate transitions in error states
before displaying the next pat tern. Secondary information about 79 fatal
errors (unrecoverable firmware errors) is not included in this document.
If a 79 fatal error occurs, replace the formatter.
JOB CANCEL
Attention
Ready
Go light
G
O button
O and JOB CANCEL simultaneously to display additional error
1
EN LaserJet 2200 Series printer control-panel light messages 15
Page 18
Primary s tatus codes
Control-panel light
pattern
Primary status
message
Start-up. The Go, Ready,
and Attention lights cycle
one after another.
Ready. The Ready light is
on and the printer is ready
to print.
Recommended
action
l No action is needed.
Note
Pressing GO or
J
OB CANCEL has no
effect until the printer is
ready.
l No action is needed.
Note
Pressing GO prints a
demo page.
16 Chapter 1 – Control-panel messages EN
Page 19

Primary status codes (continued )
Control-panel light
pattern
Primary status
message
Processing.The printer is
receiving or processing
data.
Attention. The printer
requires attention for one
of the following reasons:
- a door is open
- the toner cartridge is
missing
- print media is jammed in
the printer
- the media supply is
depleted
Recommended
action
l No action is needed.
Note
Pressing JOB CANCEL
cancels the current job.
One or two pages
might print as the
printer clears the print
job. The printer returns
to the Ready state after
the job is cancelled.
l Check for jams in
the: input area,
fusing area, and
duplex bin.
Note
to check the duplex
bin, remove tray 2 and
pull the green tab to
view the duplex
holding area.
l Pressing GO causes
the printer to attempt
to clear the jam. It
might be necessary
to clear the jam
manually and push
O or close the top
G
cover.
1
EN LaserJet 2200 Series printer control-panel light messages 17
Page 20

Continuable, fatal, and accessory errors
Additional information in the form of a secondary error message is available for
each of the following three types of errors:
• Continuable errors
• Fatal errors
• Accessory errors
The first entry in each of the following tables shows the primary error light pattern.
The remaining entries illustrate the secondary error messages. The tables also
contain information that typically appears in the status log area of the self-test/
configuration page.
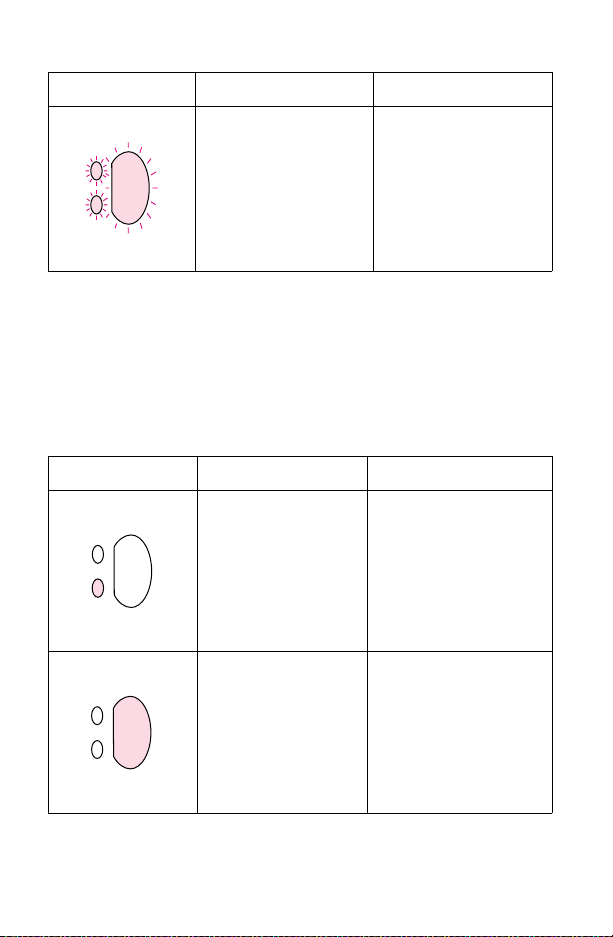
Continuable attention error codes
Control-panel light
pattern
Continuable
attention error
Action
message
Continuable error, or tray
1 is out of media.
Pressing G
printer to attempt to
recover from the error
and print whatever it can.
If the recovery is
unsuccessful, the printer
will return to the
continua ble error state.
O causes the
l Press GO to attempt
an error recovery
and continue
printing.
l If the error persists,
press G
O and
OB CANCEL
J
simultaneously to
view the secondary
continuable error
information.
18 Chapter 1 – Control-panel messages EN
Page 21
Continuable attention error secondary codes
Control-panel light
pattern
Continuable
attention error
Recommended
action
secondary message
General continuable error l Verify that all of the
l Replace the
l Replace the engine
power-supply wir e
harness connections
are connected
correctly and fully
seated.
formatter PCB.
controller.
1
Memory overflow/
memory full (20)
Status log code: 30016
EN LaserJet 2200 Series printer control-panel light messages 19
l The printer memory
is full. Press G
resume printing. If
you lose data, try to
free some printer
memory by
removing any
unnecessary fonts,
macros, or any other
data currently in the
printer memory. If
you continue to lose
data, you might
need to add more
printer memory. For
a temporary
solution, simplify the
image, or print at a
lower resolution.
O to
Page 22
Continuable attention error secondary codes (continued)
Control-panel light
pattern
Continuable
attention error
secondary message
Temporary engine error
(41.x)
Status log code: 30034
Print overrun (21)
Status log code: 30017
Recommended
action
l Press GO. The page
containing the error
will be printed.
l If the error persists,
reseat the
connections to the
laser/scanner,
formatter, and
engine controller.
l Replace the laser/
scanner.
l Replace the
formatter.
l Replace the engine
controller.
l The print job was
too complex for
available printer
memory. Press G
to resume printing. If
you lose some data,
you might need to
add more printer
memory. For a
temporary solution,
simplify the image or
print at a lower
resolution.
O
20 Chapter 1 – Control-panel messages EN
Page 23
Continuable attention error secondary codes (continued)
Control-panel light
pattern
Continuable
attention error
secondary message
Buffer flow error (22)
Status log code: 30027
Bad connection (40)
Status log code: 30018
Recommended
action
l Verify that the
printer cable is
connected properly
and fully seated at
connections. Always
use a high-quality
cable. Some nonHP cables might be
missing pin
connections or
might otherwise not
conform to IEEE1284 specifications.
l Replace the
formatter.
l The connection
between the printer
and the EIO card is
bad.
l Press GO to clear
the error message
and continue
printing.
l If the error message
persists, turn the
printer off and reset
the EIO card. Turn
the printer on.
l Replace the EIO
card.
1
EN LaserJet 2200 Series printer control-panel light messages 21
Page 24
Continuable attention error secondary codes (continued)
Control-panel light
pattern
Continuable
attention error
secondary message
NVRAM error (68)
Status log code: 30035 or
30036
I/O error (81)
Recommended
action
l A memory error
resulted in one or
more printer settings
being reset to
factory defaults.
l Print a configuration
page and verify that
the printer setting
are set correctly.
l Turn the printer off.
Press and hold
OB CANCEL and
J
turn the printer on.
Keep J
OB CANCEL
depressed until all of
the contr ol-panel
lights illuminate.
Release J
C
the print job again.
l Replace the
formatter.
l The EIO accessory
has encountered a
critical error.
l Turn the printer off
and then on.
l If the error message
persists, turn the
printer off and reset
the EIO card. Turn
the printer on.
l Replace the EIO
card.
OB
ANCEL and send
22 Chapter 1 – Control-panel messages EN
Page 25
Continuable attention error secondary codes (continued)
Control-panel light
pattern
Continuable
attention error
secondary message
Memory configuration
error
Personality or job-related
error
Status log code: 30076
Recommended
action
l Perform a cold
reset.
Note
If both the Attention
and Ready li ghts
come on before you
release G
must repeat the
procedure.
l If the error persists,
l Replace the
l Perform a cold
O, then you
remove or replace
DIMM(s).
formatter.
reset.
Note
If both the Attention
and Ready li ghts
come on before you
release G
must repeat the
procedure.
l If the error persists,
l Replace the
O, then you
remove or replace
the language DIMM.
formatter.
1
EN LaserJet 2200 Series printer control-panel light messages 23
Page 26

Continuable attention error secondary codes (continued)
Control-panel light
pattern
Continuable
attention error
Recommended
action
secondary message
EIO port error l Turn the printer off
DIMM slot 1 incompatible
error
and reseat the EIO
accessory. Turn the
printer on.
l Replace the
formatter.
l Turn the printer off.
Reseat DIMM 1.
Turn the printer on.
l If the problem
persists, replace
DIMM 1.
l Replace the
formatter.
24 Chapter 1 – Control-panel messages EN
Page 27
Continuable attention error secondary codes (continued)
Control-panel light
pattern
Continuable
attention error
secondary message
DIMM slot 2 incompatible
error
Fatal error codes
Control-panel light
pattern
Fatal error message Recommended
The printer has
experienced an error and
cannot recover. All the
lights are on.
Recommended
action
l Turn the printer off.
Reseat DIMM 2.
Turn the printer on.
l If the problem
persists, replace
DIMM 2.
l Replace the
formatter.
action
l View the fatal error
secondary codes.
l To clear the error,
turn the printer off,
and then turn it on. If
the error persists,
turn the printer off
for 15 minutes, and
then turn it on.
Note
Pressing GO and
OB CANCEL shows
J
the fatal secondary
error codes.
1
EN LaserJet 2200 Series printer control-panel light messages 25
Page 28
Fatal error secondary codes
Control-panel light
pattern
Fatal error
secondary message
Recommended
action
General fatal error (79) l Turn the power off
and back on.
l If the error persists,
turn off the power.
Remove all
accessories (for
exampl e , DIMM,
EIO card). Turn on
the printer.
l Replace the
formatter.
l Replace the engine
controller.
l Replace the power
supply.
Engine communication
error (55)
Status log code: 40055
l A printer error has
occurred. Press G
to clear the error
message.
l Check the
connections to the
formatter and the
engine controller
assembly.
l Replace the
formatter.
l Replace the engine
controller.
l Replace the power
supply.
O
26 Chapter 1 – Control-panel messages EN
Page 29

Fatal error secondary codes (continued)
Control-panel light
pattern
Fatal error
secondary message
Scanner error (52)
Status log code: 40052
Bad beam detect error
(51)
Status log code: 40051
Scan motor error (57)
Status log code:
40057
Recommended
action
l Press GO. The page
containing the error
will automatically be
reprinted.
l Turn the printer off
and reseat the laser/
scanner cables.
l Replace the laser/
scanner.
l Press GO. The page
containing the error
will automatically be
reprinted.
l Turn the printer off
and reseat the laser/
scanner cables.
l Replace the laser/
scanner.
l Turn the power off
and back on.
l If the error persists,
turn the printer off,
reseat the
connection between
the laser/scanner
assembly and the
engine controller.
Turn the printer on.
l Replace the laser/
scanner.
l Replace the engine
controller.
1
EN LaserJet 2200 Series printer control-panel light messages 27
Page 30

Fatal error secondary codes (continued)
Control-panel light
pattern
Fatal error
secondary message
Bad fuser error (50)
Status log code: 40050
Formatter internal RAM
or ROM error
Fan motor error (58)
Status log code: 40058
Recommended
action
l Be sure that the
fuser is installed
correctly and that it
is fully seated.
l Reseat the fuser
cables.
l Replace the fuser.
l Replace the engine
controller assembly.
l Replace the power
supply.
l Turn the printer off,
and then turn it back
on.
l Replace the
formatter.
l Turn the printer off,
and then turn it back
on.
l Turn the printer off,
and then reseat the
connection between
the fan and the
formatter.
l Replace the fan.
l Replace the engine
controller assembly.
28 Chapter 1 – Control-panel messages EN
Page 31

Fatal error secondary codes (continued)
Control-panel light
pattern
Fatal error
secondary message
NVRAM error (68) l Turn the printer off,
Scan buffer error (64)
Status log code: 40064
RAM controller error (65)
Status log code: 40065
Recommended
action
and then turn it back
on.
l Replace the
formatter.
l Turn the printer off,
and then turn it back
on.
l If the message
persists, replace the
formatter.
l Turn the printer off,
and then turn it back
on.
l Replace the
formatter.
1
EN LaserJet 2200 Series printer control-panel light messages 29
Page 32

Fatal error secondary codes (continued)
Control-panel light
pattern
Fatal error
secondary message
Miscellaneous interface
hardware error (67)
Status log code: 40067
Accessory error codes
Control-panel light
patterns
Accessory error
message
An error has occurred
with either the EIO port or
the DIMM (memory)
slots.
Recommended
action
l Check the I/O
connections.
l Verify that the cable
is IEEE-1284
compliant (if
applicable).
Recommended
action
l Press GO and
OB CANCEL
J
simultaneously to
view the secondary
information.
30 Chapter 1 – Control-panel messages EN
Page 33

Accessory errors secondary codes
Control-panel light
patterns
Accessory
secondary error
message
EIO port error l Turn the printer off
Recommended
action
and reseat the EIO
accessory. Turn the
printer on.
l Replace the
formatter.
1
DIMM slot 1 incompatible
error
EN LaserJet 2200 Series printer control-panel light messages 31
l Turn the printer off.
Reseat DIMM in slot
1. Turn the printer
on.
l If the problem
persists, replace the
DIMM in slot 1.
l Replace the
formatter.
Page 34

Accessory errors secondary codes (continued)
Control-panel light
patterns
Accessory
secondary error
message
DIMM slot 2 incompatible
error
Recommended
action
l Turn the printer off.
Reseat DIMM in slot
2. Turn the printer
on.
l If the problem
persists, replace the
DIMM in slot 2.
l Replace the
formatter.
32 Chapter 1 – Control-panel messages EN
Page 35

Alphabetical messages
The following control-panel messages are for the LJ 3100, LJ 3150,
LJ 3200, and LJ 4100 Series printers. Numerical messages begin on
page 67.
(number) is a group, group not allowed
Enter a different one-touch button or an unassigned speed-dial code.
Access denied/menus locked
Ask the network administrator to unlock the function.
Already in group
While programming a group-dial code, a fax number has been added
that is already in the group.
Add the next fax number to the group.
Bad duplexer connection
1 Ensure that the right-angle power cord that shipped with the printer
is being used.
2 Turn the printer off.
3 Remove and reinstall the duplexer.
4 Turn the printer on.
5 If the message persists, make sure that the duplexer is connected
and that the connector is not damaged.
6 Replace the duplexer.
1
EN Alphabetical messages 33
Page 36

Bad env. fe eder connection
1 Remove and reinstall the envelope feeder.
2 Turn the printer off and then back on.
3 Replace the envelope feeder.
Bad opt tray connection
1 Reinstall the optional tray.
2 Turn the printer off and then back on.
3 Make sure that the optional tray is connected and that the connector
is not damaged.
4 Replace the optional tray.
Blacklisted (France only)
The attempted fax number has received a voice answer or no answer,
was busy on the first dial and redials, or was busy with redials pending.
Unplug the power cord for the fax machine from the power strip or
outlet, and then plug it back in.
Busy
Check the fax number and try resending the fax. If the message
appears again, try sending to another fax machine, or try again later.
34 Chapter 1 – Control-panel messages EN
Page 37

Cancel group edit, ENTER to confirm
BACKSPACE was pressed while in a group-dial code in the Group Dial
Setup level of the menu.
1 Press S
2 Press E
3 Press S
TART to return to the group-dial code and continue editing.
NTER/MENU to go to the Group Dial Setup level of the menu.
(Press E
NTER/MENU again to choose a different group-dial code.)
TOP/CLEAR to exit the menu settings.
Canceled copy/Clear document feeder
S
TOP/CLEAR was pressed to cancel the current job while pages were
feeding from the document feeder. The cancel process will not
automatically clear the document feeder.
1 Pull the document-release door open, remove the jammed item, and
close the door.
2 Clear the items in the document-feeder tray and start over.
Canceled fax/Clear document feeder
S
TOP/CLEAR was pressed to cancel the current job while pages were
feeding from the document feeder. The cancel process will not
automatically clear the document feeder.
1 Pull the document-release door open, remove the jammed item, and
close the door.
2 Clear the items in the document-feeder tray and start over.
1
EN Alphabetical messages 35
Page 38

Canceled scan/Clear document feeder
STOP/CLEAR was pressed to cancel the current job while pages were
feeding from the document feeder. The cancel process will not
automatically clear the document feeder.
1 Pull the document-release door open, remove the jammed item, and
close the door.
2 Clear the items in the document-feeder tray and start over.
Cannot duplex/Close rear bin
1 Close the rear output bin.
2 If the message persists, check sensor PS702 in the duplexer.
Check input device alternates with
Paper path open, please close it
1 Check that all doors and trays are closed.
2 Check the tabs and sensor levers in the tray for proper operation.
3 Replace any defective tabs or sensors.
4 Replace the PCA controller in the feeder.
Check output device alternates with
Close output delivery path
1 Ensure the optional output device is fully seated and properly
installed.
2 Make sure that the paper path is closed between the printer and the
external paper-handling output device.
36 Chapter 1 – Control-panel messages EN
Page 39

Checking paper path
The engine is checking for possible jams or print media that was not
cleared from the printer.
Wait for the printer to finish checking (up to 30 seconds).
Clear document from scanner
1 Check to see if the document is jammed or if multiple sheets of the
document were loaded.
2 Check the special-media lever. It should be to the left for regular-
weight items or to the right for thick items. Thick items must be fed
one at a time.
3 Check the control panel configuration for outgoing faxes, including
the “send long pages” setting.
Close top cover
1 Close the top cover.
2 If the message persists, check SW101 for proper operation. Make
sure the wires are connected properly.
3 Replace SW101.
4 If the new switch does not solve the error, the wiring or the ECU
might be defective.
Communication error
1
1 Try resending the fax.
2 If the call fails again, check that the telephone cord is securely
connected. Then check for a dial tone on the phone line by pressing
ANUAL DIAL.
M
3 Reset the product by pressing and holding S
seconds.
4 Wait, or try resending the fax later.
EN Alphabetical messages 37
TOP/CLEAR for seven
Page 40

Configuration err # (number 1-4)
An error was detected in the static random-access memory (SRAM).
1 Unplug the power cord from the power source, wait 10 seconds, and
then reconnect the power cord.
2 If the error persists, replace the formatter.
Config. stuck addr
1 In Service mode, run the SRAM stuck address test.
2 Unplug the power cord from the power source, wait 10 seconds, and
reconnect the power cord.
3 If the error persists, replace the formatter.
Config. tied addr
1 In Service mode, run the SRAM tied address test.
2 Unplug the power cord from the power source, wait 10 seconds, and
reconnect the power cord.
3 If the error persists, replace the formatter.
Copy count set to 1
The product does not have enough memory to complete the collated
copy job.
Continue completing the collated copy job.
[Date] [Time]
The battery has failed.
You can continue to use the HP LaserJet product without replacing the
battery, b ut if y ou reenter the menu settings and then turn off the power,
the settings will be erased again.
38 Chapter 1 – Control-panel messages EN
Page 41

Decoding error # (number 1-3)
1 Unplug the power cord from the power source, wait 10 seconds, and
then reconnect the power cord.
2 If the error persists, replace the formatter.
Disk device failure
1 Reseat the EIO disk.
2 Replace the old disk device with a new disk.
Disk file operation failed
1 Check the filename and directory name.
2 Reseat the EIO disk.
3 Retry the operation.
Disk file system is full
1 Delete all unnecessary files from the EIO disk, and then try again.
2 Use HP Resource Manager to download or delete files and fonts.
(See the software Help for more information.)
3 Increase the per man ent storage (use a larger EIO disk or add a
RAM DIMM).
Disk is write protected
1
Use the HP Resource Manager software to disable the write-protection.
EN Alphabetical messages 39
Page 42

Documents were lost, START to continue
1 Press START. A report is printed.
2 Check the fax log status column for the “Fax Document was Lost”
message.
3 Resend the associated outgoing faxes. Ask the sender to resend
incom ing faxes.
Duplex error, check duplexer
1 Check the duplexer for a jam.
2 Make sure the right-angle power cord is used for the printer.
3 Reseat the duplex assembly, and check the connection.
4 Replace the duplex unit.
EIO [x] not functional
1 Reseat the EIO disk in the indicated slot [x].
2 If the problem persists, remove and replace the EIO disk.
EIO [x] initializing alternates with
Do not power off
1 Wait for the message to disappear (up to 5 minutes). If the printer
EIO card is operating correctly and communicating with the network,
this message disappears after approximately 1minute and no action
is required.
2 If the EIO card is unable to communicate with the network, this
message remains for 5 minutes and then disappears.
• Reseat or replace the indicated EIO card [x].
• Check the cable connections.
3 If the problem persists, contact the network administrator.
40 Chapter 1 – Control-panel messages EN
Page 43

EIO disk [x] non-functional
1 Reseat the indicated EIO disk [x].
2 Replace the indicated EIO disk [x].
Encoding error
1 Unplug the power cord from the power source, wait 10 seconds, and
then reconnect the power cord.
2 If the error persists, replace the formatter.
Env. feeder load [T ype][Size]
1 Load the requested envelope type and size into the envelope
feeder.
2 Make sure that the envelope size and type are set correctly on the
Paper-handling menu in the printer control panel.
3 Press G
4 Press -V
5 Press S
O if the envelope is already loaded in the feeder.
ALUE+ to scroll through the available types and sizes.
ELECT to accept the alternate type or size.
Envelope feeder size = [xxxxx]
1
• Press S
• If you do not press any buttons, the message disappears in about 1
ELECT to accept the current envelope size or press -VALUE+
to change the size, and then press S
minute.
ELECT to accept the new size.
Note
Changing the size here changes the default for the envelope-f eeder
size on the Paper-handling menu.
EN Alphabetical messages 41
Page 44

Envelope feeder type - [xxxxx]
Choose one of the following:
• Press S
• Press +V
ELECT to accept the media type, and then press GO.
type, and then press G
ALUE- to change the type, press SELECT to accept the new
O to continue.
Errors likely in pages: (page range)
Resend the fax or ask the sender to resend the fax to you.
Fatal system error
1 Turn power off and then back on.
2 Replace the firm ware DIMM.
Fax document was lost
1 If you set up faxes to be sent at a future time or to be polled, print a
fax log to identify which faxes were lost. Then reenter the faxes.
2 Faxes that were received to memory (instead of printing) have been
lost. Ask the sender to resend the fax.
Fax does not answer/Canceled send
1 Call the recipient to ensure that the fax machine is on and ready.
2 Check that you are dialing the correct fax number.
3 Check that the redial option is enabled.
4 Unplug the telephone cord from both the product and the wall, and
then reconnect the cord.
5 Unplug the product telephone cord from the wall, plug in a
telephone, and then try making a call.
6 If the error persists, replace the LIU.
42 Chapter 1 – Control-panel messages EN
Page 45

Fax does not answer/Redial pending
1 Allow the product to retry sending the fax.
2 Call the recipient to ensure that the fax machine is on and ready.
3 Check that you are dialing the correct fax number.
4 Check that the Redial on no answer option is enabled.
5 Unplug the product telephone cord from the wall, plug in a
telephone, and try making a call.
6 Plug the product phone cord into a jack for another phone line.
7 If the error persists, replace the LIU.
Fax memory error # (number 1-5)
1 Unplug the power cord from the power source, wait 10 seconds, and
then reconnect the power cord.
2 If you set up faxes to be sent at a future time or to be polled, print a
fax log to identify which faxes might have been lost. Then, reenter
the faxes.
3 Faxes that were received to memory (instead of printing) have been
lost. Ask the sender to resend the fax.
4 If the error persists, replace the formatter.
Fax memory full/Canceling receive
The product memory filled. Pages that fit into memory will be printed.
1 Print all of the faxes, and then have the sender resend the fax.
2 Cancel all fax jobs or clear the faxes from memory.
1
Fax memory full/Canceling send
The product memory filled. Pages that fit into memory were sent.
1 Print all received faxes, or wait until all pending faxes are sent.
2 Cancel all fax jobs, or clear the faxes from memory.
EN Alphabetical messages 43
Page 46

Fax receive error
1 Ask the sender to resend the fax.
2 Try faxing back to the sender or to another fax machine.
3 Check that the telephone cord is securely connected by unplugging
and reconnecting the cord.
4 Press F
5 Make sure the phone line is working. Disconnect the product, plug in
6 Connect the product to a different phone line.
AX/SEND to check for a dial tone on the phone line.
a telephone to the phone line, and then make a voice call.
Fax se nd error
1 Try resending the fax.
2 Try faxing to another fax number.
3 Check that the telephone cord is securely connected by unplugging
and reconnecting the cord.
4 Press F
5 Make sure the phone line is working. Disconnect the product, plug in
6 Connect the product to a different phone line.
AX/SEND to check for a dial tone on the phone line.
a telephone to the phone line, and then make a voice call.
Flash device failure
1 Reseat the flash DIMM, and ensure it is locked into place.
2 Remove the flash DIMM, and replace it with a new one.
Flash file operation failed
1 Check the filename and directory name.
2 Reseat the flash DIMM, and ensure it is locked into place.
3 Reattempt the operation.
44 Chapter 1 – Control-panel messages EN
Page 47

Flash file system is full
1 Delete unnecessary files from the flash DIMM, and then try again.
2 Use HP Resource Manager to download or delete files and fonts.
(See the software Help for more information.).
Flash is write protected
Use the HP Resource Manager software to disable the write protection.
Group dial not allowed in group
Type one-touch buttons (programmed as an individual speed-dial) or
speed-dial codes into a group-dial.
Group is full/FAX to start
The maximum number of fax numbers that can be added to an ad hoc
group is 20.
Resend to the ad hoc group using less fax numbers.
Group is empty, use ONE-TOUCH/SPEED DIAL
1 Begin adding fax numbers to the group-dial code by pressing the
one-touch button for each number or by pressing SPEED DIAL.
2 Type the speed-dial code for the fax number.
3 Press E
NTER/MENU.
1
EN Alphabetical messages 45
Page 48

In cleaning mode/Please wait 1 - 3 min.
The product is running an internal cleaning cycle.
Wait for the product to finish the cleaning cycle. The message will clear
when the cycle is finished.
Input device condition xx.yy
1st x = Device number in chain
2nd x = Device type (3 types):
1 = Input
2 = Output
3 = Stapler/stacker unit
yy = Device specific error
See the documentation that came with the paper-handling device.
Input limit reached
The maximum number of fax numbers that can be added to an
ad hoc group is 100.
Resend the fax, but only to 100 or fewer fax numbers.
Install duplexer
1 Install or reinsert the duplexer and ensure it is fully seated.
2 Ensure that the right-angle power cord is used for the printer.
Install toner cartridg e
Reseat or install a new toner cartridge.
46 Chapter 1 – Control-panel messages EN
Page 49

Install tray [x]
1 Reinsert the specified tray.
2 Check for damaged tabs in the tray.
3 Check for damaged switches in the printer.
4 Replace the PCA controller in the feeder.
Inva lid date or time
Reenter the date and time.
Keypad test failed
1 Run the keypad test again.
2 If the error persists, try each of the following in the order given:
• Check the cabling.
• Replace the control panel.
• Replace the formatter.
Loading program <number> alternates with
Do not power off
Wait for the program to load.
Long page? START to continue
1
1 Press S
2 If sending a fax or copying a document longer than 991 mm
EN Alphabetical messages 47
TART to continue scanning. If START is not pressed within a
few seconds, the message disappears, and the document scanner
stops scanning because it thinks the page has jammed.
(39 inches), the control panel configuration can also be set to “Send
long pages.” This ensures that long pages feed without having to
monitor the task. Press S
off.
TART before the document scanner shuts
Page 50

Manually feed [type] [size]
1 Load the requested media into tray 1.
2 Press G
3 Press -V
4 Press S
O if the appropriate media is already loaded in tray 1.
ALUE+ to scroll through the available types and sizes.
ELECT to accept the alternate type or size.
Memory full - send unscanned pages
1 Reload the unscanned pages and resend them to finish the fax job.
2 Scan the unscanned pages to the computer, and then fax them from
the computer.
Memory full - stored data lost
Add more memory to the printer or simplify the print job.
Memory is full
This message should clear automatically when the next task starts (for
example, when you start a copy or receive a fax).
Memory low/Only 1 copy/Press STOP
1 Press S
2 Use the HP LaserJet Director to make multiple copies of large
TOP/CLEAR to clear the error.
documents, or break the job into smaller jobs containing fewer
pages.
Memory low/STOP to cancel
The product memory has been almost completely filled.
Allow the product to finish the job, or press S
job.
48 Chapter 1 – Control-panel messages EN
TOP/CLEAR to cancel the
Page 51

Memory settings changed
Add more memory to the printer, or simplify the print job.
Memory shortage job cleared
1
1 Press G
2 Add more memory to the printer, or simplify the print job.
O to continue.
Memory shortage page simplified
1 Press G
2 Add more memory to the printer, or simplify the print job.
O to continue.
Modem error # (number 1-3)
1 Unplug the power cord from the power source, wait 10 seconds, and
then reconnect the power cord.
2 If the error persists, try each of the following in the order given:
• Check the cabling.
• Replace the LIU.
• Replace the formatter.
No answer
1 Check the fax number, and then try resending the fax.
2 If the message appears again, try sending to another fax machine,
or try again later.
EN Alphabetical messages 49
Page 52

No dial tone
1 Check that the telephone cord is securely connected.
2 Check for a dial tone.
• For LJ 3100 and LJ 3150 models: Press and hold S
• For LJ 3200 models: Press F
3 If necessary, check the wall outlet by plugging in a phone and
attempting to place a call.
4 Plug the product phone cord into a jack for another phone line.
5 If the error persists, replace the LIU.
6 If, after replacing the LIU, the error persists, replace the formatter.
AX/SEND.
TOP/CLEAR.
No document sent
The fax forwarding setting is on, and the product unsuccessfully
received a fax because of low memory or some other reason.
Print the faxes in memory, and then have the sender resend the
missing pages of the document.
No fax detected
The product answered the incoming call, but could not deter m ine that
the caller was a fax machine.
1 Allow the product to retry sending the fax.
2 Unplug the product telephone cord from the wall, plug in a
telephone, and then try making a call.
3 Plug the product phone cord into a jack for another phone line.
4 If the error persists, replace the LIU.
No fax in (number) tries
1 Check the fax number, and then try resending the fax.
2 If the message appears again, try sending to another fax machine,
or try again later.
50 Chapter 1 – Control-panel messages EN
Page 53

No fax pages in memory to reprint
The product attempted to execute “Reprint Last F ax” when nothing was
in memory.
Receive a fax before attempting to use this option.
No memory for report, erase/print document
1 Print all faxes that have been received in memory.
2 If you have several faxes set up to be sent at a future time or to be
polled, use job status to clear them.
No modem installed
There is a problem with the LIU.
1 Unplug the power cord from the power source, wait 10 seconds, and
then reconnect the power cord.
2 If the problem persists, replace the LIU.
3 If the problem persists, replace the formatter.
No room in fax log
The fax log was unable to print because of an error, such as out-ofpaper.
Load media in the paper-input bin so the product can print the fax log.
1
EN Alphabetical messages 51
Page 54

Non HP toner detected alternates with
Press GO to continue
Make sure that the toner cartridge is a genuine HP toner cartridge. A
non-HP toner cartridge will produce this error.
Note
Any printer repair required as a result of using non-HP toner is not
covered under the printer warranty.
• If the HP toner cartridge is new, the e-label (cartridge memory) is
missing or has been tampered with. If you believe that the toner
cartridge is a fraud, call the HP fraud hotline at
(1) (877) 219-3183 (toll-free in North America).
• If the HP toner cartridge is used, the printer will not recognize the
cartridge until 20 pages have been printed. After 20 pages have
been printed, the error message disappears.
• If the HP toner cartridge is used, and the error message remains
after 20 pages have been printed, the cartridge has run out of toner.
Replace the toner cartridge.
Not enough memory
1 Try resending the job.
2 Try reducing the amount of activity on the HP LaserJet product.
Cancel jobs in memory before resending the job.
3 If the problem persists, press and hold S
reset the product.
TOP/CLEAR for 7 seconds to
Not enough memory to duplicate for copy
1 Divide the copy job into smaller sections, and then try to copy again.
2 Use the Document Assistant to complete the copy job.
52 Chapter 1 – Control-panel messages EN
Page 55

No fax pages in memory to reprint
Wait for a fax.
As soon as a fax is in the memory, the product will reprint the fax.
Offline
The printer is offline.
O to place the printer online.
Press G
Output bin full alternates with
Clear paper from [bin name]
Remove the sheets from the output bin.
Paper bin is empty, please add paper
1 Load media.
2 If media is already loaded, remove it.
3 Check for, remove, and discard any jammed sheets.
4 Reload the media.
Paper wrapped around fuser
1 Turn the printer off to keep the media from wrapping more firmly
around the fuser.
2 Open the top cover, and remove the toner cartridge.
3 Remove all visible media.
4 Leave the printer turned off, and remove the fuser.
5 Remove any remaining media, and then replace the fuser.
1
EN Alphabetical messages 53
Page 56

Password must be 4 digits
Reenter a four-digit password.
Paused (memory full)
1 Reduce the size of the print job, or wait for other jobs to finish so
memory will be freed.
2 If faxes are set up to be polled or sent at a future time, you might
want to cancel these jobs to free memory.
PC not detected/Address invalid
1 Make sure that the parallel cable is securely connected between the
computer and the HP LaserJet product.
2 Make sure that the computer is on.
3 Make sure that a compatible e-mail program and the JetSuite Pro
software are installed on the computer.
PC print timed out
1 Allow the “print jobs retry” to continue for 5 minutes.
2 If the product still does not print, resend the print job.
Perfo rm printer maintenance
1 Install the printer maintenance kit.
2 To reset the maintenance page count after performing printer
maintenance, press I
TEM- and VALUE- while turning the printer on.
Note
The printer maintenance kit is a consumable item and is not covered
under warranty.
54 Chapter 1 – Control-panel messages EN
Page 57

Phone number error
The maximum number of characters that can be used is 60. If you have
a number longer than 60 characters, break the number into smaller
chunks.
1 Type the first part of the number, and then press R
the last character in the first number.
2 Type the second part of the number as if it were a second number
going to a group. When the product dials, it will treat both numbers
as if they are one.
EDIAL/PAUSE as
Polling-in error
Make sure that the sender’s fax machine is ready to be polled, and
check the fax number. Then, set up to poll again.
Power fail recover/Checking system
The product has detected a power failure and is performing a self-test.
1 The product should go back to the Ready state on its own. If this
message does not disappear in a couple of minutes, disconnect the
power cable from the product, wait at least 30 seconds, and then
reconnect the power cable.
2 Wait for the product to initialize.
Power fail recovery/Fax setting reset
TOP/CLEAR to clear the error. The product should return to the
Press S
Ready state.
1
Power fail recovery/Printing faxes
The product has detected a power failure and is printing all of the faxes
that it did not previously print. Once the faxes are printed, the product
returns to the Ready state.
EN Alphabetical messages 55
Page 58

Power fail recover/Send: [fax number]
The product has detected a power failure and has also detected unsent
faxes. Once the product resends the f axes, the product will return to the
Ready state.
Power off/Check DIMM #[1-3]
The DIMM in the indicated slot has failed.
Turn off the product and check the indicated DIMM.
Printer comm error
1 Check that the parallel cable is securely connected between the
product and the computer.
2 If the problem persists, unplug the power cord from the power
source for 10 seconds, and then reconnect the power cord.
3 If the problems persists, replace the formatter.
Printer comm error^1
1 Check that the parallel cable is securely connected between the
product and the computer.
2 If the problem persists, unplug the power cord from the power
source for 5 seconds, and then reconnect the power cord.
3 If the problems persists, replace the formatter.
Printer cover open or no cartridge
1 Verify that the printer door is closed.
2 Check the toner car tridge for proper installation.
56 Chapter 1 – Control-panel messages EN
Page 59

Printer fixing error, replace fixing unit
There is an error with the print engine.
1 Unplug the power cord from the power source for 10 seconds, and
then reconnect it.
2 Try connecting the product to a different power source.
3 Check the cabling to the heating element.
4 If the problem persists, replace the heating element.
5 If the problem persists, replace the ECU.
Printer is busy
No action is needed. If you already started another job, the job will be
completed when the HP LaserJet product becomes available.
Printer laser error, call for service
1 Open and reclose the printer door.
2 Unplug the power cord from the power source, wait 10 seconds, and
then reconnect the power cord.
3 If the problem persists, replace the laser/scanner assembly.
Printer motor error, call for service
A problem has occurred with the print engine.
1 Unplug the power cord from the power source, wait 10 seconds, and
then reconnect the power cord.
2 If the problem persists, replace the motor.
3 If the problem persists, replace the ECU.
1
Printer paper jam, check paper path
Check the input areas, the output areas, and the interior for the jam,
and then clear the jam. The job should continue to print. If it does not,
try reprinting the job.
EN Alphabetical messages 57
Page 60

Printer signal error
The printer door is not latched securely.
1 Open and close the printer door.
2 Unplug the power cord from the power source, wait 10 seconds, and
then reconnect the power cord.
3 If the problem persists, replace the laser/scanner assembly.
Printer tray mispick/ENTER to resume
The print engine has failed to pick up a piece of media.
1 Reload the media in the paper-input tray.
2 Press E
NTER/MENU to continue the job.
Processing job
The printer is processing a job.
Wait for the job to finish. This can take several minutes for a complex
job.
Processing cleaning page
The printer is conducting the manual cleaning-page process.
Wait for the job to finish. This can take up to 2.5 minut es.
RAM disk device failure
1 Turn the printer off and on to clear the message.
2 If the message persists, install a new RAM disk.
58 Chapter 1 – Control-panel messages EN
Page 61

RAM disk file operation failed
1 Check the file name and directory name.
2 Reseat the RAM disk.
3 Reattempt the operation.
RAM disk file system is full
1 Delete the unnecessar y files, and then try again, or turn the printer
off, and then turn the printer on to delete all files on the device.
(Delete files using HP Resource Manager or another software utility.
See the software Help for more information.)
2 If the message persists, increase the size of the RAM disk from the
Configuration menu in the printer control panel, or use HP
Resource Manager to increase or decrease the RAM disk size.
RAM disk is write protected
Use HP JetAdmin software to disable the write protection.
Receive error
Ask the sender to resend the fax.
Receiving fax busy/Canceled fax
1 Call the recipient to ensure that the fax machine is on and ready.
2 Check that you are dialing the correct fax number.
3 Check that the redial on busy option is enabled.
4 Press and hold S
5 Unplug the product from the wall, plug in a telephone, and try
making a call.
6 If the error persists, replace the LIU.
TOP/CLEAR for 7 seconds to check for a dial tone.
1
EN Alphabetical messages 59
Page 62

Receiving fax busy/Redial pending
1 Allow the product to retry sending the fax.
2 Call the recipient to ensure that the fax machine is on and ready.
3 Check that you are dialing the correct fax number.
4 Unplug the product telephone cord from the wall, plug in a
telephone, and then try making a call.
5 Plug the product phone cord into a jack for another phone line.
6 If the error persists, replace the LIU.
Redial failed
1 Try resending the fax. If the fax still fails to transmit, call the recipient
to check that the fax machine is on and working and to verify the fax
number.
2 Make sure that you are dialing the correct fax number.
3 Disconnect the telephone cord from both the product and the wall
outlet, and then reconnect it.
4 Press and hold down S
tone.
5 Make sure that the phone line is working. Disconnect the product,
plug a telephone into the phone line, and then make a call.
6 Connect the product to a different phone line
TOP/CLEAR for 7 seconds to check for a dial
Remote fax was busy
1 Try resending the fax.
2 If the fax still fails to transmit, call the recipient to check that the fax
machine is on and is working, and then verify the fax number.
Scan reference error
Recalibrate the document scanner.
60 Chapter 1 – Control-panel messages EN
Page 63

Scanner error #1
An error has occurred within the SRAM.
1 Press and hold down S
product.
2 Check the cabling connections.
3 If the error persists, unplug the power cord from its power source for
10 seconds, and then reconnect the power cord.
4 Try connecting the product to a different power source.
5 If the error persists, replace the contact image sensor.
6 If the error persists, replace the formatter.
TOP/CLEAR for 7 seconds to reset the
Scanner isn’t available
The document scanner mechanism is in use.
Wait until the document scanner has finished the current job before
sending the next job.
Scanner jam - reload
Pull the document-release door open, and then remove the jammed
document
Scanner reserved for PC scan
The product is being used to create a scan by a computer.
Wait until the computer scan has finished, or cancel the scan from the
computer software, or press S
TOP/CLEAR.
1
Scanning error/Cannot connect to PC
1 Check the connection cable.
2 Try the scan again.
EN Alphabetical messages 61
Page 64

Speed dial (number) is not assigned
Choose a speed-dial code that has already been assigned a fax
number.
System error
1 Unplug the power cord from the power source, wait 10 seconds, and
then reconnect the power cord.
2 If the message is still displayed, replace the formatter.
Toner low
The message first appears when about 15 percent of the toner is
remaining in the toner cartridge.
1 If the printer has stopped, resume pr inting by pressing G
job.
2 Have a replacement toner cartridge on hand.
O for each
Toner out
1 If the printer has stopped, resume pr inting by pressing G
job.
2 Replace the toner car tridge.
O for each
Tray [x] empty [type] [size]
1 Load the empty tray to clear the message.
2 If the message remains after the specified tray is loaded, check the
sensor arm flags for damage, and be sure they move freely.
3 Replace defective paper-out sensors.
62 Chapter 1 – Control-panel messages EN
Page 65

Tray [x] load [type] [size]
This message occurs if tray 2, 3, or 4 was requested, but the tray is
empty or the tray adjustments are not set for the requested media type
or size.
1 Ensure that all three paper-size adjustments have been made.
2 Make sure that the media type is set in the control panel.
3 Load the requested media into an indicated tray. Ensure that the
tray is fully seated.
4 If you are trying to print on A4- or letter-size media, and this
message appears, make sure the default paper size is set correctly
from the Printing menu in the printer control panel and in the
software program.
5 Press GO to print from the next available tray.
6 Press -V
7 Press S
ALUE+ to scroll through the available types and sizes.
ELECT to accept the alternate type or size.
Tray 1 load [type] [size]
1 Load the requested media into the specified tray. Ensure that the
trays are correctly adjusted for size, and that the tray type settings
(and size for tray 1) are set from the Paper-handling menu.
2 If you are trying to print A4- or letter-size media and this message
appears, make sure the default paper size is set correc tly from the
Printing menu on the printer control panel.
3 If the message appears, and the correct media is loaded:
• Ensure that all paper-size adjustments have been properly
performed.
• Ensure the tray type setting is correct in the Paper-handling
menu.
• Check the size tabs on the right side of the tray.
• Check the size switches and paper sensors.
• Ensure that the tray is fully seated.
1
EN Alphabetical messages 63
Page 66

Tray 1 load [type] [size] (continued)
4 To print on a different media that is already loaded:
• Press G
• Press -V
• Press S
O to print from the next available tray.
ALUE+ to scroll through the available types and sizes.
ELECT to accept the alternate type or size.
• Inspect the switches in the tray.
• Remove the tray, and then turn the printer on. Push the switches
by hand to see if the switches register.
Tray 1 size = [xxxx]
Choose one of the following:
• Press S
• Press -V
ELECT to accept the media size.
ALUE+ to change the size, and then press SELECT to
accept the new size.
Tray 1 type = [xxxx]
Choose one of the following:
• Press S
• Press -V
ELECT to accept the media type.
ALUE+ to change the type, and then press SELECT to
select the new type.
Unable to mopy job
Memory of file system failures would not allow a mopy job to occur.
1 Reseat the RAM DIMMs or the EIO hard disk.
2 Install additional memory or an EIO hard disk.
64 Chapter 1 – Control-panel messages EN
Page 67

Unable to store job
Memory or file system failures would not allow the printer to store the
job.
1 Reseat the RAM DIMMs or the EIO hard disk.
2 Install additional memory or an EIO hard disk.
Unrecognized format
When printing, the incorrect printer driver was selected, or an error
occurred with the parallel interface.
1 After selecting the Print command in the software program you are
using, select the HP LaserJet 3100 or 3150 as the printer.
2 Reprint the job.
3 Disconnect and reconnect the parallel cable from both the product
and the computer.
Unsuccessful call
1 Check the fax number and try resending the fax.
2 If the message appears again, try sending to another fax machine,
or try again later.
Unsupported size in tray [yy]
Load a supported media size in the tray. See chapter 5 for a list of
supported media sizes.
1
EN Alphabetical messages 65
Page 68

Use [type] [size] instead?
1 Press -VALUE+ to scroll through the available types and sizes.
2 Press S
ELECT to accept the alternate type or size.
Wait for printer to reinitialize
The RAM disk setting has been changed from the printer control panel.
This change will not take effect until the printer re initializes.
Turn the printer off, turn the printer on, and then wait for the printer to
reinitialize.
66 Chapter 1 – Control-panel messages EN
Page 69

Numerical messages
###: [group name] one-touch/speed dial
The product is waiting for you to press a programmed one-touch button
or to type a speed-dial code into a group-dial code.
Begin adding fax numbers to the group-dial code.
### not programmed [Enter] to program
NTER/MENU to program the one-touch or speed-dial.
Press E
• If you want to program a group-dial, press S
control panel menu to create a new group.
• Press S
TOP/CLEAR if you do not want to program the one-touch or
speed-dial.
TOP/CLEAR, and use the
XX.YY printer error, press Go to continue
Press GO on the printer control panel to clear the error message.
13.xx Paper jam [location]
13.0 Paper jam [location]
1 Remove the jammed media from the specified location. Check the
entire paper path for other pieces of media.
2 Open and close the top cover to clear the message.
3 Check sensors and flags in the paper path for proper operation.
4 Clean the paper-path components. Ensure that the transfer roller is
seated properly.
5 Inspect and replace the feed and separation rollers.
6 Verify that the media length meets HP specifications, and that the
media size is selected correctly in the software.
7 Ensure that the paper tray is loaded properly .
1
EN Numerical messages 67
Page 70

13.1 Paper jam open input trays
13.2 Paper jam open input trays
1 Ensure that the paper trays are loaded properly so that media can
feed from the trays.
• If multiple sheets are feeding, fan the media, and reduce the
stack height.
• Ensure that the media does not exceed the maximum length
(356 mm/14 inches).
• Rotate the media in the input tray by 180°.
2 Check the input area for obstructions, such as media in the paper
path or damage to the registration assembly.
3 Verify that the transfer roller is positioned correctly.
4 Check PS102 and PS103 for proper operation.
5 Replace any defective sensors or flags.
6 Check the pickup feed and separation rollers for unusual wear, and
replace as needed.
7 Verify that the fuser is properly installed.
13.5 Paper jam check rear door alternates with
Open and close top cover
13.6 Paper jam check rear door
alternates with
Open and close top cover
1 Check the transfer roller and small media belt to ensure that the
roller and belt are operating and can feed the media.
2 Check the paper path for obstructions at the transfer roller, toner
cartridge, paper-feed guide, fuser, and output/delivery area.
3 Check PS107 and PS108 for proper operation. Replace any
defective sensors or flags.
4 Turn the media stack over , or rotate the stack by 180° in the input
tray.
68 Chapter 1 – Control-panel messages EN
Page 71

13.10 Paper jam check duplexer alternates with
Open and close top cover
1 Check the duplexer and the rear area of the printer for obstructions
or damage.
2 In the duplexer, check P S701 and PS703 for proper operation.
3 Replace the duplexer if a sensor is defective.
13.20 Paper jam check rear door alternates with
Open and close top cover open input trays
1 Remove all media in the paper path, and then open and close the
top cover.
2 If the message persists after all media is removed:
• Check whether the media is jammed in the prefeed area
(PS102).
• Check PS102, PS103, PS107, and PS108 for proper operation.
Replace any defective sensors or flags.
13.21 Door open jam
1 Clear the jam and close the top door.
2 If the message persists, check the top door switch (SW101) for
proper operation.
13.99 Paper jam [location]
1
1 Remove jammed media from the specified location.
2 Verify that the paper tray is fully closed.
3 Inspect the feed and separation rollers, and replace if necessary.
4 Ensure that there is no obstruction in the path, such as a torn piece
of media.
5 Open and close the top cover to clear the message.
6 Check sensors and flags for proper operation.
EN Numerical messages 69
Page 72

20 Insufficient memory alternates with Press Go to
continue
Press GO to print the transferred data (some data might be lost), and
then simplify the print job, or install additional memory.
21 Page too complex alternates with Press Go to continue
O to print the transferred data (some data might be lost), and
Press G
then simplify the print job, or install additional memory.
40 EIO x bad transmission alternates with
Press Go to continue
1 Press G
2 Reseat the EIO card.
O to clear the error message and continue printing.
41.x Printer error alternates w ith
Press Go to continue
1 Press G
2 Replace the ECU.
70 Chapter 1 – Control-panel messages EN
O. The page containing the error reprints automatically. If
the error persists, try the following procedures:
• Reseat the connections to the laser/scanner and the engine
controller board.
• Replace the laser/scanner.
Page 73

41.3 Unexpected paper size alternates with
Load tray [x] type size
1 Reload the tray with the correct media size.
2 Ensure the media in the tray is loaded under the front and back tabs .
Check sensors PS103 and PS106 for proper operation.
3 If you are trying to print from tray 1, make sure that the paper-size
setting in the printer control panel is configured correctly.
4 If you are printing from tray 2, 3, or 4, verify that the three paper-size
adjustments (length guide, width guide, and size-selector switch) on
the paper tray have been made correctly. Make sure that the media
is under the corner tabs.
5 Press G
O. The page containing the error is automatically reprinted.
OR
Press C
ANCEL JOB to clear the job from the printer’s memory.
41.5 Printer error
1 This error usually occurs with smooth media, such as
transparencies or labels.
• If the error persists when using tray 1, load media one sheet at a
time.
• If the error persists when using trays 3 and 4, replace the feed
and separation rollers.
2 Check sensors PS102 and PS103 for proper operation.
1
EN Numerical messages 71
Page 74

49.xx Printer error alternates with
Cycle power to continue
1 Press CANCEL JOB to clear the print job from the printer memory.
2 Turn the printer off, and then turn the printer on.
3 Try printing a job from a different software program. If the job prints,
go back to the first program and try printing a different file. (If the
message only appears with a certain software program or print job,
contact the software vendor for assistance.)
4 If the message persists with different software programs and print
jobs, disconnect all cables to the printer that connect it to the
network or printer. Do the following in the order listed:
• Turn the printer off.
• Remove all memory DIMMs or third-party DIMMs from the printer.
(Do not remove the firmware DIMM in the lowest DIMM slot.)
• Remove all EIO devices from the printer.
• Turn the printer on.
5 If the error no longer exists, install each DIMM and EIO device one
at a time, making sure to turn the printer off and back on as you
install each device.
6 Replace a DIMM or EIO device if you determine that it causes the
error.
7 Remember to recon nect all cables that connect the printer to the
network or computer.
8 If the error persists, replace the firmware DIMM.
9 Replace the formatter.
72 Chapter 1 – Control-panel messages EN
Page 75

50 Fuser error
1 Disconnect the power cable from the product, wait at least 30
seconds, and then reconnect the power cable and wait for the
product to initialize.
2 Check the cabling connections to the heating element.
3 Replace the heating element.
4 If the error persists, replace the ECU.
50.x Fuser error
X = Description
1 = Low fuser temperature
2 = Fuser warm-up service
3 = High fuser temperature
1 Turn the printer off, wait 20 minutes, and then turn the printer on.
2 If the message persists, reseat the fuser.
3 If the message still persists, check the fuser.
• Turn the printer off and remove the fuser.
• Measure the distance between the fuser connectors J132-1 and
J132-2. If it is not within the range of 200 k
the fuser.
• If there is no continuity between the fuser connectors J143F
(neutral) and J142F (hot) with the fuser removed, replace the
fuser.
4 If the problem is not related to the fuser, replace the ECU.
Ω to 500 kΩ, replace
1
EN Numerical messages 73
Page 76

50.4 Printer error alternates w ith
Cycle power to continue
1 Remove the printer from any UPS supplies, additional power
supplies, or power strips.
2 Plug the printer into a wall outlet, and see if this resolves the
problem.
3 If the printer is already plugged into a wall outlet, try another power
source in the building that is independent of the one currently being
used.
4 The line voltage and current source at the printer location might
need to be inspected to ensure that they meet the printer’s electrical
specifications.
51 Laser error
1 Disconnect the power cable from the product, wait at least 30
seconds, reconnect the power cable, and then wait for the product
to initialize.
2 Check the cabling connections to the laser/scanner.
3 Try connecting the product to a different power source or surge
protector.
4 If the error persists, replace the laser/scanner.
51.x Printer error alternates w ith
Cycle power to continue
X = Description
1 = Beam detect error
2 = Laser error
1 Press G
2 Turn the printer off and then on.
3 Reseat the cables to the laser/scanner and ECU.
4 Replace the laser/scanner.
74 Chapter 1 – Control-panel messages EN
O. The page containing the error reprints automatically.
Page 77

52 Scanner error
1 Disconnect the power cable from the product, wait at least 30
seconds, reconnect the power cable, and then wait for the product
to initialize.
2 Try connecting the product to a different power source or surge
protector.
3 If the error persists, replace the contact image sensor.
4 If the error still persists, replace the formatter.
52.x Printer error alternates w ith
Cycle power to continue
X = Description
0 = Scanner startup error
2 = Scanner rotation error
1 Press G
2 Turn the printer off and then on.
3 Reseat the cables to the laser/scanner and ECU.
4 Replace the laser/scanner.
O. The page containing the error reprints automatically.
53 Printer error
1 Disconnect the power cable from the product, wait at least 30
seconds, reconnect the power cable, and then wait for the product
to initialize.
2 If the error persists, replace the formatter.
1
EN Numerical messages 75
Page 78

53.xy.zz Printer memory error with an accessory
The DIMM that caused the error will not be used.
X = DIMM type
0 = ROM
1 = RAM
y = Device location
0 = Internal memory (ROM or RAM)
1 to 4 = DIMM slot 1, 2, 3, or 4
zz = Error number
0 = Unsupported memory
1 = Unrecognized memory
2 = Unsupported memory size
3 = Failed RAM test
4 = Exceeded maximum RAM size
5 = Exceeded maximum ROM size
6 = Invalid DIMM speed
7 = DIMM reporting information incorrectly
8 = DIMM RAM parity error
9 = ROM needs to be mapped to an unsupported address
10 = DIMM address conflict
11 = PDC XROM out of bounds
12 = Unable to make a temporary mapping
1 Turn the printer off, and then reseat or replace the specified DIMM.
2 Try the DIMM in another slot.
3 Replace the DIMM that caused the error.
76 Chapter 1 – Control-panel messages EN
Page 79

54 Printer error
1 Disconnect the power cable from the product, wait at least 30
seconds, reconnect the power cable, and then wait for the product
to initialize.
2 If the error persists, replace the formatter.
54.1 Remove sealing tape alternates with
From toner cartridge
1 Open the top cover, and remove the toner cartridge.
2 Pull the sealing tape tab to remove the strip.
3 Reinstall the toner cartridge, and then close the top cover.
54.4 Printer error alternates w ith
Cycle power to continue
1 Remove the printer from any UPS supplies, additional power
supplies, or power strips.
2 Plug the printer into a wall outlet, and see if this resolves the
problem.
3 If the printer is already plugged into a wall outlet, try another power
source in the building that is independent of the one currently being
used.
4 The line voltage and current source at the printer location might
need to be inspected to ensure that it meets the printer’s electrical
specifications.
1
55 DC controller error
1 Disconnect the power cable from the product, wait at least 30
seconds, reconnect the power cable, and then wait for the product
to initialize.
2 Check the cabling to the ECU.
3 If the error persists, replace the ECU.
EN Numerical messages 77
Page 80

55.xx Printer error alternates with
Cycle power to continue
The page containing the error will automatically be reprinted.
1 Check the power.
2 Replace the formatter and/or firmware DIMM.
3 Replace the ECU.
56.x Printer error alternates w ith
Cycle power to continue
X = Description
1 = Illegal input or bad accessory connector
2 = Illegal output
The page containing the error automatically reprints.
1 Turn the printer off, and then turn the printer back on.
2 Check the printer configuration.
3 Verify the accessory connection.
57.x Printer error alternates w ith
Cycle power to continue
X = Description
4 = Printer fan
7 = Duplex fan
1 Check the fan connector and make sure that the fan is not blocked.
2 Replace the fan.
78 Chapter 1 – Control-panel messages EN
Page 81

58.2 Printer error alternates w ith
Cycle power to continue
1 Turn the printer off, and then turn the printer on.
2 Verify that the environmental thermistor cable is securely
connected.
3 Replace the environmental thermistor.
4 If the error persists, replace the ECU.
58.3 Printer error
1 Replace the toner car tridge.
2 Check the connection from the memory controller PCB to the engine
controller.
3 Replace the memory controller PCB.
4 Replace the cartridge memory antenna assembly.
59.x Printer error alternates w ith
Cycle power to continue
X = Description
0 = Motor error
1 = Motor startup error
2 = Motor rotation error
1 Turn the printer off and then on.
2 Make sure that the fuser or toner cartr idge is not hindering gear
movement in the drive train.
3 Verify that the cable in the main motor is seated properly.
4 If the error persists, replace the motor
1
EN Numerical messages 79
Page 82

62.x Printer error
3200 series only
1 Disconnect the power cable from the product, wait at least 30
seconds, reconnect the power cable, and then wait for the product
to initialize.
2 If the error persists, replace the formatter.
62.x Printer error
4100 series only
X = Location of probl e m
0 = Internal memory
1 to 4 = DIMM slot 1, 2, 3, or 4
1 Reseat the specified DIMM.
2 Replace the specified DIMM.
64.x Printer error alternates w ith
Cycle power
1 Turn the printer off and then on.
2 Perform a cold reset.
3 If the message persists, replace the formatter or firmware DIMM.
80 Chapter 1 – Control-panel messages EN
Page 83

66.xx.yy [type] Failure alternates with
Check cables and cycle power
First X = Device number in chain
Second X = Device type (3 types):
1 = Input
2 = Output
3 = Stapler/stacker unit
yy = Device-specific error
1 Press G
2 Turn the printer off and then on.
3 Check and reseat all cables between the printer and the specified
4 Reseat the external paper-handling device.
O to clear the message.
device.
68 NVRAM full check settings
1 Print a configuration page and check the printer settings to
determine which values have changed.
2 Hold down C
up the NVRAM by removing old areas that are not being used.
ANCEL JOB while turning the printer on. This will clean
68.x Permanent storage error alternates with
Check settings
1
An error occurred in the printer permanent storage, and one or more
printer settings has been reset to its factory default.
Print a configuration page, and then check the printer settings to
determine which values have changed.
EN Numerical messages 81
Page 84

68.x Permanent storage full
The printer permanent storage is full. Some settings might have been
reset to the factory defaults.
1 Print a configuration page, and then check the printer settings to
determine which values have changed.
2 Hold down C
up the NVRAM by removing old areas that are not being used.
ANCEL JOB while turning the printer on. This will clean
69.x Printer error alternates w ith
Cycle power to continue
X = Description
0 = The duplex mechanism has failed.
1 Turn the printer off, and then turn the printer back on.
2 Reseat the duplexer.
3 Replace the duplexer.
79 Service (####)
3200 series only
1 Disconnect the power cable from the product, wait at least 30
seconds, reconnect the power cable, and then wait for the product
to initialize.
2 If the error persists, replace the DIMMs.
3 If the error still persists, replace the formatter.
82 Chapter 1 – Control-panel messages EN
Page 85

79 Service [####]
4100 series only
1 Press CANCEL JOB to clear the print job from the printer memory.
2 Turn the printer off, and then turn the printer on.
3 Try printing a job from a different software program. If the job prints,
go back to the first program and try printing a different file. (If the
message only appears with a certain software program or print job,
contact the software vendor for assistance.)
4 If the message persists with different software programs and print
jobs, disconnect all cables to the printer that connect it to the
network or printer. Do the following in the order listed:
• Turn the printer off.
• Remove all memory DIMMs or third-party DIMMs from the printer.
(Do not remove the firmware DIMM in the lowest DIMM slot.)
• Remove all EIO devices from the printer.
• Turn the printer on.
5 If the error no longer exists, install each DIMM and EIO device one
at a time, making sure to turn the printer off and back on as you
install each device.
6 Replace a DIMM or EIO device if you determine that it causes the
error.
7 Remember to recon nect all cables that connect the printer to the
network or computer.
8 If the error persists, replace the firmware DIMM.
9 Replace the formatter.
1
EN Numerical messages 83
Page 86

80 Service (####)
81 Service (####)
1 Disconnect the power cable from the product, wait at least 30
seconds, reconnect the power cable, and then wait for the product
to initialize.
2 If the error persists, replace the formatter.
8x.yyyy EIO [z] error
The EIO accessory in slot [z] has encountered a critical error.
Z = Description
1 = EIO slot 1 -The printer detected an error with the EIO accessory.
2 = EIO slot 2 -The printer detected an error with the EIO accessory.
6 = EIO slot 1 -The EIO accessory detected an error.
7 = EIO slot 2 -The EIO accessory detected an error.
1 Turn the printer off, and then turn the printer on.
2 Turn the printer off, reseat the EIO accessory in slot [z], and then
turn the printer on.
3 Turn the printer off, remove the EIO accessory from slot [z], install it
in a different EIO slot, and then turn the printer on.
4 Replace the EIO accessory in slot [z].
84 Chapter 1 – Control-panel messages EN
Page 87

2
Service mode
Chapter contents
Service mode overview...................................................................... 87
LJ 1200 Service mode functions........................................................ 88
Initializing NVRAM and using cold reset................................. 88
PJL software commands ........................................................89
NVRAM PJL factory variab le s.................... .......................... ..91
Recalibrating the copier/scanner ............................................ 91
LJ 2200 Service mode functions........................................................ 92
Entering Service mode ........................................................... 92
Entering escape characters.................................................... 93
Setting the page count..................................................... .......94
Setting the cold-reset default.............................................. .... 95
Resetting the printer............................................................... 96
LJ 3100/3150 Service mode functions............................................... 97
Control-panel Service menu................................................... 97
Extended Service men u... ......................... .............................. 98
Self-test in Extended Service mode...................................... 100
Other tests in Extended Service mode ................................. 102
Reports in Extended Service mode ...................................... 103
Clear memory in Extended Service mode............................ 104
Softswitches.......................................................................... 105
Firmware and software downloads.......................................107
Recalibration of the document scanner................................ 108
EN Chapter contents 85
Page 88

LJ 3200 Service mode functions.......................................................110
Secondary Service menu ......................................................110
Developer’s menu .......................................................... .......111
Diagnostic mode....................................................................113
NVRAM initialization..............................................................116
PJL software commands.......................................................117
NVRAM PJL factory variab le s........... ......................... ...........119
LJ 4100 Service mode functions.......................................................120
Entering Service mode..........................................................120
Changing settings..................................................................121
86 Chapter 2 – Service mode EN
Page 89

Service mode overview
Service mode allows service personnel to verify and manipulate internal
printer settings and to access the diagnostic feature. Service mode
should be used only by authorized service personnel.
You can perform the following tasks while in Service mode:
• Print a Service mode self-test.
• Verify the page count.
• Set the page count.
• Set the maintenance count.
• Set the maintenance interval.
• Verify and set the serial number.
• Set the cold reset default. This sets the factory default paper size to
either Letter or A4.
• Turn the diagnostic function on or off (for software developer use
only).
• Clear the event log.
• Use the Extended Service mode.
• Reset softswitches.
• Perform a firmware download.
• Recalibrate the document scanner.
• Set the page count at which the next
MAINTENANCE
• Set the demo page = true/false (used to remove the demo page
from the Service mode self-test).
• Adjust the top margin.
message appears on the control panel.
PERFORM PRINTER
2
Note
Service mode functions vary among the HP LaserJet printer family.
EN Service mode overview 87
Page 90

LJ 1200 Service mode functions
Initializing NVRAM and using cold reset
The NVRAM initialization sets all default variables stored in NVRAM
back to the factory default values or to a default ROM value, depending
on the variable. It also performs a system reset.
The NVRAM initialization resets the following:
• All menu settings to factory default values
• Factory settings, such as formatter number, page counts, and
factory paper settings
To perform NVRAM initialization
1 Turn the printer off.
2 Press and hold G
3 Turn the printer back on, and continue to hold G
Ready, and Go lights turn on.
4 Release G
The device lights cycle from front to rear. The NVRAM initialization
runs until completion, when the device is in the Ready state.
O.
O until the Attention,
O.
88 Chapter 2 – Service mode EN
Page 91

PJL software commands
To set the following NVRAM variables:
Factory printer DEFAULT PAPER and copier/scanner factory default
paper size are set to the same value automatically.
Factory printer DEFA ULT LPARM:PCL SYMSET
Factory DEFAULT OEM bit
Factory DEFAULT PRINTPAGECOUNT
Factory DEFAULT SCANPAGECOUNT
Factory DEFAULT COPYPAGECOUNT
Default Quick Copy paper size is also stored in the scanner NVRAM,
but is changed only through the software or when set back to factory
default with a NVRAMINIT. Only Quick Copy image type and contrast
have a default value stored in NVRAM. They can only be changed
through the software or by NVRAMINIT, which returns them to a ROM
default value.
2
EN LJ 1200 Service mode functions 89
Page 92

The table below provides a more detailed description of the NVRAM
PJL factory variables and commands and shows possible settings for
each.
NVRAM PJL factory variables
NVRAM PJL
variable or command Possible settings
DEFAULT PAPER “Letter”, “Legal”, “A4”, “Executive”,
“Com10”, “Monarch”, “DL”, “C5”, “B5”,
“Custom”, “JISB5”, “ISOB5”, JPOST”,
JPOSTTD”, A5”, “FOOLSCAP”
DEFAULT LPARM:PCL
SYMSET
DEFAULT OEM “On”, “Off”
DEFAULT
PRINTPAGECOUNT
DEFAULT
SCANPAGECOUNT
DEFAULT
COPYPAGECOUNT
CLEARNVRAM None (command)
NVRAMINIT None (command)
“Roman8”, “ISOL1”, “ISOL2”, “ISOL5”,
“PC8”, “PC8DN”, “PC850”, PC852”,
“PC8TK”, “WINL1”, “WINL2”, “WINL5”,
“DESKTOP”, “PSTEXT”, “WNINTL”,
“VNUS”, “MSPUBL”, “MATH8”,
“PSMATH”, “WNMATH”, “PIFONT”,
“LEGAL”, “ISO4”, “ISO6”, “ISO11”,
“ISO15”, “ISO17”, “ISO21”, “IS060”,
“ISO69”, “WIN30”
0-2147483647
0-2147483647
0-2147483647
90 Chapter 2 – Service mode EN
Page 93

NVRAM PJL factory variables
To use the following commands, you need some method to send PJL
commands to the printer, either with a software tool or by copying a
binary file that contains the commands from the host using an
MS-DOS® box. For example, from the MS-DOS prompt:
copy /b filename lpt1
Here is an example of a file that uses one of the commands:
ESC%-12345X@PJL SET SERVICEMODE=HPBOISEID
@PJL ‘command’
@PJL RESET
Here is an example of using the NVRAMINIT command:
ESC%-12345X@PJL SET SERVICEMODE=HPBOISEID
@PJL NVRAMINIT
@PJL RESET
Note
Set SERVICEMODE before trying to set the variable, or you will not
archive the desired result. Also reset the PJL to be sure the
SERVICEMODE status is cleared.
To create these files, you need an editor that can insert the ESC
character or is able to copy it in from an existing file. If a software tool is
used, simply send the same strings in the same order as given for the
example files.
2
Recalibrating the copier/scanner
The optional copier/scanner automatically calibrates to the white sheet
opposite the image sensor at the beginning of each scan or copy job.
Keep the white sheet clean to make sure the optional copier/scanner
calibrates correctly.
EN LJ 1200 Service mode functions 91
Page 94

LJ 2200 Service mode functions
In Service mode, the following can be performed:
• Print a Service mode self-test.
• Verify and set the page count.
• Set the cold reset default.
• Set the demo page = true/false.
• Set the diagnostic functions on or off.
Entering Service mode
Use PJL commands to enter Service mode and perform various Service
mode configurations. Users must use the exact character and case
specified for PCL printer commands.
The following are elements of a typical printer command:
• escape character (begins escape sequence)
• parameterized character
• group character
• value field (contains both alpha and numeric characters)
• termination character (uppercase)
Escape sequences can be combined into one escape sequence string.
Follow these important rules to follow when combining code:
1 The first two characters after the escape character (the
parameterized and group characters) must be the same in all of the
commands to be combined.
2 When combining escape sequences, change the uppercase
(termination) character in each individual escape sequence to
lowercase.
Note
The final character of the combined escape sequence must be
uppercase.
92 Chapter 2 – Service mode EN
Page 95

Entering escape characters
Printer commands always begin with the escape character (ESC). The
following table shows how the escape character can be entered from
various MS-DOS programs.
MS-DOS software Program entry What appears
Lotus® 1-2-3 and Symphony® Type \027 027
WordPerfect for MS-DOS Type <27> <27>
MS-DOS Edit Hold down CTRL-P, and
MS-DOS Edlin Hold down CTRL-V,
press ESC
release, and press [
The following table shows how to use PJL commands to enter Service
mode and perform various Service mode configurations.
PJL command Description
EC%-12345X@PJL Start PJL job
@PJL SET SERVICEMODE
=HPBOISEID
@PJL SET PAGES=0 Set page count [= xxxxx]
@PJL SET SERIALNUMBER
=USBBB12345
@PJL SET CRPAPER=LETTER Set cold reset page size [=Letter/A4]
@PJL SET SKIPDEMO=FALSE Skip demo/PCL type page [=true/false]
@PJL SET DIAGNOSTICS-OFF Set diagnostics [=OFF/ON] (for ISV use)
@PJL SET SERVICEMODE=EXIT Exit Service mode
DEFAULT PAPER=LETTER Select user paper-size default
@PJL RESET Perform PJL reset
E
%-12345X Exit PJL mode
C
E
Z Print self-test/configuration page
C
E
E Reset the printer
C
Enter Service mode
Set printer serial number (=chassis label
serial number)
<--
^[
2
EN LJ 2200 Service mode functions 93
Page 96

Setting the page count
The page count is stored in the printer’s NVRAM. If it is necessary to
replace the formatter PCB, the page count should be reset to the
printer’s original page count to reflect the age of the print engine. Before
removing the old formatter PCB, print a self-test/configuration page to
verify the current page count of the printer.
PJL command Description
EC%-12345X@PJL Start PJL job
@PJL SET SERVICEMODE
=HPBOISEID
@PJL SET PAGES=0 Set page count [= xxxxx]
@PJL SET SERVICEMODE=EXIT Exit Service mode
@PJL RESET Perform PJL reset
%-12345X Exit PJL mode
E
C
E
Z Print self-test/configuration page
C
E
E Reset the printer
C
Enter Service mode
94 Chapter 2 – Service mode EN
Page 97

Setting the cold-reset default
The customization variable will determine the default paper size after a
cold reset. This is set to A4/letter at the manufacturer. This variable
might need to be reset when the formatter is replaced.
PJL command Description
EC%-12345X@PJL Start PJL job
@PJL SET SERVICEMODE
=HPBOISEID
@PJL SET CRPAPER=LETTER Set cold reset page size [=Letter/A4]
@PJL SET SERVICEMODE=EXIT Exit Service mode
@PJL RESET Perform PJL reset
%-12345X Exit PJL mode
E
C
E
Z Print self-test/configuration page
C
E Reset the printer
E
C
Enter Service mode
2
EN LJ 2200 Service mode functions 95
Page 98

Resetting the printer
Cold reset/EIO card reset
Note
This feature sets all system parameters to the factory defaults.
To perform a cold reset:
1 Turn the printer off.
2 Press and hold G
3 Turn the printer back on, and continue to hold G
light turns on.
4 Release G
The device lights begin cycling from front to rear. The cold-reset
process runs until completion, when the device is in the Ready
state.
NVRAM initialization
This feature re initializes NVRAM and sets all system parameters to the
factory defaults. During the NVRAM initialization process, all button
presses are ignored.
To perform an NVRAM initialization:
1 Turn the printer off.
2 Press and hold G
3 Turn the printer back on, and continue to hold G
Ready, and Go lights turn on.
4 Release G
The device lights begin cycling from front to rear. The NVRAM
initialization runs until completion, when the device is in the Ready
state.
O.
O until the Attention
O.
O.
O until the Attention,
O.
96 Chapter 2 – Service mode EN
Page 99

LJ 3100/3150 Service mode functions
Control-panel Service menu
Use the control-panel menu, under SERVICE, t o set up remote servicing
and to recalibrate the document scanner.
The service portion of the control panel menu is shown below in a
hierarchical diagram:
Control panel service me nu
2
Press ENTER/
M
ENU to gain
access to the
control panel
menu.
Use
< and > to
select
SERVICE, and
ENTER/
press
M
ENU.
Service
Use
< and > to
select one of the
choices below, and
ENTER/MENU.
press
Remote tes t
Remote setup
T.30 protocol trace
Scan correction
< and > to
Use
select one of the
choices below,
and press
M
display.
Receive setup
Send setup
ENTER/
ENU, or see the
Tes ts in control-panel Service mode
Brief explanations of tests in the control-panel Service mode are shown
below:
REMOTE TEST sets up the product to test through the fax line.
•
•
REMOTE SETUP, followed by RECEIVE SETUP OR SEND SETUP,
allows for softswitch settings to be sent or received through the fax
line.
T.30 PROTOCOL TRACE allows you to set how often the test is run.
•
EN LJ 3100/3150 Service mode functions 97
Page 100

Extended Service menu
Use the Extended Service mode to run various self-tests and to change
softswitch settings, such as the country code softswitch setting.
To gain access to the Extended Service menu
1 Press BACKSPACE#**.
2 Use < and > to select the choices given in the Extended Service
menu (see “Extended Service menu tree” on page 99) and press
E
NTER/MENU.
Note
See the control-panel display for further instructions.
98 Chapter 2 – Service mode EN
 Loading...