

Page 1

HP Latex 300 Printer Series
User Guide
Page 2

Edition 4
Legal notices
Trademarks
© 2016, 2017, 2018 HP Development Company,
L.P.
The information contained herein is subject to
change without notice.
The only warranties for HP products and
services are set forth in the express warranty
statements accompanying such products and
services. Nothing herein should be construed as
constituting an additional warranty. HP shall not
be liable for technical or editorial errors or
omissions contained herein.
Microsoft® and Windows® are U.S. registered
trademarks of Microsoft Corporation.
Page 3

Table of contents
1 Introduction ............................................................................................................................................................................................... 1
Welcome to your printer .......................................................................................................................................................... 2
Printer models .......................................................................................................................................................................... 2
Documentation ......................................................................................................................................................................... 3
Safety precautions ................................................................................................................................................................... 3
Main printer components ........................................................................................................................................................ 8
Front panel .............................................................................................................................................................................. 11
HP Latex Mobile ...................................................................................................................................................................... 20
Embedded Web Server .......................................................................................................................................................... 22
Connectivity and software instructions .............................................................................................................................. 28
Advanced network conguration ........................................................................................................................................ 30
Turn the printer on and o ................................................................................................................................................... 36
Restart the printer .................................................................................................................................................................. 37
2 Useful links .............................................................................................................................................................................................. 38
When you need help .............................................................................................................................................................. 38
3 Handle the substrate and troubleshoot substrate issues ................................................................................................................ 40
Overview .................................................................................................................................................................................. 42
Porous substrates .................................................................................................................................................................. 46
Load a roll onto the spindle .................................................................................................................................................. 47
Load a roll into the printer .................................................................................................................................................... 52
Ink collector (365 and 375 only) .......................................................................................................................................... 55
Loading accessory (365 and 375 only) ............................................................................................................................... 59
Assisted manual load ............................................................................................................................................................ 63
Edge holders ........................................................................................................................................................................... 65
Load a cut sheet into the printer ......................................................................................................................................... 67
Unload a roll from the printer .............................................................................................................................................. 68
Take-up reel ............................................................................................................................................................................ 69
Double-sided printing (365 and 375 only) ......................................................................................................................... 77
View information about the substrate ................................................................................................................................ 78
Change substrate width and right edge position .............................................................................................................. 79
Substrate length tracking ..................................................................................................................................................... 79
Cut substrate .......................................................................................................................................................................... 79
ENWW iii
Page 4

Bypass job start safety .......................................................................................................................................................... 80
Store the substrate ................................................................................................................................................................ 80
Substrate cannot be loaded successfully ........................................................................................................................... 80
Substrate is mispositioned ................................................................................................................................................... 81
Substrate has jammed .......................................................................................................................................................... 81
Substrate is deformed or wrinkled ...................................................................................................................................... 84
Substrate has shrunk or expanded ..................................................................................................................................... 84
Substrate has bow deformation .......................................................................................................................................... 85
Substrate is sticky and causes smears and crashes ........................................................................................................ 86
Automatic cutter does not work .......................................................................................................................................... 86
Take-up reel substrate jam ................................................................................................................................................... 86
Take-up reel does not wind .................................................................................................................................................. 86
4 Substrate settings .................................................................................................................................................................................. 88
Substrate presets ................................................................................................................................................................... 89
Online search .......................................................................................................................................................................... 89
HP Media Locator ................................................................................................................................................................... 91
Generic presets ....................................................................................................................................................................... 92
Clone a substrate preset ....................................................................................................................................................... 92
Modify a substrate preset ..................................................................................................................................................... 93
Add a new substrate .............................................................................................................................................................. 94
Delete a substrate preset ..................................................................................................................................................... 98
Faster printing ......................................................................................................................................................................... 98
Color calibration ...................................................................................................................................................................... 99
Color consistency between dierent printers (365, 375) ............................................................................................. 103
ICC proles ............................................................................................................................................................................ 103
Improve color consistency when tiling ............................................................................................................................. 104
5 Troubleshoot print-quality issues ..................................................................................................................................................... 107
General printing advice ....................................................................................................................................................... 108
Quick Solutions application (365 and 375 only) ............................................................................................................. 108
Improve print quality ........................................................................................................................................................... 109
Most-common print-quality problems ............................................................................................................................. 115
6 Ink system ............................................................................................................................................................................................. 125
Ink cartridges ........................................................................................................................................................................ 125
Printheads ............................................................................................................................................................................. 125
Maintenance cartridge ........................................................................................................................................................ 126
Safe mode ............................................................................................................................................................................. 127
7 Hardware maintenance ....................................................................................................................................................................... 128
Ink system tips ..................................................................................................................................................................... 129
Maintain the ink cartridges ................................................................................................................................................. 129
iv ENWW
Page 5

Replace an ink cartridge ..................................................................................................................................................... 129
Cannot insert an ink cartridge ........................................................................................................................................... 133
Clean (recover) the printheads ........................................................................................................................................... 133
Align the printheads ............................................................................................................................................................ 134
Front panel recommends reseating or replacing a printhead ...................................................................................... 136
Replace a printhead ............................................................................................................................................................. 136
Cannot insert a printhead ................................................................................................................................................... 142
Clean the electrical connections on a printhead ............................................................................................................. 143
Replace the maintenance cartridge .................................................................................................................................. 147
Cannot insert the maintenance cartridge ........................................................................................................................ 150
Clean and lubricate the carriage rod ................................................................................................................................. 150
Clean the encoder strip ....................................................................................................................................................... 152
Clean the platen ................................................................................................................................................................... 153
Clean the substrate-advance sensor window ................................................................................................................. 154
Clean the exterior of the printer ........................................................................................................................................ 155
Move or store the printer .................................................................................................................................................... 155
Service maintenance ........................................................................................................................................................... 156
8 Firmware update .................................................................................................................................................................................. 157
Firmware update using a USB ash drive ........................................................................................................................ 157
Firmware update using the Embedded Web Server ...................................................................................................... 158
Automatic rmware updates ............................................................................................................................................. 158
9 Accessories ............................................................................................................................................................................................ 159
Order ink supplies ................................................................................................................................................................ 159
Order accessories ................................................................................................................................................................ 161
10 Troubleshoot other issues ............................................................................................................................................................... 162
Printer cannot get an IP address ....................................................................................................................................... 163
Cannot access the Embedded Web Server ...................................................................................................................... 163
Printer is not printing .......................................................................................................................................................... 163
The software program slows down or stalls while generating the print job ............................................................. 164
Printer seems slow .............................................................................................................................................................. 164
Communication failures between computer and printer .............................................................................................. 165
Cannot connect to services such as rmware update, online search, or the Printer Data Sharing Agreement ... 165
Front-panel error codes ...................................................................................................................................................... 166
11 Printer specications ......................................................................................................................................................................... 172
Functional specications .................................................................................................................................................... 172
Physical specications ........................................................................................................................................................ 174
Memory specications ........................................................................................................................................................ 174
Power specications ........................................................................................................................................................... 174
Ecological specications ..................................................................................................................................................... 174
ENWW v
Page 6

Environmental specications ............................................................................................................................................. 175
Acoustic specications ........................................................................................................................................................ 175
Appendix A Summary of common printing problems ....................................................................................................................... 176
Glossary ..................................................................................................................................................................................................... 179
Index ........................................................................................................................................................................................................... 182
vi ENWW
Page 7

1 Introduction
●
Welcome to your printer
●
Printer models
●
Documentation
●
Safety precautions
●
Main printer components
●
Front panel
●
HP Latex Mobile
●
Embedded Web Server
●
Connectivity and software instructions
●
Advanced network conguration
●
Turn the printer on and o
●
Restart the printer
ENWW 1
Page 8

Welcome to your printer
Your printer is a color inkjet printer designed for printing high-quality images on exible substrates. Some major
features of the printer are shown below:
● Environmentally friendly, odorless, aqueous latex inks in six colors plus optimizer
● 775 ml ink cartridges (3-liter cartridges for the 375 printer)
● Sharpest print quality, smooth transitions, and ne details with 1200 real dpi
●
Consistent and repeatable print quality at every print speed
● Prints are completely dry and ready for nishing and delivery
● Print on a wide range of substrates—including most low-cost, uncoated, solvent-compatible substrates
● A range of HP recyclable substrates is available
● Consider un-laminated use with scratch resistance comparable to hard solvent inks on SAV and PVC
banners
● Durable prints with outdoor display permanence up to three years unlaminated, ve years laminated
● Hundreds of ready-made substrate presets easily available
To send print jobs to your printer, you will need Raster Image Processor (RIP) software, which should be run on a
separate computer. RIP software is available from various dierent companies.
Printer models
HP Latex 315 HP Latex 335 HP Latex 365 HP Latex 375
Supplied with the printer HP Latex 64-in Take-Up
HP Latex 54-in Printer 2-
HP Latex Substrate-
HP Latex 300/500 User
FlexiPRINT HP Basic
HP Latex 300/500 Ink
Optional accessories HP Latex 300 54-in Take-
in Spindle (including 2- to
3-in spindle adaptor)
Maintenance Kit
Edition
Up Reel (including 2-in
reel with 3-in adaptor
and Variable Front
Tension Kit)
HP Latex 64-in Take-Up
Reel
HP Latex 64-in Printer 2in Spindle (including 2- to
3-in spindle adaptor)
HP Latex 300/500 User
Maintenance Kit
FlexiPRINT HP Basic
Edition
Reel
HP Latex 64-in Printer 3in Spindle
Loading Accessory
HP Latex 300/500 User
Maintenance Kit
Collector (including
output platen protector)
HP Latex 64-in Take-Up
Reel
HP Latex 64-in Printer 3in Spindle
HP Latex SubstrateLoading Accessory
HP Latex 300/500 User
Maintenance Kit
HP Latex 300/500 Ink
Collector (including
output platen protector)
HP Latex 54-in Printer 2-
in Spindle (including 2- to
3-in spindle adaptor)
HP Latex 64-in Printer 3-
HP Latex 64-in Printer 2in Spindle (including 2- to
3-in spindle adaptor)
in Spindle
HP Latex 64-in Printer 2in Spindle (including 2- to
3-in spindle adaptor)
HP Latex 64-in Printer 3in Spindle
HP Latex 64-in Printer 2in Spindle (including 2- to
3-in spindle adaptor)
HP Latex 64-in Printer 3in Spindle
2 Chapter 1 Introduction ENWW
Page 9

HP Latex 315 HP Latex 335 HP Latex 365 HP Latex 375
HP Latex 300/500 User
HP Latex 300/500 Ink
Consumables HP 831 Latex Printheads
Documentation
The following documents can be downloaded from http://www.hp.com/go/latex300/manuals/:
● Introductory information
● Printer assembly instructions
HP Latex 300/500 User
Maintenance Kit
(1 set included in box)
HP 831 Latex Ink
Cartridges
HP 871 3-liter Ink
HP 831 Latex
Maintenance Cartridge (1
included in box)
Maintenance Kit
HP 831 Latex Printheads
(1 set included in box)
HP 831 Latex Ink
Cartridges
HP 831 Latex
Maintenance Cartridge (1
included in box)
HP Latex 300/500 User
Maintenance Kit
Collector (including the
consumable parts)
HP 831 Latex Printheads
(1 set included in box)
HP 831 Latex Ink
Cartridges
HP 831 Latex
Maintenance Cartridge (1
included in box)
HP Latex 300/500 User
Maintenance Kit
HP Latex 300/500 Ink
Collector (including the
consumable parts)
HP 831 Latex Printheads
(1 set included in box)
HP 831 Latex Ink
Cartridges
Cartridges
HP 831 Latex
Maintenance Cartridge (1
included in box)
● User guide
● Legal information
● Limited warranty
The Quick Response (QR) code images found in some parts of this user guide provide links to additional video
explanations of particular topics. For an example of such an image, see Main printer components on page 8.
Safety precautions
Before using your printer, read the following safety precautions to make sure you use the equipment safely.
You are expected to have the appropriate technical training and experience necessary to be aware of hazards to
which you may be exposed in performing a task, and take appropriate measures to minimize the risks to yourself
and to other people.
General safety guidelines
There are no operator-serviceable parts inside the printer except those covered by HP's Customer Self Repair
program (see http://www.hp.com/go/selfrepair/). Refer servicing of other parts to qualied service personnel.
Turn o the printer and call your service representative in any of the following cases:
● The power cord or plug is damaged.
● The curing enclosures are damaged.
● The printer has been damaged by an impact.
● There is any mechanical or enclosure damage.
● Liquid has entered the printer.
ENWW Documentation 3
Page 10

● There is smoke or an unusual smell coming from the printer.
● The printer has been dropped or the curing module has been damaged.
● The printer is not operating normally.
Turn o the printer in either of the following cases:
● During a thunderstorm
● During a power failure
Take special care with zones marked with warning labels.
Electrical shock hazard
WARNING! The internal circuits of curing zones, output drier, print-zone heaters, and built-in power supplies
operate at hazardous voltages capable of causing death or serious personal injury.
The printer uses two power cords. Unplug both power cords before servicing the printer.
To avoid the risk of electric shock:
● The printer must be connected to earthed mains outlets only.
● Do not attempt to dismantle the curing modules.
● Do not remove or open any other closed system covers or plugs.
● Do not insert objects through slots in the printer.
Heat hazard
The curing subsystems of the printer operate at high temperatures and can cause burns if touched. To avoid
personal injury, take the following precautions.
● Do not touch the internal enclosures of the printer's curing zones.
● Let the printer cool down when accessing the internal curing zone and output platen in case of a substrate
● Let the printer cool down before performing some maintenance operations.
Fire hazard
The curing subsystems of the printer operate at high temperatures.
To avoid the risk of re, take the following precautions.
● The customer is responsible for meeting the printer's requirements and the Electrical Code requirements
jam.
according to the local jurisdiction of the country where the equipment is installed. Use the power supply
voltage specied on the nameplate.
● Connect the power cords to dedicated lines, each protected by a branch circuit breaker according to the
information detailed in the site preparation guide. Do not use a power strip (relocatable power tap) to
connect both power cords.
● Use only the power cords supplied by HP with the printer. Do not use a damaged power cord. Do not use
the power cords with other products.
● Do not insert objects through slots in the printer.
4 Chapter 1 Introduction ENWW
Page 11

● Take care not to spill liquid on the printer. After cleaning, make sure all components are dry before using
the printer again.
● Do not use aerosol products that contain ammable gases inside or around the printer. Do not operate the
printer in an explosive atmosphere.
● Do not block or cover the openings of the printer.
● Do not attempt to dismantle or modify the curing modules.
● Ensure that the operating temperature of the substrate recommended by the manufacturer is not
exceeded. If this information is not available, ask the manufacturer. Do not load substrates that cannot be
used at an operating temperature above 125°C (257°F).
● Do not load substrates with auto-ignition temperatures below 250°C (482°F). If this information is not
available, printing must be supervised at all times. See note below.
NOTE: Test method based on EN ISO 6942:2002; Evaluation of materials and material assemblies when
exposed to a source of radiant heat, method B. The test conditions, to determine the temperature when the
substrate starts ignition (either ame or glow), were: Heat ux density 30 kW/m², copper calorimeter, K type
thermocouple.
Mechanical hazard
The printer has moving parts that could cause injury. To avoid personal injury, take the following precautions
when working close to the printer.
● Keep your clothing and all parts of your body away from the printer's moving parts.
● Avoid wearing necklaces, bracelets, and other hanging objects.
● If your hair is long, try to secure it so that it will not fall into the printer.
● Take care that sleeves or gloves do not get caught in the printer's moving parts.
● Avoid standing close to the fans, which could cause injury and could also aect print quality (by obstructing
the air ow).
● Do not touch gears or moving rolls during printing.
● Do not operate the printer with covers bypassed.
Light radiation hazard
Light radiation is emitted from the illumination of the print zone. This illumination is in compliance with the
requirements of the exempt group of IEC 62471:2006, Photobiological safety of lamps and lamp systems.
However, you are recommended not to look directly at the LEDs while they are on. Do not modify the module.
Chemical hazard
See the safety data sheets available at http://www.hp.com/go/msds to identify the chemical ingredients of your
consumables. Suicient ventilation should be provided to ensure that potential airborne exposure to these
substances is adequately controlled. Consult your usual air-conditioning or EHS specialist for advice on the
appropriate measures for your location. For more detailed information, see the “Ventilation” and “Air
conditioning” sections of the site preparation guide, available from http://www.hp.com/go/latex300/manuals/.
Ventilation
Ensure that the room in which the system is installed meets local environmental, health, and safety (EHS)
guidelines and regulations.
ENWW Safety precautions 5
Page 12
Adequate ventilation needs to be provided to ensure that potential exposure is adequately controlled. Consult
the Safety Data Sheets available at http://www.hp.com/go/msds to identify chemical ingredients of your ink
consumables. Levels of certain substances in your environment are dependent on workspace variables you
control, such as room size, ventilation performance, and duration of equipment use. Consult your EHS specialist
for advice on the appropriate measures for your location.
Air conditioning
In addition to fresh air ventilation, to avoid health hazards, consider maintaining workplace ambient levels by
ensuring the climatic operating conditions specied in this document (see Environmental specications
on page 175) to avoid operator discomfort and equipment malfunction. Air conditioning in the work area should
take into account that the equipment produces heat. Typically, the printer's power dissipation is:
● 2.2 kW (7.5 kBTU/h) for HP Latex 315 printers
● 2.6 kW (8.9 kBTU/h) for HP Latex 335 printers
● 4.6 kW (15.7 kBTU/h) for HP Latex 365 and 375 printers
Air conditioning should meet local environmental, health, and safety (EHS) guidelines and regulations.
CAUTION: The air conditioning units should not blow air directly onto the printer.
Heavy substrate hazard
Special care must be taken to avoid personal injury when handling heavy substrates.
● Handling heavy substrate rolls may require more than one person. Care must be taken to avoid back strain
and/or injury.
● Consider using a forklift, pallet truck, or other handling equipment.
● When handling heavy substrate rolls, wear personal protective equipment including boots and gloves.
Ink handling
HP recommends that you wear gloves when handling ink system components.
Warnings and cautions
The following symbols are used in this manual to ensure the proper use of the printer and to prevent the printer
from being damaged. Follow the instructions marked with these symbols.
WARNING! Failure to follow the guidelines marked with this symbol could result in serious personal injury or
death.
CAUTION: Failure to follow the guidelines marked with this symbol could result in minor personal injury or
damage to the printer.
Warning labels
Label
6 Chapter 1 Introduction ENWW
Explanation
Printer label. To identify the printer’s power cord.
Page 13
Label Explanation
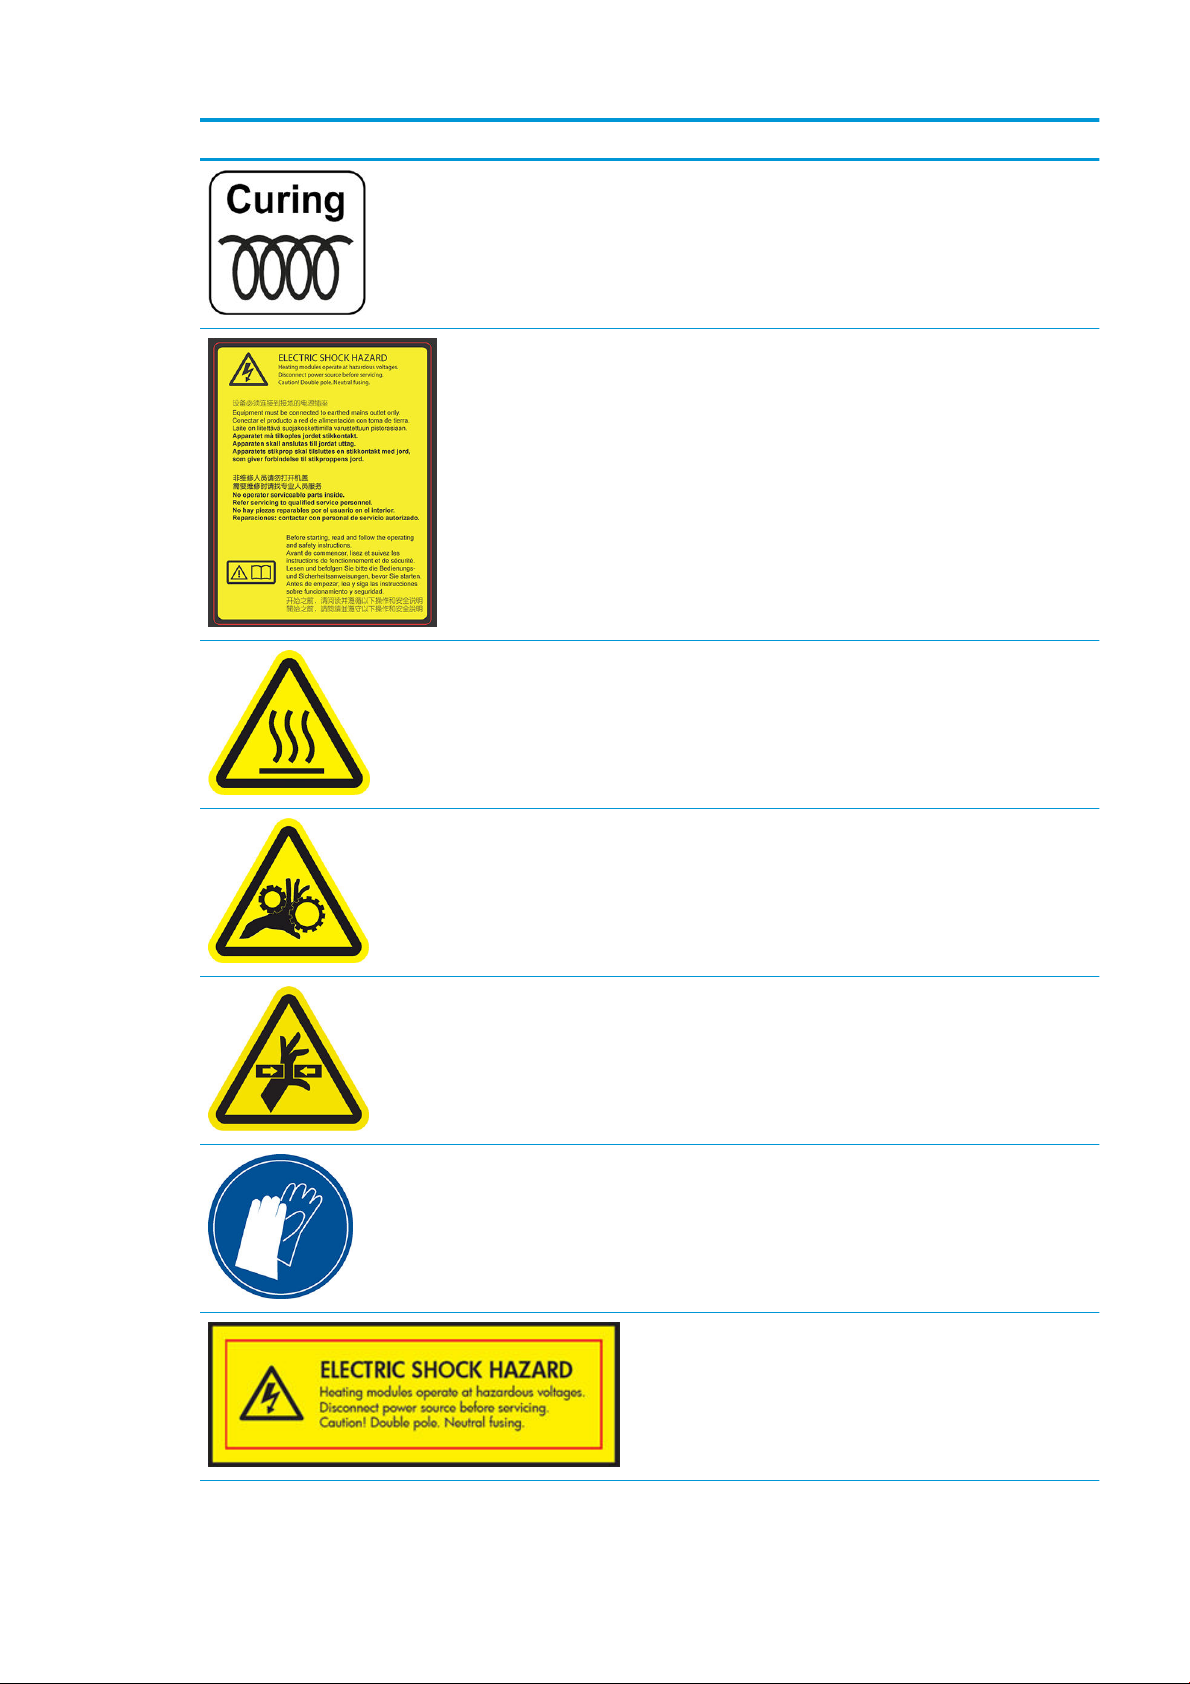
Curing label. To identify the curing power cord.
Electric shock hazard. Heating modules operate at hazardous
voltages. Disconnect power source before servicing.
CAUTION: Double pole. Neutral fusing.
Equipment to be connected to earthed mains outlet only. Refer
servicing to qualied service personnel. Disconnect all power cords
before servicing. No operator serviceable parts inside the printer.
Before starting, read and follow the operating and safety
instructions. Ensure that the input voltage is within the printer's
rated voltage range. The printer requires up to two dedicated lines.
This label is located on the e-box.
Risk of burns. Do not touch the curing zone or the output platen of
the printer: they could be hot.
This label is located on the front of the curing module.
Risk of trapped ngers. Do not touch moving gears.
These labels are located at the rear of the printer, one on the
substrate input gear and one on the take-up reel gear (335, 365,
and 375 only).
Moving part. Keep away from the moving printhead carriage. When
printing, the printhead carriage travels back and forth across the
substrate.
This label is located on the rear of the scan axis window, behind the
plastic.
You are recommended to wear gloves when handling the
maintenance cartridge, the platen, or the ink collector.
This label is located on the maintenance cartridge.
Electric shock hazard. Heating modules operate at hazardous
voltages. Disconnect all power sources before servicing.
This label is located on the curing control PCA enclosure. For service
personnel only.
ENWW Safety precautions 7
Page 14

Label Explanation
Electric shock hazard. The printer has two input power cords. Power
supplies operate at hazardous voltages. Disconnect all power cords
before servicing.
This label is located internally (in the 365 and 375 only), close to the
print-zone heating-coils enclosure between fans. For service
personnel only.
Hazardous moving parts. Rotating fan blades. Keep hands clear.
These labels are located internally, close to the print-zone heating
fans between fans (365 and 375 only), one near the vacuum fan
and one near the aerosol fan. For service personnel only.
Hazardous area. Heating modules operate at hazardous voltages.
Electric shock hazard. Equipment has two input power cords.
Disconnect all power cords before servicing. Power supplies operate
at hazardous voltages.
Double pole, neutral fusing.
Equipment to be connected to earthed mains outlet only.
This label is located in the scan and air-curtain heater control
enclosure (365 and 375 only). For service personnel only.
NOTE: The nal label position and its size on the printer may vary slightly, but should always be visible and
close to the potential risk area.
Main printer components
The above image is a QR code containing a link to a video; see Documentation on page 3.
The following views of the printer illustrate its main components.
8 Chapter 1 Introduction ENWW
Page 15
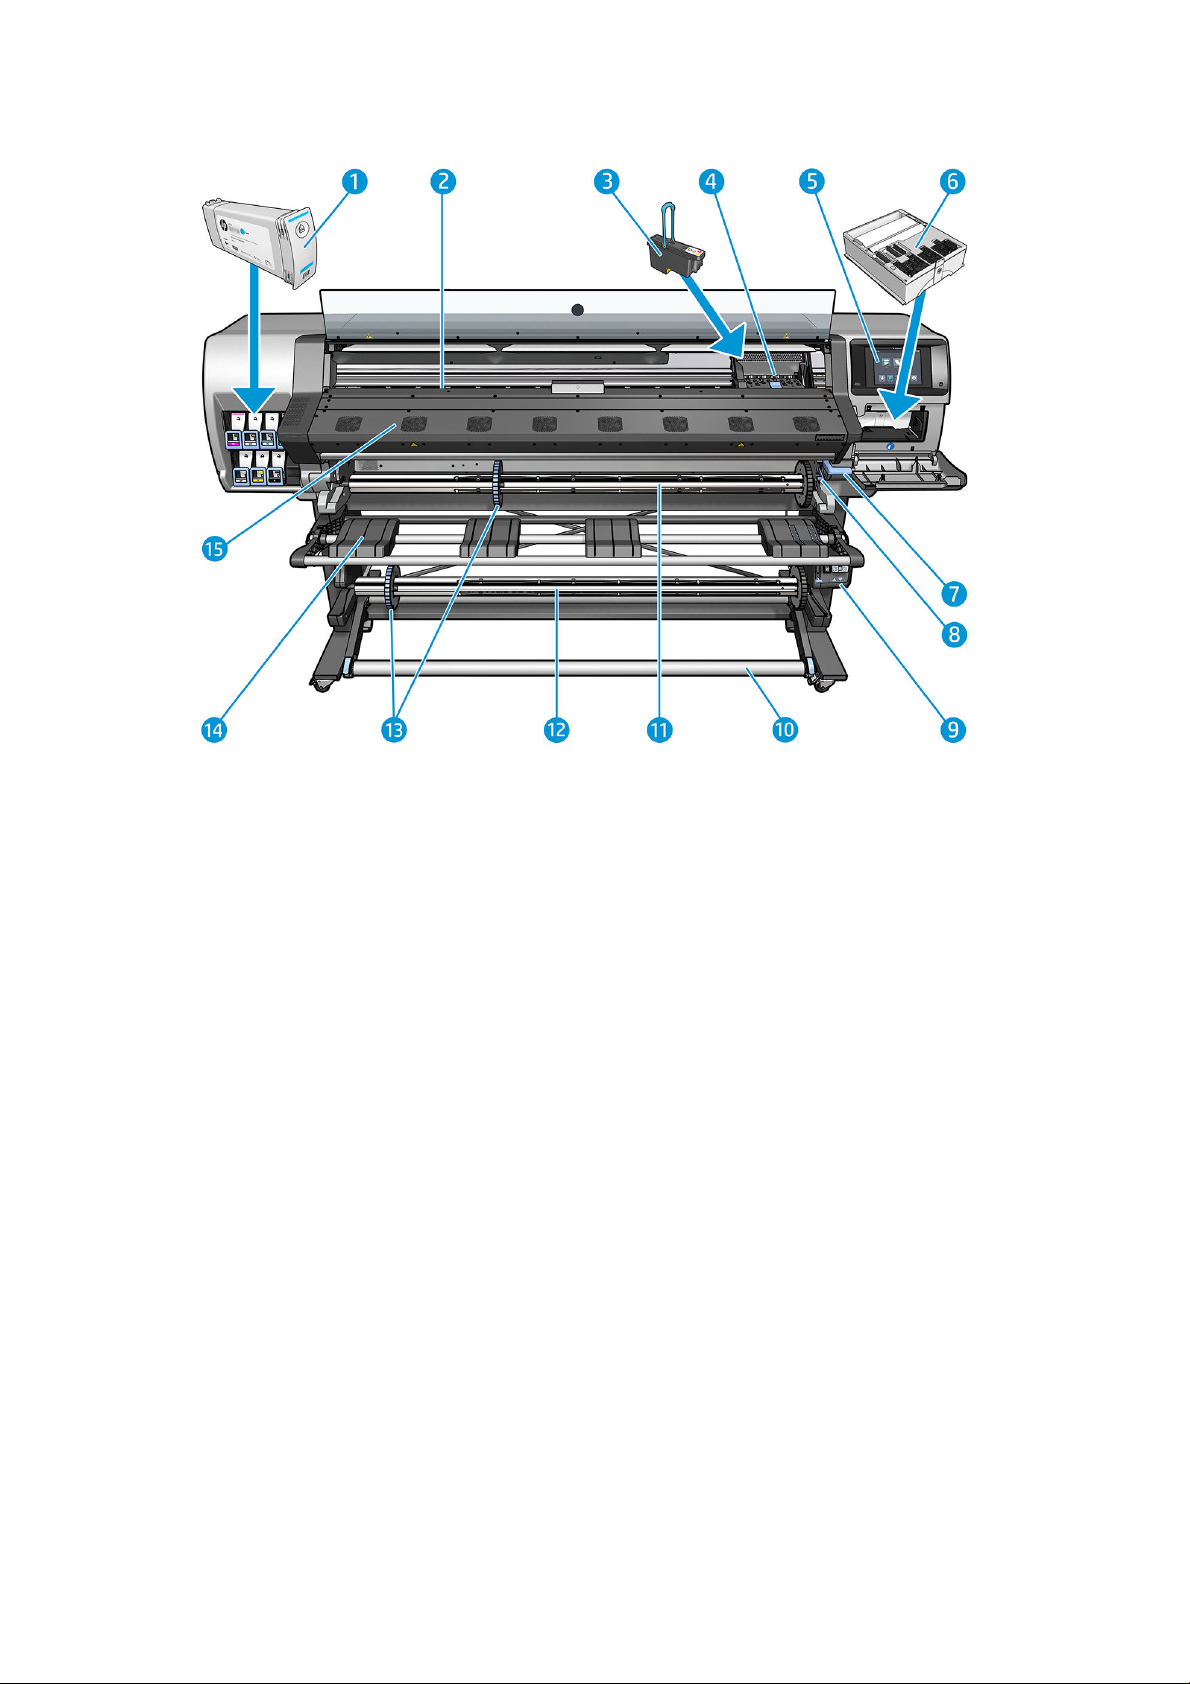
Front view
1. Ink cartridge
2. Platen
3. Printhead
4. Printhead carriage
5. Front panel
6. Maintenance cartridge
7. Substrate pinch lever
8. Spindle lock lever
9. Take-up reel motor
10. Tension bar
11. Spindle
12. Take-up reel
13. Spindle stop
14. Loading table
15. Curing module
ENWW Main printer components 9
Page 16
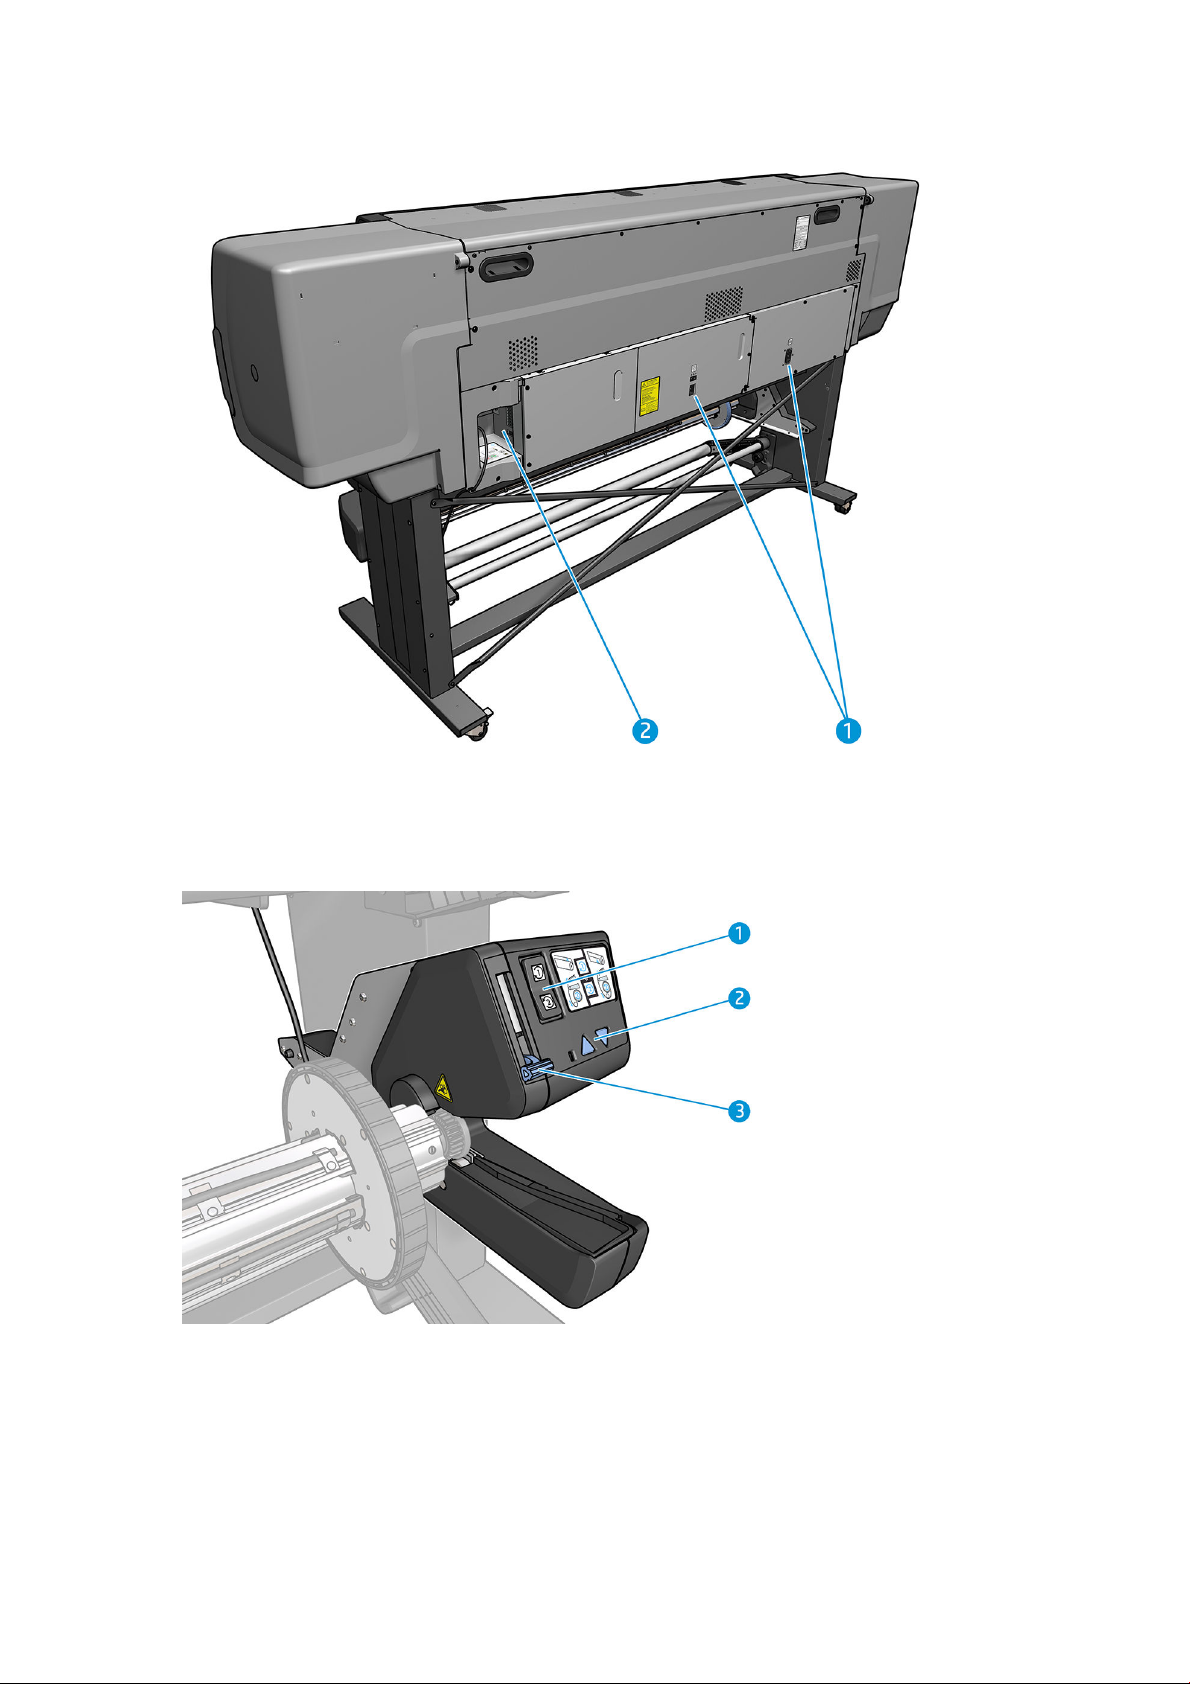
Rear view
1. Power switch and power socket
2. Sockets for communication cables and optional accessories
Take-up reel motor
1. Winding-direction switch
2. Manual winding buttons
3. Take-up reel lever
10 Chapter 1 Introduction ENWW
Page 17
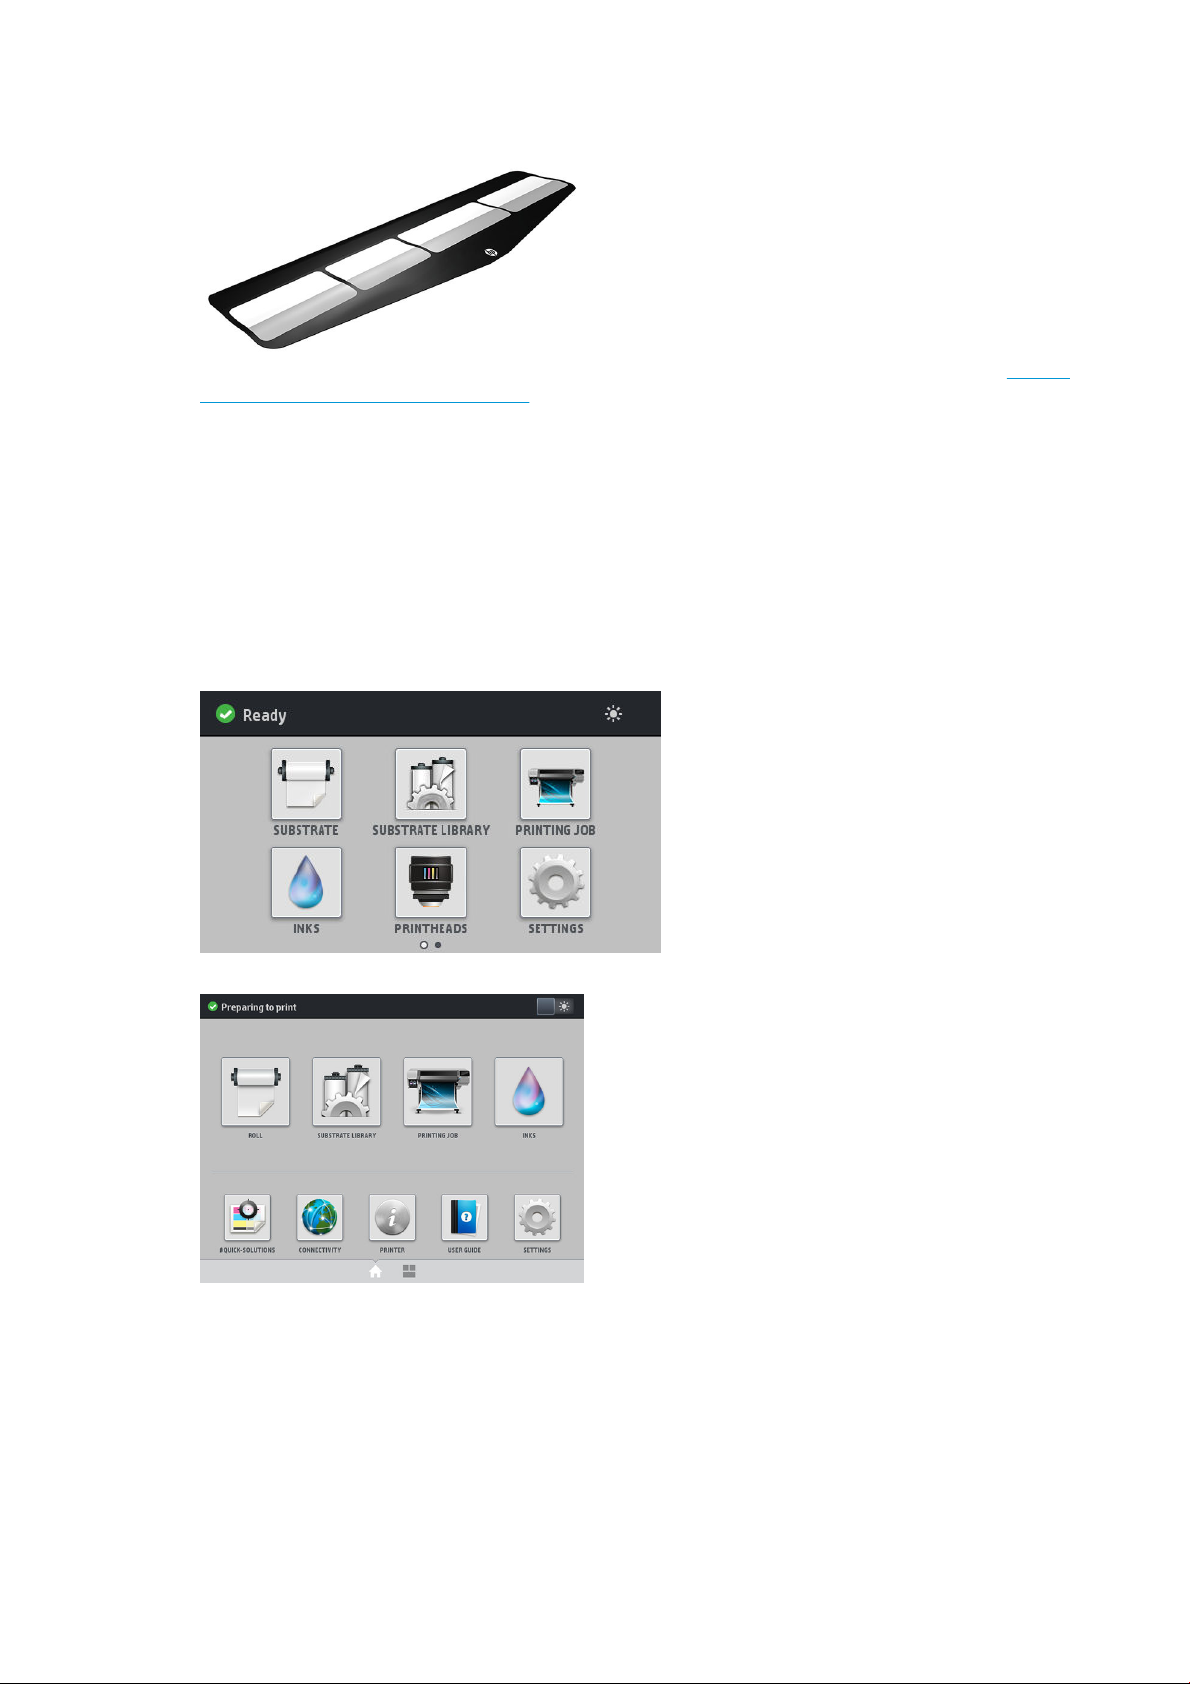
Loading accessory
The loading accessory helps you to load some substrate types that are diicult to load without it. See Loading
accessory (365 and 375 only) on page 59.
Front panel
Introduction to the front panel
The front panel is a touch-sensitive screen with a graphical user interface; it is located on the front right of the
printer. It gives you complete control of your printer: from the front panel, you can view information about the
printer, change printer settings, perform calibrations and tests, and so on. The front panel also displays alerts
(warning and error messages) when necessary.
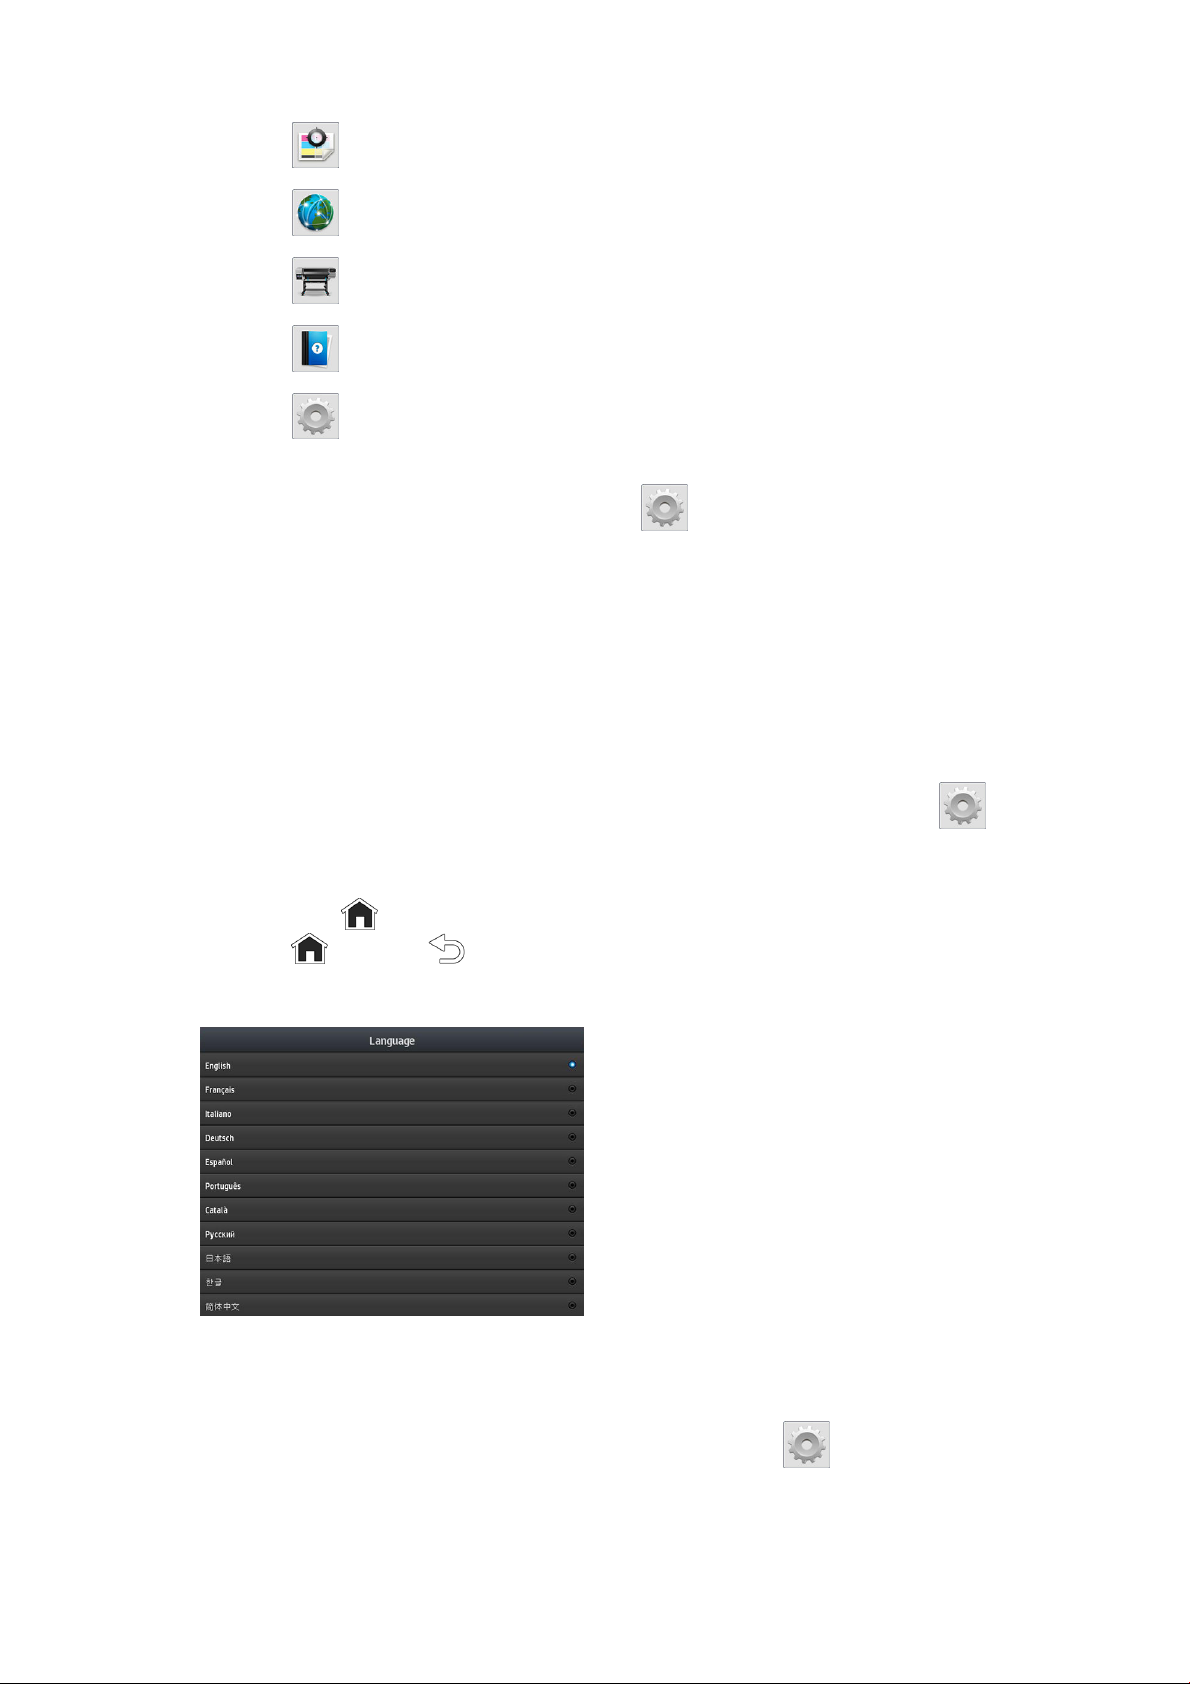
HP Latex 315/335 home screen
HP Latex 365/375 home screen
There is an alternative home screen that you can see by sliding your nger across the screen to the left. It
summarizes the status of the ink cartridges, the substrate, and the current print job.
ENWW Front panel 11
Page 18

The front panel has a large central area to display dynamic information and icons. On the left and right sides you
can see up to six xed icons at dierent times. Normally they are not all displayed at the same time.
Left and right xed icons
● Press to return to the home screen.
● Press to view help about the current screen.
● Press to go to the previous item.
● Press to go to the next item.
● Press to go back to the last-visited screen. This does not discard any changes made in the current
screen.
● Press to cancel the current process.
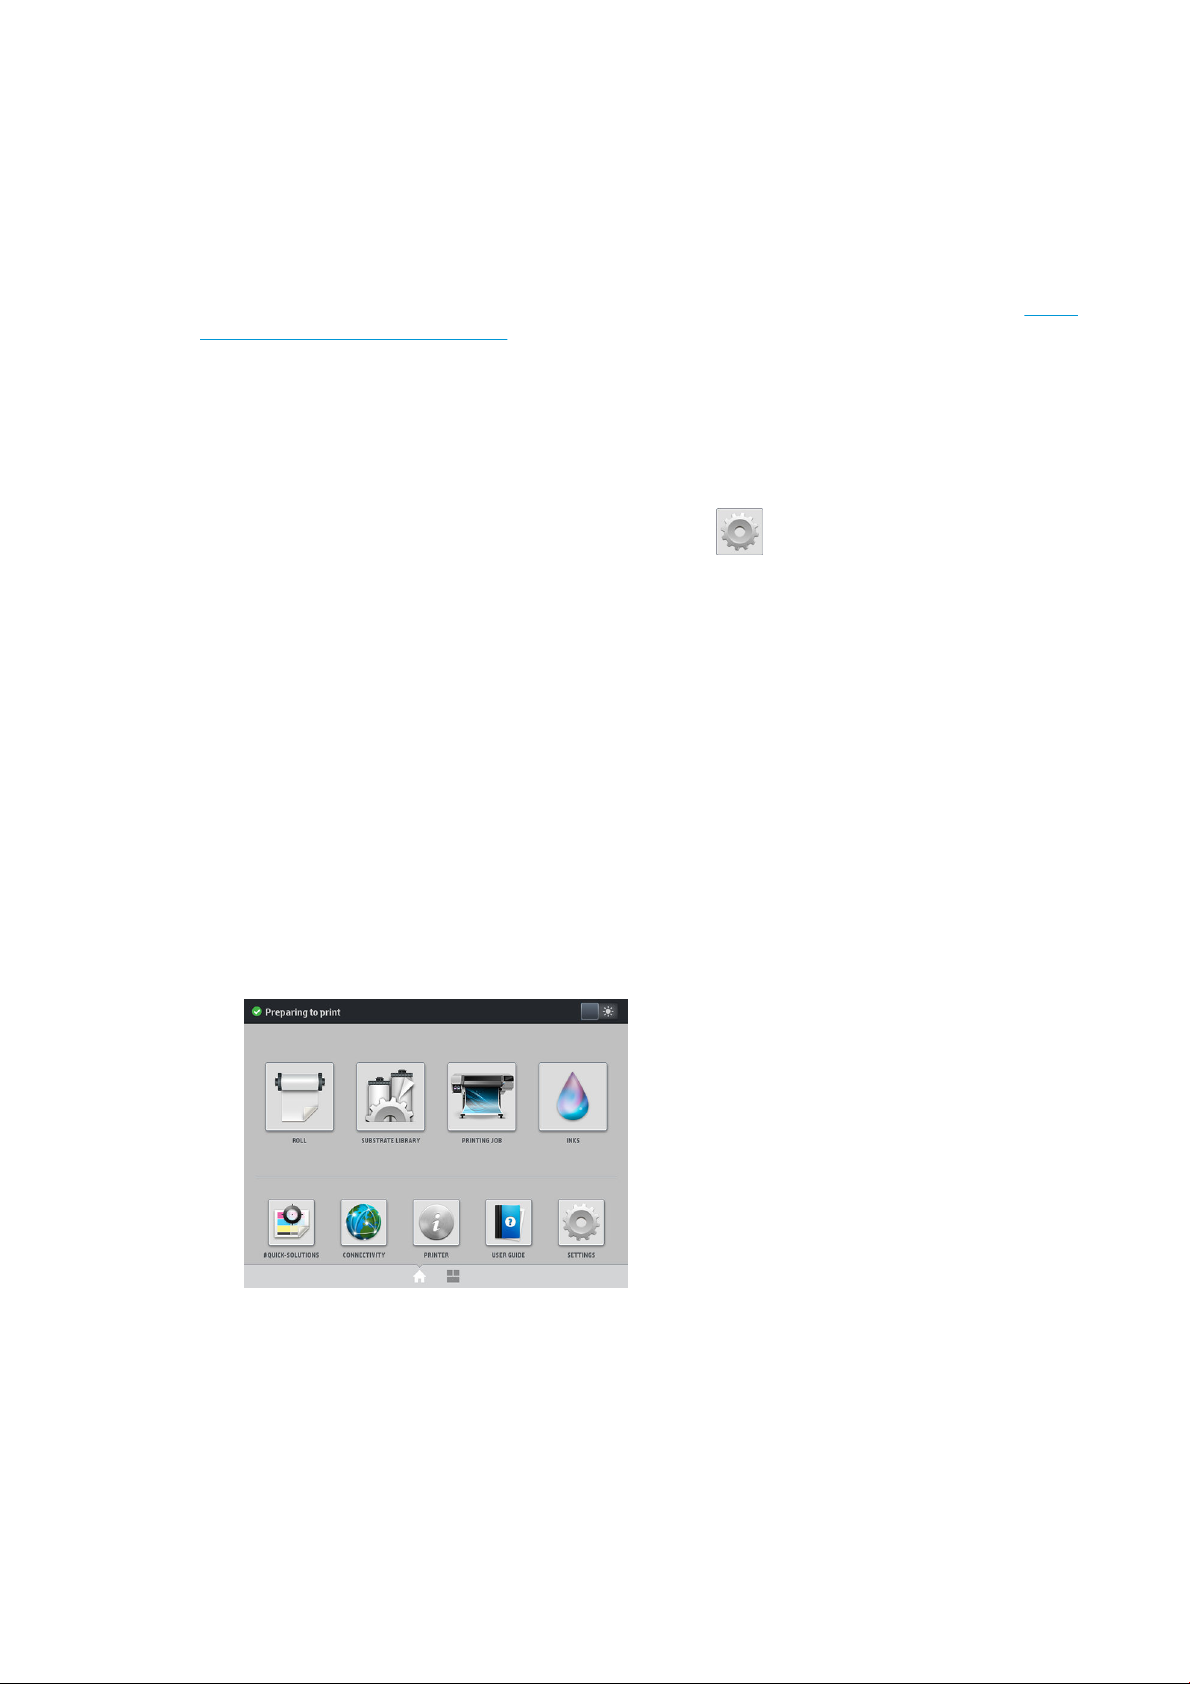
Home screen dynamic icons
The following items are displayed only on the home screen.
● At the top left of the screen is a message showing the printer status or the most important current alert.
Press this message to see a list of all current alerts, with an icon indicating the severity of each alert. You
can press an alert to get help in solving the problem.
● At the top right, press to turn on or o the print-zone illumination light.
● Press to view substrate status and perform substrate-handling operations.
● Press to open the Substrate Library and access the extensive online library of substrate presets.
● Press to view information about the job that is currently printing.
● Press to view ink-supply status and perform ink-cartridge and printhead operations.
12 Chapter 1 Introduction ENWW
Page 19
● Press to nd quick solutions to printing problems.
● Press to view network and Internet status and change related settings.
● Press to view information about the printer.
● Press for help.
● Press to view and change printer settings in general.
If the printer is left idle for some time, it goes into sleep mode and switches o the front-panel display. To
change the time that elapses before sleep mode, press , then Setup > Front panel options > Sleep mode
wait time
The printer wakes from sleep mode and switches on the front-panel display whenever there is some external
interaction with it.
Information about specic uses of the front panel can be found throughout this guide.
. You can set a time between 5 and 240 minutes; the default is 25 minutes.
Change the language of the front panel
Two methods are available to change the language that is used for the front-panel menus and messages.
● If you can understand the current front panel language, go to the front panel and press , then Setup >
Front panel options > Language.
● If you cannot understand the current front panel language, start with the printer turned o. Turn it on. As
soon as the
press
Whichever method you used, the language selection menu should now appear on the front panel.
icon appears, press it for a few seconds. When all icons have appeared on the front panel,
followed by . The front panel blinks briey.
Press the name of your preferred language.
View or set the date and time
To view or set the printer's date and time, go to the front panel and press , then Setup > Front panel
options > Date and time options.
ENWW Front panel 13
Page 20

Set altitude
If your printer is operating at more than 500 m (1640 ft) above sea level, go to the front panel and press ,
then Setup > Select altitude, to tell the printer its operating altitude.
Set time before standby
When there are no more jobs to print, or you want to pre-warm the printer (Prepare printing option in the RIP),
the printer´s curing heaters remain on for the specied time and temperature in case another job arrives or in
case you need to avoid any print-quality problem that could be caused by an incorrect temperature in the print
zone. To choose how long the heaters will stay on in this situation, go to the front panel and press
Substrate > Substrate handling options > Curing standby duration. You can select from 5 to 120 minutes.
The curing temperature during this standby period is set automatically by the printer.
Change the sleep mode setting
If the printer is left turned on but unused for a certain period of time, it automatically goes into sleep mode to
save power. The default period of time it waits is 25 minutes. To change the time the printer waits before it goes
into sleep mode, go to the front panel and press , then Setup > Front panel options > Sleep mode wait
time. Enter in minutes the wait time that you want, then press OK.
Change the loudspeaker volume
To change the volume of the printer's loudspeaker, go to the front panel and press , then Setup > Front
panel options > Speaker volume, and select O, Low, or High.
Turn audio alerts on or o
To turn the printer's audio alerts on or o, go to the front panel and press , then Setup > Front panel
options > Enable audio alert or Disable audio alert. By default, audio alerts are enabled.
then
Change the front panel display brightness
To change the brightness of the front-panel display, press , then Setup > Front panel options > Display
brightness, then select a value by moving the scroll bar. Press OK to save the value.
Change the units of measurement
To change the units of measurement that appear on the front panel, press , then Setup > Front panel
options
> Unit selection, then English or Metric.
The units of measurement can also be changed in the Embedded Web Server. See Access the Embedded Web
Server on page 23.
Restore factory settings
To restore the printer settings to their original values as set in the factory, go to the front panel and press ,
then Setup > Resets > Restore factory settings. This option restores all of the printer settings except the Gigabit
Ethernet settings and substrate presets.
14 Chapter 1 Introduction ENWW
Page 21

Check printer status
The front panel and the Embedded Web Server both display the status of the printer, the loaded substrate, and
the ink system.
Check the status of the ink cartridges
You can see the ink levels in your ink cartridges by pressing on the front panel's home screen.
For more details about any particular ink cartridge, press the rectangle representing that cartridge. The following
information is shown.
● Status
● Estimated ink level
● Capacity
● Product name
● Product number
● Serial number
● Expiration date
● Warranty status
● Manufacturer
● Supported ink cartridges
These are the possible ink cartridge status messages that you can see on the front panel:
● OK: The cartridge is working normally, with no known problems.
● Missing: There is no cartridge present, or it is not correctly connected to the printer.
● Low: The ink level is low.
● Very low: The ink level is very low.
● Empty: The cartridge is empty.
● Reseat: You are recommended to remove the cartridge and then reinsert it.
● Replace: You are recommended to replace the cartridge with a new cartridge.
● Expired: The cartridge’s expiration date has passed.
ENWW Front panel 15
Page 22

● Incorrect: The cartridge is not compatible with this printer. The message includes a list of compatible
cartridges.
● Non-HP: The cartridge is used, relled, or counterfeit.
You can also view the status of the ink cartridges in the Embedded Web Server. See Access the Embedded Web
Server on page 23.
Check the status of a printhead
The printer automatically checks and services the printheads after each print. Follow these steps to get more
information on your printheads.
1. On the front panel's home screen, press (HP Latex 365 and 375) or the printhead icon (HP Latex
315 and 335).
2. Select the printhead for which you want to see information.
3. The front panel shows the following information:
● Status
● Product name
● Product number
● Serial number
● Ink red
Warranty status
●
● Install date
These are the possible printhead status messages that you can see on the front panel:
● OK: The printhead is working normally, with no known problems.
● Missing: There is no printhead present, or it is not correctly installed in the printer.
● Reseat: You are recommended to remove the printhead and then reinsert it. If that fails, clean the electrical
connections (see Clean the electrical connections on a printhead on page 143). If that fails, replace the
printhead with a new printhead (see Replace a printhead on page 136).
● Replace: The printhead is failing. Replace the printhead with a working printhead (see Replace a printhead
on page 136).
16 Chapter 1 Introduction ENWW
Page 23
● Replacement incomplete: The printhead replacement process has not completed successfully; restart the
replacement process and let it nish completely.
● Remove: The printhead is not a suitable type for use with your printer.
● Non-HP ink: Ink from a used, relled, or counterfeit ink cartridge has passed through the printhead. See the
limited warranty document provided with your printer for details of the warranty implications.
You can also use the Embedded Web Server to check the printhead status and the warranty status. See Access
the Embedded Web Server on page 23.
Check the le system
It is possible to check the integrity of the le system on the printer's hard disk, and automatically correct any
errors. You are recommended to do this about once every six months, or if you notice any trouble in accessing
les on the hard disk.
To execute the le system check, go to the front panel and press , then Preventive maint. tasks > File
system check.
If the printer is aware of damage to the le system, for instance after a severe software problem, it may start a
le system check automatically. This can take about ten minutes.
Printer alerts
The printer can communicate two types of alerts:
● Errors: When the printer is unable to print.
● Warnings: When the printer needs attention for an adjustment, such as a calibration, preventive
maintenance, or ink cartridge replacement.
● Advice: When a rmware update is available or the downloaded rmware is ready to be installed.
Printer alerts appear in the front panel and in the Embedded Web Server.
● Front-panel display: The front panel shows the alerts in the upper left part of the screen (notication bar).
Only one alert is shown at a time. If you press the notication bar, all the current printer alerts are shown.
The list of alerts can be folded back by pressing or sliding up the bottom row of the list.
ENWW Front panel 17
Page 24

● Embedded Web Server: The Embedded Web Server shows only one alert at a time, which is judged to be
An alert may require you to perform a maintenance operation; see Hardware maintenance on page 128.
The following alerts require a service engineer:
● Service Maintenance Kit 1
● Service Maintenance Kit 2
● Service Maintenance Kit 3
Printer states
The printer may be in any one of the following states; some of them require waiting.
● Ready (cold): The printer is powered on but has not printed yet, and the heaters are not turned on.
● Preparing to print: The printer is warming up the heaters and preparing the printheads to print. This takes 1
Clicking an alert opens the application that could help to resolve it. Firmware update advice is dismissed
when entering the Printer application. Once dismissed, there won’t be any reminder later on about the
same advice (in the case of rmware updates, a new notication appears when there a new rmware
release becomes available).
the most important.
to 6 min.
● Ready for substrate
● Ready for side A/B
● Printing
● Printing side A/B
● Drying: This takes 1.5 to 5 min.
● Finishing: The printer is cooling down and preparing for stand-by. This takes 0.5 to 5 min.
You can select continuous printing using certied RIP software. Without continuous printing, the printer cures
each job separately and then winds the substrate back into the print zone before starting to print the next job in
the queue. This adds time to the printing process. Continuous printing saves time by continuing to print the next
job in the queue without stopping (tailgating), if it uses the same print mode and resolution.
NOTE: The same print mode and resolution must be used for all jobs in the RIP queue selected for continuous
printing, to optimize the overall curing time.
NOTE: When continuous printing is enabled, canceling a job could also cancel the subsequent job.
18 Chapter 1 Introduction ENWW
Page 25

Change margins
The printer margins determine the area between the edges of your image and the edges of the substrate. The
365 or 375 printer with ink collector is capable of printing with no side margins (full bleed).
The side margins for a particular print job are selected in the RIP software; if the job exceeds the substrate width,
it will be clipped.
The front panel oers additional settings for the top and bottom margins: see Margins on page 173. These
settings apply only to single prints when the cutter is not in use. The top and bottom margins are not applied
during double-sided printing.
To set the top margin at the front panel, press , then Substrate > Substrate handling options > Extra top
margin
.
To set the bottom margin at the front panel, press , then Substrate > Substrate handling options > Extra
bottom margin
NOTE: The extra top/bottom margin set in the front panel is applied in addition to the top/bottom margin
selected in the RIP.
NOTE: The side margins can be adjusted in the RIP.
.
Request the printer’s internal prints
The internal prints provide various kinds of information about your printer. Request these prints from the front
panel, without using a computer.
Before requesting any internal print, make sure that substrate is loaded and that the Ready message appears on
the front-panel display.
To print an internal print, press , then Setup > Internal prints, then select the type of internal print that you
want.
The following internal prints are available:
● Usage report: Shows estimates of the total number of prints, number of prints by substrate family, number
of prints by print-quality option, and total amount of ink used per color. The accuracy of these estimates is
not guaranteed.
● Service information: Provides information that service engineers require.
Check lifetime usage statistics
There are two ways of checking your printer's usage statistics.
NOTE: The accuracy of the usage statistics is not guaranteed.
● From the Embedded Web Server, go to the Main tab and select History > Usage. See Embedded Web Server
on page 22.
● From the front panel, press , then Setup > Internal prints > User information prints > Print usage
report.
ENWW Front panel 19
Page 26

HP Latex Mobile
Your printer supports a new application called HP Latex Mobile, which marks a new era of smart printers. This
app enables you to receive helpful consumables alerts while remotely monitoring your printer and job status on
your smartphone or tablet. It also compiles metrics related to ink and substrate usage and productivity that you
can view from your tablet. Print with greater condence, especially as you no longer have to worry about the
status of print jobs while you’re away from the printer.
NOTE: HP Latex Mobile is compatible with Android 4.1.2 or later and iOS 7 or later, and requires the printer and
the smartphone or tablet to be connected to the Internet.
NOTE: Metrics are available on tablets but not on smartphones.
Rely on alerts to tell you when attention is needed
No more wondering what’s going on with your printer while you’re away:
● Alerts keep you informed about supplies, the substrate path, and situations when the printer is not ready.
● Return to your printer and take action once you’ve been alerted.
Know the status of your printer while you’re away from it
HP Latex Mobile oers insight into printer activity and ink and substrate usage:
● Follow printer activity remotely and gain an awareness of your printer at all times.
● Stay abreast of ink levels and the amount of substrate remaining to avoid surprises and respond
accordingly.
● Use your tablet to view metrics. Email that information to your computer for more details of ink and
substrate usage as well as productivity per printer or job. Use it to improve planning and operations.
20 Chapter 1 Introduction ENWW
Page 27

Remotely keep tabs on print jobs
HP Latex Mobile enables you to monitor job completion and job history:
● Track print jobs through to completion.
NOTE: Printer updates occur roughly every ve minutes during the printing process and every several
hours when the printer is idle. Under certain circumstances, printer updates may be delayed—when system
errors occur, for certain substrate jams, in the case of a power outage—in which case the app dashboard
display shows the last known printer status.
● Monitor printed jobs through the job history.
How to add a printer to your mobile device
1. Open the HP Latex Mobile app on your mobile device.
2. Select Add new HP Latex Printer.
3. Make a note of the Service ID and Account ID.
4. Go to the printer’s front panel and press , then Setup > Printer Data Sharing Agreement.
5. Continue until you see the options Yes, I want to participate, Also send the printer’s serial number, and Also
send data to printer services. Select them all.
6. Register a new service and enter the Service ID and Account ID from your mobile device.
7. Press Continue and Accept until the registration is nished.
Alternatively, you can use the Embedded Web Server instead of the front panel.
1. In the Embedded Web Server, select the Printer Data Sharing Agreement tab.
2. Check Yes, I want to participate (send anonymous data only).
ENWW HP Latex Mobile 21
Page 28
3. Check Also send the printer’s serial number.
4. Check Also send data to printer services.
5. Check Register for a new service.
6. Enter the Service ID and Account ID from your mobile device and click Register.
7. The next screen tells you that the HP Latex to Go service will send status data from the printer to the
connected devices through the Internet. Click Accept.
Embedded Web Server
Introduction to the Embedded Web Server
The Embedded Web Server is a Web server running inside the printer. You can use it to obtain printer
information, manage settings and presets, align printheads, upload new rmware and troubleshoot problems.
Service engineers can use it to retrieve internal information that helps to diagnose printer problems.
You can access the Embedded Web Server remotely by using an ordinary Web browser running on any computer.
See Access the Embedded Web Server on page 23.
The Embedded Web Server window displays three separate tabs. Buttons near the top of each page provide
access to online help and supplies reordering.
22 Chapter 1 Introduction ENWW
Page 29

Main tab
The Main tab provides information about the following items.
● Substrate, ink, printhead and maintenance status
● Temperature of the curing module
● Substrate and ink usage and accounting
Setup tab
The Setup tab enables you to complete these tasks.
● Specify printer settings such as units of measurement and refresh date
● Specify network and security settings
● Set the date and time
● Update rmware
● Align printheads
● Upload substrate presets
● Congure e-mail notications
Networking tab
The Networking tab enables you to change the printer’s networking conguration.
Printer Data Sharing Agreement tab
The Printer Data Sharing Agreement tab enables you to sign the Printer Data Sharing Agreement and congure
your participation.
Support tab
The Support tab oers various kinds of help with your printer.
● Browse helpful information from a variety of sources
● Troubleshoot problems
● Access HP links for technical support with your printer and accessories
● Access service support pages that show current and historical data on the usage of your printer
Access the Embedded Web Server
Use the Embedded Web Server to view printer information remotely through an ordinary Web browser running
on any computer.
The following browsers are known to be compatible with the Embedded Web Server:
● Internet Explorer 7 and later for Windows
● Safari 3 and later for Mac OS X
● Mozilla Firefox 3.6 and later
● Google Chrome 7 and later
ENWW Embedded Web Server 23
Page 30

To use the Embedded Web Server on any computer, open your Web browser and type the printer's IP address in
the browser's address bar. The printer's IP address appears on the printer’s front panel, after pressing the
icon.
If you follow these instructions but fail to open the Embedded Web Server, see Cannot access the Embedded
Web Server on page 163.
Change the language of the Embedded Web Server
The Embedded Web Server functions in the following languages: English, Portuguese, Spanish, Catalan, French,
Italian, German, Simplied Chinese, Traditional Chinese, Korean, and Japanese. It uses the language that you
specied in your Web browser options. If you specify a language that it cannot support, it functions in English.
To change the language, change your Web browser's language setting. For example, in Chrome, Settings,
Language (in the advanced settings view), make sure that the language you want is at the top of the list in the
dialog box; or, in Internet Explorer version 8, go to the Tools menu and select Internet Options > Languages. Make
sure that the language you want is at the top of the list in the dialog box.
To complete the change, close and reopen your Web browser.
Restrict access to the printer
From the Embedded Web Server, you can select Setup > Security to set an administrator password. Once set, this
password must be given in order to perform the following printer functions.
● Clear accounting information.
● Update the printer’s rmware.
● Change security settings.
● View protected printer information.
● Change Internet connection settings.
● Change some networking settings.
● Congure the Printer Data Sharing Agreement.
● Run connectivity troubleshooting tests.
For more information, see the Embedded Web Server's online help.
If you forget the administrator password, you can delete the current password from the front panel: press ,
then Setup > Connectivity > Advanced > Embedded Web Server > Reset EWS password.
Join the Printer Data Sharing Agreement
You can activate or deactivate the Printer Data Sharing Agreement from the Embedded Web Server or from the
printer's front panel.
NOTE:
The Printer Data Sharing Agreement is a statistical printer-usage tracking system. It may also be used to
determine eligibility for certain usage-based reward programs, or to monitor the device in connection with
optional services such as proactive cartridge replacement, pay-per-use contracts, or support agreements
(availability varies by product, region, and country). See the Printer Data Sharing Agreement tab of the
Embedded Web Server for details on the data collected and HP’s use of the data. Once the Printer Data Sharing
24 Chapter 1 Introduction ENWW
From the front panel, press , then Setup > Printer Data Sharing Agreement.
Page 31

Agreement is enabled, your printer will automatically send 'usage snapshots' to HP through the Internet
approximately once a week, for as long as the Printer Data Sharing Agreement remains enabled. The snapshot
les are collected on a repository server, then automatically processed to extract the relevant data, which are
stored in a usage database. Sending the data does not interfere with the normal operation of your printer, and
does not require attention of any kind. You can stop participating at any time, in which case data transmissions
stop immediately.
The PDSA conguration page of the Printer Data Sharing Agreement tab is where you can start, stop, or change
your participation in the Printer Data Sharing Agreement. By default, only anonymous usage data are sent to HP,
but you have the option to include the printer’s serial number. This may be necessary for certain programs or
services, and may allow us to provide you with better product service and support. Once you have made any
changes to the settings, click the Apply button to apply them.
If the Printer Data Sharing Agreement was enabled before clicking the Apply button, a connectivity test is
automatically made to determine whether Printer Data Sharing Agreement data can be successfully delivered to
HP.
If the test completes successfully, conguration is complete and you can proceed to any other Embedded Web
Server page, or close the browser window. If the test fails, follow the instructions to try to identify and x the
problem.
The PDSA status and test page of the Printer Data Sharing Agreement tab can be used to check the current
status (enabled or not, anonymous data or not), and to run a connectivity test to check that Printer Data Sharing
Agreement data can be successfully delivered to HP.
ENWW Embedded Web Server 25
Page 32

Check printer status
The front panel and the Embedded Web Server both display the status of the printer, the loaded substrate, and
the ink system.
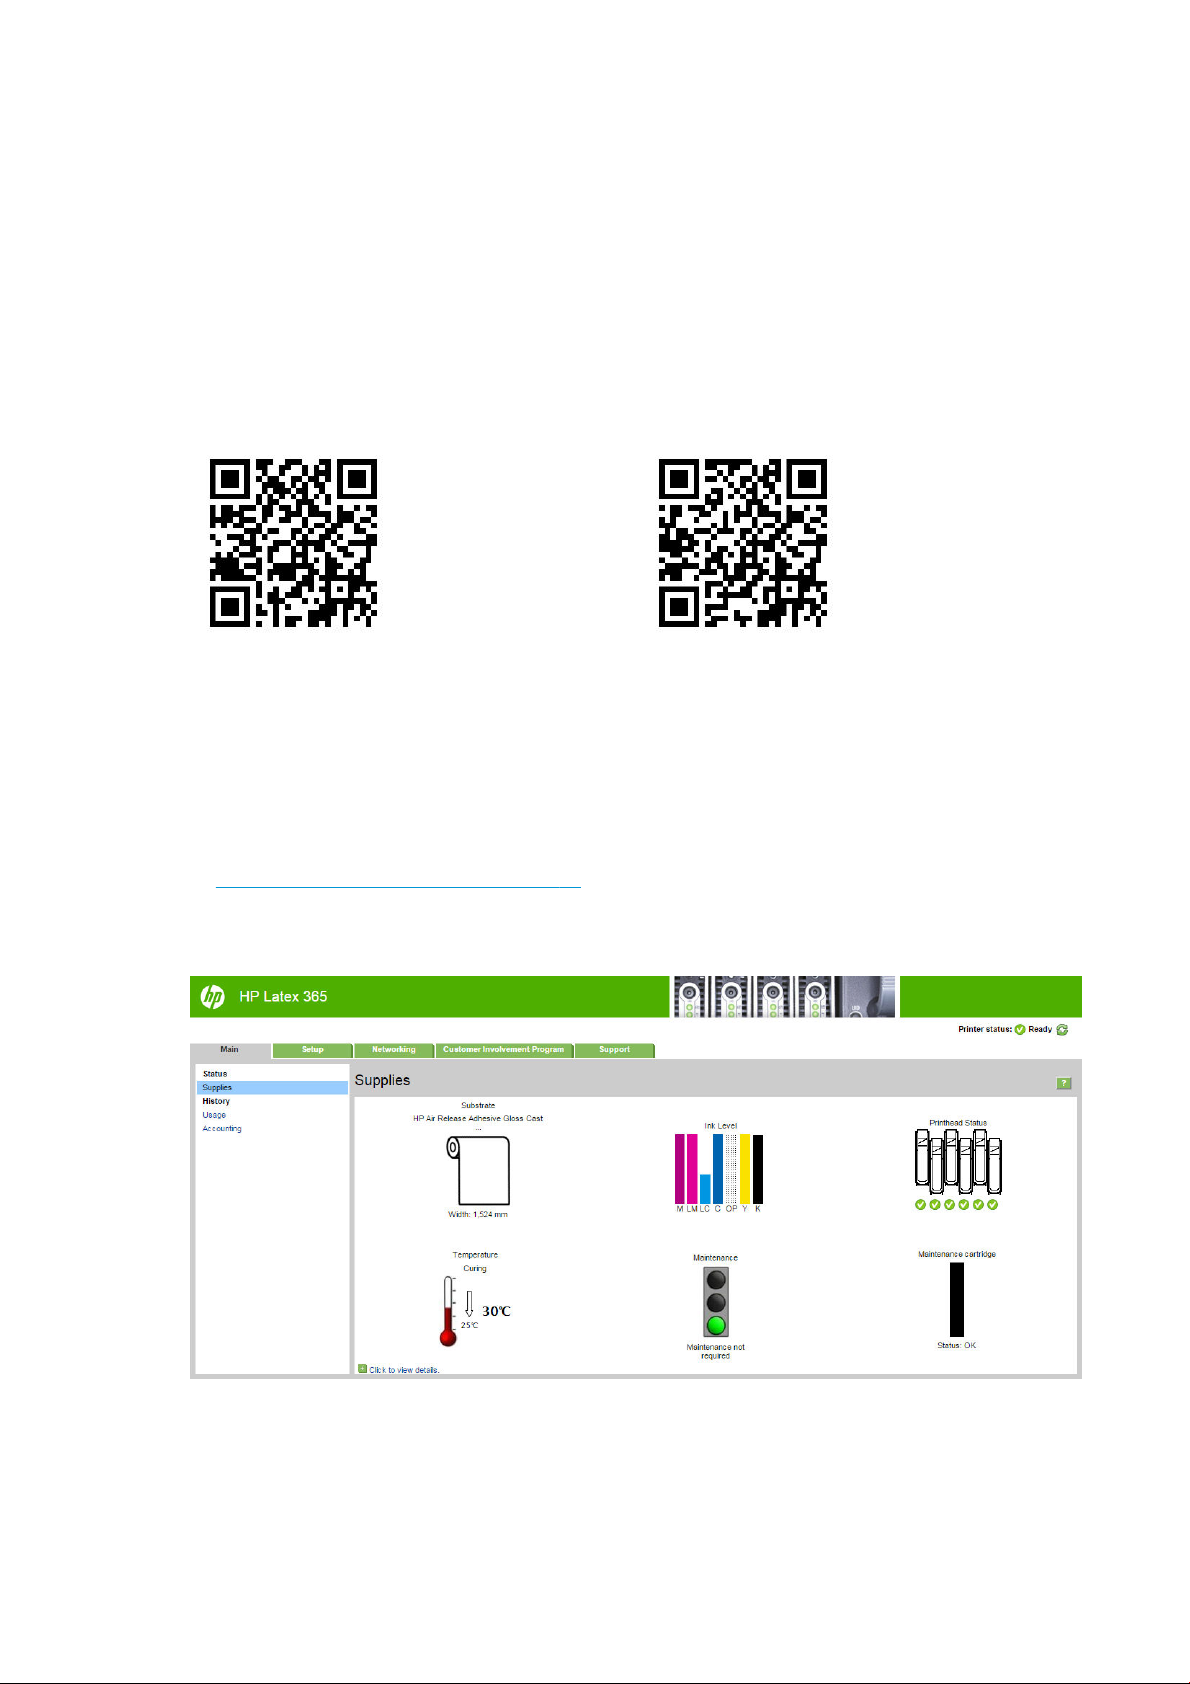
Check the status of the ink system
1. Access the Embedded Web Server (see Access the Embedded Web Server on page 23).
2. Go to the Supplies page on the Main tab.
The Supplies page shows you the status of the loaded substrate, the ink cartridges, the printheads, the heater,
and the maintenance cartridge.
The traic light shows whether maintenance is required.
For further information, click Click to view details.
Request email notication of specic error conditions
1. In the Embedded Web Server (see Access the Embedded Web Server on page 23), go to the Email Server
page on the Setup tab and ensure that the following elds are correctly lled in:
● SMTP server. This is the IP address of the outgoing mail server (Simple Mail Transfer Protocol [SMTP])
that processes all email messages from the printer. If the mail server requires authentication, email
notications will not work.
● Printer email address. Each email message that the printer sends must include a return address. This
address does not need to be a real, functional email address, but it should be unique, so that
recipients of the message can identify the printer that sent it
2. Go to the Notication page, which is also on the Setup tab.
3. Click the New icon to request new notications, or click the Edit icon to edit notications that have already
been set up. Then specify the email addresses to which notications are sent, and select the incidents that
result in notication messages.
26 Chapter 1 Introduction ENWW
Page 33

Get accounting information
There are various dierent ways of getting accounting information from your printer.
● View printer usage statistics for a particular job, see Check usage statistics for a job on page 27.
● View printer usage statistics for the whole lifetime of the printer, see Check lifetime usage statistics
on page 27.
● Request accounting data by email. The printer sends data in XML at regular intervals to a specied email
address; the data may be interpreted and summarized by a third-party application, or displayed as an Excel
spreadsheet. See Request accounting data by email on page 27.
● Use a third-party application to request printer status, printer usage or job accounting data from the printer
through the Internet. The printer provides data in XML to the application whenever requested. HP provides
a Software Development Kit to facilitate the development of such applications.
By default, user names are not included in accounting information. If you would like to include them, check the
box Show user name in job accounting in the Security menu.
Check usage statistics for a job
You can use the Embedded Web Server to check usage statistics for a particular job: go to the Main tab and select
History > Accounting.
NOTE: The accuracy of the usage statistics is not guaranteed.
Check lifetime usage statistics
There are two ways of checking your printer's usage statistics.
NOTE: The accuracy of the usage statistics is not guaranteed.
● From the Embedded Web Server, go to the Main tab and select History > Usage.
● From the front panel, press , then Setup > Internal prints > User information prints > Print usage
report.
Request accounting data by email
1. Obtain the IP address of the outgoing mail server (SMTP) from your IT department; this is required in order
to send email messages.
2. Ensure that the outgoing email server is congured to enable relaying of email messages that the printer
will send.
3. Open your Web browser and connect to the printer’s Embedded Web Server.
4. Select the Setup tab.
5. From the Conguration menu in the left-hand column, select Date & Time.
6. Ensure that the printer's date and time have been set correctly.
7. From the Conguration menu, select Email server.
8. Enter the IP address of the outgoing mail server (SMTP).
9. Specify an email address for the printer. The latter does not need to be a valid email address, because the
printer will not receive messages; but it should have the form of an email address. It serves to identify the
printer when it sends email messages.
ENWW Embedded Web Server 27
Page 34

10. From the Conguration menu, select Printer settings.
11. Set Send accounting les to Enabled.
12. Set Send accounting les to to the email address (or addresses) to which you want the accounting
information sent. This may be an address that you have created specically to receive automatically
generated messages from the printer.
13. Set Send accounting les every to the frequency with which you want the information sent, choosing a
specic number of days or prints.
14. You may want to set Exclude personal information from accounting email to On, so that the accounting
messages will not contain personal information. If this option is O, information such as user name, job
name, and account ID will be included.
When you have completed the above steps, the printer will send accounting data by email with the frequency
that you specied. The data are provided in XML and can easily be interpreted by a third-party program. The data
provided on each print job include when the job was submitted, when the job was printed, the printing time, the
type of image, the number of pages, the number of copies, the paper type and size, the amount of each color of
ink used and various other attributes of the job.
You can download an HP DesignJet Accounting Tool from HP's Web site (http://www.hp.com/go/designjet/
accounting/) that will enable you to display the XML data more readably in the form of a spreadsheet.
Analysis of the accounting data will enable you to bill customers precisely and exibly for the use of your printer.
You can, for instance:
● Bill each customer for the total amount of ink and paper used by that customer over a particular period.
● Bill each customer separately per job.
● Bill each customer separately for each project, broken down by job.
Connectivity and software instructions
Connection method
Your printer can be connected in the following way.
Connection type Speed Maximum cable length Other factors
Gigabit Ethernet Fast; varies according to
network traic
NOTE: The speed of any network connection depends on all the components that are used in the network,
which can include network interface cards, hubs, routers, switches, and cables. If any one of these components
cannot operate at high speed, you will have a low-speed connection. To get the expected performance from your
printer, you should use equipment that supports 1000TX Full Gigabit. The speed of your network connection can
also be aected by the total amount of traic from other devices on the network.
Long (100 m=328 ft) Requires extra equipment
(switches)
Connect the printer to your network
The printer is able to congure itself automatically for most networks, in a similar way to any computer in the
same network. The rst time you connect it to a network, this process may take a few minutes. If necessary, see
Advanced network conguration on page 30.
Once the printer has a working network conguration, you can check its network address from the front panel:
press .
28 Chapter 1 Introduction ENWW
Page 35

Network conguration
For more details about the current network conguration, go to the front panel and press , then
Connectivity > Network connectivity > Gigabit Ethernet > Modify conguration. From here it is possible, though
not normally necessary, to change the settings manually; this can also be done remotely using the Embedded
Web Server.
TIP: You may nd it helpful to print out the full printer network conguration on paper. This can be done from
the front panel: press , then Internal prints > Service information prints > Print connectivity conguration. If
you do not print out the full network conguration, consider making a note of the printer's IP address and
network name.
If you accidentally miscongure the printer’s network settings, you can restore the network settings to their
Using IPv6
factory values from the front panel: press
factory settings
for most networks. The printer’s other settings remain unchanged.
Your printer supports almost all network connectivity features using IPv6, just as it does using IPv4. To make full
use of IPv6, you may need to connect your printer to an IPv6 network in which there are IPv6 routers and
servers.
In most IPv6 networks, the printer will congure itself automatically as follows, and no user conguration is
necessary:
1. The printer assigns itself a link-local IPv6 address (which starts with “fe80::”).
2. The printer assigns itself stateless IPv6 addresses as indicated to it by any IPv6 routers on the network.
3. If no stateless IPv6 addresses can be assigned, the printer will try to obtain IPv6 addresses using DHCPv6.
It will also do so if the routers instruct it to do so.
The stateless and DHCPv6 IPv6 addresses can be used to access the printer, and in most IPv6 networks this will
be appropriate.
The link-local IPv6 address works only in the local subnet. Although it is possible to access the printer using this
address, it is not recommended.
. Then you must restart the printer. This automatically provides a working network conguration
, then Connectivity > Network connectivity > Advanced > Restore
It is possible to assign a manual IPv6 address to the printer, using the front panel or the Embedded Web Server. It
is also possible to disable IPv6 completely in the printer. However, it is not possible to disable IPv4 in the printer,
and therefore it is not possible to congure the printer as IPv6-only.
NOTE: In typical IPv6 use, your printer will have multiple IPv6 addresses, although it has only one IPv4 address.
TIP: You are recommended to give a name to the printer. You can do this from the front panel or (more easily)
from the Embedded Web Server.
TIP: You will generally nd it easier to use IPv4 unless you have a specic need to use IPv6.
Microsoft Windows Vista, Microsoft Windows Server 2008, later versions of Windows, and the new HP Printing
and Imaging devices have IPv6 enabled by default. For further information on IPv6, see
http://h20000.www2.hp.com/bc/docs/support/SupportManual/c00840100/c00840100.pdf. This document
discusses how name resolution plays a fundamental role in Dual-Stack transition methods. Using the name
resolution algorithm in Windows, the document goes through various network environments and studies how
the introduction of routable IPv6 addresses will aect network applications. It also discusses DHCPv6, SLAAC and
the impact to DNS, and makes some recommendations.
ENWW Connectivity and software instructions 29
Page 36

Connect the printer to the Internet
To connect to the Internet, go to the front panel and press , then Connectivity > Connectivity wizard. The
connectivity wizard also checks that the printer’s rmware is up to date. Normally you need to run the wizard
only once, when rst setting up the printer.
An Internet connection is needed for various printer functions described in this guide, such as the Embedded
Web Server.
RIP software installation
Install the RIP software by following the instructions provided with the software.
Advanced network conguration
You will probably not need to read this section, but the information is provided as it may be useful in some cases.
The printer provides a single RJ-45 connector port for a network connection. In order to meet Class B limits, the
use of shielded I/O cables is required.
The embedded Jetdirect print server supports connection to IEEE 802.3 10Base-T Ethernet, IEEE 802.3u
100Base-TX Fast Ethernet and 802.3ab 1000Base-T Gigabit Ethernet compliant networks. When connected and
powered on, the printer auto-negotiates with your network to operate with a link speed of 10, 100, or 1000
Mbps, and to communicate using full- or half-duplex mode. However, you can manually congure the link using
the printer's front panel, or through other conguration tools once network communication is established.
The printer can support multiple network protocols simultaneously, including TCP/IPv4 and TCP/IPv6. For
security, it includes features to control IP traic to and from the printer.
Verify correct operation
1. Print an IO Conguration page to check for status messages.
2. In the upper section of the IO Conguration page, look for the status message I/O Card Ready.
3. If I/O Card Ready appears, the print server is operating properly. Proceed to the next section.
If a message other than I/O Card Ready appears, try the following:
30 Chapter 1 Introduction ENWW
Page 37

a. Turn the printer o and then on again to re-initialize the print server.
b. Check that the status indicator lights (LEDs) are providing proper status.
NOTE: See Troubleshooting on page 31 for link conguration and troubleshooting information.
See the HP Jetdirect Print Servers Administrator’s Guide for your print server model to interpret and troubleshoot
other messages.
Precongure network settings if required
If your network requires that you congure network settings before you add the printer to your network
systems, you can do so now.
However, in most cases, you can skip this section. Instead, you can proceed directly to the next section to install
the printer on your network computer systems. The network installation software will allow you to congure
basic network settings and add the printer to your system conguration.
Tools for preconguration
The following tools can be used to precongure your network settings.
● The front panel
● The Embedded Web Server
● You can use an advanced conguration method, such as BootP, DHCP, Telnet, or the arp and ping
commands. For instructions, see the HP Jetdirect Print Servers Administrator’s Guide for your print server
model.
After the printer is congured with network settings, the conguration values are saved and maintained even
after it is turned o and on again.
Troubleshooting
IO Conguration page
The IO Conguration page provides comprehensive print server status. It is an important diagnostic tool,
especially if network communications are not available. For a description of messages that may appear on the IO
Conguration page, see the HP Jetdirect Print Servers Administrator’s Guide for your print server model.
LEDs
The printer has status lights (LEDs) that indicate the link status and network activity.
● When the green light is on, the printer has successfully linked to the network.
● When the yellow light is blinking, there is network transmission activity.
Link troubleshooting
If the printer does not successfully connect to the network:
● Both LEDs will be o.
● LAN Error - Loss of Carrier will be indicated on the IO Conguration page.
If a link failure is indicated, try the following:
● Check cable connections.
● Print an IO Conguration page and check link settings.
ENWW Advanced network conguration 31
Page 38

Item Description
Port Cong If the printer is properly linked, this item has one of the following values:
– 10BASE-T HALF: 10 Mbps, half-duplex
– 10BASE-T FULL: 10 Mbps, full-duplex
– 100TX-HALF: 100 Mbps, half-duplex
– 100TX-FULL: 100 Mbps, full-duplex
– 1000TX FULL
If the printer is not properly linked, one of the following messages will appear:
– UNKNOWN: The printer is in an initialization state.
– DISCONNECTED: A network connection has not been detected. Check network cables. Recongure the
link settings, or restart the printer.
Auto Negotiation Indicates whether auto-negotiation for link conguration is on or o.
– ON (default): The printer will attempt to automatically congure itself onto the network at the proper
speed and communication mode.
– OFF: You must manually congure the link speed and communication mode using the front panel. Your
settings must match those of the network for proper operation.
Reset network parameters
Network parameters (for example, the IP address) can be reset to factory default values by a cold reset: turning
the printer o and on again. After a cold reset, print an IO Conguration page to conrm that factory-reset values
have been assigned.
CAUTION: A factory-installed HP Jetdirect X.509 certicate will be saved over a cold reset to factory default
values. However, a Certicate Authority (CA) certicate that has been installed by the user to validate a network
authentication server will not be saved.
Menu items
Menu item Sub-menu item Sub-menu item Values and Description
TCP/IP Host Name An alphanumeric string, up to 32 characters, used to
identify the device. This name is listed on the HP Jetdirect
conguration page. The default host name is NPIxxxxxx,
where xxxxxx is the last six digits of the LAN hardware
(MAC) address.
IPV4 Settings Cong Method Species the method that TCP/IPv4 parameters will be
congured on the HP Jetdirect print server.
Bootp: Use BootP (Bootstrap Protocol) for automatic
conguration from a BootP server.
DHCP (default): Use DHCP (Dynamic Host Conguration
Protocol) for automatic conguration from a DHCPv4
server. If selected and a DHCP lease exists, DHCP Release
and DHCP Renew menus are available to set DHCP lease
options.
Auto IP: Use automatic link-local IPv4 addressing. An
address in the form 169.254.x.x is assigned automatically.
Manual: Use the Manual Settings menu to congure TCP/
IPv4 parameters.
32 Chapter 1 Introduction ENWW
Page 39

Menu item Sub-menu item Sub-menu item Values and Description
DHCP Release This menu appears if Cong Method was set to DHCP and a
DHCP lease for the print server exists.
No (default): The current DHCP lease is saved.
Yes: The current DHCP lease and the leased IP address are
released.
DHCP Renew This menu appears if Cong Method was set to DHCP and a
DHCP lease for the print server exists.
No (default): The print server does not request to renew the
DHCP lease.
Yes: The print server requests to renew the current DHCP
lease.
Manual Settings (Available only if Cong Method is set to Manual) Congure
parameters directly from the printer control panel:
IP Address: The unique IP address of the printer (n.n.n.n).
Subnet Mask: The subnet mask for the printer (n.n.n.n).
Syslog Server: The IP address of the syslog server (n.n.n.n)
used to receive and log syslog messages.
Default Gateway: The IP address (n.n.n.n) of the gateway or
router used for communications with other networks.
Idle Timeout: The time period, in seconds, after which an
idle TCP print data connection is closed (default is 270
seconds, 0 disables the timeout).
Default IP Specify the IP address to default to when the print server is
unable to obtain an IP address from the network during a
forced TCP/IP reconguration (for example, when manually
congured to use BootP or DHCP).
Auto IP: A link-local IP address 169.254.x.x is set.
Legacy: The address 192.0.0.192 is set, consistent with
older HP Jetdirect devices.
Primary DNS Specify the IP address (n.n.n.n) of a Primary DNS Server.
NOTE: This item appears only if Manual conguration is a
higher priority than DHCP in the Cong. Precedence table,
congured through the embedded Web server.
Secondary DNS Specify the IP address (n.n.n.n) of a Secondary Domain
Name System (DNS) Server.
NOTE: This item will appear only if Manual conguration is
a higher priority than DHCP in the Cong. Precedence table,
congured through the embedded Web server.
IPV6 Settings Enable Use this item to enable or disable IPv6 operation on the
print server.
O: IPv6 is disabled.
On (default): IPv6 is enabled.
ENWW Advanced network conguration 33
Page 40

Menu item Sub-menu item Sub-menu item Values and Description
Address Use this item to manually congure an IPv6 address.
Manual Settings: Use the Manual Settings menu to enable
and manually congure a TCP/ IPv6 address.
Enable: Select this item and choose On to enable manual
conguration, or O to disable manual conguration.
Address: Use this item to type a 32 hexadecimal digit IPv6
node address that uses the colon hexadecimal syntax.
DHCPV6 Policy Router Specied: The stateful auto-conguration method
to be used by the print server is determined by a router.
The router species whether the print server obtains its
address, its conguration information, or both from a
DHCPv6 server.
Router Unavailable: If a router is not available, the print
server should attempt to obtain its stateful conguration
from a DHCPv6 server.
Always: Whether or not a router is available, the print server
always attempts to obtain its stateful conguration from a
DHCPv6 server.
Primary DNS Use this item to specify an IPv6 address for a primary DNS
server that the print server should use.
NOTE: This item will appear only if Manual conguration is
a higher priority than DHCP in the Cong Precedence table,
congured through the embedded Web server.
Secondary DNS Use this item to specify an IPv6 address for a secondary
DNS server that the print server should use.
NOTE: This item will appear only if Manual conguration is
a higher priority than DHCP in the Cong Precedence table,
congured through the embedded Web server.
Proxy Server Species the proxy server to be used by embedded
applications in the device. A proxy server is typically used
by network clients for Internet access. It caches Web pages,
and provides a degree of Internet security, for those clients.
To specify a proxy server, enter its IPv4 address or fully-
qualied domain name. The name can be up to 255 octets.
For some networks, you may need to contact your
Independent Service Provider (ISP) for the proxy server
address.
Proxy Port Type the port number used by the proxy server for client
support. The port number identies the port reserved for
proxy activity on your network, and can be a value from 0
to 65535.
Information Print Sec Page Yes: Prints a page that contains the current security
settings on the HP Jetdirect print server.
No (default): A security settings page is not printed.
34 Chapter 1 Introduction ENWW
Page 41

Menu item Sub-menu item Sub-menu item Values and Description
Security Secure Web For conguration management, specify whether the
embedded Web server will accept communications using
HTTPS (Secure HTTP) only, or both HTTP and HTTPS.
HTTPS Required: For secure, encrypted communications,
only HTTPS access is accepted. The print server will appear
as a secure site.
HTTP/HTTPS optional: Access using either HTTP or HTTPS
is permitted.
NOTE: The factory default setting depends on the print
server model.
Reset Security Specify whether the current security settings on the print
server will be saved or reset to factory defaults.
No (default): The current security settings are maintained.
Yes: Security settings are reset to factory defaults.
Link Speed The link speed and communication mode of the print
server must match the network. The available settings
depend on the device and installed print server. Select one
of the following link conguration settings:
CAUTION: If you change the link setting, network
communications with the print server and network device
might be lost.
Embedded services
Key networking services embedded in the printer are listed below. For the latest features and services, visit
http://www.hp.com/go/jetdirect.
● Conguration and Management
Auto (default): The print server uses auto-negotiation to
congure itself with the highest link speed and
communication mode allowed. If auto-negotiation fails,
either 100TX HALF or 10TX HALF is set depending on the
detected link speed of the hub/switch port. (A 1000T halfduplex selection is not supported.)
10T Half: 10 Mbps, half-duplex operation.
10T Full: 10 Mbps, Full-duplex operation.
100TX Half: 100 Mbps, half-duplex operation.
100TX Full: 100 Mbps, full-duplex operation.
100TX Auto: Limits auto-negotiation to a maximum link
speed of 100 Mbps.
1000TX Full: 1000 Mbps, full-duplex operation.
– BootP/DHCP (IPv4 only)
– DHCPv6
– TFTP (IPv4 only)
– Web Proxy (Automatic/Manual cURL)
– LLMNR
ENWW Advanced network conguration 35
Page 42

– Telnet (IPv4 only)
– SNMP (v1, v2c, v3) agents
– Bonjour (for Mac OS X)
FTP (File Transfer Protocol)
–
– Embedded Web Server, HTTP (TCP port 80)
– Embedded Web Server, HTTPS (TCP port 443)
● Printing
– Raw IP printing (HP-proprietary TCP ports 9100, 9101, 9102)
● Security
– SNMP v3
– SSL/TLS
– Firewall
Turn the printer on and o
To turn on the printer, ensure that the power switch at the rear of the printer is turned on, then press the power
button beside the front panel.
You can leave the printer on without wasting energy. Leaving it on improves response time. When the printer has
not been used for a certain period of time, it saves power by going into sleep mode. Pressing the power button
returns it to active mode, and it can resume printing immediately.
To tun o the printer, the normal and recommended method is to press the power button.
When you turn o the printer this way, the printheads are automatically stored with the maintenance cartridge,
which prevents them from drying out.
However, if you plan to leave the printer turned o for a long period of time, you are recommended to turn it o
using the power button, and then also turn o the power switch at the rear.
36 Chapter 1 Introduction ENWW
Page 43

To turn it back on later, use the power switch at the rear. If the printer does not start automatically, press the
power button.
When the printer is turned on, it takes 2–3 minutes to initialize itself.
Restart the printer
In some circumstances you may be advised to restart the printer.
1. Turn o the printer by pressing the power button and then turning o the power switch at the rear of the
printer.
2. Wait for at least 10 seconds.
3. Turn on the power switch at the rear of the printer.
4. If the front panel does not activate, press the power button.
ENWW Restart the printer 37
Page 44

2 Useful links
Visit the HP Latex Knowledge Center at http://www.hp.com/communities/HPLatex, where you can nd detailed
information about our HP Latex products and applications, and use the forum to discuss anything related to the
business.
Product documentation: http://www.hp.com/go/latex300/manuals/
User training (quick guide) is already installed in your computer. To reinstall: http://www.hp.com/go/latex300/
quickguide/
Videos about how to use the printer: http://www.hp.com/supportvideos/ or http://www.youtube.com/
HPSupportAdvanced
Information about software RIPs, applications, solutions, inks, and substrates: http://www.hp.com/go/latex300/
solutions/
Substrate presets: http://www.hp.com/go/mediasolutionslocator (see HP Media Locator on page 91)
HP Support: http://www.hp.com/go/latex300/support/
Embedded Web Server: Use the printer’s IP address (see Access the Embedded Web Server on page 23)
Registration and communication with HP: http://www.hp.com/communities/HPLatex/.
When you need help
In most countries, support is provided by HP support partners (usually the company that sold you the printer). If
this is not the case in your country, contact HP Support on the Web as shown above.
Help is also available to you by telephone. What to do before you call:
● Review the troubleshooting suggestions in this guide.
● Review your RIP's documentation, if relevant.
● Please have the following information available:
– The printer you are using: the product number, the serial number and the service ID
NOTE:
at the rear of the printer.
– If there is an error code on the front panel, note it down; see Front-panel error codes on page 166
This information is available from the front panel: press . You may also nd it on a label
– The RIP you are using, and its version number
– If you have a print-quality problem: the substrate reference, and the name and origin of the substrate
preset used to print on it.
– The service information report (see Service information on page 39)
38 Chapter 2 Useful links ENWW
Page 45

Telephone number
Your HP Support telephone number is available on the Web: please visit http://welcome.hp.com/country/us/en/
wwcontact_us.html.
Customer Self Repair
HP's Customer Self Repair program oers our customers the fastest service under either warranty or contract. It
enables HP to ship replacement parts directly to you (the end user) so that you can replace them. Using this
program, you can replace parts at your own convenience.
Convenient, easy to use
● An HP Support Specialist will diagnose and assess whether a replacement part is required to address a
defective hardware component.
● Replacement parts are express-shipped; most in-stock parts are shipped the very same day you contact
HP.
● Available for most HP products currently under warranty or contract.
● Available in most countries.
For more information about Customer Self Repair, see http://www.hp.com/go/selfrepair/.
Service information
The printer can produce on request a list of many aspects of its current status, some of which may be useful to a
service engineer trying to x a problem. There are two dierent ways to request this list:
● In the Embedded Web Server (see Access the Embedded Web Server on page 23), select the Support tab
and then Service support > Printer information. You are recommended to request the whole list (select All
pages).
● From any computer with Internet access, enter the URL of your printer into a Web browser, followed
by /hp/device/webAccess/allServicePlot.htm. For instance, if the URL of your printer is
http://123.123.123.123, enter:
http://123.123.123.123/hp/device/webAccess/allServicePlot.htm
If you need to send the list by email, you can save the page as a le from your Web browser, and later send the
le. Alternatively, from Internet Explorer you can send the page directly: select File > Send > Page by email.
ENWW When you need help 39
Page 46

3 Handle the substrate and troubleshoot
substrate issues
●
Overview
●
Porous substrates
●
Load a roll onto the spindle
●
Load a roll into the printer
●
Ink collector (365 and 375 only)
●
Loading accessory (365 and 375 only)
●
Assisted manual load
●
Edge holders
●
Load a cut sheet into the printer
●
Unload a roll from the printer
●
Take-up reel
●
Double-sided printing (365 and 375 only)
●
View information about the substrate
●
Change substrate width and right edge position
●
Substrate length tracking
●
Cut substrate
●
Bypass job start safety
●
Store the substrate
●
Substrate cannot be loaded successfully
●
Substrate is mispositioned
●
Substrate has jammed
●
Substrate is deformed or wrinkled
●
Substrate has shrunk or expanded
●
Substrate has bow deformation
●
Substrate is sticky and causes smears and crashes
40 Chapter 3 Handle the substrate and troubleshoot substrate issues ENWW
Page 47

●
Automatic cutter does not work
●
Take-up reel substrate jam
●
Take-up reel does not wind
ENWW 41
Page 48

Overview
You can print on a wide variety of printing materials, all of which are referred to in this guide as substrates.
Substrate tips
Choosing the correct substrate for your needs is an essential step in ensuring good print quality.
Here are some tips about substrate usage.
● To print on textile substrates, in most cases you should use the ink collector. See Ink collector (365 and 375
only) on page 55.
● Using the take-up reel with some substrates, such as textiles, may give the printer better control of the
substrate and is likely to improve print quality. See Take-up reel on page 69.
● Allow all substrates to adapt to room conditions, out of the packaging, for 24 hours before using them for
printing.
● Handle lm and photo substrates by the edges, or wear cotton gloves. Skin oils can be transferred to the
substrate, leaving ngerprint marks.
● Keep the substrate tightly wound on the roll throughout the loading and unloading procedures. To make
sure that the roll stays tightly wound, consider using tape to stick the leading edge of the roll to the core
just before removing the roll from the printer. You can keep the roll taped during storage. If the roll starts to
unwind, it can become diicult to handle.
NOTE: The use of tape to stick the leading edge of the roll to the core is especially important for heavy
substrates, because the inherent stiness of the substrate can cause it to loosen and unwind from the
core.
● Print quality could be impaired if you use a substrate that is unsuitable for your image.
● Make sure that the appropriate print-quality setting is selected in the RIP.
● Whenever you load a roll, the front panel prompts you to specify the substrate type that you are loading.
For good print quality, it is essential to specify this correctly. Check that the substrate name is the same in
the front panel and in the RIP.
If the names are not the same, press on the front panel, then Substrate > Change loaded substrate;
or change the substrate in the RIP.
● Do not pull the printed substrate while the printer is printing: this can cause severe print-quality defects.
42 Chapter 3 Handle the substrate and troubleshoot substrate issues ENWW
Page 49

● When printing a series of jobs, do not let the printed substrate obstruct the output path: this can cause
severe print-quality defects.
● For more substrate tips, see Load a roll into the printer on page 52 and Assisted manual load
on page 63.
CAUTION: Removing the substrate from the printer manually without using the front panel could damage the
printer. Do this only when necessary to clear a substrate jam.
Supported substrate categories
Substrate category Substrate types Generic substrate names
Self-Adhesive Vinyl Cast self-adhesive vinyl
Calendered self-adhesive vinyl
Perforated self-adhesive vinyl
Transparent self-adhesive vinyl
Reective self-adhesive vinyl
Textile Polyester textile and fabric
Textile banner
Backdrops
Textile mesh with liner
Frontlit textile, with liner if porous
Backlit textile, with liner if porous
Canvas
Flag and voile with liner
Cotton textile
Self-adhesive textile
Generic Self-Adhesive Vinyl
Generic Self-Adhesive Vinyl High Ink
Generic Textile
Generic Canvas & Coated Textiles
ENWW Overview 43
Page 50

Substrate category Substrate types Generic substrate names
PVC Banner Frontlit banner
Backlit banner
Scrim banner
Scrimless banner
Mesh banner with liner
Blockout banner
Truck curtain banner or tarpaulin
PP and PE Film and Banner Polypropylene (PP) lm
Synthetic paper (such as Yupo)
Tyvek
Coated PE/HDPE (polyethylene) banner
PET Film Polyester (PET) backlit lm
Polyester (PET) frontlit lm
Polyester (PET) grey-back lm
Paper Coated paper
Uncoated paper
Generic PVC Banner
Generic Backlit PVC Banner
Generic PP & PE Synthetics
Generic Polyester Film
Generic Backlit Polyester Film
Generic Paper
Generic Coated Paper
Supported HP substrates
Category Substrate
Self-Adhesive
Vinyl
HP Air Release Adhesive Gloss Cast Vinyl
Without liner: 50 microns (2 mil) • 100 g/m² • 45.7 m (150 ft)
With liner: 241 microns (9.5 mil) • 260 g/m² • 45.7 m (150 ft)
HP Permanent Gloss Adhesive Vinyl
Without liner: 88 microns (3.5 mil) • 145 g/m² • 45.7 m (150 ft)/ 91,4 m (300 ft)
With liner: 238 microns (9.4 mil) • 270 g/m² • 45.7 m (150 ft)/ 91,4 m (300 ft)
HP Permanent Matte Adhesive Vinyl
Without liner: 88 microns (3.5 mil) • 145 g/m² • 45.7 m (150 ft)/ 91,4 m (300 ft)
With liner: 238 microns (9.4 mil) • 270 g/m² • 45.7 m (150 ft)/ 91,4 m (300 ft)
Photo paper
Blue-back paper
Self-adhesive paper
Generic Backlit Paper
Color
calib. Applications
Yes Vehicle wraps, car/bus/
track eets, signs
Yes
Yes
HP One-View Perforated Adhesive Window Vinyl
Without liner: 165 microns (6.5 mil) • 155 g/m² • 50 m (164 ft)
With liner: 406 microns (16 mil) • 288 g/m² • 50 m (164 ft)
No
44 Chapter 3 Handle the substrate and troubleshoot substrate issues ENWW
Page 51

Category Substrate
Color
calib. Applications
Textile
PVC Banner HP Durable Frontlit Scrim Banner
PP and PE Film
and Banners
New HP Light Textile Display Banner
See http://www.globalbmg.com/hp/
HP Heavy Textile Banner
See http://www.globalbmg.com/hp/
HP Satin Canvas
419 microns (16.5 mil) • 375 g/m² • 14.9 m (49 ft)
New HP Premium Satin Canvas
463 microns (18.2 mil) • 381 g/m² • 22.9 m (75 ft)
New HP Everyday Satin Canvas
444 microns (17.5 mil) • 340 g/m² • 22.9 m (75 ft)
New HP PVC-free Durable Suede Wall Paper
See http://www.globalbmg.com/hp/
449 microns (17.7 mil) • 535 g/m² • 35 m (115 ft)
New HP HDPE Reinforced Banner
203 microns (8 mil) • 170 g/m² • 45.7 m (150 ft)
HP Double-sided HDPE Reinforced Banner
No Indoor ags, wall
murals, interior
decoration, ne arts
Yes
Yes Banners, POP, ags,
track covers, wall
murals
Yes Banners, POP, ags,
track covers, wall
murals, large
photographs, oor
covering
See http://www.globalbmg.com/hp/
New HP Everyday Matte Polypropylene, 3 in core
203 microns (8 mil) • 120 g/m² • 61 m (200 ft)
New HP Everyday Adhesive Matte Polypropylene, 3 in core
Without liner: 180 microns (7.1 mil) • 120 g/m² • 30.5 m (100 ft)
With liner: 215 microns (8.5 mil) • 168 g/m² • 30.5 m (100 ft)
HP DuPont Tyvek Banner
PET Film
Paper HP PVC-Free Wall Paper
New HP Backlit Polyester Film
220 microns (8.7 mil) • 285 g/m² • 30.5 m (100 ft)
177 microns (7 mil) • 175 g/m² • 30.5 m (100 ft)
HP White Satin Poster Paper
165 microns (6.5 mil) • 136 g/m² • 61 m (200 ft)
HP Blue Back Billboard Paper
165 microns (6.5 mil) • 123 g/m² • 80 m (262 ft)
New HP Universal Coated Paper, 3 in core
Yes
Yes
No
No Bus shelters, airport
ads, POP, street ads
Yes POP indoor and
outdoor, windows, bus
shelters, billboards,
wall decorations
Yes
Yes
124 microns (4.9 mil) • 90 g/m² • 61 m (200 ft)
ENWW Overview 45
Page 52

Category Substrate
Color
calib. Applications
New HP Coated Paper, 3 in core
114 microns (4.5 mil) • 90 g/m² • 61 m (200 ft)
New HP Universal Heavyweight Coated Paper, 3 in core
165 microns (6.5 mil) • 125 g/m² • 61 m (200 ft)
New HP Heavyweight Coated Paper, 3 in core
167 microns (6.6 mil) • 130 g/m² • 61 m (200 ft)
New HP Super Heavyweight Plus Matte Paper, 3 in core
259 microns (10.2 mil) • 210 g/m² • 61 m (200 ft)
New HP Professional Gloss Photo Paper
See http://www.globalbmg.com/hp/
New HP Professional Satin Photo
See http://www.globalbmg.com/hp/
New HP Everyday Satin Photo Paper
See http://www.globalbmg.com/hp/
Yes
Yes
Yes
Yes
● For third-party substrate solutions with ColorPRO technology, please visit http://ColorPROtechnology.com/.
● HP PVC-free Wall Paper printed with HP Latex Inks is rated A+ according to Émissions dans l'air intérieur,
which provides a statement of the level of emission of volatile substances in indoor air posing health risks if
inhaled—on a scale from A+ (very low emission) to C (high emission).
● HP PVC-Free Wall Paper printed with HP Latex Inks is GREENGUARD Children & Schools Certied. See
http://www.greenguard.org/.
● HP PVC-Free Wall Paper printed with HP Latex Inks meets AgBB criteria for health-related evaluation of VOC
emissions of indoor building products. See http://www.umweltbundesamt.de/produkte-e/bauprodukte/
agbb.htm.
HP large-format substrate take-back program availability varies. Some recyclable HP substrates can be
recycled through commonly available recycling programs. Recycling programs may not exist in your area. See
http://www.hp.com/recycle/ for details.
Porous substrates
Porous substrates may be used with the 365 or 375 printer and the ink collector, with which you must use the
take-up reel.
The 315 and 335 printers are not designed to be used with porous substrates, and could be damaged by them,
requiring a service repair not covered by your warranty.
To check the porosity of your substrate, proceed as follows.
1. If the printer has any substrate loaded, unload it.
2. Cut a piece of self-adhesive vinyl white gloss 15 × 50 mm (0.6 × 2 in) in size.
46 Chapter 3 Handle the substrate and troubleshoot substrate issues ENWW
Page 53

3. Stick it to the platen as shown.
4. Load the substrate that you want to check.
5. Open your RIP software.
6. Download the test le from inside the printer: http://printerIP/hp/device/webAccess/images/
Ink_trespassing_check.pdf, where printerIP is the IP address of your printer.
7. Print the test le using the number of passes and substrate preset that you intend to use in future with this
substrate (or a similar prole in terms of ink limit).
8. Unload the substrate.
9. Remove the strip of self-adhesive vinyl from the platen.
10. Look at the self-adhesive vinyl you have taken from the platen.
● If the strip is completely white (has no ink on it), the tested substrate is non-porous and can be used
for printing as described in this guide.
● If there some ink on the strip, the tested substrate is porous and should not be used with the 315 or
335 printers. It may be used with the 365 or 375 printer and the ink collector.
11. Clean the platen: see Clean the platen on page 153.
Load a roll onto the spindle
TIP: As an alternative to the description here, you can see an animation of this procedure in the front panel:
press , then Substrate > Substrate load > Learn how to load spindle.
1. Make sure that the printer wheels are locked (the brake lever is pressed down) to prevent the printer from
moving.
ENWW Load a roll onto the spindle 47
Page 54

2. Lift the spindle lock lever to disengage the spindle.
3. Remove the spindle from the printer.
CAUTION: Do not insert your ngers into the spindle supports.
The spindle has a stop at each end to keep the roll in position. Remove the blue stop at the left end to
mount a new roll (the stop at the other end of a 76 mm (3 in) diameter spindle can also be removed, if you
wish). The stop slides along the spindle to hold rolls of dierent widths.
4. Unlock the blue stop.
48 Chapter 3 Handle the substrate and troubleshoot substrate issues ENWW
Page 55

5. Remove the stop from the left end of the spindle.
6. Place the roll onto the loading table.
7. Slide the spindle into the roll.
ENWW Load a roll onto the spindle 49
Page 56

8. The right stop of the 76 mm (3 in) diameter spindle has two positions: one for rolls of the printer's
maximum width, and another for narrower rolls. Remember to use the second position for narrower rolls,
which improves the curing process and allows higher printing speeds.
NOTE: The 76 mm (3 in) diameter spindle is supplied with the 365 and 375 printers and is available as an
accessory for the 335 printer.
NOTE: The 51 mm (2 in) diameter spindle supplied with the 315 and 335 printers has only one position
for the right stop. There are blue lines on the loading table corresponding to two positions, but when using
this spindle you can use only the outer position.
9. Put the blue stop on to the upper end of the spindle, and push it towards the end of the roll.
50 Chapter 3 Handle the substrate and troubleshoot substrate issues ENWW
Page 57

10. Lock the blue stop when it is in contact with the substrate.
11. Insert the spindle carefully into the printer.
WARNING! Avoid trapping your ngers between the spindle and the spindle supports.
Risk of trapped ngers
For more safety information, please see Safety precautions on page 3
CAUTION: Ensure that the sliders in the loading table are under the left hub, otherwise the spindle will not
enter correctly into the left spindle support, and could fall on the oor.
If you regularly use dierent substrates, you can change rolls more quickly if you pre-load rolls of dierent
substrates on dierent spindles. Extra spindles are available for purchase.
ENWW Load a roll onto the spindle 51
Page 58

Load a roll into the printer
To start this procedure, you need to have a roll loaded on the spindle. See Load a roll onto the spindle
on page 47.
The normal minimum substrate width is 23 inches (584 mm). To load substrates down to a minimum width of 10
inches (254 mm), go to the front panel and press , then Substrate > Substrate handling options > Enable
narrow substrate. With this option, print quality is not guaranteed.
TIP: To load a roll of textile substrate, see Loading accessory (365 and 375 only) on page 59; and remember
to use the ink collector if the substrate is porous (which textiles usually are).
TIP: When loading very thin or very thick substrates, or substrates with a tendency to curl, you should follow
the manual loading procedure to reduce the risk of substrate jams and printhead crashes; see Assisted manual
load on page 63.
1. At the printer's front panel, press , then Load.
Alternatively, press , then Substrate load > Load roll.
2. The load conguration screen appears.
52 Chapter 3 Handle the substrate and troubleshoot substrate issues ENWW
Page 59

● Skew acceptance: The available values are between 1 and 5, default 3. The printer warns you if the
skew is over the limit you have set, but you can still choose to continue loading.
● Length tracking: If you check the box and give the length of your roll, the printer reduces the spare
paper when printing and tells you the remaining length. See Substrate length tracking on page 79.
● Double-sided: May be O, Side A, or Side B. See Double-sided printing (365 and 375 only)
on page 77.
● Print zone: Choose Platen or Ink collector. See Ink collector (365 and 375 only) on page 55.
● Use loading accessory. See Loading accessory (365 and 375 only) on page 59.
● Assisted manual load. See Assisted manual load on page 63.
● Use edge holders. See Edge holders on page 65.
When you have made your choices, instructions are displayed.
3. Carefully insert the leading edge of the substrate above the smooth black roller, making sure the substrate
remains taut during the process. Avoid rewinding the substrate manually, unless the printer asks you to do
so.
WARNING! Take care not to insert your ngers inside the printer's substrate path.
The printer beeps when it detects and accepts the leading edge of the substrate.
4. Select the category and name of the substrate you are loading.
You can also search by favorites, or you can select None of these, I will choose it later: by accessing the
substrate library after completing the loading procedure. See Substrate presets on page 89.
NOTE: You should select the same substrate name that you are using in your RIP software.
5. The printer checks the substrate in various ways and may ask you to correct problems with skew or
tension.
ENWW Load a roll into the printer 53
Page 60

6. Wait until the substrate emerges from the printer, as shown below.
WARNING! Take care not to touch the curing zone or the platen, which may be hot.
Risk of burns
For more safety information, please see Safety precautions on page 3
NOTE: If you have an unexpected problem at any stage of the substrate loading procedure, see Substrate
cannot be loaded successfully on page 80.
7. If you are loading transparent substrate without opaque borders, you are asked to enter the width of the
substrate and the distance of the right edge from the printer's side plate (as indicated by the ruler on the
front of the curing module).
8. If you have chosen double-sided printing and side B—see Double-sided printing (365 and 375 only)
on page 77—the printer will look for the black reference line at this point. If it fails to nd the line, it will
ask a few questions.
9. The printer calibrates the substrate advance.
10. The printer indicates that it is ready for printing.
Take care not to cover the top fans.
54 Chapter 3 Handle the substrate and troubleshoot substrate issues ENWW
Page 61

Ink collector (365 and 375 only)
The ink collector should be used instead of the platen in the following cases:
● Whenever you intend to print on a porous substrate. See Porous substrates on page 46.
● Whenever you intend to print to the edges of the substrate without leaving any margin (full bleed printing).
The platen and the ink collector both come in two parts (left and right). To install the ink collector, rst unlock and
remove the two parts of the platen. Then install the two parts of the ink collector in their place.
The ink collector comes with blue consumable parts that should be attached to the ink collector. They can be
attached before or after installing the ink collector in the printer; but before loading any substrate. To attach
these parts, put them vertically into the ink collector and press until the two snaps on each part have clicked into
place.
TIP: You are recommended to use the take-up reel with the ink collector. See Take-up reel on page 69.
WARNING! Avoid moving parts. Handle fragile parts with care. You are recommended to wear gloves.
Moving part Fragile Wear gloves
For more safety information, please see Safety precautions on page 3
Install the ink collector
1. The platen and the ink collector both come in two parts (left and right). Unlock the platen using the two
blue locks, located at the left and right of the printer.
ENWW Ink collector (365 and 375 only) 55
Page 62

2. Remove both parts of the platen in the same way.
3. Place the two parts of the ink collector into the printer.
56 Chapter 3 Handle the substrate and troubleshoot substrate issues ENWW
Page 63

4. Ensure that the locks are locked and that there is no obstruction in the printing path.
5. Install the output platen protectors before loading substrate.
a. Insert an output platen protector on one side of the output platen.
b. Open the window.
ENWW Ink collector (365 and 375 only) 57
Page 64

c. Insert the tabs between the plastic piece and the metal.
d. Make sure the platen protector is well positioned and straight.
e. Do the same on the other side.
Follow the same method to re-install the platen when required. Attach the velcro to the back of the output platen
until tight.
Replace the blue ink collector consumables
The length of substrate that you can print with the same ink collector consumables depends on the porosity of
the substrate and the quantity of ink used on the print. If you see that the substrate is dirty when printing, stop
printing and change the ink collector consumables. Failure to do so could cause some parts of the printer to
malfunction.
1. You are recommended to wear the gloves that are included in the kit.
2. Press both snaps with your thumbs and lift the ink collector consumables vertically out of the printer.
3. Dispose of the dirty ink collector consumables.
58 Chapter 3 Handle the substrate and troubleshoot substrate issues ENWW
Page 65

4. Ensure that the ink collector is clean. If not, clean it with a damp cloth.
5. Place the new ink collector consumables into the printer vertically, starting on the right. You will hear a click
when the snaps have been inserted.
Loading accessory (365 and 375 only)
The loading accessory is designed to help in loading banner/textile/mesh substrates. It is recommended when
loading such substrates, but not obligatory.
NOTE: The edge holders can be used whether or not you decide not to use the loading accessory.
1. Before loading the substrate, check the Use loading accessory box in the Load Conguration screen on the
front panel.
IMPORTANT: Also check the Assisted manual load box, to prevent crashes between the carriage and the
load accessory. See Assisted manual load on page 63.
ENWW Loading accessory (365 and 375 only) 59
Page 66

2. Lay the textile loading accessory on the loading table and ip forward enough of the white aps to cover
the width of the substrate.
3. Pull some of the substrate from the roll and put the leading edge on the loading accessory.
4. Flip the white aps back to cover the leading edge of the substrate. The black patches are magnetic and
grip the substrate.
60 Chapter 3 Handle the substrate and troubleshoot substrate issues ENWW
Page 67

5. Lift the loading accessory and the leading edge of the substrate together.
6. Load the substrate manually, see Assisted manual load on page 63.
7. The loading accessory passes through the printer's substrate path with the substrate.
WARNING! Take care not to touch the curing zone or the platen, which may be hot.
Risk of burns
For more safety information, please see Safety precautions on page 3
ENWW Loading accessory (365 and 375 only) 61
Page 68

8. Select the category and name of the substrate you are loading.
NOTE: You should select the same substrate name that you are using in your RIP software.
TIP: When loading very thin substrates, always select the substrate type as Banner to minimize the
vacuum pressure applied while loading; when loading very thick substrates, always select the substrate
type as HP Photo-realistic Poster Paper (in the Paper category) to maximize the vacuum pressure. After
loading and before printing, go to the front panel and change to the correct type for the substrate you are
loading: press , then Substrate > Change loaded substrate.
9. After passing through the printer, the loading accessory can be removed by hand.
10. The printer checks the substrate in various ways and may ask you to correct problems with skew or
tension.
NOTE:
Substrate > Substrate handling options > Max skew setting. You can also do this on the Load Conguration
screen.
11. If you are loading transparent substrate without opaque borders, you are asked to enter the width of the
substrate and the distance of the right edge from the printer's side plate (as indicated by the ruler on the
front of the curing module).
12. If you have chosen double-sided printing and side B, the front panel may ask a question if the reference line
is not found. See Double-sided printing (365 and 375 only) on page 77.
13. The printer calibrates the substrate advance.
NOTE: You are recommended to use the take-up reel; however, it is not obligatory.
62 Chapter 3 Handle the substrate and troubleshoot substrate issues ENWW
You can specify the maximum permitted amount of skew at the front panel: press , then
Page 69

Assisted manual load
The assisted manual load procedure should be used in the following cases:
● The substrate is unusually thin or unusually thick.
● The substrate has ragged edges.
● The substrate tends to curl at the edges.
● The printing side of the substrate faces outwards.
● You intend to use the loading accessory.
In other cases, you are recommended to use the normal loading procedure. See Load a roll into the printer
on page 52.
To start the assisted manual load procedure, you need to have a roll loaded on the spindle. See Load a roll onto
the spindle on page 47.
The normal minimum substrate width is 23 inches (584 mm). To load substrates down to a minimum width of 10
inches (254 mm), go to the front panel and press , then Substrate > Substrate handling options > Enable
narrow substrate. With this option, print quality is not guaranteed.
1. Start the substrate loading procedure as usual (see Load a roll into the printer on page 52), and make sure
to check the Assisted manual load box in the load conguration screen.
You can alternatively begin at step 2, in which case the load conguration screen will appear with this
checkbox checked after you lift the pinch lever. Press Continue before taking the next step.
2. Lift the substrate pinch lever as far up as it will go.
3. Carefully insert the leading edge of the substrate above the smooth black roller, making sure the substrate
remains taut during the process. Avoid rewinding the substrate manually, unless the printer asks you to do
so.
ENWW Assisted manual load 63
Page 70

4. Continue to feed the substrate until it reaches the printing platen. Open the window to help pull the
substrate through, and keep feeding the substrate at least until the leading edge is at the same height as
the substrate roll. Align the right edge of the substrate with the right edge of the roll.
WARNING! Do not touch the printer's curing enclosure. Even after you have opened the window latch,
which disconnects the power to the curing modules, the internal surfaces could be hot. Also beware of
getting your ngers trapped in the substrate path.
Risk of burns Risk of trapped ngers
For more safety information, please see Safety precautions on page 3
TIP: If the substrate you are using tends to curl, keep feeding the substrate until the edge is out of the
printer. You are also recommended to use the take-up reel, or to disable the cutter from the front panel if
not using the take-up reel.
5. Once the substrate is correctly fed into the printer, pull down the substrate pinch lever as far as it will go.
6. Select the category and name of the substrate you are loading.
The rest of the assisted load procedure is the same as in the normal load procedure. See Load a roll into the
printer on page 52.
64 Chapter 3 Handle the substrate and troubleshoot substrate issues ENWW
Page 71

Edge holders
The edge holders are designed to prevent the edges of the substrate from rising while printing is in progress.
They are recommended only when the edges of the substrate tend to lift up and touch or damage the
printheads. They can be used with the platen or with the ink collector. When not in use, they should be stored
outside the printer.
If they are needed often, they can be stored inside the printer, to the left and right of the print platen, to avoid
substrate jams when loading the next substate.
NOTE: The edge holders extend 7 mm over the edge of the substrate. You should set a minimum left and right
margin of 7 mm (0.3 in) in the RIP when using edge holders, otherwise the printer could try to print on the edge
holders.
If you choose to use them, you should move them into position when prompted by the front panel (this prompt
appears when the Use edge holders checkbox has been checked). Open the window, place the edge holders,
then close the window.
The edge holders should be placed on the platen so that they slightly overlap the left and right edges of the
substrate. There are marks on the printer to show where to place them.
The edge holders for each printer model are the same, but they are installed in dierent ways.
WARNING! Avoid moving parts. Handle fragile parts with care. You are recommended to wear gloves.
Moving part Fragile Wear gloves
For more safety information, please see Safety precautions on page 3
Place edge holders for the 315 or 335 printer
1. There is a hole on the left for the edge holders. Insert an edge holder vertically into the hole.
ENWW Edge holders 65
Page 72

2. Slide the edge holder into its correct position.
3. Repeat with the other edge holder.
Place edge holders for the 365 or 375 printer
1. Remove the platen module or ink collector on one side of the printer.
66 Chapter 3 Handle the substrate and troubleshoot substrate issues ENWW
Page 73

2. Slide the edge holder onto the platen module or ink collector, and adjust its position: on the left, as far to
the left as possible; on the right, as far to the right as possible.
3. Put back the platen module or ink collector with the edge holder in place.
4. Repeat with the platen module or ink collector on the other side.
Align the substrate
When the substrate has been loaded, align it with the white line on the edge holder. Misalignment could result in
a substrate jam, or damage to the substrate or to the printheads.
Load a cut sheet into the printer
The printer is designed to be used with rolls of substrate. It is possible to load cut sheets into the printer, but print
quality cannot be guaranteed, and you may have some diiculty in avoiding skew.
● The sheet should be at least 1067 mm (42 in) long.
● Load the sheet by following the normal roll loading procedure (automatic or manual, depending on the
substrate).
ENWW Load a cut sheet into the printer 67
Page 74

● During the loading procedure, the printer tries to detect the winding direction of the roll by turning the
spindle in both directions. When the substrate is not attached to the spindle, the following message
appears.
●
A cut sheet is likely to be loaded with excessive skew, and the printer may not be able to correct it
automatically. If the skew as measured by the printer exceeds 3 mm/m, you are recommended to reload
the sheet. However, if the skew is tolerable, you can consider skipping the automatic skew correction. To do
so, when prompted, choose Continue with current skew.
Unload a roll from the printer
1. If you used the take-up reel during printing, unload the printed roll from the take-up reel. See Unload the
take-up reel on page 76.
On the printer's front panel, press , then Unload.
2.
Alternatively, you can press , then Substrate > Unload substrate.
3. If the printer has been tracking the length of the substrate, the front panel displays the remaining length so
that you can note it for future reference. See Substrate length tracking on page 79.
Press OK to continue.
4. When the printer has rewound the roll, lift the spindle lock lever.
5. Remove the spindle from the printer, pulling out the right end on the right side of the printer rst.
WARNING! Do not insert your ngers into the spindle supports while removing the spindle.
68 Chapter 3 Handle the substrate and troubleshoot substrate issues ENWW
Page 75

Take-up reel
Risk of trapped ngers
For more safety information, please see Safety precautions on page 3
Tension bar
When in use, the take-up reel requires a dangling loop of substrate weighed down by a tension bar. The tension
bar can be moved with the take-up reel buttons or by using the Move paper or Rewind paper options in the front
panel.
Load a roll onto the take-up reel
NOTE: Take-up reels with 51 mm (2 in) or 76 mm (3 in) diameter can be used.
1. On the printer's front panel, press , then Take-up reel.
Instructions are displayed on the screen; slide your nger laterally across the front panel to follow the
instructions to the end.
ENWW Take-up reel 69
Page 76

2. If you decide to load the take-up reel during printing, familiarize yourself with the procedural steps before
pressing the Enable button. Loading the take-up reel during printing requires you to complete the
procedure while the printer is feeding and printing substrate. Loading the take-up reel during printing saves
approximately 1.5 m (4.9 ft) of substrate.
TIP: You are recommended to keep the take-up reel winding-direction switch in the o position (see
Unload the take-up reel on page 76) to avoid unwanted movements when loading the take-up reel while
printing. Once you have the leading edge of the substrate attached to the core, and the substrate is
straight, switch the winding-direction switch to position 1 or 2, as you prefer. Setting 1 winds the substrate
so that the printed image faces in, setting 2 winds the substrate so that the printed image faces out.
The following steps assume that you have decided to load immediately. If you decide to load later, during
printing, you must complete the same operations without guidance from the front panel.
3. For easier access to the take-up reel, lift the loading table into its upright position.
4. Unlock the take-up reel by pushing its lever to the uppermost position.
70 Chapter 3 Handle the substrate and troubleshoot substrate issues ENWW
Page 77

5. Remove the take-up reel.
6. For the 335, 365, and 375 printers, lift the lever in each case to remove both of the stops from the take-up
reel; they will not be used.
7. Load the core onto the take-up reel. The core should be at least as wide as the substrate.
8. Load the take-up reel into the printer by pushing rmly on both ends.
WARNING! Take care not to get your ngers trapped.
ENWW Take-up reel 71
Page 78

Risk of trapped ngers
For more safety information, please see Safety precautions on page 3
9. Advance the substrate by pressing the Move substrate button on the front panel. Make sure that the
substrate passes in front of the loading table.
10. Pull down the center of the substrate's leading edge to straighten the substrate. Do not attempt to pull
more substrate out of the printer.
NOTE: If you are loading the take-up reel during printing, you do not need to pull the substrate taut. Tape
the substrate to the core when an adequate length of substrate has fed from the printer after printing
begins.
WARNING! Do not touch the printer's curing enclosure, which could be hot.
Risk of burns
For more safety information, please see Safety precautions on page 3
11. Adjust the position of the core on the take-up reel so that it is aligned with the substrate.
72 Chapter 3 Handle the substrate and troubleshoot substrate issues ENWW
Page 79

12. Tape the leading edge of the substrate to the core in the center, then at each side. Make sure that the
substrate is straight.
NOTE: Depending on whether you want to print the images facing in or out, place the tape accordingly.
See below.
13. Press the button on the front panel to advance the substrate, creating a loop.
ENWW Take-up reel 73
Page 80

14. Press the blue arrow on the take-up reel motor to rotate the reel one full turn. This will help to support the
weight of the tension bar.
15. Press the button on the front panel to advance the substrate again.
16. Gently lower the loading table, to avoid wrinkles and improve winding.
74 Chapter 3 Handle the substrate and troubleshoot substrate issues ENWW
Page 81

17. Carefully insert the tension bar. This is essential: the take-up reel will not function correctly without it.
18. Fit the tension bar into the supports at either side.
WARNING! Take care not to get your ngers trapped.
Risk of trapped ngers
For more safety information, please see Safety precautions on page 3
19. Use the winding-direction switch on the take-up reel motor to select the winding direction. Setting 1 winds
the substrate so that the printed image faces in. Setting 2 winds the substrate so that the printed image
faces out.
ENWW Take-up reel 75
Page 82

20. Press the Enable button on the front panel. The printer advances and calibrates the substrate.
21. The following image shows how the printer looks when it is operating. As substrate is fed from the printer,
it drops down to the tension bar, over the diverter, then down again to the take-up reel.
NOTE: When the take-up reel is in use, the substrate is not automatically cut after each print.
NOTE: For the 335, 365, or 375 printer: If the take-up reel is loaded during printing, recalibrate the substrate-
advance sensor for optimal print quality. At the front panel, press , then Image quality maintenance >
Substrate advance calibration > OMAS calibration.
Unload the take-up reel
WARNING! Take care not to get your ngers trapped.
1. On the printer's front panel, press , then Take-up reel.
The printer allows you to move the substrate to facilitate cutting.
2. Switch the winding-direction switch to the o position. The switch is in the o position when it is centered
(in other words, when the switch is neither in position 1 nor position 2).
3. To remove the tension bar, rst lift the support, then press the lever.
Risk of trapped ngers
For more safety information, please see Safety precautions on page 3
4. Use the winding button on the take-up reel motor to wind the excess substrate around the take-up reel.
5. Cut the substrate with scissors.
6. While holding the substrate, use the winding button on the take-up reel motor to wind the remainder of the
substrate around the take-up reel.
7. Unlock the take-up reel by pushing its lever to the uppermost position.
76 Chapter 3 Handle the substrate and troubleshoot substrate issues ENWW
Page 83

8. Remove the take-up reel from the printer, pulling out the end on the right side of the printer rst.
9. To remove the roll from the printer after you have unloaded the take-up reel, see Unload a roll from the
printer on page 68.
Double-sided printing (365 and 375 only)
The printer can be used to print on both sides of the substrate, in the following way.
NOTE: The print should be at least 28 cm (11 in) wide, otherwise the printer will not be able to nd the
reference line when printing the second side.
Outline
1. Tell the printer or the RIP that you intend to print on both sides.
Double-sided printing can be selected in your RIP software or at the printer's front panel. The RIP setting
takes precedence: if double-sided printing is explicitly turned on or o in the RIP software, the front panel
setting is ignored.
2. The printer prints the content that you want to appear on the rst side. After each job, the printer prints a
black reference line that is used to align the matching job on the second side.
3. After all side A jobs have been printed, cut and unload the substrate.
4. Reload the cut substrate upside down and starting at the end. The reference line marking the end of the
rst side should be face down and near the leading edge.
5. The printer nds the reference line, and uses it to start printing the second side in the right place.
NOTE: If you try to move the substrate while printing on either side, the front panel asks for conrmation,
because any such movement prevents correct alignment between the two sides.
Double-sided printing in detail
1. Load the substrate in the normal way for the substrate you are using.
2. Optionally, select the side to print in the Double Side menu on the Load Conguration screen.
If the RIP supports double-sided printing, select double-sided printing in your RIP software.
NOTE: The automatic cutter and the extra top/bottom margin are both disabled during double-sided
printing.
3. Send one or more jobs to be printed on the rst side. Before printing the rst job, the printer may advance
the substrate by about 0.5 m (20 in) so that the second side can be completely cured. After each job, the
printer prints a black reference line that is used to align the matching job on the second side.
NOTE: The chance of visible misalignment between the two sides increases with the length of the job. For
this reason, in double-sided printing you are recommended not to print any single job that is longer than 3
m (10 ft). Visible misalignment may also be caused by skew.
4. After printing all side A jobs, advance the substrate a little by going to the front panel and pressing
, then Move substrate.
ENWW Double-sided printing (365 and 375 only) 77
Page 84

● If you plan to attach the substrate to the take-up reel before printing the second side, advance the
substrate enough to achieve this.
● If you plan to attach the substrate to the take-up reel while printing the second side, advance the
substrate about 10 cm (4 in).
5. Cut the substrate, either manually or by going to the front panel and pressing , then Cut. Before
cutting, ensure that the total length of the cut substrate is more than 2 m (6 ft 7 in), otherwise you may be
unable to load it successfully.
NOTE: The Cut command will not work if the cutter is disabled: that is, if , Substrate > Substrate
handling options > Cutter is set to O.
6
. Press , then Substrate unload.
7. Reload the substrate with the already-printed side facing up as it enters the printer, and with the reference
line near the leading edge. Reload if necessary until the printer nds less than 1 mm/m skew.
TIP: Although it is not strictly necessary, you may nd it quicker to use the manual loading procedure as
an initial approximation, and then allow the printer to nd the reference line more accurately. See Assisted
manual load on page 63. If you use only the automatic loading procedure, the printer may take some time
to nd the reference line.
8. Select side B from the Double Side menu in the Load Conguration screen, so that the printer will search for
the black reference line when the substrate is loaded.
NOTE: If enable autoline detection is o, the automatic search is disabled, and the printer asks you to nd
the correct position manually.
9. The printer searches for the reference line on the substrate. If it fails to nd it, the front panel asks you to
move the substrate using the Rewind substrate and Advance substrate keys until the reference line is
aligned with the permanent line on the platen. You may nd it useful to mark where the reference line is on
the other side of the substrate.
View information about the substrate
On the front panel's home screen, press .
78 Chapter 3 Handle the substrate and troubleshoot substrate issues ENWW
Page 85

The following information appears on the front panel, if any substrate is loaded:
● The substrate type
● The substrate name
● The substrate width in millimeters (estimated by the printer)
● The remaining length of the substrate, if known
● The printing zone (platen or ink collector)
● The take-up reel status
● Whether double-sided printing is selected
● The color calibration status
If no substrate is loaded, the message Out of substrate appears.
The same information appears on the Embedded Web Server's Supplies page.
Change substrate width and right edge position
If the substrate edges are not correctly found by the printer, they can be changed from the front panel by
pressing , then Substrate > Substrate handling options > Substrate width or Right edge position.
TIP: Bear in mind that automatic edge detection will not be attempted again until the next substrate load.
Substrate length tracking
The substrate length tracking feature enables you to keep track of how much substrate remains on the roll.
1. When the roll is rst loaded onto the printer, you have the option (in the Load Conguration screen) to enter
the length of substrate on the roll. The amount of substrate that is subsequently used is then tracked.
2. When the substrate is unloaded, the front panel displays the amount remaining so that you can note it for
future reference.
The remaining length of substrate is always displayed in the Substrate area of the front panel. This information
may also be displayed in your RIP.
Cut substrate
This option is available from the printer's front panel. If you press , then the scissors icon, the printer
normally advances the substrate 10 cm (3.9 in) and cuts it.
ENWW Change substrate width and right edge position 79
Page 86

NOTE: If the cutter is disabled ( , then Substrate handling options > Cutter > O), the printer advances
the substrate but does not cut it.
NOTE: Some banners and textiles cannot be cut.
Bypass job start safety
The job start safety mode is activated by default so that the leading edge of the substrate does not crash under
the curing system.
If you print with the substrate hanging from the front of the printer, or using the take-up reel, you may want to
deactivate this option to improve throughput (not recommended). To do that, press , then Substrate >
Substrate handling options > Bypass job start safety.
Store the substrate
The following are tips for storing substrate:
● Always keep unused rolls wrapped in the plastic wrap to prevent discoloration and dust accumulation.
Rewrap partially used rolls if they are not being used.
● Do not stack rolls.
● Allow all substrates to adapt to room conditions out of the packaging for 24 hours before printing.
● Handle lm and glossy substrates by the edges or wear cotton gloves. Skin oils can be transferred to the
substrate, leaving ngerprint marks.
● Keep the substrate tightly wound on the roll throughout the loading and unloading procedures. If the roll
starts to unwind, it can become diicult to handle.
Substrate cannot be loaded successfully
Here are some suggestions to try if you cannot load the substrate successfully.
● Reread the loading instructions, and make sure that you are following them. See Handle the substrate and
troubleshoot substrate issues on page 40.
● When loading a textile substrate, remember to use the loading accessory, and select Use loading accessory
in the conguration screen.
● If automatic loading is unsuccessful, try assisted manual loading instead.
● The substrate might be loaded at an angle (skewed or mislocated). Make sure that the right edge of the
substrate is aligned with the roll on the input spindle.
● The substrate might be crumpled or warped, or have irregular edges. See Substrate is deformed or
wrinkled on page 84.
● If the substrate jams in the substrate path to the platen, the leading edge of the substrate might not be
straight or clean. Remove the initial 2 cm (1 in) of substrate from the roll and try again. This might be
necessary even with a new roll of substrate.
● Make sure that the spindle is correctly inserted.
● Make sure that the substrate is correctly loaded on the spindle.
80 Chapter 3 Handle the substrate and troubleshoot substrate issues ENWW
Page 87

● Make sure that the substrate is wound tightly.
● If the substrate is curled, and you see a Clean OMAS or disable it at the RIP alert, advance the substrate until
the whole print zone is covered, then go to the front panel and press , then Image-quality
maintenance
> Substrate-advance calibration > OMAS calibration.
Substrate is mispositioned
If you see the above display on the front panel, proceed as follows.
1. Lift the substrate lever.
2. Manually reposition the substrate on the platen.
3. Lower the substrate lever.
4. Repeat the above steps until the front panel displays the Ready message.
Substrate has jammed
When a jam occurs, the Possible substrate jam message usually appears in the front panel, with one of several
error codes (see Front-panel error codes on page 166).
If you are trying to load a very thin or very thick substrate, or a textile, remember to follow the special procedure
for loading such substrates. See Loading accessory (365 and 375 only) on page 59.
ENWW Substrate is mispositioned 81
Page 88

Check the substrate path
This problem can occur when a roll has nished and the end of the roll is stuck to the cardboard core. If this has
happened, cut the end of the roll away from the core. Then feed the substrate through the printer, and load a
new roll.
Otherwise:
1. Turn o the printer at the front panel, then also switch o the power switch at the rear.
2. Open the printer window.
3. Cut the substrate where it enters the printer, and rewind the input roll.
4. Try to move the printhead carriage out of the way.
5. Lift the substrate pinch lever as far up as it will go.
6. Carefully remove as much as possible of the jammed substrate from the top of the printer. Cut the
substrate if necessary.
82 Chapter 3 Handle the substrate and troubleshoot substrate issues ENWW
Page 89

CAUTION: Try to avoid pulling the substrate out through the input path, because this reverses the normal
direction of movement, and could damage printer parts.
WARNING! Do not touch the printer's curing enclosure, which could be hot.
Risk of burns
For more safety information, please see Safety precautions on page 3
7. Lower the substrate pinch lever.
8. Make sure that there are no pieces of substrate left in the printer. In particular, check in and under the
curing module, and in the substrate path.
9. Close the window.
10. Turn on the printer.
11. Reload the roll.
12. If some substrate continues to cause an obstruction within the printer, it can often be cleared by loading a
rigid substrate type into the printer.
13. If you nd that you have print-quality problems after a jam, try realigning the printheads. See Align the
printheads on page 134.
Avoiding substrate jams while printing
Substrate jams may be caused by loading the substrate with too much skew: do not ignore the warning message
that appears during the loading procedure in this case.
They may also be caused by not enough vacuum suction in the printing zone. If you decide to increase the
suction, do not exceed the following limits: 20 mmH2O for banners, 35 mmH2O for vinyl, and 50 mmH2O for
other substrate families.
If you experience jams only at the beginning of a print, try the following suggestions.
● Disable the automatic cutter.
● Go to the front panel and press , then Substrate handling options > Extra bottom margin and Extra
top margin. Set both margins to 100 mm. If that is not enough, try higher values.
ENWW Substrate has jammed 83
Page 90

● Increase the vacuum level in steps of 10 mmH2O. Do not exceed the following limits: 20 mmH2O for
banners, 45 mmH2O for vinyl, and 60 mmH2O for other substrate families.
Consider reducing the vacuum percentage at the front of the print zone for thin substrates.
● Increase the number of passes.
● Make sure that the substrate is stored in the same room in which the printer is located.
● Try using the substrate edge holders.
Substrate is deformed or wrinkled
If your substrate is deformed or wrinkled by the curing process, change the temperature settings before printing
the next job, and advance the substrate, using the Move substrate option in the front panel's Substrate menu, so
that the next job will be printed on undamaged substrate.
If the problem appears only at the beginning of the print, try the following suggestions.
● Disable the automatic cutter.
● Go to the front panel and press , then Substrate handling options > Extra bottom margin and Extra
top margin. Set both margins to 100 mm. If that is not enough, try higher values.
● Increase the vacuum level in steps of 10 mmH2O. Do not exceed the following limits: 20 mmH2O for
banners, 45 mmH2O for vinyl, and 60 mmH2O for other substrate families.
● Increase the number of passes.
● Make sure that the substrate is stored in the same room in which the printer is located.
Substrate has shrunk or expanded
During the printing process, some substrates may shrink, while others may expand. If this happens, the
dimensions of the print will not be correct.
As a general rule, you can expect the following percentages of shrinkage:
● Banner: less than 2%
● Self-adhesive vinyl: less than 0.5%
● Backlit: less than 0.5%
● Paper: less than 0.5%
● PP & PE synthetics: less than 1%
The framing problem may be solved by printing a sample and adjusting the size of the image in the RIP. You may
reuse this value for all your future prints with the same substrate, although special care must be taken when
using banners, as the shrinkage may vary up to 1% depending on the amount of ink used in the print.
You can expect the following variations from one print to another:
● Banner: less than 0.3%
● Self-adhesive vinyl: less than 0.1%
● Backlit: less than 0.05%
84 Chapter 3 Handle the substrate and troubleshoot substrate issues ENWW
Page 91

● Paper: less than 0.1%
● PP & PE synthetics: less than 0.4%
To solve the tiling problem and improve the repeatability of the printed size, you are recommended to ensure
that the substrate-advance sensor is enabled in the RIP's substrate preset, as this will improve the stability of the
prints over time. You are also recommended to tile together areas with similar amounts of ink. If this is not
possible, print the areas with dierent amounts of ink as dierent jobs and modify the length of the job with less
ink in the RIP to match its size with the job with high ink content.
Some RIPs may provide a scaling option that allows you to compensate easily for substrate shrinkage or
expansion; see your RIP documentation.
See also Variable Front Tension Kit on page 121.
Substrate has bow deformation
The following substrates may suer from bow deformation during printing, as a result of which the print will
appear curved.
● Self-adhesive vinyl substrates (some specic calendared vinyls only)
● Cellulose-based poster papers with no backing nor coating, including HP Photorealistic
This deformation may be particularly noticeable in the following applications.
● Printing images that will later be cut automatically or manually. When there is bow deformation, cutters
that are aligned on the sides may lose alignment in the center.
● Poster printing, if the poster is framed or mounted on a straight surface.
The example below shows an original image, the substrate suering from bow deformation, and the resulting
print, also suering from bow deformation.
You can compensate for this eect and restore the original shape of your image: select a correction value from
−6 to +6 in your RIP or in the substrate library. To apply the correction in your RIP, please refer to your RIP
documentation.
The chosen value should represent the vertical distance that the centre of the substrate has moved with respect
to the left and right edges. If the deformation moves the center of the substrate in the direction of substrate
advance, the correction value should be negative; if in the reverse direction, the correction value should be
positive. In practice, the required correction value is normally negative.
TIP: You can use the diagnostic image provided in http://IPaddress/hp/device/webAccess/diagnostic/
StraightnessOptimizationPlot.pdf (where IPaddress is the IP address of your printer) to help you to determine the
correct value to apply.
ENWW Substrate has bow deformation 85
Page 92

Substrate is sticky and causes smears and crashes
Some substrates may become sticky when heated by the curing system; especially banners and double-sided
banners under high temperatures. To avoid the problem, HP recommends reducing the curing temperature as
much as possible and reducing the front tension (avoid using the take-up reel if possible).
The ink collector included in the 365 and 375 printers is designed both to collect ink from textiles and porous
substrates and to reduce the friction of the substrate against the output platen. Install the ink collector as
described in Ink collector (365 and 375 only) on page 55 before printing on a sticky substrate.
Automatic cutter does not work
The automatic cutter is turned o in any of the following cases.
● When it has been manually disabled from the RIP or from the front panel. To disable the cutter from the
front panel, press
● When printing on textiles, PVC banners, or any other substrate types that it cannot cut, the RIP disables the
cutter.
● When the take-up reel is enabled.
TIP: You can disable the take-up reel from the front panel by pressing , then Take-up reel >
Enable take-up reel.
● During double-sided printing (side A or B).
● When printing internal prints (see Request the printer’s internal prints on page 19).
, then Substrate handling options > Cutter > O.
Take-up reel substrate jam
If the substrate is severely damaged on the take-up reel, do not use the printer's cutter to cut and remove the
substrate. Instead, cut the substrate manually as close as possible to the printer window, then remove the roll.
If the problem remains after removing the substrate jam, unload the take-up reel from the front panel and load it
again.
Take-up reel does not wind
Predictably, if the take-up reel is not winding as anticipated, the printed output is likely to end up on the oor. If
the printer recognizes a problem with the take-up reel, it interrupts the print job until the issue is corrected. If the
printer does not recognize a problem, the job continues to print. The following table highlights possible issues
and solutions.
Take-up reel LED status
Blinking quickly Take-up reel is not
86 Chapter 3 Handle the substrate and troubleshoot substrate issues ENWW
Issue Print job interrupted? Possible cause Possible solution
winding
Yes The tension bar is in its
lower position because
the winding direction is
not correct.
Change the winding
direction using the
winding-direction switch
on the take-up reel
motor. You may need to
use the blue arrow
buttons to collect
substrate from the oor.
Page 93

Take-up reel LED status Issue Print job interrupted? Possible cause Possible solution
Blinking slowly Take-up reel is not
winding
Solid red Take-up reel is not
winding
Solid green Take-up reel is not
winding
Solid green Take-up reel is winding in
the wrong direction
No The sensor cables are
loose or unplugged.
No There is too much
resistance on the take-up
reel motor.
No The winding-direction
switch on the take-up
reel motor is O or in the
wrong position.
No The winding-direction
switch on the take-up
reel motor is in the
wrong position.
Ensure that the sensor
cables are correctly
secured.
Ensure that nothing is
blocking the substrate
path or the tension bar.
Ensure that the switch is
On, and select the correct
winding direction (1 or 2).
Change the switch to the
correct position.
ENWW Take-up reel does not wind 87
Page 94

4 Substrate settings
●
Substrate presets
●
Online search
●
HP Media Locator
●
Generic presets
●
Clone a substrate preset
●
Modify a substrate preset
●
Add a new substrate
●
Delete a substrate preset
●
Faster printing
●
Color calibration
●
Color consistency between dierent printers (365, 375)
●
ICC proles
●
Improve color consistency when tiling
88 Chapter 4 Substrate settings ENWW
Page 95

Substrate presets
Each substrate type has its own characteristics. To obtain the best print quality, the printer has to adapt its
printing parameters to each dierent substrate type. For example, some may need more ink and some may
require higher temperatures for curing. A specication of the correct printing parameters for a particular
substrate type is called a substrate preset.
The substrate preset contains a color prole in International Color Consortium (ICC) format, which describes the
color characteristics of the combination of printer, inks, and substrate. It also contains information about other
parameters (such as curing temperature, vacuum pressure, and substrate-advance compensation) that are not
directly related to color. Substrate presets (also known as Open Media System or OMES packages) are installed in
the printer, and automatically copied to supported RIP software whenever it is connected to the printer.
The printer comes with substrate presets for the most commonly used generic substrates. Some presets may
come preinstalled in your printer (such as HP Vinyl presets); use them only with the substrates for which they
were created. For other substrates, presets named Generic are recommended over other preinstalled presets.
However, the best performance can be achieved only with presets made specically for your substrate. There are
various ways to obtain more presets:
● Use the Online search function on the front panel or the HP Media Locator on the Web to browse, search,
and download a specic preset for your substrate.
● Download a preset from the RIP vendor's website, or from the substrate vendor’s website.
● Use a generic preset designed for your substrate category, even though it is not ne-tuned for the specic
substrate type. Bear in mind that generic substrate settings cannot be modied; instead, the preset can be
cloned and then modied.
● Clone (copy) a preset for a similar substrate, and edit it as necessary.
● Create a new preset, starting from scratch, using the Add new button.
If you can nd a ready-made preset for your specic substrate, you are recommended to use it.
Online search
You can search online for a substrate preset by using the Online search function within the Substrate Library
front-panel menu. The printer connects to the HP Media Locator database on the Internet and allows you to
search all available substrate presets for your particular printer model, including HP and third-party substrate
brands. Hundreds of dierent substrate presets may be available, and the database of substrate presets is
continuously updated and expanded. You will always get the most up-to-date content in this way.
ENWW Substrate presets 89
Page 96

When the printer is connected to the database (this may take a few seconds), a list of all available substrate
presets for your printer model is displayed. You can browse the list by scrolling it, and get details on any preset
by pressing its name. Besides browsing, there are two additional ways to look for presets: free-text search and
lters.
● Free-text search allows you to type in any text using an on-screen virtual keyboard; all substrate presets
containing that text in any part of their name or description will be displayed. For example, if you search for
"vinyl" then substrate descriptions such as "self-adhesive vinyl" or "vinyl banner" will match and be
displayed. The search is case-insensitive; that is, "vinyl" will match both "vinyl" and "Vinyl".
● Filters are available for brand, type, sub-type, and application. When a value is selected for a given lter,
only the matching substrate presets will be displayed. For example, if you select "HP" from the brand lter,
only HP substrate presets will be displayed. The eect of using more than one lter is to narrow the search
to the combination of the lter settings. For example, if you choose "HP" from the brand lter and "SelfAdhesive Vinyl" from the Type lter, only substrate presets for HP Self-Adhesive Vinyl substrates are
displayed.
Once you have located the substrate preset of your choice, pressing its download icon will queue it for automatic
download and installation in the background. You can select as many substrate presets as you want for
download and installation (they will be processed in the order that they were selected). You can return to another
part of the Media Manager or another front panel screen at any time after queuing presets for download, and
this will not interrupt the download and installation process.
90 Chapter 4 Substrate settings ENWW
Page 97

Once a substrate preset has been downloaded in the background, it is checked and installed on the printer's hard
disk. During checking and installation, a full-screen message is shown on the front panel. This message
disappears when checking and installation is complete.
The new substrate preset now appears in the Substrate Library together with all previously installed and factoryprovided presets, and is ready for use.
Some supported RIPs may implement a similar online substrate-preset search function accessing the same HP
Media Locator database. Whether you use the printer's front panel search or RIP-based search does not matter:
the end result is the same. Supported RIP software synchronizes its substrate preset list with the printer, so that
printer and RIP will always have the same list.
HP Media Locator
The HP Media Locator database of substrate presets can also be accessed from a Web browser by visiting
http://www.hp.com/go/mediasolutionslocator. This provides access to the database for dierent regions, printer
models, applications, suppliers, substrate types, and so on.
When you have located the substrate preset of your choice, you can download it to your computer. To install the
preset into the printer with which you want to use it, use the printer's Embedded Web Server. Navigate to the
Setup > Substrate presets management > Import screen.
Click Browse to browse to the substrate preset le that you have previously downloaded to your computer, then
click Update to install the preset in your printer.
The Embedded Web Server also allows you to export substrate presets from your printer for use with another
printer of the same model. When importing a previously exported substrate preset, you may see a message
warning you that the package is not signed (only packages downloaded from the HP Media Locator internet
database are digitally signed, as a form of authentication); you can then ignore the warning and continue with
the installation, or abort the installation.
ENWW HP Media Locator 91
Page 98

Generic presets
Generic presets are each designed for a whole substrate category, rather than for a particular substrate type.
They cannot be edited, erased, saved, color-calibrated or ICC proled; but they can be cloned. Therefore, if you
would like to modify a generic preset in any way, you should rst clone it and then work on the clone, which is
fully editable.
The printer provides generic presets for the supported substrate categories: see Supported substrate categories
on page 43.
Clone a substrate preset
You may wish to clone and edit a preset for various reasons:
● To assign a name of your own choice to the preset
● To adjust the preset to the precise characteristics of your substrate
● To adjust the preset to your intended use of the substrate, which may range from highest-quality printing
to fast production output.
To clone a substrate preset, follow these steps:
1. Select a preset in the Substrate Library.
92 Chapter 4 Substrate settings ENWW
Page 99

2. Click Clone to clone the preset, and enter a name for the new preset.
Modify a substrate preset
You can modify a preset by pressing Modify.
Then click the icon of the print mode that you want to modify; or click Add new print mode. You can delete or
change the name of any print mode; although you should keep at least one print mode.
NOTE: You can dene up to six print modes.
NOTE: The number of passes in an existing print mode cannot be changed. If you want to change the number
of passes, create a new print mode.
NOTE: You are not allowed to create two print modes with the same number of passes, the same eiciency
mode, and the same color saturation.
To change the values, you must print a test plot. Check it and choose the number in the pull-down colorsaturation menu that matches your preferences in terms of curing and drying. If none of the options are good
enough, try changing the temperature and reprint. You can also change the substrate advance settings.
ENWW Modify a substrate preset 93
Page 100

Add a new substrate
If you cannot nd a ready-made preset for your substrate, and prefer not to use a generic preset or edit an
existing preset, you can make your own preset from scratch.
The Add New Substrate wizard guides you to work out the best settings for your substrate. It rst requests some
information about the substrate and your intended use of it, then prints some test prints and asks you to
evaluate them. From this information, it creates the new preset.
1. Ensure that the printer is in the Ready state.
2. Stop the job queue.
3. Load your new substrate, selecting the most similar substrate when asked to do so; or select None of
these.
4. When the substrate has been loaded, go to the Substrate Library on the front panel, and choose the
substrate category in the left column of the Substrate Library screen (PVC BANNER in this example), then
click + New PVC banner at the top of the right column. Your new preset will be based on a generic preset; If
there are multiple generic presets in that category, the front panel asks you to choose one of them.
5. The front panel guides you through the subsequent steps to create your new preset.
94 Chapter 4 Substrate settings ENWW
 Loading...