

Page 1

HP iPAQ
Product Guide
Page 2

© Copyright 2008 Hewlett-Packard
Development Company, L.P.
HP iPAQ products are powered by
Microsoft® Windows Mobile® 6.0 Classic
with Messaging and Security Feature Pack.
Microsoft Windows, the Windows logo,
Outlook, and ActiveSync/Windows Mobile
Device Center are trademarks of Microsoft
Corporation in the U.S. and other countries.
TM
SD Logo is a trademark of its
proprietor.
Bluetooth® is a trademark owned by its
proprietor and used by Hewlett-Packard
Development Company, L.P. under license.
All other product names mentioned herein
may be trademarks of their respective
companies.
Hewlett-Packard Company shall not be liable
for technical or editorial errors or omissions
contained herein. The information is
provided ”as is” without warranty of any kind
and is subject to change without notice. The
warranties for Hewlett-Packard products are
set forth in the express limited warranty
statements accompanying such products.
Nothing herein should be construed as an
additional warranty.
This document contains proprietary
information that is protected by copyright. No
part of this document may be photocopied,
reproduced, or translated to another
language without the prior written consent of
Hewlett-Packard Development Company,
L.P.
Second Edition January 2008
Document Part Number: 461290-002
Page 3

Table of contents
1 Register your HP iPAQ
2 Box contents
3 Components
Front panel components ....................................................................................................................... 3
Top and bottom panel components ...................................................................................................... 4
Left and right side components ............................................................................................................ 5
Back panel components ....................................................................................................................... 5
4 Set up your HP iPAQ
Step 1: Remove the battery cover ........................................................................................................ 7
Step 2: Install the battery and replace the battery cover ...................................................................... 7
Step 3: Charge the battery ................................................................................................................... 8
Step 4: Turn on your HP iPAQ ............................................................................................................. 9
Protect your HP iPAQ with a password ................................................................................................ 9
Find the serial and model number ........................................................................................................ 9
View status icons .................................................................................................................................. 9
5 Learn the basics
The Today screen .............................................................................................................................. 11
Use TodayPanel Lite .......................................................................................................................... 11
Battery saving tips .............................................................................................................................. 12
The 5–Way Navigation key ................................................................................................................ 12
Lock and unlock your HP iPAQ .......................................................................................................... 12
Enter text ............................................................................................................................................ 13
Shortcut menus .................................................................................................................................. 13
Enter owner information ..................................................................................................................... 13
Perform a soft reset ............................................................................................................................ 14
Perform a hard reset .......................................................................................................................... 14
View the Operating System (OS) information .................................................................................... 14
Change the device name ................................................................................................................... 14
Change the regional settings .............................................................................................................. 14
Adjust the volume ............................................................................................................................... 15
Change power management settings ................................................................................................. 15
Dim or adjust brightness of the backlight ........................................................................................... 15
Install and remove programs .............................................................................................................. 16
Open and close programs .................................................................................................................. 16
Set alarms and clocks ........................................................................................................................ 16
Display the clock in title bar ................................................................................................................ 17
Adjust the speed for scrolling through items in a list .......................................................................... 17
iii
Page 4

6 Connections
WLAN ................................................................................................................................................. 18
Bluetooth ............................................................................................................................................ 20
Advanced settings .............................................................................................................................. 27
WLAN terms ...................................................................................................................... 18
Automatically connect to a WLAN network ........................................................................ 19
Manually connect to a WLAN network ............................................................................... 19
Find an IP address ............................................................................................................. 20
Delete a wireless network .................................................................................................. 20
Configure the 802.1x authentication settings ..................................................................... 20
Bluetooth terms .................................................................................................................. 20
Bluetooth Manager ............................................................................................................ 21
Bluetooth Phone Manager ................................................................................................. 21
Connect to a computer via Bluetooth ................................................................................. 22
Bluetooth device profiles .................................................................................................... 22
Create, end, and accept a Bluetooth partnership .............................................................. 23
Rename a Bluetooth partnership ....................................................................................... 23
Pair and unpair devices ..................................................................................................... 24
Connect to a Bluetooth Headset ........................................................................................ 25
Make a device discoverable .............................................................................................. 25
Open Bluetooth settings .................................................................................................... 25
Authorization to access services ....................................................................................... 25
Use a passkey or bond ...................................................................................................... 25
Set a Bluetooth shared folder ............................................................................................ 26
Bluetooth Stack 2.0/EDR ................................................................................................... 26
Connect to intranet URLs .................................................................................................. 27
Change an intranet URL .................................................................................................... 27
Set up proxy server settings .............................................................................................. 27
Set up a Wireless Access Point (WAP) gateway ............................................................... 27
Configure advanced proxy settings ................................................................................... 28
Advanced connection settings ........................................................................................... 28
Set up a VPN server connection ........................................................................................ 28
Change a connection group name ..................................................................................... 29
End a connection ............................................................................................................... 29
7 HP Photosmart Mobile
HP Photosmart Mobile ....................................................................................................................... 30
Attach a voice note to a picture .......................................................................................................... 30
E-mail a picture .................................................................................................................................. 30
View a slideshow ................................................................................................................................ 31
8 Messaging
Understand messages ....................................................................................................................... 32
Types of folders .................................................................................................................................. 32
Synchronize e-mail ............................................................................................................................. 33
Set up messaging accounts ............................................................................................................... 33
Set up e-mail using Exchange server ................................................................................ 33
Internet e-mail .................................................................................................................... 34
Receive attachments ......................................................................................................... 35
Send meeting requests ...................................................................................................... 36
iv
Page 5

9 Calendar
Receive meeting requests ................................................................................................. 36
Create or change a signature ............................................................................................ 37
Use Messaging ................................................................................................................................... 37
Compose and send messages .......................................................................................... 37
Reply to or forward a message .......................................................................................... 37
Add an attachment to a message ...................................................................................... 38
Download messages ......................................................................................................... 38
Download messages from a server ................................................................................... 38
Install an online address book ............................................................................................................ 38
Windows Live Messenger .................................................................................................................. 39
Sign in and out of Messenger ............................................................................................ 39
Send instant messages ..................................................................................................... 40
Change your status ............................................................................................................ 40
Access calendar ................................................................................................................................. 41
Change the display of the work week ................................................................................................. 41
Set a default reminder for all new appointments ................................................................................ 41
Create an appointment ....................................................................................................................... 41
Update an appointment ...................................................................................................................... 42
Cancel an appointment ...................................................................................................................... 42
10 Contacts
Create a contact ................................................................................................................................. 43
Delete a contact ................................................................................................................................. 43
Change contact information ............................................................................................................... 43
Copy a contact ................................................................................................................................... 43
Find a contact ..................................................................................................................................... 44
Send an e-mail message to a contact ................................................................................................ 44
Add and remove a picture .................................................................................................................. 44
Use the contact list ............................................................................................................................. 45
11 Applications
HP applications .................................................................................................................................. 46
Additional features of WM6.0 over WM5.0 ......................................................................................... 50
Windows Media Player ....................................................................................................................... 51
HP Help and Support ......................................................................................................... 46
HP iPAQ Setup Assistant .................................................................................................. 46
HP Asset Viewer ................................................................................................................ 47
Certificate Enroller ............................................................................................................. 47
Manage certificates ............................................................................................................ 48
HP iPAQ Tips ..................................................................................................................... 48
HP iPAQ QuickStart Tour .................................................................................................. 48
HP iPAQ Zip ...................................................................................................................... 48
HP iPAQ File Store ............................................................................................................ 49
HP PrintSmart Mobile ........................................................................................................ 49
HP SecureConnect Mobile ................................................................................................ 49
HP 24-pin connector .......................................................................................................... 50
Windows Media Player 10 Mobile ...................................................................................... 51
v
Page 6

MS Office applications ........................................................................................................................ 51
PDF viewer ......................................................................................................................................... 53
Games ................................................................................................................................................ 53
Internet Explorer ................................................................................................................................. 54
HP Enterprise Mobility Suite ............................................................................................................... 54
12 Notes
Write a note ........................................................................................................................................ 55
Create a copy of a note ...................................................................................................................... 55
Create a voice note ............................................................................................................................ 55
13 Storage cards
Storage cards ..................................................................................................................................... 57
Insert a storage card .......................................................................................................................... 57
Remove a storage card ...................................................................................................................... 57
View content of a storage card ........................................................................................................... 57
Clear the Now Playing list .................................................................................................. 51
Update a Library ................................................................................................................ 51
Word Mobile ....................................................................................................................... 51
Excel Mobile ...................................................................................................................... 52
PowerPoint Mobile ............................................................................................................. 52
Bubble Breaker .................................................................................................................. 53
Solitaire .............................................................................................................................. 53
14 Synchronization
Synchronization software ................................................................................................................... 59
Copy files ............................................................................................................................................ 59
Migrate data from Palm Desktop to Microsoft Windows Mobile 6.0 ................................................... 59
Wireless synchronization cost saving tips .......................................................................................... 60
Troubleshoot synchronization issues ................................................................................................. 60
15 Tasks
Set start and due dates for a task ...................................................................................................... 63
Show start and due dates in the task list ............................................................................................ 63
Set options for displaying tasks on the Today screen ........................................................................ 63
Mark a task as completed .................................................................................................................. 63
16 Product specifications
System specifications ......................................................................................................................... 64
Physical specifications ....................................................................................................................... 64
Operation environment ....................................................................................................................... 65
17 Regulatory notices
Federal Communications Commission Notice ................................................................................... 66
Modifications ...................................................................................................................... 66
Cables ................................................................................................................................ 66
Declaration of Conformity for Products Marked with the FCC Logo (United States
Only) .................................................................................................................................. 66
vi
Page 7

Canadian Notice ................................................................................................................................. 67
Avis Canadien .................................................................................................................................... 67
European Union Notice ...................................................................................................................... 67
Products with 2.4–GHz Wireless LAN Devices ................................................................. 68
Battery Warning .................................................................................................................................. 68
Battery Recycling ............................................................................................................................... 68
Battery Disposal ................................................................................................................................. 68
Disposal of Waste Equipment by Users in Private Household ........................................................... 69
Equipment Warning ............................................................................................................................ 75
Acoustics Warning .............................................................................................................................. 75
Airline Travel Notice ........................................................................................................................... 76
Medical Electronic Equipment ............................................................................................................ 76
Wireless Notices ................................................................................................................................. 76
U.S. Regulatory Wireless Notice ....................................................................................... 76
Canadian Regulatory Wireless Notice ............................................................................... 76
Brazilian Notice .................................................................................................................. 76
Japanese Notice ................................................................................................................................. 77
Wireless LAN 802.11b Devices ......................................................................................... 77
Wireless LAN 802.11g Devices ......................................................................................... 77
Bluetooth Devices .............................................................................................................. 77
Taiwan DGT Notice ............................................................................................................................ 77
Korean Notice ..................................................................................................................................... 77
18 Safety information
General Precautions ........................................................................................................................... 78
Safety Precautions for Power Cords and Accessories ....................................................................... 79
Safety Precautions for Battery Packs ................................................................................................. 79
Safety Precautions for Docking Devices ............................................................................................ 80
Safety Precautions for Products with Wireless Devices ..................................................................... 80
Safety Precautions for Products with Modems, Telecommunications or Local Area Network
Accessories ........................................................................................................................................ 80
Safety Precautions for Products with Laser Devices .......................................................................... 80
CDRH Regulations ............................................................................................................................. 81
19 Frequently asked questions
I am having trouble turning on my HP iPAQ. What should I do? ........................................................ 82
I have trouble connecting to the Internet. What should I do? ............................................................. 82
Why does the HP iPAQ operate slowly at times? .............................................................................. 82
Why do I see the Today screen layout error message on my HP iPAQ display screen? ................... 82
I have trouble charging my battery. What should I do? ...................................................................... 82
I am unable to use the ActiveSync feature. What should I do? .......................................................... 83
My HP iPAQ was not connected during WMDC installation? ............................................................. 83
My HP iPAQ was connected while I was installing but WMDC is not launching after
installation? ........................................................................................................................................ 83
Can I connect for the first time via Bluetooth? .................................................................................... 83
20 Guidelines for care and maintenance
Using your HP iPAQ ........................................................................................................................... 84
Cleaning your HP iPAQ ...................................................................................................................... 84
vii
Page 8

Carrying or storing your HP iPAQ ...................................................................................................... 84
21 Accessories for HP iPAQ
viii
Page 9

1 Register your HP iPAQ
You need to register your HP iPAQ with Hewlett-Packard to be able to:
Access support and services, and get the most out of your HP products.
●
Manage your profile.
●
Sign up for free support alerts, driver notices, and personalized newsletters.
●
After registering your HP iPAQ, you will receive an e-mail message regarding special offers and
promotions. Visit
address after registration. You are required to enter your user ID and registration password to edit your
profile online.
http://www.register.hp.com to register your HP iPAQ or update your mail or e-mail
1
Page 10
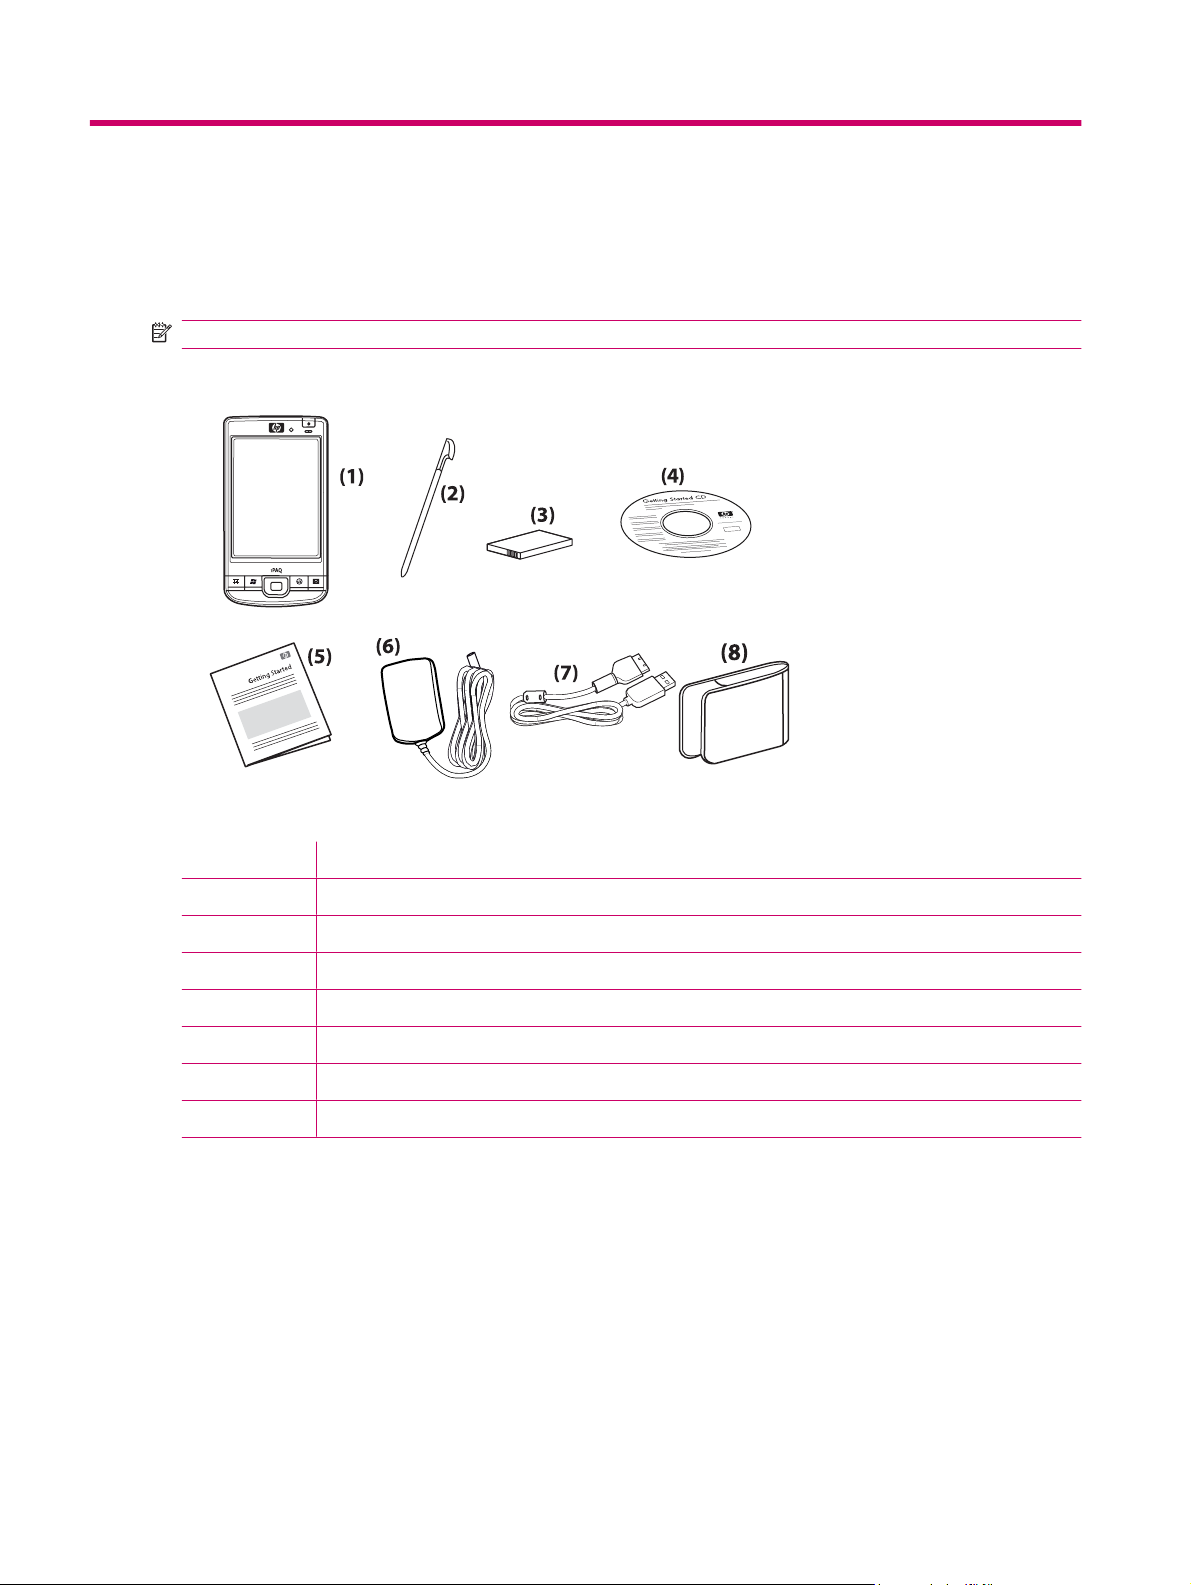
2 Box contents
This illustration depicts the items that come in the box with your HP iPAQ.
NOTE: Box contents might vary by model.
(1) HP iPAQ
(2) Stylus
(3) 2200 mAh Li-Ion removable/rechargeable battery
(4) Getting Started CD with additional software
(5) HP iPAQ documentation
(6) AC adapter
(7) HP 24-pin connector
(8) Slip case
2 Chapter 2 Box contents
Page 11
3 Components
NOTE: Not all models or features are available in all countries/regions.
Front panel components
Component Function
(1) Power Key Press and hold to switch your HP iPAQ on or off.
(2) Power/Wireless LEDs
(3) Touch Screen Use to view the contents on the screen. Use the stylus to select items,
(4) Application Key 1 Press to launch the Messaging application. Press and hold to launch
(5) Application Key 2 Press to confirm your selection. Press and hold to switch between the
(6) 5–Way Navigation Key Use to select items, navigate menus, change feature settings, or play
(7) Application Key 3 Press to display the Start menu on the screen. Press and hold to access
Solid amber– Battery charging
●
Flashing green and Solid green – One or more notifications
●
received
Solid green – Battery charge complete
●
Solid Blue – WLAN or Bluetooth is on
●
navigate menus, change feature settings, or play games.
the Windows Media Player.
landscape and portrait views.
games. Scroll up, down, left, or right by pressing the button in the
direction you want to scroll. Release the button to stop the scrolling
action. Press the button to select the item highlighted on the screen.
the Today screen.
Front panel components 3
Page 12

Component Function
(8) Application Key 4 Press to launch the Calendar. Press and hold to launch the Contacts
list.
(9) Light Sensor Use to detect environment light change and adjust backlight setting
(10) Audio Receiver Use to listen during VoIP calls.
automatically in a small range by the current backlight setting.
Top and bottom panel components
Component Function
(1) 3.5 mm Headphone Connector Plug headset into this connector to listen to audio through a headset.
(2) Charging/Communications
Port
(3) Docking Connector Use to charge your HP iPAQ using the AC adapter with the HP 24-pin
(4) Microphone Use to record voice notes.
(5) SD/SDIO/CF Card Slot Insert a Secure Digital (SD) storage card, a Secure Digital Input Output
Use to connect the mini-USB charging/synchronization cable.
NOTE: Mini-USB charging/synchronization cable is an optional
accessory.
connector.
(SDIO) card, or a Compact Flash (CF) card with the label side up for data
storage.
4 Chapter 3 Components
Page 13
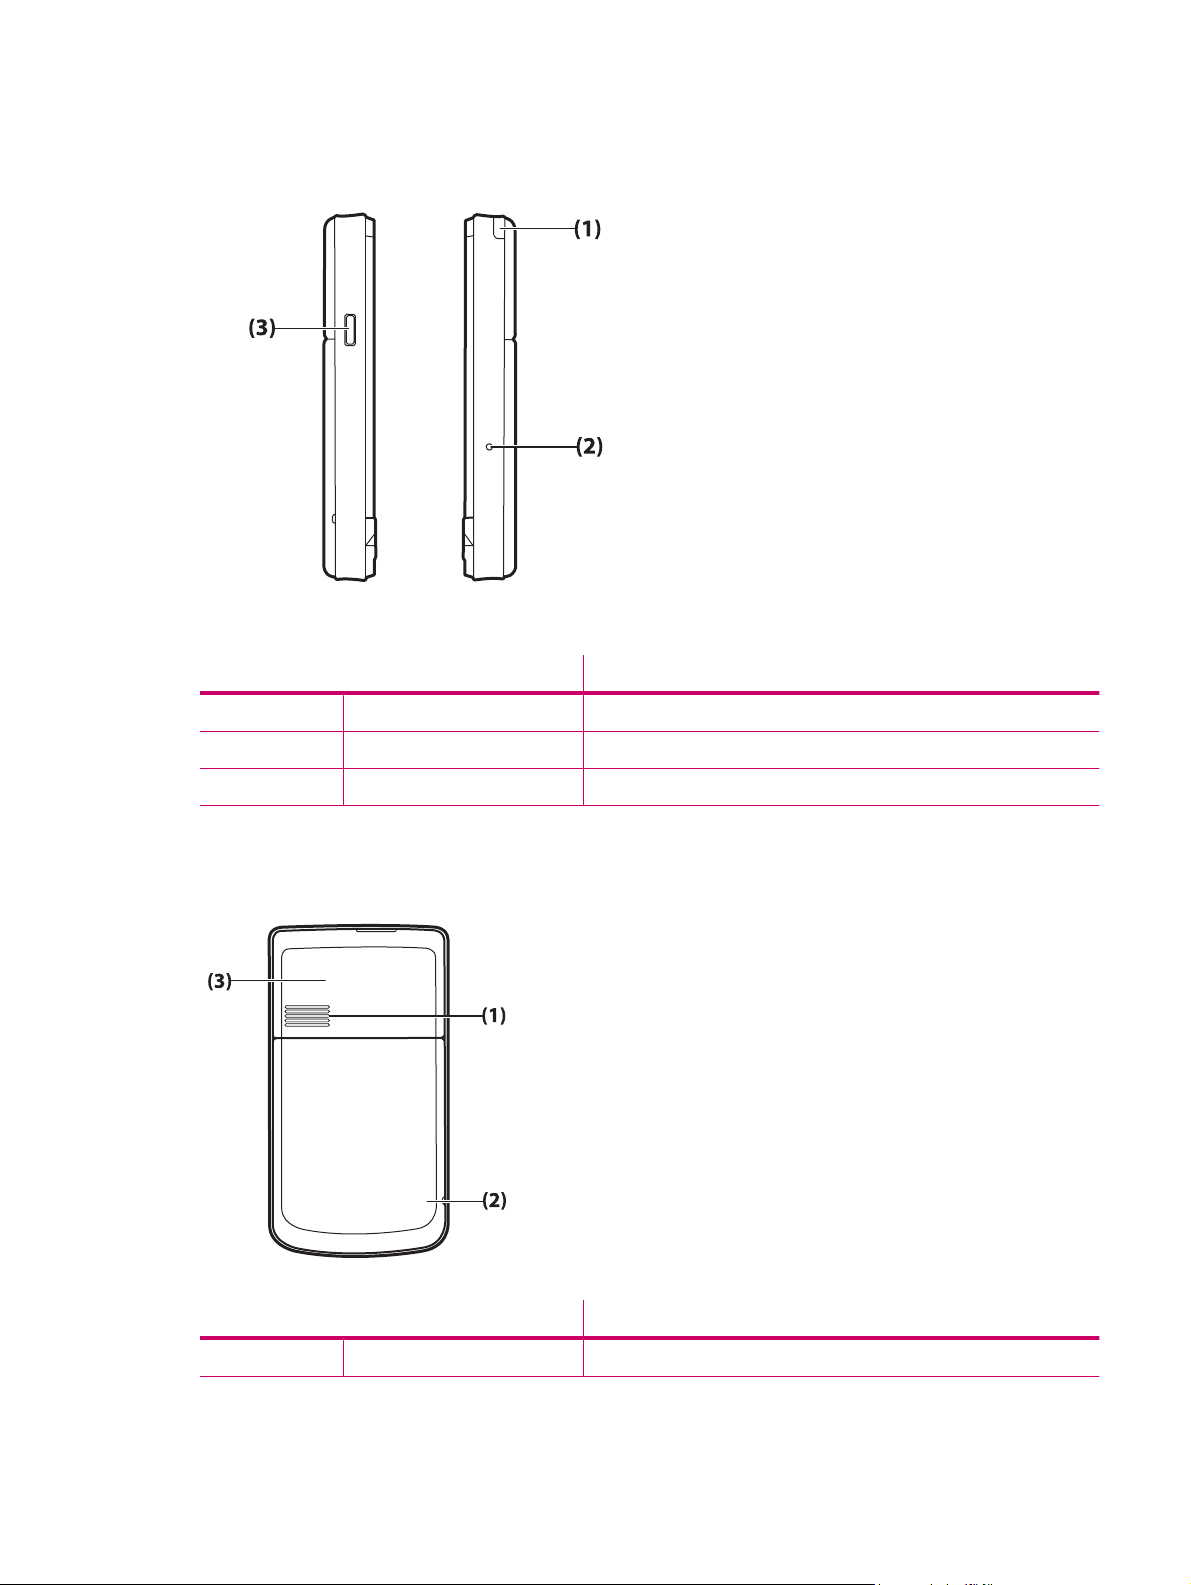
Left and right side components
Component Function
(1) Stylus Use to select elements on the screen and enter information.
(2) Reset Button Press to reset your HP iPAQ.
(3) Voice Recorder Button Use to launch the Voice Recorder application.
Back panel components
Component Function
(1) Back Speaker Use the speaker to listen to audio.
Left and right side components 5
Page 14

Component Function
(2) Bluetooth Antenna Detects and radiates Bluetooth signals.
(3) WLAN Antenna Detects WLAN hotspots.
6 Chapter 3 Components
Page 15
4 Set up your HP iPAQ
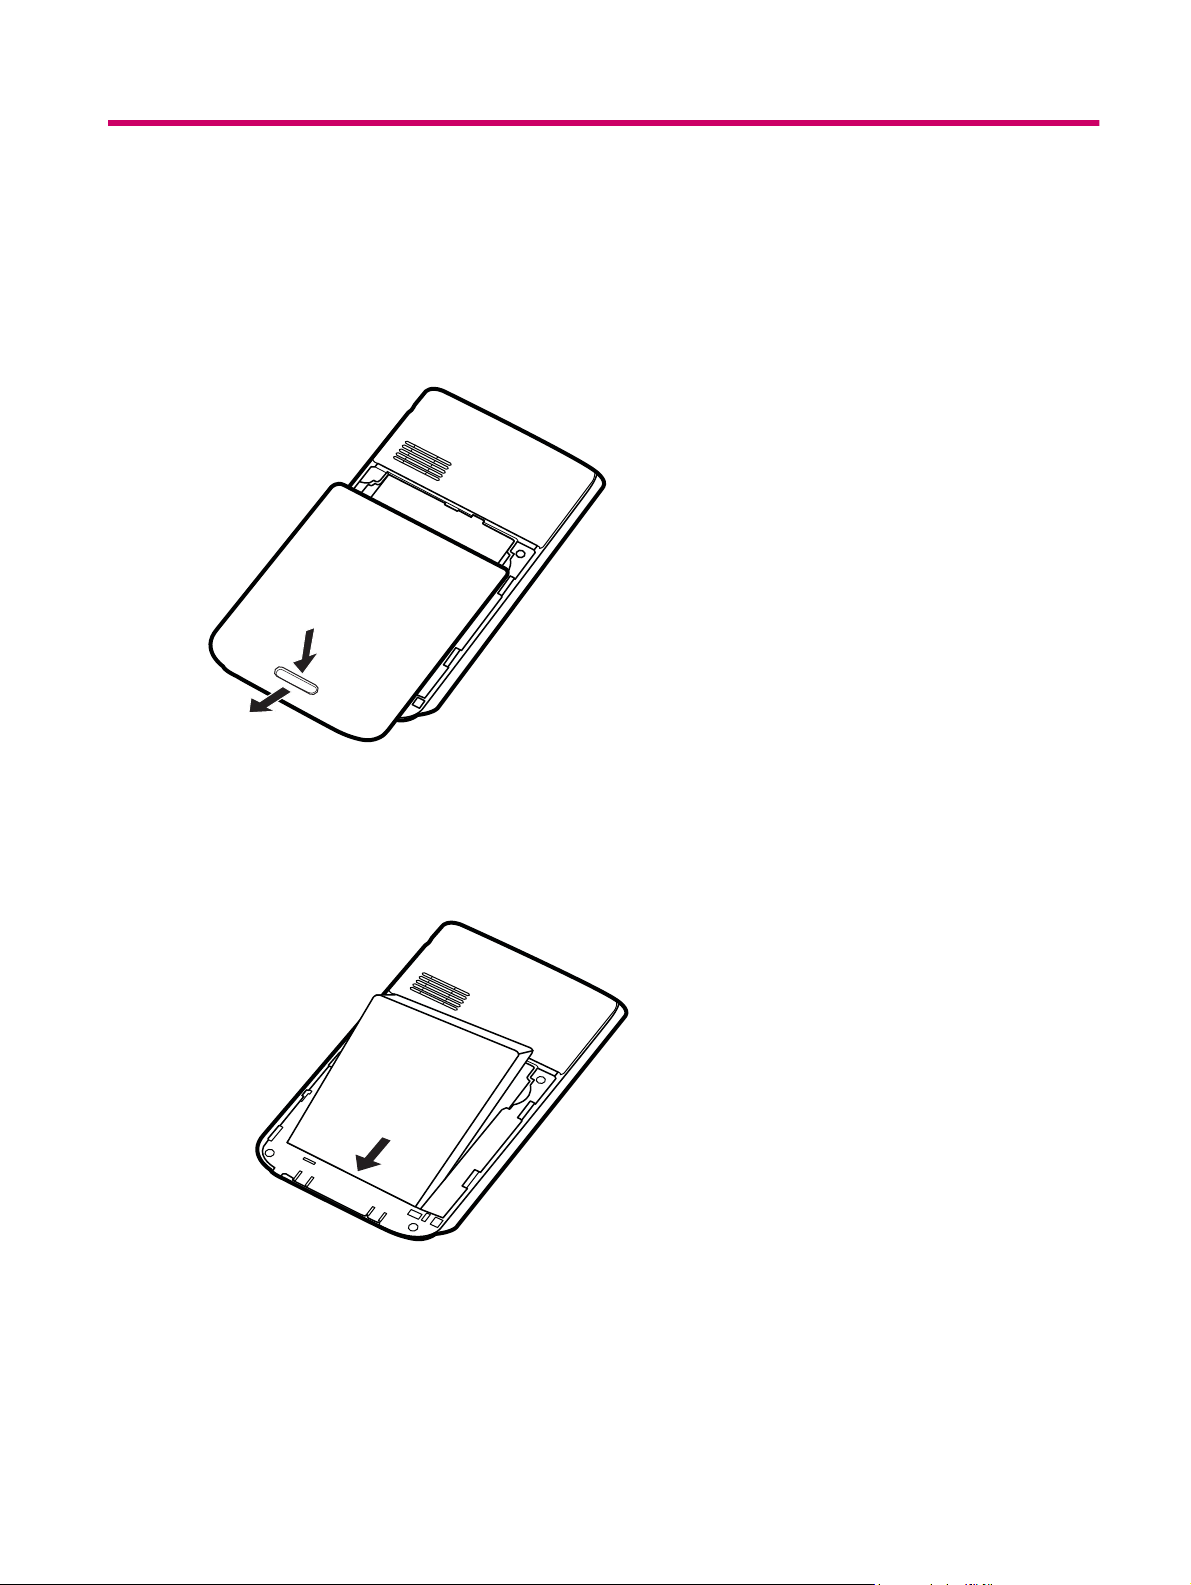
Step 1: Remove the battery cover
Slide the cover down and away from the HP iPAQ.
Step 2: Install the battery and replace the battery cover
1. Align the battery connectors on the battery with the housing pins in the battery compartment and
insert the battery.
Step 1: Remove the battery cover 7
Page 16
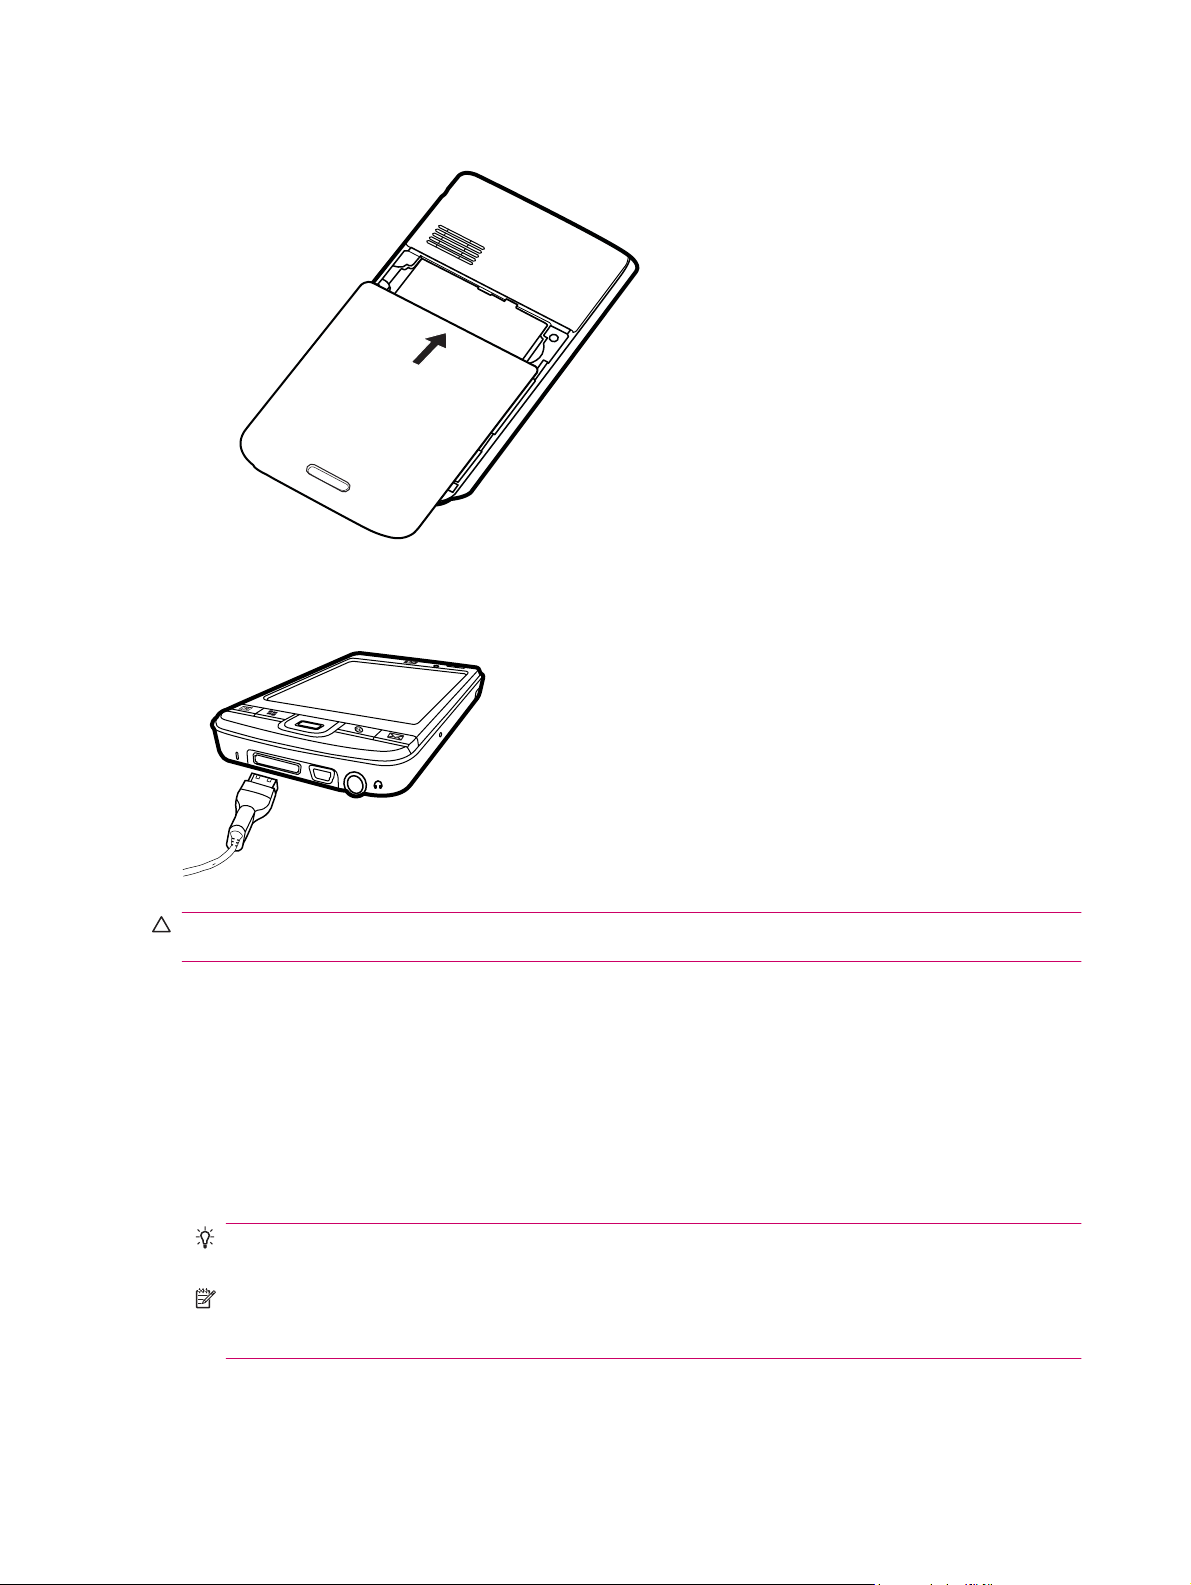
2. Place the battery cover down and slide up until it locks into place.
Step 3: Charge the battery
CAUTION: To avoid damaging your HP iPAQ or the AC adapter, make sure all connectors are properly
aligned before connecting.
The battery provides power for your HP iPAQ to operate. Your HP iPAQ comes with a HP 24-pin
connector synchronization cable, which must be used to charge the device.
It takes approximately 2–4 hours to fully charge the battery for the first time. Subsequent charges might
take longer.
1. Connect the AC adapter to an electrical outlet.
2. Connect the HP 24-pin connector end of the HP 24-pin connector synchronization cable to the
Docking connector on your HP iPAQ. The cable connector fits only one way. If the connector does
not insert easily, turn it over.
TIP: You can also charge the battery by connecting your HP iPAQ to a USB port on your computer
using the HP 24-pin connector synchronization cable.
NOTE: Whenever a replacement battery is inserted into your HP iPAQ, press the Power key for
at least two seconds. In case the device does not turn on, attach the AC adapter to turn on your
HP iPAQ.
8 Chapter 4 Set up your HP iPAQ
Page 17

Step 4: Turn on your HP iPAQ
Press the Power key to turn on your HP iPAQ. Next, follow the instructions on the screen to complete
the setup. Use the on-screen keyboard to enter information.
Protect your HP iPAQ with a password
You can secure the data on your HP iPAQ by setting a password. Each time you turn on your HP iPAQ,
you will be prompted to enter the password.
To set a password:
1. Tap Start > Settings > Lock.
2. Select the Prompt if device unused for check box, and select the time that your HP iPAQ must
be unused before you are prompted for a password.
3. In the Password type list, select the type of password you would like to use. Enter the password,
and then confirm the password.
4. On the Hint tab, enter a phrase to help you remember your password. Make sure that your hint
does not allow others to guess your password. The hint is displayed after the wrong password is
entered five times in a row.
5. When prompted, tap ok. The next time your HP iPAQ remains unused for the specified amount of
time, you will be prompted to enter your password.
TIP: Follow the steps above to change or reset your password.
Find the serial and model number
Locate the serial and model numbers before contacting HP Customer Support, particularly if you are
calling for in-warranty support.
View the serial number and model ID by tapping Start > Programs > HP Help and Support > Serial
and Model Number.
You can also find this information next to the battery of your HP iPAQ. To locate the serial number:
1. Remove the battery cover.
2. Locate the label containing the serial number next to the battery.
View status icons
The following table lists the common status indicators and their meanings.
Icon Status Icon Status
Instant message received New e-mail
Sync error Battery level
Battery level low Battery charging
Step 4: Turn on your HP iPAQ 9
Page 18

Icon Status Icon Status
No battery or battery fault Bluetooth
Bluetooth off WLAN off
10 Chapter 4 Set up your HP iPAQ
Page 19

5 Learn the basics
Get started with your HP iPAQ by learning basic functions such as knowing the Today screen, entering
text, and synchronizing data.
The Today screen
The Today screen displays the date and time and provides a quick status of the remaining battery
capacity and upcoming appointments. At the top of the Today screen, the connectivity icons, volume
indicator, and clock are displayed.
From the Today screen, tap the
the All tab, you can turn all wireless connections on/off.
To customize the Today screen:
1. Tap Start > Settings > Today.
2. On the Appearance tab, select the required theme for the background of the Today screen.
3. On the Items tab, select the items to appear on the Today screen.
TIP: To move the order in which the items appear, tap Start > Settings > Today. On the Items tab,
tap Move Up or Move Down.
Use TodayPanel Lite
Icon Name Function
TodayPanel Lite Use to change the TodayPanel Lite options or the
Battery power Use to view the amount of remaining battery power
Main memory Use to view the amount of available main memory
(iPAQ Wireless) icon to open the iPAQ Wireless application. On
Today screen settings.
on your HP iPAQ. Set the standby period, time
duration for turning off the HP iPAQ, and USB
charging method.
on your HP iPAQ. View, activate, and stop all
running programs from this screen.
Storage memory Use to view the amount of available storage
memory on your HP iPAQ. View, activate, and stop
all running programs from this screen.
Backlight Use to view and change the backlight options on
your HP iPAQ.
To use TodayPanel Lite, tap the required icon, make the necessary changes, and tap ok.
The Today screen 11
Page 20

You can change the TodayPanel Lite icons to compact mode, which allows more space on the Today
screen. You can also change the memory and storage settings to display as percentages instead of file
sizes.
To change the TodayPanel Lite icons to compact mode:
1.
Tap the
2. Tap the Display Mode list and select Compact.
To display memory and storage as percentages:
1.
Tap the
2. Tap the Display Memory as list or the Display Storage as list and select the percentage listed.
3. Tap ok.
To remove the TodayPanel Lite application from the Today screen:
1. Tap Start > Settings > Today > Items.
2. Clear the TodayPanel check box and tap ok.
For more options, visit
(TodayPanel Lite) icon > Options to open the TodayPanel Lite application.
(TodayPanel Lite) icon > Options to open the TodayPanel Lite application.
http://www.rhinocode.com to upgrade to TodayPanel.PRO.
Battery saving tips
You can adjust the settings on your HP iPAQ to fit your individual needs and to help your battery last
as long as possible between charges. Here are some recommendations to conserve battery life:
Sounds – Every time you are notified of an event, battery power is consumed. Tap Start >
●
Settings > Personal >Sounds & Notifications to turn off any unnecessary notifications.
Auto Turn Off the Backlight – Tap Start > Settings > System > Backlight. Specify a short
●
amount of wait before turning off the backlight. On the Battery Power tab, set Turn off backlight
if device is not used for to 10 seconds.
Turn off Bluetooth and WLAN – Always turn off Bluetooth and WLAN when not in use.
●
HP also offers a variety of accessories to keep your HP iPAQ charged when you are out of the office
for extended time periods. These include the mini-USB synchronization cable and travel adapter. Use
original HP batteries and chargers to charge your HP iPAQ.
To check the battery power, tap Start > Settings > System > Power.
The 5–Way Navigation key
The 5–Way Navigation key is used to navigate the menu system, change feature settings, or play
games. It is also used to scroll up and down a list and select a required function.
TIP: Up and down are your primary movements while navigating within menus or through the
Contacts list. Move left and right to change the feature settings and edit text. Press the button to select
the item highlighted on the screen.
Lock and unlock your HP iPAQ
You can lock your HP iPAQ to prevent accidental key presses while you carry your device.
12 Chapter 5 Learn the basics
Page 21

NOTE: When your device is locked, you can still receive e-mail notifications and see appointment
reminders.
To lock your HP iPAQ:
On the Today screen, tap Device unlocked.
To unlock your HP iPAQ:
On the Today screen, tap Unlock. Now, your iPAQ is unlocked and ready for use.
Enter text
Based on your preference, you can use the on-screen keyboard or a handwriting recognition feature
such as Block Recognizer, Keyboard Letter Recognizer, or Transcriber to enter text.
1. Tap Start > Settings > Personal > Input.
2. On the Input Method tab, select a text input method and change options as appropriate.
3. Tap ok.
You can now go to a program (such as Notes) and start entering text.
Text-Input Method Definition
Block Recognizer Use a single stroke to write letters, numbers, symbols, and
punctuation marks that get converted into typed text.
Keyboard Tap keys on the keyboard to enter text.
Letter Recognizer Write individual letters, numbers, and punctuation marks that
Transcriber Write in cursive, print, or mixed handwriting (consisting of both
TIP: Change the text input method from within any program by tapping the (Input Selector)
arrow and selecting an input method.
Shortcut menus
A shortcut menu is displayed when you tap and hold an item. This menu displays the most common
commands for the specific item. For example, you can delete an appointment by using commands on
a shortcut menu.
When the shortcut menu displays, tap the action you want to perform.
To close a shortcut menu without performing an action, tap anywhere outside the menu.
Enter owner information
Enter your personal information, such as your name and address, so that the HP iPAQ can be returned
to you if it is lost.
are converted into typed text.
cursive and print), and convert your writing into typed text.
1. Tap Start > Settings > Personal > Owner Information.
2. On the Identification tab, enter your personal information.
Enter text 13
Page 22

TIP: You can edit the owner information directly from the Today screen.
Perform a soft reset
A soft reset stops all running applications, but does not erase any programs or saved data.
NOTE: Be sure to close all running applications before performing a soft reset.
To perform a soft reset:
1. Locate the recessed Reset button on the HP iPAQ.
2. Use the stylus to lightly press the Reset button.
Perform a hard reset
A hard reset stops all running applications and erases any program which you have installed or saved
data.
To perform a hard reset:
1. Press the Application Key 3, Application Key 2, and the Voice Recorder button simultaneously
and hit the Reset button once.
2. Press and hold the Application Key 3, Application Key 2, and the Voice Recorder button until
Clean boot is displayed at the bottom of the screen.
View the Operating System (OS) information
Tap Start > Settings > System > About.
The Version tab displays important device information, including the type of processor and the amount
of available memory.
Change the device name
The device name is used to identify your HP iPAQ in the following situations:
Synchronizing with a computer
●
Connecting to a network
●
NOTE: If you synchronize multiple devices with the same computer, each device must have a unique
name.
To change the device name:
1. Tap Start > Settings > System > About > Device ID tab.
2. Enter a name. The device name must begin with a letter, consist of letters from A to Z and numbers
from 0 to 9, and should not contain spaces.
Change the regional settings
The style in which numbers, currency, dates, and times are displayed is specified in regional settings.
14 Chapter 5 Learn the basics
Page 23

To change the regional settings:
1. Tap Start > Settings > System > Regional Settings > Region.
2. Select a region.
The region you select determines the options available on the other tabs.
3. To customize additional settings, tap the tabs given below to display the required options:
Region
●
Number
●
Currency
●
Time
●
Date
●
Adjust the volume
You can change the volume for various sounds, such as the sound you hear when you tap program
names and menu options.
1.
Tap the
2. Move the system volume slider on the screen to the required volume level.
3. To mute system sounds, tap Off.
You can also set a specific sound for a specific event.
1. Tap Start > Settings > Personal > Sounds & Notifications.
2. On the Sounds tab, choose how you want to be notified by selecting the appropriate check boxes.
3. On the Notifications tab, in the Event list, tap an event name and choose how you want to be
notified by selecting the appropriate check boxes. You can choose from several options, such as
a special sound, a message, or a flashing light.
NOTE: Turning off sounds and the LED notification helps conserve battery power.
(Speaker) icon at the top of the screen.
Change power management settings
1. Tap Start > Settings > System > Power.
2. Tap Advanced and select the length of time the HP iPAQ should remain on when using battery
power or external power.
Dim or adjust brightness of the backlight
You can set the backlight to dim after a specified amount of time has elapsed.
1. Tap Start > Settings > System > Backlight.
2. Tap Battery power or External Power.
3. Select the backlight options of your choice.
Adjust the volume 15
Page 24

You can also increase or decrease the brightness of the backlight.
Move the slider near the
change the brightness by tapping Start > Settings > System > Backlight > Brightness.
(Backlight) icon to increase or decrease the brightness. You can also
Install and remove programs
To install programs on your HP iPAQ:
1. Use a HP 24-pin connector synchronization cable to connect your HP iPAQ to your computer.
2. Follow the instructions in the Installation Wizard provided with the program you want to install.
3. Check the screen on your HP iPAQ to see if any further steps are necessary to complete the
program installation.
To remove programs from your HP iPAQ:
1. Tap Start > Settings > System > Remove Programs.
2. Select the check boxes for programs you want to remove, and then tap Remove.
NOTE: By removing a program from your HP iPAQ, you can increase available memory on the device.
If programs are lost from your HP iPAQ for any reason, most of them can be re-installed using any
synchronization software. See
Synchronization software on page 59 for more information.
Open and close programs
You do not need to exit a program to open another or to conserve memory. The system manages
memory automatically.
To open a program, tap Start, and then select the required program from the list. If you do not see the
program you want to launch, tap Start > Programs.
In most cases, selecting x or ok will close an application but will not stop the application from running
in memory. However, you can close it manually.
1. Tap Start > Settings > System > Memory > Running Programs.
2. From the Running Programs list, tap the program you want to close, and then tap Stop.
Set alarms and clocks
To set alarm on your HP iPAQ:
1. Tap Start > Settings > System > Clock & Alarms > Alarms.
2. Tap <Description> to enter a name for the alarm.
3. Tap a week day to set the alarm. You can also set the alarm for multiple days.
4. Tap Time and set the time for the alarm.
5.
Tap the
sound.
(Alarm) icon to specify the type of alarm. You can choose a single sound or a repeating
6. If you choose to play a sound, tap the list next to the Play sound check box, and then tap the sound
you want to set.
16 Chapter 5 Learn the basics
Page 25

To set time on your HP iPAQ:
1. Tap Start > Settings > System > Clock & Alarms > Time.
2. Select Home to set the time zone, local time, and date when you are in your home country. Select
Visiting to set these options while traveling.
Display the clock in title bar
When viewing certain programs, the clock might not be displayed in the title bar. To display the clock in
the title bar at all times:
1. Tap Start > Settings > System > Clock & Alarms.
2. On the More tab, tap to select the Display the clock on the title bar in all programs check box.
Adjust the speed for scrolling through items in a list
To change the scrolling speed:
1. Tap Start > Settings > Personal > Buttons > Up/Down Control.
2. Under Delay before first repeat, move the slider to reduce or increase the time that elapses before
scrolling begins.
3. Under Repeat rate, move the slider to change the time it takes to scroll from one item to the next.
Display the clock in title bar 17
Page 26

6 Connections
You can use your HP iPAQ to connect to and exchange information with other handheld devices, your
computer, various network types, or the Internet. Following are the ways to get connected:
WLAN
●
Bluetooth
●
You can access all these connection types by tapping Start > Settings > Connections.
WLAN
With wireless access, you do not need to use cables to connect your HP iPAQ to the Internet. Instead,
access points transmit data to and from your wireless device. Your HP iPAQ can connect to an IEEE
802.11b/g device or connect directly to other WLAN-enabled devices.
With WLAN, you can:
Access the Internet
●
Send and receive e-mail
●
Access corporate network information
●
Use Virtual Private Networks (VPNs) for secure remote access
●
Use hotspots for wireless connectivity
●
On the Today screen, tap the (iPAQ Wireless) icon to access the WLAN features.
NOTE: Use of dial-up and wireless Internet, e-mail, corporate networks, and other wireless
communications, such as Bluetooth devices, might require separately purchased additional hardware
and other compatible equipment, in addition to a standard WLAN infrastructure and a separately
purchased service contract. Not all Web content might be available. Some Web content might require
installation of additional software.
WLAN terms
It is recommended that you become familiar with the following terms as you begin to use WLAN
technology.
Term Definition
802.11 standard An approved standard specification of radio technology from the Institute of Electrical and
Device-to-computer or ad-hoc A mode that does not use access points. It provides independent peer-to-peer connectivity in
Domain Name System (DNS) The way that Internet domain names are located and translated into IP addresses. It is easy
Electronics Engineers (lEEE) used for wireless local area networks (WLANs).
a wireless LAN.
to remember name for an Internet address. Every Web site has its own specific IP address
on the Internet.
Encryption An alphanumeric (letters and/or numbers) conversion process of data primarily used for
18 Chapter 6 Connections
protection against any unauthorized people.
Page 27

Term Definition
Hotspots Public or private areas where you can access WLAN service. These wireless connections can
be located, for example, at a library, cyber cafe, hotel, airport lounge, or convention center.
This service can be free or sometimes requires a fee.
Infrastructure This connection mode uses wireless access points to connect to networks.
Automatically connect to a WLAN network
When you turn on the WLAN radio, your HP iPAQ automatically detects WLAN networks that are
broadcasting their signals. If your WLAN network is not set to broadcast, then you have to connect to it
manually. Before trying to connect to a WLAN network, determine if authentication information is needed
by contacting your network administrator.
1.
2.
Tap the
Tap the
(iPAQ Wireless) icon.
(WLAN) icon to turn on WLAN.
3. Once the HP iPAQ detects a WLAN network, you are asked to choose if you want to connect.
Select the network you want to connect to and tap Connect.
Manually connect to a WLAN network
A wireless network can be added manually by entering the settings information to add the network.
Before trying to connect to a WLAN network, determine if authentication information is needed by
contacting your network administrator.
1.
2.
Tap the
Tap the
(iPAQ Wireless) icon.
(WLAN) icon to turn on WLAN.
3. Tap Start > Settings > Connections > iPAQ Wireless > WLAN > View WLAN Networks >
Wireless > Add New…
4. Enter the Network name.
5. Choose a connection method. Select The Internet to connect to the Internet through an ISP or
select Work to connect to a company network. You should select Work if the network requires a
proxy server.
6. Tap Next.
To use authentication, select the authentication method from the Authentication list.
●
To use data encryption, select an encryption method from the Data Encryption list.
●
To automatically use a network key, tap The key is automatically provided, else enter the
●
Network key and Key index.
NOTE: To delete a connection, tap Start > Settings > Connections > iPAQ Wireless > WLAN >
View WLAN Networks > Wireless. Tap and hold the connection you want to remove, and then tap
Remove Settings.
WLAN 19
Page 28

Find an IP address
1.
Tap the
2.
Tap the
3. Connect to a network automatically or manually by tapping Start > Settings > Connections >
iPAQ Wireless > WLAN > View WLAN Networks > Network Adapters.
4. Select a WLAN network. The WLAN IP address is shown here.
(iPAQ Wireless) icon.
(WLAN) icon to turn on WLAN.
Delete a wireless network
You can delete networks you manually entered. However, if a network was automatically detected, you
cannot delete it.
To delete an existing or available wireless network:
1.
Tap the
2.
Tap the
3. Tap WLAN > View WLAN Networks > Wireless.
4. In the Configure Wireless Networks box, tap and hold the network you want to delete.
5. Tap Remove Settings.
(iPAQ Wireless) icon.
(WLAN) icon to turn on WLAN.
Configure the 802.1x authentication settings
Before performing these steps, determine if authentication information is needed by contacting your
network administrator.
1. To manually enter information, tap Start > Settings > Connections > iPAQ Wireless >
WLAN > View WLAN Networks > Network Adapters.
2. In Wireless networks list, select the network you want to configure.
3. For increased security, select the Use IEEE 802.1x network access control check box. Then,
select the appropriate EAP type.
Bluetooth
Bluetooth wireless technology is a short-range data communication technology. It uses frequency
hopping in timeslots and has the ability to simultaneously handle both data and voice transmissions.
Bluetooth signals avoid interference from other signals by hopping to a new frequency after transmitting
or receiving a data packet. Therefore, this technology is robust, cost-effective, and replaces cables
connecting devices assuring high levels of security.
Bluetooth terms
It is recommended that you become familiar with the following terms as you begin to use Bluetooth
technology.
Term Definition
Authentication Verification of a numeric passkey before a connection or activity can be completed.
20 Chapter 6 Connections
Page 29

Term Definition
Authorization Approval of a connection, access, or activity before it can be completed.
Bonding (Paired devices) Creating a trusted connection between your device and another. After a bond is created,
the two devices become paired. A paired device does not require authentication or
authorization.
Device address Unique electronic address of a Bluetooth device.
Device discovery Location and recognition of another Bluetooth device.
Device ID Name that a Bluetooth device provides when discovered by another device.
Encryption Method of protecting data.
Passkey Code you enter to authenticate connections or activities requested by other devices.
Personal Information Manager
(PIM)
Profiles Collection of Bluetooth settings.
Service discovery Determination of which programs you have in common with other devices.
Bluetooth Manager
Use Bluetooth Manager to:
Establish connections
●
Exchange business cards
●
Display shortcuts
●
To access Bluetooth manager:
1.
Tap the
2.
Tap the
3. Tap Bluetooth > Bluetooth Connections. The first screen that displays is My Shortcuts.
When you are required to locate a device and connect to it, tap New. The Bluetooth browser then
searches for other Bluetooth devices.
Collection of programs used to manage daily business tasks (for example: Contacts,
Calendar, and Tasks).
(iPAQ Wireless) icon.
(Bluetooth) icon to turn Bluetooth on.
Bluetooth Phone Manager
Use Bluetooth Phone Manager to connect your HP iPAQ to a Bluetooth-enabled cell phone, which allows
use of the phone as a modem to browse the Internet or transfer other information. To do this, create a
Bluetooth connection between your HP iPAQ and the cell phone, and then send information to the phone
using Bluetooth. The phone relays the information over the phone line and then sends back to your
HP iPAQ any information requested over the connection.
NOTE: Ensure both your HP iPAQ and the cell phone are turned on, discoverable, and within close
range.
Bluetooth 21
Page 30

To establish a connection between your HP iPAQ and a cell phone using Bluetooth Phone Manager:
1. Tap Start > Settings > Connections > Bluetooth> Bluetooth Manager.
2. If using the application for the first time, tap Yes to set up a pairing with a Bluetooth phone.
3. Follow the on-screen instructions to create a pairing between your HP iPAQ and the phone.
For more information, open Bluetooth Phone Manager and tap Tools > Help.
Connect to a computer via Bluetooth
For best results, connect the HP iPAQ to the computer using USB to establish a synchronization
relationship before connecting via Bluetooth.
1. Follow the instructions in the synchronization software help on the computer for configuring
Bluetooth on your computer.
2. On the HP iPAQ, tap Start > Programs > ActiveSync.
3. Tap Menu > Connect via Bluetooth. Make sure the device and computer are within close range.
4. If this is the first time you have connected to this computer via Bluetooth, complete the Bluetooth
wizard on the HP iPAQ and set up a Bluetooth partnership with the computer.
5. Tap Sync.
6. Tap Menu > Disconnect Bluetooth.
TIP: To preserve battery power, turn off Bluetooth.
Bluetooth device profiles
The functions that Bluetooth supports are called services or profiles. You can communicate only with
Bluetooth devices that support at least one of the following profiles:
ActiveSync–Uses Serial Port Profile (SPP) to connect to ActiveSync on a computer
●
Advanced Audio Distribution Profile (A2DP)
●
Audio Video Remote Control Profile (AVRCP)
●
Basic Imaging Profile (BIP)
●
Basic Printer Profile (BPP)
●
Dial-up Networking (DUN)
●
File Transfer Protocol (FTP)
●
Generic Access Profile (GAP)
●
Headset Support Profile (HSP)
●
Human Interface Device Profile (HID)
●
Object Exchange (OBEX) Protocol
●
Object Push Protocol (OPP)
●
Personal Area Network (PAN)
●
Serial Port Profile (SPP)
●
Service Discovery Protocol (SDP)
●
22 Chapter 6 Connections
Page 31

Create, end, and accept a Bluetooth partnership
You can exchange information between your HP iPAQ and another device that has Bluetooth
capabilities. For this, you will have to first create a Bluetooth partnership between the two devices.
NOTE: To exchange information between two Bluetooth enabled devices, make sure Bluetooth is
turned on both devices. The devices need not be in the discoverable mode.
1. Make sure the two devices are turned on, discoverable, and within close range.
2. Tap Start > Settings > Connections > Bluetooth.
3. Tap Bluetooth Manager > New > Explore a Bluetooth Device. Your HP iPAQ searches for other
devices with Bluetooth capabilities and displays them in the list.
4. Tap the name of the other device, and tap Next.
5. In Security, if you want to use a secure, encrypted connection (recommended for enhanced
security), check this box, and tap Next. Otherwise, leave the Security field blank and tap Next.
6. Enter the same passkey on the other device.
7. Tap Finish.
8. To give the partnership a more meaningful name, tap and hold the device name under My
Shortcuts, then tap Rename.
To end a Bluetooth partnership:
1. Tap Start > Settings > Connections > Bluetooth > Bluetooth Manager.
2. Tap and hold the partnership you want to end.
3. Tap Delete.
To accept a Bluetooth partnership:
1. Make sure your device is turned on, discoverable, and within close range.
2. When prompted to accept a partnership with the device that is requesting the relationship, tap
Yes.
3. If a passkey is requested, enter an alphanumeric passkey between 1 and 16 characters in
Passkey
a passkey provides greater security.
4. To give the partnership a more meaningful name, change the name of the device in Name.
5. Tap Finish.
If you cannot discover another device, try the following:
Make sure Bluetooth is turned on.
●
Move closer to the device.
●
Make sure the device you are attempting to connect to is switched on and is in the discoverable
●
mode.
box and tap Next. Enter the same passkey in the device requesting the partnership. Using
Rename a Bluetooth partnership
1. Tap Start > Settings > Connections > Bluetooth.
2. Tap the Browse icon located next to Current profile.
Bluetooth 23
Page 32

3. Select the partnership you want to rename, and tap Rename.
4. In Enter the name of the new profile box, enter a new name for the partnership.
5. Tap ok.
Pair and unpair devices
You can pair devices such that they exchange a computer generated security key prior to each
connection. The security key is generated from a unique Bluetooth device address, a random number,
and a user-defined password. After two devices are paired, they have a trusted relationship with each
other. You do not need to give any additional input. Without giving constant authorization, your
connections and activities can then be performed between the paired devices.
To pair devices:
1.
Tap the
2.
Tap the
3. Tap Bluetooth >Bluetooth Connections > Menu > Paired devices.
4. Tap Add.
5. Tap Lookup icon.
6. Tap a device.
7. Enter a password in the Passkey field.
8. Tap ok.
9. Enter the same password into the other device.
If you can see other devices, but you cannot connect or exchange data with them, try the following:
Make sure the other device has not restricted your access.
●
Try initiating pairing from the other device. Some Bluetooth devices can only initiate pairing and
●
cannot respond to pairing requests from other devices.
If other devices cannot find or connect to your HP iPAQ, try the following:
Make sure Bluetooth is turned on.
●
(iPAQ Wireless) icon.
(Bluetooth) icon to turn Bluetooth on.
Make sure you have not restricted other devices from finding yours. Refer to Requiring a Passkey
●
or Bond for more information.
Check your Bluetooth settings to make sure you have allowed your device to be discovered by
●
others to connect. Refer to Making a Device Discoverable for more information.
To remove a paired relationship between devices:
1.
Tap the
2. Make sure that Bluetooth is already on. If not, turn on Bluetooth.
3. Tap Bluetooth > Bluetooth Connections > Menu > Paired devices.
4. Tap a device name.
5. Tap Remove.
6. Tap Yes to remove the pairing.
24 Chapter 6 Connections
(iPAQ Wireless) icon.
Page 33

Connect to a Bluetooth Headset
You can use a Bluetooth headset (or other Bluetooth hands-free device) with your HP iPAQ when you
create a partnership between them.
1. Make sure that the two devices are turned on, discoverable, and within close range.
2. Tap Start > Settings > Connections > HP iPAQ Wireless.
3. Tap Bluetooth > Bluetooth Connections > Menu > New Shortcut.
4. Select Hands-free/Headset setup and follow the on-screen instructions.
Make a device discoverable
When your HP iPAQ is discoverable, other devices with Bluetooth capabilities can detect, or discover,
your HP iPAQ and attempt to beam information to it, establish a partnership, or use a Bluetooth service.
1. Tap Start > Settings > Connections.
2. Tap Bluetooth > Accessibility.
3. Select the Allow other devices to connect check box, and then select the Other devices can
discover me check box.
NOTE: If you no longer want your HP iPAQ to be discoverable, clear the Allow other devices to
connect check box.
Open Bluetooth settings
1.
Tap the
2.
Tap the
3. Tap Bluetooth > Bluetooth Settings.
(iPAQ Wireless) icon.
(Bluetooth) icon to turn Bluetooth on.T
Authorization to access services
If you choose to require authorization to access services, you have to authorize each connection. Your
HP iPAQ always asks you if the connection should be permitted.
1.
Tap the
2.
Tap the
3. Tap Bluetooth > Bluetooth Settings > Services.
4. Tap the service you want to enable: File Transfer, Information Exchange, Serial Port, Personal
Network Server, Hands Free, or Dial-up Networking Server.
5. Select Authorization required.
6. Tap ok.
(iPAQ Wireless) icon.
(Bluetooth) icon to turn Bluetooth on.
Use a passkey or bond
To establish a secure connection with another device, you can use the passkey feature or an established
bond. You can also add data encryption to this type of security. A passkey is a code you enter to
Bluetooth 25
Page 34

authenticate connections requested by other devices. The passkey must be known and used by both
parties or the connection will not be allowed.
1.
Tap the
2.
Tap the
3. Tap Bluetooth > Bluetooth Settings > Services.
4. Tap the service you want to enable:File Transfer, Information Exchange, Serial Port, Personal
Network Server, Hands free, or Dial-up Networking Server.
5. Select Authorization required and Authentication (Passkey) required if you want more security.
6. Select Encryption Required if you want all the data exchanged between the devices to be
encrypted.
7. Tap ok.
(iPAQ Wireless) icon.
(Bluetooth) icon to turn Bluetooth on.
Set a Bluetooth shared folder
You can determine the folder that other devices access when they connect to your HP iPAQ.
1.
2.
Tap the
Tap the
(iPAQ Wireless) icon.
(Bluetooth) icon to turn Bluetooth on.
3. Tap Bluetooth > Bluetooth Settings > Services > File Transfer.
4. Under Service Settings, select your preferred settings.
5. Tap Advanced.
6.
Tap the
7. Tap ok.
(Folder) icon and locate the required file folder.
Bluetooth Stack 2.0/EDR
A2DP (Advanced Audio Distribution Profile) technology allows users to send CD quality stereo music
from one device to another using Bluetooth wireless technology. A2DP is one of the modes available
for Bluetooth technology.
NOTE: Even though the Bluetooth Stereo Headphones support A2DP profile, the user's iPAQ model
and OS should be compatible with A2DP in order for the user to use this feature. Operating systems
from Windows Mobile 5.0 (based on the Windows CE 5.0 kernel) onwards are compatible with and fully
support A2DP if an appropriate device (embedded in the PDA or phone) is used.
26 Chapter 6 Connections
Page 35

Advanced settings
Connect to intranet URLs
To connect to intranet sites that have periods in their URLs (for example, intranet.companyname.com),
add them to the Work URL Exceptions list.
1. Tap Start > Settings > Connections > Connections > Advanced > Exceptions.
2. Tap Add new URL.
3. In Work URL, enter the intranet URL.
NOTE: If you use many URLs that share the same root company name, you can avoid entering them
individually by entering *.companyname.com.
Change an intranet URL
1. Tap Start > Settings > Connections > Connections > Advanced > Exceptions.
2. Tap the intranet URL exception you want to change, then make the required changes.
NOTE: To delete a work URL exception, tap and hold it in the list, then tap Delete.
Set up proxy server settings
If you are connected to your Internet Service Provider (ISP) or private network during synchronization,
your device should download proper proxy settings during synchronization from your computer. If these
settings are not on your computer or need to be changed, you can change them manually.
Before you begin, obtain the following information from your ISP or network administrator:
User name
●
Password
●
Proxy Server name
●
Port
●
Type of Socks protocol used
●
To set up proxy server settings:
1. Tap Start > Settings > Connections > Connections.
2. If a proxy server has not been set up, tap Set up my proxy server, else tap Edit my proxy
server.
3. Select the This network connects to the Internet and This network uses a proxy server to
connect to the Internet check boxes.
4. In the Proxy server box, enter the proxy server name.
5. To change such settings as port number or proxy server type, tap Advanced and change the
required settings.
Set up a Wireless Access Point (WAP) gateway
To access WAP sites through Internet Explorer, configure your device to use a WAP gateway.
Advanced settings 27
Page 36

Before you begin, obtain the following information from your ISP or network administrator:
User name
●
Password
●
ISP server phone number
●
WAP gateway server name
●
Port number
●
1. Tap Start > Settings > Connections > Connections > Advanced > Select Networks > My Work
Network> Edit… If a proxy server has not been set up, tap New…
2. On the Proxy Settings tab, select the This network connects to the Internet and This network
uses a proxy server to connect to the Internet check boxes.
3. If necessary, in the Proxy server box, enter the proxy server name.
4. Tap Advanced > WAP.
5. In the Server box, enter the WAP gateway server name. Under Port, enter the port number. The
most common WAP port number is 9201.
6. Enter any logon credentials required by the WAP gateway server.
Configure advanced proxy settings
1. For the appropriate server type, enter the proxy server name and port.
2. If necessary, enter the credentials for connecting with your proxy server.
3. If you are configuring a Socks proxy, select Socks 4 or Socks 5. If using Socks 5, enter the
credentials for connecting with your proxy server.
Advanced connection settings
1.
Tap the
2.
Tap the
3. To connect to a network, tap Start > Settings > Connections > Connections > Advanced >
Select Networks.
4. Select My ISP to connect to the Internet through an ISP or select My Work Network to connect
to a company network. Select My Work Network if the network requires a proxy server. If you need
to change or create a new network management name, tap Edit… or New…, and then tap ok.
5. From the Connections screen, tap Advanced to set up your Dialing Rules and Exceptions and
tap ok.
(iPAQ Wireless) icon.
(WLAN) icon to turn on WLAN.
Set up a VPN server connection
A VPN connection helps you to securely connect to servers, such as a corporate network, via the
Internet.
Before you begin, obtain the following information from your network administrator:
User name
●
Password
●
28 Chapter 6 Connections
Page 37

Domain name
●
TCP/IP settings
●
Host name or IP address of the VPN server
●
To set up a VPN server connection:
1. Tap Start > Settings > Connections > Connections.
2. Under My Work Network, tap Add a new VPN server connection and follow the instructions in
the New Connection wizard.
3. Under most circumstances, you should not change any advanced settings. However, you need to
change advanced settings when:
The server to which you are connecting does not use dynamically-assigned addresses, and
●
you need to enter your TCP/IP settings.
You need to change server DNS or WINS settings.
●
If either of these circumstances applies, from the My VPN screen, tap Advanced and fill in the
appropriate information. Tap ok to save the changes and return to the My VPN screen.
4. To view additional information for any screen in the wizard or while changing settings, tap Help.
Change a connection group name
Your device is already set up with two groups of connection settings: My ISP and My Work Network.
You can also change the name of these groups. For example, if you put all of your corporate settings
under My Work Network Connections, you can change the name to your company’s name.
1. Tap Start > Settings > Connections > Connections.
2. After you have created a new connection, under My ISP or My Work Network, tap Add a new
modem connection to create a new connection.
3. Under My ISP, or My Work Network, tap Manage Existing Connections.
4. Tap General.
5. Enter a name for the settings group and tap ok.
End a connection
It can be useful to end a connection when you are done using it. This frees resources on your HP iPAQ
and can save connection charges.
When connected via a modem or VPN, tap Connections > Disconnect.
●
When connected via cable, detach your HP iPAQ from the cable.
●
When connected via Bluetooth, tap Start > Settings > Connections > Bluetooth > Bluetooth
●
Manager > Active Connection. Tap and hold the connection name, and then tap Disconnect.
When connected via a network (Ethernet) card, remove the card from your HP iPAQ.
●
Advanced settings 29
Page 38

7 HP Photosmart Mobile
HP Photosmart Mobile
You can use HP Photosmart Mobile to:
View pictures stored on your HP iPAQ or a storage card.
●
Add voice or text notes to pictures.
●
Print pictures.
●
View a slideshow.
●
Send pictures as e-mail attachments or via Bluetooth.
●
Associate a picture with a contact.
●
Assign a picture to the Today screen background.
●
Attach a voice note to a picture
To attach a voice note to a picture:
1. Tap Start > HP Photosmart Mobile.
2. Tap the thumbnail to which you want to add a voice note.
3.
Tap the
4.
Tap the
5.
Speak into the microphone to record the voice note and tap the
6.
Tap the
(Cassette) icon.
(Record) button on the Recording toolbar.
(Cassette) icon again to close the Recording toolbar.
E-mail a picture
To e-mail a picture:
1. Tap Start > HP Photosmart Mobile.
2. Tap the thumbnail to be sent via e-mail.
NOTE: If the media file is protected by Digital Rights Management (DRM), you would not be able
to view or hear it. DRM is a software that enables secure distribution and prevents illegal distribution
of pictures, videos, music, movies, and ring tones over the Internet. For more information on DRM,
refer to the on-screen help by tapping Start > Help and search for DRM.
3. Tap Menu > Send > E-mail Attachment.
4. Select the Reduce sent photo size to check box, and then select the required reduction
percentage.
(Stop) button when finished.
5. Tap Next.
30 Chapter 7 HP Photosmart Mobile
Page 39

6. Enter the appropriate e-mail address or use Contacts by tapping Menu > Add Recipient.
7. Enter other appropriate information, such as an e-mail title and message.
8. Tap Send.
NOTE: To send the e-mail immediately, you need to either enable WLAN on your HP iPAQ or connect
the device to a computer for synchronization with the Exchange Server.
View a slideshow
To view a slideshow:
1. Tap Start > HP Photosmart Mobile.
2.
Tap the
3.
Tap the screen to view the
(Slideshow) button at the bottom of the screen.
(Forward), (Backward), and (Stop) buttons.
View a slideshow 31
Page 40

8 Messaging
Understand messages
To send and receive e-mail messages from an e-mail account, you need to connect to the Internet or
your corporate network, depending on the account.
You can send and receive:
Outlook e-mail
●
Internet e-mail through an ISP
●
You can also access e-mail from work using a VPN connection.
E-mail in the Outlook e-mail account is sent and received through synchronization with a computer using
any synchronization software or through wireless synchronization directly with an Exchange Server.
Synchronization software on page 59 for more information.
See
Internet e-mail is sent and received by connecting to a Post Office Protocol 3 (POP3) or Internet
Message Access Protocol 4 (IMAP4) e-mail server. When connecting to a POP3 or IMAP4 server, you
need to use a modem to connect to your ISP. You can use an Ethernet card to connect to the local area
network to which your e-mail server is connected.
Types of folders
Each messaging account has its own set of folders with the following default messaging folders:
Deleted Items
●
Drafts
●
Inbox
●
Outbox
●
Sent Items
●
The messages you send and receive through the account are stored in these folders. You can also
create additional folders within each account.
32 Chapter 8 Messaging
Page 41

The e-mail folders on your HP iPAQ work as follows:
If you use an Outlook e-mail account, e-mail messages in the Inbox folder in Outlook are
●
synchronized automatically with your HP iPAQ. You can choose to synchronize additional folders
by designating them for synchronization. The folders you create and the messages you move are
mirrored on the e-mail server. You can read the messages while you are away from your computer.
If you use a POP3 account and you move e-mail messages to a folder you created, the link is
●
broken between the messages on your HP iPAQ and their copies on the e-mail server. When you
connect, the e-mail server detects that the messages are missing from the Inbox folder on your
HP iPAQ and deletes them from the e-mail server. This prevents having duplicate copies of a
message, but it also means that you no longer have access to messages that you move to folders
created from anywhere except your HP iPAQ.
If you use an IMAP4 account, the folders you create and the e-mail messages you move are
●
mirrored on the e-mail server. Therefore, messages are available to you anytime you connect to
your e-mail server, whether it is from your HP iPAQ or computer. This synchronization of folders
occurs whenever you connect to your e-mail server, create new folders, or rename/delete folders
when connected. You can also set different download options for each folder.
Synchronize e-mail
When you synchronize Outlook e-mail on a computer with your device, e-mail messages are
synchronized as follows:
Messages in the Inbox folder on your computer or Exchange Server are copied to the Inbox folder
●
of the Outlook e-mail account on your device.
Messages in the Outbox folder on your device are transferred to Exchange Server or Outlook, and
●
then sent from those programs.
When you delete a message on your device, it gets deleted from your computer or Exchange Server
●
the next time you synchronize.
The default sync settings synchronize messages from the past three days and the first 0.5 KB of
●
each new message is downloaded. It does not download file attachments.
NOTE: For more information on starting Outlook e-mail synchronization or changing synchronization
settings, see the synchronization software help on the computer or tap Contents.
Set up messaging accounts
Set up e-mail using Exchange server
1. Tap Start > Messaging > New E-mail Account.
2. Enter your e-mail address in the E-mail address box and tap Next.
3. Scroll and select the Exchange server option from the Your e-mail provider list.
4. Tap Next to synchronize outlook with your organization's Exchange e-mail server.
5. In Server address, enter the Outlook Web Access server address and tap Next.
NOTE: Select This server requires an encrypted (SSL) connection check box to ensure you
always send e-mail from this account using an Secure Sockets Layer (SSL) connection.
6. Enter the User name, Password, and Domain on the Edit Server Settings screen.
7. Select the check box for the items you want to synchronize, and tap Finish.
Synchronize e-mail 33
Page 42

Internet e-mail
Create a new POP3 or IMAP4 account
You must set up an e-mail account that you have with an ISP or an account that you access using a
VPN server connection (typically a work account) before you can send and receive e-mail.
1. Tap Start > Messaging > New E-mail Account.
2. Enter the account name and then Tap Next .
3. Scroll and select the Internet e-mail option from the Your e-mail provider list and tap Next.
4. Enter your name and required account name and tap Next.
5. Enter the incoming server name and select the required account type, POP3 or IMAP4.
You can also perform the following functions:
Change the time intervals for downloading new messages.
●
Download attachments.
●
Limit the number of messages that are downloaded.
●
Setting Description
User name Enter the user name assigned to you by your ISP or network
administrator. This is often the first part of your e-mail address,
which is displayed before the at sign (@).
Password Choose a strong password. You have the option to save your
password so that you do not need to enter it each time you
connect to your e-mail server.
Domain Not required for an account with an ISP. Might be required for
a work account.
Account type Select POP3 or IMAP4.
Account name Enter a unique name for the account, such as Work or Home.
This name cannot be changed later.
Incoming mail Enter the name of your e-mail server (POP3 or IMAP4).
Outgoing mail Enter the name of your outgoing e-mail server (SMTP).
Require SSL connection Select this to ensure you always send e-mail from this account
using an SSL connection. This enables you to send personal
information more securely. Note that if you select this and your
ISP does not support an SSL connection, you might not be able
to send e-mail.
Outgoing mail requires authentication Select this if your outgoing e-mail server (SMTP) requires
authentication. Your user name and password from above is
used.
Use separate settings Select this if your outgoing e-mail server requires a different
user name and password than the ones you entered before.
Outgoing server settings Configure these settings to ensure that your outgoing e-mail
messages are delivered.
User name Enter your user name for the outgoing e-mail server.
Password Enter your password for the outgoing e-mail server.
34 Chapter 8 Messaging
Page 43

Setting Description
Domain Enter the domain of the outgoing e-mail server.
Require SSL for outgoing mail Select this to ensure you always send e-mail from this account
TIP: You can set up several e-mail accounts in addition to your Outlook e-mail account but you cannot
add a new account while connected. Tap Menu > Stop Send/Receive to disconnect.
Change e-mail download options
You can customize the following download options for each e-mail account that you have with an ISP,
or any account that you access using a VPN server connection (typically a work account).
You can choose:
Whether messages are downloaded automatically.
●
How much e-mail is downloaded.
●
If and how attachments are downloaded (IMAP4 only).
●
To change the e-mail download options, do the following:
using an SSL connection. This enables you to send personal
information more securely. Note that if you select this and your
ISP does not support an SSL connection, you might not be able
to send e-mail.
1. In the message list, tap Menu > Options.
2. Select the e-mail account.
3. Tap Next until you reach Server information.
4. Tap Next until you reach Message download Limit, and then select Entire Message Receive
attachments check box.
TIP: To send and receive messages automatically, tap Connect, check for messages and enter a
time interval. Connecting automatically might result in higher connection charges.
To save memory, limit the number of e-mails downloaded to your device by lowering the number of days
to display.
To change options for an Outlook e-mail account, tap Start > ActiveSync > Menu > Options.
Delete an account
1. Tap Start > Messaging.
2. Tap Menu > Options.
3. Tap and hold the account name, and tap Delete.
Receive attachments
An attachment sent with an e-mail message or downloaded from the server is displayed below the
subject of the message. Tapping the attachment opens the attachment if it has been fully downloaded
or marks it for download the next time you send and receive e-mail. You can also download attachments
automatically with your messages if you have an Outlook e-mail or IMAP4 e-mail account.
Set up messaging accounts 35
Page 44

If you have an Outlook e-mail account, do the following:
1. Tap Start > ActiveSync.
2. Tap Menu > Options.
3. Tap E-mail > Settings, and then select Include File Attachments.
If you have an IMAP4 e-mail account with an Internet Service Provider (ISP) or an account that you
access using a VPN server connection (typically a work account), do the following:
1. Tap Start > Messaging.
2. Tap Menu > Options.
3. Tap the name of the IMAP4 account.
4. Tap Next until you reach Message download Limit, and then select Entire Message Receive
attachments check box.
TIP: Embedded images and objects cannot be received as attachments.
An embedded message can be viewed as an attachment when using IMAP4 to receive e-mail. However,
this feature does not work if Transport Neutral Encapsulation Format (TNEF) is enabled so that you can
receive meeting requests.
To store attachments on a storage card rather than on the device, tap Menu > Tools > Options >
Storage, and select the Store attachments on a storage card check box.
Send meeting requests
To send meeting requests:
1. Tap Start > Calendar.
2. Tap the appointment , and then tap Menu > Edit > Appointment > Attendees.
3. For required attendees, tap Add Required Attendees… and for optional attendees, tap Add
optional Attendees…
4. Select a contact, and then tap Done.
5. Tap ok, and then tap Yes to send the meeting request.
Receive meeting requests
If you receive your e-mail messages through any synchronization software, you can receive meeting
requests. When connecting directly to an e-mail server, the server must be running Microsoft Exchange
Server version 5.5 or later for you to receive meeting requests. See
on page 59 for more information.
If the server is running Microsoft Exchange Server 2000 or later, your meeting requests are automatically
received in your Inbox. However, to receive meeting requests on Microsoft Exchange Server 5.5, do the
following:
Ask your system administrator to activate Rich Text Format (RTF) and TNEF support for your
●
account.
Synchronization software
With TNEF enabled, your messages that are included in other messages as attachments are not
received, and you cannot know if a message has an attachment until you get the full copy. In
addition, download time might be longer.
Change e-mail download options if your account is not set up to receive attachments.
●
36 Chapter 8 Messaging
Page 45

After you are set up to receive meeting requests, do the following:
1. Open the meeting request.
2. Tap Accept, or Menu > Tentative, or Menu > Decline. If you want, you can also include a message
with the response. The response will be sent the next time that you synchronize or connect to your
e-mail server, and your device calendar will be updated.
Create or change a signature
1. Tap Start > Messaging.
2. Tap Menu > Options.
3. Tap Accounts > Signatures…
4. Select the account for which you want to create or change a signature.
5. Select the Use signature with this account check box if it is not already selected.
6. Select the Use when replying and forwarding check box if wanted.
7. Enter a signature in the box.
To stop using a signature, clear the Use signature with this account check box.
TIP: You can use a different signature with each messaging account.
Use Messaging
Compose and send messages
1. In the message list, tap and select an account.
2. Tap Menu > New.
3. Enter the e-mail address of one or more recipients, separating them with a semicolon. To access
addresses and phone numbers from Contacts, tap To.
4. Enter your message. To quickly add common messages, tap Menu > My Text and tap a required
message.
5. To check the spelling, tap Menu > Spell Check.
6. Tap Send.
TIP: To set the priority, tap Menu > Message Options…
NOTE: If you are working offline, e-mail messages are moved to the Outbox folder and are sent the
next time you connect.
Reply to or forward a message
1. Tap on the message to open it, and then tap Menu > Reply, Reply All, or Menu > Forward.
2. Enter your response. To quickly add common messages, tap Menu > My Text and tap a required
message.
3. To check the spelling, tap Menu > Spell Check.
4. Tap Send.
Use Messaging 37
Page 46

NOTE: If you want to keep the original text with the outgoing message, tap Menu > Tools >
Options… then tap Message. You must select the When replying to e-mail, include body check box.
Add an attachment to a message
1. In an open message, tap Menu > Insert and tap the item you want to attach: Picture, Voice
Note, or File.
2. Select the file you want to attach or record a voice note.
NOTE: Embedded objects cannot be attached to messages.
Download messages
The manner in which you download messages depends on the type of account you have:
To send and receive e-mail for an Outlook e-mail account, begin synchronization through
●
ActiveSync.
TIP: By default, messages you send are not saved on your device to help conserve memory. If you
want to keep copies of sent messages in the messaging list, tap Menu > Tools > Options… >
Message, and select the Keep copies of sent items in Sent folder check box. If your account is an
Outlook E-mail or IMAP4 account, you must also select the Sent Items folder for synchronization. To
do this, tap Menu > Tools > Manage Folders… and select the check box next to the Sent Items folder.
Download messages from a server
1. Tap Menu > Go To and tap the account you want to use.
2. Tap Menu > Send/Receive.
The messages on your device and e-mail server are synchronized. New messages are downloaded
to the device Inbox folder, messages in the device Outbox folder are sent, and messages that
have been deleted from the server are removed from the device Inbox folder.
TIP: To read the entire message, tap Menu > Download Message while in the message window. If
you are in the message list, tap and hold the message, and then tap Menu > Download Message. The
message will download the next time you send and receive e-mail. This will also download message
attachments if you have selected those options while setting up your e-mail account.
The size column in the message list displays the local size and server size of a message. These numbers
might differ because the size of a message can vary between the server and the device.
Install an online address book
Many e-mail servers, including servers running Exchange Server, can verify names with an online
address book called a directory service, using a protocol known as Lightweight Directory Access
Protocol (LDAP). When you create an e-mail account, the directory service of your e-mail server is added
to the Address, and you are given the option to enable it. After it is enabled, Messaging checks your
contact list and then the directory service to verify names that you enter in the To, Cc, and Bcc fields.
To enable a directory service or if you want to use additional services, follow these steps:
1. If you are adding a new account, ask your network administrator for the name of the directory
service and the server.
2. In the message list, tap Menu > Tools > Options… > Address.
3. In the In Contacts, get e-mail addresses from list, select which e-mail address book to check in
contacts. Contacts will be checked first unless you select None.
38 Chapter 8 Messaging
Page 47

4. If your e-mail server is already listed, select the server's directory service check box to enable it
and tap ok.
5. If your e-mail service is not listed, tap Add…
6. In the Directory name and Server boxes, enter the LDAP directory and server names.
7. Ask your network administrator if authentication is necessary for your server. If so, select the
Authentication is necessary on this server check box, and enter your user name and password.
8. If you want the Messaging application to check this service, select the Check name against this
server check box.
TIP: To delete a service, tap and hold the service, and then tap Delete.
While synchronizing your Outlook E-mail account, disable any directory services you have installed by
clearing the Check name against this server check box. This helps avoid getting error messages when
Messaging tries to verify names against the service that you are not connected to.
Windows Live Messenger
You can use MSN Messenger on your HP iPAQ to send instant messages. MSN Messenger provides
the same chat environment as of the MSN Messenger on your computer.
With the MSN Messenger feature, you can:
Send and receive Instant Messages.
●
Change your own status or view the status of others on your list.
●
Invite others for a chat conversation.
●
Block certain contacts from seeing your status or sending you messages.
●
To use MSN Messenger, you need a Microsoft.NET Passport account unless you already have a Hotmail
account. To set up a Microsoft.NET Passport account, go to
account, you can use your HP iPAQ MSN Messenger feature.
Sign in and out of Messenger
Tap Start > Programs > Messenger to open MSN Messenger feature.
To sign into the Messenger:
1. Tap Sign In after navigating to a required sign-in status.
2. Enter your information in the Sign-in and Password box. Tap Sign In.
To sign out of the Messenger:
Tap Menu > Sign Out to sign-out of MSN Messenger.
If you do not sign out of MSN Messenger, you remain on a data connection, which might result in
additional charges from your service provider. The session will not time out or end unless one of the
following occurs:
User ends instant messenger session
●
http://www.passport.net. After you have an
The device is turned off or moves out of range
●
Windows Live Messenger 39
Page 48

Send instant messages
You can send Instant Messages from your MSN Messenger to contacts on your messenger list.
To send Instant Messages:
1. Select the person to whom you want to send an Instant Message and tap Send.
2. Enter your message, and tap Send.
You can also manage your contacts and control their visibility.
To manage contacts in the MSN Messenger:
Tap Menu > Add new contact to create a new contact.
●
Tap Menu > Contact options > Delete to delete an existing contact.
●
Tap Menu > Block/Unblock to block or unblock the selected contact from seeing your status and
●
sending you Instant Messages.
NOTE: Tap Menu > My Text to add common messages when composing instant messages. Tap
Menu > Invite to invite a contact to an ongoing chat. You can also see who is already talking to you or
change between chats by tapping Menu > Chats.
Change your status
You can change your status on MSN Messenger according to your need. To change your status:
1. Tap and select your name in the contact list.
2. Press Menu > Change Appearances, and navigate to select the required status.
40 Chapter 8 Messaging
Page 49

9 Calendar
Access calendar
Use Calendar to schedule appointments, including meetings and other events. You can display
appointments for the day on the Today screen.
To access Calendar, tap Start > Calendar.
Change the display of the work week
You can customize your calendar for a work week to start on Sunday or Monday. You can schedule
your calendar for a five to seven-day week.
To change the display of the work week:
1. Tap Start > Calendar.
2. Tap Menu > Tools > Options… > General.
To specify the first day of the week, tap Sunday or Monday in the 1st day of week box.
●
3. To specify the number of days to appear in a work week, tap 5-day week, 6-day week, or 7-day
week in the Week view box.
4. Tap ok.
Set a default reminder for all new appointments
To automatically turn on a reminder for all new appointments:
1. Tap Start > Calendar.
2. Tap Menu > Tools > Options… > Appointments.
3. Select the Set reminders for new items check box.
4. Set the time for the reminder to alert you.
5. Tap ok.
Create an appointment
To create an appointment:
1. Tap Start > Calendar.
2. Tap Menu > New Appointment > Appointment.
3. Enter the required information, and then tap ok.
Access calendar 41
Page 50

Update an appointment
To update an appointment on your calendar:
1. Tap Start > Calendar.
2. Tap the appointment, and then tap Menu > Edit to make your changes.
3. Tap ok.
Cancel an appointment
When you delete an appointment in calendar on your HP iPAQ, it is also deleted on your computer the
next time you synchronize. If the appointment has not been synchronized with a computer, it will be
deleted only from your HP iPAQ.
1. Tap Start > Calendar.
2. Tap to select the appointment you want to delete, and then tap Menu > Delete Appointment.
3. Tap Yes to delete the appointment, or tap No to keep it.
NOTE: Calendar items can be deleted only from the Agenda view or from an open calendar
appointment. To delete from other views, open the appointment, and tap Menu > Delete.
42 Chapter 9 Calendar
Page 51

10 Contacts
Create a contact
1. Tap Start > Contacts.
2. Tap New and enter the contact information.
3. Tap ok.
NOTE: If your contact list has been filtered by a category when you create a contact, that category is
automatically assigned to the new contact.
If most of the contacts you create have phone numbers that begin with the same area code, in
Contacts, tap Menu > Options… and enter that area code in the Area code box.
For more information on creating contacts, tap Start > Help.
Delete a contact
1. On the Today screen, tap Contacts or Start > Contacts.
2. Tap and hold the contact to delete.
3. Tap Delete Contact.
4. Tap Yes to confirm the deletion.
Change contact information
1. On the Today screen, tap Contacts or Start > Contacts.
2. Tap the required contact.
3. Tap Menu > Edit and enter the changes.
4. Tap ok.
Copy a contact
1. On the Today screen, tap Contacts or Start > Contacts.
2. Tap and hold the contact you want to copy.
3. Tap Copy Contact.
4. Tap the copy of the contact.
5. Tap Menu > Edit.
6. Change the contact information as needed and tap ok.
NOTE: The displayed category is automatically assigned to the new contact.
Create a contact 43
Page 52

Find a contact
1. On the Today screen, tap Contacts or Start > Contacts.
2. If you are not in the Name view, tap Menu > View By > Name.
3. Do one of the following:
Begin entering a name or phone number in the provided text box until the contact you want
●
is displayed. To show all contacts again, tap the text box and clear the text, or tap the arrow
to the right of the text box.
Use the alphabetical index displayed at the top of the contact list.
●
Filter the list by categories. In the contact list, tap Menu > Filter. Then tap a category you
●
have assigned to a contact. To show all contacts again, tap All Contacts.
NOTE: To search for a contact by entering a name or number, or by using the alphabetical index, you
need to be in the Name view.
Send an e-mail message to a contact
1. On the Today screen, tap Contacts or Start > Contacts.
2. Tap the contact you want to send a message to.
3. Tap the address you want to send a message to.
4. Tap the account you want to send the message from.
NOTE: To quickly add a contact's address to a new message, tap To, Cc, or Bcc, and then tap
Menu > Add Recipient…. Tap the contact you want to send the message to and choose the address,
if necessary.
Add and remove a picture
To add a picture to the contact information:
1. On the Today screen, tap Contacts or Start > Contacts.
2. Tap the contact.
3. Tap Menu > Edit.
4. Tap Picture.
5. Tap the picture you want to add.
To remove a picture from the contact information:
1. On the Today screen, tap Contacts or Start > Programs > Contacts.
2. Tap the contact.
3. Tap Menu > Edit.
4. Tap Menu > Remove Picture.
44 Chapter 10 Contacts
Page 53

Use the contact list
There are several ways to use and customize the contact list. Here are a few tips on how to make it
work for you.
1. On the Today screen, tap Contacts or Start > Contacts.
2. In the contact list, do any of the following:
To search for a contact by entering a name or number, or by using the alphabetical index,
●
enter the name or number into the Enter a name… box.
To see a list of contacts employed by a specific name or company, tap Menu > View By >
●
Name or Company.
To see a list of available actions for a contact, tap and hold the contact.
●
NOTE: To display a greater number of contacts on the screen, tap Menu > Options…, select the
Show contact names only check box, and clear the Show alphabetical index check box.
Use the contact list 45
Page 54

11 Applications
HP applications
HP Help and Support
The HP Help and Support application increases visibility, accessibility, and usability of the existing
help, support, learning content, and tools.
To access HP Help and Support:
1. Tap Start > Programs > HP Help and Support.
2. To view additional information, tap the appropriate HTML links.
Serial and Model Numbers – displays the product’s serial number, model ID, product ID,
●
and IMEI number.
HP iPAQ QuickStart Tour – launches the HP iPAQ QuickStart Tour application.
●
HP iPAQ Tips – launches the HP iPAQ Tips application.
●
Help Topics – launches a table of content that lists help topics for programs installed on your
●
iPAQ.
Customer Support – launches the Find More Information screen, which lists the sources
●
for information on various topics.
System Details – launches the HP Asset Viewer application.
●
NOTE: Tap About to view the application name, version number, and copyright information.
HP iPAQ Setup Assistant
Use HP iPAQ Setup Assistant to simplify configuring settings on your HP iPAQ.
HP iPAQ Setup Assistant lets you save the settings on your computer. This can help you restore
configuration settings on your HP iPAQ at any time. HP iPAQ Setup Assistant also allows you to perform
a factory reset on your HP iPAQ and view detailed product information.
Using HP iPAQ Setup Assistant, you can manage multiple configurations and apply them quickly to your
HP iPAQ. You can create a new configuration, modify existing settings, delete a selected configuration,
or apply selected settings to your HP iPAQ.
Select the following tabs to configure your settings:
Owner Information – Enter your identification information and notes to describe you and your
●
HP iPAQ. This is helpful if you lose your HP iPAQ.
Wireless Network – Wireless Network settings describe the configuration needed to connect to
●
your work, home, or other wireless network.
Proxy – Proxy servers are located between two networks and are used to help prevent an attacker
●
from invading a private network. You can enter proxy settings to specify the proxy configuration for
your network.
46 Chapter 11 Applications
Page 55

E-mail – E-mail settings describe the configuration required to connect to and check your Internet
●
e-mail accounts.
Exchange Server – Exchange Server is used to access e-mail, calendars, contacts, tasks, and
●
other mailbox contents while on the go. You can set up Outlook on your HP iPAQ to synchronize
directly with your organization's Exchange Server.
VoIP – Voice over Internet Protocol (VoIP) routes voice conversations using an IP-based network.
●
VoIP to VoIP phone calls to any provider are typically free. SIP Proxy servers are used to implement
call-routing policies and provide features to users.
Browser Favorite – Use your HP iPAQ Setup Assistant to create and manage a list of your favorite
●
URLs. You can access these URLs using the Internet Explorer on your HP iPAQ.
Finish – In case of a new configuration, after you click Finish, enter a configuration name and an
●
optional password, and then click OK in the save configuration. If this is an existing configuration,
the existing name and password will be used.
HP Asset Viewer
Use the HP Asset Viewer application to view information about the system, integrated modules, and
attached accessories.
To access HP Asset Viewer:
1. Tap Start > Settings > System > HP Asset Viewer.
2. To view additional system information, tap the appropriate tabs:
The Identity tab displays the serial number and user information.
●
The Memory tab displays the iPAQ device memory information.
●
The Version tab displays the iPAQ device version information.
●
The Display tab displays the iPAQ device display panel information.
●
The System tab displays the iPAQ device system information.
●
The Bluetooth tab displays the iPAQ device Bluetooth information.
●
The WLAN tab displays the iPAQ device WLAN information.
●
The Extended ROM tab displays the iPAQ device customized software version and its details.
●
NOTE: If the iPAQ device does not have customized software, the Extended ROM tab will
not be displayed.
Certificate Enroller
Certificate Enroller is an enhanced security feature for retrieving and registering new certificates. This
application-initiated enrollment allows you to request a user certificate from a certificate server.
NOTE: Certificate Enroller picks up certificate types from Active Directory as well as from the device
data store. You must enter a server name for retrieving the certificate, and if required, a valid username
and password.
HP applications 47
Page 56

To access Certificate Enroller:
1. Tap Start > Settings > Certificate Enroller.
2. Use the on-screen keyboard to enter server name, user name, and password. Tap ok to save the
settings.
NOTE: Tap Retrieve to initiate the transaction of downloading the certificate from the server.
3. Once the certificate is retrieved, tap Menu > Cancel to exit.
NOTE: Tap Menu > About to view a brief description of the application, application name, version
number, and copyright statement.
Manage certificates
1. Tap Start > Settings > System > Certificates.
2. Select a certificate tab.
The Personal tab displays your personal certificates.
●
The Intermediate tab displays the intermediate certification authorities.
●
The Root tab displays the root certification authorities.
●
NOTE: To view the certificate details, tap the required certificate on each tab.
HP iPAQ Tips
Use HP iPAQ Tips to perform operations on your HP iPAQ in a quick and efficient manner. A tip is
displayed on your screen every time you turn on your HP iPAQ. Tap Menu > Next to display the next
tip. To quit the application, tap Dismiss. You can also access HP iPAQ Tips by tapping Start >
Programs > HP Help and Support > HP iPAQ Tips.
TIP: You can also access the HP iPAQ Tips application by tapping Start > Programs.
HP iPAQ QuickStart Tour
HP iPAQ QuickStart Tour is a fun way to learn more about your HP iPAQ. It provides basic information
about the tasks and activities you can perform using your HP iPAQ. You can try each feature as you go
through this tutorial. You can return to the same position in the QuickStart tour by simply tapping
Start > Programs > HP Help and Support > HP QuickStart Tour.
TIP: You can also access the HP iPAQ QuickStart application by tapping Start > Programs.
HP iPAQ Zip
Use the HP iPAQ Zip application to:
View and extract contents of a zip file received as an e-mail attachment.
●
View and extract contents of a zip file using the file explorer.
●
Open a selected item from the zipped file.
●
Extract/view encrypted files.
●
To view the file contents, tap the required zip file. This will display the filename, the date and time when
the file was last modified, and the file size.
48 Chapter 11 Applications
Page 57

Tap Open to open a file you want to view. This file will open as a Read Only document.
Tap Menu, and then tap the following commands to perform the respective functions:
Extract all: Extract all the files at the same time to the user directory.
●
Extract: Extract the selected files to the user directory.
●
View: Change the display layout of the file. The contents of the zipped file can be displayed as
●
details, list, icons, or tiles.
About: Display the version of the HP iPAQ Zip application.
●
Exit: Exit from the HP iPAQ Zip application.
●
NOTE: You will not be able to open or extract files that are larger than 20 MB in size.
If the zip file is encrypted using a password, the HP iPAQ Zip Password screen is displayed when you
try to open any of the zip file contents. Type the appropriate password in the Enter Password box using
the on-screen keyboard to view the required file.
HP iPAQ File Store
You can install programs and save important files in the iPAQ File Store folder, which can be accessed
from the File Explorer on your HP iPAQ. Programs and files stored on your iPAQ File Store folder are
retained if you perform a full reset on your HP iPAQ.
To save files to iPAQ File Store:
1. Copy the files to be saved to the iPAQ File Store folder.
2. Tap Start > Programs > File Explorer > My HP iPAQ > iPAQ File Store.
3. Tap Edit > Paste.
CAUTION: iPAQ File Store might contain a special folder called ”hp” to store system files. Do not
save new files or modify existing files in the hp folder.
NOTE: Before saving files to the iPAQ File Store folder, it is a good idea to determine how much
memory is available in the folder. To view the amount of memory, tap Start > Settings > System >
Memory > Storage Card, and then select iPAQ File Store from the list.
HP PrintSmart Mobile
HP PrintSmart Mobile application provides printing support over Bluetooth, IR, and WLAN network. It
also provides printing support for various document formats including .doc, .xls, .jpg, .bmp, and .html.
Use HP PrintSmart Mobile to print information from your HP iPAQ mobile device to a compatible printer
while away from the office and whenever you need it.
For more information, refer the Getting Started CD.
HP SecureConnect Mobile
Use HP SecureConnect Mobileto automatically connect your HP iPAQ to WLAN hotspots or home
and office networks. You need to follow an online registration process to begin using this application.
All communications carried out using HP SecureConnect Mobile are strongly encrypted and are
therefore secure.
HP applications 49
Page 58

HP 24-pin connector
HP 24-pin connector provides you a consistent method to manage the relationship between your device
and cable/dock. The pin assignments on this connector are capable of accommodating next generation
IPAQ accessories. Additionally, it is optimized for size and dockable in a cradle.
HP 24-pin connector is compatible with the following:
Charging Dock
●
Audio Entertainment Dock
●
Thin Client Dock
●
Desk Phone Dock
●
Car Dock
●
Travel Dock
●
PC Dock
●
Barcode Scanning Dock
●
RFID Tag Reader/Programmer Dock
●
POS Magnetic Stripe Reader Dock
●
Additional features of WM6.0 over WM5.0
This section has been designed to summarize the changes between the previous version and the recent
version.
Search Microsoft Exchange mailbox on server for items that match specified criteria.
●
Receive, view, compose and send e-mail in HTML format.
●
Download a single message in its entirety, including inline images and/or attachments–without
●
having to do a full Send/Receive.
Open SharePoint links to documents stored on SharePoint servers, linked in HTML e-mail.
●
Assign, mark complete and clear flags from both the e-mail inbox list view and e-mail read view.
●
Limit the number of e-mail messages that are displayed in the e-mail list view to only those that
●
match filter criteria from the user.
Designed for both 12-key and 30-key equipped devices, for a core set of functions in both e-mail
●
inbox list view and email read view.
Receive, reply to, forward and compose Information Rights Management (IRM) protected mail.
●
View acceptance status of all attendees in the meeting view.
●
Retrieve and set Out-of-Office (OOF) status, along with OOF message.
●
Share your mobile device internet access with a PC via USB or Bluetooth in only a couple of clicks.
●
Windows Live is the premier services’ offering for Windows Mobile 6 powered devices that unifies
●
the user’s information, helps them pursue interests and deepen the relationships that enrich their
life.
50 Chapter 11 Applications
Page 59

Windows Media Player
Windows Media Player 10 Mobile
Windows Media Player 10 Mobile has enhanced features that allow you to enjoy your digital media both
at home and on the go. The personal computer version of Windows Media Player 10 can be downloaded
for free from Microsoft.
With this version of media player, you can:
Sync your music, photos, videos, and recorded TV to your HP iPAQ for easy enjoyment on the go.
●
Automatically convert video and recorded TV during sync to an optimized and size-reduced format
●
for better viewing on your HP iPAQ.
Manually select digital media to sync to your HP iPAQ, or automatically sync to your HP iPAQ each
●
time you connect, based on your preferences.
For a complete list of features and more, visit
NOTE: Protected files are digital media files that are secured with a license to prevent unauthorized
use or playback. Licenses are created and managed by using the DRM technology. To learn more about
Windows Media DRM 10, protected files, and other features, refer to the on-screen help by tapping
Start > Help > Contents > Search >Using Windows Media Player Mobile.
Clear the Now Playing list
Under Windows Media Player, the Now Playing playlist displays the currently playing file and any files
that are queued up to play next. You can quickly remove all items from the playlist by clearing it.
1. If you are on the Library screen, select the Now Playing category to display the Now Playing
screen. If you are on the Playback screen, select Now Playing to display the Now Playing screen.
2. On the Now Playing screen, tap Menu > Clear Now Playing.
For more details, refer to the on-screen help, tap Start > Help > Contents > Using Windows Media
Player Mobile.
Update a Library
In most cases, Windows Media Player Mobile automatically updates your libraries as necessary.
However, you can manually update a library to ensure that it has links to any new files that you might
have recently copied to your HP iPAQ or a removable storage card.
1. If you are not already on the Library screen, tap Menu > Library…
http://www.microsoft.com/windowsmedia.
2. On the Library screen, tap Menu > Update Library…
3. Wait for the files to be added, and then tap Done.
For more details, refer to the on-screen help, tap Start > Help > Contents > Using Windows Media
Player Mobile.
MS Office applications
Word Mobile
You can create and edit documents and templates in Word Mobile. You can also save the documents
and templates as .doc, .rtf, .txt, and .dot files.
Windows Media Player 51
Page 60

With Word Mobile, you can:
Edit Word documents and templates created on your computer.
●
Open and edit Pocket Word (*.psw) documents
●
NOTE: If you edit a document, you will need to save it in .doc, .rtf, .txt, or .dot format.
To access Word Mobile, tap Start > Office Mobile > Word Mobile.
Options available when you tap Menu allow you to:
Create a new document or edit an existing document.
●
Format a document.
●
Check spellings and count words in a document.
●
Save, move, rename, or delete a document.
●
Excel Mobile
You can create and edit workbooks and templates on your HP iPAQ with Excel Mobile.
With Excel Mobile, you can:
View, edit, and create charts and graphics, which can be embedded as objects in a worksheet or
●
placed on a separate worksheet.
Enter formulas and functions, and then filter data to see the subset of information you want.
●
Split panes to view different parts of a worksheet at the same time.
●
Freeze the top and left-most panes in a worksheet to keep row and column labels or other data
●
visible as you scroll through a sheet.
To access Word Mobile, tap Start > Office Mobile > Excel Mobile.
To access options for organizing and formatting a worksheet, open a worksheet and tap Menu. In
addition to Cut, Copy, and Paste, there are options in Menu that allow you to:
Paste cells using Paste Special.
●
Clear cell contents and formats applied to cells.
●
Insert new cells, charts, symbols, functions, and define names in a workbook.
●
Set dimensions for rows and columns. Align cells, set font and style for the text, and set cell borders.
●
Create new worksheets and save, rename, or delete existing worksheets.
●
PowerPoint Mobile
Use PowerPoint Mobile to open and view slide show presentations created on your computer.
With PowerPoint Mobile, you can:
Open a presentation from an e-mail message.
●
Download a presentation from a file share or the Internet.
●
Copy a presentation to your HP iPAQ via a storage card.
●
NOTE: Slide shows created in *.ppt or *.pps format with PowerPoint ‘97 and later can be viewed on
your device.
52 Chapter 11 Applications
Page 61

PowerPoint features that are not supported on your HP iPAQ include:
Notes: Notes written for slides are not visible.
●
Rearranging or editing slides: PowerPoint Mobile is a viewer only.
●
To access Word Mobile, tap Start > Office Mobile > PowerPoint Mobile.
Options available when you tap Menu allow you to:
Set up a slide show.
●
Rename, move, delete, or create a copy of a presentation.
●
PDF viewer
The ClearVue PDF application lets you view any PDF document on your HP iPAQ. To access this
application:
1. Tap Start > Programs > ClearVue PDF.
2. Tap File > Open… > to open a PDF.
3. Tap Zoom to select the appropriate option for better viewing.
4. Tap File > Exit to quit the application.
Games
Bubble Breaker
The objective of Bubble Breaker is to have balls (more than one) of the same color deleted from the
screen. The fewer balls you leave behind, the higher your score will be.
To start a new game:
1. Tap Start > Programs > Games > Bubble Breaker.
2. Tap New Game to start a new game.
3. Tap Menu > Statistics to select a style to display relative entries.
4. Tap Menu > Options… to edit the settings for the game.
NOTE: To recall the balls you deleted, tap Menu > Undo Move.
To play a game:
1. Tap Start > Programs > Games > Bubble Breaker.
2. Tap New Game to start a new game.
3. Scroll and select a ball which is of the same color as the other balls around.
4. Tap the selected balls twice to delete the balls from the screen.
Solitaire
The objective of Solitaire is to use all the cards in the deck to build up four suit stacks in ascending order,
beginning with the aces. You win the game when all cards are on the suit stacks.
PDF viewer 53
Page 62

To play a game:
1. Tap Start > Programs > Games > Solitaire.
2. Tap Menu > New Game to start a new game.
3. Tap and hold the card you want to move and drag it to the card stack to which you want to move
the card.
4. Move any aces on the seven stacks to the four card spaces at the top of the screen, and then make
any other available plays.
5. Tap a card twice to move it to the four card stack on the upright corner of the screen if it belongs
there. The card that is faced up on the four card stacks is always available for play.
6. When you have made all the available plays, tap Draw to turn over cards.
Internet Explorer
Use Internet Explorer to view and download Web pages as well as browse Web sites through
synchronization or when connected to the Internet.
Before connecting to the Internet, setting up a wireless connection or network card, you need to obtain
the following:
ISP or wireless service provider
●
ISP server phone number or access point
●
User name and password
●
You can learn more about Internet Explorer by tapping Start > Help > Contents > Browse the Web.
To access Internet Explorer, tap Start > Internet Explorer.
HP Enterprise Mobility Suite
Use the HP Enterprise Mobility Agent to help you easily configure and manage your HP iPAQ.
http://redirect.hp.com/svs/rdr to download and install the HP Enterprise Mobility Agent.
Visit
After you install the
install different applications from the Internet on your HP iPAQ. This application requires WLAN
connection with access to internet.
HP Enterprise Mobility Agent, the application will configure, download, and
54 Chapter 11 Applications
Page 63

12 Notes
Write a note
1. Tap Start > Programs > Notes.
NOTE: Writing must be selected as the default input mode.
2. Tap New.
3. Write your text on the screen.
4. Tap ok to return to the note list.
To select the handwritten text, tap and hold next to the writing. As soon as dots appear and before they
form a complete circle, quickly drag across the writing.
If the writing crosses three ruled lines, it is treated as a drawing rather than text.
Create a copy of a note
To create a copy of a note:
1. Tap Start > Programs > Notes.
2. Tap the note you want to copy.
3. Select the text on the screen, and then tap Menu > Copy.
4. Open the required note from the note list or a new note to which the selected content is to be copied.
5. Tap Menu > Paste.
If you paste the contents in a new note, a copy of the note displays in the note list.
Create a voice note
To create a stand-alone recording (voice note) or add a recording to a note:
1. Tap Start > Programs > Notes.
2. Do one of the following:
To create a stand-alone recording, record from the note list.
●
To add a recording to a note, create or open a note.
●
NOTE: If the Recording toolbar does not appear, tap Menu > View Recording Toolbar.
3.
Tap the
4. Speak into the microphone located at the bottom of the unit.
5.
When finished recording the note, tap the (Stop) button on the Recording Toolbar.
(Record) button.
6. Tap ok to return to the note list.
Write a note 55
Page 64

NOTE: If recording in an open note, an icon displays in the note. If creating a stand-alone recording,
an icon displays in the note list.
Also, you can create a voice note in Photosmart Mobile and attach the note to a picture.
56 Chapter 12 Notes
Page 65

13 Storage cards
Storage cards
Use optional storage cards for:
Expanding the memory of your HP iPAQ
●
Adding functionality
●
You can use SD cards or CF cards for additional data storage. The micro SD and mini SD cards can
also be used with an SD adapter in your HP iPAQ.
NOTE: Storage cards must be purchased separately and are not included with your HP iPAQ.
To locate information about storage cards, visit http://www.hp.com/accessories/ipaq.
Insert a storage card
To insert a storage card into the storage card slot on your HP iPAQ:
1. Locate the storage card slot on the top of your HP iPAQ.
2. Open the protective cover.
3. Insert the storage card into the storage card slot and push the connection edge of the card firmly
into the storage card slot.
NOTE: If your storage card is not recognized, follow the card manufacturer's instructions to install it.
If you have trouble inserting a storage card, try the following:
Make sure the label is facing down.
●
Make sure you are not inserting the card at an angle.
●
Make sure you insert the connection area (the metal area) first.
●
Remove a storage card
To remove a storage card from the storage card slot on your HP iPAQ:
1. Close all programs that are using the storage card.
2. Remove the card from the storage card slot by lightly pushing on the card to unlock it.
3. When the card disengages and pops out, pull it from the storage card slot.
View content of a storage card
Use File Explorer to view the files that are located on your optional storage card.
1. Tap Start > Programs > File Explorer.
2. Navigate to select the Memory Card folder to see a list of files and folders.
Storage cards 57
Page 66

If the HP iPAQ does not recognize your storage card, try the following:
Make sure you have firmly pushed the storage card into the storage card slot.
●
Make sure to install any drivers that came with the storage card.
●
58 Chapter 13 Storage cards
Page 67

14 Synchronization
Synchronization software
If your computer is running Windows XP or an earlier version, synchronization settings are managed
through Microsoft ActiveSync. Microsoft ActiveSync 4.5 is available on the Getting Started CD. You can
also visit
ActiveSync.
If your computer is running Windows Vista, synchronization settings are managed through Windows
Mobile Device Center (WMDC). WMDC 6.1 is available on the Getting Started CD. You can also visit
http://www.microsoft.com/windowsmobile to download WMDC.
Copy files
You can copy files to and from the computer using ActiveSync.
To copy files using ActiveSync:
1. Connect your HP iPAQ to the computer using a synchronization cable.
2. On the computer, select Start > Programs > ActiveSync.
3. In the ActiveSync window, select Explore.
http://www.microsoft.com/windowsmobile for more information or to download Microsoft
4. Double-click Windows Mobile-Based Device.
5. Open Windows Explorer on your computer and locate the files to be copied.
NOTE: You cannot copy preinstalled files or system files.
6. Drag and drop the files between your HP iPAQ and the computer. ActiveSync converts the files so
that they can be used by the Office Mobile programs, if necessary.
To copy files using WMDC:
1. Connect your HP iPAQ to the computer and wait for WMDC to launch automatically.
2. Click File Management to open the Mobile Device folder for your device.
3. In the Mobile Device folder, navigate and select the file that you want to copy on your device or
computer.
Move the files directly into My Documents on your HP iPAQ (or into a folder inside My Documents).
Migrate data from Palm Desktop to Microsoft Windows Mobile 6.0
If you used a Palm OS based device before purchasing your HP iPAQ, you need to migrate your data
from the Palm Desktop software to Microsoft Windows Mobile 6.0.
Synchronization software 59
Page 68

To migrate data from Palm Desktop to Windows Mobile 6.0:
1. Ensure that you have Microsoft Outlook 98 or higher installed on your computer.
2. Insert the Companion CD that came with your Palm unit into your computer's CD-ROM drive. From
the Discover Your Handheld screen, select Install Microsoft Conduits. Alternatively, you can
reinstall the Palm Desktop software. During the configuration process, select Synchronize your
handheld with Microsoft Outlook and Palm Desktop software.
NOTE: Microsoft Outlook must be set as your default e-mail program to properly synchronize
with the Palm Desktop software. If you need to change your settings, open Microsoft Outlook, then
click Tools > Options > Other tab and check the Make Outlook the default program for
E-mail, Contacts, and Calendar check box. Click Apply > OK, and then restart your computer.
3. Use the HotSync software located on the Companion CD that came with your Palm unit to
synchronize your Palm information with Outlook. Refer to the instructions that came with your Palm
unit for help installing or using HotSync.
4. When Outlook is synchronized with your Palm device, uninstall Hotsync from your computer. Click
Start > Control Panel > double-click Add or Remove Programs. Select Palm Desktop, then
click Remove. Follow the on-screen instructions.
5. Insert the Getting Started CD into your computer’s CD-ROM drive and follow the on-screen
instructions to install ActiveSync on your computer and create a partnership between your HP iPAQ
and your computer.
Wireless synchronization cost saving tips
How you manage the cost of wireless synchronization from your HP iPAQ depends on your priorities.
To Do this
Reduce network connection or data transfer costs Increase the time between scheduled synchronizations or
Extend battery life Schedule synchronization less frequently or synchronize
Keep your information up to date During periods of high mail volume, schedule synchronization
synchronize manually. Check the details of your rate plan.
manually.
at regular but frequent intervals. During periods of low mail
volume, schedule synchronization as items arrive.
NOTE: The device power-down timer is reset each time you synchronize. If you schedule a
synchronization interval that is smaller than the time interval set for the device to automatically power
down, the device never turns off to save battery power.
Troubleshoot synchronization issues
Following is a list of symptoms that might indicate synchronization issues:
No ActiveSync tone plays (or a gray icon displays), and there is no activity in the Microsoft
●
ActiveSync window on your computer.
ActiveSync tone plays, and the ActiveSync icon on your computer changes to a swirling green icon.
●
The Retrieving settings message displays on your computer, but the ActiveSync connection
drops prior to establishing the partnership.
60 Chapter 14 Synchronization
Page 69

ActiveSync is searching for a connection but cannot establish one. (The green icon on your
●
computer continues to spin.)
Synchronization has been established between your HP iPAQ and computer but connection has
●
dropped. (The green icon on your computer stops spinning and grays out.)
The firewall or other network protection software message box is displayed when ActiveSync tries
●
to access the network or Internet.
WMDC does not launch even after installation.
●
Here is a list of tips to help you troubleshoot synchronization issues:
Check the OS on your computer before you begin synchronizing information between your
●
HP iPAQ and computer. The synchronization method varies depending on the OS running on the
computer.
NOTE: HP does not guarantee the accurate functionality of any third party applications with
Windows Vista.
If you are running ActiveSync 4.5 or WMDC 6.1 and personal firewall software on your computer,
●
please add ActiveSync 4.5 or WMDC 6.1 to the firewall program's exception list.
(Firewall software, such as Sygate Personal Firewall, TrendMicro PC-cillin Internet Security 2005,
Norton Personal Firewall, McAfee Personal Firewall, or Zone Alarm Security Suite might block
synchronization.) Refer to the documentation that came with your firewall program to determine
how to add ActiveSync 4.5 or WMDC 6.1 to the program's exception list. To further troubleshoot a
firewall application, visit:
http://www.microsoft.com/windowsmobile.
During the ActiveSync installation, if you inadvertently selected the Microsoft Exchange Server
●
check box and are not planning to connect to an Exchange server, follow these steps:
Connect your HP iPAQ to your computer. Make sure an ActiveSync connection is established.
◦
On your computer, click Start > All Programs > Microsoft ActiveSync.
◦
Click Tools > Options.
◦
Clear the boxes for the sync items listed under the Server group.
◦
Select the check boxes under the Computer group for those items you want to synchronize.
◦
Disconnect your HP iPAQ from your computer and wait for the ActiveSync or WMDC message
●
confirming that your device is no longer connected. Reconnect your HP iPAQ to your computer.
Wait to see if your HP iPAQ connects to your computer.
On your computer, in the ActiveSync application, select File > Connection Settings. Confirm that
●
USB is selected as a potential connection method.
Connect your HP iPAQ to a different USB port on your computer.
●
Check your synchronization cable. Consider using another synchronization cable, if available.
●
Try synchronizing via a Bluetooth connection.
●
Troubleshoot synchronization issues 61
Page 70

Restart your computer and HP iPAQ and reconnect your iPAQ to your computer.
●
Uninstall ActiveSync or WMDC from your computer, and then reinstall it.
●
To uninstall ActiveSync from your computer, click Start > Control Panel > Add or Remove
◦
Programs > Microsoft ActiveSync. Then click Remove > Yes.
To uninstall WMDC from your computer, click Start > Control Panel > Uninstall or Change
◦
a Program > Windows Mobile Device Center and Windows Mobile Device Center Driver
Update. Then click Uninstall.
After trying the above solutions without any success in solving your connection problem, perform a
factory reset on your HP iPAQ using the HP iPAQ Setup Assistant.
You can reinstall applications on your HP iPAQ after the hard or clean reset is complete by using
ActiveSync or WMDC on your computer.
After your HP iPAQ is synchronized properly, do the following:
For ActiveSync, select Tools > Add/Remove Programs, and then select any programs you want
●
to reinstall.
For WMDC, when the device is not synchronizing, select Programs and Services > Add/Remove
●
Programs. Select the programs you want to reinstall and click OK.
62 Chapter 14 Synchronization
Page 71

15 Tasks
Set start and due dates for a task
1. Tap Start > Programs > Tasks.
2. Tap the task you want to set start and due dates for.
3. Tap Edit and do one or both of the following:
Tap Starts to enter a start date for the task.
●
Tap Due to enter a due date for the task.
●
4. Tap ok.
Show start and due dates in the task list
1. Tap Start > Programs > Tasks.
2. Tap Menu > Options…
3. Select the Show start and due dates check box.
4. Tap ok.
Set options for displaying tasks on the Today screen
If you have a large number of tasks, you might want to specify the kind of tasks that are displayed on
the Today screen.
1. Tap Start > Settings > Personal > Today.
2. Tap Items, and then select the Tasks check box.
3. Tap Tasks to access options, then tap Options…
4. Under Display number of, select the type of tasks to appear on the Today screen.
5. In the Category list, select whether to display only tasks assigned to a specific category or to display
all tasks.
Mark a task as completed
To mark a task as completed:
1. Tap Start > Programs > Tasks.
2. In the task list, select the check box next to the task you want to mark as completed.
To mark an open task as completed:
1. Tap Edit.
2. In the Status box, tap Completed.
Set start and due dates for a task 63
Page 72

16 Product specifications
System specifications
NOTE: Not all models described are available in all countries/regions. For more information on
specifications for your particular model, on your HP iPAQ, tap Start > Settings > System >
AssetViewer.
System Feature Description
Processor Monahans LV 624
Operating System Microsoft® Windows Mobile 6.0
Memory 256 MB Flash & 128 MB SDRAM
External Power 5V/2A DC charger
Display 4” VGA TFT
LED Backlight 8 white light
SD/SDIO/CF Slot Supports SD/SDIO/CF memory
Wired Stereo Headset 3.5–mm with 3 and 4 pin support for stereo or VoIP headset
Antenna WLAN and Bluetooth dual antennas
Audio Audio Speaker-1, Audio Receiver-1, and one 3.5–mm stereo
Battery 2200 mAh Li-Ion removable/rechargeable battery
Bluetooth Bluetooth 2.0, Profiles: Headset/ Handsfree/ OBEX/ PAN/
WLAN IEEE 802.11b/g, supports collaborative coexistence with
Physical specifications
US Metric
Length 5.2677 in 133.8 mm
Width 2.9685 in 75.4 mm
Depth 0.685 in 17.4 mm
Weight 6.702 oz 190 g
headset jack
FTP/ Serial Port/ A2DP, 10 meter range (approximately
33 feet)– High-speed, low-power, short-range wireless
communication with other Bluetooth devices, support
collaborative coexistence with IEEE 802.11b/g
Bluetooth 2.0 + EDR
64 Chapter 16 Product specifications
Page 73

Operation environment
US Metric
Temperature Operating 23° to 113° F -5° to 45° C
Non-operating –4° to 140° F –20° to 60° C
Relative Humidity Operating 30 % to 85 % 30 % to 85 %
Non-operating 30 % to 90 % 30 % to 90 %
Maximum Altitude Operating 0 to 15,000 ft 0 to 4572 m
Non-operating 0 to 40,000 ft 0 to 12192 m
Operation environment 65
Page 74

17 Regulatory notices
Federal Communications Commission Notice
This equipment has been tested and found to comply with the limits for a Class B digital device, pursuant
to Part 15 of the FCC Rules. These limits are designed to provide reasonable protection against harmful
interference in a residential installation. This equipment generates, uses, and can radiate radio
frequency energy and, if not installed and used in accordance with the instructions, may cause harmful
interference to radio communications. However, there is no guarantee that interference will not occur
in a particular installation.
If this equipment does cause harmful interference to radio or television reception, which can be
determined by turning the equipment off and on, the user is encouraged to try to correct the interference
by one or more of the following measures:
Reorient or relocate the receiving antenna.
●
Increase the separation between the equipment and receiver.
●
Connect the equipment into an outlet on a circuit different from that to which the receiver is
●
connected.
Consult the dealer or an experienced radio or television technician for help.
●
Modifications
The FCC requires the user to be notified that any changes or modifications made to this device that are
not expressly approved by HP may void the user's authority to operate the equipment.
Cables
To maintain compliance with FCC Rules and Regulations, connections to this device must be made with
shielded cables having metallic RFI/EMI connector hoods.
Declaration of Conformity for Products Marked with the FCC Logo (United States Only)
This device complies with Part 15 of the FCC Rules. Operation is subject to the following 2
conditions:
1. This device may not cause harmful interference.
2. This device must accept any interference received, including interference that may cause
undesired operation.
If you have questions about the product that are not related to this declaration, write to
Hewlett-Packard Company
P. O. Box 692000, Mail Stop 530113
Houston, TX 77269–2000
or call 1–800–HP–INVENT (1–800–474–6836)
66 Chapter 17 Regulatory notices
Page 75

For questions regarding this FCC declaration, write to
Hewlett-Packard Company
P. O. Box 692000, Mail Stop 510101
Houston, TX 77269–2000
or call HP at 281–514–3333
To identify your product, refer to the part, series, or model number located on the product.
Canadian Notice
This Class B digital apparatus meets all requirements of the Canadian Interference-Causing Equipment
Regulations.
Avis Canadien
Cet appareil numérique de la classe B respecte toutes les exigences du Règlement sur le matériel
brouilleur du Canada.
European Union Notice
Products bearing the CE marking comply with the following EU Directives:
Low Voltage Directive 2006/95/EC
●
EMC Directive 2004/108/EC
●
CE compliance of this product is valid only if powered with the correct CE-marked AC adapter provided
by HP.
If this product has telecommunications functionality, it also complies with the essential requirements of
the following EU Directive:
R&TTE Directive 1999/5/EC
●
Compliance with these directives implies conformity to harmonized European standards (European
Norms) that are listed in the EU Declaration of Conformity issued by HP for this product or product family.
This compliance is indicated by one of the following conformity markings placed on the product.
This CE marking is valid for non-telecommunications products and for EU harmonized
●
telecommunications products, such as Bluetooth®.
This CE marking is valid for EU non-harmonized telecommunications products.
●
*If applicable, a notified body number is used. Refer to the regulatory label provided on this product.
Hewlett-Packard GmbH, HQ-TRE, Herrenberger Strasse 140, D-71034 Böblingen, Germany
The telecommunications functionality of this product may be used in the following EU and EFTA
countries:
Canadian Notice 67
Page 76

Austria, Belgium, Bulgaria, Cyprus, Czech Republic, Denmark, Estonia, Finland, France, Germany,
Greece, Hungary, Iceland, Ireland, Italy, Latvia, Liechtenstein, Lithuania, Luxembourg, Malta,
Netherlands, Norway, Poland, Portugal, Slovak Republic, Romania, Slovenia, Spain, Sweden,
Switzerland, and United Kingdom.
Products with 2.4–GHz Wireless LAN Devices
France
L'utilisation de cet equipement (2.4GHz Wireless LAN) est soumise a certaines restrictions: Cet
equipement peut être utilisé a l'interieur d'un batiment en utilisant toutes les frequences de 2400 a
2483.5MHz (Chaîne 1-13). Pour une utilisation en environement exterieur, les frequences comprises
entre 2400-2454 MHz (Chaîne 1-9) peuvent être utilisé. Pour les dernieres restrictions, voir
http://www.arcep.fr.
For 2.4 GHz Wireless LAN operation of this product certain restrictions apply: This product may be used
indoors for the entire 2400–2483.5 MHz frequency band (channels 1–13). For outdoor use, only 2400–
2454 MHz frequency band (channels 1–9) may be used. For the latest requirements, see
http://www.arcep.fr.
Italy
E'necessaria una concessione ministeriale anche per l'uso del prodotto. Verifici per favore con il proprio
distributore o direttamente presso la Direzione Generale Pianificazione e Gestione Frequenze.
License required for use. Verify with your dealer or directly with the General Direction for Frequency
Planning and Management (Direzione Generale Pianificazione e Gestione Frequenze).
Battery Warning
WARNING! This HP iPAQ contains a lithium ion rechargeable battery. To reduce the risk of fire or
burns, do not disassemble, crush, puncture, short external contacts, or dispose of in fire or water.
Replace only with the HP spare.
CAUTION: Risk of explosion if battery is replaced by an incorrect type. Dispose of used batteries
according to the instructions.
Battery Recycling
HP encourages customers to recycle used electronic hardware, HP original print cartridges, and
rechargeable batteries. For more information about recycling programs, visit
recycle.
Battery Disposal
WARNING! When a battery has reached the end of its useful life, do not dispose of the battery in
general household waste. Follow the local laws and regulations in your area for computer battery
disposal.
http://www.hp.com/
68 Chapter 17 Regulatory notices
Page 77

Disposal of Waste Equipment by Users in Private Household
Disposal of Waste Equipment by Users in Private Household in the European
Union
This symbol on the product or on its packaging indicates that this product
must not be disposed of with your other household waste. Instead, it is your
responsibility to dispose of your waste equipment by handing it over to a
designated collection point for the recycling of waste electrical and
electronic equipment. The separate collection and recycling of your waste
equipment at the time of disposal will help to conserve natural resources and
ensure that it is recycled in a manner that protects human health and the
environment. For more information about where you can drop off your waste
equipment for recycling, please contact your local city office, your household waste
disposal service or the shop where you purchased the product.
.
.
.
Disposal of Waste Equipment by Users in Private Household 69
Page 78

70 Chapter 17 Regulatory notices
Page 79

Disposal of Waste Equipment by Users in Private Household 71
Page 80

72 Chapter 17 Regulatory notices
Page 81

Disposal of Waste Equipment by Users in Private Household 73
Page 82

Bortskaffande av avfallsprodukter från användare i privathushåll inom Europeiska
Unionen
Om den här symbolen visas på produkten eller förpackningen betyder det
att produkten inte får slängas på samma ställe som hushållssopor. I stället
är det ditt ansvar att bortskaffa avfallet genom att överlämna det till ett
uppsamlingsställe avsett för återvinning av avfall från elektriska och
elektroniska produkter. Separat insamling och återvinning av avfallet
hjälper till att spara på våra naturresurser och gör att avfallet återvinns på
ett sätt som skyddar människors hälsa och miljön. Kontakta ditt lokala
kommunkontor, din närmsta återvinningsstation för hushållsavfall eller
affären där du köpte produkten för att få mer information om var du kan lämna ditt avfall
för återvinning.
74 Chapter 17 Regulatory notices
Page 83

Equipment Warning
WARNING! To reduce the risk of personal injury, electrical shock, fire or damage to the equipment:
Plug the AC adapter into an AC outlet that is easily accessible at all times.
Disconnect power from the equipment by unplugging the AC adapter from the AC outlet or unplugging
the synchronization cable from the host computer.
Do not place anything on the power cord or any of the other cables. Arrange them so that no one may
accidentally step on or trip over them.
Do not pull on a cord or cable. When unplugging from the electrical outlet, grasp the cord by the plug
or, in the case of the AC adapter, grasp the AC adapter and pull out from the electrical outlet.
Do not use converter kits sold for appliances to power your HP iPAQ.
Acoustics Warning
WARNING! Listening to this device at high volume levels and for extended durations may damage
one’s hearing. In order to reduce the risk of damage to hearing, one should lower the volume to a safe,
comfortable level, and reduce the amount of time listening at high levels.
Equipment Warning 75
Page 84

For your own safety, before using headsets or earphones, always reset the volume. Some
●
headphones are louder than other headphones, even if the volume control setting is the same.
Changing the default audio or equalizer settings might lead to higher volume and should only be
●
done with caution.
Headsets or earphones used with this device should comply with the headphone limits in EN
●
50332-2.
Airline Travel Notice
Use of electronic equipment aboard commercial aircraft is at the discretion of the airline.
Medical Electronic Equipment
If you have a medical condition that requires you to use a pacemaker, hearing aid, or any type of medical
electronic equipment, consult the manufacturer of the equipment to determine if the medical equipment
is shielded from RF energy. Turn off your HP iPAQ in health care facilities or hospitals when there are
posted restrictions requiring you to do so.
Wireless Notices
In some environments, the use of wireless devices may be restricted. Such restrictions may apply aboard
airplanes, in hospitals, near explosives, in hazardous locations, etc. If you are uncertain of the policy
that applies to the use of this device, please ask for authorization to use it prior to turning it on.
U.S. Regulatory Wireless Notice
WARNING! Exposure to Radio Frequency (RF) Radiation The radiated output power of this device
is below the FCC radio frequency exposure limits. Nevertheless, the device should be used in such a
manner that the potential for human contact during normal operation is minimized.
To avoid the possibility of exceeding the FCC radio frequency exposure limits, human proximity to the
antenna should be minimized. No metallic body accessories are allowed and 1.5 cm spacing between
PDA and the body must be maintained to satisfy RF Exposure.
This PDA has been tested and demonstrated compliance when Bluetooth and Wi-Fi are transmitting
simultaneously. This PDA must not be co-located or operating in conjunction with any other antenna or
transmitter.
Canadian Regulatory Wireless Notice
Operation is subject to the following two conditions: (1) this device may not cause interference, and (2)
this device must accept any interference, including interference that may cause undesired operation of
the device.
Brazilian Notice
Este equipamento opera em caráter secundário, isto é, não tem direito a proteção contra interferência
prejudicial, mesmo de estações do mesmo tipo, e não pode causar interferência a sistemas operando
em caráter primário.
76 Chapter 17 Regulatory notices
Page 85

Japanese Notice
Wireless LAN 802.11b Devices
Wireless LAN 802.11g Devices
Bluetooth Devices
Taiwan DGT Notice
Korean Notice
Japanese Notice 77
Page 86

18 Safety information
To reduce the risk of bodily injury, electric shock, fire, and damage to the equipment, observe the safety
precautions in this document.
General Precautions
Heed service markings: Except as explained elsewhere in your product documentation, do not service
your product yourself. Opening or removing covers that are marked may expose you to electric
shock. For service information on components inside these compartments, call Customer Care.
Request service for damaged products: Turn off the product, unplug it from the electrical outlet, and
request service from a service partner under the following conditions:
The power cord or plug is damaged.
●
Liquid has been spilled into the product.
●
An object has fallen into the product.
●
The product has been exposed to rain or water.
●
The product has been dropped or damaged.
●
There are noticeable signs of overheating.
●
The product does not operate normally when you follow the operating instructions.
●
Avoid hot areas: The product should be placed away from heat sources such as radiators, heat
registers, stoves, and other products (such as amplifiers) that produce heat.
Allow the product to cool: Allow the product to cool before removing covers and touching internal
components.
Avoid wet areas: Never use the product in a wet location.
Avoid inserting objects into product: Never insert objects of any kind into slots or other openings in
the product.
Avoid blocking vents: Slots and openings are provided for ventilation. To prevent overheating, do not
obstruct vents. Using a computer on a soft surface, such as a pillow, blanket, rug, or thick clothing may
block airflow.
Clean the product properly: Unplug the product from the wall outlet before cleaning it. Do not use
liquid cleaners or aerosol cleaners. Use a soft cloth dampened with water for cleaning exterior
components, but NEVER apply water directly to the product or to an LCD screen.
Use recommended mounting accessories: Do not use the product on an unstable table, cart, stand,
tripod, or bracket. Mount the product according to the manufacturer’s instructions, and use a mounting
accessory recommended by the manufacturer.
Use the product with approved equipment: Use your product only with the computers and
accessories identified as suitable for use with your product.
Adjust the volume: Turn down the volume before using headphones or other audio devices.
78 Chapter 18 Safety information
Page 87

Safety Precautions for Power Cords and Accessories
WARNING! To reduce the risk of electric shock, fire, or damage to the equipment, do not attempt to
power the product with a voltage converter kit sold for appliances.
Use the correct external power source: A product should be operated only from the type of power
source indicated on the electrical ratings label. If you are not sure of the type of power source required,
call Customer Care, your service partner, or local power company. For a product that operates from
battery power or other sources, refer to the operating instructions that are included with the product.
Avoid overloading the electrical circuit: Do not overload an electrical outlet, power strip, or
convenience receptacle. The overall system load must not exceed 80% of the branch circuit rating. If
power strips are used, the load should not exceed 80% of the input rating of the power strip.
Observe extension cord ratings: If an extension cord or power strip is used, make sure that the cord
or strip is rated for the product and that the total ampere ratings of all products plugged into the extension
cord or power strip do not exceed 80% of the ampere rating limit of the extension cord or power strip.
Select the correct voltage: Ensure that the voltage select switch on the product is in the correct position
for the type of voltage you use (115 V ac or 230 V ac).
Use an approved AC adapter: Only the AC adapter provided with the product, a replacement AC
adapter provided by HP, or an AC adapter purchased as an accessory from HP should be used with
the product.
Use an approved power cord: If you were not provided with a power cord for your product, you should
purchase a power cord that is approved for use in your country.
The power cord must be rated for the product and for the voltage and current marked on the electrical
ratings label of the product. The voltage and current rating of the cord should be greater than the voltage
and current rating marked on the product. In addition, the diameter of the wire must be a minimum of
0.75 mm²/18AWG, and the length of the cord should be between 1.5 meters (5 feet) and 2 meters (6.5
feet) long. If you have questions about the type of power cord to use, call Customer Care.
Position the power cord carefully: Route the power cord so that it will not be walked on, tripped over,
or pinched by items placed upon or against it. Pay particular attention to the plug, electrical outlet, and
the point where the power cord exits the product.
Plug power cord into the proper outlet: Plug the product into an electrical outlet that is easily
accessible at all times. If the product is a 3-wire grounding type, be sure the outlet is the proper grounded
(earthed) type. Do not disable the power cord grounding plug because it is an important safety feature.
Unplug the power cord properly: Disconnect power from the product by unplugging the power cord
from the electrical outlet. Do not pull on cords and cables. When unplugging the cord from an electrical
outlet, grasp and pull the cord by the plug.
Safety Precautions for Battery Packs
WARNING! To reduce the risk of fire or burns, do not disassemble, crush, or puncture a battery pack;
short the external contacts on a battery pack; or dispose of a battery pack in fire or water. Do not expose
a battery pack to high temperatures above 60°C (140°F). Replace only with a battery pack approved
for this computer.
WARNING! There is a danger of explosion if a battery pack is incorrectly replaced. Replace it only
with an approved battery pack for this product.
WARNING! Keep battery packs away from children.
Safety Precautions for Power Cords and Accessories 79
Page 88

Handle battery packs carefully: Replace a battery pack only with a battery pack approved for this
product. For information about removing a battery pack, refer to your product documentation.
When a battery pack has reached the end of its useful life, do not dispose of the battery pack
in general household waste. Follow the local laws and regulations in your area for computer battery
pack disposal.
In Europe, dispose of or recycle the battery packs by using the public collection system or by returning
them to HP, your service partner, or their agents.
Safety Precautions for Docking Devices
Avoid unstable mounting: Do not place a monitor with an unstable base or a monitor heavier than 25
kilograms (55 pounds) on top of a monitor stand, unless the monitor stand is marked for use with a
heavier monitor. Instead, place the monitor on a work surface next to the docking device.
Safety Precautions for Products with Wireless Devices
WARNING! Exposure to radio frequency radiation. The radiated output power of wireless devices
is below the FCC radio frequency exposure limits. Nevertheless, the device should be used in such a
manner that the potential for human contact during normal operation is minimized. To avoid the
possibility of exceeding the FCC radio frequency exposure limits, human proximity to the antenna should
not be less than 20 cm (8 inches) during normal operation.
Safety Precautions for Products with Modems, Telecommunications or Local Area Network Accessories
WARNING! To reduce the risk of fire, electric shock, and injury to persons when using this device,
always follow basic safety precautions, including the following:
Do not use this product near water–for example: near a bathtub, washbowl, kitchen sink or laundry
●
tub; in a wet basement; or near a swimming pool.
Avoid using this product during an electrical storm. There is a remote risk of electric shock from
●
lightning.
Do not use this product to report a gas leak while in the vicinity of the leak.
●
Always disconnect the modem cable before opening the equipment enclosure or touching an
●
uninsulated modem cable, jack, or internal component.
If this product was not provided with a telephone line cord, use only No. 26 AWG or larger
●
telecommunication line cord in order to reduce the risk of fire.
Do not plug a modem or telephone cable into the RJ-45 (network) jack.
●
Safety Precautions for Products with Laser Devices
WARNING! In addition to the general precautions described earlier in this section, be sure to observe
the following precautions when operating a product equipped with a laser device. Failure to observe
these precautions could result in fire, bodily injury, and damage to the equipment.
For information about laser equipment repair, call Customer Care.
80 Chapter 18 Safety information
Page 89

If your product is equipped with laser products, it complies with appropriate safety standards, including
IEC 60825. With specific regard to the laser, the equipment complies with laser product performance
standards set by government agencies for Class 1 laser products. It does not emit hazardous light; the
beam is totally enclosed during all modes of customer operation and maintenance.
CDRH Regulations
The Center for Devices and Radiological Health (CDRH) of the U.S. Food and Drug Administration
implemented regulations for laser products effective August 2, 1976. These regulations apply to laser
products manufactured from August 1, 1976, onward. Compliance is mandatory for products marketed
in the United States.
WARNING! Use of controls or adjustments, or performance of procedures other than those specified
herein or in the laser product installation guide, may result in hazardous radiation exposure.
the laser product.
This system is classified as a Class 1 laser product. This label appears on
CDRH Regulations 81
Page 90

19 Frequently asked questions
I am having trouble turning on my HP iPAQ. What should I do?
Your HP iPAQ displays to have problems with the battery. Please perform the following checks:
Is the battery charged?
●
Is the battery properly installed?
●
I have trouble connecting to the Internet. What should I do?
If you have trouble connecting to the Internet, please perform the following checks:
Make sure you have subscribed for a data service from your service operator.
●
Make sure you entered correct setting parameters, such as APN and IP addresses in data profile
●
setup.
Why does the HP iPAQ operate slowly at times?
You should have at least 1.5 to 2 MB of free memory space on your HP iPAQ so that the device operates
efficiently. To check the free memory space, tap Start > Settings > System > Memory. Remember to
delete or transfer old e-mail messages and pictures on your HP iPAQ to free available memory space.
Why do I see the Today screen layout error message on my HP iPAQ display screen?
You will get a Today screen layout error message if you did not select a Today screen layout. To correct
this, tap Start > Settings > Personal and select a layout for the Today screen.
I have trouble charging my battery. What should I do?
If you have trouble charging your battery, please perform the following checks:
Is the battery charger correctly plugged into the battery charger socket on the HP iPAQ?
●
Is the power cord of the charger damaged?
●
Is the battery very old? If yes, replace with a new battery and try again.
●
NOTE: To locate information about batteries, visit http://www.hp.com/accessories/ipaq.
82 Chapter 19 Frequently asked questions
Page 91

I am unable to use the ActiveSync feature. What should I do?
To be able to use the ActiveSync feature, upgrade your computer to the latest version of ActiveSync. It
is recommended to use ActiveSync 4.5 or a higher version. Visit
for the latest versions.
http://www.microsoft.com/downloads
My HP iPAQ was not connected during WMDC installation?
Although you do not need to connect your HP iPAQ during the installation process of WMDC, it is highly
recommended to have it connected.
My HP iPAQ was connected while I was installing but WMDC is not launching after installation?
In some cases after an upgrade, you will need to disconnect and reconnect the device for WMDC to
launch.
Can I connect for the first time via Bluetooth?
The initial connection between your HP iPAQ and the desktop WMDC application needs to happen with
a HP 24-pin connector synchronization cable. After this initial connection, you will be able to set up
Bluetooth for future connections.
I am unable to use the ActiveSync feature. What should I do? 83
Page 92

20 Guidelines for care and maintenance
It is recommended that you follow certain guidelines to prevent possible damage to your HP iPAQ and
to keep it in a good condition.
Using your HP iPAQ
Avoid using your HP iPAQ in dusty and extremely high or low temperature environments.
●
Do not spill water on your HP iPAQ or expose it to the rain.
●
Avoid removing the battery without turning off your HP iPAQ.
●
Do not apply strong force or shocks to your HP iPAQ.
●
Keep the HP iPAQ and its accessories away from children.
●
Do not insert metal objects into the charging/communications port of your HP iPAQ. This can
●
short-circuit the battery and result in danger.
Turn off your HP iPAQ or switch it to silent mode when you are asked to in public places.
●
Cleaning your HP iPAQ
Use a soft, clean, and slightly moistened cloth to clean your HP iPAQ. Do not let water come into
●
contact with the earpiece, microphone, or the metal surface.
Do not wipe your HP iPAQ with any corrosive liquid or coarse objects. This can damage the outer
●
surface of your HP iPAQ.
Carrying or storing your HP iPAQ
Do not leave your HP iPAQ in extremely high or low temperature environments.
●
Remove the battery from your HP iPAQ if it is not going to be used for a long period. Store the
●
HP iPAQ and its battery in a cool, dark, and dry place.
84 Chapter 20 Guidelines for care and maintenance
Page 93

21 Accessories for HP iPAQ
Use original HP batteries and chargers to charge your HP iPAQ.
●
Do not use your HP iPAQ battery and charger for other purposes.
●
Use any the following accessories to enhance your HP iPAQ experience:
Protection – Belt case, Skin-fit protection (silicon cases), and screen protectors.
●
Headsets – Wired stereo headsets, Bluetooth mono-headsets, and Bluetooth stereo headsets
●
GPS – Bluetooth GPS receiver, Navigator and Maps, and FM Transmitter to pair with vehicle audio
●
systems
Keyboards and stylus – Bluetooth HID keyboard, Stylus
●
Power and Charging accessories – Power adapters, chargers, and batteries
●
For information on accessories for your HP iPAQ, visit
NOTE: Accessories might vary by model.
http://www.hp.com/accessories/ipaq.
85
 Loading...