

Page 1

Internet Express for Tru64 UNIX Version
6.10
Administration Guide
Abstract
This document describes how to use the Administration utility for HP Internet Express to manage a Web server and the Internet
services provided with the product.
HP Part Number: 5900-1418
Published: March 2011
Page 2

© Copyright 2010, 2011 Hewlett-Packard Development Company, L.P.
Confidential computer software. Valid license from HP required for possession, use or copying. Consistent with FAR 12.211 and 12.212, Commercial
Computer Software, Computer Software Documentation, and Technical Data for Commercial Items are licensed to the U.S. Government under
vendor's standard commercial license. The information contained herein is subject to change without notice. The only warranties for HP products
and services are set forth in the express warranty statements accompanying such products and services. Nothing herein should be construed as
constituting an additional warranty. HP shall not be liable for technical or editorial errors or omissions contained herein. UNIX is a registered
trademark of The Open Group.
Page 3

Contents
About This Document...................................................................................12
Intended Audience..................................................................................................................12
Document Organization..........................................................................................................12
Typographic Conventions.........................................................................................................13
Related Information.................................................................................................................14
Reading the Documentation.....................................................................................................14
Reading Documentation Using the Administration Utility..........................................................14
Reading Documentation Using the Public Web Server.............................................................14
Reading Documentation from the Internet Express CD–ROM ...................................................15
On a Tru64 UNIX System...............................................................................................15
On a PC......................................................................................................................15
Reading Reference Pages for Internet Express Components......................................................15
Reading the Open Source Software Component Documentation...............................................16
Reader's Comments................................................................................................................16
1 Using the Administration Utility...................................................................18
Using the Administration Utility Main Menu...............................................................................19
Registering Your Internet Express Installation..........................................................................20
Navigating the Administration Utility....................................................................................20
Using Administration Utility Forms........................................................................................20
Accessing Administration Servers..............................................................................................22
Accessing the Internet Express Login Account.............................................................................23
Accessing and Managing the Internet Monitor...........................................................................23
Managing Internet Express in a TruCluster Environment................................................................23
Using Internet Express Services in a Cluster...........................................................................24
TruCluster Impact on Internet Express Administration...............................................................24
Installing and Removing Components........................................................................................24
Accessing Web-Based System Management Tools.......................................................................26
Performing Web-Based System Management.........................................................................26
Tuning Kernel Attribute Values..............................................................................................27
2 Where to Find More Information.................................................................29
Internet Express and AlphaServer Products Web Sites..................................................................29
Open Source Software Web Sites.............................................................................................29
System Security Web Sites.......................................................................................................34
Other Useful Web Sites...........................................................................................................35
Encompass............................................................................................................................36
3 User Administration..................................................................................37
Overview of User Accounts......................................................................................................38
Specifying User Names......................................................................................................39
Assigning Passwords to User Accounts..................................................................................39
Purging Obsolete Passwords................................................................................................39
Searching for User Accounts................................................................................................40
Assigning Users to Groups..................................................................................................41
Creating Captive Accounts for Named Users..............................................................................42
Creating Captive Accounts for Generic Users.............................................................................43
Creating a Noncaptive Account for a UNIX System User..............................................................44
Creating Groups....................................................................................................................46
Contents 3
Page 4

Displaying User Account Information.........................................................................................47
Deleting User Accounts...........................................................................................................48
Changing Groups for User Accounts.........................................................................................49
Changing the Password for an Account.....................................................................................51
Changing Mail Services for Users.............................................................................................52
Assigning Regular Delivery Mail Service...............................................................................53
Assigning POP with Password Mail Service...........................................................................53
Assigning the Cyrus IMAP Mail Service.................................................................................54
Assigning Cyrus IMAP with Password Mail Service.................................................................54
Assigning APOP with Password Mail Service.........................................................................55
Managing the iass Account.....................................................................................................55
Changing the iass Account Forwarding Address....................................................................55
Managing the .users.list File................................................................................................55
Listing User Accounts and Passwords................................................................................56
Purging Passwords for User Accounts...............................................................................56
Removing the .users.list File.............................................................................................56
Managing the User Self-Administration Feature...........................................................................56
Enabling and Disabling the User Self-Administration Feature....................................................57
Enabling User Self-Administration When No Web Server Configuration Exists.......................58
Enabling User Self-Administration When a Current Web Server Configuration Exists..............59
Modifying the Web Server Configuration..............................................................................59
Enabling and Disabling Login Delays...................................................................................60
Managing User Self-Administration Groups...........................................................................61
Adding Groups.............................................................................................................61
Deleting and Modifying Groups......................................................................................62
Enabling and Disabling Groups......................................................................................63
Customizing the User Self-Administration Feature....................................................................63
4 User Authentication...................................................................................65
Managing the LDAP Module for System Authentication................................................................65
Default Configuration for the LDAP Module for System Authentication........................................66
Creating Branches.............................................................................................................69
Extended LDAP Schema for UNIX Account Information............................................................70
Indexing Attributes for the Directory Servers...........................................................................71
Adding Indices for OpenLDAP........................................................................................72
Configuring the LDAP Module for System Authentication..............................................................72
Modifying the LDAP Module Configuration............................................................................73
Defining LDAP System Parameters....................................................................................73
Configuring LDAP Password Attributes..............................................................................74
Configuring LDAP Group Attributes..................................................................................75
Testing the LDAP Module Configuration.................................................................................76
Enabling and Disabling the LDAP Module.............................................................................76
Importing and Exporting Users from /etc/passwd.......................................................................76
Importing Users into the Directory Server...............................................................................77
Importing Users from NIS....................................................................................................77
Exporting Users from the Directory Server..............................................................................77
Adding an LDAP User in a C2 Environment...........................................................................77
Access Control..................................................................................................................78
Utilities for Maintaining User Information in the LDAP Directory Server...........................................78
Checking the LDAP Server Configuration...............................................................................81
Extracting Users from the /etc/passwd File............................................................................81
Adding a User Entry...........................................................................................................81
Deleting a User Entry.........................................................................................................82
Retrieving a User Entry........................................................................................................82
4 Contents
Page 5

Synchronizing with a Password File......................................................................................83
Adding a Group Entry........................................................................................................83
Maintaining Group Membership..........................................................................................84
Deleting a Group Entry.......................................................................................................84
Retrieving a Group Entry.....................................................................................................85
Setting a User's Password in the LDAP Directory Server...........................................................85
Starting the ldapcd Daemon................................................................................................85
Stopping the ldapcd Daemon..............................................................................................86
Maintaining the LDAP Directory Server Using LDAP Commands....................................................86
Adding Entries to an LDAP Database....................................................................................86
Modifying Entries in an LDAP Database................................................................................86
Overview of the LDAP Client....................................................................................................87
Actions Performed by the LDAP Client...................................................................................87
Authentication Actions Performed.........................................................................................87
Files Modified by theLDAP Module for System Authentication...................................................87
Files Not Modified by the LDAP Module for System Authentication............................................87
Other Important Files..........................................................................................................87
/etc/ldapusers.deny......................................................................................................87
/etc/ldapusers.allow.....................................................................................................88
Behavior of the the ldapdc Daemon.....................................................................................88
Debugging ldapdc.............................................................................................................88
Operation of login/su........................................................................................................88
5 Mail Delivery Administration......................................................................90
Sendmail Server Administration................................................................................................90
Configuring the System as a Standalone Mail System.............................................................91
Configuring the System as a Mail Client................................................................................91
Configuring the System as a Mail Server...............................................................................91
Creating and Deleting Host Aliases for a Mail Server.........................................................92
Changing the Sendmail Server Configuration........................................................................93
Configuring Mail Protocols.............................................................................................94
Creating and Deleting Pseudo Domain Aliases.............................................................94
Configuring the MTS Protocol.....................................................................................95
Configuring the DECnet Phase IV Protocol....................................................................95
Configuring the DECnet/OSI Protocol.........................................................................96
Configuring the UUCP Protocol..................................................................................97
Configuring the X.25 Protocol....................................................................................97
Configuring Masquerading............................................................................................98
Accessing the Configure Masquerading Form...............................................................98
Users Automatically Excluded from Masquerading........................................................99
Configuring Your System for Masquerading...............................................................100
Configuring Virtual Domains.........................................................................................101
Enabling Procmail as a Local Mailer..............................................................................103
Enabling Anti-Virus......................................................................................................103
Configuring Anti-Spam.................................................................................................104
Configuring Relaying..............................................................................................104
Configuring the Access Database.............................................................................105
Configuring Checking on Sender's Information...........................................................107
Configuring LDAP........................................................................................................107
Configuring Mail Filters (MILTER)...................................................................................108
Adding a Mail Filter...............................................................................................109
Modifying a Mail Filter...........................................................................................109
Deleting a Mail Filter..............................................................................................110
Filters Included with Internet Express..........................................................................110
Contents 5
Page 6

Creating a New Mail Filter......................................................................................110
Adding the Sample Filter Using the Administration Utility.............................................110
Testing the New Filter..............................................................................................110
Configuring Queues....................................................................................................111
Adding a Queue....................................................................................................111
Modifying a Queue Group......................................................................................112
Deleting a Queue Group.........................................................................................112
Configuring Queue Performance...................................................................................113
Configuring Trusted Layer Security.................................................................................114
Enabling Support Using the Access Database.................................................................116
Controlling the Sendmail Server.........................................................................................118
Configuring Mailbox Access.............................................................................................118
Viewing the Sendmail Server Log.......................................................................................119
Majordomo Mailing List Administration....................................................................................119
Creating a Majordomo Mailing List....................................................................................119
Changing a Majordomo Mailing List Configuration..............................................................120
Changing List Owner or Charter...................................................................................120
Changing Administration Parameters.............................................................................121
Changing Subscription Parameters................................................................................121
Changing Message Content Parameters.........................................................................122
Changing Digest Parameters.........................................................................................123
Changing Command Access Parameters........................................................................123
Changing Moderated List Parameters.............................................................................124
Changing List Restriction Parameters..............................................................................124
Changing Address Processing Parameters......................................................................125
Deleting a Majordomo List................................................................................................125
Mailman.............................................................................................................................125
Create a Mailing List........................................................................................................126
Creating the Initial Mailman List Using a Script....................................................................126
Deleting a Mailing List......................................................................................................126
Managing Mailman.........................................................................................................126
Managing Mailing Lists...............................................................................................126
Mailman Scripts...............................................................................................................128
Mailman Log Files............................................................................................................128
Bogofilter Spam Filter............................................................................................................128
Training Bogofilter............................................................................................................128
Filtering with Bogofilter.....................................................................................................129
Filter Integration with Other Tools.......................................................................................129
Using Bogofilter with procmail......................................................................................129
Mutt Integration with Bogofilter.....................................................................................130
Pine Integration with Bogofilter......................................................................................130
Mail Transport Agent (MTA) Integration with Bogofilter.....................................................130
6 Mail Access Administration......................................................................132
POP Mail Server Administration..............................................................................................132
Controlling the POP3 Server..............................................................................................132
Controlling the POP2 Server..............................................................................................132
Controlling the POPPASSD Server.......................................................................................132
Viewing the POP Mail Server Log.......................................................................................133
IMAP Mail Server Administration............................................................................................133
Setting Up a UNIX User Account for UW IMAP....................................................................134
Setting Up a UNIX User Account for Cyrus IMAP..................................................................134
Converting IMAP Mail Folders...........................................................................................134
Controlling the Cyrus IMAP Server......................................................................................135
6 Contents
Page 7

Controlling the UW IMAP Server.......................................................................................135
Configuring SSL for UW-IMAP...........................................................................................136
Viewing the IMAP Server Log............................................................................................136
IMP Webmail Administration..................................................................................................137
Accessing the IMP Webmail Administration Menu................................................................138
Enabling and Disabling IMP Webmail................................................................................138
Managing Mail Server Settings.........................................................................................139
Modifying the Mail Server List...........................................................................................140
Adding a Mail Server..................................................................................................140
Modifying a Mail Server..............................................................................................142
Deleting a Mail Server.................................................................................................142
Managing Mailbox Settings..............................................................................................142
Managing Compose Settings............................................................................................143
Managing Message Settings.............................................................................................144
Managing Logging Settings..............................................................................................145
Managing Preference Driver Settings..................................................................................147
Managing Miscellaneous IMP Settings................................................................................148
Managing Horde Settings.................................................................................................148
Managing Turba Settings..................................................................................................150
Using IMP Upgrade Tools.................................................................................................151
Upgrading IMP Configurations......................................................................................152
Upgrading IMP Databases...........................................................................................152
Accessing IMP Webmail...................................................................................................154
Additional Webmail Documentation...................................................................................154
7 Web Services Administration...................................................................155
Secure Web Server Administration..........................................................................................155
Accessing the Secure Web Servers.....................................................................................156
Web Server Management.................................................................................................157
Changing Configuration Parameters...................................................................................157
Changing the Password for the Administration Web Server....................................................158
Allowing Remote Access to the Internet Monitor Administration Server.....................................159
ht://Dig Search Tool Administration.......................................................................................159
Creating the Search Index.................................................................................................159
Searching the Index.........................................................................................................163
Documentation................................................................................................................163
8 XML Component Administration...............................................................164
Directories and Subsets for XML Components...........................................................................164
Apache Axis Server Administration.........................................................................................165
Managing the Apache Axis Server.....................................................................................165
Enabling and Disabling the Apache Axis Server..................................................................165
Apache Cocoon Servlet Administration....................................................................................165
Managing the Apache Cocoon Servlet...............................................................................166
Enabling and Disabling the Cocoon Servlet.........................................................................166
Viewing the Cocoon Log Files............................................................................................166
9 Network Security Administration...............................................................167
TCP Wrapper Administration..................................................................................................167
Network Services Wrapped by Internet Express...................................................................167
Controlling Access to Other Network Services.....................................................................168
Modifying Access to a Wrapped Network Service...............................................................168
Testing TCP Security Modifications.....................................................................................169
Contents 7
Page 8

FireScreen Administration.......................................................................................................170
Installing FireScreen..........................................................................................................171
Configuring FireScreen.....................................................................................................175
Setting Command-Line Options.....................................................................................176
Setting the Screening Mode..........................................................................................178
Adding a Screening Rule.............................................................................................178
Checking Syntax of Screening Rules...............................................................................180
Deleting a Screening Rule............................................................................................180
Starting and Stopping FireScreen.......................................................................................181
Starting FireScreen......................................................................................................181
Stopping FireScreen.....................................................................................................182
Viewing FireScreen Status..................................................................................................183
Viewing FireScreen Screening Rules...............................................................................183
Viewing the FireScreen Log...........................................................................................183
Viewing FireScreen Statistics.........................................................................................184
Snort Intrusion Detection System .............................................................................................184
Configuring Snort Decoder...............................................................................................185
Configuring Snort Preprocessor..........................................................................................185
Running Snort..................................................................................................................186
Viewing Alert Messages....................................................................................................186
FreeRADIUS Server Administration..........................................................................................186
Considerations While Installing FreeRADIUS........................................................................187
Starting and Stopping the FreeRADIUS Server......................................................................187
Understanding FreeRADIUS Configuration Files....................................................................187
Viewing FreeRADIUS Log File............................................................................................189
10 Proxy Services Administration.................................................................190
Dante SOCKS Server Administration.......................................................................................190
Controlling the Dante SOCKS Server..................................................................................190
Configuring the Dante SOCKS Server.................................................................................191
Accessing Dante SOCKS Information..................................................................................191
Squid Proxy/Caching Server Administration.............................................................................191
Configuring the Squid Proxy/Caching Server......................................................................192
Reinitializing the Disk Cache.............................................................................................192
Managing the Squid Proxy/Caching Server........................................................................192
Rotating Log Files.............................................................................................................193
Displaying Access Statistics...............................................................................................193
Controlling the Squid Proxy/Caching Server........................................................................194
11 LDAP Directory Server Administration.......................................................195
Understanding the LDAP Directory Schema..............................................................................195
Using the LDAP Browser........................................................................................................196
Installing and Running the LDAP Browser.............................................................................197
Managing Frequently Used Connections.............................................................................197
Connecting to an LDAP Server......................................................................................197
Creating or Editing Frequently Used Connections.............................................................197
Connecting to an LDAP Server using SSL........................................................................198
Disconnecting from an LDAP Server...............................................................................199
Reconnecting to an LDAP Server....................................................................................199
Using the Main Browsing Window ....................................................................................199
Opening a New Main Window....................................................................................200
Closing a Main Window.............................................................................................200
Viewing a Directory Entry in a Separate Window............................................................200
8 Contents
Page 9

Refreshing an Entry.....................................................................................................200
Controlling Client-Side Schema Checking.......................................................................200
Adding a New Directory Entry......................................................................................201
Modifying a Directory Entry..........................................................................................201
Deleting a Directory Entry............................................................................................201
Copying a Directory Entry............................................................................................201
Renaming a Directory Entry..........................................................................................202
Moving a Directory Entry.............................................................................................202
Adding Attributes........................................................................................................202
Modifying Attributes....................................................................................................202
Deleting Attributes ......................................................................................................203
Managing Directory Entry Templates.............................................................................203
Creating Entry Templates..............................................................................................203
Modifying Entry Templates...........................................................................................203
Deleting Directory Entry Templates.................................................................................203
Renaming Directory Entry Templates..............................................................................203
Copying Directory Entry Templates................................................................................203
Searching the Directory....................................................................................................204
Viewing the Object Class Schema......................................................................................204
Viewing the Attribute Schema............................................................................................204
User Configuration File.....................................................................................................205
Managing and Using the OpenLDAP Directory Server...............................................................205
Managing the OpenLDAP Directory Server..........................................................................205
Controlling the OpenLDAP Directory Server....................................................................205
Configuring the OpenLDAP Directory Server...................................................................205
Configuring the OpenLDAP Directory Server Independently of the Installation Procedure.......206
12 OpenSLP Administration........................................................................207
OpenSLP Overview...............................................................................................................207
Configuration Files and Examples...........................................................................................207
Configuring OpenSLP............................................................................................................208
Using the OpenSLP Configuration and Registration Files........................................................208
Configuring Optional Security...........................................................................................208
Running the Services........................................................................................................209
Running the Example Configuration.........................................................................................210
Considerations for Using SLP APIs...........................................................................................210
Documentation.....................................................................................................................211
13 FTP Server Administration.......................................................................213
Administering Pure-FTP Server.................................................................................................213
Creating or Modifying an Anonymous Pure-FTP User Account................................................213
Enabling or Disabling Anonymous Pure-FTP Access...............................................................214
Enabling or Disabling chroot.............................................................................................214
Displaying Active Pure-FTP Users........................................................................................215
Enabling or Disabling Pure-FTP server.................................................................................215
14 Samba File and Print Server Administration..............................................216
Enabling and Disabling the Samba Server...............................................................................216
Options for Modifying the smb.conf Configuration File..............................................................216
Understanding the smb.conf Configuration File.........................................................................216
Administering the Samba Server Using the SWAT Program........................................................219
Configuring the Samba Server Using the SWAT Program......................................................219
Configuring Global Variables.......................................................................................222
Contents 9
Page 10

Configuring Share Parameters.......................................................................................222
Controlling Printers......................................................................................................223
Viewing the Status of the Server....................................................................................223
Viewing the Current Configuration.................................................................................223
Administering Passwords..............................................................................................223
15 InterNetNews Server Administration........................................................225
INN Daemons......................................................................................................................226
Specifying INN Configuration Data........................................................................................226
Configuring an External Newsfeed..........................................................................................227
Displaying an External Newsfeed.......................................................................................228
Adding an External Newsfeed...........................................................................................229
Modifying an External Newsfeed.......................................................................................231
Removing an External Newsfeed........................................................................................231
Modifying Newsfeed Defaults............................................................................................231
Updating the Local Active File............................................................................................232
Managing Client Access........................................................................................................232
Displaying Client Access Groups........................................................................................233
Adding a Client Access Group..........................................................................................233
Modifying an Existing Client Access Group.........................................................................234
Removing a Client Access Group.......................................................................................234
Displaying Client Authentication Groups.............................................................................235
Managing Client Authentication Groups.............................................................................235
Adding Client Authentication Groups.............................................................................235
Modifying Client Authentication Groups.........................................................................236
Deleting Client Authentication Groups............................................................................237
Configuring Storage Options..................................................................................................237
Configuring Storage Method Entries...................................................................................237
Displaying Storage Method Entries................................................................................237
Adding a New Storage Method Class ..........................................................................238
Modifying a Storage Method Class ..............................................................................238
Deleting a Storage Method Class .................................................................................239
Configuring the CNFS Storage Method ..............................................................................239
Displaying CNFS Entries..............................................................................................239
Adding New CNFS Entries...........................................................................................239
Modifying CNFS Entries...............................................................................................240
Deleting CNFS Entries..................................................................................................241
Managing Article Expiration..................................................................................................241
Displaying Article Expiration Definitions..............................................................................241
Adding an Article Expiration Definition...............................................................................242
Modifying an Article Expiration Definition...........................................................................244
Deleting an Article Expiration Definition..............................................................................245
Modifying the Retention Period for Expired Articles...............................................................245
Managing Local Newsgroups................................................................................................245
Creating Local Newsgroups..............................................................................................246
Deleting Local Newsgroups...............................................................................................246
Viewing INN Log Files...........................................................................................................246
Controlling the INN Server....................................................................................................247
16 Internet Relay Chat Administration...........................................................248
Configuring IRC....................................................................................................................248
Controlling the IRC Server......................................................................................................248
10 Contents
Page 11

17 PostgreSQL Database and MySQL Administration......................................249
Installing PostgreSQL.............................................................................................................249
Starting and Stopping PostgreSQL Server.................................................................................249
Viewing the PostgreSQL Log File.............................................................................................250
Administering PostgreSQL Accounts.........................................................................................251
Important Files and Directories...........................................................................................251
Running the Postmaster Startup Script..................................................................................252
Using Existing PostgreSQL Accounts....................................................................................252
Setting up a Crontab Entry for Vacuuming Databases................................................................252
Scaling PostgreSQL...............................................................................................................256
MySQLadministrationAdministering MySQL..............................................................................258
Directories and Files Established by MySQL Installation.........................................................258
Starting and Stopping MySQL...........................................................................................258
Starting and Stopping the MySQL Server Using a Command Line..........................................259
MySQL Configuration Files................................................................................................259
MySQL Log Files..............................................................................................................259
Viewing the MySQL Error Log............................................................................................259
Viewing the MySQL General Log.......................................................................................259
18 BIND Domain Name Server Administration..............................................260
BIND Overview....................................................................................................................260
Important BIND Files and Directories.......................................................................................260
Enabling BIND.....................................................................................................................262
Running the BIND Startup Script.............................................................................................263
BIND Documentation............................................................................................................263
19 Jabber.................................................................................................265
Controlling the Jabber Server.................................................................................................265
20 Twiki...................................................................................................266
Starting TWiki......................................................................................................................266
21 Stunnel................................................................................................267
Sample client server configuration...........................................................................................267
A Sendmail Supplemental Information..........................................................268
Creating a Certificate of Authority..........................................................................................268
Background - OpenSSL Certificate Creation..............................................................................268
Mail Filter Example...............................................................................................................269
Glossary..................................................................................................272
Index.......................................................................................................276
Contents 11
Page 12

About This Document
This manual describes how to use the HP Internet Express for Tru64™ UNIX Administration utility
to configure and manage Internet software components supplied with the product kit. Information
on managing components that are not configured through the Administration utility is also included
in this document, as well as information on managing user accounts.
For more information on configuring Internet software, see the documentation for the particular
Internet component and the documentation for the UNIX shell command environment. For more
information on HP Tru64™ UNIX system management, see the Tru64 UNIX operating system
documentation.
Intended Audience
This manual is intended for the system administrator who will manage an AlphaServer™ system
running Internet Express for Tru64 UNIX.
Document Organization
This manual consists of the following:
• Chapter 1 describes how to access and use the Administration utility.
• Chapter 2 provides pointers to Web sites where you can get more information on Internet
Express, Open Source software, and Web authorities and standards organizations.
• Chapter 3 explains how to manage user accounts using the Administration utility.
• Chapter 4 explains how to manage user authentication with the LDAP Module for System
Authentication.
• Chapter 5 describes how to manage the mail delivery components: the Sendmail server,
Majordomo, Mailman, and Bogofilter.
• Chapter 6 describes how to manage the mail access components: POP, IMAP, and IMP
Webmail.
• Chapter 7 explains how to configure and manage Web services, which includes the Secure
Web Server for Tru64 UNIX powered by Apache and the ht://Dig search tool.
• Chapter 8 describes how to manage the XML components.
• Chapter 9 explains how to manage the network security administration tools that include TCP
Wrapper security modifications, and to set up firewall protection, Snort intrusion detection,
and FreeRADIUS user authentication.
• Chapter 10 explains how to configure and manage the proxy services, which include the
Dante SOCKS Server and the Squid Proxy/Caching Server.
• Chapter 11 describes how to set up and manage the LDAP Directory servers.
• Chapter 12 describes how to configure and manage OpenSLP.
• Chapter 13 describes how to configure the FTP Server.
• Chapter 14 explains how to configure and manage the Samba File and Print Server.
12
• Chapter 15 explains how to set up and use InterNetNews (INN).
• Chapter 16 explains how to manage Internet Relay Chat (IRC).
• Chapter 17 describes how to administer the PostgreSQL account and use related commands
and also how to administer MySQL.
• Chapter 18 describes how to enable BIND and start the BIND server.
Page 13

• Chapter 19 describes how to start jabber.
• Chapter 20 describes how to start twiki.
• Chapter 21 describes how to set up client and server for secure sessions.
• Appendix A describes how to create a certificate of authority, and also includes a sample
mail filter.
• The Glossary contains a glossary of terms used in this manual.
This manual also contains an index.
Typographic Conventions
This document uses the following typographical conventions:
%, $, or # A percent sign represents the C shell system prompt. A dollar sign
audit(5) A manpage. The manpage name is audit, and it is located in
Command A command name or qualified command phrase.
Computer output Text displayed by the computer.
Ctrl+x A key sequence. A sequence such as Ctrl+x indicates that you
ENVIRONMENT VARIABLE The name of an environment variable, for example, PATH.
represents the system prompt for the Bourne, Korn, and POSIX
shells. A number sign represents the superuser prompt.
Section 5.
must hold down the key labeled Ctrl while you press another key
or mouse button.
ERROR NAME The name of an error, usually returned in the errno variable.
Key The name of a keyboard key. Return and Enter both refer to the
same key.
Term The defined use of an important word or phrase.
User input Commands and other text that you type.
Variable The name of a placeholder in a command, function, or other
syntax display that you replace with an actual value.
[] The contents are optional in syntax. If the contents are a list
separated by |, you must choose one of the items.
{} The contents are required in syntax. If the contents are a list
separated by |, you must choose one of the items.
... The preceding element can be repeated an arbitrary number of
times.
Indicates the continuation of a code example.
| Separates items in a list of choices.
WARNING A warning calls attention to important information that if not
understood or followed will result in personal injury or
nonrecoverable system problems.
CAUTION A caution calls attention to important information that if not
understood or followed will result in data loss, data corruption,
or damage to hardware or software.
IMPORTANT This alert provides essential information to explain a concept or
to complete a task
NOTE A note contains additional information to emphasize or supplement
important points of the main text.
Typographic Conventions 13
Page 14

Related Information
The Internet Express Documentation Bookshelf provides access to the following documents:
• Release Notes — This manual includes release notes for Internet Express.
• Read This First — This manual describes the contents of the kit.
• Installation Guide — This document describes how to install the administration software and
Open Source Internet software provided on the Internet Express for Tru64 UNIX Installation
and Documentation CD–ROM. When you run the installation procedure in a Web browser,
the Installation Guide (in HTML format) is linked to the procedure to provide online help.
• Administration Guide — This manual.
• Secure Web Server Administration Guide — This manual describes how to use the Secure
Web Server Administration utility.
• Internet Services User's Guide — This manual explains how to get started with e-mail, the TIN
news reader, and a Web browser using a character-cell terminal.
• Internet Monitor Administrator's Guide — This manual describes how to install, configure,
and use the Internet Monitor software.
• QuickSpecs — This document is a specification of the Internet Express product.
• Software Description and Licensing Terms — This document describes the terms and conditions
for software packaged with the current version of Internet Express.
• Best Practices documents for Internet Express — These documents provide you with
recommended methods for performing specific tasks, rather than presenting all options.
Additional Best Practices are available at the Tru64 UNIX Publications Web site:
http://h30097.www3.hp.com/docs/best_practices/
• Internet Express Reference Pages — These reference pages are supplied with components that
can be installed and managed using Internet Express.
See Chapter 2 for a list of Web sites and other information sources for Internet Express products
and services as well as commercial and nonprofit organizations that might be of interest.
Reading the Documentation
This section describes the different methods for accessing the Internet Express documentation.
Reading Documentation Using the Administration Utility
After installation of the Secure Web Server subset (IAEAPCH), the Internet Express Documentation
subset (IAEDOC), and the Internet Express Administration Utility subset (IAEADM), access the
Administration utility for Internet Express main menu (see Section ) at:
http://hostname.domain:8081
where hostname.domain is the host name and domain of the system running Internet Express.
Follow the documentation link from this page to read the Internet Express documentation.
Reading Documentation Using the Public Web Server
You can also read the documentation without the Administration utility by using the public Web
server (if you chose to configure one) to access the documentation index page at
http://hostname.domain/documents/bookshelf.html. If this URL does not work, verify
that the Web server configuration file, /usr/internet/httpd/admin/conf/httpd.conf,
contains the following line:
Alias /documents/ "/usr/internet/docs/IASS/"
14
Page 15

The Internet Express documentation files are installed in the /usr/internet/docs/IASS
directory.
• You can access the Documentation Bookshelf installed on your system by entering the following
URL (substituting the name of your system for hostname) in your browser:
http://hostname/documents/bookshelf.html
• You can also read the installed documentation directly from the file system using a Web
browser running on the same system by using the file URL:
file:/usr/internet/docs/IASS/bookshelf.html
Reading Documentation from the Internet Express CD–ROM
You can also access the Documentation Bookshelf on the Internet Express Installation and
Documentation CD–ROM from your Tru64 UNIX System or a PC. The documentation is available
in the following formats:
• HTML
• Portable Document Format (PDF)
On a Tru64 UNIX System
To read the documentation from the Internet Express Installation and Documentation CD–ROM on
an AlphaServer system, follow these steps:
1. Log in to your system as root.
2. Insert and mount the CD–ROM, replacing drive with the name of your CD–ROM drive:
# mount /dev/drive /mnt
Usually this will be:
# mount /dev/disk/cdrom0c /mnt
3. In a Web browser, open the Documentation Bookshelf file by entering the following URL:
file:/mnt/index.htm
4. Click on the book you want to open.
On a PC
To read the documentation from the Internet Express Installation and Documentation CD–ROM on
a PC, follow these steps:
1. Insert the CD–ROM into your PC's CD–ROM drive.
The Bookshelf page is automatically displayed in your browser.
If the Bookshelf does not appear, open the following URL, replacing drive with the letter of
your CD–ROM drive:
file:drive:\index.htm
2. Click on the book you want to open.
Reading Reference Pages for Internet Express Components
Reference pages for Internet Express components are available in HTML format from the Internet
Express Reference Pages index page. These HTML reference pages can be viewed using a Web
browser.
Alternatively, you can view these reference pages from a command line in a terminal window if
you modify the search path for the man command.
The man command's search path needs to include the following directories for Internet Express
component reference pages:
Reading the Documentation 15
Page 16

/usr/share/man
/usr/local/man
/usr/internet/pgsql/man
/usr/internet/openldap/man
/usr/news/man
/usr/local/samba/man
/usr/internet/httpd/man
/usr/opt/hpapache2/man
You can specify an alternative search path when entering the man command by using the M or P
option; for example:
# man -M /usr/news/man active.5
You can also define the man command's MANPATH environment variable on the command line or
in a file, such as your .profile file or .login file.
For example, suppose your MANPATH environment variable was defined to be the following:
/usr/share/man:/usr/dt/share/man:/usr/local/man
If you are using the sh or ksh shell, you could modify the MANPATH to add to the search path by
adding the following:
# set MANPATH $MANPATH:/usr/internet/pgsql/man:/usr/internet/openldap/man:/usr/news/man: \
/usr/local/samba/man:/usr/internet/httpd/man:/usr/opt/hpapache2/man
# export MANPATH
If you are using the csh shell, you would use a command line like the following:
# setenv MANPATH $MANPATH:/usr/internet/pgsql/man:/usr/internet/openldap/man: \
/usr/news/man:/usr/local/samba/man:/usr/internet/httpd/man:/usr/opt/hpapache2/man
For details about defining reference page search paths, see man(1).
Reading the Open Source Software Component Documentation
The product kit also provides documentation (in ASCII text and HTML) for software components
included with Internet Express. This documentation is located in the /usr/internet/docs
directory on the system where Internet Express is installed.
Reader's Comments
HP welcomes any comments and suggestions you have on this and other Tru64 UNIX manuals.
You can send your comments in the following ways:
• Fax: 603–884–0120. Attn: USPG Publications, ZKO3–3/Y32
• Internet electronic mail: readers_comment@zk3.dec.com
A Reader's Comment form is located on your system in the following location:
/usr/doc/readers_comment.txt
• Mail:
Hewlett-Packard Company
USD Publications Manager
ZKO3-3/Y32 110
Spit Brook Road
Nashua, NH 03063-2698
16
Please include the following information along with your comments:
Page 17

• The full title of the document
• The section numbers and page numbers of the information on which you are commenting
• The version of Tru64 UNIX and Internet Express that you are using
• If known, the type of processor that is running Tru64 UNIX
The Tru64 UNIX Publications Group cannot respond to system problems or technical support
inquiries. Please address technical questions to your local system vendor or to the appropriate HP
technical support office. Information provided with the software media explains how to send
problem reports to HP.
Reader's Comments 17
Page 18

1 Using the Administration Utility
The Administration utility for Internet Express helps you manage Internet services and the AlphaServer
system through a Web browser. Because you use a browser to perform these tasks, you are not
expected to be familiar with Tru64 UNIX.
The Administration utility is a set of CGI programs that use a configured instance of the Secure
Web Server (powered by Apache) on port 8081. You access the Administration utility by entering
the following URL in a Web browser running on a local system:
http://host.domain.name:8081/
The Administration utility server is password-protected. You must provide a user name (admin by
default) and a password (which is set during installation).
Using the Administration utility, you can perform the following types of tasks:
• Manage user accounts — You can create various types of user accounts to provide access to
Internet services. By default, an administrator can manage user accounts only from the local
system (that is, the system on which Internet Express software is installed). However, you can
use Web Server Administration functions to allow access from remote systems. See Chapter 3
for more information.
• Administer Internet services — You configure Internet services (such as anonymous FTP, the
Squid proxy/caching server, and InterNetNews) to operate within your environment, view
log files to determine how users are making use of the Internet services you provide, and link
to the sysman utility to shut down and reboot the system, manage local printers, and perform
other system management
• Access online documentation — The Documentation Bookshelf allows you to:
Access the complete set of Internet Express documentation in HTML, and PDF formats.
◦
The documentation includes links to third-party Web sites for the Internet components that
ship with the product, as well as links to HP Web sites offering information of interest to
AlphaServer administrators.
◦ Search the reference pages included with the Internet Express software. This document
also provides links to these reference pages.
◦ Search the Tru64 UNIX Web site. Of particular interest to AlphaServer administrators is
the Technical Information page (http://h30097.www3.hp.com/technical.html).
• Display the copyrights of the third-party Internet components shipped with Internet Express.
See Section : Using the Administration Utility Main Menu for more information on using the
Administration utility Main Menu and how to register your installation.
For information on the various administration servers available through the Administration utility
and how to access these servers, see Section : Accessing Administration Servers.
For information on the iass login account, see Section : Accessing the Internet Express Login
Account.
For information on accessing and managing the Internet Monitor, see Section : Accessing and
Managing the Internet Monitor.
For information on managing Internet Express in a TruCluster environment, see Section : Managing
Internet Express in a TruCluster Environment.
For information on installing and removing components, see Section : Installing and Removing
Components.
For information on Web-based system administration and kernel tuning, see Section : Accessing
Web-Based System Management Tools.
18 Using the Administration Utility
Page 19
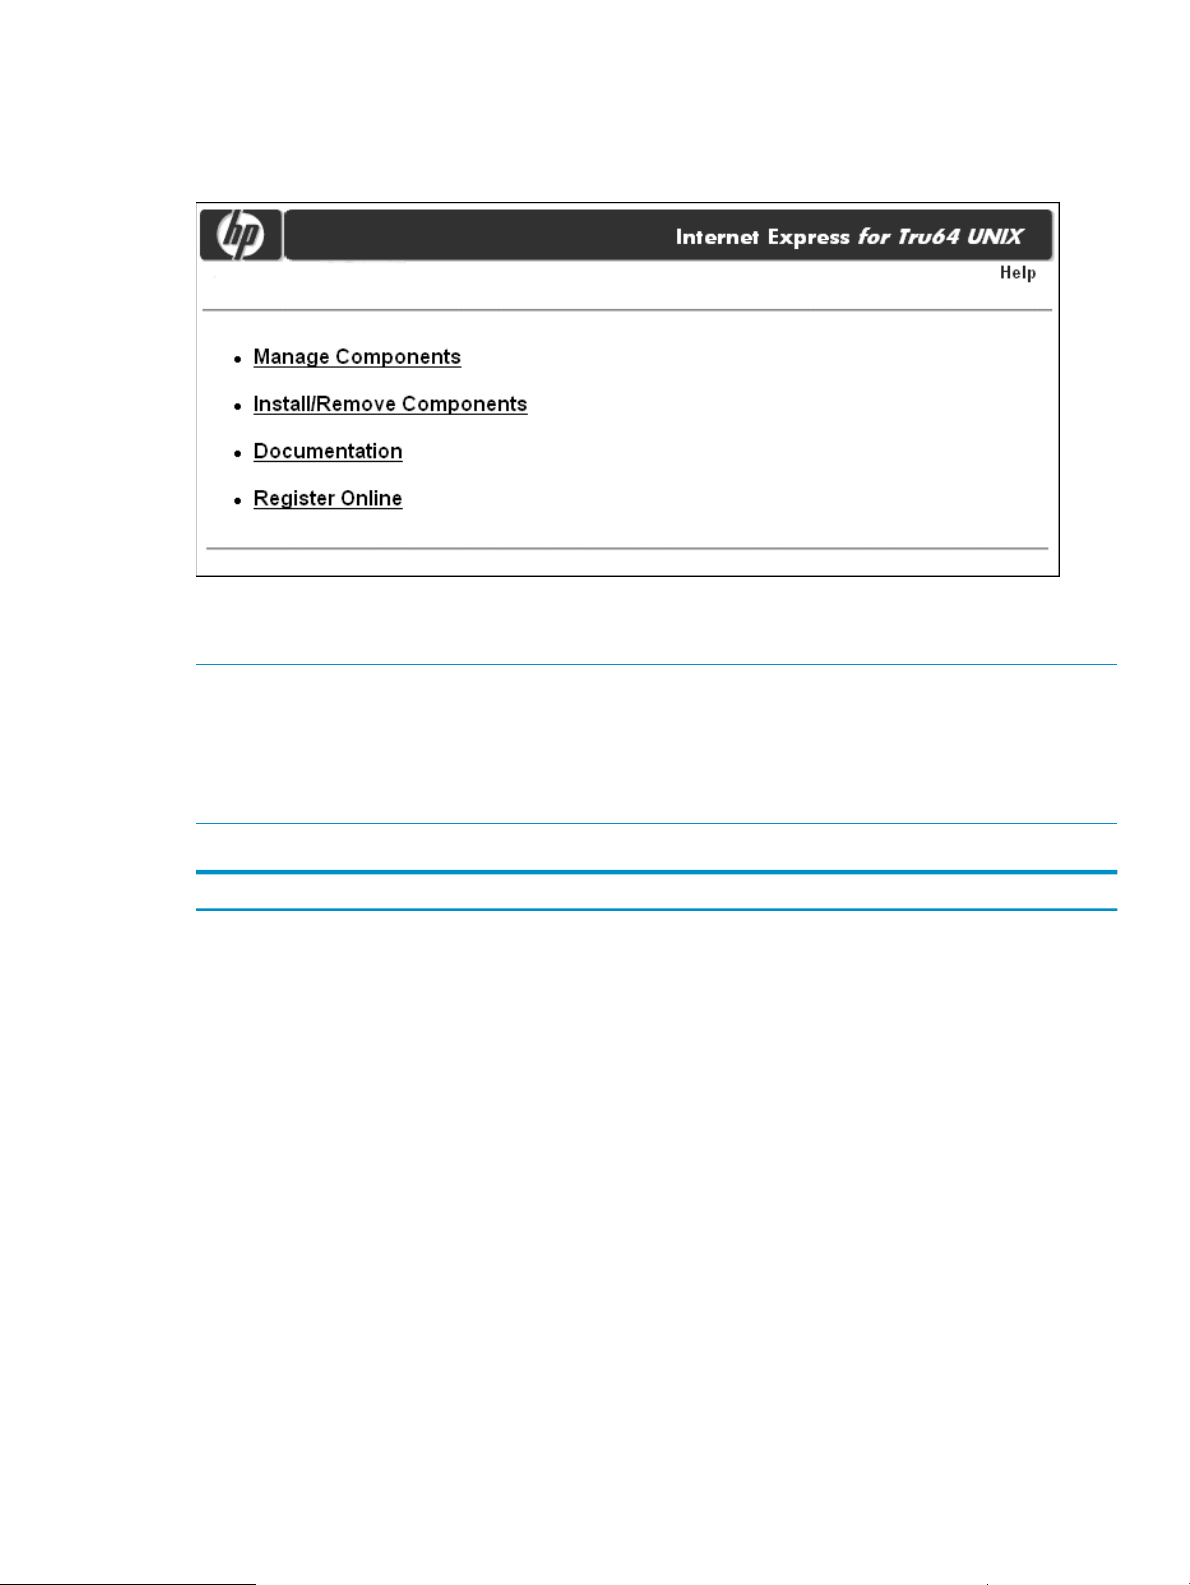
Using the Administration Utility Main Menu
Figure 1 shows the Administration utility for Internet Express Main Menu.
Figure 1 Administration Utility Main Menu
Table 1 shows which selection to make From the Administration utility Main menu, depending on
the task you want to perform.
Note:
The availability of certain administration tasks depends on the Internet Express components installed
on your system. For example, if the security components, FireScreen, and TCP Wrapper are not
installed on your system, the Network Security category does not appear on the Manage
Components menu.
Table 1 Administration Utility Menu Options and Tasks
TasksMenu Options
Manage Components
User Administration, including user account management (Chapter 3) and user
authentication management (Chapter 4), which includes managing the LDAP
Module for System Authentication for identifying and authenticating individual
users (Section ).
Mail delivery administration, including the Sendmail Server, Majordomo,
Mailman, and Bogofilter (Chapter 5)
Mail access administration, including POP, IMAP, and IMP Webmail (Chapter 6)
Web services administration, including the Secure Web Server, and the ht://Dig
search tool (Chapter 7)
XML components administration (Chapter 8)
Network security administration, including TCP Wrapper, Snort intrusion
detection, FireScreen, and FreeRADIUS (Chapter 9).
Proxy services administration, including the Squid Proxy/Caching Server and
Dante SOCKS server (Chapter 10)
Directory services administration, which includes the Lightweight Directory
Access Protocol (LDAP) server (Chapter 11)
OpenSLP administration (Chapter 12)
FTP Server administration (Chapter 13)
Samba File and Print Server administration (Chapter 14)
Using the Administration Utility Main Menu 19
Page 20

Table 1 Administration Utility Menu Options and Tasks (continued)
TasksMenu Options
InterNetNews (INN) administration (Chapter 15)
Internet Relay Chat (IRC) Server administration (Chapter 16)
PostgreSQL account administration (Chapter 17)
MySQL account administration (Chapter 17)
BIND domain name server (Chapter 18)
Install or remove components (Section : Installing and Removing Components).Install/Remove Components
Documentation
Register Online
Access the Internet Express documentation (Section : Reading the
Documentation).
Register your installation online (Section : Registering Your Internet Express
Installation).
Registering Your Internet Express Installation
The Register Online option From the Administration utility Main menu allows you to register your
installation of Internet Express. After you fill out the HP registration form, you will receive information
on future releases. After you complete the online registration form, the Register Online option will
no longer appear on the main menu.
Navigating the Administration Utility
To navigate the Administration utility, select specific menu options listed on each screen. As you
proceed through the screen hierarchy, a navigation bar appears directly under the Internet Express
banner at the top of the screen. These links allow you to go back one level or several levels, as
follows:
• Return to the Main menu
• Return to the Main menu for the current menu (for example, the Manage Components menu)
• Return to the menu for the current task (for example, Manage Sendmail Server)
Using Administration Utility Forms
Most of the tasks you perform using the Administration utility require you to complete a form to
provide the information needed to complete the task. Figure 2 shows a sample Administration
utility form.
20 Using the Administration Utility
Page 21
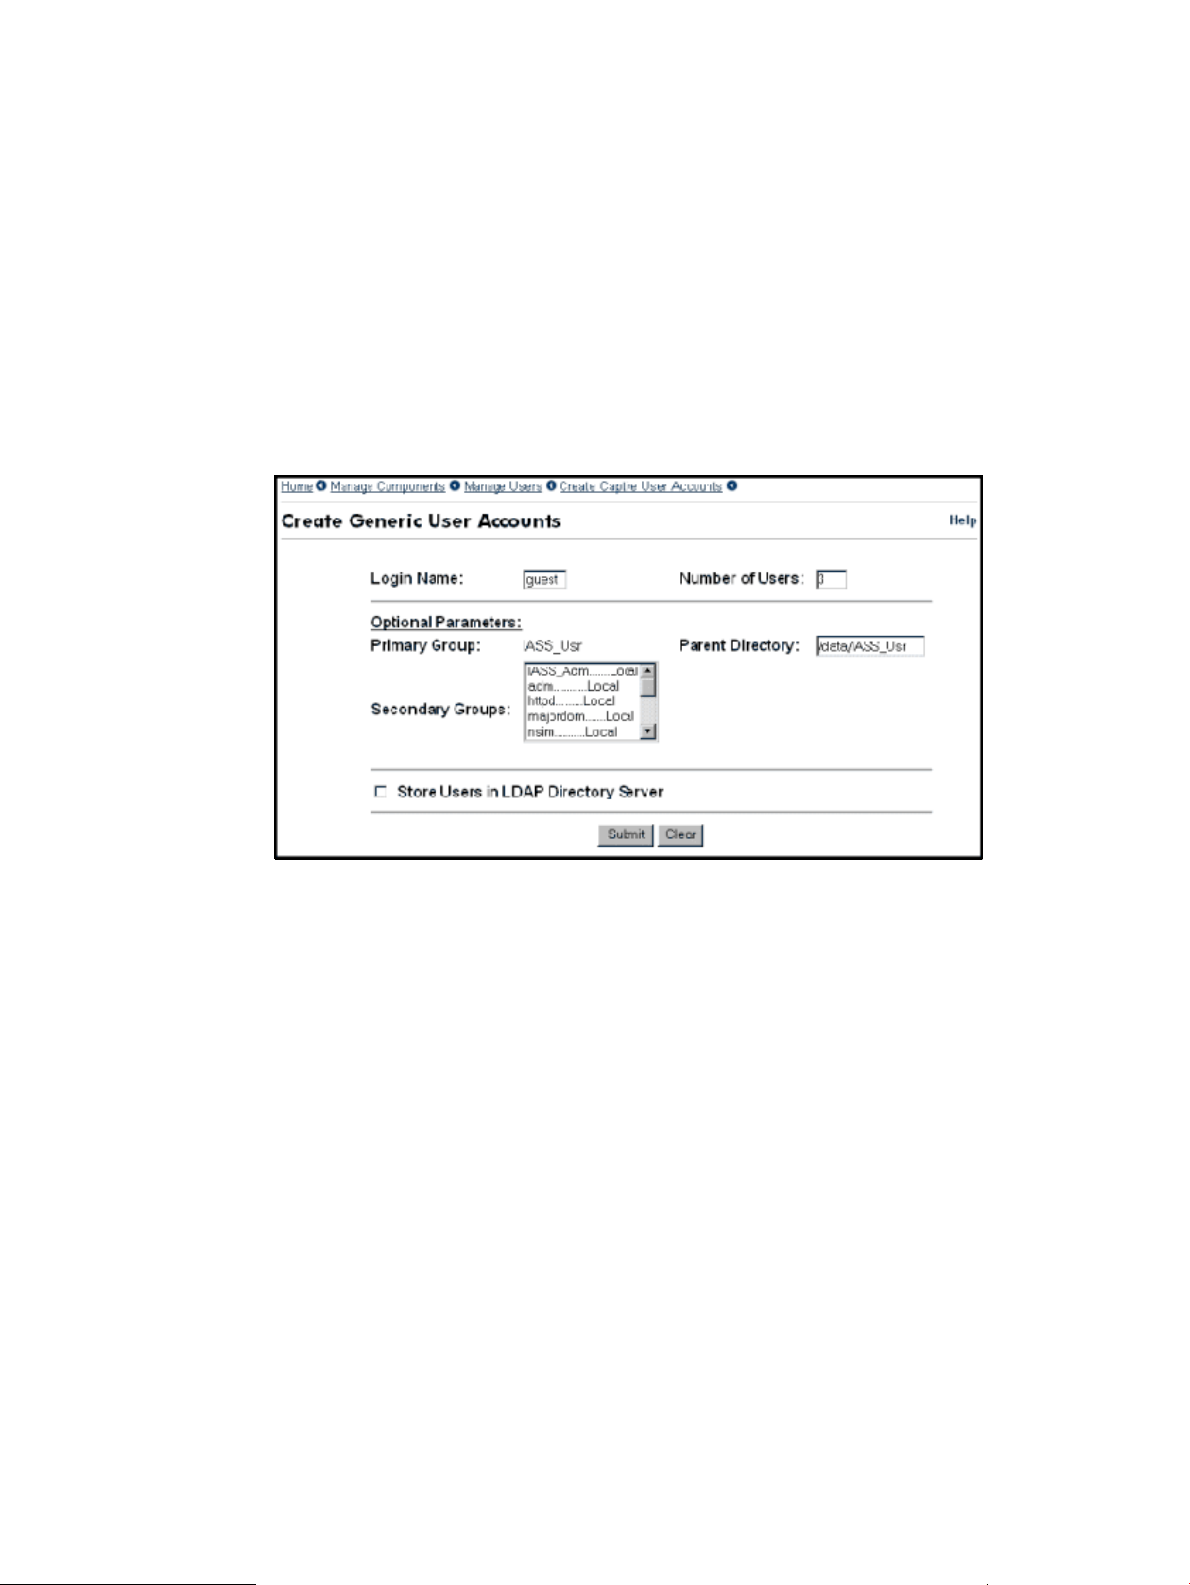
Figure 2 Sample Administration Utility Form
Every Administration utility form has the following properties:
• A navigation bar at the top of the form (Section : Navigating the Administration Utility)
• The name of the form (in Figure 2, Create Generic User Accounts)
• Text fields, list boxes, buttons, and other input fields for collecting data and transmitting it to
the Administration utility
• Submit, Reset, or Clear buttons (separated from the data area by a short horizontal rule):
Using the Administration Utility Main Menu 21
Page 22

The Submit button transmits the data you specified on the form to the Administration utility◦
◦ The Reset button (not shown in Figure 2) erases the data you specified and restores the
default values (if any)
◦ The Clear button erases the data in all fields
Some forms have additional links at the bottom of the form (for example, the form for managing
the Secure Web Server provides a link to the Apache documentation on the Apache Web site).
To complete the form shown in Figure 2, follow these steps:
1. Enter a name in the Login Name field.
2. Enter a number in the Number of Users field.
3. Click on one or more of the groups in the Secondary Groups list box. (On this form, this step
is optional.) To clear a selection, click on it again.
Use the scroll bar at any time to display additional groups.
4. Click on Submit.
Accessing Administration Servers
Internet Express provides the following administration servers for managing Internet services:
• Administration Utility —A set of CGI programs that use a configured instance of the Secure
Web Server listening on port 8081 (and port 8089, for backward compatibility with previous
releases).
• Internet Monitor administration — The Internet Express installation script installs the Internet
Monitor Administration Server on port 8086.
The administration servers installed are password protected. When you attempt to access one of
these servers, you must provide the user name (admin by default) and password (which is set
during installation). To change the password for the Internet Express Administration utility, see
Chapter 7.
Note:
The Secure Web Server is initially configured to allow access to the Internet Express Administration
utility from the local system only. To allow access from remote systems, see the Secure Web Server
Administration Guide.
Table 2 summarizes the ports on which the administration accounts are installed by default, and
shows the URLs for accessing these accounts. In the URLs shown in Table 2, host.domain.name
represents the fully qualified host name of the local system (the system on which Internet Express
is installed).
Table 2 Internet Express Accounts and Ports
URLDescriptionPort Number
Internet Express8081
Internet Monitor8086
http://host.domain.name:8081/
http://host.domain.name:8086/
You access the administration servers from an HTML-based Web browser. Enter the appropriate
URL, as shown in Table 2.
22 Using the Administration Utility
Page 23

Note:
A user who accesses the Administration utility is granted the ability to access privileged files and
perform system management tasks until exiting from the browser. The user retains privileges even
when browsing files that are not part of Internet Express.
Do not leave an Administration session unattended. Also, limit access to the admin account to
those individuals authorized to perform Internet system management tasks.
Accessing the Internet Express Login Account
The Internet Express installation procedure creates the iass login account, which you can use to
view the names and passwords for Internet Express captive accounts you have created using the
Administration utility (Chapter 3).
The iass account receives mail when:
• You create a captive user account (named or generic).
• Statistics for the InterNetNews (INN) server are generated. (A nightly report is mailed to the
iass account.)
• The news server is down.
During installation, you can specify a forwarding address for the iass account to have this mail
sent to a more convenient e-mail address.
You can access the iass account using two methods:
• By logging in from the Tru64 UNIX command line. The password for the iass account is set
during installation.
• By using the Manage iass Account menu item from the Manage Users menu (see Section :
Managing the iass Account).
Note:
If the locker account exists from a previously installed version of Internet Express, the iass
account is set up as an alias for the locker account.
Accessing and Managing the Internet Monitor
The HP Internet Monitor software allows administrators to monitor Internet services running on a
Tru64 UNIX system. The Internet Monitor product can be accessed directly or from the Administration
utility for Internet Express.
To access the Internet Monitor from the Administration utility:
1. Choose Manage Components from the Internet Express main menu.
2. In the Manage Components table, click on Internet Monitor under Quality of Service. The
Internet Services Administration server prompts for your user ID and password, then lets you
proceed.
To enable or disable the Internet Monitor from running, you use the Start/Stop the Internet Monitor
menu option from the Administration utility. For details, see the Internet Monitor Administrator's
Guide.
To configure the Internet Monitor components, see the Internet Monitor Administrator's Guide.
Managing Internet Express in a TruCluster Environment
TruCluster Server software provides high availability for Tru64 UNIX systems. This chapter describes
the special considerations to administer Internet Express running in a cluster running TruCluster
Server Version 5.0 and higher software.
Accessing the Internet Express Login Account 23
Page 24

Using Internet Express Services in a Cluster
If you are running Internet Express in a cluster, be aware of the following considerations:
• For all services, use the cluster alias to access the service to provide highest availability. All
services have been configured to allow the cluster alias to be used.
• InterNetNews, Squid, Internet Relay Chat, OpenLDAP, and Tomcat run as single-instance
servers. Only one instance of these servers will be run within the cluster. The/sbin/init.d
scripts have been modified to use Cluster Application Availability (CAA) for these services.
The service names are innd, squid, ircd, and slapd respectively.
• The Secure Web Servers and the sendmail daemon run on all cluster members concurrently.
Connections are distributed amongst the cluster members based on how the cluster alias has
been configured. See cluamgr(8).
• All other services use inetd to make connections and start server processes. Connections
are also distributed for these services among the cluster members.
TruCluster Impact on Internet Express Administration
There are some specific variations of the Administration utility user interface if you are running
Internet Express in a TruCluster Server cluster environment. These variations include the following:
• Depending on the type of service, the active status of the service for each member where it
may run is displayed.
• Starting and stopping a service applies to the entire cluster. If more than one instance of a
service is running in the cluster, all are affected.
• Some information is specific to each member in the cluster. In these cases, a listbox is displayed
at the top of the page, indicating which member is being affected. The listbox contains all
cluster member names; selecting a different member will cause the display and subsequent
actions to affect the selected member. The instances where this is the case include the following:
◦ Tuning the kernel for Internet services
◦ Installing and managing FireScreen
◦ Displaying the mail log file
◦ Shutting down or rebooting the operating system
Installing and Removing Components
You can use the Administration utility to add new Internet components or remove previously installed
components, as well as include your own component on the Manage Components menu.
To add or remove Internet components, follow these steps:
1. From the Administration utility Main menu, choose Install/Remove Components.
2. If the information from a recent Internet Express installation exists in the /tmp directory, the
Subset Selection form is displayed. Otherwise, the Administration utility prompts you for the
mount point and the CD-ROM device name before displaying the Subset Selection Form.
The Subset Selection form lists each Internet Express subset, identifies those that are mandatory,
and indicates whether each optional subset has already been installed.
3. On the Subset Selection form:
• To install a component, click on Install.
• To remove a component, click on Remove. (You cannot remove a mandatory subset.)
4. Scroll to the bottom of the form and click on Submit.
To include your own component on the Administration Utility Manage Components menu (Figure 3),
create a file in the /usr/internet/httpd/admin/htdocs/osis/components directory,
24 Using the Administration Utility
Page 25

one line per file, that includes fields with the table category name, component title and description,
and URL link. Each field must be separated by a semi-colon to ensure the file is correctly parsed
for display in the Manage Components table. The category name can be the same as an existing
category or a completely new category.
The following example is the menu configuration file for the IMP Webmail component. (The IMP
Webmail component is part of the Mail category in the Manage Components table.)
Mail;IMP Webmail;/mail/manage_imp.php
If the new component requires a URL that includes the hostname and cluster alias, the following
keywords (Table 3) will be substituted with the appropriate value when the keywords appear in
the URL that you provide in the menu configuration file:
Table 3 Keywords for URL Line
Substituted ValueKeyword
The current protocol (http or https).http
The current Web server (hostname or cluster alias, and port).HTTP_HOST
The hostname of the local host.HOSTNAME
The port number from the current Web server.PORT
Figure 3 shows the manage components with the major Internet Express components grouped by
category.
Installing and Removing Components 25
Page 26
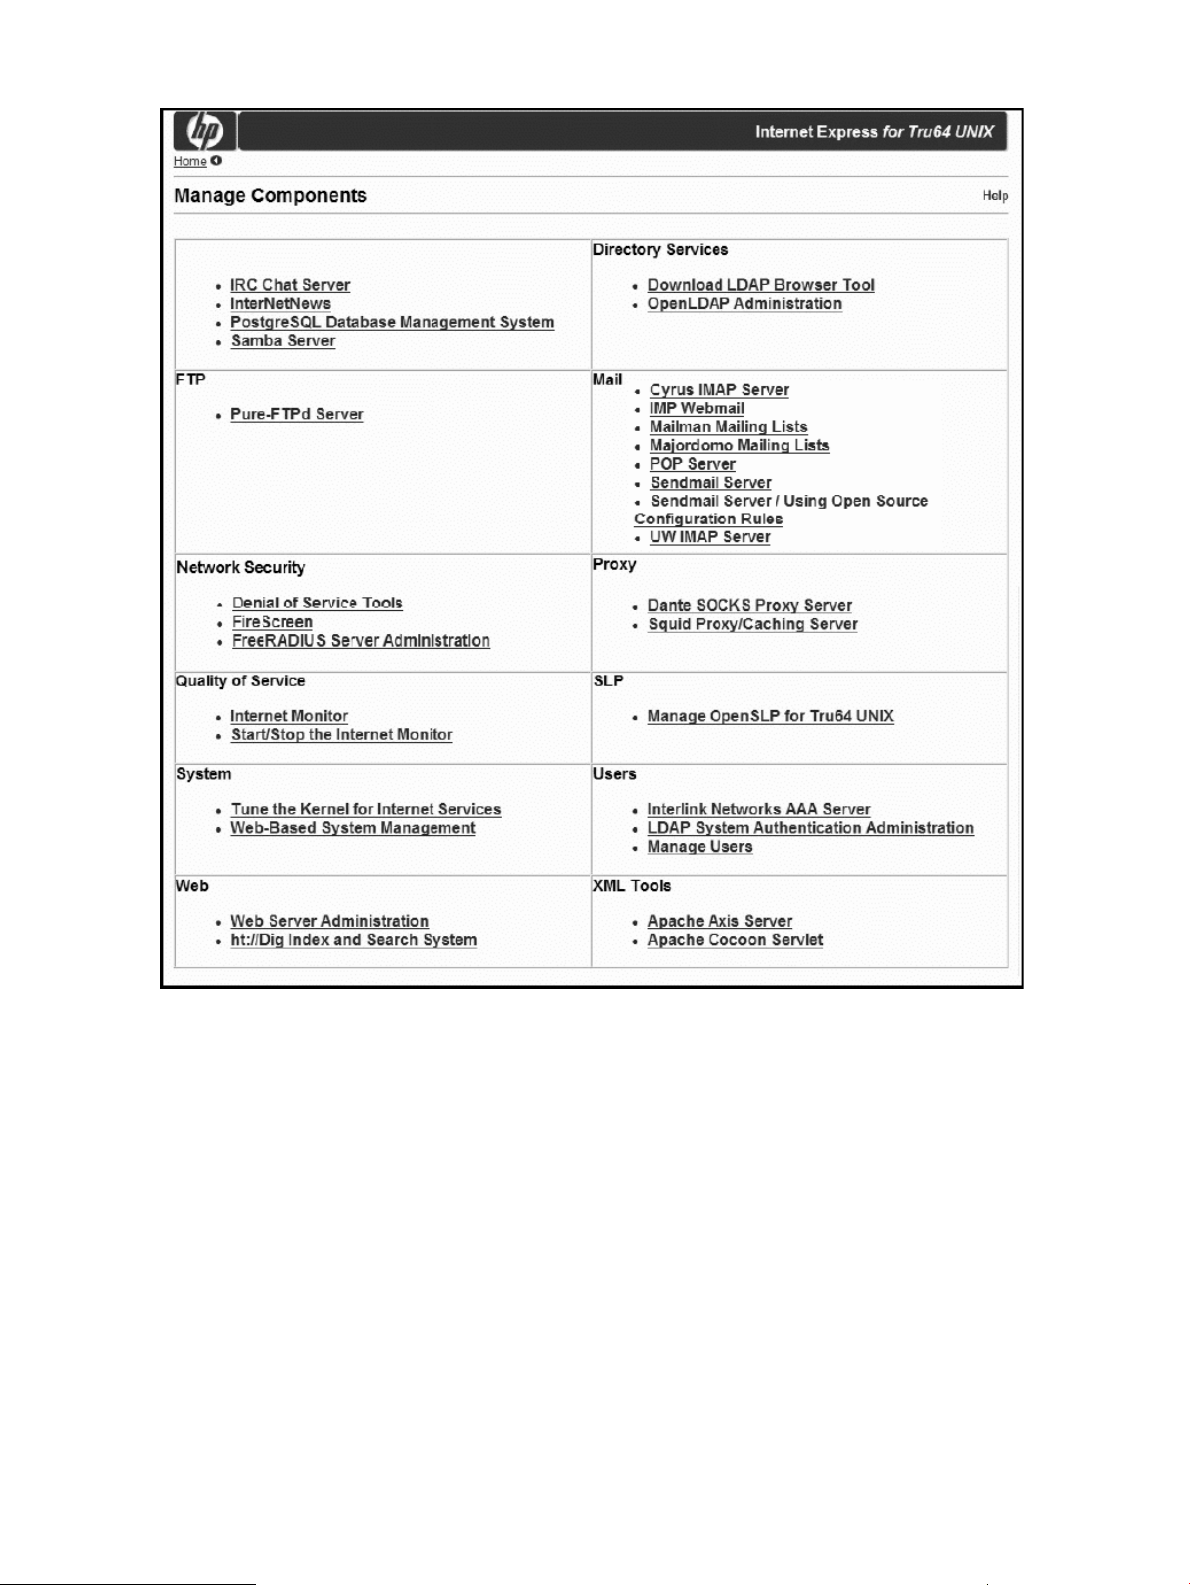
Figure 3 Manage Components Menu
Accessing Web-Based System Management Tools
This section describes the system management options available from the Internet Express
Administration utility. From the Administration utility Manage Components menu, you can:
• Link to the sysman Web-based management utility to perform Web-based system management
(Section : Performing Web-Based System Management)
• From the Administration utility, tune kernel subsystem parameters to improve the performance
of Internet services (Section : Tuning Kernel Attribute Values).
Performing Web-Based System Management
From the Administration utility Manage Components menu, you can link to the sysman Web-based
management utility to perform a variety of system management tasks such as shutting down and
rebooting the system, and managing local printers. Follow these steps to access the sysman
Web-based management utility:
1. Under System on the Manage Components menu, choose Web-Based Management.
2. From the Web-Based Management menu, click on the link for the sysman utility. From the
sysman Main menu, you can select the type of management function you want to perform.
26 Using the Administration Utility
Page 27

Tuning Kernel Attribute Values
By tuning attribute values in the following kernel subsystems, you can optimize the Internet-related
services running on your AlphaServer system for various process loads, system configurations,
network topologies, and other conditions:
• Generic subsystem (generic)
• Internet subsystem (inet)
• Network subsystem (net)
• Process subsystem (proc)
• Socket subsystem (socket)
• Virtual memory subsystem (vm)
For detailed information on how each kernel subsystem attribute affects the performance of Internet
services on an AlphaServer system, see Tuning Compaq Tru64 UNIX for Internet Services, available
at the following URL:
http://h30097.www3.hp.com/docs/internet/TITLE.HTM
To use the Administration utility to tune Internet-related kernel subsystem attributes, follow these
steps:
1. Ensure that JavaScript is enabled in your browser preferences.
2. From the Administration utility Main menu, choose Manage Components.
3. From the Manage Components menu, under System, choose Tune the Kernel for Internet
Services.
The Administration utility queries the running kernel (using the sysconfig -q command)
and the system configuration file (using the sysconfigdb -l command) to obtain the values
to display in the Run-Time Value and Boot-Time Value text fields, respectively.
If any messages occurred while the Administration utility was building the Tune the Kernel for
Internet Services form, a link appears at the top of the form. Click on this link for details.
4. Use either of the following methods to tune the values in these text fields:
• Type a value in the Run-Time Value field to change the value in the running kernel.
Type a value in the Boot-Time Value field to replace the value in the /etc/sysconfigtab
file.
• Click on one of the following buttons in the Suggested Values column:
◦ Recommended—Sets both the Run-Time Value and the Boot-Time Value to the
optimized value recommended for AlphaServer systems with average loads, under
normal conditions, and typical server hardware and network configurations.
Note:
Because AlphaServer configurations differ, and a recommended value might not
provide optimal performance for all configurations, exercise caution when modifying
attribute values.
◦ Current—Sets both the Run-Time Value and Boot-Time Value to the run-time value the
attribute had when the form was initially displayed.
◦ Default—Sets both the Run-Time Value and the Boot-Time Value to the default setting
for the attribute.
5. To set the attribute values as shown on the form, click on Submit. To discard any changes you
made, click on Reset.
Run-Time Value changes are set in the running kernel and take effect immediately.
Accessing Web-Based System Management Tools 27
Page 28

Boot-Time Value changes are set in the system configuration file (/etc/sysconfigtab) and
take effect the next time you boot the system.
6. After you submit the form, it is redisplayed and shows the attribute value changes that you
made. Reboot the operating system for these changes to take effect. When you reboot, the
boot-time attribute values become the run-time attribute values and the run-time values you
previously set are lost.
28 Using the Administration Utility
Page 29

2 Where to Find More Information
This chapter contains a list of Web sites and other information sources that are relevant to the
administration of Internet Express for Tru64 UNIX. The list includes links to Web sites dealing with
Internet Express products and services, and system security, as well as links to commercial and
nonprofit organizations on the World Wide Web that might be of interest.
Note:
The URLs and contents of sites listed here are subject to change. HP is not responsible for Web
sites for third-party software provided with Internet Express for Tru64 UNIX.
Internet Express and AlphaServer Products Web Sites
Information on AlphaServers and Internet Express can be found at the following sites:
• The following Tru64 UNIX Web site provides information on tuning your system to improve
the performance of your Web server, news server, and mail server:
http://h30097.www3.hp.com/technical.html
• The following Web site includes specifications for various HP AlphaServer models, information
on software packages, and ordering information:
http://h18002.www1.hp.com/alphaserver/
Open Source Software Web Sites
Information on Open Source software is available from the following Web sites:
analog
http://www.analog.cx
Analog is a tool for analyzing log files, included with the Secure Web Server. This site provides
a description of analog, sample reports that can be generated using analog, and access to sites
to download the latest version of the software.
Apache
http://www.apache.org/
Apache Web servers let users create and manage a Web site on the Internet and Intranet. The
Apache HTTP Web Server Project homepage contains versions of the Apache Web Server that
you can download and documentation for each version.
BIND
http://www.isc.org/products/BIND/bind9.html
The Berkeley Internet Name Domain (BIND) implements a domain name server for a number of
operating systems, including Tru64 UNIX. Internet Express provides the latest version of BIND,
which contains both a name server and a resolver library.
Dante SOCKS Server
http://www.inet.no/dante/
Dante is a circuit-level firewall/proxy server that can be used to provide convenient and secure
network connectivity to a wide range of hosts while requiring only the server Dante runs on to have
external network connectivity. Dante also includes an extension to the SOCKS Version 4 and
Version 5 protocols that provides a more generic bind(2) functionality, similar to what non-SOCKS
programs expect.
Internet Express and AlphaServer Products Web Sites 29
Page 30

expect
http://expect.nist.gov/
expect is a tool for automating and testing interactive applications, such as telnettelnet, FTP,
passwd, fsck, rlogin, tip, and so on. Exploring Expect: A Tcl-Based Toolkit for Automating
Interactive Applications (ISBN 1-56592-090-2), written by Don Libes and published by O'Reilly
& Associates, is an excellent source of information. The expect homepage provides access to
FAQs, examples, contributed scripts, and software.
Firefox
http://www.mozilla.org/products/firefox/
Firefox is a free open source Web browser based on the Mozilla code base.
FreeRADIUS
http://www.freeradius.org
FreeRADIUS is a configurable, scaleable user authentication tool. For information on administering
FreeRADIUS, see Section : FreeRADIUS Server Administration
GnuPG
http://www.gnupg.org
GnuPG (GNU Privacy Guard) is GNU's tool for secure communication and data storage. It can
be used to encrypt data and to create digital signatures. It includes an advanced key management
facility
ht://Dig Search Tool
http://www.htdig.org
The ht://Dig search tool is a complete World Wide Web index and search system for a domain
or an Intranet. It covers the search needs for a single company, campus, or subsection of a Web
site. For information on administering ht://Dig, see Section : ht://Dig Search Tool Administration.
IMAP
http://www.washington.edu/imap/
http://asg.web.cmu.edu/cyrus/
The Internet Message Access Protocol (IMAP) allows a client to access and manipulate electronic
mail messages on a server. The current version of the protocol is 4 and is described in RFC 1730.
The Internet Express kit includes two implementations of IMAP:
• University of Washington IMAP (UW-IMAP) Server
• Cyrus IMAP Server by Carnegie Mellon University
The Internet Express kit includes documentation on IMAP in the /usr/internet/docs/imap
directory.
IMP Webmail
http://www.horde.org/imp
The Internet Messaging Program (IMP) is written in PHP and provides Webmail access to IMAP
(and POP3) clients. For a set of FAQs (Frequently Asked Questions), visit the following URL:
http://www.horde.org/faq/
INN Server
http://www.isc.org/index.pl?/sw/inn/
30 Where to Find More Information
Page 31

InterNetNews (INN) is a complete usenet system that provides tools to manage newsfeed services,
including connections to external newsfeed configurations and control of client access to newsgroups.
The Internet Software Consortium homepage for the INN server provides release notes and access
to the latest kit. For more information on newsfeeds and the InterNetNews Server, see the Usenet
and InterNetNews document by Thomas Podnar and the set of FAQs by Tom Limoncelli in /usr/
internet/docs/inn/nntp.ps.
For information on how to enable authentication of Usenet group changes using PGPverify, visit
the following URL:
ftp://ftp.uu.net/networking/news/misc/pgpcontrol/README.html
IRC Server
http://www.irchelp.org/
Internet Relay Chat (IRC) allows users to communicate with each other in real time across a network
of Internet servers. The EFnet #IRChelp help archive provides general information and pointers to
many FAQs and clients. Information on configuring IRC is included in usr/internet/irc/
example.conf on the Internet Express kit. For more information on IRC, see the irc(1) and ircd(8)
reference pages.
Jabber
http://jabberd.org
Jabber Jabber is an Extensible Messaging and Presence Protocol (XMPP) server. Extensible
Messaging and Presence Protocol (XMPP) is an open, XML-based protocol originally aimed at
near-real-time, extensible instant messaging (IM) and presence information (e.g., buddy lists), but
now expanded into the broader realm of message oriented middleware.It remains the core protocol
of the Jabber Instant Messaging and Presence technology. Built to be extensible, the protocol has
been extended with features such as Voice over Internet Protocol and file transfer signaling.
Lynx Web Browser
http://lynx.isc.org
Lynxis a fully featured World Wide Web browser for users connected to a system via
cursor-addressable, character-cell terminals or terminal emulators. Lynx is a product of the Distributed
Computing Group within Academic Computing Services of The University of Kansas.
The /usr/internet/docs/lynx directory contains documentation on Lynx.
Majordomo Automated Internet Mailing Lists Manager
http://www.greatcircle.com/majordomo/
Majordomo is a set of programs that automate operation and maintenance of Internet mailing lists.
The Internet Express kit includes the documentation on Majordomo in the /usr/internet/
majordomo directory.
Mailman
http://www.gnu.org/software/mailman/
Mailman manages mailing and e-newsletter lists.
Mozilla
http://www.mozilla.org/
The Mozilla Application Suite includes a set of applications, including a Web browser, E-mail
client, news reader, chat, and Web page editor.
Open Source Software Web Sites 31
Page 32

MySQL
MySQL is an open source database management system that relies on SQL for processing the data
in the database. MySQL is most commonly used for Web applications and for embedded
applications and is a popular alternative to proprietary database systems.
http://www.mysql.com
OpenLDAP
http://www.openldap.org
The Lightweight Directory Access Protocol (LDAP) is an Internet standard directory service protocol
that runs over TCP/IP. It can be used to provide a standalone directory service or to provide
lightweight access to the X.500 directory. The OpenLDAP Project is a collaborative effort to provide
a robust, commercial-grade, fully featured, and open source suite of LDAP applications and
development tools. The project is managed by a worldwide community of volunteers who use the
Internet to communicate, plan, and develop the OpenLDAP suite and its related documentation.
OpenSLP
http://www.openslp.org
The Service Location Protocol (SLP) is provides client/server applications with the means to discover
and select system services on the network. Internet Express provides the OpenSLP server and
Application Program Interfaces (APIs) based on the SLP Version 2 standard protocol.
Perl
http://www.perl.com
The Practical Extraction and Report Language (Perl) is an interpreted language distributed over
Usenet. See this Web site for more information on Perl, including FAQs, documentation, newsgroups,
and software updates.
PHP Hypertext Preprocessor
http://www.php.net/
The PHP hypertext preprocessor is a server-side, cross-platform, HTML embedded scripting language.
It is built into the public instance of the Secure Web Server shipped with Internet Express Version
6.4 and allows you to create dynamic Web content by embedding conditional directives in your
HTML file.
Pine Mail Client and Pico Editor
http://www.washington.edu/pine/
Pine is an IMAP e-mail client for terminals or terminal emulators. Pine is easy to learn; command
choices are presented at the bottom of each screen. Pico is the editor that Pine uses. This Web site
at the University of Washington provides complete documentation, FAQs, and access to the
software.
The Internet Express kit includes documentation on Pine and Pico in the Internet Services User's
Guide.
POP Mail Server
http://www.eudora.com/freeware/servers.html
POP (Post Office Protocol) allows single-user hosts to read electronic mail from a server. These sites
provide information on the current version of the Qualcomm popper POP Mail Server.
The Internet Express kit includes documentation on POP in the /usr/internet/docs/pop
directory.
32 Where to Find More Information
Page 33

PostgreSQL Relational Database Management System
http://www.postgresql.org
PostgreSQL is an object-relational database management system, supporting many SQL constructs.
PostgreSQL is a required component for the Internet Monitor, but it can also be installed as a
separate component with Internet Express.
The Internet Express kit includes PostgreSQL documentation in the source tar files on the Internet
Express “Installation and Documentation? CD-ROM. Documentation is also available from the
PostgreSQL Web site.
Procmail Mail Filtering Language
http://www.procmail.org/ftp://ftp.procmail.org/pub/procmail/
The Procmail mail filtering language, written by Stephen van den Berg of Germany, lets you filter
hundreds or thousands of incoming mail messages per day according to a predefined set of rules.
The Procmail language understands details about most UNIX mail transport and delivery agents,
giving you the platform to write custom mail filtering scripts. The Procmail filtering engine can be
invoked by Sendmail or by a user's .forward file.
See procmail(1), procmailrc(5), and procmailsc(5) for more information on using procmail.
Extensive examples are provided in procmailex(5).
The Infinite Ink Web site (http://www.ii.com) contains pointers to documentation, examples, and
FAQ, and provides a link to the FTP site where you can obtain the Procmail kit.
Pure-FTP Server
http://www.pureftpd.org/
File Transfer Protocol (FTP) is a client/server protocol that allows a user on one computer to transfer
files to and from another computer over a TCP/IP network. An anonymous FTP account on your
system allows any remote user to log in to your system using an FTP or anonymous user name.
Once logged in, that user can access a special directory hierarchy that contains publicly accessible
files and can transfer those files to another system using FTP.
Samba File and Print Server
http://www.samba.org
The Samba File and Print Server for Windows provides file and print services to SMB clients, such
as Windows 2000, Windows NT, or LAN Manager. It also provides NETBIOS name serving and
browsing support.
At the Samba Web site, you can obtain documentation on the Samba server, report problems,
and download the latest software. Visit the comp.protocols.smb newsgroup for information
on the Samba server protocol.
Sendmail Mail Transport Agent
http://www.sendmail.org/
Sendmail is the BSD Mail Transport Agent supporting mail transport by means of TCP/IP using
Simple Mail Transfer Protocol (SMTP).
Squid Proxy/Caching Server
http://squid-cache.org
Squid is a high-performance proxy/caching server that supports FTP, Gopher, and HTTP data
objects. Squid tends to be faster than other proxy/caching servers because it maintains linked
objects in RAM, caches DNS lookups, and supports nonblocking I/O, negative caching of objects,
and DNS lookups. Squid documentation and FAQs are available from the Squid homepage.
Open Source Software Web Sites 33
Page 34

The Internet Express kit includes documentation on Squid in the /usr/internet/docs/squid
directory.
Struts
http://struts.apache.org/
Apache Struts is a free open-source framework for creating Java web applications.
TCP Wrapper
ftp://ftp.porcupine.org/pub/security/index.html
TCP Wrapper intercepts an incoming network connection and verifies that the connection is allowed
before passing the connection to the network daemon. TCP Wrapper is configured through the
/etc/hosts.allow file. The FTP archive of the Mathematics and Computing Science Department
of Eindhoven University of Technology (the Netherlands) contains TCP Wrapper kits.
Tomcat Java Servlet and JSP Engine
http://jakarta.apache.org/tomcat
http://archive.apache.org/dist/java/
Tomcat is part of the Jakarta Project and the official reference implementation for the Java Servlet
2.2 and JavaServer Pages 1.1 Technologies. The goal of the Jakarta Project is to provide
commercial-quality server solutions based on the Java Platform that are developed in an open and
cooperative fashion. Tomcat is the Java Servlet and JSP Engine, a product of the Jakarta Project.
TIN News Reader
http://www.tin.org/
TIN is a full-screen news reader for terminals or terminal emulators on UNIX systems. The TIN
homepage allows you to download the latest version of TIN, access TIN mailing lists, and submit
problem reports.
XML Components
http://xml.apache.org/
The XML components provide commercial-quality, standards-based XML solutions and include:
Xerces XML parsers in C++ and Java, Xalan XSLT Stylesheet Processor in C++ and Java, Batik
toolkit for Scalable Vector Graphics (SVG) in Java, FOP XSL formatting objects in Java, Cocoon
XML-based Web publishing in Java, and Apache Axis.
Apache Axis is an implementation of the SOAP (Simple Object Access Protocol) submission to the
W3C. SOAP is a lightweight protocol for exchange of information in a decentralized, distributed
environment. Apache Axis, which is a follow-on project to Apache SOAP based on the Simple
Object Access Protocol, is a lightweight protocol for exchange of information in a decentralized,
distributed environment.
Apache Axis consists of three parts: an envelope that defines a framework for describing what is
in a message and how to process it, a set of encoding rules for expressing instances of
application-defined datatypes, and a convention for representing remote procedure calls and
responses. Information about the Apache Axis Server can be found at:
http://ws.apache.org/axis/
System Security Web Sites
Information on system security is available from the following sites:
CERT
http://www.cert.org/
34 Where to Find More Information
Page 35

The Computer Emergency Response Team (CERT) is a clearinghouse for security-related events that
occur in the Internet community. If you are an administrator, subscribe to the CERT mailing list and
frequently check the CERT advisories.
CERT works with the Internet community to facilitate the community's response to security events
involving hosts, takes proactive steps to improve the community's awareness of security issues, and
conducts research aimed at improving the security of existing systems. CERT services include a
24-hour hotline for responding to security incidents, product vulnerability assistance, and technical
documentation and tutorials.
CIAC
http://www.ciac.org/ciac/
The Computer Incident Advisory Capability (CIAC) site is maintained by the U.S. Department of
Energy. The Web site offers computer security information, as well as workshops, consulting, and
security incident-handling information.
CSRC
http://csrc.ncsl.nist.gov/
The Computer Security Resource Clearinghouse (CSRC) is a U.S. Government archive containing
security information and contacts maintained by the National Institute on Standards and Technology
(NIST).
Other Useful Web Sites
The following sites contain information that might be of interest:
Applications
http://cws.internet.com/
The Consummate WinSock Applications Web site contains access to numerous Internet applications
for personal computer users. The site is owned by Forrest H. Stroud, whose purpose is to “help net
users stay current on the latest, greatest WinSock applications.?
InterNIC
www.internic.net/
The Internet Network Information Center (InterNIC) is a collection of Network Information Service
managers, selected by the National Science Foundation (NSF), who provide and coordinate
services for the NSF network community.
Microsoft
http://www.microsoft.com/
The Microsoft homepage contains information on Internet-based products and lets you download
software.
World Wide Web Consortium
http://www.w3.org/
The World Wide Web Consortium homepage is funded by the Internet industry and managed by
MIT's Laboratory for Computer Science, INRIA (the European Laboratory for Particle Physics), and
CERN (Institut Nationale de Recherche en Informatique et Automatique). The Consortium produces
specifications and software (available at no cost) that help realize the full potential of the Web.
This site is an excellent source of information on Web authoring and Web site administration.
Other Useful Web Sites 35
Page 36

Encompass
http://www.encompassus.org
Encompass, formerly DECUS (US Chapter), is an association of information technology professionals
who share a common interest in the products, services, and technologies of Hewlett-Packard
Company. From their homepage, you can find connections to member services, local user groups,
training, events, and publications.
36 Where to Find More Information
Page 37

3 User Administration
The Manage Users menu lets you perform a variety of user account management functions. To
access this menu:
1. From the Internet Express Administration Utility Main menu, choose Manage Components.
The Manage Components menu is displayed.
2. From the Manage Components menu, under Users, choose Manage Users. The Manage Users
menu is displayed (Figure 4).
Figure 4 Manage Users Menu
From the Manage Users menu, you can perform the following tasks:
• Create named captive accounts (see Section : Creating Captive Accounts for Named Users)
or generic captive accounts (see Section : Creating Captive Accounts for Generic Users) for
Internet Express users, and elect to store the account information in an LDAP directory server
• Create noncaptive accounts for UNIX system users (see Section : Creating a Noncaptive
Account for a UNIX System User), and elect to store the account information in an LDAP
directory server
• Create groups for user accounts (see Section : Creating Groups), and elect to store the group
information in an LDAP directory server
• Display user account information (see Section : Displaying User Account Information)
• Delete user accounts (see Section : Deleting User Accounts)
• Change the secondary groups an account is assigned to (see Section : Changing Groups for
User Accounts)
37
Page 38

• Change an account's password (see Section : Changing the Password for an Account)
• Change an account's mail service (see Section : Changing Mail Services for Users)
• Manage the iass account (see Section : Managing the iass Account)
• Allow users to self-manage their accounts (see Section : Managing the User Self-Administration
Feature)
Overview of User Accounts
The Administration utility supports the management of the following types of user accounts:
• Captive accounts for named users—You can create captive accounts for individual users
(Section : Creating Captive Accounts for Named Users). This function is useful to create a
small number of specifically named accounts. You can specify passwords or let the system
generate them for you.
• Captive accounts for generic users—Using a batch process, you can create a large number
of generically named accounts with system-generated passwords (Section : Creating Captive
Accounts for Generic Users).
• Noncaptive accounts for system users—You can create standard UNIX accounts for individual
system users (Section : Creating a Noncaptive Account for a UNIX System User).
Notes:
By default, the user accounts are created with regular delivery mail service. To change a user's
mail service, see Section : Changing Mail Services for Users.
On a system using the Network Information Services (NIS), you cannot create a user name that
conflicts with an NIS user name even if that name does not exist in your local /etc/passwd file.
Be sure to periodically check the contents of the ~iass/.users.list file to purge obsolete
users and passwords (see Section : Purging Obsolete Passwords).
When you create any user account (captive or noncaptive, named or generic), you can elect to
have the account information stored in an LDAP directory (if you are using an LDAP directory server
on your system).
The users of the captive accounts that you create have access to the Internet services you install on
your system. The accounts are called captive because the user is restricted to a predefined menu
of functions (through either a standalone terminal or terminal emulation on a PC), which provides
access to the following services and functions:
• Electronic mail—Send and receive e-mail from other users on the Internet, including those who
use the local system as their e-mail server for POP3 or IMAP clients.
• News—Use terminal-type news readers.
• World Wide Web—Use a character-cell Web browser (Lynx) or a graphical Web browser
(if it is installed and the DISPLAY environment variable is set).
• Change Password—Change the current login password for the user's account.
• User's Guide—Read an online version of the Internet Services User's Guide, which explains
how to access and use mail, news, and the Web browser.
Internet Express captive account users cannot access the Tru64 UNIX shell.
The user of a noncaptive UNIX account that you create has access to the shell and enjoys all
privileges of the groups to which the user is assigned.
Accounts are not required for any users who will access your system using only Web browsers or
news clients. Remember that user accounts are system resources and must be managed to ensure
system security. Create new noncaptive user accounts judiciously.
38 User Administration
Page 39

Note:
Whenever you use the Administration utility to manage user accounts, you may see a message
displayed in a box titled Security Information warning you that some unencrypted information may
be transmitted over the network. Click on Continue to continue the operation.
You can temporarily disable this message by clearing the checkmark in front of Show This Alert
Next Time. To enable the message, make sure your browser security preferences are set to display
a message before submitting a form over an unsecured connection.
Specifying User Names
Note the following rules when specifying the user name for an account (or the user-name prefix
for a generic account):
• Use only alphabetic, numeric, or a combination of alphabetic and numeric characters.
• Do not use nonalphanumeric characters (for example, spaces, colons, hyphens, underscores,
or periods) in the user name.
Assigning Passwords to User Accounts
All user accounts have passwords. You can assign a password when you create an account for a
named captive Internet Express account or for a UNIX system user. Alternatively, the Administration
utility can generate the password for these accounts. (You do not assign passwords to generic
captive accounts; the utility automatically generates the passwords for these accounts.)
To make a password more secure, make sure the password contains:
• Between 8 and 64 characters
If you are not running ENHANCED (C2) security on your system, the password can be no
more than 8 characters
• A mixture of uppercase and lowercase letters
• Unusual capitalization, symbols, or digits
Passwords that do not meet these criteria are rejected by the Administration utility.
Purging Obsolete Passwords
The passwords that the Administration utility automatically generates (for any type of account) are
recorded in the ~iass/.users.list file.
If you specify a password for a named captive account or a UNIX account, the event is noted in
this file, but the actual password is not recorded.
Entries are not automatically removed from the ~iass/.users.list file when you delete an
account. If you do not periodically remove obsolete entries, this file can become large.
When you log in to the iass account and the ~iass/.users.list file exists, the menu item
Manage .users.list is displayed. Use this function to view, print, or remove the recorded
passwords.
Caution:
The passwords in ~iass/.users.list are not encrypted. Because these passwords are also
recorded in encrypted form in /etc/passwd, you may want to consider removing them from
.users.list. Use caution when printing or displaying this data.
To ensure a secure system, require users to change their passwords regularly. See the Tru64 UNIX
System Administration manual for information on how to change passwords.
Overview of User Accounts 39
Page 40

You can also access the ~iass/.users.list using the Manage iass Account menu item (see
Section : Managing the iass Account).
Searching for User Accounts
Several user management tasks (such as displaying or deleting user accounts or changing groups)
require you to select the user accounts on which you want to operate. The Administration utility
allows you to search for user accounts, using one or more of the following search criteria:
• Name Pattern
• Group
• Mail Service
If you select more than one search criterion, the logical operator AND is applied to the criteria.
Therefore, using more than one search criterion tends to refine the search. For example, the Display
User Account form in Figure 5 (accessed from Manage Users menu) shows how to construct a
query to find user accounts that contain the letter a in the name and use the Regular Delivery mail
service.
Figure 5 Searching for User Accounts
When you click on Apply, the results of your search are displayed in the User Account Selection
List frame (to the right of the User Account Selection Criteria frame). You can select individual
accounts from the list box (press and hold the Control key and click MB1), or you can select all
the accounts by clicking on Display All. In Figure 6, the administrator has selected three of the 15
accounts that match the query shown in Figure 5. The Administration utility will operate on these
three accounts only.
40 User Administration
Page 41

Figure 6 Selecting User Accounts
To return the criteria in the User Account Selection Criteria frame to their default values, click on
Reset. If you do not clear or reset the previous choices, they remain in effect to be used in a
subsequent query. You can omit an individual selection criterion from subsequent queries by turning
off its associated checkbox.
Assigning Users to Groups
When you create a user account, you can assign the user to from one to four logical categories
called groups. You can select from existing groups, which are displayed in a list box. To create a
new group, see Section : Creating Groups.
The Administration utility allows you to select from groups with a group identifier (GID) of 15 or
greater that are defined on the local system. The utility also creates an IASS_Usr group with a
GID of 1000 (or the next available GID above 1000), and assigns all captive users to this group.
You can select captive accounts (for modification or deletion) by using the IASS_Usr group as a
selection criterion.
Note:
If the group Lkr_Usr_ exists from a previously installed version of Internet Express, then the
IASS_Usr group is not created and Lkr_Usr_ is used instead.
There is a limit to the number of users you can assign to a given group and to the length of a group
name. See the Tru64 UNIX System Administration manual for more information on these limits.
The forms to create user accounts contain a list box that you can use to select from among the
existing groups on your system. To select multiple groups, click on up to four groups in the list box.
Optionally, you can also associate a Tru64 UNIX user account with up to four additional secondary
groups by selecting more than one group from the list box. (If you select more than four groups,
the user is assigned to only the first four groups, starting at the top of the list.)
Overview of User Accounts 41
Page 42

For captive Internet Express users, group assignment is optional. You can select up to four groups
to associate with an Internet Express user account. The Administration utility automatically assigns
IASS_Usr (or Lkr_Usr_, if it exists from a previously installed version of Internet Express) as the
primary group to Internet Express captive accounts.
Note:
If the Enable Group Attributes field is checked in the LDAP Module for System Authentication —
Configure Group Attributes, and the LDAP Module for System Authentication is enabled (see
Section : Configuring LDAP Group Attributes), then the LDAP secondary groups will appear on the
Create System User Account, Create Named User Account, and Create Generic User Accounts
pages.
For noncaptive Tru64 UNIX system users, you must assign the user to at least a primary group.
This group becomes the login group for the account. The Administration utility sets the default
primary group for noncaptive accounts to users; if the users group does not exist, the default
primary group is IASS_Usr (or Lkr_Usr_, if it exists from a previously installed version of Internet
Express).
Note:
If you need to change an account's primary group, you must use Tru64 UNIX commands at the
shell prompt.
After a set of Internet Express accounts is associated with a group, you can use that group to make
modifications to the set of accounts. For example, if you assign a set of captive accounts to the
group finance, you can later modify or delete the group. All accounts associated with the
finance group will be modified or deleted in that one action. Also, if you select Display User
Accounts and specify a group, information on all users in that group is displayed.
Creating Captive Accounts for Named Users
To create a named captive account, follow these steps:
1. From the Manage Users menu, choose Create Captive User Accounts.
2. From the Create Captive User Accounts menu, choose Create Named User Account.
3. Specify the user (login) name for the account in the Login Name field (see Section : Specifying
User Names).
4. Optionally, specify a password in the Password field. To verify the password, enter it again
in the Verify Password field. (The system will generate a password if you do not specify one.)
5. To specify the parent directory for these generic accounts, enter the full pathname of the parent
directory (excluding the login name) in the Parent Directory field. The default login directory
for generic captive accounts is /data/IASS_Usr/login_name (or
/data/Lkr_Usr_/login_name, if the /data/Lkr_Usr_ directory exists from a previously
installed version of Internet Express).
6. Optionally, specify the account name. (This is usually the full given name of the person for
whom you are creating the account.)
7. Optionally, assign the account to up to four existing groups (see Section : Assigning Users to
Groups) by selecting the groups from the Secondary Groups list box. (The Administration utility
automatically assigns captive user accounts to the IASS_Usr group as the primary group.)
8. If you installed and enabled the LDAP Module for System Authentication, the Create Named
Captive Account form displays a checkbox labeled Store Users in LDAP Directory Server.
Check this checkbox when you want to store this user account information in the LDAP directory
server.
9. Click on Submit.
Figure 7 shows the Create Named User Account form.
42 User Administration
Page 43

Figure 7 Creating a Named User Account
When the captive account for the named user is successfully added to the system, the Administration
utility displays information about the account on a confirmation page.
Creating Captive Accounts for Generic Users
You can create a single Internet Express generic user account, or multiple accounts at once, with
system-generated user names and passwords. You can optionally assign generic user accounts to
existing or new groups (see Section : Assigning Users to Groups). The Administration utility
automatically assigns passwords to generic accounts.
To create a generic captive account, follow these steps:
1. From the Manage Users menu, choose Create Captive User Accounts.
2. From the Create Captive User Accounts menu, choose Create Generic User Accounts.
3. Specify the user-name prefix in the Login Name field (for example, guest).
The system automatically generates a password for each generic user account.
4. Specify the number of generic accounts you want to create in the Number of Users field (for
example, 5).
5. Optionally, assign the account to up to four existing groups (see Section : Assigning Users to
Groups) by selecting each group from the Secondary Groups list box. (The Administration
utility automatically assigns IASS_Usr as the primary group for generic captive accounts.)
6. To specify the parent directory for these generic accounts, enter the full pathname of the parent
directory for generic accounts in the Parent Directory field. The default login directory for
generic captive accounts is /data/IASS_Usr/LoginPrefixNumber (or
/data/Lkr_Usr_/LoginPrefixNumber, if the /data/Lkr_Usr_ directory exists).
7. If you installed and enabled the LDAP Module for System Authentication, the Create Generic
User Accounts form displays a checkbox labeled Store Users in LDAP Directory Server. Check
this checkbox when you want to store this user account information in the LDAP directory
server.
8. Click on Submit.
Figure 8 shows the Create Generic User Accounts form.
Creating Captive Accounts for Generic Users 43
Page 44

Figure 8 Creating Generic User Accounts
For example, suppose you specify guest as the prefix and 3 as the number of users. If no existing
user name matches the specified prefix (guest), the Administration utility creates accounts for
guest1, guest2, and guest3. If any of the combinations of prefix and number results in an
existing account name, the utility increments the number by one and tests to be sure this results in
a unique account name. For example, if guest1 exists, the Administration utility creates accounts
for guest2, guest3, and guest4. If guest3 also exists, the utility creates accounts for guest2,
guest4, and guest5, and so on, until three unique accounts are created.
There is no limit to the number of generic user-name prefixes you can specify, and each of these
generic user-name prefixes can have from 1 through 999 accounts created for it.
Because creating a large number of accounts can take time, generic account creation runs as a
background process. You can use the Administration utility for other purposes while this background
process runs. Any errors that occur are logged in the /usr/internet/admin/log/
addgenuser.log file.
Creating a Noncaptive Account for a UNIX System User
To create a noncaptive account for a UNIX system user, follow these steps:
1. From the Manage Users menu, choose Create System User Account.
2. From the Manage Users menu, choose Create System User Account.
3. Specify the user's login name in the Login Name field (see Section : Specifying User Names).
The login name (and UID) you assign to the account are recorded in the /etc/passwd file.
4. Specify the login directory for this account in the Login Directory field. You must specify the
full path of the user's login directory on the local system. For example, if the system account
login name is vpr, then specify the login directory as parent_dir/vpr. If the login directory
you specify does not exist, it is created for you and populated with default login script templates
(obtained from the /usr/skel directory).
5. Optionally, you can:
44 User Administration
Page 45

Specify and verify the user password (see Section : Assigning Passwords to User Accounts).
•
If you do not specify a password, the system generates one.
• Specify a user identifier (UID).
You can enter a UID greater than 105 (up to the maximum UID value available on the
system), but if you leave the user ID field blank, the Administration utility assigns the next
available UID from the list maintained in the /etc/passwd file.
• Provide the full name of the account user (returned as output from the finger command).
• Change the user's primary group by selecting from among the existing groups displayed
in the Primary Group pull-down menu.
The Administration utility assigns the group users as the default primary group. If the
users group does not exist, the default primary group is IASS_Usr (or Lkr_Usr_, if
it exists from a previously installed version of Internet Express). The Create System User
Account form allows you to change the default primary login group by choosing from a
list of existing groups.
To create a group, see Section : Creating Groups.
• Add the user to up to four additional secondary groups by selecting each group from the
Secondary Groups list box.
In the /etc/group file, the user is added to the groups you select. See Section : Assigning
Users to Groups for more information on assigning a user to groups.
• Change the user's UNIX shell by selecting a shell from the pull-down menu (usr/bin/
sh is the default shell).
Among the selections is No shell, which is useful for an account that no one will log
into, such as an anonymous FTP account or a mail account that is used only to access
mail messages through POP or IMAP.
• If you installed and enabled the LDAP Module for System Authentication, the Create
System User Account form displays a checkbox labeled Store Users in LDAP Directory
Server. Check this checkbox when you want to store this user account information in the
LDAP directory server.
• Disable logins (for instance, in creating an account for FTP activity) by clicking on the
Yes radio button in the Disable Login field.
6. Click on Submit.
Note:
If you have root access to the local system, you can unlock accounts and add accounts to user
groups with GIDs less than 15 using UNIX command-line utilities (such as useradd, usermod,
and passwd). You can also use the dxaccounts GUI to perform these tasks.
Figure 9 shows the Create System User Account form.
Creating a Noncaptive Account for a UNIX System User 45
Page 46

Figure 9 Creating a System User Account
Creating Groups
To create a user group, follow these steps:
1. From the Manage Users menu, choose Create Groups.
2. On the Create Groups form, enter the name of the new group you want to create in the Unique
Group Name field. (The names of existing groups are displayed in the Available Groups list
box as a convenience.)
Use only alphabetic, numeric, or combinations of alphabetic and numeric characters. Do not
use spaces, colons, hyphens, underscores, periods, or other nonalphanumeric characters.
3. Optionally, you can specify a group ID (GID) for a group name. If this field is left blank, the
GID will be generated by the system. The following rules apply to GIDS:
• Group names can share GIDs.
• There can be multiple groups with the same GID.
• Groups names must be unique.
• Multiple group names cannot exist. This applies to each database.
• The same group name may be stored in both the local and LDAP database. If this is true,
the local group will by default be used first by the application.
4. If you installed the LDAP Module for System Authentication, the Create Groups form displays
a checkbox labeled Store in Directory Server. Check this checkbox when you want to store
this group information in the LDAP directory server.
5. Click on Add.
The group you created is displayed in the Existing Groups list box, and is immediately available
to add to user accounts. Figure 10 shows the Create Groups form.
46 User Administration
Page 47

Note:
On a system using the Network Information Services (NIS), you cannot create a group name that
conflicts with an NIS group name even if that name does not exist in your local /etc/group file.
Figure 10 Creating Groups
Displaying User Account Information
You can display user account information for any number of selected users. (See Section : Searching
for User Accounts for instructions on searching for users.)
To display user account information, use one of the following methods:
• Click on one or more names from the User Account list and click on Display Selected.
• Click on Display All to select all the names in the User Name list box.
As shown in Figure 11, the Administration utility displays the following information for each account
you selected:
• User name
• UID
• Source of user account information (Local means the user information is stored in the /etc/
passwd file; LDAP means the information is stored in the an LDAP directory server).
• Primary group
• Login directory
• Login shell
• The full account name associated with the user
Displaying User Account Information 47
Page 48

Figure 11 Displaying User Account Information
Note:
On a system using the Network Information Services (NIS), the names of UNIX system accounts
(or groups) are not displayed in the User Account Names (or User Account Groups) list box, nor
will any NIS user information be included in the output when you click on Submit.
Deleting User Accounts
You can deny a user access to the system by deleting a user's account. You can also specify the
removal of the home and mail directories associated with the deleted account.
Notes:
You cannot use the Administration utility to delete a Tru64 UNIX user that has a UID value of less
than 105. You also cannot delete a user account while that user is logged in, or delete the Internet
Express administrator's account, iass. For more information on managing Tru64 UNIX system
user accounts, see the Tru64 UNIX System Administration manual.
Internet Express accounts and passwords are stored in the ~iass/.users.list file. Entries are
not automatically removed from this file when you delete an account. If you do not periodically
remove obsolete entries, the .users.list file can become large. See Section : Purging Obsolete
Passwords for information on how to purge obsolete entries from this file.
To deny access to the account for a period of time without deleting all of the files associated with
that account, change the account password rather than deleting the account itself. For more
information on changing the password, see Section : Changing the Password for an Account.
If you want to reuse an account, delete the account and its directories and then re-create the
account. With this process, you automatically delete all of the previous user's files and avoid the
possibility of private or personal files becoming available to the new user of the account.
Caution:
When you delete a user account, the directories and files for that account cannot be restored
(unless the directories and files were previously backed up).
To delete one or more user accounts, follow these steps:
1. From the Manage Users menu, choose Delete User Accounts.
2. Search for the user accounts you want to delete. (See Section : Searching for User Accounts
for instructions on searching for user accounts.)
3. To display user account information, use one of the following methods:
48 User Administration
Page 49

Click on one or more names from the User Account list and click on Display Selected.•
• Click on Display All to select all the names in the User Account list box.
4. The Delete User Accounts form shows the login name, UID, primary group and login directory
for each user you selected.
To remove a user's home directory when the account is deleted, click on the checkbox in the
Remove Directory column. (By default, a user's home directory remains on the system after
the account is deleted.) All files assigned to that user are deleted and the disk space used by
that account is freed for other use.
When deleting a large number of user accounts, you can go directly to a specific page in the
listing by entering the page number in the text field at the top of the form and clicking on Go
To Page. Note that when you click the Delete button, all of the selected user accounts are
deleted, not just the user accounts on the current page.
Newsgroup postings and messages that the user sent to other users are not deleted. This
applies to user accounts that you delete individually or as a group (when you select accounts
to delete based groups to which they belong).
5. Click on Delete to delete the displayed accounts. To cancel the deletion, click on Reset.
Note:
On a system using the Network Information Services (NIS), the names of UNIX system accounts
are not displayed in the User Account Names list box, but will be included (if any match the
selection criteria) with the Internet Express captive accounts when you click on Submit.
Figure 12 shows the result of a request to delete the val1 account. The home and mail directories
for the val1 account will be deleted with the account.
Figure 12 Deleting User Accounts
Changing Groups for User Accounts
You can use the Administration utility to change the list of secondary groups to which one or more
user accounts are assigned. (To change an account's primary group, you must use Tru64 UNIX
commands.)
To modify the secondary groups to which a user belongs, follow these steps:
1. From the Manage Users menu, choose Change User Account Secondary Groups. The User
Account Selection Criteria form then displays.
2. Search for the user accounts whose secondary group assignments you want to change. (See
Section : Searching for User Accounts for instructions on searching for users.)
After you select the user accounts and press Apply, the User Accounts Selection List displays.
Changing Groups for User Accounts 49
Page 50

3. Use one of the following methods to select user accounts:
• Click on one or more names from the User Account Selection List and click on Display
Selected.
• Click on Display All to select all the names in the User Name list box.
4. The Change User Secondary Groups form shows the current group assignments for the selected
users. In the Secondary Groups list box, click on one or more secondary groups to which the
selected users are to be assigned. (See Section : Assigning Users to Groups for more
information on assigning users to groups.)
• To retain existing group assignments for an account, select the existing groups in addition
to the new groups.
• If a user account's primary group is the same as one of the secondary groups you select,
the duplicate group is dropped from the secondary group assignment for this account.
5. Click on Submit to replace the existing secondary group assignments with the new ones.
In Figure 13, the val1 and dylan accounts will be added to the sysadmin group. To retain the
assignment to groups httpd and operator, these groups must also be selected (not shown).
50 User Administration
Page 51

Figure 13 Changing User Account Secondary Groups
Changing the Password for an Account
The Change User Account Password function is useful when a user has forgotten the password for
an account, or if you want to retain a user account on the system but deny access temporarily to
the account. You do not need to know the current password for an account to change the account's
password. You can view passwords in the .users.list file by logging into the iass account
(see Section : Purging Obsolete Passwords).
To change the password for a captive or system user account, follow these steps:
Changing the Password for an Account 51
Page 52

1. From the Manage Users menu, choose Change User Account Password.
2. Use the User Account Selection Criteria frame to search for the user account whose password
you want to change. (See Section : Searching for User Accounts for instructions on searching
for users.)
3. In the resulting User Account Selection List frame, click on one user whose password you want
to change and click on Display Selected.
4. Enter the new password for the selected account in the New Password field, and again in the
Verify Password field. If you make a mistake, click on Clear.
Passwords must conform to the conventions described in Section : Assigning Passwords to
User Accounts.
If you want the Administration utility to generate a password for you, leave these fields blank.
5. Click on Submit to change the password.
The utility displays a message to tell you that a record of this transaction was sent to the iass
account. Log in to the iass account periodically to review the contents of the .users.list file,
and to delete obsolete account information in that file (see Section : Purging Obsolete Passwords).
Changing Mail Services for Users
You can use the Administration utility to change the mail service for a single user, a group of users,
or all the users on your system. You must have root privileges to change a user's mail service.
Some mail services require you to specify a password to protect a user's mail. In addition, the
Cyrus IMAP mail service requires you to specify access rights for the user's mail directories
(subdirectories for folders inherit the access rights of the user's top-level mail directory).
To change the mail service for one or more users:
1. Search for the user accounts you want to change. Click on the check boxes corresponding to
one or more of the following search criteria:
• Name Pattern — Search for user account names using any UNIX regular expression. The
default name pattern searches for all user accounts.
• Group — Select one or more groups from the list box. The Administration utility searches
for all user accounts belonging to any of the chosen groups.
• Mail Service — Select one or more mail service types from the list box. The Administration
utility searches for all user accounts assigned to any of the chosen mail services.
Click on Apply to conduct the search. The Administration utility lists all user accounts matching
the selection criteria.
To erase your choices and start a new search, click on Reset.
2. Click on one or more names from the resulting list box.
To conduct another search without choosing names from the resulting list box, click on the up
arrow icon to return to the User Account Selection Criteria frame.
Note:
On a system using the Network Information Services (NIS), the names of UNIX system accounts
are not displayed in the User Account Names list box, but will be included (if any match the
selection criteria) with the Internet Express captive accounts when you click on Submit.
3. Assign one of the following mail services to the selected user accounts, depending on which
mail services are installed and active on your system:
• Regular Delivery (see Section : Assigning Regular Delivery Mail Service)
• POP with Password (see Section : Assigning POP with Password Mail Service)
• Cyrus IMAP (see Section : Assigning the Cyrus IMAP Mail Service)
52 User Administration
Page 53

• Cyrus IMAP with Password (see Section : Assigning Cyrus IMAP with Password Mail
Service)
• APOP (see Section : Assigning APOP with Password Mail Service)
Assigning Regular Delivery Mail Service
With regular delivery, mail is delivered into the /var/spool/mail directory. Assign the Regular
Delivery mail service to users who read their mail as follows:
• Locally, with a UNIX client (such as mailx, mh commands, or dxmail)
• Using a POP mail server
• Using the University of Washingon IMAP (UW-IMAP) Server
For users who want to use a password other than their login password to access mail using POP,
choose either POP with Password (see Section : Assigning POP with Password Mail Service) or
APOP (see Section : Assigning APOP with Password Mail Service).
Note:
If you choose either POP with Password or APOP, the user's mail client must be configured
accordingly. Otherwise, the users will be unable to access their mail.
To assign regular delivery service to the users you selected, follow these steps:
1. From the Change User Account Mail Service form, choose Regular Delivery from the Mail
Service menu.
2. Click on Submit. A new form is displayed, requesting one or more types of authentication.
3. If prompted for the Administrator Password, enter the password for the iass account. (For
new installations of Internet Express, the iass account password is specified during installation.)
4. Click on Submit. A status message confirms the change in mail service.
5. Optionally, you can select additional user accounts and modify their mail delivery methods
by choosing User Account Selection from the navigation bar.
6. When finished, use the navigation bar at the top of the form to return to the Manage Users
menu or the Home menu.
Assigning POP with Password Mail Service
You can set up selected users to use POP mail with a clear-text password other than their login
password. This password is stored in the popauth file, and protects the users' mail from
unauthorized access.
To assign POP with password mail service to the users you selected, follow these steps:
1. From the Change User Account Mail Service form, choose POP with Password from the Mail
Service menu.
2. Click on Submit. A new form is displayed, requesting one or more types of authentication.
3. If prompted for the Administrator Password, enter the password for the iass account. (For
new installations of Internet Express, the iass account password is specified during installation.)
4. To specify the POP password for the selected users, enter the password in the Enter Alternate
Mail Password field and enter it again in the Verify Password field. A password is required.
Mail passwords must contain at least six characters, in a combination of upper- and lowercase
letters and numbers. Special characters, such as the at sign (@), dollar sign ($), percent sign
(%), number sign (#), period ( . ), hyphen ( - ), or underscore ( _ ), while not required, are
recommended.
5. Click on Submit. A status message confirms the change in mail service.
Changing Mail Services for Users 53
Page 54

6. Optionally, you can select additional user accounts and modify their mail delivery methods
by choosing User Account Selection from the navigation bar.
7. When finished, use the navigation bar at the top of the form to return to the Manage Users
menu or the Home menu.
Assigning the Cyrus IMAP Mail Service
To assign the Cyrus IMAP service to the users you selected, follow these steps:
1. From the Change User Account Mail Service form, choose Cyrus IMAP from the Mail Service
menu.
2. Click on Submit. A new form is displayed, requesting one or more types of authentication.
3. If prompted for the Administrator Password, enter the password for the iass account. (For
new installations of Internet Express, the iass account password is specified during installation.)
4. You must specify access privileges for the selected users' mail directories. Select one of the
following from the Access Control List menu:
• All — Grants the user full access rights.
• Read — Grants the user lookup, read, and seen access rights.
• Post — Grants the user lookup, read, seen, and post access rights.
• Append — Grants the user lookup, seen, post, write, and insert access rights.
5. Click on Submit. A status message confirms the change in mail service.
6. Optionally, you can select additional user accounts and modify their mail delivery methods
by choosing User Account Selection from the navigation bar.
7. When finished, use the navigation bar at the top of the form to return to the Manage Users
menu or the Home menu.
Assigning Cyrus IMAP with Password Mail Service
To assign the Cyrus IMAP service with a password to the users you selected, follow these steps:
1. From the Change User Account Mail Service form, choose Cyrus IMAP with Password from
the Mail Service menu.
2. Click on Submit. A new form is displayed, requesting one or more types of authentication.
3. If prompted for the Administrator Password, enter the password for the iass account. (For
new installations of Internet Express, the iass account password is specified during installation.)
4. You must specify access privileges for the selected users' mail directories. Select one of the
following from the Access Control List menu:
• All — Grants the user full access rights.
• Read — Grants the user lookup, read, and seen access rights.
• Post— Grants the user lookup, read, seen, and post access rights.
• Append — Grants the user lookup, read, seen, post, write, and insert access rights.
5. To specify the users' IMAP password, enter the password in the Alternate Mail Password field
and enter it again in the Verify Password field. A password is required.
Mail passwords must contain at least six characters, in a combination of upper- and lowercase
letters and numbers. Special characters, such as the at sign (@), dollar sign ($), percent sign
(%), number sign (#), period ( . ), hyphen ( - ), or underscore ( _ ), while not required, are
recommended.
6. Click on Submit. A status message confirms the change in mail service.
54 User Administration
Page 55

7. Optionally, you can select additional user accounts and modify their mail delivery methods
by choosing User Account Selection from the navigation bar.
8. When finished, use the navigation bar at the top of the form to return to the Manage Users
menu or the Home menu.
Assigning APOP with Password Mail Service
You can set up selected users to use POP mail with an encrypted password (using MD5 encryption).
This password is stored in the popauth file, and protects the users' mail from unauthorized access.
To assign POP with an alternate password service to the users you selected, follow these steps:
1. From the Change User Account Mail Service form, choose APOP from the Mail Service menu.
2. Click on Submit. A new form is displayed, requesting one or more types of authentication.
3. If prompted for the Administrator Password, enter the password for the iass account. (For
new installations of Internet Express, the iass account password is specified during installation.)
4. To specify the users' encrypted POP password, enter the password in the Alternate Mail
Password field and enter it again in the Verify Password field. A password is required.
Mail passwords must contain at least six characters, in a combination of upper- and lowercase
letters and numbers. Special characters, such as the at sign (@), dollar sign ($), percent sign
(%), number sign (#), period ( . ), hyphen ( - ), or underscore ( _ ), while not required, are
recommended.
5. Click on Submit. A status message confirms the change in mail service.
6. Optionally, you can select additional user accounts and modify their mail delivery methods
by choosing User Account Selection from the navigation bar.
7. When finished, use the navigation bar at the top of the form to return to the Manage Users
menu or the Home menu.
Managing the iass Account
The installation procedure for Internet Express allows you to create the iass account. Using the
Manage the iass Account menu, you can perform the following tasks:
• Change the forwarding address for the iass account (Section : Changing the iass Account
Forwarding Address).
• Manage the ~iass/.users.list file (Section : Managing the .users.list File).
Changing the iass Account Forwarding Address
The installation procedure for Internet Express allows you to set a forwarding address for e-mail
addressed to the iass account. This is useful if, for example, the administrator wants to have
e-mail forwarded to root or some other e-mail account that is regularly monitored.
If you did not set a forwarding address during installation, you can set it by using the Modify iass
Account menu. To do this, follow these steps:
1. From the Manage Users menu, choose Manage iass Account.
2. From the Manage iass Account menu, choose Change iass Account Mail Forward Address.
3. Enter the forwarding address in the Mail Forwarding Address field. If you had previously set
a forwarding address, it will be displayed in this field.
4. Click on Change to modify the forwarding address.
5. To remove the forwarding address, click on Remove.
Managing the .users.list File
The file ~iass/.users.list contains the account names and passwords of users. From the
Manage the .users.list file menu, you have the following options:
Managing the iass Account 55
Page 56

• List User Accounts and Passwords (see Section : Listing User Accounts and Passwords)
• Purge Passwords for User Accounts (see Section : Purging Passwords for User Accounts)
• Remove the .users.list file (see Section : Removing the .users.list File)
Listing User Accounts and Passwords
Use the Manage iass Account menu to list user accounts and passwords stored in the ~iass/
.users.list file.
To do this, follow these steps:
1. From the Manage Users menu, choose Manage iass Account.
2. From the Manage iass Account menu, choose Manage .users.list.
3. From the Manage .users.list menu, choose List User Accounts and Passwords.
The user accounts and passwords are displayed.
Purging Passwords for User Accounts
Use the Manage iass Account menu to purge passwords for user accounts stored in the ~iass/
.users.list file.
To do this, follow these steps:
1. From the Manage Users menu, choose Manage iass Account.
2. From the Manage iass Account menu, choose Manage .users.list.
3. From the Manage .users.list menu, choose Purge Passwords for User Accounts.
A confirmation message is displayed.
Removing the .users.list File
Use the Manage iass Account menu to remove the ~iass/.users.list file.
To do this, follow these steps:
1. From the Manage Users menu, choose Manage iass Account
2. From the Manage iass Account menu, choose Manage .users.list.
3. From the Manage .users.list menu, choose Remove .users.list.
A confirmation message is displayed.
Managing the User Self-Administration Feature
The User Self-Administration feature allows users to directly manage their own account information
without requesting help from an administrator. This feature enables users to change their password
and, if the Procmail subset (IAEPROC) is installed, users can enable vacation mail. Additional
administrative options allow administrators to selectively enable or disable different functionality.
For example, you can allow users to change their passwords but not enable vacation mail, or vice
a versa. You can also use the Administration utility to create a template to add your own
functionality.
Note:
In order to administer the User Self-Administration feature, you must have a public Web server
instance installed. Without a public Web server instance, the Manage User Self-Administration
link will not appear on the Manage Users menu.
This section describes how to perform the following tasks:
56 User Administration
Page 57

• Enable (or disable) the User Self-Administration feature (Section : Enabling and Disabling the
User Self-Administration Feature)
• Modify the Web server configuration (Section : Modifying the Web Server Configuration)
• Enable (or disable) a delay in the processing of login requests (Section : Enabling and Disabling
Login Delays)
• Manage groups (Section : Managing User Self-Administration Groups)
• Customize the User Self-Administration feature (Section : Customizing the User
Self-Administration Feature)
Note:
The user's Web browser must support cookies to access the User Self-Administration feature. If
users do not have this support or if they choose not to accept cookies, they cannot access this
feature.
Enabling and Disabling the User Self-Administration Feature
To enable the User Self-Administration feature:
1. From the Manage Users menu, choose Manage User Self–Administration. The Manage User
Self-Administration menu is displayed (Figure 14).
Managing the User Self-Administration Feature 57
Page 58

Figure 14 Manage User Self-Administration Menu
2. From the Manage User Self-Administration menu, choose Enable/Disable User
Self-Administration.
The Administration utility displays the current status allowing you to enable or disable user
self-administration, depending on which is appropriate. Figure 15 shows a page where the
User Self-Administration feature is disabled.
3. Click on Enable to enable user self-administration. Once this feature has been enabled, the
Enable button changes to Disable.
Figure 15 Enable/Disable User Self-Administration Page
When you disable the User Self-Administration feature, users will not be able to access the User
Self-Administration pages. In this case, a system administrator might need to reset the user account
information. You can also customize the default status message (Section : Customizing the User
Self-Administration Feature).
Enabling User Self-Administration When No Web Server Configuration Exists
When you enable the User Self-Administration feature for the first time or enable it after removing
a previous Web server configuration, the Administration utility prompts you to select a virtual host
for the public Web server, which serves the self-administration pages. If there is no configured
virtual host on the public Web server, you must create a virtual host before proceeding. It is highly
recommended that you select (or create) a Secure Sockets Layer (SSL) virtual host to protect sensitive
information such as user names and passwords. The following steps complete the process:
58 User Administration
Page 59

1. From the Configure Web Server for User Self-Administration form, select an SSL virtual host
from the list box.
2. Enter an alias name or accept the default name. (The alias name is used to access the
self-administration pages.) The alias name should begin and end with a slash (/). For example,
if you set the virtual host to _default_:443 and the alias name to /SelfAdmin/, the
administration pages will be accessed by https://hostname/SelfAdmin/login.php.
3. Click on the Submit button. Your public Web server is configured and the User
Self-Administration feature is enabled. A status message is displayed.
Enabling User Self-Administration When a Current Web Server Configuration Exists
When you enable the User Self-Administration feature subsequent times, the public Web server is
running and the current configuration options are displayed. When you click on Enable from the
Enable/Disable User Self-Administration page, a form is displayed listing the current configuration
of virtual host and alias name. You can enable the User Self-Administration feature in one of the
following ways:
1. Click on Accept to enable the User Self-Administration feature without changing configurations.
A status message is displayed when completed. To modify the configuration, continue with
the remaining steps.
2. Click on Modify to change the virtual host and alias name of the public Web server.
3. Select an SSL virtual host from the list box.
4. Accept the default alias name for the virtual host or optionally enter an alias name. (The alias
name is used to access the pages.) Figure 16 shows the virtual host selection and default alias
name.
Figure 16 Configure Web Server for Self-Administration Form
5. Click on the Submit button. Your public Web server is configured and the User
Self-Administration feature is enabled. A status message is displayed.
Modifying the Web Server Configuration
You can modify the Web server configuration for the User Self-Administration feature without
disabling it; you can change or remove the Virtual Host and Alias Name configurations. When
you choose to remove these configurations, the User Self-Administration feature then becomes
disabled.
To modify the Web server configurations for the User Self-Administration feature:
Managing the User Self-Administration Feature 59
Page 60

1. From the Manage User Self-Administration menu, choose Modify Web Server Configuration.
2. Select a Virtual Host from the list of virtual hosts or click on Remove Configurations to remove
all user self-administration configurations from the httpd.conf file (Figure 17: Modify Web
Server Configuration Page).
When you select a virtual host, it must be configured on your system. See Section : Enabling
User Self-Administration When No Web Server Configuration Exists for more information.
Figure 17 Modify Web Server Configuration Page
3. Edit the alias name, if desired. The alias name must begin and end with a slash (/).
4. Click on Submit. If you chose to remove configurations, you will be prompted to confirm that
action. A status message is displayed.
Enabling and Disabling Login Delays
By default, a security measure is in place which causes a delay in the processing of login requests
after a number of successive failed login attempts. This feature can be disabled, though not
recommended, because disabling will expose your system to security risks.
To enable or disable a delay in the processing of login requests:
1. From the Manage Users menu, choose Manage User Self–Administration.
The Manage User Self-Administration menu is displayed.
2. From the Manage User Self-Administration menu, choose Enable/Disable Login Delay. The
Enable/Disable Login Delay page is displayed.
3. Click on Enable to enable login delays. Figure 18 shows that login delays have been enabled.
Once this feature has been enabled, the Enable button changes to Disable.
Figure 18 Enable and Disable Login Delays
60 User Administration
Page 61

Managing User Self-Administration Groups
The User Self-Administration feature is organized in different groups that can be enabled and
disabled independently. User self-administration groups contain the following elements:
• ID – A unique, short word used to identify a group.
• Description – Information used as menu item text and as page headers.
• Main Page – Information that identifies the file to which the user's main menu provides a link.
• Enabled status – Message that specifies whether the group is accessible to users.
Internet Express provides two groups as built-ins, Vacation Mail and Change User Password. In
addition to these groups, you can add your own group. The following sections describe how to
add and modify existing groups.
Adding Groups
You can add new groups to contain additional functionality for the User Self-Administration feature.
Groups allow you to easily enable and disable parts of your configuration and create templates
to wrap new functionality. Templates perform the following functions:
• Verify that the group is enabled.
• Verify that a user is logged in.
• Make sure that the login has not expired.
• Create a header if these conditions are met or display the customizable disabled message.
To add a group:
1. From the Manage Users menu, choose Manage User Self–Administration. The Manage User
Self-Administration menu is displayed.
2. From the Manage User Self-Administration menu, choose Manage Groups. The Manage
Groups form is displayed.
3. Enter a description in New Group Description field. Click on Add. The Add Group form is
displayed (Figure 19), allowing you to specify group attributes.
4. On the Add Group form, enter a unique ID in ID field. The ID should be a short, one-word
value.
5. Optionally, revise the description you entered in Step 3.
6. Enter the pathname and file name for the main page of this group. The path should be relative
to the User Self-Administration home directory. For example, if the file is located at
$selfadmin_home/data/foo.php, set the value to data/foo.php.
7. Click on the Create Template check box if you would like a template created for the main
page. Use the template file as the basis for all files you create in this group. Existing templates
are not overwritten.
8. Click on the Enabled checkbox to enable the group. When a group created with the User
Self-Administration feature is disabled, users cannot access the pages and the link is not
available from the main menu.
9. Click on Submit. A status message is displayed when the group is created. Figure 19 shows
the Add Group form completed for a new group, System Mail.
Managing the User Self-Administration Feature 61
Page 62

Figure 19 Adding Groups
Deleting and Modifying Groups
To modify the properties for an existing group or delete an existing group:
1. From the Manage User Self-Administration menu, choose Manage Groups. The Manage
Groups forms is displayed. Existing groups are listed in the Existing Group Descriptions field.
2. Select the group you want to delete or modify from this list.
62 User Administration
Page 63

To delete a group, click on the Delete button. This will remove the group definition and
•
menu item from the user's main menu but will not remove any files. A status message is
displayed.
• To modify group attributes, click on the Modify button. For built-in groups, you can only
modify the Enabled status and the description string. All group attributes, except ID, are
available for custom groups.
a. Change the group description in the Description field.
b. Change the name for the main page. This name should be relative to User
Self-Administration home directory. For example, if the file is located at
$selfadmin_home/data/foo.php, then its name should be set to data/
foo.php.
c. Select the Create Template check box if you want a template created for the main
page. Use the template file as the basis for all files you create in this group. Existing
templates will not be overwritten.
d. Select the Enabled check box to enable the group. When a group created with the
User Self-Administration feature is disabled, users cannot access the pages and the
link is not available from the menu.
e. Click on Submit. A status message is displayed when the group modifications are
processed.
Enabling and Disabling Groups
To enable or disable groups and not edit other properties, do the following:
1. From Manage User Self-Administration menu, choose Enable/Disable Groups. A list of existing
group descriptions is displayed. Each description is followed by a check box.
A checked box indicates that the group is enabled and an unchecked box indicates it is
disabled. Enable or disable a group as desired.
2. Click on Submit. A status message is displayed.
Customizing the User Self-Administration Feature
You can add functionality to allow users to make changes to other user account information. The
Administration utility allows users to change their passwords and use a vacation mail service.
Note:
Changes to the vacation mail service can be made only if you have installed the Procmail subset
(IAEPROC).
To add functionality, you should create a new group for each menu item to be added to the user's
main menu page (see Section : Managing User Self-Administration Groups). All new files must be
in the /usr/internet/httpd/admin/htdocs/osis/selfadmin/data directory to ensure
that they are not deleted during future Internet Express updates.
To customize the User Self-Administration feature:
1. From the Manage Users Menu, choose Manage User Self-Administration.
2. Follow instructions in Section : Adding Groups to add a new group. Select the option to create
a template in the Add Group form. Use the created page as a basis for each PHP page in
group.
3. Follow instructions in Section : Enabling and Disabling Groups to enable the group after you
have completed adding your custom functionality.
Alternately, you can add new functionality without using groups. This method will, however, prevent
you from selectively enabling or disabling groups. For more information and instructions, refer to
the
Managing the User Self-Administration Feature 63
Page 64

/usr/internet/httpd/admin/htdocs/osis/selfadmin/data/template.php file.
You can customize the display properties of the user pages by editing defaults.inc and
style.css files located in the
/usr/internet/httpd/admin/htdocs/osis/selfadmin/data directory.
The defaults.inc file contains paths to the image files used for the header, bullets, and link
arrows. This file also contains the definition of attributes used to create the header. The most
important attribute is the width attribute, which defines the width of the page.
The style.css file is the stylesheet used by all pages. It defines the styles applied to fonts and
background color.
When you disable the User Self-Administration feature or individual groups, a default status message
is displayed when users attempt to access these pages. You can customize this message by editing
the page_disabled.inc file in the
/usr/internet/httpd/admin/htdocs/osis/selfadmin/data directory.
By changing this message, you can direct your users to contact the administrator to change their
account information.
64 User Administration
Page 65

4 User Authentication
The Internet Express Administration utility lets you set up and manage user authentication with the
LDAP Module for System Authentication, which serves as a central repository of user information,
for identifying and authenticating individual users
This chapter describes the following:
• Section : Managing the LDAP Module for System Authentication
• Section : Overview of the LDAP Client
Managing the LDAP Module for System Authentication
The LDAP Module for System Authentication is a loadable authentication mechanism based on the
Tru64 UNIX Security Integration Architecture. It intercepts security-related system calls and extracts
the information from an LDAP Directory server. This allows you to use LDAP authentication without
making any changes to application source code or recompiling.
The Lightweight Directory Access Protocol (LDAP) is an Internet standard directory service protocol
that runs over TCP/IP. An LDAP server manages entries in a directory, and makes the information
available to users and applications across the network. An LDAP server can be used as a central
repository of user information to identify and authenticate individuals. When used in this way, an
LDAP server is similar to Network Information Services (NIS), also known as yellow pages. When
compared to NIS, an LDAP server offers the following advantages:
• An LDAP directory is highly scalable
• LDAP directories are dynamically updated, saving administrators time because it is not
necessary to rebuild maps and push them onto the network. Also, changes are available
virtually immediately.
• An LDAP directory database can be used to centralize management of user related information
• The ability to modify an attribute can be controlled at the attribute level. Users can be allowed
to modify noncritical information (such as their preferred login shell or mail forwarding address)
on their own. Modifications to more sensitive information (such as UID, GID, or a user's home
directory) can be restricted to authorized directory managers only.
• You can set up multiple LDAP servers to make the data in the directory highly available.
Through a process called replication, you can ensure that all LDAP servers have identical
copies of the directory. The LDAP servers bind to one another and through standard LDAP
commands, propagate changes to the directory.
When you install and enable the LDAP Module for System Authentication subset, user and group
authentication takes place through an LDAP server. For example, an LDAP server transparently
provides authentication information for login (rlogin, ftp, telnet) and mail (POP and IMAP).
For users not found in the LDAP directory, authentication will automatically fall back to using the
local authentication mechanism (/etc/passwd) and/or NIS, if it is configured.
When the LDAP Module for System Authentication is installed on your system, the Administration
utility for Internet Express provides the following capabilities:
• You can configure the LDAP Module for System Authentication and test changes to the
configuration (see Section : Configuring the LDAP Module for System Authentication)
• When you create any user account (captive or noncaptive, named or generic), you can elect
to have the account information stored in an LDAP database (if you are using an LDAP directory
server in your environment)
• You can enable and disable the LDAP Module for System Authentication to authenticate users
through LDAP or through traditional UNIX methods, respectively
Managing the LDAP Module for System Authentication 65
Page 66

Chapter 11 describes how to administer Internet Express-provided Directory servers.
Default Configuration for the LDAP Module for System Authentication
Internet Express configures the security matrix in the/etc/sia/matrix.conf file to use the LDAP
Module for System Authentication. The security matrix consists of a list of security-related system
calls and the library to be used for each call. As shown in Example 1, the siad_ses_authent
and siad_ses_estab calls are configured to use the libsialdap.so library first. If that library
is not available, or if the requested information is not found in the LDAP server's directory, then
the libc.so library is used.
See the siacfg(8) and matrix.conf(4) reference pages for more information about configuring
security methods.
Example 1 Security Matrix Enabled for LDAP
.
.
.
siad_getgrgid=(BSD,libc.so) (LDAP,/usr/shlib/libsialdap.so)
siad_setpwent=(BSD,libc.so) (LDAP,/usr/shlib/libsialdap.so)
.
.
.
When you install the LDAP Module for System Authentication, the installation procedure checks
the validity of the configuration information you supplied, and tries to connect to the LDAP server
you specified during the installation, then enables the LDAP Module for System Authentication. If
the connection fails, or if the required schema attributes are not found, the LDAP Module for System
Authentication is not enabled and you must use the LDAP Module for System Authentication
Administration menu to enable it (after correcting the problems) or use the /usr/internet/
ldap_tools/ldap_enable utility. Check the attribute values in the Distinguished Name,
Password, System Name, Port Number, and the Search Base fields (see Section ).
The LDAP Module for System Authentication gets its information from the LDAP server by way of
the ldapcd caching daemon (see Figure 20). This daemon runs at all times and is started by the
following entry in the /etc/inittab file:
ldapcd:34:respawn:/usr/sbin/ldapcd -D > /dev/console 2>&1
66 User Authentication
Page 67

Figure 20 LDAP Caching Daemon
program
getpwent
libc.so
SIA library
SIA/LDAP plug-in library
controlled by:
maximum threads
controlled by:
active connections
socket
network connection
caching daemon (ldapcd)
controlled by:
expire entries
expire cache
LDAP directory server
cache
ZK-1475U-AI
Configuration information, used by the LDAP caching daemon and the provided tools, use a the
configuration file, /etc/ldapcd.conf. This file provides information on how to connect to the
LDAP directory server, the attribute mappings for the password and group entries, and caching
parameters. This file must contain a clear text password that allows the utilities to connect to the
directory server, and should always be read-only by root. The configuration file is shown in
Example 2. HP recommends that you use the Administration utility to modify the /etc/
ldapcd.conf file. To validate the configuration file, use the /usr/internet/ldap_tools/
ldap_check utility.
Managing the LDAP Module for System Authentication 67
Page 68

Example 2 LDAP Caching Daemon Configuration File
#
# directory server and port, active ldap connections cached
# by the daemon, max worker threads started
#
directory: host.xyz.com
searchbase: "o=XYZCompany"
port: 389
connections: 6
max_threads: 64
3
4
5
#
# max entries in cache, and number of seconds before entries
# expire in the cache
#
pw_cachesize: 2000
6
pw_expirecache: 120
gr_cachesize: 100
gr_expirecache: 600
machine_dn: "cn=Directory Manager"
machine_pass: "password"
#
# the objectClass name of a password entry
pw_oclass: posixAccount
1
2
7
8
# name mappings for password attribute fields
pw_username: uid
pw_password: userPassword
9
10
pw_uid: uidNumber
pw_gid: gidNumber
pw_quota:
pw_comment: description
pw_gecos: gecos
pw_homedir: homedirectory
pw_shell: loginshell
# the objectClass name of a group entry
gr_oclass: posixGroup
11
# name mappings for group attribute fields
gr_oclass: unixGroup
12
gr_name: cn
gr_password: userPassword
gr_gid: gidNumber
gr_members: MemberUID
1
Host name of the LDAP directory server to be used for user authentication.
2
The root of the branch in the directory server's database where user information is stored.
3
The default directory server port; this must match the port you are using for the directory
server.
4
Maximum number of open connections to the directory server maintained by the ldapcd
caching daemon.
5
Maximum number of threads maintained by the ldapcd caching daemon. Each thread
handles one connection to a local program. Allowing a higher number of threads may
enable better response from the LDAP caching daemon, but requires more memory. If you
are running a service that requires a large number of connections (for example, a mail
service), set the maximum number of threads to 64 or greater (if your system has sufficient
memory).
68 User Authentication
Page 69

6
The value of pw_cachesize determines how many individual passwd entries are allowed
to be cached. The value of pw_expirecache determines the maximum length of time that
the ldapcd caching daemon will check the cache for an individual passwd entry. When
the value of pw_expirecache is exceeded, the ldapcd daemon returns to the server to
look for the requested passwd entry.
The values for gr_cachesize and gr_expirecache work similarly to pw_cachesize
and pw_expirecache, but they work for group entries.
7
The value of machine_dn is the distinguished name by which the ldapcd caching daemon
binds to the directory to do searches and retrievals of information from the directory. By
requiring each system to use a particular DN, you can determine which machines are
accessing the directory and for what purpose. Further, you can also control read and search
access to the directory on a machine-account basis.
8
The name for the object class that defines the attributes for a UNIX account in the extended
schema on your server (see Section : Extended LDAP Schema for UNIX Account Information).
9
LDAP attribute names (on the right) are mapped to fields (on the left) in the passwd structure
returned by a call to getpwent.
10
Only the encrypted password is stored in the userPassword attribute.
11
The name for the object class that defines the attributes for a UNIX group in the extended
schema defined on your server (see Section : Extended LDAP Schema for UNIX Account
Information).
12
LDAP attribute names (on the right) are mapped to fields (on the left) in the group structure
returned by a call to getgrent(3).
Note:
HP recommends you use the Administration utility to modify the ldapcd.conf file.
Creating Branches
By creating branches, you can organize an LDAP directory tree into meaningful categories of
information, each with its own search base. The use of branches can improve the performance of
an LDAP server by allowing queries to be confined to the branch that contains the information of
interest. For example, you might create a separate branch to contain user information. To create
a user information branch on the directory server, follow these steps:
1. Find the following information in the /etc/ldapcd.conf file:
• Value of searchbase
• Value of machine_dn
• Value of machine_pass
2. Decide on a name for a new branch; for example, accounts.
3. Create a file containing the following, substituting the value you found in step 1 for
searchbase:
dn: ou=accounts,o=searchbase
objectclass: top
objectclass: organizationalUnit
ou: accounts
description: description
4. Run the following command, substituting the values you found in step 1 for searchbase,
machine_dn, and machine_pass, and specify the name of the file you created in step 3
with the -f option:
/usr/local/bin/ldapmodify -add \
-D "machine_dn" -w "machine_pass" \
-f file
Managing the LDAP Module for System Authentication 69
Page 70

5. Verify that the accounts branch works by entering the following command, substituting the
values you found in step 1 for searchbase, machine_dn, and machine_pass:
/usr/local/bin/ldapsearch \
-D "machine_dn" -w "machine_pass" \
-b "searchbase" \
ou=accounts
6. Use the Administration utility (or manually edit the /etc/ldapcd.conf file) to add the
following entry, substituting the value you found in step 1 for searchbase:
userbranch: ou=accounts,searchbase
Note:
After you add a default user or group branch to the /etc/ldapcd.conf file, the Administration
utility and the LDAP utilities in /usr/internet/ldap_tools use this branch by default. As a
result, other entries that were created before you added the group or user branch might be masked.
Extended LDAP Schema for UNIX Account Information
Internet Express depends on the existence of certain object classes and attributes being present in
the directory server. These items are defined by RFC 2307 and are present when you use a directory
server installed by Internet Express.
If you are planning on using a directory server not installed by Internet Express, you will need to
verify that required schema elements are present. The required schema elements are documented
in RFC 2307. This RFC can be found at:
http://www.faqs.org
If you want to use schema objects other than those defined in RFC 2307, and are planning on
using the Internet Express LDAP authentication module, you will have to change the default
configuration to recognize your custom objects and attributes. The needed changes can be made
using the Internet Express system administration user interface (see Section : Default Configuration
for the LDAP Module for System Authentication).
The Internet Express kit includes LDAP utilities that work with the RFC 2307 schema objects supplied
by Internet Express. See Section : Utilities for Maintaining User Information in the LDAP Directory
Server for information on these utilities. Note that these LDAP tools are sensitive to the directory
servers schema and so will not be able to support a schema that differs greatly from the RFC 2307
definition. A provided tool, /usr/internet/ldap_tools/ldap_check, can be used to verify
the schema once the configuration changes have been made.
The LDAP utilities require the userPassword attribute that can store and return unchanged the
supplied value which is in the form:
{crypt}crypted-string
where {crypt} is a keyword or phrase used to indicate the type of password encryption for the
passwd file and crypted-string is the encrypted password.
Directory servers provided by Internet Express properly handle this feature. Other directory servers,
such as Oracle's Internet Directory will interpret the supplied string as a password to be encrypted
and will return a value that is not compatible with the standard BSD crypt mechanism. When using
such a directory server, it is necessary to create a schema object similar to the RFC 2307
unixAccount object, except with another attribute substituted for the standard attribute
userPassword. This substitute attribute should be of the type case exact string. Be sure to
use the substituted attribute name in the LDAP Caching Daemon Configuration File.
Example 3 shows sample user and group object class definitions.
70 User Authentication
Page 71

Example 3 Sample RFC 2307 User and Group Object Class Definitions
#
# Partial RFC 2307 schema.
#
# The OIDs are derived from iso(1) org(3) dod(6)
# internet(1) directory(1) nisSchema(1).
#
# Attribute types from RFC 2307
#
attribute uidNumber 1.3.6.1.1.1.1.0 int single
attribute gidNumber 1.3.6.1.1.1.1.1 int single
attribute gecos 1.3.6.1.1.1.1.2 cis single
attribute homeDirectory 1.3.6.1.1.1.1.3 ces single
attribute loginShell 1.3.6.1.1.1.1.4 ces single
attribute memberUid 1.3.6.1.1.1.1.12 ces
#
# ojectclass from rfc2307
#
# posixAccount is an auxiliary class. You may use account as a structural
# class.
objectclass posixAccount
oid
1.3.6.1.1.1.2.0
requires
objectClass,
cn,
uid,
uidNumber,
gidNumber,
homeDirectory
allows
userPassword,
loginShell,
gecos,
description
objectclass posixGroup
oid
1.3.6.1.1.1.2.2
superior
top
requires
objectClass,
cn,
gidNumber
allows
userPassword,
memberUid,
description
Indexing Attributes for the Directory Servers
Directory servers use indexes to aid in searching the directory. Directory server indexes greatly
improve the performance of searches in the directory databases, but they do so at the cost of
potentially slower database modification and entry creation operations. Indexes will also cost more
in terms of system resources, especially in disk-space use.
The directory server maintains five distinct types of indexes, as described in Table 4.
Managing the LDAP Module for System Authentication 71
Page 72

Table 4 LDAP Database Index Types
DescriptionIndex Type
pres
eq
approx
matching rule
Adding Indices for OpenLDAP
To index attributes for your directory server using OpenLDAP, follow these steps:
1. Shut down slapd using the following command:
# /sbin/init.d/openldap stop
2. Edit the /usr/internet/etc/slapd.conf file and add new indices.
3. Restart slapd using the following command:
# /sbin/init.d/openldap start
For more information about adding indexing with OpenLDAP, see:
http://www.openldap.org
Presence index. Allows for searches that return every entry that contains the indexed
attribute.
Equality index. Allows for searches that return the entries containing an attribute that
is set to a specific value.
Approximate index. Used only for string values such as commonName or givenName.
Allows for phonetic searching.
Substring index. Allows for searches that return entries containing a specified substring.sub
International index. Allows for searches that return entries that are sorted according to
a specified collation order.
Configuring the LDAP Module for System Authentication
When you install the LDAP Module for System Authentication subset, you can use the Administration
utility to perform the following tasks:
• Modify the configuration of the LDAP Module for System Authentication (see Section : Modifying
the LDAP Module Configuration)
• Test the configuration of the LDAP Module for System Authentication (see Section : Testing the
LDAP Module Configuration)
• Enable or disable the LDAP Module for System Authentication (see Section : Enabling and
Disabling the LDAP Module)
72 User Authentication
Page 73

Notes:
After you configure the LDAP Module for System Authentication, you must import users (unless you
are using an existing LDAP server). For instructions on importing or exporting users and groups to
and from the LDAP directory server, see Section : Importing and Exporting Users from /etc/passwd.
Statically linked clients and executables (which do not use shared libraries) cannot take advantage
of the LDAP Module for System Authentication loadable architecture. For example, the /sbin/ls
command (which is typically the default for root) is statically linked. On a system using the LDAP
Module for System Authentication to authenticate user names, the output from the /sbin/ls -l
command resembles the following:
-rw-r--r-- 1 1008 IASS_Usr 60 Nov 13 15:05 bar
-rw-r--r-- 1 1008 IASS_Usr 1765 Nov 13 15:05 bs.txt
-rw-r--r-- 1 1008 IASS_Usr 97 Nov 13 15:05 file.txt
-rw-r--r-- 1 1008 IASS_Usr 855 Nov 13 15:05 file2.txt
-rw-r--r-- 1 1008 IASS_Usr 2 Nov 13 15:05 foo
Note that the owner is shown as a number instead of a name. (If groups were defined in the LDAP
database rather than the /etc/group file, the output would have shown a number in place of
group name, as well.)
In general, use the system tools in /usr/bin when the LDAP Module for System Authentication
is enabled.
Modifying the LDAP Module Configuration
You can use the Administration utility to configure the following attributes of the LDAP Module for
System Authentication:
• System parameters (see Section : Defining LDAP System Parameters)
• Password attributes (see Section : Configuring LDAP Password Attributes)
• Group attributes (see Section : Configuring LDAP Group Attributes
The default configuration parameters for the Group attributes are correct for most LDAP servers.
Do not modify these fields unless you are very familiar with LDAP schemas and the schemas used
by your server. The Internet Express installation and configuration utilities correctly configure the
Internet Express-supplied LDAP servers to work with ldapcd. HP strongly recommends that you do
not change these values.
Defining LDAP System Parameters
To define system parameters for the LDAP Module for System Authentication, follow these steps:
1. From the Administration utility Main menu, choose Manage Components.
2. From the Manage Components menu, under Users, choose LDAP Module for System
Authentication.
3. From the LDAP Module for System Authentication Administration menu, choose Modify
Configuration.
4. From the Modify Configuration menu, choose Define System Parameters.
When the Define System Parameters form is displayed, the default values shown are those
stored in the /etc/ldapcd.conf file.
5. Specify a Distinguished Name and Password. The Distinguished Name and Password are
what you will use to bind to the directory server. These values are set when you initially
configure the directory server during installation. Typically, you use the root distinguished
name and password as specified in the directory server's configuration file (sladpd.conf).
For the OpenLDAP Directory Server, the installation procedure initially sets the Root
Configuring the LDAP Module for System Authentication 73
Page 74

Distinguished Name to cn=root,o=<hostname>. The OpenLDAP Directory Server uses the
password specified to access the iass login account and the administration servers for the
initial Root DN Password.
6. The System Name is the name of the system on which the LDAP directory server is running or
a comma-separated list of names of systems on which replicated directory servers are running.
7. Search Base is the top level of the branch in the LDAP database containing user information
(see Section : Creating Branches).
8. The Port Number value must match the port you are using for the directory server. The default
port for the directory server is 389.
9. The Active Connections value specifies the maximum number of open connections maintained
by ldapcd caching daemon (see Figure 20).
10. The Thread Maximum value specifies the maximum number of threads maintained by ldapcd
caching daemon (see Figure 20). Each thread handles one connection to a local program.
Allowing a higher number of threads enables better response from the LDAP caching daemon,
but requires more memory. If you are running a service that requires a large number of
connections (for example, a mail service), set the maximum number of threads to 64 or greater
(if your system has sufficient memory).
11. The value of Password Entries in Cache determines how many individual passwd entries are
allowed to be cached. The value of Password Expire Cache determines the maximum length
of time that the ldapcd caching daemon will check the cache for an individual passwd entry.
When the value of Password Expire Cache is exceeded, the ldapcd daemon returns to the
server to look for the requested passwd entry.
12. The values for Group Entries in Cache and Group Expire Cache work similarly to Password
Entries in Cache and Password Expire Cache, respectively, but apply to group entries.
13. Click on Submit.
If the ldapcd.conf file was successfully updated, the Define System Parameters form is
redisplayed with the Success icon at the top.
Configuring LDAP Password Attributes
To configure LDAP password attributes, follow these steps:
1. From the Administration utility Main menu, choose Manage System.
2. From the Manage System menu, choose Configure LDAP Module for System Authentication.
3. From the LDAP Module for System Authentication Administration menu, choose Modify
Configuration.
4. From the Modify Configuration menu, choose Configure Password Attributes.
When the Configure Password Attributes form is displayed, the default values shown are those
stored in the /etc/ldapcd.conf file.
5. Using the Configure Password Attributes form, you can modify the mapping between LDAP
attributes and the fields in the passwd structure returned by a call to getpwent. By default,
the getpwent fields are mapped to the attribute names defined by the Internet Express
extended schema (see Section : Extended LDAP Schema for UNIX Account Information).
The Object Class Name field represents the object class for the password structure in the LDAP
schema. Only change this field if you are using an object class other than the default
(posixPassword). The object class chosen must contain attributes for all of the components
of a passwd entry. See the passwd(4) reference page for more information about passwd
entries.
The Password Branch Name field is used as the starting point in the LDAP directory for password
entries. Branches are used to partition a directory into smaller, easier to manage sections and
are not required.
74 User Authentication
Page 75

The remaining fields allow you to change the name of the LDAP attribute within the Object
Class selected for the Password structure. The name of each attribute must be a member of
the object class specified in the Object Class Name field.
• The Login Name field represents the name of the LDAP attribute to be used within the
Password Object Class to store the name of a UNIX login (user) name. The default value
is uid.
• Comment Field represents the name of the attribute used to store an optional comment
for each user. The default value is description.
• The User Password Name field represents the name of the attribute used to store the user's
password. The default value is userpassword.
• The Gecos field represents the name of the attribute used to store user gecos information
(full name, phone number, and so on). The default value is gecos.
• The User ID field represents the name of the attribute used to store the UID number. The
default value is uidNumber.
• The Home Directory Name field represent the attribute used to store the users home
directory information. The default value is homedirectory.
• The Group ID field represents the name of the attribute used to store the GID number of
a users default group. The default value is uidNumber.
• The Login Shell field represents the name of the attribute used to store the users default
login shell. The default value is loginshell.
6. Click on Submit.
If the ldapcd.conf file was successfully updated, the Configure Password Attributes form is
redisplayed with the Success icon at the top.
Configuring LDAP Group Attributes
To configure LDAP group attributes, follow these steps:
1. From the Administration utility Main menu, choose Manage Components.
2. From the Manage Components menu, under Users, choose LDAP Module for System
Authentication.
3. From the LDAP Module for System Authentication Administration menu, choose Modify
Configuration.
4. From the Modify Configuration menu, choose Configure Group Attributes.
When the Configure Group Attributes form is displayed, the default values shown are those
stored in the /etc/ldapcd.conf file.
5. Using the Configure Group Attributes form, you can modify the mapping between LDAP
attributes and the fields in the group structure returned by a call to getgrent(3). By default,
the getgrent fields are mapped to the attribute names defined by the Internet Express
extended schema (see Section : Extended LDAP Schema for UNIX Account Information).
The Object Class Name field represents the object class for the group structure in the LDAP
schema. Only change this field if you are using an object class other than the default
(posixGroup). The object class chosen must contain attributes for all of the components of
a group(4) entry. Refer to the group(4) reference page for more information about group
components.
The Group Branch Name field is used as the starting point in the LDAP directory for Group
entries. Branches are used to partition a directory into smaller, easier to manage sections and
are not required.
Configuring the LDAP Module for System Authentication 75
Page 76

The remaining fields allow you to change the name of the LDAP attribute within the Object
Class selected for the Group structure. The name of each attribute must be a member of the
object class specified in the Object Class Name field.
• The Group Name field represents the name of the LDAP attribute to be used within the
Group Object Class to store the name of a UNIX user group. The default value is cn.
• The Group ID Name field represents the name of the LDAP attribute to be used within the
Group Object Class to store the Group ID (gid) number. The default value is gidNumber.
• The Password Name field is the name of the attribute to be used for storing Group
Password entries. The default value is userPassword.
• The Group Members Name field represents the name of the attribute to be used to store
the member IDs belonging to groups. The default value is MemberUID.
6. Click on Submit.
If the ldapcd.conf file was successfully updated, the Configure Group Attributes form is
redisplayed with the Success icon at the top.
Testing the LDAP Module Configuration
When you choose Test Configuration from the LDAP Module for System Authentication Module
Administration menu, the Administration utility performs the following tasks:
• Reads the ldapcd.conf file and verifies its contents
• Connects to the directory server specified in ldapcd.conf
• Verifies that you can use the distinguished name and password in the ldapcd.conf file to
bind to the directory server
• Checks that the attributes that are mapped to the passwd and group structures are in the
schema
Enabling and Disabling the LDAP Module
You can enable or disable the LDAP Module for System Authentication as follows:
1. From the Administration utility Main menu, choose Manage Components.
2. From the Manage Components menu, under Users, choose LDAP Module for System
Authentication.
3. From the LDAP Module for System Authentication Administration menu, choose Enable/Disable
Module.
4. The current status of the LDAP Module for System Authentication is displayed at the top of the
form.
If the module is currently enabled, you can disable or restart the module.
If the module is currently disabled, you can enable it by clicking on Start.
Note:
Whenever you enable or disable the LDAP Module for System Authentication, you must reboot the
system. Otherwise, some applications (such as cron and Advanced Server for UNIX) will not
detect the change in authentication method.
Importing and Exporting Users from /etc/passwd
The following sections describe how to import users into, and export users from, the directory
server.
76 User Authentication
Page 77

Importing Users into the Directory Server
To import users from the /etc/passwd file and store them in the LDAP database, follow these
steps:
1. Configure the LDAP server to use extended LDAP schema for UNIX account information (see
Section : Extended LDAP Schema for UNIX Account Information).
2. Verify through either of the following methods that the server is running and that you can
connect to it:
• Use the Test the LDAP Configuration function in the Administration utility (see Section :
Testing the LDAP Module Configuration).
• Edit the /etc/ldapcd.conf file and run the
/usr/internet/ldap_tools/ldap_check utility.
3. Identify the users that you want to put into the LDAP directory and extract user information
from the /etc/passwd file. Use the passwd_extract utility (see Section ) with the -f
option to extract users from /etc/passwd and store the records (formatted as passwd entries)
in a file. For example,
# usr/internet/ldap_tools/passwd_extract -f /tmp/ldapusers user1 user2 ...
Note:
Processing a large number of users may take a while.
4. Use the passwd_extract utility again, this time, replace -f with -r.
5. Use the ldap_add_user utility (see Section ) to populate the LDAP directory with the extracted
user records in the file created in step 3.
6. Move the remainder file created in step 4 to /etc/passwd and run the mkpasswd utility,
or, manually remove the users with the vipw utility (see vipw(8)).
Importing Users from NIS
To import users from NIS, follow these steps:
1. Use ypcat to fetch the user information from the NIS server, and then use the
passwd_extract utility. For example:
# ypcat passwd | /usr/internet/ldap_tools/passwd_extract -f
/tmp/ldapusers [user1 user2 ...]
2. Use the ldap_add_user utility (see Section : Adding a User Entry) to populate the LDAP
directory with the extracted user records in the file created in step1.
Exporting Users from the Directory Server
To export users from the directory server, follow these steps:
1. Use the ldap_get_users -f output-file command to extract user records from the
LDAP database.
2. Merge the file created in step 1 with the /etc/passwd file. See the vipw(8) reference page.
Adding an LDAP User in a C2 Environment
There is an additional step required when you have C2 security enabled. For each system into
which you wish the user to be able to login, you must add an edauth entry. The entry should be
of the form:
echo "<username>:u_name=<username>:u_id#<uid>:u_oldcrypt#3:u_lock@:chkent:"\
| /usr/tcb/bin/eduath -s
Importing and Exporting Users from /etc/passwd 77
Page 78

Access Control
By default, users defined in the LDAP database are able to log into every system which uses that
database in conjunction with the LDAP Module for System Authentication. If you want to limit user
access to specific systems, use the access control files /etc/ldapusers.deny and /etc/
ldapusers.allow.
A default /etc/ldapusers.deny file is provided at installation time. Included are all of the
standard system users: root, bin, daemon, and so on. If you want to deny access to a user, add
that user's name to the /etc/ldapusers.deny file.
If you want to disallow access to all but a few users, use the /etc/ldapusers.allow file. If the
/etc/ldapusers.allow file exists on a system, only users listed in that file are allowed to log
in using LDAP authentication. Note that this is true even if /etc/ldapusers.allow is empty —
its very existence invokes the stricter access control rules.
Utilities for Maintaining User Information in the LDAP Directory Server
The Internet Express software kit includes several utilities that you can use to maintain the extended
LDAP directory server shipped with Internet Express. The following utilities, summarized in Table 5,
are installed in the /usr/internet/ldap_tools directory:
• ldap_check—Section : Checking the LDAP Server Configuration
• passwd_extract—Section : Extracting Users from the /etc/passwd File
• ldap_add_user—Section : Adding a User Entry
• ldap_del_user—Section : Deleting a User Entry
• ldap_get_user—Section : Retrieving a User Entry
• ldap_sync_user—Section : Synchronizing with a Password File
• ldap_add_group—Section : Adding a Group Entry
• ldap_mod_group—Section : Maintaining Group Membership
• ldap_del_group—Section : Deleting a Group Entry
• ldap_get_group—Section : Retrieving a Group Entry
• ldap_passwd—Section : Setting a User's Password in the LDAP Directory Server
• ldap_enable—Section : Starting the ldapcd Daemon
• ldap_disable—Section : Stopping the ldapcd Daemon
78 User Authentication
Page 79

Table 5 LDAP Database Utilities
DescriptionOptionsProgram Name
ldap_add_user
ldap_del_user
ldap_get_user
Noneldap_check
-b branch—Branch to add users to; should be a
full distinguished name, including the search base.
-f input-file – Specifies the name of the file
containing user records to add to the directory server.
-m – Modify existing record.
-n – Do not submit.
-v – Verbose output.
-b branch – Branch to delete users from.
-f input-file – Specifies an input file containing
login names.
-n – Do not submit.
-v – Verbose output.
-b branch – Branch to get users from.
-s searchfilter – Specifies an optional LDAP
search filter to select the password entries to output.
-S searchfilter – Specifies an optional LDAP
search filter to select the password entries to output.
Differs from the -s option in that the provided filter is
wrapped within a filter that adds an object class
restriction on the query.
-R start[-end] – Specifies a range of user IDs to
be retrieved, including the endpoints. If you do not
specify the -end portion of the range, then all users
greater than or equal to the start value are
retrieved.
-f output-file – Specifies the name of the output
file in which to store search results (default is stdout).
Checks either ./ldapcd.conf
or /etc/ldapcd.conf against
the listing of directory servers in
the conf file. Validates all entries
related to the directory server.
Diagnostics are printed to
stdout; when the exit code is
greater than 0, a problem was
encountered.
Adds a user to the LDAP directory
server. Users can be specified on
the command line, in a file, or
from stdin (with -f -).
Deletes a user from the LDAP
directory server. You can specify
users on the command line, in a
file, or from stdin (with -f -).
Retrieves entries selected from the
LDAP directory server for specified
users. By default, this program
selects all users on the default user
branch or search base.
ldap_sync_user
ldap_add_group
-b branch – Branch to add users to; should be a
full distinguished name, including the search base
-n – Do not submit
-v – Verbose output.
-C – Do not create/modify the CN attribute
-b branch – Branch to which to add group.
-n – Do not submit.
-m – Modify existing entry.
-v – Verbose output.
Utilities for Maintaining User Information in the LDAP Directory Server 79
Synchronizes the users in the
directory server with the provided
input which is in passwd format.
Adds a group to the LDAP
directory server. Can be used on
the command line, from a file, or
from stdin.
Page 80

Table 5 LDAP Database Utilities (continued)
DescriptionOptionsProgram Name
ldap_mod_group
ldap_del_group
ldap_get_group
-b branch – Branch in which groups to be modified
reside.
-r – Remove login names from specified group.
-R – Remove login names from all groups.
-b branch – Branch from which to delete groups.
-n – Do not submit.
-v – Verbose output.
-b branch – Branch to get groups from.
-f output-file – Specifies the name of the output
file in which to store search results (the default is
stdout).
-s searchfilter – Specifies an optional LDAP
search filter to select the group entries to output.
-S searchfilter – Specifies an optional LDAP
search filter to select the group entries to output. Differs
from the -s option in that the provided filter is
wrapped within a filter that adds an object class
restriction on the query.
-R start[-end] – Specifies a range of group IDs
to be retrieved, including the endpoints. If you do not
specify the -end portion of the range, then all groups
greater than or equal to the start value are
retrieved.
Assigns the listed login names to
the specified group. Use the -r
option to remove the specified
login names from the group or the
-R option to remove login names
from all groups.
Deletes a group from the LDAP
directory server. Can be used on
the command line, from a file, or
from stdin.
Gets group entries from the LDAP
directory server. By default, selects
all groups on the default group
branch or search base. Use the -s
option to select a subset of group.
passwd_extract
[username ...]
None.ldap_enable
None.ldap_disable
-f output-file – Specifies the output file in which
to store
passwd entries that match the selection criteria (the
default is stdout).
-g range – Extracts passwd entries that match the
specified range of GIDs. Use commas and/or hyphens
to separate the range values (for example, 23,
40-49).
-i input-file – Specifies the file from which to
extract users (the default is /etc/passwd).
-r output-file – Specifies the output file in which
to store
passwd entries that do not match the selection criteria
(that is, the remaining passwdentries after extracting
matching entries).
-u range – Extracts passwd entries that match the
specified range of UIDs. Use commas and/or hyphens
to separate the range values (for example, 350,
400-1000).
-v – Verbose output.
Starts the ldapcd daemon and
configures SIA to use the LDAP
authentication mechanism.
Stops the ldapcd daemon and
configures SIA to not use the LDAP
authentication mechanism.
Extracts users from the specified
input file (/etc/passwd is the
default). Specify users to be
extracted by name (as parameters
to the passwd_extract
command) or by using one or
more options in any combination.
80 User Authentication
Page 81

Checking the LDAP Server Configuration
The ldap_check utility validates the contents of the ./ldapcd.conf or /etc/ldapcd.conf
file as follows:
• Verifies that the specified directory servers are running and that connections to the servers
can be made
Note:
If any of the LDAP servers specified in the ldapcd.conf file fail the verification, the remaining
servers are not checked and the entire verification fails.
• Verifies that the search base (the top-level directory for searches) exists
• If specified, verifies that user and group branches exist (see Section : Creating Branches)
• Verifies that user and group object classes exist
• Validates all object classes and attributes
If a problem is encountered during either of these checks, the ldap_check utility returns an exit
code greater than 0.
Extracting Users from the /etc/passwd File
Use the passwd_extract utility to extract users from the specified input file (/etc/passwd is
the default) and store the extracted records in the specified output file (with the -f option).
Optionally, you can use the -r option (with the -f option) to extract entries that do not match the
selection criteria to a remainder file. The records in the output file and remainder file (if any) are
formatted as passwd(4) entries.
You can extract users based on:
• User name, specified by a space-separated parameter list:
passwd_extract hill susan mike cliff austin powers
Note that if no output file is specified, the default is stdout.
• Any combination of individual UIDs or range of UIDs:
passwd_extract
-u 500,624,700-800 -f output-file
• Any combination of individual GIDs or range of GIDs:
passwd_extract -g 23,29-35,50 -f output-file
• Any combination of names, UIDs and GIDs:
passwd_extract -e james bond -u 500,624,700-800 -g 23,29-35,50 -f output-file
To extract records from a file other than /etc/passwd, specify the input file name with the -i
option. For example:
# passwd_extract larry curly moe -i myusers -f stooges
The records in the input file must be formatted as passwd entries.
Adding a User Entry
The ldap_add_user utility adds one or more user entries to the LDAP database. To use this utility
on the command line, provide the following arguments:
ldap_add_user logname passwd uid gid gecos homedir shell
Utilities for Maintaining User Information in the LDAP Directory Server 81
Page 82

The ldap_add_user utility adds users to the first directory server specified in the ldapcd.conf
file. If multiple servers are listed, only the first is used, even if it is not operational. The distinguished
name (DN) is constructed as follows:
logname_attribute=logname,branch
The logname_attribute is replaced by the attribute name specified by the pw_username
entry in the ldapcd.conf file. The logname is the user's login name. The branch is one of three
possible values, taken in this order:
1. Value specified on the command line using the -b option
2. Value of the userbranch attribute in the ldapcd.conf file
3. Value of the searchbase attribute in the ldapcd.conf file
If a problem is encountered when adding a user to the LDAP database, the ldap_add_user
utility returns an exit code greater than 0.
For a description of the options you can use with this utility, see Table 5.
To add one or more users from a file:
ldap_add_user -f input-file
To add one or more users from stdin:
cat filename | ldap_add_user -f -
Note:
The input must be in passwd(4) format.
Deleting a User Entry
The ldap_del_user utility works in a similar fashion to ldap_add_user, except that users are
removed, rather than added, to the directory server.
If a problem is encountered when deleting a user from the LDAP directory server, the
ldap_del_user utility returns an exit code greater than 0.
For a description of the options you can use with this utility, see Table 5.
For example, to delete a user from the command line:
ldap_del_user logname [ logname ... ]
To delete one or more user or users listed in a file:
ldap_del_user -f input-file
To delete one or more users from stdin:
cat filename | ldap_del_user -f -
Note:
The input must be in passwd(4) format, but only the login name portion of each record is used.
Anything beyond the first colon (:) in each input record is ignored.
A list of names (one per line) is also acceptable as input.
Retrieving a User Entry
Use the ldap_get_user utility to retrieve passwd entries for specified users in the LDAP directory
server. Unless otherwise specified, the ldap_get_user utility selects all users on the default user
branch or search base. Use the -s option to select a subset of users (see Table 5).
If a problem is encountered when retrieving a user from the LDAP directory server, the
ldap_get_user utility returns an exit code greater than 0.
For a description of the options you can use with this utility, see Table 5.
82 User Authentication
Page 83

To retrieve all users:
ldap_get_user [ -b branch ] [ -f filename ]
Note:
In the following examples, the -b branch and -f output-file options (not shown) can also
be used.
To use a search filter to find users:
ldap_get_user -s filter
To use a search filter with object class restrictions added to the search:
ldap_get_user -S filter
For example, a search filter might look like the following:
uid=bjensen (&(uidNumber>=10)(uidNumber<=20))
Note:
You must quote the filter string according to your shell.
To retrieve a range of users (where start is the starting UID in the range and end is the optional
ending UID in the range):
ldap_get_user -R start[-end]
If you do not specify end, the search retrieves all users from the starting UID through the highest
UID in the LDAP directory server.
To retrieve specific users:
ldap_get_user user [ user ...]
Synchronizing with a Password File
Use the ldap_sync_user utility to synchronize the ldap directory entries for users with the contents
of a passwd file. This utility adds, updates or deletes users as needed to ensure that the contents
of the directory match the supplied entries. This utility is intended to provide easy synchronization
of the directory server with an alternate source for login information (such as NIS), where the
alternate source is considered the master source of the information.
If a problem is encountered , the ldap_sync_user utility returns an exit code greater than 0.
For a description of the options you can use with this utility, see Table 5.
To synchronize users:
ldap_sync_user [-b branch ] [ filename]
Adding a Group Entry
Use the ldap_add_group utility to retrieve group(4) entries from the LDAP directory server.
(Use the ldap_mod_group utility to add users to groups. See Section for more information.) The
ldap_add_group utility adds groups to the first directory server specified in the ldapcd.conf
file. If multiple servers are listed, only the first is used, even if it is not operational.
The ldap_add_group utility constructs the distinguished name (DN) as follows:
groupname_attribute=groupname,branch
The groupname_attribute is replaced by the attribute name specified by the gr_name entry
in the ldapcd.conf file. The groupname is the group name. The branch is one of three possible
values, taken in this order:
1. Value specified on the command line using the -b option
2. Value of the userbranch attribute in the ldapcd.conf file
3. Value of the searchbase attribute in the ldapcd.conf file
Utilities for Maintaining User Information in the LDAP Directory Server 83
Page 84

If a problem is encountered when creating a group in the LDAP directory server, the
ldap_add_group utility returns an exit code greater than 0.
For a description of the options you can use with this utility, see Table 5.
To add one or more groups from a file:
ldap_add_group -f input-file
To add one or more groups from stdin:
cat filename | ldap_add_group -f -
Note:
The input must be in group(4) format.
Maintaining Group Membership
Use the ldap_mod_group utility to add or remove users from groups in the LDAP database. The
ldap_mod_group utility adds the specified login names to the specified group as group members.
Use the -r option to remove the specified login names from the group member list.
If a problem is encountered when modifying group membership in the LDAP database, the
ldap_mod_group utility returns an exit code greater than 0.
For a description of the options you can use with this utility, see Table 5.
For example, to add one or more users to a group:
ldap_mod_group group logname [ logname ...]
To remove one or more users from a group:
ldap_mod_group -r group logname [ logname ...]
To remove a user from all groups:
ldap_mod_group -R logname
Deleting a Group Entry
Use the ldap_del_group utility to delete one or more groups from the LDAP directory server.
The ldap_del_group utility works in a similar fashion to ldap_add_group, except that groups
are removed, rather than added, to the directory server.
If a problem is encountered when deleting a group from the LDAP directory server, the
ldap_del_group utility returns an exit code greater than 0.
For a description of the options you can use with this utility, see Table 5.
For example, to delete groups from the command line:
ldap_del_group groupname [ groupname ... ]
To remove groups specified in a file:
ldap_del_group -f filename
To remove groups specified by stdin:
cat filename | ldap_del_group -f -
84 User Authentication
Page 85

Notes:
The input must be in group(4) format, but only the group name will be used.
A list of group names (one per line) is also acceptable as input.
Retrieving a Group Entry
Use the ldap_get_group utility to retrieve group(4) entries for selected groups in the LDAP
directory server. Unless otherwise specified, the ldap_get_group utility selects all groups on the
default group branch or search base. Use the -s option to select a subset of users (see Table 5).
If a problem is encountered when retrieving a group from the LDAP directory server, the
ldap_get_group utility returns an exit code greater than 0.
For a description of the options you can use with this utility, see Table 5.
For example, to retrieve all groups:
ldap_get_group [ -b branch ] [ -f input-file ]
Note:
In the following examples, the -b branch and -f input-file options (which are not shown)
can also be used.
To use a search filter to find groups:
ldap_get_group -s filter
To use a search filter with object class restrictions added to the search:
ldap_get_group -S filter
A search filter might look like the following:
gid=staff (&(gidNumber>=10)(gidNumber<=20))
Note:
You must quote the filter string in accordance with your shell.
To retrieve a range of groups (where start is the starting GID in the range and end is the optional
ending GID in the range):
ldap_get_group -R start[-end]
If you do not specify end, the search retrieves users from the starting GID to the highest GID in the
LDAP directory server.
To retrieve specific groups:
ldap_get_group group [ group ...]
Setting a User's Password in the LDAP Directory Server
As root, you can set a user's password in the LDAP directory server by using the ldap_passwd
utility:
ldap_passwd loginname new_passwd
The ldap_passwd utility attempts to clear the local ldapcd daemon's cache.
Starting the ldapcd Daemon
Use the ldap_enable utility to configure the system to use the LDAP caching daemon (ldapcd)
with the existing ldapcd.conf configuration file.
You can also start the ldapcd daemon using the Administration utility; see Section : Enabling and
Disabling the LDAP Module.
Utilities for Maintaining User Information in the LDAP Directory Server 85
Page 86

Note:
Whenever you enable or disable the LDAP Module for System Authentication, you must reboot the
system. Otherwise, some applications (such as cron and Advanced Server for UNIX) will not
detect the change in authentication method.
Stopping the ldapcd Daemon
Use the ldap_disable utility to stop the LDAP caching daemon (ldapcd) and configure the
system so that the LDAP Authentication will not be used.
You can also stop the ldapcd daemon using the Administration utility; see Section : Enabling and
Disabling the LDAP Module.
Note:
Whenever you enable or disable the LDAP Module for System Authentication, you must reboot the
system. Otherwise, some applications (such as cron and Advanced Server for UNIX) will not
detect the change in authentication method.
Maintaining the LDAP Directory Server Using LDAP Commands
You can use LDAP commands (instead of the LDAP utilities supplied with Internet Express) to formulate
different queries than those provided by the Internet Express LDAP utilities. The following sections
describe how to use these commands to add and modify LDAP entries.
Adding Entries to an LDAP Database
To modify an entry in an existing LDAP database, you can use the ldapmodify command. In the
following example, the ldapmodify command is reading from standard input:
# /usr/internet/ldap_sdk/tools/ldapmodify -w admin \
-D "cn=root, o=HP Engineering, c=US"
dn: cn=Joseph Shmoe, o=HP Engineering, c=US
changetype: modify
replace: title
title: Process Engineer
^D
modifying entry cn=Joseph Shmoe, o=HP Engineering, c=US
You can use the ldapsearch command to retrieve the modified entry:
# /usr/local/bin/ldapsearch -b 'o=HP Engineering, c=US'
'cn=Joe Shmoe'
cn=Joseph Shmoe, o=HP Engineering, c=US
objectclass=person
cn=Joseph Shmoe
cn=Joe Shmoe
sn=Shmoe
givenname=Joseph
mail=shmoe@fac.digieng.com
uid=jshmoe
title=Process Engineer
For more information, see ldapmodify(1).
Modifying Entries in an LDAP Database
To modify an entry in an existing LDAP database, you can use the ldapmodify command. In the
following example, the ldapmodify command is reading from standard input: #
/usr/internet/ldap_sdk/tools/ldapmodify-w admin \ -D "cn=root, o=HP
86 User Authentication
Page 87

Engineering, c=US" dn: cn=Joseph Shmoe, o=HP Engineering, c=US
changetype: modify replace: title title: Process Engineer - ^D modifying
entry cn=Joseph Shmoe, o=HP Engineering, c=US
You can use the ldapsearch command to retrieve the modified entry:
# /usr/local/bin/ldapsearch -b 'o=HP
Engineering, c=US' 'cn=Joe Shmoe' cn=Joseph
Shmoe, o=HP Engineering, c=US objectclass=person cn=Joseph
Shmoe cn=Joe Shmoe sn=Shmoe givenname=Joseph mail=shmoe@fac.digieng.com
uid=jshmoe title=Process Engineer
For more information, see ldapmodify(1).
Overview of the LDAP Client
This section provides a summary of the LDAP client functionality and related files.
Actions Performed by the LDAP Client
The LDAP client daemon does the following when started.
• Updates the /etc/sia/matrix.conf file to include the LDAP Security Integration Architecture
(SIA) mechanism.
• Adds the following entry to the /etc/inittab file to automatically start the LDAP client
daemon when the system starts:
ldapcd:34:respawn:/usr/sbin/ldapcd -D /dev/console 2&1
Authentication Actions Performed
When you install and enable the LDAP Module for System Authentication subset, user and group
authentication takes place through an LDAP server.
For example, an LDAP server transparently provides authentication information for login (rlogin,
ftp, telnet, su) and mail (POP and IMAP).
For users not found in the LDAP directory, authentication automatically falls back to using the local
authentication mechanism (/etc/passwd) and/or NIS, if it is configured.
Files Modified by theLDAP Module for System Authentication
The LDAP module for system authentication configures the security matrix in the /etc/sia/
matrix.conf file for system authentication.
The security matrix consists of a list of security-related system calls and the library to be used for
each call.
Files Not Modified by the LDAP Module for System Authentication
The LDAP module does not add or modify either /etc/nsswitch.conf or /etc/svc.conf.
In case /etc/nsswitch.conf or /etc/svc.conf are modified manually by someone to
include LDAP entries, you should revert the file back to its original state.
Other Important Files
Other relevant files include /etc/ldapusers.deny and /etc/ldapusers.allow .
/etc/ldapusers.deny
The /etc/ldapusers.deny file is a text file in which you enter the name of a Tru64 UNIX user
who will not be authenticated by LDAP authentication.
A default /etc/ldapusers.deny file is provided when you install the LDAP client software.
Overview of the LDAP Client 87
Page 88

/etc/ldapusers.allow
If you want to disallow access to all but a few users, you must create the /etc/ldapusers.allow
file. The /etc/ldapusers.allow file is a text file in which you enter the name of a Tru64 UNIX
user who will only be authenticated by LDAP authentication.
If the /etc/ldapusers.allow file exists on a system, only users listed in that file are allowed
to log in using LDAP authentication. Note that this is true even if /etc/ldapusers.allow is
empty. The existence of this file invokes the stricter access control rules.
Additional considerations related to the /etc/ldapusers.deny and /etc/ldapusers.allow
files include the following:
• Consider if the /etc/ldapusers.allow file is not present, then all the users except for
those in /etc/ldapusers.deny file should be allowed to log in.
• If the /etc/ldapusers.allow file is present then only the users present in that file are
allowed to log in.
• If an user is present in both /etc/ldapusers.allow and /etc/ldapusers.deny , then
the user should be allowed to log in. The /etc/ldapusers.allow file has a higher
precedence over /etc/ldapusers.deny .
• If the user is not in either /etc/ldapusers.allow or /etc/ldapusers.deny, then the
user should not be allowed to log in.
Behavior of the the ldapdc Daemon
The ldapcd daemon runs at all times and is started by the following entry in the /etc/inittab
file:
ldapcd:34:respawn:/usr/sbin/ldapcd -D /dev/console 2&1
Thus, whenever ldapcd exits for some reason, the daemon is restarted using /etc/inittab.
Debugging ldapdc
To enable logging for ldapcd, add debug: 1 at the end of the /etc/ldapcd.conf file.
ldapcd logs a file as ldapcd.log.XXXX under /usr/tmp/, where XXXX is a randomly selected
value.
You may enable debug and look at the log file for any errors.
Operation of login/su
The login/su command inspects the /etc/sia/matrix.conf file and attempts to authenticate
users based on the mechanisms specified there. Consider the following situation in which the same
users are present in multiple databases, such as LDAP and NIS:
• There are three users, user1, user2, and user3 in LDAP.
• There are three users, user1, user4, and user5 in nis. ( Note that there is a user1 in both LDAP
and NIS).
• An entry for user1 exists in /etc/ldapusers.deny.
To address this issue, the administrator should log in to the machine as root and run the following
command:
# su user2
The su operation first examines /etc/passwd, then in NIS and finally in LDAP ( based on the
entries in /etc/sia/matrix.conf) and authenticates the user with LDAP database as the user
that is present in LDAP. The command is successful.
Next, the administrator should run the following command as a root:
88 User Authentication
Page 89

# su user1
The su operation examines NIS and returns success. As it is successful, su completes the operation
and /etc/ldapusers.deny is ignored.
Overview of the LDAP Client 89
Page 90

5 Mail Delivery Administration
Using the Internet Express Administration utility, you can manage the following delivery components:
• Sendmail Mail Transport Agent for sending, distributing, and delivering mail (Section : Sendmail
Server Administration).
• Majordomo mailing list administrator to create and maintain mailing lists (Section : Majordomo
Mailing List Administration).
• Mailman mailing list management system (Section : Mailman)
• Bogofilter to filter spam (Section : Bogofilter Spam Filter)
Sendmail Server Administration
There are two administrative interfaces and related macro definitions for the SMTP package,
Sendmail.
• The older administration interface iuses the classic macros. This interface includes new support
for including anti-virus actions. You can access this interface by selecting Sendmail Server
from the Administration utility Main menu.
• The newer Sendmail administration utility includes a support based on usage of the open
source features from sendmail.org, mailers and macros. The new macro base enforces more
control over potential spamming and includes more restrictions over relaying. The newer
Sendmail administration includes Clam AV anti-virus mail filter, general mail filters, queue
support, performance support, and more complete support for Secure Transport Level Security
(TLS). You can access this interface by selecting Sendmail Server/ Using Open Source
Configuration Rules from the Administration utility Main menu.
Note:
During the configuration of the sendmail.cf file, the Sendmail administration checks the
network options and if it finds an Internet Protocol version 6 network, it will auto-configure
itself for both Internet Protocol versions 6 and 4 networks.
You can set up or modify the Sendmail server configuration as follows:
• Standalone—Does not send or receive mail from any other system. A standalone system can
send and receive mail from other users on the same system only. See Section : Configuring
the System as a Standalone Mail System for instructions.
• Client—A system that depends on a mail server for all mail processing. A client system must
be connected to the same network as its mail server. See Section : Configuring the System as
a Mail Client for instructions.
• Server—Central host that performs all mail processing, such as forwarding, routing, addressing,
aliasing, and mail delivery. See Section : Configuring the System as a Mail Server for
instructions.
You can also configure the following additional server features using the Administration utility:
◦ Mail Protocols (see Section : Configuring Mail Protocols)
◦ Masquerading (see Section : Configuring Masquerading)
◦ Virtual domains (see Section : Configuring Virtual Domains)
◦ Procmail (see Section : Enabling Procmail as a Local Mailer)
◦ Clam Anti-virus (see Section : Enabling Anti-Virus)
◦ Anti-spam (see Section : Configuring Anti-Spam)
90 Mail Delivery Administration
Page 91

◦ LDAP (see Section : Configuring LDAP)
◦ Configure MILTER (Sendmail Server/ Using Open Source Configuration Rules only) (see
Section : Configuring Mail Filters (MILTER))
◦ Configure Queues (Sendmail Server/ Using Open Source Configuration Rules only ) (see
Section : Configuring Queues)
◦ Configure Queue Performance (Sendmail Server/ Using Open Source Configuration
Rules only) (see Section : Configuring Queue Performance)
◦ Configure Trusted Layer Security (TLS) (Sendmail Server/ Using Open Source Configuration
Rules only) (see Section : Configuring Trusted Layer Security)
For instructions on specifying mailbox access for the Sendmail server, see Section : Configuring
Mailbox Access. For information on viewing the mail log, see Section : Viewing the Sendmail
Server Log.
In a TruCluster Server environment, the sendmail daemon runs on all cluster members concurrently.
Connections are distributed among the cluster members based on how the cluster alias has been
configured. See cluamgr(8).
For information on tuning your system to improve the performance of your mail server, visit the
following Tru64 UNIX site:
http://h30097.www3.hp.com/technical.html
Refer to Section : Overview of User Accounts for details on creating accounts. For instructions on
changing mail delivery types, refer to Section .
Configuring the System as a Standalone Mail System
To configure a standalone mail system, follow these steps:
1. From the Administration utility Main menu, choose Manage Components.
2. Under Mail on the Manage Components menu, choose Sendmail Server.
3. From the Sendmail Server Administration menu, choose Configure Sendmail Server.
4. From the Configure Sendmail Server form, choose Standalone and click on Configure.
5. When the configuration has been successful, the Configure as Standalone page displays a
message indicating the Sendmail server has been restarted.
Use the navigation bar to return to the Configure Sendmail Server menu or to the Sendmail
Server Administration menu.
Configuring the System as a Mail Client
To configure your system as mail client, follow these steps:
1. Under Mail on the Manage Components menu, choose Sendmail Server.
2. From the Sendmail Server Administration menu, choose Configure Sendmail Server.
3. From the Configure Sendmail Server menu, choose Client and click on Configure.
4. On the Configure as Client form, specify the name of the mail server system that will relay all
mail and click on Submit.
The system that will act as mail server to this client must be on the same network as the client.
5. When the configuration has been successful, the Configure Client page displays a message
indicating the Sendmail server has been restarted.
Use the navigation bar to return to the Configure Sendmail Server menu or to the Sendmail
Server Administration menu.
Configuring the System as a Mail Server
To configure your system as a mail server, follow these steps:
Sendmail Server Administration 91
Page 92

1. Under Mail on the Manage Components menu, choose Sendmail Server.
2. From the Sendmail Server Administration menu, choose Configure Sendmail Server.
3. From the Configure Sendmail Server menu, choose Server and click on Configure.
4. On the Configure Server form, you must first configure the Internet Mail Protocol (SMTP). The
first time you configure your system as a mail server, the Available Protocols menu offers only
the Internet Mail Protocol. Additional protocols are offered after you complete the Internet
Mail Protocol configuration.
To configure the Internet Mail Protocol, click on Configure. The Configure Sendmail Protocol
form is displayed. Follow these steps:
a. Click on Host Alias... to specify one or more mail aliases for this server (see Section ).
b. Select one of the following routing methods:
• None—Send mail directly to the addressee.
• Internet—Forward mail addressed to systems outside your corporation to the relay
system specified in Relay Hostname.
• Nonlocal—Forward mail addressed to systems outside your local site to the relay
system specified in Relay Hostname.
• Local—Forward all mail addressed to any system other than this server to the relay
specified in Relay Hostname.
If you select None, continue with step 5. Otherwise, continue with step 4c.
c. Enter the name of the system that will process mail using the Internet (SMTP) protocol in
the Relay Hostname field.
d. Select a Relay Protocol from among the protocols installed on your system. SMTP is the
default.
5. Click on Submit.
The Administration utility displays a message indicating that the changes have been accepted.
Click on Continue to return to the Configure Server form.
6. A top domain is needed if your organization uses any other protocols besides TCP/IP to
deliver mail (for example, DECnet or UUCP). The top domain is used to:
• Encapsulate mail addresses for non-IP protocols before sending mail out over the Internet
• Determine whether to omit the host name when rewriting the address on the From: line
You can accept the default top domain, or enter another domain in the Top Domain field.
(The top domain is usually your company name and Internet domain, for example, hp.com
or isc.org.) You can enter from 1 to 21 alphanumeric characters (including special
characters). The address cannot start or end with a hyphen (-).
7. Click on Submit.
The Administration utility displays a message stating that the configuration was successful,
and that the Sendmail server has been restarted.
8. You can return to the Configure Sendmail Server menu to configure additional mail protocols
or advanced features, such as masquerading, enabling virtual domains or Procmail, anti-spam,
or LDAP (Section : Changing the Sendmail Server Configuration). Use the navigation bar at
the top of the screen to return to the Configure Sendmail Server menu.
Creating and Deleting Host Aliases for a Mail Server
A host alias is a nickname for your system. If you changed this system's host name (or plan to in
the near future), a host alias allows Sendmail to recognize both names—the current host name
and the host alias—as synonyms for this system. You can also use host aliases to allow Sendmail
to recognize all the system's network interface names as synonyms for this system.
92 Mail Delivery Administration
Page 93

If you configured your system to be a mail server, you can use the Administration utility to create
one or more host aliases for any protocol you configure for the server. (You can also create one
or more host aliases for your system when you initially configure it as a mail server; see Section :
Configuring the System as a Mail Server.)
To set up a host alias for the mail server, follow these steps:
1. Under Mail on the Manage Components menu, choose Sendmail Server.
2. From the Sendmail Server Administration menu, choose Configure Sendmail Server.
3. On the Configure Sendmail Server menu, ensure that Server is selected and click on Configure.
4. From the Configure Sendmail Server menu, choose Configure Mail Protocols.
5. On the Configure Server form, do one of the following:
• Select a new protocol from Available Protocols, and then click on Configure.
• Select a previously configured protocol from Configured Protocols, and then click on
Modify.
The Configure Sendmail Protocol form is displayed.
6. Click on Host Alias.... The Host Alias form is displayed.
7. To add a new host alias, type the name of the alias in the Alias field and then click on Add.
The new alias name is displayed in the Current Alias list box.
To delete an existing host alias, click on the alias name in the Current Alias list box and click
on Delete.
8. When you are finished adding or deleting host aliases for this protocol, click on Submit to
return to the Configure Sendmail Protocol form.
9. Click on Submit. A message is displayed confirming that the changes have been accepted.
Click on OK to return to the Configure Server form.
10. On the Configure Server form, you can select another protocol to configure. If you are finished
configuring protocols, click on Submit.
A message is displayed indicating that the configuration was successfully changed. Click on
OK to return to the Configure Sendmail Server menu, and then click on Done.
Changing the Sendmail Server Configuration
After you configure your system as a mail server, you can change the configuration, configure
additional mail protocols, or configure advanced mail server features as follows:
1. Under Mail on the Manage Components menu, choose either Sendmail Server or Sendmail
Server/ Using Open Source Configuration Rules, depending on which Sendmail administration
interface you are using.
2. From the Sendmail Server Administration menu, choose Configure Sendmail Server.
3. On the Configure Sendmail Server menu, ensure that Server is selected, and click on Configure.
4. Select one of the following:
• Configure Mail Protocols (see Section : Configuring Mail Protocols)
• Configure Masquerading (see Section : Configuring Masquerading)
• Configure Virtual Domains (see Section : Configuring Virtual Domains)
• Enable/Disable Procmail (see Section : Enabling Procmail as a Local Mailer)
• Clam Anti-virus (see Section : Enabling Anti-Virus)
• Configure Anti-Spam (see Section : Configuring Anti-Spam)
• Configure LDAP (see Section : Configuring LDAP)
• Configure MILTER (Sendmail Server/ Using Open Source Configuration Rules only) (see
Section : Configuring Mail Filters (MILTER))
Sendmail Server Administration 93
Page 94

• Configure Queues (Sendmail Server/ Using Open Source Configuration Rules only ) (see
Section : Configuring Queues)
• Configure Queue Performance (Sendmail Server/ Using Open Source Configuration
Rules only) (see Section : Configuring Queue Performance)
• Configure Trusted Layer Security (TLS) (Sendmail Server/ Using Open Source Configuration
Rules only) (see Section : Configuring Trusted Layer Security)
Configuring Mail Protocols
When you initially configure your system as a mail server, you are required to configure the SMTP
protocol (see Section : Configuring the System as a Mail Server). After configuring the SMTP
protocol (and completing the rest of the mail server configuration), you can reconfigure the SMTP
protocol, or add the following additional protocols to the mail server configuration:
• Message Transport System (see Section : Configuring the MTS Protocol)
• DECnet Phase IV (see Section : Configuring the DECnet Phase IV Protocol)
• DECnet/OSI (Phase V) (see Section : Configuring the DECnet/OSI Protocol)
• UNIX-to-UNIX Copy Program (UUCP) (see Section : Configuring the UUCP Protocol)
• X.25 (PSInet) (see Section : Configuring the X.25 Protocol)
To configure a mail protocol, do one of the following on the Configure Sendmail Server form:
• Select the protocol you want from the Available Protocols menu and click on Configure.
• Select the protocol you want from the Configured Protocols menu and click on Modify.
The configuration form appropriate for the protocol you selected is displayed.
Creating and Deleting Pseudo Domain Aliases
A pseudo domain alias is used by Sendmail to determine the protocol that a mail message requires.
The message is properly encapsulated by Sendmail before being sent out over the Internet.
If you configured your system to be a mail server, you can use the Administration utility to create
one or more pseudo domain aliases for the MTS, DECnet/OSI, UUCP, and X.25 protocols.
To set up a pseudo domain alias for a protocol, follow these steps:
1. Under Mail on the Manage Components menu, choose Sendmail Server.
2. From the Sendmail Server Administration menu, choose Configure Sendmail Server.
3. On the Configure Sendmail Server menu, ensure that Server is selected and click on Configure.
4. On the Configure Server form, do one of the following:
• Select a new protocol from Available Protocols, and then click on Configure.
• Select a previously configured protocol from Configured Protocols, and then click on
Modify.
The Configure Sendmail Protocol form is displayed.
5. Click on Pseudo Domain Alias.... The Pseudo Domain Alias form is displayed.
6. To add a new pseudo domain alias, type the name of the alias in the Alias field, and then
click on Add. The new alias name is displayed in the Current Alias list box.
To delete an existing pseudo domain alias, click on the alias name in the Current Alias list
box and click on Delete.
7. When you are finished adding or deleting pseudo domain aliases for this protocol, click on
Submit to return to the protocol configuration form.
8. Continue to configure the protocol as described in Section : Configuring the MTS Protocol
through Section : Configuring the X.25 Protocol.
94 Mail Delivery Administration
Page 95

Configuring the MTS Protocol
To configure the MTS protocol for the Sendmail server, complete the Configure MTS Protocol form
as follows:
1. Create one or more pseudo domain aliases, if needed (see Section : Creating and Deleting
Pseudo Domain Aliases).
2. Create one or more host aliases, if needed (see Section : Creating and Deleting Host Aliases
for a Mail Server).
3. Select one of the following routing methods:
• Internet—Forwards mail over the Internet to an unspecified gateway. The Internet depends
on BIND/ DNS to select an appropriate relay; therefore, you do not need to specify a
relay host name for Internet routing.
• Direct—Sends mail directly to the addressee. This option is not displayed if the MTS
protocol is not installed on this server.
• Relay—Forwards mail to another system (called the relay host) for processing.
4. If you chose Relay routing:
• Enter the name of the relay system in the Relay Hostname field. You can enter from 1 to
21 alphanumeric characters (including special characters). The name cannot start or end
with a hyphen (-).
• Select the relay protocol (the protocol that will be used to forward mail to the relay) from
the Relay Protocol pull-down menu. SMTP is the default.
5. Accept the default pseudo domain (mts) or enter another pseudo domain in the Pseudo Domain
field.
6. Click on Submit. A message is displayed indicating that the changes have been accepted.
Click on Continue to return to the Configure Sendmail Server form.
If an error occurs, use the navigation bar to return to the Configure MTS Protocol form.
7. On the Configure Server form, you can select another protocol to configure.
If you are finished configuring protocols, click on Submit. A message is displayed confirming
that the configuration was successful, and that the Sendmail Server has been restarted. Use
the navigation bar to return to the Configure Sendmail Server menu.
Configuring the DECnet Phase IV Protocol
If DECnet is installed and configured on your system, you can configure the DECnet Phase IV
protocol.
To configure the DECnet Phase IV protocol for the Semdmail server, complete the Configure DNET
Protocol form as follows:
1. Create one or more pseudo domain aliases, if needed (see Section : Creating and Deleting
Pseudo Domain Aliases).
2. Create one or more host aliases, if needed (see Section : Creating and Deleting Host Aliases
for a Mail Server).
3. Select one of the following routing methods:
• Internet—Forwards mail over the Internet to an unspecified gateway. The Internet depends
on BIND/DNS to select an appropriate relay; therefore, you do not need to specify a
relay host name for Internet routing.
• Direct—Sends mail directly to the addressee. This option is not displayed if the DECnet
Phase IV protocol is not installed on this server.
• Relay—Forwards mail to another system (called the relay host) for processing.
4. If you chose Relay routing:
Sendmail Server Administration 95
Page 96

Enter the name of the relay system in the Relay Hostname field. You can enter from 1 to
•
21 alphanumeric characters (including special characters). The name cannot start or end
with a hyphen (-).
• Select the relay protocol (the protocol that will be used to forward mail to the relay) from
the Relay Protocol pull-down menu. SMTP is the default.
5. Enter the DECnet node address for this server (area.node) for this server in the Node Address
field; for example, 32.958.
6. A pseudo domain is used by Sendmail to determine the protocol that a mail message requires.
The message is properly encapsulated by Sendmail before being sent out over the Internet.
Accept the default pseudo domain (ENET) or enter another pseudo domain in the Pseudo
Domain field.
7. Click on Submit. A message is displayed indicating that the changes have been accepted.
Click on Continue to return to the Configure Sendmail Server form.
If an error occurs, use the navigation bar to return to the Configure DNET4 Protocol form.
8. On the Configure Server form, you can select another protocol to configure.
If you are finished configuring protocols, click on Submit. A message is displayed confirming
that the configuration was successful, and that the Sendmail server has been restarted. Use
the navigation bar to return to the Configure Sendmail Server menu.
Configuring the DECnet/OSI Protocol
If DECnet is installed and configured on your system, you can configure the DECnet/OSI protocol.
To configure the DECet/OSI (Phase V) protocol for the Sendmail server, complete the Configure
DNET Protocol form as follows:
1. Create one or more pseudo domain aliases, if needed (see Section : Creating and Deleting
Pseudo Domain Aliases).
2. Create one or more host aliases, if needed (see Section : Creating and Deleting Host Aliases
for a Mail Server).
3. Select one of the following routing methods:
• Internet—Forwards mail over the Internet to an unspecified gateway. The Internet depends
on BIND/DNS to select an appropriate relay; therefore, you do not need to specify a
relay host name for Internet routing.
• Direct—Sends mail directly to the addressee. This option is not displayed if the DECnet/OSI
protocol is not installed on this server.
• Relay—Forwards mail to another system (called the relay host) for processing.
4. If you chose Relay routing:
• Enter the name of the relay system in the Relay Hostname field. You can enter from 1 to
21 alphanumeric characters (including special characters). The name cannot start or end
with a hyphen (-).
• Select the relay protocol (the protocol that will be used to forward mail to the relay) from
the Relay Protocol pull-down menu. SMTP is the default.
5. The default DNS Name Space is the total collection of names that one or more DECdns servers
know about, look up, manage, and share. The name space for your site is the token before
the colon ( : ) in your Phase V node name. For example, dec is the name space for the
address dec:.foo.bar. Accept the default DNS name space or enter another name space
in the DNS Name Space field.
6. A pseudo domain is used by Sendmail to determine the protocol that a mail message requires.
The message is properly encapsulated by Sendmail before being sent out over the Internet.
96 Mail Delivery Administration
Page 97

Accept the default pseudo domain (D5NET) or enter another pseudo domain in the Pseudo
Domain field.
7. Click on Submit. A message is displayed indicating that the changes have been accepted.
Click on Continue to return to the Configure Sendmail Server form.
If an error occurs, use the navigation bar to return to the Configure DNET5 Protocol form.
8. On the Configure Server form, you can select another protocol to configure.
If you are finished configuring protocols, click on Submit. A message is displayed confirming
that the configuration was successful, and that the Sendmail server has been restarted. Use
the navigation bar to return to the Configure Sendmail Server menu.
Configuring the UUCP Protocol
To configure the UUCP protocol for the Sendmail server, complete the Configure UUCP Protocol
form as follows:
1. Create one or more pseudo domain aliases, if needed (see Section : Creating and Deleting
Pseudo Domain Aliases).
2. Create one or more host aliases, if needed (see Section : Creating and Deleting Host Aliases
for a Mail Server).
3. Select one of the following routing methods:
• Internet — Forwards mail over the Internet to an unspecified gateway. The Internet depends
on BIND/DNS to select an appropriate relay; therefore, you do not need to specify a
relay host name for Internet routing.
• Direct—Sends mail directly to the addressee. This option is not displayed if the UUCP
protocol is not installed on this server.
• Relay—Forwards mail to another system (called the relay host) for processing.
4. If you chose Relay routing:
• Enter the name of the relay system in the Relay Hostname field. You can enter from 1 to
21 alphanumeric characters (including special characters). The name cannot start or end
with a hyphen (-).
• Select the relay protocol (the protocol that will be used to forward mail to the relay) from
the Relay Protocol pull-down menu. SMTP is the default.
5. Click on Submit. A message is displayed indicating that the changes have been accepted.
Click on Continue to return to the Configure Sendmail Server form.
If an error occurs, use the navigation bar to return to the Configure UUCP Protocol form.
6. On the Configure Server form, you can select another protocol to configure.
If you are finished configuring protocols, click on Submit. A message is displayed confirming
that the configuration was successful, and that the Sendmail server has been restarted. Use
the navigation bar to return to the Configure Sendmail Server menu.
Configuring the X.25 Protocol
To configure the X.25 protocol for the Sendmail server, complete the Configure X25 Protocol form
as follows:
1. Create one or more pseudo domain aliases, if needed (see Section : Creating and Deleting
Pseudo Domain Aliases).
2. Create one or more host aliases, if needed (see Section : Creating and Deleting Host Aliases
for a Mail Server).
3. Select one of the following routing methods:
Sendmail Server Administration 97
Page 98

Internet—Forwards mail over the Internet to an unspecified gateway. The Internet depends
•
on BIND/DNS to select an appropriate relay; therefore, you do not need to specify a
relay host name for Internet routing.
• Direct—Sends mail directly to the addressee. This option is not displayed if the X.25
protocol is not installed on this server.
• Relay—Forwards mail to another system (called the relay host) for processing.
4. If you chose Relay routing:
• Enter the name of the relay system in the Relay Hostname field. You can enter from 1 to
21 alphanumeric characters (including special characters). The name cannot start or end
with a hyphen (-).
• Select the relay protocol (the protocol that will be used to forward mail to the relay) from
the Relay Protocol pull-down menu. SMTP is the default.
5. Click on Submit. A message is displayed indicating that the changes have been accepted.
Click on Continue to return to the Configure Sendmail Server form.
If an error occurs, use the navigation bar to return to the Configure X25 Protocol form.
6. On the Configure Server form, you can select another protocol to configure.
If you are finished configuring protocols, click on Submit. A message is displayed confirming
that the configuration was successful, and that the Sendmail server has been restarted. Use
the navigation bar to return to the Configure Sendmail Server menu.
Configuring Masquerading
Masquerading is the process of transforming the local host name portion of a mail address into
that of another host. A masquerading mail message appears to have come from the other host
rather than the local host.
Error messages are often returned to the sender address on the message envelope. When many
hosts are masquerading as a single host, all error messages are delivered to the central
masquerading host.
When you enable masquerading on a configured Sendmail Server, all the host aliases you create
will automatically assume the masquerading host name.
Accessing the Configure Masquerading Form
To access the Configure Masquerading form, follow these steps:
1. Under Mail on the Manage Components menu, choose Sendmail Server.
2. From the Sendmail Server Administration menu, choose Configure Sendmail Server.
3. On the Configure Sendmail Server menu, ensure that Server is selected and click on Configure.
4. From the Configure Sendmail Server menu, choose Configure Masquerading.
Figure 21 shows the Configure Masquerading form.
98 Mail Delivery Administration
Page 99

Figure 21 Configure Masquerading Form
Users Automatically Excluded from Masquerading
The following users are always excluded from masquerading (whether or not you explicitly specify
them in the Excluded Users List field or in the Excluded Users File):
• root
• postmaster
• news
• uucp
Sendmail Server Administration 99
Page 100

• mailer-daemon
• rdist
• nobody
• daemon
• pop
• imap
Configuring Your System for Masquerading
To configure your system for masquerading, follow these steps:
1. To enable masquerading, turn on the Enable Masquerading checkbox. (To disable
masquerading while retaining the masquerading configuration, turn off this checkbox.)
2. Enter the masquerading host name in the Masquerade As field. This field is required. When
masquerading is enabled, all the host aliases for your system (see Section : Creating and
Deleting Host Aliases for a Mail Server) will automatically assume this masquerading host
name, unless you check Exclude Host Aliases From Masquerading (see step 8). The system
can have only one masquerading host name, and must be a valid, fully qualified name.
3. You can specify additional hosts and domains that you want to assume the masquerading
host name by entering the names in the Masquerading Hosts/Domains List field. Separate the
names using a space. In Figure 21, the host server.xyzcorp.com and the domain
xyzcorp.com will assume the masquerading host name xyzcorp.com.
Note:
You must specify an entry in the Masquerading Hosts/Domains List field if you intend to exclude
host aliases from masquerading (see step 8) or if you want to enable masquerading for
subdomains (see step 9). You must specify to Sendmail the hosts and domains you want to
masquerade (since the local host name and local aliases will be excluded).
4. If you have a file containing the names of hosts and/or domains that you would like to assume
the masquerading host name, enter the full pathname of that file in the Masquerading
Hosts/Domains File field. In Figure 21, the file /mydir/masked-hosts.txt contains
additional host and domain names to be masqueraded, each on a separate line, as shown
in the following example:
host1.site.domain.com
host2.site.domain.com
host3.site.domain.com
You can specify only one file in the Masquerading Hosts/Domains File field.
5. To prevent the masquerading host name from appearing in the mail header of messages from
particular users, enter those user names in the Excluded Users List field. Separate the names
using a space. In Figure 21, mail messages from the users julia, sarah, and barbara
will not use the masquerading host name.
6. If you have a file containing the names of users whose mail headers should not use the
masquerading host name, enter the full pathname of this file in the Excluded Users File field.
Each user name must occupy a separate line in the file, as shown in the following example:
admin
peter
vpr
rich
You can specify only one file in the Excluded Users File field.
100 Mail Delivery Administration
 Loading...