

Page 1

HP Intelligent Infrastructure Analyzer v2.0 Software User Guide
Abstract
This document describes how to use HP Intelligent Infrastructure Analyzer software user interface for an online monitoring and
diagnostic solution, which is intended for the physical layer of Storage Area Network (SAN) based on optical components
such as Small Form-Factor Pluggable (SFP) transceivers.
HP Part Number: 714230-001
Published: September 2013
Edition: 3
Page 2

© Copyright 2013 Hewlett-Packard Development Company, L.P.
The information contained herein is subject to change without notice. The only warranties for HP products and services are set forth in the express
warranty statements accompanying such products and services. Nothing herein should be construed as constituting an additional warranty. HP shall
not be liable for technical or editorial errors or omissions contained herein.
Acknowledgments
Confidential computer software. Valid license from HP required for possession, use or copying. Consistent with FAR 12.211 and 12.212, Commercial
Computer Software, Computer Software Documentation, and Technical Data for Commercial Items are licensed to the U.S. Government under
vendor's standard commercial license.
The information contained herein is subject to change without notice. The only warranties for HP products and services are set forth in the express
warranty statements accompanying such products and services. Nothing herein should be construed as constituting an additional warranty. HP shall
not be liable for technical or editorial errors or omissions contained herein.
Intel and Pentium are trademarks of Intel Corporation in the U.S. and other countries.
Microsoft, Windows, Windows XP, Windows Server 2003/2008 (x86, x64), and Windows Vista and Windows 7 are U.S. registered trademarks
of Microsoft Corporation.
Java is a registered trademark of Oracle and/or its affiliates.
Page 3

Contents
1 Overview..................................................................................................5
Intended Audience....................................................................................................................5
Introduction..............................................................................................................................5
Acronyms and abbreviations......................................................................................................5
System requirements for HP IIAS management station....................................................................5
2 Installing, repairing, upgrading, and removing HP IIAS ..................................7
Installing HP IIAS .....................................................................................................................7
Repairing HP IIAS ....................................................................................................................7
Upgrade from HP IIAS v1.0/v1.1 to HP IIAS v2.0..........................................................................8
Removing HP IIAS ....................................................................................................................9
3 Installing, repairing, and removing HP IIASCIM Server v2.0 for Windows........10
Installing HP IIASCIM Server v2.0 for Windows..........................................................................10
Repairing HP IIASCIM Server v2.0 for Windows.........................................................................10
Removing HP IIASCIM Server v2.0 for Windows.........................................................................10
4 Installing, and removing HP IIASCIM Server v2.0 for ESXi 5.x.........................11
Prerequisites...........................................................................................................................11
Removing HP IIASCIM Server v2.0 from ESXi 5.x........................................................................11
5 Installing, and removing HP IIASCIM Server v2.0 for RHEL x86/x86_64 .........12
Prerequisites...........................................................................................................................12
Removing HP IIAS CIMServer v2.0 from RHEL x86/x86_64.........................................................12
6 Installing, and removing IIASCIM Server v2.0 for SLES x86/x86_64...............13
Prerequisites...........................................................................................................................13
Removing HP IIAS CIMServer v2.0 from SLES x86/x86_64..........................................................13
7 Using HP IIAS .........................................................................................14
Overview..............................................................................................................................14
HP IIAS GUI .....................................................................................................................14
HP IIAS Navigation Menus..................................................................................................16
Using HP IIAS .......................................................................................................................16
Prerequisites for Discovery...................................................................................................16
Managing SAN Profiles......................................................................................................17
Creating new SAN profile for monitoring switches, hosts, and storage devices......................17
Edit SAN profile............................................................................................................22
Activate SAN profile......................................................................................................23
Deactivate SAN profile..................................................................................................23
Delete SAN profile........................................................................................................24
Rescan SAN..........................................................................................................................24
HP IIAS terminologies..............................................................................................................24
SAN Topology.......................................................................................................................25
Prerequisites for Topology...................................................................................................25
Overview..........................................................................................................................25
Using SAN Topology.....................................................................................................26
SAN Inventory........................................................................................................................29
Switches Inventory Summary View........................................................................................29
Switch detailed Inventory................................................................................................30
Hosts Inventory Summary View............................................................................................32
Host detailed Inventory..................................................................................................33
Storage Devices Inventory Summary View.............................................................................34
Storage Devices detailed Inventory..................................................................................35
Contents 3
Page 4

Unknown Devices Inventory Summary View...........................................................................37
Unknown Devices detailed Inventory................................................................................38
Event Manager.......................................................................................................................38
SAN Event and SAN Diagnostic Logs...................................................................................38
SAN Event Log..............................................................................................................39
SAN Diagnostic Logs.....................................................................................................41
Firmware prerequisites for SFP diagnostics...................................................................41
Firmware prerequisites for SFP diagnostics specific to 3PAR storage device.......................42
SAN Diagnostic GUI.................................................................................................42
Configuration.........................................................................................................................44
Notifications.....................................................................................................................44
Reports.............................................................................................................................45
Account Management........................................................................................................45
Licensing..........................................................................................................................46
Prerequisite to generate permanent license for HP IIAS ......................................................46
Licensing......................................................................................................................46
Upgrade HP IIAS v1.0/v1.1 to HP IIAS v2.0.................................................................47
Reporter................................................................................................................................47
8 Support and Other Resources.....................................................................50
Contacting HP........................................................................................................................50
Subscription......................................................................................................................50
Related Information.................................................................................................................50
Documents........................................................................................................................50
Websites..........................................................................................................................50
Documentation Feedback.........................................................................................................50
Product Feedback...................................................................................................................51
Typographic Conventions.........................................................................................................51
A Support Matrix........................................................................................52
Installing OS specific service packs...........................................................................................52
Operating systems supported for HP IIASCIM Server...................................................................52
B Host HBA error codes...............................................................................55
C Troubleshooting.......................................................................................56
Correcting conditions with SFPs and FC cables/connectors..........................................................56
Troubleshooting for Host events.................................................................................................59
Glossary....................................................................................................60
Index.........................................................................................................62
4 Contents
Page 5

1 Overview
Intended Audience
The HP Intelligent Infrastructure Analyzer Software is intended for customers having HP storage
hardware in their SAN. HP IIAS can be used to monitor and diagnose the physical layer of Storage
Area Network (SAN) in real-time, with an emphasis on the Small Form-factor Pluggable (SFP) on
FC Switch, HBA, and Storage device. The solution is highly beneficial for enterprise SAN, where
SAN management becomes cumbersome and tedious.
Introduction
HP IIAS uses industry-standard protocols (such as SNMP, SMI-S, CIM, and Telnet) to monitor the
physical layer (SFPs) across SAN, diagnose changes or events in SFP states or characteristics, and
presents the SAN topology, inventory, and diagnostic information to the user in real-time.
HP IIAS enables you to:
• Discover and collect data of B-Series and H-Series switches in SAN.
• Discover and collect data of 8Gb/16Gb HP branded Qlogic FC HBAs.
• Discover and collect data of HP 3PAR storage device.
• Periodically monitor the active profile in SAN, based on the user-configured time intervals.
• Monitor or diagnose the degrading, or failing of SFPs in an active profile.
• Generate reports (current and historical).
• Notify the user on any change in the topology or SAN component state.
• Provide SAN summary in terms of component inventory.
Acronyms and abbreviations
CIM Common Information Model
CIMOM Common Information Model Object Manager
DC Data Collection
HBA Host Bus Adapter
HP IIAS HP Intelligent Infrastructure Analyzer Software. This will be installed on the management
station.
HP IIAS
CIMSERVER
LAN Local Area Network
SAN Storage Area Network
SFP Small Form-Factor Pluggable
SMI-S SNIA’s Storage Management Initiative Specification
SNMP Simple Network Management Protocol
WWN World Wide Name
XML eXtensible Markup Language
HP Intelligent Infrastructure Analyzer Software Common Information Model Server
System requirements for HP IIAS management station
The following are the system requirements for HP IIAS management station:
Intended Audience 5
Page 6

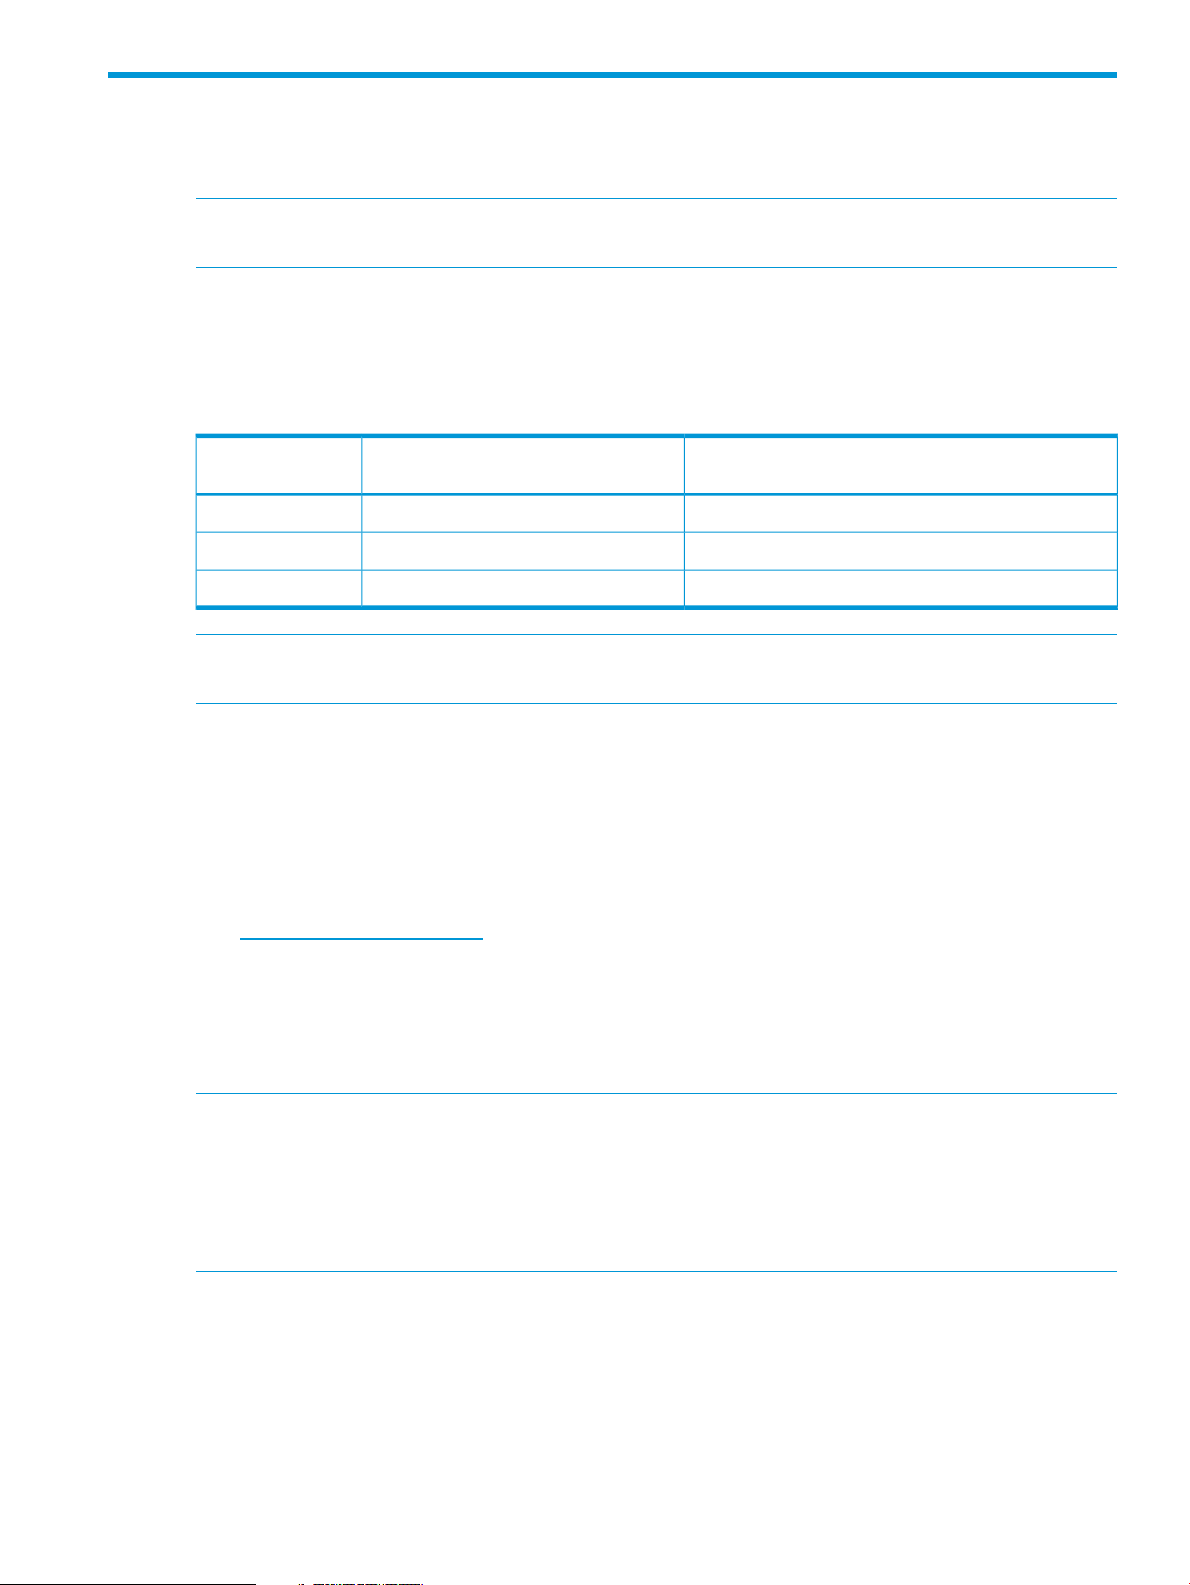
Table 1 System requirements for HP IIAS management station
Supported platforms, versions, or configurationHardware and software
Dual-core 2.0 GHz CPU or betterCPU
4 Gb or higherRAM
Product installation disk space
requirements
Windows
IP network addresses
NOTE:
250 MB
NOTE: Minimum 250 MB disk space is required on the drive where TEMP
folder is located.
300 - 350 MBMinimum disk space requirement
NOTE: Disk space will increase depending on the SAN size.
Version 8.0, 9.0, or 10.0 (compatibility view only).Internet Explorer
HP IIAS v2.0 does not work on Windows Server 2012 with KB2846071 service
pack . KB2846071 service pack has a session management issue. Please see
Microsoft site for more details.
NOTE: To enable compatibility view on IE10:
• In IE, go to Tools menu, click Compatibility View Settings .
• Select the Display all websites in Compatibility mode check box.
See “Installing OS specific service packs for supported platforms and service
packs” (page 52).
HP IIAS supports IPv4 only. The host where HP IIAS is installed must have IPv4
address.
Virtual or Physical.Host Type
• The host on which HP IIAS is installed should be able to connect to the components in the
active profile over Ethernet always.
• Following are the default TCP/IP ports used by HP IIAS:
8080, 8085, 9000, 9001, 5678, 8765
If these ports are used by another application, then the HP IIAS installer prompts to enter the
free ports that can be used.
6 Overview
Page 7
2 Installing, repairing, upgrading, and removing HP IIAS
Installing HP IIAS
To install HP IIAS , complete the following steps:
1. Download HP IIAS package from the following website:
www.hp.com/go/hp_iias.
2. Select a folder (for example, C:\temp) and save the HP IIAS install package.
3. Run IIAS_Setup.exe, and follow the steps to install the HP IIAS files.
4. Review and accept the license agreement.
By default, the HP IIAS files and documentation are installed in the following folder:
<Install_Dir>\HP Intelligent Infrastructure Analyzer Software
A message is displayed on completion of the HP IIAS installation.
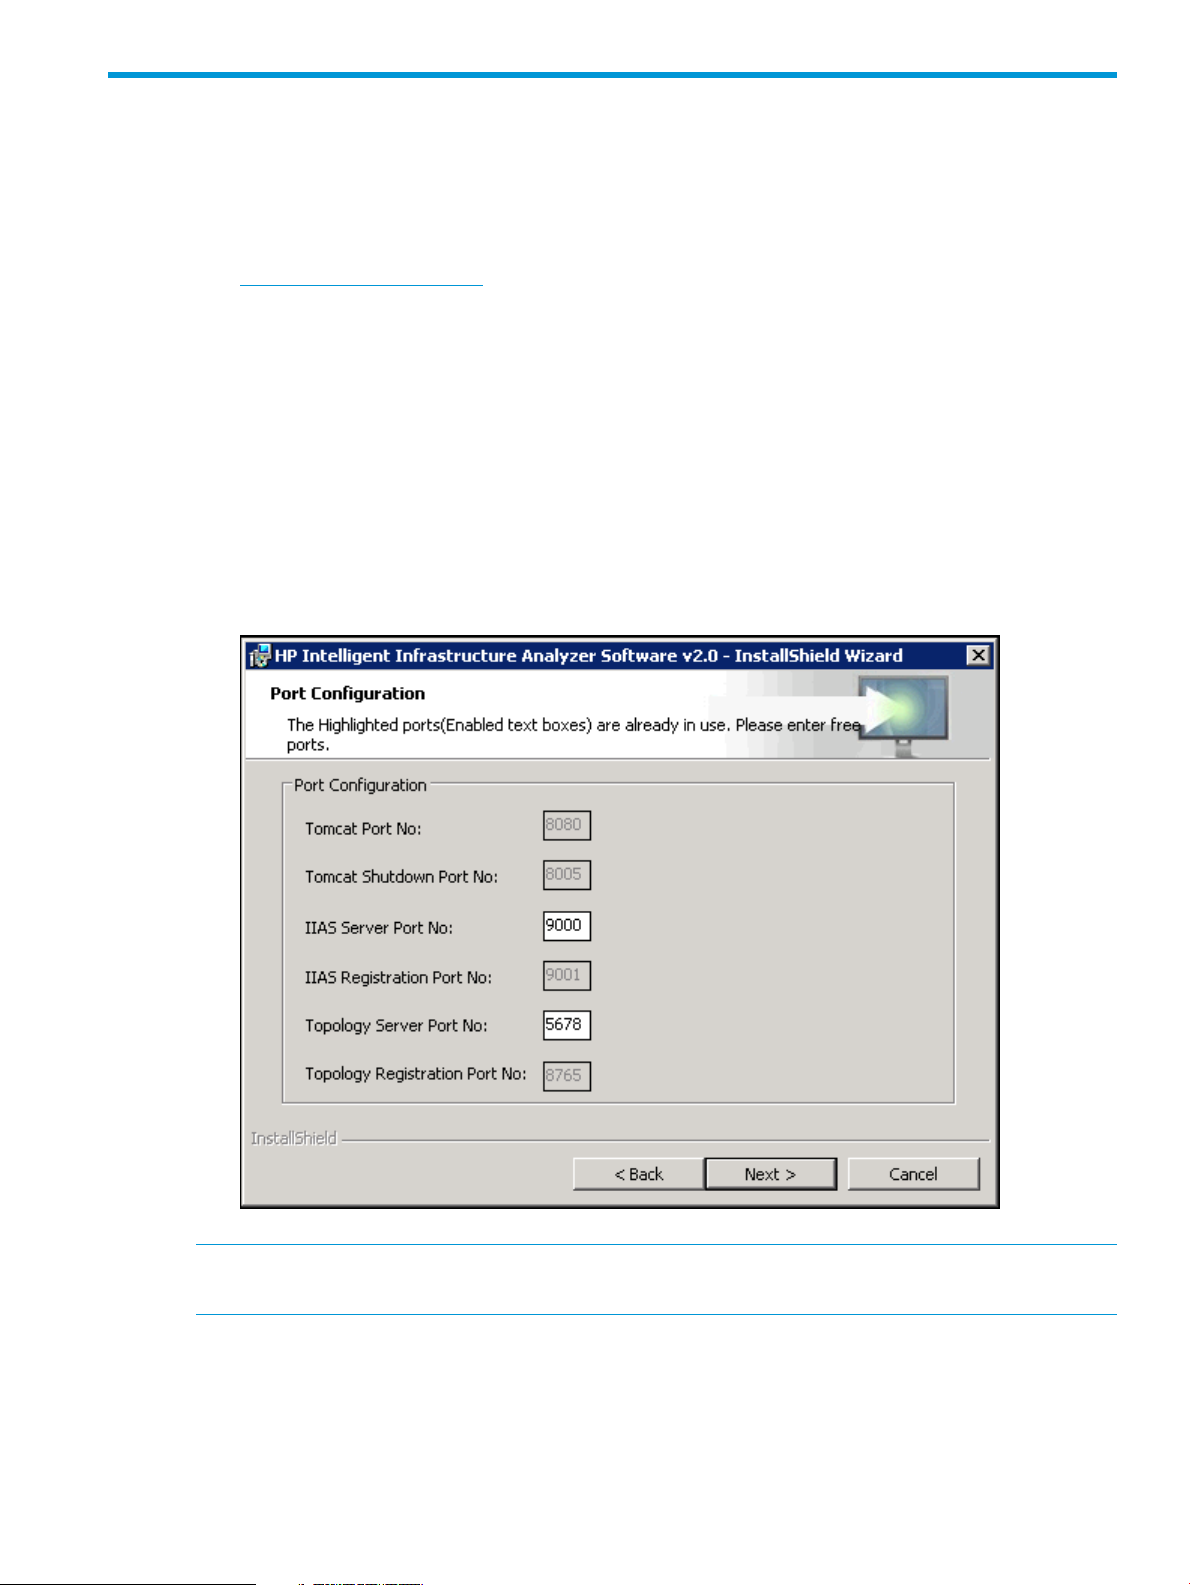
5. While installing the HP IIAS product, the installer checks for the availability of the required
port numbers. If any of the required ports are already in use, then the installer will prompt
asking for alternate port numbers as shown in Figure 1 (page 7).
Figure 1 Port Configuration
NOTE: If any issues are faced while launching HP IIAS, try changing the logon user for
IIASServer service explicitly to an administrator user.
Repairing HP IIAS
To repair the currently installed HP IIAS:
1. Run the IIAS_Setup.exe setup executable file.
2. Select Repair to repair the current installation.
Installing HP IIAS 7
Page 8
Upgrade from HP IIAS v1.0/v1.1 to HP IIAS v2.0
Before upgrading, take historical reports (hourly and daily). After the upgrade is done, the user
will not be able to access any historical data.
1. Download HP IIASv2.0 package from the following website:
www.hp.com/go/hp_iias.
2. Select a folder (for example, C:\temp) and save the HP IIAS v2.0 installation package.
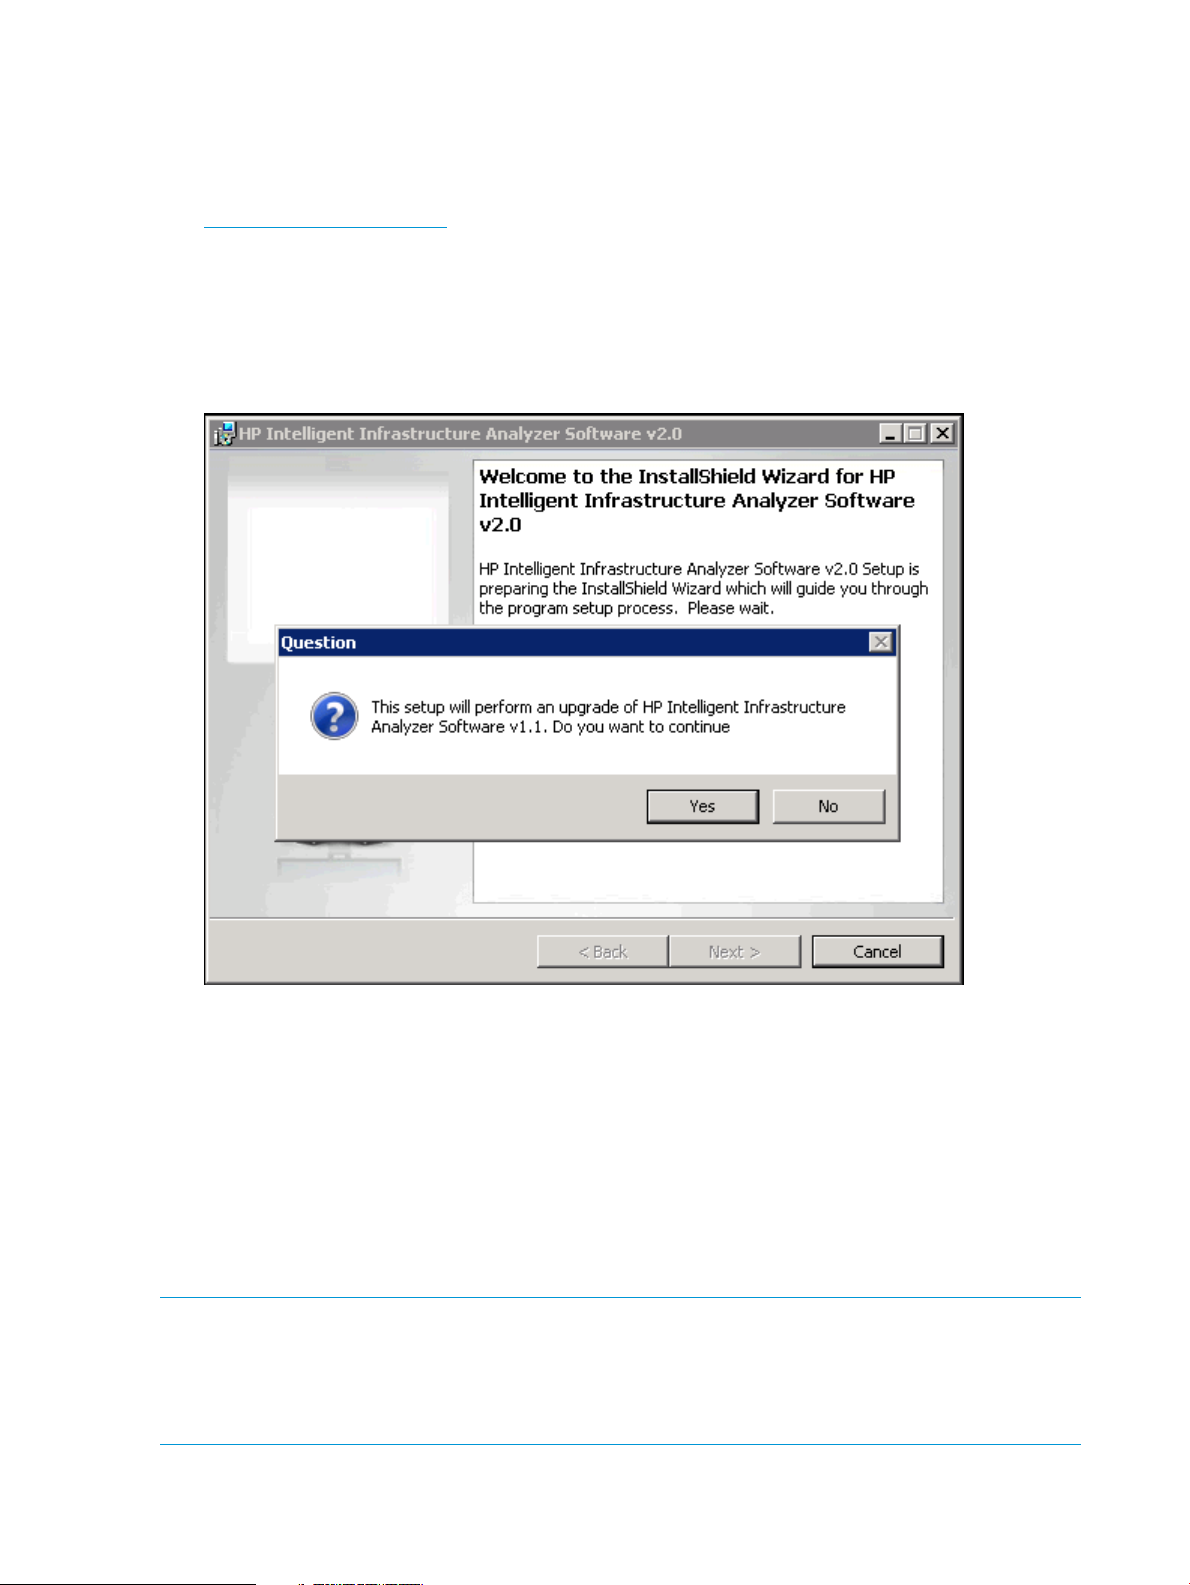
3. Run the HP IIAS v2.0 .exe file(IIAS_Setup.exe).
4. A Question window is displayed, confirming the upgrading process as shown in Figure 2
(page 8).
Figure 2 Upgrade of HP IIAS v2.0
5. Click Yes to proceed with the upgrading process and follow the steps to install the HP IIAS
files.
6. Review and accept the license agreement.
By default, the HP IIAS files and documentation are installed in the following folder:
<Install_Dir>\HP Intelligent Infrastructure Analyzer Software
A message is displayed on completion of the HP IIAS v2.0 installation.
7. While installing the HP IIAS product, the installer checks for the availability of the required
port numbers. If any of the required ports are already in use, then the installer will prompt
asking for alternate port numbers as shown in Figure 1 (page 7).
NOTE: While upgrading HP IIAS from versions (1.1/1.0) to 2.0, the profiles related to previous
versions (1.1/1.0) will be copied to <installlocation>/server/data/profiles/2.0
by the installer. If any active profile exists in the previous version of HP IIAS, then that profile will
be de-activated after the upgrade. User has to activate the profile explicitly using the Activate
button under Manage SAN profiles screen. For more details see the Manage SAN Profiles section.
8 Installing, repairing, upgrading, and removing HP IIAS
Page 9

Removing HP IIAS
To remove the HP IIAS :
1. Select Start > Settings > Control Panel > Add or Remove Programs (in case of Windows 7,
select Uninstall a program).
2. Select HP Intelligent Infrastructure Analyzer Software v2.0 from the list of currently installed
programs.
3. Click Change/Remove (in case of Windows 7, select Uninstall), and follow the steps to remove
the program.
A message is displayed confirming the successful removal of HP IIAS .
Removing HP IIAS 9
Page 10

3 Installing, repairing, and removing HP IIASCIM Server
v2.0 for Windows
NOTE: HP IIASCIM server must be installed on the Windows host platform which can be monitored
by HP IIAS. This server provides a CIM interface to HP IIAS, and enables data collection.
Installing HP IIASCIM Server v2.0 for Windows
To install HP IIASCIM Server v2.0:
1. Download HP IIASCIM Sever v2.0 for Windows package from the HP IIAS website:
www.hp.com/go/hp_iias.
2. Select a folder (for example, C:\temp), and save the HP IIASCIM Server v2.0 for Windows
installation package.
3. Run IIAS_CIMServer.exe, and follow the steps to install the HP IIASCIM Server v2.0 for
Windows files.
4. Review and accept the license agreement.
By default, the HP IIASCIM Server v2.0 for Windows files are installed in the following folder:
<Install_Dir>\IIASCIM Server
A message is displayed on completion of the HP IIASCIM Server v2.0 for Windows installation.
NOTE: See the “Support Matrix” (page 52) for the set of supported platforms.
Repairing HP IIASCIM Server v2.0 for Windows
To repair the currently installed HP IIASCIM Server:
1. Select Start > Settings > Control Panel > Add or Remove Programs.
2. Select IIASCIM Server v2.0 for Windows from the list of currently installed programs.
3. Click Repair, and follow the steps to repair the program.
A message is displayed confirming the repair of HP IIASCIM Server v2.0 for Windows.
Removing HP IIASCIM Server v2.0 for Windows
To remove HP IIASCIM Server v2.0 for Windows:
1. Select Start > Settings > Control Panel > Add or Remove Programs (in case of Windows 7,
select Uninstall a program).
2. Select HP Intelligent Infrastructure Analyzer Software v2.0 from the list of currently installed
programs.
3. Click Change/Remove, and follow the steps to remove the program.
A message is displayed confirming the successful removal of HP IIASCIM Server v2.0 for
Windows.
10 Installing, repairing, and removing HP IIASCIM Server v2.0 for Windows
Page 11
4 Installing, and removing HP IIASCIM Server v2.0 for ESXi
5.x
NOTE: HP IIASCIM server must be installed on the Windows host platform which can be monitored
by HP IIAS. This server provides a CIM interface to HP IIAS, and enables data collection.
Prerequisites
To successfully install HP IIASCIM Server, the following parameters in the SFCB config file on the
ESXi machine (/etc/sfcb.cfg) must be modified: httpProcs, doBasicAuth, and
httpLocalOnly as shown in the following table.
New value of parameter as modified by HP IIASCIM
Server InstallerDefault value of parameterParameter
102httpProcs
FalseTruedoBasicAuth
FalseTruehttpLocalOnly
NOTE: These changes can affect other providers which use the SFCB. If these changes are not
allowed, HP IIASCIM Server will not be installed.
• Ensure that the root user access to the system is available.
• The IIASCIMServer_ESXi.sh script must have executable permissions. If it does not have
the executable permissions, run the following command:
#chmod +x ./IIASCIMServer_ESXi.sh
To install HP IIASCIM Server v2.0 package for ESXi 5.x:
1. Download HP IIASCIM Server v2.0 package for ESXi 5.x from the HP IIAS website:
www.hp.com/go/hp_iias.
2. Select a folder (for example, /vmfs/volumes/datastore1/temp), and save the HP
IIASCIM Server v2.0 package.
3. Untar the file IIASCIMServer-2.0.0.0-0.ESXi.tar.
4. Run ./IIASCIMServer_ESXi.sh script, and follow the steps to install the HP IIASCIM
Server v2.0 files.
NOTE:
• If IIASCIM Server is not installed, then the installer installs a fresh copy of the IIASCIM Server.
• If the same version of IIASCIM Server is available, then the installer prompts for an
uninstallation.
• See the “Support Matrix” (page 52) for the set of supported platforms.
Removing HP IIASCIM Server v2.0 from ESXi 5.x
To remove HP IIASCIM Server v2.0 for ESXi 5.x:
1. Go to the location where the IIASCIM Server v2.0 for ESXi 5.x is installed.
2. Run the ./IIASCIMServer_ESXi.sh script.
Prerequisites 11
Page 12

5 Installing, and removing HP IIASCIM Server v2.0 for RHEL
x86/x86_64
NOTE: HP IIASCIM server must be installed on the Windows host platform which can be monitored
by HP IIAS. This server provides a CIM interface to HP IIAS, and enables data collection.
Prerequisites
NOTE: Before installing HP IIASCIM Server, run the check_prerequisites.sh script to verify
that the required system libraries are present in the system.
Ensure that the root user access to the system is available.
x86
• The IIASCIMServer_x86.sh script must have executable permissions. If it does not have
the executable permissions, run the following command:
#chmod +x ./IIASCIMServer_x86.sh
x86_64
• The IIASCIMServer_x86_64.sh script must have executable permissions. If it does not
have the executable permissions, run the following command:
#chmod +x ./IIASCIMServer_x86_64.sh
To install HP IIASCIM Server v2.0 package for RHEL x86/x86_64:
1. Download HP IIASCIM Server v2.0 package for RHEL x86/x86_64 from the HP IIAS website:
www.hp.com/go/hp_iias.
2. Select a folder (for example, /opt/temp), and save the HP IIASCIM Server v2.0 package.
3. Untar the file IIASCIMServer-2.0.0.0-0.i686-RHEL.tar (32-bit) or
IIASCIMServer-2.0.0.0-0.x86_64-RHEL.tar (64-bit) depending on the platform.
4. Run ./IIASCIMServer_x86.sh (32-bit) or ./IIASCIMServer_x86_64.sh (64-bit)
depending on the platform.
NOTE:
• If IIASCIM Server is not installed on the system, then the installer installs a fresh copy of the
IIASCIM Server.
• If the same version of IIASCIM Server is available, then the installer prompts for an
uninstallation.
• See the “Support Matrix” (page 52) for the set of supported platforms.
Removing HP IIAS CIMServer v2.0 from RHEL x86/x86_64
To remove HP IIASCIM Server v2.0 for RHEL x86/x86_64:
• Go to the location where the IIASCIM Server v2.0 for RHEL x86/x86_64 is installed.
• Run ./IIASCIMServer_x86.sh script, or the ./IIASCIMServer_x86_64.sh script
depending on the platform.
12 Installing, and removing HP IIASCIM Server v2.0 for RHEL x86/x86_64
Page 13

6 Installing, and removing IIASCIM Server v2.0 for SLES
x86/x86_64
NOTE: HP IIASCIM server must be installed on the Windows host platform which can be monitored
by HP IIAS. This server provides a CIM interface to HP IIAS, and enables data collection.
Prerequisites
Ensure that the root user access to the system is available.
x86
• The IIASCIMServer_x86.sh script must have executable permissions. If it does not have
the executable permissions, run the following command:
#chmod +x ./IIASCIMServer_x86.sh
x86_64
• The IIASCIMServer_x86_64.sh script must have executable permissions. If it does not
have the executable permissions, run the following command:
#chmod +x ./IIASCIMServer_x86_64.sh
To install HP IIASCIM Server v2.0 package for SLES x86/x86_64:
1. Download HP IIASCIM Server v2.0 package for SLES x86/x86_64 from the HP IIAS website:
www.hp.com/go/hp_iias.
2. Select a folder (for example, /opt/temp). and save the HP IIASCIM Server v2.0 package.
3. Untar the file IIASCIMServer-2.0.0.0-0.i686-RHEL.tar (32-bit) or
IIASCIMServer-2.0.0.0-0.x86_64-RHEL.tar (64-bit) depending on the platform.
4. Run ./IIASCIMServer_x86.sh (32-bit) or ./IIASCIMServer_x86_64.sh (64-bit)
depending on the platform.
NOTE:
• If IIASCIM Server is not installed on the system, then the installer installs a fresh copy of the
IIASCIM Server.
• If the same version of IIASCIM Server is available, then the installer prompts for an
uninstallation.
• See the “Support Matrix” (page 52) for the set of supported platforms.
Removing HP IIAS CIMServer v2.0 from SLES x86/x86_64
To remove HP IIASCIM Server v2.0 from SLES x86/x86_64:
• Go to the location where the IIASCIM Server v2.0 for SLES x86/x86_64 is installed.
• Run ./IIASCIMServer_x86.sh script, or the ./IIASCIMServer_x86_64.sh script
depending on the platform.
Prerequisites 13
Page 14
7 Using HP IIAS
Overview
HP IIAS is a real-time solution to monitor and diagnose the SFPs on the FC Switch, HBA, and
Storage device.
This chapter discusses the following topics:
• “HP IIAS GUI ” (page 14)
• “HP IIAS Navigation Menus” (page 16)
The following procedure provides a brief overview of using HP IIAS :
1. Specify the SAN Profile details, which include the SAN profile name and options.
2. Specify the switches, hosts, and storage devices to be monitored.
3. Activate the profile.
4. Track the inventory of the components in the SAN and their connectivity among each other
through SAN Inventory and Topology.
5. View the event notifications and diagnostics.
6. Optionally, you can generate reports.
HP IIAS GUI
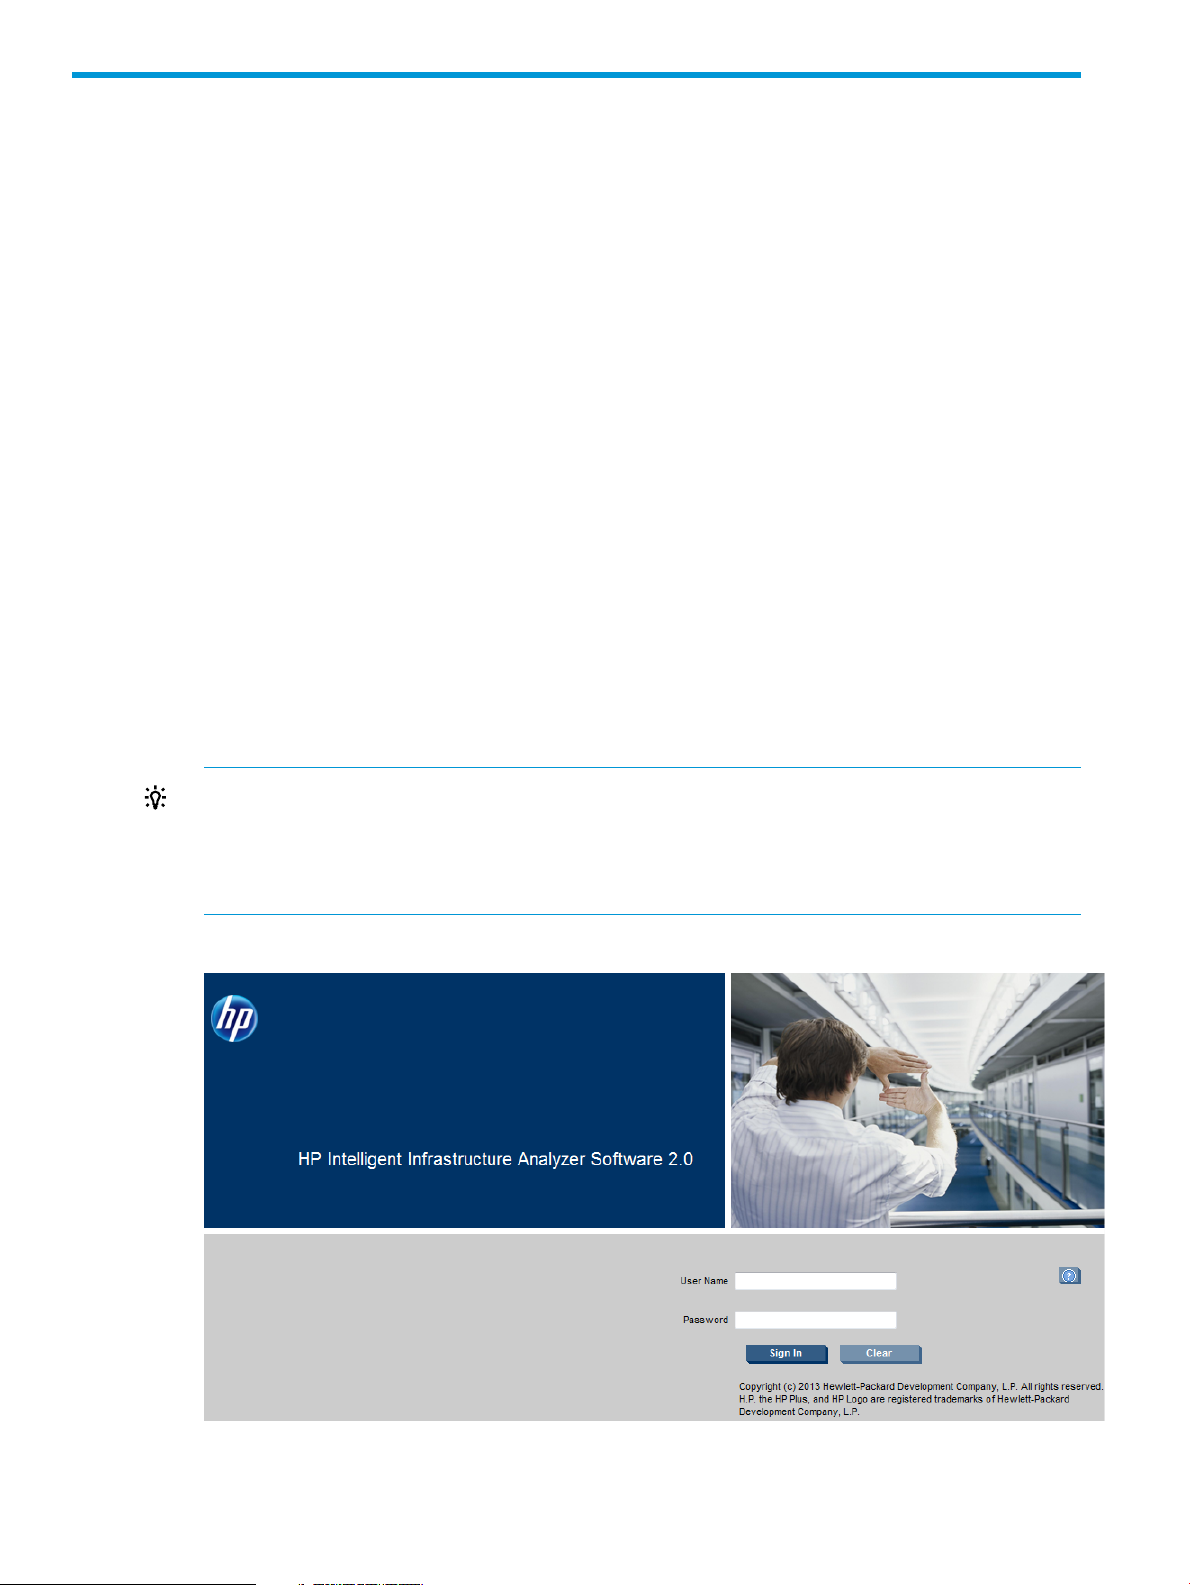
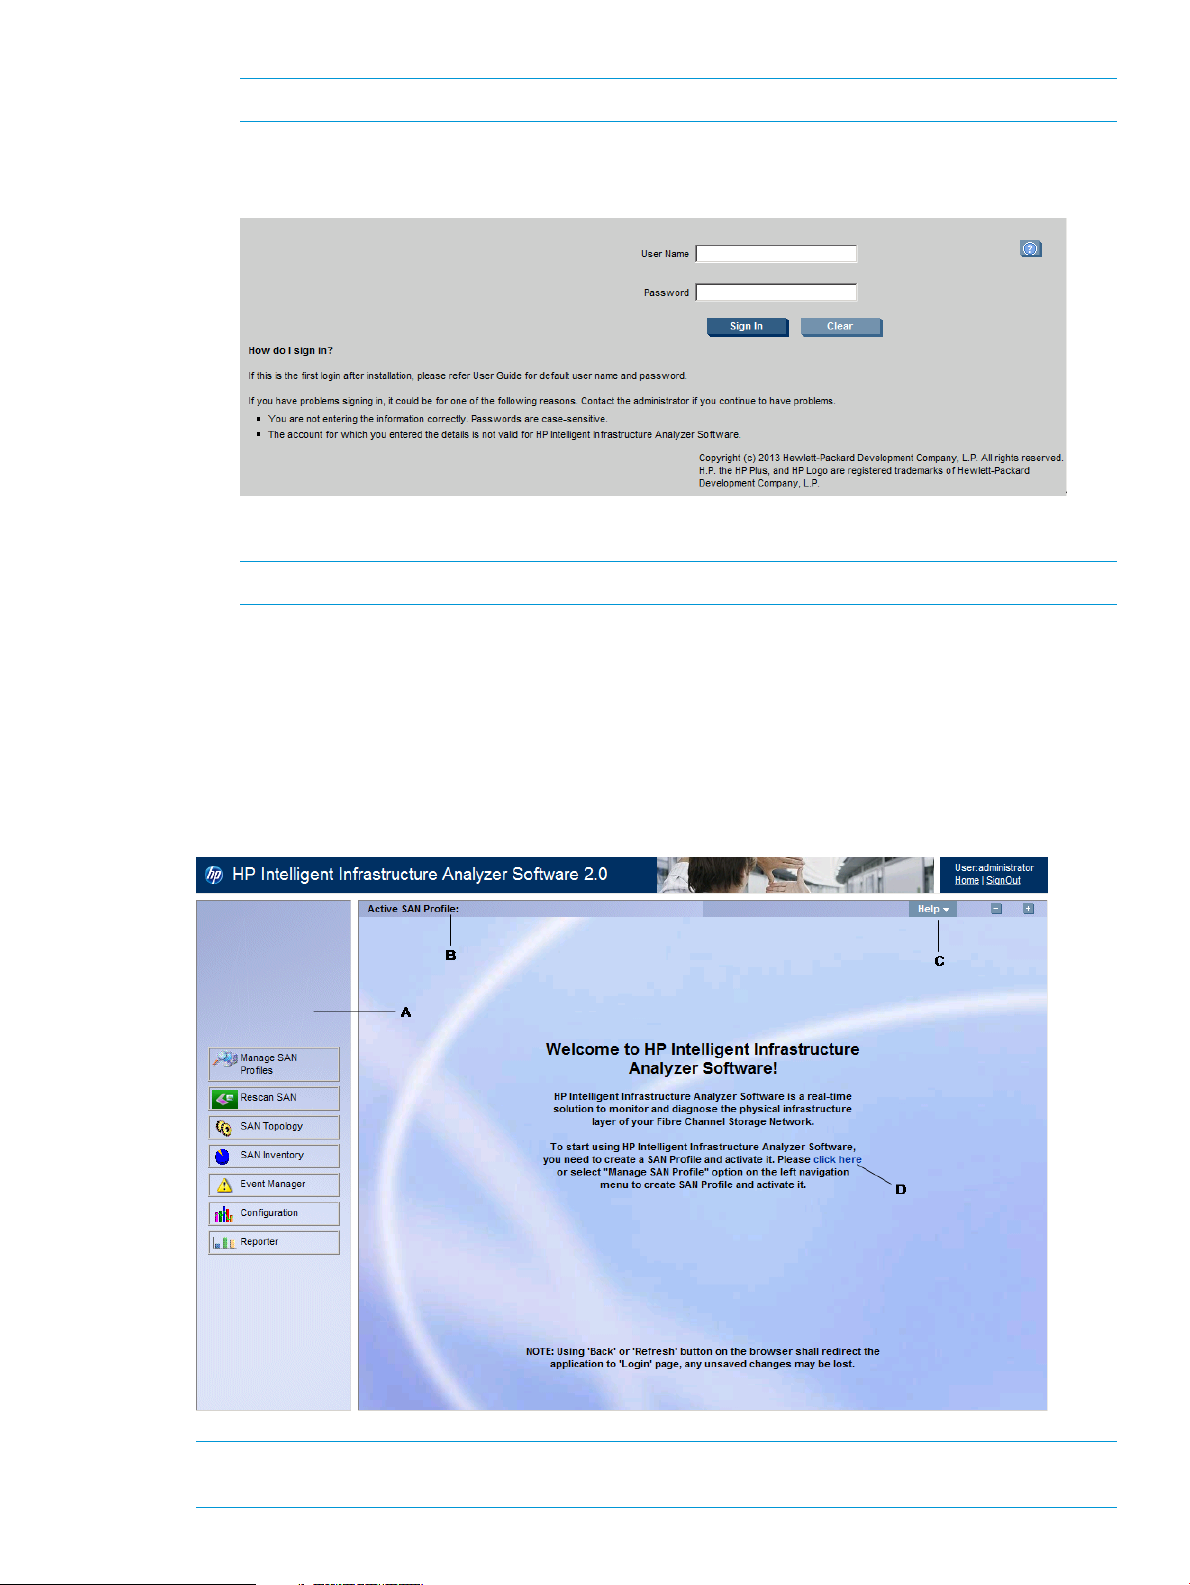
1. Launch the HP IIAS with the URL (http:\\<IPaddress of installed
system>:<portnumber>\IIASClient) OR by double-clicking the HP IIAS shortcut icon on the
desktop. The HP IIAS login page is displayed, as shown in Figure 3 (page 14).
TIP: If the product is installed on a system, for example: IP address: 1.2.3.4. While installing
the product, if port 8080 is already in use then the installer prompts the user to provide an
alternate port number. Otherwise, if port 8080 is available, the product uses that port and in
this case the installer does not prompt the user for the port number. Then, to use the HP IIAS
application enter: http://1.2.3.4:8080/IIASClient address in the address bar.
Figure 3 Login page
2. Login with the UserName and Password.
14 Using HP IIAS
Page 15
NOTE: The default username and password is administrator and administrator respectively.
Clicking "?" displays help related to login and offers suggestions in case of login issues.
Figure 4 Login help
3. Click Sign In. The HP IIAS Welcome page is displayed.
NOTE: Click here hyperlink on the Welcome page displays the Manage SAN Profiles page.
Following are the display areas in the HP IIAS GUI, as shown in Figure 5 (page 15).
• A – Navigation area.
• B – SAN profile that is active.
• C – HP IIAS help, — to hide left navigation control and + to show left navigation control.
• D – Click here hyperlink displays the Manage SAN Profiles page.
Figure 5 HP IIAS Welcome page
NOTE: The HP IIAS UI session expires, if left idle for 30 minutes. The user must re-login if the
session expires.
Overview 15
Page 16
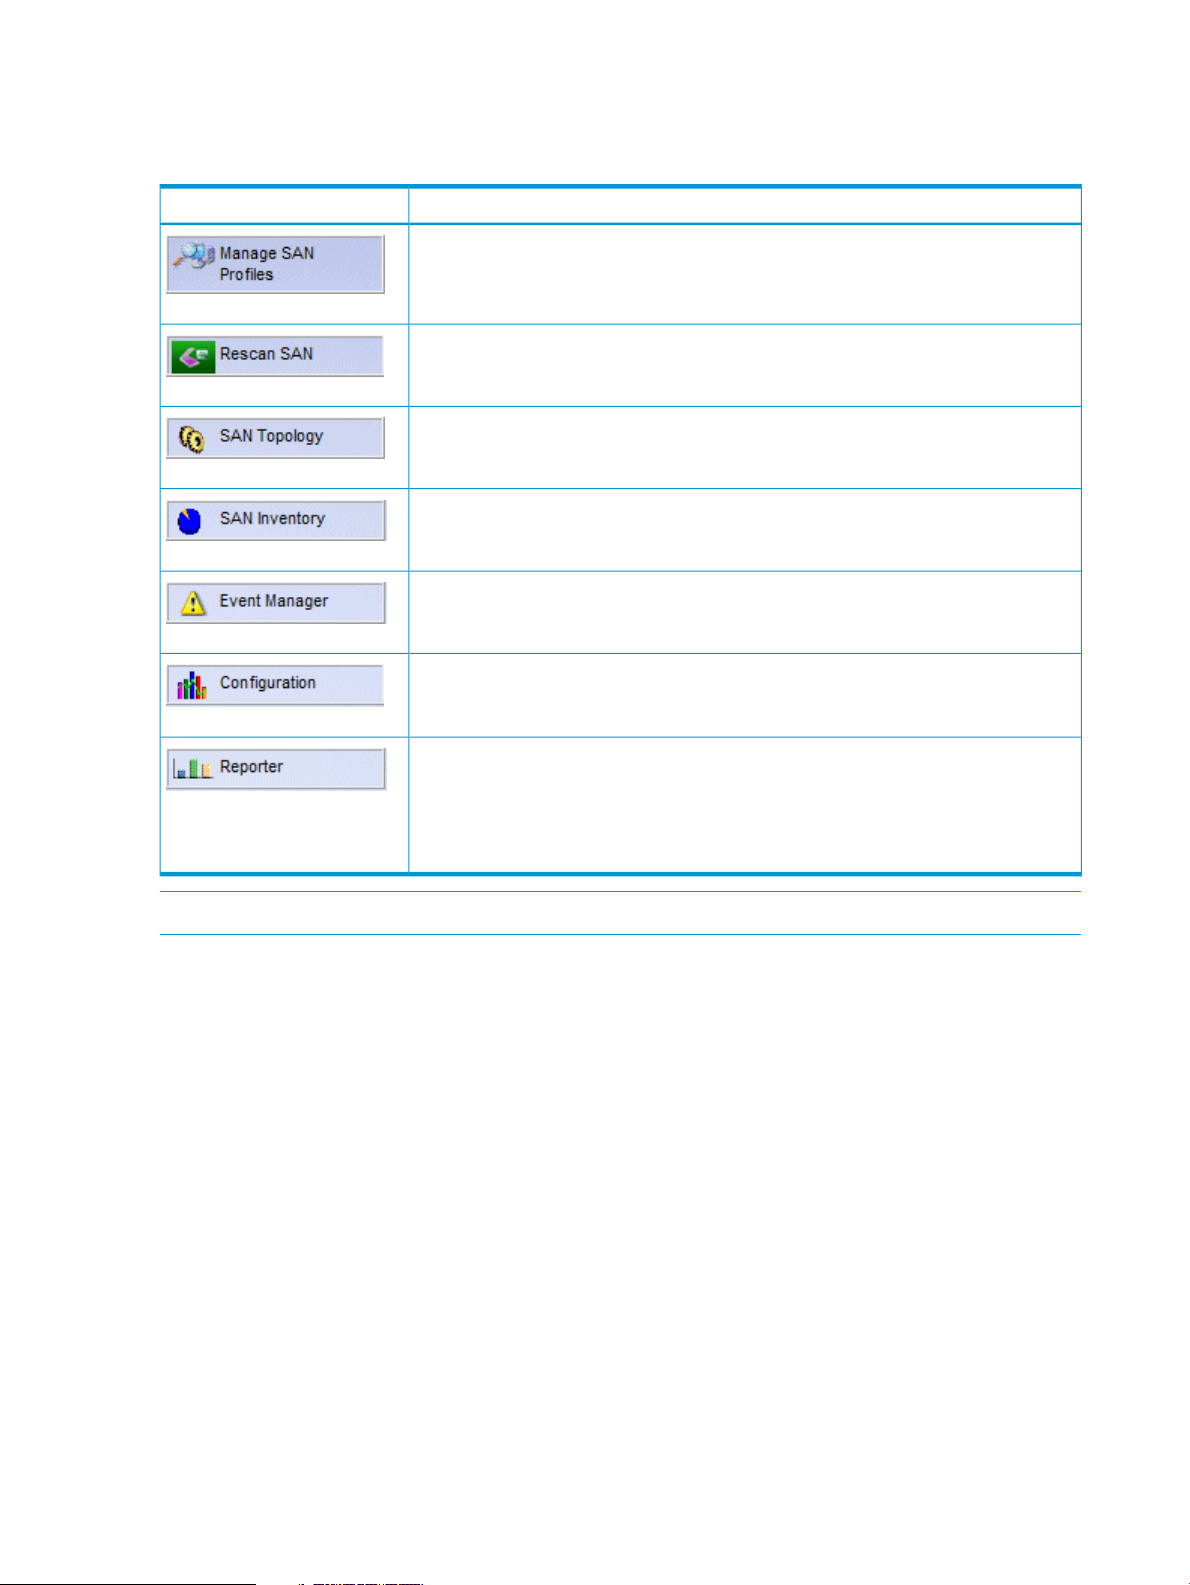
HP IIAS Navigation Menus
Table 2 (page 16) lists the navigation menu items.
Table 2 Navigation Menus
FunctionalityMenu
Includes creation, deletion, modification, activation, and deactivation of SAN profiles.
Initiate a Data Collection for the active profile.
Graphically depicts in real-time, the topology of the SAN being monitored.
Displays detailed inventory information for the discovered SAN components (such as
Switches, Hosts, Host End points, Storage devices, and Unknown devices).
Manages events and diagnostic logs.
NOTE: Do not click the browser Back button, it will go back to the login page.
Using HP IIAS
This section describes how to use HP IIAS , and discusses the following topics:
• “Managing SAN Profiles” (page 17)
• “Rescan SAN” (page 24)
• “SAN Topology” (page 25)
• “SAN Inventory” (page 29)
• “Event Manager” (page 38)
• “Configuration” (page 44)
Allows to change the product configuration settings for HP IIAS .
Generates Current report for active profile, and Historical reports for any profile. The
information in each report includes SAN inventory, SAN topology, Events, and
Diagnostics.
NOTE: Creation of historical reports can take time, depending on the parameters
specified.
• “Reporter” (page 47)
Prerequisites for Discovery
• Switches, Hosts and Storage devices must have IPv4 addresses for discovery and data
collection.
• Telnet and SNMP are required for B-Series DC.
• SNMP and SMIS are required for H-Series DC.
16 Using HP IIAS
Page 17
• HP IIAS CIM Server must be installed on Hosts (with 8Gb/16Gb HP branded Qlogic HBAs).
• HP 3PAR SMI-S provider must be running on the storage device.
• SFP diagnostics can happen only for those virtual machines (supported OS platforms as per
the “support matrix” (page 52)) that have direct connection with the HBA. Other virtual
machines can only be discovered.
NOTE: Telnet connection for a B-Series switch is on a need basis. Hence, related events are
displayed only when a telnet connection is attempted.
HP IIAS is qualified with 1024 ports in a SAN.
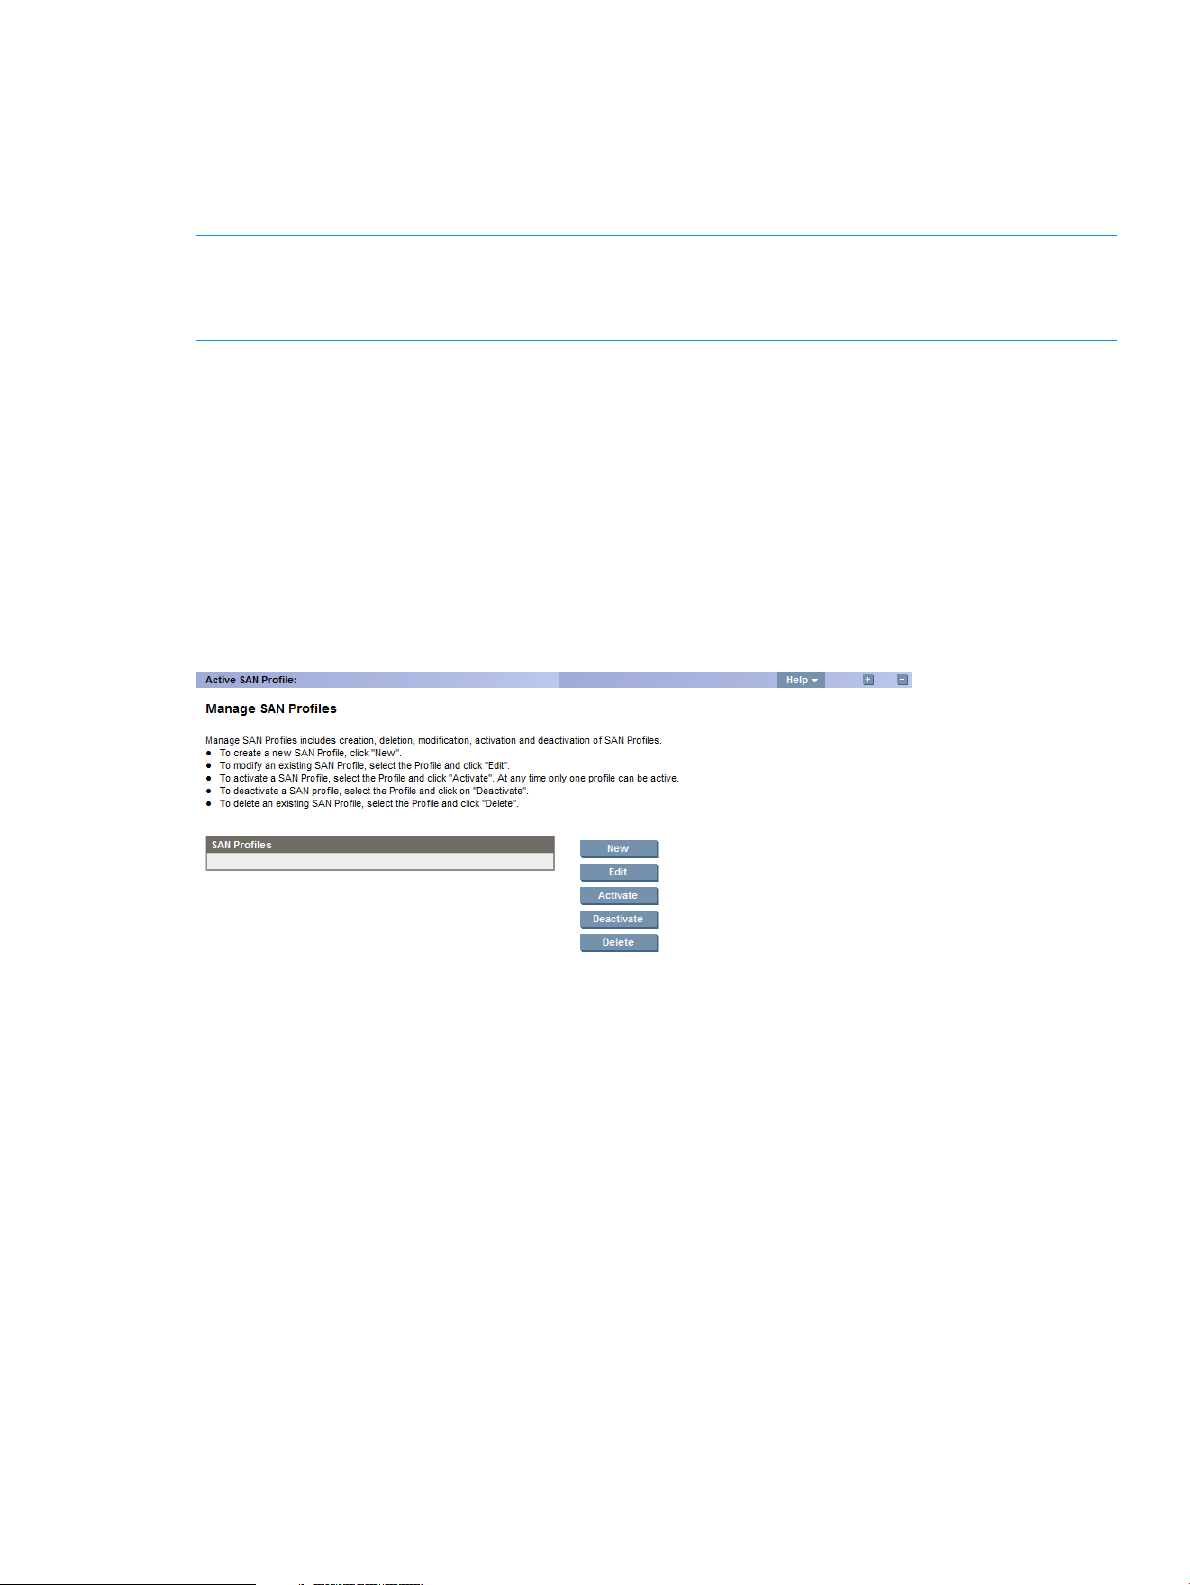
Managing SAN Profiles
In the Manage SAN Profiles page, you can perform the following tasks:
• Click New – To create a new SAN profile.
• Click Edit – To modify an existing SAN profile.
• Click Activate – To activate a SAN profile.
• Click Deactivate – To deactivate an active SAN profile.
• Click Delete – To delete an existing SAN profile.
Figure 6 Manage SAN Profiles
Creating new SAN profile for monitoring switches, hosts, and storage devices
To create a new SAN profile:
1. Click New in the Manage SAN Profiles page. Create New SAN Profile is displayed in a
separate window.
2. Enter the SAN profile name in the SAN Profile Name text box. In the Data Collection Frequency
(in minutes) drop-down list (default data collection frequency is 5 mins), select the appropriate
frequency at which data has to be collected from the SAN for monitoring and diagnostic
purposes.
3. Click Next.
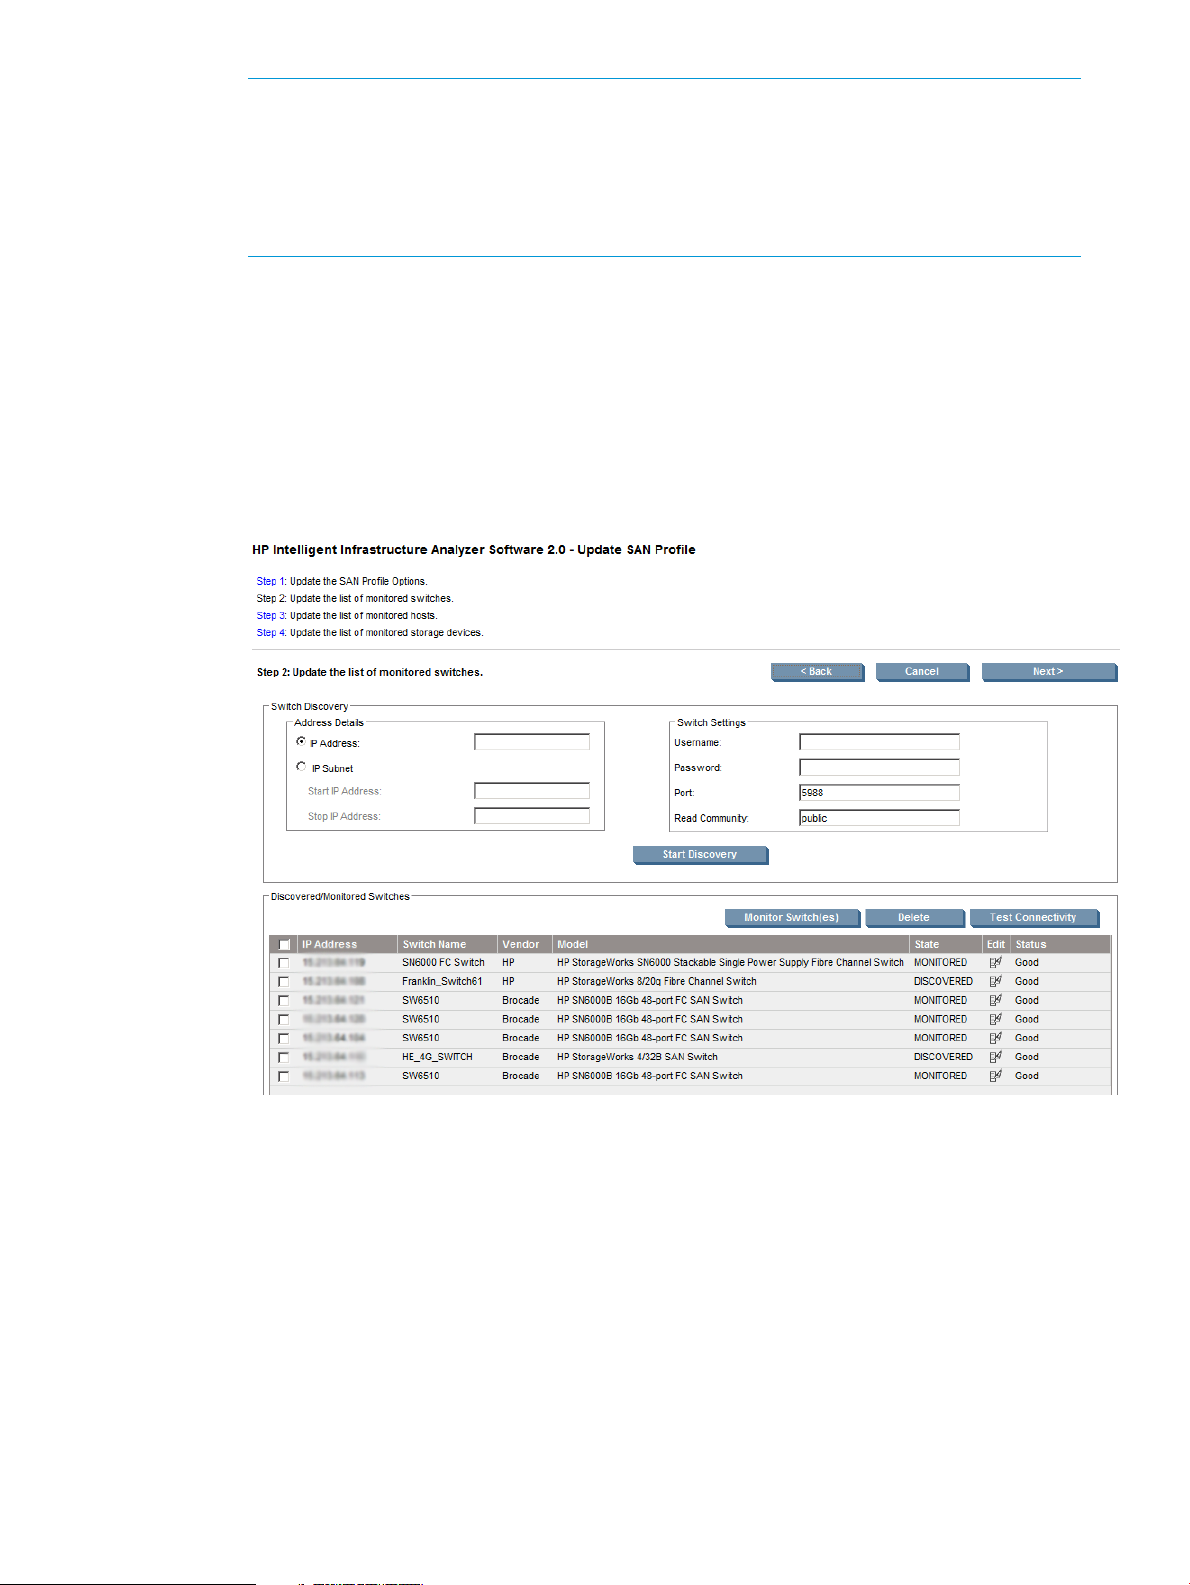
1. For the switches to be monitored:
Enter the switch details:
a. Enter the IP details in the IP Address text box.
OR
b. Enter the IP subnet details in the IP Subnet text box.
2. Under Switch Settings, enter the switch authentication credentials in the Username and
Password text box, CIMOM port details in the Port text box, and the read community
string in the Read Community text box.
Using HP IIAS 17
Page 18
NOTE:
• The Default value for CIMOM Port is 5988.
• The Default value for Read Community is public.
While installing HP CIMServer on the remote host, and if the user has used a non default
port then, enter the same here.
3. Click Start Discovery to start the discovery process.
• Based on the discovery-protocol-specific authentication process, all connected switches
are discovered and follow the step specified in 1a.
• Based on the discovery-protocol-specific authentication process, it discovers all the
switches within the IP address range and follow the step specified in 1b.
4. The discovered switches are displayed with the following details: IP Address, Switch
Name, Vendor, Model, State, Edit, and Status as shown in Figure 7 (page 18).
Figure 7 Discovered Switches
5. Select the check box of the discovered switch(es) to perform one of these actions:
6. Click Next, to select the Hosts to be monitored.
18 Using HP IIAS
For information on switch states, see “Switch Details” (page 19).
• Click on Monitor switch(es) to perform the data collection, monitoring, and SFP
diagnostics.
• Delete – removes the components from the profile.
• Test connectivity – tests the network connectivity of the components.
The following message is displayed if no switches are selected for monitoring:
Page 19

For SFP monitoring and diagnostics, a switch must be selected
for monitoring. Do you want to continue without selecting any
switch for monitoring?
• Click OK to continue without selecting the switch.
• Click Cancel to not proceed further.
NOTE: Edit option is used to:
• Update correct credentials like login, password, port and read community string.
Switch Details
Discovered Switch
Discovered Switches are the B-Series or H-Series switches that:
• Have firmware version that is not as per the requirements mentioned in “Firmware
prerequisites for SFP diagnostics” (page 41).
• Or, have a required version of firmware but not selected for monitoring in HP IIAS
profile.
Monitored Switch
Monitored Switches are the B-Series or H-Series switches that:
• Have firmware version that is as per the requirements mentioned in “Firmware
prerequisites for SFP diagnostics” (page 41).
• And, have a required version of firmware and has been selected for monitoring by
the user.
Inferred Switch
A switch connected to a ‘Discovered Switch’ or a ‘Monitored Switch’ with any of the
following conditions:
• The connected switch does not have a valid IP address. It has only fibre channel
connectivity with ‘Discovered Switch’ or ‘Monitored Switch’.
• The connected switch has a valid IP address but the credentials entered in the profile
do not apply to this switch.
• Any switch which is present in the SAN but may not have been added to the profile.
• Any switch that may have been added to the SAN after creating the profile in HP
IIAS .
For an Inferred component; Detailed Inventory, Events & Diagnostics logs are not
supported.
NOTE: The only difference between a ‘Discovered’ and ‘Monitored’ is, for a ‘Discovered
’ component: SFP monitoring, and diagnostics are not performed. Hence, there are no
diagnostic events.
4. For the Hosts to be monitored:
1. Enter the Host details:
a. Enter the IP details in the IP Address text box.
OR
b. Enter the IP subnet details in the IP Subnet text box.
2. Under Host Settings, enter the CIMOM port details in the CIMOM Port text box.
NOTE: The Default value for Port is 5988.
Using HP IIAS 19
Page 20

3. Click Start Discovery to start the discovery process.
4. The discovered Hosts are displayed with the following details: IP Address, Host Name,
Operating System, State, Edit, and Status as shown in Figure 8 (page 20).
Figure 8 Discovered hosts
For information on Host states, see “Host Details” (page 21).
5. Edit option is used to update Host details like port.
6. Select the check box of the discovered Hosts to perform one of these actions:
• Click on Monitor Hosts to perform the data collection, monitoring, and SFP
diagnostics.
• Delete – removes the components from the profile.
• Test connectivity – tests the network connectivity of the components.
NOTE: See “Support Matrix” (page 52).
20 Using HP IIAS
Page 21

Host Details
Discovered Host
Discovered hosts (operating systems as per support matrix (page 52)) that have:
• Non HP Branded Qlogic HBAs.
• Or, HP Branded Qlogic HBAs which are not supported as per the “Support
Matrix” (page 52).
• Or, supported HBA in the host however, host is not selected for monitoring by the
user.
Monitored Host
Monitored hosts (operating systems as per support matrix) that have:
• HP Branded Qlogic HBAs which are supported as per the support matrix.
• And, host has been selected by the user for monitoring.
Inferred Host end point
An HBA connected to a ‘Discovered Switch’ or a ‘Monitored Switch’ with any of the
following conditions:
• A host that is not added to the profile.
For an Inferred Host end point the Detailed Inventory, Events & Diagnostics logs are not
supported.
Using HP IIAS 21
Page 22

5. For the storage devices to be monitored:
1. Enter the storage device details:
a. Enter the IP details in the IP Address text box.
OR
b. Enter the IP subnet details in the IP Subnet text box.
2. Under Storage Device Settings, enter the Username, password and, CIMOM port details.
NOTE: The Default value for CIMOM port is 5988 and the user must have browse
facility.
3. Click Start Discovery to start the discovery process.
4. The discovered Storage devices are displayed with the following details: IP Address,
Storage device Name, Model, State, Edit, and Status as shown in Figure 9 (page 22).
Figure 9 Discovered Storage Devices
Edit SAN profile
22 Using HP IIAS
For information on storage device states, see “Storage device details” (page 22).
Storage device details
Discovered storage device
Discovered storage devices (operating systems as per support matrix) that have:
a. Any HP 3PAR storage device from which HP IIAS can do discovery and data
collection.
Monitored storage device
Monitored storage devices (operating systems as per support matrix) that have:
a. Any HP 3PAR storage device on which SFP diagnostics can be performed. Only
storage devices with Firmware version 3.1.2 and above will be eligible for
monitoring.
Inferred storage device
Inferred storage devices (operating systems as per support matrix) that have:
a. Storage devices which are connected to any of the switches which are discovered
or monitored by HP IIAS.
Page 23

To modify a profile:
1. Select the existing profile in the Manage SAN Profiles page.
2. Click Edit. The Update SAN Profile page is displayed in a separate window.
3. Change the profile and follow the “Creating new SAN profile for monitoring switches, hosts,
and storage devices” (page 17) procedure (step: 2 onwards).
CAUTION: Modifying Data Collection Frequency may result in loss of monitored data and also
may result in delayed SFP diagnostic by few DC cycles depending on the frequency modified.
Activate SAN profile
To start continuous data collection, SFP monitoring, and diagnostics, a profile must be activated.
To activate a SAN profile:
1. Select the existing SAN profile in the Manage SAN Profiles page.
2. Click Activate.
3. The Activate SAN Profile window is displayed with the following message:
Do you wish to Activate the SAN Profile – XYZ (name of the SAN profile)
• Click Yes to activate the SAN profile.
• Click No to cancel the activation.
4. The active SAN profile name is displayed on every HP IIAS page, as shown in Figure 10
(page 23).
Figure 10 Active SAN profile name
NOTE: You can activate only one SAN profile at a time and that profile is monitored. You
can change the active SAN profile at any time.
Deactivate SAN profile
To stop continuous data collection, SFP monitoring, and diagnostics, the profile must be deactivated.
To deactivate a SAN profile:
1. Select the current active profile in the Manage SAN profiles page.
2. Click Deactivate.
Using HP IIAS 23
Page 24

3. The Deactivate SAN Profile window is displayed with the following message:
Do you wish to deactivate the SAN Profile – XYZ (name of the SAN profile).
• Click Yes to deactivate the SAN profile.
• Click No to cancel the deactivation.
Delete SAN profile
To delete a SAN profile:
1. Select any deactive SAN profile in the Manage SAN Profiles page.
2. Click Delete.
3. The Delete SAN Profile window is displayed with the following message:
Do you wish to delete the SAN Profile – XYZ (name of the SAN profile)
• Click Yes to delete the SAN profile.
• Click No to cancel the deletion.
NOTE: An active profile cannot be deleted.
Rescan SAN
Clicking on Rescan SAN initiates a data collection cycle for the active profile. This data collection
cycle is different than a system initiated cycle that occurs at an interval as set in the active profile.
Initiating a Rescan SAN request while the system initiated data collection cycle is in progress, the
system does not create a separate data collection cycle for rescan instead, the rescan is considered
as completed when the system initiated cycle ends.
To rescan a SAN profile, complete the following steps:
• Click Rescan SAN from the navigation menu.
NOTE:
• Rescan SAN works only on an active profile.
• Data collection timeout is 30 minutes. However, the GUI will timeout after 40 mins if the rescan
is not complete for any reason.
HP IIAS terminologies
Inferred HBA
• HBA connected Host is not supported by HP IIAS for discovering or monitoring. HBA is
connected to FC Switch, and FC Switch is discovered or monitored in HP IIAS.
• HBA model is not supported by HP IIAS for discovering or monitoring. HBA is connected to
FC Switch, and FC Switch is discovered or monitored in HP IIAS.
• HBA connected Host is not discovered or monitored in HP IIAS. HBA is connected to FC Switch,
and FC Switch is discovered or monitored in HP IIAS.
Monitored HBA
• HBA is connected to supported Host, HBA model is supported by HP IIAS for monitoring, and
Host is selected for monitoring in the profile. The connected FC Switch may or may not be discovered
or monitored.
24 Using HP IIAS
Page 25

Discovered HBA
• HBA connected Host is not supported by HP IIAS for monitoring. However, supported for
Discovery.
• HBA connected Host is not selected for monitoring in HP IIAS profile.
Inferred Storage devices
• Storage device connected to FC switch, FC switch is discovered or monitored in HP IIAS.
Storage device is not added in the profile.
• Storage device is not supported by HP IIAS for discovering or monitoring.
Monitored Storage device
• Storage device is supported by HP IIAS for Monitoring and is selected for monitoring in profile.
The connected FC switch may or may not be monitored.
Discovered Storage Device
• Storage Device firmware is not supported by HP IIAS for monitoring.
• Storage device is not selected for monitoring in HP IIAS profile
Inferred generic device
• Device is connected to discovered or monitored FC switch, and some details are not available
to HP IIAS.
For more information, see Support matrix.
SAN Topology
Prerequisites for Topology
Java plug-in must be available in the Internet Explorer (IE) browser to view SAN topology .
Text and tool-tip for components in topology might not appear at times. Install the latest plug-in for
the IE being used, and the problem might resolve.
Latest version of Java applet
Install the Java plug-In 10.25.2 from the Microsoft website.
Enabling Java in the browser
For information on supported operating systems, see Table 11 (page 52).
1. In the Internet Explorer, click the Tools menu, and then click Internet Options.
2. Click the Security tab, and then click the Custom level... button.
3. Under Settings, scroll down to Scripting of Java applets, and select the Enable radio button.
4. Click OK to save your preference.
Overview
SAN topology depicts the topology of the SAN being monitored.
It keeps track of the following information:
• Connectivity between components.
• States of components and connectivity.
• Number of connections between every pair of connected components.
SAN Topology 25
Page 26

NOTE: Connectivity state information is available only for monitored SAN components.
Using SAN Topology
To view the graphical topology of SAN:
• Click SAN Topology on the navigation menu. A Topology page is displayed with its component
and sub-components.
This page consists of:
◦ A graphical view of the topology depicting the connectivity as shown in Figure 11
(page 28).
◦ A component based view that is categorized based on their type.
Understanding the Topology Module
Topology displays HBAs with different color icons to depict an HBA’s aggregate state.
Table 3summarizes the HBA icons with their corresponding states. For more information on
Switch/Host data collection, see Table 14 (page 53).
Table 3 HBA Icons and States
HBA StateHBA Icon
Unavailable
D : Discovered
M : Monitored
Table 4 Host Icons and States
Table 5 Switch Icons and States
Inferred
Host StateHost Icon
Unavailable
Unreachable
Switch StateSwitch Icon
Good
26 Using HP IIAS
Degrading
Page 27

Table 5 Switch Icons and States (continued)
Table 6 Storage device Icons and States
Switch StateSwitch Icon
Failed
Unavailable
Unreachable
Inferred
Storage Device StateStorage Device Icon
Inferred
Table 7 Connectivity Representation
Discovered
Monitored
Unreachable
D : Discovered
M : Monitored
DescriptionRepresentation
An ISL in good condition is represented in Black.
A non ISL link in good condition is represented in Blue.
An ISL or non ISL link with degrading SFP(s) is represented
in Amber.
An ISL or non ISL link with failed SFP(s) is represented in
Red.
The Table 8 helps in depicting the topology module represented in the graphical view.
SAN Topology 27
Page 28

Table 8 Topology Module
DepictionTopology module
A relation between a host and its HBA.
The relation between a host and its HBAs.
NOTE: The connectivity between any two SAN components is shown only by a single line, even
if there are multiple physical connections between the components. In case of multiple physical
connections, a hatch (||) is shown across the line at the center.
Besides the hatch number of good connections or number of total connections will be shown as
for example: || 2/3. In this example, out of 3 connections 2 are in good state. State of connections
are shown in the tool tip.
Figure 11 SAN Topology
28 Using HP IIAS
Page 29

SAN Inventory
Displays an Inventory summary page with four tabs:
• Switches
• Hosts and its HBAs
• Storage Devices
• Unknown Devices
NOTE:
• When you log into HP IIAS , inventory will be displayed only after one complete DC cycle.
To obtain inventory immediately you can click on Rescan.
• SAN Inventory page displays the information about the Inferred Host end points, Unknown
devices and Inferred Storage devices based on the data collected from the switch.
Switches Inventory Summary View
The Switches Inventory Summary View displays the following information about a switch component:
• Component Name
• IP Address
• Vendor
• Model
• Firmware Version
• Ports (In-Use/Total)
• WWN
• Description
SAN Inventory 29
Page 30

Switch detailed Inventory
Click the component name to view the detailed inventory as shown in the figure below.
30 Using HP IIAS
Page 31

• Switch details:
Generic Information◦
– Name
– Role
– V SAN Count
– IP Address
– Status Description
– FC Address
– Device Family
– WWN
– Firmware Version
– State Description
– Subnet Mask
◦ Manufacturer Information
Manufacturer–
– Model
– Serial Number
◦ Port Information
Total Port count–
– HBA Ports
– Storage Device Ports
– Unknown Ports
– ISL
– Free Ports
◦ Ports
Port State–
– Port Number
– Type
– Description
– Maximum Speed
– Alias Name
– Port Speed
– FC ID
– State Description
– Fabric Port WWN
– Status Description
◦ Attached Device
Attached Node WWN–
SAN Inventory 31
Page 32

– Attached Port WWN
– Node Symbolic Name
– Port Symbolic Name
◦ Transceiver
– Vendor Name
– Voltage
– Rx Input Power
– Vendor Part Number
– Serial Number
– Temperature
– Module Type
– Tx Bias Current
– Tx Output Power
– Tx Type
Hosts Inventory Summary View
The Hosts Inventory Summary View displays the following information about a host component:
• Component Name
• IP Address
• Operating System
• Description
32 Using HP IIAS
Page 33

Host detailed Inventory
Click the component name to view the detailed inventory as shown in the figure below.
SAN Inventory 33
Page 34

• Host details:
◦ Generic Information
– Name
– IP Address
– OS Name
– HBA details:
– Generic Information
– Manufacturer Information
– Firmware Information
– Ports
– Description
– Model
– Serial Number
– Vendor
– Firmware Version
– Driver Version
– WWN
– Current Speed
– Attached Port WWN
– Node WWN
– Max. Supported Speed
– Port State
– Attached Node WWN
– State Description
NOTE: For more information on State Description field, see “Host HBA
error codes” (page 55).
– Transceiver
– Vendor Name
– Voltage
– Rx Input Power
– Vendor Part Number
– Serial Number
– Temperature
– Tx Bias Current
– Tx Output Power
Storage Devices Inventory Summary View
The Storage Devices Inventory Summary View displays the following information about a SAN
component:
34 Using HP IIAS
Page 35

Component Name
•
• IP Address
• Vendor
• Model
• Firmware Version
• WWN
• Description
Storage Devices detailed Inventory
Click the component name to view the detailed inventory as shown in the figure below.
SAN Inventory 35
Page 36

36 Using HP IIAS
Page 37

• Storage Device details:
◦ Generic Information
– Device Family
– Name
– IP Address
◦ Manufacturer Information
– Manufacturer
– Firmware
– Model
– WWN
– Serial Number
– Number of Controllers
◦ Port Information
– Total number of Ports
– Total number of ISCSI Ports
– Total number of FC Ports
◦ Ports
– World Wide Node Name
– Maximum Speed
– State Description
– Type
– Attached Node WWN
– Port ID
– World Wide Port Name
– Port Speed
– Attached Port WWN
◦ Transceiver
– Vendor Name
– Voltage
– Rx Input Power
– Vendor Part Number
– Serial Number
– Temperature
– Module Type
– Tx Bias Current
– Tx Output Power
– Tx Type
SAN Inventory 37
Page 38

Unknown Devices Inventory Summary View
Unknown devices are the devices which are not recognized by HP IIAS. They are neither a switch,
host nor a storage device.
This view lists all the Unknown Devices found for the current active profile.
The Unknown Devices Inventory Summary View displays the following information about a SAN
component:
• WWN
• Description
For more information on detailed inventory, see ???.
Unknown Devices detailed Inventory
Click the component name to view the detailed inventory as shown in the figure below.
• Unknown Device details:
◦ Generic Information
– WWN
◦ Ports
– Port WWN
– Attached Port WWN
– Attached Node WWN
Event Manager
Event Manager maintains the following event logs:
• SAN Event Log
• SAN Diagnostic Log
SAN Event and SAN Diagnostic Logs
SAN event and SAN diagnostic log is displayed only for the active profile. It is automatically
updated when there is a new event.
38 Using HP IIAS
Page 39

The events in the event log are classified as Critical, Major, Warning, and Informational. An icon
is displayed to indicate the type of each event in the log.
NOTE: The user will be able to view the events for the past 30 days.
SAN Event Log
Events are generated based on the following scenarios:
• Component added and removed and replaced.
• Host path added and host path removed.
• Storage port added and removed.
• Storage port configured.
• Component connection timeout.
• Unable to acquire connection.
• State and status changed for component.
• Switch rediscovered.
• Driver version changed for the HBA.
• Firmware upgrade and downgraded.
The event log is shown in a tabular format. The rows in the table display the events, with one event
per row in descending order. The columns in the table display the following event attributes:
• ID – event ID (for example: E1).
• Severity – severity level of the event.
• Component
• Time – time when the event was generated (all the events generated from a single DC cycle
will have the same time).
• Description – event description.
Instant On license expiry event generation
License expiry event generation will be as follows:
1. Event on 50,40,30 days remaining with severity informational.
2. Event on 20, 15 days remaining with severity warning.
3. Event on everyday from 10 days remaining to 1 day remaining with severity major.
4. Critical event once license is expired.
Event Manager 39
Page 40

Figure 12 SAN Event Logs
SAN Event Logs view lists the following:
• In the Rows per page drop-down list, select the number of rows of event that must be displayed
on each page.
• Click Select All to select all the check boxes in the current page, click Unselect All to unselect
all the check boxes.
• Click Delete to delete the selected event log.
• Click the Advanced Search option, to search events based on different criteria.
Select ALL or specific event severity to perform a search accordingly.◦
◦ Select the Start Date, End Date and Component and click Search.
NOTE: Search on a Component name does not include its sub-components logs in the
list.
◦ Click Delete to delete the selected searched events.
◦ Click Clear to clear the data entered to search.
◦ Click Back to go back to the SAN Event Logs page.
NOTE: The delete operation deletes the entry permanently and it is an unrecoverable
operation.
40 Using HP IIAS
Page 41

Figure 13 Event log – Advanced search
SAN Diagnostic Logs
HP IIAS diagnoses the SFPs which are detected to be degrading or failing. HP IIAS monitors the
following five parameters of an SFP:
1. Transmit Power
2. Receive Power
3. Voltage
4. Current
5. Temperature
As part of diagnostics, above values (collected during data collection) are compared against the
threshold specification range. Threshold specification range varies based on vendor, model and
property being monitored. If the values collected are found outside the threshold range, HP IIAS
raises diagnostics events for such SFP. HP IIAS raises a separate diagnostics event for each
parameter.
NOTE:
• For embedded Blade SAN Switch, only SFPs of external ports are monitored.
• For FC switch, diagnostic happens only when the I/O (Input or output) operation occurs on
the SFP or if SFP is in failed state.
Table 9 Classification of Diagnostic events
DescriptionType
Critical
Major
Informational
If the SFP parameter value is crossed, then a Critical event is raised by HP IIAS. This may
mean degrading or degraded/failed. This may result in connectivity loss.
If the SFP monitored parameters are crossing the warning threshold limit, then a Warning
event is raised by HP IIAS. This may mean a degrading SFP or a degraded cable. This may
result in connectivity loss.
HP IIAS observes normal readings for SFP monitored parameters, then informational event is
raised by HP IIAS.
Firmware prerequisites for SFP diagnostics
SFP monitoring and diagnostics requires:
• A B-Series switch that has firmware version 7.x or later.
• A H-Series switch that has firmware version 8.0.14.03.00 or 8.0.4.04.00 or higher.
• A HP Branded 8/16Gb QLogic HBA with any firmware.
Event Manager 41
Page 42

NOTE:
• SFP monitoring and diagnostics are not performed for components that do not meet the above
mentioned requirements.
Firmware prerequisites for SFP diagnostics specific to 3PAR storage device
SFP monitoring and diagnostics requires:
• 3PAR storage device with Inform OS 3.1.2 and above.
SAN Diagnostic GUI
The columns in the table display the event attributes that are:
• ID – displays the diagnostic ID (for example: D1).
• Severity – displays the severity level of the event.
• Component
• Time – displays the time when the event was generated.
• Description – displays the diagnostic solution.
42 Using HP IIAS
Page 43

Figure 14 SAN Diagnostic Logs
SAN Diagnostic Logs, view lists the following:
• In the Rows per page drop-down list, select the number of rows of event that must be displayed
on each page.
• Click Select All to select all the check boxes in the current page, click Unselect All to unselect
all the check boxes.
• Click Delete to delete the selected event log.
• Click the Advanced Search option, to search events based on different criteria.
Select ALL or specific event severity to perform a search accordingly.◦
◦ Select the Start Date, End Date and Component and click Search.
NOTE: Search on a Component name does not include its sub-components logs in the
list.
◦ Click Delete to delete the selected searched events.
Event Manager 43
Page 44

◦ Click Clear to clear the data entered to search.
◦ Click Back to go back to the SAN Diagnostic Logs page.
Figure 15 Diagnostic log – Advanced search
Configuration
The Configuration page allows you to configure the following:
• Notifications
• Reports
• Account Management
• Licensing
Notifications
This page allows you to provide the configuration settings for e-mail notifications.
To configure the Notification page:
1. Under Event Severity, select the events that you would prefer to be notified for. The options
are:
• Informational
• Warning
• Major
• Critical
2. Under Email Server Settings enter the details accordingly:
• In the SMTP Server section, select the Enable check box to get notifications and uncheck
3. Enter Sender Email address (mandatory) – E-mail address of the sender.
4. Enter Receiver Email address (mandatory) – E-mail address of the person to be notified of task
activity and errors.
5. Click Save.
You can verify your Notification configurations by entering the data under Send a test message
using the e-mail configuration:
1. To
2. Subject
3. Message
to disable e-mail notifications.
Enter the mandatory fields:
◦ Server Name or IP Address – Name of the e-mail server.
◦ Port – Port 25 is the default SMTP port number for sending e-mails.
44 Using HP IIAS
Page 45

4. Click Send Test Message.
Figure 16 Notifications
Reports
This page allows to specify the location where the reports generated are archived.
• Enter the location where the reports will be archived in the Report Archive Location text box.
Figure 17 Reports
NOTE: HP IIAS does not clean up the archived reports. User needs to manually clean up to clear
the disk space.
Account Management
This page allows you to change the password (password for logging into HP IIAS ).
Configuration 45
Page 46

Figure 18 Account Management
Licensing
HP IIAS application has a default Instant On license which is valid for 60 days and it is applied
when a profile is activated for the first time.
After the 60 days validity period, user will have to purchase a Permanent license which has unlimited
access.
Prerequisite to generate permanent license for HP IIAS
A license for HP IIAS is generated based on the system serial number. To obtain a serial number
of the system in which HP IIAS is installed and to add a permanent license, enter the following
command in the command prompt.
wmic bios get serialnumber
Licensing
An example output is shown accordingly:
SerialNumber
CND102086W
Use the serial number output to generate a permanent license.
NOTE:
• If a virtual machine is recreated, the serial number may change and the permanent license
may not work.
This page allows the user to view and manage the license for HP IIAS . Figure 19 (page 46) shows
the currently installed licenses. Click Add License to import product licenses file as shown in Figure 20
(page 47). Browse for the .dat file and click Add License.
Figure 19 Licensing
46 Using HP IIAS
Page 47

Figure 20 Add license
Under License Summary following can be viewed:
• License Type – type of license.
• Creation Date – the day license was created.
• Valid Till – validity of the license.
Upgrade HP IIAS v1.0/v1.1 to HP IIAS v2.0
License upgrade
On upgrade from HP IIAS v1.0/1.1 to HP IIAS v2.0:
• Licenses (Instant-On or Permanent) of HP IIAS v1.0/1.1 will not be applicable after the upgrade
• After upgrading to HP IIAS v2.0, a fresh Instant On license will be applicable upon activating
• After 60 days validity period, user has to purchase a permanent license.
License downgrade
On downgrade from HP IIAS v2.0 to HP IIAS v1.0/1.1:
• Licenses (Instant-On or permanent) of HP IIAS v2.0 will not be applicable after downgrading
• Permanent license of HP IIAS v1.0/1.1 if any, will be applicable.
• If no permanent license was present for HP IIAS v1.0/1.1, and if the Instant On license is still
Reporter
This page generates current report for active profile and historical reports for any profile and the
generation of report is subject to the availability of data for the selected profile. The information
in each report includes SAN inventory, SAN topology, Events, and Diagnostic information as
shown in Figure 23 (page 49).
to HP IIAS v2.0.
a profile. This Instant On license is valid only for 60 days.
to HP IIAS v1.0/1.1.
valid (within the 60 days validity period, after activating the profile), then the Instant On license
will be applicable.
NOTE:
• HP IIAS stores data up to 30 days.
• Creation of historical reports can take time, depending on the parameters specified.
• HP IIAS takes1-2 minutes per 500 ports for generating reports.
Reporter 47
Page 48

To generate reports, complete the following steps:
1. Under Report Details, enter the following:
• Report Name – name of the report.
• Report Format – the format in which the report can be generated.
◦ Excel
◦ HTML
◦ PDF
2. Under Report Type select the type. Two types of reports can be generated.
• Current – report for current data of the active SAN.
Figure 21 Current Report Generation Result
• Historical – report for past or earlier data.
Figure 22 Historical Report Generation Result
◦ If the user wants to view the Historical report:
– Select the SAN Profile Name from the drop-down list.
– Select one of the Granularity options:
– Hourly – The system provides the SAN data on hourly basis for the last
seven days, starting from the current date. An hourly data is defined as the
first data collection cycle initiated each hour.
– Daily – The system provides the SAN data on daily basis for the last 30
days, starting from the current date. A daily data is defined as the first data
collection cycle initiated since midnight on a given date.
3. Click Generate Report to generate the SAN profile specific report.
Reports are saved in the location specified in the Report configuration page.
4. Click Cancel Report Generation to cancel the report generation process.
48 Using HP IIAS
– Select the Start Date and the End Date.
Page 49

5. Click View Generated Reports to view the generated reports in the Report Generation Result
web page.
1. Click Open/Save to view the report or save the report in any location.
2. Click Delete to delete the selected report.
Figure 23 Generated Report
Reporter 49
Page 50

8 Support and Other Resources
Contacting HP
For worldwide technical support information, see the HP support website:
http://www.hp.com/support
Before contacting HP, collect the following information:
• Product model names and numbers
• Technical support registration number (if applicable)
• Product serial numbers
• Error messages
• Operating system type and revision level
• Detailed questions
Subscription
HP recommends that you to register your product at the Subscriber's Choice for Business website:
http://www.hp.com/go/e-updates
After registering, you will receive e-mail notification of product enhancements, new driver versions,
firmware updates, and other product resources.
Related Information
Documents
The following documents provide related information:
• HP Intelligent Infrastructure Analyzer v2.0 Software Release Notes
• HP Intelligent Infrastructure Analyzer v2.0 Software Quick Start Guide
To access the online help, click Help and select HP Intelligent Infrastructure Analyzer Software Help
within the HP IIAS graphical user interface (GUI).
You can find these documents from the Manuals page of the HP Business Support Center website:
http://www.hp.com/support/manuals.
Websites
For additional information, see the following HP websites:
• http://www.hp.com
• http://www.hp.com/go/storage
• http://www.hp.com/support/manuals
• http://www.hp.com/sbso/serverstorage/index.html
• http://h18006.www1.hp.com/storage/networking/sansolutions.html
• http://h18006.www1.hp.com/products/storageworks/san/index.html
• http://www.hp.com/go/iias
Documentation Feedback
HP welcomes your feedback.
50 Support and Other Resources
Page 51

To make comments and suggestions about product documentation, send a message to
docsfeedback@hp.com. All submissions become the property of HP.
Product Feedback
To make comments and suggestions about HP IIAS , send a message to:
IntelligentInfrastructureAnalyzerSoftware@hp.com, with the subject as HP Intelligent
Infrastructure Analyzer Software query.
Typographic Conventions
Table 10 Document conventions
ElementConvention
Cross-reference links, e-mail addresses and website addresses.Blue text:Table 10 (page 51)
Bold text
Monospace text
Monospace, italic text
• Keys that are pressed.
• Text typed into a GUI element, such as a box.
• GUI elements that are clicked or selected, such as menu and list items,
buttons, tabs, and check boxes.
Text emphasisItalic text
• File and directory names.
• System output.
• Code.
• Commands, their arguments, and argument values.
• Code variables.
• Command variables.
Emphasized monospace text.Monospace, bold text
WARNING! Indicates that failure to follow directions could result in bodily harm or death.
CAUTION: Indicates that failure to follow directions could result in damage to equipment or data.
IMPORTANT: Provides clarifying information or specific instructions.
NOTE: Provides additional information.
TIP: Provides helpful hints and shortcuts.
Product Feedback 51
Page 52

A Support Matrix
Installing OS specific service packs
Table 11 HP IIAS Management Server
ArchitectureRevisionOS VersionOperating System
x86SP2Standard Edition or Enterprise EditionWindows Server 2003
x64
x86SP2Standard Edition or Enterprise EditionWindows Server 2003 R2
x64
x86SP2Standard Edition or Enterprise EditionWindows Server 2008
x64
x64No SPEnterprise EditionWindows Server 2008 R2
x64No SPWindows 2012
x86SP1Business or Enterprise EditionWindows Vista
x86SP3Professional EditionWindows XP
x86SP1Enterprise EditionWindows 7
Operating systems supported for HP IIASCIM Server
Table 12 Operating systems supported for HP IIASCIM Server
Table 13 HP IIAS Host Data collection/IIASCIM Server Installation
Windows Server 2003
Enterprise Edition
Windows Server 2003 R2
Enterprise Edition
Windows Server 2008
Enterprise Edition
x64
VersionPlatformOperating System
2003, 2008 SP2, 2008 R2, and 201232-bit,64-bitWindows
5.8,5.9,6.3,6.432-bit,64-bitRHEL (RedHat Enterprise Linux)
11 SP2, SP332-bit,64-bitSLES (SuSE Linux Enterprise)
5.0,5.1, and 5.564-bitVMware ESXi
ArchitectureRevisionOS VersionOperating System
x86SP2Standard Edition or
x64
x86SP2Standard Edition or
x64
x86SP2Standard Edition or
x64
52 Support Matrix
x64No SPEnterprise EditionWindows Server 2008 R2
x64SP1Enterprise EditionWindows 2012
x86
Page 53

Table 13 HP IIAS Host Data collection/IIASCIM Server Installation (continued)
ArchitectureRevisionOS VersionOperating System
IA64Windows Server 2008 R2
for Itanium-Based Systems
X865.8,5.9,6.3,6.4RHEL (RedHat Enterprise
Linux)
X64
X8611 SP2,11 SP3SLES (SuSE Linux Enterprise)
X64
X645.0VMware ESXi
X645.1
X645.5
Table 14 Switch/Host Data collection
Datacollection SupportSAN Components
Switch B series
Switch H series
HP branded Qlogic HBA 4Gb/8Gb/16GbWindows Server 2003
Table 15 Switch/HBA Monitoring
Table 16 3PAR Inserv monitoring
HP branded Qlogic HBA 4Gb/8Gb/16GbWindows Server 2003 R2
HP branded Qlogic HBA 4Gb/8Gb/16GbWindows Server 2008
HP branded Qlogic HBA 4Gb/8Gb/16GbWindows Server 2008 R2
HP branded Qlogic HBA 4Gb/8Gb/16GbWindows 2012
HP branded Qlogic HBA 4Gb/8Gb/16GbRHEL (RedHat Enterprise Linux) 5.8,5.9,6.3,6.4
HP branded Qlogic HBA 4Gb/8Gb/16GbSLES (SuSE Linux Enterprise) 11 SP2, SP3
HP branded Qlogic HBA 4Gb/8Gb/16GbVMware ESXi 5.0,5.1,5.5
Monitoring SupportSAN Component
Firmware7.xSwitch B series
Frimware 8.0.14.03.00 or 8.0.4.04.00 or higherSwitch H series
16Gb /8 Gb Qlogic HBAHP Branded QLogic HBA
Firmware3PAR Inserv
3PAR OS 3.1.2F200 Store Storage system
3PAR OS 3.1.3F400
3PAR OS 3.1.2StoreServ 10400
3PAR OS 3.1.3StoreServ 10800
3PAR OS 3.1.2StoreServ 7200
3PAR OS 3.1.3StoreServ 7400
Operating systems supported for HP IIASCIM Server 53
Page 54

Table 16 3PAR Inserv monitoring (continued)
Firmware3PAR Inserv
3PAR OS 3.1.2T400
3PAR OS 3.1.3T800
54 Support Matrix
Page 55

B Host HBA error codes
Table 17 Host HBA error codes
DescriptionHost HBA error code
Adapter is functional or online. Usually the initial status.ADAPTER_ONLINE
The Adapter Link or Loop is down.ERROR_FLAG_LOOP_DOWN
Driver detected error at the system level.ERROR_FLAG_SYSTEM_ERROR
Adapter configuration change is detected.ERROR_FLAG_LIP_OCCURRED
Adapter Loop is up.ERROR_FLAG_LOOP_UP
Adapter or SAN configuration needs to be re-scanned.ERROR_FLAG_PORT_UPDATE
Adapter SFP config has changed.ERROR_FLAG_SFP_UPDATE
Adapter Loop is up.LOOP_CURRENTLY_UP
Adapter is badADAPTER_DISABLED
ALT_WWN_ACTIVE
This is used in some special OEM environments where
preboot commands are sent to the adapter.
Adapter Loop is down. Constant notifications are sent.SENT_LOOP_DOWN_UPDATE
55
Page 56

C Troubleshooting
This appendix is designed to be used like Frequently Asked Questions section. It will help to find
solutions to some of the common issues that might arise when running HP IIAS .
Correcting conditions with SFPs and FC cables/connectors
Replace the FC cable/Connector with another cable/connector which is in good condition. If the
problem is indeed with the cable/connector, HP IIAS will not raise any diagnostics log for the SFP.
If HP IIAS continues to raise diagnostics log for the SFP then, replace the SFP. If HP IIAS does not
raise any diagnostics log for the SFP, then the replaced SFP is in good condition and the problem
is addressed successfully.
Problem
To obtain a serial number of the system, you enter the command wmic bios get serialnumber
in the command prompt and the following error displays:command cannot be found.
Suggestion
Add the environment variable <value of system directory> \wbem to the “PATH” and
restart the command prompt.
The following numbers in the Problem section represents a condition, and the suggestion shows
the remedial measures:
Problem
1001:
1004:
Suggestion
The credentials may have changed after they were entered while creating the profile in HP IIAS .
Please edit the profile, update the credentials (username, password, port no, SNMP read string)
and try the operation again.
Problem
1002:
1005:
Suggestion
Please check if the device is reachable through SMI-S. This can be checked by entering http://
<device ip>:<CIMOM port no.>. If the SMI-S connection is up, check the device details like IP,
user name, password & CIMOM port number stored in the profile.
Problem
1003:
Suggestion
HP IIAS allows one connection per device at a time. This error may occur if you create/edit the
profile during data collection for the active profile. Please retry the operation after some time.
56 Troubleshooting
Page 57

If the target device is a Brocade switch:
1. Check if maximum number of Telnet sessions are reached and close the sessions.
Problem
1006:
1007:
Suggestion
Ensure that SNMP is enabled on the device. If SNMP is enabled, check if the read community
string provided while creating the profile is correct, and ensure that switch is on network and is
up.
Problem
1008:
Suggestion
Collect logs and send it to support team.
Problem
1009:
Suggestion
This error is shown only for Brocade:
1. If the command prompt is not available due to password change then, change the password
and try again.
2. If the problem persist, run the sfpshow –all command and send the information to support
team.
Problem
1010:
Suggestion
Check the current firmware of the switch and verify against supported firmware.
NOTE: The switch is still present in the profile and has been moved from MONITORED state to
DISCOVERED state. All data apart from SFP dynamic data and monitoring and diagnostics will
still be available for the switch.
Problem
1013:
Suggestion
This error may impact the data collection for all switches. To collect data for all other switches,
remove the concerned switch from your profile and initiate a rescan.
Remedial measure for the timed out switch :
• Reboot your switch and rescan.
Problem
1:
2:
Correcting conditions with SFPs and FC cables/connectors 57
Page 58

4:
5:
6:
101:
102:
104:
105:
Suggestion
Follow the steps mentioned in “Correcting conditions with SFPs and FC Cables” (page 56).
Problem
3:
103:
203:
303:
Suggestion
Follow the steps mentioned in“Correcting conditions with SFPs and FC Cables” (page 56). If HP
IIAS continues to raise diagnostics logs then the problem may be with the connected SFP. Replace
the connected SFP with another SFP in good condition. If HP IIAS does not raise any diagnostics
log for the SFPs under question, then the problem is addressed successfully.
Problem
IAS Client is not able to connect to IIAS Server. The probable reason
could be that IIAS Server may not be running or has got disconnected.
Please restart the HP IIAS Server and then start the HP IIAS Client again.
Suggestion
• Add the environment variable <value of system directory> \wbem to the “PATH”
and restart the command prompt.
• Verify if firebird environment variable is used. Also if the same value is appended to ”PATH”
variable. Its value should be <installed directory>\server\lib\Firebird
• On XP, after installing HP IIAS, if you get the above specified error, then please restart your
system and try again.
Problem
Even after installing Java, applets do not run.
Cause
Java is not enabled in the web browser. If Java is already installed and the applets do not work,
the you may need to enable Java through your web browser.
Suggestion
1. In the Internet Explorer, click the Tools menu, and then click Internet Options.
2. Click the Security tab, and then click the Custom level... button.
3. Under Settings, scroll down to Scripting of Java applets, and select the Enable radio button.
4. Click OK to save your preference.
58 Troubleshooting
Page 59

Troubleshooting for Host events
Problem
1016
Suggestion
Please ensure that the host is on network and is up. Also, check if the HP IIASCIM Server is installed,
the CIMOM service is running on the remote machine, and whether the port number is modified
for CIMOM service.
Problem
1017
Suggestion
Please check if the HP IIASCIM Server is installed, and whether the port number you have mentioned
is accurate.
Problem
1018
Suggestion
Please verify if the supported HBAs are removed from the host.
Problem
1019
Suggestion
Collect logs and send it to the support team.
Troubleshooting for Host events 59
Page 60

Glossary
This glossary defines terms used in this guide or related to this product and is not a
comprehensive glossary of computer terms.
Common
Information Model
Common
Information Model
Object Manager
Data Collection Used to describe a process of preparing and collecting data, for example,
Diagnostics The process of determining the effect of change-of-state of a SAN component
Fabric A contiguous switched network composed of high-speed fibre connections.
Host Bus Adapter In computer hardware, a host controller, host adapter, or (HBA) connects
HP IIAS
CIMSERVER
HP IIAS
management
station
Local Area
Network
Monitoring The process of determining the state of a SAN component (or connectivity)
NPIV N_Port ID Virtualization or NPIV is a Fibre Channel facility allowing multiple
SAN Data
Collection
Frequency
Simple Network
Management
Protocol
Small Form-factor
Pluggable
The Common Information Model (CIM) is a computer industry standard for
defining device and application characteristics so that system administrators
and management programs will be able to control devices and applications
from different manufacturers or sources in the same way. For example, a
company that purchased different kinds of storage devices from different
companies would be able to view the same kind of information (such as:
device name and model, serial number, capacity, network location, and
relationship to other devices or applications) about each of them or be able
to access the information from a program.
A central component of the WBEM server that is responsible for the
communication between clients and providers. CIMOM also provides several
management functions, including security, and a set of commands that
provide configuration and management functions to administrators.
as part of a process improvement or similar project.
(or connectivity) on the portion of the SAN using the SAN component (or
connectivity).
Each fabric is a single instantiation of the fabric services. A fabric is an
active and intelligent non-shared interconnect scheme for nodes.
a host system (the computer) to other network and storage devices.
CIM Server installed on the host platform in order to enable data collection
by HP IIAS software.
In the windows machine where the HP IIAS software (Both Server and Client)
will be running. This machine must have the ability to connect (through
TCP/IP) to the switches/hosts/storage devices which can be discovered
and monitored.
Supplies networking capability to a group of computers in close proximity
to each other such as in an office building, a school, or a home. A LAN is
useful for sharing resources like files, printers, games or other applications.
based on the parameters associated with it.
N_Port IDs to share a single physical N_Port. This allows multiple Fibre
Channel initiators to occupy a single physical port, easing hardware
requirements in Storage area network design, especially where virtual SANs
are called for.
This is the periodicity at which management data is collected from the SAN
for monitoring and diagnostic purposes.
Is an Internet-standard protocol for managing devices on IP networks. Devices
that typically support SNMP include routers, switches, servers, workstations,
printers, modem racks, and more."[1] It is used mostly in network
management systems to monitor network-attached devices for conditions
that warrant administrative attention.
The small form-factor pluggable (SFP) is a hot-pluggable transceiver used
for both telecommunication and data communications applications. The
60 Glossary
Page 61

form factor and electrical interface are specified by a multi-source agreement
(MSA). It interfaces a network device mother board (for a switch, router,
media converter or similar device) to a fibre optic or copper networking
cable.
SMI-S Storage Management Initiative - Specification.
SMTP Simple Mail Transfer Protocol. A protocol used in TCP/IP networks for
sending and receiving emails.
SNIA’s Storage
Management
Initiative
Specification
Is a storage standard developed and maintained by the Storage Networking
Industry Association (SNIA). SMI-S defines CIM management profiles for
storage systems. The complete SMI Specification is categorized in profiles
and subprofiles. A profile describes the behavioral aspects of an
autonomous, self-contained management domain. SMI-S includes profiles
for Arrays, Switches, Storage Virtualizers, Volume Management and many
other domains.
Storage Area
Network
A dedicated network that provides access to consolidated, block level data
storage. SANs are primarily used to make storage devices, such as disk
arrays, tape libraries, and optical jukeboxes, accessible to servers so that
the devices appear like locally attached devices to the operating system.
Storage device A storage system consisting of one or more storage controllers and the disk
drives they manage.
Topology An interconnection scheme that allows multiple servers and storage devices
to communicate. Arbitrated loop and switched fabric are examples of Fibre
Channel topologies.
WWN World Wide Name. A unique Fibre Channel identifier consisting of a
16-character hexadecimal number. A WWN is required for each Fibre
Channel communication port.
61
Page 62

Index
A
activate SAN profile, 23
C
configuration, 44
account management, 45
licensing, 46
notifications, 44
reports, 45
creating new SAN profile, 17
D
deactivate SAN profile, 23
delete SAN profile, 24
detailed inventory, 30
E
edit SAN profile, 22
event manager, 38
H
HP IIAS , 5
HP IIAS GUI, 14
HP IIAS management station, 5
support and other resources, 50
Switches Inventory Summary View, 29
T
Troubleshooting, 56
U
use licensing, 46
add license, 46
I
install CIMServer, 10
install HP IIAS , 7
installing OS specific service packs, 52
M
managing SAN profiles, 17
N
navigation menu, 16
P
prerequisite to generate permanent license for HP IIAS ,
46
R
removing HP IIAS , 9
removing HP IIASCIM Server, 10
repair CIMServer , 10
repair HP IIAS , 7
reporter, 47
rescan SAN, 24
S
SAN event and SAN diagnostic logs, 38
SAN diagnostic logs, 41
SAN event log, 39
SAN inventory, 29
SAN topology, 25
using SAN topology, 26
62 Index
 Loading...