

Page 1

HP High-Definition DLP™ TV
User’s Guide
IDB5220N, ID5226N, ID5286N
Page 2

© Copyright 2006 Hewlett-Packard Development Company, L.P.
May be licensed in the United States by one or both of the U.S. Patents Nos. 4,930,158 and 4,930,160 until August 28,
2008.
Reproduction, adaptation, or translation without prior written permission is prohibited, except as allowed under
copyright laws. The information contained herein is subject to change without notice.
The only warranties for HP products and services are set forth in the express warranty statements accompanying such
products and services. Nothing herein should be construed as constituting an additional warranty. HP shall not be
liable for technical or editorial errors or omissions contained herein.
Dolby and the double-D symbol are trademarks of Dolby Laboratories. Manufactured unde r license from Dolby
Laboratories.
This television incorporates High-Definition Multimedia Interface (HDMI™) technology. HDMI, the HDMI logo, and
High-Definition Multimedia Interface are trademarks or registered trademarks of HDMI Licensing LLC.
HDTV logo is a trademark of the Consumer Electronics Association.
SRS TruSurround XT technology is incorporated under license from SRS Labs, Inc. is a trademark of SRS
Labs, Inc.
CableCARD™ is a trademark of Cable Television Laboratories, Inc.
DCR™ is a trademark of the Consumer Electronics Association and CableLabs.
Digital Light Processing™, DLP™, the DLP logo and the DL P medalli on are trademarks of Texas Instruments, Inc.
Hewlett Packard Company
10955 Tantau Avenue
Cupertino, CA 95014
ii
Page 3

Limited Warranty, Refurbished Limited
Warranty, and License Information
Hardware Limited Warranty
New Refurbished
HP Microdisplay TV
(excluding items listed below)
HP Microdisplay TV Lamp Module
(included wtih the TV or purchased separately)
Technical phone assistance to diagnose
potential hardware issues
General Terms
This HP Hardware Limited Warranty gives you, the customer, express limited warranty rights from HP, the
manufacturer. Please refer to HP's Web site for an extensive description of your limited warranty entitlements. In
addition, you may also have other legal rights under applicable local law or special written agreement with HP.
HP MAKES NO OTHER EXPRESS WARRANTY OR CONDITION, WHETHER WRITTEN OR ORAL, AND HP
EXPRESSL Y DISCLAIMS ALL WARRANTIES AND CONDITIONS NOT STATED IN THIS LIMITED WARRANTY. TO
THE EXTENT ALLOWED BY THE LOCAL LAW OF JURISDICTIONS OUTSIDE THE UNITED STATES, HP
DISCLAIMS ALL IMPLIED WARRANTIES OR CONDITIONS, INCLUDING ANY IMPLIED WARRANTIES OF
MERCHANTABILITY AND FITNESS FOR A PARTICULAR PURPOSE. FOR ALL TRANSACTIONS OCCURRING IN
THE UNITED STATES, ANY IMPLIED WARRANTY OR CONDITION OF MERCHANTABILITY, SATISFACTORY
QUALITY, OR FITNESS FOR A PARTICULAR PURPOSE IS LIMITED TO THE DURATION OF THE EXPRESS
WARRANTY SET FORTH ABOVE. SOME STATES OR COUNTRIES/REGIONS DO NOT ALLOW A LIMITA TION
ON HOW LONG AN IMPLIED WARRANTY LASTS OR THE EXCLUSION OR LIMITATION OF INCIDENTAL OR
CONSEQUENTIAL DAMAGES FOR CONSUMER PRODUCTS. IN SUCH STATES OR COUNTRIES/REGIONS,
SOME EXCLUSIONS OR LIMITATIONS OF THIS LIMITED WARRANTY MAY NOT APPLY TO YOU.
THE LIMITED WARRANTY TERMS CONTAINED IN THIS STATEMENT, EXCEPT TO THE EXTENT LAWFULLY
PERMITTED, DO NOT EXCLUDE, RESTRICT, OR MODIFY BUT ARE IN ADDITION TO THE MANDATORY
STATUTORY RIGHTS APPLICABLE TO THE SALE OF THIS PRODUCT TO YOU.
This Limited Warranty is applicable in all countries/regions and may be enforced in any country/region where HP or its
authorized service providers offer warranty service for the same product model number subject to the terms and
conditions set forth in this Limited Warranty.
Under the HP Global Limited Warranty program, products purchased in one country/region may be transferred to
another country/region, where HP or its authorized service providers offer warranty service for the same product model
number, without voiding the warranty. Warranty terms, service availability, and service response times may vary from
country/region to country/region. Standard warranty service response time is subject to change due to local parts
availability. If so, your HP authorized service provider can provide you with details.
HP is not responsible for any tariffs or duties that may be incurred in transferring the products. Transfer of the products
may be covered by export controls issued by the United States or other governments.
This Limited Warranty applies only to HP-branded and Compaq-branded hardware products (collectively referred to in
this Limited Warranty as “HP Hardware Products”) sold by or leased from Hewlett-Packard Company, its worldwide
subsidiaries, affiliates, authorized resellers, or country/region distributors (collectively referred to in this Limited
Warranty as “HP”) with this Limited Warranty. The term “HP Hardware Product” is limited to the hardware components
and required firmware. The term “HP Hardware Product” DOES NOT include any software applications or programs;
non-HP products, or non-HP branded peripherals. All non-HP products or non-HP-branded peripherals external to the
HP Hardware Product – such as external storage subsystems, displays, printers, and other peripherals – are provided
One year
Limited parts & labor warranty
90 days
Limited hardware warranty
One year 90 days
90 days
Limited parts & labor warranty
90 days
Limited hardware warranty
iii
Page 4

“AS IS” without HP warranty. However, non-HP manufacturers and suppliers or publishers may provide their own
warranties directly to you.
HP warrants that the HP Hardware Products that you have purchased or leased from HP are free from defects in
materials or workmanship under normal use during the Limited Warranty Period. The Limited Warranty Period starts
on the date of purchase or lease from HP, or from the date HP completes installation. Your dated sales or delivery
receipt, showing the date of purchase or lease of the product, is your proof of the purchase or lease date. You may be
required to provide proof of purchase or lease as a condition of receiving warranty service. You are entitled to
hardware warranty service according to the terms and conditions of this document if a repair to your HP Hardware
Product is required within the Limited Warranty Period.
Unless otherwise stated, and to the extent permitted by local law, new HP Hardware Products may be manufactured
using new materials or new and used materials equivalent to new in performance and reliability. HP may repair or
replace HP Hardware Products (a) with new or previously used products or parts equivalent to new in performance
and reliability, or (b) with equivalent products to an original product that has been discontinued. Replacement parts are
warranted to be free from defects in material or workmanship for ninety (90) days, or for the remainder of the Limited
Warranty Period of the HP Hardware Product they are replacing or in which they are installed, whichever is longer.
During the Limited Warranty Period, HP will, at its discretion, repair or replace any defective component. All
component parts or hardware products removed under this Limited Warranty become the property of HP. In the
unlikely event that your HP Hardware Product has recurring failures, HP , at its sole discretion, may elect to provide you
with (a) a replacement unit of HP's choosi n g th a t is th e same or equivalent to your HP Hardware Product in
performance, or (b) to give you a refund of your purchase price or lease payments (less interest) instead of a
replacement. This is your exclusive remedy for defective products.
Exclusions
HP does not warrant that the operation of this product will be uninterrupted or error-free. HP is not responsible for
damage that occurs as a result of your failure to follow the instructions intended for the HP Hardware Product.
This Limited Warranty does not apply to expendable or consumable parts and does not extend to any product from
which the serial number has been removed or that has been damaged or rendered defective (a) as a result of accident,
misuse, abuse, contamination, improper or inadequate maintenance or calibration, or other external causes; (b) by
operation outside the usage parameters stated in the user documentation that shipped with the product; (c) by
software, interfacing, parts, or supplies not supplied by HP; (d) by improper site preparation or maintenance; (e) by
virus infection; (f) from loss or damage in transit; or (g) by modification or service by anyone other than (i) HP, (ii) an
HP authorized service provider, or (iii) your own installation of end-user-replaceable HP or HP-approved parts if
available for your product in the servicing country/region.
Exclusive Remedy
TO THE EXTENT ALLOWED BY APPLICABLE LOCAL LAW, these terms and conditions constitute the complete and
exclusive warranty agreement between you and HP regarding the HP Hardware Product you have purchased or
leased. These terms and conditions supersede any prior agreements or representations – including representations
made in HP sales literature or advice given to you by HP or an agent or employee of HP – that may have been made
in connection with your purchase or lease of the HP Hardware Product. No change to the conditions of this Limited
Warranty is valid unless it is made in writing and signed by an authorized representative of HP.
Limitation of Liability
IF YOUR HP HARDWARE PRODUCT FAILS TO WORK AS WARRANTED ABOVE, HP'S MAXIMUM LIABILITY
UNDER THIS LIMITED WARRANTY IS EXPRESSLY LIMITED TO THE LESSER OF THE PRICE YOU HAVE PAID
FOR THE PRODUCT OR THE COST OF REPAIR OR REPLACEMENT OF ANY HARDW ARE COMPONENTS THAT
MALFUNCTION IN CONDITIONS OF NORMAL USE.
EXCEPT AS INDICATED ABOVE, IN NO EVENT WILL HP BE LIABLE FOR ANY DAMAGES CAUSED BY THE
PRODUCT OR THE FAILURE OF THE PRODUCT TO PERFORM, INCLUDING ANY LOST PROFITS OR SAVINGS
OR SPECIAL, INCIDENTAL, OR CONSEQUENTIAL DAMAGES. HP IS NOT LIABLE FOR ANY CLAIM MADE BY A
THIRD PARTY OR MADE BY YOU FOR A THIRD PARTY.
iv
Page 5

THIS LIMITATION OF LIABILITY APPLIES WHETHER DAMAGES ARE SOUGHT, OR A CLAIM MADE, UNDER
THIS LIMITED WARRANTY OR AS A TORT CLAIM (INCLUDING NEGLIGENCE AND STRICT PRODUCT
LIABILITY), A CONTRACT CLAIM, OR ANY OTHER CLAIM. THIS LIMITATION OF LIABILITY CANNOT BE WAIVED
OR AMENDED BY ANY PERSON. THIS LIMITATION OF LIABILITY WILL BE EFFECTIVE EVEN IF YOU HAVE
ADVISED HP OR AN AUTHORIZED REPRESENTATIVE OF HP OF THE POSSIBILITY OF ANY SUCH DAMAGES.
THIS LIMITATION OF LIABILITY, HOWEVER, WILL NOT APPL Y TO CLAIMS FOR PERSONAL INJURY.
THIS LIMITED WARRANTY GIVES YOU SPECIFIC LEGAL RIGHTS. YOU MAY ALSO HAVE OTHER RIGHTS
THAT MAY VARY FROM STATE TO STATE OR FROM COUNTRY/REGION TO COUNTRY/REGION. YOU ARE
ADVISED TO CONSULT APPLICABLE STATE OR COUNTRY/REGION LAWS FOR A FULL DETERMINATION OF
YOUR RIGHTS.
TO THE EXTENT ALLOWED BY LOCAL LAW, NEITHER HP NOR ITS THIRD-PARTY SUPPLIERS MAKE ANY
OTHER WARRANTY OR CONDITION OF ANY KIND, WHETHER EXPRESS OR IMPLIED, WITH RESPECT TO
THE HP PRODUCTS, AND SPECIFICALLY DISCLAIM THE IMPLIED WARRANTIES OR CONDITIONS OF
MERCHANTABILITY, SATISFACTORY QUALITY, AND FITNESS FOR A PARTICULAR PURPOSE. TO THE
EXTENT HP OR ITS THIRD-PARTY SUPPLIERS MAY NOT DISCLAIM IMPLIED WARRANTIES, THE DURATION
OF SUCH WARRANTIES ARE LIMITED TO THE DURATION OF THE WARRANTY PERIOD PROVIDED IN THIS
LIMITED WARRANTY.
Limited Warranty Period
The Limited Warranty Period for an HP Hardware Product is a specified, fixed period commencing on the date of
purchase. The date on your sales receipt is the date of purchase unless HP or your reseller informs you otherwise in
writing.
Types of Warranty Service
To enable HP to provide the best possible support and service during the Limited Warranty Period, you may be
directed by HP to verify configurations, load most recent firmware, install software patches, run HP diagnostics tests,
or use HP remote support solutions where applicable.
HP strongly encourages you to accept the use of, or to employ available support technologies provided by HP. If you
choose not to deploy available remote support capabilities, you may incur additional costs due to increased support
resource requirements. Listed below are the types of warranty support service that may be applicable to the HP
Hardware Product you have purchased.
In-Home Warranty Service
Your HP Limited Warranty service may include in-home labor support to repair your hardware. HP provides in-home
service during standard office hours. Standard office hours are typically 8:00 a.m. to 5:00 p.m., Monday through
Friday, but may vary with local business practices. If your location is outside the customary service zone (typically 50
km) response times may be longer or there may be additional charges. To locate the nearest HP authorized service
provider refer to the HP Web site at: www.hp.com/support
HP may, at its sole discretion, determine if in-home warranty service is required. For example, in many cases, the
defect can be fixed by the use of a customer self repair (CSR) part that you are required to replace yourself based on
instructions and documentation provided by HP. You are also required to cooperate with HP in attempting to resolve
the problem over the telephone. This may involve performing routine diagnostic procedures, removing third-party
options, and/or substituting options. In order to receive in-home support, you must: (a) have a representative present
when HP provides warranty services at your site; (b) notify HP if products are being used in an environment which
poses a potential health or safety hazard to HP employees or subcontractors; (c) subject to its reasonable security
requirements, provide HP with sufficient, free, and safe access to and use of all facilities, information, and systems
determined necessary by HP to provide timely support; (d) ensure that all manufacturers labels (such as serial
numbers) are in place, accessible, and legible; and (e) maintain an environment consistent with product specifications
and supported configurations.
If you require an HP representative to handle all component replacements, support uplift contracts are available at
additional cost.
v
Page 6

Carry-in Warranty Service
Under the terms of carry-in service, you will be required to deliver your HP Hardware Product to an authorized service
location for warranty repair. You must prepay any shipping charges, taxes, or duties associated with transportation of
the product to and from the service location. In addition, you are responsible for insuring any product shipped or
returned to an authorized service location and assume risk of loss during shipping.
Advanced Unit Replacement Warranty Service
Your HP Limited Warranty may include an advance unit replacement warranty service. Under the terms of the
advanced unit replacement warranty service, if a unit is diagnosed as defective, HP will ship a replacement product
directly to you. On receiving the replacement unit you will be required to return the defective unit back to HP, in the
packaging that arrives with the replacement unit, within a defined period of time, normally fifteen (15) days. HP will
incur all shipping and insurance costs to return the defective unit to HP. Failure to return the defective unit may result
in HP billing you for the replacement product.
Customer Self Repair Warranty Service
In countries/regions where it is available, your HP Limited Warranty may include a customer self repair warranty
service. If applicable, HP will determine at its sole discretion that customer self repair is the appropriate method of
warranty service. If so, HP will ship approved replacement parts directly to you to fulfill your HP Hardware Product
warranty service. This will save considerable repair time. After you contact HP and the fault diagnosis identifies that
the problem can be fixed using one of these parts, a replaceable part can be sent directly to you. Once the part arrives,
replace the defective part pursuant to the provided instructions and documentation. If further assistance is required,
call the HP Technical Support Center and a technician will assist you over the phone. In cases where the replacement
part must be returned to HP, you must ship the defective part back to HP within a defined period of time, normally
fifteen (15) days. The defective part must be returned with the associated documentation in the provided shipping
material. Failure to return the defective product may result in HP billing you for the replacement. With a customer self
repair, HP will pay all shipping and part return costs and determine the courier/carrier to be used. If customer self
repair applies to you, refer to your specific HP Hardware Product announcement. You can also obtain information on
this warranty service on the HP Web site at: www.hp.com/support
Contacting HP
If your product fails during the Limited Warranty Period and the suggestions in the product documentation do not solve
the problem, you can get support through any of the following:
• HP Customer Care on the Web offers instant access to support information and e-mail support with on-line
support technicians. Visit our Web site at: www.hp.com/support
• HP Total Care is available toll-free by phone. Be sure to have the following product information available
when you call HP:
• Serial Number
• Product Number
• Model Name and Number
• Details for your questions
• Contact HP Total Care at: 1-800-474-6836
[1-800-HP Invent]
• Contact an HP Authorized Support Provider. Use our service locator to find an HP Authorized Support
Provider near you. Go to: www.hp.com/support
vi
Page 7

Register Now
Go to: http://register.hp.com
Registration is quick and easy, and it offers:
• Email updates containing notifications about products and the most recent support alerts.
• The HP Newsgram, our monthly online magazine packed full of product news, support tips, project ideas, and
much more. Visit us at: http://subscription.support.hp.com
Protect Your Investment
Obtaining a Warranty Upgrade
Upgrade your standard factory warranty for up to 3 years of coverage with an extended service plan. Service coverage
begins on product purchase date and you must purchase the service within the first year after purchasing the TV.
For more information visit:
www.hp.com/go/totalcare (U.S. only)
or call:
1-866-234-1377
Or
www.hp.ca/totalcare (Canada only)
or call:
1-877-231-4351
Installation
Visit HPshopping at http://hpshopping.com (U.S.) or http://hpshopping.ca (Canada) for information on HP
installation services.
The information contained herein is subject to change without notice.
Copyright © 2006 Hewlett-Packard Development Company, L.P.
vii
Page 8

viii
Page 9

Safety Markings and Warnings
CAUTION: The HP television stand is included in select models. The screws supplied with the
television stand must be used to attach the stand to the television to avoid injury from
tipping. Only use the screws provided with these HP television stand models TS-5220 and
TS-5226. Please follow the instructions provided with the stand for proper installation.
The following safety markings may be present on the rear of the television:
If you have a lamp television, you will have this additional label:
ix
Page 10

If you have an LED television, you will have this additional label:
If your configuration includes a television stand, the stand will include this label:
A PRODUCT OF CHINA
UN PRODUCTO DE CHINA
UN PRODUIT DE CHINE
CAUTION: This TV stand model (TS-5220 or TS-5226) is to be used
only with the correct size (52") HP HDTV model number (IDB5220N /
ID5220N / ID5226N / ID5286N, RMN numbers CRVSB-06HG /
CRVSB-06LD). Use with other carts or stands could result in
instability possibly causing injury.
PRECAUCIÓN: Este modelo de soporte para televisor (TS-5220 o
TS-5226) se debe utilizar solamente con el HP HDTV del tamaño
correcto (52"), número de modelo (IDB5220N / ID5220N / ID5226N /
ID5286N, número de RMN CRVSB-06HG / CRVSB-06LD). El uso
con otros carros o soportes podría ocasionar inestabilidad lo que podría
causar lesiones.
ATTENTION : Ce modèle de meuble TV (TS-5220 ou TS-5226) doit
être utilisé exclusivement avec un modèle de téléviseur HDTV HP de
taille correcte (52 pouces) (IDB5220N / ID5220N / ID5226N /
ID5286N, nombre de RMN CRVSB-06HG / CRVSB-06LD). L’emploi
d’autres meubles ou chariots peut produire une instabilité susceptible
de causer des blessures.
TV STAND
TS-5220/TS-5226
x
Page 11

Symbols
Symbol Purpose
This symbol is intended to alert the user to the presence of dangerous voltage within the television’s
enclosure that may be of sufficient potential to constitute a risk of electric shock to people.
This symbol on the television is intended to alert the user to the presence of important operating and
maintenance (servicing) instructions in the literature accompanying the television.
This symbol indicates that the lamp in the television contains mercury. Special disposal of the lamp for
environmental reasons may be required under the laws applicable to your jurisdiction. For disposal or
recycling information, please contact your local authorities or the Electronic Industries Alliance.
This symbol is intended to alert the user to the presence of ultraviolet light.
This symbol is intended to alert the user to the presence of a potentially hot surface.
This symbol is intended to alert the user to the presence of a potential tip-over hazard.
Important Safety Instructions
CAUTION: Read and follow these precautions and all other instructions in this manual to reduce the
risk of injury and equipment damage.
1. Read these instructions.
2. Keep these instructions.
3. Heed all warnings.
4. Follow all instructions.
5. Do not use this apparatus near water.
6. Clean only with a dry cloth.
7. Do not block any ventilation openings. Install in accordance with manufacturer’s instructions.
8. Do not install near any heat sources such as radiators, heat registers, stoves, or other apparatus (including
amplifiers) that produce heat.
9. Do not defeat the safety purpose of the polarized or grounding-type plug. A polarized plug has two blades
with one wider than the other. A grounding type plug has two blades and a third grounding prong. The wide
blade or the third prong are provided for your safety. If the provided plug does not fit into your outlet, consult
an electrician for replacement of the obsolete outlet.
10. Protect the power cord from being walked on or pinched particularly at plugs, convenience receptacles, and
the point where they exit from the apparatus.
1 1. Only use attachments/accessories specified by the manufacturer.
12.
CAUTION: Use only with the cart, stand, tripod, bracket, or table specified by
the manufacturer, or sold with the apparatus. When a cart is used,
use caution when moving the cart/apparatus combination to avoid
injury from tip-over.
xi
Page 12

13. Unplug this apparatus during lightning storms or when unused for long periods of time.
14. Refer all servicing to qualified service personnel. Servicing is required when the apparatus has been
damaged in any way, such as power-supply cord or plug is damaged, liquid has been spilled or objects have
fallen into the apparatus, the apparatus has been exposed to rain or moisture, does not operate normally, or
has been dropped.
15.
CAUTION: To avoid personal injury or damag e to the television, always use at least two
people to lift or move it.
16. If the television is moved from a cold area, do not turn the television on for a few hours. This will allow the unit
to warm sufficiently to evaporate any condensation.
17. Install the television upright on a horizontal, solid, flat surface away from excessive heat, dust, and vibration.
18. Keep a clearance of at least 4 inches (10 cm) between the vents on the back and/or sides of the televisio n
and nearby walls or enclosures. Allow free air circulation to prevent excessive heat build up that could cause
the set to shut down or damage the television. Keep flammable objects susceptible to heat damage at least
2 feet (0.5 m) away from the television’s vents.
19. Do not allow food, small objects, or liquid to get inside the television. If this should occur, contact HP for
assistance. There are no user-serviceable parts inside except as described elsewhere in this manual.
20. Operate only from the type of power source indicated on the marking label. If you are not sure of the type of
power supplied to your home, consult your television dealer or local power company.
21. Do not handle the power cord with wet hands. Doing so may cause electric shock.
22. Do not place hands, face, or other objects near the ventilation holes of the television. Because the ventilation
holes release heat, doing so could result in damage to the television or personal injury.
23.
CAUTION: Use only with a cart, stand, tripod, bracket, hardware, or table as
specified by HP. When a cart is used, use caution when moving the
television to avoid injury from tipping over. USE WITH AN
UNAPPROVED CART, STAND, BRACKET, HARDWARE, OR
T ABLE MAY RESULT IN INSTABILITY AND POSSIBLE INJURY.
24.
WARNING! To prevent electrical shock or injury, do not remove cover except in accordance
with the instructions provided in Section 5 of “Fixing Problems” on page 41 of
this User's Guide when replacing the lamp module. Because there are no user
serviceable parts inside this television other than the lamp module, any
servicing other than replacement of the lamp module should be referred to
qualified service personnel only. Under no circumstances should anyone other
than a qualified service technician attempt to remove the cover of this television
or service it except to replace the lamp module in accordance with the
instructions provided in this User's Guide.
25. Servicing is required if the television has been damaged in any way, such as if the power cord or power plug
is damaged, liquid has been spilled or objects have fallen into the television, or the television has been
exposed to rain or moisture, does not operate normally, or has been dropped.
xii
Page 13

26.
WARNING! LED BASED TELEVISION: AT NO TIME SHOULD THIS TELEVISION EVER
BE OPERATED WHILE DISASSEMBLED IN ANY MANNER. THIS
TELEVISION USES LIGHT EMITTING DIODES (LEDs) AS A LIGHT
SOURCE, WHICH PRODUCE EXTREMELY INTENSE LIGHT. EXPOSURE
TO THE LIGHT PRODUCED BY THESE LEDs WITHOUT PROPER EYE
PROTECTION MAY RESULT IN SEVERE AND PERMANENT EYE
DAMAGE.
27. If any of the following conditions occur, immediately unplug the television from the wall outlet and contact a
qualified service technician to repair:
a. If the power cord or plug becomes damaged or frayed, do not attempt to unplug — locate the
appropriate circuit breaker and disable the outlet;
b. If the television has been exposed to rain, water, or other liquid;
c. If the television does not operate normally when operated as instructed in the operating instructions,
adjust only those controls that are covered by the operating instructions – improper adjustment of
other controls may result in damage to the television that could require extensive work by a qualified
technician to restore to the television to normal operation;
d. If the television has been dropped or the cabinet has been damaged;
e. If the television exhibits a distinct change in performance – this usually indicates that service is
required.
28. Should repair become necessary, advise the service technician servicing your television to use parts
specified by the manufacturer. Unauthorized substitutions may result in fire, electrical shock, or other
hazards.
29.
WARNING! KEEP SMALL PARTS AND OTHER OBJECTS OUT OF THE REACH OF
SMALL CHILDREN. THESE OBJECTS CAN BE ACCIDENTALLY
SWALLOWED AND RESULT IN CHOKING, SUFFOCATION, OTHER
INJURIES AND POSSIBLY DEATH. ADDITIONALLY KEEP ALL PACKAGING
MATERIALS OUT THE REACH OF SMALL CHILDREN. THESE ITEMS MAY
PRESENT A SUFFOCATION HAZARD AND CAUSE SERIOUS INJURY OR
DEAT H
30.
WARNING! Keep all packaging materials out of the reach of small children. These items
may cause choking, suffocation, other serious injury, and possibly death.
31. CAUTION: Do not disconnect power until the television has cooled and the fan stops running – up to three
minutes after turning it off. Otherwise, you might shorten the life of the lamp.
32. CAUTION: If power is removed from the television, wait more than two minutes before attempting to turn on
the television. Otherwise, you might shorten the life of the lamp.
xiii
Page 14

33.
CAUTION: Replacing the lamp module requires special considerations:
•Carefully read the complete instructions for “Replacing the Lamp Module” on
page 41 before replacing the lamp module.
•To reduce the risk of injury, use extreme care when removing the lamp module,
because broken glass might be present.
•The lamp contains a small amount of mercury. If the lamp breaks, adequately
ventilate the area where the breakage occurred, discard any nearby food and
drink, and thoroughly clean the table surface around the television. Wash
your hands after cleaning the area or handling a broken lamp. Disposal of
this lamp might be regulated because of environmental considerations.
34.
CAUTION: We recommend that the lamp be exchanged at or before the end of the lamp's
rated life – 6000 hours of use – because after that, the risk of the lamp rupturing
could increase. High-temperature glass fragments from a ruptured bulb can
cause injury, fire, or damage to property.
In addition to these general precautions, be sure to observe the following precautions when using external
television antennas and cable systems with your new television. Failure to observe these precautions could result in
fire, bodily injury, and damage to your television.
• Call the CATV (cable television) system installer’s attention to Section 820-40 of the NEC (U.S. National
Electrical Code, ANSI/NFPA 70), or Canadian Electrical Code (CAN/CSA-C22.2 No. 1), which provides
guidelines for proper grounding and, in particular, specifies that the cable ground must be connected to the
grounding system of the building, as close to the point of cable entry as practical.
• If an outside antenna or cable system is connected to the television, be sure the antenna or cable system is
electrically grounded to protect against voltage surges and built up static charges. Article 810 of the NEC
(U.S. National Electrical Code, ANSI/NFPA 70) or Canadian Electrical Code (CAN/CSA-C22.2 No. 1)
provides information about proper electrical grounding of the mast and supporting structure, grounding of the
“lead-in” wire to an antenna discharge unit, size of grounding conductors, location of the antenna discharge
unit, connection to grounding electrodes, and requirements of the grounding electrode.
• Do not place an outside antenna in the vicinity of overhead power lines or other electric light or power circuits,
or where it could fall on power lines or circuits. When installing an outside antenna system, take extreme care
to avoid touching overhead power lines that may be present at your location.
xiv
Item Description
1 Electric service equipment
2 Power service grounding electrode system (NEC Art 250, Part H)
3 Ground clamps
4 Grounding conductors (NEC Section 810-21)
5 Antenna discharge unit (NEC Section 810-20)
6 Ground clamp
7 Antenna “lead-in” wire
WARNING! To reduce the risk of fire or electric shock, do not expose this television to rain or moisture.
The television should not be used outdoors or exposed to dripping or splashing. Objects
filled with liquids such as vases should not be placed on the television.
Page 15

Safety Information
Mercury Safety
WARNING! This television lamp contains a small amount of mercury. If the lamp breaks, adequately
ventilate the area where the breakage occurred, discard any nearby food and drink, and
thoroughly clean the table surface around the television. Wash your hands after cleaning
the area or handling a broken lamp. Disposal of this lamp may be regulated due to
environmental considerations. For disposal or recycling information, contact your local
authorities or the Electronic Industries Alliance at www.eiae.org. You can find safety
information about the lamp at
www.hp.com/penknife/globalcitizenship/environment/productdata.
Regulatory Information
This section presents information that shows how your TV complies with regulations in certain regions. Any
modifications to your TV not expressly approved by HP could void the authority to operate the TV in these regions.
U.S.A.
This equipment has been tested and found to comply with the limits for a Class B digital device, pursuant to Part 15 of
the FCC Rules. These limits are designed to provide reasonable protection against harmful interference in a residential
installation. This equipment generates, uses and can radiate radio frequency energy and, if not installed and used in
accordance with the instructions, may cause harmful interference to radio communications. However, there is no
guarantee that interference will not occur in a particular installation. If this equipment does cause harmful interference
to radio or television reception, which can be determined by turning the equipment off and on, the user is encouraged
to try to correct the interference by one or more of the following measures:
• Reorient or relocate the receiving antenna.
• Increase the separation between the equipment and receiver.
• Connect the equipment into an outlet on a circuit different from that to which the receiver is connected.
• Consult the dealer or an experienced radio/TV technician for help.
This digital television is capable of receiving analog basic, digital basic, and digital premium cable television
programming by direct connection to a cable system providing such programming. A security card provided by your
cable operator is required to view encrypted digital programming. Certain advanced and interactive digital cable
services such as video-on-demand, a cable operator's enhanced program guide, and data-enhanced televi sion
services may require the use of a set-top box. For more information call your local cable operator.
When making connections to peripheral devices, to maintain compliance with FCC Rules and Regulations, use
properly shielded cables with this device.
Responsible Party
Manufacturer: Hewlett-Packard
Responsible Party: Hewlett-Packard
Address: Corporate Product Regulations Manager, 3000 Hanover Street, Palo Alto, CA 94304
Telephone: (650) 857-1501
Regulatory Model Number (1): CRVSB-06HG (for lamp HP IDB5220N and HP ID5226N) and CRVSB-06LD (for LED
HP ID5286N)
(1) For regulatory purposes, these products are assigned a Regulatory Model Number. This number should not be
confused with the trade name (HP Pavilion HD) or the product numbers EY808AA (ID5226N), EX543AA (IDB5220N),
EY809AA (ID5286N).
xv
Page 16

xvi
Page 17

Table of Contents
Limited Warranty, Refurbished Limited Warranty, and License Information........................ iii
Safety Markings and Warnings................................................................................................. ix
Symbols................................................................................................................................................................................................xi
Important Safety Instructions............................................................................................................................................................xi
Safety Information.............................................................................................................................................................................xv
Mercury Safety...........................................................................................................................................................................xv
Regulatory Information.....................................................................................................................................................................xv
U.S.A...........................................................................................................................................................................................xv
Responsible Party.....................................................................................................................................................................xv
1 Setting Up the Television............................................................................................................................................... 1
What’s in the Box? ............................................................................................................................................................................. 1
Unpackaging and Carrying the Television...................................................................................................................................... 1
Features............................................................................................................................................................................................... 1
Accessories......................................................................................................................................................................................... 2
Setting Up Your Television — The Basics...................................................................................................................................... 2
Planning Your Layout................................................................................................................................................................. 2
Installing Batteries in the Remote Control.............................................................................................................................. 3
Planning for Other Equipment.......................................................................................................................................................... 3
Planning Your System Setup.................................................................................................................................................... 3
Available Connections....................................................................................................................................................................... 4
Back Panel................................................................................................................................................................................... 4
Right Side Panel......................................................................................................................................................................... 4
Choosing and Locating Your Video Connections ......................................................................................................................... 5
Choosing and Locating Your Audio Connections ......................................................................................................................... 6
Audio Output Jacks.................................................................................................................................................................... 6
DVI Audio Input Jacks............................................................................................................................................................... 6
Choosing and Completing Your Video Connections .................................................................................................................... 7
Cabling for HDMI, DVI-D, Component, S-Video, and Composite Connections.............................................................. 7
HDMI Connection............................................................................................................................................................... 7
DVI-to-HDMI Connection.................................................................................................................................................. 7
Component-Video (YPbPr) Connection......................................................................................................................... 8
S-Video Connection................................................................................................................................................................... 8
Composite-Video Connection .......................................................................................................................................... 9
Connecting Your Other Equipment.................................................................................................................................................. 9
Antenna Only............................................................................................................................................................................. 10
Antenna and Cable .................................................................................................................................................................. 10
Standard Cable..........................................................................................................................................................................11
Cable with Set-Top Cable Box................................................................................................................................................11
Satellite Receiver...................................................................................................................................................................... 12
Cable with Cable Box/DVR..................................................................................................................................................... 13
Cable Box and VCR/DVR....................................................................................................................................................... 14
Satellite Receiver and VCR/DVR .......................................................................................................................................... 15
DVD Player or Video Gaming Device................................................................................................................................... 16
Audio: Stereo Sound System................................................................................................................................................. 16
Audio: Surround Sound or AV Receiver............................................................................................................................... 17
Computer................................................................................................................................................................................... 18
Using a CableCARD Module.......................................................................................................................................................... 18
What is a CableCARD Module? ............................................................................................................................................ 18
Installing a CableCARD Module ............................................................................................................................................ 19
Turning the Television On and Off................................................................................................................................................. 19
Plugging in the Power Cord.................................................................................................................................................... 19
Turning on the Television ........................................................................................................................................................ 20
xvii
Page 18

Turning Off the Television ....................................................................................................................................................... 21
Completing the Basic Setup........................................................................................................................................................... 21
Finding Your Available Channels........................................................................................................................................... 21
Setting the Time........................................................................................................................................................................ 22
2 Using the Photo Viewer................................................................................................................................................. 23
About Picture Viewer ....................................................................................................................................................................... 23
Inserting Your Memory Card Into the Television......................................................................................................................... 23
Removing a Memory Card.............................................................................................................................................................. 23
Browsing Pictures............................................................................................................................................................................. 24
Tagging and Untagging Pictures.................................................................................................................................................... 24
Viewing a Slideshow........................................................................................................................................................................ 24
Printing Pictures................................................................................................................................................................................ 25
Connecting the Printer............................................................................................................................................................. 25
Printing all pictures................................................................................................................................................................... 25
Printing one picture or multiple copies of one picture........................................................................................................ 25
Printing all tagged photos ....................................................................................................................................................... 26
Clearing the print queue.......................................................................................................................................................... 26
Adjusting Photo Viewer Settings.................................................................................................................................................... 26
Troubleshooting Problems.............................................................................................................................................................. 27
3 Watching Television......................................................................................................................................................... 29
Overview of the Remote Control.................................................................................................................................................... 29
Using Your Remote Control............................................................................................................................................................ 30
Changing the Channel..................................................................................................................................................................... 30
Adjusting the Volume....................................................................................................................................................................... 31
Viewing Closed Captions................................................................................................................................................................ 31
Selecting a Video Source................................................................................................................................................................ 32
Using Dual Picture Mode ................................................................................................................................................................ 32
Applying Parental Controls ............................................................................................................................................................. 33
Setting Permission Levels ...................................................................................................................................................... 33
Setting a Simple Lock...................................................................................................................................................... 33
Temporarily Suspending Controls ......................................................................................................................................... 33
Changing Your Password........................................................................................................................................................ 33
Rating Systems................................................................................................................................................................................. 34
4 Adjusting the Television............................................................................................................................................... 35
Adjusting the Size (Aspect) of the Picture.................................................................................................................................... 35
Adjusting the Picture for Best Color.............................................................................................................................................. 35
Adjusting Other Picture Settings.................................................................................................................................................... 36
Adjusting Sound Settings................................................................................................................................................................ 36
Customizing Your Channels and Sources.................................................................................................................................... 36
Adding or Deleting a Channel................................................................................................................................................ 36
Setting Up Favorite Channels................................................................................................................................................ 37
Using the On-Screen Menu............................................................................................................................................................ 37
Changing Settings Using the Menu....................................................................................................................................... 37
Picture Menu............................................................................................................................................................................. 37
Advanced Picture Menu.......................................................................................................................................................... 38
Sound Menu............... ............................................................................................................................................................... 38
Source Menu............................................................................................................................................................................. 39
Setup Menu............................................................................................................................................................................... 39
xviii
Page 19

5 Fixing Problems.................................................................................................................................................................. 41
Maintaining the Television............................................................................................................................................................... 41
Cleaning the Television ........................................................................................................................................................... 41
Forgotten Passwords....................................................................................................................................................................... 41
Replacing the Lamp Module........................................................................................................................................................... 41
Replacing the LED Module............................................................................................................................................................. 43
6 Support and Repair................................................................................ .......................................................................... 45
Contacting HP Technical Support.................................................................................................................................................. 45
7 Reference Information.................................................................................................................................................... 47
Specifications.................................................................................................................................................................................... 47
xix
Page 20

xx
Page 21

1 Setting Up the Television
What’s in the Box?
Before setting up your television, make sure your shipping carton includes the following items. If any are missing,
contact HP.
•Television
• Remote Control with two AAA batteries
• Quick Setup Guide
• User’s Guide (this manual)
NOTE: The television does not include audio/video cables, because most external equi pment includes the
required cables. Cables are also available from HP and at most electronics stores.
Unpackaging and Carrying the Television
CAUTION: To avoid injury or damage to the television, use at least two people to lift or move the
television. Lift with your legs, not with your back.
NOTE: To lift your new high-definition television, place one hand above the vent on the side panel, and hold the
top front corner with the other hand.
WARNING! Keep all packaging materials out of the reach of small children. These items may cause
choking, suffocation, other serious injury or possibly death.
Features
Your new high-definition television from HP comes equipped with many features, including the new Photo Viewer.
Photo Viewer enables you to view individual photos on your television, have a slideshow of your photos, and even print
your photos through the television.
This manual illustrates the television’s features, and also its connector types. If you require further assistance with
connections, please contact HP.
NOTE: You must use a printer with PictBridge™ technology to print photos using the television.
Setting Up the Television 1
Page 22

Accessories
Increase your enjoyment of your new television with genuine HP accessories. You can purchase accessories at
www.hpshopping.com, or through your television retailer.
• HP television stand — Sets the television at an ideal viewing height,
manages cables, and houses other home entertainment equipment. The
HP television stand is included with select models, and setup information
is provided in the stand’s packaging material.
• HP replacement lamp (ID5220 DLP™) — Installs easily and brings your
television up to factory-fresh brightness.
• CableCARD™ module — Lets you add a CableCARD to your television,
which simplifies television operation and eliminates the need for a
separate cable box.
Setting Up Your Television — The Basics
Planning Your Layout
Consider the following suggestions when planning your room layout:
• The best viewing distance is roughly 9 to 25 ft (3 to 8 m), but personal preferences vary widely.
For lengthy viewing of standard-definition television channels, the upper end of this range might be more
comfortable.
• For the most comfortable viewing, measure seating distance from the center of the television.
• Design your layout so you can control the ambient light. Many people prefer viewing with minimal lighting, but
you should avoid shining bright light directly onto the screen.
• The television can work with a wide variety of input devices — television antenna, cable service, DVD player,
audio/video receiver, VCR, personal digital video recorder (DVR), video gaming device, and satellite receiver.
• Try to locate the television’s input devices to minimize the lengths of cables connecting them to the television.
Use an HP television stand or other quality stand to keep equipment close to the television. If any cable is
longer than 10 ft (3 m), consider replacing it with a high-quality, low-loss cable for best video and audio
quality.
• For the ultimate home-theater experience, consider including a 5.1 surround sound system, such as a Dolby
Digital™ system. This system consists of five speakers and a sub woofer.
• For an external sound system, place all front speakers approximately the same distance from the listener.
Place the subwoofer near a wall or corner, and place surround speakers at least as high as the listener’s
head.
CAUTION: Use only with a cart, stand, tripod, bracket, hardware, or table as
specified by HP. When a cart is used, use caution when moving the
television to avoid injury from tipping over. USE WITH AN
UNAPPROVED CART, STAND, BRACKET, HARDWARE, OR TABLE
MAY RESULT IN INSTABILITY AND POSSIBLE INJURY.
CAUTION: Keep a clearance of at least 4 in (10 cm) between the vents on the back of the television and ne arby
walls or enclosures. Allow free air circulation to prevent excessive heat build-up that could cause
shutdown or damage the television. Cooling vents are located on the bottom of the television. DO NOT
place the television on a carpet or other soft surface. Keep flammable objects or objects subject to heat
damage at least 2 ft (0.5 m) away from the vents.
2 Setting Up the Television
Page 23

Installing Batteries in the Remote Control
1. On the back of the remote control, press the latch on the battery cover and lift off the cover.
2. Insert two AAA batteries (observe the + marks on the batteries).
3. Insert the tab on the battery cover into the case, and then snap the
cover into place.
Planning for Other Equipment
Planning Your System Setup
The way you connect the components of your entertainment system depends on the specific devices you have. The
following diagrams show how several common devices could be connected, including the cables between the devices.
Audio
Video
Audio
Video
L
Y
AUDIO
DVI
R
PB
VIDEO
PR
HDTV
DIGITAL
AUDIO
OUT
Satellite Out
S-Video
Satellite In
Antenna in
Phone
Jack
Data
Satellite receiver
DVD Player
Audio
Video
Audio
Video
SPEAKERS
L
DVI
S-Video
AUDIO
R
VIDEO
Cable Out Cabl e In
Entertainment
System
Cable converter
Cable in
Antenna in
NOTE: Always use the best-quality video output available on your devices, and always use the highest-quality
cables.
Setting Up the Television 3
Page 24

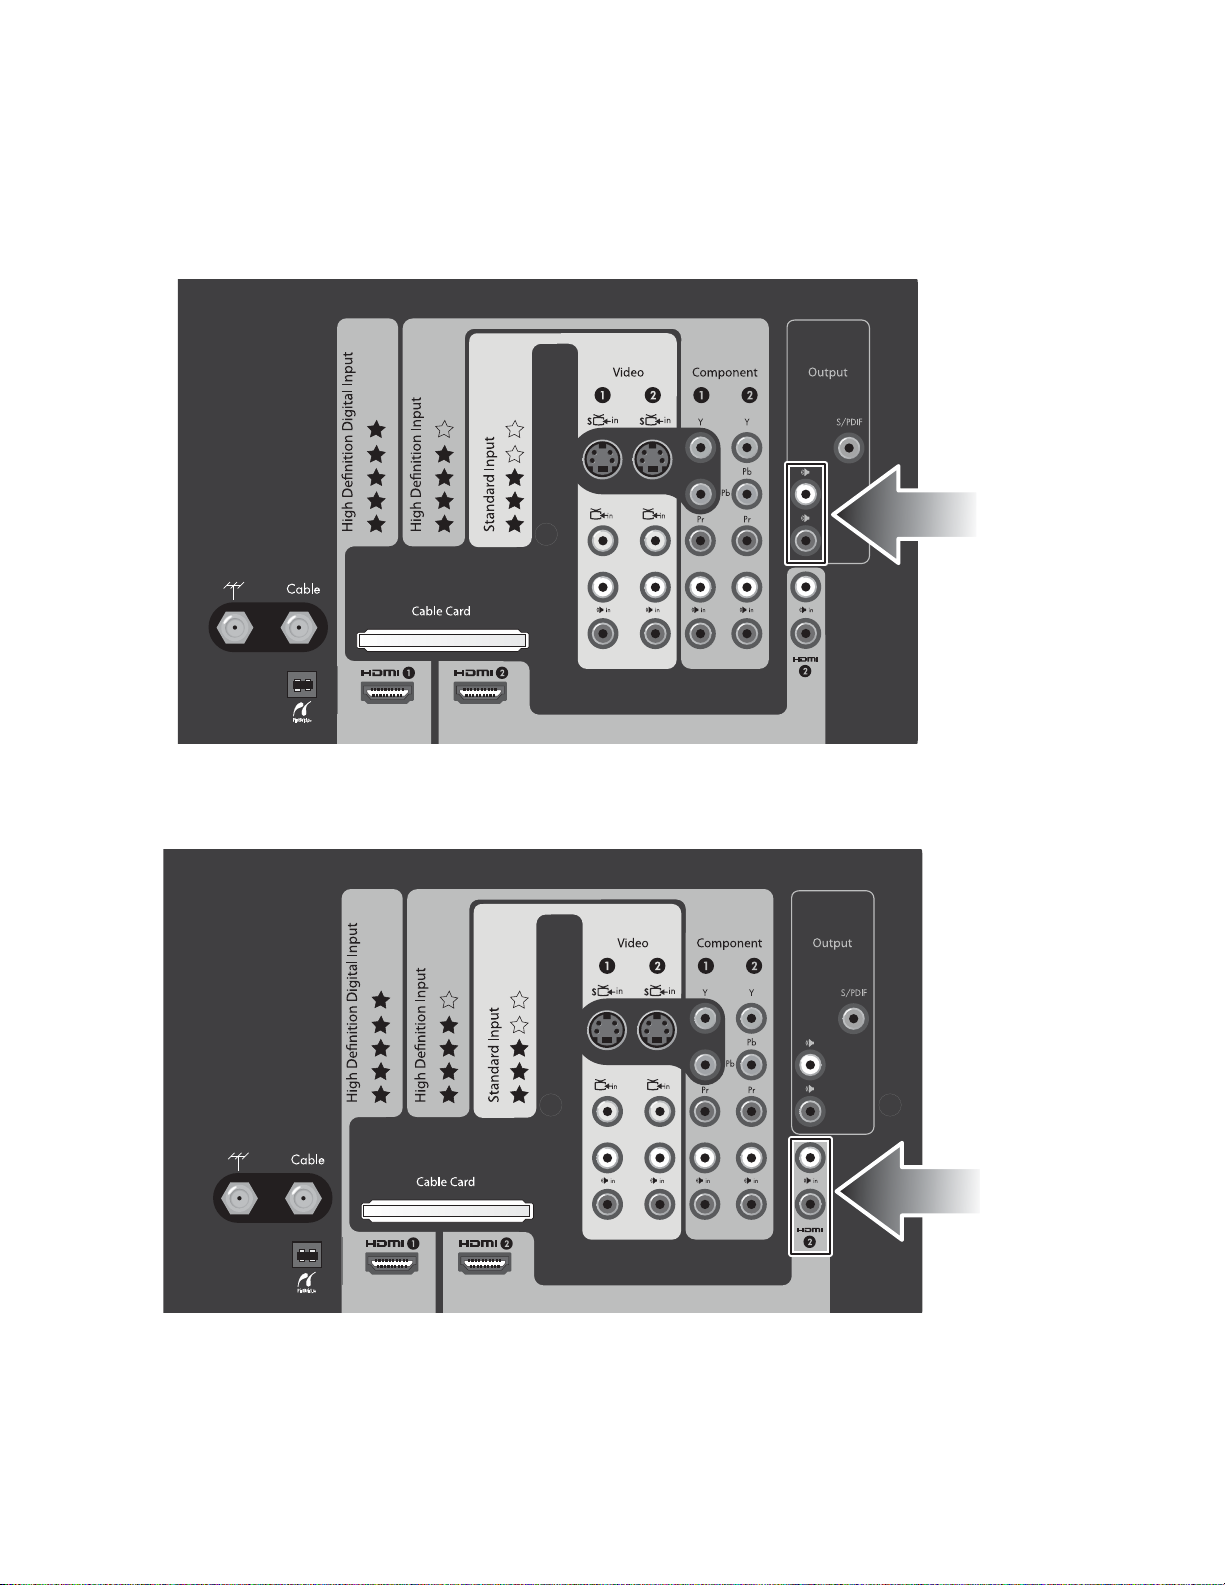
Available Connections
Your television provides convenient access to video and audio cable connections at the rear and side of the unit.
Back Panel
11
10
9
1
Item Function
1 Antenna input connector Connects an outside VHF/UHF antenna
2 Cable connector Connects cable services
3 PictBridge connector For printing photos using a PictBridge-equipped USB printer
4 HDMI™ input connectors Connects up to two HDMI or DVI-D sources, and provides video and
5 CableCARD PCMIA Slot CableCARD access slot for premium cable services
6 Composite A/V inputs Connects composite-video sources with audio
7 Component A/V inputs Connects component-video sources with audio
8 DVI audio input Audio connection for DVI-to-HDMI connections
9 Audio outputs For connecting a home entertainment system
10 Sony/Philips digital interface Allows transfer of digital audio information without analog conversion
11 S-video connectors Connects up to two S-Video sources
2
43
audio
6
5
7
8
Right Side Panel
Item Function
1 Composite/CVBS input Provides composite video input (composite
video is also referred to as CVBS — color,
CVBS L R
1 2 3
2 Left channel audio input For connecting external input equipment
3 Right channel audio input For connecting external input equipment
video, blanking, and sync)
4 Setting Up the Television
Page 25

Choosing and Locating Your Video Connections
Many video devices have more than one type of input or output port. When you connect a device to the television,
choose the connection that provides the best picture quality. The following table lists different types of connectors and
cables in order of picture quality.
Highest quality
HDMI connection. Provides highest-quality, high-definition digital picture and
digital surround sound in one connection.
DVI-to-HDMI connection. Very high quality. Requires separate sound
connection. DVI is not available on the television, but may be present on
your equipment. If so, an DVI-to-HDMI cable or DVI-to-HDMI adapter is
required.
Component-video connection (YPbPr). High quality, high-definition picture.
Requires a separate sound connection.
S-video connection. Good quality, standard-definition picture. Requires a
separate sound connection.
Composite video connection (yellow). Standard quality, standard-definition
picture. Requires a separate sound connection.
Coaxial antenna or cable connection. Standard for picture and sound from
antenna or cable service. Digital signals can carry high-definition programs
and surround sound.
Standard Quality
All the connections shown are available on the back panel of your new HP HDTV, except the DVI-to-HDMI connection.
Take a few minutes and inspect your home entertainment equipment to find the available ports. Choose the highestquality connection on each, and use that connection to connect to the televi sion.
TIP: If avail able, set the video output from your source device to 16:9 aspect (wide-screen picture). Refer to the
instructions for the video device. This provides maximum compatibility between the device and the
television.
Setting Up the Television 5
Page 26
Choosing and Locating Your Audio Connections
Audio Output Jacks
Connect to an audio receiver or amplifier for fixed-level output.
DVI Audio Input Jacks
Connect your DVI audio cables when using a DVI-to-HDMI connection.
6 Setting Up the Television
Page 27
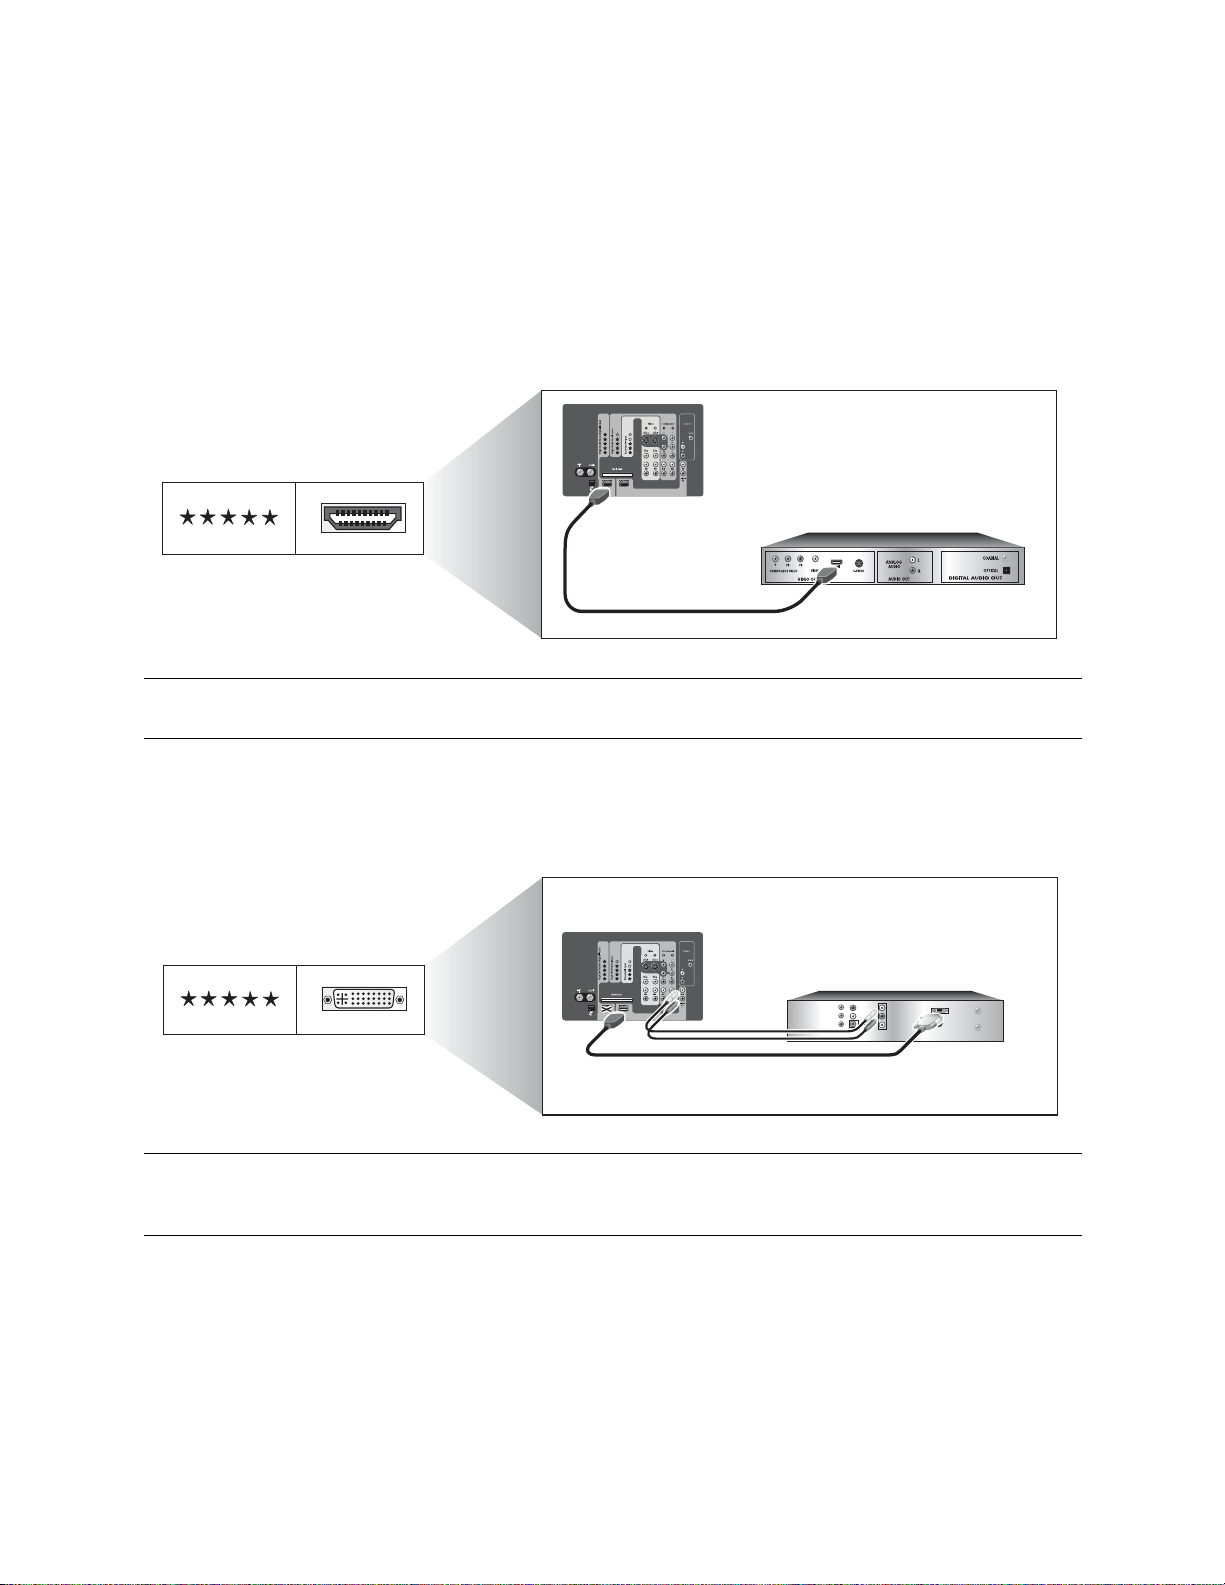
Choosing and Completing Your Video Connections
Cabling for HDMI, DVI-D, Component, S-Video, and Composite Connections
The following diagrams show how to connect video devices with different video outputs. (Connecting multiple units is
covered later in the manual.) Use the highest-quality connection available on your device.
HDMI Connection
• HDMI cable
Typical A/V equipment with
HDMI connector
HDMI
HDMI to HDMI Cable
NOTE: You can connect the HDMI 1 and the HDMI 2 inputs on the television. The HDMI cable carries video
and audio signals.
DVI-to-HDMI Connection
• DVI-to-HDMI cable (or HDMI-to-HDMI cable with DVI-to-HDMI adapter)
• Stereo RCA cable (two RCA connectors)
Typical A/V equipment with
DVI connector
L
Y
AUDIO
R
PB
VIDEO
DVI
HDMI - DVI Cable
DVI-to-HDMI cable
PR
HDTV
DIGITAL
AUDIO
OUT
NOTE: If you are using the television speakers, connect the DVI device only to the HDMI 2 on the television.
If you are connecting the audio directly to a sound system, you can connect DVI devices to the HDMI 1
and HDMI 2 inputs.
DVI
Cable Out
S-Video
Cable In
Setting Up the Television 7
Page 28

Component-Video (YPbPr) Connection
• Component-video cable (three RCA connectors)
• Stereo RCA cable (two RCA connectors)
Typical A/V equipment with
component-video connector
Y
Pb
Pr
NOTE: You can connect to the Component 1 and Component 2 inputs on the television.
S-Video Connection
• S-video cable
• Stereo RCA cable (two RCA connectors)
Typical A/V equipment with
S-Video connector
S-Video
NOTE: You can connect to the Video 1 and Video 2 inputs on the television. Two S-video or composite-video
connections are supported for each of these two inputs.
8 Setting Up the Television
Page 29
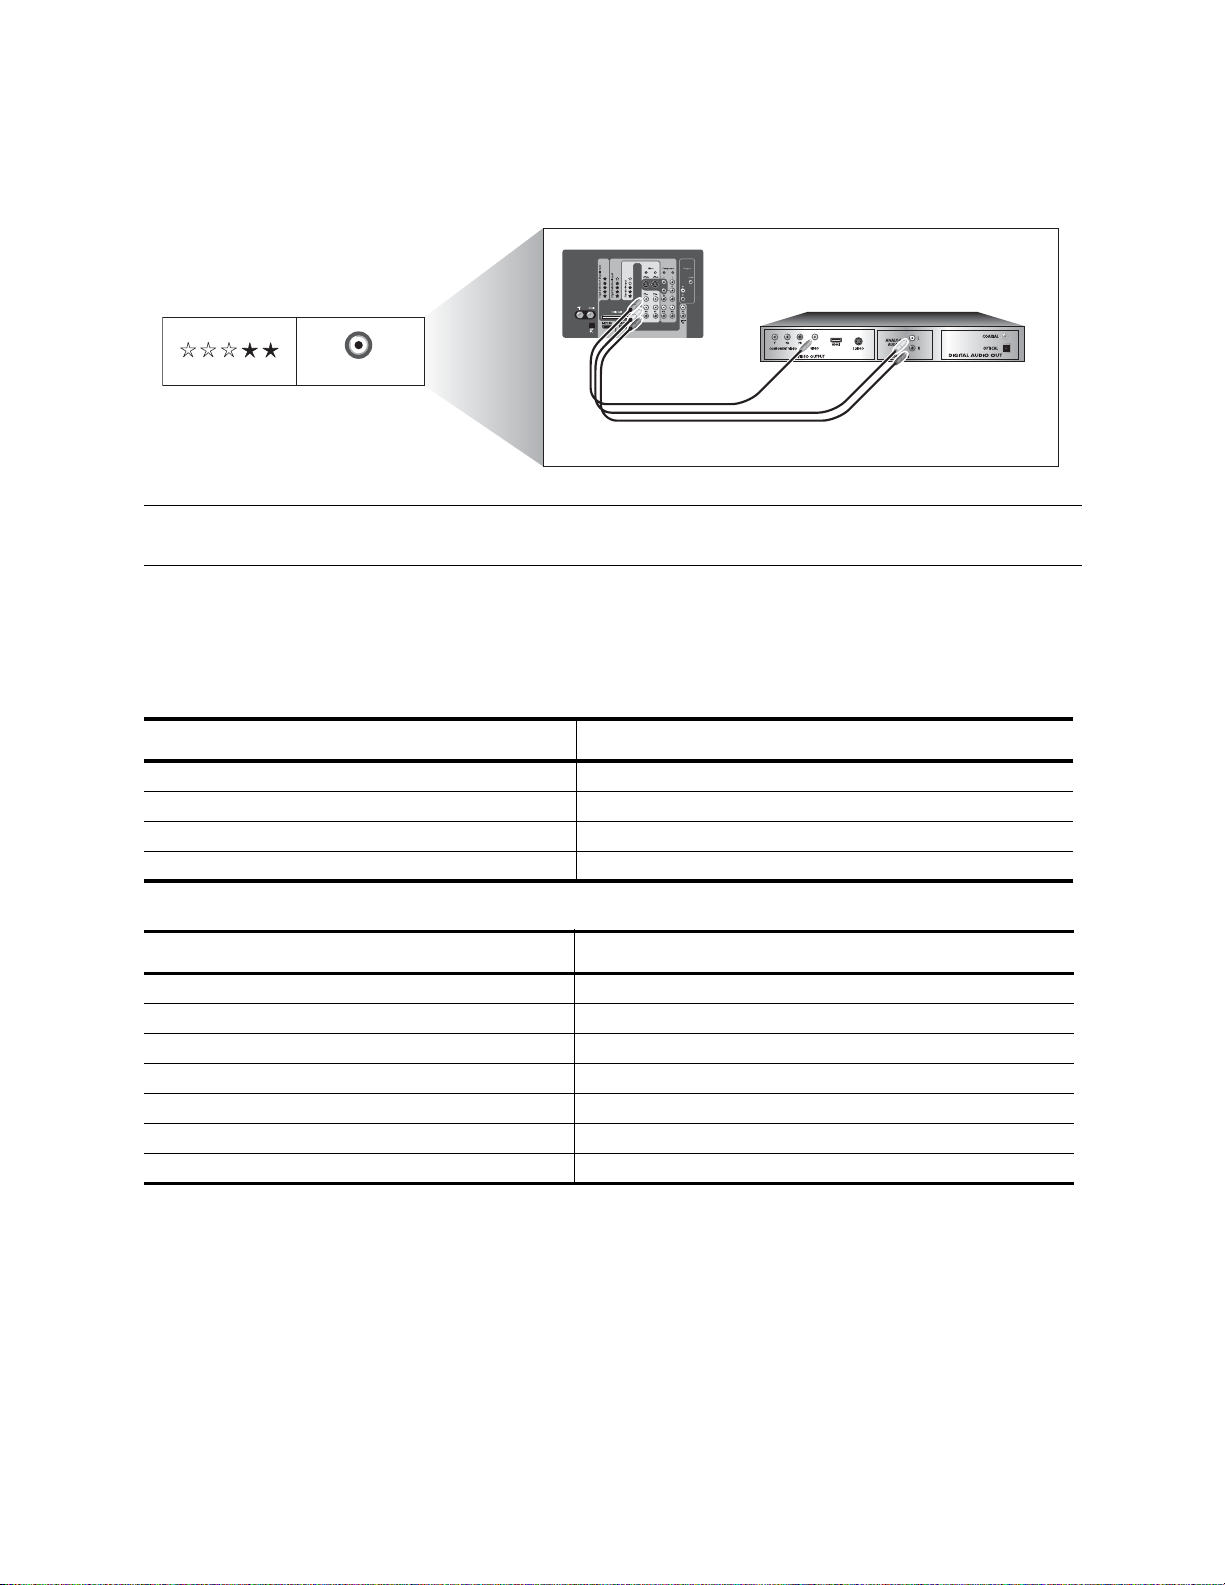
Composite-Video Connection
• Composite-video/audio cable (three RCA) or separate video and audio cables
Typical A/V equipment with
composite-video connector
Video
NOTE: You can connect to the Video 1, and Video 2 inputs on the television. Both the S-video and composite-
video connections are supported for each of these two inputs.
Connecting Your Other Equipment
If you have a television antenna, cable service, or other equipment not shown above, use one of the basic connections
listed in the following tables.
Basic antenna and cable connections
To connect this equipment... See...
Antenna “Antenna Only” on page 10
Antenna and cable “Antenna and Cable” on page 10
Standard cable (no set-top box) “Standard Cable” on page 11
Cable with set-top cable box “Cable with Set-Top Cable Box” on page 11
Other equipment connections
To connect this equipment... See...
Satellite receiver (without VCR or DVR) “Satellite Receiver” on page 12
Cable box and VCR/DVR “Cable Box and VCR/DVR” on page 14
Satellite receiver and VCR/DVR “Satellite Receiver and VCR/DVR” on page 15
DVD player or video gaming device “DVD Player or Video Gaming Device” on page 16
Audio: Stereo sound system “Audio: Stereo Sound System” on page 16
Audio: Surround sound or AV receiver “Audio: Surround Sound or AV Receiver” on page 17
Computer “Computer” on page 18
Setting Up the Television 9
Page 30
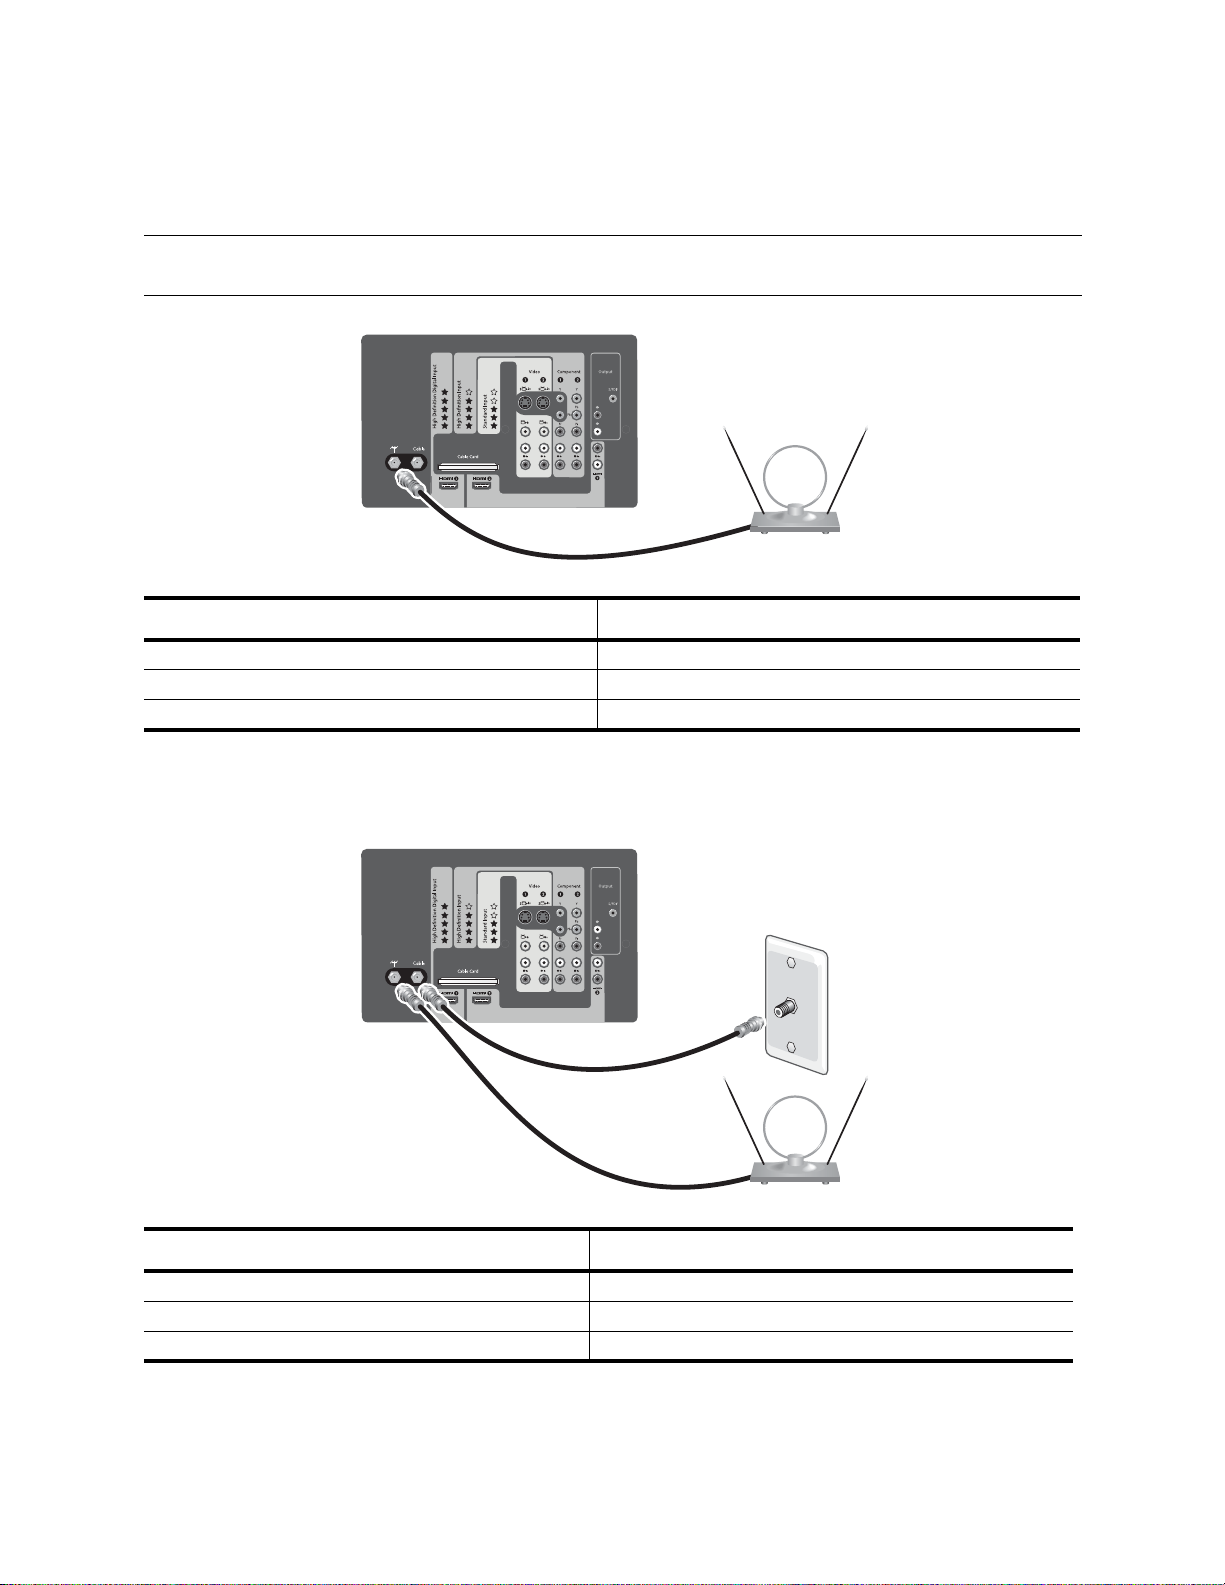
Antenna Only
If your antenna cable has a standard coaxial connector, connect the cable as shown.
TIP: If your antenna has flat, twin-lead cable or other type of cable, connect the antenna cable to a coaxial
adapter, then connect the adapter to the television antenna input.
T o do this... Do this...
Watch television received from an antenna Press Source and select Antenna
Scan for available channels in your area See “Finding Your Available Channels” on page 21
Connect additional equipment See “Connecting Your Other Equipment” on page 9
Antenna and Cable
If you have an antenna and a cable connection, connect them as shown.
To do this... Do this...
Watch cable channels Press Source and select Cable
Scan for available channels See “Finding Your Available Channels” on page 21
Connect additional equipment See “Connecting Your Other Equipment” on page 9
10 Setting Up the Television
Page 31
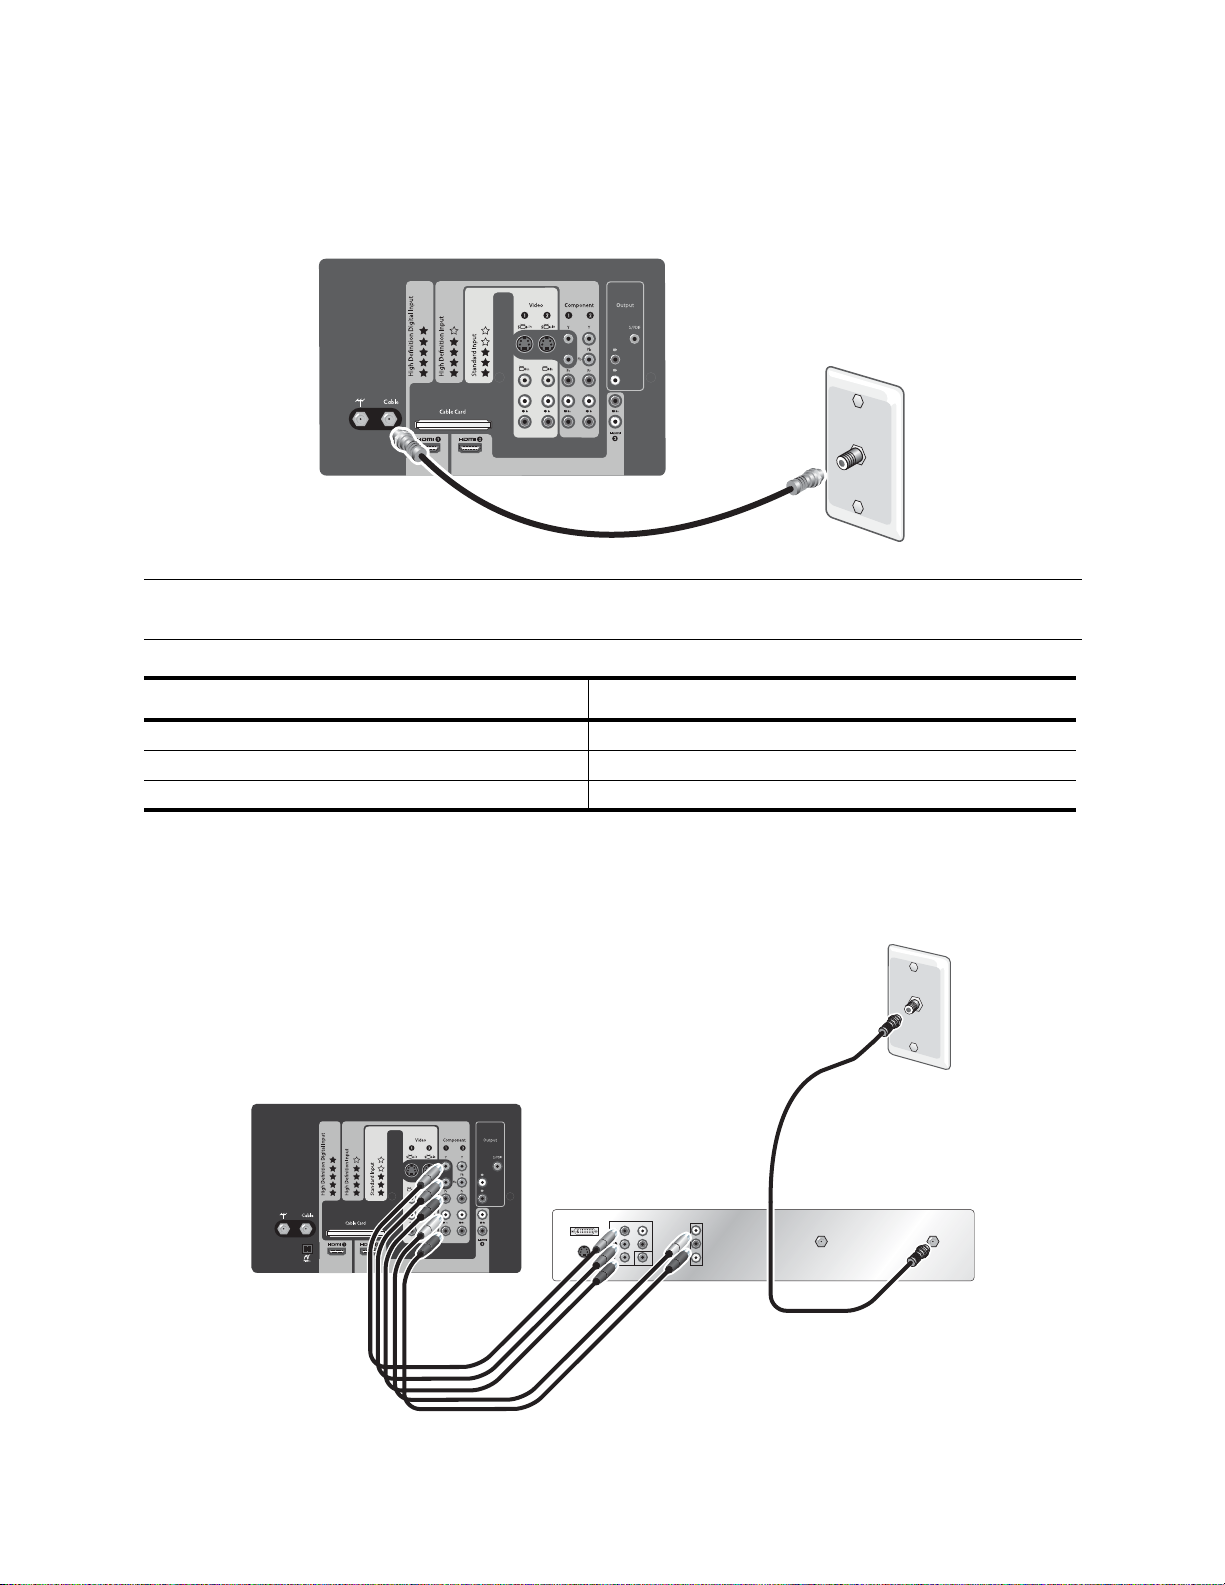
Standard Cable
If your cable service does not require a set-top cable box (STB), connect the cable as shown. This setup enables you
to watch unscrambled channels.
NOTE: Use this connection if you install a CableCARD module in your television. See “Installing a CableCARD
Module” on page 19.
T o do this... Do this...
Watch cable channels Press Source and select Cable
Scan for available channels See “Finding Your Available Channels” on page 21
Connect additional equipment See “Connecting Your Other Equipment” on page 9
Cable with Set-Top Cable Box
If your cable service requires a set-top cable box (STB) to view scrambled channels, connect the components as
shown. This setup enables you to watch scrambled and unscrambled channels.
S-Video
L
DVI
AUDIO
R
Cab le O ut
Cab le I n
Setting Up the Television 11
Page 32
• If your cable box has different connectors than those shown, use the highest-quality video connection
available. Observe the color-coding on all connectors.
• For digital cable, your set-top cable box (STB) might require a special splitter. Contact your cable provider for
information. Or you can omit the splitter and omit the connection to the television cable input.
• If all cable channels are scrambled, connect the incoming cable directly to the cable box (omit the splitter and
omit the connection to the television cable input).
• You can eliminate the cable box if your cable provider can install a CableCARD module in the television. See
“Installing a CableCARD M od u l e” on page 19.
T o do this... Do this...
Watch cable channels Press Source and select Component 1
Scan for available channels See “Finding Your Available Channels” on page 21.
Connect additional equipment “Connecting Your Other Equipment” on page 9
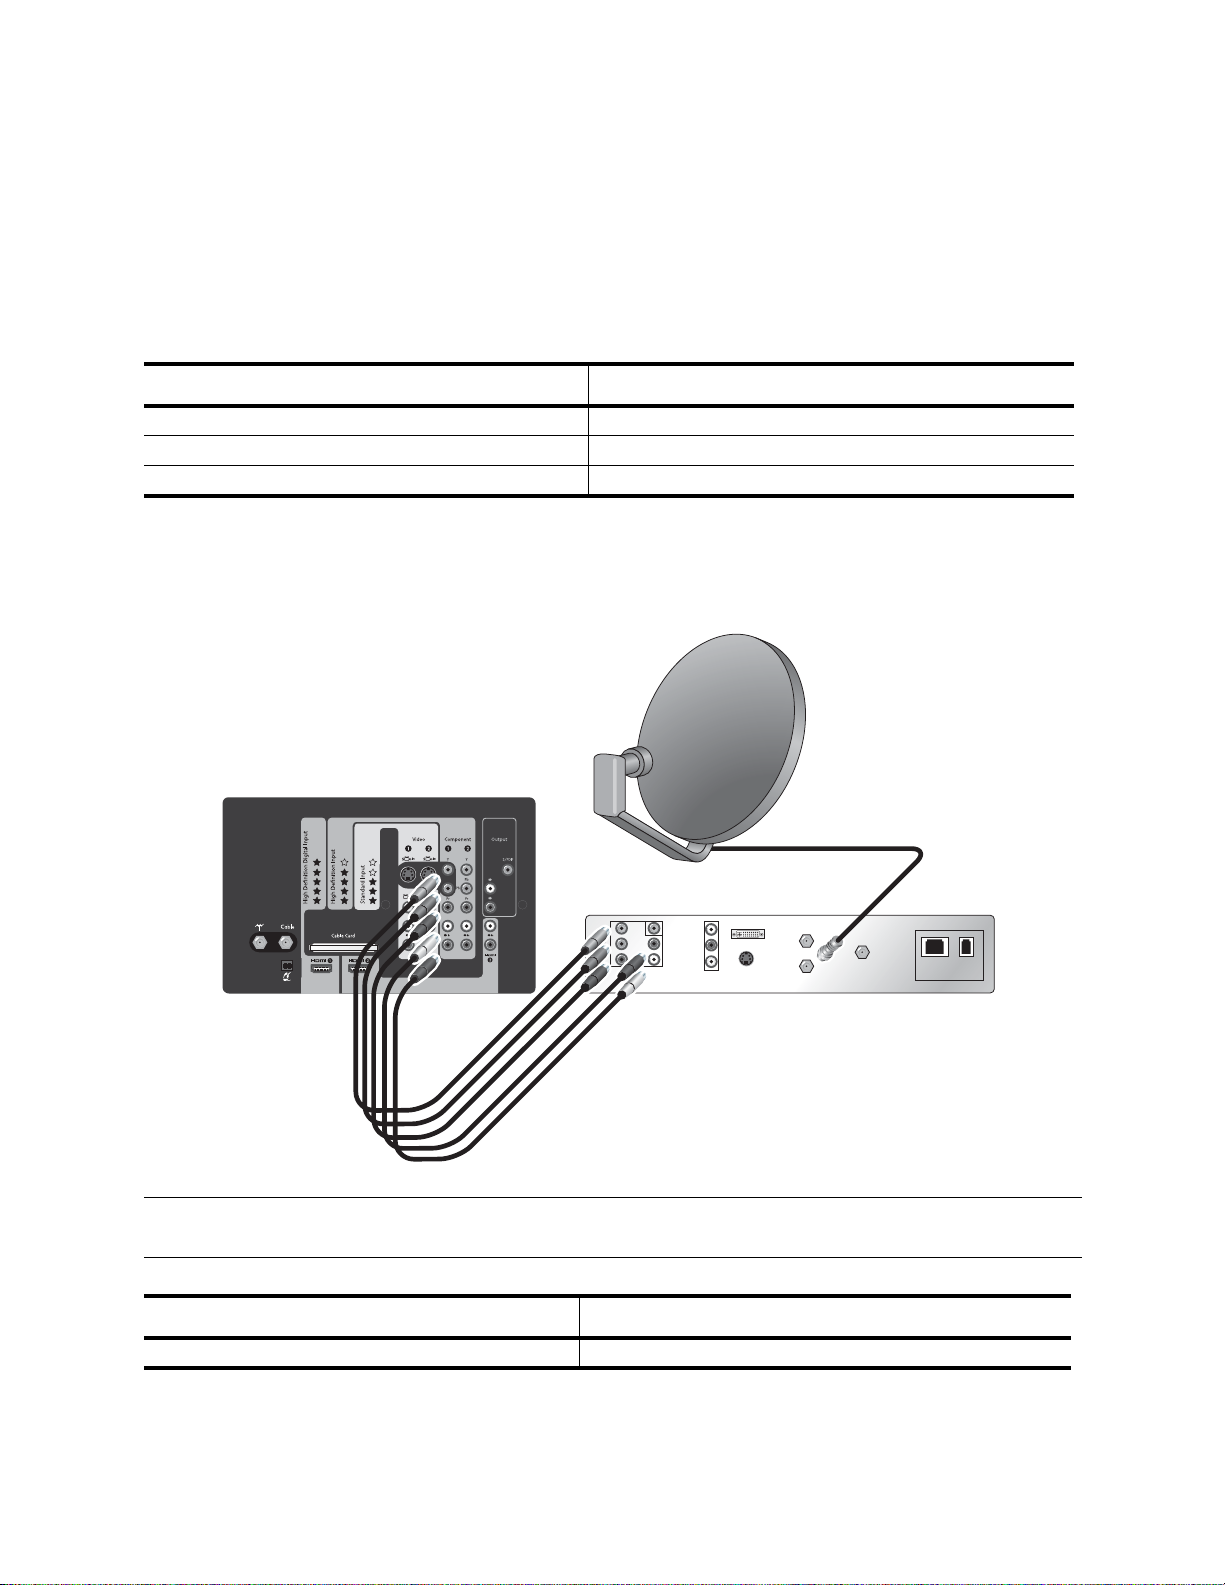
Satellite Receiver
If you have a satellite receiver (SAT) without a VCR or personal digital video recorder (DVR), you can connect it as
shown.
DIGITAL
AUDIO
OUT
AUDIO
VIDEO
L
R
Y
PB
PR
HDTV
DVI
S-Video
Satellite Out
Satellite In
Antenna in
Phone
Data
Jack
NOTE: If your device has different connectors than those shown, use the highest-quality video connection
available. Observe the color-coding on all connectors.
T o do this... Do this...
Watch satellite channels Press Source and select Component 1
12 Setting Up the Television
Page 33

Cable with Cable Box/DVR
If you have standard cable service and your cable box is equipped with a personal digital video recorder (DVR),
connect your system as shown. This setup also enables you to record one channel while viewing another.
• If your cable box has different connectors than those shown, use the highest-quality video connection
available. Observe the color-coding on all connectors.
• If all cable channels are scrambled and you have no CableCARD module installed, connect the incoming
cable directly to the DVR cable box (omit the splitter and omit the connection to the television cable input).
IN
Splitter
OUT OUT
DVI
S-Video
AUDIO
L
Cable Out
T o do this... Do this...
Watch television channels Press Source and select Cable
Watch VCR or DVR program Press Source and select Component 2
Scan for available channels See “Finding Your Available Channels” on page 21
Cable In
Setting Up the Television 13
Page 34

Cable Box and VCR/DVR
If you have a set-top cable box (STB) and a VCR or personal digital video recorder (DVR), connect them as shown.
OUT OUT
Splitter
IN
L
DVI
S-Video
AUDIO
R
Cable Out
Cable In
In
Out
NOTE:
• If your devices have different connectors than those shown, use the highest-quality video connection
available. Observe the color-coding on all connectors.
• For digital cable, your set-top cable box (STB) might require a special two-direction splitter. Contact your
cable provider for information. Or you can omit the splitter and omit the connection to the television cable
input.
• If all channels are scrambled, connect the incoming cable directly to the cable box (o mit the splitter and
omit the connection to the television cable input).
• You can eliminate the cable box if your cable provider can install a CableCARD module in the television.
See “Installing a CableCARD Module” on page 19.
T o do this... Do this...
Watch cable-box channels Press Source and select Component 2
Watch VCR or DVR programs Press Source and select Video 1
Watch cable channels directly Press Source and select Cable
14 Setting Up the Television
Page 35

Satellite Receiver and VCR/DVR
If you have a satellite receiver and a VCR or personal digital video recorder (DVR), connect them as shown.
DVI
S-Video
Satellite Out
Satellite In
In
Out
Antenna in
Phone
Data
Jack
DIGITAL
AUDIO
OUT
AUDIO
VIDEO
L
R
Y
PB
PR
HDTV
NOTE: If your devices have different connectors than those shown, use the highest-quality video connections
available. Observe the color-coding on all connectors.
T o do this... Do this...
Watch satellite channels Press Source and select Component 2
Watch VCR or DVR channels Press Source and select Video 1
Setting Up the Television 15
Page 36

DVD Player or Video Gaming Device
If you have a DVD player, video gaming device, or other device with a standard video output, connect it as shown.
In
Out
• If your devices have different connectors than those shown, use the highest-quality video connections
available. Observe the color-coding on all connectors.
T o do this... Do this...
Watch video from the DVD player Press Source and select Component 2
Watch video from the gaming device Press Source and select Video 1
Audio: Stereo Sound System
If you have a stereo system, you can play the television sound through it. Connect the stereo to the television as
shown.
SPEAKERS
16 Setting Up the Television
Page 37

NOTE:
• Observe the color-coding on all connectors.
• You can disable the television speakers and listen to only the stereo speakers.
• The volume buttons on the television remote control normally adjust the television volume. This means you
do not have to adjust the volume on the stereo system.
T o do this... Do this...
Change the volume Press the volume buttons on the stereo system
Disable the television speakers Press Menu and go to Sound > Internal Speakers
Audio: Surround Sound or AV Receiver
If you have a 5.1 surround sound system or audio-video receiver , you can connect its audio to your television as
shown. You also can connect other equipment to the sound system.
SUB
SPEAKERS
• The digital audio output on the television sends Dolby Digital surround sound only when you are viewing a
source connected to an antenna, cable, or HDMI input, and only if the program contains surround sound.
Otherwise, the digital audio output sends digital stereo sound.
• Other devices with digital audio outputs can be connected directly to the surround sound system so you can
hear surround sound. You can omit the audio connections to the television for those devices.
• Devices with only stereo outputs can be connected directly to the surround sound system or to the television.
• If the AV receiver also supports multiple video connections, you can connect video outputs from other
equipment to that device, and then connect the video output from the receiver to the television. Use the
highest-quality video connections available.
T o do this... Do this...
Change the volume. Press the volume button on the remote
Disable television speakers. Press Menu and go to Sound > Internal Speakers
Setting Up the Television 17
Page 38

Computer
If the computer has an S-video output, you can connect it to the television as shown using either S-Video 1 or
S-Video 2.
NOTE: If the computer display does not appear on the television, you might have to press a combination of
keys on the computer to turn on the computer’s VGA output. For instructions, refer to the user
documentation provided with your computer.
To do this... Do this...
View the computer display Press Source and select Video 1 or Video 2
Using a CableCARD Module
What is a CableCARD Module?
The CableCARD feature built into your new HP HDTV provides a point of access for cable services in your area
without the need for a set-top cable box (STB).
The CableCARD feature allows you to decrypt digital cable and use higher-quality components to handle scaling and
display of cable channels.
By installing a CableCARD module in your television, you can enjoy features normally provided by a set-top cable box
without connecting a cable box or operating another piece of equipment.
The availability, setup, and pricing of CableCARD service is determined by your local cable provider, not by HP.
Contact your cable provider for information about this service in your area.
NOTE: Current CableCARD technology does not support interactive features such as video-on-demand that
require two-way communication. Such features (if available in your area) require a set-top cable box.
Contact your cable provider for information about advanced features they may offer in your area.
CAUTION: The CableCARD module is extremely sensitive to static electricity and can be permanently damaged by
it. Handle the module only by the front plate. Before inserting the module into the television, discharge
your body’s static electricity by touching one of the video or audio connectors on the television panel.
18 Setting Up the Television
Page 39
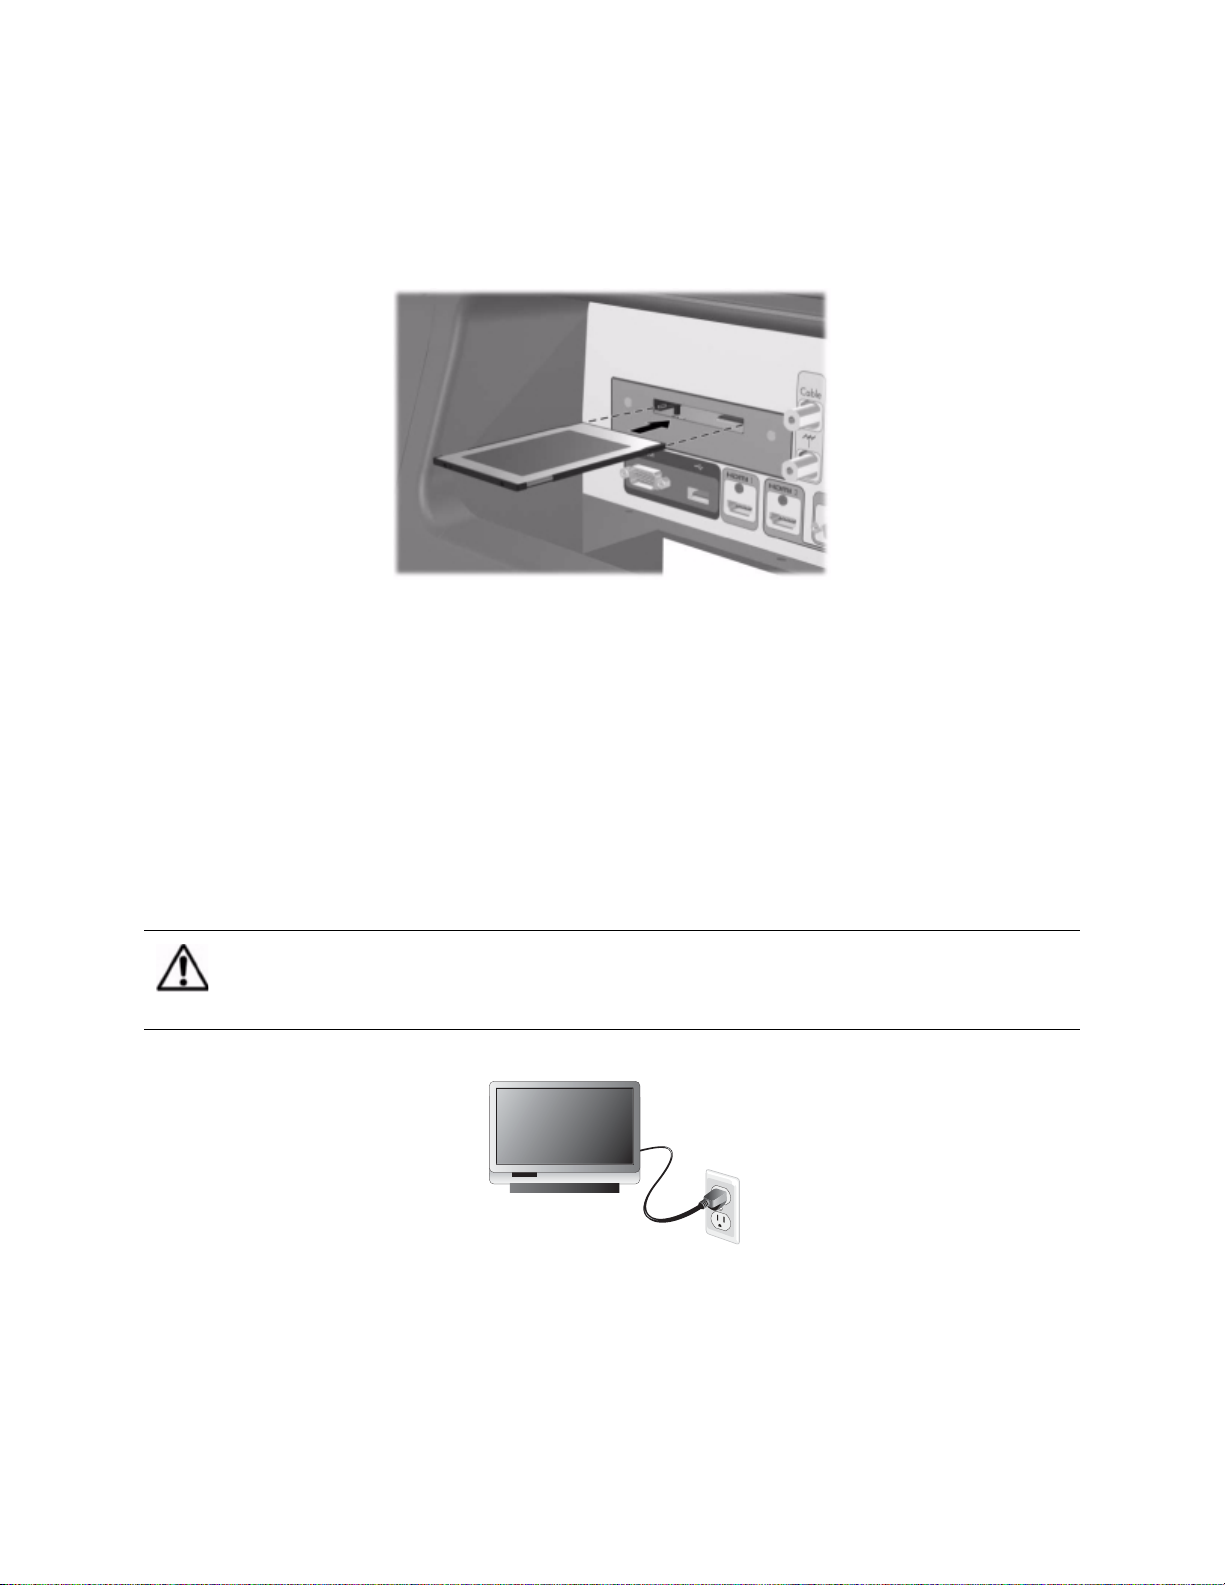
Installing a CableCARD Module
You must obtain the CableCARD module from your local cable provider. After installing the card, follow any setup
instructions provided with the card.
The following figure shows a typical CableCARD module, and is for illustration only.
1. Turn off the television. The CableCARD slot can be found in the back of the television.
2. Gently push the card into the slot until it stops. When fully inserted, the card will stick out slightly. Do not
attempt to force the card into the television!
3. Press Menu. Press the left or right arrow buttons to go to Source > Cable card, and press OK. Your cable
provider uses the information in the CableCARD screens to activate and configure the CableCARD service.
4. To remove the CableCARD module, first turn off the television, and then pull the card out of the slot. The
CableCARD functions are then removed automatically.
Turning the Television On and Off
Plugging in the Power Cord
• Plug the power cord into a polarized outlet.
CAUTION: Do not defeat the safety purpose of the polarized plug attached to the television. A
polarized plug has two blades with one wider than the other. The wide blade is provided for
your safety. If the polarized plug does not fit into your existing outlet, contact a qualified
electrician to replace the obsolete outlet with a polarized outlet.
Setting Up the Television 19
Page 40

Turning on the Television
• Press the power button on the front of the television or on the remote control.
1
2
Item Function
1 Power Turns the television on and off.
2 Menu Opens the main menu.
3 OK Selects an item.
4 Volume Increases or decreases the volume. Moves up and down through the on-
screen menus.
5 Arrows Changes the channel. Moves left and right through the on-screen menus.
The television might take a minute or so to warm up and display a bright picture.
NOTE: It is normal for parts of the television and the air coming out of the vents to be very warm. If the
television starts to overheat, the television will shut down.
5
3
4
20 Setting Up the Television
Page 41
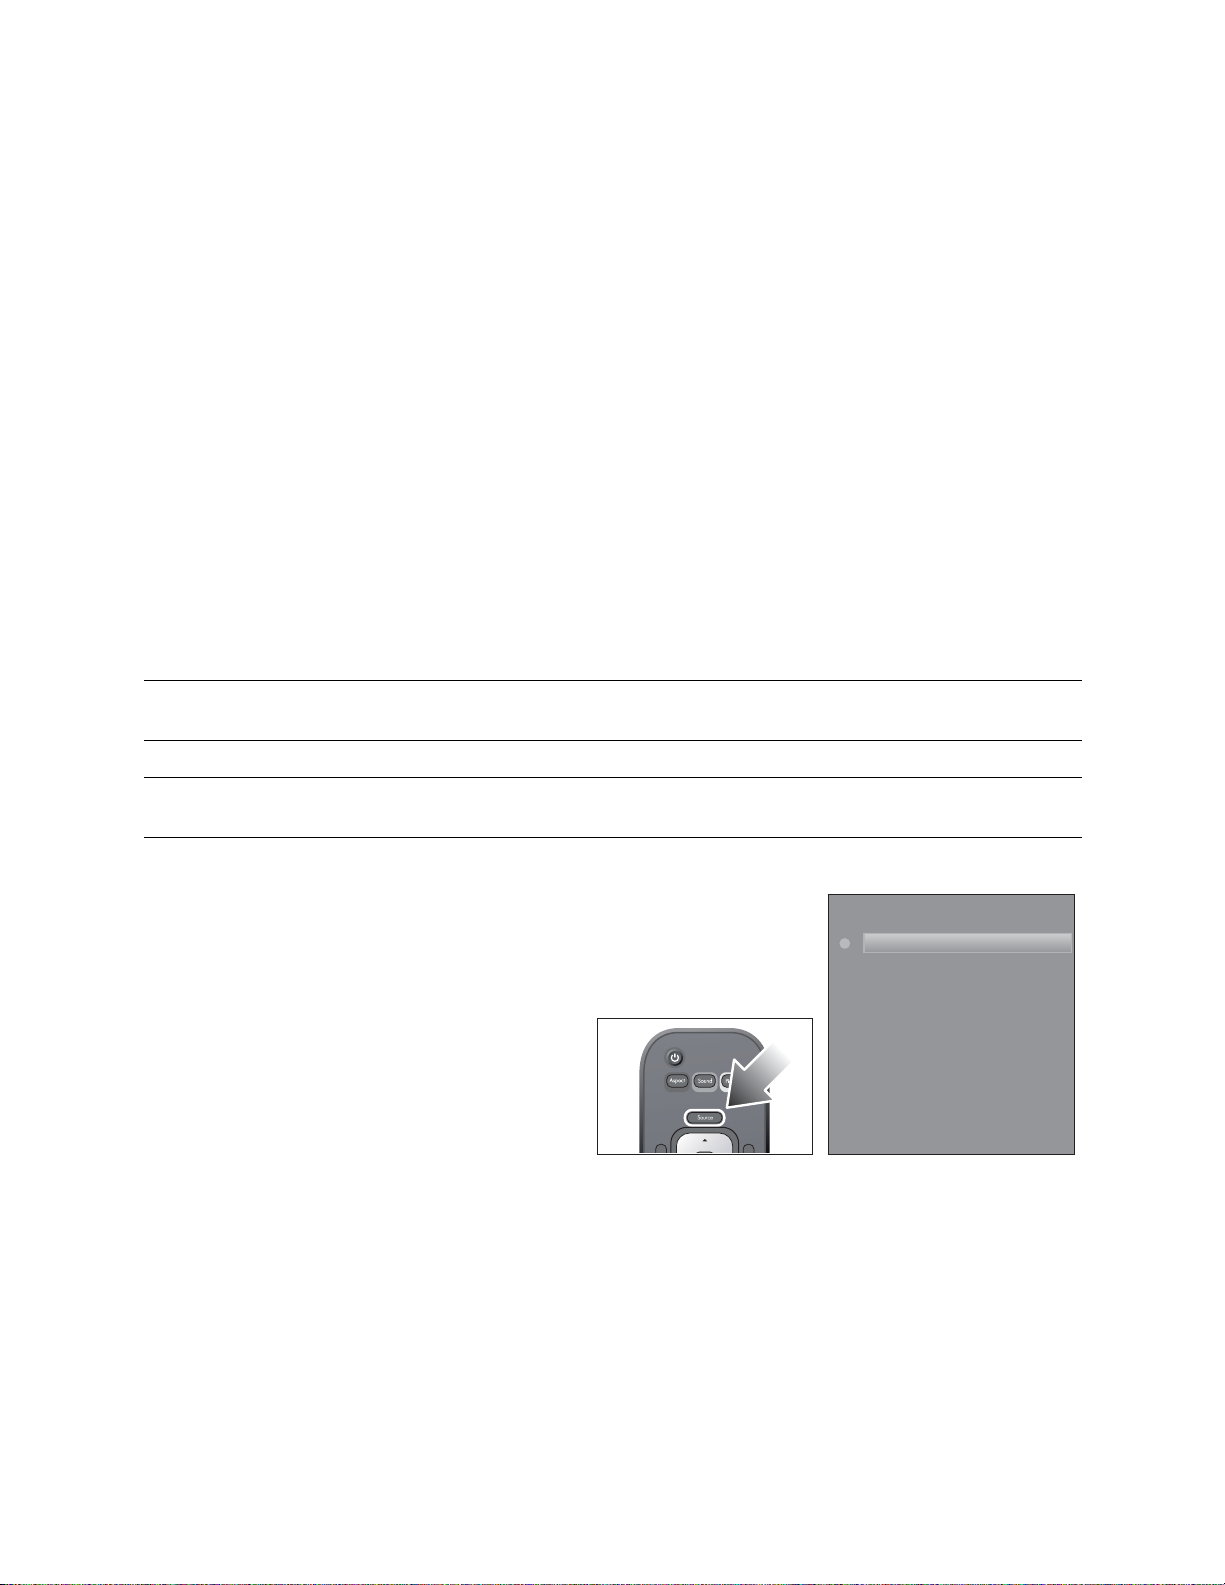
Turning Off the Television
• Press the power button on the television or on the remote control.
The internal fans continue to run for a short time during the cool-down period. Even though the television is off, it
continues to use a small amount of power.
If you turn on the television again during the cool-down period, the television might not turn on as quickly as usual.
CAUTION:
• Do not disconnect power until the television has cooled and the fan stops running—up to three minutes after
turning it off. Otherwise, you might shorten the life of the lamp.
• If power is removed from the television, wait more than two minutes before attempting to turn on the
television. Otherwise, you might shorten the life of the lamp.
Completing the Basic Setup
Finding Your Available Channels
After you connect your cable and/or antenna, you are ready to find the available channels. These are the channels you
can receive on the television’s tuner using the Ch+ and Ch- buttons.
TIP: If you have a cable box or satellite receiver , you must set up that device before you can view channels from
that source. The television tuner receives channels only from the antenna and cable inputs.
NOTE: The following steps can take from one minute to more than 30 minutes, depending on the available
channels in your area.
If you have an antenna connected to the antenna input:
1. On the remote control, press Source. Press
the arrow buttons to select Antenna and
press OK.
2. Press Menu. Press the left or right arrow
buttons to select the Source menu.
3. Press the up or down arrow buttons to select
Channel setup and press OK. Press the up
or down arrow to select Auto search. Press
OK.
4. Wait for the television to scan all available
channels.
Antenna
Cable
HDMI 1
HDMI 2
Component 1
Component 2
Video 1
Video 2
Video 3
Photo Viewer
If you have cable service connected to the cable input:
1. On the remote control, press Source. Press the arrow buttons to select Cable and press OK.
2. Press Menu. Press the left or right arrow buttons to select the Source menu.
3. Press the up or down arrow buttons to select Channel setup and press OK. Press the up or down arrow to
select Auto search. Press OK.
4. Wait for the television to scan all available channels.
After all channels are found, you can manually add or remove channels from the list. See “Adding or Deleting a
Channel” on page 36.
Setting Up the Television 21
Page 42

Setting the Time
NOTE: The time and date will only appear when the Guide button is pressed.
1. Press Menu. Press the left and right arrow buttons to select the Setup menu. Press OK.
2. Press the up and down arrows to select Time. Press OK.
3. Enter the following settings using the arrow buttons:
•Time zone
• Daylight savings
TIP: The television automatically sets the date and time. If the television loses power, please note that it can take
an hour or more to discover and reestablish the required information.
22 Setting Up the Television
Page 43
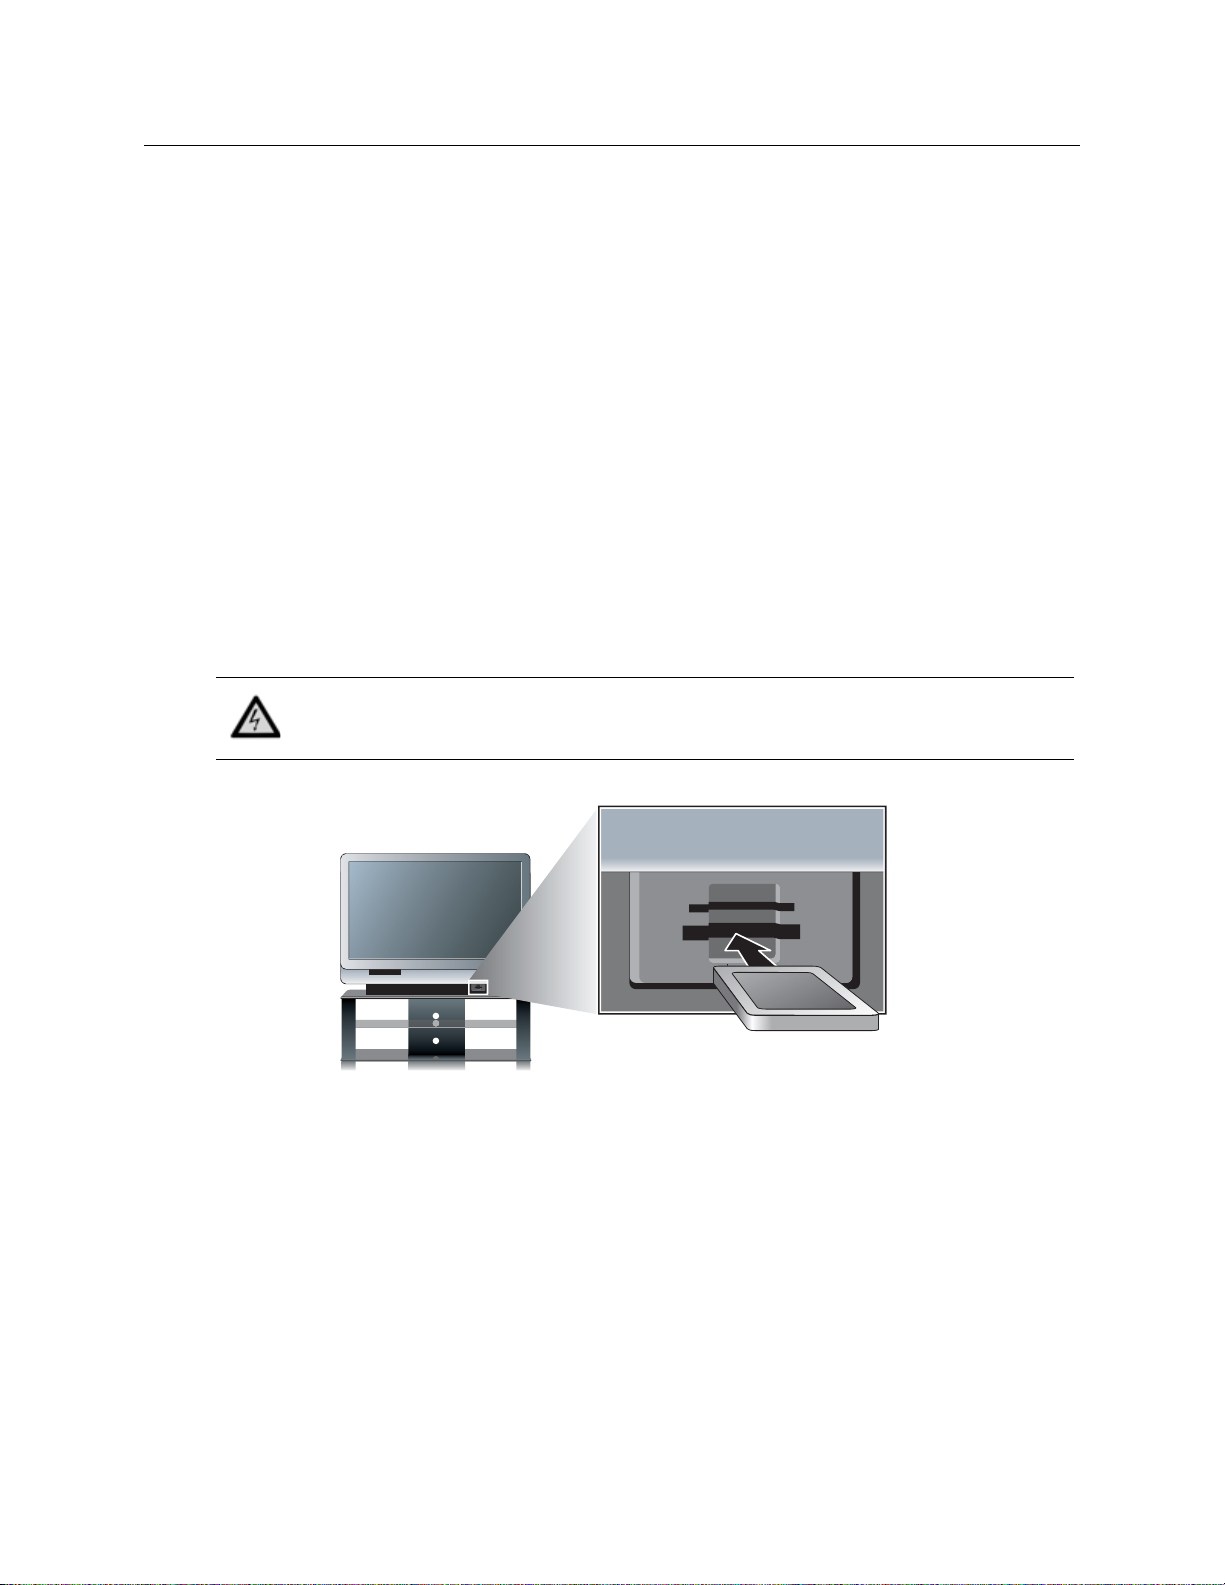
2 Using the Photo Viewer
About Picture Viewer
Using Photo Viewer you can view your digital pictures on your HD television. You can view individual pictures, rotate
pictures, view slideshows of your pictures, and even print your pictures through the ease of the television’s remote
control.
Inserting Your Memory Card Into the Television
Before you can view your pictures, insert your memory card into the television’s card reader slot.
1. Remove the memory card from your camera. For instructions, refer to the camera manufacturer’s documentation.
2. Insert your card into the card reader slot, located at the bottom right of the front of the television.
• If you have a compact flash card (a compact flash card has a larger form size), insert it into the bottom
slot. Press the card firmly into place.
• For all other card types, use the top slot. This slot fits many sizes of memory cards, and may be wider
than your memory card. Insert your card into the center of the slot. Press the card firmly into place.
Most memory cards have arrows that indicate which way to insert the card. Make sure the arrow is on the top
of the card and pointing into the card reader slot.
CAUTION: Be sure not to insert more than one memory card into the television at one time.
If multiple cards are in the television at the same time, the data on the memory
cards may be corrupted and data could be permanently lost.
3. The television should automatically begin reading the card. If it does not, press Source. Use the up and down
arrow buttons to select Photo Viewer, then press OK.
Removing a Memory Card
• To remove a memory card, gently pull the card toward you and out of the television.
Using the Photo Viewer 23
Page 44

Browsing Pictures
This feature allows you to view and search through all the photos on your memory card.
1. On the remote control, press Menu. Use the left and right arrow buttons to select Browse, then press OK.
2. The photos are then displayed as thumbnails. To view a photo full-screen, use the left and right arrow buttons
to highlight the photo, then press OK. To return to thumbnail view, press OK.
NOTE:
• You can rotate a picture by pressing the red button.
• You can use Ch+ and Ch- to page through the thumbnails.
• As you browse through your pictures, you can tag specific pictures for viewing in a slideshow. For more
information, refer to “Tagging and Untagging Pictures” on page 24.
Tagging and Untagging Pictures
Tagging pictures allows you to mark specific photos for viewing in a slideshow.
1. On the remote control, press Menu. Use the left and right arrow buttons to select Browse, then press OK.
2. To tag a photo:
• Use the left and right arrow buttons to select a photo, then press the green button. Tagged photos are
marked with a check at the bottom.
To untag a photo:
• Highlight the photo and press the green button. To untag all photos, press the yellow button.
Viewing a Slideshow
A slideshow is a sequential, full-screen view of all your pictures. The photos automatically advance at specified time
intervals.
1. Press Menu. Use the left and right arrow buttons to select Slideshow, then press OK.
2. If no photos are tagged, the slideshow begins. If some photos are tagged, use the up and down arrow buttons
to select whether to view all photos or just the tagged photos, then press OK.
NOTE:
• To manually go forward or backwards in the slideshow, press the left and right arrow buttons.
• To pause a slideshow, press OK or Info.
• To queue photos for printing during a slideshow, press OK or Info to pause the slideshow. Then, do one of
the following:
• To print one copy of the photo, press the yellow button.
• To print more than one copy of a photo, use the number pad to specify the number of copies to
print.
The number of copies will be indicated near the picture. When you are finished, press OK or Info to return
to the slideshow.
• To adjust the time delay on the slideshow or have the slideshow automatically repeat, refer to “Adjusting
Photo Viewer Settings” on page 26.
24 Using the Photo Viewer
Page 45

Printing Pictures
Your printer must use PictBridge technology. If it does not, you will not be able to print photos through the television.
NOTE: When printing photos, note that your printer may not support all of the available print options. When you
access the Print screen, only the available options will be shown.
Connecting the Printer
To print photos, you must first connect your printer to the television. The television is already printer-ready. Once
connection is established the on-screen display will provide step-by-step instructions.
1. Connect the USB cable from the printer to the PictBridge slot on the back of the television.
Printing all pictures
To print all the pictures on the memory card:
1. Insert the memory card into the television.
2. Connect the printer to the television. Turn on the printer.
3. On the remote control, press Menu. Use the left and right arrow buttons to select Print. Press OK.
4. Use the up and down arrow buttons to select the settings you want to change. When you are done, use the up
and down arrow buttons to select Print Now and press OK.
Printing one picture or multiple copies of one picture
To print one picture or multiple copies of one picture:
1. Insert the memory card into the television.
2. Connect the printer to the television. Turn on the printer.
3. On the remote control, press Menu. Use the arrow buttons to select Photo Options, and press OK.
4. Use the left and right arrow buttons to review your pictures.
5. To queue a photo for printing, press the yellow button (for 1 copy) or a numbered button (for multiple copies).
The number of copies will be indicated near the picture.
6. Use the arrow buttons to select Print photos. Press OK.
7. On the Print screen, use the arrow buttons to select the desired print options:
• Paper size — Selects the paper size that the photos will be printed on.
•Print layout — Selects the layout of the printer photos.
• Print photo filename — Adds or removes the filename of the photo from the printed output.
• Print photo date — Adds or removes the photo date from the printed output.
• Print pictures — Prints the pictures. Select Queued.
8. When you are finished, use the up and down arrow buttons to select Print Now and press OK.
Using the Photo Viewer 25
Page 46

Printing all tagged photos
To print all tagged photos:
1. Insert the memory card into the television.
2. Connect the printer to the television. Turn on the printer.
3. Tag the photo(s) you want to print. Refer to “Tagging and Untagging Pictures” on page 24.
4. On the remote control, press Menu. Use the arrow buttons to select Photo Options and press OK.
5. Use the up and down arrow buttons to select Add tagged photos to print queue and press OK.
6. Use the arrow buttons to select Print photos. Press OK.
7. On the Print screen, use the arrow buttons to select the desired print options:
• Paper size — Selects the paper size that the photos will be printed on.
•Print layout — Selects the layout of the printer photos.
• Print photo filename — Adds or removes the filename of the photo from the printed output.
• Print photo date — Adds or removes the photo date from the printed output.
• Print pictures — Prints the pictures. Select Queued.
8. When you are finished, use the up and down arrow buttons to select Print Now and press OK.
Clearing the print queue
• After you print, you will be prompted if you want to clear the print queue. Wh en prompted, use the arrow
buttons to select Yes and press OK.
—or—
• Use the arrow buttons to select Photo Options and press OK. Use the up and down arrow buttons to select
Clear print queue and press OK.
Adjusting Photo Viewer Settings
1. Press Menu. Use the arrow buttons to go to the Setup menu. Press OK.
2. On the Settings screen, use the up and down arrow buttons to select the setting and then use the right and
left arrow to change the setting. The default settings are the preferred settings. Note that your printer may not
support all options. The settings are as follows:
Setting Description
Slideshow timing Changes the time each photo is displayed during a slideshow.
Slideshow repeat? Specifies whether or not slideshow repeats when it is finished.
Paper size Changes the paper size used by the printer.
Print layout Changes the layout of the printer photos.
Print photo filename Adds or removes the filename from the printed photos.
Print photo date Adds or removes the date the pho to was taken to the printed photos.
Date format Adjusts how the date is displayed.
Time format Adjusts how the time is displayed.
3. When you are finished, use the arrow buttons to select DONE and press OK.
26 Using the Photo Viewer
Page 47

Troubleshooting Problems
Problem
The printer outputs a blank
sheet of paper.
The television reports ‘No
printer available’ when you
initiate a print job.
No images are shown when a
memory card has been
inserted.
Some thumbnail images are
missing when you print an
index page.
Some of the images on the
memory card show up as
'invalid'.
You rotate an image and then
remove the memory card. The
next time the card is inserted,
the rotation information has
been lost.
Possible Cause: There is a mismatch between the paper size selected and the
paper in the printer.
Solution: Restart the print job and specify a paper size that matches the paper
loaded in the printer.
Possible Cause: You have selected a print size larger than the current paper
size.
Solution: Restart the print job and specify a print size that can fit on the paper
loaded in the printer.
Possible Cause: A printer is not connected to the television.
Solution: Connect a printer to the television and try again.
Possible Cause: A printer is connected, but the printer is not powered on.
Solution: Power on the printer and try again.
Possible Cause: There was a communications problem between the television
and the printer.
Solution: Disconnect the printer from the television and wait 15 seconds. Then
reconnect the printer to the television. Try printing again.
Possible Cause: The memory card has not been fully inserted into the card
reader slot.
Solution: Verify that the card is completely inserted in the card reader slot. Pull
out the memory card and insert it again.
Possible Cause: You have used an external image manipulation program to
adjust some of the images and the image manipulation tool created a nonstandard embedded thumbnail, which could not be handled by the printer.
Solution: Print an index page using the original, un-altered images.
Possible Cause: The images are not baseline encoded, RGB JPEG images.
Solution: None. The television only supports JPEG images which use the RGB
colorspace and baseline encoding.
Possible Cause: The memory card was write-protected, so the rotation
information could not be saved.
Solution: On the memory card, change the write-protection feature so that you
can write to the memory card and try again.
Possible Cause: The memory card is full, so there is no room to save the rotation
information. (If the memory card is full, a card warning icon appears on the
screen.)
Solution: Using the camera, remove unwanted pictures, freeing up space on the
memory card.
Using the Photo Viewer 27
Page 48

Problem
You mark images for printing
and remove the memory card.
The next time the card is
inserted, the printing
information has been lost.
A really large image is shown
as an 'invalid' image.
Possible Cause: The memory card was write-protected, so the rotation
information could not be saved.
Solution: On the memory card, change the write-protection feature so that you
can write to the camera card and try again.
Possible Cause: The memory card is full, so there is no room to save the rotation
information. (If the memory card is full, a card warning icon appears on the
screen.)
Solution: Using the camera, remove unwanted pictures, freeing up space on the
memory card.
Possible Causes: The image is too wide. Photo Viewer only supports images up
to 10,000 pixels wide
Solution: Reduce the width of the image using your camera or an editing
program and try again.
28 Using the Photo Viewer
Page 49

3 Watching Television
Overview of the Remote Control
Use the remote control to control all aspects of operating the television. On-screen menus will guide you through the
controls and features. When using the remote control, point it at the panel on the front of the television.
Item Function
1 Power Turns the television on and off.
1
2
9
10
3
11
4
12
5
13
6
14
7
15
8
16
17
2 Aspect (red) Changes the overall size and stretching of the
picture.
3 Sound (green) Changes to a different combination of sound options.
4 Source Selects an input source: Cable, Antenna, HDMI 1,
HDMI 2, Component 1, Component2, Video 1, Video
2, Video 3, or Photo Viewer.
5 Menu Opens the main menu.
6 Volume Increases or decreases the volume.
7 Mute Turns off (mutes) the sound.
8 CC Turns closed captioning on and off, and selects the
mode.
9 Picture (yellow) Changes your picture and color settings: Normal,
Movie, Vivid, Studio.
10 Arrow buttons,
OK, and back
11 Guide Shows the Electronic Program Guide
12 Info Shows channel or source information.
13 Last Shows the last channel previously displayed.
14 Channel Changes the displayed channel.
15 Favorites Shows the next of your favorite channels.
16 Sleep Changes the delayed shutoff timing.
17 Keypad Enters numerical values for channels or settings.
Moves through the on-screen menus to make
selections.
(when available).
Watching Television 29
Page 50
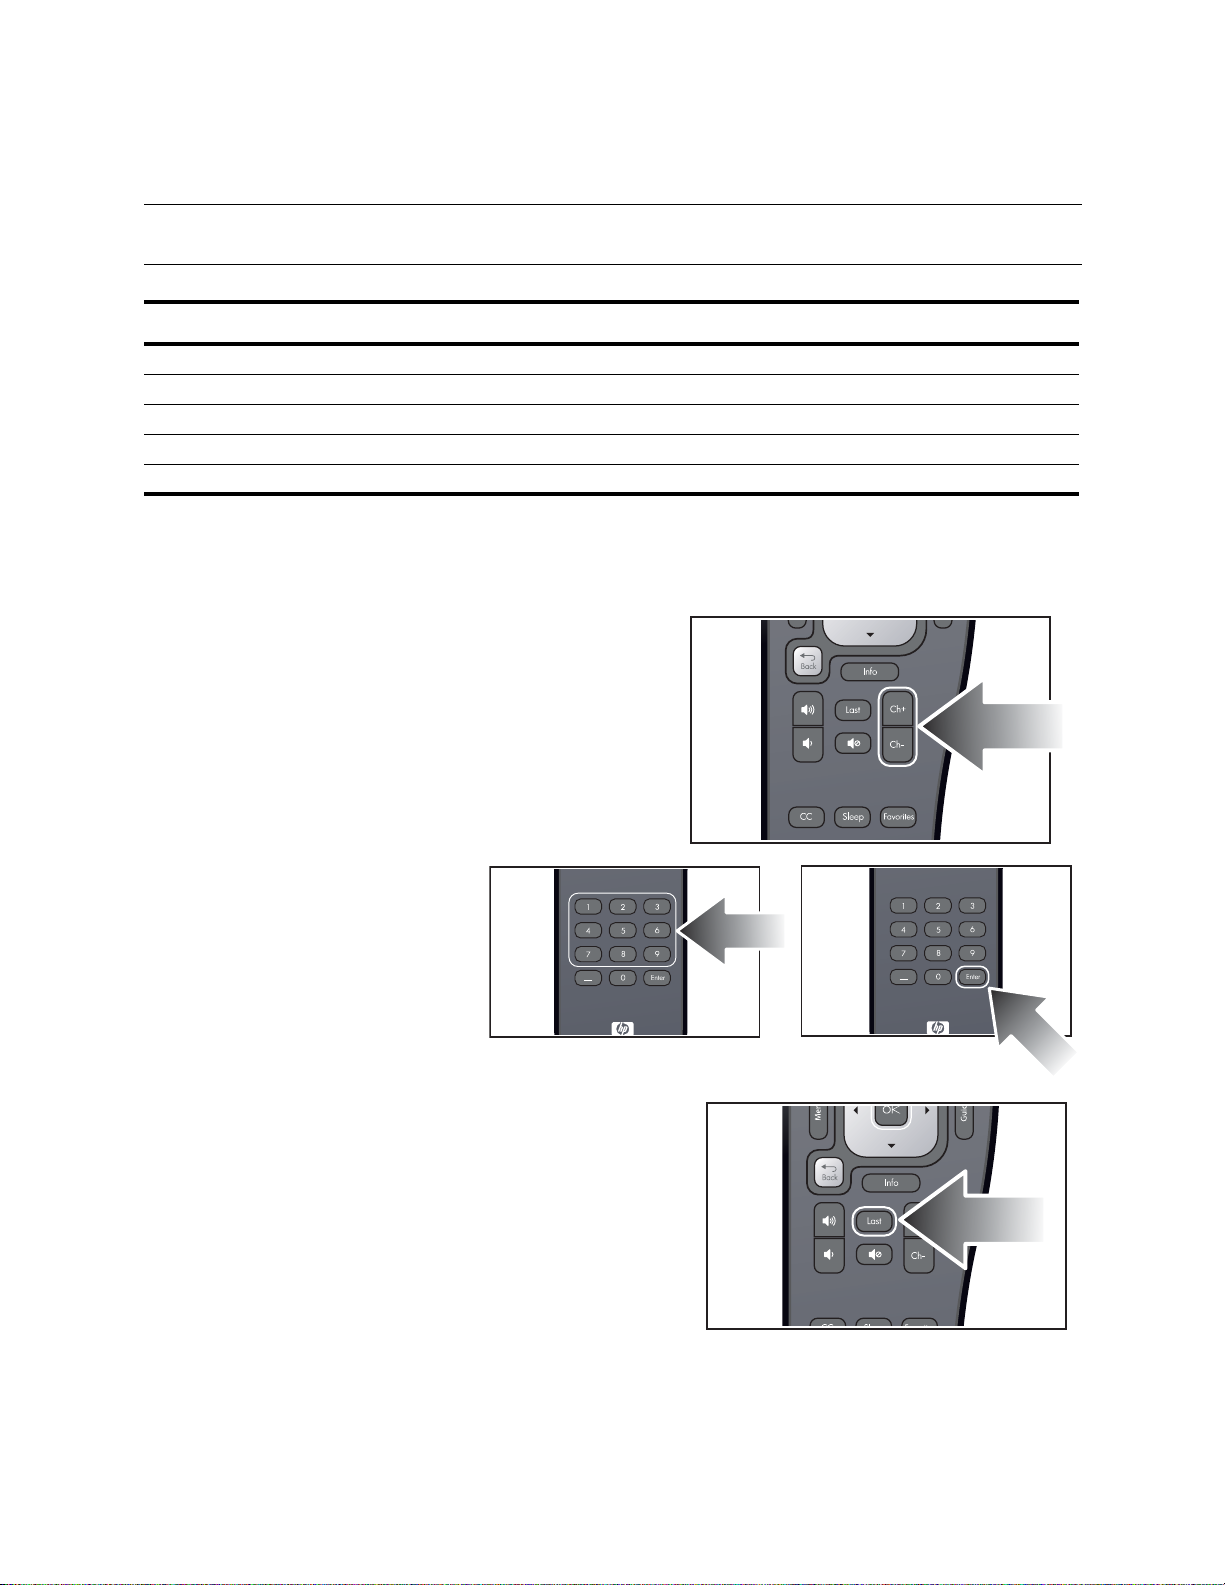
Using Your Remote Control
NOTE: Before using the remote control, install two AAA batteries. See “Installing Batteries in the Remote
Control” on page 3.
T o do this... Do this...
Turn the television on or off Press the power button on the remote control or the television
Change the channel Press Ch+ or Ch-
Adjust the volume Press the volume button up or down
View a different sour ce Press Source and then use the up and down arrow buttons
Adjust the picture Press Picture
Changing the Channel
• To browse your available channels, press Ch+ or Ch-.
• To select a standard channel,
press 0 thru 9, and then Enter.
You can enter channels using
1, 2, or 3 digits (12, 012, etc.).
• T o select digital channels, enter
all three digits. Press 0 thru 9,
- , 0 thru 9, and then Enter.
The sub-channel follows the
hyphen (-).
• To go to the last channel
displayed, press Last.
• To select your favorite channels, press Favorites.
30 Watching Television
Page 51

• To view detailed digital channel information (when
available), press Guide.
Adjusting the Volume
NOTE: The volume buttons on the remote control always change the volume of the television speakers. They
do not change the volume of any external sound system.
• Press the up or down volume button .
• To temporarily mute the sound, press the mute button.
Viewing Closed Captions
Your new television enables you to view closed captioning for certain shows and movies received on the television
antenna input and cable input.
NOTE: If you have a set-top cable box (STB) or satellite receiver not connected to the television’s antenna
input or cable input, you cannot use the television to control closed captioning for this source. You must
use whatever options are provided by the cable or satellite equipment.
Press CC on the remote control one or more times to cycle
through these options:
• Closed Caption mode On
• Closed Caption mode On mute
• Closed Caption mode Off
Depending on the program, you might be able to customize the content and appearance of the captions.
1. Press Menu. Use the arrow buttons to select the Setup menu and press OK.
2. Use the arrow buttons to select Closed Caption setup and press OK.
Watching Television 31
Page 52

Selecting a Video Source
• To choose from a list of sources, press Source, use the
arrows to select the source, then press OK.
• To display information about the current source, press
Info.
Using Dual Picture Mode
NOTE: To use dual picture mode, one of the pictures must be from HDMI 1 or HDMI 2.
1. Press Menu. Use the arrow buttons to select the Source menu. Use the arrow bu ttons to select Dual pi cture
and press OK.
2. Use the arrow buttons to select Dual mode. Then use the right arrow to select PIP or Side-by-side.
3. Press the down arrow, then use the right arrow to select the source. If you are using the PIP mode, use the
arrow buttons to specify the size and layout for the second picture.
T o do this... Do this...
Find the active picture Use the left and right arrows or OK on the remote
control when no border is visible
Change the size of the active picture (PIP) Use the up and down arrows on the remote control
Move the border to the other picture and play its
sound
Move an overlapping picture (PIP) Press Menu, then go to Source > Dual picture >
Show only the active picture (end two pictures) Press Menu, then go to Source > Dual picture >
Use the left and right arrows on the remote control
Layout
Dual mode
32 Watching Television
Page 53

Applying Parental Controls
The television enables you to control the display of certain types of shows, movies, and channels, such as programs
received on the antenna input and cable input.
NOTE: If you have a set-top cable box (STB) or satellite receiver not connected to the television’s antenna
input or cable input, you cannot use the television’s controls to block programs for this source.
You must use whatever controls are provided by the cable or satellite equipment.
Setting Permission Levels
By using the standard ratings associated with many television shows and movies, the television can block the types of
content you do not want to view. By setting a lock at a certain television or movie rating, you block shows or movies
that exceed that rating.
TIP: If you want to watch a blocked program, you can temporarily suspend the parental controls if you know the
password. See “Temporarily Suspending Controls” on page 33.
Setting a Simple Lock
The simplest way to block unwanted shows and movies is to choose one of the predefine d rating levels.
1. Press Menu. Use the arrow buttons to select the Setup menu and press OK.
2. Use the arrow buttons to select Lock, and press OK. Use the arrow buttons to select Password and then
select OK.
3. If no password is set: when prompted, press a sequence of four 0 through 9 buttons to create a new
password.
If a password is set: when prompted, press the buttons for your password.
4. Use the arrow buttons and OK to select the ratings you want to block.
NOTE: Many news, sports, and general interest programs are not rated.
Temporarily Suspending Controls
If you want to watch a show that would be blocked by your normal control settings, you can temporarily turn off the
controls.
1. Press Menu. Use the arrow buttons to select the Setup menu and press OK.
2. Use the arrow buttons to select Lock, and press OK. Use the arrow buttons to select Password and then
select OK.
3. When prompted, enter your password using the remote control.
4. Use the arrow buttons to select Suspend locks? and set this setting to Yes. This will suspend the locks until
the television is turned off.
Changing Your Password
The password prevents other viewers from watching programs or changing the parental controls without permission.
1. Press Menu. Use the arrow buttons to select the Setup menu and press OK.
2. Use the arrow buttons to select Lock, and press OK. Use the arrow buttons to select Password and then
select OK.
3. When prompted, enter your password using the remote control.
4. Use the arrow buttons to select Set password. Press a sequence of four 0 through 9 buttons for the new
password.
TIP: To cancel parental control, press Menu. Select Setup > Lock. When prompted, enter your password using
the remote control. Use the arrow buttons and OK to de-select all of the blocked ratings.
Watching Television 33
Page 54

Rating Systems
NOTE:
• A large rating icon appears in the upper left-hand corner of the television screen for the first 15 seconds of
every rated program of 30 minutes or less. For every rated program longer than an hour, a rating icon
appears in the upper left-hand corner of the screen at the beginning of each half hour. A rating icon is also
displayed after every commercial break for all rated programs.
• The ratings systems available through the television change depending on your input source.
Rating Description
USA television age ratings
TV-Y All children
TV-Y7 Directed to children age 7 and above
TV-G General audience
TV-PG Parental guidance suggested
TV-14 Parents strongly cautioned
TV-MA Mature audiences only
USA television content ratings
FV Fantasy or cartoon violence
V Violence
L Coarse or crude indecent language
S Sexual situations
D Suggestive or sexual dialog
USA movie ratings
G General audience (all ages)
PG Parental guidance suggested (some material may not be suitable for children)
PG-13 Parents strongly cautioned (some material may be inappropriate for children under age 13)
R Restricted (parental guidance suggested for children under age 17)
NC-17 No one age 17 or under allowed
X No one age 17 or under allowed
NR Not rated.
Canada English ratings
C Children (all ages)
C8+ Children age 8 and above
G General (all audiences)
PG Parental guidance (some material may not be suitable for children)
14+ Viewers age 14 and above
18+ Adult (viewers age 18 and above)
Canada French ratings
G General
8+ Not for children under age 8
13+ Not for children under age 13
16+ Not for viewers under age 16
18+ Adult (viewers age 18 and above)
34 Watching Television
Page 55
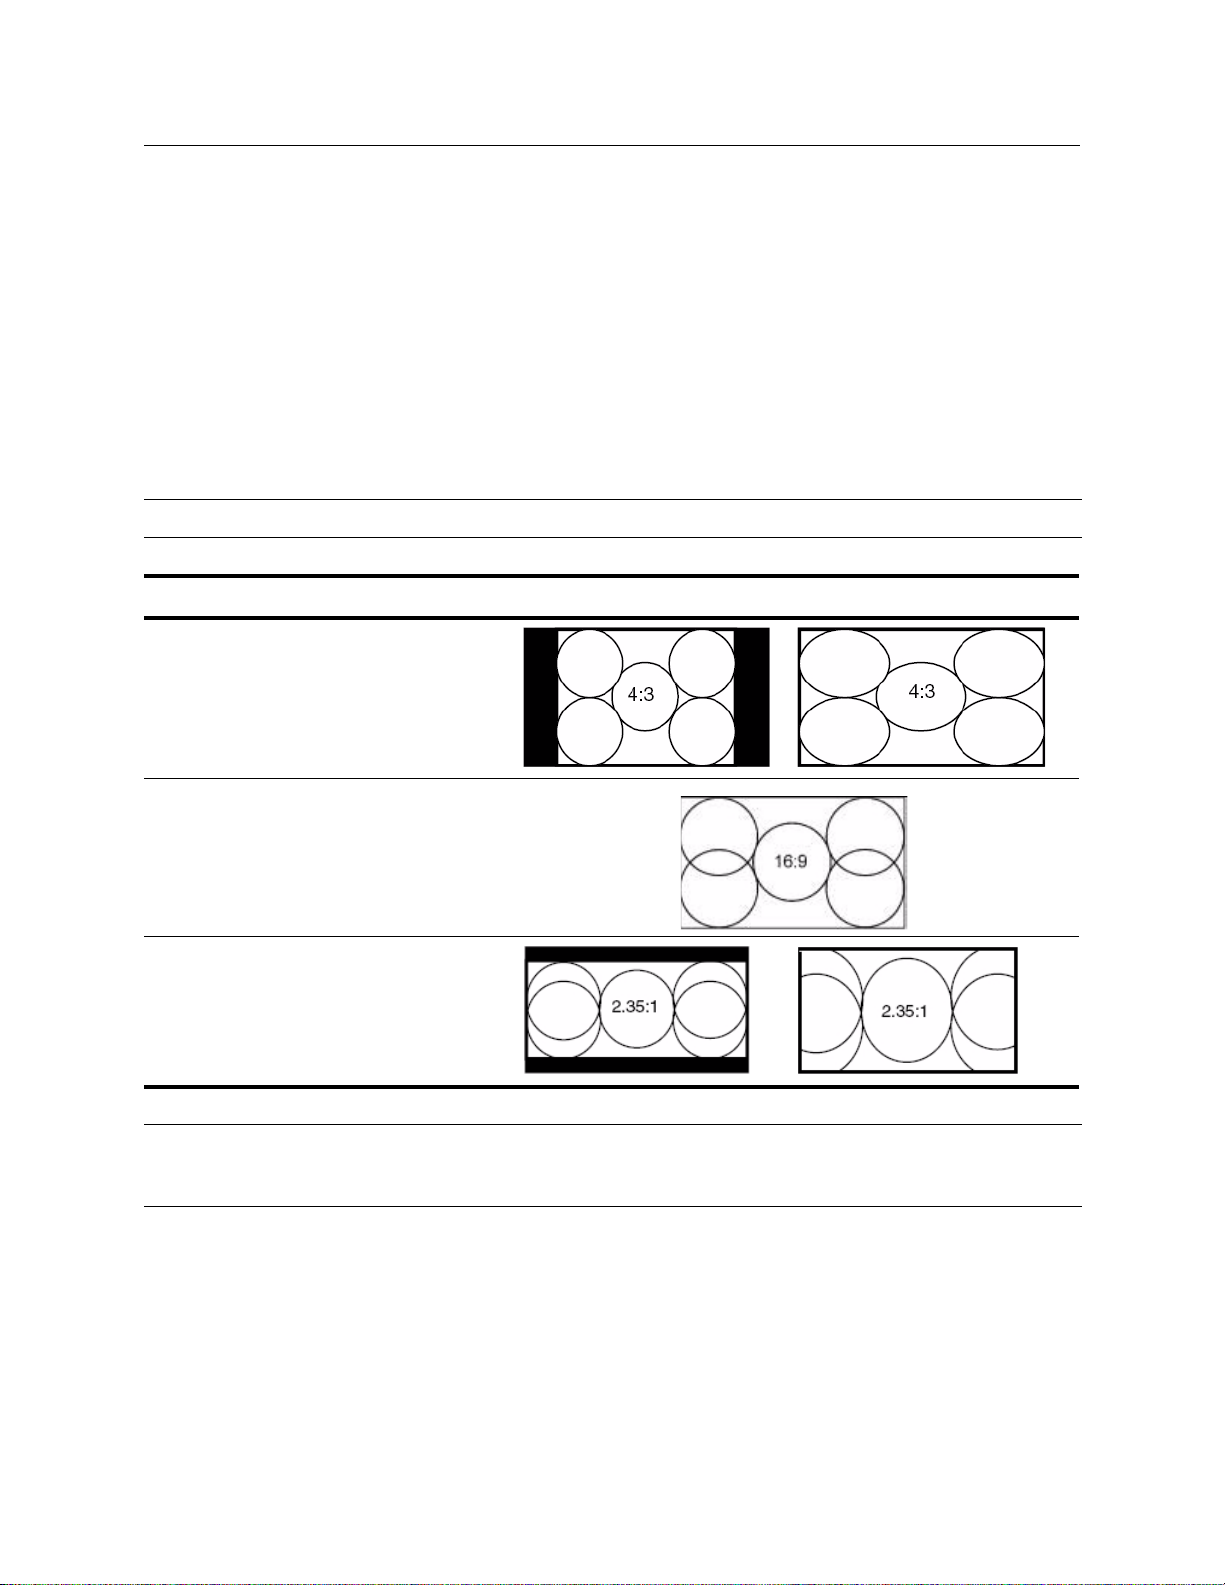
4 Adjusting the Television
Adjusting the Size (Aspect) of the Picture
Video images come in several different sizes, depending on the video content and the source device. If a picture does
not fit the shape of your television screen, you have several choices:
• shrink the picture to fit the screen with black bars filling the unused space
• zoom the picture to fill the screen
• stretch the picture to fill the screen.
Press Aspect one or more times to find the size and shape you like best. The options may vary, depending on the
input resolution. For some options, some parts of the picture might be off the screen or stretched.
TIP: Th e Normal setting is the only setting that will always display the picture with no distortion.
Type of picture Resulting views
Normal
• Best fit (side bars fill screen)
Wide-Screen Picture
• Best fit (fills screen)
Zoom
• Best fit (top and bottom bars fill screen)
TIP: Set the video output from the source device to a 16:9 aspect ratio (wide-screen picture) whenever possible.
Refer to the instructions for the video device. This provides maximum compatibility between the device and
the television.
Adjusting the Picture for Best Color
Y o u can fine-tune the picture settings on your television to get the best color and image quality. You can perform these
steps for each input port that you use. Do them in the order shown. For some input ports, some of these settings might
not be available, and you should skip these adjustments.
1. Press the Picture button and select the picture mode you want to use for the current source. If you are satisfied with the color, stop here.
2. Press Menu. Use the arrow buttons to select the Picture menu and press OK.
Adjusting the Television 35
Page 56

3. Go to the Brightness menu. Adjust to the highest setting that still gives the darkest black for black areas. You
can view black objects or shadowed areas.
4. Go to Contrast. Adjust to the highest setting that does not wash out fine detail in bright areas. You can view
bright clouds or textured white areas.
5. Go to Advanced color > Gamma. Adjust to the setting that gives the best overall midrange brightness. This
should have minimal effect on blacks and whites.
6. Go to Advanced color > Color temperature. Adjust to the setting where whites and colors look best.
7. Go to Advanced color > Vibrant Black and adjust the setting (LED television only). The Vibrant Black™
contrast enhancer setting improves the contrast in dark images.
8. Go to Advanced color > Brightness boost and adjust the setting (Lamp television only). Off enables the
most natural colors. On enables the brightest picture.
9. Go to Noise reduction. Adjust the setting to create the best display.
10. Go to Color saturation. Adjust to the setting where colors look most natural.
11. Go to Advanced color > Tint. Adjust to the setting where colors look most natural.
12. Repeat all steps if necessary.
TIP: To reset the Picture menu, press Menu. Use the arrow buttons to select the Setup menu and press OK. Go
to Picture > Reset, press OK, and select Yes.
Adjusting Other Picture Settings
The on-screen menu provides many settings that enable you to fine-tune the picture.
1. Press Menu. Use the arrow buttons to select the Advanced Picture menu and press OK.
2. Change the picture settings as needed.
Adjusting Sound Settings
To get descriptions for all available sound adjustments, see “Sound Menu” on page 38.
To do this... Do this...
Change the volume Press the volume buttons.
Adjust the sound quality Press Menu. Use the arrow buttons to select the Sound
menu and press OK. Use the right arrow to enter the
Advanced sound menu. Use the remote to modify these
settings.
Turn off the spea ke rs Press Menu. Use the arrow buttons to select the Sound
menu and press OK. Go to Internal speakers and change
this setting to Off.
Customizing Your Channels and Sources
Adding or Deleting a Channel
You can manually add or delete channels in the list of channels for the antenna or cable input, which enables you to
add a new channel that becomes available or hide a channel you want to omit when browsing channels.
1. Optional: tune to the channel you want to add or delete.
2. Press Menu. Use the arrow buttons to select the Source menu and press OK. Use the arrow buttons to
select Channel setup and then Edit Channels and press OK.
3. Use the arrow buttons to specify the channels you want to add or delete.
4. Press back to close the list.
36 Adjusting the Television
Page 57

Setting Up Favorite Channels
You can quickly tune to your most-watched channels by creating a list of favorite channels.
To tune to a favorite cable channel:
• Press Favorites one or more times.
To add a channel to your favorites (or delete a channel):
1. Press Menu. Use the arrow buttons to select the Source menu and press OK.
2. Use the arrow buttons to select Channel setup and then Edit Favorites and press OK.
Using the On-Screen Menu
Changing Settings Using the Menu
You can change television settings using the on-screen menu. These steps show the general operation.
1. Press Menu to display the on-screen menu.
2. Press the arrow buttons to highlight the desired menu, then press OK to open that menu.
3. Press the arrow buttons to highlight the desired setting, then press OK.
4. Press left and right or up and down to adjust the setting, as prompted.
5. To return to a previous menu, press back one or more times.
6. To close the on-screen menu, press Menu.
NOTE: You can also use the buttons on the television to work the on-screen menu.
•The Menu button opens the menu and also corresponds to back.
•Use the arrow/OK keys for navigation.
Picture Menu
Some picture adjustments are used only for certain input sources. Unavailable adjustments are shown in gray in the
on-screen menu.
Setting Description
Picture mode Adjusts color and picture settings to one of several combinations designed for
different types of viewing situations. You can change the picture mode at any time to
get the best picture from different sources in different environments. Yo u can also
customize each picture mode for each source.
Brightness Brightens or darkens the picture.
Contrast Sets the difference between light and dark areas.
Sharpness Sharpens or softens the picture.
Noise reduction Automatically reduces static in the picture.
Color saturation Adjusts the intensity of colors.
Advanced color Adjusts advanced color settings.
Gamma Enhances mid-tone areas of the picture.
Tint Shifts colors toward red or green.
Color temperature Shifts colors toward red or blue.
R Gain, G Gain,
BGain
Adjusts the amount of red (R), blue (B), and green (G).
Adjusting the Television 37
Page 58

Setting Description
Brightness boost Forces higher brightness. Off allows the most natural colors. On allows the brightest
picture. (Lamp television only)
Vibrant Black
Reset For the current source, restores all picture settings for the current picture mo de to
™
Vibrant Black™ contrast enhancer improves the contrast in dark images. (LED
television only.)
their default settings.
Advanced Picture Menu
Setting Description
Aspect Selects how the picture fits on the screen. You should find one setting that fits the
complete picture on the screen without distortion.
Film mode Automatically detects 3:2 film content and provides the best picture detail.
H Position Adjusts the picture left or right within the projection area for an analog signal.
V Position Adjusts the picture up or down within the projection area for an analog signal.
DVI color Adjusts the digital-video color range when not automatically defined. Set to Default
unless you are viewing DVI output from a DVI video source or "extended DVI" output.
DVI range Extends the dynamic range to take advantage of the full range from Personal
Computers (PCs) or other extended range dev ices.
Reset For the current source, restores all Advanced Picture menu settings to factory default
settings.
Sound Menu
Setting Description
Volume Adjusts the loudness of the sound.
Balance Adjusts the relative loudness of the left and right channels.
Internal speakers Sets whether the television speakers are turned on.
Standard audio For standard television programs, sets the type of sound: stereo, monaural, or a
secondary audio program (SAP).
DTV audio For DTV (Digital TV), sets the language of the audio program.
SRS TruSurround XT
Advanced sound Adjusts advanced sound settings. Not all channels provide all options.
SRS TruBass When SRS T ruSurround XT is on, this slider adjusts the level of bass response.
SRS Dialog Clarity When SRS TruSurround XT is on, this slider adjusts the level of improved dialog
Treble When SRS TruSurround XT is off, this slider adjusts the loudness of higher pitches.
Bass When SRS TruSurround XT is off, this slider adjusts the loudness of lower pitches.
™
Virtualized 5.1 surround sound experience over two speakers.
intelligibility.
38 Adjusting the Television
Page 59

Source Menu
Setting Description
Source Shows the list of sources so you can choose a source.
Channel setup Sets up the available channels.
Cable system Changes the input frequency received by the television.
Auto search Scans all channels on the input device for valid channels.
Edit channels Adds or removes channels from the listing.
Edit favorites Adds or removes favorite channels.
Dual Picture Turns on and configures the dual picture mode to displa y more than one picture on
the television.
Dual mode Turn the dual picture mode on or off and specifies the display.
Source Specifies the input source for the second picture.
Size Specifies the size for the second picture.
Layout Specifies the position of the second picture.
Cable card Initializes and configures the CableCARD (if available).
Reset cable card Resets the CableCARD (if available).
Setup Menu
Setting Description
Language Selects the language used by the on-screen menu.
Time Sets up the clock.
Time zone Sets the time zone.
Daylight saving Turns the adjustment for daylight saving time on or off.
Sleep timer Sets or shows how long the television will stay on before automatically turning
off. When activated, this function operates only one time.
Closed Caption mode Sets whether closed captions are shown. On mute displays captions only
while sound is muted.
Closed Caption setup Configures television closed captions for the antenna and cable inputs.
Standard CC Selects a caption option for standard channels.
DTV CC Selects the closed caption option for DTV (Digital Television) channels.
Customize DTV CC Adju s ts the configuration for captions on DTV (Digital Television).
Lock Configures the television to place a password to prohibit viewing of channels.
Password Places a password on channels based on their content.
Enter password Sets the password for the lock setting.
Suspend locks? Allows the viewing of bloc ked channels until the television is turned off.
Set password Changes the password after it has been set.
Movie blocking Allows or blocks movies with specific movie ratings.
TV blocking Allows or blocks programs with specific television ratings.
Canada English Allows or blocks programs based on the Canada English rating system.
Canada French Allows or blocks programs based on the Canada French rating system.
Adjusting the Television 39
Page 60

Setting Description
Dynamic rating Displays additional rating systems that may be available to block channels
based on their content. The available rating systems depend on your input
source.
Menu timeout Sets how many seconds the on-screen menu waits for input before it closes.
Factory reset Restores all menu settings to factory default settings.
About Displays information and status for the television.
40 Adjusting the Television
Page 61

5 Fixing Problems
Maintaining the Television
The television is designed to require very little maintenance. For best performance, keep the television clean, and
replace the lamp module after 6000 hours of service.
Cleaning the Television
Keep the television clean as follows:
• Keep the television in an area free from excessive dust and dirt. You cannot clean any of the television’s
internal surfaces.
• Wipe the screen and case with a soft, dry cloth. Do not use water, polish, solvent, or other substances.
• Use a vacuum cleaner to clean dust from the air vents on the back and sides of the television. Do this at least
yearly, or more often if there is visible accumulation.
Forgotten Passwords
If you have parental controls set on your television and forget your password, turn off the television. Then press the
following sequence of six buttons on the remote control: Menu, 000, OK, power. This allows access to the Lock menu
without entering a password, but only until you turn off the television. You must create a new password before you can
change lock settings or view blocked programs.
Replacing the Lamp Module
As the television operates over time, its lamp module gradually becomes less bright and more susceptible to breakage.
You can install a new lamp modul e anyt i me to bring the television up to factory-fresh brightness. We recommend
replacing the lamp module after approximately 6000 hours of service.
HP replacement lamp: RF873AA#ABA
CAUTION: We recommend that the lamp be exchanged at or before the end of the lamp’s rated life
— 6000 hours of use — because after that, the risk of the lamp rupturing could increase.
High-temperature glass fragments from a ruptured bulb can cause injury, fire, or damage
to property.
CAUTION: Replacing the lamp module requires special considerations:
• Carefully read the complete instructions for “Replacing the Lamp Module” in this Section 5
before replacing the lamp module.
• To reduce the risk of injury, use extreme care when removing the lamp module, because
broken glass might be present.
• The lamp contains a small amount of mercury. If the lamp breaks, adequately ventilate the area
where the breakage occurred, discard an y near by food and drink, and thoroughly clean the
table surface around the television. Wash your hands after cleaning the area or handling a
broken lamp. Disposal of this lamp might be regulated because of environmental
considerations.
Fixing Problems 41
Page 62
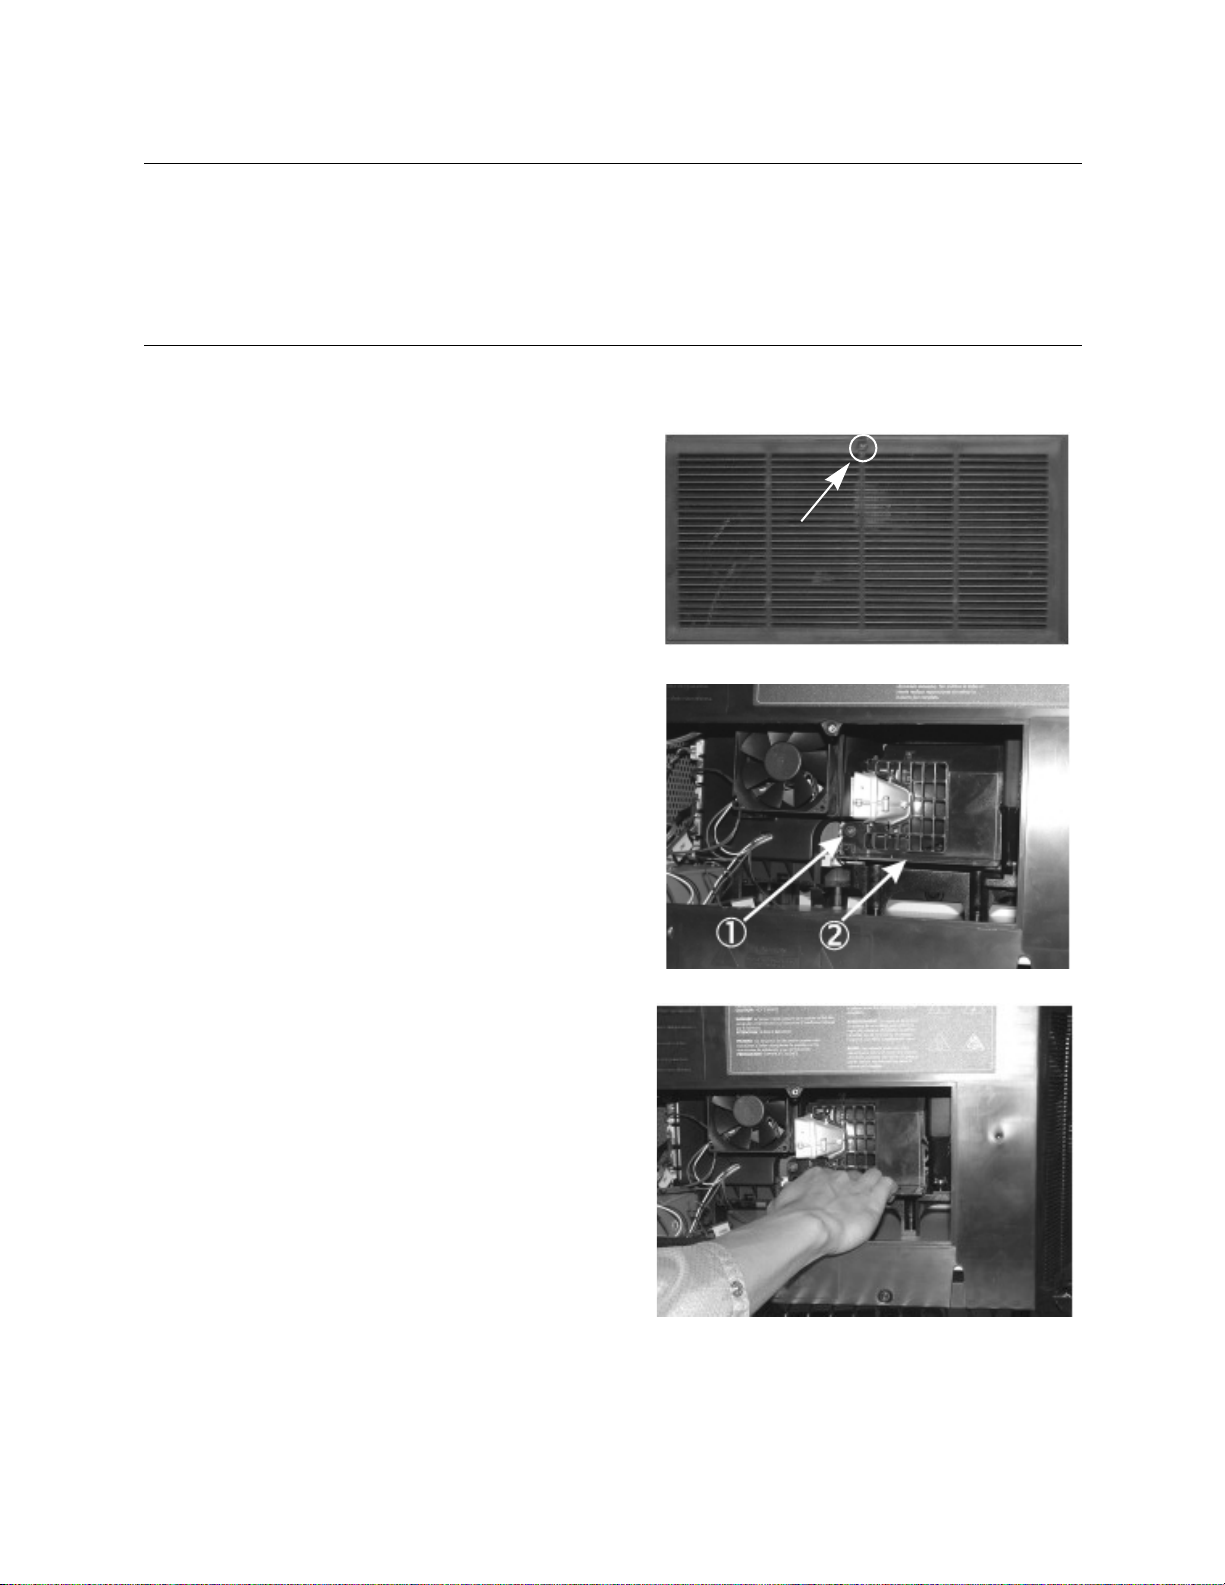
NOTE:
• For disposal or recycling information, contact your local authorities or the Electronic Industries Alliance at
www.eiae.org.
• You can find safety information about the lamp at
www.hp.com/hpinfo/globalcitizenship/environment/productdata.
• Consult the installation instructions packed with the replacement lamp module for any updates to the
following.
1. Turn off the television and allow it to cool for at least 30 minutes.
2. After the 30 minutes (or more) has elapsed, unplug the power cord to remove AC power from the television.
3. On the back of the television, unscrew the single
slotted screw located at the top center edge of the
lamp access cover, then lift and remove the cover.
4. Loosen the screw (1) on the lamp module (the screw
does not come completely out), then pull out the
module using its handle (2).
5. Insert the new lamp module into the opening, firmly
press it into place, and tighten the screw (1) loosened
in step 4.
6. Insert the tabs on the lower edge of the lamp cover
into the openings in the case. Position the cover and
replace the screw removed in step 3.
7. Plug in the power cord and turn on the television. If the lamp does not turn on after the warm-up period,
reinstall the lamp module by repeating the steps above.
42 Fixing Problems
Page 63

8. Reset the lamp time counter:
a. On the remote control, press Menu. Use the arrow buttons to select the Setup menu and press OK.
Then use the arrow buttons to select About and the press OK.
b. With the About screen displaying on the television, press the right arrow button three times. In the
Lamp service screen, press the red button on the remote control to reset the lamp time counter and
then press OK.
Replacing the LED Module
The LED module is not a customer-replaceable part. If this part is need of repair, contact HP service personnel. Refer
to “Support and Repair” on page 4 5.
Fixing Problems 43
Page 64

44 Fixing Problems
Page 65

6 Support and Repair
Contacting HP Technical Support
HP provides expert advice on using your HP HDTV (High-Definition Television), and can help you solve problems you
might have with your television. Support options and availability vary by product, country/region, and language.
To get the best, most efficient results, use the HP support process in the following order.
Step 1: HP Documentation
Review the owner’s manual and setup guide included with the television. You’ll often find the answers to many of your
questions in these documents.
Step 2: HP Technical Support
HP Technical Support offers instant Internet access to support information, helpful tips, and the latest updates,
24 hours a day, seven days a week, at no additional cost to you.
Visit our Web site: www.hp.com/support.
HP Technical Support Web Sites
By connecting to the Internet, you can obtain a wide variety of information about your television, including product help
and user forum information.
HP Technical Support Email
HP’s email support provides you with direct, one-to-one assistance from an HP service technician. Email support is a
great way to ask a specific, detailed question about your situation. Many emails are answered within an hour.
Step 3: HP Telephone Support
HP provides telephone support at no additional cost for as long as you own your television. (Standard phone company
charges do apply.) Telephone support is available in any country where the product is distributed by HP.
Before Calling
Before calling HP for support, be sure to try steps 1 and 2, above.
If you can’t solve the problem using these resources, call an HP service technician at one of the numbers listed below.
Please make sure to have your television easily in reach, and be ready to provide the following information:
• The television model and serial numbers.
• Any messages that were displayed when the situation occurred.
• When did this happen?
• Has this happened before? Can you re-create it?
• Did you add any new hardware or software before this situation began?
• What have you tried to solve the problem?
Support Phone Number
If you need help solving a problem, contact HP telephone support at one of the following numbers.
Visit www.hp.com/support for the latest phone number for your country or region.
• Canada: 1-800-474-6836 or 1-800-HP INVENT
• United States: 1-800-474-6836 or 1-800-HP INVENT
Support and Repair 45
Page 66

For Repair Service
If you suspect that your HP television needs repair, call HP telephone support. An HP service technician will diagnose
the problem and coordinate the repair process. HP support will direct you to the best solution, through either an
authorized service provider or an HP facility. Repair covered by the limited warranty is provided at no additional cost
during the limited warranty period. After the warranty period, you will be quoted a repair cost.
46 Support and Repair
Page 67

7 Reference Information
This chapter lists the specifications, safety information, and regulatory information for the HP HDTV (High-Definition
Television).
Specifications
Because HP continually improves its products, the following specifications are subject to change. For the latest
specifications, visit the HP Web site at www.hpshopping.com.
IDB5220N (Lamp) ID5226N (Lamp) ID5286N (LED)
Screen 52" diagonal size 16:9 widescreen
Size 52 inch: 50" x 37" x 15"
Weight
(without stand,
if applicable)
Resolution 1280 x 720 1280 x 720 1920 x 1080
Technology DLP technology featuring HP Visual Fidelity technology
Connection
panel
RF inputs 1- Antenna (F-type) 1 - Cable (F-type)
Video inputs 2 - HDMI
Audio inputs 5 - Stereo (left and right RCA)
Digital Audio
Inputs
Audio outputs 1 - Stereo (left and right RCA) adjustable level
CableCARD CableCARD ready (DCR™ 1)
Video
compatibility
Audio
Features
Audio
Functions
TV only: <85 lbs. TV only: <85 lbs. TV only: <95 lbs.
Dual picture with dual tuner (PIP, PBP)
Dark Video Enhancement
Accessible from rear and side
2 - Component-video (YPbPr)
2 - S-video
3 - Composite-video (2-Rear I/O & 1-Side I/O)
1 - HDMI input has a separate Analog Stereo-Audio input to support DVI
1 - Coaxial Digital-Audio output (for external amplifier)
Antenna: NTSC, ATSC, 480i/p, 720p, 1080i
Cable: NTSC, QAM, ClearQAM, 480i/p, 720p, 1080i
Composite/S-video: NTSC, 480i
Component: 480i/p, 720p, 1080i/p*
HDMI: 480i/p, 720p, 1080i/p*, VGA, SVGA, XGA, WXGA, SXGA
2 Channel Stereo sound system
Left and right full range stereo speakers
15 watts per channel
Auto volume correction, Dynamic audio correction, can be set by user
Volume control, mute, balance, treble, bass, Virtual Surround Sound
MTS: Mono, Stereo, SAP
Reference Information 47
Page 68

Lamp 150 W
6000-hour average lamp life (to half of original
brightness)
HP replacement lamp module: L2114A
Security V-chip for antenna and cable inputs
Parental lock prevents viewing of unapproved content and channels
Power 120 V nominal at 60 Hz
300 W (lamp) maximum; 250 W (LED) maximum
Environment Operating:
Temperature: 5 to 35 °C (41 to 95 °F)
Humidity: 10 to 85% RH, non-condensing
Altitude: up to 3,000 m (10,000 ft), up to 25 °C (77 °F)
Storage:
Temperature: -20 to 60 °C (-4 to 140 °F)
Humidity: 10 to 85% RH, non-condensing
Altitude: up to 9,000 m (30,000 ft)
Not applicable. (This
television uses LED
technology.)
48 Reference Information
 Loading...