

Page 1

Patch Management User Guide for HP-UX
11.x Systems
HP Part Number: 5900-1048
Published: August 2010
Edition: 13
Page 2

© Copyright 2004, 2010 Hewlett-Packard Development Company, L.P.
Confidential computersoftware. Valid license from HP required for possession, use or copying. Consistent with FAR 12.211and 12.212, Commercial
Computer Software, Computer Software Documentation, and Technical Data for Commercial Items are licensed to the U.S. Government under
vendor's standard commercial license.
The informationcontained hereinis subject to change without notice. Theonly warranties forHP productsand services are set forth in theexpress
warranty statements accompanying such products and services. Nothing herein should be construed as constituting an additional warranty. HP
shall not be liable for technical or editorial errors or omissions contained herein.
Acknowledgements
UNIX® is a registered trademark of The Open Group.
Revision History
Table 1 Revision history
Manufacturing Part
Number
Systems
HP-UX5992-4020
HP-UX5992-0674
HP-UX5991-6449
HP-UX5991-5309
HP-UX5991-4825
HP-UX5991-2722
HP-UX5991-1163
HP-UX5991-0686
Publication DateEdition NumberSupported VersionsSupported Operating
August 20101311i v1, 11i v2, 11i v3HP-UX5900-1048
September 20101211i v1, 11i v2, 11i v3HP-UXB3921–90030
September 20091111i v1, 11i v2, 11i v3HP-UX5992–6582
March 20081011.0, 11i v1, 11i v1.6, 11i
v2, 11i v3
September 2007911.0, 11i v1, 11i v1.6, 11i
v2, 11i v3
February 2007811.0, 11i v1, 11i v1.6, 11i
v2, 11i v3
June 2006711.0, 11i v1, 11i v1.6, 11i
v2
March 2006611.0, 11i v1, 11i v1.6, 11i
v2
December 2005511.0, 11i v1, 11i v1.6, 11i
v2
May 2005411.0, 11i v1, 11i v1.6, 11i
v2
December 2004311.0, 11i v1, 11i v1.6, 11i
v2
HP-UX5990-6753a
September 2004211.0, 11i v1, 11i v1.6, 11i
v2
HP-UX5990-6753
April 2004111.0, 11i v1, 11i v1.6, 11i
v2
Page 3

Table of Contents
1 HP-UX patches and patch management......................................................................7
Patch management strategies.................................................................................................................7
How to get patches............................................................................................................................8
Where to start....................................................................................................................................8
2 Quick start guide for patching HP-UX systems............................................................9
Overview.................................................................................................................................................9
Before you begin.....................................................................................................................................9
Should you use standard HP-UX patch bundles?.............................................................................9
Should you use individual patches?.................................................................................................9
Standard HP-UX patch bundles......................................................................................................10
Acquiring and installing standard HP-UX patch bundles...................................................................10
Acquiring the bundles.....................................................................................................................10
Installing the bundles......................................................................................................................11
Advanced topic: using Dynamic Root Disk (DRD).........................................................................12
Acquiring and installing individual patches........................................................................................13
Acquiring the patches......................................................................................................................13
Installing the patches.......................................................................................................................15
Advanced topic: using Dynamic Root Disk (DRD).........................................................................16
3 HP-UX patch overview..................................................................................................17
Patch-related concepts..........................................................................................................................17
Patch identification..........................................................................................................................17
HP-UX software structure...............................................................................................................17
Patch bundles...................................................................................................................................18
Software depots and patch depots..................................................................................................18
Patch status......................................................................................................................................19
Patch state........................................................................................................................................19
State..................................................................................................................................................20
Category tags...................................................................................................................................20
Which patches are on a system?...........................................................................................................21
Examples of the swlist command................................................................................................22
Ancestors and supersession..................................................................................................................25
Ancestors.........................................................................................................................................25
Advanced topic: determining patch ancestors...........................................................................25
Supersession....................................................................................................................................26
Advanced topic: displaying supersession information.............................................................27
Advanced topic: supersession and the patch_state attribute...............................................28
Patch-related attributes.........................................................................................................................29
Patch dependencies...............................................................................................................................31
Types of dependencies.....................................................................................................................31
Corequisites and prerequisites........................................................................................................31
Advanced topic: determining corequisite and prerequisite filesets with the swlist
command....................................................................................................................................32
Enforced and unenforced (manual) dependencies.........................................................................32
Impact of dependencies on acquiring patches................................................................................32
Patch rollback and commitment...........................................................................................................33
Patch rollback...................................................................................................................................33
Advanced topic: patch installation and rollback files................................................................33
Patch commitment...........................................................................................................................33
Advanced topic: patch cleanup utility............................................................................................34
HP-UX patch ratings.............................................................................................................................34
Table of Contents 3
Page 4

HP patch rating of 1 ........................................................................................................................35
Rating details .............................................................................................................................35
HP patch rating of 2 ........................................................................................................................35
Rating details .............................................................................................................................35
HP patch rating of 3 ........................................................................................................................35
Rating details .............................................................................................................................35
Critical and noncritical patches............................................................................................................36
Finding information for a specific patch...............................................................................................36
Patch documentation ......................................................................................................................36
Advanced topic: the readme attribute............................................................................................38
Obtaining information using the ITRC...........................................................................................38
Accessing information on the ITRC...........................................................................................38
Patch warnings......................................................................................................................................38
The warning field............................................................................................................................39
Critical and noncritical warnings....................................................................................................39
How to handle patch warnings.......................................................................................................40
Questions to ask...............................................................................................................................40
Advanced topic: finding patches with warnings............................................................................40
Backup and recovery............................................................................................................................41
Considerations.................................................................................................................................41
4 Patch management overview......................................................................................42
Patch management life cycle.................................................................................................................42
HP service contracts..............................................................................................................................45
Patch management and software change management strategies.......................................................45
Establishing a software change management strategy ..................................................................45
Recommendations for software change management ...................................................................46
Consideration of HP patch rating....................................................................................................47
Patch management and software depots.........................................................................................47
Proactive patching strategy.............................................................................................................48
Acquiring patches for proactive patching..................................................................................48
Advanced topic: HP-UX Software Assistant..............................................................................49
Reactive patching strategy...............................................................................................................49
Acquiring patches for reactive patching ...................................................................................50
Advanced topic: security patching strategy ...................................................................................50
Advanced topic: scanning for security patches ..............................................................................51
Testing the patches to be installed .......................................................................................................51
5 What are standard HP-UX patch bundles?...............................................................52
Key features..........................................................................................................................................52
Standard HP-UX patch bundles...........................................................................................................52
Obtaining standard HP-UX patch bundles..........................................................................................53
6 Using the IT Resource Center......................................................................................55
Obtaining an ITRC user account...........................................................................................................55
Useful pages on the ITRC.....................................................................................................................55
Find individual patches........................................................................................................................55
Key features.....................................................................................................................................56
Accessing the patch database and finding an individual patch.....................................................56
Advanced topic: checking for special installation instructions............................................................58
Advanced topic: checking for all patch dependencies.........................................................................59
Check for patches with dependencies.............................................................................................59
Standard patch bundles........................................................................................................................62
Custom patch bundles - run a patch assessment..................................................................................62
Support information digests.................................................................................................................62
Key features.....................................................................................................................................62
4 Table of Contents
Page 5

Ask your peers in the forums...............................................................................................................62
Search knowledge base.........................................................................................................................62
Key features ....................................................................................................................................63
7 Using software depots for patch management.........................................................64
Common software distributor commands for patching.......................................................................64
Depot types...........................................................................................................................................65
Directory depots..............................................................................................................................65
Tape depots......................................................................................................................................66
Using depots.........................................................................................................................................66
Choosing depot type and depot location........................................................................................67
Viewing depots.....................................................................................................................................67
Examples of the swlist command................................................................................................67
Creating and adding to a directory depot............................................................................................69
Copying patches to depots..............................................................................................................70
Advanced topic: HP-UX Software Assistant...................................................................................71
Copying products with patch dependencies to depots...................................................................71
Registering and unregistering directory depots...................................................................................71
Examples of registering and unregistering depots.........................................................................72
Advanced topic: access control lists................................................................................................72
Verifying directory depots....................................................................................................................73
Examples of verifying directory depots..........................................................................................73
Removing software from a directory depot..........................................................................................74
Advanced topic: removing superseded patches from a depot.......................................................76
Removing a directory depot ................................................................................................................77
Installing patches from a depot............................................................................................................77
Examples of installing patches from a depot..................................................................................79
Installing products with patch dependencies from a depot...........................................................80
Custom patch bundles..........................................................................................................................80
Examples of listing patches and bundles........................................................................................81
Creating a custom bundle................................................................................................................82
8 Using HP-UX Software Assistant for patch management.........................................85
For more information............................................................................................................................85
9 Using Dynamic Root Disk for patch management....................................................86
For more information............................................................................................................................87
10 The Patch Assessment Tool........................................................................................88
Benefits of the Patch Assessment Tool..................................................................................................88
Using the Patch Assessment Tool.........................................................................................................88
Example of running the Patch Assessment Tool..................................................................................89
11 Support and other resources.....................................................................................91
Contacting HP.......................................................................................................................................91
Before you contact HP.....................................................................................................................91
HP contact information...................................................................................................................91
Subscription service.........................................................................................................................91
Documentation feedback.................................................................................................................91
Related information..............................................................................................................................91
Documents.......................................................................................................................................91
HP websites.....................................................................................................................................92
Non-HP websites.............................................................................................................................92
Typographic conventions......................................................................................................................92
A Patch usage models.....................................................................................................94
Patch usage model 1: hardware/application software change.............................................................95
Patch usage model 2: third-party hardware/software qualification.....................................................97
Table of Contents 5
Page 6

Patch usage model 3: operating environment cold install....................................................................98
Patch usage model 4: operating environment update........................................................................100
Patch usage model 5: proactive patch.................................................................................................102
Patch usage model 6: reactive patch...................................................................................................103
Glossary.........................................................................................................................104
Index...............................................................................................................................107
6 Table of Contents
Page 7
1 HP-UX patches and patch management
Patches are software that HP releases to deliver incremental updates to a system. Patches are
best known for delivering defect fixes, but also deliver new functionality and features, enable
new hardware, and update firmware. You can use HP-UX patches to update HP-UX software
without having to completely reinstall a system application. For a description of patches, see
Chapter 3: “HP-UX patch overview” (page 17).
You might wonder why you should be concerned with patch management. HP recommends
that you address patch management to reduce the risk of problems such as system hangs, panics,
memory leaks, data corruption, application failures, and security breaches. If your job involves
any of the following concerns, then you need patch management:
• Having proper system functionality and performance
• Maintaining system security
• Maintaining system reliability and availability
• Obtaining the latest system enhancements and functionality
• Reading about problems and solutions before you encounter them
• Limiting the number of patches to install if you encounter a problem
• Limiting the amount of time required to troubleshoot problems
Patch management involves any of the following tasks:
• Selecting or acquiring patches
• Applying patches
• Updating previously applied patches with more current patches
• Verifying patches
• Testing patches
• Listing patches already applied to existing software
• Copying patches
• Maintaining repositories, or depots, of patches for easy selection
• Committing applied patches
• Removing or rolling back applied patches
For a description of patch management, see Chapter 4: “Patch management overview” (page 42).
NOTE: You can approach patch management in many different ways with no one approach
being the correct way. You must base decisions regarding patch management on the specifics of
your individual situation. Even then, there might be more than one reasonable path.
Patch management strategies
This guide addresses two basic patch management strategies. Most customers use a combination
of both strategies:
Proactive Patching Patching regularly to avoid problems
Reactive Patching Patching after a problem occurs
No matter what strategy or combination of strategies you adopt, keep in mind that any change
to a system, including change incurred during the process of patch management, risks the
introduction of new problems to a system. This guide discusses some steps that you can take to
mitigate the risk associated with patching systems.
Patch management strategies 7
Page 8

How to get patches
HP provides numerous ways to acquire patches, ensuring that system administrators with
different goals and different levels of expertise can find a patch source to fit their needs. You can
obtain patches individually or in groups of related patches known as patch bundles.
This guide discusses the following HP-UX patch sources:
• IT Resource Center (ITRC) website:
http://itrc.hp.com
• Patch Tools:
HP-UX Software Assistant (SWA) is the HP-recommended utility to maintain currency with
HP-published security bulletins and recommended patch levels for HP-UX 11i software.
See “Using HP-UX Software Assistant for patch management” (page 85) for more
information.
Where to start
If you have immediate patching needs, see Chapter 2: “Quick start guide for patching HP-UX
systems” (page 9).
If you want to learn about patching options, read all chapters in this guide, and then choose the
resource that best meets your needs.
8 HP-UX patches and patch management
Page 9

2 Quick start guide for patching HP-UX systems
This quick start guide is for system administrators who have immediate patching needs. It is a
limited solution to general patching issues. If you need in-depth information about patching,
review the rest of this document and the other patch-related resources in Section : “Related
information” (page 91).
NOTE: You will require root user privileges to complete these procedures.
Overview
This quick start guides you through basic patch management tasks and provides minimal detail:
• “Before you begin” (page 9)
Before you acquire and install the patch bundles or individual patches, you should consider
some patch-related questions. See “Should you use standard HP-UX patch bundles?”
(page 9) and “Should you use individual patches?” (page 9).
• “Acquiring and installing standard HP-UX patch bundles” (page 10)
When initially patching a system, it is important to establish a stable baseline of patches.
This section shows you how to acquire and install the standard HP-UX patch bundles. See
Chapter 5 (page 52) for more information.
• “Acquiring and installing individual patches” (page 13)
In addition to the standard HP-UX patch bundles, you might need to install individual
patches. For example, you might want more recent patches found on the HP IT Resource
Center (ITRC) website than those contained in a standard HP-UX patch bundle on media.
You might also want the latest security patches.
For additional information, visit the ITRC website at http://itrc.hp.com.
Before you begin
The following sections contain questions that you should review before you begin the quick start
procedures.
Should you use standard HP-UX patch bundles?
Before you acquire and install standard HP-UX patch bundles, consider the following questions:
• Is this a new system?
• Do you want to establish a baseline of patches?
• Do you want to update the existing baseline of patches?
• Are you adding new hardware to the system?
If you answer yes to any of these questions, then you should continue with “Acquiring and
installing standard HP-UX patch bundles” (page 10).
HP recommends using the HP-UX Quality Pack Patch bundle for the proactive maintenance of
all HP-UX systems. For a description of the Quality Pack Patch bundle and all other standard
HP-UX patch bundles, see “Standard HP-UX patch bundles” (page 10) .
Should you use individual patches?
HP recommendsusing individual patches whenperforming reactive patching tasks. For example,
when a system is experiencing a problem, you should apply an individual patch or the smallest
set of patches to fix the problem, and not an entire patch bundle.
Please refer to “Acquiring and installing individual patches” (page 13) for more information.
Overview 9
Page 10
NOTE: In addition to the information in this guide, you should review the release notes for the
product you are patching.
Standard HP-UX patch bundles
Table 2-1 shows the bundle names for the HP-UX 11i releases. See Chapter 5 (page 52) for more
information.
Table 2-1 Standard HP-UX patch bundle names
HP-UX 11i v3 (B.11.31)HP-UX 11i v2 (B.11.23)HP-UX 11i v1 (B.11.11)Patch Bundle Name
N/AFeature Enablement
Hardware Enablement
Quality Pack
Required
BUNDLE11iBUNDLE11i
NOTE: Standard HP-UX patch bundles are cumulative. The latest version of a bundle includes
patches from all previous versions. Also, the standard patch bundles might have overlapping
content. This will not affect the patching process.
Acquiring and installing standard HP-UX patch bundles
The standard HP-UX patch bundles provide recommended sets of HP-UX system patches, which
you should use for proactive patching. See Chapter 5 (page 52) for information on specific
standard patch bundles.
Acquiring the bundles
To obtain standard patch bundles from the web, perform the following steps:
1. Log in to the target system.
2. Determine the operating system release by entering this command:
uname -r
Record the information. You will use this information in step 8.
FEATURE11iFEATURE11i
HWEnable11iHWEnable11iHWEnable11i
QPKAPPSQPKAPPSGOLDAPPS11i
QPKBASEQPKBASEGOLDBASE11i
N/A
3. Be sure that you are logged in as a user with write permissions to the download directory
that you plan to use.
These instructions assume you are using the /tmp directory.
4. Log in to the ITRC at http://itrc.hp.com.
Be sure to log in to the appropriate site (Americas/Asia Pacific or European).
NOTE: You must link your active HP support agreement (that includes Software Updates)
to your ITRC profile before downloading patches. Use the My Profile link for instructions
after completing login at the ITRC website.
5. Select Patch database from the left navigation.
6. Select find standard patch bundles.
7. Select HP-UX patch bundles.
8. Select the most recent release name for the operating system (by release date).
10 Quick start guide for patching HP-UX systems
Page 11

9. Select the bundle/depot link. The bundles are cumulative; select the latest.
The bundle's main page is displayed. It shows the following information and links:
• Each patch contained in the bundle.
If the bundle contains patches with warnings, which are notifications of known problems,
they are listed near the top of the page.
• All patch identifications (IDs) are linked to the patch database on the ITRC and provide
detailed patch information.
• In the right-hand navigation menu you can access the readme file for the bundle by
selecting the bundle readme link. Review the readme for critical installation information.
10. Ensure all items are checked. Click add to selected patch list.
If you see additional patches in the selected patch list, the ITRC selected them to replace
patches with warnings. See “Patch warnings” (page 38).
11. Review your choices to ensure all items are checked. Click download selected.
The download patches page is displayed.
12. Under the heading “download items in one operation”, select a format option (HP
recommends the gzip package). Select a zip package only if you are certain that the HP-UX
system can unpack a .zip file.
You can use the commands whereis(1) and which(1) to make sure you have the appropriate
software. For example, use whereis gzip to determine if the program is installed and use
which gzip to determine if the program is in your path.
13. Click download. Make the appropriate selections (based on the browser you are using) to
save the selected bundle to the /tmp/temporary_depot directory on the target system.
14. Record the name of the file being downloaded.
The following section refers to the file as patches.xxx.
Installing the bundles
To install the downloaded bundle, repeat the following steps for each bundle.
1. Log in to the target system.
2. Unpack the downloaded file patches.xxx by using one of these commands:
• If the downloaded file is patches.tgz:
gunzip -c patches.tgz | tar xvf -
• If the downloaded file is patches.tar:
tar -xfv patches.tar
• If the downloaded file is patches.zip:
unzip patches.zip
You must have an installed application that can unpack a .zip file. Not all HP-UX
systems have such an application. If you do not have a system that can unpack a .zip
file, then you would need to use a system that does, then transfer the unpacked files to
the target system.
You can use the program locating commands whereis(1) and which(1) to make sure you
have the appropriate software. For example, use whereis gzip to determine if the
program is installed and use which gzip to determine if the program is in your path.
3. As root, run the create_depot_hp-ux_11 script.
4. Verify the download by entering this command:
swverify -d \* @ /tmp/temporary_depot/depot
You will see the message "* Verification succeeded."
Acquiring and installing standard HP-UX patch bundles 11
Page 12

5. Find the bundle names by entering this command:
swlist -d @ /tmp/temporary_depot/depot
6. Record all bundle names.
The bundle name is the first word of each line under the Bundle(s) heading.
7. This step is critical. When you install a QPK or HWE patch bundle, the system reboots
automatically. Before you install abundle (step 9), you need to follow your company's policy
regarding a system reboot.
8. This step is critical. Before you install the bundle, back up the system.
9. Install the bundles by entering this command:
swinstall -s /tmp/temporary_depot/depot -x autoreboot=true \
-x patch_match_target=true
During the installation, the system prints progress details to the screen.
10. Monitor the screen for error messages.
The system reboots automatically as part of the installation process.
11. Verify that the installation was successful:
• Repeat the swlist command for each bundle name you recorded in step 6:
swlist
-l bundle bundle_name
Ensure that the bundle is shown in the output.
• Repeat the swverify command for each bundle name you recorded in step 6:
swverify bundle_name
— This command might not always complete in a short amount of time.
— If the verification is successful, the last few lines of output contain the line "*
Verification succeeded."
— If the verification was not successful, view the /var/adm/sw/swagent.log file
for additional information related to the swverify command failure. If this is not
sufficient to resolve the problem, consult more advanced resources in Section :
“Related information” (page 91).
• View the swagent log file, located at /var/adm/sw/swagent.log. This log includes
information related to the installation.
— Find the section pertaining to the installation just performed (located near the end
of the file if you check it immediately after the install). Review this section and
make sure that there were no errors ("ERROR").
— If you find errors, consult more advanced resources in Section : “Related
information” (page 91) to resolve the problem.
Advanced topic: using Dynamic Root Disk (DRD)
By using Dynamic Root Disk (DRD) you can minimize the downtime required to apply a patch
bundle, do most of your proactive maintenance during normal business hours, and have a fast,
reliable backup mechanism if your system does not function as expected after the application of
a patch bundle. With DRD, you create a copy (or clone) of the root disk that you can apply patches
to, while your system is still up and running. Once all the patches are loaded on the clone, you
can then reboot the system using the clone as your active root volume. If for any reason you
decide that the patched root volume does not perform as you desire, you can quickly reboot the
original system image. For more information, please see Chapter 9 (page 86).
12 Quick start guide for patching HP-UX systems
Page 13

Acquiring and installing individual patches
At times, you might find it necessary to acquire and install individual patches based on known
patch IDs.
For example, you might read an HP-UX security bulletin in which HP recommends that you
install specific patches. Another possibility is that you are installing software that requires specific
patches for the software to function properly. Customers also frequently acquire and install
individual patches for reactive patching. Whichever the case, you can use the Patch Database on
the ITRC website to quickly and simply acquire specified patches as well as their dependencies.
If you are unfamiliar with patches with dependencies, see Chapter 3: “HP-UX patch overview”
(page 17).
NOTE: HP assigns each HP-UX patch a unique identification or patch ID. Each HP-UX patch
ID has the form PHXX_#####, where:
• PH is an abbreviation for Patch HP-UX
• XX is replaced with one of the following values for the HP-UX area being patched:
— CO = command patches
— KL = kernel patches
— NE = network patches
— SS = patches related to all other subsystems
• ##### is replaced with a unique four- or five-digit number.
In general, the numeric portion of the patch ID is higher for more recently released patches.
Acquiring the patches
To acquire the patches from the web, perform the following steps:
1. Log in to the target system.
2. Determine the operating system release by entering this command:
uname -r
Record this information. You will use it in step 8.
3. Be sure that you are logged in as a user with write permissions to the download directory
you plan to use.
These instructions assume you are using the /tmp/some_patch_directory directory.
4. Log in to the ITRC at http://itrc.hp.com.
Be sure to log in to the appropriate site (Americas/Asia Pacific or European).
5. Select Patch database from the left navigation.
6. In the text box, enter the patch ID for the patch you want to download. Then click ».
If it exists, the selected patch is displayed on the search results page. Patches (possibly differing
from the patch you requested) display in one to three columns.
7. Review the patches in the table.
• specified: Shows the patch ID you requested.
• recommended: Shows the patch HP recommends for download/install based on the
patch you requested (it might be different than the patch you specified). If you see a
patch in this column, it meets all requirements of the patch you requested. HP
recommends you download and install this patch.
• most recent: Shows the most recent version of the requested patch.
Acquiring and installing individual patches 13
Page 14
The following icons might be displayed along with the patch ID.
• This symbol means that the patch has a warning associated with it. You should
review the warning text to determine whether it applies to the system.
• This icon means that the patch has Special Installation Instructions. You should
always read them.
See Table 6-1: “Navigating the search results table” (page 56) for a description of all table
icons.
8. To review details about a patch, select the patch ID to open the patch details page.
At a minimum, you should review the information provided in the following fields:
• Special Installation Instructions: Read this section to determine if the chosen patch has
additional steps that you must perform during installation.
• Warning: This section will only exist if the patch has a warning associated with it.
Carefully read the information to determine how or whether the patch's problems will
impact the system. If the warning does impact the system, you must decide whether
the problem appears severe enough to avoid installing the patch. If this is the case, select
an alternate patch if one is available.
• Patch Dependencies, Hardware Dependencies, Other Dependencies: Note the patch IDs because
you must later verify that the patches are included on the list of patches that you
download.
9. When you finish viewing this page, return to the search results page.
10. On the search results page, check the box next to the patch ID of the patch to download.
TIP: If the recommended column appears, you should select the patch in that column
unless you have a valid reason not to.
11. Add the checked patch to the list of patches to download by clicking add to selected patch
list.
• If the patch you chose has a warning associated with it, the patch warning(s) page appears.
• If this happens, verify the patch you are downloading and click continue.
• The selected patch list page is displayed.
12. The Patch Database might automatically add some patches to the download list to satisfy
dependencies. You should download these along with the patches you explicitly selected.
13. To add more patches to the patch list, click add patches.
14. After acquiring all the patches you need, click download selected to open the download
patches page.
15. Under the heading download items in one operation or download items individually, select a
format option (HP recommends gzip package) and a download server. Select a zip package
only if you are certain the HP-UX system can unpack a .zip file.
You can use the commands whereis(1) and which(1) to make sure you have the appropriate
software. For example, use whereis gzip to determine if the program is installed and use
which gzip to determine if the program is in your path.
16. Click download. Make the appropriate selections (based on the browser you are using) to
save the selected bundle to the /tmp/some_patch_directory directory on the target
system.
17. Record the name of the file being downloaded.
The following section refers to the file as patches.xxx.
14 Quick start guide for patching HP-UX systems
Page 15

Installing the patches
To install the downloaded patches, perform the following steps:
1. Log in to the target system.
2. Unpack the downloaded file, patches.xxx:
• If the downloaded file is patches.tgz:
gunzip -c patches.tgz |
tar xvf -
• If the downloaded file is patches.tar:
tar -xfv patches.tar
• If the downloaded file is patches.zip:
unzip patches.zip
You must have an installed application that can unpack a .zip file. Not all HP-UX
systems have such an application.
You can use the program locating commands whereis(1) and which(1) to make sure you
have the appropriate software. For example, use whereis gzip to determine if the
program is installed and use which gzip to determine if the program is in your path.
3. As root, run the create_depot_hp-ux_11 script.
The patches are now in a depot in the some_patch_directory directory.
4. Verify the download:
swverify -d \* @ /tmp/some_patch_directory/depot
You will see the message "* Verification succeeded."
5. This step is critical. When you install the patches, the system might reboot automatically.
Before you install patches (step 8), you need to follow your company's policy regarding a
system reboot.
6. This step is critical. Before you install the patches, back up the system.
7. You can remove the following files to clean up the directory and save space:
• patch files of the form PHXX_#####
• .text files
• .depot files
• depot.psf file
• downloaded .tgz, .tar, or .zip file
• create_depot_hp-ux_11 file
• readme file
8. Install the patches using the following command:
swinstall -s /tmp/some_patch_directory/depot -x autoreboot=true \
-x patch_match_target=true
During the installation, the system prints progress details to the screen.
9. Monitor the screen for error messages.
The system reboots automatically if any of the patches you are installing requires it. Be
patient. The patch installation can be slow for large numbers of patches.
Acquiring and installing individual patches 15
Page 16

10. Verify that the installation was successful:
• Enter the command: swlist -l product
Ensure that the installed patches are shown in the output.
• Execute the swverify command on each of the new patches:
swverify patch_id
— This command might not always complete in a short period of time.
— If the verification is successful, the last few lines of output contain the line "*
Verification succeeded."
— If the verification was not successful, view the /var/adm/sw/swagent.log
filefor additional information related to the swverify command failure. If this is
not sufficient to resolve the problem, consult more advanced resources in Section :
“Related information” (page 91).
• View the swagent log file, located at /var/adm/sw/swagent.log. This log includes
information related to the installation.
— Find the section pertaining to the installation just performed (located near the end
of the file if you check it immediately after the install). Review this section, and
ensure that there were no errors ("ERROR").
— If you find errors, consult more advanced resources in Section : “Related
information” (page 91) to resolve the problem.
Advanced topic: using Dynamic Root Disk (DRD)
By using Dynamic Root Disk (DRD) you can minimize the downtime required to apply patches,
do most of your proactive maintenance during normal business hours, and have a fast, reliable
backup mechanism if your system does not function as expected after the application of the
patches. With DRD, you create a copy (or clone) of the root disk that you can apply patches to
while your system is still up and running. Once all the patches are loaded on the clone, you can
then reboot the system, using the clone as your active root volume. If for any reason you decide
the patched root volume does not perform as you desire, you can quickly reboot the original
system image. Note that if you are only applying a few patches, the time it takes to create a clone
using DRD (similar to the time required by Ignite-UX to create a recovery image) might not be
a valuable investment of your time. For more information, please see Chapter 9 (page 86).
16 Quick start guide for patching HP-UX systems
Page 17

3 HP-UX patch overview
Patch-related concepts
Patch identification
HP assigns each HP-UX patch a unique identification or patch ID. Each HP-UX patch ID has the
form PHXX_#####, where:
• PH is an abbreviation for Patch HP-UX
• XX is replaced with one of the following values for the HP-UX area being patched:
— CO = command patches
— KL = kernel patches
— NE = network patches
— SS = patches related to all other subsystems
• ##### is replaced with a unique four- or five-digit number.
In general, the numeric portion of the patch ID is higher for more recently released patches.
HP-UX software structure
To understand some of the topics presented in this chapter, you shouldhave a basic understanding
of the structure of HP-UX software. Patches are part of this software structure. You will also
need to use Software Distributor.
The following list provides an overview of theSoftware Distributor for HP-UX (SD-UX) software
objects that compose HP-UX software.
• Fileset
— A fileset is a grouping of one or more files contained in a product. A fileset groups a
subset of a product's files into a manageable unit.
— Filesets include the files and control scripts that make up a product. For more information
about control scripts, see the Software Distributor Administration Guide on the HP Business
Support Center website at http://www.hp.com/go/sd-docs.
— Filesets must exist within a product.
— Although a patch has a unique name, the names of the filesets contained in a patch
match the corresponding base filesets that they patch.
• Product
— A product is a software object that is packaged and distributed for users to acquire and
install.
— Products are composed of one or more filesets and might additionally contain one or
more control scripts.
— A product can exist either within a bundle or as its own entity.
• Bundle
— A bundle is an encapsulation of products into a single software object.
— Bundles are, sometimes, optional software objects.
— Product objects are included in a bundle by reference only.
— If the products within the bundle are all patches, the bundle is known as a patch bundle.
For more information about these software objects, see the Software Distributor Administration
Guide on the HP Business Support Center website at http://www.hp.com/go/sd-docs.
Patch-related concepts 17
Page 18

Patch bundles
Patch bundles play an important role in patch management. A patch bundle is a collection of
patches that have been grouped into a single software object to meet a specific need. Many HP-UX
users find that acquiring and installing these bundles, as opposed to acquiring and installing
patches individually, simplifies the patch management process.
Your first encounter withpatch bundles might be with the standard HP-UX patch bundles. These
bundles contain patches that HP has assembled to meet a specific need. For example, the basic
purpose of Quality Pack patch bundles is to deliver defect-fix patches for proactive maintenance.
HP releases updated versions of the bundles on a regular schedule and tests them to ensure a
high level of reliability. Using standard HP-UX patch bundles can be a less error-prone and more
efficient way to patch a system than acquiring and installing individual patches. For more
information, see Chapter 5: “What are standard HP-UX patch bundles?” (page 52).
Each patch bundle includes all patch dependencies for the successful installation of all patches
that apply to a system. Additionally, some patch bundles, such as HWEnable11i and
FEATURE11i, deliver patches for the successful installation of product bundles that include I/O
driver products, for example, USB-00. The selection ofproduct bundles with patch dependencies
will result in the automatic selection of required patches from the applicable patch bundle. This
automatic selection of patch dependencies can simplify the management and installation of
products or patches with patch dependencies.
Patch bundles also make it easier for you to determine the current level of patches on a system.
For example, there could be hundreds of individual patches contained in an installed bundle,
but the swlist command lists, by default, only the bundle name rather than each individual
patch contained in the bundle.
For example, if you installed the December 2003 Quality Pack patch bundles on an HP-UX 11i
v1 (B.11.11) system, output for the bundles would be similar to the following:
GOLDAPPS11i B.11.11.0312.4 Gold Applications Patches for HP-UX 11i v1,
December 2003
GOLDBASE11i B.11.11.0312.4 Gold Base Patches for HP-UX 11i v1,
December 2003
For more information about listing the products on a system, see “Which patches are on a system?”
(page 21).
You might also find yourself working with patch bundles if you use the ITRC Patch Assessment
Tool, which allows you to create your own custom patch bundles. For more information, see
Chapter 10: “The Patch Assessment Tool” (page 88).
Software depots and patch depots
Software depots, or simply depots,are an integral part of patchmanagement. A depot is a special
type of file or directory that has been formatted for use by SD-UX as a software repository. In
the general case, depots contain a diverse array of software products. A depot can exist as a
directory tree on a SD-UX file system or on CD or DVD media, and it can exist as a tape archive
(tar) archive on serial media (tape). All depots share a single logical format, independent of the
type of media on which the depot resides. Depots can reside on a local or remote system. You
can package software directly into a depot or copy packaged software into the depot from
elsewhere. This guide focuses on depots as repositories for patches and patch bundles. Such
depots can be referred to as patch depots.
Patch depots are a very effective mechanism for managing patches. You can create your own
custom patch depots to meet various patch management needs. You can also create special depots
to be located on a patch server that acts as a source for patch or bundle installations on other
systems.
HP uses patch depots to deliver patches and patch bundles. For more information about depots,
see Chapter 7: “Using software depots for patch management” (page 64).
18 HP-UX patch overview
Page 19

Patch status
Patches have an associated status. The initial value of a patch's status does not change, but over
the life of the patch, modifiers might be added (as described in this section). You can find the
value for a patch's status in the Status field. This field is in the patch’s patch details page on the
ITRC and in the patch text file. To obtain the most up-to-date values for patch status, use the
patch details page. A patch status has the following values and modifiers to describe it.
Initial values for patch status include the following:
• General Release (GR)
• Special Release (SR)
Modifiers for patch status values include the following:
• Superseded
• With Warnings
HP has approved GR patches for widespread use.
HP intends an SR patch for limited distribution. It is available only through special channels.
Indicates that the patch has been replaced by a newer patch. For more information about
supersession, see “Ancestors and supersession” (page 25).
Results in the additional patch status values General Superseded and Special
Superseded.
Indicates that the patch has an associated warning. For more information about warnings,
see “Patch warnings” (page 38).
Most patches have a status of General Release or General Superseded.
Patch state
A patch that has been installed on a target system is assigned an attribute called patch_state
that provides information about a patch. For example, the patch_state tells you whether the
patch hasbeen committed or superseded. For more information about attributes, see “Patch-related
attributes” (page 29).
There are four values for patch_state:
• applied
• committed
• superseded
Results in the additional patch status values General Release With Warnings and
Special Release With Warnings.
The patch is currently activeon the system and is the most recent member of its supersession
chain to have been loaded.
The patch's rollback files have been deleted, or the patch was installed without saving
rollback files. The patch cannot be directly removed from the system. For more information
about patch rollback, see “Patch rollback and commitment” (page 33).
The patch has been superseded by another patch that has been installed on the system. The
patch is no longer active. For more information about supersession, see “Ancestors and
supersession” (page 25).
• committed/superseded
The patch has been committed and superseded by another patch installed on the system.
Patch-related concepts 19
Page 20

State
IMPORTANT: For HP-UX11.0 systems, you must install patch PHCO_22526or a superseding
patch for proper functionality regarding the committed/superseded patch_state.
Use the following SD-UX commands to determine patch_state values:
• Show the patch_state value for patch patch_id by entering this command:
swlist -l fileset -a patch_state patch_id
• Show the patch_state values for all patches on the local system by entering this command:
swlist -l fileset -a patch_state *,c=patch
For more information regarding the swlist command, see “Which patches are on a system?”
(page 21).
Filesets (patch and nonpatch) have an attribute called state that indicates the current installation
state of a fileset. During installation, software is transitioned through the following states:
transient, installed, and configured. During removal, software is transitioned through
these states: configured, installed, and transient.
An SD-UX operation leaves a fileset in one of the following states:
• installed
Software has been successfully installed but not yet configured.
• configured
Software has been successfully installed and configured. No further operations are required.
• corrupt
SD-UX has encountered an unexpected condition during software installation checks.
• transient
When SD-UX moves software from one location to another, the software is in a transient
state. If an interruption occurs during the transfer, the state remains transient.
For more information about these states, see the Software Distributor Administration Guide on the
HP Business Support Center website at http://www.hp.com/go/sd-docs.
Use the following swlist command to view the state associated with patch patch_id:
swlist -l fileset -a state | grep patch_id
For more information about the swlist command,see “Which patches are on a system?”
(page 21).
Category tags
Patches have categories, or category tags, associated with them to simplify the process of
determining the general purpose of a specific patch. A patch might have multiple categories
specified. This section provides a list of common patch categories. A patch always has the category
tag patch.
Although you can use category tags in conjunction with several SD-UX commands, including
the swinstall and swcopy commands, you should only use category tags with the swlist
command.
Because of the cumulative nature of patches, many category tags for a patch are inherited from
the patch's ancestors. Therefore, if patch A is created to deliver a critical fix, it will have a
critical tag, and all patches superseding it will also have a critical tag.
20 HP-UX patch overview
Page 21

You can determine patch categories for a given patch in the following ways:
• Viewing the Category Tags field on the patch details page or inthe text file for the patch.
• Using the swlist command:
swlist -l product -a category_tag patch_id
This command also shows any category tags that have been manually added to the patch by a
user. For swlist examples that use category tags and for more information about the swlist
command, see “Which patches are on a system?” (page 21).
The following list provides a subset of patch-related categories:
• patch
This category tag is always present for patches because software objects with the is_patch
attribute set to true have the built-in, reserved category of patch. For more information
about attributes, see “Patch-related attributes” (page 29).
• hardware_enablement
A patch that provides support for new hardware.
• enhancement
A patch that provides an enhancement.
• special_release
— A patch with restricted distribution, usually intended for installation by one specific
customer or set of customers.
— Information for special_release patches is not always available using the ITRC's
Patch Database or other official HP information sources. However, you might encounter
references to these patches when viewing information related to other patches.
— A patch cannot inherit this tag.
• critical
— A patch that repairs a critical problem. For more information, see “Critical and noncritical
patches” (page 36).
A patch that has a critical tag also has one or more of the following tags: panic,
halts_system, corruption, memory_leak.
• firmware
A patch that provides model-specific firmware updates.
• manual_dependencies
— A patch that contains one or more dependencies that are not enforced by SD-UX tools.
For more information, see “Patch dependencies” (page 31).
— A patch cannot inherit this tag.
Which patches are on a system?
SD-UX is included with the HP-UX operating system and provides a powerful set of tools for
centralized HP-UX software management. Many SD-UX commands start with sw; for example:
swlist, swinstall, swreg, swremove, swcopy, and swverify. For more information about
SD-UX, see the Software Distributor Administration Guide on the HP Business Support Center
website at http://www.hp.com/go/sd-docs.
The swlist command can be invaluable in determining which patches and patch bundles are
on an HP-UX system. You can use the swlist command to display information about software
products that are installed on a local or remote host, or that are stored in a local or remote depot.
You can use the various command arguments and options to customize the information returned.
See the swlist(1M) manpage.
Which patches are on a system? 21
Page 22

This section presents some examples of swlist to display information about patches, bundles,
and depots.
NOTE: For brevity and improved readability, some lines of SD-UX command output have been
shortened or removed.
Examples of the swlist command
Use the swlist command with no arguments to get a default listing of all top-level software
installed on the local host:
swlist
For example:
$ swlist
# Initializing...
# Contacting target "some_system"...
#
# Target: some_system:/
# Bundle(s):
BUNDLE11i B.11.11.0102.2 Required Patch Bundle for HP-UX 11i, February 2001
GOLDAPPS11i B.11.11.0312.4 Gold Applications Patches for HP-UX 11i v1, Dec 2003
GOLDBASE11i B.11.11.0312.4 Gold Base Patches for HP-UX 11i v1, December 2003
HWEnable11i B.11.11.0309.4 Hardware Enablement Patches for HP-UX 11i, Sep 2003
MOZILLA 1.4.0.00.00 Mozilla 1.4 for HP-UX
T1471AA A.03.50.000 HP-UX Secure Shell
# Product(s) not contained in a Bundle:
PHCO_28848 1.0 Software Distributor Cumulative Patch
PHCO_29010 1.0 shar(1) patch
PHCO_29495 1.0 libc cumulative patch
PHSS_28677 1.0 CDE Applications Periodic Patch
vim 5.8 Vi IMproved
The swlist command has many arguments. This chapter considers only the following arguments
and operands:
swlist [-d] [-l level] [-a attribute] [-s source] [software_selections] [-x
option=value] [@ target_selections]
• -d
Directs the swlist command to operate on a software depot rather than on software
currently installed on the system. When you use this argument, you must also use the @
target_selections argument to specify the depot.
• -l level
— Lists all software objects down to the specified level. The following is a partial list of
supported level values:
◦ depot: Lists software available from registered depots.
◦ bundle: Shows only bundles.
◦ product: Shows only products.
◦ patch: Shows all applied patches.
◦ fileset: Shows products and filesets.
◦ file: Shows products, filesets, files, and numbers (used in software licensing).
◦ category: Shows all categories of available patches for patches thathave included
category objects in their definition.
— Specifies multiple values for level:
-l bundle -l product: Shows bundles and the products they contain.
22 HP-UX patch overview
Page 23

• -a attribute
Specifies one or more attributes to display. For more information about attributes, see
“Patch-related attributes” (page 29).
• -s source
Specifies the software source to list. Use this argument as an alternative way to list a depot.
• software_selections
— Specifies software objects to be listed.
— Applies only if the level is bundle, product, fileset, file, or patch.
— Use wildcards [ ], *, ? in the specification of the software_selections if you
want to make multiple selections. For example:
◦ A specification of bun[12] selects software bun1 and bun2.
◦ A specification of \* selects all software.
— Views the manpages for sd(5) using the command:
man 5 sd
• -x option=value
— Sets the option to specified value.
— The default behavior of the swlist command is to show only the latest patches installed
on a system. It does not show patches that have been superseded. To list superseded
patches, set the show_superseded_patches option to true:
swlist -x show_superseded_patches=true
— Specifies multiple -x options if needed.
• @ target_selections
— Specifies the target of the command. You can specify the swlist command operate on
a system other than the local host or on a depot. For example, to specify the swlist
command operate on the system host1:
swlist @ host1
— Operates on the software depot depot1 located in directory some_directory on the
local host:
swlist @ /some_directory/depot1
— Operates on the depot depot2 located in directory some_directory on the system
host1:
swlist @ host1:/some_directory/depot2
For a complete list of swlist arguments, consult the swlist(1M) manpage or the Software
Distributor Administration Guide on the HP Business Support Center website at http://www.hp.com/
go/sd-docs.
To filter the output to display only patches, use the -l argument in combination with a software
selection using the category tag patch:
swlist -l level *,c=category_tag
For example:
$ swlist -l product *,c=patch
# Initializing...
# Contacting target "some_system"...
#
# Target: some_system:/
PHCO_28848 1.0 Software Distributor Cumulative Patch
PHCO_29010 1.0 shar(1) patch
PHCO_29495 1.0 libc cumulative patch
Which patches are on a system? 23
Page 24

PHSS_28677 1.0 CDE Applications Periodic Patch
...
The following command shows patches that have a manual_dependencies category tag:
swlist -l level *,c=category_tag
For example:
$ swlist -l product *,c=manual_dependencies
# Initializing...
# Contacting target "chb26006"...
#
# Target: chb26006:/
PHCO_24198 1.0 ioscan(1M) patch
PHCO_25831 1.0 SCSI Ultra160 driver Online Addition script
PHCO_25841 1.0 Add Rock Ridge extension to mount_cdfs(1M)
PHCO_26252 1.0 mount_vxfs(1M) cumulative patch
...
The following command shows bundles on the system specified:
swlist -l level @ target_selections
For example:
$ swlist -l bundle @ some_system
# Initializing...
# Contacting target "some_system"...
#
# Target: some_system:/
BUNDLE11i B.11.11.0102.2 Required Patch Bundle for HP-UX 11i, Feb 2001
GOLDAPPS11i B.11.11.0312.4 Gold Applications Patches for HP-UX 11i v1, Dec 2003
GOLDBASE11i B.11.11.0312.4 Gold Base Patches for HP-UX 11i v1, Dec 2003
HWEnable11i B.11.11.0309.4 Hardware Enablement Patches for HP-UX 11i, Sep 2003
MOZILLA 1.4.0.00.00 Mozilla 1.4 for HP-UX
T1471AA A.03.50.000 HP-UX Secure Shell
Table 3-1: “Variations of the swlist command” (page 24) lists numerous swlist command
variations that you might find useful. These examples can also help you learn how to combine
various swlist arguments.
Table 3-1 Variations of the swlist command
swlist -l depot
swlist -l depot @ some_host
swlist -d -l product @
\some_host:/some_directory/some_depot
swlist -l product -s
\some_host:/some_directory/some_depot
swlist -d -l product *,c=patch @
\some_host:/some_directory/some_depot
swlist -d -l category @
\some_host:/some_directory/some_depot
swlist -a readme -l product *,c=critical
Descriptionswlist Commands
Displays the registered depots located on thelocal system.
Displays the registered depots located on the system
some_host.
Alternates commands that list the products stored in the
software depot /some_directory/some_depot on the
system some_host.
Lists all patches in the depot
/some_directory/some_depot on the system
some_host.
Lists all category tags associated with the contents of the
depot /some_directory/some_depot on the system
some_host.
Displays thereadme documentationfor patch patch_id.swlist -a readme -l product patch_id
Displays the readme documentation for all patches
installed on the local system which contain critical
functionality.
Lists the products contained in bundle some_bundle.swlist -l product some_bundle
24 HP-UX patch overview
Page 25

Table 3-1 Variations of the swlist command (continued)
Descriptionswlist Commands
Lists the category tags for patch patch_id.swlist -l product -a category_tag patch_id
swlist -l product -a category_tag
\*,c=patch
Ancestors and supersession
The related concepts of ancestors and supersession are integral to patches and patch management.
It is important that you gain a basic understanding of both. It might also be helpful for you to
recall information presented in “HP-UX software structure” (page 17).
Ancestors
The ancestor of a patch is the original softwareproduct that a patch modifies. Ancestry is defined
only at the fileset level. Each patch fileset has only one ancestor fileset that composes the base
software that a patch modifies. However, there might be one or more versions of this ancestor
fileset. The patch fileset has the same extension as its ancestor. For example, fileset Xserver.AGRM
is the ancestor of patch fileset PHSS_29183.AGRM. You can see an additional example in
“Advanced topic: determining patch ancestors” (page 25).
Ancestry impacts both patch installation and patch removal. A patch fileset cannot be installed
on a system unless its ancestor fileset software either is already installed or is being installed
during the same operation. Similarly, when an ancestor fileset is removed, all the patches that
have been applied to it are also removed.
Advanced topic: determining patch ancestors
Lists the patches installed on the local system and their
corresponding category tags.
You can determine a patch fileset's ancestor using the patch's ancestor attribute with the
swlist command. The following command lists the ancestor filesets for the filesets of patch
patch_id:
swlist -l fileset -a attributepatch_id
For example:
$ swlist -l fileset -a ancestor PHSS_29183
# Initializing...
# Contacting target "chb26006"...
# Target: chb26006:/
# PHSS_29183
PHSS_29183.AGRM Xserver.AGRM,fr=B.11.11,v=HP
PHSS_29183.DDX-ADVANCED Xserver.DDX-ADVANCED,fr=B.11.11,v=HP
PHSS_29183.DDX-ENTRY Xserver.DDX-ENTRY,fr=B.11.11,v=HP
PHSS_29183.DDX-LOAD Xserver.DDX-LOAD,fr=B.11.11,v=HP
PHSS_29183.DDX-SAM Xserver.DDX-SAM,fr=B.11.11,v=HP
PHSS_29183.DDX-SLS Xserver.DDX-SLS,fr=B.11.11,v=HP
PHSS_29183.DDX-UTILS Xserver.DDX-UTILS,fr=B.11.11,v=HP
PHSS_29183.X11-SERV Xserver.X11-SERV,fr=B.11.11,v=HP
PHSS_29183.X11-SERV-MAN Xserver.X11-SERV-MAN,fr=B.11.11,v=HP
PHSS_29183.XEXT-DBE Xserver.XEXT-DBE,fr=B.11.11,v=HP
PHSS_29183.XEXT-DBE-MAN Xserver.XEXT-DBE-MAN,fr=B.11.11,v=HP
PHSS_29183.XEXT-DPMS Xserver.XEXT-DPMS,fr=B.11.11,v=HP
PHSS_29183.XEXT-DPMS-MAN Xserver.XEXT-DPMS-MAN,fr=B.11.11,v=HP
PHSS_29183.XEXT-HPCR Xserver.XEXT-HPCR,fr=B.11.11,v=HP
PHSS_29183.XEXT-HPCR-MAN Xserver.XEXT-HPCR-MAN,fr=B.11.11,v=HP
PHSS_29183.XEXT-MBX Xserver.XEXT-MBX,fr=B.11.11,v=HP
PHSS_29183.XEXT-RECORD Xserver.XEXT-RECORD,fr=B.11.11,v=HP
Patch filesets that have been applied to an ancestor fileset are listed in the ancestor's
applied_patches attribute. Enter the following command:
Ancestors and supersession 25
Page 26

swlist -a applied_patches fileset_name
For example:
$ swlist -a applied_patches Xserver.AGRM
# Initializing...
# Contacting target "chb26006"...
# Target: chb26006:/
Xserver.Runtime.AGRM
PHSS_21817.AGRM,fa=HP-UX_B.11.11_32/64
PHSS_26619.AGRM,fa=HP-UX_B.11.11_32/64
PHSS_26622.AGRM,fa=HP-UX_B.11.11_32/64
PHSS_26638.AGRM,fa=HP-UX_B.11.11_32/64
PHSS_29169.AGRM,fa=HP-UX_B.11.11_32/64
PHSS_29183.AGRM,fa=HP-UX_B.11.11_32/64
For more information see the Software Distributor Administration Guide on the HP Business Support
Center website at http://www.hp.com/go/sd-docs.
Supersession
Supersession is the process of replacing an earlier patchwith a new patch. A new patchsupersedes
all previous patches for its particular patch chain. Upon installation of the new (superseding)
patch, its files replace files of the patches being superseded. Patches for HP-UX products are
always cumulative. Each new patch contains all aspects of all its preceding patches.
A series of patches form a supersession chain. A supersession chain includes the following:
• The nonpatch software product being patched.
• Each patch that fixes the nonpatch software product.
• Each patch that fixes the patches.
Figure 3-1 shows a simple, hypothetical supersession chain in which a product has been
superseded by PHXX_31937, which in turn has been superseded by PHXX_32384, which has
been supersededby PHXX_43826. In general, patch numbers increase along a patch supersession
chain.
26 HP-UX patch overview
Page 27
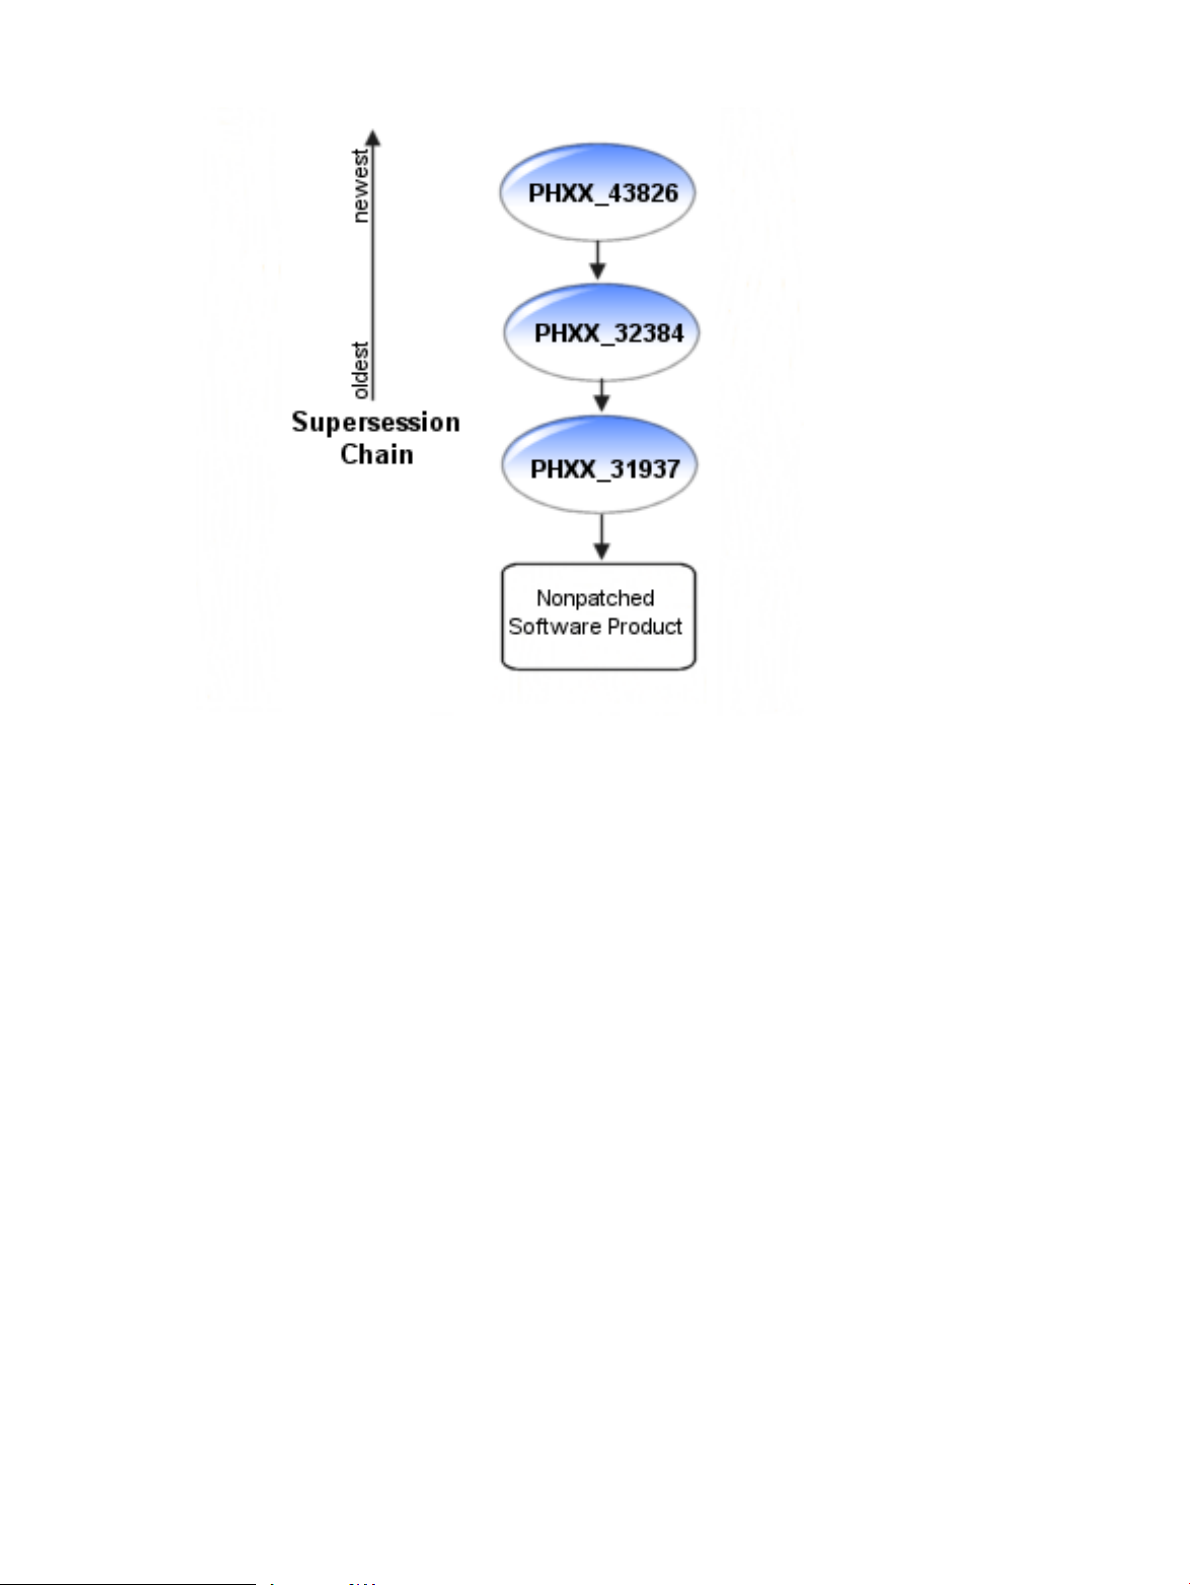
Figure 3-1 Patch Supersession Chain in a Patch Family
The cumulative nature of a patch allows it to satisfy all dependencies on all patches it supersedes.
The converse is not true, however. A superseded patch will not satisfy a dependency on a
superseding patch.For more information aboutdependencies, see “Patch dependencies” (page 31).
You can determine which patches a given patch supersedes by viewing either the patch's patch
details page or the patch's patch text file. See the Supersedes field for more information.
Advanced topic: displaying supersession information
By default, the swlist command does not show superseded patches, but you can use the
show_superseded_patches option to show them. Enter this command:
swlist -l patch -x show_superseded_patches=true
You can also use the HP-UX Patch Tool show_patches to show superseded patches. To show
superseded patches, enter this command:
show_patches -s
You can list the filesets that have directly superseded the filesets of a given patch installed on
the system. This is done by using the swlist command to show the superseded_by attribute
of the patch.In thefollowing example, patch PHSS_27875 is superseded by patch PHSS_28681:
swlist -l level -a attribute \ -x option=valuepatch_id
For example:
$ swlist -l fileset -a superseded_by \
-x show_superseded_patches=true PHSS_27875
# Initializing...
# Contacting target "some_system"...
#
# Target: some_system:/
#
# PHSS_27875
PHSS_27875.X11-JPN-S-MSG PHSS_28681.X11-JPN-S-MSG,fa=HP-UX_B.11.11_32/64
Ancestors and supersession 27
Page 28

PHSS_27875.X11-RUN-CL PHSS_28681.X11-RUN-CL,fa=HP-UX_B.11.11_32/64
PHSS_27875.X11-TCH-B-MSG PHSS_28681.X11-TCH-B-MSG,fa=HP-UX_B.11.11_32/64
You can also show the filesets that a given patch has superseded. These superseded filesets will
be listed whether or not they are installed on a system. This is done by using the swlist command
to list the supersedes attribute of the patch. Note that the first patch of any particular patch
supersession chain does not have a supersedes attribute. In the following example, patch
PHSS_28681 is shown to supersede patches PHSS_27875, PHSS_26498, and PHSS_25201.
(The output has been reformatted to improve readability.)
swlist -l level -a attributepatch_id
For example:
$ swlist -l fileset -a supersedes PHSS_28681
# Initializing...
# Contacting target "some_system"...
#
# Target: some_system:/
#
# PHSS_28681
PHSS_28681.X11-JPN-S-MSG
PHSS_27875.X11-JPN-S-MSG,fr=*
PHSS_26498.X11-JPN-S-MSG,fr=*
PHSS_28681.X11-RUN-CL
PHSS_27875.X11-RUN-CL,fr=*
PHSS_26498.X11-RUN-CL,fr=*
PHSS_25201.X11-RUN-CL,fr=*
PHSS_28681.X11-TCH-B-MSG
PHSS_27875.X11-TCH-B-MSG,fr=*
PHSS_26498.X11-TCH-B-MSG,fr=*
Advanced topic: supersession and the patch_state attribute
When a superseding patch is applied to a system, the superseded patch (if there was one) remains
on the system but is not active. Only the top patch of the chain is in the active (applied) state.
For more information about patch state, see “Patch state” (page 19).
You can use the following swlist command to show the patch_state attribute for patch
patch_id:
swlist -a patch_state -x show_superseded_patches=true patch_id
It is important to note that the availability of a newer, superseding patch does not preclude the
use of the older patch. Depending on the circumstances, a superseded patch might be a better
choice than the patch superseding it. Older patches have had more exposure to varied, real-world
use. When they have been shown to induce no ill effects, they are generally safer than newer
patches that supersede them. Thus, if two patches in a supersession chain solve the problem you
are facing, you might find that the older patch is the better choice.
Because HP-UX patches are cumulative, a superseding patch negates the need for the previous
patch. As an example, patch PHSS_29377 delivers all the features and fixes of all other patches
shown in Figure 3-2: “HP-UX Patch Supersession Chain” (page 29). This patch will also satisfy
any dependencies on all patches in the supersession chain.
SD-UX does not allow you to install a patch that has been superseded by another patch already
installed on a system. Using Figure 3-2: “HP-UX Patch Supersession Chain” (page 29) as an
example, if you have patch PHSS_29377 installed on a system SD-UX will not allow you to
install patch PHSS_29323.
Patch supersession chains can be more complex than the one shown in Figure 3-2: “HP-UX Patch
Supersession Chain” (page 29).
28 HP-UX patch overview
Page 29
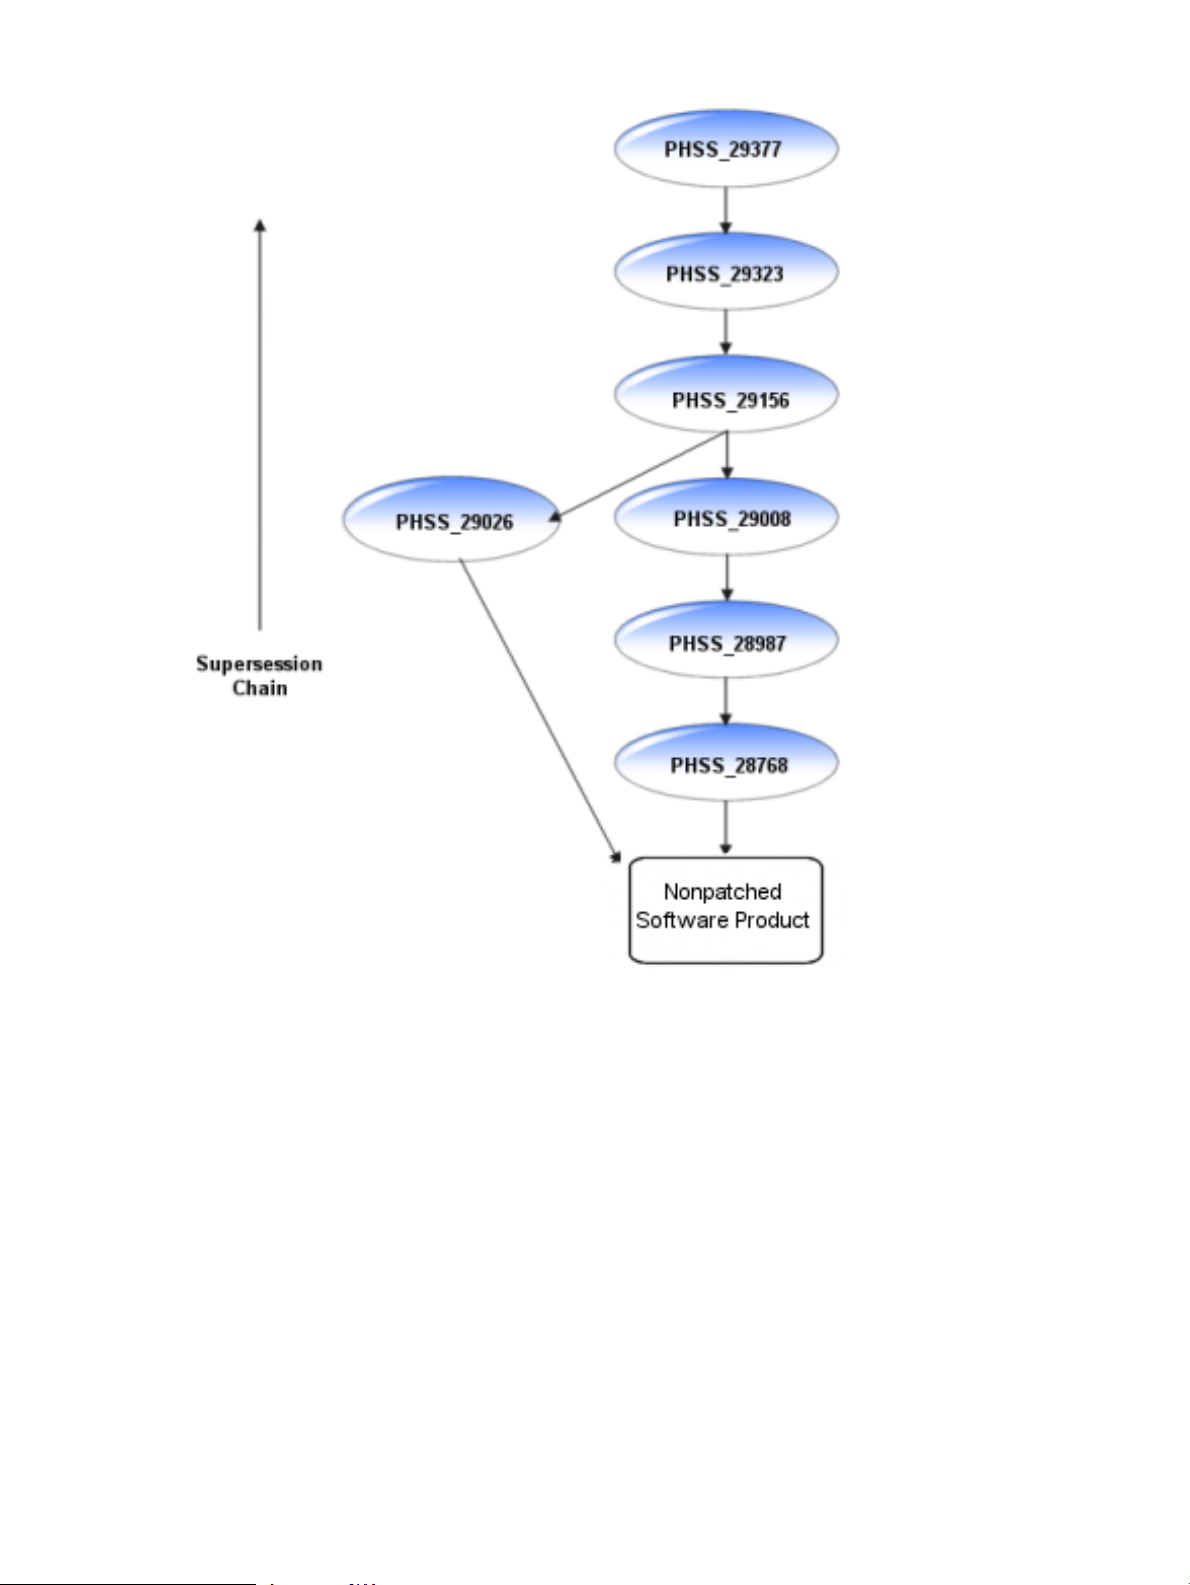
Figure 3-2 HP-UX Patch Supersession Chain
The supersession chain in Figure 3-2: “HP-UX Patch Supersession Chain” (page 29) is composed
of two separate supersession chains that were combined when patch PHSS_29156 superseded
both PHSS_29026 and PHSS_29008. Again, because of the cumulative nature of HP-UX patches,
patch PHSS_29377 delivers all the features and fixes delivered by the other six patches in this
supersession chain.
Patch-related attributes
Each of the SD-UX objects described in “HP-UX software structure” (page 17) has a set of
properties known as attributes that provide information about the object's characteristics. For
patches, these attributes control aspects of patch behavior and define patch properties and
relationships. (See “State” (page 20) and “Patch state” (page 19).)
For informationabout how you can use attributes with the swlist command, see “Which patches
are on a system?” (page 21).
Patch-related attributes 29
Page 30

The following list describes a subset of available attributes:
• ancestor
— Applies to filesets.
— Identifies the fileset that must be on the system for the patch to be installable.
• category_tag
— Applies to products or filesets.
— Provides a label for a fileset or product. Several tags are defined during patch creation;
users can create others with the swmodify command.
— See “Category tags” (page 20).
• is_patch
— Applies to both patch products and filesets.
— When set to true, is_patch enables patch behavior.
• is_reboot
— Applies to filesets.
— When set to true, is_reboot indicates that installation of the fileset will cause the
system to reboot.
• patch_state
— Applies to patch filesets.
— Records the condition of patches.
— See “Patch state” (page 19).
• readme
— Applies to products.
— Contains the patch's original text file.
• software_spec
— Applies to bundles, products, or filesets.
— Contains the fully qualified identifier for the bundle, product, or fileset. Uniquely
identifies a specific instance of a software object.
• state
— Applies to filesets.
— Provides useful information about the installation state of software.
— See “State” (page 20).
• supersedes
— Applies to patch filesets.
— Lists all prior filesets that a patch fileset supersedes.
— See “Ancestors and supersession” (page 25).
• superseded_by
— Applies to patch filesets.
— Records the software specification of the fileset that superseded the fileset on a given
system. This attribute is set only for installed patch filesets, and never in software depots.
— See “Ancestors and supersession” (page 25).
You can show these attributes with the swlist command using the -a attribute argument,
replacing attribute with one of the previously listed attributes. For more information about
the swlist command, see “Which patches are on a system?” (page 21).
30 HP-UX patch overview
Page 31

Patch dependencies
A patch that depends on other software in order to install or run correctly is said to have a
dependency on that other software. In order to become fully active, a patch might require changes
to areas of the system other than those it modifies. Such a patch might have a documented
dependency on one or more patches or nonpatch software products that are responsible for the
changes in these other areas.
For example, in Figure 3-3: “Patch Supersession Chains and Patch Dependencies” (page 31),
PHXX_31967 and PHXX_31937 depend on each other (mutual dependency). At a later time,
PHXX_32384 supersedes PHXX_31937, and PHXX_31967 can be successfully installed with
either patch. (PHXX_32384, as a cumulative patch, will satisfy the entire dependency.)
Figure 3-3 Patch Supersession Chains and Patch Dependencies
However, a superseded (older) patch does not satisfy a dependency on a superseding (newer)
patch. Figure 3-3: “Patch Supersession Chains and Patch Dependencies” (page 31) provides an
example. PHXX_33662 supersedes PHXX_31967, butPHXX_33662 has anupdated dependency
on the superseding patch PHXX_32384. In this case, the older patch (PHXX_31937) doesn't
satisfy the new dependency
For more information about supersession, see “Ancestors and supersession” (page 25).
Types of dependencies
HP provides patch dependency information for a patch in its patch details page and its patch text
file. The dependency information is contained in the following fields:
• Patch Dependencies
Patches that are required for proper operation.
• Other Dependencies
Various dependencies that cannot be described as patch dependencies, such as those that
are needed only under specific circumstances.
NOTE: While looking at a patch details page or a patch text file, you might notice an additional
field that is dependency related. The Hardware Dependencies field represents a different type
of dependency than those presented in this section. It does not show dependencies on other
patches, but rather gives specific system models to which a patch is limited.
Corequisites and prerequisites
A corequisite fileset must be available for installation to start and must be present when
installation is complete. No installation ordering is predictable.
Patch dependencies 31
Page 32

A prerequisite adds a requirement that the order of installation be controlled. The prerequisite
fileset must be installed before the requesting fileset. This implies that some content of the
prerequisite is used or modified during the installation process.
Advanced topic: determining corequisite and prerequisite filesets with the swlist command
You can use the following command to determine the dependent filesets. Replace
dependency_type with either corequisite or prerequisite, as appropriate.
swlist -vl fileset -a dependency_type
fileset
For example:
$ swlist -vl fileset -a corequisite PHSS_29964.DCEC-ENG-A-MAN
# Initializing...
# Contacting target "some_system"...
# PHSS_29964.DCEC-ENG-A-MAN
fileset
corequisites PHCO_24400.CORE-SHLIBS,fa=HP-UX_B.11.11_32/64
Enforced and unenforced (manual) dependencies
A patch's dependency upon another patch will either be enforced or unenforced by SD-UX.
Starting with HP-UX 11i v1 (B.11.11), SD-UX install commands supported the use of requisites
for automatically enforcing dependencies. Prior to HP-UX 11i v1, users had to maintain
dependencies manually.
• Enforced dependencies
Dependencies that are registered using corequisite or prerequisite attributes and managed
by SD-UX.
• Unenforced dependencies (also known as manual dependencies)
Dependencies that SD-UX does not register as requisites and thus cannot enforce when
performing patch installation. You can identify these types of dependencies by checking the
manual_dependency category tag. The user must ensure that the required patches are
installed to satisfy these manual dependencies.
Impact of dependencies on acquiring patches
HP strongly recommends that you use the ITRC as your primary source for acquiring patches.
If you acquire individual patches using the ITRC's Patch Database, the patches required to meet
the dependencies of these patches are automatically selected for download along with the patches
you selected manually. The analysis performed by the Patch Database to select these patches
takes into account supersession and patch warnings. Unless you have a specific reason to do
otherwise, you should download these automatically selected patches along with the patches
you explicitly selected. This automatic selection of patches represents one of the many time
saving features provided by the ITRC.
For a description of how to identify and acquire the additional patches that might be needed to
satisfy dependencies, see “Advanced topic: checking for all patch dependencies” (page 59).
NOTE: If you download patches from sources other than the ITRC, you are completely
responsible for identifying and downloading the patches required to satisfy all dependencies.
Standard HP-UX patch bundles, such as the Quality Pack, do not require users to perform any
dependency analysis. All patches required to satisfy all dependencies are included in the bundles.
Using standard HP-UX patch bundles increases confidence that you have obtained and installed
all necessary patches to satisfy all dependencies.
32 HP-UX patch overview
Page 33

Patch rollback and commitment
Patch rollback
You might occasionally want to remove a patch and restore the system to its prepatched state.
This process is known as patch rollback. For example, if you installed a patch that resulted in
unacceptable system behavior, you might choose to roll back this patch. However, rollback is
possible only if certain files were saved as part of the patch installation process. During patch
installation, the default behavior is to save copies of all files that are replaced by the new patch
before the new versions of these files are loaded. These saved files are called rollback files and
are the key to making patch rollback possible. When you roll back a patch, these rollback files
are restored to the system. You should override the default behavior only if you have a complete
understanding of the patch rollback process.
You cannot roll back a patch unless one of the following is true:
• Rollback files corresponding to the patch are available for reinstallation.
• Base software and the patch that modifies the software are removed at the same time
(removing the base software also removes the patches associated with that software).
• For superseded patches, you must first roll back the superseding patch.
You can use the swremove command to roll back a patch (if no dependencies exist for the patch).
Use the following command to roll back the patch patch_id:
swremove patch_id
As is true for many SD-UX commands, you can add the -p option to execute the command in
preview-only mode. This mode allows you to view output from the command without actual
changes occurring. You should initially execute the command in preview mode:
swremove -p patch_id
Advanced topic: patch installation and rollback files
When installing patches, you can explicitly specify that rollback files not be saved. To do this,
you add the -x patch_save_files=false option to the swinstall command:
$ swinstall -s /tmp/temporary_depot/depot -x autoreboot=true \
-x patch_match_target=true x patch_save_files=false
Only use the false option if you will never remove a patch under any circumstances.
Patch commitment
Allowing for patch rollback does come at a cost, because the files required for patch rollback
consume disk space. If disk space is an issue on a system, you can commit the patches; a process
that deletes the associated rollback files, thereby freeing disk space. If disk space is not an issue
on a system, you should avoid committing the patches, and leave rollback files in place. If any
patch in a supersession chain is committed, all prior patches in the chain lose the ability to be
restored, and the save area disk space for those patches will also be reclaimed.
Do not undertake patch commitment without serious consideration of the consequences. When
you commit a patch, simple rollback of the patch is no longer possible. Because of this, you should
carefully select which patches should be committed. Good candidates include patches that were
thoroughly tested in the environment prior to installation, and patches that have been installed
on the system for a significant period of time and have not resulted in unwarranted conditions.
Other good candidates are patches that have been superseded multiple times. You should also
consider a patch's warning status and its HP rating before committing the patch.
To commit an individual patch, execute the swmodify command on the patch with the
patch_commit=true option. To commit the patch patch_id, enter this command:
swmodify -x patch_commit=true patch_id
You can add the -p option to this command so it will be executed in preview-only mode.
Patch rollback and commitment 33
Page 34

Advanced topic: patch cleanup utility
The patch utility called cleanup allows you to commit all patches that have been superseded
a specified number of times. You can execute this command in preview mode in order to see
what effect the command will have without actually making any changes. You should always
use the preview mode first. This is accomplished by including the -p option. The command has
the following format:
cleanup [-p] -c number
The cleanup utility is delivered by the following patches (and their superseding patches):
• PHCO_27779 (HP-UX 11.0, B.11.00)
• PHCO_27780 (HP-UX 11i v1, B.11.11)
• PHCO_32220 (HP-UX 11i v2, B.11.23)
• Shipped with SD-UX (HP-UX 11i v3, B.11.31)
For example, the following command will execute in preview mode. When executed without
the -p option, the command causes all patches superseded three or more times to be committed.
The patches to be committed are shown in the output of the command.
$ cleanup -p -c3
### Cleanup program started at 04/13/04 07:17:40
Preview mode enabled. No modifications will be made.
Commit patches superseded at least 3 time(s) on 'some_system'.
Obtaining superseded patch information...done.
The following patches superseded at least 3 time(s) can be committed:
Superseded # Times Superseded Disk Space in /var/adm/sw/save Superseded By
========== ================== ============================== =============
PHKL_23313 3 66560 bytes PHKL_26519
PHKL_26233 3 180224 bytes PHKL_28267
PHNE_23288 3 59392 bytes PHNE_23645
PHNE_26388 4 6581248 bytes PHNE_28103
PHNE_28103 3 6694912 bytes PHNE_28983
PHSS_21817 5 12379136 bytes PHSS_26619
PHSS_26492 3 8761344 bytes PHSS_27872
PHSS_26619 4 14969856 bytes PHSS_26622
PHSS_26622 3 27064320 bytes PHSS_26638
All information has been logged to /var/adm/cleanup.log.
### Cleanup program completed at 04/13/04 07:17:40
HP-UX patch ratings
HP-UX patches have a corresponding quality rating called the HP rating. HP assigns a patch
rating of 1 (numeral or star) to each HP-UX patch when it is released. Over time, HP might update
the rating value to 2 or 3 (numeral or stars) to convey increased confidence in the patch. The
higher the rating, the lower the risk of side effects and the more suitable the patch is for
mission-critical environments.
You can use the ITRC's Patch Database to find the rating value for a specific patch. The ITRC
graphically represents a patch's rating by displaying one to three stars beside the patch ID in the
results of a patch search. “Obtaining information using the ITRC” (page 38) provides details on
how to do this.
If HP learns of a problem caused by or exposed by an HP-UX patch, HP issues a patch warning
describing the problem and ceases recommending the patch, but does not change the patch
rating. If a patch has a warning associated with it, you will no longer be able to view the rating
on the ITRC's Patch Database. For more information on patch warnings, see “Patch warnings”
(page 38).
The followingrating related information pertains only to patches that have no associated warnings.
34 HP-UX patch overview
Page 35

HP patch rating of 1
Although these patches have passed rigorous prerelease testing, HP recommends that you use
these patches only if all of the following conditions are true:
• If you are in a reactive patching situation.
• The highest-rated patch that addresses the problem is rated 1.
• You cannot wait for the patch to increase to a higher rating.
Whenever possible, you should wait until the patch gains more exposure and achieves a rating
of 2 or 3. For more information on reactive and proactive patching, see Chapter 4: “Patch
management overview” (page 42).
Rating details
The following list provides more details about patch ratings of 1:
• Upon release, patches are assigned a rating of 1.
• These patches have successfully completed internal testing by HP.
• Because they are new, these patches have an inherent level of risk associated with them that
you might find unacceptable. However, they are made available in case you are willing to
accept the increased risk because the patch resolves a specific issue on a system.
• If you choose to use one of these patches, you should evaluate and test it carefully prior to
deployment on a system.
HP patch rating of 2
HP recommends that you use patches rated 2 for both proactive and reactive patching and when
a patch rated 3 is not available.
Patches rated 1 might be upgraded to a rating of 2 on any given day (based on the amount of
customer exposure). Therefore, if you chose to defer patch installation to wait for a patch rating
to be upgraded to a rating of 2, you can check for this upgrade on a daily basis.
Rating details
The following list provides more details on patch ratings of 2:
• These patcheshave met minimum criteria based on the number ofdays available to customers
and the number of times downloaded with no problems reported.
• These patches mightappear inthe recommendedcolumn ofthe ITRC's Patch Database patch
search results page (provided they have no associated patch warnings).
HP patch rating of 3
Rating 3 is the highest rating HP assigns to a patch. These patches represent the lowest level of
risk. HP recommends you use patches rated 3 whenever possible for both proactive and reactive
patching.
If you are waiting for a specific patch to reach a rating of 3, check the patch quarterly to determine
whether it has been promoted from a rating of 2 to a rating of 3.
Rating details
The following list provides more details on patch ratings of 3:
• These patches have passed more levels of testing than patches rated 1 or 2.
• These patches mightappear inthe recommendedcolumn ofthe ITRC's Patch Database patch
search results page (provided they have no associated patch warnings).
HP-UX patch ratings 35
Page 36

Critical and noncritical patches
HP-UX patches are considered to be either critical or noncritical. You can determine whether a
patch is labeled as critical by looking at the Critical field on the patch details page or in the patch
text file for the patch. This field identifies newly delivered critical content.
HP considers a patch to be critical if the patch provides a fix for a critical problem. Examples
include patches that provide fixes for the following problems:
• System panic or hang
• Process abort, hang, or failure
• Data corruption
• Severe performance degradation
• Application-specific critical issues
HP considers a patch to be noncritical if the patch provides fixes for only noncritical problems.
Examples of noncritical problems include the following:
• Extraneous debug, warning, or error messages
• Failure to address all documented issues
• Minor regressions in behavior
A patch is considered critical if it contains any critical fixes, even if they were introduced in
earlier (superseded) patches. The Critical field for such a patch contains the following text:
"No (superseded patches were critical)"
In addition, the field gives the ID of the patch that introduced the critical fix. The Critical field
for patch PHSS_30011 is shown in the following screen. It shows that superseded patch
PHSS_29735 actually introduced the critical fix.
Critical:No (superseded patches were critical)
PHSS_29735: CORRUPTION
Critical patches have a critical category tag. The category tags (and swlist command used
to acquire the category tags) for patch PHSS_30011 are shown in the following screen. See
“Category tags” (page 20) for more information.
$ swlist -l product -a category_tag PHSS_30011
# Initializing...
# Contacting target "some_system"...
#
# Target: some_system:/
# PHSS_30011 patch defect_repair general_release critical
enhancement corruption manual_dependencies
Finding information for a specific patch
The best place to obtain information about a specific patch is the patch's patch details page on the
ITRC.
Patch documentation
All patches have a patch details page, a patch text file, and readme information. The patch details
page should be your first choice for obtaining information because it contains the most up-to-date
information available. This is not always true for the patch text file or the patch readme.
You can find the documentation at the following resources:
• See Chapter 6: “Using the IT Resource Center” (page 55). For the patch details page, go to
the ITRC website at http://itrc.hp.com.
• The patch text file will be in the downloaded file after you download a patch from the ITRC.
See Chapter 6: “Using the IT Resource Center” (page 55).
• The patch readme will be on the system after you install the patch.
36 HP-UX patch overview
Page 37

The patch details page and the patch text file contain the same fields and provide detailed
information about a patch. Table 3-2: “Subset of fields in patch text file and patch details page ”
(page 37) shows a subset of these fields.
Table 3-2 Subset of fields in patch text file and patch details page
DescriptionField
Patch Name
Patch Description
Creation Date
Post Date
Warning
Hardware Platforms - OS Releases
Filesets
Status
Critical
Category Tags
The patchID. See “Patch identification”(page 17) for more information about
the format of patch IDs.
A terse description of the patch.
The date the patch was created.
The date the patch was released for general distribution.
If the patch has an associated warning, this field shows the date the warning
was issued and provides information about the warning. This field is present
only if the patch hasan associated warning. For more information, see “Patch
warnings” (page 38).
The hardware platforms and HP-UX OS releases where you can install the
patch.
A listing of the filesets that compose this patch.
This is set to Y if the installation of this patch requires a reboot.Automatic Reboot?
The support status of the patch. For more information, see “Patch status”
(page 19).
If this patch is consideredcritical, or if it supersedes a critical patch,additional
information is provided. For more information, see “Critical and noncritical
patches” (page 36).
A listing of the categories associated with this patch. For more information,
see “Category tags” (page 20).
Symptoms
Defect Description
Patch Dependencies
Hardware Dependencies
Other Dependencies
Supersedes
Installation Instructions
Special Installation Instructions
Patch Family Tree
The symptoms of the problem.
A detailed description of the defect.
This is set to Y if the patch is an enhancement.Enhancement
All patches that this patch depends upon for proper operation. You must
install thelisted patchesif you areinstalling thispatch. Formore information,
see “Patch dependencies” (page 31).
The specific system models to which this patch is applicable.
The various dependencies that cannot be described in a simple manner. For
example, dependencies that are needed only under specific circumstances
will be listed here. For more information, see “Patchdependencies” (page 31).
A list of all patches replaced, or superseded, by this patch. For more
information, see “Ancestors and supersession” (page 25).
The standard installation instructions common to all patches.
Any special instructions not included in those mentioned previously. This
field occasionally includes dependency information.
The patch family tree browser shows the lineage for a specified patch. The
root of the tree (the top-most patch) is the latest patch in the patch chain. Its
predecessors areshown beneath it, indented to the rightwith an arrow symbol
pointing to the succeeding patch. Patches at the same indentation level that
point to the same patch have the same successor.
Finding information for a specific patch 37
Page 38

Advanced topic: the readme attribute
Each patchhas an SD-UX attribute called readme that you can view using the swlist command.
See “Patch-related attributes” (page 29) for more information about attributes. The readme
attribute contains the patch's original text file. Be aware that, although the readme attribute
allows you to quickly and conveniently access information about patches on the system, this
information is static. Because of this, the readme will not contain more current information.
For example, even if a patch has an associated warning, the readme file won’t contain a Warning
field. Because the command returns a large amount of text, you might want to either redirect the
output to a file or pipe the output to the more command, as follows:
swlist -l product -a readme patch_id | more
You can use other variations of the swlist command to obtain thereadme information for
multiple patches. For example, if you want to obtain the readme information for all patches on
the local system that have manual dependencies, you can use the following command (output
is redirected to the manual.txt file):
swlist -l product -a readme *,c=manual_dependencies
> manual.txt
Obtaining information using the ITRC
The ITRC's Patch Database is the best resource for acquiring information about a specific patch.
Consult Chapter 2: “Quick start guide for patching HP-UX systems” (page 9) and Chapter 6:
“Using the IT Resource Center” (page 55) for more information about using the Patch Database,
including information about downloading patches and satisfying dependencies.
Accessing information on the ITRC
1. Log in to the ITRC at http://itrc.hp.com.
Be sure to log in to the appropriate site (Americas/Asia Pacific or European).
2. Select Patch database from the left navigation.
3. Select find individual patches.
4. Select HP-UX to go to the search for patches page.
5. To find instructions, select the How would you like to search?, Search Criteria and read
our usage guide links.
6. Select the OS revision.
7. From the search for patches step 2 drop-down list, select Search by Patch IDs.
8. In the text box next to the drop-down list, enter the patch ID for the patch you want to
download. Then click search.
If it exists, the selected patch is displayed in the search results page. Patches (possibly differing
from the patch you requested) are displayed in one to three columns.
• You can display the patch details page for a specific patch by selecting the patch ID.
• Unless a patch has a warning, the HP rating is represented graphically by the number
of stars displayed next to a patch ID.
• If a patch has a warning, the patch has a triangular yellow icon displayed beside it.
• Available replacement patches might be shown in the recommended and most recent
columns. If you choose to use a replacement and there is a patch shown in the
recommended column, this is the patch you should use.
Patch warnings
A patch warning is a notification that a patch causes or exposes adverse behavior. Patch warnings
provide specific information about this incorrect behavior, as well as other important details and
38 HP-UX patch overview
Page 39

recommendations. This information helps you to make decisions about the patch, such as whether
to install or remove a patch with a warning from the system.
The warning field
You can find patch warning information in the Warning field of a patch's patch details page or
patch text file. This field exists only for patches that have a warning. The Warning field is the
definitive source of information about a patch warning. The following screen shows part of the
Warning field for patch PHKL_30065.
Warning: 04/01/22 - This Critical Warning has been issued by HP.
- PHKL_30065 introduced behavior that can cause a panic on
systems configured with greater than 32 GB of device swap.
The behavior will occur only if all the following factors occur:
- The system is configured with more device swap than is
supported by the current value of the swchunk(5) tunable kernel parameter.
- The system has 2 or more swap devices.
- Pages are actually written to the non-primary swap device which
exceeds the swchunk(5) supported limit.
.
.
.
The Warning field contains the following information:
• The issue date of any warnings (year/month/day format)
• Whether the patch warning is critical or noncritical (see “Critical and noncritical warnings”
(page 39))
• A description of the problem
• A suggested course of action for the problem might be provided
• A reference to a replacement patch might be provided
See “Finding information for a specific patch” (page 36) for a description of how you can access
a patch details page and a patch text file.
Critical and noncritical warnings
Patch warnings are either critical or noncritical. You can find this information in the first line of
the Warning field in the patch's patch details page or in the patch text file.
HP considers a patch warning to be critical if the patch causes or exposes a critical problem.
Examples of critical patches include the following:
• System panic or hang
• Process abort, hang, or failure
• Data corruption
• Severe performance degradation
• Application-specific critical issues
HP considers a patch warning to be noncritical if the patch causes or exposes a noncritical problem.
Noncritical problems are those other than the ones described previously. Examples of noncritical
problems include the following:
• Extraneous debug, warning, or error messages
• Failure to address all documented issues
• Minor regressions in behavior
Patch warnings 39
Page 40

How to handle patch warnings
Your initial response to a warning for a patch on a system should be to carefully read the
associated warning text and research the issue to gain a complete understanding of how or if
the warning will impact the system.
Because of the number and complexity of the factors involved, there is no single correct way of
dealing with a patch with a warning. The following items show some possible courses of action:
• In some cases, such as if you encounter a critical problem on the system, immediate removal
of the patch might be necessary.
• In many cases, removal and replacement can wait until the next scheduled maintenance
window.
• In other cases, such as when the problem does not affect the hardware or software
configuration, there is no need for you to take any action. In fact, HP discourages unnecessary
change because it can cause down time and because there is always some risk when making
a change to the system.
Questions to ask
If you must deal with a patch that has a warning, consider the following questions in deciding
whether or not to use, or continue to use, the patch:
• Is the system environment susceptible to the problem?
A patch with a warning might not cause problems for every customer. Exposure depends
on the system-use models, and whether you have any of the affected configurations. The
previous screen is a good example of this situation. Unless the system is configured with
greater than 32 GB of device swap and meets all the other conditions listed, the patch warning
given for patch PHKL_30065 will have no impact on the system.
• Is a replacement patch available, and, if so, is its HP rating acceptable for the system?
A replacement patch might be available. You can use the ITRC Patch Database to attempt
to locate such a patch. Simply search using the explicit patch ID of the patch that has a
warning. If there is a replacement patch, it will be displayed in the search results page. If a
replacement patch exists, you must take into account its advantages and disadvantages.
This includes consideration of the patch's HP rating. See “HP-UX patch ratings” (page 34).
After answering the previous two questions, you must consider the following questions in order
to develop an appropriate course of action for your situation:
• What is the severity of the problem associated with the patch?
• If the patch is already on the system, has it caused any problems?
• What is your tolerance for down time if a reboot is necessary?
• What is the timing of the next maintenance window?
• What are your company's system administration policies?
As a final point, if you choose to remove a patch with a warning from a system, make sure that
the patch is not contained in any of the depots used for patch installations. For more information
about patch depots, see Chapter 7: “Using software depots for patch management” (page 64).
Advanced topic: finding patches with warnings
HP provides the HP-UX Software Assistant (SWA) tool at no charge. SWA can perform a number
of checks including published security issues, installed patches with warnings, and missing
patches with critical fixes. Once an analysis has been performed, you can use SWA to download
any recommended patches or patch bundles and create a depot ready for installation. For more
information, see Chapter 8: “Using HP-UX Software Assistant for patch management” (page 85).
40 HP-UX patch overview
Page 41

Backup and recovery
Always perform a backup of the system before making patch-related system changes. You should
have a backup in the event that unacceptable behavior occurs as a result of patching.
This section provides some resources that you can investigate for recovery strategies. It does not
provide the details needed for recovering from patch-related problems.
• Ignite-UX
Ignite is an HP-UX administration toolset that allows the simultaneous installation of HP-UX
on multiple clients, the creation and use of custom installations, the creation of recovery
media, and theremote recovery of clients.For more information, see the Ignite-UX web page
at http://www.hp.com/go/ignite-ux. The make_net_recovery and make_tape_recovery
features of Ignite can be good starting points for investigating recovery tools.
• Data Protector is an HP product that you can use for data protection and disaster recovery.
For more information, see the HP OpenView Storage Data Protector website at http://
h18006.www1.hp.com/products/storage/software/dataprotector/index.html.
Considerations
• You should have a detailed recovery plan formulated before you install any patches.
• You should know how long the system can be down for patch installation, and set aside a
portion of that time for recovery in case it is required.
• When patching critical systems, some customers have a redundant environment in place to
take over in the event that anything goes wrong with the production system.
• If you install patches with patch rollback files, then patch rollback will be an option if there
are problems with the patch installation. See “Patch rollback and commitment” (page 33).
Backup and recovery 41
Page 42

4 Patch management overview
Patch management is a process used to ensure that the appropriate patches are installed on a
system. Patch management is becoming increasingly important for users of all types of systems,
from desktop systems to mission-critical servers.
Industry experience has shown that failures in patch management can lead to financial loss, loss
of data, exploitation of security vulnerabilities, and other negative consequences. Problems such
as these can damage an organization's reputation, and can even result in legal consequences.
Because of this, many organizations are finding that having a robust patch management process
in place is no longer optional. Additionally, many of these organizations require their overall
patching strategy to include a proactive patching component similar to the one presented in this
chapter.
Although patchmanagement should be a topic of concern to all users, a robust patch management
strategy is especially important if the environment includes any of the following:
• Mission-critical systems
Can lessen exposure to a variety of risks.
• Large number of systems
Can result in more efficient and effective patching.
This chapter presents some basic patch management strategies and concepts. Some of the concepts
are general in nature, whereas others are specific to patching HP-UX systems.
Patch management life cycle
The following list presents the primary functions of a patch management life cycle:
1. Following a formal patch management strategy.
You should develop and follow a formal patch management strategy, incorporating the
appropriate concepts to meet your availability needs. Ideally, your strategy should include
proactive patching, reactive patching, and a separate plan for security patches. These topics
are described later in this chapter.
2. Identifying and acquiring patches.
First, determine which patches you need in various circumstances:
• If you encounter a problem, you must determine which patches you need to resolve it.
• Monitor the systems regularly to determine whether there are security patches or critical
patches available for a system, or whether warnings have been issued against installed
patches.
— The HP-UX Software Assistant (SWA) Tool can help you identify security patches
applicable to systems, as well as patches with warnings. For more information, see
Chapter 8: “Using HP-UX Software Assistant for patch management” (page 85).
— If you download patches using the HP IT Resource Center (ITRC), you will be sent
an email notification if a warning is issued against any patch you downloaded. For
more information, see Chapter 6: “Using the IT Resource Center” (page 55).
• Determine whether the patches chosen for installation require additional patches or
other software to satisfy dependencies. The ITRC Patch Database can help you with
this task.
42 Patch management overview
Page 43

Second, use standard HP-UX patch bundles as your starting point:
• HP provides standard HP-UX patch bundles including the Quality Pack (QPK),
Hardware Enablement (HWE), and Feature Enablement Patch Bundle (FEATURE11i)
patch bundles.
The QPK consists of defect fixes and the HWE consists of patches that are required for
new hardware products.
The FEATURE11i bundle enables new features and enhancements to the HP-UX
operating system and applications by providing the complete, minimal set of patches
required.
— New HP-UX operating system features and enhancements sometimes require the
selection of a “key patch.” For example, to enable the Locality-Optimized Resource
Alignment (LORA) feature you must select the key patch PHKL_38980, which will
then automatically select all dependent patches. See the Feature Enablement Patch
Bundle section in the HP-UX Release Notes for a list of enhancements and features
included in your FEATURE11i bundle.
— When installing applications from AR media, patches satisfying those applications'
dependencies are automatically selected from the FEATURE11i bundle on the AR
media. This process works with any application that lists patch dependencies as
corequisites. For this reason, FEATURE11i is the only standard patch bundle
included on the AR media, as well as the OE media.
The patches in these patch bundles are tested extensively with the latest OE Update
Release, so HP can recommend these patch bundles as a starting point when acquiring
patches for your needs. Simply download the bundles from the ITRC or your latest HP
media.
FEATURE11i, HWE, and QPK bundles are delivered onthe HP-UX 11i v3 OEUR media.
HP-UX 11i v3 and v2 AR media also include the FEATURE11i bundle. QPK bundles
can be found on the 11i v2 Support Pack media and the HP-UX 11i v1 Support Plus
media .
For more information about standard HP-UX patch bundles, see Chapter 5: “What are
standard HP-UX patch bundles?” (page 52).
• If you have constructed a list of patch needs, compare that with the patches in your
selected bundles. If you are missing patches from your list, obtain them individually
using the ITRC Patch Database.
3. Deploying patches.
• Patch testing.
You should install the patches on one or more levels of preproduction systems and
perform testing. Testing is discussed in more detail later in this chapter.
• Planning deployment.
Determine the details regarding how the installation of the patches will occur on
production systems. The frequency and timing of patch installation maintenance
windows must be chosen to meet with particular system down time limitations and the
need to install the new patches. You might choose the timing of patching to coincide
with your current maintenance windows. However, for reactive patching, you might
be required to use unscheduled maintenance. For proactive patching, common intervals
are quarterly, every other quarter, and yearly. You should also consider the availability
of new patches and, if you are using standard HP-UX patch bundles, you will likely
want to choose a schedule that in some way coincides with the release dates of new
bundles.
Patch management life cycle 43
Page 44

Some specific criteria to consider when planning your change:
— Backup of your system.
— System down time.
— When are your maintenance windows? What length of time are they?
— In the event of patches causing negative side effects, what steps will you take to
back out changes, and how long will it take to execute these steps?
— To significantly reduce downtime, and to take advantage of the ability to easily
switch back to your original image if the applied patches cause any negative side
effects, consider using Dynamic Root Disk (DRD). With DRD, you create a copy
of the root disk (or clone) that you can apply patches to, while your system is still
up and running. Once all the patches are loaded on the clone, you can then reboot
the system, using the clone as your active root volume. If for any reason you decide
that the patched root volume does not perform as you desire, you can quickly
reboot the original system image. For more information, please see Chapter 9
(page 86).
• Installing patches.
— Review Special Installation Instructions.
Prior to beginning the process of patch installation, review the patches to be installed
to find any associated Special Installation Instructions. You can use the
show_patches –it command directed at the source depot to list Special
Installation Instructions documented within any patches in the depot. For more
information, see show_patches(1).
— Install patches on the systems.
— Verify patches.
Verify that the patches installed correctly and that the patch had the desired effect.
— Recover disk space.
If disk space is an issue, you might find that you need to commit patches. This
process recovers disk space consumed by files that were saved to allow patch
rollback. Your organization should develop a formal plan to determine when and
how patches should be committed. See Chapter 3: “HP-UX patch overview”
(page 17) for more information.
• If you have opted to use DRD to reduce your downtime, you will need to create a clone
and apply the patches to the clone, then boot the clone once all changes have been
implemented. For more information, please see Chapter 9 (page 86).
4. Tracking the patch levels of the systems. (Patch level refers to the set of active patches on
the system.)
• Patch level is important when determining which patches are needed on each system.
• You need to know the patch levels of the systems when interpreting patch testing results.
• If you need to open a support call, you might be asked for the current patch level to aid
in troubleshooting.
You should keep all similarly configured production systems at the same patch level.
5. Managing patch-related changes to systems.
• You might find it helpful to log all patch-related system changes.
• You might find it helpful to document the results of patch testing and installation.
• Many customers findit helpful to havea formal change-request process associated with
their patch management process.
44 Patch management overview
Page 45

HP service contracts
If you would like assistance with your patch management work, you can purchase a Mission
Critical level HP service contract. This entitles you to a proactive service called patch analysis.
In patch analysis, an HP support engineer furnishes you with a custom list of recommended
patches. At the Mission Critical (highest) contract level, your assigned HP engineer even helps
you define a patch management strategy based on the software change management principles
defined in this chapter. For more information, visit the HP Software Support Services website at
http://www.hp.com/hps/software.
Patch management and software change management strategies
Patch management is a complex topic. Because of the complexity, there is not one right way to
perform patch management. If you ask 10 patching experts to describe their approach to patch
management, you will likely get 10 different answers. You must determine which approach to
patch management works best in your situation based on your particular environment and your
constraints.
This section discusses software change management and recommendations, as well as the three
basic patch management strategies among others:
• Proactive patch management strategy
• Reactive patch management strategy
• Security patch management strategy (Advanced Topic)
You might find that one of these strategies is a good fit for your organization. In most cases, a
customized combination works well. For example, you could select a reactive patching strategy
for most patching, but proactively patch your most update-sensitive areas. Security patch strategies
often do not fit within the proactive or reactive strategies. In these cases, you need to follow a
different strategy. Again, there is more than one path to creating an acceptable patch management
strategy.
For your convenience, HP has created six Patch Usage Model flow charts that illustrate the high
level steps you would follow for six basic patch management strategies. These Patch Usage
Models can be found in Appendix A (page 94).
Establishing a software change management strategy
This section outlines a set of patch management strategies based on use and tolerance for down
time. There is always a risk that software patches that have been successfully tested in a controlled
environment will cause problems when applied to a new configuration. For this reason, it is
important to limit the number of changes made to a target system.
The first step in defining your strategy is to determine what level of software change management
you want to implement. HP has developed three strategies for dealing with software change
management in mission critical environments. These strategies are based on operational
requirements. The same concepts apply just as well to non-mission critical environments.
The following are three strategies for software change management. These strategies are described
in Table 4-1: “Operational factor and patch management strategy matrix” (page 46):
• Restrictive
• Conservative
• Innovative
HP service contracts 45
Page 46

Table 4-1 Operational factor and patch management strategy matrix
Self-MaintenanceImpact on Core
NoHighUnacceptableNoRestrictive
NoMediumUnacceptableNoConservative
YesLowAcceptableYesInnovative
Strategy
Unplanned Down TimeNew FeaturesPatch Management
Business
The process of selecting an appropriate software change management strategy seeks to align
behavior with the key business objectives of the systems involved. The goals of evaluating an
operation and choosing an appropriate strategy include:
• Reduced risk
• Increased system and application availability
• Reduced maintenance time
There are four operational factors that should determine your appropriate strategy:
• New features
Do you need to introduce new operating system or application features into the operating
environment?
• Unplanned down time
What is your tolerance for the operationbeing unavailable outside the scheduled maintenance
windows?
• Impact on core business
How are business functions affected by down time?
• Self-maintenance
This is an indication of whether or not all system planning and maintenance activities are
performed inhouse without vendor or third-party involvement.
Recommendations for software change management
The following are recommendations for software change management that correspond to each
software change strategy. They cover the following five areas:
• Operating System and Applications
Includes versions of the operating system as well as the applications running in the
environment.
• Proactive Patching
Includes all patching activities for which no symptoms or problems are currently evident.
• Reactive Patching
Performed in response to a visible system problem.
• Change Management
Covers all processes and standards used to manage data center operations.
• Test Environment
Includes systems, software, and equipment used to support the production operations. The
test environment is used to evaluate changes before they are put into production.
Table 4-2: “Recommendations based on strategy” (page 47) offers recommendations to help you
implement your chosensoftware change management strategy.Consider using DRD for all three
strategies listed in Table 4-2to reduce downtime, perform maintenance during regular business
46 Patch management overview
Page 47

hours, and provide an efficient way to back out changes if necessary. See Chapter 9 (page 86)
for more details.
Table 4-2 Recommendations based on strategy
Restrictive
Conservative
Innovative
Stable release,
available for one
year or more.
Stable release,
available for six
months or more.
Stable release,
available for two
months or more.
Use only
thoroughly tested
patches with the
highest level of
exposure.
Use only
thoroughly tested
patches with
substantial
exposure.
Carefully review
patches for risks
and benefits.
Reactive PatchingProactive PatchingOS & ApplicationsStrategy
Make fewest
changes possible
to restore
function.
Perform full
diagnostic
analysis before
attempting a
solution.
Make fewest
changes possible
to restore
function.
Perform full
diagnostic
analysis before
attempting a
solution.
Focus on
restoration of
function.
Limit number of
concurrent
changes.
Management
Formal plan with
explicit roles and
responsibilities.
Prepared plan to
back out changes,
if necessary.
Documented
disaster recovery
plan that is
updated and
tested at least
yearly.
Formal plan with
explicit roles and
responsibilities.
Prepared plan to
back out changes,
if necessary.
Established roles
and
responsibilities.
Test EnvironmentChange
Dedicated
equipment that
matches
production
environment,
including
simulated loads.
Dedicated
equipment that
matches
production
environment.
Test or
development
equipment or off
hours on
production
environment.
Consideration of HP patch rating
Regardless of the type of patching strategy you choose to implement, you should include a policy
detailing when it is appropriate to select patches for each HP patch rating. Based on rating alone,
it is always appropriate to select a patch rating of 3, but under what circumstances will you allow
patches rated 2 or 1 to be installed?
For more information about HP patch ratings, see “HP-UX patch ratings” (page 34).
Patch management and software depots
Users with multiple systems generally find that, regardless of the type of patching strategy they
choose toimplement, patch management isbest accomplished by managingpatches in centralized
software depots. You should maintain one depot for each set of similarly configured systems.
You then use these depots as your patch source for all patch installations. In this way, you can
maintain the same patch level on all the systems with less overall effort. Using depots also
minimizes reboots when you install new patches. You should be able to install the entire content
of a single depot with only a single reboot.
For more information about these SD-UX software depots, see Chapter 7: “Using software depots
for patch management” (page 64).
Patch management and software change management strategies 47
Page 48

Proactive patching strategy
The goal of a proactive patching strategy is problem prevention. Many patches that provide
defect fixes are released long before you need them on your system. The crux of proactive patching
is identifying these patches and applying them in a safe manner. By definition, your starting
point for proactive patching should be a system you believe to be functioning normally. Most
proactive patching can be scheduled and carefully controlled. This is one of the benefits of this
approach. To automate the process of identifying and selecting patches, see Chapter 8: “Using
HP-UX Software Assistant for patch management” (page 85). To reduce the downtime required
to perform proactive maintenance, see Chapter 9: “Using Dynamic Root Disk for patch
management” (page 86).
As compared with the reactive patching strategy (see the following section), proactive patching
generally creates more system change and requires regularly scheduled patch installation
maintenance windows. Although the system down time associated with patch installation is a
disadvantage of proactive patching, HP highly recommends proactive patching as the strategy
of choice.
The following benefits can be achieved by implementing a proactive patch management strategy:
• Problem avoidance
• Reduced risk
• Reduced unplanned down time
• Enhanced functionality and tools
• Increased time for testing
Because proactive patching involves installation of patches before a problem occurs, this strategy
allows more time to complete sufficient testing than does reactive patching. For a flow chart of
the high-level steps suggested for proactive patching, see Appendix A (page 94).
Acquiring patches for proactive patching
Although patching is not a one-size-fits-all process, the following generic recommended strategy
embodies many of our customers' best practices:
1. Identify the patches to acquire. You can identify and track these on an ongoing basis, or you
can engage in patch analysis that targets a specific proactive patching cycle.
2. Acquire the latest Quality Pack (QPK) patch bundle and, if you are planning any hardware
changes, the latest Hardware Enablement (HWE) patch bundle.
3. Determine whether the patches included in the standard HP-UX patch bundles cover your
entire list of identified patches. Use the ITRC Patch Database to acquire any missing patches.
4. Scan the patches for warnings and run the HP-UX Software Assistant Tool.
5. Create one depot for the acquired patches and copy them into it. You can choose to copy
the latest Operating Environment (OE) products to the depot.
6. Test the depot content.
7. Create a deployment plan and roll out the new depot within your maintenance window.
The following details apply to acquiring the latest QPK and HWE patch bundles:
• The QPK patch bundle is an excellent vehicle for proactive patching and was created for
this purpose. The HWE patch bundle contains patches required by new hardware products
that HP has released. To enable or pre-enable support for new hardware, you should select
this bundle. New HP-UX core enhancements are introduced as part of the Software Pack
48 Patch management overview
Page 49

(SPK). If you want to install one of these new features, see the Software Pack documentation
on the HP Business Support Center website at http://www.hp.com/go/spb-docs.
• All the standard HP-UX patch bundles can be downloaded from the ITRC and are available
on media from HP. For more information, see Chapter 5: “What are standard HP-UX patch
bundles?” (page 52).
• If you have a support contract at the Mission Critical level, you are entitled to a regular
customer patch analysis from HP. This analysis results in the creation of custom patch
bundles for your distinct computing environments.
Use the ITRC Patch Database to acquire any patches that you have not yet obtained. Compare
the entire list of patches that you identified specifically for an environment with the content of
the patch bundles.
• If you are missing just a few patches, use the ITRC Patch Database to acquire them. For more
information about using the ITRC, see Chapter 6: “Using the IT Resource Center” (page 55).
• If you are missing numerous patches, you should use the SWA Tool to acquire them. See
“Using HP-UX Software Assistant for patch management” (page 85).
The following details apply to patches with warnings, and security patches.
• Although HP attempts to include only the highest-quality patches in the standard HP-UX
patch bundles, occasionally a warning is issued for a patch in one of those bundles. You can
review individual patch bundles for warnings using the ITRC Patch Bundles page.
• You can acquire more up-to-date patches individually. Security patches are good examples
of patches that you might obtain individually rather than as a part of a bundle. HP-UX
Software Assistant can help you identify any security patches missing from a system. The
ITRC should be your primary resource for downloading these individual patches.
Advanced topic: HP-UX Software Assistant
HP-UX Software Assistant (SWA)
• manages a lot of the patch management complexity for you.
• does not require an upload of your information to HP – SWA runs local to your system.
For information, see Chapter 8: “Using HP-UX Software Assistant for patch management”
(page 85).
Reactive patching strategy
Reactive patching involves installing patches to restore system functionality after a problem
occurs. The goal of reactive patching is to fix the problem as quickly as possible and with as little
user disruption as possible.
Because reactive patching is so disruptive, typically only the most critical problems: panics,
failures, and corruption are reactively patched. Your action depends on the software change
management strategy you use. When you use a restrictive strategy (see “Recommendations for
software change management ” (page46)), the fewer critical problems you will need to reactively
fix.
More granular changes are generally safer. While proactive patching usually involves the
installation of many patches at one time, reactive patching involves installing only the patches
believed to be necessary. Another difference between these two approaches is that reactive
patching is likely to be performed under greater pressure and urgency than proactive patching.
Even customers who typically use a proactive patch strategy might at times find it necessary to
patch reactively.
The following are benefits of reactive patching:
• Timely problem resolution
• Controlled, minimal changes
Patch management and software change management strategies 49
Page 50

Reactive patching has some important disadvantages as compared with proactive patching. The
process of identifying a problem fix can be made more difficult as your system falls further
behind the most recent patch levels available. In addition, the required patch will likely contain
much more new content than if you had performed frequent proactive updates. You might also
find it difficult to perform adequate testing in reactive patching situations, and this could lead
to the introduction of additional problems.
Acquiring patches for reactive patching
The easiest way to identify your required patch is to call the HP Response Center. This works
only if you have the appropriate support contract. Alternatively, you can carefully research the
problem using resources such as the ITRC. The ITRC's self-solve tools, such as the search
knowledge base link, can help with that query. For more information, see Chapter 6: “Using the
IT Resource Center” (page 55).
Next, using the ITRC Patch Database, you must identify the patches needed to resolve the
problem. For reactive patch management, patch acquisition and installation should be strictly
limited to the smallest set of patches believed to provide a solution to a current system problem.
Do not use the unplanned down time as an opportunity to make unrelated changes. This is
especially true for mission-critical systems.
Once you know what patches are needed to solve the problem, you must determine when to
patch your system. In making this decision, you should consider the following factors:
• Severity of the problem
• Frequency of occurrence
• Availability of system down time for patching
Follow these steps to patch your system reactively:
1. Isolate the problem and identify the patches with the highest HP rating that represent a
potential fix.
2. Acquire the needed patches and any patches needed to satisfy dependencies.
3. If you have a patch depot, add these patches to it and use this as a test base.
4. Test the patch. In some cases the problem is so serious (such as a when a critical system is
down) that you might need to omit the test step. This is especially true if it takes a long time
to replicate the problem, or if the configuration is difficult to replicate. If you choose to omit
testing, do so only with the knowledge of the risks you might incur.
5. Determine a suitable time to install the patches.
6. Install the patches.
If you have multiple, similarly configured systems and you need to patch one of them reactively,
consider patching the remaining systems as soon as it is reasonably possible. This is because it
is likely that your other systems will suffer the same problems at some future point. Additionally,
there are benefits to maintain the same patch level on similar systems.
Advanced topic: security patching strategy
Security patching requires both urgency and a need to be proactive. It does not fit neatly into
the proactive or reactive patching strategies. At times, you might need to apply security patches
proactively prior to the next scheduled patch installation maintenance window.
When you use the ITRC to acquire patches, it is safe practice to obtain patches listed as
recommended. Because of the urgency associated with security fixes, there are many instances
when a security patch is too new to have this rating. However, many customers give a new
security fix priority over an older patch recommended by the ITRC. Because most patches that
fix a security problem fix only a single problem, this practice is not as risky as it might seem.
50 Patch management overview
Page 51

Advanced topic: scanning for security patches
You can use the SWA Tool to identify security patches for installation. This tool also identifies
patches that have associated warnings. For more information about SWA, see Chapter 8: “Using
HP-UX Software Assistant for patch management” (page 85).
Testing the patches to be installed
The single most important action that can ensure the success of a software patch is to first test
the changes in a nonproduction environment. Every environment is unique, and patch testing
can uncover potential problems unique to the environment in which the patches will be installed.
If you test thoroughly, you can reduce the chance of encountering problems with new patches.
The level of testing you perform depends in part on the patch management strategy you choose.
For example, because proactive patching involves installing patches before a problem occurs, it
allows more time than reactive patching to complete a sufficient level of patch testing.
HP subjects all General Release (GR) and Special Release (SR) patches to extensive
testing. See Chapter 3: “HP-UX patch overview” (page 17) for more information about GR and
SR patches. However, it is impossible to test all permutations of all patches on all hardware
configurations. Therefore, prior to deploying the patches on production systems, you should
test the set of patches you intend to install in a test environment that closely simulates the
production configuration. Even if you are deploying a standard HP-UX patch bundle, you should
still perform testing. Deploying any patch without first testing it in an environment increases a system's
exposure to risk.
The following is an outline of a basic patch test scenario:
1. The patches to be installed are identified and acquired.
2. The acquired patches are installed on a test system and tested to a standard that your
organization considers acceptable. Many organizations break this step into multiple levels
of testing to accomplish distinct goals. If testing results in unsatisfactory results, you must
perform an investigation to identify the root cause of the problem before proceeding.
3. The tested patches are installed on production systems.
The success of your testing approach relies heavily on how closely the configuration of the test
environment matches the configuration of the production systems on which the tested patches
will be installed. Within hardware limits, it is a best practice to duplicate the production
environment as closely as possible.
Ideally, you have a test system that is identical to the production system on which patches are
to be installed, and you have sufficient time available to test all patches prior to deploying them.
This situation allows you to perform very effective testing to verify that the patches to be installed
will not result in unexpected or undesirable system behavior.
Many customers have a two- or three-tiered approach to testing. Patches are initially installed
on a system that is often referred to as the development system. These types of systems are used
for local development. In a three-tiered system, after certain organization-specific rules have
been met, the patches are installed on another system that is often referred to as the test system.
The patches must then meet another set of organization-specific rules. For example, many
customers require that the patches be installed on the test system for some specified period of
time with no problems. The amount of time varies widely and can be as short as a week. However,
for many customers, one to three months is considered a reasonable time frame for testing. Once
these rules have been satisfied, the patches are installed on one or more production systems.
Customers who initially install the patches on only a subset of their production systems typically
monitor these systems for several weeks prior to installing the patches on the remaining
production systems. For reactive patching, the longer testing time frames are usually not
reasonable and a stripped-down approach to testing is usually required.
Testing the patches to be installed 51
Page 52

5 What are standard HP-UX patch bundles?
Patches can be grouped into collections known as patch bundles, or simply bundles. HP provides
a number of prepackaged, standard HP-UX patch bundles that you can install as a unit. This
chapter shows you how to obtain standard HP-UX patch bundles. Table 5-1: “Standard HP-UX
patch bundle names” (page 52) shows the QPK and other standard patch bundles. HP tests these
bundles rigorously to ensure a high level of reliability and updates many of them periodically.
Using standard patch bundles can be a less risky and more efficient way to patch a system than
installing patches individually.
HP recommends that you use standard HP-UX patch bundles for proactive patching, regardless
of whether you have a support contract.
NOTE: For HP-UX 11i v1 (B.11.11) releases, HP delivers standard HP-UX patch bundles and
diagnostic tools on Support Plus media and the ITRC.
For the HP-UX 11i v2 (B.11.23) releases, HP delivers standard HP-UX patch bundles on Support
Pack media and the ITRC.
For HP-UX 11i v3 (B.11.31) releases, HP delivers standard HP-UX patch bundles on OE media
and the ITRC.
See Table 5-2: “Standard HP-UX patch bundle use and release dates” (page 53) for more
information.
Key features
Standard HP-UX patch bundles can be a very useful part of a proactive patch management
strategy for the following reasons:
• The bundles save you time during patching and reduce the risk of errors.
• HP tests all patches in the bundle as a group.
• The bundles provide an easy way to standardize the level of patches on systems.
• The bundles provide a solution commonly used by other customers.
• HP performs all dependency analysis to ensure standard HP-UX patch bundles contain all
patches necessary to meet dependencies.
• Unlike installing multiple patches individually, whichmight require a reboot for each patch,
installation of a bundle never requires more than one system reboot.
• You can use bundles to create standard patch depots foreasy deployment to multiple systems.
• The bundles provide a convenient way to track patches on a system.
• ITRC provides support for standard HP-UX patch bundles.
Standard HP-UX patch bundles
Table 5-1 (page 52) shows the individual bundle names for the HP-UX 11i releases.
Table 5-1 Standard HP-UX patch bundle names
HP-UX 11i v3 (B.11.31)HP-UX 11i v2 (B.11.23)HP-UX 11i v1 (B.11.11)Patch Bundle Name
N/AFeature Enablement
Hardware Enablement
Quality Pack
Required
52 What are standard HP-UX patch bundles?
FEATURE11iFEATURE11i
HWEnable11iHWEnable11iHWEnable11i
QPKAPPSQPKAPPSGOLDAPPS11i
QPKBASEQPKBASEGOLDBASE11i
BUNDLE11iBUNDLE11i
N/A
Page 53

NOTE: Standard HP-UX patch bundles are cumulative, which means that you can install the
latest version of the bundle to get all the previous changes.
The standard HP-UX patch bundles (QPK, FEATURE11i, and HWE) might have overlapping
content. This does not affect your patching.
For the HP-UX 11i releases, Table 5-2 (page 53) shows when to use the bundles and also shows
the release information.
Table 5-2 Standard HP-UX patch bundle use and release dates
Update ScheduleWhen to UseDescriptionPatch Bundle
Quality Pack (QPK) • To configure a new
Hardware Enablement
(HWE)
Required Patch Bundle
(BUNDLE11i)
Feature Enablement Patch
Bundle (FEATURE11i)
For HP-UX 11i v1 (B.11.11),
HP-UX 11i v2 (B.11.23), and
HP-UX 11i v3 (B.11.31) the
QPK is delivered as two
bundles:
• Base Quality Pack patch
bundle has the same
purpose as the
single-bundle QPK.
• Applications Quality
Pack patch bundle has
all stable, defect-fix
patches for the OE
applications.
HWE providesthe minimal
set of patches for
supporting new and legacy
hardware using HP-UX.
The HP-UX 11i v1 Required
Patch Bundle consists of
patches for HP-UX 11i v1,
which are required to install
and update the operating
system.
FEATURE11i provides the
minimal set of patches for
supporting new HP-UX
software features and
enhancements.
system.
• To obtain defect fixes.
• Use as available for
proactive patching.
• To get a new system.
• To add new hardware to
the system.
Installed automaticallywith
the appropriate core
software.
To enable the use of new
HP-UX features or
enhancements.
HP-UX 11i v1, v2, and v3:
As needed
The v2 QPK bundle will
have a final update
December 2010.
HP-UX 11i v1, v2, and v3:
As needed
HP-UX 11i v1 and v2: As
needed
HP-UX 11i v3: N/A
HP-UX 11i v2 and v3: As
needed.
Obtaining standard HP-UX patch bundles
The following options are available for obtaining patch bundles:
• Option 1: HP-UX Software Assistant
The SWA Tool is the preferred option for obtaining standard HP-UX patch bundles. See
Chapter 8: “Using HP-UX Software Assistant for patch management” (page 85) for more
information.
• Option 2: ITRC
You can obtain the standard HP-UX patch bundles from the ITRC. Access requires you have
an ITRC login. Follow the online instructions to register with the ITRC, or see Chapter 6:
“Using the IT Resource Center” (page 55) for more information.
• Option 3: Software Depot
You can access the HP Software Depot home website directly at http://www.hp.com/go/
softwaredepot.See Chapter 7: “Using software depots for patch management” (page 64).
Obtaining standard HP-UX patch bundles 53
Page 54

TIP: Acquiring and installing standard HP-UX patch bundles is a two-step process. See
Chapter 2: “Quick start guide for patching HP-UX systems” (page 9).
54 What are standard HP-UX patch bundles?
Page 55

6 Using the IT Resource Center
The IT Resource Center (ITRC) is a website you can personalize to provide a wide range of
services and support, including support for HP-UX patch management. The ITRC website is
your fastest connection to HP Support and is located at http://itrc.hp.com.
This chapter presents many of the ITRC HP-UX patch-related areas. You should explore the links
on the ITRC main page and familiarize yourself with all the ITRC has to offer. For more
information, select Online help from the left navigation or Introducing the ITRC from the right
navigation Useful links menu.
Many ITRC services require you to obtain a user account, and some ITRC services require
additional authorization such as a certain level of support agreement or an online purchase.
Obtaining an ITRC user account
Most ITRC areas require you to have a user account. To obtain a user account:
1. Go to the ITRC at http://itrc.hp.com.
2. From the Select language pull down at the very top of the page, select your preferred language.
3. Choose the appropriate site (Americas/Asia Pacific or European).
4. Select Register from the left navigation.
5. Select My Profile from the left navigation.
6. Under the “Link support agreements, HP Care Packs and warranties to your profile” heading,
add any support agreements, care packs, and warranties to your profile. This option allows
access to additional services, including the download of patches.
Useful pages on the ITRC
The following pages are expanded on in this chapter.
• self-solve tools
— “Search knowledge base” (page 62)
• patching
— “Find individual patches” (page 55)
— “Standard patch bundles” (page 62)
— “Custom patch bundles - run a patch assessment” (page 62)
• downloads/licensing
— “Find individual patches” (page 55)
— “Standard patch bundles” (page 62)
• collaborate
— “Ask your peers in the forums” (page 62)
• assessment and warranty
— “Custom patch bundles - run a patch assessment” (page 62)
• notifications
— “Support information digests” (page 62)
Find individual patches
The ITRC patch database should be your primary means of searching for patches, getting
information about patches, and acquiring patches. The patch database is an excellent tool for system
administrators who employ a reactive patch management strategy. The patch database is also an
excellent general-purpose tool to refresh specific patches with newer versions.
Obtaining an ITRC user account 55
Page 56

NOTE: This section only addresses finding individual patches, not finding firmware.
Key features
With the patch database, you can search for patches using a variety of criteria. Once the search
returns the results, you can obtain information, including the following:
• Patch rating
• Patch that HP recommends, if any
• Most recent patch
• Patch warning, if any
• Supersession by another patch
• Supersession of other patches
• A patch details page containing comprehensive information about each patch returned
See Table 6-1: “Navigating the search results table” (page 56) for descriptions of the search
results.
Accessing the patch database and finding an individual patch
1. Log in to the ITRC at http://itrc.hp.com.
You must log in to the appropriate site (Americas/Asia Pacific or European).
2. Select Patch database, then select HP-UX under the find individual patches link.
3. To find instructions, select the How would you like to search?, Search Criteria, or read our
usage guide links.
4. Enter your search parameters, then click search.
Patches returned by a search are shown on the search results page. The following screen
shows results from a patch database search for the patch PHKL_23183.
Table 6-1 (page 56) shows how to interpret the information in the search results table.
Table 6-1 Navigating the search results table
specified
recommended
(hp rating)
56 Using the IT Resource Center
DescriptionTerm
Provides a terse patch description for the specified patch.description
If you search for a specific patch it is displayed in the specified column,
which is only shown when a search is done for a specific patch ID.
If there is an HP recommended patch, it appears in the recommended
column and might not be the patch you searched for.
Shows the latest patch without a warning in the supersession chain.most recent
Indicates the quality rating assigned to a patch. Three stars is the highest
rating assigned to any patch. The higher the rating, the lower the risk of
side effects and the more suitable the patch is for mission-critical
environments.
The patches shown in a row are the same or are related by supersession.Patch Row
Page 57
Table 6-1 Navigating the search results table (continued)
DescriptionTerm
Patch ID Link
Patch Warning Icon
notes:
Table Icons
Access thepatch details page associatedwith a patch by selecting the patch
ID. This page contains extensive information about the patch.
If a patch has a warning associated with it, no stars are displayed.
Instead, a yellow, triangular symbol appears.
Select the patch ID link to go to the patch details page. Read the Warning
section.
Provides additional information about icons and information returned
with patches.
Icons are displayed along with the patches to provide additional
information.
critical fix
reboot required
possible reboot required
not available
enhancements only
special instructions
hardware enablement
5. You can download one patch of your choice from each row of patches returned by the search.
• Select the checkbox next to the patch ID link.
• Click the add to selected patch list button.
6. You should view thespecial installation instructions and check for dependencies
for each patch you want to download by selecting the patch ID link.
• See “Advanced topic: checking for special installation instructions” (page 58).
• See “Advanced topic: checking for all patch dependencies” (page 59).
For example, in the previously shown screen, if you selected PHKL_28766 and then add to
selected patch list, you would see the selected patch list table as shown below.
Find individual patches 57
Page 58

7. Read through the following Advanced Topic sections, then continue with the procedures
in “Check for patches with dependencies” (page 59)
Advanced topic: checking for special installation instructions
Some patches might have extra installation instructions, called special installation
instructions, that you should follow to install the patch successfully. The following steps
show you how to access these instructions.
1. If there is a patch in the selected patch list that has the special instructions icon beside it, select
the patch ID link to display the patch details page for the patch.
2. On the patch details page, read the special installation instructions section. You
should follow the instructions given here when you install the patch.
3. Select the view selected patch list link located in the upper right corner of the patch details
page to return to the selected patch list page.
4. Repeat these steps for any remaining patches in the selected patch list that also have special
instructions icons.
58 Using the IT Resource Center
Page 59

TIP: You can use the show_patches –it command directed at a source depot to list Special
Installation Instructions documented within any patches in the depot. For more information, see
show_patches(1).
The show patches command is available on 11i v3 systems, and is available as a patch in
preceding HP-UX versions:
• PHCO_32220 for 11i v2
• PHCO_27780 for 11i v1
Advanced topic: checking for all patch dependencies
The Patch Database automatically selects patches to meet certain dependencies for patches that
have been selected for download. The Patch Database can detect and select patches that are
required to meet enforced dependencies, and in most cases this is sufficient. However, if any of
the patches selected for download have unenforced (manual) dependencies on other patches,
the Patch Database does not identify these.
You are responsible for verifying that all patches necessary to satisfy dependencies have been selected for
download. If you do not perform this verification, certain features related to your chosen patches
might not attain full functionality upon installation. This section describes how to determine
whether these patches are significant for your environment.
Check for patches with dependencies
Perform the following steps after selecting patches to download (after step 7 in the “Accessing
the patch database and finding an individual patch” (page 56)). Repeat these steps for each patch
on your selected patch list, including any new patches you add as a result of performing these
steps.
Advanced topic: checking for all patch dependencies 59
Page 60

1. Select a patch ID link in the selected patch list to display the patch details page for the patch.
For example, in the following screen, select the PHKL_28766 link.
2. Read the other dependencies and special installation instructions sections of the patch
details page. The other dependencies section, and occasionally the special installation
instructions section, might list additional patches or products that are needed to obtain full
functionality of the patch selected.
If additional patches are listed, determine whether any are needed for your specific situation.
If so, note the patch IDs for use in step 3.
For example, the Other Dependencies section for PHKL_28766 shows that PHKL_21549
is needed only if you want a specific performance improvement. If not, you do not need to
download the listed patch.
Other Dependencies
PHKL_21549 is required when using the gang scheduler.
Without PHKL_21549, the gang scheduler exhibits unacceptable
perfomance after this patch is installed.
60 Using the IT Resource Center
Page 61

3. Return to the selected patch list page by selecting the view selected patch list link located in
the upper right corner of the patch details page. If any patches were noted in step 2 for other
dependencies or special installation instructions, verify they are listed in the selected patch
list. If not, you should add each one. To do this, select the add patches link.
• Enter your search criteria, including the patch ID for a search by patch ID, and then
click search.
Patches returned by a search are shown on the search results page.
• You can choose to download one patch of your choice from each row of patches returned
by the search. Keep in mind that you do not necessarily have to download the exact
patch noted in step 2. There might be a better choice, such as a recommended patch
that the search returned.
1. Select the checkbox next to the patch ID link.
2. Click the add to selected patch list button.
For example, if you choose to add patch PHKL_21549, the selected patch list is updated
as shown in the following screen.
Advanced topic: checking for all patch dependencies 61
Page 62

Standard patch bundles
The find standard patch bundles link on the patch database page provides the find bundles page
to help you acquire standard HP-UX patch bundles. See Chapter 5: “What are standard HP-UX
patch bundles?” (page 52) for more information.
Custom patch bundles - run a patch assessment
The Patch Assessment Tool allows you to create custom patch bundles specific to an environment.
This web-based tool replaced the Custom Patch Manager Tool. The Patch Assessment Tool can
be valuable for system administrators employing a proactive patch management strategy. See
Chapter 10 “The Patch Assessment Tool” for detailed information.
TIP: HP-UX Software Assistant (SWA) was released in January, 2007 as a software upgrade to
the Patch Assessment Tool. For more information, see Chapter 8: “Using HP-UX Software
Assistant for patch management” (page 85).
Support information digests
The ITRC provides Subscriber's Choice, the home for digest subscriptions.
Key features
Digest subscriptions allow you to do the following:
• Stay up to date with the latest support information from HP via email.
• Select your areas of interest and receive the appropriate digests from HP.
To access the Subscriber's choice page:
1. Log in to the ITRC at http://itrc.hp.com.
2. Select Patch database.
3. On the right navigation under useful links, select subscribe to patch digests.
Ask your peers in the forums
The ITRC forums are gathering places for IT professionals. You can use the forums to solve
problems, exchange ideas, and learn from peers who also use the ITRC. HP engineers might
participate in all of these forums to share their advice; however, these forums are intended
primarily as a peer-to-peer resource.
To access patch-specific issues in the ITRC forums:
1. Log in to the ITRC at http://itrc.hp.com.
2. Select Forums from the left navigation.
3. Select HP-UX, and then patches from the HP-UX - categories.
4. From the patches page, you can read previously posted questions and replies, and you can
post a question or reply of your own.
Search knowledge base
This functionality allows you to search across the HP knowledge base for answers to your
support-related questions and for technical support documents to solve problems. This interface
makes it easy for you to narrow your searches to documents which pertain to a particular product
area or platform by using predefined categories. Additionally, you can limit searches to particular
document types.
62 Using the IT Resource Center
Page 63

Key features
The Knowledge Base helps you to do the following:
• Solve problems yourself with timely technical support information.
• Search the HP Knowledge Base for technical documents, including patch information,
• Retrieve a specific document using its document identification (ID).
To access the knowledge base page:
1. Log in to the ITRC at http://itrc.hp.com.
2. Select Search knowledge base from the left navigation.
security bulletins, and service requests related to HP-UX and a variety of other areas.
Search knowledge base 63
Page 64

7 Using software depots for patch management
A software depot, or simply depot, is a special type of file or directory formatted for use by
Software Distributor for HP-UX (SD-UX). Depots can contain a variety of software products.
This chapter focuses specifically on depots as repositories for patches and patch bundles. These
depots are commonly referred to as patch depots.
Common uses for patch depots include the following:
• Patch depots are an extremely effective mechanism for managing patches. They can be
especially beneficial in managing patches for groups of systems.
• Patch depots can be used as a single source of patches. This helps you to install all patches
in a single installation session.
• Depots are used for software delivery. When you download patches or patch bundles from
HP, you receive either a depot or a file that contains a depot.
• Patch depots can be transferred using email or file transfer protocol (FTP).
Patch depots are an extremely useful patch management tool for systems whose patching you
manage as a group. For these groups, you can use patch depots to centrally manage tasks such
as defining, testing, and updating patch configurations. First, you create a separate centralized
depot for each group; then you manage the patches in each depot rather than on each individual
system. These centralized depots, which can be accessed remotely, are used as the single patch
source for patch installations on all systems in the corresponding group. This allows you to
maintain the same patch level (set of active patches) on all your systems with less overall effort.
Another benefit of using depots is that they minimize the number of reboots required during
patch installation. If you place all the patches to install into a single depot, you will be able to
install the entire contents of the depot onto a system with a single reboot.
For information about depots beyond the scope of this guide, see the Software Distributor
Administration Guide on the HP Business Support Center website at http://www.hp.com/go/
sd-docs.
Common software distributor commands for patching
Please note that use of the various SD-UX commands requires root privileges. For information
on the SD-UX commands, see the Software Distributor Administration Guide on the HP Business
Support Center website at http://www.hp.com/go/sd-docs.
Table 7-1 SD commands and patch tools
DescriptionSD-UX Command
check_patches
cleanup
Check for installation problems and issues related to patches. Options allow
you to check for patches missing the SD-UX patch attributes, missing patch
filesets, patch object modules missing from archive libraries, patch filesets
with the incorrect patch_state, patch filesets not in the configured state,
and patch filesets that fail swverify.
This command is available on 11i v3 systems, and is available as a patch in
preceding HP-UX versions:
• PHCO_27780: 11.11 HP-UX Patch Tools
• PHCO_32220: 11.23 HP-UX Patch Tools
See check_patches(1M) for more information.
Allows you to commit all patches that have been superseded a specified
number oftimes. You can execute this command in preview mode to see what
effect the command will have without making any changes.
64 Using software depots for patch management
Page 65

Table 7-1 SD commands and patch tools (continued)
DescriptionSD-UX Command
This command is available on 11i v3 systems, and is available as a patch in
preceding HP-UX versions:
• PHCO_27780: 11.11 HP-UX Patch Tools
• PHCO_32220: 11.23 HP-UX Patch Tools
See cleanup(1M) for more information.
show_patches
swcopy
swinstall
swlist
swmodify
swreg
swremove
swverify
List patches installed on a system or in a depot. Options allow you to list
patches that are active, superseded, require Special Installation Instructions,
or have any Other Dependencies.
This command is available on 11i v3 systems, and is available as a patch in
preceding HP-UX versions:
• PHCO_27780: 11.11 HP-UX Patch Tools
• PHCO_32220: 11.23 HP-UX Patch Tools
See show_patches(1) for more information.
Copies software from a software source to a depot or from one depot to
another. Can add products to an existing depot, replace products already on
a depot, or create a new depot.
Use to install software. Also use to perform software configuration.
Use to list software elements, their attributes, and their organization. It lists
both installed software and software contained within a depot.
Use tochange informationin theinstalled productsdatabase ordepot catalog
files.
Use to register or unregister depots.
Use to remove previously installed software or remove packaged software
from a depot.
Use to verify installed software or depot software for correctness and
completeness.
sysdiff
Depot types
There are two types of SD-UX software depots:
• Directory depots
• Tape depots
Both are commonly used and provide the same basic functionality. However, each has its own
advantages for you to consider. This chapter focuses on using directory depots for patch
management. Less emphasis is placed on the use of tape depots.
Directory depots
Directory depots, also known as network depots, are more practical than tape depots for patch
management tasks. Directory depots exist as a directory structure, and the name of the depot's
root directory is the name of the depot.
Compares SD-UXpackaged software andactive patches between two systems.
This command is available on 11i v3 systems and is available as a patch for
11i v2:
• PHCO_32220: 11.23 HP-UX Patch Tools
See sysdiff(1) for more information.
Depot types 65
Page 66

For patch management, directory depots offer the following advantages over tape depots:
• Can be made available to remote users. See “Registering and unregistering directory depots”
• Are optimized for random access by multiple simultaneous sessions.
• Allow for customized access controls. See “Advanced topic: access control lists” (page 72).
• Allow SD-UX verification. See “Verifying directory depots” (page 73).
• Allow modification.
Using these features, you can centrally define and support standardized sets of patches for
members of your organization to use for patch installation.
There are other benefits to using directory depots. Installation from a directory depot on a local
or remote disk is likely to be faster than installing from removable media. You can also install
software onto a remote system without having to physically load the install media onto the
system.
For example, consider a company with multiple locations over a large geographical region. This
company creates and maintains a centralized directory depot for companywide use and locates
it on a networked system at location A. Employees at location B can install software from this
depot onto systems at location C without ever leaving their desks.
Tape depots
Tape depots, also known as serial access depots, are primarily used for software transfer. Tape
depots are completely contained within a single file, which is formatted as a tape archive (tar),
and are accessed in a serial manner. Within the archive, directory and file entries are organized
using the same structure as that used for directory depots. Tape depots have the default file
extension .depot. Although you are not required to use this extension, it can help you to easily
distinguish tape depots from other files.
If you download patches or patch bundles from HP, you receive tape depots. These depots might
be contained in another file, such as a tar file or a shell archive (shar) file. Although the tape
depot format was designed to support software delivery on tape, tape depots are not limited to
tape media. You can locate them anywhere a directory depot can be located.
(page 71).
Using depots
As you start identifying uses for depots in your patch management process, you should consider
the intended purpose and use model for each potential depot. There are many appropriate patch
management uses for depots, including the following:
• Periodic patch depot — contains patches that define the current recommended patch level.
These are patches that you have tested as a group on the target configuration. You will
generate periodic patch depots on a regular basis. Here are some possible generation time
frames:
— Semiyearly or yearly, to coincide with the release of specific-standard HP-UX patch
— Monthly, to allow more timely inclusion of critical fixes and security patches.
— Regularly in advance of scheduled system down time to take advantage of the
• Critical patch depot — contains critical fix or security-related patches that were not available
when you created the latest periodic patch depot. Use this depot to update any systems that
encounter known failures and to bring systems up to the latest level of security patches. You
can use this depot as the starting point for the next version of the periodic patch depot.
bundles, such as Quality Pack (QPK) or Hardware Enablement (HWE).
opportunity to install new patches.
Many users find it unacceptable to modify the contents of a periodic patch depot after
it has undergone analysis and testing. In this case, you can create a critical patch depot
to supplement a periodic patch depot.
66 Using software depots for patch management
Page 67

• Application depot — contains patches specific to a given application. This type of depot
might actually be a specific version of a periodic patch depot.
After you have identified the need that a specific depot will address, you should determine
whether a directory depot or a tape directory best suits your needs. Most often, directory depots
will be more useful for patch management. You must also select a location for the depot.
Choosing depot type and depot location
You should review the following considerations before creating and using depots:
• Do you require the depot to be available remotely for use by SD-UX commands such as
the swinstall command?
If you are creating a depot for remote access, you need a directory depot. You must place
the depot on a networked system that is accessible by all of the intended users, and you
must register the depot. See “Registering and unregistering directory depots” (page 71).
• Will the depot be heavily used?
You should ensure that both the system and the network are capable of meeting performance
needs based on the intended use. If multiple users will access the depot simultaneously,
you need a directory depot.
• What amount of disk space and what level of disk performance are required?
You should ensure that both the disk space and level of disk performance are capable of
meeting these needs. Depots can be large, and depot operations can involve a significant
amount of disk activity.
• Is the availability of the depot critical?
If the answer to this question is yes, you should consider high-availability storage solutions
such as disk arrays or mirroring.
• Does your organization need a heightened level of security?
If the answer to this question is yes, you should give additional consideration to safeguarding
the depot. Access Control Lists (ACLs) can play a role in depot security. See “Advanced
topic: access control lists” (page 72). In many cases, users of depots install software from
the depot as the root user. Therefore, any compromise of software in a depot could lead to
a security breach.
Although overlooked at times, a well-conceived depot-naming scheme can be very helpful. This
is especially true if you have multiple depots, and is even more important if multiple users will
access the depots.
• You should combine all the patches needed for a given purpose into a single depot.
• The depotshould include all products (including patches) necessary to meet the dependencies
of patches in the depot.
• You can help limit risk by making only the necessary changes to the depot.
• You can reduce the size of a depot by removing superseded patches. See “Advanced topic:
removing superseded patches from a depot” (page 76).
Viewing depots
Use the swlist command to list the registered directory or tape depots on a local or remote
system. You can also use the swlist command to view the contents of a directory or tape depot.
This section provides examples of how to use the swlist command to view depots.
Examples of the swlist command
To view a list of registered depots on the local system, use this command:
swlist -l depot
Viewing depots 67
Page 68

For example:
$ swlist -l depot
# Initializing...
# Target "my_system" has the following depot(s):
/var/spool/sw
/depot/patches/2003-07_periodic_depot
/depot/patches/2004-01_periodic_depot
/tmp_depot/PHSS_29735.depot
To view a list of registered depots on a remote system, use this command:
swlist -l depot @ remote_system
For example:
$ swlist -l depot @ swdepot.xyz.com
# Initializing...
# Target "swdepot.xyz.com" has the following depot(s):
/depot/patches/11.00
/depot/patches/11.04
/depot/patches/11.11
/depot/patches/11.23
To list the contents of a directory or tape depot, use this command:
swlist -l level -d @ remote_system:/directory_path/depot_name
The following values for level are useful: bundle, product, and fileset. For more
information about level, see Chapter 3: “HP-UX patch overview” (page 17).
For example:
$ swlist -l product -d @ swdepot.xyz.com:/depot/patches/11.11
# Initializing...
# Contacting target "swdepot.xyz.com"...
#
# Target: swdepot.xyz.com:/depot/patches/11.11
#
PHCO_23263 B.11.11.15 HP AutoRAID Manager cumulative patch
PHCO_23370 1.0 lint(1) library patch
PHCO_23463 1.0 sysdef(1) patch
PHCO_23492 1.0 Kernsymtab Patch
PHCO_23702 1.0 cumulative header file patch for prot.h
PHCO_23909 1.0 cu(1) patch
...
To view the contents of a specified directory depot at various levels, use this command:
swlist -l level @ remote_system:/directory_path/depot_name
The following values for level are useful: bundle, product, and fileset. This command
does not work for a tape depot.
For example:
$ swlist -l product @ swdepot.xyz.com:/depot/patches/1123.depot
# Initializing...
# Contacting target "swdepot.xyz.com"...
#
# Target: swdepot.xyz.com:/depot/patches/1123.depot
#
PHCO_29605 1.0 VxVM 3.5~IA.004 Command Patch 01
PHCO_29793 1.0 audisp(1M) patch
PHCO_29957 1.0 libc cumulative patch
PHCO_30027 1.0 Release notes document
...
For more information about the swlist command, see the Software Distributor Administration
Guide on the HP Business Support Center website at http://www.hp.com/go/sd-docs.
68 Using software depots for patch management
Page 69

Creating and adding to a directory depot
You can use the swcopy command to create a directory depot from an existing tape or directory
depot. Software objects from the source depot are copied into the target directory. By default,
the swcopy command automatically registers newly created directory depots for use by Software
Distributor.
The swcopy command has many possible arguments. For information, consult the swinstall(1M)
manpage or the Software Distributor Administration Guide on the HP Business Support Center
website at http://www.hp.com/go/sd-docs. Note that the swcopy instructions are contained in
the swinstall manpage.
In this chapter, consider only the following command arguments:
swcopy [-p] -s [source_system:] /directory_path/source_depot
software_selections @ [target_system:] /directory_path/target_depot
The swcopy arguments are as follows:
• -p
— Executes in preview mode when given the optional -p command line argument.
— Does not perform the software copy. It shows what the output from executing the
command will be.
— Results in the creation of the root directory for the depot as well as a catalog directory
and a swagent.log file. The log file contains useful information, including disk space
analysis. The command output includes instructions for viewing the information in the
log file. These instructions are similar to the following:
NOTE: More information may be found in the agent
logfile using the command
"swjob -a log target_system-1234 \
@ target_system:/some_directory/target_depot".
• -s [source_system:]/directory_path/source_depot
— Specifies the tape or directory depot from which patches will be copied.
— Include the name of the source_system to specify a system other than the local one.
— Use the appropriate path and depot name of the depot on the media to copy from a
depot located on media, such as CD or DVD.
• software_selections
— Specifies the software to be copied.
— Replace software_selections with a wildcard to copy multiple products to the
target depot with one command. For example:
◦ \* selects everything from the source depot.
◦ \*,c=patch selects all patches from the source depot.
◦ PHXX_12345 selects patch PHXX_12345 from the source depot.
• @ [target_system:]/directory_path/target_depot
— Specifies the depot directory into which the selected patches will be copied.
— Include the name of the target_system to specify a system other than the local one.
— If this target does not exist and you execute the swcopy command as a user with
appropriate permissions, the target is created. If you do not have the required
permissions, the commandgenerates an error message that provides information about
actions you can take to resolve the problem.
Creating and adding to a directory depot 69
Page 70

Copying patches to depots
The following example shows how to copy patch PHCO_27780 from a remote directory depot
to a local directory depot. The process creates the local depot. The following values are specified
in the command line:
• source_system: remote_system
• source_depot: /depot/patches/11.11/
• target_system: my_system
• target_depot: /my_depots/new_directory_depot/
1. List the registered depots on the local system before copying the patch:
$ swlist -l depot
# Initializing...
# Target "my_system" has the following depot(s):
/var/spool/sw
The target_depot/my_depots/new_directory_depot/ does not yet exist.
2. List the registered depots on the remote system:
$ swlist -l depot @ remote_system
# Initializing...
# Target "remote_system" has the following depot(s):
/depot/patches/11.00
/depot/patches/11.04
/depot/patches/11.11
/depot/patches/11.23
Note the source_depot.
3. Show the contents of the source_depot using /depot/patches/11.11/:
$ swlist -l product @ remote_system:/depot/patches/11.11
# Initializing...
# Contacting target "remote_system"...
#
# Target: remote_system:/depot/patches/11.11
#
...
PHCO_27752 1.0 audevent(1M) cumulative patch
PHCO_27758 1.0 gsp parser & DIMM labels
PHCO_27780 1.0 HP-UX Patch Tools
PHCO_27781 1.0 su(1) cumulative patch
PHCO_27828 1.0 ups_mond(1M) cumulative patch
...
Note the patch to be copied into the target_depot.
4. Execute the swcopy command in preview mode by including the -p argument:
$ swcopy -p -s remote_system:/depot/patches/11.11 PHCO_27780 \
@ /my_depots/new_directory_depot
The swcopy command generates a log file. The swcopy output contains a swjob command.
5. Use the swjob command to read the log file. This command also verifies that there is
sufficient disk space for the copy.
$ swjob -a log my_sys-0827 @
my_system:/my_depots/new_directory_depot
6. Read the log file.
7. Execute the swcopy command without the preview argument:
$ swcopy -s remote_system:/depot/patches/11.11 PHCO_27780 \
@ /my_depots/new_directory_depot
70 Using software depots for patch management
Page 71

8. Show the registered depots on the local system again:
$ swlist -l depot
# Initializing...
# Target "my_system" has the following depot(s):
/var/spool/sw
/my_depots/new_directory_depot
The newly created depot is listed.
9. Show the contents of the new depot:
$ swlist -l product -d @ /my_depots/new_directory_depot
# Initializing...
# Contacting target "my_system"...
#
# Target: my_system:/my_depots/new_directory_depot
#
PHCO_27780 1.0 HP-UX Patch Tools
Note that PHCO_27780 is present.
Advanced topic: HP-UX Software Assistant
You can use the HP-UX Software Assistant (SWA) tool to analyze a system then create a depot.
For information, see Chapter 8: “Using HP-UX Software Assistant for patch management”
(page 85).
Copying products with patch dependencies to depots
Add new or updated applications (including products with patch dependencies) to new or
existing directory depots by using swcopy with the enforce_dependencies=false and
autoselect_patches=false options. Using the default options could select extra patches
from different patch bundles on HP-UX media. Applications with patch dependencies should
only require patches from the FEATURE11i bundle on the same HP-UX media. Use swcopy
with the same options for copying the FEATURE11i bundle to your network depot. (Applications
on the Software Pack media do not have required patches in the FEATURE11i bundle, so in this
case, use the default options to copy the applications.)
Registering and unregistering directory depots
You must register a directory depot if you want its contents to be available for remote access by
SD-UX commands across a network. Conversely, you might have to restrict remote access to a
specific directory depot.
For example, you might be in the process of creating a directory depot to use for patch installation
on production systems. Prior to completing testing on the depot, you do not want users to perform
any installations from this depot; therefore, you need to restrict access to the depot. In this case,
you simply unregister the depot to prevent remote access. You can also register or unregister
tape depots, but you cannot use a registered tape depot as a software source for remote systems.
Registering and unregistering directory depots 71
Page 72

NOTE:
• Registered depots on a network server are both visible and accessible to remote systems.
These depots can be used as a software source for remote systems.
• Unregistered depots on a network server are neither visible nor accessible to remote systems.
These depots cannot be used as a software source for remote systems.
Depots can be registered or unregistered in the following ways:
• The swreg command explicitly registers or unregisters depots.
• The swcopy command automatically registers newly created depots.
• The swremove command automatically unregisters a depot after removing all the software
contained in the depot.
If you have a depot that you want other users to access, you must register it. You should only
do this if you intend the depot to be used as a software source for remote systems.
Depot registration is not required for access from the local host. Registration also is not required
for using the swlist command remotely to view depot contents. For additional details about
the swreg command, see the swreg(1M) manpage and the Software Distributor Administration
Guide on the HP Business Support Center website at http://www.hp.com/go/sd-docs.
Examples of registering and unregistering depots
To register a depot, use this command:
swreg -l depot directory_path_to_depot
For example:
$ swreg -l depot /depot/patches/2003-07_periodic_depot/
======= 05/05/04 09:55:53 MDT BEGIN swreg SESSION (non-interactive)
* Session started for user "some_user@my_system".
* Beginning Selection
* Targets: my_system
* Objects: /depot/patches/2003-07_periodic_depot/
* Selection succeeded.
======= 05/05/04 09:55:53 MDT END swreg SESSION (non-interactive)
To unregister a depot, use this command:
swreg -u -l depot directory_path_to_depot
For example:
$ swreg -u -l depot /depot/patches/2003-07_periodic_depot/
======= 05/05/04 09:40:17 MDT BEGIN swreg SESSION (non-interactive)
* Session started for user "some_user@my_system".
* Beginning Selection
* Targets: my_system
* Objects: /depot/patches/2003-07_periodic_depot
* Selection succeeded.
======= 05/05/04 09:40:17 MDT END swreg SESSION (non-interactive)
Advanced topic: access control lists
If you require finer control over directory depot access, you should familiarize yourself with
Access Control Lists (ACLs) and the swacl command. You can use ACLs to grant a variety of
access rights to certain systems or users. For more information, see the Software Distributor
Administration Guide on the HP Business Support Center website at http://www.hp.com/go/
sd-docs.
72 Using software depots for patch management
Page 73

Verifying directory depots
You can use the swverify command to verify the contents of a directory depot. Tape depots
are not valid targets for the swverify command.
Depot verification does the following:
• Verifies that all dependencies can be met. For more information about dependencies, see
Chapter 3: “HP-UX patch overview” (page 17).
• Reports missing files.
• Checks file attributes, including permissions, file types, size, checksum, mtime, and major
and minor attributes.
If a depot fails verification, it might still be usable for your needs. You must read the swverify
output to determine the cause and the implications of the failure.
The format of the swverify command is as follows:
swverify -d software_selection @ depot_location
The swverify command has many arguments. For information, consult swverify(1M) and the
Software Distributor Administration Guide on the HP Business Support Center website at http://
www.hp.com/go/sd-docs.
This chapter discusses the following command arguments:
• -d
Directs the swverify command to operate on a directory depot rather than on software
currently installed on the system.
When you use this argument, you must also use the @ depot_location argument to
specify the depot.
• software_selection
Specifies the software to be verified.
To verify multiple products, replace software_selection with a wildcard. For example:
— \* selects everything from the source depot.
— \*,c=patch selects all patches from the source depot.
— PHXX_12345 selects patch PHXX_12345 from the source depot.
• @ depot_location
Specifies the directory depot that contains the software to be verified.
Examples of verifying directory depots
The following example verifies the directory depot /my_depots/new_directory_depot.
The verification was successful, as indicated by the output “Verification succeeded”.
For example:
$ swverify -d \* @ /my_depots/new_directory_depot
======= 05/03/04 12:28:51 MDT BEGIN swverify SESSION
(non-interactive) (jobid=my_system-0831)
* Session started for user "some_user@my_system".
* Beginning Selection
* Target connection succeeded for
"my_system:/my_depots/new_directory_depot".
* Software selections: PHCO_27780.CMDS-AUX,r=1.0,
a=HP-UX_B.11.11_32/64,v=HP,fr=1.0,fa=HP-UX_B.11.11_32/64
* Selection succeeded.
* Beginning Analysis
* Session selections have been saved in the file
Verifying directory depots 73
Page 74

"/.sw/sessions/swverify.last".
* The analysis phase succeeded for
"my_system:/my_depots/new_directory_depot".
* Verification succeeded.
NOTE: More information may be found in the agent logfile using the command
"swjob -a log my_system-0831 @ my_system:/my_depots/new_directory_depot".
======= 05/03/04 12:28:51 MDT END swverify SESSION (non-interactive)
(jobid=my_system-0831)
The following example verifies the directory depot /my_depots/PHSS_30278_depot/. This
depot contains one patch, PHSS_30278. This patch is dependent on patch PHSS_29657, which
is not included in the depot. Because of this, the verification failed. The command output indicates
how you can obtain more information about the failure. In this case, if patch PHSS_29657 is
already installed on the target system, you can use depot PHSS_30278_depot for installation
of patch PHSS_30278, even though the depot failed verification.
For example:
$ swverify -d \* @ /my_depots/PHSS_30278_depot
======= 05/03/04 13:04:00 MDT BEGIN swverify SESSION
(non-interactive) (jobid=my_system-0841)
* Session started for user "some_user@my_system".
* Beginning Selection
* Target connection succeeded for
"my_system:/my_depots/PHSS_30278_depot".
NOTE: The software "PHSS_30278" was successfully marked, but it depends
on the following software items which could not be found in the source.
However, these items may already be in the target. This will be checked
during the Analysis Phase: PHSS_29657.LANG-AUX,fa=HP-UX_B.11.23_IA
* Software selections:
PHSS_30278.F90-JPN-E-MAN,r=1.0,a=HP-UX_B.11.23_IA/PA,
v=HP,fr=1.0, fa=HP-UX_B.11.23_IA/PA
PHSS_30278.F90-JPN-S-MAN,r=1.0,a=HP-UX_B.11.23_IA/PA,
v=HP,fr=1.0, fa=HP-UX_B.11.23_IA/PA
PHSS_30278.F90-RELNOTES,r=1.0,a=HP-UX_B.11.23_IA/PA,
v=HP,fr=1.0, fa=HP-UX_B.11.23_IA
PHSS_30278.FORT90-MAN,r=1.0,a=HP-UX_B.11.23_IA/PA,
v=HP,fr=1.0, fa=HP-UX_B.11.23_IA/PA
PHSS_30278.FORT90-PRG,r=1.0,a=HP-UX_B.11.23_IA/PA,
v=HP,fr=1.0, fa=HP-UX_B.11.23_IA
* Selection succeeded.
* Beginning Analysis
* Session selections have been saved in the file
"/.sw/sessions/swverify.last".
ERROR: "my_system:/my_depots/PHSS_30278_depot": The software
dependencies for 1 products or filesets cannot be resolved.
* The analysis phase failed for
"my_system:/my_depots/PHSS_30278_depot".
* Verification had errors.
NOTE: More information may be found in the agent logfile using the
command "swjob -a log my_system-0841 @
my_system:/my_depots/PHSS_30278_depot".
======= 05/03/04 13:04:01 MDT END swverify SESSION (non-interactive)
(jobid=my_system-0841)
Removing software from a directory depot
If you need to remove patches from a directory depot, you can do so by using the swremove
command.
74 Using software depots for patch management
Page 75

swremove [-p] -d patch_to_remove @ [target_system:]
/some_directory/target_depot
A basic description of these swremove arguments follows:
• -p
Executes the command in preview mode.
• -d
Operates on a depot rather than on installed software.
• patch_to_remove
— Specifies the patches to be removed.
— Replace with a wildcard to remove multiple patches with one command. For example:
— ◦ \* selects everything from the source depot.
◦ \*,c=patch selects all patches from the source depot.
◦ PHXX_12345 selects patch PHXX_12345 from the source depot.
• @ [target_system:]/some_directory/target_depot
— Include target_system if you want to specify a system other than the local one.
— Use to specify the directory depot from which the selected patches will be removed.
The success or failure of the command is indicated in the output, which also details how to get
more information.
It is good practice to unregister a depot that has been made available for remote use prior to
modifying the depot. When you have completed depot modifications, reregister the depot to
make it available again.
The following example shows how to remove patch PHCO_27780 from directory depot
/my_depots/new_directory_depot on the system named my_system:
For example:
$ swremove -d PHCO_27780 @ my_system:/my_depots/new_directory_depot
======= 05/03/04 13:25:01 MDT BEGIN swremove SESSION
(non-interactive) (jobid=my_system-0843)
* Session started for user "some_user@my_system".
* Beginning Selection
* Target connection succeeded for
"my_system:/my_depots/new_directory_depot".
* Software selections:
PHCO_27780.CMDS-AUX,r=1.0,a=HP-UX_B.11.11_32/64,
v=HP,fr=1.0, fa=HP-UX_B.11.11_32/64
* Selection succeeded.
* Beginning Analysis
* Session selections have been saved in the file
"/.sw/sessions/swremove.last".
* The analysis phase succeeded for
"my_system:/my_depots/new_directory_depot".
* Analysis succeeded.
* Beginning Execution
* The execution phase succeeded for
"my_system:/my_depots/new_directory_depot".
* Execution succeeded.
NOTE: More information may be found in the agent logfile using the
command "swjob -a log my_system-0843 @
my_system:/my_depots/new_directory_depot".
Removing software from a directory depot 75
Page 76

======= 05/03/04 13:25:02 MDT END swremove SESSION (non-interactive)
(jobid=my_system-0843)
Advanced topic: removing superseded patches from a depot
If you have a depot that you are using for patch installation that contains both superseded patches
and corresponding superseding patches, the superseded patches will never be installed and are
a waste of disk space. There is a patch utility called cleanup that you can use to remove all
patches from a software depot if they have been superseded by patches that are also available
in the depot. This command works only for directory depots, not tape depots.
The cleanup utility is delivered by the following patches (and their superseding patches):
• PHCO_27779 (HP-UX 11.0, B.11.00)
• PHCO_27780 (HP-UX 11i v1, B.11.11)
• PHCO_32220 (HP-UX 11i v2, B.11.23)
• Shipped with SD-UX (HP-UX 11i v3, B.11.31)
To execute cleanup on the depot some_depot, you can use the following command:
cleanup [-p] -d /some_directory/some_depot
If you use the -p option, the command executes in preview mode. You will be able to see what
changes will be made without any changes actually occurring. HP recommends that you always
execute the command in preview mode first.
For additional information and command options, see the cleanup(1M) manpage.
The following example shows how to use the cleanup command to remove superseded patches
from the depot /my_depots/patch_depot.
• Use the swlist command to show the contents of depot /my_depots/patch_depot.
The depot contains two patches: PHCO_24630 and PHCO_27780. The patch PHCO_27780
supersedes PHCO_24630.
$ swlist -l product -d @ /my_depots/patch_depot
# Initializing...
# Contacting target "my_system"...
#
# Target: my_system:/my_depots/patch_depot
#
PHCO_24630 1.0 HP-UX Patch Tools
PHCO_27780 1.0 HP-UX Patch Tools
• Use the cleanup command in preview mode to see what changes will occur. The command
output shows that patch PHCO_24630 will be removed because the cleanup command
removes superseded patches; the output states “PHCO_24630 superseded by
PHCO_27780”.
$ /usr/sbin/cleanup -p -d /my_depots/patch_depot
### Cleanup program started at 05/04/04 07:48:27
Preview mode enabled. No modifications will be made.
Cleanup of depot '/my_depots/patch_depot'.
Obtaining the list of patches in the depot:
/my_depots/patch_depot ...done.
Obtaining the list of superseded 11.X patches in the depot:
/my_depots/patch_depot ...The following superseded patches exist in the depot:
====================================================
PHCO_24630 superseded by PHCO_27780
All information has been logged to /var/adm/cleanup.log.
### Cleanup program completed at 05/04/04 07:48:27
• Run the cleanup command:
$ /usr/sbin/cleanup -d /my_depots/patch_depot
### Cleanup program started at 05/04/04 07:50:39
Cleanup of depot '/my_depots/patch_depot'.
Obtaining the list of patches in the depot:
/my_depots/patch_depot ...done.
76 Using software depots for patch management
Page 77

Obtaining the list of superseded 11.X patches in the depot:
/my_depots/patch_depot ...The following superseded patches
exist in the depot:
====================================================
PHCO_24630 superseded by PHCO_27780
Please be patient; this may take several minutes.
Removing superseded 11.X patches from depot:
/my_depots/patch_depot ...done.
The superseded 11.X patches have been removed from the depot:
/my_depots/patch_depot.
All information has been logged to /var/adm/cleanup.log.
### Cleanup program completed at 05/04/04 07:50:39
• Use the swlist command to show the contents of depot /my_depots/patch_depot.
The depot now contains only one patch: PHCO_27780
$ swlist -l product @ /my_depots/patch_depot
# Initializing...
# Contacting target "my_system"...
#
# Target: my_system:/my_depots/patch_depot
#
PHCO_27780 1.0 HP-UX Patch Tools
Removing a directory depot
The method of depot removal described here is a two-step process. First, ensure that the depot
is unregistered by using the swreg command. Second, remove the depot's root directory.
The following example shows how to remove directory depot /my_depots/PHCO_27780_depot
on local system my_system.
1. Use the following swreg command to unregister the depot:
$ swreg -u -l depot /my_depots/PHCO_27780_depot
======= 08/06/04 14:10:35 MDT BEGIN swreg SESSION
(non-interactive)
* Session started for user "root@my_system".
* Beginning Selection
* Targets: my_system
* Objects: /my_depots/PHCO_27780_depot
* Selection succeeded.
======= 08/06/04 14:10:36 MDT END swreg SESSION
(non-interactive)
2. Remove the depot's root directory and contents:
$ rm -r /my_depots/PHCO_27780_depot/
Installing patches from a depot
To install patches from a directory or tape depot, use the swinstall command.
• For additional information about the swinstall command, see the swinstall(1M) manpage
and the Software Distributor Administration Guide on the HP Business Support Center website
at http://www.hp.com/go/sd-docs.
• For more information about installing patches, see Chapter 2: “Quick start guide for patching
HP-UX systems” (page 9).
When you run the swinstall command, the output tells you the success or failure of the
command and how to get additional information. Prior to actually installing patches, you should
run the swinstall command in preview mode by including the -p argument.
Removing a directory depot 77
Page 78

Although the swinstall command takes many arguments, the following are pertinent to this
discussion:
swinstall [-p] -s source_system:/some_directory/source_depot [-x autoreboot=true
-x patch_match_target=true software_selections] [@ target_selections]
A basic description of these swinstall arguments follows:
• -p
Executes the command in preview mode. When executed in preview mode, the swinstall
command does not perform the software installation. Rather, this argument shows what
the output from executing the command would be if the patch were installed.
Creates a log file that contains information such as disk space requirements and use. The
command output includes instructions for viewing the log file. The instructions are similar
to the following:
NOTE: More information may be found in the agent
logfile using the command
"swjob -a log some_system-1251 @ some_system:/".
• -ssource_system:/some_directory/source_depot
Specifies the tape or directory depot from which patches will be installed. For a tape depot,
this must refer to a local depot.
To install from a depot located on media, such as CD or DVD, use the appropriate path and
depot name of the depot on the media.
• -x autoreboot=true
Reboots the system when required.
• -x patch_match_target=true
Selects for installation only those patches that correspond to products installed on the target
system.
• software_selections
Specifies the software to be installed. If you use the -x patch_match_target=true
option, you do not need to specify a software selection.
To install multiple products to the target depot with one command, replace
software_selections with a wildcard. For example:
— \* selects everything from the source depot.
— \*,c=patch selects all patches from the source depot.
— PHXX_12345 selects patch PHXX_12345 from the source depot.
• @ target_selections
Specifies the system on which the specified software is to be installed. Use this optional
argument if the target system is not the local system.
CAUTION: Before you install any patches, you should back up your system.
On the previous page, the swinstall command with the arguments includes the
autoreboot=true argument. If the Automatic Reboot field of a patch's patch details page or
in the patch text file is set to true when you use the swinstall command to install patches
then the target system will automatically reboot.
A brief warning is given just prior to system reboot, but the system goes down immediately after
the warning is issued. Therefore, it is very important that, prior to installing any patches that
require a system reboot, you follow your company's policy regarding a system reboot.
For information, see the Software Distributor Administration Guide on the HP Business Support
Center website at http://www.hp.com/go/sd-docs and the swinstall(1M) manpage.
78 Using software depots for patch management
Page 79

Examples of installing patches from a depot
To install all applicable patches in the directory depot /my_depots/depot on the local system,
use this command:
For example:
$ swinstall -s /my_depots/depot \
-x autoreboot=true -x patch_match_target=true
======= 05/03/04 14:07:16 MDT BEGIN swinstall SESSION
(non-interactive) (jobid=my_system-0856)
* Session started for user "some_user@my_system".
* Beginning Selection
* Target connection succeeded for "my_system:/".
* Source connection succeeded for "my_system:/my_depots/depot".
* Source: /my_depots/depot
* Targets: my_system:/
* Software selections:
PHSS_30501.AGRM,l=/,r=B.11.11.22,
a=HP-UX_B.11.11_32/64,v=HP,fr=B.11.11.22,
fa=HP-UX_B.11.11_32/64
...
PHSS_30501.XEXT-RECORD,l=/,r=B.11.11.22,
a=HP-UX_B.11.11_32/64,v=HP,
fr=B.11.11.22,fa=HP-UX_B.11.11_32/64
* Selection succeeded.
* Beginning Analysis
* Session selections have been saved in the file
"/.sw/sessions/swinstall.last".
* The analysis phase succeeded for "my_system:/".
* Analysis succeeded.
NOTE: More information may be found in the agent logfile using the
command "swjob -a log my_system-0856 @ my_system:/".
======= 05/03/04 14:07:22 MDT END swinstall SESSION
(non-interactive) (jobid=my_system-0856)
To select and install specific patches from a depot, use this command:
swinstall -x autoreboot=true -s depot software_selections
Use thesoftware_selections argument to specify which software to install.Using wildcards,
you can select multiple products for installation. For example:
• \* selects everything from the source depot.
• \*,c=patch selects all patches from the source depot.
• PHXX_12345 selects patch PHXX_12345 from the source depot.
To install a single patch, PHCO_28175, from directory depot /my_depots/a_depot, use this
command:
For example:
$ swinstall -x autoreboot=true -s /my_depots/a_depot PHCO_28175
======= 05/03/04 14:22:52 MDT BEGIN swinstall SESSION
(non-interactive) (jobid=my_system-0864)
* Session started for user "some_user@my_system".
* Beginning Selection
* Target connection succeeded for "my_system:/".
* Source connection succeeded for
"my_system:/my_depots/a_depot".
Installing patches from a depot 79
Page 80

NOTE: The patch match operation failed to find patches for target
software on "my_system" which passed the filter.
* Source: /my_depots/a_depot
* Targets: my_system:/
* Software selections:
PHCO_28175.CORE-ENG-A-MAN,r=1.0,a=HP-UX_B.11.11_32/64,v=HP,
fr=1.0,fa=HP-UX_B.11.11_32/64
* Selection succeeded.
* Beginning Analysis and Execution
* Session selections have been saved in the file
"/.sw/sessions/swinstall.last".
* The analysis phase succeeded for "my_system:/".
* The execution phase succeeded for "my_system:/".
* Analysis and Execution succeeded.
NOTE: More information may be found in the agent logfile using the
command "swjob -a log my_system-0864 @ my_system:/".
======= 05/03/04 14:23:38 MDT END swinstall SESSION (non-interactive)
(jobid= my_system-0864)
Installing products with patch dependencies from a depot
Set autoselect_patches=false when using swinstall for selection of applications on
HP-UX media or directory depots with multiple patch bundles. The default use of
autoselect_patches=true might select extra patches from other patch bundles. Most
products will only require a few patches that are delivered in the FEATURE11i bundle. The
automatic selection of the other patches is not required for the installation and support of these
products with specific patch dependencies.
Custom patch bundles
Although bundles are not directly related to depots, they can be helpful when you use them in
combination with directory depots for patch management. Bundles allow you to group sets of
related patches. A bundle can be more recognizable than a group of individual patches when
located in a depot or installed on a system. For more information about bundles, see Chapter 3:
“HP-UX patch overview” (page 17).
Creating your own custom bundles is not difficult; however, to use the method presented here,
you must have Ignite-UXinstalled on your system. Ignite-UX is an HP-UX administration toolset
that helps with the following tasks:
• Installing HP-UX
• Creating custom install configurations or golden images
• Recovering HP-UX clients remotely
• Creating custom recovery media
• Managing and monitoring multiple client installation sessions
NOTE: You can also use the HP-UX Software Assistant (SWA) tool to create a custom bundle.
See Chapter 8: “Using HP-UX Software Assistant for patch management” (page 85).
For more information about Ignite-UX, see the Ignite-UX Administration Guide, which is available
on the HP Business Support Center website at http://www.hp.com/go/ignite-ux-docs.
You can also visit the Ignite-UX webpage at http://www.hp.com/go/ignite-ux.
You can use Ignite-UX to create custom bundles from patches that you have placed in a temporary
depot. You can then move this bundle to a permanent depot, such as a periodic depot, for
installation purposes. HP recommends custom bundle creation when you have a group of closely
80 Using software depots for patch management
Page 81

related patches that you want to place in a depot with other patches. This is advantageous for
the following reasons:
• When you list the contents of the depot, you see the bundle rather than the individual
patches.
• If you choose to install only this group of patches, you simply select the bundle for
installation.
• After installing abundle, when you usethe swlist command to list the patches on a system
you will see the bundle rather than the individual patches contained in the bundle.
Suppose you have a group of 10 patches related to software application XYZ in the first quarter
of 2005. You can create a bundle of these patches and name it 2005_Q1_APP_XYZ. You can then
place this bundle in your periodic patch depot. When you use the swlist command to list the
contents of the depot, the bundle name shows up instead of the 10 individual patches. This can
be very helpful when the swlist command returns a large list, because your bundle is more
visible than the individual patches.
Examples of listing patches and bundles
The followingtwo examples show swlist command output after the group of 10 related patches
described previously were added to a depot and installed on a system. Note that it is time
consuming and tedious to determine if all 10 patches are listed because they are interspersed
among all the other patches in the output.
For example:
#
# Bundle(s):
#
SOME_BUNDLE_001 rev bundle description
SOME_BUNDLE_002 rev bundle description
#
# Product(s) not contained in a Bundle:
#
SOME_PATCH_001 rev patch description
INDIVIDUAL_XYZ_PATCH_001 rev patch description
SOME_PATCH_002 rev patch description
SOME_PATCH_003 rev patch description
SOME_PATCH_004 rev patch description
INDIVIDUAL_XYZ_PATCH_002 rev patch description
...
SOME_PATCH_067 rev patch description
SOME_PATCH_068 rev patch description
SOME_PATCH_069 rev patch description
INDIVIDUAL_XYZ_PATCH_010 rev patch description
...
SOME_PATCH_134 rev patch description
INDIVIDUAL_XYZ_PATCH_015 rev patch description
SOME_PATCH_135 rev patch description
SOME_PATCH_136 rev patch description
...
If you bundle the patches into a bundle called 2005_Q1_APP_XYZ_BUNDLE, it is much easier
to determine if the patches are included in the swlist output.
#
# Bundle(s):
#
SOME_BUNDLE_001 rev bundle description
SOME_BUNDLE_002 rev bundle description
2005_Q1_APP_X_BUNDLE rev bundle description
#
# Product(s) not contained in a Bundle:
Custom patch bundles 81
Page 82

#
SOME_PATCH_001 rev patch description
SOME_PATCH_002 rev patch description
...
Creating a custom bundle
The following example shows how to create a custom bundle. Before you do so, for example,
perform an assessment to determine which patches to add to the periodic patch depot
/my_depots/periodic_depot/. For this example, the following patches will be added to the
periodic patch depot:
• PHCO_24587
• PHCO_25130
• PHCO_28175
• PHCO_28830
Next, download the patches and create a temporary depot (/my_depots/temporary_depot/)
containing the patches. Finally, perform the following steps to create a custombundle containing
these patches, and copy the bundle to a periodic patch depot. The name of the new bundle is
PATCH_ASSESSMENT_05042005. Note that 05042005 represents the date on which the patch
assessment was performed.
1. List the patches in the temporary depot /my_depots/temporary_depot/, which contains
the patches identified by the patch assessment.
For example:
$ swlist -d @ /my_depots/temporary_depot/
# Initializing...
# Contacting target "my_system"...
# Target: my_system:/my_depots/temporary_depot/
#
# No Bundle(s) on my_system:/my_depots/temporary_depot/
# Product(s):
#
PHCO_24587 1.0 psrset(1M) man page patch
PHCO_25130 1.0 vPar manpage cumulative patch
PHCO_28175 1.0 vPar commands man pages patch
PHCO_28830 1.0 security(4) man page cumulative patch
2. Create a bundle containing these four patches. The following command creates a bundle in
the temporary depot named PATCH_ASSESSMENT_05042005 with a title of “May 04,
2005: HP-UX 11.11 Patch Assessment Patches” and a revision of 1.0.
$ make_bundles -B \
-n PATCH_ASSESSMENT_05042005 \
-t "May 04, 2005: HP-UX 11.11 Patch Assessment Patches" \
-r 1.0 \
/my_depots/temporary_depot/
3. List the contents of the temporary depot. Note the presence of the newly created bundle.
$ swlist -d @ /my_depots/temporary_depot/
# Initializing...
# Contacting target "my_system"...
# Target: my_system:/my_depots/temporary_depot/
#
# Bundle(s):
#
PATCH_ASSESSMENT_05042005 1.0 May 04, 2005:
HP-UX 11.11 Patch Assessment Patches
82 Using software depots for patch management
Page 83

4. Preview copying the bundle (using the -p argument) from the temporary depot to the
periodic depot. Review the output generated by this command.
$ swcopy -p -s my_system:/my_depots/temporary_depot/ PATCH_ASSESSMENT_05042005 \
@ my_system:/my_depots/periodic_depot/
======= 05/04/05 14:25:00 MDT BEGIN swcopy SESSION (non-interactive)
(jobid=my_system-1132)
* Session started for user "some_user@my_system".
* Beginning Selection
* "my_system:/my_depots/periodic_depot/": This target does not exist
and will be created.
* Source connection succeeded for "my_system:/my_depots/temporary_depot/".
* Source: my_system:/my_depots/temporary_depot/
* Targets: my_system:/my_depots/periodic_depot/
* Software selections:
PATCH_ASSESSMENT_05042005,r=1.0,a=HP-UX_B.11.11_32/64
PHCO_24587.ADMN-ENG-A-MAN,r=1.0,a=HP-UX_B.11.11_32/64,v=HP,
fr=1.0,fa=HP-UX_B.11.11_32/64
PHCO_25130.CORE-ENG-A-MAN,r=1.0,a=HP-UX_B.11.11_32/64,v=HP,
fr=1.0,fa=HP-UX_B.11.11_32/64
PHCO_28175.CORE-ENG-A-MAN,r=1.0,a=HP-UX_B.11.11_32/64,v=HP,
fr=1.0,fa=HP-UX_B.11.11_32/64
PHCO_28830.ADMN-ENG-A-MAN,r=1.0,a=HP-UX_B.11.11_32/64,v=HP,
fr=1.0,fa=HP-UX_B.11.11_32/64
PHCO_28830.CORE-ENG-A-MAN,r=1.0,a=HP-UX_B.11.11_32/64,v=HP,
fr=1.0,fa=HP-UX_B.11.11_32/64
PHCO_28830.PAUX-ENG-A-MAN,r=1.0,a=HP-UX_B.11.11_32/64,v=HP,
fr=1.0,fa=HP-UX_B.11.11_32/64
PHCO_28830.SEC-ENG-A-MAN,r=1.0,a=HP-UX_B.11.11_32/64,v=HP,
fr=1.0,fa=HP-UX_B.11.11_32/64
* Selection succeeded.
* Beginning Analysis
* Session selections have been saved in the file
"/.sw/sessions/swcopy.last".
* The analysis phase succeeded for
"my_system:/my_depots/periodic_depot/".
* Analysis succeeded.
NOTE: More information may be found in the agent logfile using the
command "swjob -a log my_system-1132 @
my_system:/my_depots/periodic_depot/".
======= 05/04/05 14:25:01 MDT END swcopy SESSION (non-interactive)
(jobid=my_system-1132)
5. Copy the bundle from the temporary depot to the periodic depot.
$ swcopy -s my_system:/my_depots/temporary_depot/ PATCH_ASSESSMENT_05042004 \
@ my_system:/my_depots/periodic_depot/
======= 05/04/04 14:25:20 MDT BEGIN swcopy SESSION (non-interactive)
(jobid=my_system-1133)
* Session started for user "some_user@my_system".
* Beginning Selection
* "my_system:/my_depots/periodic_depot/": This target does
not exist and will be created.
* Source connection succeeded for "my_system:/my_depots/temporary_depot/".
* Source: my_system:/my_depots/temporary_depot/
* Targets: my_system:/my_depots/periodic_depot/
* Software selections:
PATCH_ASSESSMENT_05042004,r=1.0,a=HP-UX_B.11.11_32/64
PHCO_24587.ADMN-ENG-A-MAN,r=1.0,a=HP-UX_B.11.11_32/64,v=HP,
fr=1.0,fa=HP-UX_B.11.11_32/64
PHCO_25130.CORE-ENG-A-MAN,r=1.0,a=HP-UX_B.11.11_32/64,v=HP,
fr=1.0,fa=HP-UX_B.11.11_32/64
PHCO_28175.CORE-ENG-A-MAN,r=1.0,a=HP-UX_B.11.11_32/64,v=HP,
fr=1.0,fa=HP-UX_B.11.11_32/64
PHCO_28830.ADMN-ENG-A-MAN,r=1.0,a=HP-UX_B.11.11_32/64,v=HP,
fr=1.0,fa=HP-UX_B.11.11_32/64
PHCO_28830.CORE-ENG-A-MAN,r=1.0,a=HP-UX_B.11.11_32/64,v=HP,
Custom patch bundles 83
Page 84

fr=1.0,fa=HP-UX_B.11.11_32/64
PHCO_28830.PAUX-ENG-A-MAN,r=1.0,a=HP-UX_B.11.11_32/64,v=HP,
fr=1.0,fa=HP-UX_B.11.11_32/64
PHCO_28830.SEC-ENG-A-MAN,r=1.0,a=HP-UX_B.11.11_32/64,v=HP,
fr=1.0,fa=HP-UX_B.11.11_32/64
* Selection succeeded.
* Beginning Analysis and Execution
* Session selections have been saved in the file
"/.sw/sessions/swcopy.last".
* The analysis phase succeeded for
"my_system:/my_depots/periodic_depot/".
* The execution phase succeeded for
"my_system:/my_depots/periodic_depot/".
NOTE: More information may be found in the agent logfile using the
command "swjob -a log my_system-1133 @
my_system:/my_depots/periodic_depot/".
======= 05/04/04 14:25:22 MDT END swcopy SESSION (non-interactive)
(jobid=my_system-1133)
* Analysis and Execution succeeded.
6. The periodic depot now contains the newly created bundle.
$ swlist -d @ /my_depots/periodic_depot/
# Initializing...
# Contacting target "my_system"...
# Target: my_system:/my_depots/periodic_depot/
#
# Bundle(s):
#
PATCH_ASSESSMENT_05042004 1.0 May 04, 2004: HP-UX 11.11 Patch
Assessment Patches
7. Finally, remove the temporary depot.
$ swreg -u -l depot my_system:/my_depots/temporary_depot/
$ rm -r /my_depots/temporary_depot/
84 Using software depots for patch management
Page 85

8 Using HP-UX Software Assistant for patch management
HP-UX Software Assistant (SWA) is a tool that consolidates and simplifies patch management
and security bulletin management on HP-UX systems. It is the HP-recommended utility for
maintaining currency with HP-published security bulletins and recommended patch levels for
HP-UX 11i software.
SWA's major functions are:
• Analysis – SWA runs as a client-side patch and security analysis tool. An HP-supplied
catalog file with known problems and fixes is downloaded from the HP IT Resource Center
(ITRC) and compared to the software installed on the system.
Systems can be analyzed for patch warnings, critical defects, security bulletins, missing
Quality Pack (QPK) patch bundles, and user-specified patches and patch families.
• Report – SWA is able to generate a variety of reports based on its analysis. Action (a to-do
list of patches to install plus manual actions), Issue (list of potential problems found), and
Detail (cross-reference between issues and actions) reports are available. These reports are
consolidated in an HTML report with links to the technical knowledge base.
• Download Software from HP – Based on the analysis, SWA obtains patches from HP and
creates a Software Distributor (SD) depot of software for installation.
IMPORTANT:
Version C.02.75 of SWA is required to allow entitled customers access to the ITRC. SWA C.02.75
supersedes all preceding versions.
You can use SWA from the HP-UX command line or from HP SIM.
To run SWA from HP SIM, use HP SIM version 5.2 or later HP-UX Central Management Server
(CMS).
SWA is supported on HP-UX 11i v3, v2, and v1 systems.
For more information
For details on using SWA, see the following references. To download the SWA product free of
charge, go to the SWA webpage at https://www.hp.com/go/swa.
• The HP-UX Software Assistant website at https://www.hp.com/go/swa provides the product
overview, download links, installation instructions, and access to documentation.
• The HP-UX Software Assistant Release Notes provides the features and functionality of the
latest release, and known problems.
• The HP-UX Software Assistant System Administration Guide describes how to use SWA.
• The Patch Usage Models in Appendix A (page 94) provide information on where SWA fits
into the overall patch process.
• The HP-UX Software Assistant manpages describe the commands and provide examples.
For HP-UX releases, the manpages are available from the command line using the man
command.
— swa(1M)
— swa-report(1M)
— swa-get(1M)
— swa-step(1M)
— swa-clean(1M)
For more information 85
Page 86

9 Using Dynamic Root Disk for patch management
This chapter introduces the HP-UX Dynamic Root Disk (DRD) tool for patching HP-UX systems
and reducing system downtime.
DRD provides you with the ability to clone an HP-UX system image to an inactive disk, and
then:
• perform system maintenance on the clone while your HP-UX 11i system is online.
• automatically synchronize the active image and the clone, eliminating the need to manually
update files on the clone.
• quickly reboot during off-hours – after the desired changes have been made – significantly
reducing system downtime.
• utilize the clone for system recovery, if needed.
• rehost the clone on another system for testing or provisioning – only on VMs or blades
running HP-UX 11i v3 LVM, and VMs running HP-UX 11i v2 LVM.
• perform an OE Update on the clone from an older version of HP-UX 11i v3 to HP-UX 11i
v3 Update 4 or later.
Currently DRD is supported in the following environments:
• HP-UX 11i v3 (B.11.31) September 2007 Release or later
• HP-UX 11i v2 (B.11.23) September 2004 Release or later
• Logical Volume Manager (LVM) 1.0
• VxVM 4.1
• VxVM 5.0
• An extra disk beyond the requirements to run the operating system. The disk should be
local or a SAN and large enough to contain the root volume group.
DRD is a set of commands with which you can clone the active system root volume group, install
and manage patches (11i v2 and v3) and products (11i v3 only) on the clone, then boot the clone
as the new active system.
You can use DRD to manage patches and products when the following criteria apply to your
environment:
1. There is a desire to limit downtime.
2. The patches and products being installed would require a reboot anyway.
3. The system being managed is running HP-UX 11i v2 (B.11.23) September 2004 Release or
later, or the HP-UX 11i v3 (B.11.31) September 2007 release or later.
4. A local or SAN disk large enough to contain the root volume group is available.
5. The root volume group can be, but does not need to be mirrored.
DRD is not useful when the following criteria apply to your environment:
1. The downtime for software maintenance is not an issue.
2. The patches and products being managed do not require a reboot, and apply to programs
that can be stopped during the installation/removal of the patch.
3. The system being managed is not running HP-UX 11i v2 (B.11.23) September 2004 Release
or later, or the HP-UX 11i v3 (B.11.31) September 2007 release or later.
4. An extra disk that is large enough to hold the root volume group is not available.
86 Using Dynamic Root Disk for patch management
Page 87

For more information
• See the DRD webpage at http://www.hp.com/go/drd for links to download the DRD product
free of charge and to access DRD documentation, including the release notes, administrators
guide, and white papers.
• The Patch Usage Models in Appendix A (page 94) provide information on where DRD fits
into the overall patch process.
• The DRD manpages describe the commands and provide examples. For HP-UX releases,
the manpages are available from the command line using the man drd command.
— drd(1m)
— drd-activate(1m)
— drd-clone(1m)
— drd-deactivate(1m)
— drd-mount(1m)
— drd_register_mirror(1m)
— drd-rehost(1m)
— drd-runcmd(1m)
— drd-status(1m)
— drd-sync(1m)
— drd-umount(1m)
— drd_unregister_mirror(1m)
— drd-unrehost(1m)
For more information 87
Page 88

10 The Patch Assessment Tool
Benefits of the Patch Assessment Tool
You can use the Patch Assessment Tool to create custom patch bundles for individual HP-UX
systems and for multiple systems you manage as a group. The Patch Assessment Tool simplifies
the bundle creation process by guiding you through system-based patch analysis and selection.
HP's web-based Patch Assessment Tool is available on the IT Resource Center (ITRC) website at
http://itrc.hp.com.
TIP: HP-UX Software Assistant (SWA) was released in January, 2007 as a software upgrade to
the Patch Assessment Tool. For more information, see Chapter 8: “Using HP-UX Software
Assistant for patch management” (page 85).
The Patch Assessment Tool replaces the Custom Patch Manager (CPM) Tool.
In addition to creating custom bundles, you can also use the Patch Assessment Tool to do the
following:
• Ensure your system meets the HP recommended patch configuration.
• Ensure all applicable security patches are installed on the system.
• Identify and acquire replacement patches for patches with warnings installed on the system.
If you are implementing a proactive patch management strategy, the Patch Assessment Tool can
be usefulas your primary method of patch selection. See Chapter4: “Patchmanagement overview”
(page 42) for more information about proactive patching.
The benefits of using the Patch Assessment Tool to select and acquire patches include:
• The assessment returns a set of patches customized to your needs based on your input:
— Select or deselect patches that provide critical fixes.
— Select or deselect patches that fix security vulnerabilities.
— Include sets of patches that pertain to specific applications.
— Select or deselect replacement (or superseding) patches for patches already on a system
that have noncritical or critical warnings.
— Require that a specific patch be included in the assessment.
— Request the latest Quality Pack (QPK) patch bundle.
• The tool automatically checks the selected patches against each other as well as against
patches currently installed on the system to detect conflicts and dependencies.
• The assessment results include information detailing why each patch was recommended.
• You can download recommended patches as a tar, zip, or gzip package.
You can use the program locating commands whereis(1) and which(1) to make sure you have
the appropriate software. For example, use whereis gzip to determine if the program is
installed and use which gzip to determine if the program is in your path.
Using the Patch Assessment Tool
1. Log in to the ITRC at http://itrc.hp.com.
Please note that you need to log in to the appropriate site (Americas/Asia Pacific or European).
2. Select Patch database.
3. Select run a patch assessment.
The run a patch assessment page is displayed.
88 The Patch Assessment Tool
Page 89

4. You can access information regarding the use of the Patch Assessment Tool, including how
to complete the tasks in the previous list, from the useful links navigation menu on the run
a patch assessment page. Some links include the following topics:
• running a patch assessment
• configuring an assessment profile
• interpreting assessment results
5. To run an assessment, you must complete the following tasks. The following items represent
an outline of these tasks; for procedures you can use the useful links navigation menu or
“Example of running the Patch Assessment Tool” (page 89).
• Download a collection script to the system to be analyzed.
• Run the collection script.
The collection script creates a file called hostname.fs, where hostname is the result
of the uname -n command. Thisfile contains information about what software, patches,
and patch bundles are installed on the system.
• Upload hostname.fs to the Patch Assessment site.
• Select an assessment profile.
The assessment profile specifies what rules the tool should use when determining which
patches and patch bundles to select for the system. You can select the default HP
recommended assessment profile or you can create a custom assessment profile. A
custom profile allows you to do the following:
— A custom profile allows you to select a patch strategy.
— A custom profile allows you to specify that the assessment select patches for any
of the following:
◦ Latest QPK patch bundle
◦ Security patches
◦ Replacements for installed patches with critical warnings
◦ Replacements for installed patches with any warnings
◦ Critical fixes
◦ Updates for patches already installed
◦ Miscellaneous patches for the specific operating system of the system being
assessed
◦ Miscellaneous patches for the specific hardware model of the system being
assessed
◦ Application-specific patch sets
◦ All applicable patches
Use the ITRC frequently to monitor your patch environment.
Example of running the Patch Assessment Tool
The following example shows the steps to follow for creating a custom patch assessment profile
and for running a patch assessment using this profile. The example assumes you are accessing
the ITRC from the system to be analyzed. If this is not the case, you can still use the Patch
Assessment Tool, but you must perform intermediate steps to transfer files to the system you
are using to access the ITRC and the system to be analyzed.
1. Open a browser window on the target system.
2. Log in to the ITRC at http://itrc.hp.com.
3. Select Patch database from the left navigation.
Example of running the Patch Assessment Tool 89
Page 90

4. Select run a patch assessment.
The run a patch assessment page is displayed. This is the home page for the Patch Assessment
Tool. You can see that no system information has been uploaded.
5. Select (upload new system information).
The upload system information page is displayed.
6. Download the collection script swainv to the target system.
7. Run the data collection script, swainv, on the target system.
This creates an HP-UX Software Assistant inventory file called inventory.xml.
8. In the browser window that you opened in step 1, click the Browse... button and select the
output file.
9. Click submit to upload the file.
10. Select create a new assessment profile under step 2.
11. Create and customize the assessment profile. After making your selections, click the save
button.
12. Select your new profile under step 2 and select display candidate patches under step 3.
This produces the patch assessment results page.
13. Review the patches on the patch assessment results page and place a check mark next to the
patch bundles and patches you want to download.
Each patch has text detailing the reason for its selection. Patches listed are linked to detailed
information on the ITRC regarding the patch and might also have notes associated with
them.
14. Select the add to selected patch list button, which appears at the bottom of the patch assessment
results page – you will probably have to scroll down to see it.
The selected patch list page appears.
15. Review the list.
Additional patches that are needed to satisfy the dependencies of your selected patches will
appear in this list.
16. Click download selected when you are sure the patch list is satisfactory.
The download patches page is displayed.
17. Begin downloading by selecting the desired download format.
When the download is complete, the selected patches will be on the system and ready for
installation.
90 The Patch Assessment Tool
Page 91

11 Support and other resources
Contacting HP
Before you contact HP
Be sure to have the following information available before you contact HP:
• Technical support registration number (if applicable)
• Service agreement ID (SAID)
• Product serial number
• Product model name and number
• Product identification number
• Applicable error message
• Add-on boards or hardware
• Third-party hardware or software
• Operating system type and revision level
HP contact information
For the name of the nearest HP authorized reseller:
• See the Contact HP worldwide (in English) webpage (http://welcome.hp.com/country/us/
en/wwcontact_us.html).
For HP technical support:
• In the United States, for contact options see the Contact HP United States webpage (http://
welcome.hp.com/country/us/en/contact_us.html). To contact HP by phone:
— Call 1-800-HP-INVENT (1-800-474-6836). This service is available 24 hours a day, 7 days
a week. For continuous quality improvement, calls may be recorded or monitored.
— If you have purchased a Care Pack (service upgrade), call 1-800-633-3600. For more
information about Care Packs, refer to the HP website (http://www.hp.com/hps).
• In other locations, see the Contact HP worldwide (in English) webpage (http://
welcome.hp.com/country/us/en/wwcontact_us.html).
Subscription service
HP recommends you register your product at the Subscriber's Choice for Business website: http://
www.hp.com/united-states/subscribe/gateway
After registering, you will receive email notification of product enhancements, new driver
versions, firmware updates, and other product resources.
Documentation feedback
HP welcomes your feedback. To make comments and suggestions about product documentation,
send a message to http://www.hp.com/bizsupport/feedback/ww/webfeedback.html.
Include the document title and manufacturing part number. All submissions become the property
of HP.
Related information
Documents
• HP-UX Software Assistant Administration Guide
• Dynamic Root Disk Administrator's Guide
Contacting HP 91
Page 92

• Ignite-UX Administration Guide
• Software Distributor Administration Guide
• Support Plus User Guide
• Read Before Installing Support Plus
HP websites
• HP Home Page
• HP-UX 11i features and news
• Software Assistant
• Dynamic Root Disk
• Ignite-UX
• IT Resource Center
• HP Software Depot
• Software Distributor
• System diagnostic and monitoring tools
• HP ITRC hp-ux technical documentation forum
• HP_UX_Docs Twitter account
Non-HP websites
• hpux-admin mailing list
• HP-UX Porting and Archive Centre: http://hpux.its.tudelft.nlhttp://hpux.connect.org.uk
Typographic conventions
This document uses the following typographical conventions:
%, $, or #
audit(5) A manpage. The manpage name is audit, and it is located in
Command
Computer output
Ctrl+x A key sequence. A sequence such as Ctrl+x indicates that you
ENVIRONMENT VARIABLE The name of an environment variable, for example, PATH.
[ERROR NAME]
Key The name of a keyboard key. Return and Enter both refer to the
Term The defined use of an important word or phrase.
User input
Variable
[] The contents are optional in syntax. If the contents are a list
{} The contents are required in syntax. If the contents are a list
A percent sign represents the C shell system prompt. A dollar
sign represents the system prompt for the Bourne, Korn, and
POSIX shells. A number sign represents the superuser prompt.
Section 5.
A command name or qualified command phrase.
Text displayed by the computer.
must hold down the key labeled Ctrl while you press another
key or mouse button.
The name of an error, usually returned in the errno variable.
same key.
Commands and other text that you type.
The name of a placeholder in a command, function, or other
syntax display that you replace with an actual value.
separated by |, you must choose one of the items.
separated by |, you must choose one of the items.
92 Support and other resources
Page 93

... The preceding element can be repeated an arbitrary number of
times.
Indicates the continuation of a code example.
| Separates items in a list of choices.
WARNING A warning calls attention to important information that if not
understood or followed will result in personal injury or
nonrecoverable system problems.
CAUTION A caution calls attention to important information that if not
understood or followed will result in data loss, data corruption,
or damage to hardware or software.
IMPORTANT This alert provides essential information to explain a concept or
to complete a task
NOTE A note contains additional information to emphasize or
supplement important points of the main text.
Typographic conventions 93
Page 94

A Patch usage models
Sof twar e Ass is tan t (SW A ) Usa g e
Ig nite -UX (I U X) U sa ge
Dy na mic Roo t Disk (D R D) Usa ge
Sof twar e Di stribu tor (S D) Usa g e
IT R esour ce C enter (IRTC) Usa ge
This appendix lists the following patch usage models:
• “Patch usage model 1: hardware/application software change” (page 95)
• “Patch usage model 2: third-party hardware/software qualification” (page 97)
• “Patch usage model 3: operating environment cold install” (page 98)
• “Patch usage model 4: operating environment update” (page 100)
• “Patch usage model 5: proactive patch” (page 102)
• “Patch usage model 6: reactive patch” (page 103)
The following legend is used in all the diagrams in this appendix.
94 Patch usage models
Page 95

Patch usage model 1: hardware/application software change
Begin:
Planning for change
to hardware or software
Ye s
NoNo
Is a complete
OE update or
install required?
Is this a
hardware
upgrade/
change?
Go to A - HP-UX
11i v2/v3
Hardware Change
Go to the HP-UX
11i v2/v3 OE
Update Model 4
Go to B - HP-UX
11i v2/v3
Software Change
Ye s
A
End :
New hardware
deployed
Check documentation
or the IRTC at
http://irtc.hp.com
for hardware support
requirements
Install all required
software and hardware
components in test
and then production
If required,
update
firmware
(non-HP-UX
updates)
Include required
software in master
depot or
golden image
Create
recovery/archive
image
Acquire latest HWE
and if required
get additional HP
software and
patches on media
or from website
Sof twar e A ss ist an t (SW A) U sa ge
Ig nite -U X (I UX) U sa ge
Dy na mic Roo t Di sk (D RD) Usage
Sof twar e Di st ribu tor (S D) U sa ge
IT R e sour ce Cente r (IRTC) U sa ge
NOTE: The latest OE Update Release (OEUR) media and Application Release (AR) media
include new and updated software. The HP-UX 11i v2 and v3 OEUR media include all standard
patch bundles. The AR media only include the FEATURE11i patch bundle for applications that
require patches during installation. Patch bundles can be obtained from the ITRC.
New hardware support might require patches from the HWE patch bundle, along with diagnostics
and new or updated drivers in I/O bundles. Additional HP software can be obtained from the
Software Depot. The new hardware components are only claimed and enabled after software
installation completes.
Patch usage model 1: hardware/application software change 95
Page 96
B
End :
New software
deployed
Review existing
change
management
procedures
Include required
software in
master depot
or golden
image
Install all required
software and patches
in test and then
production
Create
recovery/
archive
image
Acquire software
and patches on
media or from
Web site
Use
DRD
to minimize
downtime?
Create clone
Activate and
reboot clone
* Ensure the latest
drd_unsafe_patch_list
file is loaded
Apply all required
software and patches
to clone and test/validate
Check with
application vendor
for specific tools
recommendations
and patches
No
Ye s
NOTE: The latest OEUR media and AR media include new and updated software. The 11i v2
and v3 OEUR media include all standard patch bundles. The AR media only include the
FEATURE11i patch bundle for applications on AR media that require patches during installation.
Patch bundles can be obtained from the ITRC.
The new HP-UX 11i v2 Software Pack media include the SPK product bundles with required
patches in the same depot. Selection of the desired SPK product bundle will automatically select
the required patches. Most product bundles from the HP Software Depot will also include
required patches in the same depot.
Older SPK bundles that include patches (from 11i v1 and v2 releases) should be in a separate
depot from the standard patch bundles. This requirement might result in two install sessions
with two system reboots.
Additional software can be obtained at the HP Software Depot.
* More information is available in the Managing Rare DRD-Unsafe Patches white paper, available
at http://www.hp.com/go/drd-docs.
96 Patch usage models
Page 97
Patch usage model 2: third-party hardware/software qualification
No
No
No
No
Ye s
Ye s
Ye s
Ye s
Begi n:
Product needs to be
certified on HP-UX
11i v2/v3
Review HP-UX Software
Transition Kit for compliance
(software.hp.com–HP-UX
11i v2 only)
Is a
complete
OE update
or install
required?
Use DRD to
minimize
downtime?
Acquire latest QPK
using SWA or from
OE media (if OE
media is used,
check for latest
QPK updates
from the ITRC)
Install
QPK
Create clone
* Ensure the latest
drd_unsafe_patch_list
file is loaded
Apply QPK to clone
and test/validate
Port of third
party
product?
Perform
qualification
testing
Testing
successful
Review HP Patch
Equivalency
information for
additional
patches
En d:
Product qualified
Go to the HP-UX
11i v2/v3 OE
Update model 4
Go to the HP-UX
11i v2/v3 Reactive
Patching model 6
Activate and
reboot clone
NOTE: * More information is available in the Managing Rare DRD-Unsafe Patches white paper,
available at http://www.hp.com/go/drd-docs.
Patch usage model 2: third-party hardware/software qualification 97
Page 98

Patch usage model 3: operating environment cold install
Cold install OE,
all patch bundles,
optional products
from OE DVD
Install additional HP
applications from
Application Software
Media and or/optional
core enhancements from
Software Pack (found on
Software Depot at
http://www.hp.com/
go/softwaredepot
Install
additional HP
Applications or
optional core
ehancements?
Find and
install 3rd
party
applications
Create final
recovery/
archive
image
E n d :
Functioning updated
system
Test/
validation/
reload data/
deploy
Run Software
Assistant (SWA)
to find additional
issues and their
resolution.
Updated products
and patches will be
identified; manual
actions might be
required.
Use SWA to create
depot of additional
patches, if needed.
Act on
recommended
actions from
SWA as
appropriate;
will include
manual
actions and
installation of
patches and
products
Begin:
First New HP-UX
11i v2/v3 System
Begin:
Additional HP-UX
11i v2/v3 Systems
Use factory
ignited
image?
Use an
existing
depots?
No
Use media
as source
for install?
Go to A
Go to A-1
Go to C
Go to C-1
Go to B – HP-UX
11i v2/v3
Depot Creation
Use an existing
customer created
“golden” image
or master depot?
Install from master
depots or
golden image
Do you want
to use Ignite-
UX depots?
Refer to the Ignite-UX website:
www.hp.com/go/ignite-ux
No
No
No
No
No
Ye s
Ye s
Ye s
Ye s
Ye s
1
Ye s
A
NOTE: All 11i v1 OEUR media and Support Plus media (with the required patch bundles) used
during installation must come from the same media set. The 11i v2 and v3 OEUR media include
all standard patch bundles needed during installation.
Additional software can be obtained from the HP Software Depot.
98 Patch usage models
Page 99

Copy additional
HP products from
Application
Software Media
into Application
Depot
Copy optional
core
enhancements
from
Software
Pack (SPK)
Install
additional
products and
patches from
additinal 11 i
depots
Copy QPKAPPS
bundle from OE
media into
Application Depot
Cold install
OE from
Core Depot
Installing
additional
HP
products?
Installing
optional
core
enhancements?
Create 11i install
depot (Core Depot)
with desired OE
content (including
all patch bundles)
and additional
products from
OE DVD
Find and install
required 3rd party
software, other
non-OE
applications
and hardware
products/patches
Create
Ignite-UX
configurations
Create final
recovery/
archive
image
End :
Deploy system to
production
Test/
validation/
reload data/
deploy
Run Software
Assistant (SWA)
to find additional
issues and
their resolution.
Updated products
and patches will be
identified; manual
actions might be
required.
Use SWA to create
depot of additional
patches, if needed.
Act on
recommended
actions from SWA
as appropriate;
will include
manual actions
and installation
of patches
and products
B
C
No No
Ye s Ye s
Go to C - HP-UX
11i2/v3 Depot Install
C-1
NOTE: Refer to the Ignite-UX Administration Guide at http://www.hp.com/go/ignite-ux-docs.
Ignite-UX commands and SD commands may be used in creating depots for installation and
update. More information may be found at http://www.hp.com/go/sw-deployment-docs.
SPK bundles should not be included in a depot with any other patches or patch bundles.
HP applications and SPK bundles may be acquired from http://www.hp.com/go/softwaredepot
Patch usage model 3: operating environment cold install 99
Page 100

Patch usage model 4: operating environment update
Create final
recovery/
archive
image
En d:
Functioning
updated system
Test/
validation/
deploy
Run Software
Assistant (SWA)
to find additional
issues and
their resolution.
Updated products
and patches will be
identified; manual
actions might be
required.
Use SWA to create
depot of additional
patches, if needed.
Act on
recommended
actions from SWA
as appropriate;
will include
manual actions
and installation
of patches
and products
Go to HP-UX 11i v2/v3
Operating Environment
Cold Install model
Cold install
O/S?
Begin:
Consider updating
the O/S
Updating from
11i v1.6 or 11i v2
prior to 09/2004
to 11i v2
09/2004
or later
Update using
media as
source?
go to B – HP-UX
11i v2/v3
Depot Creation
go to A – HP-UX
11i v2/v3 Update
From Media
* swinstall
August 2004
Bundle 11i
Consulting opportunity – engage
HP Support Representative if needed
Update OE,
optional drivers,
QPK, HWE, and
optional products
from OE DVD
using Update-UX
Update additional HP
applications from
Application Software
Media and or/optional
core enhancements
from Software Pack
Updating
additional HP
Applications or
optional core
enhancements?
Install new
Update-UX
from OE DVD
Find and
install 3rd
party
applications
No No
No
No
Ye s
Ye s
Ye s
Ye s
A
NOTE: HP applications and SPK bundles can also be acquired from Software Depot.
* Refer to August 2004 Bundle11i documentation for more details http://www11.itrc.hp.com/
service/rsb/rsbDisplay.do?fileName=patches_hpux/hpux11iv2_9000_integrity.htm.
100 Patch usage models
 Loading...