

Page 1

Integrating HP-UX 11.x Account Management and
Authentication with Microsoft Windows 2000
White Paper
!
!
!!
Printed in: U.S.A.
© Copyright 2001 Hewlett-Packard Company
Page 2

Legal Notices
The information in this document is subject to change without notice.
Hewlett-Packard makes no warranty of any kind with regard to this manual, including, but not limited to, the implied
warranties of merchantability and fitness for a particular purpose. Hewlett-Packard shall not be held liable for errors
contained herein or direct, indirect, special, incidental or consequential damages in connection with the furnishing,
performance, or use of this material.
Warranty. A copy of the specific warranty terms applicable to your Hewlett-Packard product and replacement parts can be
obtained from your local Sales and Service Office.
Restricted Rights Legend. Use, duplication or disclosure by the U.S. Government is subject to restrictions as set forth in
subparagraph (c) (1) (ii) of the Rights in Technical Data and Computer Software clause at DFARS 252.227-7013 for DOD
agencies, and subparagraphs (c) (1) and (c) (2) of the Commercial Computer Software Restricted Rights clause at FAR
52.227-19 for other agencies.
Hewlett-Packard Company
19420 Homestead Road
Cupertino, California 95014 U.S.A.
Copyright Notices
©copyright 2001 Hewlett-Packard Company, all rights reserved.
Reproduction, adaptation, or translation of this document without prior written permission is prohibited, except as allowed
under the copyright laws.
Posix is a registered trademark of the IEEE.
UNIX is a registered trademark of The Open Group.
NIS is a trademark of Sun Microsystems, Inc.
Active Directory and Windows are either registered trademarks or trademarks of Microsoft Corporation.
Other product and brand names are trademarks of their respective owners.
2
Page 3

Introduction
Many enterprises contain a mixture of operating systems and platforms. Often a single user has both Windows 2000 and
UNIX accounts on multiple systems. Having a common authentication service and account information data store across
platforms improves security, administration and the end-user experience.
Windows 2000 servers provide network-wide common authentication and data storage, but Windows clients don’t
interoperate with other vendor’s solutions. Fortunately, HP-UX can dynamically add authentication and name service libraries
to an existing system, allowing it to utilize a variety of services. The basis of the Microsoft services comes from industry
standard protocols (Kerberos
mostly requires configuration modifications to handle the differences between Microsoft’s implementation and those of other
providers of similar services.
This white paper describes how to use existing products to integrate HP-UX authentication, user and group management with
Microsoft Windows 2000. Utilizing the LDAP-UX Client Services and PAM Kerberos Authentication products from HP, and
Microsoft’s Services for UNIX 2.0 (SFU), the Windows 2000 Active Directory (AD) can be used as a common data store for
both Windows 2000 and HP-UX. In addition, HP-UX users can be authenticated using the same user name, password and
Kerberos server utilized by the Windows clients.
1
and LDAP2) already supported by HP-UX. Integrating HP-UX as a client of these services
1
“The Kerberos Network Authentication Service (V5)”, J. Hohl, C. Neuman, IETF RFC 1510, September 1993
2
“Lightweight Directory Access Protocol (v3)”, M. Wahl, T. Howes, S. Kille, IETF RFC 2251, December 1997
3
Page 4

HP-UX and Windows 2000 Integration Products
Both HP-UX and Windows 2000 operating systems offer new features which make the integration possible.
HP-UX
The following products, released as part of the system core and via Application CDs, provide the framework allowing HP-UX
to become more flexible and more interoperable:
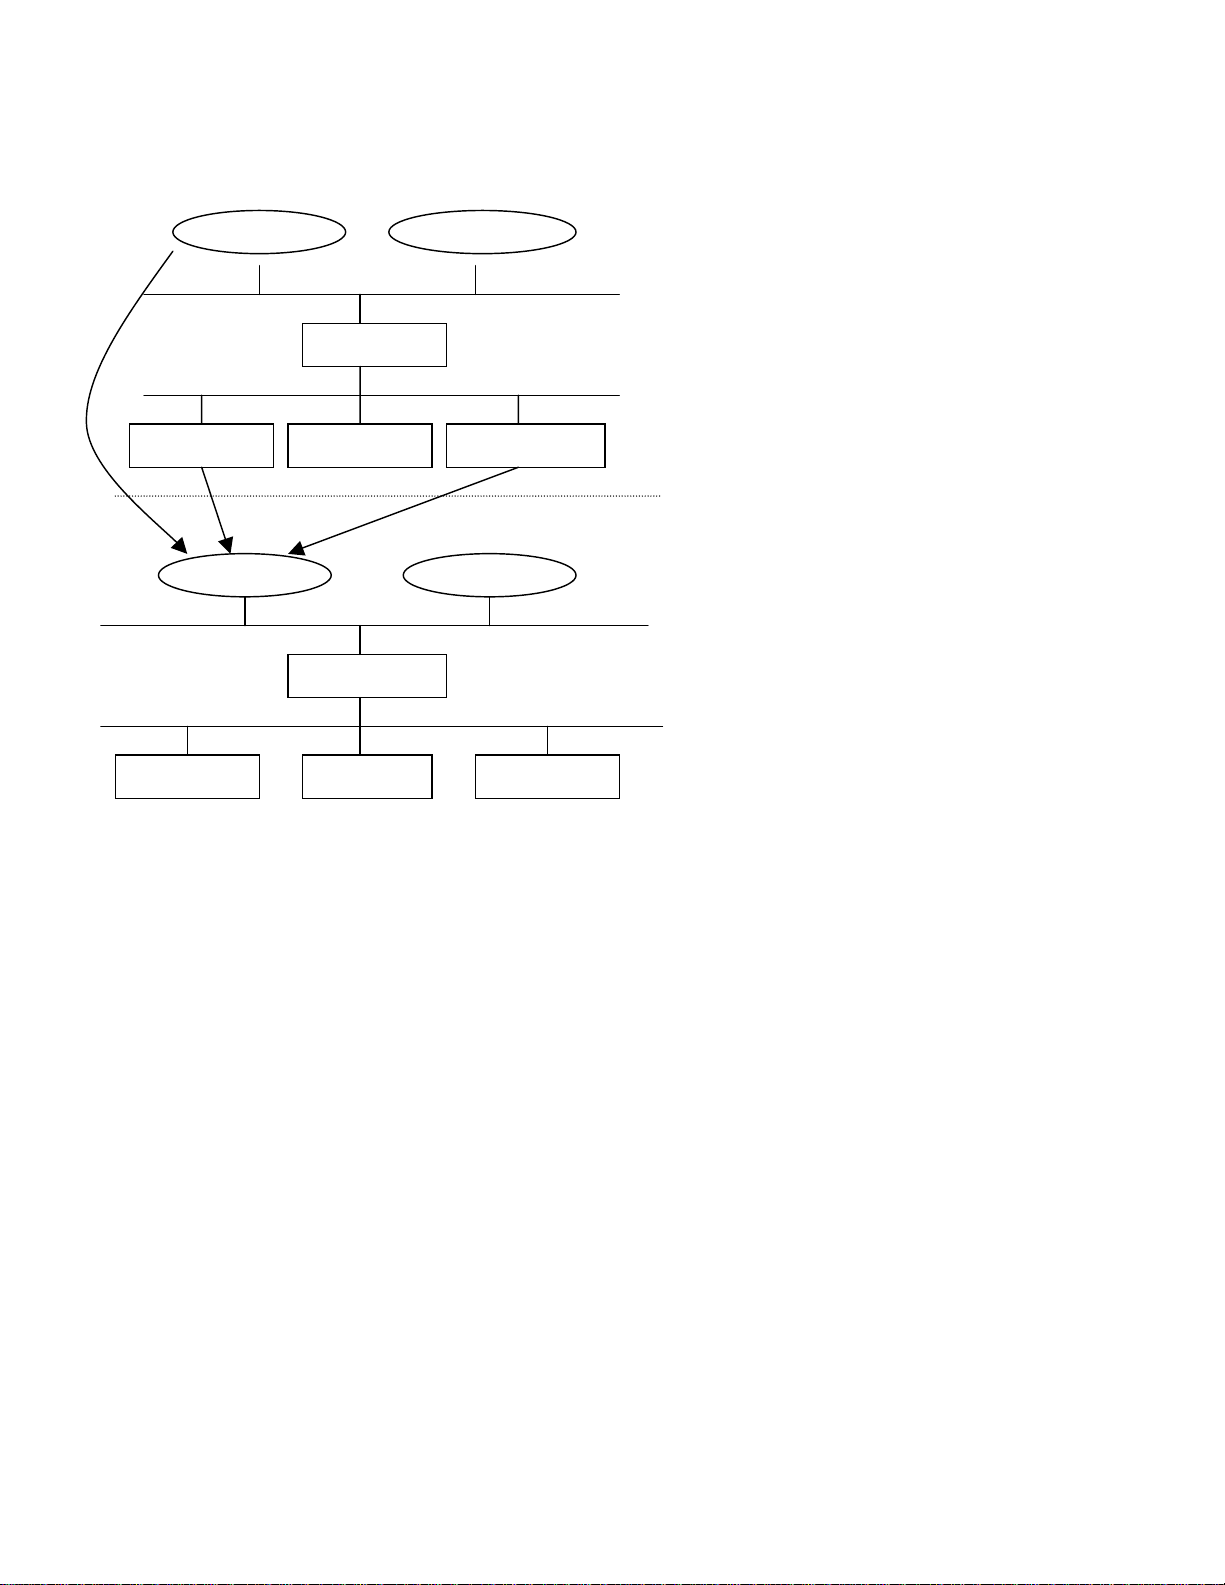
PAM and NSS:
As of release 11.0, HP-UX supports the Name Service Switch (NSS) and Pluggable Authentication Module (PAM)
architecture. These architectures provide a method to install and configure multiple name and authentication services without
affecting the higher level commands and APIs. For example, by installing the PAM Kerberos authentication library, and
modifying the file /etc/pam.conf, the HP-UX login command will now authenticate users with a Kerberos server, instead of
using the default local PAM_UNIX authentication.
NSS and PAM give HP-UX system administrators the flexibility to choose where to store user account information and how
to authenticate a user who wants to login to the system.
LDAP-UX:
The LDAP-UX integration product, released in March 2001 on the HP-UX Application CD, includes a NSS library that
retrieves account and group information from Lightweight Directory Access Protocol (LDAP) v3 compliant data repositories.
It is designed with the goal of being di rectory vendor neutral, and flexible regarding tree structur e, schema and naming
convention. There fore, through some configuration mod i fic ations, the NSS LDAP library will be able to retrieve information
from the Windows 2000 directory service.
PAM Kerberos:
The PAM Kerberos product supports Kerberos authentication, which authenticates users without sending plain text passwords
over the network. HP-UX PAM Kerberos has been tested with Microsoft Windows 2000 and MIT Kerberos V5 Key
Distribution Center (KDC).
The following figure shows how these components work together:
4
Page 5
getp
getg
()
N
N
N
N
…..
….
….
N
PAM:
login,su…. application…
PAM Library
PAM_UNIX PAM_LDAP PAM_Kerberos
NSS:
SS_FILES
wnam()
SS Engine
SS_NIS
rnam
SS_LDAP
Application services
Reads /etc/pam.conf to
see which authentication
module to use
Authentication modules
APIs to access user/system
information
Reads /etc/nsswitch.conf
to decide which name
service module to use
ame service modules
Windows 2000
Following two primary Windows 2000 features built on top of existing industry standards improve Windows 2000’s
capability to interoperate with UNIX platforms:
Active Directory (AD):
This is an LDAP based directory which Windows 2000 uses to store all its data. LDAP is an open internet standard. The
support of LDAP allows Windows 2000 to interoperate with other vendors’ LDAP directory enabled applications.
Kerberos Services:
Kerberos is the primary authentication method for Microsoft clients connecting to Windows 2000 server. Kerberos is an
industry standard for network security. With the support of Kerberos authentication, Windows 2000 is able to authenticate
Kerberos clients rega rdless of what platforms the clients reside on.
Active Directory and Kerberos are integrated seamlessly in the Windows 2000 operating system. Active Directory domain
controllers are automatically configured to provide Kerberos with authentication services, and by default, all Windows 2000
computers are configured to operate as Kerberos clients.
Services for UNIX (SFU):
5
Page 6

Other than operating system improvements, Microsoft also provides the Services for UNIX (SFU) product to enhance the
interoperability with UNIX-based systems. SFU 2.0 has features which make setting up a mixed enterprise environment a lot
easier.
The following figure illustrates the Windows 2000 components that HP-UX depends on for proper integration:
Kerberos Services
Windows 2000
authentication services
SFU
2.0
1. NIS Server
Active Directory Windows 2000 data store
2. AD schema
extension
Retrieve account information
6
Page 7
N
How HP-UX and Windows 2000 Products Integrate
There are two approaches to integrate HP-UX account managemant and authentication with Windows 2000:
• NIS
• LDAP
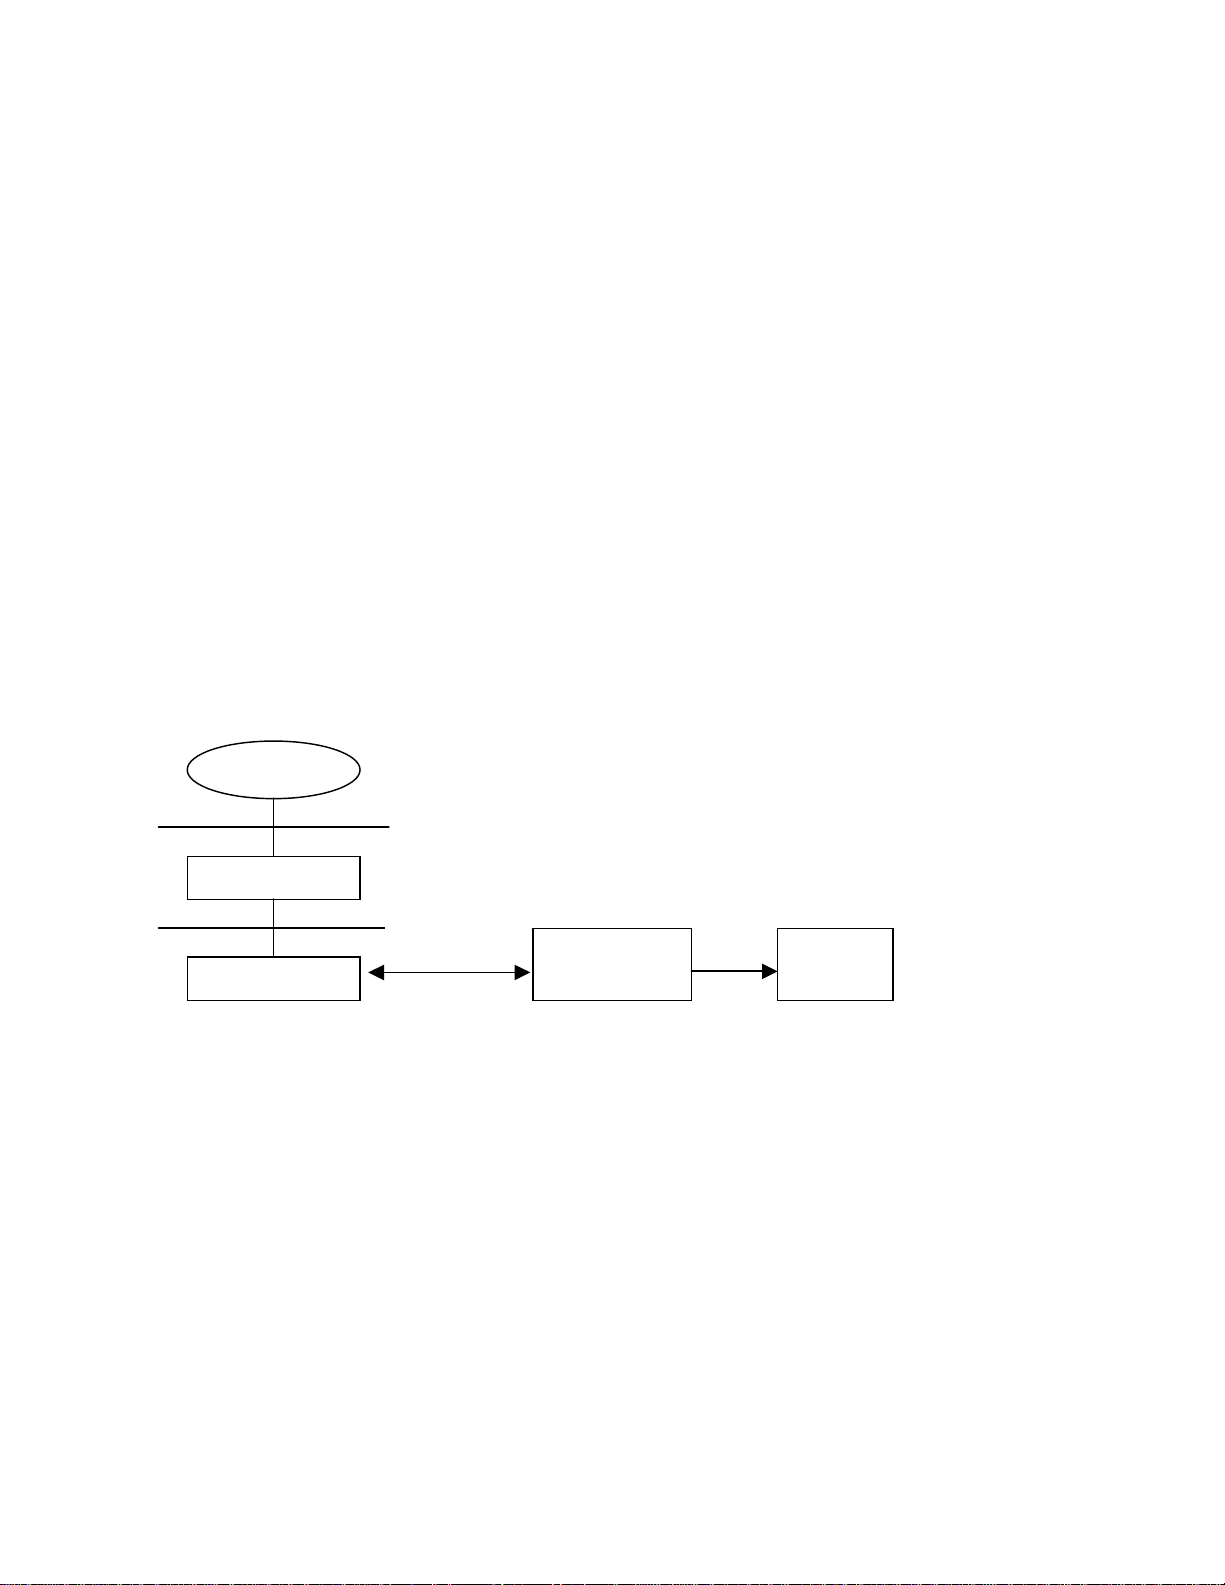
NIS Integration:
Windows 2000 as NIS Server + HP-UX as NIS Client + HP-UX PAM_Kerberos
Server for NIS is one of the SFU 2.0 tools, which enables Windows 2000 to serve as an NIS server. It utilizes AD to store
user account and group information. An NIS client on HP-UX communicates with the NIS server on Windows 2000 to
retrieve information from AD. The PAM Kerberos product on HP-UX uses Windows 2000 Kerberos Services to authenticate
users who want to log into HP-UX machines. Although PAM_UN IX can authenticate use rs stored in an NIS server, it is not a
good choice for this integration, because PAM_UNIX mainly retrieves user account information from the server, then
authenticates users on the client machine, which doesn’t have the benefit of common authentication. The following figure
illustrates the integration between two NIS platforms.
NIS:
HP-UX Client Windows 2000 Server
getpwnam()
NSS engine
IS protocol
NSS_NIS
Server for NIS
(SFU 2.0)
Active
Directory
7
Page 8
N
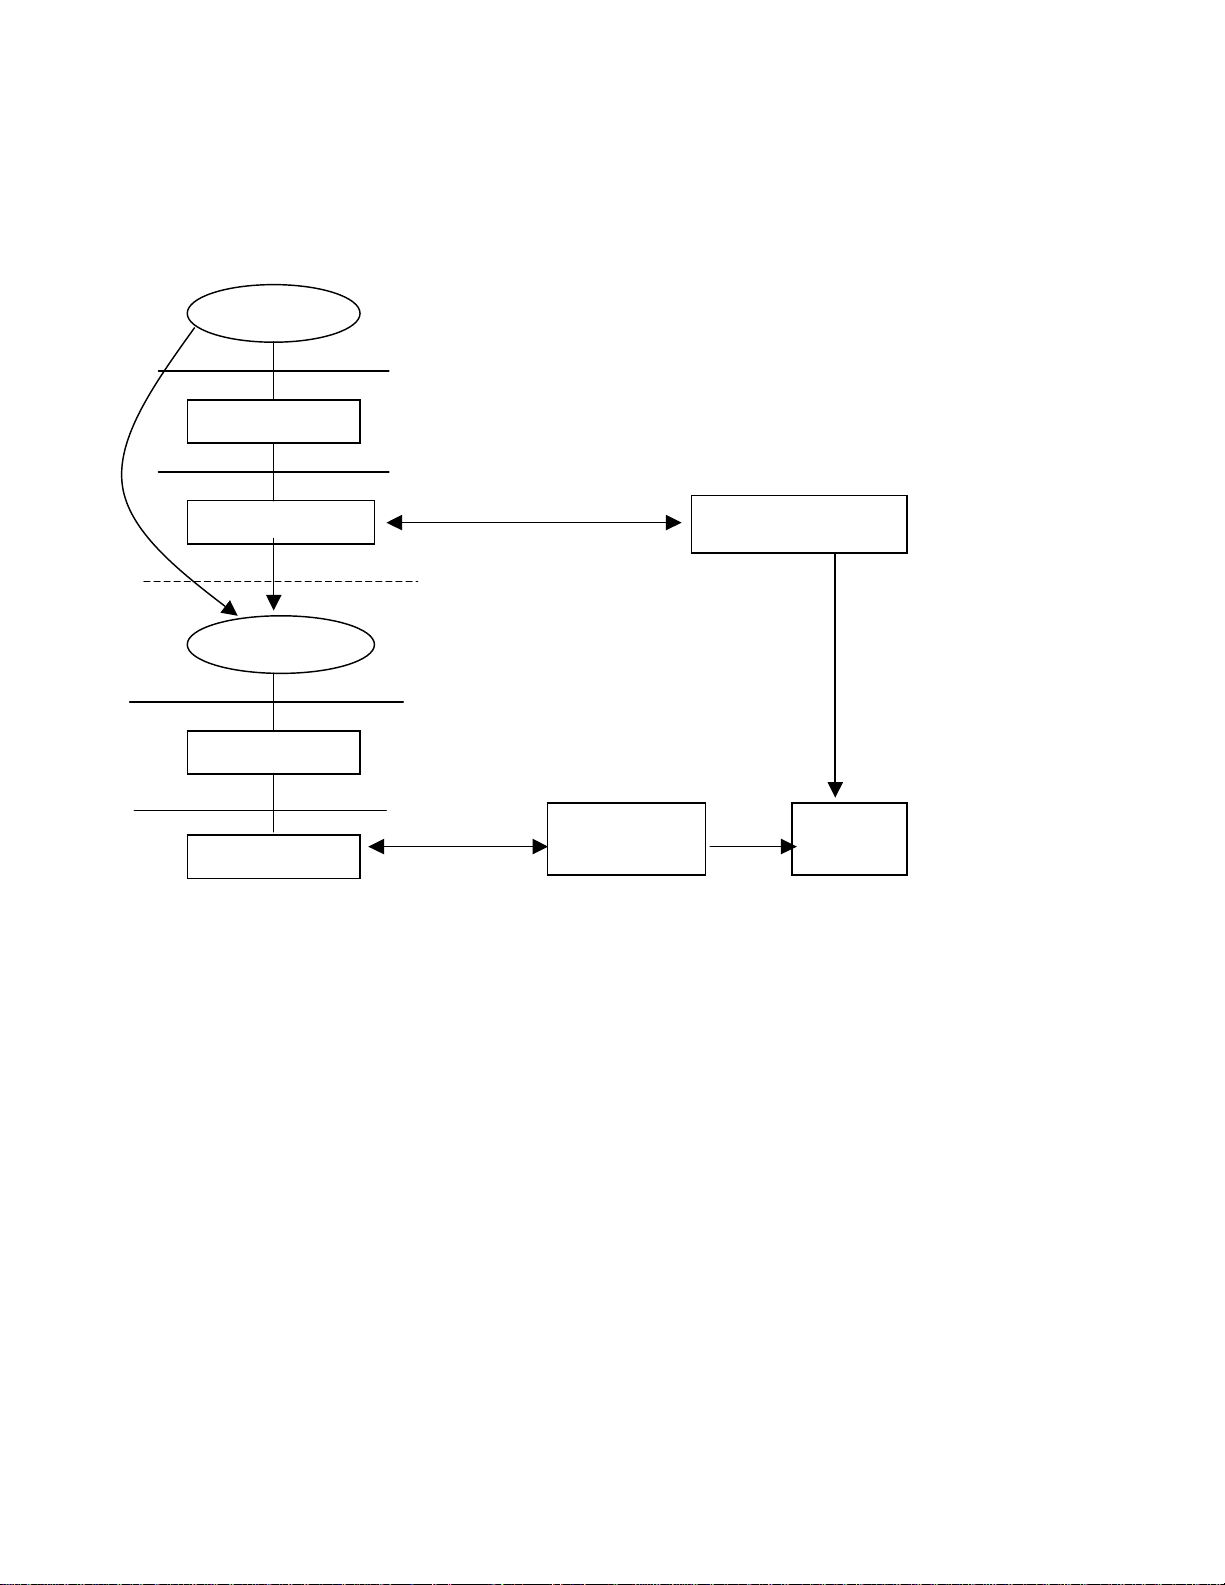
NIS+PAM_Kerberos:
HP-UX client Windows 2000 server
login
PAM Library
Kerberos protocol
PAM_Kerberos
getpwnam()
NSS engine
NSS_NIS
IS protocol
Server for NIS
(SFU 2.0)
Kerberos Services
Active
Directory
8
Page 9

LDAP Integration:
Windows 2000 as LDAP server + HP-UX as LDAP Client + HP-UX PAM_Kerberos
HP-UX uses Windows 2000 AD to store user account and group information. The LDAP-UX client on HP-UX retrieves
information from AD. The PAM Kerberos product on HP-UX uses Windows 2000 Kerberos Services to authenticate users
who want to log into HP-UX machines. The following figure illustrates the integration between two platforms.
LDAP:
HP-UX Client Windows 2000 Server
getpwnam
NSS engine
LDAP protocol
NSS_LDAP
LDAP + PAM_Kerberos:
HP-UX Client Windows 2000 Server
login
PAM Library
Active
Directory
Extend
schema
Server for NIS
(SFU 2.0)
PAM_Kerberos
getpwnam()
NSS engine
NSS_LDAP
9
Kerberos protocol
LDAP protocol
Kerberos Services
Active
Directory
Server for NIS
(SFU 2.0)
Page 10

NIS vs. LDAP Integration:
The NIS integration might be a better choice if you already deployed NIS in your environment, and all you want is to migrate
the NIS server to use Windows 2000 so that you can have a central server for both UNIX and Windows 2000 user accounts.
However, this integration limits the server and client communication to what NIS can provide.
LDAP directory technology has been widely accepted by the industry. It provides distributed, scalable and flexible services
for an enterprise environment. It also avoids the dependency on UNIX connectivity products from Microsoft. If your goal is
to adopt the new technique and take advantage of current functionality as well as future enhancements, the LDAP integration
would be a better choice.
10
Page 11

Benefits of Integration
Integrating HP-UX account management and authentication with Windows 2000 benefits system administrators and end-users
in three major ways:
Common Authentication
With the integration, both Windows 2000 users and HP-UX users are authenticated by Windows 2000 Kerberos Services.
This provides the benefit of common authentication.
Common authentication in a heterogeneous environment is a big advantage. Every user gains system access using the same
authentication method. A system administrator can easily enforce login process and password policies across two platforms,
but also allows users to use just one password to access all systems. Both system security and usability can improve with
common authentication.
Common Data Repository
The integration allows Active Directory to serve as a central data repository for both Windows 2000 and HP-UX account
information. This simplifies an administrator’s job tremendously. He/she just has to administer one database for all users and
groups, which can significantly minimize the maintenance cost and prevent errors resulting from databases not being
synchronized.
Single Point of Account Management
Integrating common authentication and common data repository provides a single point of account management to system
administrators. In an enterprise environment with thousands of users, this is very critical to the success of keeping all accounts
current. Another benefit is that system adiminstrators can be sure that when a user is added/removed that he/or she is
granted/denied access to all systems. A good example is when a person leaves the company. By removing him/her from one
database, administrators have removed all access for that operson.
11
Page 12

Configuring Windows 2000 and HP-UX Using NIS Integration
This section describes how to configure your Windows 2000 and HP-UX system for NIS integration.
Preparing Windows 2000 for HP-UX Integration
The following four steps are all you need to do with Windows 2000 to integrate HP-UX NIS account management and
authentication with Windows 2000. However, the sequence of installing Active Directory and SFU is important. When SFU
2.0 is installed, Active Directory must already exist, so that SFU can extend posix attributes.
Step 1: Install Active Directory into your Windows 2000 server.
One primary component of integration is Active Directory. So, your Windows 2000 server must have Active Directory
installed. You install Active Directory by prompting your Windows 2000 server to become a domain controller using the
Active Directory Installation wizard. To initiate the installation wizard, you click on “Start”, “Programs”,
“Administrative Tools”, “Configure Your Server”, then choose Active Directory in the left column, and click on “Start”.
The installation wizard installs and configures components that provide the Active Directory directory service, including
the Kerberos V5 protocol authentication software.
Step 2: Add an account for HP-UX client machine to AD.
Use the Active Directory Users and Computers tool to create a user account for your HP-UX host. This is a required step
to set up a Kerberos client to communicate with Windows 2000 Kerberos Services.
Step 3: Use ktpass to create the keytab file for HP-UX client machine.
Use the ktpass tool to create the keytab file and set up an identity mapping for the host account. The following is an
example showing you how to run ktpass to create the keytab file for the UNIX host myhost with the KDC realm
LA.CAL.COM.
C:> ktpass -princ host/myhost@LA.CAL.COM -mapuser myhost -pass
mypasswd -out unix.keytab
If your machine doe sn’t have ktpass, you can install it from your Windows 2000 Server compact disc, in the directory
support/tool.
Refer to Configuration Guide for Kererbos Products on HP-UX for detailed information on how to configure Windows
2000 as a KDC server, including how to use ktpass.The configura tion guide can b e obtained from
http://docs.hp.com/hpux/internet
Step 4: Install SFU 2.0, including Server for NIS.
Posix accounts have some attributes which are not used by Windows 2000. For example, user ID number, login shell,
home directory, etc. To use AD as a data repository for HP-UX users, you need to extend the AD schema to include the
posix schema defined in RFC 2307
AD schema roughly based on RFC 2307 for posix accounts. Installing Server for NIS enables Windows 2000 server to
act as an NIS server, so that any NIS client can retrieve information stored in AD.
Server for NIS is not part of the default installation. You will have to explicitly choose “Customized Installation” at the
“Installation Optoins” screen and select the “Server for NIS”. The server will be automatically started after it is installed
successfully.
3
. It can be done easily by installing SFU 2.0. The SFU tool Server for NIS extends the
Preparing HP-UX for Windows 2000 Integration
3
“An Approach for Using LDAP as a Network Information Service”, L. Howad, IETF RFC 2037, March 1998
12
Page 13

The following describes how to configure your HP-UX machine as a NIS client and use PAM Kerberos to authenticate users
logging into the machine.
NIS Client Configuration
Step 1: Configure HP-UX as a NIS client.
Edit /etc/rc.config.d/namesvrs, and change the following variables:
NIS_CLIENT=1
NIS_DOMAIN=nisdomain
Nisdomain is the default NIS domain created by SFU 2.0, usually it is the first domain component of your domain root.
For example, if your domain root is dc=la,dc=cal,dc=com, SFU 2.0 creates a default NIS domain called la.
Step 2: Change Name Service Switch (NSS) to use NIS.
The passwd and group entries in /etc/nsswitch.conf must include the keyword nis, for example:
passwd: files nis
group: files nis
This tells the Name Service Switch to retrieve user account and group information firstly from the local /etc/passwd file.
If this fails, then retrieve the information from an NIS server, which is Windows 2000 in our case. If your machine
doesn’t have /etc/nsswitch.conf, you can create one from copying /etc/nsswitch.nis. However, in that case, you will have
to decide how you want to configure other services (e.g. hosts, networks, rpc. etc).
Step 3: Start HP-UX as a NIS client.
You can start the client by doing “/sbin/init.d/nis.client start”.
PAM Kerberos Configuration
Step 1: Download and install the PAM Kerberos product.
If the OS version of your HP-UX machine is 11.00, you need to download and install PAM Kerberos product
(J5849AA). It can be obtained from HP software depot web site, http://software.hp.com. After downloading the
software from the web site, you use /usr/sbin/swinstall to install the product onto your HP-UX. The installation
instruction can also be found from the web site. If the OS version of your HP-UX machine is 11i, unless you unselect
it, PAM Kerberos is installed on your machine as part of the core operating system by default. You can also install it
individually from the HP-UX 11i OS CD if needed.
The PAM Kerberos Release Note (J5849AA-90001) and Configuration Guide for Kerberos Products on HP-UX
(J5849-90003) can be obtained from http://docs.hp.com/hpux/internet
information about the product.
If your HP-UX is 11.00, the 11.0 patch PHCO_22265 must be installed. It can be obtained from the HP Electronic
Support Center at:
http://us-support.external.hp.com
http://europe-support.external.hp.com
The patch number can be superseded at any time. The above patch number is current as of December 27, 2000. If
your HP-UX machine is 11i, the above patch has been incorporated into HP-UX 11i, the patch is not required.
or
. These two documents provide you detailed
13
Page 14

Step 2: Configure your HP-UX machine to authenticate using PAM Kerberos.
The PAM Kerberos Release Note contains detailed information on how to configure a HP-UX machine to use PAM
Kerberos and use Windows 2000 as the KDC. Here is the brief description of the task.
Create /etc/krb5.conf:
/etc/krb5.conf is the Kerberos configuration file which specifies the default realm, the location of a KDC server and
the log file names. The Kerberos client depends on the configuration to locate the realm’s KDC. The following is an
example of /etc/krb5.conf which has the realm LA.CAL.COM, and machine myhost.la.cal.com as KDC:
[libdefaults]
default_realm = LA.CAL.COM
default_tgs_enctypes = DES-CBC-CRC
default_tkt_enctypes = DES-CBC-CRC
ccache_type = 2
[realms]
LA.CAL.COM = {
kdc = MYHOST.LA.CAL.COM:88
kpasswd_server = MYHOST.LA.CAL.COM:464
}
[domain_realm]
.la.cal.com = LA.CAL.COM
[logging]
kdc = FILE:/var/log/krb5kdc.log
admin_server = FILE:/var/log/kadmin.log
default = FILE:/var/log/krb5lib.log
The permission of /etc/krb5.conf should be 644 and owned by root.
Add the Kerberos services to /etc/services:
The /etc/services file needs to contain Kerberos services. If your /etc/services is from the HP-UX 11.00 release, the
Kerberos will already exist. If your /etc/services doesn’t have Kerberos services, add the following:
kerberos 88/udp kdc # Kerberos v5 kdc
kerberos 88/tcp kdc # Kerberos V5 kdc
klogin 543/tcp # Kerberos rlogin -kfall
kshell 544/tcp cmd # Kerberos remote shell
kerberos-adm 464/udp # Kerberos 5 password change protocol
kerberos-adm 464/tcp # Kerberos 5 password change protocol
kerberos-adm 749/udp # Kerberos 5 admin/changepw
kerberos-adm 749/tcp # Kerberos 5 admin/changepw
krb5_prop 754/tcp # Kerberos slave propagation
eklogin 2105/tcp # Kerberos encrypted rlogin
krb524 4444/tcp # Kerberos 5 to 4 ticket translator
Add a host key to the /etc/krb5.keytab file:
14
Page 15

The keytab file is the one described in the previous section on Windows 2000 using ktpass. You need to transfer this file
securely to your HP-UX machine and name it krb5.keytab in the /etc/ directory. If you already have an existing
/etc/krb5.keytab file, you need to merge the new keytab file with the existing one. ktutil is a tool provided with the
product for you to import the keys. This file should be readable only by root.
Synchronize the HP-UX clock to the Windows 2000 clock:
The clocks in Windows 2000 and your HP-UX machine must be synchronized. The default clock sync time is within 5
minutes. You can run Ne twork Time Synchronizer t o synchronize both clocks. If the tool is not available, you can
manually synchronize them by setting “Date/Time Properties” on Windows 2000 and running “/etc/set_parms
date_time”on HP-UX.
Step 3: Change /etc/pam.conf to use PAM Kerberos.
/etc/pam.conf is the PAM configuration file which specifies PAM service modules for PAM applications. To use PAM
Kerberos as authentication module, you will need to edit /etc/pam.conf to include the PAM Kerberos library
/usr/lib/security/libpam_krb5.1 for all four services: authentication, account management, session management, and
password management. Refer to PAM Kerberos Release Note for detailed information on PAM configuration. The
following is an example:
login auth sufficient /usr/lib/security/libpam_krb5.1
login auth required /usr/lib/security/libpam_unix.1 try_first_pass
su auth sufficient /usr/lib/security/libpam_krb5.1
su auth required /usr/lib/security/libpam_unix.1 try_first_pass
dtlogin auth sufficient /usr/lib/security/libpam_krb5.1
dtlogin auth required /usr/lib/security/libpam_unix.1 try_first_pass
dtaction auth sufficient /usr/lib/security/libpam_krb5.1
dtaction auth required /usr/lib/security/libpam_unix.1 try_first_pass
ftp auth sufficient /usr/lib/security/libpam_krb5.1
ftp auth required /usr/lib/security/libpam_unix.1 try_first_pass
OTHER auth sufficient /usr/lib/security/libpam_unix.1
#
# Account management
#
login account required /usr/lib/security/libpam_krb5.1
login account required /usr/lib/security/libpam_unix.1
su account required /usr/lib/security/libpam_krb5.1
su account required /usr/lib/security/libpam_unix.1
dtlogin account required /usr/lib/security/libpam_krb5.1
dtlogin account required /usr/lib/security/libpam_unix.1
dtaction account required /usr/lib/security/libpam_krb5.1
dtaction account required /usr/lib/security/libpam_unix.1
ftp account required /usr/lib/security/libpam_krb5.1
ftp account required /usr/lib/security/libpam_unix.1
OTHER account sufficient /usr/lib/security/libpam_unix.1
#
# Session management
#
15
Page 16

login session required /usr/lib/security/libpam_krb5.1
login session required /usr/lib/security/libpam_unix.1
dtlogin session required /usr/lib/security/libpam_krb5.1
dtlogin session required /usr/lib/security/libpam_unix.1
dtaction session required /usr/lib/security/libpam_krb5.1
dtaction session required /usr/lib/security/libpam_unix.1
OTHER session sufficient /usr/lib/security/libpam_unix.1
#
# Password management
#
login password sufficient /usr/lib/security/libpam_krb5.1
login password required /usr/lib/security/libpam_unix.1
passwd password sufficient /usr/lib/security/libpam_krb5.1
passwd password required /usr/lib/security/libpam_unix.1
dtlogin password sufficient /usr/lib/security/libpam_krb5.1
dtlogin password required /usr/lib/security/libpam_unix.1
dtaction password sufficient /usr/lib/security/libpam_krb5.1
dtaction password required /usr/lib/security/libpam_unix.1
OTHER password sufficient /usr/lib/security/libpam_unix.1
At this point you have finished PAM Ker beros configuration for the i ntegration. If you follow the PAM Kerberos Releas e
Note steps, you can ignore the step configuring user accounts into /etc/passwd. The integration allows you to store user
accounts in AD; you don’t need duplicated account information in the local /etc/passwd file or other data repository.
16
Page 17

Configuring Windows 2000 and HP-UX Using LDAP Integration
This section describes how to configure your Windows 2000 and HP-UX systems for LDAP integration.
Preparing Windows 2000 for HP-UX Integration
The following describes how to configure your Windows 2000 server to work with LDAP-UX Client Services.
Software Installation
Step 1: Install Active Directory into your Windows 2000 server.
Follow the directions in “Step 1: Install Active Directory into your windows 2000 server” on page 12.
Step 2: Install Active Directory administrative tools.
The Active Directory administrative tools are required for you to manage AD. These tools are included with Windows
2000 Server to simplify directory administration. Therefore, if your system is running Windows 2000 Server, it is
automatically include d. If your system is running Windo ws 2000 Professional, you will have to separately install the
Windows 2000 Administrative tools, which include the tools to manage Active Directory. One of the important tools is
“Active Directory Users and Computers”. You will need it to manage user accounts.
Another Active Directory administrative tool is the Active Directory Schema snap-in, which allows you to manage AD
schema. You need to register the Active Directory Schema DLL before you can use it. To register, you log on to the
domain controller as an administrator, click Start and select Run, in the Run dialog box, type in “regsvr32
schmmgmt.dl l”.
You may also need the ADSI (Active Directory Services Interface) editor. It is part of Windows 2000 Support Tools.
You use it to create and modify AD objects. To install Windows 2000 Support Tools, you need Windows 2000 Server
CD, you click on support/tools/setup to start the setup wizard.
Both the Active Directory Schema snap-in and the ADSI editor are not available from the Windows 2000 Administrative
Tools menu. Yo u need to use Micr osoft Management Conso le (MMC) to set up them as part of your manage ment
environment. Refer to Step-by-Step Guide to the Microsoft Management Console in the URL:
http://www.microsoft.com/windows2000/library/planning/walkthroughs/default.asp
for detailed information on MMC.
Step 3: Install SFU 2.0 to extend the posix schema into AD.
As for NIS integration, you need to install SFU 2.0, especially Server for NIS to extend the posix schema.
Active Directory Configuration
Step 1: Add a proxy user to AD.
The LDAP-UX product allows you to decide how the client will bind to the directory, either bind anonymously or using a
proxy user. By default, binding to AD anonymously doesn’t give you enough access right to retrieve user and group
information in the directory. However, the user and group information is mandatory to log into a HP-UX machine. You
need to configure a proxy user in AD for the LDAP-UX to retrieve the information. Use the Windows 2000 management
tool, Active Directory Users and Computers, to add a proxy user. The only purpose of a proxy user is to allow the LDAP-
UX client to retrieve the user and group information, but not to update AD entries. So, you want to set the proxy user as a
member of the “Domain Users” group, but not a member of the “Administrator” group. This is very important to protect
17
Page 18

AD from malicious modification. See Appendix A for information about how to set the appropriate access control for a
proxy user.
Step 2: Add an account for HP-UX client machine to AD.
Follow direction in “Step 2: Add an account for HP-UX client machine to AD” on page 12.
Step 3: Use ktpass to create the keytab file for HP-UX client machine.
Follow the directions in “Step 3: Use ktpass to create the keytab file for HP-UX client machine” on page 12.
Preparing HP-UX for Windows 2000 Integration
As described previously, you need two HP-UX products (PAM_Kerberos and LDAP-UX) to set up your HP-UX machine as
an AD client and utilize Windows 2000 Kerberos Services to authenticate HP-UX users. You also need an HP-UX 11.00
PAM patch to support these two products if the OS version of your HP-UX machine is 11.00. For the information of PAM
Kerberos and PAM patch, refer to the previous section. The following is where you can obtain LDAP-UX product:
• LDAP-UX Client Services (J4269AA): this product can be obtained from the HP-UX Application CD released in March,
2001.
• Installing and Administering LDAP-UX Client Services with Microsoft Windows 2000 Active Directory (J4269-90009):
can be downloaded from HP documentation web site
http://docs.hp.com/hpux/internet.
LDAP-UX Client Services Configuration
The following briefly describes the steps to set up your HP-UX for Windows 2000 integration. More detailed information can
be found in the document listed above.
Step 1: Install the LDAP-UX Client Services product into your HP-UX machine.
Obtain the product from the Application CD released in March, 2001 or after, and use /usr/sbin/swinstall to install it into
your HP-UX machine. swinstall will reboot your system after installing the product. The product software will be placed
into /opt/ldapux and /etc/opt/ldapux.
Step 2: Configure your HP-UX machine to use AD as the directory server.
Run the setup tool:
After you install LDAP-UX Client Services product successfully, the setup tool can be found in /opt/ldapux/config. To
run the setup tool, you need to log in as root and change the directory to /opt/ldapux/config (i.e. cd), then type in ./setup.
The setup asks you a series of questions and usually provides default answers. Press the Enter key to accept the default,
or change the value and press Enter. One of the questions asks you to enter the profile name. The following standard
profile name is recommended:
cn=domainProfile,cn=configuration, dc=domain,dc=myorg,dc=org
For example, if your domain is la.cal.com, the profile name recommended is:
cn=laProfile,cn=configuration,dc=la,dc=cal,dc=com
Refer to “Installing and Administering LDAP-UX Client Services with Windows 2000 Active Directory” for detailed
information.
Verify profile cache:
18
Page 19

After you run the setup tool successfully, use the tool /opt/ldapux/config/display_profile_cache to display the profile from
a binary profile. By default, it displays the currently active profile in /etc/opt/ldapux/ldapux_profile.bin. You can check
the display to see if the configuration is correct.
Again, for detailed information on how to use create_profile_cache and display_profile_cache, refer to “Installing and
Administering LDAP-UX Client Servicess with Windows 2000 Active Director”.
Step 3: Configure a proxy user.
Part of the setup tool allows you to configure a proxy user. If you don’t use the setup tool to configure it, the tool
/opt/ldapux/config/ldap_proxy_config can also configure a proxy user for the client accessing the directory. The proxy
user information is stored encrypted in the file /etc/opt/ldapux/pcred and in kernel memory. You must run this tool logged
in as root. The following example configures the proxy user with the contents of the file proxy_file and creates or updates
the file /etc/opt/ldapux/pcred with the information in proxy_file:
/opt/ldapux/config/ldap_proxy_config -f proxy_file
The proxy user configuration can be verified, assuming the directory is accessible, by executing the command:
/opt/ldapux/config/ldap_proxy_config -v
Again, refer to Installing and Administering LDAP-UX Client Services with Microsoft Windows 2000 Active Directory
for more options.
Step 4: Change Name Service Switch (NSS) to use LDAP.
When the LDAP-UX product is installed, a NSS configuration file for LDAP, /etc/nsswitch.ldap, is created. You can
either edit the original /etc/nsswitch.conf to specify the ldap name service and other name services you want to use, or
copy /etc/nsswitch.ldap to /etc/nsswitch.conf. As of March 2001, only password and group are supported with AD. You
should not specify “ldap” for other services if your directory server is Windows 2000 AD.
PAM Kerberos Configuration
Follow direction in “PAM Kerberos Configuration” on page 13.
19
Page 20

Security
Traditionally, HP-UX stores user account information in the local /etc/passwd file. Unless, the system is in trusted mode, any
user logging into the system can read all other users’ encrypted passwords in /etc/passwd; and that is still true even if the
system deploys Network Information Service (NIS). The exposure of passwords is a security risk. Windows 2000 uses AD to
store account information, but Kerberos client keys and passwords are well protected. You cannot display them using
directory search tools. Even an administrator cannot obtain a user’s password or client key from AD. So, integrating HP-UX
accounts with Windows 2000 provides better password protection for HP-UX. Also, using Windows 2000 Kerberos Services
to authenticate HP-UX users is more secure than traditional UNIX authentication.
However, be aware of some general security issues when using directory services as a data repository. In UNIX platforms, a
super user, who has all the power to manipulate the system, is identified by uid = 0, which is the attribute uidNumber in AD.
The uidNumber and other security-sensitive attributes (i.e. login shell, home directory) need to be protected from change by
an arbitrary user. By default, a regular Windows 2000 domain user is not given the capability to modify AD objects. When
granting access right, an AD administrator must be very careful about the protection of security-sensitive attributes. HP has
published a white paper for security issues associated directory services. The white paper is “Preparing Your LDAP Directory
for HP-UX Integration White Paper”, which can be downloaded from HP documentation web site,
http://doc s.hp.com/hpux/internet. Although the white paper is not spe cifically dedicated to the info rmation for Wind ows 2000
Active Directory, the general principles are still applied.
20
Page 21

Administration
The administrative tasks for users and groups will become a lot easier for system administrators. On the other hand, the
integration will not cause any changes for end users.
System administrator
Although most user accounts and groups can be stored in AD, the HP-UX local /etc/passwd still has its value. It is
recommended the super user account (root) to be configured in /etc/passwd, so that even if the network is down, root still can
login to perform necessary tasks for recovery. Some other special accounts should also reside in /etc/passwd, for example,
bin, adm, daemon, and others. They are specific to UNIX-platforms.
Except for those few accounts to be kept in the local /etc/passwd file, with the integration, Active Directory can become a user
and group data repository for both Windows 2000 and HP-UX. The system administrator will mostly utilize the Windows
2000 management tool, Active Directory Users and Computers, to administer user accounts and group information, including
performing the following tasks:
Add and delete groups
If a group to be added is for HP-UX, or both HP-UX and Windows 2000, you, as an administrator, need to get a group ID
after the group is created successfully. The following shows you how to do it:
• click on the group you want to modify and choose “Properties” from the “Action” pane. A property screen with
several properties is displayed, choose “UNIX Attributes”.
• choose a domain from the list for the “NIS Domain” field. If you did not create an NIS domain explicitly, SFU 2.0
creates a default one for you based on your domain root.
• fill in the field “GID (Group ID)”.
You can apply the same procedure to an existing Windows 2000 group, if you want to use the group for HP-UX users.
If you want to add posix users into the group, you will have to use ADSI Editor and add the posix users’ msSFUName to the
group’s memberUid.
To delete a group, click on the group you want to delete from the list, then click on “Delete” from the “Action” pane.
Add and delete user accounts
If a user to be added is for HP-UX, or both HP-UX and Windows 2000, you need to add some posix account specific
information after the account is created successfully:
• click on the user you want to modify and choose “Properties” from the “Action” pane.
• a property screen with several properties is displayed, choose “UNIX Attributes”,
• choose an NIS domain for the “NIS Domain” field.
• fill in the fields: “UID”, “Login Shell”, “Home Directory”, and “Primary group name/GID”. They correspond to the
fields in /etc/passwd.
The above procedure can also be applied to a Windows 2000 account which wants the capability to log into HP-UX.
To delete the account, click on the user you want to delete from the user list, then click on “Delete” from the “Action” pane.
21
Page 22

Manage account and password policies
One of the benefits of the integration is a single point of account management. So, you will be able to manage and enforce
account and password policies by using Active Directory. The Active Directory Users and Computers allows you to set
account options and account expiration, etc. Those policies will become effective either when a user logs into Windows 2000
or the HP-UX machine.
Known problems and limitations
Slow performance on object enumeration
If you need to enumerate directory objects via getpwent() or getgrent() and you have a large database in Active Directory (for
example, more than 5,000 objects), you may experience slow performance depending on the hardware model of your PC.
Some HP-UX commands (e.g. finger, groups, newgrp) with implementation dependencies on getgrent() may also experience
the performance degradation.
Password expiration
When a user’s password expires, Windows 2000 prompts for the new password, then allows the user to login using the new
password. But if the user logs into HP-UX before he changes his password in Windows 2000, the user will not be prompted
for a new password and cannot login. The Windows 2000 administrator will have to reset the user’s password, or the user has
to log into Windows 2000 client to get a new password before he/she can log into HP-UX machines.
User forced to change password
If the account option “User must change password at next logon” is set, the user cannot log into HP-UX machines even
through the password is still valid.
User name length
HP-UX 1l.x limits the length of a user name to 8 characters or less, which is not a limitation for Windows 2000. So, if a user
is to be added for HP-UX or both, you cannot set the field “User logon name” longer than 8 characters.
End user
Login procedure
The integration is invisible to end users. Whether logging into Windows 2000 or HP-UX, they use the same procedure as they
do without integration.
Password change
Users change their passwords as usual, regardless which platform they log into. If the password is changed from Windows
2000, the new password is also good for logging into HP-UX, and vice versa.
Shell/finger information change
The shell and finger information stored in Active Directory can not be changed using chsh/chfn. The Windows 2000 system
adiminstrator can use the Active Directory Users and Computers tool to change them.
22
Page 23

Migration
If you choose the LDAP approach to integrate HP-UX account management and authentication with Windows 2000, the
LDAP-UX Client Services product provides a set of migration tools to help you migrate your user and group information
from the local /etc/passwd and group files or NIS server to Active Directory. The tools create an ldif file based on the
information you enter interactively or the environment variables you set in advance. All posix data except password will be
migrated. There is a technical difficulity to convert unix-encrypted password to the format of password Windows 2000 KDC
expects. As a result, all user and group entries are migrated without a password. For security reasons, all user accounts are
disabled when they are imported into Active Directory. Before a user can log into a Windows 2000 PC or a HP-UX machine,
the Windows 2000 administrator will have to enable the account and set password first.
The migration tools can be found in /opt/ldapux/migrate/ads. Refer to Installing and Administering LDAP-UX with Microsoft
Windows 2000 Active Directory for detailed information.
23
Page 24

Appendix A: Setting a Proxy User’s Access Rights
When using the LDAP-UX product to integrate HP-UX accounts into Active Directory, you need to configure a proxy user to
retrieve user account information. The proxy user needs to be able to read all users' and groups' posix attributes. The
following explains how you can grant the proxy user required access.
If you select the “Permissions compatible with pre-Windows 2000 services” as the default permissions for user and groups
when you install Active Directory, then any authenticated user will be granted with "Read All Properties" and "Read
Permissions" of user and group objects. As a result, any user can read all attributes of user and group objects, therefore, any
domain user can be configured as a proxy user. However, for security reasons, this may not be your best choice.
If you select the “Permissions compatible only with Windows 2000 services” as the default permissions for user and groups
when you install Active Directory, authenticated users will be granted the right to read all properties of their own objects, but
limited properties of other objects. As a result, a user can read posix attributes of his own user and group objects, but not
other users' posix attributes. There are two options which you, as an Windows 2000 server administrator, can grant the proxy
user the permission to read all user's and group's posix attributes:
1) Configure the proxy user to be a member of "Pre-Windows 2000 Compatible Access" group. By doing this, you allow the
proxy user to read all properties of user and group objects. Here is how to configure it:
a) Start Active Directory Users and Computers.
b) From the domain tree, click Builtin.
c) Click "Pre-Windows 2000 Compatible Access" and choose "Properties" from the Action menu.
d) From the "Pre-Windows 2000 Compatible Access Properties" dialog box, choose the "Members" tab.
e) Click "Add", from a list of all users and groups, choose the user name which you want to configure as a proxy user,
or type in the proxy user name, then click "Add" (see the screen below).
f) Click "OK" to save the configuration.
2) Delegate the posix attribute read access to the proxy user. By doing this, you allow the proxy user to read only posix
attributes of user and group objects:
a) Start Active Directory Users and Computers.
24
Page 25

b) Click the container which contains the pr oxy user, usually it is "Users", choose "Delegate Control..." from the Action
menu.
c) The Delgation of Control Wizard starts, click "Next".
d) A screen for you to select users and groups, click "Add” a list of users and groups are displayed, choose the proxy
user from the list or type in the proxy user name, then click "Add" and "OK"(same as the above screen).
e) Back to the screen to select users and groups, click "Next".
f) You are given the screen to identify the scope of the task you want to delegate. Choose "Only the following objects
in folder", check "Group objects", click "Next".
g) You are given a screen to select the permissions, choose "Property-specific" and the following permissions:
Read gidNumber
Read memberUid
Read msSFUPassword
Read msSFUName
then click “Next”.
h) You are given the screen which confirms your configuration, click on "finish" if everything is correct, otherwise,
click "Back" to change.
25
Page 26

i) Repeat abo ve steps to delegate user posix attributes to the proxy user by choosing "User objects" in f), and choose
the following posix user attributes in g):
Read gecos
Read loginShell
Read msSFUHomeDirectory
Read msSFUPassword
Read gidNumber
Read uidNumber
Read msSFUName
Read shadowFlag
Read shadowExpire
Read shadowInactive
Read shadowWarning
Read shadowMax
Read shadowMin
Read shadowLastChange
26
 Loading...