

Page 1

NIS+ to LDAP Migration Guide
HP-UX 11.0, 11i v1 and v2
Editon 3
Manufacturing Part Number : J4269-90054
E0606
© Copyright 2006 Hewlett-Packard Company, L.P.
Page 2

Legal Notices
The information in this document is subject to change without notice.
Hewlett-Packard makes no warranty of any kind with regard to this
manual, including, but not limited to, the implied warranties of
merchantability and fitness for a particular purpose. Hewlett-Packard
shall not be held liable for errors contained herein or direct, indirect,
special, incidental or consequential damages in connection with the
furnishing, performance, or use of this material.
Warranty
A copy of the specific warranty terms applicable to your Hewlett-Packard
product and replacement parts can be obtained from your local Sales and
Service Office.
U.S. Government License
Proprietary computer software. Valid license from HP required for
possession, use or copying. Consistent with FAR 12.211 and 12.212,
Commercial Computer Software, Computer Software Documentation,
and Technical Data for Commercial Items are licensed to the U.S.
Government under vendor's standard commercial license.
Copyright Notices
Copyright 2006 Hewlett-Packard Company L.P. All rights reserved.
Reproduction, adaptation, or translation of this document without prior
written permission is prohibited, except as allowed under the copyright
laws.
Trademark Notices
UNIX is a registered trademark in the United States and other
countries, licensed exclusively throughThe Open Group.
NIS is a trademark of Sun Microsystems, Inc.
Netscape and Netscape Directory Server are registered trademarks of
Netscape Communications Corporation in the United States and other
countries. Other product and brand names are trademarks of their
respective owners.
ii
Page 3

1. Overview of NIS+ to LDAP Migration
Migration Overview . . . . . . . . . . . . . . . . . . . . . . . . . . . . . . . . . . . . . . . . . . . . . . . . . . . . . . 2
Documentation References. . . . . . . . . . . . . . . . . . . . . . . . . . . . . . . . . . . . . . . . . . . . . . . 3
Overview of the LDAP-UX Integration Product. . . . . . . . . . . . . . . . . . . . . . . . . . . . . . . . 4
LDAP Directory Server and LDAP-UX Client Services . . . . . . . . . . . . . . . . . . . . . . . 4
Comparing Features and Security Between LDAP-UX and NIS+ . . . . . . . . . . . . . . . . . 5
Feature Comparison Between LDAP and NIS+ . . . . . . . . . . . . . . . . . . . . . . . . . . . . . . 5
Security Comparison Between LDAP-UX and NIS+ . . . . . . . . . . . . . . . . . . . . . . . . . . 6
Trusted Mode . . . . . . . . . . . . . . . . . . . . . . . . . . . . . . . . . . . . . . . . . . . . . . . . . . . . . . . . . 8
Comparing LDAP and NIS+ Information Sharing. . . . . . . . . . . . . . . . . . . . . . . . . . . . . . 9
How LDAP-UX Client Services Work . . . . . . . . . . . . . . . . . . . . . . . . . . . . . . . . . . . . . 10
LDAP-UX Client Administrator’s Tools And Migration Scripts . . . . . . . . . . . . . . . . . . 12
2. Migrating NIS+ to LDAP
Before You Begin . . . . . . . . . . . . . . . . . . . . . . . . . . . . . . . . . . . . . . . . . . . . . . . . . . . . . . . 15
Summary of Migration Steps . . . . . . . . . . . . . . . . . . . . . . . . . . . . . . . . . . . . . . . . . . . . . 17
Migrating NIS+ Service Data to the LDAP Server. . . . . . . . . . . . . . . . . . . . . . . . . . . 17
Migrating NIS+ Clients to LDAP-UX Client Services . . . . . . . . . . . . . . . . . . . . . . . . 18
Installing and Configuring Your LDAP Directory Server . . . . . . . . . . . . . . . . . . . . . . . 19
Installing Netscape Directory Server . . . . . . . . . . . . . . . . . . . . . . . . . . . . . . . . . . . . . 19
Configuring Netscape Directory Server. . . . . . . . . . . . . . . . . . . . . . . . . . . . . . . . . . . . 19
Installing the LDAP-UX Integration Product . . . . . . . . . . . . . . . . . . . . . . . . . . . . . . . . 20
Installing ONC EP/NCF Software and AutoFS 2.3 Patch. . . . . . . . . . . . . . . . . . . . . . . 21
ONC EP/NCF Software Requirement . . . . . . . . . . . . . . . . . . . . . . . . . . . . . . . . . . . . . 21
AutoFS Patch Requirement . . . . . . . . . . . . . . . . . . . . . . . . . . . . . . . . . . . . . . . . . . . . . 22
Extending Publickey or Automount Schema Into Netscape Directory Server . . . . . . . 23
Publickey and Automount Schemas . . . . . . . . . . . . . . . . . . . . . . . . . . . . . . . . . . . . . . 24
Importing Your NIS+ Data to Your LDAP Directory Server . . . . . . . . . . . . . . . . . . . . . 26
Steps to Import Your NIS+ Data into Your Directory. . . . . . . . . . . . . . . . . . . . . . . . . 27
Configuring LDAP-UX Client Services. . . . . . . . . . . . . . . . . . . . . . . . . . . . . . . . . . . . . . 32
Verify LDAP-UX Client Services. . . . . . . . . . . . . . . . . . . . . . . . . . . . . . . . . . . . . . . . . . . 36
Contents
3. Command and Tool Reference
The ldappasswd Command . . . . . . . . . . . . . . . . . . . . . . . . . . . . . . . . . . . . . . . . . . . . . . . 39
Syntax . . . . . . . . . . . . . . . . . . . . . . . . . . . . . . . . . . . . . . . . . . . . . . . . . . . . . . . . . . . . . . 39
Examples. . . . . . . . . . . . . . . . . . . . . . . . . . . . . . . . . . . . . . . . . . . . . . . . . . . . . . . . . . . . 40
LDAP Directory Tools . . . . . . . . . . . . . . . . . . . . . . . . . . . . . . . . . . . . . . . . . . . . . . . . . . . 40
ldapentry . . . . . . . . . . . . . . . . . . . . . . . . . . . . . . . . . . . . . . . . . . . . . . . . . . . . . . . . . . . .41
iii
Page 4

Contents
ldapsearch . . . . . . . . . . . . . . . . . . . . . . . . . . . . . . . . . . . . . . . . . . . . . . . . . . . . . . . . . . . 44
ldapmodify. . . . . . . . . . . . . . . . . . . . . . . . . . . . . . . . . . . . . . . . . . . . . . . . . . . . . . . . . . . 44
ldapdelete . . . . . . . . . . . . . . . . . . . . . . . . . . . . . . . . . . . . . . . . . . . . . . . . . . . . . . . . . . .44
NIS+ to LDAP Migration Scripts . . . . . . . . . . . . . . . . . . . . . . . . . . . . . . . . . . . . . . . . . . 44
Environment Variables. . . . . . . . . . . . . . . . . . . . . . . . . . . . . . . . . . . . . . . . . . . . . . . . . 47
General Syntax For Migration Scripts . . . . . . . . . . . . . . . . . . . . . . . . . . . . . . . . . . . . 47
Naming Context . . . . . . . . . . . . . . . . . . . . . . . . . . . . . . . . . . . . . . . . . . . . . . . . . . . . . . 48
Migrating The Credential Table . . . . . . . . . . . . . . . . . . . . . . . . . . . . . . . . . . . . . . . . . 49
Migrating Most of Service Data Using One Script . . . . . . . . . . . . . . . . . . . . . . . . . . . 50
Migrating Individual Service Data . . . . . . . . . . . . . . . . . . . . . . . . . . . . . . . . . . . . . . . 51
Migrating User-Defined Maps . . . . . . . . . . . . . . . . . . . . . . . . . . . . . . . . . . . . . . . . . . . 52
Examples. . . . . . . . . . . . . . . . . . . . . . . . . . . . . . . . . . . . . . . . . . . . . . . . . . . . . . . . . . . . 52
Glossary . . . . . . . . . . . . . . . . . . . . . . . . . . . . . . . . . . . . . . . . . . . . . . . . . . . . . . . . 57
Index . . . . . . . . . . . . . . . . . . . . . . . . . . . . . . . . . . . . . . . . . . . . . . . . . . . . . . . . . . . 59
iv
Page 5

Preface: About This Document
The latest version of this document can be found on line at:
http://www.docs.hp.com
This document describes the migration procedures used to migrate the
NIS+ server to the LDAP directory server and to install LDAP-UX Client
Services on HP-UX NIS+ clients.
The document printing date and part number indicate the document’s
current edition. The printing date will change when a new edition is
printed. Minor changes may be made at reprint without changing the
printing date. The document part number will change when extensive
changes are made.
Document updates may be issued between editions to correct errors or
document product changes. To ensure that you receive the updated or
new editions, you should subscribe to the appropriate product support
service. See your HP sales representative for details.
Intended Audience
This document is intended for system and network administrators that
have experience using the NIS+, Netscape Directory Server and
LDAP-UX Integration product and have detailed knowledge of how the
products are deployed in your organization. To successfully migrate from
NIS+ environment to LDAP-UX Integration environment, you must
understand product features and operation of LDAP-UX Client Services
and Netscape Directory Server for HP-UX.
Publishing History
Table 1 Publishing History
Document
Manufacturing
Part Number
J4269-90047 11i v1 and v2 B.04.00 June, 2005
J4269-90050 11i v1 and v2 B.04.00 August, 2005
Operating
Systems
Supported
Supported
Product
Versions
Publication
Date
v
Page 6

Table 1 Publishing History (Continued)
Document
Manufacturing
Part Number
J4269-90054 11i v1 and v2 B.04.00 June, 2006
Operating
Systems
Supported
Supported
Product
Versions
Publication
Date
What’s in This document
This manual describes migration procedures you take to migrate the
NIS+ servers to the LDAP directory server and to install the LDAP-UX
Client Services on NIS+ clients.
The manual is organized as follows:
Chapter 1 Migration Overview Use this chapter for a migration
overview, a high level overview of the LDAP-UX
Integration product, and feature and security
comparisons between LDAP-UX and NIS+.
Chapter 2 Migrating NIS+ to LDAP Use this chapter to learn
how to migrate NIS+ service data from the NIS+ server
to the LDAP directory server, and how to install
LDAP-UX Client Services on the NIS+ clients.
Chapter 3 Command and Tool Reference Use this chapter to
learn about the migration tools used to migrate NIS+
service data to the Netscape Directory Server.
vi
HP Encourages Your Comments
HP encourages your comments concerning this document. We are truly
committed to providing documentation that meets your needs.
Please send comments to: netinfo_feedback@cup.hp.com
Please include document title, manufacturing part number, and any
comments, errors found, or suggestions for improvement you have
concerning this document. Also, please include what we did right so we
can incorporate it into other documents.
Page 7

1 Overview of NIS+ to LDAP
Migration
This chapter provides the migration overview, a high level overview of
what the LDAP-UX Integration product is, and feature and security
comparisons between LDAP-UX and NIS+. It contains the following
sections:
• “Migration Overview” on page 2
• “Overview of the LDAP-UX Integration Product” on page 4
• “Comparing Features and Security Between LDAP-UX and NIS+” on
page 5
• “Comparing LDAP and NIS+ Information Sharing” on page 9
• “LDAP-UX Client Administrator’s Tools And Migration Scripts” on
page 12
Chapter 1 1
Page 8

Overview of NIS+ to LDAP Migration
Migration Overview
Migration Overview
One of the features of LDAP-UX Integration product 4.0 delivers
functionality that provides a replacement for NIS+ by using the
LDAP-UX Integration product in place of the features provided by NIS+.
This evolution means that the NIS+ Client and Server products will no
longer be released as part of the HP-UX 11i v3 release. The LDAP-UX
Integration product is the recommended replacement for NIS+. In order
to plan for NIS+ obsolescence, if you are running NIS+, you will need to
migrate your NIS+ environment to LDAP-UX Integration.
The migration to LDAP-UX Integration includes converting the NIS+
server to an LDAP directory server, migrating the NIS+ tables to the
LDAP directory and installing the LDAP-UX Client Services on all NIS+
clients.
HP is providing the LDAP-UX Integration product version B.04.00
including the migration package on HP-UX 11i v3. This migration
package runs on HP-UX 11i v1 and v2 systems via the web release on
June, 2005. You can plan and perform the migration at your earliest
convenience and do not need to wait until updating to HP-UX 11i v3 to
perform the migration.
Before you update the NIS+ server system to HP-UX 11i v3 or at the
time of the update, you need to install and configure an LDAP directory,
then migrate the NIS+ server data to the LDAP directory server. At the
time of the migration, if you desire load balancing, you can turn off the
NIS+ replica servers and reconfigure them to become LDAP replica
servers. After the NIS+ servers are migrated to the LDAP directory
server, you need to install and configure LDAP-UX Client Services
B.04.00 on all NIS+ client systems.
This migration guide documents the migration procedures you take to
migrate the NIS+ server to the LDAP directory server and to install the
LDAP-UX Client Services on all NIS+ clients.
NIS+ client software will not be supported or provided on HP-UX 11i v3.
If updating a system running the NIS+ client to HP-UX 11i v3 from an
earlier operating system version, you must reconfigure the
/etc/nsswitch.conf file to use another service for name resolution at
the time the system is updated to HP-UX 11i v3. Name resolution
services include ldap, nis, dns and files.
Chapter 12
Page 9

Overview of NIS+ to LDAP Migration
Migration Overview
NOTE Any user applications that are calling NIS+ APIs directly without using
the Name Service Switch (NSS) must be modified to call the
corresponding LDAP APIs to do the same task. The LDAP-UX
Integration product supports Mozilla LDAP SDK. The Mozilla LDAP
SDK is a Software Development Kit that contains a set of LDAP
Application Programming Interfaces (APIs) to build LDAP-enabled
clients. The functionality implemented in the SDK closely follows the
interface outlined in RFC 2251, the Lightweight Directory Access
Protocol (v3).
For detailed information on how to use the LDAP API functions
contained in the Mozilla LDAP SDK, and how to enable your client
applications to connect to the LDAP servers, refer to Mozilla LDAP C
SDK Programmer’s Guide at
http://www.mozilla.org/directory/csdk-docs/.
Documentation References
To successfully migrate from NIS+ environment to LDAP-UX
Integration environment, you must understand product features and
operation of LDAP-UX Client Services and Netscape Directory Server for
HP-UX. For detailed procedures on how to set up, install and configure
LDAP-UX Client Services and Netscape Directory Server, please consult
one or more of the following references at
http://docs.hp.com/hpux/internet:
• LDAP-UX Client Services B.04.00 Administrator’s Guide
• Preparing Your Directory for HP-UX Integration
• Netscape Directory Server Administrator’s Guide
Chapter 1 3
Page 10

Overview of NIS+ to LDAP Migration
Overview of the LDAP-UX Integration Product
Overview of the LDAP-UX Integration
Product
The LDAP-UX Integration product uses the Lightweight Directory
Access Protocol (LDAP) to centralize user, group and network
information management in an LDAP directory. The LDAP-UX
Integration product includes the following subproducts:
• LDAP-UX Client Services. Provides both an LDAP-based Pluggable
Authentication Module (PAM) and Name Service Switch (NSS)
module.
— PAM is the Pluggable Authentication Model, which allows the
HP-UX OS and its applications to perform authentication of
users, without detailed knowledge about the particular method
used to manage user data. (LDAP, Kerberos, /etc/passwd file,
etc...)
— NSS is the Name Service Switch, which is a pluggable name
resolution service. It is used by various C library APIs, such as
getpwname() and others to discover user, group and other
POSIX-related information.
• LDAP-UX Client Administrator’s Tools and Migration Scripts. These
administrator’s tools manage data in the LDAP directory server. The
migration scripts are used to migrate NIS or NIS+ service data to the
LDIF files or to the LDAP directory.
• Mozilla LDAP Software Development Kit (SDK). This kit contains
the LDAP Application Programming Interfaces (APIs) for building
LDAP-enabled clients.
LDAP Directory Server and LDAP-UX Client Services
LDAP directory servers provide services to their clients as a data
repository to centralize and to delegate the administration of
applications, networks, and user data.
The LDAP directory server offers the following security features:
• Centralized management of user, group, and network information.
Chapter 14
Page 11

Overview of NIS+ to LDAP Migration
Comparing Features and Security Between LDAP-UX and NIS+
• Centralized authentication of HP-UX PAM-enabled applications and
LDAP-enabled enterprise applications.
• Host access control of individual users or groups.
• Enforcement of global account and password policies.
• Data privacy using SSL encryption.
• Co-existence with HP-UX Trusted Mode and shadow passwords.
LDAP-UX Client Services simplifies HP-UX system administration by
consolidating account, group and other configuration information into a
central LDAP directory server. The LDAP-UX Client Services product
works with a variety of LDAP v3 capable directory servers and is fully
tested with the Netscape Directory Server and the Windows 2000/2003
Active Directory Servers.
For detailed information on the integration of LDAP-UX Client Services
with the Netscape Directory Server for HP-UX version 6.x, refer to
LDAP-UX Client Services Administrator’s Guide at http://docs.hp.com.
For detailed information on the integration of LDAP-UX Client Services
with the Windows 2000/2003 Active Directory Server, refer to LDAP-UX
Client Services with Microsoft Windows 2000/2003 Administrator’s
Guide at http:;//docs.hp.com.
Comparing Features and Security Between
LDAP-UX and NIS+
This section describes the LDAP-UX and NIS+ features and security
comparisons.
Feature Comparison Between LDAP and NIS+
Both NIS+ and LDAP server provide services to their clients as a data
repository. The NIS+ server supports SecureRPC with Diffie-Hellman
authentication. The LDAP directory server not only provides
authentication, but also uses access control when the clients attempt to
Chapter 1 5
Page 12

Overview of NIS+ to LDAP Migration
Comparing Features and Security Between LDAP-UX and NIS+
access the database. The LDAP server provides global account and
password policies to LDAP-enabled clients and applications. There are
some feature differences between LDAP and NIS+.
Table 1-1 compares features between LDAP and NIS+:
Table 1-1 Features Comparison between LDAP and NIS+
Feature NIS+ LDAP
hierarchical data yes yes
dynamic updates yes yes
dynamic replication yes yes
access control list yes yes
complex data no yes
multiple master replication no yes
trusted system mode on
HP-UX
account/password policies yes yes
a. LDAP-UX Client Services version B.03.30 or later supports
coexistence with Trusted Mode.
yes
a
Security Comparison Between LDAP-UX and NIS+
This section describes the security comparison between NIS+ and LDAP
as follows:
• NIS+ uses SecureRPC with Diffie-Hellman authentication. This
mechanism uses public/private key pairs which are 192-bits long. It
is an old mechanism which has been shown to be compromised easily.
• With the LDAP-UX product, the HP-UX operating system can use an
LDAP directory for centralized security policy enforcement,
authentication and authorization. LDAP-UX supports simple and
SASL Digest-MD5 for user and proxy authentication. SSL is also
supported for secured communication between an LDAP client and
the directory server. With SSL support, the LDAP-UX Client
provides a more secure way to protect the password over the
network. SSL is a more robust scheme than SecureRPC.
Chapter 16
Page 13

Overview of NIS+ to LDAP Migration
Comparing Features and Security Between LDAP-UX and NIS+
• NIS+ can hide passwords from users and supports Trusted Mode to
offer extensive password and account policies. But, the passwords
are sent in clear text format over a network.
With LDAP support, passwords can be hidden from users. Passwords
may also be hashed to protect passwords. The LDAP directory server
supports UNIX-crypt, SHA, and SSHA hashing methods. Although
SASL, Digest-MD5 protects passwords over a network during
authentication, it requires passwords to be stored in clear text
format in the directory server.
Table 1-2 compares security between LDAP-UX and NIS+:
Table 1-2 Security Comparison between LDAP-UX and NIS+
LDAP-UX
Coexisting with
Trusted Mode
Security
NIS+ with
Trusted Mode
last login reporting yes local accounts only
auditing yes yes
account expiration yes
administrative account lock yes
lock account due to max failed
yes
a
a
a
logins
option to disallow null passwords yes
auto-generated passwords yes
password history yes
a
a
a
boot authentication local accounts only local accounts only
lock device due to max failed logins yes local accounts only
time-of-day login restrictions yes
a
who last changed the password yes
long passwords local accounts only
a
a
Chapter 1 7
Page 14

Overview of NIS+ to LDAP Migration
Comparing Features and Security Between LDAP-UX and NIS+
a. Enforced by Trusted Mode for local accounts. Enforced by the LDAP
server for LDAP accounts.
Trusted Mode
NIS+ supports Trusted Mode to provide extensive password and audit
policies for local accounts. LDAP-UX Client Services version B.03.30 or
later supports coexistence with Trusted Mode system. Local-based
accounts can benefit from the Trusted Mode security policies, while
LDAP-based accounts benefit from the security policies offered by the
LDAP server. Having Trusted Mode support also enables LDAP-based
and local-based accounts to be audited in Trusted mode.
The coexistence of LDAP-UX with a Trusted Mode system has
limitations and usage requirements. For detailed information, refer to
the “Integrating with Trusted Mode” section in the LDAP-UX Client
Services Administrator’s Guide at http://docs.hp.com.
Chapter 18
Page 15
Comparing LDAP and NIS+ Information Sharing
Comparing LDAP and NIS+ Information
Sharing
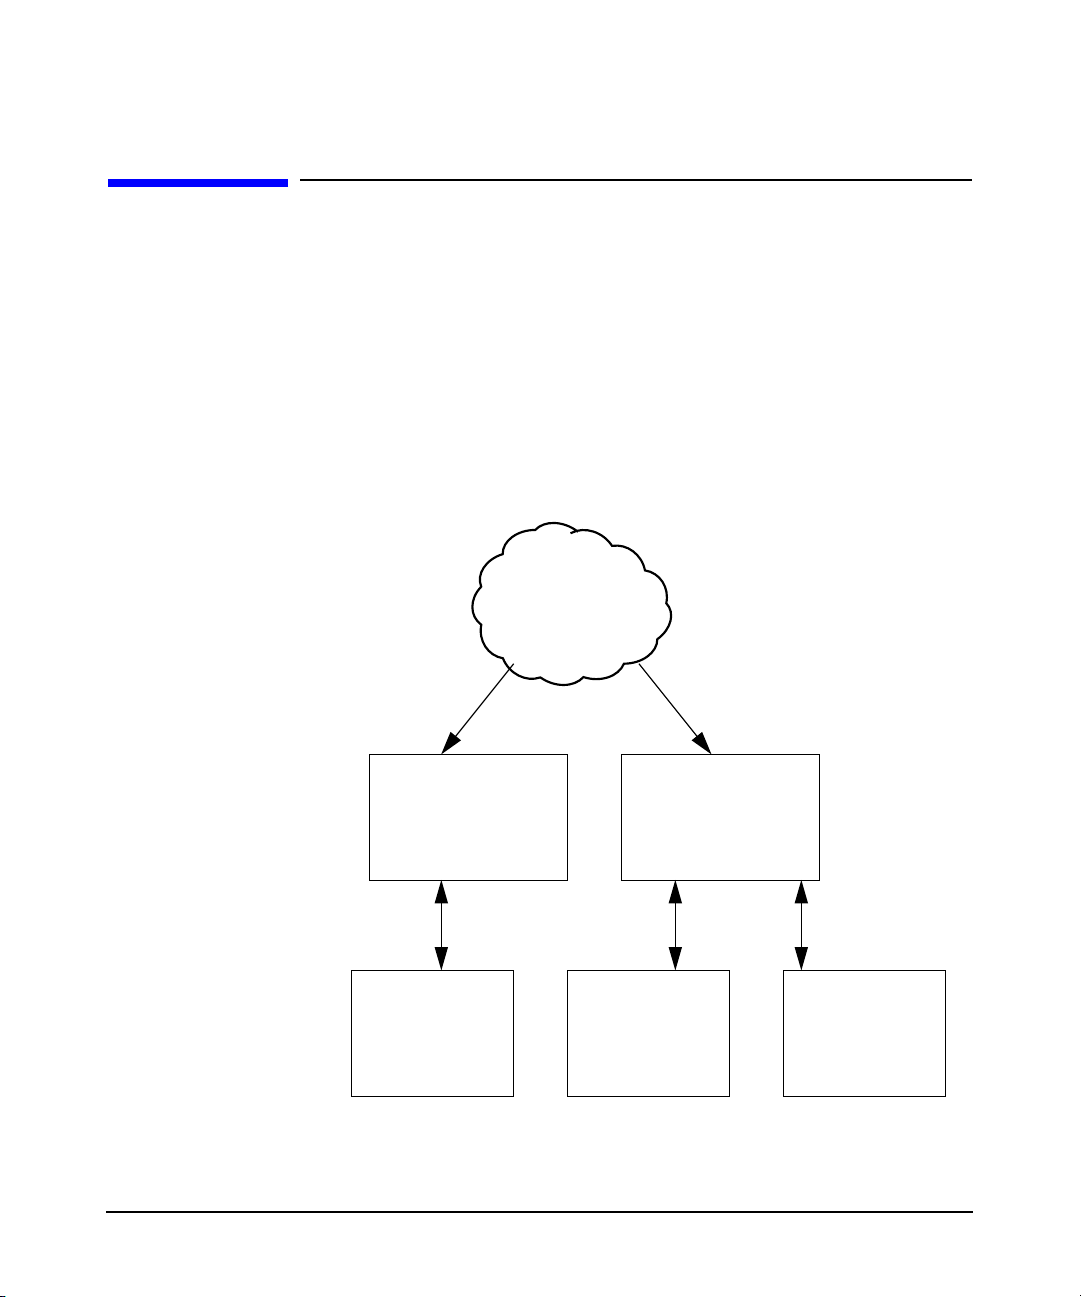
Traditionally, HP-UX account and configuration information is stored in
text files like /etc/passwd and /etc/group. NIS+ is used to ease system
administration by sharing the information across systems on the
network. With NIS+, account and configuration information resides on
NIS+ servers. NIS+ client systems retrieve this shared information
across the network from NIS+ servers, as shown in Figure 1-1.
Figure 1-1 A Simplified NIS+ Environment
NIS+ Master
Server
Overview of NIS+ to LDAP Migration
Map transfers
NIS+ Replica
Server Server
NIS+ Requests
Chapter 1 9
NIS+ Replica
NIS+ Client NIS+ ClientNIS+ Client
Page 16
Overview of NIS+ to LDAP Migration
Comparing LDAP and NIS+ Information Sharing
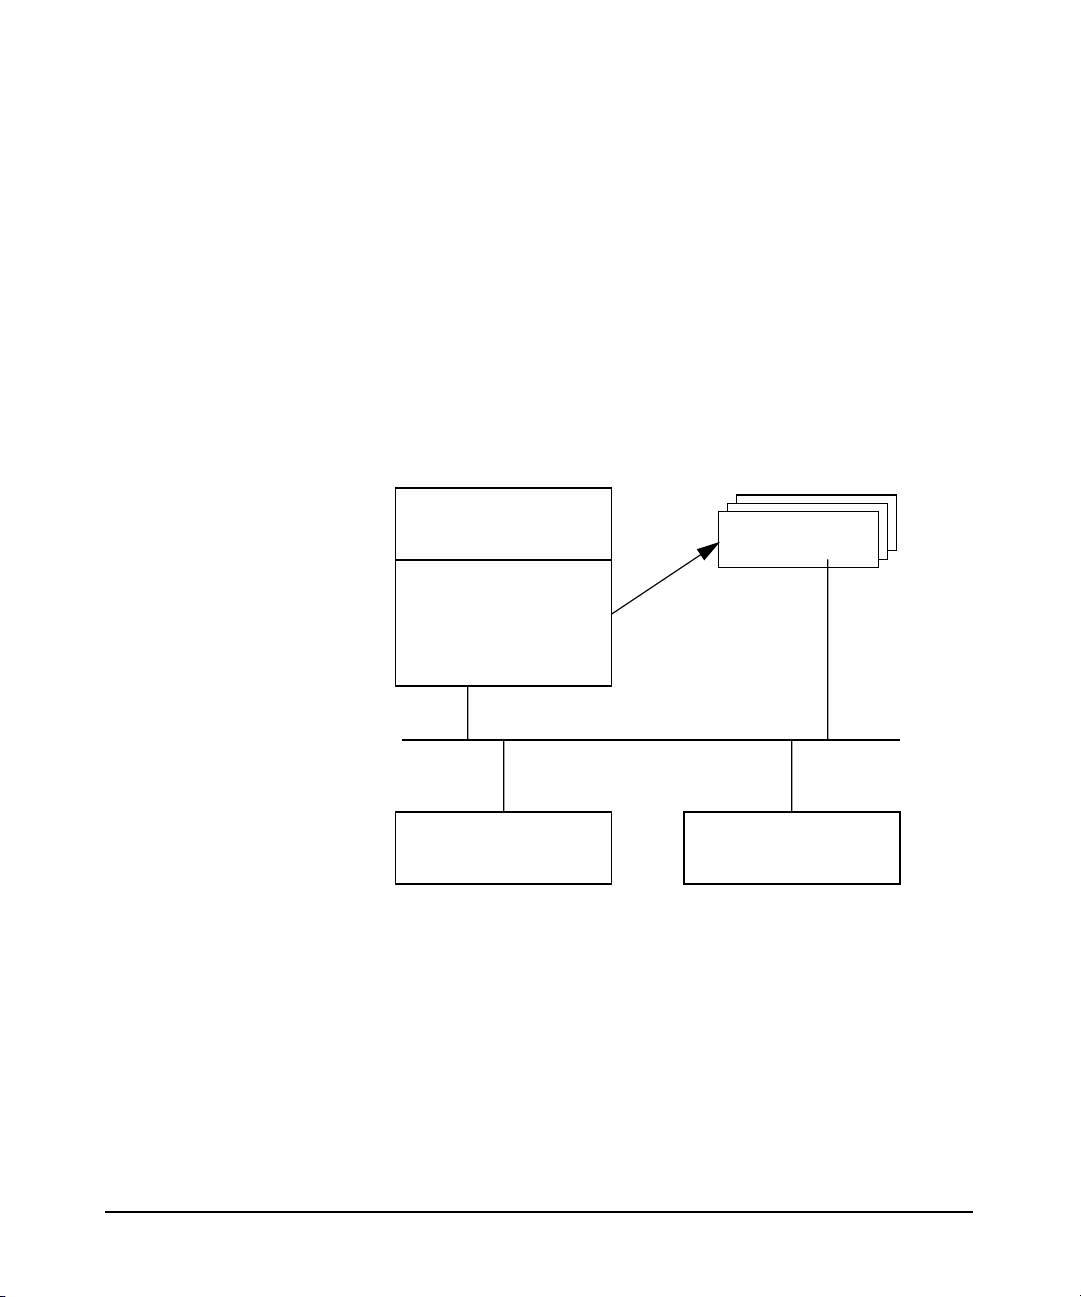
LDAP-UX Client Services improves on this configuration information
sharing. User, group, and other network operating system configuration
information can be integrated with other identity information in other
organization-wide applications. The account and configuration
information is stored in an LDAP directory. Client systems retrieve this
shared configuration information across the network from the LDAP
directory. In addition, LDAP adds greater scalability, interoperability
with other applications and platforms, and less network traffic from
replica updates. Figure 1-3 shows a simplified LDAP-UX Client Services
Environment.
Figure 1-2 A Simplified LDAP-UX Client Services Environment
LDAP Directory
Server
user account data
netgroup data
services data
automount data
security data
LDAP Requests
LDAP-UX Client LDAP-UX Client
LDAP-UX Client Services supports the following name service data:
passwd, groups, hosts, rpc, services, networks, protocols, printers,
netgroup, automount and public key.
Updates
LDAP Directory
Server Replica
How LDAP-UX Client Services Work
LDAP-UX Client Services works by leveraging the authentication
mechanism provided in the Pluggable Authentication Module (PAM) and
the naming services provided by the Name Service Switch (NSS).
Chapter 110
Page 17

Overview of NIS+ to LDAP Migration
Comparing LDAP and NIS+ Information Sharing
Refer to pam(3) and pam.conf(4) and to Managing Systems and
Workgroups: A Guide For System Administrators at
http://docs.hp.com/hpux/os/11iv2/ for more information on PAM.
For information on NSS, refer to switch(4) and “Configuring the Name
Service Switch” in the NFS Services Administrator’s Guide at
http://docs.hp.com.
These extensible mechanisms enable you to install and use new
authentication methods and new name services without changing the
underlying HP-UX commands. With the PAM architecture support, the
HP-UX client becomes truely integrated in the LDAP environment.
The PAM_LDAP library enables the HP-UX system to use the LDAP as a
trusted server for authentication. This means that passwords can be
stored in any syntax and also means that passwords can remain hidden
from view (preventing a decryption attack on the hashed passwords).
Because passwords can be stored in any syntax, HP-UX is able to share
passwords with other LDAP-enabled applications.
Chapter 1 11
Page 18

Overview of NIS+ to LDAP Migration
LDAP-UX Client Administrator’s Tools And Migration Scripts
LDAP-UX Client Administrator’s Tools And
Migration Scripts
Table 1-3 shows a list of the LDAP-UX client administrator’s tools. These
tools can be used to manage data in an LDAP directory server.
Table 1-3 LDAP Administrator ‘s Tools
Tool Description
ldapdelete Allows you to delete entries in the
ldapmodify Allows you to add, delete, modify, or
ldappasswd Changes passwords in the LDAP
directory.
rename directory entries. All operations
are specified using LDIF update
statements.
directory.
ldapsearch Allows you to search the LDAP directory.
Table 1-4 shows the migration scripts, these migration scripts can be
found under /opt/ldapux/migrate/nisplusmigration. For a complete
description of the tools and scripts, what they do, and how to use them,
see Chapter 3, “Command and Tool Reference,” on page 39.
Table 1-4 NIS+ to LDAP Migration Tools
Tool Description
migrate_nisp_groups.pl Migrates groups from the NIS+ server
migrate_nisp_hosts.pl Migrates hosts from the NIS+ server to
migrate_nisp_services.pl Migrates services from the NIS+ server
Returns results in LDIF format.
to LDIF.
LDIF.
to LDIF.
Chapter 112
Page 19

Overview of NIS+ to LDAP Migration
LDAP-UX Client Administrator’s Tools And Migration Scripts
Table 1-4 NIS+ to LDAP Migration Tools (Continued)
Tool Description
migrate_nisp_netgroup.pl Migrates netgroups from the NIS+
server to LDIF.
migrate_nisp_networks.pl Migrates networks from the NIS+
server to LDIF.
migrate_nisp_rpc.pl Migrates RPCs from the NIS+ server to
LDIF.
migrate_all_nisplus_online.sh Migrates NIS+ name service data into
an LDAP directory.
cred_table_sort.pl Migrates credential table entries
including public keys and secret keys of
users and hosts from the NIS+ server to
the flat (etc) file.
migrate_nisp_passwd.pl Migrates all user accounts with
encrypted passwords from the NIS+
server to LDIF.
migrate_nisp_nonstandard.pl Migrates user-defined maps to LDIF
file.
migrate_nisp_autofs.pl Migrates AutoFS maps (such as
auto_master, auto_direct, auto_home,
etc...) from the NIS+ server to LDIF.
migrate_nisp_protocols.pl Migrates protocols from the NIS+ server
to LDIF.
migrate_nisp_aliases.pl Migrates aliases from the NIS+ server
to LDIF.
Chapter 1 13
Page 20

Overview of NIS+ to LDAP Migration
LDAP-UX Client Administrator’s Tools And Migration Scripts
Chapter 114
Page 21

2 Migrating NIS+ to LDAP
This chapter describes the NIS+ to LDAP migration procedures. It
includes the decisions you need to make and the procedures you need to
take to install, configure and verify the Netscape Directory Server for
HP-UX and the LDAP-UX Client Services. It contains the following
sections:
• “Before You Begin” on page 15
• “Summary of Migration Steps” on page 17
• “Installing and Configuring Your LDAP Directory Server” on page 19
• “Installing the LDAP-UX Integration Product” on page 20
• “Installing ONC EP/NCF Software and AutoFS 2.3 Patch” on page 21
• “Extending Publickey or Automount Schema Into Netscape Directory
Server” on page 23
• “Importing Your NIS+ Data to Your LDAP Directory Server” on
page 26
• “Configuring LDAP-UX Client Services” on page 32
• “Verify LDAP-UX Client Services” on page 36
Before You Begin
This section lists some things to keep in mind as you plan your
installation.
• You must have an LDAP directory. You can obtain the Netscape
Directory Server for HP-UX version 6.11 or 6.21 from your local HP
sales office or from http://www.software. hp.com and view the
documentation at http://docs.hp.com/hpux/internet.
• See the white paper Preparing Your Directory for HP-UX Integration
at http://docs.hp.com/hpux/internet for advice on how to set up and
configure your directory to work with HP-UX.
Chapter 2 15
Page 22

Migrating NIS+ to LDAP
Before You Begin
• Most examples here use the Netscape Directory Server for HP-UX
and assume you have some knowledge of this directory and its tools,
such as the Directory Console and ldapsearch. If you have another
directory, consult your directory’s documentation for specific
information.
• For detailed procedures on how to set up, install and configure the
LDAP-UX Client Services to work with the Netscape Directory
Server for HP-UX, refer to LDAP-UX Client Services B.04.00
Administrator’s Guide (J4269-90053) at http://docs.hp.com.
• The examples use a base DN of dc=cup, dc=hp, dc=com for
illustrative purposes.
Chapter 216
Page 23

Migrating NIS+ to LDAP
Summary of Migration Steps
Summary of Migration Steps
The section summarizes the steps you take when migrating NIS+ service
data to the LDAP directory server and installing the LDAP-UX Client
Services on all of NIS+ clients:
Migrating NIS+ Service Data to the LDAP Server
The section summarizes the steps you take when migrating NIS+ service
data from the NIS+ server to the LDAP directory server:
Step 1. Install and configure an Netscape Directory Server, if not already done to
replace the NIS+ root master server or subdomain master server. See
“Installing and Configuring Your LDAP Directory Server” on page 19 for
an overview of the task.
Step 2. Install the LDAP-UX Integration product including the NIS+ to LDAP
migration scripts on the NIS+ clients. See “Installing the LDAP-UX
Integration Product” on page 20 for an overview of the task.
Step 3. Extend the publickey schema to your Netscape Directory Server if you
want to migrate credential table entries including public keys and secret
keys of users and hosts from the NIS+ server to the LDAP directory
server. See “Extending Publickey or Automount Schema Into Netscape
Directory Server” on page 23 for details.
Step 4. Extend the automount schema to your Netscape Directory Server if you
want to migrate the AutoFS maps from the NIS+ server to the LDAP
directory server. “Extending Publickey or Automount Schema Into
Netscape Directory Server” on page 23 for details.
Step 5. Migrate your NIS+ database to LDIF (LDAP Directory Interchange
Format) files and import them to the Netscape Directory Server using
migration scripts. See “Importing Your NIS+ Data to Your LDAP
Directory Server” on page 26 for detailed information on how to migrate
your NIS+ data from the NIS+ server to the LDAP.
Step 6. Turn off the NIS+ replica servers.
Step 7. Migrate the NIS+ replica servers to act as LDAP replica servers, if it is
necessary.
Chapter 2 17
Page 24

Migrating NIS+ to LDAP
Summary of Migration Steps
Migrating NIS+ Clients to LDAP-UX Client Services
The section summarizes the steps you take when migrating the NIS+
client systems to LDAP-UX Client Servces:
Step 1. Install LDAP-UX Client Services B.04.00 on all NIS+ client systems, if
not already installed. See “Installing the LDAP-UX Integration Product”
on page 20 for details.
Step 2. If you use Netscape Directory Server to store and manage your public
keys or AutoFS maps, ensure that all client systems have the correct
ONC EP/NCF software or AutoFS 2.3 patch installed. See “Installing
ONC EP/NCF Software and AutoFS 2.3 Patch” on page 21 for details.
Step 3. Configure LDAP-UX Client Services B.04.00 on all client systems, if not
already configured. See “Configuring LDAP-UX Client Services” on
page 32.
Read subsequent sections of this chapter for more information on how to
migrate NIS+ to the LDAP environment.
Chapter 218
Page 25

Migrating NIS+ to LDAP
Installing and Configuring Your LDAP Directory Server
Installing and Configuring Your LDAP
Directory Server
This section describes how to install and configure your to work with
LDAP-UX Client Services. Examples are given for Netscape Directory
Server for HP-UX. If you have a different directory, see the
documentation for your directory for details on how to install and
configure it.
Installing Netscape Directory Server
You need to set up the Directory Server if it is not already installed. HP
recommends that you install the HP Netscape Directory Server product,
J4258CA. This product can be downloaded from http://software.hp.com.
You need to install the Netscape Directory Server for HP-UX version 6.11
or 6.21.
The posix schema is already installed if you have installed Netscape
Directory Server for HP-UX version 6.11 or 6.21. The schema is in the
file /opt/ldapux/ypldapd/etc/slapd-v3.nis.conf. For more
information on the posix schema (RFC2307), see
http://www/ietf.org/rfc.html. RFC 2307 consists of object classes such
as, posixAccount, posixGroup, and so on. posixAccount represents a
user entry from the /etc/passwd file. posixGroup represents a group
entry from the /etc/group file and shadowAccount provides additional
user information for added security.
Configuring Netscape Directory Server
You need to configure your directory to work with the LDAP-UX Client
Services. For detailed information on how to configure Netscape
Directory Server, refer to the following documents available at
http://docs.hp.com/en/internet.html:
• Preparing Your LDAP Directory for HP-UX Integration
• Netscape Directory Server Administrator’s Guide
• “Configure Your Directory” section in the LDAP-UX Client Services
B.04.00 Administrator’s Guide.
Chapter 2 19
Page 26

Migrating NIS+ to LDAP
Installing the LDAP-UX Integration Product
Installing the LDAP-UX Integration Product
Use swinstall(1M) to install the LDAP-UX Integration product,
J4269AA. See the LDAP-UX Client Services B.04.00 Release Notes for
more details on the installation procedures. The LDAP-UX Integration
product is available at http://www.software.hp.com. You must install the
LDAP-UX Integration product version B.04.00. You do not need to reboot
your system after installing the product
The LDAP-UX Integration product contains the following subproducts:
• LDAP-UX Client Services. Provides both an LDAP-based Pluggable
Authentication Module (PAM) and Name Service Switch (NSS)
module.
— PAM is the Pluggable Authentication Module, which allows the
HP-UX OS and its applications to perform authenticaion of
users, without detailed knowledge about the particular method
used to manage user data. (LDAP, Kerberos, /etc/passwd file,
etc...).
— NSS is the Name Service Switch which is a pluggable name
resolution service. It’s used by various C library APIs, such as
getpwnam() and others to discover user, group and other
POSIX-related information.
• LDAP-UX Client Administrator’s Tools and Migration Scripts.
Administrator’s Tools are used to manage data in the LDAP
directory server. Migration scripts are used to migrate NIS+ or NIS
service data to the LDAP directory.
• Mozilla LDAP Software Development Kit (SDK). The LDAP
Application Programming Interfaces (APIs) for building
LDAP-enabled clients.
Chapter 220
Page 27

Installing ONC EP/NCF Software and AutoFS 2.3 Patch
Installing ONC EP/NCF Software and AutoFS
2.3 Patch
ONC EP/NCF Software Requirement
When migrating NIS+ to LDAP, support for publickey requires
functionality enhancement in LDAP-UX Client Services and
enhancement in the ONC product. ONC with publickey LDAP support is
available via the ONC EP/NCF Software Pack (SPK) web release for
HP-UX 11i v1 and v2.
To enable the publickey support for LDAP, you must install the ONC
EP/NCF software bundle, ENHKEY, on your client systems. This software
can be installed after the NIS+ data is migrated into the LDAP directory
server. Refer to the ONC with Publickey LDAP Support Software Pack
Release Notes for details. Table 2-1 shows the ONC EP/NCF software
release.
Table 2-1 ONC EP/NCF Software Requirement
Migrating NIS+ to LDAP
Operating System
Supported
HP-UX 11i v1 ENHKEY June, 2006
HP-UX 11i v2 ENHKEY September, 2006
You can download the ONC EP/NCF software bundle, ENHKEY, from the
following Software Depot web site:
• Go to http://www.hp.com/go/softwaredepot
• Click on the Enhancement releases and patch bundles link
• Clink one of the following link
— HP-UX Software Pack (Optional HP-UX 11i v1 Core
Enhancements) for HP-UX 11i v1
— HP-UX Software Pack (Optional HP-UX 11i v2 Core
Enhancements) for HP-UX 11i v2
• Select the HP-UX Enhanced Key link
Chapter 2 21
Software Bundle
Name
Planned Release
Date
Page 28

Migrating NIS+ to LDAP
Installing ONC EP/NCF Software and AutoFS 2.3 Patch
AutoFS Patch Requirement
AutoFS is a client-side service that automatically mounts appropriate
file systems when users request access to them. If an automounted file
system has been idle for a period of time, AutoFS unmounts it. If you use
the LDAP directory to store and manage your AutoFS maps, you must
update your client systems to a version of AutoFS that supports LDAP.
To enable the LDAP support for AutoFS, you must install the required
patch or enhanced AutoFS version on your LDAP client systems shown
in the Table 2-2:
Table 2-2 Patch Requirement
Operating System
Supported
HP-UX 11i v1 Enhanced AutoFS
HP-UX 11i v2 PHNE_33100 August, 2005
Patch ID/Version
version
B.11.11.0509.1
Planned Release
Date
September, 2005
Chapter 222
Page 29

Migrating NIS+ to LDAP
Extending Publickey or Automount Schema Into Netscape Directory Server
Extending Publickey or Automount Schema
Into Netscape Directory Server
You must extend your Netscape Directory Server with the publickey
schema or new automount schema if you want to migrate the public keys
of users and hosts or AutoFS maps from the NIS+ server to your LDAP
directory server.
A publickey schema, which is based on IETF RFC 2307-bis is required to
migrate the publickeys in the NIS+credential table entries from the
NIS+ server to the LDAP directory. A new automount schema, which is
based on IETF RFC 2307-bis is required to migrate the AutoFS maps
(such as auto_master, auto_home, auto_direct, etc...) from the NIS+
server to the LDAP directory. You need to run the setup program on a
LDAP-UX client system, the setup program extends the publickey
schema or new automount schema into the LDAP directory.
LDAP-UX does not support the obsolete automount schema which is
shipped with Netscape Directory Server 6.x. You must manually delete it
before you can succeed to extend the new automount schema into the
LDAP directory server.
Use the following steps to extend the publickey schema or the new
automount schema into your Netscape Directory Server:
Step 1. Login to your Netscape Directory Server as root.
Step 2. Check the
/var/opt/netscape/servers/slapd-<serverID>/config/schema/10r
fc2307.ldif file on your Netscape Directory Server to see whether the
following two entries exist or not. Look for entries that contains the
following fields:
• NAME ’automountInformation’
• NAME ’automount’
The data in these two entries defines the obsolete automount schema.
The complete attribute entries are:
• attributeTypes:( 1.3.6.1.1.1.1.25 NAME
’automountInformation’ DESC ’Standard LDAP attribute type’
SYNTAX 1.3.6.1.4.1.1466.115.121.1.26 X-ORIGIN ’RFC 2307’)
Chapter 2 23
Page 30

Migrating NIS+ to LDAP
Extending Publickey or Automount Schema Into Netscape Directory Server
• objectClasses:( 1.3.6.1.1.1.2.9 NAME ’automount’ DESC
’Standard LDAP objectclass’ SUP top MUST (cn
$automountInformation)MAY (description) X-ORIGIN ’RFC2307’)
If above two entries exist, go to step 3. Otherwise, go to step 6.
Step 3. Stop your Netscape Directory Server daemon, slapd.
/var/opt/netscape/servers/slapd-<serverID>/stop-slapd
For example:
/var/opt/netscape/servers/slapd-ldapA.cup.hp.com/stop-slapd
Step 4. You must manually delete the obsolete automount schema before you can
succeed to extend the new automount schema into the LDAP directory
server. Use your editor to delete the data in two entries listed in step 2 in
the
/var/opt/netscape/servers/slapd-<serverID>/config/schema/10r
fc2307.ldif file.
Step 5. Restart the daemon, slapd. This is to ensure that the updated schema
file is recognized by Netscape Directory Server.
/var/opt/netscape/servers/slapd-<serverID>/restart-slapd
For example:
/var/opt/netscape/servers/slapd-ldapA.cup.hp.com/restart-slapd
Step 6. Run the setup program on the LDAP-UX Client system.
When you run the setup program, the setup program will import the
publickey schema and the new automount schema into Netscape
Directory Server. For the completed procedures on how to run the setup
program, refer to the “Configure the LDAP-UX Client Services” section
in LDAP-UX Client Services B.04.00 Administrator’s Guide at
http://docs.hp.com/hpux/internet.
Publickey and Automount Schemas
This section describes the publickey and the new automount schema.
Publickey Schema
The following shows the publickey schema in the LDIF format:
Chapter 224
Page 31

Migrating NIS+ to LDAP
Extending Publickey or Automount Schema Into Netscape Directory Server
objectClasses: ( 1.3.6.1.1.1.2.14 NAME ’nisKeyObject’ DESC ’An
object with a public and secret key’ SUP top AUXILIARY MUST (
cn $ nisPublicKey $ nisSecret Key ) MAY ( uidNumber $
description ) X-ORIGIN ’user defined’ )
attributeTypes: ( 1.3.6.1.1.1.1.28 NAME ’nisPublicKey’ DESC
’NIS public key’ E QUALITY octetStringMatch SYNTAX
1.3.6.1.4.1.1466.115.121.1.40 SINGLE-VALUE X -ORIGIN ’user
defined’ )
attributeTypes: ( 1.3.6.1.1.1.1.29 NAME ’nisSecretKey’ DESC
’NIS secret key’ E QUALITY octetStringMatch SYNTAX
1.3.6.1.4.1.1466.115.121.1.40 SINGLE-VALUE X -ORIGIN ’user
defined’ )
Each entry started by “attributetypes:” or “objectclasses:” must be one
continuous line.
Automount Schema
The following shows the new automount schema in the LDIF format:
objectClasses: ( 1.3.6.1.1.1.2.16 NAME ’automountMap’ DESC
’Automount Map information’ SUP top STRUCTURAL MUST
automountMapName MAY description X-ORIGIN ’user defined’ )
objectClasses: ( 1.3.6.1.1.1.2.17 NAME ’automount’ DESC
’Automount information’ SUP top STRUCTURAL MUST ( automountKey
$ automountInformation ) MAY description X-ORIGIN ’user
defined’ )
attributeTypes: ( 1.3.6.1.1.1.1.33 NAME ’automountInformation’
DESC ’Automount information’ EQUALITY caseExactIA5Match SYNTAX
1.3.6.1.4.1.1466.115.121.1.26 SINGLE-VALUE X-ORIGIN ’user
defined’ )
attributeTypes: ( 1.3.6.1.1.1.1.31 NAME ’automountMapName’
DESC ’automount Map Name’ EQUALITY caseExactIA5Match SYNTAX
1.3.6.1.4.1.1466.115.121.1.26 SINGLE-VALUE X-ORIGIN ’user
defined’ )
attributeTypes: ( 1.3.6.1.1.1.1.32 NAME ’automountKey’ DESC
’Automount Key value’ EQUALITY caseExactIA5Match SYNTAX
1.3.6.1.4.1.1466.115.121.1.26 SINGLE-VALUE X-ORIGIN ’user
defined’ )
Chapter 2 25
Page 32

Migrating NIS+ to LDAP
Importing Your NIS+ Data to Your LDAP Directory Server
Each entry started by “attributetypes:” or “objectclasses:” must be one
continuous line.
Importing Your NIS+ Data to Your LDAP
Directory Server
This section describes the steps you take to import your NIS+ data to
your LDAP directory. How you do this depends on several factors. Here
are some considerations when planning this:
• The migration scripts take your NIS+ data and generate LDIF files.
These scripts can then import the LDIF files into your directory,
creating new entries in the directory. You can start with an empty
directory, create an entirely new subtree in your directory or import
your NIS+ data into the existing directory.
• Your directory architect needs to decide where in your directory to
place your NIS+ information. Here are some possibilities:
— Create a separate subtree for NIS+ data - The migration scripts
can import all your NIS+ data into the separate subtree.
To migrate the subdomain data, create a subtree under the
parent domain. For converting the replica server to the LDAP
replica server, the root master server’s data needs to be migrated
to the LDAP directory. The replica server’s data does not need to
be migrated to the LDAP directory, as it may be outdated.
— Integrate the NIS+ information into your directory - The
migration scripts may be helpful depending on where you put the
NIS+ data in your directory. You could use them just to generate
LDIF, edit the LDIF, then use the ldapmodify tool to import the
LDIF into your directory.
• You should migrate NIS+ service data one domain at a time. Migrate
NIS+ data starting from bottom domains to the top domains.
Chapter 226
Page 33

Migrating NIS+ to LDAP
Importing Your NIS+ Data to Your LDAP Directory Server
Steps to Import Your NIS+ Data into Your Directory
Migration scripts are provided to ease the task of importing your NIS+
data into your LDAP directory. See Chapter 3, “Command and Tool
Reference,” on page 39 for a complete description of the NIS+ to LDAP
migration scripts, what they do, and how to use them.
You should migrate NIS+ service data one domain at a time. Perform the
following procedures on an NIS+ client system to migrate your NIS+
service data to the LDAP directory server.
As an example, use the following procedures to migration the NIS+
sub-domain service data with sub-domain name cup.hp.com to an LDAP
directory server LDAPSERV1 for illustrative purposes:
Step 1. Log in as root on your NIS+ client system and run the following cd
command to go to the subdirectory where the migration scripts are
located:
cd /opt/ldapux/migrate/nisplusmigration
Step 2. Select a domain to migrate. For this example, select cup.hp.com as a
domain name.
Step 3. Select the base Distinguished Name (DN) in the LDAP directory where
you want to put your NIS+ data. For this example, select "dc=cup,
dc=hp, dc=com" as the base DN.
Step 4. Export the environment variable, LDAP_BASEDN. For this example, use
following command to set the base DN to “dc=cup, dc=hp, dc=com”:
export LDAP_BASEDN=”dc=cup, dc=hp, dc=com”
Step 5. Export the environment variable, DOM_ENV. The DOM_ENV variable is the
fully qualified domain name where you migrate the NIS+ data from. For
this example, use the following command to set the DOM_ENV variable to
the domain name “cup.hp.com”:
export DOM_ENV = “cup.hp.com”
Step 6. Export the environment variable, LDAP_HOST. The LDAP_HOST variable
specifies the host name of the LDAP directory server where you migrate
the NIS+ data to. For this example, use following command to set the
LDAP directory name to LDAPSERV1:
export LDAP_HOST=”LDAPSERV1”
Chapter 2 27
Page 34

Migrating NIS+ to LDAP
Importing Your NIS+ Data to Your LDAP Directory Server
Step 7. Create the file that will contain all the data extracted from the NIS+
server and placed into a LDIF formatted file:
rm main.ldif
touch main.ldif
Step 8. If you do not have the credential tables on the NIS+ server that you want
to migrate, then skip this step and go to step 10.
Run the cred_table_sort.pl script to extract the credential table
entries including public key and secret key of users and hosts from the
NIS+ server. This creates the two files, passwd.cred.etc and
host.cred.etc:
./cred_table_sort.pl
Step 9. Run the following two scripts that migrate the credential files,
passwd.cred.etc and host.cred.etc, created in step 8 into two LDIF
files, passwd.ldif and hosts.ldif. Place passwd.ldif and
hosts.ldif into a LDIF formatted file, such as main.ldif:
../migrate_passwd.pl passwd.cred.etc passwd.ldif
../migrate_hosts.pl host.cred.etc hosts.ldif
cat passwd.ldif hosts.ldif >> main.ldif
NOTE In an NIS+ server, the public key and secret (private) key are stored in
the same directory entries for which those keys are associated. Because
of this, the passwd.cred.etc and host.cred.etc files generated by the
cred_table_sort.pl script must be migrated into the passwd.ldif
and hosts.ldif files. You must manually use the
/opt/ldapux/migrate/migrate_passwd.pl script to migrate the
passwd.cred.etc file to the passwd.ldif file and use the
/opt/ldapux/migrate/migrate_hosts.pl script to migrate the
host.cred.etc file to the hosts.ldif file.
Step 10. If you do not want to migrate the AutoFS maps to the LDAP directory,
then go to step 12. Otherwise, go to step 11.
Determine which AutoFS maps you have and which maps you want to
migrate to the LDAP server.
Chapter 228
Page 35

Migrating NIS+ to LDAP
Importing Your NIS+ Data to Your LDAP Directory Server
Step 11. Run the migrate_nisp_autofs.pl script to migrate each of the
AutoFS maps determined in steps 10 ( such as /etc/auto_master,
/etc/auto_home, /etc/auto_direc, etc...) from the NIS+ server to the
nisp_automap.ldif file. Append the nisp_automap.ldif file into the
LDIF formatted file, main.ldif. Migrate the AutoFS maps into the
LDIF file one map at a time.
./migrate_nisp_autofs.pl <autofs map name>
cat nisp_automap.ldif >> main.ldif
For example, the following commands migrate the /etc/auto_master
map to the nisp_automap.ldif and place the nisp_automap.ldif file
to main.ldif:
./migrate_nisp_autofs.pl /etc/auto_master
cat nisp_automap.ldif >> main.ldif
Step 12. If you do not have any user-defined maps or if you do not want to migrate
the user-defined maps, then skip this step.
If you want to migrate the user-defined maps to the LDAP directory, run
the migrate_nisp_nonstard.pl script to migrate each of the
user-defined maps to the nisp_nonstardard.ldif file. Place the
nisp_nonstardard.ldif file to a LDIF formatted file, main.ldif.
Migrate the user-defined maps one map at a time.
./migrate_nisp_nonstandard.pl <user-defined map>
cat nisp_nonstardard.ldif >> main.ldif
Where <user-defined map> is the name of map to be migrated.
For example, the following command migrates the user-defined map
client_sports to the nisp_nonstandard.ldif file, and places the
nisp_nonstandard.ldif file to main.ldif:
./migrate_nisp_nonstandard.pl client_sports
cat nisp_nonstardard.ldif >> main.ldif
Step 13. If you do not have any aliases service data or if you do not want to
migrate aliases service data, then skip this step.
Otherwise, run the migrate_nisp_aliases.pl script to migrate aliases
service data to the nisp_aliases.ldif file and place the
nisp_aliases.ldif file to a LDIF formatted file main.ldif as follows:
Chapter 2 29
Page 36

Migrating NIS+ to LDAP
Importing Your NIS+ Data to Your LDAP Directory Server
./migrate_nisp_aliases.pl
cat nisp_aliases.ldif >> main.ldif
Step 14. Run the /opt/ldapux/bin/ldapmodify tool to import the LDIF file
main.ldif that you created above into the LDAP directory server. For
example, the following command imports main.ldif to the base DN
cup.hp.com in the LDAP directory server LDAPSERV1:
/opt/ldapux/bin/ldapmodify -a -c -h LDAPSERV1 -D \
“cn = Directory Manager” -w <passwd> -f main.ldif
Step 15. If you choose to migrate the credential tables in steps 8 and 9 then LDIF
entries for the password, hosts and credential tables were added to the
main.ldif file. If this is the case then when you perform this step, the
following warning messages will be displayed:
adding new entry uid=pubadmin,ou=People,dc=cup,dc=hp,dc=com
ldap_add: Already exists
No action needs to be taken if you see these warnings. These warnings
are generated because the script has attempted to add the hosts and
passwd entries created in steps 8 and 9 to the LDAP directory for a
second time.
Run the following script to migrate your service data from NIS+ server to
the LDAP directory server:
./migrate_all_nisplus_online.sh
The migrate_all_nisplus_online.sh script migrates the NIS+ service
data, groups, services, netgroup, networks, protocols and rpc from the
NIS+ server into your LDAP directory in one operation. Provide the
necessary information when the script prompts you for the following
required information:
Enter the fully qualified domain name where you migrate the NIS+ data
from for the following question:
Enter the NIS+ domain to import from
Enter the host name of the LDAP directory server where you migrate the
NIS+ data to for the following question:
Enter the name of your LDAP server
Enter the manager DN for the following question. By default, you can
enter Directory Manager as the directory manager:
Chapter 230
Page 37

Migrating NIS+ to LDAP
Importing Your NIS+ Data to Your LDAP Directory Server
Enter the manager DN
Enter the credentials of the directory manager for the following question:
Enter the credentials to bind with
This completes the migration of your existing NIS+ server data into your
LDAP directory server.
Chapter 2 31
Page 38

Migrating NIS+ to LDAP
Configuring LDAP-UX Client Services
Configuring LDAP-UX Client Services
Below is a summary of how to configure LDAP-UX Client Services with
Netscape Directory Server 6.11 or later. For detailed information on how
to set up a default configuration, see the “Quick Configuration” section in
the LDAP-UX Client Services Adminstrator’s Guide available at
http://www.docs.hp.com. For detailed information on how to set up a
custom configuration, see the “Custom Confiiguration” in the LDAP-UX
Client Services B.04.00 Administrator’s Guide available at
http://www.docs.hp.com.
• If you plan to enable SSL support with LDAP-UX, you must
configure the LDAP directory server to support SSL and install the
security databases (cert7.db or cert8.db and key3.db) on
yourLDAP client before you run the setup program.
For detailed information on how to set up and configure your
Netscape Directory Server to enable SSL communication over LDAP,
refer to “Managing SSL Chapter” in the Administrator’s Guide for
Netscape Directory Server at
http://www.redhat.com/docs/manuals/dir-server/.
For detailed information on how to set up and configure the
LDAP-UX Client to enable SSL communication over LDAP, refer to
the “Configuring the LDAP-UX Client to Use SSL” section in the
LDAP-UX Client Services B.04.00 Administrator’s Guide at
http://www.docs.hp.com.
• LDAP-UX Client Services B.04.00 supports discovery and
management of publickeys in an LDAP directory. Both public and
secret keys, used by the SecureRPC API can be stored in user and
host entries in an LDAP directory server, using the nisKeyObject
objectclass. You can use chkey and newkey commands to manage
user and host keys in an LDAP server.
If you plan to store and manage the publickeys in your LDAP
directory, you must configure the LDAP-UX Client Services with
publickey supports. For the detailed information on how to configure
LDAP-UX Client Services with publickey support, refer to the
“Configure LDAP-UX Client Services With Publickey Support”
section in LDAP-UX Client Services B.04.00 Administrator’s Guide.
Chapter 232
Page 39

Migrating NIS+ to LDAP
Configuring LDAP-UX Client Services
• AutoFS is a client-side service that supports automatic mounting
and unmounting of file systems. LDAP-UX Client Services B.04.00
supports the automount service under the AutoFS subsystem. This
new feature allows you to store and manage AutoFS maps in an
LDAP directory. To enable AutoFS for LDAP support, you must
configure the Name Service Switch (NSS).
Save a copy of the /etc/nsswitch.conf file and modify the original
to add an entry for LDAP support to the automount service as
follows:
automount: files ldap
Refer to the /etc/nsswitch.ldap file for a sample.
For the detailed information on how to configure LDAP-UX Client
Services with AutoFS support, refer to the “AutoFS Support” section
in LDAP-UX Client Services B.04.00 Administrator’s Guide.
• Run the setup program. The setup program provides the following
assistance:
— Extends your Netscape directory schema with the configuration
profile schema, if not already done
— Extends your Netscape directory schema with the LDAP printer
schema if you choose to start the LDAP printer configurator
— Extends your Netscape directory schema with the automount
schema if you choose to migrate AutoFS maps to the Netscape
Directory Server
— Extends your Netscape directory schema with the public key
schema if you choose to migrate the NIS+ credential table entries
with public key/security key to the Netscape Directory Server
— Provides the option to enable SSL for secure communication
between LDAP clients and Netscape Directory Servers
— Optionally configures SASL Digest-MD5 authentication (for
Netscape Directory only)
— Creates a configuration profile entry in your Netscape directory
from information you provide
— Updates the local client’s start-up file
(/etc/opt/ldapux/ldapux_client.conf) with your directory
and configuration profile location
— Downloads the configuration profile from the directory to your
local client system
— Configures a proxy user for the client, if needed
— Starts the Client Daemon if you choose to start it
Chapter 2 33
Page 40

Migrating NIS+ to LDAP
Configuring LDAP-UX Client Services
NOTE You must run the setup program to configure the LDAP-UX Client
Services. Otherwise, the LDAP-UX Client Services will not work
properly. For detailed procedures on how to run setup program to
configure the LDAP-UX Client Services, see the “Configure the
LDAP-UX Client Services” section in the LDAP-UX Client Services
B.04.00 Administrator’s Guide available at http://www.docs.hp.com.
• Configure the Pluggable Authentication Module (PAM) by modifying
the file /etc/pam.conf.
Save a copy of /etc/pam.conf and modify the original file to add
/usr/lib/security/libpam_ldap.1 on the HP-UX 11i v1 system or
libpam_ldap.so.1 on the HP-UX 11i v2 system where it is
appropriate. If your system is in the standard mode, see
/etc/pam.ldap for an example. If your system is in the Trusted
Mode, see /etc/pam.ldap.trusted for an example.
• Configure the Name Service Switch (NSS) by modifying the file
/etc/nsswitch.conf.
Save a copy of /etc/nsswitch.conf file and modify the original to
add ldap to support name services. See /etc/nsswitch.ldap for a
sample.
• Optionally modify the disable_uid_range flag in the
/etc/opt/ldapux/ldapux_client.conf file to disable logins to the
local system from specific users.
• Optionally set up the login authorization for a subset of users from a
large repository such as an LDAP directory server.
The pam_authz service module provides functionality that allows the
administrator to control who can login to the system. Starting with
LDAP-UX Client Services B.04.00, pam_authz has been enhanced to
allow system administrators to configure their local access rules in a
local policy file, /etc/opt/ldapux/pam_authz.policy. pam_authz
uses these access control rules defined in the
/etc/opt/ldapux/pam_authz.policy file to control the login
authorization.
Chapter 234
Page 41

Migrating NIS+ to LDAP
Configuring LDAP-UX Client Services
For the detailed information on how to configure the policy file,
/etc/opt/ldapux/pam_authz.policy, see the “PAM_AUTHZ
Login Authorization Enhancement” section in the LDAP-UX Client
Services B.04.00 Administrator’s Guide
After you configure your directory and the first client system, configuring
additional client systems is simpler. Refer to the “Configure Subsequent
Client Systems” section in the LDAP-UX Client Services B.04.00
Administrator’s Guide for details.
Chapter 2 35
Page 42

Migrating NIS+ to LDAP
Verify LDAP-UX Client Services
Verify LDAP-UX Client Services
This section describes some simple ways you can verify the installation
and configuration of your LDAP-UX Client Services.
• Use the nsquery(1)1 command to test the name service:
nsquery lookup_type lookup_query [lookup_policy]
For example, to test the name service switch to resolve a username
lookup, enter:
nsquery passwd
where
username
username
ldap
is the login name of a valid user whose posix
account information is in the directory. You should see output
something like the following depending on how you have configured
/etc/nsswitch.conf:
Using "files ldap" for the passwd policy.
Searching /etc/passwd for johnw
johnw was NOTFOUND
Switch configuration: Allows fallback
Searching ldap for johnw
User name: johnw
User Id: 644
Group Id: 20
Gecos: John Bloggs,43L-C3,555-1212
Home Directory: /home/johnw
Shell: /usr/bin/ksh
Switch configuration: Terminates Search
This tests the Name Service Switch configuration in
/etc/nsswitch.conf. If you do not see output like that above, check
/etc/nsswitch.conf for proper configuration
• Use other commands to display information about users in the
directory, making sure the output is as expected:
pwget -n
nsquery hosts
grget -n
ls -l
username
host_to_find
groupname
1. nsquery(1) is a contributed tool included with the ONC/NFS
product.
Chapter 236
Page 43

Migrating NIS+ to LDAP
Verify LDAP-UX Client Services
• Log in to the client system from another system using rlogin or
telnet. Log in as a user in the directory and as a user in /etc/passwd
to make sure both work.
• Use the ls(1) or ll(1) command to examine files belonging to a user
whose account information is in the directory. Make sure the owner
and group of each file are accurate:
ll /tmp
ls -l
If any owner or group shows up as a number instead of a user or
group name, the name service switch is not functioning properly.
Check the file /etc/nsswitch.conf, your directory.
Chapter 2 37
Page 44

Migrating NIS+ to LDAP
Verify LDAP-UX Client Services
Chapter 238
Page 45

3 Command and Tool Reference
This chapter briefly describes the LDAP directory tools used to search,
add, modify or delete entries in an LDAP directory and NIS+ to LDAP
migration scripts. It includes the following sections:
• “The ldappasswd Command” on page 39 describes the command that
changes passwords in your directory.
• “LDAP Directory Tools” on page 40 briefly describes the tools
ldapsearch, ldapmodify, and ldapdelete.
• “NIS+ to LDAP Migration Scripts” on page 44 describes the shell and
perl scripts that migrate your NIS+ data to your LDAP directory.
The ldappasswd Command
This section describes the ldappasswd command and its parameters.
The ldappasswd program, installed in /opt/ldapux/bin, allows users to
change their passwords in the directory. Changing a user’s password
with ldappasswd marks the cache entry for that user as stale if caching
is enabled. ldappasswd assumes an LDAP directory server that supports
{crypt} format. (For more information, see passwd(1) and crypt(3C).)
Syntax
ldappasswd [
where
-b
-h
Chapter 3 39
options
basedn
host
options
can be any of the following:
]
specifies
where to start searching. If ypldapd is running, then
this is not required.
specifies
If ypldapd is running, then this is not required.
basedn
host
as the base distinguished name of
as the LDAP server name or IP address.
Page 46

Command and Tool Reference
LDAP Directory Tools
-c generates an encrypted password on the client. Use
-v prints the software version and exits.
-p
this parameter for directories that do not automatically
encrypt passwords. The default is to send the new
password in plain text to the directory. Netscape
Directory Server 6.x for HP-UX supports automatic
encryption of passwords.
port
specifies
-D
binddn
specifies
-w
passwd
specifies
authentication).
-l login specifies
defaults to the current user.
port
as the LDAP server TCP port number.
binddn
passwd
login
as the bind distinguished name.
as the bind password (for simple
as the uid of the account to change;
Examples
The following command changes the password in the directory for the
currently logged in user:
ldappasswd
The following command changes the password in the directory for the
user steves:
ldappasswd -l steves
LDAP Directory Tools
This section briefly describes the tools ldapsearch, ldapmodify, and
ldapdelete. These tools are described in detail in the Netscape Directory
Server for HP-UX Administrator’s Guide available at
http://docs.hp.com/hpux/internet.
Chapter 340
Page 47

Command and Tool Reference
LDAP Directory Tools
Additional tools are available in the directory
/opt/ldapux/contrib/bin, however these tools are unsupported. See
the file /opt/ldapux/contrib/bin/README for more information.
ldapentry
ldapentry is a script tool that simplifies the task of adding, modifying
and deleting entries in an LDAP directory. It supports the following
name services: passwd, group, hosts, rpc, services, networks, and
protocols.
ldapentry accepts run-time options either on the command line, or via
environment variables, which can be defined locally, in the configuration
profile or are read in from the configuration profile. The add and modify
functions open an entry into an editor with a pre-defined template to aid
the user in providing the necessary directory attributes. The template
file is customizable and can be found in
/etc/opt/ldapux/ldapentry.templates.
Configuration variables can be defined in the following locations (from
most specific to most general):
1. as shell environment variables
2. in a user 'rc' configuration file (~/.ux_ldap_admin_rc)
3. in a global configuration file /etc/opt/ldapux/client_admin.conf)
4. in the configuration profile (/etc/opt/ldapux/ldapux_profile.ldif)
The order of evaluation is that any settings on more specific locations
will overwrite any settings on more general locations. The following
configuration variables can be defined:
LDAP_BINDDN The DN of the LDAP user allowed to add, delete, or
modify the entry.
LDAP_BINDCRED The password for the above specified LDAP user. It
is recommended to not store the password in any
configuration file, the user will be prompted for it when
running ldapentry.
LDAP_HOST Host name of LDAP directory server.
LDAP_BASEDN The DN of the search base which tells ldapentry where
to start the search for the entry. In case of adding an
entry, LDAP_BASEDN determines the insert base.
Chapter 3 41
Page 48

Command and Tool Reference
LDAP Directory Tools
LDAP_SCOPE The scope of LDAP search (sub, one, base). Will default
INSERT_BASE This DN tells ldapentry where to insert new entries.
EDITOR The editor to use when an entry is added or modified.
Syntax
to sub if LDAP_BASEDN is defined, but LDAP_SCOPE
is not. You must define LDAP_BASEDN, if you define
LDAP_SCOPE.
This value will default to LDAP_BASEDN or a default
discovered by the profile. INSERT_BASE is only used
when adding entries.
ldapentry -<a|m|d> [
options
] <
service value |dn
>
where
-a Adds a new entry to the directory.
-m Modifies an existing entry in the directory.
-d Deletes an existing entry in the directory.
options
-f Delete warning override
-v Display verbose information
-b search/insert base
-s search scope
-h directory host
-p directory port
-D directory login
service
The name of the service that will determine the type of entry to edit. Can
be either passwd, group, hosts, rpc, services, or networks.
value
The name of the entry recognized by the directory to be added, modified,
or deleted.
dn
The full distinguished name of the entry to add, modify or delete.
Chapter 342
Page 49

Command and Tool Reference
LDAP Directory Tools
Refer to the ldapentry(1) man page for more detailed information.
Examples
The following configuration variables are defined in the user's
configuration file as ~/.ux_ldap_admin_rc:
LDAP_BINDDN="cn=Directory Manager"
LDAP_HOST=”myhost”
The Command
ldapentry -a passwd UserA
will try to bind to the directory on server myhost as Directory Manager,
prompt for the credentials, and retrieve the service search descriptor
from the profile LDIF file based on the service name passwd. It will then
open the template file with the editor defined by the environment
variable EDITOR and collect the input to pass it to ldapmodify to add the
new entry.
The Command
ldapentry -m "uid=UserA, ou=People, o=hp.com"
will try to bind to the directory on server myhost as Directory Manager,
prompt for the credentials, and use the entered DN to retrieve the entry
from the directory.
It will then populate a template with the retrieved information, and
collect the changes to pass to ldapmodify for execution.
NOTE Although the ldapentry tool will allow the users to modify any
information on the EDITOR window, the directory server has the final
decision on accepting the modification. If the user makes an invalid
LDIF syntax, violates the directory’s schema or does not have the
priviledge to perform the modificaiton, the ldapentry tool will report the
error after the EDITOR window is closed when it tries to update the
directory server with the information. The user will be given the option
to re-enter the EDITOR and correct the error.
Chapter 3 43
Page 50

Command and Tool Reference
NIS+ to LDAP Migration Scripts
ldapsearch
You use the ldapsearch command-line utility to locate and retrieve
LDAP directory entries. This utility opens a connection to the specified
server using the specified distinguished name and password, and locates
entries based on the specified search filter. Search results are returned in
LDIF format. For details, see the Netscape Directory Server for HP-UX
Administrator’s Guide available at http://docs.hp.com/hpux/internet.
ldapmodify
You use the ldapmodify command-line utility to modify entries in an
existing LDAP directory. ldapmodify opens a connection to the specified
server using the distinguished name and password you supply, and
modifies the entries based on the LDIF update statements contained in a
specified file. Because ldapmodify uses LDIF update statements,
ldapmodify can do everything ldapdelete can do. For details, see the
Netscape Directory Server for HP-UX Administrator’s Guide available at
http://docs.hp.com/hpux/internet.
ldapdelete
You use the ldapdelete command-line utility to delete entries from an
existing LDAP directory. ldapdelete opens a connection to the specified
server using the distinguished name and password you provide, and
deletes the entry or entries. For details, see the Netscape Directory Server
for HP-UX Administrator’s Guide available at
http://docs.hp.com/hpux/internet.
NIS+ to LDAP Migration Scripts
HP recommends that NIS+ database files are migrated to the Netscape
Directory Server. The LDAP-UX Integration product B.04.00 provides
NIS+ to LDAP migration scripts to accomplish the task in an automated
way.
This section describes the shell and perl scripts you use to migrate your
NIS+ data from the NIS+ server to your LDAP directory. These scripts
are found in /opt/ldapux/migrate/nisplusmigration. The shell
Chapter 344
Page 51

script migrate_all_nisplus_online.sh migrates all of your groups,
hosts, services, netgroup, rpc, protocols and networks maps at one time,
while the perl scripts: migrate_nisp_group.pl,
migrate_nisp_hosts.pl, migrate_nisp_services.pl,
migrate_nisp_netgroup.pl, migrate_nisp_rpc.pl, and so forth ,
migrate individual NIS maps.
The migration scripts require perl, version 5 or later, which is installed
in /opt/ldapux/contrib/bin/perl.
When using the NIS+ migration scripts to migrate NIS+ services data,
each migration script generates the corresponding LDIF file.
Table 3-1 shows the NIS+ migration tools:
Table 3-1 NIS+ to LDAP Migration Tools
Command and Tool Reference
NIS+ to LDAP Migration Scripts
Tool Description
migrate_nisp_groups.pl Migrates groups
from the NIS+
server to LDIF.
migrate_nisp_hosts.pl Migrates hosts
from the NIS+
server to LDIF.
migrate_nisp_services.pl Migrates services
from the NIS+
server to LDIF.
migrate_nisp_netgroup.pl Migrates netgroup
from the NIS+
server to LDIF.
migrate_nisp_networks.pl Migratesnetworks
from the NIS+
server to LDIF.
migrate_nisp_rpc.pl Migrates RPCs
from the NIS+
server to LDIF.
Corresponding LDIF
File
nisp_groups.ldif
nisp_hosts.ldif
nisp_services.ldif
nisp_netgroup.ldif
nisp_networks.ldif
nisp_rpc.ldif
Chapter 3 45
Page 52

Command and Tool Reference
NIS+ to LDAP Migration Scripts
Table 3-1 NIS+ to LDAP Migration Tools (Continued)
Tool Description
migrate_nisp_passwd.pl Migrates all user
accounts with
encrypted
passwords from
the NIS+ server to
LDIF.
migrate_nisp_aliases.pl Migrates all user
accounts with
encrypted
passwords from
the NIS+ server to
LDIF.
migrate_nisp_protocols.pl Migrates all user
accounts with
encrypted
passwords from
the NIS+ server to
LDIF.
migrate_nisp_nonstandard.
pl
Migrates
user-defined maps
to LDIF file.
Corresponding LDIF
File
nisp_passwd.ldif
nisp_aliases.ldif
nisp_protocols.ldif
nisp_nonstandard.ldif
migrate_nisp_autofs.pl Migrates AutoFS
maps (such as
auto_master,
auto_direct,
auto_home, etc...)
from the NIS+
server to LDIF.
nisp_automap.ldif
Chapter 346
Page 53

NIS+ to LDAP Migration Scripts
Table 3-1 NIS+ to LDAP Migration Tools (Continued)
Command and Tool Reference
Tool Description
cred_table_sort.pl Migrates
credential table
entries including
public keys and
secret keys of
users and hosts
from the NIS+
server to the flat
(etc) file.
migrate_all_nisplus_onlin
e.sh
Migrates NIS+
name service data
to an LDAP
directory.
Corresponding LDIF
File
passwd.cred.etc and
host.cred.etc
Environment Variables
When you use the NIS+ migration scripts to migrate NIS+ service data,
set the following environment variables:
DOM_ENV The fully qualified domain nam where you want to
migrate data from.
LDAP_BASEDN The base distinguished name where you want to put
data in the LDAP directory.
Examples:
The following command sets the fully qualified domain name to
“cup.hp.com”:
export DOM_ENV =”cup.hp.com”
The following command sets the base DN to “dc=cup, dc=hp, dc=com”:
export LDAP_BASEDN=”dc=cup, dc=hp, dc=com”
General Syntax For Migration Scripts
NIS+ migration scripts use the following general syntax:
Chapter 3 47
Page 54

Command and Tool Reference
NIS+ to LDAP Migration Scripts
scriptname [inputfile]
where
scriptname
inputfile
Is the name of the particular script you are using.
This only applies to the migrate_nisp_autofs.pl
and migrate_nisp_nonstandard.pl scripts which
require you to provide the name of the appropriate
name service map file that you want to migrate. For
examples, migrate_nisp_autofs.pl auto_master
and migrate_nisp_autofs.pl auto_home.
Naming Context
The naming context specifies where in your directory your NIS+ data is
located, under the base DN. For example, if your base DN is “dc=cup,
dc=hp, dc=com” the groups map is located at “ou=Group, dc=cup,
dc=hp, dc=com”. Table 3-2 shows the default naming context for the
supported services. The default works in most cases.
Table 3-2 Default Naming Context
NIS+ Map Name
group ou=group
passwd ou=people
Location in the Directory
Tree
netgroup ou=netgroups
hosts ou=hosts
networks ou=networks
protocols ou=protocols
rpc ou=rpc
services ou=services
automount automountMapName=auto_*
cred_table ou=people, ou=hosts
Chapter 348
Page 55

Table 3-2 Default Naming Context (Continued)
Command and Tool Reference
NIS+ to LDAP Migration Scripts
NIS+ Map Name
user-defined
(non-standard) map
a. In general, non-standard NIS+ maps should be
converted into LDAP-based schemas. This
procedure generally requires migration
consultation from LDAP experts.
If you change the default naming context, modify the file
migrate_common.ph and change it to reflect your naming context.
a
Location in the Directory
Tree
nisMapName=mapname
Migrating The Credential Table
The cred_table_sort.pl uses the niscat command to retrieve the
credential table entries including public keys and secret (private) keys of
users and hosts from the NIS+ server. This tool then generates the
passwd.cred.etc and host.cred.etc files in the flat (etc) format. The
passwords, hosts and credential tables are generated after you run the
cred_table_sort.pl script.
In an LDAP directory, the public keys and secret (private) keys are
stored in the same directory entries for which those keys are associated
with. Because of this, the tables generated by the cred_table_sort.pl
script must be migrated into the passwd.ldif and hosts.ldif files.
You must manually use the /opt/ldapux/migrate/migrate_passwd.pl
script to migrate the passwd.cred.etc file to the passwd.ldif file and
use the /opt/ldapux/migrate/migrate_hosts.pl script to migrate
the host.cred.etc file to the hosts.ldif file.
The public keys and secret keys for hosts are migrated to the ou=hosts
container.
Use the following steps to migrate the credential table from NIS+ server
to the hosts.ldif file and passwd.ldif file:
Step 1. Log in as root on your NIS+ client system and run the following cd
command to go to the subdirectory where the migration scripts are
located:
Chapter 3 49
Page 56

Command and Tool Reference
NIS+ to LDAP Migration Scripts
cd /opt/ldapux/migrate/nisplusmigration
Step 2. Run the cred_table_sort.pl script to extract the credential table
entries including public key and secret key of users and hosts from the
NIS+ server. This creates the two files, passwd.cred.etc and
host.cred.etc:
./cred_table_sort.pl
Step 3. Run the following two scripts that migrate the credential files,
passwd.cred.etc and host.cred.etc, created in step 2 into two LDIF
files, passwd.ldif and hosts.ldif:
../migrate_passwd.pl passwd.cred.etc passwd.ldif
../migrate_hosts.pl host.cred.etc hosts.ldif
Migrating Most of Service Data Using One Script
The shell script migrate_all_nisplus_online.sh migrates the
following NIS+ services data into your directory server in one operation:
• groups
• hosts
• services
• rpc
• netgroup
• protocols
• networks
This script calls the perl scripts described under “Migrating Individual
Service Data” on page 51.
This script takes no parameters. But, you need to provide the necessary
information when the scirpt prompts you for the following required
information:
Enter the fully qualified domain name where you migrate the NIS+ data
from for the following question:
Enter the NIS+ domain to import from
Enter the host name of the LDAP directory server where you migrate the
NIS+ data to for the following question:
Chapter 350
Page 57

Command and Tool Reference
NIS+ to LDAP Migration Scripts
Enter the name of your LDAP server
Enter the manager DN for the following question. By default, you can
enter Directory Manager as the directory manager:
Enter the manager DN
Enter the credentials of the directory manager for the following question:
Enter the credentials to bind with
Migrating Individual Service Data
The migration scripts shown below use the nisaddent command to
convert service data from the NIS+ server into the flat file format and
migrate data to LDIF. These scripts can be used to migrate the NIS+
service data, groups, hosts, netgroup, networks, services, protocols, rpc,
autofs and passwd individually. The migrate_nisp_autofs.pl script
migrates AutoFS maps (such as /etc/auto_master, /etc/auto_home,
/etc/auto_direc, etc...) from the NIS+ server to LDIF. The
migrate_nisp_autofs.pl script migrates one AutoFS map at a time.
The migrate_nisp_passwd.pl script uses the niscat command to
migrate all user accounts with encrypted passwords from the NIS+
server into LDIF file
These scripts are called by the shell script,
migrate_all_nisplus_online.sh. These perl scripts get their
information from the NIS+ server and generate LDIF files.
The following is a list of migrationt scripts used to migrate individual
service data:
• migrate_nisp_services.pl
• migrate_nisp_groups.pl
• migrate_nisp_hosts.pl
• migrate_nisp_netgroup.pl
• migrate_nisp_networks.pl
• migrate_nisp_passwd.pl
• migrate_nisp_rpc.pl
• migrate_nisp_aliases.pl
• migrate_nisp_protocols.pl
Chapter 3 51
Page 58

Command and Tool Reference
NIS+ to LDAP Migration Scripts
• migrate_nisp_autofs.pl
Migrating User-Defined Maps
The LDAP directory has a special object class, nisMap, which is used to
store user-defined (non-standard) maps. The
migrate_nisp_nonstard.pl migration script migrates user-defined
maps to LDIF file using nisMap as the object class and storing the name
of user-defined map to the nisMapName location.
In order to properly support NIS+ and NIS clients during a migration
period, these non-standard maps must be migrated to the directory.
However, non-standard maps are generally used to support legacy NIS or
NIS+ applications. Migration to LDAP should involve migration of these
applications to support LDAP, as well as translation of the dependent
non-standard maps to native LDAP schemas. This type of migration
generally requires involvment of expert LDAP consultants.
Examples
The following command migrates NIS+ service data into the LDAP
directory in one operation:
export LDAP_BASEDN=”dc=cup,dc=hp,dc=com”
export DOM_ENV=”cup.hp.com”
migrate_all_nisplus_online.sh
Chapter 352
Page 59

Command and Tool Reference
NIS+ to LDAP Migration Scripts
The following commands migrate all user accounts with encrypted
passwords from the NIS+ server into LDIF and place the results in the
nisp_passwd.ldif file:
export LDAP_BASEDN=”dc=cup,dc=hp,dc=com”
export DOM_ENV =”cup.hp.com”
migrate_nisp_passwd.pl
dn:cn=joe Bloggs,ou=People,dc=cup,dc=hp,dc=com
uid: jbloggs
cn: joe Bloggs
objectclass: top
objectclass: person
objectclass: organizationPerson
objectclass: inetOrgPerson
objectclass: posixAccount
objectclass: account
mail: jboggs@cup.hp.com
givenname: Joe
sn:bloggs
userPassword: {crypt}daCXgaxahRNkg
loginShell: /bin/ksh
uidNumber: 20
gidNumber: 20
homeDirectory: /home/jbloggs
The following commands migrate groups data from the NIS+ server to
LDIF and place the results in the nisp_group.ldif file:
export LDAP_BASEDN=”dc=cup,dc=hp,dc=com”
export DOM_ENV =”cup.hp.com”
migrate_nisp_group.pl
dn:cn=rose.cup.hp.com,ou=Groups,dc=cup,dc=hp,dc=com
objectclass: posixGroup
objectclass: top
ipHostNumber: 10.1.70.5
cn: rose
cn: rose.cup.hp.com
userPassword: {crypt}*
gidNumber: 325
Chapter 3 53
Page 60

Command and Tool Reference
NIS+ to LDAP Migration Scripts
The following commands migrate hosts data from the NIS+ server to
LDIF and places the results in the nisp_hosts.ldif file:
export LDAP_BASEDN=”dc=cup,dc=hp,dc=com”
export DOM_ENV =”cup.hp.com”
migrate_nisp_hosts.pl
dn:cn=mira.cup.hp.com,ou=Hosts,dc=cup,dc=hp,dc=com
objectclass: ipHost
objectclass: device
objectclass: top
ipHostNumber: 10.1.80.60
cn: mira
cn: mira.cup.hp.com
The following commands migrates the user defined map client_sports
from the NIS+ server to LDIF and places the results in the
nisp_nonstand.ldif file:
export LDAP_BASEDN=”dc=cup,dc=hp,dc=com”
export DOM_ENV =”cup.hp.com”
migrate_nisp_nonstandard.pl client_sports
dn:nisMapName=client_sport,nisMapName=clien_sports
objectClass: nisMap
objectClass: top
nisMapName: client_sports
dn:cn=client1,nisMapName=client_sports
objectClass: nisObject
objectClass: top
nisMapName: client_sports
cn: client1
nisMapEntry: (football, baseketball)
dn:cn=client2,nisMapName=client_sports
objectClass: nisObject
objectClass: top
nisMapName: client_sports
cn: client2
nisMapEntry: (baseball, tennis)
Chapter 354
Page 61

Command and Tool Reference
NIS+ to LDAP Migration Scripts
The following commands migrate the AutoFS map /etc/auto_indirect
from the NIS+ server to LDIF and place the results in the
nisp_automap.ldif file:
export LDAP_BASEDN=”dc=nishpbnd”
export DOM_ENV =”cup.hp.com”
migrate_nisp_autofs.pl /etc/auto_indirect
The following shows the /etc/auto_indirect file:
#local mount point remote server:directory
lab1 hostA:/tmp
lab2 hostB:/tmp
The following shows the nisp_automap.ldif file:
dn:automountMapName=auto_indirect,dc=nishpbnd
objectClass: top
objectClass: automountMap
automountMapName: auto_indirect
dn:automountKey=lab1, \
automountMapname=auto_indirect, dc=nishpbnd
objectClass: top
objectClass: automount
automountInformation:hostA:/tmp
automountKey: lab1
dn:automountKey=lab2, \
automountMapname=auto_indirect, dc=nishpbnd
objectClass: top
objectClass: automount
automountInformation:hostB:/tmp
automountKey:lab2
Chapter 3 55
Page 62

Command and Tool Reference
NIS+ to LDAP Migration Scripts
Chapter 356
Page 63

Glossary
Refer to the Glossary in the Netscape
Directory Server for HP-UX Administrator’s
Guide available at
http://docs.hp.com/hpux/internet.
Access Control Instruction A
specification controlling access to entries in a
directory.
Access Control List One or more ACIs.
ACI See Access Control Instruction
ACL See Access Control List.
IETF Internet Engineering Task Force; the
organization that defines the LDAP
specification. See http://www.ietf.org.
LDAP See Lightweight Directory Access
Protocol
LDIF See LDAP Data Interchange Format
LDAP Data Interchange Format (LDIF)
Network Information Service Plus
(NIS+) A distributed database system
providing centralized management of
common configuration files, such as
/etc/passwd and /etc/hosts.
NIS+ See Network Information Service Plus
Pluggable Authentication Module
(PAM) A framework that allows different
authentication service modules to be made
available without modifying applications.
See pam_ldap(5), pam(3), and pam.conf(4)
for more information.
The format used to represent directory
server entries in text form.
ldappasswd A command to change a user’s
password in the LDAP directory.
Lightweight Directory Access Protocol
(LDAP) A standard, extensible set of
conventions specifying communication
between clients and servers across TCP/IP
network connections.
Name Service Switch (NSS) A
framework that allows a host to get name
information from various sources such as
local files in /etc, NIS, NIS+, or an LDAP
directory without modifying applications.
See switch(4) for more information.
Glossary 57
Page 64

Glossary
Network Information Service Plus (NIS+)
Glossary58
Page 65

Index
Symbols
/etc/nsswitch.conf, 37
A
access control instruction (ACI), 57
authentication, 4, 5, 6, 7, 10, 33
B
basedn, 39, 42, 47, 52, 53, 54
C
change passwords, 39
client administration tools
ldapdelete, 44
ldapmodify, 44
ldappasswd, 39
ldapsearch, 44
Comparing Features and Security, 5
Comparing LDAP and NIS+ Information
Sharing, 9
configuration, 5, 9, 41, 42, 43
directory, 19
configuration profile, 33
D
directory, 2, 3, 4, 6, 11, 15, 17, 19, 23, 26
white paper, 15
directory configuration, 19
domain name, 27, 30, 50
I
IETF, 57
import, 26, 27, 30
import NIS maps, 26
N
naming context
default, 48
migration scripts, 48
NIS
import maps into directory, 26
NIS+ domain, 30, 50
NIS+ to LDAP migration, 15
NIS+ to LDAP migration scripts, 17, 27
nsquery, 36
NSS, 20, 34
P
PAM, 20, 34, 57
password, change, 39
profile, configuration, 33
proxy user, 33
R
RFC 2307, 19, 23
S
schema, 17
security, 5, 6, 7, 8
start-up file, 33
V
verify configuration, 36
W
white paper, directory configuration, 15
L
LDAP directory, 10
ldapdelete, 44
ldapentry, 41
ldapmodify, 44
ldappasswd, 39
syntax, 39
ldapsearch, 44
LDIF, 26, 57
M
Migrating NIS+ Service Data, 17
migration scripts, 17, 20, 26, 44, 47
59
 Loading...