

Page 1

LDAP-UX Client Services B.04.00
Administrator’s Guide
HP-UX 11i v1, v2 and v3
Edition 5
Manufacturing Part Number : J4269-90071
E0207
© Copyright 2007 Hewlett-Packard Company, L.P.
Page 2

Legal Notices
The information in this document is subject to change without notice.
Hewlett-Packard makes no warranty of any kind with regard to this
manual, including, but not limited to, the implied warranties of
merchantability and fitness for a particular purpose. Hewlett-Packard
shall not be held liable for errors contained herein or direct, indirect,
special, incidental or consequential damages in connection with the
furnishing, performance, or use of this material.
Warranty
A copy of the specific warranty terms applicable to your Hewlett-Packard
product and replacement parts can be obtained from your local Sales and
Service Office.
U.S. Government License
Proprietary computer software. Valid license from HP required for
possession, use or copying. Consistent with FAR 12.211 and 12.212,
Commercial Computer Software, Computer Software Documentation,
and Technical Data for Commercial Items are licensed to the U.S.
Government under vendor's standard commercial license.
Copyright Notices
Copyright 2006 Hewlett-Packard Company L.P. All rights reserved.
Reproduction, adaptation, or translation of this document without prior
written permission is prohibited, except as allowed under the copyright
laws.
Trademark Notices
UNIX is a registered trademark in the United States and other
countries, licensed exclusively throughThe Open Group.
NIS is a trademark of Sun Microsystems, Inc.
Netscape and Netscape Directory Server are registered trademarks of
Netscape Communications Corporation in the United States and other
countries. Other product and brand names are trademarks of their
respective owners.
ii
Page 3

Contents
1. Introduction
Overview of LDAP-UX Client Services. . . . . . . . . . . . . . . . . . . . . . . . . . . . . . . . . . . . . . . 1
How LDAP-UX Client Services Works . . . . . . . . . . . . . . . . . . . . . . . . . . . . . . . . . . . . . 3
2. Installing And Configuring LDAP-UX Client Services
Before You Begin . . . . . . . . . . . . . . . . . . . . . . . . . . . . . . . . . . . . . . . . . . . . . . . . . . . . . . . .9
Summary of Installing and Configuring. . . . . . . . . . . . . . . . . . . . . . . . . . . . . . . . . . . . . 10
Plan Your Installation . . . . . . . . . . . . . . . . . . . . . . . . . . . . . . . . . . . . . . . . . . . . . . . . . . . 12
Install LDAP-UX Client Services on a Client . . . . . . . . . . . . . . . . . . . . . . . . . . . . . . . . 20
Configure Your Directory. . . . . . . . . . . . . . . . . . . . . . . . . . . . . . . . . . . . . . . . . . . . . . . . . 21
Import Name Service Data into Your Directory. . . . . . . . . . . . . . . . . . . . . . . . . . . . . . . 25
Steps to Importing Name Service Data into Your Directory . . . . . . . . . . . . . . . . . . . 26
Configure the LDAP-UX Client Services . . . . . . . . . . . . . . . . . . . . . . . . . . . . . . . . . . . . 27
Quick Configuration . . . . . . . . . . . . . . . . . . . . . . . . . . . . . . . . . . . . . . . . . . . . . . . . . . . 29
Custom Configuration. . . . . . . . . . . . . . . . . . . . . . . . . . . . . . . . . . . . . . . . . . . . . . . . . . 34
Configure the LDAP-UX Client Serivces with SSL Support . . . . . . . . . . . . . . . . . . . . 41
Configuring the LDAP-UX Client to Use SSL. . . . . . . . . . . . . . . . . . . . . . . . . . . . . . . 42
Configure LDAP-UX Client Services with Publickey Support . . . . . . . . . . . . . . . . . . . 46
HP-UX Enhanced Publickey-LDAP Software Requirement on HP-UX 11i v1 or v2 46
Extending the Publickey Schema into Your Directory . . . . . . . . . . . . . . . . . . . . . . . 48
Admin Proxy User . . . . . . . . . . . . . . . . . . . . . . . . . . . . . . . . . . . . . . . . . . . . . . . . . . . . 48
Setting ACI for Key Management . . . . . . . . . . . . . . . . . . . . . . . . . . . . . . . . . . . . . . . . 49
Configuring serviceAuthenticationMethod . . . . . . . . . . . . . . . . . . . . . . . . . . . . . . . . 50
Configuring Name Service Switch . . . . . . . . . . . . . . . . . . . . . . . . . . . . . . . . . . . . . . . . 53
AutoFS Support . . . . . . . . . . . . . . . . . . . . . . . . . . . . . . . . . . . . . . . . . . . . . . . . . . . . . . . . 55
AutoFS Patch Requirement . . . . . . . . . . . . . . . . . . . . . . . . . . . . . . . . . . . . . . . . . . . . . 55
Automount Schemas. . . . . . . . . . . . . . . . . . . . . . . . . . . . . . . . . . . . . . . . . . . . . . . . . . . 55
Attribute Mappings . . . . . . . . . . . . . . . . . . . . . . . . . . . . . . . . . . . . . . . . . . . . . . . . . . . 60
Configuring Name Service Switch . . . . . . . . . . . . . . . . . . . . . . . . . . . . . . . . . . . . . . . . 61
AutoFS Migration Scripts . . . . . . . . . . . . . . . . . . . . . . . . . . . . . . . . . . . . . . . . . . . . . . 62
Verify the LDAP-UX Client Services . . . . . . . . . . . . . . . . . . . . . . . . . . . . . . . . . . . . . . . 68
Configure Subsequent Client Systems . . . . . . . . . . . . . . . . . . . . . . . . . . . . . . . . . . . . . . 72
Download the Profile Periodically. . . . . . . . . . . . . . . . . . . . . . . . . . . . . . . . . . . . . . . . . . 74
Use r-command for PAM_LDAP . . . . . . . . . . . . . . . . . . . . . . . . . . . . . . . . . . . . . . . . . . . 76
3. LDAP Printer Configurator Support
Overview. . . . . . . . . . . . . . . . . . . . . . . . . . . . . . . . . . . . . . . . . . . . . . . . . . . . . . . . . . . . . . 80
Definitions . . . . . . . . . . . . . . . . . . . . . . . . . . . . . . . . . . . . . . . . . . . . . . . . . . . . . . . . . . . 80
iii
Page 4

Contents
How the LDAP Printer Configurator works. . . . . . . . . . . . . . . . . . . . . . . . . . . . . . . . . . 82
Printer Configuration Parameters . . . . . . . . . . . . . . . . . . . . . . . . . . . . . . . . . . . . . . . . . 85
Printer Schema . . . . . . . . . . . . . . . . . . . . . . . . . . . . . . . . . . . . . . . . . . . . . . . . . . . . . . . . 86
An Example. . . . . . . . . . . . . . . . . . . . . . . . . . . . . . . . . . . . . . . . . . . . . . . . . . . . . . . . . . 86
Managing the LP printer configuration . . . . . . . . . . . . . . . . . . . . . . . . . . . . . . . . . . . . . 88
Limitations of Printer Configurator . . . . . . . . . . . . . . . . . . . . . . . . . . . . . . . . . . . . . . . . 91
4. Administering LDAP-UX Client Services
Using The LDAP-UX Client Daemon . . . . . . . . . . . . . . . . . . . . . . . . . . . . . . . . . . . . . . . 94
Overview . . . . . . . . . . . . . . . . . . . . . . . . . . . . . . . . . . . . . . . . . . . . . . . . . . . . . . . . . . . .94
ldapclientd. . . . . . . . . . . . . . . . . . . . . . . . . . . . . . . . . . . . . . . . . . . . . . . . . . . . . . . . . . .95
ldapclientd.conf. . . . . . . . . . . . . . . . . . . . . . . . . . . . . . . . . . . . . . . . . . . . . . . . . . . . . . . 97
Integrating with Trusted Mode . . . . . . . . . . . . . . . . . . . . . . . . . . . . . . . . . . . . . . . . . . 105
Overview . . . . . . . . . . . . . . . . . . . . . . . . . . . . . . . . . . . . . . . . . . . . . . . . . . . . . . . . . . . 105
Features and Limitations. . . . . . . . . . . . . . . . . . . . . . . . . . . . . . . . . . . . . . . . . . . . . . 105
Configuration Parameter . . . . . . . . . . . . . . . . . . . . . . . . . . . . . . . . . . . . . . . . . . . . . . 108
PAM_AUTHZ Login Authorization Enhancement . . . . . . . . . . . . . . . . . . . . . . . . . . . 109
Policy And Access Rules . . . . . . . . . . . . . . . . . . . . . . . . . . . . . . . . . . . . . . . . . . . . . . . 109
How Login Authorization Works . . . . . . . . . . . . . . . . . . . . . . . . . . . . . . . . . . . . . . . . 110
Policy File . . . . . . . . . . . . . . . . . . . . . . . . . . . . . . . . . . . . . . . . . . . . . . . . . . . . . . . . . . 111
Constructing an Access Rule in pam_authz.policy . . . . . . . . . . . . . . . . . . . . . . . . . . 112
Policy Validator . . . . . . . . . . . . . . . . . . . . . . . . . . . . . . . . . . . . . . . . . . . . . . . . . . . . . . 117
Adding a Directory Replica . . . . . . . . . . . . . . . . . . . . . . . . . . . . . . . . . . . . . . . . . . . . . . 118
Displaying the Proxy User’s DN . . . . . . . . . . . . . . . . . . . . . . . . . . . . . . . . . . . . . . . . . . 119
Verifying the Proxy User . . . . . . . . . . . . . . . . . . . . . . . . . . . . . . . . . . . . . . . . . . . . . . . . 120
Creating a New Proxy User. . . . . . . . . . . . . . . . . . . . . . . . . . . . . . . . . . . . . . . . . . . . . . 120
Example. . . . . . . . . . . . . . . . . . . . . . . . . . . . . . . . . . . . . . . . . . . . . . . . . . . . . . . . . . . . 120
Displaying the Current Profile . . . . . . . . . . . . . . . . . . . . . . . . . . . . . . . . . . . . . . . . . . . 121
Creating a New Profile. . . . . . . . . . . . . . . . . . . . . . . . . . . . . . . . . . . . . . . . . . . . . . . . . . 121
Modifying a Profile. . . . . . . . . . . . . . . . . . . . . . . . . . . . . . . . . . . . . . . . . . . . . . . . . . . . . 122
Changing Which Profile a Client Is Using . . . . . . . . . . . . . . . . . . . . . . . . . . . . . . . . . . 122
Changing from Anonymous Access to Proxy Access . . . . . . . . . . . . . . . . . . . . . . . . . . 123
Changing from Proxy Access to Anonymous Access . . . . . . . . . . . . . . . . . . . . . . . . . . 123
Performance Considerations . . . . . . . . . . . . . . . . . . . . . . . . . . . . . . . . . . . . . . . . . . . . . 125
Minimizing Enumeration Requests. . . . . . . . . . . . . . . . . . . . . . . . . . . . . . . . . . . . . . 125
Client Daemon Performance . . . . . . . . . . . . . . . . . . . . . . . . . . . . . . . . . . . . . . . . . . . . . 126
iv
Page 5

ldapclientd Caching . . . . . . . . . . . . . . . . . . . . . . . . . . . . . . . . . . . . . . . . . . . . . . . . . . 126
ldapclientd Persistent Connections . . . . . . . . . . . . . . . . . . . . . . . . . . . . . . . . . . . . . . 130
Troubleshooting . . . . . . . . . . . . . . . . . . . . . . . . . . . . . . . . . . . . . . . . . . . . . . . . . . . . . . . 131
Enabling and Disabling LDAP-UX Logging . . . . . . . . . . . . . . . . . . . . . . . . . . . . . . . 131
Enabling and Disabling PAM Logging . . . . . . . . . . . . . . . . . . . . . . . . . . . . . . . . . . . 132
Netscape Directory Server Log Files . . . . . . . . . . . . . . . . . . . . . . . . . . . . . . . . . . . . . 133
User Cannot Log on to Client System . . . . . . . . . . . . . . . . . . . . . . . . . . . . . . . . . . . . 133
5. Command and Tool Reference
The LDAP-UX Client Services Components. . . . . . . . . . . . . . . . . . . . . . . . . . . . . . . . . 138
Client Management Tools . . . . . . . . . . . . . . . . . . . . . . . . . . . . . . . . . . . . . . . . . . . . . . . 143
The create_profile_entry Tool. . . . . . . . . . . . . . . . . . . . . . . . . . . . . . . . . . . . . . . . . . . 143
The create_profile_cache Tool. . . . . . . . . . . . . . . . . . . . . . . . . . . . . . . . . . . . . . . . . . . 143
The create_profile_schema Tool . . . . . . . . . . . . . . . . . . . . . . . . . . . . . . . . . . . . . . . . . 144
The display_profile_cache Tool. . . . . . . . . . . . . . . . . . . . . . . . . . . . . . . . . . . . . . . . . . 144
The get_profile_entry Tool . . . . . . . . . . . . . . . . . . . . . . . . . . . . . . . . . . . . . . . . . . . . . 145
The ldap_proxy_config Tool . . . . . . . . . . . . . . . . . . . . . . . . . . . . . . . . . . . . . . . . . . . . 146
beq Search Tool . . . . . . . . . . . . . . . . . . . . . . . . . . . . . . . . . . . . . . . . . . . . . . . . . . . . . . . 150
Syntax . . . . . . . . . . . . . . . . . . . . . . . . . . . . . . . . . . . . . . . . . . . . . . . . . . . . . . . . . . . . . 150
Examples. . . . . . . . . . . . . . . . . . . . . . . . . . . . . . . . . . . . . . . . . . . . . . . . . . . . . . . . . . . 151
The uid2dn Tool . . . . . . . . . . . . . . . . . . . . . . . . . . . . . . . . . . . . . . . . . . . . . . . . . . . . . 153
The get_attr_map.pl Tool . . . . . . . . . . . . . . . . . . . . . . . . . . . . . . . . . . . . . . . . . . . . . . 154
LDAP Directory Tools . . . . . . . . . . . . . . . . . . . . . . . . . . . . . . . . . . . . . . . . . . . . . . . . . . 154
ldapentry . . . . . . . . . . . . . . . . . . . . . . . . . . . . . . . . . . . . . . . . . . . . . . . . . . . . . . . . . . . 155
ldapsearch . . . . . . . . . . . . . . . . . . . . . . . . . . . . . . . . . . . . . . . . . . . . . . . . . . . . . . . . . . 157
ldapmodify. . . . . . . . . . . . . . . . . . . . . . . . . . . . . . . . . . . . . . . . . . . . . . . . . . . . . . . . . . 158
ldapdelete . . . . . . . . . . . . . . . . . . . . . . . . . . . . . . . . . . . . . . . . . . . . . . . . . . . . . . . . . . 158
certutil . . . . . . . . . . . . . . . . . . . . . . . . . . . . . . . . . . . . . . . . . . . . . . . . . . . . . . . . . . . . . 158
Adding One or More Users . . . . . . . . . . . . . . . . . . . . . . . . . . . . . . . . . . . . . . . . . . . . . . 159
Name Service Migration Scripts . . . . . . . . . . . . . . . . . . . . . . . . . . . . . . . . . . . . . . . . . . 160
Naming Context . . . . . . . . . . . . . . . . . . . . . . . . . . . . . . . . . . . . . . . . . . . . . . . . . . . . . 160
Migrating All Your Files. . . . . . . . . . . . . . . . . . . . . . . . . . . . . . . . . . . . . . . . . . . . . . . 161
Migrating Individual Files . . . . . . . . . . . . . . . . . . . . . . . . . . . . . . . . . . . . . . . . . . . . . 161
Examples. . . . . . . . . . . . . . . . . . . . . . . . . . . . . . . . . . . . . . . . . . . . . . . . . . . . . . . . . . . 164
The ldappasswd Command . . . . . . . . . . . . . . . . . . . . . . . . . . . . . . . . . . . . . . . . . . . . . . 166
Syntax . . . . . . . . . . . . . . . . . . . . . . . . . . . . . . . . . . . . . . . . . . . . . . . . . . . . . . . . . . . . . 166
Examples. . . . . . . . . . . . . . . . . . . . . . . . . . . . . . . . . . . . . . . . . . . . . . . . . . . . . . . . . . . 167
Contents
v
Page 6

Contents
6. User Tasks
To Change Passwords . . . . . . . . . . . . . . . . . . . . . . . . . . . . . . . . . . . . . . . . . . . . . . . . . . 169
To Change Personal Information . . . . . . . . . . . . . . . . . . . . . . . . . . . . . . . . . . . . . . . . . 173
7. Mozilla LDAP C SDK
Overview . . . . . . . . . . . . . . . . . . . . . . . . . . . . . . . . . . . . . . . . . . . . . . . . . . . . . . . . . . . . 176
The Mozilla LDAP C SDK File Components . . . . . . . . . . . . . . . . . . . . . . . . . . . . . . . . 177
A. Configuration Worksheet
B. LDAP-UX Client Services Object Classes
Profile Attributes . . . . . . . . . . . . . . . . . . . . . . . . . . . . . . . . . . . . . . . . . . . . . . . . . . . . . . 188
C. Sample /etc/pam.ldap.trusted file
Glossary . . . . . . . . . . . . . . . . . . . . . . . . . . . . . . . . . . . . . . . . . . . . . . . . . . . . . . . 195
Index . . . . . . . . . . . . . . . . . . . . . . . . . . . . . . . . . . . . . . . . . . . . . . . . . . . . . . . . . . 197
vi
Page 7

Tables
Table 1. Publishing History Details . . . . . . . . . . . . . . . . . . . . . . . . . . . . . . . . . . . . . . xii
Table 1-1. Examples of Commands and Subsystems that use PAM and NSS . . . . . . 4
Table 2-1. Configuration Parameter Default Values . . . . . . . . . . . . . . . . . . . . . . . . . 32
Table 2-2. Enhanced Publickey-LDAP Software for HP-UX 11i v1 or v2 . . . . . . . . . 47
Table 2-3. Patch Requirement . . . . . . . . . . . . . . . . . . . . . . . . . . . . . . . . . . . . . . . . . . . 55
Table 2-4. Attribute Mappings. . . . . . . . . . . . . . . . . . . . . . . . . . . . . . . . . . . . . . . . . . . 61
Table 2-5. Migration Scripts . . . . . . . . . . . . . . . . . . . . . . . . . . . . . . . . . . . . . . . . . . . . 62
Table 4-1. Field Syntax in an Access Rule . . . . . . . . . . . . . . . . . . . . . . . . . . . . . . . . 112
Table 4-2. . . . . . . . . . . . . . . . . . . . . . . . . . . . . . . . . . . . . . . . . . . . . . . . . . . . . . . . . . . 127
Table 5-1. LDAP-UX Client Services Components. . . . . . . . . . . . . . . . . . . . . . . . . . 138
Table 5-2. LDAP-UX Client Services Libraries on the HP-UX 11.0 or 11i v1 PA
machine. . . . . . . . . . . . . . . . . . . . . . . . . . . . . . . . . . . . . . . . . . . . . . . . . . . . . . . . . . . . 140
Table 5-3. LDAP-UX Client Services Libraries on the HP-UX 11i v2 PA machine 141
Table 5-4. LDAP-UX Client Services Libraries on the HP-UX 11i v2 IA machine. 142
Table 5-5. Default Naming Context . . . . . . . . . . . . . . . . . . . . . . . . . . . . . . . . . . . . . 160
Table 5-6. Migration Scripts . . . . . . . . . . . . . . . . . . . . . . . . . . . . . . . . . . . . . . . . . . . 162
Table 7-1. Mozilla LDAP C SDK File Components on the PA machine . . . . . . . . . 177
Table 7-2. Mozilla LDAP C SDK File Components on the IA machine. . . . . . . . . . 178
Table 7-3. Mozilla LDAP C SDK API Header Files . . . . . . . . . . . . . . . . . . . . . . . . . 180
Table A-1. LDAP-UX Client Services Configuration Worksheet . . . . . . . . . . . . . . . 183
Table A-2. LDAP-UX Client Services Configuration Worksheet Explanation . . . . 184
vii
Page 8

Tables
viii
Page 9

Figures
Figure 1-1. A Simplified NIS Environment . . . . . . . . . . . . . . . . . . . . . . . . . . . . . . . . . 2
Figure 1-2. A Simplified LDAP-UX Client Services Environment . . . . . . . . . . . . . . . 3
Figure 1-3. A Simplified LDAP-UX Client Services Environment . . . . . . . . . . . . . . . 5
Figure 1-4. The Local Start-up File and the Configuration Profile . . . . . . . . . . . . . . . 7
Figure 2-1. Example Directory Structure . . . . . . . . . . . . . . . . . . . . . . . . . . . . . . . . . . 15
Figure 3-1. Printer Configurator Architecture . . . . . . . . . . . . . . . . . . . . . . . . . . . . . . 84
Figure 4-1. PAM_AUTHZ Environment . . . . . . . . . . . . . . . . . . . . . . . . . . . . . . . . . . 110
Figure 6-1. Cannot Change Passwords on Replica Servers . . . . . . . . . . . . . . . . . . . 170
Figure 6-2. Changing Passwords on Master Server with ldappasswd . . . . . . . . . . 171
Figure 6-3. Sample passwd Command Wrapper . . . . . . . . . . . . . . . . . . . . . . . . . . . 171
ix
Page 10

Figures
x
Page 11

Preface: About This Document
The latest version of this document can be found on line at:
http://www.docs.hp.com
This document describes how to install and configure LDAP-UX Client
Services product on HP-UX platforms.
The document printing date and part number indicate the document’s
current edition. The printing date will change when a new edition is
printed. Minor changes may be made at reprint without changing the
printing date. The document part number will change when extensive
changes are made.
Document updates may be issued between editions to correct errors or
document product changes. To ensure that you receive the updated or
new editions, you should subscribe to the appropriate product support
service. See your HP sales representative for details.
Intended Audience
This document is intended for system and network administrators
responsible for installing, configuring, and managing the LDAP-UX
Client Services. Administrators are expected to have knowledge of the
LDAP-UX Client Services Integration product.
New and Changed Documentation in This
Edition
This edition documents the following new information for the LDAP-UX
Client Services version B.04.00:
• Support the automount service under the AutoFS subsystem. This
new feature allows you to store and manage the automount maps in
the LDAP directory server.
• Support discovery and and management of publickeys in an LDAP
directory.
• Provide the pam_authz login authorization enhancements. This new
feature allows you to define access rules in the local policy file,
/etc/opt/ldapux/pam_authz.policy.
xi
Page 12

• Support NIS+ migration scripts that can be used to migrate from an
NIS+ domain into an LDAP directory server.
• Support Mozilla LDAP C SDK 5.14.1 which contains a set of LDAP
Application Programming Interfaces (API) to allow you to build
LDAP-enabled clients.
Publishing History
Table 1 Publishing History Details
Document
Manufacturing
Part Number
J4269-90016 11.0, 11i B.03.00 September
J4269-90030 11.0, 11i v1
J4269-90038 11.0, 11i v1 B.03.30 July 2004
J4269-90040 11.0, 11i v1
J4269-90048 11i v1 and v2 B.04.00 July 2005
J4269-90051 11i v1 and v2 B.04.00 August 2005
J4269-90053 11i v1 and v2 B.04.00 June 2006
J4269-90071 11i v1, v2 andv3B.04.00 February
Operating
Systems
Supported
and v2
and v2
Supported
Product
Versions
B.03.20 October
B.03.30 September
Publicatio
n Date
2002
2003
2004
2007
What’s in This document
xii
This manual describes how to install, configure and administer the
LDAP-UX Client Services software product.
The manual is organized as follows:
Chapter 1 Introduction Use this chapter to learn the LDAP-UX
Client Services product features, components and
client administration tools.
Page 13

Chapter 2 Installing And Configuring LDAP-UX Client
Services Use this chapter to learn how to install,
configure, and use the LDAP-UX Client Services
software.
Chapter 3 LDAP Printer Configurator Support Use this
chapter to learn how to set up, configure, and use the
printer configurator.
Chapter 4 Administering LDAP-UX Client Services Use this
chapter to understand how to administer your
LDAP-UX Clients to keep them running smoothly and
expand them as your computing environment expands.
Chapter 5 Command and Tool Reference Use this chapter to
learn about the commands and tools associated with
the LDAP-UX Client Services product.
Chapter 6 User Tasks Use this chapter to learn how to change
passwords and personal information.
Chapter 7 Mozilla LDAP C SDK Use this chapter to learn the
Mozilla LDAP SDK software features and its major file
components.
xiii
Page 14

Typographical Conventions
This document uses the following conventions.
Book Title The title of a book. On the web and on the Instant
Information CD, it may be a hot link to the book itself.
Emphasis Text that is emphasized.
Bold Text that is strongly emphasized.
Bold The defined use of an important word or phrase.
ComputerOut Text displayed by the computer.
UserInput Commands and other text that you type.
Command A command name or qualified command phrase.
Variable
[] The contents are optional in formats and command
{} The contents are required in formats and command
\ The continuous line symbol.
The name of a variable that you may replace in a
command or function or information in a display that
represents several possible values.
descriptions. If the contents are a list separated by |,
you must choose one of the items.
descriptions. If the contents are a list separated by |,
you must choose one of the items.
HP Encourages Your Comments
HP encourages your comments concerning this document. We are truly
committed to providing documentation that meets your needs.
Please send comments to: netinfo_feedback@cup.hp.com
Please include document title, manufacturing part number, and any
comment, error found, or suggestion for improvement you have
concerning this document. Also, please include what we did right so we
can incorporate it into other documents.
xiv
Page 15

1 Introduction
LDAP-UX Client Services simplifies HP-UX system administration by
consolidating account and configuration information into a central LDAP
directory. This LDAP directory could reside on an HP-UX system such as
Netscape Directory Server 6.x, or the account information could be
integrated in Windows 2000/2003 Active Directory.
Information provided in this manual outlines the installation and
administration tasks of LDAP-UX Client Services with HP-UX based
LDAP directories such as Netscape Directory Server 6.x.
For information on the integration of LDAP-UX Client Services with
Windows 2000/2003 Active Directory, see LDAP-UX with Microsoft
Windows 2000/2003 Active Directory Administrator’s Guide
(J4269-90041) at http://docs.hp.com/hpux/internet.
This chapter introduces LDAP-UX Client Services and briefly describes
how it works.
Overview of LDAP-UX Client Services
Traditionally, HP-UX account and configuration information is stored in
text files, for example, /etc/passwd and /etc/group. NIS was developed to
ease system administration by sharing this information across systems
Chapter 1 1
Page 16
Introduction
Overview of LDAP-UX Client Services
on the network. With NIS, account and configuration information resides
on NIS servers. NIS client systems retrieve this shared configuration
information across the network from NIS servers, as shown below:
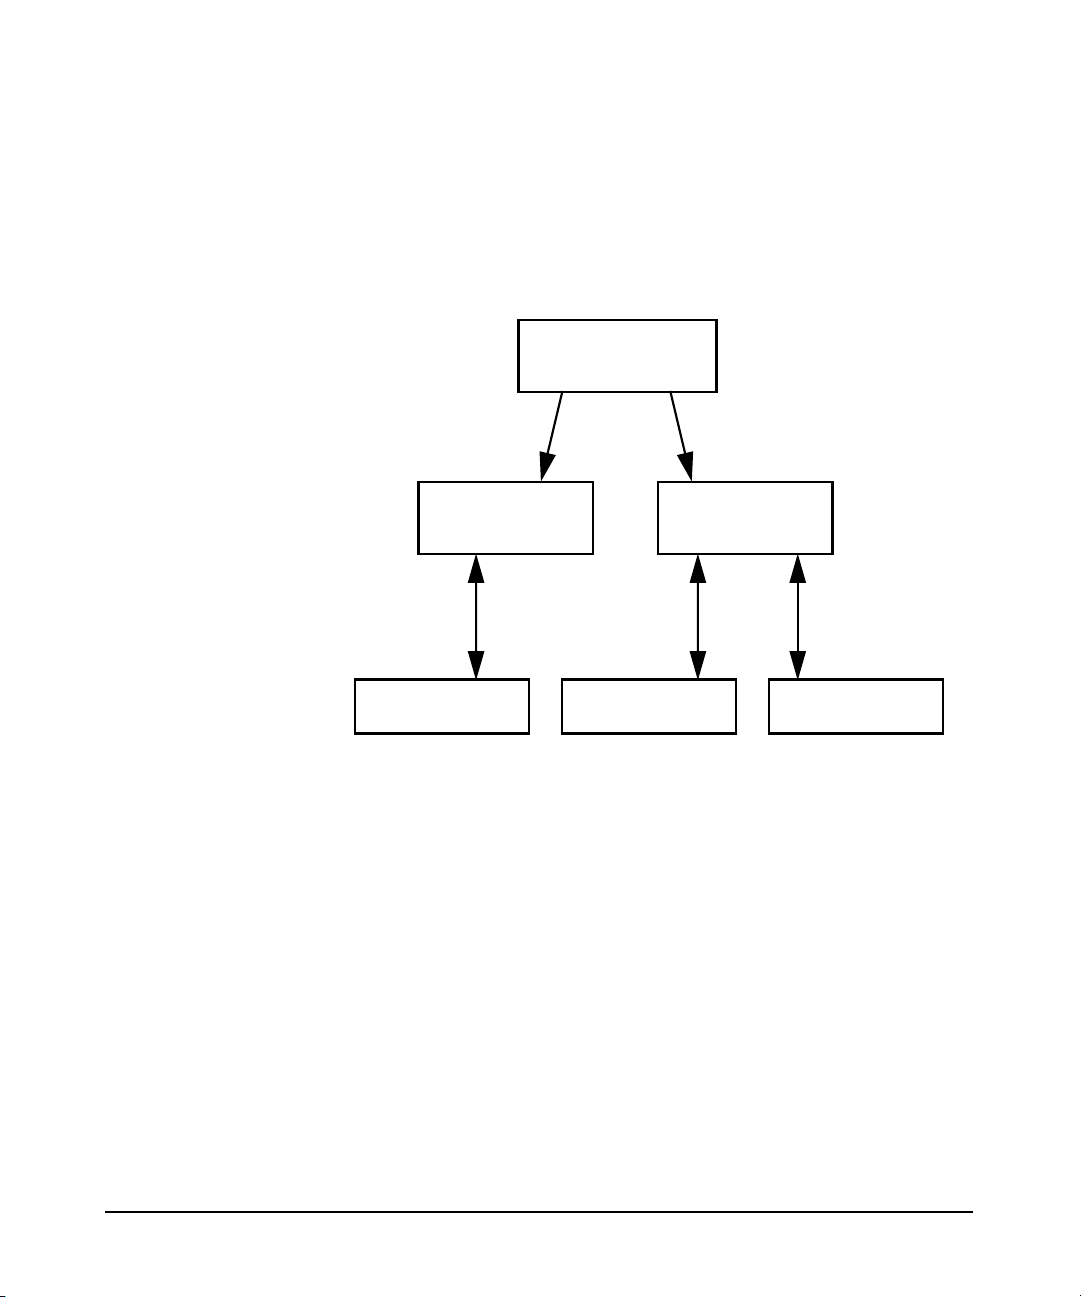
Figure 1-1 A Simplified NIS Environment
NIS master server
Map transfers
NIS slave server
NIS Requests
NIS client
LDAP-UX Client Services improves on this configuration information
sharing. HP-UX account and configuration information is stored in an
LDAP directory, not on the local client system. Client systems retrieve
this shared configuration information across the network from the LDAP
NIS slave server
NIS clientNIS client
Chapter 12
Page 17
Overview of LDAP-UX Client Services
directory, as shown below. LDAP adds greater scalability,
interoperability with other applications and platforms, and less network
traffic from replica updates.
Figure 1-2 A Simplified LDAP-UX Client Services Environment
Introduction
LDAP Directory
Server
LDAP-UX client
LDAP-UX Client Services supports the following name service data:
passwd, groups, hosts, rpc, services, networks, protocols, publickeys,
automount, netgroup. See the LDAP-UX Integration B.04.00 Release
Notes for any additional supported services.
Updates
LDAP Requests
LDAP Directory
Server Replica
LDAP-UX client
How LDAP-UX Client Services Works
LDAP-UX Client Services works by leveraging the authentication
mechanism provided in the Pluggable Authentication Module, or PAM,
and the naming services provided by the Name Service Switch, or NSS.
See pam(3), pam.conf(4), and Managing Systems and Workgroups at
http://docs.hp.com/hpux/os for information on PAM. For information on
NSS, see switch(4) and “Configuring the Name Service Switch” in
Installing and Administering NFS Services at
http://docs.hp.com/hpux/communications/#NFS.
These extensible mechanisms allow new authentication methods and
new name services to be installed and used without changing the
underlying HP-UX commands. And, by supporting the PAM architecture,
the HP-UX client becomes truly integrated in the LDAP environment.
The PAM_LDAP library allows the HP-UX system to use the LDAP
directory as a trusted server for authentication. This means that
Chapter 1 3
Page 18

Introduction
Overview of LDAP-UX Client Services
passwords may not only be stored in any syntax but also means that
passwords may remain hidden from view (preventing a decryption attack
on the hashed passwords). Because passwords may be stored in any
syntax, HP-UX will be able to share passwords with other LDAP-enabled
applications.
With LDAP-UX Client Services B.03.20 or later versions, the client
daemon, ldapclientd, becomes the center of the product. It supports
all NSS backend services for LDAP and data enumeration. It also
supports PAM_LDAP for authentication and password change.
With LDAP-UX Client Services, HP-UX commands and subsystems can
transparently access name service information from the LDAP directory
through ldapclientd. The following table shows some examples of
commands and subsystems that use PAM and NSS:
Table 1-1 Examples of Commands and Subsystems
that use PAM and NSS
Commands that use
Commands that use PAM and
NSS
ls login
nsquery
a
passwd
who ftp
whoami su
finger
b
rlogin
id telnet
logname dtlogin
groups
b
newgrp
b
pwget
b
grget
listusers
b
b
remsh
NSS
Chapter 14
Page 19
Introduction
Overview of LDAP-UX Client Services
Table 1-1 Examples of Commands and Subsystems
that use PAM and NSS (Continued)
Commands that use
NSS
b
logins
Commands that use PAM and
NSS
nslookup
a. nsquery(1) is a contributed tool included with the
ONC/NFS product.
b. These commands enumerate the entire passwd or
group database, which may reduce network and
directory server performance for large databases.
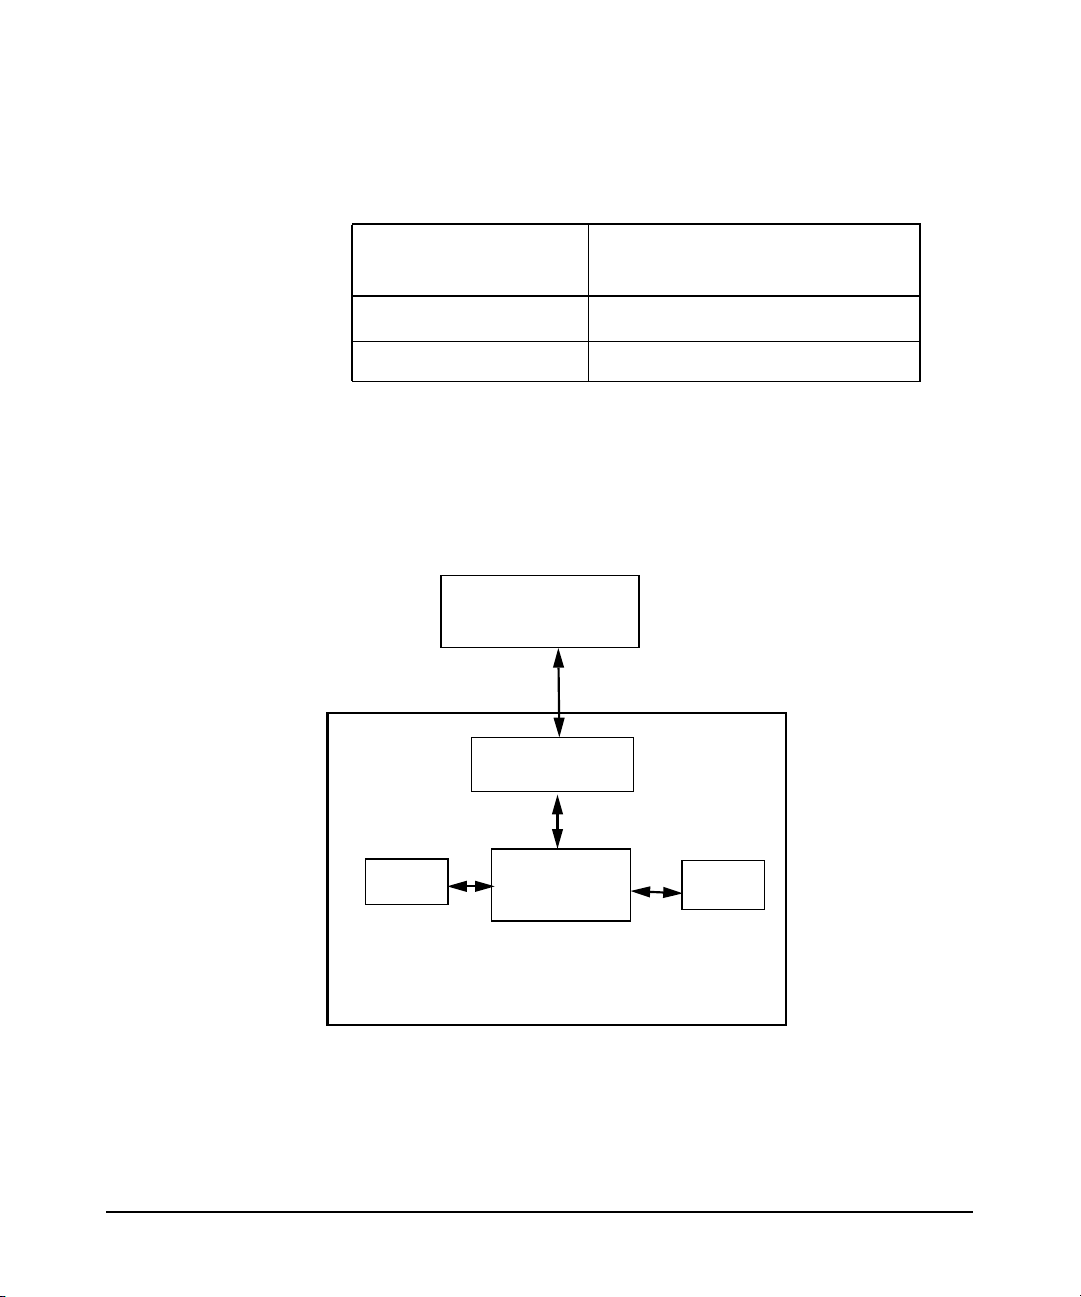
Figure 1-3 A Simplified LDAP-UX Client Services Environment
LDAP Directory
Server
LDAP
requests
LDAP C SDK
PAM
login, ftpd,
etc.
ldapclientd
NSS
ls, who,
etc.
LDAP-UX client
In addition, the getpwent(3C) and getgrent(3C) family of system calls get
user and group information from the directory.
Chapter 1 5
Page 20

Introduction
Overview of LDAP-UX Client Services
After you install and configure an LDAP directory and migrate your
name service data into it, HP-UX client systems locate the directory from
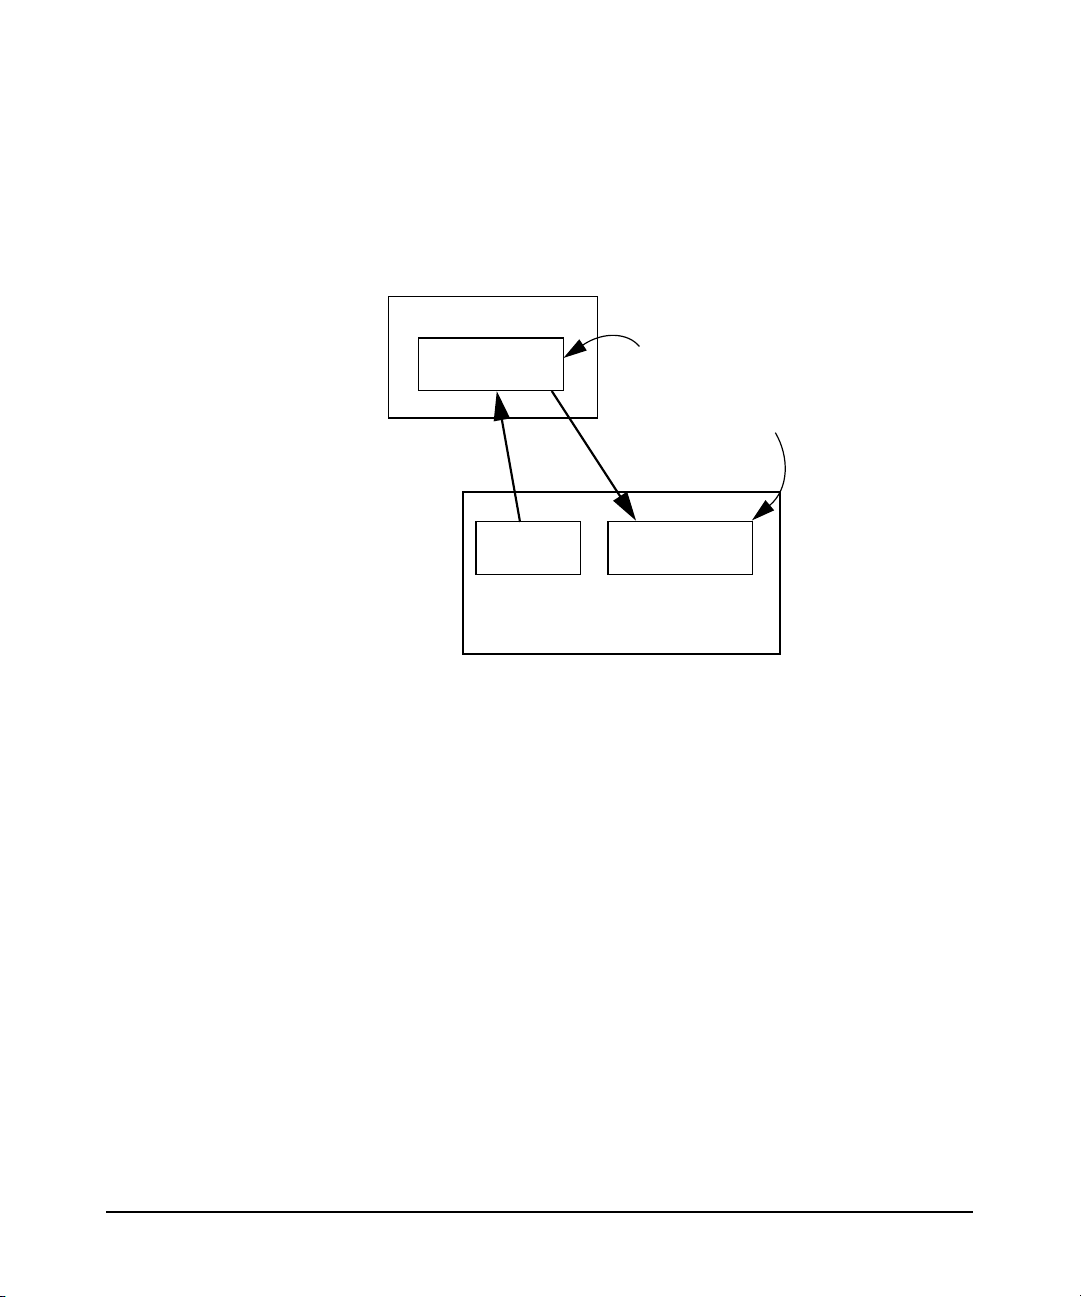
a “start-up file.” The start-up file tells the client system how to download
a “configuration profile” from the LDAP directory. The configuration
profile is a directory entry containing configuration information common
to many clients. Storing it in the directory lets you maintain it in one
place and share it among many clients rather than storing it
redundantly across the clients. Because the configuration information is
stored in the directory, all each client needs to know is where its profile
is, hence the start-up file. Each client downloads the configuration profile
from the directory.
The profile is an entry in the directory containing details on how clients
are to access the directory, such as:
• where and how clients should search the directory for user, group
and other name service information.
• how clients should bind to the directory: anonymously or as a proxy
user. Anonymous access is simplest. Configuring a proxy user adds
some security, but at the same time it adds the overhead of managing
the proxy user.
• other configuration parameters such as search time limits.
Chapter 16
Page 21
Overview of LDAP-UX Client Services
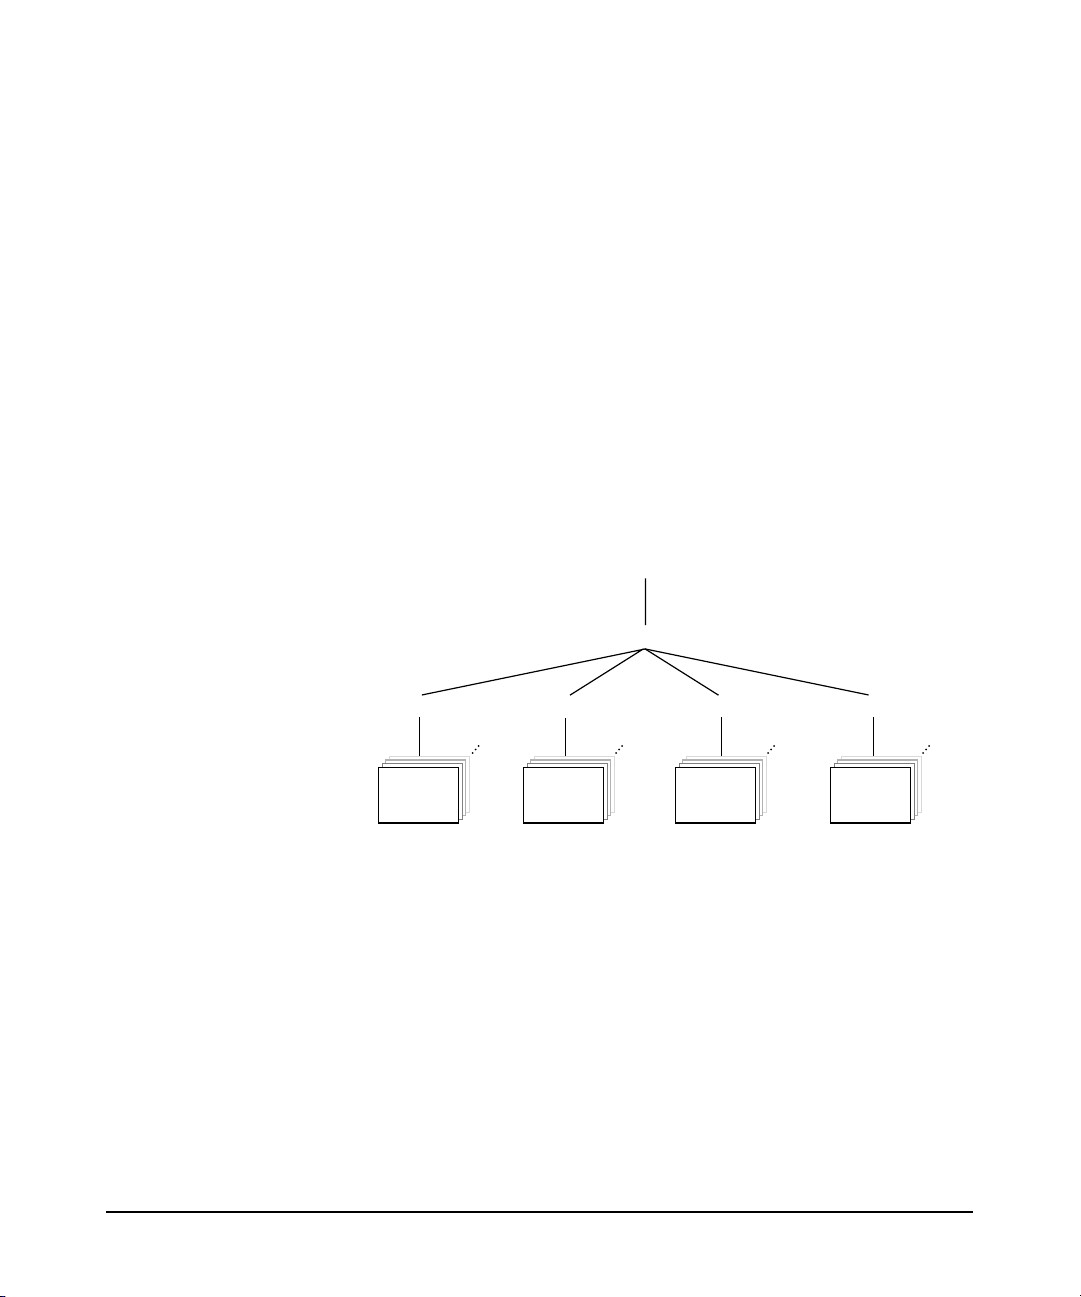
Figure 1-4 The Local Start-up File and the Configuration Profile
LDAP Directory
Introduction
The start-up file points
to the configuration
profile in the directory.
The following chapter describes in detail how to install, configure, and
verify LDAP-UX Client Services.
Configuration
profile
Start-up
file
LDAP-UX client
The shared configuration
profile is stored in the
directory and downloaded
to all LDAP-UX clients.
Configuration
profile
Chapter 1 7
Page 22

Introduction
Overview of LDAP-UX Client Services
Chapter 18
Page 23

2 Installing And Configuring
LDAP-UX Client Services
This chapter describes the decisions you need to make and the steps to
install Netscape and configure LDAP-UX Client Services. This chapter
contains the following sections:
• “Before You Begin” on page 9.
• “Summary of Installing and Configuring” on page 10.
• “Plan Your Installation” on page 12.
• “Install LDAP-UX Client Services on a Client” on page 20.
• “Configure Your Directory” on page 21.
• “Import Name Service Data into Your Directory” on page 25.
• “Configure the LDAP-UX Client Services” on page 27.
• “Configure the LDAP-UX Client Serivces with SSL Support” on
page 41.
• “Configure LDAP-UX Client Services with Publickey Support” on
page 46.
• “AutoFS Support” on page 55.
• “Verify the LDAP-UX Client Services” on page 68.
• “Configure Subsequent Client Systems” on page 72.
• “Download the Profile Periodically” on page 74.
• “Use r-command for PAM_LDAP” on page 76.
Before You Begin
This section lists some things to keep in mind as you plan your
installation.
• Use the configuration worksheet to record your decisions and other
information you’ll need later for configuration in Appendix A,
“Configuration Worksheet,” on page 183.
• See the LDAP-UX Integration B.04.00 Release Notes (J4269-90042)
at http://docs.hp.com/hpux/internet for last-minute information.
• You must have an LDAP directory. You can obtain the Netscape
Directory Server for HP-UX version 6.x from your local HP sales
office or www.hp.com and view the documentation at
http://docs.hp.com/hpux/internet/#Netscape%20Directory%20Server.
Chapter 2 9
Page 24

Installing And Configuring LDAP-UX Client Services
Summary of Installing and Configuring
• See the white paper Preparing Your Directory for HP-UX Integration
at http://docs.hp.com/hpux/internet for advice on how to set up and
configure your directory to work with HP-UX.
• Most examples here use the Netscape Directory Server for HP-UX
version 6.x and assume you have some knowledge of this directory
and its tools, such as the Directory Console and ldapsearch. If you
have another directory, consult your directory’s documentation for
specific information.
• For details on how to integrate LDAP-UX Client Services with
Windows 2000 Active Directory, please refer to LDAP-UX Client
Services with Microsoft Windows 2000/2003 Active Directory
Administrator’s Guide (J4269-90041) at
http://docs.hp.com/hpux/internet/#LDAP-UX%20Integration.
• The examples use a base DN of o=hp.com for illustrative purposes.
Summary of Installing and Configuring
The following summarizes the steps you take when installing and
configuring an LDAP-UX Client Services environment.
• See “Plan Your Installation” on page 12.
• Install LDAP-UX Client Services on each client system. See “Install
LDAP-UX Client Services on a Client” on page 20.
• Install and configure an LDAP directory, if not already done. See
“Configure Your Directory” on page 21.
• Configure your LDAP server to support SSL if you attempt to enable
SSL support with LDAP-UX.
• Migrate your name service data to the directory. See “Import Name
Service Data into Your Directory” on page 25.
• Install and set up the security database files on the LDAP-UX client
system if you want to enable SSL support with LDAP-UX. See
“Configure the LDAP-UX Client Serivces with SSL Support” on
page 41.
Chapter 210
Page 25

Installing And Configuring LDAP-UX Client Services
Summary of Installing and Configuring
• Run the setup program to configure LDAP-UX Client Services on a
client system. Setup does the following for you:
— Extends your Netscape directory schema with the configuration
profile schema, if not already done.
— Imports the LP printer schema into your LDAP directory server
if you choose to start the LDAP printer configurator.
— Imports the publickey schema into your LDAP directory if you
choose to store the public keys of users and hosts in the LDAP
directory.
— Imports the automount schema into your LDAP directory server
if you choose to store the AutoFS maps in the LDAP directory.
— Creates a start-up file on the client. This enables each client to
download the configuration profile.
— Creates a configuration profile of directory access information in
the directory, to be shared by a group of (or possibly all) clients.
— Downloads the configuration profile from the directory to the
client.
— Start the product daemon, ldapclientd, if you choose to start it.
Starting with LDAP-UX Client B.03.20 or later, the client
daemon must be started for LDAP-UX functions to work. With
LDAP-UX Client B.03.10 or earlier, running the client daemon is
optional.
See “Configure the LDAP-UX Client Services” on page 27.
• Modify the files /etc/pam.conf and /etc/nsswitch.conf on the client to
specify LDAP authentication and name service, respectively. See
“Configure the LDAP-UX Client Services” on page 27.
• Optionally modify the disable_uid_range flag in the
/etc/opt/ldapux/ldapux_client.conf file to disable logins to the local
system from specific ldap users.
• Optionally modify the /etc/opt/ldapux/pam_authz.policy and
/etc/pam.conf files to verify the user access rights of a subset of
users in a large repository needing access, if appropriate. See the
pam_authz(5) man page for the command syntax.
• Verify each client is working properly. See “Verify the LDAP-UX
Client Services” on page 68.
• See also “Configure Subsequent Client Systems” on page 72 for some
shortcuts.
Chapter 2 11
Page 26

Installing And Configuring LDAP-UX Client Services
Plan Your Installation
Plan Your Installation
Before beginning your installation, you should plan how you will set up
and verify your LDAP directory and your LDAP-UX Client Services
environment before putting them into production. Consider the following
questions. Record your decisions and other information you’ll need later
in Appendix A, “Configuration Worksheet,” on page 183.
• How many LDAP directory servers and replicas will you need?
Each client system binds to an LDAP directory server containing
your user, group, and other data. Multiple clients can bind to a single
directory server or replica server. The answer depends on your
environment, the size and configuration of your directory and how
many users and clients you have.Write your directory server host
and TCP port number in Appendix A, “Configuration Worksheet,” on
page 183. See the white paper Preparing Your Directory for HP-UX
Integration at: http://docs.hp.com/hpux/internet for more
information.
See the Netscape Directory Server Deployment Guide for more
information. You can add directory replicas to an existing LDAP-UX
Client Services environment as described under “Adding a Directory
Replica” on page 118. You may also want to review the LDAP-UX
performance white paper at http://docs.hp.com/hpux/internet.
• Where will you get your name service data from when migrating it to
the directory?
You can get it from your files in the /etc directory or, if you are using
NIS, from the same source files you create your NIS maps from, or
you can get it from your NIS maps themselves. Write this
information in Appendix A, “Configuration Worksheet,” on page 183.
See “Import Name Service Data into Your Directory” on page 25 for
how to import your information into the directory and “Name Service
Migration Scripts” on page 160 for details on the migration scripts.
To add an individual user entry or modify an existing user entry in
your directory, you can use the ldapmodify command or other
directory administration tools such as the Netscape Console. See also
the LDAP-UX Integration B.03.20 Release Notes for additional
contributed tools.
Chapter 212
Page 27

Installing And Configuring LDAP-UX Client Services
Plan Your Installation
NOTE You should keep a small subset of users in /etc/passwd, particularly
the root login. This allows administrative users to log in during
installation and testing. Also, if the directory is unavailable you can
still log in to the system.
• Where in your directory will you put your name service data?
Your directory architect needs to decide where in your directory to
place your name service information. LDAP-UX Client Services by
default expects user and group data to use the object classes and
attributes specified by RFC 2307. The migration scripts by default
create and populate a new subtree that conforms to RFC 2307.
Figure 2-1 on page 15 shows a base DN of ou=unix,o=hp.com. Write
the base DN of your name service data in Appendix A,
“Configuration Worksheet,” on page 183.
If you prefer to merge your name service data into an existing
directory structure, you can map the standard RFC 2307 attributes
to alternate attributes. See “LDAP-UX Client Services Object
Classes” on page 187 for more information.
• How will you put your user, group, and other data into your
directory?
LDAP supports group membership defined in the X.500 syntax
(using the member or uniquemember attribute), while still
supporting the RFC 2307 syntax (using the memberuid attribute).
This new group membership syntax increases LDAP-UX integration
with LDAP and other LDAP-based applications, and may reduce
administration overhead eliminating the need to manage the
memberuid attribute. In addition, a new performance improvement
has been made through the addition of a new caching daemon which
caches passwd, group and X.500 group membership information
retrieved from an LDAP server. This significantly reduces
LDAP-UX’s response time to applications. In addition, the daemon
re-uses connections for LDAP queries and maintains multiple
connections to an LDAP server to improve performance.
The migration scripts provided with LDAP-UX Client Services can
build and populate a new directory subtree for your user and group
data.
Chapter 2 13
Page 28

Installing And Configuring LDAP-UX Client Services
Plan Your Installation
If you merge your data into an existing directory, for example to
share user names and passwords with other applications, the
migration scripts can create LDIF files of your user data, but you will
have to write your own scripts or use other tools to merge the data
into your directory. You can add the posixAccount object class to your
users already in the directory to leverage your existing directory
data.
See “Import Name Service Data into Your Directory” on page 25 for
how to import your information into the directory and “Name Service
Migration Scripts” on page 160 for details on the migration scripts.
CAUTION If you place a root login in the LDAP directory, that user and
password will be able to log in as root to any client using LDAP-UX
Client Services. Keeping the root user in /etc/passwd on each client
system allows the root user to be managed locally. This can be
especially useful if the network is down because it allows local access
to the system.
It is not recommended that you put the same users both in
/etc/passwd and in the directory. This could lead to conflicts and
unexpected behavior.
• How many profiles do you need?
A configuration profile is a directory entry that contains
configuration information shared by a group of clients. The profile
contains the information clients need to access user and group data
in the directory, for example:
— Your directory server hosts
— Where user, group, and other information is in the directory
— The method clients use to bind to the directory
— Other configuration parameters such as search time limits
If these parameters are the same for all your clients, you would need
only one profile. You will need at least one profile per directory server
or replica. In general, it is a good idea to have as few profiles as
necessary to simplify maintenance. Look at the posixNamingProfile
object class in Appendix B, “LDAP-UX Client Services Object
Classes,” on page 187 to see what is in a profile to decide how many
different profiles you need.
Chapter 214
Page 29
If you are familiar with NIS, one example is to create a separate
profile for each NIS domain.
• Where in your directory will you put your profile?
The profile contains directory access information. It specifies how
and where clients can find user and group data in the directory. You
can put the profile anywhere you want as long as the client systems
can read it. For example, you might put it near your user data, or in a
separate administrative area. You should put the profile in the same
directory as your user and group data to simplify access permissions.
Clients must have access to both the profile and the user and group
data. The following example shows a configuration profile DN of
cn=profile1,ou=profiles,ou=devices,ou=unix,o=hp.com.
Figure 2-1 Example Directory Structure
Installing And Configuring LDAP-UX Client Services
Plan Your Installation
o=hp.com
ou=unix
ou=people ou=groups ou=profiles
user
data
Write your configuration profile DN on the worksheet in Appendix A,
“Configuration Worksheet,” on page 183.
• By what method will client systems bind to the directory?
Clients can bind to the directory anonymously. This is the default
and is simplest to administer. If you need to prevent access to your
data from anonymous users or your directory does not support
anonymous access, you can use a proxy user. If you configure a proxy
user, you can also configure anonymous access to be attempted in the
event the proxy user fails.
Write your client access method and proxy user DN, if needed, on the
worksheet in Appendix A, “Configuration Worksheet,” on page 183.
Chapter 2 15
data
profile1group
ou=hosts
host
data
Page 30

Installing And Configuring LDAP-UX Client Services
Plan Your Installation
• How will you increase the security level of the product to prevent an
unwanted user from logging in to the system via LDAP? What is the
procedure to set up increased login security?
The default is to allow all users stored in the LDAP directory to
login. To disallow specific users to login to a local system, you will
have to configure the disable_uid_range flag in
/etc/opt/ldapux/ldapux_client.conf file. There are two sections in this
file, the [profile] section and the [NSS] section. HP recommends that
you do not edit the [profile] section. The [NSS] section contains the
disable_uid_range flag along with two logging flags. For example, the
flag might look like this: disable_uid_range=0-100, 300-450, 89.
Another common example would be to disable root access This flag
would look like this: disable_uid_range=0.
When the disable_uid_range is turned on, the disabled uid will not
be displayed when you run commands such as pwget, listusers,
logins, etc.
NOTE The passwd command may still allow you to change a password for a
disabled user when alternative authentication methods, such as
PAM Kerberos, are used since LDAP does not control these
subsystems.
• What PAM authentication will you use? How will you set up
/etc/pam.conf? What other authentication do you want to use & in
what order?
PAM is the Pluggable Authentication Module, providing
authentication services. You can configure PAM to use ldap,
Kerberos, or other traditional UNIX locations (for example files, NIS,
NIS+) as controlled by NSS. See pam(3), pam.conf(4), and Managing
Systems and Workgroups at http://docs.hp.com/hpux/os for more
information on PAM.
It is recommended you use HP-UX file-based authentication first,
followed by LDAP or other authentication. /etc/pam.ldap is an
example of this configuration. With this configuration, PAM uses
traditional authentication first, searching /etc/passwd when any user
logs in, then attempts to authenticate to the directory if the user is
Chapter 216
Page 31

Installing And Configuring LDAP-UX Client Services
Plan Your Installation
not in /etc/passwd. If you have a few users in /etc/passwd, in
particular the root user, and if the directory is unavailable, you can
still log in to the client as a user in /etc/passwd.
• Do you want to use SSL for secure communication between LDAP
clients and Netscape Directory servers?
LDAP-UX Client Services B.03.20 or later supports SSL with
password as the credential, using either simple or DIGEST-MD5
authentication (DIGEST-MD5 for the Netscape Directory Server
only) to ensure confidentiality and data integrity between the clients
and servers. By default, SSL is disabled. For detailed information,
refer to “Configure the LDAP-UX Client Serivces with SSL Support”
on page 41.
• What authentication method will you use when you choose to enable
SSL?
You have a choice between SIMPLE with SSL (the default), or SASL
DIGEST-MD5 with SSL.
• What authentication method will you use when you choose to not
enable SSL?
You have a choice between SIMPLE (the default), or SASL
DIGEST-MD5. SASL DIGEST-MD5 improves security, preventing
snooping over the network during authentication.
Using the DIGEST-MD5 authentication, the password must be
stored in the clear text in the LDAP directory.
• Do you want to import the LDAP printer schema if you choose to
start the printer configurator?
LDAP-UX Client Services B.03.20 or later provides the integration
with the LDAP printer configurator to simplify the LP printer
management by updating LP printer configuration automatically on
your client system. A new printer schema, which is based on
IETF<draft-fleming-ldap-printer-schema-02>, is required to start the
services.
Chapter 2 17
Page 32

Installing And Configuring LDAP-UX Client Services
Plan Your Installation
IMPORTANT If you attempt to use this new feature, in the ldapclientd.conf
file, the start configuration parameter of the printer services
section must be set to “yes”. If the start option is enabled, the
printer configurator will start when ldapclientd is initialized. By
default, the start parameter is enabled.
• Do you want to import the publickey schema into your LDAP
directory if you choose to store and manage publickeys in the LDAP
directory.
LDAP-UX Client Services B.04.00 supports discovery and
management of publickeys in an LDAP directory. Both public and
private (secret) keys, used by the SecureRPC API can be stored in
user and host entries in an LDAP directory server, using the
nisKeyObject objectclass.
• Do you want to import the automount schema into your LDAP
directory server if you choose to store and manage automount maps
in the LDAP directory?
LDAP-UX Client Services B.04.00 supports the automount service
under the AutoFS subsystem. This new feature allows you to store or
retrieve automount maps in/from an LDAP directory. LDAP-UX
Client Services supports the new automount schema based on
RFC2307-bis. The nisObject automount schema can also be used if
configured via attribute mappings.
The setup program will import the new automount schema into your
Netscape Directory Server. An obsolete automount schema is shipped
with the Netscape Directory Server version 6.x. You must manually
delete the obsolete automount schema before the setup program can
successfully import the new automount schema into the LDAP
directory.
For the detailed information about AutoFS with LDAP support, see
“AutoFS Support” on page 55.
• What name services will you use? How will you set up
/etc/nsswitch.conf? What order do you want NSS to try services?
NSS is the Name Service Switch, providing naming services for user
names, group names, and other information. You can configure NSS
to use files, ldap, or NIS in any order and with different parameters.
Chapter 218
Page 33

Installing And Configuring LDAP-UX Client Services
Plan Your Installation
See /etc/nsswitch.ldap for an example nsswitch.conf file using files
and ldap. See switch(4) and “Configuring the Name Service Switch”
in Installing and Administering NFS Services at http://docs.hp.com
for more information.
It is recommended you use files first, followed by LDAP for passwd,
group and other supported name services. With this configuration,
NSS will first check files, then check the directory if the name service
data is not in the respective files. /etc/nsswitch.ldap is an example of
this configuration.
• Do you need to configure login authorization for a subset of users
from a large repository such as an LDAP directory? How will you set
up the /etc/opt/ldapux/pam_authz.policy and /etc/pam.conf
files to implement this feature?
The pam_authz service module for PAM provides functionality that
allows the administrator to control who can login to the system.
These modules are located at /usr/lib/security/libpam_authz.1 on the
HP 9000 machine and at libpam_authz.so.1 on the Integrity (ia64)
machine. pam_authz has been created to provide access control
similar to the netgroup filtering feature that is performed by NIS.
These modules are located at /usr/lib/security/libpam_authz.1 on the
HP 9000 machine (libpam_authz.so.1 on the Integrity (ia64)
machine). Starting with LDAP-UX Client Services B.04.00,
pam_authz has been enhanced to allow system administrators to
configure and customize their local access rules in a local policy file,
/etc/opt/ldapux/pam_authz.policy. pam_authz uses these
access control rules defined in the
/etc/opt/ldapux/pam_authz.policy file to control the login
authorization. pam_authz is intended to be used when NIS is not
used, such as when the pam_ldap or pam_kerberos authentication
modules are used. Because pam_authz doesn’t provide
authentication, it doesn’t verify if a user account exists.
Starting with LDAP-UX Client Services B.04.00, if the
/etc/opt/ldapux/pam_authz.policy file does not exist in the
system, pam_authz provides access control based on the netgroup
information found in the /etc/passwd and /etc/netgroup files. If
the /etc/opt/ldapux/pam_authz.policy file exists in the system,
pam_authz uses the access rules defined in the policy file to
determine who can login to the system.
Chapter 2 19
Page 34

Installing And Configuring LDAP-UX Client Services
Install LDAP-UX Client Services on a Client
For detailed information on this feature and how to configure the
/etc/opt/ldapux/pam_authz.policy file, see “PAM_AUTHZ Login
Authorization Enhancement” on page 109 or the pam_authz(5) man
page.
• How will you communicate with your user community about the
change to LDAP?
For the most part, your user community should be unaffected by the
directory. Most HP-UX commands will work as always. However, for
some LDAP directories (such as Netscape Directory Server 6.x), data
in replica servers cannot be modified. The passwd(1) command will
not work on clients configured to use such a directory replica. See “To
Change Passwords” on page 169 for how you can use ldappasswd(8)
in this situation.
Check the Release Notes for any other limitations and tell your users
how they can work around them.
Install LDAP-UX Client Services on a Client
Use swinstall(1M) to install the LDAP-UX Client Services software, the
NativeLdapClient subproduct, on a client system. See the LDAP-UX
Integration B.04.00 Release Notes for any last-minute changes to this
procedure. You don’t need to reboot your system after installing the
product.
NOTE Starting with LDAP-UX Client Services B.03.20 or later, system reboot is
not required after installing the product.
NOTE For the HP 9000 and Integrity (ia64) client systems, you need to install
the required patches. For the detailed information about the required
patches, refer to “LDAP-UX Client Services B.04.00 Release Notes at:
http://www.docs.hp.com.
Chapter 220
Page 35

Installing And Configuring LDAP-UX Client Services
Configure Your Directory
Configure Your Directory
This section describes how to configure your directory to work with
LDAP-UX Client Services. Examples are given for Netscape Directory
Server for HP-UX version 6.x. See the LDAP-UX Integration B.04.00
Release Notes for information on supported directories. If you have a
different directory, see the documentation for your directory for details
on how to configure it.
See Preparing Your LDAP Directory for HP-UX Integration at
http://docs.hp.com/hpux/internet for more details on directory
configuration.
Step 1. Install the posix schema (RFC 2307) into your directory.
If you have Netscape Directory Server for HP-UX version 4.0, or later,
the posix schema is already installed.
The schema is in the file /opt/ldapux/ypldapd/etc/slapd-v3.nis.conf. For
information on the posix schema (RFC 2307), see
http://www.ietf.org/rfc.html. RFC 2307 consists of object classes such as:
posixAccount, posixGroup, shadowAccount, etc. posixAccount represents
a user entry from /etc/passwd. posixGroup represents a group entry from
/etc/group. And shadowAccount provides additional user information for
added security.
Step 2. Restrict write access to certain passwd (posixAccount) attributes of the
posix schema.
CAUTION Make sure you restrict access to the attributes listed below. Allowing
users to change them could be a security risk
Grant write access of the uidnumber, gidnumber, homedirectory, and uid
attributes only to directory administrators; disallow write access by all
other users. You may want to restrict write access to other attributes in
the passwd (posixAccount) entry as well.
Chapter 2 21
Page 36

Installing And Configuring LDAP-UX Client Services
Configure Your Directory
With Netscape Directory Server for HP-UX, you can use the Netscape
Console or ldapmodify to set up access control instructions (ACI) so
ordinary users cannot change these attributes in their passwd entry in
the directory.
The following access control instruction is by default at the top of the
directory tree for a 6.x Netscape directory. This ACI allows a user to
change any attribute in their passwd entry:
aci: (targetattr = “*”) (version 3.0; acl “Allow self entry modification”;
allow (write)userdn = “ldap:///self”;)
You could modify this example ACI to the following, which prevents
ordinary users from changing their uidnumber, gidnumber,
homedirectory, and uid attributes:
aci: (targetattr != “uidnumber || gidnumber || homedirectory || uid”) (version
3.0; acl “Allow self entry modification, except for important posix attributes”;
allow (write)userdn = “ldap:///self”;)
You may have other attributes you need to protect as well.
To change an ACI with the Netscape Directory Console, select the
Directory tab, select your directory suffix in the left-hand panel, then
select the Object: Set Access Permissions menu item. In the dialog box,
select the “Allow self entry modification” ACI and click OK. Use the Set
Access Permissions dialog box to modify the ACI. See “Managing Access
Control” in the Netscape Directory Server Administrator’s Guide for
complete details.
Step 3. Restrict write access to certain group (posixGroup) attributes of the posix
schema.
Grant write access of the cn, memberuid, gidnumber, and userPassword
attributes only to directory administrators; disallow write access by all
other users.
With Netscape Directory Server for HP-UX, you can use the Netscape
Console or ldapmodify to set up access control lists (ACL) so ordinary
users cannot change these attributes in the posixGroup entry in the
directory. For example, the following ACI, placed in the directory at
ou=groups,ou=unix,o=hp.com, allows only the directory administrator
to modify entries below ou=groups,ou=unix,o=hp.com:
aci: (targetattr = "*")(version 3.0;acl "Disallow modification of group
entries"; deny (write) (groupdn != "ldap:///ou=Directory Administrators,
o=hp.com");)
Chapter 222
Page 37

Installing And Configuring LDAP-UX Client Services
Configure Your Directory
Step 4. Grant read access of all attributes of the posix schema.
Ensure all users have read access to the posix attributes.
When using PAM_LDAP as your authentication method, users do not
need read access to the userPassword attribute since the authentication
is handled by the directory itself. Therefore, for better security, you can
remove read access to userPassword from ordinary users.
Step 5. Configure anonymous access, if needed. If you do not configure a proxy
user, then the attributes of your name service data must be readable
anonymously.
Step 6. Create a proxy user in the directory, if needed.
To create a proxy user with Netscape Directory Server for HP-UX, use
the Netscape Console, Users and Groups tab, Create button. For
example, you might create a user uid=proxyuser,ou=Special
Users,o=hp.com.
Step 7. Set access permissions for the proxy user, if configured.
Give the proxy user created above read permission for the posix account
attributes.
With Netscape Directory Server, for example, the following ACI gives a
proxy user permission to compare, read, and search all posix account
attributes except the userPassword attribute:
aci: (target=”ldap:///o=hp.com”)(targetattr!=”userpassword”)
(version 3.0; acl “Proxy userpassword read rights”;
allow (compare,read,search)
userdn = “ldap:///uid=proxyuser,ou=Special Users,o=hp.com”;)
Step 8. The default ACI of Netscape Directory Server 6.11 allows a user to
change his own common attributes. But, for Netscape Directory Server
6.21 or later, you need to set ACI that gives a user permission to change
his own common attributes. By default, the Netscape Directory Server
6.21 or later provides the following ACI named Enable self write for
common attributes that gives a user permission to change his own
common attributes:
aci: (targetattr = "carLicense ||description ||displayName
||facsimileTelephoneNumber ||homePhone ||homePostalAddress ||initials
||jpegPhoto ||labeledURL ||mail ||mobile ||pager ||photo ||postOfficeBox
||postalAddress ||postalCode ||preferredDeliveryMethod ||preferredLanguage
||registeredAddress ||roomNumber ||secretary ||seeAlso ||st ||street
Chapter 2 23
Page 38

Installing And Configuring LDAP-UX Client Services
Configure Your Directory
||telephoneNumber ||telexNumber ||title ||userCertificate ||userPassword
||userSMIMECertificate ||x500UniqueIdentifier")
(version 3.0; acl "Enable self write for common attributes"; allow (write)
(userdn = "ldap:///self"))
You can modify the default ACI and give appropriate access rights to
change your own common attributes.
Step 9. Index important attributes for better performance of Netscape Directory
Server.
Since many of your directory requests will be for the attributes listed
below, you should index these to improve performance. If you don’t index,
your directory may search sequentially causing a performance
bottleneck. As a rule of thumb, databases containing more than 100
entries should be indexed by their key attributes.
The following attributes are recommended for indexing:
•cn
• objectclass
• memberuid
• uidnumber
• gidnumber
• uid
• ipserviceport
• iphostnumber
To index these entries with Netscape Directory Server, use the Console,
Configuration tab, Indexes tab, Add Attributes button.
Step 10. Determine if you need to support enumeration requests. If you do,
increase the Look-Through limit, the Size limit, and the
All-IDs-Threshold in the Netscape Directory Server.
Enumeration requests are directory queries that request all of a
database, for example all users or all groups. Enumeration requests of
large databases could reduce network and server performance. With
large Netscape Directories and default configurations, enumerations
may fail or provide incomplete data, but the default configuration also
may prevent performance problems from enumerations.
If you need to support enumerations with large Netscape Directories,
increase the listed parameters as described in Preparing Your LDAP
Directory for LDAP-UX Integration available at
http://docs.hp.com/hpux/internet/#LDAP-UX%20Integration.
Chapter 224
Page 39

Installing And Configuring LDAP-UX Client Services
Import Name Service Data into Your Directory
The Look-through limit specifies the maximum number of directory
entries to examine before aborting the search operation. The Size limit
determines the maximum number of entries to return to any query
before aborting. The All-IDs-Threshold specifies the number of entries
that can be maintained for an index key. In general, it is bad practice to
have an extremely large All-ID’s threashold, as it can dramatically
increase the size of your directory server’s database. However, if you
have a large number of posixAccounts, posixGroups or other form of RFC
2307 data that needs to be enumerated and you also have other large
sets of data in your directory server, increasing the All-UID’s threashold
to above the maximum number of posixAccounts, posixGroups, or others,
can dramatically increase enumeration performance.
For information on these parameters and how to change them, see the
Netscape Directory Server Administrator’s Guide. See also “Minimizing
Enumeration Requests” on page 125.
Step 11. If you want to enable SSL support with LDAP-UX, you need to turn on
SSL in your directory server. For detailed information on how to set up
and configure your Netscape Directory Server to enable SSL
communication over LDAP, see “Managing SSL Chapter” in the
Administrator’s Guide for Netscape Directory Server at
http://enterprise.netscape.com/docs/directory/61/pdf/ds61admin.pdf
Import Name Service Data into Your
Directory
The next step is to import your name service data into your LDAP
Directory. Here are some considerations when planning this:
• If you have already imported data into your directory with the
NIS/LDAP Gateway product, LDAP-UX Client Services can use that
data and you can skip to “Configure the LDAP-UX Client Services”
on page 27.
Chapter 2 25
Page 40

Installing And Configuring LDAP-UX Client Services
Import Name Service Data into Your Directory
• If you are using NIS, the migration scripts take your NIS maps and
generate LDIF files. These scripts can then import the LDIF files
into your directory, creating new entries in the directory. This only
works if you are starting with an empty directory or creating an
entirely new subtree in your directory for your data.
If you are not using NIS, the migration scripts can take your user,
group, and other data from files, generate LDIF, and import the
LDIF into your directory.
• If you integrate the name service data into your directory, the
migration scripts may be helpful depending on where you put the
data in your directory. You could use them just to generate LDIF, edit
the LDIF, then import the LDIF into your directory. For example, you
could manually add the posixAccount object class to your existing
entries under ou=People and add their HP-UX information there.
Steps to Importing Name Service Data into Your Directory
Here are the steps for importing your user and group data into your
LDAP directory. Modify them as needed.
Step 1. Decide which migration method and scripts you will use.
Migration scripts are provided to ease the task of importing your existing
name service data into your LDAP directory.
See “Name Service Migration Scripts” on page 160 for a complete
description of the scripts, what they do, and how to use them. Modify the
migration scripts, if needed.
Step 2. Back up your directory.
Step 3. Run the migration scripts, using the worksheet in Appendix A,
“Configuration Worksheet,” on page 183.
Step 4. If the method you used above did not already do so, import the LDIF file
into your directory.
Chapter 226
Page 41

Installing And Configuring LDAP-UX Client Services
Configure the LDAP-UX Client Services
Configure the LDAP-UX Client Services
Below is a summary of how to configure LDAP-UX Client Services with
Netscape Directory Server 6.x. For a default configuration, see “Quick
Configuration” on page 29. For a custom configuration, see “Custom
Configuration” on page 34 for more information.
NOTE The setup program has only been certified with Netscape Directory
Server 6.x, and Windows 2000/2003 Active Directory. See the LDAP-UX
Client Services B.04.00 Release Notes (P/N J4269-90042).
NOTE The LDAP-UX Client Services B.04.00 supports storage of automount
maps and publickeys on Netscape Directory Server 6.11 or 6.21. See the
LDAP-UX Client Services B.04.00 Release Notes (P/N J4269-90045).
• Run the Setup program. The setup program provides the following
assistance:
— Extends your Netscape directory schema with the configuration
profile schema, if not already done
— Imports the LDAP printer schema into your Netscape Directory
Server if you choose to start the LDAP printer configurator
— Imports the publickey schema into your Netscape Directory
Server if you choose to store the public keys of users and hosts in
an LDAP directory
— Imports the new automount schema into your Netscape
Directory Server if you choose to store the AutoFS maps in an
LDAP directory
— Provides the option to enable SSL for secure communication
between LDAP clients and Netscape Directory servers
— Optionally configures SASL Digest-MD5 authentication (for
Netscape Directory only)
— Creates a configuration profile entry in your Netscape directory
from information you provide
Chapter 2 27
Page 42

Installing And Configuring LDAP-UX Client Services
Configure the LDAP-UX Client Services
— Updates the local client’s start-up file
(/etc/opt/ldapux/ldapux_client.conf) with your directory and
configuration profile location
— Downloads the configuration profile from the directory to your
local client system
— Configures a proxy user for the client, if needed
— Starts the Client Daemon if you choose to start it
IMPORTANT Starting with LDAP-UX Client Services B.03.20, the client daemon,
/opt/ldapux/bin/ldapclientd, must be running for LDAP-UX
functions to work. With LDAP-UX Client Services B.03.10 or earlier,
running the client daemon, ldapclientd, is optional.
NOTE The LDAP printer configurator can support any Directory Servers
that support the LDAP printer schema based on
IETF<draft-fleming-ldap-printer-schema-02.txt>.
However, the LDAP-UX Client Services only supports automatically
importing the LDAP printer schema into the Netscape Directory
Server by running the setup program.
If your directory server does not support the LDAP printer schema,
you may experience problems when importing the printer schema.
• Configure the Pluggable Authentication Module (PAM) by modifying
the file /etc/pam.conf. See /etc/pam.ldap for a sample.
• Configure the Name Service Switch (NSS) by modifying the file
/etc/nsswitch.conf. See /etc/nsswitch.ldap for a sample.
• Optionally modify the disable_uid_range flag in the
/etc/opt/ldapux/ldapux_client.conf file to disable logins to the local
system from specific users.
• Optionally configure the authorization of one or more subgroups
from a large repository such as an LDAP directory server. For the
detailed information on how to set up the policy file,
/etc/opt/ldapux/pam_authz.policy, see “Policy File” on
page 111.
Chapter 228
Page 43

Installing And Configuring LDAP-UX Client Services
Configure the LDAP-UX Client Services
After you configure your directory and the first client system, configuring
additional client systems is simpler. Refer to “Configure Subsequent
Client Systems” on page 72 for more information.
Quick Configuration
You can quickly configure a Netscape directory and the first client by
letting most of the configuration parameters take default values as
follows. For a custom configuration, see “Custom Configuration” on
page 34.
The steps described below assume that you don’t use SSL support with
LDAP-UX. If you want to enable SSL support, see “Custom
Configuration” on page 34.
Step 1. Log in as root and run the Setup program:
cd /opt/ldapux/config
./setup
The Setup program asks you a series of questions and usually provides
default answers. Press the Enter key to accept the default, or change the
value and press Enter. At any point during setup, enter Control-b to back
up or Control-c to exit setup.
Step 2. Choose Netscape Directory as your LDAP directory server (option 1).
Step 3. Enter either the host name or IP address of the directory server where
your profile exists, or where you want to create a new profile from
Appendix A, “Configuration Worksheet,” on page 183.
Step 4. Enter the port number of the previously specified directory server that
you want to store the profile from Appendix A, “Configuration
Worksheet,” on page 183. The default port number is 389.
Step 5. If the profile schema has already been imported, setup skips this step.
Otherwise, enter “yes” to extend the profile schema if the schema has not
been imported with LDAP-UX Client Services object class
DUAConfigProfile. See Appendix B, “LDAP-UX Client Services Object
Classes,” on page 187 for a detailed description of this object class.
Step 6. If the LDAP printer schema has already been extended, setup skips this
steps. Otherwise, enter “yes” to extend the LP printer schema if you
choose to start the printer configurator. The LDAP printer configurator is
a feature that simplifies the LP printer management by refreshing LP
Chapter 2 29
Page 44

Installing And Configuring LDAP-UX Client Services
Configure the LDAP-UX Client Services
printer configurations on your client system. A new printer schema,
which is based on IETF<draft-fleming-ldap-printer-schema-02.txt>, is
required to start the services.
Step 7. If the publickey schema has already extended, setup skips this step.
Otherwise, enter “yes” to extend the publickey schema if you choose to
store the public keys of users and hosts in the LDAP directory. A
publickey schema, which is based on RFC 2307-bis is required to migrate
the publickeys in the NIS+ credential table entries on the NIS+ server to
the LDAP directory.
Step 8. If the new automount schema has already been imported, setup skips to
step 9.
Otherwise, you will be asked whether or not you want to install the new
automount schema which is based on RFC 2307-bis. Enter “yes” if you
want to import the new automount schema into the LDAP directory
server. Enter “no” if you do not want to import new automount schema
into the LDAP directory server. Setup skips to step 9 if you enter “no”.
Step 9. Next, if the setup program detects the obsolete automount schema exists
in the LDAP directory, it will prompt you for the information shown as
follows:
The obsolete automount schema exists in the directory.
If you still want to use the new automount schema, you must
perform the following steps:
1. Exit this program
2. Stop directory server
3. Remove the obsolete automount schema:
a. objectclass- automount
b. attribute-automountInformation
Note: for Netscape Directory Server, they are in
10rfc2307.ldif.
4. Start directory and re-run setup program to install the new
automount schema.
Do you still want to use the new automount schema? Press Yes
will exit this program. {YES]:
Reply “yes ” when asked do you still want to use the new automount
schema. If you reply yes, it will take you to exit this program. You must
re-run the setup program again to install the new automount schema
after you exit this program and manually delete the obsolete automount
Chapter 230
Page 45

Installing And Configuring LDAP-UX Client Services
Configure the LDAP-UX Client Services
schema. For detailed information on how to remove the obsolete
automount schema, see “Removing The Obsolete Automount Schema” on
page 59.
If you reply no, setup skips to step 9 and the new automount schema
will not be imported.
Otherwise, you will be asked to enter the DN (Distinguished Name) and
password of the directory user who can import the schema into the LDAP
directory.
Step 10. If you are creating a new profile, add all parent entries of the profile DN
to the directory (if any). If you attempt to create a new profile and any
parent entries of the profile do not already exist in the directory, setup
will fail. For example, if your profile will be
cn=profile1,ou=profiles,o=hp,com, then ou=profiles,o=hp.com
must exist in the directory or setup will fail.
Step 11. Next enter either the DN of a new profile, or the DN of an existing profile
you want to use, from Appendix A, “Configuration Worksheet,” on
page 183.
To display all the profiles in the directory, use a command like the
following:
ldapsearch -b o=hp.com objectclass=DUAConfigProfile dn
If you are using an existing profile, setup configures your client,
downloads the profile, and exits. In this case, continue with step 12
below.
Step 12. If you are creating a new profile, enter the DN and password of the
directory user who can create a new profile from Appendix A,
“Configuration Worksheet,” on page 183.
Step 13. Next, it will prompt you for the following information:
Select authentication method for users to bind/authenticate to
the server
1. SIMPLE
2. SASL DIGEST-MD5
To accept the default shown in brackets, press the Return key.
Authentication method: [1]:
Chapter 2 31
Page 46

Installing And Configuring LDAP-UX Client Services
Configure the LDAP-UX Client Services
Press the return key if you choose to accept SIMPLE authentication
method, type 2 if you choose SASL DIGEST-MD5 authentication method
for the following prompt:
Authentication method: [1]:
Step 14. Next enter the host name and port number of the directory where your
name service data is, from Appendix A, “Configuration Worksheet,” on
page 183. For high availability, each LDAP-UX client can look for name
service data in up to three different directory hosts. You can enter up to
three hosts, to be searched in order.
Step 15. Enter the base DN where clients should search for name service data
from Appendix A, “Configuration Worksheet,” on page 183.
Step 16. You can quickly configure a Netscape directory and the first client by
accepting the remaining default configuration parameters when
prompted.
Table 2-1 shows the configuration parameters and the default values
they will be configured with.
Table 2-1 Configuration Parameter Default Values
Parameter
Type of client binding Anonymous
Bind time limit 5 seconds
Search time limit no limit
Use of referrals Yes
Profile TTL (Time To Live) 0 - infinite
Use standard RFC-2307 object class attributes for
supported services
Use default search descriptions for supported services Yes
Authentication method Simple
Default
Value
Yes
Chapter 232
Page 47

Installing And Configuring LDAP-UX Client Services
Configure the LDAP-UX Client Services
To change any of these default values, refer to “Custom Configuration”
on page 34.
Step 17. After entering all the configuration information, setup extends the
schema, creates a new profile, and configures the client to use the
directory.
Step 18. Configure the Pluggable Authentication Module (PAM).
Save a copy of the file /etc/pam.conf and edit the original to specify LDAP
authentication and other authentication methods you want to use. See
/etc/pam.ldap for a sample. You may be able to just copy /etc/pam.ldap to
/etc/pam.conf. See pam(3), pam.conf(4), and Managing Systems and
Workgroups at http://docs.hp.com/hpux for more information on PAM.
Step 19. Configure the Name Service Switch (NSS).
Save a copy of the file /etc/nsswitch.conf and edit the original to specify
the ldap name service and other name services you want to use. See
/etc/nsswitch.ldap for a sample. You may be able to just copy
/etc/nsswitch.ldap to /etc/nsswitch.conf. See nsswitch.conf(4) for more
information.
Step 20. Optionally, configure the Pam Authorization Service module
(pam_authz).
LDAP-UX Client Services provides a sample configuration file,
/etc/opt/ldapux/pam_authz.conf.template. This sample file shows
you how to configure the policy file to work with pam_authz. You can
copy this sample file and edit it using the correct syntax to specify the
access rules you wish to authorize or exclude from authorization. For
more detailed information on how to configure the policy file. see
“PAM_AUTHZ Login Authorization Enhancement” on page 109.
The sample /etc/pam.conf file in the man page will show you how to
configure the /etc/pam.conf file to work with pam_authz.For more
detailed information about pam_authz, refer to the pam_authz(5) man
page.
Step 21. Optionally configure the disable_uid_range flag.
Save a copy of the file /etc/opt/ldapux/ldapux_client.conf and edit the
original to activate the disable_uid_range flag. Uncomment the flag in
the [NSS] portion of the file and fill in the UID range. The format is
disable_uid_range=uid#,[uid#-uid#], .... where uid# stands for uid
number.
Chapter 2 33
Page 48

Installing And Configuring LDAP-UX Client Services
Configure the LDAP-UX Client Services
For example: disable_uid_range=0-100,300-450,89
Note:
• White spaces between numbers are ignored.
• Only one line of the list is accepted, however, the line can be
wrapped.
• The maximum number of ranges is 20.
Step 22. “Verify the LDAP-UX Client Services” on page 68.
Step 23. Configure subsequent clients by running setup on those clients and
specifying an existing configuration profile. Or for a simpler process see
“Configure Subsequent Client Systems” on page 72.
Custom Configuration
Running the Setup program for a quick configuration, as described
above, configures your client using default values where possible. If you
would like to customize these parameters, proceed as follows.
If you want to use SSL, you must have the certificate database files,
cert7.db or cert8.db and key3.db, on your client system before you run the
custom configuration. See “Configure the LDAP-UX Client Serivces with
SSL Support” on page 41 for details.
Step 1. Perform the steps described in “Quick Configuration” on page 29.
However, after step 11, You will be asked whether you want to use SSL
or not. Enter “yes” to use SSL for the secure communication between
LDAP clients and the Netscape Directory Server. Enter “no” if you don’t
want to use SSL.
Step 2. Next, it will prompt you for selecting the authentication method for users
to bind/authenticate to the server.
You have a choice between SIMPLE (the default), or SASL DIGEST-MD5
if you choose to not enable SSL. However, you have a choice between
SIMPLE with SSL (the default), or SASL DIGEST-MD5 with SSL if you
choose to enable SSL.
If you select SASL DIGEST-MD5, two additional prompts will appear.
The first will prompt you for a user mapping (UID, DN, or Other). The
second will prompt you for a single realm to use when retrieving user
authentication information. If no realm is specified, user information will
be retrieved from the first realm the directory server offers.
Chapter 234
Page 49

Installing And Configuring LDAP-UX Client Services
Configure the LDAP-UX Client Services
Step 3. Specify the host name and optional port number where your directory is
running. If you choose to not use SSL, the default directory port number
is 389. If you choose to use SSL, the default directory port number is 636.
For high availability, each LDAP-UX client can look for user and group
information in up to three different directory servers. You are able to
specify up to three directory hosts, to be searched in order.
Step 4. Reply “no” when asked if you want to accept the remaining default
configuration parameters.
Step 5. Select the client binding you want from Appendix A, “Configuration
Worksheet,” on page 183. This determines the identity that client
systems use when binding to the directory to search for user and group
information.
Step 6. If you configured a proxy user, enter the DN and password of your proxy
user, from Appendix A, “Configuration Worksheet,” on page 183.
Step 7. Enter the maximum time in seconds the client should wait for directory
searches before aborting. Enter 0 for no time limit.
Step 8. Enter whether or not you want directory searches to follow referrals.
Referrals are a redirection mechanism supported by the LDAP protocol.
Please see your directory manuals for more information on referrals.
NOTE If you want your directory searches to follow referrals, you must allow
anonymous access into your directories.
Step 9. Enter the Profile TTL (Time To Live) value. This value defines the time
interval between automatic downloads (refreshes) of new configuration
profiles from the directory. Automatic refreshing ensures that the client
is always configured using the newest configuration profile.
If you want to disable automatic refresh or manually control when the
refresh occurs, enter a value of 0. See “Download the Profile Periodically”
on page 74.
Step 10. Next, the setup program will prompt you for the following information:
LDAP-UX Client Services supports the following services:
Chapter 2 35
Page 50

Installing And Configuring LDAP-UX Client Services
Configure the LDAP-UX Client Services
1.Password 6.Protocols
2.Shadow passwd 7.Networks
3.Group 8.Hosts
4.PAM (Pluggable Authentication Module) 9.Services
5.RPC 10.Netgroup
Each services uses a standard object class (defined by RFC
2307)
You can remap any of these attributes to alternate attributes
Do you want to remap any of the standard RFC 2307 attributes?
Enter whether or not you want to remap the standard object class
attributes to alternate attributes. You need to do this if your user and
group data do not conform to the object classes defined in RFC 2307,
posixAccount, posixGroup, shadowAccount, and so forth.
You can remap the attributes for any of the supported services: passwd,
shadow passwd, group, PAM, netgroup, rpc, protocols, networks, hosts,
automount and services. Select the service you want to remap. Then
select the attribute you want to remap and enter the new attribute
name. For example, you might map the standard UNIX user id number
attribute uidnumber to an employeeID attribute.
11.Automount
By default, LDAP-UX Client Services uses the RFC2307-bis automount
schema. The nisObject automount schema can also be used if
configured via attribute mappings.
Use the following steps if you want to remap the automount attributes to
the nisObject automount attributes:
1. Enter yes for the following question:
Do you want to remap any of the standard RFC 2307
attributes? [yes]: yes
2. If you want to select the automount service, then enter 11 for the
following question and press the return key:
Specify the service you want to map? [0]:11
3. Next, it will take you to the screen which shows you the following
information:
Current Automount attribute names:
Chapter 236
Page 51

Installing And Configuring LDAP-UX Client Services
Configure the LDAP-UX Client Services
1.automountMapName ->[automountMapname]
2.automountKey -> [automountKey]
3.automountInformation -> [automountInformation]
Specify the attribute you want to map. [0]:
You type 1 for the following question and press the return key:
Specify the attribute you want to map. [0]:1
4. Next, type the attribute nisMapName that you want to map to the
automountMapName attribute for the following question and press
the return key:
automountMapName -> nisMapName
5. Next, it will take you to the screen which shows you the following
information:
Current Automount attribute names:
1.automountMapName ->[nisMapname]
2.automountKey -> [automountKey]
3.automountInformation -> [automountInformation]
Specify the attribute you want to map. [0]:
If you want to specify the attribute to map to the automountKey
attribute , then type 2 for the following question and press the return
key:
Specify the attribute you want to map. [0]:2
6. Next, type the attribute cn you want to map to the automountKey
attribute and press the return key:
automountKey -> cn
7. Next, it will take you to the screen which shows you the following
information:
Current Automount attribute names:
1.automountMapName ->[nisMapname]
2.automountKey -> [cn]
3.automountInformation -> [automountInformation]
Specify the attribute you want to map. [0]:
Chapter 2 37
Page 52

Installing And Configuring LDAP-UX Client Services
Configure the LDAP-UX Client Services
If you want to specify the attribute to map to the
automountInformation attribute , then type 3 for the following
question and press the return key:
Specify the attribute you want to map. [0]:3
8. Next, type the attribute nisMapEntry you want to map to the
automountInformation attribute and press the return key:
automountInformation -> nisMapEntry
9. Next, it will take you to the screen which shows you the following
information:
Current Automount attribute names:
1.automountMapName ->[nisMapname]
2.automountKey -> [cn]
3.automountInformation -> [nisMapEntry]
Specify the attribute you want to map. [0]:
You type 0 to exit this menu for the following question:
Specify the attribute you want to map. [0]:0
If you will be configuring X.500 group membership support, you should
remap the group member attribute (to member or uniquemember) instead
of using the default.
NOTE Make sure that the attribute name is typed in correctly to avoid
unpredictable results later on.
See RFC 2307 at http://www.ietf.org/rfc/rfc2307.txt for a description of
the standard object classes and attributes.
Optionally, you may set up X.500 by executing the following steps:
1. #cd /opt/ldapux/config/
2. Execute the setup program:
#./setup
For the question:
Accept remaining defaults? (y/n) [y]: N
Answer “N” instead of the default “Y”
Chapter 238
Page 53

Installing And Configuring LDAP-UX Client Services
Configure the LDAP-UX Client Services
3. For the question:
Do you want to remap any of the standard RFC 2307
attributes? [No]: Y
Answer “Y” instead of the default “N”
4. For the question:
Specify the service you want to map? [0]: 3
Answer “3”
5. For the question:
Specify the attribute you want to map? [0]: 3
Answer “3”
6. Type the attributes you want to map to the member attribute:
[memberuid]: member
NOTE LDAP-UX supports DN-based (X.500 style) membership syntax. This
means that you do not need to use the memberUid attribute to define
the members of a POSIX group. Instead, you can use either the
member or uniqueMember attribute. LDAP-UX can convert from the
DN syntax to the POSIX syntax (an account name).
For Netscape Directory Server, the typical member attribute would
be either memberUid, member or uniqueMember.
7. Follow the prompts to finish the setup.
Step 11. Next, the setup program will prompt you the following information:
LDAP-UX Client Services supports the following services:
1.Password 7.Networks
2.Shadow passwd 8.Hosts
3.Group 9.Services
4.PAM (Pluggable Authentication Module) 10.Netgroup
5.RPC 11.PrinterConfigurator
6.Protocols 12.Automount
You can create up to three custom search descriptors for each
name service to search different locations in the directory for
user and group information.
Do you want to create custom search descriptors? [No]:
Chapter 2 39
Page 54

Installing And Configuring LDAP-UX Client Services
Configure the LDAP-UX Client Services
Enter whether or not you want to create custom search descriptors for
any of the supported services: passwd, shadow passwd, group, PAM,
netgroup, rpc, protocols, network, hosts and services. Select the service
you want to create a custom search descriptor for.
A custom search descriptor consists of three parts: a search base DN,
scope, and filter. Use custom search descriptors if you want clients to
search different locations in the directory or to apply different search
filters, for example some clients might search for employees only in a
particular department. Each service can have up to three different
search descriptors. The client uses the search descriptors in order until it
finds what it is looking for.
NOTE If your search filters overlap, enumeration requests will result in
duplicate entries being returned. For example, if one search filter
searched a subset of your organization and a second search filter
searched your entire organization, an enumeration request would return
duplicate entries.
See “Minimizing Enumeration Requests” on page 125 for more
information.
LDAP-UX Client Services uses the automount search filter for the
automount service as default. If you want to create the nisObject
search filter for the automount service to search a different location in
the directory, use the following steps:
1. Type yes for the following question and press the return key:
Do you want to create custom search descriptors? [No]: yes
2. Next, it will take you to the screen which shows you the following
information:
To accept the default shown in brackets, press the Return
key.
search base [dc=cup,dc=hp,dc=com]:
search scope (base, one, sub) [sub]
Search filter [(objectclass=automount)]
Chapter 240
Page 55

Installing And Configuring LDAP-UX Client Services
Configure the LDAP-UX Client Serivces with SSL Support
If you want to create the nisObject search filter for the automount
service, then type (objectclass=nisObject) for the following
prompt and press the Return key; otherwise press the return key to
accept the default search filter, objectclass=automount:
Search filter [(objectclass=automount)]:
(objectclass=nisObject)
Step 12. You will be asked whether or not you want to start the client daemon. For
LDAP-UX Client B.03.20 or later versions, the client daemon must be
started for LDAP-UX functions to work. With LDAP-UX Client B.30.10
or earlier, the client daemon is optional, and should be turned on in order
to provide better prformance (response time) and for the X.500 group
membership to work.
Configure the LDAP-UX Client Serivces with
SSL Support
The LDAP-UX Client Services provides SSL (Secure Socket Layer)
support to secure communication between the LDAP client and the
Directory Server. The LDAP-UX Client Services supports SSL with
password as the credential, using either simple bind or DIGEST-MD5
authentication (DIGEST-MD5 for Netscape Directory Server only) to
ensure confidentiality and data integrity between clients and servers.
With SSL support, the LDAP-UX Clients provides a secure way to
protect the password over the network, This allows the directory
administrator has the choice in selecting authentication mechanism,
such as using simple password stored in the directory server as a hash
syntax.
The LDAP-UX Client Services supports Microsoft Windows 2000/2003
Active Directory Server (ADS) and Netscape Directory Server (NDS)
over SSL. For detailed information on how to set up and configure your
Netscape Directory Server to enable SSL communication over LDAP, see
“Managing SSL Chapter” in the Administrator’s Guide for Netscape
Directory Server at http://www.redhat.com/docs/manuals/dir-server/
Chapter 2 41
Page 56

Installing And Configuring LDAP-UX Client Services
Configure the LDAP-UX Client Serivces with SSL Support
Configuring the LDAP-UX Client to Use SSL
You can choose to enable SSL with LDAP-UX when you run the setup
program. If you attempt to use SSL, you must install Certificate
Authority (CA) certificate on your LDAP-UX Client and configure your
LDAP directory server to support SSL before you run the setup program.
NOTE If you already have the certificate database files, cet7 or cert8.db and
key3.db, on your client for your HP-UX applications, you can simply
create a symbolic link /etc/opt/ldapux/cert7.db that points to cert7.db
or /etc/opt/ldapux/cert8.db that points to cer8.db and
/etc/opt/ldapux/key3.db that points to key3.db.
You can Download the certificate database from the Netscape
Communicator or Mozilla browser to set up the certificate database into
your LDAP-UX Client.
Steps to Download the CA Certificate from Mozilla Browser
The following steps show you an example on how to download the
Certificate Authority (CA) certificate on your client system using Mozilla
browser 1.4 for HP-UX:
Step 1. Log in to your system as root.
Step 2. Use Mozilla browser to connect to your Certificate Authority Server.
The following shows an example of using a link to connect to your
Certificate Authority Server:
https://CA servername:port number/ca/
Step 3. Click the retrieval tab in the Netscape certificate management window
screen.
Step 4. Click the “import CA certificate chain” link to take you to the “import CA
certificate chain” window screen.
Step 5. Check the “import the CA certificate chain into your browser” check box
in the “import CA certificate chain” window screen. Then, click the
submit button.
Chapter 242
Page 57

Installing And Configuring LDAP-UX Client Services
Configure the LDAP-UX Client Serivces with SSL Support
Step 6. Check the “Trust the CA to identify web sites”, “Trust the CA to identify
e-mail users”, and “Trust the CA to identify software developers”
checkboxes in the Downloading Certificate window screen. Then click OK
button.
Step 7. The Netscape Directory CA certificate will be downloaded to the
following two files on your LDAP-UX Client:
/.mozilla/default/*.slt/cert8.db
/.morilla/default/*.slt/key3.db
Step 8. You can simply copy the /.mozilla/default/*slt/cert8.db file to
/etc/opt/ldapux/cert8.db and /.mozilla/default/*slt/key3.db file to
/etc/opt/ldapux/key3.db.
Step 9. Set the file access permissions for/etc/opt/ldapux/cert7..db and
/etc/opt/ldapux/key3.db to be read only by root as follows:
-r-------- 1 root sys 65536 Jun 14 16:27 \
/etc/opt/ldapux/cert8.db
-r-------- 1 root sys 32768 Jun 14 16:27 \
/etc/opt/ldapux/key3.db
NOTE You may use the unsupported /opt/ldapux/contrib/bin/certutil
command line tool to create the certificate database files, cert8.db and
key3.db. For detailed command options and their arguments, see Using
the Certificate Database Tool available at
http://www.mozilla.org/projects/security/pki/nss/tools/certutil.html.
NOTE If your browser does not generate cert7.db or cert8.db and key3.db
security database files, you must export the certificate (preferably the
root certificate of the Certificate Authority that signed the LDAP server’s
certificate) from your certificate server as a Base64-Encoded certificate
and use the certutil utility to create the cert8.db and key3.db
security database files.
Chapter 2 43
Page 58

Installing And Configuring LDAP-UX Client Services
Configure the LDAP-UX Client Serivces with SSL Support
Steps to create database files using the certutil utility
The following steps show you an example on how to create the security
database files, cert8.db and key3.db on your client system using the
certutil utility:
Step 1. Retrieve the Base64-Encoded certificate from the certificate server and
save it.
For example, get the Base64-Encoded certificate from the certificate
server and save it as the /tmp/mynew.cert file. This file should look
like:
--------------- BEGIN CERTIFICATE ------------------------------------
-MIICJjCCAY+gAwIBAgIBJDANBgkghkiG9w0BAQQFADBxMQswCQYDVQQGEwJVUzEL
MAkga1UECBMCQ2ExEjAQBgNVBAcTCWN1cGVvsG1ubzEPMA0GA1UEChmgAhaUy29T
MRIwEAYDVQQLEw1RR1NMLUxkYXAxHDAaBgNVBAMTE0N1cnRpzmljYXR1IE1hbmFn
4I2vvzz2i1Ubq+Ajcf1y8sdafuCmqTgsGUYjy+J1weM061kaWOt0HxmXmrUdmenF
skyfHyvEGj8b5w6ppgIIA8JOT7z+F0w+/mig=
--------------- END CERTIFICATE --------------------------------------
Step 2. Use the rm command to remove the old database files,
/etc/opt/ldapux/cert8.db and /etc/opt/ldapux/key3.db:
rm -f /etc/opt/ldapux/cert8.db /etc/opt/ldapux/key3.db
Step 3. Use the certutil utility with the -N option to initialize the new
database:
/opt/ldapux/contrib/bin/certutil -N -d /etc/opt/ldapux
Step 4. Add the Certificate Authority (CA) certificate or the LDAP server’s
certificate to the security database:
• To use the certutil command to add a CA certificate to the
database:
For example, the following command adds the CA certificate,
my-ca-cert, to the security database directory, /etc/opt/ldapux,
with the Base64-Encoded certificate request file, /tmp/mynew.cert:
/opt/ldapux/contrib/bin/certutil -A -n my-ca-cert -t \
"C,," -d /etc/opt/ldapux -a -i /tmp/mynew.cert
Chapter 244
Page 59

Installing And Configuring LDAP-UX Client Services
Configure the LDAP-UX Client Serivces with SSL Support
NOTE The -t "C,," represents the minimum trust attributes that may be
assigned to the CA certificate for LDAP-UX to successfully use SSL
to connect to the LDAP directory server. If you have other
applications that use the CA certificate for other functions, then you
may wish to assign additional trust flags. See
http://www.mozilla.org/projects/security/pki/nss/tools/certutil.ht
ml for additional information.
• To use the certutil command to add the LDAP server’s certificate
to the security database:
For example, the following command adds the LDAP server’s
certificate, my-server-cert, to the security database directory,
/etc/opt/ldapux, with the Base64-Encoded certificate request file,
/tmp/mynew.cert:
/opt/ldapux/contrib/bin/certutil -A -n my-server-cert -t \
"P,," -d /etc/opt/ldapux -a -i /tmp/mynew.cert
NOTE The -t "p,," represents the minimum trust attributes that may be
assigned to the LDAP server’s certificat for LDAP-UX to successfully
use SSL to connect to the LDAP directory server. See
http://www.mozilla.org/projects/security/pki/nss/tools/certutil.ht
ml for additional information.
Chapter 2 45
Page 60

Installing And Configuring LDAP-UX Client Services
Configure LDAP-UX Client Services with Publickey Support
Configure LDAP-UX Client Services with
Publickey Support
LDAP-UX Client Services B.04.00 or later version supports discovery
and management of publickeys in an LDAP directory. Both public and
secret keys, used by the Secure RPC API can be stored in user and host
entries in an LDAP directory server, using the nisKeyObject
objectclass. Support for discovery of keys in an LDAP directory server is
provided through the getpublickey() and getsecretkey() APIs. You
can use chkey and newkey commands to manage user and host keys in
an LDAP server. The chkey -s ldap command is used to change user’s
secure RPC public key and secret key in an LDAP directory. The newkey
-u <username> -s ldap command is used to add new keys for users to
an LDAP directory while the newkey -h <hostname> -s ldap command
is used to create new keys for machines to an LDAP directory.
For detailed information on the newkey and chkey commands, refer to
newkey(1M), chkey(1), getpublickey(3N), getsecretkey() and
publickey(4) man pages.
HP-UX Enhanced Publickey-LDAP Software Requirement on HP-UX 11i v1 or v2
Support for publickey through LDAP requires functionality
enhancement in LDAP-UX Client Services and an enhancement in the
ONC product. ONC with publickey LDAP support is available through
the HP-UX Enhanced Publickey-LDAP Software Pack (SPK) web
release.
To enable the publickey LDAP support, you must install the Enhanced
Publickey-LDAP software bundle shown on Table 2-2 and LDAP-UX
Client Services B.04.00 or later on your client systems. The software
bundle contains all the required patches plus the enablement product for
this new feature. On HP-UX 11i v3, the software bundle is not required.
For detailed information, refer to the ONC with Publickey LDAP Support
Software Pack Release Notes at the following web site:
http://docs.hp.com/en/netcom.html
Chapter 246
Page 61

Installing And Configuring LDAP-UX Client Services
Configure LDAP-UX Client Services with Publickey Support
Navigate to NFS Services.
Table 2-2 Enhanced Publickey-LDAP Software for HP-UX 11i v1 or v2
Operating System
Supported
HP-UX 11i v1 Enhkey B.11.11.01 June, 2006
HP-UX 11i v2 Enhkey B.11.23.01 October, 2006
You can download the Enhanced Publickey-LDAP software bundle from
the following Software Depot web site:
• Go to http://www.hp.com/go/softwaredepot
• Click on the Enhancement releases and patch bundles link.
• Select one of the following links:
— HP-UX Software Pack (Optional HP-UX 11i v1 Core
Enhancements) for HP-UX 11i v1
and then select
HP-UX Public Key LDAP link for HP-UX 11i v1
Select and download the following software bundle, place it to
your client system, /tmp is assumed:
Enhkey B.11.11.01 HP-UX B.11.11 64+32 depot for HP-UX
11i v1
Software Bundle
Version
Planned Release
Date
— HP-UX Software Pack (Optional HP-UX 11i v2 Core
Enhancements) for HP-UX 11i v2
and then select
PublicKey-LDAP link for HP-UX 11i v2
Select and download the following software bundle, place it to
your client system, /tmp is assumed:
Enhkey B.11.23.01 HP-UX B.11.23 IA+PA depot for HP-UX
11i v2
• Use swinstall to install the software bundle:
Chapter 2 47
Page 62

Installing And Configuring LDAP-UX Client Services
Configure LDAP-UX Client Services with Publickey Support
— swinstall -x autoreboot=true -s
/tmp/ENHKEY_B.11.11.01_HP-UX_B.11.11_64_32.depot for
HP-UX 11i v1
— swinstall -x autoreboot=true -x reinstall=false -s
/tmp/ENHKEY_B.11.23.01_HP-UX_B.11.23_IA_PA.depot for
HP-UX 11i v2
Extending the Publickey Schema into Your Directory
The publickey schema is not loaded in the Netscape Directory Server. If
you are installing LDAP-UX B.04.00 or later version on your client
system, the setup program will extend the publickey schema into your
Netscape Directory Server. If you previously configured LDAP-UX
B.03.30 or earlier version, and now update the product to version B.04.00
or later, you must re-run the setup program to extend the publickey
schema into your LDAP directory. You do not need to re-run the setup
program for the subsequent client systems. For detailed information on
how to run the setup program to extend the publickey schema into an
LDAP directory, see “Quick Configuration” on page 29.
Admin Proxy User
A special type of proxy user, known as an Admin Proxy has been added to
LDAP-UX to support management of publickey information in an LDAP
directory server. The Admin Proxy represents the HP-UX
administrator’s rights in the directory server and typically is used to
represent root’s privileges extended to the directory server. Only an
Admin Proxy user is allowed to use the newkey tool to add host and user
keys into the LDAP directory server, or to use the chkey tool to modify
host keys in the LDAP directory server.
Configuring an Admin Proxy User Using ldap_proxy_config
You need to use a new ldap_proxy_config tool option -A to configure
an Admin Proxy user. You must specify the -A option along with other
options to perform operations applying to an Admin Proxy user. For
example, you can use the ldap_proxy_config -A -i command to
create an Admin Proxy user. See “The ldap_proxy_config Tool” on
page 146 for details.
Chapter 248
Page 63

Installing And Configuring LDAP-UX Client Services
Configure LDAP-UX Client Services with Publickey Support
Password for an Admin Proxy User
In order to protect user’s secret keys in the LDAP directory, the secret
keys are encrypted using the user’s password. This process is used in
NIS as well as NIS+ environments. The host’s secret key must also be
encrypted. Since the host itself does not have its own password, root’s
password is used to encrypt the host’s secret key. The chkey or newkey
command prompts for root’s password when changing or adding a key for
a host. For this reason, you may wish to configure the Admin Proxy user
in the LDAP directory to have the same password as the root user on the
master host. Although it is not required that the Admin Proxy user and
root user share the same password, it allows you to avoid storing the
Admin Proxy user’s password in the /etc/opt/ldapux/acred file. In
such case, when you run the ldap_proxy_config -A -i command to
configure the Admin Proxy user, you enter only Admin Proxy user’s DN
without the password. LDAP-UX will use the root’s password given to
the chkey and newkey commands as the Admin Proxy user’s password to
perform public key operations. However, the ldap_proxy_config -A -v
command will not be able to validate the Admin Proxy user because no
password is available to ldap_proxy_config. As a result, the message
"No password is provided. Validation is not performed” will be
displayed.
Setting ACI for Key Management
Before storing public keys in an LDAP server, LDAP administrators may
wish to update their LDAP access controls such that users can manage
their own keys, and the Admin Proxy user can manage host keys. This
section describes how you set up access control instructions (ACI) for an
Admin Proxy user or a user.
Setting ACI for an Admin Proxy User
With Netscape Directory Server 6.11 and 6.21, you can use the Netscape
Console or ldapmodify to set up ACI, which gives an Admin Proxy user
permissions to manage host and user keys in the LDAP directory.
An Example
The following ACI gives the permissions for the Admin Proxy user
uid=keyadmin to read, write, and compare nissecretkey and
nispublickey attributes for hosts and users:
dn:dc=org,dc=hp,dc=com
Chapter 2 49
Page 64

Installing And Configuring LDAP-UX Client Services
Configure LDAP-UX Client Services with Publickey Support
aci:(targetattr =”objectlass||nispublickey||nissecretkey”)
(version 3.0;acl “Allow keyadmin to change key pairs”;
allow (read,write,compare)
userdn=“ldap:///uid=keyadmin,ou=people,dc=org,dc=hp,dc=com”;)
Setting ACI for a User
The default ACI of Netscape Directory Server 6.11 allows a user to
change his own nispublickey and nissecretkey attributes. For
Netscape Directory Server 6.21, you need to set up ACI which gives a
user permission to change his own nissecretkey and nispublickey
attributes. Use the Netscape Console or ldapmodify to set up ACI for a
user.
An Example
The following ACI gives a user permission to change his own
nissecretkey and nispublickey attributes for user keys:
dn:ou=People,dc=org,dc=hp,dc=com
aci:(targetattr =”nissecretkey||nispublickey”)(version 3.0;
acl “Allow key self modification”;allow (write)
(userdn = “ldap:///self”);)
Configuring serviceAuthenticationMethod
serviceAuthenticationMethod is a newly supported attribute of the
configuration profile, /opt/ldapux/ldapux_profile.ldif. It’s function
is the same as authenticationMethod, but it allows authentication
configuration for specific name services. The
serviceAuthenticationMethod attribute is created to resolve issues
that may arise when the default authentication method is not considered
secure enough for specific name services. For example, if the default
authenticationMethod is configured as NONE then the newkey and
chkey commands would not know how to properly bind to the directory
server when changing or adding key pairs. LDAP-UX only supports the
serviceAuthenticationMethod attribute for the keyserv service, since
the keyserv service is the only one that currently needs modification of
privileges in the directory server.
To perform newkey and chkey operations, LDAP-UX binds the Admin
Proxy user to the LDAP directory using the authentication method
specified in serviceAuthenticationMethod. LDAP-UX only supports
serviceAuthenticationMethod for keyserv. Any other services
configured in serviceAuthenticationMethod will be ignored.
Chapter 250
Page 65

Installing And Configuring LDAP-UX Client Services
Configure LDAP-UX Client Services with Publickey Support
Configuring serviceAuthenticationMethod is optional. If you do not
configure serviceAuthenticationMethod, LDAP-UX binds the Admin
Proxy user to the LDAP directory using the authentication method
specified for the proxy user.
Authentication Methods
LDAP-UX Client Services supports the following authentication methods
for the keyserv service:
• simple with SSL enabled
• SASL DIGEST-MD5 with SSL enabled
• simple with SSL disabled
• SASL DIGEST-MD5 with SSL disabled
NOTE SSL settings for both authenticationMethod and
serviceAuthenticationMethod must be set the same. It is not
supported to have SSL enabled for authenticationMethod and SSL
disabled for serviceAuthenticationMethod, or vice versa.
Procedures Used to Configure serviceAuthenticationMethod
Use the following steps on one of LDAP-UX client sytems to configure the
serviceAuthenticationMethod attribute in the
/etc/opt/ldapux/ldapux_profile.ldif file:
Step 1. Login as root.
Step 2. Use the ldapentry tool to modify the profile entry in the LDAP directory
server to include serviceAuthenticationMethod. To do this,
ldapentry requires the profile DN. You can find the profile DN from
PROFILE_ENTRY_DN in /etc/opt/ldapux/ldapux_client.conf after
you finish running the setup program. The following example edits the
profile entry "cn=ldapuxprofile,dc=org,dc=hp,dc=com":
For example:
cd /opt/ldapux/bin
./ldapentry -m "cn=ldapuxprofile,dc=org,dc=hp,dc=com"
Chapter 2 51
Page 66

Installing And Configuring LDAP-UX Client Services
Configure LDAP-UX Client Services with Publickey Support
After you enter the prompts for "Directory login:" and "password:",
ldapentry will bring up an editor window with the profile entry. You can
add the serviceAuthenticationMethod attribute.
The value of the serviceAuthenticatioMethod entry depends on the
authentication method you configure. The following shows the possible
values of the serviceAuthenticationMethod attribute:
• For SASL DIGEST-MD5 using the Distinguish Name (DN) to
generate the DIGEST-MD5 hash, the data in the entry is:
serviceAuthenticationMethod:keyserv:sasl/digest-md5:\
username=dn
• For SASL DIGEST-MD5 using the UID attribute to generate the
DIGEST-MD5 hash, the data in the entry is:
serviceAuthenticationMethod:keyserv:sasl/digest-md5
• For SASL DIGEST-MD5 with SSL enabled using the DN to generate
the DIGEST-MD5 hash, the data in the entry is:
serviceAuthenticationMethod:keyserv:tls:sasl/digest-md5:
username=dn
• For SASL DIGEST-MD with SSL enabled using the UID attribute to
generate the DIGEST-MD5 hash, the data in the entry is:
serviceAuthenticationMethod:keyserv:tls:sasl/digest-md5
• For simple authentication, the data in the entry is:
serviceAuthenticationMethod:keyserv:simple
• For simple with SSL enabled, the data in the entry is:
serviceAuthenticationMethod:keyserv:tls:simple
For more information on ldapentry, refer to Chapter 5, “Command and
Tool Reference,” on page 137.
Step 3. Go to /opt/ldapux/config:
cd /opt/ldapux/config
Step 4. Use /opt/ldapux/config/get_profile_entry to download the
modified LDIF profile:
Chapter 252
Page 67

Installing And Configuring LDAP-UX Client Services
Configure LDAP-UX Client Services with Publickey Support
./get_profile_entry -s nss
Step 5. Run the /opt/ldapux/config/display_profile_cache tool to check
the configuration of the serviceAuthenticationMethod attribute:
./display_profile_cache
For example:
If the serviceAuthenticationMethod:keyserv:sasl/digest-md5
entry is added to the profile entry in the LDAP directory, you can see the
following information when you run the display_profile_cache tool:
serv-auth: keyserv:sasl/digest-md5
auth opts: username: uid
realm:
For subsequent LDAP-UX client systems that share the same profile
configuration, use the following steps to download and activate the
profile:
Step 1. Login as root.
Step 2. Go to /opt/ldapux/config:
cd /opt/ldapux/config
Step 3. Use /opt/ldapux/config/get_profile_entry to download the
modified LDIF profile:
./get_profile_entry -s nss
Step 4. Run the /opt/ldapux/config/display_profile_cache tool to check
the configuration of the serviceAuthenticationMethod attribute:
./display_profile_cache
Configuring Name Service Switch
Configure the Name Service Switch (NSS) to enable the LDAP support
for publickey.
You can save a copy of /etc/nsswitch.conf file and modify the original
to add ldap support to the publickey service. See /etc/nsswitch.ldap
for a sample.
The following shows the sample file, /etc/nsswitch.ldap:
Chapter 2 53
Page 68

Installing And Configuring LDAP-UX Client Services
Configure LDAP-UX Client Services with Publickey Support
passwd: files ldap
group: files ldap
hosts: dns files ldap
networks: files ldap
protocols: files ldap
rpc: files ldap
publickey: ldap [NOTFOUND=return] files
netgroup: files ldap
automount: files ldap
aliases: files
services: files ldap
Chapter 254
Page 69

AutoFS Support
AutoFS is a client-side service that automatically mounts appropriate
file systems when users request access to them. If an automounted file
system has been idle for a period of time, AutoFS unmounts it. AutoFS
uses name services such as files, NIS or NIS+ to store and manage
AutoFS maps.
LDAP-UX Client Services B.04.00 supports the automount service under
the AutoFS subsystem. This new feature allows users to store AutoFS
maps in an LDAP directory server. .
AutoFS Patch Requirement
In order to enable the LDAP support for AutoFS, you must install the
AutoFS patch or Enhanced AutoFS version on your client system shown
in Table 2-3:
Table 2-3 Patch Requirement
Installing And Configuring LDAP-UX Client Services
AutoFS Support
Operating System
Supported
HP-UX 11i v1 Enhanced AutoFS
HP-UX 11i v2 PHNE_33100 August, 2005
Patch ID/Version
version B.11.11.0509.1
Planned Release
Date
September, 2005
Automount Schemas
This section describes the following three automount schemas:
• new automount schema
An automount schema is based on RFC 2307-bis. This schema
defines new automountMap and automount structures to represent
the AutoFS maps and their entries in the LDAP directory.
• nisObject automount schema
Chapter 2 55
Page 70

Installing And Configuring LDAP-UX Client Services
AutoFS Support
The nisObject automount schema defines nisMap and nisObject
structures to represent the AutoFS maps and their entries in the
LDAP directory. There are some limitations that you need to be
aware of when using the nisObject automount schema.
• obsolete automount schema
This is the schema that is shipped with Netscape Directory Server
version 6.x.
The LDAP-UX Client Services supports the new automount schema. The
nisObject automount schema can also be used if configured via
attribute mappings. LDAP-UX does not support the obsolete automount
schema. You must manually delete it before the setup program can
successfully import the new automount schema into the LDAP directory
server.
Read subsequent sections of this chapter for the detailed information
about the automount schemas.
New Automount Schema
This schema is a new schema defined in RFC2307-bis. This schema
defines new automountMap and automount structures to represent
AutoFS maps and their entries in the LDAP directory. AutoFS maps are
stored in the LDAP directory server using structures defined by this
schema.
The RFC2307-bis automount schema is not loaded in the Netscape
Directory Server. If you are installing LDAP-UX B.04.00 on your client
system, the setup program will import the new automount schema into
your Netscape Directory Server. If you previously configured LDAP-UX
B.03.30 or an earlier version, and are now updating the product to
version B.04.00, you must re-run the setup program to import the new
automount schema into the LDAP directory. The subsequent client
systems do not need to re-run the setup.
Schema
The following shows the RFC 2307-bis automount schema in the LDIF
format:
objectClasses: ( 1.3.6.1.1.1.2.16
NAME ’automountMap’
DESC ’Automount Map information’
SUP top STRUCTURAL
MUST automountMapName
Chapter 256
Page 71

Installing And Configuring LDAP-UX Client Services
MAY description
X-ORIGIN ’user defined’ )
objectClasses: ( 1.3.6.1.1.1.2.17
NAME ’automount’
DESC ’Automount information’
SUP top STRUCTURAL
MUST ( automountKey $ automountInformation )
MAY description
X-ORIGIN ’user defined’ )
attributeTypes: ( 1.3.6.1.1.1.1.31
NAME ’automountMapName’
DESC ’automount Map Name’
EQUALITY caseExactIA5Match
SYNTAX 1.3.6.1.4.1.1466.115.121.1.26 SINGLE-VALUE
X-ORIGIN ’user defined’ )
attributeTypes: ( 1.3.6.1.1.1.1.32
NAME ’automountKey’
DESC ’Automount Key value’
EQUALITY caseExactIA5Match
SYNTAX 1.3.6.1.4.1.1466.115.121.1.26 SINGLE-VALUE
X-ORIGIN ’user defined’ )
AutoFS Support
attributeTypes: ( 1.3.6.1.1.1.1.33
NAME ’automountInformation’
DESC ’Automount information’
EQUALITY caseExactIA5Match
SYNTAX 1.3.6.1.4.1.1466.115.121.1.26 SINGLE-VALUE
X-ORIGIN ’user defined’ )
For Netscape Directory Server, each entry started by “attributetypes:”
or “objectclasses:” must be one continuous line.
An Example
The following shows an example of a direct AutoFS map, auto_direct,
stored in the LDAP directory server using new automount schema:
dn:automountMapName=auto_direct,dc=nishpind
objectClass: top
objectClass: automountMap
automountMapName: auto_direct
Chapter 2 57
Page 72

Installing And Configuring LDAP-UX Client Services
AutoFS Support
dn:automountKey=/mnt_direct/test1,\
automountMapname=auto_direct, dc=nishpind
objectClass: top
objectClass: automount
automountInformation:hostA:/tmp
automountKey: /mnt_direct/test1
dn:automountKey=/mnt_direct/test2,\
automountMapname=auto_direct, dc=nishpind
objectClass: top
objectClass: automount
automountInformation:hostB:/tmp
automountKey:/mnt_direct/test2
The nisObject Automount Schema
The nisObject automount schema defines nisMap and nisObject
structures to represent the AutoFS maps and their entries. The AutoFS
maps are stored in the LDAP directory server using the nisMap and
nisObject structures.
An Example
The following shows an example of a direct AutoFS map, auto_direct,
stored in the LDAP directory server using the nisObject automount
schema:
dn:nisMapName=auto_direct,dc=nishpind
objectClass: top
objectClass: nisMap
nisMapName: auto_direct
dn:cn=/mnt_direct/test1, nisMapName=auto_direct, dc=nishpind
objectClass: top
objectClass: nisObject
nisMapName: auto_direct
cn: /mnt_direct/test1
nisMapEntry:hostA:/tmp
dn:cn=/mnt_direct/test2, nisMapname=auto_direct, dc=nishpind
objectClass: top
objectClass: nisObject
nisMapName: auto_direct
cn: /mnt_direct/test2
nisMapEntry:hostB:/tmp
Chapter 258
Page 73

Installing And Configuring LDAP-UX Client Services
AutoFS Support
Limitations
The nisObject automount schema contains three attributes, cn,
nisMapEntry and nisMapName. cn is an attribute that ignores
case-matching. Consider the following example:
# an indirect map named auto_test
test1 server1:/source
TEST1 server2:/source
In the above example, because the cn attribute is case-insensitive, the
LDAP considers “cn=TEST1, nisMapName=auto_test” to be a
redefinition of “cn=test1, nisMapName=auto_test”.
Using the nisObject automount map schema, capital letters are not
significant. In other words, if two keys have names that are only
different by the use of capital letters, then one of those entries will be
rendered inoperable because the other one is the only one that can be
retrieved.
NOTE If you use the nisObject automount map schema, do not use any keys
that have capital letters and only differ from other keys by those capital
letters.
Obsolete Automount Schema
The obsolete automount schema is shipped with the Netscape Directory
Server version 6.x. You must manually delete it before the setup program
can successfully import the new automount schema into the LDAP
directory server.
Removing The Obsolete Automount Schema
Perform the following steps to delete the obsolete automount schema:
Step 1. Login to your Netscape Directory Server as root.
Step 2. Stop your Netscape Directory Server daemon, slapd.
/var/opt/netscape/servers/slapd-<server-instance>/stop-slapd
For example:
/var/opt/netscape/servers/slapd-ldapA.cup.hp.com/stop-slapd
Chapter 2 59
Page 74

Installing And Configuring LDAP-UX Client Services
AutoFS Support
Step 3. Delete the following two entries in the
/var/opt/netscape/servers/slapd-<server-instance>/ \
config/schema/10rfc2307.ldif file. These two entries contain the
‘automountInformation’ attributetype and the ‘automount’ objectclass.
The data in these two entries define the obsolete automount schema. The
complete two entries are:
• attributeTypes:( 1.3.6.1.1.1.1.25 NAME
’automountInformation’ DESC ’Standard LDAP attribute type’
SYNTAX 1.3.6.1.4.1.1466.115.121.1.26 X-ORIGIN ’RFC 2307’)
• objectClasses:( 1.3.6.1.1.1.2.9 NAME ’automount’ DESC
’Standard LDAP objectclass’ SUP top MUST (cn
$automountInformation)MAY (description) X-ORIGIN ’RFC2307’)
Step 4. Restart the daemon, slapd. This is to ensure that the updated schema
file is recognized by the Netscape Directory Server.
/var/opt/netscape/servers/slapd-<server-instance>/restart-slap
d
For example:
/var/opt/netscape/servers/slapd-ldapA.cup.hp.com/restart-slapd
After you delete the obsolete automount schema, you must re-run the
setup program to import the new automount schema into the LDAP
directory server.
Attribute Mappings
LDAP-UX Client Services B.04.00 supports attribute mappings between
the new RFC 2307-bis automount schema and the nisObject automount
schema. This feature allows the directory administrators to use the
nisObject schema if they have already deployed it.
When both new automount schema and nisObject schema exist in the
LDAP directory server, if you choose to use the nisObject automount
schema, you must run the setup program using the custom configuration
to perform the attribute mappings and search filter changes for the
automount service. The attribute mappings include the following:
• Remap the new automount attributes to the nisObject automount
attributes. The attribute mappings are done in step 10 of the Custom
Configuration. For detailed information on how to remap the
automunt attributes, see “Custom Configuration” on page 34.
Chapter 260
Page 75

Table 2-3 shows the attribute mappings:
Table 2-4 Attribute Mappings
Installing And Configuring LDAP-UX Client Services
AutoFS Support
New Automount Attribute
automountMapname nisMapname
automountKey cn
automountInformation nisMapEntry
• Change the automount search filter for the automount service to the
nisObject search filter. LDAP-UX Client Services uses the
automount search filter for the automount service as a default. The
search filter change can be done in step 11 of the Custom
Configuration. If you want to create the nisObject search filter for
the automount service to search a different location in the LDAP
directory server, see “Custom Configuration” on page 34 for details.
If you want to perform attribute mappings or search filter changes by
using the Custom Configuration, ensure that you do not accept the
remaining default configuration parameters in step 4 of the Custom
Configuration.
NOTE You can use the nisObject automount schema without attribute
mappings and search filter changes if only the nisObject automount
schema exists in the LDAP directory.
nisObject Automount
Attribute
Configuring Name Service Switch
Configure the Name Service Switch (NSS) to enable the LDAP support
for AutoFS.
You can save a copy of /etc/nsswitch.conf file and modify the original
to add LDAP support to the automount service. See
/etc/nsswitch.ldap for a sample.
The following shows the sample file, /etc/nsswitch.ldap:
Chapter 2 61
Page 76

Installing And Configuring LDAP-UX Client Services
AutoFS Support
passwd: files ldap
group: files ldap
hosts: dns files ldap
networks: files ldap
protocols: files ldap
rpc: files ldap
publickey: ldap [NOTFOUND=return] files
netgroup: files ldap
automount: files ldap
aliases: files
services: files ldap
AutoFS Migration Scripts
This section describes the migration scripts which can be used to migrate
your AutoFS maps from files, NIS servers or NIS+ servers to LDIF files.
After LDIF files are created, you can use the ldapmodify tool to import
LDIF files to your LDAP directory server. These migration scripts use
the new automount schema defined in RFC 2307-bis to migrate the
AutoFS maps to LDIF. You need to import the new automount schema
into your LDAP directory server before you use these migration scripts to
migrate AutoFS maps.
Table 2-4 describes the migration scripts:
Table 2-5 Migration Scripts
Migration Script Description
migrate_automount.pl Migrates AutoFS maps from files to
migrate_nis_automount.pl Migrates AutoFS maps from the NIS
migrate_nisp_autofs.pl Migrates AutoFS maps from NIS+
Environment Variables
When you use the AutoFS migration scripts to migrate AutoFS maps, set
the following environment variables:
LDAP_BASEDN The base distinguished name of the LDAP directory
that the AutoFS maps are to be placed in.
LDIF.
server to LDIF.
server to the nisp_automap.ldif file.
Chapter 262
Page 77

Installing And Configuring LDAP-UX Client Services
AutoFS Support
DOM_ENV This only applies to the migrate_nisp_autofs.pl
script. This variable defines the fully qualified name of
the NIS+ domain where you want to migrate your data
from.
NIS_DOMAINNAME This only applies to the migrate_nis_automount.pl
script. This variable specifies the fully qualified name
of the NIS domain where you want to migrate your
data from. This variable is optional. If the NIS domain
name is not specified, LDAP-UX uses the value of the
NIS_DOMAIN parameter configured in the
/etc/rc.conf.d/namesvrs file.
Examples:
The following command sets the fully qualified name of the NIS+ domain
to “cup.hp.com”:
export DOM_ENV=”cup.hp.com”
The following command sets the fully qualified name of the NIS domain
to “india.hp.com”:
export NIS_DOMAINNAME=”india.hp.com”
The following command sets the base DN to “dc=cup, dc=hp, dc=com”:
export LDAP_BASEDN=”dc=cup, dc=hp, dc=com”
General Syntax For Migration Scripts
The migration scripts use the following general syntax:
scriptname inputfile outfile
where
scriptname
inputfile
Is the name of the particular script you are using.
Is the fully qualified file name of the appropriate
AutoFS map that you want to migrate. For example,
/etc/auto_master.
outputfile
This only applies to the migrate_nis_automount.pl
and migrate_automount.pl scripts. This is optional
and is the name of the file where the LDIF is written.
stdout is the default output.
Chapter 2 63
Page 78

Installing And Configuring LDAP-UX Client Services
AutoFS Support
The migrate_automount.pl Script
This script, found in /opt/ldapux/migrate, migrates the AutoFS maps
from files to LDIF.
Syntax
scriptname inputfile outputfile
Examples
The following commands migrate the AutoFS map /etc/auto_direct
to LDIF and place the results in the /tmp/auto_direct.ldif file:
export LDAP_BASEDN=”dc=nishpind”
migrate_automount.pl /etc/auto_direct /tmp/auto_direct.ldif
The following shows the /etc/auto_direct file:
#local mount point remote server:directory
/mnt/direct/lab1 hostA:/tmp
/mnt/direct/lab2 hostB:/tmp
The following shows the /tmp/auto_direct.ldif file:
dn:automountMapName=auto_direct,dc=nishpind
objectClass: top
objectClass: automountMap
automountMapName: auto_direct
dn:automountKey=/mnt_direct/lab1,\
automountMapname=auto_direct, dc=nishpind
objectClass: top
objectClass: automount
automountInformation:hostA:/tmp
automountKey: /mnt_direct/lab1
dn:automountKey=/mnt_direct/lab2,\
automountMapname=auto_direct, dc=nishpind
objectClass: top
objectClass: automount
automountInformation:hostB:/tmp
automountKey:/mnt_direct/lab2
Chapter 264
Page 79

Installing And Configuring LDAP-UX Client Services
AutoFS Support
You can use the /opt/ldapux/bin/ldapmodify tool to import the LDIF
file /tmp/auto_direct.ldif that you just created above into the LDAP
directory. For example, the following command imports the
/tmp/auto_direct.ldif file to the LDAP base DN “dc=nishpind” in
the LDAP directory server LDAPSERV1:
/opt/ldapux/bin/ldapmodify -a -h LDAPSERV1 -D “cn=Directory
Manager” -w <passwd> -f /tmp/auto_direct.ldif
Where options are:
-a Add a new entry into the LDAP directory
-h The LDAP directory host name
-D The Distinguish Name (DN) of the directory manager
-w The password of the directory manager
-f The LDIF file to be imported into the LDAP directory
Chapter 2 65
Page 80

Installing And Configuring LDAP-UX Client Services
AutoFS Support
The migrate_nis_automount.pl Script
This script, found in /opt/ldapux/migrate, migrates the AutoFS maps
from the NIS server to LDIF.
Syntax
scriptname inputfile outputfile
Examples
The following commands migrate the AutoFS map /etc/auto_indirect
to LDIF and place the results in the /tmp/auto_indirect.ldif file:
export LDAP_BASEDN=”dc=nisserv1”
export NIS_DOMAINNAME=”cup.hp.com”
migrate_nis_automount.pl /etc/auto_indirect
/tmp/auto_indirect.ldif
The following shows the /etc/auto_indirect file:
#local mount point remote server:directory
lab1 hostA:/tmp
lab2 hostB:/tmp
The following shows the /tmp/auto_indirect.ldif file:
dn:automountMapName=auto_indirect,dc=nisserv1
objectClass: top
objectClass: automountMap
automountMapName: auto_indirect
dn:automountKey=lab1,\
automountMapname=auto_indirect, dc=nisserv1
objectClass: top
objectClass: automount
automountInformation:hostA:/tmp
automountKey: lab1
dn:automountKey=lab2, \
automountMapname=auto_indirect, dc=nisserv1
objectClass: top
objectClass: automount
automountInformation:hostB:/tmp
automountKey:lab2
Chapter 266
Page 81

Installing And Configuring LDAP-UX Client Services
AutoFS Support
You can use the /opt/ldapux/bin/ldapmodify tool to import the LDIF
file /tmp/auto_indirect.ldif that you just created above into the
LDAP directory. For example, the following command imports the
/tmp/auto_indirect.ldif file to the LDAP base DN “dc=nisserv1” in
the LDAP directory server LDAPSERV1:
/opt/ldapux/bin/ldapmodify -a -h LDAPSERV1 -D “cn=Directory
Manager” -w <passwd> -f /tmp/auto_indirect.ldif
The migrate_nisp_autofs.pl Script
This script, found in /opt/ldapux/migrate/nisplusmigration,
migrates the AutoFS maps from the NIS+ server to the
nisp_automap.ldif file.
Syntax
scriptname inputfile
Examples
The following commands migrate the AutoFS map /etc/auto_indirect
to LDIF and place the results in the nisp_automap.ldif file:
export LDAP_BASEDN=”dc=nishpbnd”
export DOM_ENV =”cup.hp.com”
migrate_nisp_autofs.pl /etc/auto_indirect
The following shows the /etc/auto_indirect file:
#local mount point remote server:directory
lab1 hostA:/tmp
lab2 hostB:/tmp
The following shows the nisp_automap.ldif file:
dn:automountMapName=auto_indirect,dc=nishpbnd
objectClass: top
objectClass: automountMap
automountMapName: auto_indirect
dn:automountKey=lab1, \
automountMapname=auto_indirect, dc=nishpbnd
objectClass: top
objectClass: automount
automountInformation:hostA:/tmp
automountKey: lab1
Chapter 2 67
Page 82

Installing And Configuring LDAP-UX Client Services
Verify the LDAP-UX Client Services
dn:automountKey=lab2, \
automountMapname=auto_indirect, dc=nishpbnd
objectClass: top
objectClass: automount
automountInformation:hostB:/tmp
automountKey:lab2
You can use the /opt/ldapux/bin/ldapmodify tool to import the LDIF
file nisp_automap.ldif that you just created above into the LDAP
directory. For example, the following command imports the
nisp_automap.ldif file to the LDAP base DN “dc=nishpbnd” in the
LDAP directory server LDAPSERV1:
/opt/ldapux/bin/ldapmodify -a -h LDAPSERV1 -D “cn=Directory
Manager” -w <passwd> -f nisp_automap.ldif
Verify the LDAP-UX Client Services
This section describes some simple ways you can verify the installation
and configuration of your LDAP-UX Client Services. You may need to do
more elaborate and detailed testing, especially if you have a large
environment.
If any of the following tests fail, see “Troubleshooting” on page 131.
Step 1. Use the nsquery(1)1 command to test the name service:
nsquery lookup_type lookup_query [lookup_policy]
For example, to test the name service switch to resolve a username
lookup, enter:
nsquery passwd
where
username
username
ldap
is the login name of a valid user whose posix account
information is in the directory. You should see output something like the
following depending on how you have configured /etc/nsswitch.conf:
1. nsquery(1) is a contributed tool included with the ONC/NFS product.
Chapter 268
Page 83

Installing And Configuring LDAP-UX Client Services
Verify the LDAP-UX Client Services
Using "ldap" for the passwd policy.
Searching ldap for jbloggs
User name: jbloggs
user Id: 10000
Group Id: 2000
Gecos:
Home Directory: /home/jbloggs
Shell: /bin/sh
Switch configuration: Terminates Search
This tests the Name Service Switch configuration in /etc/nsswitch.conf. If
you do not see output like that above, check /etc/nsswitch.conf for proper
configuration.
Step 2. Use other commands to display information about users in the directory,
making sure the output is as expected:
pwget -n
nsquery hosts
grget -n
ls -l
username
host_to_find
groupname
NOTE While you can use the following commands to verify your configuration,
these commands enumerate the entire passwd or group database, which
may reduce network and directory server performance for large
databases:
pwget (with no options)
grget (with no options)
listusers
logins
Step 3. Use the beq search utility to search for the following services: pwd
(password), grp (group), shd (shadow password), srv (service), prt
(protocol), rpc (RPC), hst (host), net (network), ngp (netgroup), and grm
(group membership). An example beq command using name as the
search key, grp as the service, and ldap as the library is shown below.
./beq -k n -s grp -l /usr/lib/libnss_ldap.1 nss_status........
NSS_SUCCESS
pw_name...........(iuser1)
pw_passwd.........(*)
pw_uid............(101)
pw_gid............(21)
pw_age............()
Chapter 2 69
Page 84

Installing And Configuring LDAP-UX Client Services
Verify the LDAP-UX Client Services
pw_comment........()
pw_gecos..........(gecos data in files)
pw_dir............(/home/iuser1)
pw_shell..........(/usr/bin/sh)
pw_audid..........(0)
pw_audflg.........(0)
Refer to “beq Search Tool” in Chapter 4 for command syntax and
examples.
Step 4. Log in to the client system from another system using rlogin or telnet.
Log in as a user in the directory and as a user in /etc/passwd to make
sure both work.
Step 5. Optionally, test your pam_authz authorization configuration:
If the pam_authz is configured without the pam_authz.policy file,
verify the followings:
• logging into the client system from another system using rlogin or
telnet with a user name that is a member of a +@netgroup in the
directory to make sure the user will be allowed to log in.
• logging in as a user that is a member of a -@netgroup to be sure that
the user will not be allowed to login.
If the pam_authz is configured with the pam_authz.policy file, verify
the followings:
• logging into the client system with a user name that is covered by an
allow access rule in the policy file. Make sure the user will be
allowed to log in.
• logging in as a user that is covered by a deny access rule in the
policy file. Make sure the user can not login to the client system.
Step 6. Open a new hpterm(1X) window and log in to the client system as a user
whose account information is in the directory. It is important you open a
new hpterm window or log in from another system because if login
doesn’t work, you could be locked out of the system and would have to
reboot to single-user mode.
This tests the Pluggable Authentication Module (PAM) configuration in
/etc/pam.conf. If you cannot log in, check /etc/pam.conf for proper
configuration. Also check your directory to make sure the user’s account
information is accessible by the proxy user or anonymously, as
appropriate. Check your profile to make sure it looks correct. See also
Troubleshooting in this chapter for more information.
Chapter 270
Page 85

Installing And Configuring LDAP-UX Client Services
Verify the LDAP-UX Client Services
Step 7. Use the ls(1) or ll(1) command to examine files belonging to a user whose
account information is in the directory. Make sure the owner and group
of each file are accurate:
ll /tmp
ls -l
If any owner or group shows up as a number instead of a user or group
name, the name service switch is not functioning properly. Check the file
/etc/nsswitch.conf, your directory, and your profile.
If you want to verify that you set up X.500 group membership correctly,
follow these steps:
1. Create a valid posix user and group. Add this user as a member of
this group using the attribute “member” instead of “memberuid”.
Here is an example ldif file specifying xuser2 as a member of the
group xgrpup1:
#cat example_ids.ldif
dn: cn=xgroup1,ou=Groups,o=hp.com
objectClass: posixGroup
objectClass: groupofnames
objectClass: top
cn: xgroup1
userPassword: {crypt}*
gidNumber: 999
member: uid=xuser2,ou=People,o=hp.com
dn: uid=xuser2,ou=People,o=hp.com
uid: xuser2
cn: xuser2
objectClass: top
objectClass: account
objectClass: posixAccount
userPassword: {crypt}xxxxxxxxxxxxx
loginShell: /bin/ksh
uidNumber: 9998
gidNumber: 999
homeDirectory: /home/xuser2
2. Make sure that the file /etc/nsswitch.conf specifies ldap for group
service:
#cat /etc/nsswitch.conf
:
Chapter 2 71
Page 86

Installing And Configuring LDAP-UX Client Services
Configure Subsequent Client Systems
:
group: files ldap
:
:
3. Verify:
#grget -n xgroup1
xgroup1:*:999: xuser2
If xuser2 shows up as a member of xgroup1, then your setup is
correct.
Configure Subsequent Client Systems
Once you have configured your directory and one client system, you can
configure subsequent client systems using the following steps. Modify
any of these files as needed.
Step 1. Use swinstall to install LDAP-UX Client Services on the client system.
This does not require rebooting the client system.
Step 2. Copy the following files from a configured client to the client being
configured:
• /etc/opt/ldapux/ldapux_client.conf
• /etc/opt/ldapux/pcred only if you have configured a proxy user, not if
you are using only anonymous access
• /etc/pam.conf
• /etc/nsswitch.conf
• /etc/opt/ldapux/acred if the /etc/opt/ldapux/acred file exists
• cert7.db or cert8.bd and key3.db flles if SSL is enabled
Set all file access mode permission to be the same as those of the first
client being configured.
Step 3. Download the profile by running get_profile_entry as follows:
cd /opt/ldapux/config
./get_profile_entry -s nss
Chapter 272
Page 87

Installing And Configuring LDAP-UX Client Services
Configure Subsequent Client Systems
Alternatively you could interactively run the setup program to download
the profile from the directory and respond “no” when asked if you want to
change the current configuration:
cd /opt/ldapux/config
./setup
Step 4. If you are using a proxy user, configure the proxy user by calling
ldap_proxy_config as follows:
cd /opt/ldapux/config
./ldap_proxy_config
Step 5. “Verify the LDAP-UX Client Services” on page 68.
Chapter 2 73
Page 88

Installing And Configuring LDAP-UX Client Services
Download the Profile Periodically
Download the Profile Periodically
Setup allows you to define a time interval after which the current profile
is being automatically refreshed. The start time for this periodic refresh
is defined by the time the setup program was run and the value defined
for ProfileTTL. Therefore, it does not allow you to define a specific time of
day when the profile should be downloaded (refreshed). For more
detailed information, refer to the ldapclientd(1) man page.
If you would like to manually control when you want to download the
profile, you can use the following steps:
Step 1. When creating your profile entry using setup, set the ProfileTTL value to
0.
Step 2. Using the command get_profile_entry -s nss, write a shell script
that downloads the profile. Below is an example that downloads the
profile from the directory. Modify this example for your environment. It
also compares the new and old profiles and emails a status message:
#!/bin/ksh
cp /etc/opt/ldapux/ldapux_profile.ldif /etc/opt/ldapux/ldapux_profile.sav
/opt/ldapux/config/get_profile_entry -s nss 2>&1>/tmp/profile.upd$$
diff /etc/opt/ldapux/ldapux_profile.ldif /etc/opt/ldapux/ldapux_profile.sav\
>> /tmp/profile.upd$$
if [ -s /tmp/profile.upd$$ ]; then
cat /tmp/profile.upd$$ | mailx -s "Profile cache refreshed." root@sys01
else
echo "No changes." | mailx -s "Profile cache refreshed." root@sys01
fi
rm -f /etc/opt/ldapux/ldapux_profile.sav
rm -f /tmp/profile.upd$$
Step 3. Create a crontab(1) file (or edit your existing crontab file) and specify
how frequently you want the profile to be downloaded. For example,
assuming the script above is in the file /ldapux/download_ldap_profile,
the following crontab specification specifies that
/ldapux/download_ldap_profile be executed nightly at midnight:
0 0 * * * /ldapux/download_ldap_profile
Step 4. Log in as root and schedule the job with the crontab(1) command. For
example, assuming the crontab entry above is in the file crontab.profile,
the following schedules the profile downloading:
Chapter 274
Page 89

crontab crontab.profile
Installing And Configuring LDAP-UX Client Services
Download the Profile Periodically
Chapter 2 75
Page 90

Installing And Configuring LDAP-UX Client Services
Use r-command for PAM_LDAP
Use r-command for PAM_LDAP
An enhancement has been implemented to the LDAP-UX Client Services
B.03.20, so that r-commands can work with LDAP account users whose
password is hidden, or not in clear text or crypt syntax.
If you want to use this new fearture, use the following steps:
1. Uncomment out the following line in the
/etc/opt/ldapux/ldapux_client.conf file:
#password_as = “x”
2. On the HP-UX 11.0 or 11i v1 client system, modify account
management session in /etc/pam.conf file for pam_ldap to add
“rcommand” option as shown below:
# Account management
#
login account sufficient /usr/lib/security/libpam_unix.1
login account required /usr/lib/security/libpam_ldap.1 rcommand
su account sufficient /usr/lib/security/libpam_unix.1
su account required /usr/lib/security/libpam_ldap.1
dtlogin account sufficient /usr/lib/security/libpam_unix.1
dtlogin account required /usr/lib/security/libpam_ldap.1
dtaction account sufficient /usr/lib/security/libpam_unix.1
dtaction account required /usr/lib/security/libpam_ldap.1
ftp account sufficient /usr/lib/security/libpam_unix.1
ftp account required /usr/lib/security/libpam_ldap.1
OTHER account sufficient /usr/lib/security/libpam_unix.1
OTHER account required /usr/lib/security/libpam_ldap.1 rcommand
On the HP-UX 11i v2 client system, you will modify account
management session in /etc/pam.conf file for pam_ldap to add
“rcommand” option as follows:
# Account management
#
login account required libpam_hpsec.so.1
login account sufficient libpam_unix.so.1
login account required libpam_ldap.so.1 rcommand
su account required libpam_hpsec.so.1
su account sufficient libpam_unix.so.1
su account required libpam_ldap.so.1
Chapter 276
Page 91

Installing And Configuring LDAP-UX Client Services
Use r-command for PAM_LDAP
dtlogin account required libpam_hpsec.so.1
dtlogin account sufficient libpam_unix.so.1
dtlogin account required libpam_ldap.so.1
dtaction account required libpam_hpsec.so.1
dtaction account sufficient libpam_unix.so.1
dtaction account required libpam_ldap.so.1
ftp account required libpam_hpsec.so.1
ftp account sufficient libpam_unix.so.1
ftp account required libpam_ldap.so.1
rcomds account required libpam_hpsec.so.1
rcomds account sufficient libpam_unix.so.1
rcomds account required libpam_ldap.so.1 rcommand
sshd account required libpam_hpsec.so.1
sshd account sufficient libpam_unix.so.1
sshd account required libpam_ldap.so.1
OTHER account sufficient libpam_unix.so.1
OTHER account required libpam_ldap.so.1
CAUTION Setting user password to be returned as any string for the hidden
password, and turning on the “rcommand” option for pam_ldap
account management could allow users with active accounts on a
remote host to rlogin to the local host on to a disabled account.
Chapter 2 77
Page 92

Installing And Configuring LDAP-UX Client Services
Use r-command for PAM_LDAP
Chapter 278
Page 93

3 LDAP Printer Configurator
Support
This chapter contains information describing how LDAP-UX supports
the printer configurator, how to set up the printer schema, and how to
configure the printer configurator to control its behaviors.
This chapter contains the following sections:
• “Overview” on page 80.
• “How the LDAP Printer Configurator works” on page 82.
• “Printer Configuration Parameters” on page 85.
• “Printer Schema” on page 86.
• “Managing the LP printer configuration” on page 88.
• “Limitations of Printer Configurator” on page 91.
Chapter 3 79
Page 94

LDAP Printer Configurator Support
Overview
Overview
Management of network printing is complex, and printers themselves
are more complicated. Instead of having printer configuration and
information scattered over client systems and printer servers, they can
be stored and managed from a single repository. LDAP is suited to build
a backend printer configuration database. LDAP-UX enables the
centralized management of printers, and the printer entries can easily be
distributed to clients to reduce concerns about synchronization of
configuration information. LDAP-UX comes with a printer configurator
to consolidate printer configuration and control of printer devices into
the LDAP Directory Server for a central location of printer management.
Definitions
Printer Services
HP-UX provides LP spooler system with the LP subsystem to manage
printers and print services requests. The LP subsystem is a collection of
18 programs that operate on the resources (files and subdirectories) in
LP spool directory to perform their functions, such as lpadmin,
rlpdaemon programs, and lp command.
Printing Protocol
The LP spooler system has built-in support for sending jobs to other
hosts that running rlpdaemon. rlpdaemon is a line printer daemon
(LPD) for handling remote spool requests. This feaure enables the user to
install a printer on one host and make it accessible from other hosts. It
also works with printers/printservers that have network interfaces that
support the LDP protocol. The LPD network printing protocol is the
widely used network printing protocol in the UNIX world.
LP Printer types
The LP spooler supports the following three types of printers:
• A network printer which is a printer connected to a network
interface or printserver.
• A remote printer is a printer configured on a system other than the
one you are logged into when you submit a print request.
Chapter 380
Page 95

LDAP Printer Configurator Support
Overview
• A local printer which is a printer that is directly connected to your
system.
NOTE The LDAP printer configurator only supports the HP LP spooler system,
remote printers, network printers and printerservers that support Line
Printer Daemon (LPD) protocol. It does not support local printers.
Chapter 3 81
Page 96

LDAP Printer Configurator Support
How the LDAP Printer Configurator works
How the LDAP Printer Configurator works
The Printer Configurator is a service daemon which provides the
following functions:
• Periodically searches the existing printer entries stored in LDAP
Directory Server
• Compares the search result with the master printer record file on
each scheduled ldapsearch
• Adds the print configuration to client system for each new printer
• Deletes the printer from the client system for each removed printer
• Updates master printer record file
When ldapclientd is initialized, it will enable the printer configurator
sevices at the same time. Once the printer configurator is up, it
periodically searches for any existing printer entries in the LDAP
Direcotry Server based on a predefined search filters. If there are any
printer entries in the LDAP Directory Server, the printer configurator
will extract the LP printer configuration from each printer entry.
Then, the printer configurator compares the printer configuration with
the current LP printer configuration in the client system. The result of
comparison will generate a list of new or removed printers. For a new
printer, the printer configurator adds this printer to the LP printer spool
of the client which is running the printer configurator. For a removed
printer, the printer configurator deletes this printer from the LP printer
spool of the client.
With the printer configurator, if a printer administrator attempts to
remove or add a printer, all the administrator has to do is to add or delete
the printer entry in the LDAP Directory Server. The printer
configuration will be updated automatically without manually setting
the printers on each client system.
Chapter 382
Page 97

LDAP Printer Configurator Support
How the LDAP Printer Configurator works
NOTE The system administrator manually adds or removes printers to the
HP-UX system. The LDAP Printer Configurator will only add or remove
printers that it has discovered in the LDAP directory according to the
search filter defined for the printer.
Chapter 3 83
Page 98

LDAP Printer Configurator Support
How the LDAP Printer Configurator works
Figure 3-1 Printer Configurator Architecture
Chapter 384
Page 99

LDAP Printer Configurator Support
Printer Configuration Parameters
Printer Configuration Parameters
The LDAP-UX Client Services provides four printer configuration
parameters, start, search_interval , max_printers and
lpadmin_option available for you to customize and control the
behaviors of the printer configurator. These parameters are defined in
the ldapclientd.conf file. For detailed information on these new
parameters, refer to Chapter 4, “Administering LDAP-UX Client
Services,” on page 93.
Chapter 3 85
Page 100

LDAP Printer Configurator Support
Printer Schema
Printer Schema
The new printer schema,
IETF<draft-fleming-ldap-printer-schema-02.txt>, is used to create the
printer objects that are relevant to the printer configurator services. The
draft printer schema can be obtained from IETF web site at
http://www.ietf.org. For the detailed structure information of the new
printer schema, see Appendix C. You must import the new printer
schema into the LDAP Directory Server to create new printer objects.
NOTE The LDAP printer configurator supports any Directory Servers that
support the LDAP printer schema based on
IETF<draft-fleming-ldap-printer-schema-02.txt>.
An Example
The following shows a typical printer object entry:
dn: printer-name=printer1,ou=printers,dc=cup,dc=hp,dc=com
objectclass: top
objectclass: printerabstract
objectclass: printerservice
objectclass: printerlpd
printer-name: lj81003
printer-uri: lpd://hostA.hp.com/lj81003
printer-location: 47L
printer-make-model: hp laser jet 81003
printer-service-person: John Louie
With the new printer schema, you are able to create printer objects for
the LP printer configuration.The minimum information for a printer
object entry is the local printer name, remote hostname, and the remote
printer name. The remote hostname is the system or device that the
remote printer is connected to. The remote hostname must be the fully
qualified name.
Chapter 386
 Loading...