

Page 1

Installing, Configuring and
Administering the Kerberos Server V 2.0
on HP-UX 11i
HP 9000 Networking
Edition 2
Manufacturing Part Number: T1417-90003
E0602
U.S.A.
© Copyright 2002, Hewlett-Packard Company. .
Page 2

Legal Notices
The information in this document is subject to change without notice.
Hewlett-Packard makes no warranty of any kind with regard to this
manual, including, but not limited to, the implied warranties of
merchantability and fitness for a particular purpose. Hewlett-Packard
shall not be held liable for errors contained herein or direct, indirect,
special, incidental or consequential damages in connection with the
furnishing, performance, or use of this material.
Warranty. A copy of the specific warranty terms applicable to your
Hewlett-Packard product and replacement parts can be obtained from
your local Sales and Service Office.
Restricted Rights Legend. Use, duplication or disclosure by the U.S.
Government is subject to restrictions as set forth in subparagraph (c) (1)
(ii) of the Rights in Technical Data and Computer Software clause at
DFARS 252.227-7013 for DOD agencies, and subparagraphs (c) (1) and
(c) (2) of the Commercial Computer Software Restricted Rights clause at
FAR 52.227-19 for other agencies.
HEWLETT-PACKARD COMPANY
3000 Hanover Street
Palo Alto, California 94304
U.S.A.
Use of this manual and flexible disk(s) or tape cartridge(s) supplied for
this pack is restricted to this product only. Additional copies of the
programs may be made for security and back-up purposes only. Resale of
the programs in their present form or with alterations, is expressly
prohibited.
Copyright Notices. ©copyright 1983-2002 Hewlett-Packard Company,
all rights reserved.
Reproduction, adaptation, or translation of this document without prior
written permission is prohibited, except as allowed under the copyright
laws.
©copyright 1979, 1980, 1983, 1985-93 Regents of the University of
California
2
Page 3

This software is based in part on the Fourth Berkeley Software
Distribution under license from the Regents of the University of
California.
©Copyright 1983-2002, Hewlett-Packard Co., All Rights Reserved
©Copyright 1979, 1980,1983, 1985-1993 The Regents of the Univ. of
California
©Copyright 1980, 1984, 1986 Novell, Inc.
©Copyright 1986-1992 Sun Microsystems, Inc.
©Copyright 1985-2002 Massachusetts Institute of Technology.
©Copyright 1989-93 The Open Software Foundation, Inc.
©Copyright 1986 Digital Equipment Corporation.
©Copyright 1990 Motorola, Inc.
©Copyright 1990, 1991, 1992 Cornell University
©Copyright 1989-1991 The University of Maryland
©Copyright 1988 Carnegie Mellon University
©Copyright 1984-2002 FairCom Corporation
©Copyright 1998-2002 Cybersafe Corporation
©Copyright 1991-2002 Mentat Inc.
©Copyright 1996 Morning Star Technologies Inc.
©Copyright 1996 Progressive Systems, Inc.
©Copyright 1991-2000 Isogon Corporation, All Rights Reserved.
©Copyright 1996 OpenVision Technologies, Inc., All Rights Reserved
Trademark Notices UNIX is a registered trademark in the United
States and other countries, licensed exclusively through The Open
Group.
X Window System is a trademark of the Massachusetts Institute of
Technology.
MS-DOS and Microsoft are U.S. registered trademarks of Microsoft
Corporation.
OSF/Motif is a trademark of the Open Software Foundation, Inc. in the
U.S. and other countries.
3
Page 4

4
Page 5

1. Overview
Chapter Overview . . . . . . . . . . . . . . . . . . . . . . . . . . . . . . . . . . . . . . . . . . . . . . . . . . . . . . 24
How The Kerberos Server Works . . . . . . . . . . . . . . . . . . . . . . . . . . . . . . . . . . . . . . . . . . 25
Authentication Process . . . . . . . . . . . . . . . . . . . . . . . . . . . . . . . . . . . . . . . . . . . . . . . . . . 27
DES vs 3DES Key Type Settings . . . . . . . . . . . . . . . . . . . . . . . . . . . . . . . . . . . . . . . . . . 32
2. Installation
Chapter Overview . . . . . . . . . . . . . . . . . . . . . . . . . . . . . . . . . . . . . . . . . . . . . . . . . . . . . . 34
Before Installing The Kerberos Server. . . . . . . . . . . . . . . . . . . . . . . . . . . . . . . . . . . . . . 35
Hardware Requirements . . . . . . . . . . . . . . . . . . . . . . . . . . . . . . . . . . . . . . . . . . . . . . . . . 36
Software Requirements . . . . . . . . . . . . . . . . . . . . . . . . . . . . . . . . . . . . . . . . . . . . . . . . . . 37
Installing The Kerberos Server. . . . . . . . . . . . . . . . . . . . . . . . . . . . . . . . . . . . . . . . . . . . 38
3. Migration
Chapter Overview . . . . . . . . . . . . . . . . . . . . . . . . . . . . . . . . . . . . . . . . . . . . . . . . . . . . . . 43
Policy Migration. . . . . . . . . . . . . . . . . . . . . . . . . . . . . . . . . . . . . . . . . . . . . . . . . . . . . . . . 44
Step-wise Procedure For Migration . . . . . . . . . . . . . . . . . . . . . . . . . . . . . . . . . . . . . . . . 45
4. Interoperability With Windows 2000
Chapter Overview . . . . . . . . . . . . . . . . . . . . . . . . . . . . . . . . . . . . . . . . . . . . . . . . . . . . . . 51
Understanding the Terminology. . . . . . . . . . . . . . . . . . . . . . . . . . . . . . . . . . . . . . . . . . . 52
Table of Analogous Terms . . . . . . . . . . . . . . . . . . . . . . . . . . . . . . . . . . . . . . . . . . . . . . . . 54
HP’s Kerberos Server and Windows 2000 Interoperability. . . . . . . . . . . . . . . . . . . . . . 55
Establishing Trust Between HP’s Kerberos Servers and Windows 2000. . . . . . . . . . . 56
Single Realm (Domain) Authentication . . . . . . . . . . . . . . . . . . . . . . . . . . . . . . . . . . . . . 57
Inter-Realm (Inter-Domain) Authentication . . . . . . . . . . . . . . . . . . . . . . . . . . . . . . . . . 58
Special Considerations for Interoperability . . . . . . . . . . . . . . . . . . . . . . . . . . . . . . . . . . 59
Database Considerations . . . . . . . . . . . . . . . . . . . . . . . . . . . . . . . . . . . . . . . . . . . . . . . 59
Encryption Considerations. . . . . . . . . . . . . . . . . . . . . . . . . . . . . . . . . . . . . . . . . . . . . . 59
Postdated Tickets . . . . . . . . . . . . . . . . . . . . . . . . . . . . . . . . . . . . . . . . . . . . . . . . . . . . . 59
Contents
5. Configuration
Chapter Overview . . . . . . . . . . . . . . . . . . . . . . . . . . . . . . . . . . . . . . . . . . . . . . . . . . . . . . 62
Configuration Files For The Kerberos Server . . . . . . . . . . . . . . . . . . . . . . . . . . . . . . . . 63
Auto-Configuration of the Security Server. . . . . . . . . . . . . . . . . . . . . . . . . . . . . . . . . . . 64
Manual Configuration Of The Kerberos Server. . . . . . . . . . . . . . . . . . . . . . . . . . . . . . . 67
Editing the Configuration Files . . . . . . . . . . . . . . . . . . . . . . . . . . . . . . . . . . . . . . . . . . 67
krb.conf. . . . . . . . . . . . . . . . . . . . . . . . . . . . . . . . . . . . . . . . . . . . . . . . . . . . . . . . . . . . . . . 69
5
Page 6

Contents
krb.conf Format. . . . . . . . . . . . . . . . . . . . . . . . . . . . . . . . . . . . . . . . . . . . . . . . . . . . . . . 69
Sample krb.conf File . . . . . . . . . . . . . . . . . . . . . . . . . . . . . . . . . . . . . . . . . . . . . . . . . . . . 71
krb.realms. . . . . . . . . . . . . . . . . . . . . . . . . . . . . . . . . . . . . . . . . . . . . . . . . . . . . . . . . . . . . 73
krb.realms Format . . . . . . . . . . . . . . . . . . . . . . . . . . . . . . . . . . . . . . . . . . . . . . . . . . . . 74
Sample krb.realms. . . . . . . . . . . . . . . . . . . . . . . . . . . . . . . . . . . . . . . . . . . . . . . . . . . . . . 76
Configuring The Primary Server. . . . . . . . . . . . . . . . . . . . . . . . . . . . . . . . . . . . . . . . . . . 78
Creating The Principal Database After Installation . . . . . . . . . . . . . . . . . . . . . . . . . . . 79
Add An Administrative Principal . . . . . . . . . . . . . . . . . . . . . . . . . . . . . . . . . . . . . . . . . . 80
To add an administrative principal using the Administrator . . . . . . . . . . . . . . . . . . 80
To add an administrative principal using the Remote Command-Line-Administrator
81
Create The host/<fqdn> principal And Extract Its Service Key . . . . . . . . . . . . . . . . . . 82
Start the Kerberos daemons . . . . . . . . . . . . . . . . . . . . . . . . . . . . . . . . . . . . . . . . . . . . . . 83
Define Secondary Server Network Locations. . . . . . . . . . . . . . . . . . . . . . . . . . . . . . . . . 84
Security Policies. . . . . . . . . . . . . . . . . . . . . . . . . . . . . . . . . . . . . . . . . . . . . . . . . . . . . . . .85
Password Policy File . . . . . . . . . . . . . . . . . . . . . . . . . . . . . . . . . . . . . . . . . . . . . . . . . . . 85
admin_acl_file . . . . . . . . . . . . . . . . . . . . . . . . . . . . . . . . . . . . . . . . . . . . . . . . . . . . . . . . 85
Starting the Security Server . . . . . . . . . . . . . . . . . . . . . . . . . . . . . . . . . . . . . . . . . . . . . . 86
Summary . . . . . . . . . . . . . . . . . . . . . . . . . . . . . . . . . . . . . . . . . . . . . . . . . . . . . . . . . . . . .87
Configuring The Secondary Security Servers. . . . . . . . . . . . . . . . . . . . . . . . . . . . . . . . . 89
Create the Principal Database. . . . . . . . . . . . . . . . . . . . . . . . . . . . . . . . . . . . . . . . . . . 89
Copy the Kerberos Configuration File. . . . . . . . . . . . . . . . . . . . . . . . . . . . . . . . . . . . . 89
Create a host/<fqdn> Principal and Extract Its Key . . . . . . . . . . . . . . . . . . . . . . . . . 90
6. Administration
Chapter Overview . . . . . . . . . . . . . . . . . . . . . . . . . . . . . . . . . . . . . . . . . . . . . . . . . . . . . . 92
Administering the Kerberos Database . . . . . . . . . . . . . . . . . . . . . . . . . . . . . . . . . . . . . . 93
kadmind . . . . . . . . . . . . . . . . . . . . . . . . . . . . . . . . . . . . . . . . . . . . . . . . . . . . . . . . . . . . . . 94
admin_acl_file. . . . . . . . . . . . . . . . . . . . . . . . . . . . . . . . . . . . . . . . . . . . . . . . . . . . . . . . . .95
Assigning Administrative Permissions . . . . . . . . . . . . . . . . . . . . . . . . . . . . . . . . . . . . 96
Adding Entries to the admin_acl_file . . . . . . . . . . . . . . . . . . . . . . . . . . . . . . . . . . . . . 98
Creating Administrative Accounts . . . . . . . . . . . . . . . . . . . . . . . . . . . . . . . . . . . . . . . 99
Using Restricted Adminsitrator. . . . . . . . . . . . . . . . . . . . . . . . . . . . . . . . . . . . . . . . . . 99
Password Policy File. . . . . . . . . . . . . . . . . . . . . . . . . . . . . . . . . . . . . . . . . . . . . . . . . . . . 101
Editing the Default File . . . . . . . . . . . . . . . . . . . . . . . . . . . . . . . . . . . . . . . . . . . . . . . 101
Principals . . . . . . . . . . . . . . . . . . . . . . . . . . . . . . . . . . . . . . . . . . . . . . . . . . . . . . . . . . . . 103
6
Page 7

Contents
Adding User Principals. . . . . . . . . . . . . . . . . . . . . . . . . . . . . . . . . . . . . . . . . . . . . . . . 105
Adding New Service Principals . . . . . . . . . . . . . . . . . . . . . . . . . . . . . . . . . . . . . . . . . 105
kadmin Vs kadminl . . . . . . . . . . . . . . . . . . . . . . . . . . . . . . . . . . . . . . . . . . . . . . . . . . . . 112
Administration Tools . . . . . . . . . . . . . . . . . . . . . . . . . . . . . . . . . . . . . . . . . . . . . . . . . 112
Administrator. . . . . . . . . . . . . . . . . . . . . . . . . . . . . . . . . . . . . . . . . . . . . . . . . . . . . . . . . 114
Standard Functionality of the Administrator. . . . . . . . . . . . . . . . . . . . . . . . . . . . . . 115
Local Administrator - kadminl_ui. . . . . . . . . . . . . . . . . . . . . . . . . . . . . . . . . . . . . . . . . 116
Usage of kadminl_ui . . . . . . . . . . . . . . . . . . . . . . . . . . . . . . . . . . . . . . . . . . . . . . . . . 116
Principals Tab. . . . . . . . . . . . . . . . . . . . . . . . . . . . . . . . . . . . . . . . . . . . . . . . . . . . . . . . . 118
General Tab (Principal Information window). . . . . . . . . . . . . . . . . . . . . . . . . . . . . . . . 120
Adding Principals to the Database . . . . . . . . . . . . . . . . . . . . . . . . . . . . . . . . . . . . . . . . 122
To add a principal. . . . . . . . . . . . . . . . . . . . . . . . . . . . . . . . . . . . . . . . . . . . . . . . . . . . 122
To simultaneously add multiple principals with the same settings . . . . . . . . . . . . 123
Creating an Administrative Principal . . . . . . . . . . . . . . . . . . . . . . . . . . . . . . . . . . . . . 124
To create an administrative principal. . . . . . . . . . . . . . . . . . . . . . . . . . . . . . . . . . . . 124
Finding a Principal . . . . . . . . . . . . . . . . . . . . . . . . . . . . . . . . . . . . . . . . . . . . . . . . . . . . 126
To search for a principal. . . . . . . . . . . . . . . . . . . . . . . . . . . . . . . . . . . . . . . . . . . . . . . 126
Search Criteria . . . . . . . . . . . . . . . . . . . . . . . . . . . . . . . . . . . . . . . . . . . . . . . . . . . . . . 126
Deleting a Principal. . . . . . . . . . . . . . . . . . . . . . . . . . . . . . . . . . . . . . . . . . . . . . . . . . . . 129
To delete a user principal. . . . . . . . . . . . . . . . . . . . . . . . . . . . . . . . . . . . . . . . . . . . . . 129
Loading Default Values for a Principal. . . . . . . . . . . . . . . . . . . . . . . . . . . . . . . . . . . . . 130
To reload the default values for a principal. . . . . . . . . . . . . . . . . . . . . . . . . . . . . . . . 130
Restoring Previously Saved Values for a Principal . . . . . . . . . . . . . . . . . . . . . . . . . . . 131
To restore previously saved values for a principal . . . . . . . . . . . . . . . . . . . . . . . . . . 131
Changing Ticket Information . . . . . . . . . . . . . . . . . . . . . . . . . . . . . . . . . . . . . . . . . . . . 132
To change ticket information . . . . . . . . . . . . . . . . . . . . . . . . . . . . . . . . . . . . . . . . . . . 132
Rules for Setting Maximum Ticket Lifetime . . . . . . . . . . . . . . . . . . . . . . . . . . . . . . . . 134
Example. . . . . . . . . . . . . . . . . . . . . . . . . . . . . . . . . . . . . . . . . . . . . . . . . . . . . . . . . . . . 134
Rules for Setting Maximum Renew Time. . . . . . . . . . . . . . . . . . . . . . . . . . . . . . . . . . . 135
Examples. . . . . . . . . . . . . . . . . . . . . . . . . . . . . . . . . . . . . . . . . . . . . . . . . . . . . . . . . . . 135
Changing Password Information. . . . . . . . . . . . . . . . . . . . . . . . . . . . . . . . . . . . . . . . . . 136
To change the password information. . . . . . . . . . . . . . . . . . . . . . . . . . . . . . . . . . . . . 136
Password Tab (Principal Information window) . . . . . . . . . . . . . . . . . . . . . . . . . . . . . . 138
Change Password window (Password tab) . . . . . . . . . . . . . . . . . . . . . . . . . . . . . . . . 140
Changing Key Types . . . . . . . . . . . . . . . . . . . . . . . . . . . . . . . . . . . . . . . . . . . . . . . . . . . 142
To change a DES principal’s key type to 3DES. . . . . . . . . . . . . . . . . . . . . . . . . . . . . 142
Changing Principal Attributes . . . . . . . . . . . . . . . . . . . . . . . . . . . . . . . . . . . . . . . . . . . 144
To change principal attributes. . . . . . . . . . . . . . . . . . . . . . . . . . . . . . . . . . . . . . . . . . 144
7
Page 8

Contents
Attributes Tab (Principal Information window). . . . . . . . . . . . . . . . . . . . . . . . . . . . . . 145
Deleting a Service Principal . . . . . . . . . . . . . . . . . . . . . . . . . . . . . . . . . . . . . . . . . . . . . 150
To delete a service principal. . . . . . . . . . . . . . . . . . . . . . . . . . . . . . . . . . . . . . . . . . . . 150
Extracting Service Keys. . . . . . . . . . . . . . . . . . . . . . . . . . . . . . . . . . . . . . . . . . . . . . . . . 151
To securely extract principal keys to the service key table . . . . . . . . . . . . . . . . . . . 151
Extract Service Key Table window . . . . . . . . . . . . . . . . . . . . . . . . . . . . . . . . . . . . . . . . 153
Using Groups to Control Settings. . . . . . . . . . . . . . . . . . . . . . . . . . . . . . . . . . . . . . . . . 155
To edit the default group . . . . . . . . . . . . . . . . . . . . . . . . . . . . . . . . . . . . . . . . . . . . . . 155
Group Information window (Principal Information window) . . . . . . . . . . . . . . . . . . . 156
Principal Attributes . . . . . . . . . . . . . . . . . . . . . . . . . . . . . . . . . . . . . . . . . . . . . . . . . . 158
Setting Administrative Permissions. . . . . . . . . . . . . . . . . . . . . . . . . . . . . . . . . . . . . . . 159
To set administrative permissions. . . . . . . . . . . . . . . . . . . . . . . . . . . . . . . . . . . . . . . 159
Administrative Permissions . . . . . . . . . . . . . . . . . . . . . . . . . . . . . . . . . . . . . . . . . . . . . 160
Realms Tab. . . . . . . . . . . . . . . . . . . . . . . . . . . . . . . . . . . . . . . . . . . . . . . . . . . . . . . . . . . 163
Realm Information window (Realms tab) . . . . . . . . . . . . . . . . . . . . . . . . . . . . . . . . . 164
Adding a Realm . . . . . . . . . . . . . . . . . . . . . . . . . . . . . . . . . . . . . . . . . . . . . . . . . . . . . . . 165
To add a realm. . . . . . . . . . . . . . . . . . . . . . . . . . . . . . . . . . . . . . . . . . . . . . . . . . . . . . . 165
Deleting a Realm . . . . . . . . . . . . . . . . . . . . . . . . . . . . . . . . . . . . . . . . . . . . . . . . . . . . . . 166
To delete a realm. . . . . . . . . . . . . . . . . . . . . . . . . . . . . . . . . . . . . . . . . . . . . . . . . . . . . 166
Remote Administrator - kadmin_ui . . . . . . . . . . . . . . . . . . . . . . . . . . . . . . . . . . . . . . . 167
Manual Administration Using kadmin. . . . . . . . . . . . . . . . . . . . . . . . . . . . . . . . . . . . . 170
Add a New Principal. . . . . . . . . . . . . . . . . . . . . . . . . . . . . . . . . . . . . . . . . . . . . . . . . . 172
Add Random Key . . . . . . . . . . . . . . . . . . . . . . . . . . . . . . . . . . . . . . . . . . . . . . . . . . . . 172
Specify New Password . . . . . . . . . . . . . . . . . . . . . . . . . . . . . . . . . . . . . . . . . . . . . . . . 173
Change Password to a New Randomly Generated Password. . . . . . . . . . . . . . . . . . 173
Delete a Principal . . . . . . . . . . . . . . . . . . . . . . . . . . . . . . . . . . . . . . . . . . . . . . . . . . . . 173
Extract a Principal . . . . . . . . . . . . . . . . . . . . . . . . . . . . . . . . . . . . . . . . . . . . . . . . . . . 174
List the Attributes of a Principal. . . . . . . . . . . . . . . . . . . . . . . . . . . . . . . . . . . . . . . . 175
Modifying a Principal . . . . . . . . . . . . . . . . . . . . . . . . . . . . . . . . . . . . . . . . . . . . . . . . . 175
Principal Database Utilities . . . . . . . . . . . . . . . . . . . . . . . . . . . . . . . . . . . . . . . . . . . . . 190
Creating the Kerberos Database. . . . . . . . . . . . . . . . . . . . . . . . . . . . . . . . . . . . . . . . . . 191
Database Encryption . . . . . . . . . . . . . . . . . . . . . . . . . . . . . . . . . . . . . . . . . . . . . . . . . 193
Database Master Password . . . . . . . . . . . . . . . . . . . . . . . . . . . . . . . . . . . . . . . . . . . . 194
Destroying the Kerberos Database . . . . . . . . . . . . . . . . . . . . . . . . . . . . . . . . . . . . . . . . 195
Dumping the Kerberos Database . . . . . . . . . . . . . . . . . . . . . . . . . . . . . . . . . . . . . . . . . 196
Loading the Kerberos Database . . . . . . . . . . . . . . . . . . . . . . . . . . . . . . . . . . . . . . . . . . 197
8
Page 9

Stashing the Master Key. . . . . . . . . . . . . . . . . . . . . . . . . . . . . . . . . . . . . . . . . . . . . . . . 198
Starting and Stopping Daemons. . . . . . . . . . . . . . . . . . . . . . . . . . . . . . . . . . . . . . . . . . 200
Maintenance Tasks . . . . . . . . . . . . . . . . . . . . . . . . . . . . . . . . . . . . . . . . . . . . . . . . . . . . 201
Protecting Security Server Secrets . . . . . . . . . . . . . . . . . . . . . . . . . . . . . . . . . . . . . . 201
Backing Up Primary Server Data. . . . . . . . . . . . . . . . . . . . . . . . . . . . . . . . . . . . . . . . . 202
Special Note on Backing up the Principal Database . . . . . . . . . . . . . . . . . . . . . . . . 202
Removing Unused Space From the Database . . . . . . . . . . . . . . . . . . . . . . . . . . . . . . . 204
7. Propagation
Chapter Overview . . . . . . . . . . . . . . . . . . . . . . . . . . . . . . . . . . . . . . . . . . . . . . . . . . . . . 208
Propagation Hierarchy. . . . . . . . . . . . . . . . . . . . . . . . . . . . . . . . . . . . . . . . . . . . . . . . . . 209
Propagation Relationships . . . . . . . . . . . . . . . . . . . . . . . . . . . . . . . . . . . . . . . . . . . . . 209
Service Key Table (v5srvtab). . . . . . . . . . . . . . . . . . . . . . . . . . . . . . . . . . . . . . . . . . . . . 210
Maintaining Secret Keys In The Key Table File. . . . . . . . . . . . . . . . . . . . . . . . . . . . 210
Propagation Tools. . . . . . . . . . . . . . . . . . . . . . . . . . . . . . . . . . . . . . . . . . . . . . . . . . . . . . 212
kpropd. . . . . . . . . . . . . . . . . . . . . . . . . . . . . . . . . . . . . . . . . . . . . . . . . . . . . . . . . . . . . . . 214
mkpropcf. . . . . . . . . . . . . . . . . . . . . . . . . . . . . . . . . . . . . . . . . . . . . . . . . . . . . . . . . . . . . 215
kpropd.ini . . . . . . . . . . . . . . . . . . . . . . . . . . . . . . . . . . . . . . . . . . . . . . . . . . . . . . . . . . . . 217
Sections . . . . . . . . . . . . . . . . . . . . . . . . . . . . . . . . . . . . . . . . . . . . . . . . . . . . . . . . . . . . 218
prpadmin . . . . . . . . . . . . . . . . . . . . . . . . . . . . . . . . . . . . . . . . . . . . . . . . . . . . . . . . . . . . 223
Setting Up Propagation. . . . . . . . . . . . . . . . . . . . . . . . . . . . . . . . . . . . . . . . . . . . . . . . . 224
Monitoring Propagation. . . . . . . . . . . . . . . . . . . . . . . . . . . . . . . . . . . . . . . . . . . . . . . . . 229
Monitoring the Log File . . . . . . . . . . . . . . . . . . . . . . . . . . . . . . . . . . . . . . . . . . . . . . . 229
Restarting Propagation Using the Simple Process. . . . . . . . . . . . . . . . . . . . . . . . . . 234
Restarting Propagation Using the Full Dump Method . . . . . . . . . . . . . . . . . . . . . . 235
Propagation Failure . . . . . . . . . . . . . . . . . . . . . . . . . . . . . . . . . . . . . . . . . . . . . . . . . . 235
Converting a Secondary Server to a Primary Server . . . . . . . . . . . . . . . . . . . . . . . . 236
Restarting Services. . . . . . . . . . . . . . . . . . . . . . . . . . . . . . . . . . . . . . . . . . . . . . . . . . . 237
Cleaning the Temp Directory. . . . . . . . . . . . . . . . . . . . . . . . . . . . . . . . . . . . . . . . . . . 237
Configuring for Multi-realm Enterprises . . . . . . . . . . . . . . . . . . . . . . . . . . . . . . . . . . . 239
Number of Realms per Database. . . . . . . . . . . . . . . . . . . . . . . . . . . . . . . . . . . . . . . . 239
Primary Servers That Support Multiple Realms . . . . . . . . . . . . . . . . . . . . . . . . . . . 239
Multiple Primary Servers That Support A Single Realm . . . . . . . . . . . . . . . . . . . . 240
Adding More Realms to a Multi-realm Database . . . . . . . . . . . . . . . . . . . . . . . . . . . 240
Database Propagation for Multi-realm Databases . . . . . . . . . . . . . . . . . . . . . . . . . . 240
Contents
8. Inter-realm
Considering Trust Relationships . . . . . . . . . . . . . . . . . . . . . . . . . . . . . . . . . . . . . . . . . 245
9
Page 10

Contents
One-way Trust. . . . . . . . . . . . . . . . . . . . . . . . . . . . . . . . . . . . . . . . . . . . . . . . . . . . . . . 245
Two-way Trust . . . . . . . . . . . . . . . . . . . . . . . . . . . . . . . . . . . . . . . . . . . . . . . . . . . . . . 245
Hierarchical Trust . . . . . . . . . . . . . . . . . . . . . . . . . . . . . . . . . . . . . . . . . . . . . . . . . . . 246
Other Types Of Trust . . . . . . . . . . . . . . . . . . . . . . . . . . . . . . . . . . . . . . . . . . . . . . . . . 246
Configuring for Multi-realm Enterprises . . . . . . . . . . . . . . . . . . . . . . . . . . . . . . . . . . . 247
Number of Realms per Database. . . . . . . . . . . . . . . . . . . . . . . . . . . . . . . . . . . . . . . . 247
Primary Servers That Support Multiple Realms . . . . . . . . . . . . . . . . . . . . . . . . . . . 247
Multiple Primary Servers That Support A Single Realm . . . . . . . . . . . . . . . . . . . . 248
Adding More Realms to a Multi-realm Database . . . . . . . . . . . . . . . . . . . . . . . . . . . 248
Database Propagation for Multi-realm Databases . . . . . . . . . . . . . . . . . . . . . . . . . . 248
Configuring Direct Trust Relationships . . . . . . . . . . . . . . . . . . . . . . . . . . . . . . . . . . . . 250
Direct Trust Relationship Example. . . . . . . . . . . . . . . . . . . . . . . . . . . . . . . . . . . . . . 251
Hierarchical Inter-realm Trust. . . . . . . . . . . . . . . . . . . . . . . . . . . . . . . . . . . . . . . . . . . 252
A Hierarchical Chain of Trust . . . . . . . . . . . . . . . . . . . . . . . . . . . . . . . . . . . . . . . . . . 252
Hierarchical Inter-realm Example . . . . . . . . . . . . . . . . . . . . . . . . . . . . . . . . . . . . . . 252
Hierarchical Inter-realm Configuration . . . . . . . . . . . . . . . . . . . . . . . . . . . . . . . . . . 253
9. Troubleshooting
Chapter Overview . . . . . . . . . . . . . . . . . . . . . . . . . . . . . . . . . . . . . . . . . . . . . . . . . . . . . 261
Characterizing the Problem . . . . . . . . . . . . . . . . . . . . . . . . . . . . . . . . . . . . . . . . . . . . . 262
Diagnostic Tools Summary . . . . . . . . . . . . . . . . . . . . . . . . . . . . . . . . . . . . . . . . . . . . . . 264
Troubleshooting Kerberos . . . . . . . . . . . . . . . . . . . . . . . . . . . . . . . . . . . . . . . . . . . . . . . 265
Error Messages . . . . . . . . . . . . . . . . . . . . . . . . . . . . . . . . . . . . . . . . . . . . . . . . . . . . . . 265
Logging Capabilities. . . . . . . . . . . . . . . . . . . . . . . . . . . . . . . . . . . . . . . . . . . . . . . . . . 265
Services Checklist. . . . . . . . . . . . . . . . . . . . . . . . . . . . . . . . . . . . . . . . . . . . . . . . . . . . 266
Troubleshooting Techniques. . . . . . . . . . . . . . . . . . . . . . . . . . . . . . . . . . . . . . . . . . . . 267
General Errors . . . . . . . . . . . . . . . . . . . . . . . . . . . . . . . . . . . . . . . . . . . . . . . . . . . . . . . . 271
Forgotten Passwords. . . . . . . . . . . . . . . . . . . . . . . . . . . . . . . . . . . . . . . . . . . . . . . . . . 271
Locking and Unlocking Accounts. . . . . . . . . . . . . . . . . . . . . . . . . . . . . . . . . . . . . . . . 271
Clock Synchronization . . . . . . . . . . . . . . . . . . . . . . . . . . . . . . . . . . . . . . . . . . . . . . . . 272
Typical User Error Messages . . . . . . . . . . . . . . . . . . . . . . . . . . . . . . . . . . . . . . . . . . . . 273
Decrypt integrity check failed . . . . . . . . . . . . . . . . . . . . . . . . . . . . . . . . . . . . . . . . . . 273
Password has already been used or is too close to current one . . . . . . . . . . . . . . . . 273
Administrative Error Messages . . . . . . . . . . . . . . . . . . . . . . . . . . . . . . . . . . . . . . . . . . 274
Password has expired while getting initial ticket. . . . . . . . . . . . . . . . . . . . . . . . . . . 274
Service key not available while getting initial ticket . . . . . . . . . . . . . . . . . . . . . . . . 274
10
Page 11

Contents
Reporting Problems to Your Hewlett-Packard Support Contact. . . . . . . . . . . . . . . . . 276
Glossary . . . . . . . . . . . . . . . . . . . . . . . . . . . . . . . . . . . . . . . . . . . . . . . . . . . . . . . 279
Index . . . . . . . . . . . . . . . . . . . . . . . . . . . . . . . . . . . . . . . . . . . . . . . . . . . . . . . . . . 283
11
Page 12

Contents
12
Page 13

Tables
Table 4-1. Table of Analogous Terms. . . . . . . . . . . . . . . . . . . . . . . . . . . . . . . . . . . . . . 54
Table 5-1. Security Server Files That Require Configuration . . . . . . . . . . . . . . . . . . 63
Table 6-1. Administrative Permission Settings . . . . . . . . . . . . . . . . . . . . . . . . . . . . . 96
Table 6-2. Default Password Policy Settings for the base group . . . . . . . . . . . . . . . 101
Table 6-3. Administration Tools . . . . . . . . . . . . . . . . . . . . . . . . . . . . . . . . . . . . . . . . 113
Table 6-4. Require Initial Authentication Attribute Settings . . . . . . . . . . . . . . . . . 185
Table 6-5. Principal Database Utilities. . . . . . . . . . . . . . . . . . . . . . . . . . . . . . . . . . . 190
Table 6-6. Situations that require Starting and Stopping Daemons and Services. 200
Table 7-1. Propagation Tools . . . . . . . . . . . . . . . . . . . . . . . . . . . . . . . . . . . . . . . . . . . 212
Table 7-2. Primary Server Services and Daemons. . . . . . . . . . . . . . . . . . . . . . . . . . 225
Table 9-1. Diagnostic Tools . . . . . . . . . . . . . . . . . . . . . . . . . . . . . . . . . . . . . . . . . . . . 264
Table 9-2. Table of Errors Messages . . . . . . . . . . . . . . . . . . . . . . . . . . . . . . . . . . . . . 267
13
Page 14

Tables
14
Page 15

Figures
Figure 1-1. Authentication Process. . . . . . . . . . . . . . . . . . . . . . . . . . . . . . . . . . . . . . . 28
Figure 6-1. Principals Tab . . . . . . . . . . . . . . . . . . . . . . . . . . . . . . . . . . . . . . . . . . . . . 118
Figure 6-2. General Tab (Principal Information Window). . . . . . . . . . . . . . . . . . . . 120
Figure 6-3. Password Tab (Principal Information Window) . . . . . . . . . . . . . . . . . . 138
Figure 6-4. Change Password Window (Password Tab). . . . . . . . . . . . . . . . . . . . . . 140
Figure 6-5. Attributes Tab (Principal Information Window). . . . . . . . . . . . . . . . . . 145
Figure 6-6. Extract Service Key Table Window . . . . . . . . . . . . . . . . . . . . . . . . . . . . 153
Figure 6-7. Group Information Window . . . . . . . . . . . . . . . . . . . . . . . . . . . . . . . . . . 157
Figure 6-8. Administrative Permissions. . . . . . . . . . . . . . . . . . . . . . . . . . . . . . . . . . 160
Figure 6-9. Realms Tab . . . . . . . . . . . . . . . . . . . . . . . . . . . . . . . . . . . . . . . . . . . . . . . 163
Figure 6-10. Realm Information Window (Realms Tab) . . . . . . . . . . . . . . . . . . . . . 164
Figure 6-11. Logon Window (Remote Administrator) . . . . . . . . . . . . . . . . . . . . . . . 168
Figure 6-12. Change Password Window (Remote Administrator). . . . . . . . . . . . . . 168
Figure 6-13. Warning Message (Remote Administrator) . . . . . . . . . . . . . . . . . . . . . 169
Figure 8-1. Hierarchical Inter-realm Configuration. . . . . . . . . . . . . . . . . . . . . . . . . 254
15
Page 16

Figures
16
Page 17

Preface
This manual describes how to install, configure, administer and trouble
shoot the Kerberos Server on HP 9000 servers running on HP-UX 11i.
17
Page 18

Audience
HP intends this manual for system managers or administrators
responsible for configuring and maintaining the Kerberos server on
HP-UX 11i.
This manual is based on the assumption that you have:
• An understanding of distributed network concepts and client-server
computing
• Demonstrated knowledge of UNIX
• An understanding of the basics Kerberos
Related Software Products
• PAM Kerberos on HP-UX 11i delivered as part of the HP-UX
Internet operating environment component (HP-UX 11i-OE).
• KRB5 Client Software on HP-UX 11i delivered as part of the core
O/S.
• GSS-API on HP-UX 11i (J5849AA) delivered as part of the core O/S.
Related Documentation
• Configuration Guide for Kerberos Client Products on HP-UX
(T1417-9005)
18
• PAM Kerberos Release Notes for HP-UX 11i (J5849-90002)
• PAM Kerberos Release Notes for HP-UX 11.0 (J5849-90004)
• KRB5 Client Software Release Notes for HP-UX 11.0 (J5849-90005)
• GSS-API Release Notes for HP-UX 11.0 (J5849-90006)
• Installing and Administering Internet Services (B2355-90759)
• Using Internet Services (B2355-90148)
• HP-UX operating system version 11i or later - see Installing and
Updating HP-UX for HP 9000 Series 700, or Installing and Updating
HP-UX for HP 9000 Series 800.
Accessing the World Wide Web
• HP Technical Documentation and White Papers
Page 19

— http://docs.hp.com
— http://www.unixsolutions.hp.com/products/hpux/
hpux11/whitepapers/netsecur.pdf
• HP-UX IT Resource Center:
— http://us-support.external.hp.com (US and Asia Pacific)
— http://europe-support.external.hp.com (Europe)
• The Internet Engineering Task Force RFC Pages
— http://www.ietf.org/rfc.html
Related Request for Comments (RFCs)
• RFC 1510 - The Kerberos Network Authentication Service (V5)
• RFC 1964 - The Kerberos Version 5 GSS-API Mechanism
• RFC 2743 - Generic Security Service Application Program Interface
• RFC 2744 - Generic Security Service API
19
Page 20

Conventions
The following conventions are used throughout this manual:
Text Conventions
italic Identifies book titles
bold Identifiescommand-lineoptions, command buttonsand
menu items
Syntax Conventions
fixed width Identifies file names, system prompts, operating
system commands, and UNIX error and system
messages
italic fixed Identifies variables that you need to replace according
width to your environment
bold fixed Identifies the default in a series of parameters
width
| Separates mutually exclusive parameters; only one of
the parameters separated by the bar is allowed
[ ] Pair indicates that the enclosed parameter(s) are
optional
{ } Pair indicates that only one of the enclosed parameters
is required.
20
\ Indicates that a command line, parameter, or code
continues in the following line
# Precedes a UNIX command that must be performed as a
root user
% Precedes a UNIX command that must be performed as
an ordinary user
Page 21

Using This Manual
The Installing, Configuring and Administering the Kerberos Server on
HP-UX 11i manual describes how this product can provide the
infrastructure for your security needs. Use this guide as a road map to
find information that you need to configure and maintain the Kerberos
Server.
This manual is organized as follows:
• Chapter 1, Overview - Provides an introduction to the Kerberos
Server, outlines the new features in this release and highlights the
key advantages of using the Kerberos Server.
• Chapter 2, Installation - Describes the pre-requisites and the
procedure for installing the Kerberos Server.
• Chapter 3, Migration - Explains the migration process from
Kerberos Server V 1.0 to the latest version, Kerberos Server V
2.0.
• Chapter 4, Interoperability - Contains information specific to
establishing interoperability with Windows 2000 Kerberos
implementations.
• Chapter 5, Configuration - Provides information on the
Configuration files of the Kerberos Server.Theseconfigurationfiles
have been explained in detail with relevant examples and sample
files. Also, the process for configuring your Primary Security
Server and Secondary Security Servers, have been explained
here.
• Chapter 6, Administration - Describes the procedures for
administering the Kerberos Servers’ database. It also entails a
discussion on Principals and their attributes.
• Chapter 7, Propagation - Describes the tools and procedures that
enable propagation of the Kerberos Server’s database from the
Primary Security Sever to the Secondary Security Servers.
• Chapter 8, Inter-realm - Explains inter-realm authentication and
interoperability trust. Also, a brief on the additional server
configuration requirements in deployments that use multiple realms
and inter-realm authentication.
21
Page 22

• Chapter 9, Troubleshooting - Provides trouble shooting techniques
that will enable you to resolve most of the common problems
encountered while using the Kerberos Server. Also, a brief note on
reporting problems to your Hewlett-Packard Support Contact is
provided here.
• Glossary
• Index
22
Page 23

1 Overview
This chapter provides an introduction to the HP’s Kerberos Server V
2.0, now available on HP-UX 11i.
Chapter 1 23
Page 24

Overview
Chapter Overview
Chapter Overview
This chapter covers the following topics:
• “How The Kerberos Server Works” on page 25
• “Authentication Process” on page 27
• “DES vs 3DES Key Type Settings” on page 32
Chapter 124
Page 25

Overview
How The Kerberos Server Works
How The Kerberos Server Works
The term “Kerberos” was derived from Greek mythology. “Cerberus” is
the latin variant of Kerberos who guarded the entrance of Hades, the
Greek hell. The Kerberos security system, on the other hand, guards
electronic transmissions that are sent across the network.
Kerberos is a mature network authentication protocol based on the RFC
1510 specification of the IETF. It is designed to provide strong
authentication for client or server applications by using the shared
secret-key cryptography.
The Kerberos Server is based on a distributed client-server
architecture. It ensures secure communication in a networked
environment by leveragingindividualtrustrelationships. It then brokers
that trust across enterprise-wide, distributed client-server networks.
The basic currency of Kerberos is the ticket, which the user presents in
order to use a specific service. Each service, be it a login service or an
FTP service, requires a different kind of ticket. Fortunately, the
Kerberized applications keep track of all the various kinds of tickets, so
you don’t have to.
When you first log on to Kerberos each day, you enter your Kerberos
password. In return, the Kerberos server gives you an initial ticket,
which you use to request for additional tickets from the Kerberos server
for all the other services. For this reason, the initial ticket is also often
called the ticket-granting-ticket, or TGT.
The communication between the client and server is secured by using the
Kerberos protocol. Thus, client programs make authentication requests
to an authentication server, and server programs in-turn service those
client requests. Based on a user’s credentials the server program grants
or denies a user’s request to access network applications and services.
The Kerberos Server allows entities to authenticate themselves,
without having to transmit their passwords in clear text form, over the
networks.
Chapter 1 25
Page 26

Overview
How The Kerberos Server Works
NOTE For more information on the basics of Kerberos, refer to Installing,
Configuring and Administering the Kerberos Server on HP-UX 11i
(T1417 -0001). This document is available at,
http://www.docs.hp.com
The next section describes the Kerberos Authentication process. This
section enables you to understand the intricacies of the Authentication
process.
Chapter 126
Page 27

Overview
Authentication Process
Authentication Process
Toaid you in understanding the configuration and administration issues
this section describes the authentication process. The process of
Configuring and Administering your Kerberos Server have been
discussed in detail in the subsequent chapters of this manual.
Before the Kerberos Server grants tickets to a user principal to access
secured network services, a user must sign on to the Server by providing
knowledge of secret information, such as a user name and password.
Once the server authenticates the user, it returns a set of initial
credentials for the user, consisting of a ticket-granting-ticket (TGT)
and a session key.
A service ticket is granted for a specific service principal, which can be
associated with one or more Kerberos-secured services on the same
system. The service ticket is used by a client application on behalf of the
user, to authenticate the user to the Kerberos-secured network service.
The secured client application automatically handles the transactions
with the Server and the secured application server. Service tickets and
associated session keys are generally cached in the user’s credentials
cache along with the user’s TGT.
Chapter 1 27
Page 28
Overview
Authentication Process
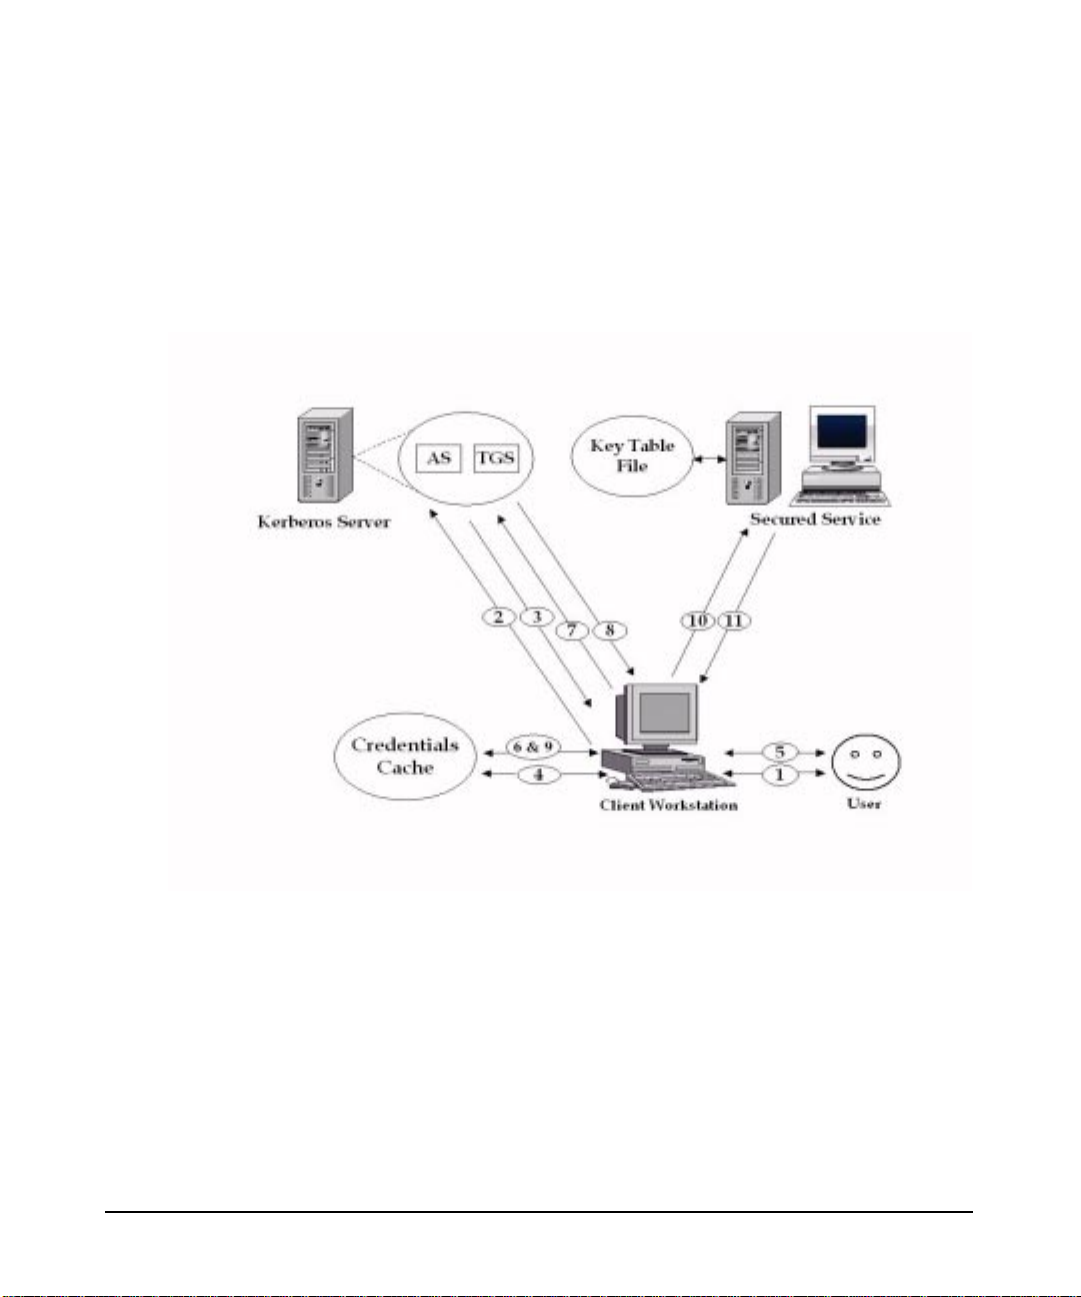
The figure shown below depicts the components of the secure
environment and the Kerberos protocol. Also, given below is a step-wise
procedure of how a client and server authenticate each other using
Kerberos. The step numbers match with the numbered arrows in the
figure below.
Figure 1-1 Authentication Process
Step 1. The user begins to use a Kerberos-secured application by entering the
user principal name and password. Optionally, the user can request for
specific ticket flags and specify the key type to be used to construct the
secret key. The user can also accept the default, configured for the client.
Step 2. The Key Distribution Center (KDC) transforms the password into the
user’s secret key and uses it to construct a message, which it sends to the
Authentication Service (AS), requesting a TGT for the user. The AS is
the component of the Kerberos Server that grants initial tickets.
Chapter 128
Page 29

Authentication Process
Step 3. If the AS can decrypt the message successfully, it knows that the
requesting user is who they claim to be, and issues a TGT. The TGT
contains the name of the user, a session key to be used by the user and
the Server for any subsequent communication. The reply message is
encrypted using the user’s secret key.
Step 4. The KDC decrypts the message using the user’s secret key. If the
application can successfully decrypt the message, the user is allowed to
use the application. The TGT and the session key from the message are
stashed in the user’s credential cache.
This protocol exchange has three important features namely:
• the authentication scheme does not require that the password be
sent across the network, either in encrypted form or in clear text
• tickets are not returned unless the principal name and password are
correct
• the client, or anyone else cannot look at or modify the contents of the
TGT
At the end of this initial exchange with the AS, the user’s credential
cache holds the user principal’s TGT and the associated session key.
These are used to obtain tickets for each network service the principal
wants to access.
Overview
To obtain access to a secured network service, the requesting client
application uses the previously obtained TGT in a dialog with the Server.
The protocol is the same as used while obtaining the TGT, except the
messages contain the name of the server, the message type and an
encrypted copy of the previously obtained TGT.
Step 5. The user runs a secured application, such as rlogin, rsh, rcp, ftp or telnet
Step 6. The secured application checks for the required service ticket in the
user’s credential cache. If it is there, skip to Step 10.
If the user does not have the required service ticket, the secured
application reads the user principal’s TGT and session key from the
user’s private credentials cache
Step 7. The secured applications sends its request for a specific service ticket to
the ticket-granting-service (TGS), along with the user principal’s TGT
and an authenticator. An authenticator is known data, such as
timestamp and user name, encrypted with the session key
Chapter 1 29
Page 30

Overview
Authentication Process
Step 8. The TGS decrypts the authenticator to check the user’s identity and
Step 9. The secured application uses the session key received with the TGT to
verifies that the user’s TGT and credentials have not expired. The TGS
reads the secured application’s service principal key from the principal
database, then builds and sends a reply back to the secured client
application.
The reply contains two different packets:
• The packet intended for the service principal contains a service
ticket, a new session key, an authenticator and other information, all
encrypted in the service principal’s key.
• The packet intended for the client contains the same session key and
other information.
Both packets are encrypted in a session key received by the client
with the TGT
decrypt the reply. It stores the service ticket packet and the new session
key in the user’s credentials cache.Theclientdoesnotattempttodecrypt
the service ticket portion of the reply. It cannot as it does not have the
service principal’s key that was used to encrypt it.
Step 10. The secured application sends the service ticket packet to the secured
service, requesting a connection. The secured service decrypts the packet
using its key stored in a service key table file (default key table file name
is v5srvtab).
If the service can decrypt the packet, it uses the session key included in
the packet to decrypt the authenticator, which contains the user
principal’s name and a timestamp. The service checks that the
timestamp is within a five minute window centered around the service’s
clock. This limits an attackers ability to replay a ticket at a time outside
the clock skew.
From the principal name contained in the authenticator, the service
knows that the user has been authenticated and is who the user claims
to be. The service then performs authorization checks for the principal
name. If the checks are successful, a connection is established.
Step 11. The secured application may require the secured service to authenticate
itself, mutual authentication.
Chapter 130
Page 31

Overview
Authentication Process
Kerberos-secured applications perform this optional step. First, the
service modifies the data in the authenticator with an algorithm known
to the client. The authenticator is then encrypted in the session key and
returned to the client. The client uses its copy of the session key to
decrypt the authenticator and verifies that the data was properly
modified.
The most important aspect of this authentication protocol is that it is
based on shared secrets between the Kerberos Server and each
principal, that is, the user and service principals. The service principal
that successfully decrypts a ticket can trust that the Kerberos Server
created and encrypted the ticket, since only the server and the service
principal share the key that correctly encrypted and decrypted the ticket.
A user can view the tickets issued to them by running klist.
Chapter 1 31
Page 32

Overview
DES vs 3DES Key Type Settings
DES vs 3DES Key Type Settings
In the processes outlined above, what happens if the user principal and
the service principal do not use the same key type? The answer is - the
process continues as described. Here’s why.
There is no step in which the client or the service accepts a message
encrypted by the other’s key. The Kerberos Server acts as the only
trusted party. Both the client application and the service share a secret
with only the server.
The authenticator data that must be encrypted or decrypted by both the
service and the client is encrypted in session keys. The server sends the
required session keys to the client and service in packets that are
encrypted with their respective keys. The Kerberos Server determines
the strongest encryption allowed for the session key by checking the key
type settings for the user and service principals. If both have a 3DES key
stored in the database, the session key type that is returned is of type
3DES. If only one has a 3DES key and the other has a DES key, then the
session key that is returned is of type DES.
Note that the server will never return a session key in the service ticket
packet that uses stronger encryption than the session key included with
a TGT packet. If a user principal has both a 3DES and DES key, and uses
the DES key to obtain a TGT - all service tickets obtained using this TGT
will contain DES session keys.
WARNING The krbtgt/<REALM NAME> is the ticket-granting principal. This is
a reserved principal that is automatically created when a realm
is added to the database. The krbtgt/<REALM NAME>principal
must be assigned a key type or default keys issued by the
Kerberos Server will use the 3DES encryption type.
Chapter 132
Page 33

2 Installation
This chapter provides preliminary information that you would need to
understand before you begin to install the on your HP-UX systems. It also
provides you with the installation procedures that will enable you to
install the HP’s Kerberos Server V 2.0.
Chapter 2 33
Page 34

Installation
Chapter Overview
Chapter Overview
This chapter contains the following sections:
• “Before Installing The Kerberos Server” on page 35
• “Hardware Requirements” on page 36
• “Software Requirements” on page 37
• “Installing The Kerberos Server” on page 38
Chapter 234
Page 35

Installation
Before Installing The Kerberos Server
Before Installing The Kerberos Server
Before you install the Server, it is recommended that you:
• Ensure that the Kerberos Server is installed on a system that is
physically secure and has restricted access to it. If necessary,
ascertain that the system, on which you install the Server, is kept
under lock and key.
• Disable all the network services, such as ftp, telnet, rlogin,
finger et all, by restricting access to the machine. You can do this,
by changing the /etc/inetd.conf file to deactivate the
non-kerberized services. The inetd daemon must be restarted after
these changes have been made.
• Also, ensure thatthefilesystemisprotectedwithproperpermissions
in order to restrict the non-root users from accessing and
manipulating the Kerberos Server maintained files, such as cache
files, stash files et all.
• Ensure that you have the HP-UX 11i installed on your system. You
can check the version of the HP-UX operating system by using the
uname -r command.
The following pages of this chapter describe the minimum software and
hardware requirements that you would need before you install the
Kerberos Server (T1417AA) software.
Chapter 2 35
Page 36

Installation
Hardware Requirements
Hardware Requirements
This section describes the hardware requirements for the Kerberos
Server software for HP 9000 server systems.
OS Platform and Version Compatibility
The version of the Kerberos Server you are installing must be
compatible with the version of HP-UX you are running.
• Disk space required to install: 10 Mb
• Install the software with the system up
• Single-user state required or recommended? No
• Reboot after installation is not required
Chapter 236
Page 37

Installation
Software Requirements
Software Requirements
This section describes the software requirements for the Kerberos
Server software for HP 9000 server systems. Before installing the Server
product, ensure that the software listed below has been correctly
installed on your system.
Refer to the related documentation if you need more information about
any of these products. If you cannot find the software or information you
need, contact your HP representative or logon to our website,
http://www.software.hp.com.
• HP-UX operating system version 11i - see Installing and Updating
HP-UX for HP 9000 Series 700, or Installing and Updating HP-UX
for HP 9000 Series 800.
• KRB5 Client Software on HP-UX 11i, delivered as part of the core O/S.
Chapter 2 37
Page 38

Installation
Installing The Kerberos Server
Installing The Kerberos Server
If you are migrating your Kerberos database from version 1.0 to the
new version, version 2.0, create a dump file of the older Kerberos
database before installing the new version of HP’s Kerberos Server.
Refer to Chapter 3, “Migration,” on page 41.
Step 1. Insert the software media (tape or disk) in the appropriate drive
Step 2. Type: swinstall
See the man page on swinstall (1m) for more information on this
command
Step 3. Click on OK on the “Specify Source” window.
Step 4. Highlight T1417AA in the ‘Software Selection’dialog, then select ‘Mark
For Install’ from the ‘Actions’ menu to install all filesets in the
bundle.
Step 5. When you have marked the product components you want to install,
select ‘Install (analysis)’ from the ‘Actions’ menu.
Step 6. When you have successfully completed the analysis, click on OK from the
‘Analysis’ dialog to load the Kerberos Server filesets.
If you are migrating your Kerberos database from version 1.0 to version
2.0, the following message is displayed:
The kerberos database dump file needs to be created before you
go ahead with this installation. If this is a migration from
Kerberos Server Ver 1.0 to Kerberos Server 2.0, refer to the
section Migration, in the Installing, Configuring and
Administering the Kerberos Server on HP-UX 11i.
The swinstall utility loads the filesets. Estimated time for processing is
five minutes.
If the installation is not successful, an error message is displayed. The
cause of the failure will appear at the end of /var/adm/sw/swagent.log
file.
Chapter 238
Page 39

Installation
Installing The Kerberos Server
NOTE The Software Distributor is documented in Managing HP-UX Software
with SD-UX.
Your Kerberos Server is now installed. ToconfiguretheServerto act as
either the Primary Security Server or one of the Secondary
Security Servers refer to, Chapter 5, “Configuration,” on page 61, for
more details.
Chapter 2 39
Page 40

Installation
Installing The Kerberos Server
Chapter 240
Page 41

3 Migration
This chapter describes the migration procedure to migrate from the
Kerberos Server V 1.0 to the Kerberos Server V 2.0. The Kerberos
database formats of version 1.0 and version 2.0 are not compatible with
each other. Hence, the database from the Kerberos Server V 1.0 needs
Chapter 3 41
Page 42

Migration
to be migrated to the Kerberos Server V 2.0 database format.
The older database version of Kerberos contains the Principal and Policy
related information. The new version of the Kerberos Server supports
automatic migration of only the Principal related information.
NOTE The Policies cannot be automatically migrated to the new version of the
Kerberos Server. This task has to performed manually.
Chapter 342
Page 43

Chapter Overview
• “Policy Migration” on page 44
• “Step-wise Procedure For Migration” on page 45
Migration
Chapter Overview
Chapter 3 43
Page 44

Migration
Policy Migration
Policy Migration
In the previous version of the Kerberos Server, version 1.0, a policy
with any name and attribute values could be created. Further, any
principal could subscribe to any of the policies present in the database.
In the new version of the Kerberos Server, version 2.0, the policies are
classified depending on the instance name of the Principal. Refer to
“Password Policy File” on page 101, for more information on classifying
policies.
The Policy information is available as a dump file after you have
migrated the dump file from version 1.0 to version 2.0. The
administrator needs to explicitly classify the Principals and add the
Policies to the password.policy file, as per the site policy.
Also, the system administrator needs to perform the task of manually
migrating the admin_acl_file from version 1.0 to version 2.0. Refer to
“admin_acl_file” on page 95, for more information.
Chapter 344
Page 45

Migration
Step-wise Procedure For Migration
Step-wise Procedure For Migration
Given below is a step-wise procedure to migrate from version 1.0 to
version 2.0 of the Kerberos Server.
NOTE The lines beginning with => is a continuation with the previous line.
Step 1. Dump the database on the version 1.0 Server
On the Kerberos Server version 1.0, dump the database with the
default dump version. The dump file must contain the default header,
“kdb5_util load_dump version 5”
# kdb5_util dump /opt/krb5/dumpfilev1.0
Step 2. Stop the version 1.0 Kerberos daemons
Step 3. Install the Kerberos Server version 2.0 on your system
Step 4. Migrate version 1.0 dump file to version 2.0 dump file.
Run the kdb_migrate tool to generate the version 2.0 dump file
# kdb_migrate -i /opt/krb5/dumpfilev1.0 -o
=> /tmp/kdb_migrate.log
=> /opt/krb5/dumpfilev2.0 -p /opt/krb5/polv2 -1
If the /var/adm/krb5/krb5kdc/kdc.conf file does not exist and,
• the master key name is not the default (K/M) then it needs to be
specified as an argument in kdb_migrate, by specifying the -M
option.
• the encryption type will be the encryption type of the master
principal obtained from the dumpfilev1.0, if the -e option is not
specified.
If the /etc/krb5.conf file does not exist, the migration process fails.
Chapter 3 45
Page 46

Migration
Step-wise Procedure For Migration
The password of the master key can also be changed while executing the
migration tool. The tool will prompt you for a password change. If you
want to change the password, type yes at the command prompt. If you do
not want to change the password, type no at the command prompt.
NOTE The same password has to be used while creating the minimal database
for version 2.0 of the Kerberos Server, as described in Step 5.
The Policyinformationisavailablein/opt/krb5/polv2 andthelogs will
be available in /tmp/kdb_migrate.log directory.
Step 5. Configure the Kerberos Server V 2.0
This can either be done manually or by using the krbsetup tool.
The following values need to be the same in both the versions of the
Kerberos Server:
• realm name
• master key name
The master key password should be identical to the one that was used in
version 1.0. This is applicable if you have not opted to change the
password, as mentioned in Step 4. If you have changed the password, the
same new password has to be used while creating the Kerberos Server
version 2.0 database.
If the -e option is used to change the master key encryption type from
version 1.0 to version 2.0, in Step 4, then the same new encryption type
has to be used for the master key while creating the database in version
2.0.
If the -e option is not specified, in Step 4, then the encryption type with
which the version 2.0 database is created should be the same as the one
specified while creating the version 1.0 database. Refer to the kdc.conf
manpage, master_key_entry, for more details.
# krbsetup
This is an interactive tool that will prompt you for the required
parameters. Refer to the krbsetup (1M) manpage or
“Auto-Configuration of the Security Server” on page 64, for more details.
Chapter 346
Page 47

Step-wise Procedure For Migration
Step 6. Load the new version of the dump file generated from Step 4.
Use the kdb_load tool to load the database from the dump file,
/opt/krb5/dumpfilev2.0.
# kdb_load -f /opt/krb5/dumpfilev2.0
On successful completion the following message is displayed:
“Load Successful”
The migration of the Principal information is now complete.
Given below are a few pointers that need to be considered:
• The principal information is migrated from version 1.0 to version 2.0.
• The policy related information exists in the /opt/krb5/polv2 file.
The system administrator needs to decide on the policies and add the
policies to the /opt/krb5/password.policy file.
• The admin_acl_file cannot be migrated. The system administrator
needs to be add the appropriate acls to the
/opt/krb5/admin_acl_file using the old admin_acl_file. Refer
to “admin_acl_file” on page 95, for more information.
Migration
• The log messages of Step 4 are logged in the file,
/tmp/kdb_migrate.log.
If there are any problems during loading the new version of the
dump file it needs to be diagnosed by the system administrator.
The log messages inform the failure ([ERR] message) and successful
migrations ([LOG] messages), et all.
If the system administrator wants to configure a new system to be the
Kerberos Server version 2.0 and wants to use the existing version
1.0 dump file, it can be accomplished by securely copying the dump file
onto a new system and by following Steps four to six, as discussed above.
The /ect/krb5.conf of the version 1.0 Server must be copied to the new
system. Also, the /var/adm/krb5/krb5kdc/kdc.conf has to be copied if
the master key principal name is not the default, K/M. If only the master
key principal name differs from the default, avoid copying the kdc.conf
by specifying the -M option while using the kdb_migrate tool, as
described in Step 4.
Chapter 3 47
Page 48

Migration
Step-wise Procedure For Migration
Chapter 348
Page 49

4 Interoperability With Windows
2000
There are certain configuration requirements when you set up
inter-realm interoperability between HP’s Kerberos Server and
Chapter 4 49
Page 50

Interoperability With Windows 2000
Windows 2000. This chapter discusses what you need to know about
configuring such an environment. This chapter contains information
specific to establishing interoperability with Windows 2000 Kerberos
implementations. Before you read this chapter, you must be familiar
with the concepts in Chapter 8, “Inter-realm,” on page 243.
Chapter 450
Page 51

Interoperability With Windows 2000
Chapter Overview
Chapter Overview
This chapter contains the following:
• “Understanding the Terminology” on page 52
• “Table of Analogous Terms” on page 54
• “HP’s Kerberos Server and Windows 2000 Interoperability” on
page 55
• “Establishing Trust Between HP’s Kerberos Servers and Windows
2000” on page 56
• “Single Realm (Domain) Authentication” on page 57
• “Inter-Realm (Inter-Domain) Authentication” on page 58
• “Special Considerations for Interoperability” on page 59
Chapter 4 51
Page 52

Interoperability With Windows 2000
Understanding the Terminology
Understanding the Terminology
Both HP’s Kerberos Server and Microsoft provide Kerberos security
for your network. While the technology is the same - the terminology
varies.
Kerberos authentication depends upon establishing trust between users
and services via a trusted third party called a Key Distribution Center
(KDC). HP provides a KDC on the security server, while Windows 2000
provides a KDC on the domain controller.
Each KDC stores information about trusted users and services in a
central database, the principal database in HP’s terms; the domain’s
Active Directory in Microsoft terms. Each database contains a
collection of users. In HP’s terms, the database contains a collection
called a realm and each entry is a principal. In Microsoft terms, the
database contains a collection called a domain and each entry is an
account.
The most important information associated with any principal in the
Kerberos model is its unique symmetric key, that is, the key used to
encrypt and decrypt information on behalf of the principal. HP uses the
term secret key; Microsoft uses the terms long-term key or shared
principal key. The KDC, as the trusted third party, shares a unique
secret key with all of its principals. When a principal and the KDC
exchange information to establish trust, the principal uses its secret key
to encrypt the message; the KDC decrypts the message using the
principal’s secret key stored in the database and then attempts to
authenticate the principal.
During logon, if the KDC can successfully authenticate the user, it
responds with a special message called a ticket-granting ticket. The
ticket entitles the user to request access to other services known to the
KDC.
The client system stores the ticket in memory. In HP’s terminology, the
client system stores the ticket in the credentials cache and uses it to
request service tickets to authenticate to applications or services on the
network. In Microsoft terminology, the client system stores the ticket in
the secure cache and uses it to request session tickets to authenticate to
applications or services.
Chapter 452
Page 53

Interoperability With Windows 2000
Understanding the Terminology
In broad strokes, that is how the Kerberos authentication protocol works
and both implementations under discussion have virtually identical
conceptual frameworks. Of course there are mechanical differences -for
example, the HP’s implementation uses configuration files to locate host
systems and the Microsoft implementation uses strictly DNS lookup to
resolve host names. But both implementations are written to RFC 1510
and RFC 1964, and hence interoperate.
The next section, “Table of Analogous Terms” on page 54 lists the
difference in the terminologies used.
Chapter 4 53
Page 54

Interoperability With Windows 2000
Table of Analogous Terms
Table of Analogous Terms
The following terms are analogous counterparts in HP’s Kerberos Server
and Windows 2000 Kerberos implementations:
Table 4-1 Table of Analogous Terms
HP’s Kerberos Server Windows 2000
Realm Domain
Inter-Realm Inter-Domain
Secret Key Long-Term Key
Credentials Cache Secure Cache
Principal Database Active Directory
Cross-Domain
Cross-Realm
Shared Principal Key
Service Ticket Session Ticket
Security Server Domain Controller
Principal Names Account Names
Chapter 454
Page 55

Interoperability With Windows 2000
HP’s Kerberos Server and Windows 2000 Interoperability
HP’s Kerberos Server and Windows 2000
Interoperability
When you set up inter-realm interoperability between the HP’s
Kerberos Server software and Windows 2000, there are three basic
cases, each with its own configuration requirement:
Case 1
A Windows 2000 user needs access to services in an HP’s Kerberos
Server realm. Here, the HP’s Kerberos Server realm is the target
realm; the Windows 2000 domain is the source realm. The HP’s
Kerberos Server must trust the Windows 2000 domain controller to
perform secure authentication.
Case 2
A HP’s Kerberos Server principal needs access to services in a
Windows 2000 domain. Here, the Windows 2000 domain is the target
realm; the HP’s Kerberos Server realm is the source realm. The
Windows 2000 domain controller must trust HP’s Kerberos Server to
perform secure authentication.
Case 3
Two-way trust must exist between the HP’s Kerberos Server and the
Windows 2000 domain controller. Here, HP’s Kerberos Server
principals and Windows 2000 users must access services in either realm
or domain.
HP’s Kerberos Server softwaresupportstheWindows 2000 credentials
cache.
Chapter 4 55
Page 56

Interoperability With Windows 2000
Establishing Trust Between HP’s Kerberos Servers and Windows 2000
Establishing Trust Between HP’s Kerberos
Servers and Windows 2000
If you want to establish trust between Kerberos Server KRB.REALM, and
Windows 2000, W2K.DOMAIN, you would need to do the following:
Step 1. Add inter-realm service principals to the Kerberos Server realm. For
more information, refer to “Administrator” on page 114.
• If the realm is the source realm, the name of the principal is:
krbtgt/W2K.DOMAIN@KRB.REALM
• If the realm is the target realm, the name of the principal is:
krbtgt/KRB.REALM@W2K.DOMAIN
Step 2. On the Windows 2000 domain controller, use the Active Directory
Domains and Trusts snap-in to create the trust relationship.
• If the domain trusts the Kerberos Server realm, add the realm
name to the Domains that this domain trusts’ field.
• If the Kerberos Server realm trusts the Windows 2000 domain, add
the realm name to the Domains that trust this domain’ field. Keep in
mind that the passwords in Steps 1 and 2 must be identical.
Step 3. Update the client configuration files or the DNS configuration with the
name of the foreign KDC.
• For the Kerberos Server clients, add the Windows 2000 domain
controller domain name and fully qualified domain name to the
client’s/etc/krb5.conf file,and the host-to-realm name mapping
data for each available Windows 2000 service to the client’s
/etc/krb5.conf file.
• On the Windows 2000 client, invoke the Windows 2000 Ksetup tool
as follows:
Ksetup/addkdc KRB.REALM KRB_KDC_<fqdn>
Step 4. Reboot the Windows 2000 client system. It is not necessary to reboot the
Kerberos Server or Client.
Chapter 456
Page 57

Interoperability With Windows 2000
Single Realm (Domain) Authentication
Single Realm (Domain) Authentication
The simplest interoperability scenarios involve one or more client
systems in a given realm or domain that authenticate to a single Key
Distribution Center. There are two such interoperability scenarios that
do not require inter-realm authentication:
• Kerberos Server principals and Windows 2000 users can
authenticate to a Kerberos Server and access services registered in
that realm.
• Kerberos Server principals and Windows 2000 users can
authenticate to a Windows 2000 domain controller and access
services registered in that domain. Single realm authentication
requires all Kerberos Server principals and Windows 2000 users to
be entered in the same database, whether that is a principal
database on an Kerberos Server or a Windows 2000 domain
controller.
What is important to understand about single realm authentication is
that principals can only access resources in their native realm. If a
principal needs access to resources in a different realm, the
administrator must configure inter-realm authentication.
Chapter 4 57
Page 58

Interoperability With Windows 2000
Inter-Realm (Inter-Domain) Authentication
Inter-Realm (Inter-Domain) Authentication
When two distinct realms share common keys, the two realms are said to
trust one another. With that trust in place, principals can securely access
services in their native realm as well as those in the trusted realm. HP
terms such access inter-realm authentication; Microsoft terms it
inter-domain authentication or cross-realm authentication.
The following are examples of interoperability scenarios:
• A Kerberos principal can authenticate to a Kerberos Server and
access services registered in its native realm as well as trusted
Windows 2000 domains.
• A Kerberos principal can authenticate to a Windows 2000 domain
controller and access services registered in its native domain as well
as trusted foreign domains or realms.
• A Windows 2000 principal can authenticate to a Kerberos Server and
access services registered in its native realm as well as trusted
foreign realms or domains.
• A Windows 2000 principal can authenticate to a Windows 2000 KDC
and access services registered in its native domain as well as trusted
foreign domains or realms.
Inter-realm authentication relies on secure authentication between
users and the KDC in a single realm. The shared inter-realm key
between trusted KDCs provides the extra link to create a chain of trust
that allows a principal in one realm to authenticate to a service in a
trusted foreign realm.
Chapter 458
Page 59

Interoperability With Windows 2000
Special Considerations for Interoperability
Special Considerations for Interoperability
You must consider the following issues related to interoperability with
Windows 2000 implementations.
Database Considerations
Your network can contain more than one server, but there is only one
master copy of the database that is propagated to all secondary servers.
In a Windows 2000 Kerberos implementation, an enterprise can contain
more than one domain controller, and each domain controller contains a
writable copy of the database. Therefore, the two Kerberos
implementations cannot share the same database.
You cannot propagate database entries between Kerberos Servers and
Windows 2000 domain controllers. Do not attempt to set a Windows 2000
domain controller as a secondary server to a Kerberos primary server,or
vice versa.
Encryption Considerations
In the Kerberos authentication protocol, critical information is never
sent in clear text, over the network. Instead it is encrypted using a
specified algorithm. Although HP’s Kerberos Server supports 3DES
encryption, Windows 2000 requires DES encryption when it
interoperates with other Kerberos implementations. Thus, principals in
these realms who must access resources in Window 2000 domains must
use a DES key type.
Postdated Tickets
While the Kerberos server and client supports postdated tickets, the
Windows 2000 domain controller and client do not. If you use postdated
tickets to run batch procedures over time, be sure the procedure does not
need access to Windows 2000 services.
Chapter 4 59
Page 60

Interoperability With Windows 2000
Special Considerations for Interoperability
Chapter 460
Page 61

5 Configuration
This chapter describes and discusses the configuration files and
procedures to configure the Kerberos Server on your HP-UX 11i
systems.
Chapter 5 61
Page 62

Configuration
Chapter Overview
Chapter Overview
This chapter contains the following sections:
• “Configuration Files For The Kerberos Server” on page 63
• “Auto-Configuration of the Security Server” on page 64
• “Manual Configuration Of The Kerberos Server” on page 67
• “krb.conf” on page 69
— “Sample krb.conf File” on page 71
• “krb.realms” on page 73
— “Sample krb.realms” on page 76
• “Configuring The Primary Server” on page 78
— “Creating The Principal Database After Installation” on page 79
— “Add An Administrative Principal” on page 80
— “Create The host/<fqdn> principal And Extract Its Service Key”
on page 82
— “Define Secondary Server Network Locations” on page 84
• “Security Policies” on page 85
• “Starting the Security Server” on page 86
• “Summary” on page 87
• “Configuring The Secondary Security Servers” on page 89
Chapter 562
Page 63

Configuration Files For The Kerberos Server
Configuration Files For The Kerberos Server
During installation, several critical Kerberos Server files should have
been installed on your system. These files must now be configured on the
Primary Security Server and then copied to all the Secondary Security
Servers on your network. Table 5-1 lists and briefly describes the server
files that need to be configured. A detailed description of the
configuration files listed in the table below is available in the subsequent
sections of this chapter, for your reference.
Table 5-1 Security Server Files That Require Configuration
File Function
krb.conf Describes the default realm of the primary
server and the roles of each server for that
particular realm
krb.realms Provides a way to map the host name or
domain name to the associated realm name
Configuration
admin_acl_file Controls the administrative permissions for
administrators.
password.policy Controls password policy for the entire
security network
kpropd.ini Contains the configuration information that
is used for propagation. This is a text file.
Chapter 5 63
Page 64

Configuration
Auto-Configuration of the Security Server
Auto-Configuration of the Security Server
An automated tool named, krbsetup, has been provided to
auto-configure your Kerberos Server. Using this tool, you can
configure; un-configure; start and stop the kdcd and the kadmind
daemons.
This tool is installed at the following directory:
/opt/krb5/sbin
This tool will automatically create your krb.conf and krb.realms files
and places them in the /opt/krb5 directory. This tool allows you:
• specify whether you want to configure your Kerberos server as either
a Primary security server or a Secondary security server
• customize your realm name
• enables you with the option of creating a stash file
• allows you to specify the encryption type
The other sections in the configuration files will be set to it’s default
values. If you want to customize these sections, you will have to
manually edit the configuration files and restart the kdcd and kadmind
daemons using this tool. This tool also allows you to customize the
encryption type and stash file.
Refer to “Configuration Files For The Kerberos Server” on page 63, for
more information.
NOTE It is strongly recommend that you use this tool to configure your basic
Kerberos Server.
Given below is a step-wise procedure to auto-configure your Kerberos
server:
Step 1. Run the utility, /opt/krb5/sbin/krbsetup
Step 2. Select one of the following options:
Chapter 564
Page 65

1) Configure the server
2) Start the Kerberos daemons
3) Stop the Kerberos daemons
4) Un-configure the Server
5) Exit
6) Help
Step 3. Select option 1 to configure the server.
a. You will be prompted to opt between Configuring your Kerberos
Server as either a Primary Security Server or a Secondary Security
Server.
1. Select option 1 to configure your Kerberos Server as a primary
security server
2. Select option 2 to configure your Kerberos Server as a secondary
security server. Before you logon to the Remote Administrator,
stop the daemons that are already running on the Secondary
Server.
Configuration
Auto-Configuration of the Security Server
NOTE The steps mentioned below are the identical for configuring both the
primary security server as well as the secondary security server.
b. You will be prompted to specify the encryption type. If you do not
specify this value, the default value, DES-MD5, will be selected.
c. You will be prompted to stash the principal database key on your local
disk. Press “y” to stash the principal database key file or “n” if you do
not want to stash the principal database key file.
d. If you have selected 1, that is, selected to configure your primary
security server, you are now prompted for the names of your
secondary security servers.
e. If you have selected 2, that is, selected to configure your secondary
security server, you are now prompted for the name of your Primary
Security Server.
f. You will be prompted to enter the realm name. The default value is
displayed. If you choose to use the default then, press the return key,
else enter your realm name.
g. You will be prompted to enter the database master password.
Chapter 5 65
Page 66

Configuration
Auto-Configuration of the Security Server
h. You will be prompted to re-enter the database master password to
verify the password.
i. Your configuration is now complete and your Kerberos daemons are
up and running. To return to the main menu, press the return key.
Step 4. Select option 2 to start the Kerberos daemons. Press the return key to
return to the main menu.
Step 5. Select option 3 to stop the Kerberos daemons. Press the return key to
return to the main menu.
Step 6. Select option 4 to un-configure the Kerberos daemons. You will be
prompted with a message to confirm this action. Press “y”toun-configure
the Kerberos Server and “n” to return to the main menu.
Step 7. Select option 5 to exit from the tool.
Step 8. Select option 6 to view the help contents.
The krb.conf file, with the default values for all the sections generated
by the auto-configuration tool is as shown below:
Your_Realm_NAme
Your_Realm_Name Your_Secondary_Server1
Your_Realm_Name Your_Secondary_Server2
Your_Realm_Name host.subdomain.domain.com admin server
The krb.realms file, with the default values generated by the
auto-configuration tool is as shown below:
Your_Primary_Security_Server Your_Realm_Name #
.Your_Secondary_Security_Server Your_Realm_Name #
*.Your_Domain_Name Your_Realm_Name #
Chapter 566
Page 67

Configuration
Manual Configuration Of The Kerberos Server
Manual Configuration Of The Kerberos Server
The following sections of this chapter describe the procedure to manually
configure your Security Servers. We recommend that you use the
auto-configuration tool to setup your basic Kerberos Security Server.
Formoreinformation on auto-configuration, refer to “Auto-Configuration
of the Security Server” on page 64.
The Key Distribution Center (KDC) issues Kerberos tickets. Each KDC
contains a copy of the Kerberos database. The Primary Security Server
contains the master copy of the database that is propagated to all the
Secondary Security Servers, at regular intervals. All database changes,
such as password changes, are made on the Primary Security Server.
Usually, a Secondary Security Server provides Kerberos ticket-granting
services, but not database administration. This allows clients to continue
to obtain tickets when the Primary Security Server is unavailable.
Werecommend that you install your Kerberos Security Server to be able
to function as either the Primary or one of the Secondary Servers. This
will enable you to easily switch between your Primary Security Server
with one of the Secondary Security Servers, if necessary. The installation
procedure described below is based on this recommendation.
The subsequent sections describe the configuration files and a systematic
series of steps required to manually configure your Primary and
Secondary Security Servers.
Editing the Configuration Files
The Kerberos Security Server can be configured with two Kerberos
files, namely:
• the configuration file - krb.conf
• the realms file - krb.realms
The Configuration file,krb.conf,specifiestheSecurity Servers available
for client authentication and defines the default realm for the host. The
Realms file, krb.realms, defines the host-to-realm or
domain-to-realm mapping data. The following sections contain a
detailed discussion on these two files.
Chapter 5 67
Page 68

Configuration
Manual Configuration Of The Kerberos Server
Modify the configuration files, /opt/krb5/krb.conf and
/opt/krb5/krb.realms to reflect the correct information, such as the
hostname and realm name, for your realm.
Refer to “Configuring The Primary Server” on page 78, for more details.
Chapter 568
Page 69

Configuration
krb.conf
krb.conf
The krb.conf file contains information about the default realm of the
host, the administration server, and security servers for known
realms. We recommend that you copy the krb.conf.sample file from
/opt/krb5/example/krb.conf to the /opt/krb5/krb.conf directory.
This file must reside in the /opt/krb5 directory and must have the
following permissions assigned to it:
-rw-r--r-- root 3
The configuration file identifies the servers that support authentication
for the designated realm and defines the default realm for the host where
the file is stored.
The krb.conf file lists the host system’s default realm and maps known
realms to their Primary and Secondary Security Servers by hostname
and network location.
The krb.conf file allows the client to locate servers on the network for
authenticaton requests. For inter-realm authentication, an entry that
maps the foreign realm to its host Security Server needs to be added to
the configuration file.
Assuming your network environment performs load-balancing and
redundancy, you must create multiple versions of the krb.conf file. It is
important that Secondary Servers are configured to act as
authentication servers. This allows the Primary Server to be available
for tasks other than authentication.
This file is used during propagation configuration. The realm specified in
the first line of the configuration file is regarded as the server’s default
realm. This has to be the first realm created in the database containing
the K/M principal.
krb.conf Format
Your_Realm_Name
Your_Realm_Name Your_Secondary_Server1
Your_Realm_Name Your_Secondary_Server2
Your_Realm_Name host.subdomain.domain.com admin server
Chapter 5 69
Page 70

Configuration
krb.conf
The first line of the krb.conf file identifies the host systems default
realm.
The second line and its subsequent lines require fields that identify the
Security Server hostnames. Each field in line must be separated by a
space or a tab.
The following format is generally used:
• The first field in the krb.conf file denotes the realm name. By
convention, realm names are in upper-case letters to visually
distinguish them from domain names.
NOTE Realm names are case sensitive; you must type the correct case for
the realm name if your site does not follow the upper-case
convention.
• The second field of the configuration file indicates the fully qualified
domain name (FQDN) of the host security server for that realm.
• The order of entries in the krb.conf file is important on the client
system as it is used to identify the intended order of redundant
Security Servers. Applications attempting to connect to the Security
Server, use this file to read the entries in the listed order.Redundant
security servers are used when higher priority security servers are
unavailable or a network time-out has occurred. For example, during
the authentication sequence when the network connection between
the client and a security server is interrupted.
To create comments, use the pound sign (#). Any characters after a
# symbol are ignored. Blank lines and any leading or trailing white
spaces in a line are also ignored.
Chapter 570
Page 71

Sample krb.conf File
The sample krb.conf file named krb.conf.sample is available in the
/opt/krb5/example directory. Copy this sample file to
/opt/krb5/krb.conf file and modify it to reflect the hostnames and
realm name for your realm.
NOTE The realm names are case sensitive.
Replace the underlined Your_Realm_Name, Your_Secondary_Server1,
Your_Secondary_Server2 and hostname.subdomain.domain.com with
the name of your Kerberos REALM, Primary and Secondary Servers
hostnames.
Your_Realm_Name
Your_Realm_Name Your_Secondary_Server1
Your_Realm_Name Your_Secondary_Server2
Your_Realm_Name host.subdomain.domain.com admin server
Configuration
Sample krb.conf File
Given below is an example with a brief explanation of the krb.conf file.
BAMBI.COM
BAMBI.COM fox.bambi.com
BAMBI.COM goat.bambi.com
BAMBI.COM deer.bambi.com admin server #
Where:
• the realm name is
— bambi.com
• the primary security server is
— deer.bambi.com
• the secondary security server 1 is
— fox.bambi.com
• the secondary security server 2 is
— goat.bambi.com
Chapter 5 71
Page 72

Configuration
Sample krb.conf File
REFERENCE
To view the krb.conf manpage, type the following command at the
prompt:
shell%: man krb.conf
Services
The services file contains entries that allow client applications to
establish socket connections to the KDC or to the applications servers. A
KDC client requires the following entries in the /etc/services file:
#
# Kerberos services
#
kerberos5 88/udp kdc # Kerberos V5 kdc
kerberos5 88/tcp kdc # Kerberos V5 kdc
kerberos-adm 749/tcp # Kerberos 5 admin/changepw
krb5_prop 754/tcp # Kerberos slave propagation
kerberos-cpw 751/tcp kerberos_master # Kerberos changepw
NOTE If you do not use the krbsetup tool to configure your Kerberos Server,
the services mentioned above should be manually added to the
/etc/services file.
REFERENCE
To view the services manpage, issue the following command:
shell%: man services
Chapter 572
Page 73

Configuration
krb.realms
krb.realms
The realms file defines host-to-realm or domain-to-realm name
mapping data. The krb.realms file is located only on the Kerberos
Server systems. This file maps hostnames to realms names. The
krb.realms is located in the following directory:
/opt/krb5
The realms file ensures that all systems on the network understand the
other systems that reside in each realm. The krb.realms file enables
secure applications to determine the realm from which a request for a
ticket can be made, in order to gain access to a service.
If you have decided to follow the default realm naming convention, it not
necessary to maintain this file. The default naming convention is the
upper-case letter equivalent to the domain name.
The Kerberos Server, by default, assumes the upper-case equivalent of
the host’s domain in its realm name. Thus, if the realm names are the
upper-case equivalents of your domain name, you do not need to
configure and maintain a krb.realms file on your client systems.
NOTE The realm names are case sensitive.
Secure applications initially search for a matching hostname and then a
matching domain name in the krb.realms file. If a match is not found, a
wildcard match is initiated.
If no translation entry applies or the file does not exist, the host’s realm
name is considered to be the host’s domain name. This domain name is
converted to the upper-case equivalent.
The realms file must contain sufficient entries to define the realm used
by every service a client computer must access. One version of the realms
file that contains all required entries for your enterprise, can be created.
If you support inter-realm authentication, the realms file must contain
the required entries to locate the foreign realms.
Chapter 5 73
Page 74

Configuration
krb.realms
NOTE This file does not identify systems as primary or secondary servers, nor
does it define the relationship between the primary and secondary
servers. These definitions exist in the configuration file, krb.conf.
krb.realms Format
Your_Primary_Security_Server Your_Realm_Name #
.Your_Secondary_Security_Server Your_Realm_Name #
*.Your_Domain_Name Your_Realm_Name #
You can add entries to the file to identify various translations from
hostnames to realm names. The order of the entries is insignificant.
Each entry in the file requires two fields which, is separated either by a
space or a tab. The following format is generally used:
• The first field specifies a name. You can either specify a hostname or
multiple hosts with one entry using the wildcards described in the
following pages of this chapter.
• The second field specifies the associated realm. By convention, realm
names are in upper-caseletters to visually distinguish them from the
domain names.
NOTE Realm names are case-sensitive; you must type the correct case for
the realm name if your site does not follow the upper-case
convention.
To create comments, use the pound sign (#). Any characters after a #
symbol are ignored. Blank lines and any leading or trailing white spaces
on a line are also ignored.
Toidentifymultiplehosts that belong to the same realm in one entry, use
one of the following wildcard characters:
. (a period) Begin the name field with a period followed by a
domain name to designate all hosts in the specified
domain belong to the indicated realm.
Chapter 574
Page 75

Configuration
krb.realms
For example, to indicate that hosts deer.bambi.com
and goat.bambi.com belong to REALM1, you need to
add the following entry in your krb.realms file:
.bambi.com REALM1
* (an asterisk) Begin the name field with an asterisk followed by a
parent domain name to designate all hosts in
subdomains belong to the indicated realms.
For example, to indicate that hosts june.sales.com
and july.sales.com belong to REALM2, you need to
add the following entry in your krb.realms file:
*.sales.com REALM2
Chapter 5 75
Page 76

Configuration
Sample krb.realms
Sample krb.realms
The sample krb.realms file named krb.realms.sample is available in
the /opt/krb5/examples directory. Copy this sample file and modify it
to reflect your realm name. This file should be copied to the following
location:
/opt/krb5
NOTE The realm names are case sensitive.
Replace the underlined Your_Realm_Name,
Your_Primary_Security_Server, Your_Secondary_Server_Server
and Your_Domain_Name with the name of your Kerberos REALM, primary
and secondary servers hostnames.
Your_Primary_Security_Server Your_Realm_Name #
.Your_Secondary_Security_Server Your_Realm_Name #
*.Your_Domain_Name Your_Realm_Name #
Given below is an example with a brief explanation of the krb.realms
file.
deer.bambi.com BAMBI.COM # map host directly
.fox.bambi.com BAMBI.COM # all hosts in domain
*.bambi.com BAMBI.COM # all the other hosts belonging
to the domain and sub-domains
Line one of the krb.realms file maps the host admin.bambi.com to the
BAMBI.COM realm.
Line two of the krb.realms file maps all hosts in the fox.bambi.com
domain to the BAMBI.COM realm
NOTE The preceding dot in this line identifies the first field as a domain name
rather than a hostname.
Typically, this line is not required as the realm name, by default, is the
upper-case equivalent of the domain name.
Chapter 576
Page 77

Configuration
Sample krb.realms
Line three of the krb.realms file maps all hosts in the domain and
sub-domains with the root name bambi.com to the BAMBI.COM realm.
Chapter 5 77
Page 78

Configuration
Configuring The Primary Server
Configuring The Primary Server
Before you begin configuring, ensure that your primary and secondary
servers are installed. The following section describes the initial
configuration tasks you need to perform to get your Primary and
Secondary Security Servers up and running.
The Primary Security Server requires four basic configuration tasks,
namely:
• Create the Principal database
• Add an administrative principal
• Create a host/<fqdn> principal and extract its service key
• Start the Kerberos daemons
• Define network locations of all the secondary servers
These configuration tasks have been discussed in the subsequent
sections of this chapter.
Chapter 578
Page 79

Creating The Principal Database After Installation
Creating The Principal Database After
Installation
If you choose not to create the principal database during installation, you
must do so before configuring the Security Server. To do this, use the
following command:
kdb_create -s
NOTE kdb_create, by default, uses the 3DES encrypted database.
Forthose of you using the older version, HP’s Kerberos Server V 1.0,
and wish to migrate their Principal Database to the new version, HP’s
Kerberos Server V 2.0, can do so. Refer to Chapter 3, “Migration,” on
page 41.
Configuration
Chapter 5 79
Page 80

Configuration
Add An Administrative Principal
Add An Administrative Principal
Use the Administrator instead of the Command-Line-Administrator
option to add the principal account. Refer to, “kadmin Vs kadminl” on
page 112, for more information on using the Administrator and the
Command-Line-Administrator.
While it is possible to use the kadmin option to create an administrative
principal, it cannot be used to assign administrative privileges. If you
must use the kadmin utilities to manage your administrative prinicpals,
use a text editor to add the required entries to the file.
NOTE You need to be logged in as a root user in order to execute the tasks
mentioned above. These tasks must be performed on the Primary
Security Server.
For the first administrative principal, we recommend that you assign all
permissions, indicated by ‘*’ in the admin_acl_file. Refer to
“admin_acl_file” on page 95, for more information.
To add an administrative principal using the Administrator
1. Run Administrator, kadminl_ui
2. Add a new principal to the default realm using the following syntax:
identifier/admin@DEFAULT_REALM
3. Assign password
4. Using the Edit-> Edit Administrative Permissions menu,
assign ALL administrative permissions to the principal
5. On the Attributes tab, clear the Require Password Change
Checkbox.
6. Save your changes and close the Administrator
The principal account, by default, requires a password change at the first
logon. However, kadmin does not permit password changes, unless you
have explicit permissions to do so.
Chapter 580
Page 81

Configuration
Add An Administrative Principal
To enable authentication, you must disable the password change
requirement when you create the administrative principal account.
If you are using the kadminl_ui, go to the Attributes tab on the
Principal Information Window and clear the Require Password
Change checkbox. If you are using kadminl, use the mod command and
set nopwchg to indicate no password change is required.
You can also disable the password change requirement by setting the
NoReqChangePwd setting in the principal’s password policy file to 1.
Refer to “Administrator” on page 114, for more information on using the
Administrator.
To add an administrative principal using the Remote Command-Line-Administrator
1. Run Command-Line-Administrator, kadmin
2. Add a new principal to the default realm using the following syntax:
command: add
Name of Principal to add: admin
Enter password:password
Re-enter password for verification:password
Principal added
Refer to “Manual Administration Using kadmin” on page 170, for more
information on assigning administrative privileges to principals.
Chapter 5 81
Page 82

Configuration
Create The host/<fqdn> principal And Extract Its Service Key
Create The host/<fqdn> principal And Extract
Its Service Key
To allow principal database propagation, the Primary Server must have
a host/<fqdn> principal and the service key for this principal must be
extracted to that server’s service key table file.
The host/<fqdn> principal is not automatically added to the principal
database on installation of the Security Server software; it must be
manually done using either kadminl_ui or kadminl.
NOTE You need to be logged in as a root user in order to execute the tasks
mentioned above. These tasks must be performed on the Primary
Security Server.
We recommend that you create a host/<fqdn> principal and extract its
service key using ktutil. To do this, at the command prompt, type:
kadminl -R “ext host/<fqdn>”
The host/<fqdn> is added to the principal database, along with a
random key. The random key is added to the service key table. To verify
that these operations were successful, use the ktutil-l to list the
contents of the key table file. The existence of a host/entry indicates
that the principal was successfully added to the database with a random
key.
Chapter 582
Page 83

Configuration
Start the Kerberos daemons
Start the Kerberos daemons
The krbsetup tool can be used to start the Kerberos daemons, namely:
• kdcd
• kadmind
NOTE You cannot use the krbsetup tool to start the kpropd daemon. This has
to be done manually.
Alternatively, you can the following command to start the Kerberos
daemons, kdcd and kadmind daemons.
/sbin/init.d/krbsrv start
You cannot use the command specified in the line above, to start the
kpropd daemon.
To start the kpropd daemon, use the following command:
/opt/krb5/sbin/krpopd
Chapter 5 83
Page 84

Configuration
Define Secondary Server Network Locations
Define Secondary Server Network Locations
To configure propagation, you must define server network locations by
altering the content of the Kerberos configuration files. You cannot use
the DNS lookup to configure propagation.
Refer to the Chapter 7, “Propagation,” on page 207, for more information.
For each Secondary Server installed on your network, you must edit the
krb.conf file on the Primary Security Server by adding an entry to
define the role of this Secondary Security Server in the realm. Refer to
“krb.conf” on page 69 for more information on the configuration files.
Chapter 584
Page 85

Configuration
Security Policies
Security Policies
There are two files that are directly related to the security of the network
in your organization. Namely,
• password policy file
• admin_acl_file
Password Policy File
This file controls password rules such as password length, number of
character types, and the lifetime of a password. This file is located on
each Primary and all the Secondary Security Servers.
Refer to “Password Policy File” on page 101, for more information on the
Password Policy File.
admin_acl_file
The admin_acl_file lists the various administrators along with their
respective administrative permissions. It also lists the principals whose
attributes cannot be changed without explicit privileges. This file is
located in the Primary Security Server. It must be protected with
appropriate read-write privileges and must be accessible only by a root
user.
Refer to “admin_acl_file” on page 95, for more information on the adding
entries to the admin_acl_file and assigning administrative
permissions.
Chapter 5 85
Page 86

Configuration
Starting the Security Server
Starting the Security Server
Once the Kerberos database has been created and the administrative
principals set up, you are ready to start the Kerberos daemons on the
Primary Security Server.
To do this, edit the /etc/rc.config.d/krbsrv file to reflect the
following values:
KDC = 1
ADMD = 1
Type, /sbin/init.d/krbsrv start
You can also start the kerberos daemons by typing:
# /opt/krb5/sbin/kdcd
# /opt/krb5/sbin/kadmind
You can verify that the daemons have started properly by checking for
their startup messages in the system log files.
A common error message returned by these programs is “Address
already in use”. This message indicates that the kdcd or kadmind is
configured to use a port that is already being used by another program.
Since the KDC uses the well-known port 88, this error most likely
indicates that a previous instance of the KDC is still running.
Chapter 586
Page 87

Configuration
Summary
Summary
Given below is a summarized step-wise procedure to configure the KDC
server.
Step 1. Install the Kerberos Server. For more information on carrying out this
step, refer to “Installing The Kerberos Server” on page 38.
Step 2. Create and modify the configuration files /opt/krb5/krb.conf, and
/opt/krb5/krb.realms. Refer to “Configuration Files For The Kerberos
Server” on page 63.
Step 3. Create the Database using the kdb_create command.
# /kdb_create “Your_Realm_Name” -s
Step 4. Use kadminl to add the administrative principals to the Kerberos
database.
# /opt/krb5/admin/kadminl
Refer to “Add An Administrative Principal” on page 80, for more
information.
Step 5. Create an admin_acl_file.
Refer to “admin_acl_file” on page 95 for more information.
Step 6. Start the Kerberos daemons on the Primary Security Server. Edit the
/etc/rc.config.d/krbsrv file to reflect the following values:
KDC = 1
ADMD = 1
Type, /sbin/init.d/krbsrv start
You can also start the kerberos daemons by typing the following
commands at the command prompt:
shell% /opt/krb5/sbin/kdcd
shell% /opt/krb5/sbin/kadmind
You can also start the Kerberos daemons by typing the command
prompt:
Chapter 5 87
Page 88

Configuration
Summary
% /sbin/initd/krbsrv start
Verify that the daemons have started properly by checking for the
messages in the system log files.
Step 7. Once the KDC is set up and running, it is time to create the principals of
all the hosts and users into the Kerberos database.
Chapter 588
Page 89

Configuration
Configuring The Secondary Security Servers
Configuring The Secondary Security Servers
You are now ready to start configuring the secondary security servers.
Assuming that you are setting up the Primary Security Server so that
you can easily switch the Primary Security Server with one of the
Secondary Servers, you should perform each of the steps on the Primary
Server as well as on the Secondary Server.
All Secondary Security Servers require three basic configuration tasks as
listed below:
• Create the principal database
• Copy the Kerberos configuration file
• Create a host/<fqdn> principal and extract its key
Refer to the Chapter, “Propagation” on page 207, for more information on
configuring the Secondary Security Server for Propagation.
Create the Principal Database
By default, the Kerberos Security Server uses 3DES to encrypt the
principal database. Therefore, if you are adding a Secondary Security
Server to an existing deployment where DES encryption is used to secure
its principal database, create the database afterinstallationinvokingthe
following command:
kdb_create -s -e enctype
where enctype is either 1 for DES-CBC-CRC or 3 for DES-CBC-MD5.
Copy the Kerberos Configuration File
For the greatest flexibility for hierarchical propagation, each Secondary
Server must have a copy of the Kerberos configuration file from the
Primary Server. The default path and file name is:
/opt/krb5/krb.conf
Chapter 5 89
Page 90

Configuration
Configuring The Secondary Security Servers
Create a host/<fqdn> Principal and Extract Its Key
To allow principal database propagation, each Secondary Server must
contain a host/<fqdn> principal. Also, the key for this principal must be
extracted to that server’s service key table file.
Creating a host/<fqdn> principal and extracting its key is performed on
a Secondary Server the same way it is performed on a Primary Server.
Refer to “Create The host/<fqdn> principal And Extract Its Service Key”
on page 82 under the Primary Security Server section for complete
instructions.
You do not need to be logged on as a root user to perform these steps on
a Secondary Server. Instead, you must run kadmin and logon using the
administrative principal name and password when prompted for this
information.
Each KDC needs a host service principal in the Kerberos database. You
can create these from any host, once the kadmind daemon is running.
Chapter 590
Page 91

6 Administration
This chapter describes the procedures that will help you to administer
and maintain the Kerberos database. It also entails a discussion on
Principals and how to manage them using either the Administrator or
the Command-Line Administrator.
Chapter 6 91
Page 92

Administration
Chapter Overview
Chapter Overview
This chapter contains the following sections:
• “Administering the Kerberos Database” on page 93
• “kadmind” on page 94
• “admin_acl_file” on page 95
• “Password Policy File” on page 101
• “Principals” on page 103
• “kadmin Vs kadminl” on page 112
• “Administrator” on page 114
— “Local Administrator - kadminl_ui” on page 116
— “Remote Administrator - kadmin_ui” on page 167
• “Manual Administration Using kadmin” on page 170
• “Principal Database Utilities” on page 190
• “Creating the Kerberos Database” on page 191
• “Destroying the Kerberos Database” on page 195
• “Dumping the Kerberos Database” on page 196
• “Loading the Kerberos Database” on page 197
• “Stashing the Master Key” on page 198
• “Starting and Stopping Daemons” on page 200
• “Maintenance Tasks” on page 201
• “Backing Up Primary Server Data” on page 202
• “Removing Unused Space From the Database” on page 204
Chapter 692
Page 93

Administration
Administering the Kerberos Database
Administering the Kerberos Database
Once, you have installed and configured the HP-UX Kerberos Server
version 2.0, the Kerberos database will contain the default Kerberos
principals, their keys, and other administrative information about each
of these principal’s, for your realm. For more information on installing
your security server, refer to Chapter 2, “Installation,” on page 33.
The kerberos database utilities can be used to globally manage the
principals and their utilities. The programs that allow you do so, are the
Administrator and the Command-Line-Administrator.
The Administrator is the graphical-user-interface that can be used to
manage your principals and realms. This includes both the remote,
kadmin_ui, and the local, kadminl_ui, administrators. These programs
have been discussed in detail, in the subsequent sections.
The Remote Administrator, kadmin, contacts the Kerberos Database -
kadmind for Kerberos authentication whereas the Local Administrator,
kadminl, does not require a server for authentication. The kadminl runs
only on the primary server, where the Kerberos database is located.
The Kerberos daemon, kadmind, is required for Kerberos Authentication.
This daemon has been discussed in the next section of this chapter, with
the files required for this daemon to be up and running.
Chapter 6 93
Page 94

Administration
kadmind
kadmind
The kadmind command starts the administrative server. This
administrative server runs on Kerberos server that stores the Kerberos
principal database. The kadmind accepts password change requests and
remote requests to administer the information in this database.
kadmind requires the following configuration files to be set for it to work
appropriately:
krb.conf The Kerberos configuration file contains configuration
information for the Kerberos Server. Refer to
“krb.conf” on page 69, for more information.
krb.realms The Kerberos realms file maps hostnames to their
realms names. Refer to “krb.realms” on page 73, for
more information.
ACL file kadmind’s access control list (ACL) that lists the
various principals along with their respective
permissions. This file is located in the /krb5 directory.
Refer to “admin_acl_file” on page 95, for more
information.
Password This files controls the password policy for all the
Policy File Principals. For more information, refer to “Password
Policy File” on page 101.
Chapter 694
Page 95

Administration
admin_acl_file
admin_acl_file
This file lists authorized principals with their respective administrative
permissions. It also lists principals that cannot be modified without
explicit privileges. This file is located only on the primary security server,
at the following location:
/opt/krb5
It must be protected with appropriate read-write privileges and must
be accessible only by the root user.
kadmind checks for the principal’s permissions in the admin_acl_file.
The admin_acl_file can be edited directly on the primary server,orcan
also be edited remotely using the Administrative Permissions
window of the Administrator.
The general format of the file is:
identifier/instance@REALM [perms_list] [# comments]
where,
identifier The principal’s name
instance The administrative instance associated with the
principal. It is recommended that you add an admin
instance to each administrative principal name.
If the prinicpal resides in the primary security server’s
default realm, the @REALM is optional; else you will
need to explicitly specify the principal’s realm.
[perms_list] You need to add one or more of the permissions letters
listed in the table below, with no spaces between them.
[# comment] Contains any optional remarks about the principal.
Characters after the pound symbol are ignored.
Each line in the admin_acl_file matches an administrative principal with a set of permissions. Wildcards can also be used to enter groups of principal names.
Chapter 6 95
Page 96

Administration
admin_acl_file
Assigning Administrative Permissions
Administrative principals may have varying levels of trust assigned to
them, depending on your organization’s policies. Table 6-1 lists the
possible administrative permission settings and the letter designator
used in the admin_acl_file to indicate the permissions assigned to the
principal account. Permissions designated with a lower case letter apply
only to the realm to which the administrative principal belongs.
Permissions designated with an upper-case letter apply to all realms.
The [permissions] is an optional string containing one or more of the
options listed in the table below.
The Restricted administrator setting is a modifier; it must be used in
conjunction with permissions. There are several important
considerations that need to be taken into account while using r, R and Rr
modifiers. Refer to “Using Restricted Adminsitrator” on page 99, for
more information.
NOTE The e, E, g and G switches are not affected by the r and R permissions.
* overrides the r and R switches
Table 6-1 Administrative Permission Settings
Administrator Field Name
Add Principals a or A
Change Principal Passwords c or C
Delete Principals d or D
Edit the admin_acl_file.
Note: This setting cannot be restricted by the r or R
permissions
Edit Group Defaults g or G
Inquire about Principals. Assign this attribute to all
administrative principals to allow use of the
administrative tools
ACL file
Character
e or E
i or I
Chapter 696
Page 97

Table 6-1 Administrative Permission Settings (Continued)
Administration
admin_acl_file
Administrator Field Name
List prinicpal. This is redundant with i or I
Note: This permission is not displayed in
Administrator
Modify Principals m or M
Extract Keys x or X
Restricted Administrator. Use the r, R and Rr
modifiers in combination with the a, A, c, C, d, D,
i, I, m, M, or x. X permissions to permit
administrative principals to use those options only
against certain principals.
NOTE The order of the permission letters is irrelevant.
The principal can also include the “*” wildcard as the admin_acl_file
supports the following identifier/instance wildcards:
• */instance
ACL file
Character
l or L
r or R
• identifier/*
This makes it easier to add groups of principal names to the file. So if you
want any principal with the instance “admin” to have permissions to
administer the database, you could use the principal “*/admin@REALM”.
where ‘REALM’ is your primary security server’s realm.
Forexample, to grant all principals with the admin instance, who need to
have all the permissions assigned to them, add the following line in the
acl file:
*/admin@FINANCE.BAMBI.COM *
where,
* all prinicpals
admin instance
Chapter 6 97
Page 98

Administration
admin_acl_file
FINANCE.BAMBI.COM realm name
* all permissions
To grant the principal, rabbit@FINANCE.BAMBI.COM, permission to add,
list and inquire about any principal in the database, you can add the
following line into the acl file:
rabbit@FINANCE.BAMBI.COM ali
Adding Entries to the admin_acl_file
You can add any principal name to the admin_acl_file as an entry with
or without assigned administrative permissions.
To add a principal with assigned permissions, use the Principal
Information’s attribute tab of kadminl_ui. Refer to “Administrative
Permissions” on page 160.
Deciding which principal names to add to the admin_acl_file is a
strategic decision. Consider the following:
• There should be only one admin_acl_file per primary server. All
realms supported by the primary server are included in this file.
• Any principal name added to this file should have adequate
protection, so that only the most trusted administrative principals
can alter the principal account using the remote administration tool.
• Principals in the admin_acl_file that have assigned permissions
can log on to the administrative tools, thereby becoming
administrative principals.
The r, R, or Rr modifiers, when used with the a or A permission, restrict
the principal names that can be added to the database. For instance,
principals assigned the ‘IARiar’ permissions cannot add new principals
that use an identifier/instance@REALM, which is already included in
the admin_acl_file.
To take advantage of this restriction, you must consider the names you
may want to add to the admin_acl_file.
Chapter 698
Page 99

Administration
admin_acl_file
Creating Administrative Accounts
You can set administrative permissions in the admin_acl_file using
one of the following methods:
• Using the Administrator to set administrative permissions. The
admin_acl_file is automatically edited, when you change the
administrative permissions of the principal.
• Edit the admin_acl_file directly. To edit this file you must have the
required system file administration rights.
Using Restricted Adminsitrator
The r, R, and Rr modifiers are used in combination with the a, A, c, C, d,
D,i, I, m,M,orx, X permissions to permit administrative principals to use
those options only against certain principals.
How the r/R Modifiers Work
There are several important considerations about using the r, R, and Rr
modifiers:
• The r modifier restricts only lower-case permissions. For instance,
administrative principals assigned the ird permissions cannot
delete principals from their own realm that are included in the
admin_acl_file.
Note that the r modifierdoesnotrestrictupper-case permissions. For
instance, administrative principals assigned the IMimr permissions
cannot modify principals in their own realm that are included in the
admin_acl_file, but are able to modify any principal in all other
realms supported by the primary security server.
• The R modifier restricts only upper-case letter permissions and only
applies to realms other than the administrative principal’s realm.
Forinstance, administrative principals assigned the IRD permissions
cannot delete principals included in the admin_acl_file from any
other realm except their own.
Note that IRDid is equivalent to the IRD permissions because the
upper-casepermissions (not including the r and R modifiers) apply to
all realms.
Chapter 6 99
Page 100

Administration
admin_acl_file
In either case, administrative principals can delete any principal
from their own realm, but have restricted delete privileges in realms
other than their own.
As another example, administrative principals assigned the IDRm or
IDRidm permissions have restricted delete permissions in all other
realms but not their own, but can modify and delete any principal in
their own realm.
• The Rr modifiers restricts permissions for all principals in the
admin_acl_file for all realms supported by the primary security
server. For example, administrative principals assigned the IMRimr
permission cannot modify principals included in the
admin_acl_file in any realm, including their own. They can only
modify principals that are not included in the admin_acl_file.
• The e, E, g, and G permissions are not affected by the r, R, and Rr
modifiers.
• Administrative principals assigned icr or ICRicr are still able to
change their own passwords using the administrative tools.
Permissions other than c and C are restricted for the restricted
administrative principals. For instance, principals assigned with the
imr permission are not able to modify their own principal accounts.
An administrative principal assigned the r or R in combination with
e or E can use Administrator to remove the r modifier from their
admin_acl_file entry. Do not assign these permission
combinations. Some examples would be, ier, IER, IERr, or IEr.
• Administrative principals assigned the ic, icr, IC or ICR
permissions are able to change principal attributes and extract
service keys, in addition to changing principal passwords. According
to the r and R modifier rules, restricted administrators can only
make perform these actions for principal accounts not includedinthe
admin_acl_file.
Chapter 6100
 Loading...