

Page 1

F230
Car Camcorder
User Manual
Page 2

Page 3

Table of Contents
1 Introduction .................................................................................................................................... 2
1.1 Features .................................................................................................................................. 2
1.2 What's in the Box .................................................................................................................. 2
1.3 Product Overview ................................................................................................................. 3
2 Getting Started .............................................................................................................................. 4
2.1 Inserting the Memory Card ................................................................................................ 4
2.2 Installation ............................................................................................................................. 4
2.3 Adjust Device Position ......................................................................................................... 5
2.4 Connecting to Power ........................................................................................................... 6
2.5 Powering the Camcorder ................................................................................................... 7
2.6 Set Date & Time .................................................................................................................... 7
2.7 Default Settings .................................................................................................................... 8
3 Using the Car Camcorder ........................................................................................................... 8
3.1 Recording Videos ................................................................................................................. 8
3.2 Recording Screen ................................................................................................................. 8
3.3 Adjusting the Settings ......................................................................................................... 9
3.4 Loop Recording ................................................................................................................. 10
3.5 Emergency Video Protection ......................................................................................... 10
3.6 Motion Detection ............................................................................................................... 10
3.7 Vibration Detection ........................................................................................................... 10
3.8 Parking Mode ...................................................................................................................... 11
3.9 Taking a Snapshot ............................................................................................................. 11
3.10 Playback Videos & Photos ............................................................................................ 11
3.11 Managing Video & Photo Files ..................................................................................... 12
4 Menu Overview ........................................................................................................................... 13
5 FAQs ............................................................................................................................................... 14
6 Customer Support ..................................................................................................................... 15
7 Important Safety Precautions ............................................................................................... 15
8 Product Specifications ............................................................................................................. 18
9 Limited Warranty ....................................................................................................................... 19
-1-
Page 4
1 Introduction
Welcome to the Hewlett Packard (HP) F230 Car Camcorder. Protect you and your vehicle
with real-time video and audio recording whilst you're driving.
1.1 Features
• Full HD 1920 x 1080P
• 2.0" LED Color screen
• Up to 120-degree wide angle lens
• Built-in G-Sensor
• Motion Detection
• Parking Mode
• Audio Recording
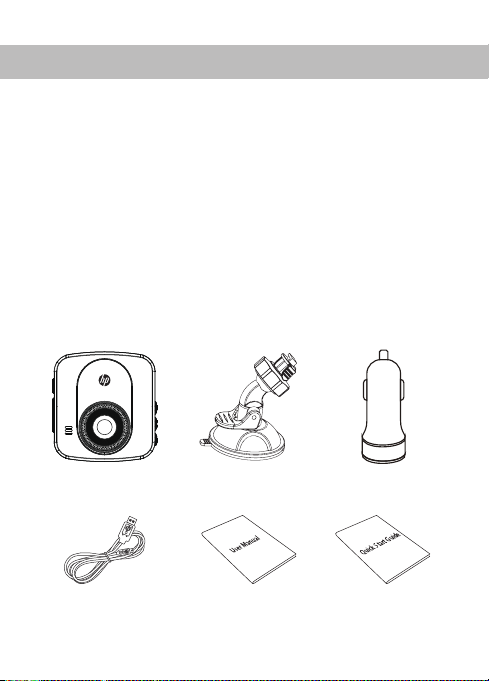
1.2 What's in the Box
Car Camcorder Car ChargerCar Mount
User ManualUSB Cable Quick Start Guide
-2-
Page 5
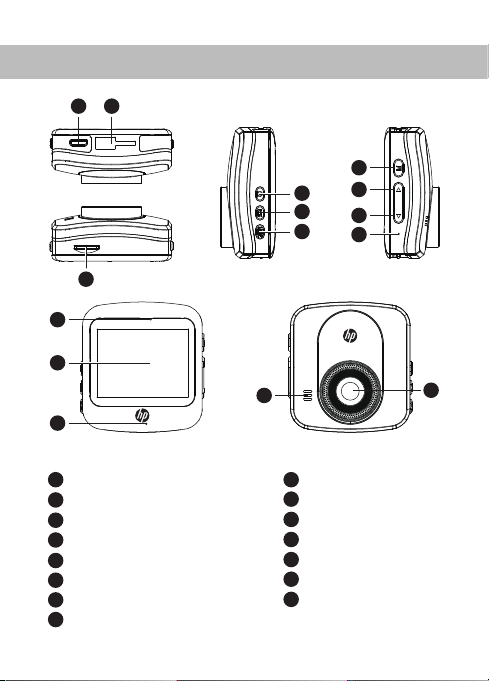
1.3 Product Overview
12
3
11
12
13
7
8
4
5
9
6
10
14
15
Car Mount Slot
1
USB Connector
2
Memory Card Slot
3
Power Button
4
Recording (REC) / OK Button
5
Mode Button
6
Menu (M) Button
7
Up Button
8
Down Button
9
10
Reset Pinhole
11
Indicator Light
Display Screen
12
Microphone
13
14
Speaker
15
Front Lens
-3-
Page 6
2 Getting Started
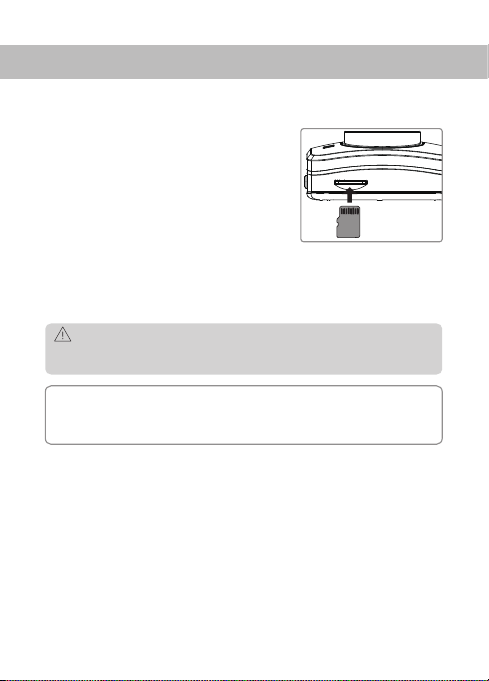
2.1 Inserting the Memory Card
Insert the memory card, with the pins facing
towards the front of the device, until it clicks
into place.
Remove Memory Card
Push the edge of the memory card inward until you feel it click, then allow it to push out
until you can remove it from the slot.
WARNING:
It is recommended to format the memory card before initial use. Please note that all
data saved on the memory card will be erased after formatting.
Note:
• Supports Micro SDHC cards up to 32GB (Class 4 or above).
• Do not remove or insert memory card whilst the device is powered on - this may
damage the memory card.
2.2 Installation
Please follow the below instructions for mounting your camcorder to your vehicles
windshield:
1. Slide the car mount into the slot on top of the device until a click sound is heard.
2. Peel off the protective plastic backing from the suction-cup. Place the device on your
windshield and firmly press down on the lever to secure.
-4-
Page 7
1 2
WARNING:
Do not install the device on a tinted window - doing so may damage the tint film.
-5-
Page 8
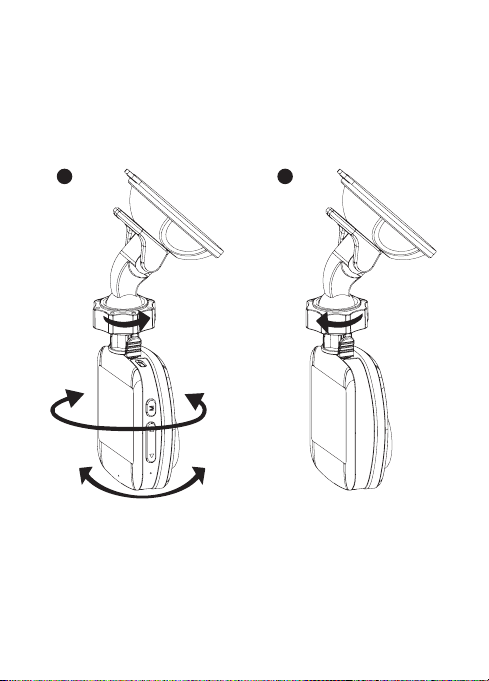
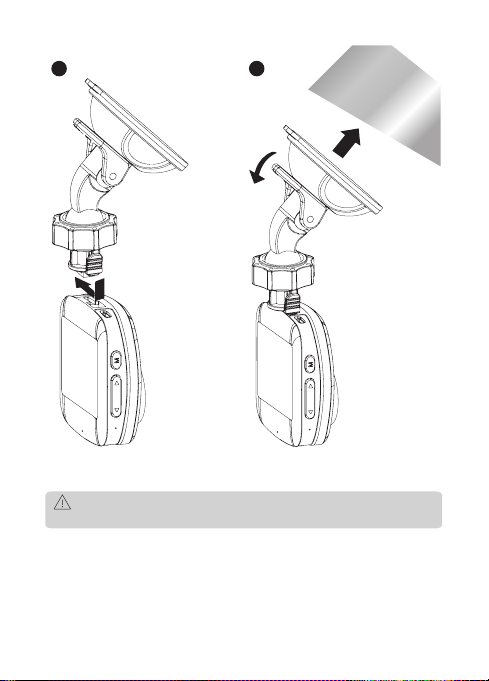
2.3 Adjust Device Position
1. Loosen the nut to swivel the device vertically or horizontally.
2. Tighten the nut to secure the device in position.
1 2
-6-
Page 9
2.4 Connecting to Power
Use only the supplier car adapter to power the camcorder and charge the built-in
battery.
1. Plug one end of the car charger
into the USB Connector of the
camcorder.
2. Plug the other end into your
vehicles lighter socket.
WARNING:
If the environment reaches 115-degrees Fahrenheit or above, the car adapter may
stop charging the camcorder battery. This is characteristic of a Lithium Polymer
battery and is not a malfunction.
2.5 Powering the Camcorder
Automatic Power
• Once the vehicle engine is switched on, the camcorder automatically powers on.
• When the vehicle engine is switched off, the camcorder will automatically save the
recording and power off within 10 seconds.
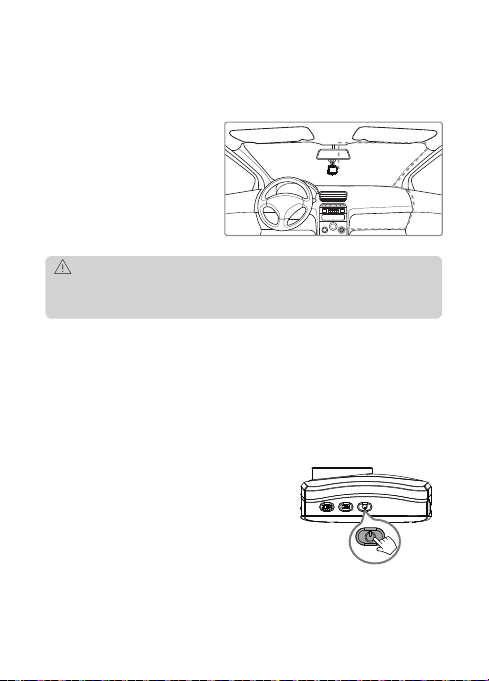
Manual Power
• To manually turn power on, short press the Power
Button (4).
• To manually turn the power off, press and hold the
Power Button (4) for 3 seconds.
-7-
Page 10

2.6 Set Date & Time
Before using the device, we recommend you set the correct date and time:
1. If the device is recording, short press
the 'REC' button (5) to stop and enter
Standby Mode.
2. Press the 'M' button (7) twice to enter
the General Settings menu.
3. Press the 'Up' and 'Down' buttons
(8 & 9) to select Date/Time and press
'REC' button (5) to confirm.
4. Press the 'Up' and 'Down' buttons
(8 & 9) to adjust the value and then
press 'REC' button (5) to confirm and
move to the next field.
5. With all fields correct, press the 'M' button (7) to save and exit the menu.
WARNING:
Date/Time settings may automatically reset themselves if the battery is allowed to
completely drain.
2.7 Default Settings
Please find below the full list of Default Settings for this camcorder:
Default Settings
Resolution 1080P HD Key Tone ON
Loop Recording 3 mins Language English
Motion Detection OFF Frequency 60 Hz
Record Audio ON Screen Saver 3 mins
Date Stamp ON
Vibration Detection Normal
-8-
Page 11

3 Using the Car Camcorder
3.1 Recording Videos
With an SD card inserted and the device connected to power, when the car engine is
switched on the camcorder will automatically power on and start recording. When the
vehicle engine is switched off, the camcorder will automatically save the recording and
power off within 10 seconds.
Alternatively, short press the 'REC' button (5) to stop/start video recording manually.
3.2 Recording Screen
1 2 3
4
11
10 9
No. Item Description
1 Mode
2 Recording
Emergency Video
3
Protection
4 Recording Interval Indicates the length of the current recording.
5 Resolution Indicates which video resolution is selected.
Indicates current camcorder mode (e.g. Video Mode,
Photo Mode, Playback)
A flashing red dot indicates the camcorder is currently
recording.
A key icon indicates the current recording file is
protected.
5
6
7
8
-9-
Page 12

No. Item Description
6 Microphone Indicates if Microphone is set On or Off.
7 Memory Card Indicates if a Memory Card is inserted.
8 Battery
9 Time Indicates the current time.
10 Date Indicates the date.
11 Loop Recording Indicates if Loop Recording is set, and at what interval.
Indicates the estimated remaining battery power / if the
device is being charged.
3.3 Adjusting the Settings
Customize the video recording and other general settings via the on-screen display
(OSD) menus:
1. If the device is recording, short press the 'REC' button (5) to stop and enter Standby
Mode.
2.1 Press the 'M' button (7) once to open the Mode Menu (settings will change according
to the mode you are in - Video/Photo/Playback Mode)
2.2 Press the 'M' button (7) twice to enter the General Settings menu.
3. Press the 'Up' and 'Down' buttons (8 & 9) to select a menu option and press the 'REC'
button (5) to enter the selected menu.
4. Press the 'Up' and 'Down' buttons (8 & 9) to select the desired setting and press the
'REC' button (5) to confirm the setting.
5. Press the 'M' button (7) to exit the menu.
-10-
Page 13

3.4 Loop Recording
Videos are recorded and saved to the memory card in set intervals. Once the memory
card is full, Loop Recording automatically overwrites the earliest unprotected saved file.
This prevents long duration video clips from being lost in a single overwrite.
Video files can be saved to the memory card in 1, 3 or 5 mins intervals: Video Mode >
Loop Recording.
3.5 Emergency Video Protection
If Vibration Detection is enabled and senses an unusual impact or collision the
camcorder will automatically protect the currently recorded video file from being
overwritten. A key icon appears top left to signify the current recording is protected.
To manually protect a video file during a recording, short press the 'M' button (7).
3.6 Motion Detection
With Motion Detection enabled, video recording is automatically started when
movement is detected by the camera lens. After approximately 10 seconds with no
movement detected, video recording is automatically paused.
Enable/disable feature: Video Mode > Motion Detection
WARNING:
Motion Detection requires the camcorder to be powered. For using this feature whilst
the vehicle is parked and the engine is off, you may need to hardwire the camcorder
to your vehicle. Please seek assistance from a trained mechanic before attempting
this installation.
3.7 Vibration Detection
The Vibration Detection feature senses for unusual impacts or collisions detected by the
built-in G-Sensor. It automatically triggers the Emergency Video Protection and Parking
Mode features.
Set the sensitivity to automatically trigger these features with smaller or larger
vibrations (feature can also be turned Off): Video Mode > Vibration Detection
-11-
Page 14

3.8 Parking Mode
Enable Parking Mode for the camcorder to continue monitoring your vehicle for unusual
impact or collision when the engine is turned off and parked. If a vibration is detected, the
device will automatically turn on and begin recording. Approximately 30 seconds after
the motion or vibration is finished, the device will automatically return to monitoring
mode. All recordings are automatically protected from being overwritten.
Enable/disable feature: Video Mode > Parking Mode
Note:
• In Parking Mode the device is powered by the internal rechargeable battery.
• Parking Mode is not recommended for long term parking situations due to the
devices limited battery life.
• When your vehicle is parked facing forward, turn the dash cam around so the lens
is facing the rear window of the vehicle for optimal monitoring.
3.9 Taking a Snapshot
1. If the device is recording, short press
the 'REC' button (5) to stop and enter
Standby Mode.
2. Press the 'MODE' button (6) to enter
Photo Mode, and short press the 'REC'
button (5) to take a snapshot.
3.10 Playback Videos & Photos
1. If the device is recording, short press the
'REC' button (5) to stop and enter Standby
Mode.
2. Press the 'MODE' button (6) twice to enter
Playback Mode.
3. Press the 'Up' button (8) to select the
Previous file.
Press the 'Down' button (9) to select the
Next file.
Press the 'REC' button (5) to Play/Pause a video file.
-12-
Page 15

3.11 Managing Video & Photo Files
1. Go to Playback Mode (see 3.10).
2. Navigate to the file you wish to manage
and press the 'M' button (7).
3. Press the 'Up' and 'Down' buttons (8 & 9)
to select either Delete or Protect, then
press the 'REC' button (5).
Delete
Delete the file by selecting Delete Current,
or select Delete All to delete all unprotected
files saved to the memory card.
Protect
Protect the file from being overwritten by the Loop Recording feature (see 3.4 and 3.5).
WARNING:
Deleted files cannot be recovered. Please ensure you backup important files before
deleting them.
-13-
Page 16

4 Menu Overview
Menu Feature Description Available option
Resolution
Loop Recording 1 min / 3 mins / 5 mins
Motion Detection Off / On
Video
Record Audio Off / On
Mode
Date Stamp Off / On
Vibration
Detection
Parking Mode Off / On
Key Tone Off / On
General
Settings
Language
Set the resolution of the
videos to be recorded.
Set the duration of each
video file recorded to the
memory card (see 3.4).
Enable/disable motion
detection (see 3.6).
Enable/disable audio
recording.
Add/remove a date and time
stamp, visible on saved
video recordings and photos.
Adjust the sensitivity of the
G-Sensor (see 3.7).
Enable/disable to protect
your vehicle from hit-and-run
incidents when the engine i
s off (see 3.8).
Set the date/time (see 2.5).Date/Time
Enable/disable the sound
effect when pressing the
buttons.
Preset the language of the
user interface.
-14-
1080P HD 1920 x 1080
1080P 1440 x 1080
720P 1280 x 720
WVGA 848 x 480
VGA 640 x 480
Off / High / Middle / Low
YYYY / DD / MM
HH : MM : SS
English / French / Spanish /
Portuguese / Deutsch /
Italian / Traditional Chinese /
Russia / Japanese / Korean /
Polish
Page 17

Menu Feature Description Available option
Screen Saver
General
Settings
Format Cancel / OK
Default Setting Cancel / OK
Adjust the light frequencyFrequency 50Hz / 60Hz
Select time taken for display
screen to automatically turn
off during operation.
Format the memory card.
Warning: ALL content on the
memory card will be deleted
and CANNOT be restored or
recovered.
Reset all options to the
factory default settings.
Firmware version.Version
Off / 3 mins / 5 mins /
10 mins
-15-
Page 18

5 FAQs
Where should I place the Camcorder?
• We recommend that you mount the Car Camcorder as close to the center of the
windshield as possible. This should neither distract the driver nor block the drivers
view (see 2.4).
Why does the Camcorder stop recording after some time?
• If motion detection is enabled, the camcorder will automatically stop recording when
no movements is detected for more than 10 seconds (see 3.6).
• Your micro SD card may be full and need to be formatted before using again. 1080P
HD videos are big in size and G-sensor locked videos cannot be erased automatically.
We recommend formatting your memory card every 14 days.
Why do you recommend Class 4 micro SD card or above?
• 1080P HD video has a bigger data flow and hence requires a micro SD card with faster
writing speed. If memory cards below Class 4 are used, they may cause the Camcorder
to freeze or other related video recording/erasing issues.
How do I turn off the screen/audio during recording?
• To turn off the screen, short press the Power button (4) once during recording. To turn
off Audio Record, short press the 'MODE' button (6) during recording. (Pleae note: this
does not interrupt the recording).
How long will my battery last after a full charge?
• The camcorder battery usually takes 2-3 hours to fully charge. This can happen
simultaneously whilst the Camcorder is plugged into your car and recording. The
battery can last 15-60 mins on a full charge depending on the model and
environmental temperature.
How do I record videos?
• All camcorders are programmed to automatically record when there is power
connected and a memory card inserted. When the engine is turned off, or power is
disconnected, the camcorder will stop recording approximately after 3-10 secs.
Manually start/stop recording by pressing the 'REC' button (5).
-16-
Page 19

6 Customer Support
Many questions regarding the operation of your HP product can be answered by reading
the instruction manual packaged with this product.
If this product is deemed to be defective and is under warranty, you may return the
product to the following address for repair or replacement. For support / technical
assistance, contact us at:
HP Branded Product Group
13517 Benson Avenue
Chino, California, USA, 91710
Toll-Free No: 1-866-886-6878
Email: hpsupport@ideausa.com
7 Important Safety Precautions
The content in this document is for information purpose and is subject to change without
prior notice. We made every effort to ensure that this User Guide is accurate and
complete. However, no liability is assumed for any errors and omissions that may have
occurred. The manufacturer reserves the right to change the technical specifications
without prior notice.
Notes on Installation
1. Install the device near the rear-view mirror to obtain the best open-field view. Do NOT
install the Dash Cam in a location that will obstruct your required driving view.
2. Make sure that the lens is within the wiping range of the windscreen wiper to ensure a
clear view even when it rains.
3. Do not touch the lens with your fingers. Finger grease may be left on the lens and will
result in unclear videos or snapshots. Clean the lens on a regular basis.
4. Do not install the device on a tinted window. Doing so may damage the tint film.
5. Make sure that the installation position is not hindered by the tinted window.
Caution
• Use the authorized charger only.
• Never disassemble or attempt repair of this product. Doing so may damage the Dash
Cam, cause electric shock and void your product warranty.
-17-
Page 20

• Never short-circuit the battery.
• Exposing the Dash Cam to open flames can cause an explosion.
• Due to local laws and vehicles safety considerations, do not manually operate the
device while driving.
• HP is NOT responsible for the loss of any data/content during operation.
• Before mounting, please check with the local DMV for the traffic laws of the location/
method to mount appropriately.
• Audio recorded with the video may not be valid jurisdictional evidence, and it may be
illegal to present such audio to the jury in some states.
For some vehicles, DC power socket will keep the supply of power after the engine is
turned off. To avoid car battery drain, please manually unplug the Dash Cam when the
engine is turned off.
IMPORTANT:
Before you start using the Car Camcorder it is assumed that you agree to the above
statements.
FCC Statement
This equipment has been tested and found to comply with the limits for a Class B digital
device, pursuant to Part 15 of the FCC Rules. These limits are designed to provide
reasonable protection against harmful interference in a residential installation. This
equipment generates, uses and can radiate radio frequency energy and, if not installed
and used in accordance with the instructions, may cause harmful interference to radio
communications. However, there is no guarantee that interference will not occur in a
particular installation. If this equipment does cause harmful interference to radio or
television reception, which can be determined by turning the equipment off and on, the
user is encouraged to try to correct the interference by one or more of the following
measures:
• Reorient or relocate the receiving antenna.
• Increase the separation between the equipment and receiver.
• Connect the equipment into an outlet on a circuit different from that to which the
receiver is connected.
• Consult the dealer or an experienced radio/TV technician for help.
This device complies with Part 15 of the FCC Rules. Its operation is subject to the
following two conditions: (1) This device may not cause harmful interference, and (2)
this device must accept any interference received, including interference that may cause
undesired operation.
FCC Caution: Any changes or modifications not expressly approved by the party
responsible for compliance could void the user's authority to operate this equipment.
-18-
Page 21

8 Product Specifications
Image Sensor
Storage Media
LED Display
Lens
Focus Range
Movie Clip
Still image (Photograph)
G-Sensor
Microphone
Speaker
Interface
Battery
Operating Temperature
Operating Humidity
Storage Temperature
Dimensions
Weight
Car Charger
CMOS sensor
Supports Micro SDHC, up to 32GB Class 4 or above
2.0” LED color TFT (230K pixels)
Wide Angle Fixed Focus lens F2.4
1.0m~Infinity
Resolution: 1080P (1920 x 1080); 720P (1280 x 720)
Format: AVI
Resolution: 12M(4032x3024)
Format: JPEG
Yes
Yes
Yes
Micro USB
Built-in Li-polymer rechargeable (This battery is NOT
replaceable)
14° ~ 158° F
20 ~ 70% RH
-4° ~ 158° F
55 x 60 x 25mm
Approx. 40g (1.4 oz)
INPUT: DC 12-24V, OUTPUT: DC 5V
-19-
Page 22

9 Limited Warranty
Your HP Product is warranted to be free from defects in materials or workmanship under normal use for
1 years starting on your date of purchase. Your dated sales or delivery receipt is your proof of purchase.
You may be required to provide proof of purchase as a condition of receiving warranty service.
During the warranty period, if a defective HP Product covered by this Limited Warranty is returned to the
designated HP Service Center, it will be repaired or replaced, at the option of the Service Center, or its
purchase price will be refunded. No repair, replacement or refund will be accepted unless the Service
Center first provides you with a Return Material Authorization (RMA). If your HP Product has recurring
failures, at the option of the Service Center, either you will be furnished with a different product that is
equivalent in performance or you will receive a refund of your purchase price. Service Center support may
be provided by an HP subcontractor or other third parties. Please see the HP Service Center information
provided below.
When permitted by local law, HP Products and any replacement products or parts may contain new
materials or used materials equivalent to new in performance and reliability. Replacement products or
parts will have functionality at least equal to that of the product or part being replaced. Replacement
products and parts are warranted to be free from defect in materials or workmanship for 90 days, or for
the remainder of the warranty period for the HP Product which they are replacing or in which they are
installed, whichever is longer.
Exclusions
This Limited Warranty does not include technical assistance. This Limited Warranty does not cover
cosmetic damage, loss or damage in transit, or damage resulting from (a) accident, misuse, abuse or
other external causes; (b) product elements not supplied by HP; (c) improver site preparation or
maintenance; or (d) modification or service by anyone other than HP, an HP Service Center or another
HP-authorized service provider.
Limitations/Local Laws
EXCEPT AS EXPRESSLY SET FORTH IN THIS LIMITED WARRANTY, THERE ARE NO OTHER WARRANTIES,
EXPRESS OR IMPLIED, FOR YOUR HP PRODUCT. ALL OTHER WARRANTIES, INCLUDING ANY IMPLIED
WARRANTIES OF MERCHANTABILITY OR FITNESS FOR A PARTICULAR PURPOSE, ARE EXPRESSLY
DISCLAIMED ANY IMPLIED WARRANTIES IMPOSED BY LAW ARE LIMITED IN DURATION TO THE APPLICABLE
WARRANTY PERIOD.
This Limited Warranty gives you specific legal rights, and it is governed by the laws of the state and
country in which your HP Product was purchased. You may also have other rights that vary from state to
state and country to country. You are advised to consult applicable state and country laws to determine
your rights. Some states and countries do not allow any limitation on how long a limited warranty will
last, or any exclusion or limitation of incidental or consequential damages. In such states and countries,
some of the exclusions or limitations stated in this Limited Warranty may not apply to you.
-20-
Page 23

Sole Remedies/No Incidental or Consequential Damages
To the extent allowed by local law, the remedies provided in the Limited Warranty are your sole and
exclusive remedies. These terms and conditions supersede any prior agreements or representations,
including statements made in sales literature or advice given in connection with your purchase.
TO THE EXTENT ALLOWED BY LOCAL LAW, AND EXCEPT AS SPECIFICALLY SET FORTH IN THIS LIMITED
WARRANTY, IN NO EVENT SHALL HP, ANY HP SERVICE CENTER OR ANY HP AUTHORIZED SERVICE
PROVIDER BE LIABLE FOR (1) ANY DAMAGES CAUSED BY THE PRODUCT OR THE FAILURE OF THE
PRODUCT TO PERFORM, (2) ANY DAMAGES RESULTING FROM LOSS OF PROGRAMS OR DATA, OR (3) ANY
DIRECT, INDIRECT, SPECIAL INCIDENTAL OR CONSEQUENTIAL DAMAGES, WHETHER BASED ON CONTRACT,
TORT, OR ANY OTHER LEGAL THEORY, AND WHETHER OR NOT ADVISED OF THE POSSIBILITY OF SUCH
DAMAGES, HP MAKES NO OTHER WARRANTIES.
Locate Your HP Support / Service Center
If you require support during the warranty period, locate the HP Support Contact and Service Center for
this product at:
www.hp.com/go/warrantyinfo or www.hp.com/support
Technical support telephone number: +1-866-886-6878
-21-
Page 24

UM_F230_v1.0_1711
 Loading...