

Page 1

HP Elite Autofocus Webcam
User’s Guide
— Lea esto —
Guía del usuario de la webcam de
enfoque automático HP Elite
Manuel de l’utilisateur de la Webcam
autofocus HP Elite
Version 2.0
Page 2

Page 3

Table of Contents iii
Table of Contents
English ....................................................................................................5
Español ................................................................................................25
Français ................................................................................................45
Page 4

iv HP Elite Autofocus Webcam User’s Guide
Page 5

HP Elite Autofocus Webcam
User’s Guide
Page 6

Copyright © 2007–2008 Hewlett-Packard Development Company, L.P.
The information contained herein is subject to change without notice.
The only warranties for HP products and services are set forth in the express warranty statements
accompanying such products and services. Nothing herein should be construed as constituting an
additional warranty. HP shall not be liable for technical or editorial errors or omissions contained
herein.
Product Registration
Registration is quick, easy and offers: e-mail updates containing notifications about product
enhancements, the most recent support alerts, and driver updates specific to the product(s)
you own.
For faster help, be sure to register your recently purchased product at https://register.hp.com
Page 7

Table of Contents 7
Table of Contents
Welcome ................................................................................................9
Overview .............................................................................................................9
Using Your HP Webcam ........................................................................11
Recording a Video ...............................................................................................11
Starting a Video Chat ..........................................................................................12
Using Your Webcam as a Video Monitor ...............................................................13
Editing a Video ...................................................................................................14
Editing a Video in ArcSoft WebCam Companion ...............................................14
Editing a Video in ArcSoft VideoImpression .......................................................14
Taking a Picture ..................................................................................................15
Editing a Picture ..................................................................................................16
Adjusting Settings .................................................................................17
Adjusting Brightness and Contrast .........................................................................17
Creating a Personal Profile ...................................................................................18
Adjusting Capture Settings ....................................................................................19
Adjusting Image Properties ...................................................................................19
Adjusting Camera Settings ....................................................................................20
Troubleshooting ....................................................................................21
Page 8

8 HP Elite Autofocus Webcam User’s Guide
Page 9

HP Elite Autofocus Webcam User’s Guide 9
Welcome
Congratulations on purchasing the HP Elite Autofocus Webcam.
This guide shows you how to use your new webcam to record videos, start video chats,
use your webcam as a security cam, take pictures, and adjust the webcam settings.
Overview
1 Video Record button
2 HP Instant Chat button
3 Snapshot button
4 Integrated microphone
5 USB connector
6 Adjustable clip
7 Privacy shutter
8 Autofocus lens
5
8
6
2
1
7
4
3
Page 10

10 HP Elite Autofocus Webcam User’s Guide
Page 11
HP Elite Autofocus Webcam User’s Guide 11
Using Your HP Webcam
Recording a Video
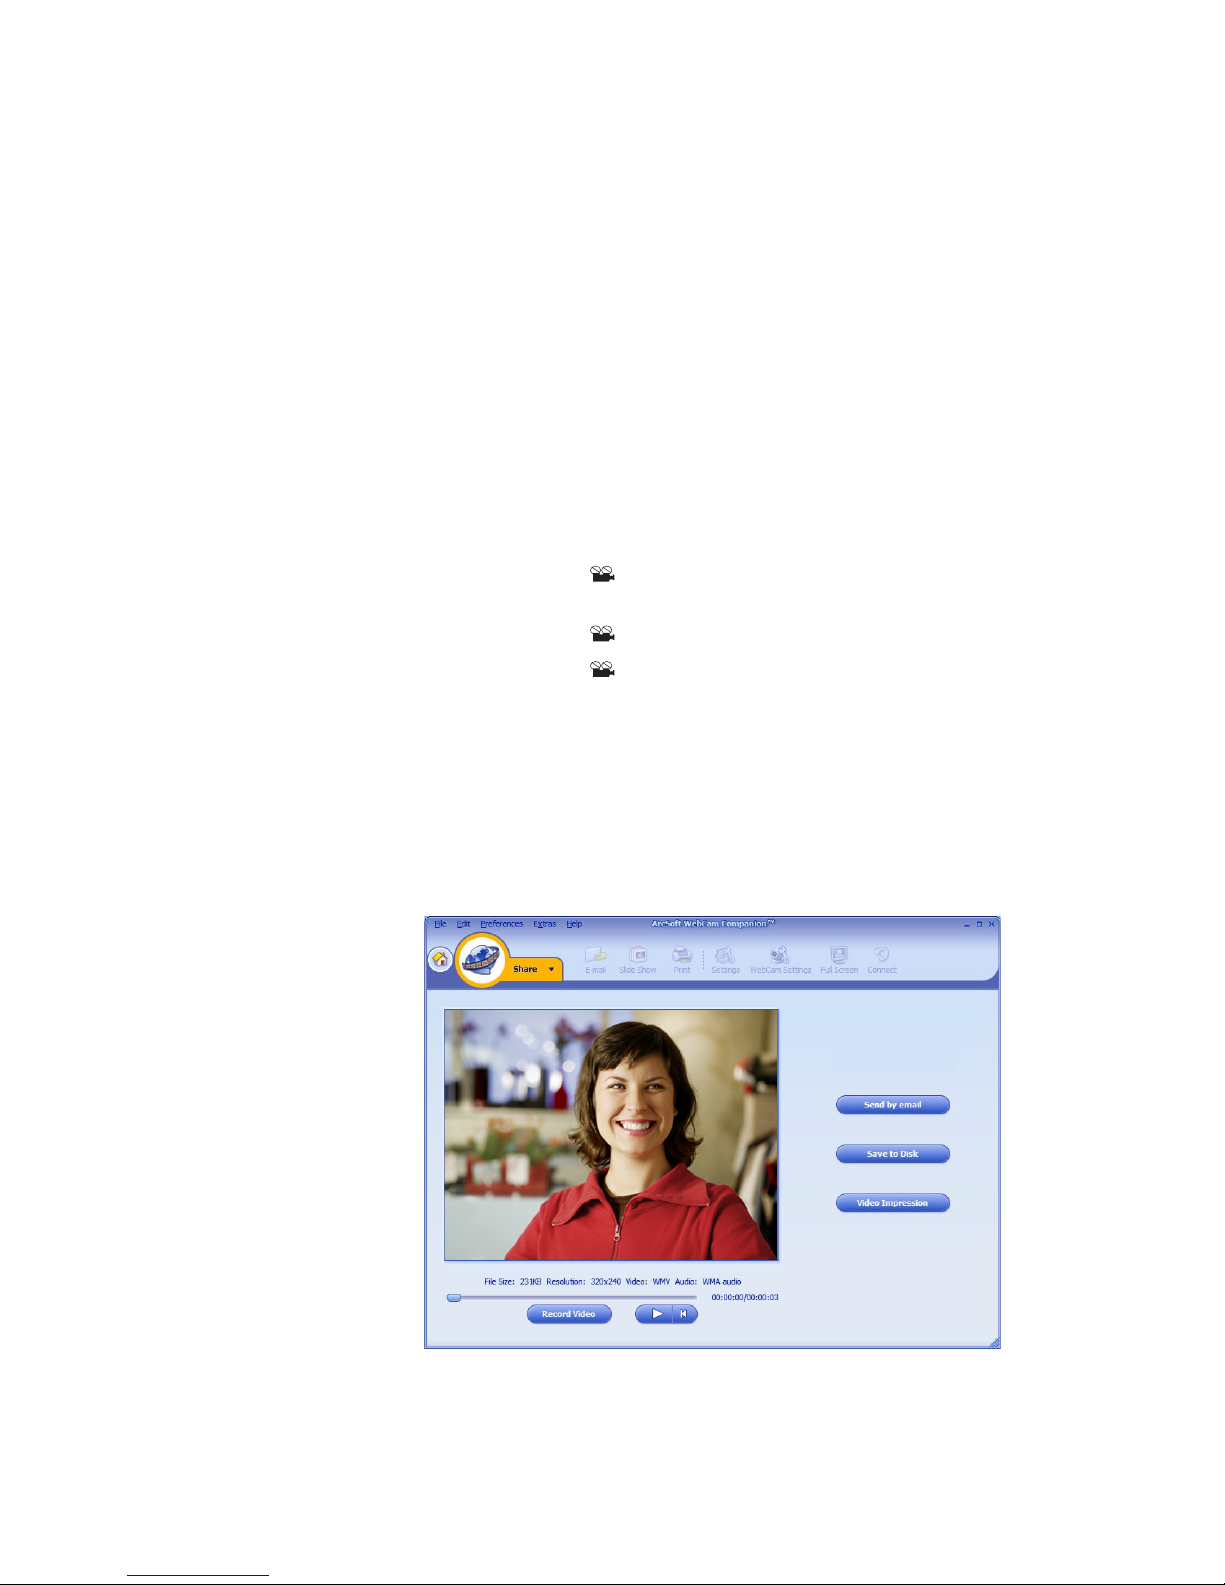
1 Press the Record Video button on your webcam to open ArcSoft WebCam
Companion™.
2 Press the Record Video button or click Capture to begin recording the video.
3 Press the Record Video button again or click Stop Recording to stop
recording the video.
4 Select one of the following buttons:
Send by email: Enables you to send the video as an e-mail attachment.
Save to Disk: Enables you to save the video on your computer.
Video Impression: Opens the video for editing in ArcSoft VideoImpression
®
.
To learn more about using ArcSoft WebCam Companion, click the Help menu.
Page 12
12 HP Elite Autofocus Webcam User’s Guide
Starting a Video Chat
You can add live video to the most popular
instant messaging (IM) applications
(ISP connection required):
AOL
®
Instant Messenger™ (AIM®)
Windows Live
™
Messenger
Ya hoo!
®
Messenger
Skype
®
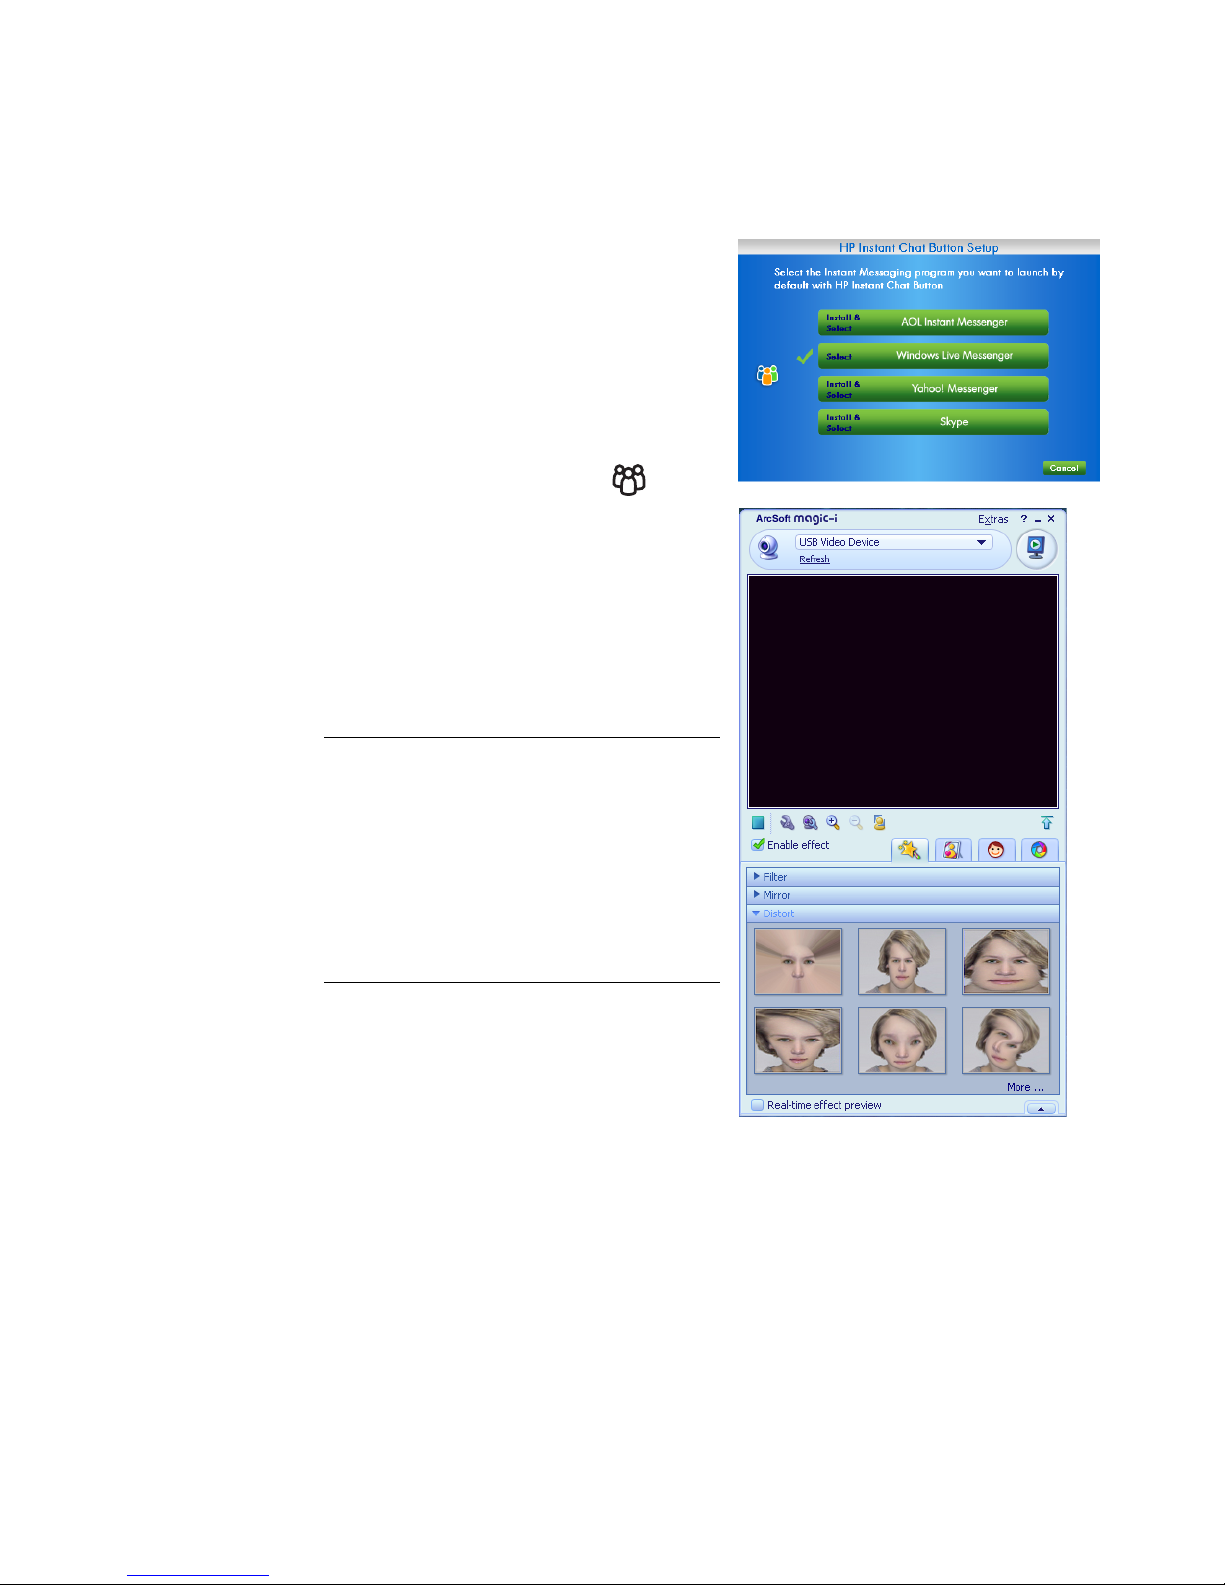
1 Press the HP Instant Chat button
on your webcam.
2 Select the instant messaging (IM)
application you want to use.
3 If prompted, follow the onscreen
instructions to install and set up the
IM application.
4 Follow the video chat steps in the
IM application’s documentation.
Now you’re ready to enhance your video
chats with special effects and to broadcast
videos from your PC hard drive. To learn
more about using ArcSoft Magic-i™ 3, click
the Help ? icon in the upper-right corner of
the Magic-i 3 window.
NOTE: The HP Instant Chat Button Setup
options only appear during initial setup. The
next time you press the HP Instant Chat
button, the selected IM application opens
automatically.
To select a different IM application after you
complete initial setup, click Start >
All Programs > ArcSoft Magic-i 3 >
HP Instant Chat Button Setup.
Page 13

HP Elite Autofocus Webcam User’s Guide 13
Using Your Webcam as a Video Monitor
1 Double-click the WebCam Companion icon on the Windows desktop.
2 Click Monitor .
3 Click Start Monitor to begin monitoring.
4 Click Stop Monitor to finish monitoring and save the video to your PC.
If you want to send a video snapshot by e-mail, upload the video to your FTP site, or
change the location of your media folder, ArcSoft WebCam Companion can do all that
and more. To learn more about using ArcSoft WebCam Companion, click the Help menu.
Page 14
14 HP Elite Autofocus Webcam User’s Guide
Editing a Video
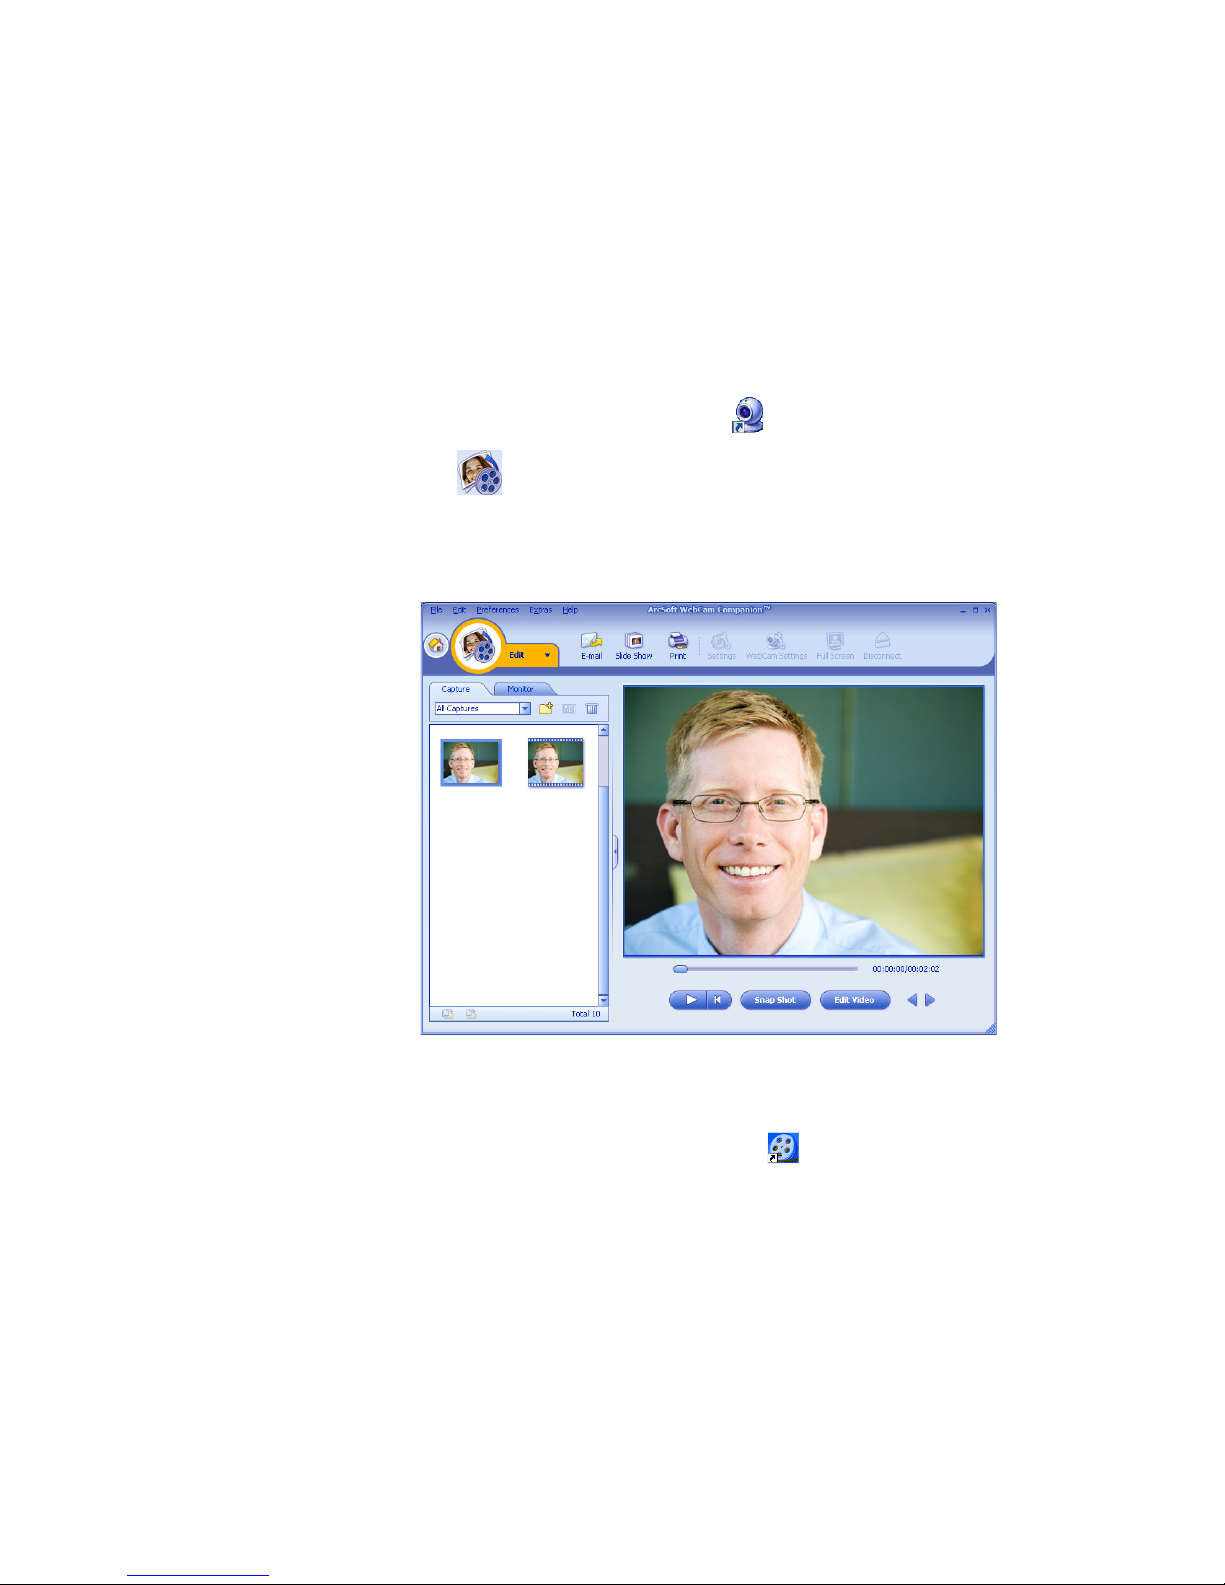
You can edit your videos in ArcSoft WebCam Companion or in ArcSoft VideoImpression.
For basic editing functions, use ArcSoft WebCam Companion, for advanced editing
functions use ArcSoft VideoImpression.
Editing a Video in ArcSoft WebCam Companion
1 Double-click the WebCam Companion icon on the Windows desktop.
2 Click Edit .
3 Highlight the video you want to edit, and then click Edit Video.
To learn about specific editing functions, click the Help menu.
Editing a Video in ArcSoft VideoImpression
1 Double-click the ArcSoft VideoImpression icon on the Windows desktop.
2 Click Open an Existing Project.
3 Select the video you want to edit.
To learn about using ArcSoft VideoImpression, click the Help menu.
Page 15
HP Elite Autofocus Webcam User’s Guide 15
Taking a Picture
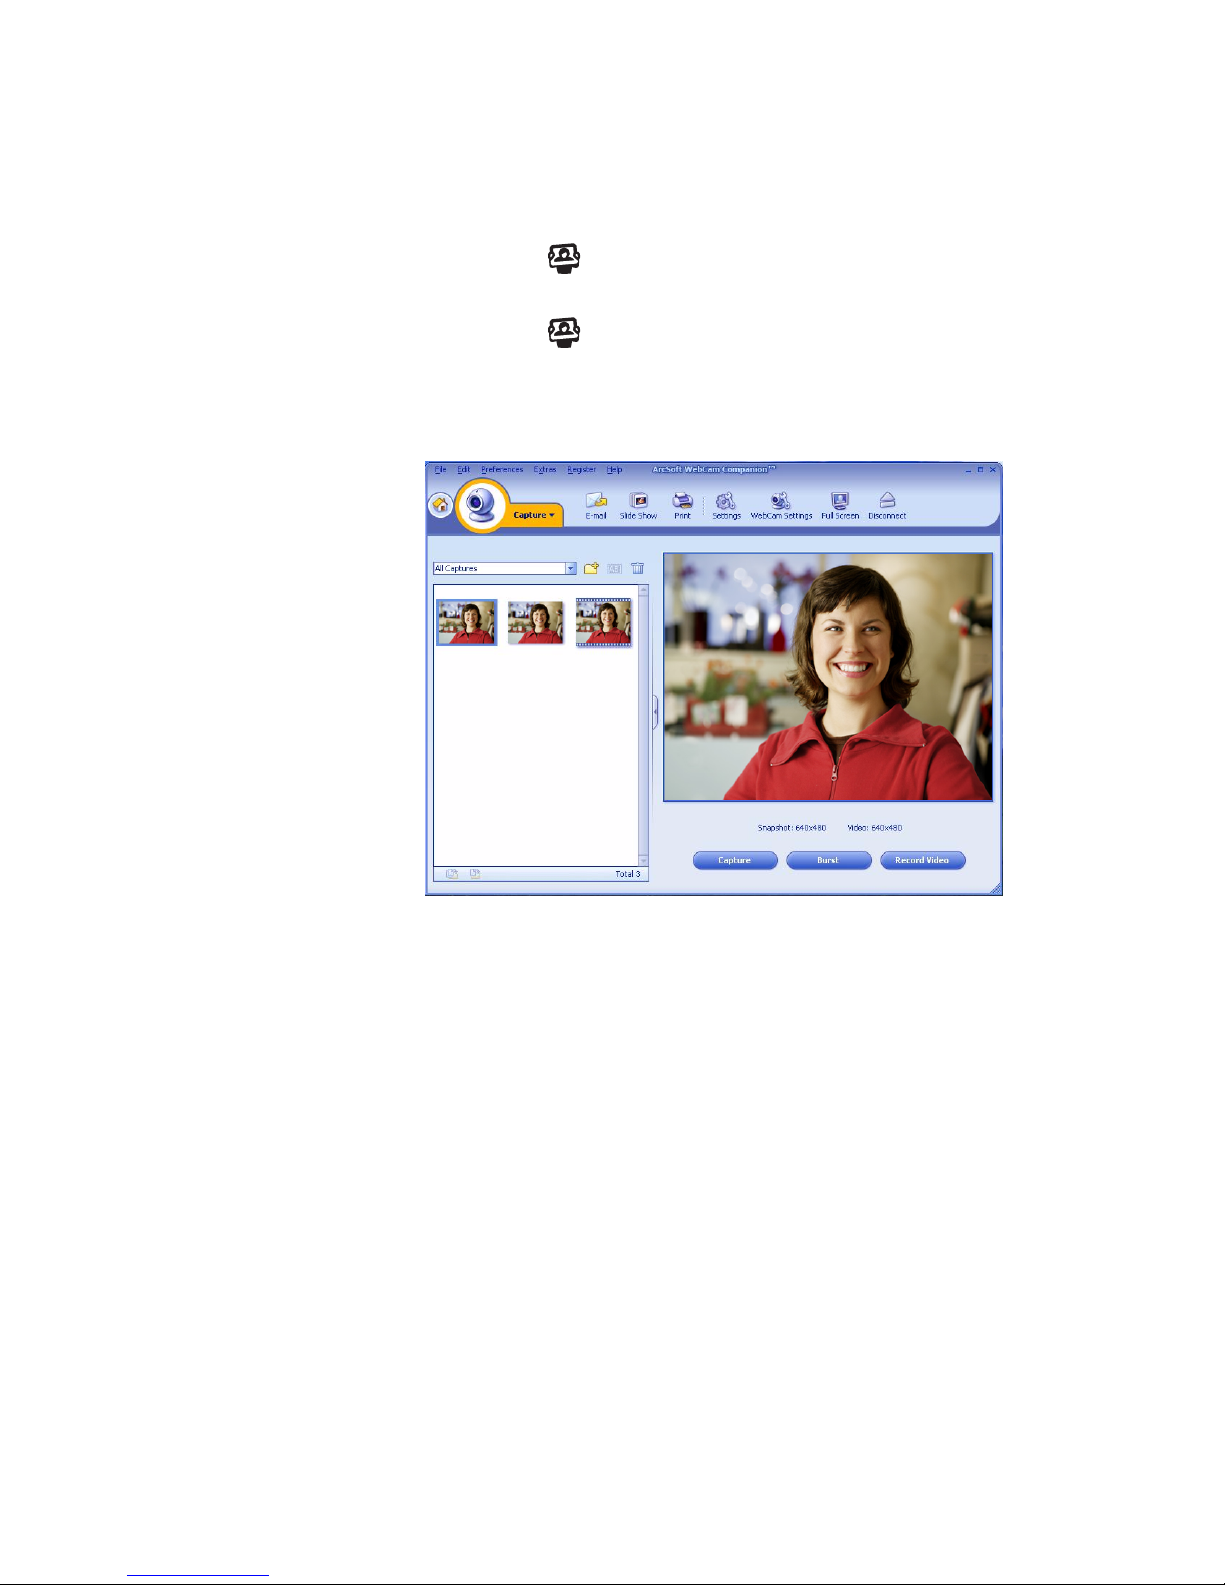
1 Press the Snapshot button on your webcam to open ArcSoft WebCam
Companion.
2 Press the Snapshot button again or click Capture to take the picture.
To learn more about taking pictures with ArcSoft WebCam Companion, click the
Help menu.
Page 16
16 HP Elite Autofocus Webcam User’s Guide
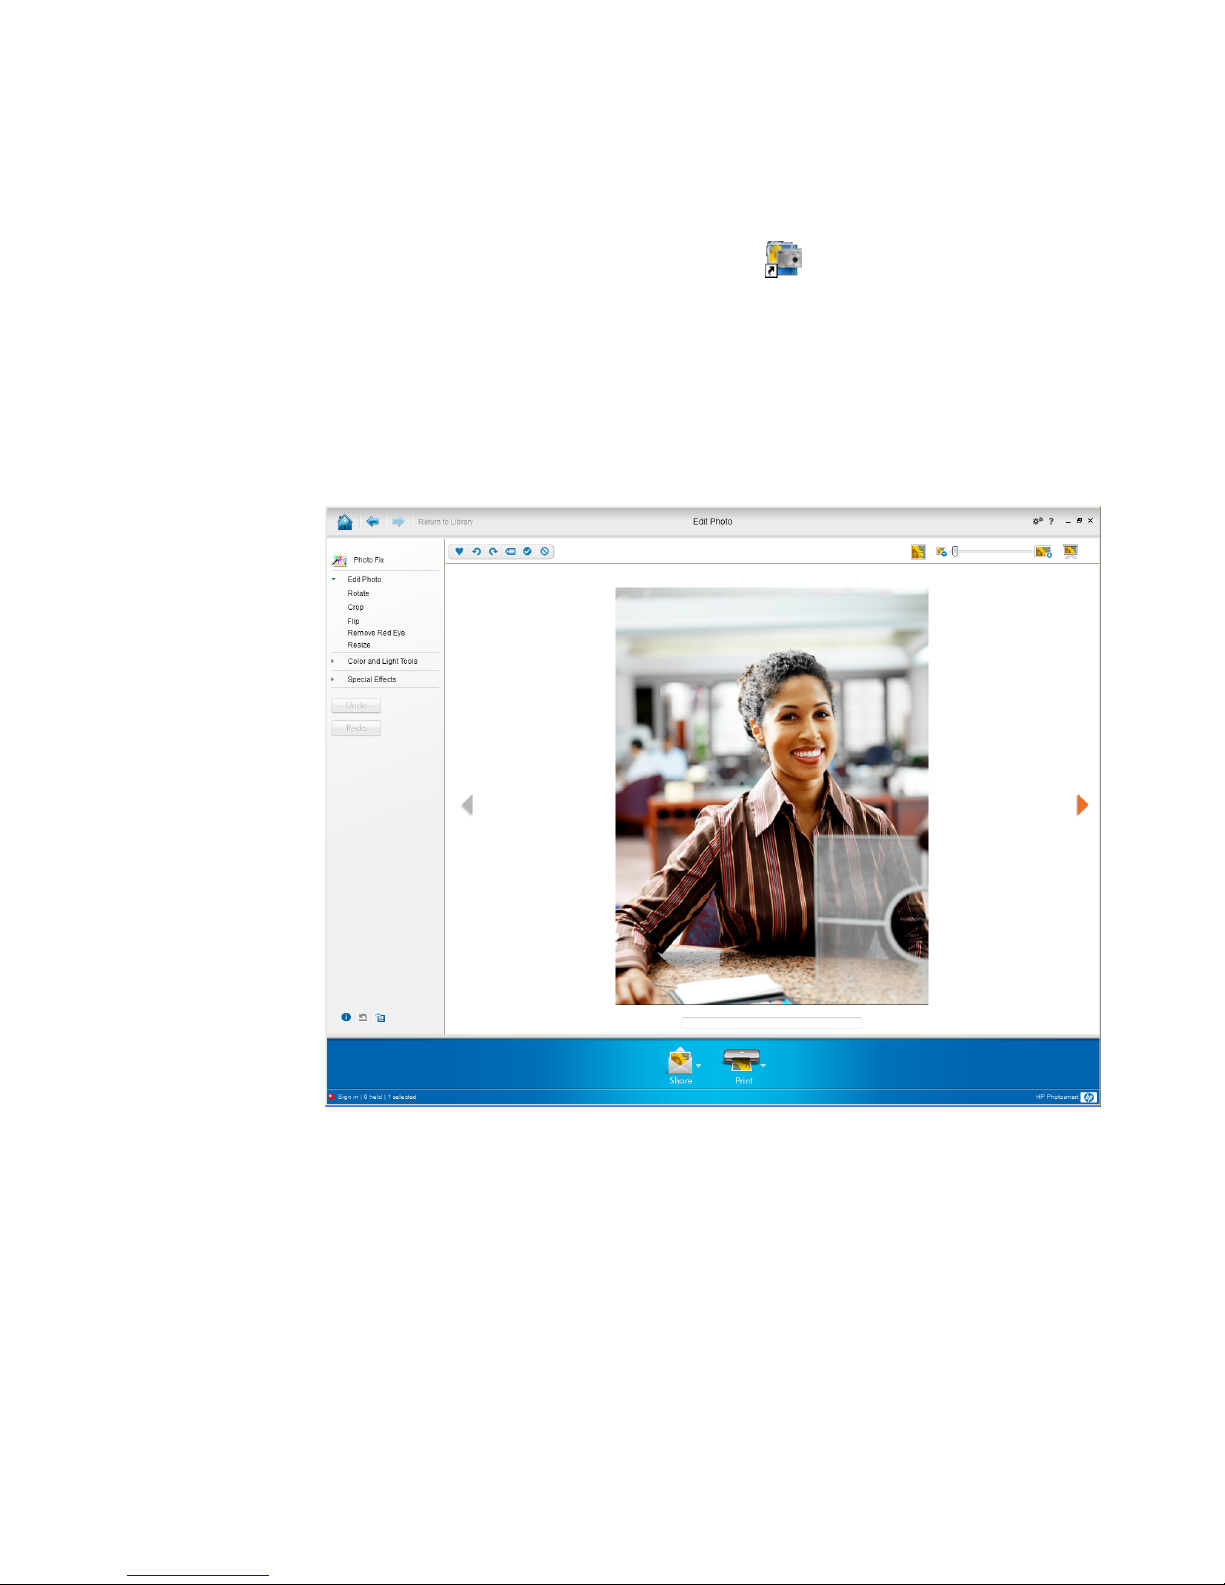
Editing a Picture
1 Double-click the HP Photosmart Essential icon on the Windows desktop.
2 Click View Library.
3 Right-click the picture you want to edit, and select Edit from the pop-up menu.
4 Select an editing option from the Photo Fix menu on the left side of the screen.
To learn more about editing, printing, and sharing pictures with HP Photosmart Essential,
click the Help ? icon in the upper-right corner of the Photosmart Essential window.
Page 17
HP Elite Autofocus Webcam User’s Guide 17
Adjusting Settings
This chapter shows you how to adjust settings in ArcSoft Magic-i 3 and ArcSoft WebCam
Companion.
Adjusting Brightness and Contrast
1 Double-click the Magic-i 3 icon on
the Windows desktop.
2 Click the Generic Settings icon.
3 Remove the check mark from the Auto
Enhance box.
4 Drag the sliders to adjust these settings:
Brightness
Contrast
5 Click OK.
NOTE: To restore all the factory settings, click Default.
Page 18
18 HP Elite Autofocus Webcam User’s Guide
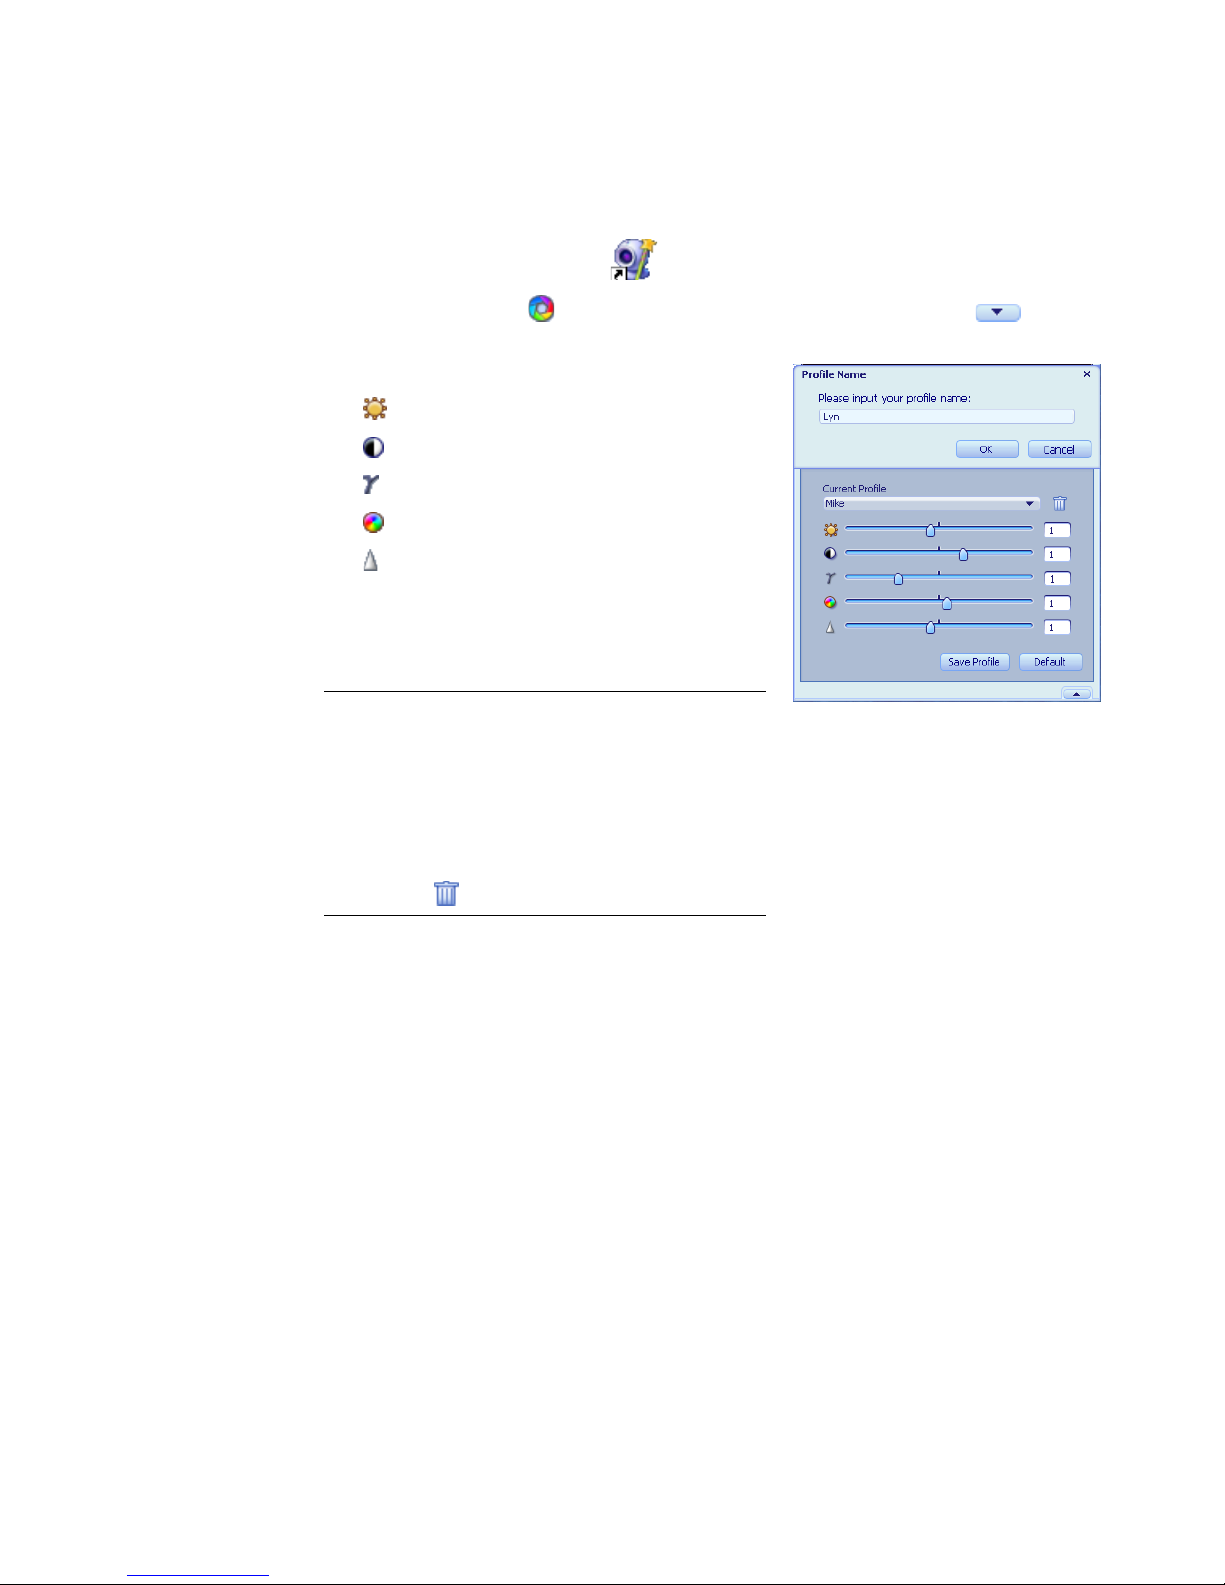
Creating a Personal Profile
1 Double-click the Magic-i 3 icon on the Windows desktop.
2 Click the Profiles tab. (If this tab is not visible, click the Expand tab to
expand the screen.)
3 Drag the sliders to adjust these settings:
Brightness
Contrast
Gamma
Saturation
Sharpness
4 Click Save Profile.
5 Enter a name for the profile.
6 Click OK.
NOTE:
To restore the factory settings, click Default.
To apply a previously saved profile, select the
profile name from the Current Profile list.
To delete a profile, select the profile name from
the Current Profile list, and then click the
Delete icon.
Page 19
HP Elite Autofocus Webcam User’s Guide 19
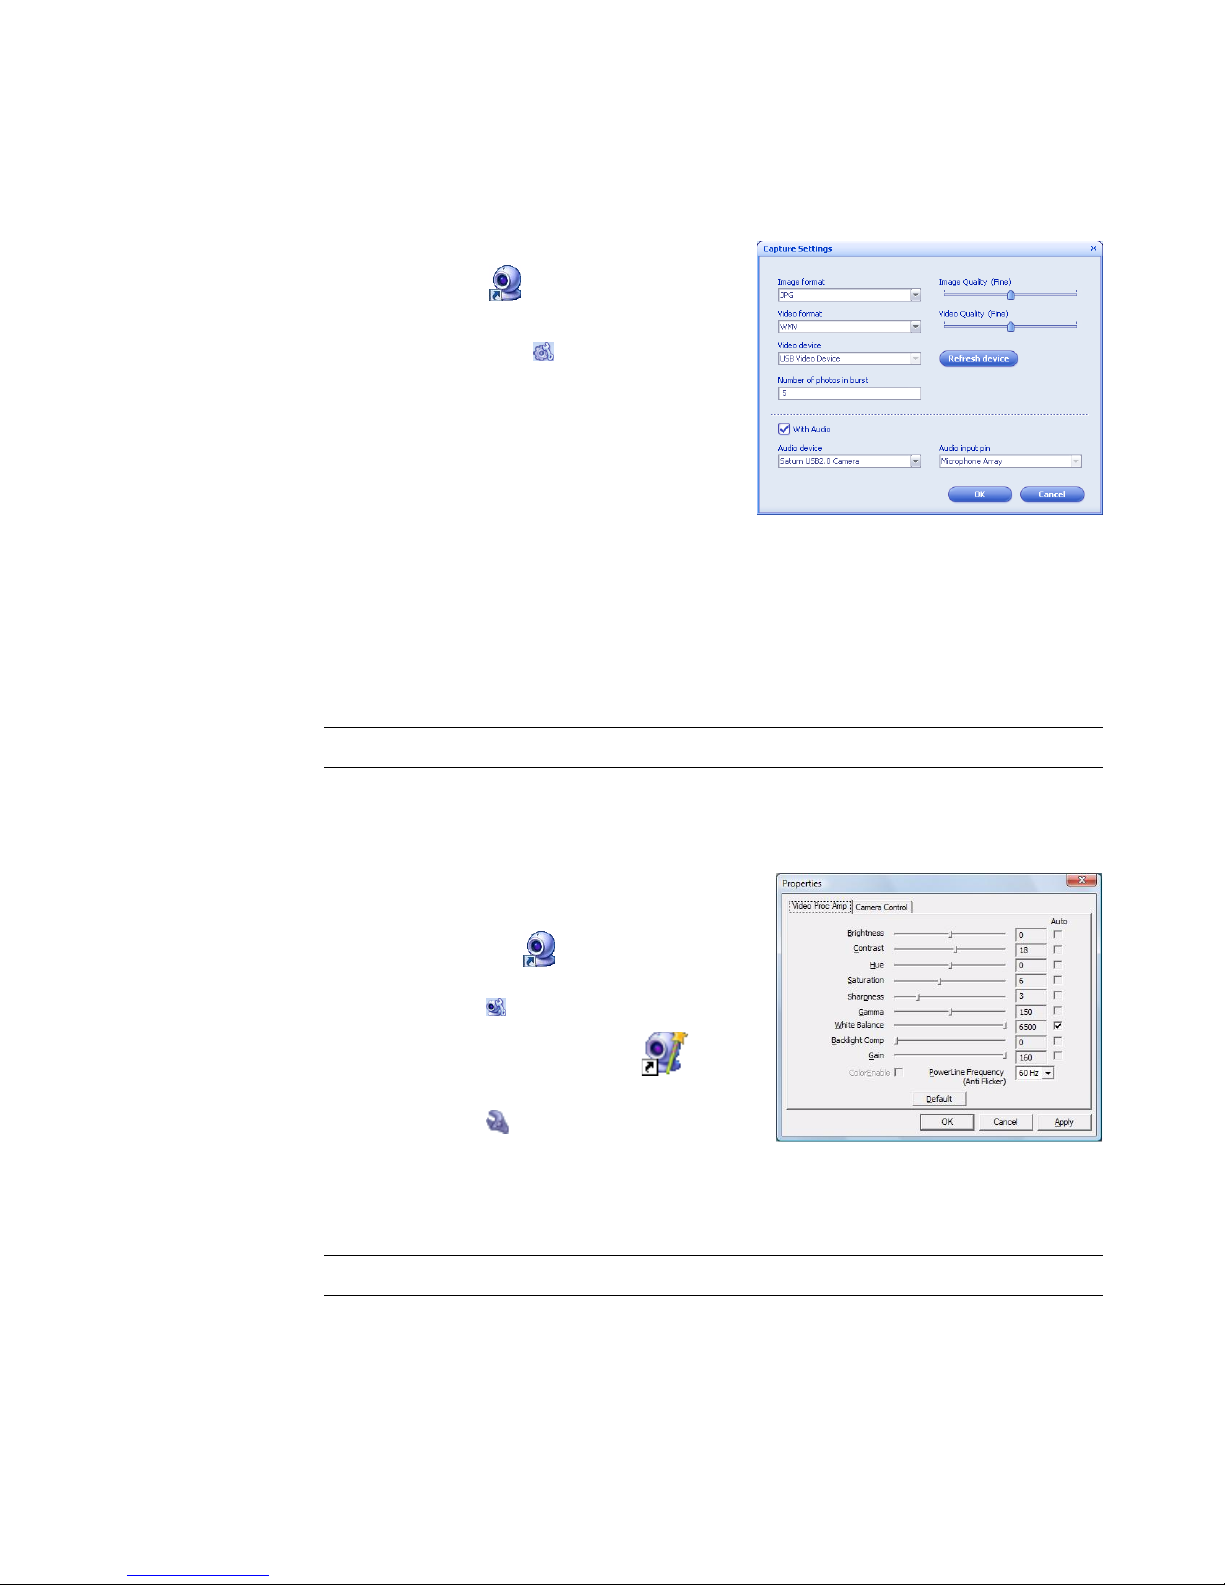
Adjusting Capture Settings
1 Double-click the WebCam
Companion icon on the Windows
desktop.
2 Click the Settings icon.
3 Adjust any of these settings:
Image Format sets the default file
format for still image captures.
Image Quality sets the default resolution
for still image captures.
Video Format sets the default file format
for videos you record.
Video Quality sets the default resolution for videos you record.
Number of photos in burst sets the number of images captured in burst mode.
With Audio turns the webcam’s microphone on and off.
4 Click OK.
Adjusting Image Properties
1 Do one of the following:
Double-click the WebCam
Companion icon on the Windows
desktop, and then click the WebCam
Settings icon.
Double-click the Magic-i 3 icon on
the Windows desktop, and then click the
Settings icon.
2 Click the Video Proc Amp tab.
3 Drag the sliders to adjust the individual settings.
4 Click OK.
NOTE: To restore all the factory settings, click Refresh device.
NOTE: To restore the factory settings, click Default.
Page 20
20 HP Elite Autofocus Webcam User’s Guide
Adjusting Camera Settings
1 Do one of the following:
Double-click the WebCam
Companion icon on the Windows
desktop, and then click the WebCam
Settings icon.
Double-click the Magic-i 3 icon on
the Windows desktop, and then click the
Settings icon.
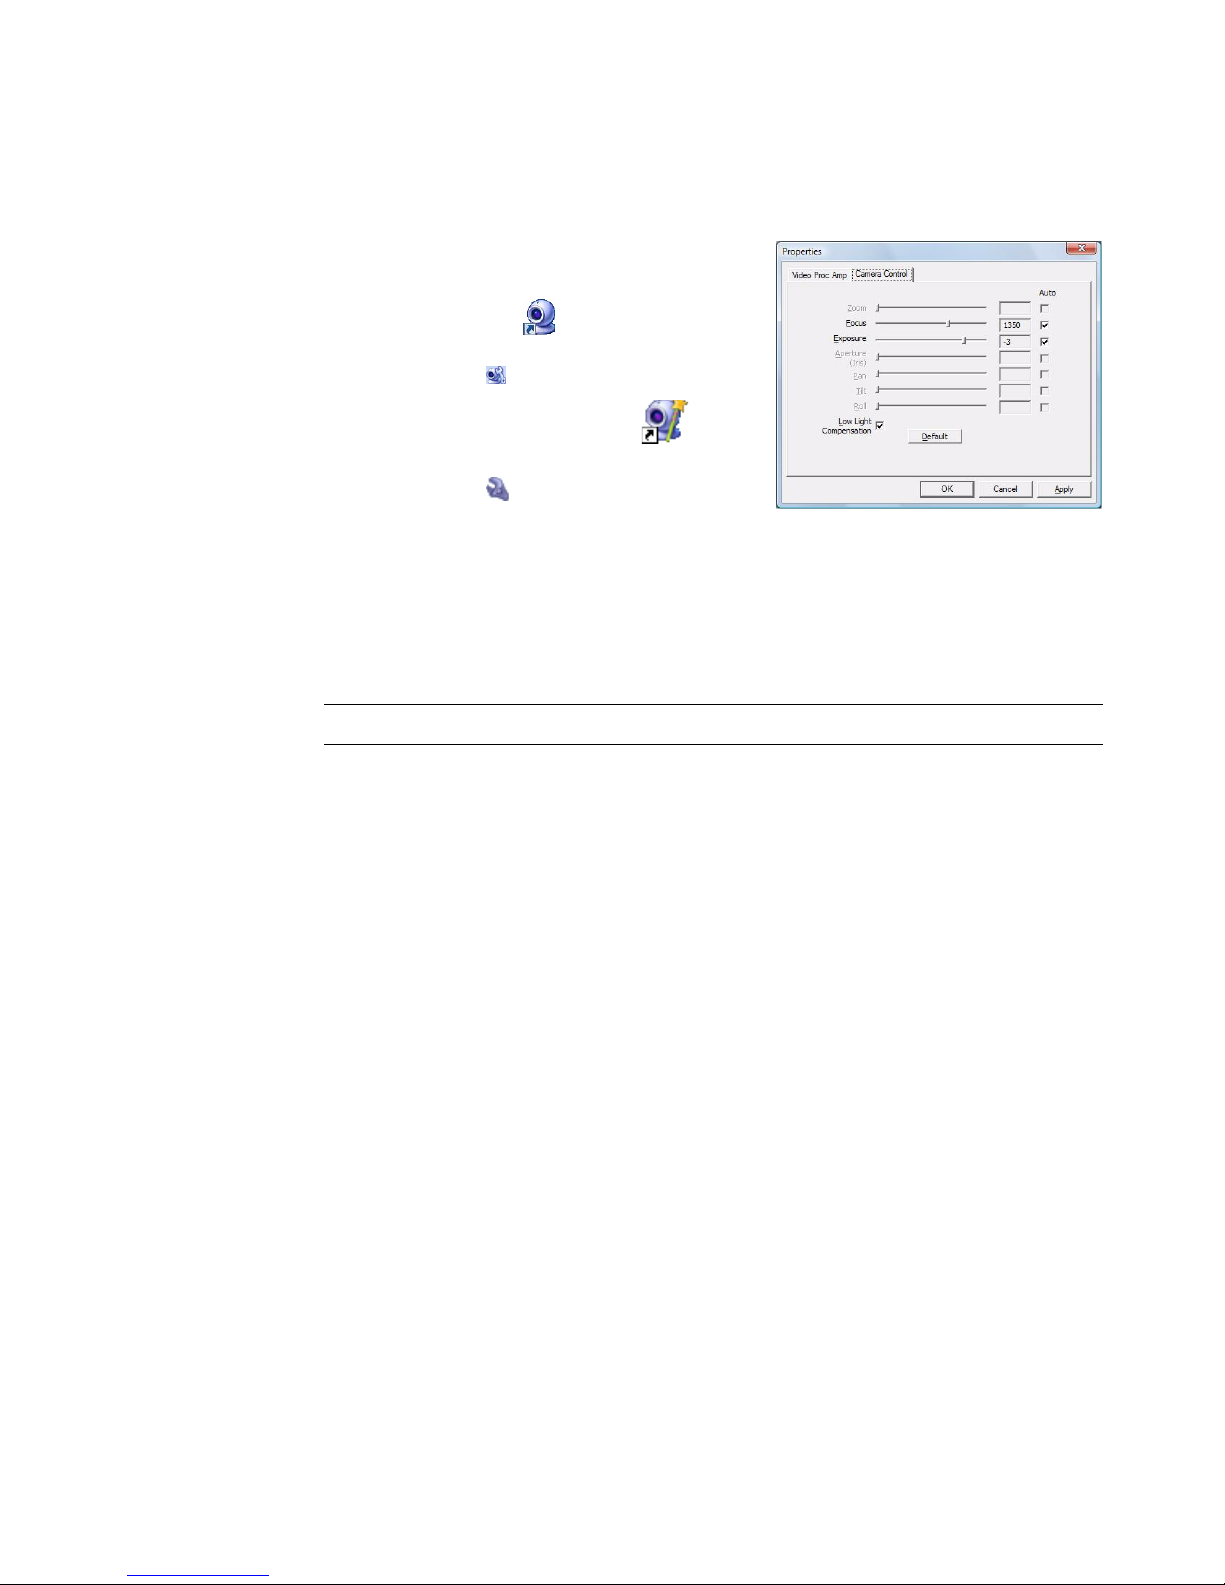
2 Click the Camera Control tab.
3 To manually adjust a setting, remove the check from the check box next to the item you
want to change, and then drag the slider for that item to adjust the setting.
4 To manually adjust the brightness of onscreen images, remove the check from the Low
Light Compensation check box.
5 Click OK.
NOTE: To restore the factory settings, click Default.
Page 21

HP Elite Autofocus Webcam User’s Guide 21
Troubleshooting
Problem Solution
The image is fuzzy Make sure that you removed the protective film from the webcam lens.
Turn off the autofocus feature and use the software settings to manually adjust
the focus. See
Adjusting Image Properties
and Adjusting Camera Settings for
details.
I don’t want to use Magic-i 3
with my IM application
Open your IM application and use the preference settings to select a different
video device. See the documentation for your IM application for details.
I closed Magic-i 3 during a
chat, and now my webcam
isn’t connected to my IM
application
Re-open Magic-i 3 by double-clicking the Magic-i 3 icon on your
computer desktop, or select a different video device in your IM application.
See your IM documentation for details.
I want to turn off the autofocus
feature
1 Do one of the following:
Double-click the WebCam Companion icon on the Windows
desktop, and then click the WebCam Settings icon.
Double-click the Magic-i 3 icon on the Windows desktop, and
then click the Settings icon.
2 Click the Camera Control tab.
3 Remove the check from Focus check box.
4 Drag the Focus slider to manually adjust the focus.
5 Click OK or Apply.
Magic-i 3 closes when I press
the Snapshot button
Only one application can use your webcam at a time. If the video stream has
disappeared from your IM application, close the IM application and then press
the HP Instant Chat button again to open both Magic-i 3 and your IM
application.
Page 22

22 HP Elite Autofocus Webcam User’s Guide
ArcSoft WebCam Companion
closes when I press the
HP Instant Chat button
Only one application can use your webcam at a time. To re-open ArcSoft
WebCam Companion, press the Snapshot button.
The webcam buttons are not
working properly
Look in the Windows System Tray for the Button Manager icon.
If you don’t see the Button Manager icon, then open
My Computer, navigate to the Program Files\HP\Button
Manager folder, and double-click the BM.EXE file.
If you do see the Button Manager icon, then insert the CD that
came with your HP webcam and install the following components:
DirectX (Windows XP only)
HP Webcam Software and Magic-i 3
I hear an echo or feedback in
the speakers
On Windows XP computers (Classic view):
1 Click Start > Control Panel > Sounds and Audio Devices.
2 Click the Audio tab.
3 Under Sound playback, click Volume, and drag the Master Volume
slider to adjust the speaker volume.
4 Under Sound recording, click Volume, and drag the Microphone slider
to adjust the microphone volume.
On Windows Vista computers (Classic view):
1 Click Start > Control Panel > Sound.
2 Click the Playback tab.
3 Select the Speaker you are using and then click Properties.
4 Click the Levels tab and drag the sliders to adjust the output level.
5 Click the Recording tab.
6 Select the Microphone you are using and then click Properties.
7 Click the Levels tab and drag the sliders to adjust the input level.
The webcam audio is not
synchronized with the
webcam video
From the Video Capture screen, select the Resolution list, and set the video
resolution to 640x480 to synchronize the video and audio. After
synchronizing the audio and video, try increasing the resolution to the next
level. If the problem recurs, go back to the previous resolution setting.
Problem Solution
Page 23

HP Elite Autofocus Webcam User’s Guide 23
Still need help? Please refer to the warranty that came with your webcam for support phone numbers and Web site
information.
I unplugged the webcam and
it doesn’t work when I plug it
in again
You need to re-establish the connection with the webcam application. Do one
of the following:
In Magic-i 3, click Refresh.
In ArcSoft WebCam Companion, click Connect.
If the camera still doesn’t function, close the webcam application, make sure
the camera is connected to your computer, and then re-open the webcam
application.
The webcam’s response is
slow and the images are jerky
The USB port on your computer does not support your current resolution
setting. Do one of the following:
Connect your camera to a USB 2.0 port, so you can continue to use your
current resolution setting.
From the Video Capture screen, select the Resolution list, and set the
video resolution to 640x480.
Problem Solution
Page 24

24 HP Elite Autofocus Webcam User’s Guide
Page 25

— Lea esto —
Guía del usuario de la webcam de
enfoque automático HP Elite
Page 26

Copyright © 2007–2008 Hewlett-Packard Development Company, L.P.
La información contenida en el presente documento podrá cambiar sin previo aviso.
Las únicas garantías de los productos de Hewlett-Packard (HP) se estipulan en las declaraciones de
garantía expresas que acompañan a los productos. Nada de lo mencionado aquí debe
interpretarse como garantía adicional. HP no será responsable de los errores técnicos o editoriales
ni de las omisiones que pueda contener el presente documento.
Registro del producto
Registrarse es rápido, fácil y le ofrece: Mensajes de correo electrónico con avisos sobre la mejora
de ciertos productos, avisos sobre asistencia y actualización de controladores específicos para sus
productos.
Para obtener una ayuda más rápida, asegúrese de registrar su producto en
https://register.hp.com
Page 27

Índice 27
Índice
Bienvenido ...........................................................................................29
Introducción ........................................................................................................29
Uso de su webcam HP ..........................................................................31
Grabación de vídeo ............................................................................................31
Iniciar un chat de vídeo ........................................................................................32
Uso de la webcam como monitor de vídeo .............................................................33
Edición de vídeo .................................................................................................34
Edición de vídeo en ArcSoft WebCam Companion ............................................34
Edición de vídeo en ArcSoft VideoImpression .....................................................34
Tomar una foto ....................................................................................................35
Edición de una foto .............................................................................................36
Ajuste de los parámetros ......................................................................37
Ajuste del brillo y del contraste .............................................................................37
Creación de un perfil personal ..............................................................................38
Ajuste de la configuración de captura ....................................................................38
Ajuste de las propiedades de la imagen ................................................................39
Ajuste de la configuración de la cámara ................................................................40
Resolución de problemas ......................................................................41
Page 28

28 Guía del usuario de la webcam de enfoque automático HP Elite
Page 29

Guía del usuario de la webcam de enfoque automático HP Elite 29
Bienvenido
Gracias por comprar la webcam de enfoque automático HP Elite.
En esta guía le mostramos cómo usar su nueva webcam para grabar vídeos, iniciar chats
de vídeo, usar su webcam como cámara de seguridad, tomar fotografías y ajustar la
configuración de la webcam.
Introducción
1 Botón de grabación de vídeo
2 Botón de chat instantáneo HP
3 Disparador
4 Micrófono integrado
5 Conector USB
6 Clip ajustable
7 Cierre de privacidad
8 Objetivo de enfoque automático
5
8
6
2
1
7
4
3
Page 30

30 Guía del usuario de la webcam de enfoque automático HP Elite
Page 31

Guía del usuario de la webcam de enfoque automático HP Elite 31
Uso de su webcam HP
Grabación de vídeo
1 Pulse el botón Grabar vídeo de su webcam para abrir ArcSoft WebCam
Companion™.
2 Pulse el botón Grabar vídeo o haga clic en Capturar para comenzar a
grabar vídeo.
3 Pulse el botón Grabar vídeo o haga clic en Detener la grabación para
dejar de grabar vídeo.
4 Seleccione uno de los botones siguientes:
Enviar por correo electrónico: Le permite enviar el vídeo por correo electrónico
como documento adjunto.
Guardar en disco: Le permite guardar el vídeo en su ordenador.
Video Impression: Abre el vídeo para su edición en ArcSoft VideoImpression
®
.
Para aprender más sobre el uso de ArcSoft WebCam Companion, haga clic en el menú
Ayuda.
Page 32

32 Guía del usuario de la webcam de enfoque automático HP Elite
Iniciar un chat de vídeo
Puede añadir vídeo en directo a las
aplicaciones más populares de mensajería
instantánea (necesitará una conexión ISP):
AOL
®
Instant Messenger™ (AIM®)
Windows Live
™
Messenger
Ya hoo!
®
Messenger
Skype
®
1 Pulse el botón Chat instantáneo
HP en su webcam.
2 Seleccione la aplicación de mensajería
instantánea (IM) que quiere utilizar.
3 En caso de que aparezcan instrucciones
en la pantalla, sígalas para instalar y
configurar la aplicación de mensajería
instantánea.
4 Siga los pasos de chat de vídeo de la
documentación de la aplicación de
mensajería instantánea.
Ahora ya está listo para mejorar sus chats de
vídeo con efectos especiales y emitir vídeos desde el disco duro. Para saber más sobre el
uso de ArcSoft Magic-i™ 3, haga clic en el icono Ayuda ? de la parte superior derecha
de la ventana de Magic-i 3.
NOTA: Las opciones de configuración del
botón de chat instantáneo HP sólo aparecen
en la configuración inicial. La próxima vez
que pulse el botón de chat instantáneo HP, se
abrirá automáticamente la aplicación de
mensajería instantánea.
Para seleccionar una aplicación de
mensajería distinta tras la configuración
inicial, haga clic en Inicio > Todos los
programas > ArcSoft Magic-i 3 >
Configuración Botón Chat
instantáneo HP.
Page 33

Guía del usuario de la webcam de enfoque automático HP Elite 33
Uso de la webcam como monitor de vídeo
1 Haga doble clic en el icono WebCam Companion del escritorio de
Windows.
2 Haga clic en Supervisar .
3 Haga clic en Iniciar supervisión para empezar la supervisión.
4 Haga clic en Detener la supervisión para finalizar la supervisión y guardar el
vídeo en su PC.
Si desea enviar un fotograma de vídeo por correo electrónico, cargar el vídeo en su FTP o
cambiar la ubicación de su carpeta multimedia, ArcSoft WebCam Companion puede
hacer esto y mucho más. Para aprender más sobre el uso de ArcSoft WebCam
Companion, haga clic en el menú Ayuda.
Page 34

34 Guía del usuario de la webcam de enfoque automático HP Elite
Edición de vídeo
Puede editar sus vídeos en ArcSoft WebCam Companion o en ArcSoft VideoImpression.
Para las funciones básicas de edición, utilice ArcSoft WebCam Companion, y para las
avanzadas utilice ArcSoft VideoImpression.
Edición de vídeo en ArcSoft WebCam Companion
1 Haga doble clic en el icono WebCam Companion del escritorio de
Windows.
2 Haga clic en Editar .
3 Resalte el vídeo que desea editar y haga clic en Editar vídeo.
Para aprender sobre funciones de edición específicas, haga clic en el menú Ayuda.
Edición de vídeo en ArcSoft VideoImpression
1 Haga doble clic en el icono ArcSoft VideoImpression del escritorio de
Windows.
2 Haga clic en Abrir un proyecto existente.
3 Seleccione el vídeo que desea editar.
Para aprender cómo usar ArcSoft VideoImpression, haga clic en el menú Ayuda.
Page 35

Guía del usuario de la webcam de enfoque automático HP Elite 35
Tomar una foto
1 Pulse el botón Disparador de su webcam para abrir ArcSoft WebCam
Companion.
2 Pulse el botón Disparador otra vez o haga clic en Capturar para tomar
la foto.
Para aprender más sobre cómo tomar fotos con ArcSoft WebCam Companion, haga clic
en el menú Ayuda.
Page 36

36 Guía del usuario de la webcam de enfoque automático HP Elite
Edición de una foto
1 Haga doble clic en el icono HP Photosmart Essential del escritorio de
Windows.
2 Haga clic en Ver biblioteca.
3 Haga clic con el botón derecho encima de la foto que quiera editar y seleccione
Editar del menú emergente.
4 Seleccione una opción de edición del menú Ajuste de foto de la izquierda de la
pantalla.
Para aprender más sobre la edición, impresión y compartir fotos con HP Photosmart
Essential, haga clic en el icono Ayuda ? de la parte superior derecha de la ventana de
Photosmart Essential.
Page 37

Guía del usuario de la webcam de enfoque automático HP Elite 37
Ajuste de los parámetros
En este capítulo se muestra cómo ajustar los parámetros de ArcSoft Magic-i 3 y ArcSoft
WebCam Companion.
Ajuste del brillo y del contraste
1 Haga doble clic en el icono
Magic-i 3 del escritorio de
Windows.
2 Haga clic en el icono Configuración
general .
3 Elimine la marca de la casilla
Realce automático.
4 Arrastre los botones deslizantes para
ajustar estos parámetros:
Brillo
Contraste
5 Haga clic en Aceptar.
NOTA: Para restaurar los ajustes de fábrica, haga clic en Predeterminado.
Page 38

38 Guía del usuario de la webcam de enfoque automático HP Elite
Creación de un perfil personal
1 Haga doble clic en el icono Magic-i 3 del escritorio de Windows.
2 Haga clic en la ficha Perfiles . (Si esta ficha no se encuentra visible, haga clic en
la ficha Expandir para expandir la pantalla.)
3 Arrastre los botones deslizantes para ajustar
estos parámetros:
Brillo
Contraste
Gamma
Saturación
Nitidez
4 Haga clic en Guardar perfil.
5 Introduzca un nombre para el perfil.
6 Haga clic en Aceptar.
Ajuste de la configuración de captura
1 Haga doble clic en el icono WebCam
Companion del escritorio de
Windows.
2 Haga clic en el icono Configuración .
NOTA:
Para restaurar los ajustes de fábrica, haga clic en Predeterminado.
Para aplicar un perfil guardado anteriormente, seleccione el nombre del perfil de la
lista Perfil actual.
Para eliminar un perfil, seleccione el nombre del perfil de la lista Perfil actual y, a
continuación, haga clic en el icono Eliminar .
Page 39

Guía del usuario de la webcam de enfoque automático HP Elite 39
3 Ajuste uno de los parámetros siguientes:
Formato de imagen sirve para establecer el formato de archivo predeterminado
para las imágenes fijas.
Calidad de la imagen sirve para establecer la resolución predeterminada para
las imágenes fijas.
Formato de vídeo sirve para establecer el formato de archivo predeterminado
para los vídeos que grabe.
Calidad del vídeo sirve para establecer la resolución predeterminada para los
vídeos que grabe.
Número de fotos de una ráfaga sirve para establecer el número de imágenes
que se tomarán cuando se esté en el modo de ráfaga.
Con audio sirve para encender y apagar el micrófono de la webcam.
4 Haga clic en Aceptar.
Ajuste de las propiedades de la imagen
1 Proceda de una de las siguientes maneras:
Haga doble clic en el icono WebCam
Companion del escritorio de
Windows y a continuación haga clic en el
icono Configuración de la
webcam .
Haga doble clic en el icono
Magic-i 3 del escritorio de
Windows y a continuación haga clic en el
icono Configuración .
2 Haga clic en la ficha Amplificador procesador de vídeo.
3 Arrastre los botones deslizantes para ajustar cada parámetro.
4 Haga clic en Aceptar.
NOTA: Para restaurar los ajustes de fábrica, haga clic en Actualizar el dispositivo.
NOTA: Para restaurar los ajustes de fábrica, haga clic en Predeterminado.
Page 40

40 Guía del usuario de la webcam de enfoque automático HP Elite
Ajuste de la configuración de la cámara
1 Proceda de una de las siguientes maneras:
Haga doble clic en el icono WebCam
Companion del escritorio de
Windows y a continuación haga clic en el
icono Configuración de la
webcam .
Haga doble clic en el icono
Magic-i 3 del escritorio de
Windows y a continuación haga clic en el
icono Configuración .
2 Haga clic en la ficha Control de la cámara.
3 Para ajustar manualmente un parámetro, quite la marca de la casilla al lado del
elemento que desee cambiar y después arrastre la barra deslizante para ajustarlo.
4 Para ajustar manualmente el brillo de las imágenes de la pantalla, quite la marca de
la casilla Compensación para poca luz.
5 Haga clic en Aceptar.
NOTA: Para restaurar los ajustes de fábrica, haga clic en Predeterminado.
Page 41

Guía del usuario de la webcam de enfoque automático HP Elite 41
Resolución de problemas
Problema Solución
La imagen aparece borrosa Asegúrese de que ha quitado la película de protección del objetivo de la
webcam.
Desactive la función de enfoque automático y utilice los ajustes de software
para ajustar manualmente el enfoque. Consulte
Ajuste de las propiedades de
la imagen y Ajuste de la configuración de la cámara para más información.
No quiero utilizar Magic-i 3
con mi aplicación de
mensajería instantánea
Abra su aplicación de mensajería instantánea y utilice los ajustes de
preferencias para seleccionar un dispositivo de vídeo distinto. Consulte la
documentación de su aplicación de mensajería instantánea para obtener más
información.
Cerré Magic-i 3 durante un
chat y ahora mi webcam no
está conectada a mi
aplicación de mensajería
instantánea
Vuelva a abrir Magic-i 3 haciendo doble clic en el icono Magic-i 3 del
escritorio o seleccione un dispositivo de vídeo distinto en su aplicación de
mensajería instantánea. Consulte la documentación de su aplicación de
mensajería instantánea para obtener más información.
Quiero desactivar la función
de enfoque automático
1 Proceda de una de las siguientes maneras:
Haga doble clic en el icono WebCam Companion del
escritorio de Windows y a continuación haga clic en el icono
Configuración de la webcam .
Haga doble clic en el icono Magic-i 3 del escritorio de
Windows y a continuación haga clic en el icono Configuración .
2 Haga clic en la ficha Control de la cámara.
3 Elimine la marca de la casilla Enfoque.
4 Arrastre el botón Enfoque para ajustar manualmente el enfoque.
5 Haga clic en Aceptar o Aplicar.
Page 42

42 Guía del usuario de la webcam de enfoque automático HP Elite
Magic-i 3 se cierra cuando
pulso el botón Disparador
Sólo una aplicación puede utilizar su webcam a la vez. Si el flujo de vídeo ha
desaparecido de su aplicación de mensajería instantánea, cierre la aplicación
y pulse otra vez el botón Chat instantáneo HP para abrir Magic-i 3 y
su aplicación de mensajería instantánea.
ArcSoft WebCam Companion
se cierra cuando pulso el
botón de chat instantáneo HP
Sólo una aplicación puede utilizar su webcam a la vez. Para volver a abrir
ArcSoft WebCam Companion, pulse el botón Disparador .
Los botones de la webcam no
funcionan correctamente
Busque el icono Button Manager en la bandeja de sistema de
Windows.
Si no ve el icono Button Manager, abra Mi PC, navegue hasta la
carpeta Archivos de programa\HP\Button Manager y haga
doble clic en el archivo BM.EXE.
Si ve el icono Button Manager, inserte el CD que vino con su
webcam HP e instale los componentes siguientes:
DirectX (sólo Windows XP)
Software de la webcam HP y Magic-i 3
Oigo un eco o ruido en los
altavoces
En ordenadores con Windows XP (vista clásica):
1 Haga clic en Inicio > Panel de control > Sonido y dispositivos de
audio.
2 Haga clic en la ficha Audio.
3 En Reproducción de sonido, haga clic en Volumen y arrastre el botón
Volumen principal para ajustar el volumen de los altavoces.
4 En Grabación de sonido, haga clic en Volumen y arrastre el botón
Micrófono para ajustar el volumen del micrófono.
En ordenadores con Windows Vista (vista clásica):
1 Haga clic en Inicio > Panel de control > Sonido.
2 Haga clic en la ficha Reproducción.
3 Seleccione el altavoz que utiliza y haga clic en Propiedades.
4 Haga clic en la ficha Niveles y arrastre los botones para ajustar el nivel
de salida.
5 Haga clic en la ficha Grabación.
6 Seleccione el micrófono que utiliza y haga clic en Propiedades.
7 Haga clic en la ficha Niveles y arrastre los botones para ajustar el nivel
de entrada.
Problema Solución
Page 43

Guía del usuario de la webcam de enfoque automático HP Elite 43
¿Sigue necesitando ayuda? Consulte la garantía que vino con su webcam para obtener los teléfonos de
asistencia y la información sobre el sitio web.
El audio de la webcam no
está sincronizado con el vídeo
de la webcam
Desde la pantalla de Vídeo seleccione la lista Resolución y establezca la
resolución del vídeo en 640x480 para sincronizar el vídeo y el audio. Tras
sincronizar el audio y el vídeo, incremente la resolución al nivel siguiente. Si el
problema sigue, vuelva a la resolución anterior.
He desenchufado la webcam
y ya no funciona cuando la
vuelvo a enchufar
Debe volver a establecer la conexión con la aplicación de la webcam.
Proceda de una de las siguientes maneras:
En Magic-i 3, haga clic en Actualizar.
En ArcSoft WebCam Companion, haga clic en Conectar.
Si la cámara sigue sin funcionar, cierre la aplicación de la webcam,
asegúrese de que la cámara está conectada a su ordenador y vuelva a abrir
la aplicación de la webcam.
La respuesta de la webcam es
lenta y las imágenes salen
movidas
El puerto USB de su ordenador no admite la resolución que ha elegido.
Proceda de una de las siguientes maneras:
Conecte su cámara a un puerto USB 2.0 para poder continuar utilizando
la resolución actual.
Desde la pantalla de Vídeo seleccione la lista Resolución y establezca
la resolución del vídeo en 640x480.
Problema Solución
Page 44

44 Guía del usuario de la webcam de enfoque automático HP Elite
Page 45

Manuel de l’utilisateur de la Webcam
autofocus HP Elite
Page 46

Copyright © 2007–2008 Hewlett-Packard Development Company, L.P.
Les informations contenues dans le présent document peuvent faire l’objet de modifications sans
préavis.
Les garanties des produits et services HP sont exclusivement présentées dans les déclarations
expresses de garantie accompagnant ces produits et services. Aucun élément de ce document ne
peut être considéré comme une garantie supplémentaire. La société HP ne saurait être tenue
responsable des erreurs ou omissions de nature technique ou rédactionnelle qui pourraient
subsister dans ce document.
Enregistrement du produit
L’enregistrement, simple et rapide, vous apporte en outre : des mises à jour par e-mail concernant
les avis d’amélioration de produit, les alertes techniques les plus récentes et les mises à jour de
pilotes s’appliquant à vos produits.
Pour nous permettre de vous aider plus rapidement, n’oubliez pas d’enregistrer votre produit sur
notre site Web https://register.hp.com
Page 47

Table des matières 47
Table des matières
Bienvenue ............................................................................................49
Présentation ........................................................................................................49
Utilisation de votre webcam HP ............................................................51
Enregistrement d’une vidéo ...................................................................................51
Lancement d’une conversation vidéo ......................................................................52
Utilisation de votre webcam comme un moniteur vidéo ............................................53
Modification d’une vidéo .....................................................................................54
Modification d’une vidéo dans ArcSoft WebCam Companion .............................54
Modification d’une vidéo dans ArcSoft VideoImpression .....................................54
Prise de cliché .....................................................................................................55
Modification d’un cliché .......................................................................................56
Réglage des paramètres .......................................................................57
Réglage de la luminosité et du contraste .................................................................57
Création d’un profil personnel ...............................................................................58
Réglage des paramètres de capture .......................................................................58
Réglage des propriétés de l’image ........................................................................59
Réglage des paramètres de la caméra ...................................................................60
Dépannage ...........................................................................................61
Page 48

48 Manuel de l’utilisateur de la Webcam autofocus HP Elite
Page 49

Manuel de l’utilisateur de la Webcam autofocus HP Elite 49
Bienvenue
Félicitations ! Vous venez d’acheter une webcam autofocus HP Elite.
Ce manuel vous présente les procédures d’utilisation de votre webcam pour enregistrer
des vidéos, lancer des conversations vidéo, utiliser votre webcam comme une caméra de
sécurité, prendre des photos et régler les divers paramètres de la webcam.
Présentation
1 Bouton Enregistrer vidéo
2 Bouton Chat instantané HP
3 Bouton de prise de cliché
4 Microphone intégré
5 Connecteur USB
6 Clip ajustable
7 Obturateur de protection
8 Lentille de mise au point automatique
5
8
6
2
1
7
4
3
Page 50

50 Manuel de l’utilisateur de la Webcam autofocus HP Elite
Page 51

Manuel de l’utilisateur de la Webcam autofocus HP Elite 51
Utilisation de votre webcam HP
Enregistrement d’une vidéo
1 Appuyez sur le bouton Enregistrer vidéo de votre webcam pour ouvrir ArcSoft
WebCam Companion™.
2 Appuyez sur le bouton Enregistrer vidéo ou cliquez sur Capturer pour
démarrer l’enregistrement vidéo.
3 Appuyez de nouveau sur le bouton Enregistrer vidéo ou cliquez sur le bouton
Arrêter l’enregistrement pour arrêter l’enregistrement vidéo.
4 Sélectionnez l’un des boutons suivants :
Envoyer par courriel : vous permet d’envoyer la vidéo en pièce jointe à un
courriel.
Enregistrer sur disque : vous permet d’enregistrer la vidéo sur votre
ordinateur.
Video Impression : ouvre la vidéo pour modification dans ArcSoft
VideoImpression
®
.
Pour plus d’informations sur l’utilisation d’ArcSoft WebCam Companion, cliquez sur le
menu Aide.
Page 52

52 Manuel de l’utilisateur de la Webcam autofocus HP Elite
Lancement d’une conversation vidéo
Vous pouvez intégrer de la vidéo en direct
dans les applications de messagerie
instantanée (MI) les plus répandues
(connexion FAI requise) :
AOL
®
Instant Messenger™ (AIM®)
Windows Live
™
Messenger
Ya hoo!
®
Messenger
Skype
®
1 Appuyez sur le bouton Chat
instantané HP de votre webcam.
2 Sélectionnez l’application de messagerie
instantanée (MI) que vous souhaitez
utiliser.
3 En cas d’invite, suivez les instructions à
l’écran pour installer et configurer
l’application MI.
4 Suivez les étapes relatives à la
conversation vidéo dans la
documentation de votre application MI.
Vous êtes désormais prêt à agrémenter vos
conversations vidéo d’effets spéciaux et à diffuser des vidéos à partir de votre disque dur.
Pour plus d’informations sur l’utilisation d’ArcSoft Magic-i™ 3, cliquez sur l’icône Aide ?
dans le coin supérieur droit de la fenêtre Magic-i 3.
REMARQUE : les options de configuration
du bouton Chat instantané HP apparaissent
uniquement lors de la configuration initiale.
La prochaine fois que vous appuierez sur ce
bouton, l’application MI choisie s’ouvrira
automatiquement.
Pour sélectionner une autre application MI
une fois le réglage initial terminé, cliquez sur
Démarrer > Tous les programmes >
ArcSoft Magic-i 3 > HP Instant Chat
Button Setup.
Page 53

Manuel de l’utilisateur de la Webcam autofocus HP Elite 53
Utilisation de votre webcam comme un moniteur
vidéo
1 Double-cliquez sur l’icône WebCam Companion sur le bureau Windows.
2 Cliquez sur Surveiller .
3 Cliquez sur Démarrer la surveillance pour commencer le contrôle.
4 Cliquez sur Arrêter la surveillance pour arrêter le contrôle et enregistrer la vidéo
sur votre ordinateur.
Si vous voulez envoyer un cliché vidéo par courriel, chargez la vidéo sur votre site FTP, ou
modifiez l’emplacement de votre dossier de média, ArcSoft WebCam Companion peut
faire tout cela et bien plus encore. Pour plus d’informations sur l’utilisation d’ArcSoft
WebCam Companion, cliquez sur le menu Aide.
Page 54

54 Manuel de l’utilisateur de la Webcam autofocus HP Elite
Modification d’une vidéo
Vous pouvez modifier des vidéos dans ArcSoft WebCam Companion ou dans ArcSoft
VideoImpression. Pour les fonctions de modification de base, utilisez ArcSoft WebCam
Companion, pour les fonctions de modification avancées, utilisez ArcSoft
VideoImpression.
Modification d’une vidéo dans ArcSoft WebCam
Companion
1 Double-cliquez sur l’icône WebCam Companion sur le bureau Windows.
2 Cliquez sur Edition .
3 Sélectionnez la vidéo à modifier puis cliquez sur Modifier la vidéo.
Pour plus d’informations sur les fonctions de modification spécifiques, cliquez sur le
menu Aide.
Modification d’une vidéo dans ArcSoft
VideoImpression
1 Double-cliquez sur l’icône ArcSoft VideoImpression sur le bureau Windows.
2 Cliquez sur Ouvrir un projet existant.
3 Sélectionnez la vidéo que vous voulez modifier.
Pour plus d’informations sur l’utilisation d’ArcSoft VideoImpression, cliquez sur le
menu Aide.
Page 55

Manuel de l’utilisateur de la Webcam autofocus HP Elite 55
Prise de cliché
1 Appuyez sur le bouton Snapshot de votre webcam pour ouvrir ArcSoft
WebCam Companion.
2 Appuyez de nouveau sur le bouton Snapshot ou cliquez sur Capturer pour
prendre la photo.
Pour plus d’informations sur la prise de photos avec ArcSoft WebCam Companion,
cliquez sur le menu Aide.
Page 56

56 Manuel de l’utilisateur de la Webcam autofocus HP Elite
Modification d’un cliché
1 Double-cliquez sur l’icône HP Photosmart Essential sur le bureau Windows.
2 Cliquez sur Afficher la bibliothèque.
3 Cliquez avec le bouton droit de la souris sur la photo à modifier, puis sélectionnez
Modifier à partir du menu contextuel.
4 Sélectionnez une option d’édition à partir du menu Correction d’images à gauche
de l’écran.
Pour plus d’informations sur la modification, l’impression et le partage de photos sous
HP Photosmart Essential, cliquez sur l’icône Aide ? dans le coin supérieur droit de la
fenêtre Photosmart Essential.
Page 57

Manuel de l’utilisateur de la Webcam autofocus HP Elite 57
Réglage des paramètres
Ce chapitre décrit les procédures de réglage des paramètres d’ArcSoft Magic-i 3 et
d’ArcSoft WebCam Companion.
Réglage de la luminosité et du contraste
1 Double-cliquez sur l’icône
Magic-i 3 sur le bureau Windows.
2 Cliquez sur l’icône Paramètres
génériques .
3 Décochez la case Amélioration
automatique.
4 Faites glisser les curseurs pour régler les
paramètres suivants :
Luminosité
Contraste
5 Cliquez sur OK.
REMARQUE : pour rétablir les paramètres d’usine, cliquez sur Par défaut.
Page 58

58 Manuel de l’utilisateur de la Webcam autofocus HP Elite
Création d’un profil personnel
1 Double-cliquez sur l’icône Magic-i 3 sur le bureau Windows.
2 Cliquez sur l’onglet Profils . (Si cet onglet n’est pas visible, cliquez sur l’onglet
Développer pour agrandir l’écran.)
3 Faites glisser les curseurs pour régler les
paramètres suivants :
Luminosité
Contraste
Gamma
Saturation
Netteté
4 Cliquez sur Enregistrer le profil.
5 Entrez le nom du profil.
6 Cliquez sur OK.
Réglage des paramètres de capture
1 Double-cliquez sur l’icône WebCam
Companion sur le bureau
Windows.
2 Cliquez sur l’icône Paramètres .
REMARQUE :
Pour rétablir les paramètres d’usine, cliquez sur Par défaut.
Pour appliquer un profil précédemment créé, sélectionnez le nom correspondant dans
la liste Profil actuel.
Pour supprimer un profil, sélectionnez le nom correspondant dans la liste Profil actuel,
puis cliquez sur l’icône Supprimer .
Page 59

Manuel de l’utilisateur de la Webcam autofocus HP Elite 59
3 Réglez l’un des paramètres suivants :
Format d’image permet de définir le format de fichier par défaut pour les captures
d’image fixe.
Qualité d’image permet de définir la résolution par défaut pour les captures
d’image fixe.
Format vidéo permet de définir le format de fichier par défaut pour les vidéos que
vous enregistrez.
Qualité vidéo permet de définir la résolution par défaut pour les vidéos que vous
enregistrez.
Nombre de photos dans le groupe permet de définir le nombre d’images prises
en mode groupe.
Avec audio permet d’activer et de désactiver le microphone de la webcam.
4 Cliquez sur OK.
Réglage des propriétés de l’image
1 Effectuez l’une des opérations suivantes :
Double-cliquez sur l’icône WebCam
Companion sur le bureau
Windows, puis cliquez sur l’icône
Paramètres de la WebCam .
Double-cliquez sur l’icône
Magic-i 3 sur le bureau Windows
puis cliquez sur l’icône Paramètres .
2 Cliquez sur l’onglet Amp proc vidéo.
3 Faites glisser les curseurs pour régler les paramètres individuels.
4 Cliquez sur OK.
REMARQUE : pour rétablir les paramètres d’usine, cliquez sur Actualiser le
périphérique.
REMARQUE : pour rétablir les paramètres d’usine, cliquez sur Par défaut.
Page 60

60 Manuel de l’utilisateur de la Webcam autofocus HP Elite
Réglage des paramètres de la caméra
1 Effectuez l’une des opérations suivantes :
Double-cliquez sur l’icône WebCam
Companion sur le bureau
Windows, puis cliquez sur l’icône
Paramètres de la WebCam .
Double-cliquez sur l’icône
Magic-i 3 sur le bureau Windows
puis cliquez sur l’icône Paramètres .
2 Cliquez sur l’onglet Contrôle de la
caméra.
3 Pour régler un paramètre manuellement, décochez la case en regard de l’élément à
modifier puis faites glisser le curseur sur l’élément dont le paramètre doit être réglé.
4 Pour régler manuellement la luminosité des images à l’écran, décochez la case
Compensation luminosité faible.
5 Cliquez sur OK.
REMARQUE : pour rétablir les paramètres d’usine, cliquez sur Par défaut.
Page 61

Manuel de l’utilisateur de la Webcam autofocus HP Elite 61
Dépannage
Problème Solution
L’image est floue Assurez-vous d’avoir enlevé le film protecteur de la lentille de la webcam.
Désactivez la fonctionnalité de mise au point automatique et utilisez les
paramètres du logiciel pour régler manuellement la mise au point. Pour plus de
détails, reportez-vous aux sections
Réglage des propriétés de l’image
et
Réglage des paramètres de la caméra
.
Je ne veux pas utiliser
Magic-i 3 avec mon
application de messagerie
instantanée
Ouvrez votre application MI et utilisez les paramètres de préférence pour
sélectionner un autre périphérique vidéo. Pour plus de détails, consultez la
documentation relative à votre application MI.
J’ai fermé Magic-i 3 au cours
d’une conversation, ma
webcam n’est plus connectée
à mon application MI
Ouvrez à nouveau Magic-i 3 en double-cliquant sur l’icône Magic-i 3 sur
le bureau de votre ordinateur ou sélectionnez un autre périphérique vidéo
dans votre application MI. Pour plus de détails, consultez la documentation de
votre application.
Je souhaite désactiver la
fonctionnalité de mise au point
automatique
1 Effectuez l’une des opérations suivantes :
Double-cliquez sur l’icône WebCam Companion sur le bureau
Windows, puis cliquez sur l’icône Paramètres de la
WebCam .
Double-cliquez sur l’icône Magic-i 3 sur le bureau Windows
puis cliquez sur l’icône Paramètres .
2 Cliquez sur l’onglet Contrôle de la caméra.
3 Décochez la case Mise au point.
4 Faites glisser le curseur de la Mise au point pour la régler
manuellement.
5 Cliquez sur OK ou sur Appliquer.
Page 62

62 Manuel de l’utilisateur de la Webcam autofocus HP Elite
Magic-i 3 se ferme lorsque
j’appuie sur le bouton
Snapshot
Votre webcam ne peut être utilisée que par une seule application à la fois. Si la
transmission vidéo n’apparaît plus sur votre application MI, fermez cette
dernière puis appuyez une nouvelle fois sur le bouton Chat instantané
HP pour ouvrir Magic-i 3 et votre application.
ArcSoft WebCam Companion
se ferme lorsque j’appuie sur
le bouton Chat instantané HP
Votre webcam ne peut être utilisée que par une seule application à la fois. Pour
ouvrir de nouveau ArcSoft WebCam Companion, appuyez sur le bouton
Snapshot .
Les boutons de la webcam ne
fonctionnent pas correctement
Recherchez l’icône Button Manager dans la barre d’état système de
Windows.
Si l’icône Button Manager n’apparaît pas, ouvrez alors votre
Poste de travail, accédez au dossier Program Files\HP\
Button Manager, puis double-cliquez sur le fichier BM.EXE.
Si l’icône Button Manager apparaît, insérez alors le CD fourni
avec votre webcam HP pour installer les composants suivants :
DirectX (Windows XP uniquement)
Logiciel de la HP Webcam et Magic-i 3
J’entends un écho ou un effet
de retour dans les
haut-parleurs
Sur les ordinateurs Windows XP (affichage classique) :
1 Cliquez sur Démarrer > Panneau de configuration > Sons et
périphériques audio.
2 Cliquez sur l’onglet Audio.
3 Sous Lecteur audio, cliquez sur Volume, et faites glisser le curseur du
Volume principal pour régler le son des haut-parleurs.
4 Sous Enregistrement audio, cliquez sur Volume, et faites glisser le curseur
du Microphone pour régler le son de ce dernier.
Sur les ordinateurs Windows Vista (affichage classique) :
1 Cliquez sur Démarrer > Panneau de configuration > Son.
2 Cliquez sur l’onglet Lecture.
3 Sélectionnez le type de haut-parleur utilisé, puis cliquez sur Propriétés.
4 Cliquez sur l’onglet Niveaux, puis faites glisser les curseurs
correspondants pour régler le niveau de sortie.
5 Cliquez sur l’onglet Enregistrement.
6 Sélectionnez le type de microphone utilisé, puis cliquez sur Propriétés.
7 Cliquez sur l’onglet Niveaux, puis faites glisser les curseurs
correspondants pour régler le niveau d’entrée.
Problème Solution
Page 63

Manuel de l’utilisateur de la Webcam autofocus HP Elite 63
Vous avez d’autres questions ? Reportez-vous à la garantie fournie avec votre webcam pour obtenir les numéros
de téléphone de l’assistance technique et les adresses de site Web utiles.
Le son de la webcam n’est pas
synchronisé avec la vidéo
Dans l’écran Capturer vidéo, sélectionnez la liste Résolution et définissez la
résolution vidéo sur 640x480 pour synchroniser la vidéo et l’audio. Cela fait,
essayez d’augmenter la résolution sur le niveau supérieur. Si le même
problème survient, revenez au réglage précédent.
J’ai débranché la webcam et
elle ne fonctionne pas lorsque
je la rebranche
Vous devez rétablir la connexion avec l'application de la webcam. Effectuez
l’une des opérations suivantes :
Dans Magic-i 3, cliquez sur Rafraîchir.
Dans ArcSoft WebCam Companion, cliquez sur Connecter.
Si la caméra ne fonctionne toujours pas, fermez l'application de la webcam,
assurez-vous que la caméra est connectée à votre ordinateur et ouvrez de
nouveau l'application de la webcam.
La réponse de la webcam est
lente et l’image est instable
Le port USB de votre ordinateur ne prend pas en charge votre paramètre de
résolution actuel. Effectuez l’une des opérations suivantes :
Branchez votre caméra à un port USB 2.0 afin de continuer à utiliser votre
paramètre de résolution actuel.
Dans l’écran Capturer vidéo, sélectionnez la liste Résolution et
définissez la résolution vidéo sur 640x480.
Problème Solution
Page 64

Part number: 5992-2507
 Loading...