

Page 1

HP Digital Pen 250 User’s Guide
HP Forms Automation System 1.1
September 20, 2004
Page 2

Page 3

Contents
Chapter 1 Introducing the Digital Pen
Introduction......................................................................................................................... 6
About the Digital Pen ...........................................................................................................6
Operating Conditions......................................................................................................... 6
Pen Components ............................................................................................................... 7
Power LED ..................................................................................................................... 7
Memory LED .................................................................................................................. 8
Vibration System ............................................................................................................. 8
About the Digital Pen Download Software .............................................................................. 8
About Digital Forms .............................................................................................................9
Chapter 2 Getting Started
Before You Begin................................................................................................................. 12
Installing the Download Software........................................................................................... 12
Uninstalling the Download Software....................................................................................... 13
Connecting the Digital Pen .................................................................................................... 13
Charging the Digital Pen....................................................................................................... 14
Changing the Ink Cartridge................................................................................................... 14
Chapter 3 Using the Download Software
Viewing Pen Settings ............................................................................................................18
Configuring the Pen Software ................................................................................................ 19
Configuring the Pen Power-Off ............................................................................................. 19
Configuring the Download Process ....................................................................................... 20
Identifying a Pen................................................................................................................ 21
Configuring a Pen Password................................................................................................ 22
Changing a Password ..................................................................................................... 23
Clearing a Password ....................................................................................................... 23
About the User Info Tab ...................................................................................................... 23
About the Enterprise Services Tab ......................................................................................... 24
Setting Transaction Log Reports............................................................................................. 25
Downloading Data............................................................................................................... 26
About the Download Manager............................................................................................. 26
Downloading Data in the “Prompt for Download” Mode ........................................................... 26
Downloading Data in the “Auto-Start Download” Mode ............................................................ 27
Downloading Data in the “Do nothing” Mode......................................................................... 27
Downloading Data in the “Silent Download” Mode ................................................................. 28
Viewing the Transaction Log.................................................................................................. 28
Transaction Log Example..................................................................................................... 30
Successful Download....................................................................................................... 30
‘Failed’ Transaction ......................................................................................................... 31
Incomplete Transaction..................................................................................................... 32
Failure Due to Authorization Problems ................................................................................. 33
HP Digital Pen 250 User’s Guide 3
Page 4

Contents
Chapter 4 Troubleshooting
Checking the Pen................................................................................................................. 36
Checking the Cradle ............................................................................................................ 36
Checking the Pen Download Software .................................................................................... 36
Other Problems.................................................................................................................... 37
Resetting the Digital Pen .......................................................................................................37
The pen vibrates three times when a Send Box is checked......................................................... 37
The Transaction Log contains error messages .......................................................................... 37
The pen does not capture data............................................................................................. 37
Performing a Pen Reset ....................................................................................................... 37
Performing a Pen Master Reset ............................................................................................. 38
HP Digital Pen 250 User’s Guide4
Page 5

1 Introducing the Digital
Pen
The HP Digital Pen 250 is part of the HP Forms Automation System. As you write on a
digital form, the information you write is recorded electronically and stored in the pen.
This enables you to fill out forms simply by writing on them. You can then download the
information from the pen so that it can be processed.
This chapter introduces the features of your digital pen and the download software that
you use with it.
Page 6

Chapter 1 Introducing the Digital Pen
Introduction
This book is for users of the HP Digital Pen 250 and the related software. It provides the information you
need to set up and use your digital pen, and includes troubleshooting information for some common
problems.
It assumes you are familiar with using a PC.
About the Digital Pen
Your digital pen writes like an ordinary pen, but it also contains a camera. When you use the pen to
write on specially printed paper (known as digital paper), the camera records each pen stroke
electronically in the pen memory.
The pen memory can store the equivalent of 40 A4 pages of full text or recording data for up to 200
forms, whichever comes first.
The pen battery when fully charged provides power for 2 hours of continuous writing use, or for the
equivalent of about 25 pages of full text. If the pen is left on but unused, a full charge lasts 10 hours. If
the pen is turned off, a charge lasts approximately four weeks.
Operating Conditions
To keep the HP Digital Pen 250 in working order, treat it like any electronic device:
• Keep it away from sources of heat, such as the dashboard of a car on a hot day. Operating
conditions are from 0ºC to 40ºC (32ºF to 104ºF). Never place the pen in conditions that exceed
60ºC (140ºF).
• Avoid drops and shocks; for example, the pen will fail if repeatedly dropped on the floor.
• Keep it away from damp environments and avoid spillages and immersion.
• Keep it away from dirty and dusty environments, which could block the pen optical system.
The pen can be used in a wide range of light conditions. It has been tested up to a light intensity of 100
kLux, the equivalent of using the pen outside on a sunny day. The pen contains an infrared light source
and camera, so it can also be used in bad light conditions or even in complete darkness.
You should only charge the battery in temperatures between 5Cº to 40ºC (41ºF to 104ºF).
The warranty does not cover damage as a result of accident or misuse of the pen or cradle.
HP Digital Pen 250 User’s Guide6
Page 7
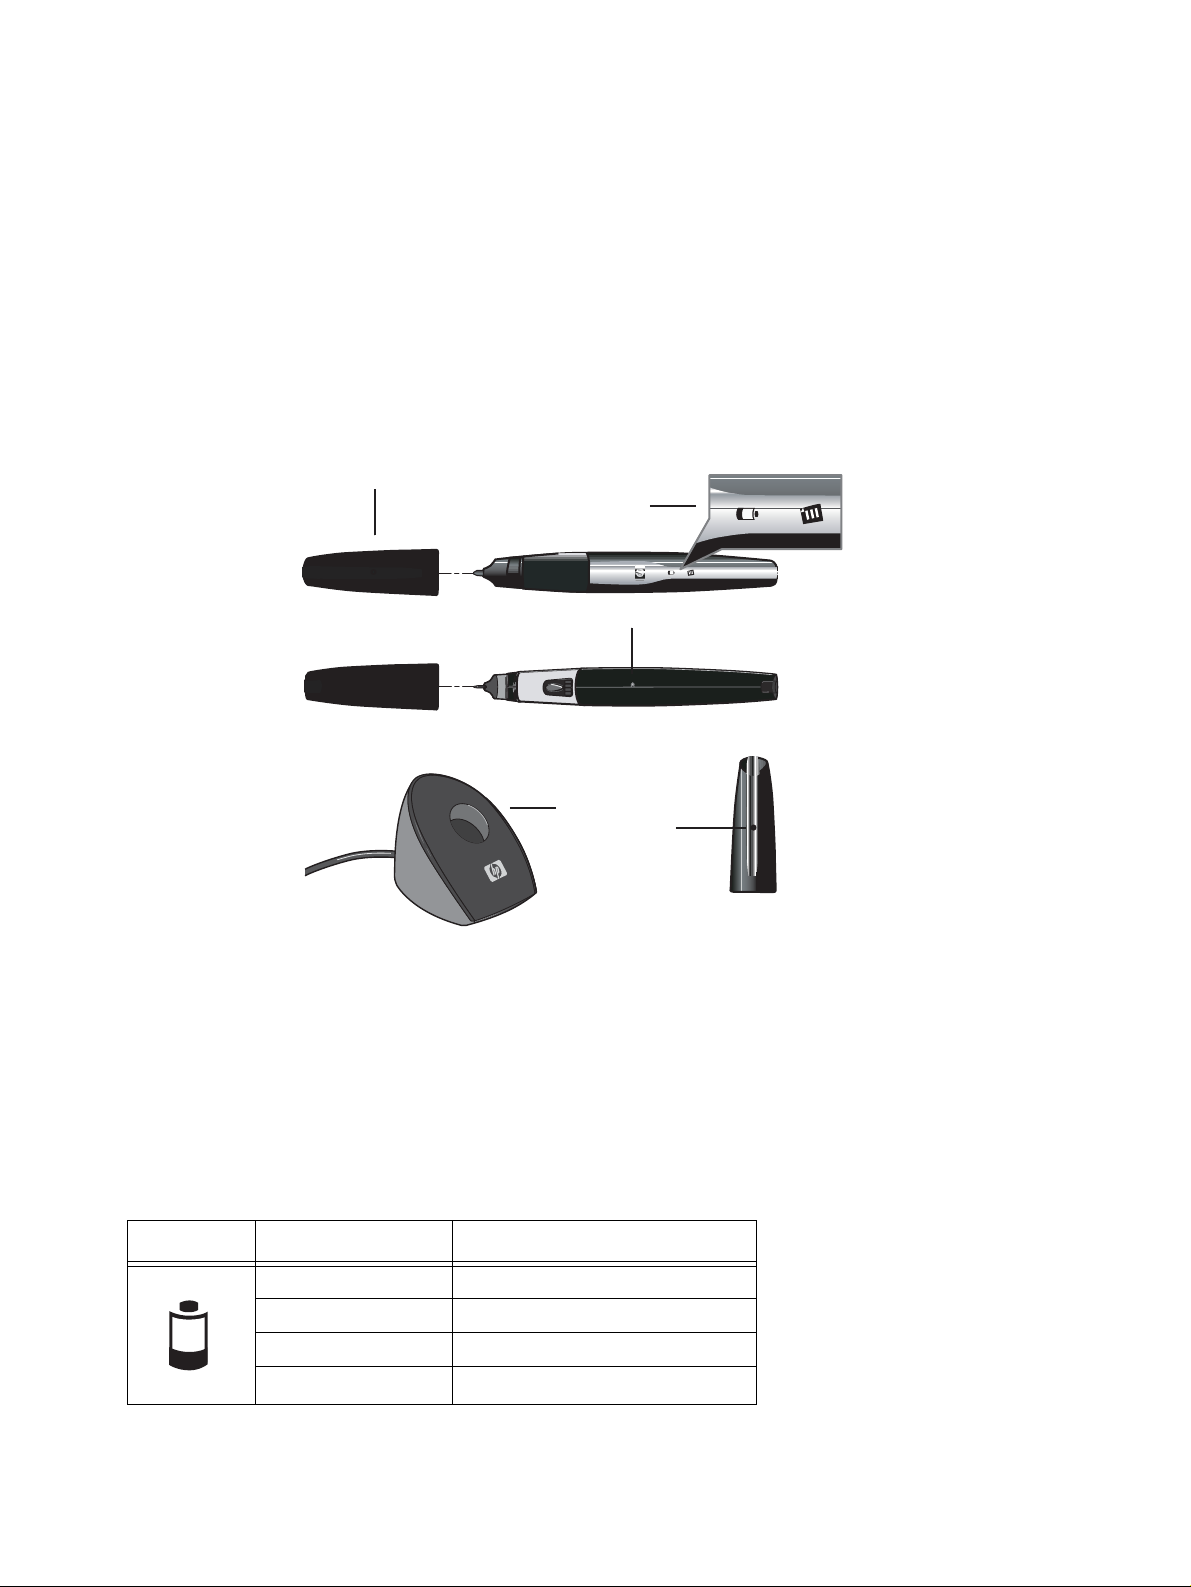
Pen Components
The HP Digital Pen has the following elements (which are illustrated in the following figure):
1. Pen cap. Acts as the on/off switch for the pen.
2. Power and memory LEDs. Provide power and memory status information.
3. Reset button. Resets the pen. (See “Resetting the Digital Pen” on page 37 for more information.)
4. Cradle. Downloads handwritten documents from the pen to the computer and charges the pen.
5. Ink cartridge removal hole. Used to change the ink cartridge of the digital pen.
Chapter 1 Introducing the Digital Pen
1
2
3
4
5
Protect your HP Digital Pen 250 from theft or loss by attaching your pen with the ring attachment at the
end of the pen. Use the screws at the bottom of the cradle to secure to a desk, table, or stand it in kiosk
situations.
A space for a sticker on the pen's exterior identifies the pen owner and avoids confusion in situations
where several pens are used.
Power LED
The power LED shows you the charge level of the battery. When you power on the pen (by removing the
cap), the power LED flashes rapidly and then becomes a color indicating the battery charge level:
Icon Battery Charge Level
green over 50%
amber 30-50%
red 10-30%
flashing red under 10%: pen will shut down
HP Digital Pen 250 User’s Guide 7
Page 8

Chapter 1 Introducing the Digital Pen
If the battery charge level falls below 10%, the pen shuts down automatically. This ensures that there is
sufficient battery power to preserve the information stored in the pen memory until the pen is charged
and the information downloaded, so no data is lost. A pen in this state retains information for up to two
years.
When the digital pen is writing on a digital form and capturing data, the power LED is bright green.
When the pen is in the cradle, the power LED flashes during battery charging and green when the
battery is fully charged.
Memory LED
The memory LED shows the amount of memory available for storing strokes and completed forms.
Note: The pen cannot store more than 200 completed forms. If this limit is reached, you will not be
able to tick the Send Box on any more forms and the pen will vibrate 3 times if you try to do
so.
When you power on the pen (by removing the cap), the memory LED flashes rapidly and then becomes
green, amber, or red according to how much memory is available or how many forms can be filled (up
to 200):
Icon Memory Available
green More that 50%
amber 30-50%
red 1-30%
flashing red No memory left
When the digital pen is writing on a digital form and capturing data, the memory LED is brighter.
When the pen is in the cradle, the memory LED is lit unless a data download is in progress, in which
case it flashes.
Vibration System
The digital pen contains a vibration system that gives you feedback as you use it. In normal use, it
vibrates once when you power up the pen and twice when you check the Send Box on a digital form. If
the pen vibrates at any other time, this indicates one of the following errors:
• The battery charge level is below 10%. The pen is about to shut down automatically to preserve the
information stored. Dock the pen so that it charges.
• The pen strokes memory is full. Dock the pen and download the stored information to free up
memory space.
• The pen cannot capture data because the form is badly printed.
• The pen cannot capture data because of black lines, text or graphics on the form.
About the Digital Pen Download Software
The Digital Pen Download Software is delivered as part of the HP Forms Automation System and is used
to download information captured with an HP Digital Pen 250 so that it can be processed. The
Download Software allows you to control how information is downloaded from your digital pen through
HP Digital Pen 250 User’s Guide8
Page 9

your computer, to view the download status in the transaction log, and to clear the pen memory after a
successful download. It also lets you modify settings that are saved in the pen, such as a name
identifying the pen or a password.
About Digital Forms
A digital form is a printed paper form that has a special pattern that enables your digital pen to record
the information you write on the form with your digital pen. A digital form can contain items to select,
spaces for you to write in, either in block capitals or in ordinary handwriting, and areas for drawings or
sketches. Digital forms can be several pages long, and every digital form contains a Send Box.
When you write on a digital form the pen records the pen strokes. When you have finished filling out a
form, tick the Send Box. This indicates to the digital pen that the next time it is docked the information
from the form should be downloaded and processed.
Chapter 1 Introducing the Digital Pen
HP Digital Pen 250 User’s Guide 9
Page 10

Chapter 1 Introducing the Digital Pen
HP Digital Pen 250 User’s Guide10
Page 11

2 Getting Started
This chapter explains how to prepare your digital pen and the Download Software for
use. It describes how to install the Digital Pen Download Software and the pen
hardware.
Page 12
Chapter 2 Getting Started
Before You Begin
Caution: You must install the Download Software before physically connecting the digital pen and
cradle. This will ensure that the correct pen driver is installed. If the Download Software is
not installed and you connect the cradle, you will see a “found new hardware” popup.
Close the popup and continue as described below.
You must have the following software on your PC:
• Microsoft Windows 2000 Professional (SP4) or Microsoft Windows XP Professional (SP1 or SP2).
• Microsoft .NET Framework 1.1. If this is not already installed, the files are available with the
Download Software installation files or can be downloaded from http://www.microsoft.com/net.
Refer to the readme file supplied with the software for any last-minute installation requirements and
notes.
Installing the Download Software
In some cases, the system administrator installs this software for users. If the system administrator asks
you to install the software, make sure that you know the Service Controller URL before you begin. The
Service Controller is the central database that controls the HP Forms Automation System. The system
administrator will give you this information.
Note: If you are using the Discovery Kit, the Download Software is installed and configured
automatically.
To install the Download Software, complete the following steps:
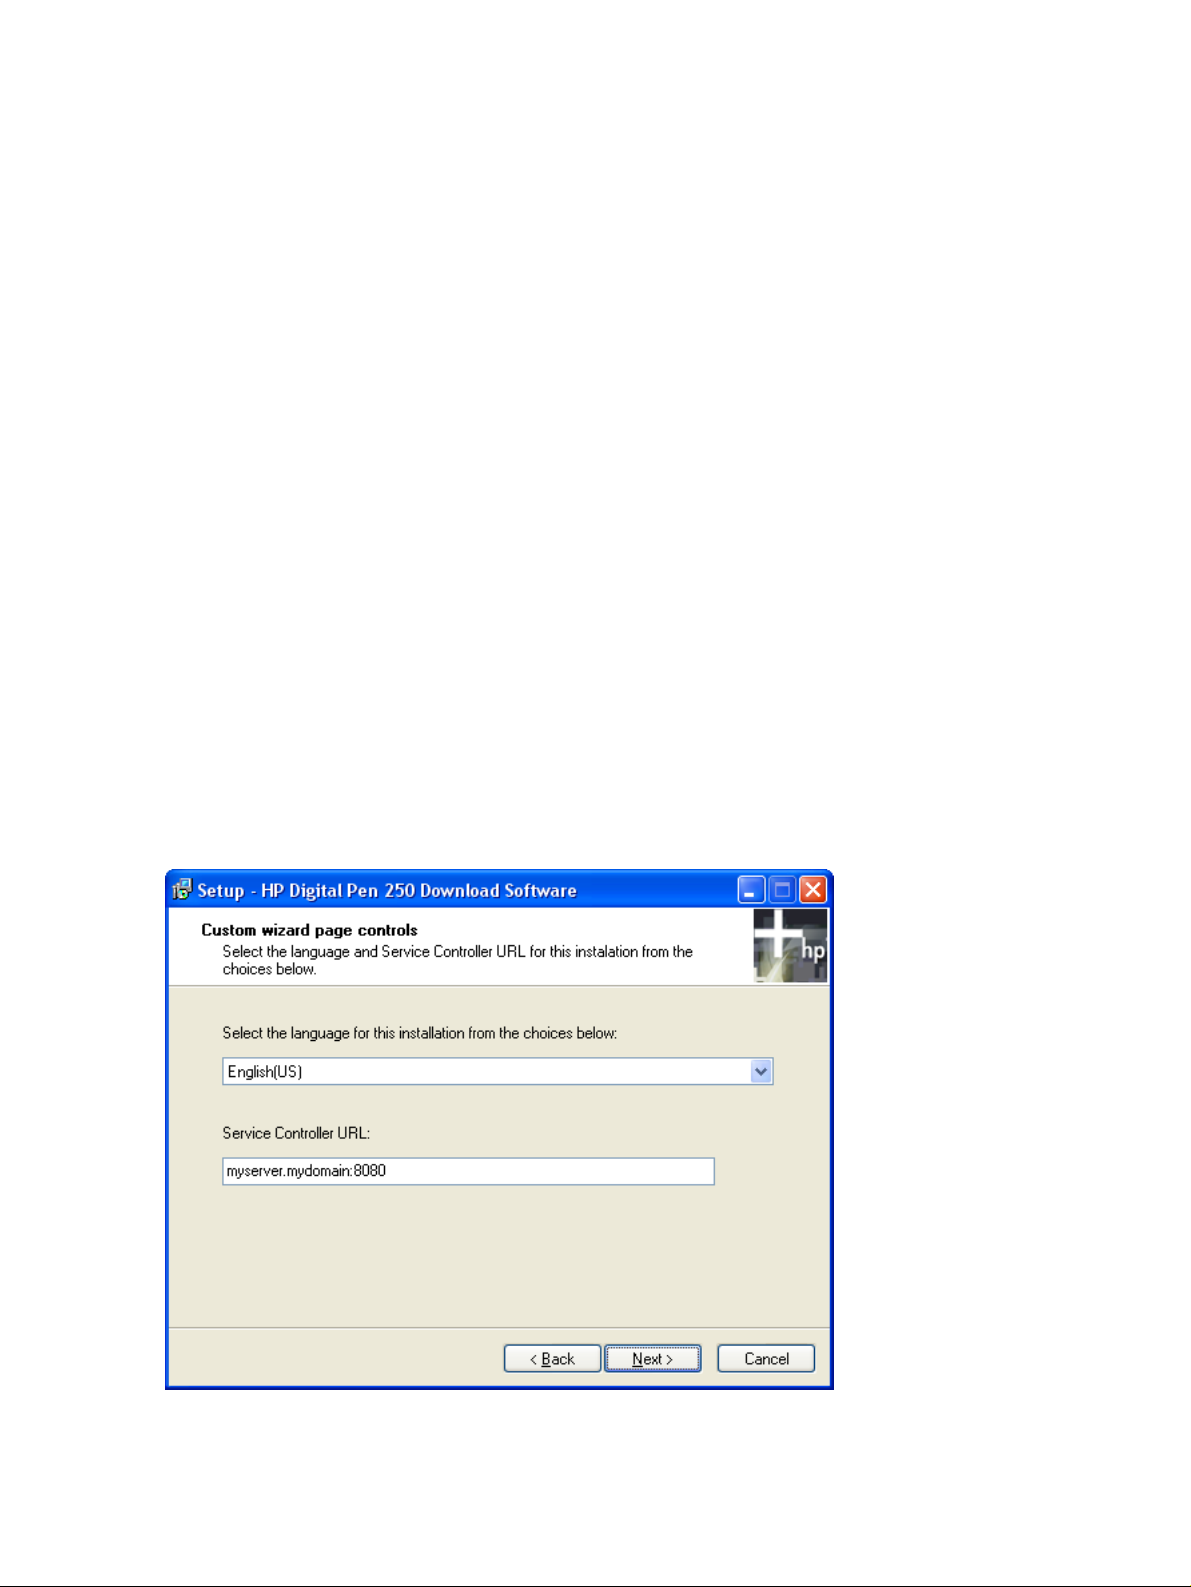
1. Double click setup.exe. After a Welcome screen, the following window will be displayed.
HP Digital Pen 250 User’s Guide12
Page 13

2. From the drop-down menu, select the installation language and click Select. This selects the
language of the Download Software.
3. Enter the Service Controller URL supplied by the system administrator, in the format
myserver.mydomain:8080.
4. Click Next. The License Agreement will be displayed.
5. You must accept the terms of agreement to install the Download Software. Read the License
Agreement carefully and select I Agree. Click Next.
6. Choose a folder where you want to install the files.
7. Once the software installation is complete, select Yes to restart your computer if this is required.
After the Download Software is installed, connect your digital pen to your PC.
Uninstalling the Download Software
To uninstall the pen software, go to Control Panel > Add or Remove Programs, locate the Digital Pen
Software and click Remove.
Connecting the Digital Pen
Chapter 2 Getting Started
The HP Digital Pen 250 is connected to your PC by plugging the pen’s cradle into a USB port on the PC
and docking the pen.
You can connect more than one pen to a PC either with a single, shared cradle, or by connecting
several cradles. If you want to use a USB hub to connect cradles to the PC, you must use a powered
hub.
Note: The Download Software must be installed before you connect the digital pen to your PC.
To connect the HP Digital Pen 250, use the following procedure:
1. Make sure your PC is running.
2. Connect the cradle to the PC using the USB connector.
3. Remove the pen cap to power on the pen. If the pen battery contains sufficient charge, the memory
and battery status LEDs flash and the pen vibrates once to indicate that it is on.
Note: If the pen does not have sufficient battery charge to power the LEDs dock the pen in the
cradle. When the pen has sufficient charge it powers on automatically, and a “Found new
hardware” message is displayed. This may take up to 20 minutes.
4. Insert the pen into the cradle. The Microsoft Windows operating system will detect the new
hardware and load the appropriate drivers.
5. Leave the pen in the cradle until it is fully charged before you use it for the first time. Charging the
battery fully can take up to two hours.
The digital pen icon appears in the task bar. This icon indicates that the pen software is running and
shows whether or not the pen is in the cradle. If the pen is not in the cradle, the icon has a red dot.
HP Digital Pen 250 User’s Guide 13
Page 14

Chapter 2 Getting Started
When you place the pen in the cradle, the icon shows a small green dot and a banner appears with
summary details, as shown in the following figure:
Charging the Digital Pen
You can use the HP Digital Pen 250 to write up to the equivalent of 25 pages of full text before the
battery needs to be charged. When the power status LED indicates the battery is low, remove the pen
cap and insert the pen into the cradle.
If the pen LEDs do not power when you take the pen cap off, the battery may be too low to power the
pen.
When the pen is placed in the cradle, the LEDs should remain on. If the LEDs go out when the pen is
docked, then the battery level may be too low to power the LEDs. Wait for 20 minutes then check that
the power LED is flashing to indicate that the pen is charging.
If the LEDs were lit and they go out when pen is placed in the cradle, then your USB connector is not
connected properly.
Note: If the cradle is connected to the PC using a USB hub, then be sure to use a powered USB
hub. Your pen will not charge if connected to a non-powered USB hub.
Changing the Ink Cartridge
When the ink cartridge in the pen runs out, replace it with one of the refills supplied with your pen. Use
the pen’s cap to remove the empty ink cartridge.
1. Remove the cap from the pen.
2. Place the ink cartridge tip in the hole in the pen cap clip.
3. Tilt the pen cap slightly clockwise.
HP Digital Pen 250 User’s Guide14
Page 15

Chapter 2 Getting Started
4. Pull the cap away from the pen. The ink cartridge should pull away with the cap. Remove it
completely from the pen and discard it.
5. Insert a new ink cartridge into the pen.
6. Press the pen tip against the surface of a notepad to secure it in place.
You can get additional refills at local office supply retailers. Make sure that refills you buy are compliant
with the ISO 12757-1 standard.
Caution: Make sure the refills do not contain carbon because carbon ink can interfere the pattern on
the paper, causing errors.
HP Digital Pen 250 User’s Guide 15
Page 16

Chapter 2 Getting Started
HP Digital Pen 250 User’s Guide16
Page 17

3 Using the Download
Software
This chapter describes how to use the Digital Pen Download Software to configure pen
settings, configure the download process, set passwords, change and clear passwords,
download data to your computer, and view transaction logs.
Page 18

Chapter 3 Using the Download Software
Viewing Pen Settings
To view information about your digital pen:
1. Double-click the pen icon in your taskbar. The Pen Settings dialog box is displayed.
You can also launch the Pen Settings dialog box from the Start menu by selecting Settings > Control
Panel > Digital Pen Settings.
Your PC can connect to several pens, depending on the number of USB ports available. If you are
connected to more than one pen, select the pen you want to configure from the Select Pen drop-down
menu.
The pens listed in the Select Pen menu are identified using an 11 digit reference number and a name.
The reference number is the pen ID, a unique identifier that was assigned to the pen during
manufacturing. The name that appears next to the reference is the name or identifier entered in the
Owner Information field of the Password tab. This information is stored in the pen.
HP Digital Pen 250 User’s Guide18
Page 19

The left pane of this dialog box displays information about your HP Digital Pen 250, including:
• Select Pen: this drop-down box displays the unique pen ID of your pen or pens, as well as the owner
information.
• Owner Info: displays the owner information you entered in the Password tab of this dialog box.
• Download Date and Download Time: display the date and time when information was last
downloaded by your computer.
• Battery: displays the current battery level.
• Auto Power Off: displays the time delay for turning your pen off automatically. For more information
about this setting, see “Configuring the Pen Power-Off” on page 19.
• Memory: displays the amount of memory available.
• Firmware Version: provides the version of your pen’s firmware.
• Pen Driver Version: provides the version of the Windows driver you are running.
Configuring the Pen Software
Configuring the Pen Power-Off
Chapter 3 Using the Download Software
You can configure the pen to automatically switch off when the cap has been removed and the pen has
not been used for a given time.
1. View the Pen Settings dialog box as indicated in “Viewing Pen Settings” on page 18.
2. Using the Auto Power Off drop-down list, select either Disabled (to disable the Auto Power Off
feature), 30 minutes, or 1 hour.
3. Click OK.
If your pen has automatically powered off, power it on again by replacing and then removing the cap.
Note: If you are using the Auto Power Off feature, make sure that your pen is powered on before
you fill out a form. Otherwise, no data will be captured, even though the pen will continue to
write.
HP Digital Pen 250 User’s Guide 19
Page 20

Chapter 3 Using the Download Software
Configuring the Download Process
You can set your pen’s download mode from the Download tab in the Pen Settings dialog box.
Select your download mode from the At Pen Connection drop-down list. You can configure your pen to
operate in one of the following download modes:
• Auto-start Download. Each time the pen is placed in the cradle, data is downloaded and processed
automatically without prompting the user.
• Do nothing. Nothing happens when the pen is placed in the cradle. You trigger the download by
right-clicking the pen icon is the taskbar and clicking Start Download Now.
• Prompt for Download. Each time the pen is placed in the cradle, you are prompted before data is
downloaded and processed by the HP Forms Automation System.
• Silent Download. This is like auto-start download but the transaction log is not displayed. Instead, a
window appears informing you that there are new URLs for the results or new messages from the
Service Controller.
Note: Ignore the Display Warning Messages check box. This is not used by the HP Forms
Automation System.
HP Digital Pen 250 User’s Guide20
Page 21

Identifying a Pen
You can use the Pen Settings dialog box to provide a name that identifies the pen. This name is called
the pen owner name. The name is used to identify your pen from the Select Pen drop-down list in the left
pane of the Pen Settings dialog box.
To set a pen owner name:
1. Double-click the pen icon in your taskbar. The Pen Settings dialog box is displayed.
2. Enter an identifying name or keyword in the Owner Information field. This name is stored in the pen
itself.
3. Click Apply.
You can also enter a pen owner name from the Download Manager window (illustrated below). The
Download Manager window will appear when you dock the pen in the cradle.
Chapter 3 Using the Download Software
1. Click Set.
2. Enter the owner name in the Owner Information field.
3. Click Ok.
HP Digital Pen 250 User’s Guide 21
Page 22

Chapter 3 Using the Download Software
Configuring a Pen Password
You can set a password for your pen. The password mechanism prevents anyone from downloading
data from a lost or stolen pen. The password is stored in the pen. Every time the pen is placed in its
cradle, you are prompted to enter the password.
To set the password:
1. Double-click the pen icon in your taskbar. The Pen Settings dialog box is displayed.
2. Select the Password tab, which is illustrated below:
3. To set the user password, click Set/Change Password. The Password Management dialog box is
displayed.
4. Enter the password in the Enter New Password field. The password must be between 6 and 31
characters (alpha and numeric).
5. Confirm the password you entered by typing it again in the Confirm New Password field.
6. Select the Remember Password check box if you want your PC to remember your password each
time you insert your pen in its cradle.
Note: You will be prompted to enter the password if the pen is used on another PC.
7. Click OK to save your changes and close the Password Management dialog box.
HP Digital Pen 250 User’s Guide22
Page 23

Chapter 3 Using the Download Software
Changing a Password
Once you have set a password, you can return to the Password tab to change it, for example if you
suspect that someone else knows your password. To change your password:
1. Double-click the pen icon in your taskbar. The Pen Settings dialog box is displayed.
2. In the Password tab, click Set/Change Password. The Password Management dialog box is
displayed.
3. Enter the current password for your pen in the Current Password field.
4. Enter the new password in the Enter New Password field. Confirm the new password by typing it
again in the Confirm New Password field.
5. Click OK.
Clearing a Password
You can clear the password at any time if you decide that you no longer want to use a password to
protect your pen. To clear your current password:
1. Double-click the pen icon in your taskbar. The Pen Settings dialog box is displayed.
2. In the Password tab, click Clear Active Password. The Password Management dialog box is
displayed.
3. Enter the current password for your pen in the Current Password field.
4. Click OK.
About the User Info Tab
Depending on the HP Forms Automation System deployment, this tab is sometimes provided, enabling
you to enter user details that are stored in the pen and can be retrieved by the forms processing
software. If this tab is not present, the user information is managed by the Service Controller
administrator.
HP Digital Pen 250 User’s Guide 23
Page 24

Chapter 3 Using the Download Software
About the Enterprise Services Tab
Depending on the HP Forms Automation System deployment, this tab is sometimes provided, enabling
you to manage the address of the Service Controller, pen data memory, and regional settings. If this tab
is not present, the information is managed by the Service Controller administrator.
Note: If you are using the Discovery Kit, the Enterprise Services tab is not visible.
If the tab is present, you can manage the information as follows:
1. Double-click the pen icon in your taskbar. The Pen Settings dialog box is displayed.
2. Select the Enterprise Services tab, which is illustrated below:
3. The Enabled radio button in the Enterprise Service section must be selected.
4. In the Service Web Address field, enter the Service Controller address provided by the system
administrator.
Note: The Activate this Pen button is not enabled or required for this version of the Pen software.
5. The Memory area lets you clear the pen data memory.
Click Clear Pen memory if you want to delete all data from your pen’s memory.
Warning: Clicking Clear Pen memory will delete all data, including data or forms which have not
been processed.
6. The Regional Settings area contains information about the pen’s time zone and language. This
information is stored in the pen. You can modify these settings using the drop-down boxes provided.
For more information regarding these parameters, see the Deployment Guide.
7. Once you are satisfied with the settings, click Apply to save your changes.
HP Digital Pen 250 User’s Guide24
Page 25

Setting Transaction Log Reports
The transaction log provides feedback to the pen user about the status of forms processing.
You can set when the transaction log is displayed, as follows:
1. Double-click the pen icon in your taskbar. The Pen Settings dialog box is displayed.
2. Select the Transaction Log tab, which is illustrated below:
Chapter 3 Using the Download Software
3. From the Display Transaction Log drop-down menu, select one of the following options:
• If required. This will open the transaction log only if the forms processing software returns a URL
or message.
• Always. The transaction log will always open.
• Never. The transaction log must be opened manually. However, if you have still set a number of
URL to open to 1 or greater, the Transaction Log will not open, but the URL page will be
displayed.
4. You can also set the maximum number of URLs that can open automatically, using the up/down
arrows. There is no limit to this value, but you are not recommended to open more than 15 URLs
simultaneously.
Note: If the number of URLs returned by the forms processing application is higher than the value
set here, and the Displaying Transaction Log option is set to Never, then a pop-up message
informs you that there are URLs to view.
If the Displaying Transaction Log option is set to Required or Always, then the Transaction
Log is displayed.
5. Click Apply.
HP Digital Pen 250 User’s Guide 25
Page 26

Chapter 3 Using the Download Software
Downloading Data
When you insert the pen in its cradle, its behavior depends on how you configured the data download
setting for the pen in “Configuring the Download Process” on page 20.
This section describes the Download Manager dialog box and how to download data in each of the
pen’s operational mode.
About the Download Manager
You can use the Download Manager dialog box to start the downloading process and to make the
following changes to the pen software settings:
• Set or Change an owner for your pen. The option available depends on whether you have already
set the Owner Information field in the Pen Settings dialog box. For more information, see
“Identifying a Pen” on page 21.
• Set or Change a password for your pen. The option available depends on whether you have
already set a password. The fields you complete are the same as those you use when you set or
change a password using the Pen Settings dialog box. For more information, see “Changing a
Password” on page 23.
• Change the download setting so that the next time you insert your pen in its cradle the data is
downloaded immediately. Do this by checking the Don’t show this window again (Silent Download)
check box in the Download Manager dialog box.
Downloading Data in the “Prompt for Download” Mode
If your pen is configured to prompt you each time before downloading data, use the following
procedure to download data:
1. Insert the digital pen in its cradle.
If you have configured a user password, the Password Management window will appears. Enter
your password in the Current Password field.
You can sele ct Remember My Password to avoid having to type it each time you insert the pen in its
cradle.
HP Digital Pen 250 User’s Guide26
Page 27

Chapter 3 Using the Download Software
The Download Manager dialog box automatically appears as follows:
2. Select the Don’t show this window again check box if you want the pen to download data
automatically in the future.
3. Click Start to start downloading and processing the pen data immediately.
During the downloading process, a progress bar appears in the Download Manager dialog box
that indicates how much of the download has been achieved. Clicking Close stops the download
process immediately and closes the dialog box.
4. Once processing is complete, the Transaction Log Manager window opens automatically, or as
specified by the Display Transaction Log setting (see “Setting Transaction Log Reports” on page 25).
Downloading Data in the “Auto-Start Download” Mode
If you have chosen the “Auto-Start Download” mode for downloading your pen data, the Download
Manager dialog box does not appear each time. Instead, when you insert your pen in its cradle the
data is downloaded and processed automatically.
To view the results of each form, open the transaction log by right-clicking the pen icon in your taskbar
and selecting Transaction Log. For more information about transaction logs, see “Viewing the
Transaction Log” on page 28.
Downloading Data in the “Do nothing” Mode
If you have chosen the “Do nothing” mode for downloading data, when you insert the pen in its cradle
no data is downloaded. When you want to download data, use the following procedure:
1. Right-click the pen icon in your taskbar and select Start Download Now.
If you have configured a user password, enter it in the Password field.
You can sele ct Remember My Password to avoid having to type it each time you insert the pen in its
cradle.
HP Digital Pen 250 User’s Guide 27
Page 28

Chapter 3 Using the Download Software
2. Select the Don’t show this window again check box if you want the pen to download data
immediately in the future.
3. Click Start to download the pen data.
During the downloading process, a progress bar appears in the Download Manager dialog box
that indicates how much of the download has been achieved. Clicking Close stops the download
process immediately and closes the dialog box.
4. Once processing is complete, you can view the results in the Transaction Log window. Depending
on the Transaction Manager Display setting, the Transaction Log may be displayed automatically.
Downloading Data in the “Silent Download” Mode
If you have chosen the “Silent Download” mode for downloading data and you have set the Display
Transaction Log to “Never”, when you insert the pen in its cradle the data is downloaded and a pop-up
window is displayed, indicating that the data has been downloaded.
The transaction log is displayed when you click on the link in the pop-up window. If you have set the
maximum number of URLs to display to 1 or more, the URL page will be displayed automatically.
Viewing the Transaction Log
The transaction log displays a history of all the forms that have been filled out by the digital pen. It is
important to regularly check the transaction log to view the feedback provided by the application in the
form of URLs, to read error and status messages, and to periodically clean up the pen’s memory.
To view the transaction log, right-click the pen icon in your taskbar and select Transaction Log. If more
than one pen is connected to the PC, select the Pen ID from the list displayed.
HP Digital Pen 250 User’s Guide28
Page 29

Chapter 3 Using the Download Software
An example of a transaction log follows. To view the details of any of the transactions, click on the
transaction line. The details will be displayed in the bottom pane.
The fields of the transaction log are described in Table 1, “Transaction Log Field Descriptions”.
Table 1: Transaction Log Field Descriptions
Field Name Description
Status This field contains information about the download status of the form data. It can contain one of
the following values: Failed, Queued, Committed or Completed.
Failed indicates that the form could not be processed. The data is kept in the pen’s memory and
the Download Software will try to process it the next time the pen is inserted in its cradle or when
the user clicks Start Download Now from the taskbar right-click menu.
Queued indicates that the forms in the pen memory have not yet been sent for processing.
Committed indicates that the forms have been successfully downloaded and processed.
Completed indicates that the forms have been successfully downloaded and processed and that
the URL providing information about the form has been visited.
Name If processing has completed successfully, this field contains the form application name. If process-
ing did not complete successfully, this field may contain a page address.
Date and Time This field provides the day and time when the Send Box was checked. You can click on the arrow
in the title bar to reorganize the list of transactions from first to last or from last to first.
HP Digital Pen 250 User’s Guide 29
Page 30

Chapter 3 Using the Download Software
Field Name Description
Address This field indicates the address
URL This field contains the URL of a page generated by the form processing application to provide
additional information or instructions to the user.
Message This field contains any status or error messages produced by the processing application during the
data download.
If the transaction log becomes full (200 forms), the oldest completed transactions are automatically
removed to make room for new transactions.
To remove all entries from the transaction log, click the Clear Pen Memory button.
Caution: This removes all entries from the transaction log, and deletes all data from your pen,
including all queued and failed transactions.
Transaction Log Example
A maintenance technician regularly inspects test equipment in a factory. After each inspection, he
completes a form containing information about himself (name, ID number) and the tests (date,
equipment tested, test passed or test failed). He can also enter comments.
Twice a day, he docks his pen and downloads his completed forms. He has configured the Download
Manager to download information immediately and to display the transaction log when processing is
complete. This following example shows how the transaction log evolves depending on the status of the
different transactions.
Successful Download
During the morning the technician fills out 3 forms. The next time he docks his pen, the transaction log is
updated as shown below. He knows that all 3 forms were processed successfully due to the Status
shown as ‘Committed’ and the Message is ‘OK’.
Status Name Date and Time
Committed Report Form MRF55 7/25/2003 11:20:48 AM
3
Committed Report Form MRF55 7/25/2003 10:36:14 AM
2
Committed Report Form MRF55 7/25/2003 10:14:37 AM
1
Name Report Form MRF55
Date and Time 7/25/2003 11:20:48 AM
Status Committed
Address 96.0.0.115
URL http://15.180.35:8080/Training/output/check206.htm
Message OK
HP Digital Pen 250 User’s Guide30
Page 31

Chapter 3 Using the Download Software
‘Failed’ Transaction
During the afternoon, he fills out a new form. However, the next time he docks his pen, due to a network
failure, the form cannot be processed. The transaction log now contains a 4th line.
Status Name Date and Time
Failed 96.4.1.1586 7/25/2003 2:12:04 PM
4
Committed Report Form MRF55 7/25/2003 11:20:48 AM
3
Committed Report Form MRF55 7/25/2003 10:36:14 AM
2
Committed Report Form MRF55 7/25/2003 10:14:37 AM
1
Name 96.4.1.1586
Date and Time 7/25/2003 2:12:04 PM
Status Failed
Address
URL
Message Unable to connect to server. Please check that the network
is available.
If you click on line 4, you will see the following details displayed in the bottom pane:
Field Name Description
Status The Status is shown as ‘Failed’.
Name This field now shows a number, the page address of the digital paper form. The form name cannot
be displayed since the name is provided by the Service Controller, which is not available.
Error Message This field now indicates that the service running the Service Controller could not be contacted
because of a problem with the network.
When a download fails, the data in the pen is not erased and will remain in the pen ‘outbox’. Each time
the pen is docked the pen will attempt to download until successful.
The following day, the technician again docks his pen. The transaction log is updated as follows:
Status Name Date and Time
Committed Report Form MRF55 7/25/2003 2:12:04 PM
4
Committed Report Form MRF55 7/25/2003 11:20:48 AM
3
Committed Report Form MRF55 7/25/2003 10:36:14 AM
2
Committed Report Form MRF55 7/25/2003 10:14:37 AM
1
Name Report Form MRF55
Date and Time 7/25/2003 2:12:04 PM
Status Committed
Address 96.0.0.115
URL http://15.180.35:8080/Training/output/check206.htm
Message OK
As the network is now working, the entry for the form that could not be downloaded due to network
problems has now changed (line 4). The Date and Time is not changed because this is the date and
HP Digital Pen 250 User’s Guide 31
Page 32

Chapter 3 Using the Download Software
time when the Send Box was checked, indicating that it is the same form, but now the status is
Committed - showing that the download has succeeded.
Incomplete Transaction
During the day, the technician fills in a form but forgets to enter his ID number. When he docks the pen,
the transaction log is as follows:
Status Name Date and Time
5 Committed Report Form MRF55 7/26/2003 10:22:46 AM
Committed Report Form MRF55 7/25/2003 2:12:04 PM
4
Committed Report Form MRF55 7/25/2003 11:20:48 AM
3
Committed Report Form MRF55 7/25/2003 10:36:14 AM
2
Committed Report Form MRF55 7/25/2003 10:14:37 AM
1
Name Report Form MRF55
Date and Time 7/26/2003 10:22:46 AM
Status Committed
Address
URL http://MRF55.Journal.asp?id=256
Message Data entry error - please check URL
Line 5 represents the new form that the technician filled out that morning. Because he has forgotten his
ID, the form processing application requests additional confirmation before completing the transaction
in the database. The status is marked as Committed, since all data has been downloaded from the pen,
but the service provider message in the bottom pane indicates to the technician that he should check the
URL shown. On clicking the URL, a new window pops up showing the information that was entered on
the form and asking him to confirm his employee number then to click OK.
Once done, the Status of the transaction changes to ‘Completed’.
HP Digital Pen 250 User’s Guide32
Page 33

Chapter 3 Using the Download Software
Failure Due to Authorization Problems
Later, the technician attempts to repair some faulty equipment, and completes an order form. However,
he does not have the required authority to order parts, so the next time he docks his pen, the transaction
fails, as shown in line 6:
Status Name Date and Time
6 Failed Order Form NOF38 7/26/2003 3:31:02 PM
5 Committed Report Form MRF55 7/26/2003 10:22:46 AM
Committed Report Form MRF55 7/25/2003 2:12:04 PM
4
Committed Report Form MRF55 7/25/2003 11:20:48 AM
3
Committed Report Form MRF55 7/25/2003 10:36:14 AM
2
Committed Report Form MRF55 7/25/2003 10:14:37 AM
1
Name Order Form NOF38
Date and Time 7/26/2003 3:31:02 PM
Status Failed
Address
URL
Message The pen does not have access to this service in the Service
Controller.
Once all of the forms have been processed, there is no need to keep the details in the transaction log.
The technician clicks Clear Pen Memory, to start again with a clean log.
HP Digital Pen 250 User’s Guide 33
Page 34

Chapter 3 Using the Download Software
HP Digital Pen 250 User’s Guide34
Page 35

4 Troubleshooting
This chapter provides procedures for troubleshooting problems with the HP Digital Pen
250.
Page 36

Chapter 4 Troubleshooting
If the pen does not turn on when you remove the cap, if it does not charge or is not detected by the PC
when you dock, use the following checks to determine the cause of the problem.
Checking the Pen
To check that the pen is functioning correctly, do the following:
1. Check that the pen is on: both the power and memory LEDs should be lit.
2. Put on the pen cap. The LEDs should go out.
3. Remove the cap from the pen and the LEDs should flash briefly then show the appropriate color for
the battery charge level (see “Power LED” on page 7) and memory usage (see “Memory LED” on
page 8). The pen will also vibrate briefly to indicate that it is ready for writing.
• If the LEDs do not light as described above, ensure that the pen battery is charged by placing
the pen in its cradle for 20 minutes.
• If the LEDs do not light after 20 minutes, ensure that the cradle is correctly connected (see
“Checking the Cradle” on page 36) and try charging the pen from another PC with a cradle
that is known to function correctly.
• If after checking the pen, cradle and software the pen is still not functioning, try performing a
pen reset (see “Resetting the Digital Pen” on page 37).
Note: If the pen cap is left off, and the pen has been configured to automatically power-off (see
“Configuring the Pen Power-Off” on page 19), the pen will switch itself off automatically
after the specified time. To power on the pen, put the cap on the pen and remove it again.
Checking the Cradle
When the cradle is correctly connected and powered, the pen LEDs will remain on when the pen is
placed in the cradle. If the LEDs go out when the pen is in its cradle, check that the cradle is firmly
connected to the PC’s USB port. For more information, see “Connecting the Digital Pen” on page 13.
If the cradle is connected to the PC using a USB hub, then be sure to use a powered USB hub. Your pen
will not charge if connected to a non-powered USB hub.
Note: If the pen battery is completely discharged, the LEDs will not light immediately even if the
cradle is correctly connected. Allow the pen to charge by placing the pen in the cradle for at
least 20 minutes.
Checking the Pen Download Software
If the Pen Download Software is correctly installed, there is a pen icon in the Windows taskbar. If this
icon is not present, you need to install or reinstall the software. You can also check that the Pen
Download Software is installed by clicking Control Panel > Add/Remove Programs.
When the pen is docked, the dot on the icon turns from red to green. If the pen icon does not turn
green, check the pen and the cradle are correctly connected and that the pen is charged.
Note: If the pen is configured in silent download mode or in download later mode, it can appear
that nothing happens when you dock the pen.
HP Digital Pen 250 User’s Guide36
Page 37

Other Problems
The pen vibrates three times when a Send Box is checked
You have filled 200 forms. This is the maximum number of forms that can be stored in the pen. The
strokes information captured for subsequent forms is stored in the pen memory but you cannot
download it. Dock the pen and download the data to free up memory.
The Transaction Log contains error messages
If you see error messages in the Transaction Log, check the information in the Service Provider Message
column and the Error Message column, and follow the instructions given there. If you consistently see
the message “Unable to connect to server” but there are no network problems, check the Service
Controller URL is correctly set (see “About the Enterprise Services Tab” on page 24).
The pen does not capture data
Chapter 4 Troubleshooting
When the tip of the pen is on pattern, the LEDs should brighten to indicate that it is capturing data. If
the LED lights do not become bright green, check that the page of the form has pattern and that the
pattern is not too light. If you think the pattern might be too light then try using another digital pen on
the form to confirm this.
If the pen buzzes during capture, this indicates that the pen cannot read the pattern, for one of the
following reasons:
• The pattern is badly printed. Try reprinting the form, perhaps using a different printer.
• The pattern is covered by black items on the form (lines, text, or graphics).
Resetting the Digital Pen
If you have completed the pen, cradle and software checks but the pen still does not function, then try
performing a reset, or a master reset.
You can also perform a reset or master reset for any of the following symptoms:
• The pen does not turn off when I put the cap on.
• The pen vibrates whenever I write.
• The pen does not vibrate when I check a Send Box.
Performing a Pen Reset
Use the following instructions to reset the pen:
1. Take off the pen cap.
2. Reset the pen by pressing the reset button with a paper clip or pencil tip. Information stored in the
pen, including strokes memory and outbox, is not lost when you reset the pen.
HP Digital Pen 250 User’s Guide 37
Page 38

Chapter 4 Troubleshooting
If the pen is still frozen after performing a reset, you can perform a master reset to restore the pen to the
factory settings.
Performing a Pen Master Reset
Caution: Perform a master reset only as a last resort because you will lose all the information in the
pen’s memory, including the password.
To perform a master reset, do the following:
1. Take off the pen cap.
2. Press the pen tip on a surface while you press the reset button with a paper clip or pencil tip. The
LEDs will flash red.
3. Remove the paper clip or pencil tip from the reset button, but continue pressing the pen to the
surface. After flashing red for approximately 15 seconds, the LEDs start to cycle through red/
amber/green. The pen can now be lifted from the surface. After a few seconds, the LEDs go back to
their normal state and the pen vibrates to indicate that the reset is complete and it can be used
again.
HP Digital Pen 250 User’s Guide38
Page 39

Chapter 4 Troubleshooting
HP Digital Pen 250 User’s Guide 39
Page 40

© Copyright 2003-2004 Hewlett-Packard Development Company, L.P. The information contained herein is
subject to change without notice. The only warranties for HP products and services are set forth in the express
warranty statements accompanying such products and services. Nothing herein should be construed as
constituting an additional warranty. HP shall not be liable for technical or editorial errors or omissions
contained herein.
 Loading...