

Page 1

HP df800 Series
Digital Picture Frame
數位相框
デジタル・ピクチャ・フレーム
디지털 액자
User Manual
使用說明書
ユーザー・マニュアル
사용 설명서
Revision 1.0a
Page 2

FCC Compliance Statement
Note: This equipment has been tested and found to comply with the
limits for a Class B digital device, pursuant to Part 15 of the FCC
Rules. These limits are designed to provide reasonable protection
against harmful interference in a residential installation. This equipment
generates, uses, and can radiate radio frequency energy and, if not
installed and used in accordance with the instructions, may cause
harmful interference to radio communications. However, there is no
guarantee that interference will not occur in a particular installation. If
this equipment does cause harmful interference to radio or television
reception, which can be determined by turning the equipment off and
on, the user is encouraged to try to correct the interference by one of
the following measures:
- Reorient or relocate the receiving antenna.
- Increase the separation between the equipment and receiver.
- Connect the equipment into an outlet on a circuit different from that to
which the receiver is connected.
- Consult the dealer or an experienced radio/TV technician for help.
FCC Caution: To assure continued compliance, (example – use only
shielded interface cables when connecting to computer or peripheral
devices). Any changes or modifications not expressly approved by
the party responsible for compliance could void the user’s authority to
operate this equipment.
This device complies with Part 15 of the FCC Rules. Operation is subject
to the following two conditions: (1) this device may not cause harmful
interference, and (2) this device must accept any interference received,
including interference that may cause undesired operation.
Page 3
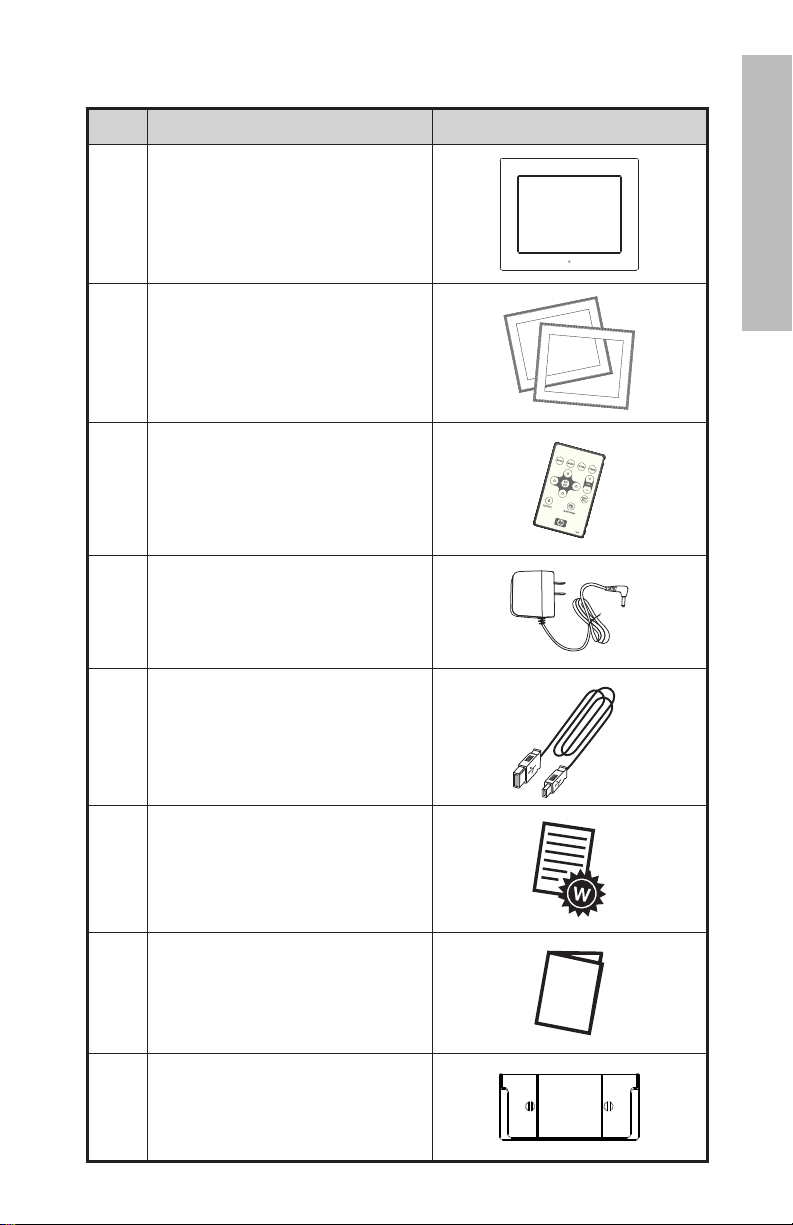
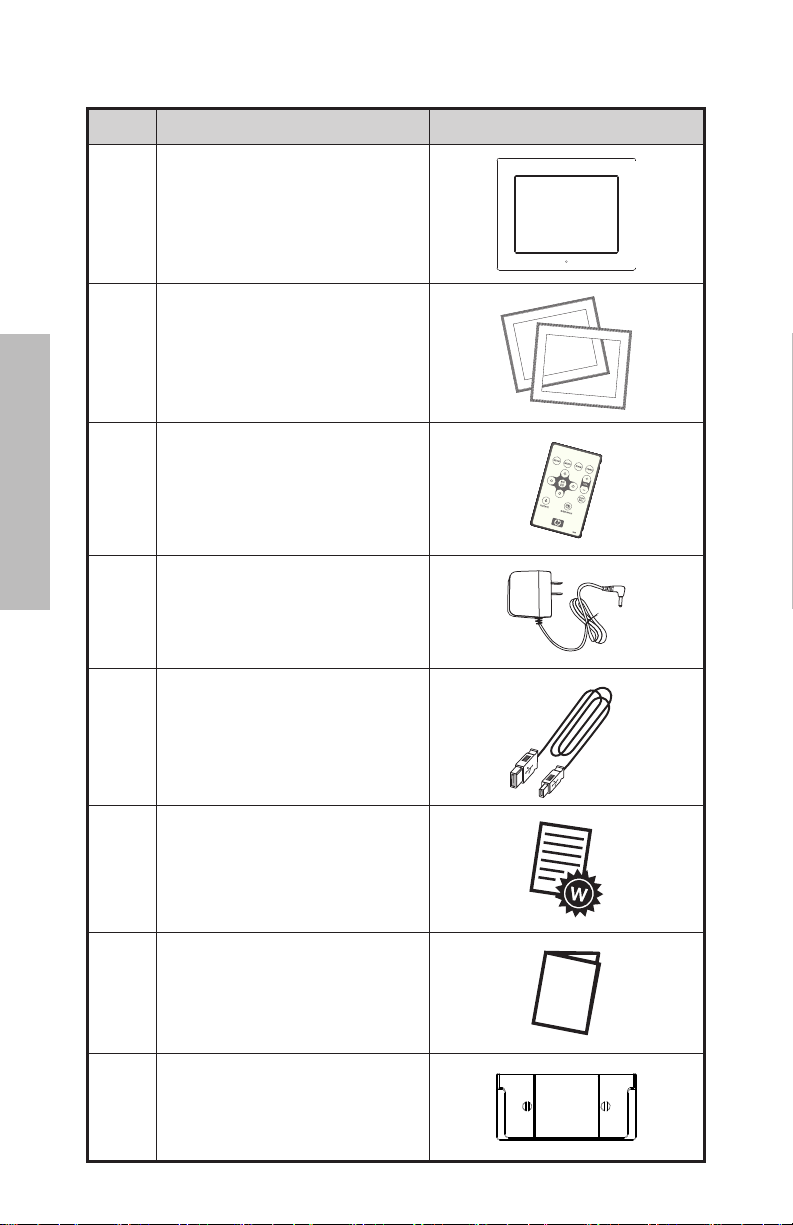
What’s in the Box
Qty Item Image
1 Digital Picture Frame
2 Additional Frames
1 Remote Control
Universal Power Adapter
1
(9V, 1.5A, 100/240 switching)
english
1 USB 2.0 Cable
1 Warranty Document
1 User Manual
1 Remote Controller Holder
1
Page 4
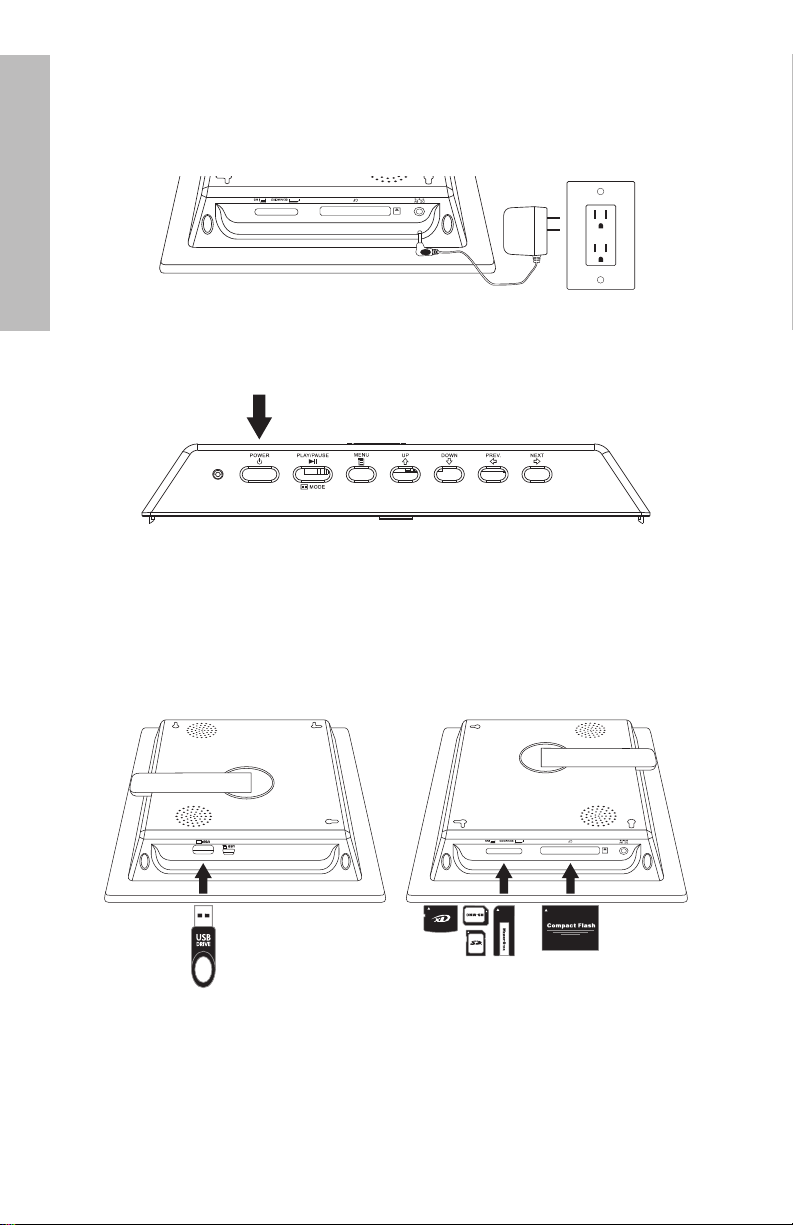
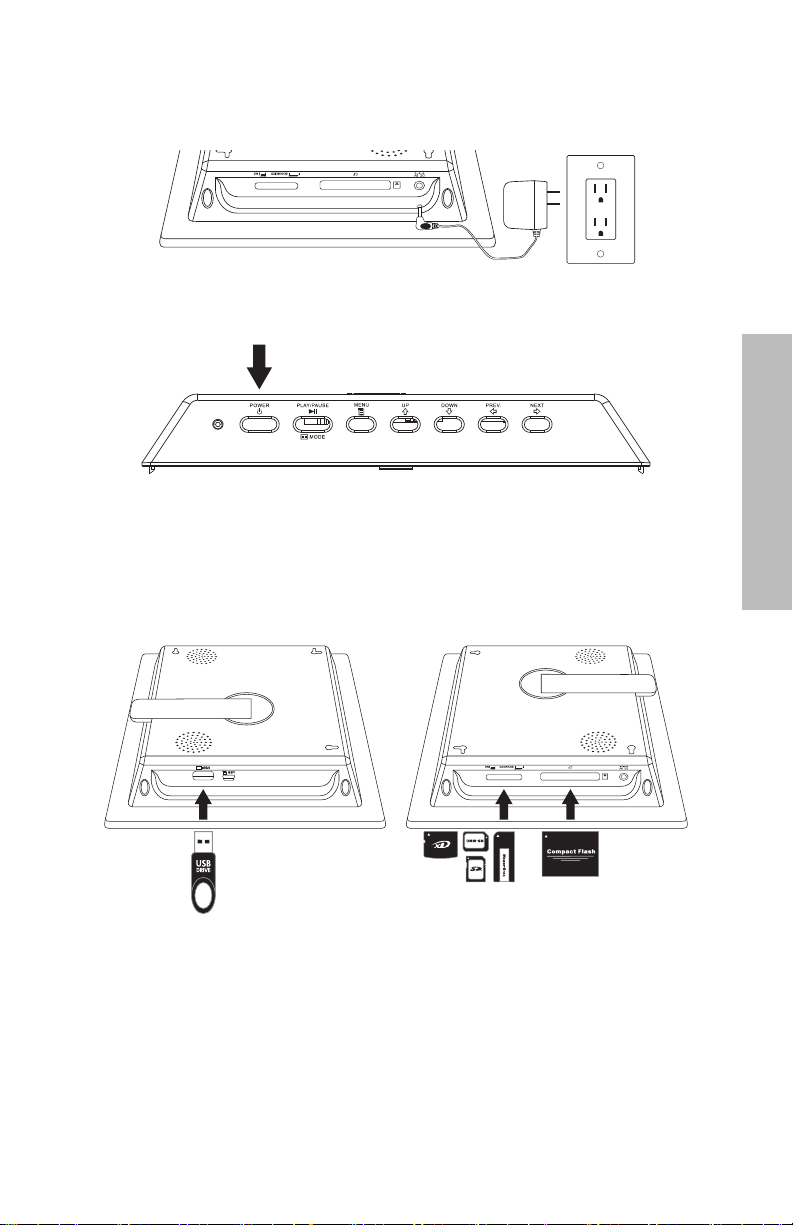
Getting Started
1. Connect the power cord into the DC input of the digital picture frame
and plug the adapter into a power outlet.
english
2. Unfold the attached stand to its extended position and push the
POWER button on the top of the digital picture frame.
3. Insert a memory card or USB storage device (external memory)
containing desired photos, music, and/or video into the appropriate
card slot or USB port as illustrated below. Note: Memory cards and
USB storage devices must be orientated correctly. Generally, labels
on these cards or USB devices must be facing outward as illustrated
below.
4. A slide show for your photos will automatically begin in a few
seconds. If music tracks are available on the same external memory
device, the slide show will be displayed with background music
unless disabled in Settings. Enjoy it and have fun!
2
Page 5
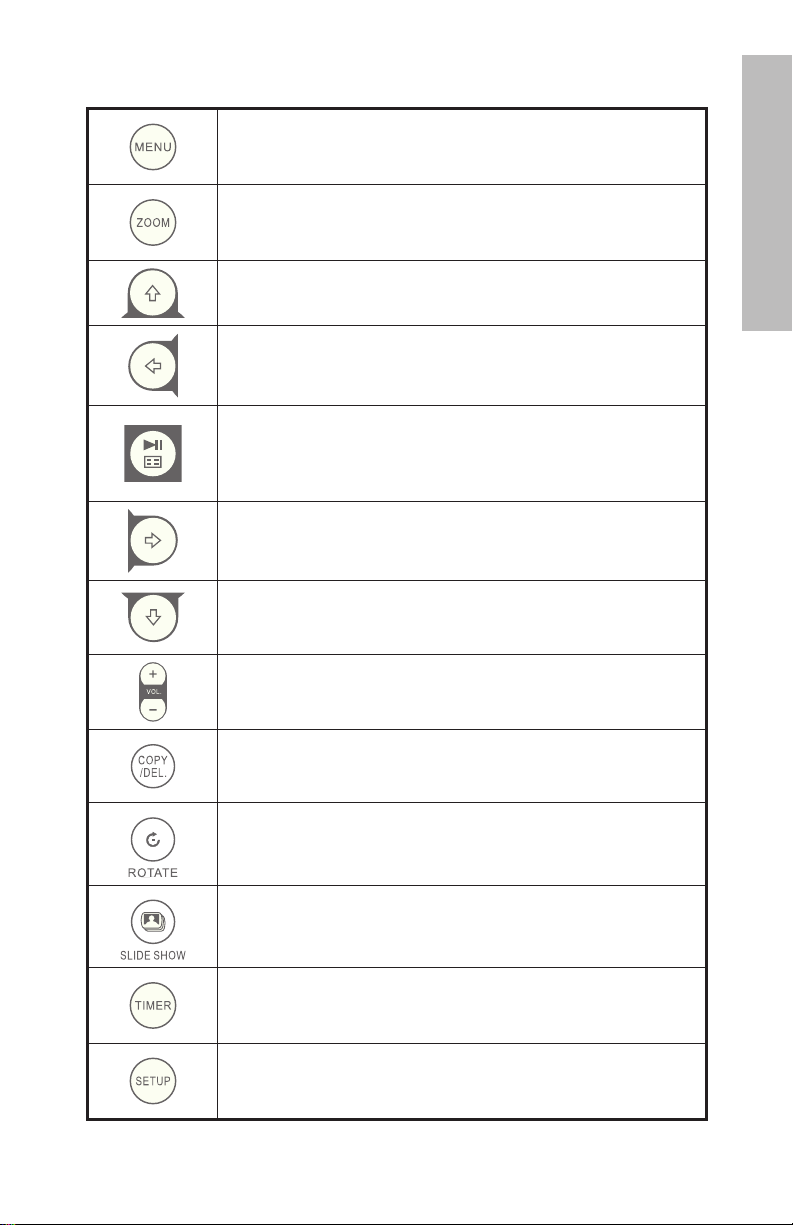
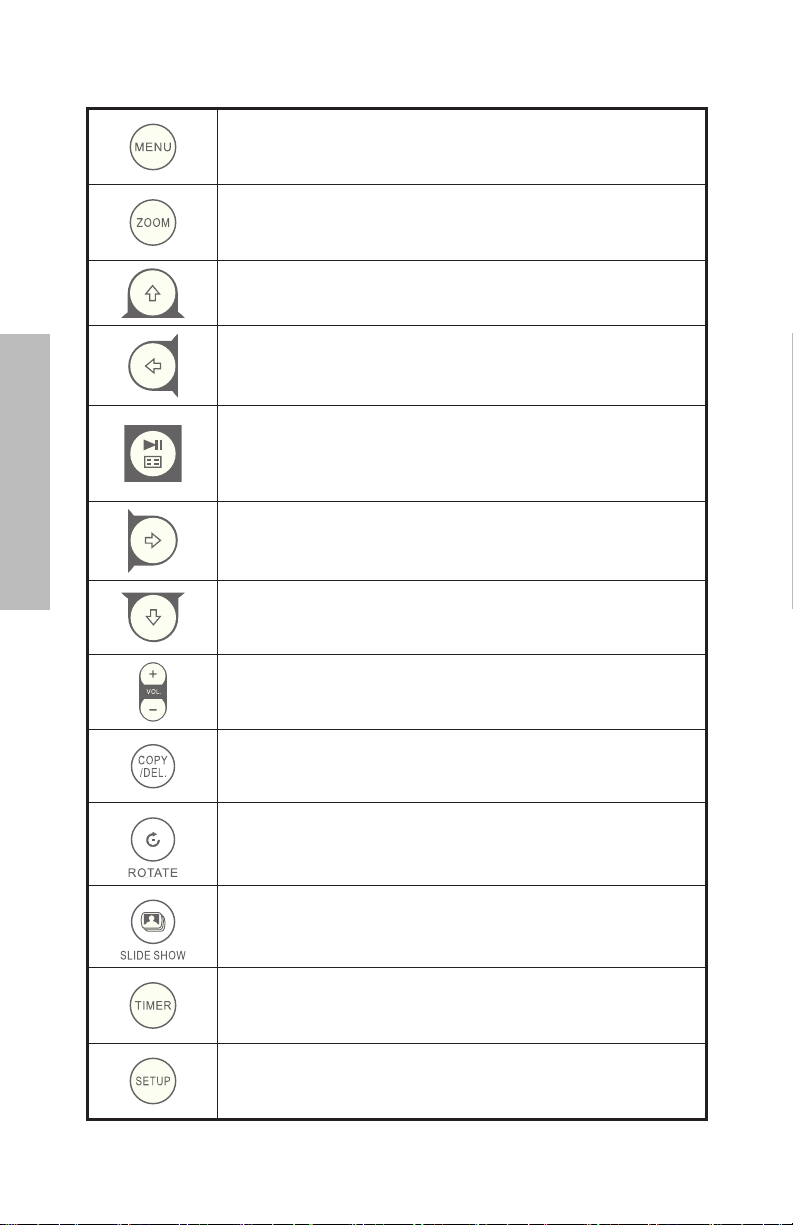
Remote Control
MENU: Press to access menu mode.
ZOOM: Press to enlarge picture in browse mode.
UP: Press to move up in thumbnail mode or when setting
options.
PREV or RETURN: Press to move left in browse, thumbnail or
menu mode, or return to previous screen in slide show mode.
PLAY/PAUSE or MODE: Press to change display mode (slide
show, browse, or thumbnail). Press to play or pause music
or video les. Press to make selections in menu or settings
mode.
NEXT: Press to move right in browse, thumbnail or menu
mode.
DOWN: Press to move down in thumbnail mode or when
setting options.
VOL + / - : Press the + button to increase and the – button
to decrease audible playback volume.
english
COPY/DEL: Press this button in Browse, Thumbnail or MUSIC
mode to initiate the copy or delete process.
ROTATE: Press to rotate the picture during browse mode.
SLIDESHOW: Press this button to begin a photo slideshow.
Timer: Press this button to view calendar and press again to
view the clock mode.
SETUP: Press this button to open the setup menu.
3
Page 6
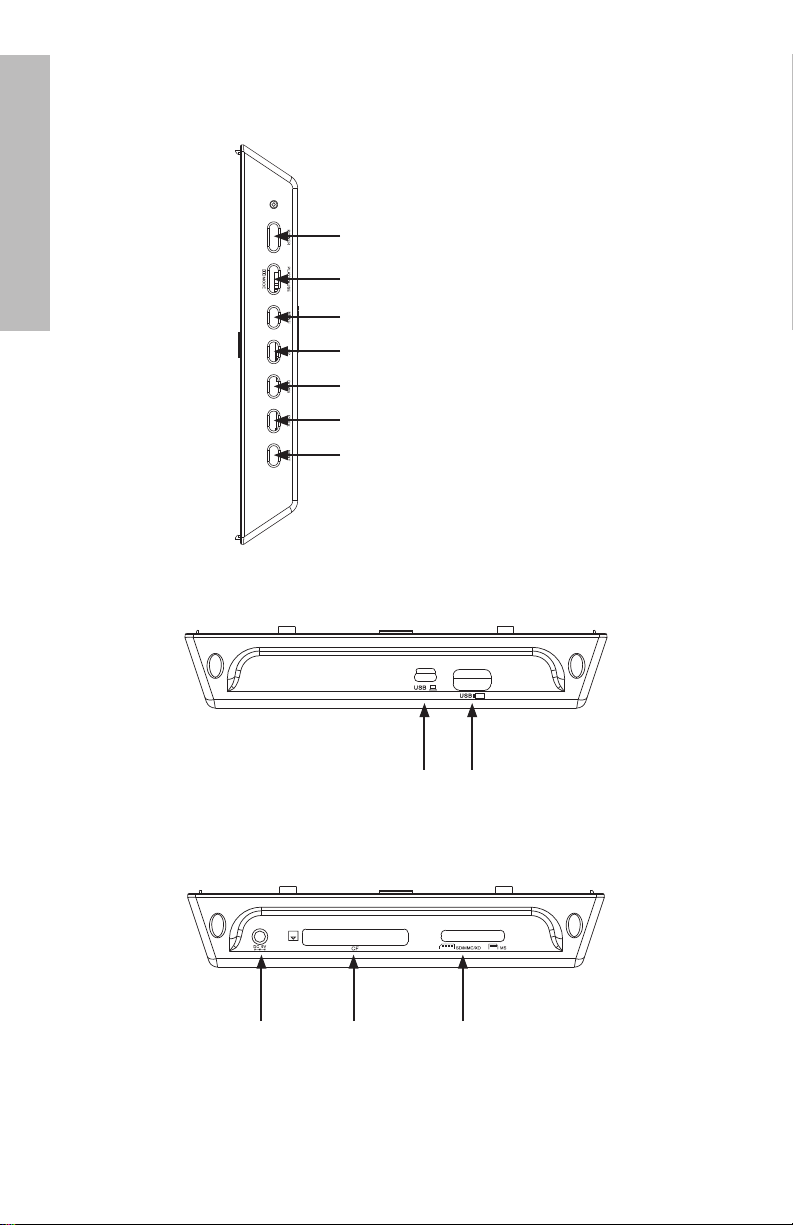
Picture Frame
Top View: Power and Transport
english
Left Side View: USB Port and Mini USB Port for PC Connect
Power button & LED
PLAY/PAUSE/MODE button
MENU button
UP button
DOWN button
PREV button
NEXT button
USB SlotMini USB Slot
Right Side View: External Memory Slots
Power Input CF Card Slot SD/MMC/xD/MS Card Slot
4
Page 7
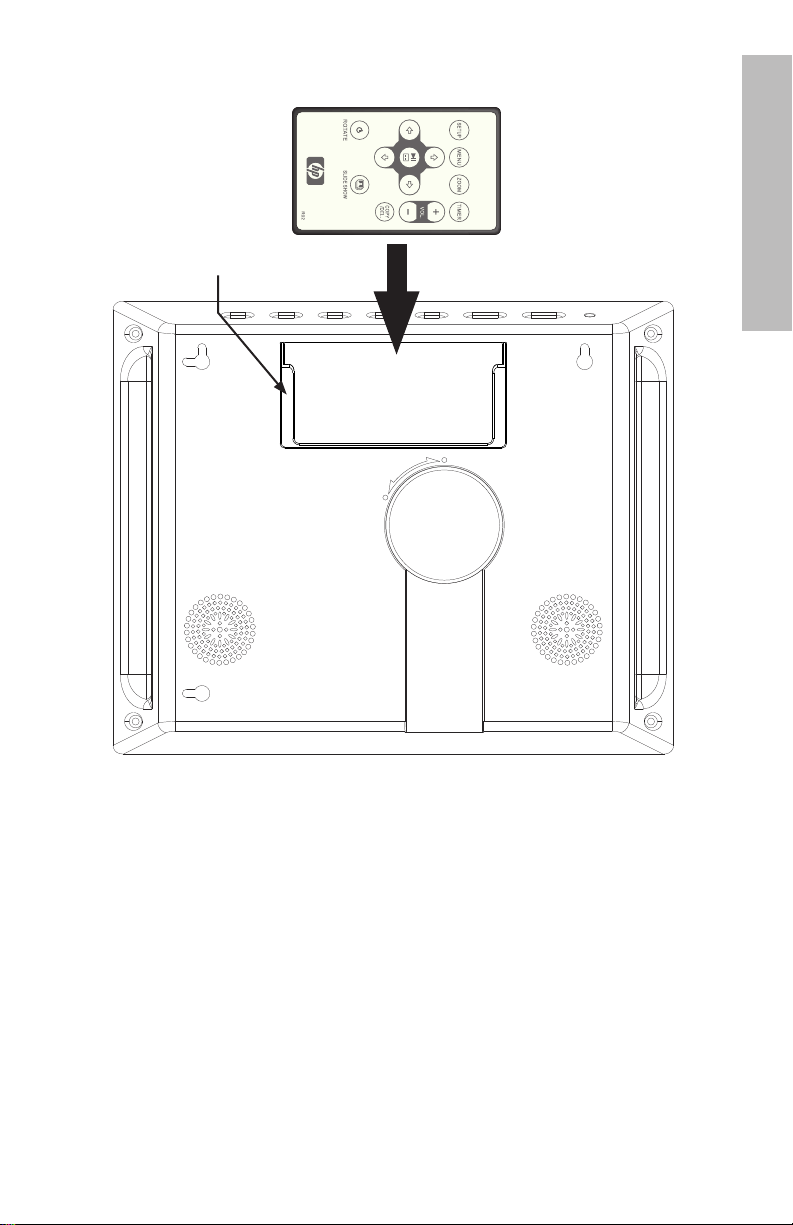
Rear View: Remote Controller Holder
Remote Controller Holder
english
5
Page 8
Key Features
Features
english
Add or delete photos from external memory devices, and internal memory.
Photo slide show with music
• 9 different photo transition options.
• Shuffle mode optional.
Photo slide show without music
• 9 different photo transition options.
• Shuffle mode optional.
Photos/Images
• View individual photos in Browse mode (see later section).
• View Photo thumbnails.
• Photo zoom and rotate.
Playback music/audio tracks
• Music tracks must be in an mp3 file format
Playback video clips
• Video clips must be in an Motion JPEG (.avi and .mov) file format.
Clock and Calendar
• Includes alarm clock functionality
Basic Brightness and Contrast adjustment controls
Basic Color and Tint adjustment controls
7 on screen display languages
• English, French, Spanish, Italian, German, Dutch, & Portuguese
6
Page 9
Initial Setup
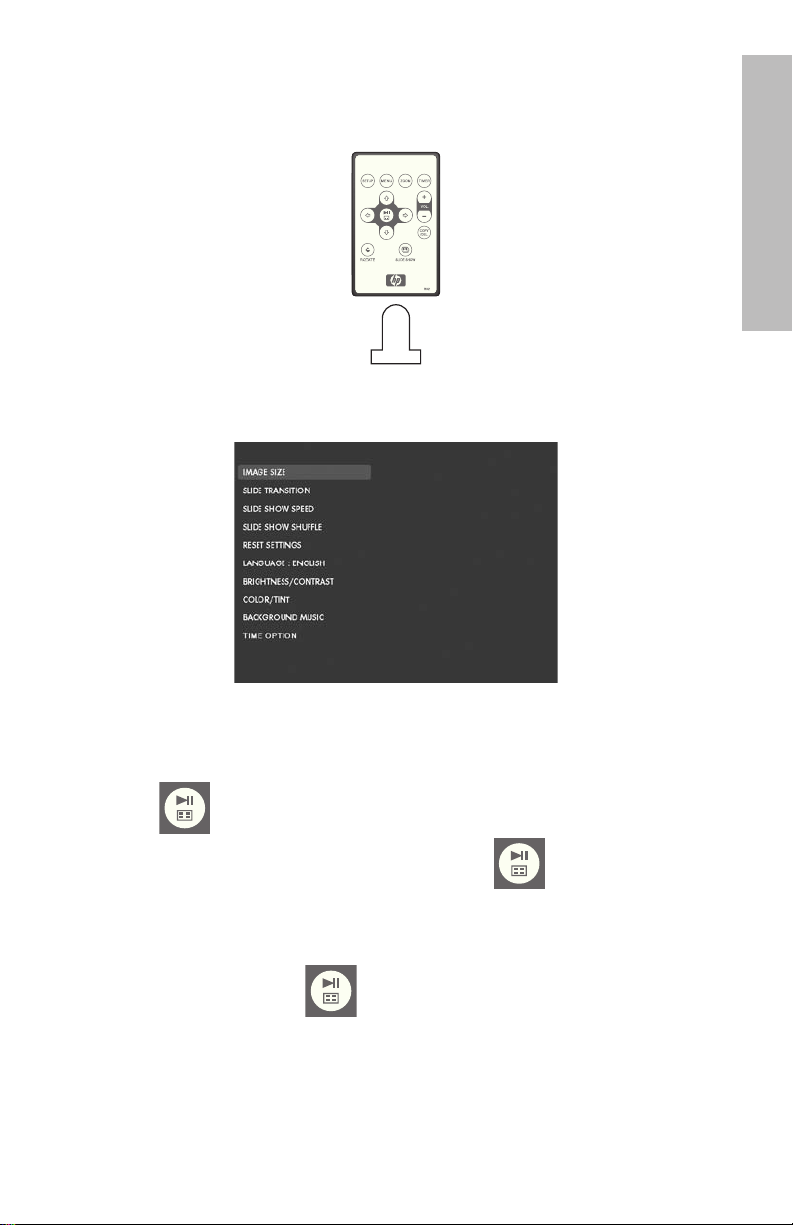
PULL
1. Pull tab from remote control to activate.
2. Power on the picture frame and press SETUP button.
english
3. Press the directional arrows to highlight “LANGUAGE”. Note: If
desired language is already selected, go to step 5.
4. Press button and use the directional arrow buttons to highlight
the desired On-Screen-Display language. Press to select the
language.
5. Change other settings by using the directional keys to highlight the
desired option and press to select the desired option.
7
Page 10

IMAGE SIZE: Select “ORIGINAL” to display photos with their original
properties. Display photo in full height in normal aspect ratios.
Select “OPTIMAL” to allow the frame to display photos with optimized
properties. Photo(s) will enlarge to fit the full width of the screen.
The default option is “ORIGINAL”.
english
SLIDE TRANSITION: Choose from 9 options and select the desired
transition. The default option is set to “RANDOM”.
SLIDE SHOW SPEED: Select the desired photo display length. Options
are: 5, 10, 30, 60 SECONDS, I HOUR, and 24 HOURS. The default
option is “5 SECONDS”.
SLIDE SHOW SHUFFLE: Select “ON” to display photos in a random
order. Photos will not repeat until all have been displayed.
Select “OFF” to display photos in sequential order. The default option
is set to “OFF”.
RESET SETTINGS: Select this to restore all options to factory default
settings. A confirmation prompt will be displayed before settings are
reset.
LANGUAGE: Select this to choose the desired screen language option.
The default is “ENGLISH”.
BRIGHTNESS/CONTRAST: Select this option to change the displays
brightness and contrast properties.
Use the & buttons to change the display contrast. Use
the & buttons to change the display brightness.
COLOR/TINT: Select this option to change the displays color and tint
properties.
Use the & buttons to change the display color. Use the
& buttons to change the display tint.
8
Page 11

BACKGROUND MUSIC: Turn background music on or off during the
slide show. Note: Only mp3 file formats are supported for playback.
TIME OPTION: Select “12H” for standard AM and PM time display.
Select “24H” for a 24 hour clock display.
english
9
Page 12
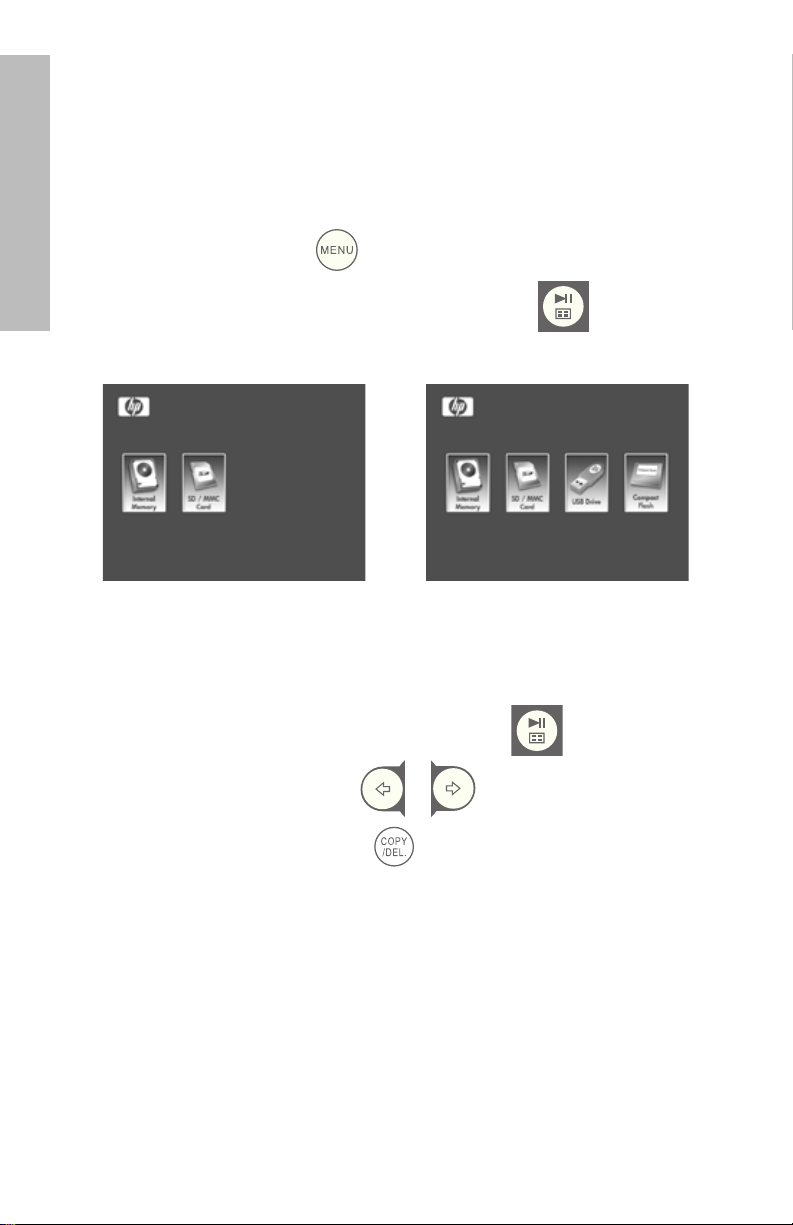
Photo/Music/Video Content Management
The HP Digital Picture Frame can play back content from internal and
external memory devices such as USB Flash drives and memory cards
typically used with digital cameras. More than one external memory
device can be inserted; however, content from one memory source
can be selected for playback at any given time. To select the desired
english
memory source, press the button TWICE and use the arrow keys
to highlight the appropriate memory icon. Press the to select this
content source. Example illustrated below:
or
There are two methods on how to get content in the internal memory.
From external memory device: Insert external memory device
with desired content into the appropriate connector. A slide
show will automatically begin. Press the button to stop
the slide show. Use the & buttons to navigate to the
desired photo. Press the button to start the copy process.
Follow the on screen prompts as illustrated below to copy
the photo onto the frame’s internal memory. Repeat for each
desired photo/image.
NOTE: Only one photo/picture can be copied (or deleted) at a
time from or to external memory devices.
10
Page 13

To copy audio files, press the button. Use the arrow
buttons to navigate to the icon and press the
button. Select the desired audio file and repeat the copy
process as previously illustrated.
If desired, content can be copied onto external memory devices
from the internal memory. Select the internal memory source
and repeat the copy process but select the desired external
memory device as the memory destination location.
english
11
Page 14
english
From a PC/notebook: For the first connection, it is
recommended to remove all external memory sources. Power
on the HP Digital Picture Frame and connect the HP Digital
Picture Frame to your Windows™ 2000 (with service pack 4
or greater), Windows™ XP (with Service Pack 2 or greater), or
Windows™ Vista PC/notebook by using the USB cable provide
with product (see illustration below):
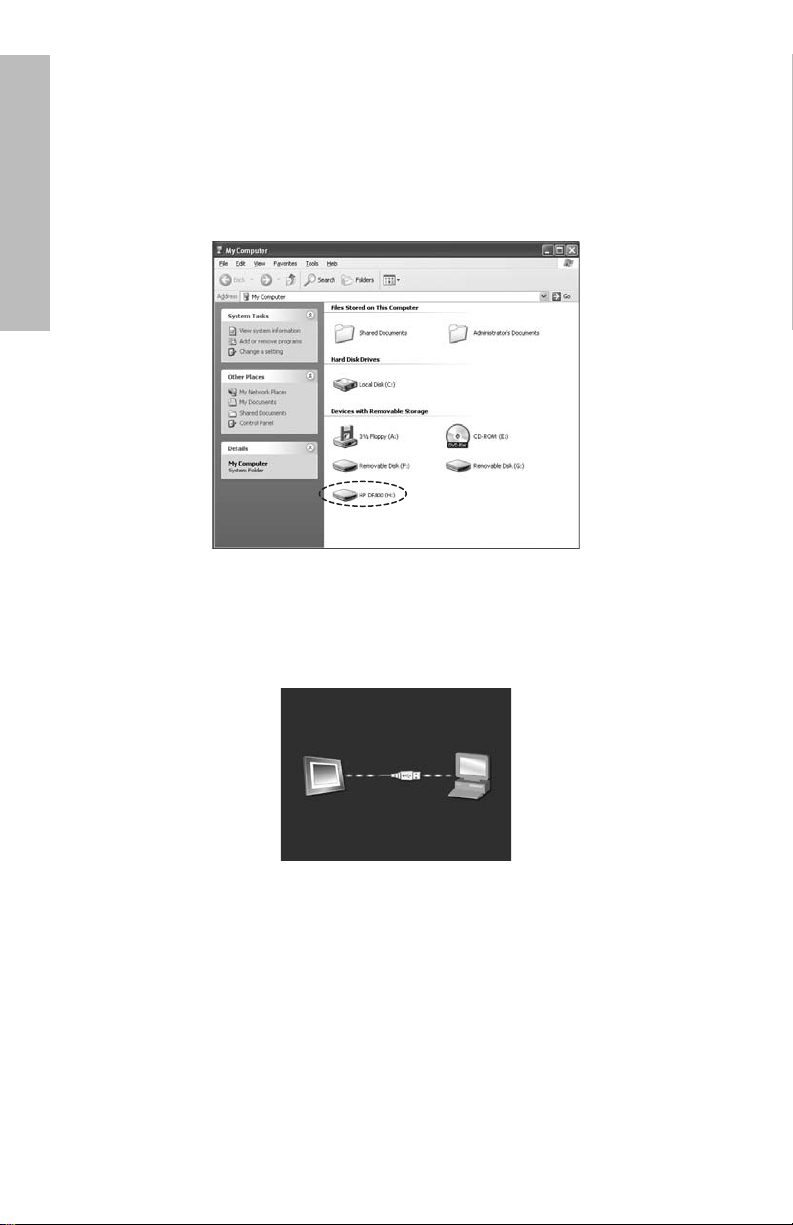
3 new drive letters will appear in Windows Explorer. These
new drive letters represent the Digital Picture Frame’s internal
memory, Memory card slot 1 and Memory card slot 2. The
digital picture frame will display the graphic below:
1 of the 3 new drive letters is the HP Digital Picture Frame’s
internal memory and will be labeled HP df800. Drive
letter assignment MAY vary from PC to PC. Use standard
Windows™ copy and paste procedures to move content onto
the frame’s internal memory. To check the picture frame's
available memory, right click on the internal memory drive
letter and select Properties. A properties menu will appear
displaying the available/Free space (in Mega Bytes[MB]).
Disconnect the PC/notebook when desired content has been
copied successfully.
12
Page 15
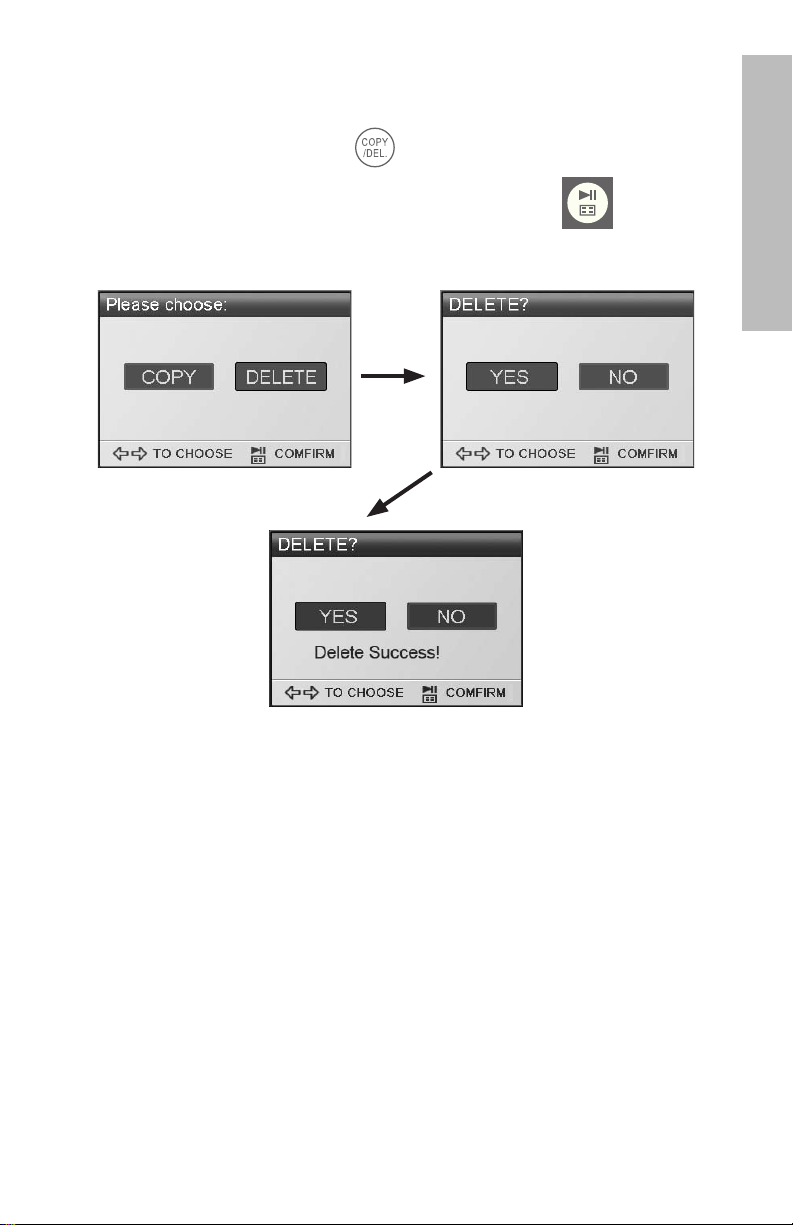
Removing content from memory: Content can be removed/
deleted from internal and external memory in the same manner
as it was added. Select the desired photo/music file to be
deleted and press the button. Use the arrow button to
highlight the DELETE button icon and press the to confirm
this action as illustrated below:
english
Follow the on screen menus to complete the task. Repeat the
process for each file to be deleted.
13
Page 16
Photo/Picture Slide Show
Slide show modes
Slide show mode will begin automatically a few seconds after the frame
is powered on or when an external memory card/USB Flash drive is
inserted. There are two slide show modes, one with background music
english
and the other without. Review the Initial Setup section of this document
for details on how to change desired settings.
Browse mode
To exit slideshow mode, press once. “Browse mode” will be displayed on the lower right section of the screen for a few seconds. This
allows forward and previous photo viewing as well as a copy/delete,
rotate, and zoom options.
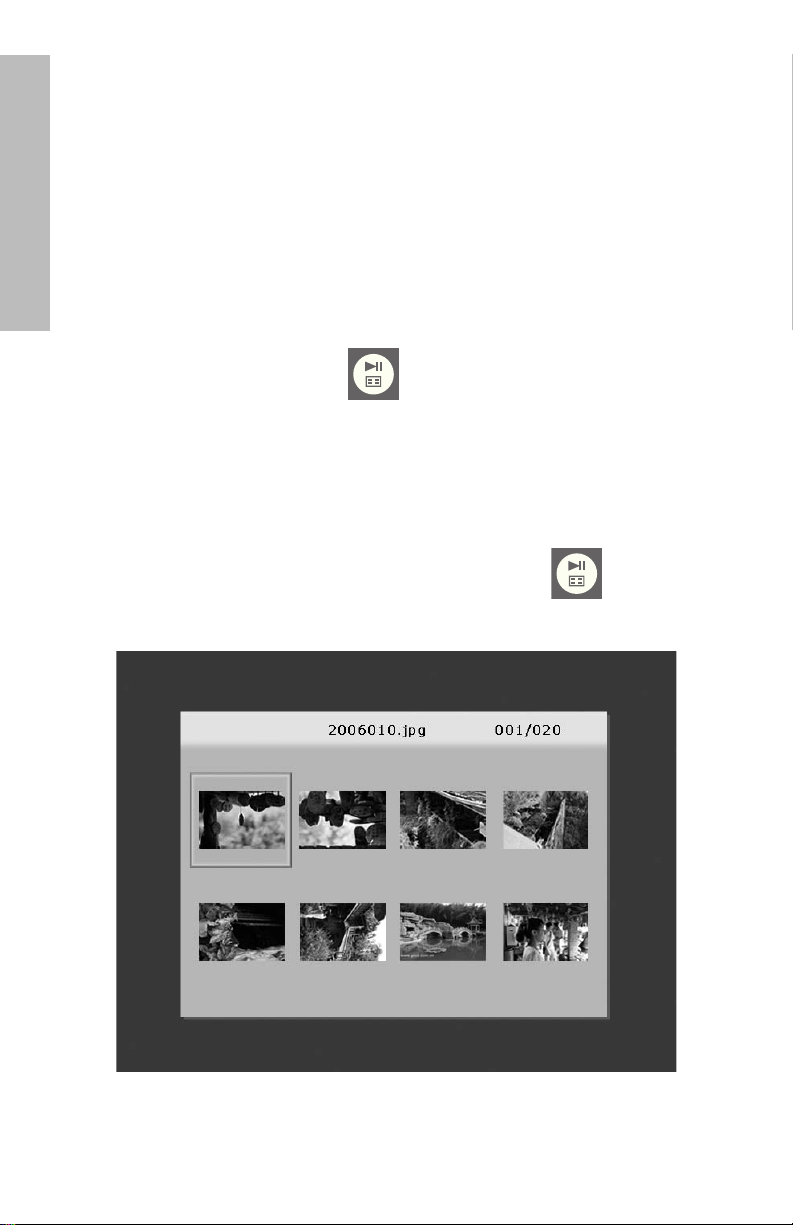
Thumbnail mode
To view photos/pictures in thumbnail mode, press the twice when
in slideshow mode or once when in browse mode.
14
Page 17
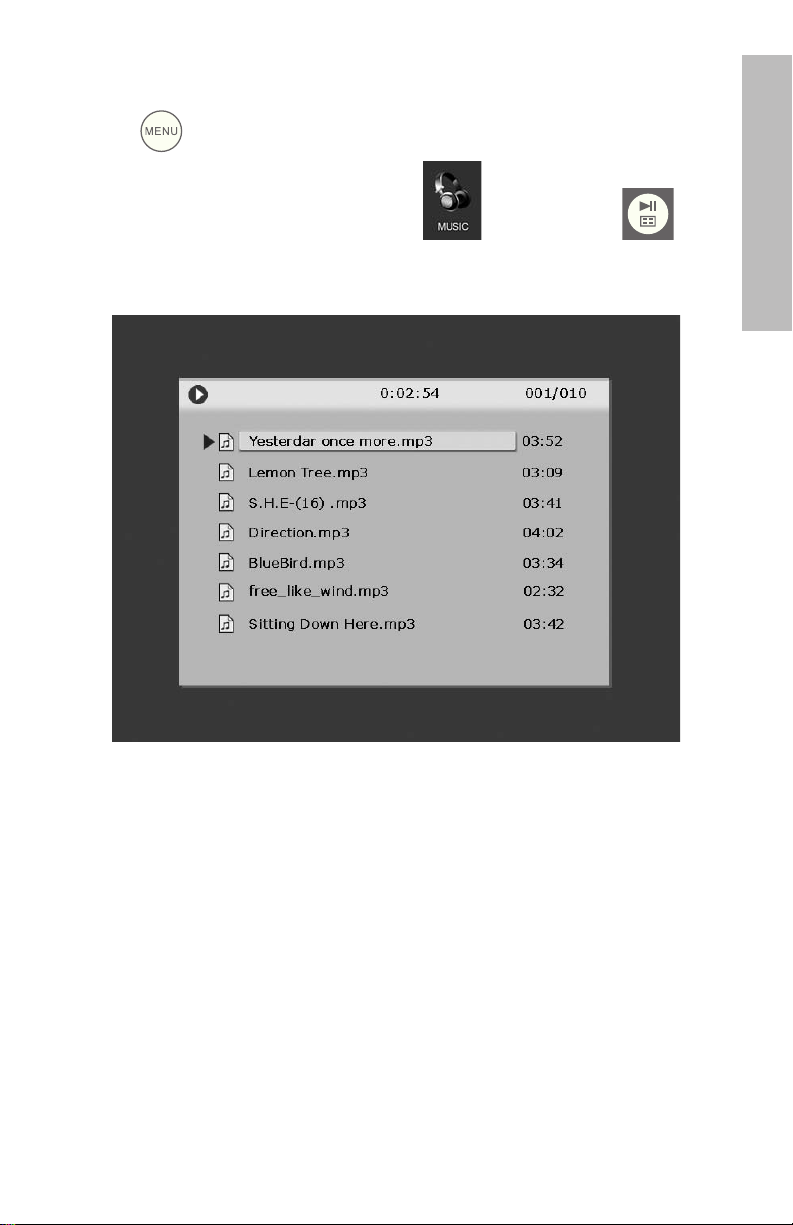
Music Playback
Press to access the menu screen.
Use the directional arrows to select the icon then press .
The frame will display a list of music/audio files found on the selected
memory source as illustrated below.
english
The first music track in the list will begin to play.
• The default playback mode is to play from first to last track
then repeat from the first track.
Supported audio format: MP3
15
Page 18
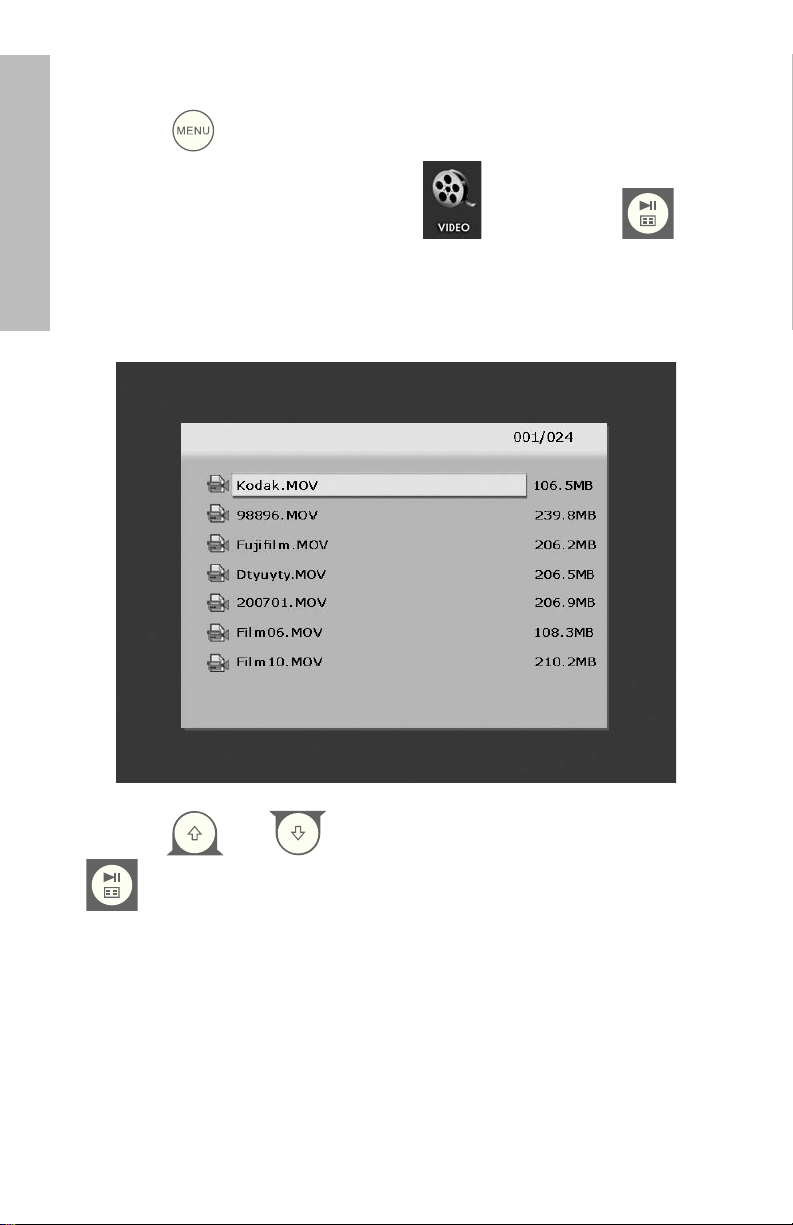
Video Playback
Press the button to access the menu screen of the frame.
english
Use the directional arrows to select the icon then press to
conrm.
The frame will display a list of supported video clips/les found on the
selected memory source as illustrated below.
Press the and buttons to select a desired video clip. Press
to start playback.
• The default playback mode will automatically play the next
video clip until the end of the list, and then start over from the
beginning.
Supported Video format: Motion JPEG (.avi and .mov)
16
Page 19
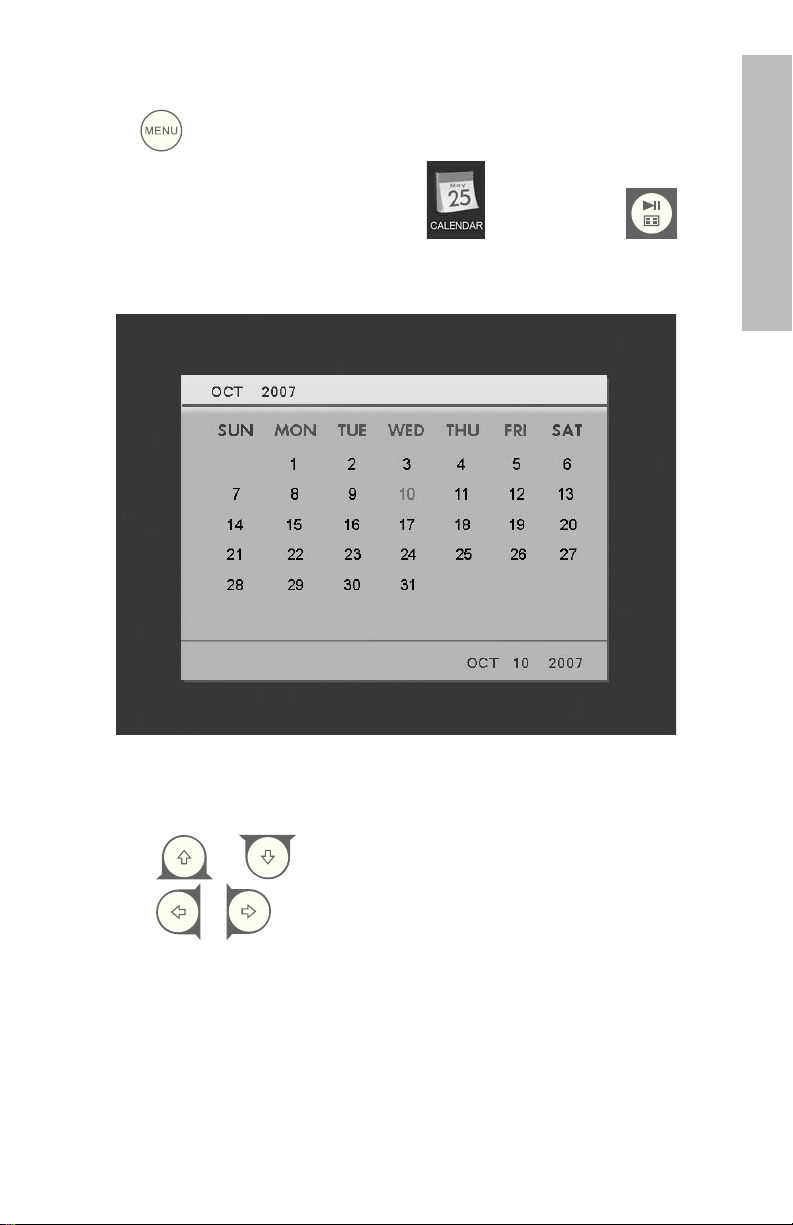
Calendar
Press to access the menu screen.
Use the directional buttons to select the icon then press .
The frame will display the calendar screen similar to the illustration
below.
english
The calendar will display the current date. To adjust the date, review
the next section titled Clock Setup and Viewing.
Use the & buttons to view the previous or next month(s).
Use the & buttons to highlight the different days in the
month.
17
Page 20
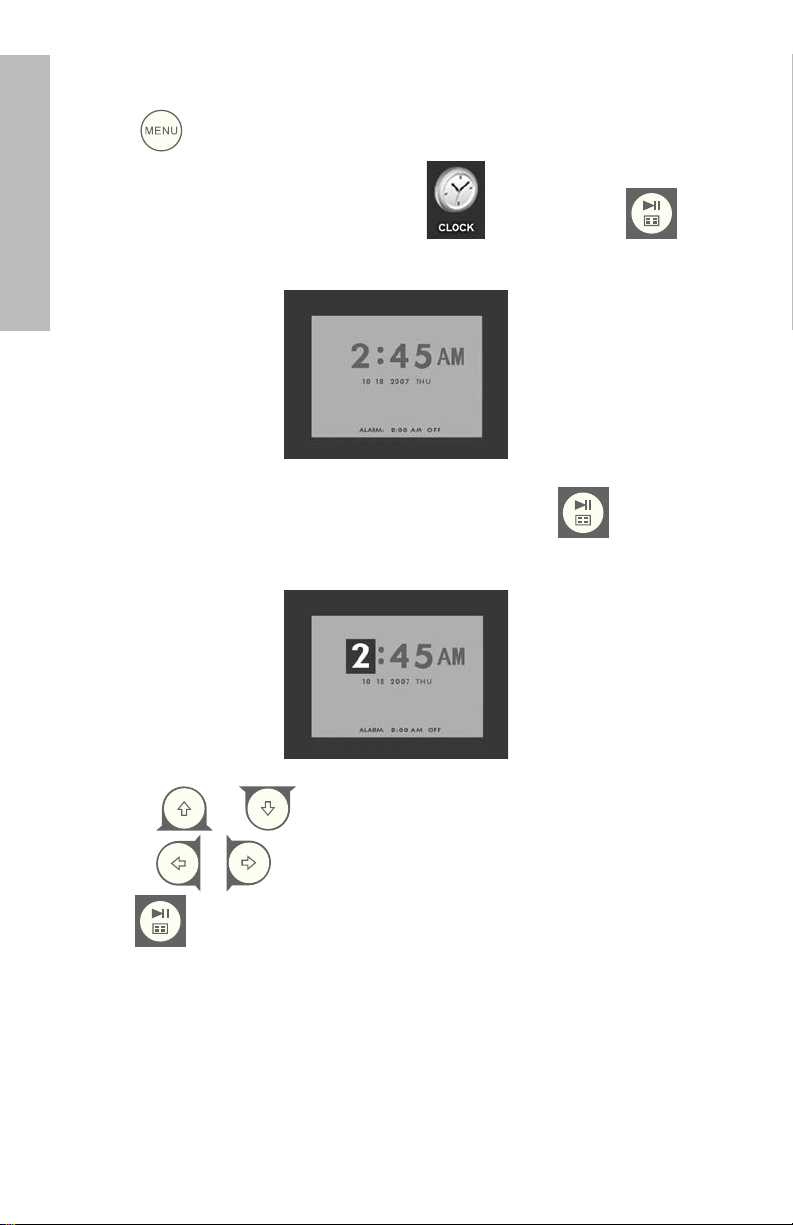
Clock Setup and Viewing
Press to access the menu screen.
english
Use the directional buttons to select the icon then press .
The frame will display the Clock screen as illustrated below.
To change the clock time and alarm settings, press the button
and the hour number will begin to flash.
Use the & buttons to change the clock option settings.
Use the & buttons to move between the clock options.
Press when desired date, time, and alarm settings are selected.
NOTE: The HP df800 Digital Picture Frame has a Real Time Clock (RTC)
battery backup that allows the clock to maintain correct date and time
when powered off. It is important that the df800 remains powered up
for at least 6 hours to achieve a full charge. Once fully charged, the
battery backup will allow the df800 to be powered down up to 36
hours. If the df800 is powered off for more than the battery limits, the
date and time will need to be reconfigured.
18
Page 21
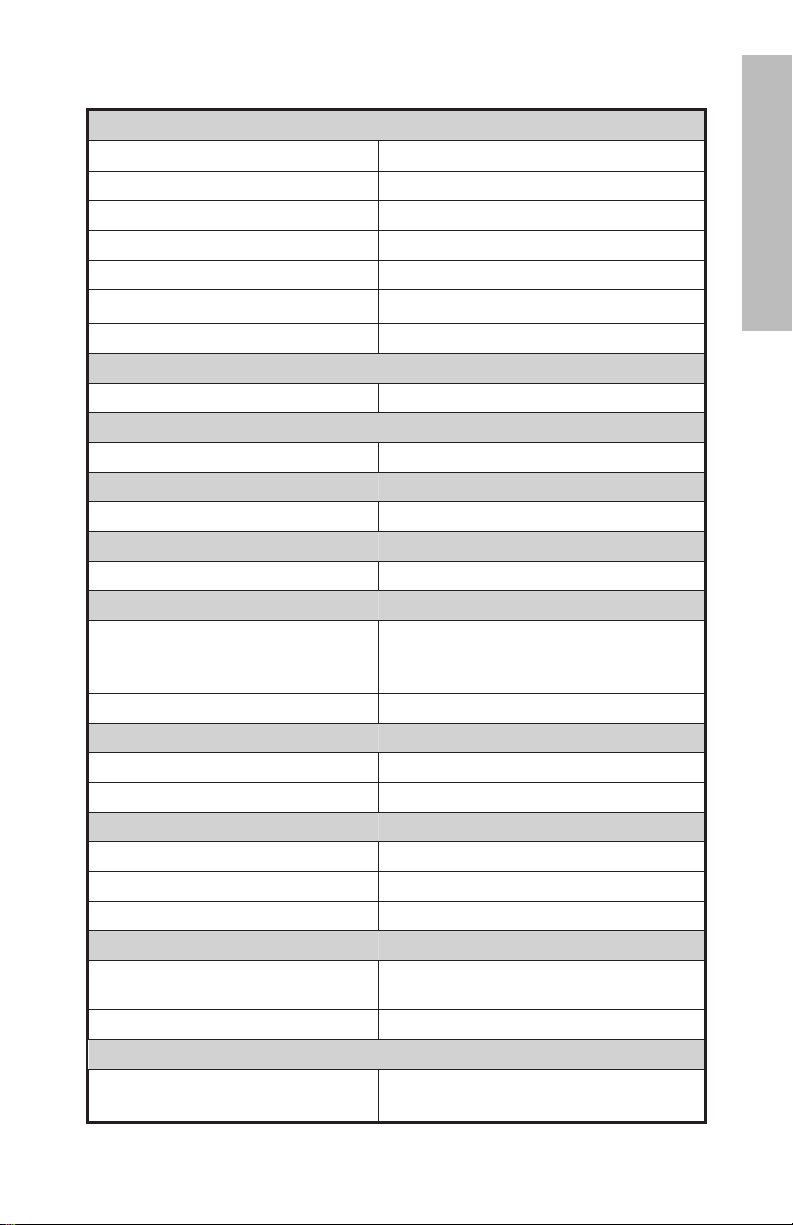
Specications
Panel Specification
Size
Aspect ratio 4:3
Resolution 800x600 pixels
Contrast ratio 400:1
Brightness 200 cd/m2
Viewing Angle - Horizontal 65/65
Viewing Angle - Vertical 60/40
Power
External AC Power Adapter +9V, 1.5A
Audio
Internal speakers Stereo
Connectivity
USB Ports 1 (STD 1.1 Host)
Storage/Media
Internal memory 128MB
Supported Memory cards
Memory Stick Pro (MS Pro), Secure
Memory cards slot 1
Memory cards slot 2 Compact Flash (CF)
Connectivity
USB for link to PC
USB for thumb drive
Media Files Supported:
Video file formats Motion JPEG (.avi and .mov)
Photo file formats JPEG - (Base line only)
Audio file formats
User Interface/Control
Buttons at the Top of digital picture
frame
Remote control
Supported Languages
On-Screen Display
Digital (SD 2.0), XD Picture Card, &
Multi Media Card (MMC)
Standard “A” receptacle
English, French, Spanish, Italian,
German, Dutch, & Portuguese
8”
Mini “B” receptacle
MP3
Yes
Yes
english
19
Page 22
Frequently Asked Questions
Question Answer
How far away can I use the
remote control?
english
Why can’t I display some of my
Photos?
Why can’t I play some of my
music tracks?
Why can’t I play some of my
video clips?
Can I delete photos from
external memory cards or flash
drives?
Can I delete photos from
internal memory?
Up to 15ft (5m)
Some photo/image file formats are
not supported. Please refer to the
specifications.
Some music file formats are not supported.
Please refer to the specifications.
Some video file formats are not supported.
Please refer to the specifications.
Yes, refer to the “Photo/Music/Video
Content Management” section of this
document.
Yes, refer to the “Photo/Music/Video
Content Management“ section of this
document.
Remove all external memory sources or
How can I switch to the internal
memory?
Why can’t I use my Windows™
98 or Me system to copy
content onto the frame?
Why can’t I use my Apple™
system to copy content onto the
frame?
I have lost or damaged my
remote and/or power adapter.
Can I order replacements?
How can I find the latest
information/FAQs about my HP
Digital Picture Frame?
press the button TWICE on the
remote and select the internal memory
icon.
The appropriate USB drivers are not
supplied for this product and are NOT
native to these operating systems
Connecting the frame will only allow
access to the memory card slot 1 and
no other source. If desired, content from
the Apple™ can be copied onto a slot
1 memory card. Following procedures
documented in “Photo/Music/Video
Content Management” section of this
document, content could be copied onto
the frame’s internal memory.
Note: This WILL NOT be a supported
process.
Yes. Visit www.hp.com/support for more
details.
Visit www.hp.com/support for more details
and the latest information.
20
Page 23

Cleaning and Care Tips
√ Please power off the HP Digital Picture Frame before cleaning.
√ DO NOT spray or pour liquid cleaning agents directly on the
screen or frame.
√ DO NOT use ammonia, alcohol, or abrasive detergent cleaning
agents.
Cleaning the Screen:
1. Wipe screen with a clean, soft, lint-free cloth to remove dust
and loose particles.
2. If further cleaning is required, apply an appropriate
cleaning agent (approved for LCD displays) to a clean, soft,
lint-free cloth and wipe the screen.
• NOTE: do not apply too much pressure on the screen to
avoid damaging it.
Cleaning the Frame and Backing:
1. Use a clean, soft, lint-free cloth to remove dust and loose
particles.
english
2. If desired, apply an appropriate cleaning agent to a clean,
soft, lint-free cloth and wipe the appropriate surfaces.
21
Page 24
繁體中文
內容物
數量 項目 影像
1
數位相框
2
其他相框
1
遙控器
通用電源變壓器
1
(在 9V、1.5A、100/240 間
切換)
1
USB 2.0 電纜
1
保固文件
1
使用說明書
1
遙控器收納架
22
Page 25
入門指南
1. 將電源線連接到數位相框的 DC 輸入,並將變壓器插入電源插座。
2. 將隨附的腳架完全展開,然後按數位相框頂部的 POWER 鈕。
3. 如下圖所示,將含有所需相片、音樂和/或視訊的記憶卡或 USB 存
放裝置(外接記憶卡)插入適當的卡槽或 USB 埠。
註:記憶卡和 USB 存放裝置必須正確插入。一般而言,記憶卡和 USB
存放裝置上的標籤必w須朝外,如下圖所示。
繁體中文
4. 相片投影片會在幾秒後開始自動播放。如果音樂曲目也在同一個外部
記憶體裝置上,除非停用設定,否則投影片會搭配背景音樂示。盡情
享受使用本產品的樂趣吧!
23
Page 26
繁體中文
遙控器
MENU: 按此鈕存取選單模式。
ZOOM: 按此鈕在瀏覽模式中放大圖片。
UP: 按此鈕在縮圖模式中或在設定選項時向上移動。
PREV 或 RETURN: 按此鈕在瀏覽、縮圖或選單模式中向
左移動,或在投影片播放模式中返回上一個畫面。
PLAY/PAUSE 或 MODE: 按此鈕變更顯示模式(投影片播
放、瀏覽或縮圖)。按此鈕播放或暫停音樂或視訊檔
案。按此鈕在選單或設定模式中選擇項目。
NEXT: 按此鈕在瀏覽、縮圖或選單模式中向右移動。
DOWN: 按此鈕在縮圖模式中或在設定選項時向下移
動。
VOL + / - : 按 + 鈕提高播放音量,按 – 鈕降低播
放音量。
COPY/DEL: 在瀏覽模式或音樂模式中按此鈕開始複製
或刪除。
ROTATE: 按此鈕在瀏覽模式中旋轉圖片。
SLIDESHOW: 按此鈕開始播放相片投影片。
Timer: 按此鈕檢視日曆,再按一次檢視時鐘模式。
SETUP: 按此鈕開啟設定選單。
24
Page 27

相框
俯視圖:電源與傳輸
POWER 按鈕 & LED
PLAY/PAUSE/MODE 按鈕
MENU 按鈕
UP 按鈕
DOWN 按鈕
PREV 按鈕
NEXT 按鈕
左側視圖:連接電腦的 USB 連接埠和迷你 USB 連接埠
USB 插槽迷你 USB 插槽
仰視圖:外接記憶卡插槽與電源
繁體中文
電源輸入
CF 卡插槽 SD/MMC/xD/MS 卡插槽
25
Page 28

後視圖:遙控器收納架
遙控器收納架
繁體中文
26
Page 29

主要功能
功能
從外部記憶體裝置或內部記憶體新增或刪除相片。
搭配音樂播放相片投影片
• 9 種不同的相片轉換選項
• 隨機播放模式選項
不搭配音樂播放相片投影片
• 9 種不同的相片轉換選項
• 隨機播放模式選項
相片/影像
• 在瀏覽模式中檢視單張相片(請參閱下一個部分)
• 檢視相片縮圖
• 相片縮放與旋轉
播放音樂/音訊曲目
• 音樂曲目必須為 mp3 檔案格式
繁體中文
播放視訊短片
• 視訊短片必須為 Motion JPEG(.avi 和 .mov)檔案格式
時鐘與日曆
• 包含鬧鐘功能
基本亮度與對比度調整控制
基本色彩與色調調整控制
7 種螢幕顯示語言
• English, Français, Español, Italiano, Deutsch, Nederlands,
Português
27
Page 30

初始設定
PULL
1. 從遙控器拉出標籤,啟動遙控器。
2. 開啟相框電源,按 SETUP 按鈕。
繁體中文
3. 按箭頭鍵反白顯示“LANGUAGE”(語言)。註:如果已選取所需的
語言,請移至步驟 5。
4. 按 鈕,然後用箭頭鍵反白顯示所需的螢幕顯示語言。按
鈕選擇語言。
5. 若要變更其他設定,用箭頭鍵反白顯示所需的選項,然後按
鈕選擇所需的選項。
28
Page 31

IMAGE SIZE(影像大小):選擇 “ORIGINAL”(原始),以相片的原
始特性顯示相片。以正常縱橫比顯示相片的全高。
選擇 “OPTIMAL”(最佳化),允許相框以相片的最佳特性顯示相
片。放大相片以符合全螢幕的寬度。
預設選項為 “OPTIMAL”(最佳化)。
SLIDE TRANSITION(投影片轉換方式):從 9 個選項中選擇所需的轉
換方式。預設選項設定為 “RANDOM”(隨機)。
SLIDE SHOW SPEED(投影片播放速度):選擇所需的相片顯示長
度。選項有:5、10、30、60 秒、I 小時、24 小時。預設選項為“5
SECONDS”(5 秒)。
SLIDE SHOW SHUFFLE(投影片隨機播放):選擇 “ON”(開啟),
以隨機順序顯示相片。顯示全部相片後,不會重複播放。
選擇“OFF”(關閉),依序顯示相片。預設選項設定為 “OFF”(關
閉)。
RESET SETTINGS(重設設定):選擇此選項,將所有選項恢復為原廠預
設設定。重設設定前會顯示確認提示。
LANGUAGE(語言):選擇此選項,選擇所需的螢幕顯示語言。預設
設定為 “ENGLISH”(英語)。
BRIGHTNESS/CONTRAST(亮度/對比度):選擇此選項,變更顯示亮
度與對比度。
用 和 按鈕變更顯示對比度。用 和 按鈕
變更顯示亮度。
COLOR/TINT(色彩/色調):選擇此選項,變更顯示色彩與色調。
用 和 按鈕變更顯示色彩。用 和 按鈕變
更顯示色調。
繁體中文
BACKGROUND MUSIC(背景音樂):播放投影片時,開啟或關閉背景
音樂。註:僅支援 mp3 檔案格式播放。
TIME OPTION(時間選項):選擇 “12H”(12 小時),以 AM 和 PM
格式顯示時間。選擇 “24H”,以 24 小時時制顯示時鐘。
29
Page 32

相片/音樂/視訊內容管理
HP 數位相框可播放內部與外部記憶體裝置的內容,例如:USB 隨身
碟,以及數位相機最常使用的記憶卡。可插入一個以上的外部記憶體
裝置;但是一次只能選取一個記憶體來源來播放其內容。若要選擇所
需的記憶體來源,按兩次 鈕,然後用箭頭鍵反白顯示適當的記
憶體圖示。按 ,選擇此內容來源。圖示如下:
繁體中文
有兩種方法可以讀取內部記憶體的內容。
從外部記憶體裝置:將含有所需內容的外部記憶體裝置插入適
當的連接器。投影片會自動開始播放。按 鈕停止投影
片播放。用 和 按鈕瀏覽所需的相片。按
鈕開始複製。如下圖所示,按照畫面上的提示將相片複製到相
框的內部記憶體。對每張要複製的相片/影像重複此步驟。
註:一次只能複製(或刪除)一張相片/圖片,不論外部記憶
體裝置是複製來源或複製目的地。
或
30
Page 33

若要複製音訊檔案,按 鈕。用箭頭鍵瀏覽到
圖示,然後按 鈕。選擇所需的音訊檔案,然後重複複
製步驟,如上圖所示。
若有需要,可將內部記憶體的內容複製到外部記憶體裝置。選
擇內部記憶體來源,然後重複複製步驟,但是這次選擇所需的
外部記憶體裝置作為複製目的地。
繁體中文
31
Page 34

從個人電腦/筆記型電腦:若是第一次連接,建議移除所有
外部記憶體來源。開啟 HP 數位相框電源,使用本產品隨附
的 USB 電纜連接 HP 數位相框和 Windows™ 2000(Service
Pack 4 版本以上)、Windows™ XP(Service Pack 2 版本以
上),或 Windows™ Vista 個人電腦/筆記型電腦(請參見
下圖):
繁體中文
3 個新磁碟機字母會出現在 Windows Explorer 中。這些字母
分別代表數位相框的內部記憶體、記憶卡插槽 1、記憶卡插槽
2。數位相框會顯示下圖:
其中一個新磁碟機字母代表 HP 數位相框的內部記憶體,標
示為 HP df800。視個人電腦而定,指定的磁碟機字母可能不
同。使用標準的 Windows™ 複製並貼上程序,將內容移至相
框的內部記憶體。若要檢查相框的可用記憶體,在代表內部記
憶體的字母上按一下滑鼠右鍵,然後選擇 [內容]。內容選單
出現,顯示可用空間(以 Mega Bytes [MB] 為單位)。
所需的內容已成功複製後,中斷個人電腦/筆記型電腦的連
線。
32
Page 35

移除記憶體的內容: 可移除/刪除內部與外部記憶體的內
容,方法與新增的步驟相同。選擇要刪除的相片/音樂檔案,
然後按 鈕。如下圖所示,用箭頭鍵反白顯示 DELETE
按鈕圖示,然後按 確認此動作:
按照畫面上的選單完成步驟。對每個要刪除的檔案重複此步
驟。
繁體中文
33
Page 36

相片/圖片投影片播放
投影片播放模式
投影片播放模式會在開啟相框電源或插入外接記憶卡/USB 隨身碟的
幾秒後自動開始。有兩個投影片播放模式,一個是搭配背景音樂,另
一個是不搭配背景音樂。有關如何變更所需設定,請參閱本使用說明
書的初始設定部分。
瀏覽模式
若要離開投影片播放模式,按一下 。“Browse mode”(瀏覽
模式)會顯示在畫面右下角數秒。可讓您檢視上一張或下一張相片,
以及使用複製/刪除、旋轉、縮放選項。
縮圖模式
繁體中文
若要以縮圖模式檢視相片/圖片,在投影片播放模式中按兩下
,或在瀏覽模式下按一下 。
34
Page 37

音樂播放
按 鈕,存取選單畫面。
用箭頭鍵選擇 圖示,然後按 。
相框會顯示在選取記憶體來源上找到的音樂/音訊檔案清單,如下圖
所示。
繁體中文
開始播放清單上的第一首音樂曲目。
• 預設播放模式是從第一首曲目播放到最後一首曲目,然後再
重頭開始。
支援的音訊格式:MP3
35
Page 38

視訊播放
按 鈕存取相框的選單畫面。
用箭頭鍵選擇 圖示,然後按 確認。
相框會顯示在選取記憶體來源上找到的視訊短片/檔案清單,如下圖
所示。
繁體中文
按 鈕和 鈕,選擇所需的視訊短片。按 開始播
放。
• 預設播放模式會自動播放下一個視訊短片,直至清單結束,
然後再重頭開始。
支援的視訊格式:動畫 JPEG(.avi 和 .mov)
36
Page 39

日曆
按 鈕,存取選單畫面。
用箭頭鍵選擇 圖示,然後按 。
相框會顯示類似下圖的日曆畫面。
繁體中文
日曆會顯示目前的日期。若要調整日期,請參閱下一部分的時鐘設定
和檢視。
用 和 按鈕檢視上(幾)個月或下(幾)個月。
用 和 按鈕反白顯示該月份中的不同日期。
37
Page 40

時鐘設定與格式
按 鈕,存取選單畫面。
用箭頭鍵選擇 圖示,然後按 。
相框會顯示時鐘畫面,如下圖所示。
繁體中文
若要變更時鐘時間和鬧鐘設定,按 鈕,則「小時」會開始閃
爍。
用 和 按鈕變更時鐘選項設定。
用 和 按鈕在時鐘選項間移動。
選擇所需的日期、時間和鬧鐘設定時,按 。
註:HP df800 數位相框裝有即時時鐘 (RTC) 備用電池,關閉電源時
也能保持正確的日期和時間。df800 至少要連續充電 6 個小時才能充
滿,這點很重要。充飽電後,備用電池可讓 df800 連續使用長達 36
小時。如果 df800 的關機時間超過電池限制,日期和時間必須重新設
定。
38
Page 41

規格
面板規格
尺寸
縱橫比 4:3
解析度 800x600 畫素
對比度 400:1
亮度 200 cd/m2
可視角度-水平 65/65
可視角度-垂直 60/40
電源
外部 AC 電源變壓器 +9V, 1.5A
音訊
內部揚聲器 立體聲
連接
USB 埠 1 (STD 1.1 Host)
存放裝置/媒體
內部記憶體 128MB
支援的記憶卡
Memory Stick Pro (MS Pro), Secure
記憶卡插槽 1
記憶卡插槽 2 Compact Flash (CF)
連接
連接到個人電腦的 USB
USB Thumb Drive
支援的媒體檔案:
視訊檔案格式 動畫 JPEG(.avi 和 .mov)
相片檔案格式 JPEG-(僅限 Baseline)
音訊檔案格式
使用者介面/控制
數位相框頂部的按鈕
遙控器
支援語言
螢幕顯示
Digital (SD 2.0), XD Picture Card,
& Multi Media Card (MMC)
English, Français, Español,
Italiano, Deutsch, Nederlands,
8”
迷你 “B” 插座
標準 “A” 插座
MP3
是
是
Português
繁體中文
39
Page 42

常見問答集
問題 答案
使用遙控器的有效距離有多
遠?
為什麼無法顯示某些相片?
最遠 15 英尺(5 公尺)
本產品不支援某些相片/影像檔案格式。
請參閱規格。
為什麼無法播放某些音樂曲
目?
為什麼無法播放某些視訊短
片?
我可以刪除外接記憶卡或隨身
碟的相片嗎?
我可以刪除內部記憶體中的相
片?
繁體中文
我要如何切換到內部記憶體?
為什麼我不能在 Windows™ 98
或 Windows™ Me 作業系統上
將內容複製到相框?
為什麼我不能在 Apple™ 作業
系統上將內容複製到相框?
本產品不支援某些音樂檔案格式。請參閱
規格。
本產品不支援某些視訊檔案格式。請參閱
規格。
可以,請參閱本使用說明書的「相片/音
樂/視訊內容管理」部分。
可以,請參閱本使用說明書的「相片/音
樂/視訊內容管理」部分。
移除所有外部記憶體來源,或在遙控器
上按兩次 鈕,選擇內部記憶體圖
示。
本產品未隨附適當的 USB 磁碟機,使用的
USB 磁碟機不相容於這些作業系統。
連接相框後只能存取記憶卡插槽 1,不能
存取其他來源。若有需要,Apple™ 作業
系統上的內容可以複製到記憶卡插槽 1。
請按照本使用說明書的「相片/音樂/視
訊內容管理」部分,可將內容複製到相框
的內部記憶體。
我的遙控器和/或電源變壓器
遺失或損壞。我可以訂購更換
零件嗎?
我要如何找到 HP 數位相框的
最新資訊/常見問答集?
註:這是不受支援的步驟。
可以。有關詳細資訊,請瀏覽
www.hp.com/support。
有關詳細資訊和最新資訊,請瀏覽
www.hp.com/support。
40
Page 43

清潔和保養的秘訣
√ 清潔前,請關閉 HP 數位相框的電源。
√ 請勿在螢幕或相框上直接噴灑或潑灑清潔液。
√ 請勿使用氨水、酒精或研磨清潔劑。
清潔螢幕:
1. 使用乾淨的非棉絨軟布擦拭螢幕,清除灰塵和掉落的粒
子。
2. 如果需要進一步清潔,請用乾淨的非棉絨軟布蘸有適當的
清潔劑(經 LCD 顯示幕核准)來擦拭螢幕。
• 註:請勿在螢幕上施加過大的壓力,以免造成損壞。
清潔相框和背部:
1. 使用乾淨的非棉絨軟布清除灰塵和掉落的粒子。
2. 若有需要,請用乾淨的非棉絨軟布蘸有適當的清潔劑來擦
拭適當的表面。
繁體中文
41
Page 44

箱の中に含まれているもの
数量 アイテム 画像
1 デジタル・ピクチャ・フレーム
2 追加フレーム
1 リモート・コントロール
ユニバーサル電源アダプター
1
(9V、1.5A、100/240 スイッチ)
日本語
1 USB 2.0 ケーブル
1 保証書
1 ユーザー・マニュアル
1 リモート・コントロール・ホルダー
42
Page 45

始めに
1. 電源コードをデジタル・ピクチャ・フレームの DC 入力に接続し、コン
セントにアダプターのプラグを差し込みます。
2. 付属スタンドを伸長状態へと広げ、デジタル・ピクチャ・フレー
ム先端の POWER ボタンを押します。
3. 以下の図のように、適切なカードスロットまたは USB ポートに必要な
フォト、音楽および/またはビデオを含む、お持ちのメモリカードまた
は USB 記憶装置(外部記憶装置)を挿入します。 注意: メモリカード
と USB 記憶装置は正しい方向に向けてください。 通常、これらのカー
ドまたは USB 機器上にあるラベルは、以下の図のように外側に向い
ていなければなりません。
日本語
4. 数秒たつと、フォト・スライドショーが自動的に始まります。 音楽トラッ
クが同じ外部記憶装置で利用できる場合、設定を無効にしない限り、
スライドショーはバックグラウンド・ミュージックと共に表示されます。
どうぞ心ゆくまでお楽しみください!
43
Page 46

リモート・コントロール
MENU: メニュー・モードにアクセスします。
ZOOM: ブラウズ・モードの画像を拡大します。
UP: サムネイル・モードまたはオプション設定時に上に移動
します。
PREV または RETURN: ブラウズ、サムネイル・モードまたは
メニュー・モードで左に移動、またはスライドショー・モード
で前のスクリーンに戻ります。
PLAY/PAUSE または MODE: 表示モードを切り替えます(ス
ライドショー、ブラウズまたはサムネイル)。 音楽またはビデ
オ・ファイルを再生または一時停止させます。 メニューあるい
は設定モードで選択を行います。
NEXT: ブラウズ、サムネイルまたはメニュー・モードにおいて
右に移動します。
DOWN: サムネイル・モードまたはオプション設定時に下に
移動します。
日本語
VOL + / - : 再生音量を + ボタンで大きく、 - ボタンで小さ
くします。
COPY/DEL: ブラウズまたはミュージック・モードでコピーま
たは削除を行います。
ROTATE: ブラウズ・モードでピクチャを回転させます。
SLIDESHOW: フォト・スライドショーを開始します。
Timer: 1 回押すとカレンダーを見ることができ、もう 1 回押す
と時計モードを見ることができます。
SETUP: セットアップメニューを開きます。
44
Page 47

ピクチャ・フレーム
上から見た図: 電源と出力
POWER ボタン & LED
PLAY/PAUSE/MODE ボタン
MENU ボタン
UP ボタン
DOWN ボタン
PREV ボタン
NEXT ボタン
左側から見た図: PC 接続用 USB ポートと Mini USB ポート
下側から見た図: 外部メモリスロットと電源
電源入力 CF カードス
ロット
45
日本語
USB スロットMini USB スロット
SD/MMC/xD/MS
カードスロット
Page 48

背面から見た図: リモート・コントロール・ホルダー
リモート・コントロール
・ホルダー
日本語
46
Page 49

キーの各機能
機能
外部記憶装置および内部メモリへのフォトの追加と削除を行います。
音楽つきフォト・スライドショー
· 9 種の多様なフォト・トランジションのオプション
· シャッフル・モードのオプション
音楽なしフォト・スライドショー
· 9 種の多様なフォト・トランジションのオプション
· シャッフル・モードのオプション
フォト/画像
· ブラウズ・モードで個別のフォトを見る(後述のセクションを参照)
· フォト・サムネイルを見る
· フォトのズームと回転
音楽/オーディオファイルの再生
· 音楽トラックは mp3 ファイル形式のみ
ビデオクリップの再生
· ビデオクリップは Motion JPEG ( .avi と .mov )ファイル形式のみ
時計とカレンダー
· 目覚まし時計機能つき
基本の明るさおよびコントラスト調整コントロール
基本色および色調調整コントロール
7 つのオン・スクリーン・ディスプレイ( OSD )言語
· 英語、フランス語、スペイン語、イタリア語、ドイツ語、オランダ語、ポルトガル
語
47
日本語
Page 50

初期設定
PULL
1. リモート・コントロールからタブを取り外して使える状態にします。
2. フォト・フレームの電源を入れ、 SETUP ボタンを押します。
3. ポインタ矢印ボタンを押して “LANGUAGE” をハイライトにします。 注
意: 使用する言語を選択済みの場合はステップ 5 に進んでください。
日本語
4. ボタンを押してポインタ矢印ボタンを使い、使用する OSD 言語
をハイライトにします。 を押して言語を選択します。
5. ポインタ矢印で必要なオプションをハイライトにすることにより、その
他設定を変更します。 を押して希望のオプションを選択します。
48
Page 51

IMAGE SIZE (画像サイズ): フォトを元のサイズのまま表示する場合は
“ORIGINAL” を選択します。 通常のアスペクト比でフルハイトにフォトを
表示します。
最適化されたサイズでフレームにフォトを表示させる場合は “OPTIMAL”
を選択します。 フォトがスクリーンの幅全体に合うように拡大されます。
デフォルトの設定は “OPTIMAL” です。
SLIDE TRANSITION (スライドトランジション): 9 種類のオプションか
らお好みのトランジションを選択します。 デフォルトのオプションは
“RANDOM” に設定されています。
SLIDE SHOW SPEED (スライドショー速度): 希望のフォト表示時間の長
さを選択します。 オプションは 5、10、30、60 秒、 1 時間および 24 時間
です。 デフォルトの設定は “5 秒” です。
SLIDE SHOW SPEED (スライドショー・シャッフル): フォトをランダムな順
序で表示させる場合は “ON” を選択します。 すべてのフォトが表示され
るまで、フォトは繰り返し表示されません。
フォトを順番に表示させる場合は “OFF” を選択します。 デフォルトのオ
プションは “OFF” に設定されています。
RESET SETTINGS (設定リセット): すべてのオプションを工場出荷時の
初期設定に戻します。 設定がリセットされる前に確認メッセージが表示
されます。
LANGUAGE (言語): 希望のスクリーン表示言語を選択します。 デフォル
トの設定は “ENGLISH” です。
日本語
BRIGHTNESS/CONTRAST (明るさ/コントラスト): 画面の明るさとコント
ラストを調整します。
と ボタンを使い、画面のコントラストを調整します。
と ボタンを使い、画面の明るさを調整します。
COLOR/TINT (色/色調): 画面の色と色調を調整します。
と ボタンを使い、画面の色を調整します。 と ボ
タンを使い、画面の色調を調整します。
49
Page 52

BACKGROUND MUSIC (バックグラウンド・ミュージック): スライドショー
の間のバックグラウンド・ミュージックをオンまたはオフにします。 注意:
mp3 形式のみ再生がサポートされています。
TIME OPTION (時計オプション): 標準の AM および PM 時間表示には
“12H” を選択します。 24 時間形式で時間表示させる場合は “24H” を選
択します。
日本語
50
Page 53

フォト/音楽/ビデオコンテンツ管理
HP デジタル・ピクチャ・フレームを使い、内部メモリおよび USB フラッシ
ュドライブやメモリカードなどの一般にデジタルカメラで使用される外
部記憶装置からコンテンツを再生することができます。 1 つ以上の外部
記憶装置を差し込んで使うことができます。ただし、一度に再生できるメ
モリソースは 1 つだけです。 使用するめもリソースの選択は、 ボ
タンを 2 回押し、矢印キーを使って希望のメモリのアイコンをハイライト
表示します。 を押してこのコンテンツソースを選択します。 下図に
例を示します:
または
内部メモリにコンテンツを取り込む方法は 2 つあります。
外部記憶装置から: 使用するコンテンツが保存された外部記憶
装置を適切なコネクタに挿入します。 スライドショーが自動的
に始まります。 スライドショーを停止するには、 ボタンを
押します。 および ボタンを使い、希望のフォトに移動
します。 ボタンを押してコピーを開始します。 下図に示す
ように、スクリーン上の指示に従ってフォトをフレームの内部メ
モリにコピーします。 取り込む各フォト/画像に対してこの動作を
繰り返します。
注意: 外部記憶装置からは一度に 1 つのフォト/ピクチャのみコ
ピー(または削除)が可能です。
51
日本語
Page 54

日本語
オーディオファイルをコピーするには、 ボタンを押しま
す。 矢印ボタンを使って アイコンに移動し、 ボタ
ンを押します。 使用するオーディオファイルを選択し、上述のよ
うにコピー手順を繰り返します。
ご希望に応じて、内部メモリから外部記憶装置にコンテンツを
コピーすることができます。 内部メモリソースを選択し、希望
の外部記憶装置をコピー先に選択してコピー手順を繰り返しま
す。
52
Page 55

パソコン/ノートブックコンピュータから: 始めの接続の際は、外
部メモリソースをすべて取り外すことを推奨します。 HP デジタル
・ピクチャ・フレームの電源を入れ、製品付属の USB ケーブルを
使い、 HP デジタル・ピクチャ・フレームをお使いの Windows™
2000 (service pack 4 以降)、 Windows™ XP (service pack 2 以
降)、または Windows™ Vista パソコン/ノートブックコンピュー
タに接続します(下図を参照):
Windows エクスプローラに 3 つの新しいドライブレターが表示
されます。 これらの新しいドライブレターは、デジタル・ピクチャ
・フレームの内部メモリ、メモリカードスロット 1 、メモリカード
スロット 2 をそれぞれ表します。デジタル・ピクチャ・フレームは
以下の画面を表示します:
3 つの新しいドライブレターのうち 1 つは HP デジタル・ピクチ
ャ・フレームの内部メモリで、 HP df800 と表示されます。 ドライ
ブレターの割当ては、コンピュータによって異なります。 標準の
Windows™ のコピー&ペースト手順を使い、フレームの内部メ
モリにコンテンツをコピーします。 ピクチャ・フレームの利用可
能なメモリを確認するには、内部メモリを示すドライブレター上
で右クリックし、プロパティを選択します。 利用可能な(空き)領
域を(メガバイト [MB] で)表示したプロパティメニューが開きま
す。
必要なコンテンツのコピーが完了したらパソコン/ノートブック
コンピュータとの接続を解除します。
53
日本語
Page 56

コンテンツのメモリからの削除: コンテンツは内部および外部メ
モリから上述の追加と同じ方法で削除することができます。 削
除したいフォト/音楽ファイルを選択し、 ボタンを押しま
す。 矢印ボタンを使って DELETE ボタンのアイコンをハイライト
表示し、下図に示すように、 を押してこの動作を確定しま
す。
日本語
オンスクリーン・メニューに従ってこのタスクを完了します。 削除
する各ファイルに対してこの手順を繰り返します。
54
Page 57

フォト/ピクチャ・スライドショー
スライドショー・モード
スライドショー・モードはフレームの電源が入った数秒後、または外部メ
モリカード/ USB フラッシュドライブが挿入されると、自動的に始まりま
す。 スライドショー・モードには、バックグラウンド・ミュージック有りと無
しの 2 つのモードがあります。 設定の変更について詳しくは本マニュア
ルの「初期設定」セクションを参照してください。
ブラウズ・モード
スライドショー・モードを終了するには、 を一度押します。 すると、
スクリーン右下に数秒間 “Browse mode”(ブラウズ・モード)と表示され
ます。 このモードでは、先や前のフォトの閲覧や、コピー/削除、回転、ズ
ームのオプションを利用することができます。
サムネイル・モード
フォト/ピクチャをサムネイル・モードで見るためには、 ボタンをス
ライドショー・モードでは 2 度、ブラウズ・モードでは 1 度押します。
55
日本語
Page 58

音楽再生
を押してメニュー画面にアクセスします。
ポインタ矢印を使って アイコンを選び、 を押します。
フレームは以下の図のように、選択されたメモリソースにある音楽/オー
ディオファイルのリストを表示します。
日本語
リストの一番上にある最初の曲の再生が始まります。
• デフォルトの再生モードは、最初の曲から最後の曲まで再生した
後、最初の曲からまた繰り返します。
対応するオーディオ形式: MP3
56
Page 59

ビデオ再生
を押してメニュー画面にアクセスします。
ポインタ矢印を使って アイコンを選び、 を押します。
フレームは以下の図のように、選択されたメモリソースにある適応する
ビデオクリップ/ファイルのリストを表示します。
と ボタンを押して、見たいビデオクリップを選択します。
を押すと再生が始まります。
• デフォルトの再生モードは、自動的に次のビデオクリップを再生
し、リストの最後まで再生が終わると、また最初から再生を始め
ます。
対応するビデオ形式: Motion JPEG (.avi と .mov)
57
日本語
Page 60

カレンダー
を押してメニュー画面にアクセスします。
ポインタ矢印を使って アイコンを選び、 を押します。
フレームに下図のようなカレンダー画面が表示されます。
日本語
カレンダーには現在の日付が表示されます。 日付の調整を行なうには、
次の「時計のセットアップおよび表示」というセクションを参照してくださ
い。
と ボタンを使って、前月または翌月を見ることができます。
と ボタンを使ってその月の異なる日付をハイライト表示しま
す。
58
Page 61

時計のセットアップと表示
を押してメニュー画面にアクセスします。
ポインタ矢印を使って アイコンを選び、 を押します。
フレームに下図のような時計画面が表示されます。
時計の時間とアラーム設定を変更するには ボタンを押すと時間
の数字が点滅を開始します。
と ボタンを使い、時計のオプション設定を変更します。
と ボタンを使い、時計のオプション設定間で移動します。
入力したい日付、時間、アラーム設定を選択した後、 を押します。
注意: HP df800 デジタル・ピクチャ・フレームはリアルタイムクロック(
RTC )バッテリーバックアップを装備しており、電源が入っていないときも
正確な日付と時間を保つことができます。 df800 を最低 6 時間電源を入
れた状態にして完全に充電することが重要です。 充電完了後、バッテリー
バックアップで 36 時間まで df800 は電源を切った状態にしておくことが
できます。 このバッテリー制限時間を超えて df800 の電源が投入されな
い場合、日付と時間を再設定する必要があります。
59
日本語
Page 62

日本語
仕様
パネルの仕様
寸法
アスペクト比 4:3
解像度 800x600 ピクセル
コントラスト比 400:1
明るさ 200 cd/m2
視野角-水平 65/65
視野角-垂直 60/40
電力
外部 AC 電源アダプター +9V, 1.5A
オーディオ
内蔵スピーカー ステレオ
接続方法
USB ポート 1 (STD 1.1 Host)
ストレージ/メディア
内部メモリ 128MB
対応するメモリカード:
Memory Stick Pro (MS Pro), セキュア・
メモリカードスロット 1
メモリカードスロット 2 Compact Flash (CF)
接続方法
パソコンへの接続用 USB
USB メモリ用 USB
対応するメディアファイル:
ビデオ・ファイル形式 Motion JPEG (.avi と .mov)
フォトファイル形式 JPEG - (ベースラインのみ)
オーディオファイル形式
ユーザーインターフェース/コントロ
ール
デジタル・ピクチャ・フレーム上のボ
タン
リモート・コントロール
対応する言語:
オン・スクリーン・ディスプレイ
デジタル (SD 2.0), XD Picture Card, マ
ルチメディア・カード (MMC)
Mini “B” レセプタクル
標準 “A” レセプタクル
英語、フランス語、スペイン語、イタリア
語、ドイツ語、オランダ語、ポルトガル語
60
8”
MP3
可
可
Page 63

FAQ
質問 回答
リモート・コントロールはどのく
らい離れたところから使用でき
ますか?
いくつかのフォトが表示できな
いのはなぜですか?
いくつかの音楽トラックが再生
できないのはなぜですか?
いくつかのビデオクリップが再
生できないのはなぜですか?
外部メモリカードまたはフラッ
シュドライブからフォトを削除で
きますか?
内部メモリからフォトを削除で
きますか?
5m 離れたところから可能です。
対応していないフォト/イメージファイル形
式があります。 「仕様」を参照してください。
対応していない音楽ファイル形式がありま
す。 「仕様」を参照してください。
対応していないビデオ・ファイル形式があり
ます。 「仕様」を参照してください。
はい、本マニュアルの「フォト/音楽/ビデオ
コンテンツ管理」セクションを参照してくだ
さい。
はい、本マニュアルの「フォト/音楽/ビデオ
コンテンツ管理」セクションを参照してくだ
さい。
すべての外部メモリソースを取り外すか、
どうしたら内部メモリに切り替え
ることができますか?
なぜ Windows™ 98 または Me
システムを使ってフレームにコ
ンテンツをコピーできないので
すか?
なぜ Apple™ システムを使って
フレームにコンテンツをコピー
できないのですか?
リモートおよび/または、電源ア
ダプターを失くし、または破損
しました。 交換品は注文できま
すか?
どうしたら HP デジタル・ピクチ
ャ・フレームに関する最新の情
報/ FAQ を見つけることができ
ますか?
リモート・コントロールの ボタンを
2 回押して内部メモリアイコンを選択してく
ださい。
本製品には対応する USB ドライバが付属し
ていません。これらのオペレーティングシス
テムには対応していません。
フレームの接続時はメモリカードスロット 1
のみアクセス可能で、他のソースにはアクセ
スできません。 必要に応じて Apple™ から
のコンテンツをスロット 1 のメモリカードに
コピーすることができます。 本マニュアルの
「フォト/音楽/ビデオコンテンツ管理」セクシ
ョンの手順に従い、フレームの内部メモリ
にコンテンツをコピーすることができます。
注意: これはサポートしていない手順です。
できます。 www.hp.com/support で詳細
をご覧ください。
www.hp.com/support で詳細および最新
情報をご覧ください。
日本語
61
Page 64

クリーニングおよび手入れの仕方
√ クリーニングの前に、HP デジタル・ピクチャ・フレームの電源を切
ってください。
√ スクリーンまたはフレームに直接液体の洗剤を吹きかけたり、ある
いはかけたりしないでください。
√ アンモニア、アルコール、または研磨剤の入った洗剤を使用しない
でください。
スクリーンの掃除:
1. ほこりや微粒のゴミを取り除くには、清潔で、柔らかく、糸くず
のついていない布でスクリーンを拭きます。
2. さらなる掃除が必要な場合、清潔で、柔らかく、糸くずのつい
ていない布で適当な洗剤(LCD ディスプレイに認められたも
の)を使用してスクリーンを拭きます。
• 注意: ダメージを避けるため、スクリーンにあまり圧力をかけ
てはいけません。
フレームおよび裏側の掃除:
日本語
1. ほこりや微粒のゴミを取り除くには、清潔で、柔らかく、糸くず
のついていない布でスクリーンを拭きます。
2. さらなる掃除が必要な場合、清潔で、柔らかく、糸くずのつい
ていない布で適当な洗剤を使用して適当な箇所を拭きます。
62
Page 65

패키지 내용물
수량 내용물 이미지
1 디지털 액자
2 액자 틀
1 리모콘
범용 전원 어댑터
1
(9V, 1.5A, 100/240 겸용)
1 USB 2.0 케이블
1 보증서
1 사용 설명서
1 리모콘 홀더
한국어
63
Page 66

시작하기
1. 전원 코드를 디지털 액자의 DC 입력 단자에 연결하고 어댑터를 전
원 콘센트에 연결하십시오.
2. 뒷면에 부착된 스탠드를 펴고 디지털 액자의 윗면에 있는 POWER
버튼을 누르십시오.
3. 원하는 사진, 음악 및/또는 동영상이 저장되어 있는 메모리 카드
또는 USB 저장 장치 (외장 메모리) 를 아래 그림과 같이 적합한
카드 슬롯 또는 USB 포트에 삽입하십시오. 참고: 메모리 카드 및
USB 저장 장치는 올바른 방향으로 삽입해야 합니다. 일반적으로
메모리 카드 또는 USB 장치의 라벨이 아래 그림과 같이 바깥쪽을
향하도록 삽입합니다.
4. 사진의 슬라이드쇼가 수 초 후에 자동으로 시작됩니다. 삽입한 외
한국어
장 메모리 카드에 음악 트랙이 포함되어 있는 경우에는 설정을 비
활성화하지 않는 한 배경 음악과 함께 슬라이드쇼가 디스플레이됩
니다. 음악을 들으며 사진을 감상하십시오!
64
Page 67

리모콘
MENU: 메뉴 모드에 액세스합니다.
ZOOM: 검색 모드에서 사진을 확대합니다.
UP: 미리보기 모드 또는 설정 옵션에서 위로 이동합니다.
PREV 또는 RETURN: 검색, 미리보기, 메뉴 모드에서 왼쪽
으로 이동하고, 슬라이드쇼 모드에서 이전 화면으로 되돌아
갑니다.
PLAY/PAUSE 또는 MODE: 디스플레이 모드 (슬라이드쇼,
검색, 미리보기) 를 변경합니다. 음악 또는 동영상 파일을 재
생 또는 일시 정지합니다. 메뉴 또는 설정 모드에서 설정을
선택합니다.
NEXT: 검색, 미리보기, 메뉴 모드에서 오른쪽으로 이동합
니다.
DOWN: 미리보기 모드 또는 설정 옵션에서 아래쪽으로 이
동합니다.
VOL + / - : + 버튼을 누르면 볼륨이 커지고 – 버튼을
누르면 볼륨이 작아집니다.
COPY/DEL: 검색 모드 또는 음악 모드에서 복사/삭제합
니다.
ROTATE: 검색 모드에서 사진을 회전합니다.
SLIDESHOW: 사진의 슬라이드쇼를 시작합니다.
Timer: 한 번 누르면 달력이 디스플레이되고 한 번 더 누
르면 시계 모드가 디스플레이됩니다.
SETUP: 설정 메뉴를 엽니다.
65
한국어
Page 68

액자
윗면: 전원 및 실행
Power 버튼 및 LED
PLAY/PAUSE/MODE 버튼
MENU 버튼
UP 버튼
DOWN 버튼
PREV 버튼
NEXT 버튼
좌측면: PC 연결용 USB 포트 및 미니 USB 포트
밑면: 외장 메모리 슬롯 및 전원
전원 입력 CF 카드 슬
한국어
롯
USB 슬롯미니 USB 슬롯
SD/MMC/xD/MS
카드 슬롯
66
Page 69

뒷면: 리모콘 홀더
리모콘 홀더
67
한국어
Page 70

주요 기능
기능
외장 메모리 장치 및 내장 메모리에 사진 추가 또는 삭제
음악과 함께 사진 슬라이드쇼
· 9 가지 사진 슬라이드 옵션
· 랜덤 모드 옵션
음악 없이 사진 슬라이드쇼
· 9 가지 사진 슬라이드 옵션
· 랜덤 모드 옵션
사진/이미지
· 검색 모드에서 개별 사진 보기 (다음 부분 참조)
· 사진 미리보기
· 사진 확대 및 회전
음악/오디오 트랙 재생
· mp3 파일 형식의 음악 재생 가능
한국어
동영상 클립 재생
· 모션 JPEG (.avi 및 .mov) 파일 형식의 동영상 클립 재생 가능
시계 및 달력
· 알람 시계 기능 포함.
기본적인 밝기 및 명암 조절
기본적인 색상 및 색조 조절
7개국어의 온스크린 디스플레이 언어
· 영어, 프랑스어, 스페인어, 이탈리아어, 독일어, 네덜란드어, 포르투갈
어
68
Page 71

초기 설정
PULL
1. 리모콘에서 탭을 제거하십시오.
2. 액자의 전원을 켜고 SETUP 버튼을 누르십시오.
3. 화살표 키를 눌러 “LANGUAGE (언어)” 로 이동하십시오. 참
고: 원하는 언어가 이미 선택된 경우에는 5 단계로 건너뛰십시오.
4. 버튼을 누르고 화살표 키를 사용하여 원하는 온스크린 디스
플레이 언어를 선택하십시오. 를 눌러 선택을 확인하십시오.
5. 다른 설정을 변경하려면 화살표 키를 사용하여 변경하려는 옵션으
로 이동한 후, 를 눌러 선택하십시오.
69
한국어
Page 72

IMAGE SIZE (이미지 크기): “ORIGINAL (원본)”을 선택하면 사
진이 원본 속성으로 디스플레이 됩니다. 사진이 표준 화면비의 전체
높이로 디스플레이됩니다.
“OPTIMAL (최적)”을 선택하면 사진이 최적 속성으로 디스플레이
됩니다. 사진이 스크린의 전체 너비에 맞게 확대됩니다.
기본 옵션은 “OPTIMAL (최적)”입니다.
SLIDE TRANSITION (슬라이드 모드): 9 가지 옵션에서 원하는 슬
라이드 옵션을 선택합니다. 기본 옵션은 “RANDOM (랜덤)”입니
다.
SLIDE SHOW SPEED (슬라이드쇼 속도): 원하는 사진 디스플레이
시간을 5, 10, 30, 60 초, I 시간, 24 시간 중에서 선택합니다. 기본
옵션은 “5 SECONDS (5 초)”입니다.
SLIDE SHOW SHUFFLE (슬라이드쇼 랜덤): “ON (켜기)” 을 선택
하면 사진이 랜덤으로 디스플레이됩니다. 모든 사진이 디스플레이되
기 전까지는 사진이 반복 디스플레이되지 않습니다.
“OFF (끄기)”를 선택하면 사진이 순서대로 디스플레이됩니다. 기
본 옵션은 “OFF (끄기)”입니다.
RESET SETTINGS (설정 초기화): 이 옵션을 선택하면 모든 설정 옵
션이 기본 설정으로 초기화됩니다. 설정이 초기화되기 전에 확인 창
이 표시됩니다.
LANGUAGE (언어): 원하는 스크린 언어 옵션을 선택합니다. 기본 옵
션은 “ENGLISH (영어)”입니다.
BRIGHTNESS/CONTRAST (밝기/명암): 디스플레이의 밝기 및 명암
을 변경합니다.
및 버튼을 사용하여 디스플레이의 명암을 변경합니다.
및 버튼을 사용하여 디스플레이의 밝기를 변경합니다.
COLOR/TINT (색상/색조): 디스플레이의 색상 및 색조를 변경합니
다.
한국어
및 버튼을 사용하여 디스플레이의 색상을 변경합니다.
및 버튼을 사용하여 디스플레이의 색조를 변경합니다.
70
Page 73

BACKGROUND MUSIC (배경 음악): 슬라이드쇼의 배경 음악을 켜거
나 끕니다. 참고: mp3 파일 형식만 지원됩니다.
TIME OPTION (시간 옵션): “12H” 를 선택하면 시간이 표준 AM
및 PM 형식으로 표시되고, “24H” 를 선택하면 24 시간 형식으로
시간이 표시됩니다.
71
한국어
Page 74

사진/음악/동영상 컨텐츠 관리
HP 디지털 액자는 내장 메모리는 물론, 디지털 카메라에 일반적으
로 사용되는 USB 플래시 드라이브 및 메모리 카드와 같은 외장 메모
리 장치에 저장된 컨텐츠를 재생할 수 있습니다. 액자에 하나 이상
의 외장 메모리 장치를 삽입할 수 있지만 하나의 메모리 소스로부터
컨텐츠를 선택하여 재생할 수 있습니다. 메모리 소스를 선택하려면
버튼을 두 번 누르고 다음 그림과 같이 화살표 키를 사용하여
원하는 메모리 아이콘으로 이동한 후 를 눌러 이 컨텐츠 소스를
선택하십시오.
또는
다음 방법을 통해 내장 메모리에 컨텐츠를 복사하거나 삭제할 수 있
습니다.
한국어
외장 메모리 장치에서: 원하는 컨텐츠가 저장되어 있는 외장
메모리 장치를 적합한 커넥터에 삽입합니다. 슬라이드쇼가
자동으로 시작됩니다. 버튼을 눌러 슬라이드쇼를 중지
합니다. 및 버튼을 눌러 원하는 사진으로 이동합
니다. 버튼을 눌러 복사 절차를 시작합니다. 아래 그림
과 같은 화면 지시에 따라 사진을 액자의 내장 메모리에 복사
합니다. 복사하려는 각 사진/이미지를 같은 방법으로 복사합
니다.
참고: 한 번에 한 장의 사진/이미지를 외장 메모리 장치에
서/로 복사 (또는 삭제) 할 수 있습니다.
72
Page 75

오디오 파일을 복사하려면 버튼을 누르고, 화살표 키
를 사용하여 아이콘을 선택하고 버튼을 누릅니
다. 원하는 오디오 파일을 선택하고 위에서 설명한 복사 절차
를 진행합니다.
필요할 경우 내장 메모리의 컨텐츠를 외장 메모리 장치로 복
사할 수 있습니다. 내장 메모리 소스를 선택하고 외장 메모
리 장치를 메모리 대상 위치로 선택하여 복사 절차를 진행합
니다.
73
한국어
Page 76

PC/노트북에서: 처음 연결할 경우, 모든 외장 메모리 소스를
분리하십시오. HP 디지털 액자의 전원을 켜고 본 제품에 제
공된 USB 케이블을 사용하여 HP 디지털 액자를 Windows™
2000 (서비스 팩 4 이상), Windows™ XP (서비스 팩 2 이
상), 또는 Windows™ Vista PC/노트북에 연결합니다 (아래
그림 참조).
Windows Explorer에 3 개의 새로운 드라이브 문자가 나타
납니다. 이 새로운 드라이브 문자는 디지털 액자의 내장 메모
리, 메모리 카드 슬롯 1, 메모리 카드 슬롯 2를 나타냅니다.
디지털 액자에 아래와 같은 그래픽이 디스플레이됩니다.
한국어
3 개의 새로운 드라이브 문자 중 하나는 HP 디지털 액자의
내장 메모리이며 HP df800로 표시됩니다. 드라이브 문자는
PC에 따라 다를 수 있습니다. 표준 Windows™ 복사 및 붙여
넣기 절차를 사용하여 컨텐츠를 액자의 내장 메모리로 이동
하십시오. 액자의 사용 가능한 메모리 용량을 확인하려면 내
장 메모리 드라이브 문자를 오른쪽 클릭하여 속성을 선택합니
다. 사용 가능한 공간(메가바이트[MB])이 표시된 속성 메뉴
가 나타납니다.
원하는 컨텐츠의 복사 절차가 완료되면 PC/노트북을 분리합
니다.
74
Page 77

메모리에서 컨텐츠 삭제: 내장 메모리 및 외장 메모리에서 컨
텐츠를 복사하는 것과 같은 방법으로 제거/삭제할 수 있습니
다. 삭제하려는 사진/음악 파일을 선택하고 버튼을 누
릅니다. 아래 그림과 같이 화살표 키를 사용하여 DELETE
(삭제) 버튼을 선택한 후 을 눌러 이 선택을 확인합니
다.
화면 메뉴에 따라 작업을 완료합니다. 삭제하려는 각 파일을
같은 방법으로 삭제합니다.
75
한국어
Page 78

사진/이미지 슬라이드쇼
슬라이드쇼 모드
슬라이드쇼 모드는 액자의 전원을 켜거나 외장 메모리 카드/USB 플
래시 드라이브가 삽입된 후 수 초 후에 자동으로 시작됩니다. 슬라이
드쇼에는 배경 음악 활성화 모드와 배경 음악 비활성화 모드가 있습
니다. 설정을 변경하는 방법은 본 설명서의 초기 설정 부분을 참조하
십시오.
검색 모드
슬라이드쇼 모드를 나가려면 를 한 번 누르십시오. “Browse
mode (검색 모드)”가 화면의 우측 하단에 수 초간 표시됩니다. 검
색 모드에서는 이전 및 다음 사진을 볼 수 있으며, 사진을 복사/삭제,
회전 및 확대할 수 있습니다.
미리보기 모드
미리보기 모드에서 사진/이미지를 보려면 슬라이드쇼 모드에서
를 두 번 (검색 모드에서 한 번) 누르십시오.
한국어
76
Page 79

음악 재생
를 눌러 메뉴 화면을 표시하십시오.
화살표 키를 사용하여 아이콘을 선택하고 를 누르십시
오.
화면에 아래 그림과 같이 선택한 메모리 소스에 저장된 음악/오디오
파일 목록이 나타날 것입니다.
음악 트랙 목록에 있는 첫 번째 곡이 재생됩니다.
• 기본 재생 모드는 첫 번째 트랙에서 마지막 트랙까지 재생
한 후 첫 번째 트랙부터 다시 반복 재생하도록 설정되어 있
습니다.
지원 오디오 형식: MP3
77
한국어
Page 80

동영상 재생
버튼을 눌러 메뉴 화면을 표시하십시오.
화살표 키를 사용하여 아이콘을 선택하고 을 누르십시
오.
화면에 아래 그림과 같이 선택한 메모리 소스에 저장된 지원되는 동
영상 클립/파일 목록이 나타날 것입니다.
및 버튼을 눌러 원하는 동영상 클립을 선택하고
을 누르면 재생이 시작됩니다.
• 기본 재생 모드는 다음 동영상 클립에서 마지막 클립까지 자
동으로 재생한 후 첫 번째 클립부터 다시 반복 재생하도록 설
정되어 있습니다.
지원 동영상 형식: 모션 JPEG (.avi 및 .mov)
한국어
78
Page 81

달력
를 눌러 메뉴 화면을 표시하십시오.
화살표 키를 사용하여 아이콘을 선택하고 을 누르십시
오.
화면에 아래 그림과 유사한 달력 화면이 나타날 것입니다.
달력에 현재 날짜가 표시됩니다. 날짜 변경에 대한 내용은 다음 부분
의 시계 설정 및 보기를 참조하십시오.
및 버튼을 사용하여 이전 또는 다음 달을 볼 수 있습니
다.
및 버튼을 사용하여 다른 날짜를 하이라이트할 수 있습니
다.
79
한국어
Page 82

시계 설정 및 보기
버튼을 눌러 메뉴 화면을 표시하십시오.
화살표 키를 사용하여 아이콘을 선택하고 을 누르십시
오.
화면에 아래 그림과 같이 시계 화면이 나타날 것입니다.
시계의 시간 및 알람 설정을 변경하려면 버튼을 누르십시오. 시
간 숫자가 점멸할 것입니다.
및 버튼을 사용하여 시계 옵션 설정을 변경합니다.
및 버튼을 사용하여 시계 옵션을 이동합니다.
원하는 날짜, 시간, 알람 설정을 선택한 후 을 누르십시오.
참고: HP df800 디지털 액자에는 전원이 꺼졌을 때 시계가 올바른 날
한국어
짜와 시간을 유지할 수 있도록 실시간 클록 (RTC) 배터리 백업이 내
장되어 있어 있습니다. df800을 완전하게 충전하려면 최소 6 시간 전
원이 켜져 있어야 하며, 완전하게 충전된 배터리 백업은 df800의 전
원이 꺼진 상태에서 최대 36 시간 동안 유지됩니다. 이 배터리 한계를
초과하면 df800의 날짜와 시간을 다시 설정해야 합니다.
80
Page 83

사양
패널 사양
크기
화면비 4:3
해상도 800x600 픽셀
명암비 400:1
밝기 200 cd/m2
시야각 – 수평 65/65
시야각 – 수직 60/40
전원
외장 AC 전원 어댑터 +9V, 1.5A
오디오
내장 스피커 스테레오
연결
USB 포트 1 (STD 1.1 호스트)
저장/미디어
내장 메모리 128MB
메모리 카드 지원
메모리 스틱 프로 (MS Pro), 시큐어
메모리 카드 슬롯 1
메모리 카드 슬롯 2 콤팩트 플래시 (CF)
연결
PC 연결 용 USB
USB 드라이브 용 USB
미디어 파일 지원:
동영상 파일 형식 모션 JPEG (.avi 및 .mov)
사진 파일 형식 JPEG - (베이스라인 만)
오디오 파일 형식
사용자 인터페이스/제어 버튼
디지털 (SD 2.0), XD 픽처 카드, 멀티
미디어 카드 (MMC)
8”
미니 “B” 커넥터
표준 “A” 커넥터
MP3
디지털 액자 윗면의 제어 버튼
리모콘
언어 지원
온스크린 디스플레이(OSD)
Yes
한국어
Yes
영어, 프랑스어, 스페인어, 이탈리아어,
네덜란드어, 포르투갈어
81
Page 84

자주 묻는 질문
질문 대답
리모콘 사용 거리는 얼마나 됩
니까?
최대 15ft (5m) 입니다.
왜 일부 사진을 디스플레이할
수 없습니까?
왜 일부 음악 트랙을 재생할 수
없습니까?
왜 일부 동영상 클립을 재생할
수 없습니까?
외장 메모리 카드 또는 플래시
드라이브에서 사진을 삭제할
수 있습니까?
내장 메모리에서 사진을 삭제
할 수 있습니까?
내장 메모리로 전환하려면 어
떻게 해야 합니까?
왜 Windows™ 98 또는 Me 시
스템을 사용하여 컨텐츠를 액
자에 복사할 수 없습니까?
왜 Apple™ 시스템을 사용하
여 컨텐츠를 액자에 복사할 수
없습니까?
일부 사진/이미지 파일 형식은 지원되지
않습니다. 사양을 참조하십시오.
일부 음악 파일 형식은 지원되지 않습니
다. 사양을 참조하십시오.
일부 동영상 파일 형식은 지원되지 않습니
다. 사양을 참조하십시오.
예. 본 설명서의 “사진/음악/동영상 컨텐
츠 관리” 부분을 참조하십시오.
예. 본 설명서의 “사진/음악/동영상 컨텐
츠 관리” 부분을 참조하십시오.
모든 외장 메모리 소스를 분리하거나 리모
콘의 버튼을 두 번 누르고 내장 메
모리 아이콘을 선택하십시오.
이 운영 체제에 적합한 네이티브 USB 드
라이버가 본 제품에 제공되어 있지 않습
니다.
액자에 연결하면 메모리 카드 슬롯 1에
만 액세스할 수 있습니다. 필요할 경우
Apple™ 의 컨텐츠를 슬롯 1 메모리 카드
에 복사할 수 있습니다. 본 설명서의 “사
진/음악/동영상 컨텐츠 관리” 부분의 설
명에 따라 컨텐츠를 액자의 내장 메모리에
복사할 수 있습니다.
한국어
리모콘 및/또는 전원 어댑터를
분실했거나 파손된 경우, 새 것
으로 주문할 수 있습니까?
HP 디지털 액자에 대한 최신
정보/FAQ 를 어디서 찾아볼
수 있습니까?
참고: 이것은 지원되는 절차는 아닙니다.
예. 자세한 내용은 www.hp.com/
support 를 참조하십시오.
자세한 정보 및 최신 정보는 www.
hp.com/support 를 참조하십시오.
82
Page 85

유지 및 관리 팁
√ HP 디지털 액자를 닦기 전에 전원을 끄십시오.
√ 액상 세제를 스크린 또는 액자 틀에 직접 뿌리거나 붓지 마십시
오.
√ 암모니아, 알코올, 연마제가 포함된 세제를 사용하지 마십시오.
스크린 닦기:
1. 보풀이 일지 않는 깨끗하고 부드러운 천으로 스크린의 먼
지 및 이물질을 닦아주십시오.
2. 마른 천으로 닦이지 않는 이물질은 적합한 세제 (LCD 디
스플레이용) 를 보풀이 일지 않는 깨끗하고 부드러운 천에
묻혀 스크린을 닦아주십시오.
• 참고: 스크린을 과도하게 누르면 손상될 수 있으므로 주의
하십시오.
C액자 틀 및 뒷면 닦기:
1. 보풀이 일지 않는 깨끗하고 부드러운 천으로 먼지 및 이물
질을 닦아주십시오.
2. 마른 천으로 닦이지 않는 이 물질은 적합한 세제를 보풀이
일지 않는 깨끗하고 부드러운 천에 묻혀 닦아주십시오.
83
한국어
Page 86

 Loading...