

Page 1

Digital Photo Frame
User Guide
7” df730v1
8” df840v1
10.1” df1010v1
Page 2

Note: Your frame style and features may differ from those documented in this User Guide.
UG E_df 730v1 df840v1 df1010v1_v1.0_2012.06.28
2
Page 3

Table of Contents
Introduction ............................................................................................................................................. 5
DPF Key Features ................................................................................................................................................. 5
What’s in the Box ................................................................................................................................................... 5
Compatible Memory Cards ......................................................................................................................... ........... 5
Overview of the DPF ............................................................................................................................... 5
Remote Control ....................................................................................................................................... 6
Control Buttons on DPF ......................................................................................................................... 6
Getting Started ........................................................................................................................................ 7
The HOME Screen .................................................................................................................................. 7
SETUP Menu Overview .......................................................................................................................... 7
About Selecting Options ........................................................................................................................ 8
Select Media Source ............................................................................................................................... 8
Personalized Digital Greeting Card ....................................................................................................... 8
The Virtual Keyboard ............................................................................................................................................. 8
Enter Greeting............................................................................................................................................. ........... 9
Assign Personal Background Image ...................................................................................................................... 9
PHOTOS ................................................................................................................................................ 10
Photo Thumbnails ................................................................................................................................................ 10
View Individual Photo during a Slideshow ........................................................................................................... 10
Zoom or Rotate Photos ........................................................................................................................................ 10
Adjust Screen Colors ........................................................................................................................................... 10
Optimal Image Display ......................................................................................................................................... 11
Photo Import Method ........................................................................................................................................... 11
Display Current Time with Photos ....................................................................................................................... 11
Display Photo File Date/Time Stamp with Photos ............................................................................................... 11
Import Photos into Internal Memory ..................................................................................................................... 11
Delete Photos from Internal Memory ................................................................................................................... 12
PHOTO SLIDESHOWS .......................................................................................................................... 12
Slideshow of Photos in Internal Memory ............................................................................................................. 12
Slideshow of Photos on your Media Source ........................................................................................................ 12
Slideshow Folders ............................................................................................................................................... 12
Set Slideshow Interval ......................................................................................................................................... 13
Set Slideshow Transition ..................................................................................................................................... 13
Set Slideshow Shuffle ................................................................................................................................. ......... 14
CALENDAR/CLOCK .............................................................................................................................. 14
Select Media Source for Calendar Slideshow ..................................................................................................... 14
Set Schedule..................................................................................................................... ................................... 14
Disable Schedule ................................................................................................................................................. 14
Run the Schedule ................................................................................................................................................ 15
Run Schedule from Slideshow ............................................................................................................................................... 15
Run Schedule from CALENDAR/CLOCK Screen ............................................................. ..................................................... 15
Set the Date and Time ......................................................................................................................................... 15
DPF to PC – USB Connection .............................................................................................................. 15
Set Sleep Mode ..................................................................................................................................... 16
Set Language ........................................................................................................................................ 17
Reset to Factory Defaults .................................................................................................................... 17
3
Page 4

Frequently Asked Questions ............................................................................................................... 17
Important Safety Precautions .............................................................................................................. 18
Cleaning the DPF................................................................................................................................................. 18
Product Specifications ......................................................................................................................... 18
Limited Warranty .................................................................................................................................. 19
FCC Statement .................................................................................................................................................... 20
Declaration of Conformity.................................................................................................................... 20
4
Page 5
Introduction
Welcome to the Hewlett Packard (HP) Multimedia Digital Photo Frame (DPF). Now you can display your digital photos
directly from your memory card, no computer is necessary.
DPF Key Features
Simple Plug & Play
Displays digital photo files (JPEG up to 16 mega
pixels)
Displays Calendar/Clock with photo slideshow
Does not require a computer
Infrared Remote Control and control buttons on
the frame
128MB or 256MB Internal Memory (varies by model)
16:9 Aspect Ratio
Mini USB 2.0 Device Port
5 in 1 Memory Cards Slot
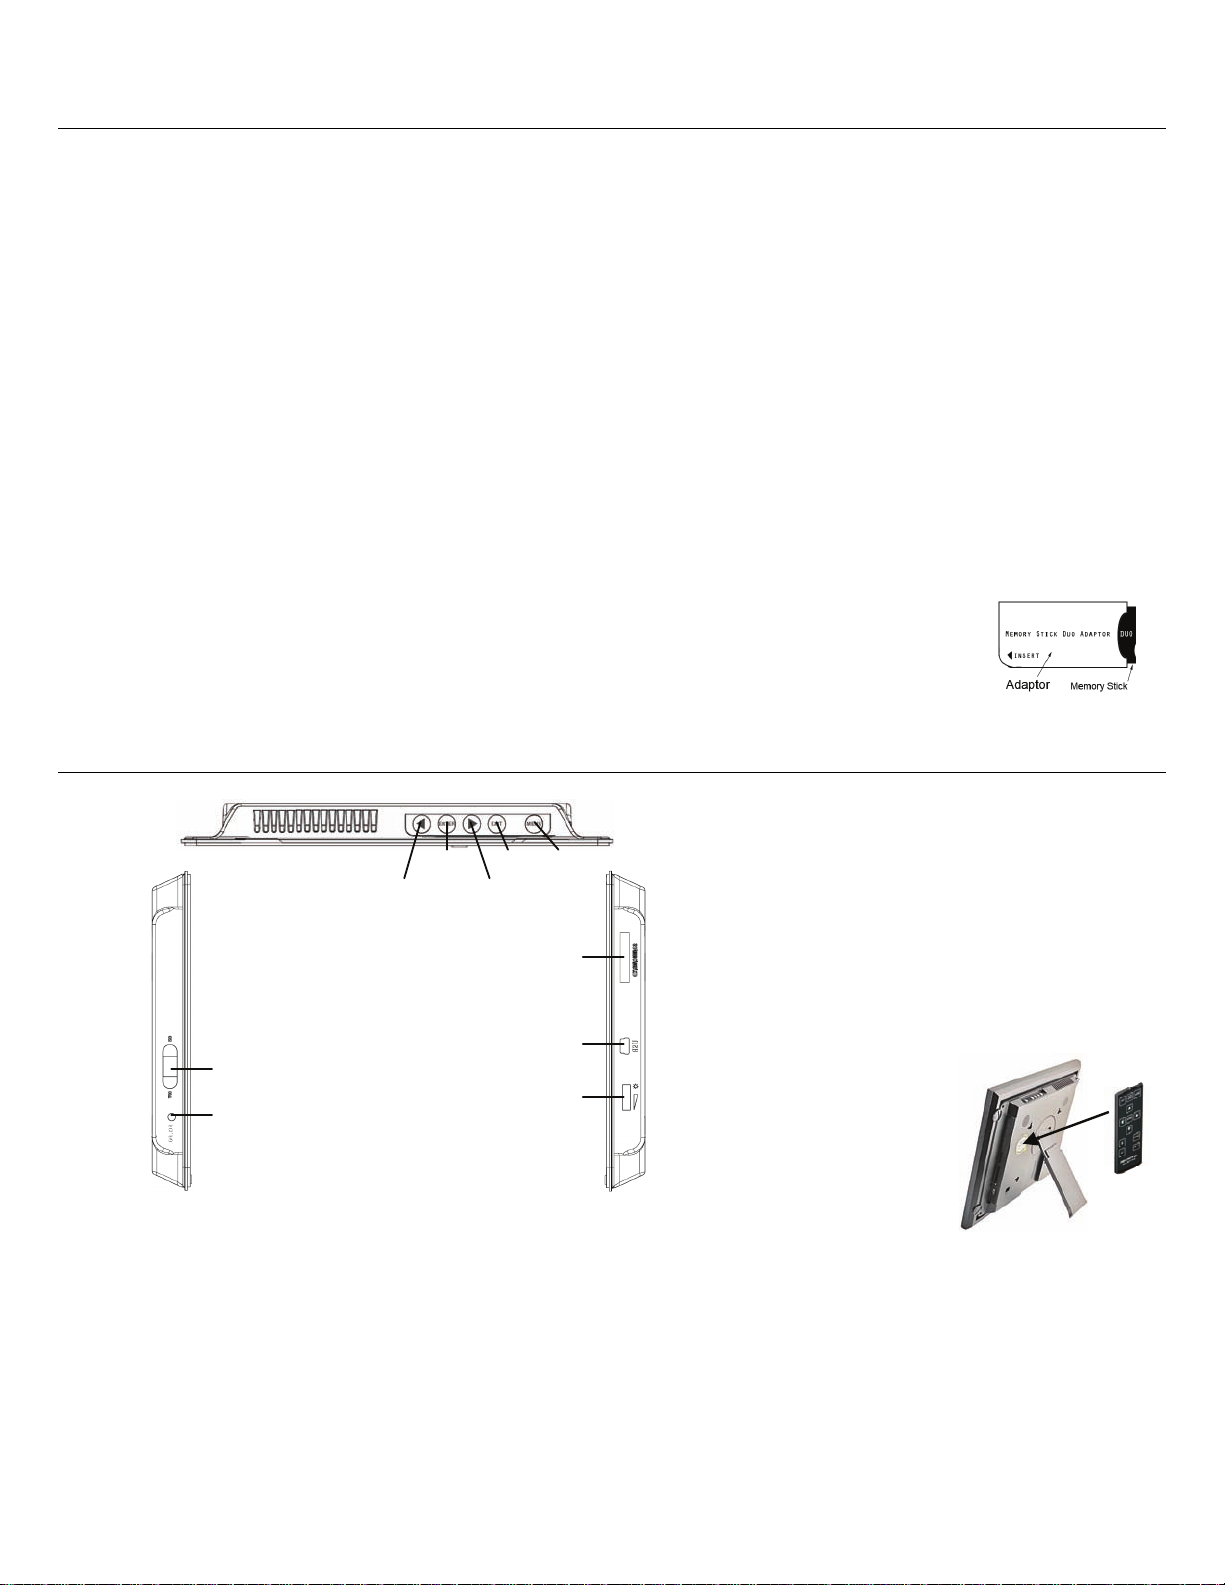
Compatible Memory Cards
Compatible memory cards include: Secure Digital™ (SD), MultiMedia Card™(MMC), xD Card,
Memory Stick™(MS), MemoryStick Pro™, and Memory Stick Pro Duo™* (The Memory Stick
Pro Duo™ requires an additional adaptor to fit properly into the DPF. You can purchase the
adaptor at retail outlet stores that sell memory cards.)
Overview of the DPF
What’s in the Box
Digital Photo Frame (DPF)
AC Power Cord and Adapter
Infrared Remote Control
Decorative Paper Mat(s) (varies by model)
Quick Start Guide, User Guide
Scroll Right Scroll Left
ENTER EXIT MENU
Store Remote Control
You can avoid misplacing the remote control by
safely storing it on the back of the DPF when
not in use.
Memory cards slot
The top back of the remote control has a builtin magnet and the back of the DPF has a
‘magnetic area’ so you can simply attach the
remote control to the back of the DPF for safe
keeping.
Power ON/OFF
DC power jack
Mini USB (device)
Brightness control
LEFT side RIGHT side
(The memory card slots, ports, and jacks in your DPF may be different than those pictured here.)
5
Page 6
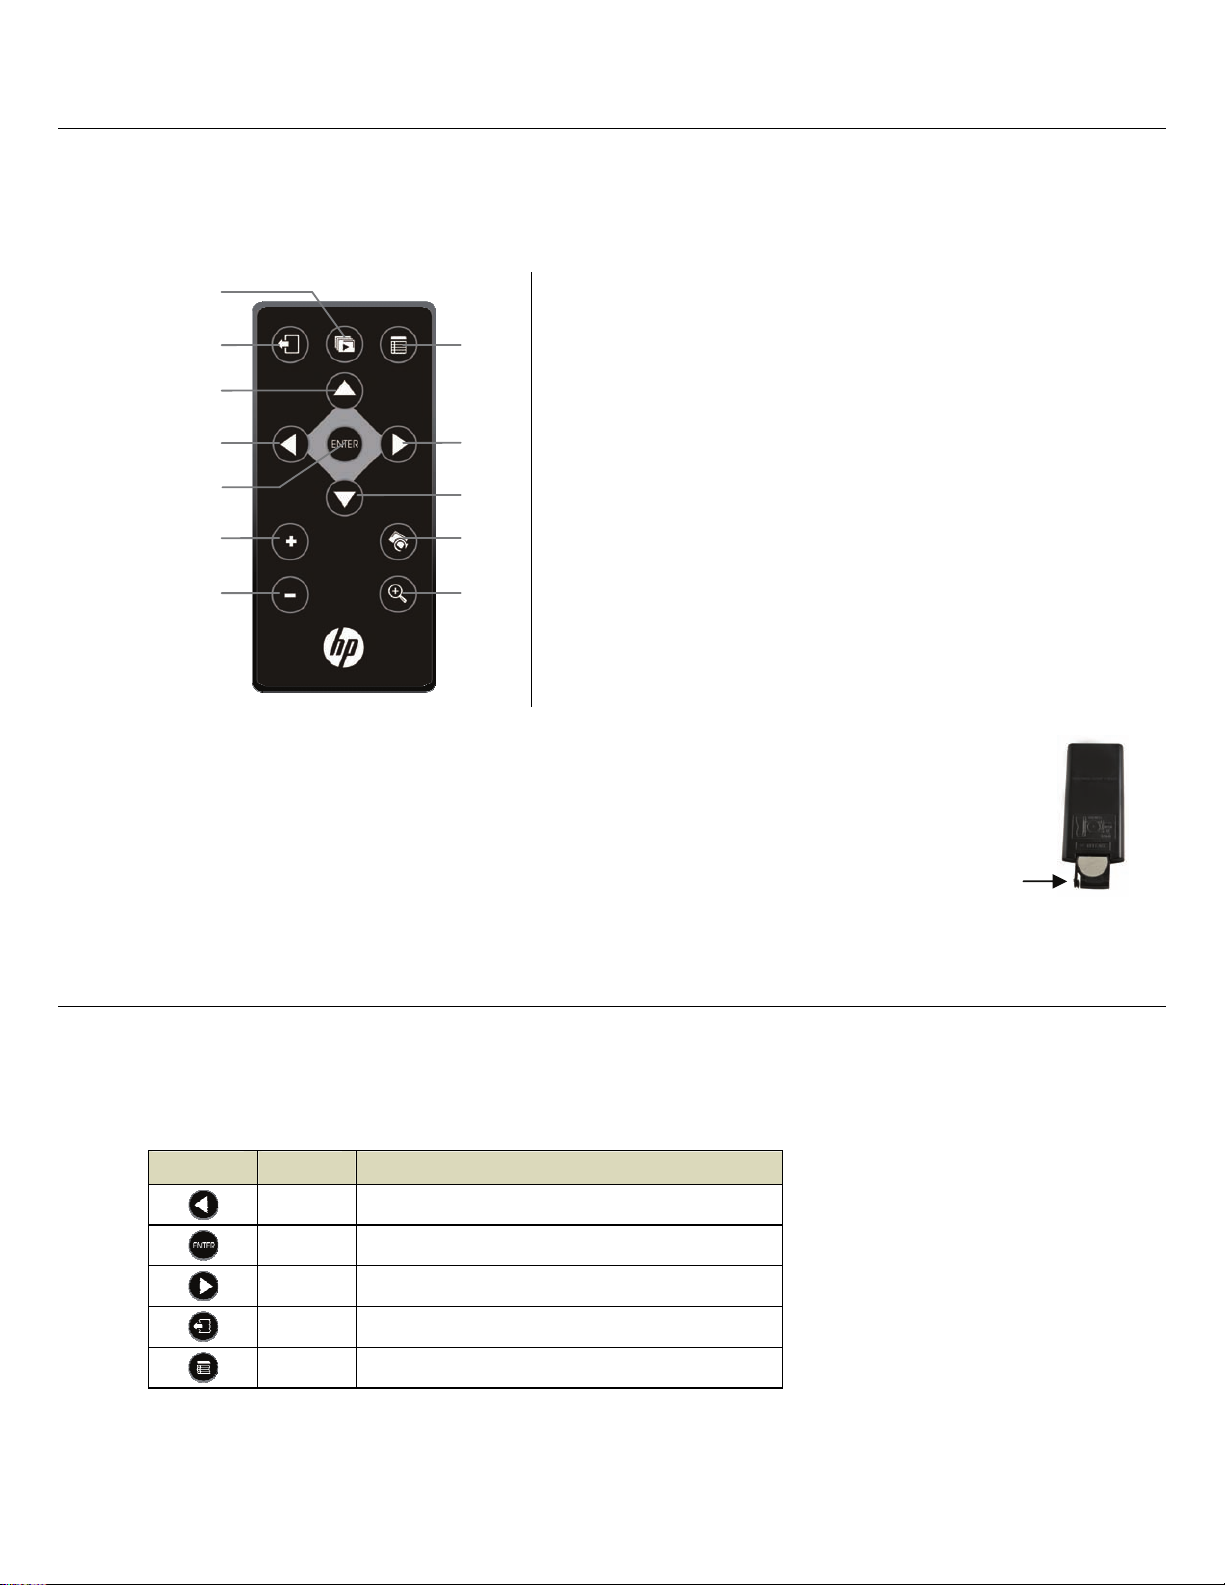
Remote Control
You can access all of the DPF’s features, and perform all of the functions by using the remote control. You will be able to
perform several functions with the remote control that are not possible with the top-back panel control buttons.
Note: Before first time use, pull the plastic tab sticking out of the remote control. It protects the battery and the remote
control will not work unless it is removed.
1
2
3
8
1
Start Slideshow
2 Exit or go back 8 Access Setup screens (Menu)
3 Scroll up
4
9
4 Scroll previous 9 Scroll forward
5
6
7
10
11
12
5 Play/Pause/Select object 10 Scroll down
6 Volume adjust higher 11 Rotate image
or Select object
7 Volume adjust lower 12 Enlarge image
or De-select object
Replace the Remote Control Battery
1. Hold the remote control with the buttons facing down.
2. Push and hold the small release tab while pulling the battery tray out.
3. Replace the “CR2025” Lithium battery on the tray with the positive (+) side facing up.
4. Push the tray back in until it clicks into place.
Release tab
Control Buttons on DPF
You can perform many (but not all) of the DPF functions by using the control buttons located on the top-back panel of the
DPF. Their basic functions are the same no matter when you use them.
TIP: The instructions throughout this Us er Guide only reference the use of the remote control. However, if desired, you
can use the frame control buttons when these buttons are referenced:
Remote Frame Action
6
ENTER
EXIT
MENU
Scroll left
Play/Pause/Select object
Scroll right
Exit the current display, or go back a screen
Access Setup screens
Page 7

Page 8

Photo Import Method
Set photos to be imported compressed or original resolution and file size (page 11)
Set Sleep Mode
Reset to Factory
Defaults
Set Language
Greeting Card
Power saving function (page 16)
Returns all function settings to the factory defaults (page 17)
Select desired DPF display language (page 17)
Create a personalized greeting which will be displayed when the unit is powered on
(page 8)
About Selecting Options
Throughout this User Guide, when you are instructed to ‘select’ a function option or button, unless otherwise instructed,
use
to highlight [the referenced option], and then press
to select.
Select Media Source
If you have inserted one or more external media sources (i.e., memory card), you can use the Select Media Source
function to switch between the internal memory and your external media source for viewing your photos.
You will also use this function to view the contents of the
(page 12).
Slideshow Folders after you assign photos to these folders
1. On the
2. Select
HOME screen, press
to display the
Select Media Source, and then select the desired media source (sources not present will not be available).
Internal Memory = Built-in flash memory
SD/MMC = Secure DigitalTM / Multi MediaTM card
MS = Memory StickTM (Standard, Pro, and Duo)
xD = Standard flash memory card
Slideshow Folders = View photos after assigning to folders (page 12)
Setup Menu.
Personalized Digital Greeting Card
You can set a personalized greeting which displays when the DPF is powered on. This feature is especially useful when
presenting this DPF as a gift.
The Virtual Keyboard
You will use a virtual keyboard for entering your personalized greeting.
Navigate the keyboard as follows:
To select the desired characters, use
multiple times as needed.
to highlight the keys, and then press ,
8
Page 9

STYLE 1 2 3 4 = Select the background image appropriate for your greeting (can also be your personal photo)
DEL = Clears the entry field
Enter Greeting
1. On the HOME screen, press
2. Select
3. Select Yes to create a new greeting or delete existing greeting, or select No to edit existing greeting.
4. Enter a greeting
5. Select the
= Scroll through your entry to edit as needed
Note: You can also use the remote control buttons as follows:
= View your greeting with selected background image
TITLE MSG = Toggle between the Title and Message entries
ABC/abc/SYM = Toggles between upper and lower case letters, and the following symbols:
_ ! : ; $ ( ) [ ] \ & / % ^ ! + = ~ - | < > { }
Backspace = Erases last selected character
Done = Completes entry
Cancel = Return to the previous screen without an entry
+’ = Scroll forward through entry to edit as needed
‘
-‘ = Scroll back through entry to edit as needed
‘
ROTATE = Backspace, erases last selected character
ZOOM = Toggles between ABC / abc / SYM screens
Setup Menu screen.
Greeting Card.
to display the
Title (i.e., Happy Bi rthday, Merry Christmas).
TITLE MSG button to toggle between the Title and Message entry screens.
To enter multiple lines of text, use either the TITLE MSG button or the ↵ located on the #1 key (depending on
model).
TIP: If entering multiple lines, to avoid losing your progress should you leave the unit or have a power
interruption, it is recommended that you select
6. Select
7. Select VIEW to view your greeting, and then press
8. When satisfied with your greeting, select
STYLE 1 2 3 4 to choose a background appropriate for your greeting.
Style 1 Default – Blue with scroll (or your personal photo – see Assign Personal Background Image on page 9)
Style 2 – Balloons
Style 3 – Gift with gold ribbon
Style 4 – Roses
Assign Personal Background Image
You can enhance your personal greeting even more by assigning one of your own photos as the greeting
background.
1. Choose the photo you want as your background, and then name it exactly
IMPORTANT: showme.jpg must be a standard JPG and not in a progressive format
2. Copy your showme.jpg file into the root folder of the DPF’s internal memory. Use the DPF to PC – USB
Connection instructions (page 15) to copy the file to the root folder (do not copy into Photos folder).
3. Follow steps 1-6 under
Done periodically to save your message.
to return to the keyboard screen.
Done to save.
showme.jpg.
Enter Greeting (above), and select the Default style.
9
Page 10

4. Your greeting will now display your personal photo as the background.
5. Select
6. When satisfied with your greeting, select
VIEW to view your greeting, and then press
Done to save.
to return to the keyboard screen.
PHOTOS
The PHOTOS feature includes many functions for optimizing and customizing your viewing preferences. You can view
your photos individually or as slideshows. Other optional functions allow you to display the current time with your images,
display the photo file date/time, adjust the screen colors, choose slideshow transitions, and even schedule slideshows
according to your weekly schedule.
Photo Thumbnails
1. On the HOME screen, select the PHOTOS-Manage button.
2. Use
pages.
3. To view an individual photo in full screen, press
4. While the photo is displayed, you can use
View Individual Photo during a Slideshow
to scroll through individual photos, or use the Page Up/Page Down arrows to scroll full
on the highlighted photo.
to view the next/previous photos.
1. With the desired photo displayed, press
2. The photo will be displayed approximately 60 seconds and then the slideshow will automatically resume, or you
can press
Zoom or Rotate Photos
You can temporarily magnify or rotate photos while viewing them in single photo view. The rotation of a photo will be
saved only for photos in the internal memory.
Zoom or Rotate a photo during a slideshow
1. With the photo displayed that needs rotating, press ZOOM or ROTATE, multiple times if necessary, to
achieve the desired view.
2. Press
Zoom or Rotate a photo from the Photo Thumbnails screen
1. On the HOME screen, select the PHOTOS-Manage button.
2. On the
then press
TIP: When a photo is zoomed, you can pan around the photo by using
Adjust Screen Colors
You can adjust the four LCD color levels for optimal image viewing.
to pause the slideshow.
SLIDESHOW to resume the slideshow.
or
SLIDESHOW to resume the slideshow.
Photo Thumbnails screen, press
to select
ZOOM or ROTATE multiple times if necessary to achieve the desired view.
portions of the photo that are not currently visible.
the desired photo to be magnified or rotated, and
to view
10
1. On the
2. Select
HOME screen, press
Adjust Screen Colors.
to display the
Setup Menu.
Page 11

3. Use
achieved.
4. Use
TIP: You can also adjust the brightness with the dial on the left side of the DPF.
Optimal Image Display
You can choose the desired display mode for displaying your photos on the DPF as follows:
to scroll through the LCD options, and use
to select Done.
to adjust the setting until the desired view is
1. On the
2. Select
HOME screen, press
Optimal Image Display, and then select the desired setting.
Original = Displays photos in actual photo size.
Optimal (default) = Optimizes the size and resolution to best fit the screen, which may result in part of a photo not being
visible on the screen.
Photo Import Method
When importing files into the internal memory from an external media source, the file can be optimized or left as the
original file size and resolution.
1. On the
2. Select
HOME screen, press
Photo Import Method, and then select the desired setting.
Optimized (default) = The photo file is downscaled in size and compressed into a smaller sized JPEG, allowing more
photos to be stored in the internal memory.
Original = The photo file is stored keeping its original size and resolution
Display Current Time with Photos
You can have the current time displayed with your photos if desired.
1. On the
2. Select
3. Select
HOME screen, press
Slideshow Setup, and then select On or Off under ‘Display Current Time’.
Done.
to display the
to display the
to display the
Setup Menu.
Setup Menu.
Setup Menu.
TIP: If the time is incorrect, refer to Set the Date and Time to set the clock (page 15).
Display Photo File Date/Time Stamp with Photos
Most digital cameras typically include a Date/Time stamp when saving photo files. If your photo files contain this
Date/Time information, you can have it displayed with your photos if desired.
1. On the
2. Select
3. Select
HOME screen, press
to display the
Slideshow Setup, and then select On or Off under ‘Display Photo Date/Time’.
Done.
Import Photos into Internal Memory
You can import your photo files from memory cards into the DPF’s internal memory. The number of photo files you
can import depends on file size and available memory.
1. Insert your media source into the DPF. The memory card option screen will be displayed.
Setup Menu.
11
Page 12

2. To import all photos, select Import All Photos.
To import individual
3. Use
-‘ will deselect).
(‘
4. Press
, and then select Import Selected Photos.
photos, select Select Photos to Import.
Delete Photos from Internal Memory
You can delete photo files from the DPF’s internal memory, but not from an external media source (i.e., memory
card). Refer to your media source documentation for instructions on deleting files from these devices.
TIPS: It is recommended to make backup copies of the photos before you delete them from the DPF.
Be sure you have
Internal Memory
to scroll through the photos, and then press ‘+’ to select the desired photos to import
as your selected media source.
1. On the
2. To delete all
To delete individual
(‘
3. A confirmation message appears; select
memory.
TIP: If, by mistake, you select
HOME screen, select the PHOTOS-Manage button.
photos, press , and then select Delete All.
photos, use
to highlight the photos you want to delete, press ‘+’ to select
-‘ will deselect), press , and then select Delete Selected.
Yes to delete the photos, or No to keep the photos in the internal
Yes to delete photos, press
deleted will not be automatically restored.
to cancel the delete operation. Photos already
PHOTO SLIDESHOWS
The DPF can display all of the photos on the selected media source as a slideshow, or you can select specific photos for a
custom slideshow.
Slideshow of Photos in Internal Memory
You can play a slideshow of the photos stored in the DPF’s internal memory by simply powering on the DPF (with no
external media source inserted) and then wait for the slideshow to automatically begin.
Slideshow of Photos on your Media Source
Insert an external media source and then power on the DPF; the slideshow will begin displaying your photos.
If you insert a media source after power on, a
Slideshow Folders
There are five category folders in the internal memory into which you can assign photo files for personalized
organization and slideshows (these folder names cannot be changed):
Only photos stored in the internal memory can be assigned to the slideshow folders. Assigned photos are not
physically moved or copied into the folders, rather, a link is assigned to the photo so it appears to be located in the
folder. If you delete the actual photo file from internal memory, the link to the folder will also be deleted.
Assign Photos to Slideshow Folder
12
memory card option screen is displayed; select Start Slideshow.
Family – Vacation – Events – Others
1. On the HOME screen, select the PHOTOS-Manage button.
2. On the
Photo Thumbnails screen, use
to scroll through your photos.
Page 13

3. To assign an individual photo: With the desired photo displayed, press .
To assign multiple
4. Select
Assign to Folder, and then select the desired folder into which you want to assign the photos.
photos: Press ‘+’ to select desired photos (‘-‘ will deselect), and then press .
Play Slideshow from Slideshow Folder
1. On the HOME screen, press .
2. Select
3. Select
4. Select the desired folder containing the photos you want to view in your slideshow.
5. On the
Select Media Source, and then press .
Slideshow Folders.
Folders Thumbnails screen, press Slideshow.
Copy or Reassign Photos to Different Folders
After assigning photos to folders you can copy those photos to other folders, or you can reassign photos to
appear in a different folder.
1. With the slideshow folders slideshow playing (per above instructions), press
Thumbnails
2. To copy or reassign an individual
To copy or reassign multiple
select those that you want to copy or reassign (
screen.
photo, highlight the desired photo and then press .
photos, use
deselects), and then press .
to scroll through the photos, use to
twice to display the
Folder
3. Select
reassign or copy the photos.
Set Slideshow Interval
You can set the speed at which the slideshow photos transition from one to another.
1. On the
2.
Select Slideshow Setup,
3. Use
HOME screen, press
5, 10, 30, 60 seconds, 1 hour, or 24 hours
4. Select Done.
Set Slideshow Transition
You can set the transition ‘special effects’ as photos transition from one to another during a slideshow.
1. On the
2. Select
3. Use
HOME screen, press
Slideshow Setup.
Off = Photos transition from one photo to the next without special effects.
Random (default) = Photos will transition using all special effects randomly throughout a slideshow.
Remaining special effects = Choose individual transition effect as desired
Copy to Folder or Reassign to Folder, and then select the desired folder into which you want to
to display the
to select Slideshow Interval, and then use
to display the
to select Slideshow Transition, and use
Setup Menu.
Setup Menu.
to select your desired setting.
to select your desired setting.
4. Select Done.
13
Page 14

Set Slideshow Shuffle
You can set the slideshow to display your photos in a random ‘shuffle’ order, or display them in the order as stored on
the selected media source.
1. On the
2. Select
3. Use
Slideshow Setup.
HOME screen, press
to select Slideshow Shuffle, and then use
to display the
Setup Menu.
to select your desired setting.
ON = Displays photos randomly
OFF(default) = Displays photos in the order found on selected media source
4. Select Done.
CALENDAR/CLOCK
Your DPF can be used as a personal desk calendar which displays a continuous slideshow of photos on the selected
media source, and real-time clock. To display the
The slideshow will be displaying photos found on the currently selected media source.
Select Media Source for Calendar Slideshow
You can easily change the media source if you want the calendar/clock slideshow to display photos from a different
media source (i.e., memory card, slideshow folder).
On the
Select the desired media source from the
CALENDAR/CLOCK screen, press , and then select the Media Source button in the upper right corner.
Set Schedule
You can schedule the DPF to automatically go into a “stand-by” mode and resume operation according to your weekly
schedule. For example, if you have your DPF on your desk at work, you may want to display the calendar/clock or
play a slideshow from 8:30am to 5:30pm every weekday, and then set the DPF to remain in stand-by mode
throughout the weekend. The following Monday morning, the DPF would resume operation at 8:30am.
CALENDAR/CLOCK screen, select CALENDAR from the HOME screen.
Select Media screen.
1. On the
2. Select
3. Use
4. To set the
5. Use
6. When correct times are set, select
Disable Schedule
After the schedule has been enabled (per above instructions), you can disable the schedule whenever desired.
1. On the
2. Select
3. Select
14
CALENDAR/CLOCK screen, press .
Set Schedule.
settings.
to move between the fields and
Weekends On/Off, select the Enable Weekends Schedule button, and then use
to move between the fields and
to change the field values in Weekdays On/Off.
to change the field values in
Weekends On/Off.
Done to return to the previous screen.
CALENDAR/CLOCK screen, press .
Set Schedule, and then select the Enable Weekdays Schedule or Enable Weekends Schedule button.
The time fields will display
OFF.
Done.
to access the
Page 15

Run the Schedule
After the schedule times have been set (per above instructions), you will use the Run Schedule function whenever
you want the schedule to take effect.
There are two methods for running the schedule, either from a slideshow or from the
CAUTION: After you select the
Run Schedule from Slideshow
1. Start a slideshow, and then press
small timer clock will appear indicating the schedule is active. To run the schedule when the
button is no longer displayed, restart your slideshow and then press
appears again.
2. The DPF will go into stand-by mode according to the schedule, and when it resumes operation, the
slideshow will again begin
to play.
Run Schedule from CALENDAR/CLOCK Screen
1. On the CALENDAR/CLOCK screen, press .
2. Select
operate according to the set schedule.
3. The DPF will go into stand-by mode according to the schedule, and when it resumes operation, the
Calendar/Clock screen will again be displayed.
Set the Date and Time
CALENDAR/CLOCK screen.
Run Schedule function, any user intervention will cancel the activation (i.e.,
pressing remote or control button, powering off) and the schedule will not take effect until you select
this function again to re-activate.
when the
Run Schedule button appears (approx 10 seconds). A
Run Schedule
when the
Run Schedule button
Run Schedule. A small timer clock will appear indicating the schedule is active, and then the DPF will
1. On the CALENDAR/CLOCK screen, press .
2. Select
3. Select
Set Date/Time, and then select the options and use
Done.
to change the field values.
DPF to PC – USB Connection
You can connect the DPF to a Windows PC or Macintosh computer via a USB cable to copy files between the computer
and the DPF’s internal memory.
If you have memory cards inserted in the DPF, you can also copy between the PC, internal memory, and memory cards.
Connect DPF to Windows PC
1. Connect the small end of the USB cable to DPF’s Mini USB port, and the larger end to an available USB port on
your computer.
2. A window opens listing all drives connected to your computer.
3. The internal memory (titled HP_DPF) and each memory card present in the DPF will be associated with one disk
drive on your PC.
IMPORTANT: If your PC is connected to Local Area Network drives, or if you have multiple drive letters
4. Double-click the desired drive to display the files on the card.
5. To copy files from a media source, select and drag them into the DPF’s internal memory drive (HP_DPF).
already assigned to peripheral devices, you will need to manage your drive settings in
Windows to free up the four drive letters immediately following your CD-ROM drive so the
DPF can assign them to memory card slots properly.
15
Page 16

6. Similarly, to copy files from your computer to the internal memory, first locate the files on your computer, select
the files you want to copy, and then drag and drop them into the DPF’s internal memory drive.
TIP: Most cameras and graphic programs store photos in the Windows XP ‘My Pictures’ or Vista ‘Pictures’
folder. If you didn’t save them to any other location, you may find them there.
Disconnect DPF from Windows PC
It is important to always perform a safe PC ‘release’ before disconnecting the DPF USB cable from the PC.
WARNING: Do not unplug or switch off the DPF when files are being transferred, as that can seriously damage the
memory.
Windows Vista
1. On the Windows System Tray, click the hardware removal icon.
2. Click the
3. When the message “This device can now be safely removed from the computer” appears, you can disconnect the
USB cable from your computer.
Windows XP
1. On the Windows System Tray, click the hardware removal icon.
2. Click
3. Select the storage device corresponding with the DPF, and then click
opens.
4. Click
5. When the message “It is now Safe to Disconnect Hardware” appears, you can disconnect the USB cable from
your computer.
Safely remove USB mass Storage device message corresponding with the DPF device drive.
Remove Hardware Safely.
Close.
Connect DPF to Macintosh Computer
1. Use a USB cable to connect the DPF to your Macintosh computer.
2. Macintosh will recognize the DPF as an external storage device.
3. Drag and drop files between the two devices as you normally move files.
Disconnect DPF from Macintosh Computer
1. To safely disconnect the DPF from your Macintosh, select DPF’s icon on your desktop and press Command-e to
eject the disk.
2. When the icon is no longer on the desktop, it is safe to unplug the USB cable.
Set Sleep Mode
Stop to disconnect. A final dialog box
The DPF will stay on until you power it off, however, to save power you can set it to automatically go into a sleep mode
when left idle for a specific amount of time.
1. On the
2. Select
OFF (default) = Power saver is ‘disabled’; DPF will remain on until you power it off or change the sleep mode setting
2/4/8 Hours = The DPF will automatically go into sleep mode when left idle the specified amount of time
3. Select Done.
HOME screen, press
Set Sleep Mode, and then select the desired setting.
to display the
Setup Menu.
16
Page 17

Set Language
Depending on model, this DPF may include multiple languages for the user interface display.
1. On the
2. Select
HOME screen, press
Set Language, and then select the desired language.
to display the
Setup Menu.
Reset to Factory Defaults
If you have changed function settings, using this feature will restore all settings to the factory pre-set defaults.
1. On the
2. Select
3. Press
HOME screen, press
to display the
Reset to Factory Defaults, and then select Yes to reset, or No to leave current settings.
to return to the
HOME screen.
Setup Menu.
Frequently Asked Questions
Q: How do I set up my DPF?
A: It is very simple to get your Digital Photo Frame setup. Just plug the power adapter into the DPF and into a standard
wall outlet, and then power it on. A slideshow will begin displaying the images pre-loaded in the internal memory. To
view your own photos, insert a memory card into the card slot on the side of the DPF. Select
memory card option screen.
Q: What memory cards can the Digital Photo Frame Read?
A: Compatible memory cards include: Secure Digital™ (SD), MultiMedia Card™(MMC), xD Card, Memory Stick™(MS),
MemoryStick Pro™, and Memory Stick Pro Duo™.
Start Slideshow from the
Q: I set up the Digital Photo Frame; why won’t it turn on?
A: The po wer ada pter may not be securely connected to the DPF or the power switch may not be in the ON position.
Q: I have a memory card in the DPF; why can’t I view my photos?
A: A) Be sure that the memory card is one of the formats listed above and that the files on the card are JPEG images
files. Some digital cameras save images in other formats. Refer to your camera’s user guide if your photos are not
JPEG files.
B) Make sure the memory card is inserted all the way into the card slot.
C) On the
begin displaying your photos.
Q: Why is the photo display slower with some photos than others?
A: Higher resolution photos load more slowly. Try using lower resolution photos or down scaling your images. Refer to
your camera’s operating user guide for details on down scaling your photos.
Q: Can I insert multiple memory cards?
A: No, there is only one memory card slot.
Q: Does the DPF have built-in (internal) memory?
A: Yes. The memory size varies by model.
Q: Does the DPF support all JPEG and Motion JPEG files?
A: No. The DPF only supports JPEG and Motion JPEG files taken from a digital camera. The DPF may not read all image
files downloaded from the Internet or from other software graphic applications.
HOME screen, press , choose Select Media Source, select the desired media source, and then press
. Press to return to the HOME screen and then select the PHOTOS-PLAY button. The slideshow should
17
Page 18

Page 19

1.866.949.2624
Page 20

VistaQuest Corporation
 Loading...