

Page 1

HP df300 Series
Digital Picture Frame
數位相框
デジタル・ピクチャ・フレーム
User Manual
ユーザー・マニュアル
使用說明書
Revision 1.0a
Page 2

3
FCC Compliance Statement
Note: This equipment has been tested and found to comply with the limits for
a Class B digital device, pursuant to Part 15 of the FCC Rules. These limits
are designed to provide reasonable protection against harmful interference
in a residential installation. This equipment generates, uses, and can radiate
radio frequency energy and, if not installed and used in accordance with the
ENGLISH
instructions, may cause harmful interference to radio communications. However,
there is no guarantee that interference will not occur in a particular installation.
If this equipment does cause harmful interference to radio or television
reception, which can be determined by turning the equipment off and on, the
user is encouraged to try to correct the interference by one of the following
measures:
- Reorient or relocate the receiving antenna.
- Increase the separation between the equipment and receiver.
- Connect the equipment into an outlet on a circuit dif ferent from that to which
the receiver is connected.
- Consult the dealer or an experienced radio/TV technician for help.
FCC Caution: To assure continued compliance, only use shielded interface
cables when connecting to computer or peripheral devices. Any changes or
modifications not expressly approved by the p arty responsible for compliance
could void the user’s authority to operate this equipment.
This device complies with Part 15 of the FCC Rules. Operation is subject to the
following two conditions: (1) this device may not cause harmful interference,
and (2) this device must accept any interference received, including interference
that may cause undesired operation.
2
Page 3

Table of Contents
FCC Compliance Statement
What’s in the Box?
Getting Started
Initial Setup
Setup Menu
Key Features
Picture Options
Specifications
Frequently Asked Questions
Cleaning and Care Tips
Getting Help
2
ENGLISH
4
5
7
9
11
12
17
18
19
20
3
Page 4

5
What’s in the Box?
Qty Item Image
1 3.5” Digital Picture Fram e
ENGLISH
Universal Power Adapter
1
(5V, 0.5A, 100/240 switching)
1 USB 2.0 Cable
1 User Manual
1 Warrant y Document
IMPOR TANT: Pleas e keep t his
docume nt for t echnic al supp ort c ontac t
4
inform ation.
Page 5
Getting Started
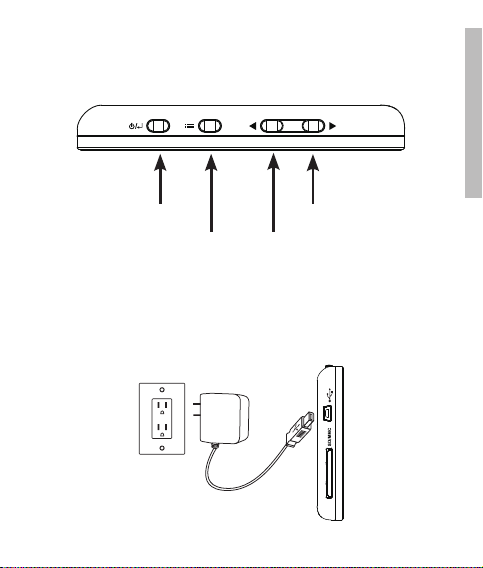
1. The digital picture frame has basic co ntrol buttons on the top of the frame
as illustrated below.
Power
Options Left/Previous
2. Unfold the attached stand to it s extended position. Attach the USB cab le
to the AC adapter. Connect the mini connector of the cable to the digital
picture frame, and plug the adapter into a wall power outlet as illustrated
below. The picture frame will automatically power on and begin charging
the internal bat ter y. Please allow 2 to 3 hours for a full internal battery
charge.
5
Right/Next
ENGLISH
Page 6
7
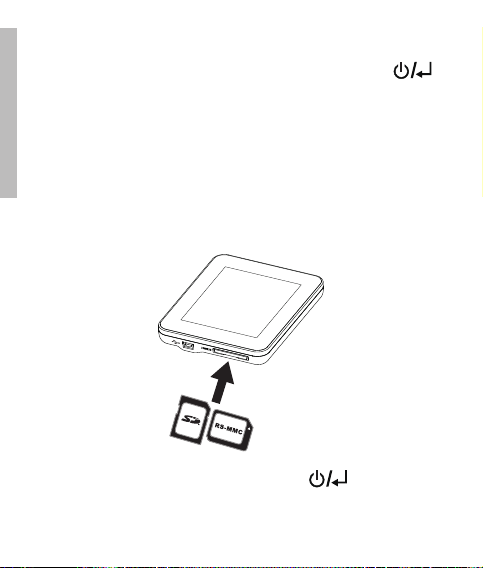
3. If the frame did not automatically power on, press and hold the
button on the top of the frame for 3 to 5 se conds. The df300 Digital
Picture Frame is preloaded with pic tures that illustrate the b asic features of
this product and a slideshow will begin in a few seconds. If you wish to
eventually delete the se pictures from the internal memory, please reference
ENGLISH
the PICTURE OPTIONS section of this manual.
4. If you wish to immediate ly view your own pictures, insert a SD memory
card containing desired pictures into the card slot. In a few seconds,
a slide show of your pictures will begin. Note: Memory card must be
orientated correctly as illustrated below. Push the memory card into the
slot until it is locked into position.
5. To turn the picture frame off, press and hold the button for 3 to 5
seconds.
6
Page 7
Initial Setup
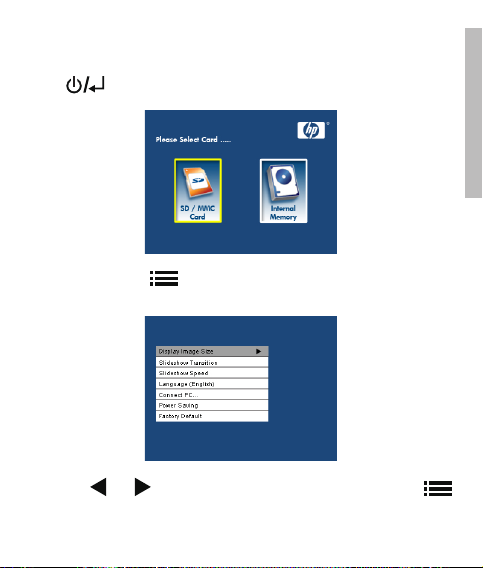
1. Power on the picture frame and allow the picture slideshow to begin. Press
the button to view the Memory Source Screen as illustrated below.
2. Press and hold the button until the SETUP MENU is displayed as
illustrated below.
3. Use the and buttons to highlight the desired setting. Press the
button to select the setting options.
7
ENGLISH
Page 8

9
4. Continue to use the and buttons to highlight the desired option.
Press the button to select the desired option.
5. Press the
ENGLISH
button again to exit the SETUP MENU and re turn to the Memory Source
Screen.
6. Use the
the button to sel ect the de sired memory source. This will begin a
slideshow with pictures from the selected memor y source.
button to return to th e SETUP MENU. Press the
and buttons to highlight the desired memor y source. Pre ss
8
Page 9

Setup Menu
Option Description
Select “ORIGINAL” to display pictures with their
original properties. Display picture in full height
in normal aspect ratios. Some picture may not fill
Display Image Size
Slideshow Transition
Slideshow Speed
Language
the screen, and leave space on both sides. Select
“OPTIMAL” to allow the frame to display pictures
with optimized proper ties. Picture(s) will enlarge to
fit the full width of the screen.
The factory default option is “ORIGINAL”.
Choose from 6 options and select the preferred
transition. Options are: Normal, Random,
Top_Bottom, Curtain, Open_ Door, and Cross_Comb.
The default option is set to “RANDOM”.
Select the desired picture display length. Options
are: 5 seconds, 10 seconds, 30 seconds.
The default option is 5 seconds.
Choose from 7 On Screen Display languages.
Options are: English, German, French, Spanish,
Portuguese, Italian, and Dutch.
The factory default is English .
9
ENGLISH
Page 10
11
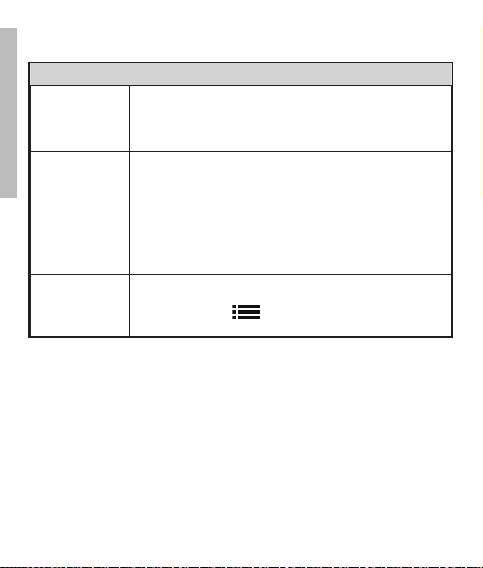
Option Description
Connect to PC
ENGLISH
Power Saving
Select this option when the frame is connected to the PC
to switch to file transfer mode. In this mode, you will be
able to access the SD/SDHC/MMC card.
This feature will automatically turn off the LCD on the
HP digital picture frame to save valuable energy. You
can choose from 4 settings. Options are: 5 minutes, 10
minutes, 30 minutes, or No Power Saving.
If you want to turn on the LCD, press any key on the photo
frame.
The factory default is set to No Power Saving.
Factory Default
If you wish to restore ALL the settings to the factory
default, press the button.
10
Page 11

Key Features
Feature
Picture slideshow
• Automatic picture transition with 6 dif ferent variations.
Multiple picture viewing options
• View individual pictures in Browse mode (see later section)
• Copy pictures from an SD to internal memory without a PC connection
• Zoom and rotate individual pictures
Brightness, contrast, tint, and color adjustments in photo browse mode.
Add pictures from a SD card to the internal memor y.
Rechargeable internal battery power for portable viewing.
• Recharge by AC adapter or PC/Laptop USB connection
• Up to 2 hours of battery power between charges.
Power saving mode
• Choose between 4 different settings.
11
ENGLISH
Page 12

13
Picture Options
Slideshow modes
Slideshow mo de will begin automatically a few seconds after the frame is
powere d on or when an external memory card is inser ted.
Browse mode
ENGLISH
To exit slideshow mode, press the button on ce. A pause symbol will
be briey displayed in the upper right of the screen. This allows forward and
previous picture viewing by pre ssing the and arrow buttons.
Thumbnail mode
To view pictures in a thumbnail mode, press the but ton t wice when in
slideshow or once when in browse mode. See illustrated below for thumbnail
example.
Use the and buttons to navigate to a picture. Press the button to
view the selecte d picture.
12
Page 13
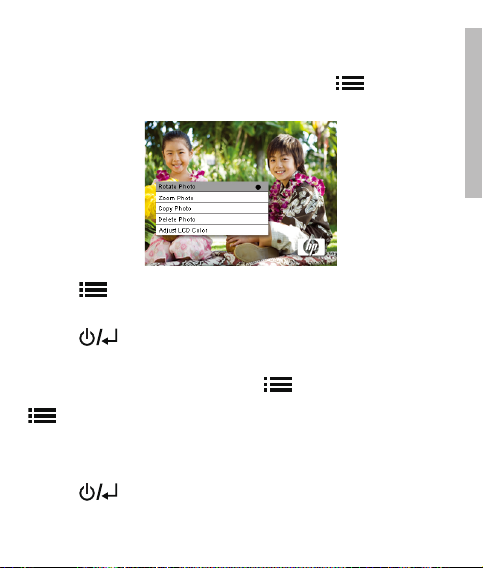
Picture Rotation
While in slideshow o r browse mode, press and hol d the button until the
PICTURE OPTIONS menu is displaye d as illustrated below.
Press the button to rotate the displayed picture. Each press of this button
will rotate the pic ture by 90 de gree s in a clockwise motion.
Press the but ton to remove the PICTURE OPTIONS menu.
Picture Zoom
While in browse mod e, press and hold the button until the PI CTURE
OPTIONS menu is displayed. Picture s can b e zoomed to 4X by pressing the
button. Each press of this button will increase the zoom by 1X until 4X.
At 4X, press this button once to return to the original view. Note: if a picture
is zoom ed while in slideshow mode, the frame will automatically enter into
photo browse mode.
Press the but ton to remove the PICTURE OPTIONS menu.
13
ENGLISH
Page 14
15
Copying pic tures ont o internal memory
Pictures can only be copied onto the df300 frame’s internal mem ory from a
Secure Digital (SD or SDHC) or MMC memory card.
1. Insert an SD/SDHC/MMC memor y card with the desired pictures into the
ENGLISH
frame’s memor y card slot.
2. Power on the picture frame and a slideshow from the SD/SDHC/MMC
memory card will automatically begin in a few seconds. Press the
button to switch to browse mode or thumbnail mo de.
3. Use the or arrow buttons to navigate to the picture you wish to
copy.
4. Press and hold the but ton until the PIC TURE OPTI ONS menu is
displayed.
5. Use the arrow but ton to highlight the COPY PHOTO option.
6. Press the
Once the picture has been copied, an Ok text box will b e briefly
displayed.
7. Press the
8. If you wish to copy more pictures, simply repeat the above steps until
finished.
button to begin copying the picture to internal memory.
button to remove the PI CTURE OPTIONS menu.
14
Page 15
Deleting pictures from internal memor y
Pictures can only be deleted from the df300 frame’s internal memor y.
1. Power down the picture frame.
2. If applicable, remove the memory card from the slot. This is done by
pushing the card further into the slot until the card l atch mechanism is
released. The card is now in an unlocked position. Remove the memory
card.
3. Turn on the frame and allow the slideshow of pictures on the internal
memory to begin. Press the button once to stop the slide show.
4. Use the
delete.
5. Press and hold the
displayed.
6. Use the
7. Press the
the picture has been deleted, an Ok tex t box will be briey displayed.
8. If you wish to delete the next displayed image, press the
again. Repeat this step until nished
9. Press the
10. If you wish to delete more pictures, simply repe at the above steps until
and arrow buttons to navigate the picture you wish to
button until the PICTURE OPTIONS menu is
arrow b utton to highlight the DELETE PHOTO option.
button to delete the picture from the internal memor y. Once
button
button to remove the PI CTURE OPTIONS menu.
nished.
15
ENGLISH
Page 16
17
Adjust LCD Color
While in browse mod e, press and hold the button until the PI CTURE
OPTIONS menu is displayed.
1. Use the arrow button to highlight the Adjust LCD Color option.
ENGLISH
2. Press the
3. The Brightness option will be highlighted. Use the or arrow buttons
to adjust screen brightness. Adjust to the desired level.
4. Press and hold the or arrow button until the next option is
highlighted (Contrast, Color, and Tint). Again, use the or arrow
buttons to adjust the selected option.
5. When finished, press the button to return to the PIC TURE OPTI ONS
menu. Press the button again to return to Browse mode.
button to display the Adjustment options.
16
Page 17

Specifications
Panel Specification
Screen Size 3.5”
Frame Dimension 95 x 77 x 13 (mm)
Aspect ratio 4:3
Resolution 320x240 pixels
Power
External AC Power Adapter +5V, 0.5A
Connectivity
USB Ports
Stora ge/Media
Internal memor y Up to 45 photos
Supporte d Memory cards
Memory cards slot Secure Digital (SD 2.0, SDHC) and MMC
Media Files Supported
Picture file formats JPEG - (Base line only)
Supporte d Languag es
On-Screen Display
1- Mini USB 2.0 for recharging the internal
battery via AC adapter or PC/Laptop USB
English, French, Spanish, Italian, German,
connection.
Dutch, & Portuguese
17
ENGLISH
Page 18

19
Frequently Asked Questions
Question Answer
Why can’ t I display som e of my Pi cture s?
ENGLISH
Why is my p icture frame not res ponding
to any bu tton selec tions?
How lon g does it take t o fully charge the
Digital Pictur e Frame’s int ernal batt ery?
How lon g will th e internal battery sup ply
power to the frame?
Can I ove rcharg e the in terna l bat tery? No
How lon g will th e internal battery las t? Up to 2 years
Some pi cture/im age fil e form ats are not
suppo rted. Pleas e refer to the specification s.
Use a sm all pap er clip or other tool to pre ss
the RESE T button located o n the b ack of t he
frame under the fold ing sta nd.
Approximatel y 3 hours.
Up to 2 hours.
Can I re place the internal b attery if it
expires?
Can I de lete p icture s from a SD memo ry
card using the d f300 Digi tal Pic ture
Frame?
Can I de lete p icture s from i ntern al
memor y?
How can I switch t o the in terna l memory?
How can I find th e late st info rmatio n/
FAQs abou t my HP Digital Pi cture F rame?
No
No. Only pictur es on t he inte rnal m emor y
can be d elete d.
Yes, refer to the Picture Option s section of
this do cument.
Remove t he external m emor y card o r
refere nce th e Initia l Setup secti on of th is
manual.
Visit w ww.hp.com/supp ort fo r more detail s
and the lates t infor matio n.
18
Page 19

Cleaning and Care Tips
√ Please power off the HP Digital Picture Frame before cleaning.
√ DO NOT push on the screen too firmly.
√ DO NOT spray or pour liquid cle aning agents directly on the screen
or frame.
√ DO NOT use ammonia, alcohol, or abrasive detergent cle aning agents.
Cleaning the Scree n:
1. Wipe screen with a clean, soft, lint-free cloth to remove dust
and loose particles.
2. If further cleaning is required, apply an appropriate cleaning
agent (approved for LCD displays) to a clean, soft, lint-free
cloth and wip e the screen.
• NOTE: do not apply too much pressure on the screen to avoid
damaging it.
Cleaning the Frame and Backing:
1. Use a cle an, soft, lint-free cloth to remove dust and loose
particles.
2. If de sired, apply an appropriate cleaning agent to a cle an,
soft, lint-free cloth and wipe the appropriate sur faces.
19
ENGLISH
Page 20

Getting Help
Should you have a technical
support question or your HP
Digital Picture frame requires
service within the warranty
period, please contact the
ENGLISH
original point of purchase or
an authorized HP reseller in
your country. If service is not
available at those locations,
please contact an HP Branded
Product warranty agent
from the support contact list
provided below. A service
agent will work with you to
troubleshoot your issue and
if necessary, issue a Return
Material Authorization (RMA)
number in order to replace
your HP Branded Product. For
warranty claims, you will be
required to provide a copy
of your original dated sales
receipt as proof of purchase
and the issued RMA number.
You will be responsible for
shipping charges when
shipping the product to the
Region Language Number
Asia Pacic English and Mandarin + 886 3 578 1005
service center. The service agent will provide
you with an address and you will also be
responsible for any shipping charges to
the warranty service center. Once your
product is received by this service center, a
replacement unit will be shipped back to you
typically within 5 business days.
Mailing Address:
Asia Pacic
HP DPF RMA Center
8, Dusing Road, Hsinchu Science Part,
Hsinchu 300, Taiwan,
ROC
Email Support:
Language Email Address
English english@hpodd.com
Chinese trad.chinese@hpodd.com
Japanese nippon@hpodd.com
Korean korean@hpodd.com
Contact/Phone Support:
20
Page 21

目錄
FCC 法規遵循聲明
盒內品項
開始使用
初次設定
設定選單
重要功能
相片選項
規格
常見問答集
清潔與保養秘訣
尋求協助
22
23
25
27
29
30
35
36
37
38
2
繁體中文
Page 22

23
盒內品項
數量 項目 內容物
1 3.5 “ 數位相框
萬用電源變壓器
1
(5V,0.5A,100/ 240 切換)
1 USB 2.0 纜線
繁體中文
1 使用者手冊
1 保固文件
重要事項:請保留本文件,以參考技術支
22
援聯絡資訊。
Page 23

開始使用
1. 在數位相框的頂部,可找到基本的控制按鈕,如下圖所示。
Powe r
電源
Option s選項Left/P revious
2. 將隨附的基座掀開,將 USB 纜線接上 AC 變壓器。將纜線的迷你接頭接上數位相
框,並將 AC 變壓器插入牆壁電源插座,如下圖所示。相框將自動開機,並為內建
電池充電。請等候 2 到 3 小時,讓內建電池完全充飽。
往左/ 前一張
23
Right/ Nex t
往右/ 下一張
繁體中文
Page 24

25
3. 如果相框電源未自動開機,請按住相框頂部的 鈕 3 到 5 秒。df300 數
位相框已預先載入相片,展示本產品的基本功能,並於數秒鐘內開始播放幻燈秀。
如果您決定將這些相片從內部記憶體中刪除,可參考本手冊相片選項一節的說明。
4. 若想立即瀏覽您自己的相片,請將儲存您相片的 SD 記憶卡插入記憶卡插槽中。您
的相片幻燈秀將在幾秒鐘內開始播放。註:記憶卡必須以正確方向置入,如下圖所
示,將記憶卡推入插槽到底。
繁體中文
5. 若要關閉相框電源,請按住 鈕 3 到 5 秒。
24
Page 25

初次設定
1. 啟動相框,等待相片幻燈秀開始播放。按 按鈕檢視 Memory Source
Screen(記憶體來源畫面),如下圖所示。
2. 按住 按鈕不放,直到顯示 SETUP MENU(設定選單),如下圖所示。
3. 使用 和 按鈕移動反白框,停在您想要的設定上。再按 按鈕選擇
設定選項。
25
繁體中文
Page 26

27
4. 繼續使用 和 移動反白框,挑選您的選項。再按 按鈕確定所選
選項。
5. 按
6. 使用
繁體中文
按鈕返回 SETUP MENU(設定選單)。再按一次 按鈕結束
SETUP MENU(設定選單),並返回 Memory Source Screen(記憶體來源畫面)。
和 按鈕,反白選取所要的記憶體來源。按 按鈕,挑選您指
定的記憶體來源;接下來播放的幻燈秀,相片將來自您所選擇的記憶體來源。
26
Page 27

設定選單
選項 說明
選擇「ORIGINAL(原始)」,以原始屬性顯示相片。以正常
Display Image Size(
顯示影像尺寸)
長寬比全高度顯示相片,許多相片可能無法填滿整個畫
面,而在兩側留有空白。選擇「OPTIMAL(最佳)」,讓相
框以最理想屬性顯示相片,適度放大之後的相片,將與畫
面完全等寬。
原廠預設選項為「ORIGINAL(原始)」。
Slideshow
Transition(幻燈秀
過場)
Slideshow Speed(幻
燈秀速度)
Language(語言)
Connect to PC (連接
到個人電腦)
從 6 種選項中,選擇偏好的過場特效。選項包括:
Normal(正常)、Random(隨機)、Top_Bottom(由
上到下)、Curtain(簾幕)、Open_Door(開門)和
Cross_Comb (交梳)。
預設選項設定為 Random(隨機)。
選擇您偏好的相片顯示長度。選項有:5 秒、10 秒、30 秒
預設選項為 Fast(快速;約 5 秒)。
7 種螢幕選單語言,供您選擇。選項有:English(英
語)、German(德語)、French(法語)、Spanish(西班牙
語)、Portuguese(葡萄牙語)、Italian(義大利文)和
Dutch(荷蘭文)。
原廠預設為 English(英語)。
相框連接到個人電腦時選擇此選項,以切換到檔案傳輸模
式,使用者在此模式可存取 SD/SDHC/MMC 記憶卡。
27
繁體中文
Page 28

29
Option D esc ription
此功能將自動關閉 HP 數位相框,以節省寶貴的能源。有 4 種
Power Saving(
省電功能)
Factory
Default(原廠預
設値)
繁體中文
設定可供選擇。選項有:5 minutes(5 分鐘)、10 minutes(
10 分鐘)、30 minutes(30 分鐘) 或 No Power Saving(
省電功能關閉)。
若想啟動 LCD,請按相框上任一個鍵。
原廠預設為 No Power Saving (省電功能關閉)。
如果想要將所有設定回復為原廠預設値,請按 按鈕。
28
Page 29

重要功能
功能
相片幻燈秀
• 自動使用 6 種不同過場特效,串連每張相片。
多重相片檢視選項。
• 以 Browse(瀏覽)模式檢視個別相片(請參閱下文)。l
• 將相片從 SD 卡上直接複製到內建記憶體中,不必連接個人電腦。
• 放大並旋轉個別相片。
在相片瀏覽模式中,調整亮度、對比度、色相與色彩。
將 SD 卡中的相片,加入內建記憶體裡。
可充電的內建電池電力,方便您隨身攜帶瀏覽。
• 透過 AC 變壓器或 PC/ 筆記型電腦 USB 連線充電。
• 最多可使用 2 小時後再行充電。
省電模式
• 有 4 種不同設定可供選擇。
29
繁體中文
Page 30

31
相片選項
Slides how(幻燈秀)模式
在啟動相框電源或插入外部記憶卡後幾秒,將自動進入幻燈秀模式。
Browse(瀏覽)模式
若要離開幻燈秀模式,請按一下 按鈕。畫面右上角將短暫顯示暫停符號。這時
即可按 和 箭頭按鈕,來回檢視相片。
Thu m bn ail(縮圖)模式
若要以縮圖模式檢視相片,在幻燈秀時按兩下,或在瀏覽模式時按一下 按鈕。
請參考下列的縮圖範例。
繁體中文
利用 和 按鈕來瀏覽相片。按 按鈕檢視所選擇的相片。
30
Page 31

相片旋轉
在瀏覽模式中,按 按鈕不放,直到顯示如下圖的 PICTURE OPTIONS(相片選
項)選單。
按 按鈕旋轉顯示的相片。每按一次按鈕,相片就會順時鐘旋轉 90 度。
按 按鈕清除PICTURE OPTIONS(相片選項)選單。
相片放大
在瀏覽模式中,按住 按鈕不放,直到顯示 PICTURE OPTIONS(相片選項)選單。
可按 按鈕,將相片放大到 4 倍。每按一次按鈕,便放大一倍,最多放大到 4
倍。放大 4 倍時,再按一次 按鈕,即恢復原始尺寸。註:若在幻燈秀模式中放
大相片,相框將自動進入相片瀏覽模式。
按 按鈕,離開 PICTURE OPTIONS(相片選項)選單。
31
繁體中文
Page 32

33
將相片複製到內建 記憶體中
相片只能從「安全數位卡」(SD 或 SDHC)或 MMC 記憶卡上,複製到 df300 相框的內
建記憶體。
1. 將存有待複製相片的 SD 記憶卡,插入相框的記憶卡插槽中。
2. 啟動相框電源,幾秒後將自動使用 SD 記憶卡的相片播放幻燈秀。按
鈕,切換到瀏覽或縮圖模式。
3. 使用
4. 按住
5. 利用
6. 按
繁體中文
7. 按
8. 若有其他相片需要複製,請重複上述步驟,直到全部完成。
和 箭頭按鈕,依序顯示各張相片,直到您想複製的相片出現。
按鈕不放,直到顯示 PICTURE OPTIONS(相片選項)選單。
箭頭按鈕,反白選取 COPY PHOTO(複製相片)選項。
按鈕,開始複製相片至內建記憶體內。複製一旦完成,將短暫顯示 Ok
(完成)文字方塊。
按鈕,離開 PICTURE OPTIONS(相片選項)選單。
32
按
Page 33

從內建記憶體中刪除相片
只有 df300 相框內建記憶體中的相片,可以直接刪除。
1. 關閉相框電源。
2. 如果可以的話,請先將 SD 卡從插槽中拔出。拔卡方式是將卡再往插槽方向向裏
推,直到卡榫裝置鬆開。確定記憶卡鬆開,之後,再拔出 SD 卡。
3. 啟動相框電源,並讓內部記憶體相片的幻燈秀開始播放。按一次
幻燈秀。
4. 使用
5. 按住
6. 利用
7. 按
8. 如果想刪除下一個顯示的影像,請再按一次
9. 按
10. 如果想刪除更多相片,只要重複上述步驟即可。
和 箭頭按鈕,瀏覽各張相片,直到想刪除的相片出現。
按鈕不放,直到顯示 PICTURE OPTIONS(相片選項)選單。
箭頭按鈕反白選取 DELETE PHOTO(刪除相片)選項。
按鈕,從內建記憶體中刪除相片。相片刪除後,將短暫顯示 Ok(完成)文
字方塊。
成。
按鈕清除 PICTURE OPTIONS(相片選項)選單。
按鈕。重複此一步驟直到完
33
按鈕停止
繁體中文
Page 34

35
調整 LCD 色 彩
在「瀏覽」模式中,按住 鈕,直到顯示 PICTURE OPTIONS (相片選項) 選單。
1. 按 箭頭鈕反白選取 Adjust LCD Color (調整 LCD 色彩) 選項。
2. 按 鈕顯示調整選項。
3. 將反白顯示 Brightness (亮度) 選項。利用 和 箭頭鈕調整螢幕亮度。
將亮度調整到所要的程度。
4. 按住 和 箭頭鈕,直到反白顯示下一個選項 (對比度、色彩與色相)。再
次利用 和 箭頭鈕調整所選的選項。
5. 完成時請按 鈕返回 PICTURE OPTIONS (相片選項) 選單。再按一次
繁體中文
鈕返回「瀏覽」模式。
34
Page 35

規格
面板規格
螢幕尺寸 3.5”
相框尺寸 95 x 77 x 13 (mm)
長寬比 4:3
解析度 320 x 240像素
電源
外接 AC 電源變壓器 +5V, 0.5A
連線能力
USB 連接埠
儲存/ 媒體
內建記憶體 最多 45 張相片
支援的記憶卡
記憶卡插槽
支援的媒體檔
相片檔案格式 JPEG - (僅限 Base line)
支援的語言
視控螢幕選單
1 個 Mini USB 2.0 連接埠,可透過 AC 變壓器或
PC/ 筆記型電腦 USB 連線為內建電池充電。
安全數位卡 Secure Digital(SD 2.0、SDHC)
English(英語)、French(法語)、Spanish(西班
牙語)、Italian(義大利文)、German(德語)、
Dutch(荷蘭文) 和 Portuguese(葡萄牙語)
35
與 MMC
繁體中文
Page 36

37
常見問答集
問題 答案
為什麼我的相片有些無法顯示? 未支援某些相片/ 影像檔格式,請參考規格。
按任何按鈕,相框都沒反應,怎麼辦?
完全充飽數位相框的內建電池,要花多
久時間?
內建電池的供電時間有多久? 最多 2 小時。
我可以過充內建電池嗎? 不可以
繁體中文
內建電池的使用壽命有多長? 最多 2 年。
如果電池超過使用壽命,我可以更換內
建電池嗎?
我可以利用 df300 數位相框刪除 SD 記
憶卡上的相片嗎?
我可以刪除內建記憶體中的相片嗎?
我要如何切換到內建記憶體?memory?
我要到哪裡取得關於 HP 數位相框的最新
資訊/常見問答集?
用細的迴紋針或其他工具,按壓相框背後折疊座架下
的 RESET(重設)按鈕。
約 3 小時。
不行。
不行,只能刪除內建記憶體中的相片。
可以,請參考本文件的 Picture Options(相片選
項)一節。
Remove the external memory card or 拔出外接
記憶卡,或參考本手冊的「初次設定」一節。 this
manual.
如需更多最新的詳細資訊,請造訪 www.hp.com/
support。
36
Page 37

清潔與保養秘訣
√ 進行清潔前請關閉 HP 數位相框的電源。
√ 請勿緊壓螢幕。
√ 請勿將液態清潔劑直接噴在或倒在螢幕或相框上。
√ 請勿使用氨、酒精或研磨清潔劑。
清潔螢幕:
1. 使用乾淨的無絮軟布,擦拭螢幕、清除灰塵和鬆散微粒。
2. 若需要進一步清潔,在乾淨的無絮軟布上加入適合的清潔劑(配方
可供 LCD 顯示器使用者),並用軟布擦拭螢幕。
• 註:請勿對螢幕過度施壓,以免損壞。
清潔相框與背板:
1. 使用乾淨的無絮軟布,擦拭螢幕、清除灰塵和鬆散微粒。.
2. 如果想要的話,可在乾淨的無絮軟布上,沾上適合的清潔劑,並用
軟布擦拭適合的表面。
37
繁體中文
Page 38

取得協助
若有技術支援問題,或是在保固期內需要維修 HP 數位相框,請聯絡當地的原始購買
商家或 HP 授權經銷商。如未能取得服務,請利用以下支援聯絡清單,與 HP 品牌產
品之保固服務代表連繫。服務代表會與客戶共同解決問題,並在必要時發出退貨授權
(RMA) 號碼,以更換 HP 品牌產品。若要申請保固,則須提供附有日期之售貨收據副
本,作為購買產品及 RMA 號碼之證明。客戶須自行負擔將產品運送到保固服務中心
之費用,服務代表將提供地址,並由客戶自行負擔運費。保固服務中心收到產品之後,
一般會在 5 個工作天內寄出替換品。
Email Support:
Language Email Address
English english@hpodd.com
Chinese trad.chinese@hpodd.com
Japanese nippon@hpodd.com
繁體中文
Korean korean@hpodd.com
Mailing Address:
Asia Pacic
HP DPF RMA Center
8, Dusing Road, Hsinchu Science Part,
Hsinchu 300, Taiwan,
ROC
Contact/Phone Support:
Region Language Number
Asia Pacic English and Mandarin + 886 3 578 1005
38
Page 39

目次
FCC 適合性宣言
パッケージ内容
はじめる前に
初期セットアップ
セットアップ メニュー
主な機能
画像オプション
仕様
よくある質問
お手入れと管理
ヘルプ
2
40
41
43
45
47
48
53
54
55
56
日本語
Page 40

41
パッケージ内容
数量 アイテム 外観
1 3.5” デジタル ピクチャ フレーム
ユニバーサル電源アダプタ(5V、
1
0.5A、100/240 切り替え可能)
1 USB 2.0 ケーブル
1 ユーザー マニュアル
日本語
1 保証書
重要:本書にはテクニカルサポートを受
ける際の連絡先が記載されていますの
で、保管してください。
40
Page 41

Getting Started
1. デジタル ピクチャ フレームには、下図のとおりフレーム上部に基本コントロー
ル ボタンが搭載されています。
Power
電源
Options
オプション
2. スタンドを広げてください。USB ケーブルを AC アダプタに接続します。ケーブ
ルのミニコネクタをデジタル ピクチャ フレームに接続し、アダプタを下図のよ
うに壁のコンセントに差し込みます。ピクチャ フレームの電源が入り、内蔵バ
ッテリの充電が始まります。内蔵バッテリが完全に充電されるまで、2~3時間
お待ちください。
41
Right/Next
右/次へ
Left/P revious
左/戻る
日本語
Page 42

43
3. フレームの電源が自動的に入らない場合は、フレーム上部の ボタン
を3~5秒間長押しします。df300 デジタル ピクチャ フレームには、本 製品の
基本機能などを紹介する画像があらかじめ格納されており、数秒でスライドシ
ョーが始まります。内部メモリからこれらの画像を削除する場合は、本書の画
像オプションのセクションを参照してください。
4. すぐに自分の画像をご覧になりたい場合は、写真が保存された SD メモリカー
ドをカードスロットに挿入してください。数秒で SD メモリカード内の写真のス
ライドショーが始まります。メモ:メモリカードは下図のように正しい向きで挿
入してください。メモリカードがしっかりと挿入されるまで押してください。
5. ピクチャ フレームの電源を切るには、 ボタンを3~5秒長押ししま
日本語
す。
42
Page 43

初期セットアップ
1. ピクチャ フレームの電源を入れ、スライドショーを開始します。 ボタ
ンを押し、下図のように Memory Source Screen (メモリ ソース画面 ) を表示
します。
2. 下図のように SETUP MENU (セットアップ メニュー) が表示されるまで
ボタンを長押しします。
3. と ボタンを使って任意の設定アイテムを選択します。 ボタンを
押して設定オプションを選択します。
43
日本語
Page 44

45
4. と ボタンを使って任意のオプションを選択します。 ボタンを押
して希望のオプションを選択します。
5.
ボタンを押すと SETUP MEN U (セットアップ メニュー) に戻ります。
をもう一度押すと SETU P ME NU (セットアップ メニュー) を閉じて、
Memor y Source Screen (メモリ ソース画面) に戻ります。
と ボタンを使って任意のメモリ ソースを選択します。 ボタンを
6.
押して希望のメモリ ソースを選択します。選択されたメモリ ソースの画像のス
ライドショーが始まります。
日本語
44
Page 45

セットアップ メニュー
オプション 説明
“ORIGINAL (オリジナル)” を選択すると、本来のプロパ
ティで画像を表示します。画像を標準の縦横比で、縦
に合わせて表示します。一部の画像は、全画面に表示
画像の表示サイズ
スライドショー効果
されず、左右にスペースが残る場合があります。
“OPTIMAL(最適化)” を選択すると、最適のプロパテ
ィで画像を表示します。 画像は画面の幅に合わせて
拡大されます。
工場出荷時の初期設定は “ORIGINAL(オリジナル)”
です。
スライドショーの効果は6種類から選ぶことができ
ます。選択肢はNormal (ノーマル)、Random (ラン
ダム)、Top_Bottom (上から下へ)、Curtain (カーテ
ン)、Open_Door (開き戸)、Cross_Comb (クロスコン
ボ) です。
初期設定は “RANDOM (ランダム)” です。
スライドショー速度
言語
画像が表示される長さを選択します。選択肢は5秒、
10秒、30秒のいずれかです。
初期設定は “Fast (速い)” (約5秒) です。
7種類のオンスクリーン・ディスプレイ言語から任意
の言語を選択することができます。選択肢はEnglish
(英語)、Germa n (ドイツ語)、French (フランス語)、
Spanish (スペイン語)、Portuguese (ポルトガル語)、
Italian (イタリア語)、Dutch (オランダ語) です。
初期設定は English ( 英語) となっています。
45
日本語
Page 46

47
オプション 説明
PC に接続
パワーセービ
ング
工場出荷時の初
期設定
日本語
フレームが PC に接続されているときは、このオプション
を選択して転送モードに切り替えます。このモードでは、
SD/SDHC/MMC カードにアクセスすることができます。
節電のために HP デジタルピクチャ フレームの LCD を
自動的にオフにする機能です。4つの設定から選択できま
す。選択肢は5分、10分、30分、またはパワーセービング
なしです。
パワーセービング中に LCD をオンにする場合は、ピクチャ
フレームのボタンをどれか1つ押してください。
初期設定ではパワーセービング機能は無効になっていま
す。
If you wish to restore ALL the setti ngs to t he factory
default, press the button.
46
Page 47

主な機能
特徴
ピクチャ スライドショー
• 6種類の異なる効果で写真を自動表示します。
複数写真の表示オプション。
• 参照モードで1枚ずつの写真を表示できます (この後のセクションで説明)。
• PC に接続することなく、画像を SD カードから内部メモリにコピーできま
す。
• 画像を1枚ずつズームしたり、回転したりできます。
参照モードで輝度、コントラスト、色合い、色の調整。
SD カードから内部メモリに写真を追加。
充電式内蔵バッテリで移動にも強い。
• AC アダプタや PC/ノートの USB 接続で充電できます。
• 内蔵バッテリによる最長再生時間は2時間です。
パワーセービング モード
• 4つの異なる設定から選択できます。
47
日本語
Page 48

49
画像オプション
スライドショー モード
スライドショー モードは、フレームの電源を入れて数秒後、または外部メモリカー
ドを挿入したときに起動します。
参照モード
スライドショー モードを終了するには、 ボタンを1回押します。画面右上に
一時停止の記号が短時間だけ表示されます。このときに と ボタンを押す
と、前または次の画像を表示できます。
サムネイル モード
サムネイル モードで画像を表 示するには、スライドショー モードのときに
ボタンを2回、参照モードのときに1回押します。下図のサムネイル例をご覧くださ
い。
と ボタンで画像を選びます。 ボタンを押して選択された画像を表
示します。
日本語
48
Page 49

画像の回転
参照モードで ボタンを長押しすると、下図のような PICTURE OPT IONS
(画像オプション) メニューが表示されます。
ボタンを押して選択された画像を回転させます。このボタンを押すたびに、
画像は90°ずつ時計回りに回転します。
ボタンを押すと PICTUR E OPTIONS (画像オプション) メニューを終了し
ます。
画像のズーム
参照モードで ボタンを長押しすると、PICTURE OPT IONS ( 画像オプショ
ン) メニューが表示されます。 ボタンを押すと、画像を4倍まで拡大できま
す。ボタンを1回押すたびに、1倍ずつ拡大し、最大で4倍になります。4倍になった
時点でこのボタンを押すと、もとのサイズに戻ります。メモ:スライドショー モード
のときに画像をズームすると、ピクチャ フレームは自動的に参照モードに切り替
わります。
ボタンを押すと PICTUR E OPTIONS (画像オプション) メニューを終了し
ます。
49
日本語
Page 50

51
画像を内部メモリにコピー
画像は Secure Digital (SD または SDHC) や M MC メモリカードから df300 フ
レームの内部メモリへのみコピーすることができます。
1. 画像の入った SD メモリカードをフレームのメモリカード スロットに挿入しま
す。
2. ピクチャ フレームの電源を入れると、数秒後に SD メモリカードからのスライ
ドショーが始まります。 ボタンを押して参照モードまたはサムネイル モ
ードに切り替えます。
3. と ボタンを使ってコピーする画像を選択します。
4. ボタンを長押しし、PICT UR E OP TIONS (画像オプション) メニューを
表示します。
5. ボタンを使って”COPY PHOTO (写真をコピー )” オプションをハイライトし
ます。
6. ボタンを押して画像を内部メモリにコピーします。画像がコピーされる
と、OKテキストボックスが表示されます。
7.
ボタンを押すと PICTUR E OPTIONS (画像オプション) メニューを終
了します。
8. その他の画像をコピーする場合は、同じ操作を繰り返します。
日本語
50
Page 51

内部メモリからの画像削除
画像は df 300 フレームの内部メモリからのみ削除することができます。
1. ピクチャ フレームの電源を切ります。
2. SD カードが入っている場合は、スロットから取り出します。カードを取り出す
際は、カードをもう一度押し、カードのロックを解除します。これでカードを抜
き取ることができます。SD カードを取り外してください。
3. ピクチャ フレームの電源を入れ、内部メモリに保存された画像のスライドショ
ーを始めます。 ボタンを1回押すと、スライドショーを停止します。
と ボタンを使って削除する画像を選択します。
4.
ボタンを長押しし、PICTURE OPTIONS (画像オプション) メニューを
5.
表示します。
6.
ボタンを使って”DELETE PHOTO (写真を削除 )” オプションをハイライト
します。
7.
ボタンを押して画像を内部メモリから削除します。画像を削除すると、
OKテキストボックスが表示されます。
8. 次に表示された画像も削除する場合は、もう一度
の操作を繰り返し、削除したい画像を削除します。
9.
ボタンを押すと PICTUR E OPTIONS (画像オプション) メニューを終
了します。
10. その他の画像を削除する場合は、同じ操作を繰り返します。
51
ボタンを押します。こ
日本語
Page 52

53
LED カラーの調整
参照モードで PICTURE OPTIONS (画像オプション) が表示されるまで ボ
タンを長押しします。
1. ボタンを使って Adjust LCD C olor (LCD カラーの調整) を選択します。
2. ボタンを押して調整オプションを表示します。
3. Bright ness (輝度) オプションが選択されます。 と ボタンを使って、
画面の輝度をちょうど良い明るさに調整します。
4. 次のオプション (コントラスト、色、色合い) が選択されるまで と ボタ
ンを長押しします。さらに と ボタンを使って選択されたオプションを
調整します。
5. 調整が済んだら、 ボタンを押して PICTURE OP TIONS (画像オプショ
ン) メニューに戻ります。もう一度 ボタンを押すと参照モードに戻りま
す。
日本語
52
Page 53

仕様
パネル仕様
画面サイズ 3.5”
フレームサイズ 95 x 77 x 13 (m m)
縦横比 4:3
解像度 320 x 240 ピクセル
電源
外部 AC 電源アダプタ +5V, 0.5A
接続
USB ポート
ストレージ/メディア
内部メモリ 最大45枚の画像
対応メモリカード
メモリカード スロット
対応メディアファイル
画像ファイル形式 JPEG - (ベースラインのみ)
対応言語
オンスクリーン・ディスプレイ
AC アダプタまたは PC/ノート USB 接続による
内蔵バッテリ充電用のミニ USB 2.0
セキュアデジタル (SD 2.0、SDHC) および
英語、ドイツ語、フランス語、スペイン語、ポル
トガル語、イタリア語、オランダ 語
53
MMC
日本語
Page 54

55
よくある質問
問題点 解答
表示できない画像があるのはなぜですか?
ボタンを押してもピクチャ フレームが反
応しません。
デジタル ピクチャ フレームの内蔵バッテリ
を完全に充電するには、どれくらい時間が
かかりますか?
内蔵バッテリ使用の場合、ピクチャ フレー
ムはどれくらい使用できますか?
内部バッテリを過充電しても大丈夫ですか? いいえ。
内蔵バッテリの寿命はどれくらいですか? 最長2年です。
内蔵バッテリが切れたら、交 換できますか? いいえ。
df300 デジタル ピクチャ フレームで、SD
メモリカードの画像を削除できますか?
内部メモリの画像を削除できますか?
日本語
どうやって内部メモリに切り替えるので
すか?
HP デジタル ピクチャ フレームの最新
情報やよくある質問はどこに掲載されて
いますか?
54
ピクチャ フレームでは対応していない画像/イ
メージ形式があります。詳しくは仕様をご覧
ください。
小さなペーパークリップなどを使って、フレーム
背面の折り畳みスタンドの下にあるリセットボタ
ンを押してください。
約3時間です。
最長2時間です。
いいえ。内部メモリに保存された画像のみ削
除できます。
はい。本書の画像オプションのセクションを参
照してください。
外部メモリカードを取り外すか、または本書の
初期セットアップを参照してください。
詳細や最新 情報については、ウェブサイト
www. hp.com/support を参 照してください。
Page 55

お手入れと管理
√ お手入れを行う前に、まず HP デジタル ピクチャ フレームの電源を切
ってください。
√ 画面を強く押さないでください。
√ 液体クレンザーを直接フレーム画面に吹き付けないでください。
√ アンモニア、アルコール、研磨剤などの洗浄剤を使用しないでください。
画面のお手入れ:
1. きれいで、柔らかい、糸くずなどのない布でホコリなどを拭き取
ってください。
2. まだ汚れが落ちない場合は、適切なクリーニング材 (LCD ディス
プレイ用) をきれいで、柔らかい、糸くずなどのない布にあてが
い、画 面を拭いてください。
• メモ:画面を傷つける恐れがあるため、力を入れないでくださ
い。
フレームやケースの背面のお手入れ:
1. きれいで、柔らかい、糸くずなどのない布でホコリなどをお使
いください。
2. 必要に応じて、適切なクリーニング材をきれいで、柔らかい、糸
くずなどのない布にあてがい、表面を拭き取ってください。
55
日本語
Page 56

ヘルプ
テクニカルサポートが必要な
場合や、保証期間中に HP デ
ジタル ピクチャ フレームの修
理が必要な場合は、お買い上
げ店または HP 認定の販 売店
にお問い合わせください。上
記の場所で修 理を受けられな
い場合は、以下のページに記
載されたサポート連 絡先から、
HP ブランド製品の保証代理
店にお問い合わせください。サ
ービススタッフがお客様のトラ
ブルをお聞きし、必要に応じ
て HP ブランド製品の交 換を
申請するための RM A 番号を
発行いたします。保証の必 要な
製品については、お買い上げ証
明として、お買い上げ時の領収
書と RM A 番号が必要となり
ます。製品をサービスセンター
にお送りになる場 合、郵送費は
お客様負担となりますのでご
了承ください。サービススタッ
フが送付先住所を提供します。
サービスセンターまでの郵送費
を含め、一切の運送手 数料は
お客様のご負担となります。サ
ービスセンターがお客様からの
日本語
Region Language Number
Asia Pacic English and Mandarin + 886 3 578 1005
製品を受け取ると、5日(営業日)以内に交換 品
が発送されます。
Email Support:
Language Email Address
English english@hpodd.com
Chinese trad.chinese@hpodd.com
Japanese nippon@hpodd.com
Korean korean@hpodd.com
Mailing Address:
Asia Pacic
HP DPF RMA Center
8, Dusing Road, Hsinchu Science Part,
Hsinchu 300, Taiwan,
ROC
Contact/Phone Support:
56
Page 57

Page 58

 Loading...