

Page 1

HP DDS-3 T
User’s Guide
ape Drive
Workstation Systems Group
Order No. A1658–90702
Edition E1296
Printed in U.S.A.
Page 2

Hewlett-Packard Co. 1996
First Printing: December 1996
UNIX
is a registered trademark in the United States and other countries, licensed exclusively
X/Open Company Limited.
NOTICE
The information contained in this document is subject to change without notice.
HEWLETT–PACKARD MAKES NO WARRANTY OF ANY KIND WITH REGARD TO THIS
MATERIAL INCLUDING BUT NOT LIMITED TO THE IMPLIED WARRANTIES OF
MERCHANTABILITY AND FITNESS FOR A PARTICULAR PURPOSE. Hewlett-Packard shall
be liable
not
the furnishing, performance or use of this material.
for errors contained herein or for incidental or consequential damages in connection with
through
Hewlett-Packard
not furnished by Hewlett-Packard.
This
document contains proprietary information which is protected by copyright. All rights reserved.
No
part of
this document may be photocopied, reproduced or translated to another language without the
prior written consent of Hewlett-Packard Company.
RESTRICTED RIGHTS LEGEND. Use, duplication, or disclosure by government is subject to
restrictions
Clause at DFARS 252.227.7013. Hewlett-Packard Co., 3000 Hanover St., Palo Alto, CA 94304.
10 9 8 7 6 5 4 3 2 1
assumes no responsibility for the use or reliability of its software on equipment that is
as set forth in subdivision (c) (1) (ii) of the Rights in T
echnical Data and Computer Software
Page 3

Contents
Preface
Audience vii.
Safety and Regulatory Statements viii
Installation Notice ix
Related Manuals x. . . . . . . . . . . . . . . . . . . . . . . . . . . . . . . . . . . . . . . . . . . . . . . . . . . . . . . .
Revision Historyx. . . . . . . . . . . . . . . . . . . . . . . . . . . . . . . . . . . . . . . . . . . . . . . . . . . . . . . . .
Questions, Suggestions, or Problems xi
Documentation Conventionsxi. . . . . . . . . . . . . . . . . . . . . . . . . . . . . . . . . . . . . . . . . . . . . . .
. . . . . . . . . . . . . . . . . . . . . . . . . . . . . . . . . . . . . . . . . . . . . . . . . . . . . . . . . . . . .
. . . . . . . . . . . . . . . . . . . . . . . . . . . . . . . . . . . . . . . . . . . . . . . . . . . . . . . .
Chapter 1 Introduction
General Description 1–2.
DDS-3 Drive Environmental Requirements 1–3
DDS-3 Drive Physical Specifications 1–5
Preparing to Install the DDS-3 Drive 1–6
T
ools Required
Verifying Kit Contents 1–6
Operating System Support 1–6
Setting the SCSI-2 Address 1–7
Address Jumpers
Preparing the System 1–11
SCSI-2 Connection and Termination 1–12
Powering Off the Workstation and Any Peripherals 1–13
Adding or Removing the DDS-3 Drive Bezels or Expansion Brackets 1–14
. . . . . . . . . . . . . . . . . . . . . . . . . . . . . . . . . . . . . . . . . . . . . . . . . . .
. . . . . . . . . . . . . . . . . . . . . . . . . . . . . . . . . . . . . . . . . . . . . . . . . . . . .
. . . . . . . . . . . . . . . . . . . . . . . . . . . . . . . . . . . . . . . . . . . . . . . . . . .
. . . . . . . . . . . . . . . . . . . . . . . . . . . . . . . . . . . . . . . . . . . . . . . . . .
. . . . . . . . . . . . . . . . . . . . . . . . . . . . . . . . . . . . . . . . . .
. . . . . . . . . . . . . . . . . . . . . . . . . . . . . . . . . . . . . . . . .
. . . . . . . . . . . . . . . . . . . . . . . . . . . . . .
. . . . . . . . . . . . . . . . . . . . . . . . . . . . . . . . . . .
. . . . . . . . . . . . . . . . . . . . . . . . . . . . . . . . . . . . . . .
1–6
. . . . . . . . . . . . . . . . . . . . . . . . . . . . . . . . . . . . . . . . . . . . . . .
. . . . . . . . . . . . . . . . . . . . . . . . . . . . . . . . . . . . . . . . . . . .
. . . . . . . . . . . . . . . . . . . . . . . . . . . . . . . . . . . . . . . . . . .
1–8
. . . . . . . . . . . . . . . . . . . . . . . . . . . . . . . . . . .
. . . . . . . . . . . . . . . . . . . . . . . . . .
. . . . . . . . . . . .
iii
Page 4

Contents
Chapter 2 Using the DDS-DC Drive
Your DDS-3 Drive Configuration 2–2.
Controls and Features of the DDS-3 Drive 2–2
LEDs 2–3
. . . . . . . . . . . . . . . . . . . . . . . . . . . . . . . . . . . . . . . . . . . . . . . . . . . . . . . . . . . . .
Data Cassettes
Media Life 2–3
Cleaning the T
Media Restrictions
Setting the Write-Protect T
Using the DDS-3 Drive 2–6
Loading and Unloading a Data Cassette 2–6
Verifying the DDS-3 Tape Drive Operation 2–7
Media Interchangeability Restrictions
Ordering Information 2–9
. . . . . . . . . . . . . . . . . . . . . . . . . . . . . . . . . . . . . . . . . . . . . . . . . . . . .
. . . . . . . . . . . . . . . . . . . . . . . . . . . . . . . . . . . . . . . . . . . . . . . . . . . . .
ape Heads
. . . . . . . . . . . . . . . . . . . . . . . . . . . . . . . . . . . . . . . . . . . . . . .
. . . . . . . . . . . . . . . . . . . . . . . . . . . . . . . . . . . . . . . . . . . . . . . . .
. . . . . . . . . . . . . . . . . . . . . . . . . . . . . . . . . . . . . . . . . . . . . . . .
. . . . . . . . . . . . . . . . . . . . . . . . . . . . . . . . . . . . . . . . .
. . . . . . . . . . . . . . . . . . . . . . . . . . . . . . . . . . .
. . . . . . . . . . . . . . . . . . . . . . . . . . . . . . . . . . . . . . . . . .
ab on a Data Cassette
. . . . . . . . . . . . . . . . . . . . . . . . . . . . . . . . .
. . . . . . . . . . . . . . . . . . . . . . . . . . . . . . .
. . . . . . . . . . . . . . . . . . . . . . . . . . . . . . . . . . .
. . . . . . . . . . . . . . . . . . . . . . .
Chapter 3 Troubleshooting and Removal/Replacement Procedures
Troubleshooting 3–1.
Checking the Address Settings for Single-Ended Drives 3–2
Checking the Hardware Installation 3–3
Rechecking the Address Settings
Verifying the System Operation Using the Support T
Removal/Replacement Procedures
Field Replaceable Units
Powering Off the System 3–8
Removing and Replacing the DDS-3 Drive 3–9
Adding or Removing the DDS-3 Drive Bezels and Expansion Brackets 3–9
. . . . . . . . . . . . . . . . . . . . . . . . . . . . . . . . . . . . . . . . . . . . . . . . . . . . . .
. . . . . . . . . . . . . . . . . . . .
. . . . . . . . . . . . . . . . . . . . . . . . . . . . . . . . . . . . .
. . . . . . . . . . . . . . . . . . . . . . . . . . . . . . . . . . . . . . .
ools Manager
. . . . . . . . . . . . . . . . . . . . . . . . . . . . . . . . . . . . . . . . .
. . . . . . . . . . . . . . . . . . . . . . . . . . . . . . . . . . . . . . . . . . . . . .
. . . . . . . . . . . . . . . . . . . . . . . . . . . . . . . . . . . . . . . . . . . . .
. . . . . . . . . . . . . . . . . . . . . . . . . . . . . . .
. . . . . . . . . . . .
. . . . . . . .
2–3
2–4
2–4
2–4
2–7
3–5
3–5
3–8
3–8
Appendix
iv
A
SCSI Connector Pinouts
Page 5

Figures
Contents
Tables
1–1. HP DDS-3 Drive 1–2.
1–2. HP DDS-3 Drive Physical Specifications 1–5
1–3. Rear View of DDS-3 Drive and SCSI Address/Jumper Settings 1–9
1–4. Switch Settings for Data Compression Mode 1–10
1–5. Adding a Bezel to the DDS-3 Drive 1–14
1–6. Removing a Bezel from the DDS-3 Drive 1–15
1–7 Adding or Removing Expansion Brackets 1–15
2–1. DDS-3 Drive Controls and Indicators 2–2
2–2. Setting the Write-Protect Tab on a DDS Tape 2–5
2–3.
Loading a Data Cassette
3–1. Adding a Bezel to the DDS-D3 Drive 3–10
3–2. Removing a Bezel from the DDS-D3 Drive 3–10
3–3. Adding or Removing Expansion Brackets 3–11
2–1. LED Display Codes 2–3
2–2. HP DDS Drive Compatibility 2–8
A–1. SCSI Connector Pinouts A–1
. . . . . . . . . . . . . . . . . . . . . . . . . . . . . . . . . . . . . . . . . . . . . . . .
. . . . . . . . . . . . . . . . . . . . . . . . . . . . . .
. . . . . . . . . . . . .
. . . . . . . . . . . . . . . . . . . . . . . . . .
. . . . . . . . . . . . . . . . . . . . . . . . . . . . . . . . . .
. . . . . . . . . . . . . . . . . . . . . . . . . . . . .
. . . . . . . . . . . . . . . . . . . . . . . . . . . . .
. . . . . . . . . . . . . . . . . . . . . . . . . . . . . . . . .
. . . . . . . . . . . . . . . . . . . . . . . . . . .
. . . . . . . . . . . . . . . . . . . . . . . . . . . . . . . . . . . . . . . . . . . .
. . . . . . . . . . . . . . . . . . . . . . . . . . . . . . . .
. . . . . . . . . . . . . . . . . . . . . . . . . . .
. . . . . . . . . . . . . . . . . . . . . . . . . . . . .
. . . . . . . . . . . . . . . . . . . . . . . . . . . . . . . . . . . . . . . . . . . . . . .
. . . . . . . . . . . . . . . . . . . . . . . . . . . . . . . . . . . . . . .
. . . . . . . . . . . . . . . . . . . . . . . . . . . . . . . . . . . . . . . . . . . .
2–6
v
Page 6

Preface
The HP DDS-3 T
DDS-3 drive.
We’ve organized this guide as follows:
Chapter 1 Provides a general description of the DDS-3 drive and the procedures for
Chapter 2 Describes the DDS-3 drive configurations, its controls and features, and
Chapter 3 Provides information on caring for DDS tapes, troubleshooting
Appendix A Lists the pinouts for the SCSI connector on the DDS-3 drive.
Audience
This guide is intended for use by anyone familiar with the the HP workstations who
wants to install and configure the DDS drive.
ape Drive User’s Guide
installing it into a system.
provides directions for using it.
information, and removal/replacement procedures for the DDS-3 drive.
describes how to install, configure, and use the
vii
Page 7

Preface
Safety and Regulatory Statements
See the Owner’s Guide that came with your system for safety informtion.
Federal Communications Commission (FCC)
This equipment has been tested and found to comply with the limits for a Class B digital
device, pursuant to part 15 of the FCC Rules and the Canadian Department of
Communications. These limits are designed to provide reasonable protection against
harmful interference in a residential installation. This equipment generates, uses, and can
radiate radio frequency energy and, if not installed and used in accordance with the
instructions may cause harmful interference to radio communications. However, there is
no guarantee that interference will not occur in a particular installation.
Hewlett-Packard’s system certification tests were conducted with HP-supported
peripheral devices and HP shielded cables, such as those you receive with your computer.
Changes or modifications not expressly approved by Hewlett-Packard could void the
user’s authority to operate the equipment.
viii
Operation of this device is subject to the following conditions:
• This device may not cause harmful interference.
• This
device must accept interference received, including interference that may
undesired operation.
cause
• Cables used with this device must be properly shielded to comply with the
requirements of the FCC.
Canadian Department of Communications (CDC)
This digital apparatus does not exceed the Class A limits for radio noise emissions from
digital apparatus as set out in the Radio Interference Requirements of the Canadian
Department of Communications.
Page 8

Preface
Emissions Regulations Compliance
Any third-party I/O device installed in HP system(s) must be in accordance with the
requirements set forth in the preceding Emissions Regulations statements. In the event
that a third-party noncompliant I/O device is installed, the customer assumes all
responsibility and liability arising therefrom.
Electrostatic Discharge (ESD) Precautions
Electrostatic charges can damage the integrated circuits on printed circuit boards. To
prevent such damage from occurring, observe the following precautions during board
unpacking and installation:
• Stand on a static-free mat.
• Wear a static strap to ensure that any accumulated electrostatic char
discharged from your body to ground.
ge is
• Connect all equipment together, including the static-free mat, static strap, routing
nodes, and peripheral units.
• Keep uninstalled printed circuit boards in their protective antistatic bags.
• Handle
protective antistatic bags.
printed circuit boards by their edges, once you have removed them from their
ix
Page 9

Preface
Installation Notice
Products designated in the applicable Hewlett-Packard price list as customer-installable
can be installed by computer-knowledgeable customers who carefully read and follow the
instructions provided. Customers who elect to have the product installed by our field
personnel are charged the applicable field installation charge, as covered under the
standard terms and conditions. For more information, please contact your local sales
representative.
Related Manuals
For more information, refer to the following documents:
• The Owner’s Guide that came with your system
• HP-UX Installing Peripherals: HP 9000 Series 700 (B2355–90006)
• Using Your HP Workstation (A2615–90003)
• HP V
• System Administration T
isual User Envir
onment User
asks HP 9000 Series 700 Computers
’s Guide (B1171–90061)
(B2355–90040)
• Using HP-UX (B2910–90001)
Documents specific to HP DDS drives:
• User’s Manual, Vol 1 of HP DDS T
echnical Manual (C1534–9091
1)
• Integration Guide, Vol 2 of HP DDS Technical Manual (C1534–90912)
• The SCSI Interface, Vol 3 of HP DDS Technical Manual (C1534–90913)
• Background to DDS Products, Vol 4 of
• HP
Contact your HP supplier for copies.
x
DDS Configuration Guide
, V
HP DDS T
ol 5 of HP DDS T
echnical Manual (C1534–90914)
echnical Manual
(C1534–90915)
Page 10

Questions, Suggestions, or Problems
If you have any questions, suggestions, or problems with our hardware, software, or
documentation, please call 1–888–301–5932 (U.S. and Canada), or contact the HP
Response Center for your country.
Documentation Conventions
Unless otherwise noted in the text, this guide uses the following symbolic conventions:
literal values Bold words or characters in formats and command descriptions
represent commands that you must use literally. Pathnames are
also in bold.
Preface
user-supplied Italic words or characters in formats and command descriptions
values represent values that you must supply. Italics are also used in
text for emphasis.
screen display Information that the system displays appears in this typeface.
Return
A rectangle with rounded corners and a key label denotes a key on
your keyboard. (In this manual we refer to the Return key. On
your keyboard the key may be labeled either Return or Enter.)
This symbol indicates the end of a chapter or appendix.
xi
Page 11

Chapter 1
Introduction
This document describes the HP DDS-3 drive (HP model number C1537A), its
installation, operation, troubleshooting, and removal/replacement procedures.
This chapter introduces the DDS-3 drive and contains the following information:
• General description of the drive
• Preparing to install the drive
• Preparing the system
• Powering off the workstation and any peripherals
• Adding or removing the DDS-3 drive bezels or expansion brackets
1–1
Page 12
Introduction
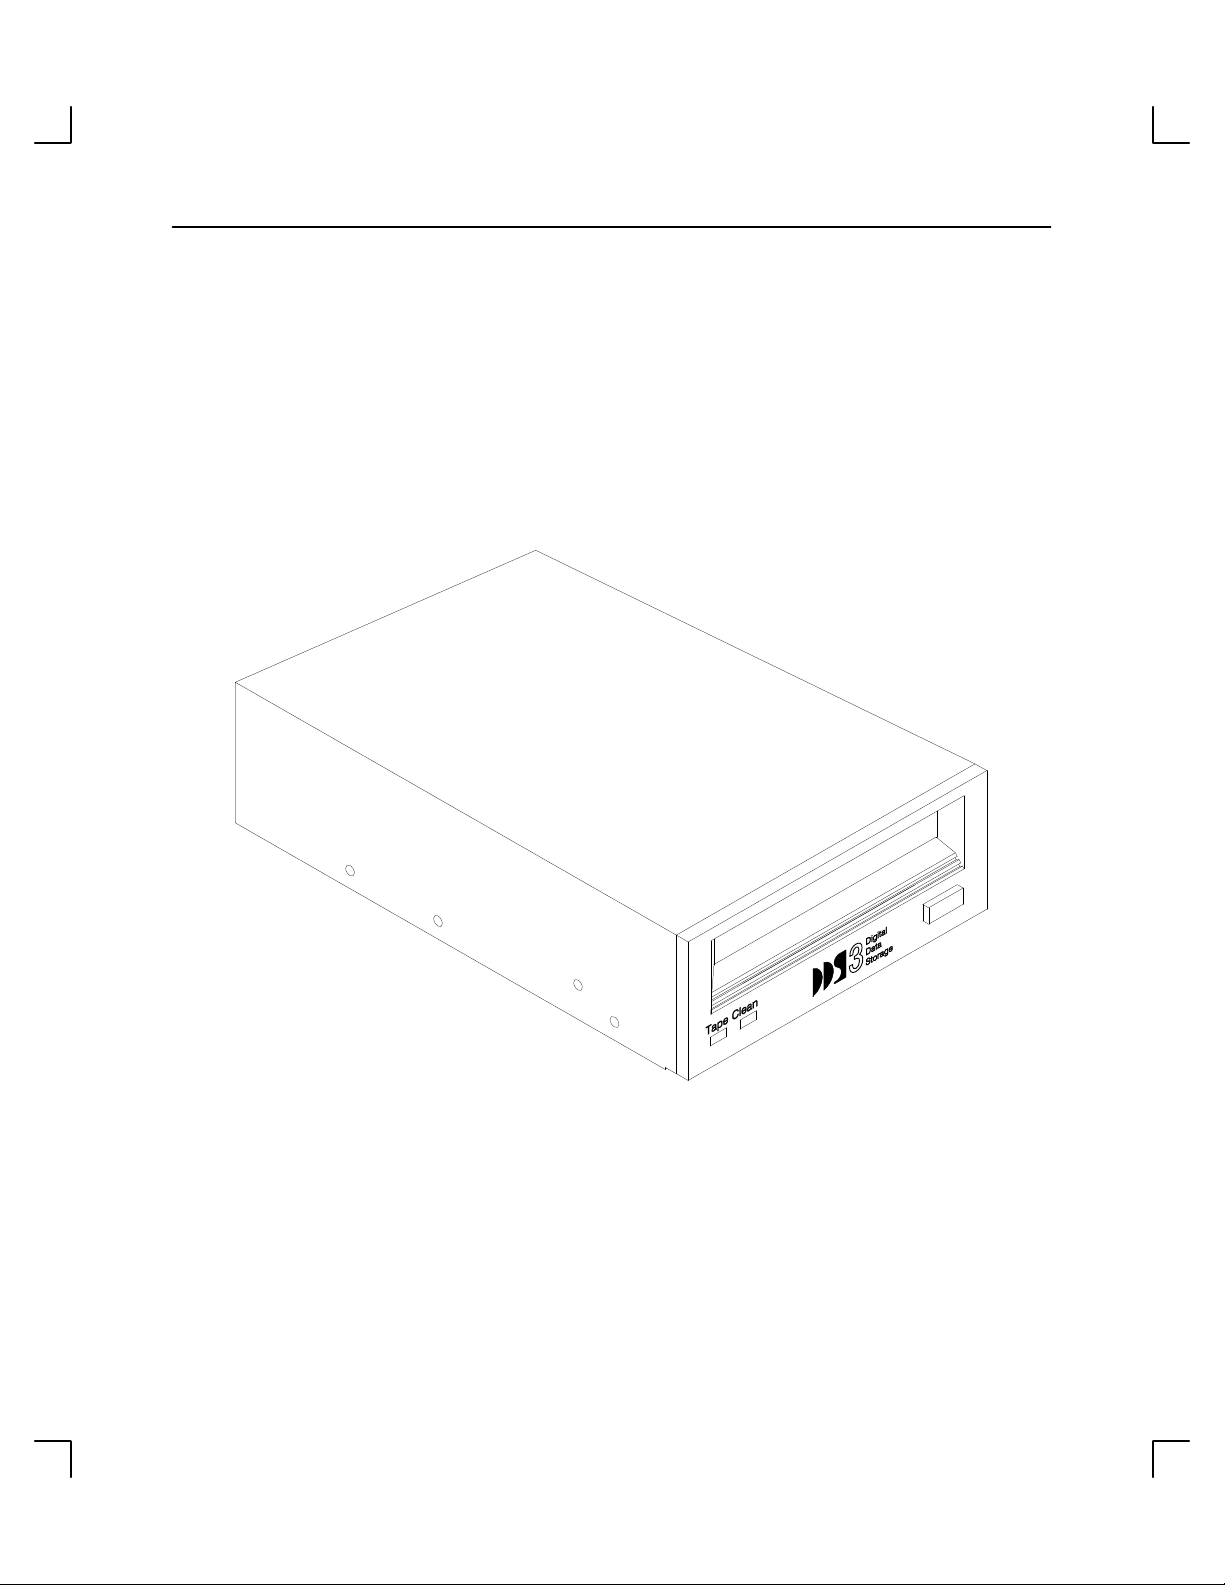
General Description
The HP DDS-format drives have been developed by Hewlett Packard for data storage
drives that build on DAT technology. The DDS-3 drive has 12-GB native capacity and
24–GB compressed capacity
DDS–2 drive formats. Figure 1–1 shows the DDS-3 drive.
. The DDS–3 drive is compatible with all DDS–1 and
1–2
Figure 1–1. HP DDS-3 Drive
Page 13

DDS-3 Drive Environmental Requirements
The DDS-3 drive has the following environmental requirements:
• Ambient Temperature
Operating 5_ C to 40_ C
(41_ F to 104_ F)
Non-Operating –40_ C to 70_ C
(–40_ F to 158_ F)
• Humidity
Operating 20% to 80%RH (non-condensing)
Non-Operating 5% to 95%RH
Maximum wet bulb temperature = 26_ C
• Vibration
Operating (3 axes for drives, 1 axis for autoloaders)
Swept Sine 0.3 g peak, 5–500 Hz @ 1 octave/min
Random 5–350 Hz @ 0.00053 g
HP C1534A/ 350–500 Hz @ –6 dB/octave
36A/53A 500 Hz @ 0.000271 g
Random 5–350 Hz @ 0.0002 g
HP C1533A/ 350–500 Hz @ –6 dB/octave
HP C1537A 500 Hz @ 0.0001 g2/Hz (≈0.3 g rms)
Non-Operating
Swept Sine 0.75 g peak, 5–500 Hz @ 1 octave/min
Random 5–100 Hz @ 0.020 g
100–137 Hz @ –6 dB/octave
137–350 Hz @ 0.0107 g
350–500 Hz @ –6 dB/octave
500 Hz @ 0.0052 g
Introduction
2
/Hz
2
/Hz (≈0.5 g rms)
2
/Hz
2
/Hz
2
/Hz
2
/Hz (≈2.41 g rms)
1–3
Page 14

Introduction
• Shock
Operating (3 axes for drives)
no performance change 5.0 g peak for 3 ms: half sine
Operating (3 axes for drives)
no data loss
Non-Operating (3 axes)
no damage 0 km to 15.2 km (0 to 50,000 ft)
8.0 g peak for 11 ms: half sine
• Altitude
Operating 0 km to 4.6 km (0 to 15,000 ft)
Non-Operating 0 km to 15.2 km (0 to 50,000 ft)
• Transportation
Vibration Type 1 package (3 axes)
Swept Sine 0.5 g peak, 5–200–5 Hz @ 1 octave/min
5 min dwell at peak resonance
Random 5–100 Hz @ 0.015 g
100–200 Hz @ –6 dB/octave
200 Hz @ 0.0038 g
(30 min/axis)
Impact Type 1 package
10 vertical impacts (6 faces and 4 bottom package corners from
910 mm height)
2
/Hz
2
/Hz(≈1.47 g rms)
1–4
• Suspended Particles
Operating and Non–Operating Suspended particle environment,
particles <200 microgram/cubic meter
•
Acoustic Noise Emissions
<5.0 bel soundpower
Page 15
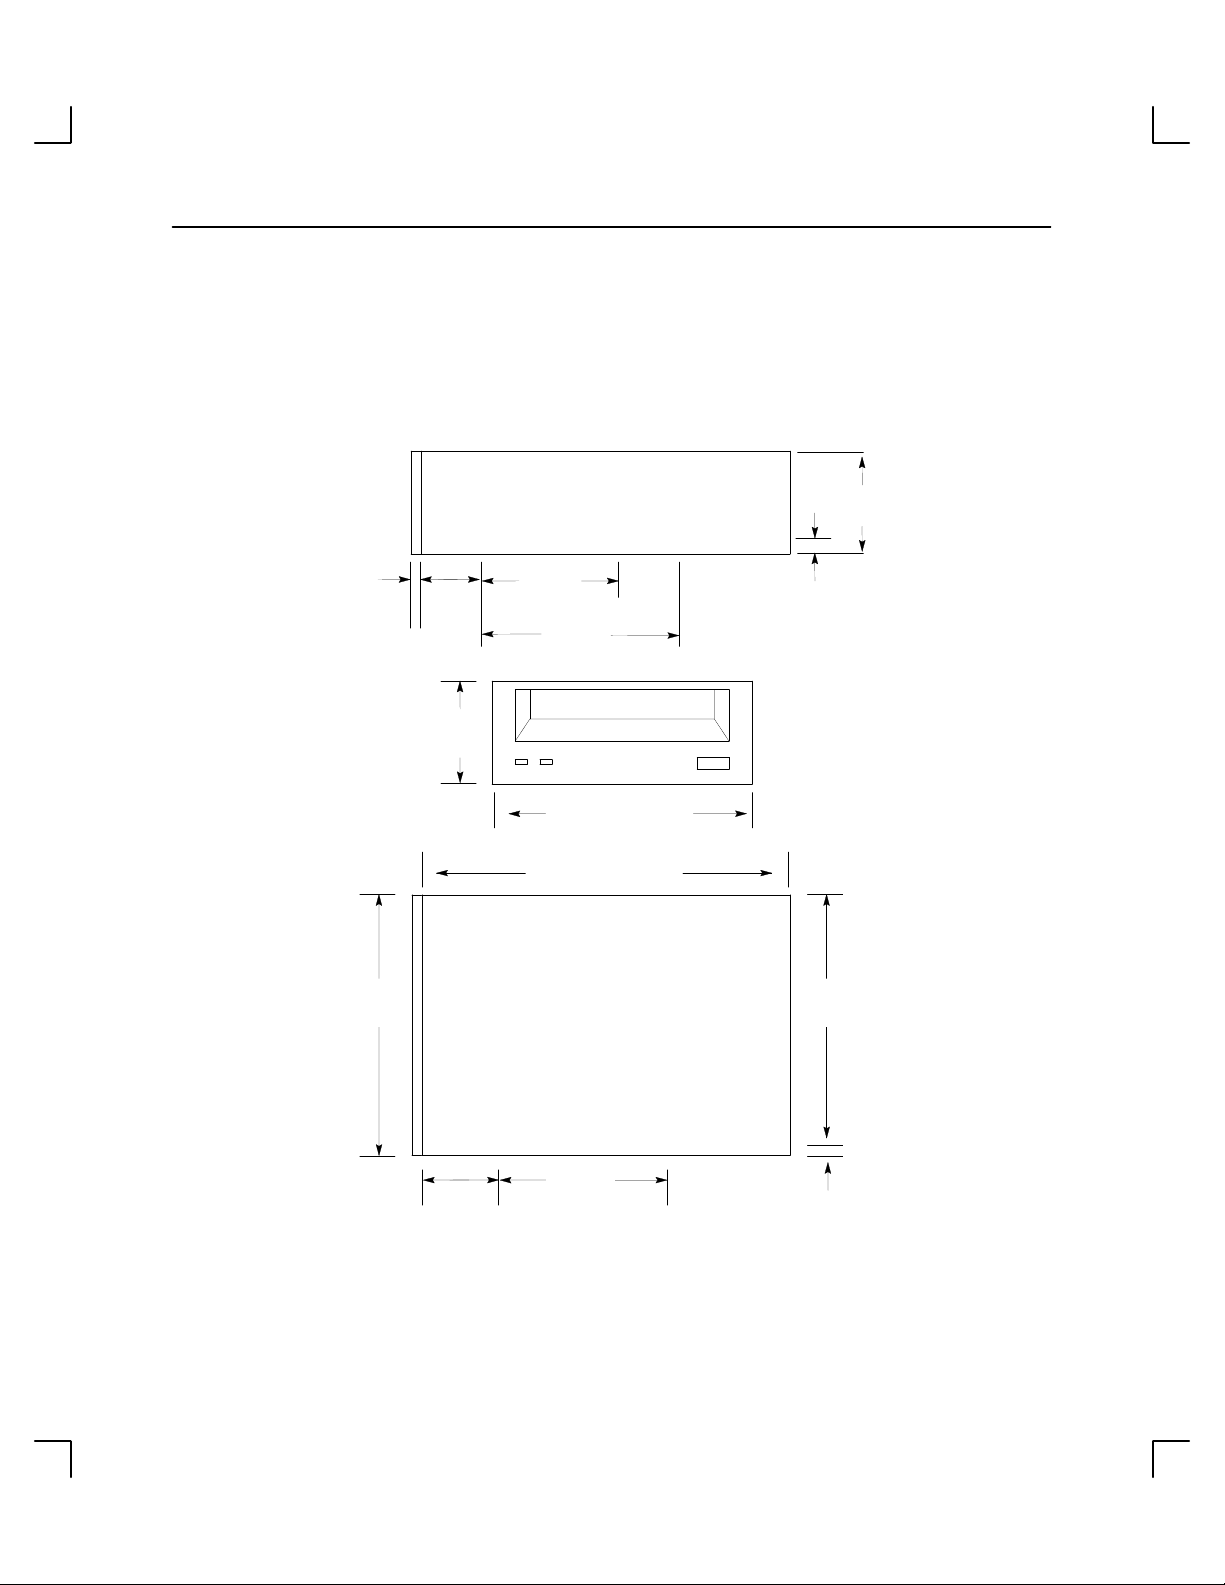
DDS-3 Drive Physical Specifications
Figure 1–2 describes the physical specifications of the DDS-3 drive.
41.3 mm
+++
(1.61 in.)
Introduction
4 mm
(0.15 in.)
101.6 mm
(3.96 in.)
21 mm
(0.82 in.)
41.3 mm
(1.61 in.)
30.9 mm
(1.20 in.)
60 mm
(2.34 in.)
90 mm
(3.51 in.)
101.6 mm (3.96 in.)
150 mm (5.85 in.)
5 mm
(0.20 in.)
++
94 mm
(3.66 in.)
++
70 mm
(2.73 in.)
3.8 mm
(.15 in.)
Figure 1–2. HP DDS-3 Drive Physical Specifications
1–5
Page 16

Introduction
Preparing to Install a New DDS-3 Drive
The following information describes how to prepare the DDS-3 drive for installation.
Tools Required
The following tools are needed to install the DDS-3 drive:
• #2 Phillips screwdriver
• Small needlenose pliers
• T10 torx wrench
Verifying Kit Contents
Verify that the kit contains one of each of the following:
1–6
• DDS-3 drive (part number 0950–2650) and bezel.
• Set of 4 screws (M4x6)
• Power adapter cable
• Set
of two expansion
brackets and four screws (M3x6 T10)
(not included in all kits)
• SCSI I/O cable
• Static strap
• HP DDS-3 T
NOTICE: If any contents of your kit are missing, contact your sales
representative.
Operating System Support
The HP DDS-3 drive supports HP-UX 10.01 and later. This drive requires patches
PHSS_7894 (or equivalent replacement) for support of the Support T
patch PHSS_7583 (or equivalent replacement) for offline SCSI testing..
ape Drive User’s Guide
(A1658–90702)
ools Manager
, and
Page 17

Introduction
Setting the SCSI-2 Address
The DDS-3 drive must have a unique SCSI-2 target address. The DDS-3 drive jumpers
are set at the factory to the SCSI-2 default address of 3, as shown in Figure 1–3. We
recommend that you keep the default address, if possible.
You must also ensure that the Operation Mode jumpers are set for correct drive operation,
as shown in Figure 1–4. We ship the drive with the Operation Mode jumpers set to
operate correctly with your system.
CAUTION: SCSI tape drives are susceptible to mechanical and electrostatic
shock. When handling a DDS-3 drive, always wear the staticgrounding wrist strap that comes in the DDS-3 drive kit, and always handle the drive carefully.
Electrostatic charges can damage drives. To prevent such damage
from occurring, observe the following precautions during unpacking and installation:
D Stand on a static-free mat.
D Wear a static strap to ensure that any accumulated electrostatic
ge discharges from your body to ground.
char
D Connect all equipment together, including the static-free mat,
static strap, routing nodes, and peripheral units.
D Keep uninstalled DDS-3 drives in their protective antistatic
bags.
If you need to change the DDS-3 drive address or operation mode, follow these
instructions, referring to Figures 1–3 and 1–4:
1. Locate the jumpers at the back of the DDS-3 drive.
2. To change the jumper settings, use needlenose pliers to set the drive’s SCSI ID to an
address that is not used by another SCSI device. Check that the other jumpers are set
correctly.
1–7
Page 18

Introduction
3. If you need to change the Operation Mode switches, locate the switches on the un-
Address Jumpers
To set the drive’s address, use the SCSI-2 address jumpers, and perform the following
steps:
1. Attach the static-grounding wrist strap by following the instructions on the package.
2. Locate the address jumpers on the rear of the DDS-3 drive. Figure 1–3 shows the
derside of the DDS-3 tape drive. Switches 1 and 2 are used to configure the data
compression operation mode. Switches 3 through 8 are used to specify drive connectivity and functionality according to host or customer requirements. The default setting is all switches ON.
Attach one end of the strap to the system chassis.
rear of the DDS-3 drive with the significant bits identified.
1–8
3. Set the drive’s SCSI-2 target address to an address that’s not used by another SCSI-2
device. Using Figure 1–3 as a guide, use needlenose pliers to set the jumpers. When
finished, refer to “Preparing the System,” later in this chapter, for information on
verifying the jumpers have been set correctly and your system sees the drive.
NOTICE: Do not use SCSI-2 address 7 because the system’s SCSI-2
controller uses address 7 by default. We advise that you do not
SCSI-2 address 6 because the root disk drive uses it.
use
Page 19

Term
PWR
Introduction
Bit 0
Bit1
Bit 2
SCSI Connector
SCSI
Term
ID
PWR*
0
1
2
SCSI
2
Bit 1 Bit 0 Bit 2 Bit 1 Bit 0
Bit
ID
4
5
6
Power Connector
Term
PWR*
3
(Default)
*T
erm PWR is not used in HP workstation configurations.
Figure 1–3. Rear View of DDS-3 Drive and SCSI Addr
ess/Jumper Settings
1–9
Page 20

Introduction
"
#"!
1–10
!! !
!" "
!! ! !"
" !!
!!
!" "
!!
" !" "
Figure 1–4. Switch Settings for Data Compr
ession Operation Mode
Page 21

Preparing the System
Perform the following steps to prepare the system for the DDS-3 drive installation:
1. Determine the existing SCSI-2 address settings currently in use on your system by
completing the following steps.
2. Enter the following at the prompt:
Introduction
/usr/sbin/ioscan
RETURN
After a few moments the ioscan utility lists all of the SCSI I/O devices it could find.
The list appears similar to the following:
H/W
Path Class Description
============================================
bc
8 bc I/O Adapter
8/0 ext_bus GSC built-in Fast/Wide SCSI Interface
8/0.0 target
8/0.0.0 disk QUANTUM LPS1080WD
8/0.5 target
8/0.5.0 disk DEC DSP3210SW
8/0.6 target
8/0.6.0 disk DEC DSP3210SW
8/12 ba Core I/O Adapter
8/12/5 ext_bus Built-in SCSI
8/12/5.3 target
8/12/5.3.0 tape. HP C1537A
8/12/5.4 target
8/12/5.4.0 disk. SEAGATE ST3600N
8/12/5.6 target
1–11
Page 22

Introduction
8/12/5.6.0 disk MICROP 2112
10 bc I/O Adapter
10/12 ext_bus GSC add-on Fast/Wide SCSI Interface
10/12.4 target
10/12.4.0 disk SEAGATE ST31200W
3. Shut down the system.
If you are running HP-UX under HP VUE, shut down your system according to the
shutdown procedure described in the owner’s guide that came with your workstation.
If you are running HP-UX without HP VUE, shut down your system by typing the
following command:
1–12
# /etc/shutdown -h
RETURN
You must have superuser privileges to use the /etc/shutdown command. If you do
not have superuser privileges, contact your system administrator.
If your workstation is part of a cluster, refer to Managing Clusters of HP 9000 Com-
puters for instructions on shutting down.
SCSI-2 Connection and Termination
Only single-ended SCSI-2 configuration is supported.
Only unshielded connectors can be used.
The DDS-3 drive does not support termination on the device itself. Normally, drives such
as this are not required to be at the end of a bus, but if this is unavoidable, HP
recommends using a feed-through SCSI terminator that plugs directly into the rear of the
drive.
Page 23

If you do not already have a SCSI terminator, you must order either terminator K2291
(bale-lock style) or terminator C2904A (thumbscrew style).
NOTICE: Use care when inserting and removing feed-through terminators to
avoid damaging the end walls of the terminator and the drive.
Powering Off the Workstation and Any Peripherals
To power off the workstation and any peripherals, perform the following steps:
1. Power off the workstation, using the power switch on the front of the workstation.
CAUTION: Do not power off your workstation without first shutting down
HP-UX. Powering off with HP-UX still running could damage the
data on the disks associated with your workstation.
Introduction
If you are already at the boot-administration level (the level used to check the SCSI-2
IDs), you do not need to shut down before powering off.
If you accidentally rebooted HP-UX while determining the address settings, see
“Preparing the System,” earlier in this chapter, for instructions on shutting down HP-UX.
2. Disconnect the power cord from the rear of the workstation and the wall outlet.
3. Power off any external peripherals attached to your workstation, and unplug their
power cables from the wall outlet.
1–13
Page 24

Introduction
Adding or Removing the DDS-3 Drive Bezels or Expansion Brackets
Depending on the size of the drive opening in your system, you may need to add or
remove a bezel or expansion brackets to ensure that your DDS-3 drive fits in your
system.
Part numbers for the HP bezels are as follows:
• C1533–60104 – 3 1/2 inch Dove Grey
• C1533–60204 – 5 1/4 inch Dove Grey
• C1533–60105 – 3 1/2 inch Flint Grey
• C1533–60205 – 5 1/4 inch Flint Grey
NOTICE: Before performing any of these changes, make sure there is not a
cassette in the drive.
1–14
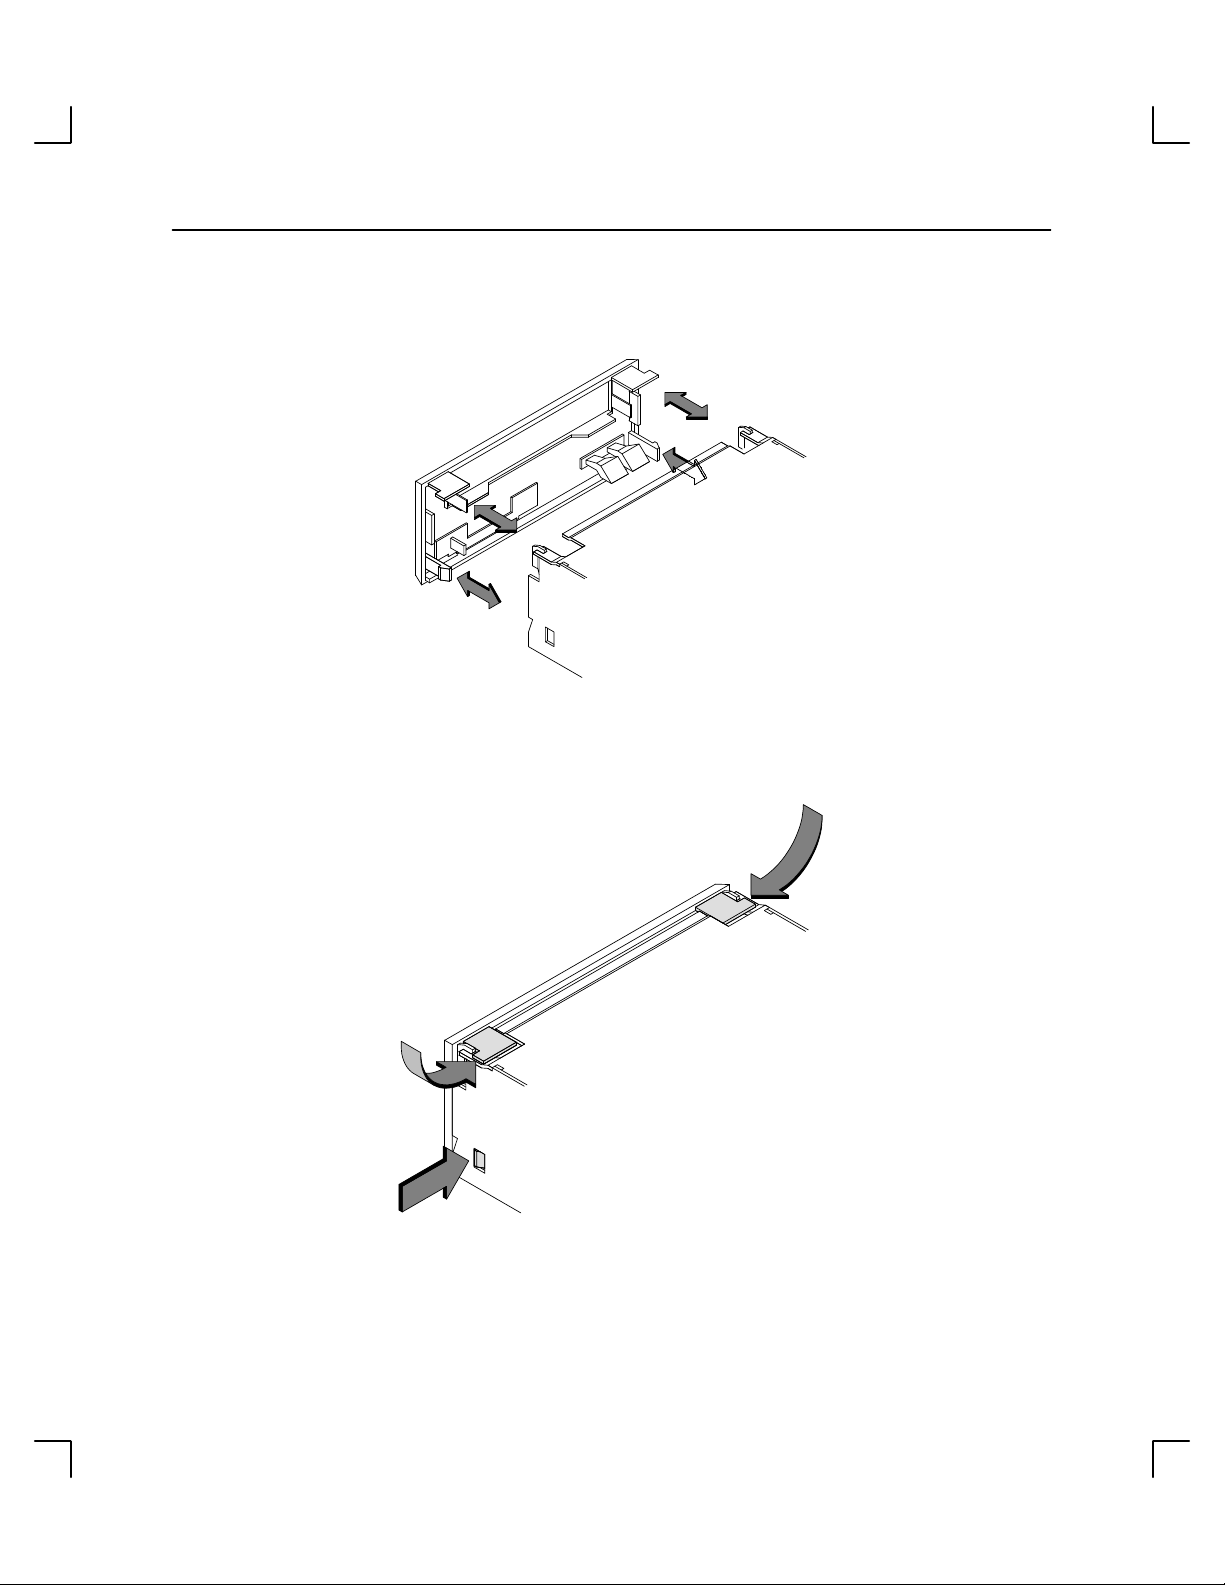
To add a bezel (it can be a 3.5-inch bezel, or a 5.25-inch bezel) to your drive, push the
bezel onto the drive, making sure the tabs click into place. Refer to Figure 1–5.
Figure 1–5. Adding a Bezel to the DDS-3 Drive
Page 25

Introduction
To remove a bezel from a drive, use a straight blade screwdriver to lift the bezel tabs
from the top of the drive, and push in the tabs at the sides of the drive. Refer to Figure
1–6.
Figure 1–6. Removing a Bezel from the DDS-3 Drive
To add expansion brackets to the drive or to remove them, use a T10 torx wrench to
either tighten or remove the four torx screws that hold each expansion bracket to the
drive. Refer to Figure 1–7.
1–15
Page 26

Introduction
You are now ready to begin the hardware installation of your DDS-3 drive. The
step-by-step instructions for installing the drive are found in the owner’s guide that came
with your workstation.
Figure 1–7. Adding or Removing Expansion Brackets
1–16
Page 27

Chapter 2
Using the DDS-3 Drive
This chapter provides the following information on using your DDS-3 drive:
• DDS-3 drive configuration
• Controls and features of the DDS-3 drive
• Using the DDS-3 drive
To verify HP-UX system operation, see the owner’s guide that came with your
workstation.
For more information on checking or reconfiguring the kernel for a device driver or file,
see
System Administration Tasks Manual: HP 9000 Series 700 Computers.
2–1
Page 28

Using Y
our DDS Drive
Your DDS-3 Drive Configuration
Your HP-UX operating system comes with preconfigured device files and drivers. If you
use these preconfigured device files and drivers, you won’t need to configure your
DDS-3 drive with the operating system.
To find out more about creating and using device files, see the owner’s guide that came
with your system.
Controls and Features of the DDS-3 Drive
Your DDS-3 tape drive is either a 3 1/2-inch form factor, or a 5 1/4-inch form factor
DDS-3 tape drive with data compression and a SCSI interface. It conforms to the DDS-3
format standard for storing computer data. It’s a high-capacity, high transfer-rate device
for data storage on tape.
2–2
Figure 2–1 shows the LEDs and eject button of the DDS-3 drive.
T
ape Light
Figure 2–1. DDS-3 Drive Contr
Clean/Attention Light
Eject Button
ols and Indicators
Page 29

Using Y
our DDS Drive
LEDs
The front panel has two colored LEDs: the Tape Light and the Clean/Attention Light. The
Tape Light flashes green to show activity (loading, unloading, reading, and writing).
Steady green means a cartridge is loaded.
The Clean/Attention Light flashes amber to indicate head cleaning is needed or a
cartridge is near the end of its life. Steady amber means a hard fault.
Table 2–1. LED Display Codes
Tape Clean/ Meaning
Light Attention
Activity
Activity – read or write
Cartridge loaded
Any
Any
Cleaning needed
Fault
– load or unload
Key
OFF
Steady Green
Steady Amber
Flashing Green
1/2 sec on, 1/2 sec of
Flashing Amber
1/2 sec on, 1/2 sec of
Fast Flash Green
1/4 sec on, 1/4 sec of
Data Cassettes
Media Life
HP DDS data cassettes are currently specified to 2000 passes over any part of the tape
under optimal environmental conditions (50% relative humidity, 22 degrees C). During a
tape operation, any one area of the tape may have multiple passes over the heads. This
translates into approximately 200 to 300 backups or restores.
f
f
f
Under certain conditions, the life of your data cassette is less than 200 to 300 backups or
restores. Replace your data cassettes after 100 backups or restores if your operating
conditions meet any of the following criteria:
2–3
Page 30

Using Y
our DDS Drive
• The relative humidity in your operating environment is consistently less than
50%.
• You know that the backup software you are using makes multiple passes over
sections of the tape during backups or restores.
• You notice that when you do backups and restores the tape stops and starts fre-
quently.
Cleaning the T
Clean the heads of your tape drive after every 25 hours of tape drive use or if the Media
Wear (Caution) signal is displayed on the LED.
NOTICE: Only use HP Cleaning Cassettes (HP92283K) to clean the tape
Follow this procedure to clean the tape heads:
ape Heads
heads. Do not use swabs or other means of cleaning the tape heads.
1. Insert the cleaning cassette into the drive. The tape automatically loads the cassette
and cleans the heads. At the end of the cleaning cycle, the drive ejects the cassette.
2. Write the current date on the cleaning cassette label so that you know how many
times you have used it. Discard the cleaning cassette after you have used it 50 times.
Media Restrictions
If you interchange media between other HP workstation DDS tape drives, note that data
cassettes with compressed data can only be read by tape drives that have data
compression capabilities. This includes data cassettes that contain both compressed and
noncompressed data.
2–4
Setting the Write-Protect Tab on a Data Cassette
You can only store or change information on a data cassette when the write-protect tab is
in the write position. So, before trying to write to the data cassette, make sure that the
write
write-protect tab is in the
position, as shown in Figure 2–2.
Page 31

Using Y
Figure 2–2. Setting the Write-Protect Tab on a DDS Tape
our DDS Drive
To protect information on a data cassette from being overwritten, set the write-protect tab
to the write-protect position, as shown in Figure 2–2.
NOTICE: The write-protect tab should always be in the write position for
transferring data to a cassette.
2–5
Page 32
Using Y
our DDS Drive
Using the DDS-3 Drive
This section describes how to perform tasks with your DDS-3 tape drive.
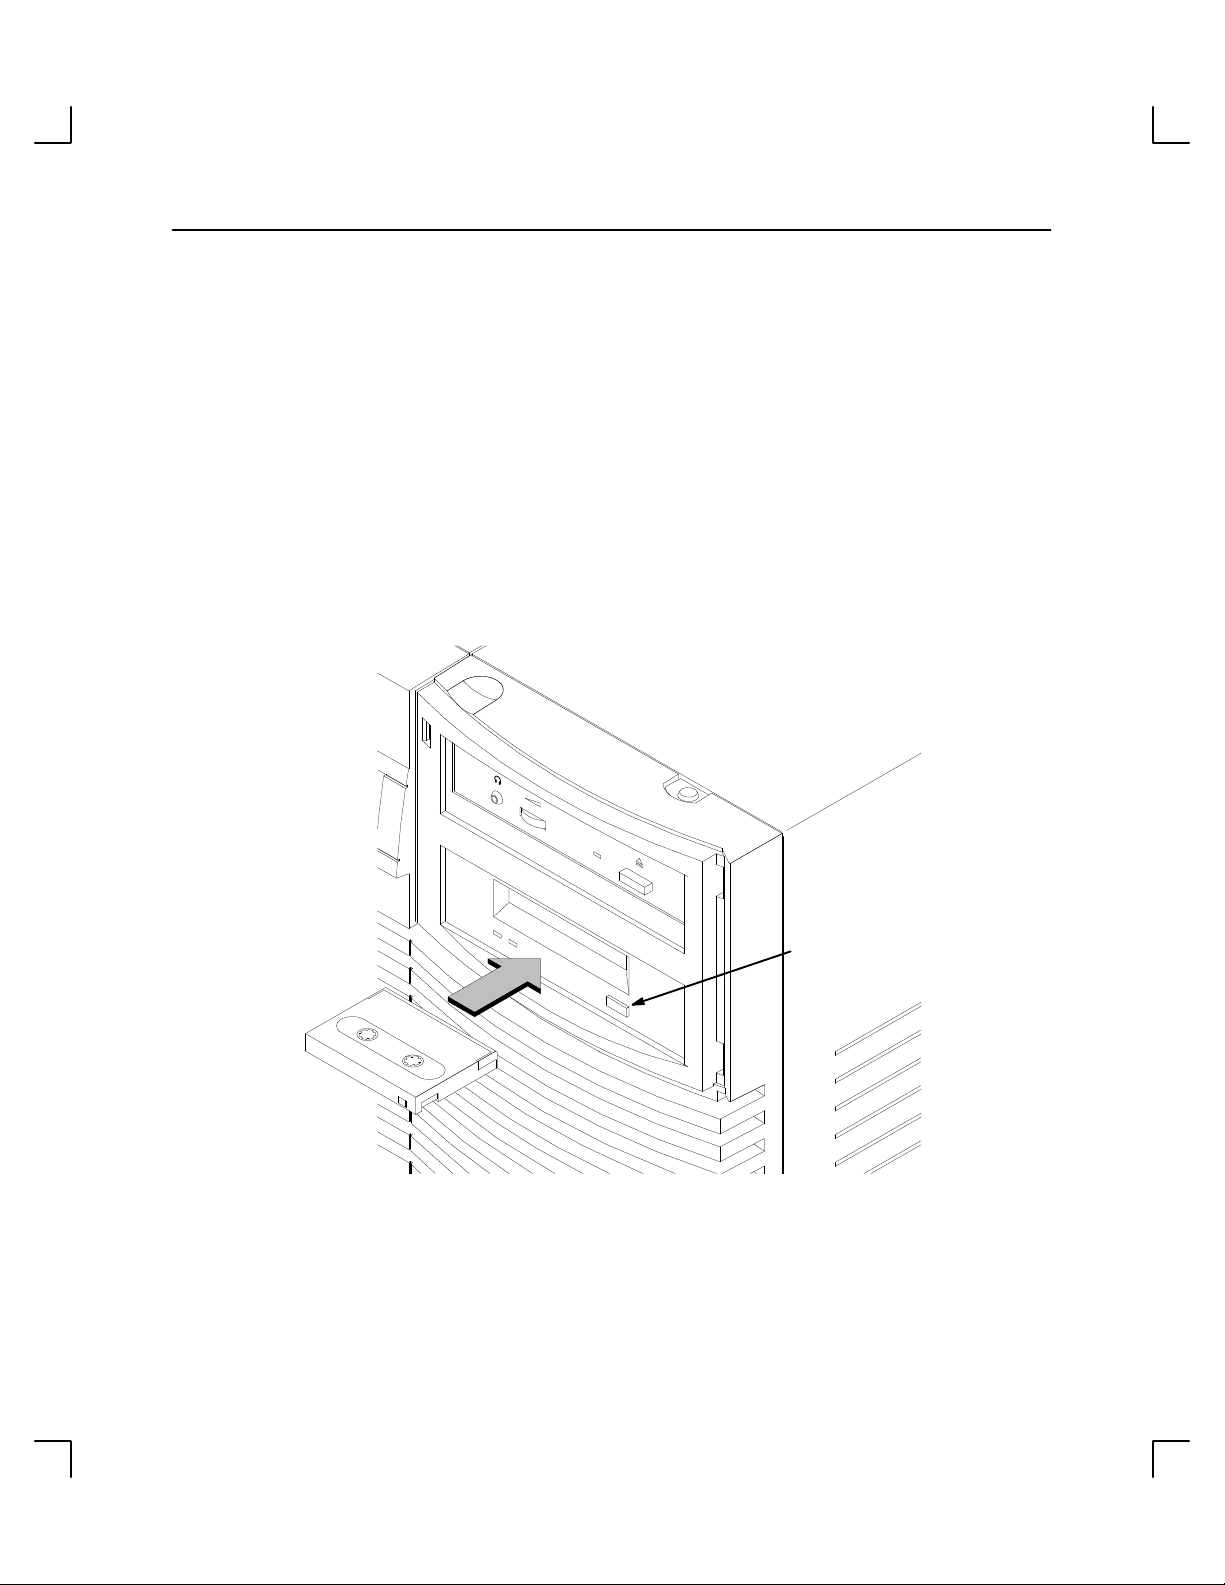
Loading and Unloading a Data Cassette
Follow these steps to load and unload a data cassette from the DDS-3 tape drive:
1. Insert the data cassette into the drive, as shown in Figure 2–3.
2–6
Eject Button
Figure 2–3. Loading a Data Cassette
Page 33

Using Y
our DDS Drive
2. Push the data cassette about three quarters of an inch into the drive. The drive
automatically pulls the data cassette the rest of the way in. When the Tape LED on
the left front of the drive stops flashing, the drive has loaded the data cassette.
3. To remove the data cassette, press and release the eject button on the front of the
drive, as shown in Figure 2–3. The Tape LED on the drive flashes on and off. Ten to
twenty seconds later
cassette from the drive.
Verifying the DDS-3 Tape Drive Operation
To verify that your workstation can communicate with the DDS-3 tape drive, type the
following:
, the data cassette slides partway out of the drive. Remove the
/usr/sbin/ioscan -d stape
Return
After a few moments the ioscan utility returns a message similar to the following:
H/W Path Class Description
============================================
bc
8 bc I/O Adapter
8/12 ba Core I/O Adapter
8/12/5 ext_bus Built-in SCSI
8/12/5.3 target
8/12/5.3.0 tape HP HPC1537A
If your DDS-3 drive is not listed, go to Chapter 3, “Troubleshooting and Removal/
Replacement Procedures.”
For information on using device files or archiving data to or from the DDS-3 drive, see
the owner’s guide that came with your workstation.
Media Interchangeability Restrictions
If you interchange media between DDS-format tape drives, note that data cassettes with
compressed data can only be read by tape drives that have data compression capabilities.
2–7
Page 34

Using Y
our DDS Drive
Refer to Tables 2–2 and 2–3 for information on which tapes you can use with each of
HP’s DDS drives.
Table 2–2. HP DDS Tape Drive Capability Without Data Compression
Tape Length
60 meter 1.3 GB 1.3 GB 1.3 GB 1.3 GB
90 meter Not Supported 2.0 GB 2.0 GB 2.0 GB
120 meter Not Supported Not Supported 4.0 GB 4.0 GB
125 meter Not Supported Not Supported Not Supported 12.0 GB
Tape Length
60 meter 2.6 GB 2.6 GB 2.6 GB 2.6 GB
90 meter Not Supported 4.0 GB 4.0 GB 4.0 GB
120 meter Not Supported Not Supported 8.0 GB 8.0 GB
125 meter Not Supported Not Supported Not Supported 24.0 GB
Full Height 5 1/4
inch DDS Tape
Drive
Table 2–3. HP DDS Tape Drive Capability With Data Compression
Full Height 5 1/4
inch DDS Tape
Drive
DDS-DC
T
ape Drives
DDS-DC
T
ape Drives
DDS-2
T
ape Drives
DDS-2
T
ape Drives
DDS-3
T
ape Drives
DDS-3
T
ape Drives
2–8
Page 35

Using Y
Ordering Information
To order Hewlett-Packard data cassettes and cleaning cassettes for use in your DDS-3
tape drive, use the following order numbers:
our DDS Drive
• HP92283A Box of five 60-meter DDS data cassettes
• HP92283B Box of five 90-meter DDS data cassettes
• HP92300A Box of five 120-meter DDS data cassettes
• HPC1517A Box of five 125-meter DDS data cassettes
• HP92283K
Package of two head-cleaning cassettes
• HP92283L Lockable storage box for 12 cassettes
CAUTION: Use only data cassettes labeled as DDS (Digital Data Storage) cas-
settes. Never use audio cassettes labeled DA
in your DDS-format drive. Using DA
your drive.
T cassettes could damage
T (Digital Audio Tape)
2–9
Page 36

Chapter 3
Troubleshooting and Removal/Replacement Procedures
This chapter provides the following information on troubleshooting and
removal/replacement procedures for your DDS-3 drive:
•
Checking the address settings
• Checking the hardware installation
• Verifying system operation
•
Field Replaceable Units
• Powering off the system
• Removing and replacing the DDS-3 drive
• Adding or removing DDS-3 drive bezels and expansion brackets
3–1
Page 37

Troubleshooting and Removal/Replacement Procedures
Troubleshooting
If you have trouble with any of these procedures, see the owner’s guide that came with
your system.
This chapter explains what to do if you experience problems during the configuration
process. It also explains how to run the Support Tools Manager or the Extended Self Test
to verify your system.
If you are experiencing difficulty booting the system, reconfiguring HP-UX, or using the
DDS-3 drive, complete each of the following tasks, in the order they are presented, until
you discover and correct the problem:
• Check the address settings of any single-ended SCSI-2 devices.
• Check that you have installed the hardware correctly.
• Recheck the device list.
3–2
• Run verification tests.
NOTICE: To run xstm on HP–UX 10.01, you need to install patch
PHSS_7894.
Checking the Address Settings for Single-Ended Drives
Check the address settings of each single-ended SCSI-2 device on the bus. Make sure
that no device has the same address setting as another. If you find two devices with the
same address, change one of the devices to a different, unused address setting. To check
the address settings for each single-ended SCSI-2 device, type the following in a terminal
window or HP-UX command line:
/usr/sbin/ioscan
After a few moments the ioscan utility lists all of the SCSI I/O devices it could find. The
list appears similar to the following:
RETURN
Page 38

Troubleshooting and Removal/Replacement Procedures
H/W Path Class Description
============================================
bc
8 bc I/O Adapter
8/0 ext_bus GSC built-in Fast/Wide SCSI Interface
8/0.0 target
8/0.0.0 disk QUANTUM LPS1080WD
8/0.5 target
8/0.5.0 disk DEC DSP3210SW
8/0.6 target
8/0.6.0 disk DEC DSP3210SW
8/12 ba Core I/O Adapter
8/12/5 ext_bus Built-in SCSI
8/12/5.3 target
8/12/5.3.0 tape HP C1537A
8/12/5.4 target
8/12/5.4.0 disk SEAGATE ST3600N
8/12/5.6 target
8/12/5.6.0 disk MICROP 2112
10 bc I/O Adapter
10/12 ext_bus GSC add-on Fast/Wide SCSI Interface
10/12.4 target
10/12.4.0 disk SEAGATE ST31200W
Checking the Hardware Installation
Perform the following steps to check the hardware installation:
CAUTION: The DDS-3 drive is susceptible to mechanical and electrostatic
shock. When handling the drive, always wear the static strap that
came in the DDS-3 drive kit. Always handle the drive carefully.
1. Check that the SCSI-2 terminator is connected to the single-ended SCSI-2 port on
the rear I/O panel of the system unit (if there are no external SCSI-2 devices), or
that the last external single-ended SCSI-2 device is terminated.
3–3
Page 39

Troubleshooting and Removal/Replacement Procedures
2. Attach the static-grounding wrist strap by following the instructions on the package
that contains the strap.
3. Shut down HP-UX.
NOTICE: If you are already at the boot administration level, you do not need
to shut down; skip this step and go on to Step 4.
If you are running HP-UX under HP VUE, shut down your system by performing
the shutdown procedure described in the owner’s guide that came with your workstation.
If you are running HP-UX without HP VUE, shut down your system by typing the
following command:
# /etc/shutdown -h
You must have superuser privileges to use the /etc/shutdown command. If you do
not have superuser privileges, contact your system administrator.
If your workstation is part of a cluster, refer to Managing Clusters of HP 9000 Com-
puters for instructions on shutting down.
RETURN
4. Power off the workstation, using the power switch on the front of the workstation.
CAUTION: Do not power off your workstation without first shutting down
HP-UX. Powering off with HP-UX still running could damage
the data on the disks associated with your workstation.
5. Remove the drive and check the jumpers, as described in “Removal/Replacement
Procedures” at the end of this chapter.
6. Replace the drive.
7. Check the cable connections of your DDS-3 drive. Make sure that the connectors are
aligned and seated correctly.
3–4
Page 40

Troubleshooting and Removal/Replacement Procedures
8. Recheck the device list (see “Rechecking the Address Settings” below).
Rechecking the Address Settings
Check the address settings again to see if the drive is now listed (see “Checking the
Address Settings for Single-Ended Drives,” earlier in this chapter).
If the DDS-3 drive and all other SCSI-2 devices available to you before you installed the
DDS-3 drive are now listed, run the system verification test for your software version, as
explained in the next sections.
If the DDS-3 drive is still not listed, or one of the SCSI-2 devices available to you before
you installed the DDS-3 drive is still not listed, contact your service representative.
Verifying the System Operation Using the Support Tools Manager
HP-UX uses a diagnostics product called the Support T
ools Manager that allows system
operation verification.
You can access the Support Tools Manager in a terminal window. If you are using HP
VUE as your interface, you can also access the Support Tools Manager through the
sys_admin directory.
Three interfaces are available with the Support Tools Manager: a command line interface
(accessed through the cstm command), a menu-driven interface (accessed through the
mstm command), and the graphical user interface (accessed through the xstm
command).
For more information on these user interfaces, see the online man pages by entering the
following at a command line prompt:
man cstm
man mstm
man xstm
RETURN
RETURN
RETURN
3–5
Page 41

Troubleshooting and Removal/Replacement Procedures
To access the Support T
ools Manager
, perform the following steps:
1. Click on the Terminal Control on the Front Panel of your Workspace.
T
erminal Control
A terminal window opens.
2. Move the mouse cursor into the terminal window and click the left mouse button.
3. Enter the following at the prompt:
3–6
cstm
RETURN
The following screen appears:
Support Tool Manager Version A.01.00
Type ’help’ for a list of available commands.
CSTM>
At the CSTM> prompt, you can enter several commands. To see what commands are
available, type the help command.
Page 42

Troubleshooting and Removal/Replacement Procedures
4. To verify the system operation, type the following at the CSTM> prompt:
CSTM> verify all
RETURN
Messages similar to the following appear:
Verification has started on device (CPU).
Verification has started on device (FPU).
CSTM>Verification of (FPU) has completed.
CSTM>Verification of (CPU) has completed.
5. Press
6. To exit the Support T
RETURN
to return to the CSTM> prompt after all test results are reported.
CSTM> exit
ools Manager
RETURN
, type the following:
If any tests failed, further diagnosis is necessary by qualified service personnel. Contact
your designated service representative.
3–7
Page 43

Troubleshooting and Removal/Replacement Procedures
Removal/Replacement Procedures
The removal/replacement procedures for the DDS-3 drive follow.
CAUTION: Electrostatic charges can damage the integrated circuits on printed
circuit boards. To prevent such damage from occurring, follow
proper ESD precautions.
Field Replaceable Units
The following components are authorized for field replacement.
Description Part Number
DDS-3, Replacement C1537–67201
DDS-3, Exchange C1537–69201
Powering Off the System
Before performing the removal/replacement procedures, observe the following
precautions:
1. Refer to the owner’s guide that came with your system for the procedures to power
off the system.
2. Unplug the system unit power cord and the power cords of any peripheral devices
from the power source.
3. Unplug the system unit power cord from the back of the system unit.
WARNING: Failure to properly shut down and remove power from the system can
create a personal hazard, or may result in hardware damage or data
corruption.
3–8
Page 44

Troubleshooting and Removal/Replacement Procedures
Removing and Replacing the DDS-3 Drive
To open your system and to remove and reinstall the DDS-3 drive, refer to the owner’s
guide that came with your system. Read “Preparing to Install the DDS-3 Drive” in
Chapter 1 of this guide before beginning an installation.
Adding or Removing the DDS-3 Drive Bezels and Expansion Brackets
Depending on the size of the drive opening in your system, you may need to add or
remove a bezel or expansion brackets to ensure that your DDS-3 drive fits in your
system.
NOTICE: Before performing any of these changes, make sure there is not a
cassette in the drive.
• To add a bezel (it can be a 3.5-inch bezel, or a 5.25-inch bezel) to your drive,
push onto the drive, making sure the tabs click into place. Refer to Figure 3–1.
• To remove a bezel from a drive, use a straight blade screwdriver to lift the bezel
tabs from the top of the drive, and push in the tabs on the sides of the drive.
Refer to Figure 3–2.
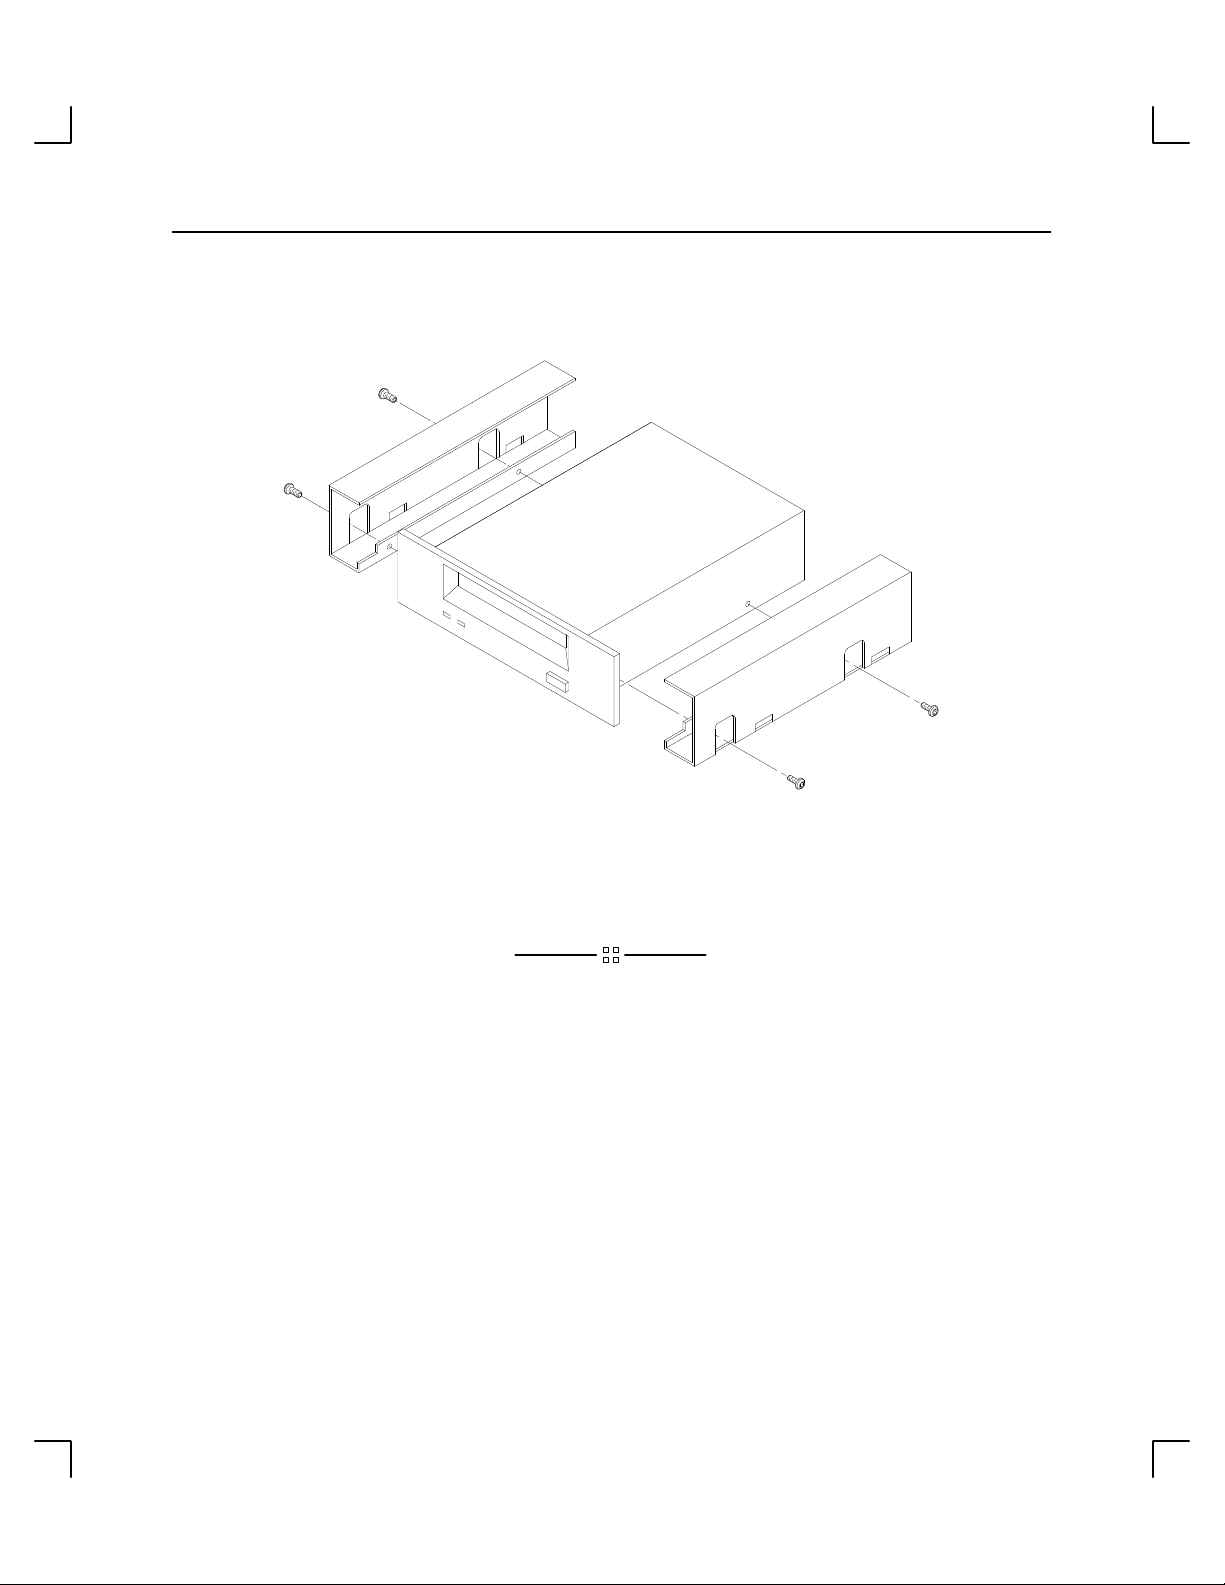
• To add or remove expansion brackets to the drive, use a T10 torx wrench to ei-
ther tighten or remove the four torx screws that hold each expansion bracket to
the drive. Refer to Figure 3–3.
3–9
Page 45
Troubleshooting and Removal/Replacement Procedures
Figure 3–1. Adding a Bezel to the DDS-3 Drive
3–10
Figure 3–2. Removing a Bezel from the DDS-3 Drive
Page 46
Troubleshooting and Removal/Replacement Procedures
Figure 3–3. Adding or Removing Expansion Brackets
3–11
Page 47

Appendix
A
SCSI Connector Pinouts
Table A–1. SCSI Connector Pinouts
PIN
1 GND 26 TERMPWR
2 DB(0) 27 GND
3 GND 28 GND
4 DB(1) 29 GND
5 GND 30 GND
6 DB(2) 31 GND
7 GND 32 –ATN
8 DB(3) 33 GND
9 GND 34 GND
10 DB(4) 35 GND
11 GND 36 –BSY
12 DB(5) 37 GND
13 GND 38 –ACK
14 DB(6) 39 GND
15 GND 40 –RST
16 DB(7) 41 GND
17 GND 42 –MSG
18 DB(P) 43 GND
19 GND 44 –SEL
20 GND 45 GND
21 GND 46 –C/D
22 GND 47 GND
23 GND 48 –REQ
24 GND 49 GND
25 OPEN 50 –I/O
SIGNAL PIN SIGNAL
A–1
Page 48

Index
B
bezels,
adding or removing, 1–15, 3–10
C
commands
cstm, 3–6
exit, 3–8
ioscan, 2–7
verify
, 3–8
cstm command, 3–6
D
data compression, operation mode, 1–10
DDS–DC drive
cassette, write–protect tab, 2–4–
2–9
cleaning the tape heads, 2–4– 2–9
configuration, 2–2
controls and features, 2–2
introduction, 1–1
LED indicators, 2–3– 2–9
display codes, 2–3
loading and unloading a cassette,
2–6
media interchangeability
restrictions, 2–4– 2–9
media life, 2–3– 2–9
ordering information, 2–9
troubleshooting, 3–2–3–12
using the drive, 2–1
verifying drive operation, 2–7
write–protecting a data cassette,
2–4– 2–9
E
environmental requirements, 1–3
exit command, SupportW
expansion brackets, adding or
removing, 1–15, 3–10
ave, 3–8
G
general description, 1–2
I
indicators, LED, DDS–DC drive, 2–3–
2–9
installation
OS support, 1–6
preparing the system, 1–1
adding or removing drive
bezels or expansion
brackets, 1–15
powering of
SCSI–2 connection and
termination, 1–13
preparing to install, 1–6
setting the SCSI–2 address, 1–7
tools required, 1–6
verifying kit contents, 1–6
ioscan command, 2–7
f, 1–14
1
J
jumpers, SCSI ID, DDS–DC drive, 1–9
Index-1
Page 49

L
S
LEDs, DDS–DC drive, 2–3– 2–9
display codes, 2–3
loading and unloading a data cassette,
2–6
M
media interchangeability restrictions,
2–8
DDS–DC drive, 2–4– 2–9
O
online help, cstm command, 3–6
operation mode, switch settings, 1–10
ordering information, 2–9
P
physical specifications, 1–5
pinouts, SCSI connector
, A–1
SCSI connector pinouts, A–1
SCSI IDs, jumpers, DDS–DC drive, 1–9
SCSI–2 connection and termination,
1–13
Support T
system verification tests, 3–6–3–12
ools Manager
, 3–6–3–12
T
termination, 1–13
troubleshooting
checking address settings,
3–2–3–12
checking hardware installation,
3–4–3–12
system verification tests, 3–6–3–12
Support T
verifying system operation,
3–6–3–12
ools Manager
3–6–3–12
,
R
removal/replacement procedures, 3–9
Index-2
V
verify command, 3–8
verifying the drive operation, 2–7
Page 50

HP
DDS-3 T
User’s Guide
ape Drive
Workstation Systems Group
Order No. A1658–90702
Edition E1296
Printed in U.S.A.
Page 51

Order Number: A1658–90702
Edition 1296
Printed in U.S.A.
 Loading...