

Page 1

WL210 WIRELESS PCI CARD
QUICK INSTALL GUIDE
Page 2

Notice
The information in this document is subject to change without
notice.
COMPAQ COMPUTER CORPORATION SHALL NOT BE
LIABLE FOR TECHNICAL OR EDITORIAL ERRORS OR
OMISSIONS CONTAINED HEREIN; NOR FOR INCIDENTAL
OR CONSEQUENTIAL DAMAGES RESULTING FROM THE
FURNISHING, PERFORMANCE, OR USE OF THIS
MATERIAL.
This document contains information protected bycopyright. No
part of this document may be photocopied or reproduced in any
form without prior written consent from Compaq Computer
Corporation.
© 2001 Compaq Computer Corporation.
Compaq and the Compaq logo are registered in the U.S. Patent and
Trademark Office.Windows, Windows NT, andthe Windows logo
are either registered trademarks or trademarks of Microsoft
Corporation in the United States and/or other countries. Microsoft
products are licensed to OEMs by Microsoft Licensing, Inc., a
wholly owned subsidiary of Microsoft Corporation.
Product names mentioned herein are may be trademarks and/or
registered trademarks of their respective companies.
WL210 WirelessPCI CardQuick Install Guide
February 2001.
Page 3

Table of Contents
Table of Contents_____________________________________________ i
chapter 1: About 11 Mbps Wireless LAN __________________________ 1-1
Kit Contents_________________________________________ 1-1
Network Options______________________________________ 1-2
Peer-to-Peer Workgroup ____________________________ 1-2
Home Office Networking ____________________________ 1-4
Enterprise Networking______________________________ 1-5
WL210 Wireless PCI Card Features ________________________ 1-7
WL210 Wireless PCI Card Features ________________________ 1-9
About the CD-ROM___________________________________ 1-10
Finding Information __________________________________ 1-11
chapter 2: Install the WL210 Wireless PCI Card _____________________ 2-1
Configure the WL210 Wireless PCI Card_____________________ 2-4
Installation for MS-Windows 2000 _____________________ 2-4
Installation for MS-Windows 98 & ME___________________ 2-5
Installation for MS-Windows 95 _______________________ 2-5
Installation for MS-Windows NT 4.0 ____________________ 2-6
Verify Proper Installation________________________________ 2-7
i
Page 4

chapter 3: Installation for Windows _____________________________ 3-1
Introduction ________________________________________ 3-1
Insert your WL110 Wireless PC Card_______________________ 3-3
Install Drivers _______________________________________ 3-4
Before You Start the Installation ______________________ 3-4
What You Need to Know ____________________________ 3-4
Driver Installation for Windows _______________________ 3-5
Set Windows Network Properties _________________________ 3-7
Wireless LAN Properties________________________________ 3-8
Configuration Profile_______________________________ 3-9
Basic Settings ___________________________________ 3-11
Finish the Installation__________________________________ 3-14
After Restarting Your Computer_______________________ 3-15
chapter 4: Working with 11 Mbps Wireless LAN and Windows__________ 4-1
Introduction ________________________________________ 4-1
Use your WL110 Wireless PC Card ________________________ 4-2
Radio Antennae __________________________________ 4-2
Remove the WL110 Wireless PC Card __________________ 4-2
Maintenance of your WL110 Wireless PC Card____________ 4-4
View Other Computers_________________________________ 4-4
Using the Client Manager_______________________________ 4-6
View Wireless Link Quality __________________________ 4-7
View/Modify WL110 Wireless PC Card Settings ___________ 4-8
ii
Page 5

chapter 5: Advanced Settings __________________________________ 5-1
Introduction _________________________________________ 5-1
Advanced Parameters Tab ______________________________ 5-2
Admin Parameters Tab _________________________________ 5-4
appendix A: Card Specifications ________________________________ A-1
Physical Specifications _________________________________ A-1
WL210 Wireless PCI Card ___________________________ A-1
WL110 Wireless PC Card____________________________ A-2
Electrical Characteristics________________________________ A-3
WL210 Wireless PCI Card ___________________________ A-3
WL110 Wireless PC Card____________________________ A-3
Networking Characteristics ______________________________ A-4
Regulatory Information _________________________________ A-5
WL210 Wireless PCI Card ___________________________ A-5
WL110 Wireless PC Card____________________________ A-5
Radio Characteristics __________________________________ A-6
appendix B: Troubleshooting___________________________________ B-1
LED Activity _____________________________________ B-1
Can Not Connect To The Network______________________ B-6
LEDs Work But Can’t Connect to Network________________ B-6
iii
Page 6

Page 7

chapter 1
About 11 Mbps Wireless LAN
Kit Contents
The WL210 Wireless PCI Card kit includes:
a. One WL210 Wireless PCI Card
b. One WL110 PC Card.
c. The “WL210 Wireless PCI Card Quick Install Guide”
d. One Compaq 11 Mbps Wireless LAN CD-ROM.
The Quick Install Guide is an abstract from the electronic
User’s Guide that is included on the CD-ROM.
About 11 Mbps Wireless LAN 1-1
Page 8

Network Options
The WL210 Wireless PCI Card Kit enables you to:
Connect your computer to a Peer-to-Peer workgroup of
wireless computing devices (see Figure 1-1 on page 1-3).
Connect your computer to a Small Office/Home Office
(SOHO) network that includes a WL310 Gateway (see
Figure 1-2 on page 1-4).
Connect your computer to a Local Area Network (LAN)
Infrastructure that includes Compaq access points (see
Figure 1-3 on page 1-5 and Figure 1-4 on page 1-6).
Expand the capabilities of your access points, to support
wireless devices that have been equipped with Compaq
wireless LAN adapters.
Peer-to-Peer Workgroup
The Peer-to-Peer workgroup configuration enables you to
quickly set up a small wireless workgroup, where the
workgroup participants can exchange files using features like
“File and Printer Sharing” as supported by M icrosoft
Networking.
1-2 About 11 Mbps Wireless LAN
Page 9
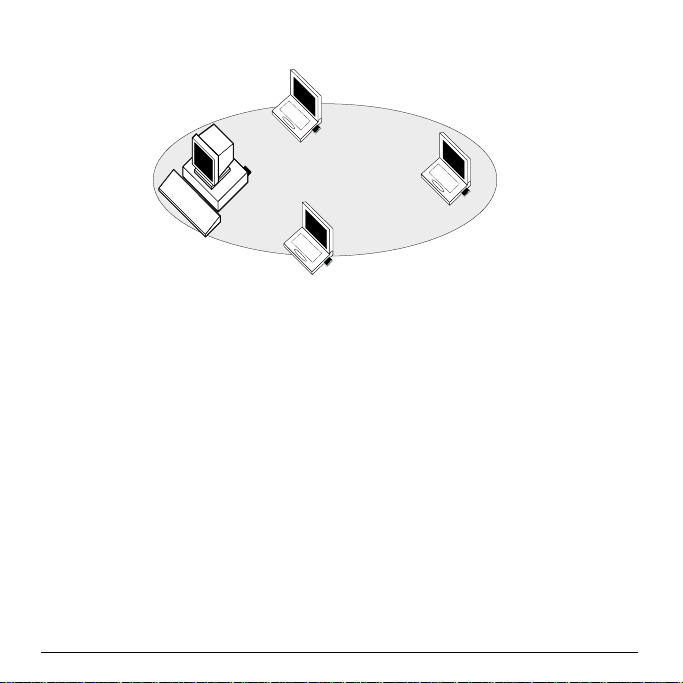
Figure 1-1 Peer-to-Peer Wireless Workgroup
You can use this option to setup a temporary or ad-hoc
network in environments where no access points are
available (for example in Small Office/Home Office(SOHO)
environments).
As long as the stations are within range of one another, this is
the easiest and least expensive way to set up a wireless
network.
About 11 Mbps Wireless LAN 1-3
Page 10
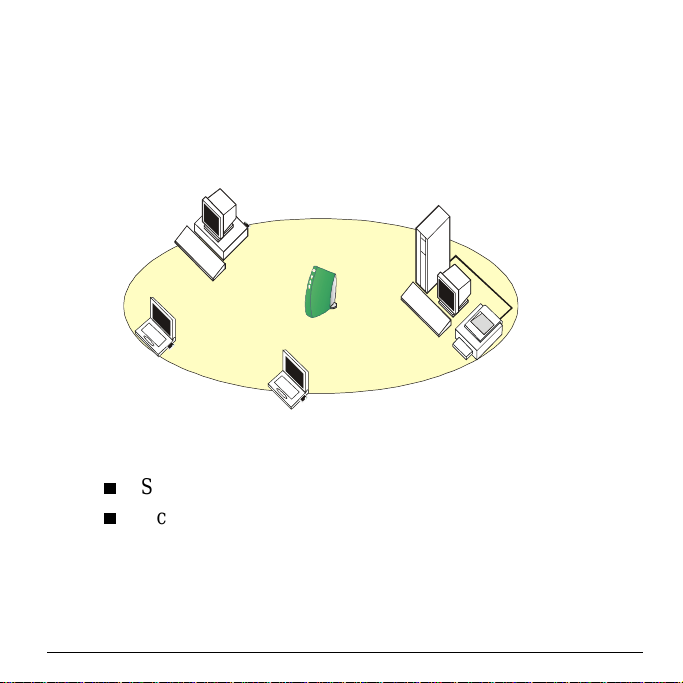
Home Office Networking
With the Compaq WL310 Wireless Home Office Gateway,
wireless access to the Internet or other c omputers is at your
fingertips.
Figure 1-2 Connect to a Residential Gateway (RG)
All you ne ed to do is connect the wireless computers to the
WL310 Gateway, and you are ready to:
Share files and printers, and
Access the Internet via the built-inmodem of the WL310
Gateway.
Optionally the WL310 Gateway allows you to connect your
wireless stations to previously installed wired computers and/
or an external cable, an xDSL or a ISDN modem.
1-4 About 11 Mbps Wireless LAN
Page 11
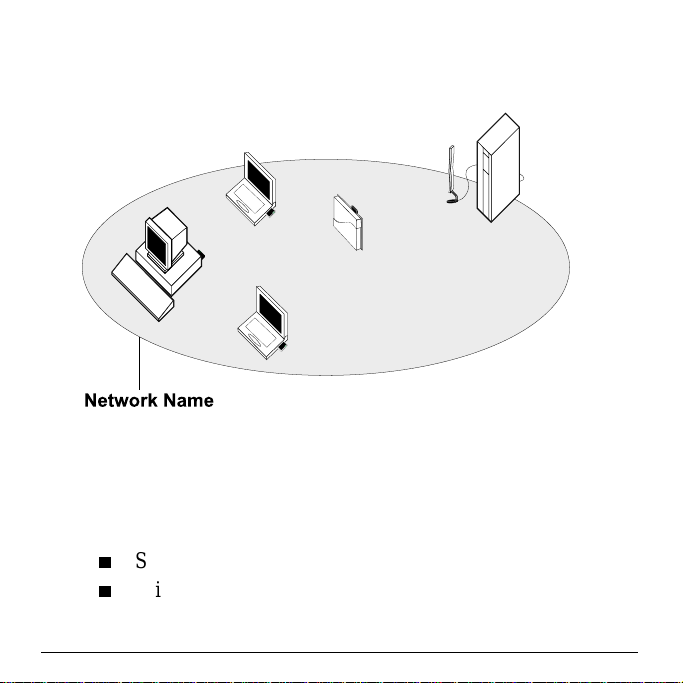
Enterprise Networking
Figure 1-3 Stand Alone Wireless LAN
With the WL410 WirelessSMB Access Point and/or WL510
Wireless Enterprise Access Point you can connect to a
corporate Local Area Network (LAN) infrastructure to have
wireless access to a ll network facilities.
LAN Infrastructures may either be :
Stand-alone wireless LANs as pictured in Figure 1- 3.
Wireless network infrastructures connected to an existing
Ethernet network as pictured in Figure 1-4 on page 1-6.
About 11 Mbps Wireless LAN 1-5
Page 12

Figure 1-4 LAN Infrastructure
It’s Easy
The WL210 Wireless PCI Card functions like any standard
wired Ethernet card, but 11 Mbps Wireless LAN doe s not
need any wires!
Where an Ethernet card requires a cable connection to a hub
and/or patch panel, the cable physically ties you down to the
location of the wired connection.
1-6 About 11 Mbps Wireless LAN
Page 13

Compaq 11 Mbps Wireless LAN allows you to connect your
computer to a Local Area Network (LAN) system from
anywhere within the wireless coveragearea. Expanding or redesigning your network is easy: Add or relocate access
points, power-up your (new) wireless computers, and you’re
done!
Unlike Ethernet, wireless connectivity will enable you to
roam throughout the network while remaining connected to
the LAN.
Note: All Compaq 11 Mbps Wireless LAN products, are
radio products. Refer to the flyer “Information to the
User” for regulatory information that may apply in
your country.
WL210 Wireless PCI Card Features
The WL210 Adapter is a wireless network card that fits into
any standard PCI slot.
The WL110 PC Card has two LED indicators and two
integrated antennas. Optionally you can use the WL110 PC
Card in combination with an external antenna.
About 11 Mbps Wireless LAN 1-7
Page 14
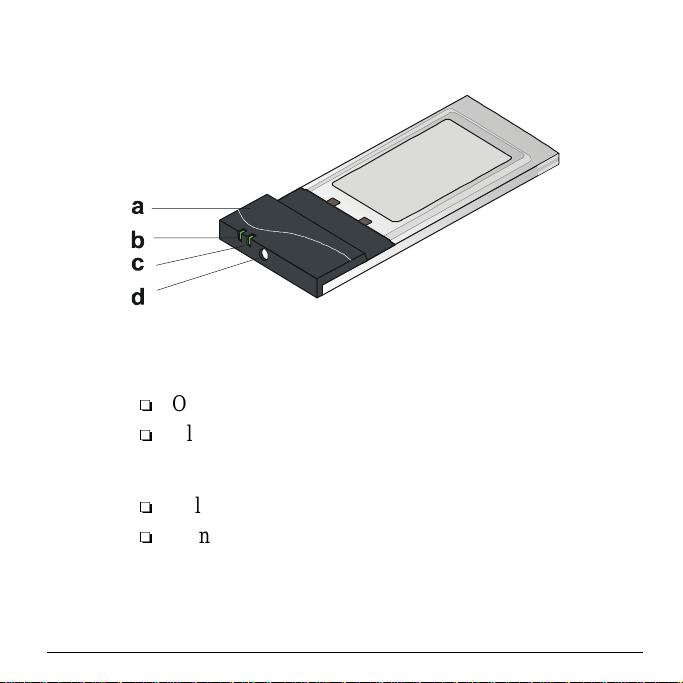
Figure 1-5 The WL110 Wireless PC Card
a. Integrated Antennas
b. Radio LED
Off - No wireless activity
Blinking - Sensing/transmitting wireless data
c. Power ON/OFF LED
Solid Green - standard operational mode
Blinking Green - Power Management mode
d. Connector for optional External Antenna.
1-8 About 11 Mbps Wireless LAN
Page 15

WL210 Wireless PCI Card Features
The WL210 Adapter is:
Wi-Fi (Wireless Fidelity) certified by the
Wireless Ethernet Compatibility Alliance
(WECA). This m eans that your 11 Mbps
Wireless LAN hardware will communicate with other
vendors’ IEEE 802.11 compliant wireless LAN products.
Fully compatible with a ny other wireless LAN system
based on Direct Sequence Spread Spectrum (DSSS)
radio technology that complies with the “IEEE 802.11
standard on wireless LANs (Revision B)”.
The WL210 Adapter supports the following wireless LAN
features:
Automatic Transmit Rate Select mechanism in the
transmit range of 11, 5.5, 2 and 1 Mbit/s.
Automatic Frequency Channel Selection (2.4 GHz)
allowing roaming over m ultiple channels.
Card Power Management.
128-bit RC4 data encryption (also supports 64-bit RC4/
Wired Equivalent Privacy - WEP ).
About 11 Mbps Wireless LAN 1-9
Page 16

About the CD-ROM
The CD-ROM contains both software and documentationfor
the WL210 Wireless PCI C ard.
If you wish to install 11 Mbps Wireless LAN drivers and
software, turn to chapter 3 “Installation for Windows”.
Note: Prior to copying or installing the software, you are
advised to read the Software License Agreement
“
LICENSE.TXT”, located in the root folder of the CD-
ROM. B y installing, copying or using the software,
you are consenting to be bound by this agreement. If
you do not agree to all of the terms of the Software
License Agreement, do not download, copy or install
the software.
It is the policy of Compaq to improve products as
new technology, components, software and firmware
become available. Before you proceed with the
installation of this product, visit our website at:
www.compaq.com/support/files/networking/wlan/
Verify if newer versions of the software that was
shipped with your product are available.
Download and install the latest software with your
purchased product.
http://
to:
1-10 About 11 Mbps Wireless LAN
Page 17

Finding Information
The Quick I nstall Guide was designed to give you a brief
introduction about the WL210 Adapter and the Compaq
wireless network system.
In this printed document you will find the most important
information to get your wireless network up and running,
with a minimum set of parameters for the MS-Windows 95/
98, NT, 2000 and M E operating systems.
Context-sensitive help for the configuration m enus and tools
is available when you:
Click the button on your screen, or
Press the function key on your keyboard.
F1
About 11 Mbps Wireless LAN 1-1 1
Page 18

Page 19

chapter 2
Install the WL210 Wireless PCI Card
To insert the WL210 Wireless PCI Card into your computer,
carefully follow the following steps:
1. Shut down your computer.
2. Switch off the power of:
Your computer,
All external devices connected to your computer.
3. Disconnect the power cord from your computer and
unplug all external devices from the wall outlets.
Install the WL210 Wireless PCI Card 2-1
Page 20
!
DANGER:
Failureto turn off an unplug your computer before removing the
cover can result in personal injury or damage to the computer.
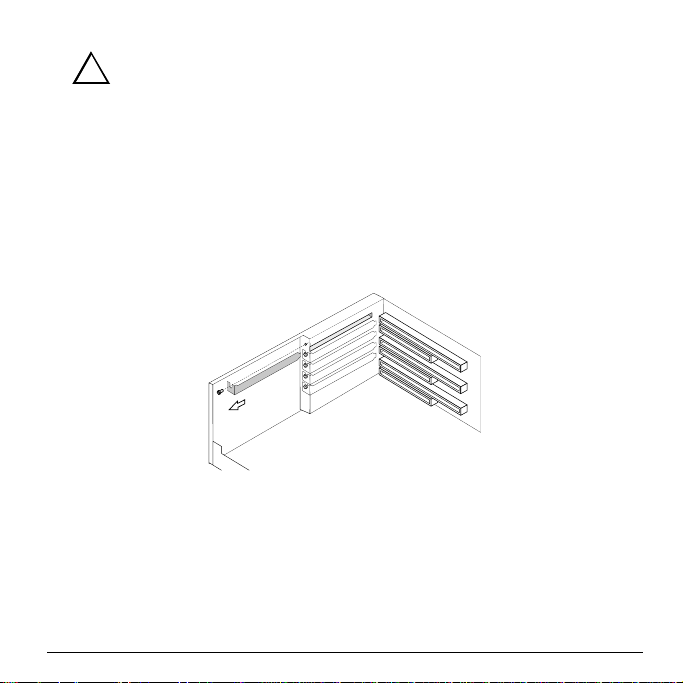
4. Remove the c over of your computer, according to the
instructions in the documentation that c ame with your
computer.
5. Select an available slot for your adapter and remove the
metal filler strip ( as pictured above). Keep the screw for
fixing the adapter later.
CAUTION:Electrostatic discharge may cause damage to
your computer and/or WL210 Adapter. To avoid
damage, first touch the metal chassis of your
computer before you remove the WL210
Adapter from its anti-static bag and insert the
WL210 Adapter into your computer.
2-2 Install the WL210 Wireless PCI Card
Page 21
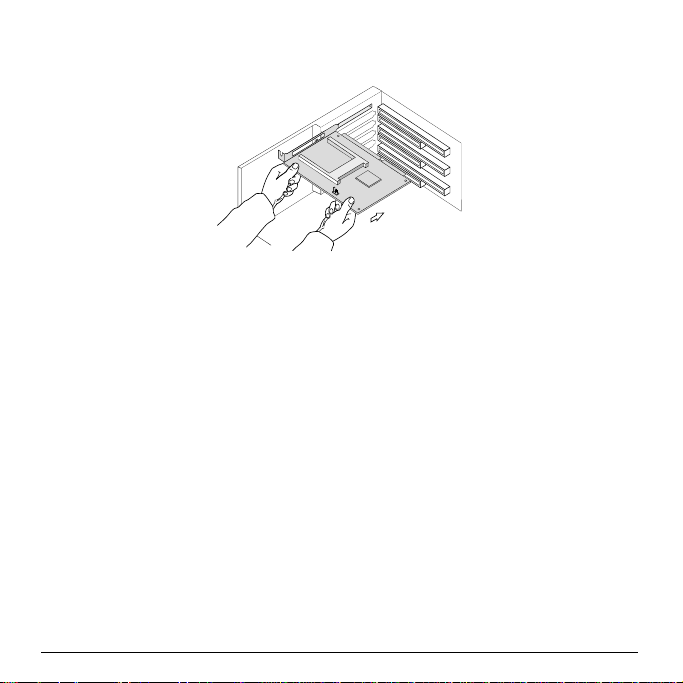
6. Gently insert the connector of the WL210 Adapter into
the slot until the card is properly seated.
7. Secure the card into place with the screw that you
removedinstep5.
8. Put the computer cover back into place according to the
instructions in the user’s guide that came with your
computer.
9. Reconnect all the external devices to your computer.
10. Re-insert the power cords and connect them to the mains
sockets.
11. Switch on the power of your computer to complete the
hardware installation.
Install the WL210 Wireless PCI Card 2-3
Page 22

Configure the WL210 Wireless PCI Card
Most of today’s Microsoft operating systems will
automatically detect and configure the WL210 Wireless PCI
Card hardware. Some of these operating systems however,
may require you to install an additional dr iver (the PCI
Enabler), to allow you to use the WL210 Adapter in
combination with the WL110 Wireless PC Card.
Therefore, prior to inserting the WL110 PC Card into the PC
Card slot of your WL210 Adapter, follow the installation
instructions as described for your operating system to
complete the installation of the WL210 Adapter.
Installation for MS-Windows 2000
Although the WL210 Wireless PCI Card will work fine in
some computers running Windows 2000, most computer
systems require the Microsoft Service Pack 1 update to allow
“Interrupt S haring” on the WL210 Adapter.
1. Update your Windows 2000 operating system using
Microsoft’s Windows 2000 Service Pack 1 or higher.
This Service Pack is available from the Microsoft
website at
2. Once you insert the WL210 Wireless PCI Card into your
computer, the operating system will automatically detect
the new hardware and enable the driver.
http://www.microsoft.com.
2-4 Install the WL210 Wireless PCI Card
Page 23

3. To verify if the installation was completed successfully,
proceed as described on page 2-7.
Installation for MS-Windows 98 & ME
Upon (re)starting your computer, Windows 98/ME will
automatically detect the adapter, and start the installation.
1. Follow the instructions on your screen, confirming the
settings proposed by the operating system.
2. When prompted to restart your computer select Yes to
complete the installation procedure.
3. To verify if the installation was completed successfully,
proceed as described on page 2-7.
Installation for MS-Windows 95
Installing the WL210 Wireless PCI C ard in Windows 95
requires you to install the “PCI Enabler” provided on the CDROM that came with your product.
1. Insert the CD-ROM that came with your WL210
Wireless PCI Card into your computer.
Your operating system will automatically start the CD.
2. Select your language
3. Clickon“Install Windows 95 PCI Enabler”
Install the WL210 Wireless PCI Card 2-5
Page 24

4. Follow the instructions on your screen.
5. To verify if the installation was completed successfully,
proceed as described on page 2-7.
Note: If the C D-ROM does not start automatically:
1. Click the Windows Start button
2. Select
Run
3. Browse to the CD-ROM
4. Double-click the file “
Run_CD.exe”
Installation for MS-Windows NT 4.0
Installing the W L210 Wireless PCI Card in Windows NT 4.0
requires you to installthe “PCI Enabler” provided on the CDROM that came with your product.
1. Remove the WL110 Wireless PC Card from the WL210
Wireless PCI Card.
2. Start-up your computer and:
a. Check the blue start-up screen to verify which NT
Service Pack is installed on th e computer.
b. Log in as the “Administrator” of the workstation.
If the computer is running with Service Pack v3.0 or
lower, download and install Service Pack v6a from the
2-6 Install the WL210 Wireless PCI Card
Page 25

Microsoft website (http://www.microsoft.com)priorto
installing the WL210 Adapter.
3. Insert the CD-ROM that came with your WL210
Wireless PCI Card into your computer.
Your operating system will automatically start the CD.
4. Select your language
5. Clickon“
Install Windows NT 4.0 PCI Enabler”
6. Follow the instructions on your screen.
7. Shut down Windows and r estart your computer.
When prompted to run diagnostics, c lick
yes and wait for
the computer to restart.
8. Afterthe restart, insert the WL110 Wireless PC Card and
click
OK to install the WL110 PC Card driver.
9. Restart your computer and verify if the installation was
completed successfully as described on page 2-7.
Verify Proper Installation
To verify proper installation of your WL210 Wireless PCI
Card, proceed as follows:
1. On the Windows task bar click the Start button, point to
Settings andthenclickControl Panel.
Install the WL210 Wireless PCI Card 2-7
Page 26

2. Double-click the PC Card (PCMCIA) icon and verify if the
PC Card properties window c orrectly displays the
WL110 Wireless PC Card hardware.
For Windows 95/98/2000 and ME, proceed with chapter 3
“Installation for Windows”.
2-8 Install the WL210 Wireless PCI Card
Page 27

chapter 3
Installation for Windows
Introduction
The installation of your WL110 Wireless PC Card for
Windows consists of the following steps:
1. Insert the CD-ROM to install the Client Manager
software (see page 3-2).
2. Insert your WL110 Wireless PC Card (see page 3-3).
3. Install drivers (see page 3-4).
4. Set the wireless LAN properties (see page 3-8).
5. Finish installation (see pa ge 3-14).
Note: If you intend to use the WL110 PC Card in the
WL510 Wireless Enterprise Access Point, please
refer to the documentation that was shipped with the
device. Alternatively you can download these
Installation for Windows 3-1
Page 28

documents from our website at: http://www.compaq.com/
support/files/networking/wlan/
.
Install the Client Manager
The Client Manager program is a software tool that you can
use to check the quality of your network connection.
Note: It is not mandatory to install the Client Manager
program in order to establish a network connection,
but it provides you with more options to:
View/change the settings of your network
connection.
Monitor your network connection.
To install the Client M anager software, proceed as follows:
1. Insert the software CD-ROM that came with your
WL110 Wireless PC Card kit into your computer.
Your operating system will automatically start the CD.
2. Select your Language
3. Click on “Install Compaq Client M anager”
4. Follow the instructions on your screen.
Note: If the C D-ROM does not start automatically:
1. Click the Windows
Start button
3-2 Installation for Windows
Page 29

2. Select Run
3. Browse to the CD-ROM
4. Double-click the file “
Run_CD.exe”
Insert your WL110 Wireless PC Card
1. Unpack your WL110 Wireless PC C ard kit and verify
that all items are present, as de scribed in “Kit Contents”
on page 1-1.
If any of the items described appear to be damaged or
missing, please contact your supplier.
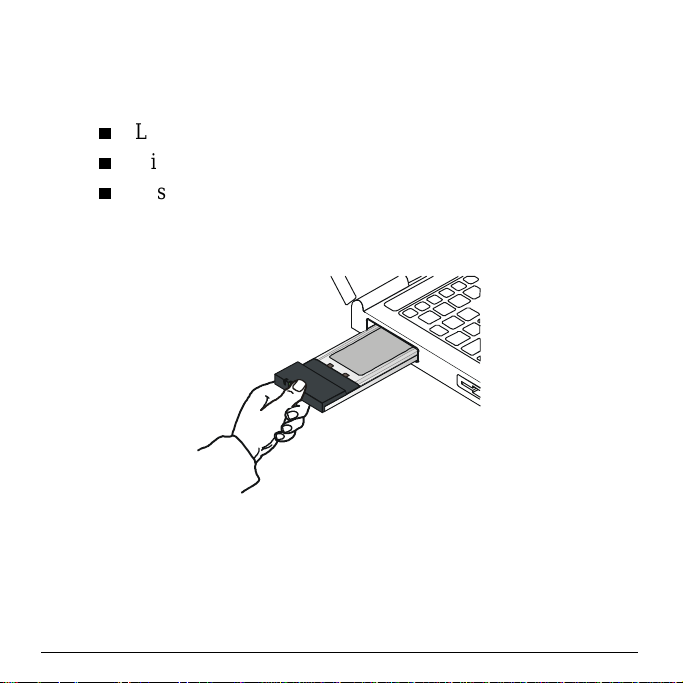
2. Insert the WL110 PC Card into the PC Card slot of your
computer as pictured in Figure 3-1.
Installation for Windows 3-3
Page 30

Figure 3-1 Inserting the WL110 Wireless PC Card into Your Computer
Install Drivers
Before You Start the Installation
Before you start the installation, you are advised to keep the
Windows CD-ROM or software diskettes close at hand. If
your computer came with a factory-installed Windows
operating system, these files will be stored on your
computer’s hard disk, in the form of cabinet (*.cab) files.
What You Need to Know
Installing a WL110 Wireless PC Ca rd requires the same level
of expertise that you would need to install a standardEthernet
3-4 Installation for Windows
Page 31

network adapter card. It is assumed that you have a working
knowledge of standard Windows operations and of installing
network adapter cards. Refer to the Windows Help when
necessary (on the Windows task bar, press the
select
Help).
Start button and
Driver Installation for Windows
Most M icrosoft Windowsoperating systems support “ Plug &
Play” for WL110 Wireless PC Cards. Once you i nsert the
WL110 PC C ard into your computer, these operating systems
will automatically:
Detect the card, and enable the driver, or
Startthe Add New Hardware wizard and prompt you to
install the driver, when the operating system cannot find
the required driver.
This would typically occur when inserting the 11 Mbps
Wireless LAN WL110 Wireless PC Card into your
computer for the very first time.
When Windows starts the
1. Follow the instructions on your screen.
2. When you are prompted to locate the driver installation
files, insert the C ompaq CD-ROM and navigate to the
folder that matches your operating system:
Add New Hardware wizard:
Installation for Windows 3-5
Page 32

Windows 2000: D:\Drivers\Win_2000
Windows ME: D:\Drivers\Win_ME
Windows 98: D:\Drivers\Win_98
Windows 95: D:\Drivers\Win95
Windows NT: D:\Drivers\Win_NT
When finished installing the drivers, Windows
automatically opens the
Add/Edit Configuration Profile
window.
3. Continue with “Set Windows Network Properties” on
page 3-7.
Note: If your computer does not detect the new hardware
you can c onsult appendix B “Troubleshooting”.
3-6 Installation for Windows
Page 33

Set Windows Network Properties
If this is the very first time that Ne tworking support is
installed onto your computer, the Windows operating system
will prompt you to enter a computer and workgroup na me.
These names will be used to identify your computer on the
Microsoft Network Neighborhood.
Figure 3-2 Windows Network Identification Properties
1. In the Computer Name field, enter a unique name for your
computer.
2. In the
3. (Optional) Provide a description of the computer in the
Workgroup field, enter the name of your workgroup.
Computer Description field.
Installation for Windows 3-7
Page 34

For more information about setting your Windows Network
Properties, consult your Windows documentation or the
Windows on-line help information.
Wireless LAN Properties
After installing the drivers, Windows will open the Add/Edit
Configuration Profile window for your WL110 Wireless PC
Card as pictured in Figure 3-3.
Figure 3-3 Add/Edit Configuration Profile window
3-8 Installation for Windows
Page 35

Configuration Profile
The Add/Edit Configuration P rofile window enables you to
specify one or more network connection profiles.
For example you can set up profiles for your office, your
home or an ad-hoc workgroup to share files with your
colleagues or friends while being “on the road”.
For more information about the different types of networks,
refer to “Network Options” on page 1-3.
To connect your computer to a wireless network you will
need to:
1. Assign a name to the network profile
2. Use the pull-down menu on the right to select how you
wish to c onnect to the wireless network:
Via the WL410 Wireless SMB Access Point or
WL510 Wireless Enterprise Access Point to connect
to the corporate network
Via the WL310 Wireless Home Office Gateway, or
An ad-hoc peer-to-peer workgroup of wireless
stations without access point.
3. Click the
Edit Profile button to view/modify the
parameters for the selected profile.
Installation for Windows 3-9
Page 36

For first-time installations, you are advised to setup a single
profile using only the Basic Settings.
Note: The number and type of parameters you need to
specify may differ according to the selected
connection type.
For information about the various options press the
F1
key or click the
Figure 3-4 Edit Configuration window
Help button.
3-10 Installation for Windows
Page 37

Basic Settings
To connect to a wireless network, all you need to specify is:
AvalidNetwork Name.
(Optional) a valid Encryptionkey.
Network Name
The Network Name is a case-sensitivestring of alphanumeric
characters in the range of “a” to “z”, “A” to “Z” and “0”to
“9“. It c onnects you to the wireless LAN, like a cable would
connect a wired computer to an Ethernet LAN.
Valid values are subject to the type of network to which you
wish to c onnect your computer:
To connect to a WL310 Wireless Home Office Gateway,
enter the 6-digit Network Name that is printed on a label
at the bottom of the WL310 Gateway device.
To connect to a Peer-to-Peer workgroup, e nter the name
as agreed upon by the workgroup participants.
If you wish to start a workgroup yourself, enter a name
with a maximum of 32 alphanumeric characters, and
share that value with your workgroup participants.
To connect to an access point, such as the WL410
Wireless SMB Access Point or WL510 Wireless
Installation for Windows 3- 11
Page 38

Enterprise Access Point, enter the value as defined by
your LAN Administrator.
This value should have a maximum of 32 alphanumeric.
characters.
Alternatively you may choose to enter the value “ANY”
(all character upper-case) to connect to any IEEE 802.11
compliant wireless network in the vicinity of your
computer.
Proceed with the Encryption Key settings, or click
confirm and return to the Add/Edit Configuration P rofile
window.
Encryption Key
To enhance the security of your wireless c ommunications,
you can a lso choose to enable wireless data encryption.
The encryption options differ according to the selected
configuration profile (page 3-9).
CAUTION:To allow communication, all wireless devices
should use identical encryption settings. As the
encryption key is case-sensitive, make sure you
enter it with care.
OK to
3-12 Installation for Windows
Page 39

When you selected to connect to a WL310 Wireless
Home OfficeGateway, you can enter one encryption key.
The d efault Encryption Key matches the last 5 characters
of the Ne twork Name.
CAUTION:Do not modify this key unless you have already
changed the encryption key of your W L310
Gateway.
When connecting to a Peer-to-Peer workgroup, enter the
key as agreed upon by the workgroup participants.
When connecting to a corporate LAN via the Access
Point pr ofile, the encryption tab allows you to enter up to
four different keys in either alphanumerical or
hexadecimal format.
Enter the values as defined by your LAN Administrator.
Note: The keys should be entered in exactly the sa me order
as in the access point.
Advanced Parameters
The Edit Configuration window also provides access to the
advanced parameters in the Advanced and Admin tab.
You are advised to leave these parameters to their default
settings, unless special situations require a change of these
parameters. For a description of these parameters, consult the
on-line help file or the “User’s Guide” on the CD-ROM.
Installation for Windows 3- 13
Page 40

Finish the Installation
When you have finished the “Wireless LAN Properties”,
click the
window and to proceed with the installation process.
Windows will finish building the driver configuration
database and copy some files to your computer’s hard disk.
OK button to close the Add/Edit Configuration
If the Windows operating system prompts you to identify
the location of the Windows files, specify the drive and
directory of the Windows Installation C D-ROM or
diskettes.
When you had a WL110 Wireless PC Card installed on
your computer before, most of these files are already
available on your hard disk drive. If you do not have the
Windows CD-ROM available, you may try replacing the
proposed path in the Copy Files From dialog box with:
“
C:\Windows\System”or“C:\Windows\”
If the Windows operating system prompts you to identify
the location of driver files (typically file names starting
with the characters w *.*) specify the drive and directory
of the C D-ROM:
Windows 2000: D:\Drivers\Win_2000
Windows ME: D:\Drivers\Win_ME
Windows 98: D:\Drivers\Win_98
3-14 Installation for Windows
Page 41

Windows 95: D:\Drivers\Win95
Windows NT: D:\Drivers\Win_NT
If you downloaded the files from the Internet, point to the
disk drive or directory where you saved files.
When Windows has finished copying files,it will prompt you
to restart your computer. Click
OK button to complete the
installation.
After Restarting Your Computer
After you have restarted your computer, the Windows
operating system will:
1. Detect the WL110 Wireless PC Card (you can hear the
two-tone sound of the PC C ard Socket Controller).
2. Load the driver
3. Display a dialog box requesting you to enter a Windows
user name and password.
The password you enter here will be the one used to
login to the Windows Network Neighborhood.
Write down this password and keep it in a safe place.
Installation for Windows 3- 15
Page 42

Verifying installation
To verify if the installation of the drivers was completed
successfully:
Check if the Windows task bar displays the PC Card icon
as pictured in Figure 3-5.
Check the LEDs on your WL110 Wireless PC Card.
— A steady green Power LED indicates the WL110
Wireless PC Card is active.
— A flickering green Radio LED indicates wireless
activity.
For other LED behavior see appendix B.
(Optional) To check the quality of the network
connection, start the Client M anager program as
described in chapter 4 “Working with 11 M bps Wireless
LAN and Windows”.
Figure 3-5 PC Card icon on the Windows task bar
r
3-16 Installation for Windows
Page 43

chapter 4
Working with 11 Mbps Wireless LAN and Windows
Introduction
This chapter provides general information on how to:
Use your WL110 Wireless PC Card
View Other Computers
View Wireless Link Quality
View/Modify WL110 Wireless PC Card Settings
Working with 11 Mbps Wireless LAN and Windows 4-1
Page 44

Use your WL110 Wireless PC Card
Radio Antennae
The built-in radio and antennae of your WL110 Wireless P C
Card perform best in an ope n environment with as few
obstacles as possible.
To achieve the maximum range for wireless
communications do not cover the card with objects such
as books or thick stacks of paper.
If you a re using the card inside a desktop computer you
may consider the purchase of the optional Range
Extender Antenna.
Remove the WL110 Wireless PC Card
If you do not need the wireless connectivity of your WL110
PC Card, you can remove the card from its slot as pictured in
Figure 4-1.
CAUTION:When removing the WL110 PC Card you will
lose your connection to the network. Prior to
removing the WL110 P C Card, make sure you
have closed all files and network applications
(such as e-mail).
4-2 Working with 11 Mbps Wireless LAN and Windows
Page 45
You areadvised to always disable the WL110 PC Cardprior
to removing the card from the PC Card slot. This will allow
the Windows operating system to:
Log off from the network server
Disable the driver
Disconnect power to the PC C ard slot (which will extend
battery life for m obile computers).
Figure 4-1 Remove the WL110 Wireless PC Card
To stop using the WL110 P C Card:
1. Click once on the PC Card icon on the right side of the
Windows task bar.
2. Select the option
Stop CompaqW L110 PC Card.
Working with 11 Mbps Wireless LAN and Windows 4-3
Page 46

3. Waita few seconds until the operatingsystems displays a
pop-up message to indicate you can safely remove the
PC Card.
Alternatively,you can disable the WL110 PC Card via the PC
Card icon on the Control Panel.
Maintenance of your WL110 Wireless PC Card
If you a re not using the 11 Mbps Wireless LAN WL110
Wireless PC Card for wireless c ommunications, extend its
life by storing it inside the transparent plastic casing that was
shipped with the product.
To clean the WL110 Wireless PC Card, gently wipe it with a
soft (damp) cloth.
CAUTION:To avoid da mage to the WL110 Wireless PC
Card do not use abrasive materials, or rinse the
card with liquids.
View Other Computers
When multiple 11 Mbps Wireless LAN stations are up-andrunning in your wireless network, you can use the procedure
described below to display the other computers:
1. Start Windows Explorer.
4-4 Working with 11 Mbps Wireless LAN and Windows
Page 47

2. Scroll down the list of files and folders to look for the
item
Network Neighborhood.
3. Double-click the
Network Neighborhood item to display all
stations in your Microsoft Networking Group.
4. To display other workgroups in the network
environment, double-click the
Entire Network icon.
If you cannot find other (11 Mbps Wireless LAN) networked
computers, verify whether the other 11 Mbps Wireless LAN
computers are:
Powered up and logged on to the network.
Configured to operate with identical Microsoft Network
settings concerning:
— Networking Protocol.
— Wireless Network Name
— Workgroup Name
To view or modify the
Station Name or Workgroup of your
computer, p roceed as follows:
1. Click the button from the Windows task bar.
2. Click on
3. In the Control Panel window, double-click the
Settings, and then on Control Panel.
Network
icon.
Working with 11 Mbps Wireless LAN and Windows 4-5
Page 48

4. In the Network Settings window, select the Identification
tab.
You can verify and change the
Station Name or Workgroup
parameters.
Note: You have to restart your computer before changes to
the Network Settings will be effected.
To verify the radio connection with other stations refer to
“View Wireless Link Quality” on page 4-7.
Using the Client Manager
If you installed the 11 Mbps Wireless LAN Client Manager
as de scribed in “Install the Client Manager” on page 3-2, you
can use the Client Manager to:
Verify the qua lity of your wireless connection to the
network.
View/Modify the configuration settings of your wireless
WL110 Wireless PC Card.
The Client Manager will start automatically every time you
power up your computer.
The Client Manager icon is displayed in the “System
Tray” of your Windows task bar at the right-side on
the bottom of your screen, indicating that the
Client Manager program is running.
4-6 Working with 11 Mbps Wireless LAN and Windows
Page 49

Click the icon once with your left mouse button to
retrieve a more detailed status overview.
Click the icon once with your right mouse button to
display a m enu with more options.
View Wireless Link Quality
You can use the Client Manager icon on the Windows task
bar to verify the link quality of your network connection.
An overview of all possible icons is givenin Table 4-1. When
the Client Manager icon is not indicating excellent or good
radio connection, act as described in Table 4-1.
Table 4-1 Client Manager Icon
Icon Description Color
Excellent radio connection Green
Good radio connection Green
Marginal radio connection:
The radio signal is weak. Move closer to the:
• 11 Mbps Wireless LAN access point, or
• 11 Mbps Wireless LAN Base Station
Working with 11 Mbps Wireless LAN and Windows 4-7
Yel lo w
Page 50

Icon Description Color
Poor radio connection:
The radio signal is very weak. Save your files and move
closer to the:
• 11 Mbps Wireless LAN access point, or
• 11 Mbps Wireless LAN Base Station
No radio connection because:
• Looking for initial connection, or
• You have moved out of range of the network.
Peer-to-Peer network connection Blank
Red
Red
View/Modify WL110 Wireless PC Card Settings
If you would like to view or modify 11 Mbps Wireless LAN
parameters,for example because you wouldlike toconnect to
another network or type of network, proceed a s follows:
1. Right-click on the Client Manager icon on the
Windows task bar.
2. Fromthe m enu, select
and select:
Add/Edit Profile to add a new profile or to modify an
existing profile.
Configuration Profile (see Figure 4-2)
4-8 Working with 11 Mbps Wireless LAN and Windows
Page 51

One of the existingprofiles (if present) to select a profile
without viewing or modifying the settings.
After selecting and a nother profile, the PC Card will use
the selected profile to connect to the wireless network.
Figure 4-2 Edit Wireless Configuration Settings
If your Client Manager icon is not visible, you have to start
the Client Manager program again:
1. Click the button from the Windows task bar.
2. Select
Programs, and then select the Compaq Wireless LAN
program group.
3. Next select
Client Manager to start the Client M anager
program.
Alternatively you can to change the WL110 Wireless PC
Card configuration via the Control Panel:
1. Click the button from the Windows task bar.
Working with 11 Mbps Wireless LAN and Windows 4-9
Page 52

2. Click on Settings, and then on Control Panel.
3. In the Control Panel window, double-click the
Network
icon.
Wireless
4. (Optional) Change the parameters you would like to
modify, and click
the OK button to confirm your changes, or
the Cancel button to ignore your modifications.
4-10 Working with 11 Mbps Wireless LAN and Windows
Page 53

chapter 5
Advanced Settings
Introduction
Although your WL110 Wireless PC Card will work fine in
most network environment with the basic settings as
described on chapter 3 “Installation for Windows”, you may
wish to explore the advanced parameters optionsas displayed
on the Configuration window for your adapter.
Advanced pa rameters are available only in the configuration
profiles that connect to an access point.
Consult your LAN Administrator for information about
whether these parameters apply to your situation.
For more information consult your LAN A dministrator. You
can also refer to the help fileand the “11 Mbps WirelessLAN
Manager Suite User’s guide”.
Advanced Settings 5-1
Page 54

Advanced Parameters Tab
This tab of the Edit Configuration window allows you to
adjust a number of parameters related to the performance of
your wireless adapter.
Figure 5-1 Setup Advanced Parameters
Card Power Management allows you to extend the
battery life of (mobile) wireless devices.
Interference Robustness allows you to remedy slow
performance related to in-band interference from devices
like microwave ovens.
5-2 Advanced Settings
Page 55

RTS/CTS Medium Reservation controls the deferral
behavior of wireless devices. Enabling this option m ay
improve reliability of the network when:
— many wireless stations operate in an environment
with relatively few access points, and
— network performance is poor network due to
excessive frame collisions at the access points.
Advanced Settings 5-3
Page 56

Admin Parameters Tab
The Admin pa rameters tab allows LAN A dministrators to
ensure that your adapter settings match specific settings that
applytotheentirenetwork.
Figure 5-2 Setup Admin Parameters
Distance between Access Points allows you to control
network performance in relation to the number of access
points in your network.
MAC Address allows you to assign a local MAC address
to your adapter in case your network operating system
requires local addressing.
5-4 Advanced Settings
Page 57

appendix A
Card Specifications
Physical Specifications
WL210 Wireless PCI Card
Form Factor
Dimensions
Temperature & Humidity (non condensing)
Operation
Tran sit
Storage
Single slot adapter card for Type-II PC Cards (no ejector)
(LxW) 160x98 mm
0° to 55° C maximum humidity 95%
-20° to 60° C humidity 15 to 95%
-10° to 60° C humidity 10 to 90%
Card Specifications A-1
Page 58

WL110 Wireless PC Card
Form Factor
Dimensions
Weight
Temperature & Humidity (non condensing)
Operation
Tra ns it
Storage
Although the WL110 Wireless PC Card may still operate in
the range of -20° to 70°C, operation outside the range of 0° to
55° C may no longer be according to specifications
WL110 Wireless PC Card Type-II Extended
(LxWxH) 117.8 x 53.95 x 8.7 mm
45 gram (PC Card)
0° to 55° C maximum humidity 95%
-20° to 70° C humidity 15 to 95%
-10° to 60° C humidity 10 to 90%
A-2 Card Specifications
Page 59

Electrical Characteristics
WL210 Wireless PCI Card
PC Card Bus
PCI bus
Chipset
Power Supply
WL110 Wireless PC Card
Doze Mode
Receive Mode
Transmit Mode
Power Supply
16 bit, 5V (compliant with the R2 PC Card
interface defined in the 1995 PC Card standard).
PCI Local Bus (compliant with the PCI Local Bus
Specification Revision 2.1)
• PCI to Cardbus bridge TI 1410
• Power interface TI TPS2211
5 V taken directly from PCI bus
10 mA
180 mA
280 mA
5 V
Card Specifications A-3
Page 60

Networking Characteristics
Compatibility
Host Operating
System
Media Access
Protocol
Data Rate
• IEEE 802.11 Standard for Wireless LANS (DSSS)
• Wi-Fi (Wireless Fidelity) certified by the Wireless
Ethernet Compatibility Alliance (WECA).
Microsoft Windows® 95:
• NDIS3 Miniport Driver
Microsoft Windows® NT v4.0:
• NDIS4 Miniport Driver
Microsoft Windows® 98/ME and 2000:
• NDIS5 Miniport Driver
CSMA/CA (Collision Avoidance) with
Acknowledgment (ACK)
• High 11 Mb/s
• Medium 5.5 Mb/s
• Standard 2 Mb/s
•Low 1 Mb/s
The cards use an automatic Transmit Rate Select
mechanism.
A-4 Card Specifications
Page 61

Regulatory Information
WL210 Wireless PCI Card
EMC Compliance
Product Safety
WL110 Wireless PC Card
Wireless communication is often subject to local radio
regulations. Although wireless networking products have
been designed for operation in the license-free2.4 GHz band,
local radio regulationsmay im pose a number of limitations to
the use of wireless communication equipment.
Note: Refer to the flyer “Information to the User” for more
USA FCC CFR47 Part 15-B, class B
Europe • 89/336/EEC, EMC Directive incl. CE Mark
• EN 55022, Class B (Emissions)
• EN 50082-1 (Immunity)
Japan VCCI Standard Class B (Emissions)
USA UL 1950, UL Listed
Europe EN60950
Japan IEC 950
regulatory information that may apply in your
country.
Card Specifications A-5
Page 62

Radio Characteristics
R-F Frequency Band 2.4 GHz (2400-2500 MHz)
Supported subchannels
Modulation Technique Direct Sequence Spread Spectrum
Spreading 11-chip Barker Sequence
Bit Error Rate (BER)
Nominal Output Power 15 dBm
Encryption 128-bit (RC4), also supports 64-bit RC4/WEP
1 2412
2 2417
3 2422
4 2427
5 2432
6 2437
7 2442
8 2447
9 2452
10 2457 (default)
11 2462
CCK 11 & 5.5 Mb/s, DQPSK for 2 Mb/s and DBPSK
for 1 Mb/s
-
Better than 10
5
(Wired Equivalent Privacy)
A-6 Card Specifications
Page 63

Range/Transmit Rate
Open Office 160 m
Semi-Open Office 50 m
Closed Office 25 m
Receiver Sensitivity -83 dBm -87 dBm -91 dBm -94 dBm
Delay Spread (FER of
<1%)
11 Mb/s 5.5 Mb/s 2 Mb/s 1 Mb/s
270 m
(525 ft.)
(165 ft.)
(80 ft.)
65 ns 225 ns 400 ns 500 ns
(885 ft.)
70 m
(230 ft.)
35 m
(115 ft.)
400 m
(1300 ft.)
90 m
(300 ft.)
40 m
(130 ft.)
550 m
(1750 ft.)
115 m
(375 ft.)
50 m
(165 ft.)
The range of the wireless signal is related to the Transmit
Rate of the wireless communication. Communications at
lower Transmit range will travel larger distances.
Note: The range values listed above are typical distances as
measured at the Compaq 11 Mbps Wireless LAN
laboratories. These values may provide a rule of
thumb and m ay vary according to the actual radio
conditions a t the location where the 11 M bps
Wireless LAN product will be installed.
The range of your wireless devices can be affected when the
antennas are placed near metal surfaces and solid highdensity materials.
Card Specifications A-7
Page 64

Range is also impacted due to “obstacles” in the signal path
of the radio that may either absorb or reflect the r adio signal.
The listed ranges a re typical values when used indoors in
“office environments” that can be described as follows:
In Open Office environments, antennas can “see” each
other, i.e. there are no physical obstructions between
them.
In Semi-open Office environments, work space is
divided by shoulder-height, hollow wall elements;
antennas are at desktop level.
In Closed Office e nvironments, work space is separated
by floor-to-ceiling brick walls.
A-8 Card Specifications
Page 65

Auto Channel Selection
When installing WL110 Wireless PC Cards the channel
configuration is managed as follows:
For wireless clients that operate in an 11 Mbps Wireless
LAN Infrastructure, the W L110 Wireless PC Card will
automatically start operation at the channel identified by
the access points. When roaming between different
access points the station can dynamically switch to
another channel if r equired.
For WL110 Wireless PC Cards installed into wireless
clients that operate in an “Peer-to-Peer” mode, the
WL110 PC Card will default use channel 10.
When inserted into the WL510 Wireless Enterprise
Access Point, the WL110 PC Card will use the factoryset default channel (printed in bold), unless the LAN
Administrator selected a different channel when
configuring the access point device.
Card Specifications A-9
Page 66

Page 67

appendix B
Troubleshooting
LED Activity
If you e ncounter difficulty using a nd/or installing your 11
Mbps Wireless LAN product, the error may be related to
various causes:
Out-of range situation, which prevents the WL110 PC
Card from e stablishing a wireless connection with the
network.
Configuration mismatch, which prevents the WL110 PC
Card from e stablishing a wireless connection with the
(correct) network.
Absence of, or conflict of the 11 Mbps Wireless LAN
Driver.
Troubleshooting B-1
Page 68

A problem or conflict with the PC Card slot which
prevents the WL110 Wireless PC Card from powering
on.
A conflict of the hardware with another device.
The starting point to troubleshoot problems with your
wireless network is looking at the LED activityof the WL110
PC Card.
Table B-1 provides an overview of the various modes of
operation and the associated LED activity. It also includes a
number of troubleshooting hints, that may help you solve the
problem.
B-2 Troubleshooting
Page 69

Tab le B -1 LE D Activ ity
Power LED Radio LED Description/Action
Continuous
Green
Blinking Standard operational mode.
• Card is powered on.
• Sensing/transmitting wireless data.
Off • Card is powered on.
• No wireless activity.
No action is required.
Flicker Flicker Power Management mode:
• Card is powered on, but set to power saving
mode, to conserve battery life.
• Flashes indicates that the card wakes up at
regular intervals to verify if there is wireless data
addressed to your computer.
Troubleshooting B- 3
Page 70

Power LED Radio LED Description/Action
Both LEDs blink once
every 10 seconds
The WL110 PC Card works fine, but did not yet
succeed establishing a wireless connection with the
wireless Infrastructure.
Actions:
• Contact the LAN Administrator to verify the
Network Name assigned to the wireless
infrastructure.
• Contact the LAN Administrator to verify the
correct value(s) of the encryption keys.
• Contact the LAN Administrator to verify whether
the network infrastructure has been set to deny
“ANY” as valid Network Name (Closed Network).
• Change the configuration of your WL110 PC Card
to enter the correct Network Name
• If there are no access point devices available,
change the configuration of your WL110 PC Card
to run in “Peer-to-Peer” mode.
B-4 Troubleshooting
Page 71

Power LED Radio LED Description/Action
Off Off Card is not powered on, so it can not transmit/
receive data.
The cause may either be:
• No Driver loaded/installed
• Card - Driver mismatch which prevented the
driver from loading
• Device conflict which prevented the driver from
loading
Actions:
• Verify if a driver has been installed, if not install
the driver.
• View/Modify the device settings of the WL110 PC
Card to determine/resolve the occurrence of a
conflict with another device
• Verify the versions of the driver, and the
embedded software in the WL110 PC Card (also
referred to as Station firmware).
• Check our website at:
support/files/networking/wlan/
http://www.compaq.com/
to download and
install the latest embedded software and driver.
Troubleshooting B- 5
Page 72

Can Not Connect To The Network
If your WL110 PC C ard seems to be working fine, but you
are not able to connect to the network, this error might be due
to a configuration mismatch.
For example if both LEDs of your WL110 P C Card blink
once every ten seconds, the problem is likely to be caused by
a configuration mismatch of:
Network Name
Encryption Key
The 11 Mbps WirelessLAN Network Name is case-sensitive.
LEDs Work But Can’t Connect to Network
If you c an not connect to the network while the LEDs
indicate that the network is working properly (Power LED is
on, Radio LED blinks) your problems might be ca used by:
Incorrect TCP/IP settings for your wireless network
adapter (“Changing TCP/IP Settings” on page B-7).
Your Windows operating system requires a n update with
a Microsoft Service Pack “Install Windows2000 Service
Pack” on page B-10).
Note: Some older versions of the Windows 95 operating
system will not automatically install the necessary
TCP/IP network protocol.
B-6 Troubleshooting
Page 73

Changing TCP/IP Settings
Consult your LAN Administrator for the values of your TCP/
IP settings.
To change the TCP/IP Settings:
1. On the Windows task bar click the
2. Select
Settings andthenselectControl Panel.
3. On the Control Panel window, double c lick on the
Network icon to view the Network Properties.
4. From the list of installed components, check if the
-> Compaq WL110 PC Card
If this protocol is not yet installed, c lick the Add but-
protocol is installed.
ton and select the TCP/IP protocol from the list. Refer
to the Windows Help for more information.
If this protocol is installed, select this protocol and
click the Properties button. Check if the parameters
resemble the settings provided by your LAN Administrator. M ake Changes if necessary, and click OK
when you’re done.
5. When prompted, restart your computer.
Start button
TCP/IP
Troubleshooting B- 7
Page 74

Static IP Addressing for Peer-to-Peer networks
In networks with S tatic IP addressing, the network
administrator manually assigns an IP address to each
computer. Once a Static IP address is assigned,a computer
uses the same IP address every time it reboots and logs on to
the network, unless you manually change the IP address in
the
Network Properties dialog box. Networks using Static I P
addresses are easy to set up and do not require additional
network management software.
A Peer-to-Peer network environmentis best suited for
addressing
, because of its simplicity.
Static IP
Peer-to-Peer networks are also not likely to have a DHCP
server already set up on the network.
Configure TCP/IP Settings for Static IP Addressing
Note: This IP configuration should only be applied to
wireless networks that do not have a DHCP server
installed.
1. Right-click Network Neighborhood on your desktop.
2. Select
3. Select the
Properties from the pop-up menu to display the
Network Properties dialog box.
Configuration tab, and click TCP/IPCompaq WL110
PC Card
.
B-8 Troubleshooting
Page 75

4. Click Properties to display the TCP/IP Properties dialog box.
Make sure the
Specify an IP address option is selected.
Note: In accordance with private IP addressing you can use
IP addresses from
Subnet Mask of
Each computer on the network must have a unique
IP address. It is best to assign the value
to the first computer,
192.168.0.1 to 192.168.0.254 with the
255.255.255.0.
192.168.0.1.
192.168.0.2 to the next
computer and so on.
All computers on the network must use the same
Subnet Mask value
5. Click
OK to return to the Network Properties dialog box.
6. Select the
Identification tab.
255.255.255.0.
a. In the Computer Name field, create a unique name to
identify the computer.
Each computer on the network must have a unique
computer name.
b. In the
Workgroup field, create a workgroup name.
This name is the same for all computers on the
wireless network.
c. In the
Computer Description field, you can enter a
detailed description for the computer.
Troubleshooting B- 9
Page 76

7. Click OK when completed. Click Yes to restart the
computer with the new network settings.
Install Windows 2000 Service Pack
If you c an no connect a Windows 2000 computer to the
network while the LEDs indicate your wireless a dapter is
working properly (Power LED is green, the R adio LED
flickers and Client Manager shows a wireless connection) the
computer probably has not been updated to Service Pack 1.
1. Insert the software CD-ROM that came with your
WL210 Wireless PCI Card kit into your computer.
Your operating system will automatically start the CD.
2. Select your Language
3. Clickon“
4. Follow the instructions on your screen.
Note: If the C D-ROM does not start automatically:
Windows NT/2000 Service Packs”
1. Click the Windows
Start button
2. Select Run
3. Browse to the CD-ROM
4. Double-click the file “
Run_CD.exe”
B-10 Troubleshooting
 Loading...