

Page 1

Notice
© 2000 Compaq Computer Corporation
COMPAQ and the Compaq logo Registered in U.S. Patent and Trademark Office. Microsoft and Windows
are trademarks of Microsoft Corporation.
All other product names mentioned herein may be trademarks or registered trademarks of their respective
companies.
Compaq shall not be liable for technical or editorial errors or omissions contained herein. The information in
this document is subject to change without notice.
The information in this publication is subject to change without notice and is provided "AS IS" WITHOUT
WARRANTY OF ANY KIND. THE ENTIRE RISK ARISING OUT OF THE USE OF THIS INFORMATION
REMAINS WITH RECIPIENT. IN NO EVENT SHALL COMPAQ BE LIABLE FOR ANY DIRECT,
CONSEQUENTIAL, INCIDENTAL, SPECIAL, PUNITIVE OR OTHER DAMAGES WHATSOEVER
(INCLUDING WITHOUT LIMITATION, DAMAGES FOR LOSS OF BUSINESS PROFITS, BUSINESS
INTERRUPTION OR LOSS OF BUSINESS INFORMATION), EVEN IF COMPAQ HAS BEEN ADVISED
OF THE POSSIBILITY OF SUCH DAMAGES. THE FOREGOING SHALL APPLY REGARDLESS OF THE
NEGLIGENCE OR OTHER FAULT OF EITHER PARTY AND REGARDLESS OF WHETHER SUCH
LIABILITY SOUNDS IN CONTRACT, NEGLIGENCE, TORT, OR ANY OTHER THEORY OF LEGAL
LIABILITY, AND NOTWITHSTANDING ANY FAILURE OF ESSENTIAL PURPOSE OF ANY LIMITED
REMEDY.
The limited warranties for Compaq products are exclusively set forth in the documentation accompanying
such products. Nothing herein should be construed as constituting a further or additional warranty.
Compaq Presario
First Edition (June 2000)
Part Number 208084
Page 2

Page 3

Table of Contents
Preface .........................................................................................................................v
Chapter 1 Getting Started......................................................................................1-1
Features............................................................................................................................1-1
Taking a Look at the Notebook.........................................................................................1-2
Right-Side View...........................................................................................................1-2
Left-Side View..............................................................................................................1-3
Rear View....................................................................................................................1-3
Front View....................................................................................................................1-4
Top-Open View............................................................................................................1-4
Getting the Notebook Running..........................................................................................1-6
Connecting to AC Power .............................................................................................1-6
Using Battery Power....................................................................................................1-7
Starting Up...................................................................................................................1-7
Turning Off the Notebook ............................................................................................1-7
Warranty Certificate..........................................................................................................1-8
Safety and Comfort...........................................................................................................1-8
Registration.......................................................................................................................1-8
Registering with Microsoft ...........................................................................................1-8
Registering with Compaq ............................................................................................1-8
Chapter 2 Using the Computer.............................................................................. 2-1
Floppy Disk Drive..............................................................................................................2-1
Connecting the External Floppy Drive.........................................................................2-1
Inserting and Ejecting Diskettes ..................................................................................2-2
Formatting Diskettes ...................................................................................................2-2
Hard Disk Drive.................................................................................................................2-2
CD/DVD/CD-RW Drive.....................................................................................................2-3
Connecting the External CD/DVD/CD-RW Drive ........................................................2-3
Inserting/Removing a CD ............................................................................................2-3
Manually Releasing a CD............................................................................................2-4
Keyboard...........................................................................................................................2-4
Fn Key.........................................................................................................................2-4
Typewriter Keys...........................................................................................................2-4
My Presario – Getting Started Table of Contents i
Page 4

Function Keys............................................................................................................. 2-4
Cursor-Control Keys ................................................................................................... 2-5
Numeric Keypad ......................................................................................................... 2-5
Windows Keys ............................................................................................................ 2-5
Hot Keys ..................................................................................................................... 2-6
Easy Access Buttons.................................................................................................. 2-6
Touchpad ......................................................................................................................... 2-7
Using the Touchpad.................................................................................................... 2-7
Changing the Configuration........................................................................................ 2-8
Scroll Button................................................................................................................ 2-8
Introducing Power Management ......................................................................................2-9
Automatic Power Management................................................................................... 2-9
Manual Power Management....................................................................................... 2-9
Suspend-to-File .......................................................................................................... 2-9
Taking Care of Your Notebook....................................................................................... 2-10
Maintenance ............................................................................................................. 2-10
Traveling................................................................................................................... 2-10
Chapter 3 Battery Operations ............................................................................... 3-1
AC Adapter.......................................................................................................................3-1
Battery Pack..................................................................................................................... 3-1
Recharging the Battery Pack...................................................................................... 3-1
Replacing the Battery Pack......................................................................................... 3-1
Important Notes on Using the Battery Pack................................................................ 3-2
Low Battery Signals and Actions...................................................................................... 3-3
Chapter 4 System Expansion................................................................................ 4-1
External Connections....................................................................................................... 4-1
Connecting an External Monitor ................................................................................. 4-1
Connecting an IR Device............................................................................................ 4-1
Connecting an USB Device ........................................................................................ 4-2
Connecting an IEEE 1394 Device............................................................................... 4-2
Internal Installation...........................................................................................................4-2
Installing a PC Card.................................................................................................... 4-2
Notebook Upgrade...................................................................................................... 4-3
Chapter 5 Setup Configuration Utility .................................................................. 5-1
Introduction....................................................................................................................... 5-1
Starting SCU............................................................................................................... 5-1
Moving Around and Making Selections............................................................................ 5-2
ii Table of Contents My Presario – Getting Started
Page 5

Main Menu ........................................................................................................................5-3
Advanced Menu................................................................................................................5-5
Security Menu...................................................................................................................5-6
Power Menu......................................................................................................................5-7
Exit Menu........................................................................................................................5-11
Chapter 6 Preventive Maintenance.......................................................................6-1
What is Preventive Maintenance? ....................................................................................6-1
Backing Up Your Files ......................................................................................................6-1
Using Microsoft Backup...............................................................................................6-1
Deleting Unwanted Files...................................................................................................6-2
Taking Inventory of Your Hard Disk.............................................................................6-2
Emptying the Recycle Bin............................................................................................6-2
Deleting Unwanted Mail...............................................................................................6-2
Deleting Temporary Internet Files ...............................................................................6-2
Increasing Temporary Internet File Space..................................................................6-2
Deleting the Internet History File .................................................................................6-3
Optimizing the Computer Hard Disk .................................................................................6-3
Using ScanDisk ...........................................................................................................6-3
Using Disk Defragmenter............................................................................................6-3
Appendix A Specification .......................................................................................A-1
CPU, Memory and Main Components ............................................................................. A-1
Controller and Interface ................................................................................................... A-2
Power...............................................................................................................................A-2
Environment Specification ............................................................................................... A-2
Glossary
My Presario – Getting Started Table of Contents iii
Page 6

List of Figures
Figure 1-1. Right-Side View ............................................................................................ 1-2
Figure 1-2. Left-Side View............................................................................................... 1-3
Figure 1-3. Rear View .....................................................................................................1-3
Figure 1-4. Front View..................................................................................................... 1-4
Figure 1-5. Opening the Cover........................................................................................1-4
Figure 1-6. Top-Open View............................................................................................. 1-5
Figure 1-7. Connecting the AC Adapter.......................................................................... 1-6
Figure 2-1. 3.5-inch Diskette........................................................................................... 2-1
Figure 2-2. Inserting a Diskette....................................................................................... 2-2
Figure 2-3. Using the External CD-ROM Drive ...............................................................2-3
Figure 2-4. Cursor-Control Keys .....................................................................................2-5
Figure 2-5. Numeric Keypad ........................................................................................... 2-5
Figure 2-6. The Touchpad............................................................................................... 2-7
Figure 2-7. Scroll Button.................................................................................................. 2-8
Figure 3-1. Unlocking the Battery Pack...........................................................................3-2
Figure 3-2. Removing the Battery Pack .......................................................................... 3-2
Figure 4-1. Installing a PC Card...................................................................................... 4-3
Figure 5-1. Main SCU Screen......................................................................................... 5-1
iv Table of Contents My Presario – Getting Started
Page 7

Preface
This manual contains information that will help you operate the computer. It is divided into 6 chapters, and
an appendix.
Chapter 1, Getting Started, takes you through the process of setting up the computer and identifying its
external components.
Chapter 2, Using the Notebook, tells you how to use the computer’s components and features.
Chapter 3, Battery Operations, provides information on power.
Chapter 4, System Expansion, provides information on installing and using peripheral devices.
Chapter 5, Setup Configuration Utility, describes the SCU program that configures the computer’s BIOS
settings.
Chapter 6, Preventive Maintenance, provides information on regular maintenance of the computer files
and hard disk.
Appendix A, Specifications, gives a brief specification for the computer.
My Presario – Getting Started Table of Contents v
Page 8

vi Table of Contents My Presario – Getting Started
Page 9

Getting Started
1
In this Chapter
Features, 1-1
Taking a Look at the
Notebook, 1-2
Getting the Notebook
Running, 1-6
Warranty Certificate, 1-8
Safety and Comfort, 1-8
Registration, 1-8
NOTE: For the latest information
on the motherboard and CPU
installed in your note- book,
please contact with your dealer
for details.
* Only available on selected
model.
Congratulations on purchasing your new notebook. This slim, lightweight designed notebook incorporates advanced capabilities, which
allow you to boots up your performance in the world of multimedia.
This chapter introduces the features and components of the
notebook, and tells you how to get the notebook up and running.
Features
• Intel Mobile Pentium III series microprocessor
Your notebook is equipped with one of the most advanced central
processors for excellent performance.
• Built-in PCI audio system
With your notebook’s audio capabilities, you can experience
fantastic 3D audio sensations and realistic acoustic effects.
• PCMCIA Slot with CardBus and ZV port support
CardBus and ZV port standards satisfy the need for high-speed
data transmission, such as required by full-motion video, video
capture, and networking.
• IR Port support
With the IR port, wireless communications are possible between
your notebook and an IR device.
• USB Port support
The Universal Serial Bus standard gives you the benefits of having
one single interface for multiple interfaces when low-to-medium
speed peripherals are concerned.
• IEEE 1394 Port support*
The IEEE 1394 standard describes a serial bus driven by an
advanced communication protocol, which provides faster data
transmission rates and universal I/O interconnect.
• Power Management
You can conserve power automatically and manually by setting up
the Power Management capabilities of your notebook.
• Modem Card
The Fax/Modem/Voice function allows your notebook to transmit
data over the phone lines.
• LAN Card
The LAN function allows your notebook to be connected to a
network environment.
My Presario – Getting Started Getting Started 1-1
Page 10
* 4X-6X DVD-ROM / CD-RW
drive as an option.
** It depends on your CPU types.
Tips: Before you begin, you’ll
want to become familiar with the
components of your Compaq
Presario.
Other basic components of your notebook system are:
• External 3.5-inch, 1.44MB (Megabytes) floppy disk drive with USB
connection and hot plug supported
• ATA3 IDE hard disk drive, Ultra DMA/33 supported
• External 24X CD-ROM drive*
• 64/128MB SDRAM on board, one SO-DIMM socket supported to
provide up to 192/256MB SDRAM upgrade capability
• 128/256KB on-die L2 cache memory**
• 4MB SGRAM video memory
• TFT LCD (Liquid Crystal Display) with VGA/SVGA/XGA resolution
• Notebook keyboard
• Touchpad device
• Microphone and stereo speaker set
• I/O connectors for external expansion
• AC adapter
• Li-ion rechargeable battery pack
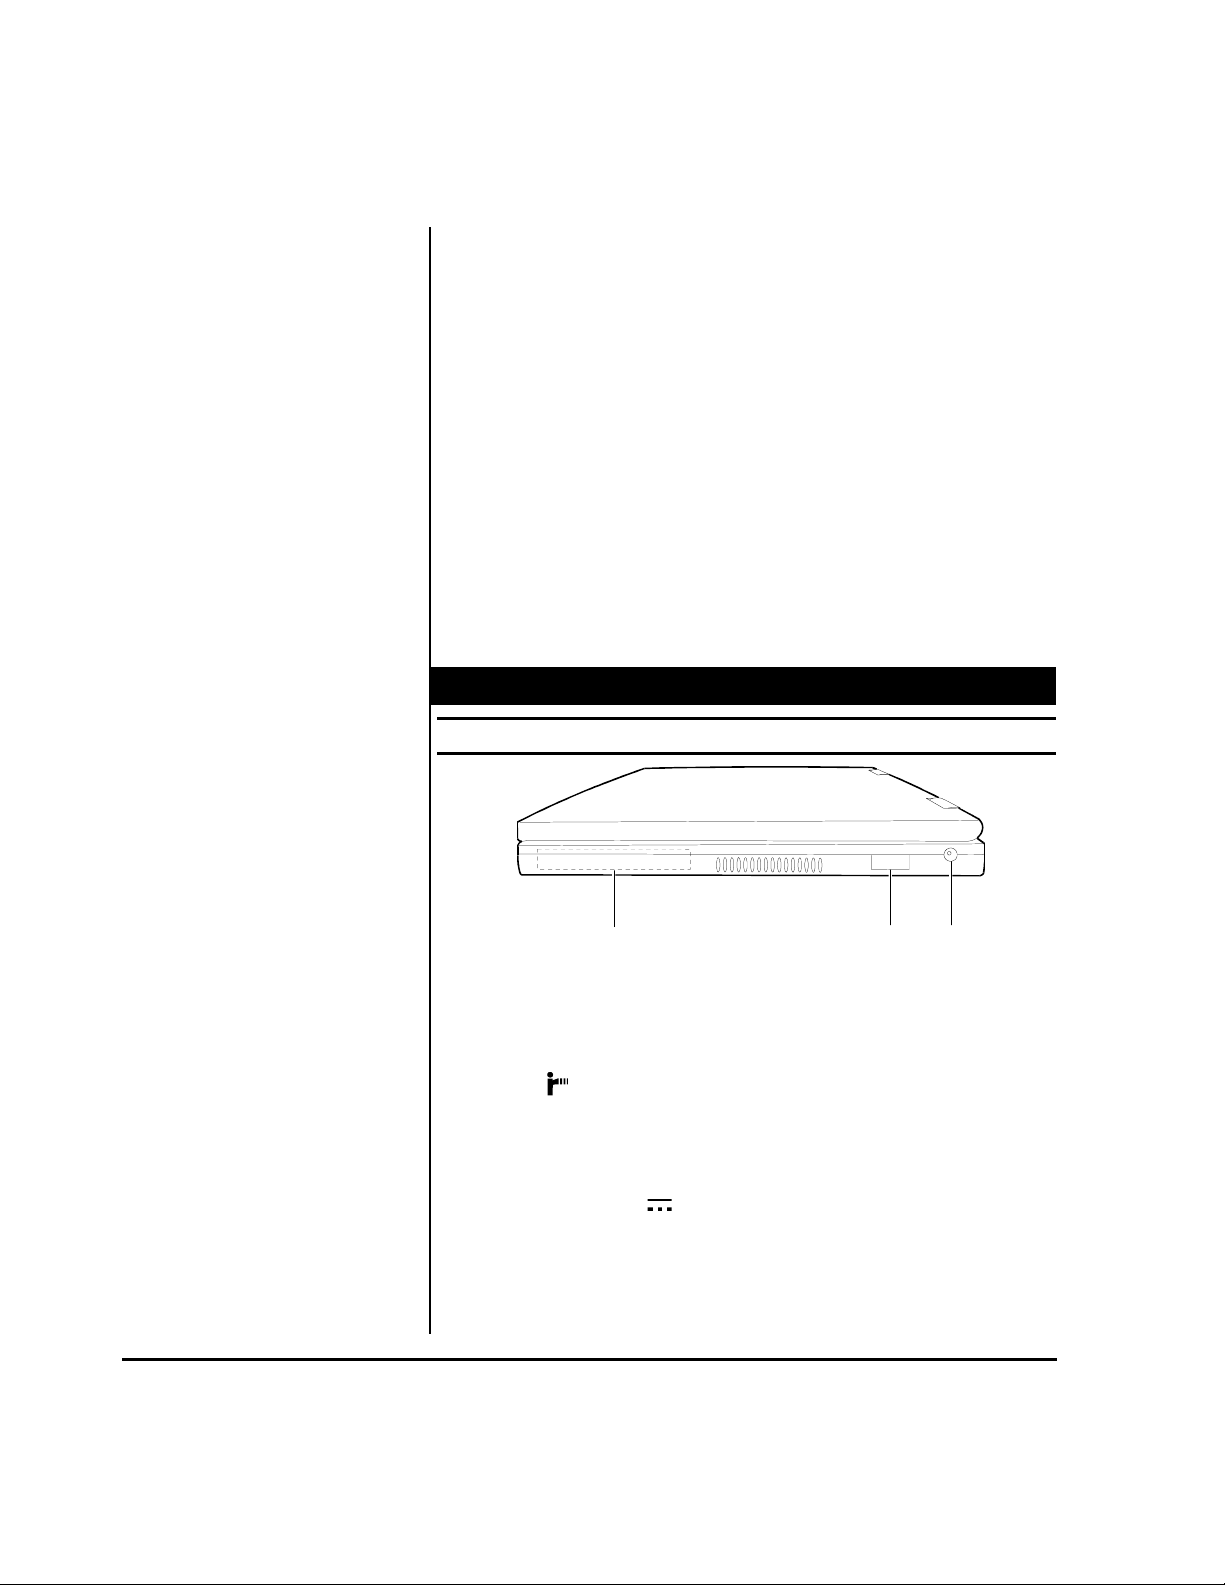
Taking a Look at the Notebook
Right-Side V iew
Getting Started 1-2 My Presario – Getting Started
1. Hard Disk Drive
Inside is the hard disk drive of your notebook, often referred as
drive C. (See “Hard Disk Drive” in Chapter 2 for more information.)
2. IR Port (
This infrared port complies with IrDA 1.3 (FIR, up to 4 Mbit/s) and
ASK standards, which allow your notebook to connect to an IR
device wirelessly. (See “Connecting an IR Device” in Chapter 4
for important notes.)
3. Power Connector (
This is for connecting the AC adapter.
)
Figure 1-1. Right-Side View
)
2
3
Page 11
345
6
3
CAUTION:
1. Never install telephone wiring
during a lightning storm.
2. Never install telephone jacks in
wet locations unless the jack is
specifically designed for wet
locations.
3. Never touch uninsulated
telephone wires or terminals
unless the telephone line has
been disconnected at the
network interface.
4. Use caution when installing or
modifying telephone lines.
5. Avoid using the telephone
function during an electrical
storm. There may be a remote
risk of electric shock from
lightning.
6. Do not use the telephone
function to report a gas leak in
the vicinity of the leak.
7. To reduce the risk of fire, use
only No. 26 AWG or larger
telecommunication line cord.
8. Unit shall be connected to
Telecommunication Network
through a line cord which
meets the requirements of
Australian Communications
Authority (ACA) Technical
Standard TS008.
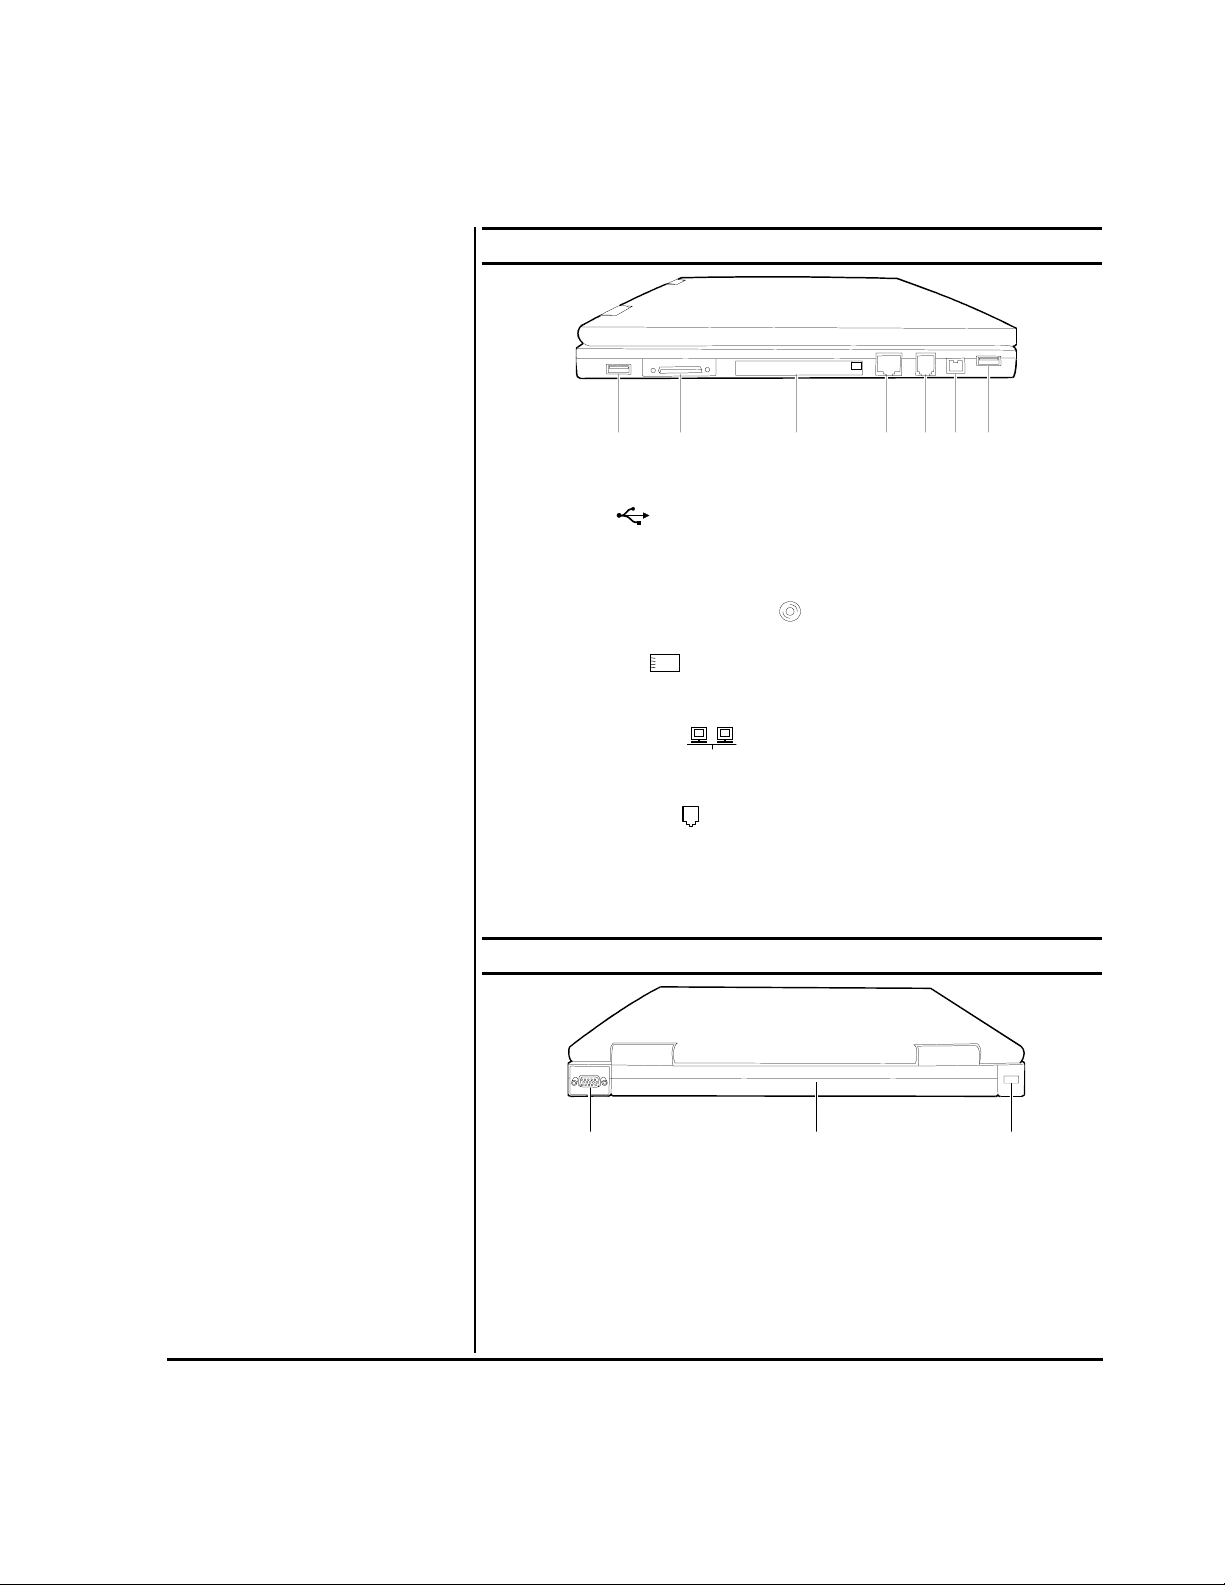
Left-Side View
12
Figure 1-2. Left-Side View
1
1. USB Port ( )
The 4-pin Universal Serial Bus port is for connecting an USB
device. (See “Connecting an USB Device” in Chapter 4 for more
information.)
2. CD/DVD/CD-RW Drive Port (
)
This port is for connecting the external CD/DVD/CD-RW drive.
3. PC Card Slot (
)
Your notebook supports one PC Card. (See “Installing a PC Card”
in Chapter 4 for more information.)
4. RJ-45 Connector (
)
With the RJ-45 connector, the type 1 STP or category 5 UTP cable
can be connected to your notebook.
5. RJ-11 Connector (
)
With the RJ-11 connector, the normal telephone line can be
connected to your notebook.
6. IEEE 1394 Port (Only available on selected model)
This port is for connecting an IEEE 1394 device.
Rear View
1. VGA Port
This 15-pin analog port is for connecting an external monitor.
2. Battery Pack
The battery pack supplies power to your notebook when external
power is not connected. (See Chapter 3 for more information.)
1
Figure 1-3. Rear View
2
My Presario – Getting Started Getting Started 1-3
Page 12
3
3. Kensington Lock Anchor (
)
This rectangular hole can be used as an anchor point for a
Kensington-type security cable. You can use this cable to lock your
notebook to an appropriate location for security.
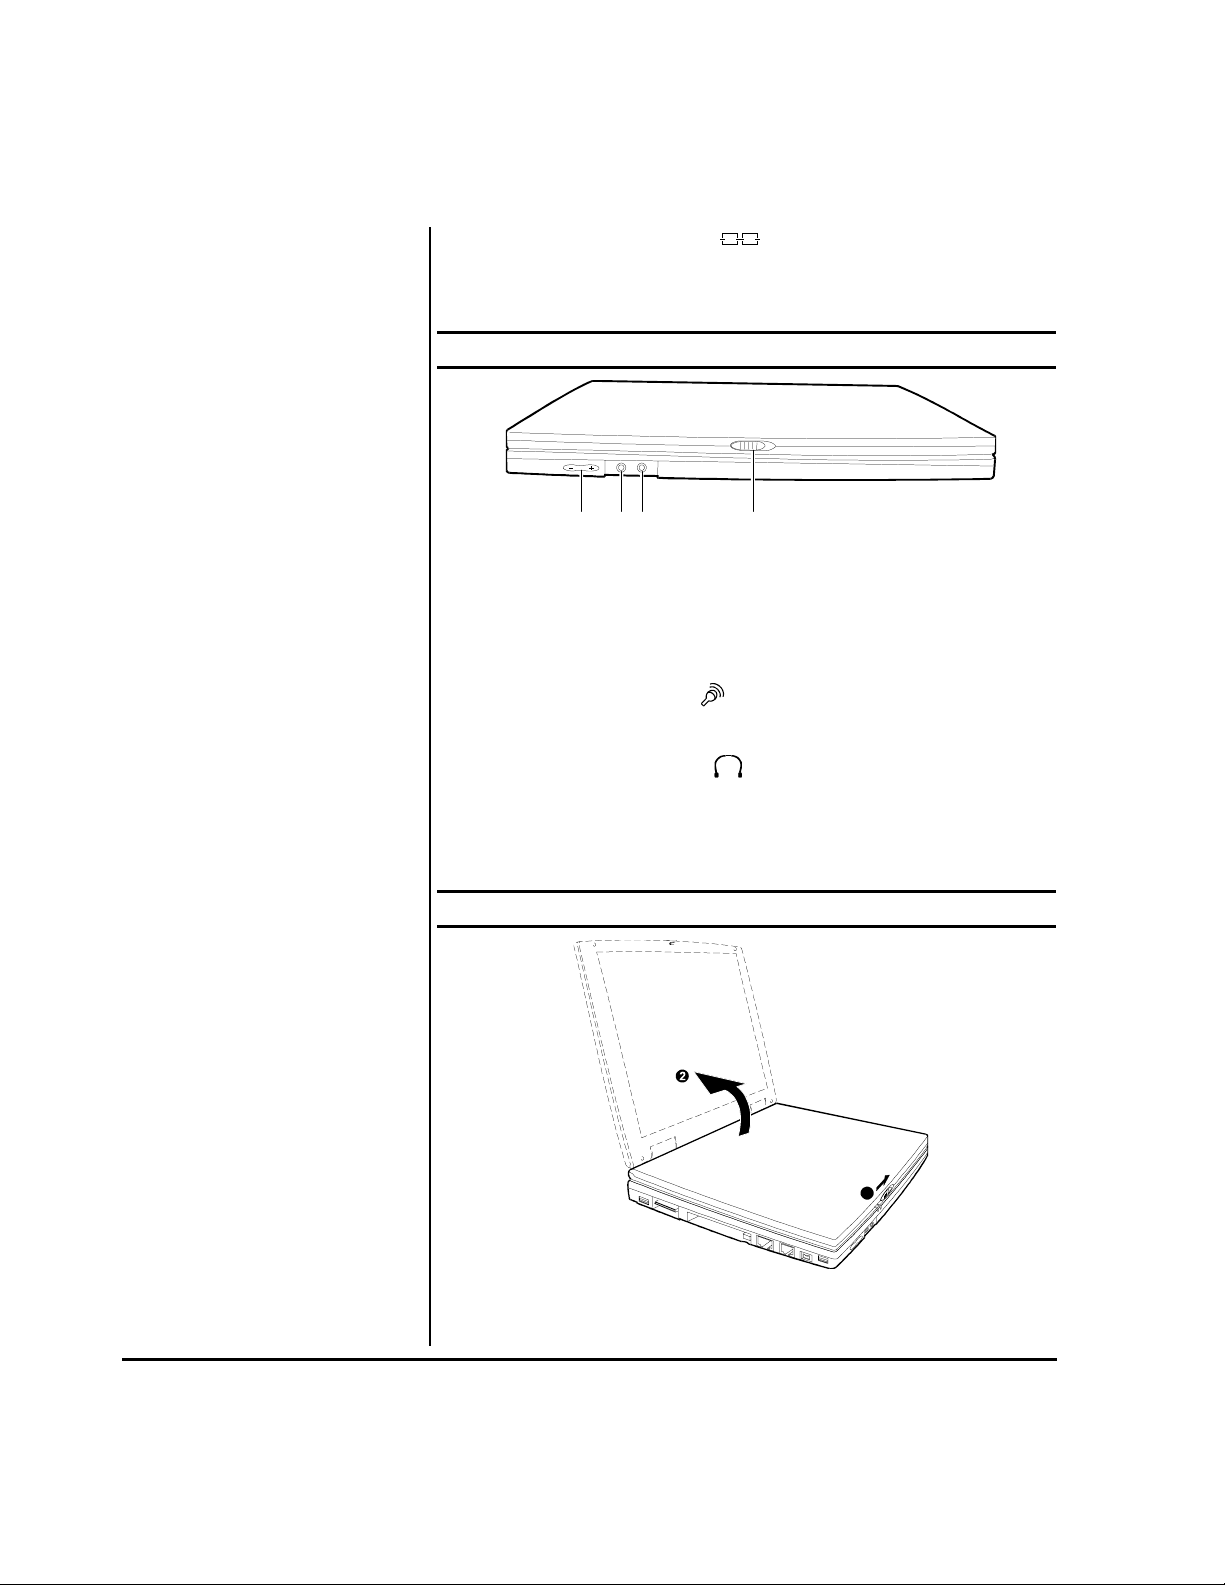
Front View
1. Volume Control ( - , + )
This controls the volume of the sound coming from the notebook.
Press the minus ( - ) button to decrease the volume. Press the
plus ( + ) button to increase the volume.
2. Microphone Connector (
This can be connected to an external microphone for use in place
of the notebook's built-in microphone.
3. Audio Output Connector (
This can be connected to a set of headphones, external speakers
12
Figure 1-4. Front View
)
4
)
with amplifier or an audio recording device.
4. Top Cover Latch
This cover latch keeps the top cover firmly closed.
Top-Open View
Tips: To open the cover, press
the cover latch toward the right
(See Figure 1-5 !), and then lift
the cover (See Figure 1-5 ").
1
Figure 1-5. Opening the Cover
Getting Started 1-4 My Presario – Getting Started
Page 13
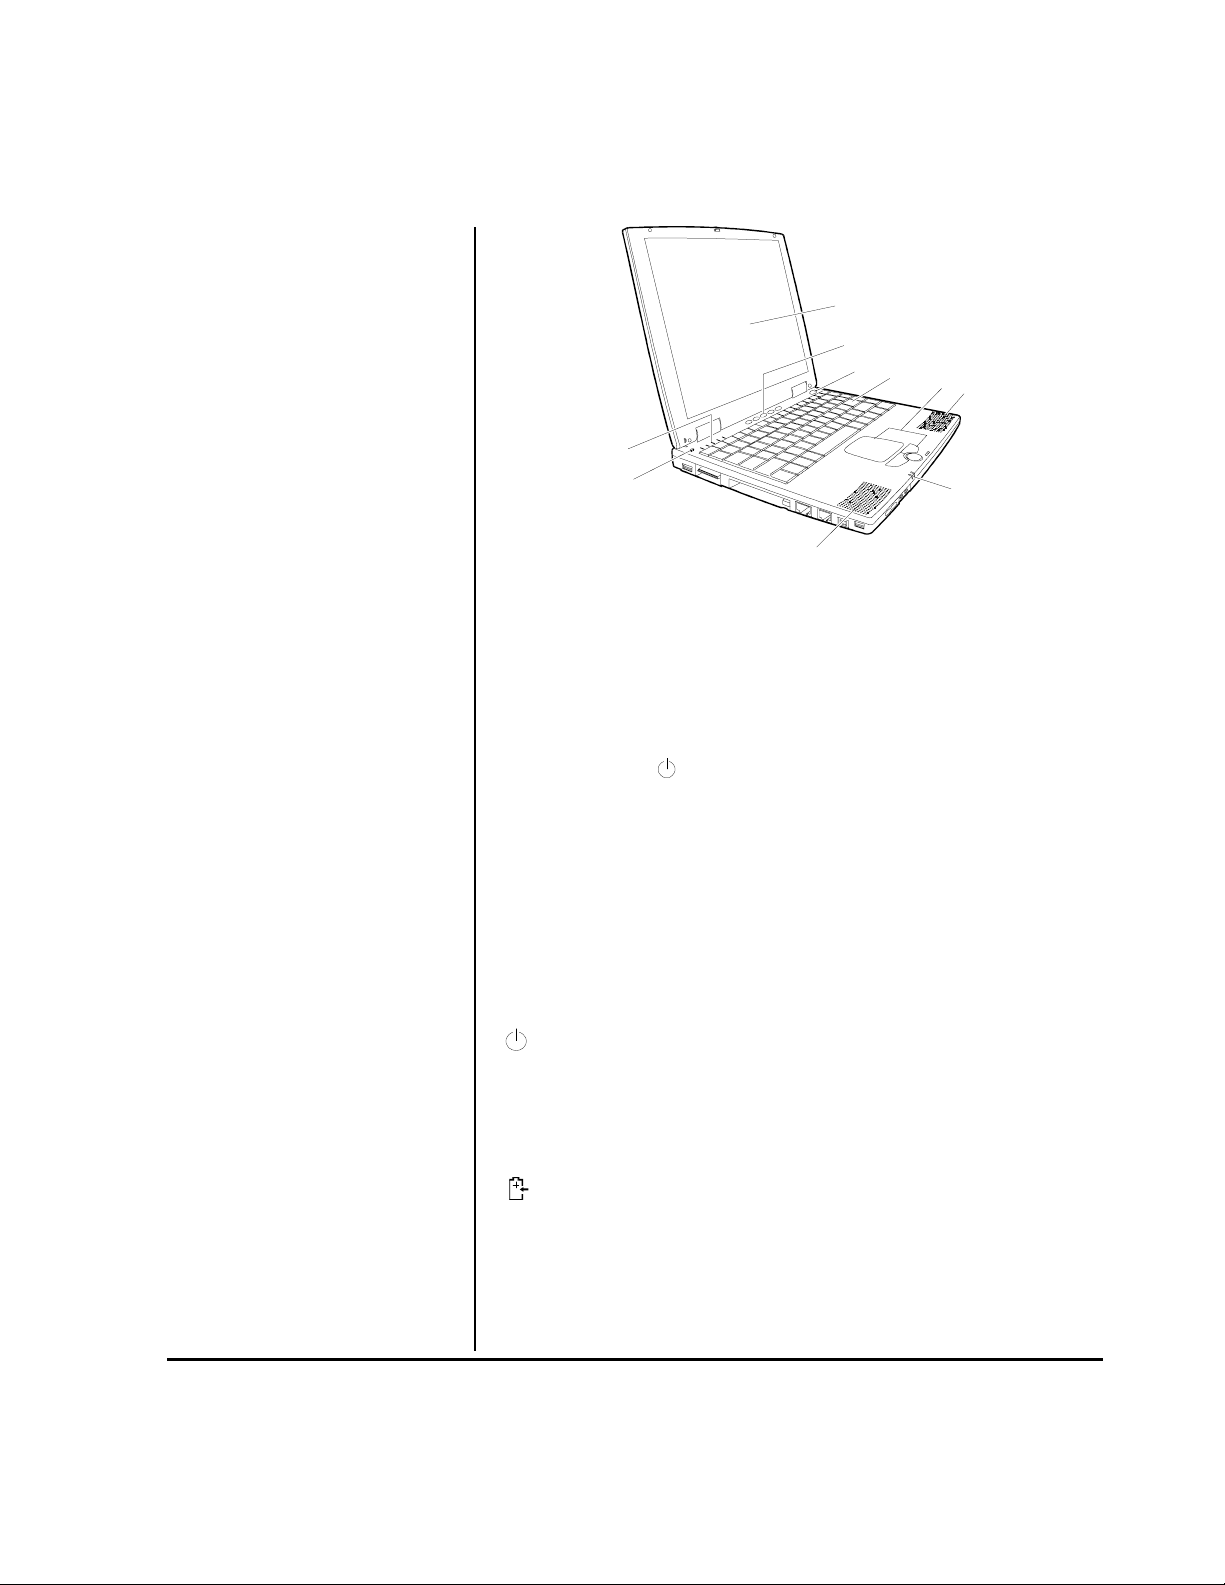
6
CAUTION: Do not place heavy
objects on top of the notebook
when it is closed as this can
damage the display.
1
2
3
4
5
6
8
9
7
1. LCD Display
This is the liquid crystal display of your notebook.
Figure 1-6. Top-Open View
2. Easy Access Buttons
These one-touch buttons allow you to launch specific application
fast.
(See “Keyboard” in Chapter 2 for more information.)
3. Power Button (
)
Press this button to turn the notebook power ON or OFF.
4. Keyboard
This keyboard provides all the functions of a full-size 101/102-key
keyboard. (See “Keyboard” in Chapter 2 for more information.)
5. Touchpad
This is the pointing device of your notebook. (See “Touchpad” in
Chapter 2 for information.)
6. Stereo Speaker Set
This is the built-in speaker set of your notebook.
7. Power Status Indicators
AC/Battery Power Indicator
• Glows green when the notebook is using AC/Battery power.
• Blinks when the notebook, using AC/battery power, is in
Suspend-to-RAM mode. (See “Introducing Power
Management” in Chapter 2 for information on Suspend-to RAM mode.)
Battery Status Indicator
• Stays off when the battery is fully charged.
• Blinks red when the battery is lower than 10% capacity.
• With AC adapter connected, the indicator glows orange while
the battery is being charged, or glows green while it is fully
charged.
My Presario – Getting Started Getting Started 1-5
Page 14
CAUTION: Whenever you
disconnect the AC adapter,
always unplug from the electrical
outlet first before you unplug
from the notebook. A reverse
procedure may damage the AC
adapter or notebook.
8. Device Status Indicator
LAN In-use Indicator glows when the notebook is
connected to network.
CD-ROM Drive/Hard Disk Drive In-use Indicator glows
when the notebook is accessing the CD-ROM drive/hard disk
drive.
Num Lock Indicator glows when the Num Lock function is
activated.
Caps Lock Indicator glows when the Caps Lock function is
activated.
Scroll Lock Indicator glows when the Scroll Lock function is
activated.
9. Microphone (
This is the built-in microphone of your notebook.
)
Getting the Notebook Running
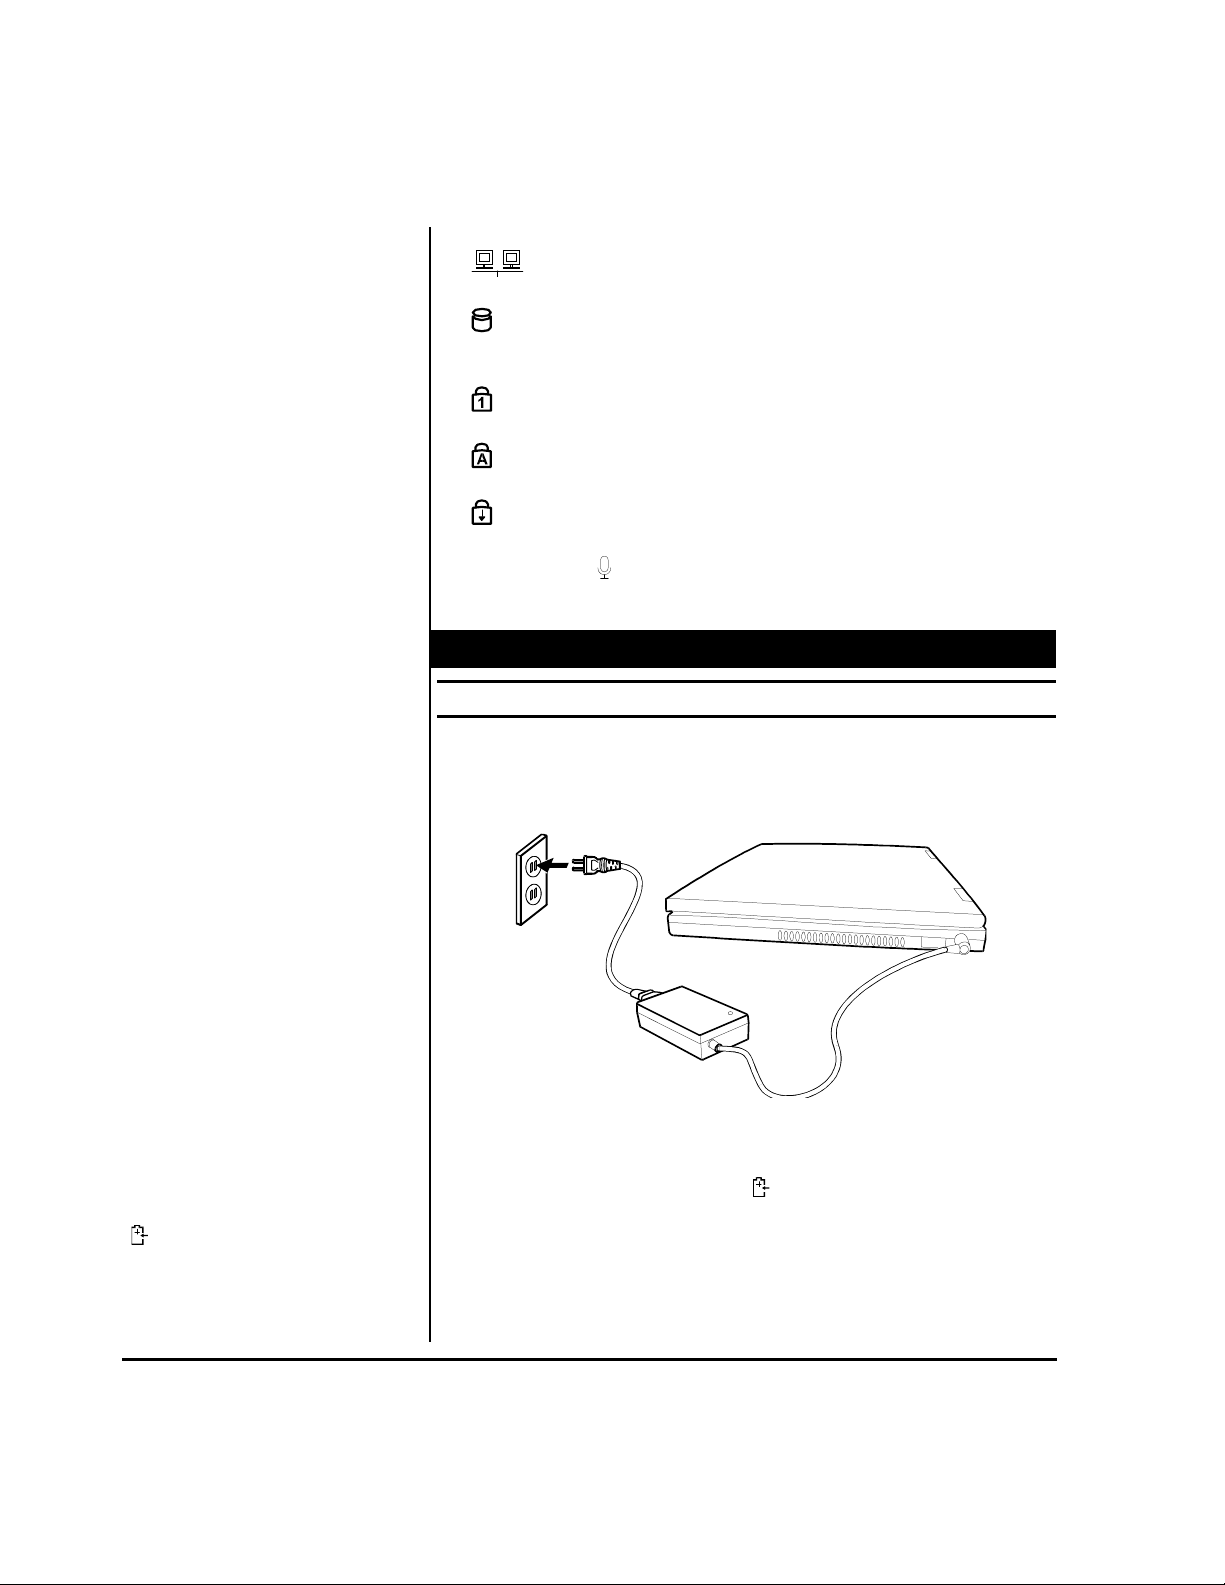
Connecting to AC Power
1. Plug the DC cord of the AC adapter to the power connector on the
right of the notebook.
2. Plug the female end of the AC cord to the AC adapter and the
male end an electrical outlet.
NOTE: When the AC adapter is
connected, the indicator on the
AC adapter lights up, indicating
that power is being supplied from
the electrical outlet to the AC
adapter and onto your notebook.
When the Battery Status Indicator
(
) on the notebook glows
orange, it means that the AC
adapter is charging the battery.
Getting Started 1-6 My Presario – Getting Started
3. To fully charge the battery, leave the notebook power off, and wait
until the Battery Status Indicator (
When the AC adapter is not connected, you can operate the
notebook using battery power only.
Figure 1-7. Connecting t he AC Adapter
) glows green.
Page 15

Tips: You can also adjust the
brightness of the display to attain
display clarity. To adjust
brightness, press [Fn]+[F7] or
[Fn]+[F8].
NOTE: The SCU program allows
you to enter the configuration
information and store it in CMOS
RAM. The configuration
information is needed by the
notebook to identify the installed
devices. Under SCU, you can
also activate certain features
such as Power Saving and
Security.
NOTE: To avoid viruses brought
in by diskettes, it is advised that
you boot the system from the
hard disk instead of a diskette. If
you must boot up from drive A,
make sure the booting diskette is
clean.
CAUTION: Never turn off the
notebook when the Disk Drive
In-use Indicator is on. You may
lose your data by doing so.
Using Battery Power
When the AC adapter is not connected, you can use battery power.
To assure optimum battery life, fully charge and discharge the battery
at least once and then fully charge the battery before you first use
battery power. (See Chapter 3 for more information on using battery
power.)
Starti ng Up
A computer starts up with an operating system existing on the hard
disk, a CD, or a diskette. The computer will automatically load the
operating system after you turn it on. This process is called booting.
The notebook comes to you ready for use. This means the hard disk
is pre-formatted and contains the files necessary for booting.
1. Open the top cover by sliding the cover latch toward the right and
lifting up the cover.
2. Turn on the notebook by pressing the Power
Switch (Figure 1-6 #3).
3. Tilt the cover forward or backward to a
comfortable viewing position.
4. Each time the notebook is turned on, it performs a Power-On Self
Test (POST). This checks the status of major computer devices
including the system board, memory, video, keyboard, and disk
drive. Some status messages from POST will appear on the
screen.
If the POST has detected a mismatch between the actual
hardware configuration and the configuration information stored in
CMOS RAM, you will see error message(s) telling you to run the
SCU program. (See Chapter 5 for instructions on running SCU.)
5. When POST successfully completes its check, the notebook first
tries to boot from drive A, C, or CD-ROM depending on the “Boot
Sequence” setting in the SCU program.
Turning Off the Notebook
1. If you are using a program, save your data and exit the program.
2. First make sure all disk drive in-use indicators are off, then remove
any diskette or CD from the drive.
3. Click the Start button on the Windows desktop, select Shut Down,
then Shut Down, and then click OK and the computer will turn off
automatically. Otherwise, turn off the notebook by pressing the
Power Button.
4. To close the top cover, tilt down the cover until the cover latch
clicks into place.
5. To disconnect the AC adapter, unplug from the electrical outlet
My Presario – Getting Started Getting Started 1-7
Page 16

CAUTION: If you have to turn
the notebook on again
immediately after turning it off,
wait for at least five seconds.
T urning the notebook off and on
rapidly may damage the system
circuit.
NOTE: Your computer is an
electrical device. Treat it with
care to avoid personal injury and
damage to the equipment.
first; then unplug from the notebook.
Warranty Certificate
The warranty details Compaq’s commitment to repair or replace parts
during the warranty period and lists important Compaq telephone
numbers. In the event of a mechanical problem, contact Compaq
not the retailer who sold you the computer.
Keep the warranty in a safe place for future reference.
Safety and Comfort
The My Presario—Learning More CD contains safety and comfort
information about how to:
• Set up your work area for maximum comfort
• Practice good posture, hand position, work habits, and health
habits while using your notebook
• Use a grounding plug to prevent electrical shorts, shocks, or fires
• Use a surge protector to regulate the flow of electricity to the
notebook, modem, and all peripherals—such as a printer,
speakers, and monitor.
Registration
The first time you turn on your
computer, you are guided
through the registration process
before you can access the
Windows desktop.
It is very important that you
register
→
Windows with Microsoft
→
Your notebook with Compaq
Registering with Mi crosoft
To register the Windows operating system with Microsoft, follow the
on-screen instructions. After entering the appropriate information on
each screen, click the Next button to move to the next screen.
When you have finished, register your notebook with Compaq.
Registering with C ompaq
To register your notebook with Compaq, follow the on-screen
instructions. After entering the appropriate information on each
screen, click the Next button to move to the next screen.
Getting Started 1-8 My Presario – Getting Started
Page 17
Using the Notebook
Using the Notebook
Using the NotebookUsing the Notebook
2
In this Chapter
Floppy Disk Drive, 2-1
Hard Disk Drive, 2-3
CD/DVD/CD-RW Drive, 2-3
Keyboard, 2-4
Touchpad, 2-8
Introducing Power
Management, 2-10
Tak ing Care of Your Notebook,
2-11
My Presario – Getting Started Using the Notebook 2-1
This chapter gives operating basics on the notebook’s components
such as the floppy disk drive, hard disk drive, CD-ROM drive,
keyboard, and touchpad. It also introduces Power Management and
gives you tips in care and maintenance.
Floppy Disk Drive
Your notebook comes with an external floppy disk drive designated
as drive A. The external floppy disk drive allows you to load new
programs into your notebook, or to store data on a removable
diskette so you can transfer data from one computer to another.
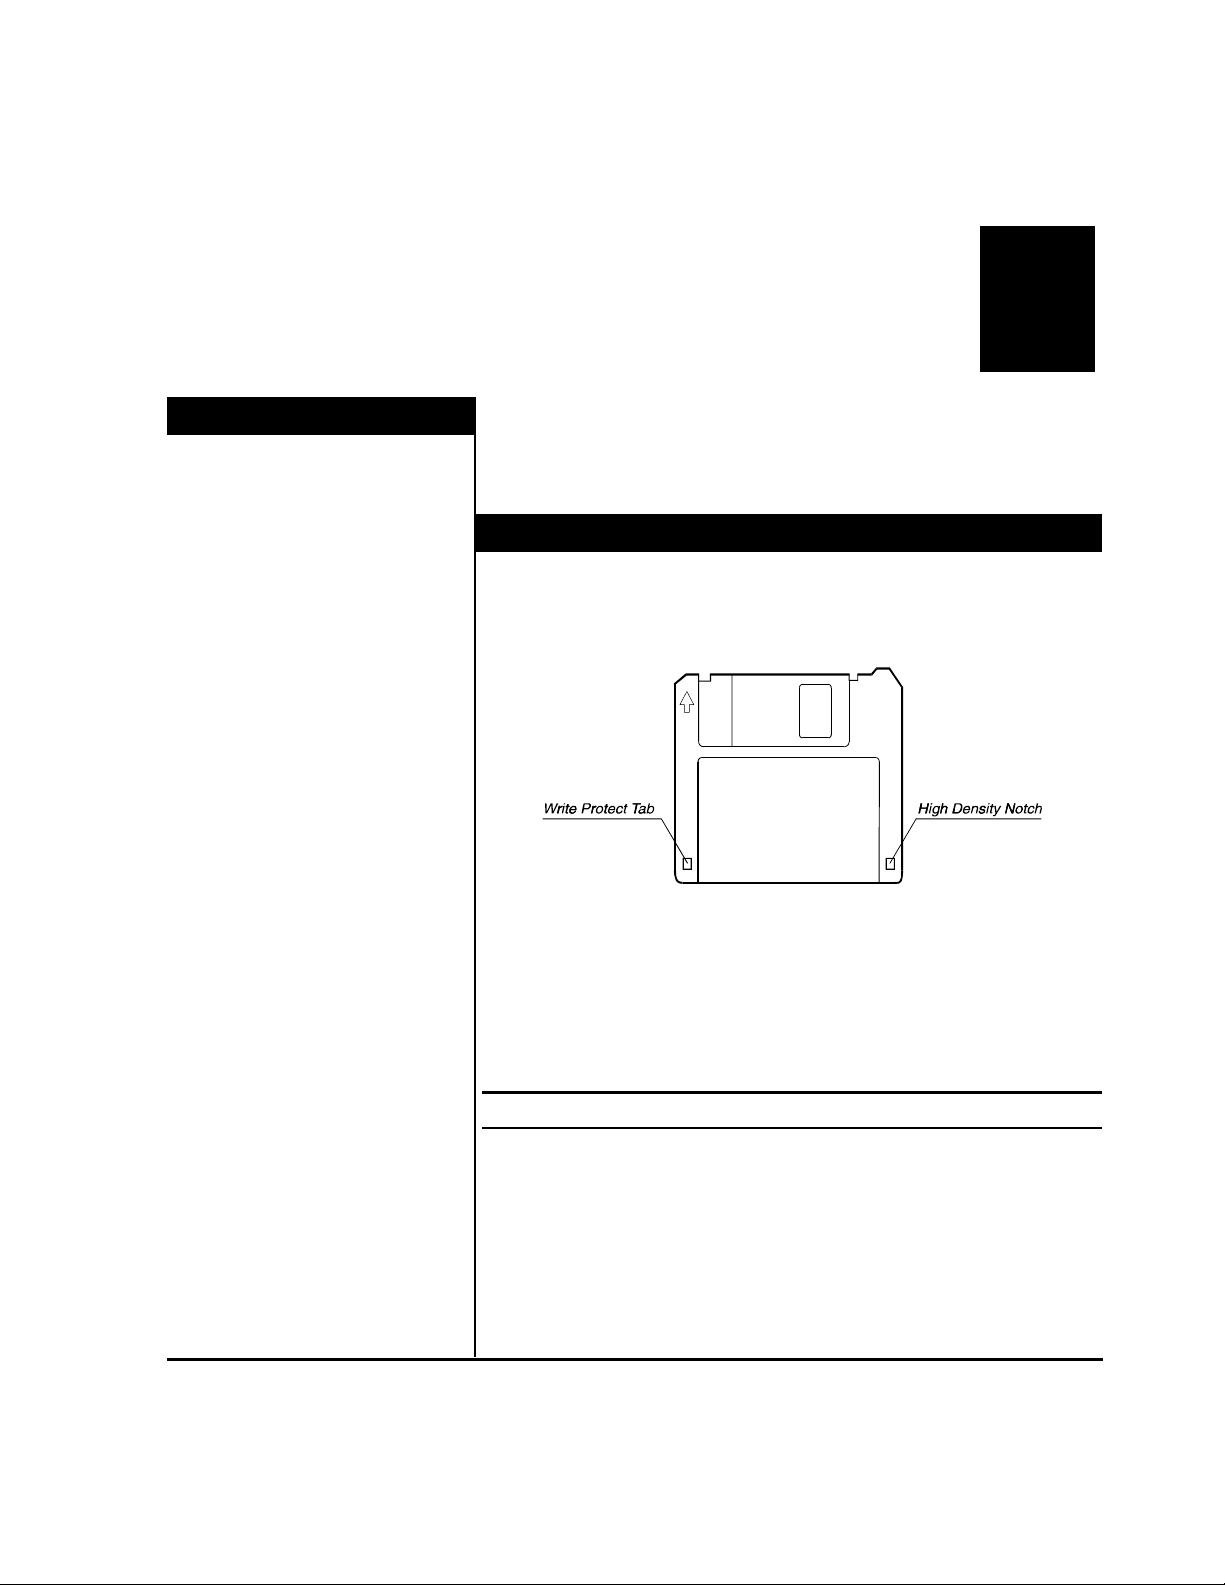
Figure 2-1. 3.5-inch Diskett e
This disk drive is compatible with either double- density (2DD) 720KB
diskettes or high-density (2HD) 1.44MB diskettes. Notice that both
types of diskettes have an arrow imprinted on the front upper left
corner, and a slidable write-protect tab on the bottom left corner, as
illustrated above. When slid downward, the write-protect tab prevents
data from being written to, or erased from, the diskette.
Connecting the External Floppy Drive
To use the floppy disk drive, connect the data cable of the drive to
any one of the USB port on the left side of your notebook (See Figure
2-2 !). Since
USB connections allow hot-swapping, you can directly connect and
disconnect the drive without turning off your notebook.
Page 18

CAUTION:
1. Never turn off or reset the
notebook while the floppy disk
drive in-use indicator is on.
2. Always store your diskettes in
a safe, clean container,
protecting them from the dust
and magnetic fields.
CAUTION:
1. To avoid unexpected data loss
caused by viruses or
accidents, please make
regular backups of your files
from the hard disk to diskettes.
2. Never turn off or reset the
notebook while the hard disk
drive in-use indicator is on. In
addition to possible data loss,
the system and the hard disk
drive’s sensitive circuitry may
be damaged by that.
Inserting and Ejecting Diskettes
To insert a diskette, hold it with the arrow facing up and towards the
drive. Slide the disk into the drive until it clicks into place (See Figure
2-2 ").
1
Eject Button
2
Figure 2-2. Inserting a Disket te
To eject a diskette, first make sure that the floppy disk drive in-use
indicator is off, and then press the eject button on the drive. When
the diskette pops out of the drive, remove the diskette and store it
properly.
Formatting Diskettes
A diskette must be formatted before it can store any data. For
information on how to format a diskette, please consult your
operating system manual.
Hard Disk Drive
Your notebook comes with a hard disk drive designated as drive C. A
hard disk drive, also called a fixed disk, is a storage device with
non-removable, rotating, magnetic storage platters. Compared with a
diskette, a hard disk can retrieve and record data much faster and
has a much larger storage capacity.
Your hard disk drive is a 2.5-inch IDE (Integrated Drive Electronics)
hard disk drive. This type of drive utilizes the latest technology in fast,
reliable mass storage by integrating directly onto the drive all the
control circuitry necessary for operation. This allows the drive
manufacturer to carefully optimize the drive performance.
Using the Notebook 2-2 My Presario – Getting Started
Page 19

n
NOTE:
1. In reality, a DVD is totally
different from a CD. However,
in this manual they are both
referred as CDs for
convenience.
2. A DVD-ROM drive can read
both DVDs and CDs; while a
CD-ROM drive can only read
CDs.
3. If your notebook equipped with
optional CD-RW drive, you can
create your own CDs by two
types of media: CD-R and
CD-RW disks. A CD-R media
can be written once only; a
CD-RW is reusable because it
can be erased and rewritten
for numerous times. CD-R
media can be played on most
of the newer CD players,
CD-ROM and DVD-ROM
drives.
CAUTION:
1. When inserting a CD, do not
push the CD- ROM drive
harshly.
2. Make sure the CD is correctly
inserted into the tray, then
close the tray.
3. Do not leave the CD tray open.
Moreover, avoid touching the
lens in the tray with your hand.
If the lens becomes dirty, the
CD- ROM may malfunction.
CD/DVD/CD-RW Drive
Your notebook comes with an external CD-ROM, DVD-ROM or
CD-RW drive. The external CD/DVD/CD-RW drive utilizes removable
5.25-inch compact disks, which look like standard music CDs. The
compact disk is an ideal medium for data storage or multimedia
program because of its huge amount of data capacity.
Connecting the External CD/DVD/CD-R W Drive
To connect the external CD/DVD/CD-RW drive, follow these steps:
1
2
M
a
u
n
a
l
E
e
j
c
t
H
l
o
E
e
j
c
t
B
t
u
t
n
o
Eject Butto
Figure 2-3. Using the External CD-ROM Dri ve
Manual Eject Hole
1. Make sure the notebook is not turned on or connected to AC
power.
2. Pull out the data cable from its storage slot on the
CD/DVD/CD-RW drive.
Firmly connect the data cable to the CD/DVD/CD-RW port on the left
side of the notebook (Figure 2-3 !).
Inserting/Removing a CD
To insert or remove a CD, follow these steps:
1. Turn on the computer.
2. Push the eject button and the CD tray will slide out. If the tray only
slides out partially, gently pull it until fully extended.
3. To insert a CD, place the CD in the tray with its label facing up. To
remove a CD, hold the CD by its outer edge and lift it up from the
tray (Figure 2-3 ").
4. Slide the tray back into the drive bay.
e
My Presario – Getting Started Using the Notebook 2-3
Page 20

4. Do not wipe the lens with
rough surfaced materials (such
as paper towel). Instead, use a
cotton swab to wipe the lens
gently.
FDA regulations require the
following statement for all
laser-based devices:
“Caution, Use of controls or
adjustments or performance of
procedures other than those
specified herein may result in
hazardous radiation exposure.”
Manually Releasing a CD
In the unlikely event that you are unable to release the CD tray by
pressing the eject button, you can manually release the CD as
follows:
1. Turn off the system.
2. Insert a small rod into the manual eject hole (see Figure 2-3) and
push firmly to release the tray.
3. Pull the tray out until the tray is fully extended, then remove the
CD.
Keyboard
Your notebook keyboard has all the functions of a standard
AT-enhanced keyboard plus some keys specific to your notebook.
Fn Key
The [Fn] key, at the lower left corner of the keyboard, is used with
another key to perform the alternative function of a key. The letter
“Fn” and the alternative functions are identified by the color of blue
on the keytops. To perform a desired function, press and hold [Fn],
then press the other key.
Typewriter Keys
Typewriter keys are similar to the keys on a typewriter. Several keys
are added such as the [Ctrl], [Alt], [Esc], and lock keys for special
purposes. When the lock keys are pressed, their corresponding
indicators will light up.
• [Num Lock]
Pressing this key toggles the Num Lock on and off. When on, the
Num Lock activates the numeric keys.
• [Scroll Lock]
Pressing this key toggles Scroll Lock on and off. The Scroll Lock is
defined by individual programs.
• [Caps Lock]
Pressing this key toggles the Caps Lock on and off. When on, the
Caps Lock keeps the letter keys in uppercase.
Function Keys
On the top row of the keyboard are the function keys: [F1] to [F12].
Function keys are multi-purpose keys that perform functions defined
by individual programs.
Hot key functions are assigned to [Fn]+[F3] through [Fn]+[F12] by
your notebook. (See “Hot Keys” later in this chapter for more
information.)
Using the Notebook 2-4 My Presario – Getting Started
Page 21

Cursor-Control Keys
At the lower right corner of the keyboard are four
cursor/screen-control keys.
The [↑], [↓], [←], and [→] cursor-control keys, also called arrow keys,
control cursor movement.
When used with [Fn] key pressed, these keys become [Home],
[PgUp], [PgDn], and [End] keys.
PgUp
NOTE:
1. When the numeric keypad is
activated and you need to type
the English letter, you can
either turn Num Lock off or
Figure 2-4. Cursor-Control Keys
The [Ins] and [Del] keys are located at the upper right of the
keyboard, which are used for editing purpose.
Numeric Keypad
A 15-key numeric keypad is embedded in the typewriter keys as
shown below:
PgDn EndHome
hold down [Fn] and press the
key without turning Num Lock
off.
2. If the “Keyboard Numlock” item
in the SCU program is set to
Disabled, you can not directly
use the numeric keypad on the
notebook keyboard even if
Num Lock is on. T o use the
numeric keys in this case, you
can hold down [Fn] key first.
3. Some software may not be
able to use the numeric
keypad on the notebook. If so,
use the numeric keypad on an
Figure 2-5. Numeric Keypad
Numeric keys facilitate entering of numbers and calculations. When
Num Lock is on, the numeric keys are activated, meaning you can
use these keys to enter numerals.
external keyboard instead.
Windows Keys
On the Windows keyboard, you can find one Windows Logo key ( # )
and one Application Logo key (
). The two keys are used with
other keys to perform software-specific functions. (See your Windows
manual.)
My Presario – Getting Started Using the Notebook 2-5
Page 22

Hot Keys
Hot keys refer to a combination of keys that can be pressed at any
time to activate special functions. Most hot keys operate in a cyclic
way. Each time a hot key is pressed, it shifts the corresponding
function to the other or next choice.
The functions of hot keys are described below.
F1
User defined.
F2
User defined.
F3
Toggle between video display output to the LCD
screen, external CRT monitor, and simultaneous
(display on both).
F4
F5
Force the notebook into Suspend-to-RAM or
Suspend-to-File mode (depending on the BIOS setup).
Audio on/off.
F6
Toggle panel on/off.
F7
Decrease LCD brightness.
F8
Increase LCD brightness.
F9
Play/Pause.
NOTE: Button functions may
vary by model and by region.
F10
Stop.
F11
Reverse.
F12
Forward.
Using the Notebook 2-6 My Presario – Getting Started
Easy Access Buttons
With these one-touch buttons, you can get on the Internet fast, read
your e-mail, or check out the latest entertainment.
Function of these buttons are described below.
Page 23

NOTE: If you swap the left and
right buttons, “tapping” on the
touch- pad as an alternative
method of pressing the left
button will no longer be valid.
My Presario – Getting Started Using the Notebook 2-7
Your notebook integrates a touchpad pointing device, compatible with
the Microsoft Mouse and IBM PS/2 mouse, which allows you to take
advantage of software that requires or recognizes a pointing device.
Using the Touchpad
Placing and Moving the Finger
To use the touchpad, place your thumb or forefinger on the touchpad.
The rectangular pad acts like a miniature duplicate of your display. As
you slide your fingertip across the pad, the pointer, or cursor, on the
screen moves in the same direction across the screen as your
fingertip moves across the pad.
Point and Click
When you have placed the cursor over the icon, menu item or
command that you wish to execute, you can press the left button
once or twice to execute the command. This procedure is called
“Point and click” or “point and double-click”. On the touchpad, you
can execute point and clicking even more rapidly. Instead of clicking
by pressing the left button, you can just tap gently anywhere on the
rectangular pad of the touchpad. Tap twice rapidly to execute a
Instant Internet provides your daily start point to the Internet.
It connects you to a Web page filled with local weather, news,
sports and financial information.
My Presario is your instant connection to Compaq for getting
the most out of your computer and the Internet. Learn about
the top Internet Zones or adventure into your favorite Activity
Centers to get creative using the Web.
Retail Central provides an instant connection to your
computer store and a variety of leading consumer companies.
E-mail provides one-touch access for sending and reading
your e-mail.
Touchpad
Figure 2-6. The Touchpad
Page 24

double-click. Unlike a traditionally pointing device, the whole pad acts
as if it were a left button and each tap on the pad is equivalent to
pressing the left button.
Drag and Drop
You can execute commands or move files by using “drag and drop”.
In drag and drop, you activate a file by pointing to it and clicking.
However, when you click the button, you do not release the button
but instead hold it down. You can then drag the active file around the
screen by moving your finger around the pad. When you have placed
the file where you want it, for example in a new directory, release the
left button. The file will drop into the new location. Y ou can also do
drag and drop operations using the touchpad as a large left button.
Position the cursor over the item that you want to drag. Gently tap
twice on the pad. On the second tap, keep your finger in contact with
the pad. You can then drag the selected object around the screen by
moving your fingertip across the pad. When you lift your fingertip
from the pad, the selected object will drop into place.
Changing the Configuration
You may want to customize the mouse. For example, if you are a
left-handed user, you can swap the buttons over so that you can use
the right button to generate events that are normally generated by
the left button. You can also change the size of the on-screen pointer,
the speed of the pointer and so on.
If you are using Windows, double-click the “Mouse” icon in the
Windows Control Panel. The Mouse Properties window allows you to
change various configurations. Instead of Windows, you can also use
the touchpad software supplied with your notebook to change the
configuration.
Scroll Button
In addition to the standard left and right buttons, there is a scroll
button. You can scroll the window up by pressing
of the button, and down by pressing
, the lower half.
, the upper half
Scroll Button
Figure 2-7. Scroll Button
Using the Notebook 2-8 My Presario – Getting Started
Page 25

CAUTION:
1. The suspend-to-file partition
may not exist on your hard
disk. Check with your dealer to
know if it exists. If there is no
suspend- to-file partition, you
can not use the
Suspend-to-File feature.
2. The 0VMAKFIL utility allows
you to create the
suspend-to-file partition.
My Presario – Getting Started Using the Notebook 2-9
The Power Management feature of your notebook helps conserve
power. The followings briefly describe the features. To establish
Power Management, run the SCU program. (See “Power Menu” in
Chapter 5 for instructions.)
Automatic Power Management
Local Power Management
Local Power Management controls notebook subsystems. When a
subsystem is inactive for a period of time, called “time-out,” it is
automatically shut down or slowed down to reduce power
consumption. The subsystem will be active again when next
accessed.
The subsystems under power management are:
•••• Hard Disk Drive
•••• Floppy Disk Drive
•••• CD-ROM/DVD-ROM/CD-RW Drive
The above components will power down after the pre-set timing.
Global Power Management
Global Power Management automatically puts the notebook into
suspend mode when the notebook is inactive for a period of time,
called “time-out.” The notebook will wake up whenever an activity is
detected (e.g. pressing a key).
The time-out settings for suspend mode can be set up in the SCU
program. The notebook suspends to RAM or disk depending on the
“Suspend Data to” setting in the SCU program.
Manual Power Management
You can manually initiate Suspend mode at any time in one of these
ways:
• By pressing the hot key [Fn]+[F4].
• By closing the top cover.
Note that this works only if the “Cover Close” item is set to
Suspend in the SCU program.
For information on Suspend-to-File mode, see the following section.
Suspend-to-File
When the notebook suspends to file, the system preserves all the
running application programs as a file in a “suspend-to-file partition”
on the hard disk. The notebook then turns off automatically. When
you next turn on the notebook, it reads the file from the
suspend-to-file partition back into memory, so that your notebook is
Introducing Power Management
Page 26

returned to exactly the same state it was in when you suspended it.
Suspend-to-File is a very useful feature. People frequently open
many applications when they use computers. It takes some time to
get all these applications open and running, and normally they all
have to be closed before the system can be turned off. If you use the
Suspend-to-File feature, you don’t have to close the applications as
the state of your notebook is saved to file. When you turn on your
notebook next time, your notebook with all the applications open will
be recreated in just a few seconds.
Taking Care of Your Notebook
Maintenance
• Avoid placing the notebook in a location subject to high humidity,
extreme temperatures, mechanical vibration, direct sunlight, or
heavy dust.
• Do not place heavy objects on top of the notebook when it is
closed, as this may damage the LCD.
• To assure smooth operation of the touchpad, occasionally clean
the pad by using adhesive tape to remove the dust and grease on
its surface.
• Occasionally clean the notebook with a soft cloth moistened with
water. Do not use soap or liquid cleaners on the display.
• Take care of the battery pack by following the instructions
described in “Important Notes on Using Battery Pack” in Chapter 3.
Traveling
• Make sure the battery pack is fully charged.
• Make sure the notebook is turned off and the top cover is firmly
closed.
• Disconnect the AC adapter from the notebook and take it with you.
Use the AC adapter as the power source and as a
battery-recharger.
• Allow extra time for airport security. Many airports inspect
electronic devices carefully.
• Hand-carry the notebook. Do not check it in as luggage.
• If you plan to travel abroad with your notebook, consult your dealer
for the appropriate AC power cord fitting the electricity standard of
your destination.
Using the Notebook 2-10 My Presario – Getting Started
Page 27

Battery Oper ations
Battery Oper ations
Battery Oper ationsBattery Oper ations
3
In this Chapter
AC Adapter, 3-1
Battery Pack, 3-1
Low Battery Signals and
Actions, 3-3
CAUTION:
1. The AC adapter (Model
LE-9702B-01+) is designed for
use with your notebook only.
Connecting the AC adapter to
another device can damage
the adapter.
2. The AC power cord supplied
with your notebook is for use
in the country where you
purchased your notebook. If
you plan to go overseas with
the notebook, consult your
dealer for the appropriate
power cord.
NOTE: To ensure best
performance of the battery, it is
advised that you fully discharge
and then recharge the battery
before you use it for the first
time.
This chapter tells you what you should know when using battery. For
optimal performance of the battery, be sure to follow the notes
described in this chapter.
AC Adapter
The AC adapter serves as a converter from AC (Alternating Current)
to DC (Direct Current) power because your notebook runs on DC
power, but an electrical outlet usually provides AC power. It operates
in the range of 100∼240V AC.
The battery pack automatically recharges while your notebook is
connected to AC power.
Battery Pack
The battery pack supplies power to your notebook when external
power is not available. It is rechargeable using the AC adapter.
Recharging the Battery Pack
To recharge the battery pack, connect the AC adapter to the
notebook and an electrical outlet. It takes approximately 90 minutes
to charge the battery pack to 80% capacity and one or two more
hours to fully charge the battery pack.
During recharging, the Battery Status Indicator (
glows orange. You are advised to keep the notebook power off while
the battery is being recharged. The battery is fully recharged when
the Battery Status Indicator glows green.
Replacing the Battery Pack
If you often use the battery power for a long period of time while
traveling, you may consider the purchase of an additional battery
pack from your dealer, and keep it with you in fully charged state as a
backup.
To replace the battery pack, follow these steps:
1. Make sure the notebook is not turned on or connected to AC
power.
) on the notebook
My Presario – Getting Started Battery Operations 3-1
Page 28

2. Carefully put the notebook upside down.
Slide the battery lock outward to the "unlock" (
) position.
Battery Stopper
Battery Lock Lever
Figure 3-1. Unlocking the Batt ery Pack
CAUTION: There is danger of
explosion if the battery is
3. Slide the battery release latch outward to the "unlock" ( )
position, and, while holding it in the unlock position, remove the
battery pack out of its compartment.
incorrectly replaced. Replace the
battery only with the notebook
manufacturer’s optional battery
packs. Discard used batt erie s
Battery Release Lever
according to the dealer’s
instructions.
4. Fit the new battery pack into the compartment. The battery release
latch should click into the locked place.
5. Slide the battery lock inward to the "lock" (
the battery pack in place.
Important Notes on Using the Battery Pack
Recharging and Discharging
• Recharging will not start if the battery’s temperature is below 0°C
(32°F) or above 40°C (104°F). Also, during recharging, the
recharging will stop if the battery’s temperature gets above 60°C
(140°F). To avoid problems caused by temperatures, make sure
the battery is not too hot before you begin to recharge the battery.
• During recharging, do not disconnect the AC adapter before the
battery has been fully charged; otherwise you will get a
prematurely charged battery.
• After the notebook has been fully recharged, do not immediately
disconnect and reconnect the AC adapter to charge it again. Doing
so may damage the battery.
• Do not leave the battery completely discharged for too long as this
may affect the battery’s performance.
Figure 3-2. Removing the Battery Pac k
) position to secure
Battery Operations 3-2 My Presario – Getting Started
Page 29

CAUTION:
1. If the “Low Battery Warning
Beep” item is disabled in the
SCU program, the notebook
will not beep.
2. If the suspend-to-file partition
does not exist or the
“Suspend-to- File” item is not
set in the SCU, the notebook
will not be able to suspend to
disk. It will keep on beeping
until you take actions or until
the battery runs out of charge.
3. If you are using a flash PC
card, do not access the card
upon low battery warning. The
battery may run out of charge
before the action is completed,
thus making the access
unsuccessful.
4. If you fail to save your data
before the battery completely
runs out of charge, then you
lose your data.
Operating and Handling
• Never remove the battery pack while it is in use. If you need to
replace the battery pack, make sure you have turned off the
notebook power.
• Leave the battery pack in place unless you will replace it. If you
remove the battery pack, keep it away from conductors such as
metals and water. In case the battery’s pins get into touch with
conductors, the battery may become unusable as a result of
short-circuit.
• When you disconnect the AC adapter, disconnect from the
electrical outlet first and then from the notebook.
• To prevent data loss that may be caused by low battery, develop
the habit of frequently saving your data to the hard disk or a
diskette.
• Do not attempt to disassemble the battery pack.
Maintaining
• When you install a new battery, fully charge and discharge the
battery at least once and then fully charge the battery before you
begin to use the battery power for the first time.
• Protect your notebook from extremes in temperature. (See
“Environmental Specifications” in Appendix A for temperature
range.)
Low Batt ery Signals and Actions
Low Battery occurs when the battery has approximately 10% of its
charge remaining. The notebook gives warning beeps and the
Battery Status Indicator (
Immediately save your data upon the Low Battery warning. The
remaining operating time depends on how you are using the
notebook: if you are using the audio subsystem, PC card, hard or
floppy disk drives, the battery might run out of charge very quickly.
Always respond to the Low Battery warning by suspending your
notebook to disk, turning off the notebook, or connecting the AC
adapter.
If you do not take any action, after two minutes the notebook will
automatically suspend to disk and turn off.
) blinks red to alert you to take actions.
My Presario – Getting Started Battery Operations 3-3
Page 30

Page 31

System Expansion
System Expansion
System ExpansionSystem Expansion
4
In this Chapter
External Connections, 4-1
Internal Installation, 4-2
This chapter introduces the optional devices for your notebook and to
install some of the devices.
External Connections
I/O connectors on the notebook’s rear and side panels allow you to
connect external devices to your notebook. See the figures in
Chapter 1 for connector locations and the descriptions that follow.
This section provides notes on connecting some peripheral devices.
Connecting an External Monitor
If you want the benefits of a larger color display screen, you can
connect an external VGA- compatible CRT monitor to your notebook.
Follow these steps to connect a monitor to your notebook:
1. Make sure that your monitor is configured for analog operation
and that the voltage setting corresponds to that of the electrical
outlet. Consult the monitor’s manual for instructions.
2. Make sure the notebook is not turned on or connected to AC
power.
3. Open the cover on the rear of the notebook. Plug the monitor’s
D-type signal connector to the notebook’s VGA port.
4. Plug one end of the monitor's power cord into the power socket on
the monitor and the other end to an electrical outlet.
5. To use the monitor, turn on the monitor before turning on the
notebook.
6. The monitor should respond by default. If not, you can switch the
display to the monitor by pressing [Fn]+[F3].
Supplied with your notebook are several video utilities and drivers
which offer extended video modes.
Connecting an IR Device
The IR port on the right side of the notebook allows you to take
advantage of an IR device for wireless communications.
In addition to following the instructions supplied with the device, take
note of the following:
• The IR device must face the IR port of the notebook within the
effective range, i.e. within ±15-degrees angle and 70 cm distance.
My Presario – Getting Started System Expansion 4-1
Page 32

Tips: For the connection of IEEE
1394 devices, please follow the
instructions supplied with the
devices.
Tips: See the documentation
supplied with your PC card for
further instructions.
System Expansion 4-2 My Presario – Getting Started
• Make sure the “Ir Mode” items are set properly in the SCU
program. (See “Advanced Menu” in Chapter 5 for information.)
• To take advantage of the IR communications, you need third party
software.
Connecting an USB Device
There are two USB ports marked as on the left side of the
notebook, allowing you to connect USB devices.
USB is specified to be an industry standard extension to the PC
architecture. It features wide range of applications such as multiple
connections and compound devices (i.e., mouse, keyboard, printer,
modem, etc.).
Follow the instructions supplied with the device to make connection.
Connecting an IEEE 1394 Device (for selected model
only)
There is an IEEE 1394 port marked as on the left side of the
notebook, allowing you to connect 1394 devices.
IEEE 1394 is the next-generation serial bus standard, featuring
high-speed data transfer, multi-channel communication link, and "Hot
Plug" connectivity. It allows connections of up to 63 devices. The
applications include not only computer peripheral devices such as
scanner, printer and high-quality CCD, but also consumer electronic
equipments such as DVCAM and VCR.
Internal Installation
Installing a PC Card
PC cards, available in the market, provide various functions.
Examples are memory cards, fax/modem cards, and LAN cards.
PC cards that conform to the PCMCIA 2.1 standard can be used with
your notebook. The PC card slot also supports two advanced
interfaces: CardBus and ZV (Zoomed Video) port.
CardBus provides compatibility with 16-bit PC cards and extends
performance and functionality by adding 32-bit data transfers, and by
employing PCI (Peripheral Component Interconnect) concepts.
Typical PC cards that utilize CardBus are graphic video, full-motion
video, SCSI host bus, and high speed network cards. Typical PC
cards that utilize the ZV port are MPEG and Video Capture cards.
Follow these steps to insert a PC card.
1. Install the PCMCIA software.
2. Locate the PC card slot on the left side of the notebook.
Page 33

CAUTION: Keep the protection
card in the slot when no PC card
is installed.
Note: Do not make any
hardware change by yourself.
3. A protection card is installed inside the PC card slot to serve as a
cover for the slot. This cover protects the slot against foreign
matters such as the dust and water. Before using a PC card, press
the eject button to remove the protection card.
4. Slide the PC card with its label facing up into the slot until the
eject button pops out.
5. To remove a PC card, press the eject button.
Eject Button
Eject Button
Figure 4-1. Instal l i ng a PC Card
Notebook Upgrade
You can upgrade your notebook by adding memory for a maximum of
192/256MB. However, you should ask your dealer for assistance to
avoid damage made to your notebook.
My Presario – Getting Started System Expansion 4-3
Page 34

Page 35

Setup
Setup
SetupSetup
Configuration Utility
Configuration Utility
Configuration UtilityConfiguration Utility
5
In this Chapter
Introduction, 5-1
Main Menu, 5-3
Advanced Menu, 5-5
Security Menu, 5-6
Power Menu, 5-7
Exit Menu, 5-11
NOTE:
1. The SCU screen shots shown
in this chapter are for your
reference only. The actual
items on your notebook may
differ.
2. The SCU program may have
been updated after the
publication of this manual.
My Presario – Getting Started Setup Configuration Utility 5-1
This chapter tells you how to configure your system using the SCU
(Setup Configuration Utility).
Introduction
SCU allows you to configure the BIOS settings. Those settings are
vital for your notebook to identify the types of installed devices as
well as to utilize special features. Typical menu items include Date
and Time, the types of disk drives, and the amount of memory.
Special features include Power Saving and Security.
The settings information is stored in the CMOS (Complementary
Metal Oxide Semiconductor) RAM, which is powered by a RTC
backup battery.
You may need to run SCU when:
• You see an error message on the screen requesting you to run
SCU.
• You want to restore the factory default settings.
• You want to modify some specific settings.
Starting SCU
SCU is built into the system board. To run SCU, press [F10] during
system startup. The main SCU screen appears as shown in Figure
5-1.
Main Advanced Security Power Exit
Floppy Drive A = Disabled Configure Startup
Hard Drive 0 = 4112 MB Conditions. (Date
Hard Drive 1 = 1277 MB and Time, Display,
Base = 640 KB etc.)
Extended = 16368 KB
Total RAM = 17392 KB
<Up/Down> Select Item <Esc> Cancel
<Left/Right> Select Menu <Enter> Toggle Value
Figure 5-1. Main SCU Screen
Item Specific Help Peripheral and Memory
Boot conditions,
Page 36

Setup Configuration Utility 5-2 My Presario – Getting Started
The SCU screen can be divided into four areas:
• On the top line of the screen is the menu bar, which lists the titles
of the available menus. Each menu title contains a pull-down
menu, which displays items for settings.
• The left column on the screen displays current settings of the
system. If you open a pull-down menu and select an item that
provides multiple options, the left column will display a submenu
where you can make further selections.
• The right column on the screen provides details of the selected
item.
• The bottom part of the screen provides keyboard/mouse
instructions for moving around and making selections.
Moving Around and Making Selections
You must go through two or three levels to complete the setting for
an item. In most cases, there are three levels: menu title, pull-down
menu, and submenu.
To move around and make selections, you can use both the
touchpad/mouse and keyboard.
Using the Touchpad/Mouse
You are advised to use the touchpad or mouse. It is more
straightforward than using the keyboard.
For most items, simply move the pointer with the touchpad/mouse
and left-click on the intended item. To cancel your selection, click
the right button. For some items, you will need to select with the
arrow keys.
Using the Keyboard
Keyboard information can be found at the bottom of the screen. You
can also use the shortcut key, which is highlighted in a different color
on the screen.
Described below is the general procedure to complete a setting by
use of the keyboard:
1. Select a menu title with the left/right arrow key and press [Enter] to
pull down the menu. You can directly pull down a menu by
pressing the shortcut key.
2. From the pull-down menu, select an item with the up/down arrow
key and press [Enter] to access the submenu. You can directly
access the
submenu by pressing the shortcut key. The submenu displays the
options you can select. If no submenu appears, simply press
[Enter] to enable or disable the specific function.
3. For most menu items, pressing the [Tab] key will jump from one
item to another, thus allowing you to go through the items quickly.
Page 37

To confirm the changes you make, press [Enter] or select the OK
button. To cancel the changes, press [Esc] or select the Cancel
button.
The Main pull-down menu, as shown below, contains the basic
configuration settings of the system.
Main
Date and Time
IDE Settings
√√√√ Fast Boot
Boot Sequence
Display Mode
The followings describe in sequence all the items of the Main menu.
Main Menu
Date and Time
The “Date and Time” item sets the system date and time.
When this item is selected, the submenu will display as shown below.
Hour 17 Month 4
Minute 18 Day 29
Second 54 Year 2000
Date and Time
IDE Settings
The “IDE Settings” item sets the type of the hard disk drive in your
system.
When this item is selected, the submenu will display as shown below.
Primary Channel
IDE Serrings
( ) Standard
( ) Fast PIO
( ) Multiword DMA
(••••) Ultra DMA-33
The default setting is Ultra DMA-33.
My Presario – Getting Started Setup Configuration Utility 5-3
Page 38

Fast Boot
The “Fast Boot” item, when enabled, speeds up the booting
procedure by bypassing the memory test.
When this item is selected, no submenu will display. A check mark
( √ ) indicates Enabled; an underline ( _ ) indicates Disabled.
The default setting is Enabled.
Boot Sequence
NOTE: If you set all booting
options to the same device (say,
Hard Disk C), then the notebook
will try to boot from that device
only.
The “Boot Sequence” item sets the sequence of booting.
When this item is selected, the submenu will display as shown below.
1st Boot Device
( ) Hard Disk C ( ) Hard Disk C
( ) CD-ROM Drive (••••) CD-ROM Drive
(••••) Diskette A ( ) Diskette A
2nd Boot Device
(••••) Hard Disk C
( ) CD-ROM Drive
( ) Diskette A
Boot Sequence
3rd Boot Device
The default setting is Diskette A ! Hard Disk C ! CD-ROM Drive.
Display Mode
The “Display Mode” item sets the display mode in your system.
When this item is selected, the submenu will display as shown below.
(••••) Auto
( ) LCD Only
( ) Simultaneously
Display Mode
Video Display Select
Setup Configuration Utility 5-4 My Presario – Getting Started
Page 39

The default setting is Auto.
Options
Auto
Descriptions
The external CRT monitor (if connected) will
respond after power on. If a monitor is not
connected, the LCD will respond.
LCD Only
Only the LCD will respond after power on even if
an external CRT monitor is connected.
Simultaneously
Both the CRT monitor (if connected) and the
LCD will respond after power is on. If a monitor is
not connected, only the LCD will respond.
The Advanced pull-down menu, as shown below, contains the I/O
configuration settings of the system.
Advanced
Ir Mode
√√√√ SaveToFile Warning Message
Keyboard Numlock
Pointing Device
√√√√ Resolution Expansion
The followings describe in sequence all the items of the Advanced
menu.
Advanced Menu
Ir Mode
The “Ir Mode” item sets the communications compatibility mode for
the IR port.
When this item is selected, the submenu will display as shown below.
( ) ASK
( ) IrDA 1.0
(••••) IrDA 1.1
IR Mode
IR Mode Settings
Select according to the type of device with which the notebook is to
communicate.
The default setting is IrDA1.1.
My Presario – Getting Started Setup Configuration Utility 5-5
Page 40

SaveToFile Warning Message
The “SaveT oFile Warning Message” item sets if the warning
message will appear after system power on when there is no
Suspend-to-File partition on the hard disk.
When this item is selected, no submenu will display. A check mark
( √ ) indicates Enabled; an underline ( _ ) indicates Disabled.
The default setting is Enabled.
Keyboard Numlock
NOTE: If you disable this option,
the numeric keypad on the
notebook keyboard will not
function even if the Num Lock
indicator is on. However, an
externally-connected keyboard is
not affected by this feature.
The “Keyboard Numlock” item sets if the numeric keypad will
function.
When this item is selected, no submenu will display. A check mark
( √ ) indicates Enabled; an underline ( _ ) indicates Disabled.
The default setting is Disabled.
Pointing Device
The “Pointing Device” item enables or disables the built-in touchpad
and track point.
When this item is selected, no submenu will display. A check mark ( √ )
indicates Enabled; an underline ( _ ) indicates Disabled. Disable this option if
you are using a serial mouse.
Resolution Expansion
The “Resolution Expansion” item, when enabled, enlarges the
display area on the LCD screen.
When this item is selected, no submenu will display. A check mark
( √ ) indicates Enabled; an underline ( _ ) indicates Disabled.
The default setting is Enabled.
The Security pull-down menu, as shown below, contains the Security
settings that safeguard your system against unauthorized use.
Security
System Password
The followings describe in sequence all the items of the Security
menu.
Security Menu
Setup Configuration Utility 5-6 My Presario – Getting Started
Page 41

System Password
The “System Passwor d” item allows you to set the password for your
system. The password is required for starting up the system and
running the SCU program.
When the item is selected, the submenu will display as shown below.
When setting a password, first make sure that Num Lock is off, then
type your
password in the entry field and press [Enter]. Confirm your password
by typing it again and pressing [Enter].
For the password to take effect, enable the “Enable Password” item.
Enter old Power-On Password: ........
Enter new Power-On Password: ........
Verify new Power-On Password: ........
[ ] Enable Password
System Password
Power Menu
The Power pull-down menu, as shown below, contains the Power
Management settings which help save power.
Power
√√√√ Enable Power Management
_ Max Performance
√√√√ Balanced Power Saving
_ Max Power Saving
_ Customize
Intel(R) SpeedStep(TM) Tech
The followings describe in sequence all the items of the Power menu.
Enable Power Management
The “Enable Power Management” item is the master control for the
Power Management features.
My Presario – Getting Started Setup Configuration Utility 5-7
Page 42

When this item is selected, no submenu will display. A check mark
( √ ) indicates Enabled; an underline ( _ ) indicates Disabled.
The default setting is Enabled.
Max Performance / Balanced Power Saving / Max Power
Saving / Customize
These four items are mutually-exclusive options. You can select
one of them. A check mark ( √ ) indicates Enabled; an underline ( _ )
indicates Disabled.
Descriptions of the four options are:
Options
Max Performance
Descriptions
Select this option for the pre-defined
settings which allow maximum
performance but shortest battery life.
Balanced Power Saving
Select this option for the pre-defined
settings which allow moderate
performance and moderate battery life.
Max Power Saving
Select this option for the pre-defined
settings which allow longest battery life
but minimum performance.
Customize
Select this option for setting up your own
preferences. When this option is
selected, a submenu will appear. See the
following subsection for information.
Customizing Power Management Features
NOTE: To know the pre-defined
settings for the above three
options, you can select the next
option to view the settings in the
submenu.
To customize Power Management features, select “Customize” from
the Power pull-down menu. The submenu will display as shown
below.
Hard Disk Power Down After: 20 Min
Standby After: Disabled
Suspend After: Disabled
Suspend Data to: RAM
Cover Close: Suspend
Battery Low Warning Beep: Enabled
VGA Activity: Enabled
Resume On Time: Disabled
Hour 0
Minute 0
Second 0
Resume On Modem Ring: Disabled
Customize
The followings describe in sequence all the items of this submenu.
Setup Configuration Utility 5-8 My Presario – Getting Started
Page 43

My Presario – Getting Started Setup Configuration Utility 5-9
Hard Disk Power Down After
The “Hard Disk Power Down After” item sets the time-out period for
the hard disk to power down if it is not in use during the set period.
The hard disk will power up again when next accessed.
The available options are Disabled, 1 Min, 2 Min, 4 Min, 8 Min, 10
Min, 15 Min, and 20 Min.
Standby After
The “Standby After” item sets the time-out period for initiating
Standby mode. It works in conjunction with the previous item “Idle
Mode.” After the notebook enters Idle mode, the Power Saving starts
the time-out for the Standby mode. If the notebook remains in Idle
mode until the time-out period for Standby mode has been reached,
the notebook enters Standby mode.
If Standby mode is in effect, several system subsystems go into
standby or off mode so that system power will be reduced. The
system will wake up from Standby mode when system activity is
detected.
The available options are Disabled, 1 Min, 2 Min, 4 Min, 6 Min, 8 Min,
12 Min, and 16 Min.
Suspend After
The “Suspend After” item sets the time-out period for initiating
Suspend mode. It works in conjunction with the previous item
“Standby After.” After the notebook enters Standby mode, the Power
Saving starts the time-out for the Suspend mode. If the notebook
remains in Standby mode until the time-out period for Suspend mode
has been reached, the notebook enters Suspend mode.
The Suspend mode is determined by the next item, “Suspend Data
to.” It can be either Suspend-to-RAM or Suspend-to-File.
When Suspend-to-RAM mode is initiated, several system
subsystems go into standby or off mode so that system power will be
reduced further. The system will wake up from Suspend-to-RAM
mode when a key is pressed. “Resume On Time” and “Resume On
Modem Ring”, if enabled in this submenu, can also wake up the
system from Suspend-to-RAM mode.
When Suspend-to-File mode is initiated, the system preserves all the
running application programs as a file in a “suspend-to-file partition”
on the hard disk and then turns off automatically.
The available options are Disabled, 1 Min, 2 Min, 5 Min, 10 Min, and
15 Min.
Suspend Data to
The “Suspend Data to” item defines the Suspend mode of your
system.
Page 44

NOTE: When using a PCMCIA
modem card or internal modem,
you must keep a modem- related
program running to enable this
feature.
Setup Configuration Utility 5-10 My Presario – Getting Started
The available options are RAM and Disk.
Cover Close
The “Cover Close” item sets the notebook status when you close the
cover.
Descriptions of the available options are:
Options
Video Off
CRT Display
Suspend
Battery Low Warning Beep
This item sets if the system will alert you upon low battery capacity.
The available options are Enabled and Disabled.
VGA Activity
The “VGA Activity” item sets if obvious video activities (such as
screen savers) will prevent Power Management modes.
Descriptions of the available options are:
Options
Enabled
Disabled
Resume On Time
The “Resume On Time” item enables or disables the system’s
waking up from Suspend-to-RAM mode at a time specified by the
next three items.
The available options are Enabled and Disabled. If you select
Enabled, set the time for the next three items.
Hour/Minute/Second
The “Hour”, “Minute”, and “Second” items work in conjunction with
the previous item “Resume On Time.” It sets the alarm time for
waking up the system from Suspend-to-RAM mode.
Enter the value in each field by typing the number.
Resume On Modem Ring
The “Resume on Modem Ring” item enables or disables the system’s
waking up from Suspend-to- RAM mode when the modem receives
an incoming call.
The available options are Enabled and Disabled.
Descriptions
The LCD screen will be off when you close the
cover.
The display output will switch to the external CRT
monitor.
Either Suspend-to-RAM or Suspend-to-File is
initiated depending on the setting of the previous
item, “Suspend Data to”.
Descriptions
Power Management will not take effect if there are
VGA activities.
Power Management will ignore VGA activities.
Page 45

NOTE: This menu item will not
appear if the CPU does not
support Geyserville feature.
Intel® SpeedStep™ Tech.
This option takes advantage of Intel’s Geyserville technology, which
can reduce the power consumption of CPU.
When this item is selected, the submenu will display as shown below.
Intel(R) SpeedStep(TM) Tech.
Geyserville
(••••) Automatic
( ) Maximum Performance
( ) Battery Optimized
( ) Disabled
The default setting is Automatic.
Exit Menu
The Exit pull-down menu, as shown below, displays ways of exiting
SCU. After finished with your settings, you must save and exit SCU
so that the settings can take effect.
Exit
Save Change and Exit
Discard Changes and Exit
Get Default Values
Load Previous Values
Descriptions of the Exit choices are:
Choices
Save Change and Exit
Discard Changes & Exit
Descriptions
Save changes you have made and exit.
Exit without saving the changes you
have made.
Get Default Values
Load factory default values for all the
items.
Load Previous Values
Restore previous values for all the items.
My Presario – Getting Started Setup Configuration Utility 5-11
Page 46

Page 47

Preventive
Maintenance
6
In this Chapter
What is Preventive
Maintenance?, 6-1
Backing Up Your Files, 6-1
Deleting Unwanted Files, 6-2
Optimizing the Computer Hard
Disk, 6-3
Note: Information in this chapter
is specific to Microsoft Internet
Explorer, the standard Internet
browser included with your
computer.
Tips: You may want to backup
critical files more frequently.
You turn on your computer and it won't start. You get an error
message that prevents you from getting your work done — and
there's no one around who knows what to do. Help!
Computer problems can happen, but regular preventive maintenance
will go a long way to help you avoid them.
In this chapter, you will learn how to keep your computer in peak
operating condition.
What is Preventive Maintenance?
Basic preventive maintenance procedures include the following:
→ Creating backups of your files
→ Deleting unwanted files
→ Maximizing your hard disk
→ Running VirusScan
Perform these preventive maintenance tasks at the intervals
recommended below, or more often if you use your computer a great
deal.
Procedure Frequency
Backup Files (see note below) Monthly
Delete Unwanted Files As Needed
Maximize Your Hard Disk Monthly
Run Virus Scan As Needed
Backing Up Your Files
Tips: It is a good idea to run
Microsoft Backup before deleting
files from the hard disk. If you
accidentally delete an important
file, it can be retrieved from the
back- up file.
My Presario – Getting Started Preventive Maintenance 6-1
Using Microsoft Backup
You can use Microsoft Backup to back up files to the hard disk,
diskettes, a Zip disk, CD-RW, or another computer on your network.
If your original files are damaged or lost, you can restore them from
the backup.
1. Close all open programs.
2. From the Windows taskbar, click the Start button, then point to
Programs, then Accessories, then System Tools, and then click
Backup. The Microsoft Backup window is displayed.
3. Select the drive you want to backup.
Page 48

Caution: When deleting files,
make sure you don’t delete any
files that are necessary for
system or program operation,
including the following file
extensions: .exe, .dll, or .ini.
Caution: Files that are emptied
from the Recycle Bin cannot be
retrieved.
Tips: When you delete mail in
Microsoft Outlook, the mail is
stored in the Deleted Items folder
on the hard disk. You will want to
delete this mail periodically from
the hard disk.
4. Click the Start button to begin the backup.
Deleting Unwanted Files
Deleting Unwanted Files
Deleting Unwanted Files
Deleting Unwanted FilesDeleting Unwanted Files
Taking Inventory of Your Hard Disk
1. Double-click the My Computer icon on the Windows desktop. The
My Computer window is displayed.
2. Right-click the disk on which you need to free space, and click
Properties on the pop-up menu.
3. On the General tab, click Disk Cleanup.
4. Click the files you want to delete.
5. Click OK.
Emptying the Recycle Bi n
1. Double-click the Recycle Bin icon on the Windows desktop.
Or you can:
1. Click individual files and press Delete. Or click the File menu, and
then click Empty Recycle Bin to remove all files.
2. Click Yes to confirm the deletion.
Deleting Unwanted Mail
1. Right-click the Deleted Items icon on the Outlook toolbar.
2. Select Empty “Deleted Items” Folder.
3. Click Yes.
Deleting Temporary Internet Files
1. Double-click the Microsoft Internet Explorer icon on the Windows
desktop.
2. From the Tools menu in Internet Explorer, click Internet Options.
3. Click Delete Files.
4. Click OK.
Increasing Temporary Internet File Space
1. Double-click the Microsoft Internet Explorer icon on the Windows
desktop.
2. From the Tools menu, click Internet Options.
3. Click Settings.
4. To increase the amount of space to store pages in, click the slider
and move it to the right.
5. Click OK to verify the new setting.
Preventive Maintenance 6-2 My Presario – Getting Started
Page 49

Note: The History area allows
you to designate the number of
days that the History list keeps
track of your pages.
Note: If you haven’t
defragmented the hard disk for a
while, the operation may take an
hour or longer.
6. Click OK to apply the setting.
Deleting the Internet His tory File
1. Double-click the Microsoft Internet Explorer icon on the Windows
desktop.
2. On the Tools menu in Internet Explorer, click Internet Options.
3. Click the General tab.
4. Click Clear History.
5. Click OK to clear the Internet History file.
Optimizing the Computer Hard Di sk
Optimizing the Computer Hard Disk
Optimizing the Computer Hard Disk
Optimizing the Computer Hard DiskOptimizing the Computer Hard Disk
Using ScanDisk
1. Close all open programs in the system tray, such as Compaq
Service Connection, and printer. (The system tray is located at the
far left of the Windows taskbar at the bottom of the screen.)
2. From the Windows taskbar, click the Start button, then point to
Programs, then Accessories, then System Tools, and then click
Scan Disk.
3. Select the drive you want to scan.
4. Click Start to begin scanning.
Using Disk Defragmenter
1. Close all open programs..
2. From the Windows taskbar, click the Start button, then point to
Programs, then Accessories, then System Tools, and then click
Disk Defragmenter.
3. Select the drive you want to defragment.
4. Click OK to begin defragmenting.
My Presario – Getting Started Preventive Maintenance 6-3
Page 50

Page 51

Specifications
A
In this Chapter
CPU, Memory, and the Main
Components, A-1
Controller and Interface, A-2
Power, A-2
Environmental Specifications,
1-8
NOTE: Specifications are subject
to change without any prior
notice.
CPU, Memory, and the Main Components
• CPU
Intel Mobile Pentium III series microprocessor
• RAM
Integrated 64/128 MB SDRAM, 1 x 144 pin SDRAM-DIMM socket
for expansion, spec up to 192/256 MB
• Cache memory
128/256 KB on-die
• ROM BIOS
256 KB Flash EEPROM
• LCD display
12.1-inch TFT XGA LCD, resolution up to 1024x768
• Notebook keyboard
Windows 98 keyboard, including numeric keypad, 12 function
keys, a special Fn (Function) key
• Floppy disk drive
3.5-inch, 1.44 MB, USB (external)
• Hard diskdrive
2.5-inch, Enhanced-IDE, Ultra DMA 33 supported, 6.4 GB or
above
• CD drive
ATAPI IDE 24x CD-ROM drive
4x/6x DVD-ROM drive (optional)
• Touchpad
PS/2-compatible
• Modem
56Kbps internal Fax Modem
•
LAN
10/100BASE-TX
My Presario – Getting Started Specifications A-1
Taking a Look at the Notebook
Page 52

Video controller
•
High performance CRT/LCD VGA controller, TFT/DSTN
supported, resolution up to 1024x768
•
Audio controller
Integrated PCI full-duplex 3D stereo technology, MS Windows
Sound System supported
•
PCMCIA expansion slot
PCMCIA 2.1/JEIDA 4.1 compliant, ExCA extension and PC card
standards supported, type II x 1, CardBus and ZV Port supported
Power
AC adapter
•
Universal AC adapter, 100~240 V, 50~60 Hz, 19V output, 3.16A
DC, current overload and over-charging protection
Battery pack
•
4-cell 4/3 A 3.7V Li-ION battery
(optional high-capacity battery pack)
Environmental Specifications
Operating 10°C to 35°C 20% to 80% (non-condensing)
Storage 0°C to 60°C 10% to 90% (non-condensing)
Temperature Humidity
A-2 Specifications My Presario – Getting Started
Page 53

Glossary
This Glossary defines commonly used terms to help new users understand computer concepts.
1394 port A new type of connector for
plugging in peripherals with extremely fast
data transfer rates, such as video cameras.
B
back up To copy files in case the original files
are lost or damaged.
browser Software that searches for, displays,
and downloads text, graphics, sound, and
video from the Web.
C
click (left click) To press and quickly release
the left mouse button to select an it em.
Ctrl+Alt+Delete Pressing and holding down
the Ctrl key, t hen t he Alt key, then the Delete
key, and then releasing all three keys, to close
a program that is locked (not responding).
cursor The blinking vertical line on the screen
that indicates where the next character
appears when you type.
computer on the Internet.
drive A device that reads and sometimes
writes to storage media. Examples are
CD-ROM, CD-R, CD-RW, DVD-ROM, Zip,
diskette, and hard drives.
drop-down menu A list of opt ions that
displays when you click a menu, on the menu
bar, or on the down arrow of a dialog box.
E
e-mail (electronic mail) Messages sent over
the Internet.
F
fax modem A modem that allows your
computer to transmit and receive faxes.
file extension A period and three characters
after a file name t hat indicate the program in
which the file was created. For example,
filename.doc. The .doc extension indicates
that the file was created in Microsoft Word.
D
dialog box A small window that requests
information from t he user before a command
can be completed.
double-click To press and quickly release the
left mouse button two times in rapid
succession to open an item.
download To receive f iles from another
My Presario – Getting Started Glossary 1
hard disk Internal storage media for
permanent storage of system files, program
files, utility files, and dat a files.
hardware The physical components of a
computer — the parts you can physically
touch.
HTML (hypertext markup language) The
H
Page 54

standard language for docum ent s designed
for viewing on the W eb with a browser. T hey
are easily identified by the file extension .htm
or .html. See file extension.
hyperlink An embedded link to another
document or W eb site. When you position the
cursor over a hyperlink (colored text or image),
a small hand is displayed. When you click t he
hyperlink, your browser displays the new
document or W eb site.
icon A small picture that represents a m enu
command, file, prog r am, tool, or peripheral.
Internet A worldwide collection of computer
networks that are interconnected so that users
can share electronic information.
ISP (Internet service provider) A company
that provides access to the Internet. To use the
service, you need the ISP software, a user
name, a password, and access phone
number(s).
N
navigate To move through a Web site or
online document by clicking the hyperlinks
embedded in the text or images.
network Two or more computer s linked
together to share resources, such as programs,
files, and printers.
O
OS (operating system) The interface that
permits a person and a computer to “talk” to
one another.
P
peripheral An external device connected to a
computer. Examples are a monitor, keyboard,
mouse, joystick, scanner, printer, and digital
camera.
M
maximize To enlarge the screen (or maximize
the window) in a Windows-based program by
clicking the Maximize button—t he button with
an open square in the upper-right corner of a
window that has not been maximized.
minimize To shrink a running progr am
window into a button on the Windows taskbar
by clicking the Minimize button—the button
with the minus si gn in the upper-right corner of
a window. Click the button on the taskbar to
view the window again.
modem A device inside the computer that
converts data from digital format to analog
format so that it can be transferred through a
standard telephone line to another computer.
The modem in the receiving computer
converts the data back to digital format.
Glossary 2 My Presario – Getting Started
pop-up menu A list of options that pops up
when you right-click an icon on the desktop or
taskbar, the vacant part of the desktop, a
selection in a document, or a file in Windows
Explorer. See right-click.
program A set of instructions, written in
invisible code, that tells the hardware what
tasks to perform. See software.
N
RAM (random access memory) The main
memory of the computer.
right-click To press and quickly release the
right mouse button to display a menu of
options. See pop-up menu.
S
Page 55

scroll To gradually move informat ion acr oss
the screen when a document or W eb page is
too long or too wide to view all at once.
search engine A program, accessed on the
Internet, that allows you to search large
databases for informat ion, using keywords or
phrases.
server A computer with a large hard disk that
serves (provides information to) other
computers connected to it by a network. The
Internet is a network of servers. When you
send or receive e-mail, it travels from the
sender’s computer to the receiver’s computer
through a number of servers.
shortcut An icon on the W indows deskt op
that you double-click to launch a program.
software A progr am that you can install on a
computer from a disk ette, CD, DVD, Zip disk,
or the Internet. See program.
surf To jump from place t o place on t he
Internet, searching for topics of interest, by
clicking hyperlinks. See hyperlink.
surge protector A device that regulates the
flow of electricity to the computer and prevents
high-voltage surges f r om damaging the
equipment.
connectors and cables.
V
virus A set of software instructions written to
harm computers.
W
window A screen that displays on the
Windows desktop after you select an item or
open a program.
Windows desktop The main screen you see
when your computer completes startup.
Windows taskbar The gr ay bar across t he
bottom of the screen when your computer
completes startup.
World Wide Web A system of Internet
servers that support documents form at ted in
HTML. See HTML.
Z
zipped file A file that has been compressed to
a smaller size by compression software, such
as WinZip. It can be identified by the file
extension .zip. See file extension.
U
upload To send information to anot her
computer on the Internet.
URL (uniform resource locator) The
address of a Web site, such as
www.compaq.com.
USB port (universal serial bus port) A
connector for plugg ing in multiple,
ultra-high-speed peripherals. USB ports are
gradually replacing serial ports and parallel
ports and eliminating the need f or so many
My Presario – Getting Started Glossary 3
Page 56

 Loading...