

HP Color LaserJet 1600 Series Service Manual
HP Color LaserJet 1600
Service Manual


HP Color LaserJet 1600
Service Manual

Copyright and License
FCC Class A Statement
Trademark Credits
© 2006 Copyright Hewlett-Packard
Development Company, L.P.
Reproduction, adaptation, or translation
without prior written permission is
prohibited, except as allowed under the
copyright laws.
The information contained in this document
is subject to change without notice.
The only warranties for HP products and
services are set forth in the express
warranty statements accompanying such
products and services. Nothing herein
should be construed as constituting an
additional warranty. HP shall not be liable
for technical or editorial errors or omissions
contained herein.
CB373-90930
Edition 1, 3/2006
This equipment has been tested and found
to comply with the limits for a Class A
digital device, pursuant to Part 15 of the
FCC Rules. These limits are designed to
provide reasonable protection against
harmful interference when the equipment is
operated in a commercial environment.
This equipment generates, uses and can
radiate radio frequency energy and, if not
installed and used in accordance with the
instruction manual, may cause harmful
interference to radio communications.
Operation of this equipment in a residential
area is likely to cause harmful interference,
in which case the user will be required to
correct the interference at his own
expense. The end user of this product
should be aware that any changes or
modifications made to this equipment
without the approval of Hewlett-Packard
could result in the product not meeting the
Class A limits, in which case the FCC
could void the user’s authority to operate
the equipment.
Adobe Photoshop® and PostScript are
trademarks of Adobe Systems Incorporated.
CorelDRAW™ is a trademark or registered
trademark of Corel Corporation or Corel
Corporation Limited.
Microsoft®, Windows®, MS-DOS®, and
Windows NT® are U.S. registered
trademarks of Microsoft Corporation.
Netscape™ and Netscape Navigator™ are
U.S. trademarks of Netscape
Communications Corporation.
TrueType™ is a U.S. trademark of Apple
Computer, Inc.
ENERGY STAR® and the ENERGY STAR
logo® are U.S. registered marks of the
United States Environmental Protection
Agency. Details on the proper use of the
marks are explained in the "Guidelines for
Proper use of the ENERGY STAR® Name
and International Logo."

Table of contents
1 Product information
Quick access to printer information.........................................................................................................2
Printer configuration................................................................................................................................3
Printer features........................................................................................................................................4
Walk around.............................................................................................................................................6
Front view (shown with optional Tray 3).................................................................................6
Back and side view.................................................................................................................7
Control panel...........................................................................................................................8
Understanding supplies status...............................................................................8
Understanding printer status..................................................................................8
Understanding control panel layout.......................................................................9
Software.................................................................................................................................................11
Supported drivers..................................................................................................................11
Software and supported operating systems........................................................11
Software for Windows...........................................................................................................11
Uninstalling Windows software.............................................................................................12
Print-media specifications......................................................................................................................13
General guidelines................................................................................................................13
Paper and print media...........................................................................................................13
Printing and storage environment.........................................................................................13
Envelopes.............................................................................................................................14
Labels....................................................................................................................................16
Transparencies.....................................................................................................................16
Media support tables.............................................................................................................16
Supported print media for Tray 1, Tray 2, and optional Tray 3............................16
Unsupported media (media to avoid)...................................................................17
2 Installation
Site preparation.....................................................................................................................................20
Operating environment.........................................................................................................20
Minimum system requirements.............................................................................................21
Requirements for PC systems.............................................................................21
Package contents..................................................................................................................................22
Install input devices...............................................................................................................................23
Installing optional Tray 3.......................................................................................................23
Loading Tray 1......................................................................................................................23
Installing supplies..................................................................................................................25
Print cartridges.....................................................................................................25
ENWW iii

3 Managing and maintenance
Managing supplies.................................................................................................................................30
Life expectancies of replacement supplies...........................................................................30
Checking and ordering supplies...........................................................................................30
Storing supplies....................................................................................................................31
Replacing and recycling supplies.........................................................................................31
HP policy on non-HP supplies..............................................................................................31
HP anti-counterfeit Web site.................................................................................................31
Cleaning the printer...............................................................................................................................32
To clean the printer at the printer..........................................................................................32
To clean the fuser using HP Toolbox...................................................................................33
Cleaning spilled toner...........................................................................................................33
Calibrating the printer............................................................................................................................34
To calibrate the printer at the printer....................................................................................34
To calibrate the printer from the HP Toolbox........................................................................34
4 Operational theory
Engine control system...........................................................................................................................36
Basic sequence of operation................................................................................................36
Power-on sequence..............................................................................................................37
Motors and fans....................................................................................................................37
Image formation system........................................................................................................................39
Image formation process......................................................................................................41
Developing stage..................................................................................................................43
Transfer stage.......................................................................................................................46
Separation stage...................................................................................................................47
Fusing stage.........................................................................................................................47
Pickup and feed system........................................................................................................................49
Manual feed slot pickup mechanism....................................................................................51
Paper feed mechanism.........................................................................................................51
Skew correction by the registration shutter..........................................................................51
Jam detection........................................................................................................................52
Solenoid, motor, and fan locations.......................................................................................53
Printed circuit assembly locations.........................................................................................53
250-sheet tray solenoid and printed circuit locations...........................................................54
Service-only tools (service only)............................................................................................................56
General timing chart..............................................................................................................56
Printer calibration..................................................................................................................57
To check status using the control panel..............................................................30
To check and order supplies using HP Toolbox..................................................30
Replacing the print cartridges..............................................................................31
Main motor failure detection.................................................................................38
Fan motor failure detection..................................................................................38
Latent image formation........................................................................................42
Laser/scanner system..........................................................................................43
Print cartridge.......................................................................................................44
Transfer belt (ETB)...............................................................................................45
5 Removal and replacement
Overview................................................................................................................................................60
iv ENWW

Service approach...................................................................................................................................61
Removal and replacement procedures.................................................................................................62
6 Troubleshooting
Troubleshooting process.......................................................................................................................98
Clearing jams ......................................................................................................................................100
Print problems......................................................................................................................................108
Pre-service procedures.........................................................................................................61
Print cartridge replacement...................................................................................................62
ETB removal and replacement.............................................................................................64
Fuser removal and replacement...........................................................................................73
Formatter removal and replacement....................................................................................81
DC controller removal and replacement...............................................................................85
Separation pad removal and replacement............................................................................88
Paper pickup roller removal and replacement......................................................................89
Control panel removal and replacement...............................................................................91
Troubleshooting checklist.....................................................................................................98
Paper path..........................................................................................................................100
Common causes of paper jams..........................................................................................101
Where to look for jams........................................................................................................102
Jams inside the printer........................................................................................................103
Input jams...........................................................................................................................104
Tray 1.................................................................................................................104
Tray 2.................................................................................................................105
Output jams.........................................................................................................................105
Jams in the top bin.............................................................................................105
Pickup delay jam................................................................................................106
Pickup stationary jam.........................................................................................106
Delivery delay jam..............................................................................................106
Wrapping jam......................................................................................................................106
Delivery stationary jam.......................................................................................................106
Start-up residual paper jam................................................................................................106
Door open jam....................................................................................................................107
Getting information..............................................................................................................108
Control panel messages....................................................................................108
Alert and warning messages.............................................................108
Critical error messages.....................................................................109
Supplies messages...........................................................................110
Status messages...............................................................................113
Status log only messages.................................................................113
Reports menu.....................................................................................................114
Configuration page.............................................................................................115
Supplies Status page.........................................................................................117
Menu map..........................................................................................................117
Status log...........................................................................................................118
Service menu settings........................................................................................120
Secondary service menu....................................................................................120
Printed image quality problems..........................................................................................121
Improving print quality........................................................................................121
Paper Types menu............................................................................121
ENWW v

Print Modes menu.............................................................................122
Print quality menu..............................................................................122
Understanding print-quality settings...................................................................123
To temporarily change print-quality settings.....................................123
To change print-quality settings for all future jobs............................123
Identifying and correcting printed image defects...............................................124
Print-quality checklist.........................................................................124
Paper handling issues........................................................................................................124
Wrong size/type media.......................................................................................124
Cannot select a tray or feature to use................................................................125
Performance problems.......................................................................................................125
Functional tests (service only).............................................................................................................127
Engine test print..................................................................................................................127
Service mode functions (service only).................................................................................................128
Cold reset............................................................................................................................128
NVRAM initializer................................................................................................................128
Super NVRAM initializer.....................................................................................................128
Restoring page counts and serial number..........................................................................129
Cleaning the ETB................................................................................................................129
Troubleshooting tools..........................................................................................................................130
Printer pages and reports...................................................................................................130
Demo page.........................................................................................................130
Configuration page.............................................................................................131
Event log............................................................................................................132
Supplies Status page.........................................................................................132
Fuser cleaning page...........................................................................................133
Print quality troubleshooting pages....................................................................133
Control panel messages (error codes)..............................................................133
Alert and warning messages.............................................................133
Critical error messages.....................................................................135
Supplies messages...........................................................................135
Status messages................................................................................................................138
Status log only messages...................................................................................................139
Service menu......................................................................................................................139
Restoring the factory-set defaults......................................................................139
To restore the factory-set defaults....................................................139
General print quality issues................................................................................................139
Solving issues with color documents..................................................................................143
HP Toolbox..........................................................................................................................................146
HP Toolbox.........................................................................................................................146
To view HP Toolbox...........................................................................................146
Troubleshooting tab...........................................................................................146
Print quality troubleshooting pages....................................................................................146
Printer calibration................................................................................................................146
Cleaning page.....................................................................................................................146
Configuration page..............................................................................................................147
Diagnostic resources...........................................................................................................................148
Reports menu.....................................................................................................................148
Web diagnostics tools.........................................................................................................148
Repetitive image defect ruler...............................................................................................................149
vi ENWW

Firmware and software updates..........................................................................................................150
7 Parts and diagrams
Overview..............................................................................................................................................152
Assembly locations..............................................................................................................................156
Covers.................................................................................................................................................162
Internal assemblies..............................................................................................................................164
Input devices........................................................................................................................................188
Diagrams.............................................................................................................................................210
Alphabetical parts list...........................................................................................................................211
Numerical parts list..............................................................................................................................240
Appendix A Product specifications
Physical specifications.........................................................................................................................270
Replacement supplies specifications..................................................................................................271
Print cartridge life................................................................................................................271
Electrical specifications.......................................................................................................................272
Environmental specifications...............................................................................................................273
Acoustical specifications......................................................................................................................274
Appendix B Product warranty statements
Hewlett-Packard limited warranty statement.......................................................................................276
Print Cartridge Limited Warranty Statement.......................................................................................277
Appendix C Regulatory statements
Declaration of Conformity....................................................................................................................280
Laser safety statement........................................................................................................................281
Canadian DOC statement...................................................................................................................281
VCCI statement (Japan)......................................................................................................................281
Korean EMI statement.........................................................................................................................281
Finnish laser statement.......................................................................................................................282
Index....................................................................................................................................................................283
ENWW vii

viii ENWW

1 Product information
This section provides information about the following topics:
Quick access to printer information
●
●
Printer configuration
Printer features
●
Walk around
●
Software
●
Print-media specifications
●
ENWW 1
Quick access to printer information
User guide
Contains detailed information for using the printer and troubleshooting problems. This guide is
available in two formats on the CD-ROM that came with the printer: in PDF format for printing and
HTML format for online viewing. It is also available through the HP Toolbox software.
Getting started guide
Provides step-by-step instructions for installing and setting up the printer.
HP Toolbox
Use to check the printer status and settings and to view troubleshooting information and online
documentation.
2 Chapter 1 Product information ENWW
Printer configuration
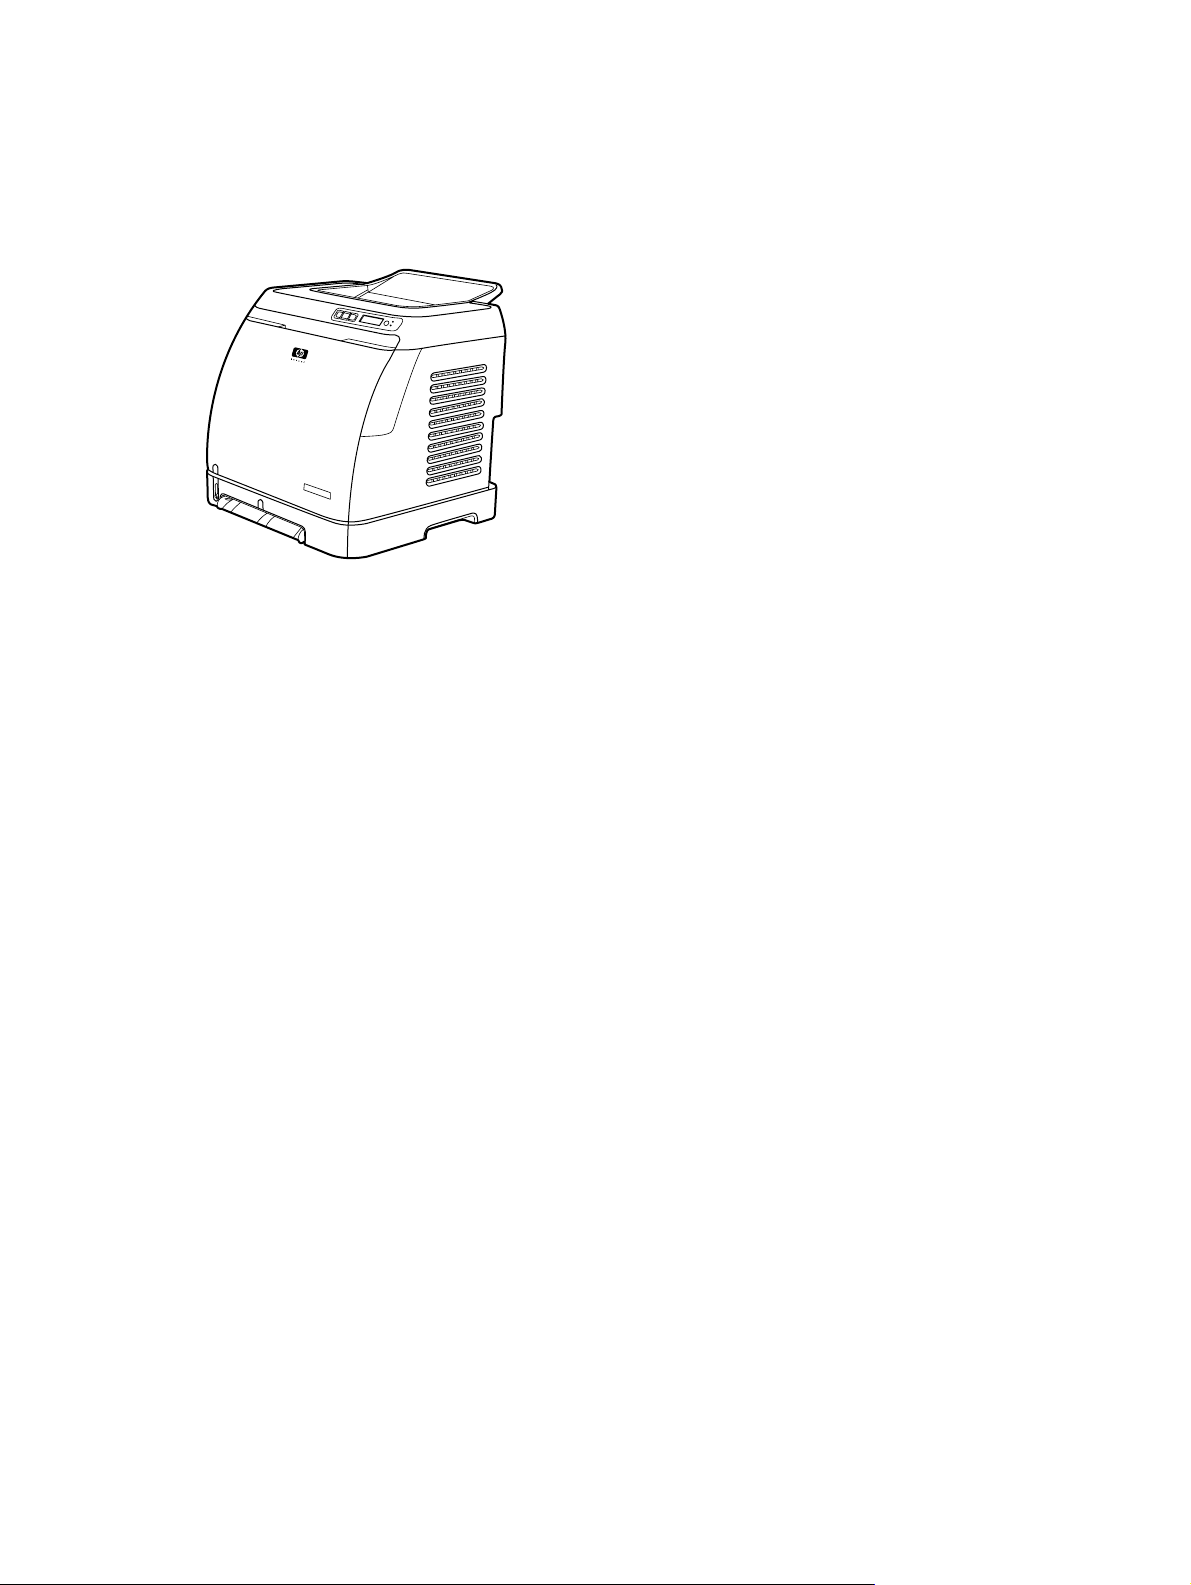
HP Color LaserJet 1600
The HP Color LaserJet 1600 printer is available in the configuration described below.
Figure 1-1 HP Color LaserJet 1600 printer
The HP Color LaserJet 1600 printer is a four-color laser printer that prints eight pages per minute
(ppm) in both monochrome (black and white) and color.
Trays. The printer comes with a single sheet priority feed slot (Tray 1) and a universal tray
●
(Tray 2) that holds up to 250 sheets of various paper types and sizes or 10 envelopes. It
supports an optional 250-sheet paper tray (optional Tray 3).
Connectivity. The printer provides a Hi-Speed Universal Serial Bus (USB) 2.0 port for
●
connectivity.
Memory. The printer contains 16 megabytes (MB) of synchronous dynamic random access
●
memory (SDRAM). No additional memory can be added.
ENWW Printer configuration 3

Printer features
Table 1-1 Printer features
Feature HP Color LaserJet 1600 printer
Color printing
Fast print speed ● Prints in black on letter-size paper up to 8 ppm and on
Excellent print quality
Ease of use
Flexible paper handling
● Provides laser printing in full color by using the four
process colors: cyan, magenta, yellow, and black
(CMYK).
A4-size paper up to 8 ppm. Prints in color on A4/letter
at 8 ppm.
ImageREt 2400 provides 2400 dpi equivalent color
●
quality through a multilevel printing process.
True 600 by 600 dots per inch (dpi) text and graphics.
●
Adjustable settings to optimize print quality.
●
● The HP UltraPrecise print cartridge has a finer toner
formulation that provides sharper text and graphics.
Few supplies to order. Supplies are easy to install.
●
● Convenient access to printer information and settings
by using the HP Toolbox software.
Convenient access to all supplies and to the paper path
●
through the front door.
● Trays 1 and 2 for letterhead, envelopes, labels,
transparencies, custom-sized media, postcards,
HP LaserJet glossy paper, HP LaserJet Tough paper,
heavy paper, and HP Laser Photo paper.
Interface connections
Energy savings
Economical printing
Supplies
A 125-sheet top output bin.
●
Print on Both Sides (manually).
●
● Hi-Speed USB 2.0 port.
● The printer automatically conserves electricity by
substantially reducing power consumption when it is
not printing.
● As an ENERGY STAR® partner, Hewlett-Packard
Company has determined that this product meets
ENERGY STAR® guidelines for energy efficiency.
ENERGY STAR® is a U.S. registered service mark of
the United States Environmental Protection Agency.
N-up printing (printing more than one page on a sheet)
●
and Printing on Both Sides features save paper.
● A Supplies Status page with print cartridge gauges that
show the supply levels that remain. For HP supplies
only.
● No-shake cartridge design.
Authentication for HP print cartridges.
●
4 Chapter 1 Product information ENWW

Table 1-1 Printer features (continued)
Feature HP Color LaserJet 1600 printer
● Internet-enabled, supplies-ordering capability.
Introductory black, yellow, cyan, and magenta print
●
cartridges — approximately 1,000 pages each based
on approximately 5% coverage per color. See
Managing supplies on page 30.
Accessibility
Expandability
Memory
● Online user guide that is compatible with text screen-
readers.
All doors and covers can be opened by using one hand.
●
Optional Tray 3. This 250-sheet universal tray reduces
●
how often you have to add paper to the printer. Only
one additional 250-sheet tray can be installed on the
printer.
16 MB of DRAM.
●
NOTE No additional memory can be added.
ENWW Printer features 5
Walk around
The following illustrations identify the locations and names of key components of this printer.
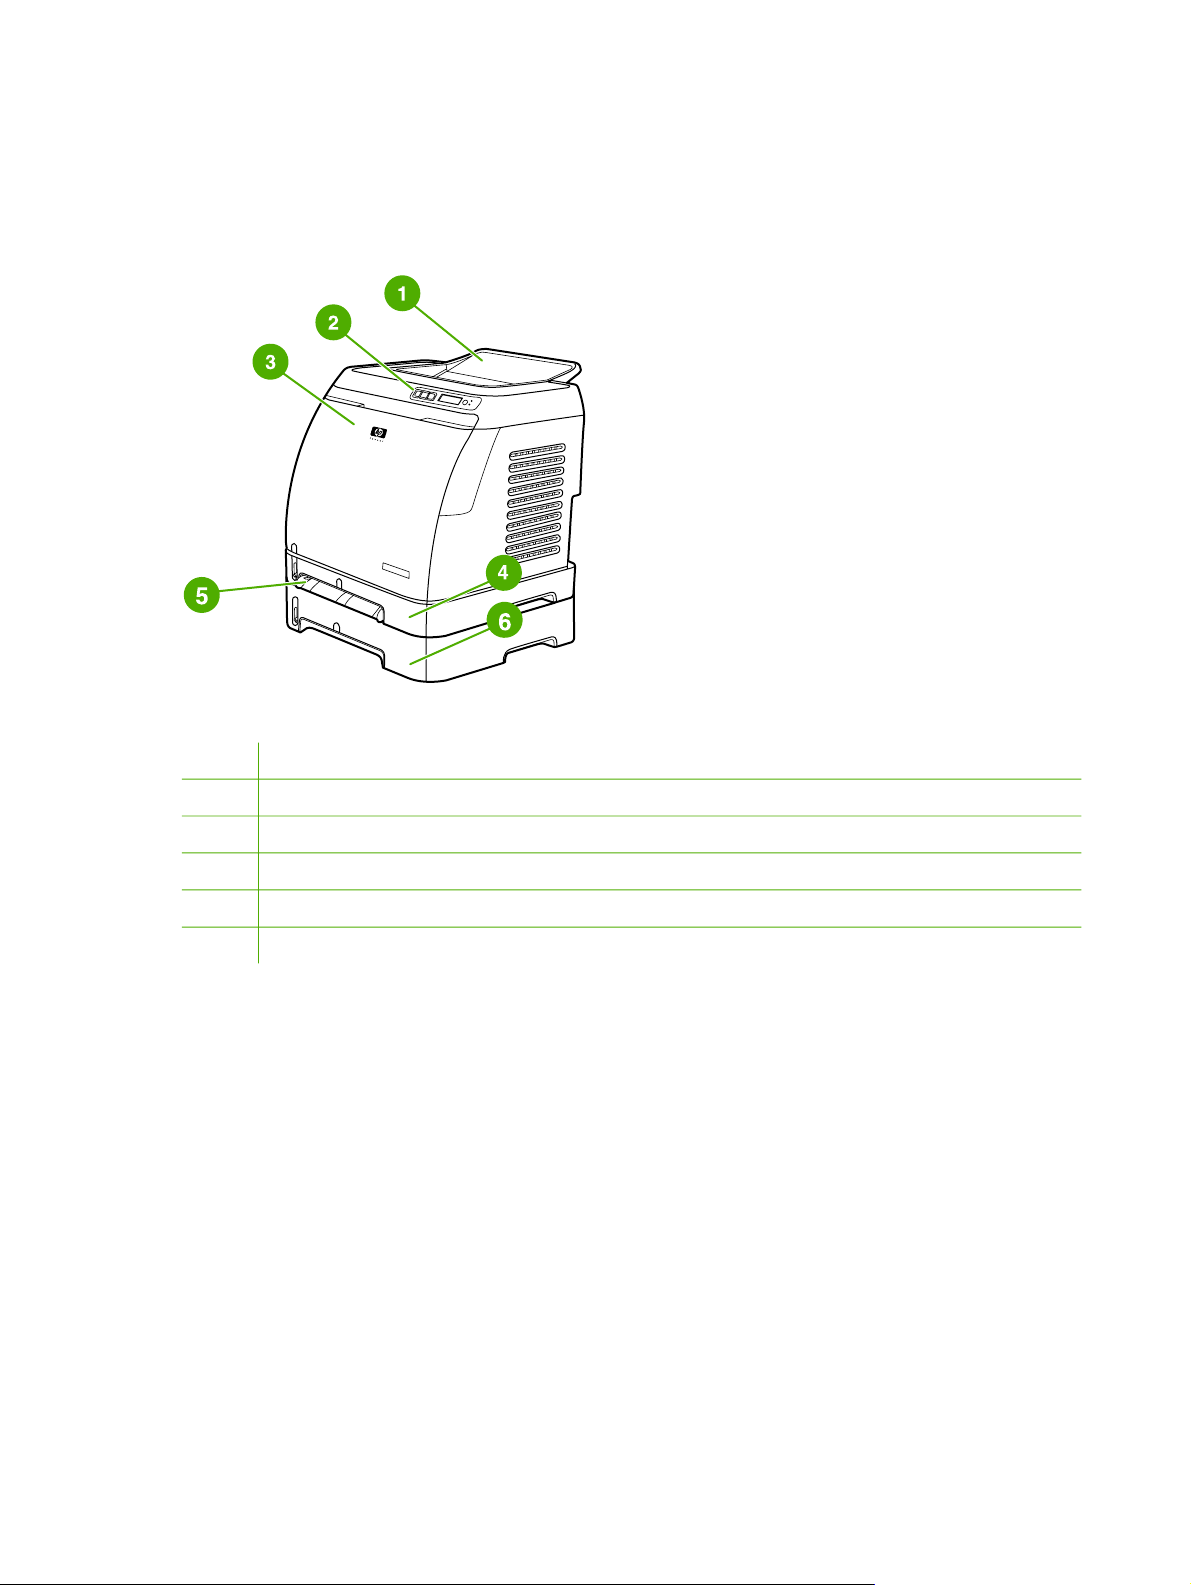
Front view (shown with optional Tray 3)
Figure 1-2 Front view (shown with optional Tray 3)
1 Output bin
2 Printer control panel
3 Front door
4 Tray 2 (250 sheets)
5 Tray 1 (single sheet priority feed slot)
6 Tray 3 (optional; 250 sheets)
6 Chapter 1 Product information ENWW
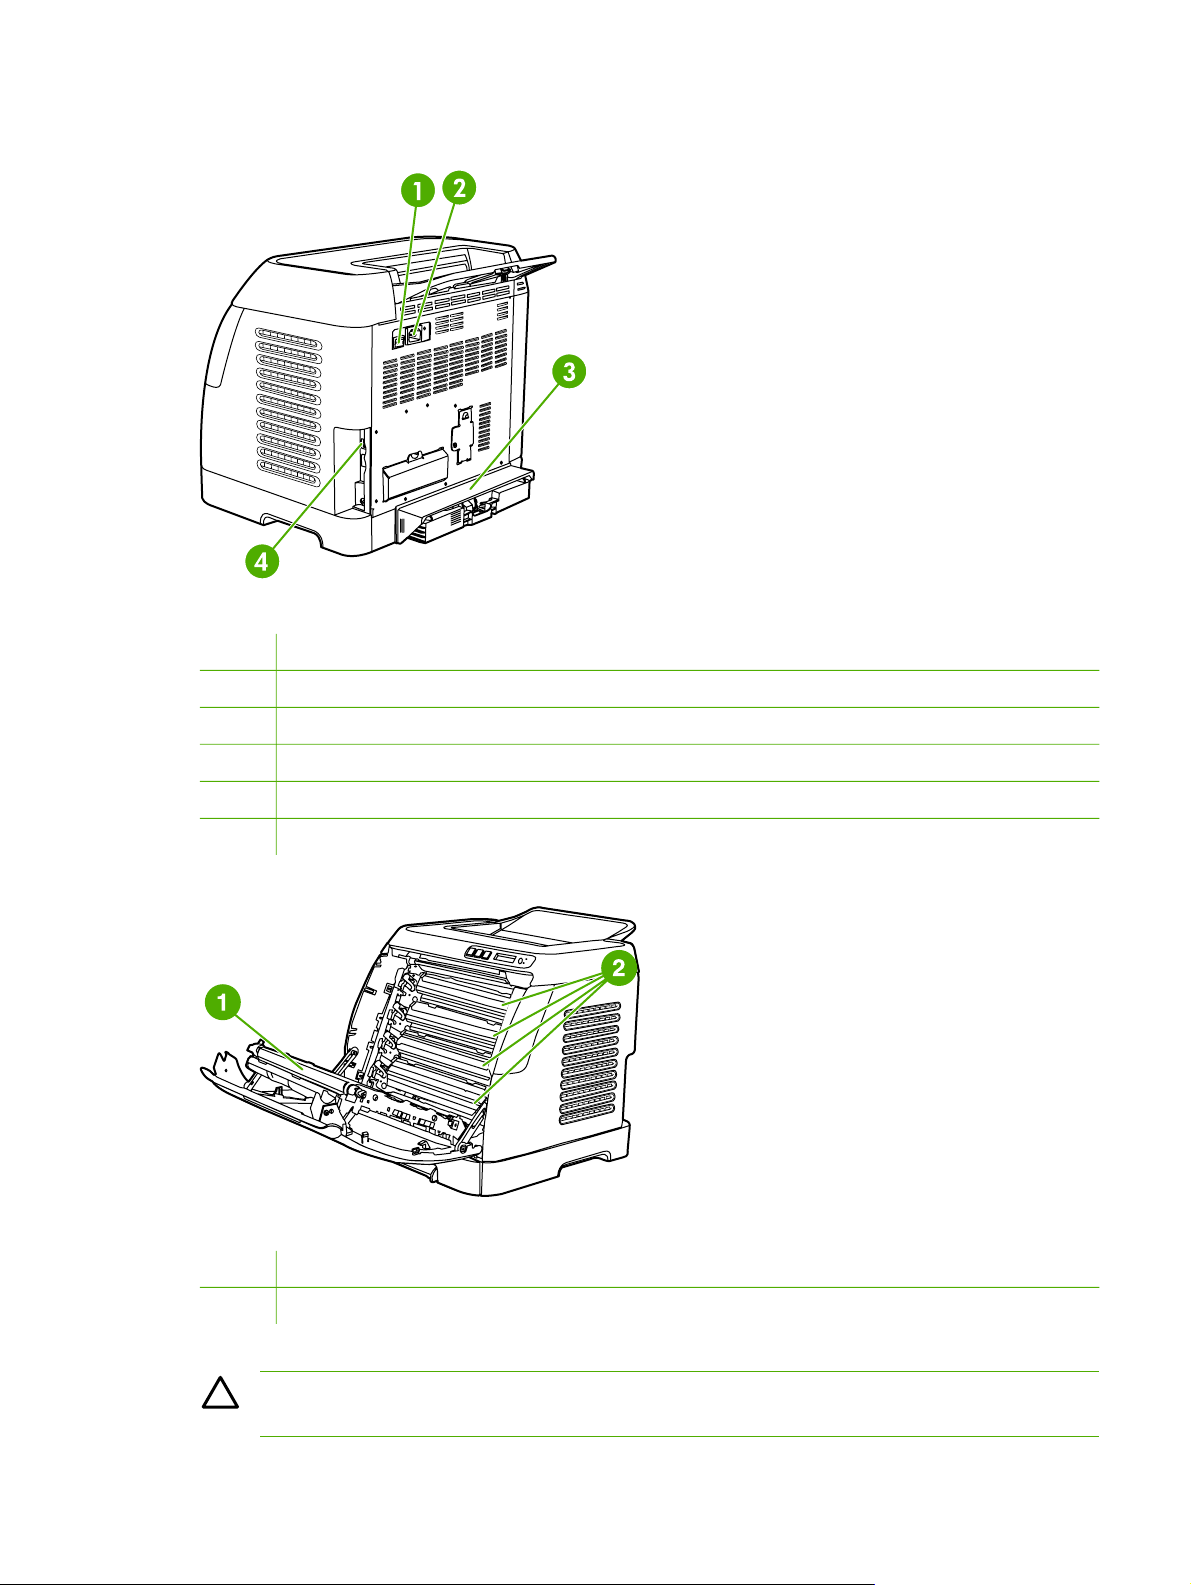
Back and side view
Figure 1-3 Back and side view
1 On/off switch
2 Power connection
3 Engine test button access door
4 Access door
5 Dust cover
7 USB connection
Figure 1-4 Transfer belt (ETB) and print cartridges
1 Transfer belt (ETB)
2 Print cartridges
CAUTION Do not place anything on the transfer belt, which is located on the inside of the
front door. Otherwise, the printer may be damaged, adversely affecting print quality.
ENWW Walk around 7

Model and serial number location
The model number and serial numbers are listed on identification labels located on the rear of the
printer. The model number is alphanumeric, such as Q6455A, for the HP Color LaserJet 1600
printer. The serial number contains information about the country/region of origin, the printer version,
production code, and the production number of the printer.
Figure 1-5 Model and serial number information
Control panel
Understanding supplies status
The supplies gauges show the consumption levels of print cartridges (black, yellow, cyan, and
magenta).
Black, yellow, cyan, and magenta supplies status gauges
A ? appears instead of the consumption level when the level is not known. This can occur in the
following circumstances:
● Missing cartridges
● Incorrectly placed cartridges
Cartridges with an error
●
Some non-HP cartridges
●
The supplies gauge appears whenever the printer shows the Ready state with no warnings. It will
also appear when the printer shows a warning or error message concerning a print cartridge or
multiple supplies. If a supply is empty, the gauge will flash.
Understanding printer status
Cancel Job button
●
When the Ready light is blinking, pressing
(Cancel Job) cancels the current job.
When a supplies status gauge is blinking and the Attention light is on (indicating that a non-HP
●
supply has been installed), pressing
8 Chapter 1 Product information ENWW
(Select) allows you to continue printing.

CAUTION You might not receive any indication when a non-HP supply is empty. For more
information about using non-HP print cartridges, see
on page 31. If you continue printing after the supply is empty, damage to the printer can occur.
Hewlett-Packard limited warranty statement on page 276.
See
Attention light
Generally, the Attention light blinks when the printer is out of paper, when a jam has occurred, or
when other problems that need attention occur.
The Attention light is on and one of the Supplies Status gauges is blinking the first time a non-HP
supply is installed.
Ready light
The Ready light is on when the printer is ready to print (experiencing no errors that prevent printing)
and blinks when it is receiving data to be printed.
Ready light and Select button
HP policy on non-HP supplies
●
When the Ready light is on and the Attention light is blinking, pressing
print job after you load print media for a manual feed, or clears some errors.
●
When the Ready light is blinking, the front door has been opened and then closed. Press
(Select) to return the printer to the Ready state. If you do not press (Select), the printer
returns to the Ready state on its own.
Left and Right arrow buttons
Use the
menus.
A Demo page can be printed by pressing the
simultaneously.
(Left arrow) and
(Right arrow) buttons to navigate through the printer control panel
(Left arrow) and
(Right arrow) buttons
(Select) continues the
Understanding control panel layout
This section provides information about printer status and control panel layout.
Control panel layout
The printer contains the following lights and buttons on the control panel:
ENWW Walk around 9
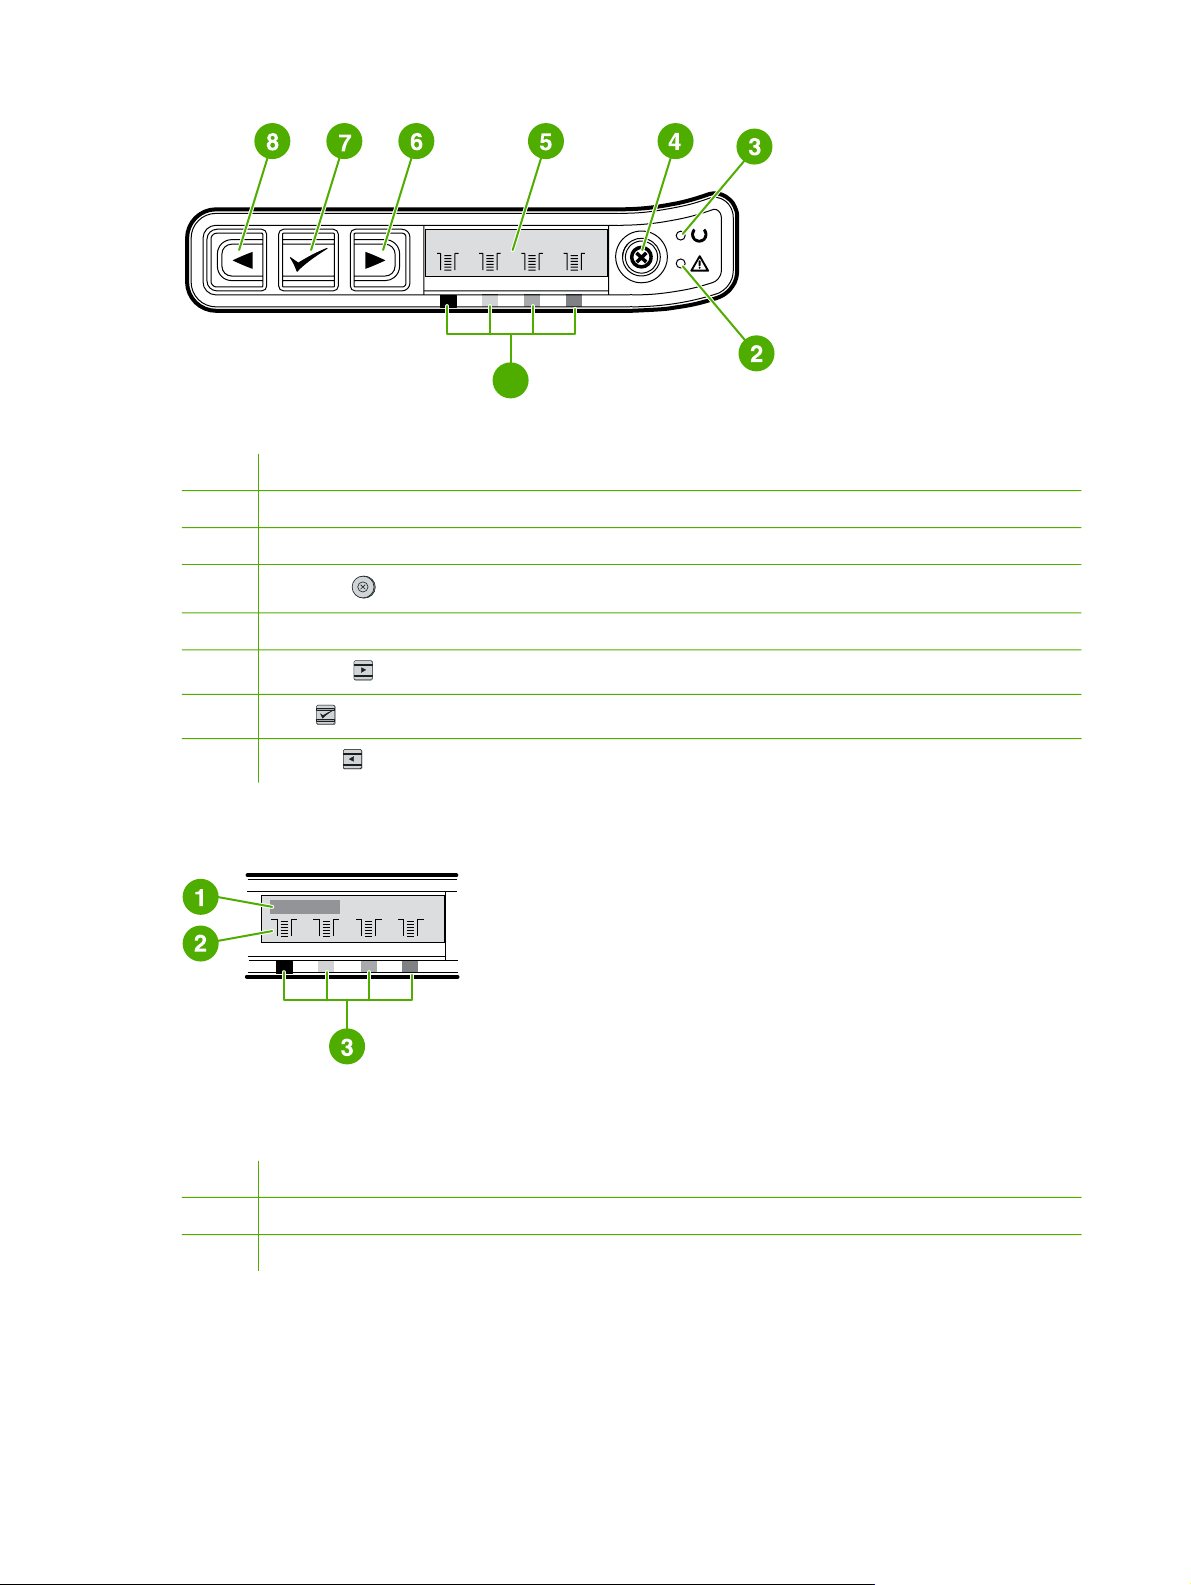
Figure 1-6 Control panel layout
1 Color print cartridge indicators
2 Attention light (amber)
3 Ready light (green)
1
4
5 Message area
6
7
8
Cancel Job
Right arrow button
Select
Left arrow button
button
button
Display
Figure 1-7 Control panel display
The printer display gives you information about the printer, job status, and levels of supplies.
1 Message area
2 Supplies gauges
3 Print cartridge colors are indicated from left to right: black, yellow, cyan, and magenta
10 Chapter 1 Product information ENWW

Software
This section contains information about the software used with the HP Color LaserJet 1600 printer.
Supported drivers
Software and supported operating systems
For easy printer setup and access to the full range of printer features, HP strongly recommends that
you install the software that is provided. Not all software is available in all languages. See the Getting
Started Guide for installation instructions, and see the Readme file for the latest software information.
The most recent drivers, additional drivers, and other software are available from the Internet and
other sources.
The printer supports the following operating systems:
● Microsoft® Windows® 98 Second Edition and Windows Millennium Edition (Me) (Add Printer
● Microsoft® Windows® 2000 and Windows XP
● Microsoft® Windows® Server 2003
The following table lists the software that is available for your operating system.
installation)
Table 1-2 HP Color LaserJet 1600 printer software
Feature Windows 98 Second
Edition, Me
Windows Installer
Windows printer driver
HP Toolbox software
Windows 2000 Windows XP
Software for Windows
When you install the software for Windows, you can directly connect the printer to a computer by
using a USB cable. See the Getting Started Guide for installation instructions, and see the Readme
file for the latest software information.
The following software is available to all users of the printer.
Printer drivers
A printer driver is a software component that provides access to printer features and provides the
means for the computer to communicate with the printer.
Using Help
The printer driver has Help dialog boxes that can be activated from the Help button in the printer
driver, the F1 key on the computer keyboard, or the question mark symbol (?) in the upper-right
ENWW Software 11

corner of the printer driver. These Help dialog boxes give detailed information about the specific
printer driver. Help for the printer driver is separate from the Help for your program.
HP Toolbox
You must perform a complete software installation to use the HP Toolbox.
The HP Toolbox provides links to printer status information and help information, such as the user
guide; and tools for diagnosing and solving problems. You can also view explanations and
animations on the control panel. See
Managing and maintenance on page 29 for more information.
Uninstalling Windows software
After a printing system installation, use the uninstall icon in the HP Color LaserJet 1600 printer
program group to select and remove any or all of the HP printing system components.
Starting the Uninstaller
1. Click Start, select Programs (All Programs for Windows XP) and choose HP.
2. In the HP Color LaserJet 1600 program group, click the HP Color LaserJet 1600 uninstall
icon.
3. The uninstaller guides you through removing the printing system components.
NOTE For driver-only (Add Printer/New Driver) installations, delete the printer icon from the
Printers folder (Windows 98 Second Edition, Windows Me, Windows 2000, and Windows XP).
12 Chapter 1 Product information ENWW

Print-media specifications
This section contains information about specifications for the quality of print media, guidelines for
print media usage, and guidelines for print media storage.
General guidelines
Some print media might meet all of the guidelines in this manual and still not produce satisfactory
results. This problem might be the result of improper handling, unacceptable temperature and
humidity levels, or other variables over which Hewlett-Packard has no control.
Before purchasing large quantities of print media, always test a sample and make sure that the print
media meets the requirements specified in the HP LaserJet Printer Family Print Media Guide
available at
This printer accepts a variety of media, such as cut-sheet paper (including up to 100% recycled-fibercontent paper), envelopes, labels, transparencies, HP LaserJet glossy paper, HP LaserJet Tough
paper, HP LaserJet Photo paper, and custom-size paper. Properties such as weight, composition,
grain, and moisture content are important factors that affect printer performance and output quality.
Print media that does not meet the guidelines outlined in this manual can cause the following
problems:
http://www.hp.com/support/ljpaperguide.
CAUTION Using print media that does not meet HP specifications can cause problems for
the printer, requiring repair. This repair is not covered by the Hewlett-Packard warranty or
service agreements.
CAUTION Use only paper designed for laser printers. Paper for inkjet printers may damage
the printer.
Poor print quality
●
Increased jams
●
● Premature wear on the printer, requiring repair
Paper and print media
For print-media specifications, see Media support tables on page 16.
Printing and storage environment
Ideally, the printing and media-storage environment should be at or near room temperature, and not
too dry or too humid. Remember that paper is hygroscopic; it absorbs and loses moisture rapidly.
Heat works with humidity to damage paper. Heat causes the moisture in paper to evaporate, while
cold causes it to condense on the sheets. Heating systems and air conditioners remove most of the
humidity from a room. As paper is opened and used, it loses moisture, causing streaks and
smudging. Humid weather or water coolers can cause the humidity to increase in a room. As paper is
opened and used it absorbs any excess moisture, causing light print and dropouts. Also, as paper
loses and gains moisture it can distort. This issue can cause jams.
As a result, paper storage and handling are as important as the paper-making process itself. Paper
storage environmental conditions directly affect the feed operation and print quality.
ENWW Print-media specifications 13

Care should be taken not to purchase more paper than can be easily used in a short time (about
three months). Paper stored for long periods can experience heat and moisture extremes, which can
cause damage. Planning is important to prevent damage to a large supply of paper.
Unopened paper in sealed reams can remain stable for several months before use. Opened
packages of paper have more potential for environmental damage, especially if they are not wrapped
with a moisture-proof barrier.
The media-storage environment should be properly maintained to ensure optimum printer
performance. The required condition is 20° to 24°C (68° to 75°F), with a relative humidity of 45% to
55%. The following guidelines should be helpful when evaluating the paper's storage environment:
● Print media should be stored at or near room temperature.
The air should not be too dry or too humid (to moderate the hygroscopic properties of paper).
●
The best way to store an opened ream of paper is to rewrap it tightly in its moisture-proof
●
wrapping. If the printer environment is subject to extremes, unwrap only the amount of paper to
be used during the day's operation to prevent unwanted moisture changes.
Avoid storing paper and print media near heating and air conditioning vents or near windows
●
and doors that are frequently open.
Envelopes
Envelopes can be printed from Tray 1 or Tray 2. Select the type of envelope that you are using from
the Print dialog box or the printer driver.
In your program, set the margins for the envelope. The following table gives typical address margins
for a commercial #10 or DL envelope.
Table 1-3 Envelope specifications
Type of address Top margin Left margin
Return address 15 mm (0.6 inch) 15 mm (0.6 inch)
Delivery address 51 mm (2 inches) 89 mm (3.5 inches)
● For the best print quality, position margins no closer than 15 mm (0.6 inch) from the edges of
the envelope.
● Avoid printing over the area where the envelope seams meet.
Envelope storage
Proper storage of envelopes helps contribute to print quality. Envelopes should be stored flat. If air is
trapped in an envelope and creates an air bubble, then the envelope might wrinkle during printing.
Envelope construction
Envelope construction is critical. Envelope fold lines can vary considerably, not only between
manufacturers, but also within a box from the same manufacturer. Successful printing on envelopes
14 Chapter 1 Product information ENWW
depends upon the quality of the envelopes. When selecting envelopes, consider the following
components:
●
Weight: The weight of the envelope paper should not exceed 90 g/m
2
(24 lb) or jamming might
occur.
● Construction: Before printing, envelopes should lie flat with less than 6 mm (0.25 inch) curl,
and should not contain air.
● Condition: Envelopes should not be wrinkled, nicked, or otherwise damaged.
Temperature: Use envelopes that are compatible with the heat and pressure of the printer. This
●
printer fusing temperature is 210°C (410°F).
Size: Use only envelopes that are within the following size ranges.
●
Table 1-4 Envelope size ranges
Tray Minimum Maximum
Tray 1 or Tray 2 76 x 127 mm (3 x 5 inches) 216 x 356 mm (8.5 x 14 inches)
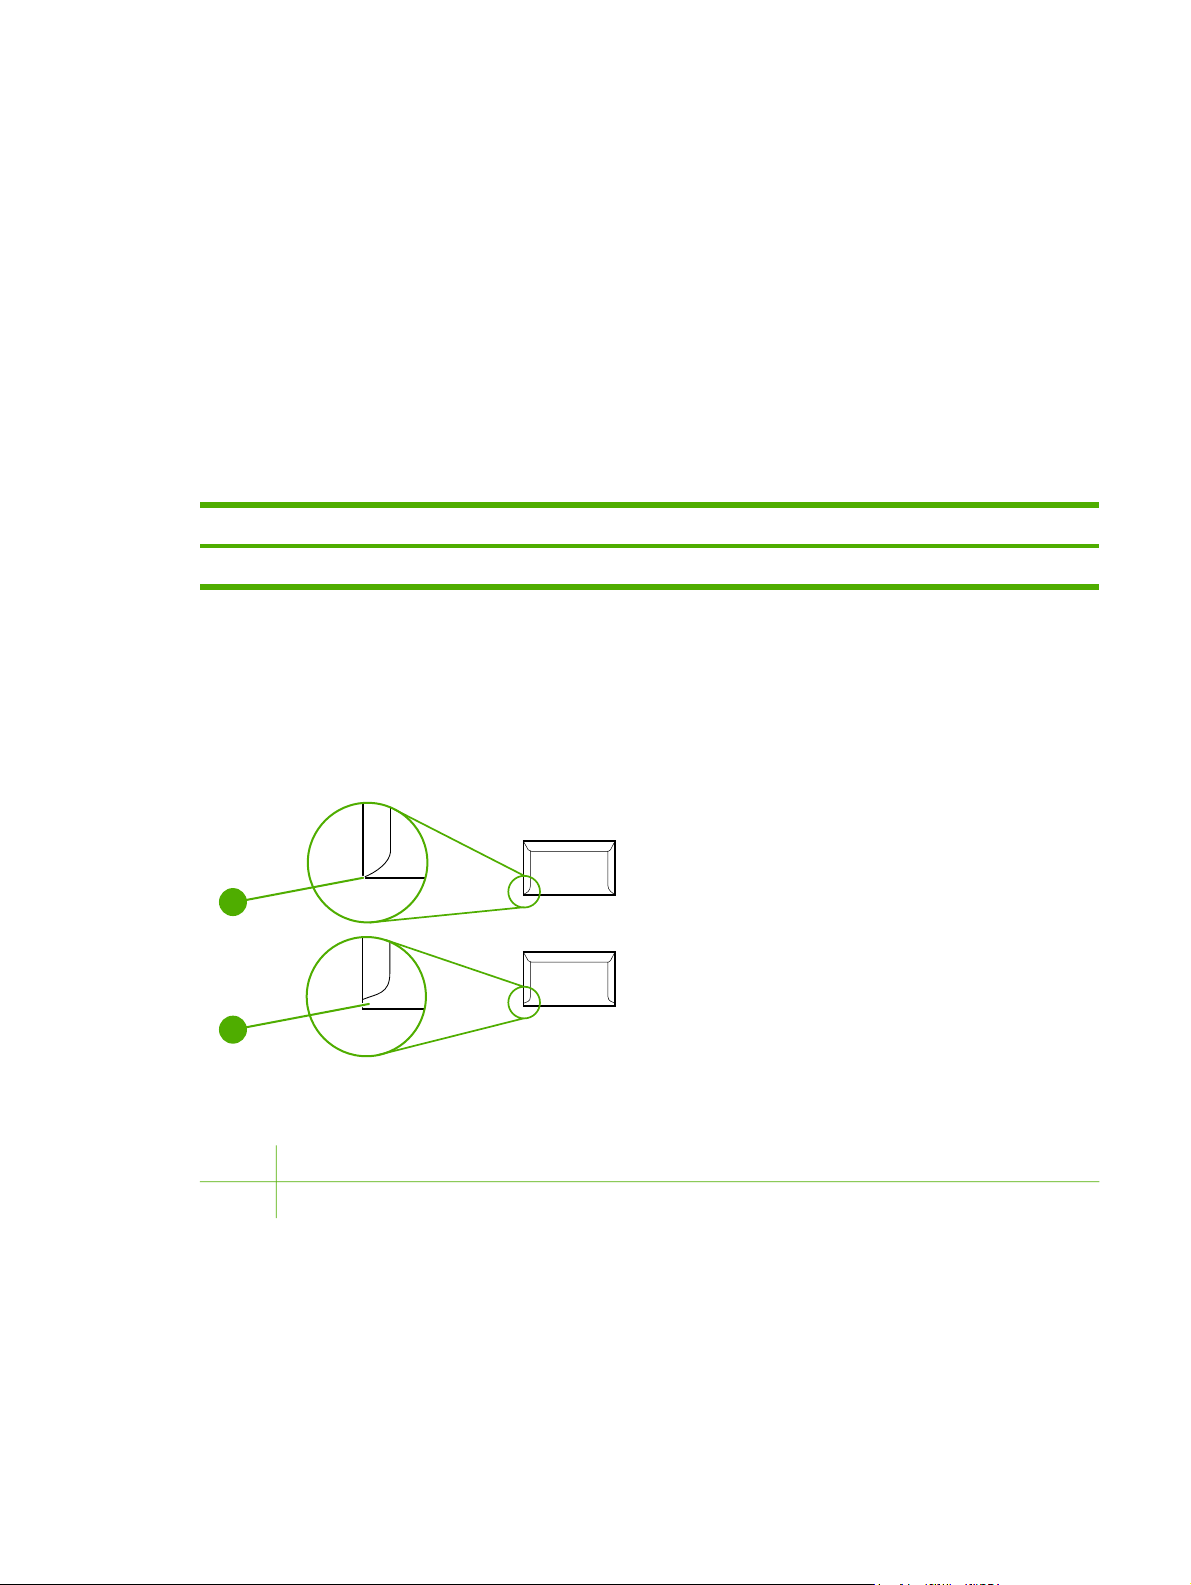
Envelopes with double side-seams
Double side-seam construction has vertical seams at both ends of the envelope rather than diagonal
seams. This style might be more likely to wrinkle. Be sure the seam extends all the way to the corner
of the envelope as illustrated below.
1
2
Figure 1-8 Envelope double side-seam construction
1 Acceptable
2 Unacceptable
Envelopes with adhesive strips or flaps
Envelopes with a peel-off adhesive strip or with more than one flap that folds over to seal must use
adhesives that are compatible with the heat and pressure in the printer. The extra flaps and strips
might cause wrinkling, creasing, or even jams and might damage the fuser.
ENWW Print-media specifications 15

Labels
Select the type of label that you are using from the Print dialog box or the printer driver.
CAUTION To avoid damaging the printer, use only labels that are recommended for laser
printers. To prevent serious jams, always use Tray 1 or Tray 2 to print on labels. Never print
on the same sheet of labels more than once or print on a partial sheet of labels.
When selecting labels, consider the quality of each component:
Adhesives: The adhesive material should be stable at 210°C (410°F), which is the printer
●
fusing temperature.
Arrangement: Only use labels with no exposed backing between them. Labels can peel off
●
sheets with spaces between the labels, causing serious jams.
● Curl: Before printing, labels must lie flat with no more than 13 mm (0.5 inch) of curl in any
direction.
● Condition: Do not use labels that have wrinkles, bubbles, or other indications of separation.
Transparencies
Use only Tray 1 or Tray 2 to print on transparencies. Select Transparencies from the Print dialog
box or the printer driver.
The printer supports printing on color transparencies. Use only transparencies that are
recommended for use in laser printers.
Transparencies that are used in the printer must be able to withstand 210°C (410°F), which is the
printer fusing temperature.
CAUTION To avoid damage to the printer, use only transparencies that are recommended
for use in laser printers.
Media support tables
This section contains information about the sizes, weights, and capacities of paper and other print
media that each tray supports.
Supported print media for Tray 1, Tray 2, and optional Tray 3
This section contains information about the sizes, weights, and capacities of paper and other print
media that each tray supports.
Tray 1 and Tray 2 specifications
Table 1-5 Tray 1 and Tray 2 specifications
Tray 1 and Tray 2
Dimensions
1
Weight Capacity
2
Paper Minimum: 76 x 127 mm
(3 x 5 inches)
Maximum: 216 x 356 mm
(8.5 x 14 inches)
60 to 163 g/m
2
(16 to 43 lb) Single sheet of 75 g/m
(20 lb) paper for Tray 1
Up to 250 sheets for Tray 2
2
16 Chapter 1 Product information ENWW

Table 1-5 Tray 1 and Tray 2 specifications (continued)
Tray 1 and Tray 2
Dimensions
1
Weight Capacity
2
HP LaserJet glossy paper
and HP LaserJet photo paper
Same as the preceding
listed minimum and
maximum sizes.
75 to 163 g/m2 (20 to 43 lb)
Single sheet of HP LaserJet
glossy paper or HP LaserJet
photo paper for Tray 1
Up to 25 mm (0.99 inch)
stack height for Tray 2
HP Premium Cover paper
3
200 g/m2 (75 lb) cover
Single sheet of HP Cover
paper for Tray 1
Up to 25 mm (0.99 inch)
stack height for Tray 2
Transparencies and opaque
film
Thickness: 0.10 to 0.13 mm
(3.9 to 5.1 mils)
Single sheet of transparency
or opaque film for Tray 1
Up to 50 sheets for Tray 2
Labels
Thickness: up to 0.23 mm
(up to 9 mils)
Single sheet of labels for
Tray 1
Up to 25 mm (0.99 inch)
stack height for Tray 2
Envelopes
Up to 90 g/m2 (16 to 24 lb)
Single envelope for Tray 1
Up to ten envelopes for
Tray 2
1
The printer supports a wide range of standard and custom sizes of print media. Check the printer driver for supported sizes.
2
Capacity can vary depending on media weight and thickness, and environmental conditions.
3
Hewlett-Packard does not guarantee results when printing with other types of heavy paper.
Optional Tray 3 specifications
Table 1-6 Optional Tray 3 specifications
Optional Tray 3 (250–sheet
Dimensions
1
Weight Capacity
tray)
Paper Minimum: 76 x 127 mm
60 to 163 g/m2 (16 to 43 lb)
Up to 250 sheets
(3 x 5 inches)
Maximum: 216 x 356 mm
(8.5 x 14 inches)
1
The printer supports a wide range of standard and custom sizes of print media. Check the printer driver for supported sizes.
2
Capacity can vary depending on media weight and thickness, and environmental conditions.
2
Unsupported media (media to avoid)
Avoid using the following media:
● Paper that has been stapled. Staples left in reused paper will cause printer damage that will
require repairs that may not be covered under the warranty.
● Sheets of labels that have been used more than once or partial sheets of labels
● Labels that are not specifically recommended for laser printers
ENWW Print-media specifications 17

Labels that are separating from the backing sheet or are wrinkled or damaged in any way
●
● Transparencies that are not specifically recommended for laser printers
● Media that has been stored in a high-humidity environment
Labels with exposed glue or adhesive
●
18 Chapter 1 Product information ENWW

2 Installation
This chapter contains information about the following topics.
Site preparation
●
●
Package contents
Install input devices
●
ENWW 19
Site preparation
Below are recommendations for the printer location and placement.
Operating environment
The printer must be kept in a proper location to maintain the performance level that has been set at
the factory. In particular, be sure that the environment adheres to the specifications listed in this
chapter.
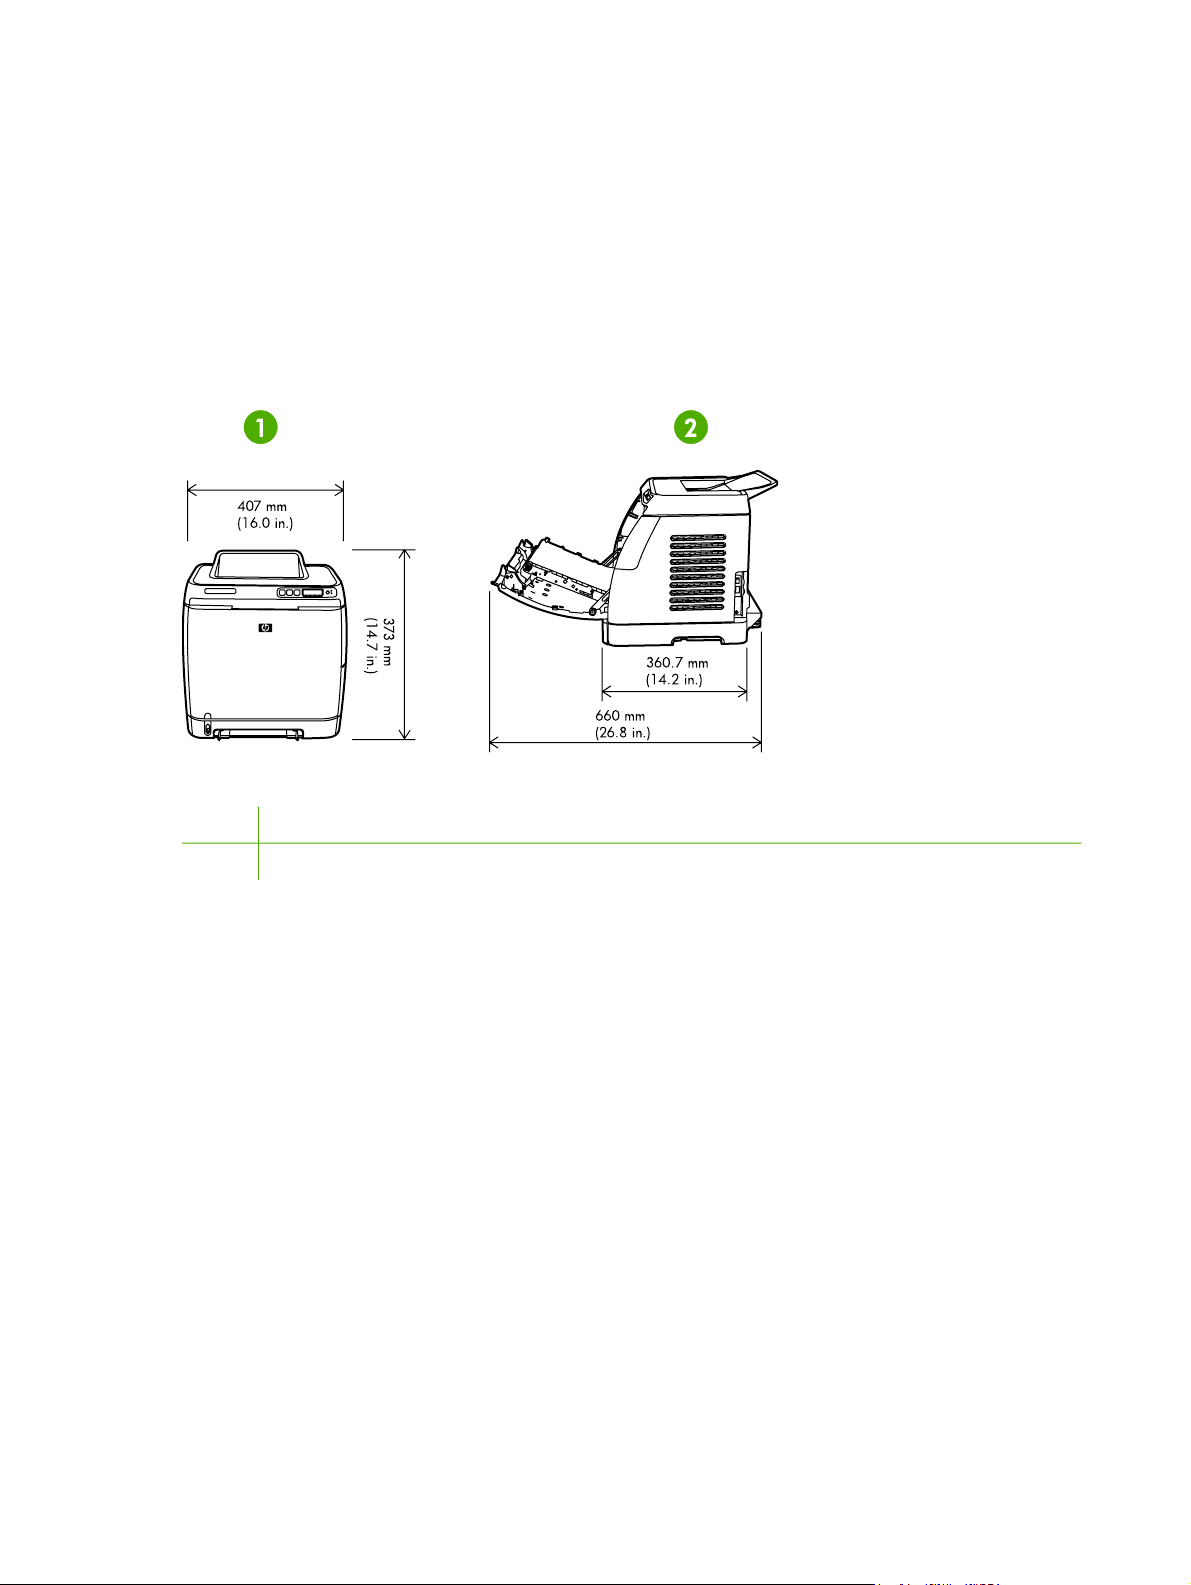
The printer must have 2 inches of space above and around it.
Figure 2-1 Printer dimensions
1 Front view
2 Side view
Make sure the printer has the following:
● A well-ventilated, dust-free area
As surface that will support up to 18 kg (40 lbs)
●
A constant temperature and humidity (Do not install near water sources, humidifiers, air
●
conditioners, refrigerators, or other major appliances.)
A hard level surface (not more than a 2° angle)
●
Make sure to keep the printer away from the following:
● Direct sunlight, dust, open flames, or water
Direct flow of exhaust from air ventilation systems
●
Magnets and devices that emit a magnetic field
●
20 Chapter 2 Installation ENWW
 Loading...