

Page 1
hp color LaserJet
1500 series
use
Page 2

Page 3

HP color LaserJet 1500 series printer
User guide
Page 4

Copyright and License
©Copyright Hewlett-Pac kard Company 2003
All Rights Reserved. Except as allowed by
copyright laws or herein, reproduction,
adaptation, or translation without prior written
permission is prohibited.
A user of the Hewlett-Packard printer
associated with this user guide is granted a
license to: a) print hard copies of this
user guide for PERSONAL, INTERNAL or
COMPANY use subject to the restriction not
to sell, re-sell or otherwise distribute the hard
copies; and b) place an electronic copy of
this user guide on a network server, provided
access to the electronic copy is limited to
PERSONAL, INTERNAL users of the
Hewlett-Packard printer associated with this
user guide.
The information contained in this document
is subject to change without notice.
Part number: Q2488-90929
Edition 1, 4/2003
Trademark Credits
Energy Star® and the Energy Star logo are
U.S. registered marks of the United States
Environmental Protection Agency.
Microsoft® and Windows® are U.S.
registered trademarks of Microsoft
Corporation.
Netscape™ and Netscape Navigator™ are
U.S. trademarks of Netscape
Communications Corporation.
Hewlett-Packard Company
11311 Chinden Boulevard
Boise, Idaho 83714 U.S.A.
Page 5
HP Customer Care
Telephone support
HP provides free telephone support during the warranty period. When you call, you will be connected to a responsive
team waiting to help you. For the telephone number for your country/region, see the flyer that shipped in the box with
the product. Before calling HP, have the following information ready: product name and serial number, date of
purchase, and description of the problem.
You can also find support on the Internet at http://www.hp.com/support/callcenters
. Click next to your language,
and then click next to your country/region to see a list of the customer care centers in your area.
Online and other support
Online Services: for 24-hour
access to information using a
modem or Internet connection
Software utilities, drivers,
and electronic information
HP direct ordering for
accessories or supplies
HP Support Assistant CD This support tool offers a comprehensive online information system designed to provide
World Wide Web URL: Updated HP printer software, product and support information, and
printer drivers in s e ver al lang uages c an be o btained f rom: http:/ /www .h p .com/go/clj 1500
in English.)
Printe r drivers: Visit http://www.hp.com
HP. Type color laserjet 1500 as the product name, and then click to see a list of
available drivers. The Web page for the drivers might be in English, but you can download the
drivers themselves in several languages.
Visit: http://www.hp.com/go/su ppo rt/clj1500. (Site is in English.)
Call: See the flyer that shipped in the box with the product.
Visit: http://www.hp.com/go/ljsupplies
Call: 1-800-538-8787 (U.S.) or 1-800-387-3154 (Canada).
technical and product information on HP products. To subscribe to this quarterly service in the
U.S. or Canada, call 1-800-457-1762. In Hong Kong SAR, Indonesia, Malaysia, or Singapore,
call Mentor Media at (65) 740-4477.
, and click Drivers. Under the HP Drivers section, click
. (Site is
HP Service Information To locate HP-Authorized Dealers, call 1-800-243-9816 (U.S.) or 1-800-387-3867 (Canada).
For service for your product, call the customer support number for your country/region. See the
flyer that shipped in the box with the printer.
HP Service Agreements Call: 1-800-835-4747 (U.S.) or 1-800-268-1221 (Canada).
Extended Service: 1-800-446-0522
ENWW 3
Page 6

4 ENWW
Page 7

Contents
HP Customer Care . . . . . . . . . . . . . . . . . . . . . . . . . . . . . . . . . . . . . . . . . . . . . . . . . . 3
1 Printer basics
Introduction . . . . . . . . . . . . . . . . . . . . . . . . . . . . . . . . . . . . . . . . . . . . . . . . . . . . . . . . 7
Printer configurations. . . . . . . . . . . . . . . . . . . . . . . . . . . . . . . . . . . . . . . . . . . . . . . . . 8
Printer features . . . . . . . . . . . . . . . . . . . . . . . . . . . . . . . . . . . . . . . . . . . . . . . . . . . . . 9
Printer parts . . . . . . . . . . . . . . . . . . . . . . . . . . . . . . . . . . . . . . . . . . . . . . . . . . . . . . . 10
Interface port . . . . . . . . . . . . . . . . . . . . . . . . . . . . . . . . . . . . . . . . . . . . . . . . . . . 11
Control panel features . . . . . . . . . . . . . . . . . . . . . . . . . . . . . . . . . . . . . . . . . . . . 12
Software and supported operating systems . . . . . . . . . . . . . . . . . . . . . . . . . . . . . . 14
Software for Windows . . . . . . . . . . . . . . . . . . . . . . . . . . . . . . . . . . . . . . . . . . . . . . . 15
Software for Macintosh . . . . . . . . . . . . . . . . . . . . . . . . . . . . . . . . . . . . . . . . . . . . . . 16
Software tips . . . . . . . . . . . . . . . . . . . . . . . . . . . . . . . . . . . . . . . . . . . . . . . . . . . . . . 17
Uninstalling the printing software . . . . . . . . . . . . . . . . . . . . . . . . . . . . . . . . . . . . . . 18
Uninstalling software for Windows . . . . . . . . . . . . . . . . . . . . . . . . . . . . . . . . . . . 18
Uninstalling software for Macintosh . . . . . . . . . . . . . . . . . . . . . . . . . . . . . . . . . . 18
Accessories and ordering information . . . . . . . . . . . . . . . . . . . . . . . . . . . . . . . . . . . 19
2 Printing tasks
Introduction . . . . . . . . . . . . . . . . . . . . . . . . . . . . . . . . . . . . . . . . . . . . . . . . . . . . . . . 21
Choosing paper and other print media. . . . . . . . . . . . . . . . . . . . . . . . . . . . . . . . . . . 22
Supported print media for tray 1 . . . . . . . . . . . . . . . . . . . . . . . . . . . . . . . . . . . . 23
Supported print media for optional tray 2 . . . . . . . . . . . . . . . . . . . . . . . . . . . . . 23
Purchasing paper and other print media . . . . . . . . . . . . . . . . . . . . . . . . . . . . . . 24
Loading trays . . . . . . . . . . . . . . . . . . . . . . . . . . . . . . . . . . . . . . . . . . . . . . . . . . . . . 25
Loading tray 1. . . . . . . . . . . . . . . . . . . . . . . . . . . . . . . . . . . . . . . . . . . . . . . . . . . 25
Loading optional tray 2. . . . . . . . . . . . . . . . . . . . . . . . . . . . . . . . . . . . . . . . . . . . 26
Printing a job . . . . . . . . . . . . . . . . . . . . . . . . . . . . . . . . . . . . . . . . . . . . . . . . . . . . . . 27
Gaining access to printer driver settings . . . . . . . . . . . . . . . . . . . . . . . . . . . . . . 30
Features in the printer driver . . . . . . . . . . . . . . . . . . . . . . . . . . . . . . . . . . . . . . . 31
Choosing an output location . . . . . . . . . . . . . . . . . . . . . . . . . . . . . . . . . . . . . . . . . 35
Printing on special print media. . . . . . . . . . . . . . . . . . . . . . . . . . . . . . . . . . . . . . . . . 36
Printing on envelopes. . . . . . . . . . . . . . . . . . . . . . . . . . . . . . . . . . . . . . . . . . . . . 36
Printing on labels . . . . . . . . . . . . . . . . . . . . . . . . . . . . . . . . . . . . . . . . . . . . . . . . 37
Printing on grayscale transparencies . . . . . . . . . . . . . . . . . . . . . . . . . . . . . . . . 38
Printing on custom-sized print media or cardstock . . . . . . . . . . . . . . . . . . . . . . 39
Printing on letterhead or preprinted forms . . . . . . . . . . . . . . . . . . . . . . . . . . . . . 40
Printing on both sides (duplexing manually) . . . . . . . . . . . . . . . . . . . . . . . . . . . . . . 41
Canceling a print job . . . . . . . . . . . . . . . . . . . . . . . . . . . . . . . . . . . . . . . . . . . . . . . . 42
Using color. . . . . . . . . . . . . . . . . . . . . . . . . . . . . . . . . . . . . . . . . . . . . . . . . . . . . . . . 43
HP ImageREt 2400 . . . . . . . . . . . . . . . . . . . . . . . . . . . . . . . . . . . . . . . . . . . . . . 43
HP ColorSmart (Windows only) . . . . . . . . . . . . . . . . . . . . . . . . . . . . . . . . . . . . . 43
Managing color options . . . . . . . . . . . . . . . . . . . . . . . . . . . . . . . . . . . . . . . . . . . 44
Matching colors . . . . . . . . . . . . . . . . . . . . . . . . . . . . . . . . . . . . . . . . . . . . . . . . . 47
3 Managing the printer
Introduction . . . . . . . . . . . . . . . . . . . . . . . . . . . . . . . . . . . . . . . . . . . . . . . . . . . . . . . 49
Special pages . . . . . . . . . . . . . . . . . . . . . . . . . . . . . . . . . . . . . . . . . . . . . . . . . . . . . 50
HP color LaserJet 1500 toolbox. . . . . . . . . . . . . . . . . . . . . . . . . . . . . . . . . . . . . . . . 53
Contents 5
Page 8

4 Problem solving and maintenance
Introduction . . . . . . . . . . . . . . . . . . . . . . . . . . . . . . . . . . . . . . . . . . . . . . . . . . . . . . . 57
Clearing jams . . . . . . . . . . . . . . . . . . . . . . . . . . . . . . . . . . . . . . . . . . . . . . . . . . . . . 58
Resolving control panel messages . . . . . . . . . . . . . . . . . . . . . . . . . . . . . . . . . . . . . 63
Supplies Status lights . . . . . . . . . . . . . . . . . . . . . . . . . . . . . . . . . . . . . . . . . . . . 64
Printer Status lights . . . . . . . . . . . . . . . . . . . . . . . . . . . . . . . . . . . . . . . . . . . . . . 67
Secondary light patterns for Printer Status lights . . . . . . . . . . . . . . . . . . . . . . . 69
Solving print-quality problems . . . . . . . . . . . . . . . . . . . . . . . . . . . . . . . . . . . . . . . . . 71
Solving issues with all printed documents . . . . . . . . . . . . . . . . . . . . . . . . . . . . . 72
Solving issues with color documents . . . . . . . . . . . . . . . . . . . . . . . . . . . . . . . . . 78
Resolving problems that generated messages . . . . . . . . . . . . . . . . . . . . . . . . . . . . 80
Resolving problems that did not generate messages . . . . . . . . . . . . . . . . . . . . . . . 81
Solving general printing problems . . . . . . . . . . . . . . . . . . . . . . . . . . . . . . . . . . . 83
Solving common Macintosh problems . . . . . . . . . . . . . . . . . . . . . . . . . . . . . . . . 86
Cleaning the printer . . . . . . . . . . . . . . . . . . . . . . . . . . . . . . . . . . . . . . . . . . . . . . . . . 88
Calibrating the printer. . . . . . . . . . . . . . . . . . . . . . . . . . . . . . . . . . . . . . . . . . . . . . . . 89
Managing supplies . . . . . . . . . . . . . . . . . . . . . . . . . . . . . . . . . . . . . . . . . . . . . . . . . . 90
Supplies life . . . . . . . . . . . . . . . . . . . . . . . . . . . . . . . . . . . . . . . . . . . . . . . . . . . . 90
Checking and ordering supplies. . . . . . . . . . . . . . . . . . . . . . . . . . . . . . . . . . . . . 90
Storing supplies . . . . . . . . . . . . . . . . . . . . . . . . . . . . . . . . . . . . . . . . . . . . . . . . . 91
Replacing and recycling supplies . . . . . . . . . . . . . . . . . . . . . . . . . . . . . . . . . . . 91
HP policy on non-HP supplies . . . . . . . . . . . . . . . . . . . . . . . . . . . . . . . . . . . . . . 92
HP fraud hotline . . . . . . . . . . . . . . . . . . . . . . . . . . . . . . . . . . . . . . . . . . . . . . . . . 92
Appendix A Service and support
Introduction . . . . . . . . . . . . . . . . . . . . . . . . . . . . . . . . . . . . . . . . . . . . . . . . . . . . . . . 93
Hewlett-Packard limited warranty statement . . . . . . . . . . . . . . . . . . . . . . . . . . . . . . 94
Limited warranty for the print cartridges and imaging drum . . . . . . . . . . . . . . . . . . 95
Availability of support and service . . . . . . . . . . . . . . . . . . . . . . . . . . . . . . . . . . . . . . 96
HP maintenance agreements . . . . . . . . . . . . . . . . . . . . . . . . . . . . . . . . . . . . . . . . . 96
On-site service agreements . . . . . . . . . . . . . . . . . . . . . . . . . . . . . . . . . . . . . . . . 96
Repacking the printer . . . . . . . . . . . . . . . . . . . . . . . . . . . . . . . . . . . . . . . . . . . . . . . 97
Appendix B Specifications and regulatory information
Introduction . . . . . . . . . . . . . . . . . . . . . . . . . . . . . . . . . . . . . . . . . . . . . . . . . . . . . . . 99
Printer specifications . . . . . . . . . . . . . . . . . . . . . . . . . . . . . . . . . . . . . . . . . . . . . . . 100
Environmental Product Stewardship program . . . . . . . . . . . . . . . . . . . . . . . . . . . . 102
Protecting the environment. . . . . . . . . . . . . . . . . . . . . . . . . . . . . . . . . . . . . . . . 102
Material safety data sheet . . . . . . . . . . . . . . . . . . . . . . . . . . . . . . . . . . . . . . . . 104
FCC regulations . . . . . . . . . . . . . . . . . . . . . . . . . . . . . . . . . . . . . . . . . . . . . . . . . . . 105
Regulatory statements . . . . . . . . . . . . . . . . . . . . . . . . . . . . . . . . . . . . . . . . . . . . . 106
Declaration of Conformity. . . . . . . . . . . . . . . . . . . . . . . . . . . . . . . . . . . . . . . . . 106
Laser safety statement . . . . . . . . . . . . . . . . . . . . . . . . . . . . . . . . . . . . . . . . . . . 107
Canadian DOC statement . . . . . . . . . . . . . . . . . . . . . . . . . . . . . . . . . . . . . . . . 107
Regulatory Model Identification Number . . . . . . . . . . . . . . . . . . . . . . . . . . . . . 107
Appendix C Print media specifications
Introduction . . . . . . . . . . . . . . . . . . . . . . . . . . . . . . . . . . . . . . . . . . . . . . . . . . . . . . 109
General guidelines . . . . . . . . . . . . . . . . . . . . . . . . . . . . . . . . . . . . . . . . . . . . . . . . . 110
Tray specifications . . . . . . . . . . . . . . . . . . . . . . . . . . . . . . . . . . . . . . . . . . . . . . . . 111
Paper and print media . . . . . . . . . . . . . . . . . . . . . . . . . . . . . . . . . . . . . . . . . . . . . . 113
Envelopes . . . . . . . . . . . . . . . . . . . . . . . . . . . . . . . . . . . . . . . . . . . . . . . . . . . . . . . 116
Labels . . . . . . . . . . . . . . . . . . . . . . . . . . . . . . . . . . . . . . . . . . . . . . . . . . . . . . . . . . 118
Grayscale transparencies . . . . . . . . . . . . . . . . . . . . . . . . . . . . . . . . . . . . . . . . . . . 118
Index
6 ENWW
Page 9

1 Printer basics
Introduction
This section provides information about the following topics:
● “Printer configurations” on page 8
● “Printer features” on page 9
● “Printer parts” on page 10
● “Software and supported operating systems” on page 14
● “Software for Windows” on page 15
● “Software for Macintosh” on page 16
● “Software tips” on page 17
● “Uninstalling the printing software” on page 18
● “Accessories and ordering information” on page 19
ENWW Chapter 1 Printer basics 7
Page 10
Printer configurations
Thank you for purchasing the HP color LaserJet 1500 series printer. This printer is available in
the configurations described below.
HP color LaserJet 1500L
The HP color LaserJet 1500L printer is a four-color laser printer that prints at 16 pages per
minute (ppm) in black and white, and 4 ppm in color.
● Trays. The printer comes with a multipurpose tray (tray 1) that holds up to 125 sheets of
various print media or 10 envelopes. Compatible with an optional 250-sheet tray (tray 2) for
standard sizes.
● Connectivity. The printer provides a universal serial bus (USB) port for connectivity. An
optional external HP Jetdirect print server is also available.
● Memory. The printer contains 16 megabytes (MB) of random access memory (RAM).
HP color LaserJet 1500
The HP color LaserJet 1500 printer comes with the features that the 1500 model provides as
well as tray 2.
8 Printer basics ENWW
Page 11

Printer features
Color printing ● Capable of laser printing in full color using the four process colors: cyan, magenta, yellow, and
black.
Fast print speed
Excellent print quality
Ease of use
Expandability
Flexible paper handling
● Prints letter-size paper at 16 ppm for black or 4 ppm for color.
● True 600 by 600 dots per inch (dpi) text and graphics.
● ImageREt2400 provides 2400 dpi color laser-class qual ity throu gh a m ul til evel printing process.
● Adjustable settings to optimize print quality.
● The HP UltraPrecise print cartridge has a finer toner formulation that provides sharper text and
graphics.
● Few supplies to order. Supplies are easy to install.
● Convenient access to printer information and settings using software tools
(HP color LaserJet 1500 toolbox).
● Optional tray 2. Included with the 1500; compatible with the 1500L model. This 250-sheet tray
for standard sizes reduces the frequency with which you have to add paper to the printer. Only
one 250-sheet tray can be installed on the printer.
● Optional external HP Jetdirect print server for connecting to a network.
● Adjustab le t ray 1 (multipurpose tra y) f or l etterhea d, en v el opes , la bels , g rayscale transpa rencie s,
custom-sized media, postcards, and heavy paper.
● Optional tray 2 (250-sheet tray) for standard-size paper.
● One 125-sheet output bin and one output door. Select the top output bin (face down) for most
jobs, including grayscale transparencies. Use the rear output door (face up) for jobs on heavy
paper, light paper, or special print media.
● Straig ht-t hrou gh pap er path ca pab ili ty from tray 1 to the rear output door .
● Manual duplexing. See “Printing on both sides (duplexing manually)” on page 41.
Interface connections
Networking
Enhanced memory
Energy savings
Economical printing
Print cartridges
● USB port.
● Optional external HP Jetdirect print server.
● All common network protocols such as Ethernet, Token Ring, and LocalTalk are available using
an optional external HP Jetdirect print server. See “External HP Jetdirect print server ” on
page 19 for a list of compatible external HP Jetdirect print servers.
● The printer comes with 16 MB of memory.
● The printer automatically conserves electricity by substantially reducing power consumption
when not printing.
● As an ENERGY STAR
meets E
NERGY STAR guidelines for energy efficiency. ENERGY STAR
®
partner, Hewlett-Packard Company has determined that this product
®
is a U.S . regist ered service
mark of the United States Environmental Protection Agency.
● Multiple pages per sheet (N-up) printing and two-sided printing using manual duplexing saves
paper. See “Printing multiple pages on one sheet of paper (N-up printing)” on page 33 and
“Printing on both sides (duplexing manually)” on page 41.
● Supplies St atus page w ith print cartridge and imag ing drum gauge s to displ a y lif e rem aining. F or
HP supplies only.
● No-shake cartridge design.
● Authentication for HP print cartridges.
● Enabled supplies ordering capability.
ENWW Chapter 1 Printer basics 9
Page 12
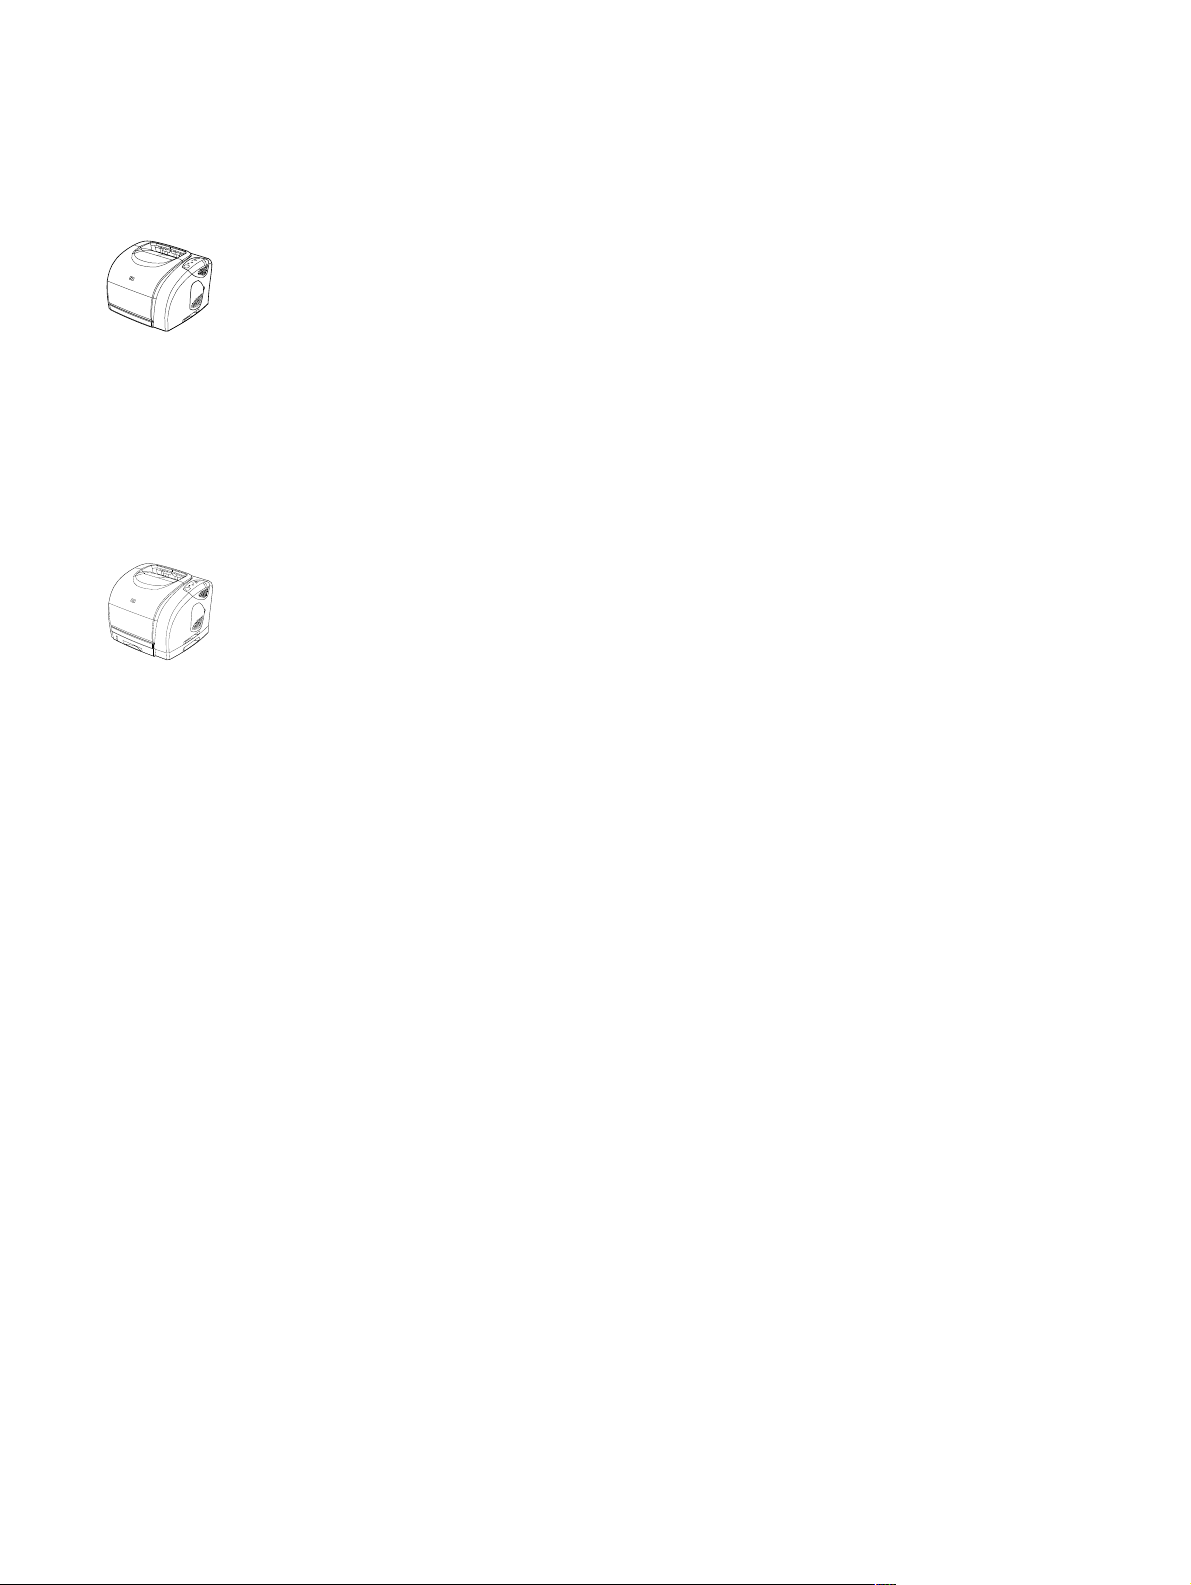
Printer parts
Before using the printer, familiarize yourself with the parts of the printer.
Control panel
Top output
bin
Top cover
Power
switch
Control
panel
USB interface
Tray 1
Optional tray 2
(1500 only)
Rear output
door
Power
connector
10 Printer basics ENWW
Page 13
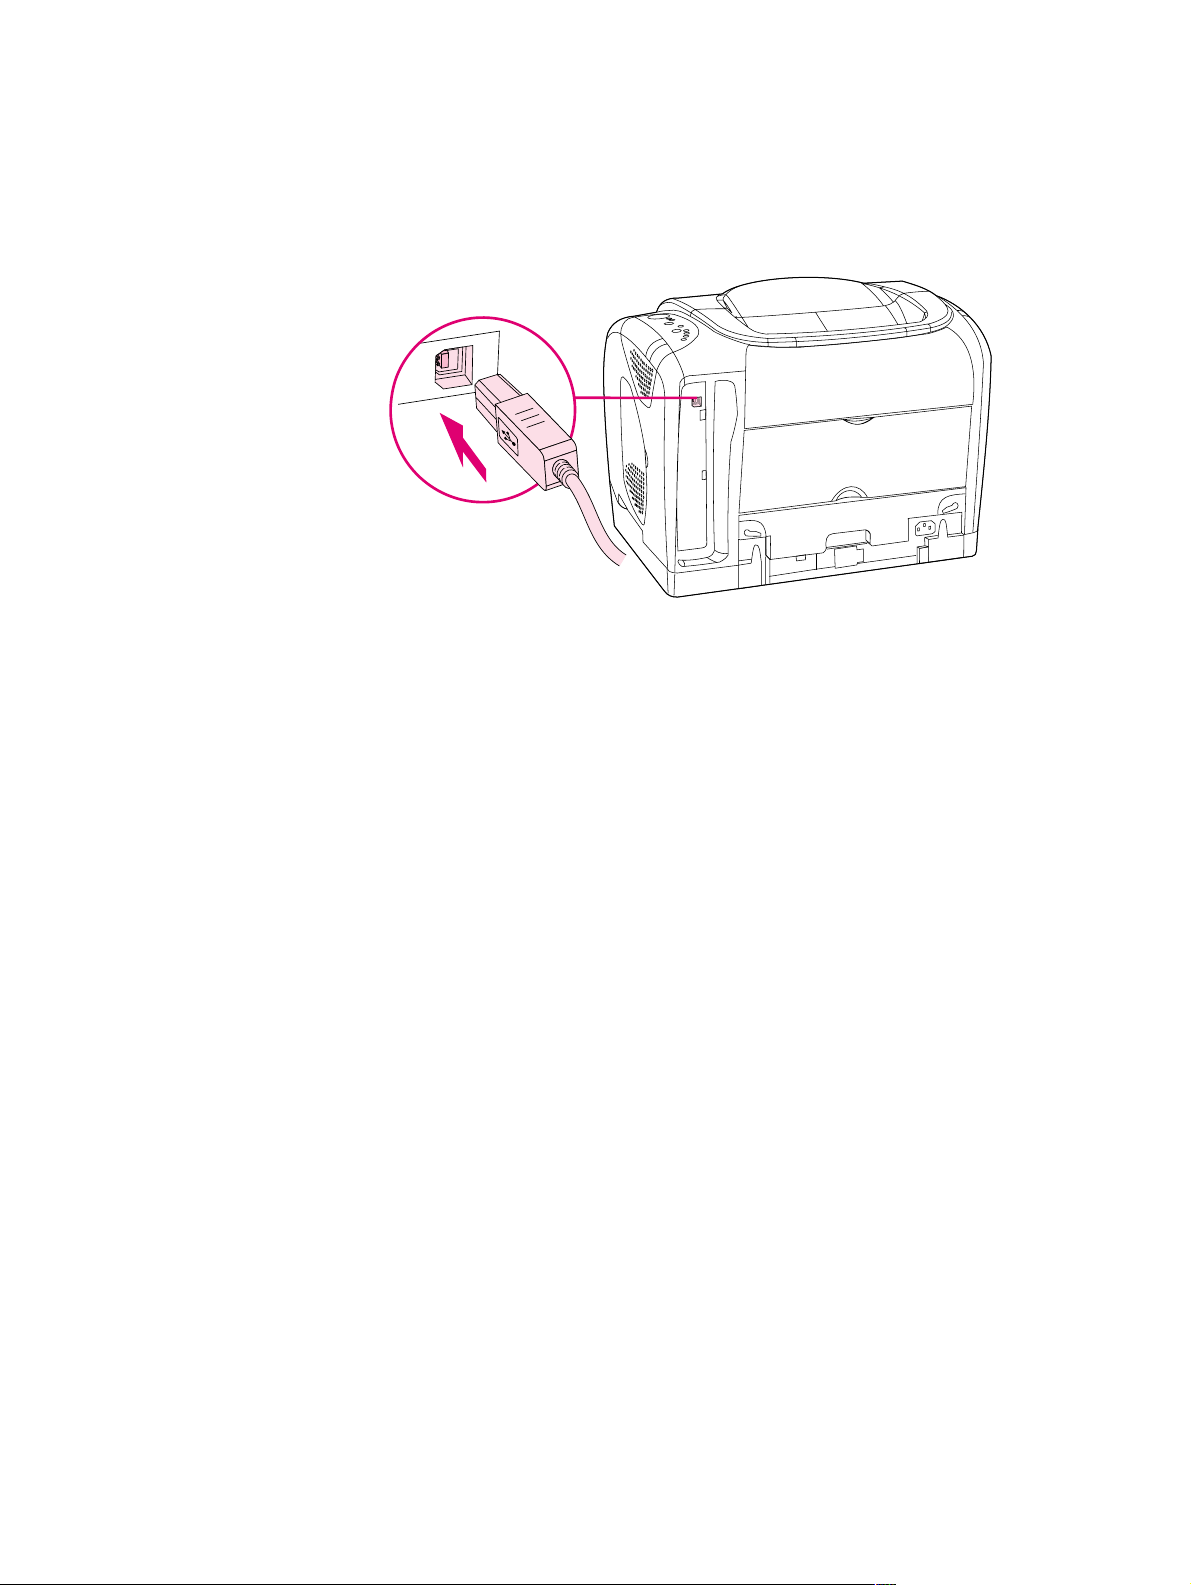
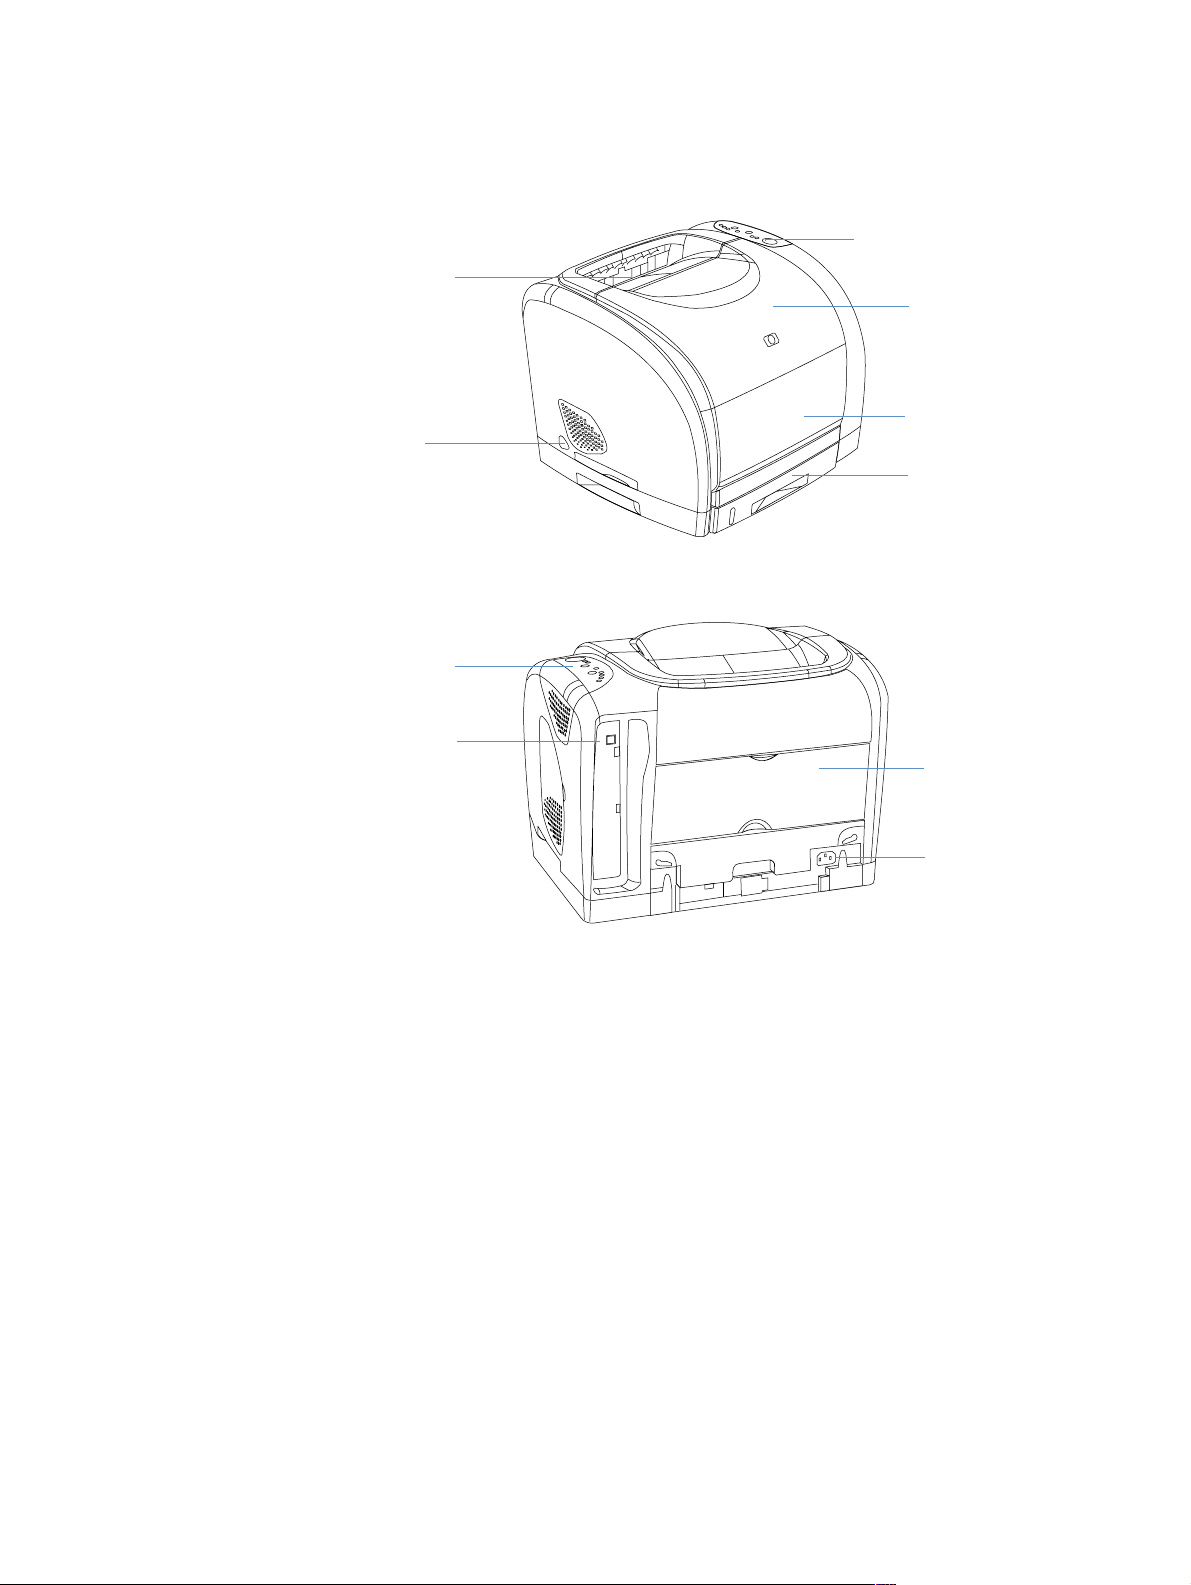
Interface port
All 1500 series printers have a USB port. An optional external HP Jetdirect print server is also
available. To order, see “Accessories and ordering information” on page 19 or contact your local
HP dealer.
USB port
ENWW Chapter 1 Printer basics 11
Page 14
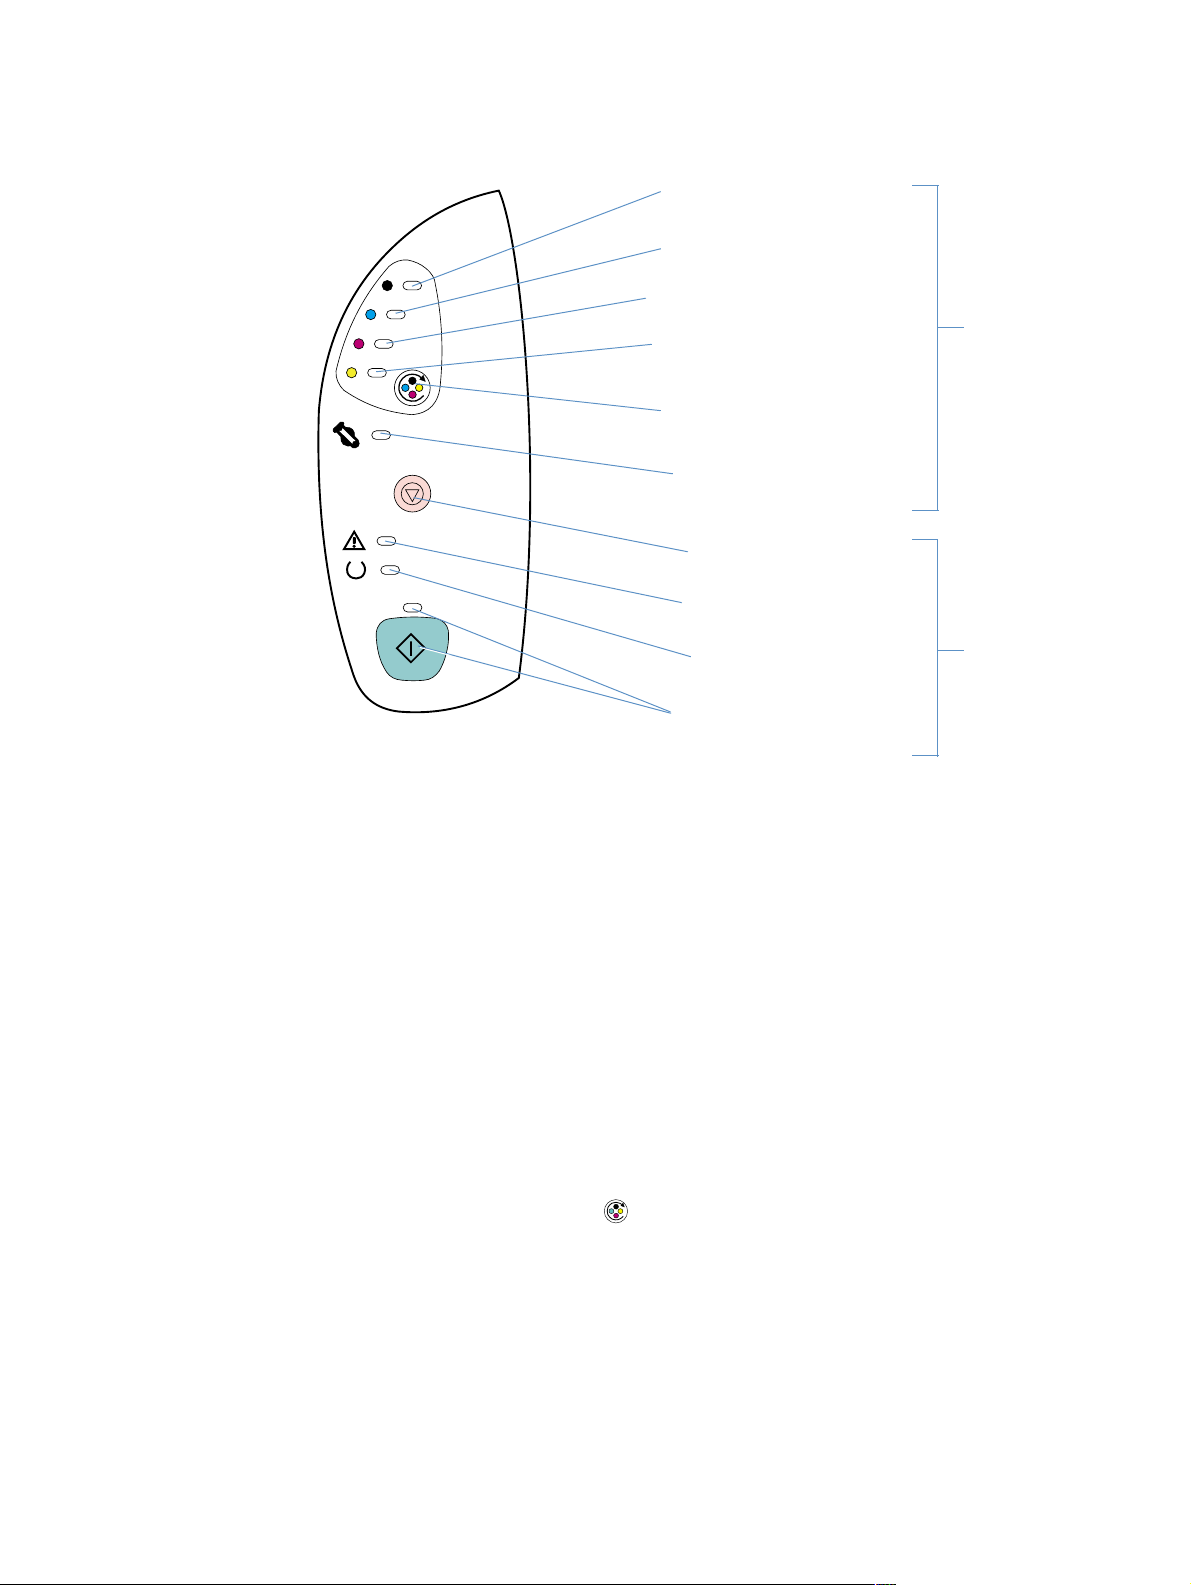
Control panel features
The printer contains the following lights and buttons on its control panel:
Black print-cartridge
light
Cyan print-cartridge
light
Magenta print-cartridge
light
Yellow print-cartridge
light
R
OTATE CAROUSEL
button
Imaging-drum
light
Supplies Status lights
and buttons
CANCEL JOB
button
Attention light
Printer Status light s
and buttons
(amber)
Ready light
(green)
Go light and
G
O button (both green)
The lights and buttons are arranged into two main groups: Supplies Status (top) and Printer
Status (bottom). T o interpret and troubleshoot control panel light messages, see “Resolving
control panel messages” on page 63.
Understanding Supplies Status
The printer contains five lights and one button to indicate and control the status of the print
cartridges and imaging drum. To interpret and troubleshoot control panel light messages, see
“Resolving control panel messages” on page 63.
Black, Cyan, Magenta, and Yellow Supplies Status lights
These lights indicate when a print cartridge is low (light is on), empty or missing (light blinks), or
the first time you install a non-HP print cartridge (light blinks and Attention light is on). These
lights will not indicate low or empty status for non-HP print cartridges.
Rotate Carousel button
When the top cover is closed, pressing (R
OTATE CAROUSEL) rotates the print-cartridge
carousel to bring the next print cartridge into the top position. The light for the print cartridge that
is approaching the top position blinks quickly two or three times.
Imaging drum light
This light indicates when the imaging drum is low (light is on) empty or missing (light blinks), or
the first time you install a non-HP imaging drum (light blinks and Attention light is on). This light
will not indicate low or empty status for non-HP imaging drums.
12 Printer basics ENWW
Page 15

Understanding Printer Status
The printer has two buttons and three lights to indicate and control the printer status. To interpret
and troubleshoot control panel light messages, see “Resolving control panel messages” on
page 63.
Cancel Job button
● When the Ready light is blinking, pressing (CANCEL JOB) cancels the current job.
● When the printer is not experiencing an error, pressing (GO) and (CANCEL JOB)
simultaneously prints a Configuration page and a Supplies Status page.
● When a Supplies Status light is blinking and the Attention light is on (indicating a non-HP
supply has been installed), pressing (C
CAUTION You will not receive any indication when a non-HP supply is empty. If you continue printing after
the supply is empty, damage to the printer can occur. See “Hewlett-Packard limited warranty
statement” on page 94.
Attention light
Generally , the Attention light blinks when the printer is out of paper, when a jam has occurred, or
when other problems that need attention occur.
The Attention light is on in conjunction and one of the Supplies Status lights is blinking the first
time a non-HP supply is installed.
Ready light
ANCEL JOB) allows you to continue printing.
The Ready light is on when the printer is ready to print (experiencing no errors that prevent
printing) and blinks when it is receiving data to be printed.
Go light and Go button
● When the Go light is on and the Attention light is blinking, pressing (GO) continues the
print job after you load paper for a manual feed or clears some errors.
● When the Go light is blinking, the top cover has been opened and then closed or you have
pressed (R
you do not press (G
OTATE CAROUSEL). Pressing (GO) returns the printer to the Ready state. If
O), the printer returns to the Ready state on its own after
approximately eight seconds.
● When the Go light is off, pressing (GO) prints a Demo page. Pressing (GO) and
(C
ANCEL JOB) simultaneously prints a Configuration page and a Supplies Status page.
ENWW Chapter 1 Printer basics 13
Page 16
Software and supported operating systems
For easy printer setup and access to the full range of printer features, HP strongly recommends
that you install the software provided. Not all software is available in all languages. See the
getting started guide for installation instructions, and see the Readme for the latest software
information.
The most recent drivers, additional drivers, and other software are available from the Internet
and other sources. If you do not have access to the Internet, see “HP Customer Care” on
page 3.
The printer comes with software for the following operating systems:
● Microsoft
(32-bit)
● Macintosh System 9.x, and OS X
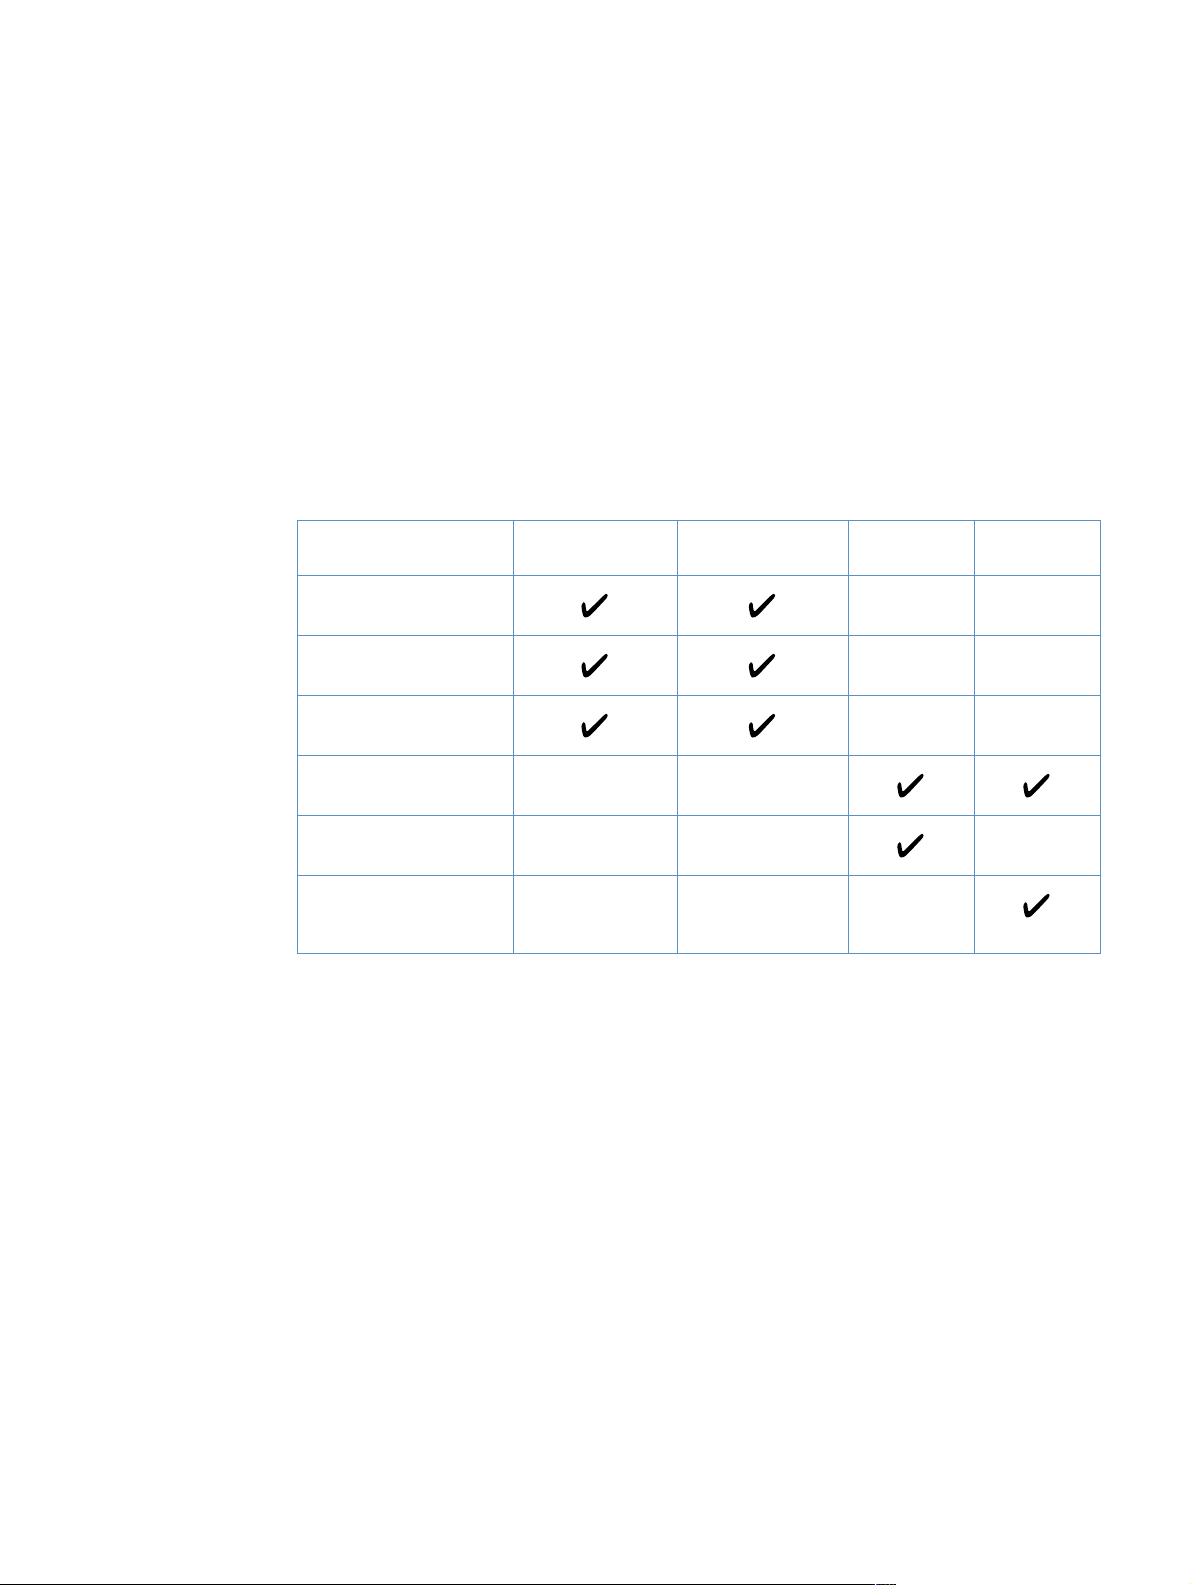
The table lists the software that is available for your operating system.
®
Windows 98, Windows 2000, Windows Millennium Edition (Me), and Windows XP
Windows 98, Me Windows 2000 and
Windows XP*
Windows Installer
HP 1500 driver
HP color LaserJet 1500
toolbox
Macintosh Installer
Macintosh printer driver
Macintosh printer driver
and printer dialog
extensions (PDEs)
* XP refers to 32-bit. The 64-bit XP only receives the Unidriver.
Macintosh
OS 9.x
Macintosh
OS X
14 Printer basics ENWW
Page 17

Software for Windows
When you install the software for Windows, you can directly connect the printer to a computer
using a USB cable or you can connect the printer to the network using an optional external
HP Jetdirect print server. Different software is available depending on the type of installation you
chose. See the getting started guide for installation instructions, and see the Readme for latest
software information.
The following software is available to all users of the printer, whether you connected the printer
directly to a computer using a USB cable, or whether you connected the printer to the network
using an optional external HP Jetdirect print server.
Printer drivers
A printer driver is a software component that provides access to printer features and provides the
means for the computer to communicate with the printer. For help using your printer driver, see
“Gaining access to printer driver settings” on page 30.
Using Help
The printer driver has Help dialog boxes that can be activated from the Help button in the print er
driver, the F1 key on the computer keyboard, or the question mark symbol (?) in the upper-right
corner of the printer driver. These Help dialog bo xes give det a il e d information about the sp ec if ic
printer driver. Help for the printer driver is separate from the Help for your program.
HP color LaserJet 1500 toolbox
The HP color LaserJet 1500 toolbox provides links to printer status information and help
information, such as this user guide; and tools for diagnosing and solving problems. Y ou can also
view explanations and animations of light messages on the control panel. See “Managing the
printer” on page 49 for more information.
Note You must have performed a complete software installation in order to use the
HP color LaserJet 1500 toolbox.
ENWW Chapter 1 Printer basics 15
Page 18

Software for Macintosh
The printer includes the following software for Macintosh computers.
Mac OS 9.x and Mac OS X classic
An installation program for the printer driver is provided on the HP color LaserJet 1500 CD-ROM.
Mac OS X (PDEs)
PDEs are code plug-ins that provide access to printer features, such as number of copies,
duplexing, and quality settings. An installation program for the printer driver and PDEs is
provided on the HP color LaserJet 1500 CD-ROM.
16 Printer basics ENWW
Page 19

Software tips
How do I gain access to printer features?
Printer features are available in the printer driver . Some features such as custom paper sizes and
page orientation might also be available in the program you are using to create a file. Change
settings in the program, if possible, because changes made in the program override changes
made in the printer driver.
Gain access to advanced printer features from the printer driver (or the Print dialog box for
Macintosh). See “Gaining access to printer driver settings” on page 30 for help with specific
printer-driver features.
How do I get the latest printing software?
When you want to check for and install upgrades to the printing software, you can download
drivers from the World Wide Web or HP’s FTP servers.
To download drivers
1 Visit http://www.hp.com, and click Drivers.
2 Under the HP Drivers section, click HP.
3 Type color laserjet 1500 as the product name, and then click to see a list of
available drivers. The Web page for the drivers might be in English, but you can download
the drivers themselves in several languages.
If you do not have Internet access, contact HP Customer Care. (See “HP Customer Care” on
page 3 or the flyer that came in the printer box.) See the Readme file for additional release
information.
What other software is available?
See the Readme file provided on the HP color LaserJet 1500 CD for additional software included
and for supported languages.
ENWW Chapter 1 Printer basics 17
Page 20

Uninstalling the printing software
Uninstall software using the directions below for your operating system.
Uninstalling software for Windows
The printer comes with an uninstall utility that you can use to select and remove any or all of the
Windows HP printing system components from your computer.
Note T o uninstall the software from Windows 2000 or XP, you must log on with administrator privileges.
1 Close all open programs.
For Windows 98 and Me:
a Press C
b Select a program except Explorer or Systray and click End Task.
c Repeat step b until all programs except Explorer and Systray are closed.
For Windows 2000 and XP:
a Press C
b Click Task Manager and then click the Applications tab.
c Select a program and click End Task.
d Repeat step c until all programs are closed.
2 On the Start menu, point to Programs, point to HP color LaserJet 1500, point to Tools,
and click Uninstall.
3 Click Next, select the HP printing system components that you want to uninstall, and click
OK.
4 Follow the directions on the screen. When the message “The following file is a shared file but
is not used by any other programs. Would you like to delete it?” appears, click Yes to All. The
system finishes removing files.
5 If prompted to restart the computer, click OK.
TRL+ALT+DELETE. The Close Program dialog box opens.
TRL+ALT+DELETE. The Windows NT Security dialog box opens.
Uninstalling software for Macintosh
To remove the printing software from your Macintosh, drag the HP LaserJet files to the Trash. If
you are using Mac OS X, you must also drag the PDEs to the Trash.
For Mac OS 9.x: The driver files are located in:
Macintosh HD\System Folder\Extensions\Printer Descriptions.
For Mac OS X: The driver files are located in:
Macintosh HD\Library\Printers\PPDs\Contents\Resources\<lang>.lproj.
For Mac OS X: The PDEs are located in:
Macintosh HD\Library\Printers\PPD Plugins\hp*
18 Printer basics ENWW
Page 21

Accessories and ordering information
The following list of accessories was current at the time of printing. Ordering information and
availability of the accessories might change during the life of the printer. For the most current
ordering information, visit http://www.hp.com
Supplies, and Accessories, and then click Printing and Digital Imaging.
Option Description or use Part number
Supplies
Black print cartridge Life of 5,000 pages at 5% coverage C9700A
Cyan print cartridge Life of 4,000 pages at 5% coverage C9701A
Yellow print cartridge Life of 4,000 pages at 5% coverage C9702A
Magenta print cartridge Life of 4,000 pages at 5% coverage C9703A
Imaging drum Imaging drum life is 20,000 pages if printing black only; 5,000
Cable and interface accessories
External HP Jetdirect print
server
Wireless (802.11b) Jetdirect
print server
USB cable 2-meter standard USB-compatible device connector C6518A
Paper handling accessories
Optional tray 2 250-sheet input tray for letter and A4 sizes. Only one
Paper and other print media
HP LaserJet paper Premium HP-brand paper for use with HP LaserJet printers. HPJ1124 (letter)
HP Premium Choice paper HP bond paper with a weight of 120.32 g/m
HP Printing paper HP-brand paper for use with HP LaserJet printers. HPP1122 (letter)
HP Multipurpose paper HP-brand paper for a variety of uses. HPM1120 (letter)
HP LaserJet Tough paper Robust paper with a satin finish. Paper will not tear and will
Grayscale transparencies The printer supports printing in grayscale on grayscale or
Extended service packs
User-replaceable parts
Fuser Replace when print-quality issues remain after you have
Separation pad and pick-up
rollers
pages if printing in color. Approximate life is 6,000 to 8,000
pages.
External HP Jetdirect print servers
● HP Jetdirect 175x J6035A
● HP Jetdirect 310x J6038A
● HP Jetdirect 380x J6061A
250-sheet tray can be installed.
Note: This tray is included with the 1500 model.
withstand the weather. For documents requiring durability
and longevity.
color transparencies. Grayscale transparencies are usually
less expensive.
Contact HP Customer Care for availability and for ordering.
cleaned the engine and tried all troubleshooting measures.
(See “Cleaning the printer” on page 88 and “Solving print-
quality problems” on page 71.)
Replace when the printer is picking up multiple sheets or no
sheets. Trying different paper did not resolve the problem.
, clic k Products & Services, click Options,
C9704A
C9698A
CHP310 (A4)
HPJ1424 (legal)
2
(32 lb.) HPU1132 (letter)
CHP410 (A4)
CHP210 (A4)
HPM1420 (legal)
Q1298A (letter)
Q1298B (A4)
92296T (letter)
92296U (A4)
Contact HP Customer Care
to order parts.
Contact HP Customer Care
to order parts.
ENWW Chapter 1 Printer basics 19
Page 22

Option Description or use Part number
Supplementary Documentation
HP LaserJet Printer Family Print
Media Guide
HP color LaserJet 1500 series
printer user guide
HP color LaserJet 1500 series
printers CD-ROM
A guide to using paper and other print media with
5963-7863
HP LaserJet printers.
A printed copy of this user guide.
● English Q2488-90907
● Chinese, simplified Q2488-90924
● Chinese, traditional Q2488-90923
● Czech Q2488-90920
● Danish Q2488-90914
● Dutch Q2488-90913
● Finnish Q2488-90915
● French Q2488-90908
● German Q2488-90910
● Italian Q2488-90909
● Korean Q2488-90922
● Norwegian Q2488-90916
● Portuguese, Brazilian Q2488-90912
● Polish Q2488-90919
● Russian Q2488-90918
● Spanish, Castilian Q2488-90911
● Swedish Q2488-90917
● Turkish Q2488-90921
Visit http://www.hp.com/support/clj1500
to find the CD-ROM part number.
20 Printer basics ENWW
Page 23

2 Printing tasks
Introduction
This section provides information about common printing tasks.
● “Choosing paper and other print media” on page 22
● “Loading trays” on page 25
● “Printing a job” on page 27
● “Choosing an output location” on page 35
● “Printing on special print media” on page 36
● “Printing on both sides (duplexing manually)” on page 41
● “Canceling a print job” on page 42
● “Using color” on page 43
For information about managing the printer and its settings using the HP color LaserJet 1500
toolbox see “Managing the printer” on page 49.
ENWW Chapter 2 Printing tasks 21
Page 24

Choosing paper and other print media
The printer models come with input trays as specified below.
● The 1500L comes with one input tray (tray 1). You can add one optional tray 2 (250-sheets).
● The 1500 model comes with two input trays (tray 1 and tray 2) standard.
Because tray 2 is not included for both models, it will be referred to as optional tray 2 in this
documentation.
By default, the printer draws first from tray 1. If tray 1 is empty, the printer draws from optional
tray 2.
Tray 1
Optional tray 2
22 Printing tasks ENWW
Page 25

Supported print media for tray 1
Tray 1 holds up to 125 sheets of paper or up to 10 envelopes. See “Loading tray 1” on page 25.
Supported sizes
Tray 1 adjusts for sizes from 76 by 127 mm (3 by 5 inches) to a legal-size sheet of 216 by 356
mm (8.5 by 14 inches).
See “Tray specifications” on page 111 for specific dimensions.
Supported types
Tray 1 supports these types of print media.
● Various types and weights of paper, including weights ranging from 60 to 177 g/m
47 lb).
● Envelopes. See “Printing on envelopes” on page 36.
● Labels. See “Printing on labels” on page 37.
● Grayscale transparencies. See “Printing on grayscale transparencies” on page 38.
● Custom-sized print media or cardstoc k. See “Printing on custom-sized print media or
cardstock” on page 39.
● Postcards. See “Printing on custom-sized print media or cardstock” on page 39.
See “Print media spe cifications” on page 109 for specific types and weights.
2
(16 to
Supported print media for optional tray 2
Optional tray 2 holds up to 250 sheets of paper. See “Loading optional tray 2” on page 26.
CAUTION Load only paper in optional tray 2. Other types of print media, such as labels or grayscale
transparencies, might jam if printed from optional tray 2.
Supported sizes
● A4
● A5
● B5 (ISO and JIS)
● Letter
● Legal
● Executive
● 8.5 by 13 inches
See “Tray specifications” on page 111 for specific dimensions.
Supported types
● Various types of paper of average weight (60 to 105 g/m
● Letterhead
● Prepunched paper
● Preprinted forms
2
, or 16 to 28 lb)
See “Print media spe cifications” on page 109 for specific types and weights.
ENWW Chapter 2 Printing tasks 23
Page 26

Purchasing paper and other print media
You can print on a variety of print media, such as heavy or light paper, envelopes, labels, and
custom-sized print media from tray 1. You can print on standard-weight paper from any tray . You
can also print to paper that has up to 100 percent recycled fiber content. Properties such as
weight, grain, and moisture content are important factors affecting printer performance and
output quality. To achieve the best possible print quality, use only high-quality paper intended for
color laser printers.
See “Print media specifications” on page 109 for more details.
Always test a sample of paper before purchasing large quantities. Your paper supplier should
understand the requirements specified in the HP LaserJet Printer Family Print Media Guide. See
“Print media specifications” on page 109 for more information. For ordering information, see
“Supplementary Documentation” on page 20, or visit http://www.hp.com/ljsupplies
.
24 Printing tasks ENWW
Page 27
Loading trays
Load special print media, such as envelopes, labels, and grayscale transparencies, in tray 1 only.
Load only paper in optional tray 2.
1
2
3
4
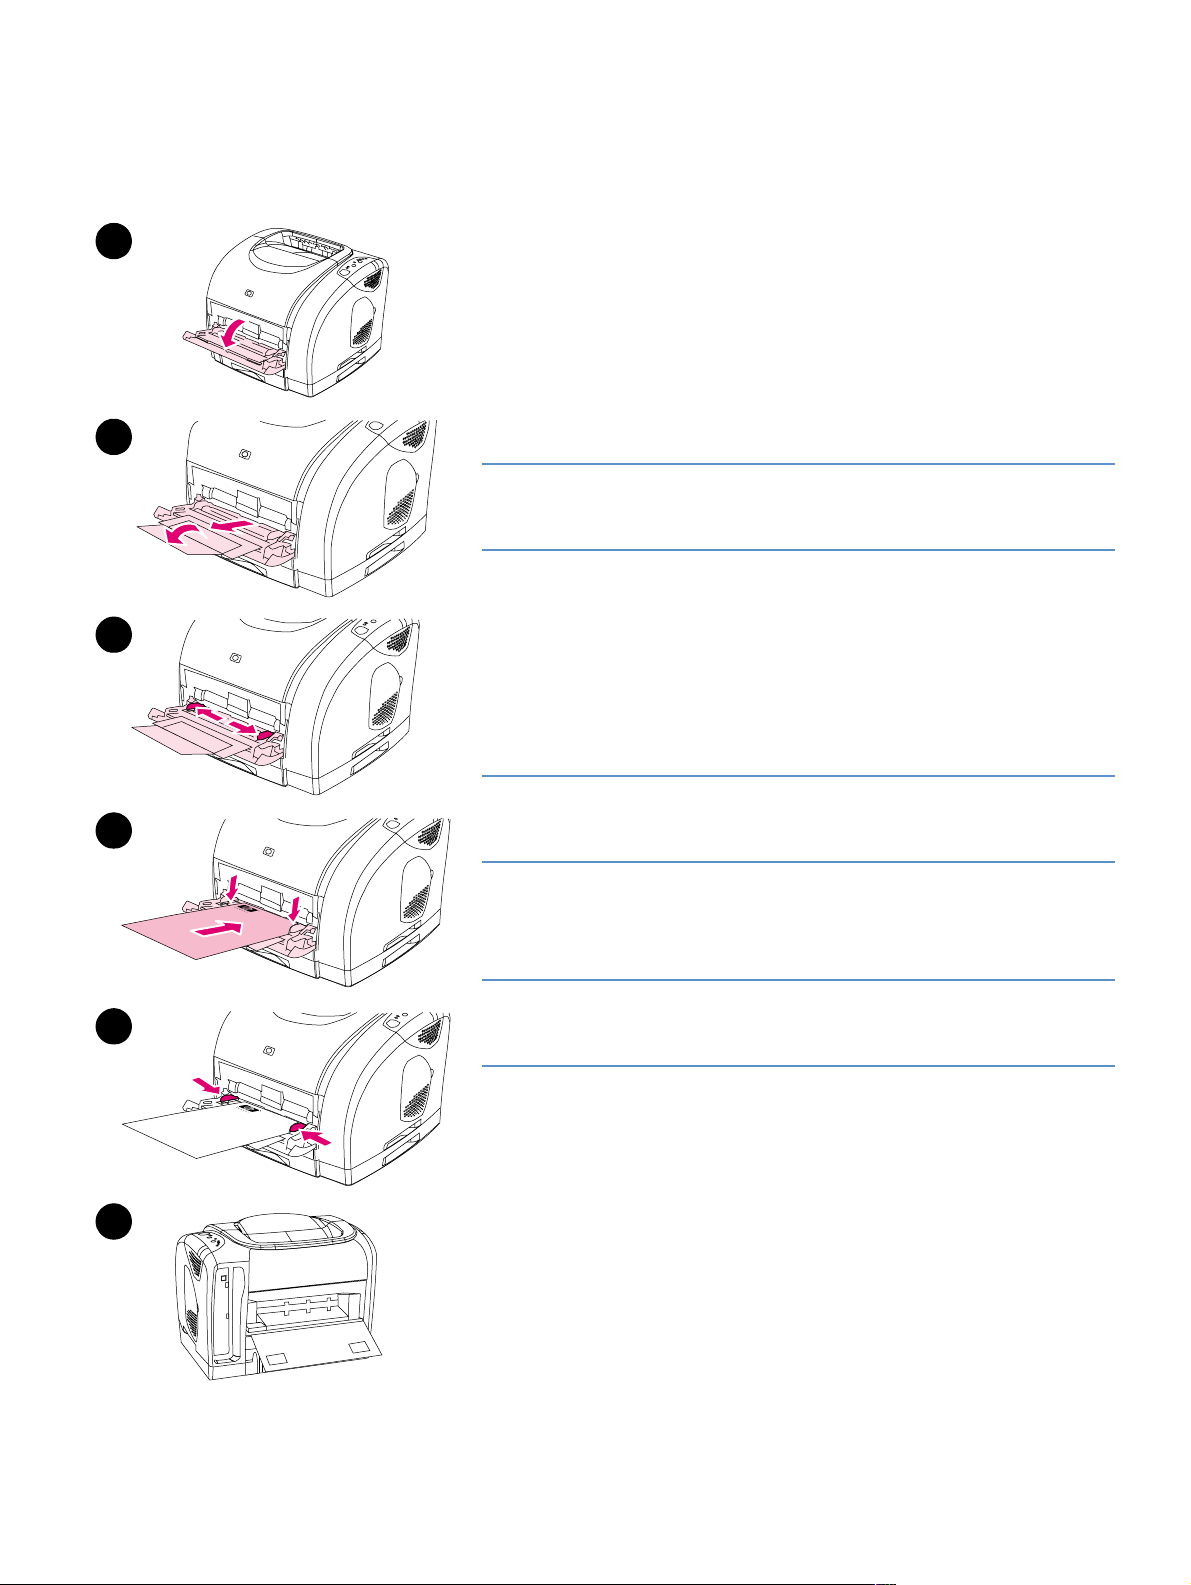
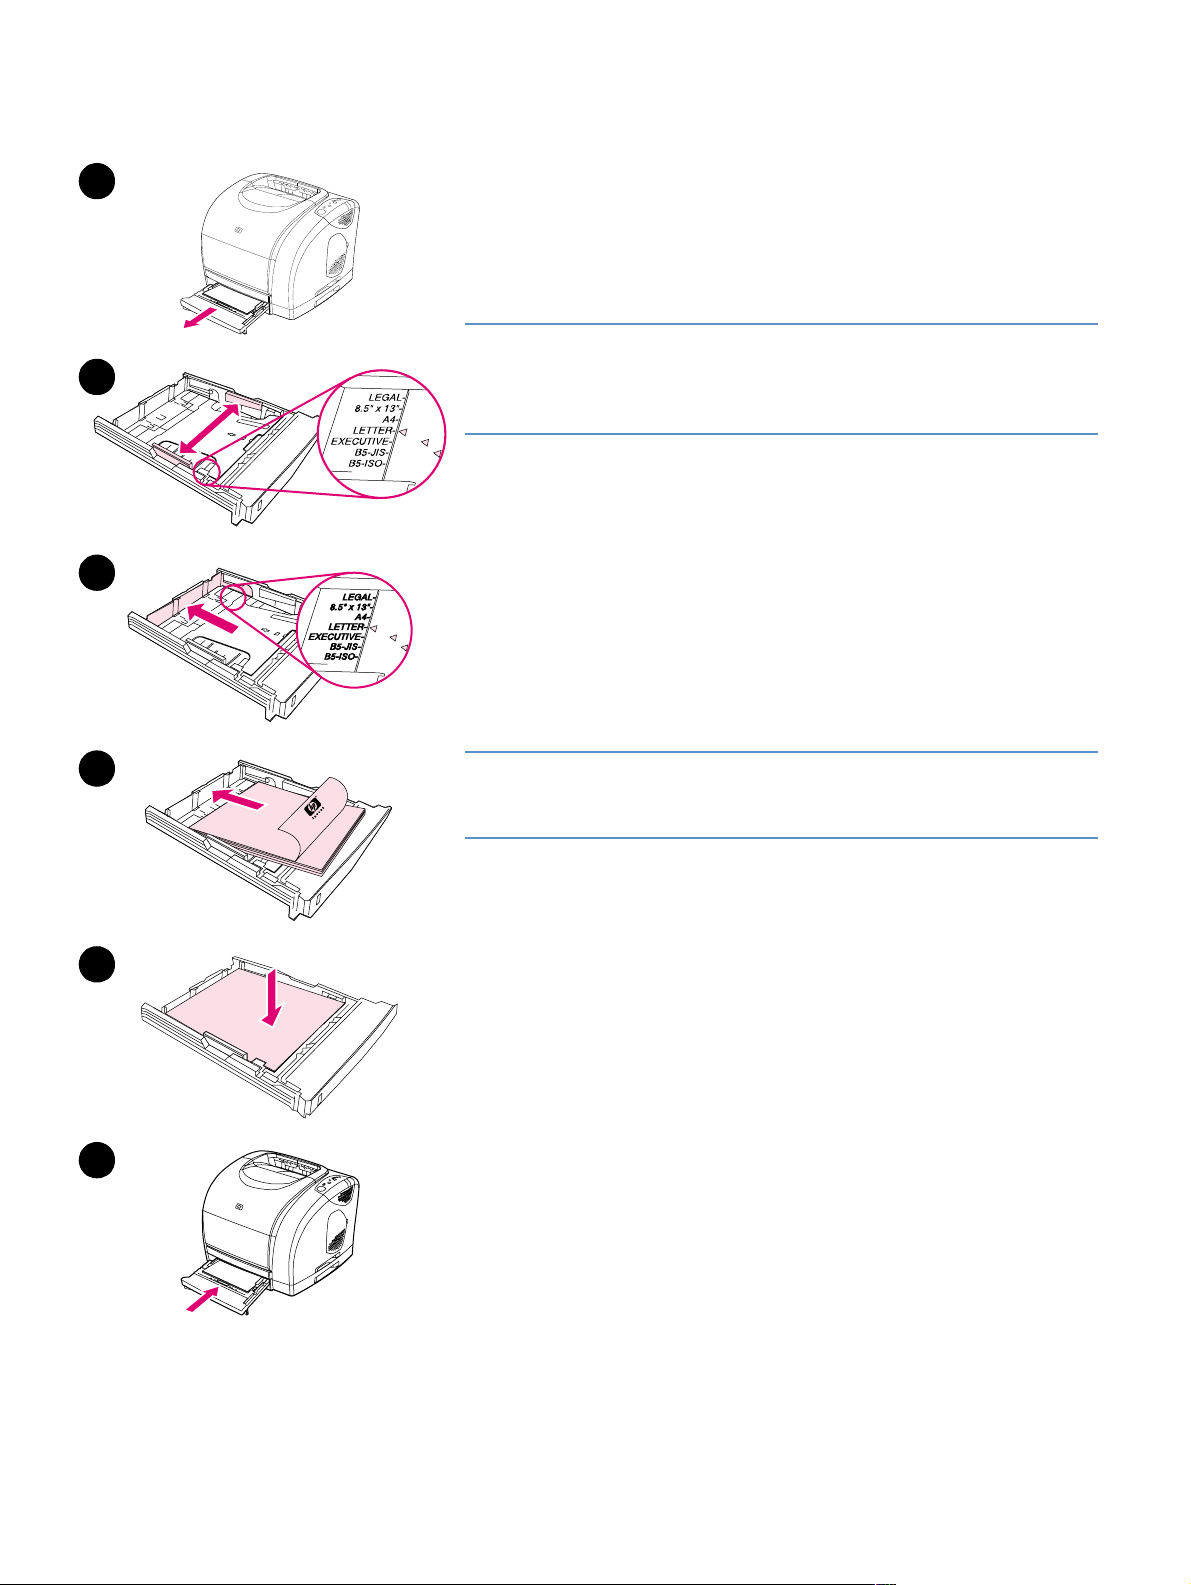
Loading tray 1
Tray 1 (the multipurpose tray) holds up to 125 sheets of paper or other
print media, or up to 10 envelopes.
For information about loading special print media such as labels and
grayscale transparencies, see “Printing on special print media” on
page 36.
To load tray 1
CAUTION
Avoid adding print media to tray 1 while the printer is printing, or jams
can occur.
1 Open tray 1.
2 Slide out the tray extender. If the print media being loaded is longer
than 229 mm (9 inches), also open the additional tray extender.
3 Slide the width guides slightly wider than the print media.
4 Place print media into the tray with the side to be printed up, and the
top, short edge in first.
Note
If you are manually duplexing, see “Printing on both sides (dup lexing
manually)” on page 41 for loading instructions.
5
6
5 Slide the paper width guides inward until they lightly touch the print
media stack on both sides without bending it. Make sure the print
media fits under the tabs on the width guides.
CAUTION
Wait for the printer to finish printing before closing tray 1 (optional).
Closing the tray before the printer finishes can cause jams.
6 On the back of the printer, lower the rear output door if you are
printing on special media, such as labels, envelopes, or heavy or
light paper, to prevent curl.
ENWW Chapter 2 Printing tasks 25
Page 28
1
2
3
Loading optional tray 2
Optional tray 2 supports standard-size paper only. Paper includes
average-weight letterhead and prepunched paper. For additional
information about letterhead and prepunched paper, see “Printing on
letterhead or preprinted forms” on page 40.
CAUTION
Print special print media such as labels and grayscale transparencies
from tray 1 only. Printing special print media from optional tray 2 can
cause jams.
To load optional tray 2
1 Pull optional tray 2 out of the printer and remove any paper.
2 Move the side width guides to match the size of paper you are
loading.
3 Extend the rear of the tray until the arrow on the markings points to
the size you are loading.
4 Load the paper. If this is special paper such as letterhead, load it
with the side to be printed down and the top edge toward the front of
the tray.
4
5
6
Note
If you are manually duplexing, see “Printing on both sides (duplexing
manually)” on page 41 for loading instructions.
5 Make sure the stack of paper is flat in the tray at all four corners,
and keep it below the height tabs on the paper length guide in the
rear of the tray. Push down on the metal paper lift plate to lock it into
place.
6 Slide the tray back into the printer. If you set the rear of the tray to
one of the longer sizes, the back of the tray will protrude from the
back of the printer.
26 Printing tasks ENWW
Page 29

Printing a job
This section provides basic printing instructions. When making changes to printing settings,
there is a hierarchy to how changes are prioritized. (Note that the names of commands and
dialog boxes might vary depending on your program.)
● “Page Setup” dialog box. This dialog box opens when you click Page Setup or a similar
● “Print” dialog box. This dialog box opens when you click Print, Print Setup, or a similar
● Printer driver. The printer driver opens when you click Properties in the Print dialog box.
About printing by Source versus by Type or Size
Three settings affect how the printer driver tries to pull paper when you send a print job. These
settings, Source, Type, and Size, appear in your program Page Setup dialog box, the Print
dialog box, or the printer driver. The printer automatically selects a tray if you do not change
these settings. If you do want to change these settings, you can print by Source, by Type, by
Size, or by Type and Size. (For Macintosh, types and sizes are both available from the Paper
pop-up menu.)
command on the File menu. This dialog box is part of the program in which you are working.
Settings changed here override settings changed anywhere else.
command on the File menu. It is also part of the program, but it has a lower priority than the
Page Setup dialog box. Settings changed in the Print dialog box do not override settings
changed in the Page Setup dialog box. Settings changed here do override settings changed
in the printer driver.
Settings changed here do not override settings changed anywhere else. (For Macintosh, the
printer driver settings are integrated into the Print dialog box.)
● Source. Printing by Source means you choose a specific tray from which you want the printer
to pull paper. The printer tries to print from this tray, no matter what type or size is loaded in
it. However, if you choose a tray that is configured from the HP color LaserJet 1500 toolbox
for a type or size that does not match your print job, the printer does not print automatically.
Instead, it waits for you to load the tray you chose with the type or size of print media for your
print job. If you load the tray, the printer begins printing. (If it does not begin, you might need
to configure the tray to match the size or type of the print job.) Or, press (G
O) to have the
printer try to print from another tray.
● Type or Size. Printing by Type or Size means you want the printer to pull paper or print media
from the first tray that is loaded with the type or size that you choose. Always pri nt b y Type f or
special print media such as labels or grayscale transparencies.
• If you want to print by Type or Size and the trays have not been configured for a certain
type or size from the HP color LaserJet 1500 toolbox, load the paper or print media into
tray 1 and then select the Type or Size from the Page Setup dialog box, the Print dialog
box, or the printer driver.
• If y ou often print on a certain type or size of media, the printer administrator (for a network
printer) or you (for a directly connected printer) can use the
HP color LaserJet 1500 toolbox to configure a tray for that type or size. (See “Settings
tab” on page 54.) Then, when you choose that Type or Size as you print a job, the printer
pulls from the tray configured for that type or size.
ENWW Chapter 2 Printing tasks 27
Page 30

To print from Windows
1 Make sure paper is loaded in the printer.
2 On the File menu, click Page S etu p or a similar command. Ensure that the settings are
correct for this document.
3 From the File menu, click Print, Print Setup, or a similar command. The Print dialog box
opens.
4 Select this printer and change any settings that you need. Do not change any settings, such
as page size or orientation, that you set in the Page Setup dialog box.
5 If this print job is for a standard size and weight of paper, you probably do not need to change
the Source is (tray), Type is, or Size is settings, and you can go to step 7. Otherwise, go to
the next step.
6 If this print job is to be printed on a non-standard size or weight of paper, choose how the
printer selects paper.
• To print by Source (tray), select the tray in the Print dialog box, if possible.
• To print by Source (tray) when this setting is not available in the Print dialog box, click
Properties and on the Paper tab, select the tray in the Source is field.
• To print by Type or Size, click Properties and on the Paper tab, select type or size in the
Type is or Size is field. (For some paper such as letterhead, you will set both the Type
and Size.) Always print by Type for special print media such as labels or grayscale
transparencies.
7 If you have not yet done so, click Properties. The printer driver opens.
8 On the various tabs, set any settings that you want that did not appear in the Page Setup or
Print dialog box. For more information about printer-driver settings, see “Features in the
printer driver” on page 31.
9 By default, the printer prints to the top output bin, which is the best location for most print
jobs, including grayscale transparencies. For labels, heavy paper, or other special print
media, lower the rear output door on the printer.
10 Select the Print command to print the job.
28 Printing tasks ENWW
Page 31

To print from Macintosh
1 Make sure paper is loaded in the printer.
2 On the File menu, click Page Setup.
3 Make sure that this printer is selected in the Format for pop-up menu.
4 Select the size of paper onto which you are printing.
5 Select the Orientation and Scale, if necessary, and click OK.
6 On the File menu, click Print.
7 Select the Source (tray) from which you want to print or select the Type of media onto which
you want to print in one of these ways. Alw ays print by Type for special print media such as
labels or grayscale transparencies.
• Mac OS 9.x: On the General pop-up menu, select the tray or type of media from the
Page Source pop-up menu.
• Mac OS X: On the Paper pop-up menu, select the tray or type of media.
8 Set any other settings you want, such as watermarks. (For more information, see “Gaining
access to printer driver settings” on page 30.)
9 By default, the printer will print to the top output bin, which is the best location for most print
jobs, including grayscale transparencies. For labels, heavy paper, or other jobs requiring a
straight-through path, lower the rear output door on the printer.
10 Select the Print command to print the job.
ENWW Chapter 2 Printing tasks 29
Page 32

Gaining access to printer driver settings
This section lists the common printing features that are controlled through the printer driver. (The
printer driver is the software component you use to send print jobs to the printer.) You can
change settings temporarily for the print jobs that you print while the program is still open. You
can also make permanent changes to the default settings that will be in effect now and in the
future.
Operating System Temporarily change settings for
jobs printed now
Windows 98, 2000,
Me, XP (32-bit)
Mac OS 9.x On the File menu, click Print. Change
Mac OS X On the File menu, click Print. Change
* Access to default printer settings might be restricted and therefore unavailable.
From the File menu, click Print, select this
printer, and then click Properties. (The
actual steps can vary; this is the most
common method.)
settings that you want on the various popup menus.
settings that you want on the various popup menus.
Using the printer-driver Help (Windows only)
Once you are in the printer driver, you can use its Help, which is separate from the Help in a
program. You can activate Help for the printer driver in two ways.
Permanently change default settings*
Click Start, point to Settings, and then click Printers or
Printers and Faxes. Right-click the printer icon, and
choose Properties. Many features are available by
choosing the Printing Pre f erenc es c omma nd (2000 and
XP) instead.
On the File menu, click Print. As you change settings on
a pop-up menu, click Save Settings.
On the File menu, click Print. Change settings that you
want on the various pop-up m enu s, and then on the main
pop-up menu, click Save Custom Settings. These
settings are saved as the Custom option. To use the new
settings, you must select the Custom option every time
you open a program and print.
● Click the Help button anywhere it appears in the printer driver. The Help windows give
detailed information about the specific printer driver in use.
● When you see a , click it to view information regarding the field, option, or button that the
i
bubble adjoins.
30 Printing tasks ENWW
Page 33

Features in the printer driver
Some printer drivers and some operating systems do not support all printer features.
● Selecting a Source
● Selecting a Type or Size
● Setting a custom paper size
● Printing in grayscale
● Changing color settings
● Creating and using watermarks
● Printing multiple pages on one sheet of paper
(N-up printing)
● Creating and using Quick Sets
● Reducing or enlarging
● Printing on different paper for the first page
● Restoring default printer-driver settings
For manual duplexing, see “Printing on both sides (duplexing manually)” on page 41.
Selecting a Source
You can print by Source (tray) or by Type or Size. To print by Source, follow these steps. For more
information, see “About printing by Source versus by Type or Size” on page 27. For Macintosh,
types and sizes are all grouped together under the Paper pop-up menu.
● Windows: From the Print dialog box in your program, select the Source (tray), if possible.
Otherwise, choose a tray from the Source is field from the Paper tab in your printer driver.
● Mac OS 9.x: From the Print dialog box, choose a tray from the Paper Source pop-up menu
on the General pop-up menu.
● Mac OS X: From the Print dialog box, select the tray or type of media from the Paper pop-up
menu.
Selecting a Type or Size
You can print by Source (tray) or by Type or Size. If you are printing to special print media, such
as heavy paper, it is important to print by Type to achieve good results. To print by Type or Size,
follow these steps. For more information, see “About printing by Source versus by Type or Size”
on page 27. For Macintosh, types and sizes are all grouped together under the Paper pop-up
menu.
● Windows: From the printer driver, choose a type in the Type is field of the Paper tab. Or,
choose a size from the Size is field. For some paper, such as letterhead, you will choose a
type and size.
● Mac OS 9.x: From the Print dialog box, choose a type from the Paper pop-up menu on the
General pop-up menu.
● Mac OS X: From the Print dialog box, select the tray or type of media from the Paper pop-up
menu.
ENWW Chapter 2 Printing tasks 31
Page 34

Setting a custom paper size
Use the Custom Paper feature to set up the printer to print to sizes other than standard ones.
● Windows: Try to set this setting from one of these locations, in this order: the Page Setup
dialog box in the program, the Print dialog box in the program, or the Paper tab in the printer
driver.
● Mac OS: Gain access to Custom Paper features from the Page Setup dialog box. From the
Page Attributes pop-up menu, select Custom Page Size.
Note Mac OS X does not support selecting a custom paper size.
Printing in grayscale
If you have a document that you created in color, it will automatically print in color. Or, you can
set the printer to print a color document in grayscale (black and white) only.
● Windows: Select the Print In Grayscale option on the Color tab of the printer driver.
● Mac OS: In the Print dialog box, select the Color pop-up menu and then select Print in
Grayscale.
Changing color settings
When you are printing in color, the printer driver automatically sets the optimal color settings for
you. Howev e r, you can manually make adjustments to how the printer prints in color for text,
graphics, and photographs. See “Using color ” on page 43 for more information.
● Windows: On the Color tab of the printer driver, click Options.
● Mac OS: In the Print dialog box, select the Color pop-up menu and change the settings of
the various color attributes.
Creating and using watermarks
The Watermark options allow you to specify that text be placed “underneath” (in the background
of) an existing document. For example, you might want to have large gray letters reading “draft”
or “confidential” placed diagonally across the first page or all pages of a document. You can
change color, position, and wording of the watermark.
Note If you are using Windows 2000 or XP, you must have Administrator privileges to create
watermarks. Y ou do not need Administrator privileges to add existing watermarks to documents.
● Windows: Gain access to the Watermark options from the Effects tab in your printer driver.
● Mac OS 9.x: Gain access to the Watermark options from the watermark/overlay pull-down
menu in the Print dialog box.
32 Printing tasks ENWW
Page 35

Printing multiple pages on one sheet of paper (N-up printing)
N-up printing is the ability to print multiple pages on one sheet of paper. The pages will appear
decreased in size. You can specify up to sixteen pages per sheet, and they will be arranged on
the sheet as shown below if you use the default arrangement. You can also choose whether a
border appears around each page or not.
● Windows: Gain access to Pages per Sheet on the Finishing tab in the printer driver.
● Mac OS: Gain access to Pages per sheet by choosing the Layout pop-up menu in the Print
dialog box.
Creating and using Quick Sets
Quick Sets allow you to save the current print-driver settings such as page orientation, N-up
printing, or paper source for later use. You can save up to a total of 30 sets of settings. For
convenience, Quick Sets can be selected and saved from most printer-driver tabs.
Note If you are using Windows 2000, you must have Administrator privileges to save Quick Sets.
● Windows: Create Quick Sets from most printer-driver tabs. Later, you can gain access to
Quick Sets from the Finishing tab in the printer driver.
● Mac OS: This feature is not supported.
Reducing or enlarging
The Fit to Page option allows you to scale your document to a percentage of its normal size. You
can also choose to scale your document to fit on any size of paper supported by the printer.
● Windows: Gain access to Fit to Page settings on the Effects tab in the printer driver.
● Mac OS: Gain access to Reduce and Enlarge (Scale) settings from the Page Setup dialog
box.
ENWW Chapter 2 Printing tasks 33
Page 36

Printing on different paper for the first page
Printing on different paper for the first page is useful if you are printing a letter for example that
uses letterhead on the first page and plain sheets for the subsequent pages. The size for all
pages of the print job must be the same in the printer driver.
● Windows: Try to set this setting from one of these locations, in this order: the Page Setup
dialog box in the program, the Print dialog box in the program, or the Paper tab in the printer
driver.
● Mac OS: You can select the required media source and type on the Paper pop-up menu from
the Print dialog box.
Restoring default printer-driver settings
You can return all settings in the printer driver to their default values. This measure might be
useful if you are experiencing quality issues, or if the paper is not being selected from the correct
tray.
● Windows: Choose Defaults in the Quick Sets box from the Finishing tab of the printer
driver.
● Mac OS 9.x: Drag the desktop printer icon to the Trash, and then set up the printer in the
Chooser.
● Mac OS X: The Standard option contains the default settings and is automatically selected
each time you open a program. Or, select it from the Presets pop-up menu.
34 Printing tasks ENWW
Page 37

Choosing an output location
The printer comes with the top output bin and a rear output door for printing to a straight-through
paper path. Print jobs emerge from the top output bin when the rear output door is closed. Print
jobs emerge from the back of the printer when the rear output door is open.
● Use the top output bin when printing most jobs, including jobs on average-weight paper and
letterhead, as well as grayscale transparencies. The top output bin can hold up to
125 sheets. Prevent more than 125 sheets from accumulating in the top output bin, or jams
can occur.
● Use the rear output door (straight-through paper path) when printing envelopes, labels,
heavy- or light-weight paper, and other thick or special print media (except grayscale
transparencies). Remove each sheet as it exits the printer.
Top output bin
Rear output door
ENWW Chapter 2 Printing tasks 35
Page 38

Printing on special print media
Printing speeds might be automatically reduced when printing on any special-sized print media.
2
1
3
Printing on envelopes
Load envelopes into tray 1 only.
● The weight of the envelope paper should not exceed 105 g/m
(24 lb).
● Make sure envelopes are undamaged and are not stuck together.
● Never use env elopes with clasps, snaps, windows, coated linings,
self-stick adhesives, or other synthetic materials.
● If you are using a non-standard size of envelope, select the
appropriate one as the Type.
CAUTION
Failure to follow the guidelines above can result in jams.
For more information, see “Print media specifications” on page 109.
To print on envelopes
1 Open tray 1 and slide out the extender fully. If tray 1 is already
open, remove any paper or other print media from it.
2 On the back of the printer, lower the rear output door to prevent the
envelopes from curling.
2
4
5
3 Slide the width guides in tray 1 outward until they are slightly wider
than the envelopes.
4 Place the stack of envelopes into the tray with the side to be printed
up and the short edge in. The stamp end must enter the printer first.
Note
If the envelope has a flap on a short edge, this edge must enter the
printer first.
5 Slide the width guides inward until they lightly touch the stack
without bending it. The stack should be centered between the
guides and must be under the tabs on the guides.
6 Choose the envelope you are using as the Size (Windows) or the
Paper (Macintosh) from the Print dialog box or the printer driver.
You can also choose your envelope in your application by clicking
File, Page Setup, and then click Paper Size.
36 Printing tasks ENWW
Page 39

Printing on labels
Follow the guidelines here for using labels. See “Print media specifications” on page 109 for
more details.
CAUTION T o avoid damaging the printer, use only labels recommended for laser printers. T o prev ent serious
jams, always use tray 1 to print labels and always use the straight-through paper path. Never print
on the same sheet of labels more than once or print on a partial sheet of labels.
● Avoid labels that are separating from the backing sheet or are wrinkled or damaged in any
way.
● Place labels only in tray 1 with the side to be printed up and the top, short edge in first.
● Choose Labels as the Type (Windows) or the Paper (Mac OS 9.x) from the Print dialog box
or the printer driver. For Mac OS X, click Printer Features on the Print dialog box, and then
click Media type.
● Remove label sheets as they print from the straight-through paper path to prevent them from
sticking together.
● If a sheet of labels jams in the printer, see “Clearing jams” on page 58.
ENWW Chapter 2 Printing tasks 37
Page 40

Printing on grayscale transparencies
The printer supports printing in graysc ale on grayscale or color transparencies. (Grayscale
transparencies are usually less expensive.) See “Grayscale transparencies” on page 118 for
more details.
CAUTION T o avoid damaging the printer, use only transparencies recommended for laser printers. T o prevent
serious jams, always use tray 1 to print grayscale transparencies.
● Load grayscale transparencies into tray 1 only.
● Choose Grayscale Transparencies as the Type (Windows) or the Paper (Macintosh) from
the Print dialog box or the printer driver.
● Use the top output bin to reduce curling. (This rule is for grayscale transparencies only. For
other special print media, use the straight-through paper path to reduce curling.)
● To prevent grayscale transparencies from sticking together, remove each one from the top
output bin as it prints.
● Place grayscale transparencies on a flat surface after removing them from the printer.
38 Printing tasks ENWW
Page 41

Printing on custom-sized print media or cardstock
Postcards, 3-by-5-inch (index) cards, and other custom-sized print media can be printed from
tray 1. The minimum size is 76 by 127 mm (3 by 5 inches) and the maximum size is 216 by 356
mm (8.5 by 14 inches).
● Always insert the short edge first into tray 1. To print in landscape mode, make this selection
through your program. Inserting paper long edge first might cause a paper jam.
● In your program, set margins at least 6.4 mm (.25 inches) away from the edges of the print
media.
● Choose the custom media you are using as the Type in the printer driver and set the correct
Size.
● Lower the rear output door to use the straight-through paper path and reduce curl.
● See “Print media specifications” on page 109 for more information.
ENWW Chapter 2 Printing tasks 39
Page 42

Printing on letterhead or preprinted forms
This section shows how to orient letterhead or preprinted forms when you are printing only on
one side. For duplex (two-sided printing) orientation, see “Printing on both sides (duplexing
manually)” on page 41.
● Orient paper as shown below.
Orientation of letterhead in tray 1: side to be printed up, top edge in first.
Orientation of letterhead in tray 2: side to be printed down, top edge toward the front of
the tray.
● Lower the rear output door if the paper is heavy to reduce curl.
● Avoid raised or embossed letterhead.
● Avoid letterhead that is printed with low-temperature inks, such as those used in some types
of thermography.
● The printer uses heat and pressure to fuse toner to the paper. Make sure that any colored
paper or preprinted forms use inks that are compatible with this fusing temperature (195° C
or 383° F for 0.1 second).
40 Printing tasks ENWW
Page 43

Printing on both sides (duplexing manually)
To print on both sides of the paper, you will have to go to the printer and reinsert the paper
manually after the first side has printed.
CAUTION Do not print on both sides of labels or transparencies. Damage to the printer and jams might result.
To duplex manually (Windows only)
1 Insert enough paper into one of the trays to accommodate the print job. If you are loading
special paper such as letterhead, load it in one of these ways.
• For tray 1, load the letterhead paper with the front side down, bottom in first.
• For optional tray 2, load the letterhead paper with front side up, top edge toward the back
of the tray.
Tray 1
Optional tray 2
2 In the printer driver, select the Print on Both Sides option and send the job to print.
3 After the job finishes printing, remove any blank paper from tray 1. Insert the printed stack,
with the blank side up, top edge in first. You must print the second side from tray 1.
Tray 1
4 Press (G
O).
ENWW Chapter 2 Printing tasks 41
Page 44

Canceling a print job
A print job can be stopped from a program, from a print queue, or from the (CANCEL JOB)
button on the printer.
● If the printer has not started printing, first try to cancel the job within the program that sent
the print job.
● If the print job is waiting in a print queue or print spooler such as the Printers group in
Windows or Print Monitor or Print Center Queue (Mac OS), try to delete the job from there
next.
● If the print job is already printing, press (CANCEL JOB) on the printer. The printer finishes
printing any pages that are already moving through the printer and deletes the remainder of
the print job.
● Pressing (CANCEL JOB) cancels only the current job in the printer. If more than one print
job is in printer memory, you must press (C
starts printing.
If the Printer Status lights continue to cycle after a job has been canceled, the computer is still
sending the job to the printer. Either delete the job from the print queue or wait until the computer
finishes sending data.
ANCEL JOB) once for each job after the job
42 Printing tasks ENWW
Page 45

Using color
This printer offers great color as soon as you set it up. It provides a combination of automatic
color features for ease of use, as well as manual settings for more precise color adjustments.
The printer provides carefully designed and tested color tables to provide smooth, accurate color
rendition of all printable colors. The printer also offers these capabilities to help manage color:
● HP ImageREt 2400
● HP ColorSmart (Windows only)
● Managing color options
● Matching co lors
HP ImageREt 2400
HP ImageREt 2400 is a technology that provides you with the best color print-quality without
having to change driver settings or make tradeoffs between print quality, performance, and
memory. ImageREt 2400 produces sharp images and crisp, clear text using laser printing.
ImageREt 2400 provides 2400 dpi color laser-class quality through a multilevel printing process.
This process precisely controls color by combining up to four colors within a single dot and by
varying the amount of toner in a given area. As a result, ImageREt 2400, together with the
600-by-600 engine resolution, creates millions of smooth colors.
In contrast, the single-level printing process found in the default mode of other color laser printers
does not allow the colors to be mixed within a single dot. This process, called dithering,
significantly hinders the ability to create a wide range of colors without reduced sharpness or
visible dot structure.
HP ColorSmart (Windows only)
The Automatic color setting (HP ColorSmart) enables optimal color output automatically for
diverse types of documents. This feature utilizes object tagging that allows optimal color and
halftone settings to be used for different objects (text, graphics, and images) on a page. The
printer driver analyzes which objects the page contains and uses halftone and color settings that
provide the best print quality for each object.
ENWW Chapter 2 Printing tasks 43
Page 46

Managing color options
By default, the Color setting is set to Automatic, which is normally the best setting. However, if
you have special color needs, you can change color settings. You can also set color documents
to print in grayscale (black and white).
● Windows: These settings appear on the Color tab in the printer driver.
Manual options (Windows)
Manual options (Macintosh)
Print in Grayscale
Selecting the Print in Gra yscale option from your printer driver prints your document in
grayscale. This option is useful for previewing preliminary copies of slides and hardcopy output
quickly, or for color documents that will be photocopied or faxed.
Automatic versus Manual color adjustment
You can allow the printer driver to select the best color options, or you can make adjustments
yourself.
● Automatic. The Automatic option is the default setting and is recommended for printing all
color documents. Automatic optimizes the neutral-gray color treatment, halftones, and edge
enhancements used for text, graphics, and photographs in a document.
● Manual. The Manual option allows you to adjust the neutral-gray color treatment, halftones,
and edge enhancements for text, graphics, and photographs. See “Manual options
(Windows)” on page 45 for descriptions of what the options do.
For more information, see the Help in the printer driver.
44 Printing tasks ENWW
Page 47

Manual options (Windows)
If you select Manual, you can individually adjust the Halftoning and Neutral Grays options for
each of the major elements: text, graphics, and photographs. Edge Control and RGB Color are
global settings.
Halftone options
Halftone options affect the resolution and clarity of your color output. You can independently
adjust halftone settings for text, graphics, and photos. The two halftone options are Smooth and
Detail. If your program converts text and graphics to raster, the Photographic settings will also
control text and graphics.
● Smooth provides better results for large, solid-filled print areas. It also enhances photos by
smoothing out fine color gradations. Choose this option when uniform and smooth area fills
are the most important attributes.
● Detail is useful for text and graphics that require sharp distinctions among lines or colors, or
images that contain a pattern or a high level of detail. Choose this option when sharp edges
and details are the most important attributes.
Neutral Grays
Neutral Grays determines the method for creating neutral gray colors. If your program converts
text and graphics to raster, the Photographic settings will also control text and graphics.
● Black Only generates neutral colors (grays and black) using only black toner. This option
guarantees that neutral colors do not have a color cast.
● 4-Color generates neutral colors by combining all four colors of toner. This option produces
smoother gradients and transitions to non-neutral colors. It also produces the darkest
possible black.
Edge Control
This option determines how edges are rendered. Edge Control consists of two components:
Adaptive Halftoning and Trapping. Adaptive Halftoning increases the edge sharpness. Trapping
reduces the effect of color plane misregistration by slightly overlapping the edges of adjacent
objects.
● On sets Trapping and Adaptive Halftoning to On.
● Off sets Trapping and Adaptive Halftoning to Off.
RGB Color
This option determines how colors are rendered.
● Default interprets RGB color as sRGB, which is the accepted standard for many software
companies and organizations, such as Microsoft and the World Wide Web Consortium.
● Device sets the printer to print RGB data in raw device mode. To render photographs
properly when this option is selected, you must manage color in the program in which you
are working or in the operating system.
ENWW Chapter 2 Printing tasks 45
Page 48

Manual options (Macintosh)
If you select Manual, you can individually adjust the Halftoning, Neutral Grays, Edge Control,
and RGB Color options as global settings.
Halftone options
Halftone options affect the resolution and clarity of your color output. You can independently
adjust halftone settings for text, graphics, and photos. The two halftone options are Smooth and
Detail. If your program converts text and graphics to raster, the Photographic settings will also
control text and graphics.
● Smooth provides better results for large, solid-filled print areas. It also enhances photos by
smoothing out fine color gradations. Choose this option when uniform and smooth area fills
are the most important attributes.
● Detail is useful for text and graphics that require sharp distinctions among lines or colors, or
images that contain a pattern or a high level of detail. Choose this option when sharp edges
and details are the most important attributes.
Neutral Grays
Neutral Grays determines the method for creating neutral gray colors.
● Black Only generates neutral colors (grays and black) using only black toner. This option
guarantees that neutral colors do not have a color cast.
● 4-Color generates neutral colors by combining all four colors of toner. This option produces
smoother gradients and transitions to non-neutral colors. It also produces the darkest
possible black.
Edge Control
This option determines how edges are rendered. Edge Control consists of two components:
Adaptive Halftoning and Trapping. Adaptive Halftoning increases the edge sharpness. Trapping
reduces the effect of color plane misregistration by slightly overlapping the edges of adjacent
objects.
● On sets Trapping and Ad apti ve Halftoning to On.
● Off sets Trapping and Adaptive Halftoning to Off.
RGB Color
This option determines how colors are rendered.
● Default interprets RGB color as sRGB, which is the accepted standard for many software
companies and organizations, such as Microsoft and the World Wide Web Consortium.
● Device sets the printer to print RGB data in raw device mode. To render photographs
properly when this option is selected, you must manage color in the program in which you
are working or in the operating system.
46 Printing tasks ENWW
Page 49

Matching colors
The process of matching printer output color to your monitor is quite complex because printers
and computer monitors use different methods of producing color. Monitors display colors by ligh t
pixels using an RGB (red, green, blue) color process, but printers print colors using a CMYK
(cyan, magenta, yellow, and black) process.
Several factors can influence your ability to match printed colors to those on your screen. These
factors include:
● Print media
● Printer colorants (toner)
● Printing process (inkjet, press, or laser technology for example)
● Overhead lighting
● Programs
● Printer drivers
● Computer operating system
● Monitors
● Video cards and drivers
● Operating environment, such as it is very humid or very dry
● Personal differences in perception of color
Keep in mind the above factors when colors on your screen do not perfectly match your printed
colors. For most users, the best method for matching colors on your screen to your printer is to
print sRGB colors. The printer uses sRGB and automatically optimizes color output.
For more information about solving issues related to color output, see “Problem solving and
maintenance” on page 57.
ENWW Chapter 2 Printing tasks 47
Page 50

48 Printing tasks ENWW
Page 51

3 Managing the printer
Introduction
This printer comes with several software tools that help you monitor, troubleshoot problems with,
and maintain the printer. The software tools are:
● “Special pages” on page 50
● “HP color LaserJet 1500 toolbox” on page 53
ENWW 3 Managing the printer 49
Page 52

Special pages
Special pages reside within the memory of the printer. These pages help you to diagnose and
solve problems with the printer.
Note If the printer language was not correctly set during installation, you can set the language manually
so that the pages print in one of the supported languages.
Demo page
To print the Demo page, press (GO) when the printer is Ready (Ready light on) and not
printing. You can also view this page from the HP color LaserJet 1500 toolbox.
Configuration page
The Configuration page lists current settings and properties of the printer. You can print a
Configuration page from the printer or the HP color LaserJet 1500 toolbox. To print the
Configuration page from the printer, press (G
Supplies Status page also prints.)
O) and (CANCEL JOB) simultaneously. (The
1
2
1 Printer Information. This section contains basic information about the printer, such as the
product name, printer name, and page count.
2 Event Log. This section contains information about printer errors.
3 Paper Tray Information. This section contains information about the trays, such as whether
optional trays are installed, and the type and size of paper that might be set for each tray.
3
50 Managing the printer ENWW
Page 53

Supplies Status page
The Supplies Status page lists the remaining life of HP print cartridges and HP imaging drums. It
also lists the estimated pages remaining, number of pages printed, and other supplies
information. You can print a Supplies Status page from the printer or from the
HP color LaserJet 1500 toolbox. To print from the printer, press (G
simultaneously. (The Configuration page also prints.)
1
2
3
O) and (CANCEL JOB)
4
5
1 Ordering Information. This section contains basic information about how to order new HP
supplies.
2 Print-cartridge area. This area contains a section for each of the print cartridges and
provides information about HP print cartridges. This information includes the part number for
each print cartridge, whether each print cartridge is low, and the life remaining for each print
cartridge expressed as a percentage, as a graphic, and as the estimated number of pages
remaining. This information is only pro vided for HP supplies. If a non-HP supply is i nstalled,
you see an alert message instead.
3 Recycling Information. This section contains the website you can visit for information about
recycling.
4 Imaging-drum area. This area contains the same information for the imaging drum that the
print-cartridge area provides for the print cartridges.
5 Warranty Note. This section contains information about how the printer warranty is affected
when you use non-HP supplies. It also requests that you call the HP fraud hotline if a supply
that is being detected as a non-HP supply was sold to you as a genuine HP supply. (See “HP
fraud hotline” on page 92.)
ENWW 3 Managing the printer 51
Page 54

Usage page
The usage page indicates the page count for each page size that has been printed, the total
page count, and the amount of toner used on a page. You can print a Usage page from the
HP color LaserJet 1500 toolbox.
1
2
3
1 Printer Information. This section contains basic information about the printer, such as the
product name and the printer name.
2 Usage totals. This area contains a page count for each page size the printer uses, and a
total page count.
3 Toner coverage. This section contains toner coverage totals for each of the four print
cartridges: black, cyan, magenta, and yellow.
52 Managing the printer ENWW
Page 55

HP color LaserJet 1500 toolbox
The HP color LaserJet 1500 toolbox is only supported for Windows 98 and later. You must have
performed a complete software installation to use the HP color LaserJet 1500 toolbox.
You can view the HP color LaserJet 1500 toolbox when the printer is directly connected to your
computer or connected to the network. The HP color LaserJet 1500 toolbox is a Web page that
opens in a Web browser and provides access to the device, printer documentation, and printer
management and troubleshooting tools.
To use the HP color LaserJet 1500 toolbox, you must have Microsoft Internet Explorer 4 or later
or Netscape Navigator 4 or later. All pages can be printed from the browser.
You do not have to have Internet access to open and use the HP color LaserJet 1500 toolbox.
Howe v e r, if you cl ic k a l ink in the Other Links area, you must have Internet access in order to go
to the site associated with the link.
To view HP color LaserJet 1500 toolbox
1 Open the HP color LaserJet 1500 toolbox in one of these ways:
• On the desktop, double-click the HP color LaserJet 1500 toolbox icon.
• On t he Start menu, point to Programs, point to HP color LaserJet 1500, and choose the
HP color LaserJet 1500 toolbox.
Note Once you open the URL, you can bookmark it so that you can return to it quickly in the future.
2 The HP color LaserJet 1500 toolbox opens in a Web browser. The HP color
HP co lo r LaserJet 1500 toolbox software contains these tabs: the Information tab, the
Settings tab, the Printer tab, the Documentation tab, and the Troubleshooting tab. It also
contains an area with links to the HP web site. See the following sections for more
information about each tab or area.
Note If a network port is selected, a Network tab also appears.
Information tab
The Information pages group consists of the following pages.
● Device Status. This page displays the printer status and shows the life remaining of HP
supplies, with 0 percent representing that a supply is empty. The page also shows the type
and size of print media set for each tray. To change the default settings, click Change
Settings.
● Configuration page. This page shows the information found on the printer Configuration
page.
● Supplies Status. This page shows the life remaining of HP supplies, with 0 percent
representing that a supply is empty . This page also provides supplies part numbers. T o order
new supplies, click Order Supplies in the Other Links area on the left side of the window.
To visit any website, you must have Internet access.
● Event log. This page shows a list of all printer events and errors.
● Usage page. This page shows a summary of the number of pages the printer has printed,
grouped by size and type.
● Device Information. This page also shows the printer network name, address, and model
information. To change these entries, click Device Information on the Settings tab.
ENWW 3 Managing the printer 53
Page 56

Settings tab
This tab allows you to configure the printer from your computer. The Settings tab can be
password protected. If this printer is networked, always consult with the printer administrator
before changing settings on this tab.
The Settings tab contains the following pages.
● Configure Device. Configure all printer settings from this page. This page contains the
traditional menus found on printers using a control panel display. These menus include
Information, Paper Handling, Configure Device, and Diagnostics.
● Alerts. Network only. Set up to receive e-mail alerts for various printer events.
● Email. Network only. Used in conjunction with the Alerts page to set up incoming and
outgoing e-mail, as well as to set e-mail alerts.
● Security. Set a password that must be entered to gain access to the Settings and
Networking tabs. Enable and disable certain features of the EWS.
● Other Links. Add or customize a link to another web site. This link is displayed in the Other
Links area on HP color LaserJet 1500 toolbox pages. These permanent links always appear
in the Other Links area: HP Instant Support™, Order Supplies, and Product Support.
For more information, see “Other links” on page 55.
● Device Inf orm atio n. Name the printer and assign an asset number to it. Enter the name and
e-mail address for the primary contact who will receive information about the printer.
● Language. Determine the language in which to display the embedded Web server
information.
Printer tab
The Printer tab allows you to choose which HP color LaserJet 1500 series printer to print from if
more than one printer is connected to the network. More than one HP color LaserJet 1500 series
printer can be connected to the computer through a local area network (LAN) or through direct
connect.
Documentation tab
This section of the navigation bar contains links to these information sources:
● Install Notes. Contains late-breaking information about the printer. In English only.
● Read Me! Contains information discovered after other documentation such as the user guide
was developed.
● User Guide - PDF. Contains the information about the printer usage, warranty,
specifications, and support that you are currently reading. This PDF format can be printed by
page, chapter, or the entire document, and will be formatted as a traditional book.
● User Guide - HTML. Contains the information about the printer usage, warranty,
specifications, and support that you are currently reading. This HTML format allows you to
easily search for specific topics and jump between topics. Viewable from Windows-based
computers only.
54 Managing the printer ENWW
Page 57

Troubleshooting tab
This section of the navigation bar contains links to the information pages of the printer. From this
section, you can view the following pages:
● Control Panel Help. Allows you to view animations of control panel light messages, identify
what the light pattern means, and view information for resolving the message.
● Cleaning Page. You can clean the print path using this tool. See “Managing supplies” on
page 90 for instructions.
● Diagnostic Tools. These pages can help you resolve problems with color printing tasks and
calibrate the printer.
● Demo pages. These are additional demonstration pages you can print.
Networking tab
This tab allows the network administrator to control network-related settings for the printer when
it is connected to an IP-based network. This tab will not appear if the printer is directly connected
to a computer, or if the printer is connected to a network using anything other than an optional
external HP Jetdirect print server.
Other links
This section contains links that connect you to the Internet. You must have Internet access in
order to use any of these links. If you use a dial-up connection and did not connect when you first
opened the HP color LaserJet 1500 toolbox, you must connect before you can visit these
websites. Connecting might require that you close the HP color LaserJet 1500 toolbox and
reopen it.
● HP Instant Support™. Connects you to the HP website to help you find help for issues that
might arise. This service analyzes your printer error log and configuration information to
provide diagnostic and support information specific to your printer.
● Order Supplies. Click this link to connect to the HP website and order genuine HP supplies,
such as print cartridges, an imaging drum, and paper.
● Product Support. Connects to the support site for the HP color LaserJet 1500 printer. Then,
you can search for help with a specific problem.
ENWW 3 Managing the printer 55
Page 58

56 Managing the printer ENWW
Page 59

Problem solving and
4
maintenance
Introduction
This troubleshooting information is organized to help you resolve printing problems. Choose the
general type of problem from the following list.
● There is a jam in the printer. See “Clearing jams” on page 58.
● Printer lights, other than the Ready light, are on or blinking. See “Res olvi ng co ntr ol panel
messages” on page 63.
● The document printed, but the print quality was not what was expected. See “Solving print-
quality problems” on page 71.
● A message is on the computer. See “Resolving problems that generated messages” on
page 80.
● There is a problem, but no lights are on or blinking and there are no messages on the
computer. See “Resolving problems that did not generate messages” on page 81.
Additional information is available about these maintenance topics:
● “Cleaning the printer” on page 88
● “Calibrating the printer” on page 89
● “Managing supplies” on page 90
ENWW Chapter 4 Problem solving and maintenance 57
Page 60

Clearing jams
Occasionally, paper or other print media can become jammed during a print job. Some causes
include:
● Input trays are loaded improperly or overfilled.
● Tray 2 is removed during a print job.
● The top cover is opened during a print job.
● Too many sheets accumulated in an output area or blocked an output area.
● Paper being used does not meet HP specifications. See “Print media specifications” on
● The environment in which the paper was stored is too humid or too dry. See “Print media
Where to look for jams
Jams can occur in these locations:
● Inside the printer. See “To clear jams from inside the printer” on page 59.
● In input areas. See “To clear jams from input areas” on page 60.
● In output areas. See “To clear jams from output areas” on page 61.
Find and remove the jam using the instructions on the following pages. If the location of the jam
is not obvious, look first inside the printer.
page 109.
specifications” on page 109.
Loose toner might remain in the printer after a jam. This problem should resolve itself after a few
sheets have printed. See “Loose toner” on page 74.
58 Problem solving and maintenance ENWW
Page 61
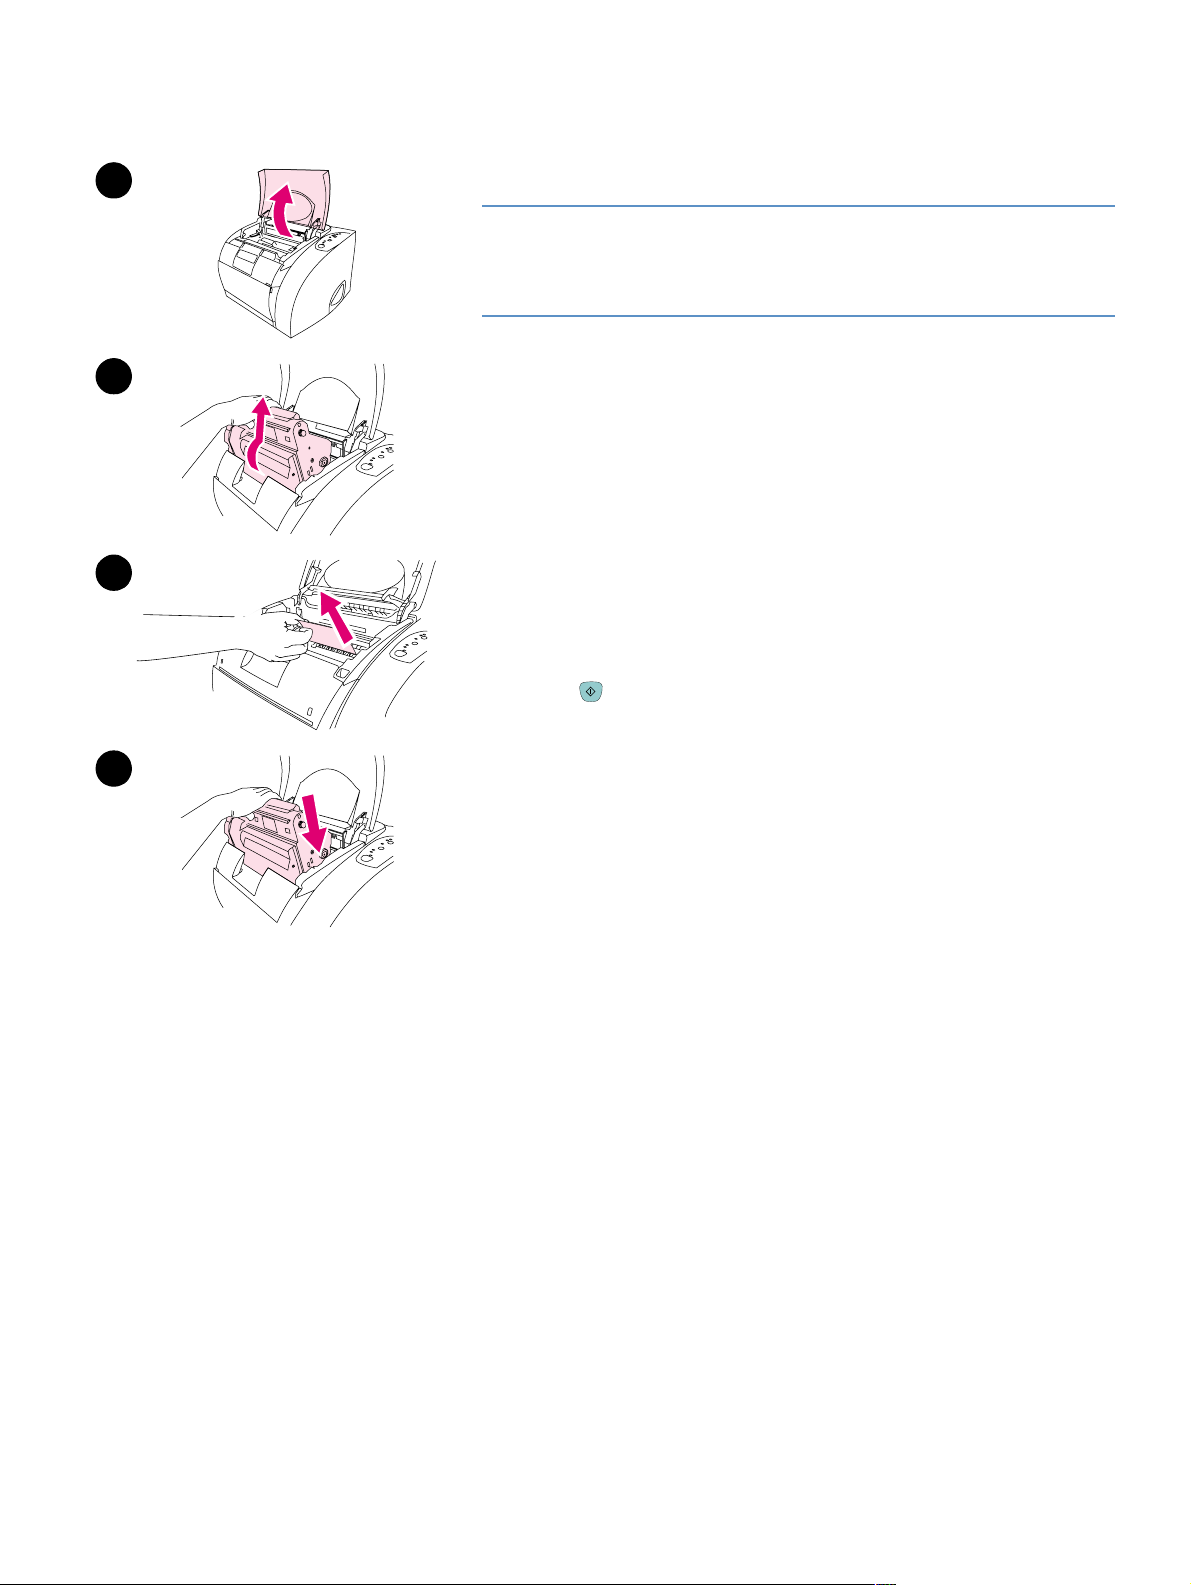
1
2
To clear jams from inside the printer
CAUTION
Jams in this area might result in loose toner on the page. If you get toner
on your clothes or hands, wash them in cold water. (Hot water will set
the toner into the fabric.)
1 Open the top cover.
2 Remove the imaging drum by pushing it away from you and lifting it
out of the printer. You cannot reach jams by removing the print
cartridges.
3 Complete one of these steps:
● If the leading edge of the paper is visible, carefully pull the paper
out of the printer.
3
4
● If the paper is too difficult to remove, remove the jam as
described in “To clear jams from output areas” on page 61.
4 After the jam has been removed, replace the imaging drum and
close the top cover.
5 Press (G
blinking, then another jam is present. See “To clear jams from input
areas” on page 60 and “To clear jams from output areas” on
page 61.
O) if the Go light is blinking. If the Attention light is still
ENWW Chapter 4 Problem solving and maintenance 59
Page 62

1
2
To clear jams from input areas
1 Open tray 2 to expose the jam.
2 Complete one of these steps:
● If the jam has already partially entered the printer, see “To clear
jams from inside the printer” on page 59.
● If the jam is only in the input tray, remove the jam by pulling it out
by the visible edge. Realign all of the paper in the tray and go to
step 4.
3 If you could not remove the jam from inside the printer or by pulling
it out of the tray, grasp the jam from the outside of the printer and
carefully pull it free.
4 Push the paper down to lock the metal paper lift plate into place
(tray 2 only) and slide the tray back into the printer.
3
4
5
5 Open the top cover, close it again, and then press (G
light is blinking. If the Attention light is still blinking, then another jam
is present. See “To clear jams from inside the printer” on page 59
and “To clear jams from output areas” on page 61.
O) if the Go
60 Problem solving and maintenance ENWW
Page 63
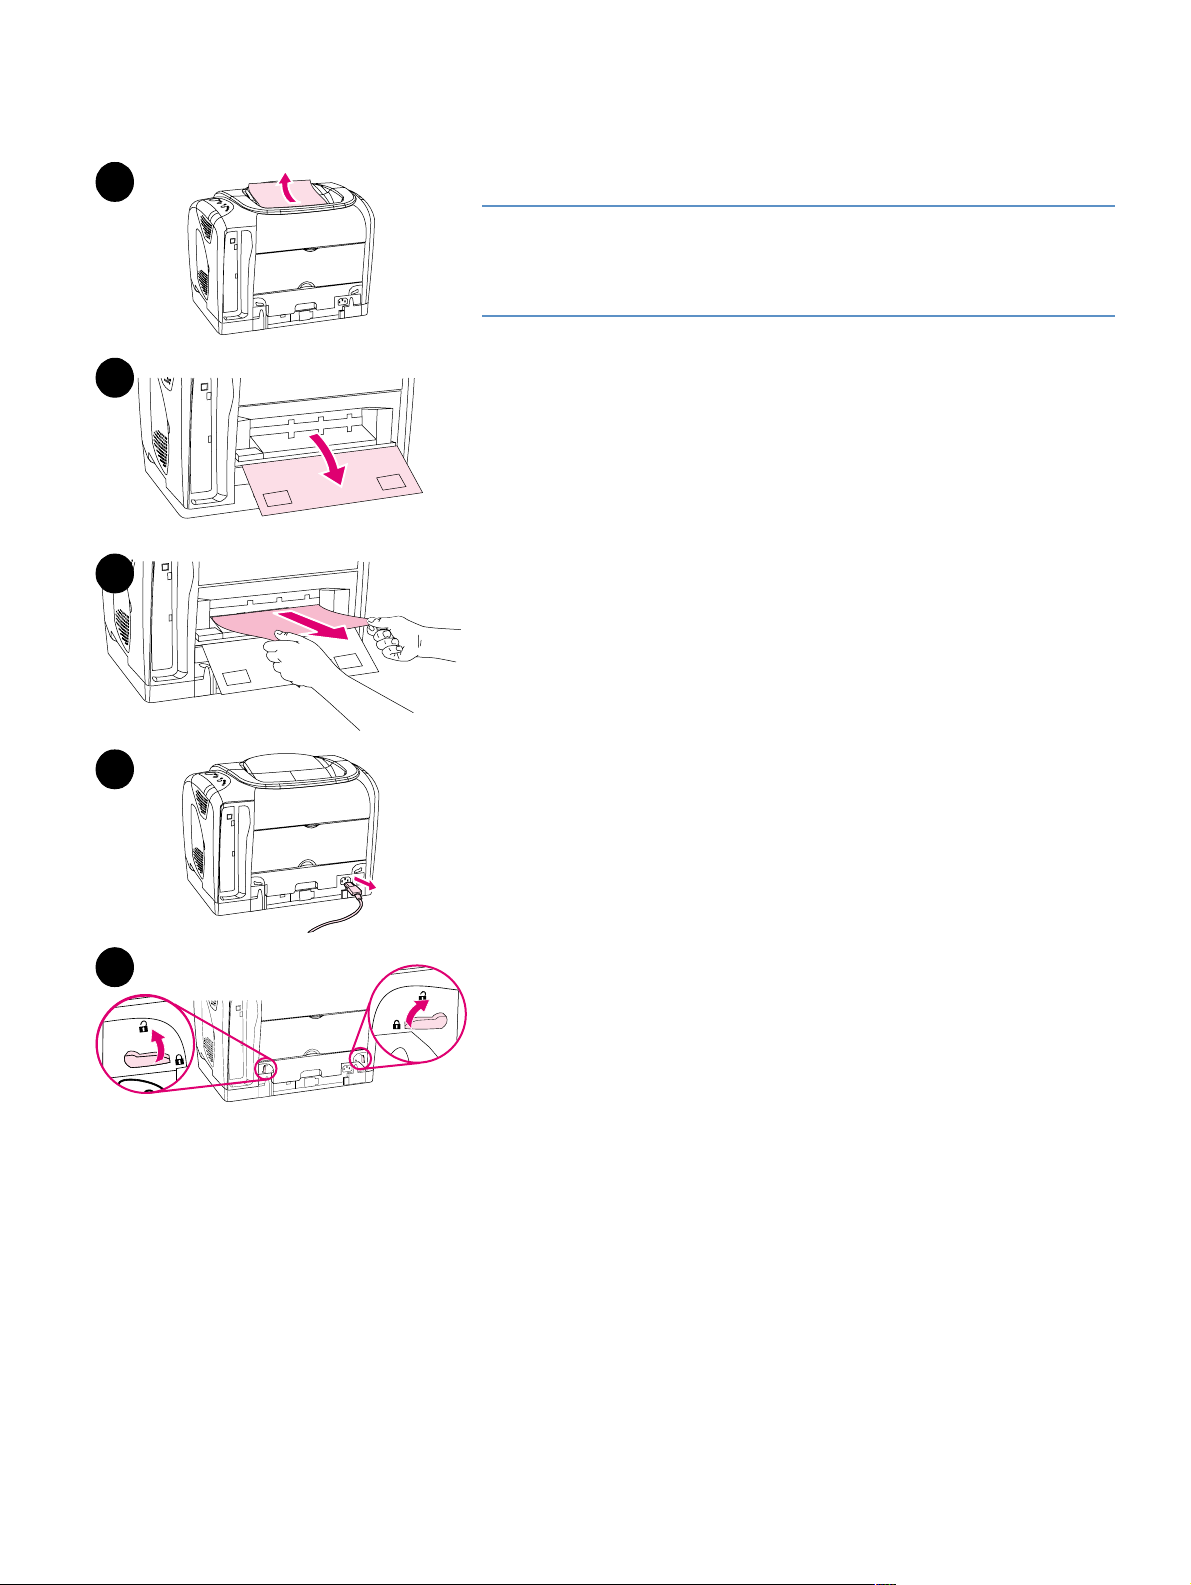
1
2
3
To clear jams from output areas
CAUTION
Jams in these areas might result in loose toner on the page. If you get
toner on your clothes or hands, wash them in cold water. (Hot water will
set the toner into the fabric.)
1 Complete one of these steps:
● If the paper is not almost completely visible from the top output
bin, go to step 2.
● If the paper is almost completely visible, pull it carefully out of the
printer and go to the last step.
2 Open the rear output door.
3 If the leading edge of the paper is visible from the rear opening,
carefully pull the paper out.
4 If the jam is too far into the printer to remove, turn off the printer and
disconnect the power cable.
5 Rotate the locks on the fuser to the unlocked position.
4
5
ENWW Chapter 4 Problem solving and maintenance 61
Page 64

6
7
6 Grasp the fuser handles and pull to remove the fuser from the
printer.
WARNING!
The parts on the internal surface of the fuser are very hot. To avoid
burning yourself, do not touch those parts.
7 Using both hands, slowly and steadily remove any paper from inside
the printer. Then, carefully reinsert the fuser and secure the locks.
8 Reconnect the power cable and turn on the printer.
9 Open the top cover, close it again, and then press (G
light is flashing. If the Attention light is still blinking, then there is
another jam. See “To clear jams from inside the printer” on page 59
and “To clear jams from input areas” on page 60.
O) if the Go
62 Problem solving and maintenance ENWW
Page 65

Resolving control panel messages
Printer status is indicated by light patterns on the control panel. Two sets of lights are on the
control panel: Supplies Status lights and Printer Status lights:
Black print-cartridge
light
Cyan print-cartridge
light
Magenta print-cartridge
light
Yellow print-cartridge
light
R
OTATE CAROUSEL
button
Imaging-drum
light
Supplies Status lights
and button
CANCEL JOB
button
Attention light
(amber)
Ready light
(green)
Go light and
G
O button (both green)
The lights can be in any one of the following states:
OnOff Blinking
See the following information to interpret control panel lights, or see the HP color LaserJet 1500
toolbox to view animations of the light patterns and the messages they indicate.
Printer Status lights
and buttons
ENWW Chapter 4 Problem solving and maintenance 63
Page 66

Supplies Status lights
This section describes the meaning of the patterns for the lights in the Supplies Status area.
Information about supplies also appears in the HP color LaserJet 1500 toolbox. (For more
information, see “Managing the printer” on page 49.) To order new supplies, see “Accessories
and ordering information” on page 19.
Light pattern Recommended action
Black print cartridge low
The blac k print-c artridge light is o n. T he printer continues to print w itho ut any action required unti l the print
cartridge is empty. Order a new print cartridge.
Cyan print cartridge low
The cyan print-cartridge light is on. The printer cont in ue s to prin t witho ut any action required until the print
cartridge is empty. Order a new print cartridge.
Magenta print cartridge low
The magenta print-cartridge light is on. The printer continues to print without any action required until the
print cartridge is empty. Order a new print cartridge.
Yellow print cartridge low
The yello w print-cartridge light is on . The printer c ontinue s to print witho ut any action r equired un til the print
cartridge is empty. Order a new print cartridge.
Imaging drum is low
The imaging-drum light is on. The printer continues to print without any action required until the imaging
drum is empty. Order a new imaging drum.
64 Problem solving and maintenance ENWW
Page 67

Light pattern Recommended action
Black print cartridge is empty or missing
The black print-cartridge light is blinking. The printer stops printing.
The print cartridge is empty or missing, or the printer cannot detect the print cartridge correctly. You must
replace the print cartridge before the printer can continue printing.
Reinsert or replace the print cartridge. If the print-cartridge light is still b l ink in g but the Attention light is not
on, turn the printer off and then back on again. If the problem persists, contact HP Customer Care. See
“HP Customer Care” on page 3, or see the flyer that came in the printer box for contact information.
Cyan print cartridge is empty or missing
The cyan print-cartridge light is blinking. The pri nter stops printing.
The print cartridge is empty or missing, or the printer cannot detect the print cartridge correctly. You must
replace the print cartridge before the printer can continue printing.
Reinsert or replace the print cartridge. If the print-cartridge light is still b l ink in g but the Attention light is not
on, turn the printer off and then back on again. If the problem persists, contact HP Customer Care. See
“HP Customer Care” on page 3, or see the flyer that came in the printer box for contact information.
Magenta print cartridge is empty or missing
The magenta print-cartridge light is blinking. The printer stops printi ng.
The print cartridge is empty or missing, or the printer cannot detect the print cartridge correctly. You must
replace the print cartridge before the printer can continue printing.
Reinsert or replace the print cartridge. If the print-cartridge light is still b l ink in g but the Attention light is not
on, turn the printer off and then back on again. If the problem persists, contact HP Customer Care. See
“HP Customer Care” on page 3, or see the flyer that came in the printer box for contact information.
Yellow print cartridge is empty or missing
The yellow print-cartridge light is blin kin g. The printer sto ps prin tin g.
The print cartridge is empty or missing, or the printer cannot detect the print cartridge correctly. You must
replace the print cartridge before the printer can continue printing.
Reinsert or replace the print cartridge. If the print-cartridge light is still b l ink in g but the Attention light is not
on, turn the printer off and then back on again. If the problem persists, contact HP Customer Care. See
“HP Customer Care” on page 3, or see the flyer that came in the printer box for contact information.
Imaging drum is empty or missing
The imaging-drum light is blinking. The printer stops printing.
The imaging drum is empty, missing, or the printer cannot detect the imaging drum correctly. You must
replace the imaging drum before the printer can continue printing.
Reinsert or replace the imaging drum. If the imaging-drum light is still blinking but the Attention light is not
on, turn the printer off and then back on again. If the problem persists, contact HP Customer Care. See
“HP Customer Care” on page 3, or see the flyer that came in the printer box for contact information.
ENWW Chapter 4 Problem solving and maintenance 65
Page 68

Light pattern Recommended action
Black print cartridge is a non-HP print cartridge
CAUTION: If yo u continue printing once this p rint cartridge is empty, damage to the printer can oc cur. See
“Hewlett-Packard limited warranty statement” on page 94.
The black print-cartridge light is blinking and the Attention light is on. The printer stops printing.
If you still want to use this non-HP print cartridge, press
not receive an y indica tion from the p rinter Supplies Sta tus lights , the Supp lies Status page, or a ny sof tware
component (such as HP color LaserJet 1500 toolbox) when this print cartridge is low or empty.
Cyan print cartridge is a non-HP print cartridge
CAUTION: If yo u continue printing once this p rint cartridge is empty, damage to the printer can oc cur. See
“Hewlett-Packard limited warranty statement” on page 94.
The cyan print-cartridge light is blinking and the Attention light is on. The printer stops printing.
If you still want to use this non-HP print cartridge, press
not receive an y indica tion from the p rinter Supplies Sta tus lights , the Supp lies Status page, or a ny sof tware
component (such as HP color LaserJet 1500 toolbox) when this print cartridge is low or empty.
Magenta print cartridge is a non-HP print car tridge
CAUTION: If yo u continue printing once this p rint cartridge is empty, damage to the printer can oc cur. See
“Hewlett-Packard limited warranty statement” on page 94.
(CANCEL JOB) to continue printing. You will
(CANCEL JOB) to continue printing. You will
The magenta print-cartridge light is blinking and the Attention light is on. The printer stops printing.
If you still want to use this non-HP print cartridge, press
not receive an y indica tion from the p rinter Supplies Sta tus lights , the Supp lies Status page, or a ny sof tware
component (such as HP color LaserJet 1500 toolbox) when this print cartridge is low or empty.
(CANCEL JOB) to continue printing. You will
Yellow print cartridge is a non-HP print cartridge
CAUTION: If yo u continue printing once this p rint cartridge is empty, damage to the printer can oc cur. See
“Hewlett-Packard limited warranty statement” on page 94.
The yellow print-cartridge light is blinking and the Attention light is on. The printer stops printing.
If you still want to use this non-HP print cartridge, press
not receive an y indica tion from the p rinter Supplies Sta tus lights , the Supp lies Status page, or a ny sof tware
component (such as HP color LaserJet 1500 toolbox) when this print cartridge is low or empty.
(CANCEL JOB) to continue printing. You will
Imaging drum is a non-HP imaging drum
CAUTION: If you con tin u e printing once this imaging drum is empty, damage to the printer can occur. See
“Hewlett-Packard limited warranty statement” on page 94.
The imaging-drum light is blinking and the Attention light is on. The printer stops printing.
If you still want to use this non-HP imaging drum, press
not receive an y indica tion from the p rinter Supplies Sta tus lights , the Supp lies Status page, or a ny sof tware
component (such as HP color LaserJet 1500 toolbox) when this print cartridge is low or empty.
(CANCEL JOB) to conti nue printing. Yo u will
66 Problem solving and maintenance ENWW
Page 69

Printer Status lights
The following section describes the meaning of the light patterns in the Printer Status area.
Light pattern Error and recommended action
All control panel
lights
Startup
All control panel lights cycle one after another. Pressing buttons has no effect until the printer is in the
Ready state.
Ready
The Ready (green) light is on and the printer is ready to print. No action is needed. Pressing (GO)
prints a Demo page. Pressing
page and a Supplies Status page.
(GO) and (CANCEL JOB) simultaneousl y prints a Con fig uration
Processing
The Ready light is blinking. The printer is receiving or processing data.
Pressing
print job. The printer returns to the Ready state (Ready light on) after the job has been canceled.
(CANCEL JOB) cancels the curren t jo b . O ne or tw o page s mig ht print as the p rinter clea rs the
Attention error
The Attention light is blinking in these situations:
● The top cover is open.
● The printer is out of paper.
● The printer has a jam.
For the first cause, close the top cover. For the second cause, load paper. For the last cause, open and
close the top cover after you resolve the problem. If the problem is not resolved, the Attention light
continues to blink.
Interaction state
The Go light is blinking. The top cover has been opened and then closed, or you pressed
(R
OTATE CAROUSEL). Pressing (GO) returns the printer to the Ready state. If you do not press
O), the printer automatically returns to the Ready state after approximately 10 seconds. Pressing
(G
(R
OTATE CAROUSEL) brings another print cartridge to the top position.
ENWW Chapter 4 Problem solving and maintenance 67
Page 70

Light pattern Error and recommended action
Attention with Ability to Continue
The Attention light is blinking and the Go light is on. The printer stops printing. The message appears in
these situations:
● Manual feed with pause. Someone sent a manual feed job and the printer is waiting for the special
paper. Load paper into tray 1, and if the printer does not begin printing once the pages are reloaded,
press
(GO). Or, just press (GO) to try to print from another tray.
● Manu al tw o - side d printi ng. Th e printer h as fini sh ed pri nti ng th e fir st s ide of a m an u al du pl ex job, and
the printer is waiting f o r someo ne to relo ad the pag es so i t can print the s econd side. If th e printer d oes
not begin printing once the pages are reloaded, press
● P aper out in the s elected tra y. Someone is trying to print by Source (tr ay) and there is no paper i n the
selected tray. Add paper to that tray to print from it. Or, press
The printer continues printing after it finishes running a cleaning cycle, which takes approx imately 20
seconds.
● Paper is too small. The print image is larger than the size of paper in the tray. Load the correct size
and press
takes approximately 20 seconds.
● Continuable state. Press (GO) for the printer to attempt to recover from the error and print
whatever data it can. If successful, the printer completes the job while Ready light blinks. If
unsuccessful, the printer continues to display the Attention with Ability to Continue state. Perform one
of these steps:
●Press and hold (GO) and (CANCEL JOB) simultaneously to displa y a seco ndary light pattern.
●Press (CANCEL JOB) to cancel the print job. If the prob lem has bee n resolved, the printer returns
(GO). The printer continues printing after it finishes running a cleaning cycle, which
(See “Secondary light patterns for Printer Status lights” on page69.)
to the Ready state (Ready light on).
(GO).
(GO) to try to print from another tra y.
Service error
The Attention light, Rea dy li ght, and G o li ght are on. The printer stops printing. Pres si ng an y button has no
effect. Perform these steps.
● Turn the printer off and then on again. If the problem persists, leave the printer off for 15 minutes to
reset the printer.
● If the printe r is connected to a power s trip or surge protec tor , disc onnect it an d connect th e powe r cable
directly to a working wall outlet.
● If the problem continues, contact HP Customer Care. See “HP Customer Care” on page 3 or the
support flyer that came in the printer box.
68 Problem solving and maintenance ENWW
Page 71

Secondary light patterns for Printer Status lights
This section d escribe s the seco ndary light patterns th at y ou can dis pla y wh en y ou e xperienc e an
Attention with Ability to Continue state. This error has its own set of secondary light patterns, so
a section is included here for it.
Secondary light patterns provide more information about the more specific type of error that
occurred. To understand the secondary light pattern, press and hold (G
(C
ANCEL JOB) simultaneously. When the secondary light pattern appears, use this section to
identify the associated error. When you release the buttons, the light pattern for the original error
appears again.
Secondary light patterns for Attention with Ability to Continue state
This section provides the meaning for the secondary light patterns that you can display while you
are experiencing an Attention with Ability to Continue state (Attention light is blinking and Go light
is on).
Light pattern Error and recommended action
O) and
41.3 Unexpected Size error or 41.x Printer error
The Ready light is on.
● Load the correct size of paper. If the correct size is loaded, press (GO).
● If printing does not resume, open the top cover, remove the imaging drum, and check for a jam inside
the printer .
40 Bad Transmission error
The Attention light, Ready light, and Go light are on. Press (GO) to try to print a portion of the job.
● If the printer is connected to the network, make sure the cable is securely connected between the
optional external HP Jetdirect print server and the network port.
● If the printer is directly connected to a computer, the cable between the printer and computer has a
bad connection or the cable is of poor quality. Disconnect the cable and reconnect it. Make sure you
are using a high-quality USB cable. See “Accessories and ordering information” on page 19
22 Buffer Overflow error
The Ready light and Go light are on. Press (GO) to try to print a portion of the job.
● The connection between the printer and the computer is loose. Check the connection to ensure that it
is secure.
● The cable is malfunctioning. Try using a different, high-quality USB cable. See “Accessories and
ordering information” on page 19
● Contact HP Customer Care. See “HP Customer Care” on page 3, or see the flyer that came in the
printer box for contact information.
ENWW Chapter 4 Problem solving and maintenance 69
Page 72

General Continuable error
The Attention light, Ready light, and Go light are blinking.
● Press (GO) to try to continue printing.
● If the error persists, contact HP Customer Care. See “HP Customer Care” on page 3, or see the flyer
that came in the printer box for contact information.
68.x Permanent Storage error
The Attention light is blinking. The nonvolatile memory (NVRAM) is temporarily full.
(GO) to clear the message. Check the p rinter set tings to ensure they are correct. If the prob lem
Press
persists, contact HP Customer Care. See “HP Customer Care” on page 3, or see the flyer that cam e in the
printer box for contact information.
70 Problem solving and maintenance ENWW
Page 73

Solving print-quality problems
If your document is printing but the quality is not what you expected, start by using the printquality checklist
Print-quality checklist
General print-quality problems can be solved by following the checklist below.
1 Check the printer driver to make sure you are using the best available print-quality option, or
return to the default settings.
2 Check that the paper or print media you are using meets specifications. See “Print media
specifications” on page 109. Generally, smoother paper provides better results although
coated, photo, and glossy papers are not supported.
3 If you are using a special print media such as labels, grayscale transparencies, or letterhead,
ensure that you have printed by Type. See “Printing a job” on page 27.
4 Print a Configuration page and Supplies Status page at the printer by pressing (G
(C
ANCEL JOB) simultaneously.
• Check the Supplies Status page to see if any supplies are low or empty. No information is
provided for non-HP print cartridges.
• If the pages do not print correctly , the problem is with the hardware. Contact HP Customer
Care. See “HP Customer Care” on page 3 or the flyer that shipped in the printer box.
5 Try printing from a different program. If the page prints correctly, the problem is with the
program from which you were printing.
6 Print a demo page from the HP color LaserJet 1500 toolbox. If the page prints correctly,
there might be a problem with the printing software. Uninstall the printing software (see
“Uninstalling the printing software” on page 18) and then reinstall it (see the getting started
guide).
7 Restart the computer and the printer and try printing again. If the problem is not resolved,
choose one of these options:
• If the problem is affecting all printed pages, see “Solving issues with all printed
documents” on page 72.
• If the problem is affecting only pages printed in color, see “Solving issues with color
documents” on page 78.
O) and
ENWW Chapter 4 Problem solving and maintenance 71
Page 74
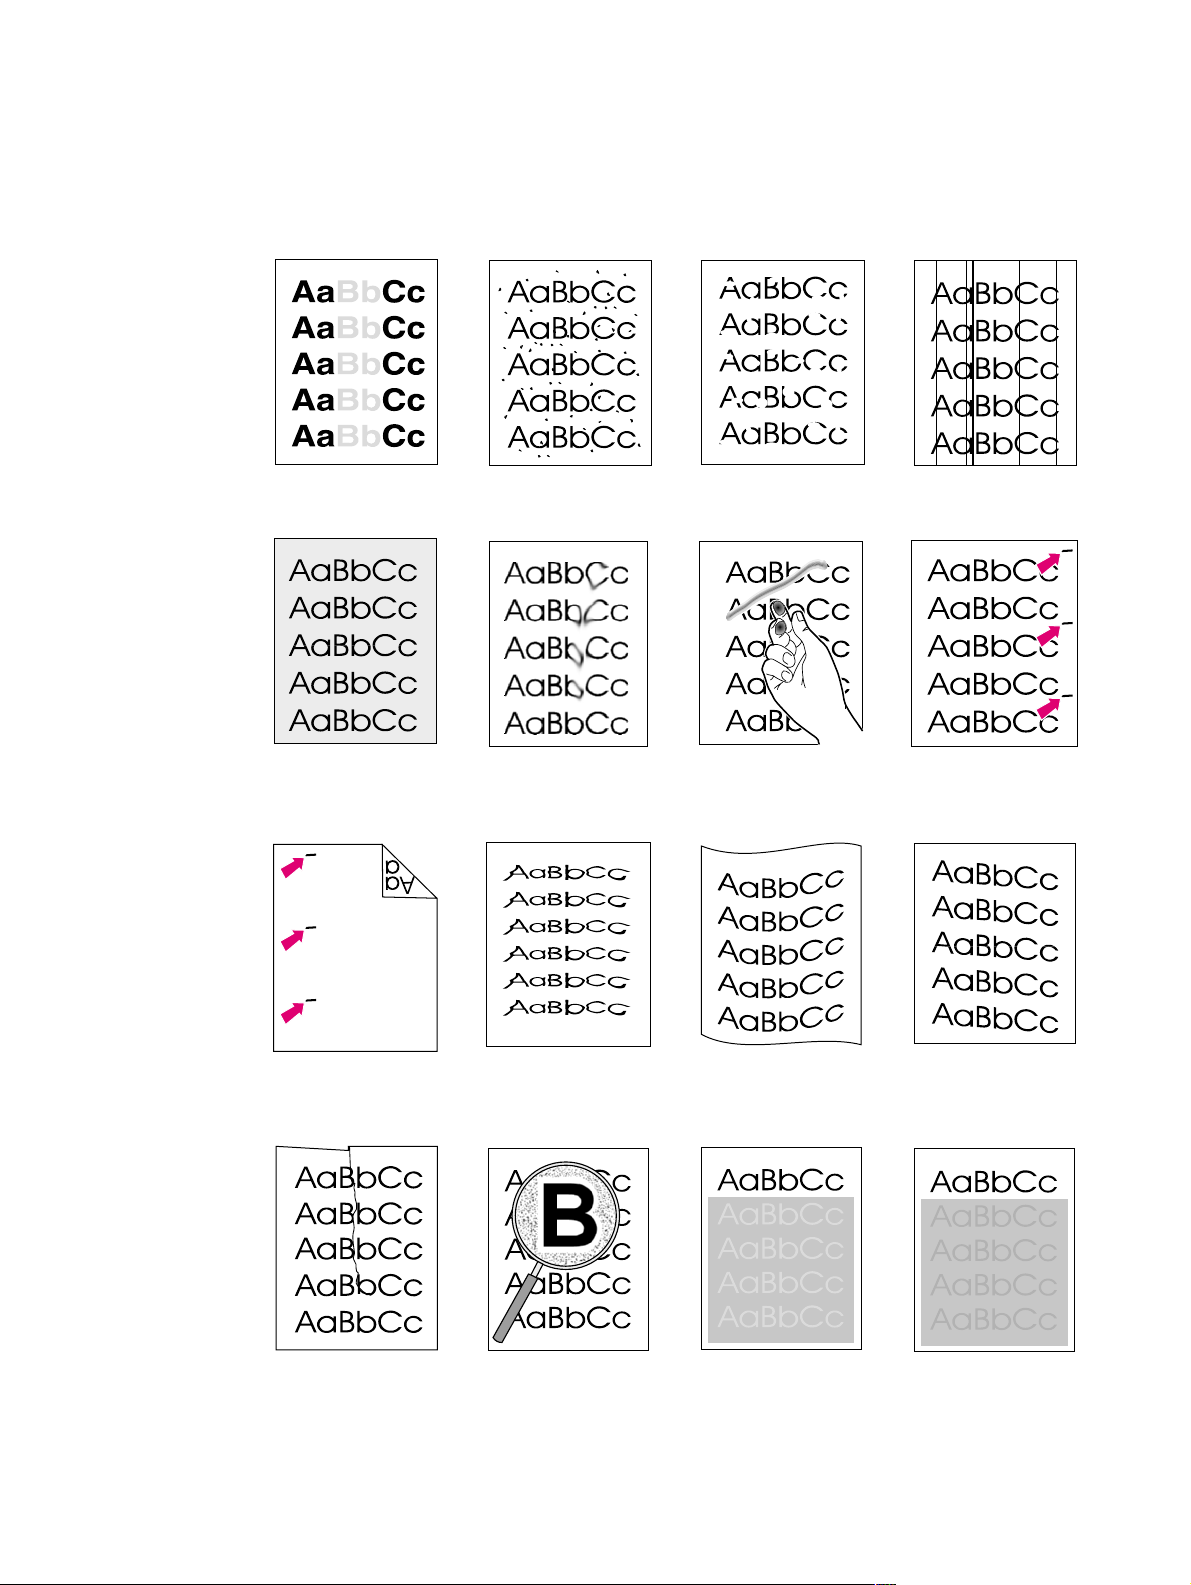
Solving issues with all printed documents
The examples below depict letter-size paper that has passed through the printer short-edge first.
These examples illustrate problems that would affect all pages you print, whether you print in
color or in black only. The topics that follow list the typical cause and solution for each of these
examples.
Light print or fade
Gray background
Repetitive defects on
the back
Toner specks
Toner smear
Misformed characters
Dropouts Vertical lines
Loose toner
Curl or wave
Repetitive defects on
the front
Page skew
Wrinkles or creases
72 Problem solving and maintenance ENWW
Toner scatter outline
Random image
repetition (light)
Random image
repetition (dark)
Page 75

Light print or fade
A vertical streak or an incorrect or faded color area appears on the page.
● The paper might not meet HP’s paper specifications (for example, the paper is too moist or
too rough). See “Print media specifications” on page 109.
● One or more print cartridges are low. If you are using non-HP print cartridges, no messages
appear on the printer control panel or in the HP color LaserJet 1500 toolbox.
● The imaging drum might be low or empty. Print the Supplies Status page to check remaining
life. Replace the imaging drum if it is low or empty.
● If none of the print cartridges or the imaging drum is low or empty, remove the print
cartridges one at a time and inspect the toner roller in each to see if the roller is damaged. If
so, replace the print cartridge.
● If the problem is not resolved, see “If the problem is not resolved” on page 77.
Toner specks
● The paper might not meet specifications. For example, the paper is too moist or too rough.
See “Print media spe cifications” on page 109.
● The paper path might need cleaning. See “Cle ani ng the pr in ter ” on page 88.
● If the problem is not resolved, see “If the problem is not resolved” on page 77.
Dropouts
Faded areas, generally rounded, occur randomly on the page.
● A single sheet of paper might be defective. Try reprinting the job.
● The moisture content of the paper is uneven or the paper has moist spots on its surface. Try
different paper, such as high-quality paper intended for laser printers. See “Print media
specifications” on page 109.
● The paper lot is flawed. The manufacturing processes can cause some areas to reject toner.
Try a different brand of paper, such as high-quality paper intended for laser printers. See
“Print media specifications” on page 109.
● The imaging drum might be defective. See “Repetitive defects on the front” on page 74.
● If these steps do not correct the problem, contact HP Customer Care. See “HP Customer
Care” on page 3 or the support flyer that came in the printer box.
● If the problem is not resolved, see “If the problem is not resolved” on page 77.
Vertical lines
Vertical streaks or bands appear on the page.
● One or more print cartridges are low or defective. Print the Supplies Status page to check
remaining life. If you are using non-HP print cartridges, no messages appear on the printer
control panel or in the HP color LaserJet 1500 toolbox.
● Clean the printer using a cleaning page. See “Cleaning the printer” on page 88.
● Use the tools on the Troubleshooting tab of the HP color LaserJet toolbox to correct the
problem.
● If the problem is not resolved, see “If the problem is not resolved” on page 77.
ENWW Chapter 4 Problem solving and maintenance 73
Page 76

Gray backgr ound
The amount of background toner shading becomes unacceptable.
● Perf orm a calibration. See “Calibrating the printer” on page 89.
● Use a different paper with a lighter basis weight. See “Print media specifications” on
page 109.
● Check the printer environment. Very dry (low humidity) conditions can increase the amount
of background shading.
● One or more print cartridges are low. If you are using non-HP print cartridges, no messages
appear on the printer control panel or in the HP color LaserJet 1500 toolbox.
● The imaging drum might be low or empty. Print the Supplies Status page to check remaining
life. Replace the imaging drum if it is low or empty.
● If the problem is not resolved, see “If the problem is not resolved” on page 77.
Toner smear
Toner smears appear on the leading edge of the paper.
● Check the paper type and quality. Use a different paper , such as high-quality paper intended
for laser printers. See “Print media specifications” on page 109.
● If toner smears appear on the leading edge of the paper, the paper guides are dirty, or there
is debris in the print path. See “Cleaning the printer” on page 88.
● The imaging drum might be low or empty. Check the status of the imaging drum using the
printer control panel or in the HP color LaserJet 1500 toolbox and replace the imaging drum
if it is low or empty.
● If the problem is not resolved, see “If the problem is not resolved” on page 77.
Loose toner
Toner smears easily when touched.
● In the printer driver, select the Paper tab and set Type is to match the type of paper you are
printing. Print speed might be slower if you are using heavy paper.
● Check the paper type and quality. Use a different paper , such as high-quality paper intended
for laser printers. See “Print media specifications” on page 109.
● Clean the inside of the printer. See “Cleaning the printer” on page 88.
● The fuser might be damaged. Contact HP Customer Care. See “HP Customer Care” on
page 3 or the support flyer that came in the printer box.
● If the problem is not resolved, see “If the problem is not resolved” on page 77.
Repetitive defects on the front
Marks repeatedly appear on the printed side of the page at even intervals.
● In the printer driver, select the Paper tab and set Type is to match the type of paper on
which you are printing. Print speed might be slower if you are using heavy paper.
● Clean the printer. See “Cleaning the printer” on page 88.
● Use the tools on the Troubleshooting tab of the HP color LaserJet toolbox to correct the
problem.
● The imaging drum might be defective. Replace the imaging drum.
● The fuser might be damaged. Contact HP Customer Care. See “HP Customer Care” on
page 3 or the support flyer that came in the printer box.
● If the problem is not resolved, see “If the problem is not resolved” on page 77.
74 Problem solving and maintenance ENWW
Page 77

Repetitive defects on the back
Marks repeatedly appear on the unprinted side of the page at even intervals.
● Internal parts might have toner on them. The problem will likely correct itself after a few more
pages.
● Clean the printer. See “Cleaning the printer” on page 88.
● The fuser might be damaged. Contact HP Customer Care. See “HP Customer Care” on
page 3 or the support flyer that came in the printer box.
● If the problem is not resolved, see “If the problem is not resolved” on page 77.
Misformed characters
● If characters are improperly formed so that they produce hollow images, the paper might be
too slick of a paper, such as a photo, glossy, or coated paper. Use a different paper, such as
high-quality paper intended for laser printers. See “Print media specifications” on page 109.
● If characters are improperly formed so that they produce a wavy effect, the laser scanner
might need service. Verify that the problem also occurs on the Configuration page. If so,
contact HP Customer Care. See “HP Customer Care” on page 3 or the support flyer that
came in the printer box.
● If the problem is not resolved, see “If the problem is not resolved” on page 77.
Curl or wave
● Turn over the stack of paper in the tray. Also try rotating the paper 180 degrees in the input
tray.
● Set the correct Type in the printer driver. Heavier paper might take longer to print.
● Open the rear output door to print to the straight-through paper path.
● Check the paper type and quality . Both high temperature and humidity will cause paper curl.
Use a different paper, such as high-quality paper intended for laser printers. See “Print
media specifications” on page 109.
● If the problem is not resolved, see “If the problem is not resolved” on page 77.
ENWW Chapter 4 Problem solving and maintenance 75
Page 78

Page skew
● Make sure the paper or other print media is loaded correctly and that the guides are not too
tight or too loose against the stack. See “Loading trays” on page 25.
● Check the paper type and quality. Use a different paper , such as high-quality paper intended
for laser printers. See “Print media specifications” on page 109.
● If the problem is not resolved, see “If the problem is not resolved” on page 77.
Wrinkles or creases
● Make sure that paper is loaded properly.
● Turn over the stack of paper in the input tray, or try rotating the paper 180 degrees in the
input tray.
● Open the rear output door to print to the straight-through paper path.
● Check the paper type and quality. Use a different paper , such as high-quality paper intended
for laser printers. See “Print media specifications” on page 109.
● If the problem is not resolved, see “If the problem is not resolved” on page 77.
Toner scatter outline
● Turn over the stack of paper in the tray.
● Perf orm a calibration. See “Calibrating the printer” on page 89.
● Small amounts of toner scatter are normal for laser printing.
● If large amounts of toner have scattered around the characters, the paper might have high
resistivity. Use a different paper, such as high-quality paper intended for laser printers. See
“Print media specifications” on page 109.
● If the problem is not resolved, see “If the problem is not resolved” on page 77.
Random image repetition
If an image that appears at the top of the page (in solid black) repeats farther down the page (in
gray field), the toner might not have been completely erased from the last job. The repeated
image might be lighter or darker than the field in which it appears.
● From your program, change the tone (darkness) of the field that the repeated image appears
in.
● From your program, rotate the whole page 180 degrees to print the lighter image first.
● Change the order in which the images are printed. For example, have the lighter image at the
top of the page, and the darker image further down the page.
● If the defect occurs later in a print job, turn the printer off for 10 minutes, and then turn the
printer on to restart the print job.
● If the problem is not resolved, see “If the problem is not resolved” on page 77.
76 Problem solving and maintenance ENWW
Page 79

If the problem is not resolved
If the problem is not resolved, try these steps:
1 Perform a cleaning and calibration. See “Cleaning the printer ” on page 88.
2 Print the Configuration page and Suppl ies Statu s pag e again .
• If the pages print correctly, then the problem is with the program, computer, or printer
driver. Go to the next step.
• If the pages do not print correctly, then the problem is with the printer itself. The problem
might be the fuser. Contact HP Customer Care. See “HP Customer Care” on page 3 or
the support flyer that came in the printer box.
3 Change the Type setting in the printer driver. If this step does not help, go to the next step.
4 If the problem still persists, check the paper type and quality. (See “Print media
specifications” on page 109.) Use a different paper, such as high-quality paper intended for
laser printers. Coated, photo, and glossy papers are not supported.
5 Print to a different printer.
• If the page prints correctly, then the problem is with the printer driver for the
HP color LaserJet 1500 printer. Uninstall the printer driver and reinstall it.
• If the page does not print correctly, the problem is with the program or the computer. See
the documentation for the program or the computer.
ENWW Chapter 4 Problem solving and maintenance 77
Page 80

Solving issues with color documents
This section describes issues that can occur when you print in color. Whenever you are
experiencing color-related issues, calibrate the printer before trying any other steps. See
“Calibrating the printer” on page 89.
Only black prints Missing or incorrect
color
Color prints
inconsistently
Colors do not match
Color pages have
inconsistent finish
Only black prints
Only black is printing when the document should be printing in color.
● Color mode is not selected in your program or printer driver. Select color mode instead of
grayscale mode.
● If you are printing on transparencies, all transparencies print in grayscale.
● The correct printer driver is not selected in the program. Select the correct printer driver.
● The printer is not properly configured. Verify the printer configuration by printing a
Configuration page. If no color appears on the Configuration page, contact HP Customer
Care.
78 Problem solving and maintenance ENWW
Page 81

Missing or incorrect color
● You have changed the color settings manually. Return the color setting to Automatic. See
“Changing color settings” on page 32.
● Your print media does not meet the specifications for this printer. Use a different paper, such
as a high-quality paper intended for laser printers. See “Print media specifications” on
page 109.
● You are operating the printer in excessively humid conditions. Verify that the printer
environment is within humidity specifications.
● A print cartridge might be low. Check the printer control panel, print a Supplies Status page,
or view the HP color LaserJet 1500 toolbox to see. (If you are using a non-HP cartridge,
none of these sources will provide information about a low or empty print cartridge.) If so,
replace the print cartridge.
● Perform a calibration. See “Calibrating the printer” on page 89.
Color prints inconsistently
A color is printing inconsistently after you load a new print cartridge.
● Another print cartridge might be low. Check the supplies status lights or the
HP color LaserJet 1500 toolbox to see if a print cartridge is low and replace it if necessary. If
you are using a non-HP print cartridge, it might be low or empty but you will receive no
indication.
● Print cartridges might be improperly installed. Remove the print cartridge for the color that is
printing inconsist entl y and reinstall it.
Colors do not match
The colors on the printed page do not match the colors as they appear on the screen.
● The colors on your computer monitor differ from the printer output. Try selecting Screen
Match in the Color tab of the printer driver.
● Print the Configuration and Supplies Status pages to ensure that they print correctly. If not,
the problem is with the printer.
● Try printing from a different program.
● Extremely light colors or extremely dark colors on screen are not printing. Your program
might interpret extremely light colors as white or extremely dark colors as black. If so, avoid
using extremely light or extremely dark colors.
● Other factors, such as the light or paper quality, are affecting the output. Use a different
paper, such as a high-quality paper intended for laser printers. See “Print media
specifications” on page 109 and “Using color” on page 43.
● Perform a calibration. See “Calibrating the printer” on page 89.
Color pages have inconsistent finish
● Use a smooth paper or print media, such as a high-quality paper made for laser printers.
Generally, the smoother the paper, the better the results. Coated, photo, and glossy papers
are not supported. See “Print media specifications” on page 109.
ENWW Chapter 4 Problem solving and maintenance 79
Page 82

Resolving problems that generated messages
This section helps resolve problems that generated messages on the computer.
Messages for Windows only
This section lists some common errors that only provide a simple message but no information for
resolving the error. Errors that you see in Printer Status and Alerts in the HP color LaserJet 1500
toolbox provide their own instructions for resolving the error. For other errors generated by your
operating system, see the documentation for the operating system or computer.
Message Solution
“Error Writing to USB00x ” in
Windows 98 or Me.
● Make sure that there is paper in the tray.
● Make sure the cables are connected correctly, the printer is on, and the Ready light is on.
● Print a Demo page from the HP color LaserJet1500 toolbox to ensure that the computer
can communicate with the printer.
● On the Start menu, point to Settings and click Printers. Right-click the
HP color LaserJet 1500 driver and select Properties. Click Details and then click Port
Settings. Clear the Chec k P ort State bef ore Pr inting chec k box and click OK. Cl ic k Spool
Settings, select Print Directly to Printer, and click OK. (Note: Selecting Printing Directly
to Printer disables some enh anc ed driver functionality.)
● Try printing again.
“General Protection Fault”
“Exception OE”
“Spool32”
● Restart the computer and try again.
● Clear the contents of the computer Temp folder, which is generally located in C:\Windows
(98 and Me) or C:\Winnt (2000 and XP).
“Illegal Operation ”
Other Windows messages See Microsoft Windows 98, 2000, Me, or XP documentation that came with the operating
system or computer for information.
80 Problem solving and maintenance ENWW
Page 83

Resolving problems that did not generate messages
Begin by using the troubleshooting checklist.
Troubleshooting checklist
If the printer is not responding properly, complete the steps in the following checklist, in order. If
the printer does not pass a step, follow the corresponding troubleshooting suggestions. If a step
resolves the problem, you can stop without performing the rest of the steps on the checklist.
1 Make sure the printer Ready light is on. If no lights are on, complete these steps:
a Check the power cable connections.
b Check that the power switch is on.
c Check the power source by plugging the printer directly into the wall or into a different
outlet.
d If none of these measures restores power, contact HP Customer Care. (See
“HP Customer Care” on page 3 or the support flyer that came in the printer box.)
2 Check the cabling.
a Check the cable connection between the printer and the computer or the optional exter-
nal HP Jetdirect print server. Make sure the connection is secure.
b Make sure that the cable itself is not faulty by using a different cable, if possible.
c Check the network connection. See “Solving general printing problems” on page 83.
3 Ensure that the print media you are using meets specifications. See “Print media
specifications” on page 109.
4 Press (G
Supplies Status page.
a If the pages do not print, check that there is paper in at least one tray.
b If the page jams in the printer, go to “Clearing jams” on page 58.
5 If the Configuration and Supplies Status pages print, check the following items.
a If the pages print correctly, then the printer hardware is working. The problem is with the
computer you are using, with the printer driver, or with the program.
b If the pages do not print correctly, calibrate the printer. See “Calibrating the printer” on
page 89. Print the pages again. If the pages still do not print correctly, the problem is
with the printer hardware. Contact HP Customer Care. (See “HP Customer Care” on
page 3 or the support flyer that came in the printer box.)
6 At the computer, check the print queue or print spooler (Print Monitor or Print Center for Mac
OSs) to see if the printer is paused or set to print offline.
7 Verify that you have installed the HP color LaserJet 1500 series printer driver. Check the
program to make sure that you are using an HP color LaserJet 1500 series printer driver.
O) and (CANCEL JOB) simultaneously to print a Configuration page and a
ENWW Chapter 4 Problem solving and maintenance 81
Page 84

8 Print a short document from a different program that has worked in the past. If this solution
works, th en t he pr ob le m is w ith the pr og r am y o u are usin g. I f thi s so luti on do es no t w ork (th e
document does not print) complete these steps:
a Try printing the job from another computer that has the printer software installed.
b If you connected the printer to the network, connect the printer directly to a computer
with a USB cable. Redirect the printer to the proper port, or reinstall the software,
choosing the new connection type you are using.
9 Print a page from the HP color LaserJet 1500 toolbox.
a If it prints, there might be a problem with the printing software. Uninstall the printing soft-
ware (see “Uninstalling the printing software” on page 18) and then reinstall it (see the
getting started guide).
b If the page does not print, then the problem is with the computer or the program.
10 If the problem is still not resolved, see “Solving general printing problems” on page 83.
82 Problem solving and maintenance ENWW
Page 85

Solving general printing problems
In addition to the problems listed in this section, see “Solving common Macintosh problems” on
page 86 if you are using a Macintosh computer.
Symptom Possible Cause Solution
The print job is extremely
slow.
The printer pulls paper or
print media from the
wrong tray.
The job might be very complex, if it
contains graphics, for example.
The maximum speed is 16 ppm in
black and 4 ppm in color.
Printing speeds might be
automatically reduced when printing
special-sized media.
In the pr inter driver, the Typ e or Size
is set for card stock or other heavy
paper.
The Source (tray) sele cti on mi ght be
incorrect.
● Wait for the job to print.
● Reduce the complexity of the page or try adjusting the
print quality setting s . If this problem occ urs fr equently, add
memory to the printer.
Wait for the print job to finish.
Wait for the print job to finish.
● If y ou are prin ting on hea v y paper, the Type or Size sh ould
be set to a heavy paper setting. The printer prints more
slowly to provide better quality. Wait for the job to print.
● If you are not printing on heavy paper, set Type or Size in
the printer driver to plain paper.
● In the default settings for this printer, select the Paper tab
and ensure that Type is set to plain paper. You can
override this setting from the printer driver when you print
on heavy paper.
● For Windows, ensure that the correct paper source is
selected by clicking File in your application, and then
clicking Page Setup.
Note: If Page Setup or a similar option is not available in
your application , the settin g of the driv e r can be verified by
clicking File, and then clicking Print. In the Print dialog
box, click Properties, and then select the Paper tab to
verify the setting.
● For Macintosh, set the Source in the Print dialog box.
● Remove any paper from other trays to make the printer
select from the desired tray.
The Type or Size setting does not
match the size of pape r or print media
loaded in the tray.
Open the HP color LaserJet 1500 toolbox. Select the Device
tab, and then clic k Settings. C lick Confi gure Device , and then
click Paper Handling. Verify that the paper size and type
settings match the size and type of the paper that is loaded in
the printer .
Paper is loaded in tray1. Remove any paper from tray1. The printer pulls from tray 1 if
you did not specify a tray that had a compatible size or type
loaded and tray 1 is unconfigured.
ENWW Chapter 4 Problem solving and maintenance 83
Page 86

Symptom Possible Cause Solution
Printer does not pull
paper from tray 2.
The printer does not
respond when the Print
command is selected in
the software.
The rear paper length guid e (tra y 2) is
set incorrectly.
The tray is not recognized in the
To set the rear guides properly, see “Loading optional tray 2”
on page 26.
Set the printer software to recognize the tray.
printer software.
If the printer does not pull paper from
either tray, the problem might be the
paper.
● Try a different type or brand of paper.
● Ensure that you are using a high-quality paper made for
laser printers. Coated, photo, and glossy papers are not
supported. See “Print media specifications” on page 109.
To order, see “Accessories and ordering information” on
page 19.
The separation pad and the pick-up
rollers might be worn out.
Replace the separation pad and pick-up rollers. Contact
HP Customer Care to order pa rts. See “HP Customer Care” on
page 3 or see the support flyer that shipped in the printer box.
The printer experienced an error. Check the control panel lights on the printer to determine if an
error exists.
If no control panel lights are on, the
printer is not receiving power.
● Ch eck the po wer ca ble connec tion betwee n the printer and
the power source.
● Check that the power switch is on.
● Check that the power source (outlet or surge protector) is
receiving power.
● If none of the above measures works, contact
HP Customer Care. See “HP Customer Care” on page 3
or see the support flyer that shipped in the printer box.
The printer might be in Manual Fe ed
mode (Attention light blinking and Go
Add paper to tray 1 if it is empty. If paper is already in the tray,
(GO).
press
light on).
The wrong printer was selecte d in the
software.
In the Print or Printer Setup dialog box, make sure that the
HP color LaserJet 1500 is selected as the printer.
There might be a jam. Clear any jams. See “Clearing jams” on page 58.
The printer is on a network and is not
receiving a signal.
The interface cable between the
● Disconnect the printer from the network and attach it
directly to a computer using a USB cable.
● Clear any stopped jobs from the print queue.
● Print a job that you know works.
● Reinstall the printing software.
Disconnect and reconnect the interface cable.
computer (or network) and the printer
is not connected properly.
The interface cable is defective.
● If possible, connect the interface cable to another
computer (or optional external HP Jetdirect print server)
and print a job you know works.
● Try using a different cable.
If the printer is connected to a
computer, the software for the printer
is not configured for the printer port.
Check the printer selection menu in the software to make sure
it is accessing the correct port. If the computer has more than
one port, make sure that the printer is associated with the
correct one.
84 Problem solving and maintenance ENWW
Page 87

Symptom Possible Cause Solution
Pages print, but all colors
do not print or the pages
are completely blank.
The paper curls when
exiting the top output bin .
If pages print completely blank, the
file might have blank pages.
A print cartridge might be low or
empty.
If you are using non-HP print
cartridges, one or more print
cartridges is low or empty. The control
panel lights do not indicate low or
empty for non-HP print cartridges.
The paper needs to print to the
straight-through paper path.
The stack was slightly curled when it
was placed in the tray.
The paper does not meet
specifications.
If you are printing on light media, the
Type setting may not be correct.
Check the file to make sure that it does not contain blank
pages.
Check the printer c ontrol pane l fo r a Supplies Status messa ge,
print a Supplies Status page, or view the
HP color LaserJet 1500 toolbox to see the levels remaining in
the print cartridges. Replace any print cartridges that are low
or empty. Messages are not created for non-HP print
cartridges.
Replace one or more of the print cartridges.
Open the rear output do or to print to the straigh t-through p aper
path. Remove each sheet as it exits the printer.
Tur n the stack over in the tray.
See “Print media specifi cat ions” on page 109.
Select Light in the Type is field in the printer driver.
The printer prints, but the
text is wrong, garbled, or
incomplete.
The interface cable is loose or
defective.
The printer is on a network or s ha ring
device and is not receiving a clear
signal.
The wrong driver was selected in the
software.
The printer driver is malfunctioning. Print a page from the HPcolor LaserJet 1500 toolbox. If the
The program is malfunctioning. Try printing a job from another program.
If the printer is connected to a
computer, the operating system is
malfunctioning.
Disconnect the printer cable and reconnect it. Try a print job
you know works. If possible, attach the cable and printer to
another computer and try a print job that you know works.
Finally, try a new cable.
Disconnect the p rinter from the n etwork and a ttach it di rectly to
a computer with a U SB c able. Print a job that you know works.
In the Print or Printer Setup dialog box, make sure that the
HP color LaserJet 1500 is selected as the printer.
page prints, then the problem is with the printer driver.
Uninstall and reinstall the printer driver.
Uninstall the HPcolor LaserJet 1500 series software and then
reinstall it.
ENWW Chapter 4 Problem solving and maintenance 85
Page 88

Solving common Macintosh problems
In addition to the problems listed in “Solving general printing problems” on page 83 , this section
lists problems that can happen only when using Mac OS 9.x and Mac OS X.
Symptom Possible Cause Solution
Problems in the Chooser (Mac OS 9.x) or in the Print Center (Mac OS X)
The printer driver icon
does not appear in the
Chooser (Mac OS 9.x) or
in the Print Center (Mac
OS X).
The printer driver does
not automatically set up
your selected printer e ve n
though you clicked Auto
Setup in the Chooser
(Mac OS 9.x) or in the
Print Center (Mac OS X).
Printing Errors
A print job was no t sent to
the printer that you
wanted.
Software was not installed correctly. The LaserWriter driver should be present as a part of the Mac
OS. Make sure that the Las erWriter driver is in the Extensions
folder within the systems folder. If not, install the LaserWriter
driver from your Mac OS CD-ROM.
The interface cable might not be high
quality.
An incorrect network might be
selected.
Another printer with the same or
similar name might have received
your print job.
Make sure that you are using a high-quality interface cable.
Make sure that the printer is on the correct network. Select the
Network or AppleTalk Control Panel from Con trol Panels in
the Apple menu and then choose the correct network.
Reinstall the printer software. See the getting started guide.
● Check the AppleTalk name of the printer displayed on the
Configuration page.
● Make sure that the cables are connected correctly, the
printer is on, and the Ready light is on.
86 Problem solving and maintenance ENWW
Page 89

Symptom Possible Cause Solution
USB Problems
You are unable to print
from a third-party USB
card.
When connected using a
USB cable, the printer
does not appear in the
Macintosh Chooser (Mac
OS 9.x) or in the Print
Center (Mac OS X) after
the driver is selected.
This error occurs when the software
for USB printers is not installed.
This problem is caused by either a
software or hardware component.
When adding a third-party USB card, you might need the
Apple USB Adapter Card Support software. The most current
version of this software is available from the Apple website.
Software troubleshooting
● Che ck that your Macintosh su pports USB.
● Verify if your Macintosh has Mac OS 9.x and later.
● Ensure that your Macintosh has the appropriate USB
software fro m Apple.
Note: The iMac and Blue G3 des ktop Macintosh systems mee t
all the requirements to connect to a USB device.
Hardware troubleshooting
● Check that the printer is turned on.
● Verify that the USB cable is properly connected.
● Che ck that you are using the ap pro priate hi gh-s pe ed U SB
cable.
● Ensure that there are not too many USB devices drawing
power from the c hain. Discon nect all devices from the
chain and connect the cab le directly to the U SB port on the
host computer.
● Check to see if more than two nonpowered USB hubs are
connected in a row on the chain. Disconnect all devices
from the chain and connect the cable directly to the USB
port on the host computer.
Note: The iMac keyboard is a nonpowered USB hub.
ENWW Chapter 4 Problem solving and maintenance 87
Page 90

Cleaning the printer
During the printing process, paper, toner and dust particles can accumulate inside the printer.
Over time, this buildup can cause print-quality problems such as toner specks or smearing. This
printer has a cleaning mode that can correct and prevent these types of problems.
To clean the engine
Note The following procedure must be performed from the HP color LaserJet 1500 toolbox, which is
only supported for Windows 98 and later. To clean the engine when the computer is running a
different, supported operating system, see the late-breaking Readme on the root of the CD-ROM,
or visit http://www.hp.com/support/clj1500.
1 Make sure the printer is turned on and in the Ready state.
2 Open the HP color LaserJet 1500 toolbox.
3 On the Troubleshooting tab, click Cleaning Page and click Print. A page with a pattern
prints from the printer.
4 At the printer, remove any paper that might be in tray 1.
5 Remove the page that printed and load it face down into tray 1.
6 At the computer, press Clean.
88 Problem solving and maintenance ENWW
Page 91

Calibrating the printer
The printer automatically calibrates at the following times:
● when the power is turned on,
● every time 100 pages have printed,
● after the printer has been inactive for four or more hours,
● each time the print cartridge is changed.
You can also calibrate the printer manually when you are having color-related issues.
To calibrate the printer at the printer
1 Turn the printer off and then on again.
To calibrate the printer from the HP color LaserJet 1500 toolbox
1 Open the HP color LaserJet 1500 toolbox in one of these ways:
• On the desktop, double-click the HP color LaserJet 1500 toolbox icon.
• On t he Start menu, point to Programs, point to HP color LaserJet 1500, and choose the
HP color LaserJet 1500 toolbox.
2 On the Troubleshooting tab, click Diagnostic Tools (on the left side of the screen).
3 Click Color Calibration.
ENWW Chapter 4 Problem solving and maintenance 89
Page 92

Managing supplies
For warranty information about these supplies, see “Limited warranty for the print cartridges and
imaging drum” on page 95.
Supplies life
The life of the imaging drum depends on the number of black-only or color pages that print jobs
require. An HP color LaserJet 1500 series imaging drum lasts an average of 20,000 pages when
printing black-only pages and 5,000 pages when printing color pages. Actual life lies somewhere
between these two numbers, depending on the number of black-only pages you print versus
color. The average life is between 6,000 and 8,000 pages.
The life of a print cartridge depends on the amount of toner that print jobs require. When printing
text at 5 percent coverage, an HP color LaserJet 1500 series cyan, magenta, or yellow print
cartridge lasts an average of 4,000 pages, and a black print cartridge lasts an average of 5,000
pages.
Checking and ordering supplies
You can check the supplies state using the printer control panel, printing a Supplies Status page,
or through the HP color LaserJet 1500 toolbox. HP recommends that you place an order for a
replacement print cartridge when you first receive the Low message for a print cartridge. The
Low message indicates that approximately two weeks of life remains. When you use a new,
authentic HP print cartridge or imaging drum, you can obtain the following types of supplies
information:
● amount of cartridge or drum life remaining
● estimated number of pages remaining
● number of pages printed
● other supplies information
Note If the printer is directly connected to a computer, you can set Printer Status and Alerts to notify
you when supplies are low.
To check status and order using the control panel
Do one of the following:
● Check the supplies status lights on the printer control panel. These lights indicate when a
print cartridge or the imaging drum is low or empty. The lights also indicate when a non-HP
print cartridge is first installed. See “Supplies Status lights” on page 64 to interpret the light
patterns.
● Press (GO) and (CANCEL JOB) simultaneously. A Supplies Status page (and the
Configuration page) prints. Check the supplies levels on the Supplies Status page. See
“Special pages” on page 50 for more information.
If the supplies levels are low, you can order supplies through your local HP dealer, by telephone,
or online. See “Accessories and ordering information” on page 19 for part numbers. To order
online, visit http://www.hp.com
Accessories, and then click Printing and Digital Imaging.
, click Products & Services, click Options, Supplies, and
90 Problem solving and maintenance ENWW
Page 93

To check and order using the HP color LaserJet 1500 toolbox
If the printer is directly connected to the computer, you can set the Printer Status and Alerts
section of the HP color LaserJet 1500 toolbox to notify you when the supplies are low. On both
directly connected and network printers, you can receive messages that supplies are low or
empty if you choose to receive alerts about events that do not prevent the printer from printing (a
print cartridge is low) or that do prevent the printer from printing (a print cartridge is empty). After
receiving a message, click Order Supplies Online in Printer Status and Alerts to connect to the
Supplies section of the HP website. You must have Internet access to connect to the website.
Storing supplies
Follow these guidelines for storing print cartridges and the imaging drum:
● Do not remove the print cartridge or imaging drum from its package until you are ready to
use it.
CAUTION T o pre vent damage, do not expose the print cartridge or imaging drum to light for more than a few
minutes.
● See “Environmental specifications” on page 101 for operating and storage temperature
ranges.
● Store the supply in a horizontal position.
● Store the supply in a dark, dry location away from heat and magnetic sources.
Replacing and recycling supplies
To install a new HP print cartridge or imaging drum and recycle the used one, follow the
instructions included in the box containing the new supply, or see the getting started guide. See
“HP LaserJet printing supplies” on page 103 for more information about recycling.
ENWW Chapter 4 Problem solving and maintenance 91
Page 94

HP policy on non-HP supplies
Hewlett-Packard Company cannot recommend the use of non-HP supplies, either new or
remanufactured. Because they are not HP products, HP cannot influence their design or control
their quality. Service or repairs required as a result of using a non-HP supply will not be covered
under the printer warranty.
When you insert a supply into the printer, the printer will inform you if the supply is not a genuine
HP supply . If you insert a genuine HP supply that has reached the low state from another HP
printer, the printer identifies the supply as non-HP. Simply return the supply to the original printer
to reactivate HP features and functionality.
Resetting the printer for non-HP supplies
When you install a non-HP print cartridge or imaging drum, the light next to the print cartridge or
imaging drum you replaced blinks and the Attention light is on. You must press (C
the first time you install this non-HP supply. The status lights will not indicate when this type of
supply is low or empty.
CAUTION The printer will not stop printing when this type of supply is empty . Printer damage could occur if
the printer prints with an empty print cartridge or imaging drum. See “Hewlett-Packard limited
warranty statement” on page 94 and “Limited warranty for the print cartridges and imaging drum”
on page 95 .
ANCEL JOB)
HP fraud hotline
Call the HP fraud hotline if the supplies status lights or the Status and Alerts page in the
HP color LaserJet 1500 toolbox indicates that the print cartridge or imaging drum is not an
HP print cartridge and you think that it is genuine. HP will help determine if the product is
genuine and take steps to resolve the problem.
Your print cartridge or imaging drum might not be a genuine HP one if you notice the following
issues:
● You are experiencing a high number of problems with the print cartridge or imaging drum.
● The print cartridge or imaging drum does not look like it usually does (for example, the pull
tab or the box is different).
In the United States, call toll-free: 1-877-219-3183.
Outside the United States, you can call collect. Dial the operator and ask to place a collect call to
this telephone number: 1-770-263-4745. If you do not speak English, a representative at the HP
fraud hotline who speaks your language will assist you. Or, if someone who speaks your
language is not available, a language line interpreter will connect approximately one minute after
the beginning of the call. The language line interpreter is a service that will translate between you
and the representative for the HP fraud hotline.
92 Problem solving and maintenance ENWW
Page 95

A
Service and support
Introduction
This section contains support and service information.
● “Hewlett-Packard limited warranty statement” on page 94
● “Limited warranty for the print cartridges and imaging drum” on page 95
● “Availability of support and service” on page 96
● “HP maintenance agreements” on page 96
● “Repacking the printer” on page 97
ENWW Appendix A Service and support 93
Page 96

Hewlett-Packard limited warranty statement
HP PRODUCT DURATION OF WARRANTY
HP color LaserJet 1500L, 1500 1 year, Return to Authorized Service Center
1. HP warrants to you, the end-user customer, that HP hardware and accessories will be free from defects in
materials and workmanship after the date of purchase, for the period specified above. If HP receives notice of
such defects during the warranty period, HP will, at its option, either repair or replace products which prove to be
defective. Replacement products may be either new or equivalent in performance to new.
2. HP warrants to you that HP software will not fail to execute its programming instructions after the date of
purchase, for the period specified above, due to defects in material and workmanship when properly installed and
used. If HP receives notice of such defects during the warranty period, HP will replace software which does not
execute its programming instructions due to such defects.
3. HP does not warrant that the operation of HP products will be uninterrupted or error free. If HP is unable, within a
reasonable time, to repair or replace any product to a condition as warranted, you will be entitled to a refund of
the purchase price upon prompt return of the product.
4. HP products may contain remanufactured parts equivalent to new in performance or may have been subject to
incidental use.
5. Warranty does not apply to defects resulting from (a) improper or inadequate maintenance or calibration,
(b) software, interfacing, parts or supplies not supplied by HP, (c) unauthorized modification or misuse,
(d) operation outside of the published environmental specifications for the product, or (e) improper site
preparation or maintenance.
6. T O THE EXTEN T ALL O WED BY LOCA L LAW, THE ABOVE WARRANTIES ARE EX CLUSIV E AND N O O T HER
WARRANTY OR CONDITION, WHETHER WRITTEN OR ORAL, IS EXPRESSED OR IMPLIED AND HP
SPECIFICALLY DISCLAIMS ANY IMPLIED WARRANTIES OR CONDITIONS OF MERCHANTABILITY,
SATISFACTORY QUALITY, AND FITNESS FOR A PARTICULAR PURPOSE. Some countries/regions, states or
provinces do not allow limitations on the duration of an implied warranty, so the above limitation or exclusion
might not apply to you. This warranty gives you specific legal rights and you might also have other rights that vary
from country/region to country/region, state to state, or province to province.
7. HP’s limited warranty is valid in any country/region or locality where HP has a support presence for this product
and where HP has marketed this product. The level of warranty service you receive may vary according to local
standards. HP will not alter form, fit or function of the product to make it operate in a country/region for which it
was never intended to function for legal or regulatory reasons.
8. T O THE EX TENT ALLO W ED B Y LOCA L LAW, THE REM EDIES IN THI S WARRANTY STA TEMENT A RE YOUR
SOLE AND EXCLUSIVE REMEDIES. EXCEPT AS INDICATED ABOVE, IN NO EVENT WILL HP OR ITS
SUPPLIERS BE LIABLE FOR LOSS OF DATA OR FOR DIRECT, SPECIAL, INCIDENTAL, CONSEQUENTIAL
(INCLUDING LOST PROFIT OR DATA), OR OTHER DAMAGE, WHETHER BASED IN CONTRACT, TORT, OR
OTHERWISE. Some countries/regions, states or provinces do not allow the exclusion or limitation of incidental or
consequential damages, so the above limitation or exclusion may not apply to you.
THE WARRANTY TERMS CONTAINED IN THIS STATEMENT, EXCEPT TO THE EXTENT LAWFULLY
PERMITTED, DO NOT EXCLUDE, RESTRICT OR MODIFY AND ARE IN ADDITION TO THE MAND ATORY
STATUTORY RIGHTS APPLICABLE TO THE SALE OF THIS PRODUCT TO YOU.
94 Service and support ENWW
Page 97

Limited warranty for the print cartridges and imaging drum
This HP product is warranted to be free from defects in materials and workmanship during its
useful life (end of life is indicated by a printer control panel low-life message).
This warranty does not cover products that have been modified, refurbished, remanufactured,
misused or tampered with in any way.
This limited warranty gives you specific legal rights. You may have other rights which vary from
state to state, province to province and country/region to country/region.
THE ABOVE WARRANTIES ARE EXCLUSIVE AND NO OTHER WARRANTY, WHETHER
WRITTEN OR ORAL, IS EXPRESSED OR IMPLIED. THE HEWLETT-PACKARD COMPANY
SPECIFICALLY DISCLAIMS THE IMPLIED WARRANTIES OR MERCHANTABILITY AND
FITNESS FOR A PARTICULAR PURPOSE. TO THE EXTENT ALLOWED BY APPLICABLE
LAW, IN NO EVENT SHALL HEWLETT-PACKARD COMPANY BE LIABLE FOR ANY
INCIDENTAL, CONSEQUENTIAL, SPECIAL, INDIRECT, PUNITIVE, OR EXEMPLARY
DAMAGES OR LOST PROFITS FROM ANY BREACH OF THIS WARRANTY OR
OTHERWISE.
In the event that your product proves to be defective, please return to place of purchase with a
written description of the problem.
ENWW Appendix A Service and support 95
Page 98

Availability of support and service
Around the world, HP provides a variety of service and support options for purchase. Availability
of these programs will vary depending upon your location.
HP maintenance agreements
HP has several types of maintenance agreements that meet a wide range of support needs.
Maintenance agreements are not part of the standard warranty. Support services vary by area.
Contact HP Customer Care to determine the services available to you and for more information
about maintenance agreements. In general, the printer will have the following maintenance
agreements:
On-site service agreements
To provide you with the level of support best suited to your needs, HP has on-site service
agreements with three response times:
Priority On-Site Service
This agreement provides 4-hour service response to your site for calls made during normal HP
business hours.
Next-Day On-Site Service
This agreement provides support by the next working day following a service request. Extended
coverage hours and extended travel beyond HP’s designated service zones are available on
most on-site agreements (for additional charges).
Weekly (Volume) On-Site Service
This agreement provides scheduled weekly on-site visits for organizations that use many
HP products. This agreement is designated for sites using 25 or more workstation products,
including printer s, plotters, compu t ers, and disk dri ves.
96 Service and support ENWW
Page 99

Repacking the printer
If HP Customer Care determines that your printer needs to be returned to HP for repair, follow
the steps below to repack the printer before shipping it.
CAUTION Shipping damage as a result of inadequate packing is the customer’s responsibility.
To repack the printer
1 Remove and retain the imaging drum.
2 Remove and retain all four print cartridges. To remove them:
a Open the top cover and remove the print cartridge that is in the access position.
b Close the top cover and press (R
c Open the top cover and remove the print cartridge that is now in the access position.
d Repeat steps b and c to remove the two remaining print cartridges.
CAUTION It is extremely important to remove the print cartridges before shipping the printer. Print cartridges
left in the printer during shipping will leak and entirely cover the printer engine and other parts
with toner.
T o prevent damage to the print cartridge, avoid touching the roller on it, and store the print cartridge
in its original packing material or so that it is not exposed to light.
3 If the problem does not involve optional tray 2, remove and retain the tray.
4 Remove and retain the power cable, interface cable, and optional accessories.
5 If possible, include print samples and 50 to 100 sheets of paper or other print media that did
not print correctly.
6 Include a completed copy of the “Service information form” on page 98.
7 Use the original shipping container and packing material, if possible. If you have already
disposed of the printer packing material, contact a local mailing service for information about
repacking the printer. HP recommends insuring the equipment for shipment.
OTATE CAROUSEL).
ENWW Appendix A Service and support 97
Page 100

Service information form
WHO IS RETURNING THE EQUIPMENT?
Person to contact: __________________________________________ Phone: ________________
Alternate contact: __________________________________________ Phone: ________________
Return shipping address: Special shipping instructions:
Date:
WHAT ARE YOU SENDING?
Model name: Model number: Serial number:
Please attach any relevant printouts. Do NOT ship accessories (manuals, cleaning supplies, etc.) that are not required to complete the repair.
HAVE YOU REMOVED THE PRINT CARTRIDGES AND IMAGING DRUM?
You must remove them before shipping the printer, unless a mechanical problem prevents you from doing so.
❏ Yes. ❏ No, I cannot remove them.
WHAT NEEDS TO BE DONE? (Attach a separate sheet if necessary.)
1. Describe the conditions of the failure. (What was the failure? What were you doing when the failure occurred? What software
were you running? Is the failure repeatable?)
2.If the failure is intermittent, how much time elapses between failures? _______________________________
3.If the unit connected to any of the following, give the manufacturer and model number.
Personal computer: Modem: Network:
4.Additional comments:
HOW WILL YOU PAY FOR THE REPAIR?
❏ Under warranty Purchase/received date: ____________________________
(Attach proof of purchase or receiving document with original received date.)
❏ Maintenance contract number: ______________________
❏ Purchase order number: ___________________________
Except for contract and warranty service, a purchase order number and/or authorized signature must accompany any
request fo r serv ice. If stand ard repair prices do no t apply, a minimum purchase order is requi red. Standard re pair prices can be
obtained by contacting an HP-authorized repair center.
Authorized signature: ____________________________________________ Phone: _________________________
Billing address: Special billing instructions:
98 Service and support ENWW
 Loading...