

Page 1
hp color 9850mfp
quick reference
Page 2

Page 3

Copyright Information
© 2004 Copyright Hewlett-Packard
Development Company, L.P.
Reproduction, adaptation or translation
without prior written permission is prohibited,
except as allowed under the copyright laws.
The information contained herein is subject to
change without notice.
The only warranties for HP products and
services are set forth in the express warranty
statements accompanying such products and
services. Nothing herein should be construed
as constituting an additional warranty. HP
shall not be liable for technical or editorial
errors or omissions contained herein.
Part number: Q3225-90906
Edition 1, 3/2004
FCC Class A Statement
This equipment has been tested and found to
comply with the limits for a Class A digital
device, pursuant to Part 15 of the FCC Rules.
These limits are designed to provide
reasonable protection against harmful
interference when the equipment is operated
in a commercial environment. This equipment
generates, uses and can radiate radio
frequency energy and, if not installed and
used in accordance with the instruction
manual, may cause harmful interference to
radio communications. Operation of this
equipment in a residential area is likely to
cause harmful interference, in which case the
user will be required to correct the
interference at his own expense. The end
user of this product should be aware that any
changes or modifications made to this
equipment without the approval of
Hewlett-Pac kard could result in the product
not meeting the Class A limits, in which case
the FCC could void the user’s authority to
operate the equipment.
Trademark Credits
All products mentioned herein may be
trademarks of their respective companies.
Page 4

ii ENWW
Page 5

Contents
1 Getting started
MFP parts . . . . . . . . . . . . . . . . . . . . . . . . . . . . . . . . . . . . . . . . . . . . . . . . . . . . . . . . . . . . . 2
The MFP . . . . . . . . . . . . . . . . . . . . . . . . . . . . . . . . . . . . . . . . . . . . . . . . . . . . . . . . . . . 2
The control panel . . . . . . . . . . . . . . . . . . . . . . . . . . . . . . . . . . . . . . . . . . . . . . . . . . . . 3
The Main screen (touch screen) . . . . . . . . . . . . . . . . . . . . . . . . . . . . . . . . . . . . . . . . . 4
Turning the MFP on and off . . . . . . . . . . . . . . . . . . . . . . . . . . . . . . . . . . . . . . . . . . . . 6
To turn on the power. . . . . . . . . . . . . . . . . . . . . . . . . . . . . . . . . . . . . . . . . . . . . . . . . . 6
To turn off the power. . . . . . . . . . . . . . . . . . . . . . . . . . . . . . . . . . . . . . . . . . . . . . . . . . 7
Help mode . . . . . . . . . . . . . . . . . . . . . . . . . . . . . . . . . . . . . . . . . . . . . . . . . . . . . . . . . . . . . 8
To display the Help screen from the Main screen. . . . . . . . . . . . . . . . . . . . . . . . . . . . 8
To display the Help Screen from other screens . . . . . . . . . . . . . . . . . . . . . . . . . . . . . 9
2 Copying
Selecting color mode. . . . . . . . . . . . . . . . . . . . . . . . . . . . . . . . . . . . . . . . . . . . . . . . . . . . 12
Improving color copy . . . . . . . . . . . . . . . . . . . . . . . . . . . . . . . . . . . . . . . . . . . . . . . . . . . . 13
Using the scanning glass. . . . . . . . . . . . . . . . . . . . . . . . . . . . . . . . . . . . . . . . . . . . . . . . . 13
Using the RADF (ADF) . . . . . . . . . . . . . . . . . . . . . . . . . . . . . . . . . . . . . . . . . . . . . . . . . . 14
Choosing a paper size. . . . . . . . . . . . . . . . . . . . . . . . . . . . . . . . . . . . . . . . . . . . . . . . . . . 17
To select copy size automatically (APS). . . . . . . . . . . . . . . . . . . . . . . . . . . . . . . . . . 17
To reduce and enlarge . . . . . . . . . . . . . . . . . . . . . . . . . . . . . . . . . . . . . . . . . . . . . . . 18
Duplexing (2-sided copying) . . . . . . . . . . . . . . . . . . . . . . . . . . . . . . . . . . . . . . . . . . . . . . 20
Using the RADF (ADF) . . . . . . . . . . . . . . . . . . . . . . . . . . . . . . . . . . . . . . . . . . . . . . . 20
Using the scanner glass . . . . . . . . . . . . . . . . . . . . . . . . . . . . . . . . . . . . . . . . . . . . . . 22
Using the optional finisher features . . . . . . . . . . . . . . . . . . . . . . . . . . . . . . . . . . . . . . . . . 25
To staple . . . . . . . . . . . . . . . . . . . . . . . . . . . . . . . . . . . . . . . . . . . . . . . . . . . . . . . . . . 25
To punch holes . . . . . . . . . . . . . . . . . . . . . . . . . . . . . . . . . . . . . . . . . . . . . . . . . . . . . 25
Making folded booklets . . . . . . . . . . . . . . . . . . . . . . . . . . . . . . . . . . . . . . . . . . . . . . . . . . 26
To make a triple fold . . . . . . . . . . . . . . . . . . . . . . . . . . . . . . . . . . . . . . . . . . . . . . . . . 28
To insert covers. . . . . . . . . . . . . . . . . . . . . . . . . . . . . . . . . . . . . . . . . . . . . . . . . . . . . 29
Making trimmed booklets. . . . . . . . . . . . . . . . . . . . . . . . . . . . . . . . . . . . . . . . . . . . . . . . . 30
Cover sheet feeding . . . . . . . . . . . . . . . . . . . . . . . . . . . . . . . . . . . . . . . . . . . . . . . . . . . . 33
Off-line finishing. . . . . . . . . . . . . . . . . . . . . . . . . . . . . . . . . . . . . . . . . . . . . . . . . . . . . . . . 36
3 Loading trays
Loading paper . . . . . . . . . . . . . . . . . . . . . . . . . . . . . . . . . . . . . . . . . . . . . . . . . . . . . . . . . 40
Loading paper in Trays 1, 2, and 3 . . . . . . . . . . . . . . . . . . . . . . . . . . . . . . . . . . . . . . 40
Loading paper in the multi-sheet bypass tray . . . . . . . . . . . . . . . . . . . . . . . . . . . . . . 43
Loading paper in the HP 2500-Sheet High Capacity Input (HCI) . . . . . . . . . . . . . . . 44
Loading tabbed sheets in Tray 1, 2, or 3. . . . . . . . . . . . . . . . . . . . . . . . . . . . . . . . . . 46
Loading tabbed sheets in the HCI. . . . . . . . . . . . . . . . . . . . . . . . . . . . . . . . . . . . . . . 47
Loading tabbed sheets in the multi-sheet bypass tray . . . . . . . . . . . . . . . . . . . . . . . 48
Supported paper sizes for trays. . . . . . . . . . . . . . . . . . . . . . . . . . . . . . . . . . . . . . . . . . . . 49
4 Adding toner
Adding toner . . . . . . . . . . . . . . . . . . . . . . . . . . . . . . . . . . . . . . . . . . . . . . . . . . . . . . . . . . 52
ENWW iii
Page 6

5 Emptying the trash basket
Empty trash basket of the HP 3 Hole Punch Kit . . . . . . . . . . . . . . . . . . . . . . . . . . . . . . . 58
Empty trash basket of the HP Trimmer Unit . . . . . . . . . . . . . . . . . . . . . . . . . . . . . . . . . . 60
6 Clearing jams
Clearing paper jams . . . . . . . . . . . . . . . . . . . . . . . . . . . . . . . . . . . . . . . . . . . . . . . . . . . . 64
When “JAM” appears on the folder key (or arrow key flashes). . . . . . . . . . . . . . . . . 64
Clearing staple jams . . . . . . . . . . . . . . . . . . . . . . . . . . . . . . . . . . . . . . . . . . . . . . . . . . . . 66
Appendix A Paper Sizes
Appendix B Warranty and regulatory information
Hewlett-Packard limited warranty statement. . . . . . . . . . . . . . . . . . . . . . . . . . . . . . . 71
Index
iv ENWW
Page 7

1Getting started
ENWW 1
Page 8
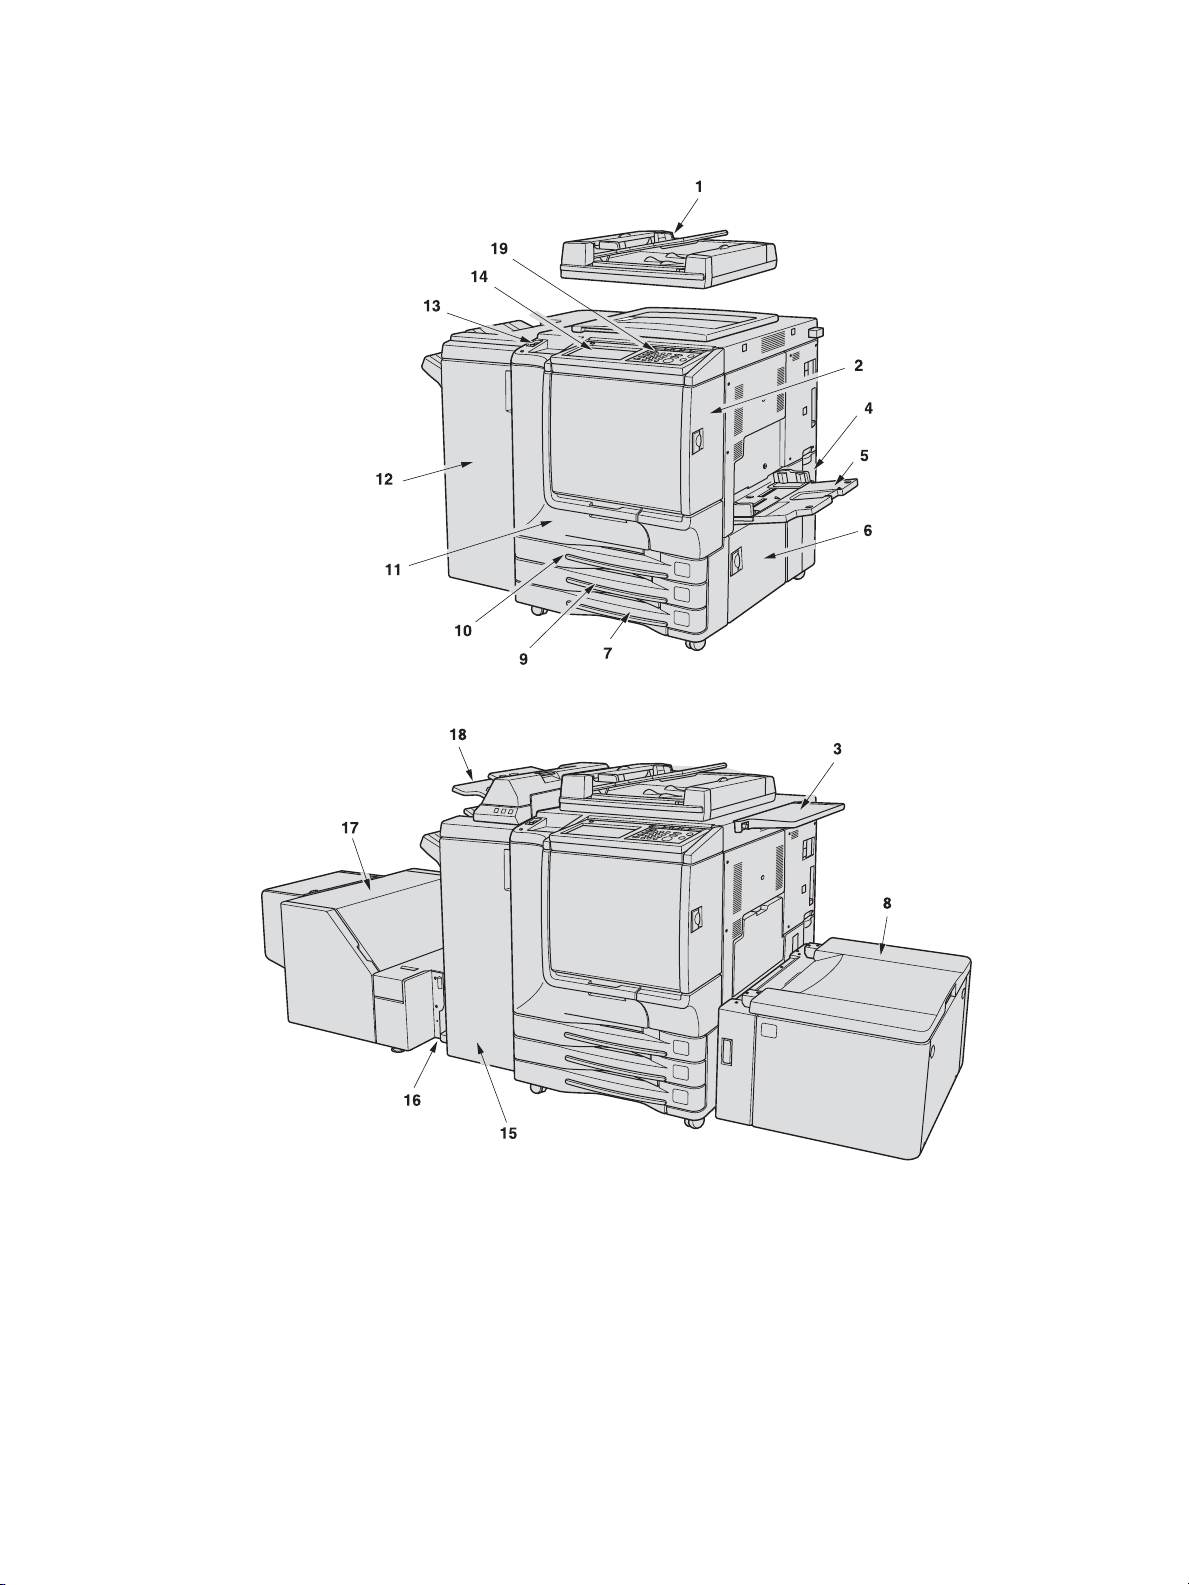
MFP parts
The MFP
1 HPAutomatic Document Feeder (RADF (ADF)) automatically feeds multiple
originals, one at a time, to the scanner glass for copying.
2 Toner access door opens to replenish the black or color toner.
3 Work table provides a convenient workspace for documents before and after
copying.
4 Toner recovery box opens to replace the filled toner box with a new one.
5 Multi-sheet bypass tray opens to use copy paper of another size or type than
those loaded in the engine trays or HCI.
6 Right side door opens to allow removal of misfed paper.
2 1 Getting started ENWW
Page 9
7 Tray 3 (universal tray) is user-adjustable and holds 400 sheets (28 lb paper)
from 330 by 483 mm (13 by 19 inches) to 139 by 216 mm (5.5 by 8.5R inches).
8 Tray 4/HCI (HP 2500-Sheet High Capacity Input (HCI)) holds 2,200 sheets (28 lb
paper) from 330 by 483 mm (13 by 19 inches) to Letter.
9 Tray 2 (universal tray) is user-adjustable and holds 400 sheets (28 lb paper)
from 330 by 483 mm (13 by 19 inches) to 139 by 216 mm (5.5 by 8.5R inches).
10 Tray 1 (universal tray) is user-adjustable and holds 400 sheets (28 lb paper)
from 330 by 483 mm (13 by 19 inches) to 139 by 216 mm (5.5 by 8.5R inches).
11 Front door opens to allow removal of misfed paper.
12 HP 3000-Sheet Stapler/Stacker (optional) sorts, staple-sorts, or groups copies
into finished sets.
13 Power switch turns the MFP power on/off when pressed.
14 Liquid crystal display (LCD) Touch display shows interactiv e operation screens.
15 HP 3000-Sheet Multifunction Finisher (optional) sorts, staple-sorts, or groups
copies into finished sets. The HP 3000-Sheet Multifunction Finisher also folds
or staples and folds copies into booklet-style sets, or folds a maxim um of t hree
copies into tri-fold documents.
16 HP Trimmer Adapter Kit (optional) connects the Finisher and HP Trimmer Unit.
17 HP Trimmer Unit (optional) trims the end of booklet.
18 HP Post Insertion Kit (optional) loads cover sheet paper and feeds the sheet as
cover to the sorted sets, used in combination with HP 3000-Sheet
Stapler/Stacker and HP 3000-Sheet Multifunction Finisher.
19 Control panel controls MFP operations and displays messages as required.
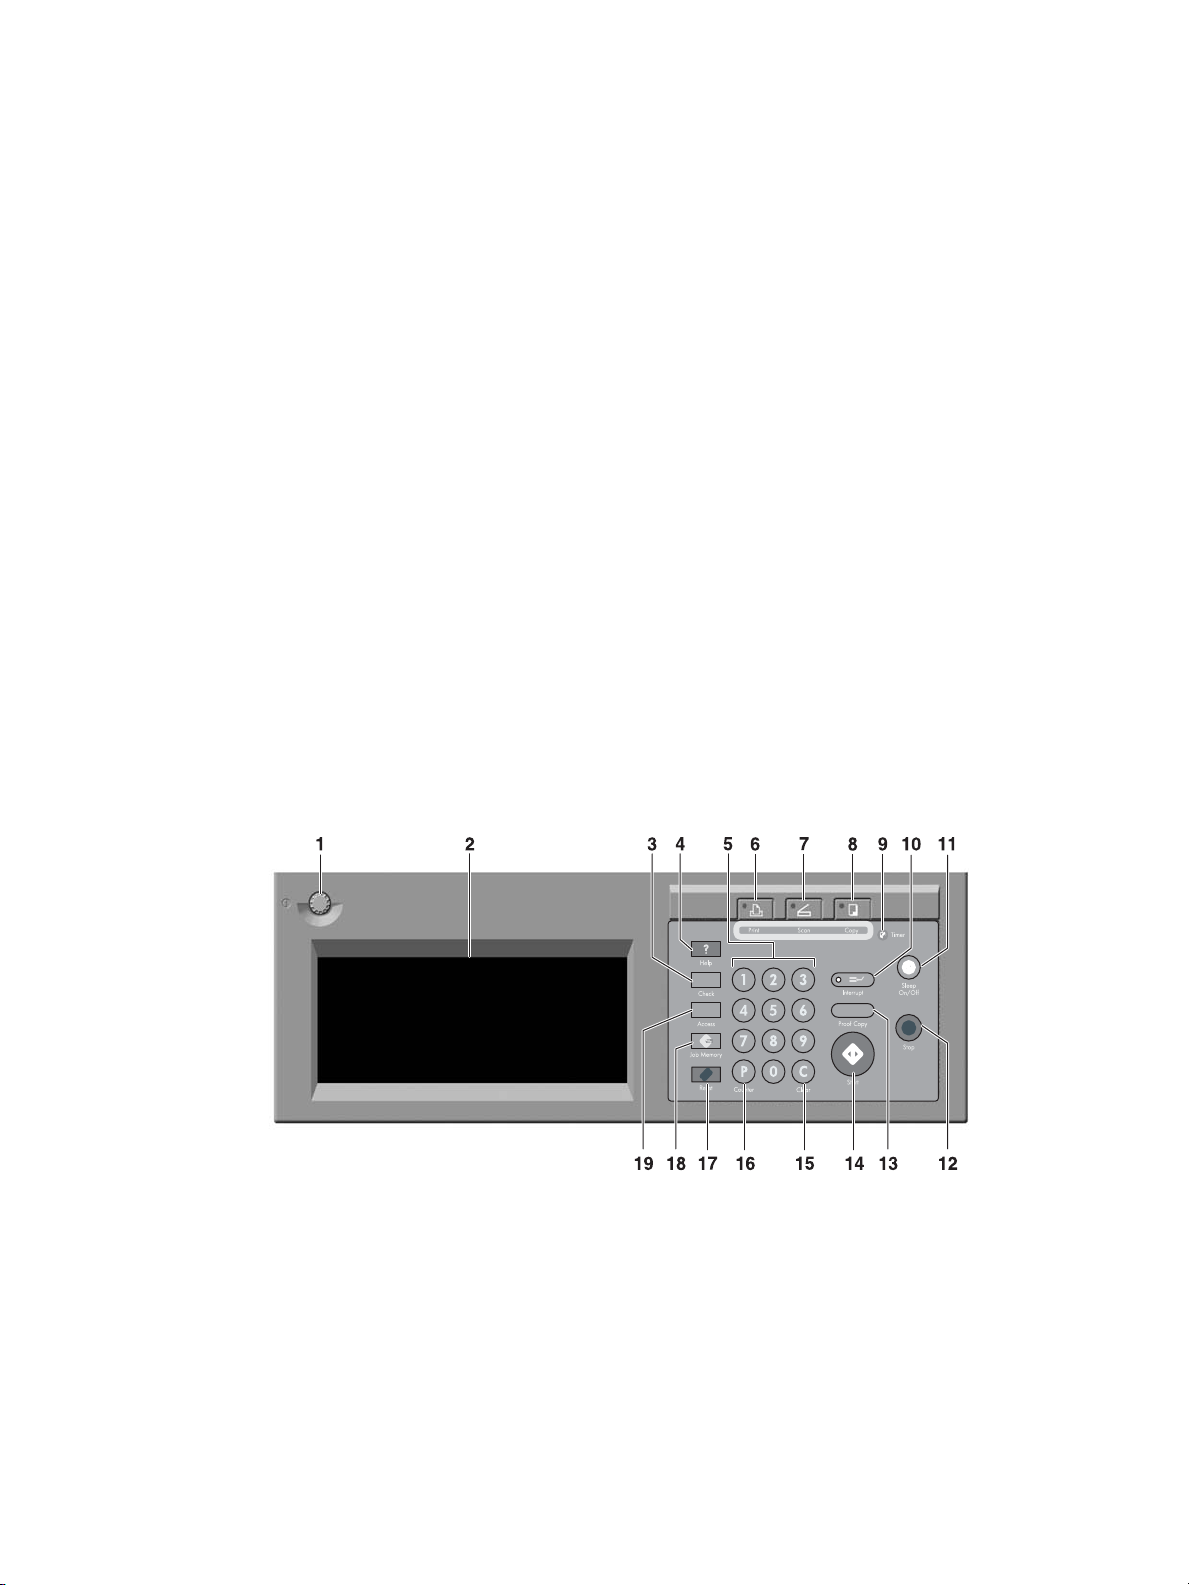
The control panel
1 CONTRAST ADJUSTMENT DIAL can be turned to adjust the touch panel
contrast.
2 LCD TOUCH DISPLAY shows engine and copying status, help information,
interactive screens, and touch keys for selecting all functions.
3 Check displays a screen showing all settings that are selected for the current
job.
4 Help displays a screen with help for the currently selected function, or to
access the Key Operator Mode screen.
5 KEYPAD allows numeric values to be typed.
ENWW MFP parts 3
Page 10

6 PRINTER switches the engine operation mode to printer. This key does not
function at present.
7 SCANNER switches the engine operation mode to scanner.
8 COPY switches the engine operation mode to copy.
9 Timer lights when the timer function is set.
10 Interrupt stops copying in progress to allow copying from the scanner glass.
11 Sleep On/Off activates power-saving mode for times when the MFP is inactive,
or activates Timer Interrupt mode when the Weekly Timer function is active.
12 Stop key stops the copying sequence and deletes the stored memory.
13 Proof Copy outputs a single set of copies to confirm whether the current
settings are selected properly.
14 Start activates copying or scanning.
15 (C) (Clear) allows resetting of print quantity.
16 (P) (Counter) displays the Counter screen or accesses programming modes for
setting special functions.
17 Reset restores the MFP to automatic mode settings or to Key Operator settings.
18 Job Memory displays screens for selecting job memory/job recall functions.
19 Access sets the engine to allow copying only when the Copy monitor password
is entered.
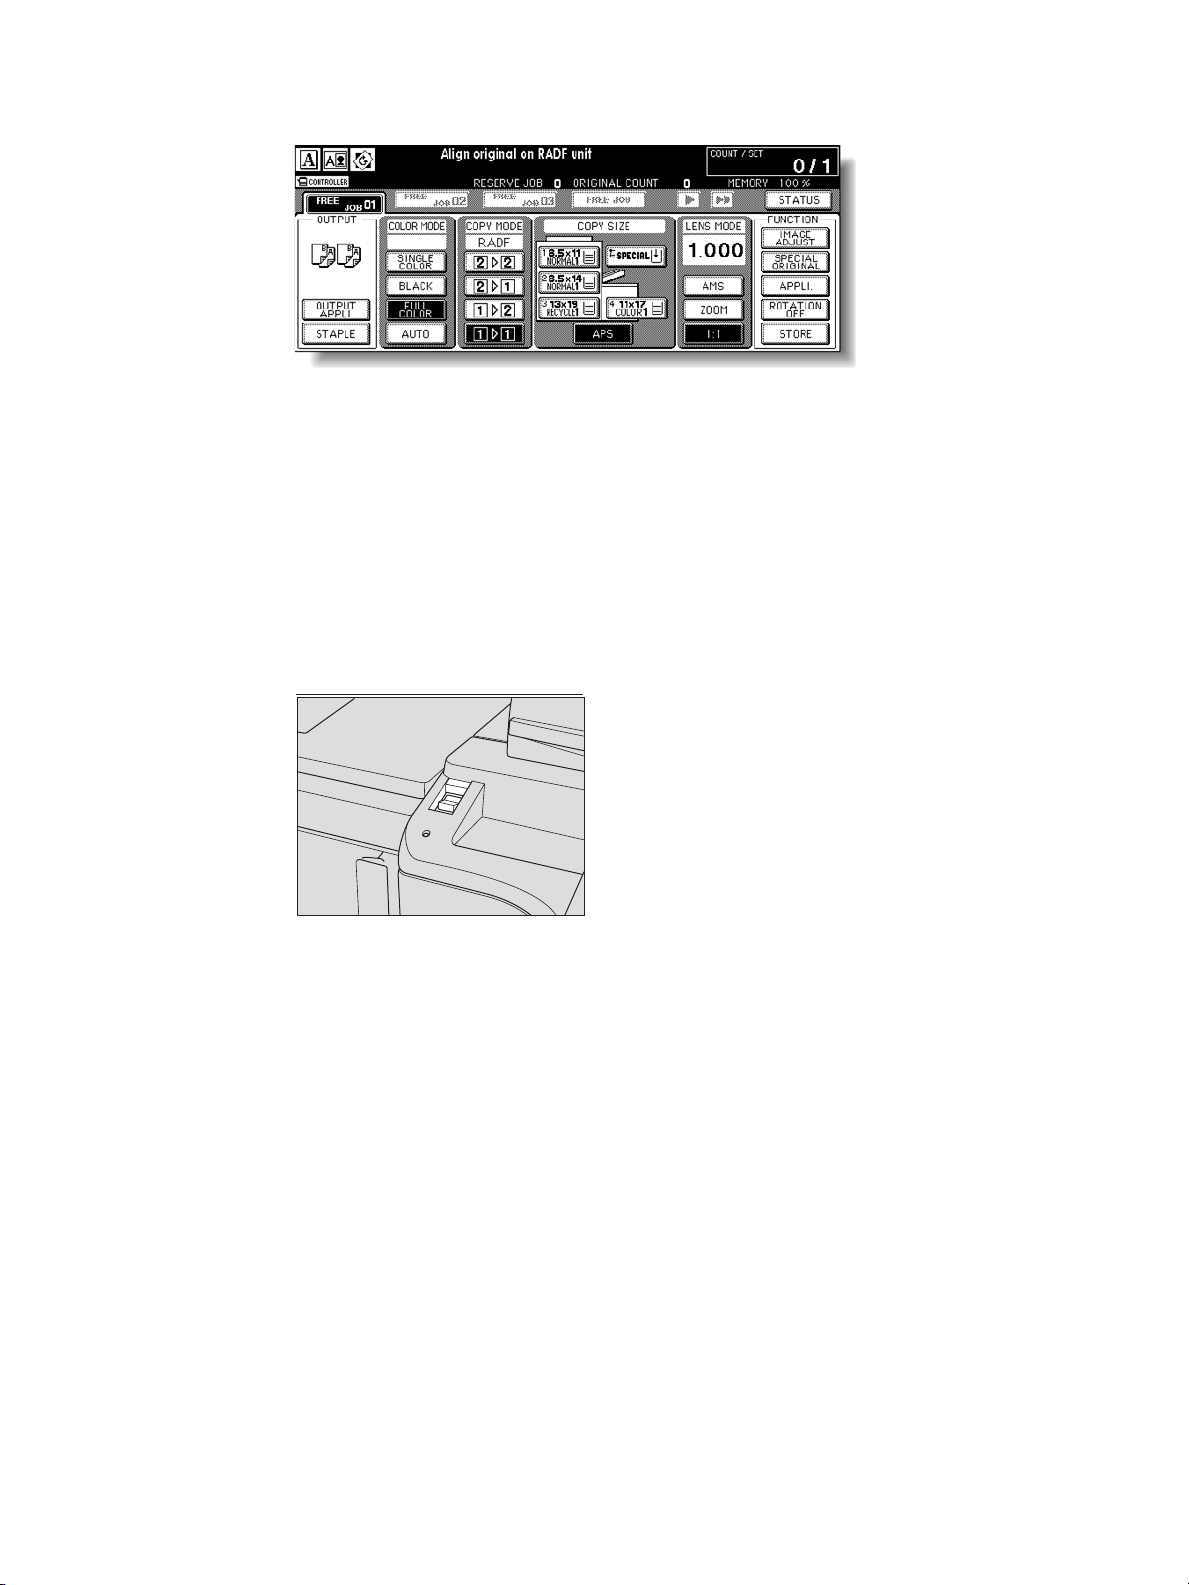
The Main screen (touch screen)
1 Folder keys:
FREE JOB is selected to specify copy job conditions.
When scanning starts, FREE JOB changes to SCAN JOB, and then changes to
PRINT JOB when the engine starts printing.
FREE JOB at the right side of SCAN JOB or PRINT JOB can be touched to
specify reserve job conditions. Up to nine reserve jobs can be set. The arrow
keys at the right side of folder keys are used to scroll.
4 1 Getting started ENWW
Page 11

2 Word icons:
The ADD TONER icon displays when the toner supply becomes low. The toner
color to be supplied is indicated by a letter; C (cyan), M (magenta), Y (yellow), or
K (black).
The Printer icon indicates the engine status when operating as a printer.
3 Graphic icons:
The Original direction icon indicates the original direction specified on the
Special Original popup menu.
The Image adjust icon indicates the Enhance mode specified on the Special
Original popup menu.
The Rotation icon is displayed when Rotation automatically functions.
The Toner recovery box icon is displayed when replacement of the toner
recovery box is due.
The PM icon is displayed when preventive maintenance is due.
4 The Message area displays the engine status and procedure required at that
time.
5 Reserve job counts the reserve jobs already specified.
6 Original count counts the original pages placed in the document feeder as the y
are scanned.
7 The TYPE/SIZE key appears when the Bypass key is selected, and is touched to
specify the type and size of the paper loaded in the multi-sheet bypass tray.
8 The Count/Set indicator indicates the print quantity entered from the control
panel keypad, and also indicates the print count on the left of the set count
while printing.
9 The Memory indicator indicates the remaining memory available for the next
operation.
10 The STATUS key allows you to view the current job status, to change the
printing order of reserve jobs, and to cancel printing a reserve job.
11 The IMAGE ADJUST key allows you to display five sorts of the Image
Adjustment Setting screens to adjust the image quality.
12 The SPECIAL ORIGINAL key allows you to s pecify the condition of originals to
be scanned.
13 The OUTPUT APPLI (Application) key allows you to select various application
functions.
14 The ROTATION OFF key allows you to release the rotation function.
15 The STORE key allows you to store scanned images into memory.
16 The Lens mode area is used to select the desired magnification ratio.
17 The Copy size area is used to select the desired copy size or automatic paper
selection (APS).
18 The Copy mode area is used to select the copy mode (11, 12, 21, or 22).
19 The Color mode area is used to specify the desired color mode (single color,
black, full color, or auto).
20 The Output mode keys are used to specify the desired output mode.
21 The Output icon area displays the appropriate output icon according to the
selected output mode.
ENWW MFP parts 5
Page 12
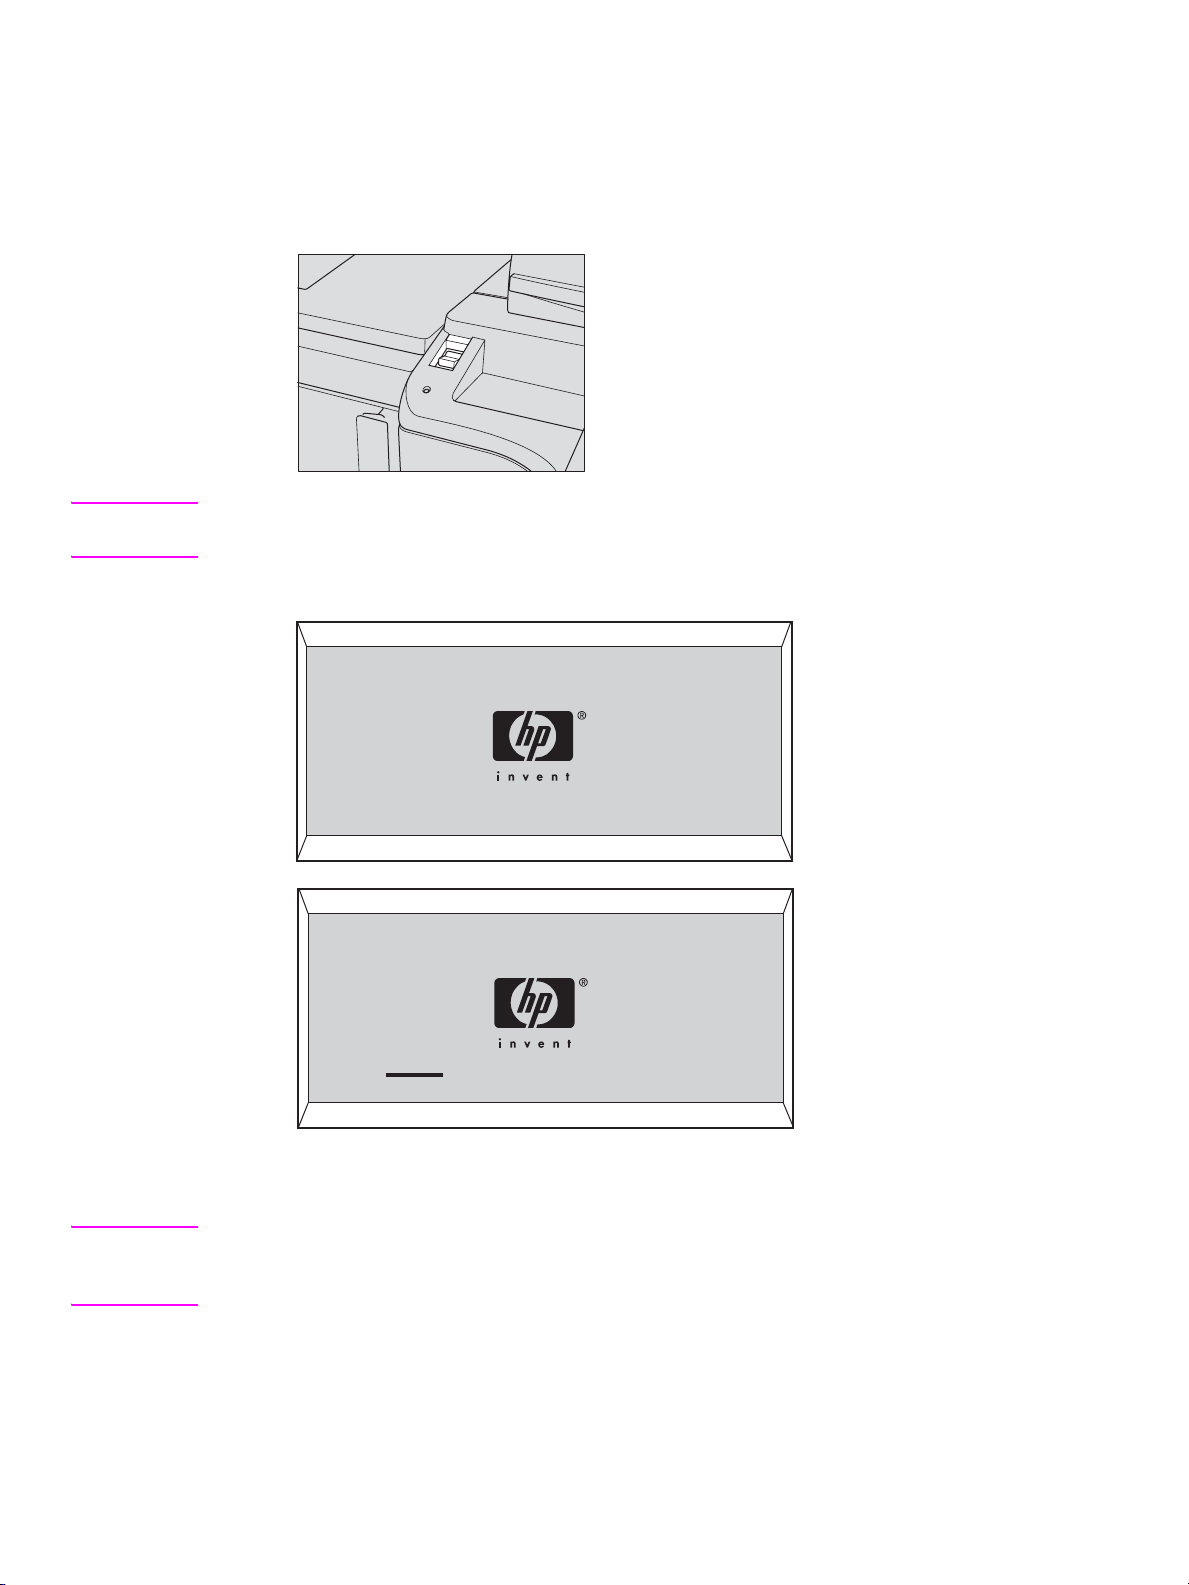
Turning the MFP on and off
To turn on the power
1 Turn on the power switch.
The power switch is located on the left side of the control panel.
.
Note The main power switch is located on the upper-left side of the internal engine. Do not use the main
power switch in usual operation.
2 The Wake-up screen and Warm-up screens are displayed.
.
Wake-up screen
Warm-up screen
A few seconds after the Wake-up screen appears in the LCD Touch display, a Warm-up
screen is displayed for approximately 6.5 minutes.
Note You can set reserve jobs while the engine warms up. Touch the LCD screen to change the Warm-up
screen to the Main screen, and then check that the message “Ready to copy reserve” is display ed
on the Main screen.
6 1 Getting started ENWW
Page 13
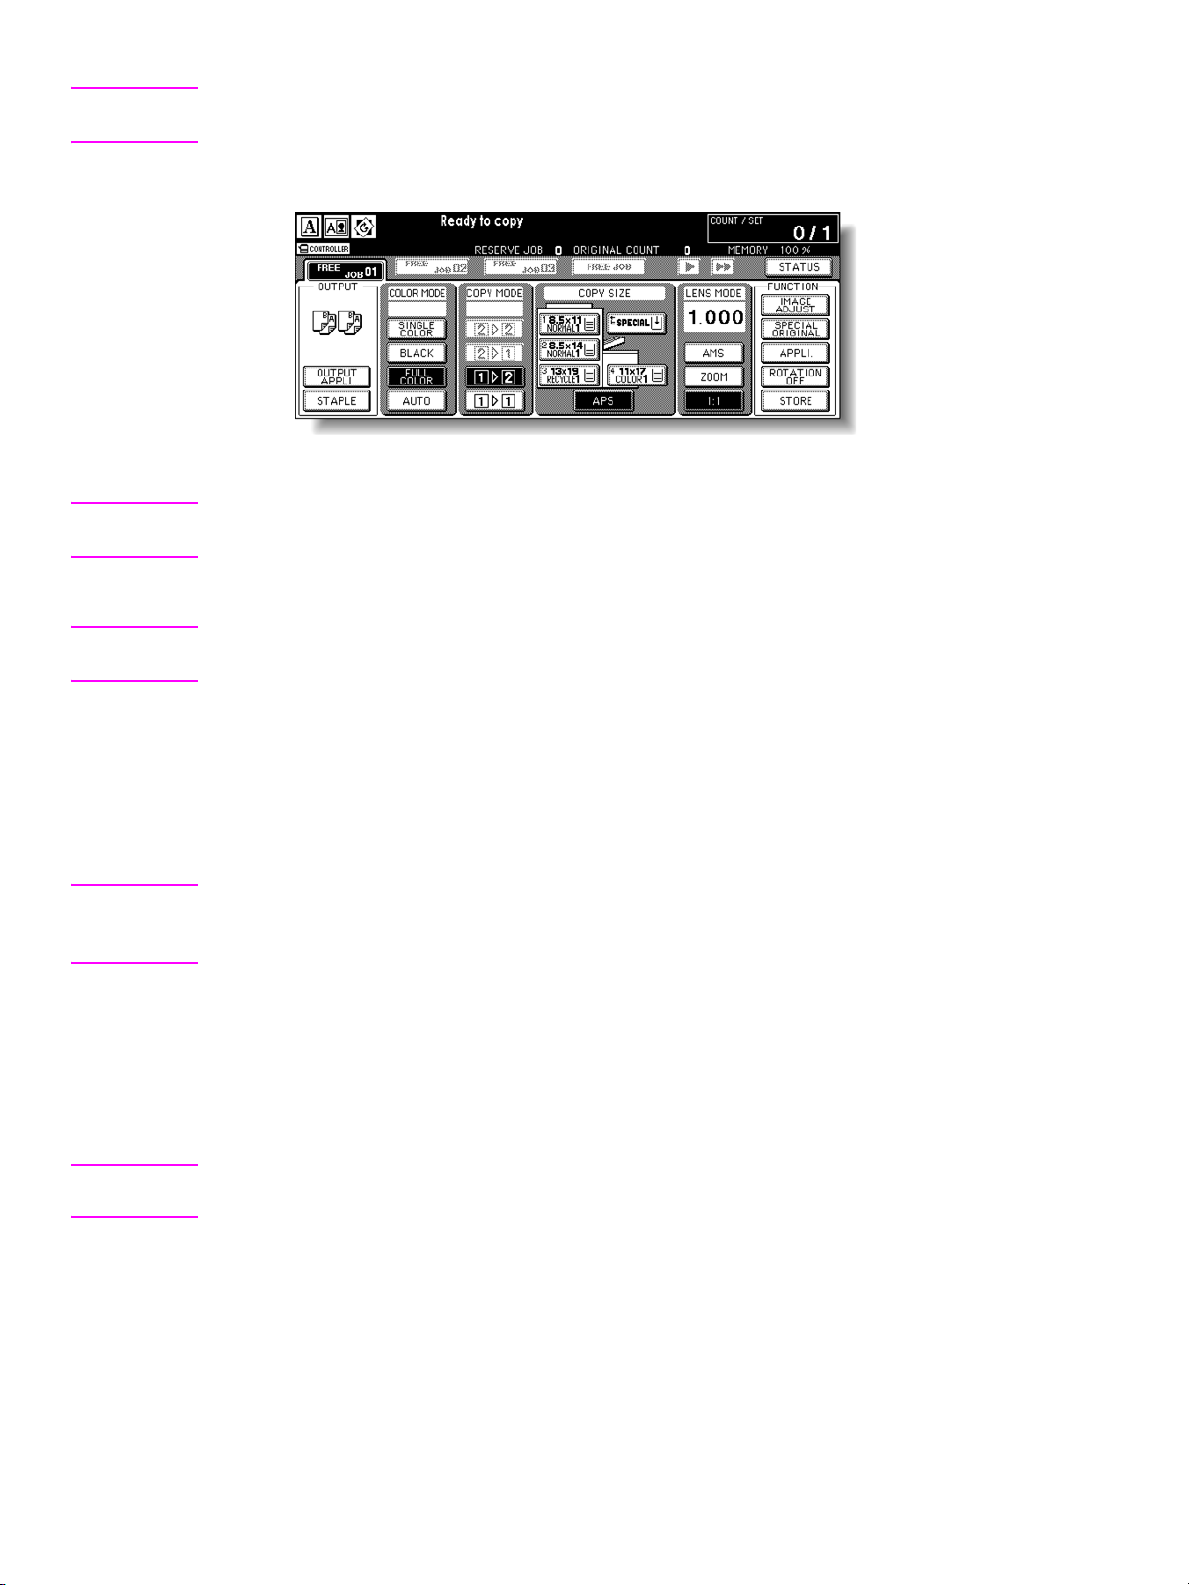
3 The Main screen displays.
The message on the Main screen informs you that the copying job is now available.
When the initial settings are changed by the key operator, the Main screen displays the
modified conditions.
When “Enter E.C.M. pass word” is displayed, type your password to use the MFP.
When “Set the key counter” is displayed, insert the key counter to its inlet on the right side of
the engine.
To turn off the power
1 Turn off the power switch.
The power switch is located on the left side of the control panel.
The Touch display and all the light emitting diodes (LEDs) on the control panel are turned off.
Do not use the main power switch during usual operation.
When the engine is under control of the Weekly Timer function, turning off the power switch
deactivates the function.
ENWW MFP parts 7
Page 14
Help mode
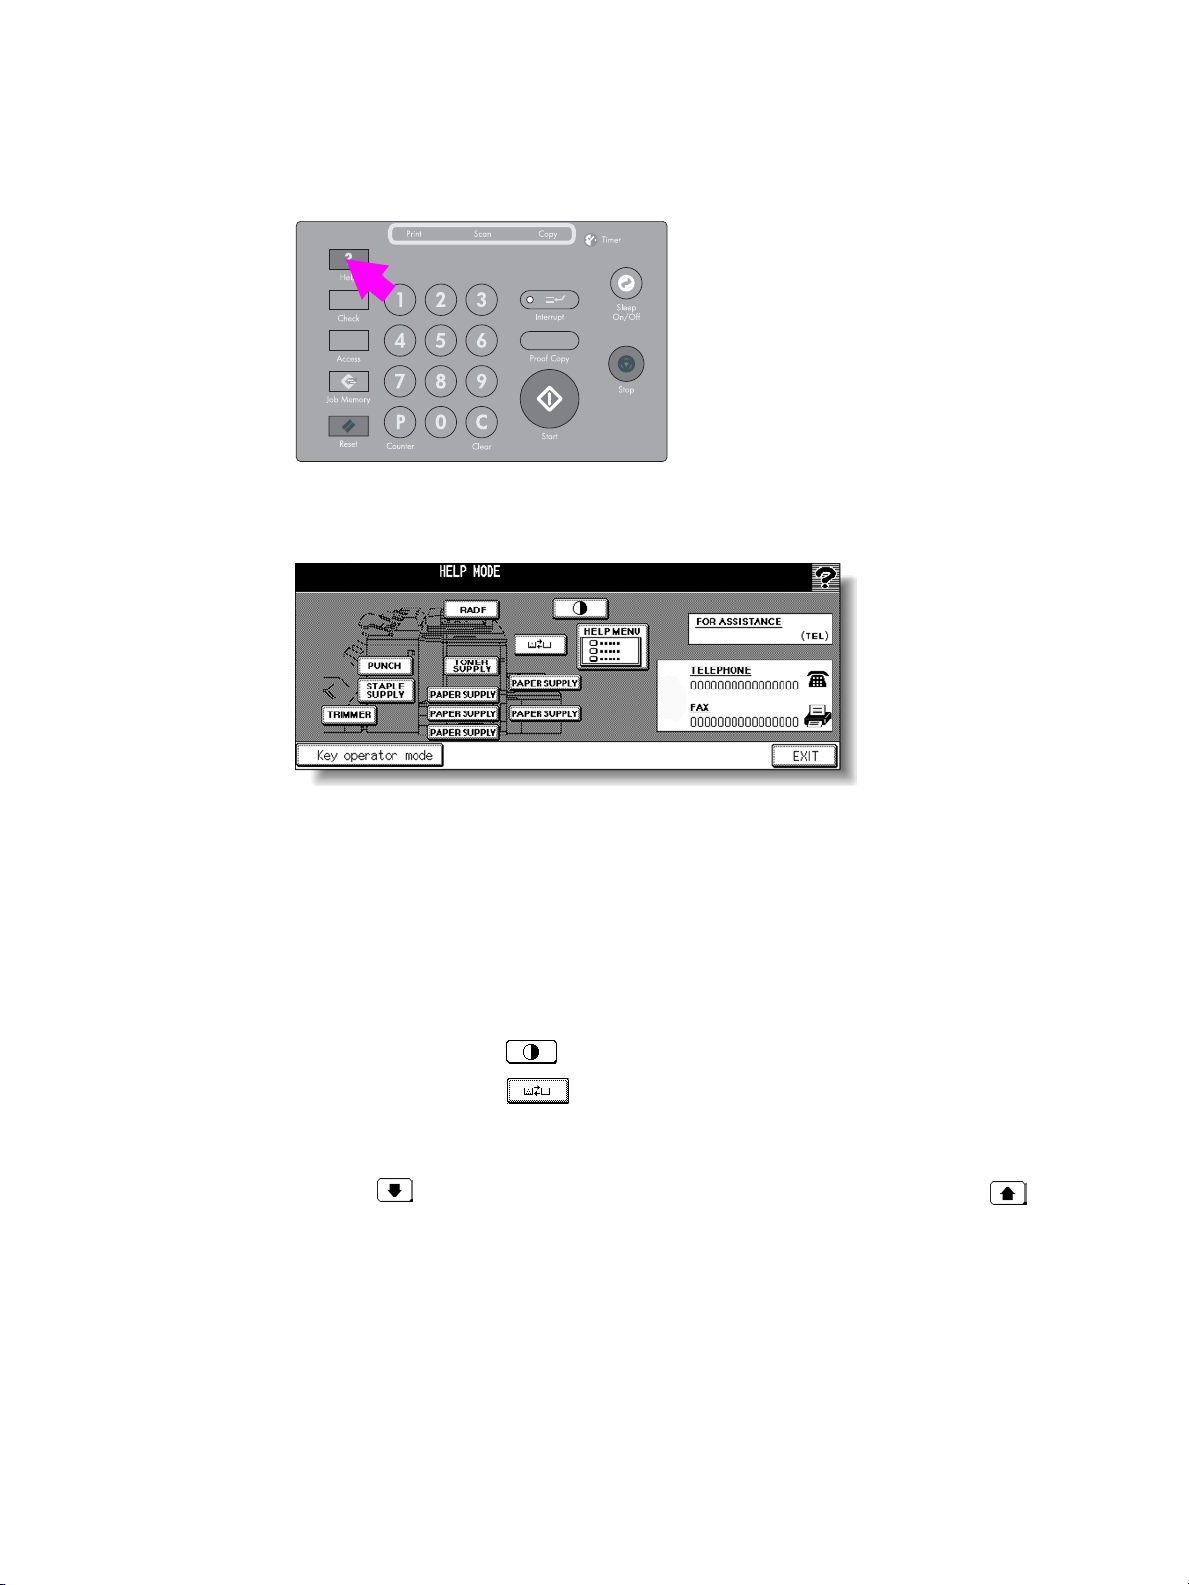
To display the Help screen from the Main screen
1 Return to the Main screen, and then press Help.
The Help screen is displayed.
2 Touch the desired key to display specific information.
● STAPLE SUPPLY provides information on replacing the staple cartridge.
● PUNCH provides information on emptying the trash basket.
● TRIMMER provides information on emptying the trash basket.
● RADF (ADF) provides information on positioning originals in the document feeder.
● TONER SUPPLY provides information on adding toner.
● PAPER SUPPLY provides information on loading paper in each tray.
● HELP MENU displays the Help Menu screen that provides a list of all the MFP functions.
When a function item is touched, the Help screen displays information specific to that topic.
● PANEL CONTRAST displays the screen to adjust the contrast of the LCD panel.
● Toner recovery box provides information on exchanging the toner recovery box.
● FOR ASSISTANCE displays the extension number of the Key Operator.
● TELEPHONE/FAX displays the phone/fax number of your service center.
● Touch on the Help screen, if provided, to scroll to the next page. Touch to return
to the previous page.
● Touch KEY OPERAT OR MODE to enter the Key Operator mode. For more information, see
“An outline of the key operator mode” in the “Key Operator mode” section in the
HP 9850mfp System Administrators Guide.
3 Touch EXIT to return to the Main screen.
8 1 Getting started ENWW
Page 15
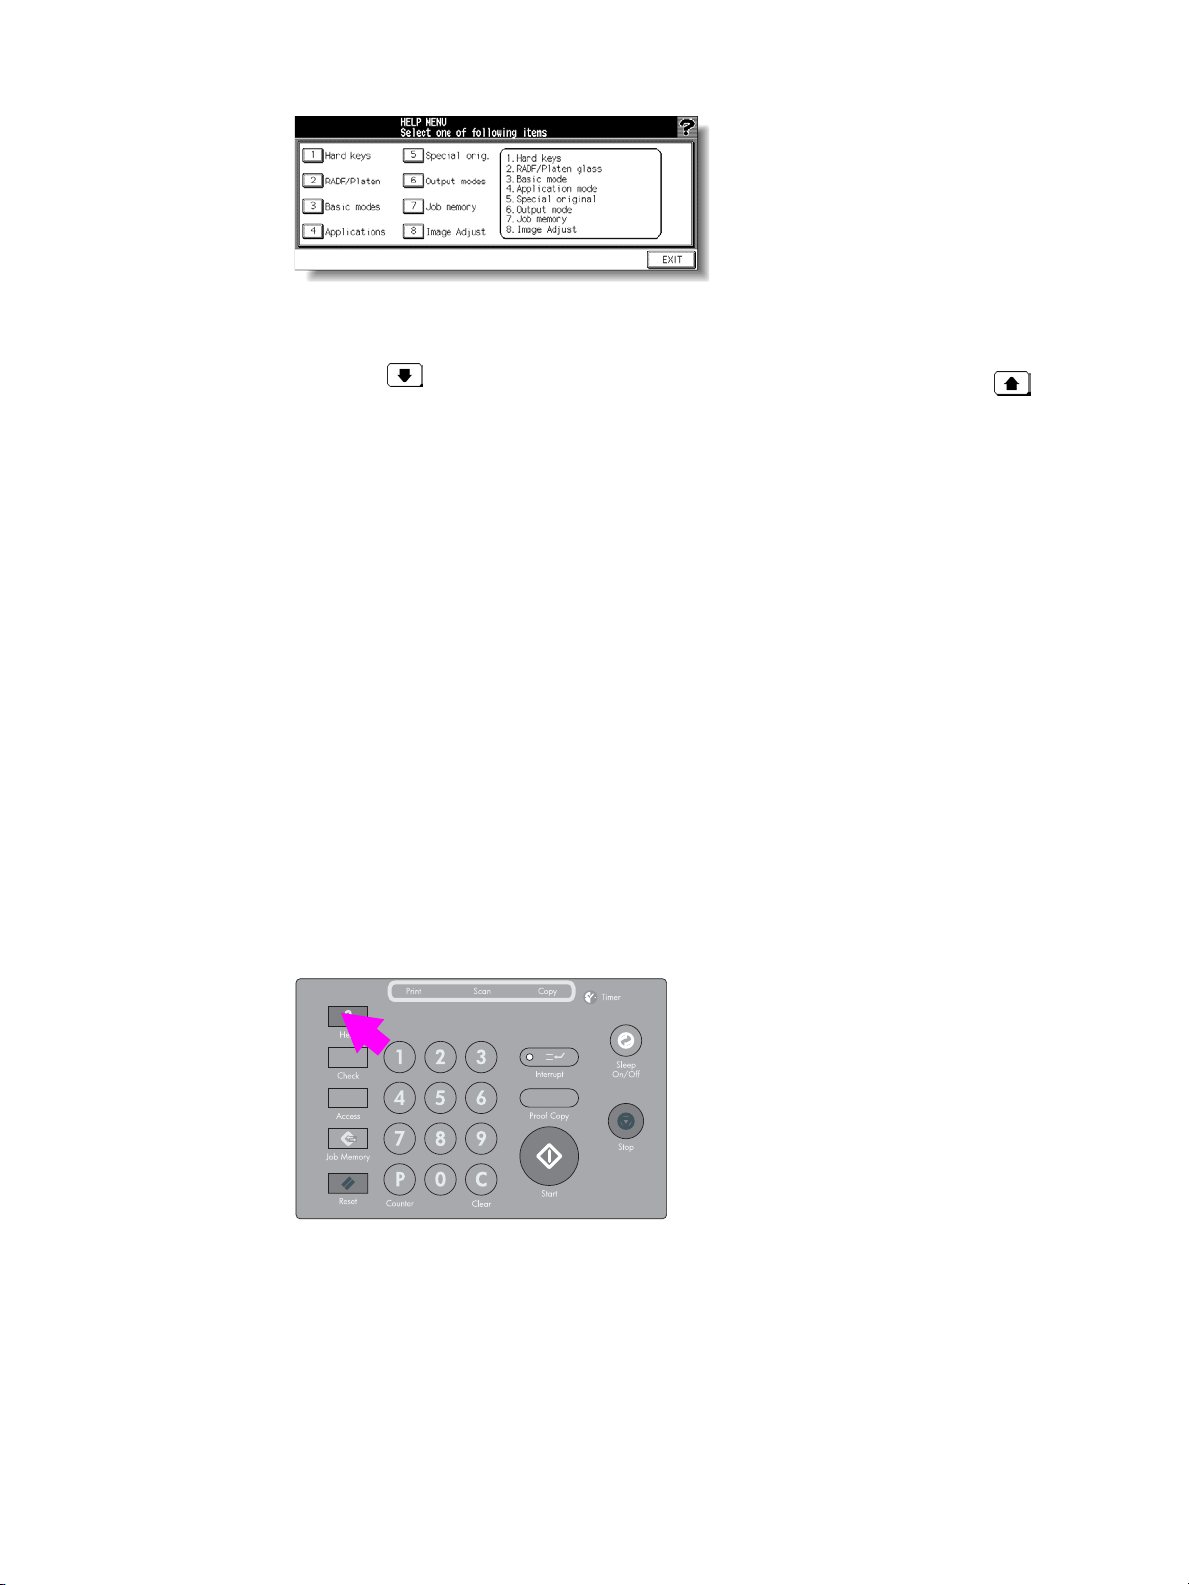
Help Menu screen
a Select one of the eight help menu items on the Help Menu screen to display subsequent
Help screens.
b Touch on the Help screen, if provided, to scroll to the next page. T ouch to return
to the previous page.
c Touch MENU on the subsequent Help screen to return to the Help Menu screen, and then
touch EXIT to restore the Main screen.
● “1. Hard keys” displays the information on control panel buttons.
● “2. RADF (ADF)/Scanner” displays the information on unsuitable RADF (ADF)
originals and maintenance of the document feeder and scanner glass.
● “3. Basic modes” displays the information on basic functions provided on the Main
screen.
● “4. Applications” displays operational information on 16 application functions provided
on the Application Selection screen.
● “5. Special orig.” displays the information on functions provided on the Special
Original popup menu.
● “6. Output modes” displays the information on Finisher functions.
● “7. Job memory” displays the information on Job Memory.
● “8. Image Adjust” displays the information on Color Image Adjustment.
To display the Help Screen from other screens
1 While in any screen other than the Main screen, press Help.
The Help screen displays to provide the information about the current screen mode and
setting procedures.
2 Touch EXIT.
The screen that was displayed before pressing Help is restored.
ENWW Help mode 9
Page 16

10 1 Getting started ENWW
Page 17

2Copying
ENWW 11
Page 18
Selecting color mode
The following four color modes are available:
AUTO mode detects whether the scanned original is a colored or black-and-white image and
automatically selects either FULL COLOR mode or BLACK mode for copying.
FULL COLOR mode makes full-colored copies whether the original image is colored or not.
BLACK mode makes black-and-white copies whether the original image is colored or not.
SINGLE COLOR mode copies in one color to be selected from red, green, blue, magenta, cyan,
or yellow .
The FULL COLOR mode is initially selected. Follow the procedure below to change the
Color mode.
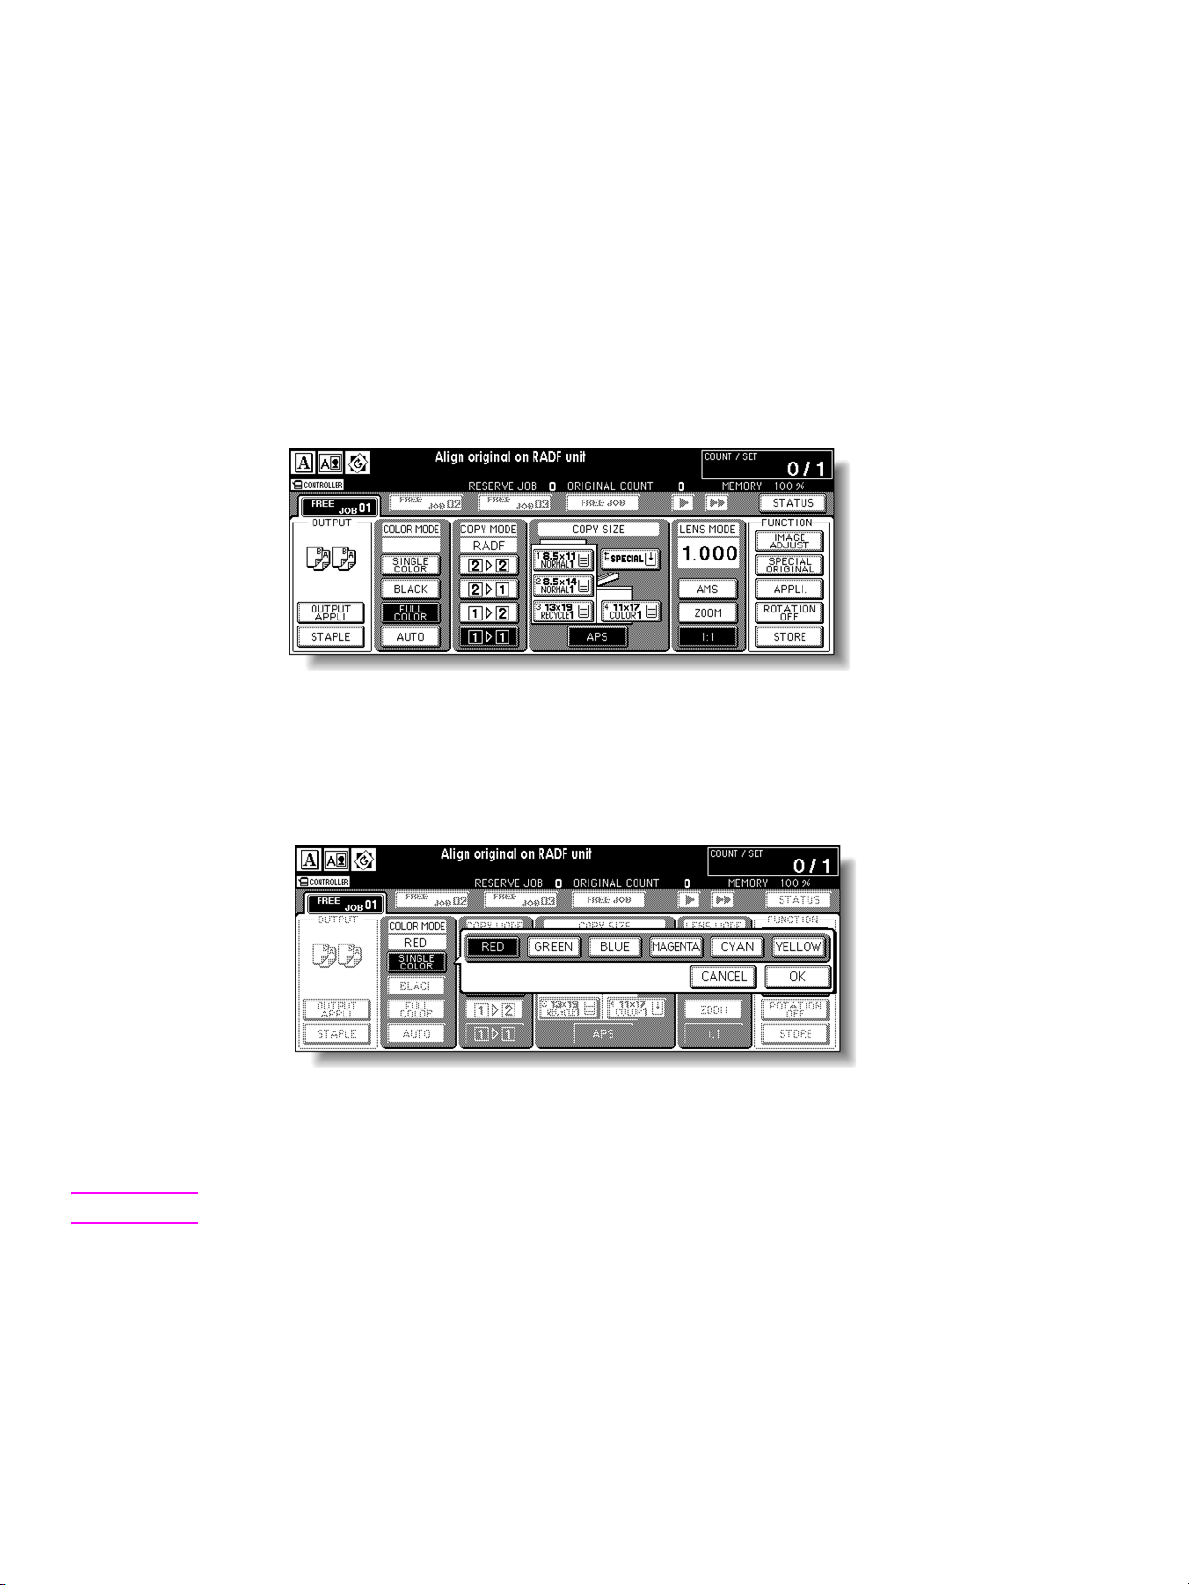
1 Touch a mode key under COLOR MODE on the Main screen to select the desired Color mode.
When starting a new copying job, make sure to close the RADF (ADF) securely, and then
press Reset.
FULL COLOR is already highlighted when the initial settings are restored.
Selecting SINGLE COLOR displays a pop-up menu for specifying a color.
Touch the desired color key, and then touch OK.
The selected color is indicated under the COLOR MODE indication of the Main screen, with
the SINGLE COLOR key highlighted.
Note Touch CANCEL to restore the previous setting.
2 Select additional copy conditions, as desired.
3 Type the desired print quantity by using the control panel keypad.
4 Position original(s).
5 Press Start.
12 2 Copying ENWW
Page 19
Improving color copy
To improve the color copy quality, this engine provides three types of adjustment methods: color
adjustment, selecting the image reproduction method and its adjustment, and other adjustments.
The color adjustment is performed by varying the level of pigments in RGB model or CMYK model,
or by modifying the hue, saturation, and brightness of the image.
To reproduce the copy image, select one of the two methods, the Dither (error diffusion) method or
the Screen method. The Image Detection function helps in selecting the most appropriate method
for each part of the original to make the copies of scanned image.
For further improvement, use Copy Density or apply filters for Sharpness, Contrast, and Gloss
mode.
Note For detailed information about color adjustments, see the following subsections in the “Color Image
Adjustment” section of the HP Color 9850mfp System Administrator Guide:
Selecting density level and whitening background
Changing color using RGB and HSB values (color adjustment)
Changing colors using CMYK value (color balance adjustment)
Selecting line screen, dot screen, or high compression (screen settings)
Adjusting sharpness and contrast/selecting the gloss mode
For detailed information about settings that can improve color, see the following subsections in the
“Color Image Adjustment” section of the HP Color 9850mfp System Administrator Guide:
Making adjustment in image detection (image judge)
Specifying original type
Using the scanning glass
Use the scanner glass when the originals are not suitable for use with the document feeder, for
example, when size is incompatible, or when originals are folded, stapled, torn, or generally in a
poor condition.
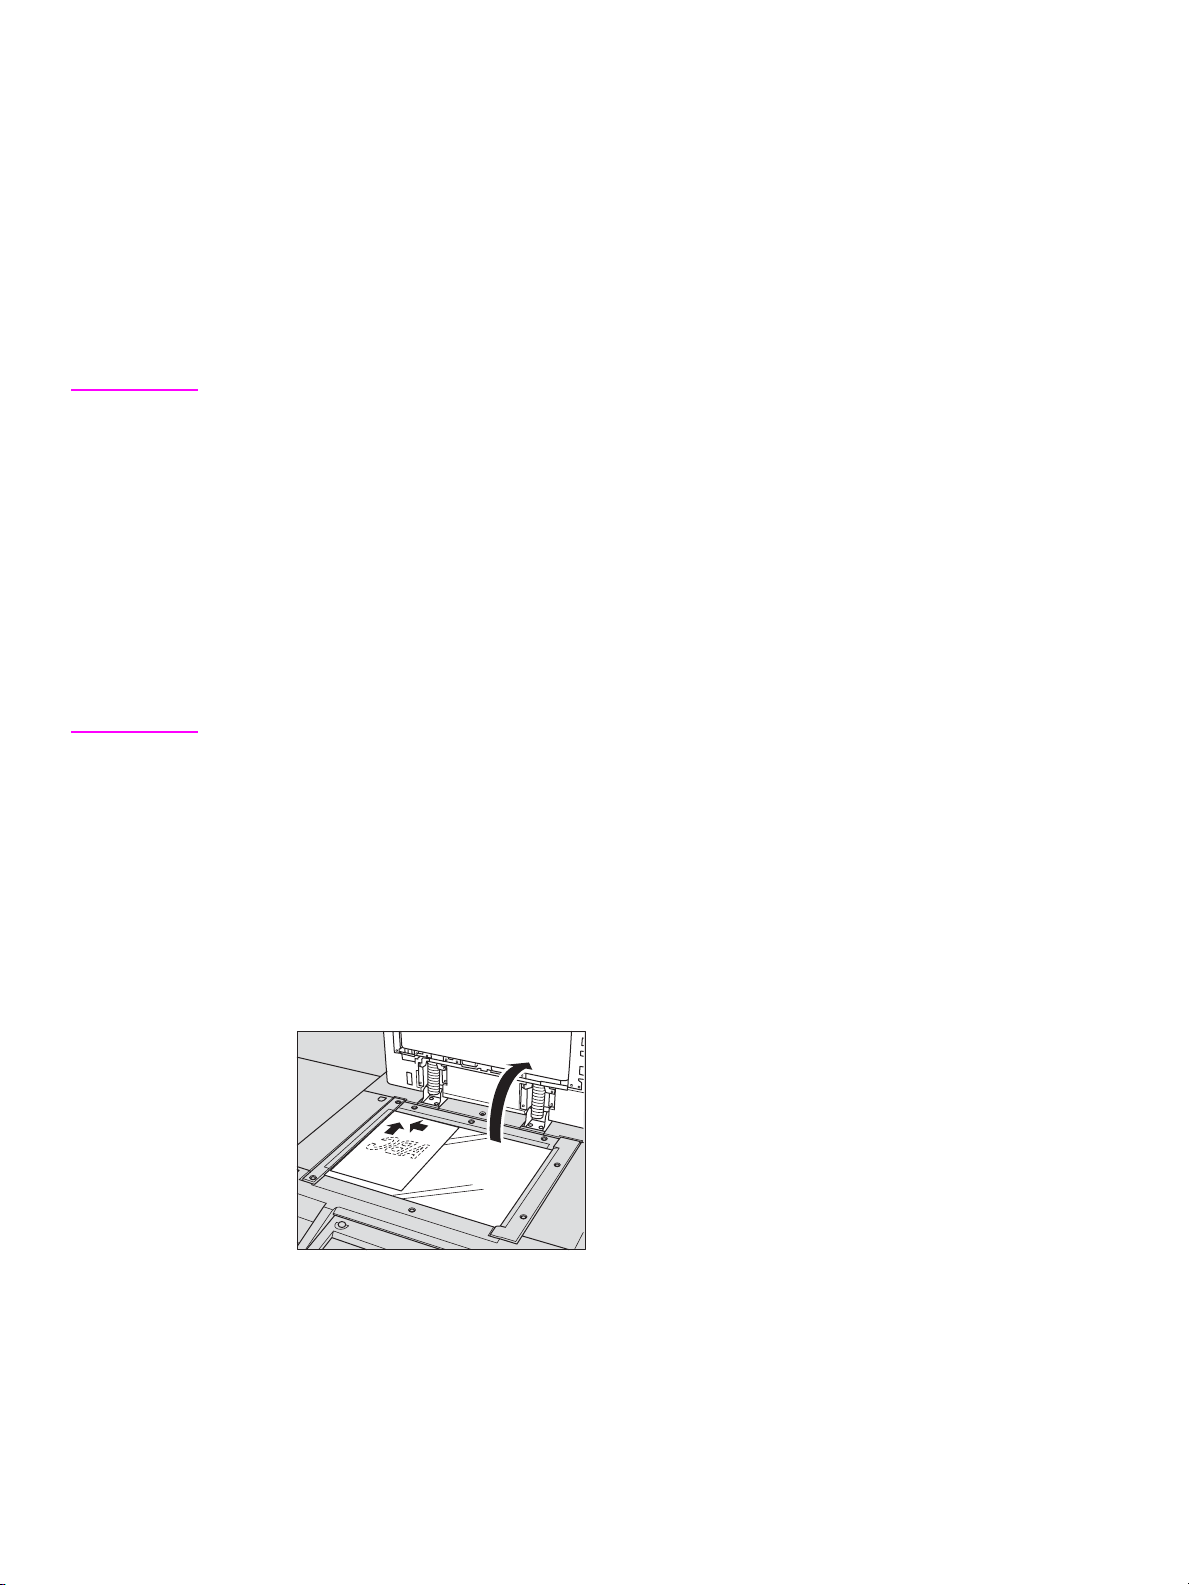
1 Raise the document feeder.
2 Place original face down in the left rear corner.
The direction of the original should conform to the Original direction icon displayed at the
upper left corner of the Main screen.
ENWW Improving color copy 13
Page 20

Note The copy result may not be satisfactory if the original is set in wrong direction. Make sure the original
is set in the same direction as indicated by the Original direction icon, especially when making
double-sided copies or using the Staple, Stapling & Folding, Folding, or Booklet mode.
3 Gently close the document feeder or platen cover to prevent the original from shifting on the
glass.
Note When selecting Book Copy, Non-Image Area Erase, AUTO mode in Repeat, or AUTO Layout, do
not close the document feeder.
WARNING! Do not place originals that are too heavy, and do not press too hard when a thick original is placed and
is under pressure of the RADF (ADF). In such cases the glass may break and you may be injured.
Using the RADF (ADF)
The HPAutomatic Document Feeder (RADF (ADF)) automatically feeds up to 100 originals
directly to the scanner area, starting with the top sheet. The RADF (ADF) should only be used for
unstapled, smooth, and flat originals.
Positioning originals in Normal mode
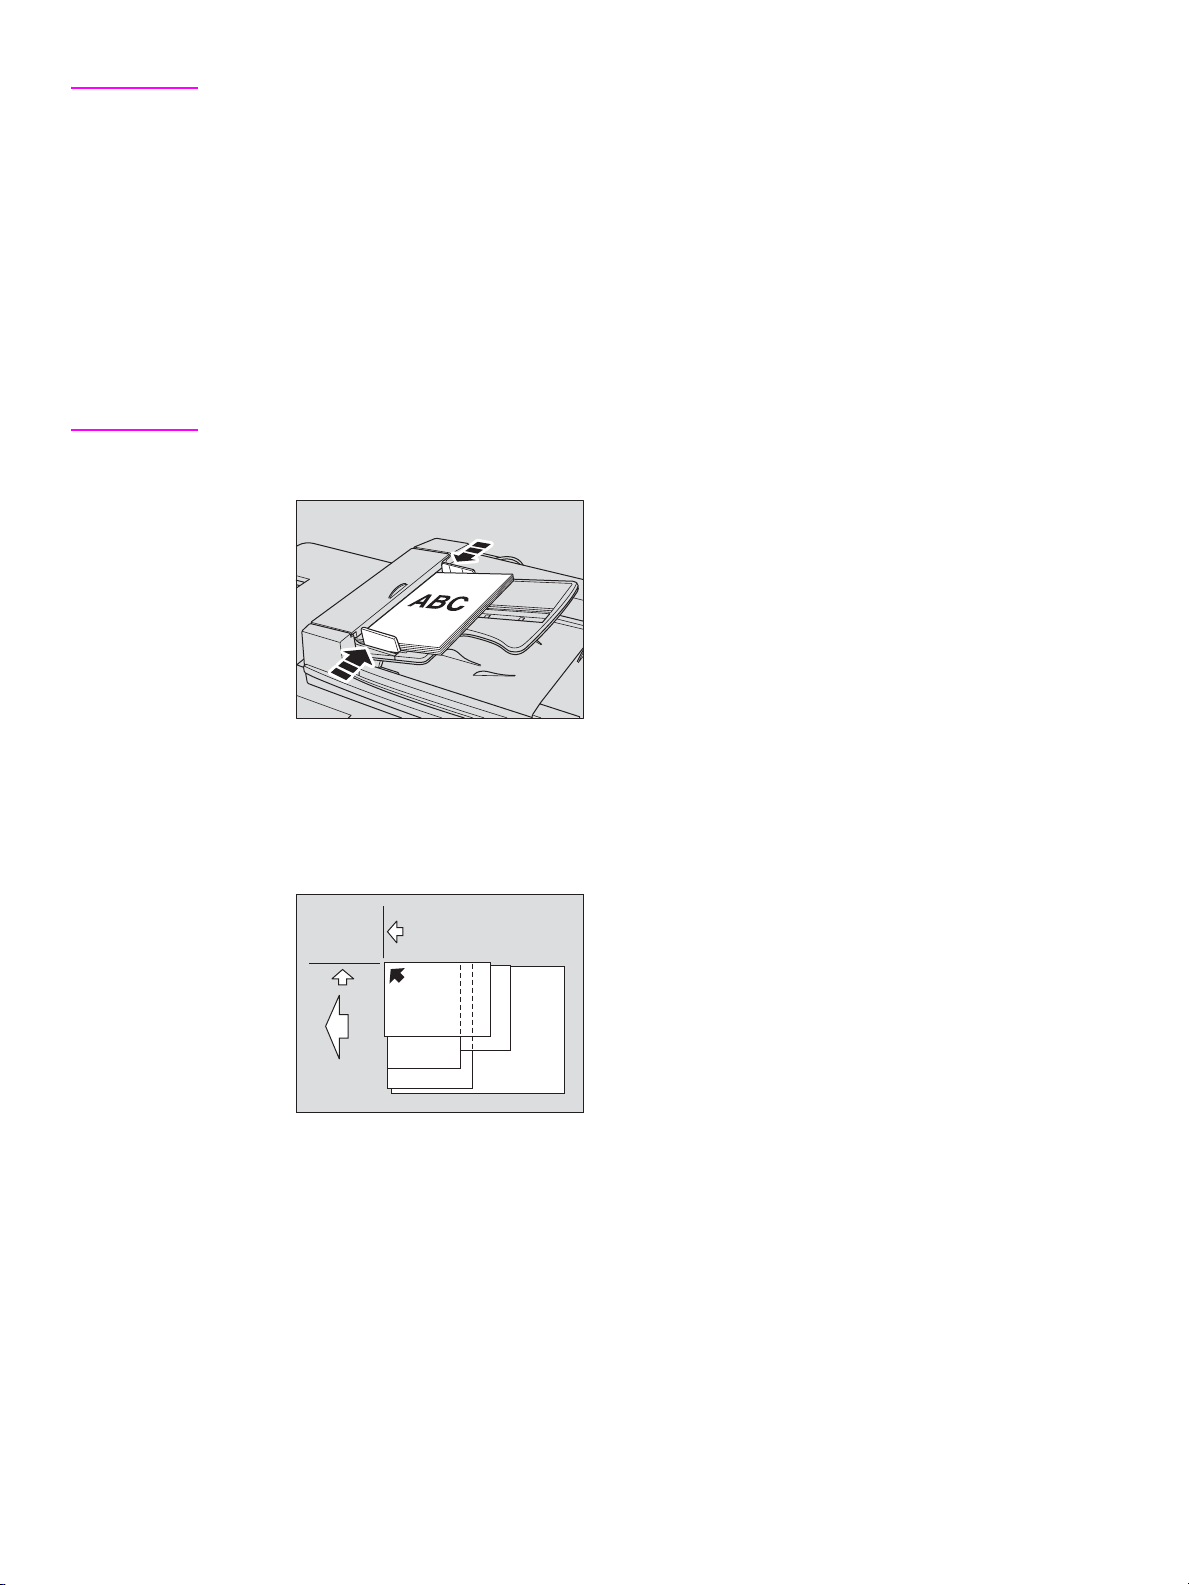
1 Arrange originals in order.
2 Position original(s) face up in the document feeder tray.
Place two-sided originals with page one face up.
The direction of the originals should conform to the Original direction icon displayed at the
upper left corner of the Main screen.
Up to 100 originals can be set at a time.
14 2 Copying ENWW
Page 21
Note The copy result may not be satisfactory if the originals are set in the wrong direction. Make sure that
the originals are set in the same direction as indicated by the Original direction icon, especially when
making double-sided copies or using the Staple, Stapling & Folding, Folding, or Booklet mode. For
more details, see “Specifying original direction” in the “Special original” section of the
HP Color 9850mfp System Administrator Guide.
Make sure to use suitable RADF (ADF) originals.
Do not set more than 100 originals or over the limit indicated on the paper guides. Otherwise, a
paper misfeed will occur and may damage the originals.
Before placing originals in the tray, make sure the document feeder is completely closed. Once
closed, do not open the document feeder because the selected copy conditions can be altered
automatically.
3 Adjust the paper guides.
Positi oning originals in Mixed Original mode
Mixed size originals can be copied together from the document feeder.
1 Arrange originals in order.
Arrange the mixed size originals as illustrated below.
2 Position mixed originals face up, aligned with the left rear side of the document feeder tray.
Place two-sided originals with page one face up.
Up to 100 originals can be set at a time.
ENWW Using the RADF (ADF) 15
Page 22

Note Make sure to use suitable RADF (ADF) originals.
Do not set more than 100 originals or over the limit indicated on the paper guides. Otherwise, a
paper misfeed will occur and may damage the originals.
Before placing originals in the tray , make sure the document feeder is fully closed. Once closed, do
not open the document feeder because the selected copy conditions may be altered automatically.
3 Adjust the paper guides.
Positioning originals in Z-Folded Original mode
Z-Folded Original mode detects the folded original size without using the size detection sensor of
the RADF (ADF).
1 Arrange originals in order.
2 Position original(s) face up in the document feeder tray.
Place two-sided originals with page one face up.
Up to 100 originals can be set at a time.
Note Make sure to use suitable RADF (ADF) originals.
Do not set more than 100 originals or over the limit indicated on the paper guides. Otherwise, a
paper misfeed will occur and may damage the originals.
Before placing originals in the tray , make sure the document feeder is fully closed. Once closed, do
not open the document feeder because the selected copy conditions may be altered automatically.
3 Adjust the paper guides.
16 2 Copying ENWW
Page 23
Choosing a paper size
To select an appropriate copy size for getting your desired copy result, use APS, or select copy
size manually on the touch display, as required.
To select copy size automatically (APS)
APS detects the size of originals placed on the RADF (ADF) or scanner glass, and automatically
selects and feeds copy paper of the same size, or selects an appropriate size according to the
magnification ratio selected.
APS is not available when using non-standard size or wide paper.
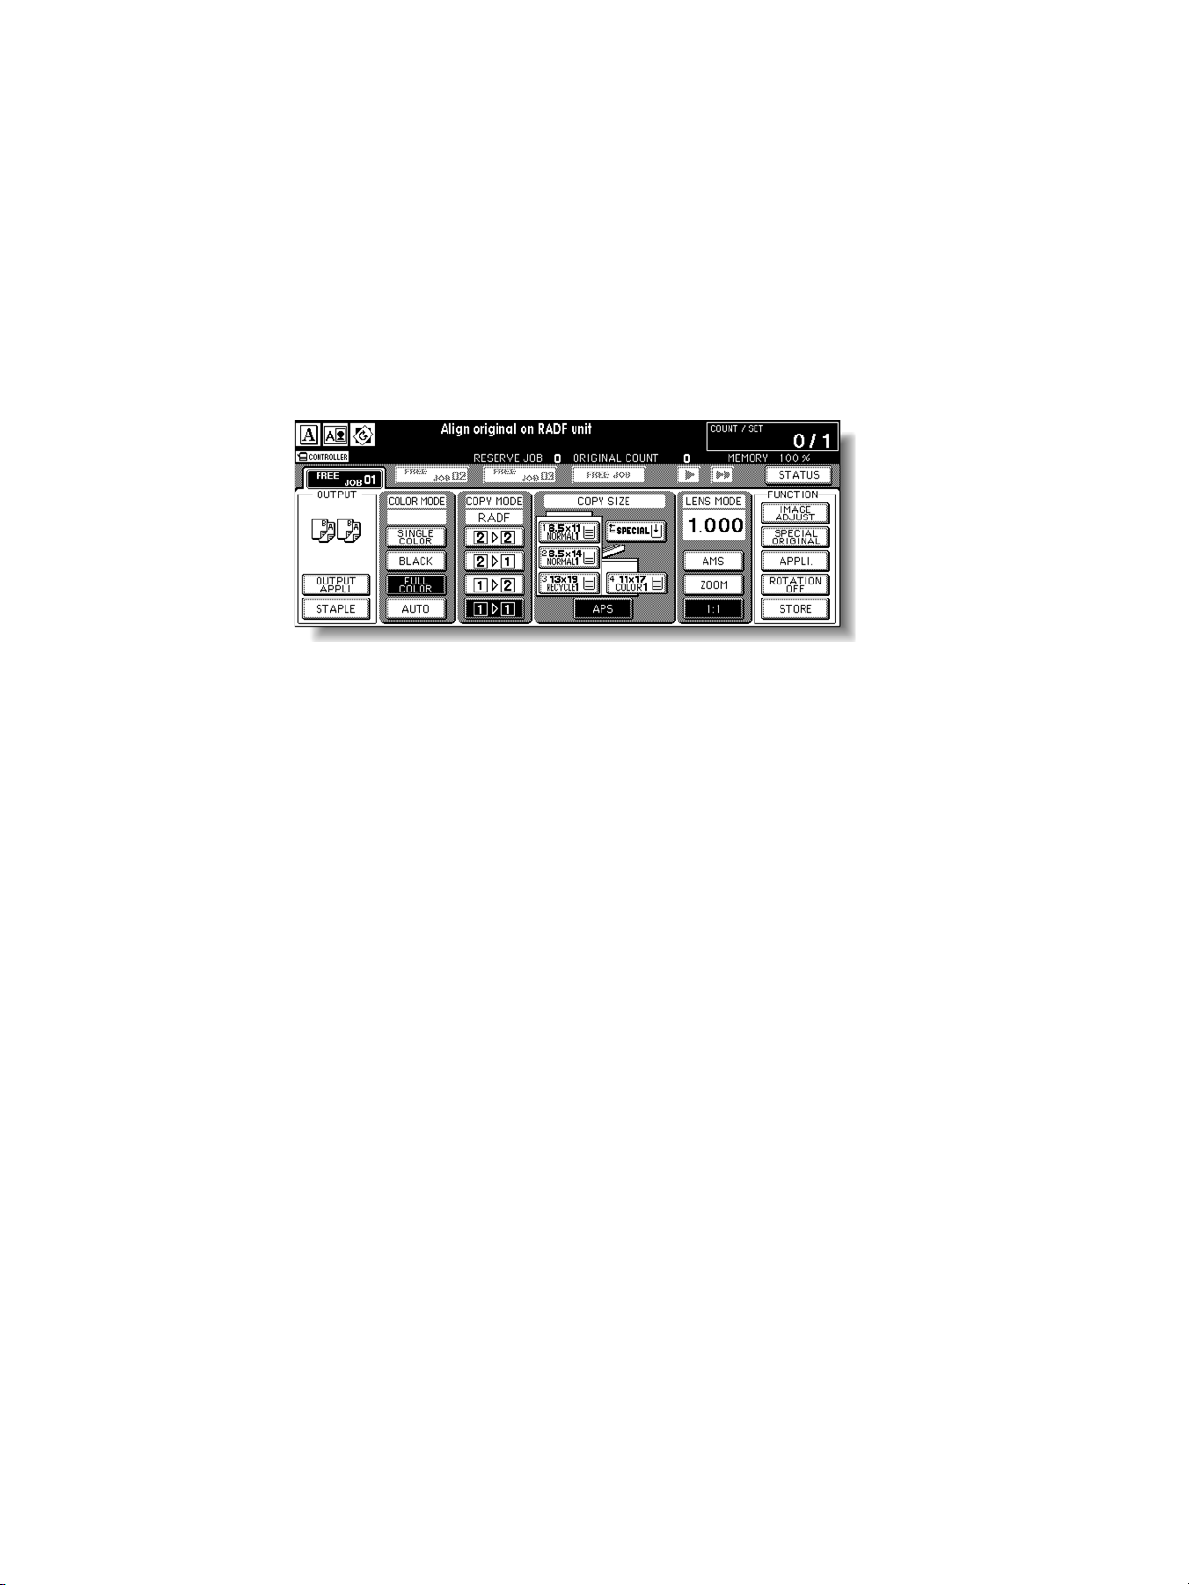
1 Touch to highlight APS under COPY SIZE on the Main screen.
2 Select additional copy conditions, as desired.
3 Type the desired print quantity by using the control panel keypad.
4 Position original(s).
Detectable original sizes can be changed from inch sizes to AB sizes, A sizes, or inch sizes
and AB sizes mixed.
A key operator can deactivate APS when the original is set in the RADF (ADF) or on the
scanner glass.
5 Press Start.
Scanned images are printed on the copy size automatically selected.
ENWW Choosing a paper size 17
Page 24
Note If the appropriate copy paper is not loaded in any tray, no copying is performed and a message
prompts you to load the appropriate paper.
Copy results may not be satisfactory due to the Rotation function. In this case, turn off the function
manually.
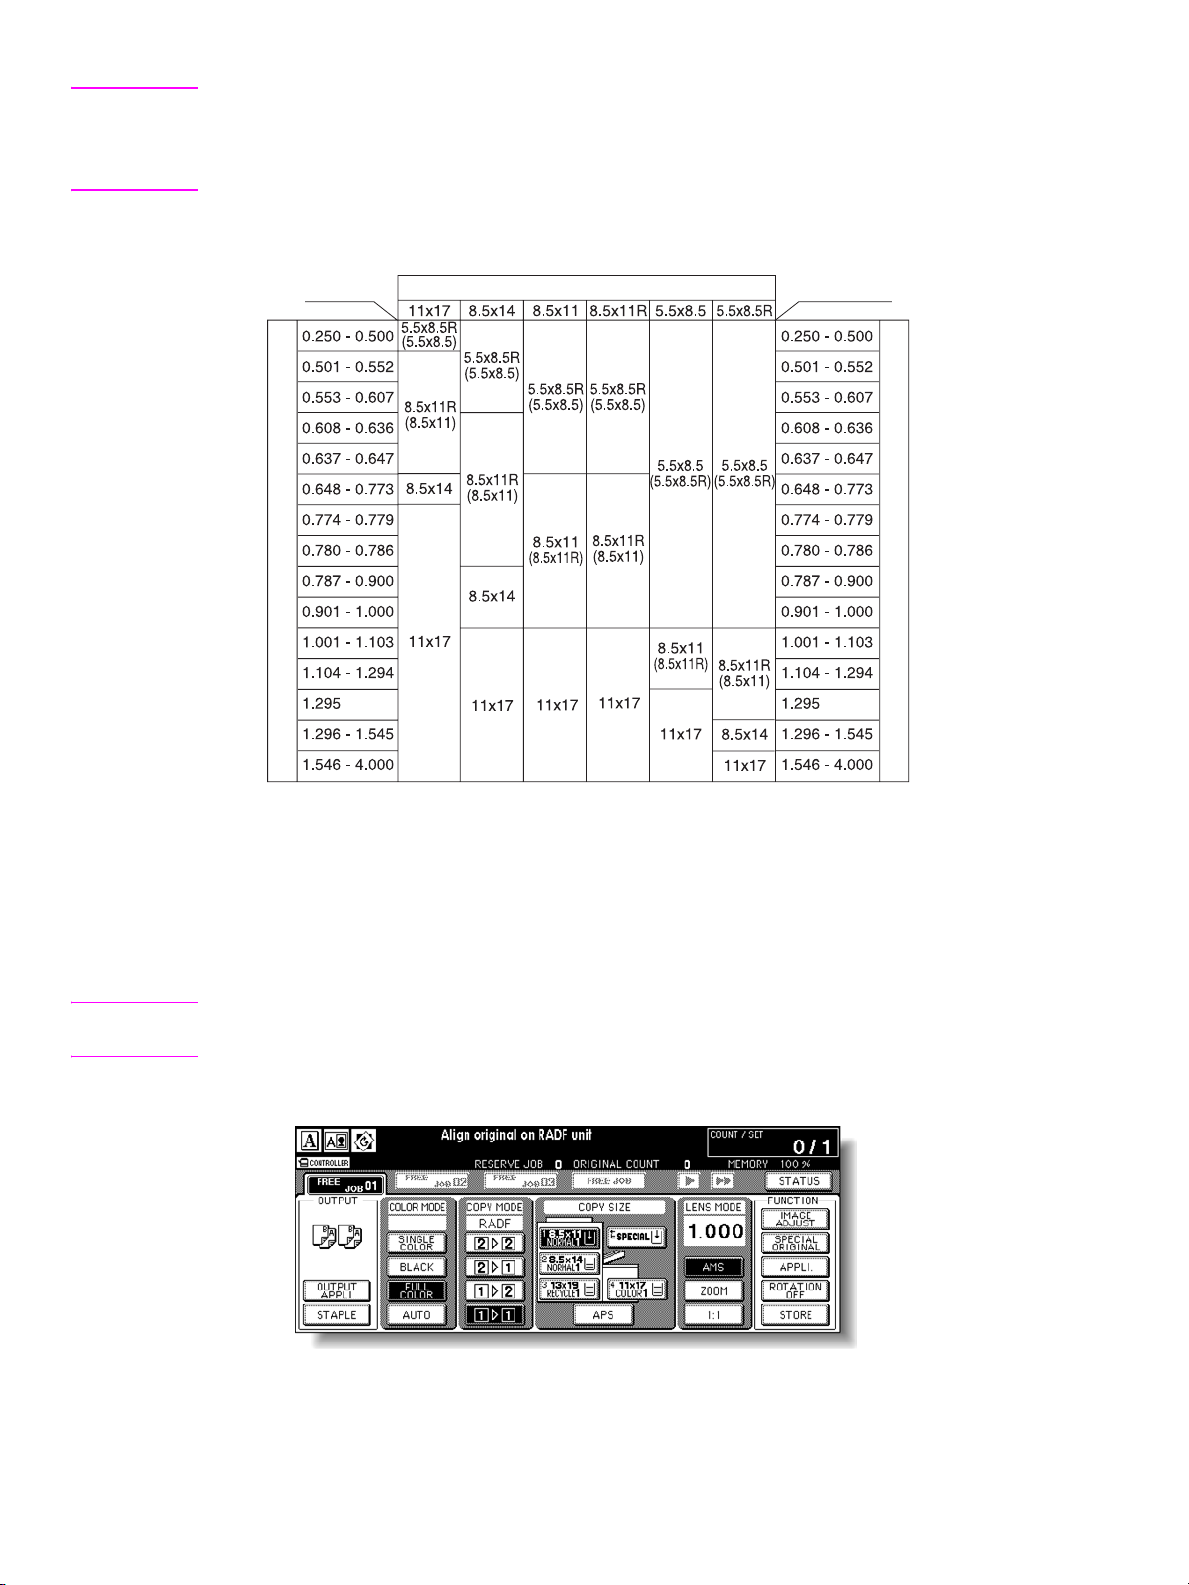
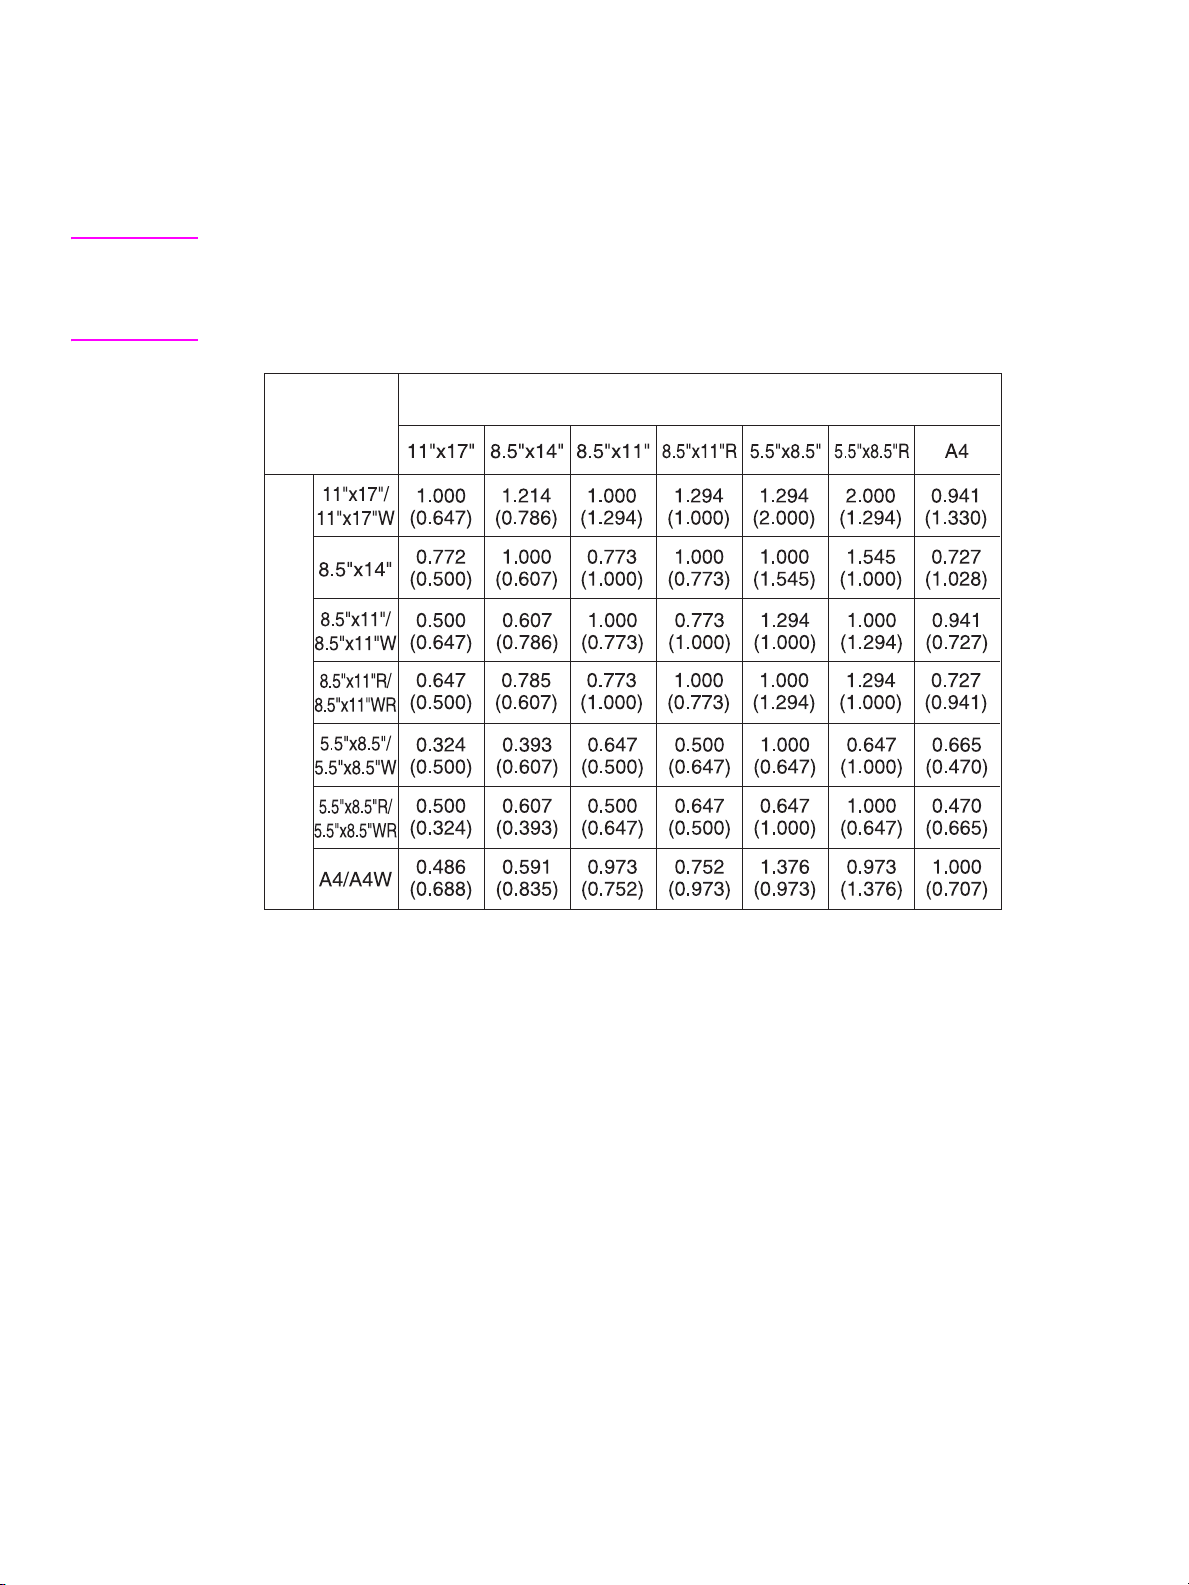
See the table below for the relation of original size, magnification ratio, and copy paper size.
Copy size
Magnification ratio
Original size
Copy size
Magnification ratio
( ): Rotation functions
To reduce and enlarge
When a copy size is specified on the touch display, an appropriate reduction or enlargement ratio
is selected automatically according to the original size detected from the RADF (ADF) or the
scanner glass.
Note Wide paper size can be specified when AMS is in use.
In this case, the same magnification ratio as that of the standard size is selected automatically.
1 Touch a tray key on the main screen to select the desired copy size.
The selected tray key is highlighted, and under the LENS MODE the AMS key is also
highlighted.
2 Select additional copy conditions, as desired.
18 2 Copying ENWW
Page 25
3 Type the desired print quantity by using the control panel keypad.
4 Position original(s).
5 Press Start.
Scanned images are printed on the specified copy size in the magnification ratio automatically
selected.
Note The copy result may not be satisfactory due to the Rotation function. In this case, turn the function
off manually.
See the table below for the relation of original size, copy paper size, and magnification ratio
automatically selected.
AMS Table
Copy size
Original size
( ): Rotation functions
ENWW Choosing a paper size 19
Page 26
Duplexing (2-sided copying)
The Main screen is initially set to the 1 > 1 copy mode to make single-sided copies from
single-sided originals.
Follow the procedure below to make double-sided copies from the originals scanned from the
document feeder or from the scanner glass.
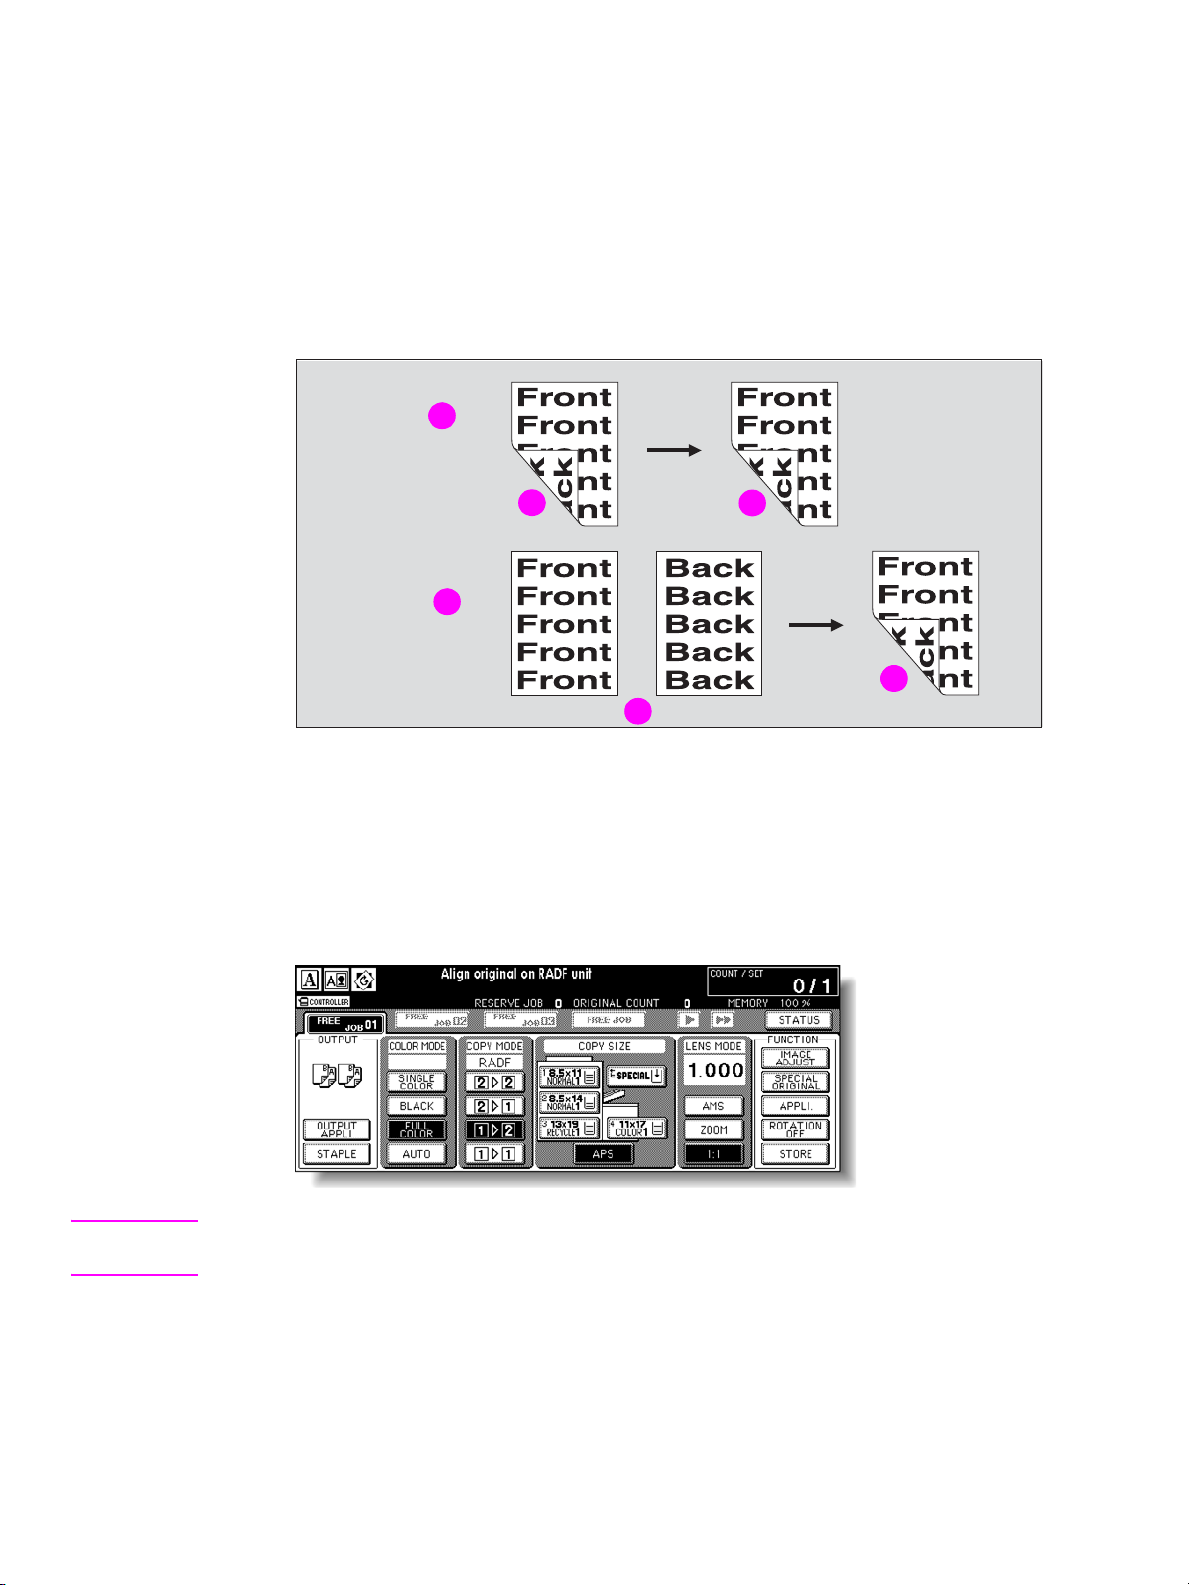
Using the RADF (ADF)
Select the copy mode according to the original type (single-sided or double-sided).
1
2
4
5
1 2 > 2 copying
2 Double-sided original
3 Duplex copy
4 1 > 2 copying
5 Single-sided original
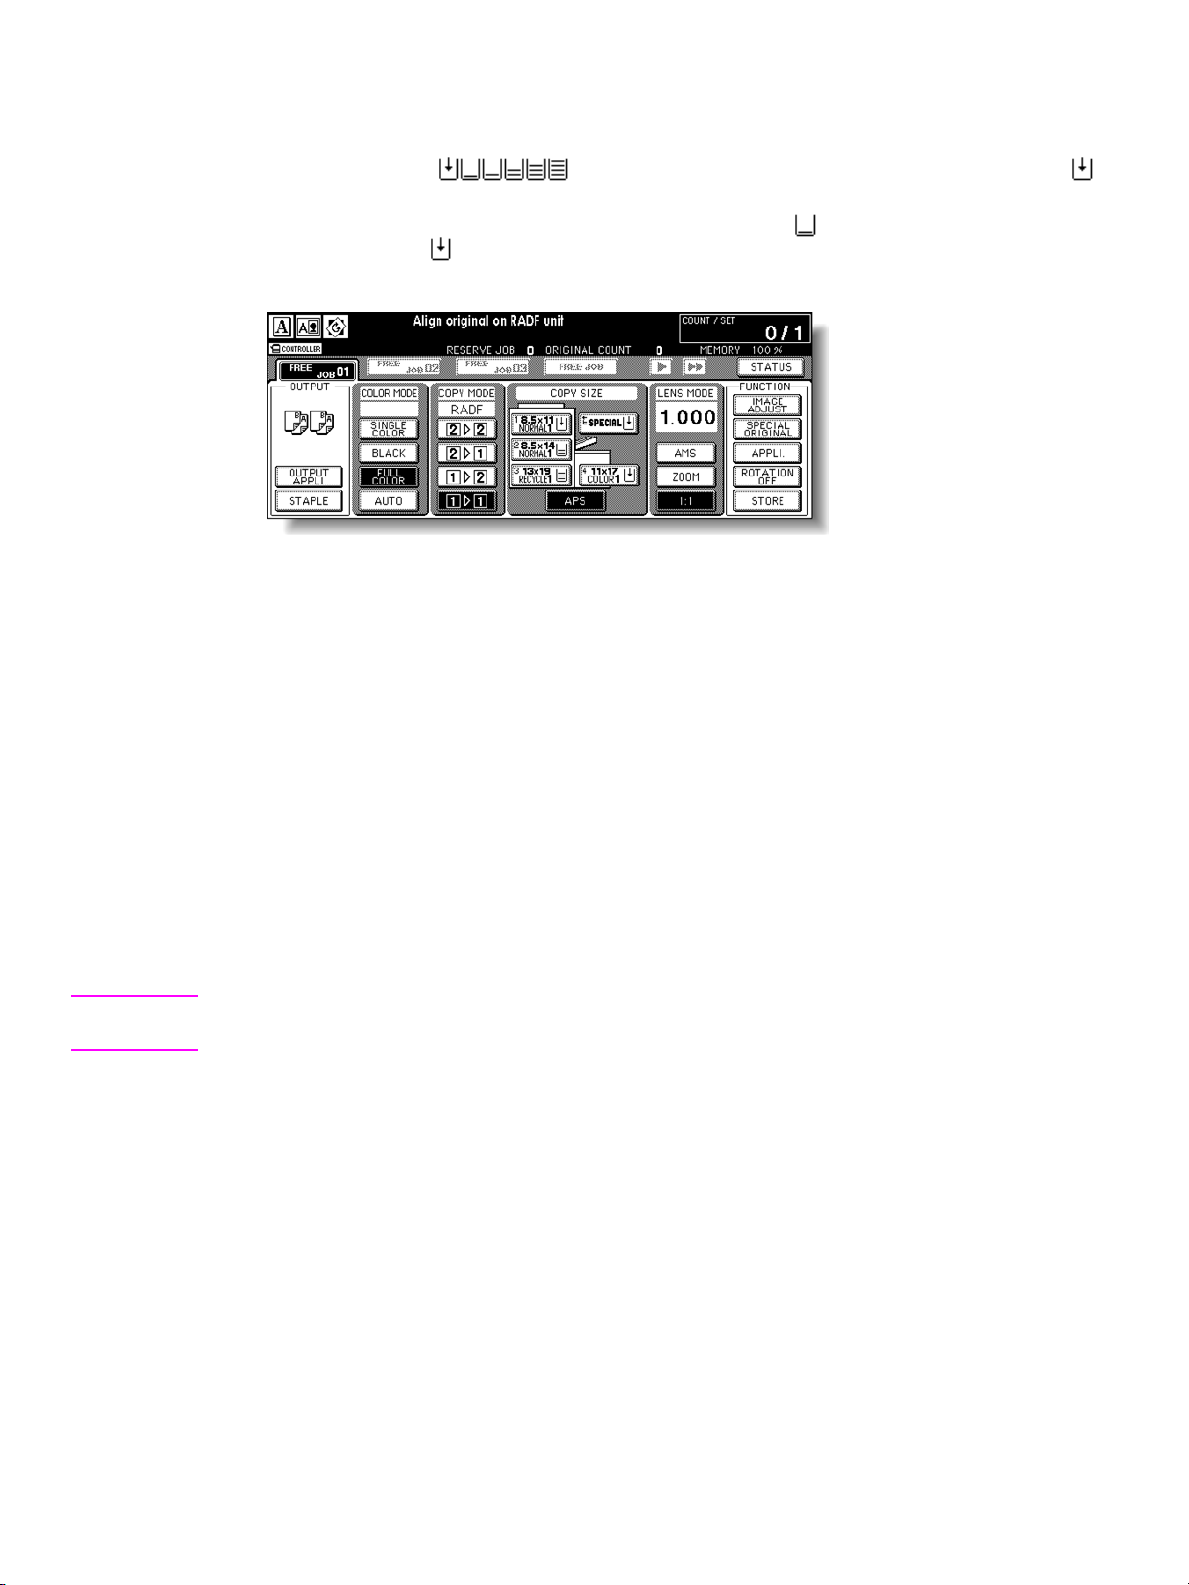
1 Touch 12 or 22 on the Main screen to highlight it.
3
3
Note When starting a new copying job, make sure to close the RADF (ADF) securely, and then
press Reset.
20 2 Copying ENWW
Page 27

2 Check the original set direction.
The Original direction icon is located at the upper left corner of the Main screen.
To change the original set direction, touch SP ECIAL ORIGI NAL on the Main screen to
display the Special Original popup menu, and then touch the desired original direction key
to highlight it.
To return to the Main screen, touch OK.
3 Select the Binding mode.
Touch OUTPUT APPLI on the Main screen to display the Output Mode popup menu, and then
touch the desired Binding mode key to highlight it.
Note Selecting UP BINDING makes copies upside down on the reverse side, while RIGHT&LEFT
BINDING copies normally.
To return to the Main screen, touch OK.
4 Select additional copy conditions, as desired.
Note Some incompatible conditions may automatically release the selected copy mode. In this case,
arrange the settings so that they are compatible with the selected copy mode.
5 Type the desired print quantity by using the control panel keypad.
ENWW Duplexing (2-sided copying) 21
Page 28

6 Position originals face up in the document feeder according to the original direction.
Use RADF (ADF) store mode when the original count exceeds 100.
7 Press Start.
The engine starts to scan originals, and then prints duplex copies when ready for output.
Note Press Stop to suspend the scanning or printing job.
CAUTION When the Finisher/Trimmer Unit/100-sheet output tray capacity is exceeded due to the print quantity
selected, remove the copied sets as they exit to avoid misfed paper.
Using the scanner glass
Use the scanner glass to scan originals unsuitable for the document feeder.
1 Check the original set direction.
The Original direction icon is located at the upper left corner of the Main screen.
To change the original set direction, touch SPECIAL ORIGINAL on the Main screen to display
the Special Original popup menu, and then touch the desired original direction key to highlight
it.
To return to the Main screen, touch OK.
22 2 Copying ENWW
Page 29

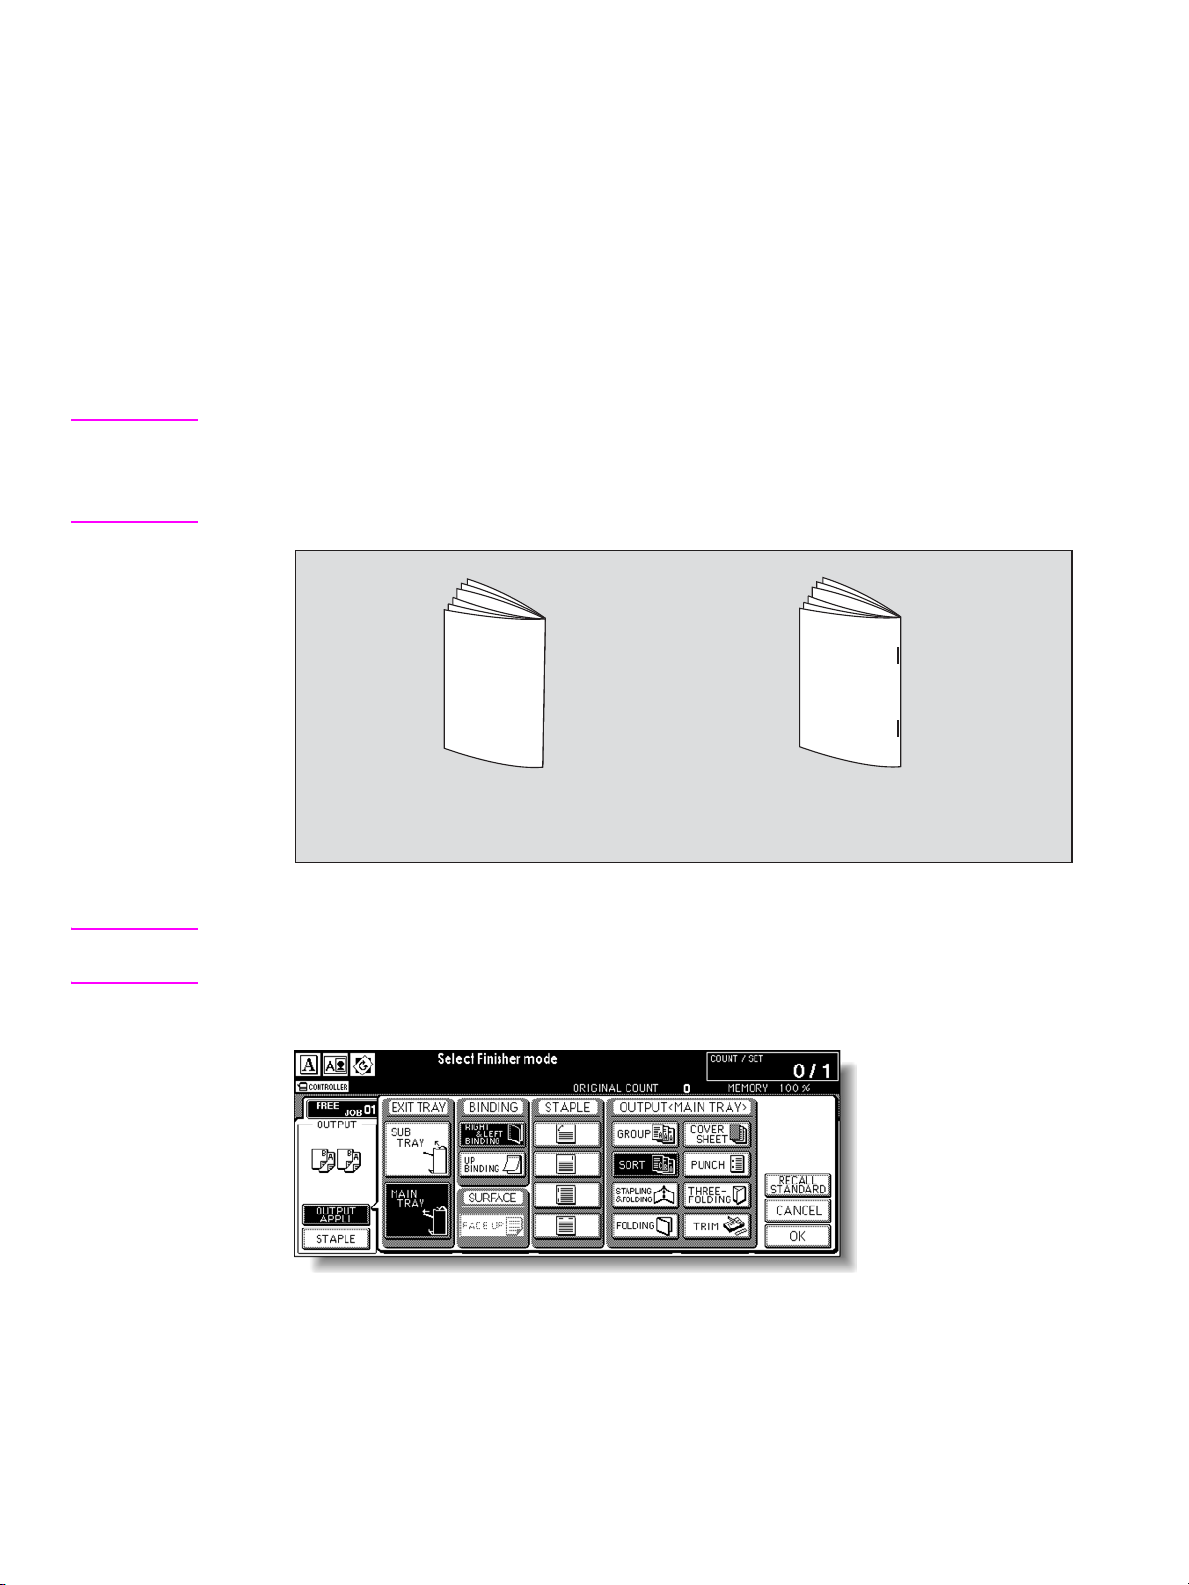
2 Select the Binding mode.
Touch OUTPUT APPLI on the Main screen to display the Output Mode popup menu, and then
touch the desired Binding mode key to highlight it.
Note Selecting UP BINDING makes copies upside down on the reverse side, while RIGHT&LEFT
BINDING copies normally.
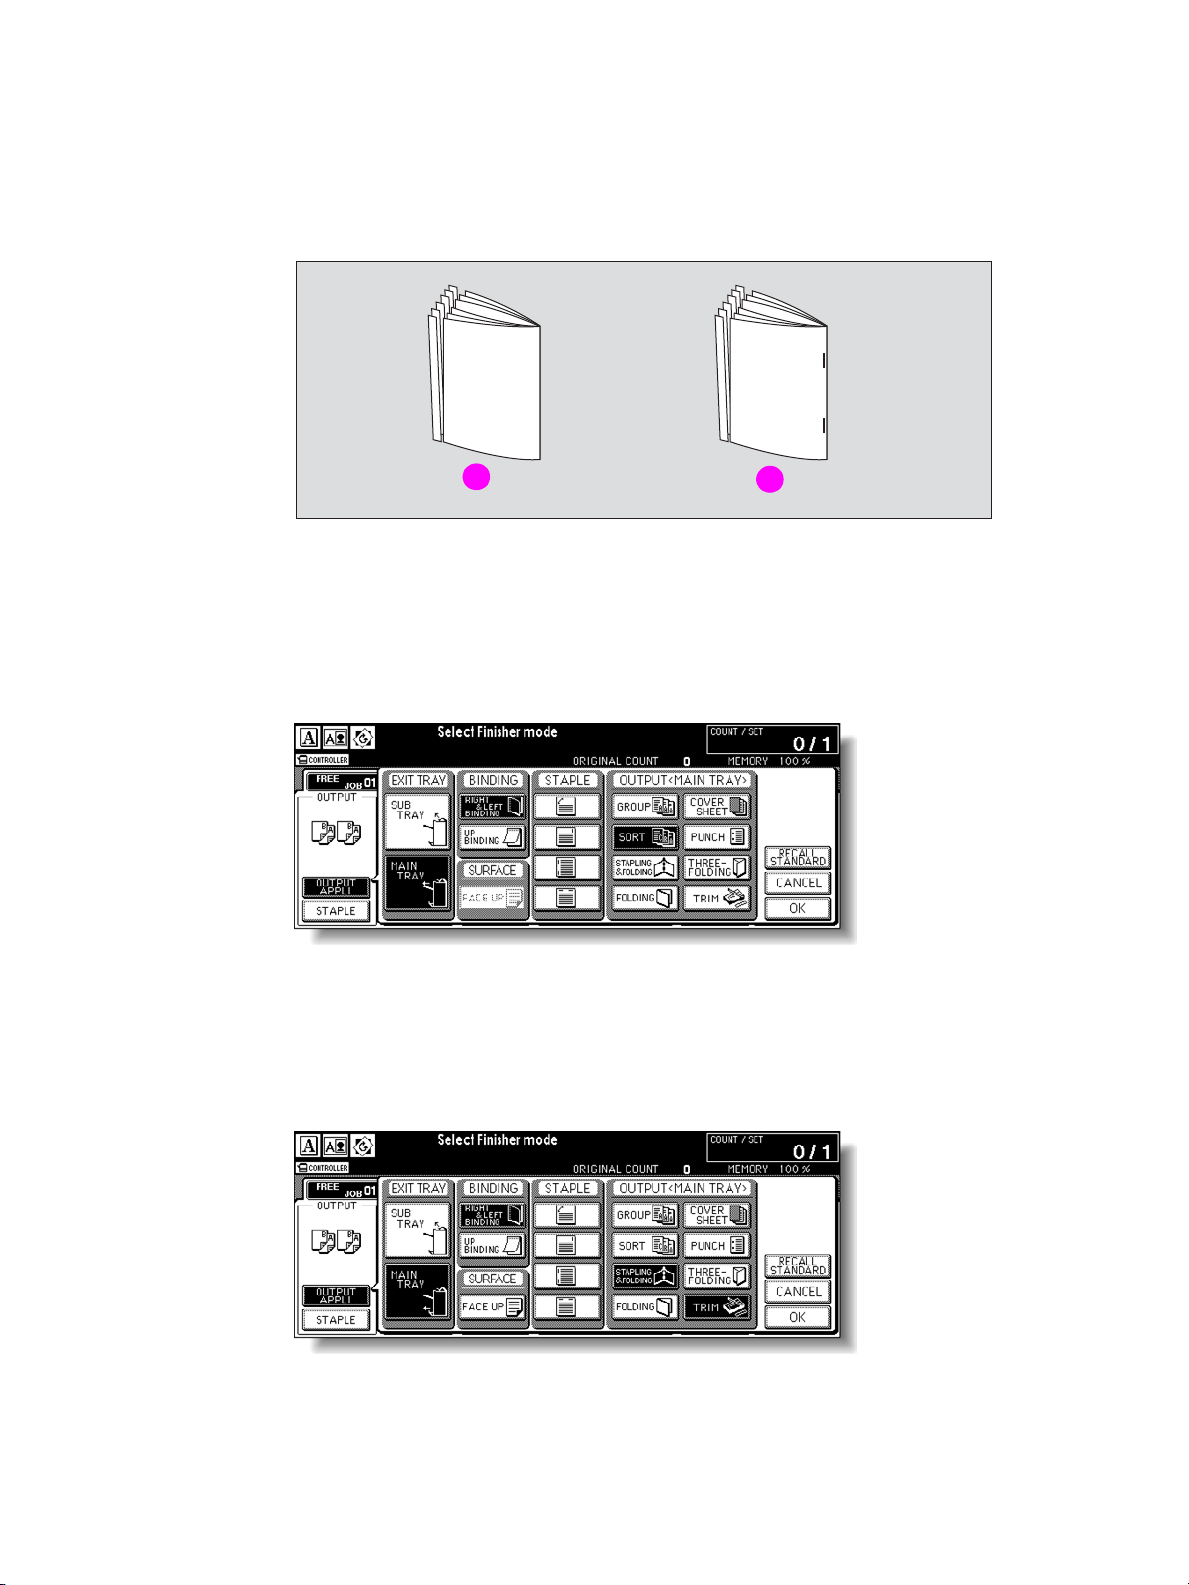
1
2
1 Binding mode
2 Copies
Touch OK to return to the Main screen.
3 Position original face down on the scanner glass according to the original direction, and then
close the document feeder or scanner cover.
Make sure to start from the first page.
ENWW Duplexing (2-sided copying) 23
Page 30
Note Use Non-Image Area Erase to prevent the black copy marks to be produced when scanning the
original with the document feeder or scanner cover open.
4 Touch 12 on the Main screen to highlight it.
The STORE key is automatically highlighted on the screen.
Note Do not press Reset at this point, otherwise the scanner mode is released and the MFP will stop
scanning the original.
5 Select additional copy conditions, as desired.
Note Some incompatible conditions may automatically release the selected copy mode. In this case,
arrange the settings so that they are compatible with the selected copy mode.
6 Type the desired print quantity by using the control panel keypad.
7 Press Start to scan.
The front side image of the double-sided copy is scanned into memory.
8 Turn the original over, and then press Start.
Repeat this step until all originals are scanned.
Note The Memory indicator on the upper right of the Main screen allows you to check the remaining
memory.
To delete the scanned data without printing, pres s Stop.
9 After all originals are scanned, touch STORE to exit the Store mode.
STORE will no longer be highlighted.
10 Press Start to print.
All the data in memory is output.
Press Stop to suspend the printing job.
CAUTION When the Finisher/Trimmer Unit/100-sheet output tray capacity is exceeded due to the print quantity
selected, remove the copied sets as they exit to avoid misfed paper.
24 2 Copying ENWW
Page 31

Using the optional finisher features
To staple
1 Close the RADF (ADF) securely, and then press Reset.
2 Main screen, touch Staple.
3 Touch OUTPUT APPLI.
4 Touch the desired staple position key, and then touch OK.
5 Touch Special Original.
6 Touch the desired original set direction key , and then touch OK.
7 Select additional copy conditions, as desired.
8 Enter the desired print quantity from the Control panel keypad.
9 Enter the desired print quality.
10 Position the originals.
11 Press START.
Note The maximum number of sheets of coated paper with the paper weight between 81 to 256 g/m2 that
can be stapled is 10.
To punch holes
1 On the Main screen, touch OUTPUT APPLI.
The Output Mode popup menu will be displayed.
2 Touch MAIN TRAY, if it is not highlighted.
3 Touch PUNCH to display the Punch Position popup menu.
4 Touch the desired punch position key on the screen to highlight it.
5 Touch OK on the Punch Position popup menu to restore the Output Mode popup menu.
6 Touch OK on the Output Mode popup menu to complete the setting and return to the Main
screen.
The selection made in punch position will be displayed in the OUTPUT icon area.
7 Specify the original set direction.
a Touch SPECIAL ORIGINAL on the Main screen to display the Special Original popup
menu.
b Touch the desired original set direction key, and then touch OK to return to the Main
screen.
8 Select additional copying features, as required.
9 Enter the desired print quantity from the Control panel keypad.
10 Position the originals in the document feeder.
11 Press START.
ENWW Using the optional finisher features 25
Page 32

Making folded booklets
The Folding and Stapling & Folding modes are available only when the HP 3000-Sheet
Multifunction Finisher option is installed. When any of these modes are selected, the Booklet
feature is automatically selected and indicated on the Application selection screen.
Note When copying two-sided signature originals using the Folding or Stapling & Folding mode, release
the automatically selected Booklet mode on the Application selection screen.
When copying dark originals or using Reverse image mode together with Folding or Stapling &
Folding mode, the folded line of the output copies may be slightly shifted.
The following copy results may be expected when using Folding or Stapling & Folding mode:
● In the Folding mode, each copied set is folded and output to the Booklet tray of the Finisher.
● In the Stapling & Folding mode, each copied set is stapled at two positions (saddle stitched),
and then folded and put into the Booklet tray of the Finisher.
Specifications for Folding/Stapling & Folding mode
● Use the RADF (ADF).
● Maximum number of folded sheets in Folding mode
28 lb paper or less: three sheets (less than in Staple & Folding mode because they are
not clinched first)
● Maximum number of folded sheets in Stapling & Folding mode
20 lb paper or less: 20 sheets
19 sheets with a thick cover paper
28 lb paper or less: 16 sheets
15 sheets with a thick cover paper
● Paper size: 305 by 457 mm (12 by 18 inches), Ledger, Legal, 216 by 279 mm (8.5 by
11R inches, A4R
● Paper weight: 16 - 28 lb; Special stock (20 lb paper is recommended)
● Booklet tray capacity:
When the Booklet tray capacity is exceeded, the Finisher will stop operating. Select the
appropriate print quantity by referring to the following capacities.
Using 20 lb paper:
Approximately 100 sheets maximum (12 by 18, Ledger, Legal)
Folding: 33 sets maximum of three-sheet-folded booklet (33 x 3 = 99 sheets)
Stapling & Folding: 20 sets maximum of five-sheet-folded booklet (20 x 5 = 100
sheets)
five sets maximum of 20-sheet-folded booklet (5 x 20 = 100 sheets)
Approximately 75 sheets maximum 216 by 279 mm (8.5 by 11 inches, A4R)
Folding: 25 sets maximum of three-sheet-folded booklet (25 x 3 = 75 sheets)
Stapling & Folding: 15 sets maximum of five-sheet-folded booklet (15 x 5 = 75
sheets)
Using 28 lb paper:
Approximately 80 sheets maximum 305 by 457 mm (12 by 18 inches), Ledger, Legal
Folding: 26 sets maximum of three-sheet-folded booklet (26 x 3 = 78 sheets)
Stapling & Folding: 16 sets maximum of five-sheet-folded booklet (16 x 5 = 80
sheets)
26 2 Copying ENWW
Page 33
five sets maximum of 15-sheet-folded booklet (5 x 15 = 75 sheets)
Approximately 60 sheets maximum 216 by 279 mm (8.5 by 11R inches), A4R
Folding: 20 sets maximum of three-sheet-folded booklet (20 x 3 = 60 sheets)
Stapling & Folding: 12 sets maximum of five-sheet-folded booklet (12 x 5 = 60
sheets)
● Incompatible conditions with Booklet selected: APS, 1 > 1, 2 > 1, ACS, Sort, Staple-sort,
Group, Face up, Three-folding, Rotation sort, Rotation group, Punch, Back cover feeding,
Mixed original, Whole area in non STD size, Tab paper, Sheet/Cover insertion, Combination,
Program job, Multi-page enlargement, Non-image area erase, Reverse image, and Repeat.
● Incompatible conditions without Booklet: Sort, Staple-sort, Group, Face up, Rotation sort,
Rotation group, Three-folding, Punch, Back cover feeding, Mixed original, Book copy, Program
job, Multi-page enlargement, and Reverse image.
Note The maximum number of sheets of coated paper over 80 g/m
The maximum number of sheets of coated paper over 80 g/m
The maximum number of sheets of coated paper with the paper weight between 81 to 256 g/m
2
is 10.
2
that can be stapled is 10.
2
that
can be stapled is 10.
1 Touch OUTPUT APPLI on the Main screen to display the Output mode popup menu.
Note When starting a new copying job, make sure to close the RADF (ADF) securely, and then press
Reset.
2 Touch MAIN TRAY, if not highlighted.
ENWW Making folded booklets 27
Page 34

3 Touch STAPLING & FOLDING or FOLDING, as desired.
.
Note Selecting STAPLING & FOLDING or FOLDING automatically switches the Output tray to Booklet
tray. Notice that the arrow pointing from the Main tray shifts to the Booklet tray.
When selecting STAPLING & FOLDING, the engine with the Trimmer Unit installed selects
TRIM automatically. To cancel the trimming mode, touch TRIM.
4 Touch OK on the Output mode popup menu.
The Main screen is restored and the selection made in the output mode is reflected in the
OUTPUT icon area.
5 Select additional copying features, as required.
Note NO COVER SHEET of Booklet is automatically selected.
To change this selection, touch OUTPUT APPLI on the Main screen to display the Application
Selection screen. On this screen, touch Booklet twice to display the Booklet mode selection screen
to make another selection or to release the setting.
6 Enter the desired print quantity from the control panel keypad.
7 Position originals.
When loading originals, notice the following limits on capacity:
Folding mode:
● 12 pages or less for simplex copying
● Six pages or less for duplex copying
Stapling & Folding mode:
● 80/64 pages or less for simplex copying (20/28 lb paper)
● 40/32 pages or less for duplex copying (20/28 lb paper)
Exceeding the above capacity limits may cause problems in the Finisher.
8 Press Start.
When the Booklet tray capacity is exceeded, the Finisher will stop operating. To avoid this, select
the appropriate print quantity.
To make a triple fold
1 Load Letter size or A4R size copy paper in a tray.
2 Touch OUTPUT APPLI on the Main screen to display the Output mode popup menu.
3 Touch MAIN TRAY, if not highlighted.
4 Touch THREE-FOLDING to highlight it.
5 Touch OK on the popup menu to complete the setting and return to the Main screen.
The THREE-FOLDING icon is displayed in the OUTPUT icon area.
28 2 Copying ENWW
Page 35

6 Select additional copying features, as required.
Touch to highlight the 8.5 by 11R or A4R tray key, if not already highlighted.
7 Enter the desired print quantity from the control panel keypad.
8 Position originals.
9 Press Start.
To insert covers
The HP Post Insertion Kit is available as an option on the HP 3000-Sheet Stapler/Stacker and HP
3000-Sheet Multifunction Finisher.
Load cover sheet paper into this device and use the sheets as front covers for copied sets output
to the Main output tray. The sheets can also be used as booklet-type covers for copied sets output
to the Booklet tray in the Folding or Stapling & Folding mode.
1 Touch OUTPUT APPLI on the Main screen to display the Output mode popup menu.
2 Touch MAIN TRAY, if not highlighted.
3 Touch COVER SHEET to display the c over sheet insert selection screen.
4 Touch FRONT, FRONT+BACK, or BACK to highlight it, and then select the covers tray.
When you select FRONT+BACK mode, you can specify different tray sources for each.
5 Touch OK to restore the Output mode popup menu.
6 Touch OK on the Output mode popup menu.
The Main screen is restored.
7 Select additional copying features, as required.
8 Load the cover sheet paper into the optional cover sheet feeder of the HP 3000-Sheet
Stapler/Stacker and HP 3000-Sheet Multifunction Finisher.
9 Enter the desired print quantity from the control panel keypad.
10 Position originals.
11 Press Start.
ENWW Making folded booklets 29
Page 36

Making trimmed booklets
The Trimming mode is available only when the HP Trimmer Unit option is installed on the
HP 3000-Sheet Multifunction Finisher. This function can be used with Folding or Stapling &
Folding mode to make each copied set folded or stapled and folded, trimmed at the edge that
opens the booklet, and then output to the Trimmer Unit tray.
Specifications for Trimming mode
● Maximum number of folded sheets in Folding mode
28 lb paper or less: three sheets (less than in Staple & Folding mode because they
● Maximum number of folded sheets in Stapling & Folding mode
20 lb paper or less: 20 sheets
28 lb paper or less: 16 sheets
● Paper size: 12 by 18, Ledger, Legal, 8.5 by 11, A4R
● Paper weight: 16 - 28 lb
● Trimmer Unit tray capacity:
When the Trimmer Unit tray capacity is exceeded, the Finisher and Trimmer Unit will stop
operating. Select an appropriate print quantity by referring to the following capacities.
Approximately 512 sheets maximum (20 lb paper)
Folding and Trimming: 100 sets maximum of three-sheet-folded booklet
Stapling & Folding and Trimming: 100 sets maximum of two - five-sheet-folded booklet
Approximately 410 sheets maximum (28 lb paper)
Folding and Trimming: 100 sets maximum of three-sheet-folded booklet
Stapling & Folding and Trimming: 80 sets maximum of two - five-sheet-folded booklet
are not clinched first)
19 sheets with a thick cover paper
15 sheets with a thick cover paper
(100 x 3 = 300 sheets maximum)
(100 x 5 = 500 sheets maximum)
50 sets maximum of 6 - 10-sheet-folded booklet
(50 x 10 = 500 sheets maximum)
32 sets maximum of 11 - 16-sheet-folded booklet
(32 x 16 = 512 sheets maximum)
25 sets maximum of 17 - 20-sheet-folded booklet
(25 x 20 = 500 sheets maximum)
(100 x 3 = 300 sheets maximum)
(80 x 5 = 400 sheets maximum)
40 sets maximum of 6 -10-sheet-folded booklet
(40 x 10 = 400 sheets maximum)
25 sets maximum of 11 - 16-sheet-folded booklet
(25 x 16 = 400 sheets maximum)
20 sets maximum of 17 - 20-sheet-folded booklet
(20 x 20 = 400 sheets maximum)
30 2 Copying ENWW
Page 37
● Incompatible conditions with Booklet selected: APS, 1 > 1, 2 > 1, ACS, Sort, Staple-sort,
Group, Face up, Rotation sort, Rotation group, Three-Folding, Punch, Back cover feeding,
Mixed original, Whole area in non-STD size, Tab paper, Sheet/cover insertion, Combination,
Program job, Multi-page enlargement, Non-image area erase, Reverse image, and Repeat.
● Incompatible conditions without Booklet: Sort, Staple-sort, Group, Face up, Rotation sort,
Rotation group, Three-folding, Punch, Back cover feeding, Mixed original, Book copy, Program
job, Multi-page enlargement, and Reverse image.
1
2
1 Folding and trimming
2 Stapling & Folding, and trimming
1 Touch OUTPUT APPLI on the Main screen.
The Output Mode popup menu is displayed.
2 Touch MAIN TRAY, if not highlighted.
3 Select the desired trimming mode.
Touch STAPLING & FOLDING or FOLDING, as desired.
When selecting FOLDING, also touch TRIM to highligh t it.
When selecting STAPLING & FOLDING, TRIM is selected automatically if the Trimmer Unit is
installed.
ENWW Making trimmed booklets 31
Page 38

Note When copying two-sided signature originals using the Folding or Stapling & Folding mode, release
the automatically selected Booklet mode on the Application Selection screen.
When copying dark originals or using Reverse image mode together with Folding or Stapling &
Folding mode, the folded line of the output copies may be shifted slightly.
4 Touch OK on the Output mode popup menu.
The Main screen will be restored and the selection made in the output mode will be reflected
in the OUTPUT icon area.
5 Select additional copying features, as required.
NO COVER SHEET of Booklet is initially selected.
To change this selection, touch OUTPUT APPLI on the Main screen to disp la y the Appl icat io n
selection screen. On this screen, touch Booklet twice to display the Booklet mode selection
screen to make another selection or to release the setting.
6 Enter the desired print quantity from the control panel keypad.
7 Position originals.
When loading originals, notice the following limits on capacity:
Folding mode:
● 12 pages or less for simplex copying
● Six pages or less for duplex copying
Stapling & Folding mode:
● 80/64 pages or less for simplex copying (20/28 lb paper)
● 40/32 pages or less for duplex copying (20/28 lb paper)
Exceeding the above capacity limits may cause the Finisher to quit operating.
8 Press Start.
When the Trimmer Unit tray capacity is exceeded, the Finisher and Trimmer Unit will stop
operating. To avoid this, select the appropriate print quantity.
32 2 Copying ENWW
Page 39

Cover sheet feeding
The HP Post Insertion Kit is available as an option on the HP 3000-Sheet Stapler/Stacker and
HP 3000-Sheet Multifunction Finisher.
Load cover sheet paper into this device and use the sheets as front covers for copied sets output
to the Main output tray. The sheets can also be used as booklet-type covers for copied sets output
to the Booklet tray in the Folding or Stapling & Folding mode.
Note Paper loaded into the cover sheet feeder cannot be copied.
This function is incompatible with Cover sheet mode (COVER WITH COPY SHEET and COVER
WITH BLANK SHEET) in Booklet and Cover mode in Sheet/cover Insertion.
Specifications for cover sheet feeding
● Cover paper size:
Upper tray; Letter, 216 by 279 mm (8.5 by 11R inches), 139 by 216 mm (5.5 by 8.5
inches)
Lower tray; 305 by 457 mm (12 by 18 inches), Ledger, Legal, 216 by 279 mm
(8.5 by 11R inches), 139 by 216 mm (5.5 by 8.5 inches)
139 by 216 mm (5.5 by 8.5 inches) paper is available in portrait type feeding only).
● Cover paper weight: (200 g/m
● Tray capacity: 200 sheets, (200 g/m
● Incompatible Conditions: Group, Rotation sort, Rotation group, Output to secondary (sub) tray,
Punch, Cover mode in Sheet/Cover insertion, Cover sheet mode in Booklet, and Multi-page
enlargement
● Incompatible with Back cover feeding: Folding, Stapling & Folding, and Three-folding
2
) 13 - 110 lb cover paper
2
(110 lb) cover paper or 30 mm thick for both trays
2
1
3
1 Copied set with cover attached
2 Cover sheet
3 Copied sets with cover attached in Folding or Stapling & Folding mode
ENWW Cover sheet feeding 33
Page 40

1 Touch OUTPUT APPLI on the Main screen to display the Output mode popup menu.
2 Touch MAIN TRAY, if not highlighted.
3 Touch COVER SHEET to display the cover sheet insert selection screen.
4 Touch FRONT, FRONT+BACK, or BACK to highlight it, and then select the covers tray.
When you select FRONT+BACK mode, you can specify different tray sources for each.
Note Copy paper sizes available to be loaded are different in each tray.
5 Touch OK to restore the Output mode popup menu.
6 Touch OK on the Output mode popup menu.
The Main screen is restored.
7 Select additional copying features, as required.
34 2 Copying ENWW
Page 41

8 Load the cover sheet paper into the optional cover sheet feeder of the HP 3000-Sheet
Stapler/Stacker and HP 3000-Sheet Multifunction Finisher.
1
2
1 Upper tray
2Lower tray
If the paper size loaded in the cover sheet feeder is not suitable, the following messages are
displayed and copying is unavailable until the correct size is loaded.
Please load cover sheet in
cover sheet feeder
Adapt paper size between
cover sheet and selected paper
9 Enter the desired print quantity from the control panel keypad.
10 Position originals.
11 Press Start.
CAUTION When the Finisher output tray capacity is exceeded due to the print quantity selected, remove the
copied sets as they exit to avoid misfed paper.
ENWW Cover sheet feeding 35
Page 42

Off-line finishing
The Off-Line finishing function enables you to finish documents independent of MFP operation.
This function is available only with the HP Post Insertion Kit installed on the HP 3000-Sheet
Stapler/Stacker and HP 3000-Sheet Multifunction Finisher. To use this convenient function, simply
load paper into the lower tray of the cover sheet feeder, select the desired mode from the Off-line
finishing control panel located on the top of the Finisher, and then press the Start/Stop button.
The available finishing modes are described below:
HP 3000-Sheet Stapler/Stacker + HP Post Insertion Kit
● One oblique staple: Main tray
● Two parallel staples: Main tray
HP 3000-Sheet Stapler/Stacker + HP Post Insertion Kit + HP 3 Hole Punch Kit
● One oblique staple
● Two parallel staples
● Punch
HP 3000-Sheet Multifunction Finisher + HP Post Insertion Kit + HP 3 Hole Punch Kit
● One oblique staple
● Two parallel staples
● Stapling & Folding (two staples in the center + folding)
● Three-folding
HP 3000-Sheet Multifunction Finisher + HP Post Insertion Kit + HP 3 Hole Punch Kit
● One oblique staple
● Two parallel staples
● Stapling & Folding (two staples in the center + folding)
● Three-folding
● Punch
Specifications for manual stapling one oblique staple and two parallel staples
● Paper size: 305 by 457 mm (12 by 18 inches), 279 by 432 mm (11 by 17 inches), 216 by
356 mm (8.5 by 14 inches), 216 by 279 mm (8.5 by 11 inches), 216 by 279 mm (8.5 by 11R
inches), 139 by 216 mm (5.5 by 8.5 inches), A4, A4R (210 by 297 mm, 8.27 by 11.69
inches)
● Paper weight: 13 - 28 lb (20 lb paper is recommended)
● Staple capacity: 50/40 sheets maximum (20/28 lb paper)
● Output tray: Main output tray
Specifications for manual punch
● Paper size: 305 by 457 mm (12 by 18 inches), 279 by 432 mm (11 by 17 inches), 216 by
279 mm (8.5 by 11 inches), A4 (210 by 297 mm (8.27 by 11.69 inches)
● Paper weight: 13 - 34 lb (20 lb paper is recommended)
● Punch capacity: 200 sheets maximum (28 lb paper) or within 30 mm thick
● Output tray: Main output tray
36 2 Copying ENWW
Page 43
Specifications for manual stapling & folding mode
● Paper size: 305 by 457 mm (12 by 18 inches), 279 by 432 mm (11 by 17 inches), 216 by
356 mm (8.5 by 14 inches), 216 by 279 mm (8.5 by 11R inches), A4, A4R (210 by 297 mm,
8.27 by 11.69 inches)
● Paper weight: 16 - 28 lb (20 lb paper is recommended)
● Staple capacity: 20/16 sheets maximum (20/28 lb paper)
19/15 sheets maximum (20/28 lb paper with a thick paper cover)
● Output tray: Booklet tray
Specifications for manual three-folding mode
● Paper size: 216 by 279 mm (8.5 by 11R inches), A4R, 210 by 297 mm (8.27 by 11.69
inches)
● Paper weight: 16 - 28 lb (20 lb paper is recommended)
● Folding capacity: three sheets maximum (28 lb paper)
● Output tray: Booklet tray
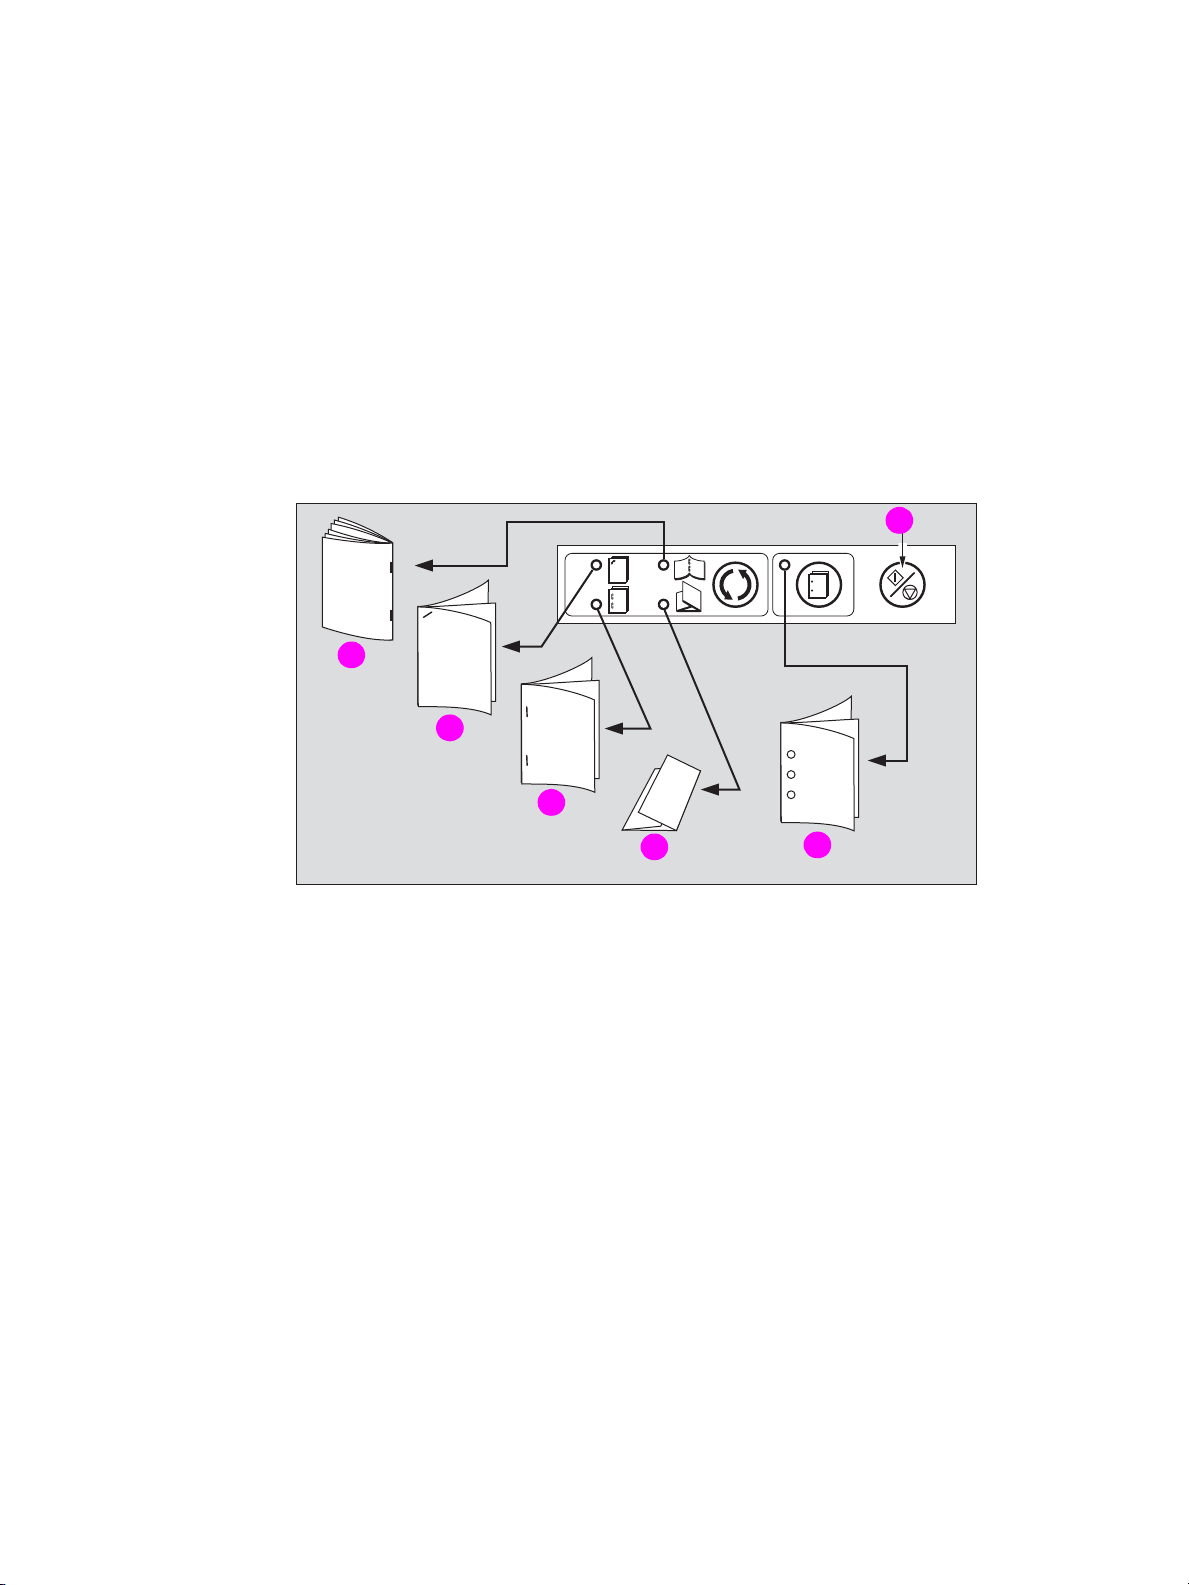
6
1
2
1 Stapling & Folding
2 One oblique staple
3 Two parallel staples
4 Three-folding
5 Punching
6 Start/Stop button
3
4
5
ENWW Off-line finishing 37
Page 44

1 Load paper into the lower tray of the cover sheet feeder, as described below for each mode.
2
1
1Lower tray
2 Guide plate
● One oblique staple/two parallel staples: Face up
● Punch: Face up
● Stapling & Folding: Face up for the outside of the finished set
● Three-Folding: Face up for the outside of the folded set
Align the guide plate. The indicator light of the Start/Stop button turns green.
2 Press the Staple mode selection button and/or Punch button to select the desired mode.
Punch mode is compatible with one oblique staple, two parallel staples, or Stapling & Folding
mode.
3 Press the Start/Stop button.
Finished sheets are delivered to the appropriate tray according to the mode selected.
Note If you want to stop the Off-Line Finishing operation, press the Start/Stop button again. The Finisher
will stop operating. When using Stapling & Folding mode, the unfinished set will be left in the stacker
unit inside the Finisher.
CAUTION When the Booklet tray capacity is exceeded, the Finisher will stop. To avoid this, select the
appropriate print quantity.
CAUTION When the Finisher output tray capacity is exceeded due to the print quantity selected, remove the
copied sets as they exit to avoid misfed paper.
38 2 Copying ENWW
Page 45

3Loading trays
ENWW 39
Page 46
Loading paper
A paper indicator is shown on each tray key of the Main screen to indicate the paper tray level (six
levels are provided: ) of the tray. (The multi-sheet bypass tray displays only “ ”
when the tray becomes empty.)
When the paper supply in a tray becomes low, the indicator “ ” appears on the tray key, and
then it changes to “ ” when paper in that tray becomes empty and the tray key blinks on the
screen.
Follow the procedure below to supply the empty tray with copy paper.
Each tray key displays a paper type and a number that indicates the paper weight to be loaded.
The following paper types are provided:
Normal, Recycled, Colored, Fine, Coated, User, Tab paper, and Exclusive A to D
The numbers corresponding to the paper weight are:
1: 64 - 74 g/m
2: 75 - 80 g/m
3: 81 - 105 g/m
4: 106 - 162 g/m
5: 163 - 209 g/m
6: 210 - 256 g/m
2
(17 lb - 18 lb)
2
(19 lb - 20 lb)
2
(21 lb - 28 lb)
2
(29 lb - 42 lb)
2
(43 lb - 115 lb index)
2
(116 lb - 143 lb index) (for the HCI and multi-sheet bypass tray only)
The key operator can change this setting. For more information, see “(1) Date & time setting” for
details on the engine trays and the Tray 4/HCI in the “Key Operator mode” section of the
HP Color 9850mfp System Administrators Guide.
Note Make sure to load only the paper type and weight set for the tray.
When using paper with punch holes, the copy result may not be satisfactory due to the hole positions.
Loading paper in Trays 1, 2, and 3
1 Withdraw Tray 1, 2, or 3 and open the paper pick roller.
40 3 Loading trays ENWW
Page 47

WARNING! Do not withdraw the tray forcibly; you can be injured.
Withdraw the tray completely until the green line appears at the left rear side of the tray.
To load the same size as loaded before, proceed to step 4.
If changing the paper size, proceed to the next step.
2 Adjust the position of the side guide plate.
Pull up the lock lever at the front, and then slide the side guide plate to the desired position.
See the size indication on the bottom plate of the tray to determine the position of the side
guide plate.
Push down the lock lever firmly until it clicks into position to secure the side guide plate.
Make sure to secure the side guide plate in position according to the size indicated on the tray
bottom plate, so that the engine can detect the correct paper size.
3 Adjust the position of the rear stopper.
To slide the rear stopper to the right, hold it at the upper part and slide it while pressing down
slightly.
With the other hand, hold the rear stopper at the lower part to slide it to the left.
Make sure to press down the rear stopper when moving it to the right, and also make sure to
hold it at the lower part when moving it to the left. Do not move the rear stopper forcibly,
otherwise it can be damaged.
ENWW Loading paper 41
Page 48

4 Place paper on the tray.
Load paper aligning it to the right side of the tray, and then align the rear stopper to the paper.
Make sure that the rear guide plate is securely aligned to the paper to avoid engine trouble.
Do not load above the limit indicated on the side guide plate.
5 When paper is positioned properly, close the paper pick roller.
6 Gently push in the tray until it locks into place.
The indicator “ ” on the tray key will change to “ ”.
Note To avoid engine trouble, do not push the tray into the engine.
42 3 Loading trays ENWW
Page 49

Loading paper in the multi-sheet bypass tray
When using the multi-sheet bypass tray, specify the paper type to be loaded in the tray at the same
time.
1 Open the multi-sheet bypass tray located on the right side of the MFP.
.
2 Load copy paper and adjust the paper guides to the paper size.
Note Stack paper up to 200 sheets (28 lb). When loading special paper, do not exceed the limit indicated
on the paper guides because this could lead to a paper misfeed.
Transparency film or ink-jet paper cannot be used with this engine.
3 When copying is completed, close the multi-sheet bypass tray.
ENWW Loading paper 43
Page 50

Loading paper in the HP 2500-Sheet High Capacity Input (HCI)
Make sure to load only the paper type and weight set for HP 2500-Sheet High Capacity Input.
Only the key operator can change this setting. For more information, see “(6) Paper type/special
size set” in the “Key Operator mode” section of the HP Color 9850mfp System Administrators
Guide.
1 Open the top door of HP 2500-Sheet High Capacity Input.
The bottom plate will go up.
Note Make sure to turn on the power switch before loading paper in the HP 2500-Sheet High Capacity
Input or the bottom plate will not function.
To load the same size as loaded before, proceed to step 3.
If changing the paper size, proceed to the next step.
2 Adjust the position of the paper guides and rear stopper.
a Turn the four paper guide knobs and two rear stopper knobs counterclockwise to loosen
them.
b Move the upper part of the two paper guides to the appropriate positions according to the
size indication, and then turn the paper guide knobs (two for each) clockwise to secure the
guides.
44 3 Loading trays ENWW
Page 51
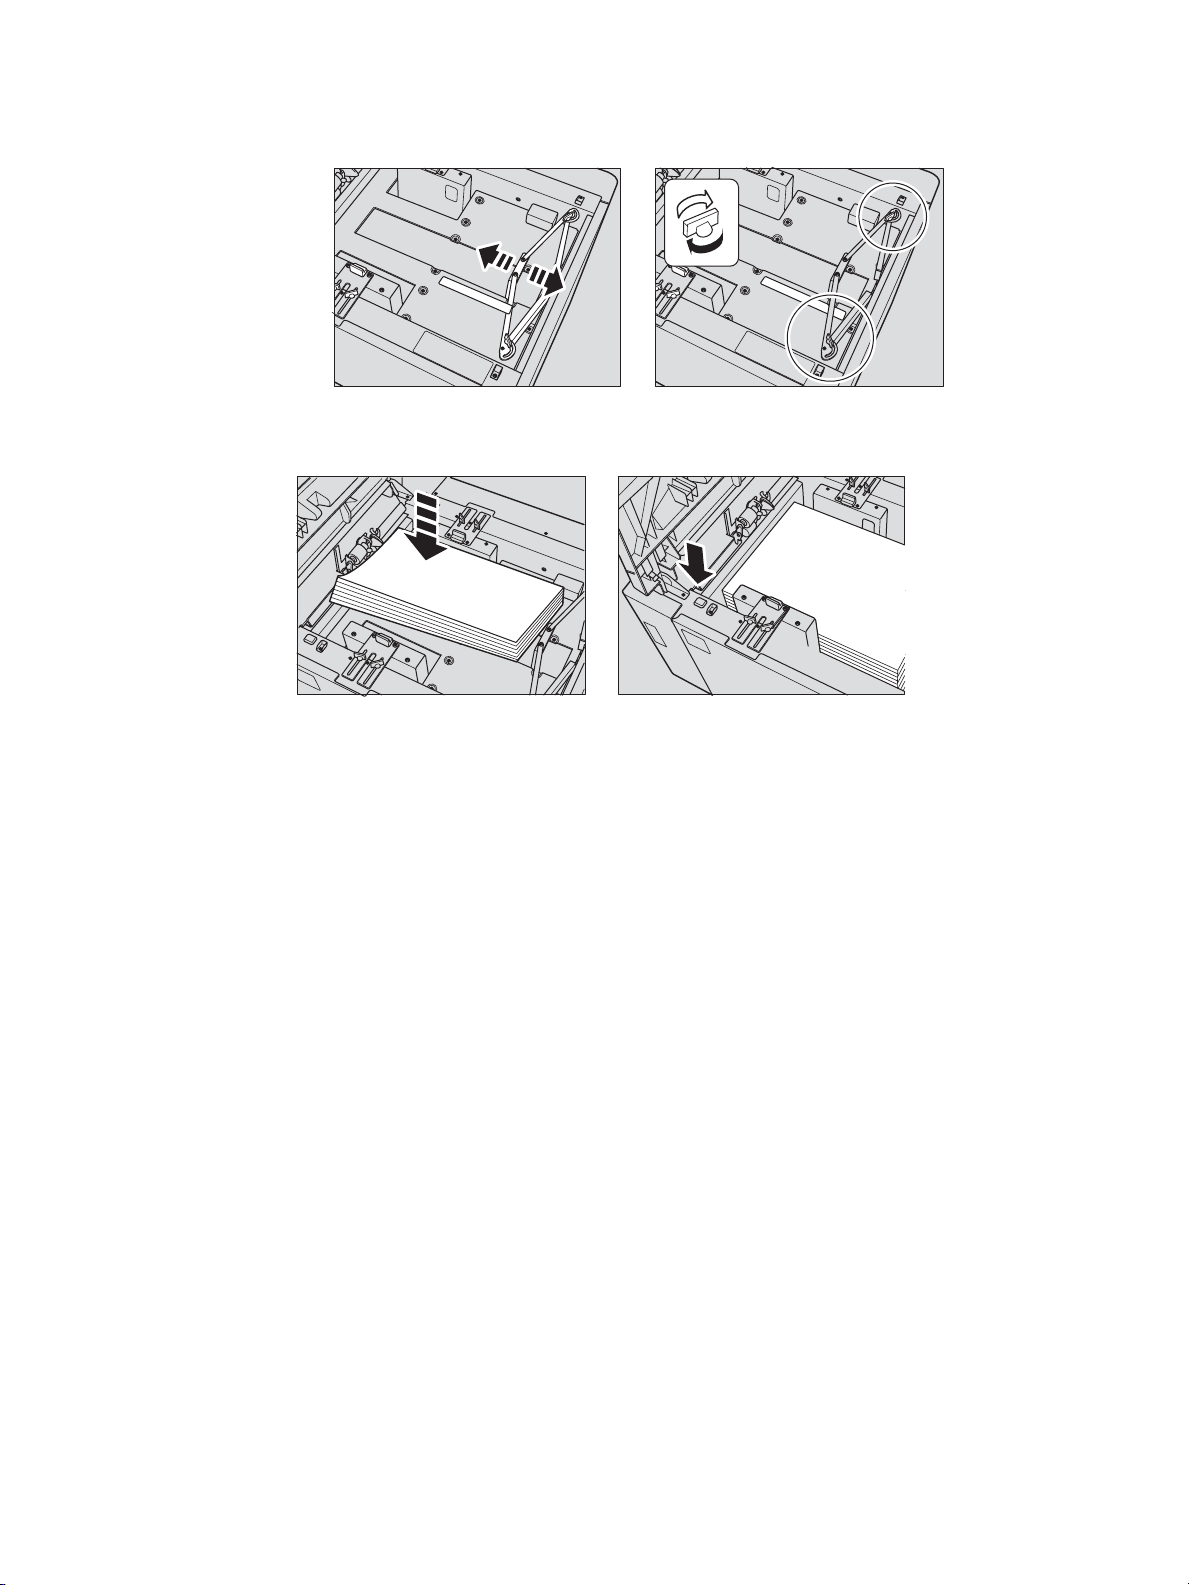
c Move the rear stopper to the appropriate position according to the size indicator on the
bottom plate, and then turn the two rear stopper knobs clockwise to secure the rear
stopper.
3 Press the paper loading button once, and then load the paper.
The bottom plate will go down.
ENWW Loading paper 45
Page 52

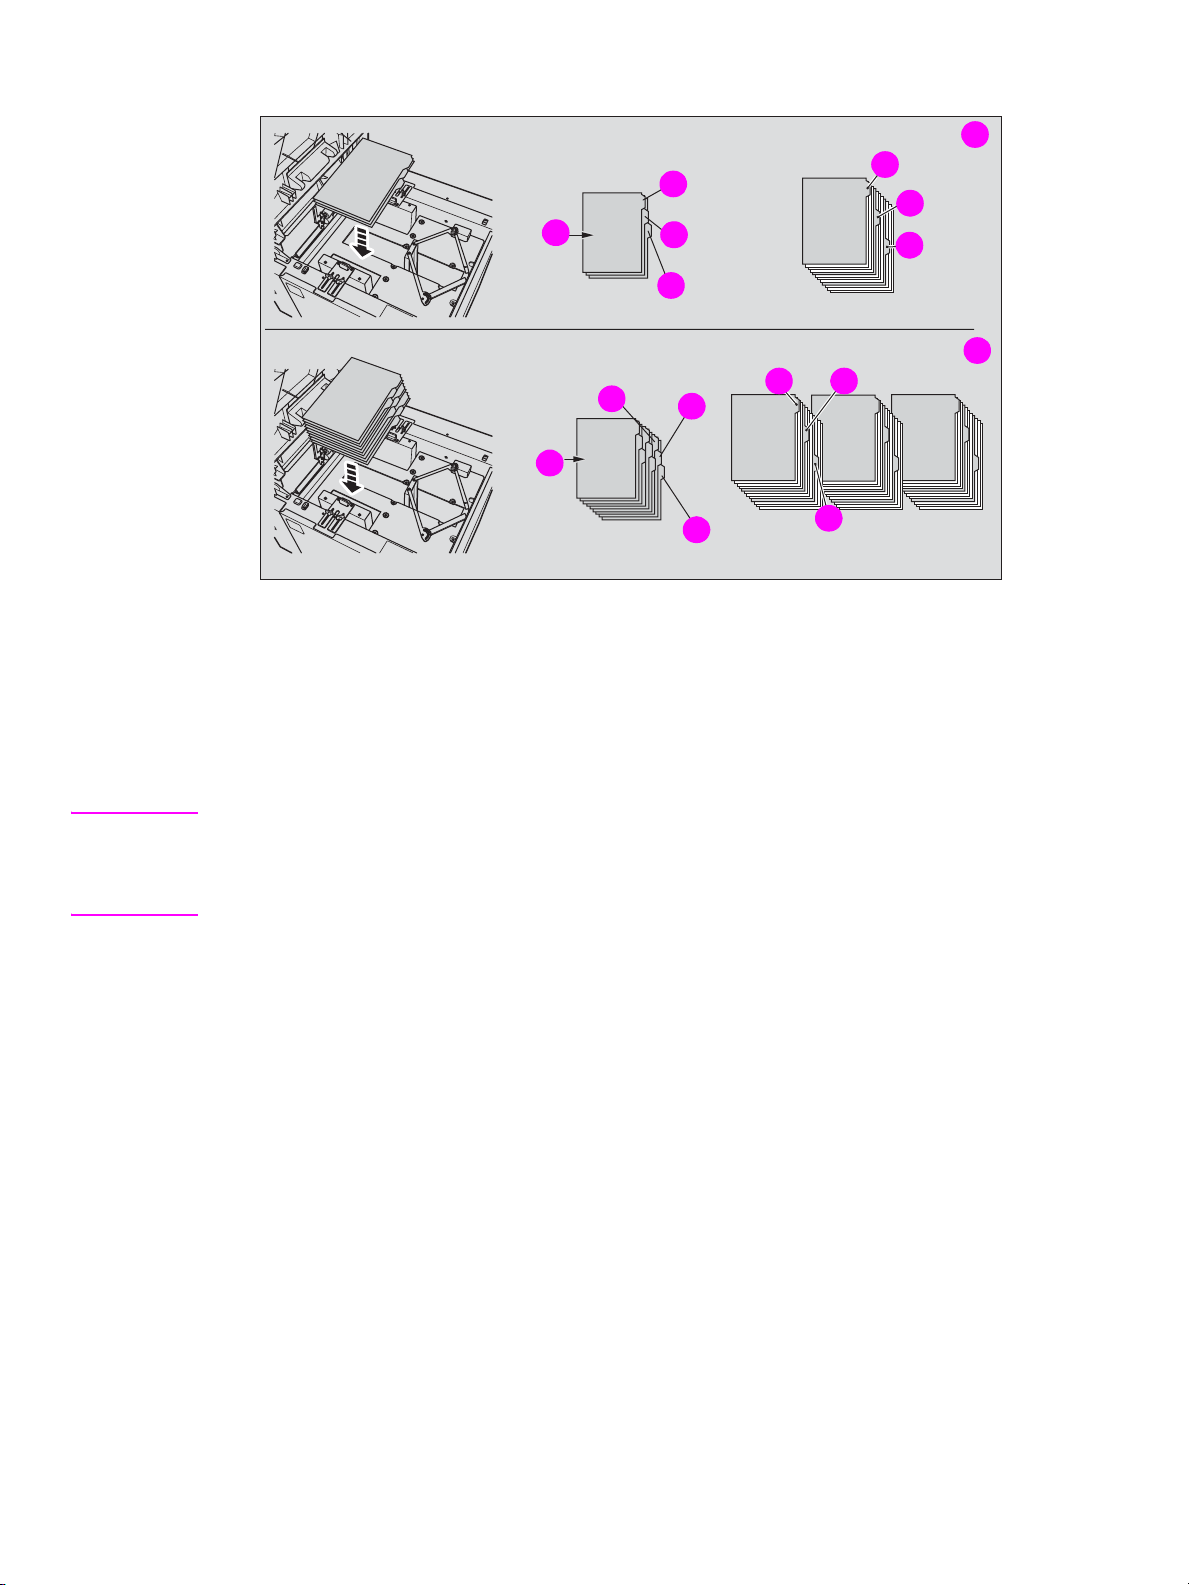
Loading tabbed sheets in Tray 1, 2, or 3
When TAB is displayed on the tray key of the Main screen, follow the procedure below to supply
the tray with tabbed sheets.
The tray paper type can be specified in the Key Operator setting. For more information, see “(6)
Paper type/special size set” in the “Key operator mode” section of the HP 9850mfp System
Administrators Guide.
Note The tab extension width should be 12.5 mm (0.5 inch) or less.
Rear
Front
6
3
Rear
Front
4
5
Section 3
Section 3
Management
Management
One finished set
3
4
6
3
4
5
5
Three finished sets
1 Example: Three tabbed sheets loaded in position for one finished set
2 Example: Nine tabbed sheets loaded in position for three finished sets
3 First tab
1
3
4
5
2
4 Second tab
5 Third tab
6 Printed side
1 Remove Tray 1, 2, or 3.
2 Open the paper feed roller.
3 Place the tabbed sheets on the tray as illustrated above.
4 Move the green levers (located at the front and the left side) to the edge of the paper.
5 Close the paper feed roller, and then push in the tray until it locks into place.
46 3 Loading trays ENWW
Page 53
Loading tabbed sheets in the HCI
Rear
3
3
4
6
4
5
5
Front
Rear
One finished set
3 4
Front
3
Section 1
Section 1
Introduction
6
Introduction
4
5
5
Three finished sets
1 Example: Three tabbed sheets loaded in position for one finished set
2 Example: Nine tabbed sheets loaded in position for three finished sets
3 First tab
4 Second tab
1
2
5 Third tab
6 Printed side
Note The tab extension width must be 12.5 mm (0.5 inch) or less.
To load the tabbed sheets into the HCI, contact your service representative to position the rear
stopper for the paper size to be loaded.
1 Open the HCI top door.
2 Press the paper loading button to lower the HCI bottom plate.
3 Load the tabbed sheets into the HCI as illustrated above.
4 Close the HCI top door.
ENWW Loading paper 47
Page 54
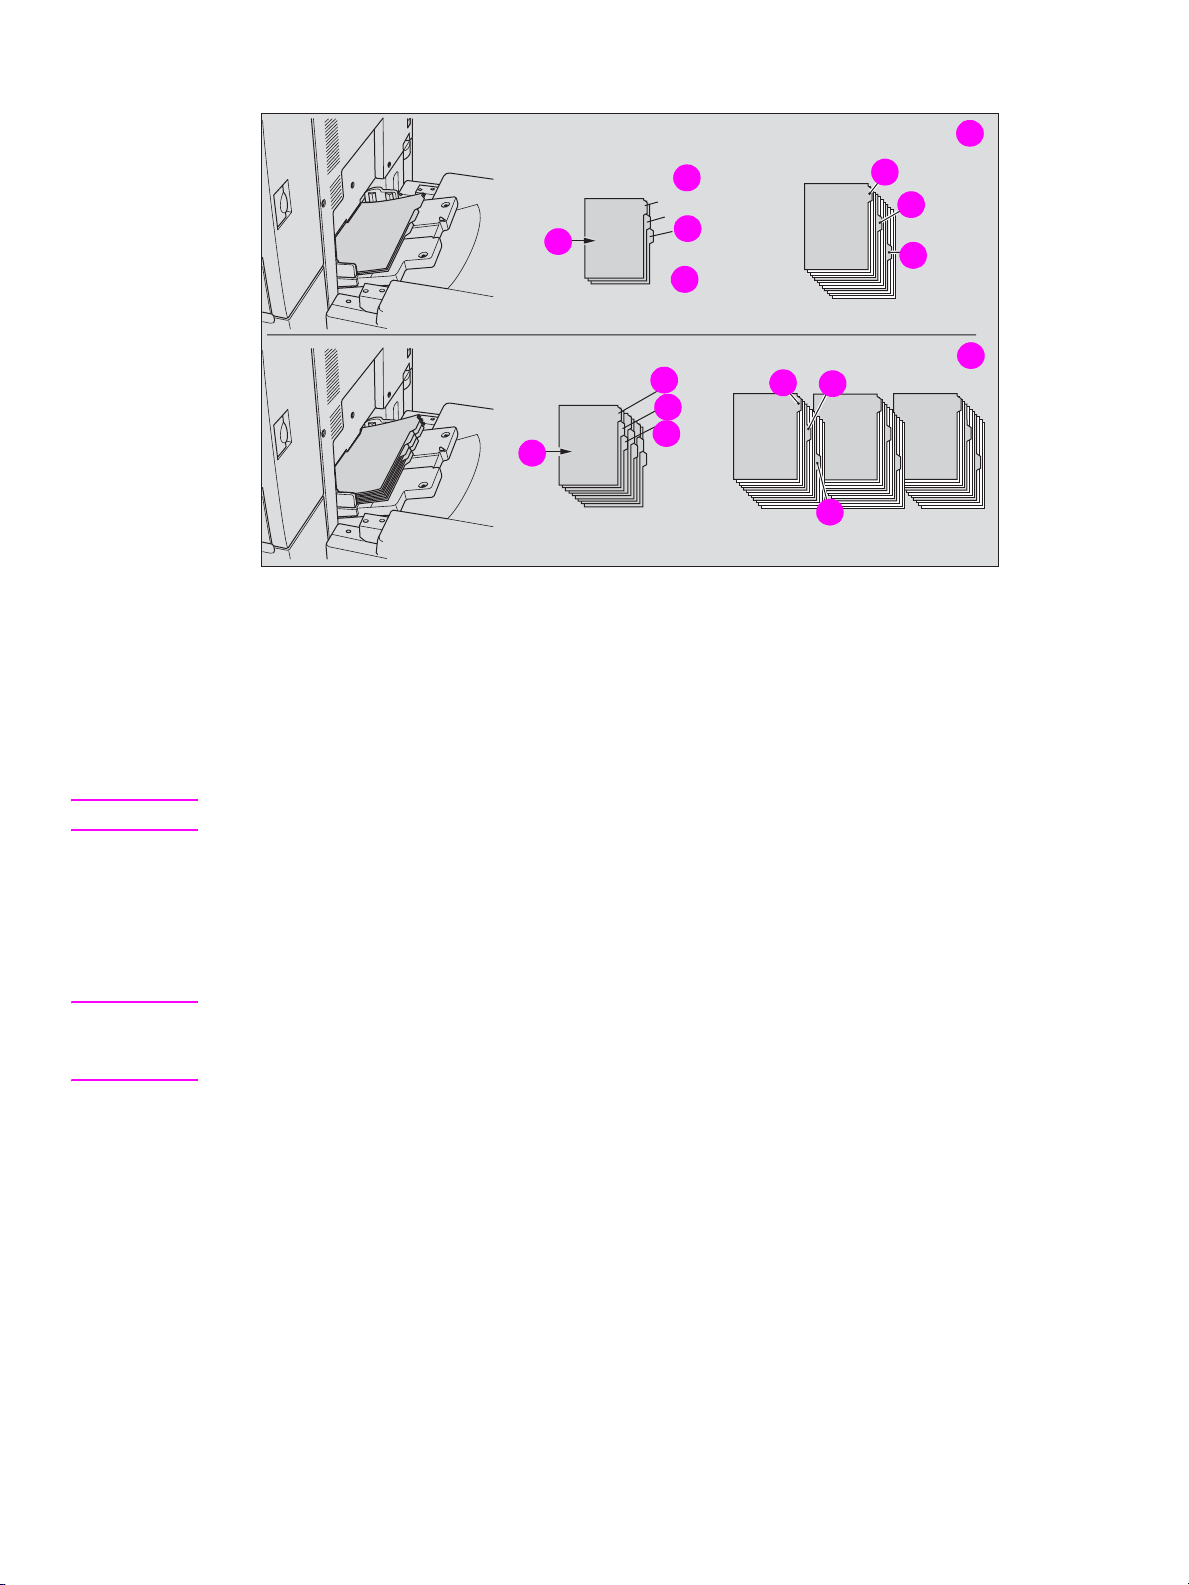
Loading tabbed sheets in the multi-sheet bypass tra y
Rear
3
3
4
6
4
5
5
Front
Rear
3
One finished set
3
4
4
Section 1
Section 1
Introduction
6
Introduction
5
5
Front
Three finished sets
1 Example: Three tabbed sheets loaded in position for one finished set
2 Example: Nine tabbed sheets loaded in position for three finished sets
3 First tab
4 Second tab
1
2
5 Third tab
6 Printed side
Note The tab extension width should be 12.5 mm (0.5 inch) or less.
1 Open the multi-sheet bypass tray located on the right side of the copier.
2 Load tabbed sheets as illustrated above.
3 Adjust the paper guides to the paper size.
4 Specify the paper type as TAB for the multi-sheet bypass tray.
Note See “Copying using special paper (multi-sheet bypass tray)” in the “Copying operations” section of
the HP 9850mfp System Administrators Guide for information about specifying the paper type in the
multi-sheet bypass tray.
48 3 Loading trays ENWW
Page 55

Supported paper sizes for trays
The following table shows the standard paper sizes for each of the trays.
Size Tray 1 Tray 2 Tray 3 Tra y 4
(HCI)
A3
A4
A4R
A5
B4
B5
B5R
Half-letter R
Foli o (F4)
Letter
Letter R
Legal
1 111 1
1 111 1
2 222 2
222 2
1 111 1
1 111 1
1 112 1
111 1
2 222 2
1 111 1
1 111 1
1 111 1
Multi-sheet
bypass tray
Tabloid/11 by 17
305 by 457 mm
12 by 18 inches
330 by 483 mm
13 by 19 inches
1
STD size
2
Non STD size for trays
1 111 1
1 111 1
1 111 1
ENWW Supported paper sizes for trays 49
Page 56

50 3 Loading trays ENWW
Page 57

4Adding toner
ENWW 51
Page 58

Adding toner
When toner supply is low, the message “Please add toner”, and the ADD TONER icon
( ) display on the touch display. The toner color to be supplied is indicated by a
letter of the alphabet: C (cyan), M (magenta), Y (yellow), or K (black).
Note Use the same number toner bottle as described on the label on the toner bottle cover . Otherwise, it
may cause engine trouble.
1
1 Toner number labels
Add toner using the following procedure:
52 4 Adding toner ENWW
Page 59

1 Loosen toner by tapping both the top and bottom of the new toner bottle on a solid surface,
and then shake the bottle at least five times.
o
2 Open the toner access door.
ENWW Adding toner 53
Page 60
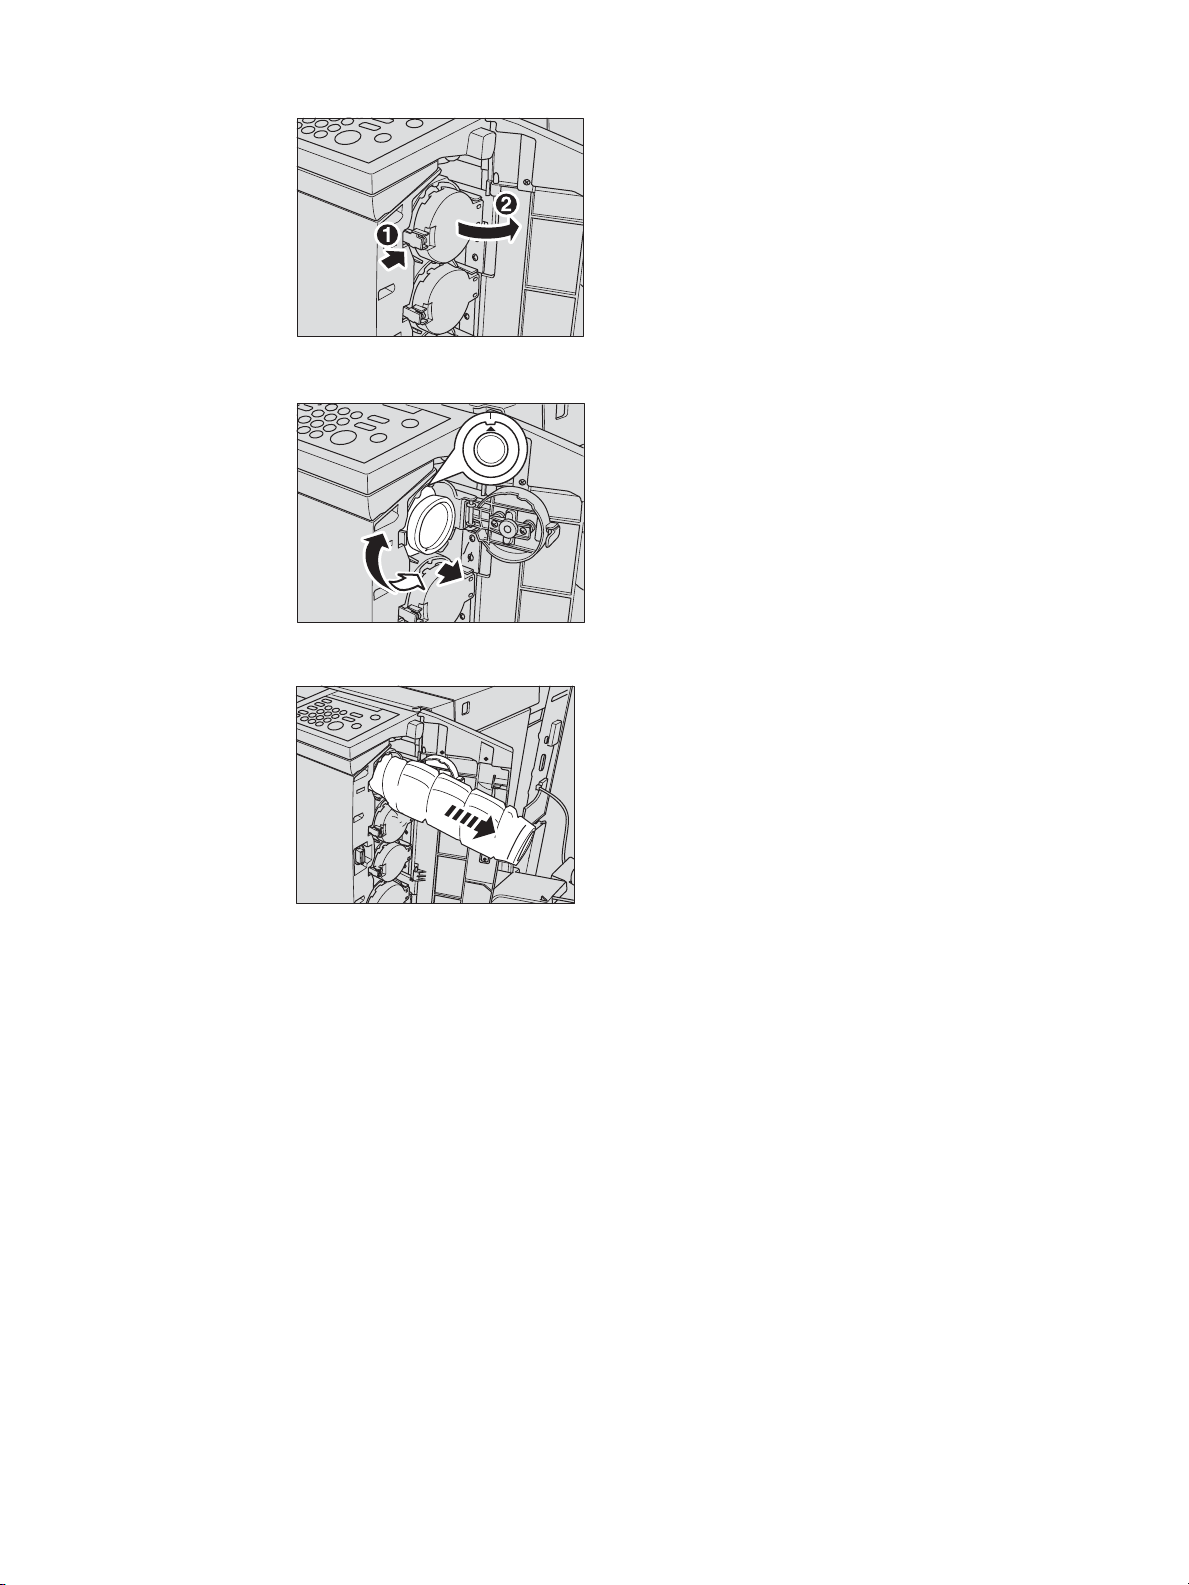
3 Unlock and open the toner bottle cover of the empty toner bottle.
4 Partially withdraw the toner bottle, and then turn it to set the “Up arrow” mark at the top.
5 Remove the bottle.
54 4 Adding toner ENWW
Page 61
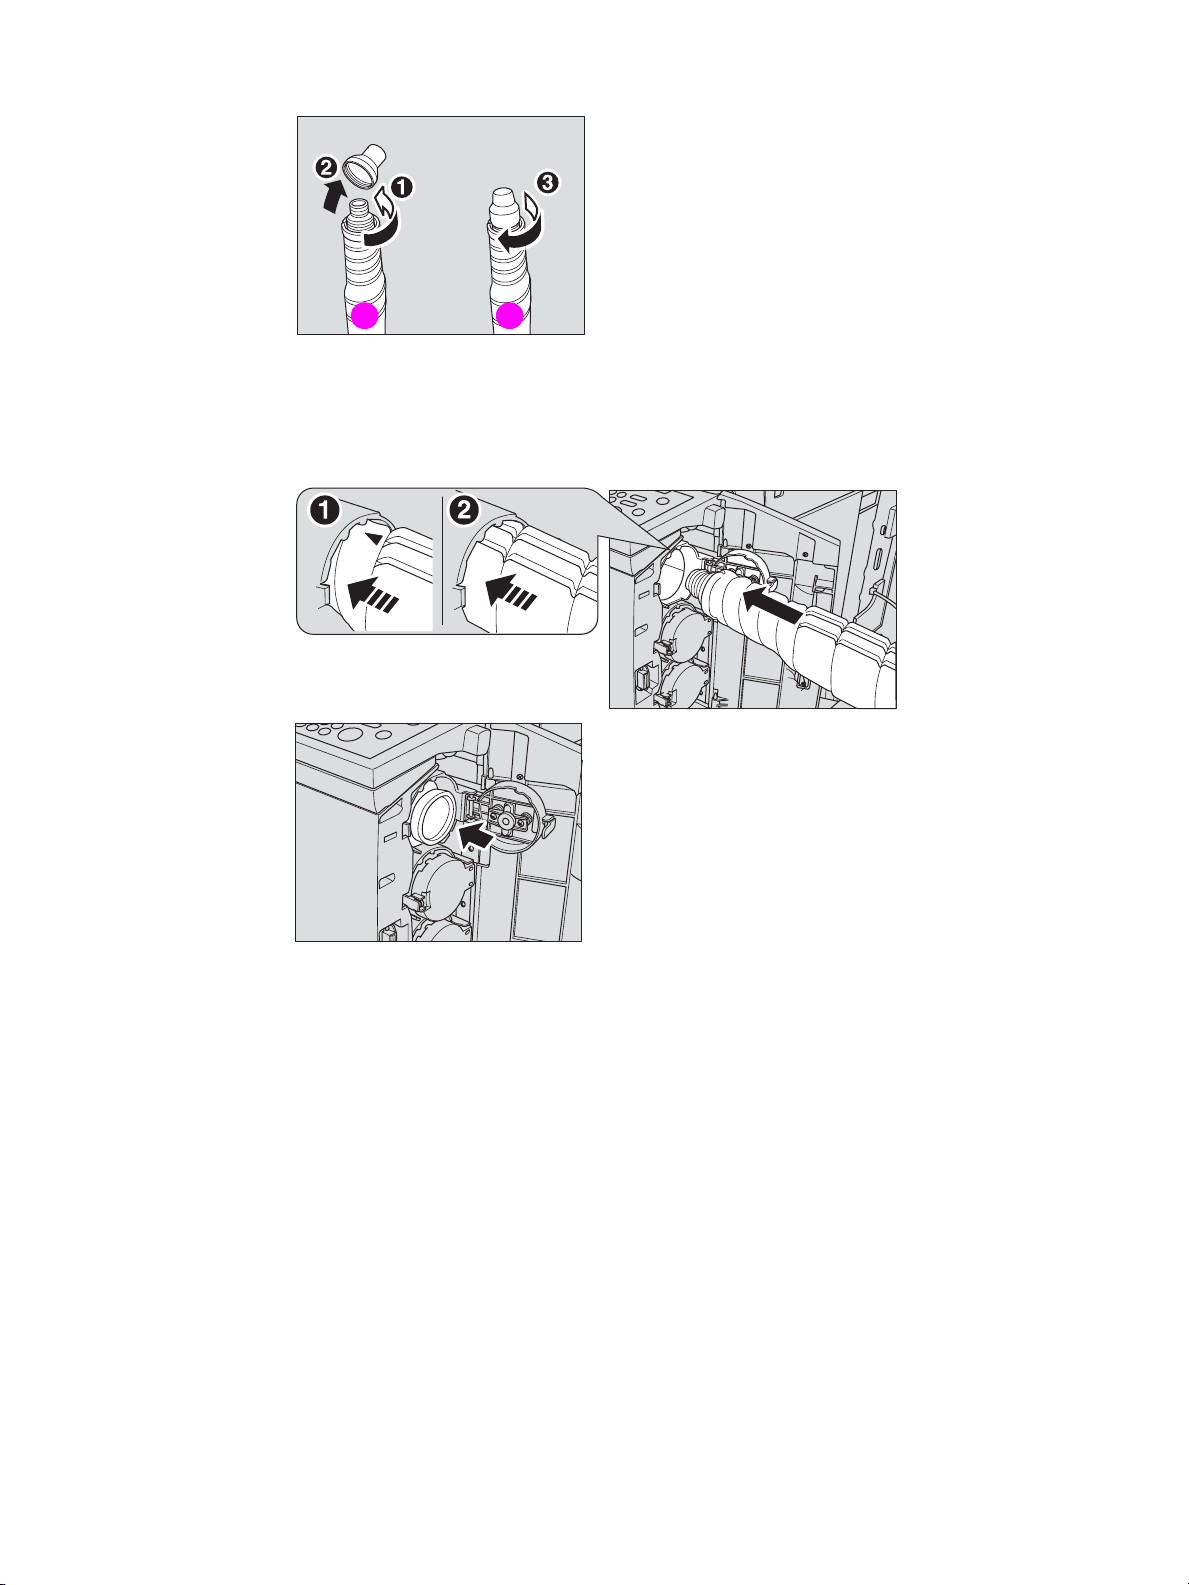
6 Remove the cap of the new toner bottle, and then place the same cap on the removed bottle.
1 2
1 New toner bottle
2 Empty toner bottle
7 Position the “Up arrow” mark at the top and align the grooves of the toner bottle with the ridges
at the bottle opening. Next, push the toner bottle until it locks in place.
ENWW Adding toner 55
Page 62

8 Close and lock the toner bottle cover, and then close the toner access door.
Note The toner bottle cover cannot be locked if the toner bottle is not set in place.
WARNING! Do not throw the empty toner bottle into fire. This is dangerous because the toner may catch fire.
WARNING! Keep the toner bottle away from children. The toner is non-toxic; however, if you inhale the toner,
seek medical advice. If the toner comes in contact with your eyes, wash with water immediately and
seek medical advice.
56 4 Adding toner ENWW
Page 63

5Emptying the trash basket
ENWW 57
Page 64

Empty trash basket of the HP 3 Hole Punch Kit
Note The “T rash basket of Punching Kit is full/Please empty trash basket” message applies to all HP Hole
Punch Kits installed on the Finisher.
When the trash basket becomes full, the “Trash basket of Punching Kit is full/Please empty trash
basket” message is displayed on the touch screen, and the finished set is generated without being
punched even if Punch mode is selected.
.
Follow the procedure below to empty the trash basket.
1 Open the Finisher door.
2 Withdraw the trash basket.
58 5 Emptying the trash basket ENWW
Page 65

3 Empty the trash basket.
4 Place the trash basket in its original position, and then close the Finisher door securely.
.
ENWW Empty trash basket of the HP 3 Hole Punch Kit 59
Page 66

Empty trash basket of the HP Trimmer Unit
When the trash basket becomes full, the “Trash basket of Trimmer is full/Please empty trash
basket” message is displayed on the touch screen, and the finished set is generated without being
trimmed even if the Trimming mode is selected.
Follow the procedure below to empty the trash basket:
1 Open the Trimmer Unit front door.
2 Withdraw the trash basket.
60 5 Emptying the trash basket ENWW
Page 67

3 Empty the trash basket.
4 Place the trash basket in its original position, and then close the Trimmer Unit front door
securely.
.
ENWW Empty trash basket of the HP Trimmer Unit 61
Page 68

62 5 Emptying the trash basket ENWW
Page 69

6Clearing jams
ENWW 63
Page 70

Clearing paper jams
When a paper misfeed occurs, the MFP stops making copies and misfed paper codes display on
the screen to indicate misfeed area(s). The copying operation cannot be continued until all the
misfeed locations are cleared.
Illustration explanation key
Touch to display the subsequent
screens for the disposal action.
Paper jam posit i on display
Numbers flashing or lighting indicate
the jammed positions.
Message area
An action will be displayed
The above screen displays all the jam numbers for the sake of explanation.
Actually, only a f ew numbers appear when a paper misfeed occurs.
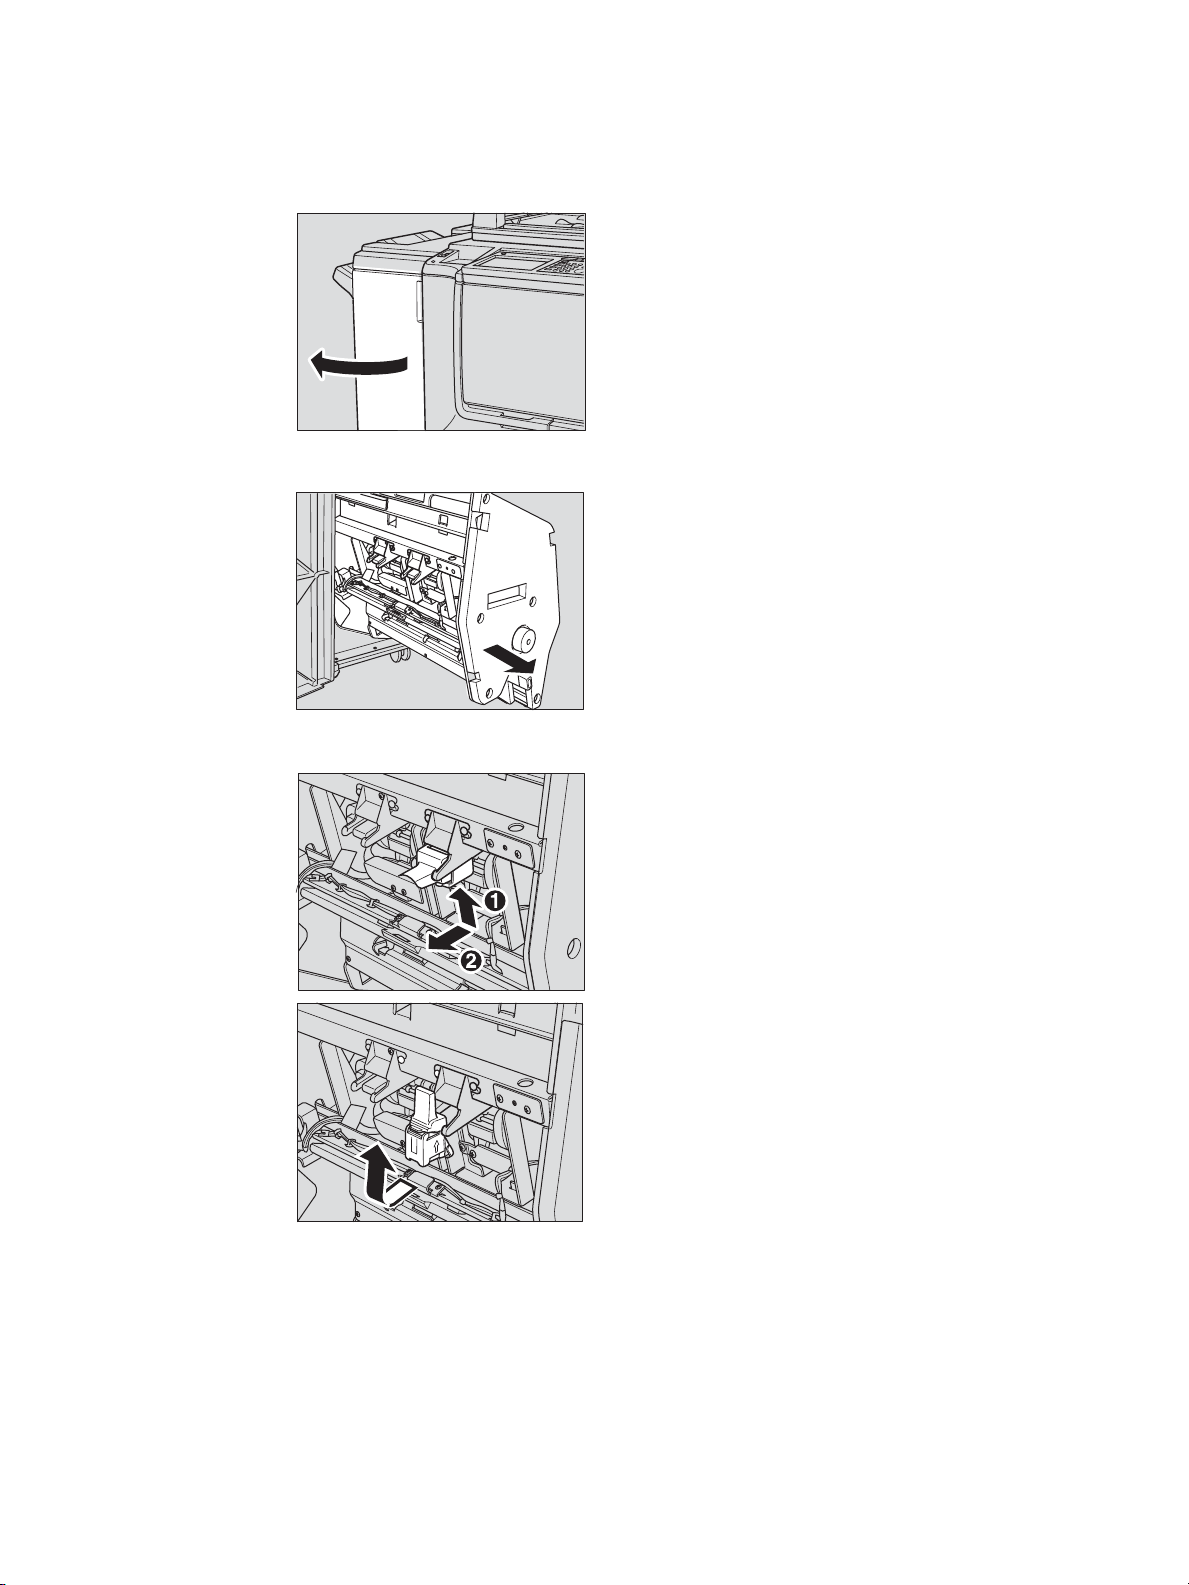
1 Touch Illustration explanation on the screen.
The screen illustrating the method for the disposal action is displayed.
2 Follow the procedure on the screen to remove the misfed paper.
Touch on the screen, if provided, to go to the next page of illustrations.
Note When removing misfed paper, make sure to leave no torn paper inside the engine.
3 When completed, the Main screen is restored.
If any misfeed location remains, the screen displays the next disposal procedure in the
message area and the location number in the jam position display. Repeat steps 1 to 2 until all
the locations are cleared.
WARNING! The drum unit generates high voltage; to avoid electric shock, never touch the area.
CAUTION The internal fuser is very hot; to avoid getting burned, do not touch it.
To avoid injury, be careful while removing staples stuck inside the engine.
To avoid injury, do not insert fingers into the two RADF (ADF) hinge portions.
When “JAM” appears on the folder key (or arrow key flashes)
If a misfeed occurs with the print/scan job in progress while you are setting a reserve job, the
SCAN or PRINT JOB folder key on the Main screen changes to flashing JAM JOB.
When more than four jobs have been specified, and the folder key of the print/scan job in trouble is
not currently displayed on the screen, use the arrow key to scroll to the job that is flashing.
Follow the procedure below to remove misfed paper.
1 Display the Jam position screen.
64 6 Clearing jams ENWW
Page 71
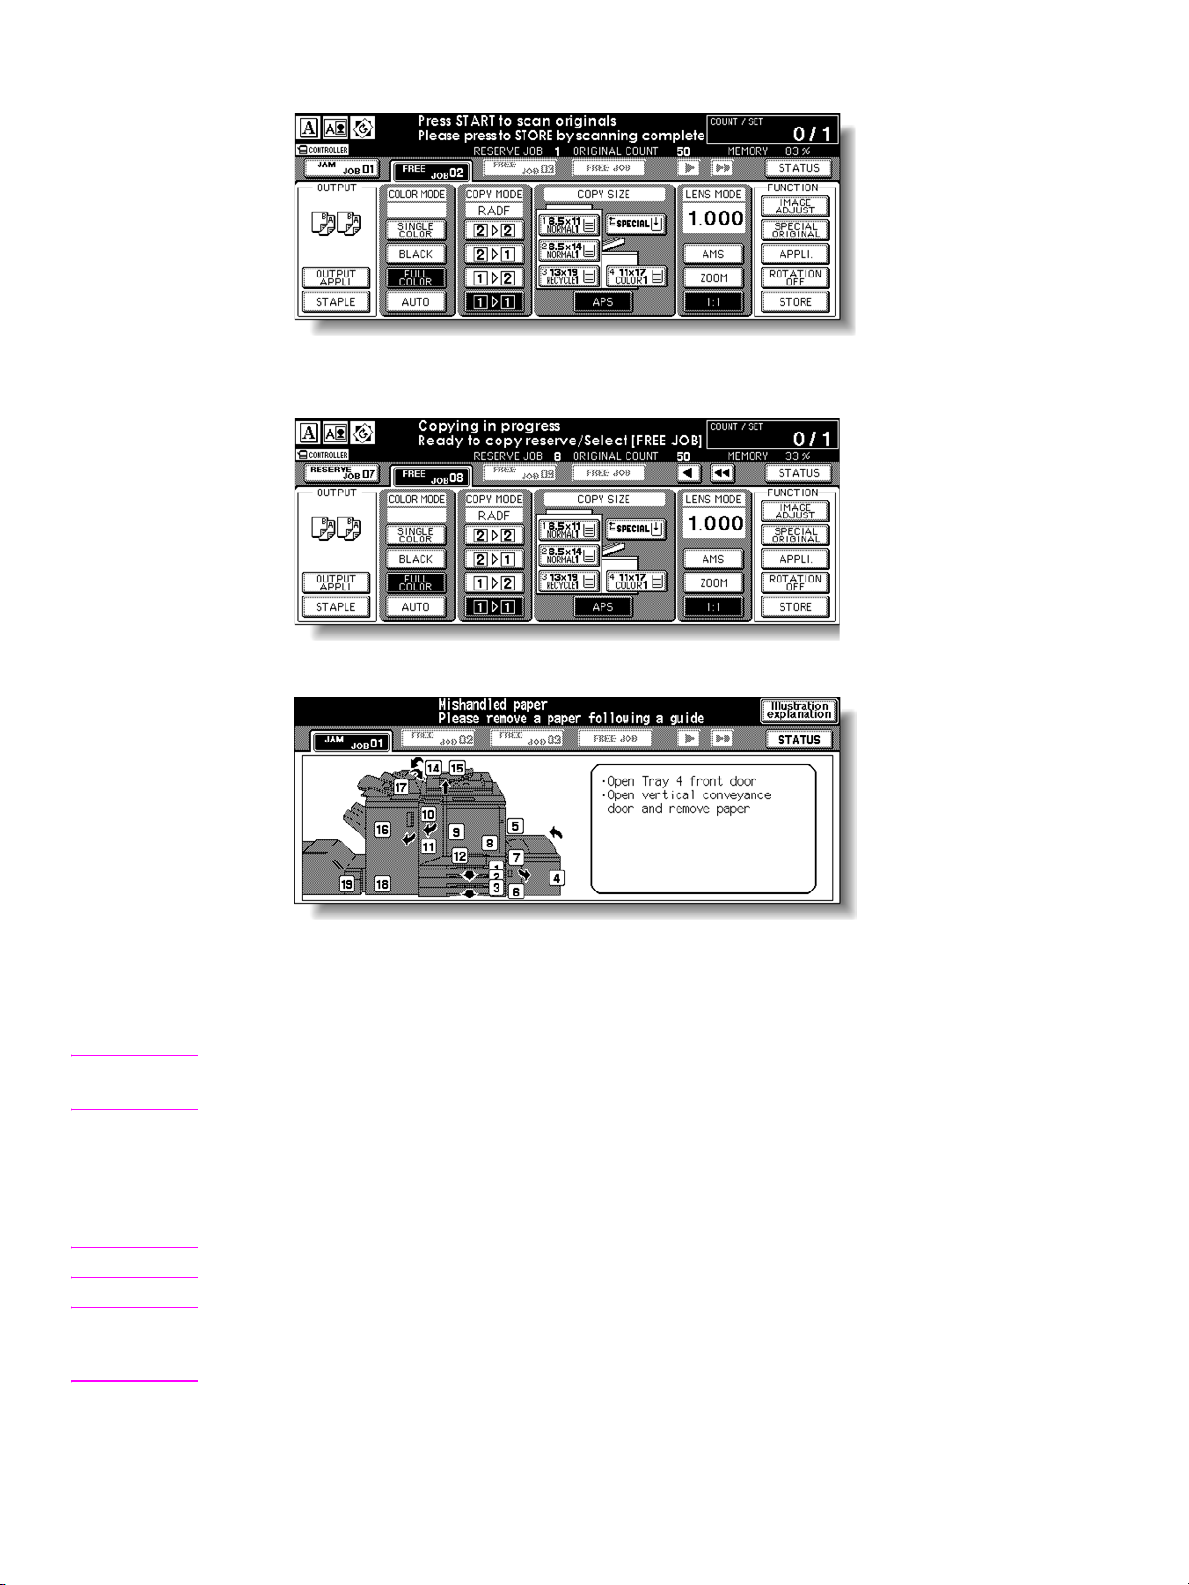
Touch JAM JOB. The Jam position screen displays.
When the arrow key flashes, touch the key to scroll to the JAM JOB folder key, and then touch
it to display the Jam position screen.
2 Touch Illustration explanation.
The screen illustrating the method for the disposal action is displayed.
3 Follow the procedure on the screen to remove the misfed paper.
When all procedures are completed, the Main screen is restored.
Note JAM JOB has changed to STOP, and the settings for the current printing job are displayed on the
screen.
4 Press Start.
The scan/print job resumes.
5 Touch FREE JOB to continue the reserve job setting.
WARNING! The drum unit generates high voltage; to avoid electric shock, never touch the area.
WARNING! The internal fuser is very hot; to avoid getting burned, do not touch it.
To avoid injury, be careful while removing staples stuck inside the engine.
To avoid injury, do not insert fingers into the two RADF (ADF) hinge portions.
ENWW Clearing paper jams 65
Page 72
Clearing staple jams
Use the following steps to clear a jam caused by a damaged staple.
1 Open the front door.
.
2 Slide the stapler unit toward you.
3 Remove the staple cartridge.
66 6 Clearing jams ENWW
Page 73

4 Press down on the transparent plastic lever.
5 Remove the damaged staple.
6 Press down on the metallic part until it clicks.
7 Reinstall the staple cartridge.
ENWW Clearing staple jams 67
Page 74

8 Slide the stapler unit into the device.
9 Close the front door.
68 6 Clearing jams ENWW
Page 75

A
Paper Sizes
The following table provides dimensions for commonly used paper sizes.
Size English
(inches)
A3 11.69 by 16.54 297 by 420
A4 8.27 by 11.70 210 by 297
A4R 11.70 by 8.27 297 by 210
A5 5.83 by 8.27 148 by 210
A5R 8.27 by 5.83 210 by 148
B4 10.12 by 14.33 257 by 364
B4R 14.33 by 10.12 364 by 257
B5 7.17 by 10.12 182 by 257
B5R 10.12 by 7.17 257 by 182
B6R 5.02 by 7.17 128 by 182
Half-letter 5.5" X 8.5" 140 by 216
Half-letter R 8.5 by 5.5 216 by 140
Letter 8.5 by 11.0 215.9 by 279.4
Letter R 11.0 by 8.5 279.4 by 215.9
Metric
(millimeters)
Legal 8.5 by 14 215.9 by 355.6
Tabloid/Ledger 11.0 by 17.0 279.4 by 431.8
Note For more information, see the “Paper and original information” section in the HP Color 9850mfp
System Administrator Guide.
ENWW 69
Page 76

70 A Paper Size s ENWW
Page 77

Warranty and regulatory
B
information
Hewlett-Packard limited warranty statement
1 HP offers the customer no product warranty on this MFP; however, for information on a
Service Maintenance Contract on your product, please contact your authorized HP Reseller.
The Supplies warranty is set forth below.
2 HP products may contain remanufactured parts equivalent to new in performance or may have
been subject to incidental use.
3 TO THE EXTENT ALLOWED BY LOCAL LAW, THE ABOVE WARRANTIES (IF ANY) ARE
EXCLUSIVE AND NO OTHER WARRANTY OR CONDITION, WHETHER WRITTEN OR
ORAL, IS EXPRESSED OR IMPLIED AND HP SPECIFICALLY DISCLAIMS ANY IMPLIED
WARRANTIES OR CONDITIONS OF MERCHANTABILITY, SATISFACTORY QUALITY, AND
FITNESS FOR A PARTICULAR PURPOSE. Some countries/regions, states, or provinces do
not allow limitations on the duration of an implied warranty , so the above limitation or exclusion
might not apply to you. This warranty gives you specific legal rights and you might also have
other rights that vary from country/region to country/region, state to state, or province to
province.
4 TO THE EXTENT ALLOWED BY LOCAL LAW, THE REMEDIES IN THIS WARRANTY
STATEMENT ARE YOUR SOLE AND EXCLUSIVE REMEDIES. EXCEPT AS INDICATED
ABOVE , IN NO EVEN T WILL HP OR ITS SUPPL IERS B E LIAB LE FOR LOSS OF D ATA FOR
FOR DIRECT, SPECIAL, INCIDENTAL, CONSEQUENTIAL (INCLUDING LOST PROFIT OR
DATA), OR OTHER DAMAGE, WHETHER BASED IN CONTRACT, TORT, OR OTHERWISE.
Some countries/regions, states, or provinces do not allow the exclusion or limitation of
incidental or consequential damages, so the above limitation or exclusion may not apply to
you.
5 THE WARRANTY TERMS CONTAINED IN THIS STATEMENT, EXCEPT TO THE EXTENT
LAWFULLY PERMITTED, DO NOT EXCLUDE, RESTRICT, OR MODIFY AND ARE IN
ADDITION TO THE MANDATORY STATUTORY RIGHTS APPLICABLE TO THE SALE OF
THIS PRODUCT TO YOU.
ENWW 71
Page 78

72 B Warranty and regulatory information ENWW
Page 79

Index
Symbols
[C] (Clear.) key 4
[P] (Counter) key 4
A
access key 4
add toner icon 5, 52
APPLI 5
B
Basic Screen 4
black mode 12
booklets
folded 26
trimmed 30
C
check 3
check key 3
clearing paper jams 64
color copy, improving 13
contrast adjustment dial 3
control panel 3
copy key 4
count/set indicator 5
cover sheet feeding 33
D
doors
front 3
toner access 2
double-sided copying 20
duplexing 20
E
engine
information 2
F
folded booklets 26
folder keys 4
folding mode 26
free job key 4
front door 3
full color mode 12
G
graphic icons 5
H
help 3
help key 3
help menu screen 9
Help mode 8
Help Screen
displaying from Main screen 8
displaying from other screens 9
Help screen 8
HP 3000-Sheet Multifunction Finisher 3
HP Post Inse rtion Kit 3
HP Trimmer Adapter Kit 3
HP Trimmer Unit 3
I
icons 5
add toner 5
graphic 5
image adjust 5
original direction 5
pm 5
printer 5
rotation 5
toner recovery box 5
word 5
image
adjust icon 5
adjust key 5
improving color copy 13
interrupt
key 4
J
jam job 64
jam job key 64
jammed paper
clearing 64
job memory key 4
K
keypad 3
keys
control panel 3
folder 4
L
LCD touch display 3
loading paper 40
HCI 44
multi-sheet bypass tray 43
Trays 1, 2, and 3 40
M
making folded booklets 26
memory
indicator 5
message area 5
MFP parts 2
modes
black 12
single color 12
trimming 30
multi-sheet bypass tray 2
supported paper sizes 49
ENWW Index 73
Page 80

O
off-line finishing 36
optional features 25
original direction icon 5
P
paper
indicator 40
loading 47
paper jams
clearing 64
paper size, choosing 17
paper sizes
commonly used 69
supported 49
supported for input trays 49
parts 2
pm icon 5
power switch 3
print
job key 4
printer 4
icon 5
key 4
proof copy
key 4
punching 25
R
RADF (ADF)
automatic document feeder 2
using 20
regulatory information 71
reset key 4
right side door 2
rotation icon 5
rotation off key 5
touch screen 4
trash basket 58, 60
Tray 4
supported paper sizes 49
Trays 1, 2, and 3
supported paper sizes 49
trays 1,2, and 3 49
trimmed booklets 30
trimming mode 30
type/size key 5
W
wake-up screen 6
warm-up screen 6
warranty information 71
word icons 5
work table 2
S
scan job key 4
scanner 4
key 4
scanner glass
using 20, 22
single color mode 12
sleep on/off key 4
special original key 5
specifications
double-sided copying 20
stapling 25
start key 4
status key 5
stop key 4
store key 5
supported paper sizes 49
T
tabbed sheets
HCI 47
multi-sheet bypass tray 47
timer
indicator 4
toner
access door 2
collection box 2
collection box icon 5
74 Index EN
Page 81

Page 82

© 2004 Hewlett-Packard Development Company, L.P.
*Q3225-90906*
*Q3225-90906*
www.hp.com
Q3225-90906
 Loading...