

Page 1

HP Photosmart Premium Fax C410
series
Page 2

Page 3

Contents
1 HP Photosmart Premium Fax C410 series Help....................................................................3
2 How do I?...................................................................................................................................5
3 Finish setting up the HP Photosmart
Add the HP Photosmart to a network.........................................................................................7
Set up the HP Photosmart for faxing........................................................................................16
4 Get to know the HP Photosmart
Printer parts..............................................................................................................................37
Control panel features..............................................................................................................40
Display icons.............................................................................................................................41
HP Apps Manager....................................................................................................................42
6Print
Print documents........................................................................................................................51
Print photos..............................................................................................................................52
Print a creative project..............................................................................................................58
Print a Web page......................................................................................................................64
Print forms and templates (Quick Forms)...............................................................................64
Print from anywhere..................................................................................................................69
Print from the Web without a computer....................................................................................71
7Scan
Scan to a computer..................................................................................................................73
Scan to a memory card or USB storage device.......................................................................74
Contents
8Copy
Copy text or mixed documents.................................................................................................79
9Fax
Send a fax................................................................................................................................87
Receive a fax............................................................................................................................92
10 Save photos
Save photos to your computer..................................................................................................95
Back up photos from a memory card to a USB storage device................................................96
11 Work with cartridges
Check the estimated ink levels.................................................................................................99
Order ink supplies...................................................................................................................100
Replace the cartridges............................................................................................................100
Cartridge warranty information...............................................................................................102
Print and evaluate a print quality report..................................................................................103
12 Solve a problem
HP support..............................................................................................................................107
Setup troubleshooting.............................................................................................................110
1
Page 4

Improve print quality...............................................................................................................119
Print troubleshooting...............................................................................................................126
Memory card troubleshooting.................................................................................................131
Scan troubleshooting..............................................................................................................134
Copy troubleshooting..............................................................................................................137
Fax troubleshooting................................................................................................................142
Errors......................................................................................................................................191
14 Technical information
Contents
Notice......................................................................................................................................237
Cartridge chip information......................................................................................................237
Specifications.........................................................................................................................238
Environmental product stewardship program.........................................................................240
Regulatory notices..................................................................................................................246
Regulatory wireless statements..............................................................................................249
Regulatory telecommunication notices...................................................................................252
Japan safety statement..........................................................................................................256
Index............................................................................................................................................259
2
Page 5

1 HP Photosmart Premium Fax
C410 series Help
For information about the HP Photosmart, see:
•
Finish setting up the HP Photosmart
Get to know the HP Photosmart
•
Print
•
Scan
•
Copy
•
Fax
•
Save photos
•
Work with cartridges
•
Solve a problem
•
Technical information
•
HP Photosmart Premium Fax C410
series Help
HP Photosmart Premium Fax C410 series Help 3
Page 6

series Help
Chapter 1
HP Photosmart Premium Fax C410
4 HP Photosmart Premium Fax C410 series Help
Page 7

2 How do I?
This section contains links to commonly performed tasks, such as printing photos,
scanning, and making copies.
Print a variety of documents
•
Scan documents and photos
•
Make a copy
•
Send and receive faxes
•
Load paper
•
Replace the cartridges
•
How do I? 5
How do I?
Page 8

Chapter 2
How do I?
6 How do I?
Page 9

3 Finish setting up the
HP Photosmart
• Add the HP Photosmart to a network
Set up the HP Photosmart for faxing
•
Add the HP Photosmart to a network
• WiFi Protected Setup (WPS)
Wired (Ethernet) network
•
Wireless with a router (infrastructure network)
•
Wireless without a router (ad hoc connection)
•
WiFi Protected Setup (WPS)
To connect the HP Photosmart to a wireless network using WiFi Protected Setup (WPS),
you will need the following:
A wireless 802.11 network that includes a WPS-enabled wireless router or access
point.
A desktop computer or laptop with either wireless networking support, or a network
interface card (NIC). The computer must be connected to the wireless network that
you intend to install the HP Photosmart on.
To connect the HP Photosmart using WiFi Protected Setup (WPS)
▲ Do one of the following:
Use the Push Button (PBC) method
a. Select the setup method.
Press the Wireless button.
Highlight Wi-Fi Protected Setup and press OK.
Highlight Push Button and press OK.
b. Set up a wireless connection.
Press the corresponding button on your WPS-enabled router or other
networking device.
Press OK.
c. Install the software.
NOTE: The product displays a timer for approximately two minutes, in which you
must press the corresponding button on your networking device.
Finish setting up the HP Photosmart 7
Finish setting up the HP Photosmart
Page 10

Chapter 3
Use the PIN method
a. Set up a wireless connection.
Press the Wireless button.
Highlight Wi-Fi Protected Setup and press OK.
Highlight PIN and press OK.
The device displays a PIN.
Enter the PIN on the WPS-enabled router or other networking device.
Check the display on the product to see if the connection was successful or
not. If you receive an error, press OK to try the connection again.
b. Install the software.
NOTE: The product display a timer for approximately two minutes, in which you
need to enter the PIN on your networking device.
If the connection to the network is successful, the blue wireless light on the
Wireless button should come on and remain steady. If it is blinking, this indicates that
connection to the network is not a good.
Related topics
Install the software for a network connection
Wireless with a router (infrastructure network)
To connect the HP Photosmart to an integrated wireless WLAN 802.11 network, you will
need the following:
A wireless 802.11 network that includes a wireless router or access point.
A desktop computer or laptop with either wireless networking support, or a network
interface card (NIC). The computer must be connected to the wireless network that
you intend to install the HP Photosmart on.
Broadband Internet access (recommended) such as cable or DSL.
If you connect the HP Photosmart on a wireless network that has Internet access, HP
recommends that you use a wireless router (access point or base station) that uses
Dynamic Host Configuration Protocol (DHCP).
Network name (SSID).
WEP key or WPA Passphrase (if needed).
Finish setting up the HP Photosmart
To connect the HP Photosmart with the Wireless Setup Wizard
1. Write down your network name (SSID) and WEP key or WPA passphrase.
2. Start Wireless Setup Wizard.
a. Press the Wireless button.
b. Highlight Wireless Setup Wizard and press OK.
The setup wizard searches for available networks, and then displays list of
detected network names (SSIDs).
3. Highlight your network name and press OK.
8 Finish setting up the HP Photosmart
Page 11

4. Follow the prompts on display to complete connection.
5. Install software.
If the connection to the network is successful, the blue wireless light on the
Wireless button should come on and remain steady. If it is blinking, this indicates that
connection to the network is not a good.
Related topics
Install the software for a network connection
Wireless without a router (ad hoc connection)
Use this section if you want to connect the HP Photosmart to a wireless-capable computer
without using a wireless router or access point.
There are two methods you can use to connect the HP Photosmart to your computer
using an ad hoc wireless network connection. Once connected, you can install the
HP Photosmart software.
Turn on the wireless radio for the HP Photosmart and the wireless radio on your computer.
On your computer, connect to the network name (SSID) hp (product model).(6-digit
unique identifier), which is the default ad hoc network created by the HP Photosmart.
The 6-digit identifier is unique to each printer.
OR
Use an ad hoc network profile on your computer to connect to the product. If your
computer is not currently configured with an ad hoc network profile, consult the Help file
for your computer Operating System for the proper method to create an ad hoc profile on
your computer. Once the ad hoc network profile has been created, insert the installation
CD that came with the product and install the software. Connect to the ad hoc network
profile you created on your computer.
NOTE: An ad hoc connection can be used if you do not have a wireless router or
access point but do have a wireless radio on your computer. However, an ad hoc
connection may result in a lower level of network security and possibly reduced
performance when compared to an infrastructure network connection using a wireless
router or access point.
To connect the HP Photosmart to a Windows computer with an ad hoc connection, the
computer must have a wireless network adapter and an ad hoc profile. Create a network
profile for a Windows Vista or Windows XP computer using the directions below.
Add the HP Photosmart to a network 9
Finish setting up the HP Photosmart
Page 12

Chapter 3
NOTE: The product comes configured with a network profile with hp (product
model).(6-digit unique identifier) as the network name (SSID). However, for
security and privacy HP recommends you create a new network profile on your
computer as described here.
To create a network profile (Windows Vista)
NOTE: The product comes configured with a network profile with hp (product
model).(6-digit unique identifier) as the network name (SSID). However, for
security and privacy HP recommends you create a new network profile on your
computer as described here.
1. In the Control Panel, double-click Network and Internet, then Network and
Sharing Center..
2. In the Network and Sharing Center (under Tasks on the left), select Set up a
connection or network.
3. Choose the connection option Set up a wireless ad hoc (computer-to-computer)
network, then click Next. Read the description and warnings about ad hoc networks,
then click Next>.
4. Enter details, including Network name (the SSID for your ad hoc connection),
Security type, and SecurityPassphrase. If you are going to save this network
connection, check Save this network. Make a note of the SSID and the Security key/
Passphrase for future reference. Click Next
5. Continue to follow the prompts to complete setup of the ad hoc network connection.
To create a network profile (Windows XP)
NOTE: The product comes configured with a network profile with hp (product
model).(6-digit unique identifier) as the network name (SSID). However, for
security and privacy HP recommends you create a new network profile on your
computer as described here.
1. In the Control Panel, double-click Network Connections.
2. On the Network Connections window, right-click the Wireless Network
Connection. If you see Enable on the pop-up menu, select it. Otherwise, if you see
Disable on the menu, the wireless connection is already enabled.
3. Right-click the Wireless Network Connection icon, and then click Properties.
4. Click the Wireless Networks tab.
Finish setting up the HP Photosmart
5. Select the Use Windows to configure my wireless network settings check box.
6. Click Add, and then do the following:
a.In Network name (SSID) box, type in a unique network name of your choice.
NOTE: The network name is case sensitive, so it is important to remember
any uppercase (capital) and lowercase (small) letters.
b. If there is a Network Authentication list, select Open. Otherwise, go to the next
step.
c.In the Data encryption list, select WEP.
10 Finish setting up the HP Photosmart
Page 13

d. Make sure that the check box is not selected next to The key is provided for me
automatically. If it is selected, click the check box to clear it.
e.In the Network key box, type a WEP key that has exactly 5 or exactly 13
alphanumeric (ASCII) characters. For example, if you enter 5 characters, you
might enter ABCDE or 12345. Or, if you enter 13 characters, you might enter
ABCDEF1234567. (12345 and ABCDE are examples only. Select a combination
of your choosing.)
Alternatively, you can use HEX (hexadecimal) characters for the WEP key. A HEX
WEP key must be 10 characters for 40 bit encryption, or 26 characters for 128 bit
encryption.
f.In the Confirm network key box, type the same WEP key you typed in the
previous step.
NOTE: You must remember the exact uppercase (capital) and lowercase
(small) letters. If you enter your WEP key incorrectly on the product, the
wireless connection will fail.
g. Write down the WEP key exactly as you typed it, including uppercase and
lowercase letters.
h. Select the check box for This is a computer-to-computer (ad hoc) network;
wireless access points are not used.
i. Click OK to close the Wireless network properties window, and then click OK
again.
j. Click OK again to close the Wireless Network Properties Connection window.
Using the LAN card configuration program, create a network profile that has the following
values:
• Network name (SSID): Mynetwork (example only)
NOTE: You should create a network name that is unique and easy for you to
remember. Just remember that the network name is case-sensitive. Therefore,
you must remember which letters are uppercase and lowercase.
• Communication mode: ad hoc
• Encryption: enabled
To connect to a wireless ad hoc network
1. Press the Wireless button.
2. Press the down arrow button to highlight Wireless Setup Wizard, and then press
OK.
This runs the Wireless Setup Wizard. The setup wizard searches for available
networks, and then displays a list of detected network names (SSIDs). The
infrastructure networks appear first in the list, followed by available ad hoc networks.
The networks with the strongest signal appear first, the weakest appear last.
3. On the display, look for the network name you created on your computer (for example,
Mynetwork).
Add the HP Photosmart to a network 11
Finish setting up the HP Photosmart
Page 14

Chapter 3
4. Use the arrow buttons to highlight the network name, and then press OK.
If you found your network name and selected it, go on to step 6.
If you do not see your network name in the list
a.Select Enter a New Network Name (SSID).
The visual keyboard appears.
b. Enter the SSID. Use the arrow buttons on the control panel to highlight a letter or
number on the visual keyboard, and then press OK to select it.
NOTE: You must enter the exact uppercase (capital) and lowercase (small)
letters. Otherwise, the wireless connection will fail.
c. When you are finished entering the new SSID, use the arrow buttons to highlight
Done on the visual keyboard, and then press OK.
TIP: If the product is unable to discover the network based on the network
name you entered, you will see the following prompts. You may want to move
the product closer to the computer and try running the Wireless Setup Wizard
again to automatically discover the network.
d. Press the down arrow button until Ad Hoc is highlighted, and then press OK.
e. Press the down arrow button until Yes, my network uses WEP encryption is
highlighted, and then press OK. The visual keyboard displays.
If you do not want to use WEP encryption, press the down arrow button until No,
my network does not use encryption is highlighted, and then press OK. Go to
step 7.
5. If prompted, enter your WEP key as follows. Otherwise go to step 7.
a. Use the arrow buttons to highlight a letter or number on the visual keyboard, and
then press OK to select it.
NOTE: You must enter the exact uppercase (capital) and lowercase (small)
letters. Otherwise, the wireless connection will fail.
b. When you are finished entering the WEP key, use the arrow buttons to highlight
Done on the visual keyboard.
6. Press OK again to confirm.
The product will attempt to connect to the SSID. If a message says you entered an
invalid WEP key, check the key you wrote down for your new network, follow the
Finish setting up the HP Photosmart
prompts to correct the WEP key, and then try again.
7. When the product connects successfully to the network, go to your computer to install
the software.
If the connection to the network is successful, the blue wireless light on the
Wireless button should come on and remain steady. If it is blinking, this indicates that
connection to the network is not a good.
NOTE: You can print the Wireless Network Test report at the end of a successful
Wireless Setup Wizard connection which can help identify any potential future
issues with the network setup.
12 Finish setting up the HP Photosmart
Page 15

Related topics
Install the software for a network connection
Wired (Ethernet) network
Before you connect the HP Photosmart to a network, make sure you have all of the
required materials.
A functional Ethernet network that includes a router, switch, or hub with an Ethernet
port.
CAT-5 Ethernet cable.
Although standard Ethernet cables look similar to standard telephone cables, they
are not interchangeable. There is a different number of wires in each one, and each
has a different connector. An Ethernet cable connector (also called an RJ-45
connector) is wider and thicker and always has 8 contacts on the end. A phone
connector has between 2 and 6 contacts.
A desktop computer or laptop on the same network.
NOTE: The HP Photosmart supports networks with automatic speed negotiation
capable of 10 or 100 Mbps.
To connect the product to the network
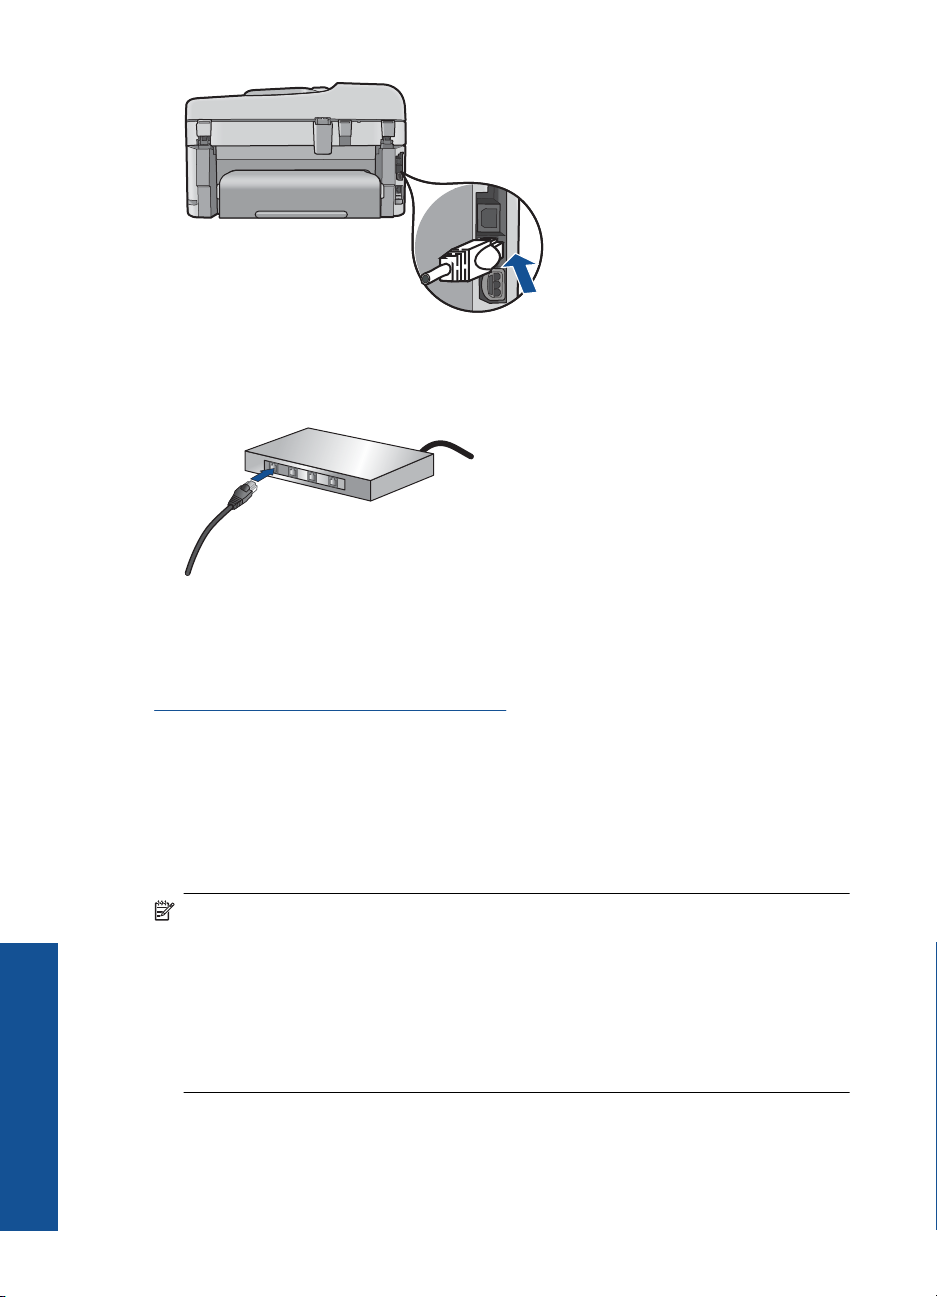
1. Remove the yellow plug from the back of the product.
2. Connect the Ethernet cable to the Ethernet port on the back of the product.
Add the HP Photosmart to a network 13
Finish setting up the HP Photosmart
Page 16
Chapter 3
3. Connect the other end of the Ethernet cable to an available port on your Ethernet
router, switch, or wireless router.
4. Once you have connected the product to the network, install the software.
Related topics
Install the software for a network connection
Install the software for a network connection
Use this section to install the HP Photosmart software on a computer connected to a
network. Before you install the software, make sure you have connected the
HP Photosmart to a network. If the HP Photosmart has not been connected to a network,
follow the onscreen instructions during the software installation to connect the product to
the network.
NOTE: If your computer is configured to connect to a series of network drives, make
Finish setting up the HP Photosmart
sure that your computer is currently connected to these drives before installing the
software. Otherwise, the HP Photosmart software installer might try to use one of the
reserved drive letters and you will not be able to access that network drive on your
computer.
NOTE: Installation time can range from 20 to 45 minutes depending on your
operating system, the amount of available space, and the processor speed of your
computer.
14 Finish setting up the HP Photosmart
Page 17

To install the Windows HP Photosmart Software on a networked computer
1. Quit all applications running on your computer.
2. Insert the installation CD that came with the product into the CD-ROM drive on your
computer and follow the onscreen instructions.
NOTE: If the HP Photosmart is not connected to a network, run the Wireless
Setup Wizard from the Network menu on the HP Photosmart. If during software
installation, the software cannot find the product on the network or you were
unable to successfully run the Wireless Setup Wizard, you will be prompted to
temporarily connect the product to the computer using the USB setup cable to
install the HP Photosmart on your network. Do not connect the USB setup cable
to the computer until prompted.
3. If a dialog box about firewalls appears, follow the instructions. If you see firewall pop-
up messages, you must always accept or allow the pop-up messages.
4. On the Connection Type screen, select an appropriate option, and then click Next.
The Searching screen appears as the Setup program searches for the product on
the network.
5. On the Printer Found screen, verify that the printer description is correct.
If more than one printer is found on the network, the Printers Found screen appears.
Select the product you want to connect.
6. Follow the prompts to install the software.
When you have finished installing the software, the product is ready for use.
7. To test your network connection, go to your computer and print a self-test report to
the product.
Tips for setting up and using a networked printer
Use the following tips to set up and use a networked printer:
• When setting up the wireless networked printer, make sure your wireless router or
access point is powered on. The printer searches for wireless routers, then lists the
detected network names on the display.
• To verify the wireless connection, check the blue wireless light on the Wireless
button.
◦ If the light is off, this indicates that the wireless radio is off and the HP Photosmart
is not connected to the network.
◦ If the light is on, this indicates that the wireless radio is on and there is a network
connection.
◦ If the light is blinking, this indicates that the wireless radio is on but there is no
network connection.
• If your computer is connected to a Virtual Private Network (VPN), you need to
disconnect from the VPN before you can access any other device on your network,
including the printer.
• To learn more about how to find your network security settings, change from a USB
to a wireless connection, and work with your firewall and anti-virus programs during
printer setup, see the printed documentation for information.
Finish setting up the HP Photosmart
Add the HP Photosmart to a network 15
Page 18

Chapter 3
Set up the HP Photosmart for faxing
Before you begin setting up the HP Photosmart for faxing, determine which kind of phone
system your country/region uses. The instructions for setting up the HP Photosmart for
faxing differ depending on whether you have a serial- or parallel-type phone system.
• If you do not see your country/region listed in the table below, you probably have a
serial-type phone system. In a serial-type phone system, the connector type on your
shared telephone equipment (modems, phones, and answering machines) does not
allow a physical connection to the "2-EXT" port on the HP Photosmart. Instead, all
equipment must be connected at the telephone wall jack.
NOTE: In some countries/regions that use serial-type phone systems, the phone
cord that came with the HP Photosmart might have an additional wall plug
attached to it. This enables you to connect other telecom devices to the wall jack
where you plug in the HP Photosmart.
• If your country/region is listed in the table below, you probably have a parallel-type
telephone system. In a parallel-type phone system, you are able to connect shared
telephone equipment to the phone line by using the "2-EXT" port on the back of the
HP Photosmart.
NOTE: If you have a parallel-type phone system, HP recommends you use the
2-wire phone cord supplied with the HP Photosmart to connect the HP Photosmart
to the telephone wall jack.
Table 3-1 Countries/regions with a parallel-type phone system
Argentina Australia Brazil
Canada Chile China
Colombia Greece India
Indonesia Ireland Japan
Korea Latin America Malaysia
Mexico Philippines Poland
Portugal Russia Saudi Arabia
Finish setting up the HP Photosmart
16 Finish setting up the HP Photosmart
Singapore Spain Taiwan
Thailand USA Venezuela
Vietnam
Page 19

If you are unsure which kind of telephone system you have (serial or parallel), check with
your telephone company.
See the following sections to set up the HP Photosmart for faxing:
•
Choose the correct fax setup for your home or office
Select your fax setup case
•
Additional fax setup information
•
Choose the correct fax setup for your home or office
To fax successfully, you need to know what types of equipment and services (if any) share
the same phone line with the HP Photosmart. This is important because you might need
to connect some of your existing office equipment directly to the HP Photosmart, and you
might also need to change some fax settings before you can fax successfully.
To determine the best way to set up the HP Photosmart in your home or office, first read
through the questions in this section and record your answers. Next, refer to the table in
the following section and choose the recommended setup case based on your answers.
Make sure to read and answer the following questions in the order they are presented.
1. Do you have a digital subscriber line (DSL) service through your telephone company?
(DSL might be called ADSL in your country/region.)
Yes, I have DSL.
No.
If you answered Yes, proceed directly to
DSL. You do not need to continue answering questions.
If you answered No, please continue answering questions.
2. Do you have a private branch exchange (PBX) phone system or an integrated
services digital network (ISDN) system?
If you answered Yes, proceed directly to
PBX phone system or an ISDN line. You do not need to continue answering questions.
If you answered No, please continue answering questions.
3. Do you subscribe to a distinctive ring service through your telephone company that
provides multiple phone numbers with different ring patterns?
Yes, I have distinctive ring.
No.
If you answered Yes, proceed directly to
on the same line. You do not need to continue answering questions.
If you answered No, please continue answering questions.
Are you unsure if you have distinctive ring? Many phone companies offer a distinctive
ring feature that allows you to have several phone numbers on one phone line.
When you subscribe to this service, each phone number will have a different ring
pattern. For example, you can have single, double, and triple rings for the different
numbers. You might assign one phone number with a single ring to your voice calls,
and another phone number with double rings to your fax calls. This allows you to tell
the difference between voice and fax calls when the phone rings.
Case B: Set up the HP Photosmart with
Case C: Set up the HP Photosmart with a
Case D: Fax with a distinctive ring service
Set up the HP Photosmart for faxing 17
Finish setting up the HP Photosmart
Page 20

Chapter 3
4. Do you receive voice calls at the same phone number you will use for fax calls on the
HP Photosmart?
Yes, I receive voice calls.
No.
Please continue answering questions.
5. Do you have a computer dial-up modem on the same phone line as the
HP Photosmart?
Yes, I have a computer dial-up modem.
No.
Are you unsure if you use a computer dial-up modem? If you answer Yes to any of
the following questions, you are using a computer dial-up modem:
• Do you send and receive faxes directly to and from your computer software
applications through a dial-up connection?
• Do you send and receive e-mail messages on your computer through a dial-up
connection?
• Do you access the Internet from your computer through a dial-up connection?
Please continue answering questions.
6. Do you have an answering machine that answers voice calls at the same phone
number you will use for fax calls on the HP Photosmart?
Yes, I have an answering machine.
No.
Please continue answering questions.
7. Do you subscribe to a voice mail service through your telephone company at the same
phone number you will use for fax calls on the HP Photosmart?
Yes, I have a voice mail service.
No.
After you have completed answering the questions, proceed to the following section
to select your fax setup case.
Select your fax setup case
Select your fax setup case
Now that you have answered all the questions about the equipment and services that
share the phone line with the HP Photosmart, you are ready to choose the best setup
case for your home or office.
Finish setting up the HP Photosmart
18 Finish setting up the HP Photosmart
From the first column in the following table, choose the combination of equipment and
services applicable to your home or office setting. Then look up the appropriate setup
case in the second or third column based on your phone system. Step-by-step
instructions are included for each case in the sections that follow.
If you have answered all the questions in the previous section and have none of the
described equipment or services, choose "None" from the first column in the table.
Page 21

NOTE: If your home or office setup is not described in this section, set up the
HP Photosmart as you would a regular analog phone. Make sure you use the phone
cord supplied in the box to connect one end to your telephone wall jack and the other
end to the port labeled 1-LINE on the back of the HP Photosmart. If you use another
phone cord, you might experience problems sending and receiving faxes.
Other equipment/services
sharing your fax line
None
(You answered No to all
questions.)
DSL service
(You answered Yes to question
1 only.)
PBX or ISDN system
(You answered Yes to question
2 only.)
Distinctive ring service
(You answered Yes to question
3 only.)
Voice calls
(You answered Yes to question
4 only.)
Voice calls and voice mail
service
(You answered Yes to
questions 4 and 7 only.)
Computer dial-up modem
(You answered Yes to question
5 only.)
Voice calls and computer dialup modem
(You answered Yes to
questions 4 and 5 only.)
Voice calls and answering
machine
(You answered Yes to
questions 4 and 6 only.)
Voice calls, computer dial-up
modem, and answering
machine
(You answered Yes to
questions 4, 5, and 6 only.)
Recommended fax setup for
parallel-type phone systems
Case A: Separate fax line (no
voice calls received)
Case B: Set up the
HP Photosmart with DSL
Case C: Set up the
HP Photosmart with a PBX
phone system or an ISDN line
Case D: Fax with a distinctive
ring service on the same line
Case E: Shared voice/fax line Case E: Shared voice/fax line
Case F: Shared voice/fax line
with voice mail
Case G: Fax line shared with
computer dial-up modem (no
voice calls received)
Case H: Shared voice/fax line
with computer dial-up modem
Case I: Shared voice/fax line
with answering machine
Case J: Shared voice/fax line
with computer dial-up modem
and answering machine
Recommended fax setup for
serial-type phone systems
Case A: Separate fax line (no
voice calls received)
Case B: Set up the
HP Photosmart with DSL
Case C: Set up the
HP Photosmart with a PBX
phone system or an ISDN line
Case D: Fax with a distinctive
ring service on the same line
Case F: Shared voice/fax line
with voice mail
Not applicable.
Not applicable.
Not applicable.
Not applicable.
Set up the HP Photosmart for faxing 19
Finish setting up the HP Photosmart
Page 22

Chapter 3
(continued)
Other equipment/services
sharing your fax line
Recommended fax setup for
parallel-type phone systems
Recommended fax setup for
serial-type phone systems
Voice calls, computer dial-up
modem, and voice mail service
(You answered Yes to
questions 4, 5, and 7 only.)
Case K: Shared voice/fax line
with computer dial-up modem
and voice mail
Related topics
Additional fax setup information
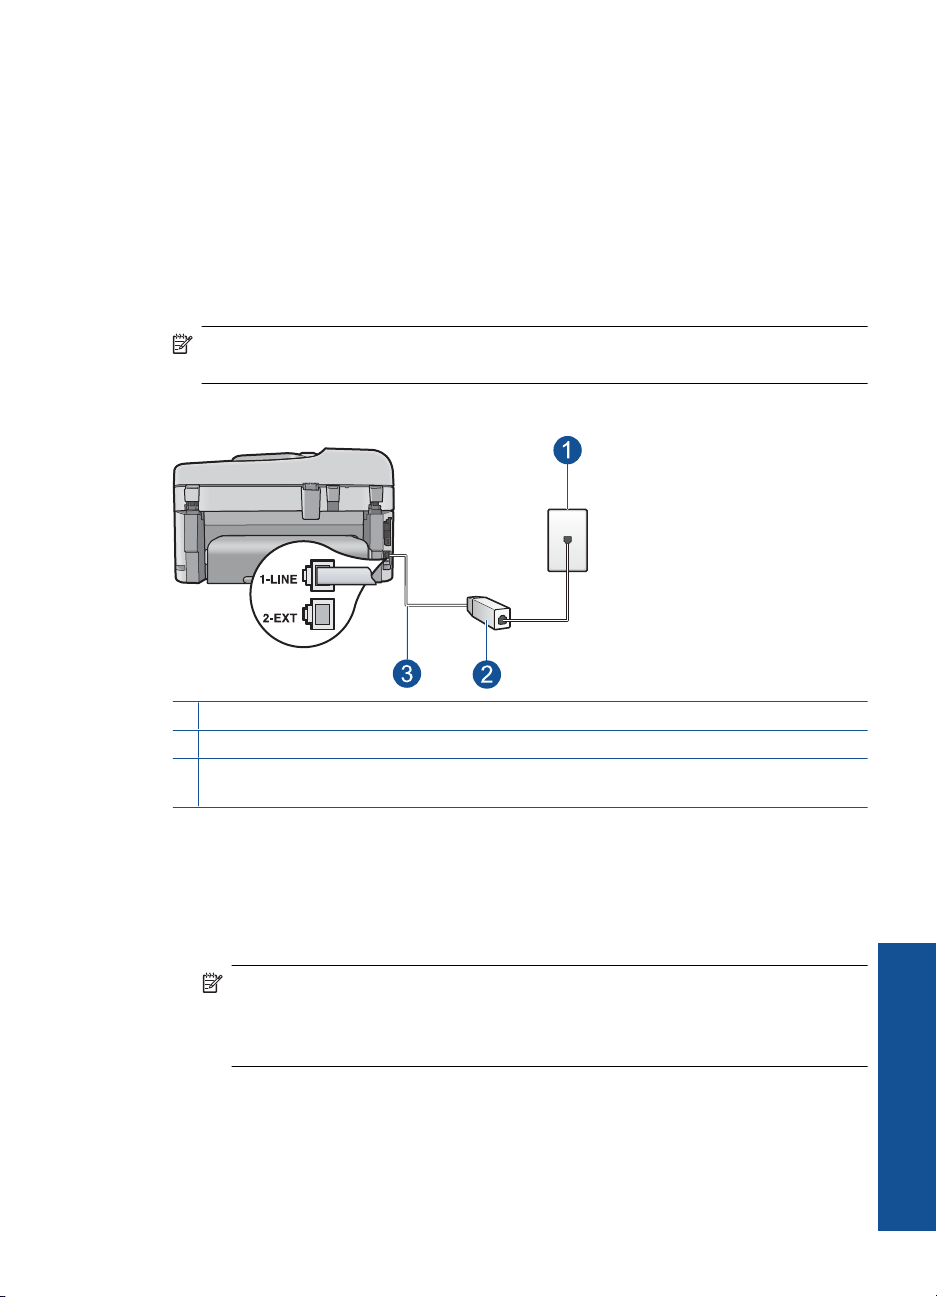
Case A: Separate fax line (no voice calls received)
If you have a separate phone line on which you receive no voice calls, and you have no
other equipment connected on this phone line, set up the HP Photosmart as described
in this section.
Figure 3-1 Back view of the HP Photosmart
Not applicable.
1 Telephone wall jack
2 Use the phone cord supplied in the box with the HP Photosmart to connect to the "1-LINE"
port
To set up the HP Photosmart with a separate fax line
1. Using the phone cord supplied in the box with the HP Photosmart, connect one end
Finish setting up the HP Photosmart
to your telephone wall jack, then connect the other end to the port labeled 1-LINE on
the back of the HP Photosmart.
NOTE: If you do not use the supplied cord to connect from the telephone wall
jack to the HP Photosmart, you might not be able to fax successfully. This special
phone cord is different from the phone cords you might already have in your home
or office.
2. Turn on the Auto Answer setting.
3. (Optional) Change the Rings to Answer setting to the lowest setting (two rings).
4. Run a fax test.
20 Finish setting up the HP Photosmart
Page 23
When the phone rings, the HP Photosmart will answer automatically after the number of
rings you set in the Rings to Answer setting. Then it will begin emitting fax reception
tones to the sending fax machine and receive the fax.
Case B: Set up the HP Photosmart with DSL
If you have a DSL service through your telephone company, use the instructions in this
section to connect a DSL filter between the telephone wall jack and the HP Photosmart.
The DSL filter removes the digital signal that can interfere with the HP Photosmart, so
the HP Photosmart can communicate properly with the phone line. (DSL might be called
ADSL in your country/region.)
NOTE: If you have a DSL line and you do not connect the DSL filter, you will not be
able to send and receive faxes with the HP Photosmart.
Figure 3-2 Back view of the HP Photosmart
1 Telephone wall jack
2 DSL filter and cord supplied by your DSL provider
3 Use the phone cord supplied in the box with the HP Photosmart to connect to the "1-LINE"
port
To set up the HP Photosmart with DSL
1. Obtain a DSL filter from your DSL provider.
2. Using the phone cord supplied in the box with the HP Photosmart, connect one end
to your telephone wall jack, then connect the other end to the port labeled 1-LINE on
the back of the HP Photosmart.
NOTE: If you do not use the supplied cord to connect from the telephone wall
jack to the HP Photosmart, you might not be able to fax successfully. This special
phone cord is different from the phone cords you might already have in your home
or office.
Set up the HP Photosmart for faxing 21
Finish setting up the HP Photosmart
Page 24

Chapter 3
3. Connect the DSL filter cord to the telephone wall jack.
NOTE: If you have other office equipment or services attached to this phone line,
such as a distinctive ring service, answering machine, or voice mail, see the
appropriate section in this section for additional setup guidelines.
4. Run a fax test.
Case C: Set up the HP Photosmart with a PBX phone system or an ISDN line
If you are using either a PBX phone system or an ISDN converter/terminal adapter, make
sure you do the following:
• If you are using either a PBX or an ISDN converter/terminal adaptor, connect the
HP Photosmart to the port that is designated for fax and phone use. Also, make sure
that the terminal adapter is set to the correct switch type for your country/region, if
possible.
NOTE: Some ISDN systems allow you to configure the ports for specific phone
equipment. For example, you might have assigned one port for telephone and
Group 3 fax and another port for multiple purposes. If you have problems when
connected to the fax/phone port of your ISDN converter, try using the port
designated for multiple purposes; it might be labeled "multi-combi" or something
similar.
• If you are using a PBX phone system, set the call waiting tone to "off".
NOTE: Many digital PBX systems include a call-waiting tone that is set to "on"
by default. The call waiting tone will interfere with any fax transmission, and you
will not be able to send or receive faxes with the HP Photosmart. Refer to the
documentation that came with your PBX phone system for instructions on how to
turn off the call-waiting tone.
• If you are using a PBX phone system, dial the number for an outside line before dialing
the fax number.
• Make sure you use the supplied cord to connect from the telephone wall jack to the
HP Photosmart. If you do not, you might not be able to fax successfully. This special
phone cord is different from the phone cords you might already have in your home or
office. If the supplied phone cord is too short, you can purchase a coupler from your
local electronics store and extend it.
Finish setting up the HP Photosmart
22 Finish setting up the HP Photosmart
Page 25

Case D: Fax with a distinctive ring service on the same line
If you subscribe to a distinctive ring service (through your telephone company) that allows
you to have multiple phone numbers on one phone line, each with a different ring pattern,
set up the HP Photosmart as described in this section.
Figure 3-3 Back view of the HP Photosmart
1 Telephone wall jack
2 Use the phone cord supplied in the box with the HP Photosmart to connect to the "1-LINE"
port
To set up the HP Photosmart with a distinctive ring service
1. Using the phone cord supplied in the box with the HP Photosmart, connect one end
to your telephone wall jack, then connect the other end to the port labeled 1-LINE on
the back of the HP Photosmart.
NOTE: If you do not use the supplied cord to connect from the telephone wall
jack to the HP Photosmart, you might not be able to fax successfully. This special
phone cord is different from the phone cords you might already have in your home
or office.
2. Turn on the Auto Answer setting.
3. Change the Distinctive Ring setting to match the pattern that the telephone company
assigned to your fax number.
NOTE: By default, the HP Photosmart is set to answer all ring patterns. If you
do not set the Distinctive Ring to match the ring pattern assigned to your fax
number, the HP Photosmart might answer both voice calls and fax calls or it might
not answer at all.
4. (Optional) Change the Rings to Answer setting to the lowest setting (two rings).
5. Run a fax test.
The HP Photosmart will automatically answer incoming calls that have the ring pattern
you selected (Distinctive Ring setting) after the number of rings you selected (Rings to
Answer setting). Then it will begin emitting fax reception tones to the sending fax machine
and receive the fax.
Set up the HP Photosmart for faxing 23
Finish setting up the HP Photosmart
Page 26

Chapter 3
Case E: Shared voice/fax line
If you receive both voice calls and fax calls at the same phone number, and you have no
other office equipment (or voice mail) on this phone line, set up the HP Photosmart as
described in this section.
Figure 3-4 Back view of the HP Photosmart
1 Telephone wall jack
2 Use the phone cord supplied in the box with the HP Photosmart to connect to the "1-LINE"
port
3 Telephone (optional)
To set up the HP Photosmart with a shared voice/fax line
1. Using the phone cord supplied in the box with the HP Photosmart, connect one end
to your telephone wall jack, then connect the other end to the port labeled 1-LINE on
the back of the HP Photosmart.
NOTE: If you do not use the supplied cord to connect from the telephone wall
jack to the HP Photosmart, you might not be able to fax successfully. This special
phone cord is different from the phone cords you might already have in your home
or office.
2. Now you need to decide how you want the HP Photosmart to answer calls,
automatically or manually:
Finish setting up the HP Photosmart
• If you set up the HP Photosmart to answer calls automatically, it answers all
incoming calls and receives faxes. The HP Photosmart will not be able to
distinguish between fax and voice calls in this case; if you suspect the call is a
voice call, you will need to answer it before the HP Photosmart answers the call.
To set up the HP Photosmart to answer calls automatically, turn on the Auto
Answer setting.
• If you set up the HP Photosmart to answer faxes manually, you must be available
to respond in person to incoming fax calls or the HP Photosmart cannot receive
faxes. To set up the HP Photosmart to answer calls manually, turn off the Auto
Answer setting.
3. Run a fax test.
24 Finish setting up the HP Photosmart
Page 27

4. Plug your phone into the telephone wall jack.
5. Do one of the following, depending on your phone system:
• If you have a parallel-type phone system, remove the white plug from the port
labeled 2-EXT on the back of the HP Photosmart, and then connect a phone to
this port.
• If you have a serial-type phone system, you might plug your phone directly on top
of the HP Photosmart cable which has a wall plug attached to it.
If you pick up the phone before the HP Photosmart answers the call and hear fax tones
from a sending fax machine, you will need to answer the fax call manually.
Case F: Shared voice/fax line with voice mail
If you receive both voice calls and fax calls at the same phone number, and you also
subscribe to a voice mail service through your telephone company, set up the
HP Photosmart as described in this section.
NOTE: You cannot receive faxes automatically if you have a voice mail service at
the same phone number you use for fax calls. You must receive faxes manually; this
means you must be available to respond in person to incoming fax calls. If you want
to receive faxes automatically instead, contact your telephone company to subscribe
to a distinctive ring service, or to obtain a separate phone line for faxing.
Figure 3-5 Back view of the HP Photosmart
1 Telephone wall jack
2 Use the phone cord supplied in the box with the HP Photosmart to connect to the "1-LINE"
port
Set up the HP Photosmart for faxing 25
Finish setting up the HP Photosmart
Page 28
Chapter 3
To set up the HP Photosmart with voice mail
1. Using the phone cord supplied in the box with the HP Photosmart, connect one end
to your telephone wall jack, then connect the other end to the port labeled 1-LINE on
the back of the HP Photosmart.
NOTE: If you do not use the supplied cord to connect from the telephone wall
jack to the HP Photosmart, you might not be able to fax successfully. This special
phone cord is different from the phone cords you might already have in your home
or office.
2. Turn off the Auto Answer setting.
3. Run a fax test.
You must be available to respond in person to incoming fax calls, or the HP Photosmart
cannot receive faxes.
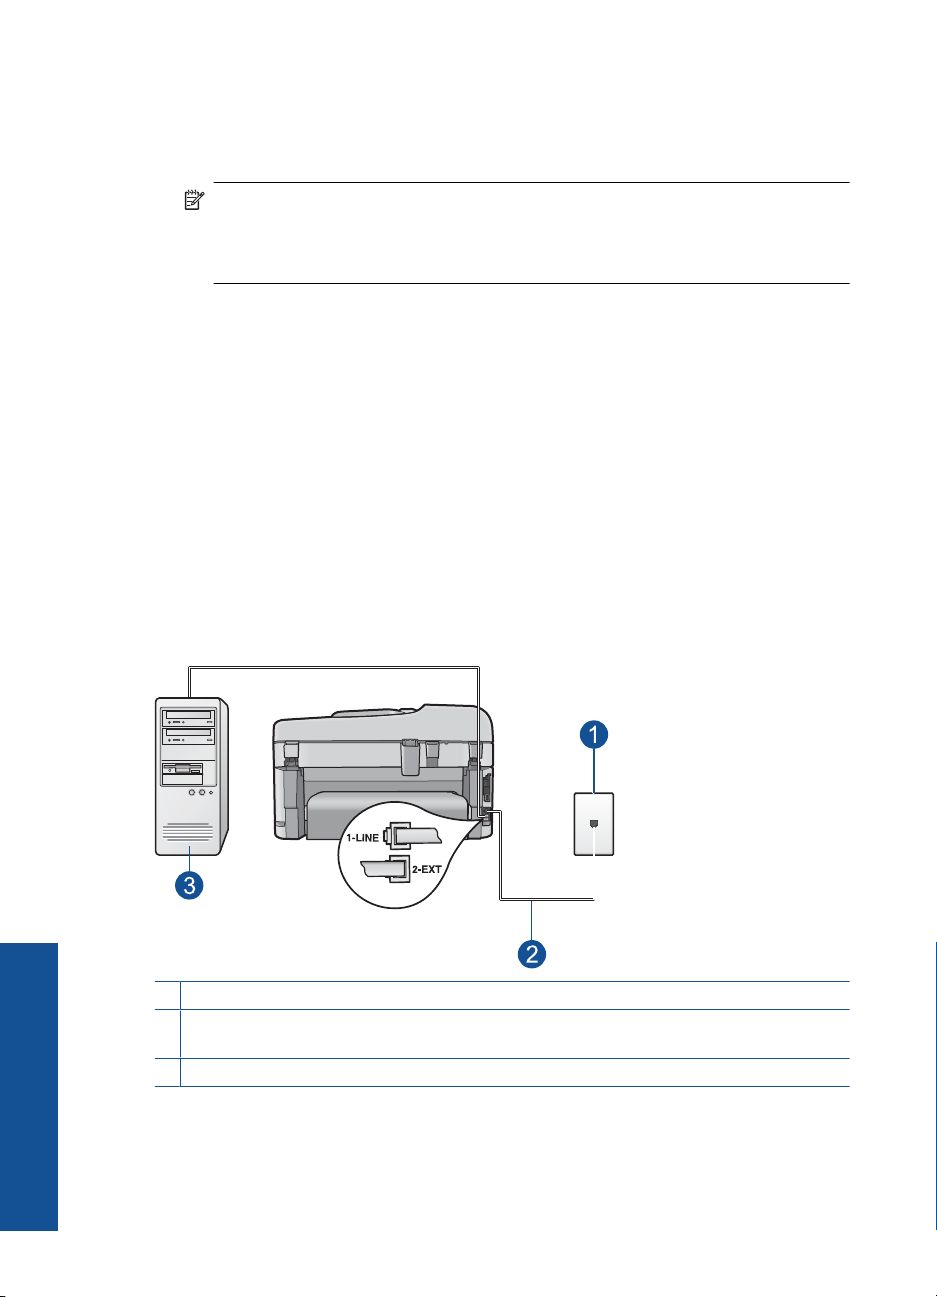
Case G: Fax line shared with computer dial-up modem (no voice calls received)
If you have a fax line on which you receive no voice calls, and you also have a computer
dial-up modem connected on this line, set up the HP Photosmart as described in this
section.
Since your computer dial-up modem shares the phone line with the HP Photosmart, you
will not be able to use both your modem and the HP Photosmart simultaneously. For
example, you cannot use the HP Photosmart for faxing if you are using your computer
dial-up modem to send an e-mail or access the Internet.
Figure 3-6 Back view of the HP Photosmart
Finish setting up the HP Photosmart
1 Telephone wall jack
2 Use the phone cord supplied in the box with the HP Photosmart to connect to the "1-LINE"
port
3 Computer with modem
26 Finish setting up the HP Photosmart
Page 29

To set up the HP Photosmart with a computer dial-up modem
1. Remove the white plug from the port labeled 2-EXT on the back of the HP Photosmart.
2. Find the phone cord that connects from the back of your computer (your computer
dial-up modem) to a telephone wall jack. Disconnect the cord from the telephone wall
jack and plug it into the port labeled 2-EXT on the back of the HP Photosmart.
3. Using the phone cord supplied in the box with the HP Photosmart, connect one end
to your telephone wall jack, then connect the other end to the port labeled 1-LINE on
the back of the HP Photosmart.
NOTE: If you do not use the supplied cord to connect from the telephone wall
jack to the HP Photosmart, you might not be able to fax successfully. This special
phone cord is different from the phone cords you might already have in your home
or office.
4. If your modem software is set to receive faxes to your computer automatically, turn
off that setting.
NOTE: If you do not turn off the automatic fax reception setting in your modem
software, the HP Photosmart will not be able to receive faxes.
5. Turn on the Auto Answer setting.
6. (Optional) Change the Rings to Answer setting to the lowest setting (two rings).
7. Run a fax test.
When the phone rings, the HP Photosmart will answer automatically after the number of
rings you set in the Rings to Answer setting. Then it will begin emitting fax reception
tones to the sending fax machine and receive the fax.
Case H: Shared voice/fax line with computer dial-up modem
If you receive both voice calls and fax calls at the same phone number, and you also have
a computer dial-up modem connected on this phone line, set up the HP Photosmart as
described in this section.
Since your computer dial-up modem shares the phone line with the HP Photosmart, you
will not be able to use both your modem and the HP Photosmart simultaneously. For
example, you cannot use the HP Photosmart for faxing if you are using your computer
dial-up modem to send an e-mail or access the Internet.
There are two different ways to set up the HP Photosmart with your computer based on
the number of phone ports on your computer. Before you begin, check your computer to
see if it has one or two phone ports.
• If your computer has only one phone port, you will need to purchase a parallel splitter
(also called a coupler), as shown below. (A parallel splitter has one RJ-11 port on the
front and two RJ-11 ports on the back. Do not use a 2-line phone splitter, a serial
splitter, or a parallel splitter which has two RJ-11 ports on the front and a plug on the
back.)
Figure 3-7 Example of a parallel splitter
Set up the HP Photosmart for faxing 27
Finish setting up the HP Photosmart
Page 30

Chapter 3
• If your computer has two phone ports, set up the HP Photosmart as described below.
Figure 3-8 Back view of the HP Photosmart
1 Telephone wall jack
2 "IN" phone port on your computer
3 "OUT" phone port on your computer
4 Telephone
5 Computer with modem
6 Use the phone cord supplied in the box with the HP Photosmart to connect to the "1-LINE"
port
To set up the HP Photosmart on the same phone line as a computer with two phone
ports
1. Remove the white plug from the port labeled 2-EXT on the back of the HP Photosmart.
2. Find the phone cord that connects from the back of your computer (your computer
dial-up modem) to a telephone wall jack. Disconnect the cord from the telephone wall
jack and plug it into the port labeled 2-EXT on the back of the HP Photosmart.
3. Connect a phone to the "OUT" port on the back of your computer dial-up modem.
4. Using the phone cord supplied in the box with the HP Photosmart, connect one end
Finish setting up the HP Photosmart
to your telephone wall jack, then connect the other end to the port labeled 1-LINE on
the back of the HP Photosmart.
NOTE: If you do not use the supplied cord to connect from the telephone wall
jack to the HP Photosmart, you might not be able to fax successfully. This special
phone cord is different from the phone cords you might already have in your home
or office.
28 Finish setting up the HP Photosmart
Page 31

5. If your modem software is set to receive faxes to your computer automatically, turn
off that setting.
NOTE: If you do not turn off the automatic fax reception setting in your modem
software, the HP Photosmart will not be able to receive faxes.
6. Now you need to decide how you want the HP Photosmart to answer calls,
automatically or manually:
• If you set up the HP Photosmart to answer calls automatically, it answers all
incoming calls and receives faxes. The HP Photosmart will not be able to
distinguish between fax and voice calls in this case; if you suspect the call is a
voice call, you will need to answer it before the HP Photosmart answers the call.
To set up the HP Photosmart to answer calls automatically, turn on the Auto
Answer setting.
• If you set up the HP Photosmart to answer faxes manually, you must be available
to respond in person to incoming fax calls or the HP Photosmart cannot receive
faxes. To set up the HP Photosmart to answer calls manually, turn off the Auto
Answer setting.
7. Run a fax test.
If you pick up the phone before the HP Photosmart answers the call and hear fax tones
from a sending fax machine, you will need to answer the fax call manually.
Set up the HP Photosmart for faxing 29
Finish setting up the HP Photosmart
Page 32
Chapter 3
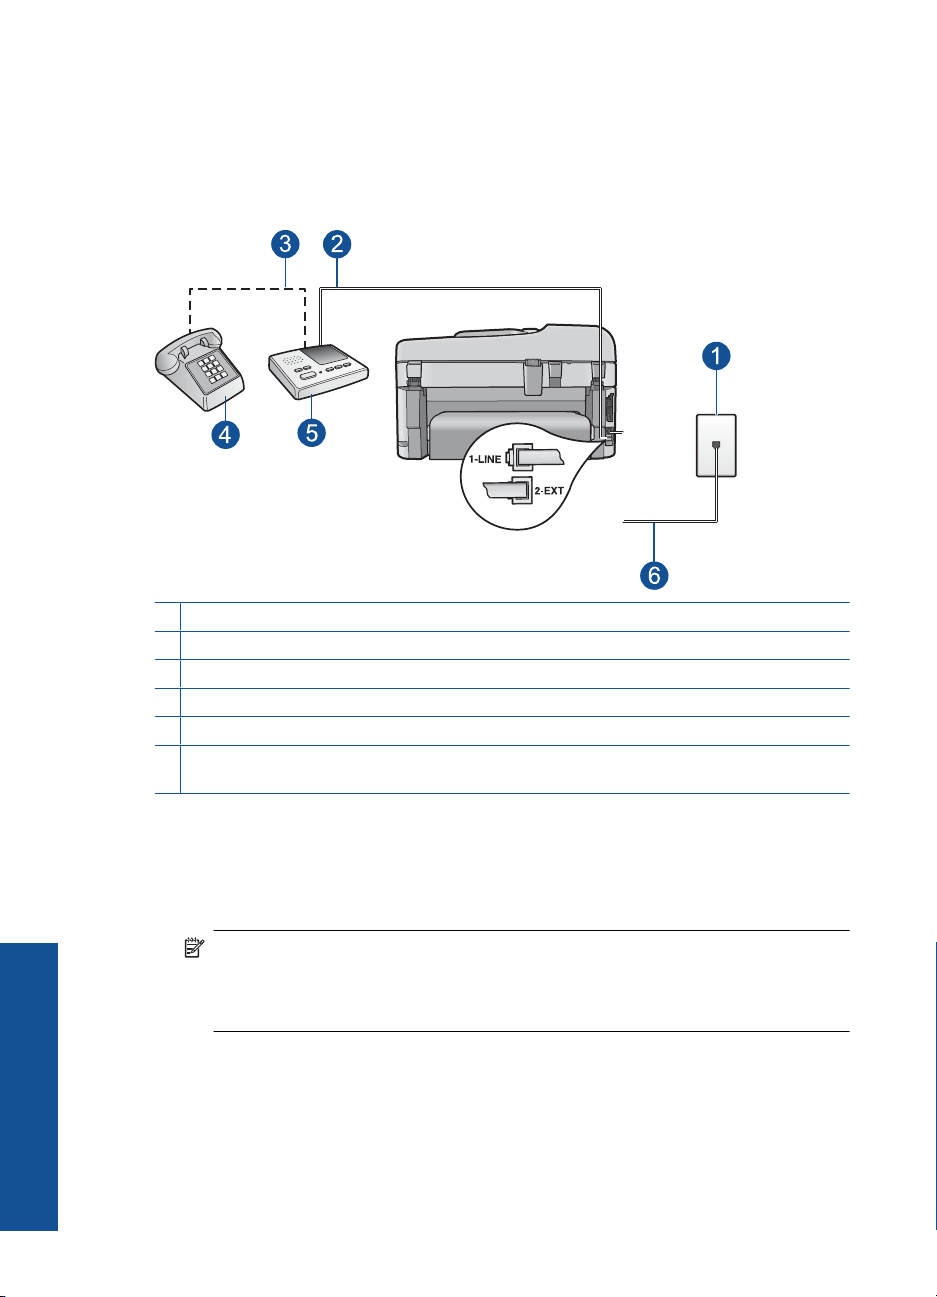
Case I: Shared voice/fax line with answering machine
If you receive both voice calls and fax calls at the same phone number, and you also have
an answering machine that answers voice calls at this phone number, set up the
HP Photosmart as described in this section.
Figure 3-9 Back view of the HP Photosmart
1 Telephone wall jack
2 "IN" port on your answering machine
3 "OUT" port on your answering machine
4 Telephone (optional)
5 Answering machine
6 Use the phone cord supplied in the box with the HP Photosmart to connect to the "1-LINE"
port
To set up the HP Photosmart with a shared voice/fax line with answering machine
1. Remove the white plug from the port labeled 2-EXT on the back of the HP Photosmart.
2. Unplug your answering machine from the telephone wall jack, and connect it to the
port labeled 2-EXT on the back of the HP Photosmart.
Finish setting up the HP Photosmart
NOTE: If you do not connect your answering machine directly to the
HP Photosmart, fax tones from a sending fax machine might be recorded on your
answering machine, and you probably will not be able to receive faxes with the
HP Photosmart.
30 Finish setting up the HP Photosmart
Page 33

3. Using the phone cord supplied in the box with the HP Photosmart, connect one end
to your telephone wall jack, then connect the other end to the port labeled 1-LINE on
the back of the HP Photosmart.
NOTE: If you do not use the supplied cord to connect from the telephone wall
jack to the HP Photosmart, you might not be able to fax successfully. This special
phone cord is different from the phone cords you might already have in your home
or office.
4. (Optional) If your answering machine does not have a built-in phone, for convenience
you might want to connect a phone to the back of your answering machine at the
"OUT" port.
NOTE: If your answering machine does not let you connect an external phone,
you can purchase and use a parallel splitter (also known as a coupler) to connect
both the answering machine and telephone to the HP Photosmart. You can use
standard phone cords for these connections.
5. Turn on the Auto Answer setting.
6. Set your answering machine to answer after a low number of rings.
7. Change the Rings to Answer setting on the HP Photosmart to the maximum number
of rings supported by your device. (The maximum number of rings varies by country/
region.)
8. Run a fax test.
When the phone rings, your answering machine will answer after the number of rings you
have set, and then play your recorded greeting. The HP Photosmart monitors the call
during this time, "listening" for fax tones. If incoming fax tones are detected, the
HP Photosmart will emit fax reception tones and receive the fax; if there are no fax tones,
the HP Photosmart stops monitoring the line and your answering machine can record a
voice message.
Case J: Shared voice/fax line with computer dial-up modem and answering
machine
If you receive both voice calls and fax calls at the same phone number, and you also have
a computer dial-up modem and answering machine connected on this phone line, set up
the HP Photosmart as described in this section.
Since your computer dial-up modem shares the phone line with the HP Photosmart, you
will not be able to use both your modem and the HP Photosmart simultaneously. For
example, you cannot use the HP Photosmart for faxing if you are using your computer
dial-up modem to send an e-mail or access the Internet.
There are two different ways to set the HP Photosmart with your computer based on the
number of phone ports on your computer. Before you begin, check your computer to see
if it has one or two phone ports.
• If your computer has only one phone port, you will need to purchase a parallel splitter
(also called a coupler), as shown below. (A parallel splitter has one RJ-11 port on the
front and two RJ-11 ports on the back. Do not use a 2-line phone splitter, a serial
Set up the HP Photosmart for faxing 31
Finish setting up the HP Photosmart
Page 34

Chapter 3
splitter, or a parallel splitter which has two RJ-11 ports on the front and a plug on the
back.)
Figure 3-10 Example of a parallel splitter
• If your computer has two phone ports, set up the HP Photosmart as described below.
Figure 3-11 Back view of the HP Photosmart
1 Telephone wall jack
2 "IN" phone port on your computer
3 "OUT" phone port on your computer
4 Telephone (optional)
5 Answering machine
6 Computer with modem
7 Use the phone cord supplied in the box with the HP Photosmart to connect to the "1-LINE"
Finish setting up the HP Photosmart
port
To set up the HP Photosmart on the same phone line as a computer with two phone
ports
1. Remove the white plug from the port labeled 2-EXT on the back of the HP Photosmart.
2. Find the phone cord that connects from the back of your computer (your computer
dial-up modem) to a telephone wall jack. Disconnect the cord from the telephone wall
jack and plug it into the port labeled 2-EXT on the back of the HP Photosmart.
32 Finish setting up the HP Photosmart
Page 35

3. Unplug your answering machine from the telephone wall jack, and connect it to the
“OUT” port on the back of your computer modem.
This allows a direct connection between the HP Photosmart and your answering
machine, even though the computer modem is connected first in line.
NOTE: If you do not connect your answering machine in this way, fax tones from
a sending fax machine might be recorded on your answering machine, and you
might not be able to receive faxes with the HP Photosmart.
4. Using the phone cord supplied in the box with the HP Photosmart, connect one end
to your telephone wall jack, then connect the other end to the port labeled 1-LINE on
the back of the HP Photosmart.
NOTE: If you do not use the supplied cord to connect from the telephone wall
jack to the HP Photosmart, you might not be able to fax successfully. This special
phone cord is different from the phone cords you might already have in your home
or office.
5. (Optional) If your answering machine does not have a built-in phone, for convenience
you might want to connect a phone to the back of your answering machine at the
"OUT" port.
NOTE: If your answering machine does not let you connect an external phone,
you can purchase and use a parallel splitter (also known as a coupler) to connect
both the answering machine and telephone to the HP Photosmart. You can use
standard phone cords for these connections.
6. If your modem software is set to receive faxes to your computer automatically, turn
off that setting.
NOTE: If you do not turn off the automatic fax reception setting in your modem
software, the HP Photosmart will not be able to receive faxes.
7. Turn on the Auto Answer setting.
8. Set your answering machine to answer after a low number of rings.
9. Change the Rings to Answer setting on the HP Photosmart to the maximum number
of rings supported by your device. (The maximum number of rings varies by country/
region.)
10. Run a fax test.
When the phone rings, your answering machine will answer after the number of rings you
have set, and then play your recorded greeting. The HP Photosmart monitors the call
during this time, "listening" for fax tones. If incoming fax tones are detected, the
HP Photosmart will emit fax reception tones and receive the fax; if there are no fax tones,
the HP Photosmart stops monitoring the line and your answering machine can record a
voice message.
Case K: Shared voice/fax line with computer dial-up modem and voice mail
If you receive both voice calls and fax calls at the same phone number, use a computer
dial-up modem on the same phone line, and subscribe to a voice mail service through
your telephone company, set up the HP Photosmart as described in this section.
Set up the HP Photosmart for faxing 33
Finish setting up the HP Photosmart
Page 36

Chapter 3
NOTE: You cannot receive faxes automatically if you have a voice mail service at
the same phone number you use for fax calls. You must receive faxes manually; this
means you must be available to respond in person to incoming fax calls. If you want
to receive faxes automatically instead, contact your telephone company to subscribe
to a distinctive ring service, or to obtain a separate phone line for faxing.
Since your computer dial-up modem shares the phone line with the HP Photosmart, you
will not be able to use both your modem and the HP Photosmart simultaneously. For
example, you cannot use the HP Photosmart for faxing if you are using your computer
dial-up modem to send an e-mail or access the Internet.
There are two different ways to set up the HP Photosmart with your computer based on
the number of phone ports on your computer. Before you begin, check your computer to
see if it has one or two phone ports.
• If your computer has only one phone port, you will need to purchase a parallel splitter
(also called a coupler), as shown below. (A parallel splitter has one RJ-11 port on the
front and two RJ-11 ports on the back. Do not use a 2-line phone splitter, a serial
splitter, or a parallel splitter which has two RJ-11 ports on the front and a plug on the
back.)
Figure 3-12 Example of a parallel splitter
Finish setting up the HP Photosmart
34 Finish setting up the HP Photosmart
Page 37

• If your computer has two phone ports, set up the HP Photosmart as described below.
Figure 3-13 Back view of the HP Photosmart
1 Telephone wall jack
2 "IN" phone port on your computer
3 "OUT" phone port on your computer
4 Telephone
5 Computer with modem
6 Use the phone cord supplied in the box with the HP Photosmart to connect to the "1-LINE"
port
To set up the HP Photosmart on the same phone line as a computer with two phone
ports
1. Remove the white plug from the port labeled 2-EXT on the back of the HP Photosmart.
2. Find the phone cord that connects from the back of your computer (your computer
dial-up modem) to a telephone wall jack. Disconnect the cord from the telephone wall
jack and plug it into the port labeled 2-EXT on the back of the HP Photosmart.
3. Connect a phone to the "OUT" port on the back of your computer dial-up modem.
4. Using the phone cord supplied in the box with the HP Photosmart, connect one end
to your telephone wall jack, then connect the other end to the port labeled 1-LINE on
the back of the HP Photosmart.
NOTE: If you do not use the supplied cord to connect from the telephone wall
jack to the HP Photosmart, you might not be able to fax successfully. This special
phone cord is different from the phone cords you might already have in your home
or office.
Set up the HP Photosmart for faxing 35
Finish setting up the HP Photosmart
Page 38

Chapter 3
5. If your modem software is set to receive faxes to your computer automatically, turn
off that setting.
NOTE: If you do not turn off the automatic fax reception setting in your modem
software, the HP Photosmart will not be able to receive faxes.
6. Turn off the Auto Answer setting.
7. Run a fax test.
You must be available to respond in person to incoming fax calls, or the HP Photosmart
cannot receive faxes.
Additional fax setup information
For additional fax setup information, in specific countries/regions, see the Fax
Configuration Web site listed below.
Austria www.hp.com/at/faxconfig
Germany www.hp.com/de/faxconfig
Switzerland (French) www.hp.com/ch/fr/faxconfig
Switzerland (German) www.hp.com/ch/de/faxconfig
United Kingdom www.hp.com/uk/faxconfig
Spain www.hp.com/es/faxconfig
The Netherlands www.hp.com/nl/faxconfig
Belgium (France) www.hp.com/be/fr/faxconfig
Belgium (Dutch) www.hp.com/be/nl/faxconfig
Portugal www.hp.com/pt/faxconfig
Sweden www.hp.com/se/faxconfig
Finland www.hp.com/fi/faxconfig
Denmark www.hp.com/dk/faxconfig
Norway www.hp.com/no/faxconfig
Ireland www.hp.com/ie/faxconfig
Finish setting up the HP Photosmart
France www.hp.com/fr/faxconfig
Italy www.hp.com/it/faxconfig
South Africa www.hp.com/za/faxconfig
Poland www.hp.pl/faxconfig
Russia www.hp.ru/faxconfig
36 Finish setting up the HP Photosmart
Page 39

4 Get to know the HP Photosmart
• Printer parts
Control panel features
•
Display icons
•
HP Apps Manager
•
Printer parts
• Front view of the printer
Get to know the HP Photosmart
Get to know the HP Photosmart 37
Page 40
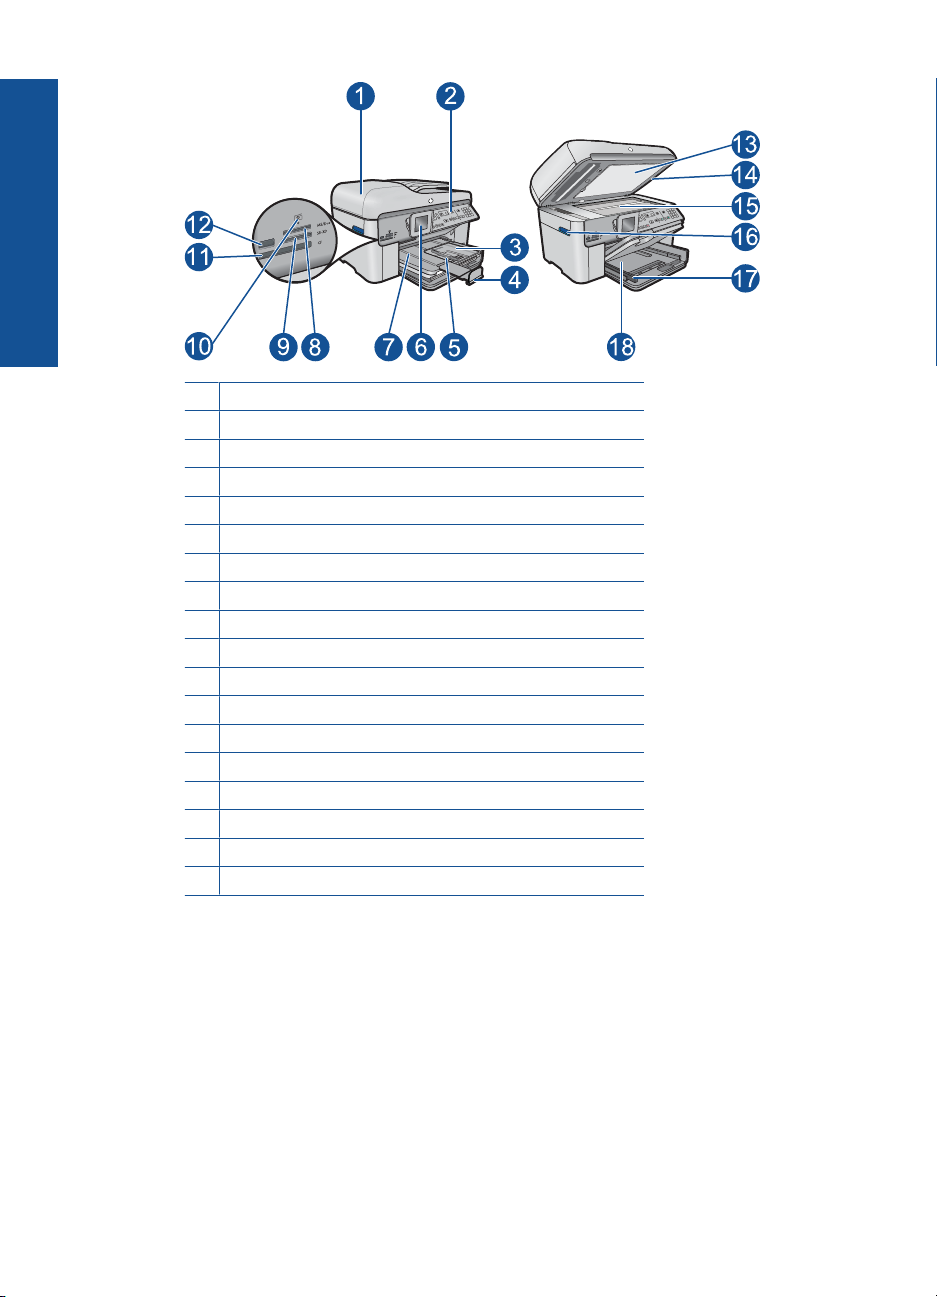
Get to know the HP Photosmart
Chapter 4
1 Automatic document feeder
2 Control panel
3 Photo tray
4 Paper tray extender (also referred to as the tray extender)
5 Paper-width guide for the photo tray
6 Color graphics display (also referred to as the display)
7 Output tray
8 Memory card slot for Memory Stick cards
9 Memory card slot for Secure Digital and xD cards
10 Photo light
11 Memory card slot for CompactFlash cards
12 Front USB port for your camera or other storage device
13 Lid backing
14 Lid
15 Glass
16 Cartridge door access handle
17 Paper-width guide for the main input tray
18 Main input tray (also referred to as the input tray)
• Top and rear views of the printer
38 Get to know the HP Photosmart
Page 41

21 Printhead assembly
22 Cartridge access area
23 Model number location
24 Rear USB port
25 Ethernet port
26 Power connection (Use only with the power adapter supplied by HP.)
27 1-LINE (fax) and 2-EXT (phone) ports
28 Two-sided printing accessory
Get to know the HP Photosmart
Printer parts 39
Page 42

Chapter 4
Get to know the HP Photosmart
Control panel features
Figure 4-1 Control panel features
1 Color graphics display (also referred to as the display): Displays menus, photos, and
messages. The display can be pulled up and angled for better viewing.
2 Back: Returns to the previous screen.
3 Menu: Presents a set of options related to the current display.
4 Attention light: Indicates a problem occurred. See the display for more information.
5 Home: Returns to the Home screen (the default screen when you turn on the product).
6 OK: Selects a menu setting, value, or photo.
7 Directional pad: Navigates through photos and menu options.
8 Zoom In: Zooms in on a photo. Use this button together with the arrows on the directional
pad to crop the photo before printing.
9 Zoom Out: Zooms out to show more of a photo.
10 Wireless: Opens the Network menu where you can access the Wireless Setup Wizard and
Wi-Fi Protected Setup.
11 ePrint: Opens the Web Services menu where you can view, change, and print your e-mail
address.
12 Apps:Provides a quick and easy way to access and print information from the Web, such as
maps, coupons, coloring pages, and puzzles. Also use to print a variety of blank forms, such
as school paper, music paper, mazes, and checklists.
13 Auto Answer: Turns the Auto Answer feature on or off. The recommended setting varies
depending on the services and equipment on your phone line.
14 Keypad: Enters fax numbers, values, or text.
15 On: Turns the product on or off. When the product is off, a minimal amount of power is still
used. To completely remove power, turn off the product, then unplug the power cord.
16 Space: Enters spaces and pound signs for fax-related tasks.
3 def
2 abc
7 pqrs
1
4 ghi
6 mno5 jkl
8 tuv
9 wxyz
#
0
*
OK
40 Get to know the HP Photosmart
Page 43

17 Symbols: Enters symbols and asterisks for fax-related tasks.
18 Start Fax: Sends or receives a black-and-white or color fax.
19 Start Copy: Starts a black-and-white or color copy.
20 Start Scan: Opens the Scan Menu where you can select a destination for your scan.
21 Print Photos: Prints the photos selected on your memory card. If no photos are currently
selected, the product prints the photo currently showing on the display.
22 Cancel: Stops the current operation.
23 Help: Provides help about the current display.
24 Setup: Opens the Setup menu where you can change product settings and perform
maintenance functions.
25 2-Sided: Opens the 2-sided menu where you can change settings to make 2-sided copies
and faxes.
Display icons
The following icons can appear at the top right side of the display to provide important
information about the HP Photosmart.
Icon Purpose
Shows that the ink level in all the ink cartridges is 50% or more.
Get to know the HP Photosmart
Shows that one or more of the ink cartridges are low on ink. You should replace
the ink cartridge when the print quality is no longer acceptable.
Shows that an unknown ink cartridge is inserted. This icon might appear if an
ink cartridge contains non-HP ink.
Indicates that there is a wired network connection.
Shows that the HP Photosmart is set up to receive faxes automatically. If this
icon is not showing, you will have to receive faxes manually.
Indicates the presence and signal strength of a wireless network connection.
Indicates the presence of an ad hoc wireless network connection.
Display icons 41
Page 44

Chapter 4
Get to know the HP Photosmart
HP Apps Manager
HP Apps are special documents such as Calendars, Posters, Recipes, and Cards that
you can print directly from your printer without using your computer. You can download
additional HP Apps from the Web (requires Web connectivity).
Manage HP Apps
▲ Add new HP Apps.
a. Press the arrow buttons to scroll to the HP Apps menu option. Press OK.
b. Press the arrow buttons to scroll to the More menu option, and then press OK.
c. Highlight the desired app that you want to add, and then press OK. Follow the
prompts.
d. View the animation for this topic.
42 Get to know the HP Photosmart
Page 45

5 Paper basics
You can load many different types and sizes of paper in the HP Photosmart, including
letter or A4 paper, photo paper, transparencies, and envelopes.
This section contains the following topics:
•
Recommended papers for photo printing
Recommended papers for printing
•
Load media
•
Information on paper
•
Recommended papers for photo printing
If you want the best print quality, HP recommends using HP papers that are specifically
designed for the type of project you are printing.
Depending on your country/region, some of these papers might not be available.
HP Advanced Photo Paper
This thick photo paper features an instant-dry finish for easy handling without smudging.
It resists water, smears, fingerprints, and humidity. Your prints have a look and feel
comparable to a store-processed photo. It is available in several sizes, including A4, 8.5
x 11 inch, 10 x 15 cm (4 x 6 inch) (with or without tabs), 13 x 18 cm (5 x 7 inch), and two
finishes - glossy or soft gloss (satin matte). It is acid-free for longer lasting documents.
HP Everyday Photo Paper
Print colorful, everyday snapshots at a low cost, using paper designed for casual photo
printing. This affordable, photo paper dries quickly for easy handling. Get sharp, crisp
images when you use this paper with any inkjet printer. It is available in semi-gloss finish
in several sizes, including A4, 8.5 x 11 inch, and 10 x 15 cm (4 x 6 inch) (with or without
tabs). For longer-lasting photos, it is acid-free.
Paper basics
HP Photo Value Pack
HP Photo Value Packs conveniently package original HP cartridges and HP Advanced
Photo Paper to save you time and take the guesswork out of printing affordable
professional photos with your HP Photosmart. Original HP inks and HP Advanced Photo
Paper have been designed to work together so your photos are long lasting and vivid,
print after print. Great for printing out an entire vacation’s worth of photos or multiple prints
to share.
To order HP papers and other supplies, go to
choose your country/region, follow the prompts to select your product, and then click one
of the shopping links on the page.
NOTE: At this time, some portions of the HP Web site are available in English only.
www.hp.com/buy/supplies. If prompted,
Paper basics 43
Page 46

Chapter 5
Recommended papers for printing
If you want the best print quality, HP recommends using HP papers that are specifically
designed for the type of project you are printing.
Depending on your country/region, some of these papers might not be available.
HP Advanced Photo Paper
This thick photo paper features an instant-dry finish for easy handling without smudging.
It resists water, smears, fingerprints, and humidity. Your prints have a look and feel
comparable to a store-processed photo. It is available in several sizes, including A4, 8.5
x 11 inch, 10 x 15 cm (4 x 6 inch) (with or without tabs), 13 x 18 cm (5 x 7 inch), and two
finishes - glossy or soft gloss (satin matte). It is acid-free for longer lasting documents.
HP Everyday Photo Paper
Print colorful, everyday snapshots at a low cost, using paper designed for casual photo
printing. This affordable, photo paper dries quickly for easy handling. Get sharp, crisp
images when you use this paper with any inkjet printer. It is available in semi-gloss finish
in several sizes, including A4, 8.5 x 11 inch, and 10 x 15 cm (4 x 6 inch) (with or without
Paper basics
tabs). For longer-lasting photos, it is acid-free.
HP Brochure Paper or HP Superior Inkjet Paper
These papers are glossy-coated or matte-coated on both sides for two-sided use. They
are the perfect choice for near-photographic reproductions and business graphics for
report covers, special presentations, brochures, mailers, and calendars.
HP Premium Presentation Paper or HP Professional Paper
These papers are heavy two-sided matte papers perfect for presentation, proposals,
reports, and newsletters. They are heavyweight for an impressive look and feel.
HP Bright White Inkjet Paper
HP Bright White Inkjet Paper delivers high-contrast colors and sharp text. It is opaque
enough for two-sided color usage with no show-through, which makes it ideal for
newsletters, reports, and flyers. It features ColorLok Technology for less smearing, bolder
blacks, and vivid colors.
HP Printing Paper
HP Printing Paper is a high-quality multifunction paper. It produces documents that look
and feel more substantial than documents printed on standard multipurpose or copy
paper. It features ColorLok Technology for less smearing, bolder blacks, and vivid colors.
It is acid-free for longer lasting documents.
HP Office Paper
HP Office Paper is a high-quality multifunction paper. It is suitable for copies, drafts,
memos, and other everyday documents. It features ColorLok Technology for less
smearing, bolder blacks, and vivid colors. It is acid-free for longer lasting documents.
44 Paper basics
Page 47

HP Iron-On Transfers
HP Iron-on Transfers (for color fabrics or for light or white fabrics) are the ideal solution
for creating custom T-shirts from your digital photos.
HP Premium Inkjet Transparency Film
HP Premium Inkjet Transparency Film makes your color presentations vivid and even
more impressive. This film is easy to use and handle, and dries quickly without smudging.
HP Photo Value Pack
HP Photo Value Packs conveniently package original HP cartridges and HP Advanced
Photo Paper to save you time and take the guesswork out of printing affordable
professional photos with your HP Photosmart. Original HP inks and HP Advanced Photo
Paper have been designed to work together so your photos are long lasting and vivid,
print after print. Great for printing out an entire vacation’s worth of photos or multiple prints
to share.
ColorLok
HP recommends plain papers with the ColorLok logo for printing and copying of everyday
documents. All papers with the ColorLok logo are independently tested to meet high
standards of reliability and print quality, and produce documents with crisp, vivid color,
bolder blacks, and dry faster than ordinary plain papers. Look for papers with the ColorLok
logo in a variety of weights and sizes from major paper manufacturers.
Paper basics
To order HP papers and other supplies, go to www.hp.com/buy/supplies. If prompted,
choose your country/region, follow the prompts to select your product, and then click one
of the shopping links on the page.
NOTE: At this time, some portions of the HP Web site are available in English only.
Load media
1. Do one of the following:
Load 10 x 15 cm (4 x 6 inch) paper
a. Raise photo tray lid.
Raise photo tray lid and slide paper-width guide outwards.
Load media 45
Page 48

Paper basics
Chapter 5
b. Load paper.
Insert stack of photo paper into photo tray with short edge forward and print
side down.
Slide stack of paper forward until it stops.
NOTE: If the photo paper you are using has perforated tabs, load photo
paper so that tabs are closest to you.
Slide paper-width guide inward until it stops at edge of paper.
c. Lower photo tray lid.
46 Paper basics
Page 49
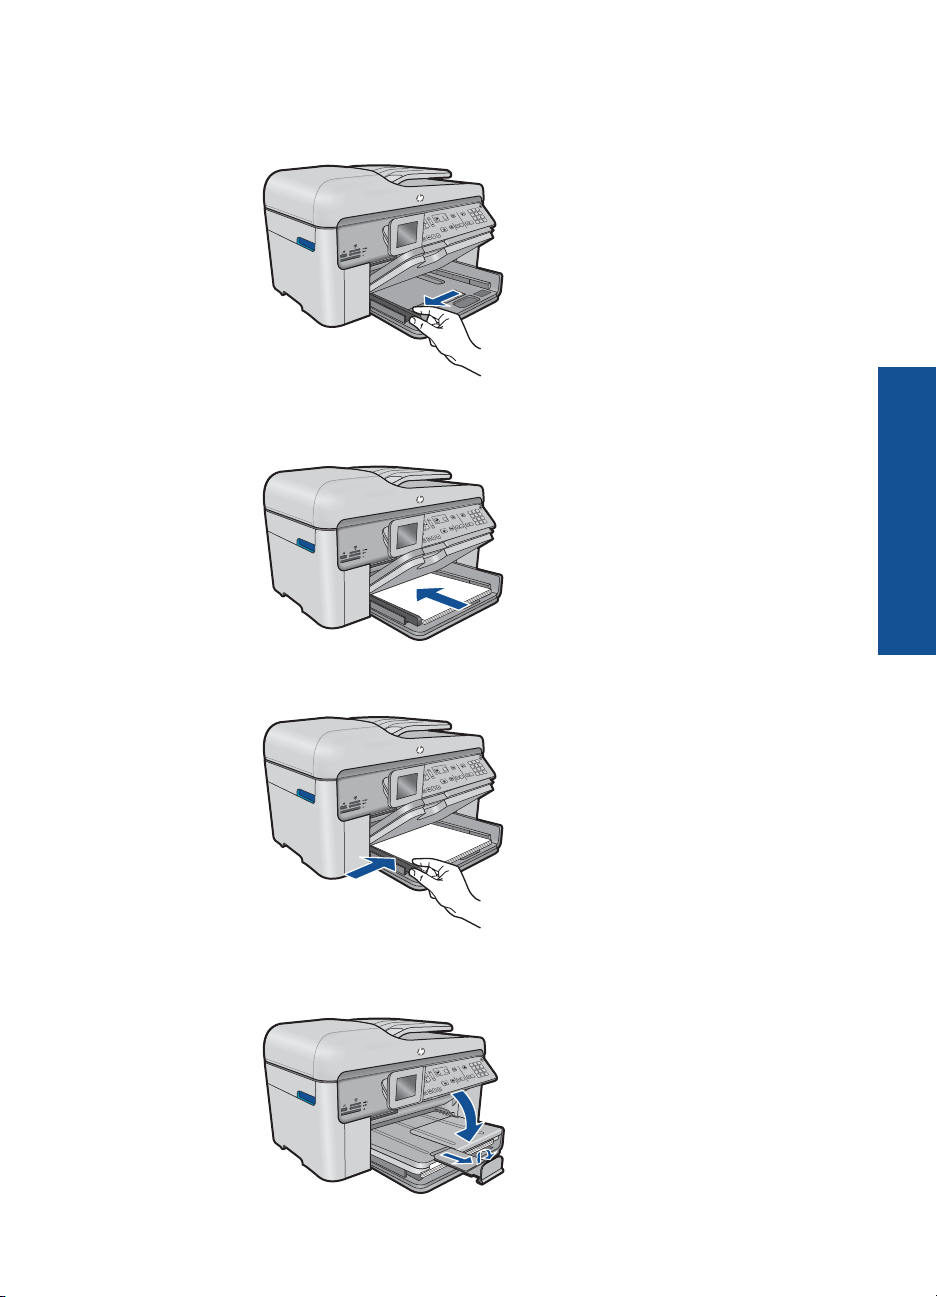
Load A4 or 8.5 x 11 inch paper
a. Raise output tray.
Raise output tray and slide paper-width guide outwards.
b. Load paper.
Insert stack of paper into main input tray with short edge forward and print
side down.
Slide stack of paper forward until it stops.
Slide paper-width guide inward until it stops at edge of paper.
Paper basics
c. Lower output tray.
Lower output tray and pull tray extender towards you, as far as it will go. Flip
the paper catch at the end of the tray extender.
Load media 47
Page 50

Paper basics
Chapter 5
NOTE: When you use legal-size paper, leave the paper catch closed.
Load envelopes
a. Raise output tray.
Raise output tray and slide paper-width guide outwards.
Remove all paper from the main input tray.
b. Load envelopes.
Insert one or more envelopes into far-right side of main input tray, with
envelope flaps on left and facing up.
c. Lower output tray.
48 Paper basics
Slide stack of envelopes forward until it stops.
Slide paper-width guide inward against stack of envelopes until it stops.
Page 51

2. View the animation for this topic.
Related topics
Information on paper
Information on paper
The HP Photosmart is designed to work well with most paper types. Test a variety of
paper types before buying a large quantity. Find a paper type that works well and is easy
to purchase. HP papers are designed for the best quality results. In addition, follow these
tips:
• Do not use paper that is too thin, that has a slick texture, or that stretches easily. It
can feed incorrectly through the paper path, causing paper jams.
• Store photo media in its original packaging inside a resealable plastic bag on a flat
surface in a cool, dry place. When you are ready to print, remove only the paper you
plan to use immediately. When you have finished printing, return any unused photo
paper to the plastic bag.
• Do not leave unused photo paper in the input tray. The paper might start to curl, which
might reduce the quality of your printouts. Curled paper can also cause paper jams.
• Always hold photo paper by the edges. Fingerprints on photo paper can reduce print
quality.
• Do not use paper that is heavily textured. It can cause graphics or text to print
improperly.
• Do not combine different paper types and paper sizes in the input tray; the entire stack
of paper in the input tray must be the same size and type.
• Store printed photos under glass or in a storage book to prevent bleeding over time
from high humidity.
Paper basics
Information on paper 49
Page 52

Paper basics
Chapter 5
50 Paper basics
Page 53

6Print
Print documents
Print photos
Print a creative project
Print a Web page
Print forms and templates (Quick Forms)
Print from anywhere
NOV
Related topics
Load media
•
Recommended papers for photo printing
•
Recommended papers for printing
•
Print documents
Most print settings are automatically handled by the software application. You need to
change the settings manually only when you change print quality, print on specific types
of paper or transparency film, or use special features.
To print from a software application
1. Make sure you have paper loaded in the input tray.
2. On the File menu in your software application, click Print.
3. Make sure the product is the selected printer.
Print from the Web without a computer
Print 51
Page 54

Chapter 6
4. If you need to change settings, click the button that opens the Properties dialog box.
Depending on your software application, this button might be called Properties,
Options, Printer Setup, Printer, or Preferences.
NOTE: When printing a photo, you must select options for the specific photo
paper and photo enhancement.
5. Select the appropriate options for your print job by using the features available in the
Advanced, Printing Shortcuts, Features, and Color tabs.
TIP: You can easily select the appropriate options for your print job by choosing
one of the predefined print tasks on the Printing Shortcuts tab. Click a type of
print task in the Printing Shortcuts list. The default settings for that type of print
task are set and summarized on the Printing Shortcuts tab. If necessary, you
can adjust the settings here and save your custom settings as a new printing
shortcut. To save a custom printing shortcut, select the shortcut and click Save
As. To delete a shortcut, select the shortcut and click Delete.
6. Click OK to close the Properties dialog box.
7. Click Print or OK to begin printing.
Related topics
Recommended papers for printing
•
Load media
•
View the print resolution
•
Use printing shortcuts
•
Set the default print settings
•
Stop the current job
•
Print photos
• Print photos saved on your computer
Print photos from a memory card or USB storage device
•
Print photos saved on your computer
Print
To print a photo on photo paper
1. Load up to 13 x 18 cm (5 x 7 inch) paper in the photo tray or full-size photo paper in
the main input tray.
2. Slide the paper-width guide inward until it stops at the edge of the paper.
3. On the File menu in your software application, click Print.
4. Make sure the product is the selected printer.
5. Click the button that opens the Properties dialog box.
Depending on your software application, this button might be called Properties,
Options, Printer Setup, Printer, or Preferences.
6. Click the Features tab.
52 Print
Page 55

7. In the Basic Options area, from the Paper Type drop-down list, select More. Then,
select the appropriate photo paper type.
8. In the Resizing Options area, from the Size drop-down list, select More. Then, select
the appropriate paper size.
If the paper size and paper type are not compatible, the printer software displays an
alert and allows you to select a different type or size.
9. (Optional) Select the Borderless printing check box if it is not already checked.
If the borderless paper size and paper type are not compatible, the product software
displays an alert and allows you to select a different type or size.
10. In the Basic Options area, select a high print quality, such as Best, from the Print
Quality drop-down list.
NOTE: To achieve the highest dpi resolution, you can use the Maximum dpi
setting with supported types of photo paper. If Maximum dpi is not listed in the
Print quality drop-down list, you can enable it from the Advanced tab. For more
information, see
Print using the maximum dpi.
11. In the HP Real Life Technologies area, click the Photo fix drop-down list and select
from the following options:
• Off: applies no HP Real Life Technologies to the image.
• Basic: enhances low-resolution images; moderately adjusts image sharpness.
12. Click OK to return to the Properties dialog box.
13. Click OK, and then click Print or OK in the Print dialog box.
Related topics
Recommended papers for photo printing
•
Load media
•
Print using the maximum dpi
•
View the print resolution
•
Use printing shortcuts
•
Set the default print settings
•
Stop the current job
•
Print photos from a memory card or USB storage device
1. Do one of the following:
Print single photo on small-size paper
a. Load paper.
Load up to 13 x 18 cm (5 x 7 inch) photo paper in photo tray.
Print
Print photos 53
Page 56
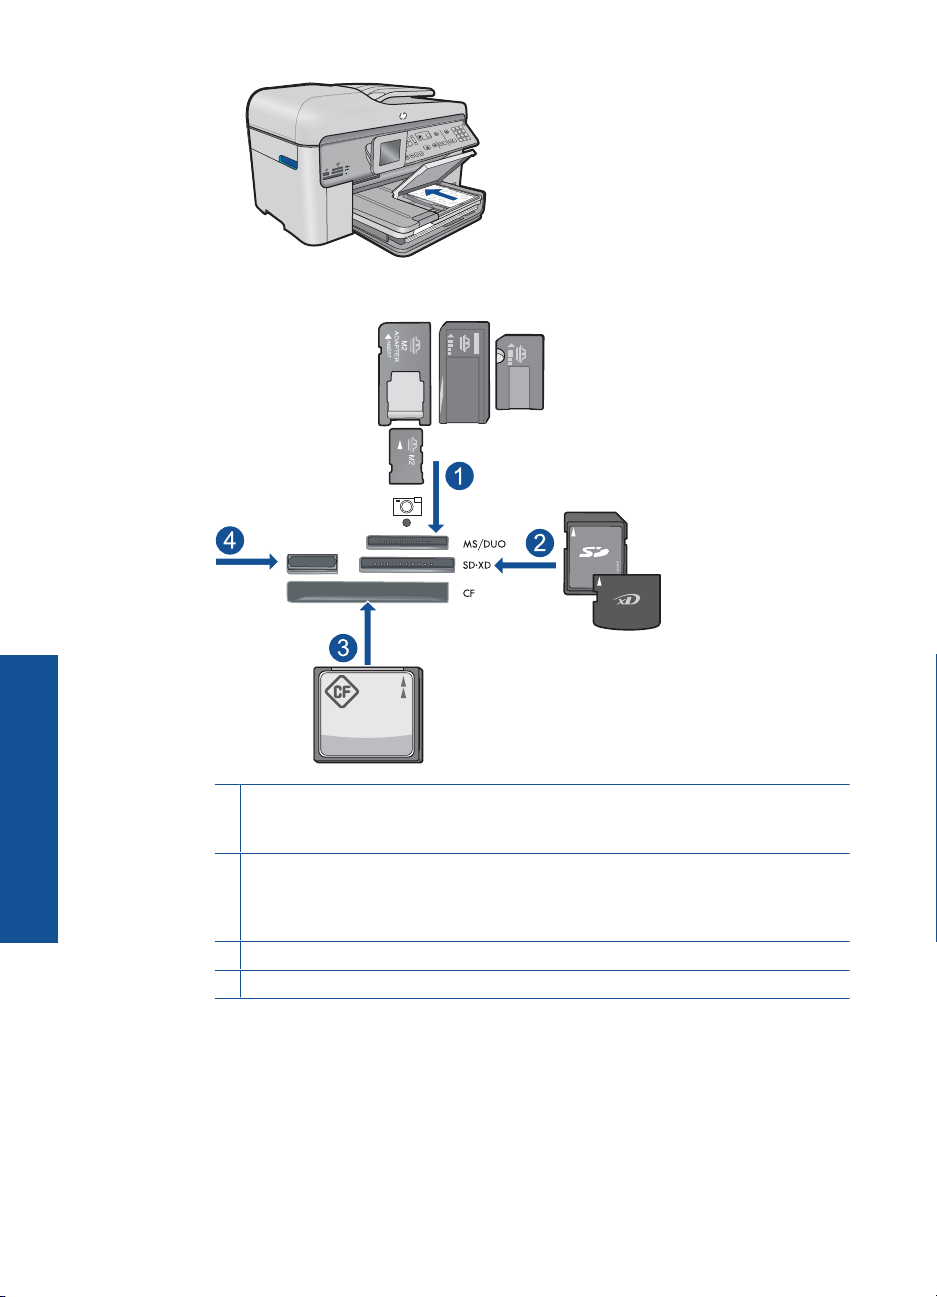
Chapter 6
b. Insert memory.
Print
54 Print
1 Memory Stick, Memory Stick Pro, Memory Stick Select, Memory Stick Magic Gate,
Memory Stick Duo or Pro Duo (adapter optional), Memory Stick Pro-HG Duo (adapter
optional), or Memory Stick Micro (adapter required)
2 MultiMediaCard (MMC), MMC Plus, Secure MultiMedia Card, MMC Mobile (RS-MMC;
adapter required), Secure Digital (SD), Secure Digital Mini (adapter required), Secure
Digital High Capacity (SDHC), TransFlash MicroSD Card (adapter required), or xDPicture card
3 CompactFlash (CF) types I and II
4 Front USB port: For digital cameras and removable drives
c. Select photo.
Highlight View & Print and press OK.
Highlight photo and press OK.
Page 57
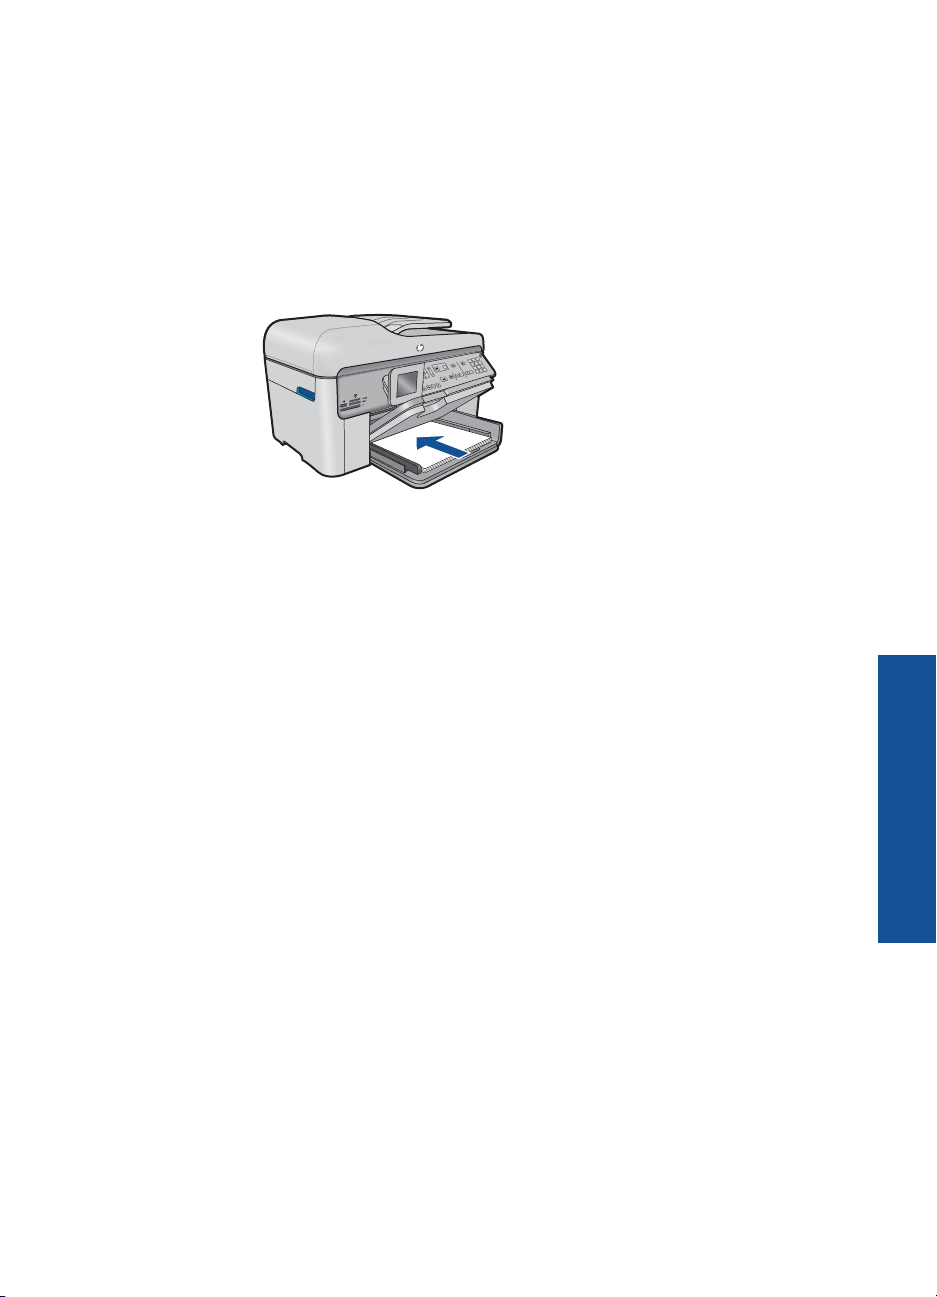
Increase number of copies and press OK.
Press OK to preview print job.
d. Print photo.
Press Print Photos.
Print single photo on full-size paper
a. Load paper.
Load full-size paper in the main input tray.
b. Insert memory.
Print photos 55
Print
Page 58

Chapter 6
1 Memory Stick, Memory Stick Pro, Memory Stick Select, Memory Stick Magic Gate,
Memory Stick Duo or Pro Duo (adapter optional), Memory Stick Pro-HG Duo (adapter
optional), or Memory Stick Micro (adapter required)
2 MultiMediaCard (MMC), MMC Plus, Secure MultiMedia Card, MMC Mobile (RS-MMC;
adapter required), Secure Digital (SD), Secure Digital Mini (adapter required), Secure
Digital High Capacity (SDHC), TransFlash MicroSD Card (adapter required), or xDPicture card
3 CompactFlash (CF) types I and II
4 Front USB port: For digital cameras and removable drives
Print
56 Print
c. Select photo.
Highlight View & Print and press OK.
Highlight photo and press OK.
Increase number of copies and press OK.
d. Change page layout.
Press OK to preview print job.
Press Menu to change print settings.
Highlight Layout and press OK.
Highlight A4 Borderless and press OK.
Press Back.
e. Print photo.
Press Print Photos.
Page 59

Print multiple photos on full-size paper
a. Load paper.
Load full-size paper in the main input tray.
b. Insert memory.
1 Memory Stick, Memory Stick Pro, Memory Stick Select, Memory Stick Magic Gate,
Memory Stick Duo or Pro Duo (adapter optional), Memory Stick Pro-HG Duo (adapter
optional), or Memory Stick Micro (adapter required)
2 MultiMediaCard (MMC), MMC Plus, Secure MultiMedia Card, MMC Mobile (RS-MMC;
adapter required), Secure Digital (SD), Secure Digital Mini (adapter required), Secure
Digital High Capacity (SDHC), TransFlash MicroSD Card (adapter required), or xDPicture card
3 CompactFlash (CF) types I and II
4 Front USB port: For digital cameras and removable drives
Print photos 57
Print
Page 60

Chapter 6
c. Select photo.
Highlight View & Print and press OK.
Highlight photo and press OK.
Increase number of copies and press OK.
d. Change page layout.
Press OK to preview print job.
Press Menu to change print settings.
Highlight Layout and press OK.
Highlight 10x15 on A4 and press OK.
Press Back.
e. Print photo.
Press Print Photos.
2. View the animation for this topic.
Related topics
Recommended papers for photo printing
•
Edit photos before printing
•
Stop the current job
•
Print a creative project
Print
1. Do one of the following:
Print album pages
a. Load paper.
Load up to 13 x 18 cm (5 x 7 inch) photo paper in photo tray or full-size photo
paper in main input tray.
b. Insert memory.
58 Print
Page 61

1 Memory Stick, Memory Stick Pro, Memory Stick Select, Memory Stick Magic Gate,
Memory Stick Duo or Pro Duo (adapter optional), Memory Stick Pro-HG Duo (adapter
optional), or Memory Stick Micro (adapter required)
2 MultiMediaCard (MMC), MMC Plus, Secure MultiMedia Card, MMC Mobile (RS-MMC;
adapter required), Secure Digital (SD), Secure Digital Mini (adapter required), Secure
Digital High Capacity (SDHC), TransFlash MicroSD Card (adapter required), or xDPicture card
3 CompactFlash (CF) types I and II
4 Front USB port for digital cameras and removable drives
c. Select project type.
Highlight Create and press OK.
Highlight Album Pages and press OK.
d. Follow prompts.
Print panoramic photos
a. Load paper.
Load 10 x 30 cm (4 x 12 inch) panorama paper in the main input tray.
Print a creative project 59
Print
Page 62

Chapter 6
b. Insert memory.
Print
60 Print
1 Memory Stick, Memory Stick Pro, Memory Stick Select, Memory Stick Magic Gate,
Memory Stick Duo or Pro Duo (adapter optional), Memory Stick Pro-HG Duo (adapter
optional), or Memory Stick Micro (adapter required)
2 MultiMediaCard (MMC), MMC Plus, Secure MultiMedia Card, MMC Mobile (RS-MMC;
adapter required), Secure Digital (SD), Secure Digital Mini (adapter required), Secure
Digital High Capacity (SDHC), TransFlash MicroSD Card (adapter required), or xDPicture card
3 CompactFlash (CF) types I and II
4 Front USB port: For digital cameras and removable drives
c. Select project type.
Highlight Create and press OK.
Highlight Panorama Prints and press OK.
Page 63

d. Select photo.
Highlight photo and press OK.
Increase number of copies and press OK.
Press OK to preview print job.
e. Print photo.
Press Print Photos.
Print wallet photos
a. Load paper.
Load up to 13 x 18 cm (5 x 7 inch) photo paper in photo tray or full-size photo
paper in main input tray.
b. Insert memory.
1 Memory Stick, Memory Stick Pro, Memory Stick Select, Memory Stick Magic Gate,
Memory Stick Duo or Pro Duo (adapter optional), Memory Stick Pro-HG Duo (adapter
optional), or Memory Stick Micro (adapter required)
2 MultiMediaCard (MMC), MMC Plus, Secure MultiMedia Card, MMC Mobile (RS-MMC;
adapter required), Secure Digital (SD), Secure Digital Mini (adapter required), Secure
Digital High Capacity (SDHC), TransFlash MicroSD Card (adapter required), or xDPicture card
3 CompactFlash (CF) types I and II
4 Front USB port: For digital cameras and removable drives
Print a creative project 61
Print
Page 64

Chapter 6
c. Select project type.
Highlight Create and press OK.
Highlight Wallet Photos and press OK.
d. Follow prompts.
Print passport photos
a. Load paper.
Load up to 13 x 18 cm (5 x 7 inch) photo paper in photo tray or full-size photo
paper in main input tray.
b. Insert memory.
Print
62 Print
1 Memory Stick, Memory Stick Pro, Memory Stick Select, Memory Stick Magic Gate,
Memory Stick Duo or Pro Duo (adapter optional), Memory Stick Pro-HG Duo (adapter
optional), or Memory Stick Micro (adapter required)
2 MultiMediaCard (MMC), MMC Plus, Secure MultiMedia Card, MMC Mobile (RS-MMC;
adapter required), Secure Digital (SD), Secure Digital Mini (adapter required), Secure
Digital High Capacity (SDHC), TransFlash MicroSD Card (adapter required), or xDPicture card
3 CompactFlash (CF) types I and II
4 Front USB port: For digital cameras and removable drives
c. Select project type.
Highlight Create and press OK.
Highlight Passport Photos and press OK.
d. Follow prompts.
Page 65
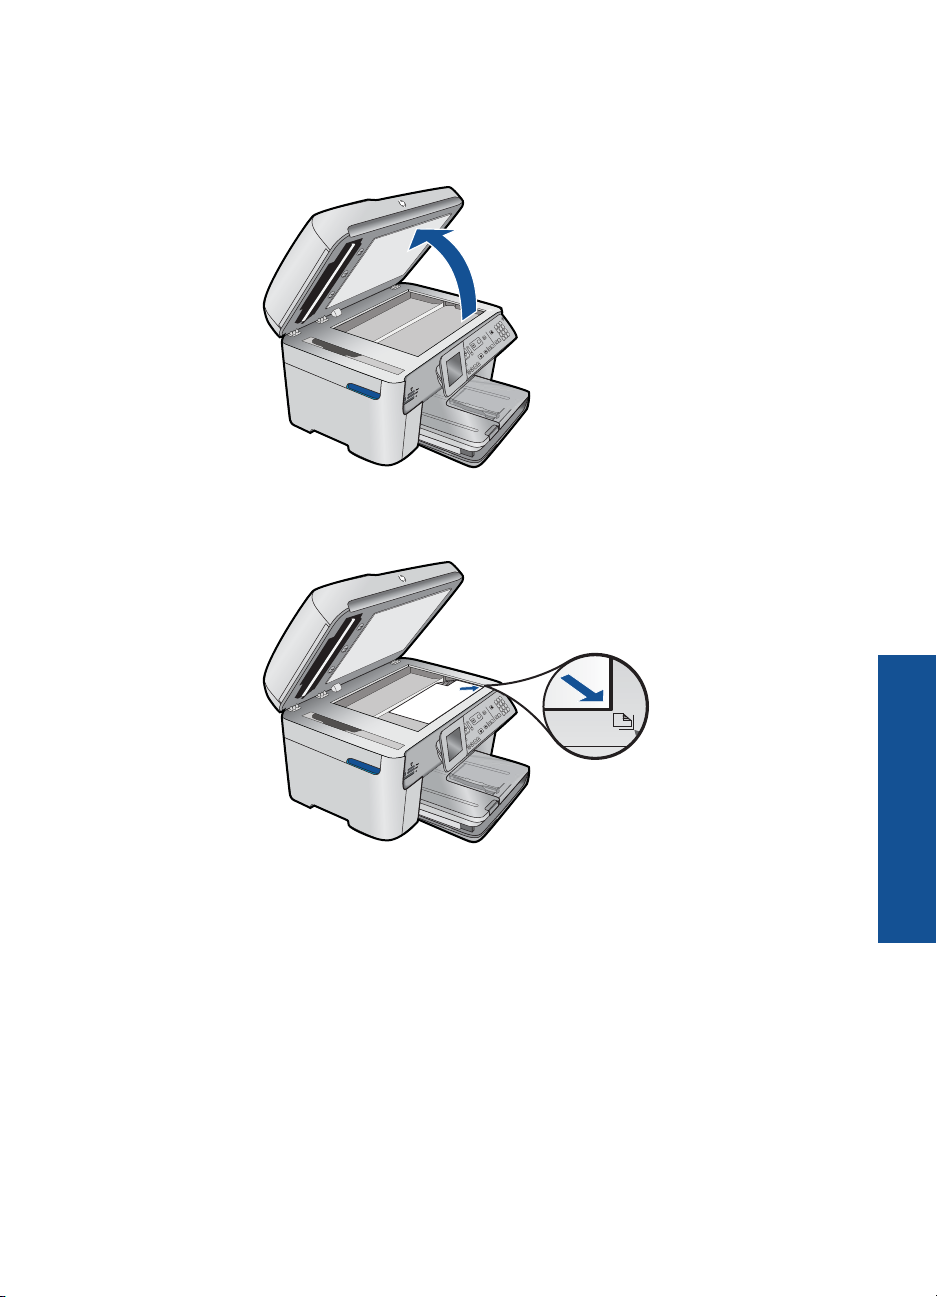
Reprint photos
a. Load original.
Lift lid on product.
Load original print side down on right front corner of glass.
Close lid.
b. Load paper.
Load up to 13 x 18 cm (5 x 7 inch) photo paper in photo tray or full-size photo
paper in main input tray.
c. Select project type.
Highlight Create and press OK.
Highlight Scan and Reprint and press Print Photos.
2. View the animation for this topic.
Print
Print a creative project 63
Page 66

Chapter 6
Related topics
Recommended papers for printing
•
Edit photos before printing
•
Stop the current job
•
Print a Web page
You can print a Web page from the Web browser your computer on the HP Photosmart.
If you use Internet Explorer (6.0 or higher) or Firefox (2.0 or higher), you can use HP
Smart Web Printing to ensure simple, predictable web printing with control over what
you want and how you want it printed. You can access HP Smart Web Printing from the
toolbar in Internet Explorer. For more information about HP Smart Web Printing, see
the help file provided with it.
To print a Web page
1. Make sure you have paper loaded in the main input tray.
2. On the File menu in your Web browser, click Print.
The Print dialog box appears.
3. Make sure the product is the selected printer.
4. If your Web browser supports it, select the items on the Web page that you want to
include in the printout.
For example, in Internet Explorer, click the Options tab to select options such as As
laid out on screen, Only the selected frame, and Print all linked documents.
5. Click Print or OK to print the Web page.
TIP: To print Web pages correctly, you might need to set your print orientation to
Landscape.
Print forms and templates (Quick Forms)
The HP Photosmart contains built-in templates that enable you to print common forms,
such as narrow or wide ruled notebook paper, graph paper, task checklists, calendars
(not supported on all models), and music sheets on plain letter- or A4-size paper. You
Print
64 Print
can also print games such as dots and fun mazes, which have a different pattern each
time you print them.
To print forms from the control panel
1. Make sure you have paper loaded in the input tray.
2. Press Apps.
3. Press the arrow button to highlight Quick Forms, and then press OK.
4. Press the down arrow button to highlight the form you want to print, and then press
OK.
5. If prompted, select the type of form to print.
6. Press the up arrow button to increase the number of copies, and then press OK.
Page 67

Print using the maximum dpi
Use maximum dpi mode to print high-quality, sharp images.
To get the most benefit from maximum dpi mode, use it to print high-quality images such
as digital photographs. When you select the maximum dpi setting, the printer software
displays the optimized dots per inch (dpi) that the HP Photosmart printer will print. Printing
in maximum dpi is supported on the following paper-types only:
• HP Premium Plus Photo Paper
• HP Premium Photo Paper
• HP Advanced Photo Paper
• Photo Hagaki cards
Printing in maximum dpi takes longer than printing with other settings and requires a large
amount of disk space.
To print in Maximum dpi mode
1. Make sure you have paper loaded in the input tray.
2. On the File menu in your software application, click Print.
3. Make sure the product is the selected printer.
4. Click the button that opens the Properties dialog box.
Depending on your software application, this button might be called Properties,
Options, Printer Setup, Printer, or Preferences.
5. Click the Advanced tab.
6. In the Features area, select the Enable maximum dpi setting check box.
7. Click the Features tab.
8. In the Paper Type drop-down list, click More, and then select the appropriate paper
type.
9. In the Print Quality drop-down list, click Maximum dpi.
NOTE: To find out what dpi the product will print based on the paper type and
print quality settings you selected, click Resolution.
10. Select any other print settings that you want, and then click OK.
Related topics
View the print resolution
View the print resolution
The printer software displays the print resolution in dots per inch (dpi). The dpi varies
according to the paper type and print quality that you select in the printer software.
To view the print resolution
1. Make sure you have paper loaded in the input tray.
2. On the File menu in your software application, click Print.
Print
View the print resolution 65
Page 68

Chapter 6
3. Make sure the product is the selected printer.
4. Click the button that opens the Properties dialog box.
Depending on your software application, this button might be called Properties,
Options, Printer Setup, Printer, or Preferences.
5. Click the Features tab.
6. In the Paper Type drop-down list, select the type of paper that you have loaded.
7. In the Print Quality drop-down list, select the appropriate print quality setting for your
project.
8. Click the Resolution button to view the print resolution dpi for the paper type and
print quality combination you selected.
Use printing shortcuts
Use printing shortcuts to print with print settings that you use often. The printer software
has several specially designed printing shortcuts that are available in the Printing
Shortcuts list.
NOTE: When you select a printing shortcut the appropriate printing options are
automatically displayed. You can leave them as is, change them, or create your own
shortcuts for commonly used tasks.
Use the Printing Shortcuts tab for the following print tasks:
• General Everyday Printing: Print documents quickly.
• Photo Printing–Borderless: Print to the top, bottom, and side edges of 10 x 15 cm
(4 x 6 inch) and 13 x 18 cm (5 x 7 inch) HP Photo Papers.
• Paper-saving Printing: Print two-sided documents with mutliple pages on same
sheet to reduce paper usage.
• Photo Printing–With White Borders: Print a photo with a white border around the
edges.
• Fast/Economical Printing: Produce draft-quality printouts quickly.
• Presentation Printing: Print high-quality documents, including letters and
transparencies.
• Two-sided (Duplex) Printing: Print two-sided pages with the HP Photosmart.
Print
66 Print
To create a printing shortcut
1. On the File menu in your software application, click Print.
2. Make sure the product is the selected printer.
3. Click the button that opens the Properties dialog box.
Depending on your software application, this button might be called Properties,
Options, Printer Setup, Printer, or Preferences.
4. Click the Printing Shortcuts tab.
5. In the Printing Shortcuts list, click a printing shortcut.
The print settings for the selected printing shortcut are displayed.
6. Change the print settings to those you want in the new printing shortcut.
7. Click Save as and type a name for the new printing shortcut, and then click Save.
The printing shortcut is added to the list.
Page 69

To delete a printing shortcut
1. On the File menu in your software application, click Print.
2. Make sure the product is the selected printer.
3. Click the button that opens the Properties dialog box.
Depending on your software application, this button might be called Properties,
Options, Printer Setup, Printer, or Preferences.
4. Click the Printing Shortcuts tab.
5. In the Printing Shortcuts list, click the printing shortcut that you want to delete.
6. Click Delete.
The printing shortcut is removed from the list.
NOTE: Only the shortcuts that you have created can be deleted. The original HP
shortcuts cannot be deleted.
Set the default print settings
If there are settings that you frequently use for printing, you might want to make them the
default print settings so they are already set when you open the Print dialog box from
within your software application.
To change the default print settings
1. In the HP Solution Center, click Settings, point to Print Settings, and then click
Printer Settings.
2. Make changes to the print settings, and click OK.
Edit photos before printing
1. Do one of the following:
Rotate photo
a. Select photo.
Highlight View & Print and press OK.
Highlight photo and press OK.
b. Edit photo.
Press Menu.
Highlight Rotate and press OK.
Press OK when done.
Print
Edit photos before printing 67
Page 70

Chapter 6
Crop photo
a. Select photo.
Highlight View & Print and press OK.
Highlight photo and press OK.
b. Edit photo.
Press Menu.
Highlight Crop and press OK.
Press OK when done.
Photo fix
a. Select photo.
Highlight View & Print and press OK.
Highlight photo and press OK.
b. Edit photo.
Press Menu.
Highlight Photo Fix and press OK.
Select desired option and press OK .
Add frame
a. Select photo.
Highlight View & Print and press OK.
Highlight photo and press OK.
b. Edit photo.
Press Menu.
Highlight Add Frame and press OK.
Select desired option and press OK .
Print
68 Print
Adjust brightness
a. Select photo.
Highlight View & Print and press OK.
Highlight photo and press OK.
b. Edit photo.
Press Menu.
Highlight Brightness and press OK.
Set brightness and press OK when done.
Page 71

Color effect
a. Select photo.
Highlight View & Print and press OK.
Highlight photo and press OK.
b. Edit photo.
Press Menu.
Highlight Color Effect and press OK.
Select desired option and press OK.
2. View the animation for this topic.
Print from anywhere
HP ePrint is a free service from HP that allows you to print from your mobile device or
computer anytime, anywhere. Just send an email to your printer's email address, and the
email message and any supported file attachments you included in the email will print.
You can print images, Word, PowerPoint, and PDF documents.
NOTE: Documents printed with HP ePrint may appear different in style, formatting,
and text flow from the original. For documents that need to be printed with a higher
quality (such as legal documents), we recommend that you print from the software
application on your computer, where you will have more control over what your
printout looks like.
NOTE: To help prevent unauthorized email, HP assigns a random email address to
your printer, never publicizes this address, and by default does not respond to any
sender. HP ePrint also provides industry-standard spam filtering and transforms email
and attachments to a print-only format to reduce the threat of a virus or other harmful
content. However, HP ePrint does not filter emails based on content, so it cannot
prevent objectionable or copyrighted material from being printed.
• Get started using HP ePrint
Print a document from anywhere
•
Learn more about using HP ePrint
•
Get started using HP ePrint
To use HP ePrint, you need to have your printer connected to a network and to the
Internet. If you did not do this during setup, refer to the following steps.
To connect to the Internet
1. Press the ePrint button.
2. Press the down arrow button to highlight Enable Web Services, and then press
OK.
3. Press OK to accept the terms of use.
Print
Print from anywhere 69
Page 72

Chapter 6
4. Follow the prompts on the display.
When the setup is complete, the HP Photosmart prints a report with important
information about your HP ePrint settings. This report includes the email address for
your printer. Make a note of this email address as you will need it to use HP ePrint.
5. Sign up online with HP ePrint, where you can set security options and check the status
of the print job.
Find the registration Web address on the printout and type it into the address box in
a Web browser. Follow the instructions on the sign-up page.
NOTE: Only the person who registered the email address can sign in.
Related topics
Add the HP Photosmart to a network
Print a document from anywhere
To print a document from anywhere
1. If you do not know your printer's email address, follow these steps to find it.
a. Press the ePrint button.
b. Make sure that Display Email Address is highlighted, and then press OK.
The email address appears on the screen.
TIP: To print the email address, press OK. Then press the down arrow until
Print Info Page is highlighted, and then press OK. The email address appears
on the printout.
2. Compose and send an email to your printer.
a. Create a new email and type the printer's email address in the To box.
b. Type text in the body of the email and attach the documents or images that you
want to print.
c. Send the email.
The printer prints your email.
NOTE: To receive email, your printer must be connected to the Internet. Your
Print
email will print as soon as it is received. As with any email, there is no
guarantee when or if it will be received. When you register online with HP
ePrint, you can check the status of your jobs.
3. View the animation for this topic.
Learn more about using HP ePrint
Sign up at HP's free HP ePrinterCenter website to set up increased security for HP ePrint,
specify the email addresses that are allowed to send email to your printer, and access
other free services.
To sign up, you will need the name of your printer, which is the first part of the printer's
email address.
Go to the HP ePrinterCenter website for more information and specific terms and
conditions:
70 Print
www.hp.com/go/ePrinterCenter.
Page 73

Print from the Web without a computer
You can print coloring pages, weather reports, coupons, and cards from the web directly
from your HP Photosmart without having to go to a computer using HP Apps.
•
Get started using HP Apps
Print a Web page using HP Apps
•
Learn more about using HP Apps
•
Get started using HP Apps
To use HP Apps, you need to have your printer connected to a network and to the
Internet. If you did not do this during setup, refer to the following steps.
To connect to the Internet
1. Press the ePrint button.
2. Press the down arrow button to highlight Enable Web Services, and then press
OK.
3. Press OK to accept the terms of use.
4. Follow the prompts on the display.
Related topics
Add the HP Photosmart to a network
Print a Web page using HP Apps
To print using HP Apps
1. Make sure you have paper loaded in the main input tray.
2. Press the Apps button.
3. Highlight the app that you want to print, and then press OK.
4. Follow the prompts on the display.
Learn more about using HP Apps
Learn about HP Apps for printing content from the web, simply and easily. Click here to
go online for more information.
Print
Print from the Web without a computer 71
Page 74

Chapter 6
Print
72 Print
Page 75

7 Scan
• Scan to a computer
Scan to a memory card or USB storage device
•
TIP: You can also scan and reprint a photo. For more information, see Print a
creative project.
Scan to a computer
1. Do one of the following:
Single page scan
a. Load original.
Lift lid on product.
Load original print side down on right front corner of glass.
Scan
Scan 73
Page 76

Chapter 7
Close lid.
b. Start scan.
Press Start Scan.
Highlight Scan to Computer and press OK.
Highlight HP Photosmart and press OK.
Multiple page scan
a. Load original.
Remove any staples or clips from the original document.
Slide original with print side up into document feeder tray until the product
detects the pages.
Slide paper-width guide inward until it stops at edge of paper.
b. Start scan.
Press Start Scan.
Highlight Scan to Computer and press OK.
Highlight desired option and press OK.
2. View the animation for this topic.
Related topics
Stop the current job
Scan to a memory card or USB storage device
NOTE: You can send the scanned image as a JPEG image to the memory card or
storage device that is currently inserted. This enables you to use the photo print
options to print borderless prints and album pages from the scanned image.
1. Do one of the following:
Single page scan
a. Load original.
Lift lid on product.
Scan
74 Scan
Page 77

Load original print side down on right front corner of glass.
Close lid.
b. Insert memory.
Scan to a memory card or USB storage device 75
Scan
Page 78

Chapter 7
1 Memory Stick, Memory Stick Pro, Memory Stick Select, Memory Stick Magic Gate,
Memory Stick Duo or Pro Duo (adapter optional), Memory Stick Pro-HG Duo (adapter
optional), or Memory Stick Micro (adapter required)
2 MultiMediaCard (MMC), MMC Plus, Secure MultiMedia Card, MMC Mobile (RS-MMC;
adapter required), Secure Digital (SD), Secure Digital Mini (adapter required), Secure
Digital High Capacity (SDHC), TransFlash MicroSD Card (adapter required), or xDPicture card
3 CompactFlash (CF) types I and II
4 Front USB port: For digital cameras and removable drives
Scan
76 Scan
c. Start scan.
Press Start Scan.
Highlight Scan to Memory Card or Scan to USB Flash Drive and press
OK.
Highlight desired option and press OK.
Multiple page scan
a. Load original.
Remove any staples or clips from the original document.
Slide original with print side up into document feeder tray until the product
detects the pages.
Page 79

Slide paper-width guide inward until it stops at edge of paper.
b. Insert memory.
1 Memory Stick, Memory Stick Pro, Memory Stick Select, Memory Stick Magic Gate,
Memory Stick Duo or Pro Duo (adapter optional), Memory Stick Pro-HG Duo (adapter
optional), or Memory Stick Micro (adapter required)
2 MultiMediaCard (MMC), MMC Plus, Secure MultiMedia Card, MMC Mobile (RS-MMC;
adapter required), Secure Digital (SD), Secure Digital Mini (adapter required), Secure
Digital High Capacity (SDHC), TransFlash MicroSD Card (adapter required), or xDPicture card
3 CompactFlash (CF) types I and II
4 Front USB port: For digital cameras and removable drives
Scan to a memory card or USB storage device 77
Scan
Page 80

Chapter 7
c. Start scan.
Press Start Scan.
Highlight Scan to Memory Card or Scan to USB Flash Drive and press
OK.
Highlight desired option and press OK.
2. View the animation for this topic.
Related topics
Stop the current job
Scan
78 Scan
Page 81

8Copy
Copy text or mixed documents
TIP: You can also copy and reprint a photo. For more information, see Print a
creative project
Copy text or mixed documents
1. Do one of the following:
1-sided original to 1-sided copy
a. Load paper.
Load full-size paper in the main input tray.
b. Load original.
Lift lid on product.
Copy
Load original print side down on right front corner of glass.
Copy 79
Page 82
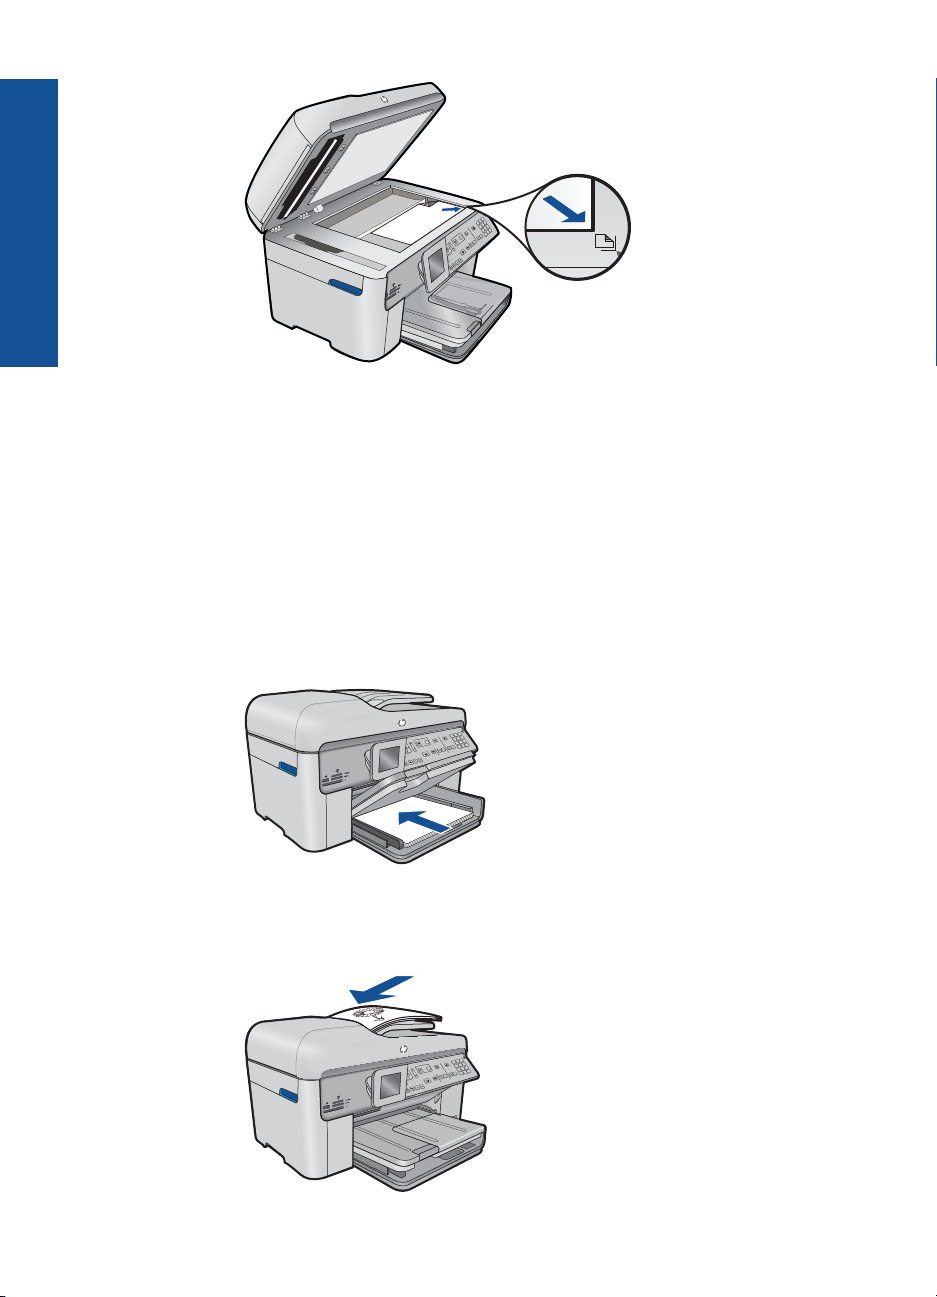
Copy
Chapter 8
Close lid.
c. Specify number of copies.
Highlight Copy and press OK.
Press up arrow button or use keypad to increase number of copies .
d. Start copy.
Press Start Copy.
1-sided original to 2-sided copy
a. Load paper.
Load full-size paper in the main input tray.
80 Copy
b. Load original.
Slide original with print side up into document feeder tray until the product
detects the pages.
Page 83
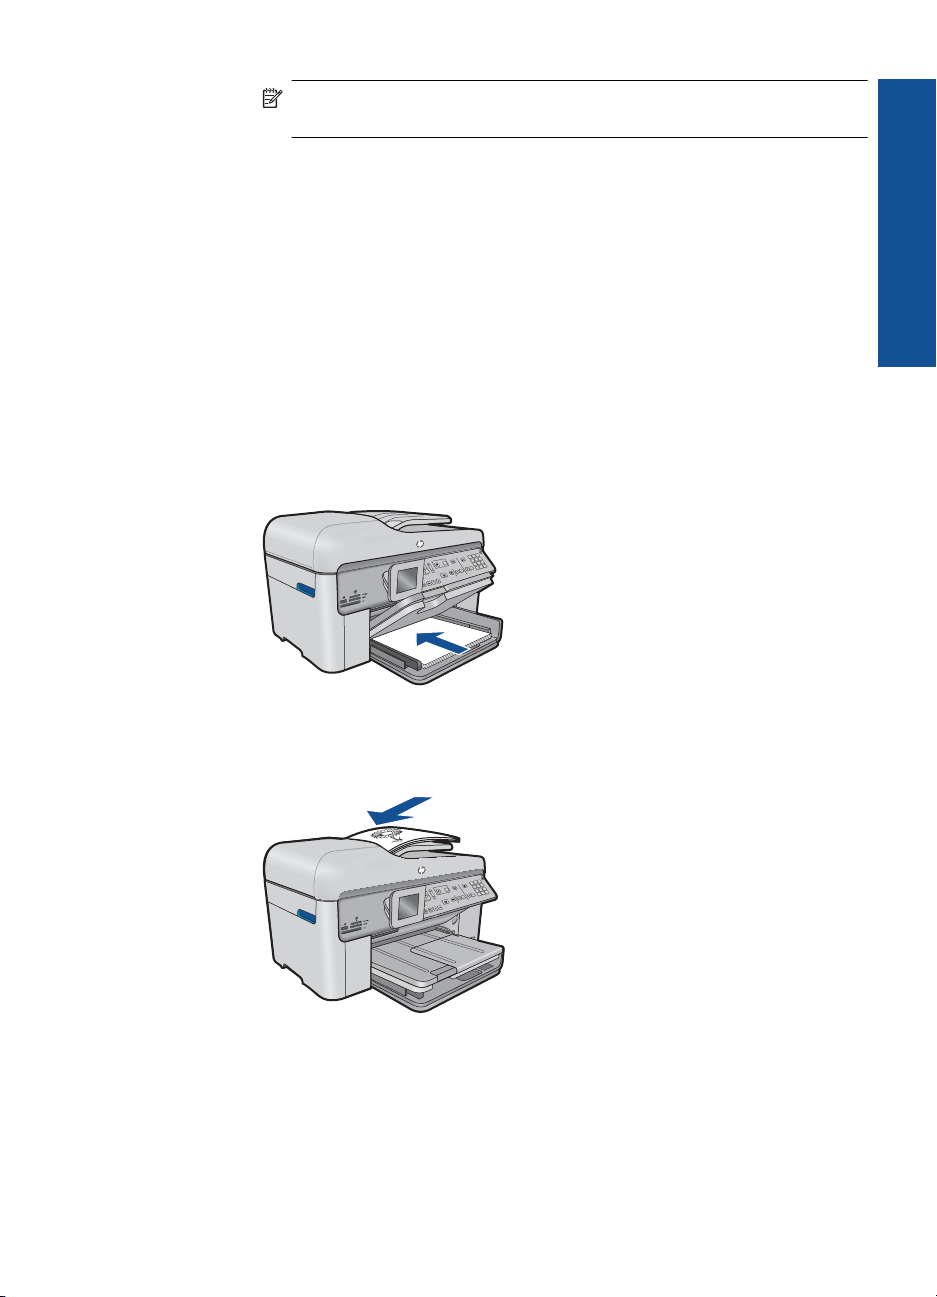
NOTE: You can also load the original print side down on the right front
corner on the glass.
Slide paper-width guide inward until it stops at edge of paper.
c. Specify 2-sided option.
Press 2-Sided on control panel.
Highlight Copy and press OK.
Highlight 1-Sided Original 2-Sided Copy and press OK.
d. Specify number of copies.
Press up arrow button or use keypad to increase number of copies .
e.Start copy.
Press Start Copy.
2-sided original to 2-sided copy
a. Load paper.
Load full-size paper in the main input tray.
Copy
b. Load original.
Slide original with print side up into document feeder tray until the product
detects the pages.
Slide paper-width guide inward until it stops at edge of paper.
c. Specify 2-sided option.
Press 2-Sided on control panel.
Highlight Copy and press OK.
Highlight 2-Sided Original 2-Sided Copy and press OK.
Copy text or mixed documents 81
Page 84

Copy
Chapter 8
d. Specify number of copies.
Press up arrow button or use keypad to increase number of copies .
e. Start copy.
Press Start Copy.
2-sided original to 1-sided copy
a. Load paper.
Load full-size paper in the main input tray.
b. Load original.
Slide original with print side up into document feeder tray until the product
detects the pages.
82 Copy
Slide paper-width guide inward until it stops at edge of paper.
c. Specify 2-sided option.
Press 2-Sided on control panel.
Highlight Copy and press OK.
Highlight 2-Sided Original 1-Sided Copy and press OK.
d. Specify number of copies.
Press up arrow button or use keypad to increase number of copies .
e. Start copy.
Press Start Copy.
2. View the animation for this topic.
Page 85

Related topics
Change the copy settings
•
Preview a copy before printing
•
Stop the current job
•
Change the copy settings
To set the number of copies from the control panel
1. Press OK when Copy is highlighted on the Home Screen.
2. Press the up arrow button or use the keypad to increase the number of copies, up to
the maximum.
(The maximum number of copies varies by model.)
3. Press Start Copy.
To set the paper size from the control panel
1. Press OK when Copy is highlighted on the Home Screen.
2. Press the Menu button to select Copy Settings.
3. Press the down arrow button to highlight Paper Size and then press OK.
4. Press the down arrow button to highlight the appropriate paper size present in the
input tray, and then press OK.
Copy
To set the paper type for copies
1. Press OK when Copy is highlighted on the Home Screen.
2. Press the Menu button to select Copy Settings.
3. Press the down arrow button to highlight Paper Type, and then press OK.
4. Press the down arrow button until the appropriate paper type appears, and then press
OK.
Refer to the following table to determine which paper type setting to choose based
on the paper loaded in the input tray.
Paper type Control panel setting
Copier paper or letterhead Plain Paper
HP Bright White Paper Plain Paper
HP Premium Plus Photo Paper, Glossy Premium Photo
HP Premium Plus Photo Paper, Matte Premium Photo
Change the copy settings 83
Page 86

Chapter 8
Paper type Control panel setting
Copy
HP Premium Plus 10 x 15 cm (4 x 6 inch)
Photo Paper
HP Photo Paper Photo Paper
HP Everyday Photo Paper Everyday Photo
HP Everyday Photo Paper, Semi Gloss Everyday Matte
HP Premium Paper Premium Inkjet
Other inkjet paper Premium Inkjet
HP Professional Brochure & Flyer Paper
(Glossy)
HP Professional Brochure & Flyer Paper
(Matte)
HP Premium or Premium Plus Inkjet
Transparency Film
Other transparency film Transparency
Plain Hagaki Plain Paper
Glossy Hagaki Premium Photo
L (Japan only) Premium Photo
Advanced Photo Paper Advanced Photo
Premium Photo
Brochure Glossy
Brochure Matte
Transparency
To change the copy quality from the control panel
1. Press OK when Copy is highlighted on the Home Screen.
2. Press the Menu button to select Copy Settings.
84 Copy
3. Press the down arrow button to highlight Quality, and then press OK.
4. Press the up arrow or down arrow button to select a copy quality, and then press
OK.
To adjust the copy contrast from the control panel
1. Press OK when Copy is highlighted on the Home Screen.
2. Press the Menu button to select Copy Settings.
3. Press the down arrow button to highlight Lighter/Darker, and then press OK.
Page 87

4. Do one of the following:
• Press the right arrow button to darken the copy.
• Press the left arrow button to lighten the copy.
5. Press OK.
Preview a copy before printing
After changing settings on the HP Photosmart for making a copy, you can preview an
image of the expected output on the display before starting the copy.
NOTE: To ensure an accurate preview, change the paper size and type to reflect
the actual paper you have loaded in the input tray. If you use the Automatic settings,
the onscreen preview might not accurately represent the output. Instead, the preview
will reflect what the output would be if the default paper type and size were loaded in
the input tray.
Previews appear when you select Preview on the Copy Menu, or when you use the crop
feature to specify a specific area of the original to copy.
To preview your copy from the control panel
1. Press OK when Copy is highlighted on the Home Screen.
2. Press the Menu button to select Copy Settings.
Copy
3. Change copy settings on the product to accurately reflect the copy you want to make.
4. Press the down arrow button to highlight Preview, and then press OK.
An image on the display shows how your copy will print.
5. Press Start Copy to accept the preview and begin copying.
Related topics
Change the copy settings
Preview a copy before printing 85
Page 88

Copy
Chapter 8
86 Copy
Page 89

9Fax
• Send a fax
Receive a fax
•
Send a fax
1. Do one of the following:
Fax photo
a. Load original.
Lift lid on product.
Fax
Load original print side down on right front corner of glass.
Fax 87
Page 90

Chapter 9
Close lid.
b.Press Start Fax and wait for tone.
c. Enter number.
Fax 1–sided document
a. Load original.
Remove any staples or clips from the original document.
Slide original with print side up into document feeder tray until the product
detects the pages.
Fax
Slide paper-width guide inward until it stops at edge of paper.
b.Press Start Fax and wait for tone.
c. Enter number.
Fax 2–sided document
a. Load original.
Remove any staples or clips from the original document.
Slide original with print side up into document feeder tray until the product
detects the pages.
88 Fax
Page 91

Slide paper-width guide inward until it stops at edge of paper.
b. Specify 2-sided option.
Press 2-Sided on control panel.
Highlight Fax Send and press OK.
Highlight 2-Sided Original and press OK.
c. Press Start Fax and wait for tone.
d. Enter number.
2. View the animation for this topic.
Alternate methods of faxing
Initiate a fax from your phone
•
Send a fax to multiple recipients
•
Schedule a fax to send later
•
Set up and use speed dial
•
Initiate a fax from your phone
Sending a fax manually allows you to make a phone call and talk with the recipient before
you send the fax. This is useful if you want to inform the recipient that you are going to
send them a fax before sending it. When you send a fax manually, you can hear the dial
tones, telephone prompts, or other sounds through the handset on your telephone. This
makes it easy for you to use a calling card to send your fax.
Depending on how the recipient has their fax machine set up, the recipient might answer
the phone, or the fax machine might take the call. If a person answers the phone, you
can speak with the recipient before sending the fax. If a fax machine answers the call,
you can send the fax directly to the fax machine when you hear the fax tones from the
receiving fax machine.
Fax
To send a fax manually from a connected phone
1. Load your originals print side up into the document feeder tray.
Initiate a fax from your phone 89
Page 92

Chapter 9
NOTE: This feature is not supported if you load your originals on the glass. You
must load your originals in the document feeder tray.
2. Dial the number by using the keypad on the phone that is connected to the
HP Photosmart.
NOTE: Do not use the keypad on the control panel of the HP Photosmart. You
must use the keypad on your phone to dial the recipient's number.
3. If the recipient answers the telephone, you can engage in a conversation before
sending your fax.
NOTE: If a fax machine answers the call, you will hear fax tones from the
receiving fax machine. Proceed to the next step to transmit the fax.
4. Once you are ready to send the fax, press Start Fax.
If you were speaking with the recipient before sending the fax, inform the recipient
that they should press Start on their fax machine after they hear fax tones.
The telephone line is silent while the fax is transmitting. At this point, you can hang
up the telephone. If you want to continue speaking with the recipient, remain on the
line until the fax transmission is complete.
Send a fax to multiple recipients
Fax
You can send a fax to multiple recipients without first setting up a group speed dial.
NOTE: The list of recipients you specify for this fax is not saved and only works for
sending faxes in black. If you intend to send other faxes to the same recipient list, you
should create a group speed dial list.
To broadcast a fax to multiple recipients from the control panel
1. Press OK when Fax is highlighted on the Home Screen.
2. Press the Menu button to select Fax Menu.
3. Press the down arrow button to highlight Broadcast Fax, and then press OK.
4. Press OK, and then enter the fax number by using the keypad, or press the down
arrow button to access speed dials.
NOTE: You can add up to 20 individual fax numbers.
5. Press Start Fax.
6. When prompted, load your originals print side up and top first in the center of the
document feeder tray.
7. Press Start Fax again.
90 Fax
Page 93

Schedule a fax to send later
You can schedule a black-and-white fax to be sent within the next 24 hours. This enables
you to send a black-and-white fax late in the evening, when phone lines are not as busy
or phone rates are lower, for example. The HP Photosmart automatically sends your fax
at the specified time.
You can only schedule one fax to be sent at a time. You can continue to send faxes
normally, however, while a fax is scheduled.
NOTE: You cannot schedule a color fax due to memory limitations.
To schedule a fax from the control panel
1. Load your originals print side up into the document feeder tray.
2. Press OK when Fax is highlighted on the Home Screen.
3. Press the Menu button to select Fax Menu.
4. Press the down arrow button to Send Fax Later, and then press OK.
5. Enter the send time by using the numeric keypad, and then press OK. If prompted,
press 1 for AM, or 2 for PM.
6. Enter the fax number by using the keypad.
7. Press Start Fax.
The HP Photosmart scans all pages and the scheduled time appears on the display.
The HP Photosmart sends the fax at the scheduled time.
Fax
To cancel a scheduled fax
1. Press OK when Fax is highlighted on the Home Screen.
2. Press the Menu button to select Fax Menu.
3. Press the down arrow button to highlight Send Fax Later, and then press OK.
4. Press the down arrow button to highlight Cancel scheduled fax, and then press
OK.
NOTE: You can also cancel the scheduled fax by pressing Cancel on the control
panel when the Send Fax Later message is visible on the display.
Set up and use speed dial
You can quickly send a black-and-white or color fax from the HP Photosmart using speed
dials. This section provides instructions for sending the fax in black and white.
Set up and use speed dial 91
Page 94

Fax
Chapter 9
To create speed dial entries from the control panel
1. Press Setup.
2. Press the down arrow button to highlight Speed Dial Setup, and then press OK.
3. Press the down arrow button to highlight Individual Speed Dial, and then press
OK.
4. Press the down arrow button to select the displayed speed dial entry. You can also
press the down arrow button to highlight a different unassigned entry, and then press
OK.
5. Enter the fax number for the speed dial entry by using the numeric keypad, and then
press OK.
TIP: To add a pause in the fax number you are entering, press the up arrow
button. A dash (-) appears on the display.
The visual keyboard appears on the display.
6. Use the visual keyboard to enter the name. When you are finished, highlight Done
on the visual keyboard, and then press OK.
7. Press OK if you want to set up another number.
To send a fax using speed dials from the control panel
1. Load your originals print side up into the document feeder tray. If you are sending a
single-page fax, such as a photograph, you can also load your original print side down
on the glass.
NOTE: If you are sending a multiple-page fax, you must load the originals in the
document feeder tray. You cannot fax a multiple-page document from the glass.
2. Press OK when Fax is highlighted on the Home screen.
3. Press the down arrow button to access speed dials.
4. Press the down arrow button until the appropriate speed dial entry is highlighted, or
enter the speed dial code by using the keypad on the control panel.
Press OK.
5. Press Start Fax.
• If the device detects an original loaded in the automatic document feeder,
the HP Photosmart sends the document to the number you entered.
• If the device does not detect an original loaded in the automatic document
feeder, the Feeder Empty prompt appears. Make sure your original is loaded
print side down on the glass, and then press the dwon arrow button to highlight
Fax original from scanner glass, and press OK.
TIP: If the recipient reports issues with the quality of the fax you sent, you can
try changing the resolution or contrast of your fax.
Receive a fax
When you are on the phone, the person you are speaking with can send you a fax while
you are still connected. This is referred to as manual faxing. Use the instructions in this
section to receive a manual fax.
You can receive faxes manually from a phone that is:
92 Fax
Page 95

• Directly connected to the HP Photosmart (on the 2-EXT port)
• On the same phone line, but not directly connected to the HP Photosmart
To receive a fax manually
1. Make sure the product is turned on and you have paper loaded in the input tray.
2. Remove any originals from the document feeder tray.
3. Set the Rings to Answer setting to a high number to allow you to answer the incoming
call before the product answers. Or, turn off the Auto Answer setting so that the
product does not automatically answer incoming calls.
4. If you are currently on the phone with the sender, instruct the sender to press Start
on their fax machine.
5. When you hear fax tones from a sending fax machine, do the following:
a. Press Start Fax on the control panel.
b. When prompted, press the down arrow button to highlight Receive Fax
Manually, and then press OK.
6. After the product begins to receive the fax, you can hang up the phone or remain on
the line. The phone line is silent during fax transmission.
Related topics
Stop the current job
Fax
Receive a fax 93
Page 96

Fax
Chapter 9
94 Fax
Page 97

10 Save photos
• Save photos to your computer
Back up photos from a memory card to a USB storage device
•
Save photos to your computer
To save photos
1. Insert memory.
1 Memory Stick, Memory Stick Pro, Memory Stick Select, Memory Stick Magic Gate,
Memory Stick Duo or Pro Duo (adapter optional), Memory Stick Pro-HG Duo (adapter
optional), or Memory Stick Micro (adapter required)
2 MultiMediaCard (MMC), MMC Plus, Secure MultiMedia Card, MMC Mobile (RS-MMC;
adapter required), Secure Digital (SD), Secure Digital Mini (adapter required), Secure
Digital High Capacity (SDHC), TransFlash MicroSD Card (adapter required), or xD-Picture
card
3 CompactFlash (CF) types I and II
4 Front USB port: For digital cameras and removable drives
Save photos 95
Save photos
Page 98

Chapter 10
2. Save photos.
▲ Highlight Save and press OK.
NOTE: If product is network-connected, a list of available computers
appears. Select computer to which you want to transfer photos, and then
continue to next step.
3. Follow Prompts.
▲ Follow onscreen prompts on computer to save photos to computer.
4. View the animation for this topic.
Related topics
Stop the current job
Back up photos from a memory card to a USB storage device
To back up photos
1. Insert memory.
a. Insert a memory card into appropriate slot on product.
Save photos
96 Save photos
Page 99
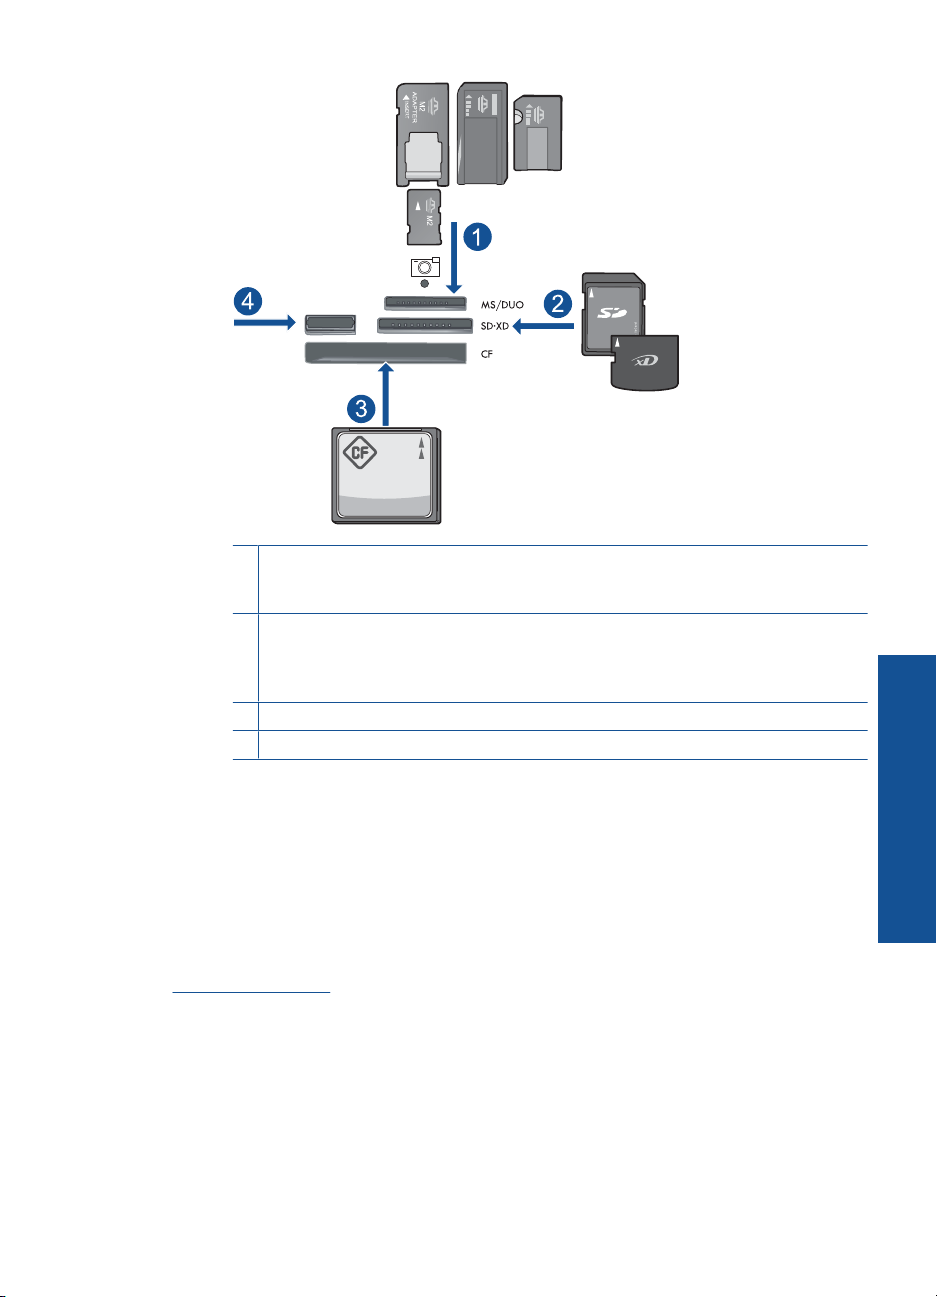
1 Memory Stick, Memory Stick Pro, Memory Stick Select, Memory Stick Magic Gate,
Memory Stick Duo or Pro Duo (adapter optional), Memory Stick Pro-HG Duo (adapter
optional), or Memory Stick Micro (adapter required)
2 MultiMediaCard (MMC), MMC Plus, Secure MultiMedia Card, MMC Mobile (RS-MMC;
adapter required), Secure Digital (SD), Secure Digital Mini (adapter required), Secure
Digital High Capacity (SDHC), TransFlash MicroSD Card (adapter required), or xDPicture card
3 CompactFlash (CF) types I and II
4 Front USB port: For digital cameras and removable drives
b. When photo light stops flashing, connect a storage device to the front USB port.
2. Save photos.
▲ Highlight Yes, back up Memory Card to storage device. and press OK.
3. Remove memory.
4. View the animation for this topic.
Related topics
Stop the current job
Save photos
Back up photos from a memory card to a USB storage device 97
Page 100

Chapter 10
Save photos
98 Save photos
 Loading...