

Page 1

PHOTOSMART PREMIUM
USB
USB
MMC
e-ALL-IN-ONE C310 SERIES
Start setup here...
Verify box contents.
1
Unpack printer. Remove all tape, protective lm, and packing material.
2
Connect and power on.
3
Important! Do not connect a USB cable unless prompted by the software!
(Windows® only)
Inside...
Setup troubleshooting 2
Get to know your HP Photosmart 3
Features and tips 4
What’s new? Web Services 5
Network Printer Setup 6
* Not included with all models
English
Connect the power cord and adapter.
Follow the Setup Wizard.
4
Be sure to follow the instructions on the display to
guide you through setting up and connecting the
HP Photosmart, including how to set up a networked
printer connection and install ink cartridges.
For computers without a CD/DVD drive, go to
www.hp.com/support to download and install the
software.
Printed in [English]
© 2010 Hewlett-Packard Development Company, L.P.
Printed in [Simplied Chinese]
to turn on the HP Photosmart.
Press
WiFi Protected Setup (WPS)
This HP Photosmart supports WiFi Protected Setup
(WPS) for easy one-button wireless setup.
• During setup, if you are prompted for WPS and
you have a WPS router, press the WPS button on
the router. The wireless LED on the printer will turn
on if the connection is successful.
• Otherwise, follow the setup wizard on the printer
display to be guided through wireless setup.
Register your HP Photosmart.
Get quicker service and support alerts by
registering at www.register.hp.com.
*CN503-90064*
*CN503-90064*
CN503-90064
Page 2

Setup troubleshooting
If the HP
Photosmart
doesn’t turn on...
English
If you are unable
to print...
Check the power cord.
• Make sure the power cord is rmly connected to both the printer and the power adaptor. An
LED on the power supply will be lit if the power cord is working.
• If you are using a power strip, check that the power strip is turned on. Or, plug the printer
directly into a power outlet.
• Test the power outlet to make sure that is working. Plug in another appliance that you know
works, and see if it has power. If not, there may be a problem with the power outlet.
• If you plugged the printer into a switched outlet, check that the outlet is turned on.
1. Turn off the printer, and then unplug the power cord. Plug the power cord back in, and then
press the button to turn on the printer.
2. Take care not to press the button too quickly. Press it only once. It might take a few minutes
for the printer to turn on, so if you press the button more than once, you might be turning
off the printer.
3. If you have completed all the above steps, but are still having a problem, contact HP support
for service. Go to www.hp.com/support.
Windows
Make sure that your HP Photosmart is set as the
default printer and is not ofine.
1. On the Windows taskbar, click Start.
2. Then click Control Panel.
3. Then open:
• Devices and Printers (Windows 7)
• Printers (Vista)
• Printers and Faxes (XP)
Look to see if your printer has a check mark in
a circle next to it. If not, right-click the printer
icon and choose “Set as default printer” from
the menu.
Mac
Uninstall and reinstall the software.
The uninstaller removes all the HP software
components that are specic to this HP
Photosmart. It does not remove any components
that are shared by other printers or programs.
To uninstall the software:
1. Disconnect the printer from your computer.
2. Open the Applications: Hewlett-Packard
folder.
3. Double-click HP Uninstaller. Follow the
onscreen instructions.
If you still can’t print, or if the Windows
software installation failed:
1. Remove the CD from your computer’s CD
drive, and then disconnect the printer from
the computer.
2. Restart the computer.
3. Temporarily disable any rewall software
and close any anti-virus software.
4. Insert the printer software CD into the
computer CD drive, then follow the
onscreen instructions to install the printer
software. Do not connect the USB cable
until you are told to do so.
5. After the installation nishes, restart the
computer and any security software you
disabled or closed.
2
To install the software:
1. Insert the CD into your computer’s CD
drive.
2. On the desktop, open the CD, then
double-click the HP Installer.
3. Follow the onscreen instructions.
Page 3
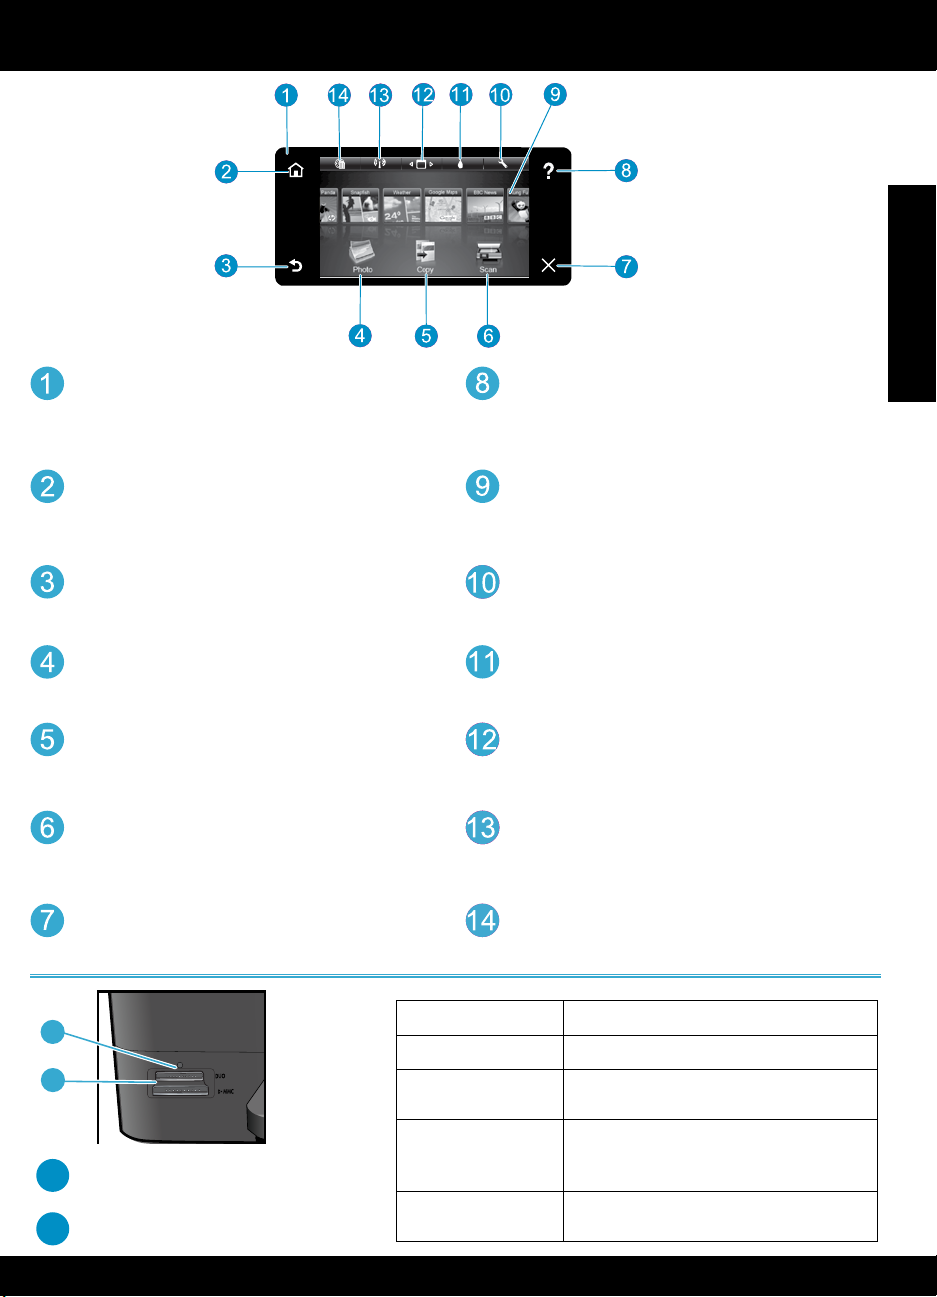
Get to know your HP Photosmart
a
b
English
Display The color touch screen displays menus,
photos, and messages. Flick horizontally or vertically
to scroll through photos and menu items.
Home Returns to the Home screen (the default screen
when you turn on the product).
Back Returns to the previous screen.
Photo Opens the Photo menu where you can view,
edit, print, and save your photos.
Copy Opens the Copy menu where you can select a
copy type or change the copy settings.
Scan Opens the Scan menu where you can select a
destination for your scan.
Cancel Stops the current operation.
Help Touch Help on the Home screen to see all Help
topics. Touch Help on any screen to see Help for that
screen.
Apps Provides a quick and easy way to access and
print information from the Internet, such as maps,
coupons, coloring pages, and puzzles.
Setup Opens the Setup menu where you can change
product settings and perform maintenance functions.
Ink Levels Opens the Ink menu to show estimated ink
levels.
Manager Opens the Manager where you can remove
Apps from your My Favorites list.
Wireless* Opens the Network menu where you can
access the Wireless Setup Wizard and WiFi Protected
Setup.
HP ePrint Opens the Web Services menu where can
view and print your printer’s email address.
a
*Wireless Light States
Off The wireless radio is off.
b
LED for Memory Card Slots
Memory Card Slots (DUO, SD-MMC)
s
On (Steady) The wireless radio is on and the printer is
connected to the network.
Flashing (Slowly) The wireless radio is on but it is not
connected to a network. It may be trying
to connect.
Flashing (Quickly) The printer failed to connect to the network
using WiFi Protected Setup.
3
Page 4
Features and tips
Print
English
Copy
• Print photos directly from a memory card in various sizes and papers. Use the Photo
menu on the printer display for browsing photos, applying automatic xes, and making
selections.
• Print documents and photos from software applications on a connected computer.
• When installing new cartridges, see the graphic on the cartridge wrap for instructions. Make
sure to remove the plastic wrap and the orange tab before twisting off the orange plastic cap.
• The rst time you set up and use the HP Photosmart, make sure to install the ink cartridges that
were shipped with your device. These cartridges are specially formulated for the rst-time use
of your printer.
• Make sure you have sufcient ink. To check the estimated ink levels, select Settings on the
printer display, select Tools, then select Display Estimated Levels.
• Photo Black cartridges are compatible with this printer.
Ink usage
Ink from the cartridges is used in the printing process in several ways, including:
• Initialization, which prepares the printer and cartridges for printing.
• Printhead servicing, which keeps print nozzles clear and ink owing smoothly.
Also, some residual ink is left in the cartridge after it is used. For more information, go to:
www.hp.com/go/inkusage.
• Make color or black and white copies. Use the Copy menu on the printer display to choose
color, actual size of original or resize to t, quality setting (draft, normal, and best), paper
size, and the number of copies.
• Load single-sheet or thin originals, print side down, on the right front corner of the glass.
• For thick originals, like a page in a book, remove the lid. Place the original, print side down,
into the right front corner of the glass. If possible, lay the lid on top of the original to provide
a white background.
Scan
Get more info
• Scan photographs or documents. Use the Scan menu on the printer display to select Scan to
PC, Scan to Card, or Reprint. Then, load the original, print side down, on the right front corner
of the glass. Choose a scan shortcut: Photo to File, Photo to Email, or PDF Document.
• If you are scanning to a connected computer, the scanning software will open for you to make
adjustments and other selections, including the location of the scan le.
• For best scanning, keep the glass and the back of the lid clean. The scanner interprets any
spot or mark detected as part of the scan image.
Find more information
Additional product information can be found in the onscreen Help and Readme le that are
installed with the HP Photosmart software.
• Onscreen Help includes instructions on product features and troubleshooting. It also provides
product specications, legal notices, environmental, regulatory, and support information, plus
links to more information online on the web.
• The Readme le contains HP support contact information, operating system requirements, and
the most recent updates to your product information.
To access the onscreen Help from your computer:
• Windows XP, Vista, Win 7: Click Start > All Programs > HP > Photosmart C310 series > Help.
• Mac OS X v10.5 and v10.6: In Finder, click Help > Mac Help. In the Help Viewer, choose HP
Product Help from the Mac Help pop-up menu.
4
Page 5

What’s new? Web Services
NOV
How to get started with HP ePrint
To use HP ePrint, you must have your printer connected to a network with an Internet connection.
• Press the Wireless button on the HP Photosmart front panel.
• Select the Web Services menu from the printer display. From here, you can turn the service on
or off, display the printer’s email address, and print an information page.
HP ePrint
HP Apps
Print from anywhere
HP’s free ePrint service provides an easy way to print from email, anywhere and anytime. Just
forward an email to your printer’s email address from your computer or mobile device, and both
the email message and recognized attachments will print.
• HP ePrint might not have come with your printer, but you can easily add it via product update.
See www.hp.com/go/ePrintCenter for availability and details.
• Attachments may print differently than they appear in the software program which created
them, depending on the original fonts and layout options used.
• Free product updates are provided with this service. Some updates may be required to enable
certain functionality.
Your printer is protected
To help prevent unauthorized email, HP assigns a random email address to your printer, never
publicizes this address, and by default does not respond to any sender. HP ePrint also provides
industry-standard spam ltering and transforms email and attachments to a print-only format to
reduce the threat of a virus or other harmful content.
• The HP ePrint service does not lter emails based on content, so it cannot prevent
objectionable or copyrighted material from being printed.
Print the web, without a computer
Select an Apps icon on the printer display to print pages for the whole family.
Note: An Internet connection is required.
• Use the Quick Forms app locally. Print calendars, notebook and graph paper, even puzzles.
• Add more Apps from the web. Print coloring pages, greeting cards, and more!
• Free product updates are provided with this service. Some updates may be required to enable
certain functionality.
English
ePrintCenter
Specs
Use the HP ePrintCenter website
Use HP’s free ePrintCenter website to set up increased security for HP ePrint, specify the email
addresses that are allowed to send email to your printer, get more HP Apps, and access other free
services.
Go to the ePrintCenter website for more information and specic terms and conditions:
www.hp.com/go/ePrintCenter
Power specications
Note: Use this printer only with the power adapter supplied by HP.
• Power adapter: 0957-2271 (Brazil - 0957-2289)
• Input voltage: 100 to 240 Vac
• Input frequency: 50-60 Hz
• Power consumption: 85W Maximum, 50W Average
5
Page 6

Network Printer Setup
Changing from USB to wireless network connection
If you initially set up your printer using a USB connection to your computer, you can switch the
connection to a wireless network connection by following these steps.
English
USB
to
Wireless
If your printer
is not found
during software
installation...
Windows
To change from USB to wireless connection:
1. Click Start, click HP, click Photosmart C310
series, then click USB to Wireless. Keep
your USB cable connected until prompted
to disconnect it.
2. Follow the instructions on the displayed
screens.
• Click Next to move from one screen to
the next.
• Click Help to get additional information
about what is required on that screen.
Mac
To change from USB to wireless connection:
1. On the HP Photosmart front panel,
press the Wireless button to display the
Wireless menu on the printer display.
2. Select Wireless Settings, then Wireless
Setup Wizard on the display.
3. Follow the steps in the Wireless Setup
Wizard to connect the printer.
4. To add the printer, go to System
Preferences, select Print & Fax, then
click the + button under the Printers list
at the left. Select your printer from the
list.
Troubleshooting for a wireless printer setup
Check that your printer is connected to your network.
Run a Wireless Network Test to check that your printer is on the network. To do this:
1. On the HP Photosmart front panel, press the Wireless button to display the Wireless menu
on the printer display.
2. Select Run Wireless Network Test on the display.
3. The Wireless Network Test Report is automatically printed.
• Check the top of the report to see if anything failed during the test.
• See the Diagnostic Summary of all tests performed, and whether or not your printer
passed.
• View the Conguration Summary to identify the Network Name (SSID), Hardware
Address (Mac), and IP address.
If your printer is not connected to the network:
1. Press the Wireless button on the Printer Display to open the Wireless menu. Select
Wireless Setup Wizard.
2. Follow the instructions on the screen.
For additional help with setting up a wireless connection, go to the Wireless Printing Center
site: www.hp.com/go/wirelessprinting.
6
Page 7

Fixing connectivity issues
You may have picked the wrong network or typed in your network name (SSID)
incorrectly.
Check these settings to ensure that they are correct.
You may have typed your wireless password (WEP key or WPA passphrase) incorrectly.
• If you are using encryption on your network, you’ll need to enter a key. These are case-
sensitive so be sure that it has been entered correctly.
• If the network name (SSID) or the wireless password are not found automatically during
installation, and you don’t already know them, you can download the Network Diagnostic
Utility, which can help you locate them.
• The Network Diagnostic Utility runs on computers with Windows XP SP3, Vista, or Windows
7 OS. The computer should also be wirelessly connected to your network. To download the
Network Diagnostic Utility, go to: www.hp.com/go/wirelessprinting.
You may have a router problem.
Try restarting both the printer and the router by turning off the power on each. Then, turn them
both on again.
Your computer may not be connected to your network.
Make sure that the computer is connected to the same network to which the HP Photosmart is
connected.
Your computer may be connected to a Virtual Private Network (VPN).
Temporarily disconnect from the VPN before proceeding with the installation. Being connected to
a VPN is like being on a different network. You will need to disconnect from the VPN to access the
printer over the home network.
English
Security software may be blocking communication.
Security software (rewall, anti-virus, anti-spyware) installed on your computer may be blocking
communication between the printer and the computer. An HP Diagnostic Utility runs during
installation and can identify rewalls installed on the printer.
Go to: www.hp.com/go/wirelessprinting for more help with rewalls. Try temporarily
disconnecting your rewall, anti-virus, or anti-spyware applications to see if you can nish
the installation successfully. You should re-enable the security applications after installation is
complete.
Setup your rewall software to allow communication over UDP port 427 (Windows).
After software installation
If your printer has been successfully installed, but you are having trouble printing:
• Turn off the router, printer, and computer. Then, turn on router, printer, and computer -- in that
order.
• If powering down and up doesn’t solve the problem, run the Network Diagnostic Utility
(Windows):
• Go to: www.hp.com/go/wirelessprinting to download the Network Diagnostic Utility, then
run it.
7
Page 8

HP printer limited warranty statement
HP product Duration of limited warranty
Software Media 90 days
Printer 1 year
English
Print or Ink cartridges Until the HP ink is depleted or the “end of warranty” date printed
Printheads (only applies to products with customer 1 year
replaceable printheads)
Accessories 1 year unless otherwise stated
A. Extent of limited warranty
1. Hewlett-Packard (HP) warrants to the end-user customer that the HP products specified above will be free from defects
in materials and workmanship for the duration specified above, which duration begins on the date of purchase by the
customer.
2. For software products, HP’s limited warranty applies only to a failure to execute programming instructions. HP does not
warrant that the operation of any product will be interrupted or error free.
3. HP's limited warranty covers only those defects that arise as a result of normal use of the product, and does not cover
any other problems, including those that arise as a result of:
a. Improper maintenance or modification;
b. Software, media, parts, or supplies not provided or supported by HP;
c. Operation outside the product's specifications;
d. Unauthorized modification or misuse.
4. For HP printer products, the use of a non-HP cartridge or a refilled cartridge does not affect either the warranty to the
customer or any HP support contract with the customer. However, if printer failure or damage is attributable to the use of
a non-HP or refilled cartridge or an expired ink cartridge, HP will charge its standard time and materials charges to
service the printer for the particular failure or damage.
5. If HP receives, during the applicable warranty period, notice of a defect in any product which is covered by HP's
warranty, HP shall either repair or replace the product, at HP's option.
6. If HP is unable to repair or replace, as applicable, a defective product which is covered by HP's warranty, HP shall,
within a reasonable time after being notified of the defect, refund the purchase price for the product.
7. HP shall have no obligation to repair, replace, or refund until the customer returns the defective product to HP.
8. Any replacement product may be either new or like-new, provided that it has functionality at least equal to that of the
product being replaced.
9. HP products may contain remanufactured parts, components, or materials equivalent to new in performance.
10. HP's Limited Warranty Statement is valid in any country where the covered HP product is distributed by HP. Contracts
for additional warranty services, such as on-site service, may be available from any authorized HP service facility in
countries where the product is distributed by HP or by an authorized importer.
B. Limitations of warranty
TO THE EXTENT ALLOWED BY LOCAL LAW, NEITHER HP NOR ITS THIRD PARTY SUPPLIERS MAKES ANY
OTHER WARRANTY OR CONDITION OF ANY KIND, WHETHER EXPRESS OR IMPLIED WARRANTIES OR
CONDITIONS OF MERCHANTABILITY, SATISFACTORY QUALITY, AND FITNESS FOR A PARTICULAR PURPOSE.
C. Limitations of liability
1. To the extent allowed by local law, the remedies provided in this Warranty Statement are the customer's sole and
exclusive remedies.
2. TO THE EXTENT ALLOWED BY LOCAL LAW, EXCEPT FOR THE OBLIGATIONS SPECIFICALLY SET FORTH IN
THIS WARRANTY STATEMENT, IN NO EVENT SHALL HP OR ITS THIRD PARTY SUPPLIERS BE LIABLE FOR
DIRECT, INDIRECT, SPECIAL, INCIDENTAL, OR CONSEQUENTIAL DAMAGES, WHETHER BASED ON
CONTRACT, TORT, OR ANY OTHER LEGAL THEORY AND WHETHER ADVISED OF THE POSSIBILITY OF
SUCH DAMAGES.
D. Local law
1. This Warranty Statement gives the customer specific legal rights. The customer may also have other rights which vary
from state to state in the United States, from province to province in Canada, and from country to country elsewhere in
the world.
2. To the extent that this Warranty Statement is inconsistent with local law, this Warranty Statement shall be deemed
modified to be consistent with such local law. Under such local law, certain disclaimers and limitations of this Warranty
Statement may not apply to the customer. For example, some states in the United States, as well as some governments
outside the United States (including provinces in Canada), may:
a. Preclude the disclaimers and limitations in this Warranty Statement from limiting the statutory rights of a consumer
(e.g., the United Kingdom);
b. Otherwise restrict the ability of a manufacturer to enforce such disclaimers or limitations; or
c. Grant the customer additional warranty rights, specify the duration of implied warranties which the manufacturer
cannot disclaim, or allow limitations on the duration of implied warranties.
3. THE TERMS IN THIS WARRANTY STATEMENT, EXCEPT TO THE EXTENT LAWFULLY PERMITTED, DO NOT
EXCLUDE, RESTRICT, OR MODIFY, AND ARE IN ADDITION TO, THE MANDATORY STATUTORY RIGHTS
APPLICABLE TO THE SALE OF THE HP PRODUCTS TO SUCH CUSTOMERS.
Dear Customer,
You will find below the name and address of the HP entity responsible for the performance of the HP Limited Warranty in your
country.
You may have additional statutory rights against the seller based on your purchase agreement. Those rights are not
in any way affected by this HP Limited Warranty.
Ireland: Hewlett-Packard Ireland Limited, 63-74 Sir John Rogerson's Quay, Dublin 2
United Kingdom: Hewlett-Packard Ltd, Cain Road, Bracknell, GB-Berks RG12 1HN
Malta: Hewlett-Packard International Trade B.V., Malta Branch, 48, Amery Street, Sliema SLM 1701, MALTA
South Africa: Hewlett-Packard South Africa Ltd, 12 Autumn Street, Rivonia, Sandton, 2128, Republic of South Africa
on the cartridge has been reached, whichever occurs first. This
warranty does not cover HP ink products that have been refilled,
remanufactured, refurbished, misused, or tampered with.
HP Limited Warranty
8
Page 9

PHOTOSMART PREMIUM
USB
USB
MMC
e-ALL-IN-ONE C310 SERIES
由此开始设置...
确认包装盒内物品。
1
拆开打印机包装。去除所有胶带、保护膜和包装材料。
2
连接并打开电源。
3
重要事项!在软件没有提示之前,请勿连接 USB 电缆!
(仅限 Windows®)
内容...
设置疑难排解 10
HP Photosmart 入门 11
功能和技巧 12
新增功能 Web 服务 13
网络打印机设置 14
* 并非所有型号都提供
简体中文
连接电源线和适配器。
按照
4
设置向导 进行操作。
确保按照显示屏上的说明完成 HP Photosmart 的设置
和连接操作,包括如何设置网络打印机连接和安装
墨盒。
如果计算机没有 CD/DVD 驱动器,请转至
www.hp.com/support 以下载和安装该软件。
按下
打开 HP Photosmart 电源。
WiFi 保护设置 (WPS)
此 HP Photosmart 支持 WiFi 保护设置 (WPS) 。只
需按下 WPS 按钮,即可进行无线设置。
• 在设置过程中,如果提示您进行 WPS 并且您具
有 WPS 路由器,那么请按下路由器上的 WPS 按
钮。一旦连接成功,打印机上的无线 LED 指示灯
将会亮起。
• 否则,请按照打印机显示屏上的设置向导完成无
线设置。
注册 HP Photosmart。
通过在 www.register.hp.com 注册,获得更快的服务
和支持通知。
Page 10

设置疑难排解
如果 HP
Photosmart 无法
开启...
简体中文
如果无法打印...
检查电源线。
• 确保电源线牢固地连接到打印机和电源适配器。如果电源线正常,则电源上的 LED 灯亮起。
• 如果使用电源插线板,请确保插线板的开关已打开。或者将打印机直接插入电源插座。
• 测试电源插座,确保其工作正常。插上另一台可正常工作的设备,查看该设备是否有电。如
果没有,则电源插座可能有问题。
• 如果将打印机插入到带开关的插座中,请确保该插座开关已打开。
1. 关闭打印机电源,然后拔下电源线。重新插上电源线,然后按
2. 小心别按 按钮太快。仅按一下按钮。打印机可能需要几分钟才能打开,所以如果多次按
按钮,可能会关闭打印机。
下
3. 如果已经完成了所有上述步骤,但仍有问题,请联系 HP 支持部门进行维修。转至
www.hp.com/support。
Windows
确保 HP Photosmart 设置为默认打印机且未处
于脱机状态。
1. 在 Windows 任务栏上单击开始。
2. 然后单击控制面板。
3. 然后打开:
• 设备和打印机 (Windows 7)
• 打印机 (Vista)
• 打印机和传真 (XP)
查看打印机旁边是否有一个带对号的圈。如果
没有,右键单击打印机图标并从菜单中选择
设置为默认打印机 。
如果您仍无法打印,或 Windows 软件安装失败:
1. 从计算机的 CD 驱动器中取出 CD,然后断
开打印机与计算机间的连接。
2. 重新启动计算机。
3. 暂时禁用所有防火墙软件并关闭所有反病
毒软件。
4. 将打印机软件 CD 插入计算机的 CD 驱动
器,然后按照屏幕说明进行操作以安装打
印机软件。请勿在没有提示的情况下连接
USB 连接线。
5. 安装完成后,重新启动计算机以及任何禁
用或关闭的安全软件。
Mac
卸载并重新安装软件。
卸载程序会删除所有此 HP Photosmart 特定的
HP 软件组件,但不会删除与其他打印机或程序
共享的任何组件。
卸载软件的方法:
1. 断开打印机和计算机的连接。
2. 打开 Applications: Hewlett-Packard 文件
夹。
3. 双击 HP Uninstaller(HP 卸载程序)。按
照屏幕上的说明执行操作。
安装软件的方法:
1. 将 CD 插入计算机的 CD 驱动器。
2. 在桌面上,打开 CD,然后双击
HP Installer(HP 安装程序)。
3. 按照屏幕上的说明执行操作。
按钮打开打印机。
10
Page 11

HP Photosmart 入门
a
b
显示 彩色触摸屏可以显示菜单、照片和消息。您可
以横向或纵向移动以浏览照片和菜单项。
主屏幕 返回主屏幕(打开产品时的默认屏幕)。
返回 返回到上一个屏幕。
照片 打开
辑、打印和保存照片。
复印 打开
型或更改复印设置。
扫描 打开
取消 停止当前的操作。
照片 菜单,在此菜单中可以查看、编
复印 菜单,在此菜单中可以选择复印类
扫描菜单 ,从中可以选择扫描目的地。
帮助 触摸主屏幕上的
题。触摸任何屏幕上的 帮助 可以看到关于该屏幕
的帮助。
Apps 提供访问 Web 和打印来自 Web 的信息(如地
图、优惠券、填色卡和拼图)的快捷简便方法。
设置 打开
置并执行维护功能。
墨水量 打开
管理器 打开
表中删除应用程序。
无线* 打开
导 和 WiFi 保护设置。
HP ePrint 打开
打印打印机的电子邮件地址。
设置 菜单,在此菜单中可以更改产品设
墨水 菜单以显示估计的墨水量。
管理器 ,从中可以从 我的收藏 列
网络 菜单,从中可以访问 无线设置向
帮助 可以看到所有帮助主
Web 服务 菜单,从中可以查看和
简体中文
a
b
存储卡插槽的 LED 灯
存储卡插槽(DUO 和 SD-MMC)
s
*无线指示灯状态
熄灭 无线广播已关闭。
开启(稳定) 无线广播已开启,打印机已连接到网络。
闪烁(缓慢) 无线广播已开启,但未连接到网络。它可
能正在尝试连接。
闪烁(快速) 打印机未能使用 WiFi 保护设置连接到网络。
11
Page 12

功能和技巧
打印
• 直接从存储卡打印各种大小和纸张的照片。使用打印机显示屏上的照片菜单可以浏览照片、
应用自动修复和进行选择。
• 从连接的计算机上的软件应用程序打印文档和照片。
• 安装新的墨盒时,请参阅墨盒包装上的图示以了解安装说明。确保在拆掉了塑料包装和橙色
标签之后才旋开橙色塑料盖子。
• 第一次安装和使用 HP Photosmart 时,请确保安装设备附带的墨盒。这些墨盒是专为第一次
使用打印机准备的。
• 确保墨水充足。要检查估计的墨水量,在打印机显示屏上选择设置,再选择工具,然后选择
显示估计的墨水量。
• 照片黑色 墨盒与此打印机兼容。
墨水使用
打印过程中有多种方式使用墨盒中的墨水,包括:
• 初始化,准备打印机和墨盒进行打印。
• 打印头维护,保持打印喷嘴清洁、墨水流畅。
简体中文
获取详细信息
复印
扫描
此外,墨盒用完后,墨盒中还会残留一些墨水。有关详细信息,请转至:
www.hp.com/go/inkusage。
• 制作彩色或黑白副本。使用打印机显示屏上的复印菜单可以选择颜色、原件的实际大小或调
整到适合页面大小、质量设置(草稿、正常和最佳)、纸张大小以及复印的份数。
• 将单张或薄的原件打印面朝下放到玻璃板的右上角。
• 对于较厚的原件,如书中的某页,则除去盖子。将原件打印面朝下放到玻璃板的右上角。如
果可能,将盖子放在原件顶部,以提供白色的背景。
• 扫描照片或文档。使用打印机显示屏上的扫描菜单选择扫描至 PC、扫描至存储卡、或重印。
将原件打印面朝下放到玻璃板的右上角。选择扫描快捷方式:照片至文件、照片至电子邮
件或 PDF 文档。
• 如果要扫描到连接的计算机,将为您打开扫描软件以进行调整和其他选择,包括扫描文件的
位置。
• 要获得最佳扫描结果,请保持玻璃板和盖子衬板的清洁。扫描仪会将检测到的任何斑点或标
记都视为扫描图像的一部分。
查找更多信息
其他产品信息可以在随 HP Photosmart 软件安装的屏幕帮助和 自述文件 中找到。
• 屏幕帮助包括关于产品功能和疑难排解的说明。它还提供产品规格、法律声明、环境、法规
和支持的信息,以及 Web 上更多在线信息的链接。
• 自述文件包含 HP 支持联系信息、操作系统要求和产品信息的最新更新。
要访问计算机上的屏幕帮助:
• Windows XP、Vista 和 Win 7:单击开始 > 所有程序 > HP > Photosmart C310 series > 帮助。
• Mac OS X v10.5 和 v10.6:在 Finder 中,单击帮助 > Mac 帮助。在帮助查看器中,从 Mac
帮助弹出式菜单中选择 HP 产品帮助。
12
Page 13

新增功能 Web 服务
NOV
HP ePrint 入门
• 要使用 HP ePrint,必须使用 Internet 连接将打印机连接到网络。
• 按下 HP Photosmart 前面板上的无线按钮。
• 从打印机显示屏上选择 Web 服务菜单。从这里,您可以打开或关闭服务,显示打印机的电
子邮件地址以及打印信息页。
HP ePrint
HP 应用程序
随时随地打印
HP 的免费 ePrint 服务使您能够随时随地从电子邮件轻松打印。只需将电子邮件从您的计算机或
移动设备转发到打印机的电子邮件地址,邮件内容和识别出来的附件就都可以打印出来。
• HP ePrint 可能不随打印机一起提供,但是您可以通过产品更新轻松地添加它。请参阅
www.hp.com/go/ePrintCenter 以获取可用性和详细信息。
• 根据所用的原件字体和版式选项,附件打印出来后,可能和创建它们的软件程序中所展现的
外观不同。
• 免费产品更新附送此服务。可能需要某些更新才能启用特定功能。
打印机受保护
为协助阻止未经授权的电子邮件,HP 为您的打印机分配随机的电子邮件地址,绝不会公开这个
地址,且默认不回复任何发件人。HP ePrint 还提供了行业标准垃圾邮件过滤功能,并将电子邮件
和附件转换为仅打印格式,以减少病毒或其他有害内容的威胁。
• HP ePrint 服务不会基于内容过滤电子邮件,因此它无法防止打印令人反感或侵犯版权的内容。
简体中文
不使用计算机打印 Web 内容
在打印机显示屏上选择 Apps 图标可以打印整个系列的页面。
注意:需要 Internet 连接。
• 使用本地 快速表单 应用程序。可以打印日历、笔记和图纸,甚至拼图。
• 从 web 添加更多应用程序。可以打印彩色页面、贺卡等等!
• 免费产品更新附送此服务。可能需要某些更新才能启用特定功能。
ePrintCenter
规范
使用 HP ePrintCenter 网站
使用 HP 的免费 ePrintCenter 网站可以增加 HP ePrint 的安全,指定允许向您的打印机发送电子邮
件的电子邮件地址、获取更多 HP 应用程序以及访问其他免费服务。
转至 ePrintCenter 网站可以获取更多信息以及特定的条款与条件: www.hp.com/go/ePrintCenter
电源规格
注意:此打印机仅使用 HP 提供的电源适配器。
• 电源适配器:0957-2271(巴西 - 0957-2289)
• 输入电压:100–240 Vac
• 输入频率:50-60 Hz
• 功耗:最大功耗 85W,平均功耗 50W
13
Page 14

网络打印机设置
将 USB 连接更改为无线网络连接
如果您最初是用 USB 连接至计算机来设置打印机的,可以通过执行以下步骤将连接改为无线
网络连接。
简体中文
USB 到无线
如果在软件安装
过程中找不到打
印机...
Windows
要从 USB 连接更改为无线连接:
1. 依次单击开始、HP、Photosmart C310
series 以及 USB 到无线。保持 USB 电缆连
接,直到提示您断开它为止。
2. 按照显示屏幕上的说明进行操作。
• 单击下一步从一个屏幕移动到下一个
屏幕。
• 单击帮助获取关于此屏幕上所需内容的
其他信息。
Mac
要从 USB 连接更改为无线连接:
1. 在 HP Photosmart 前面板上,按下无
线按钮以在打印机显示屏上显示无线菜
单。
2. 选择无线设置,然后在显示屏上选择无
线设置向导。
3. 按照
4. 要添加打印机,请转至系统首选项,
无线设置向导 中的步骤连接打
印机。
选择打印和传真,然后在左边的 打印
机 列表下单击 + 按钮。从列表中选
择打印机。
无线打印机设置疑难排解
检查您的打印机是否已连接到网络。
运行无线网络测试检查打印机是否已联网。要执行此操作:
1. 在 HP Photosmart 前面板上,按下无线按钮以在打印机显示屏上显示无线菜单。
2. 在显示屏上选择运行无线网络测试。
3. 将自动打印无线网络测试报告。
• 检查报告的开头,查看测试过程中有无出现故障。
• 查看执行的所有测试的
• 查看 配置摘要 以确认网络名称 (SSID)、硬件地址 (Mac) 和 IP 地址。
诊断摘要 以及打印机是否通过测试。
如果您的打印机未连接到网络:
1. 在打印机显示屏上按下无线按钮可以打开无线菜单。选择无线设置向导。
2. 随后按照屏幕上的说明操作即可。
有关设置无线连接的其他帮助,请转至 Wireless Printing Center 网站:
www.hp.com/go/wirelessprinting。
14
Page 15

修复连接问题
您可能选择了错误的网络或没有正确键入网络名称 (SSID)。
检查这些设置以确保设置正确。
可能输入了不正确的无线密码(WEP 密钥或密码)。
路由器可能存在问题。
尝试重新启动打印机和路由器:先关闭打印机和路由器的电源,然后,将它们再次打开。
您的计算机可能没有连接到网络。
确保将计算机与 HP Photosmart 连接到同一网络。
您的计算机可能已连接到虚拟专用网络 (VPN)。
在继续安装前临时断开 VPN 的连接。连接到 VPN 如同位于其他网络。您需要断开与 VPN 的连
接才能访问家庭网络上的打印机。
安全软件可能会阻止通信。
安装在计算机上的安全软件(防火墙、反病毒、反间谍)可能会阻止打印机和计算机之间的通
信。HP 诊断实用程序在安装过程中运行,可以识别打印机上安装的防火墙。
请转至:www.hp.com/go/wirelessprinting 以获取关于防火墙的更多帮助。请尝试暂时断开与防
火墙、反病毒或反间谍应用程序的连接以查看是否可成功完成安装。安装完成后,可重新启用安
全性应用程序。
• 如果在网络上使用了加密,那么将需要输入密钥。这些密钥是区分大小写的,所以请确保正
确输入了密钥。
• 如果安装过程中未自动找到网络名称 (SSID) 或无线密码,而您又不知道,那么可以下载网络
诊断实用程序,帮助您查找网络名称或无线密码。
• 网络诊断实用程序可以在安装了 Windows XP SP3、Vista 或 Windows 7 操作系统的计算机
上运行。计算机应该也无线连接到网络。要下载网络诊断实用程序,请转至:
www.hp.com/go/wirelessprinting。
简体中文
设置防火墙软件以允许通过 UDP 端口 427 (Windows) 进行通信。
软件安装后
如果成功安装了打印机,但是打印出了问题:
• 关闭路由器、打印机和计算机的电源。然后打开路由器、打印机和计算机的电源(需按此顺
序进行)。
• 如果打开关闭电源不能解决此问题,请运行网络诊断实用程序 (Windows):
• 请转至:www.hp.com/go/wirelessprinting 下载网络诊断实用程序,然后运行它。
15
Page 16

HP 打印机有限保修声明
⫓䇂㵘㆗㬫䇤䇻㡅⫓䇂㵘㋪⹊㋮⿈ⷝ⭥⥛㠘
简体中文
㛋
16
 Loading...