

Page 1
hp business inkjet
3000 · 3000n · 3000dtn
Page 2

Copyright Information
© Copyright Hewlett-Packard Company 2002
All Rights Reserved. Reproduction, adaptation, or translation
without prior written permission is prohibi te d, except as allowed
under the copyright laws.
Edition 1: 9/2003
版权信息
© 版权所有 Hewlett-Packard Company 2003
保留所有权利。除版权法允许外,未经事先书面许可,不得对
此进行复制、改编或翻译。
第 1 版:9/2003
Warranty
The information contained in this document is subject to change
without notice.
Hewlett-Packard makes no warranty of any kind with respect to
this information.
HEWLETT-PACKARD SPECIFICALLY DISCLAIMS THE IMPLIED
WARRANTY OF MERCHANTABILITY AND FITNESS FOR A
PARTICULAR PURPOSE.
Hewlett-Packard shall not be liable for any direct, indirect,
incidental, consequential, or other damage alleged in connection
with the furnishing or use of this information.
Trademark Credits
Microsoft
trademarks of Microsoft Corporation. All other products
mentioned herein may be trademarks of their respective
companies.
®
, Windows®, and Windows NT® are U.S. registered
担保
本文档中的信息如有更改,恕不另行通知。
Hewlett-Packard 对此信息不做任何担保。
HEWLETT-PACKARD 特别声明不对适销性和特殊用途的适用
性做出暗示担保。
对于直接的、间接的、偶然的、继发的、或所谓的与本设备的
安装或使用本信息有关的其它损害, Hewlett-Packard 概不负
责。
商标信誉
®
Microsoft
、 Windows® 和 Windows NT® 为 Microsoft
Corporation 在美国的注册商标。此处所提及的所有其它产品
均为其各自公司的商标。
Page 3
Safety Information
安全信息
Always follow basic safety precautions when using this product
to reduce risk of injury from fire or electric shock.
1 Read and understand all instructions in the documentation that
comes with the printer.
2 Use only a grounded electrical outlet when connecting this
product to a power source. If you do not know whether the
outlet is grounded, check with a qualified electrician.
3 Observe all warnings and instructions marked on the product.
4 Unplug this product from wall outlets before cleaning.
5 Do not install or use this product near water, or when you
are wet.
6 Install the product securely on a stable surface.
7 Install the product in a protected location where no one can
step on or trip over the line cord, and the line cord cannot
be damaged.
8 If the product does not operate normally, see Troubleshooting.
9 There are no user-serviceable parts inside. Refer servicing to
qualified service personnel.
使用此产品时,请始终遵守基本的安全防范措施以降低导致火
灾及电击伤害的危险。
1 请阅读并理解此打印机随附文档中的所有说明。
2 将此产品连接到电源时,仅可使用接地的电源插座。如果您
不清楚插座是否接地,则需要请经验丰富的电工进行检查。
3 请遵守产品上标注的所有警告及说明。
4 在清洁本产品前,请从插座上拔下插头。
5 切勿在水边,或在身上潮湿时安装或使用本产品。
6 请将本产品安装在平稳的表面上。
7 请将本产品安装在受保护的场所,以免有人踩到线路线或
被线路线绊倒,以使线路线不受到损害。
8 如果本产品没有正常运行,请参阅 Starter CD 上
联机用户指南的 “疑难解答”。
9 未随机提供用户耐用的零件。请向已授权的服务人员咨询
维修事宜。
안전 정보
화재나 감전으로 인한 부상의 위험을 줄이기 위해 본 제품 사용시
항상 기본 안전 주의사항을 따르십시오.
1 프린터와 함께 제공되는 사용 설명서의 모든 지침을 읽고
이해하십시오.
2 이 제품에 전원을 연결할 때는 접지된 전기 소켓만
사용하십시오. 소켓이 접지되어 있는지 알 수 없으면 전기
기술자에게 문의하십시오.
3 제품에 표시된 모든 경고와 지시를 준수하십시오.
4 청소하기 전에는 콘센트에서 제품의 플러그를 뽑으십시오.
5 본 제품을 물가나 몸이 젖은 상태 에서 설치 또는 사용하지
마십시오.
6 제품은 안전한 곳에서 안전하게 설치하십시오.
7 라인 코드를 밟거나 발에 걸리지 않으며 손상을 입지 않는
보호된 장소에 제품을 설치하십시오.
8 제품이 정상적으로 작동하지 않을 경우, Starter CD에 있는
온라인 사용자 설명서의 문제 해결을 참조하십시오
내부에는 사용자가 서비스할 수 있는 부품은 없습니다.
9 서비스는 승인된 서비스 직원에게 맡기십시오.
安全資訊
使用本產品時,請務必遵守基本的安全注意事項,以降低火及電擊
的傷害。
1 閱讀並瞭解隨印表機一同提供的文件中的所有指示。
2 將此產品連接到電源時,只能使用已接地的電源插座。如果您
不清楚插座是否已接地,則需要請經驗丰富的電工進行檢查。
3 查看產品標示的所有警告及指示。
4 清潔前取下牆壁的產品插座。
5 請勿在近水或潮濕的情況下安裝或使用本產品。
6 在穩固的表面安裝本產品。
7 在線材不受踐踏的安全位置安裝本產品,且線材必須是
完好的。
8 若產品無法正常運作,請參閱 Starter CD 上的聯機
使用者指南之 「疑難排解」。
9 其中無使用者可自行維修的零件。請將產品送修合格的
服務人員。
Page 4
1
6
1
2
3
4
5
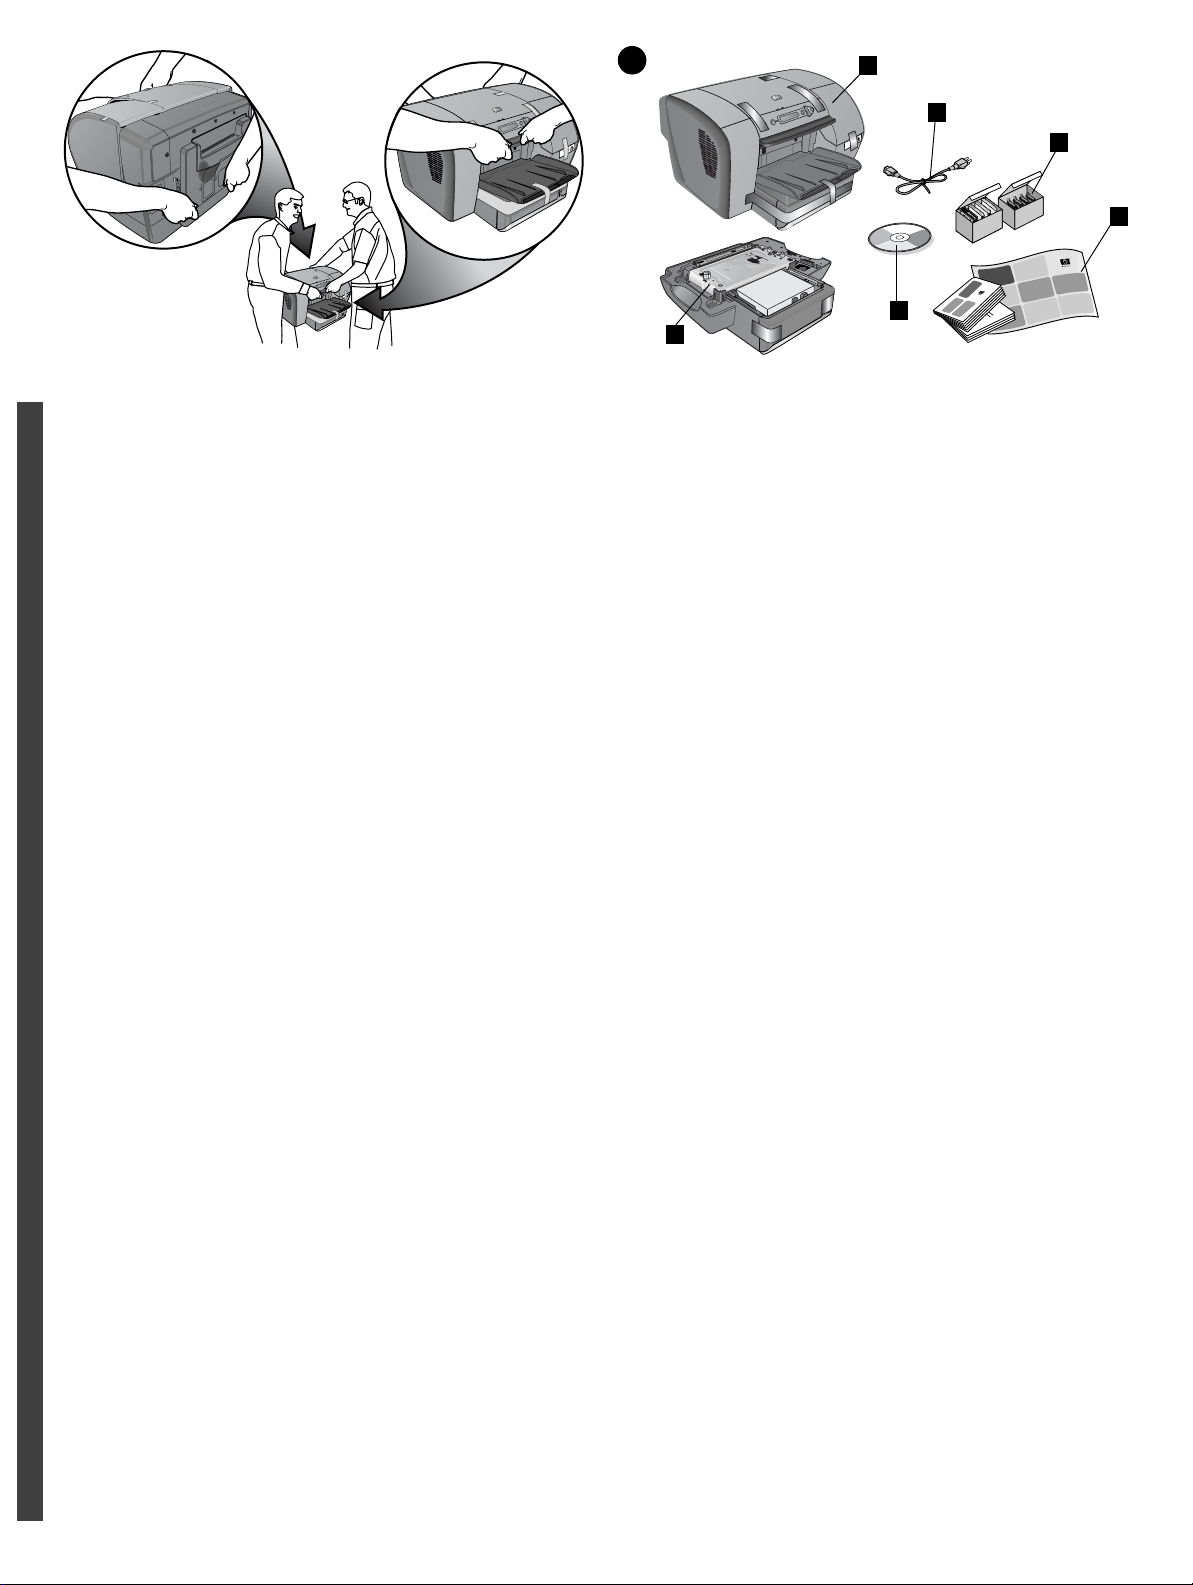
WARNING!
The printer is heavy. To prevent physical injury, two people should
lift and move the printer. Each person should grasp the front of the
printer under the lip below the LCD control panel, and grasp the
indentation on either side of the rear manual feed unit.
English
警告!
打印机很重。 为防止身体受到伤害,抬起并移动打印机时最好
由两人协作。 每个人都应抓住打印机前部的 LCD 控制面板下
边,并抓住后部手动进纸装置各边的凹口。
简
体
中
文
경고 !
프린터는 무겁습니다 . 부상을 방지하기 위해 두 사람이 프린터를
들고 이동해야 합니다 . 두 사람 모두 프린터 앞쪽의 LCD 제어판
아래 뚜껑 밑을 잡고 뒤쪽은 수동 급지 장치 양쪽의 오목한 곳을
한
잡아야 합니다 .
국
어
Step 1: Check the package contents.
1) HP Business Inkjet 3000 series printer, 2) power cord,
3) ink cartridges and printheads, 4) printed documentation
(setup poster, getting started guide, HP customer support guide),
5) Starter CD (software and electronic documentatio n), 6) Tray 3
(included only with the HP Business Inkjet 3000dtn)
步骤 1: 检查包装箱内的物品。
1) HP Business Inkjet 3000 系列打印机, 2) 电源线,
3) 墨盒和打印头, 4) 印刷文档 (安装海报、使用入门指南、
HP 客户支持指南), 5) Starter CD (软件和电子文档),
6) 纸盘 3 (仅 HP Business Inkjet 3000dtn 提供)
단계 1: 패키지 내용물 확인 .
1) HP Business Inkjet 3000 시리즈 프린터 , 2) 전원 코드 ,
3) 잉크 카트리지와 프린트 헤드 , 4) 인쇄된 설명서
( 설치 포스터 , 시작 안내서 , HP 고객 지원 카드 ),
5) Starter CD ( 소프트웨어 및 전자 설명서 ), 6) 용지함 3
(HP Business Inkjet 3000dtn 에만 포함 )
警告!
印表機很重, 為防止身體受到傷害,最好由兩人一起抬起並移動印
表機。 每個人都應抓住印表機前端的 LCD 控制面板下緣,並抓住
繁
後端手動進紙裝置各邊的凹口。
體
中
文
步驟 1: 檢查包裝箱中的物品。
1) HP Business Inkjet 3000 系列印表機,2) 電源線,
3) 墨匣和列印噴頭,4) 書面文件 (安裝海報、使用入門指南、
HP 客戶支援指南),5) Starter CD (軟體和電子文件),
6) 紙匣 3 (僅 HP Business Inkjet 3000dtn 提供)
3
Page 5
2
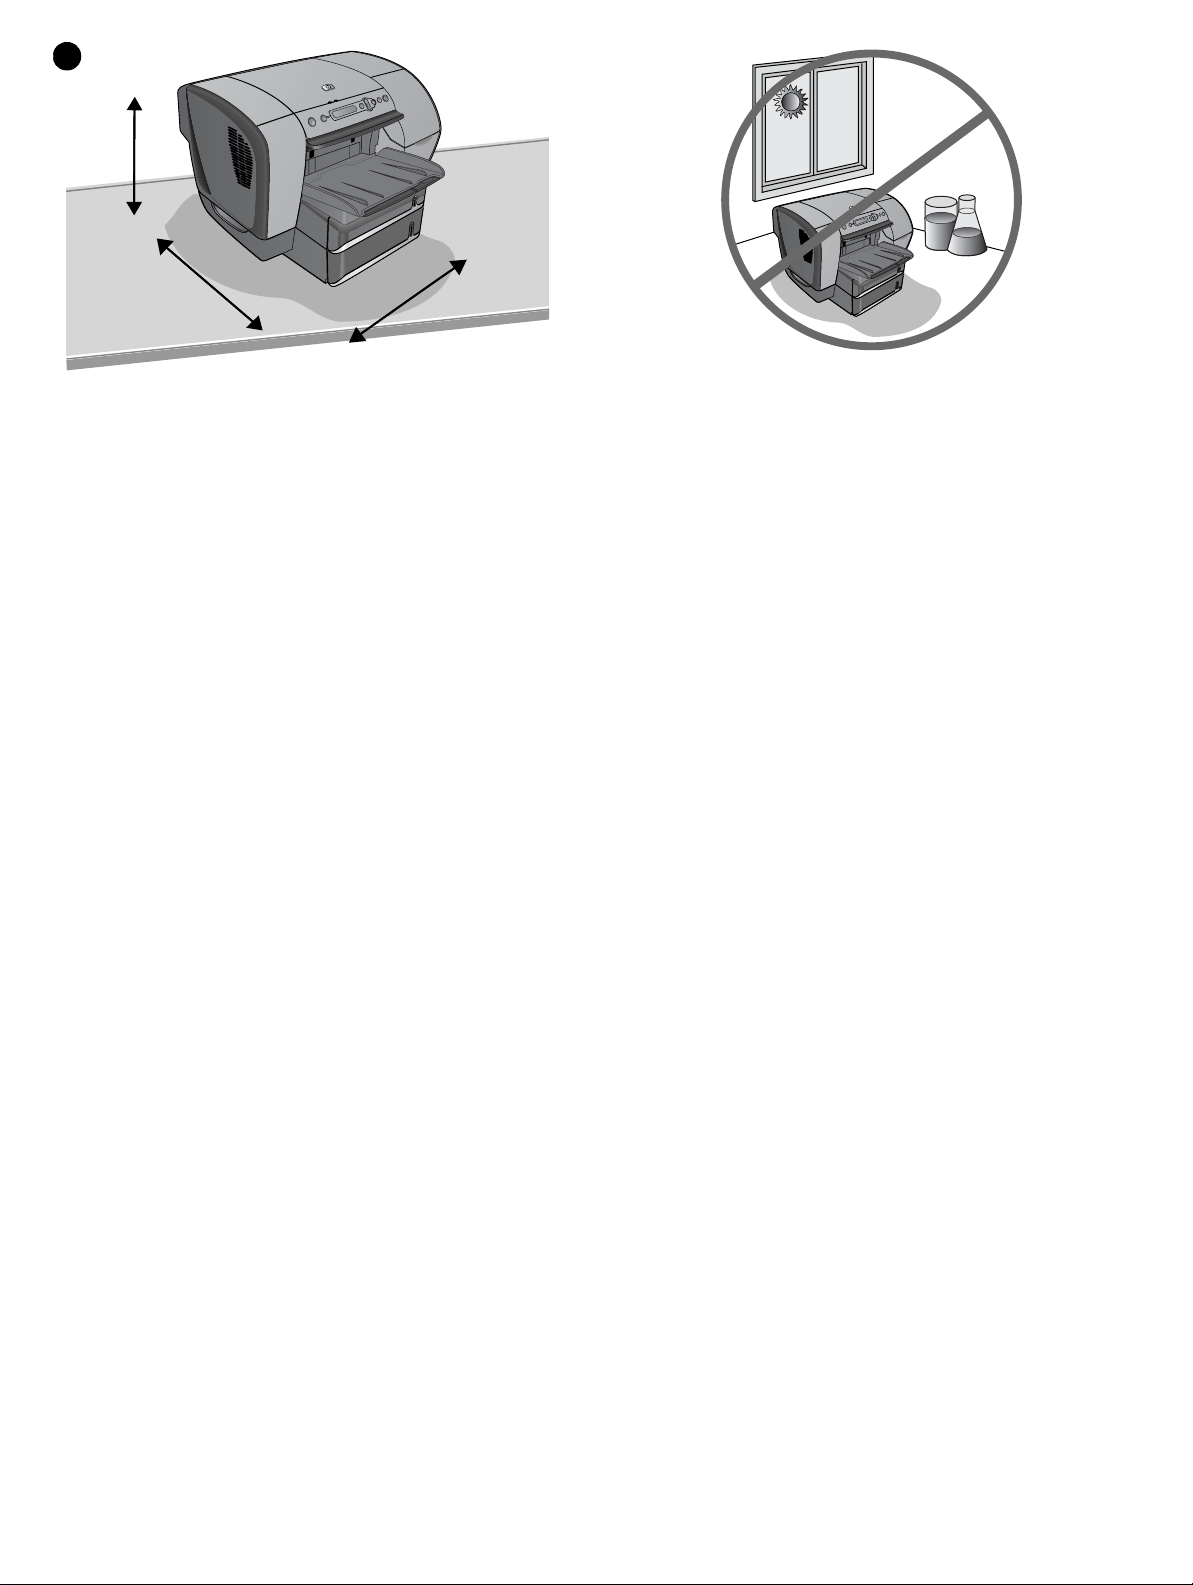
462 mm*
(18.2 in)
640 mm (25.2 in)
592 mm (23.3 in)
Step 2: Prepare the location.
The surface must be sturdy, level, and located in a well-ventilated
area. Allow space around the printer, including 50 mm (2 inches)
for ventilation. Also, make sure to leave enough room so you can
access Tray 1 at the back of the printer.
*Includes Tray 3 height (107 mm or 4.2 inches). Tray 3 is included
only with the HP Business Inkjet 3000dtn.
步骤 2: 留出位置。
放置表面必须坚固、水平且通风良好。 在打印机周围留出一定
空间,包括留出 50 毫米 (2 英寸)用于通风。 此外,确保留
出足够空间,以便可以使用打印机后部的纸盘 1。
* 包括纸盘 3 高度 (107 毫米或 4.2 英寸)。 仅 HP Business
Inkjet 3000dtn 提供纸盘 3。
Do not place the printer in direct sunlight or near chemicals. Make
sure that the environment does not experience abrupt changes in
temperature or humidity.
Temperature: 15° to 35° C (59° to 95° F)
Relative humidity: 10 to 80%
不要将打印机置于阳光直射之处或化学物品附近。 确保环境不
会有骤然的温度和湿度变化。
温度: 15° 到 35° C (59° 到 95° F)
相对湿度: 10 到 80%
단계 2: 장소 준비 .
표면은 단단하고 수평하고 환기가 잘 되는 곳이어야 합니다 .
프린터 주변에 환기를 위한 50 mm(2 인치 ) 의 공간을 포함하여
프린터 주변을 넉넉히 띄어 놓으십시오 . 또한 용지함 1 에 접근할
수 있도록 충분한 공간을 남겨 두십시오 .
* 용지함 3 의 높이 (107 mm 또는 4.2 인치 ) 포함 . 용지함 3 은
HP Business Inkjet 3000dtn 에만 포함됨 .
步驟 2: 放置位置的準備。
放置表面必須堅固、平穩且置於通風良好之處。 在印表機周圍騰出
一定空間,包括 50 公釐 (2 英吋)的空間以利於通風。 此外,請
確保騰出的空間足以使用印表機背部的紙匣 1。
* 包括紙匣 3 高度 (107 公釐或 4.2 英吋)。 僅 HP Business
Inkjet 3000dtn 提供紙匣 3。
직사 광선이 비추는 곳이나 화학 약품 근처에 놓지 마십시오 .
주변 환경의 온도나 습도가 갑자기 변하지 않는지 확인하십시오 .
온도 : 15° - 35° C (59° - 95° F)
상대 습도 : 10 - 80%
請勿將印表機置於陽光直射的地點或化學物品附近。 務必放置在穩
定的環境,而不可有急遽的溫度或溼度變化。
溫度: 15° 至 35° C (59° 至 95° F)
相對濕度: 10 至 80%
4
Page 6
3
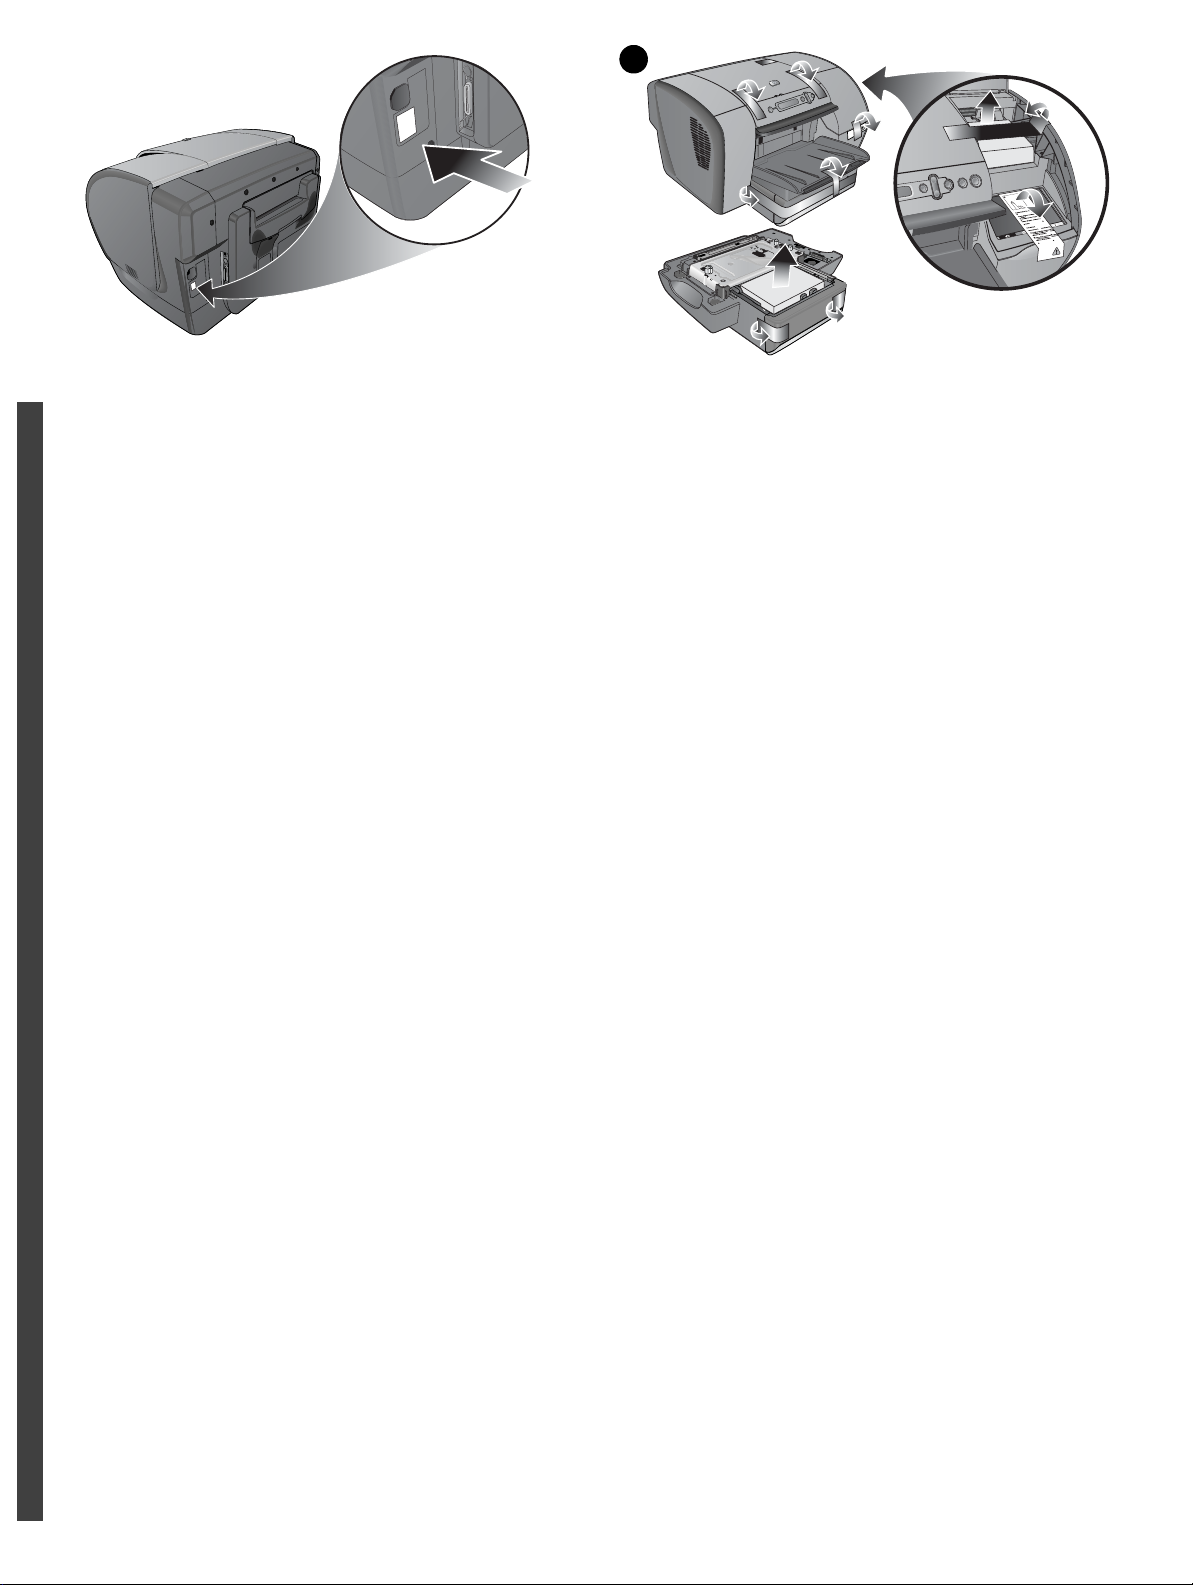
Make sure that the location has an adequate power supply.
Check the voltage rating on your printer, located on the right
rear corner next to the alternating current (AC) socket.
Power requirements:
100 to 240 volts AC
50/60 Hz (±3 Hz)
English
确保该位置有合适的电源。 检查打印机的额定电压
(位于右后角、交流电插座旁)。
电源要求:
100 到 240 伏交流电
简
50/60 赫兹 (±3 赫兹)
体
中
文
설치 장소에 적절한 전원이 공급되는지 확인하십시오 . 프린터의
전압 등급을 확인하십시오 (AC 소켓 옆 오른쪽 모서리에 있음 ).
전력 요구사항 :
AC 100 - 240 볼트
50/60 Hz (± 3 Hz)
한
국
어
Step 3: Remove the packing materials.
1) Make sure to remove all packing tape and foam from the inside
of the printer. 2) Unpack optional Tray 3* (C8227A), and remove
the packing tape and shipping foam. 3) Move the printer and
Tray 3 to the prepared location.
*Included with the HP Business Inkjet 3000dtn
步骤 3: 去除包装材料。
1) 确保去除打印机内的所有包装胶带和泡沫材料。 2) 拆开可选
纸盘 3* (C8227A) 的包装,并去除包装胶带和装运泡沫材料。
3) 将打印机和纸盘 3 移到确定好的位置。
* 随 HP Business Inkjet 3000dtn 一起提供
단계 3: 포장 풀기 .
1) 프린터 내부의 포장 테이프와 스티로폼을 모두 제거하십시오 .
2) 용지함 3(C8227A) 의 포장을 풀고 포장용 테이프와 운송용
스티로폼을 제거합니다 .
3) 프린터와 용지함 3 을 준비된 장소로 옮기십시오 .
*HP Business Inkjet 3000dtn 에 포함됨
確保該位置有適用的電源。 檢查印表機的額定電壓
(位於右後角、交流電插座旁)。
電力要求:
100 至 240 伏交流電
繁
50/60 赫茲 (±3 赫茲)
體
中
文
步驟 3: 移除包裝材料。
1) 確保已移除印表機內的所有包裝膠帶和泡沫塑料。 2) 拆開選用
紙匣 3* (C8227A) 的包裝,並移除包裝膠帶和裝運泡沫塑料。
3) 將印表機和紙匣 3 移到準備好的位置。
* 隨 HP Business Inkjet 3000dtn 一起提供
5
Page 7
4
5
1
2
3
4
5
6
7
8
9
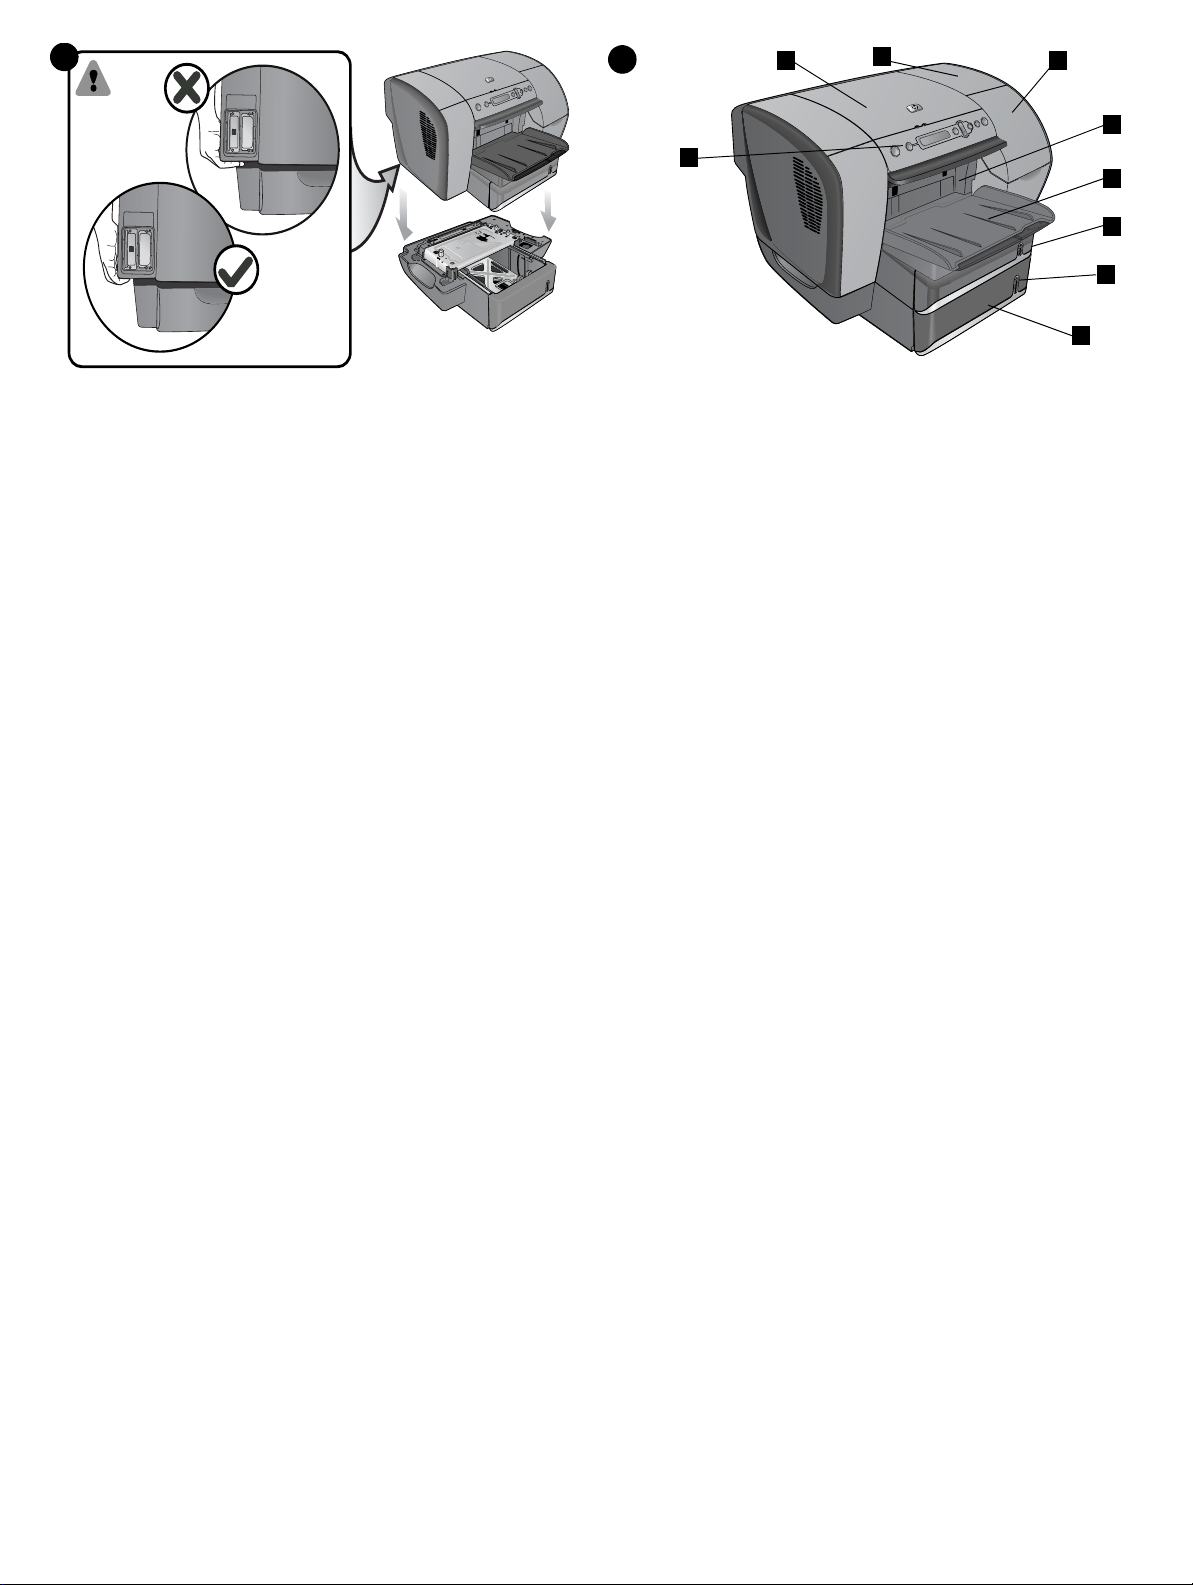
Step 4: Install Tray 3.
If you have purchased the HP Business Inkjet 3000dtn, set the
printer on top of Tray 3. WARNING: Be careful to keep your
fingers and hands clear of the bottom of the printer.
步骤 4: 安装纸盘 3。
如果您购买了 HP Business Inkjet 3000dtn,请将打印机放在纸
盘 3 上。警告: 注意不要用手或手指触摸打印机底部。
단계 4: 용지함 3 설치 .
HP Business Inkjet 3000dtn 를 구입했으면 , 프린터를 용지함
3 위에 놓습니다 . 경고 : 프린터 바닥에 손가락과 손을 갖다 대지
마십시오 .
Step 5: Identify printer parts (front).
1) LCD control panel, 2) top cover, 3) printhead cover,
4) ink cartridge cover, 5) simplex unit (or optional auto-duplex
unit*), 6) output bin, 7) Tray 2, 8) paper level indicator, 9) Tray 3*
*Included with the HP Business Inkjet 3000dtn
步骤 5: 识别打印机部件 (正面)。
1) LCD 控制面板, 2) 顶盖, 3) 打印头盖, 4) 墨盒盖,
5) 单面打印装置 (或可选自动双面打印装置 *),
6) 出纸槽, 7) 纸盘 2, 8) 纸张数量指示器, 9) 纸盘 3*
* 随 HP Business Inkjet 3000dtn 一起提供
단계 5: 프린터 부품 식별 ( 전방 ).
1) LCD 제어판 , 2) 상단 덮개 , 3) 프린트 헤드 덮개 , 4) 잉크
카트리지 덮개 , 5) 간단한 장치 또는 옵션 자동 양면 인쇄 장치 *,
6) 출력함 , 7) 용지함 2, 8) 용지 수평 표시기 9) 용지함 3*
*HP Business Inkjet 3000dtn 에 포함됨
步驟 4: 安裝紙匣 3。
如果您購買了 HP Business Inkjet 3000dtn,請將印表機放在紙匣
3 上。警告: 注意不要用手或手指觸摸印表機底部。
步驟 5: 識別印表機部份 (正面)。
1) LCD 控制面板,2) 頂蓋,3) 列印噴頭蓋,4) 墨匣蓋,
5) 單面列印裝置 (或選用自動雙面列印裝置 *), 6) 出紙槽,
7) 紙匣 2,8) 紙張數量指示燈,9) 紙匣 3*
* 隨 HP Business Inkjet 3000dtn 一起提供
6
Page 8
1
2
3
4
4
5
5
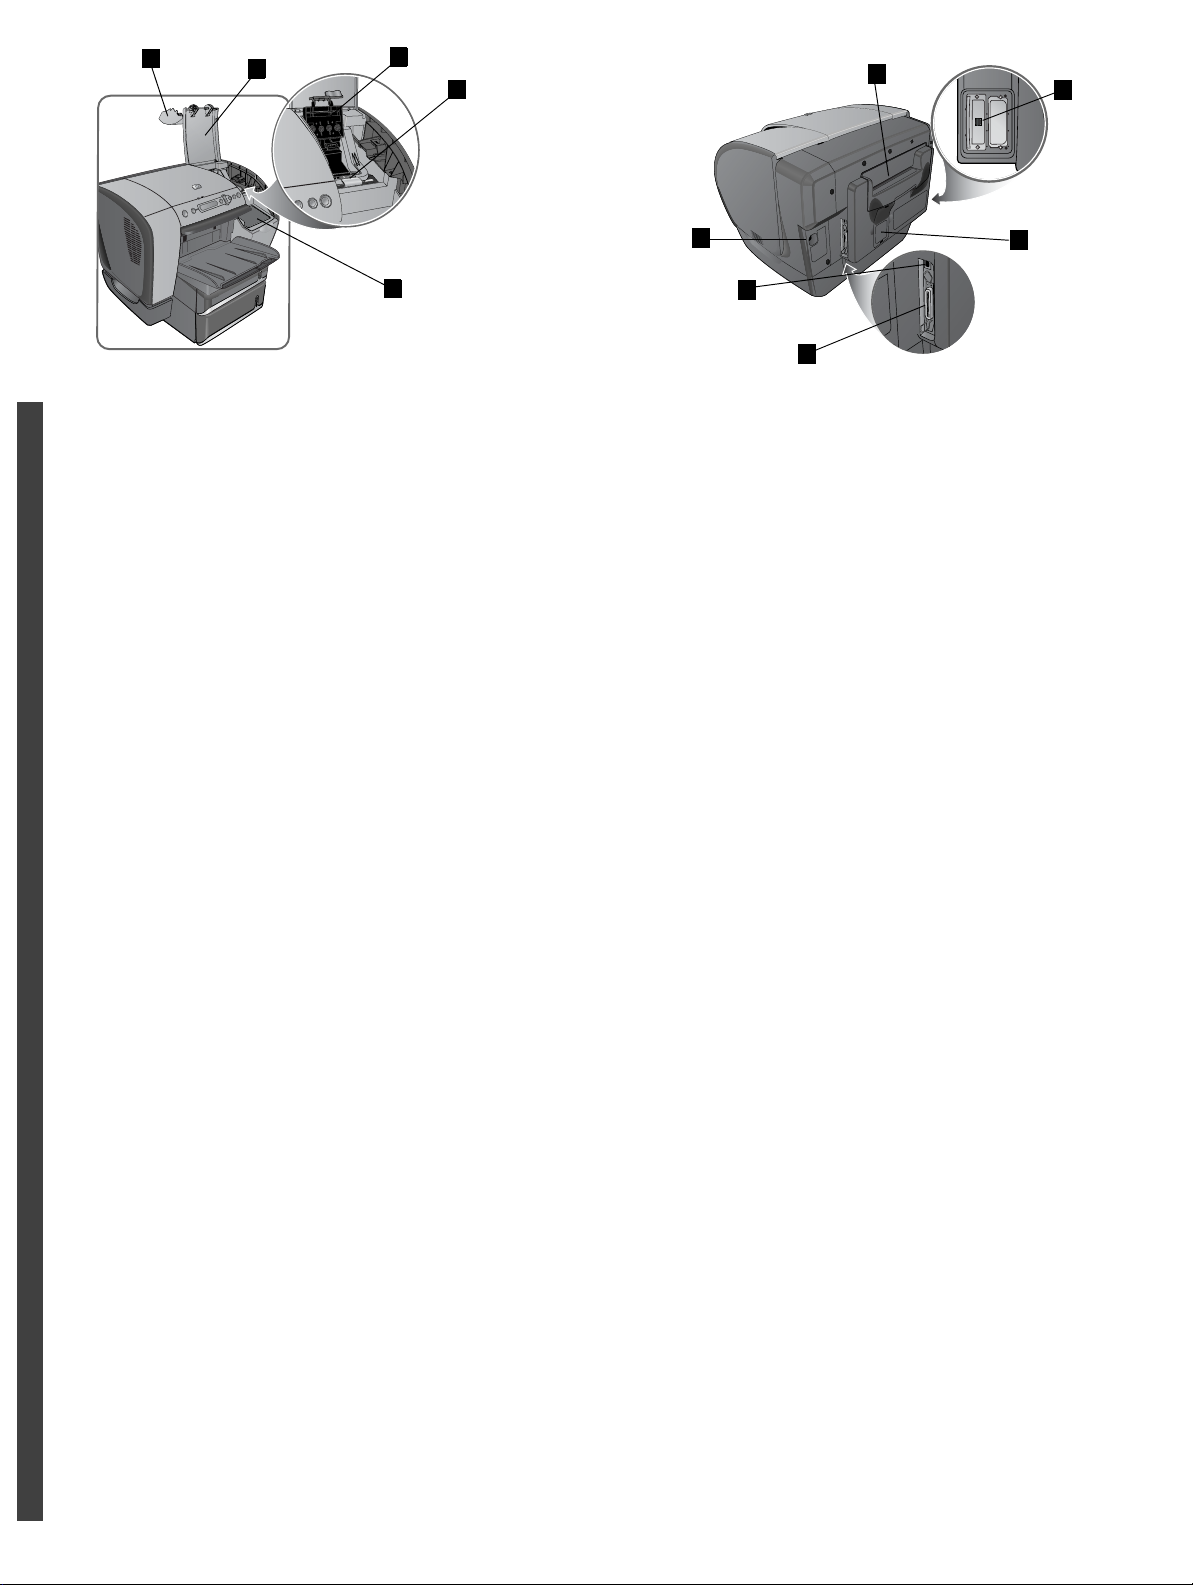
Identify printer parts (printing supplies area).
1) Ink cartridge cover, 2) printhead cover, 3) printhead latch,
4) printhead slots, 5) ink cartridge slots
English
识别打印机部件 (打印耗材区域)。
1) 墨盒盖, 2) 打印头盖, 3) 打印头锁栓, 4) 打印头插槽,
5) 墨盒插槽
简
体
中
文
3
2
1
6
Identify printer parts (back).
1) Parallel port, 2) universal serial bus (USB) port, 3) power input,
4) rear manual feed unit (Tray 1), 5) EIO slots, 6) DIMM cover
识别打印机部件 (后部)。
1) 并行端口, 2) 通用串行总线 (USB) 端口, 3) 电源输入,
4) 后部手动进纸装置 (纸盘 1), 5) EIO 插槽, 6) DIMM 盖
프린터 부품 식별 ( 인쇄 공급 영역 ).
1) 프린트 헤드 덮개 , 2) 잉크 카트리지 덮개 , 3) 프린트
헤드 걸쇠 , 4) 프린트 헤드 슬롯 , 5) 잉크 카트리지 슬롯
한
국
어
識別印表機部份 (列印耗材區域)。
1) 墨匣蓋,2) 列印噴頭蓋,3) 列印噴頭鎖栓,4) 列印噴頭插槽,
5) 墨匣插槽
繁
體
中
文
프린터 부품 식별 ( 후방 ).
1) 병렬 포트 , 2) USB 포트 , 3) 전원 입력 , 4) 후방 수동 급지
장치 ( 용지함 1), 5) EIO 슬롯 , 6) DIMM 덮개
識別印表機部份 (後面)。
1) 平行埠,2) 通用序列匯流排 (USB) 埠,3) 電源輸入,
4) 後端手動進紙裝置 (紙匣 1), 5) EIO 插槽,6) DIMM 蓋
7
Page 9
6
1
4
2
3
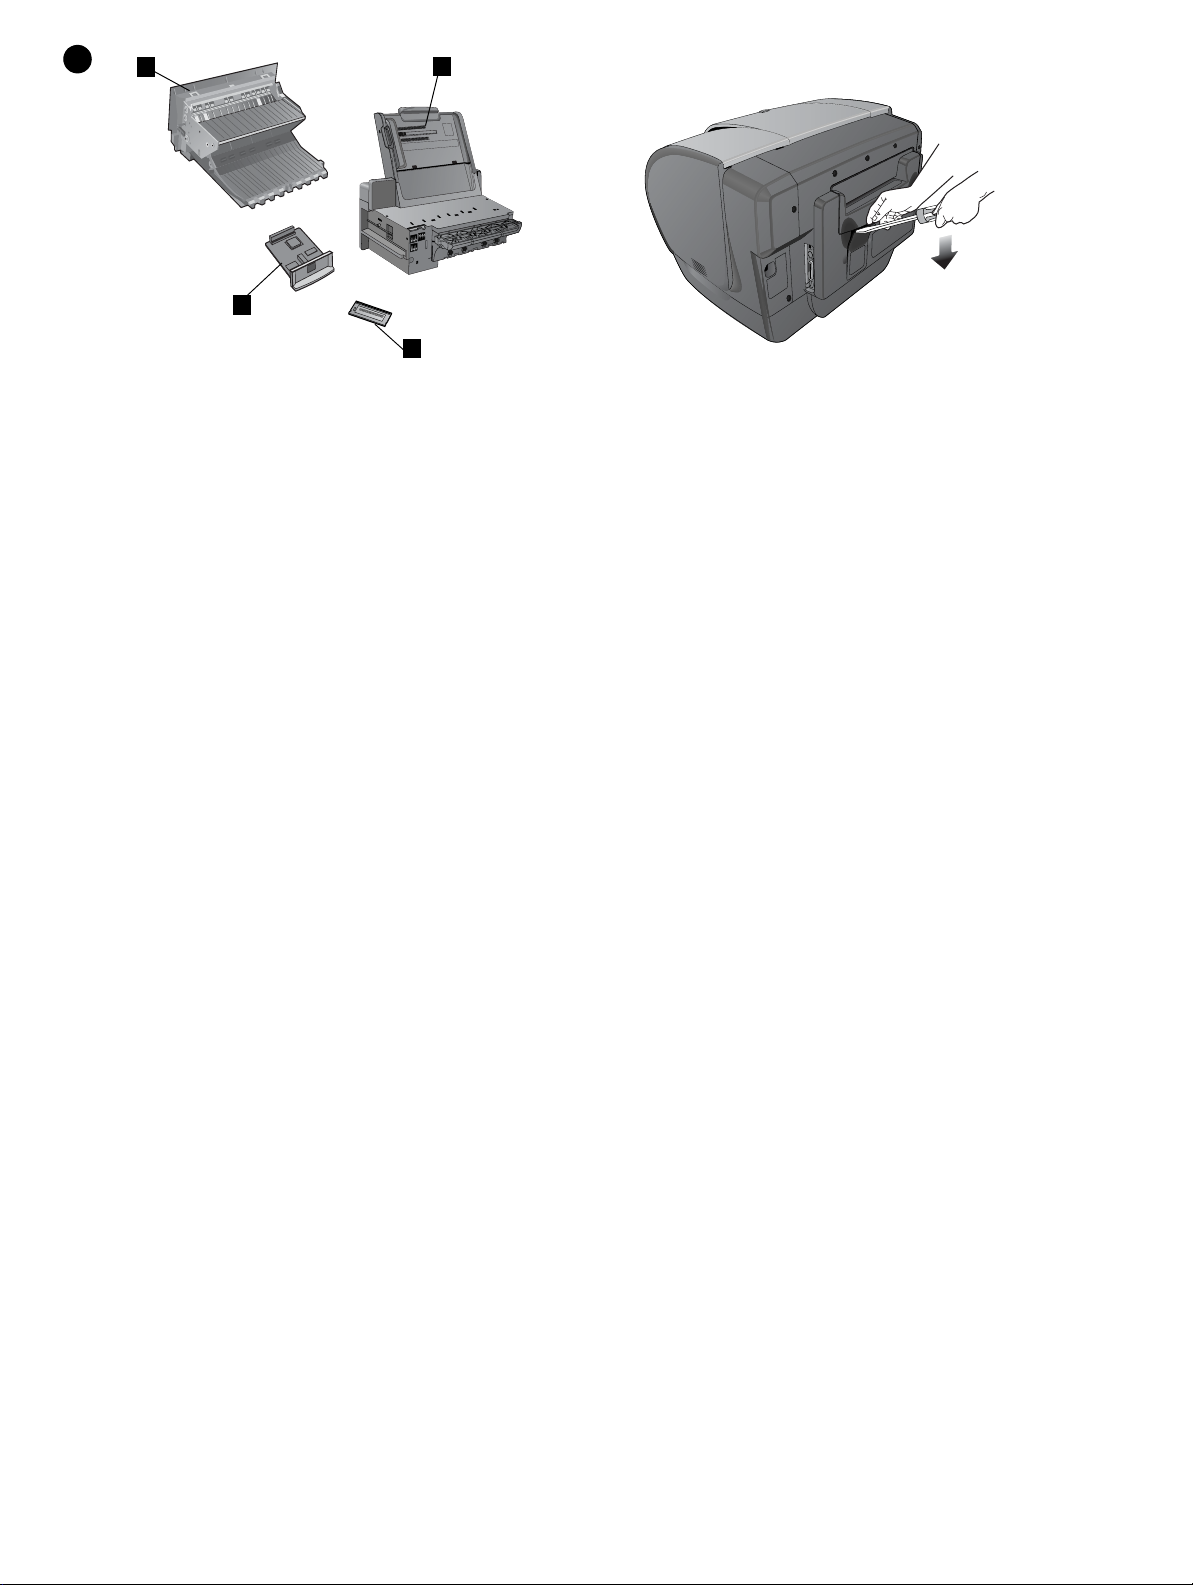
Step 6: Install optional accessories.
If you have purchased other optional accessories* for the printer,
install them at this time.
*1) auto-duplex unit (C8219A), 2) multipurpose tray (C8226A),
3) memory modules (C4287A, C7846A, C9121A),
4) EIO accessories: EIO hard disk (J6054B), EIO Jetdirect print
servers (J6057A, J6058A, J4167A, J3111A, J3110A)
步骤 6: 安装可选附件。
如果您购买了打印机的其它可选附件 *,请在此时进行安装。
*1) 自动双面打印装置 (C8219A), 2) 多用途纸盘 (C8226A),
3) 内存模块 (C4287A, C7846A, C9121A),
4) EIO 附件: EIO 硬盘 (J6054B)、 EIO Jetdirect 打印服务器
(J6057A, J6058A, J4167A, J3111A, J3110A)
단계 6: 액세서리 ( 선택 사양 ) 설치 .
프린터의 다른 액세서리 ( 선택 사양 ) 를 구입한 경우 지금
설치하십시오 .
*1) 자동 양면 인쇄 장치 (C8219A), 2) 다용도 용지함 (C8226A),
3) 메모리 모듈 (C7842A, C7843A, C7845A, C7846A, C9121A),
4) EIO 액세서리 : EIO하드 디스크 (J6054B)(J6057A, J6058A,
J4167A, J3111A, J3110A)
Install DIMMs (optional).
To remove the DIMM cover from the back of the printer, insert a
flathead screwdriver into the top slot. Gently push down on the
screwdriver’s handle with one hand, g rasp the cov er with the other
hand, and remove the cover. Note: For information on installing
other optional accessories, see the documentation that came with
the accessory.
安装 DIMM (可选)。
要从打印机后部卸下 DIMM 盖,请将平头螺丝刀插入顶部插
槽。 一手轻轻地按下螺丝刀手柄,另一手抓住盖板,将盖板卸
下。 注:有关安装其它可选附件的信息,请参阅随附件一起提
供的文档。
DIMM ( 선택 사양 ) 설치 .
프린터 뒤쪽에서 DIMM 을 제거하려면 일자형 드라이버를 슬롯에
넣으십시오 . 한 손으로 드라이버 손잡이를 누른 상태에서 다른 한
손으로 덥개를 잡고 제거하십시오 . 주 : 기타 다른 선택형
액세서리에 대한 정보는 액세서리에 동봉된 설명서를
참조하십시오 .
步驟 6: 安裝可選附件。
如果您購買了印表機的其他選用附件 *,請在此時進行安裝。
*1) 自動雙面列印裝置 (C8219A),2) 多用途紙匣 (C8226A),
3) 記憶體模組 (C4287A, C7846A, C9121A),4) EIO 附件:
EIO 硬碟 (J6054B)、EIO Jetdirect 列印伺服器 (J6057A、
J6058A、J4167A、J3111A、J3110A)
安裝 DIMM (可選)。
若要從印表機後端卸下 DIMM 蓋,請將平頭螺絲起子插入頂部插
槽。 一手輕輕地按下螺絲起子把手,另一手抓住蓋板,將蓋板卸
下。 注:有關安裝其他可選附件的資訊,請參閱隨附件一起提供的
文件。
8
Page 10

CAUTION: Alwa ys wear a grounding wrist strap (or similar device)
when handling sensitive electronic components. Failure to do so
could result in damage to the parts.
English
1) Remove the DIMM from the antistatic package, and then align
the DIMM with an empty DIMM slot. 2) Insert and press the DIMM
into the slot until it snaps into place. 3) Insert the bottom of the
cover into the printer, and then gently apply pressure to the top of
the cover until the cover snaps into place.
注意:处理敏感电子部件时,请始终戴着接地腕带 (或类似
设备)。 否则会损坏部件。
简
体
中
文
주의 : 민감한 전자 부품을 다룰 때는 항상 접지 손목띠 ( 또는
유사 장치 ) 를 착용하십시오 . 이렇게 하지 않으면 부품이 손상될
수 있습니다 .
한
국
어
注意: 處理敏感電子部件時,請一律戴著接地腕帶 (或類似
裝置)。 否則會損壞部件。
繁
體
中
文
1) 从防静电包装中卸下 DIMM,然后将 DIMM 与空 DIMM 插槽
对齐。 2) 插按 DIMM 使其进入插槽,直到锁定到位。 3) 将盖板
底部插入打印机,然后在盖板顶部轻轻用力,直到盖板锁定
到位。
1) 정전기 방지용 포장에서 DIMM 을 꺼낸 다음 빈 DIMM 슬롯에
DIMM 을 맞춥니다 . 2) DIMM 을 슬롯에 삽입하고 딸깍 소리가
날 때까지 밀어 넣습니다 . 3) 덮개 밑부분을 프린터에 끼우고 딸깍
소리가 날때까지 살짝 누릅니다 .
1) 從防靜電包裝中卸下 DIMM,然後將 DIMM 與空 DIMM 插槽
對齊。 2) 插按 DIMM 使其進入插槽並鎖入定位。 3) 將蓋板底部
插入印表機,然後在蓋板頂部輕輕用力,直到蓋板鎖入定位。
9
Page 11

7
8
10
9
8
7
Step 7: Connect the power cable and turn on the printer.
1) Connect the power cord to the printer and an AC power
receptacle. 2) Press the po wer b utton on the LCD control panel to
turn on the printer. Note: Do not connect the printer to the
computer until you are prompted to do so by the installer software.
步骤 7: 连接电源线,打开打印机。
1) 将电源线连接到打印机和交流电源插座。 2) 在 LCD 控制面
板上按电源按钮,打开打印机。 注:不要将打印机连接到计算
机上,除非安装软件提示进行此操作。
2
1
3
4
6
5
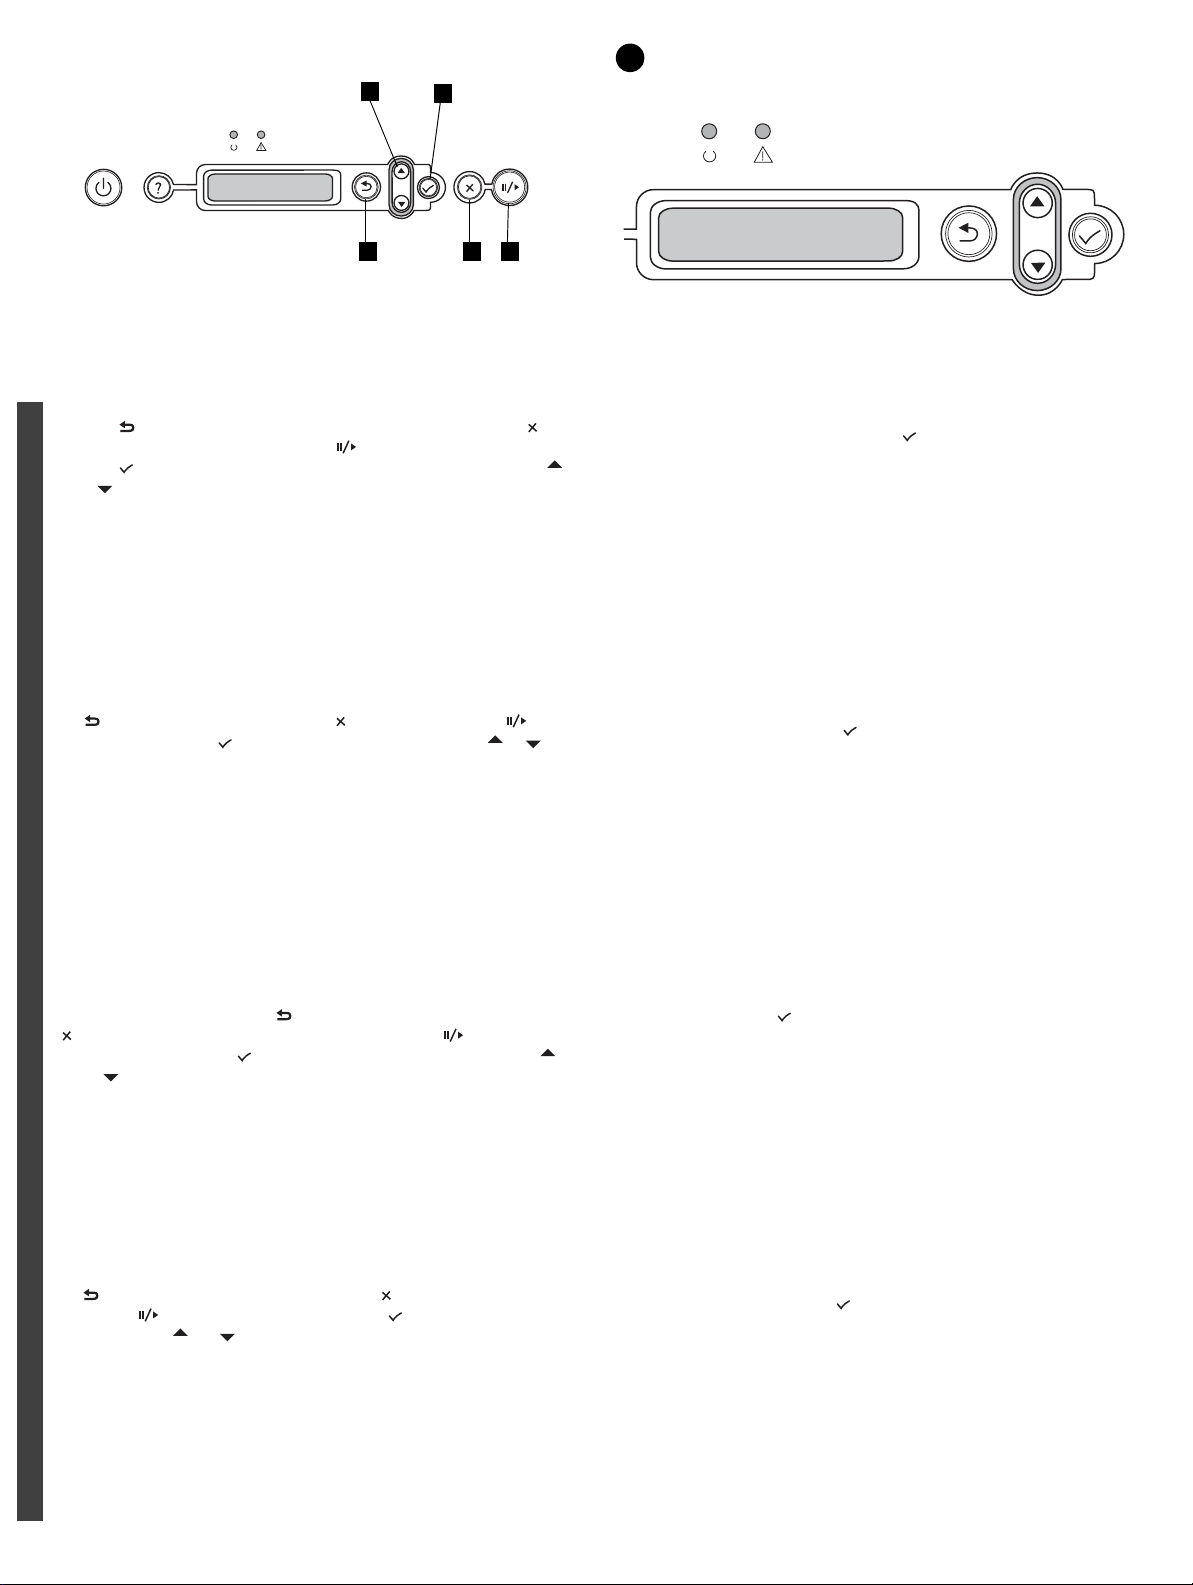
Step 8: Identify LCD control panel items.
1) Power button, 2) Help button, 3) LCD display, 4) Back button,
5) Up and Down arrow buttons, 6) Select button,
7) Pause/Resume button, 8) Cancel Job button,
9) Attention light, 10) Ready light
步骤 8: 识别 LCD 控制面板项目。
1) 电源按钮, 2) 帮助按钮, 3) LCD 显示屏, 4) 返回按钮,
5) 向上和向下箭头按钮, 6) 选择按钮, 7) 暂停 / 恢复按钮,
8) 取消作业按钮, 9) 提示指示灯, 10) 就绪指示灯
단계 7: 프린터 연결 및 전원 켜기 .
1) 전원 코드를 프린터 및 교류 (AC) 전원 콘센트에 연결합니다 .
2) LCD 제어판의 전원 단추를 눌러 프린터를 켭니다 . 주 : 설치
소프트웨어가 프린터를 컴퓨터에 연결하라는 메시지를 표시할
때까지는 프린터를 컴퓨터에 연결하지 마십시오 .
步驟 7: 連接電源線並啟動印表機。
1) 將電源線連接到印表機和交流電源插座。 2) 在 LCD 控制面板上
按電源按鈕,啟動印表機。 注: 切勿將印表機連接到電腦上,除非
安裝軟體已經提示您進行此操作。
단계 8: LCD 제어판 항목 식별 .
1) 전원 단추 , 2) 도움말 단추 , 3) LCD 디스플레이 , 4) 뒤로 단추 ,
5) 위와 아래 화살표 단추 , 6) 선택 단추 , 7) 일시 중지 /
재실행 단추 , 8) 작업 취소 단추 , 9) 주의 표시등 ,
10) 준비 표시등
步驟 8: 識別 LCD 控制面板項目。
1) 電源按鈕,2) 說明按鈕,3) LCD 顯示器,4) 返回按鈕,
5) 向上和向下箭頭按鈕,6) 選取按鈕,7) 暫停/恢復按鈕,
8) 取消作業按鈕,9) 提示指示燈,10) 就緒指示燈
10
Page 12
5
1 2 3
4
9
Navigating the LCD control panel menus.
1) The button returns you to the previous menu. 2) The
button cancels a selection. 3) The button exits all menus.
4) The button enters the menus and selects items. 5) The
and buttons scroll through menus.
English
浏览 LCD 控制面板菜单。
1) 按钮让您返回前一菜单。 2) 按钮取消选择。 3) 按钮
退出所有菜单。 4) 按钮进入菜单并选择项目。 5) 和按钮
在菜单之间滚动。
简
体
中
文
LCD 제어판 메뉴 사용 .
1) 이전 메뉴로 돌아가려면 을 누릅니다. 2) 선택을 취소하려면
버튼을 누릅니다 . 3) 모든 메뉴를 종료하려면 을 누릅니다 .
4) 항목을 선택하려면 을 누릅니다 . 5) 메뉴를 이동하려면
한
또는 을 누릅니다 .
국
어
Step 9: Set the LCD control panel language.
1) On the LCD control panel, press , select CONFIGURE DEVICE,
and then select SYSTEM SETUP. 2) Select LANGUAGE, and then select
the language for the LCD control panel.
步骤 9: 设置 LCD 控制面板语言。
1) 在 LCD 控制面板上,按 ,选择配置设备,然后选择
系统设置。 2) 选择语言,然后选择用于 LCD 控制面板的语言。
단계 9: LCD 제어판 언어 설정 .
1) LCD 제어판에서 을 누르고 CONFIGURE DEVICE 를 선택한
다음 SYSTEM SETUP 을 선택합니다 . 2) LANGUAGE 를 선택한 다음
LCD 제어판 언어를 선택합니다 .
瀏覽 LCD 控制面板功能表。
1) 按鈕可讓您返回前一個功能表。 2) 按鈕可取消某一項選取
作業。 3) 按鈕可結束所有功能表。 4) 按鈕可進入功能表並
選取項目。 5) 和 按鈕可在功能表之間捲動。
繁
體
中
文
步驟 9: 設定 LCD 控制面板語言。
1) 在 LCD 控制面板上,按 ,選取設定裝置,然後選取
系統設定。 2) 選取語言,然後選取用於 LCD 控制面板的語言。
11
Page 13

10
Step 10: Load paper in Tray 2 or optional Tray 3.
1) Grasp the handle under the front of the tray, and pull the tray
out until it stops. Note: Do not pull the tray completely out of the
printer. 2) Slide the paper length guide and paper width guide to
their outermost positions.
步骤 10: 将纸张装入纸盘 2 或可选纸盘 3。
1) 抓住纸盘前部下面的手柄,拉出纸盘,直到停止。 注:不要
将纸盘从打印机中完全抽出。 2) 将纸张长度导板和纸张宽度导
板滑到最外侧位置。
단계 10: 용지함 2 또는 용지함 3 ( 선택 사양 ) 에 용지 공급 .
1) 용지함 앞쪽 아래에 있는 손잡이를 잡고 용지함이 멈출 때까지
잡아 당깁니다 . 주 : 용지함을 프린터 밖으로 완전히 당기지
마십시오 . 2) 용지 길이 조정대 및 너비 조정대를 가장 바깥쪽으로
밉니다 .
3) Place up to 300 sheets of paper (or 50 transparencies) into
Tray 2 or up to 700 sheets of paper (or 50 transparencies) into
optional Tray 3. See the onscreen user’s guide for more media
specifications. 4) Slide the paper length guide and paper width
guide until they fit snugly against the media. 5) Slide the tray into
the printer until the tray closes completely.
3) 纸盘 2 最多可装 300 页纸张 (或 50 张投影胶片),可选纸
盘 3 最多可装 700 页纸张 (或 50 张投影胶片)。有关更多的
介质规格,请参阅联机用户指南。 4) 滑动纸张长度导板和纸张
宽度导板,直到紧贴介质。 5) 将纸盘滑入打印机,直到纸盘完
全关闭。
3) 용지함 2 에 최대 300 장의 용지 ( 또는 50 장의 투명 용지 ) 또는
용지함 3 에 최대 700 장의 용지 ( 또는 50 장의 투명 용지 ) 를 올려
놓습니다 . 4) 용지에 맞게 용지 길이 조정대 및 너비 조정대를
밉니다 . 5) 용지함이 완전히 닫힐 때까지 용지함을 프린터에 밀어
넣습니다 .
步驟 10: 將紙張裝入紙匣 2 或選用紙匣 3。
1) 抓住紙匣前端下面的把手,拉出紙匣到底。 注: 切勿將紙匣從
印表機中完全抽出。 2) 將紙張長度導軌和紙張寬度導軌滑到最外
側位置。
3) 紙匣 2 最多可裝 300 頁紙張 (或 50 張投影片),選用紙匣 3
最多可裝 700 頁紙張 (或 50 張投影片)。有關其他的媒介規格,
請參閱聯機使用者手冊。 4) 滑動紙張長度導軌和紙張寬度導軌,
直到導軌緊貼著媒介。 5) 將紙匣滑入印表機,直到紙匣完全關閉。
12
Page 14

11
Step 11: Install the ink cartridges.
1) Lift the ink cartridge cover . 2) Remove each ink cartridge* from
its package.
*Black ink cartridge, 69 ml (C4844A); Cyan ink cartridge, 55 ml
(C4804A); Magenta ink cartridge, 55 ml (C4805A); Yellow ink
cartridge, 55 ml (C4806A)
English
步骤 11: 安装墨盒。
1) 提起墨盒盖。 2) 去除每个墨盒 * 的包装材料。
* 黑色墨盒, 69 毫升 (C4844A) ;青色墨盒, 55 毫升
(C4804A) ;品红色墨盒, 55 毫升 (C4805A) ;黄色墨盒,
简
55 毫升 (C4806A)
体
中
文
단계 11: 잉크 카트리지 설치 .
1) 잉크 카트리지 * 덮개를 들어 올립니다 . 2) 각 잉크 카트리지의
포장을 풉니다 .
* 검정색 잉크 카트리지 , 69 ml(C4844A); 청록색 잉크 카트리지 ,
한
55 ml(C4804A); 자홍색 잉크 카트리지 , 55 ml(C4805A); 노랑색
국
잉크 카트리지 , 55 ml(C4806A)
어
3) Align the arrow on each cartridge with the arrow on its
color-coded slot, and then insert the cartridge into the slot.
4) To ensure prop er contact, press firmly on the cartridges until
they snap into place.
3) 将每个墨上的箭头和其颜色代码插槽上的箭头对齐,然后将
墨盒插入插槽。 4) 要确保正确的接触位置,请用力按下墨盒,
直到卡到位为止。
3) 각 카트리지에 있는 화살표를 색상이 지정된 슬롯에 있는
화살표에 맞춘 다음 카트리지를 슬롯에 끼웁니다 .
4) 잘 접촉되도록 하려면 딸칵 소리가 날 때까지 카트리지를
세게 누릅니다 .
步驟 11: 安裝墨匣。
1) 打開墨匣蓋。 2) 移除每個墨匣 * 的包裝材料。
* 黑色墨匣,69 毫升 (C4844A);青色墨匣,55 毫升 (C4804A);
洋紅色墨匣,55 毫升 (C4805A);黃色墨匣,55 毫升 (C4806A)
繁
體
中
文
3) 將每個墨匣上的箭頭和其顏色代碼插槽上的箭頭對齊,然後將
墨匣插入插槽。 4) 為了確保正確的接觸位置,請用力按下墨匣,
直到卡住定位為止。
13
Page 15

12
Step 12: Install the printheads.
Note: Before you open the printhead cover, make sure that the
printer is plugged in and turned on. Otherwise, you cannot install
the printheads.
1) Open the printhead cover. 2) Lift the printhead latch from the
rear, and then pull it forward and down to release the hook from
the metal catch. 3) Lift and push the latch toward the back of the
printer.
步骤 12: 安装打印头。
注: 打开打印头盖之前,确保打印机已插上电源并已开机。
否则,无法安装打印头。
1) 打开打印头盖。 2) 从后面提起打印头锁栓,然后将其向前下
方拉动,以使锁钩从金属扣中松开。 3) 抬起锁栓,并将其推向
打印机的背面。
단계 12: 프린트 헤드 설치 .
주 : 프린트 헤드 덮개를 열기 전에 프린터의 플러그를 꽂고
전원을 켜십시오 . 그렇지 않으면 프린트 헤드를 설치할 수
없습니다 .
1) 프린트 헤드 덮개를 엽니다 . 2) 뒤쪽에서 프린트 헤드
걸쇠를 들어 올린 다음 앞쪽 아래로 당겨 금속 고리를 풉니다 .
3) 걸쇠를 들어 올리고 프린터 뒤쪽으로 누릅니다 .
4) Remove each printhead* from its package, and then remove
the protective tape from each printhead. 5) Remove the plastic
cap from each printhead. 6) Insert each pr inthead into its
color-coded slot, and then press firmly on each printhead to
ensure proper contact after installation.
*Black printhead (C5023A), Cyan printhead (C5024A), Magenta
printhead (C5025A), Yellow printhead (C5026A)
4) 去除每个打印头 * 的包装材料,然后去除打印头上的保护胶
带。 5) 去除每个打印头塑料帽。 6) 将每个打印头插入其颜色代
码插槽,然后在完成安装之后用力按下每个打印头,以确保接
触良好。
* 黑色打印头 (C4810A) ;青色打印头 (C4811A) ;品红色打印
头 (C4812A) ;黄色打印头 (C4813A)
4) 패키지에서 프린트 헤드 * 를 꺼낸 다음 프린트 헤드에서
보호용 테이프를 떼어냅니다 . 5) 각 프린트 헤드에 있는 플라스틱
탭을 탭에 있는 화살표 표시대로 당겨 제거합니다 . 6) 각 프린트
헤드를 색상으로 지정된 슬롯에 끼운 다음 설치 후에 잘
접촉되도록 각 프린트 헤드를 세게 누릅니다 .
* 검정색 프린트 헤드 (C5024A), 청록색 프린트 헤드 (C5023A)
자홍색 프린트 헤드 (C5025A), 노랑색 프린트 헤드 (C5026A)
步驟 12: 安裝印字頭。
注: 打開列印噴頭蓋之前,請確保印表機已插上電源並已開機。
否則無法安裝印字頭。
1) 打開印字頭蓋。 2) 從後面提起印字頭鎖栓,然後將其向前下方
拉動,讓鎖勾與金屬扣鬆開。 3) 提起鎖栓,並將其推向印表機的
背面。
4) 移除每個印字頭 * 的包裝材料,然後移除印字頭上的保護膠帶。
5) 拆除每個列印噴頭的塑膠護蓋。 6) 將每個印字頭插入其顏色代
碼插槽,然後在完成安裝之後用力按下每個印字頭,以確保接觸
良好。
* 黑色印字頭 (C4810A);青色印字頭 (C4811A);紫紅色印字頭
(C4812A);黃色印字頭 (C4813A)
14
Page 16

13
7) Pull the latch all the way forward and down, engage the catch
with the hook, and then push the latch towards the back of the
printer. Note: You might have to apply some pressure to close the
latch. 8) Close the printhead cover and the ink cartridge cover.
The printer aligns the printheads and prints alignment page and
calibration pages. This process takes about 20 minutes.
English
7) 将锁栓向前下方拉动,用锁钩钩住金属扣,然后将锁栓向打
印机背面推动。 注:可能需要用些力才能合上锁栓。 8) 关闭打
印头盖和墨盒盖。 打印机校准打印头并打印校准页。 此过程大
约需要 20 分钟。
简
体
中
文
7) 걸쇠를 앞쪽 아래로 당겨 고리를 채운 다음 걸쇠를 프린터
뒤에서 앞쪽으로 누릅니다 . 주 : 걸쇠를 닫는 데 힘이 약간
듭니다 . 8) 프린트 헤드 덮개와 잉크 카트리지 덮개를 닫습니다 .
프린터가 프린트 헤드를 정렬하고 정렬 페이지를 출력합니다 .
한
이 과정은 약 20 분 정도 소요됩니다 .
국
어
Step 13: Print a configuration page.
On the LCD control panel, press , select INFORMATION, and then
select PRINT CONFIGURATION to print a configuration page.
步骤 13: 打印配置页。
在 LCD 控制面板,按 ,选择信息,然后选择打印配置以打
印配置页。
단계 13: 구성 페이지 인쇄 .
LCD 제어판에서 을 누르고 INFORMATION 을 선택한 다음 PRINT
CONFIGURATION 을 선택하여 구성 페이지를 인쇄합니다 .
7) 將鎖栓向前下方拉動,用鎖勾勾住金屬扣,然後將鎖栓向印表
機背面推動。 注:您可能需要用些力才能合上鎖栓。 8) 關閉列印
噴頭蓋和墨匣蓋。 印表機會校準列印噴頭並列印校準頁。 此過程大
約需要 20 分鐘。
繁
體
中
文
步驟 13: 請列印組態頁。
在 LCD 控制面板上,按 ,選取資訊,然後選取列印組態以列印
組態頁。
15
Page 17

14
Step 14: Install the software and connect the printer.
Insert the Starter CD into the CD-ROM drive, and then follow the
appropriate procedure for your operating system and connection
(USB, parallel, or network). Note: Do not connect the printer to
the computer until you are prompted to do so by the installer
software.
步骤 14: 安装软件并连接打印机。
将 Starter CD 插入 CD-ROM 驱动器,然后按照适合您操作
系统和连接方式 (USB、并行或网络)的步骤进行操作。
注:不要将打印机连接到计算机上,除非安装软件提示进行此
操作。
단계 14: 소프트웨어 설치 및 프린터 연결 .
Starter CD 를 CD-ROM 드라이브에 삽입한 다음 운영 체제와
연결 (USB, 병렬 또는 네트워크 ) 에 적합한 절차를 따릅니다 .
설치 소프트웨어가 프린터를 컴퓨터에 연결하라는 메시지를
표시할 때까지는 프린터를 컴퓨터에 연결하지 마십시오 .
주 : 설치 소프트웨어가 프린터를 컴퓨터에 연결하라는 메시지를
표시할 때까지는 프린터를 컴퓨터에 연결하지 마십시오 .
When prompted by the installer software, connect the printer
using either a network cable (included only with the HP Business
Inkjet 3000n and 3000dtn), a parallel cable, or a USB cable.
Connections:
Direct to network. Connect one end of the network cable to the
RJ-45 port. Connect the other end to the network.
安装软件提示时,用网络电缆 (仅 HP Business Inkjet 3000n
and 3000dtn 提供)、并行电缆或 USB 电缆连接打印机。
连接:
直接连到网络。 将网络电缆的一端连接到 RJ-45 端口, 另一端
连接到网络。
설치 소프트웨어가 프린터를 연결하라는 메시지를 표시하면 ,
네트워크 케이블 (HP Business Inkjet 3000n 및 3000dtn 에만
포함된 ), 병렬 케이블 , 또는 USB 케이블을 이용하여 프린터를
연결하십시오 .
연결 :
네트워크에 직접 연결 . 네트워크 케이블의 한 쪽 끝을 RJ-45
포트에 연결하고 다른 쪽은 네트워크에 연결합니다 .
步驟 14: 安裝軟體並連接印表機。
將 Starter CD 插入 CD 光碟機,然後遵循適合您作業系統和連接
方式 (USB 連接、平行連接或網路連接)的步驟進行操作。
注: 切勿將印表機連接到電腦上,除非安裝軟體已經提示您進行此
操作。
在安裝軟體提示您時,使用網路電纜 (僅隨 HP Business
Inkjet 3000n and 3000dtn 一起提供)、平行電纜或 USB 電纜
連接印表機。
連接:
直接連到網路。 將網路電纜的一端連接到 RJ-45 埠。 將另一端連
接到網路。
16
Page 18

Network print server. Connect one end of a network cable into
the server. Connect the other end to the network. Connect one
end of another network cable to the printer and the other end to
the network.
English
Peer to peer (direct to network). Connect one end of a network
cable to your computer. Connect the other end to the network.
Connect one end of another network cable to the printer and the
other end to the network.
网络打印服务器。将网络电缆的一端连接到服务器, 另一端连
接到网络。 将另一网络电缆的一端连接到打印机,另一端连接
到网络。
简
体
中
文
네트워크 프린트 서버 . 네트워크 케이블의 한 쪽 끝을 서버에
연결하고 다른 쪽은 네트워크에 연결합니다 . 다른 네트워크
케이블의 한 쪽 끝을 프린터에 연결하고 다른 쪽은 네트워크에
연결합니다 .
한
국
어
網路列印伺服器。 將網路電纜的一端連接到伺服器。 將另一端連
接到網路。 將另一網路電纜的一端連接到印表機,另一端連接到
網路。
繁
體
中
文
对等式连接 (直接连到网络) 。 将网络电缆的一端连接到计算
机, 另一端连接到网络。 将另一网络电缆的一端连接到打印
机,另一端连接到网络。
피어 투 피어 ( 네트워크에 직접 연결 ). 네트워크 케이블의 한
쪽 끝을 컴퓨터에 연결하고 다른 쪽은 네트워크에 연결합니다 .
또 다른 네트워크 케이블의 한 쪽 끝을 프린터에 연결하고 다른
쪽은 네트워크에 연결합니다 .
對等式連接 (直接連到網路)。 將網路電纜的一端連接到電腦。
將另一端連接到網路。 將另一網路電纜的一端連接到印表機,
另一端連接到網路。
17
Page 19

Peer to peer (parallel). Connect two or more computers to the
network hub using network cables. Connect one end of a parallel
cable to the printer. Connect the other end to a computer.
Parallel connection. Connect the parallel cable to the proper port
on the printer. Connect the other end of the cable to the computer.
对等式连接 (并行) 。 用网络电缆将两台或多台计算机连接到
网络集线器。 将并行电缆的一端连接到打印机,另一端连接到
计算机。
피어 투 피어 ( 병렬 ). 두 개 이상의 컴퓨터를 네트워크 케이블을
이용하여 네트워크 허브에 연결합니다 . 병렬 케이블의 한 쪽은
프린터에 다른 쪽은 컴퓨터에 연결합니다 .
對等式連接 (平行)。 用網路電纜將兩台或多台電腦連接到網路集
線器。 將平行電纜的一端連接到印表機,另一端連接到電腦。
并行连接。将并行电缆连接到打印机上的正确端口, 将电缆的
另一端连接到计算机。
병렬 연결 . 병렬 케이블을 프린터의 올바른 포트에 연결하고
케이블의 다른 쪽 끝을 컴퓨터에 연결합니다 .
平行連接。將平行電纜連接到印表機上相應的連接埠。 再將電纜另
一端連接到電腦。
18
Page 20
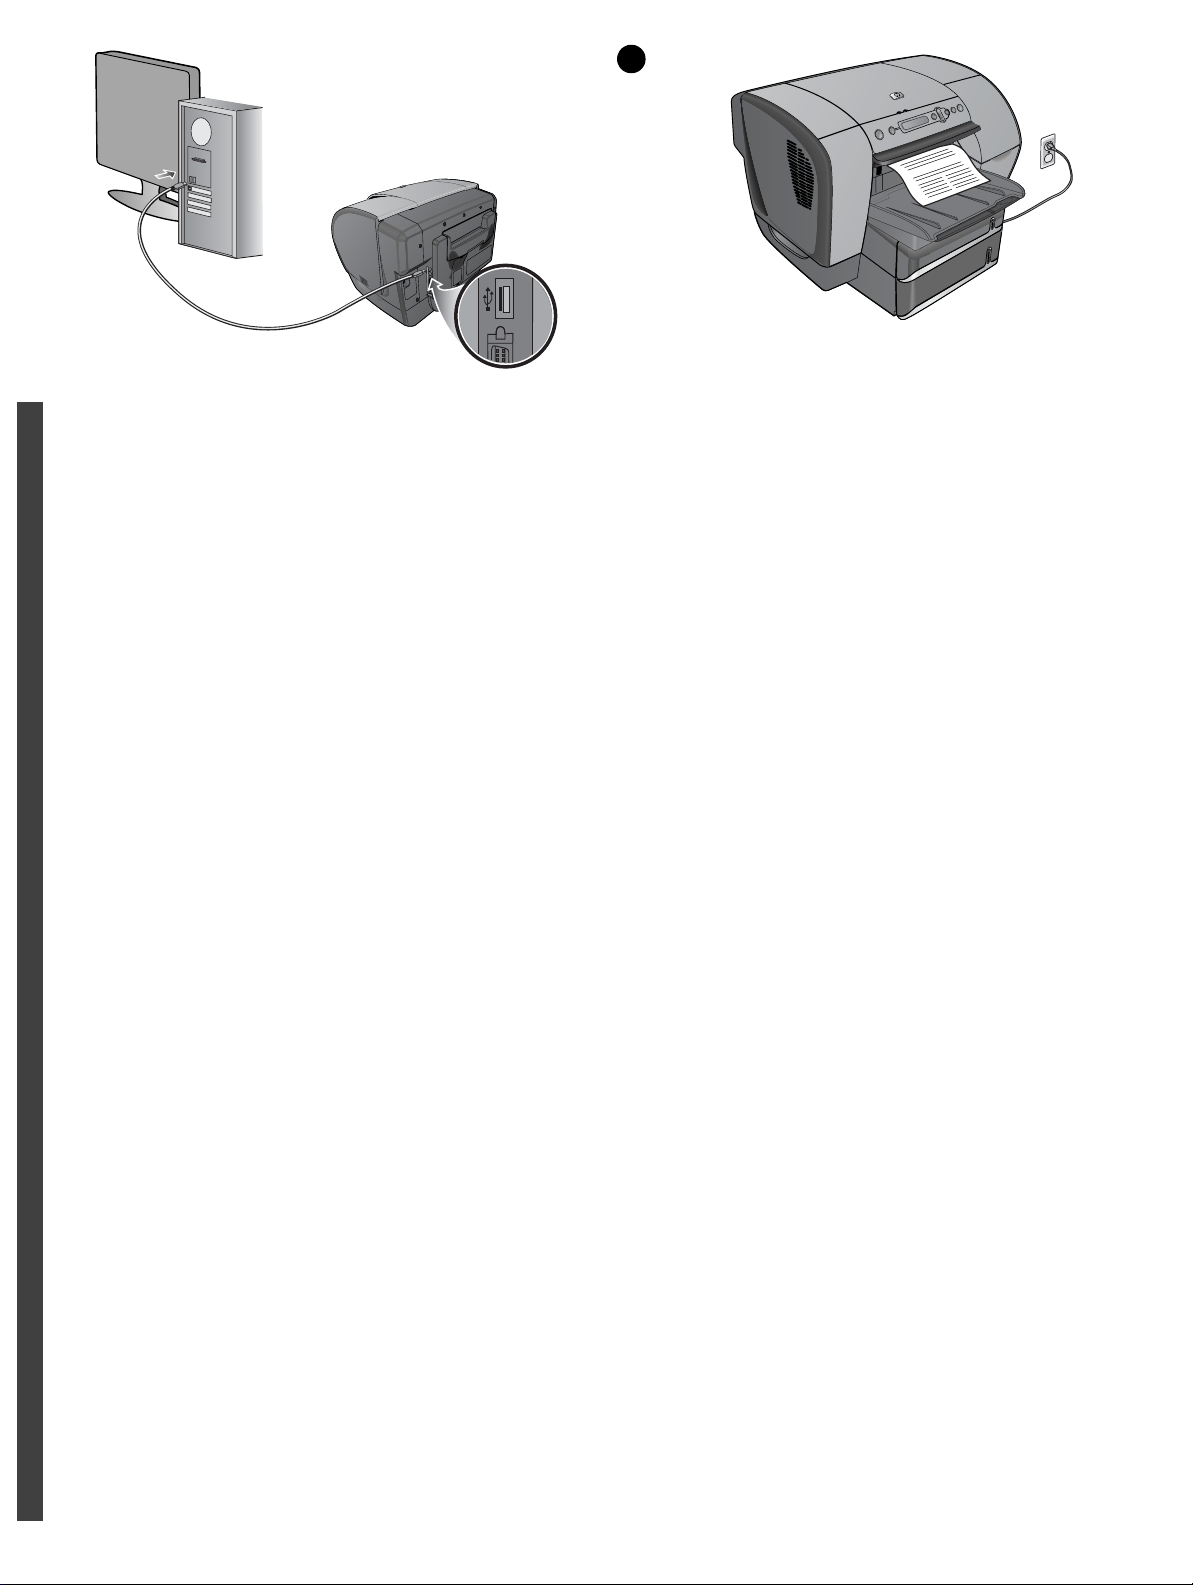
15
USB connection. Connect the USB cable to the proper port on
the printer. Connect the other end of the cable to the computer.
English
USB 连接。将 USB 电缆连接到打印机上的正确端口, 将电缆
的另一端连接到计算机。
简
体
中
文
USB 연결 . USB 케이블을 프린터의 올바른 포트에 연결하고
케이블의 다른 쪽 끝을 컴퓨터에 연결합니다 .
Step 15: Test the software installation.
After you complete the software installation and connect the
printer to the computer, print a document from an application you
use frequently.
步骤 15: 测试软件安装。
完成软件安装并将打印机连接到计算机后,请从经常使用的
应用程序中打印一份文档。
단계 15: 소프트웨어 설치 테스트 .
소프트웨어 설치를 완료하고 프린터를 컴퓨터에 연결한 후에
자주 사용하는 응용 프로그램에서 문서를 인쇄합니다 .
한
국
어
USB 連接。將 USB 電纜連接到印表機上適當的連接埠。 再將電纜
另一端連接到電腦。
繁
體
中
文
步驟 15: 測試軟體安裝。
完成軟體安裝並將印表機連接到電腦後,請從經常使用的應用程式
中列印一份文件。
19
Page 21

16
Step 16: Register the printer.
Register the printer to receive important support and technical
information. If you did not register the printer while installing the
software, you can register at http://www.register.hp.com
.
步骤 16: 注册打印机。
注册打印机以接收重要的支持和技术信息。 如果在安装软件
时未注册打印机,则可在 http://www.register.hp.com
上进行
注册。
단계 16: 프린터 등록 .
중요한 지원 및 기술 정보를 받아 보려면 프린터를 등록하십시오 .
http://www.register.hp.com
에서 등록할 수 있습니다 .
Congratulations!
Your printer is ready to use. For information about using the
printer and troubleshooting, refer to the following resources:
the onscreen user’s guide on the Starter CD
hp instant support (For more information, see the
onscreen user’s guide.)
the product support site at
http://www.hp.com/support/businessinkjet3000
the HP customer support card (in box)
恭喜您!
打印机已准备就绪可以使用了。 有关使用打印机和故障排除的
信息,请参阅以下资源:
Starter CD 上的联机用户指南
hp instant support (有关详细信息,请参阅屏幕上的用户
指南。)
产品支持网站
http://www.hp.com/support/businessinkjet3000
HP 客户支持卡 (在包装箱中)
축하합니다 !
프린터를 사용할 준비가 되었습니다 . 프린터 사용과 문제 해결에
대한 자세한 내용은 다음 리소스를 참조하십시오 .
Starter CD 에 있는 온라인 사용자 설명서
hp instant support( 자세한 사항은 화면상의 사용자 설명서
참조 )
http://www.hp.com/support/businessinkjet3000 의 제품 지원
사이트
HP 고객 지원 카드 ( 상자에 포함 )
步驟 16: 註冊印表機。
註冊印表機以接收重要的支援和技術資訊。 如果在安裝軟體時未註
冊印表機,則可在 http://www.register.hp.com
上進行註冊。
恭喜您!
您的印表機可以使用了。 有關使用印表機和疑難排解的資訊,請參
閱以下資源:
Starter CD 上的聯機使用者手冊
hp instant support (有關詳細資訊,請參閱聯機使用者
手冊。)
產品支援網站 http://www.hp.com/support/businessinkjet3000
HP 客戶支援卡 (在包裝箱中)
20
Page 22

Hewlett-Packard Limited Warranty Statement
HP product Duration of Limited Warranty
Software 1 year
Accessories 1 year
Print cartridges 90 days
Printer peripheral hardware (see below for details) 1 year
Extent of Limited Warranty
1 Hewlett-Packard warrants to the end-user customer that the HP
products specified above will be free from defects in materials and
workmanship for the duration specified above, which dur ation begins
on the date of purchase by the customer.
2 For software products, HP's limited warranty applies only to a failure
to execute programming instructions. HP does not warrant that the
operation of any product will be uninterrupted or error free.
3 HP's limited warranty covers only those defects that arise as a result
of normal use of the product, and does not cover any other problems,
including those that arise as a result of:
a Improper maintenance or modification;
b Software, media, parts, or supplies not provided or supported by
HP;
c Operation outside the product's specifications.
d Unauthorized modification or misuse.
4 For HP printer products, the use of a non-HP print cartridge or a
refilled print cartridge does not affect either the warranty to the
customer or any HP support contract with the customer. However, if
printer failure or damage is attributable to the use of a non-HP or
refilled print cartridge, HP will charge its standard time and materials
charges to service the printer for the particular failure or damage.
5 If HP receives, during the applicable warranty period, notice of a
defect in any product which is covered by HP's warranty, HP shall
either repair or replace the product, at HP's option.
6 If HP is unable to repair or replace, as applicable, a defectiv e product
which is covered by HP's warranty, HP shall, within a reasonable time
after being notified of the defect, refund the purchase price for the
product.
7 HP shall have no obligation to repair, replace, or refund until the
customer returns the defective product to HP.
8 Any replacement product may be either new or like new, provided
that it has functionality at least equal to that of the product being
replaced.
9 HP products may contain remanufactured parts, components, or
materials equivalent to new in performance.
10 HP's Limited Warranty Statement is valid in any country/region where
the covered HP product is distributed by HP. Contracts for additional
warranty services, such as on-site service, are available from any
authorized HP service facility in countries/regions where the product
is distributed by HP or by an authorized importer.
Limitations of Liability
1 To the extent allowed by local law, the remedies provided in this
Warranty Statement are the customeris sole and exclusive remedies.
2 TO THE EXTENT ALLOWED BY LOCAL LAW, EXCEPT FOR THE
OBLIGATIONS SPECIFICALLY SET FORTH IN THIS WARRANTY
STATEMENT, IN NO EVENT SHALL HP OR ITS THIRD PARTY
SUPPLIERS BE LIABLE FOR DIRECT, INDIRECT, SPECIAL,
INCIDENTAL, OR CONSEQUENTIAL DAMAGES, WHETHER
BASED ON CONTRACT, TORT, OR ANY OTHER LEGAL THEORY
AND WHETHER ADVISED OF THE POSSIBILITY OF SUCH
DAMAGES.
Local Law
1 This Warranty Statement gives the customer specific legal rights.
The customer may also have other rights which vary from state to
state in the United States, from province to province in Canada, and
from country/region to country/region elsewhere in the world.
2 To the extent that this Warranty Statement is inconsistent with local
law, this Warranty Statement shall be deemed modified to be
consistent with such local law. Under such local law, certain
disclaimers and limitations of this Warranty Statement may not apply
to the customer. For example, some states in the United States, as
well as some governments outside the United States (including
provinces in Canada), may:
a Preclude the disclaimers and limitations in this Warranty
Statement from limiting the statutory rights of a customer (e.g. the
United Kingdom);
b Otherwise restrict the ability of a manufacturer to enforce such
disclaimers or limitations; or
c Grant the customer additional warranty rights, specify the
duration of implied warranties which the manufacturer cannot
disclaim, or allow limitations on the duration of implied warranties.
3 FOR CONSUMER TRANSACTIONS IN AUSTRALIA AND NEW
ZEALAND, THE TERMS IN THIS WARRANTY STATEMENT,
EXCEPT TO THE EXTENT LAWFULLY PERMITTED, DO NOT
EXCLUDE, RESTRICT, OR MODIFY, AND ARE IN ADDITION TO,
THE MANDATORY STATUTORY RIGHTS APPLICABLE TO THE
SALE OF THE HP PRODUCTS TO SUCH CUSTOMERS.
Limitations of Warranty
TO THE EXTENT ALLOWED BY LOCAL LAW, NEITHER HP NOR ITS
THIRD PARTY SUPPLIERS MAKES ANY OTHER WARRANTY OR
CONDITION OF ANY KIND, WHETHER EXPRESS OR IMPLIED
WARRANTIES OR CONDITIONS OF MERCHANTABILITY,
SATISFACTORY QUALITY, AND FITNESS FOR A PARTICULAR
PURPOSE.
Page 23

Hewlett-Packard 有限保修声明
HP 产品
有限保修期限
软件 1 年
附件 1 年
打印墨盒 90 天
打印机外设硬件 (参见以下详细说明)
有限保修范围
1 Hewlett-Packard 向最终用户保证:以上列出的 HP 产品在上述
期限内无材料和工艺瑕疵,期限自客户购买之日起计算。
2 对于软件产品, HP 的有限保修仅适用于无法执行程序指令的故
障。 HP 并不保证任何产品的运行不会中断或没有错误。
3HP 的有限保修仅适用于产品在正常使用情况下出现的瑕疵,
不适用于其它任何问题,包括由以下原因导致的问题:
a 维护或修改不当;
b 非 HP 提供或支持的软件、介质、部件或配件;
c 在产品规格外进行操作;
d 未授权的修改或滥用。
4 在 HP 打印机产品上使用非 HP 打印墨盒或重新装灌的墨盒并
不影响 HP 对客户的保证或与客户的任何 HP 支持合同。 但是,
如果因使用非 HP 或重新装灌的打印墨盒而造成打印机故障或
损坏, HP 将对特定故障或损坏按维修打印机的标准时间和材
料收费。
5 如果在适用的保修期内 HP 收到关于在 HP 保修范围内的任何产
品瑕疵通知,由 HP 决定对产品进行修理或替换。
6 如果 HP 无法在适用的情况下修理或替换 HP 保修范围内的有瑕
疵产品, HP 将在收到瑕疵通知后的合理时间内退还产品的购买
款项。
7 如果用户不把有瑕疵的产品退回 HP, HP 则没有义务修理、
替换或退款。
8 替换的产品可能是全新或近似新的,只要其性能至少与被替换产
品相同。
9HP 产品可能包含性能上相等于新的再生产部件、组件或材料。
10 HP 的 “有限保修声明”在任何由 HP 经销 HP 保修产品的国家 /
地区均有效。 在由 HP 或授权的进口商经销 HP 产品的国家 /
地区,可从任何授权的 HP 维修站得到有关附加保修服务 (如现
场服务)合同。
1 年
责任限制
1 在当地法律允许的范围内,本 “保修声明”中提供的补偿是客户
2 在当地法律允许的范围内,除本 “保修声明”中具体列出的责任
当地法律
1 本 “保修声明”赋予客户特定的法律权利。 客户可能还有其它
2 如果本 “保修声明”与当地法律不一致,则应将本 “保修声明”
3 对于澳大利亚和新西兰的消费者交易,在法律许可的范围内,
唯一且排他的补偿。
外,在任何情况下,对任何直接、间接、特殊、偶然或继起性损
坏,无论是基于合同、侵权、或其他任何法律理论,且无论是否
对此类损坏发生的可能性有无通知, HP 或其第三方供应商均不
承担责任。
权利,具体因美国的州、加拿大的省以及世界其它地方的国家 /
地区而各有不同。
视作修改成与当地法律一致。 在当地法律的制约下,本 “保修声
明”的某些免责声明和限制可能不适用于客户。 例如,在美国的
某些州以及美国以外的一些政府 (包括加拿大的省)可能:
a 阻止本 “保修声明”中的免责声明和限制来限定客户的法定
权利 (如英国);
b 以其他方式限制生产商实施此类免责声明或限制的能力;或者
c 授予客户其他保修权利、指定生产商不能否认的暗示保修期
限、或允许限制暗示保修期限。
本 “保修声明”中的条款并不排除、限制或修改适用于向此类
用户销售的 HP 产品的强制性法定权利,且是对这些法定权利的
补充。
担修限制
在当地法律允许的范围内,HP 及其第三方供应商均不作其他任何保证
或任何种类的要件,无论是对适销性、质量满意度或对特殊用途的适
用性都不作任何明示或暗示的保证或要件。
Page 24

Hewlett-Packard 제한 보증 규정
HP 제품 제한 보증 기간
소프트웨어
액세서리
1 년
1 년
잉크 카트리지 90 일
프린터 주변 장치 하드웨어(자세한 내용은 아래 참조)1 년
제한 보증의 연장
1 Hewlett-Packard는 일반 사용자가 제품을 구입한 날로부터 정해진 기
간 동안 상기 hp 제품이 재료와 기술에 있어 결함이 없음을 보증합니
다.
2 소프트웨어 제품의 경우, HP의 제한 보증은 프로그램이 제대로 실행
되지 않는 경우에만 적용됩니다. HP는 제품의 작동이 중단되지 않거
나 오류가 발생하지 않는다는 보증은 하지 않습니다.
3HP의 제한 보증은 제품을 정상적으로 사용하여 발생한 결함에만 적
용되며 다음의 결과로 발생한 결함을 포함하여 다른 문제에 대해서는
적용되지 않습니다.
a 부적절한 유지보수 또는 개조;
bHP가 제공 또는 지원하지 않는 소프트웨어, 용지, 부품 또는 소모
품;
c 제품 사양을 벗어난 작동;
d 비승인 개조 또는 남용.
4HP 프린터 제품의 경우, HP 제품이 아닌 잉크 카트리지나 잉크를 리
필한 잉크 카트리지를 사용한 경우에도 고객에 대한 보증이나 고객과
의 기타 HP 지원 계약이 유효합니다. 하지만 프린터의 고장이나 손상
이 HP 제품이 아닌 잉크 카트리지나 잉크를 리필한 카트리지의 사용
으로 인해 발생한 경우에는 HP에서 프린터의 특정 고장이나 손상을
수리하는 데 소요된 표준 시간 및 재료에 대해 비용을 청구합니다.
5 보증 기간 중에 HP가 보증 범위에 해당되는 제품에 결함이 있음을 통
지 받는 경우, HP는 결함 제품을 수리하거나 교환해 주어야 합니다.
6HP의 보증 범위에 해당되는 결함 있는 제품을 HP에서 수리할 수 없거
나 교환해 줄 수 없는 경우, HP는 결함을 통지 받은 후 합당한 기간 내
에 제품의 구입가를 환불해 드립니다.
7 고객이 결함 있는 제품을 HP에 반품하기 전에는 HP에서 해당 제품을
수리, 교체 또는 환불해야 할 의무가 없습니다.
8 교환 제품은 신품이거나 적어도 교체할 제품과 동일한 기능을 가진 신
품과 동등한 제품입니다.
9HP 제품에는 성능에 있어서 신품에 준하는 제조 부품, 구성 요소 또는
재료가 포함됩니다.
10 HP 제한 보증은 HP에서 HP 제품을 판매하는 모든 국가에서 유효합
니다. 방문 서비스와 같은 추가 보증 서비스에 대한 계약은 HP나 공인
수입업체에서 제품을 공급하는 공인된 HP 서비스 센터를 통해서만
이루어질 수 있습니다.
책임의 제한
1 지역법이 허용하는 범위에서 본 보증 조항에 명시된 배상은 고객에게
2 지역법이 허용하는 범위에서 HP 또는 협력업체는 본 보증 조항에 특
지역법
1 본 보증 조항은 고객에게 특정한 법적 권리를 부여합니다. 고객은 미
2 본 보증 조항이 지역법과 일치하지 않는 부분에 대해서는 본 보증 조
3 호주나 뉴질랜드 거래 고객의 경우, 법적으로 허용되는 범위를 제외하
제공되는 유일하고도 독점적인 배상입니다.
별히 명시한 책임을 제외하고 어떠한 계약이나 불법 행위 또는 다른
어떤 법적 이론 근거에 관계없이 직접적, 간접적, 특별적, 우발적 또는
결과적인 손해에 대해서 책임을 지지 않습니다.
국, 캐나다에서는 주마다, 그리고 전세계 국가마다 다른 권리를 가질
수 있습니다.
항을 해당 지역법과 일관되게 수정해야 합니다. 이러한 지역법에 따라
본 제한 보증 조항이 고객에게 적용되지 않을 수도 있습니다. 예를 들
어, 미국 내의 일부 주와 미국 이외의 일부 국가(캐나다 주 포함)에서
는 다음 사항이 적용됩니다.
a 본 보증 조항의 부인 및 제한으로 인해 고객의 법적 권리를 제한하
지 못합니다(예: 영국);
b 그렇지 않으면, 그러한 부인 및 제한을 시행하는 제조업체의 자격
을 제한합니다;혹은
c 고객에게 추가 보증 권한을 부여하거나, 제조업체에서 부인할 수
없는 묵시적 보증 기간을 지정하거나 그렇지 않으면 묵시적 보증
기간에 대한 제한을 허용하지 않습니다.
고 본 보증 조항은 이 고객에 대해 HP 제품 판매에 적용할 수 있는 의
무적인 법적 권리를 배제, 제한 또는 수정하지 못합니다.
보증의 제한
지역법이 허용하는 범위에서 , HP 또는 협력업체는 상업성 , 품질 만족 및
특정 목적에의 적합성에 대한 명시적이거나 묵시적인 어떠한 다른 보증도
하지 않습니다 .
Page 25

Hewlett-Packard 有限保固聲明
HP 產品
軟體
配件
列印墨匣
印表機週邊硬體 (參閱下述詳情)
有限保固內容
1 Hewlett-Packard 向用戶保證,上述的 HP 產品在從客戶購貨日期開
始計算之上述的保固期限內,不會有材料或製造過程上的瑕疵。
2 對於軟體產品,HP 的有限保固僅適用於無法執行程式指令的情形。
HP 無法保證任何產品的作業,一定不會中斷或是不會發生錯誤。
3HP 的有限保固僅適用於產品在正常使用狀況下所出現的瑕疵;而不
包含任何其它問題,並且不包括下述情形所產生的問題:
a 不良的維護和修改;
b 使用不是 HP 提供或支援的軟體、紙材、零件、和耗材;
c 在產品適用的規格範圍之外使用;
d 未授權的修改或是濫用。
4 在 HP 印表機產品上使用非 HP 廠牌或是重灌墨水的列印墨匣,不會
影響客戶的保固權益或是任何客戶所購買的 HP 支援服務合約。但
是,如果因為使用非 HP 廠牌或是重灌墨水的列印墨匣,而造成印表
機的故障或損壞,則對於該特定故障或損壞的修理服務,HP 以標準
的時間和材料費用收費。
5 如果 HP 在適用的保固期限內,收到任何受 HP 保固保證之產品有瑕
疵的通知,HP 得以決定為客戶修理或是更換該產品。
6 如果 HP 無法適當地修理或更換在 HP 保固期內的有瑕疵產品,則在
收到有瑕疵之通知後的一段合理期間內,HP 會向客戶退還該產品的
原購買金額。
7 客戶必須先將有瑕疵的產品退還給 HP 後,HP 才有修理、更換、
或退款的義務。
8 用來更換的產品,可能是全新或近似全新的產品;如果是近似全新
的產品,其性能最少會和被更換的產品一樣。
9HP 的產品中,可能會包含性能等於新品,但是有翻修過的零件、
元件、和材料。
10 HP 的 《有限保固聲明》適用於任何 HP 有銷售所保證之 HP 產品的
國家或地區。 在任何 HP 或授權進口商有銷售所保證之 HP 產品的國
家或地區,用戶可向任何授權的 HP 維修單位購買額外的保固服務合
約,例如是到府服務的合約。
有限保固期限
1 年
1 年
90 天
1 年
責任的限制
1 在當地法律允許的範圍內,此保固聲明所提供的補償,是客戶唯一而
所有的補償。
2 在當地法律允許的範圍內,除了此保固聲明上述的明確義務以外,
對於任何直接、間接、特殊、附屬、或後果性損害,不論是以合約、
侵權、或任何其他法律理論為基礎,亦不論是否有事先通知這種損害
的可能性,HP 及其協力廠商均不負任何責任。
當地法律
1 本 《保固聲明》為客戶提供明確的法律權益。 美國的各州、加拿大的
各省、以及全球的各國家或地區,均可能有不同的法律,因此客戶可
能還會有其他的權益。
2 如果本 《保固聲明》和當地法律有所抵觸,則此 《保固聲明》視為
自動修訂,以符合當地法律的規定。如果有這樣的當地法律,則本
《保固聲明》的某些聲明事項和限制,可能不適用於該地區的客戶。
例如美國某些的州,以及美國以外的某些政府 (包括加拿大的省),
可能會:
a 禁止此 《保固聲明》內的聲明事項和限制條文來限制客戶的法定
權益 (例如是英國);
b 或是另外限制製造廠商施行這種聲明事項和限制條文;或是
c 為客戶提供額外的保固權益、指定製造廠商所不能拒絕之暗示性
保固的期限、或是允許暗示性保固服務期限的限制。
3 對於澳洲和紐西蘭的消費性交易,除法律允許的範圍外,本 《保固聲
明》內的條款,並不排除、限制、或修改 HP 產品銷售給這些客戶時
所適用的法定權益,而是另外提供的額外權益。
保固的限制
在當地法律允許的範圍內,HP 及其協力廠商均不做任何其他的保證或提
供任何形式的條款;不論是適銷性、品質滿意度、或特定用途的適用性,
都沒有任何明確或暗示的保證或條款。
Page 26

Page 27

Page 28

printed on
recycled paper
使用再生
纸张印刷
copyright © 2003
Hewlett-Packard Company
printed in Singapore
新加坡印刷
http://www.hp.com/support/businessinkjet3000
*C8116-90024*
*C8116-90024*
C8116-90024
 Loading...