

Page 1
hp business inkjet
3000 • 3000n • 3000dtn
user’s guide
Page 2

Page 3

hp business inkjet 3000
hp business inkjet 3000n
hp business inkjet 3000dtn
user’s guide
Page 4

Copyright information
© 2002 Hewlett-Packard Company
All Rights Reserved. Reproduction, adaptations, or translation without prior written
permission is prohibited except as allowed under copyright laws.
Edition 1, 11/2002
Warranty
The information contained in this document is subject to change without notice.
Hewlett-Packard makes no warranty of any kind with respect to this information.
HEWLETT-PACKARD SPECIFICALLY DISCLAIMS THE IMPLIED WARRANTY OF
MERCHANTABILITY AND FITNESS FOR A PARTICULAR PURPOSE.
Hewlett-Packard shall not be liable for any direct, indirect, incidental, consequential, or
other damage alleged in connection with the furnishing or use of this information.
No part of this document may be photocopied, reproduced, or translated to another
language without the prior written consent of Hewlett-Packard Company.
Trademark Credits
®
Adobe
, Adobe® PostScript®3™, Acrobat®, and PostScript® are trademarks of Adobe
Systems Incorporated.
AutoCAD™ is a U.S. trademark of Autodesk, Inc.
HP-UX Release 10.20 and later and HP-UX Release 11.00 and later (in both 32 and 64-
bit configurations) on all HP 9000 computers are Open Group UNIX 95 branded products.
Microsoft
®
, MS-DOS®, MS Windows®, Windows®, and Windows NT® are U.S. registered
trademarks of Microsoft Corporation.
Netscape and Netscape Navigator are U.S. trademarks of the Netscape Communications
Corporation.
*PANTONE
Pentium
®
is Pantone, Inc.'s check-standard trademark for color.
®
is a U.S. registered trademark of Intel Corporation.
TrueType™ is a U.S. trademark of Apple Computer, Inc.
®
is a registered trademark of the Open Group.
UNIX
ENWW
Page 5

Contents
Getting started
Additional resources. . . . . . . . . . . . . . . . . . . . . . . . . . . . . . . . . . 1-1
Printer configurations . . . . . . . . . . . . . . . . . . . . . . . . . . . . . . . . . 1-3
HP Business Inkjet 3000 . . . . . . . . . . . . . . . . . . . . . . . . . . . 1-3
HP Business Inkjet 3000n . . . . . . . . . . . . . . . . . . . . . . . . . . 1-3
HP Business Inkjet 3000dtn. . . . . . . . . . . . . . . . . . . . . . . . . 1-3
Setting up
Understanding printer parts . . . . . . . . . . . . . . . . . . . . . . . . . . . . 2-1
Setting up the printer . . . . . . . . . . . . . . . . . . . . . . . . . . . . . . . . . 2-4
Set up the printer . . . . . . . . . . . . . . . . . . . . . . . . . . . . . . . . . 2-4
Connect the power cord and turn on the printer. . . . . . . . . . 2-5
Set up the LCD control panel for your language (optional) . 2-5
Install the ink cartridges . . . . . . . . . . . . . . . . . . . . . . . . . . . . 2-6
Install the printheads . . . . . . . . . . . . . . . . . . . . . . . . . . . . . . 2-6
Install the printer software and connect the interface cable. 2-7
Enable optional accessories in the printer driver . . . . . . . . 2-17
Installing optional accessories
Multipurpose tray (100-sheet tray) . . . . . . . . . . . . . . . . . . . . . . . 3-1
Installing the optional multipurpose tray. . . . . . . . . . . . . . . . 3-2
700-sheet tray (Tray 3). . . . . . . . . . . . . . . . . . . . . . . . . . . . . . . . 3-2
Auto-duplex unit . . . . . . . . . . . . . . . . . . . . . . . . . . . . . . . . . . . . . 3-3
Installing the auto-duplex unit . . . . . . . . . . . . . . . . . . . . . . . 3-3
HP Jetdirect print server. . . . . . . . . . . . . . . . . . . . . . . . . . . . . . . 3-4
Installing an HP Jetdirect print server . . . . . . . . . . . . . . . . . 3-4
Obtaining more information . . . . . . . . . . . . . . . . . . . . . . . . . 3-7
Additional printer memory and font DIMMs . . . . . . . . . . . . . . . . 3-8
EIO hard disk drive. . . . . . . . . . . . . . . . . . . . . . . . . . . . . . . . 3-8
Installing memory and font DIMMs. . . . . . . . . . . . . . . . . . . . 3-8
Checking memory installation . . . . . . . . . . . . . . . . . . . . . . 3-10
ENWW i
Page 6

Setting printer options
Understanding the LCD control panel . . . . . . . . . . . . . . . . . . . . 4-1
Printing an LCD control panel menu map. . . . . . . . . . . . . . . . . . 4-2
Changing LCD control panel menu settings. . . . . . . . . . . . . . . . 4-3
Retrieve Job menu . . . . . . . . . . . . . . . . . . . . . . . . . . . . . . . . . . . 4-4
Information menu . . . . . . . . . . . . . . . . . . . . . . . . . . . . . . . . . . . . 4-4
Paper Handling menu. . . . . . . . . . . . . . . . . . . . . . . . . . . . . . . . . 4-5
Configure Device menu . . . . . . . . . . . . . . . . . . . . . . . . . . . . . . . 4-9
Printing menu. . . . . . . . . . . . . . . . . . . . . . . . . . . . . . . . . . . . 4-9
Print Quality menu . . . . . . . . . . . . . . . . . . . . . . . . . . . . . . . 4-12
System Setup menu. . . . . . . . . . . . . . . . . . . . . . . . . . . . . . 4-13
I/O menu . . . . . . . . . . . . . . . . . . . . . . . . . . . . . . . . . . . . . . 4-15
Resets menu . . . . . . . . . . . . . . . . . . . . . . . . . . . . . . . . . . . 4-16
Diagnostics menu. . . . . . . . . . . . . . . . . . . . . . . . . . . . . . . . . . . 4-16
Service menu . . . . . . . . . . . . . . . . . . . . . . . . . . . . . . . . . . . . . . 4-17
EIO menu . . . . . . . . . . . . . . . . . . . . . . . . . . . . . . . . . . . . . . . . . 4-18
Resetting the HP Jetdirect print server . . . . . . . . . . . . . . . 4-19
Configuring network connectivity
Configuring Novell NetWare frame type parameters . . . . . . . . . 5-1
Configuring TCP/IP parameters . . . . . . . . . . . . . . . . . . . . . . . . . 5-2
Setting the link speed . . . . . . . . . . . . . . . . . . . . . . . . . . . . . . . . . 5-3
Disabling network protocols (optional) . . . . . . . . . . . . . . . . . . . . 5-4
Selecting and using print media
Media and paper-handling specifications . . . . . . . . . . . . . . . . . . 6-1
Supported media types . . . . . . . . . . . . . . . . . . . . . . . . . . . . 6-1
Supported media sizes. . . . . . . . . . . . . . . . . . . . . . . . . . . . . 6-3
Media handling. . . . . . . . . . . . . . . . . . . . . . . . . . . . . . . . . . . 6-4
Selecting and loading print media . . . . . . . . . . . . . . . . . . . . . . . 6-6
Tips for loading media . . . . . . . . . . . . . . . . . . . . . . . . . . . . . 6-6
Configuring trays . . . . . . . . . . . . . . . . . . . . . . . . . . . . . . . . . 6-7
Loading Tray 1. . . . . . . . . . . . . . . . . . . . . . . . . . . . . . . . . . . 6-7
To set media size and type in the LCD control panel. . . . . 6-10
Using the printer driver . . . . . . . . . . . . . . . . . . . . . . . . . . . . . . . 6-11
Changing printer settings in Windows . . . . . . . . . . . . . . . . 6-11
Changing printer settings in the Mac OS . . . . . . . . . . . . . . 6-12
Printing using the printer drivers . . . . . . . . . . . . . . . . . . . . 6-13
Printing on special media . . . . . . . . . . . . . . . . . . . . . . . . . . . . . 6-16
Printing on envelopes and cards . . . . . . . . . . . . . . . . . . . . 6-17
Printing on transparencies . . . . . . . . . . . . . . . . . . . . . . . . . 6-18
Printing on heavy media. . . . . . . . . . . . . . . . . . . . . . . . . . . 6-19
Printing on custom size media . . . . . . . . . . . . . . . . . . . . . . 6-20
ii ENWW
Page 7

Printing on both sides of the page . . . . . . . . . . . . . . . . . . . . . . 6-21
Guidelines for printing on both sides of a page . . . . . . . . . 6-21
Layout options . . . . . . . . . . . . . . . . . . . . . . . . . . . . . . . . . . 6-22
Using remote diagnostics tools
Using the Toolbox. . . . . . . . . . . . . . . . . . . . . . . . . . . . . . . . . . . . 7-1
Printer Status . . . . . . . . . . . . . . . . . . . . . . . . . . . . . . . . . . . . 7-1
Information . . . . . . . . . . . . . . . . . . . . . . . . . . . . . . . . . . . . . . 7-2
Using the embedded Web server. . . . . . . . . . . . . . . . . . . . . . . . 7-3
System requirements . . . . . . . . . . . . . . . . . . . . . . . . . . . . . . 7-3
Gaining access to the embedded Web server. . . . . . . . . . . 7-4
Embedded Web server pages . . . . . . . . . . . . . . . . . . . . . . . 7-4
hp instant support. . . . . . . . . . . . . . . . . . . . . . . . . . . . . . . . . . . 7-10
Using hp instant support . . . . . . . . . . . . . . . . . . . . . . . . . . 7-11
Security and privacy. . . . . . . . . . . . . . . . . . . . . . . . . . . . . . 7-11
HP Web Jetadmin. . . . . . . . . . . . . . . . . . . . . . . . . . . . . . . . . . . 7-12
Troubleshooting and maintaining the printer
General troubleshooting tips. . . . . . . . . . . . . . . . . . . . . . . . . . . . 8-1
Quick checkup . . . . . . . . . . . . . . . . . . . . . . . . . . . . . . . . . . . 8-1
Printing a Configuration page. . . . . . . . . . . . . . . . . . . . . . . . 8-4
Printing a Supplies Status page. . . . . . . . . . . . . . . . . . . . . . 8-5
Solving advanced printer problems . . . . . . . . . . . . . . . . . . . . . . 8-6
Problems with the printer . . . . . . . . . . . . . . . . . . . . . . . . . . . 8-6
Printing problems . . . . . . . . . . . . . . . . . . . . . . . . . . . . . . . . 8-11
Color problems. . . . . . . . . . . . . . . . . . . . . . . . . . . . . . . . . . 8-17
Media-handling problems. . . . . . . . . . . . . . . . . . . . . . . . . . 8-20
Solving media feed problems . . . . . . . . . . . . . . . . . . . . . . . . . . 8-23
Incorrect media type or size. . . . . . . . . . . . . . . . . . . . . . . . 8-23
Incorrect resolution (dpi) and media type combinations. . . 8-24
Media jams. . . . . . . . . . . . . . . . . . . . . . . . . . . . . . . . . . . . . 8-25
Maintaining the printheads . . . . . . . . . . . . . . . . . . . . . . . . . . . . 8-31
Cleaning the printheads . . . . . . . . . . . . . . . . . . . . . . . . . . . 8-31
Cleaning the printhead contacts. . . . . . . . . . . . . . . . . . . . . 8-32
Aligning the printheads. . . . . . . . . . . . . . . . . . . . . . . . . . . . 8-34
Replacing ink cartridges and printheads . . . . . . . . . . . . . . . . . 8-34
Replacing ink cartridges. . . . . . . . . . . . . . . . . . . . . . . . . . . 8-34
Replacing printheads . . . . . . . . . . . . . . . . . . . . . . . . . . . . . 8-35
Calibrating color . . . . . . . . . . . . . . . . . . . . . . . . . . . . . . . . . . . . 8-36
Calibrating linefeed. . . . . . . . . . . . . . . . . . . . . . . . . . . . . . . . . . 8-37
ENWW iii
Page 8

Ordering supplies and accessories
Available accessories. . . . . . . . . . . . . . . . . . . . . . . . . . . . . . . . . 9-1
Paper handling accessories. . . . . . . . . . . . . . . . . . . . . . . . . 9-1
DIMMs . . . . . . . . . . . . . . . . . . . . . . . . . . . . . . . . . . . . . . . . . 9-1
Interface cables . . . . . . . . . . . . . . . . . . . . . . . . . . . . . . . . . . 9-2
Networking accessories . . . . . . . . . . . . . . . . . . . . . . . . . . . . 9-3
Supplies . . . . . . . . . . . . . . . . . . . . . . . . . . . . . . . . . . . . . . . . . . . 9-4
Ink cartridges . . . . . . . . . . . . . . . . . . . . . . . . . . . . . . . . . . . . 9-4
Printheads . . . . . . . . . . . . . . . . . . . . . . . . . . . . . . . . . . . . . . 9-4
Everyday paper . . . . . . . . . . . . . . . . . . . . . . . . . . . . . . . . . . 9-4
Business communication paper . . . . . . . . . . . . . . . . . . . . . . 9-5
Presentation paper. . . . . . . . . . . . . . . . . . . . . . . . . . . . . . . . 9-6
Photo paper . . . . . . . . . . . . . . . . . . . . . . . . . . . . . . . . . . . . . 9-7
Customer support and printer specifications
Contacting customer support . . . . . . . . . . . . . . . . . . . . . . . . . . 10-1
HP help on the Web. . . . . . . . . . . . . . . . . . . . . . . . . . . . . . 10-1
hp instant support. . . . . . . . . . . . . . . . . . . . . . . . . . . . . . . . 10-1
Telephone support . . . . . . . . . . . . . . . . . . . . . . . . . . . . . . . 10-2
Printer specifications . . . . . . . . . . . . . . . . . . . . . . . . . . . . . . . . 10-3
Hewlett-Packard Limited Warranty Statement . . . . . . . . . . . . 10-11
Safety and regulatory statements. . . . . . . . . . . . . . . . . . . . . . 10-13
Power Cord statement . . . . . . . . . . . . . . . . . . . . . . . . . . . 10-13
LEDs classification. . . . . . . . . . . . . . . . . . . . . . . . . . . . . . 10-13
Energy consumption . . . . . . . . . . . . . . . . . . . . . . . . . . . . 10-13
FCC statement. . . . . . . . . . . . . . . . . . . . . . . . . . . . . . . . . 10-13
Declaration of Conformity statement/
Normes de sécurité (Canada) . . . . . . . . . . . . . . . . . . . . . 10-15
EMI statement (Europe). . . . . . . . . . . . . . . . . . . . . . . . . . 10-15
EMI statement (Korea). . . . . . . . . . . . . . . . . . . . . . . . . . . 10-15
Declaration of Conformity. . . . . . . . . . . . . . . . . . . . . . . . . 10-16
Printing using PostScript emulation
Installation notes. . . . . . . . . . . . . . . . . . . . . . . . . . . . . . . . . . . . . A-1
Upgrading from an older version of Windows . . . . . . . . . . . A-1
Identifying different printer drivers in Windows NT 4.0. . . . . A-2
Installing the printer driver only. . . . . . . . . . . . . . . . . . . . . . . . . . A-2
Current HP Business Inkjet users . . . . . . . . . . . . . . . . . . . . A-3
Specific printer features/issues. . . . . . . . . . . . . . . . . . . . . . . . . . A-3
Paper Type (Windows 98) or Media Type
(Windows NT 4.0) . . . . . . . . . . . . . . . . . . . . . . . . . . . . . . . . A-4
Print Quality . . . . . . . . . . . . . . . . . . . . . . . . . . . . . . . . . . . . . A-4
Print Color as Gray. . . . . . . . . . . . . . . . . . . . . . . . . . . . . . . . A-5
Pages per Sheet . . . . . . . . . . . . . . . . . . . . . . . . . . . . . . . . . A-5
Watermark Printing . . . . . . . . . . . . . . . . . . . . . . . . . . . . . . . A-6
Job Storage . . . . . . . . . . . . . . . . . . . . . . . . . . . . . . . . . . . . . A-8
iv ENWW
Page 9

LCD control panel messages
LCD control panel message types . . . . . . . . . . . . . . . . . . . . . . . B-1
Status messages . . . . . . . . . . . . . . . . . . . . . . . . . . . . . . . . . B-1
Warning messages . . . . . . . . . . . . . . . . . . . . . . . . . . . . . . . B-1
Error messages . . . . . . . . . . . . . . . . . . . . . . . . . . . . . . . . . . B-1
Critical error messages . . . . . . . . . . . . . . . . . . . . . . . . . . . . B-2
LCD control panel messages . . . . . . . . . . . . . . . . . . . . . . . . . . . B-2
Index
ENWW v
Page 10

vi ENWW
Page 11

1
Getting started
Thank you for purchasing this printer. This guide provides information
about the following topics:
z Setting up the printer
z Installing and using printer software
z Installing optional accessories
z Setting printer options
z Connecting and using the printer on a network
z Printing on different media types
z Using remote diagnostic tools
z Maintaining the printer
z Solving problems with the printer
z Printer supplies, support, and specifications
z Emulated PostScript printing
z LCD control panel messages
Additional resources
The following resources provide additional information abou t the printer:
z Setup poster
The setup poster provides illustrated setup information. A printed
version of this document is provided with the printer. Also, an
electronic version is available as an Adobe
Document Format (PDF) file on the Starter CD.
z Getting started guide
The getting started guide provides instructions for setting up the
printer, as well as warranty and regulatory information. This guide is
provided with the printer in a printed format.
ENWW 1-1
®
Acrobat® Portable
Page 12

z
Toolbox (Windows only)
The Toolbox provides status and maintenance information about
the printer, as well as step-by-step guidance for printing tasks.
(Printer status information is only available if the printer is
connected to a network.) For more information, see “Using the
Toolbox.”
z Printer driver online help (Windows only)
The online help provides information about using the printer driver.
z HP Jetdirect Print Server Administrator’s Guide
This guide provides information for config uring an d troub leshooti ng
the HP Jetdirect print server used with this printer. It is available as
a PDF file on the Starter CD.
z Embedded Web server
The embedded Web server provides configuration, status, and
diagnostic information about the printer. It also includes links to
hp instant support and myPr intMileage, which are Web-based t ools
that help you diagnose and solve printer problems, and manage
your printing activities and printer supplies more effectively. The
embedded Web server can be used from a standard Web browser
or from the Toolbox (Windows only).
For more information, see “Using the embedded Web server.”
z hp instant support
hp instant support is a Web-based tool that provides you with
product-specific services, troubleshooting tips, and information
about your printer's ink and media usage. With th is information, you
can diagnose and solve printer problems, and manage your printing
activities and printer supplies more effectively. For more
information, see “Using hp instant support.”
z World Wide Web
The following HP websites have the latest printer software, product
information, and support information available for the printer.
• http://www.hp.com/support/businessinkjet3000
• http://www.hp.com
1-2 ENWW
Page 13

Printer configurations
This printer is available in the configurations described in this section.
HP Business Inkjet 3000
The HP Business Inkjet 3000 printer is a four-color Inkjet printer that
prints up to 21 pages per minute (ppm) in monochrome (black and
white) and 17 ppm in color in Fast mode. The laser-equivelant speed is
10 ppm for monochrome and 8 ppm for color. (Laser-equivalent speed
is the print speed that can be expected in relation to the pages-perminute speed of laser printers.) This configuration of the printer can
produce 2400 by 1200 dots per inch (dpi) in Photo mode (using the
PCL 6 printer driver for Windows).
z Trays. The printer comes with a tray that holds up to 300 sheets of
print media, and up to 50 transparencies (Tray 2). It supports letter,
legal, executive, JIS executive, A4, JIS B5, and ISO B5 size media.
The printer also comes with Tray 1, which provides a straight-
through paper path and feeds a single sheet of media at a time.
z Connectivity. The printer provides a parallel port and a universal
serial bus (USB) port for connectivity. The printer also conta ins two
enhanced input/output (EIO) slots and a standard bidirectional
parallel cable interface (IEEE-1284 compliant).
z Memory. The printer contains 64 megabytes (MB) of synchronous
dynamic random access memory (SDRAM) on the formatter and
24 MB SDRAM on the printer base. To allow for memory
expansion, the printer has three DIMM slots that accept 64 or
128 MB RAM each or 4 MB flash DIMMs. This printer can support
up to 344 MB of memory (including the 24 MB on the printer base).
HP Business Inkjet 3000n
The HP Business Inkjet 3000n printer includes the features of the
HP Business Inkjet 3000, plus an HP Jetdirect print server. An
HP Jetdirect print server allows the printer to be shared in a network
environment by connecting the printer directly to the network.
HP Business Inkjet 3000dtn
The HP Business Inkjet 3000dtn printer includes the features of the
HP Business Inkjet 3000n printer, plus a 700- sheet tray (Tray 3) and an
auto-duplex unit for automatic 2-sided printing.
ENWW 1-3
Page 14

1-4 ENWW
Page 15
Setting up
2
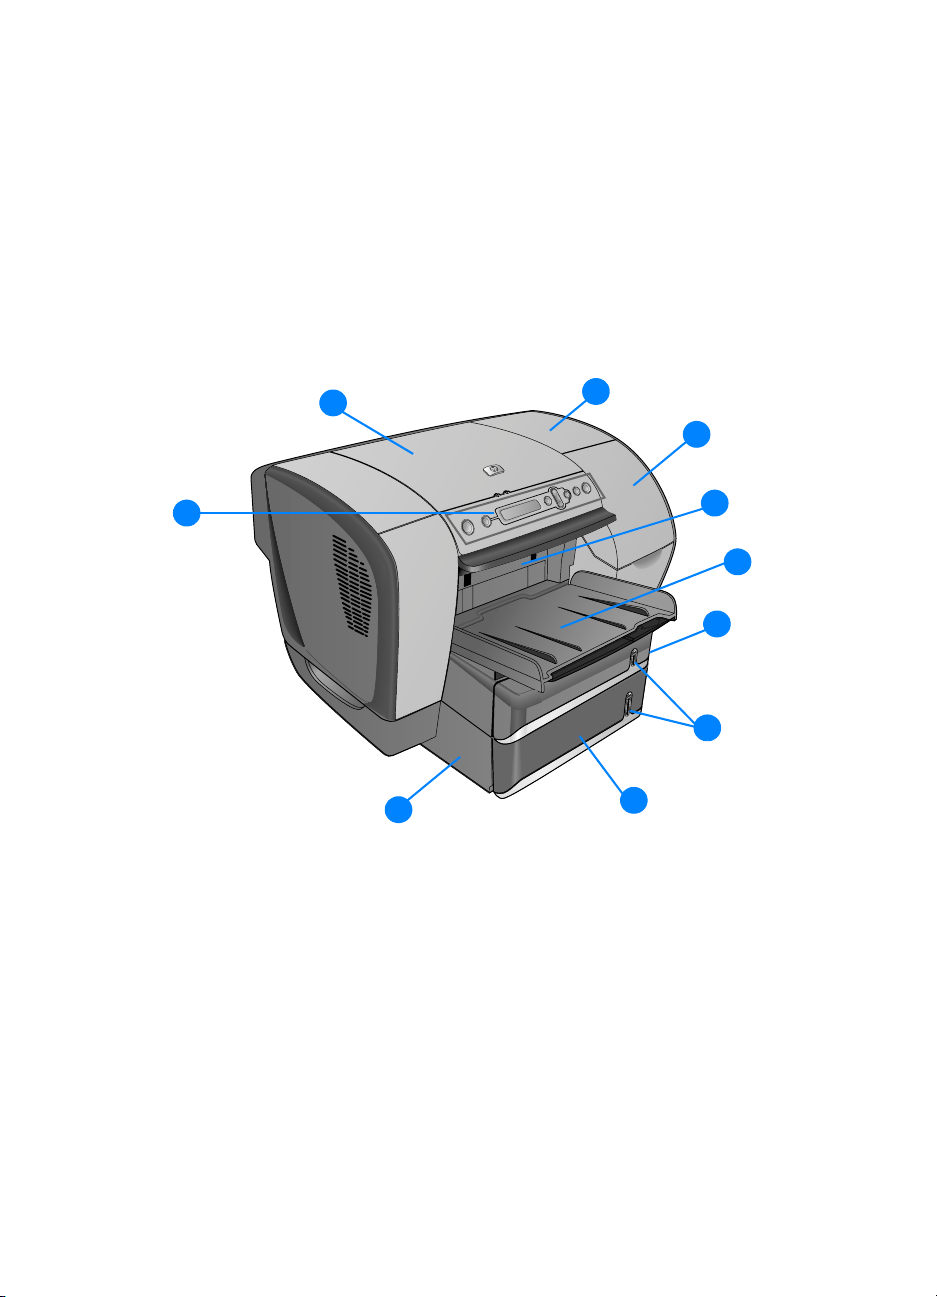
Understanding printer parts
1
1 LCD control panel
2 Top cover
3 Printhead cover
4 Ink cartridge cover
2
10
3
4
5
6
7
8
9
5 Simplex unit or optional auto-duplex unit
6 Output bin
7 Tray 2
8 Media level indicators
9 Tray 3 (optional)
10 Tray 3 base (holds Tray 3 and supports the printer)
ENWW 2-1
Page 16
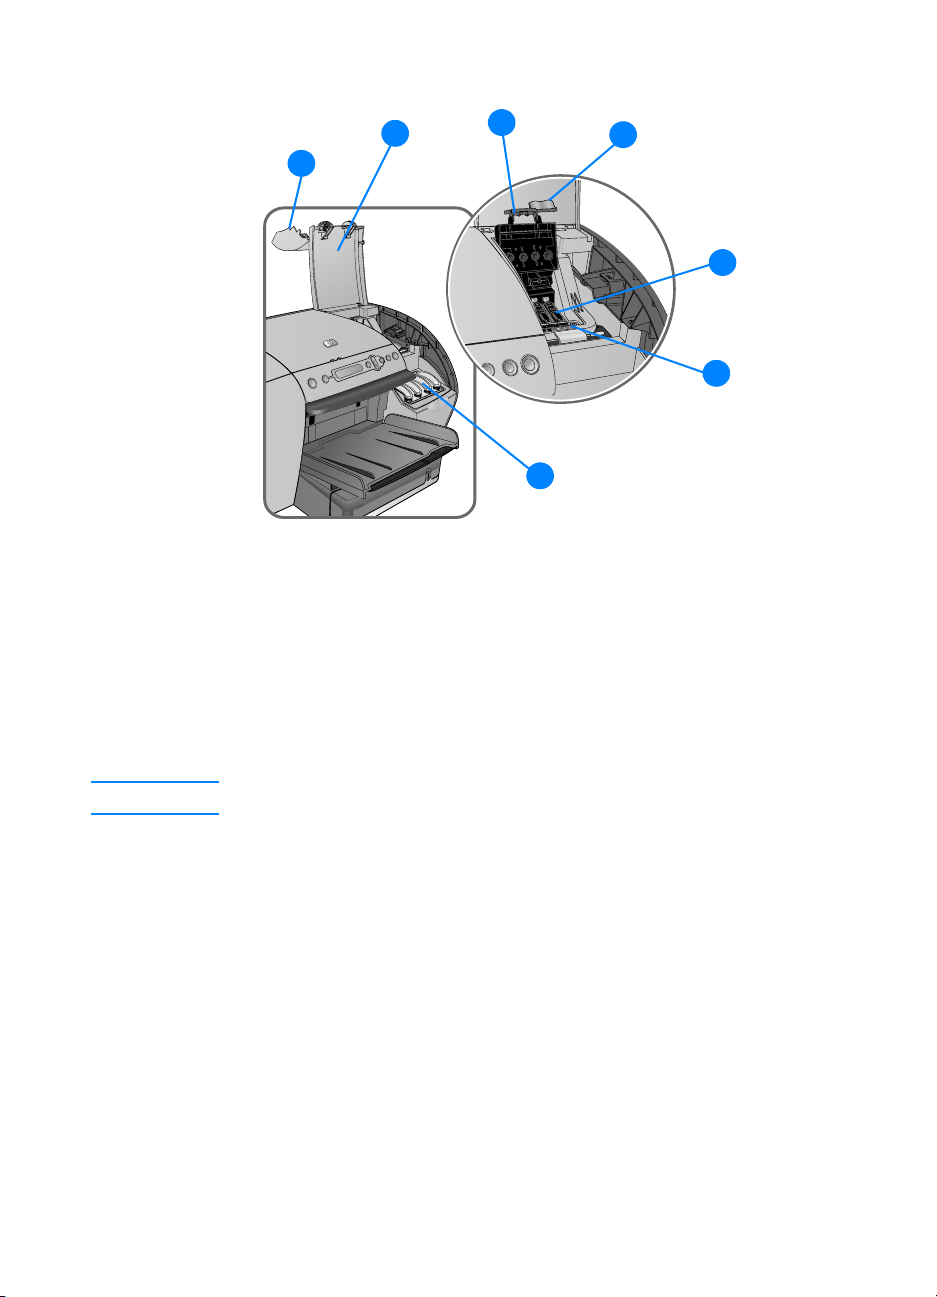
2
1
1 Ink cartridge cover
2 Printhead cover
3 Hook (connects to the catch and must be engaged for the printer
to operate)
3
7
4
5
6
4 Printhead latch (provides access for installing or removing
printheads from their color-coded sockets)
Note To open the printhead latch, you must turn on the printer.
5 Printheads
6 Catch (metal bar that secures the hook and engages the
printhead latch)
7 Ink cartridges
2-2 ENWW
Page 17
1
2
3
4
6
5
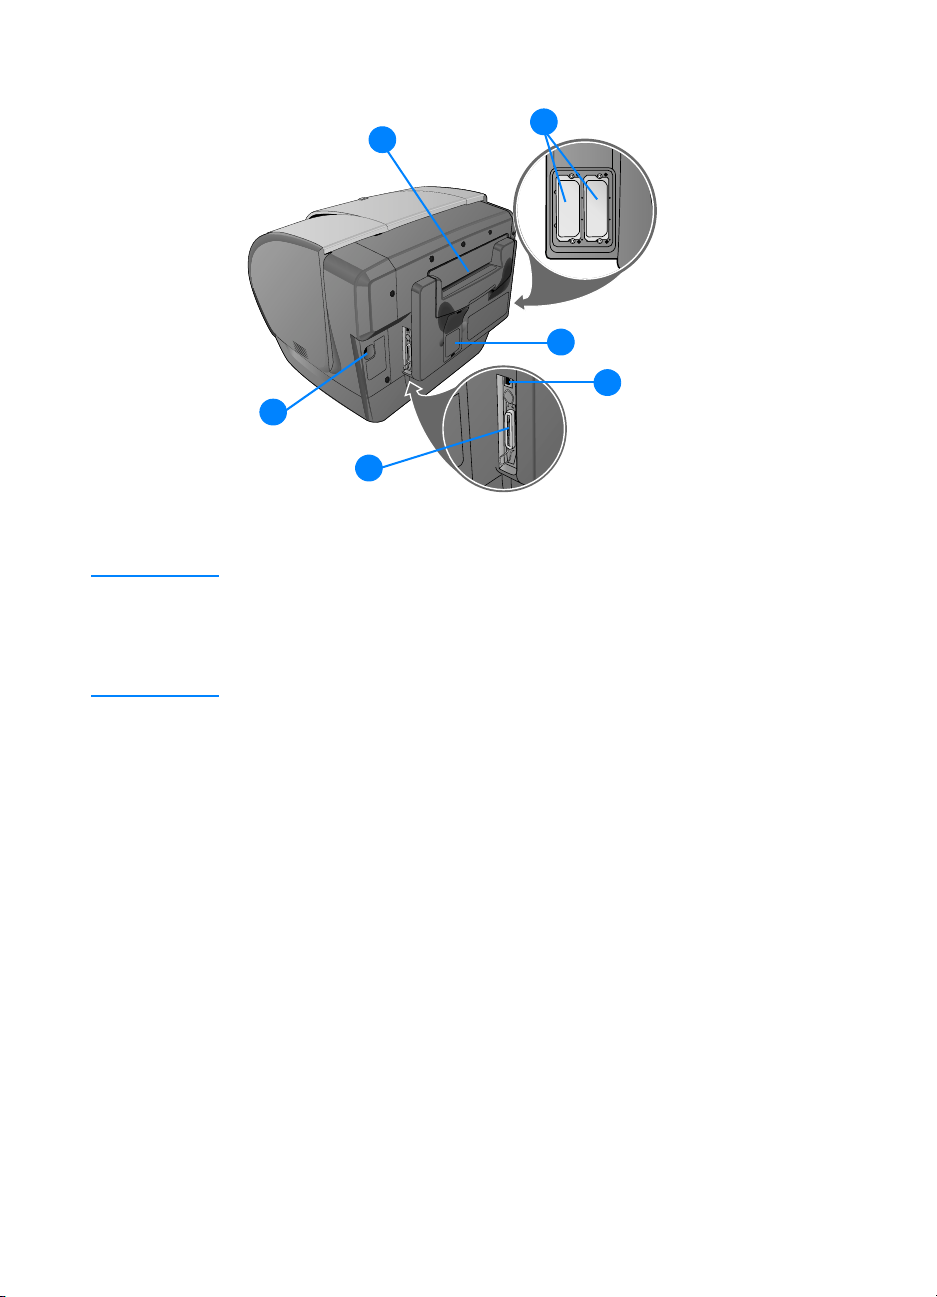
1 Tray 1
Note The printer comes with a single sheet manual feed unit in the Tray 1
location. You can purchase a multipurpose tray as an optional
accessory, which is installed in place of the single sheet manual
feed unit in the Tray 1 location. For more information, see
“Multipurpose tray (100-sheet tray).”
2 EIO slots (allow EIO accessories to be installed; The HP Business
Inkjet 3000n and 3000dtn configurations come with an HP Jetdirect
print server in one of these slots)
3 DIMM cover
4 USB port
5 Parallel port
6 Power input
ENWW 2-3
Page 18

Setting up the printer
To set up the printer, complete the following steps. For illustrated setup
information, see the setup poster.
Step 1: Set up the printer
1 Select a location for the printer that is level, sturdy, and can support
all corners of the printer, such as a low table. The locat i on should
be about 25 cm (10 inches) away from a wall to provide easy
access to the rear of the printer for using Tray 1.
2 If your printer was shipped with Tray 3 or you purchased Tray 3 as
an optional accessory, unpack Tray 3. Otherwise, go on to step 3.
a Position Tray 3 in the location where you want to place
the printer.
b Remove the tape and packing materials from Tray 3, including
the foam block located inside the tray.
3 Two people should lift the printer. Each person should grasp the
printer in the front just under the lip below the LCD control panel,
and in the rear by the indentation on either side of Tray 1.
Alternately, each person can hold on to the bottom of the printer
during lifting.
WARNING! It is strongly recommended that tw o people lift or move the p rinter.
The printer is top-heavy and can tip if lifted by only one person.
The side of the printer that holds the i nk cartridges and p rintheads
is considerably heavier than the other side.
WARNING! Do not attempt to move the printer by holding on to Tray 2 in the
front or Tray 1 in the back. This can damage the printer and might
cause you to lose your grip on the printer.
4 Move the printer to the prepared location. Be sure that the foam
packing cushions are removed from the bottom of the printer.
Gently place the printer on the prepared location.
-Or-
If installing Tray 3, align the front edge of the printer with the
front edge of the Tray 3 base. Gently lower the printer onto the
Tray 3 base.
2-4 ENWW
Page 19

WARNING! Be careful to keep your fingers and hands clear of the bottom of
the printer.
5 Remove the tape and packing materials from the printer.
Step 2: Connect the power cord and turn on
the printer
1 Connect the power cord to the printer and an alternating current
(AC) power receptacle.
2 Press (power button) on the LCD control panel to turn on
the printer.
For a description of LCD control panel button s, see “Understanding
the LCD control panel.”
WARNING! To prevent electric shock, connect the power cord to a grounded
power receptacle only. Use only the power cord included with the
printer.
Step 3: Set up the LCD control panel for your
language (optional)
When the printer is turned on for the first time, you have the option to
set the language for the LCD control panel messages.
To select the LCD control panel language
1 Press (select button) on the LCD control panel.
2 Press (down arrow button) to highlight
then press (select button)
3 Press (down arrow button) to highlight SYSTEM SETUP, and then
press (select button).
4 Press (down arrow button) to highlight
press (select button).
5 Press (down arrow button) or (up arrow button) to scroll
through the language list and highlight the language of your choice.
6 Press (select button) to confirm the language selection.
7 Press (pause/resume button) to return the prin te r to th e
.
READY state.
ENWW 2-5
CONFIGURE DEVICE, and
LANGUAGE, and then
Page 20
Step 4: Install the ink cartridges
1 Make sure the pr int er is turn ed on.
2 Lift the ink cartridge cover.
3 Remove each ink cartridge from its package.
4 Align the colored arrows, and then insert each ink cartridge into its
color-coded slot.
5 To ensure proper contact, press firmly on the cartridges until they
snap into place.
Note When replacing ink cartridges, install the new ink cartridges right
away. Ink cartridges should not be removed from the printer for long
periods of time.
Step 5: Install the printheads
CAUTION Before you lift the printhead cover, make sure that the printer
is plugged in and turned on. Otherwise, you cannot install
the printheads.
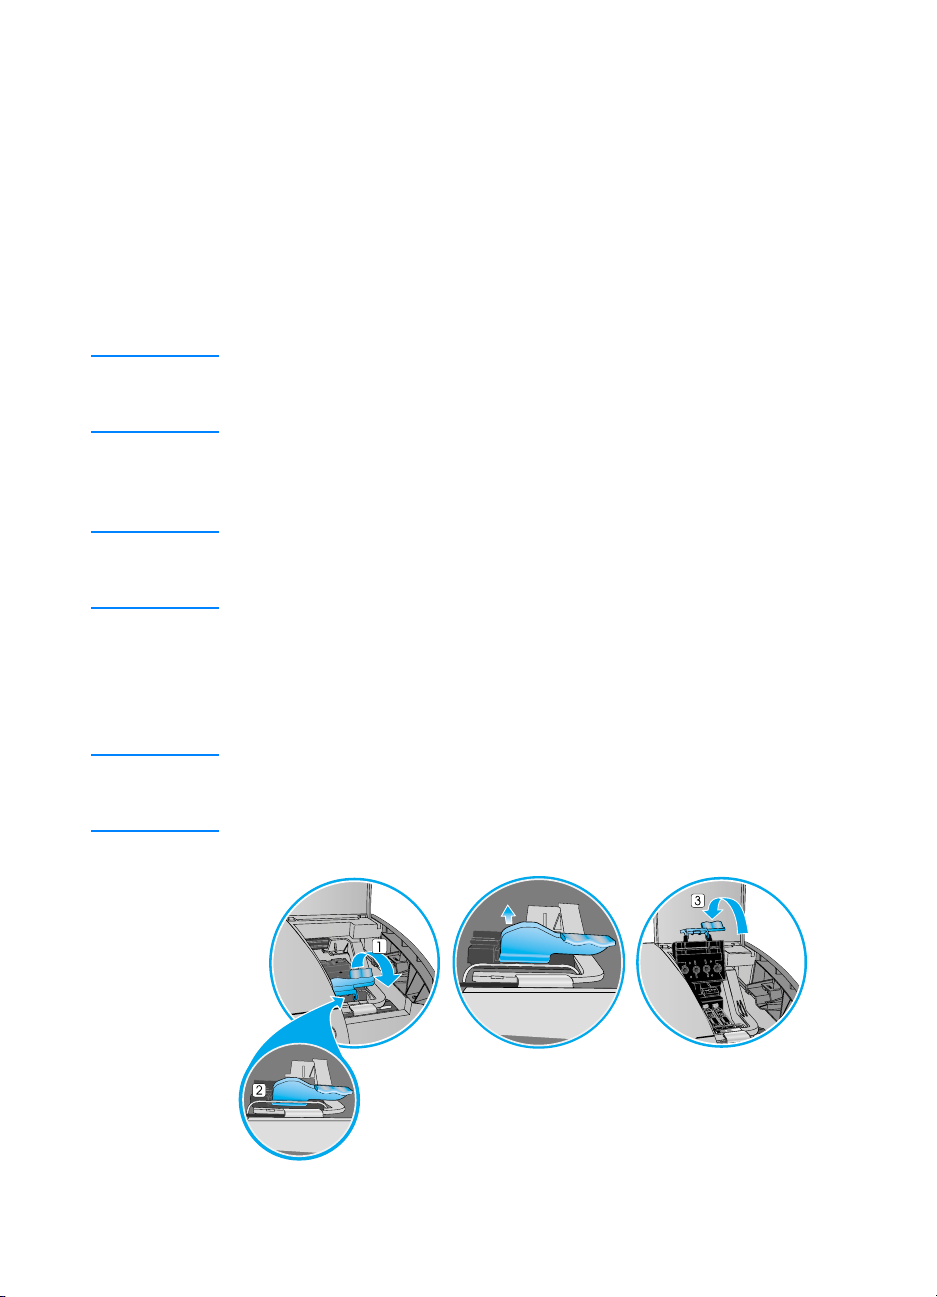
1 Lift the printhead cover.
2 To open the latch, lift it from the rear (item 1 in the graphic) and
then pull it forward and down to release the hook from the metal
catch (item 2 in the graphic).
CAUTION Do not attempt to force open the printhead latch. The printhead
carriage will move to the left when the printer is turned on, enabling
you to open the latch.
2-6 ENWW
Page 21

3 Lift and push the latch toward the back of the printer (item 3 in
the graphic).
4 Remove each printhead from its package.
5 Remove the protective tape from each printhead.
6 Remove the plastic cap from each printhead by pulling down as
indicated by the arrow on the cap.
7 Insert each printhead into its color-coded slot.
Note The color order of the printheads does not corresp ond with the color
order of the ink cartridges.
8 Press firmly on each printhead to ensure proper contact
after installation.
9 Pull the latch all the way forward and down, and engage the catch
with the hook (item 2 in the graphic). Push the latch towards the
back of the printer. You might have to apply some pressure to close
the latch.
10 Close the printhead cover and the ink cartridge cover.
11 Wait while the printer aligns the printheads. This can take abo ut 20
minutes. When the process is complete, an alignment page prints.
If no alignment page prints, check to make sure there is media in
the trays.
Step 6: Install the printer software and connect the interface cable
You can install the printer software for local printing or network printing.
For local printing, you can connect the printer using a USB cable or a
parallel cable.
For more information about using USB or parallel interface
connections with your computer, see the documentation that came
with your computer.
ENWW 2-7
Page 22

Windows printer software components
The printer software for Windows includes the following components:
z Printer drivers
Printer drivers access the printer features and allow the computer
to communicate with the printer. The following printer drivers can
be used with the printer:
• PCL 5c
• PCL 6
• PostScript (PS) level 3 emulation
The following printer drivers are included with the printer.
Operating system
Windows 98, Millennium
Windows NT 4.0
Windows 2000
Windows XP 32-bit
Windows XP 64-bit**
*
PCL 5c PCL 6 PS
*Printer features vary among printer drivers and operating systems.
**Windows XP 64-bit printer drivers are available only at
http://www.hp.com.
See the online Help in your printer driver for availability of features.
For more information about printing using the emulated PostScript
printer driver, see “Printing using PostScript emulation.”
z Toolbox
The Toolbox provides printer status and maintenance information
about the printer. For more information, see “Using the Toolbox.”
z Screen fonts
Screen fonts (also called “printer matching font s”) are fonts used by
the computer that correspond to the fonts in the printer.
Adobe PostScript
®
3™ screen fonts are also included.
z Customization Utility
This utility lets you copy the selected installation options in the
printer software onto floppy disks, to a hard drive, or to a
network drive.
2-8 ENWW
Page 23

Note Printer installation software for UNIX® (HP-UX, Sun Solaris)
networks is available for download at
http://www.hp.com/support/net_printing.
For more information about using Linux with HP printer s,
see http://hp.sourceforge.net.
For information about using the IBM PostScript 3 emulation prin ter
driver for IBM OS/2, see
http://www.hp.com/support/businessinkjet3000.
If you are using Windows NT 4.0, Windows 2000, or Windows XP,
you must have administrator privileges to install a printer driver.
ENWW 2-9
Page 24

Macintosh printer software components
The printer software for Macintosh includes the following components:
z PostScript Printer Description files (PPDs) (Mac OS 8.6 to
Mac OS 9.2.2)
PPDs, in combination with the Apple LaserWriter 8 printer driver,
access the printer features and allow the computer to communicate
with the printer. An installation program for the PPDs and other
software is provided on the Starter CD. Use the Apple
LaserWriter 8 printer driver that comes with the computer.
z Printing Dialog Extensions (PDEs) (Mac OS X)
PDEs are code plug-ins that provide access to printer features,
such as number of copies, print on both sides, and quality settings .
An installation program for the PDEs and other softwa re is provided
on the Starter CD.
z HP LaserJet Utility
The HP LaserJet Utility allows control of features that are not
available in the printer driver. Use the illustrated screens to select
printer features and complete tasks with the printer, such as the
following:
• download files, view fonts, and change many of the
printer settings
• check the ink cartridge levels
• configure and set the printer for Internet Protocol (IP) or
AppleTalk printing
Note The HP LaserJet Utility is not supported for the Korean, Japanese,
Simplified Chinese, and Traditional Chinese languages.
2-10 ENWW
Page 25

Connecting the printer using a USB cable in Windows
Use a USB cable to connect the printer to the computer if the computer
has a USB port and is running Windows 98, Windows Millennium
Edition (Me), Windows 2000, or Windows XP.
If your computer does not meet these specifications, connect the printer
to your computer using a parallel cable.
In most cases, after you install the printer softwar e an d conn e ct a
printer to the computer, you can install additional printers with USB
cables without reinstalling the printing software.
Note It is recommended that you install the software before you connect
the printer to the computer.
Do not connect the USB cable until yo u are prompted by the printer
installation software.
Software-first installation
1 Start Windows and make sure no other Windows applications
are running.
2 Insert the Starter CD into the CD-ROM drive. The CD menu runs
automatically.
If the CD menu does not run automatically, click Start, and then
click Run. At the command line box, type the letter of your
computer's CD-ROM drive followed by :\SETUP (for example, type
D:\SETUP).
3 On the CD menu, click Install Printer Driver.
4 Choose your language, and then click OK.
5 Follow the instructions on the screen.
6 Click Connected to this computer, and then click Next.
7 In the Select Port screen, click USB, and then click Next.
Note When connecting the printer using a USB cable, you can inst all only
one of the printer drivers (PCL 5c, PCL 6, or PS) at a time.
ENWW 2-11
Page 26

8 Follow the instructions on the screen to complete the installation.
9 Connect the USB cable to the computer and the printer. The Found
New Hardware wizard appears on the computer screen, and the
printer icon is created in the Printers folder.
Note If your computer is running Windows 98 or Windows Millennium
Edition, the installation program prompts you to restart the
computer. Plug in the USB cable only after Windo ws has restarted.
You can also choose to restart the computer at a later time.
Hardware-first installation
Note Before you can install the printer software on a comp ute r run nin g
Windows XP 64-bit, you must download the printer software from
http://www.hp.com.
If you have connected the USB cable to the ports on the computer and
the printer before installing the printer software, the Found New
Hardware wizard appears on the computer screen.
1 In the Found New Hardware wizard, click Next.
2 Click Search for the best driver for your device
(Recommended), and then click Next.
3 Insert the Starter CD into the CD-ROM drive.
If the CD menu appears, click Exit twice to close the CD menu.
4 Select Specify a location, click Browse to locate the installation
files for the operating system the computer is using, and then
click OK.
• For Windows 98 and Windows Millennium Edition, use
DRIVERS\<PRINTER DRIVER>\WIN9X_ME\<LANGUAGE>.
For example, DRIVERS\PCL6\WIN9X_ME\ENGLISH contains
the installation files for the English version of the PCL 6
printer driver.
• For Windows 2000 and Windows XP, use
DRIVERS\<PRINTER DRIVER>\WIN2K_XP\<LANGUAGE>.
For example, DRIVERS\PS\WIN2K_XP\ENGLISH contains the
installation files for the English version of the PS 3 printer driver.
5 Click Next, and then follow the instructions on the screen.
6 Click Next, and then c lick Finish.
7 If you are using Windows 98 or Windows Millennium Edition,
complete steps 3 through 6 again to finish the installation.
2-12 ENWW
Page 27

Connecting the printer with a USB cable in the Mac OS
Note When setting up the printer using a USB cable, install the softwar e
first, and then connect the printer to the computer.
1 Insert the Starter CD into the CD-ROM drive. The CD menu runs
automatically.
If the CD menu does not run automatically, double-click the CD icon
on the desktop, and then double-click the ClassicInstaller icon (if
you are using Mac OS 8.6 to Mac OS 9.2.2) or the CarbonInstaller
icon (if you are using Mac OS X). This icon is located in the
Installer:<language> folder of the Starter CD (where <lang uage> is
your language preference).
2 Follow the instructions on the screen.
3 Connect the cable between the ports on the computer and
the printer.
4 If you are using Mac OS 8.6 to Mac OS 9.2.2, complete steps 5
through 9.
-Or-
If you are using Mac OS X or later, complete steps 10 through 13.
Mac OS 8.6 to Mac OS 9.2.2
5 Open the Desktop Printer Utility:
• Mac OS 8.6 to Mac OS 9.0.x: On the hard drive, double-click
the Desktop Printer Utility icon in the Apple Extras:
Apple LaserWriter Software folder.
• Mac OS 9.1.x to Mac OS 9.2.2: On the hard drive, double-click
the Desktop Printer Utility icon in the Applications (Mac OS 9):
Utilities folder.
6 On the pop-up menu, select LaserWriter8, select Printer (USB)
from the list, and then click OK.
7 In the PostScript Printer Description (PPD) File section of the
window that appears, click Auto Setup.
8 Make sure HP Business Inkjet 3000 is selected and click Select.
9 Click Create. The printer icon appears on the desktop.
ENWW 2-13
Page 28

Mac OS X
10 Open the Print Center (located in the Applications\Utilities folder),
and then click Add Printer.
11 On the pop-up menu, select USB.
12 If necessary, select the Zone.
13 Select HP Business Inkjet 3000 from the list, and then click Add.
A dot appears beside the printer name, indi cating that t his printer is
now the default printer.
Connecting the printer using a parallel cable in
Windows
Use a parallel cable to connect the printer to the computer if the
computer has a parallel port and is running Windows 98,
Windows Millennium Edition, Windows NT 4.0, Win dows 2000, or
Windows XP.
1 Start Windows and make sure no other Windows applications
are running.
2 Insert the Starter CD into your CD-ROM drive. The CD menu runs
automatically.
If the CD menu does not run automatically, click Start, click Run,
and at the command line box, type the letter of your computer's
CD-ROM drive followed by :\SETUP (for example, type D:\SETUP).
3 On the CD menu, click Install Printer Driver.
4 Choose your language, and then click OK.
5 Follow the instructions on the screen.
6 Click Connected to this computer, and then click Next.
7 Be sure the Parallel check box is selected. Use the drop-down
menu to select the parallel port to which the printer is connected.
Note If the Express Install using HP recommended defaults check
box is selected, the installation program u ses default options. If you
want to specify the installation options, clear this check box.
8 Follow the instructions on the screen to complete the installation.
9 Connect the parallel cable to the computer and the printer.
2-14 ENWW
Page 29

Connecting the printer using a network connection in
Windows
Note When setting up the printer using a network connection, connect
the printer to the network first, and then install the software.
1 If an HP Jetdirect print server was purchased separately, install it in
the printer. The print server must be installed before you install the
printer software. For information about installing the HP Jetdirect
print server, see “Installing optional accessories.”
Note The HP Jetdirect print server is pre-installed in the HP Business
Inkjet 3000n and 3000dtn printer configuration s.
2 Connect the network cable between the HP Jetdirect print server
and a network port.
3 Start Windows and make sure no other Windows applications
are running.
4 Insert the Starter CD into the CD-ROM drive. The CD menu runs
automatically.
If the CD menu does not run automatically, click Start, and then
click Run. At the command line box, type the letter of your
computer's CD-ROM drive followed by :\SETUP (for example,
type D:\SETUP).
5 On the CD menu, click Install Printer Driver.
6 Choose your language, and then click OK.
7 Follow the instructions on the screen.
8 Click Connected to the network, and then click Next.
9 Click Basic Server or Peer -t o-Pe er N etwo rk Set u p , and then
click Next.
10 Follow the instructions on the screen to complete the installation.
For more information about network configuration, see “Configuring
network connectivity.”
ENWW 2-15
Page 30

Connecting the printer with a network (Ethernet) cable
in the Mac OS
When connecting the printer to a network in the Mac OS, make sure the
HP Jetdirect print server is installed in the printer before you install the
printer software. For more information about installing the HP Jetdirect
print server, see “Installing optional accessories.”
1 Insert the Starter CD into the CD-ROM drive. The CD menu
runs automatically.
If the CD menu does not run automatically, double-click the CD icon
on the desktop, and then double-click the ClassicInstaller icon (if
you are using Mac OS 8.6 to Mac OS 9.2.2) or the CarbonInstaller
icon (if you are using Mac OS X). This icon is located in the
Installer:<language> folder of the Starter CD (where <lang uage> is
your language preference).
2 Follow the instructions on the screen.
3 Connect the cable between the ports on the computer and
the printer.
4 If you are using Mac OS 8.6 to Mac OS 9.2.2, complete steps 5
through 9.
-Or-
If you are using Mac OS X, complete steps 10 through 13.
Mac OS 8.6 to Mac OS 9.2.2
5 Open the Desktop Printer Utility:
• Mac OS 8.6 to Mac OS 9.0.x: On the hard drive, double-click
the Desktop Printer Utility icon in the Apple Extras:
Apple LaserWriter Software folder.
• Mac OS 9.1.x to Mac OS 9.2.2: On the hard drive, double-click
the Desktop Printer Utility icon in the Applications (Mac OS 9):
Utilities folder.
6 On the pop-up menu, select LaserWriter8, select Printer
(AppleTalk) from the list, and then click OK.
7 In the PostScript Printer Description (PPD) File section of the
window that appears, click Auto Setup.
8 Make sure HP Business Inkjet 3000 is selected, and click Select.
9 Click Create. The printer icon appears on the desktop.
2-16 ENWW
Page 31

Mac OS X
10 Open the Print Center (located in the Applications\Utilities folder),
and then click Add Printer.
11 If you are using an AppleTalk network, on the pop-up menu,
select AppleTalk.
-Or-
If you are using an LPR network, on the pop-up menu, select LPR
Printer using IP, and then type the IP address for the printer.
12 If necessary, select the Zone.
13 Select HP Business Inkjet 3000 from the list, and then click Add.
A blue dot appears beside the printer name, indicating that this
printer is now the default printer.
Step 7: Enable optional accessories in the
printer driver
If you have installed an auto-duplex unit, Tray 3, or the multipurpose
tray (which in installed in the Tray 1 location), you must enable these
optional accessories in the printer driver.
If you are using operating systems other than Windows or Macintosh,
you might need to enable optional accessories from the LCD control
panel Printing menu. For more informati on, see “Printing menu.”
To enable optional accessories in Windows
1 Click Start, point to Settings, and then click Printers
(Windows 98, Windows Millennium Edition, Windows NT 4.0, and
Windows 2000).
-Or-
Click Start, and then click Printers and Faxes (Windows XP).
2 Right-click the icon for the desired printer driver, and then click
Properties.
• PCL 6: On the Configure tab, select the check boxes for your
optional accessories, and then click OK.
• PCL 5c/PS: On the Device Options tab, click the optional
accessories you want to enable, choose Installed from the
drop-down menu, and then click OK.
Note For information on selecting and loading media for printing,
see “Selecting and loading print media.”
ENWW 2-17
Page 32

To enable optional accessories in the Mac OS
Note Mac OS X automatically enables all optional accessories in the
printer driver when you install the printer software.
1 Click the printer’s desktop printer icon.
2 On the Printing menu, click Change Setup.
3 On the Change pop-up menu, select the optional accessory you
want to enable.
4 On the To pop-up menu, select Installed.
5 Click OK.
6 Repeat this procedure for each optional accessory you want
to enable.
2-18 ENWW
Page 33

Installing optional
3
accessories
The following accessories are available for the printer.
z Multipurpose tray (100-sheet tray)
z 700-sheet tray (Tray 3)
z Auto-duplex unit
z HP Jetdirect print server
z Additional printer memory and font DIMMs
For information about ordering accessorie s, see “Ordering sup plies and
accessories.”
Multipurpose tray (100-sheet tray)
The multipurpose tray is designed to handle a variety of media types
and sizes, including heavy paper and transparencies. The multipurpose
tray is recommended if you print often on heavy paper or other special
media that requires a straight-through pape r path because it can hold
up to 100 sheets of media.
For information about using the multipurpose tray, see “To load media
in the optional multipurpose tray.”
ENWW 3-1
Page 34
Installing the optional multipurpose tray
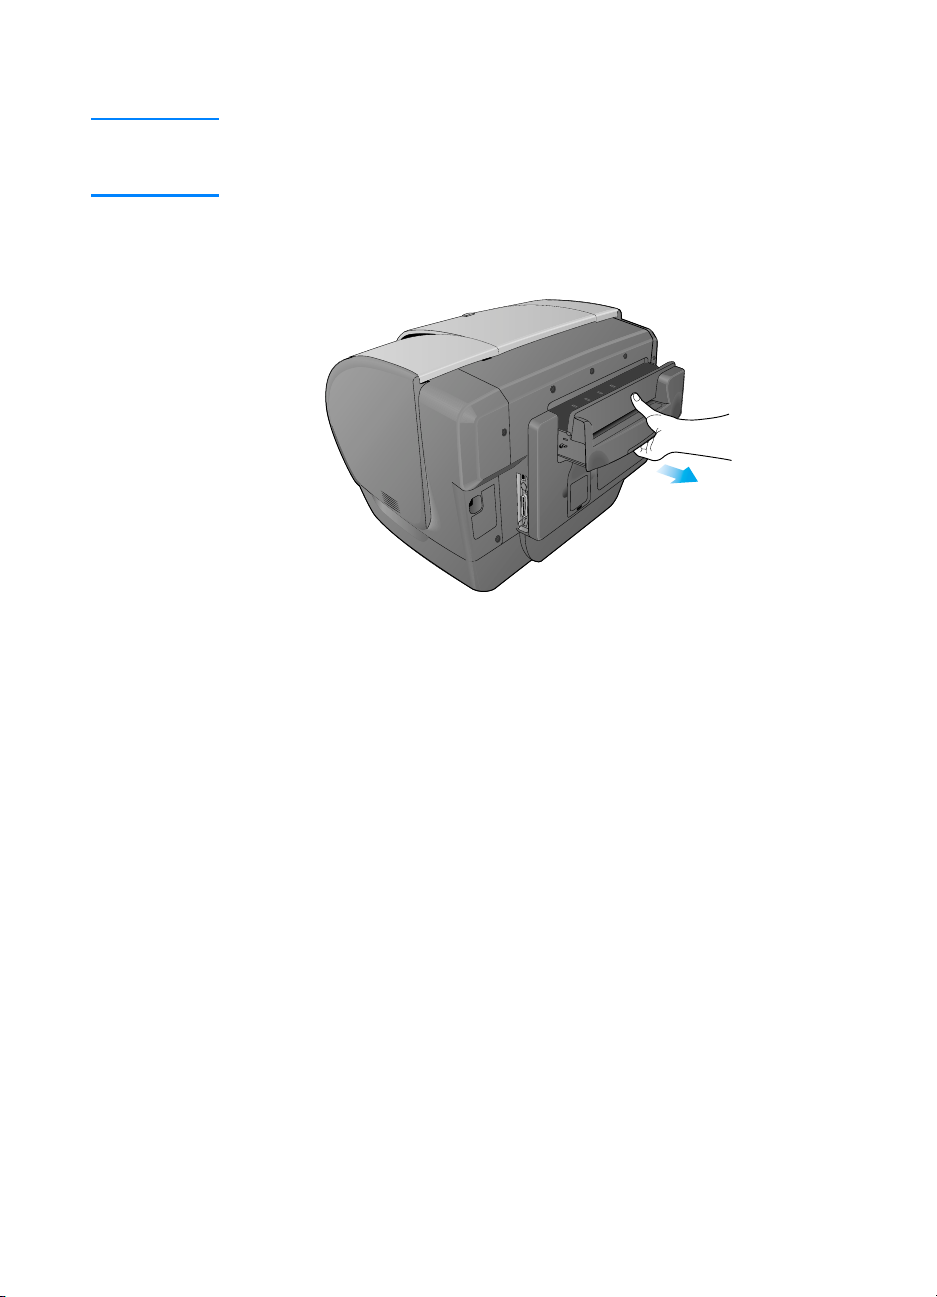
Note To install the multipurpose tray, you must first remove the single
sheet manual feed unit from the Tray 1 location at the back of
the printer.
1 Grasp the handle under the single sheet manual feed unit. Firmly
pull to remove it from the printer. Keep this item for future use.
2 Slide the multipurpose tray into the Tray 1 opening at the back of
the printer until it snaps into place.
700-sheet tray (Tray 3)
Tray 3 can hold up to 700 sheets of standard weight pape r. Tray 3 is
recommended if you frequently print multi-page documents or
anticipate a high volume of printing.
For information about installing Tray 3, see “Setting up the printer.”
For information about using Tray 3, see “To load media in Tray 2 or
optional Tray 3.”
3-2 ENWW
Page 35

Auto-duplex unit
The printer can automatically print on both sides of paper with the
auto-duplex unit. If your printer does not have an au to -d u plex un i t,
one can be purchased separately. For information about using the
auto-duplex unit, see “Printing on both sides of the page.”
Installing the auto-duplex unit
Two-sided printing (duplexing) might require additio nal memory. For
more information, see “Additional printer memory and font DIMMs.”
1 Press and hold (power button) to turn off the print er.
2 Grasp the output bin by both sides and pull it straight out of the
printer. Do not lift or tilt the output bin while removing it. Set the
output bin aside.
3 Grasp the handle under the front of Tray 2. Pull out Tray 2 until it
catches. Slightly lift up Tray 2, or move the tray counterclockwise,
and pull it completely out of the printer. Set Tray 2 aside.
4 Grasp the handle under the front of the simplex unit. Avoid touching
the star wheels. Pull the simplex unit straight out of the printer, and
set it aside. Keep the simplex unit for future use.
5 Look for the two guides inside the printer. Insert the rails of the
auto-duplex unit into these guides. Slide the auto-duplex unit into
the printer until it locks into place.
ENWW 3-3
Page 36

6 Insert Tray 2 into the Tray 2 case and push it firmly into the printer
until it locks into place.
Note If the tray will not close completely when it is reinserted, pull out the
tray half-way, and then push it in again until it closes completely.
7 Set the output bin on top of Tray 2. Push the output bin into the
printer. Be sure that both sides of the output bin sn ap into plac e.
Note You must configure the auto-duplex unit in the printer driver.
For more information, see “Enable optional accessories in the
printer driver.”
HP Jetdirect print server
Your printer can be shared in a network environment by connecting it
directly to the network with an HP Jetdirect print server. An HP Jetdirect
print server provides better performance than printing directly from a
computer, and it provides flexibility in preparing a location for the
printer.
Installing an HP Jetdirect print server
The HP Jetdirect print server can be used in both client-server and
peer-to-peer printing configurations.
Note The HP Business Inkjet 3000n and 3000dtn come with an
HP Jetdirect print server installed. It is recommended that the
printer be shared on a network through the print server.
If you own the HP Business Inkjet 3000n or 3000dtn, skip step 1
and go on to step 2, “Verify that the pr inter works.”
For a list of supported HP Jetdirect print servers, see “Networking
accessories.”
3-4 ENWW
Page 37

Step 1: Install the HP Jetdirect print server
CAUTION The HP Jetdirect print server contains electronic components that
can be damaged by static electricity. To prevent buildup of static
electricity, maintain frequent c ontact with any bare sheet metal
surface on the printer. If possible, wear a grounding wrist strap
(or similar device). Handle the print server carefully at all times.
Avoid touching electronic components or circuit paths.
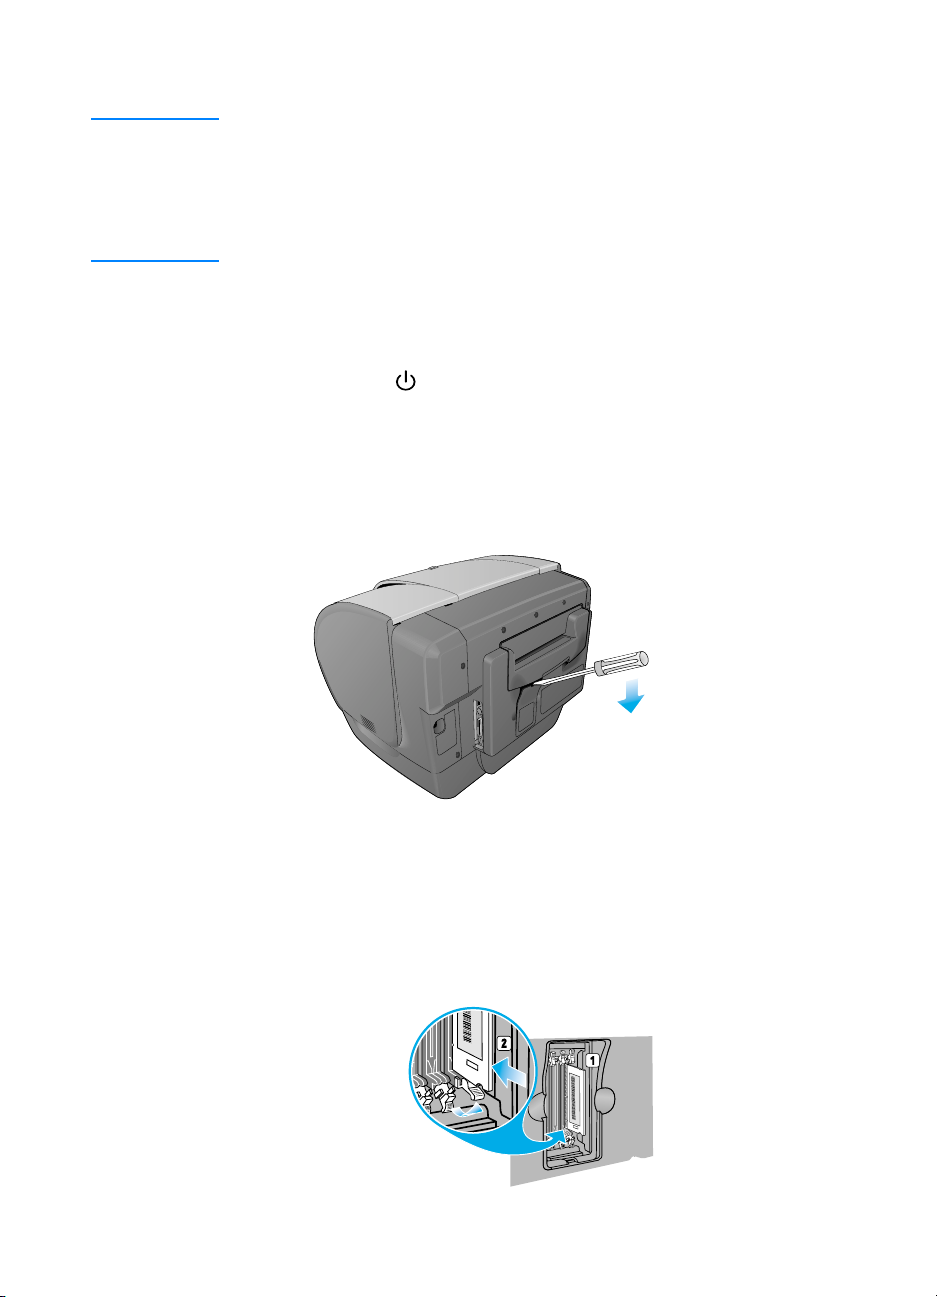
1 Press and hold (power button) to turn off the printer, and then
unplug the power cord.
2 Use a Phillips head screwdriver to loosen and remove the two
retaining screws holding the cover for the empty EIO slot onto the
printer. Remove the cover. You will not need these screws and
cover again.
3 Firmly insert the HP Jetdirect print server into the EIO slot.
4 Insert and tighten the retaining screws that came with the
HP Jetdirect print server.
5 Connect the network cable to the HP Jetdirect print server.
ENWW 3-5
Page 38

Step 2: Verify that the printer works
1 Reconnect the power cord and turn on the printer.
2 Print a Configuratio n pa ge .
a Press (select button) on the LCD control panel.
b Press (down arrow button) to highlight
then press (select button)
c Press (down arrow button) to highlight PRINT
CONFIGURATION
configuration page.
Note Because you have installed an HP Jetdirect print server, two
configuration pages print. The HP Jetdirect Configuration page
contains setup information (for example, LAN HW ADDRESS) that
might be needed for the next step.
If the Configuration page does not print, uninstall and reinstall the
print server card to ensure that it is completely seated in the slot.
, and then press (select button) to print the
.
INFORMATION, and
3-6 ENWW
Page 39

Obtaining more information
If you encounter any problems or difficulty printing over a network, see
“Configuring network connectivity” and the following sources.
Document Description
HP Jetdirect Print Server
Administrator's Guide
Documentation for the
operating system and
network operating system
This guide, included on the Starter CD, provides
detailed information about setting up and using
your HP Jetdirect print server.
It also provides information about the following:
z HP Software Solutions for HP Jetdirect
print servers
z TCP/IP configurations
z Using LPD (Lin e Printer Daemon) services
on the HP Jetdirect print server
z FTP printi ng
z Configuration page messages and
troubleshooting
z Embedded Web server to access
configuration and management pages for
the print server and device
This documentation came with your computer
or yo ur network operating system. It describes
basic network printing common to all
network printers.
In addition to these sources, printer information and configuration
features are available through HP Web Jetadmin. See “HP Web
Jetadmin” for more information.
For more information about HP Web Jetadmin and other HP network
printing software, visit the website http://www.hp.com/support/
net_printing.
ENWW 3-7
Page 40

Additional printer memory and font DIMMs
If you often print complex graphics or PostScript emulation documents,
or if you print with the optional auto-duplex unit, you might want to add
more memory to the printer. You can also install a font DIMM to print
languages such as Japanese or Korean.
Note Adding memory to the printer will allow it to process more complex
PostScript emulation and PCL 5c a nd PCL 6 jo bs, but it migh t no t
increase processing speed.
To find out how much memory is installed in the printer, print a
configuration page. See “Printing a Configuration page.”
EIO hard disk drive
An EIO hard disk drive can be used for print job storage, and to
permanently store downloaded fonts and forms in the printer. Unlike
standard printer memory, items on the EIO hard disk drive remain in th e
printer even when the printer is turned off.
For information about ordering an EIO hard disk drive, see “Memory/
storage accessories.” For information about installing and using an
EIO hard disk drive, see the documentation provided with the EIO hard
disk drive.
Installing memory and font DIMMs
The printer is shipped with 64 MB of memory on the formatter and
24 MB of memory on the printer base. The printer has three dual inline
memory module (DIMM) slots that accept 64 or 12 8 MB RAM each or
4 MB flash DIMMs. The printer can support up to 344 MB of memory
(including the 24 MB on the printer base). This additional memory is
available for purchase as an accessory. For more information,
see “Ordering supplies and accessories.”
You can also follow this procedure to install third-party
customized solutions.
3-8 ENWW
Page 41
To install memory and font DIMMs
CAUTION DIMMs contain electronic components that can be damaged by
static electricity. To prevent buildup of static electricity, maintain
frequent contact with any bare sheet metal surface on th e p rinte r.
If possible, wear a grounding wrist strap (or similar device).
Handle DIMMs carefully at all times. Avoid touching electronic
components or circuit paths.
1 If you have not already done so, print a Configuration page to find
out how much memory is installed in the printer before adding more
memory. See “Printing a Configuration page.”
2 Press and hold (power button) to turn off the print er.
3 Unplug the power cord and disconnect any cables.
4 To remove the DIMM cover from the back of the printer, insert a
flathead screwdriver into the top slot. Gently push down on the
screwdriver's handle with one hand, grasp the co ver with th e oth e r
hand, and remove the cover.
5 Remove the DIMM from the antistatic package, and then align the
DIMM with an empty DIMM slot.
6 On the DIMM slot, push the DIMM locks outward to release
the locks.
7 Insert the DIMM into the slot (item 1 in the graphic) and press it into
the printer until it snaps into the slot (item 2 in the graphic).
ENWW 3-9
Page 42

Note To remove a DIMM, the locks on the DIMM slot must be released
by pushing them outwards.
8 Replace the cover and gently apply pressure until the cover snaps
into place.
9 Reattach the power cord and any cables, and then turn on
the printer.
Checking memory installation
Follow this procedure to verify that DIMMs are installed correctly.
To check memory installation
1 Check that READY appears on the LCD control panel when the
printer is turned on. If an error message appears, a DIMM might
have been installed incorrectly.
For information about printer messages, see “LCD co ntrol panel
messages.”
2 Print a new Configuration page. Check the memory section on the
Configuration page and compare it to the Configuration page
printed before the DIMM installation. If the amount of memory has
not increased, one of the following problems might have occurred:
• The DIMM might not be installed correctly. Repeat the
installation procedure.
• The DIMM might be defective. Try a new DIMM.
3-10 ENWW
Page 43
Setting printer options
4
The LCD control panel allows you to change printer settings, view
printer status and printer messages, and diag nose printer problems.
Additional menu items can appear in th e L CD co ntro l pa nel , dep end ing
on the options installed in the printer.
Understanding the LCD control panel
9
10
1
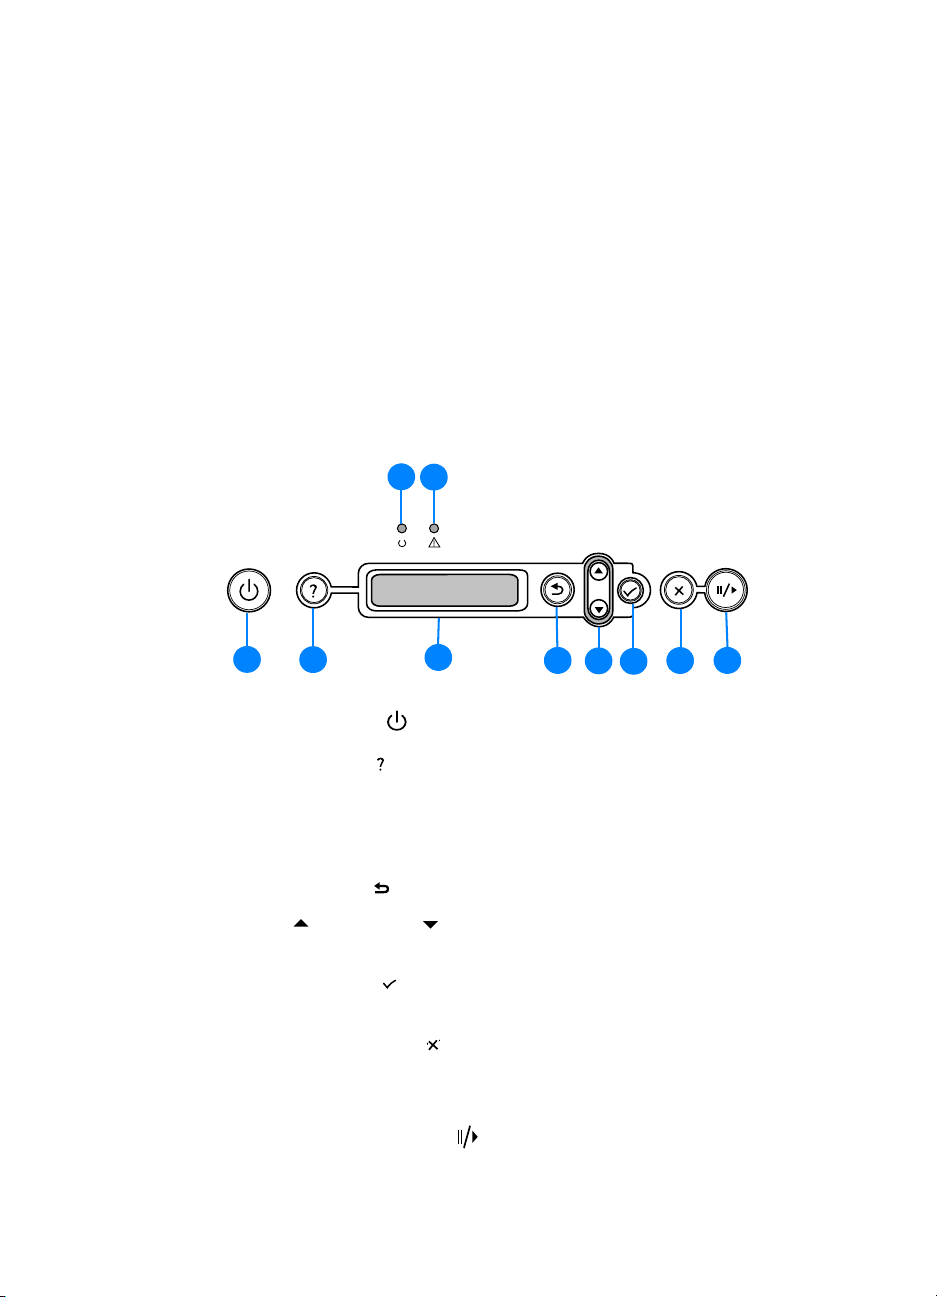
1 Power button ( ): Turns the printer off and on .
2 Help button ( ): Provides additional information about printer
3 LCD display: Shows status and error messages, as well as ink
4 Back button ( ): Navigates backward one level in the menus.
5 Up ( ) and down ( ) arrow button: Navigates through menu items
6 Select button ( ): Selects highlighted menu items. This bu tton al so
7 Cancel job button ( ): Cancels the current print job. The time it
8 Pause/resume button ( ): Temporar ily stops and restarts pr inting.
2
messages or menus.
cartridge levels.
and increases or decreases numerical values.
restarts printing after continuable erro r s.
takes to cancel depends on the size of the print job. Press this
button only once to cancel the current print job.
This button also exits the menus and exits the LCD control
panel help.
3
4
5
7 8
6
ENWW 4-1
Page 44

9 Ready light: Indicates one of three possible states:
On — The printer is onlin e and ready to accept p rint jobs. This st ate
also indicates that the printer may have buffered data that it has
finished processing but is waiting to receive more data.
Off — The printer is either offline, turned off, or has no data to
process.
Flashing — The printer is receiving data, or, if the LCD displays the
message
and go offline.
10 Attention light: Indicates one of four possible states:
On — A critical error has occurred, and the printer requires
attention. A critical-error message usually accompanies this
indicator.
Off — No conditions exist that require attention. A printer-status
message usually accompanies this indicator.
Flashing quickly — The printer has encountered an error that
requires user attention (such as an open door or a paper jam).
An error message usually accompanies this indicator.
Note For a list of messages that can appear in the LCD control panel
display, see “LCD control panel messages.”
PLEASE WAIT, the printer is attempting to stop printing
Printing an LCD control panel menu map
You can print a menu map from the LCD control panel.
To print an LCD control panel menu map
1 Press (select button) on the LCD control panel.
2 Press (down arrow button) to highlight
press (select button)
3 Press (select button) to select PRINT MENU MAP.
Note If the auto-duplex unit is installed and the auto-d uplex option is set
to
ON in the LCD control panel, do not remove the page from the
printer until both sides are finished printing.
4-2 ENWW
.
INFORMATION, and then
Page 45

Changing LCD control panel menu settings
The LCD control panel is one of three ways to set options in the printer.
You can also change options using settings in the printer driver and in
the applications from which you print. Printer driver and application
settings override LCD control panel settings for the current print job.
Application settings override default printer driver settings.
Menu items in the LCD control panel are numbered from 1-9. If a menu
has more than nine items, the additional items will appear with a letter
value from A to Z. However, the numbers and letter values are not
included in the procedures in this guide.
Items that have submenus appear with a plus sign (+) next to them.
If the second line of a two-line message is not visible, an ellipsis (...)
appears at the end of the first line of the message.
For more information about any LCD control panel menu or item,
press (help button).
Note If you cannot gain access to a menu or ite m, it is either not an option
for the printer, or you have not enabled the associated higher-level
option. When items appear with a padlock symbol next to them,
a personal identification number (PIN) is required to change
the setting.
To change an LCD control panel setting
1 Press (select button) on the LCD control panel to enter the
menus.
2 Navigate to the menu or submenu that contains the setting you
want to change.
• Press (down arrow b utton) or (up arrow button) to highlight
the desired menu. (Hold down either of these buttons t o
auto-scroll through the selections.) Press (select button) to
access the desired menu. Repeat this procedure to access
submenus.
• Press (down arrow button ) or (up arrow button) to highlight
the desired setting, and then press (select button) to save the
setting. An asterisk (*) appears next to the setting in the display,
indicating that the new setting is now the default.
3 Press (pause/resume button) to exit the menus and return the
printer to the
printer returns automatically to the
ENWW 4-3
READY state. If no key is pressed for 30 seconds, the
READY state.
Page 46

Retrieve Job menu
This menu displays all stored jobs. You can scroll through the list to find
and select a specific job. If the printer has no stored jobs, the
LCD control panel displays the message
Information menu
This menu contains printer information pages that give details about the
printer and its configuration. To print an information page, scroll to the
desired page and press (select button).
Message Description
NO STORED JOBS.
PRINT MENU MAP
PRINT
CONFIGURATION
PRINT SUPPLIES
STATUS PAGE
SUPPLIES STATUS
PRINT USAGE PAGE
PRINT DEMO
PRINT FILE
DIRECTORY
This item prints a map of the printer menu structure.
This item prints a page describing current
configuration settings (such as firmware version,
model, accessories installed, I/O support, or other
details). If an HP Jetdirect print server is installed, a
second page will be printed, which displays the
settings for the HP Jetdirect print server.
This item prints the estimated remaining life
(represented in graphical form as a gauge) for the
supplies. This item shows ink cartridge serial
numbers, the expiration date, maintenance
information, and whether ink levels are low.
This item also shows printhead serial numbers and
printhead health information.
This item displays the supplies status in a
scrollable list.
This item prints a count of all media sizes that have
passed through the printer; lists whether they were
simplex, duplex, monochrome, or color; and reports
the page count.
This item prints a demonstration page.
This item prints the name and directory of files
stored on an optional hard disk.
4-4 ENWW
Page 47

Message Description
PRINT PCL
FONT LIST
PRINT PS
FONT LIST
Paper Handling menu
These settings control the default media-selection options. However,
printer driver and software application settings override LCD control
panel settings for the current print job.
Message Value or Submenu Description
TRAY 1 SIZE LETTER
LEGAL
EXECUTIVE
A4
A6
B5(ISO)
B5(JIS)
ENVELOPE #10
ENVELOPE MONARCH
ENVELOPE C5
ENVELOPE DL
CUSTOM
ANY CUSTOM
This item prints the available PCL fonts.
This item prints the available PS (emulated
PostScript) fonts.
This item allows you to
select the media size loaded
in Tray 1.
Default =
LETTER
ENWW 4-5
Page 48

Message Value or Submenu Description
TRAY 1 TYPE PLAIN
PHOTO GLOSS
PHOTO QUALITY GLOS
PHOTO QUALITY MATT
EVERYDAY SEMI GLOS
EVERYDAY MATTE
PREMIUM INKJET
PREMIUM IJ HEAVY
BROCHURE GLOSS
BROCHURE MATTE
PM PHOTO GLOSS
PM+ PHOTO GLOSS
PM+ PHOTO MATTE
COLORFAST PHOTO
PREMIUM TRNSPRNCY
PREMIUM+ TRNSPRNCY
TRAY 2 SIZE ANY
LETTER
LEGAL
EXECUTIVE
A4
B5(JIS)
B5(ISO)
CUSTOM
ANY CUSTOM
This item allows you to
select media type loaded in
Tray 1.
Default =
This item displays the
current size configuration for
the tray. Sizes are detected
by the printer tray. To use a
custom size, load the media
in the tray and adjust the
length and width guides to fit
snugly but gently against
the media.
Default =
PLAIN
LETTER
4-6 ENWW
Page 49

Message Value or Submenu Description
TRAY 2 TYPE ANY
PLAIN
PHOTO GLOSS
PHOTO QUALITY GLOS
PHOTO QUALITY MATT
EVERYDAY SEMI GLOS
EVERYDAY MATTE
PREMIUM INKJET
PREMIUM IJ HEAVY
BROCHURE GLOSS
BROCHURE MATTE
PM PHOTO GLOSS
PM+ PHOTO GLOSS
PM+ PHOTO MATTE
COLORFAST PHOTO
PREMIUM TRNSPRNCY
PREMIUM+ TRNSPRNCY
TRAY 3 SIZE ANY
LETTER
LEGAL
EXECUTIVE
A4
B5(JIS)
B5(ISO)
CUSTOM
ANY CUSTOM
This item allows you to
select the media type loaded
in Tray 2.
Default =
This item displays the
current size configuration for
the tray. Sizes are detected
by the printer tray. To use a
custom size, load the media
in the tray and adjust the
length and width guides to fit
snugly but gently against
the media.
This item is displayed only
when Tray 3 is installed.
Default =
PLAIN
LETTER
ENWW 4-7
Page 50

Message Value or Submenu Description
TRAY 3 TYPE ANY
PLAIN
PHOTO GLOSS
PHOTO QUALITY GLOS
PHOTO QUALITY MATT
EVERYDAY SEMI GLOS
EVERYDAY MATTE
PREMIUM INKJET
PREMIUM IJ HEAVY
BROCHURE GLOSS
BROCHURE MATTE
PM PHOTO GLOSS
PM+ PHOTO GLOSS
PM+ PHOTO MATTE
COLORFAST PHOTO
PREMIUM TRNSPRNCY
PREMIUM+ TRNSPRNCY
This item allows you to
select media type loaded in
Tray 3.
This item is displayed only
when Tray 3 is installed.
Default =
PLAIN
4-8 ENWW
Page 51

Configure Device menu
Items in this menu affect printer behavior. Configure the printer
according to your printing needs.
The Configure Device menu contains several submenus: Printing, Print
Quality, System Setup, I/O, and Resets.
Printing menu
The items in this menu are used when printing from MS-DOS®, UNIX,
and Linux. If your computer is running Windows or the Mac OS,
configure these settings using the printer driver.
Message Value or Submenu Description
- 32000 This item sets the number of
COPIES
1
copies to print.
Default =
1
DEFAULT PAPER
SIZE
DEFAULT
CUSTOM PAPER
SIZE
LETTER
LEGAL
EXECUTIVE
A4
A6
B5(ISO)
B5(JIS)
ENVELOPE #10
ENVELOPE MONARCH
ENVELOPE C5
ENVELOPE DL
CUSTOM
ANY CUSTOM
UNIT OF MEASURE
X DIMENSION
Y DIMENSION
This item allows you to set the
default media size.
Default =
This item allows you to set the
unit of measurement and
dimensions for jobs that have
no dimensions. The default
paper size (see above) must
be set to
this item.
The values can be set
independently and apply to
any jobs that are sent without
dimensions.
Default =
LETTER
CUSTOM to use
INCHES
ENWW 4-9
Page 52

Message Value or Submenu Description
DEFAULT PAPER
TYPE
ANY
PLAIN
PHOTO GLOSS
PHOTO QUALITY GLO
PHOTO QUALITY MATT
EVERYDAY SEMI GLO
EVERYDAY MATTE
PREMIUM INKJET
PREMIUM IJ HEAVY
BROCHURE GLOS
BROCHURE MATTE
PM PHOTO GLOS
PM+PHOTO GLOSS
PM+PHOTO MATTE
COLORFAST PHOTO
PREMIUM TRNSPRNCY
PREMIUM+TRNSPRNCY
DUPLEX OFF
ON
DUPLEX
BINDING
OVERRIDE
A4/LETTER
LONG EDGE
SHORT EDGE
NO
YES
This item allows you to set a
default media type.
Default =
This item appears only when
an auto-duplex unit is
installed. Set the value to
to print on both sides (duplex)
or
(simplex) of a sheet of paper.
For more information, see
“Printing on both sides of the
page.”
Default =
This item appears only when
an auto-duplex unit is installed
and the duplex option is on.
Choose the binding edge
when duplexing (printing on
both sides of paper). For more
information, see “Printing on
both sides of the page.”
Default =
This item sets the printer to
print an A4 job on letter-size
paper when no A4 paper is
loaded, or to print a letter-size
job on A4 paper when no
letter-size paper is loaded.
Default =
PLAIN
ON
OFF to print on one side
OFF
LONG EDGE
NO
4-10 ENWW
Page 53

Message Value or Submenu Description
MANUAL FEED OFF
ON
COURIER FONT REGULAR
DARK
WIDE A4 NO
YES
PRINT PS
ERRORS
OFF
ON
PCL FORM LENGTH
ORIENTATION
FONT SOURCE
FONT NUMBER
FONT PITCH
SYMBOL SET
APPEND CR TO LF
This item allows you to feed
media manually.
Default =
This item allows you to select
a version of the Courier font.
Default =
This item allows you to change
the printable area of A4 paper
so that eighty 10-pitch
characters may be printed on
a single line.
Default =
This item allows you to print a
list of PS errors.
Default =
This item allows you to
configure settings for printer
control language (PCL) when
using PCL 5c or PCL 6 instead
of PostScript (PS) emulation
for the printer personality.
OFF
REGULAR
NO
OFF
ENWW 4-11
Page 54

Print Quality menu
This menu allows you to adjust aspects of print quality, including
calibration, printhead alignment, and quality level.
.
Message Value or
Submenu
ALIGN
N.A. This item begins the printhead
PRINTHEADS
COLOR
N.A. This item begins the color
CALIBRATION
LINEFEED
N.A. This item begins the linefeed
CALIBRATION
CLEAN
N.A. This item begins the printhead
PRINTHEADS
REPLACE
N.A. This item moves the printhead carriage
PRINTHEADS
DEFAULT
QUALITY LEVEL
DRAFT
NORMAL
BEST
NORMAL MODE
PRINTING
AUTO
SPEED
QUALITY
Description
alignment process.
calibration process.
calibration process.
cleaning process.
to allow users to replace the printheads.
This item allows you to select the
default level for print quality. This setting
is used if the print job contains no
print-quality selection.
Default =
This item allows you to select the type
or mode for normal mode printing to
produce optimal print output results.
NORMAL
SPEED prints at the best possible
speed, with less concern for
print quality.
QUALITY prints at a predetermined
quality level with less concern for print
speed.
AUTO combines speed and quality
settings depending on the health of
the printhead.
Default =
AUTO
4-12 ENWW
Page 55

System Setup menu
The System Setup menu allows y ou to mak e changes to g eneral printer
default settings such as PowerSave Time, printer personality
(language), and jam recovery.
Message Value or
Submenu
JOB STORAGE
1-100
LIMIT
JOB HELD
TIMEOUT
OFF
1 HOUR
4 HOURS
1 DAY
1 WEEK
TRAY BEHAVIOR USE REQUESTED
TRAY
MANUALLY FEED
PROMPT
POWERSAVE TIME 2 MINUTE
15 MINUTES
30 MINUTES
60 MINUTES
90 MINUTES
2 HOURS
4 HOURS
Description
This item allows you to set the
maximum number of jobs that can
be stored on the printer. (This item
appears only if the printer has an
optional hard disk installed.)
Default =
This item allows you to set how
long the printer stores a quick copy
job, which prints the requested
number of copies of the job and
stores a copy on the printer's
optional hard disk. Additional
copies can be printed later. (This
item appears only if the printer has
an optional hard disk installed.)
Default =
This item allows you to specify the
tray-selection behavior.
32
OFF
USE REQUESTED TRAY requires
the printer to print from only the tray
specified.
MANUALLY FEED PROMPT
requires you to press (select
button) on the LCD control panel
before printing begins.
This item reduces power
consumption when the printer
has been inactive for an
extended period.
Default =
30 MINUTES
PERSONALITY AUTO
PCL
PS
ENWW 4-13
This item sets the default
personality to automatic switching,
PCL, or PostScript emulation.
Default =
AUTO
Page 56

Message Value or
Submenu
Description
CLEARABLE
WARNINGS
JOB
ON
AUTO CONTINUE OFF
ON
SUPPLIES LOW STOP
CONTINUE
JAM RECOVERY OFF
ON
AUTO
RAM DISK AUTO
OFF
LANGUAGE
A list of available
languages appears.
This item allows you to set the
length of time that a clearable
warning is displayed on the
LCD control panel. If
selected, warnings are displayed
until the end of the current job. If
is selected, warnings are displayed
until you press (select button).
Default =
This item determines
printer behavior when the
system generates an Auto
Continuable error.
Default =
This item sets the printing action to
be taken when the low supplies
setting is reached for ink
cartridges only.
Default =
This item determines whether the
printer will attempt to reprint pages
after a jam.
Default =
This item allows you to enable or
disable the RAM disk to store print
jobs or printer fonts. This feature is
available only if no optional hard
disk is installed.
This item sets the default language.
Default =
JOB
ON
CONTINUE
AUTO
ENGLISH
JOB is
ON
4-14 ENWW
Page 57

I/O menu
The I/O menu allows you to make changes to printer interface settings.
Message Value or
Submenu
- 300 This item sets the length of time (in
I/O TIMEOUT
5
PARALLEL INPUT HIGH SPEED
ADVANCED
FUNCTIONS
EIO X TCP/IP
IPX/SPX
APPLETALK
DLC/LLC
LINK SPEED
Description
seconds) that the printer waits for
remaining data for a print job. If that
time is exceeded, the printer prints the
print job.
Default =
This item allows you to access
two options:
15
HIGH SPEED enables fast parallel
port communication with the host. If
the printer is connected to an older
computer, you may want to disable
this option.
ADVANCED FUNCTIONS allows you to
enable or disable the bi-directional
parallel communication. If you disable
this option, the host will not receive any
messages from the Printer Status and
Alerts software.
This item allows you to access
submenus for an EIO accessory, such
as the HP Jetdirect print server.
ENWW 4-15
Page 58

Resets menu
You may need to reset the printer In the following circumstances:
z You want to restore the printer’s default settings.
z Communication between the printer and computer has
been interrupted.
CAUTION When you use the restore factory settings option on this menu,
you can lose printer configuration settings.
Note This option does not reset an HP Jetdirect print se rver to its default
settings if one is installed in the printer. To reset the HP Jetdirect
print server, see “Resetting the HP Jetdirect print server.”
Message Value or
RESTORE
FACTORY
SETTINGS
POWERSAVE OFF
Diagnostics menu
This menu allows you to test various components of the printer so you
can identify and solve problems.
Message Description
PRINT EVENT LOG
SHOW EVENT LOG
PAPER PATH TEST
Description
Submenu
N.A. This item restores all values to
the printer’s predetermined
factory values.
This item enables and
ON
This item prints the last 50 entries in the printer’s
event log, starting with the most recent event.
This item displays the last 50 events on the
LCD control panel, starting with the most
recent event.
This item tests the paper handling features of the
printer. If you have difficulty printing on both sides of
the page or printing from one of the trays, run this
test to verify that the paper path is working properly.
disables PowerSave.
Default =
ON
4-16 ENWW
Page 59

Service menu
This menu requires administrator-lev el ac ce ss righ ts. These items
should be used by trained service personnel only. When prompt ed,
press (up arrow butt on) and (down arrow button) to enter the PIN,
and then press (select button) to select and confirm the PIN.
Message Value or
Submenu
CLEAR EVENT
N.A. This item clears all events listed in the
LOG
TOTAL MONO
0-9999999
PAGES
TOTAL COLOR
0-9999999
PAGES
SERIAL NUMBER
SERVICE ID
COLD RESET
PAPER
Printer serial
number
Printer service
ID number
LETTER
A4
Description
Event Log. This feature can be useful
when tracking an issue.
This item is used for tracking the
number of pages printed using only
black.
This item is used for tracking the
number of pages printed using any
color other than black.
This item displays the printer serial
number. The serial number displayed in
the LCD control panel should match the
serial number tag located on the rear of
the printer.
This item displays a number for printer
administrators to reference when
contacting customer support.
This item determines the paper size for
the default paper size setting in the
Printing menu. See “Printing menu” for
more information.
ENWW 4-17
Page 60

EIO menu
The EIO (enhanced input/output) menu appears only when an EIO
device is installed (such as an HP Jetdirect print server). If the printer
contains an HP Jetdirect print server, you can configure basic
networking parameters using the EIO menu. Network printer
administrators can also use HP Web Jetadmin to configure these and
other parameters remotely.
Note The items available on the menu vary depending on the par ticular
print server that is installed.
Message Value or
Submenu
TCP/IP ENABLE
CONFIGURE
METHOD
Description
This item allows you to enable or
disable the TCP/IP menu and set the
TCP/IP protocol parameters.
In the TCP/IP menu, you can specify
BOOTP=YES or DHCP=YES for TCP/IP
parameters to be automatically
configured by a BootP or DHCP server
when the printer is turned on.
If you specify
BOOTP=NO and
DHCP=NO, you can manually set the
following TCP/IP parameters from the
LCD control panel:
z Each byte of the IP address (IP)
z Subnet Mask (SM)
z Syslog Server (LG)
z Defaul t Gateway (GW)
z Idle Ti meout period (default is 270
seconds; 0 disables the timeout)
When setting IP numbers, press (up
arrow button) to increase the number
by 1. Press
decrease the number by 1. Press
(select button)
(down arrow button) to
to make your selection.
4-18 ENWW
Page 61

Message Value or
Submenu
Description
IPX/SPX ENABLE
FRAME TYPE
APPLETALK ENABLE
DLC/LLC ENABLE
LINK SPEED LINK SPEED
This item enables the IPX/SPX menu,
which you can use to set the IPX/SPX
protocol parameters.
In the IPX/SPX menu, you can specify
the frame type parameter used on
your network.
The default is
automatically sets and limits the frame
type to the one detected.
For Ethernet cards, frame type
selections include
AUTO, which
EN_8023, EN_II,
EN_8022, and EN_SNAP.
For Token Ring cards, frame type
selections include
TR_8022 and
TR_SNAP.
In the IPX/SPX menu for Token Ring
cards, you can also specify NetWare
Source Routing parameters, which
include
SRC RT=AUTO (default), OFF,
SINGLE R, or ALL RT.
This item allows you to enable or
disable the AppleTalk protocol.
This item allows you to enable or
disable the DLC/LLC protocol.
This item allows you to manually set the
link speed (10 or 100 Mbs).
Resetting the HP Jetdirect print server
Resetting the HP Jetdirect print server restores the factory default
values of the Jetdirect print server.
Note When you restore the factory default values for the HP Jetdirect
print server, all previously stored EIO settings are lost.
To reset the HP Jetdirect print server
1 Press and hold (power button) to turn off the print er.
2 While holding down both (select button) and (pause/resume
button) on the LCD control panel, turn on the printer.
ENWW 4-19
Page 62

4-20 ENWW
Page 63

Configuring network
5
connectivity
You can configure network parameters f rom the LCD control panel,
the embedded Web server, or for most networks, from the
HP Web Jetadmin software. For more information about using the
embedded Web server, see “Using the embedded Web server.”
For a complete list of supported networks and for instructions on
configuring network parameters, see the HP Jetdirect Print Server
Administrator’s Guide. This guide is provided on the Starter CD for
printers shipped with an HP Jetdirect print server.
Configuring Novell NetWare frame type parameters
The HP Jetdirect print server automatically selects a NetWare frame
type. Select a frame type manually only when the print server selects an
incorrect frame type. To identify the frame type chosen by the
HP Jetdirect print server, print a configuration page from the
LCD control panel. See “Printing a Configuration page.”
The following frame types are supported:
z Ethernet_802.3
z Ethernet_II
z Ethernet_802.2
z Ethernet_SNAP
ENWW 5-1
Page 64

To set the Novell NetWare frame type
1 Press (select button) on the LCD control panel to enter the
menus.
2 Press (down arrow button) to highlight
and then press (select button).
3 Press (down arrow button) to highlight
(select button).
4 Press (down arrow button) to highlight
and then press (select button).
5 Press (down arrow button) to highlight
(select button).
6 Press (down arrow button) to highlight
press (select button).
7 Press (down arrow button) to highlight the desired frame type,
and then press (select button).
8 To return to the
READY state, press (pause/resume button).
Configuring TCP/IP parameters
You can use the LCD control panel to configure the following
TCP/IP parameters:
z Usage of BOOTP or DHCP for configuration parameters
z IP address (4 bytes)
z Subnet mask (4 bytes)
z Default gateway (4 bytes)
z Syslog server
z Idle TCP/IP connection timeout (in seconds)
CONFIGURE DEVICE,
I/O, and then press
EIO X (where X = 1 or 2),
IPX/SPX, and then press
FRAME TYPE, and then
5-2 ENWW
Page 65

To manually access TCP/IP parameters
1 Press (select button) on the LCD control panel to enter
the menus.
2 Press (down arrow button) to highlight
and then press (select button).
3 Press (down arrow button) to highlight
(select button).
4 Press (down arrow button) to highlight
and then press (select button).
5 Press (down arrow button) to select the parameter you want to
configure, and then press (select button).
6 Press (down arrow button) or (up arrow button) to highlight
the option you want to select, and then press (select button).
7 To configure other parameters, press (back button) repeatedly to
return to the
through 6.
-Or-
To return to the
8 Repeat steps 3-7 to configure other parameters.
CONFIGURE DEVICE menu, and then repeat steps 1
READY state, press (pause/resume button).
Setting the link speed
CONFIGURE DEVICE,
I/O, and then press
EIO X (where X = 1 or 2),
By factory default, the link speed is set to AUTO. Use the following
procedure to set a specific speed and communication mode.
To set the link speed
1 Press (select button) on the LCD control panel to enter
the menus.
2 Press (down arrow button) to highlight
and then press (select button).
3 Press (down arrow button) to highlight
(select button).
4 Press (down arrow button) to highlight
and then press (select button).
5 Press (down arrow button) to highlight
press (select button).
ENWW 5-3
CONFIGURE DEVICE,
I/O, and then press
EIO X (where X = 1 or 2),
LINK SPEED, and then
Page 66

6 Press (down arrow button) or (up arrow button) to highlight
the desired link speed, and then press (select button).
7 To return to the
READY state, press (pause/resume button).
Disabling network protocols (optional)
By factory default, all supported network protocols are enabled.
Disabling unused protocols has the following benefits:
z It decreases printer-generated network traffic.
z It prevents unauthorized users from printing to the printer.
z It provides only pertinent information on the configuration page.
z It allows the LCD control panel to display protocol-specific error and
warning messages.
To disable network protocols
Note Do not disable the IPX/SPX protocol if Windows 98, Windows NT,
Windows Millennium Edition, Windows 2000, or Windows XP users
will be printing to the printer.
1 Press (select button) on the LCD control panel to enter
the menus.
2 Press (down arrow button) to highlight
and then press (select button).
CONFIGURE DEVICE,
3 Press (down arrow button) to highlight
(select button).
4 Press (down arrow button) to highlight
and then press (select button).
5 Press (down arrow button) to highlight the network protocol you
want to disable, and then press (select button).
6 Press (down arrow button) to highlight
(select button).
7 Press (down arrow button) to highlight
(select button).
8 Press
5-4 ENWW
(pause/resume button) to retu rn to the READY state.
I/O, and then press
EIO X (where X = 1 or 2),
ENABLE, and then press
OFF, and then press
Page 67

Selecting and using
6
print media
Media and paper-handling specifications
Supported media types
The following table lists the types of media that are compatible with the
printer and shows which media can be used with the printer’s paper
trays and accessories.
CAUTION Some media, such as transparencies and photo paper , can be used
with only the printer trays. Using this media in the auto-duplex unit
can cause jams and might damage the printer.
For information about ordering HP media, see “Ordering supplies and
accessories.”
Media Tray 1 Tray 2 Tray 3 Auto-
duplex
unit
Everyday paper
z HP Multipurpose Paper
z HP Printing Paper
z HP Office Paper
z HP Office Recycled Paper
Business communication paper
z HP Premium Inkjet Paper
(not supported by the auto-duplex unit)
z HP Professional Brochure and
Flyer Paper
z HP Premium Inkjet Heavyweight Paper
ENWW 6-1
Page 68

Media Tray 1 Tray 2 Tray 3 Auto-
duplex
unit
Presentation paper
z HP Premium Inkjet Transparency Film
z HP Premium Plus Inkjet
Transparency Film
Photo paper
z HP Premium Plus Photo Paper
z HP Premium Photo Paper
z HP Photo Paper
z HP Colorfast Photo Paper
z HP Everyday Photo Paper
z HP Photo Qua lity Inkjet Paper
*
HP Everyday Photo Paper is available in some countries/regions as
*
*
HP Photo Quality Paper. HP Everyday Photo Paper and HP Photo
Quality Inkjet Paper are supported by the auto-duplex unit.
6-2 ENWW
Page 69

Supported media sizes
The following table lists the sizes of media that are compatible with the
printer and shows which sizes can be used with the printer’s paper trays
and accessories.
CAUTION Some media, such as envelopes and cards, can be used with only
Tray 1. Using this media in Tray 2, Tray 3, or the auto-duplex uni t
can cause jams and might damage the printer and auto-duplex unit.
Standard media sizes
Media Tray 1 Tray 2 Tray 3 Auto-
duplex
unit
Standard paper sizes
z U.S. Letter
(216 by 279 mm; 8.5 by 11 inches)
z U.S. Legal
(216 by 356 mm; 8.5 by 14 inches)
z U.S. Executive
(184 by 267 mm; 7.25 by 10.5 inches)
z A4
(210 by 297 mm; 8.3 by 11.7 inches)
z JIS Executive
(216 by 330 mm; 8.5 by 13 inches)
z JIS B5
(182 by 257 mm; 7.2 by 10.1 inches)
z ISO B5*
(176 by 250 mm; 6.9 by 9.9 inches)
*ISO B5 is not supported by Tray 3.
Envelopes
z COM10 Envelope
(105 by 241 mm; 4.1 by 9.5 inches)
z DL Envelope
(110 by 220 mm; 4.3 by 8.6 inches)
z C5 Envelope
(162 by 229 mm; 6.4 by 9 inches)
z Monarch Envelope
(98 by 191 mm; 3.9 by 7.5 inches)
ENWW 6-3
Page 70

Media Tray 1 Tray 2 Tray 3 Auto-
duplex
unit
Cards
z Index cards
z 102 by 152 mm; 4 by 6 inches
z 127 by 203 mm; 5 by 8 inches
z U.S. Postcard
(89 by 140 mm; 3.5 by 5.5 inches)
z A6 card
(105 by 148 mm; 4.1 by 5.8 inches)
Custom-size media
z Tray 1
(176 by 250 mm up to 216 by 356 mm;
6.9 b y 9.8 in ches up to 8.5 by 14 inches)
z Tray 2 and the auto-duplex unit
(176 by 250 mm up to 216 by 356 mm;
6.9 b y 9.8 in ches up to 8.5 by 14 inches)
z Tray 3
(182 by 257 mm up to 216 by 356 mm;
7.2 b y 9.8 in ches up to 8.5 by 14 inches)
Media handling
Tray or
bin
Tray 1* Paper 60 to 105 g/m
Size or type of
Weight Dimensions Capacity
paper
(16 to 28 lb bond)
Transparencies See note
below table
Envelopes 75 to 90 g/m
2
2
89 by 140 mm
(3.5 by 5.5
inches) to 216
by 356 mm (8.5
by 14 inches)
Single sheet
(20 to 24 lb bond
envelope)
Cards 110 to 199 g/m
2
(29 to 53 lb Index)
Photo paper See note
below table
2
Tray 2 Paper 60 to 105 g/m
(16 to 28 lb plain
bond)
Transparencies See note
below table
176 by 250 mm
(6.9 by 9.8
inches) to 216
by 356 mm (8.5
by 14 inches)
Up to 300 (30-mm or
1.2-inch stack) of plain
paper
Up to 50 sheets
6-4 ENWW
Page 71

Tray or
bin
Size or type of
paper
Weight Dimensions Capacity
Tray 3 Paper 60 to 105 g/m2
(16 to 28 lb plain
bond)
Transparencies See note
below table
Autoduplex
unit
Paper
z U.S. Letter
z U.S. Legal
z U.S.
60 to 105 g/m
(16 to 28 lb bond)
Executive
z JIS Executive
z A4
z JIS B5
z ISO B5
Output bin All supported
media
See note
below table
182 by 257 mm
(7.2 by
10.1 inches) to
216 by 356 mm
(8.5 by 14
inches)
2
176 by 250 mm
(6.9 by 9.8
inches) to 216
by 356 mm (8.5
by 14 inches)
See note
below table
Up to 700 sheets (80-mm
or 3.2-inch stack)
Up to 50 sheets
See note below table
Up to 300 sheets plain
paper (text printing)
Note Use only recommended HP media. For more information,
see "Supported media types."
*If you are using the optional multipurpose tray in the Tray 1 location,
this tray is designed to perform best using plain paper of weight 60 to
105 g/m
2
(16 to 28 lb plain bond), with a maximum stack height of 100
sheets (11-mm or 0.43-inch stack) of plain paper. It can use the same
size media as the single sheet manual feed unit that was originally
installed in the Tray 1 location.
This tray provides a straight-through paper path that can handle card
stock of weight 105 to 210 g/m2 (28 to 56 lb bond), with a ma ximum
stack height of 10 envelopes or cards. It can also hold up to 20 sheets
of photo paper or transparencies.
ENWW 6-5
Page 72

Selecting and loading print media
By default, Tray 2 is designed to support st andar d m edia size s su ch as
letter and A4, up to 216 by 356 mm (8.5 by 14 inches). Tray 3 supports
the same standard media sizes, excluding ISO B5 and smaller media.
Tray 1 is designed to support media from 89 by 140 mm (3.5 by 5.5
inches) up to 216 by 356 mm (8.5 by 14 inches). Ho wever, you can lo ad
any supported size or type of standard media. T ra ys 2 an d 3 have
automatic media size detection. (However, these trays cannot
automatically detect media type.)
For information about configuring paper trays, see “Configuring trays.”
For a description of media you can u se with the prin ter, see “Supported
media types” and “Supported medi a sizes.“
CAUTION Loading media that is too heavy for a tray, or loading certain types
of special media (such as envelopes, cards, or heavy media) in
Tray 3 can cause jams and might damage the printe r. For a list of
media you can use with these trays, see “Media and paper- handling
specifications.”
Tips for loading media
z The default size for all trays is 216 by 279 mm (8.5 by 11 inches).
z For Tray 2 and Tray 3, insert media face-down with the short edge
of the paper facing the rear of the printer. To print horizontally
(landscape orientation), select landscape or short-edge print
orientation in your software application.
z When loading Tray 1, position the media face-up with the left edge
of the media against the left edge of the tray. For preprinted forms
and letterhead, load the media with the top edge feeding into the
printer first.
z If you purchased the optional multipurpose tray, which is installed in
the Tray 1 location, position the media face-up against the right
edge of the tray first, and then slide the media down into the tray.
Load the media print-side up. For preprinted forms and letterhead,
load the media with the top edge feeding into the print er first.
z To prevent jams, load only one type of media at a time into a tray.
Also, when adding media, always remove the existing media and
realign the media width and length guides to fit the new media.
For more information about avoiding media jams, see “Tips for
avoiding jams.”
z Always use media that conforms to the printer specifications.
For more information about types of media that can be used with
the printer, see “Media and paper-handling specifications.”
6-6 ENWW
Page 73

z Do not use paper that is heavily textured or does not accept ink
well. This type of paper can cause poorly filled graphics or text.
z The document margins must match or exceed a margin setting of
4 mm (0.13 inch).
Configuring trays
When you print a document, you can allow the prin ter to select the tray
for the print job, or you can select a specific tray in the printer driver for
the print job. These settings are available in the Source drop-down
menu in Windows printer drivers and the All pages from pop-up menu
in the Mac OS printer driver.
If you do not select a tray in the printer driver, the printer automatically
selects a tray based on the media sizes co nfigured in the printer —either
in the LCD control panel for Tray 1 or by the length and width guides in
Tray 2 or Tray 3. If neither the media type nor the media size settings
have been changed from the default setti ngs, the printer draws A4/l etter
from Tray 1. For Tray 2 and Tray 3, the printer looks for the default type,
and uses the media width and media le ngth guide se ttings to det ermine
the media size.
For information about configuring media sizes and types for trays, see
“To set media size and type in the LCD control panel.”
Loading Tray 1
Use Tray 1 for printing envelopes, cards, custom size media, and heavy
media up to 0.52 mm (0.02 inch) thick. Tray 1 provides a
straight-through paper path that allows the printer to handle heavy or
thick media. A straight-through paper path does not force the media to
curve or bend as it travels through the printer.
Note If you have purchased the optional multipurpose tray, remove the
single sheet feed unit from the Tray 1 location and install the
multipurpose tray. To use the multipur pose tray, see “To load media
in the optional multipurpose tray“ or “To print on envelopes and
cards using the optional multipurpose tray” for more information.
ENWW 6-7
Page 74

To load Tray 1 manually
1 In the printer driver, select Manual Feed as the media source, and
then select the type of media.
2 When the LCD control panel displays
[SIZE]
Position the media with the short edge of the pape r feeding into the
printer and the long edge against the left side o f the tray. The me dia
should be face-up. (When using the multipurpose tray, which is
installed in the Tray 1 location, load the media against th e right
edge of the tray, when viewing the tray from the front of the pr inter.)
For envelopes, insert a single envelope with the short edge of the
envelope feeding into the printer, the flap facing down, and the
stamp corner against the left side of the tray.
3 Push the media into the printer until you feel some resistance.
Take care not to force media into the feed slot.
4 After each sheet prints, the printer prompts you to load another
sheet of media. Load media as needed until the printer finishes
printing.
Other print jobs will not continue until the Tray 1 job is finished.
, insert a single sheet of media of the correct size and ty pe.
MANUALLY LOAD [TYPE]
To load media in the optional multipurpose tray
Note A multipurpose tray is available as an optional accessory. This
multipurpose tray is installed in the Tray 1 location in place of the
single sheet manual feed unit that came installed with th e printer.
1 Pull out the tray extension lengthwise until it clicks into place.
This extends the tray to support media up to A4 length, or 297 mm
(11.68 inches). The tray extension also serves as the media
length guide.
2 Push in the lever on the width guide and slide it to its outermost
position.
The tray has a maximum capacity of up to 100 sheets of 75 g/m
(20 lb. bond) media or an equivalent stack height of 11 mm
(.43 inch). The print-side of the media must be face-up.
For transparencies, the white strip must feed into the printer first.
3 To properly align media, place the stack against the left edge of the
tray, and then slide the media down to rest in the tray. Do not
overload the tray.
6-8 ENWW
2
Page 75

Note For more information about other media you can use with the
printer, see “Selecting and using print media.”
4 Push in the lever on the media width guide and slide it until it fits
snugly but gently against the media. Gently push down the tray
extension until it fits snugly but gently against the media. Be careful
that the tray extension does not cause the media to bend or sag.
You must configure the media size and type for the tray. For more
information, see “To set media size and type in the LCD control panel.”
To load media in Tray 2 or optional Tray 3
Note For information about printing from Tray 1, see “Loa ding Tray 1.”
1 Grasp the handle under the front of the tray, and then slowly pull
the tray out until it stops. Do not pull the tray completely out of
the printer.
2 Push in the lever on the media length guide and media width guide
and slide them to their outermost positions.
3 Place up to 300 sheets of media (up to 34 mm or 1.2 inches,
stacked) into Tray 2, or up to 700 sheets of media (up to 80 mm or
3.2 inches, stacked) into optional Tray 3. Be sure the media does
not exceed the maximum stack height as indicated on the labels in
each tray.
If printing on transparencies, load a maximum of 50 tran spar encies
into each tray, with the white strip face-up and toward the printer.
4 Push the media as far back into the tray as it will go. Make sure the
print-side of the media is facing down. Do not exceed the maximum
stack height as indicated on the yellow label inside the tray on the
right side.
Note If you are printing a two-sided (duplex) print job o n preprinted forms,
letterhead, or 3-hole punched media, the media must be loaded
differently. See “Printing on both sides of the page” for more
information.
5 Push in the lever on the media length guide and media width guide
and slide them until they fit snugly but gently against the media.
6 Insert the tray into the printer until it closes completely.
ENWW 6-9
Page 76

The printer can automatically detect some media sizes. When the
printer detects the media size, only one size will appear in the
and TRAY 3 SIZE options. If the size displayed in the LCD
SIZE
control panel does not match the media you loaded in the tray, open the
tray and make sure the media sits as far in as possible. Adju st th e
media width and length guides so they fit snugly but gently against the
media stack. Close the tray.
If the media size displayed in the LCD control panel still does not match
the size in the tray, the media must be loaded as a custom size.
If you are loading custom size media, you must configure the size in the
LCD control panel. Also, if you are printing on media th at does not
match the media type setting for th e tray, yo u must co nfigure th e media
type in the LCD control panel. For more inf ormation, see “To set media
size and type in the LCD control panel.”
TRAY 2
To set media size and type in the LCD
control panel
1 Press (select button) to enter the menus.
2 Press (down arrow button) to highlight
and then press (select button).
3 Press (select button) to select
or 3).
Note If the printer has the multipurpose tray installed, the multipurpose
tray functions as Tray 1.
4 Press (down arrow button) or (up arrow button) to scroll
through the media size list and highlight the desired media size.
5 Press (select button) to confirm the selection.
6 Press (down arrow button) to highlight
press (select button).
7 Press (down arrow button) or (up arrow button) to scroll
through the media type list and highlight the desired media type.
8 Press (select button) to confirm the selection.
9 Press (pause/resume button) to return the prin te r to th e
TRAY X SIZE (where X = 1, 2,
PAPER HANDLING,
TRAY X TYPE, and then
READY state.
Note If you do not set all of the tray size and type settings,
the printer prompts you to set the remaining options when you
print a document.
6-10 ENWW
Page 77

Using the printer driver
Changing printer settings in Windows
You can change printer settings from the LCD control panel, from the
printer driver, and from a software application.
Note Settings in a software application always take precedence over
settings in the printer driver or the LCD control panel.
If you want to set printing options for only a particular software
application, change the settings from the application. After you close
the application, the printer settings will return to the defaults configured
in the printer driver.
To change printer settings from a software application, on the File
menu, click Print, and then click Setup or Properties.
If you want to set printing options for all software applications you use
on the computer, change the default settings in the printer driver.
To change settings in the printer driver
1 From the Windows desktop, click Start, point to Settings, and then
click Printers (Windows 98, Windows Millennium Edition,
Windows NT 4.0, and Windows 2000).
-OrClick Start, and then click Printers and Faxes (Windows XP).
2 Right-click the prin te r ic on , an d then cho os e th e op tio n fo r you r
operating system:
• For Windows 98 and Windows Millennium Edition, click
Properties.
• For Windows NT 4.0, click Document Defaults or Properties.
• For Windows 2000 and Windows XP, click Printing
Preferences or Properties.
3 Change the desired settings, and then click OK.
Note For additional information, go to http://www.hp.com/support/
businessinkjet3000.
ENWW 6-11
Page 78

Changing printer settings in the Mac OS
You can change printer settings in the LC D control panel or from the
Page Setup and Print dialog boxes in the Mac OS. Settings in the
Mac OS override settings in the LCD control panel.
You can also select the default printer. The default printer is the one
that is used if you choose the Print command without first specifying
which printer you want to use with an application. The default printer
should be the printer that you use most often.
For more information about using the Mac OS to change printer
settings, see the Mac Help on your computer. For information about
using the LCD control panel, see “Setting printer options.”
To change page setup settings
1 Open the document you want to print.
2 On the File menu, click Page Setup.
3 From the Format for pop-up menu, select the printer for which
you want to format the document, and then change the desired
settings (such as selecting the type of media and setting custom
page sizes).
4 On the Paper pop-up menu (Mac OS 8.6 to Mac OS 9.2.2) or the
Paper Size pop-up menu (Mac OS X), select the media size on
which you want to print.
5 Click OK.
To change print settings
1 Open the document you want to print.
2 On the File menu, click Print.
3 Select the location of the media or the type of media on which you
want to print:
• Mac OS 8.6 to Mac OS 9.2.2: On the pop-up menu,
click All pages from, and then select the media source or the
media type.
• Mac OS X: On the pop-up menu, select Paper Feed, and click
All pages from. On the pop-up menu, select the media so urce
or the media type.
4 Change the desired settings (such as selecting a source for the
print job and choosing print quality modes).
5 Click Print.
6-12 ENWW
Page 79

Printing using the printer drivers
In most situations, you will probably print documents using the printer
driver. Although specific options vary depending on the software
application you are using, you can usually gain access to the printer
driver by clicking File, and then Print in the software application.
For more information about printer driver featur es, see the printer drive r
online help. For more information about print ing from a specific software
application, see the documentation for the software application.
Note For information about printing from a Macintosh computer,
see “Changing printer settings in the Mac OS.”
To print using the PCL 5c printer driver
1 On the File menu, click Print.
2 On the Name drop-down menu, select the PCL 5c printer driver,
and then click Properties or Setup. (The options might b e differe nt
for your application.)
3 On the Source is drop-down menu, select the location of the media
on which you want to print.
• If the media type and media size you want to print have been
configured in the LCD control panel, select Auto Select.
The printer automati cally selects the appropriate tray for the
media. For information about configuring the paper type and
paper size settings in the LCD control panel, see “To set media
size and type in the LCD control panel.”
• If you want to print an envelope, card, or other sp ecial media
using Tray 1, select Manual Feed, and then follow the
instructions in the LCD control panel. For information about
loading Tray 1, see “Loading Tray 1.”
• If you want to print from a specific tray, select Tray 1, Tray 2,
or Tray 3.
4 On the Type is drop-down menu, select the type of media you wa nt
to print.
5 Click the Paper tab.
6 On the Print Quality drop-down menu, select a print mode.
7 Change other print settings, if necessary, and then click OK.
8 Click Print.
ENWW 6-13
Page 80

To print using the PCL 6 printer driver
1 On the File menu, click Print.
2 On the Name drop-down menu, select the PCL 6 printer driver, and
then click Properties or Setup. (The options might be different for
your application.)
3 On the Size is drop-down menu, select the media size on which
you want to print.
4 On the Type is drop-down menu, select the type of media on which
you want to print.
5 On the Source is drop-down menu, select the location of the media
want to print.
• If the media type you want to print has been configured in the
LCD control panel, select Auto Select. The printer automatically
selects the appropriate tray for the media. For inform at ion ab out
configuring the media type settings in the LCD control pane l, see
“To set media size and type in the LCD control panel.”
• If you want to print an envelope, card, or other sp ecial media
using Tray 1, select Manual Feed, and then follow the
instructions in the LCD control panel. For information about
loading Tray 1, see “Loading Tray 1.”
• If you want to print from a specific tray, select Tray 1, Tray 2, or
Tray 3.
6 On the Paper tab, click a print mode in the Print Quality section.
7 Change other print settings, if necessary, and then click OK.
8 Click Print.
6-14 ENWW
Page 81

To print using the emulated PostScript printer driver
Note For more information about printing using the emulated PostScript
printer driver, see “Printing using PostScript emulation.”
1 On the File menu, click Print.
2 On the Name drop-down menu, select the emulated PostScript
(PS) printer driver, and then click Properties or Setup.
(The options might be different for your application.)
3 Select the type of media on which you want to print:
• Windows 98 and Windows Millennium Edition: Click More
Options. On the Paper type drop-down me nu, select t he media
type.
• Windows NT 4.0: On the Advanced tab, select Media on the
upper scrolling menu. In the Change Media Settings menu,
select the media type.
• Windows 2000 and Windows XP: On the Paper/Quality tab,
on the Type is drop-down menu, select the media type on which
you want to print.
4 On the Source is drop-down menu, select the location of the media
on which you want to print.
This menu is located on the Paper tab for Windows 98 and
Windows Millennium Edition, the Advanced tab for Windows NT
4.0, or the Paper/Quality tab for Windows 2000 and Windows XP.
• If the paper type on which you want to print has been configured
in the LCD control panel, select AutoSelect Tray in Windows 98
and Windows Millennium Edition, or Automatically Select in
Windows NT 4.0, Windows 2000, and Windows XP. The printer
automatically selects the appropriate tray for the media. For
information about configuring the medi a type settings in the LCD
control panel, see “To set media size and type in the LCD
control panel.”
• If you want to print an envelope, card, or other sp ecial media
using Tray 1, select Manual Feed, and then follow the
instructions on the LCD control panel. For information about
loading Tray 1, see “Loading Tray 1.”
• If you want to print to a specific tray, select Tray 1, Tray 2, or
Tray 3.
ENWW 6-15
Page 82

5 Select a print mode for the print job:
• Windows 98 and Windows Millennium Edition: On the
Device Options tab, on the Printer features list, select Print
Quality. On the Change setting for drop-down menu, select the
print mode.
• Windows NT 4.0: In the upper scrolling menu of the Advanced
tab, expand Document Options, and then expand Printer
Features. On the Change ‘Print Quality’ Setting menu, select
the print mode.
• Windows 2000 and Windows XP: On the Paper/Quality tab,
on the Print Quality drop-down menu, select the print mode.
6 Change other print settings, if necessary, and then click OK.
7 Click Print.
Printing on special media
In addition to printing on plain paper, you can print on sp ecial media,
including the following types:
z envelopes and cards
z transparencies
z heavy paper (including coated media and photo paper)
z custom size media
Note For best results, load special media in Tray 1. For more information,
see “Printing on special media.”
Select the media type, the print quality, and the med ia source in the
printer driver.
For information about supported media types and sizes, see “Selecting
and loading print media.”
6-16 ENWW
Page 83

Printing on envelopes and cards
Use Tray 1 to print envelopes and cards. If the optional multipurpose
tray is installed in the Tray 1 location, you can load up to 10 envelopes
or 10 cards.
Note If your software application supports printing envelopes or cards,
follow the application's instructions to print the envelope or card.
To print on envelopes and cards using Tray 1
1 In the printer driver, select Manual Feed as the media source, and
then select the envelope or card size.
Note For more information about configuring settings in the printer driver,
see “Using the printer driver.”
2 Print the document.
3 When the LCD control panel displays
[SIZE]
along the left side of Tray 1. Envelopes should be placed with the
flap facing down and the stamp corner against the left side of the
tray. For more information, see “Loading Tray 1.”
4 After each item prints, the printer prompts you to load another
envelope or card. Load envelopes or cards as neede d un til th e
printer finishes printing.
, insert one envelope or card of the correct size and type
MANUALLY LOAD [TYPE]
To print on envelopes and cards using the optional
multipurpose tray
Note The optional multipurpose tray is installed in the Tray 1 location.
1 Insert up to 10 envelo pe s or card s int o the mu ltip ur po se tra y, an d
position them against the right side of the tray. En velopes should be
placed with the flap facing down and the stamp corner against the
right side of the tray.
For more information about loading media, see “Selecting and
loading print media.”
2 In the printer driver, select Tray 1 as the media source, and then
select the envelope or card size.
3 Print the document.
ENWW 6-17
Page 84

Printing on transparencies
When printing on transparencies, use the following guid elines:
z Use Tray 1 to print on transparencies. If the optional multipurpose
tray is not installed in the Tray 1 location and you want to print
multiple transparencies, use Tray 2 or Tray 3.
z Load a maximum of 50 transparencies in Tray 2 or Tray 3, and up
to 20 transparencies in Tray 1 if the optional multipurpose tray is
installed in the Tray 1 location. (Be sure the media does not exceed
the maximum stack height as indicated on the labels in each tray.)
Load a single transparency at a time if the single sheet manual feed
unit is installed in the Tray 1 location.
z Handle transparencies using the edges. Oils from your fingers can
cause print quality problems.
z Use HP Premium Inkjet Transparency Film or HP Premium Plus
Inkjet Transparency Film, which is specifically designed to work
with your printer, or use other transparencies de signed to work with
HP Inkjet printers. For information about ordering transparencies,
see “Ordering supplies and accessories.”
Printing transparencies one at a time
To print a single transparency, use Tray 1. For instruct ions, see “To
load Tray 1 manually.”
To print multiple transparencies
1 Load a maximum of 20 transparencies into the optional
multipurpose tray with the rough side u p and the wh ite stri p feeding
into the printer first.
If the optional multipurpose tray is not installed, use Tray 2 or
Tray 3 with the transparencies facing rough-side down and the
white strip pointing forward into the tray. Load no more than 50
transparencies in Tray 2 or Tray 3. Be sure the media does not
exceed the maximum stack height as indicated on the labels in
each tray.
For more information about loading media, see “Selecting and
loading print media.”
2 In the printer driver, select Tray 1, Tray 2, or Tray 3 as the media
source, and then select HP Premium Transparency as the
media type.
For more information about configuring settings in the pr inter driver,
see “Using the printer driver.”
3 Print the document.
6-18 ENWW
Page 85

Printing on heavy media
When printing on heavy media (up to 0.52 mm or 0.02 inch thick), use
Tray 1. It provides a straight-through paper path that allows the printer
to handle heavy or thick media without bending or curling the media.
CAUTION Do not use media that is heavier than the media specification
recommended for this printer. Doing so can cause misfeeds, jams,
reduced print quality, and excessive mechanical wear.
See “Selecting and loading print media.”
To print on heavy media using Tray 1
1 In the printer driver, select Manual Feed as the media source,
select the appropriate media type, and then print the document.
For more information about configuring settings in the pr inter driver,
see “Using the printer driver.”
2 When the LCD control panel displays
[SIZE]
is facing up and is against the left edge of the tray.
For more information, see “Loading Tray 1.”
3 If you are printing more than one page, insert another sheet of
media when prompted by the LCD control panel.
, insert one sheet of media into Tray 1. Make sure the sheet
MANUALLY LOAD [TYPE]
To print on heavy media using the optional
multipurpose tray
Note The optional multipurpose tray is installed in the Tray 1 location.
1 Load the media face-up in the tray. Position the media against the
right edge of the tray, and then slide the media down into the tray.
For more information, see “To load media in the optional
multipurpose tray.”
2 In the printer driver, select Tray 1 as the media source, and then
select the appropriate media type.
3 Print the document.
ENWW 6-19
Page 86

Printing on custom size media
z Use Tray 1 when printing on paper that is 89 by 140 mm (3.5 by 5.5
inches) to 216 by 356 mm (8.5 by 14 inches).
z Use the optional multipurpose tray (if installed) when printing on
paper that is 89 by 140 mm (3.5 by 5.5 inches) to 216 by 356 mm
(8.5 by 14 inches).
z Use Tray 2 when printing on paper that is 176 by 250 mm (6.9 by
9.8 inches) to 216 by 356 mm (8.5 by 14 inches).
z Use optional Tray 3 when printing on paper that is 182 by 250 mm
(7.2 by 9.9 inches) to 216 by 356 mm (8.5 by 14 inches).
z Use Tray 2, Tray 3, or the optional multipurpose tray (which is
installed in the Tray 1 location) when printing multiple shee ts of
custom size media.
z If your application supports custom size media, set the media size
in the application before creating and prin ting th e docu ment. I f your
application does not support custom size media, set the size in the
printer driver, create the document, and then print it. (You might
need to reformat existing documents to print them corr ectly on
custom paper sizes.)
To print custom size media using Tray 1
1 In the printer driver, select Manual Feed as the media source,
either select or create a custom size, and then print the document.
For more information about configuring settings in the pr inter driver,
see “Using the printer driver.”
2 When the LCD control panel displays
[SIZE]
information, see “Loading Tray 1.”
3 If you are printing more than one page, insert another sheet of
media when prompted by the printer.
, insert one sheet of media into Tray 1. For more
LOAD TRAY 1 [TYPE]
To print custom size media from Tray 2, Tray 3, or the
optional multipurpose tray
Note The optional multipurpose tray is installed in the Tray 1 location.
1 Load the media in the tray.
For more information, see “Selecting and loading print media.”
2 In the printer driver, select Tray 1, Tray 2, or Tray 3 as the media
source, and then either select or create a custom size.
3 Print the document.
6-20 ENWW
Page 87

Printing on both sides of the page
The printer can automatically print on both sides of media with an
optional auto-duplex unit.
Note Make sure the auto-duplex unit has been configur ed in the pr inter
driver you are using. For more information, see “Enable optional
accessories in the printer driver.”
Guidelines for printing on both sides of a page
Note When automatically printing on both sides of a page, one side of
the page is printed first. To print the second side, the page must
partially exit the printer to be flipped. Do not attempt t o remove the
page from the printer until both sides have finished printing.
z The auto-duplex unit supports U.S. Letter, U.S. Legal, U.S.
Executive, JIS Executive, A4, JIS B5, ISO B5, and custom size
media from 176 by 250 mm (6.9 by 9.9 inches) up to 216 by 356
mm (8.5 by 14 inches).
z Do not print on both sides of transparencies, envelopes, index
cards, or paper lighter than 60 g/m
105 g/m
2
(28 lb bond). Jams might occur with these types of media.
However, double-sided special media made exclusively by HP can
be used with the auto-duplex unit.
z To print on both sides of a page, make the selection from t he
software application or printer driver. (For Windows, se e the prin ter
driver online help. For the Mac OS, see the Mac Help on your
computer.)
z If you do not use the printer driver that came with the printer, you
might need turn on the
(From the
select
CONFIGURE DEVICE menu, select the PRINTING menu,
DUPLEX, and then select ON.) You can also set the layout
options from the
z Several kinds of media require a specific orien tation when you print
DUPLEX setting in the LCD control panel.
DUPLEX BINDING item.
on both sides of a page, such as letterhead, preprinted media, and
media with watermarks and prepunched ho les. For Tr ay 1, load t he
media with the front side facing up. For Tray 2 and optional Tray 3,
load the media with the front side facing down. The media will be
face-up in the output bin after printing.
z If you attempt to print on both sides of a page without an
auto-duplex unit installed, the printer prints the document on one
side of the page.
2
(16 lb bond) or heavier than
ENWW 6-21
Page 88

Layout options
The four orientation options for printing on both sides of a page are
shown below. These options can be selected from the printer driver or
from the LCD control panel’s
BINDING
setting, and from the PCL menu, select ORIENTATION.) For
information about using the LCD control panel, see “Printing menu.”
Note For Macintosh, in the Page Setup dialog box, select portrait or
landscape orientation.
Long-edge portrait
This is the default printer setting, and the most
common layout used, with every printed image
oriented right side up. Facing pages are read from
top to bottom on the left page, then from top to
bottom on the right page.
Long-edge landscape
This layout is often used in accounting, data
processing, and spreadsheet applications.
Every other printed image is oriented
upside-down. Facing pages are read continuously
from top to bottom.
When using the PCL printer driver on a computer
that runs Windows, select “Flip Pages Up.”
PRINTING menu. (Select the DUPLEX
Short-edge portrait
This layout is often used with clipboards.
Every other printed image is oriented
upside-down. Facing pages are read continuously
from top to bottom.
When using the PCL printer driver on a computer
that runs Windows, select “Flip Pages Up.”
Short-edge landscape
Each printed image is oriented right side up.
Facing pages are read from top to bottom on
the left page, then from top to bottom on the
right page.
6-22 ENWW
Page 89

Using remote
7
diagnostics tools
Using the Toolbox
The Toolbox provides status and maintenance information about your
printer. In addition, the Toolbox gives you step-by-step guidance for
basic printing tasks and provides help for solving pro ble m s.
The Toolbox is available for Windows only.
The Toolbox has two tabs: the Printer Status tab and the
Information tab.
Note Status information is only available if the printer is connected to a
network.
To monitor a printer on a shared port (for example,
\\portname\printername) from a client machine, the Toolbox must be
running on the server machine.
Printer Status
The Printer Status tab displays ink levels and the printer status.
Your computer must be connected to a network in order to display the
status. The drop-down list displays the currently selected printer.
The status window displays the printer's status.
The Ink Cartridge Information window displays status information
about the installed cartridges.
The Preferences button lets you select Toolbox message preferences.
Ink Cartridge Information
The Ink Cartridge Information window displays the part number and
expiration date for each cartridge. The Or der Information button in this
window displays information on ordering replace m en t car tr idg es for
your printer.
ENWW 7-1
Page 90

Preferences
Use the Preferences dialog box to select which Toolbox messages
appear. You can specify whether you want to be notified by an audio
alert when an error occurs, as well as the types of error messages you
want to see, such as those messages about media and hardware.
Information
Use the Information tab to register the printer and gain access to help
information for using the printer, troubleshooting, and contacting
HP support. If the printer is connected to a network, you can also gain
access to myPrintMileage and hp instant suppor t, and you ca n dis pla y
printer hardware and ink cartridge health information. You can also
display the embedded Web server by clicking Launch.
Printer Information
z To learn more about your printing patterns, such as the types and
sizes of print jobs, ink cartridge usage, and media usage, click
myPrintMileage. This information is also available through the
embedded Web server.
z To display information about the condition of each printhead, click
Printhead Health.
z To display hardware information such as the printer model number
and service ID number, click Printer Hardware.
Help
z To use a collection of dynamic Web resources that provide
customized problem-solving information and tips, click hp instant
support. For more information about hp instant su pp or t, see “hp
instant support.”
z To register your printer, click Register Your Printer and follow the
instructions on the screen.
z To get general, step-by-step instructions for completing printer
tasks, click How Do I?
z To get general, step-by-step help with common printer proble ms,
click Troubleshooting.
z To find out how to contact HP support and get information about
your printer, click Contact HP.
7-2 ENWW
Page 91

Using the embedded Web server
The printer comes with an embedded Web server. When the printer
is connected to a network, the embedded Web server is
automatically available.
The embedded Web server allows you to view printer and network
status and to manage printing functions from your compu ter instead of
from the LCD control panel. Using a standard Web browser, this remot e
management tool allows you to do the following:
z view printer control status information
z view supplies status and order new supplies
z view the usage and event log
z receive notification of printer and supplies events
z configure the printer, events, and secu rity information
z view and change network configuration
z perform printer diagnostics
z view and print internal pages
System requirements
To use the embedded Web server, you must have the following:
z a TCP/IP-based network
z a Web browser installed on your computer, either Netscape
Navigator 4.7x or Microsoft Internet Explorer 5.0x and above
You can open and use the embedded Web server with out being
connected to the Internet, however, some features will not be available.
Note The embedded Web server can be accessed from any operating
system that supports the TCP/IP protocol and a Web browser.
The embedded Web server does not support IPX/SPX-based
network printer connections and cannot be accessed with a parallel
cable or USB cable.
You cannot view the embedded Web server pages from outside
a firewall.
ENWW 7-3
Page 92

Gaining access to the embedded Web server
You can gain access to the embedded Web server in the
following ways:
z From the Toolbox (Windows only)
Launch the embedded Web server from the Information tab in the
Toolbox. The default Web browser for the computer opens and
displays the embedded Web server information.
z From a Web browser
In a supported Web browser on your computer, t ype the IP address
assigned to the printer. For example, if the printer’s IP address is
123.123.123.123, you would type
http://123.123.123.123 into your Web br owser.
The printer IP address is listed on the Configuration page. For more
information, see “Printing a Configuration page.”
After you gain access to the embedded Web server, you can bookmark
it so that you can return to it quickly in the future.
Embedded Web server pages
The embedded Web server has three tabs that contain detailed
information about the printer, including links to e-services.
z Information
z Settings
z Networking
Information
The Information pages of the embedded Web server provide a
summary of the configuration and status of the printer and its supplies.
Device Status
z Device Status
This section displays the current status of the printer. This section
also displays control panel buttons. Clicking these button s is
equivalent to physically pushing the buttons on the printer.
7-4 ENWW
Page 93

z Supplies
This section shows the life remaining of ink cartridges, with
0 percent representing a supply that is empty. This section also
provides supplies part numbers. To order new supplies, click Order
Supplies on the left side of the window. To visit any website,
you must have Internet access.
z Media
This section displays information about the installed trays,
including the type and size of media loaded and each tray’s status.
To change the tray settings, click Change Settings.
Configuration Page
z Device Information
This section displays information about the printer, such as the
model and serial number for the printer, the version number of the
firmware, and the amount of memory installed.
z Installed Personalities and Options
This section displays the version number of the printer’s installed
personalities, installed DIMMs and other storage devices,
and printer security information.
z Memory
This section displays the total amount of memory available for the
printer, including the amount of driver workspace memory.
z Paper Trays and Options
This section displays the default media size for each installed tray,
and the total media capacity for each tray. It also shows whether a n
auto-duplex unit is installed in the printer.
Supplies Status
This page displays gauges that indicate the remaining ink levels for
each ink cartridge. It also provides supplies part numbers, the
expiration date for ink cartridges, and printhead health. You can also
find information on and links for ordering replacement supplies and
recycling used supplies.
ENWW 7-5
Page 94

Event Log
This page shows the most recent events and errors in the printer event
log. The most recent item appears at the top of the list.
Usage Page
z Identification
This section displays the printer serial number, product name,
and service ID. If the network ad ministrator has assigned a name or
asset number to the printer, these items are also displayed.
z Usage Tools
This section shows how much of each media size has been used
by the printer, and simplex and duplex totals for each media size.
It also lists how much ink has been used.
Settings
The Settings pages of the embedded Web server allow you to
configure the printer from your computer. These pages can be
password protected.
Note Always consult with your network administrator before changing the
printer configuration.
Configure Device
The Configure Device page displays the menus available in the prin ter’s
LCD control panel, except the service menu options. From the
Configure Device page, network administrators can perform
configuration functions from a computer instead of from the LCD
control panel.
7-6 ENWW
Page 95

Alerts
The Alerts pages allow you to set up the printer to send out e-mail
notifications when certain printer events occur.
z Notification Distribution Lists
This section allows you to add the e-mail addresses of the people
who will receive electronic notification of printer events, such as ink
supplies and media path events. You are provided with e-mail lists,
which you can rename as needed.
• If the printer has an optional hard disk installed, y ou can ha ve up
to four lists of 20 e-mail addresses each.
• Without an optional hard disk, you can have two lists with one
e-mail address in each list.
In addition, this page lets you configure the outgoing e-mail server
settings that the embedded W eb server uses when sending e-mail
notification of printer events.
z Select Events
This section allows you to select which types of printer events will
prompt e-mail notifications for each e-mail list. Click the type of
printer event to set the thre shold or condition un der which an e-ma il
notification is sent. For example, for the Cartridge Low event,
you can set the threshold to 20 percent. This means that e-mail
notifications are sent to the e-mail lists you specified when an ink
cartridge has 20 percent of its ink supply remaining.
Email
z Outgoing Mail
This section allows you to set the outgoing mail values for
e-mail alerts.
z Incoming Mail
This section allows you to set the incoming mail values to enable
remote requests and commands sent to the printer.
ENWW 7-7
Page 96

AutoSend
AutoSend is a feature that can help you un derstand your printing
patterns. When you enable AutoSend, usage information is sent to HP.
Hewlett-Packard uses the information sent by AutoSend in two
Web-based tools: hp instant support and myPrintMileage:
z With hp instant support, you can get troubleshooting tips to help
diagnose and solve printer problems, or prevent some proble ms
from occurring at all.
z With myPrintMileage, you can estimate the amount of ink and
paper you use each month. This information can help you manage
your printing activities and supplies more effectively.
Hewlett-Packard respects the privacy of your printe r info r ma tio n.
Information sent by AutoSend is managed following the guidelines
outlined in the Hewlett-Packard Online Privacy Statement
(http://www.hp.com/country/us/eng/privacy.htm).
Note To use AutoSend, you must first configure your e-mail settings in
the embedded Web server.
Security
This section configures the password information and other security
settings for the embedded Web server and e-mail alerts. This
information should be configured by the network administrator only.
Other Links
This page allows you to add additional links to the embedded
Web server.
Device Inf ormation
This page allows you to set the printer information displayed on the
Configuration page of the embedded Web server. This includes the
printer description, asset number, company name, and company
contact person for the printer.
Language
This page allows you to configure the language settings for the
embedded Web server.
Time Services
This page allows you to define a network time server that the printer will
use to synchronize its internal clock.
7-8 ENWW
Page 97

Networking
The Networking pages of the embedded Web server allow the network
administrator to configure the HP Jetdirect print server for the printer.
This tab will not appear if the printer is connected to a network using
anything other than an HP Jetdirect print server card.
Refer to the online help and to the HP Jetdirect Print Server
Administrator’s Guide for more information. This guide is located on the
Starter CD.
Other links
The following e-services are available from each embedded Web
server page. You must have an Internet connection to use these
e-services.
Note If you use a dial-up connection and did not con nect when yo u first
opened the embedded Web server, you must connect before you
can visit these websites. Connecting might require you to close t he
embedded Web server and reopen it.
z hp instant support
hp instant support is a Web-based tool that provides you with
product-specific services, troubleshooting tips, and information
about your printer's ink and media usage. With this information,
you can diagnose and solve printer problems, and manage your
printing activities and printer supplies more effectively.
To use this tool, detailed information, such as serial number,
error conditions, and status, is sent to HP. For more information
about hp instant support, see “hp instant support.”
z myPrintMileage
myPrintMileage is a Web-based tool included with your printer that
helps you manage your printing activities and printer supplies mor e
effectively. When you enable myPrintMileage, information about
your printer, such as the serial number and error conditions, is sent
to HP.
z Order Supplies
This page shows the remaining life of the different ink supplies and
the links to the HP website for ordering supplies, such as ink
cartridges and print media.
ENWW 7-9
Page 98

hp instant support
hp instant support is a Web-based tool that provides you
product-specific services, troubleshooting tips, and information about
your printer's ink and media usage. With this information, you can
diagnose and solve printer problems, and manage your printing
activities and printer supplies more effectively.
hp instant support provides the following information about your printer:
z Notification of printer driver and firmware updates
When a firmware or driver update for your printer is available on the
HP website, a message appears on the hp instant support
homepage. Click the link within the message to go direc tly to the
printer drivers downloads section of the HP website.
z Resolutions for specific printer errors
hp instant support provides immediate access to information that
can help you resolve error messages specific to your printer.
To see a description of the problem, as well as recommendations
for solving or preventing the problem, click the link within the
message. To see a list of past printer errors, click alerts on the left
side of the hp instant support page.
z Managing ink and media usage (myPrintMileage)
myPrintMileage helps you manage your printing activities and
printer supplies. This tool tracks your printer usage information to
help you plan the purchase of supplies.
z Obtaining support services
HP offers a variety of support services that can help you maintain
your printer. hp instant support cre ates a list of the sup port services
available for your printer. To learn more about these services or to
purchase a service, click the appropriate link.
z Easy access to troubleshooting tips
To help you quickly resolve printer problems or prevent some
problems from happening, hp instant support provides tips that are
customized for your printer.
7-10 ENWW
Page 99

Using hp instant support
You can use hp instant support from the Toolbox (if the computer is
running Windows and the printer is connecte d to a netw or k) or
embedded Web server.
Note Because Web pages used to display hp instant support (as well as
myPrintMileage) are dynamically created, cr eat ing a b ookma rk or
favorite for these Web pages and connecting using thi s bookmark
or favorite will not display the most current information. Instead,
connect from the embedded Web server or from the To olbox.
To launch hp instant support from the Toolbox
(Windows only)
Note To launch hp instant support from the Toolbox, the printer must be
connected to a network.
1 Open the Toolbox.
2 On the Information tab, click hp instant support.
The default Web browser opens and displays the current hp instant
support information for your printer.
To launch hp instant support from the embedded
Web server
1 Open a Web browser and type the IP address for the printer in the
address box.
2 In the Other Links section of any embedded Web server page, click
hp instant support.
Security and privacy
To use this tool, detailed information, such as serial number, error
conditions, and status, is sent to HP. Hewlett-Packar d re sp ec ts yo ur
privacy and manages this information according to the guidelines
outlined in the Hewlett-Packard Online Privacy Statement
(http://www.hp.com/country/us/eng/privacy.htm).
Note To view all the data that is sent to Hewlett-Packard, select Source
(for Internet Explorer) or Page Source (for Netscape) from the View
menu in your Web browser.
ENWW 7-11
Page 100

HP Web Jetadmin
HP Web Jetadmin is a web-based system administration tool that
allows remote installation and management of networked peripherals
from a Web browser. It enables network administrators to configure
network printers, manage printer features, and monit or printer status,
including levels for printer supplies.
HP Web Jetadmin is available only if the printer is connected to an
IP-based network. This browser-based software can be installed on one
of the following supported platforms:
z Windows NT 4.0 or Windows 2000
z HP-UX
z Sun Solaris
z Red Hat Linux
z SuSE Linux
To download HP Web Jetadmin software, go to
http://www.hp.com/go/webjetadmin.
7-12 ENWW
 Loading...