

Page 1

HP Business Inkjet 2800
Getting Started Guide
使用入门指南
시작 안내서
Panduan Untuk Mulai
入門ガイド
使用入門指南
Page 2
Copyright Information
© 2005 Copyright Hewlett-Packard Development Company, L.P.
Edition 1, 2/2005
Reproduction, adaptation or translation without prior written
permission is prohibited, except as allowed under the
copyright laws.
The information contained herein is subject to change
without notice.
The only warranties for HP products and services are set forth in
the express warranty statements accompanying such products
and services. Nothing herein should be construed as constituting
an additional warranty. HP shall not be liable for technical or
editorial errors or omissions contained herein.
版权信息
© 2005 版权所有 Hewlett-Packard Development Company, L.P.
2005 年 2 月第 1 版
除版权法允许之外,未经事先书面许可,不得对此进行
复制、改编或翻译。
本文包含的信息如有更改,恕不另行通知。
此类产品和服务随附的货品质量担保声明中列出 HP 产品
和服务的唯一担保。本文的其它任何内容不应被认为可以
构成其它担保。对本文所包含的技术或编辑错误、疏忽,
HP 不负有责任。
Trademark credits
Microsoft
Microsoft Corporation. All other products mentioned herein may
be trademarks of their respective companies.
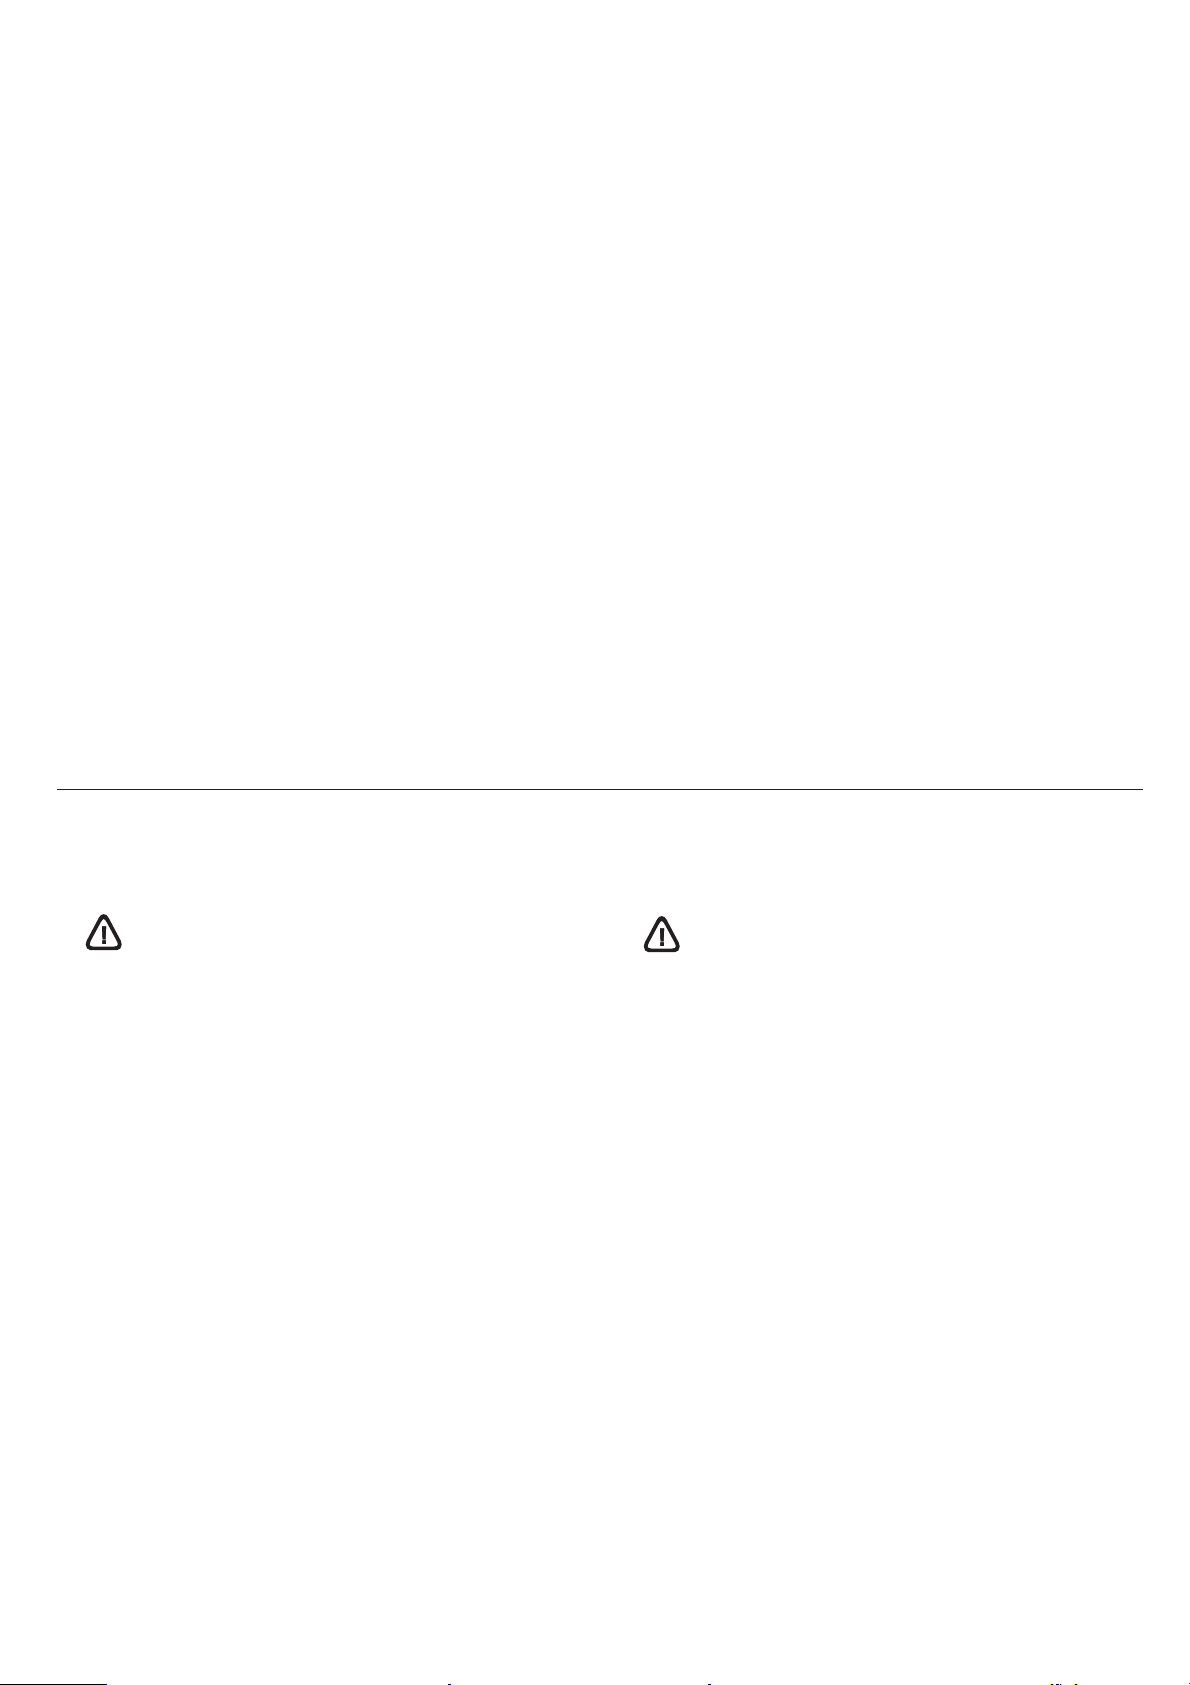
Safety Information
®
and Windows® are U.S. registered trademarks of
商标信誉
Microsoft
®
和 Windows® 是 Microsoft Corporation 在美国
的注册商标。本文提及的所有其它产品的商标分别属于各
自公司所有。
安全信息
Always follow basic safety precautions when using this product to
reduce risk of injury from fire or electric shock.
1 Read and understand all instructions in the documentation that
comes with the printer.
2 Use only a grounded electrical outlet when connecting this
product to a power source. If you do not know whether the
outlet is grounded, check with a qualified electrician.
3 Observe all warnings and instructions marked on the product.
4 Unplug this product from wall outlets before cleaning.
5 Do not install or use this product near water, or when you
are wet.
6 Install the product securely on a stable surface.
7 Install the product in a protected location where no one can
step on or trip over the line cord, and the line cord cannot
be damaged.
8 If the product does not operate normally, see the
“Troubleshooting section” in the onscreen user’s guide on the
Starter CD for your operating system.
9 There are no user-serviceable parts inside. Refer servicing to
qualified service personnel.
使用本产品时,请始终遵守基本的安全防范措施,以降低导
致火灾或电击伤害的危险。
1 请阅读并理解此打印机随附文档中的所有说明。
2 将本产品与电源连接时,只能使用接地的电源插座。
如果不知道插座是否接地,请向合格的电工咨询。
3 请遵守产品上标注的所有警告及说明。
4 在清洁本产品前,请从壁装插座拔下插头。
5 切勿在近水处或身体潮湿时安装或使用本产品。
6 请将本产品稳当地安装在平稳的表面上。
7 请将本产品安装在受保护的场所,以免有人踩到线路或
被线路绊倒,这样电源线就不会受到损坏。
8 如果本产品没有正常运行,请参阅操作系统原装
Starter CD 上联机用户指南中的 “维护与故障排除”。
9 本产品内部没有用户可维修的部件。请将维修任务交给
合格的维修人员。
2
Page 3
안전 정보
Informasi Keselamatan
화재나 감전으로 인한 부상의 위험을 줄이기 위해 본 제품을
사용시 항상 기본 안전 주의사항을 따르십시오.
1 프린터와 함께 제공되는 설명서의 모든 지침을 읽고
이해하십시오.
2 이 제품을 전원에 연결할 경우 접지된 콘센트만 사용하십시오.
콘센트가 접지되었는지 모르는 경우 공인 기술자에게 점검
받으십시오.
3 제품에 표시된 모든 경고 및 지시를 준수하십시오.
4 청소하기 전에는 콘센트에서 제품의 플러그를 뽑으십시오.
5 본 제품을 물가나 몸이 젖은 상태에서 설치 또는 사용하지
마십시오.
6 바닥이 평평한 장소에 제품을 설치하십시오.
7 전원 코드를 밟거나 발에 걸리지 않으며 손상을 입지 않는
보호된 장소에 제품을 설치하십시오.
8 제품이 정상적으로 작동되지 않으면 사용 중인 운영 체제용
Starter CD에 있는 온라인 사용자 설명서의 "유지보수 및
문제 해결"을 참조하십시오.
9 프린터 내부에는 사용자가 수리할 수 있는 부품이 없습니다.
지정 서비스 직원에게 수리를 받으십시오.
Selalu patuhi dasar-dasar keselamatan saat menggunakan
produk ini untuk mengurangi risiko luka bakar atau luka akibat
kejutan listrik.
1 Harap baca dan pahami semua instruksi yang terdapat di
dalam dokumentasi yang disertakan dengan printer ini.
2 Hanya gunakan sumber listrik yang telah dihubungkan dengan
bumi untuk produk ini. Apabila Anda tidak yakin apakah
sumber listrik Anda telah dihubungkan dengan bumi,
tanyakan pada teknisi listrik yang berijazah atau kompeten.
3 Cermati semua peringatan dan instruksi yang terdapat
pada produk.
4 Putuskan hubungan produk ini dengan sumber listrik sebelum
membersihkannya.
5 Jangan menginstal atau menggunakan produk ini dekat
dengan air, atau bila Anda dalam keadaan basah.
6 Instal produk ini dengan aman di atas permukaan yang stabil.
7 Instal produk ini di lokasi yang terlindung sehingga tidak
dimungkinkan bahwa seseorang akan terjerat pada kabel listrik
produk, dan mengakibatkan kerusakan pada kabel listrik itu.
8 Jika produk tidak berfungsi secara normal, harap baca
“Maintaining and troubleshooting” (Merawat dan mengatasi
masalah) pada panduan pengguna onscreen dalam CD starter
yang sesuai dengan sistem operasi yang Anda gunakan.
9 Tidak terdapat bagian-bagian di dalam produk ini yang dapat
diservis atau direparasi sendiri oleh pengguna.
Jika dibutuhkan layanan servis atau reparasi, mintalah pada
personalia servis yang telah ditunjuk.
安全性に関する情報
この製品を使用するときは、火災や感電による傷害の危険性を
減らすため、次の基本的な安全上の注意を必ず守ってください。
1 プリンタ付属の文書に記載されている全ての説明を読んで、
十分に理解してください。
2 この製品を電源に接続するときは、必ずアース付きの電源
コンセントを使用してください。コンセントが接地されて
いるかどうかが不明の場合は、資格のある電気技術者にご
相談ください。
3 製品上に記載された全ての警告や指示は、必ず守って
ください。
4 この製品をクリーニングする前に、必ず壁のコンセントから
プラグを外してください。
5 この製品を水気のある場所に設置したり、濡れた手で触った
りしないでください。
6 製品は、安定した平らな面に設置してください。
7 製品は、ライン コードを踏んだりまたいだりして傷つけない
ように、保護された場所に設置してください。
8 製品が正常に動作しない場合は、スタータCD に収録されて
いるオンライン ユーザーズ ガイドの、お使いのオペレーティ
ング システム用の「メンテナンスおよびトラブルシューティ
ング」を参照してください。
9 お客様が修理可能なパーツは含まれていません。修理につい
ては、弊社カスタマ・ケア・センタにご連絡ください。
安全資訊
使用本產品時,務請遵守基本的安全注意事項,以降低火及電擊的
傷害。
1 請詳閱印表機隨附文件中的各項說明。
2 將本產品與電源連結時,只能使用接地的電源插座。如果不知
道插座是否接地,請向合格的電工諮詢。
3 請遵守產品上的各項警告標示與說明。
4 清潔本產品前,請先斷開電源線。
5 請不要在近水或潮濕的情況下安裝或使用本產品。
6 在穩固的表面上牢牢地安裝本產品。
7 請將產品安裝在封閉的區域,以免電源線因踩踏或絆扯而
受損。
8 本產品之操作如有異常,請參考各作業系統 Starter CD 之線上
使用者手冊 「維護及故障排除」中的說明。
9 本產品內無使用者可維修的零組件,產品服維修請洽合格的服
務人員。
3
Page 4
5
2
3
1
4
6
87
HP Business Inkjet 2800dt/2800dtn
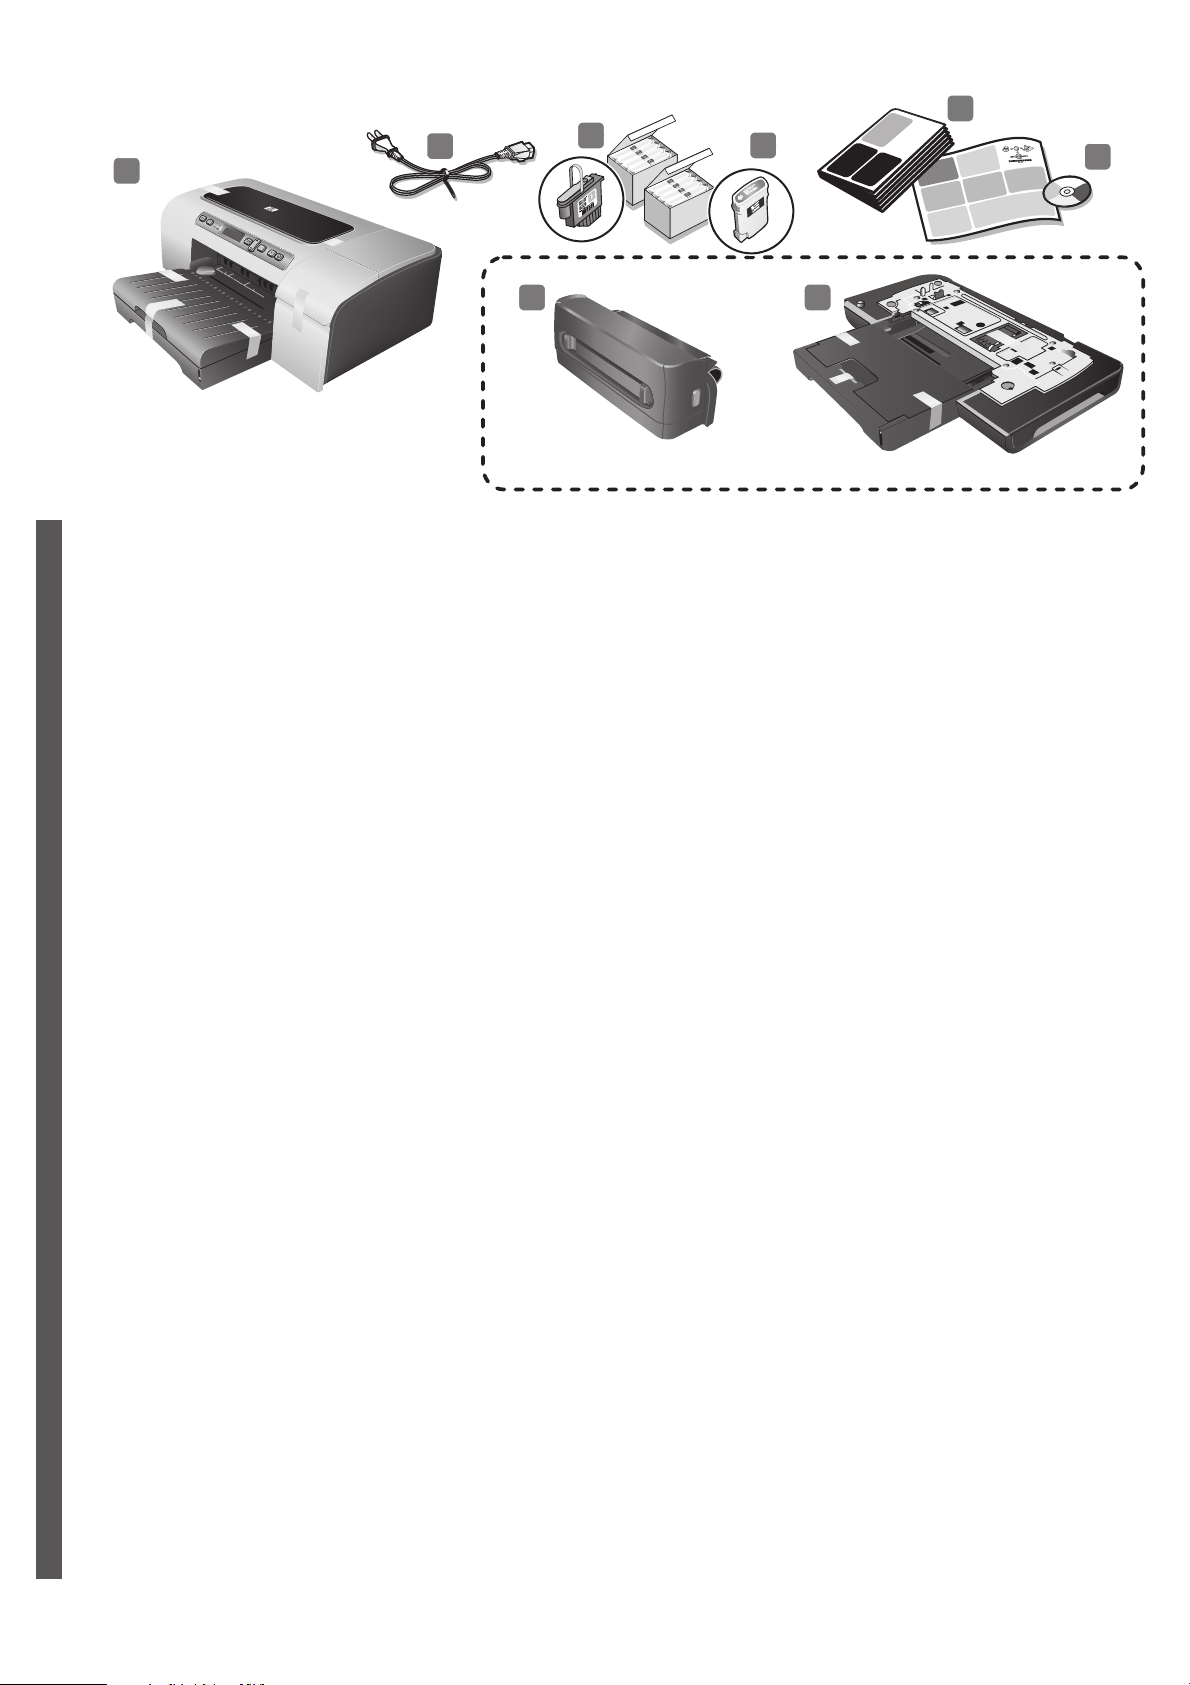
Check the package contents.
1) Printer, 2) power cord, 3) four printheads (CBMY),
4) four ink cartridges: cyan (C), black (B), magenta (M),
yellow (Y), 5) printed documentation (setup poster and this
Getting Started Guide),
English
检查包装箱中的物品。
1) 打印机, 2) 电源线, 3) 四个打印头 (CBMY),
简
4) 四个墨盒:青色 (C)、黑色 (B)、紫红色 (M)、黄色 (Y),
体
5) 印刷文档 (安装海报和使用入门指南),
中
文
패키지 안의 내용물 확인.
1) 프린터, 2) 전원 코드, 3) 인쇄헤드 4개(CBMY),
4) 잉크 카트리지 4개:녹청(C), 검정(B), 자홍(M), 노랑(Y),
한
5) 인쇄된 설명서(설치 포스터 및 이 시작 안내서),
국
어
Memeriksa isi kemasan.
1) Printer, 2) kabel daya, 3) empat printhead (CBMY),
4) empat kartrid tinta: cyan (C), hitam (B), magenta (M),
kuning (Y), 5) dokumentasi cetakan (poster setup dan
Panduan Untuk Mulai ini),
6) Starter CD (software and electronic documentation),
7) auto-duplex unit (for automatic two-sided printing;
HP Business Inkjet 2800dt and 2800dtn printers),
8) tray 2 (supports only plain paper; HP Business Inkjet 2800dt and
2800dtn printers).
6) Starter CD (软件和电子文档),
7) 自动双面打印单元 (用于自动双面打印;
HP Business Inkjet 2800dt 和 2800dtn 打印机),
8) 纸盘 2 (仅适用于普通纸; HP Business Inkjet 2800dt 和
2800dtn 打印机)。
6) Starter CD(소프트웨어 및 전자 설명서),
7) 자동 양면 유니트(자동 양면 인쇄용, HP Business Inkjet 2800dt 및
2800dtn 프린터), 8) 용지함 2(일반 용지만 사용 가능,
HP Business Inkjet 2800dt 및 2800dtn 프린터)
6) CD Starter (perangkat lunak dan dokumentasi elektronik),
7) unit auto-duplex (untuk pencetakan dua sisi secara otomatis;
printer HP Business Inkjet 2800dt dan 2800dtn),
8) baki 2 (hanya mendukung kertas biasa;
printer HP Business Inkjet 2800dt dan 2800dtn).
Bahasa Indonesia
梱包内容を確認する。
1) プリンタ、2) 電源コード、3) プリントヘッド 4 個 (CBMY)、
4) インク カートリッジ 4 個:シアン (C)、ブラック
(B)、マゼンタ (M)、イエロー (Y)、5) 印刷文書 ( セットアップ ポス
日
ターとこの入門ガイド )、
本
語
檢查包裝箱中的物品。
繁
1) 印表機、2) 電源線、3) 四組印字頭 (CBMY)、
體
4) 四組墨水匣: 靛藍 (C)、黑 (B)、紫紅 (M)、黃 (Y)、
中
5) 書面文件 (安裝說明及使用入門指南)、
文
6) スターター CD ( ソフトウェアおよびオンライン マニュアル )、
7) 自動両面印刷ユニット ( 自動両面印刷用、
HP Business Inkjet 2800dt および 2800dtn プリンタ )、
8) トレイ 2 ( 普通紙のみサポート、HP Business Inkjet 2800dt
および 2800dtn プリンタ )。
6) Starter CD (軟體及電子版文件)、
7) 供自動雙面列印的自動雙面列印單元;
(HP Business Inkjet 2800dt 及 2800dtn 印表機)、
8) 紙匣 2 (限裝普通紙;HP Business Inkjet 2800dt 及 2800dtn
印表機)。
4
Page 5
1
HP Business Inkjet 2800dt/2800dtn
2
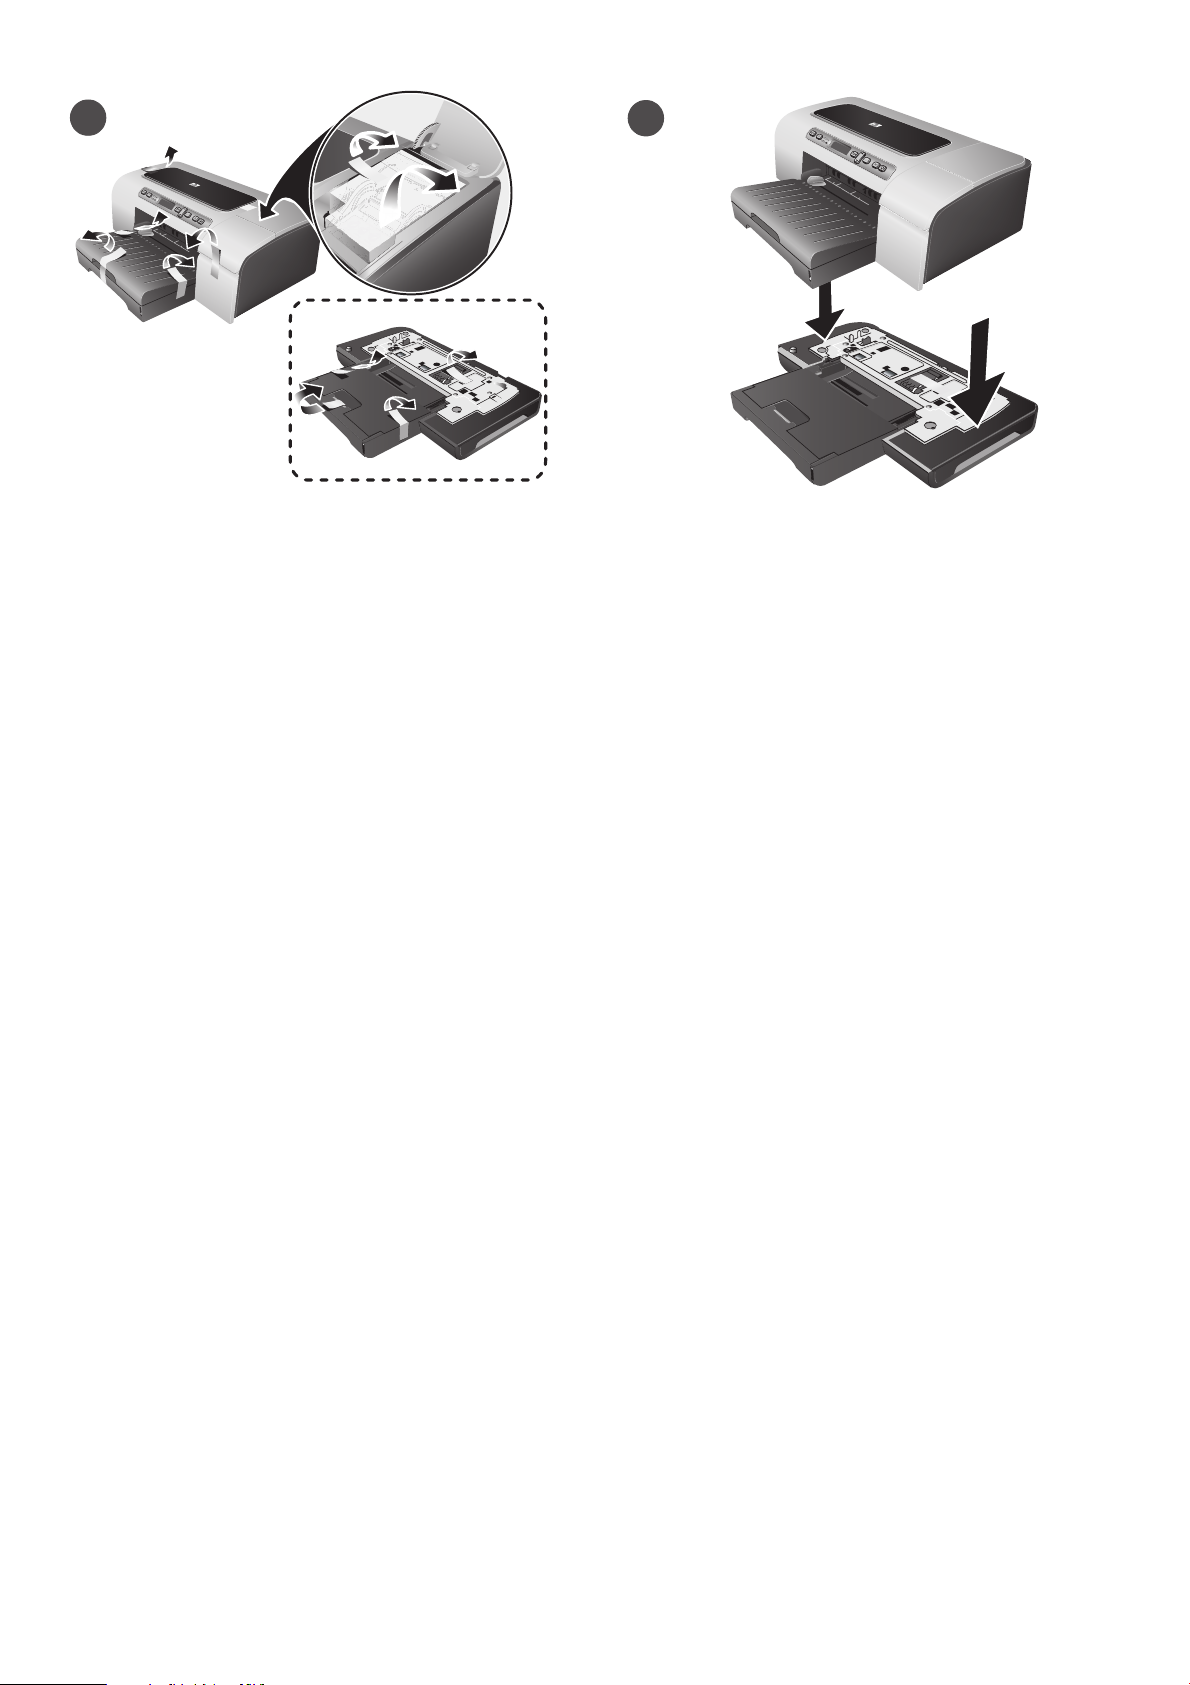
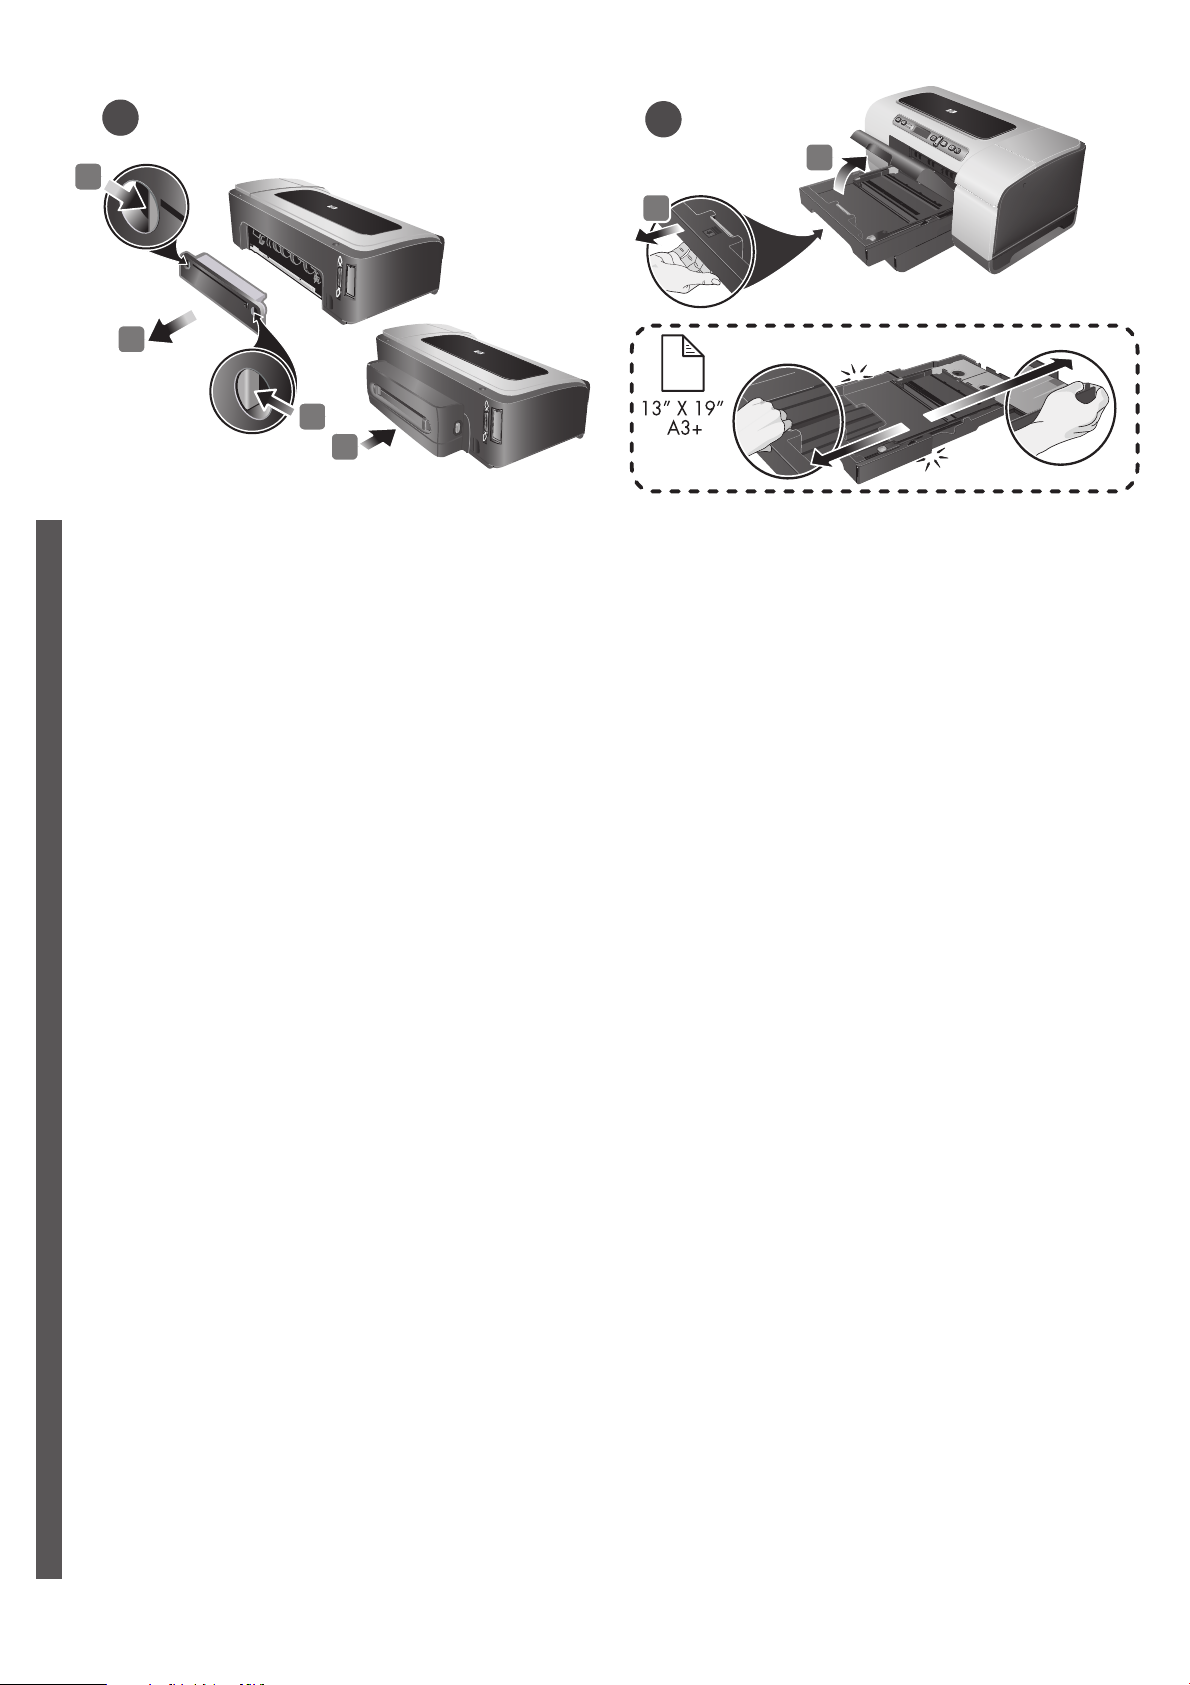
Step 1: Remove the packing tapes and materials.
Remove all packing tapes from the printer.
步骤 1: 去除包装胶带和包装材料。
去除打印机的所有包装胶带。
단계 1: 포장 테이프와 손상 방지제 제거.
프린터에 포장 테이프가 남아 있으면 제거하십시오.
Langkah 1: Melepaskan dan menyingkirkan pita serta
bahan-bahan kemasan.
Singkirkan semua pita kemasan dari printer.
Step 2: Install tray 2.
(HP Business Inkjet 2800dt and 2800dtn printers)
Set the printer on top of tray 2. Warning: Be careful to keep your
fingers and hands clear of the bottom of the printer.
步骤 2: 安装纸盘 2。
(HP Business Inkjet 2800dt 和 2800dtn 打印机)
将打印机放在纸盘 2 之上。警告:注意不要用手或手指触摸打
印机底部。
단계 2: 용지함 2 설치.
(HP Business Inkjet 2800dt 및 2800dtn 프린터)
용지함 2의 위쪽에 프린터를 올리십시오. 경고 : 프린터 하단에
손가락이나 손이 끼지 않도록 주의하십시오.
Langkah 2: Memasang baki 2.
(printer HP Business Inkjet 2800dt dan 2800dtn)
Letakkan printer di atas baki 2. Hati-hati: Jauhkan tangan dan jari-jari
Anda dari bagian bawah printer.
手順 1:梱包用テープと材料を取り除きます。
プリンタから梱包テープをすべて取り除きます。
步驟 1: 移除包裝膠帶和包裝材料。
移除印表機的所有包裝膠帶。
手順 2:トレイ 2 を取り付けます。
(HP Business Inkjet 2800dt および 2800dtn プリンタ )
プリンタをトレイ 2 の上に設置します。警告:プリンタの底部に指
や手をはさまないように注意してください。
步驟 2: 安裝紙匣 2。
(HP Business Inkjet 2800dt 及 2800dtn 印表機)
將印表機放在紙匣 2 上方。警告:手掌或手指切勿伸入印表機底部。
5
Page 6
3
4
1
2
1
3
Step 3: Install the auto-duplex unit.
(HP Business Inkjet 2800dt and 2800dtn printers)
1) Push the release buttons of the rear access panel towards each
other. 2) Pull the panel out of the printer. 3) Insert the auto-duplex unit
into the printer until it clicks. 4) Enable the auto-duplex unit in the
printer driver. See the onscreen user’s guide for information.
English
步骤 3: 安装自动双面打印单元。
(HP Business Inkjet 2800dt 和 2800dtn 打印机)
简
1) 按住背部检修板的两个释放按钮。 2) 从打印机中拉出检
体
修板。 3) 将自动双面打印单元插入打印机,直到听到卡嗒声。
中
4) 在打印机驱动程序中启用自动双面打印单元。有关详细信
文
息,请参阅联机用户指南。
1
2
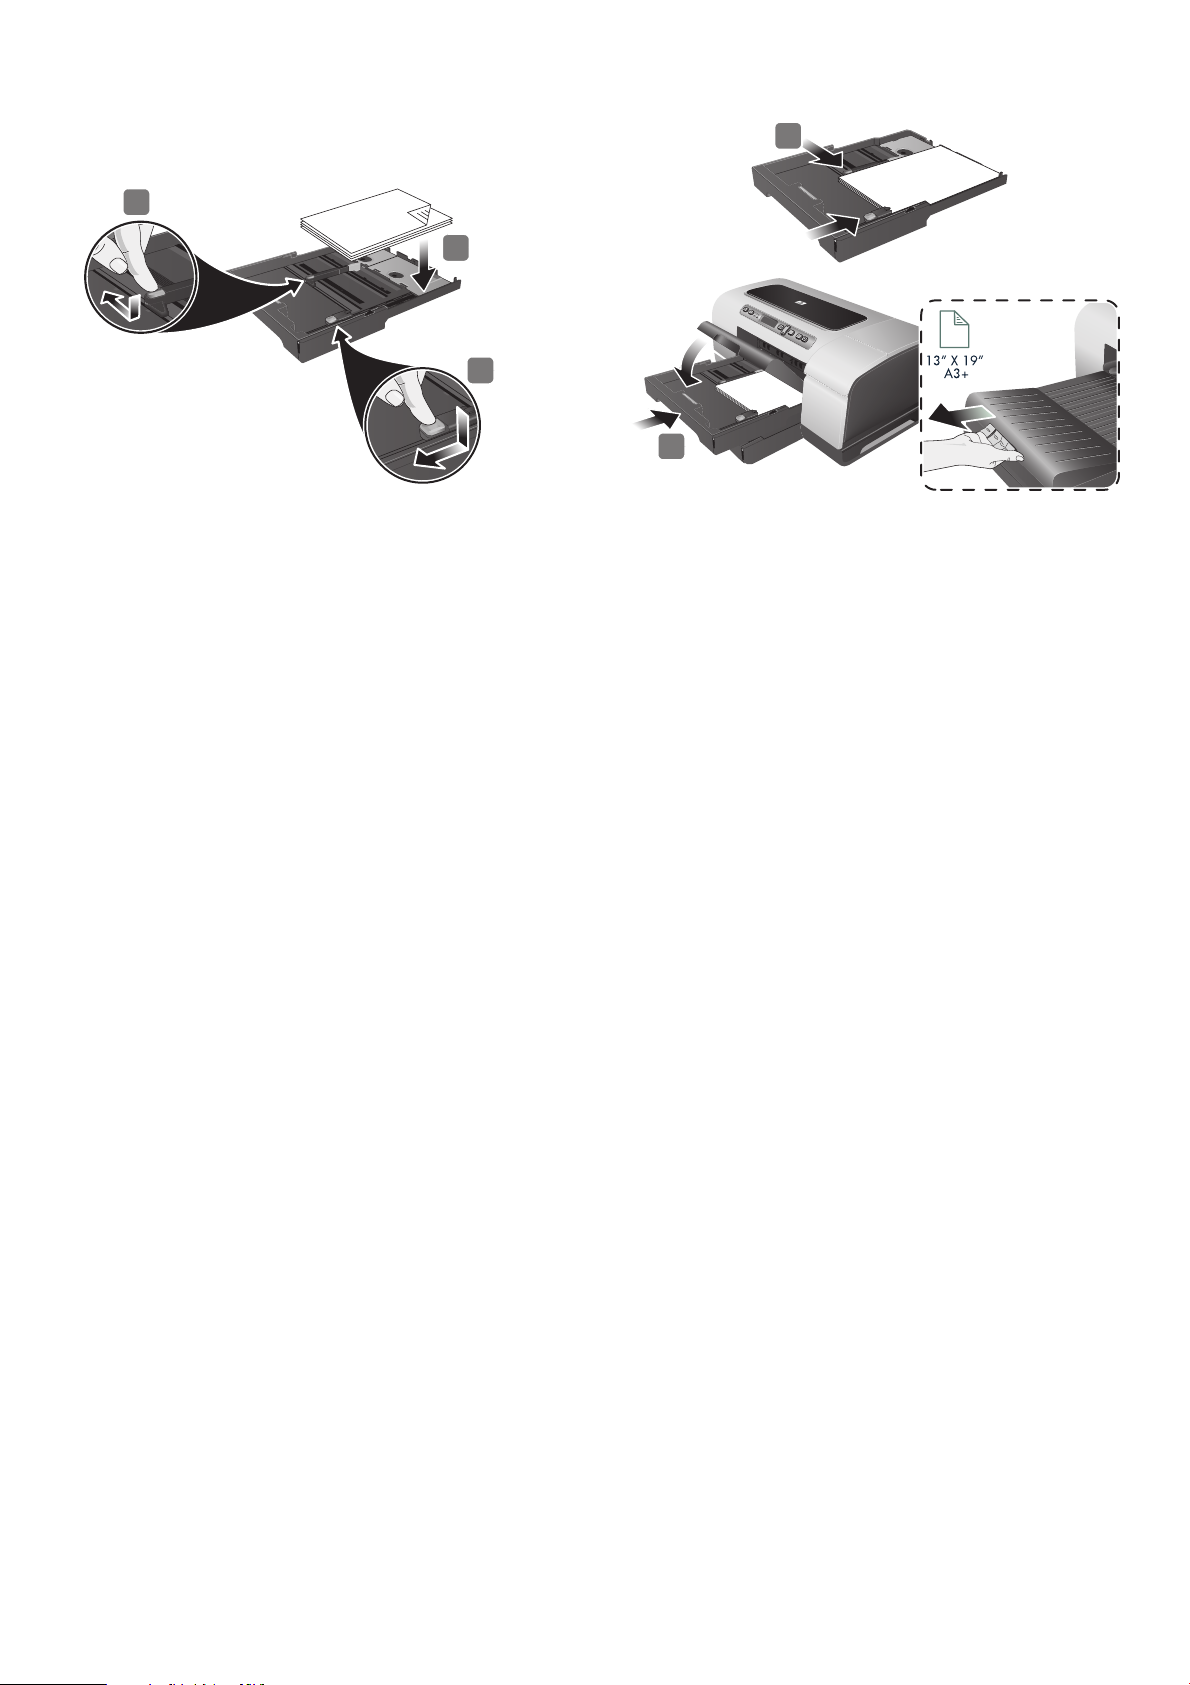
Step 4: Load paper in the printer.
1) If you are loading tray 1, raise the output tray and pull tray 1 out of
the printer by grasping under the front of the tray 1.
If you are loading tray 2, pull out tray 2 and raise its cover.
Note: If you are loading larger media, extend the tray by pressing the
tray extension lock near the front of the tray and pulling both ends of
the tray in opposite directions until it is fully extended.
步骤 4: 将打印纸装入打印机。
1) 如果要将纸张装入纸盘 1,请抬起出纸盘并抓住纸盘 1 的
前端,从打印机中拉出纸盘 1。如果要将纸张装入纸盘 2,
请拉出纸盘 2 并抬起它的盖板。
注:如果要装入较大的介质,请按下纸盘前端附近的纸盘展板
锁并朝相反方向拉纸盘的两端,直到其完全展开为止。
단계 3: 자동 양면 유니트 설치.
(HP Business Inkjet 2800dt 및 2800dtn 프린터)
1) 후면 액세스 패널의 해제 버튼을 마주 보게 당기십시오.
한
2) 프린터에서 패널을 당기십시오. 3) 딸깍 소리가 날 때까지 자동
국
양면 유니트를 밀어 넣으십시오. 4) 프린터 드라이버에서 자동 양면
어
유니트를 활성화합니다. 자세한 내용은 온라인 사용 설명서를
참조하십시오.
Langkah 3: Memasang unit auto-duplex.
(printer HP Business Inkjet 2800dt dan 2800dtn)
1) Dorong kedua tombol pelepas panel akses belakang dengan arah
saling berhadapan. 2) Tarik panel hingga keluar dari printer.
3) Dorong masuk unit auto-duplex ke dalam printer hingga terdengar
bunyi klik. 4) Aktifkan unit auto-duplex dari driver printer.
Lihat panduan pengguna onscreen untuk memperoleh petunjuk.
Bahasa Indonesia
手順 3:自動両面印刷ユニットを取り付けます。
(HP Business Inkjet 2800dt および 2800dtn プリンタ )
1) 背面アクセス パネルのリリース ボタンを押します。2) パネルを
日
プリンタから引き出します。 3) 自動両面印刷ユニットを、カチッと
はまるまでプリンタに挿入します。4) 自動両面印刷ユニットをプリ
本
ンタ ドライバで有効にします。 詳細は、オンスクリーン ユーザーズ
語
ガイドを参照してください。
단계 4: 프린터에 용지 넣기.
1) 용지함 1에 용지를 넣을 경우 출력 용지함을 올리고 용지함 1의
앞쪽을 잡고 용지함 1을 당기십시오. 용지함 2에 용지를 넣을 경우
용지함 2를 당기고 커버를 올리십시오.
주: 큰 용지를 넣을 경우에는 용지함 앞쪽의 용지함 확장 잠금 장치를
누르고 반대 방향으로 용지함 양쪽 끝을 당겨 용지함을 확장하십시오.
Langkah 4: Memasukkan kertas ke dalam printer.
1) Jika Anda mengisi baki 1, angkat baki output dan tarik keluar baki 1
dari printer dengan memegang bagian bawah dari bagian depan
baki 1. Jika Anda mengisi baki 2, tarik baki 2 dan angkat tutupnya.
Catatan: Jika Anda memuat kertas atau media cetak yang lebih
besar, panjangkan baki dengan menekan kunci sambungan baki yang
terdapat di dekat bagian depan baki dan tarik kedua ujungnya ke arah
berhadapan hingga terkembang sepenuhnya.
手順 4:プリンタに用紙をセットします。
1) トレイ 1 をセットする場合は、排紙トレイを持ち上げてトレイ 1
正面下部をつかみ、トレイ 1 をプリンタから引き出します。
トレイ 2 にメディアをセットする場合は、トレイ 2 を引き出
してカバーを持ち上げます。
注記:大きなサイズのメディアをセットしている場合は、トレイ正
面にあるトレイ拡張部ロックを押してトレイを伸ばし、トレイの両
端を反対方向に引きます。
步驟 3: 安裝自動雙面列印單元。
繁
(HP Business Inkjet 2800dt 及 2800dtn 印表機)
體
1) 將後側蓋板鬆脫鈕向內壓。2) 將後側蓋板拉出印表機。
中
3) 將自動雙面列印單元插入印表機直到定位為止。4) 從印表機驅動程
文
式啟動自動雙面列印單元。詳細說明請參考線上使用手冊。
步驟 4: 印表機裝紙。
1) 在紙匣 1 裝紙時,請先抬高出紙匣,握住紙匣 1 下方,
將紙匣 1 拉出印表機。在紙匣 2 裝紙時,請將紙匣 2 拉出印表機後
打開紙匣護蓋。
注意:裝較大的印材時,請按紙匣前段的加長鎖,並將紙匣兩端向外
拉開直到定位為止。
6
Page 7
5
3
4
3
6
3) Press the button of the media width guide and slide it to
the left. Press the button of the media length guide and slide it
towards you. 4) Insert up to 150 sheets of paper, print-side down
along the right of the tray. Make sure the stack of paper aligns with the
right and back edges of the tray, and does not spill over the edges.
Note: Tray 2 supports only plain paper. It can hold up to 250 sheets of
plain paper.
3) 按住介质宽度导板的按钮,将导板滑动到左侧。按住介质长
度导板的按钮,然后将其向外滑动。 4) 插入最多 150 页纸张,
纸叠的打印面朝下并靠纸盘右侧放置。确保纸叠与纸盘的右边
和后边对齐,并且不会超出纸盘边缘。注:纸盘 2 仅支持普通
纸。纸盘 2 最多可容纳 250 张普通纸。
3) 용지 폭 조정대의 버튼을 누르고 왼쪽으로 조정대를 미십시오.
용지 길이 조정대의 버튼을 누르고 사용자쪽으로 조정대를 미십시오.
4) 용지는 최대 150장까지 넣을 수 있으며 인쇄면이 아래로 향하도록
하고 용지함 오른쪽으로 밀착시켜 넣습니다. 용지 더미를 용지함의
오른쪽 및 뒤쪽 가장자리에 맞추고 떨어지지 않도록 하십시오.
주: 용지함 2는 일반 용지만 사용할 수 있습니다. 용지함 2에는
최대 250매의 일반 용지를 넣을 수 있습니다.
3) Tekan tombol pemandu lebar media dan geser ke kiri.
Tekan tombol pemandu panjang media dan geser ke arah Anda.
4) Masukkan paling banyak 150 lembar kertas dan rapatkan pada tepi
kanan baki dengan sisi halaman yang akan dicetak menghadap
bawah . Yakinkan bahwa tumpukan kertas telah diluruskan dengan
tepi kanan dan belakang baki, dan tidak melewati tepinya.
Catatan: Baki 2 hanya mendukung kertas biasa. Baki 2 ini dapat diisi
paling banyak 250 lembar kertas.
3) メディア幅ガイドのボタンを押して、左に ずらします。横方向用
紙ガイドのボタンを押し、ガイドを 手前にずらします。 4) 印刷面を
下にして、トレイの右端に沿って最高 150 枚まで用紙をセットしま
す。用紙の束がトレイの 右端と後端に沿い、端からはみ出さないよ
う確認します。注記:トレイ 2 で処理できるのは普通紙のみです。
普通紙 250 枚までセット可能です。
5) Slide the media guides to the edges of the loaded paper.
6) If you removed tray 1, gently reinsert it and lower the output tray to
its original position. If you removed tray 2, lower the tray cover and
gently reinsert tray 2. Note: If you have extended the tray, do not
press the tray extension lock while inserting the tray. Pressing it will
cause the tray to retract when you push in the tray. Also, extend the
output tray by pulling out the media extension.
5) 将介质导板滑动到装入纸张的边缘。 6) 如果已取出纸盘 1,
请将其轻轻地重新插入,并将出纸盘降低到其原来的位置。
如果已取出纸盘 2,请放下纸盘盖并轻轻地将纸盘 2 重新
插入。注:如果已将纸盘展开,将其插入时请不要按下纸盘
展板锁。如果将其按下,推动纸盘时将导致纸盘缩回。另外,
拉出介质展板也会展开出纸盘。
5) 용지 조정대를 용지 가장자리로 미십시오. 6) 용지함 1을 꺼낸 경우
부드럽게 다시 삽입하고 출력 용지함을 원래 위치로 낮추십시오.
용지함 2를 꺼낸 경우 용지함 커버를 낮추고 용지함 2를 부드럽게 다시
삽입하십시오. 주: 용지함을 확장한 경우에는 용지함을 삽입할 때
용지함 확장 잠금 장치를 누르지 마십시오. 잠금 장치를 누른 상태에서
용지함을 밀면 용지함이 쑥 들어가게 됩니다. 또한 용지 확장을 당겨
출력 용지함을 확장하십시오.
5) Rapatkan pemandu media dengan tepi tumpukan kertas yang
telah dimuat. 6) Jika Anda telah mengeluarkan baki 1, dengan
hati-hati masukkan kembali baki itu dan turunkan baki output ke
posisi semula. Jika Anda telah mengeluarkan baki 2, turunkan
penutup baki dan dengan hati-hati masukkan kembali baki 2.
Catatan: Jika Anda telah menarik keluar sambungan baki,
jangan menekan pengunci sambungan baki saat Anda memasukkan
baki. Apabila Anda menekannya, baki akan tertarik kembali saat baki
didorong. Demikian pula, panjangkan baki output dengan menarik
keluar sambungan media.
5) 用紙ガイドを移動して、用紙の端にぴったりとそろえます。
6) トレイ 1 を取り外している場合は、プリンタにゆっくりと挿入し、
排紙トレイを元の位置に下げます。 トレイ 2 を取り外している場合
は、トレイ カバーを下げてトレイ 2 をゆっくりと挿入します。
注記:トレイを伸ばしている場合は、トレイを挿入する際にトレイ
拡張部ロックを押さないでください。 ロックを押すと、トレイを押
し入れる際にトレイが縮んでしまいます。 また、メディア拡張部を
引いて排紙トレイを伸ばします。
3) 按印材寬度導桿鈕,將導桿滑至 左側。按印材長度導桿鈕,
將導桿向自己的方向拉。4) 列印面朝下貼緊紙匣右側,插入最多
150 張紙。務請將印材貼齊紙匣右緣及後緣,紙張堆疊高度切勿
超出紙匣上緣。注意:紙匣 2 僅處理普通紙,且最多只能裝 250 張
普通紙,
5) 輕推印材導桿使貼住所裝入紙張的邊緣。 6) 紙匣 1 取出後再插入
時,請將出紙匣向下輕壓到原位置。紙匣 2 取出後再插入時,請將護
蓋向下輕壓到原位置。注意:紙匣拉長後插入紙匣時,切勿再按紙匣
加長鎖,否則將使紙匣在插入時又恢復為正常的長度。您亦可將印材
延伸承板向外拉,加長出紙匣的長度。
7
Page 8
5
2
1
6
3
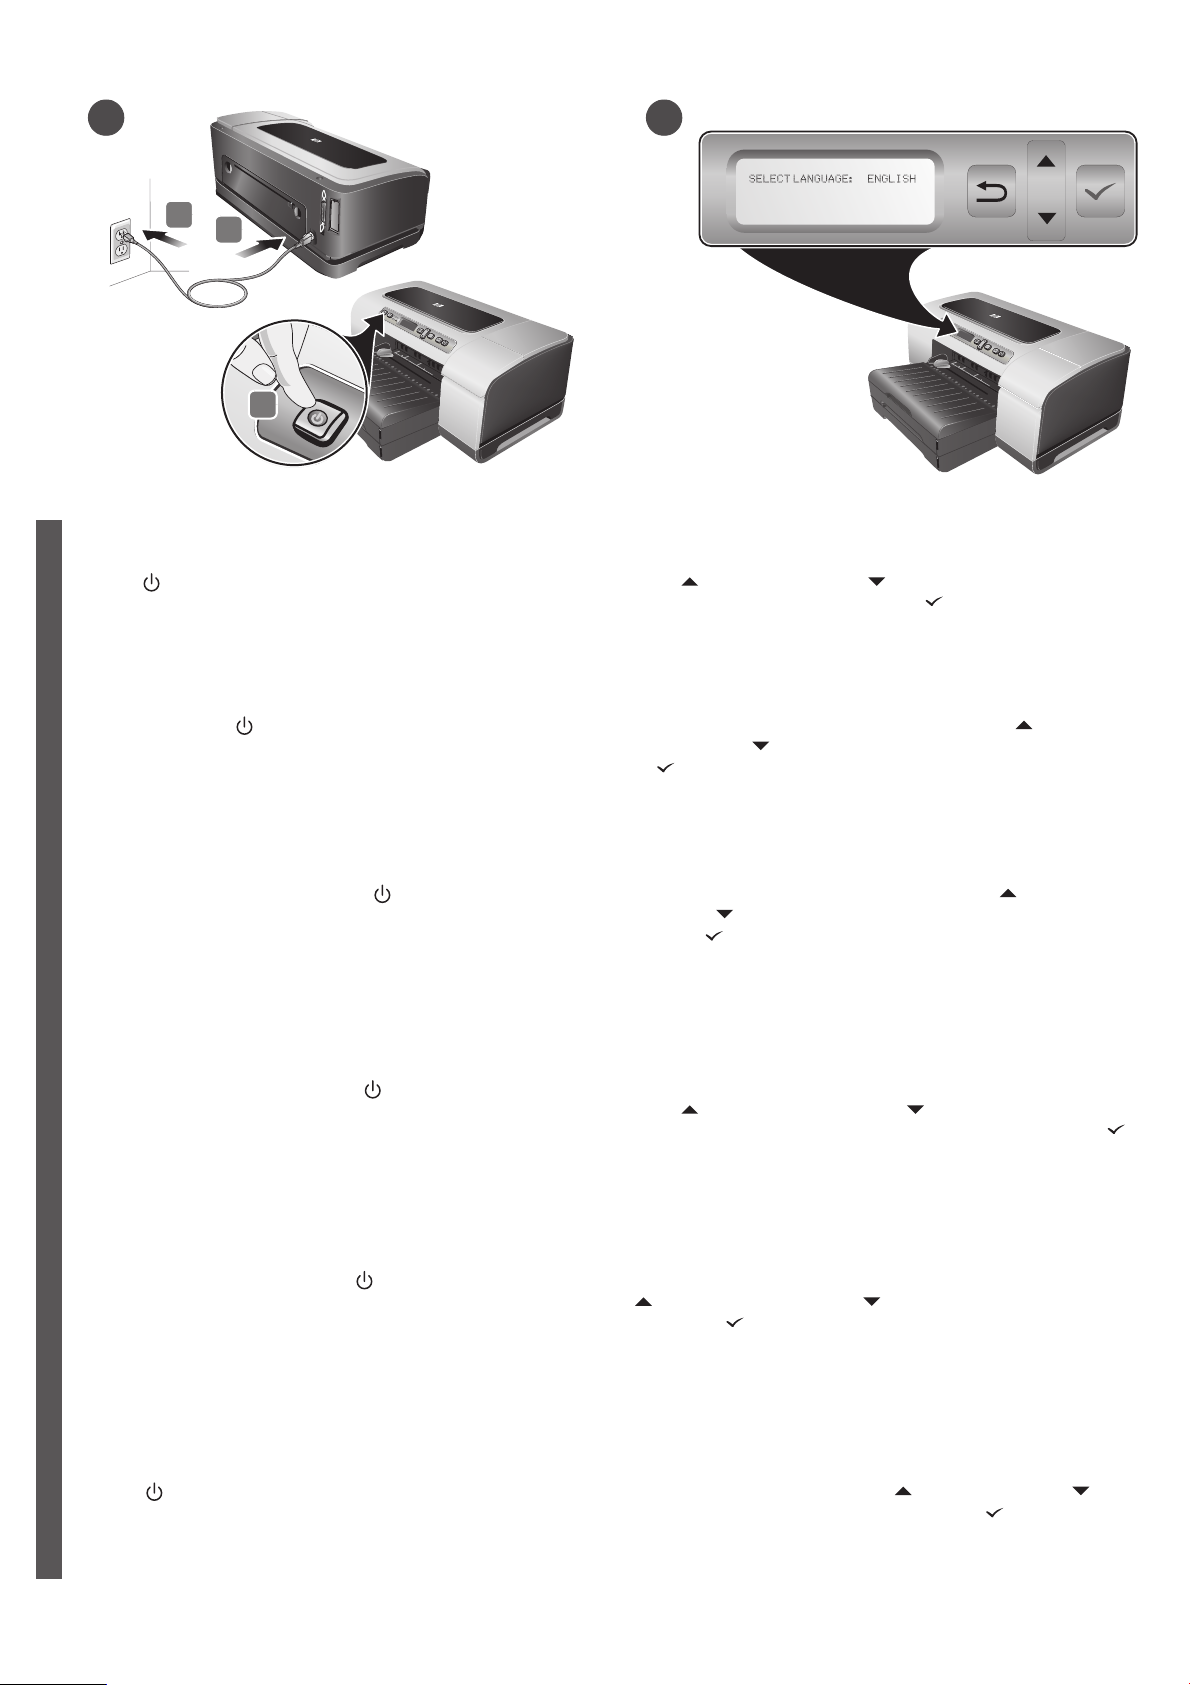
Step 5: Connect the power cord and turn on the printer.
1) Connect the power cord to the printer. 2) Connect the other end of
the power cord to an alternating current (AC) power outlet.
3) Press (Power button) to turn on the printer.
English
步骤 5: 连接电源线,然后打开打印机。
1) 将电源线连接到打印机上。 2) 将电源线的另一端连接到交流
简
电源插座上。 3) 按 (“电源”按钮)打开打印机。
体
中
文
단계 5: 전원 코드를 연결한 후 프린터 켜기.
1) 전원 코드를 프린터에 연결하십시오. 2) 전원 코드의 다른 끝을
AC(교류) 전원 콘센트에 꽂으십시오. 3) (전원 버튼)을 눌러
한
프린터의 전원을 켜십시오.
국
어
Langkah 5: Menghubungkan kabel daya dan
menghidupkan printer.
1) Hubungkan kabel daya dengan printer. 2) Colokkan ujung
lainnya ke sumber listrik AC. 3) Tekan (Tombol Daya) untuk
menghidupkan printer.
Step 6: Set the control panel language.
The control panel displays SELECT LANGUAGE: ENGLISH.
To choose another language for the control-panel display,
press (Up Arrow button) or (Down Arrow button) to
highlight the language, and then press (Select button).
步骤 6: 设置控制面板语言。
控制面板显示 SELECT LANGUAGE: ENGLISH (选择语言:
英语)。要选择其它控制面板显示语言,请按 (“向上箭
头”按钮)或 (“向下箭头”按钮)突出显示语言,然后
按 (“选择”按钮)。
단계 6: 제어판 언어 설정.
제어판에 SELECT LANGUAGE: ENGLISH가 표시됩니다.
제어판 디스플레이에서 다른 언어를 선택하려면 (위쪽 화살표
버튼) 또는 (아래쪽 화살표 버튼)을 눌러 해당 언어를 강조
표시하고 (선택 버튼)을 누르십시오.
Langkah 6: Mengatur bahasa panel kontrol.
Panel kontrol menampilkan SELECT LANGUAGE: ENGLISH
(PILIH BAHASA: BAHASA INGGRIS).
Untuk memilih bahasa lain untuk layar panel kontrol,
tekan (tombol Panah Naik) atau (tombol Panah Turun)
untuk menyorot bahasa yang akan dipilih, dan kemudian tekan
(tombol Pilih).
Bahasa Indonesia
手順 5:電源コードを接続し、プリンタの電源を入れます。
1) 電源コードをプリンタに接続します。2) 電源コードのもう一方の
端を交流 (AC) 電源に接続します。 3) (電源ボタン ) を押してプリ
ンタの電源を入れます。
日
本
語
步驟 5: 插入電源線並啟動印表機。
繁
1) 將電源線的一端插入印表機,2) 將電源線的另一端插入交流電源插
體
座, 3) 按 (電源按鈕)啟動印表機。
中
文
手順 6:コントロール パネルに表示される言語を設定する。
コントロール パネルには、
コントロール パネルの表示に別の言語を選択するには、
([ 上矢印 ] ボタン ) または ([ 下矢印 ] ボタン ) を押して言語を
強調表示し、 ([ 選択 ] ボタン ) を押します。
步驟 6: 設定控制面板語言。
控制面板顯示 SELECT LANGUAGE: ENGLISH (選擇語言 : 英文)。
改選控制面板語言的方式如下,按 (向上的方向鍵)或
(向下的方向鍵),反白顯示所要的語言,再按 (選擇鈕)。
8
[ ゲンゴノセンタク : ニホンゴ ]
が表示されます。
Page 9
7
1
3
2
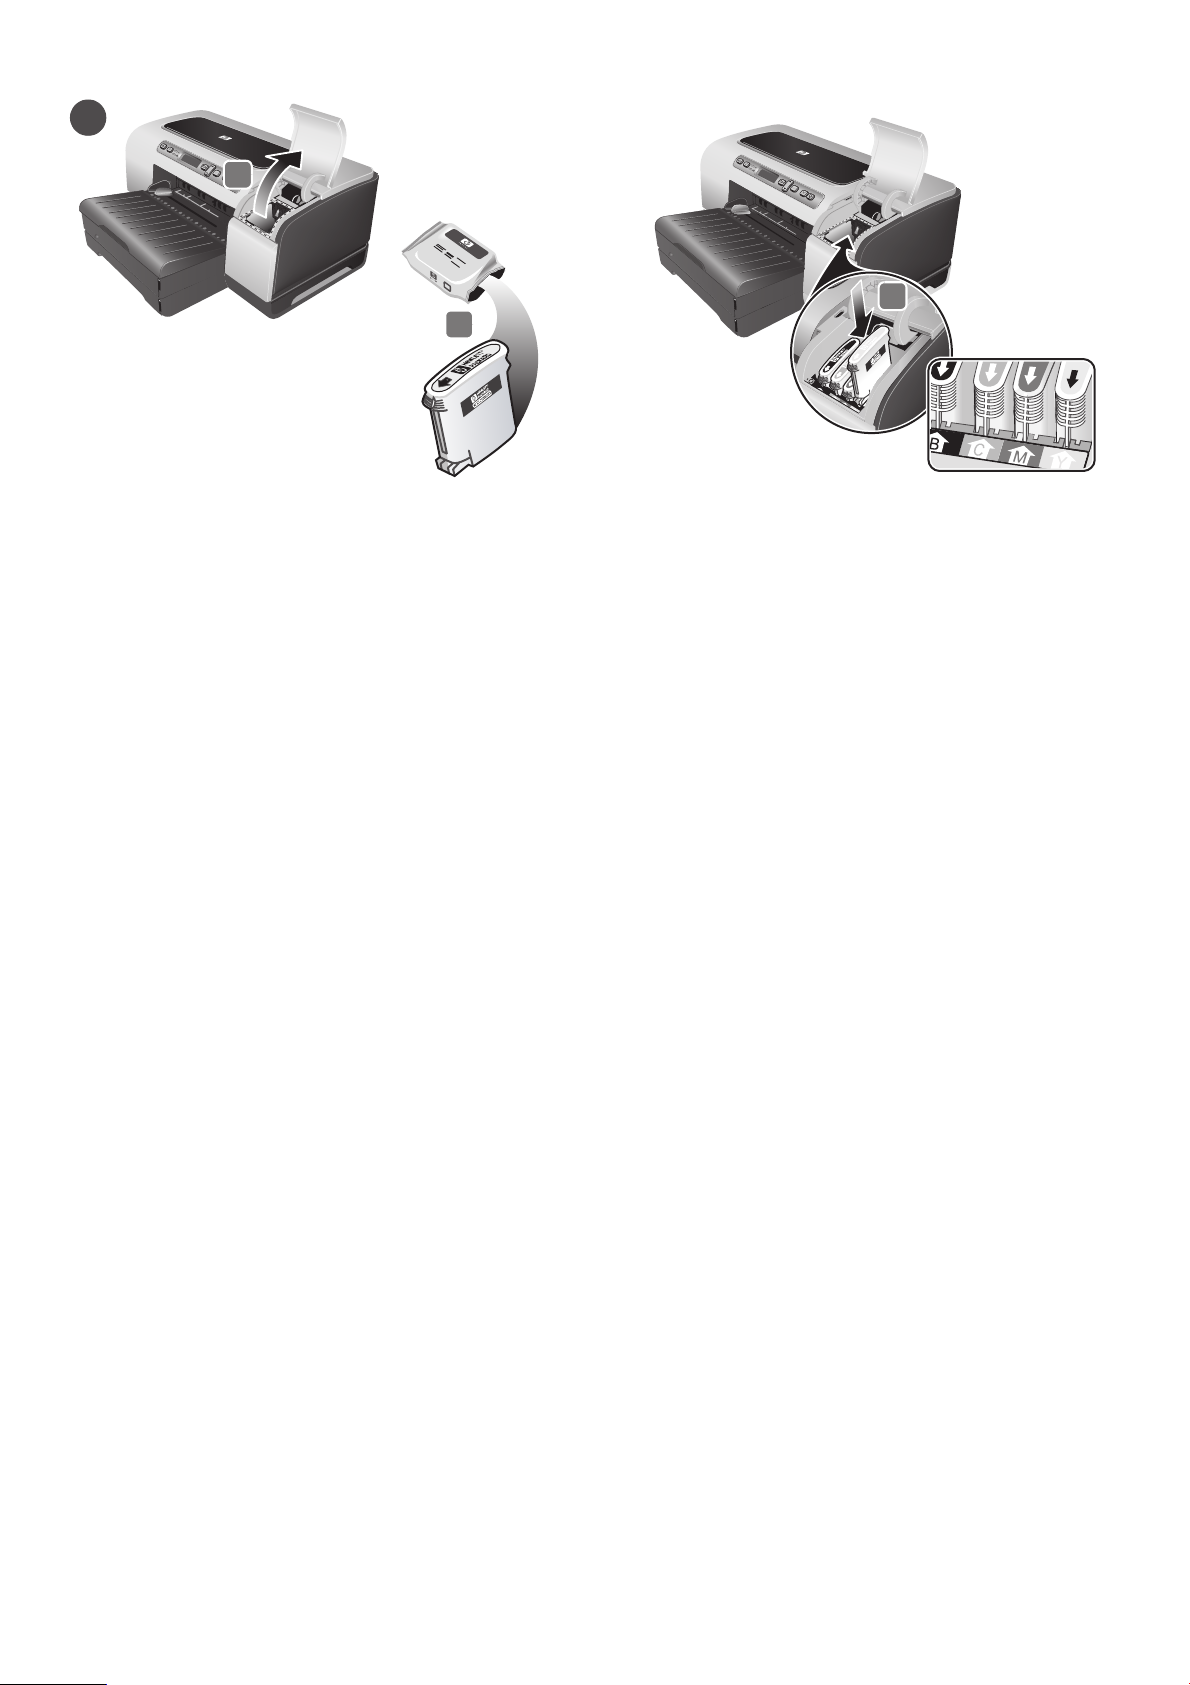
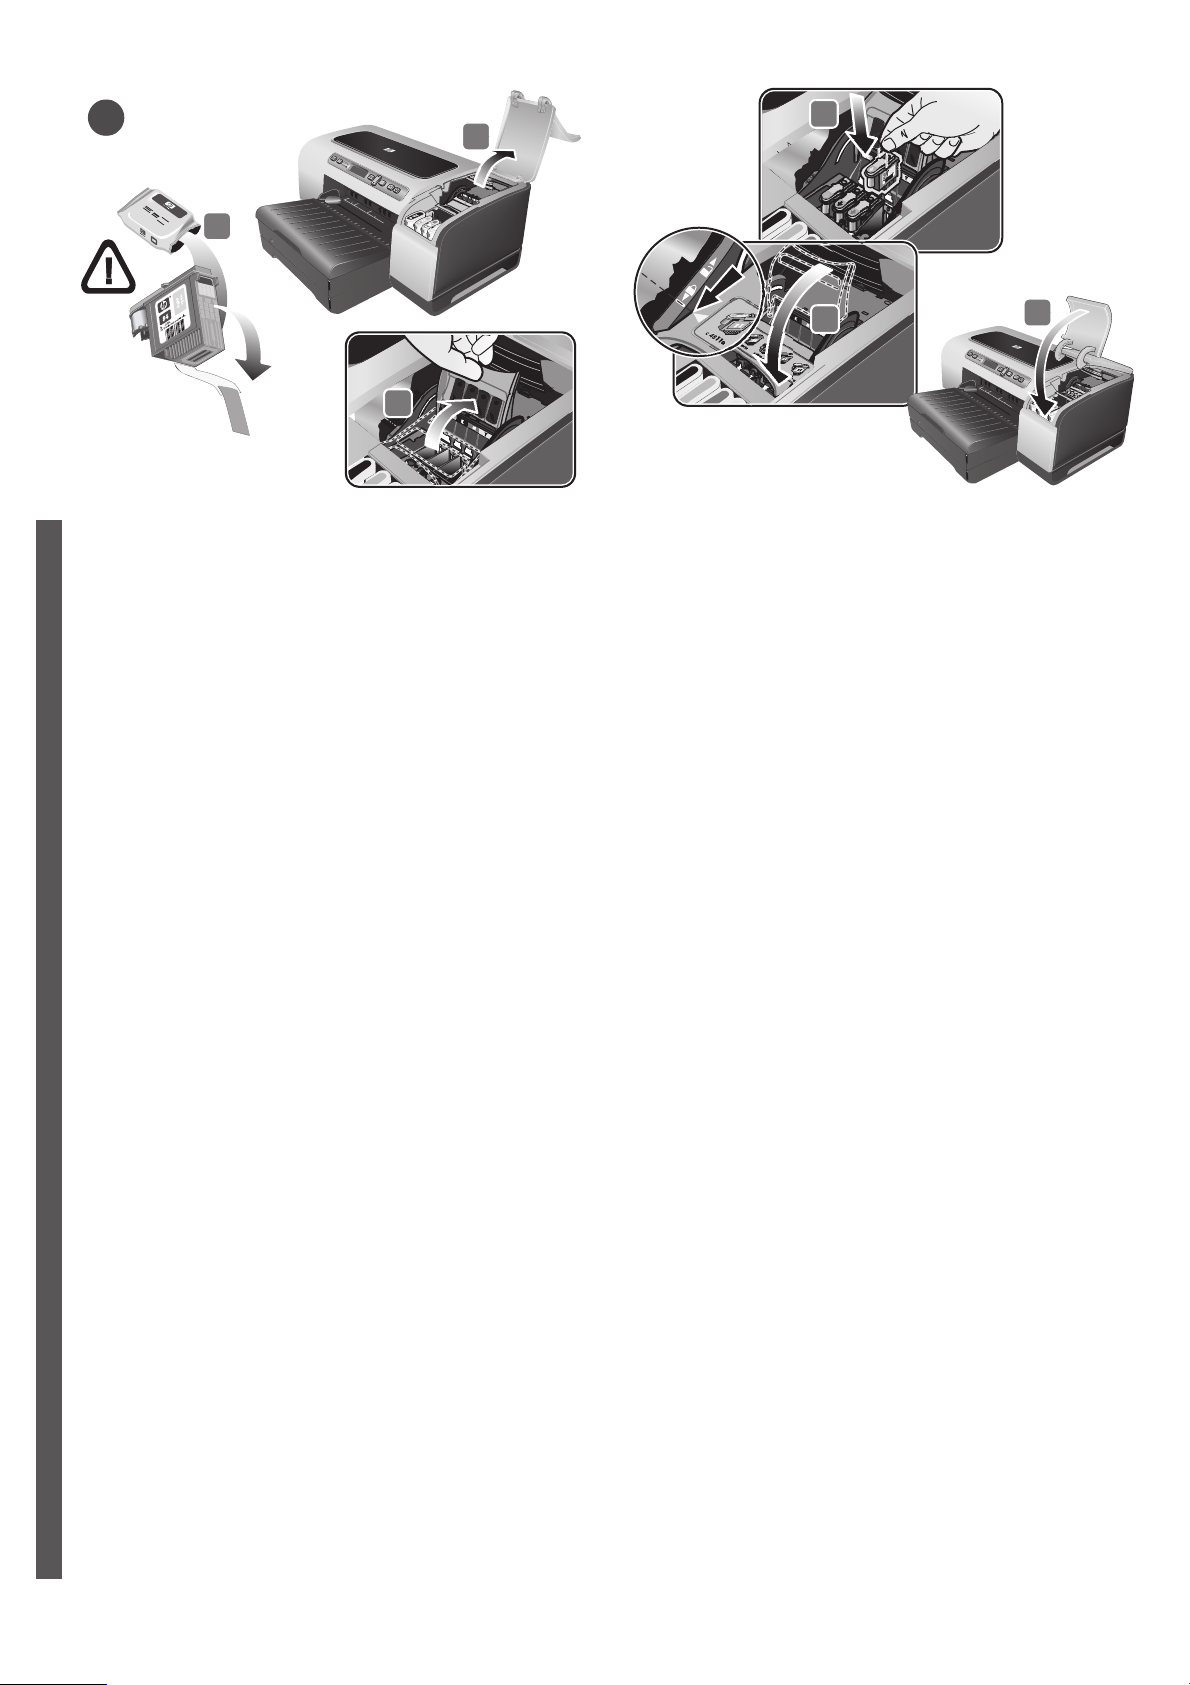
Step 7: Install the ink cartridges.
1) Lift to open the ink cartridge cover. 2) Remove each ink cartridge
from its package. Caution: HP recognizes each customer’s choice
but cannot guarantee the quality or reliability of non-HP ink cartridges.
Printer services or repairs required as a result of using non-HP
ink cartridges are not covered under warranty.
步骤 7: 安装墨盒。
1) 提起并打开墨盒盖。 2) 去除每个墨盒的包装材料。
注意:HP 尊重客户的选择,但不保证非 HP 墨盒的质量或可
靠性。因使用非 HP 墨盒而导致的打印机服务或维修不在保修
之列。
단계 7: 잉크 카트리지 설치.
1) 잉크 카트리지 커버를 들어 여십시오. 2) 각 잉크 카트리지의
포장을 떼어내십시오. 주의: HP 프린터는 고객이 장착하는 잉크
카트리지가 정품인지 아닌지 인식합니다. 타사 잉크 카트리지를
사용하는 경우 HP에서는 인쇄 품질과 신뢰성을 보장하지 않습니다.
HP 정품을 사용하지 않아 발생한 서비스 또는 수리 비용은 HP 프린터
보증 대상에 속하지 않습니다.
Langkah 7: Memasang kartrid tinta.
1) Angkat untuk membuka penutup kartird tinta. 2) Keluarkan setiap
kartrid tinta dari kemasannya. PERINGATAN: HP menghormati hak
pelanggan dalam memilih kartrid tinta, namun HP tidak menjamin
kualitas maupun keandalan kartrid tinta yang bukan dari HP.
Perbaikan printer atau servis printer yang diperlukan sebagai akibat
penggunaan kartrid tinta bukan HP tidak termasuk di dalam
garansi HP.
3) Align each cartridge with its color-coded slot, and then insert the
cartridge into the slot. To ensure proper contact, press down firmly on
the cartridges until they snap into place. Note: All four ink cartridges
must be correctly installed for the printer to work.
3) 将各个墨盒与其颜色标记插槽对齐,然后将墨盒插入插槽。
要确保正确的接触位置,请用力按下墨盒,直到卡到位为止。
注:所有四个墨盒都必须安装正确,以便打印机能正常工作。
3) 색상별 슬롯에 각 카트리지를 정렬한 다음 슬롯에 카트리지를
끼우십시오. 제자리에 맞춰질 때까지 카트리지를 눌러 카트리지가
올바로 설치되도록 하십시오. 주: 4개의 잉크 카트리지를 모두 올바로
설치해야 제대로 인쇄할 수 있습니다.
3) Sejajarkan setiap kartrid dengan slot yang telah ditandai dengan
warna, dan kemudian masukkan kartrid itu ke dalam slot.
Untuk meyakinkan pemasangan yang benar, tekan kartrid dengan
mantap hingga kartrid tepat masuk ke tempatnya.
Catatan: Printer hanya bisa dioperasikan apabila keempat kartrid
tinta telah dipasang dengan benar .
手順 7:インク カートリッジを取り付けます。
1) インク カートリッジ カバーを上に開きます。2) インク カート
リッジをパッケージから取り出します。警告:HP ではお客様の選択
肢を尊重いたしますが、HP 製でないインク カートリッジの品質や
信頼性については保証いたしかねます。HP 製以外、
または補充したインク カートリッジを使用したために必要となっ
た サービスや修理は、保証対象とはなりません。
步驟 7: 安裝墨水匣。
1) 將墨水匣向上抬打開護蓋。2) 自包裝盒中取出各墨水匣。
注意:HP 尊重客戶選用墨水匣的權利,但無法保證非 HP 原廠墨水匣
的品質及穩定性。因使用非 HP 原廠墨水匣或重新充填之墨水匣,
所導致的印表機服務或修護不在保固範圍內。
3) 各カートリッジをカラーコードされたスロットに揃え、
カートリッジをスロットに挿入します。正しく接するように、
カチッと音がするまでカートリッジをしっかり押し下げます。
注記:プリンタが機能するためには、4 つのインク カートリッジす
べてを正しく取り付ける必要があります。
3) 將墨水匣對準同色標示的墨水匣槽後插入槽內。為確使墨水匣接觸
良好,請用力按下墨水匣,直到卡入定位為止。注意:所有四個墨水
匣都必須安裝正確,印表機才能能正常運作。
9
Page 10
8
4
1
3
2
Step 8: Install the printheads.
1) Ensure the printer is turned on and lift to open the printhead cover.
2) Lift the printhead latch. 3) Remove each printhead from its
package, and then remove the protective tape from each printhead.
English
步骤 8: 安装打印头。
1) 确保打印机已打开电源,然后提起并打开打印头盖。
简
2) 提起打印头锁栓。 3) 去除每个打印头的包装材料,然后
体
去除打印头上的保护胶带。
中
文
단계 8: 인쇄헤드 설치.
1) 프린터가 켜져 있는지 확인하고 인쇄헤드 커버를 들어 여십시오.
2) 인쇄헤드 걸쇠를 들어 올리십시오. 3) 인쇄헤드의 포장을 떼어낸
한
다음 인쇄헤드 보호 테이프를 벗겨내십시오.
국
어
5
4) Insert each printhead into its color-coded slot, and then press down
firmly on each printhead to ensure proper contact. 5) Close the
printhead latch, pressing down to ensure it is in the lock position.
6) Close the printhead and ink cartridge covers.
6
4) 将每个打印头插入其颜色标记插槽,然后用力按下每个打印
头,以确保接触良好。 5) 闭合打印头锁栓,向下按以确保其锁
定到位。 6) 合上打印头和墨盒盖。
4) 각 인쇄헤드를 색상별 슬롯에 끼운 다음 각 인쇄헤드를 눌러 올바로
설치되도록 하십시오. 5) 잠금 위치에 고정되도록 아래로 눌러
인쇄헤드 걸쇠 를 닫으십시오. 6) 인쇄헤드와 잉크 카트리지 커버를
닫으십시오.
Langkah 8: Memasang printhead.
1) Pastikan bahwa printer telah dihidupkan dan angkat untuk
membuka penutup printhead. 2) Angkat pengancing printhead
3) Keluarkan setiap printhead dari kemasannya, dan kemudian
singkirkan pita pelindung dari masing-masing printhead.
Bahasa Indonesia
手順 8:プリント ヘッドの取り付け。
1) プリンタの電源が入っていることを確認し、プリントヘッド カ
バーを上に開きます。2) プリントヘッド ラッチを上げます。
3) プリント ヘッドをパッケージから取り出し、プリントヘッドから
日
保護テープをはがします。
本
語
步驟 8: 安裝印字頭。
繁
1) 務請先將印表機開機,並拉開印字頭護蓋。2) 拉起印字頭鎖栓。
體
3) 自包裝盒中取出各印字頭,並去除印字頭上的保護膠帶。
中
文
4) Masukkan setiap printhead ke dalam slot yang telah ditandai
dengan warna, setelah itu tekan masing-masing printhead ke bawah
dengan mantap untuk memastikan pemasangan yang benar.
5) Tutup pengancing printhead, tekan ke bawah untuk memastikan
pengancing sudah berada pada posisi mengunci.
6) Pasang penutup printhead dan penutup kartrid tinta.
4) 各プリント ヘッドを対応するカラーで色分けされているスロット
に挿入し、正しく接するようにしっかりと押し下げます。 5) プリン
トヘッド ラッチを閉じてから押し下げ、ロック位置にあることを確
認します。6) プリントヘッドとインク カートリッジ カバーを閉じ
ます。
4) 將各印字頭插入同色標示的插槽。請用力按下每個印字頭,以確保
接觸良好。 5) 蓋好印字頭鎖栓。請用力向下按印字頭直到鎖入定位為
止。6) 蓋上印字頭及墨水匣護蓋。
10
Page 11
9
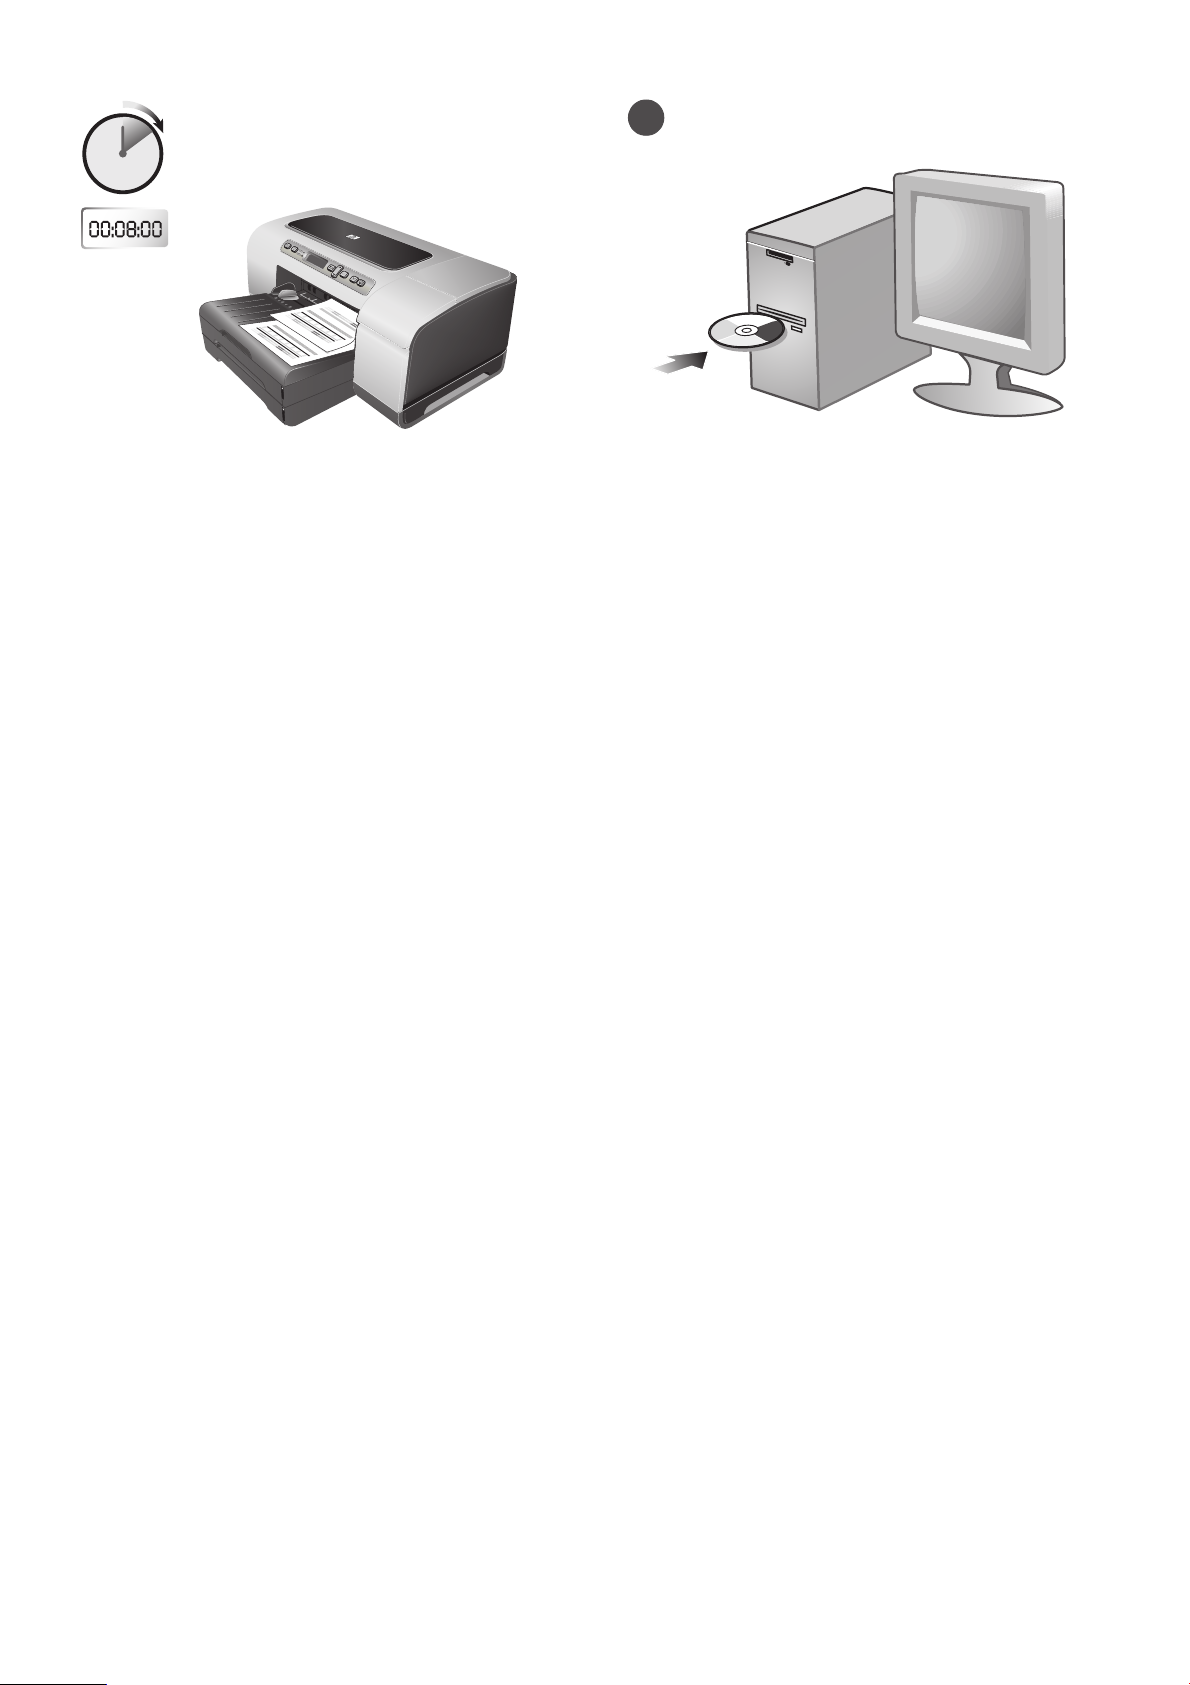
To ensure the best possible print quality, the printer aligns
the printheads. At the beginning of the alignment process, the Power
light blinks and the printer prints a status page. At the end of the
process, the printer prints two auto-alignment pages. Printhead
alignment takes approximately 8 minutes. If the printer does not print,
see “Troubleshooting” on page 16.
为确保打印质量达到最佳,打印机将校准打印头。在校准过程
之初,打印机的 “电源”指示灯闪烁并打印状态页。在校准
过程结束时,打印机会打印出两张自动校准页。打印头校准大
约需要 8 分钟。如果打印机无法打印,请参阅第 18 页上的
“故障排除”。
최상의 인쇄 품질을 얻기 위해서는 프린터가 인쇄헤드를 정렬해야
합니다. 정렬 과정을 시작하면 전원 표시등이 깜빡 거리고 상태
페이지가 인쇄됩니다. 이 과정이 끝나면 2장의 자동 정렬 페이지가
인쇄됩니다. 인쇄헤드를 정렬하는 데에는 대략 8분 정도 소요됩니다.
문서가 인쇄되지 않으면 20페이지의 "문제 해결"을 참조하십시오.
Untuk memastikan hasil cetakan yang optimal, printer mengatur
sendiri posisi printhead. Pada awal proses pengaturan posisi
printhead, Lampu Daya berkedip dan printer mencetak halaman
status. Pada akhir proses, printer mencetak dua halaman
penyelarasan printhead otomatis (auto-alignment). Pengaturan posisi
printhead ini menggunakan waktu sekitar 8 menit. Apabila printer
tidak mencetak, harap lihat “Mengatasi masalah” pada halaman 22.
Step 9: Install the printer software.
See the following instructions for your connection type (USB, parallel,
or network). For more information about installing software, see the
onscreen user’s guide on the Starter CD.
步骤 9: 安装打印机软件。
有关连接类型 (USB、并行或网络)的信息,请查看以下
说明。有关安装软件的详细信息,请参阅 Starter CD 上的联机
用户指南。
단계 9: 프린터 소프트웨어 설치.
아래의 연결 형태별(USB, 병렬 또는 네트워크) 지침을 참조하십시오.
소프트웨어 설치에 대한 자세한 내용은 Starter CD의 온라인 사용
설명서를 참조하십시오.
Langkah 9: Menginstal perangkat lunak printer.
Harap lihat petunjuk-petunjuk berikut sesuai dengan jenis sambungan
yang Anda gunakan (USB, paralel, atau jaringan).
Untuk mendapatkan informasi mengenai instalasi perangkat lunak,
harap lihat panduan pengguna onscreen di dalam CD Starter Anda.
最高のプリント品質を得るために、プリンタは プリントヘッドの位
置調整を行います。位置調整プロセスの始めに、電源ランプが点滅
し、プリンタはステータス ページを印刷します。プロセスの最後に
は、プリンタは自動調整ページを 2 ページ印刷します。プリント
ヘッドの位置調整には、約 8 分かかります。プリンタが印刷しない
場合は、ページ 24 の「トラブルシューティング」 を参照してくだ
さい。
為確保最佳的列印品質,印表機會先校準 印字頭。校準程序開始時,
印表機電源燈號會閃爍,同時印出兩頁狀態頁。校準程序結束時,
印表機會印出兩頁校準頁,此一程序費時約 8 分鐘。印表機若未列
印,請參閱第 26 頁的 「疑難排解」。
手順 9:印刷用ソフトウェアのインストール。
接続タイプ (USB、パラレル、またはネットワーク ) について以下の
手順をご覧ください。ソフトウェアのインストール手順については、
スタータ CD にあるオンライン ユーザーズ ガイドを参照してくだ
さい。
步驟 9: 安裝印表機軟體。
請參閱各連結類型 (USB、平行、無線或有線網路)的相關說明。
安裝軟體的詳細說明,請參閱 Starter CD 內的線上使用手冊。
11
Page 12

1
USB or parallel connection:
1) Insert the Starter CD into the CD drive. 2) Follow the onscreen
instructions for your connection and connect the USB ( ) or
parallel ( ) (sold separately) when prompted.
English
Note: Connect only a parallel cable or a USB cable—not both.
USB 或并行连接:
1) 将 Starter CD 插入 CD 驱动器。 2) 出现提示时,按照屏幕
简
体
上有关连接的说明连接 USB ( ) 或并行 () 电缆 (单独
中
出售)。 注:仅连接并行电缆或 USB 电缆 - 而不是同时连接
文
两者。
USB 또는 병렬 연결:
1) CD 드라이브에 Starter CD를 넣으십시오. 2) 지시가 있으면 해당
한
연결 형태에 대한 온라인 지침을 따라 USB( ) 또는 병렬()
국
(별매) 케이블을 연결하십시오. 주: 병렬 케이블 또는 USB 케이블 중
어
하나만 사용하고 둘 모두 사용하지 마십시오.
Sambungan USB atau paralel:
1) Masukkan CD Starter ke dalam drive CD. 2) Ikuti instruksi yang
tampil di layar komputer Anda (onscreen) dan, saat diminta,
hubungkan kabel USB ( ) atau paralel ( ) (dijual terpisah).
Catatan: Hubungkan salah satu dari kabel paralel atau kabel USB—
tapi jangan kedua-duanya.
Wired network connection:
1) Connect the network cable (sold separately) to the printer’s
network port and to an available port on the network hub, switch,
or router. Caution: Do not plug the network cable into a port labeled
WAN or Uplink in the hub, switch, or router.
有线网络连接:
1) 将网络电缆 (单独出售)连接至打印机的网络端口以及网络
集线器、交换机或路由器上的可用端口。注意: 不要将网络
电缆插入集线器、交换机或路由器上标有 WAN 或 Uplink 的
端口。
유선 네트워크 연결:
1) 프린터의 네트워크 포트와 네트워크 허브, 스위치 또는 라우터의 빈
포트에 네트워크 케이블(별매)을 연결하십시오. 주의: 허브, 스위치
또는 라우터의 WAN 또는 Uplink 포트에는 네트워크 케이블을
연결하지 마십시오.
Sambungan jaringan dengan kabel:
1) Hubungkan kabel jaringan (dijual terpisah) ke port jaringan pada
printer dan ujung lainnya ke port yang belum terpakai pada hub
jaringan, switch atau router. Hati-hati: Jangan colokkan kabel
jaringan ke dalam port yang ditandai dengan WAN atau Uplink pada
hub, switch atau router.
Bahasa Indonesia
USB またはパラレル接続:
1) スターター CD を CD ドライブに挿入します。2) お使いの接続に
応じて画面の指示に従って、プロンプトが表示されたら USB
日
() またはパラレル () (別売 ) 接続を行います。
本
注記:パラレル ケーブルまたは USB のどちらか一つのみを接続し
語
ます。両方接続しないでください。
USB 或平行連結:
繁
1) 將 Starter CD 插入光碟機,2) 按各連結的線上說明進行,
體
中
並於提示時插入另購的 USB ( )或平行纜線 ( )。
文
注意:切勿同時插入平行及 USB 纜線。
ワイヤ ネットワーク接続:
1) ネットワーク ケーブル ( 別売 ) をプリンタのネットワーク ポート
と、ネットワーク ハブ、スイッチ、ルーターの利用可能なポートに
接続します。注意:ネットワーク ケーブルは、ハブ、スイッチ、
またはルーターにある WAN または Uplink とラベルの付いたポート
には接続しないでください。
有線網路:
1) 將另購的網路線插入印表機的網路埠及網路集線器、交換器或路由
器上可用的接口。注意:切勿將網路線插入集線器、交換器或路由器
上 WAN 或 Uplink 標示的接口。
12
Page 13

10
3
2
2) Print the printer configuration page (see page 15) to get information
you may need for network configuration. If you encounter problem,
see “Problems connecting to a wired network” on page 16. 3) Insert
the Starter CD into the CD drive, and follow the onscreen instructions.
2) 打印打印机配置页 (见第 17 页)以获取可能用到的网络配
置信息。 如果遇到问题,请参阅第 18 页上的 “连接有线网络
时出现问题”。 3) 将 Starter CD 插入 CD 驱动器,然后按照屏
幕上的说明进行操作。
2) 네트워크 구성에 필요한 정보를 보려면 프린터 구성 페이지
(19페이지 참조)를 인쇄하십시오. 문제가 계속되면 20페이지의 "유선
네트워크 연결 문제"를 참조하십시오. 3) CD 드라이브에 Starter CD를
넣고 화면 지시를 따르십시오.
2) Cetak halaman konfigurasi printer (lihat halaman 21) untuk
memperoleh informasi yang mungkin Anda perlukan untuk
melakukan konfigurasi jaringan. Jika Anda menjumpai masalah,
lihat “Masalah yang berhubungan dengan sambungan ke jaringan
dengan kabel (wired)” pada halaman 22. 3) Masukkan CD starter
ke dalam drive CD, dan ikuti instruksi yang ditayangkan di
layar (onscreen).
Step 10: Test the printer software installation.
After you complete the software installation and connect the printer to
the computer, print a document from an application that you use
frequently to ensure that the software is installed correctly. If the
document does not print, see “Troubleshooting” on page 16.
步骤 10: 测试打印机软件安装。
完成软件安装并将打印机连接到计算机后,请从经常使用的应
用程序中打印一份文档,以确定软件安装是否正确。如果无法
打印文档,请参阅第 18 页上的 “故障排除”。
단계 10: 프린터 소프트웨어 설치 테스트.
소프트웨어 설치를 완료하고 프린터를 컴퓨터에 연결한 후 자주
사용하는 응용 프로그램에서 문서를 인쇄하여 소프트웨어가
올바로 설치되었는지 확인하십시오. 문서가 인쇄되지 않으면 20페이
지의 "문제 해결"을 참조하십시오.
Langkah 10: Menguji-coba instalasi perangkat lunak printer.
Setelah Anda selesai menginstal perangkat lunak dan
menghubungkan printer dengan komputer, coba cetak satu dokumen
dengan program aplikasi yang sering Anda gunakan untuk
memastikan bahwa perangkat lunak telah diinstal dengan benar.
Apabila dokumen tidak tercetak, harap lihat “Mengatasi masalah”
pada halaman 22.
2) プリンタ設定ページ ( ページ 23 参照 ) を印刷して、ネットワーク
設定に必要な情報を入手します。 問題が発生した場合は、 ページ 24
の「ワイヤ ネットワークへの接続問題」 を参照してください。
3) スターター CD を CD ドライブに挿入し、画面の指示に従います。
2) 請列印印表機組態頁,查看網路設定所需的資料,
(請參考頁 25)。 如有任何問題,請參考第 26 頁的 「連結有線網路
時的問題」。3) 將 Starter CD 插入光碟機,再按線上提示進行。
手順 10:インストールされたプリンタ ソフトウェアをテストし
ます。
ソフトウェアをインストールし、プリンタをコンピュータに接続し
たら、頻繁に使用するアプリケーションから文書を印刷して、ソフ
トウェアが正しくインストールされていることを確認します。文書
が印刷されない場合は、ページ 24 の「トラブルシューティング」
を参照してください。
步驟 10: 測試印表機軟體安裝。
完成軟體安裝並將印表機連結到電腦後,請從經常使用的應用程式中
列印一份文件,以確定軟件安裝是否正確。文件若未列印,請參閱
第 26 頁的 「疑難排解」。
13
Page 14

Step 11: Register the printer.
Register the printer to receive important support and technical
information. If you did not register your printer while installing the
software, you can register later at http://www.register.hp.com.
English
Congratulations!
Your printer is ready to use. For information about using the printer
and troubleshooting, see the following resources:
• Onscreen user’s guide and Readme file on the Starter CD.
• HP Instant Support (see the onscreen user’s guide)
• Product support site at
http://www.hp.com/support/businessinkjet2800
步骤 11: 注册打印机。
注册打印机以接收重要的支持和技术信息。如果在安装软件时
简
未注册打印机,可稍后在 http://www.register.hp.com 上进行
体
注册。
中
文
단계 11: 프린터 등록.
중요한 지원 및 기술 정보를 받아 보려면 프린터를 등록하십시오.
소프트웨어를 설치하는 동안 프린터를 등록하지 않아도 나중에
한
http://www.register.hp.com에서 등록할 수 있습니다.
국
어
Langkah 11: Meregistrasikan printer.
Registrasikan printer Anda agar Anda bisa memperoleh dukungan
yang berguna dan agar Anda dapat memperoleh informasi-informasi
teknis. Jika Anda belum melakukan registrasi ketika menginstal
perangkat lunak, Anda dapat melakukannya kemudian, yaitu dengan
mengunjungi http://www.register.hp.com.
Bahasa Indonesia
手順 11:プリンタを登録する。
重要なサポート情報と技術情報を受け取れるように、プリンタを登
録します。ソフトウェアのインストール中にプリンタを登録しな
かった場合は、インストール終了後に http://www.register.hp.com
日
で登録できます。
本
語
恭喜您!
打印机可以使用了。有关使用打印机和故障排除的信息,
请参阅以下资源:
• Starter CD 上的联机用户指南和 Readme 文件。
• HP Instant Support (请参阅联机用户指南)
• 产品支持网站
http://www.hp.com/support/businessinkjet2800
축하합니다!
이제 프린터를 사용할 준비가 되었습니다. 프린터 및 문제 해결
사용 방법에 대한 자세한 내용은 다음 자료를 참조하십시오:
• Starter CD의 온라인 사용 설명서 및 Readme 파일
• HP Instant Support(온라인 사용 설명서 참조)
• 제품 지원 웹 사이트
(http://www.hp.com/support/businessinkjet2800)
Selamat!
Printer Anda sekarang sudah siap digunakan. Untuk memperoleh
informasi mengenai penggunaan printer dan cara mengatasi
masalah, silakan membaca yang berikut:
• Panduan pengguna onscreen dan file Readme pada CD Starter.
• Dukungan Instan HP (lihat panduan pengguna onscreen)
• Situs dukungan produk di
http://www.hp.com/support/businessinkjet2800
HP Deskjet
プリンタを使用する準備ができました。プリンタの使い方とトラブ
ルシューティングについては、次のマニュアルを参照してください:
• オンライン ユーザーズ ガイドとスターター CD の Readme
• HP Instant Support (HP インスタント サポート ) ( オンライン
• 製品サポート サイト
プリンタをお買い上げ頂きましてありがとうございます!
ファイル。
ユーザーズ ガイドを参照してください )
(http://www.hp.com/support/businessinkjet2800)
步驟 11: 印表機註冊。
繁
請將印表機註冊以便接收重要的支援和技術資訊。安裝軟體時若未註
體
冊印表機,可稍後在 http://www.register.hp.com 上進行註冊。
中
文
恭喜!
您的印表機已可使用了。有關使用印表機和疑難排解的資訊,
請參閱下列文件:
• 線上使用手冊及 Starter CD 上的 「Readme」 檔案。
• HP 線上支援 (請參閱線上使用手冊)
• 產品支援網站 http://www.hp.com/support/businessinkjet2800
14
Page 15

Control panel
1
5 7
3
1Power button ( ): Turns the printer off and on.
2Help button ( ): Provides additional information about printer
messages or menus.
3 Attention light ( ): Indicates one of three possible states:
Off — No conditions exist that require attention. A printer-status
message usually accompanies this indicator.
Flashing — The printer has encountered an error that requires
user attention (such as an open door or a paper jam). An error
message usually accompanies this indicator.
Flashing alternately with Ready light — A critical error has
occurred, and the printer requires attention. A critical-error
message usually accompanies this indicator.
4 Ready light ( ): Indicates one of three possible states:
On — The printer is online and ready to accept print jobs.
82
Off — The printer is turned off.
Flashing — The printer is initializing, canceling a print job,
or turning off.
5 Control-panel display: Shows status and error messages,
as well as ink cartridge levels.
6 Back button ( ): Navigates backward one level in the menus.
7Up () and Down () Arrow buttons: Navigate through
menu items.
8Select button ( ): Enters the menus and selects highlighted
menu items.
9 Cancel Job button ( ): Cancels the current print job. Press this
button only once to cancel the print job. The time it takes to
cancel depends on the size of the print job. This button also exits
all menus.
10 Resume button ( ): Restarts printing after continuable errors.
This button also exits all menus.
10964
English
Troubleshooting and configuration tools
The following tools are available for troubleshooting or configuring
the printer. For more information about these tools, see the onscreen
user’s guide on the Starter CD.
Configuration page
Use the configuration page to view current printer settings, to help
troubleshoot printer problems, and to verify installation of optional
accessories, such as trays. The configuration page also contains
a log of recent events. If the printer is connected to a network,
an additional network configuration page prints; this page shows
the network settings for the printer.
If you need to call HP, print the configuration page before calling.
To print a configuration page
1 Ensure the printer is turned on.
2 Press (Select button) on the control panel.
3 Ensure
4 Press (Down Arrow button) until PRINT CONFIGURATION PAGE
INFORMATION MENU is highlighted, and then
press (Select button).
is highlighted, and then press (Select button).
Embedded Web server (EWS)
When the printer is connected to a network, you can use the printer’s
EWS to view status information, change settings, and manage the
printer at your computer.
To open the EWS
In a supported Web browser on your computer, type the IP address
that has been assigned to the printer. For example, if the IP address
is 123.123.123.123, type the following address into the Web
browser:
http://123.123.123.123.
The IP address for the printer is listed on the configuration page.
After you open the EWS, you can bookmark it so that you can return
to it quickly in the future.
15
Page 16

Troubleshooting
This section provides troubleshooting suggestions for some of
the common issues associated with hardware and
software installation.
Check the printer to ensure the following:
z Power light is on and not blinking. When the printer is first turned
on, it takes approximately 45 seconds to warm up.
z The control-panel display shows that the printer is in the
Ready state.
z No error messages appear on the computer screen.
z Power cord and other cables are working and firmly connected
to the printer.
English
z Media is loaded correctly in the tray and is not jammed in
the printer.
z Printheads and ink cartridges are properly installed in their
correct color-coded slots. Press down firmly on each one to
ensure proper contact. Ensure you have removed the tape from
each printhead.
z Printhead latch and all covers are closed.
z Rear access panel or auto-duplex unit is locked into place.
z All packing tapes and materials are removed from the printer.
z Printer can print a configuration page. See “To print a
configuration page” on page 15.
z The printer is selected as the current or default printer. See your
computer’s Online Help for more information.
z Pause Printing is not selected if you are using a computer
running Windows.
z You are not running too many programs when you are
performing a task. Close programs that you are not using or
restart the computer before attempting the task again.
Problems connecting to a network
Note: After correcting any of the following, run the setup
program again.
General network troubleshooting
If you are unable to install the printer software, ensure the following
and try running the installation program again:
z All cable connections to the computer and the printer are secure.
z The network is operational and the network hub is turned on.
z All applications, including virus protection programs and
personal firewalls, are closed or disabled.
Problems connecting to a wired network
z Ensure the printer is installed on the same subnet as the
computers that will be using the printer. Then, try running the
installation program again.
z Though it is not recommended that you assign the printer with a
static IP address, you might resolve some installation problems
(such as a conflict with a personal firewall) by doing so. For more
information, see the onscreen User’s Guide.
Problems installing software
Check the computer system to ensure the following:
z The computer meets the system requirements (see the
onscreen User’s Guide on the Starter CD).
Verify installation preliminaries
z Before installing software on a Windows computer, ensure all
other programs are closed.
z If the computer does not recognize the path to the CD drive that
you type, ensure you have specified the correct drive letter.
z If the computer cannot recognize the Starter CD in the CD drive,
inspect the CD for damage. You can download the printer driver
from http://www.hp.com/support/businessinkjet2800.
Reinstall the printer software
z If you are using Windows and the computer cannot detect
the printer, run the Scrubber utility (located in the Utils\Scrubber
folder on the Starter CD) to perform a clean printer driver
uninstallation. Restart your computer, and re-install the
printer driver.
16
Page 17

控制面板
1
5 7
3
1 电源按钮 ():打开和关闭打印机电源。
2 帮助按钮 ():提供有关打印机消息或菜单的其它信息。
3 警告指示灯 ():指示三种可能的状态:
熄灭 - 没有需要注意的情况。通常会有一条打印机状态消
息同时出现。
闪烁 - 打印机出错,需要用户介入 (例如盖板开启或卡
纸)。通常会有一条错误消息同时出现。
与就绪指示灯交替闪烁 - 打印机出现了严重错误,需要用
户介入。通常会有一条严重错误消息同时出现。
4 就绪指示灯 ():指示三种可能的状态:
亮起 - 打印机处于联机状态,并已准备就绪,可以接受打
印作业。
82
熄灭 - 打印机处于关闭状态。
闪烁 - 打印机正在进行初始化、正在取消打印作业或正在
关机。
5 控制面板显示屏:显示状态和错误消息,以及墨盒的
墨水量。
6 后退按钮 ():返回上级菜单。
7 向上 () 和向下 () 箭头按钮:浏览菜单项。
8 选择按钮 ():输入菜单及选择突出显示的菜单项。
9 取消作业按钮 ():取消当前打印作业。仅按一次此按钮
即可取消打印作业。取消打印作业所花费的时间取决于打
印作业的大小。此按钮还将退出所有菜单。
10 恢复按钮 ():出现非致命错误后重新开始打印。此按钮
还将退出所有菜单。
10964
简
体
中
文
故障排除和配置工具
以下工具可用于故障排除或配置打印机。有关这些工具的详细
信息,请参阅 Starter CD 上的联机用户指南。
配置页
使用配置页可以查看当前的打印机设置、帮助排除打印机故
障,以及检查可选附件 (如纸盘)的安装情况。配置页也包
含一个近期事件的日志。如果打印机连接到网络,则打印附加
的网络配置页;此页显示打印机的网络设置。
如果您需要致电 HP,请提前打印好配置页。
打印配置页
1 确保打印机电源已打开。
2 按控制面板上的 (“选择”按钮)。
3 确保突出显示
按 (“选择”按钮)。
4 按 (“向下箭头”按钮)直到突出显示 PRINT
CONFIGURATION PAGE (打印配置页),然后按
(“选择”按钮)。
INFORMATION MENU (信息菜单),然后
内置 Web 服务器 (EWS)
当将打印机连接至网络时,可使用打印机的 EWS 在计算机上
查看状态信息、更改设置和管理打印机。
打开 EWS
在计算机上所支持的 Web 浏览器中,键入分配给打印机的
IP 地址。例如,如果 IP 地址是 123.123.123.123,则在 Web
浏览器中键入以下地址:
http://123.123.123.123.
打印机的 IP 地址列示在配置页上。
打开 EWS 之后,可将其加入书签,以便将来能够快速返回。
17
Page 18

故障排除
本节对与硬件和软件安装相关的一些常见问题,提供了相应的
故障排除建议。
检查打印机以确认下列事项:
z “电源”指示灯亮起而不闪烁。首次打开打印机时,
大约需要 45 秒钟预热。
z 控制面板显示屏显示打印机处于 “就绪”状态。
z 计算机屏幕上无错误信息显示。
z 电源线和其它电缆处于工作状态,并牢固地连接至
打印机。
z 介质正确装入纸盘,且没有卡在打印机中。
z 打印头和墨盒正确地安装在其对应的颜色代码插槽中。
用力按每个打印头和墨盒,确保接触良好。确保去除了各
打印头上的胶带。
z 打印头锁栓和所有盖板都已关闭。
简
体
z 背部检修板或自动双面打印单元锁定到位。
中
z 打印机的所有包装胶带和包装材料都已去除。
文
z 打印机能打印配置页。请参阅第 17 页上的 “打印配置
页”。
z 打印机被选为当前或默认的打印机。有关详细信息,
请参阅计算机的联机帮助。
z 如果计算机运行的是 Windows,不能选中 “暂停打印”。
z 执行任务时未运行过多的程序。再次尝试执行任务前,
请关闭不用的程序,或重新启动计算机。
连接网络时出现问题
注:纠正下列问题后,请再次运行安装程序。
一般网络故障的排除
如果无法安装打印机软件,请检查下列事项并尝试再次运行安
装程序:
z 所有连接计算机和打印机的电缆是否牢固。
z 网络是否正常运行,以及网络集线器是否已打开。
z 所有应用程序,包括病毒防护程序和个人防火墙,是否已
关闭或禁用。
连接有线网络时出现问题
z 确保打印机与使用打印机的计算机安装在同一个子网上。
然后,尝试再次运行安装程序。
z 虽然不推荐为打印机分配静态 IP 地址,但这样做可能有
助于解决某些安装问题 (例如,与个人防火墙的冲突问
题)。有关详细信息,请参阅联机用户指南。
安装软件时出现问题
检查计算机系统以确认下列事项:
z 该计算机满足系统要求 (请参阅 Starter CD 上的联机用
户
指南)。
检查安装准备事项
z 在 Windows 计算机中安装软件之前,请确保关闭了所有
其它程序。
z 键入 CD 驱动器的路径后,如果计算机识别不出该路径,
请检查是否指定了正确的盘符。
z 如果计算机无法识别 CD 驱动器中的 Starter CD,请检查
该 CD 是否损坏。可从
http://www.hp.com/support/businessinkjet2800 下载打印
机驱动程序。
重新安装打印机软件
z 使用 Windows 操作系统时,如果计算机检测不到打印机,
请运行 Scrubber 实用程序 (位于 Starter CD 上的
Utils\Scrubber 文件夹中),进行彻底的打印机驱动程序卸
载。重新启动计算机,然后重新安装打印机驱动程序。
18
Page 19

제어판
1
5 7
3
1 전원 버튼 (): 프린터를 끄고 켭니다 .
2 도움말 버튼 (): 프린터 메시지 또는 메뉴에 대한 추가 정보를
제공합니다 .
3 주의 표시등 (): 3가지 상태 중 하나가 표시됩니다 .
꺼짐 - 주의해야 할 상황이 없습니다 . 대개 이 표시등과 함께
프린터 상태 메시지가 나타납니다 .
깜박임 - 프린터에서 사용자 주의가 필요한 오류 ( 예 : 도어 열림 ,
용지 걸림 ) 가 발생했습니다 . 대개 이 표시등과 함께 오류
메시지가 나타납니다 .
준비 표시등과 번갈아 깜박임 - 중요한 오류가 발생했으며 사용자
주의가 필요합니다 . 대개 이 표시등과 함께 중요 오류 메시지가
나타납니다 .
4 준비 표시등 (): 3가지 상태 중 하나가 표시됩니다 .
켜짐 - 프린터가 온라인 상태이고 인쇄 작업을 수행할 준비가
되었습니다 .
82
꺼짐 - 프린터가 꺼진 상태입니다 .
깜박임 - 프린터를 초기화하는 중이거나 , 인쇄 작업을 취소하는
중이거나 , 끄고 있는 중입니다 .
5 제어판 디스플레이 : 상태와 오류 메시지 , 잉크 카트리지 잔량이
표시됩니다 .
6 뒤로 버튼 (): 메뉴에서 한 단계를 뒤로 이동합니다 .
7 위 ()/ 아래 () 화살표 버튼 : 메뉴 항목 사이를 이동합니다 .
8 선택 버튼 (): 메뉴로 들어가고 강조 표시된 메뉴 항목을
선택합니다 .
9 작업 취소 버튼 (): 현재 인쇄 작업을 취소합니다 . 인쇄 작업을
취소하려면 이 버튼을 한 번만 누르십시오 . 취소하는 데 걸리는
시간은 인쇄 작업의 크기에 따라 다릅니다 . 이 버튼을 누르면 모
든 메뉴가 종료됩니다 .
10 재실행 버튼 (): 오류가 계속될 경우에 인쇄를 다시 시작합니다
. 이 버튼을 누르면 모든 메뉴가 종료됩니다 .
10964
한
국
어
문제 해결 및 구성 도구
다음과 같은 도구를 프린터의 문제를 해결하거나 프린터를
구성하는 데 사용할 수 있습니다 . 이러한 도구에 대한 자세한
내용은 Starter CD 의 온라인 사용 설명서를 참조하십시오 .
구성 페이지
구성 페이지를 인쇄하여 현재의 프린터 설정을 확인하면 프린터
문제를 해결하거나 용지함 같은 선택적 액세서리의 설치를 확인하는
데 도움이 됩니다 . 구성 페이지에는 최근 이벤트에 대한 로그도 들어
있습니다 . 프린터가 네트워크에 연결되면 추가로 네트워크 구성
페이지가 인쇄됩니다 . 이 페이지에는 프린터의 네트워크 설정이
표시됩니다 .
HP 에 도움을 요청해야 할 경우 전화를 걸기 전에 구성 페이지를
인쇄하십시오 .
구성 페이지 인쇄
1 프린터가 켜져 있는지 확인하십시오 .
2 제어판의 (선택 버튼 ) 을 누르십시오 .
3 INFORMATION MENU 가 강조 표시되었는지 확인한 다음 ( 선택
버튼 ) 을 누르십시오 .
4 PRINT CONFIGURATIO N PAGE 가 강조 표시될 때까지 (아래
화살표 버튼 ) 을 누른 다음 ( 선택 버튼 ) 을 누르십시오 .
상태 정보를 보거나 설정을 변경하거나 컴퓨터에서 프린터를 관리할
수 있습니다 .
EWS 열기
컴퓨터의 웹 브라우저에서 프린터에 할당된 IP 주소를 입력합니다 .
예를 들어 , IP 주소가 123.123.123.123 이면 웹 브라우저에 다음과
같이 입력하십시오 .
http://123.123.123.123.
프린터의 IP 주소는 구성 페이지에 나열되어 있습니다 .
EWS 를 연 후 나중에 신속하게 EWS 를 다시 열 수 있도록 즐겨찾기
에 추가할 수 있습니다 .
내장 웹 서버 (EWS)
프린터가 네트워크에 연결되어 있으면 프린터의 EWS 를 사용하여
19
Page 20

문제 해결
이 단원에서는 하드웨어 및 소프트웨어 설치시 흔히 겪는 문제에 대한
해결 방법을 제시합니다 .
프린터 점검사항 :
z 전원 표시등이 켜져 있고 깜박이지 않는지 확인하십시오 .
프린터를 처음 켤 때는 약 45 초간의 준비 시간이 걸립니다 .
z 제어판 디스플레이에 프린터가 준비 (Ready) 상태임이
표시됩니다 .
z 컴퓨터 화면에 오류 메시지가 나타나는지 확인합니다 .
z 전원 코드와 기타 케이블이 프린터에 제대로 연결되었는지
확인합니다 .
z 용지함에 용지를 올바로 넣었는지 및 프린터에 걸린 용지가
없는지 확인하십시오 .
z 인쇄헤드와 잉크 카트리지를 색상별 슬롯에 제대로 설치했는지
확인하십시오 . 각각을 세게 눌러서 접촉이 잘 되도록 합니다 .
인쇄헤드의 테이프를 제거했는지 확인하십시오 .
z 인쇄헤드 걸쇠와 모든 커버가 닫혔는지 확인하십시오 .
z 후면 액세스 패널 또는 자동 양면 유니트가 제자리에 고정되어
있는지 확인하십시오 .
z 모든 포장 테이프와 재료를 제거했는지 확인하십시오 .
z 프린터가 구성 페이지를 인쇄할 수 있는지 확인하십시오 .
자세한 내용은 19 페이지의 " 구성 페이지 인쇄 " 를
참조하십시오 .
z 프린터는 현재 또는 기본 프린터로 선택되어 있습니다 .
자세한 내용은 컴퓨터 온라인 도움말을 참조하십시오 .
z Windows 를 실행하는 컴퓨터에서 인쇄 일시 중지가 선택되지
한
국
어
않습니다 .
z 작업을 수행할 때 프로그램을 너무 많이 실행하지 않도록 합니다.
작업을 다시 시도하기 전에 사용하지 않는 프로그램은 닫거나
컴퓨터를 다시 시작합니다 .
네트워크 연결 문제
주 : 다음 중 하나를 수정한 후 설치 프로그램을 다시 실행하십시오 .
일반적인 네트워크 문제 해결
프린터 소프트웨어를 설치할 수 없으면 다음을 확인하고 설치
프로그램을 다시 실행하십시오 .
z 컴퓨터와 프린터를 연결하는 모든 케이블이 제대로 연결되었는
지 확인하십시오 .
z 네트워크가 정상적인지 및 네트워크 허브가 켜져 있는지
확인하십시오 .
z 바이러스 방지 프로그램과 개인 방화벽을 포함하여 모든 응용
프로그램을 닫거나 비활성화했는지 확인하십시오 .
유선 네트워크 연결 문제
z 프린터를 사용하게 될 컴퓨터와 동일한 서브넷에 프린터를
설치했는지 확인하십시오 . 그런 다음 설치 프로그램을 다시
실행하십시오 .
z 정적 IP 주소를 프린터에 할당하는 것은 바람직하지 않지만
정적 IP 주소를 프린터에 할당함으로써 개인 방화벽 충돌 같은
일부 설치 문제를 해결할 수 있습니다 . 자세한 내용은 온라인
사용 설명서를 참조하십시오 .
소프트웨어 설치 문제
컴퓨터 점검사항 :
z 컴퓨터가 시스템 요구사항 (Starter CD 의 온라인 사용 설명서
참조 ) 을 충족하는지 확인하십시오 .
설치 준비사항 확인
z Windows 컴퓨터에서 소프트웨어를 설치하기 전에 다른
프로그램을 모두 닫았는지 확인하십시오 .
z 입력한 CD 드라이브 경로를 컴퓨터에서 인식하지 못하는 경우
올바른 드라이브 문자를 지정했는지 확인하십시오 .
z 컴퓨터가 CD 드라이브에서 Starter CD 를 인식하지 못하는
경우 이 CD 가 손상되었는지 확인하십시오 .
http://www.hp.com/support/businessinkjet2800 에서 프린터
드라이버를 다운로드할 수 있습니다 .
프린터 소프트웨어 재설치
z Windows 를 실행하는 컴퓨터에서 프린터를 검색하지 못하는 경
우 Scrubber 유틸리티 (Starter CD 의 Utils\Scrubber 폴더에 있음
) 를 실행하여 깨끗하게 프린터 드라이버를 삭제하십시오 .
그런 다음 컴퓨터를 다시 시작하고 프린터 드라이버를
재설치하십시오 .
20
Page 21

Panel kontrol
1
5 7
3
1 Tombol Daya ( ): Menghidupkan dan mematikan printer.
2 Tombol Bantu (Help) ( ): Memberi informasi tambahan
mengenai pesan, peringatan atau menu pada printer.
3 Lampu Perhatian ( ): Menunjukkan tiga kemungkinan:
Mati — Semua dalam kondisi normal dan tidak diperlukan
perhatian. Keterangan mengenai status-printer biasanya tampil
bersama indikator ini.
Berkedip — Terjadi suatu kesalahan pada printer dan
diperlukan perhatian (misalnya ada pintu yang terbuka atau
kertas yang tersangkut). Keterangan mengenai penyebab
kesalahan biasanya tampil bersama indikator ini.
Berkedip bergantian dengan Lampu Siap — Telah terjadi
kesalahan serius pada printer dan diperlukan perhatian.
Keterangan mengenai kesalahan-serius biasanya tampil
bersama indikator ini.
4 Lampu Siap ( ): Menunjukkan tiga kemungkinan:
Hidup — Printer dalam keadaan siap untuk menerima dan
melaksanakan tugas mencetak.
Mati — Printer dimatikan.
82
Berkedip — Printer baru dihidupkan dan melakukan
pemanasan, membatalkan tugas mencetak, atau dalam proses
dimatikan.
5 Layar panel kontrol: Menunjukkan status printer, informasi dan
peringatan kesalahan, serta status tinta dalam kartrid.
6 Tombol Kembali ( ): Kembali satu tingkat di dalam
jajaran menu.
7 Tombol Panah Naik () dan Turun ( ): Untuk berpindah di
antara item yang satu ke item yang lain di dalam menu.
8 Tombol Pilih ( ): Masuk ke dalam sistem menu dan
mengeksekusi pilihan yang disorot.
9 Tombol Batal Cetak ( ): Membatalkan pekerjaan mencetak
yang sedang berlangsung. Tekan tombol ini sekali untuk
membatalkan pencetakan. Waktu yang diperlukan untuk
membatalkan tergantung pada besarnya pekerjaan yang
dicetak. Tombol ini juga digunakan untuk keluar dari menu.
10 Tombol Lanjut ( ): Melanjutkan pencetakan setelah kesalahan
diperbaiki. Tombol ini juga digunakan untuk keluar dari
semua menu.
10964
Bahasa Indonesia
Sarana untuk mengatasi masalah dan untuk melakukan konfigurasi
Sarana-sarana berikut dapat digunakan untuk mengatasi masalah
atau untuk mengkonfigurasikan printer. Harap lihat panduan
pengguna onscreen (tampil di layar) di dalam CD Starter untuk
memperoleh informasi lebih lanjut mengenai sarana-sarana ini.
Halaman konfigurasi
Dari halaman konfigurasi Anda dapat mengetahui setelan printer
yang sekarang, mengatasi masalah-masalah printer, dan melakukan
verifikasi instalasi aksesori-aksesori opsional, misalnya baki.
Halaman konfigurasi juga berisi pencatatan (log) peristiwa yang
akhir-akhir ini terjadi pada printer. Jika printer dihubungkan dengan
jaringan, Anda akan mendapat halaman tambahan tentang
konfigurasi jaringan; halaman ini berisi informasi tentang setelan
jaringan untuk printer Anda.
Seandainya Anda perlu bantuan dan menghubungi HP, cetak dahulu
halaman konfigurasi ini sebelum melakukan panggilan.
Untuk mencetak halaman konfigurasi
1 Pastikan printer telah dihidupkan.
2 Tekan (tombol Pilih) pada panel kontrol.
3 Pastikan MENU INFORMA SI di sorot, dan tekan (tombol Pilih).
4 Tekan (tombol Panah Turun) hingga CETAK HALAMAN
KONFIGURASI disorot, dan kemudian tekan (tombol Pilih).
Embedded Web Server (EWS = Server Web
Tertanam)
Bila printer dihubungkan ke jaringan, Anda dapat menggunakan
EWS printer untuk melihat status, mengubah setelan, dan mengelola
printer dari komputer Anda.
Untuk membuka EWS
Dengan browser Web yang digunakan di dalam komputer Anda,
masukkan alamat IP printer. Misalnya, jika alamat IP adalah
123.123.123.123, ketikkan alamat itu ke dalam browser Web
sebagai berikut:
http://123.123.123.123.
Alamat IP untuk printer terdapat dalam halaman konfigurasi.
Setelah EWS terbuka, Anda dapat menyimpannya ke dalam
bookmark sehingga Anda dapat mengaksesnya dengan cepat di
kemudian hari.
21
Page 22

Mengatasi masalah
Di dalam bagian ini, diberikan saran-saran untuk mengatasi
beberapa masalah umum yang sering dijumpai yang berhubungan
dengan instalasi perangkat keras maupun perangkat lunak.
Periksa printer untuk memastikan yang berikut:
z Lampu Daya menyala dan tidak berkedip. Waktu printer
baru dihidupkan, diperlukan kira-kira 45 detik untuk
pemanasan mesin.
z Layar panel kontrol menunjukkan bahwa printer dalam
keadaan Siap.
z Tidak tampil peringatan pada layar komputer.
z Kabel daya mau pun kabel-kabel lain dalam kondisi baik dan
dihubungkan ke printer dengan benar.
z Kertas atau media lain telah dimasukkan ke dalam baki dengan
benar dan tidak tersangkut di dalam printer.
z Printhead dan kartrid tinta telah dipasang dengan benar ke
dalam slot-slot dengan kode warna yang sesuai. Tekan setiap
kartrid dengan mantap untuk memastikan kontak (hubungan
permukaan) yang benar. Pastikan Anda telah menyingkirkan pita
dari masing-masing printhead.
z Pengancing printhead dan semua penutup telah ditautkan.
z Panel akses belakang atau unit auto-duplex telah dipasang
dengan benar.
z Semua pita dan bahan-bahan kemasan yang menempel ke
printer telah disingkirkan.
z Printer dapat mencetak halaman konfigurasi. Lihat “Untuk
mencetak halaman konfigurasi” pada halaman 21.
z Printer ini telah dipilih sebagai printer yang akan digunakan
sekarang atau sebagai printer baku (default). Lihat Bantuan
Online (online help) komputer Anda untuk informasi lebih lanjut.
z Opsi Jeda Cetak (Pause printing) tidak dipilih jika Anda
menggunakan komputer yang jalan dengan Windows.
z Jangan menjalankan terlalu banyak program ketika Anda
sedang mencetak. Tutup program yang tidak Anda perlukan
atau matikan dan hidupkan (restart) komputer Anda sebelum
mencoba mencetak lagi.
Instal ulang perangkat lunak printer
z Jika Anda menggunakan Windows dan komputer tidak dapat
mendeteksi printer, jalankan program Scrubber utility (terdapat
di folder Utils\Scrubber dalam CD Starter) untuk meng-‘uninstall’
(membongkar instalasi) driver dengan tuntas. Start ulang
komputer Anda, dan instal ulang driver printer.
Masalah yang berhubungan dengan
sambungan ke jaringan
Catatan: Setelah memperbaiki yang berikut, jalankan program
setup lagi.
Mengatasi masalah umum jaringan
Jika Anda tidak dapat menginstal perangkat lunak printer, pastikan
bahwa yang berikut telah dilakukan dan coba jalankan program
instalasi lagi:
z Semua hubungan kabel ke komputer dan ke printer sudah
dipasang dengan benar.
z Jaringan sudah operasional dan ‘hub’ jaringan telah diaktifkan.
z Semua program aplikasi, termasuk program anti virus dan
firewall pribadi, ditutup atau dinonaktifkan.
Masalah yang berhubungan dengan sambungan ke
jaringan dengan kabel (wired)
z Pastikan bahwa printer dan komputer-komputer yang akan
menggunakan printer ini diinstal di dalam satu subnet.
Kemudian, coba jalankan program instalasi lagi.
z Meskipun tidak dianjurkan untuk mengatur jaringan Anda
dengan alamat IP statis, namun, dengan cara ini Anda mungkin
dapat mengatasi beberapa masalah instalasi (misalnya konflik
dengan firewall pribadi). Untuk informasi lebih lanjut, lihat
Panduan Pengguna onscreen.
Masalah yang berhubungan dengan instalasi
perangkat lunak
Bahasa Indonesia
Periksa sistem komputer Anda untuk memastikan
yang berikut:
z Komputer telah memenuhi persyaratan yang diperlukan oleh
sistem (lihat Panduan Pengguna onscreen di dalam CD).
Verifikasi sebelum melakukan instalasi
z Sebelum menginstal perangkat lunak ke dalam komputer yang
dijalankan dengan Windows, yakinkan dahulu bahwa semua
program lain telah ditutup.
z Jika komputer tidak mengenali ‘path’ untuk drive CD yang Anda
ketik, yakinkan huruf drive yang Anda masukkan adalah drive
yang benar.
z Jika komputer tidak dapat mengenali CD Starter di dalam
drive CD, coba periksa barangkali CD-nya rusak. Anda juga
dapat mendownload driver untuk printer Anda dari
http://www.hp.com/support/businessinkjet2800.
22
Page 23

コントロールパネル
1
5 7
3
1[電源 ] ボタン ():プリンタの電源のオン / オフを切り替え
ます。
2[ヘルプ ] ボタン ():プリンタのメッセージまたはメニュー
に関する追加情報が提供されます。
3[注意 ] ランプ ():次の 3 つのいずれかの状態を示します。
オフ – 処置が必要な状態ではありません。プリンタ ステータス
メッセ ー ジが表示されるときは、通常この状態です。
点滅 – 処置が必要なエラーがプリンタで発生しています ( 扉が
開いている場合や紙詰まりの場合など )。エラー メッセージが
表示されるときは、通常この状態です。
[ 印刷可能 ] ランプと交互に点滅 – 重大なエラーが発生してお
り、処置が必要です。重大なエラー メッセージが表示されると
きは、通常この状態です。
4[印刷可能 ] ランプ ():次の 3 つのいずれかの状態を示し
ます。
オン – プリンタはオンラインで、印刷ジョブを受け入れる準備
ができています。
82
オフ – プリンタの電源がオフです。
点滅 – プリンタは、初期化中、印刷ジョブのキャンセル中、
または 電源オフの処理中です。
5 コントロール パネル表示:ステータスとエラー メッセージ、
および インク カートリッジの残量を表示します。
6[戻る ] ボタン ():メニューの 1 つ前のレベルに戻ります。
7[上矢印 ] () と [ 下矢印 ] () ボタン:メニュー項目を移動
します。
8[選択 ] ボタン ():メニューの表示、および強調表示された
メニュー項目の選択を行います。
9[ジョブのキャンセル ] ボタン ():印刷中のジョブをキャン
セルします。印刷ジョブをキャンセルするには、このボタンを
1 回だけ押してください。キャンセルに要する時間は、印刷
ジョブのサイズによって異なります。このボタンはすべてのメ
ニューの終了にも使用できます。
10 [ リジューム ] ボタン ():印刷の続行が可能なエラーの場合
に印刷を再開します。このボタンはすべてのメニューの終了に
も使用できます。
10964
トラブルシューティングと設定ツール
トラブルシューティングとプリンタの設定には、次のツールを使用
できます。これらのツールについては、スタータ CD にあるオンラ
イン ユーザーズ ガイドを参照してください。
設定ページ
設定ページを使用して現在のプリンタ設定を表示し、プリンタ問題
のトラブルシューティングとトレイなどのオプショナル アクセサリ
のインストールを確認します。設定ページには、最新イベントのロ
グも含まれます。プリンタがネットワークに接続されている場合
は、追加ネットワーク設定ページも印刷されます。このページには
プリンタのネットワーク設定が表示されます。
HP に連絡する場合は、電話をする前に設定ページを印刷してくだ
さい。
設定ページの印刷
1 プリンタの電源が入っていることを確認します。
2 コントロール パネルの ([ 選択 ] ボタン ) を押します。
3
[ジョウホウ メニュー ]
([ 選択 ] ボタン ) を押します。
4 ([ 下矢印 ] ボタン ) を押して
表示し、 ([ 選択 ] ボタン ) を押します。
が強調表示されていることを確認してから、
[プリント セッテイ ページ]
を強調
タの管理などが行えます。
EWS を開くには
コンピュータでサポートされている Web ブラウザで、プリンタに
割り当てられている IP アドレスを入力します。例えば、IP アドレ
スが 123.123.123.123 の場合、以下のアドレスを Web ブラウザに
入力します。
http://123.123.123.123.
プリンタの IP アドレスは、設定ページに表示されています。
EWS を開いた後、お気に入りに保存すると、後からすばやく開く
ことができます。
日
本
語
内蔵 Web サーバ (EWS)
プリンタがネットワークに接続されている場合、EWS を使用して
ステータス情報の表示、設定の変更、およびコンピュータでプリン
23
Page 24

トラブルシューティング
このセクションには、ハードウェアとソフトウェアの インストール
に関して もっともよくある問題についてのトラブルシューティング
に関する提案が説明されています。
プリンタをチェックして、以下を確認します:
z 電源ランプがオンで点滅していない。プリンタに初めて電源を
入れた場合、ウォームアップに約 45 秒かかります。
z コントロール パネルの表示が、プリンタがレディー状態になっ
ていることを表している。
z コンピュータ画面にエラー メッセージが表示されていない。
z 電源コードとそれ以外のケーブルが正しく機能し、プリンタに
しっかりと接続されていることを確認します。
z メディアがトレイに正しくセットされ、プリンタ内に詰まって
いない。
z プリントヘッドとインク カートリッジが、カラーコードされた
スロットに正しく取り付けられている。正しく接するようにプ
リント ヘッドとインク カートリッジをしっかりと押し下げて
ください。各プリントヘッドからテープを取り外してあること
を確認します。
z プリントヘッド ラッチとカバーがすべて閉じられている。
z 後部アクセス パネルまたは自動両面印刷ユニットがしっかりと
はまっている。
z 梱包テープと材料がプリンタから取り外してある。
z プリンタが設定ページを印刷できる。ページ 23 の「設定ペー
ジの印刷」 を参照してください。
z プリンタが既存のプリンタ、またはデフォルトのプリンタとし
て選択されている。詳細は、コンピュータ付属の文書を参照し
てください。
z Windows 起動中のコンピュータで [印刷の一時停止] が選択され
ていない。
z タスクの実行中に、実行しているプログラム数が多すぎない。
タスクを再試行する前に、使っていないプログラムを閉じる
か、またはコンピュータを再起動します。
プリンタソフトウェアをもう 1 度インストールします。
z Windows を使用していてコンピュータが プリンタを探知でき
ない場合は、Scrubber ユーティリティ ( スタータ CD の
Utils\Scrubber にある ) を実行してクリーン プリンタ ドライバ
のアンインストールを実行します。コンピュータを再起動し、
プリンタ ドライバを再インストールします。
ネットワークへの接続問題
注記 : 以下を修正した後、設定プログラムを 再度実行します。
一般ネットワーク トラブルシューティング
プリンタ ソフトウェアをインストールできない場合は、以下を確認
してからインストール プログラムを再度実行してみます。
z コンピュータとプリンタへケーブルが しっかりと接続されて
いる。
z ネットワークが使用できる状態で、ネットワーク ハブがオンに
なっている。
z ウィルス保護プログラムを含むあらゆるアプリケーションと
パーソナル ファイアウォールが終了しているか、または無効に
されている。
ワイヤ ネットワークへの接続問題
z プリンタを使用するコンピュータと同じサブネット上にプリン
タがインストールされていることを確認します。 インストール
プログラムを再試行します。
z プリンタに静的 IP アドレスを割り当てることは推奨されてい
ませんが、これを行うことによってインストールの問題 ( パー
ソナル ファイアウォールとの競合など ) が解決される場合があ
ります。詳細は、オンスクリーン ユーザーズ ガイドを参照し
てください。
ソフトウェアのインストールの問題
コンピュータ システムをチェックして、以下を確認し
ます:
z コンピュータがシステム要件を満たしている ( スタータ CD の
オンライン ユーザーズ ガイドを参照 )。
インストールの準備を確認します
z ソフトウェアを Windows コンピュータにインストールする前
日
本
語
に、それ以外のプログラムがすべて終了していることを確認し
ます。
z 入力した CD-ROM ドライブへのパスが認識されない場合は、
正しいドライブ 名を指定していることを確認します。
z CD-ROM ドライブでスタータ CD を認識できない場合は、
スタータ CD が破損していないかどうかを調査してください。
プリンタ ドライバは、
http://www.hp.com/support/businessinkjet2800 からダウンロー
ドできます。
24
Page 25

控制面板
1
5 7
3
1 電源按鈕 ( ):開關印表機。
2 說明按鈕 ( ):提供有關印表機訊息或目錄的其他資料。
3 注意指示燈 ( ):指示下列三種狀態:
關 - 沒有需要處理的情況本 指示燈通常伴隨一個印表機狀態
訊息。
閃爍 - 印表機發生護蓋打開或夾紙等須要人為處理的錯誤,本指
示燈通常伴隨一個錯誤訊息。
與就緒指示燈交互閃爍 - 印表機發生須要人為處理的嚴重
錯誤,本指示燈通常伴隨一個嚴重錯誤訊息。
4 就緒指示燈 ( ):指示下列三種狀態:
開 - 印表機已連線且可接受列印工作。
82
關 - 印表機已關機。
閃爍 - 印表機在啟始化中、取消列印工作中或 關機中。
5 控制面板顯示幕:顯示狀態及錯誤訊息,以及墨水匣存量。
6 上一步按鈕 ( ):返回上一層目錄。
7 上 ()及下 ()方向按鈕:在目錄項目中移動。
8 選擇按鈕 ( ):進入目錄並選擇反白顯示的目錄項目。
9 取消工作按鈕 ( ):取消目前的列印工作,按一次本鈕取消列
印工作,取消工作所需的時間視工作大小而異,本鈕亦可用來退
出全部目錄。
10 繼續按鈕 ( ):發生可繼續的錯誤後重新列印,本鈕亦可用來
退出全部目錄。
10964
疑難排解及配置工具
下列工具可用來為印表機進行疑難排解及配置,詳細說明請參閱
Starter CD 內的線上使用手冊。
組態頁
您可用組態頁檢視目前的印表機設定,以便解決印表機的問題,
或確認紙匣等選購配備的安裝是否正確。組態頁也包括最近事件的記
錄。印表機若是連在網路上,會列印另一頁網路組態頁,此一頁面顯
示印表機的網路設定。
向 HP 電話求助前請先列印組態頁。
列印組態頁
1 務請先將印表機開機。
2 按控制面板上的 (選擇鈕)。
3 務請先反白顯示 INFORMATION MENU (資訊目錄) ,
再按 (選擇鈕)。
4 按 (向下的方向鍵)直到 PRINT CONFIGURATION PAGE
(列印組態頁)反白顯示後,再按 (選擇鈕)。
內建 Web 伺服器
印表機連上網路時,您可用印表機的 EWS 功能,從電腦檢視狀態資
訊、修改設定、管理印表機。
開啟 EWS
在您電腦支援的 Web 瀏覽器內輸入印表機的 IP 位址。例如,
IP 位址若為 123.123.123.123 ,請將下列 IP 位址輸入 Web 瀏覽
器內:
http://123.123.123.123。
印表機的 IP 位址列示於印表機的組態頁內。
開啟 EWS 後,您可將 EWS 的網址設為書籤,以便將來快速再連上
本網頁。
繁
體
中
文
25
Page 26

疑難排解
本節提供某些 常見之硬體及軟體安裝問題的排解建議。
檢查下列印表機事項:
z 電源燈號亮著且未閃爍。首次開啟印表機時,大約需要 45 秒鐘
暖機。
z 控制面板顯示幕顯示印表機在 「就緒」狀態。
z 電腦螢幕上無任何錯誤訊息。
z 檢查電源線及其他纜線是否正常,且是否妥善的插入印表機中。
z 檢查印材是否均已正確的裝入紙匣且 印表機中無夾紙。
z 檢查印字頭及墨水匣是否妥善插入同色標示的插槽中。用力往下
按每個印字頭和墨水匣,確定接觸良好。檢查各印字頭上的膠帶
是否均已撕乾淨。
z 檢查印字頭鎖栓及各護蓋是否均已蓋好。
z 檢查後側面板及自動雙面列印單元是否均已插入定位。
z 檢查印表機的各包裝膠帶及包材是否均已移除。
z 印表機可列印組態頁,請參閱第 25 頁的 「列印組態頁」。
z 印表機已設定為預設印表機,進一步資訊,請參閱 電腦的線上
說明。
z 對 Windows 系統的電腦,請檢查有無點選 「暫停列印」選項。
z 沒有太多其他作業與列印工作同時執行。再次嘗試執行工作前,
請關閉不用的程式,或是重新啟動電腦。
安裝軟體時的問題
檢查電腦系統的下列事項:
z 電腦符合系統需求規範 (請參閱 Starter CD 上的線上使用
手冊)。
連結網路的問題
注意:處理下列任何問題後,請再執行一次安裝程式。
一般網路問題疑難排解
無法安裝印表機軟體時,請參閱下列事項並再執行安裝程式一次。
z 連結電腦及印表機的各纜線均已 連妥。
z 網路作業正常且網路集線器已開啟。
z 包括防毒軟體及個人防火牆在內的各項應用程式均已關閉或
停用。
連結有線網路時的問題
z 務請安裝印表機及要使用該一印表機的電腦於同一子網內,然後
再執行安裝程式一次。
z 雖然 HP 並不建議指定固定 IP 位址給印表機,但此法確實能解決
與個人防火牆衝突等安裝問題。進一步的資訊,請參閱線上使用
手冊。
檢查安裝前置作業
z 在 Windows 電腦安裝軟體前,請先關閉所有其他程式。
z 電腦若無法識別所輸入的光碟機路徑,請檢查光碟機代碼是否
正確。
z 如果電腦無法識別 光碟機中的光碟,請檢查光碟是否損壞。您可
以從 http://www.hp.com/support/businessinkjet2800 網站下載印
表機驅動程式。
重新安裝印表機軟體
z 執行 Windows 作業系統的電腦若無法偵測到 印表機,請執行
Scrubber 公用程式,徹底移除安裝印表機驅動程式,(Scrubber
程式位於 Starter CD 的 Utils\Scrubber 資料夾內)。重新啟動電
腦,再安裝印表機 驅動程式一次。
繁
體
中
文
26
Page 27

Hewlett-Packard limited warranty statement
HP product Duration of limited warranty
Software 1 year
Accessories 1 year
Ink cartridges 6 months*
Printheads 1 year*
Printer peripheral hardware (see the following details) 1 year
*For more detailed warranty information, see http://www.hp.com/support/inkjet_warranty.
Extent of limited warranty
1 Hewlett-Packard warrants to the end-user customer that the
HP products specified above will be free from defects in materials and
workmanship for the duration specified above, which duration begins
on the date of purchase by the customer.
2 For software products, HP’s limited warranty applies only to a failure
to execute programming instructions. HP does not warrant that the
operation of any product will be uninterrupted or error free.
3 HP’s limited warranty covers only those defects that arise as a result
of normal use of the product, and does not cover any other problems,
including those that arise as a result of:
a Improper maintenance or modification;
b Software, media, parts, or supplies not provided or
supported by HP; or
c Operation outside the product’s specifications;
d Unauthorized modification or misuse.
4 For HP products, the use of a non-HP ink cartridge or a refilled ink
cartridge does not affect either the warranty to the customer or any
HP support contract with the customer. However, if product failure or
damage is attributable to the use of a non-HP or refilled ink cartridge,
HP will charge its standard time and materials charges to service the
printer for the particular failure or damage.
5 If HP receives, during the applicable warranty period, notice of a
defect in any product which is covered by HP’s warranty, HP shall
either repair or replace the product, at HP’s option.
6 If HP is unable to repair or replace, as applicable, a defective product
which is covered by HP’s warranty, HP shall, within a reasonable time
after being notified of the defect, refund the purchase price for
the product.
7 HP shall have no obligation to repair, replace, or refund until the
customer returns the defective product to HP.
8 Any replacement product may be either new or like new, provided that
it has functionality at least equal to that of the product being replaced.
9 HP products may contain remanufactured parts, components,
or materials equivalent to new in performance.
10 HP’s Limited Warranty Statement is valid in any country/region where
the covered HP product is distributed by HP. Contracts for additional
warranty services, such as on-site service, are available from any
authorized HP service facility in countries/regions where the product is
distributed by HP or by an authorized importer.
Limitations of warranty
TO THE EXTENT ALLOWED BY LOCAL LAW, NEITHER HP NOR ITS
THIRD PARTY SUPPLIERS MAKES ANY OTHER WARRANTY OR
CONDITION OF ANY KIND, WHETHER EXPRESS OR IMPLIED
WARRANTIES OR CONDITIONS OF MERCHANTABILITY,
SATISFACTORY QUALITY, AND FITNESS FOR A PARTICULAR
PURPOSE.
Limitations of liability
1 To the extent allowed by local law, the remedies provided in this
Warranty Statement are the customer’s sole and exclusive remedies.
2 TO THE EXTENT ALLOWED BY LOCAL LAW, EXCEPT FOR THE
OBLIGATIONS SPECIFICALLY SET FORTH IN THIS WARRANTY
STATEMENT, IN NO EVENT SHALL HP OR ITS THIRD PARTY
SUPPLIERS BE LIABLE FOR DIRECT, INDIRECT, SPECIAL,
INCIDENTAL, OR CONSEQUENTIAL DAMAGES, WHETHER
BASED ON CONTRACT, TORT, OR ANY OTHER LEGAL THEORY
AND WHETHER ADVISED OF THE POSSIBILITY OF SUCH
DAMAGES.
Local law
1 This Warranty Statement gives the customer specific legal rights.
The customer may also have other rights which vary from state to
state in the United States, from province to province in Canada, and
from country/region to country/region elsewhere in the world.
2 To the extent that this Warranty Statement is inconsistent with local
law, this Warranty Statement shall be deemed modified to be
consistent with such local law. Under such local law,
certain disclaimers and limitations of this Warranty Statement may not
apply to the customer. For example, some states in the United States,
as well as some governments outside the United States (including
provinces in Canada), may:
a Preclude the disclaimers and limitations in this Warranty Statement
from limiting the statutory rights of a customer (e.g. the United
Kingdom);
b Otherwise restrict the ability of a manufacturer to enforce such
disclaimers or limitations; or
c Grant the customer additional warranty rights, specify the duration
of implied warranties which the manufacturer cannot disclaim, or
allow limitations on the duration of implied warranties.
3 FOR CONSUMER TRANSACTIONS IN AUSTRALIA AND NEW
ZEALAND, THE TERMS IN THIS WARRANTY STATEMENT,
EXCEPT TO THE EXTENT LAWFULLY PERMITTED, DO NOT
EXCLUDE, RESTRICT, OR MODIFY, AND ARE IN ADDITION TO,
THE MANDATORY STATUTORY RIGHTS APPLICABLE TO THE
SALE OF THE HP PRODUCTS TO SUCH CUSTOMERS.
27
Page 28

Hewlett-Packard 有限保修声明
HP 产品 有限保修期
软件 1 年
附件 1 年
墨盒 6 个月 *
打印头 1 年 *
打印机外围硬件 (请参阅以下详细资料) 1 年
* 有关保修的详细信息,请访问 http://www.hp.com/support/inkjet_warranty。
有限保修范围
1 Hewlett-Packard 向最终用户客户保证,上文指定的 HP 产品
在上文指定的期限内没有材料和工艺上的缺陷,该期限自客
户购买之日算起。
2 对于软件产品, HP 有限保修仅适用于无法执行程序指令的
情况。 HP 不保证任何产品的运行无中断或没有错误。
3 HP 有限保修仅适用于因产品的正常使用产生的缺陷,不适
用于任何其它问题,包括因以下原因产生的缺陷:
a 维护或改动不当;
b 使用不是由 HP 提供的或 HP 不支持的软件、介质、部件
或耗材;
c 操作条件超出了产品的规格;
d 未经授权地改动或误用。
4 对于 HP 打印机产品,使用非 HP 的墨盒或重注的墨盒不会
影响对客户的保修或任何 HP 与客户的支持合同。不过,如
果
打印机的故障或损坏是因为使用非 HP 的墨盒或重注的墨
盒, HP 在维修打印机时,将根据具体的故障或损坏,按照
标准的时间和材料费用收费。
5 如果在适用的保修期内,HP 收到 HP 提供保修的产品存在缺
陷的通知, HP 将自行选择修理或更换产品。
6 如果 HP 无法对 HP 保修所适用的缺陷产品进行修理或更换,
HP 将在被通知存在缺陷后合理的时间内返还本产品的购买
价格。
7 只有客户将存在缺陷的产品返还给 HP, HP 才有义务进行
修理、更换或退款。
8 任何更换的产品可能是新的或类似新的,不过其功能要至少
与被更换的产品的功能相同。
9 HP 产品可能包含性能上与新的相当的再制造零件、原件或
材料。
10 HP 有限保修声明在 HP 销售相关 HP 产品的任何国家/地区
生效。其它保修服务的合同 (例如上门服务)可以从 HP 或
授权进口商销售相应产品的国家/地区的任何授权 HP 服务
机构获得。
保修的限制
只要当地法律允许, HP 或其第三方供应商不得做出任何其它担
保或规定,无论是明示或暗示的对适销性、满意的质量以及针对
特定用途的适用性的担保或规定。
责任限制
1 只要当地法律允许,保修声明中提供的赔偿是对客户的全部
赔偿。
2 只要当地法律允许,除了本保修声明中明确提出的责任,
HP 或其第三方供应商对直接、间接、特殊、偶发或既发损
失概不负责,无论根据合同、侵权还是任何其它法律原理,
即使已被告知可能造成上述损失。
当地法律
1 本保修声明为客户提供特定的法律权利。根据在美国所处的
州的不同、在加拿大所处的省的不同以及在世界其它地方所
处的国家/地区的不同,客户可能还拥有其它权利。
2 只要本保修声明与当地法律不一致,应修改本保修声明,以
便与当地法律一致。根据此类当地法律,本保修声明中的某
些免责声明和限制可能对客户不适用。例如,在美国的某些
州以及美国以外的某些政府 (包括加拿大的省)可能会:
a 禁止本保修声明中的免责声明和限制对客户的法定权利进
行限制 (例如英国);
b 或禁止生产商强行执行此类免责声明或限制;或者
c 授予客户其它保修权利,指定生产商无法免责的暗示
保修期,或允许限制暗示保修期。
3 对于澳大利亚和新西兰的客户交易,本保修声明中包含的条
款若非法律允许,不得排除、限制或修改,并且受适用于向
此类客户销售 HP 产品的强制法定权利的限制。
28
Page 29

Hewlett-Packard 제한 보증 규정
HP 제품 제한 보증 기간
소프트웨어 1 년
부속품 1 년
잉크 카트리지 6 개월 *
인쇄헤드 1 년 *
프린터 주변 장치 하드웨어 ( 다음 세부 사항 참조 )1 년
* 보다 자세한 보증 정보는 http://www.hp.com/support/inkjet_warranty 에서 확인하십시오 .
제한 보증 범위
1 Hewlett-Packard는 일반 사용자가 제품을 구입한 날로부터 정해진
기간 동안 상기 hp 제품이 재료와 기술에 있어 결함이 없음을
보증합니다.
2 소프트웨어 제품의 경우, HP의 제한 보증은 프로그램이 제대로
실행되지 않는 경우에만 적용됩니다. HP는 제품의 작동이 중단되지
않거나 오류가 발생하지 않는다는 보증은 하지 않습니다.
3 HP의 제한 보증은 제품을 정상적으로 사용하여 발생한 결함에만
적용되며 다음의 결과로 발생한 결함을 포함하여 다른 문제에
대해서는 적용되지 않습니다.
a 부적절한 유지보수 또는 개조;
b HP가 제공 또는 지원하지 않는 소프트웨어, 용지,
부품 또는 소모품
c 제품 사양을 벗어난 작동
d 비승인 개조 또는 남용.
4 HP 프린터 제품의 경우, HP 제품이 아닌 잉크 카트리지나 잉크를
리필한 잉크 카트리지를 사용한 경우에도 고객에 대한 보증이나
고객과의 기타 HP 지원 계약이 유효합니다. 하지만 프린터의
고장이나 손상이 HP 제품이 아닌 잉크 카트리지나 잉크를 리필한
카트리지의 사용으로 인해 발생한 경우에는 HP에서 프린터의 특정
고장이나 손상을 수리하는 데 소요된 표준 시간 및 재료에 대해
비용을 청구합니다.
5 보증 기간 중에 HP가 보증 범위에 해당되는 제품에 결함이 있음을
통지 받는 경우, HP는 결함 제품을 수리하거나 교환해 주어야
합니다.
6 HP의 보증 범위에 해당되는 결함 있는 제품을 HP에서 수리할 수
없거나 교환해 줄 수 없는 경우, HP는 결함을 통지 받은 후 합당한
기간 내에 제품의 구입가를 환불해 드립니다.
7 고객이 결함 있는 제품을 HP에 반품하기 전에는 HP에서 해당 제품
을 수리, 교체 또는 환불해야 할 의무가 없습니다.
8 교환 제품은 신품이거나 적어도 교체할 제품과 동일한 기능을 가진
신품과 동등한 제품입니다.
9 HP 제품에는 성능에 있어서 신품에 준하는 제조 부품, 구성 요소 또
는 재료가 포함됩니다.
10 HP 제한 보증은 HP에서 HP 제품을 판매하는 모든 국가 및 지역에
서 유효합니다. 방문 서비스와 같은 추가 보증 서비스에 대한 계약은
HP나 공인 수입업체에서 제품을 공급하는 공인된 HP 서비스 센터
를 통해서만 이루어질 수 있습니다.
보증 제한
지역법이 허용하는 범위에서, HP 또는 협력업체는 상업성, 품질 만족 및
특정 목적에의 적합성에 대한 명시적이거나 묵시적인 어떠한 다른 보증
도 하지 않습니다.
책임 제한
1 지역법이 허용하는 범위에서 본 보증 조항에 명시된 배상은 고객에
게 제공되는 유일하고도 독점적인 배상입니다.
2 지역법이 허용하는 범위에서 HP 또는 협력업체는 본 보증 조항에
특별히 명시한 책임을 제외하고 어떠한 계약이나 불법 행위 또는
다른 어떤 법적 이론 근거에 관계없이 직접적, 간접적, 특별적, 우발
적 또는 결과적인 손해에 대해서 책임을 지지 않습니다.
지역법
1 본 보증 조항은 고객에게 특정한 법적 권리를 부여합니다. 고객은
미국, 캐나다에서는 주마다, 그리고 전세계 국가마다 다른 권리를
가질 수 있습니다.
2 본 보증 조항이 지역법과 일치하지 않는 부분에 대해서는 본 보증
조항을 해당 지역법과 일관되게 수정해야 합니다. 이러한 지역법에
따라 본 제한 보증 조항이 고객에게 적용되지 않을 수도 있습니다.
예를 들어, 미국 내의 일부 주와 미국 이외의 일부 국가(캐나다 주
포함)에서는 다음 사항이 적용됩니다.
a 본 보증 조항의 부인 및 제한으로 인해 고객의 법적 권리를
제한하지 못합니다(예: 영국).
b 그렇지 않으면, 그러한 부인 및 제한을 시행하는 제조업체의
자격을 제한합니다.
c 고객에게 추가 보증 권한을 부여하거나, 제조업체에서 부인할 수
없는 묵시적 보증 기간을 지정하거나 그렇지 않으면 묵시적 보증
기간에 대한 제한을 허용하지 않습니다.
3 호주나 뉴질랜드 거래 고객의 경우, 법적으로 허용되는 범위를
제외하고 본 보증 조항은 이 고객에 대해 hp 제품 판매에 적용할 수
있는 의무적인 법적 권리를 배제, 제한 또는 수정하지 못합니다.
29
Page 30

Pernyataan Garansi Terbatas Hewlett-Packard
Produk Hewlett-Packard Masa Garansi Terbatas
Perangkat lunak 1 tahun
Aksesori 1 tahun
Tabung tinta (Ink cartridge) 6 bulan*
Printhead 1 tahun*
Perangkat keras pendukung printer (lihat rician berikut) 1 tahun
*Untuk informasi garansi lebih rinci, lihat http://www.hp.com/support/inkjet_warranty.
Cakupan Garansi Terbatas
1 Hewlett-Packard ("HP") memberikan garansi kepada pelanggan
akhir (end-user costumer) bahwa semua produk HP yang
dicantumkan di atas akan bebas dari kerusakan bahan maupun
pengerjaan selama masa yang ditentukan di atas, sejak tanggal
pembeliannya oleh pelanggan.
2 Untuk perangkat-lunak, garansi terbatas HP hanya berlaku jika
perangkat lunak gagal melaksanakan berbagai pertunjuk
pemrograman. HP tidak memberikan garansi bahwa
pengoperasian produk akan bebas gangguan atau kesalahan.
3 Garansi terbatas HP hanya mencakup cacat yang diakibatkan oleh
penggunaan produk dengan normal, dan tidak mencakup masalah
lain, termasuk yang diakibatkan oleh:
a Perawatan dan modifikasai yang tidak benar;
b Perangkat lunak, media, suku cadang, atau pasokan yang tidak
disediakan atau didukung oleh HP;
c Pengoperasian yang tidak sesuai dengan spesifikasi produk;
d Modifikasi yang tidak resmi atau penyalahgunaan.
4 Untuk produk printer HP, penggunaan tabung tinta non HP atau
tabung tinta isi ulang tidak mempengaruhi garansi ataupun kontrak
bantuan HP untuk pelanggan. Tetapi, jika gangguan atau
kerusakan printer disebabkan oleh penggunaan tabung tinta non
HP atau isi ulang, HP akan membebankan biaya sesuai dengan
waktu standar dan bahan yang digunakan untuk memperbaiki
gangguan atau kerusakan tertentu pada printer.
5 Jika selama masa garansi yang berlaku HP menerima
pemberitahuan mengenai cacat pada produk yang dicakup oleh
garansi HP, HP akan memperbaiki atau mengganti produk itu,
menurut pilihan HP.
6 Jika HP tidak bisa memperbaiki atau mengganti produk cacat yang
tercakup oleh garansi HP sebagaimana mestinya, maka dalam
kurun waktu yang wajar setelah diberitahu tentang adanya cacat itu,
HP akan menggembalikan uang pembelian produk.
7 HP tidak berkewajiban memperbaiki, mengganti, atau
mengembalikan uang pembelian sebelum pelanggan
mengembalikan produk cacat itu ke HP.
8 Produk pengganti bisa berupa produk baru atau seperti baru,
dengan ketentuan bahwa kegunaannya minimal setara dengan
produk yang diganti.
9 Produk HP dapat mengandung suku-cadang, komponen, atau
bahan hasil daur-ulang yang kinerjanya setara dengan yang baru.
10 Pernyataan Garansi Terbatas HP berlaku di setiap negara/wilayah
di mana produk HP yang dijamin garansi didistribusikan oleh HP.
Kontrak untuk layanan garansi tambahan, seperti layanan di
tempat, dapat diperoleh dari setiap fasilitas layanan HP resmi di
negara/wilayah di mana produk itu didistribusikan oleh HP atau oleh
importir resmi.
Batasan Garansi
SESUAI DENGAN YANG DIIZINKAN OLEH HUKUM
SETEMPAT, BAIK HP MAUPUN PEMASOK PIHAK KETIGANYA
TIDAK MENYEDIAKAN GARANSI ATAU PERSYARATAN LAIN
APAPUN, BAIK GARANSI ATAUPUN PERSYARATAN YANG
DINYATAKAN SECARA TERSURAT ATAUPUN TERSIRAT
YANG MENYANGKUT DATA JUAL, MUTU YANG MEMUASKAN,
DAN KESESUAIAN UNTUK TUJUAN TERTENTU.
Batasan Tanggung Jawab
1 Sesuai dengan yang diizinkan oleh hukum setempat, ganti-rugi
yang tercantum dalam Pernyataan Garansi ini adalah ganti-rugi
satu-satunya dan menyeluruh bagi pelanggan.
2 SESUAI DENGAN YANG DIIZINKAN OLEH HUKUM SETEMPAT,
KECUALI UNTUK KEWAJIBAN YANG SECARA SPESIFIK
DITETAPKAN DALAM PERNYATAAN GARANSI INI, DALAM
PERISTIWA APA PUN HP ATAU PEMASOK PIHAK KETIGA
TIDAK BERTANGGUNG JAWAB ATAS KERUSAKAN LANSUNG,
TIDAK LANGSUNG, KHUSUS, INSIDENTAL, ATAU KERUGIAN
SEBAGAI AKIBAT, BAIK BERDASARKAN KONTRAK,
KELALAIAN, ATAU TEORI HUKUM LAINNYA, DAN BAIK
DIBERITAHUKAN TENTANG KEMUNGKINAN TERJADINYA
KERUSAKAN TERSEBUT.
Hukum Setempat
1 Pernyataan Garansi ini memberikan hak khusus kepada pelanggan.
Pelanggan dapat juga memiliki hak-hak lain yang bisa
berbeda-beda di berbagai negara bagian di Amerika Serikat, di
berbagai provinsi di Kanada, dan di berbagai nergara/wilayah lain di
dunia.
2 Jika Pernyataan Garansi ini tidak sesuai dengan hukum setempat,
Penyataan Garansi ini akan dianggap telah dimodifikasi agar sesuai
dengan hukum setempat. Menurut hukum setempat tersebut,
pengesampingan dan pembatasan tertentu dari Pernyataan
Garansi ini mungkin tidak berlaku untuk pelanggan. Misalnya,
beberapa negara bagian di Amerika Serikat, dan juga beberapa
pemerintahan di luar Amerika Serikat, dan juga beberapa negara di
luar Amerika Serikat (termasuk provinsi-provinsi di Kanada), dapat:
a mengecualikan pengesampingan dan pembatasan Pernyataan
Garansi ini sehingga tidak membatasi hak yang wajib dimiliki
pelanggan (misalnya Inggris);
b membatasi kemampuan pabrik pembuat untuk melaksanakan
pengesampingan atau pembatasan seperti itu; atau
c memberikan hak tambahan kepada pelanggan, menentukan
kurun waktu masa garansi tersirat yang tidak bisa
dikesampingkan oleh pabrik pembuat, atau mengizinkan batas
kurun waktu masa garansi tersirat.
3 UNTUK TRANSAKSI PELANGGAN DI AUSTARALIA DAN
SELANDIA BARU, KETENTUAN DALAM PERNYATAAN
GARANSI INI, KECUALI SEJAUH YANG DIIZINKAN OLEH
HUKUM, TIDAK MENGECUALIKAN, MEMBATASI, ATAU
MENGUBAH, DAN MERUPAKAN TAMBAHAN ATAS HAK YANG
WAJIB MENURUT UNDANG-UNDANG YANG BERLAKU UNTUK
PENJUALAN PRODUK HP KEPADA PELANGGAN.
30
Page 31

Hewlett-Packard 社限定保証規定
HP 社製品 限定保証期間
ソフトウェア 1 年間
アクセサリ 1 年間
インク カートリッジ 6 ヶ月*
プリント ヘッド 1 年間*
プリンタ周辺ハードウェア(詳細については、次の説明を参照して
ください)
*保証情報の詳細については、 http://www.hp.com/support/inkjet_warranty を参照してください。
1 年間
限定保証の適用範囲
1 HP 社は、エンドユーザーのお客様に対して、ご購入日から上記の
期間中、材料または製造上の欠陥がないことを保証します。
2 ソフトウェア製品に関する限定保証では、プログラム命令の実行
エラーが発生しないことのみを保証します。本製品の動作が中断し
ないこと、またはエラーがないことを保証するものではありませ
ん。
3 この限定保証は、本製品を正常に使用した際に生じた欠陥のみに
適用されます。下記の原因による欠陥には適用されません。
a メンテナンスまたは変更が不適切な場合
b HP 社以外のソフトウェア、メディア、部品、またはサプライ品
c 製品の仕様に逸脱した操作
d 未承認の変更や誤用
4 HP 社のプリンタ製品に対して、HP 社以外のインク カートリッジ、
またはインクを再充填したインク カートリッジを使用した場合、
お客様に対する保証およびお客様との HP サポート契約は適用され
ません。ただし、プリンタの不良や故障の原因が、HP 社以外の
インク カートリッジや再充填したインク カートリッジの使用に
ある場合、そのプリンタのサービスに対しては、標準の時間制料金
と材料費をお客様に負担していただきます。
5 HP 社は、保証期間中に欠陥品である旨の連絡を受けた場合、自社
の判断に基づいて欠陥品を修理または交換いたします。
6 HP 社は、保証対象の欠陥品を適切に修理または交換できない場合、
欠陥に関する通知を受理した後の妥当な期間内に、製品の購入代金
を払い戻します。
7 お客様が欠陥品を HP 社に返品するまで、修理、交換、または払い
戻しの義務は HP 社に生じません。
8 交換用の製品は、少なくとも交換前の製品と同等の機能を備えた新
品もしくは新品に近い製品とします。
9 HP 社の製品には、性能面で新品同様の再生部品、コンポーネント、
または材料が使用されることがあります。
10 HP 社限定保証規定は、対象製品が HP 社によって販売されている
国または地域において有効です。現地サービスなどの追加保証サー
ビスの契約については、HP 社または正規輸入代理店によって製品
が販売されている国または地域の最寄の正規 HP サービス機関にご
相談ください。
保証の制限
当該地域の法律で許可される範囲内で、HP 社およびそのサードパー
ティはいずれも、市場性、品質に対する満足度、および特定の目的に
対する適合性に関する保証または条件など、書面または口頭を問わず、
他のいかなる保証および条件に対して責任を負いません。
責任の制限
1 当該地域の法律で許可される範囲で、この保証に記載された救済措
置のみが唯一の救済措置となります。
2 当該地域の法律で許可される範囲で、この保証に記載されている責
務を除き、HP 社またはそのサードパーティ サプライヤは、契約、
不法行為、またはその他の法律的根拠の如何を問わず、損害発生の
可能性について告知された場合であっても、直接的、間接的、特殊
的、偶発的、あるいは結果的な損害に対して責任を負いません。
当該地域の法律
1 この保証は、お客様に特定の法的権利を与えます。お客様の権利
は、米国内の州、カナダ国内の州、およびその他の国または地域に
より異なる可能性もあります。
2 この保証が当該地域の法律と一致しない場合に限り、その当該地域
の法律と一致するように修正されます。当該地域の法律では、この
保証に記載されている特定の免責事項と制限事項が、お客様に適用
されないことがあります。たとえば、米国内の一部の州および米国
以外の国 (カナダの州を含む) の行政当局では、次の事項が定められ
ています。
a この保証の免責事項と制限事項は、消費者の法定権利を制限する
ものではない (英国など)。
b 製造業者による免責事項と制限事項の履行を規制すること。
c 消費者に追加の保証権利を提供すること、製造業者が責任を放棄
できない黙示保証の期間を規定すること、または黙示保証の限定
期間を拒否しないこと。
3 オーストラリアおよびニュージーランドでは、法律で許可される範
囲を除き、この保証の条項によって、本製品の販売に対して適用さ
れる義務的な法的権利を排除、制限、変更することはできません。
この保証の条件は、これらの法的権利に加えて適用されます。
31
Page 32

惠普科技有限保固聲明
HP 產品 有限保固的有效時間
軟體 一年
附件 一年
墨水匣 六個月 *
印字頭 一年 *
印表機周邊硬體 (請參考下列詳細資料) 一年
* 詳細的保固資訊,請上 http://www.hp.com/support/inkjet_warranty 網站查詢。
有限保固範圍
1 惠普科技向一般使用者保證,以上指定的 HP 產品自客戶購買日起,
在上述指定的保固期限內,沒有材料及製作上的瑕疵。
2 若是軟體產品,則 HP 的有限保固僅適用於執行程式指令所發生的
失敗。HP 不保證任何產品的操作都不會中斷或不發生錯誤。
3 HP 的有限保固僅涵蓋因正常使用本產品所造成的瑕疵,而不涵蓋其
他任何問題,包括因下列情事所導致的瑕疵:
a 不適當的維護或修改;
b 軟體、紙材、零件或非由 HP 提供或支援的耗材;
c 產品規格外的操作;
d 未獲授權的修改或不當使用。
4 對於 HP 印表機產品,使用非 HP 墨水匣或重新填充的墨水匣並不會
影響客戶的保固,或任何 HP 與客戶訂定之合約。然而,若印表機故
障或損壞可歸責於使用非 HP 或重新填充的墨水匣,HP 將針對此類
故障或損壞,收取標準的印表機修理工時與材料費。
5 若 HP 在保固適用期限內,接獲 HP 保固所涵蓋之任何產品瑕疵的
通知,HP 可選擇維修或更換該產品。
6 如果 HP 無法適當地維修或更換 HP 保固所涵蓋之瑕疵品,HP 應在
接獲瑕疵通知後的合理的時間內,退還產品的售價。
7 在客戶將瑕疵品退還 HP 之前,HP 不負維修、更換或退款之責任。
8 更換品可以是全新或幾乎全新,且更換品的功能至少需與被更換品
相當。
9 HP 產品可能包含效能相當於新品之再製零件、元件或材料。
10 HP 有限保固聲明適用於 HP 配銷之 HP 產品所在的任何國家
/ 地
區。其他諸如到府服務之保固服務合約,可從 HP 或授權進口商所配
銷之產品所在國家
/ 地區的任何授權 HP 服務機構取得。
保固限制
在當地法律所允許之最大範圍內,HP 及其協力供應商,對商品性、滿意
程度、以及特定用途的適用性,不承擔任何其他擔保,不論其為明示或
默示。
責任限制
1 在當地法律所允許之最大範圍內,本保固聲明提供之救濟權為客戶
獨有且排他之救濟權。
2 在當地法律所允許之最大範圍內,除非本保固聲明特別陳述之責任,
否則 HP 及其協力供應商不承擔直接、間接、特殊、附隨性或衍生性
損害之任何責任,不論其為基於合約、侵權行為或任何法律理論,
以及是否已被告知此類損害之可能性皆然。
當地法律
1 此保固聲明授與客戶特定之法律權利。根據美國各州、加拿大各省,
以及全球各個國家
/ 地區之規定,客戶可能另享其他權利。
2 當此保固聲明與當地法律相抵觸時,此保固聲明應對牴觸的範圍進
行修改以符合該當地法律。依據當地法律之效力,本保固聲明之某
些免責聲明及限制可能不適用於客戶。例如,在美國的某些州,以
及美國境外的某些政府 (包括加拿大的各省)可能:
a 排除本保固聲明中有關限制客戶之法定權利的免責聲明及限制
(如英國);
b 或是限制製造商實行此類免責聲明或限制之能力;或
c 授與客戶其他保固權利、指定製造商無法免責之隱含保固期限,
或允許限制隱含保固之期限。
3 對於澳洲及紐西蘭之消費者交易,除非法律許可,否則 HP 對此類客
戶的產品銷售,在本保固聲明之條款中不得排除、限制或修改、增
添強制性的法律權利。
32
Page 33

Page 34

Page 35

Page 36

Printed on
Recycled Paper
使用再生
纸张印刷
Copyright © 2005
Hewlett-Packard Development Company, L.P.
Printed in Singapore
新加坡印刷
http://www.hp.com/support/businessinkjet2800
Pendaftaran Petunjuk Penggunaan (Manual)
dan Kartu Jaminan/Garansi dalam
Bahasa Indonesia No:
0001/1.824.51
084/1.824.51
*C8174-90007*
*C8174-90007*
C8174-90007
 Loading...