

Page 1
Page 2

Page 3

hp business inkjet 2300
hp business inkjet 2300n
hp business inkjet 2300dtn
user’s guide
Page 4

Copyright information
© 2003 Copyright Hewlett-Packard
Development Company, L.P.
Reproduction, adaptation or translation
without prior written permission is
prohibited, except as allowed under the
copyright laws.
The information contained herein is subject
to change without notice.
The only warranties for HP products and
services are set forth in the express
warranty statements accompanying such
products and services. Nothing herein
should be construed as constituting an
additional warranty. HP shall not be liable
for technical or editorial errors or omissions
contained herein.
Edition 1, 11/2003
Trademark Credits
®
Adobe
, Adobe® PostScript®3™,
®
Acrobat
, and PostScript® are trademarks
of Adobe Systems Incorporated.
AutoCAD™ is a U.S. trademark of
Autodesk, Inc.
HP-UX Release 10.20 and later and
HP-UX Release 11.00 and later (in both 32
and 64-bit configurations) on all HP 9000
computers are Open Group UNIX 95
branded products.
Microsoft
Windows
®
, MS-DOS®, MS Windows®,
®
, and Windows NT® are U.S.
registered trademarks of Microsoft
Corporation.
Netscape and Netscape Navigator are U.S.
trademarks of the Netscape
Communications Corporation.
*PANTONE
®
is Pantone, Inc.'s
check-standard trademark for color.
®
Itanium
and Pentium® are U.S. registered
trademarks of Intel Corporation.
TrueType™ is a U.S. trademark of Apple
Computer, Inc.
®
UNIX
is a registered trademark of the
Open Group.
Safety Information
Always follow basic safety precautions
when using this product to reduce risk of
injury from fire or electric shock.
1 Read and understand all instructions
in the documentation that comes with
the printer.
2 Use only a grounded electrical outlet
when connecting this product to a
power source. If you do not know
whether the outlet is grounded, check
with a qualified electrician.
3 Observe all warnings and instructions
marked on the product.
4 Unplug this product from wall outlets
before cleaning.
5 Do not install or use this product near
water, or when you are wet.
6 Install the product securely on a
stable surface.
7 Install the product in a protected
location where no one can step on or
trip over the line cord, and the line
cord cannot be damaged.
8 If the product does not operate
normally, see “Maintaining and
troubleshooting.”
9 There are no user-serviceable parts
inside. Refer servicing to qualified
service personnel.
Page 5

Contents
Getting started
Additional resources. . . . . . . . . . . . . . . . . . . . . . . . . . . . . . . . . . . . . . . . . . . . . . . . . . . 1-1
Printer configurations . . . . . . . . . . . . . . . . . . . . . . . . . . . . . . . . . . . . . . . . . . . . . . . . . . 1-2
Understanding printer parts . . . . . . . . . . . . . . . . . . . . . . . . . . . . . . . . . . . . . . . . . . . . . 1-3
Front view . . . . . . . . . . . . . . . . . . . . . . . . . . . . . . . . . . . . . . . . . . . . . . . . . . . . . . . 1-3
Printing supplies area . . . . . . . . . . . . . . . . . . . . . . . . . . . . . . . . . . . . . . . . . . . . . . 1-4
Back view . . . . . . . . . . . . . . . . . . . . . . . . . . . . . . . . . . . . . . . . . . . . . . . . . . . . . . . 1-4
Control panel . . . . . . . . . . . . . . . . . . . . . . . . . . . . . . . . . . . . . . . . . . . . . . . . . . . . . 1-5
Connecting the printer . . . . . . . . . . . . . . . . . . . . . . . . . . . . . . . . . . . . . . . . . . . . . . . . . 1-6
Printer software components. . . . . . . . . . . . . . . . . . . . . . . . . . . . . . . . . . . . . . . . . 1-6
Connecting directly using a USB or parallel cable (Windows). . . . . . . . . . . . . . . . 1-8
Sharing the printer on a locally shared network (Windows). . . . . . . . . . . . . . . . . . 1-9
Connecting directly using a USB cable (Mac OS). . . . . . . . . . . . . . . . . . . . . . . . 1-11
Connecting to a network . . . . . . . . . . . . . . . . . . . . . . . . . . . . . . . . . . . . . . . . . . . 1-12
Uninstalling the printer software. . . . . . . . . . . . . . . . . . . . . . . . . . . . . . . . . . . . . . . . . 1-15
Uninstalling software for Windows (all versions) . . . . . . . . . . . . . . . . . . . . . . . . . 1-15
Installing optional accessories
Auto-duplex unit . . . . . . . . . . . . . . . . . . . . . . . . . . . . . . . . . . . . . . . . . . . . . . . . . . . . . . 2-1
HP Jetdirect print server. . . . . . . . . . . . . . . . . . . . . . . . . . . . . . . . . . . . . . . . . . . . . . . . 2-2
Printer memory modules . . . . . . . . . . . . . . . . . . . . . . . . . . . . . . . . . . . . . . . . . . . . . . . 2-4
500-sheet Tray 2 . . . . . . . . . . . . . . . . . . . . . . . . . . . . . . . . . . . . . . . . . . . . . . . . . . . . . 2-8
Enabling optional accessories in the printer driver. . . . . . . . . . . . . . . . . . . . . . . . . . . . 2-9
Using the printer
Selecting print media . . . . . . . . . . . . . . . . . . . . . . . . . . . . . . . . . . . . . . . . . . . . . . . . . . 3-1
Supported media sizes . . . . . . . . . . . . . . . . . . . . . . . . . . . . . . . . . . . . . . . . . . . . . 3-1
Supported media types and weights . . . . . . . . . . . . . . . . . . . . . . . . . . . . . . . . . . . 3-2
Minimum margins . . . . . . . . . . . . . . . . . . . . . . . . . . . . . . . . . . . . . . . . . . . . . . . . . 3-4
Loading print media . . . . . . . . . . . . . . . . . . . . . . . . . . . . . . . . . . . . . . . . . . . . . . . . . . . 3-5
Tips for loading media . . . . . . . . . . . . . . . . . . . . . . . . . . . . . . . . . . . . . . . . . . . . . 3-5
Loading Tray 1 or Tray 2 . . . . . . . . . . . . . . . . . . . . . . . . . . . . . . . . . . . . . . . . . . . . 3-5
Selecting trays . . . . . . . . . . . . . . . . . . . . . . . . . . . . . . . . . . . . . . . . . . . . . . . . . . . . 3-6
Printing using the printer drivers . . . . . . . . . . . . . . . . . . . . . . . . . . . . . . . . . . . . . . . . . 3-7
Changing printer settings . . . . . . . . . . . . . . . . . . . . . . . . . . . . . . . . . . . . . . . . . . . . . . . 3-8
Changing settings in Windows . . . . . . . . . . . . . . . . . . . . . . . . . . . . . . . . . . . . . . . 3-8
Changing settings in Mac OS . . . . . . . . . . . . . . . . . . . . . . . . . . . . . . . . . . . . . . . . 3-9
Printing on special media. . . . . . . . . . . . . . . . . . . . . . . . . . . . . . . . . . . . . . . . . . . . . . 3-10
Printing on cards and envelopes . . . . . . . . . . . . . . . . . . . . . . . . . . . . . . . . . . . . 3-10
Printing on transparencies . . . . . . . . . . . . . . . . . . . . . . . . . . . . . . . . . . . . . . . . . 3-10
Printing on custom-size media . . . . . . . . . . . . . . . . . . . . . . . . . . . . . . . . . . . . . . 3-11
Printing photographs . . . . . . . . . . . . . . . . . . . . . . . . . . . . . . . . . . . . . . . . . . . . . . . . . 3-12
Printing on both sides of the page . . . . . . . . . . . . . . . . . . . . . . . . . . . . . . . . . . . . . . . 3-13
Guidelines for duplexing . . . . . . . . . . . . . . . . . . . . . . . . . . . . . . . . . . . . . . . . . . . 3-13
Performing automatic duplexing . . . . . . . . . . . . . . . . . . . . . . . . . . . . . . . . . . . . . 3-14
Canceling a print job . . . . . . . . . . . . . . . . . . . . . . . . . . . . . . . . . . . . . . . . . . . . . . . . . 3-15
ENWW i
Page 6

Using diagnostics tools
Using the Toolbox . . . . . . . . . . . . . . . . . . . . . . . . . . . . . . . . . . . . . . . . . . . . . . . . . . . . 4-1
Printer Status tab. . . . . . . . . . . . . . . . . . . . . . . . . . . . . . . . . . . . . . . . . . . . . . . . . . 4-1
Information tab. . . . . . . . . . . . . . . . . . . . . . . . . . . . . . . . . . . . . . . . . . . . . . . . . . . . 4-2
Using the embedded Web server. . . . . . . . . . . . . . . . . . . . . . . . . . . . . . . . . . . . . . . . . 4-2
Embedded Web server pages. . . . . . . . . . . . . . . . . . . . . . . . . . . . . . . . . . . . . . . . 4-3
Information tab . . . . . . . . . . . . . . . . . . . . . . . . . . . . . . . . . . . . . . . . . . . . . . . . 4-4
Settings tab . . . . . . . . . . . . . . . . . . . . . . . . . . . . . . . . . . . . . . . . . . . . . . . . . . . 4-4
Networking tab . . . . . . . . . . . . . . . . . . . . . . . . . . . . . . . . . . . . . . . . . . . . . . . . 4-5
Other Links . . . . . . . . . . . . . . . . . . . . . . . . . . . . . . . . . . . . . . . . . . . . . . . . . . . 4-5
Using HP Instant Support. . . . . . . . . . . . . . . . . . . . . . . . . . . . . . . . . . . . . . . . . . . . . . . 4-6
Using myPrintMileage . . . . . . . . . . . . . . . . . . . . . . . . . . . . . . . . . . . . . . . . . . . . . . . . . 4-7
Using HP Web Jetadmin . . . . . . . . . . . . . . . . . . . . . . . . . . . . . . . . . . . . . . . . . . . . . . . 4-8
Maintaining and troubleshooting
Maintaining the printheads. . . . . . . . . . . . . . . . . . . . . . . . . . . . . . . . . . . . . . . . . . . . . . 5-1
Cleaning the printheads. . . . . . . . . . . . . . . . . . . . . . . . . . . . . . . . . . . . . . . . . . . . . 5-1
Cleaning the printhead contacts . . . . . . . . . . . . . . . . . . . . . . . . . . . . . . . . . . . . . . 5-2
Aligning the printheads . . . . . . . . . . . . . . . . . . . . . . . . . . . . . . . . . . . . . . . . . . . . . 5-3
Replacing ink cartridges and printheads . . . . . . . . . . . . . . . . . . . . . . . . . . . . . . . . . . . 5-3
Replacing ink cartridges . . . . . . . . . . . . . . . . . . . . . . . . . . . . . . . . . . . . . . . . . . . . 5-3
Replacing printheads. . . . . . . . . . . . . . . . . . . . . . . . . . . . . . . . . . . . . . . . . . . . . . . 5-4
Calibrating color . . . . . . . . . . . . . . . . . . . . . . . . . . . . . . . . . . . . . . . . . . . . . . . . . . . . . . 5-5
Calibrating linefeed . . . . . . . . . . . . . . . . . . . . . . . . . . . . . . . . . . . . . . . . . . . . . . . . . . . 5-5
General troubleshooting tips . . . . . . . . . . . . . . . . . . . . . . . . . . . . . . . . . . . . . . . . . . . . 5-6
Quick checkup. . . . . . . . . . . . . . . . . . . . . . . . . . . . . . . . . . . . . . . . . . . . . . . . . . . . 5-6
Printing a Configuration page . . . . . . . . . . . . . . . . . . . . . . . . . . . . . . . . . . . . . . . . 5-8
Solving printer problems . . . . . . . . . . . . . . . . . . . . . . . . . . . . . . . . . . . . . . . . . . . . . . . 5-9
Solving printing problems. . . . . . . . . . . . . . . . . . . . . . . . . . . . . . . . . . . . . . . . . . . . . . 5-12
Solving color problems. . . . . . . . . . . . . . . . . . . . . . . . . . . . . . . . . . . . . . . . . . . . . . . . 5-16
Solving media-handling problems . . . . . . . . . . . . . . . . . . . . . . . . . . . . . . . . . . . . . . . 5-18
Clearing media jams . . . . . . . . . . . . . . . . . . . . . . . . . . . . . . . . . . . . . . . . . . . . . . . . . 5-20
Tips for avoiding jams . . . . . . . . . . . . . . . . . . . . . . . . . . . . . . . . . . . . . . . . . . . . . 5-21
Troubleshooting installation issues . . . . . . . . . . . . . . . . . . . . . . . . . . . . . . . . . . . . . . 5-22
Ordering HP supplies and accessories
Accessories . . . . . . . . . . . . . . . . . . . . . . . . . . . . . . . . . . . . . . . . . . . . . . . . . . . . . . . . . 6-1
Media handling accessories . . . . . . . . . . . . . . . . . . . . . . . . . . . . . . . . . . . . . . . . . 6-1
DIMMs . . . . . . . . . . . . . . . . . . . . . . . . . . . . . . . . . . . . . . . . . . . . . . . . . . . . . . . . . . 6-1
Interface cables . . . . . . . . . . . . . . . . . . . . . . . . . . . . . . . . . . . . . . . . . . . . . . . . . . . 6-1
Networking accessories. . . . . . . . . . . . . . . . . . . . . . . . . . . . . . . . . . . . . . . . . . . . . 6-2
Supplies . . . . . . . . . . . . . . . . . . . . . . . . . . . . . . . . . . . . . . . . . . . . . . . . . . . . . . . . . . . . 6-2
Ink cartridges . . . . . . . . . . . . . . . . . . . . . . . . . . . . . . . . . . . . . . . . . . . . . . . . . . . . 6-2
Printheads . . . . . . . . . . . . . . . . . . . . . . . . . . . . . . . . . . . . . . . . . . . . . . . . . . . . . . 6-2
HP media. . . . . . . . . . . . . . . . . . . . . . . . . . . . . . . . . . . . . . . . . . . . . . . . . . . . . . . . 6-3
Support and warranty
Contacting customer support. . . . . . . . . . . . . . . . . . . . . . . . . . . . . . . . . . . . . . . . . . . . 7-1
Hewlett-Packard Limited Warranty Statement . . . . . . . . . . . . . . . . . . . . . . . . . . . . . . . 7-3
Printer specifications and regulatory information
Printer specifications . . . . . . . . . . . . . . . . . . . . . . . . . . . . . . . . . . . . . . . . . . . . . . . . . . 8-1
Regulatory information. . . . . . . . . . . . . . . . . . . . . . . . . . . . . . . . . . . . . . . . . . . . . . . . . 8-8
ii ENWW
Page 7

Control panel menus
Printing a control panel menu map . . . . . . . . . . . . . . . . . . . . . . . . . . . . . . . . . . . . . . . A-1
Changing printer settings from the control panel . . . . . . . . . . . . . . . . . . . . . . . . . . . . . A-1
To access the menus and settings . . . . . . . . . . . . . . . . . . . . . . . . . . . . . . . . . . . . A-1
Information menu . . . . . . . . . . . . . . . . . . . . . . . . . . . . . . . . . . . . . . . . . . . . . . . . . . . . A-2
Paper Handling menu . . . . . . . . . . . . . . . . . . . . . . . . . . . . . . . . . . . . . . . . . . . . . . . . . A-3
Configure Device menu . . . . . . . . . . . . . . . . . . . . . . . . . . . . . . . . . . . . . . . . . . . . . . . . A-5
Printing menu. . . . . . . . . . . . . . . . . . . . . . . . . . . . . . . . . . . . . . . . . . . . . . . . . . . . . . . . A-6
Maintenance menu. . . . . . . . . . . . . . . . . . . . . . . . . . . . . . . . . . . . . . . . . . . . . . . . . . . . A-7
Changing networking parameters from the control panel . . . . . . . . . . . . . . . . . . . . . . A-9
EIO menu . . . . . . . . . . . . . . . . . . . . . . . . . . . . . . . . . . . . . . . . . . . . . . . . . . . . . . . A-9
Disabling network protocols (optional). . . . . . . . . . . . . . . . . . . . . . . . . . . . . . . . . A-11
Resetting the HP Jetdirect print server . . . . . . . . . . . . . . . . . . . . . . . . . . . . . . . . A-12
Control panel messages
Control panel message types. . . . . . . . . . . . . . . . . . . . . . . . . . . . . . . . . . . . . . . . . . . . B-1
Control panel messages . . . . . . . . . . . . . . . . . . . . . . . . . . . . . . . . . . . . . . . . . . . . . . . B-2
Printing using PostScript emulation
Installation notes . . . . . . . . . . . . . . . . . . . . . . . . . . . . . . . . . . . . . . . . . . . . . . . . . . . . .C-1
Specific printer features and issues . . . . . . . . . . . . . . . . . . . . . . . . . . . . . . . . . . . . . . .C-2
Printer features . . . . . . . . . . . . . . . . . . . . . . . . . . . . . . . . . . . . . . . . . . . . . . . . . . .C-3
Index
ENWW iii
Page 8

iv ENWW
Page 9

Getting started
1
Thank you for purchasing this printer. This guide provides information about how to set up your
printer, use the printer features, and resolve printer problems.
Additional resources
The following resources provide additional information about the printer:
z Setup poster
The setup poster provides illustrated setup information. A printed version of this document is
provided with the printer. Also, an electronic version is available as an Adobe
Portable Document Format (PDF) file on the Starter CD.
z Getting started guide
The getting started guide provides instructions for setting up the printer, as well as warranty
and safety information. This guide is provided with the printer in a printed format.
z Toolbox (Windows only)
The Toolbox provides status and maintenance information about the printer, as well as
step-by-step guidance for printing tasks. For more information, see “Using the Toolbox.”
z Printer driver online help (Windows only)
The online help provides information about using the printer driver.
z HP Jetdirect Administrator’s Guide
This guide provides information for configuring and troubleshooting the HP Jetdirect print
server(s) used with this printer. It is available as a PDF file (all languages) and CHM file
(English only) on the Starter CD.
z Embedded Web server
The embedded Web server provides configuration, status, and diagnostic information about
the printer. It also includes links to HP Instant Support and myPrintMileage, which are
Web-based tools that help you diagnose and solve printer problems, and manage your printing
activities and printer supplies more effectively. The embedded Web server can be used from a
standard Web browser or from the Toolbox (Windows only).
®
Acrobat®
For more information, see “Using the embedded Web server.”
z HP Instant Support
HP Instant Support is a Web-based to ol that provides you with product-specific services,
troubleshooting tips, and information about your printer's ink and media usage. With this
information, you can diagnose and solve printer problems, and manage your printing activities
and printer supplies more effectively. For more information, see “Using HP Instant Support.”
z W orld Wide Web
The following HP websites have the latest printer software, product information, and support
information available for the printer.
• http://www.hp.com/support/businessinkjet2300
• http://www.hp.com
ENWW 1-1
Page 10

Printer configurations
This printer is available in the configurations described in this section.
HP Business Inkjet 2300
The HP Business Inkjet 2300 printer is a four-color Inkjet printer that prints up to 26 pages per
minute (ppm) in monochrome (black and white) and 20 ppm in color in Fast mode. The
laser-quality speed is 9 ppm for monochrome and 5 ppm for color. (The “laser-quality speed”
comparison has the page-per-minute speeds of the HP Business Inkjet 2300 series printers
against the benchmark of the HP Color LaserJet 4600 at comparable print quality. This
comparison is based solely on HP’s internal testing.) This printer can produce 4800 by 1200
optimized dpi (up to 4800 x 1200-optimized dpi color printing on premium photo papers, 1200
x 1200-input dpi).
z Trays. The printer comes with a tray that holds up to 150 sheets of paper, or up to 30
transparencies (Tray 1). The printer also comes with Tray 2, which holds up to 250 sheets
of plain paper. For more information, see “Supported media sizes” and “Supported media
types and weights”.
z Connectivity. The printer provides a standard bidirectional parallel port (IEEE-1284
compliant) and a universal serial bus (USB) port. The printer also contains an enhanced
input/output (EIO) slot.
z Memory. The printer contains 64 MB of memory. To allow for memory expansion, the
printer has two dual inline memory module (DIMM) slots that accept 64 or 128 MB RAM.
This printer can support up to 320 MB of memory (including the 64 MB in the printer).
HP Business Inkjet 2300n
The HP Business Inkjet 2300n printer includes the features of the HP Business Inkjet 2300
printer, plus an HP Jetdirect print server. An HP Jetdirect print server allows the printer to be
shared in a network environment by connecting the printer directly to the network.
HP Business Inkjet 2300dtn
The HP Business Inkjet 2300dtn printer includes the features of the HP Business Inkjet 2300n
printer, plus an auto-duplex unit for automatic 2-sided printing. Also, it has a larger Tray 2,
which holds up to 500 sheets of plain paper.
1-2 ENWW
Page 11
Understanding printer parts
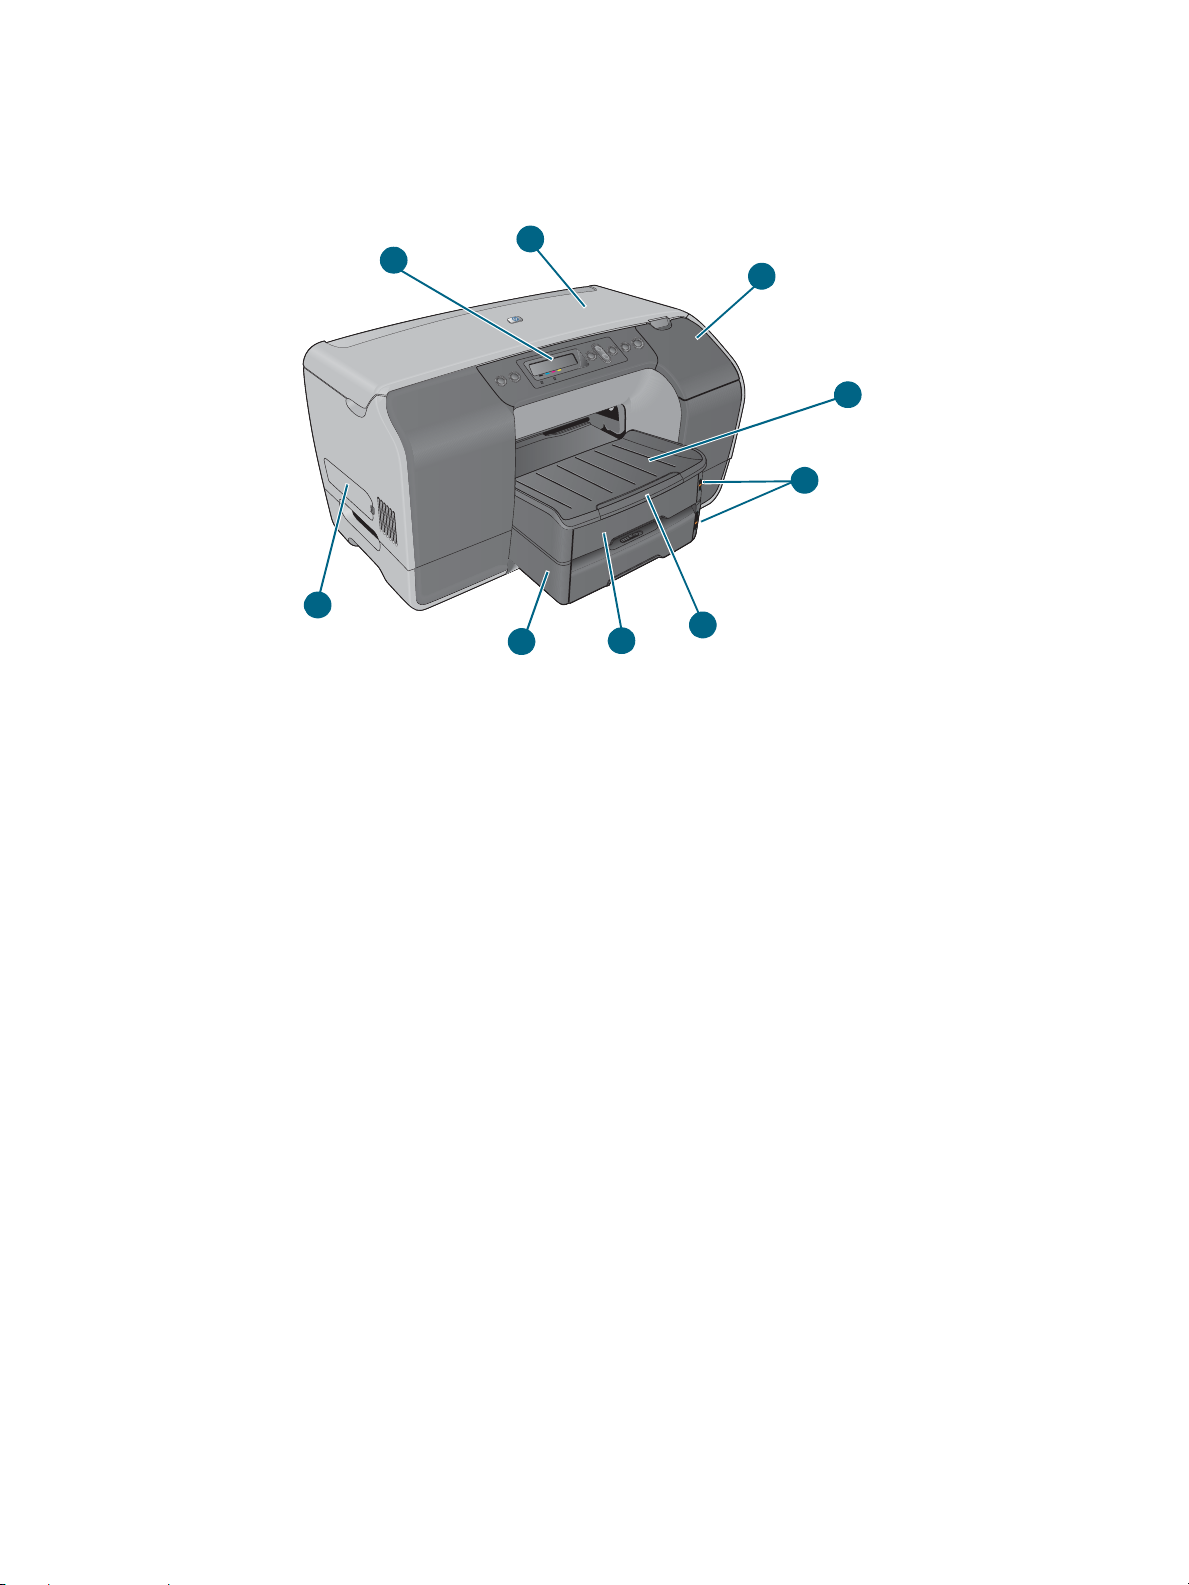
Front view
1
2
3
4
5
9
8
1 Control panel
2 Top cover
3 Ink cartridge cover
4 Output tray
5 Media level indicators
6 Tray extens io n
7 Tray 1
8 Tray 2
9 Side cover (provides access to memory modules)
7
6
ENWW 1-3
Page 12
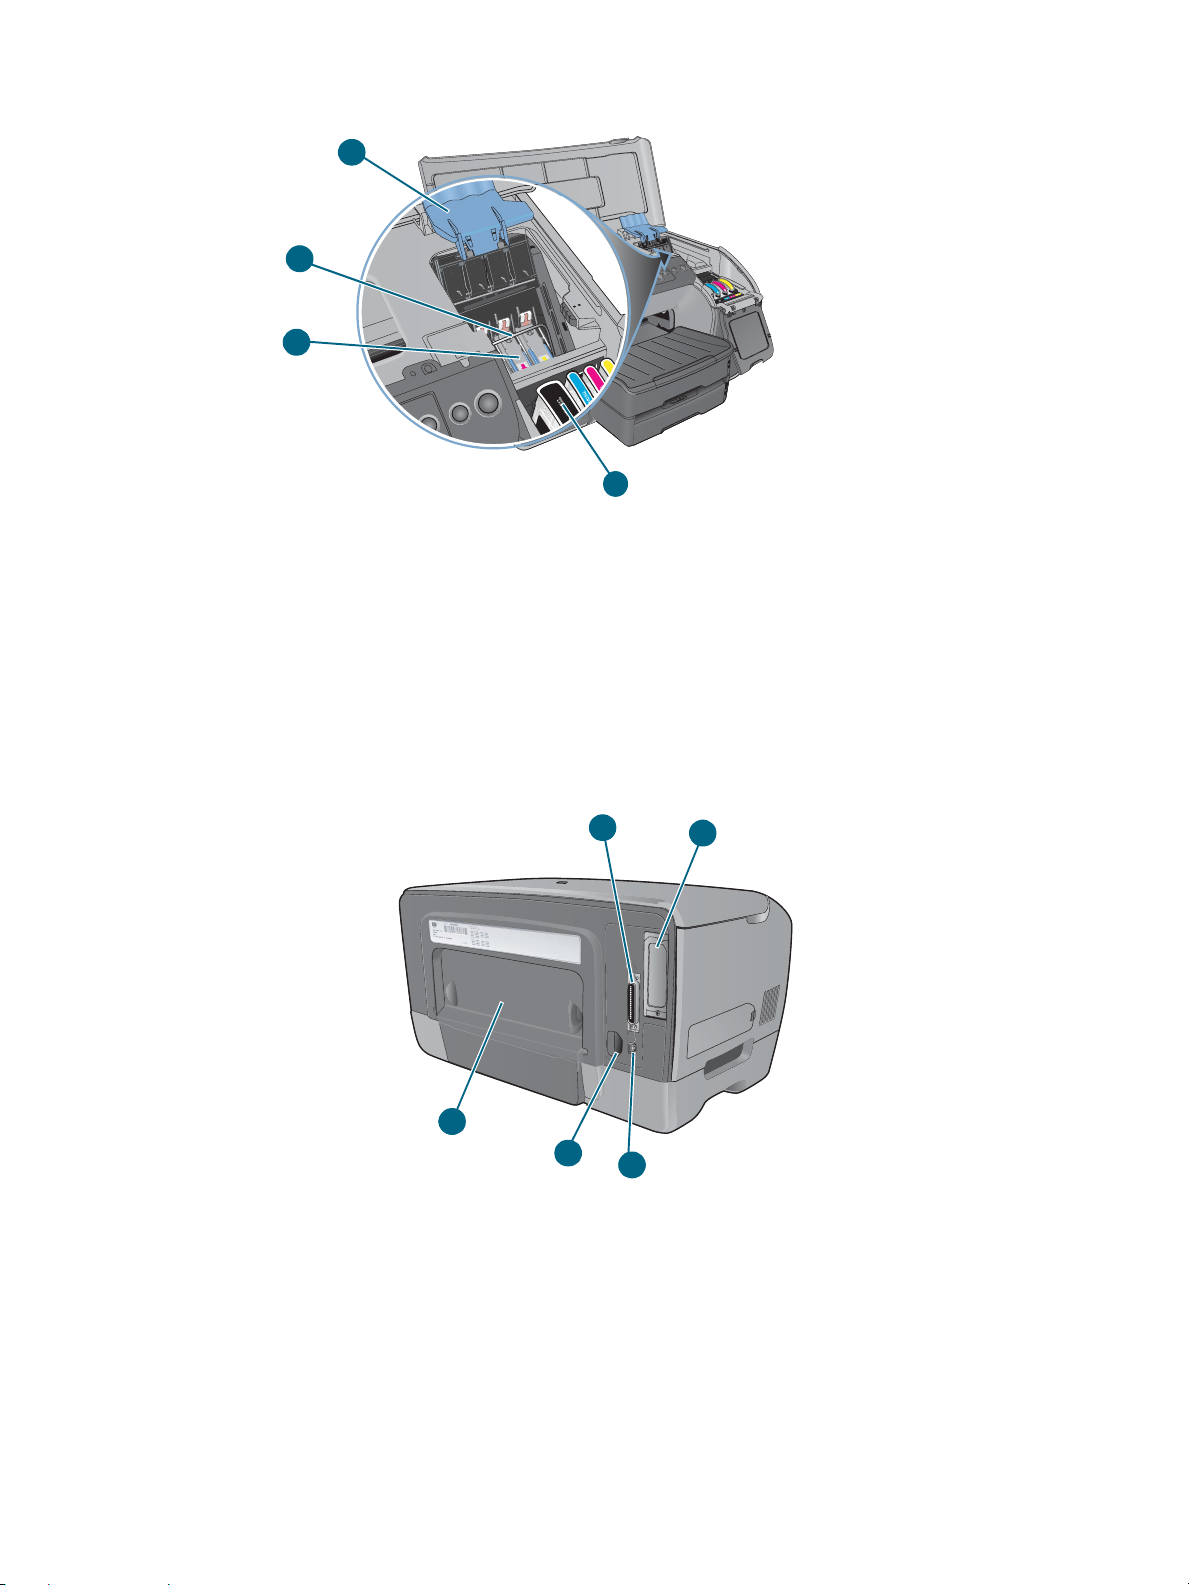
Printing supplies area
1
2
3
4
1 Printhead latch (provides access for installing or removing printheads from their
color-coded sockets)
2 Metal catch bar (catches on the hooks of the printhead latch and engages the latch)
3 Printheads
4 Ink cartridges
Back view
1 Parall el por t
1
5
4
3
2
2 EIO slot (allows an HP Jetdirect print server to be installed. The HP Business Inkjet 2300n
and 2300dtn configurations come with the print server installed.)
3 USB port
4 Power input
5 Rear access panel (to be removed when installing the optional auto-duplex unit. The
auto-duplex unit is included with the HP Business Inkjet 2300dtn.)
1-4 ENWW
Page 13

Control panel
1
2 3 4 5 6 7 8
10
9
1 Power button ( ): Turns the printer off and on.
2 Help button ( ): Provides additional information about printer messages or menus.
3 LCD display: Shows status and error messages, as well as ink cartridge levels.
4 Back button ( ): Navigates backward one level in the menus.
5 Up ( ) and Down ( ) arrow button: Navigates through menu items and increases or
decreases numerical values.
6 Select button ( ): Enters the menus and selects highlighted menu items.
7 Cancel Job button ( ): Cancels the current print job. Press this button only once to cancel
the print job. The time it takes to cancel depends on the size of the print job. This button
also exits all menus.
8 Resume button ( ): Restarts printing after continuable errors. This button also exits all
menus.
9 Ready light: Indicates one of three possible states:
On — The printer is online and ready to accept print jobs.
Off — The printer is turned off.
Flashing — The printer is initializing, canceling a print job, or turning off.
10 Attention light: Indicates one of three possible states:
Off — No conditions exist that require attention. A printer-status message usually
accompanies this indicator.
Flashing — The printer has encountered an error that requires user attention (such as an
open door or a paper jam). An error message usually accompanies this indicator.
Flashing alternately with Ready light — A critical error has occurred, and the printer
requires attention. A critical-error message usually accompanies this indicator.
For a list of messages that can appear in the control panel display, see “Control panel
messages.” For a menu map of the settings that can be accessed through the control panel,
see “Printing a control panel menu map.”
ENWW 1-5
Page 14

Connecting the printer
Your printer supports local printing or network printing.
Local printing
For local printing, you can connect the printer using a USB cable or a parallel cable. Follow
these procedures to connect the printer and install the printer software:
z Connecti ng directly using a USB or parallel cable (Windows)
z Connecting directly using a USB cable (Mac OS)
For more information about the printer software provided with the printer, see “Printer
software components.”
You can share the printer in these ways:
z You can use a simple form of networking, known as locally shared networking, if you used
a parallel cable or USB cable to connect the printer to a computer running Windows. Using
this method, you can share the printer with other Windows users. See “Sharing the printer
on a locally shared networ k (W in dows).”
z You can also use locally shared networking if you used a USB cable to connect the printer
to a computer running a Mac OS. Using this method, you can share the printer with other
Mac OS users. See “Sharing a printer on a peer-to-peer network (Mac OS).”
Network printing
If the printer has an HP Jetdirect print server installed, the printer can be shared in a network
environment by connecting it directly to the network. This allows both users of Windows and
Mac OS to print. See “Connecting to a network.”
Printer software components
Printer software for Windows and Mac OS is provided on the Starter CD that comes with your
printer.
Windows printer software components
The printer software for Windows includes the following components:
z Printer drivers
Printer drivers access the printer features and allow the computer to communicate with the
printer. The following printer drivers are included with the printer:
Operating system
Windows 98, Windows Me
*
Postscript (PS) level 3 emulation
PCL5c, PCL6, and
Windows NT 4.0
Windows 2000
Windows XP 32-bit
Windows XP 64-bit (Available only at http://www.hp.com/support/businessinkjet2300)
*Printer features vary among printer drivers and operating systems. See the online help in
your printer driver for details. If you are using the emulated PostScript printer driver on
Windows 98, Windows Me, or Windows NT 4.0, see “Printing using PostScript emulation.”
1-6 ENWW
Page 15

z Toolbox
The Toolbox provides printer status and maintenance information about the printer. For
more information, see “Using the Toolbox.”
z Screen fonts
Screen fonts (also called “printer matching fonts”) are fonts used by the computer that
correspond to the fonts in the printer. Adobe PostScript
®
3™ screen fonts are also
included.
z Customization Utility
This utility lets you select installation options and create a custom installer that can be
launched silently from a batch file. It can be found on the Starter CD menu.
Mac OS printer software components
The printer software for Mac OS includes the following components:
Operating system PPDs PDEs HP LaserJet Utility
Mac OS 9 (9.1 and later),
Mac OS X Classic (10.1 and later)
Mac OS X (10.1 and later)
z PostScript Printer Description files (PPDs)
PPDs, in combination with the Apple LaserWriter 8 printer driver, access the printer
features and allow the computer to communicate with the printer. An installation program
for the PPDs and other software is provided on the Starter CD. Use the Apple
LaserWriter 8 printer driver that comes with the computer.
z Printing Dialog Extensions (PDEs)
PDEs are code plug-ins that provide access to printer features, such as number of copies,
print on both sides, and quality settings. An installation program for the PDEs and other
software is provided on the Starter CD.
z HP LaserJet Utility
The HP LaserJet Utility allows control of features that are not available in the printer driver.
Use the illustrated screens to select printer features and complete tasks with the printer,
such as the following:
• download files, view fonts, and change many of the printer settings
• check the ink cartridge levels
• configure and set the printer for Internet Protocol (IP) or AppleTalk printing
Note The HP LaserJet Utility is not supported for the Korean, Japanese, Simplified Chinese, and
Traditional Chinese languages.
Other resources
z Printer installation software for UNIX
download at http://www.hp.com.
z For information about using Linux with HP printers, see http://www.linuxprinting.org.
z For information about using the IBM PostScript 3 emulation printer driver for IBM OS/2,
see http://www7.software.ibm.com/2bcprod.nsf.
®
(HP-UX, Sun Solaris) networks is available for
ENWW 1-7
Page 16

Connecting directly using a USB or parallel cable (Windows)
You can use a USB cable to connect the printer to the computer if the computer has a USB
port and is running Windows 98, Windows Millennium Edition (Me), Windows 2000, or
Windows XP.
If your computer does not meet these specifications, connect the printer to your computer
using a parallel cable.
Note Do not connect a USB cable and a parallel cable to the printer at the same time during
installation.
It is recommended that you install the software before you connect the printer to the computer.
Connect the USB or parallel cable only when you are prompted by the printer software.
If your computer is not running Windows 2000 (Service Pack 3 and above) or Windows XP,
you may need to restart your computer to complete the software installation when prompted.
In most cases, after you install the printer software and connect a printer to the computer, you
can install additional printers with USB cables without reinstalling the printer software.
If you are connecting the printer to a computer running Windows XP 64-bit, download the
printer driver from http://www.hp.com/support/businessinkjet2300 and install it using Add
Printer from the Printers or Printers and Faxes folder.
Software-first installation (recommended)
Follow this setup procedure if you have not yet connected a USB or parallel cable. This is the
preferred method.
Note If you are using Windows NT 4.0, Windows 2000, or Windows XP, you must have administrator
privileges to install a printer driver.
1 Close any running applications.
2 Insert the Starter CD into the CD-ROM drive. The CD menu runs automatically.
If the CD menu does not run automatically, click Start, and then click Run. At the
command line box, type the letter of your computer’s CD-ROM drive followed by :\SETUP
(for example, type D:\SETUP).
3 On the CD menu, click Install Printer Driver.
4 Choose the language you want and click OK.
5 Follow the instr uc tio ns on the screen .
6 When prompted for the connection type, click Connected directly to this computer, and
then click Next.
7 Do one of the following:
• For USB connection: Select USB Cable, and then click Next.
• For parallel connection: Select Parallel Cable and select the parallel port to which the
printer is connected (usually LPT1). Then click Next.
Note It is recommended that you install the Toolbox, which is installed by selecting Typical
Installation (Recommended). If you select Custom Installation, you can still choose to install
the Toolbox from the list of options to install. The Toolbox provides status and maintenance
informati on about your prin ter. It also prov ides acce ss to docu mentati on and onl ine hel p tools
for solving printer problems. If you do not install the Toolbox, you will not see printer error
messages on your computer screen and will not have access to the myPrintMileage website.
See “Using the Toolbox” for more information.
8 Follow the instructions on the screen to continue the installation.
1-8 ENWW
Page 17

You can share the printer during installation. To share the printer after it has been
installed, see “Sharing a printer connected to your computer.”
9 When prompted, connect the USB cable or parallel cable to the computer and the printer.
The Found New Hardware wizard appears on the screen and the printer icon is created
in the Printers folder.
Hardware-first installation
If you connected the USB cable or parallel cable before you started the software, the Found
New Hardware wizard appears on the computer screen. Follow these instructions to complete
the installation.
Note Do not turn off the printer or unplug the cable from the printer when the printer setup program
is running. If you do so, the setup program will not finish.
1 On the screen that allows you to select a method to locate the driver, select the advanced
option and click Next.
Note Do not allow the hardware wizard to perform an automatic search for the driver.
2 Select the check box that allows you to specify the driver location, ensure that the other
check boxes are cleared.
3 Insert the Starter CD into the CD-ROM drive.
If the CD menu appears, click Exit twice to close the CD menu.
4 Browse to locate the root directory on the Starter CD (for example, D:), and then click OK.
5 Click Next, and then follow the instructions on the screen.
You can share the printer during installation. To share the printer after it has been
installed, see “Sharing a printer connected to your computer.”
6 Click Finish.
• Upon completion of the installation process, the hardware wizard automatically
launches the printer setup program. This may take more than a minute. For
Windows 98 and Windows Me, you must complete the setup program at this point if
you wish to install a non-English driver.
• The setup program provides options to install non-driver components such as the
Toolbox. It is recommended that you install the Toolbox.
Sharing the printer on a locally shared network (Windows)
In a locally shared network, the printer is connected directly to the USB or parallel connector of
a selected computer (known as the server) and is shared by other computers (clients). Use
this configuration only in small groups or when usage is low. The computer connected to the
printer is slowed down when many users print to its shared printer.
You can share the printer on a locally shared network when:
z The computer connected to the printer is running Windows.
z The printer will be shared with other Windows users. (You cannot share the printer with
Mac OS users.)
To connect the printer to a Macintosh and share it with other Mac OS users, see
“Connecting directly using a USB cable (Mac OS).”
ENWW 1-9
Page 18

Sharing a printer connected to your computer
Note When sharing a locally connected printer, use the computer with the newest operating system
as the server. It is recommended that you use Windows 2000 or Windows XP as the server.
1 From the Windows desktop, do one of the following:
• Windows 98, Windows Me, Windows NT 4.0, and Windows 2000:
Click Start, point to Settings, and then click Printers.
• Windows XP:
Click Start, and then click Printers and Faxes.
Or, click Start, click Control Panel, and then click Printers and Faxes.
2 Right-click the printer and click Properti es, then sele ct the Sharing tab.
3 Select the option to share the printer, and give the printer a share name.
4 If you are sharing the printer with users of other versions of Windows, you can click
Additional Drivers to install their drivers as a convenience to them. This optional step
requires you to have the Starter CD in your CD drive.
If Windows NT 4.0 is the server, administrators need to install the Windows 2000 and
Windows XP user mode driver on the server. This is because Windows 2000 and Windows XP
cannot print using the Windows NT 4.0 kernel mode driver.
To install the Windows 2000 and Windows XP user mode driver on the Windows NT 4.0
server:
1 In the driver properties dialog box on the server, click the General tab and then click the
New Driver button.
2 When prompted for files, locate the Windows 2000 and Windows XP folder on the Starter
CD and select the user mode driver.
Using a printer connected to another computer
Clients can connect to the printer in three different ways:
z Install the printer software from the Starter CD. When prompted, select Connected via
the network, and then select Client Setup for client-server printing.
z Browse to the printer on the network and drag the printer to your Printers folder.
z Add the printer and install the software from the INF file on your network. Ask the network
administrator where the INF file is located.
On the Starter CD, the INF files are stored in folders using the following format:
<CD>:\Setup\Drivers\<driver>\<operating system>\<language>.
For example, if your CD drive letter is D, then D:\Setup\Drivers\PCL6\Win2k_XP\English
would contain the English PCL6 INF file for Windows 2000 and Windows XP.
1-10 ENWW
Page 19

Connecting directly using a USB cable (Mac OS)
Install the software first, and then connect the printer to the computer. On completing the
installation, you can share the printer with other Mac OS users if you wish. See “Sharing a
printer on a peer-to-peer network (Mac OS).”
1 Insert the Starter CD into the CD-ROM drive. The CD menu runs automatically.
If the CD menu does not run automatically, double-click the CD icon on the desktop, and
then double-click the Installer icon. This icon is located in the Installer:<language> folder
of the Starter CD (for example, Installer:English for the English version).
2 Follow the instr uc tio ns on the screen .
3 Connect the cable between the ports on the computer and the printer.
4 Turn the printer on.
5 Complete the installation in one of these ways:
• Mac OS 9 (9.1 and later): Complete steps 6 through 10.
• Mac OS X (10.1 and later): Complete steps 11 through 13.
Mac OS 9 (9.1 and later)
6 On the hard drive, double-click the Desktop Printer Utility icon in the Applications
(Mac OS 9): Utilities folder.
7 On the pop-up menu, select LaserWriter8, select Printer (US B) from the list, and then
click OK.
8 Make sure HP Business Inkjet 2300 is selected and click Select.
9 In the PostScript Printer Description (PPD) File section of the window that appears,
click Auto Setup.
10 Click Create. The printer icon appears on the desktop.
Mac OS X (10.1 and later)
11 Open the Print Center (located in the Applications\Utilities folder), and then click Add
Printer.
12 On the pop-up menu, select USB.
13 Select HP Business Inkjet 2300 from the list, and then click Add. A dot will appear
beside the printer name or the printer name will appear in boldface type, indicating that
this printer is now the default printer.
Sharing a printer on a peer-to-peer network (Mac OS)
1 On the computer that is connected to the printer, open USB Printer Sharing from Control
Panels and share the printer. Then list the printer in a network neighborhood. For more
information, see the Mac Help.
2 For other users who want to print, select the printer in the USB Printer Sharing control
panel. Then choose the neighborhood where the printer is shared and choose the printer.
ENWW 1-11
Page 20

Connecting to a network
If the printer has an HP Jetdirect print server installed, it can be shared in a network
environment by connecting it directly to the network. This configuration provides better
performance than printing through non-network connections, and the ability to share the
printer with both Windows and Mac OS users.
The HP Business Inkjet 2300n and 2300dtn come with an HP Jetdirect print server installed. If
you purchased an HP Jetdirect print server for the HP Business Inkjet 2300, install it in the
printer and connect the printer to the network. See “Installing an HP Jetdirect internal print
server.”
Installing the printer driver on a computer or server (Windows)
You must install the printer driver on the computer that is acting as the server.
1 Close any running applications.
2 Insert the Starter CD into the CD-ROM drive. The CD menu runs automatically.
If the CD menu does not run automatically, click Start, and then click Run. At the
command line box, type the letter of your computer’s CD-ROM drive followed by :\SETUP
(for example, type D:\SETUP).
3 On the CD menu, click Install Printer Driver.
4 Choose your language, and then click OK.
5 Follow the instr uc tio ns on the screen .
6 When prompted for the connection type, select Connected via the network and click
Next. Then, select Basic network setup for a PC or server (recommended) and click
Next.
7 Follow the instructions on the screen to complete the installation.
8 To set up the computer as a server, do the following.
a Select the option to share the printer, and then select to install printer drivers for
Windows clients. The installation program installs the printer driver for the server and
copies the client drivers to a location on the server for users (clients).
b Follow the instructions on the screen to complete the installation.
To allow Windows users to share this printer, see “Installing the printer driver on a W indows
client.” To allow Mac OS users to share this printer, see “Installing software for a network
printer on a Macintosh.”
1-12 ENWW
Page 21

Installing the printer driver on a Windows client
Once the printer driver has been installed on the computer acting as the server, the printer can
be shared. Individual Windows users who want to use the network printer will have to install
the printer software on their computers (clients). A client computer can connect to the printer in
the following ways:
z In the Printers folder, double-click the Add Prin te r icon and follow the instructions for a
network printer installation.
z Install the printer software from the Starter CD. When prompted, select Connected via
the network, and then select Client Setup for client-server printing.
z On the network, browse to the printer and drag it to your Printers folder.
z Add the printer and install the software from the INF file on your network. Ask the network
administrator where the INF file is located.
On the Starter CD, the INF files are stored in folders using the following format:
<CD>:\Setup\Drivers\<driver>\<operating system>\<language>.
For example, if your CD drive letter is D, then D:\Setup\Drivers\PCL6\Win2k_XP\English
would contain the English PCL6 INF file for Windows 2000 and Windows XP.
To install the printer driver using Add Printer
1 From the Windows desktop, do one of the following:
• Windows 98, Windows Me, Windows NT 4.0, and Windows 2000:
Click Start, point to Settings, and then click Printers.
• Windows XP:
Click Start, and then click Printers and Faxes.
Or, click Start, click Control Panel, and then click Printers and Faxes.
2 Double-click Add Printer, then click Next.
3 Do one of the following:
• Windows 98, Windows Me, Windows 2000, and Windows XP:
Select Network Printer.
• Windows NT 4.0:
Select Network Printer Server.
4 Click Next.
5 Do one of the following:
• Type in the network path or queue name of the shared printer and click Next. Click
Have Disk when prompted to select the printer model.
•Click Next and locate the printer in the Shared printers list.
6 Click Next and follow the instructions on the screen to complete the installation.
ENWW 1-13
Page 22

Adding a network port to the printer
If you have already installed the printer software using the printer setup program, and you
want to create a port to connect through the network to the printer via an HP Jetdirect print
server, follow these instructions:
1 Right-click the printer in the Printers folder and click Properties.
2 Do one of the following:
• Windows NT, Windows 2000, and Windows XP:
Click the Ports tab, and then click Add Port.
• Windows 98 and Windows Me::
Click the Details tab, and then click Add Port.
3 Select a new HP standard port and assign it to the printer.
4 Click OK.
Installing software for a network printer on a Macintosh
Individual Mac OS users who want to use the network printer will have to install the printer
software on their computers.
1 Insert the Starter CD into the CD-ROM drive. The CD menu runs automatically.
If the CD menu does not run automatically, double-click the CD icon on the desktop, and
then double-click the Installer icon. This icon is located in the Installer:<language> folder
of the Starter CD (for example, Installer:English for the English version).
2 Follow the instr uc tio ns on the screen .
3 Complete the installation in one of these ways:
• Mac OS 9 (9.1 and later): Complete steps 4 through 8.
• Mac OS X (10.1 and later): Complete steps 9 through 11.
Mac OS 9 (9.1 and later)
4 On the hard drive, double-click the Desktop Printer Utility icon in the Applications (Mac
OS 9): Utilities folder.
5 On the pop-up menu, select LaserWriter8, select Printer (Apple Talk) from the list, and
then click OK.
6 Make sure HP Business Inkjet 2300 is selected, and click Select.
7 In the PostScript Printer Description (PPD) File section of the window that appears,
click Auto Setup.
8 Click Create. The printer icon appears on the desktop.
You can also use the Chooser to select and add the printer. Open Chooser, select
LaserWriter, select HP Business Inkjet 2300, and then click Setup to select the PPD file.
1-14 ENWW
Page 23

Mac OS X (10.1 and later)
9 Open the Print Center (located in the Applications\Utilities folder), and then click Add
Printer.
10 Do one of the following:
• If you are using an AppleTalk network, on the pop-up menu, select AppleTalk.
• If you are using an LPR or TCP/IP network, on the pop-up menu, select LPR Printer
using IP, and then type the IP address for the printer. Alternatively, on Mac OS X
(10.2.3 and later), select Rendezvous, which allows for automatic discovery and
connection of devices over any IP network.
11 Select HP Business Inkjet 2300 from the list, and then click Add. A dot will appear beside
the printer name or the printer name will appear in boldface type, indicating that this printer
is now the default printer.
Uninstalling the printer software
Use the following procedures to uninstall the printer software.
Uninstalling software for Windows (all versions)
1 Close any running applications.
2 From the Start menu, open the Control Panel.
3 Double-click Add/Remove Programs.
4 Select the printer software that you wish to remove.
5 Click the button for adding or removing software.
6 To remove the printer software, select Remove All. To remove individual components,
select Modify the existing installation (you will need to have the Starter CD in the
CD-ROM drive).
7 Follow the instructions on the screen to complete the removal of the printer software or
components.
Note If you are using Windows NT 4.0, Windows 2000, or Windows XP, you must have administrator
privileges to uninstall the printer software.
You can also run the uninstaller as follows: from the Start menu, point to Programs, point to
hp business inkjet 2300 series, and then click Uninstall hp business inkjet 2300 series
(the actual steps depend on your operating system). Follow the instructions on the screen to
remove the printer software.
Note If the software was not successfully installed, or the uninstaller could not be found, run the
scrubber utility from the Starter CD. See the steps below.
ENWW 1-15
Page 24

Running the scrubber utility
1 Disconnect the printer from the computer.
2 On the computer, restart Windows.
3 Insert the Starter CD in the CD-ROM drive.
4 Locate the scrubber utility on the Starter CD and run the utility.
• For Windows 98 and Windows Me:
Use the scrub9x.exe file located in the Utils\Scrubber\Win9x_Me folder.
• For Windows 2000 and Windows XP:
Use the scrub2k.exe file located in the Utils\Scrubber\Win2k_XP folder.
1-16 ENWW
Page 25
Installing optional accessories
2
The following accessories are available for the printer.
z Auto-duplex unit
z HP Jetdirect print server
z Printer memory modules
z 500-sheet Tray 2
For information about ordering accessories, see “Ordering HP supplies and accessories.”
Auto-duplex unit
The printer can automatically print on both sides of the paper with the auto-duplex unit. If your
printer does not have an auto-duplex unit, one can be purchased separately.
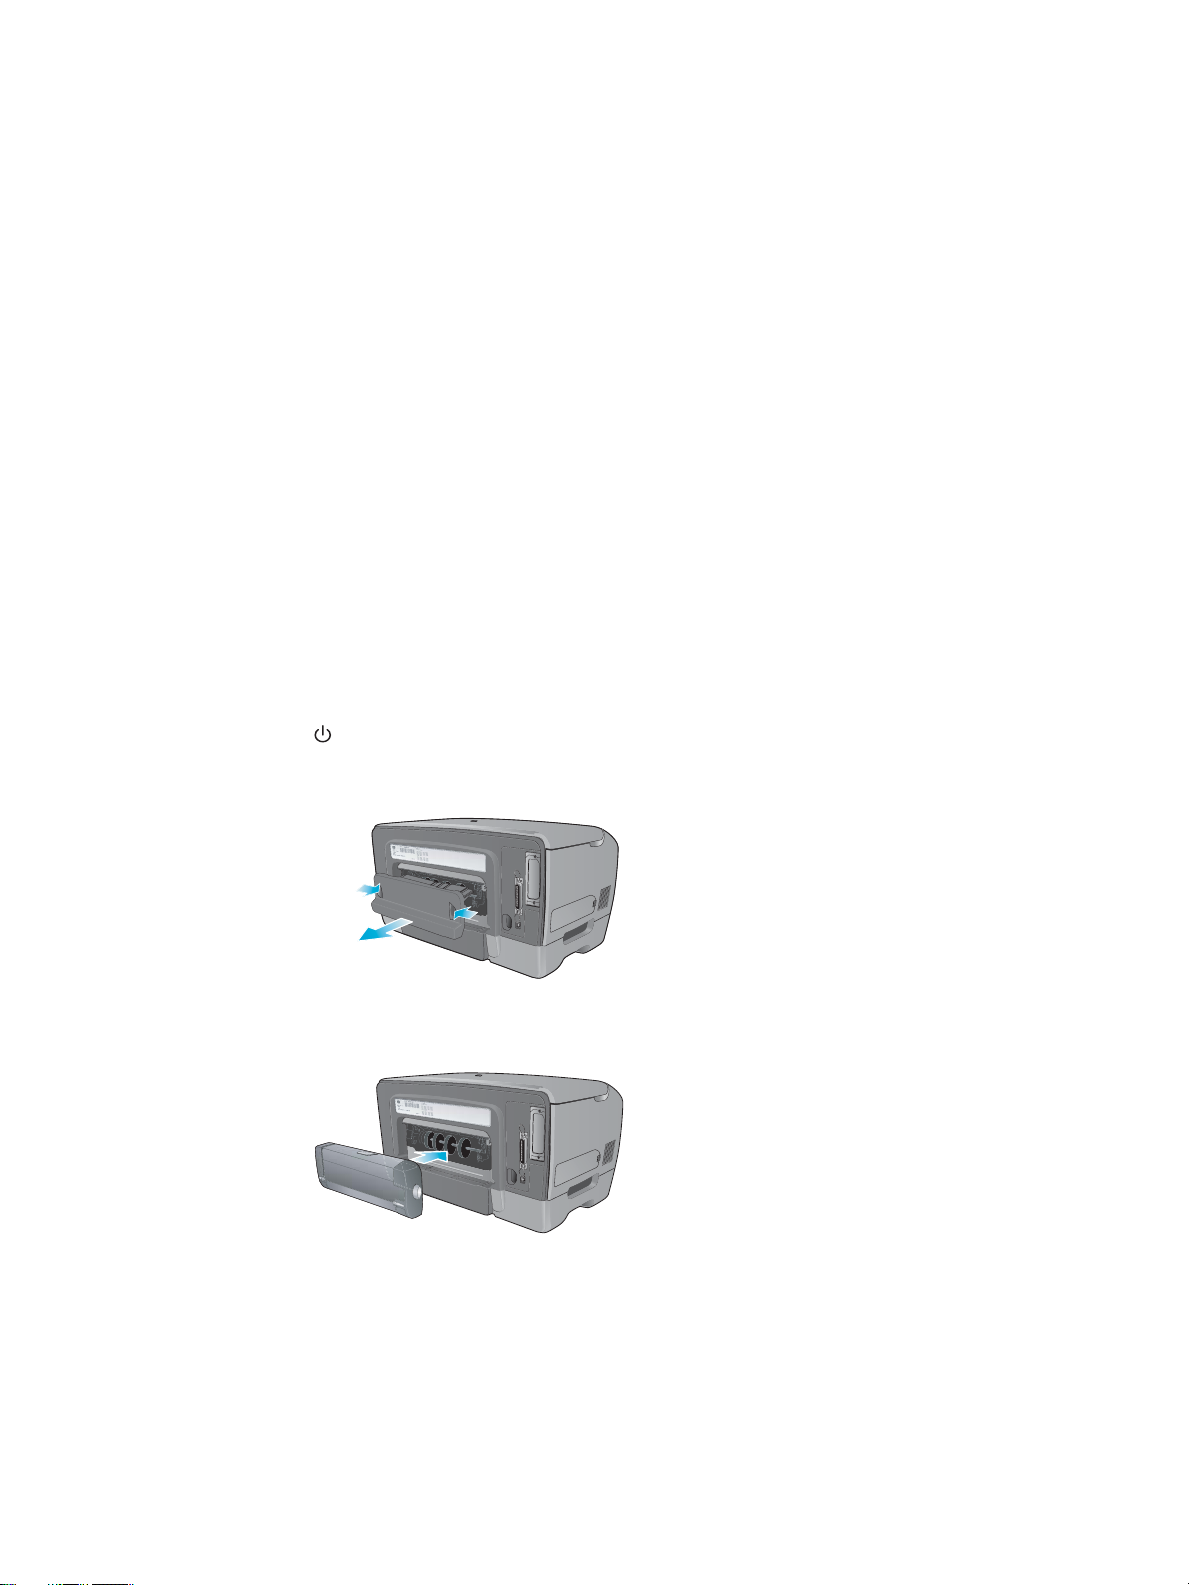
Installing an auto-duplex unit
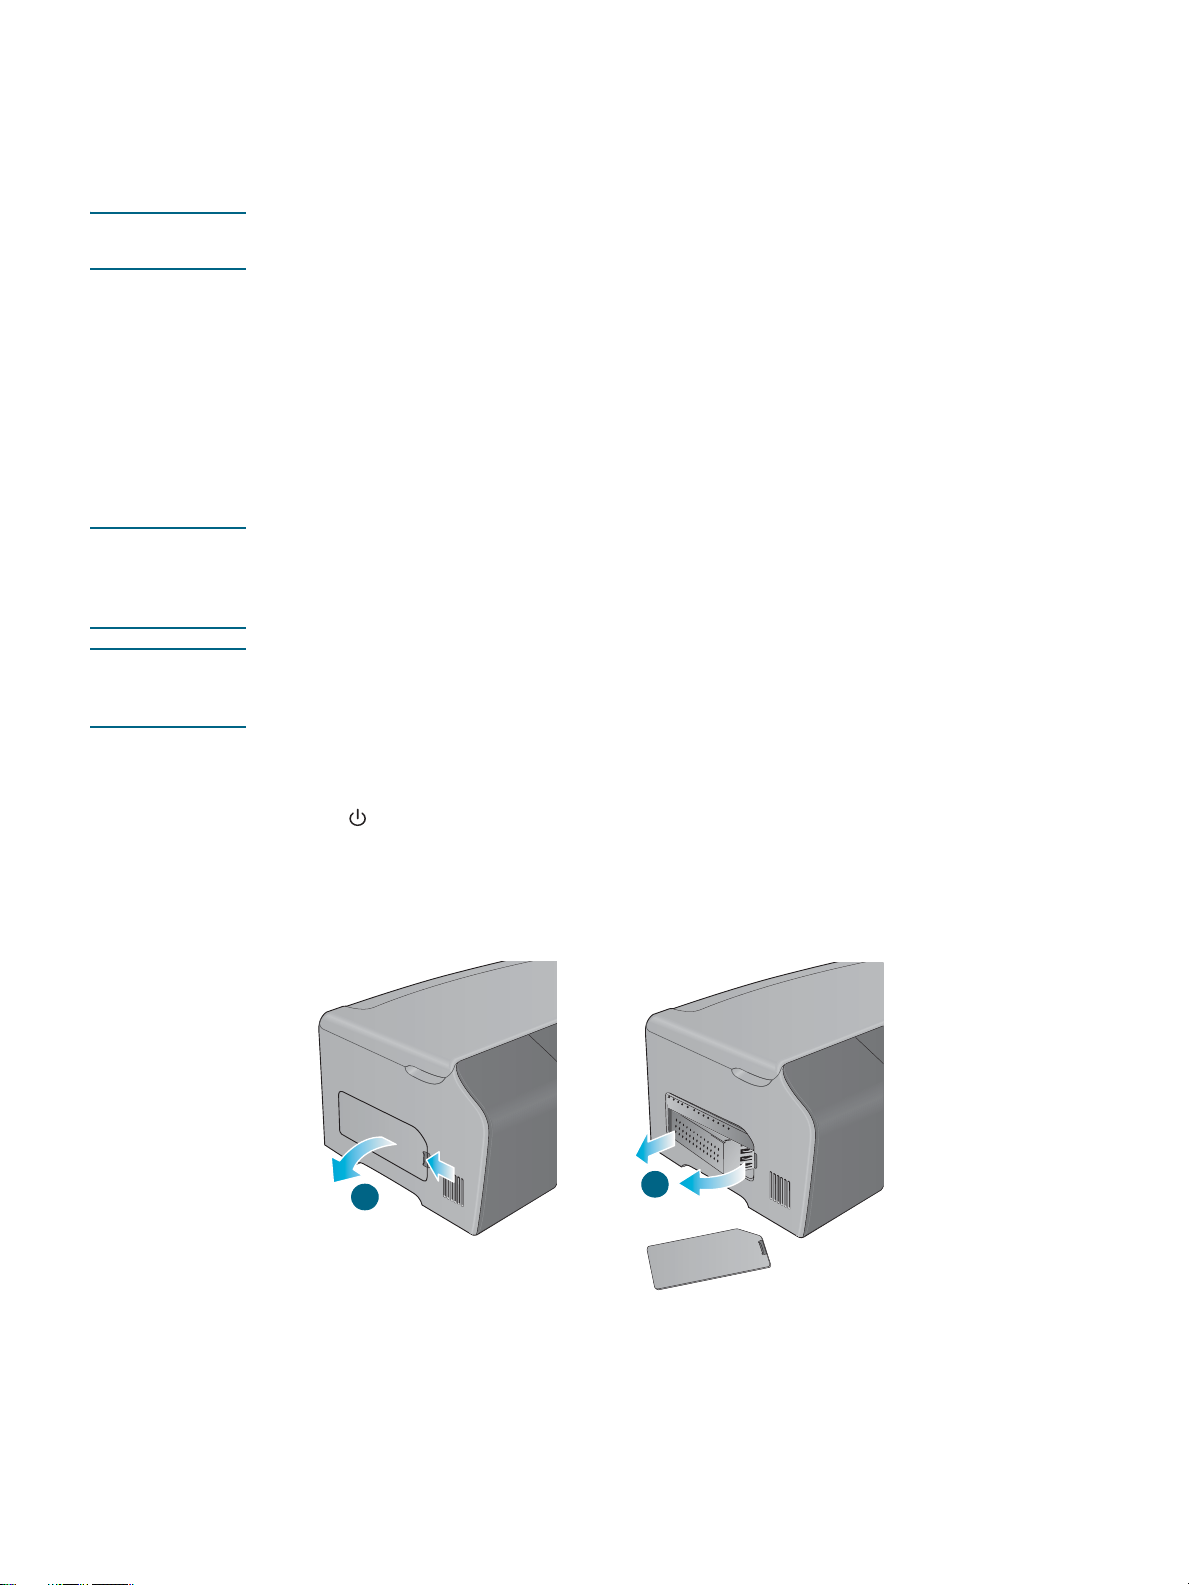
1 Press (power button) to turn off the printer.
2 Push the buttons on the rear access panel and remove the panel from the printer.
3 Slide the auto-duplex unit into the printer until the unit locks into place.
After installing the auto-duplex unit, you must enable it in the printer driver (see “Enabling optional
accessories in the printe r dr iver ”). For information on using the auto-duplex unit, see “Printing on
both sides of the page.”
If you are using operating systems other than Windows or Mac OS, you do not need to enable the
auto-duplex unit. To print on both sides of the page, turn on the
(Printing menu).
ENWW 2-1
DUPLEX setting in the control panel
Page 26
HP Jetdirect print server
Your printer can be shared in a network environment by connecting it directly to the network
with an HP Jetdirect print server. An HP Jetdirect print server provides better performance
than printing through non-network connections, and it provides flexibility in preparing a
location for the printer. The HP Jetdirect print server can be used in both client-server and
peer-to-peer printing configurations.
The HP Business Inkjet 2300n and 2300dtn come with an HP Jetdirect print server installed.
For a list of HP Jetdirect print servers that can be purchased for the HP Business Inkjet 2300,
see “Networking ac ce ss ories.”
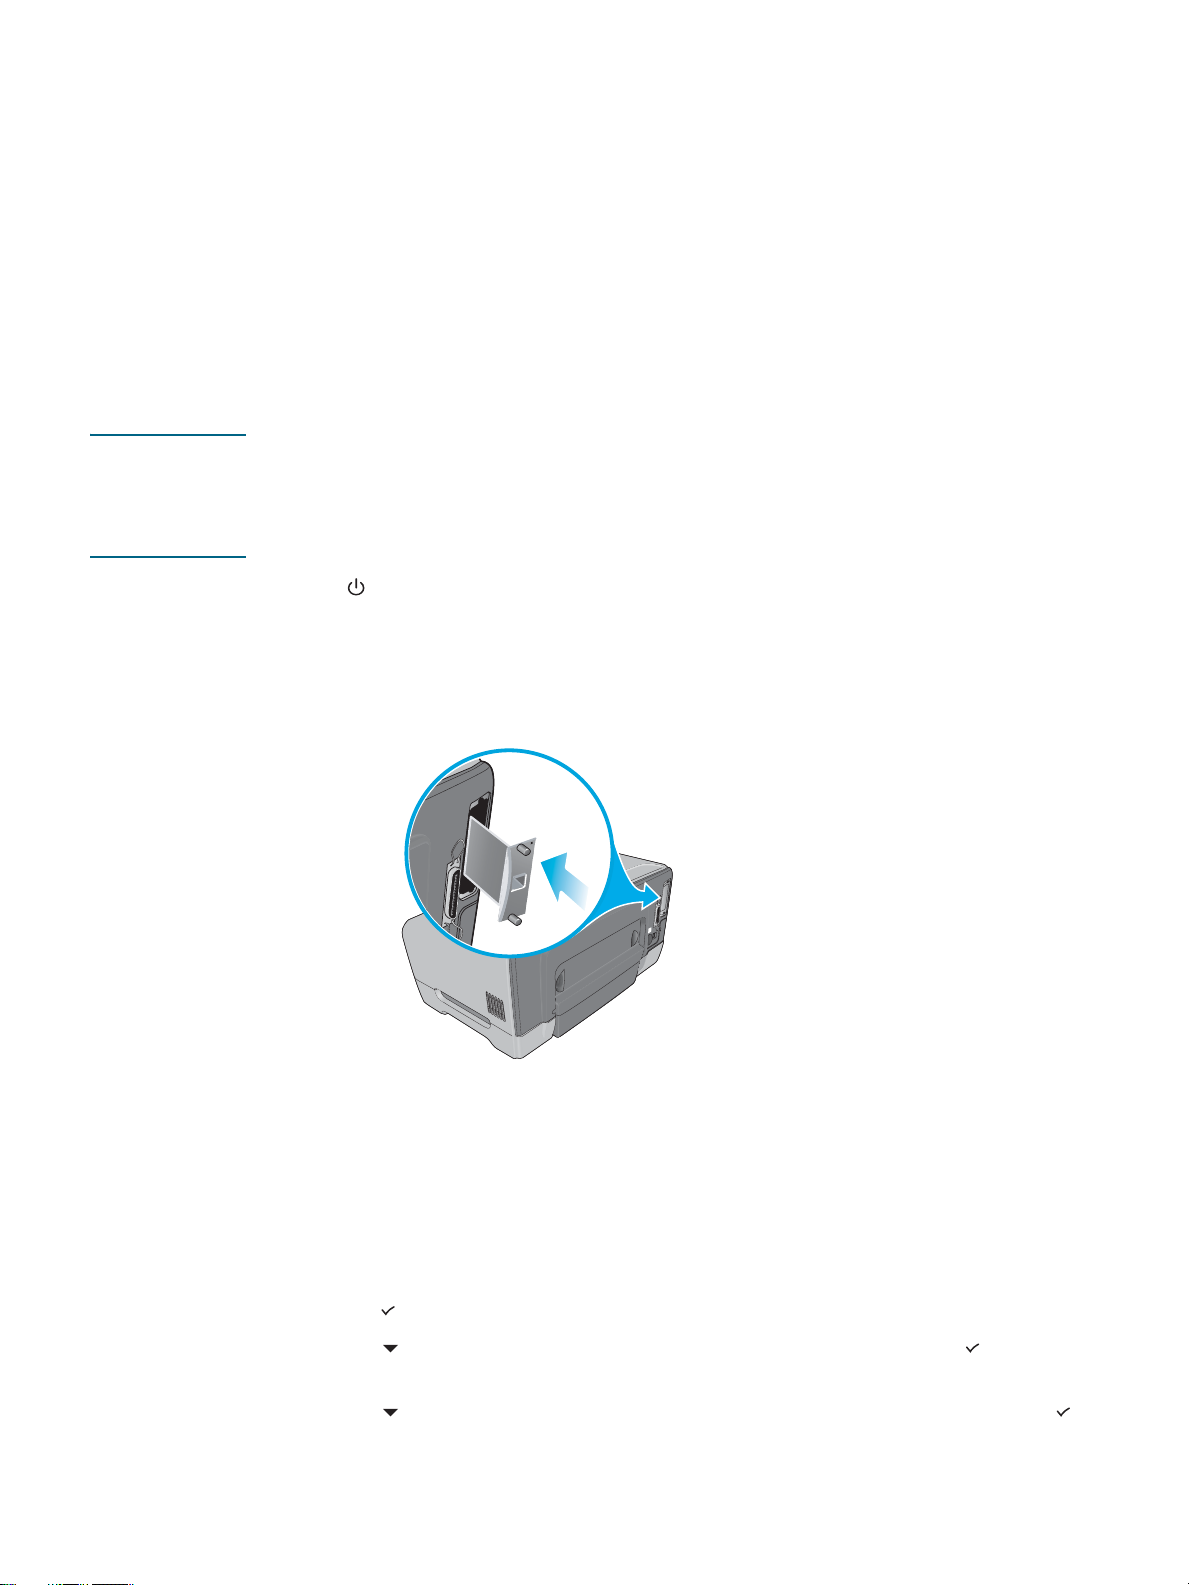
Installing an HP Jetdirect internal print server
CAUTION The HP Jetdirect print server card contains electronic components that can be damaged by
static electricity. To prevent buildup of static electricity, maintain frequent contact with any bare
sheet metal surface on the printer. If possible, wear a grounding wrist strap (or similar device).
Handle the print server card carefully at all times. Avoid touching electronic components or
circuit paths.
1 Press (power button) to turn off the printer, and then unplug the power cord.
2 Use a Phillips screwdriver to loosen and remove the two retaining screws holding the
cover for the empty EIO slot onto the printer. Remove the cover. You will not need these
screws and cover again.
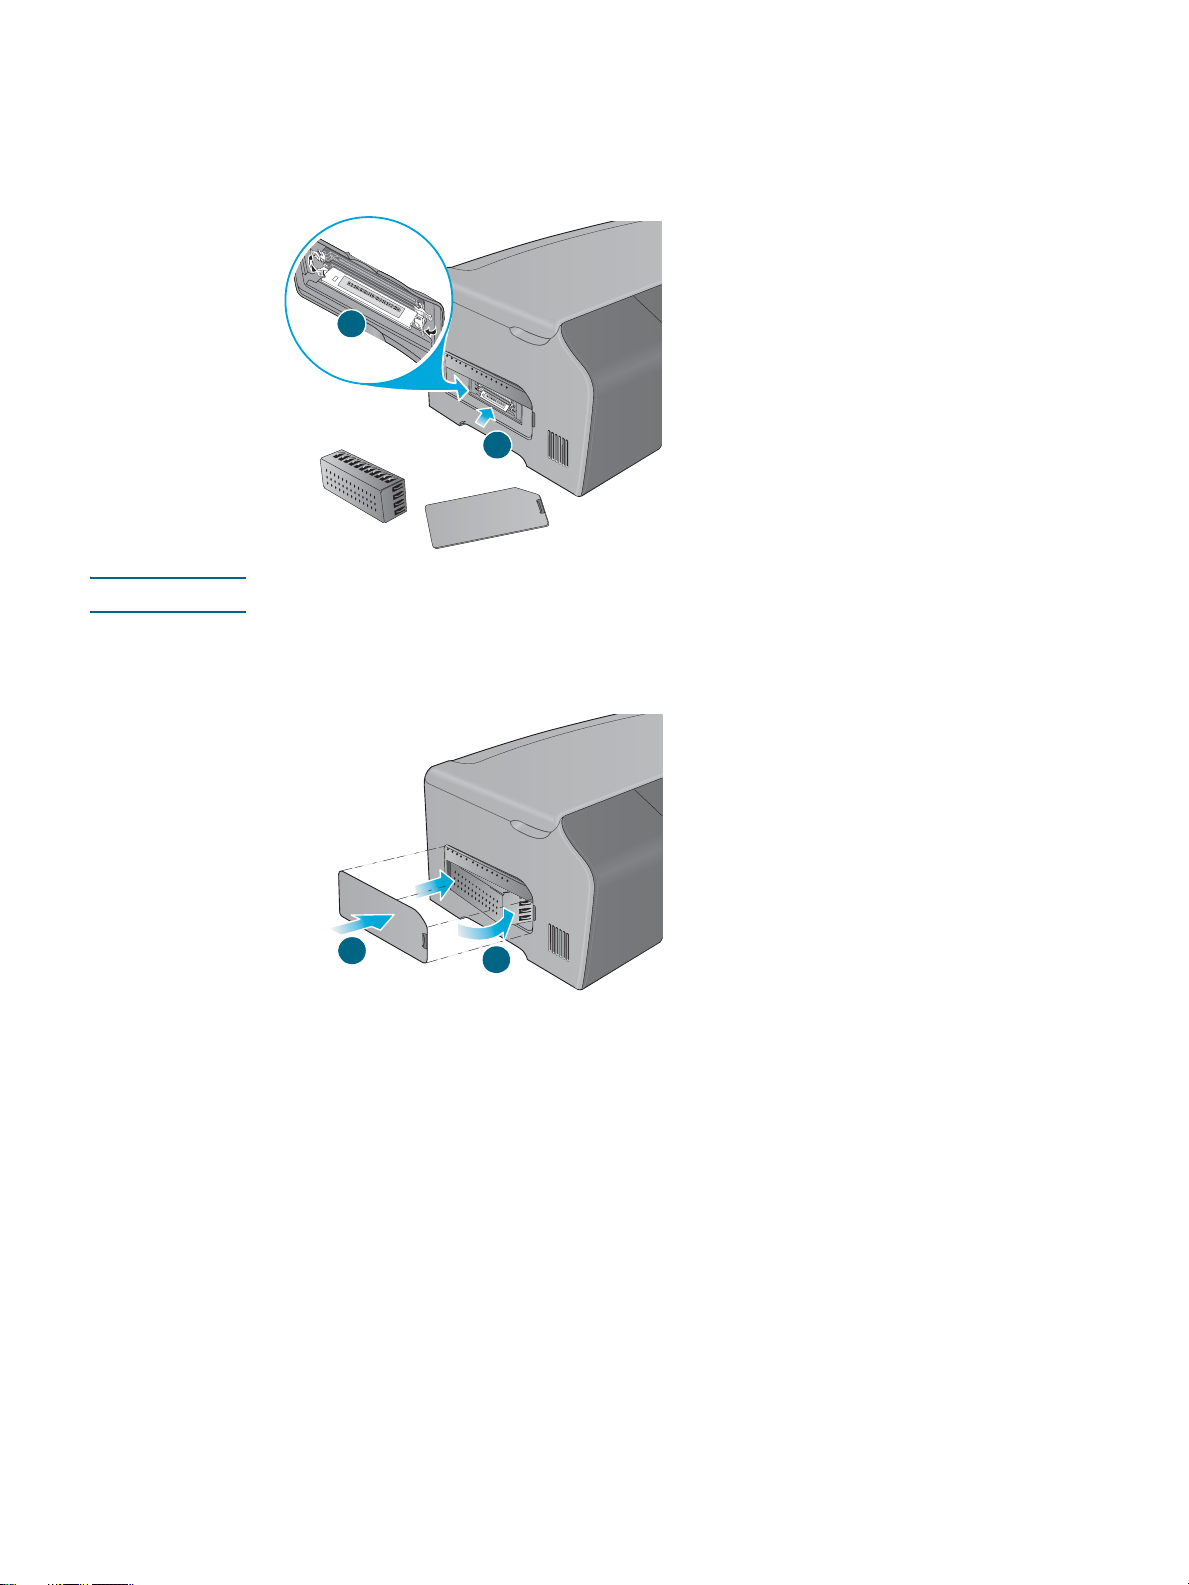
3 Firmly insert the HP Jetdirect print server card into the EIO slot.
4 Insert and tighten the retaining screws that came with the HP Jetdirect print server card.
5 Connect a network cable between the HP Jetdirect print server card and the network.
Verifying that the printer works
1 Connect the power cord and turn on the printer.
2 Print a Configuration page.
a Press (select button) on the control panel.
b Press (down arrow button) to highlight
(select button)
c Press (down arrow button) to highlight PRINT CONFIGURATION, and then press
(select button).
2-2 ENWW
.
INFORMATION, and then press
Page 27

Two pages should print. The second page is the Jetdirect Configuration page, which
contains setup information (for example, LAN HW ADDRESS) that might be needed when
you set up the printer on the network computers.
If the Jetdirect Configuration page does not print, uninstall and reinstall the print server
card to ensure that it is completely seated in the slot.
Obtaining more information
If you encounter any problems or difficulty printing over a network, see the following
resources.
Document Description
HP Jetdirect Administrator’s
Guide
Documentation for t he
operating system and
network operating system
This guide, included on the Starter CD, provides detailed information
about setting up and using your HP Jetdirect print server.
The guide also provides information about the following:
z HP Software Solutions for HP Jetdirect print servers
z TCP/IP configurations
z Using LPD (Line Printer Daemon) services on the HP Jetdirect
print server
z FTP printing
z Configuration page messages and troubleshooting
z Embedded Web serve r to acce ss config uration and managem ent
pages for the print server and device
This documentation came with your computer or your network
operating system. The documentation describes basic network
printing common to all network printers.
In addition to these resources, printer information and configuration features are available
through HP Web Jetadmin. See “Using HP Web Jetadmin” for more information.
For more information about HP Web Jetadmin and other HP network printer software, visit
http://www.hp.com/support/businessinkjet2300.
ENWW 2-3
Page 28
Printer memory modules
If you often print complex graphics or PostScript documents, or if you print with the optional
auto-duplex unit, you might want to add more memory to the printer.
Note Adding memory to the printer will allow it to process more complex print jobs, but might not
increase processing speed.
The printer contains 64 MB of memory. It has two DIMM slots that accept 64 or 128 MB RAM.
The printer can support up to 320 MB of memory (including the 64 MB in the printer). This
additional memory is available for purchase as an accessory. For more information, see
“Ordering HP supplies and accessories.”
To find out how much memory is installed in the printer, print a Configuration page. See
“Printing a Configuration page.”
Installing a DIMM
CAUTION DIMMs contain electronic components that can be damaged by static electricity. To prevent
buildup of static electricity, maintain frequent contact with any bare sheet metal surface on the
printer. If possible, wear a grounding wrist strap (or similar device). Handle DIMMs carefully
at all times. Avoid touching electronic components or circuit paths.
Note The DIMM slots are located at the left side of the printer. If your printer does not have a side
cover on the left panel, see “If your printer does not have a side cover” for instructions on
installing the DIMM.
1 If you have not already done so, print a Configuration page to find out how much memory
is installed in the printer before adding more memory. See “Printing a Configuration page.”
2 Press (power button) to turn off the printer.
3 Unplug the power cord and disconnect any cables.
4 On the left side of the printer, unlatch and remove the side cover.
5 Remove the DIMM cover.
4
6 On an empty DIMM slot, push the DIMM locks outward to release the locks.
5
2-4 ENWW
Page 29
7 Remove the DIMM from the antistatic package.
8 Align the DIMM so that the notches on the lower edge line up with the raised marks in the
DIMM slot.
9 Insert and press the DIMM into the slot until it snaps into place.
9
8
Note To remove a DIMM, release the locks on the DIMM slot by pushing them outward.
10 Replace the DIMM cover.
11 Replace the side cover.
11
12 Reattach the power cord and any cables, and then turn on the printer.
10
Checking memory installation
Follow this procedure to verify that the DIMM is installed correctly.
1 Check that
message appears, a DIMM might have been installed incorrectly.
2 Print a new Configuration page. (See “Printing a Configuration page.”)
READY appears on the control panel when the printer is turned on. If an error
3 Check the memory section on the Configuration page and compare that memory amount
to the memory amount on the Configuration page that printed before the DIMM
installation. If the amount of memory has not increased, one of the following problems
might have occurred:
• The DIMM might not be installed correctly. Remove the DIMM and repeat the
installation procedure.
• The DIMM might be defective. Try a new DIMM.
ENWW 2-5
Page 30
If your printer does not have a side cover
If your printer does not have a side cover on its left panel, follow these instructions to install the
DIMM.
1 If you have not already done so, print a Configuration page to find out how much memory
is installed in the printer before adding more memory. See “Printing a Configuration page.”
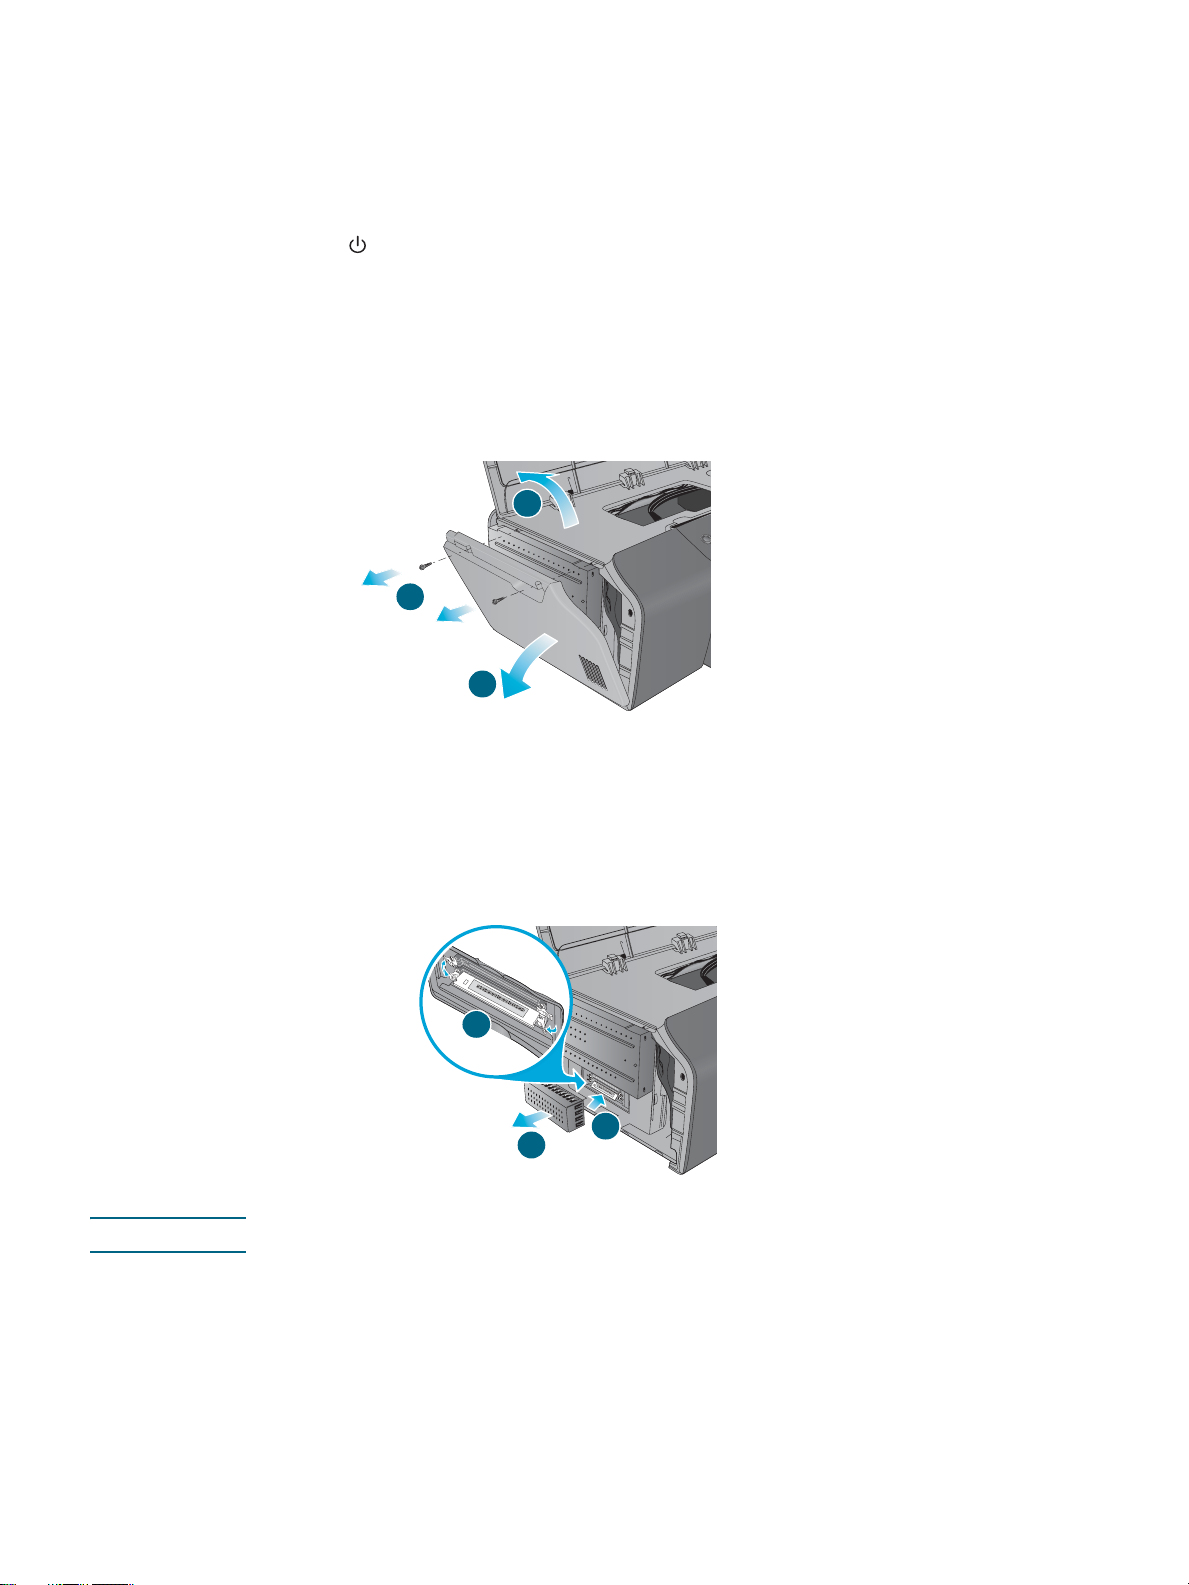
2 Press (power button) to turn off the printer.
3 Unplug the power cord and disconnect any cables.
4 Lift the printer off Tray 2.
5 Open the top cover.
6 Use a Phillips screwdriver to remove the screws at the top of the side access panel.
7 Grasp the top of the panel and remove it from the printer.
5
6
7
8 Remove the DIMM cover.
9 On an empty DIMM slot, push the DIMM locks outward to release the locks.
10 Remove the DIMM from the antistatic package. Align the DIMM so that the notches on the
lower edge line up with the raised marks in the DIMM slot.
11 Insert and press the DIMM into the slot until it snaps into place.
11
8
Note To remove a DIMM, release the locks on the DIMM slot by pushing them outward.
10
12 Replace the DIMM cover.
2-6 ENWW
Page 31

13 Insert the hooks at the bottom of the side access panel into the corresponding slots on the
printer, and then close the side access panel. You might have to apply some force to close
the panel completely.
14
12
13
14 Replace and tighten the screws.
15 Set the printer on top of Tray 2.
WARNING! Be careful to keep your fingers and hands clear of the bottom of the printer.
16 Reattach the power cord and any cables, and then turn on the printer.
17 Check that the DIMM is installed correctly. See “Checking memor y instal la tio n.”
ENWW 2-7
Page 32

500-sheet Tray 2
This optional Tray 2 can hold up to 500 sheets of plain paper, and replaces the 250-sheet
Tray 2 that comes with the HP Business Inkjet 2300 and 2300n. The HP Business Inkjet
2300dtn comes with the 500-sheet Tray 2.
Installing Tray 2
1 Unpack the tray and remove the packing tape and cardboard insert. Move the tray to the
prepared location.
2 Press (power button) to turn off the printer, and then unplug the power cord.
3 Set the printer on top of the tray.
WARNING! Be careful to keep your fingers and hands clear of the bottom of the printer.
2-8 ENWW
Page 33

Enabling optional accessories in the printer driver
If you are using operating systems other than Windows or Mac OS, you do not need to enable
the optional accessories.
To enable optional accessories in Windows
1 Do one of the following:
• Windows 98, Windows Me, Windows NT 4.0, and Windows 2000:
Click Start, point to Settings, and then click Printers.
• Windows XP:
Click Start, and then click Printers and Faxes.
Or, click Start, click Control Panel, and then click Printers and Faxes.
2 Right-click the icon for the desired printer driver, and then click Properties.
3 Select one of these tabs: Configure, Device Settings, or Device Opt ions. (The name of
the tab depends on the printer driver and operating system.) On the selected tab, click the
optional accessory you want to enable, choose Installed from the drop-down menu, and
then click OK.
To enable optional accessories in Mac OS
Note Mac OS X (10.1 and later) automatically enables all optional accessories in the printer driver
when you install the printer software.
1 Click the printer’s desktop printer icon.
2 On the Printing menu, click Change Setup.
3 On the Change pop-up menu, select the optional accessory you want to enable.
4 On the To pop-up menu, select Installed.
5 Click OK.
ENWW 2-9
Page 34

2-10 ENWW
Page 35

Using the printer
3
Selecting print media
The printer is designed to work well with most types of office paper and with 25 percent cotton
bond paper. It is best to test a variety of print media types before buying large quantities. Find a
media type that works well and is easy to purchase.
Supported media sizes
The following table lists the sizes of media that are compatible with the printer and shows which
sizes can be used with the printer’s paper trays and accessories.
Media Tray 1 Tray 2* Auto-duplex unit**
Standard paper sizes
U.S. Letter (216 by 279 mm; 8.5 by 11 inches)
U.S. Legal (216 by 356 mm; 8.5 by 14 inches)
A4 (210 by 297 mm; 8.3 by 11.7 inches)
U.S. Executive (184 by 267 mm; 7.25 by 10.5 inches)
U.S. Statement (140 by 216 mm; 5.5 by 8.5 inches)
A5 (148 by 210 mm; 5.8 by 8.3 inches)
ISO B5 (176 by 250 mm; 6.9 by 9.8 inches)
JIS B5 (182 by 257 mm; 7.2 by 10.1 inches)
Cards
Index card (76 by 127 mm; 3 by 5 inches)
Index card (102 by 152 mm; 4 by 6 inches)
Index card (127 by 203 mm; 5 by 8 inches)
Hagaki (100 by 148 mm; 3.9 by 5.8 inches)
Ofuku Hagaki (148 by 200 mm; 5.8 by 7.9 inches)
A6 card (105 by 148 mm; 4.1 by 5.8 inches)
Envelopes
U.S. #10 Envelope (105 by 241 mm; 4.125 by
9.5 inches)
A2 Envelope (111 by 146 mm; 4.375 by 5.75 inches)
Monarch Envelope (98 by 191 mm; 3.88 by 7.5 inches)
HP Greeting Card Envelope
(111 by 152 mm; 4.375 by 6 inches)
DL Envelope (110 by 220 mm; 4.3 by 8.7 inches)
C5 Envelope (162 by 229 mm; 6.4 by 9 inches)
ENWW 3-1
Page 36

Media Tray 1 Tray 2* Auto-duplex unit**
C6 Envelope (114 by 162 mm; 4.5 by 6.4 inches)
Japanese Envelope Chou #3
(120 x 235 mm; 4.7 by 9.3 inches)
Japanese Envelope Chou #4
(90 x 205 mm; 3.5 by 8.1 inches)
Custom-size media (Tray 1)
Between 76.2 to 216 mm wide and 127 to 356 mm long
(3 to 8.5 inches wide and 5 to 14 inches long)
Custom-size media (Tray 2)
Between 182 to 216 mm wide and 257 to 356 mm long
(7.2 to 8.5 inches wide and 10.1 to 14 inches long)
Custom-size media (auto-duplex unit)
Between 76.2 to 216 mm wide and 127 to 297 mm long
(3 to 8.5 inches wide and 5 to 11.7 inches long)
* Tray 2 refers to both the 250-sheet Tray 2 (provided with the HP Business Inkjet 2300 and 2300n) and the 500-sheet
Tray 2 (provided with the HP Business Inkjet 2300dtn, also available as an accessory for the HP Business Inkjet 2300
and 2300n).
** The optional auto-duplex unit allows automatic printing on both sides of the paper.
Supported media types and weights
CAUTION Some media, such as envelopes, cards, transparencies, and photo paper, can only be used
with Tray 1. Using this media in Tray 2 or the auto-duplex unit can cause jams and might
damage the printer and auto-duplex unit.
Tray Media Type Weight Capacity
Tray 1 Paper 60 to 100 g/m
(16 to 28 lb bond)
Transparencies Up to 30
Envelopes 75 to 90 g/m
(20 to 24 lb bond
envelope)
Cards Up to 200 g/m
(110 lb index)
Tray 2 Paper 60 to 100 g/m
(16 to 28 lb bond)
Auto-duplex
unit
Paper 60 to 100 g/m
(16 to 28 lb bond)
2
2
2
2
2
Up to 150 sheets of plain paper
(15 mm or 0.6 inch stacked)
(8 mm or 0.3 inch stacked)
Up to 22
(15 mm or 0.6 inch stacked)
Up to 60
(15 mm or 0.6 inch stacked)
Up to 250 sheets of plain paper
(25 mm or 1 inch stacked)
For the HP Business Inkjet 2300dtn,
Tray 2 holds up to 500 sheets
(50 mm or 2 inches stacked).
1 at a time
Cards (Ofuku Hagaki
only)
Up to 160 g/m2
(90 lb index)
1 at a time
Output tray All supported media Up to 100 sheets plain paper
(text printing)
3-2 ENWW
Page 37

Recommended HP media
The following table shows which media can be used with the printer’s trays and auto-duplex
unit. For information about ordering HP media, see “Ordering HP supplies and accessories.”
Media Tray 1 Tray 2 Auto-duplex unit
Plain paper:
z HP Bright White Inkjet Paper
z HP Office Paper
z HP Office Recycled Paper
z HP Multipurpose Paper
z HP Printing Paper
z HP Everyday Paper
z HP Everyday Copy & Print Paper
HP Premium Paper
HP Premium Inkjet Heavyweight Paper
HP Premium Inkjet Transparency Film
HP Premium Plus Inkjet Transparency Film
HP Everyday Photo Paper
HP Colorfast Photo Paper
HP Premium Plus Photo Paper
HP Premium Photo Paper
HP Photo Paper
HP Brochure and Flyer Paper
ENWW 3-3
Page 38

Minimum margins
The document margins must match or exceed these minimum settings in portrait orientation.
The illustration below shows which side of the paper and envelope corresponds to each
margin.
Top
Bottom
RightLeft
Top
Bottom
RightLeft
Media Left margin Right margin Top margin Bottom margin
Letter, legal, executive,
statement
A4, A5, ISO B5, JIS B5,
and cards
Envelopes 3.4 mm
Custom-size media
(Tray 1, Tray2)
Custom-size media
(auto-duplex unit)
6.4 mm
(0.25 inch)
3.4 mm
(0.13 inch)
(0.13 inch)
6.4 mm
(0.25 inch)
6.4 mm
(0.25 inch)
6.4 mm
(0.25 inch)
3.4 mm
(0.13 inch)
3.4 mm
(0.13 inch)
6.4 mm
(0.25 inch)
6.4 mm
(0.25 inch)
3.0 mm
(0.12 inch)
3.0 mm
(0.12 inch)
12.7 mm
(0.50 inch)
3.0 mm
(0.12 inch)
12.7 mm
(0.50 inch)
12.7 mm
(0.50 inch)
12.7 mm
(0.50 inch)
12.7 mm
(0.50 inch)
12.7 mm
(0.50 inch)
12.7 mm
(0.50 inch)
Note When you are using the auto-duplex unit, the top and bottom margins must be at least 12.7 mm
(0.5 inch).
3-4 ENWW
Page 39

Loading print media
You can load up to 150 sheets of paper in Tray 1 and 250 sheets of paper in Tray 2. For the
HP Business Inkjet 2300dtn printer, Tray 2 holds up to 500 sheets of plain paper. This
500-sheet Tray 2 is also available as an optional accessory for the HP Business Inkjet 2300
and HP Business Inkjet 2300n.
Use Tray 1 for media types such as envelopes, cards, transparencies, and photo paper.
Tips for loading media
z Always use media that conforms to the printer specifications. For more information about
the media that can be used with the printer, see “Selecting print media.”
z When loading a tray, position the media print side down with the right edge of the media
against the right edge and front guide of the tray . For preprinted forms and letterhead, load
the media with the top edge feeding into the printer first.
z To prevent jams, load only one type of media at a time into a tray. Also, when adding
media, always remove the existing media and realign the media width and length guides
to fit the new media. For more information about avoiding media jams, see “Tips for
avoiding jams.”
Loading Tray 1 or Tray 2
1 Pull the tray out of the printer.
2 If you are loading Tray 1, raise and remove the output tray.
3 If you are loading paper between 279 mm and 356 mm long (11 inches to 14 inches long),
move the latch on the tray to the right and lower the front of the tray.
Note You do not need to lower the front of the tray when loading A4-size or letter-size paper.
ENWW 3-5
Page 40

4 Slide the media length guide and media width guide to the markings in the tray for the size
you are loading. Then place the media in the tray.
A4/letter Legal
5 If you are loading Tray 1, reattach and close the output tray.
6 Slide the tray into the printer.
CAUTION Do not raise the front of the tray if legal paper is loaded, or damage to the paper or printer can
result.
7 Pull out the extension on the output tray.
8 When printing, select the appropriate media type and size in your application or printer
driver.
Selecting trays
When you print a document, you can allow the printer to select the tray for the print job, or you
can select a specific tray. These settings are available in the Source is or Paper Source
drop-down menu in Windows printer drivers, and in the All pages from pop-up menu in the
Mac OS printer driver.
If you do not select a tray in the printer driver, the printer automatically selects a tray. By
default, the printer draws paper from Tray 2 first. However, if the media type or size for the
print job are not supported by Tray 2, the printer draws media from Tray 1.
3-6 ENWW
Page 41

Printing using the printer drivers
In most situations, you will probably print documents using the printer driver. Although specific
options vary depending on the software application you are using, you can usually gain access
to the printer driver by clicking File, and then Print in the software application.
For more information about printer driver features, see the printer driver online help. For more
information about printing from a specific software application, see the documentation for the
software application.
Note For information about printing from a Macintosh, see “Changing settings in Mac OS.”
To print using the PCL 5c or PCL 6 printer driver
1 Open the document you want to print.
2 On the File menu, click Print.
3 On the Name drop-down menu, select the PCL 5c or PCL 6 printer driver, and then click
Properties or Setup. (The options might be different for your application.)
4 On the Source is drop-down menu, select the location of the media on which you want to
print.
• If you want to print from a specific tray, select Tray 1 or Tray 2.
• If you want to print an envelope, card, or other special media using Tray 1, select
Manual Feed in Tray 1.
5 On the Type is drop-down menu, select the type of media you want to print.
6 Select a Print Quality setting.
7 Change other print settings, if necessary, and then click OK.
8 Click Print.
To print using the emulated PostScript printer driver
1 Open the document you want to print.
2 On the File menu, click Print.
3 On the Name drop-down menu, select the emulated PostScript (PS) printer driver, and
then click Properties or Setup. (The options might be different for your application.)
4 Select the type of media on which you want to print:
• Windows 98 and Windows Me: Click More Options and then click OK. On the Paper
type drop-down menu, select the media type.
• Windows NT 4.0: On the Advanced tab, select Media on the upper scrolling menu. In
the Change Media Settings menu, select the media type.
• Windows 2000 and Windows XP: On the Paper/Quality tab, on the Type is drop-down
menu, select the media type on which you want to print.
5 On the Source is drop-down menu, select the location of the media on which you want to
print.
This menu is located on the Paper tab for Windows 98 and Windows Me, the Advanced
tab for Windows NT 4.0, or the Paper/Quality tab for Windows 2000 and Windows XP.
• If you want to print from a specific tray, select Tray 1 or Tray 2.
• If you want to print an envelope, card, or other special media using Tray 1, select
Manual Feed in Tray 1.
ENWW 3-7
Page 42

6 Select a print quality setting for the print job:
• Windows 98 and Windows Me: On the Device Options tab, on the Printer features list,
select Print Quality. On the Change setting for drop-down menu, select the print
mode.
• Windows NT 4.0: In the upper scrolling menu of the Advanced tab, expand Document
Options, and then expand Printer Features. On the Change ‘Print Quality’ Setting
menu, select the print mode.
• Windows 2000 and Windows XP: On the Paper/Quality tab, on the Print Quality
drop-down menu, select the print mode.
7 Change other print settings, if necessary, and then click OK.
8 Click Print or OK.
Changing printer settings
Changing settings in Windows
You can change printer settings from a software application, from the printer driver, and from
the control panel. You need to change the printer settings when you change media sizes or
types, or when you want to use optional features such as printing on both sides of the paper.
Note Settings in a software application (for example, media size) always take precedence over
settings in the printer driver or the control panel.
If you want to set printing options only for the documents you are printing from a particular
application, change the settings from the application. After you close the application, the
printer settings will return to the defaults configured in the printer driver.
If you want to set printing options for all software applications you use on the computer,
change the default settings in the printer driver. To do so, you must open the printer driver
from the Start menu.
To change settings in an application
With a document open in the application, do the following:
1 On the File menu, click Print.
2 Select the printer driver (PCL 5c, PCL 6, or PS) and then click Setup or Properties. (The
options might be different for your application.)
3 Change the settin gs and clic k OK.
4 Click Print or OK to print the document.
3-8 ENWW
Page 43

To change default settings in the printer driver
1 From the Windows desktop, do one of the following:
• Windows 98, Windows Me, Windows NT 4.0, and Windows 2000:
Click Start, point to Settings, and then click Printers.
• Windows XP:
Click Start, and then click Printers and Faxes.
Or, click Start, click Control Panel, and then click Printers and Faxes.
2 Right-click the printer icon, and then choose the option for your operating system:
• Windows 98 and Windows Me: Click Properties.
• Windows NT 4.0: Click Document Defaults or Properties.
• Windows 2000 and Windows XP: Click Printing Preferences or Properties.
3 Change the desired settings, and then click OK.
Changing settings in Mac OS
You can change printer settings from the Page Setup and Print dialog boxes in Mac OS, or
from the control panel. Settin gs in Mac OS override settings in the contr ol panel .
You can also select the default printer. The default printer is the one that is used if you choose
the Print command without first specifying which printer you want to use with an application.
The default printer should be the printer that you use most often.
For more information about changing printer settings, see the Mac Help on your computer.
To change page setup settings
1 Open the document you want to print.
2 On the File menu, click Page Setup.
3 From the Fo rm at for pop-up menu, select the printer for which you want to format the
document, and then change the desired settings (such as the page size).
4 On the Paper pop-up menu in Mac OS 9 (9.1 and later) or the Paper Size pop-up menu in
Mac OS X (10.1 and later), select the media size on which you want to print.
5 Click OK.
To change print settings
1 Open the document you want to print.
2 On the File menu, click Print.
3 Select the location of the media or the type of media on which you want to print:
• Mac OS 9 (9.1 and later): On the pop-up menu, select General. Click All pages from,
and then select the media source or the media type.
• Mac OS X (10.1 and later): On the pop-up menu, select Paper Feed. Click All pages
from, and then select the media source. Select Printer Features to change the media
type.
4 Change any other settings (such as the print quality).
5 Click Print.
ENWW 3-9
Page 44

Printing on special media
In addition to printing on plain paper, you can print on special media, including the following
types:
z cards and envelopes
z transparencies
z custom-size media
Note Always load special media in Tray 1, and select the correct media type, the print quality, and
the media source before printing.
For information about supported media types and sizes, see “Selecting print media.”
Printing on cards and envelopes
Note If your software application supports printing on cards or envelopes, follow the application’s
instructions to print the card or envelope.
To print on cards and envelopes
1 Remove Tray 1 from the printer.
2 Remove the output tray and then remove all media from Tray 1.
3 Insert the cards or envelopes into the tray (envelopes with the flaps facing up and to the
right).
4 Slide the media width and length guides to the edges of the cards or envelopes.
5 Replace the output tray and insert Tray 1 into the printer.
6 Print from your application, making sure you select the correct media size and type.
For more information about setting the printing options, see “Changing printer settings.”
Printing on transparencies
When printing on transparencies, follow these guidelines:
z Use Tray 1 to print on transparencies. Load a maximum of 30 transparencies in the tray.
z Handle transparencies using the edges. Oils from your fingers can cause print quality
problems.
z Use HP Premium Inkjet Transparency Film or HP Premium Plus Inkjet Transparency Film,
which is specifically designed to work with your printer, or use other transparencies
designed to work with HP Inkjet printers. For information about ordering transparencies,
see “Ordering HP supplies and accessories.”
3-10 ENWW
Page 45

To print on transparencies
1 Remove Tray 1 from the printer.
2 Remove the output tray and then remove all media from Tray 1.
3 Insert the transparencies into the tray, with the rough side down and the adhesive strip
pointing forward.
4 Slide the media width and length guides to the edges of the transparencies.
5 Replace the output tray and insert Tray 1 into the printer.
6 Print from your application, making sure you select the correct media size and type.
For more information about setting the printing options, see “Changing printer settings.”
7 Remove each transparency as it prints and set it aside to dry. Allowing the transparencies
to stack up may cause smearing.
Printing on custom-size media
z Use Tray 1 when printing on media that is 76.2 to 216 mm wide and 127 to 356 mm long (3
to 8.5 inches wide and 5 to 14 inches long).
z If your application supports custom-size media, set the media size in the application
before creating and printing the document. If your applicat ion does not sup port
custom-size media, set the size in the printer driver, create the document, and then print it.
(You might need to reformat existing documents to print them correctly on custom paper
sizes.)
To print custom-size media
1 Remove Tray 1 from the printer.
2 Remove the output tray and then remove all media from Tray 1.
3 Insert the custom-size media into the tray.
4 Slide the media width and length guides to the edges of the media.
5 Replace the output tray and insert Tray 1 into the printer.
6 Print from your application, making sure you select the correct media size and type.
For more information about setting the printing options, see “Changing printer settings.”
ENWW 3-11
Page 46

Printing photographs
The photographs that you take with your digital camera can be printed from a software
application such as HP Photo Printing Software.
Use Best print quality to print photographs. In this mode, printing takes longer and more
memory is required from your computer.
This printer can produce up to 4800 by 1200 optimized dpi on photo papers using the following
printer drivers:
Printer driver Operating system
PCL 6
PS Windows 2000, Window s XP, Mac OS 9 (9.1 and la ter), and MacOS X (10.1 and
Printing in this mode may require additional memory, depending on the size and resolution of
the image being printed. For example:
Image resolution Image size Extra memory required
600 dpi 203 by 254 mm (8 by 10 inches) 128 MB
1200 dpi 102 by 152 mm (4 by 6 inches) 128 MB
Remove each sheet of media as it prints and set it aside to dry. Allowing wet media to stack up
can cause smearing.
To purchase additional memory, see “Ordering HP supplies and accessories.”
Windows 98, Windows Me, Windows NT 4.0, Windows 2000, and Windows XP
later)
To print digital photographs (Windows)
1 Load the appropriate media in Tray 1. Be sure to load the media with the print side down.
2 On the File menu of the application, click Print, and then click Properties. (The actual
steps can vary; this is the most common method.)
3 On the Paper/Quality tab, select the me dia typ e yo u ar e usi ng from th e Type is menu (for
example, HP Premium Photo Paper).
4 Under Print Quality, click Best.
5 Select the media size from the Size is menu.
6 Change any other print settings if necessary.
7 Click OK to close the dialog box.
8 Click OK to print.
To print digital photographs in Mac OS 9 (9.1 and later)
1 Load the appropriate media in Tray 1. Be sure to load the paper with the print side down.
2 On the File menu of the application, click Print.
3 On the pop-up menu, select General. Click All pages from and select the media type you
are using (for example, HP Premium Photo Pa per) .
4 On the pop-up menu, select Printer Specific Options. Click Print Quality and select
Best or 4800x1200-optimized dpi. Click HP Resolution to select the resolution.
5 Change any other print settings if necessary.
6 Click Print.
3-12 ENWW
Page 47

To print digital photographs in Mac OS X (10.1 and later)
1 Load the appropriate media in Tray 1. Be sure to load the paper with the print side down.
2 On the File menu of the application, click Print.
3 On the pop-up menu, select Printer Features. Click Media Type and select the media
type you are using (for example, HP Premium Photo Paper).
4 On the pop-up menu, select Image Quality. Click Print Quality and select Best. Click HP
Resolution to select the resolution.
5 Change any other print settings if necessary.
6 Click Print.
Printing on both sides of the page
The printer can automatically print on both sides of media with the optional auto-duplex unit.
Note Make sure the auto-duplex unit has been configured in the printer driver you are using. For
more information, see “Enabling optional accessories in the printer driver.”
Guidelines for duplexing
When printing on both sides of the page, follow these guidelines.
z The auto-duplex unit supports the following media sizes: letter, ex ecutive, A4, A5, ISO B5,
JIS B5 and Ofuku Hagaki card. It can also be used for custom-size media that is between
76.2 to 216 mm wide and 127 to 297 mm long (3 to 8.5 inches wide and 5 to 11.7 inches
long).
z Do not print on both sides of transparencies, envelopes, photo paper, brochure paper,
glossy media, or paper lighter than 60 g/m
bond). Jams might occur with these types of media. However, double-sided special media
made exclusively by HP can be used with the auto-duplex unit.
z To print on both sides of a page, make the selection from the software application or
printer driver. See “Performing automatic duplexing.”
If you are using operating systems other than Windows or Mac OS, turn on the
setting in the control panel (Printing menu).
z The minimum top and bottom margins should be 12.7 mm (0.5 inch).
z When using media such as letterhead, preprinted media, and media with watermarks and
prepunched holes, make sure you load the media in the tray with the front side facing
down.
z When automatically printing on both sides of a page, one side of the page is printed first,
and the printer pauses while the ink dries. T o print the second side, the page must partially
exit the printer to be flipped. When printing is complete, the paper is dropped on to the
output tray. Do not attempt to remove the page from the printer until both sides have
finished printing.
2
(16 lb bond) or heavier than 100 g/m2 (28 lb
DUPLEX
ENWW 3-13
Page 48

Performing automatic duplexing
Before printing, make sure the auto-duplex unit has been enabled in the printer driver (see
“Enabling optional accessories in the printer driver”).
To perform automatic duplexing (Windows)
1 Load the appropriate paper in Tray 1 or Tray 2. Be sure to load the paper with the front
side facing down.
2 On the File menu of the application, click Print, and then click Properties. (The actual
steps can vary; this is the most common method.)
3 On the Finishing tab, select the Print on Both Sides check box.
4 When duplexing, the top margin might need to be increased slightly to make sure the
pages align. This may cause the contents of a page to overflow to the next page. Select
the Preserve Layout check box to reduce the page contents so that your page layout is
not affected.
5 Select or clear the Flip Pages Up check box depending on which way you want the
binding. See the graphics in the printer driver for examples.
6 Click OK to close the dialog box.
7 Click OK to print.
To perform automatic duplexing in Mac OS 9 (9.1 and later)
1 Load the appropriate paper in Tray 1 or Tray 2. Be sure to load the paper with the front
side facing down.
2 On the File menu of the application, click Print.
3 On the Layout panel, select the Print on Both Sides check box, and select the binding
orientation you want (select the correct icon).
4 Click OK.
To perform automatic duplexing in Mac OS X (10.1 and later)
1 Load the appropriate paper in Tray 1 or Tray 2. Be sure to load the paper with the front
side facing down.
2 On the File menu of the application, click Print.
3 On the Duplex panel, selec t the Print on Both Sides check box and the binding
orientation you want (select the correct icon).
4 Print the document.
3-14 ENWW
Page 49

Canceling a print job
You can cancel a print job in these ways:
z Press (cancel job button) on the printer.
Pressing the (cancel button) clears the job that the printer is currently processing. It
does not af fect jobs waiting to be processed.
z For Windows, double-click the printer icon that appears in the lower right corner of the
computer screen. Select the document you want to cancel. From the Document menu,
click Cancel.
z For Mac OS 9 (9.1 and later), double-click the desktop printer icon, select the print job,
and then click Trash.
z For Mac OS X (10.1 and later), click the Print Center icon. In the Printer List dialog box,
double-click the printer icon. In the HP Business Inkjet 2300 dialog box, select the print
job and click Delete.
ENWW 3-15
Page 50

3-16 ENWW
Page 51

Using diagnostics tools
4
Using the Toolbox
The Toolbox provides status and maintenance information about your printer. It also provides links
to the online user’s guide for step-by-step guidance for basic printing tasks and help for solving
problems. The Toolbox is available for Windows only.
To monitor a printer on a shared port (for example, \\portname\printername) from a client machine,
the Toolbox must be running on the server machine as well as the client machine.
To open the Toolbox, from the Start menu, point to Programs, point to hp business inkjet 2300
series, and then click hp business inkjet 2300 series Toolbox.
The Toolbox has two tabs: the Printer Status tab and the Information tab.
Printer Status tab
The Printer Status tab displays ink levels and the printer status. The drop-down list displays the
currently selected printer. Below the list, the status box displays the printer’s status.
Use the following buttons in the Printer Status tab to view the information and select Toolbox
message preferences.
Button What clicking the button does
Order Supplies Opens a temporary HTML file containing a disclaimer and agreement
to send your information to the HP website. If you accept the
disclaimer, you are c onn ec ted to the HP website for ordering supplie s.
Ink Cartridge Information Opens a dialog box showing the order numbers and expiry dates of
the installed cartridges. The Supplies Information button in this
dialog box display s informatio n on orde ring replacem ent cartrid ges for
your printer.
Preferences Opens a dialog box that lets you select which Toolbox messages
appear. You can specify whether you want to be notified by an audio
alert when an error occurs , as well a s the types of error messa ges you
want to see. For example, you can choose to see only messages
about paper and hardware.
You can also choose to enable myPrintMileage AutoSend, which will
provide you with a closer forecast of your printer usage in the
myPrintMileage website.
ENWW 4-1
Page 52

Information tab
The Information tab lets you register the printer and get help on using the printer, solving
problems, and contacting HP support. You can also gain access to myPrintMileage and HP
Instant Support, and display printer hardware and printhead health information. If the printer is
connected to a network, you can also display the embedded Web server by clicking Launch.
Use the buttons on the Information tab to gain access to the information and tools.
Button What clicking the button does
Launch Opens the embedded Web server if the printer is connected to a network.
For more information about the embedded Web server, see “Using the
embedded Web server.”
myPrintMileage Opens the myPrintMileage website which shows your printer usage
information, such as the siz es of prin t jobs, in k cartri dge usage, an d me dia
usage. This feature is also available through the embedded Web server.
Printer Hardware Displays hardware information such as the printer model number and
service identification num be r.
Printhead Health Displays information about the condition of each printhead.
HP Instant Support Opens the HP Instant Support website which provides customized
problem-solving inform ation and tro ubleshooting tips. For more in formation
about HP Instant Support, see “Using HP Instant Support.”
Register Your Printer Displays instructions that guide you through registering the printer online.
How Do I? Displays step-by-step instructions for completing printer tasks.
Troubleshooting Displays step-by-step help for common printe r problems.
Contact HP Displays information on how to contact HP support.
Using the embedded Web server
The printer comes with an embedded Web server. When the printer is connected to a network,
the embedded Web server is automatically available.
The embedded Web server allows you to view printer and network status and to manage
printing functions from your computer instead of from the control panel. Using a standard Web
browser, this remote management tool allows you to do the following:
z view printer status information
z view supplies status and order new supplies
z view the usage and event log
z receive notification of printer and supplies events
z configure settings such as language and security information
z perform printer maintenance tasks
z view and change network configuration
4-2 ENWW
Page 53

System requirements
To use the embedded Web server, you must have the following:
z a TCP/IP-based network (IPX/SPX-based networks are not supported)
z a Web browser installed on your computer, either Netscape Navigator 4.8 or Microsoft
Internet Explorer 5.0 and above
The printer must be connected to the network. You cannot use the embedded Web server
when the printer is connected directly to a computer.
You can open and use the embedded Web server without being connected to the Internet.
However, some features will not be available. You cannot view the embedded Web server
pages from outside a firewall.
To access the embedded Web server
You can gain access to the embedded Web server in the following ways:
z From the Toolbox (Windows only)
Launch the embedded Web server from the Information tab in the Toolbox. The default
Web browser for the computer opens and displays the embedded Web server information.
z From a Web browser (Windows and Mac OS)
In a supported Web browser on your computer, type the IP address assigned to the
printer. For example, if the printer’s IP address is 123.123.123.123, you would type
http://123.123.123.123 into your Web browser.
The printer IP address is listed on the Configuration page. For more information, see “Printing
a Configuration page.” After you gain access to the embedded Web server, you can bookmark
it so that you can return to it quickly in the future.
Embedded Web server pages
The embedded Web server has three tabs that contain detailed information about the printer,
and links to other e-services.
z Information tab
z Settings tab
z Networking tab
The current printer status appears in the top-right corner of the Web browser window. Links to
other e-services appear in the Other Links section at the bottom of the Information and
Settings tabs.
ENWW 4-3
Page 54

Informatio n ta b
The Information pages of the embedded Web server provide a summary of the configuration
and status of the printer and its supplies.
STATUS
Printer This page displays information about the printer, such as the model and
serial number of the pri nter, a nd th e trays and mem ory in stall ed. In k ca rtridge
levels are also shown.
Ink Supplies Select Status to see the current ink cartridge levels and printhead health
status for the printer. Select Pages Rema ining to see the estimated number
of pages that can be printed with the remaining ink for full co lor, business
color, or black text documents.
Usage These pages show the usage statistics:
z Consumables shows the amounts of ink and media used.
z Job shows the number of pages printed and ink used per user, for the
last 20 print jobs.
z Users shows the number of pages printed and ink used by the top 10
users.
Event Log This page shows the 10 most recent items in the printer event log. The most
recent item appears at the top of the list.
Settings tab
The Settings pages of the embedded Web server allow you to configure the printer from your
computer. These pages can be password protected. Always consult with your network
administrator before changing the printer’s configuration.
ALERTS
Notification This page allows you to add the e-mail addresses of the people who will
receive electronic notification of printer events, such as ink supplies and
media path events. You are provided with three e-mail lists, which you can
rename as needed. You can add up to two e-mail addresses to each list.
In addition, this page lets you configure the outgoing e-mail server settings
that the embedded Web server uses when sending e-mail notification of
printer events.
AutoSend This page allows you to send printer usage information to HP automatically.
HP uses this information in the myPrintMileage page to help you understand
your printing patterns. With this information, you can estimate the amount of
ink and paper you use each month , thus allowing you to manage your printin g
supplies more effectively.
The printer usage information includes the tracking of usage by individual
users. When Enable User ID is not selected (the default), the user
information that is sent to HP is encrypted and real user names are not
shown in the myPrintMileage page. Select Enable User ID if you want real
user names to be shown in the myPrintMileage page.
If AutoSend is enabled, the embedded Web server automatically sends the
usage information to HP. HP will treat this information in the manner set out
in the Hewlett-Packard Online Privacy Statement
(http://www.hp.com/country/us/eng/privacy.htm.)
Note: Before you use AutoSend, you must configure the outgoing e-mail
settings in the Notification page.
4-4 ENWW
Page 55

CONFIGURATION
Asset Tracking This lets you name the printer and assign an asset number.
Media Handling This page lets you configure the printer’s media-handling settings. For more
information about these settings, see the Paper Handling menu.
Security This c onfigures the pass word inform ation for the embe dded Web server. Th is
information should only be configured by the network administrator.
Language This page allows you to change the language for the embedded Web server
as well as the printer’ s cont rol pan el.
Usage Tracking This page shows a summary of the usage statistics, and allows you to reset
the Users statistics. (Users statistics are displayed when you select the
Information tab, Usage, and then Users tab).
Customized Link This page le ts y ou ad d a link to a Web page. The links you add app ea r in the
Other Links section, which can be found at the bottom of the Information and
Settings tabs.
MAINTENANCE
Diagnostic This page allows you to perform printer troubleshooting and maintenance
tasks, such as testing media paths in the printer, aligning printheads, and
cleaning printheads.
Networking tab
The Networking pages of the embedded Web server allow the network administrator to
configure the HP Jetdirect print server for the printer. This tab will not appear if the printer is
connected to a network using anything other than an HP Jetdirect print server card.
Refer to the online help and to the HP Jetdirect Administrator’s Guide for more information.
This guide is located on the Starter CD.
Other Links
The following e-services are available from the Information and Settings tabs. You must have
an Internet connection to use these e-services.
HP Instant Support HP Instant Support is a Web-based tool that provides you with
product-specific services, troubleshooting tips, and information about your
printer’s ink and media usage. With this information, you can diagnose and
solve printer problems, and manage your printing activities and printer
supplies more effectively.
To use this tool, detailed printer information, such as serial number, error
conditions, and statu s, is sent to HP. For more inf ormati on ab out HP Instan t
Support, see “Using HP Instant Support.”
myPrintMileage This helps you manage your printing activities and printer supplies more
effectively. For more information, see “Using myPrintMileage.”
Order Supplies This page shows the remaining life of the different ink cartridges and
provides links for the online ordering of supplies, such as ink cartridges and
print media.
Note If you use a dial-up connection and did not connect when you first opened the embedded Web
server, you must connect before you can visit these websites. Connecting might require you
to close the embedded Web server and reopen it.
ENWW 4-5
Page 56

Using HP Instant Support
HP Instant Support is a Web-based tool that provides you with product-specific services,
troubleshooting tips, and information about your printer’s ink and media usage. With this
information, you can diagnose and solve printer problems, and manage your printing activities
and printer supplies more effectively.
HP Instant Support provides the following information about your printer:
z Easy access to troubleshooting tips
To help you quickly resolve printer problems or prevent some problems from happening,
HP Instant Support provides tips that are customized for your printer.
z Resolution of specific printer errors
HP Instant Support provides immediate access to information that can help you resolve
error messages specific to your printer. To see a description of the problem, as well as
recommendations for solving or preventing the problem, click the link within the message.
To see a list of past printer errors, click Alerts on the left side of the HP Instant Support
page.
z Notification of printer driver and firmware updates
When a firmware or driver update for your printer is available on the HP website, a
message appears on the HP Instant Support homepage. Click the link within the message
to go directly to the download section of the HP website.
z Obtaining support services
HP offers a variety of support services that can help you maintain your printer. HP Instant
Support creates a list of the support services available for your printer. To learn more
about these services or to purchase a service, click the appropriate link.
z Managing ink and media usage (myPrintMileage)
myPrintMileage helps you manage your printing activities and printer supplies. This tool
tracks your printer usage information to help you plan the purchase of supplies.
To access HP Instant Support
You can use HP Instant Support from the Toolbox (Windows users only) or from the
embedded Web server if the printer is connected to an IP-based network.
z From the Toolbox (Windows only)
On the Information tab in the Toolbox, click HP Instant Support. Follow the instructions to
display the current HP Instant Support information for your printer.
z From the embedded Web server
In a Web browser, type the IP address assigned to the printer. In the Other Links section
of the Information or Settings tab, click HP Instant Support.
Note Do not bookmark Web pages used to display HP Instant Support. If you bookmark this site
and connect to it using the bookmark, the pages will not display the current information.
Instead, connect from the embedded Web server or from the Toolbox.
4-6 ENWW
Page 57

Security and privacy
To use HP Instant Support, detailed printer information, such as serial number, error
conditions, and status, is sent to HP. Hewlett-Packard respects your privacy and manages this
information according to the guidelines outlined in the Hewlett-Packard Online Privacy
Statement (http://www.hp.com/country/us/eng/privacy.htm).
Note To view all the data that is sent to Hewlett-Packard, select Source (for Internet Explorer) or
Page Source (for Netscape) from the View menu in your Web browser.
Using myPrintMileage
myPrintMileage keeps track of your printer usage to help you plan the purchase of supplies. It
consists of two parts:
z myPrintMileage website
z myPrintMileage AutoSend. This is a utility that periodically updates your printer usage
information to the myPrintMileage website. This will provide you with a closer forecast of
your printer usage.
To use the myPrintMileage website and myPrintMileage AutoSend, you must have the
following:
z The Toolbox installed.
z An Internet connection.
z The printer connected.
From the myPrintMileage website, you can find the following information about your printer:
z The amount of ink you have used. myPrintMileage forecasts how many ink cartridges you
might use in one year.
z Whether you use more black or color ink.
z The average quantity of media used per month, for each media type.
z The number of pages printed, and the estimated number of pages you can print with the
remaining amounts of ink.
To access the myPrintMileage website
You can access the myPrintMileage website from the Toolbox (Windows users only) or from
the embedded Web server if the printer is connected to an IP-based network.
z From the Toolbox (Windows only)
On the Information tab in the Toolbox, click myPrintMileage.
z From the embedded Web server
In a Web browser, type the IP address assigned to the printer. In the Other Links section
of the Information or Settings tab, click myPrintMileage.
Note Do not bookmark Web pages used to display myPrintMileage. If you bookmark this site and
connect to it using the bookmark, the pages will not display the current information. Instead,
connect to myPrintMileage as described above.
ENWW 4-7
Page 58

To enable myPrintMileage AutoSend
1 On the Printer Status tab in the Toolbox, click the Preferences button.
2 Select the Enable myPrintMileage AutoSend check box.
3 Click OK.
You can disable the utility at any time through the Toolbox or the myPrintMileage icon on the
Windows taskbar.
Using HP Web Jetadmin
HP Web Jetadmin is a Web-based system administration tool that allows remote installation
and management of networked peripherals from a Web browser. It enables network
administrators to configure network printers individually or in batch mode, manage printer
features, and monitor printer status, including levels for printer supplies.
HP Web Jetadmin is available only if the printer is connected to an IP-based network. This
browser-based software can be hosted on any of the following platforms:
z Windows NT 4.0, Windows 2000, or Windows XP Professional
z Red Hat Linux
z SuSE Linux
To download HP Web Jetadmin software, go to http://www.hp.com.
4-8 ENWW
Page 59

Maintaining and troubleshooting
5
Maintaining the printheads
Cleaning the printheads
The printheads for your printer have microscopic nozzles that can clog when exposed to the air for
more than a few minutes. The printer is designed to prevent nozzles from drying out when the
printer is idle and when it is turned off by pressing (power button) on the printer.
A printhead that is not used for long periods of time can also clog, resulting in a noticeable
decrease in print quality. To unclog the nozzles, clean the printheads.
Clean the printheads when lines or dots are missing from printed text or graphics.
Note Only clean the printheads when necessary. Cleaning the printheads when defects do not occur
in printed text or graphics wastes ink and shortens the life of the printheads.
To clean the printheads
1 Press (select button) on the control panel.
2 Press (down arrow button) to highlight
3 Press (down arrow button) to highlight
4 Press (down arrow button) to highlight
(select button).
Note Cleaning the printheads takes several minutes.
When the process is complete, the printer prints two pages with cleaning patterns.
MAINTENANCE, and then press (select button).
PRINT QUALITY, and then press (select button).
CLEAN PRINTHEADS, and then press
ENWW 5-1
Page 60

Cleaning the printhead contacts
If lines or dots are still missing from printed text or graphics after you have cleaned the
printheads, the printhead contacts might be dirty.
CAUTION HP recommends that you clean the printhead contacts only after you have cleaned the
printheads. Printhead contacts contain sensitive electronic components that can be damaged
easily.
To clean the printhead contacts
1 Turn the printer on.
2 Lift the top cover and the ink cartridge cover.
3 To open the printhead latch, lift it from the rear, and then pull it forward and down to
release the hooks from the metal catch bar.
3
4 Pull the latch up and back to uncover the printheads.
5 To remove a printhead, place your index finger in the loop of printhead’s handle, and
gently pull up until the printhead releases from the carriage assembly.
6 Using a soft, dry, lint-free cloth, carefully remove any ink from the contact pads on the
printhead and inside the printhead slot in the printer.
contact pads
ink nozzles
4
CAUTION Do not clean the ink nozzles on the bottom of the printhead.
7 Reinsert the printhead into its color-coded slot. Press down firmly on the printhead to
ensure proper contact.
8 Repeat steps 5 through 7 for the remaining printheads.
5-2 ENWW
Page 61

9 Pull the printhead latch all the way forward and down, and engage the metal catch bar
with the hooks. Push the latch toward the back of the printer. You might have to apply
some pressure to close the latch.
10 Close the top cover and the ink cartridge cover.
Aligning the printheads
The printheads are automatically aligned upon installation. Misaligned printheads produce
jagged edges or stray dots on printouts. If your printheads are misaligned, you can align them
through the control panel.
To align the printheads
1 Press (select button) on the control panel.
2 Press (down arrow button) to highlight
3 Press (down arrow button) to highlight
(select button).
4 Press (down arrow button) to highlight
(select button).
When the process is complete, the printer prints a page with alignment patterns.
MAINTENANCE, and then press (select button).
PRINT QUALITY, and then press
ALIGN PRINTHEADS, and then press
Replacing ink cartridges and printheads
Replacing ink cartridges
Replace ink cartridges when the following messages appear in the control panel:
REPLACE [COLOR] INK CARTRIDGE
[COLOR] INK CARTRIDGE EMPTY
[COLOR] INK CARTRIDGE EXPIRED
UNKNOWN [COLOR] INK CARTRIDGE
For installation information, see the instructions included with the ink cartridges.
Note When replacing ink cartridges, install the new ink cartridges right away. Ink cartridges should
not be removed from the printer for long periods of time.
ENWW 5-3
Page 62

Replacing printheads
Replace printheads when the following messages appear on the control panel:
REPLACE [COLOR] PRINTHEAD
INCOMPATIBLE [COLOR] PRINTHEAD
To replace printheads
1 Turn the printer on.
2 Lift the top cover and the ink cartridge cover.
3 To open the printhead latch, lift it from the rear, and then pull it forward and down to
release the hooks from the metal catch bar.
3
4 Pull the latch up and back to uncover the printheads.
5 To remove a printhead, place your index finger in the loop of the printhead’s handle, and
gently pull up until the printhead releases from the carriage assembly. Discard the used
printhead.
6 Remove the new printhead from its package.
7 Remove the protective tape from the printhead.
8 Insert the new printhead into its color-coded slot.
9 Press down firmly on the printhead to ensure proper contact after installation.
10 Pull the latch all the way forward and down, and engage the metal catch bar with the
hooks. Push the latch toward the back of the printer. You might have to apply some
pressure to close the latch.
11 Close the top cover and the ink cartridge cover.
12 Wait while the printer aligns the printheads. This can take a few minutes. When the
process is complete, an alignment page prints.
4
5-4 ENWW
Page 63

Calibrating color
The printer automatically calibrates color when a printhead or ink cartridge is changed.
Whenever you experience color-related problems with the printer, calibrate the color before
trying any other steps.
To calibrate color using the control panel
1 Press (select button) on the control panel.
2 Press (down arrow button) to highlight
3 Press (down arrow button) to highlight
(select button).
4 Press (down arrow button) to highlight
button).
A calibration page (with instructions) prints and the following message appears on the
control panel:
SELECT COLOR PATCH
NUMBER
5 Press (select button).
6 On the calibration page, find the box that matches the background color, and note its
number.
7 On the control panel, press (up arrow button) or (down arrow button) to highlight the
number of the box, then press (select button).
Calibrating linefeed
MAINTENANCE, and then press (select button).
PRINT QUALITY, and then press
COLOR CALIBRATION, and then press (select
If regular horizontal bands appear in printed text or graphics, calibrate the linefeed using the
following procedure.
To calibrate linefeed
1 Press (select button) on the control panel.
2 Press (down arrow button) to highlight
3 Press (down arrow button) to highlight
(select button).
4 Press (down arrow button) to highlight
(select button).
A calibration page (with instructions) prints and the following message appears on the
control panel:
FEWEST LIGHT/DARK LINES
5 Press (select button).
6 On the calibration page, find the box that has the fewest horizontal bands across it, and
note its number.
MAINTENANCE, and then press (select button).
PRINT QUALITY, and then press
LINEFEED CALIBRATION, and then press
ENWW 5-5
Page 64

7 On the control panel, press (up arrow button) or (down arrow button) to highlight the
number of the box, then press (select button).
General troubleshooting tips
If you have problems with the printer or have trouble printing, try the following troubleshooting
tips to help diagnose and solve the problems:
z Print a Configuration page, which can help diagnose printer problems. See “Printing a
Configuration page.”
z Check for problems by using the printer’s embedded Web server (if the printer is
connected to a network). For more information, see “Using the embedded Web server.”
z On the Starter CD, see the readme file or release notes for late-breaking information and
troubleshooting tips. For the latest information, visit the product support site at
http://www.hp .com/support/businessinkjet2300.
z Complete the “Quick checkup” steps.
Quick checkup
The following steps can help you diagnose and solve printer problems.
Step 1: Check the power
Make sure the power cord is connected firmly to the printer and to a working power outlet.
Make sure the printer is turned on.
Step 2: Check the print media
Make sure media is loaded correctly in the tray and that media is not jammed in the printer.
For information about loading media, see “Loading print me dia.” For information about clearing
and preventing jams, see “Clearing media jams.”
Step 3: Check the control panel and Attention light
When there is an error, the Attention light flashes. The printer displays two general types of
error messages:
Error message type Example Solution
Messages showing common
printer errors
Messages showing error
codes and short descriptions
of the errors
REPLACE [COLOR]
CARTRIDGE
XXXX.XXXX
[DESCRIPTION] :
[ACTION]
See “Control panel mess ages.”
Press (power button) to turn off the
printer, wait a few seconds, and then turn it
on again. In most situations, this action
solves the problem.
If the message persists, your printer might
need service. Write do wn the error code, an d
then go to HP Instant Support to learn more
about possible causes for the message. See
“HP Instant Support.”
5-6 ENWW
Page 65

Step 4: Check the ink cartridges and printheads
Make sure all four ink cartridges and printheads are properly installed and that the protective
tape covering the ink nozzles on each printhead has been removed. Make sure the ink
cartridges are not empty.
For information about maintaining ink cartridges and printheads, see “Replacing ink cartridges
and printheads” and “Maintaining the printheads.”
Step 5: Check the printer setup
Make sure the printer is selected as the current or default printer. If your computer is running
Windows, make sure that Pause Printing is not selected.
1 Do one of the following:
• Windows 98, Windows Me, Windows NT 4.0, and Windows 2000:
Click Start, point to Settings, and then click Printers.
• Windows XP:
Click Start, and then click Printers and Faxes.
Or, click Start, click Control Panel, and then click Printers and Faxes.
2 Right-click the printer icon, and make sure a check mark does not appear next to Pause
Printing.
For more information about checking the printer setup, see the online Help for your
computer’s operating system.
For Mac OS, do one of the following:
• Mac OS X (10.1): Make sure the Status column does not show Stop.
• Mac OS X (10.2): Double-click the printer in the printer list, then make sure the icon
shows Stop Jobs.
Step 6: Check the print settings
Make sure the print settings (such as media type, media size, margins, and color) in the printer
driver are correct. Also, check the settings in the Page Setup dialog box (typically available by
selecting Page Setup from the File menu in a software application).
Step 7: Check the US B or parallel port on your computer (if applicable)
Make sure your printer is connected directly to the USB port or parallel port. Do not share the
port with other devices, such as a Zip drive.
Step 8: Check the network setup (if applicable)
Make sure that your printer is properly set up in the network environment. Print a Jetdirect
Configuration page to verify the network settings. For more information, see “Printing a
Configuration page.”
If you are able to communicate with the printer over the network, you can use the printer’s
embedded Web server to check the network setup. For more information, see “Using the
embedded Web server.”
For information about setting up and using the printer on a network, see the HP Jetdi rect
Administrator’s Guide on the Starter CD.
ENWW 5-7
Page 66

Printing a Configuration page
1
2
3
4
The Configuration page shows the following information:
Item Description
1 Printer Information: Shows general printer information, such as
firmware version number, model name, and memory installed.
2 Printhead Information: Shows printhead health status and whether
the printhead needs to be replaced.
3 I nk Cartridge Information: Shows estimated ink levels (represented
in graphical form as gauges).
4 Event Log: Shows a log of recent events that occurred.
If an HP Jetdirect printer server is installed in the printer, an additional Jetdirect Configuration
page prints. This page shows the network settings for the print server.
To print a Configuration page
1 Press (select button) on the control panel.
2 Press (down arrow button) to highlight
3 Press (down arrow button) to highlight
(select button) to print the Configuration page.
INFORMATION, and then press (select button).
PRINT CONFIGURATION PAGE, and then press
Note If an HP Jetdirect print server is installed, two pages print. If the auto-duplex unit is installed
and the duplex option is set to
until both sides are finished printing.
5-8 ENWW
ON in the control panel, do not remove the page from the printer
Page 67

Solving printer problems
Note If the printer is used on a network, see the HP Jetdirect Administrator’s Guide on the Starter CD.
The printer is not responding
z Check the control panel for error messages
For a list of printer error messages, see “Control panel messages.”
z Check the printer setup
Check the following items:
• Make sure the ink cartridges, printheads, and print media are loaded correctly. Also
make sure that the printer cable is firmly connected from the printer to your computer
and that the power cord is connected from your printer to the power outlet.
• If you are using a parallel interface connection, ensure that the correct port (LPTx,
where “x” is the port number) is selected and that the printer is connected directly to
your computer. If your printer is connected to a switch box, make sure that you have
selected the correct switch. Or, connect the printer directly to the computer without the
switch box.
• Make sure the printer is selected as the current or default printer. For information about
setting the default printer, see the online Help for your computer’s operating system.
z Check the power
If the printer is not turned on, press (power button) on the printer. After a brief printer
startup, you should see a steady green light (the Ready light) on the control panel.
Note If you tried to print when the printer was turned off, an alert message should have appeared
on your computer. If the printer was off and you did not see a message when you tried to print,
the printer setup might be incorrect. Uninstall the printer software by running the uninstaller
program in the printer’s program group (Windows), or by selecting the uninstall option in the
Installer (Mac OS). Then reinstall the software that came with your printer.
The Attention light flashes
This indicates an event that requires user intervention or an error has occurred. For example,
a printer cover might not be closed properly, or the carriage might be jammed.
z Check the control panel
If the message shows a printer error, see “Control panel messages.” Follow the
recommended actions to resolve the error.
z Restart the printer
If the control panel displays the message
restarting the printer. Press (power button) to turn off the printer. Wait a few seconds,
and then turn it on again. In most situations, this action solves the problem. If the message
persists, your printer might need service. Write down the error code, and then go to HP
Instant Support to learn more about possible causes for the message. See “HP Instant
Support” for more information.
XXXX.XXXX [DESCRIPTION] : [ACTION], try
ENWW 5-9
Page 68

The Attention light flashes alternately with the Ready light
This indicates a critical error has occurred, and the printer requires attention. A critical-error
message usually accompanies this indicator.
Some of these messages can be cleared by restarting the printer. Press (power button) to
turn off the printer. Wait a few seconds, and then turn it on again. If a critical error persists,
service is required.
The printer shuts down unexpectedly
Make sure the power cord is connected firmly to the printer and to a working power outlet, and
that the printer is turned on. The Ready light on the control panel should be green. Try turning
the printer off, by pressing (power button), and then turn it on again.
Nothing is printed
z Be patient
Complex documents that contain many fonts, graphics, and color photos take longer to
begin printing. The control panel displays the message
light blinks when the printer is processing information to be printed.
z Check the power
Make sure the power cord is connected firmly to the printer and to a working power outlet,
and that the printer is turned on. The Ready light on the control panel should be green. Try
turning the printer off, by pressing (power button), and then turn it on again.
PROCESSING JOB and the Ready
z Check the interface cable
Make sure the interface cable (USB, parallel, or network) is connected properly.
z Check the print media
Make sure media is loaded correctly in the tray and that the print media is not jammed in
the printer. For more information about loading media, see “Loading print media.”
z Try printing a Demo page
1 Press (select button) on the control panel.
2 Press (down arrow button) to highlight
INFORMATION, and then press (select
button).
3 Press (down arrow button) to highlight
PRINT DEMO, and then press (select
button) to print the Demo page.
z Check the printer setup
Make sure the printer is selected as the current or default printer. For information about
setting the default printer, see the online Help for your computer’s operating system.
Also, if your computer is running Windows, make sure that Pause Printing is not selected.
1 Do one of the following:
• Windows 98, Windows Me, Windows NT 4.0, and Windows 2000:
Click Start, point to Settings, and then click Printers.
• Windows XP:
Click Start, and then click Printers and Faxes.
Or, click Start, click Control Panel, and then click Printers and Faxes.
2 Right-click the icon for the printer, and then make sure that Pause Printing is not
selected.
5-10 ENWW
Page 69

z Conflicting print settings are selected
An error message appears when the print features selected are incompatible. For
example, when the Paper Type selected is hp premium photo paper and Print on Both
Sides is set to On. You cannot print on both sides of this type of paper. Change either of
the print settings shown in the message. For example, you can print on both sides of Plain
Paper.
z The print to file option is selected in the printer driver
If Print to File is selected in the printer driver, the print job is saved to a file on your
computer and not printed on paper.
• Windows: From the software application, on the File menu, click Print. Make sure the
Print to File option is not selected.
• Mac OS: On the main pop-up menu in the Print dialog box, make sure the Print to file
option is not selected.
z Check the network setup
Make sure that your printer is properly set up in the network environment. For information
about setting up and using the printer on a network, see the HP Jetdirect Administrator’s
Guide on the Starter CD.
Printer takes a long time to print a job
z Check your system configuration
Make sure your computer meets the system requirements (see “Printer specifications”).
Although the printer is designed to function with a computer that meets the minimum
system requirements, printer performance is optimized with a computer that meets the
recommended system requirements.
z Make sure the computer has sufficient hard disk space
If you are printing graphics-intensive files, make sure you have enough hard disk space.
z Make sure the port setting configuration in the computer is set to ECP
(Windows 98 only)
See the computer’s manual for information on how to change your port setting, or contact
your computer manufacturer.
z Make sure the computer has enough resources availab le (Windows only)
If less than 80 percent of the computer resources are available, printing could be
significantly slower.
To make more computer resources available, close all unused applications and resend
your print job. If necessary, restart your system, and then resend your print job.
ENWW 5-11
Page 70

Solving printing problems
A blank page is printed
z Check the control panel for error messages
For a list of error messages, see “Control panel messages .”
z Check the printheads for tape
Make sure you have removed the protective tape from the ink nozzles of each printhead.
z Check the printer setup
Make sure your printer is selected as the current or default printer. For information about
setting the default printer, see the online Help for your computer’s operating system.
z Check the USB or parallel port on your computer
Make sure your printer is connected directly to the USB port or parallel port. Do not share
the port with other devices, such as a Zip drive.
Printer does not print on both sides of the media
z The duplex option was not selected in the printer driver
Make sure the duplex option is selected. For instructions on setting print options, see
“Changing printer settings”.
z The media type or size is not supported by the auto-duplex unit
You cannot print on both sides of media such as transparencies and envelopes. For more
information on the media that can be used, see “Supported media sizes” and “Supported
media types and weights”.
Placement of the text or graphics is wrong
z Make sure the media size or orientation settings are correct
Make sure the media size and page orientation selected in the software application match
the settings in the printer driver.
z Make sure the media is loaded correctly
If everything on the page is slanted or skewed, check the following:
• Make sure the media width and length guides fit snugly but gently against the edges of
the stack.
• For Tray 1, make sure that no more than 150 sheets of media (up to 15 mm or 0.6 inch,
stacked) are loaded in the tray. Tray 1 can hold a maximum of 30 transparencies.
• For Tray 2, make sure that no more than 250 sheets of plain paper (up to 25 mm or
1 inch, stacked) are loaded in the tray. Tray 2 of the HP Business Inkjet 2300dtn can
hold up to 500 sheets of plain paper (up to 50 mm or 2 inches, stacked).
For more information about loading media, see “Loading print media.”
z Make sure the margin settings are correct
If the text or graphics are cut off at the edges of the page, make sure the margin settings
for the document match or exceed the minimum margins for the printer. For more
information, see “Minimum margins.”
5-12 ENWW
Page 71

Text or graphics are cut off at the edges of a page
z Make sure the orientation settings are correct
The page orientation selected might not be correct for the document you are printing. See
“Changing printer settings” for instructions about changing print settings.
z Make sure the margin settings are correct
If the text or graphics are cut off at the edges of the page, make sure the margin settings
for the document match or exceed the minimum margins for the printer. For more
information, see “Minimum margins.”
z Make sure the content fits on the page
The size of the document you are printing may be larger than the media size in the tray.
Check if the layout of the document you are trying to print will fit on a media size supported
by the printer, and then load the correct media size. Make sure to select the correct page
orientation.
z Make sure the media is loaded correctly
Make sure the media width and length guides fit snugly but gently against the edges of the
stack. Also, make sure that the correct page orientation is selected.
For more information about loading media, see “Loading print media.” For more
information about changing print settings, see “Changing printer settings.”
z Make sure the media meets the specifications
Some media types are not suitable for use with your printer, and may not feed properly
into the printer. For more information about supported media types, see “Selecting print
media”.
z The software application cannot interpret print settings properly
On the Starter CD, see the readme file for known software conflicts. Otherwise, check
your software application manual, or contact the software manufacturer for more specific
help for this problem.
The wrong fonts are printed
z Make sure that fonts are used correctly in the document
Make sure you correctly apply the font you want to use. For example, in a graphics
application, place the words in the desired size; do not enlarge by dragging and sizing.
z Make sure the font is available in your computer
The fonts used in the document might not match the fonts currently available in your
computer or the type of font used is not designed to be printed. Make sure the font is
available in the font selection box of your software application, and make sure it is a
TrueType™ font.
TrueType is a technology that can create fonts of any size from a basic font outline.
TrueType fonts are scalable. They can be scaled at any time for use on the computer
screen or the printer. This is the standard font-scaling technology in Windows.
z The wrong printer driver is selected
Make sure your printer is selected as the current or default printer. For information about
setting the default printer, see the online Help for your computer’s operating system.
z The software application is conflicting with the printer
On the Starter CD, see the readme file for a list of known conflicts with popular software
applications, or contact the software manufacturer for help.
ENWW 5-13
Page 72

Text is jagged at the edges
z Make sure the correct type of font has been chosen
Some software applications offer custom fonts or use bitmap images of text that have
jagged edges when skewed, enlarged, or printed. By using TrueType fonts, you can
ensure that the printer is able to print smooth fonts. When selecting a font, look for the
TrueType icon.
z An incorrect media type is being used
This printer is designed to work well with most office paper types or quality 25 percent
cotton bond paper. Because the printer uses ink to produce an image, media that accepts
ink well produces the best results. Media that is heavily textured or does not accept ink
well can cause graphics and text to print poorly.
To determine if the media type is the cause of the problem, try printing the same
document on a type of media that has previously worked well with your printer. For more
information about supported media types, see “Selecting print media”.
z The software application is conflicting with the printer
On the Starter CD, see the readme file for a list of known conflicts with popular software
applications, or contact the software manufacturer for help.
The printout is incorrect or part of it is missing
z Make sure the margin settings are correct
Make sure the margin settings for the document match or exceed the minimum margins
for the printer. For more information, see “Minimum margins.”
z Color print settings might be wrong
The printer may be set to print in black and white or grayscale. Follow the instructions for
your operating system to check the setting.
• Windows: From the software application, on the File menu, click Print, and then click
Setup or Properties. Make sure the Grayscale option is not selected.
• Mac OS 9 (9.1 and later): On the main pop-up menu in the Print dialog box, select
Color Matching. Make sure the Black and White or Grayscale options are not
selected on the Print Color pop-up menu.
• Mac OS X (10.1 and later): On the main pop-up menu in the Print dialog box, select HP
Image Quality. Make sure the Print Color as Gray option is not selected.
z The wrong printer driver is selected
Make sure your printer is selected as the current or default printer. For information about
setting the default printer, see the online Help for your computer’s operating system.
Meaningless characters are printed
z A cable connection is poor
A common cause for nonsense characters is a poor cable connection between the printer
and computer.
Make sure the cable connection at both ends is good and that the cable is securely
fastened.
z The system needs to be restarted
Turn off the computer. Press (power button) to turn off the printer. Wait for a few
seconds and turn them both back on. Try printing again.
5-14 ENWW
Page 73

z The wrong printer driver is selected
Make sure your printer is selected as the current or default printer. For information about
setting the default printer, see the online Help for your computer’s operating system.
z The document file is damaged
Occasionally, a document file can become damaged. If you can print other documents
from the same software application, try to print using a backup copy of your document, if
available.
Printout is slanted or skewed
If media is twisting as it feeds or margins appear crooked, the media guides might not be
correctly positioned against the stack. Both the media length and width guides must fit snugly
but gently against the stack.
Ink is smearing
z The printout did not have time to dry
When printing documents that use a lot of ink, you must allow the document more time to
dry before handling it. This is especially true for transparencies.
The printer driver’s Normal print quality setting is to designed to optimize both drying time
and speed. This mode allows the print output to dry completely in most situations.
However, when printing in very humid environments, use the Best print quality setting to
allow a longer drying time.
z The media type is causing the smearing
Some types of media do not accept ink well, which causes the ink to dry more slowly and
results in smearing. See “Selecting print media” for more information about media.
z An incorrect media type is selected
The correct media must be selected in the printer driver. Make sure the media selected in
the printer driver matches the media loaded in the tray.
z The media has been exposed to a humid environment
If media has been exposed to a humid environment, it might be difficult to achieve the
correct drying time, especially when printing with heavy color saturation. Print on a fresh
ream of media that has been stored in a cool, dry place.
z Too much ink on the page is causing wrinkling
Color documents with rich, blended colors can use excess ink, which wrinkles the page
during printing and causes smearing. Try using the Normal or Fast print quality setting to
reduce ink, or use HP media designed for printing vivid color documents.
Ink is not filling the text or graphics completely
z The printheads have poor contact
Remove and then reinstall the printheads. See “Replacing printheads.”
z The printheads need cleaning
Whenever print quality decreases noticeably, it is a good idea to clean the printheads. For
instructions on cleaning the printheads, see “Cleaning the printheads.”
Note Printhead condition and media type are important factors in print quality. For more information,
see “Maintaining the printheads.”
ENWW 5-15
Page 74

The printheads need to be replaced
z
If the printheads are several years old, they might need to be replaced. For printhead
health information, print a Configuration page. To replace the printheads, see “Replacing
printheads.”
z An incorrect media type is being used
Some media types are not suitable for use with your printer. See “Selecting print med ia .”
z The wrong print quality setting is selected
Try to print using the Best print quality setting.
If these procedures do not help, see “HP telephone support” for information about contacting
HP support.
Regular horizontal bands appear in the text or graphics
z The printer needs to be calibrated
Perform the calibration as described in “Calibrating linefeed.”
Solving color problems
Whenever you experience color-related problems with the printer, calibrate the color before
trying any other steps. For more information, see “Calibrating color .”
Printouts appear faded or dull
z Fast print quality is selected
The Fast print quality setting allows you to print at a faster rate and is good for printing
drafts. To achieve better colored printout, select the Normal or Best print quality setting in
the printer driver.
z An incorrect media type print setting is selected
When printing on transparencies or other special media types, select the corresponding
media type in the print er driver.
z An incorrect media type is being used
Some media types are not suitable for use with your printer. See “Selecting print med ia .”
Colors are printing as black and white
z The grayscale printing option is selected
The grayscale printing option is probably selected in the printer driver. Follow the
instructions for your operating system to check the setting.
• Windows: From the software application, on the File menu, click Print, and then click
Setup or Properties. Make sure the Grayscale option is not selected.
• Mac OS 9 (9.1 and later): On the main pop-up menu in the Print dialog box, select
Color Matching. Make sure the Black and White or Grayscale options are not
selected on the Print Color pop-up menu.
• Mac OS X (10.1 and later): On the main pop-up menu in the Print dialog box, select HP
Image Quality. Make sure the Print Color as Gray option is not selected.
z The wrong printer driver is selected in the software application
Make sure the correct printer driver is selected in the application.
5-16 ENWW
Page 75

z The printer is not configured correctly
Print a Configuration page. If no color appears on the Configuration page, contact HP
support. For instructions on printing a Configuration page, see “Printing a Configur ati on
page.” See “HP telephone support” for information about contacting HP support.
Colors on the printout do not match colors as they appear on the screen
z The wrong printer driver is selected
Make sure the correct printer driver is selected in the software application.
z The software application is interpreting colors incorrectly
If extremely light or extremely dark colors are not printing correctly, the application could
be interpreting these colors as white or black. Avoid using extremely light or dark colors, or
use a different software application.
z An incorrect media type is being used
Some media types are not suitable for use with your printer. See “Selecting print med ia .”
Bleeding colors are apparent in printout
z The wrong media type setting is selected
Some media type settings (such as a transparency setting) and print quality settings (such
as Best) require more ink than others. Choose different print settings in the printer driver.
Also, make sure that you have selected the correct media type in the printer driver.
z An incorrect media type is being used
Some media types are not suitable for use with your printer. See “Selecting print med ia .”
z The ink cartridges have been refilled
HP does not guarantee or support refilled ink cartridges. Refilling processes and the use
of incompatible inks might disrupt the intricate printing system, potentially resulting in
reduced print quality and even printer damage.
To order new ink cartridges, see “Supplies” or the reorder number on the original HP ink
cartridges.
Color prints inconsistently after installing a new ink cartridge
z The ink cartridges have poor contact
Try removing and then reinstalling the ink cartridges, making sure that they snap firmly
into place.
z The printheads are clogged and need to be cleaned
For instructions on cleaning the printheads, see “Cleaning the printheads.”
Colors do not line up properly with each other
z The printheads need to be aligned
The printheads on your printer are automatically aligned when a printhead is replaced.
However, you might notice print quality improvement by performing the alignment
procedure.
To align the printheads, see “Aligning the printheads.”
z Graphics in the document are not placed properly
Use the zoom or print preview feature of your software application to check for gaps in the
placement of graphics on the page.
ENWW 5-17
Page 76

Solving media-handling problems
Media feed problems
z Print media is jammed in the printer
Check for jams.
See “Clearing media jams” for instructions on clearing a jam.
z Printer feeds multiple sheets
Make sure that only one type of media is loaded in each tray. Some media types are not
suitable for use with your printer. See “Selecting print media.”
z Media is not loaded correctly
Make sure the media width and length guides fit snugly but gently against the edges of the
stack. Also, make sure that the correct page orientation is selected.
For instructions on loading media, see “Loading print media”. For instructions on changing
print settings, see “Changing printer settings”.
z An incorrect media type is being used
Some media types are not suitable for use with your printer. See “Selecting print med ia .”
z Trays or other components are not inserted properly
Check that all trays and covers are completely closed. Make sure the optional auto-duplex
unit is installed properly.
For instructions on installing the optional auto-duplex unit, see “Installing an auto-duplex
unit”.
Tray cannot be inserted
Something in the printer is blocking the tray
Check the slot where the tray fits to ensure that nothing is broken or jammed that would
prevent the tray from being inserted.
If the tray will not close completely when it is inserted, pull out the tray and then push it in
again firmly.
Media is not picked up from a tray
z The media loaded in a tray is not the same as the media size or type selected in the
printer driver or configured in the control panel
In case of a media mismatch, the control panel displays the message
[SIZE] IN TRAY X
1 Load the correct media in the tray and make sure the media width and length guides fit
snugly but gently against the stack.
2 Press (resume button) to print.
To avoid a media mismatch, find out which tray contains the media on which you want to
print, make sure the media size and type are set correctly in the control panel, and then
select that tray in the printer driver .
. Do the following:
LOAD [TYPE]
5-18 ENWW
Page 77

z The tray’s media size or type settings configured in the control panel do not match
the size or type selected in the printer driver
In case of a media mismatch, the control panel displays the message
[SIZE] IN TRAY X
. Do the following:
LOAD [TYPE]
1 Load the correct media in the tray and make sure the media width and length guides fit
snugly but gently against the stack.
2 Check that the media size and type are set correctly in the control panel. (Media sizes
and types are set in the Paper Handling menu.)
3 Press (resume button) to print.
z An incorrect media type is being used
Some media types are not suitable for use with your printer. See “Selecting print med ia .”
z The media width guide is pressed too tightly against the stack
Check that the media width guide is pressed snugly but gently against the stack.
z The media stack exceeds the maximum stack height for the tray
Check the label inside the tray for the maximum stack height. If the media exceeds this
level, remove some of the media from the tray.
z Media is curled
Make sure the media you are using is not curled. Uncurl the media by gently bending it in
the opposite direction of the curl.
If media has been exposed to a humid environment, it might curl. Media should be stored
in a cool, dry place.
z The media lift plate inside the tray is stuck in the lowest position
Pull out the tray, and then push it in again firmly.
If the media still is not picked up from the tray, open the tray and reposition the media.
Make sure the media width and length guides fit snugly but gently against the stack. Firmly
close the tray.
Media output problem
z Pages are falling off the printer
Make sure the output tray extension is fully extended.
The output tray holds up to 100 sheets of plain paper, depending on how much the media
curls and how much ink is used on each page. Remove excess media from the output
tray.
ENWW 5-19
Page 78

Clearing media jams
If the print media is jammed in the printer, follow the instructions below to clear the jam. For
more information on how to avoid media jams, see “Tips for avoiding jams.”
1 Remove all media from the output tray.
2 Check the optional auto-duplex unit or rear access panel.
a Push the button on either side of the auto-duplex unit or rear access panel and
remove it.
b If you locate the jammed media inside the printer, grasp the media with both hands
and pull it toward you.
c If the jam is not there, push the latch on the top of the auto-duplex unit (if you have
one) and lower its cover. If the jammed media is inside, carefully remove it. Close the
cover.
d Reinsert the auto-duplex unit or rear access panel into the printer.
e If you cannot locate the jam, go to step 3.
3 Lift the output tray and check for a jam in Tray 1.
a If the media is jammed in Tray 1, pull out Tray 1. (Otherwise, go to step 4.)
b Pull the paper toward you as shown in the diagram.
c Lower the output tray and reposition Tray 1.
4 If you have not yet found the jam, check Tray 2. (Otherwise, go to step 5.)
a Pull out Tray 2. If you see the jammed media, remove it from Tray 2.
b If you cannot locate the jammed media by removing Tray 2 from the printer, turn off
the printer (if you have not already done so), and then remove the power cord.
5-20 ENWW
Page 79

c Lift the printer off Tray 2.
d Remove the jammed media from the bottom of the printer or from Tray 2.
e Reposition the printer on top of Tray 2.
5 Open the top cover and check inside the printer for any remaining media. If there is media
inside the printer, follow the steps below. (Otherwise, go to step 6.)
a When you lift the top cover, the carriage should return to the right side of the printer. If
the carriage does not return to the right side, turn the printer off.
WARNING! Do not reach into the printer when the printer is on and the carriage is stuck.
b Free the media and pull it toward you through the top of the printer.
6 After you clear the jam, close all covers, turn on the printer (if you turned it off), and then
press (resume button) to continue the print job.
The printer will continue the print job on the next page. You will need to resend the page or
pages that were jammed in the printer.
Tips for avoiding jams
If media repeatedly jams in the printer, follow these tips to avoid media jams.
z Make sure the printhead latch is properly engaged.
z Make sure nothing is blocking the paper path.
z Do not overload the trays. Tray 1 holds up to 150 sheets of paper and Tray 2 holds up to
250 sheets. For the HP Business Inkjet 2300dtn, Tray 2 holds up to 500 sheets. Be sure
the media does not exceed the maximum stack height as indicated on the label in the tray.
z Load media properly. For more information, see “Loading print media.”
z Make sure the media width and length guides fit snugly but gently against the stack of
media, but do not wrinkle or bend the media.
z Always use media that conforms with the specifications in “Selecting print media.”
z Do not use media that is damaged, curled, or wrinkled. Do not use media with cutouts or
perforations or media that is heavily textured or embossed.
z Avoid media that is too thin, has a slick texture, or “stretches” easily. Such media does not
feed properly through the printer.
ENWW 5-21
Page 80

Troubleshooting installation issues
If you had trouble installing the printer, check these items.
Hardware installation issues
z Make sure the power supply cord is connected securely to the printer. Make sure that the
power cord is connect securely between the power supply and a working power outlet.
z Make sure that all packing tape has been removed from outside and inside the printer.
z Make sure the printheads and ink cartridges are installed properly. The printer cannot
work if they are not installed.
• Make sure that you have removed the tape from the printheads.
• Make sure that all of the printheads are in their correct, color-coded slot.
• Make sure that all of the ink cartridges are in their correct, color-coded slot.
• Make sure that all of the printheads and ink cartridges are firmly installed into their
slots. Press down firmly on each one to ensure proper contact.
z If the control panel shows a printhead error message, clean the contacts on the
printheads. See “Cleaning the printhead contacts.”
z Make sure that the printhead latch is closed properly.
z Make sure that the printer is loaded with paper.
z Make sure no lights are on or blinking except the Ready light, which should be on. If the
Attention light is flashing, check for error messages on the control panel.
z Make sure that the printer can print a Configuration page.
z Make sure that any printer cable you are using is in good working order and that it is
securely connected between the appropriate connector on the printer and the computer or
a network connection.
Software installation issues
z Make sure your computer is running one of these operating systems: Windows 98,
Windows NT 4.0 (with Service Pack 6), Windows Me, Windows 2000, or Windows XP. If
you are using a Macintosh, it must be running Mac OS 9 (9.1 and later) or Mac OS X (10.1
and later).
z Make sure the computer meets at least the minimum system requirements (see “System
requirements”).
z Before installing software on a Windows computer, make sure that all other applications
are closed.
z If the computer does not recognize the path that you type to the CD-ROM drive, make
sure you are specifying the correct drive letter.
z If the computer cannot recognize the Starter CD in the CD-ROM drive, inspect the Starter
CD for damage. You can download the printer driver from
http://www.hp.com/support/businessinkjet2300.
z If your computer is running Windows, it is recommended that you install the printer
software first. Connect the USB cable or parallel cable only when prompted by the
software.
5-22 ENWW
Page 81

z When installing the printer software on a Windows computer, you must connect the printer
to the computer when prompted, otherwise the software installation cannot be completed.
If you need to install the software without connecting the printer, do the following:
• During installation, when choosing the connector type, select Other and then select
any port (for example, COM1), instead of selecting USB or parallel. Then follow the
instructions to complete the software installation without connecting the printer. When
installation is complete, a new printer icon is created in the Printers folder for each
driver selected.
• When you connect the printer to a USB or parallel port at a later time, Windows creates
another printer icon in the Printers folder. Follow the instructions below to select the
correct port for the printer(s) set up earlier. (You can delete the new printer created by
Windows.)
1 From the Windows desktop, do one of the following:
• Windows 98, Windows Me, Windows NT 4.0, and Windows 2000:
Click Start, point to Settings, and then click Printers.
• Windows XP:
Click Start, and then click Printers and Faxes.
Or, click Start, click Control Panel, and then click Printers and Faxes.
2 Right-click the printer and click Properties, then select the Ports tab.
3 Select the virtual USB port (created by Windows when the printer was connected) or
parallel port to which the printer is now connected, and then click OK.
4 To delete the new printer created by Windows, right-click the printer icon and click
Delete.
ENWW 5-23
Page 82

5-24 ENWW
Page 83

Ordering HP supplies and
6
accessories
You can order HP supplies and accessories from the HP website at
http://www.hpshopping.com.
Accessories
Media handling accessories
Auto-duplex unit
Auto-duplex unit C8247A
500-sheet Tray 2
500-sheet Tray 2 C8245A
DIMMs
Memory modules
HP 64 MB SDRAM DIMM Q1887A
HP 128 MB SDRAM DIMM C9121A
Interface cables
Parallel cables
HP IEEE-1284 A-B Parallel Cable, 2 m (6.6 ft) C2950A
HP IEEE-1284 A-B Parallel Cable, 3 m (9.8 ft) C2951A
USB cable
HP USB A-B, 2 m (6.6 ft) C6518A
ENWW 6-1
Page 84

Networking accessories
Visit http://www.hp.com for the latest information.
HP print servers
HP Jetdirect 615n (EIO) Internal Print Server Fast Ethernet
10/100Base-TX
HP Jetdirect 680n (EIO) Internal Print Server 802.11b Wireless Ethernet J6058A
HP Jetdirect 610n (EIO) Internal Print Server Token Ring
RJ-45, DB9
HP Jetdirect 380x External Print Server 802.11b Wireless Ethernet
USB
HP Jetdirect 175x External Print Server
10/100Base-TX, 1 port (USB)
HP Jetdirect 300x External Print Server
10/100Base-TX, 1 port (parallel)
HP Jetdirect 310x External Print Server
Ethernet 10/100-TX, 1 port (USB)
HP Jetdirect 500x External Print Server
10/100Base-TX, 10Base2, 3 ports (parallel)
HP Jetdirect 500x External Print Server
Token Ring, RJ-45, DB9, 3 ports (parallel)
HP Jetdirect 3700 External Print Server
10/100Base-TX, 1 port (USB 2.0)
HP Print Server Appliance 4200 J4117A
J6057A
J4167A
J6061A
J6035C
J3263A
J6038A
J3265A
J3264A
J7942A
Supplies
Ink cartridges
HP No. 10 Black ink cartridge, 69 ml C4844A
HP No. 11 Cyan ink cartridge, 28 ml C4836A
HP No. 11 Magenta ink cartridge, 28 ml C4837A
HP No. 11 Yellow ink cartridge, 28 ml C4838A
Printheads
HP No. 11 Black printhead C4810A
HP No. 11 Cyan printhea d C4811A
HP No. 11 Magenta printhead C4812A
HP No. 11 Yellow printhead C4813A
6-2 ENWW
Page 85

HP media
HP Bright White Inkjet Paper
500 sheets Letter (8.5 by 11 inches) HPB1124
500 sheets A4 (210 by 297 mm) C1825A
HP Office Paper
2500 sheets Letter (8.5 by 11 inches) 25005
10-ream carton Letter (8.5 by 11 inches) C8511
10-ream carton (3-hole punched) Letter (8.5 by 11 inches) C3HP
10-ream carton Legal (8.5 by 14 inches) C8514
HP Office Recycled Paper
500 sheets Letter (8.5 by 11 inches) E1120
500 sheets (3-hole punched) Letter (8.5 by 11 inches) E113H
500 sheets Letter (8.5 by 11 inches) E1420
HP Multipurpose Paper
5-ream carton Letter (8.5 by 11 inches) M115R
250 sheets Letter (8.5 by 11 inches) 25011
500 sheets Letter (8.5 by 11 inches) M1120
500 sheets (3-hole punched) Letter (8.5 by 11 inches) M113H
500 sheets Legal (8.5 by 14 inches) M1420
HP Printing Paper
500 sheets Letter (8.5 by 11 inches) P1122
HP Premium Plus Photo Paper
20 sheets, glossy Letter (8.5 by 11 inches) C6831A
50 sheets, glossy Letter (8.5 by 11 inches) Q1785A
20 sheets, glossy 4 by 6 inches Q1977A
20 sheets, matte Letter (8.5 by 11 inches) C6950A
20 sheets, glossy A4 (210 by 297 mm) C6832A
20 sheets, matte A4 (210 by 297 mm) C6951A
HP Premium Photo Paper
50 sheets, glossy Letter (8.5 by 11 inches) C6979A
15 sheets, glossy A4 (210 by 297 mm) Q2519A
ENWW 6-3
Page 86

HP Photo Paper
20 sheets, two-sided glossy Letter (8.5 by 11 inches) C1846A
20 sheets, two-side d glossy A4 (210 by 297 mm) C1847A
20 sheets, one-sided glossy A4 (210 by 297 mm) C6765A
HP Colorfast Photo Paper
20 sheets, glossy Letter (8.5 by 11 inches) C7013A
20 sheets, glossy A4 (210 by 297 mm) C7014A
HP Everyday Photo Paper
100 sheets, two-sided, matte Letter (8.5 by 11 inches) C7007A
25 sheets, two-sided, matte Letter (8.5 by 11 inches) C6983A
25 sheets, two-sided, semi-gloss A4 (210 by 297 mm) (Asia/Pacific) C7006A
HP Brochure and Flyer Paper
50 sheets, two-sided, glossy Letter (8.5 by 11 inches) C6817A
50 sheets, matte Letter (8.5 by 11 inches) C6955A
100 sheets, tri-fold, two-sided, glossy Letter (8.5 by 11 inches) C7020A
50 sheets, two-sided, glossy A4 (210 by 297 mm) C6818A
HP Premium Paper
200 sheets Letter (8.5 by 11 inches) 51634Y
HP Premium Inkjet Paper
200 sheets, coated, matte A4 (210 by 297 mm) 51634Z
100 sheets, coated, heavyweight A4 (210 by 297 mm) C1853A
HP Premium Inkjet Transparency Film
20 sheets Letter (8.5 by 11 inches) C3828A
50 sheets Letter (8.5 by 11 inches) C3834A
20 sheets A4 (210 by 297 mm) C3832A
50 sheets A4 (210 by 297 mm) C3835A
HP Premium Plus Inkjet Transparency Film
20 sheets Letter (8.5 by 11 inches) C7030A
50 sheets Letter (8.5 by 11 inches) C7028A
6-4 ENWW
Page 87

Support and warranty
7
Contacting customer support
If your printer is not operating properly and the troubleshooting suggestions in this guide do not
solve the problem, try using one of the following support services to obtain assistance.
HP help on the Web
Visit http://www.hp.com/support/businessinkjet2300 to find information for your printer. You will be
able to view information about setting up and using your printer, downloading printer drivers,
solving a problem, ordering supplies and accessories, and viewing the printer warranty.
HP Instant Support
HP Instant Support provides you with product-specific services, troubleshooting tips, and
information about your printer’s ink and media usage.
You can use HP Instant Support from the Toolbox (Windows users only) or embedded Web server
if the printer is connected to an IP-based network.
z From the Toolbox (Windows only)
On the Information tab in the Toolbox, click HP Instant Support. Follow the instructions to
display the current HP Instant Support information for your printer.
z From the embedded Web server
In a Web browser, type the IP address assigned to the printer. In the Other Links section of
Information or Settings tab, click HP Instant Support.
Note Do not bookmark Web pages used to display HP Instant Support. If you bookmark this site
and connect to it using the bookmark, the pages will not display the current information. Instead,
connect from the embedded Web server or from the Toolbox.
ENWW 7-1
Page 88

HP telephone support
During the warranty period, you can obtain assistance at no charge from the HP Customer
Care Center.
Customer support representatives can answer your questions regarding the setup,
configuration, installation, and operation of your printer. They can also help troubleshoot and
diagnose printer problems and give instructions for service and repair.
Current telephone support numbers are listed on the HP customer support guide, which is
included in your printer box.
Before you call
Before you call, have the following information available to give to the representative:
1 Print a Configuration page. See “Printing a Configuration page” for information on how to
print this page.
2 If your printer does not print, get the following information ready:
• What is the serial number of your printer? (Check the back of the printer.)
• What model printer do you have? (HP Business Inkjet 2300, 2300n, or 2300dtn.)
3 What operating system is your computer running?
4 Which printer driver are you using (PCL 5c, PCL 6, or PostScript emulation) and what is
the version number?
5 How is the printer connected to the system (USB, parallel, or network)?
6 If the printer is connected to the network, what is the network operating system?
7 If you have a problem printing from a particular software application, what is the
application and version number?
7-2 ENWW
Page 89

Hewlett-Packard Limited Warranty Statement
HP product Duration of Limited Warranty
Software 1 year
Accessories 1 year
Ink cartridges 90 days
Printheads 1 year
Printer peripheral hardware (see below for details) 1 year
Extent of Limited Warranty
1 Hewlett-Packard warrants to the end-user customer that the HP products specified above will be free from
defects in materials and workmanship for the duration specified above, which duration begins on the date of
purchase by the customer.
2 For software products, HP’s limited warranty applies only to a failure to execute programming instructions. HP
does not warrant that the operation of any product will be uninterrupted or error free.
3 HP’s limited warranty covers only those defects that arise as a result of normal use of the product, and does not
cover any other problems, including those that arise as a result of:
a Improper maintenance or modification;
b Software, media, parts, or supplies not provided or supported by HP;
c Operation outside the product’s specifications;
d Unauthorized modification or misuse.
4 For HP printer products, the use of a non-HP ink cartridge or a refilled ink cartridge does not affect either the
warranty to the customer or any HP support contract with the customer. However, if printer failure or damage is
attributable to the use of a non-HP or refilled ink cartridge, HP will charge its standard time and materials charges
to service the printer for the particular failure or damage.
5 If HP receives, during the applicable warranty period, notice of a defect in any product which is covered by HP’s
warranty, HP shall either repair or replace the product, at HP’s option.
6 If HP is unable to repair or replace, as applicable, a defective product which is covered by HP’s warranty, HP
shall, within a reasonable time after being notified of the defect, refund the purchase price for the product.
7 HP shall have no obligation to repair, replace, or refund until the customer returns the defective product to HP.
8 Any replacement product may be either new or like new, provided that it has functionality at least equal to that of
the product being replaced.
9 HP products may contain remanufactured parts, components, or materials equivalent to new in performance.
10 HP’s Limited Warranty Statement is valid in any country/region where the covered HP product is distributed by
HP. Contracts for additional warranty services, such as on-site service, are available from any authorized HP
service facility in countries/regions where the product is distributed by HP or by an authorized importer.
Limitations of Warranty
TO THE EXTENT ALLOWED BY LOCAL LAW, NEITHER HP NOR ITS THIRD PARTY SUPPLIERS MAKES ANY
OTHER WARRANTY OR CONDITION OF ANY KIND, WHETHER EXPRESS OR IMPLIED WARRANTIES OR
CONDITIONS OF MERCHANTABILITY, SATISFACTORY QUALITY, AND FITNESS FOR A PARTICULAR
PURPOSE.
Limitations of Liability
1 To the extent allowed by local law, the remedies provided in this Warranty Statement are the customer’s sole and
exclusive remedies.
2 TO THE EXTENT ALLOW E D BY LO C AL LAW , EXC E PT FO R THE OBLIGATIONS SP EC I FI CALLY SET
FORTH IN THIS WARRANTY STATEMENT, IN NO EVENT SHALL HP O R ITS THIRD PARTY SUPPLIE RS BE
LIABLE FOR DIRECT, INDIRECT, SPECIAL, INCIDENTAL, OR CONSEQUENTIAL DAMAGES, WHETHER
BASED ON CONTRACT, TORT, OR ANY OTHER LEGAL THEORY AND WHETHER ADVISED OF THE
POSSIBILIT Y O F SU C H DAMAGES.
Local Law
1 This Warranty Statement gives the customer specific legal rights. The customer may also have other rights which
vary from state to state in the United States, from province to province in Canada, and from country/region to
country/region elsewhere in the world.
2 To the extent that this Warranty Statement is inconsistent with local law, this Warranty Statement shall be
deemed modified to be consistent with such local law. Under such local law, certain disclaimers and limitations of
this Warranty Statement may not apply to the customer. For example, some states in the United States, as well
ENWW 7-3
Page 90

as some governments outside the United States (including provinces in Canada), may:
a Preclude the disclaimers and limitations in this Warranty Statement from limiting the statutory rights of a
customer (e.g. the United Kingdom);
b Otherwise restrict the ability of a manufacturer to enforce such disclaimers or limitations; or
c Grant the customer additional warranty rights, specify the duration of implied warranties which the
manufacturer cannot disclaim, or allow limitations on the duration of implied warranties.
3 FOR CONSUMER TRANSACTIONS IN AUSTRALIA AND NEW ZEALAND, THE TERMS IN THIS WARRANTY
STATEMENT, EXCEPT TO THE EXTENT LAWFULLY PERMITTED, DO NOT EXCLUDE, RESTRICT, OR
MODIFY, AND ARE IN AD DITION TO, THE MANDAT ORY ST ATUTORY R IGHTS AP PLIC ABLE TO THE SA LE
OF THE HP PRODUCTS TO SUCH CUSTOMERS.
7-4 ENWW
Page 91

Printer specifications and
8
regulatory information
Printer specifications
For media and media-handling specifications, see “Selecting print media.”
Specification Value
Available printer
models
Physical
dimensions
(W x H x D)
Weight HP Business Inkjet 2300 13.5 kg (29.7 lb) without printheads or ink
Connectivity HP Business Inkjet 2300
HP Business Inkjet 2300 C8125A
HP Business Inkjet 2300n C8126A
HP Business Inkjet 2300dtn C8127A
HP Business Inkjet 2300 553 by 290 by 416 mm
(21.8 by 11.4 by 16.4 inches)
HP Business Inkjet 2300n 553 by 290 by 416 mm
(21.8 by 11.4 by 16.4 inches)
HP Business Inkjet 2300dtn 553 by 355 by 463 mm
(21.8 by 14 by 18.2 inches)
cartridges
HP Business Inkjet 2300n 13.5 kg (29.7 lb) without printheads or ink
cartridges
HP Business Inkjet 2300dtn 17.2 kg (37.8 lb) without printheads or ink
cartridges
z IEEE 1284-compliant bidirectional parallel
z USB 2.0-compliant full speed
z 1 open EIO slot
z 2 DIMM slots (100 pin, SDRAM, PC 100 or
greater)
HP Business Inkjet 2300n
z IEEE 1284-compliant bidirectional parallel
z USB 2.0-compliant full speed
z HP Jetdirect Internal Print Server for Fast
Ethernet 10/100Base-TX in EIO slot
z 2 DIMM slots (100 pin, SDRAM, PC 100 or
greater)
HP Business Inkjet 2300dtn
Print method Drop-on-demand thermal inkjet printing
Ink cartridges 4 ink cartridges (1 each for black, cyan, magenta,
ENWW 8-1
z IEEE 1284-compliant bidirectional parallel
z USB 2.0-compliant full speed
z HP Jetdirect Internal Print Server for Fast
Ethernet 10/100Base-TX in EIO slot
z 2 DIMM slots (100 pin, SDRAM, PC 100 or
greater)
and yellow)
Page 92

Specification Value
Printheads 4 printheads (1 each for black, cy an, mage nta, and
yellow)
Supply yields
(based on
Ink cartridges Black: 1,750 pages
Cyan, magenta, and yellow: 1,750 pages
5percent
coverage)
Printheads Black: 16,000 pages
Cyan, magenta, and yellow: 24,000 pages
Printer memory 64 MB of built-in RAM, up to 320 MB with optional
64 or 128 MB DIMM (SDRAM,100 MHz)
Printer processor Motorola 32-bit ColdFire 4e RISC (256 MHz)
Print speed (U.S. Letter and A4) Fast mode
z Black text: 26 pages per minute (ppm)
z Mixed text with color graphics: 20 ppm
Normal mode
z Black text: 9 ppm
z Mixed text with color graphics: 8 ppm
Laser-quality speed*
z Black text: 9 ppm
z Mixed text with color graphics: 5 ppm
*The “laser-quality speed” comparison has the
page-per-minute speeds of the HP Business
Inkjet 2300 series printers against the benchmark
of the HP Color LaserJet 4600 at comparable print
quality. This comparis on is based sole ly on HP ’s
internal testing.
Resolution Monochrome Up to 1200 by 600 dots per inch (dpi)
Color HP’s enhanced Color Layering Technology with
PhotoREt III for photo quality
(up to 4800 by 1200-optimized dpi on premium
photo papers, 1200 by 1200-input dpi)
Color calibration
z ColorSync
z ICC Profiles
z Pantone
®
Printer languages z PCL 5c
z PCL 6
z PostScript 3 emulation
z Automatic language switching
Control panel languages Czech, Danish, Dutch, English, Finnish, French,
German, Hungarian, Italian, Japanese (Katakana),
Norwegian, Polish, Portuguese, Russian, Spanish,
Swedish, Turkish
Media size
z Standard U.S.: Letter, legal, executive,
statement, index cards
z Standard International: A6, A5, A4
z Custom U.S.: 3 by 5 inches wide to 8.5 by 14
inches long
z Custom Metric: 76.2 by 1 27 m m wid e to 216 b y
356 mm long
Media type Paper (plain, inkjet, and photo), envelopes,
transparencies, labels, greeting cards
Media handling Tray 1, Tray 2, output tray
8-2 ENWW
Page 93

Specification Value
Recommended
Media Weight
Media supported
(maximum number
of pages)
z Paper: 16 to 28 lb Bond using Tray 1 or Tray 2
z Envelopes: 20 to 24 lb Bond
z Cards: 110 lb Index
z Tray 1 (up to 0.58 inch or 15 mm stack):
150 sheets of plain paper, 22 envelopes, 30
transparencies
z Tray 2 (up to 0.98 inch or 25 mm stack):
250 sheets of plain paper
Operating system compatibility z Windows 98, Windows Me, Windows NT 4.0,
Windows 2000, Windows XP 32-bit
(Professional and Home Editions), and
Windows XP 64-bit Edition
z Mac OS 9 (9.1 and later), Mac OS X (10.1 and
later)
z OS/2
z Linux
z UNIX
z MS-DOS printer driver support through
third-party applications
ENWW 8-3
Page 94

Specification Value
Network operating
system
compatibility
HP Business Inkjet 2300
HP Business Inkjet 2300n
HP Business Inkjet 2300dtn
z Windows 98, Windows Me, Windows NT 4.0,
Windows 2000, Windows XP 32-bit
(Professional and Home Editions), and
Windows XP 64-bit Edition
z Windows 98, Windows Me, Windows NT 4.0,
Windows 2000, Windows XP 32-bit
(Professional and Home Editions), and
Windows XP 64-bit Edition
z Novell NetWare 4.x, 5.x, 6, NDS, and NDPS
z HP-UX 10.20, 11.x
z Solaris, 2.6, 7, 8 (SPARC systems only)
z RedHat Linux 7.1 and later
z SuSE Linux 7.1 and later
z Mac OS 9 (9.1 and later), Mac OS X (10.1 and
later)
z IBM OS/2 Warp 4.x*
z IBM AIX 3.2.5 and later*
z MPE-iX*
z Microsoft Windows Te rminal Server Editi on 4.0
z Microsoft Windows 2003 Server (formerly
known as Microsoft Windows XP Server
Terminal Services)
z Microsoft Windows 2000 Server Terminal
Services with Citrix MetaFrame 1.8
z Microsoft Windows XP Server Terminal
Services with Citrix MetaFrame 1.8
z Microsoft Windows NT Terminal Server with
Citrix V1.8
z Microsoft Windows NT Terminal Server with
Citrix XP
z Microsoft Windows 2000 Server Terminal
Services with Citrix V1.8
z Microsoft Windows 2000 Server Terminal
Services with Citrix XP
z Microsoft Windows 2000 Server Terminal
Services
* Contact your netw ork operating sys tem vend or for
software, docum ent ation, and support.
8-4 ENWW
Page 95

Specification Value
Compatible network protocols z TCP/IP
z IPX/SPX
z AppleTalk*
z DLC/LLC
z IP Direct Mode
z LPD
z FTP Printing
z IPP
z NDS
z Bindery
z NCP
z NDPS
z iPrint Telnet
z SLP
z IGMP
z BOOTP/DHCP
z WINS
z SNMP
z HTTP
*AppleTalk is not supported on Token Ring print
servers.
Advanced security *
*Applies to full-feature HP Jetdirect products with
firmware version x.24.yy or later - EIO (610n, 615n
and later), LIO (250m), External - USB (310x)
Not all protocol and operati ng system combi nations
are supported. For more information, go to
http://www.hp.com and
http://www.hp.com/support/businessinkjet2300.
z SNMPv3
z SSL/TLS (HTTPS)
ENWW 8-5
Page 96

Specification Value
System
requirements
Note: Graphicintensive, complex ,
and large files
might require more
hard disk space.
Product
certifications
Minimum z Windows 98:
Pentium
®
90 MHz, 16 MB RAM, 100 MB free
hard disk space
z Windows Me:
Pentium 150 MHz, 32 MB RAM, 100 MB free
hard disk space
z Windows NT 4.0:
Pentium 100 MHz, 32 MB RAM, 100 MB free
hard disk space
z Windows 2000:
Pentium 300 MHz, 64 MB RAM, 100 MB free
hard disk space
z Windows XP 32-bit edition:
Pentium 233 MHz, 64 MB RAM, 100 MB free
hard disk space
z Windows XP 64-bit edition:
Itanium
®
733 MHz, 1 GB RAM, 100 MB free
hard disk space
z Mac OS 9 (9.1 and later):
64 MB RAM
z Mac OS X (10.1 and later):
128 MB RAM
Recommended z Windows 98, and Windows Me:
Pentium 266 MHz, 32 MB RAM, 200 MB free
hard disk space
z Windows NT 4.0:
Pentium 266 MHz, 64 MB RAM, 200 MB free
hard disk space
z Windows 2000:
Pentium 300 MHz, 64 MB RAM, 200 MB free
hard disk space
z Windows XP 32-bit edition:
Pentium 300 MHz, 128 MB RAM, 200 MB free
hard disk space
z Windows XP 64-bit edition:
Itanium 733 MHz, 1 GB RAM, 200 MB free
hard disk space
z Mac OS 9 (9.1 and later):
128 MB RAM
z Mac OS X (10.1 and later):
256 MB RAM
Safety certifications CCC S&E (China), CSA (Canada), PSB
(Singapore), UL (USA), NOM-NYCE (Mexico),
NEMKO-GS (Germany), K Mark (Korea), CE
(European Union), B Mark (Poland), IRAM
(Argentina)
EMC Certifications FCC Title CFR Part 15 (USA), CTICK (Australia
and New Zealand), MIC Mark (Korea), CE
(European Union), BSMI (Taiwa n), GOST (Russia),
ICES (Canada), VCCI (Japan)
Font support
z 45 TrueType and 35 PostScript fonts built-in
(all PostScript emulation, PCL 5c, and PCL 6
accessible)
z Intellifont and TrueType rasterizer built into
PCL 5c and PCL 6
z Built-in support for Arabic, Cyrillic, Greek, and
Hebrew symbol sets
8-6 ENWW
Page 97

Specification Value
Duty cycle Up to 10,000 pages/month
Warranty 1 year limited warranty
Operating
environment
Electrical
specifications
Acoustic emission s
(Noise levels per
ISO 9614-1)
Operating temperature 5° to 40° C (41° to 104° F)
Recommended operating
15° to 35° C (59° to 95° F)
conditions
Storage temperature -40° to 60° C (-40° to 140° F)
Recommended relative
15 to 80 percent noncondensing
humidity
Power supply Built-in universal power supply
Power requirements Input voltage: 110 to 240 VAC (± 10%),
50 to 60 Hz
Power consumption
Sound pressure (bystander
z Printing (maximum): 65 watts
z Standby mode: less than 45 watts
z Off mode: less than 1 watt
LpAm 53 dB(A)
position)
Sound power LwAm 62 dB(A)
ENWW 8-7
Page 98

Regulatory information
FCC statement
The U.S. Federal Communications Commission (in 47 cfr 15.105) has specified that the
following notices be brought to the attention of users of this product.
This device complies with part 15 of the FCC rules. Operation is subject to the following two
conditions: (1) This device may not cause harmful interference, and (2) this device must
accept any interference received, including interference that may cause undesired operation.
Shielded cables
Use of a shielded data cable is required to comply with the Class B limits of Part 15 of the FCC
Rules.
Pursuant to Part 15.21 of the FCC Rules, any changes or modifications to this
equipment not expressly approved by the Hewlett-Packard Company, may cause
harmful interference and void the FCC authorization to operate this equipment.
Note This equipment has been tested and found to comply with the limits for a Class B digital device,
pursuant to Part 15 of the FCC Rules. These limits are designed to provide reasonable
protection against harmful interference in a residential installation. This equipment generates,
uses and can radiate radio frequency energy and, if not installed and used in accordance with
the instructions, may cause harmful interference to radio communications. However, there is
no guarantee that interference will not occur in a particular installation. If this equipment does
cause harmful interference to radio or television reception, which can be determined by turning
the equipment off and on, the user is encouraged to try to correct the interference by one or
more of the following measures:
z Reorient or relocate the receiving antenna.
z Increase the separation between the equipment and receiver.
z Connect the equipment into an outlet on a circuit different from that to which the receiver is
connected.
z Consult the dealer or an experienced radio/TV technician for help.
When connected to LAN cables using print server accessories…
Note This equipment has been tested and found to comply with the limits for a Class A digital device,
pursuant to Part 15 of the FCC Rules. These limits are designed to provide reasonable
protection against harmful interference when the equipment is operated in a commercial
environment. This equipment generates, uses, and can radiate radio frequency energy and,
if not installed and used in accordance with the instruction manual, may cause harmful
interference to radio communications. Operation of this equipment in a residential area is likely
to cause harmful interference in which case the user will be required to correct the interference
at his own expense.
EMI statement (Europe)
Applicable when connected to LAN cables using print server accessories.
This is a Cl ass A product. In a domestic environment this product may cause
radio interference in which case the user may be required to take adequate
measures.
8-8 ENWW
Page 99

EMI statement (Korea)
Applicable when connected to LAN cables using print server accessories.
EMI statement (Japan)
Applicable when connected to LAN cables using print server accessories.
EMI statement (Taiwan)
Regulatory Model Number
For regulatory identification purposes, your product is assigned a Regulatory Model Number.
The Regulatory Model Number for your product is SNPRC-0301. The regulatory number
should not be confused with the product name (HP Business Inkjet 2300) or product number
(C8125A, C8126A, or C8127A).
ENWW 8-9
Page 100

Power Cord statement
The power cord cannot be repaired. If it is defective, it should be discarded or returned to the
supplier.
LED classification
Energy consumption
Energy Star is a US registered service mark of United States Environmental Protection
Agency.
Declaration of Conformity statement/Norm es de sécurité (Canada)
This digital apparatus does not exceed the Class B limits for radio noise emissions from digital
apparatus set out in the Canadian ICES-003.
When connected to LAN cables using print server accessories, this digital apparatus does not
exceed the Class A limits for radio noise emissions from digital apparatus set out in the
Canadian ICES-003.
Le présent appareil numérique n'émet pas de bruits radioélectriques dépassant les limites
applicables aux appareils numériques de Classe B prescrites dans la réglement sur le
brouillage radioélectrique édicté par le NMB-003 du Canada.
Connecté à un réseau par des accessoires de serveur, l'appareil n'émet pas de bruits
radioélectriques dépassant les limites applicables aux appareils numériques de Classe A
prescrites dans le réglement sur le brouillage radioélectrique édicté par la NMB-003 du
Canada.
8-10 ENWW
 Loading...