

Page 1
getting started guide
Leitfaden zur Inbetriebnahme
guide de mise en route
before setup
• Windows: Install the printer software first.
Only connect the USB or parallel cable when
prompted.
• Network and Mac OS: Connect the
printer before installing the printer software.
aan de slag
guida introduttiva
avant i'installation
• Windows : Commencez par installer le logiciel
de l'imprimante. Ne connectez le câble USB ou
parallèle que lorsque vous y êtes invité.
• Réseau et Mac OS : Connectez l'imprimante
avant d'installer son logiciel.
vóór de installatie
• Windows: installeer eerst de printersoftware.
Sluit de parallelle of USB-kabel pas aan als dit
wordt gevraagd.
• Netwerk en Mac OS: sluit de printer aan
voordat u de printersoftware installeert.
Vor der Installation
• Windows: Installieren Sie die Drucker-Software
zuerst. Schließen Sie das USB- oder parallele
Kabel erst an, wenn Sie dazu aufgefordert werden.
• Netzwerk und Mac OS: Schließen Sie den
Drucker an, bevor Sie die Drucker-Software
installieren.
prima dell'installazione
• Windows: installare prima il software della
stampante. Collegare il cavo USB o il cavo
parallelo solo quando richiesto.
• Rete e Mac OS: collegare la stampante prima
di installare il software della stampante.
Page 2

Copyright Information
© 2003 Copyright Hewlett-Packard Development Company, L.P.
Reproduction, adaptation or translation without prior written
permission is prohibited, except as allowed under the copyright
laws.
The information contained herein is subject to change without
notice.
The only warranties for HP products and services are set forth in
the express warranty statements accompanying such products
and services. Nothing herein should be construed as constituting
an additional warranty. HP shall not be liable for technical or
editorial errors or omissions contained herein.
Edition 1, 11/2003
Trademark Credits
®
Microsoft
, Windows®, and Windows NT® are U.S. registered
trademarks of Microsoft Corporation. All other products
mentioned herein may be trademarks of their respective
companies.
Informations sur le copyright
© 2003 Copyright Hewlett-Packard Development Company, L.P.
Toute reproduction, adaptation ou traduction sans autorisation
expresse et écrite est interdite, sauf dans le cadre de la
réglementation relative aux droits d'auteur.
Les informations contenues dans ce document sont susceptibles
d'être modifiées sans préavis.
Les seules garanties couvrant les produits et les services HP
sont celles stipulées de façon explicite dans les déclarations de
garantie accompagnant ces produits et services. Rien dans le
présent document ne peut être considéré comme constituant une
garantie supplémentaire. HP n'est en aucun cas responsable des
omissions ou erreurs d'ordre technique ou éditorial éventuelles
contenues dans le présent document.
Edition 1, 11/2003
Marques commerciales
®
Microsoft
, Windows® et Windows NT® sont des marques
commerciales aux Etats-Unis de Microsoft Corporation. Tous les
autres produits mentionnés dans ce document sont des marques
de leurs sociétés respectives.
Safety Information
Always follow basic safety precautions when using this product to
reduce risk of injury from fire or electric shock.
1 Read and understand all instructions in the documentation that
comes with the printer.
2 Use only a grounded electrical outlet when connecting this
product to a power source. If you do not know whether the
outlet is grounded, check with a qualified electrician.
3 Observe all warnings and instructions marked on the product.
4 Unplug this product from wall outlets before cleaning.
5 Do not install or use this product near water, or when you are
wet.
6 Install the product securely on a stable surface.
7 Install the product in a protected location where no one can
step on or trip over the line cord, and the line cord cannot be
damaged.
8 If the product does not operate normally, see “Maintaining and
troubleshooting” in the onscreen user’s guide on the
Starter CD.
9 There are no user-serviceable parts inside. Refer servicing to
qualified service personnel.
Sicherheitsinformationen
Beachten Sie beim Einsatz dieses Produkts immer die folgenden
Sicherheitshinweise, um die Verletzungsgefahr und das Risiko
eines elektrischen Schlags zu verringern.
1 Lesen Sie alle Anweisungen in der Dokumentation, die mit
dem Drucker geliefert wird.
2 Verwenden Sie ausschließlich eine geerdete Steckdose für
den Anschluss dieses Produktes an die Stromversorgung.
Wenn Sie sich nicht sicher sind, ob die Steckdose geerdet
ist, so lassen Sie dies durch einen qualifizierten Elektriker
überprüfen.
3 Alle am Produkt angebrachten Warnungen und Anweisungen
sind zu befolgen.
4 Ziehen Sie vor dem Reinigen des Produkts den Netzstecker
aus der Steckdose.
5 Dieses Produkt darf nicht in der Nähe von Wasser betrieben
bzw. von einer nassen Person aufgestellt oder bedient werden.
6 Sorgen Sie für sicheren Stand des Produkts auf einer stabilen
Auflagefläche.
7 Wählen Sie für das Produkt einen geschützten Standort,
an dem keine Personen auf das Netzkabel treten oder darüber
stolpern können. Das Netzkabel darf nicht beschädigt werden.
8 Wenn das Produkt nicht einwandfrei arbeitet, schlagen
Sie unter „Wartung und Fehlerbehebung“ im
Onscreen-Benutzerhandbuch auf der Start-CD nach.
9 Im Inneren des Geräts befinden sich keine vom Endnutzer
instandsetzbaren Teile. Beauftragen Sie mit Wartung und
Instandsetzung qualifiziertes Kundendienstpersonal.
2
Page 3

Consignes de sécurité
Veiligheidsinformatie
Respectez toujours les précautions de sécurité élémentaires
quand vous utilisez ce produit afin de réduire les risques de
blessures dues au feu ou à un choc électrique.
1 Lisez et comprenez toutes les instructions contenues dans la
documentation livrée avec l'imprimante.
2 Utilisez toujours une prise de courant avec mise à la terre lors
du branchement de ce produit à une source d'alimentation. Si
vous ne savez pas si une prise de courant est mise à la terre,
consultez un électricien qualifié.
3 Suivez tous les avertissements et toutes les instructions
indiqués sur le produit.
4Débranchez cet appareil des prises murales avant de procéder
à un nettoyage.
5 N'installez jamais cet appareil près d'une source d'eau, ni si
vous êtes mouillé.
6 Installez l'appareil en toute sécurité sur une surface stable.
7 Installez l'appareil en un lieu protégé où personne ne puisse
marcher sur le cordon ou trébucher sur celui-ci, et où le cordon
ne puisse pas être endommagé.
8 Si le produit ne fonctionne pas normalement, reportez-vous à
la section « Maintaining and troubleshooting » (Maintenance et
dépannage) du guide de l'utilisateur en ligne, disponible sur le
CD de mise en route.
9 L'appareil ne contient aucune pièce dont l'entretien doive être
réalisé par l'utilisateur. Confiez l'entretien à du personnel
qualifié.
Neem bij het gebruik van dit product altijd de algemene
voorzorgsmaatregelen in acht om de kans op letsel ten
gevolge van brand of elektrische schokken te beperken.
1 Zorg dat u alle instructies in de printerdocumentatie hebt
gelezen en begrepen.
2 Sluit dit product uitsluitend aan op een geaard stopcontact.
Als u niet zeker weet of een stopcontact geaard is, kunt u
advies inwinnen bij een erkende elektricien.
3 Neem alle waarschuwingen en aanwijzingen in acht die op
dit product worden aangegeven.
4 Haal het netsnoer uit het stopcontact voordat u dit product
reinigt.
5 Plaats of gebruik dit product niet in de buurt van water of
wanneer u nat bent.
6 Zorg dat het product stevig op een stabiel oppervlak staat.
7 Zet het product op een veilige plaats waar niemand op het
netsnoer kan trappen of erover kan struikelen en het netsnoer
niet wordt beschadigd.
8 Raadpleeg Onderhoud en problemen oplossen in de
gebruikershandleiding op de installatie-cd-rom als het
product niet naar behoren functioneert.
9 Dit product bevat geen onderdelen die door de gebruiker
kunnen worden onderhouden. Laat
onderhoudswerkzaamheden over aan erkende
onderhoudsmonteurs.
Informazioni sulla sicurezza
Per usare questo prodotto, seguire sempre le precauzioni di
sicurezza fondamentali al fine di ridurre il rischio di lesioni alle
persone derivanti da incendi o scariche elettriche.
1 Si consiglia di leggere e apprendere tutte le istruzioni
contenute nei documenti forniti insieme alla stampante.
2 Per collegare il prodotto a una presa di corrente, usare
esclusivamente una presa elettrica collegata a massa.
Controllare con un elettricista qualificato se la presa elettrica è
collegata a massa.
3 Seguire tutte le avvertenze e le istruzioni stampigliate sul
prodotto.
4 Prima di effettuare la pulizia, scollegare il prodotto dalle prese
a parete.
5 Non installare o utilizzare il prodotto nelle vicinanze di acqua o
in luoghi umidi.
6 Installare il prodotto su una superficie stabile, in modo che
risulti fermo e al sicuro.
7 Installare il prodotto in un luogo protetto dove non possa
essere calpestato o dove non si possa inciampare sul cavo di
alimentazione che, a sua volta, non deve essere danneggiato.
8 Se il prodotto non funziona correttamente, vedere
"Manutenzione e risoluzione dei problemi" nella Guida per
l'utente visualizzabile nel CD di avviamento.
9 All'interno non vi sono pezzi su cui l'utente possa effettuare
riparazioni. Per le riparazioni rivolgersi esclusivamente a
personale qualificato.
3
Page 4
1
1
8
2
2
4
3
0
0
2
,
y
n
a
p
m
o
C
rd
a
k
r
c
e
a
p
P
a
tt
p
e
l
d
w
e
l
e
c
H
y
t
c
h
e
r
g
i
r
n
o
py
d
o
c
te
n
©
ri
p
a
n
i
h
C
n
i
d
e
t
n
i
r
p
3
290 mm*
(11.4 in)
6
7
G
e
t
tin
G
g
e
tt
S
in
G
ta
g
et
rt
S
e
ti
d
G
ta
n
g
e
G
r
S
ted
t
ti
u
G
t
n
i
a
d
g
e
G
rt
e
t
ed
St
ti
u
G
ng
id
a
e
G
rt
e
t
e
S
tin
u
d
ta
i
d
p
g
G
rte
r
e
e
S
p
u
a
y
d
o
ta
r
i
u
e
d
w
fo
G
r
e
a
i
te
ll
r
d
n
ui
d
s
e
re
d
e
ed
tu
s
1
d
se
t
)
p
I
G
h
e
s
P
e
t
o
a
fo
u
2
s
d
)
l
d
e
lo
id
SM
r
t
e
w
u
s
p
i
3
e
s
T
n
(
P
)
g
th
ne
L
g
e
D
a
tw
A
p
t
e
r
P
o
o
w
r
g
d
k
a
a
u
)
y
c
te
p
t:
(
e
w
r
-m
e
a
p
y
a
(
a
y
i
p
l
d
o
r
se
r
i
u
e
re
e
r
w
p
f
v
c
o
e
t
a
a
i
y
o
ll
r
r
o
d
re
n
r
)
y
u
d
s
e
r
e
s
w
e
e
f
e
tu
o
s
d
1
a
ill
r
s
v
r
)
dd
e
p
th
s
ic
n
IP
s
e
e
t
e
re
e
a
e
o
s
t
f
2
ss
)
1
d
o
s
u
d
)
t
-
)
ll
d
e
o
p
e
S
o
he
I
s
r
t
P
p
e
w
M
u
to
ss
t
a
p
i
io
fo
3
2)
T
n
s
d
P
)
g
(n
th
n
llo
d
L
e
S
a
g
r
t
e
et
D
es
w
M
l
a
up
A
w
p
te
i
3
s
T
n
r
P
o
t
P
o
w
)
g
(n
g
r
h
g
d
L
k
a
e
et
D
a
uc
)
a
y
p
A
t
w
t
e
t
e
(
r
:
P
e
w
o
o
w
-m
rk
ga
a
d
a
y
u
)
a
y
c
te
il
(d
p
t:
(e
w
se
re
i
-m
re
a
r
p
y
v
c
a
(
e
to
a
y
il
r
d
o
r
r
)
s
ir
u
y
e
e
w
e
rv
s
fo
c
e
e
t
a
i
rv
o
ll
r
r
d
r
)
s
i
n
y
d
c
e
e
r
e
s
es
e
s
er
t
1
d
)
u
s
v
t
-
)
e
p
o
i
h
I
c
s
P
e
p
e
a
to
f
tio
s
2
)
o
dd
s
)
-
l
n
e
S
lo
o
al
r
t
e
p
w
M
u
s
tio
p
i
3
s
T
n
p
P
)
g
(n
th
n
L
g
re
a
e
et
D
l
a
p
p
A
w
te
a
y
r
P
o
o
w
o
re
r
ga
d
u
k
a
u
w
)
f
y
c
te
(
o
t
a
i
:
e
w
l
r
l
d
-
s
m
a
ne
d
y
a
r
et
es
(
e
i
l
d
1
d
u
s
s
t
)
ire
e
p
e
I
h
s
rv
P
e
ct
a
to
er
o
fo
2
d
ry
)
s
)
l
d
e
S
lo
r
t
s
e
w
M
er
u
s
p
in
3)
s
T
v
t
P
i
g
(
L
ce
h
ne
g
e
D
s
a
tw
A
)
p
te
-
r
P
o
w
o
o
rk
g
d
p
a
a
u
)
ti
y
c
te
o
(
p
t:
n
e
w
re
a
-m
a
l
p
y
a
(
a
y
il
d
o
r
s
i
u
e
e
r
w
ec
f
r
v
o
e
to
a
i
l
r)
r
l
d
ry
n
dr
s
e
e
s
e
e
e
tu
s
1)
d
r
s
v
e
p
th
ic
IP
s
e
t
e
o
a
s
fo
2
)
s
d
-
)
l
d
o
et
lo
S
r
e
w
p
M
u
ss
t
p
i
io
3
T
n
P
)
g
(n
th
n
L
a
ga
e
e
D
l
tw
A
p
te
r
P
o
o
w
g
r
d
k
a
a
u
)
y
c
t
e
t:
(
e
w
-m
ay
a
(
i
l
d
se
ir
e
r
v
c
e
to
r)
ry
s
e
r
v
ic
e
s
)
o
p
t
i
o
n
a
l
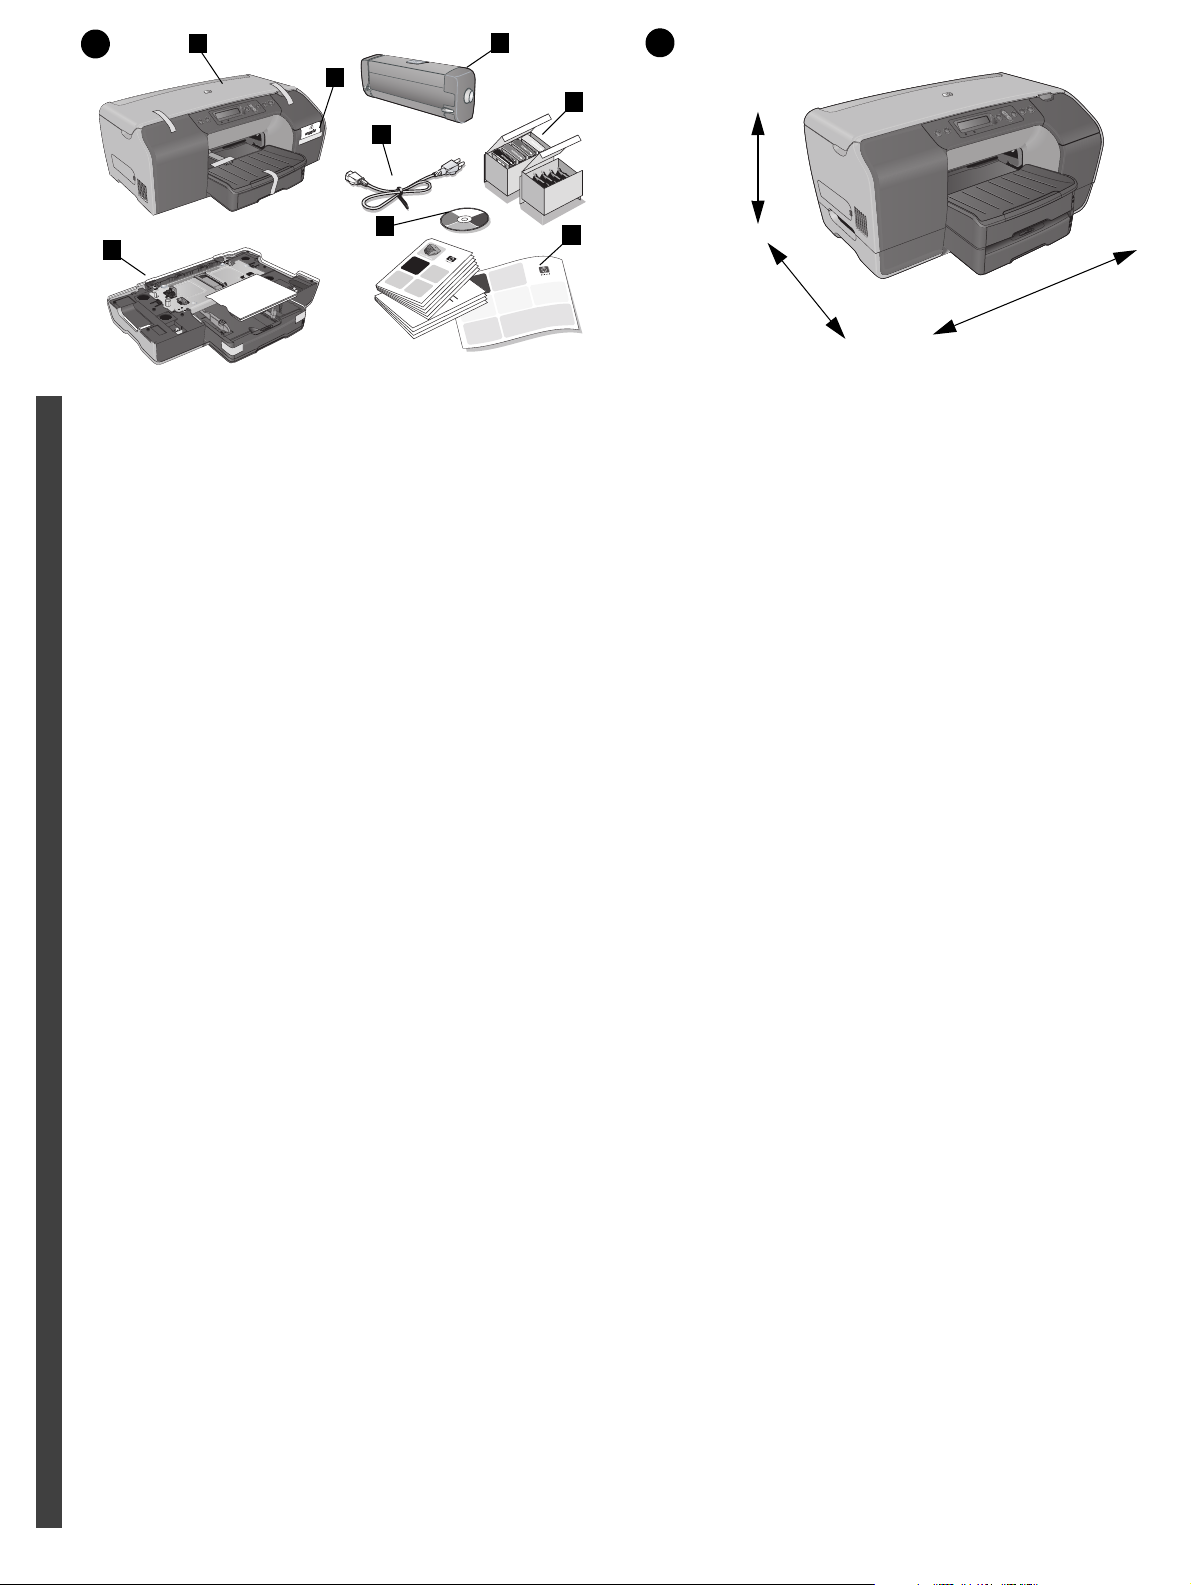
Step 1: Check the package contents.
1) HP Business Inkjet 2300 series printer, 2) installing supplies
flyer, 3) power cord, 4) ink cartridges and printheads, 5) printed
documentation (setup poster, getting started guide, HP customer
support guide), 6) Starter CD (software and electronic
documentation), 7) Tray 2 , 8) auto-duplex unit (HP Business
Inkjet 2300dtn only)
English
Schritt 1: Inhalt der Packung überprüfen.
1) HP Business Inkjet 2300 Series-Drucker, 2) Broschüre über
das Verbrauchsmaterial, 3) Netzkabel, 4) Tintenpatronen und
Druckköpfe, 5) gedruckte Dokumentation (Poster zur
Druckereinrichtung, Leitfaden zur Inbetriebnahme,
HP Kundendienstheft), 6) Start-CD (Software und elektronische
Dokumentation), 7) Fach 2, 8) Auto-Duplexeinheit (nur
DeutschFrançaisNederlandsItaliano
HP Business Inkjet 2300dtn)
5
416 mm (16.4 in)
553 mm (21.8 in)
Step 2: Prepare the location.
The surface must be sturdy, level, and located in a well-ventilated
area. Allow space around the printer, including 50 mm (2 inches)
for ventilation.
*Includes Tray 2 height (80 mm or 3.1 inches). For the HP
Business Inkjet 2300dtn, Tray 2 height is 145 mm (5.7 inches),
giving a total printer height of 355 mm (14 inches). With the
auto-duplex unit installed, the depth is 463 mm (18.2 inches).
Schritt 2: Standort vorbereiten.
Die Fläche muss fest und eben sein, der Raum muss gut belüftet
sein. Lassen Sie um den Drucker herum Platz, für die Belüftung
werden 50 mm (2 Zoll) benötigt.
*Einschließlich der Höhe von Fach 2 (80 mm oder 3,1 Zoll).
Die Höhe von Fach 2 des HP Business Inkjet 2300dtn beträgt
145 mm (5,7 Zoll), der Drucker insgesamt ist 355 mm hoch
(14 Zoll). Mit installierter Auto-Duplexeinheit beträgt die Tiefe
463 mm (18,2 Zoll).
Etape 1 : Vérifiez le contenu du carton.
1) Imprimante HP Business Inkjet 2300 series, 2) dépliant
d'installation des composants d'impression, 3) cordon
d'alimentation, 4) cartouches d'encre et têtes d'impression,
5) documentation papier (carte de configuration, guide de mise en
route, guide d'assistance clientèle HP), 6) CD de mise en route
(logiciels et documentation électronique), 7) bac 2, 8) unité
recto-verso automatique (HP Business Inkjet 2300dtn
uniquement)
Stap 1: De inhoud van de verpakking controleren.
1) HP Business Inkjet 2300 series printer, 2) folder voor het
installeren van benodigdheden, 3) netsnoer, 4) inktpatronen en
printkoppen, 5) gedrukte documentatie (installatieposter,
beknopte handleiding, handleiding voor
HP-klantenondersteuning), 6) installatie-cd-rom (software en
elektronische documentatie), 7) Lade 2, 8) automatische
duplex-eenheid (alleen voor de HP Business Inkjet 2300dtn)
Fase 1: Verificare il contenuto della confezione.
1) Stampante HP Business Inkjet serie 2300, 2) opuscolo per
l'installazione dei materiali di consumo, 3) cavo di alimentazione,
4) cartucce e testine di stampa, 5) documentazione stampata
(poster di installazione, guida introduttiva, guida per l'assistenza
ai clienti HP), 6) CD di avviamento (software e documentazione
elettronica), 7) vassoio 2, 8) unità duplex automatico (solo per le
stampanti HP Business Inkjet 2300dtn)
Etape 2 : Choix de l'emplacement.
Placez l'imprimante sur une surface plane et stable, dans une
zone bien aérée. Laissez un espace libre autour de l'imprimante,
notamment 50 mm (2 pouces) pour la ventilation.
*Hauteur du bac 2 (80 mm, soit 3,1 pouces) incluse. Dans le cas
d'une imprimante HP Business Inkjet 2300dtn, le bac 2 est haut
de 145 mm (5,7 pouces), soit une hauteur totale de l'imprimante
de 355 mm (14 pouces). Une fois l'unité recto-verso automatique
installée, la profondeur est de 463 mm (18,2 pouces).
Stap 2: De locatie voorbereiden.
Het oppervlak moet stevig en egaal zijn en de omgeving moet
goed geventileerd zijn. Zorg dat er ruimte overblijft rondom de
printer, inclusief 50 mm voor de ventilatie.
*Inclusief de hoogte van Lade 2 (80 mm). De hoogte van Lade 2
van de HP Business Inkjet 2300dtn is 145 mm, waardoor de totale
hoogte van de printer 355 mm bedraagt. Als de automatische
duplex-eenheid is geïnstalleerd, bedraagt de diepte 463 mm.
Fase 2: Preparare la superficie su cui collocare la stampante.
La superficie deve essere solida, piana e situata in una posizione
ben aerata. Lasciare spazio sufficiente intorno alla stampante,
inclusi 50 mm (2 pollici) per la ventilazione.
*Inclusa l'altezza del vassoio 2 (80 mm o 3,1 pollici). Nelle
stampanti HP Business Inkjet 2300dtn, l'altezza del vassoio 2 è di
145 mm (5,7 pollici). L'altezza totale della stampante è di 355 mm
(14 pollici). Se è installata l'unità duplex automatico, la profondità
è di 463 mm (18,2 pollici).
4
Page 5
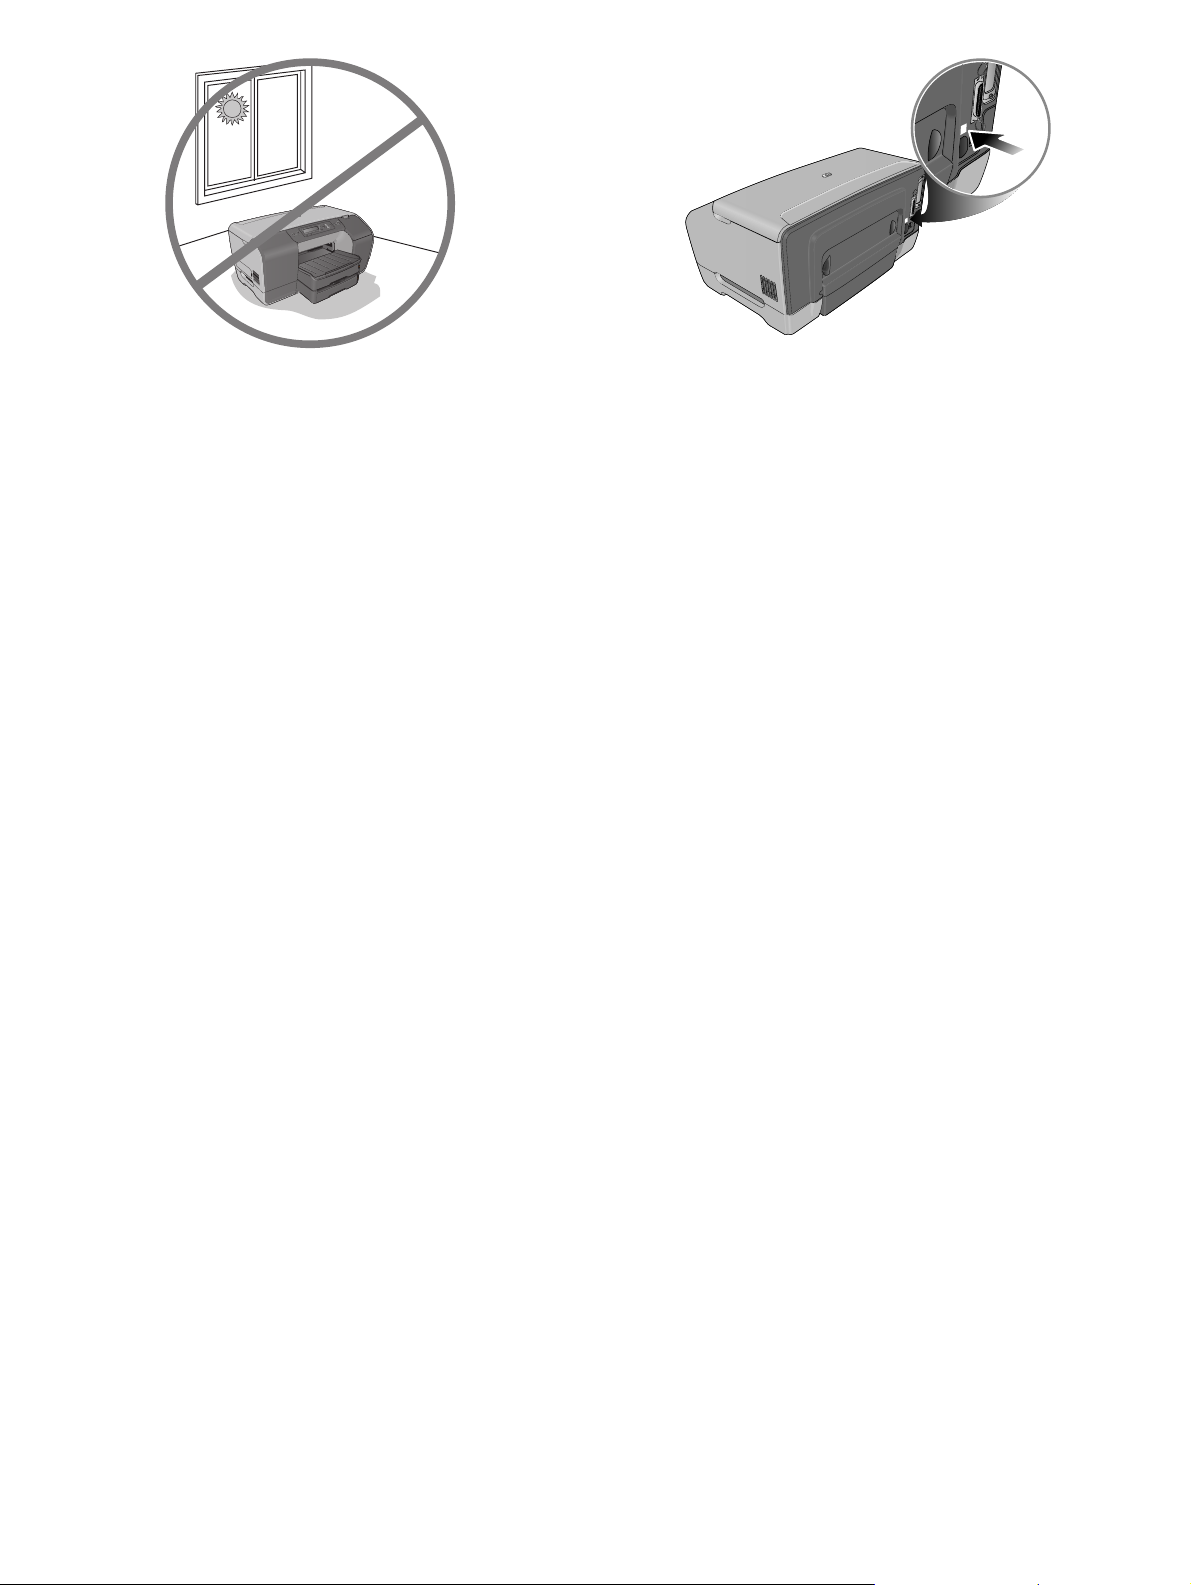
Do not place the printer in direct sunlight or near chemicals. Make
sure that the environment does not experience abrupt changes in
temperature or humidity.
z Temperature: 15° to 35° C (59° to 95° F)
z Relative humidity: 10 to 80%
Make sure that the location has an adequate power supply.
Check the voltage rating on your printer, located on the rear
corner next to the alternating current (AC) socket.
Power requirements:
z 100 to 240 volts AC
z 50/60 Hz (±3 Hz)
Stellen Sie den Drucker nicht an Orte mit hoher
Sonneneinstrahlung oder neben Chemikalien. Vermeiden
Sie plötzliche Änderungen hinsichtlich Temperatur oder
Luftfeuchtigkeit.
z Temperatur: 15° C bis 35° C
z Relative Luftfeuchtigkeit: 10 bis 80%
Evitez l'exposition directe de l'imprimante aux rayons du soleil ou
à des produits chimiques. Assurez-vous que la pièce n'est pas
exposée à des changements brusques de température ou
d'humidité.
z Te m p érature : de 15 à 35°C
z Humidité relative : de 10 à 80 %
Plaats de printer niet in direct zonlicht of in de buurt van
chemicaliën. Zorg ervoor dat er in de omgeving van de printer
geen abrupte schommelingen in de temperatuur of de
luchtvochtigheid optreden.
z Temperatuur: 15° tot 35° C
z Relatieve luchtvochtigheid: 10 tot 80%
Stellen Sie eine ausreichende Stromversorgung sicher.
Überprüfen Sie die auf Ihrem Drucker angegebene Spannung,
die sich hinten neben dem Netzanschluss befindet.
Stromanforderungen:
z 100 bis 240 Volt Wechselstrom
z 50/60 Hz (± 3 Hz)
Assurez-vous de disposer dans la pièce d'une alimentation
électrique adaptée. Vérifiez la tension de l'imprimante, indiquée à
l'arrière près de la prise de courant alternatif.
Alimentation :
z 100 à 240 volts (courant alternatif)
z 50/60 Hz (± 3 Hz)
Zorg ervoor dat de locatie een geschikte stroomvoorziening heeft.
Controleer het voltage van de printer. Dit wordt vermeld op de
achterkant naast de aansluiting voor het stopcontact.
Voedingsvereisten:
z 100 tot 240 volt (wisselstroom)
z 50/60 Hz (±3 Hz)
Non esporre la stampante alla luce diretta del sole né posizionarla
accanto a sostanze chimiche. Assicurarsi che nell'ambiente non si
verifichino improvvise variazioni di temperatura o di umidità.
z Temperatura: da 15° a 35° C (da 59° a 95° F)
z Umidità relativa: da 10 a 80%
Assicurarsi che sia disponibile una fonte di alimentazione elettrica
adeguata. Verificare il voltaggio della stampante, indicato
nell'angolo posteriore accanto alla presa per la corrente alternata
(CA).
Requisiti di alimentazione:
z da 100 a 240 volt AC
z da 50 a 60 Hz (con tolleranza di 3 Hz)
5
Page 6
3 4
3
0
0
2
y,
n
a
p
m
o
C
d
r
r
a
e
k
p
c
a
a
p
P
t
t
d
e
l
c
y
ewle
c
e
H
r
t
h
n
g
o
i
r
d
y
p
te
o
n
i
c
r
p
©
a
in
h
C
in
d
e
int
r
p
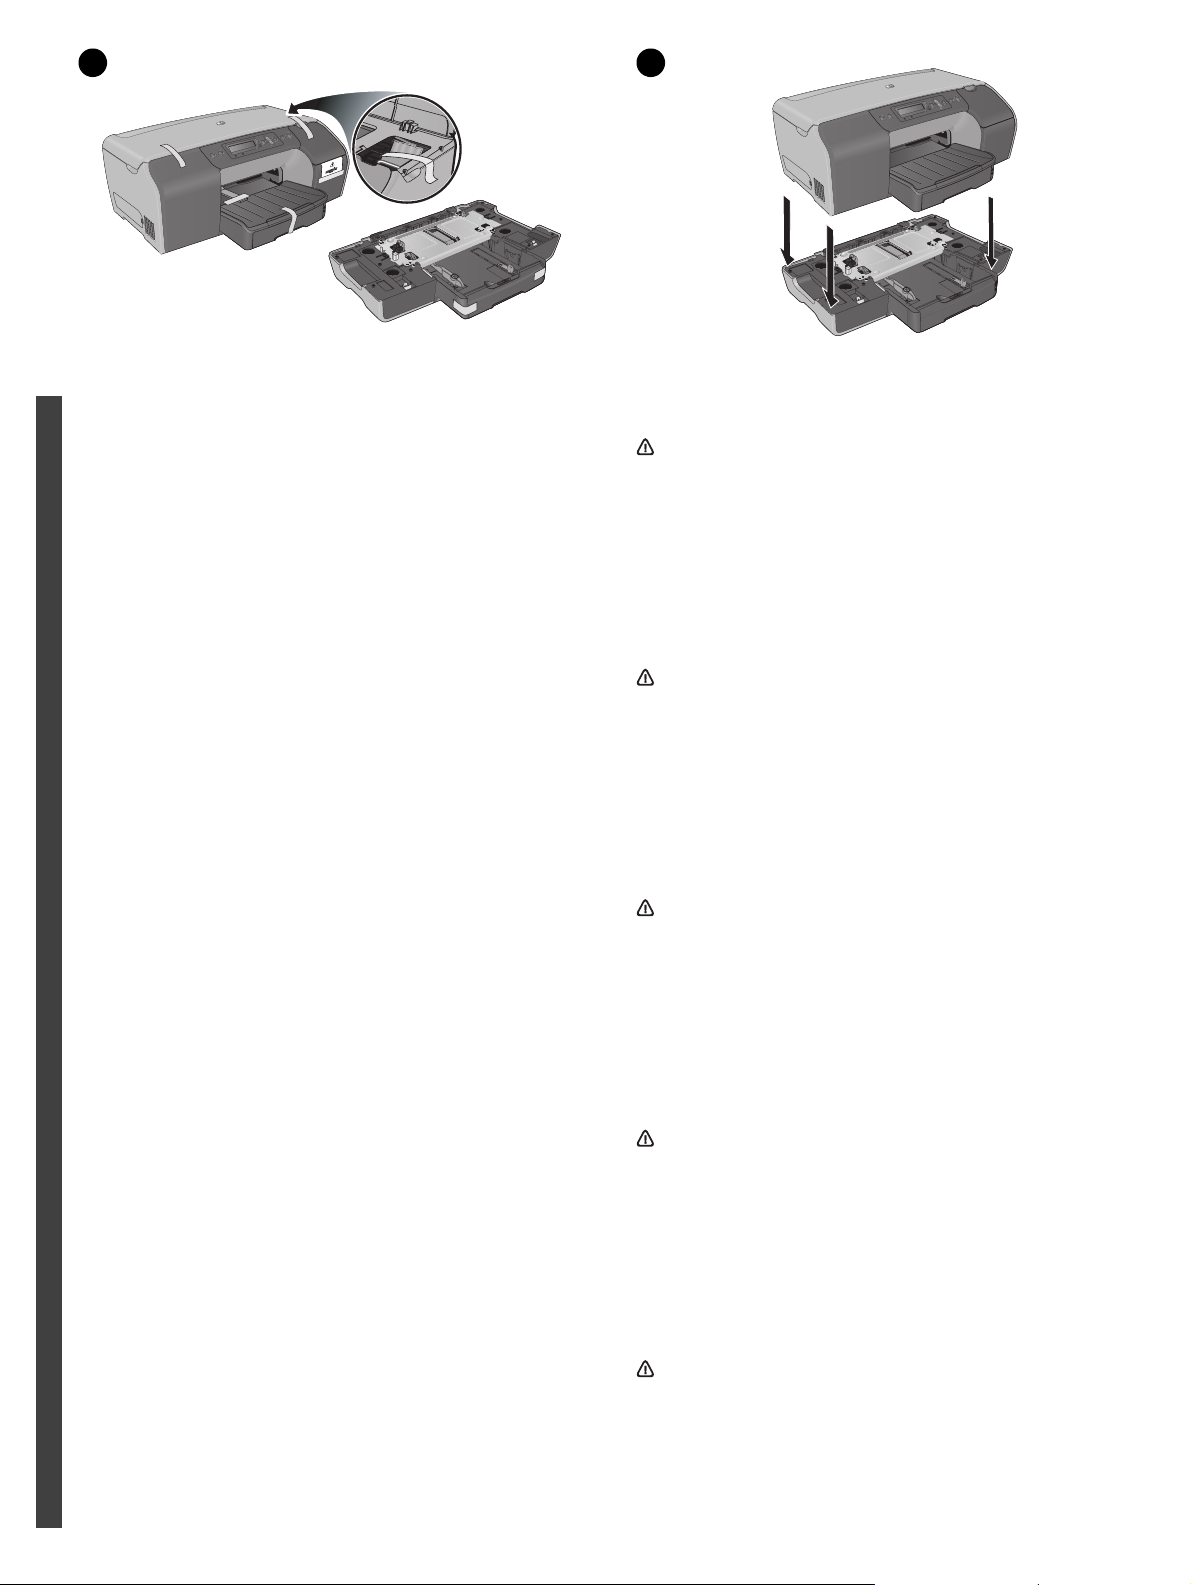
Step 3: Remove the packing materials.
1) Remove all packing tape from the outside and inside of the
printer. 2) Unpack Tray 2, and remove the packing tape and
packing material. 3) Move the printer and Tray 2 to the prepared
location.
English
Schritt 3: Verpackungsmaterial entfernen.
1) Entfernen Sie alle Verpackungsklebestreifen am und im
Drucker. 2) Packen Sie Fach 2 aus, und entfernen Sie die
Schutzstreifen und das Verpackungsmaterial. 3) Stellen Sie
Drucker und Fach 2 an den vorbereiteten Platz.
DeutschFrançaisNederlandsItaliano
Etape 3 : Retirez les matériaux d'emballage.
1) Retirez tous les rubans adhésifs d'emballage se trouvant à
l'extérieur et à l'intérieur de l'imprimante. 2) Déballez le bac 2 et
retirez la bande adhésive et le matériel d'emballage. 3) Déplacez
l'imprimante et le bac 2 à l'emplacement préparé.
Step 4: Install Tray 2.
Set the printer on top of Tray 2.
WARNING! Be careful to keep your fingers and hands clear of
the bottom of the printer.
Schritt 4: Fach 2 installieren.
Setzen Sie den Drucker auf dem Fach 2 ab.
ACHTUNG! Achten Sie darauf, dass Ihre Finger und Hände
nicht unter den Drucker geraten.
Etape 4 : Installation du bac 2.
Posez l'imprimante sur le bac 2.
AVERTISSEMENT ! Veillez à ne pas placer vos doigts ou vos
mains au-dessous de l'imprimante.
Stap 3: Het verpakkingsmateriaal verwijderen.
1) Verwijder de verpakkingstape van de buiten- en binnenkant
van de printer. 2) Haal Lade 2 uit de verpakking en verwijder de
verpakkingstape en het verpakkingsmateriaal. 3) Zet de printer en
Lade 2 op de locatie die u hebt voorbereid.
Fase 3: Rimuovere il materiale di imballo.
1) Rimuovere completamente il nastro di imballaggio dall'esterno
e dall'interno della stampante. 2) Disimballare il vassoio 2 e
rimuovere il nastro e il materiale di imballaggio. 3) Collocare la
stampante e il vassoio 2 nella posizione predisposta.
Stap 4: Lade 2 installeren.
Plaats de printer boven op Lade 2.
WAARSCHUWING! Zorg dat u niet met uw vingers en handen
aan de onderkant van de printer komt.
Fase 4: Installare il vassoio 2.
Posizionare la stampante sopra il vassoio 2.
AVVERTENZA: fare attenzione a tenere le dita e le mani
lontane dal fondo della stampante.
6
Page 7
5
1
2
3
4
2
1
3
5
9
8
7
6
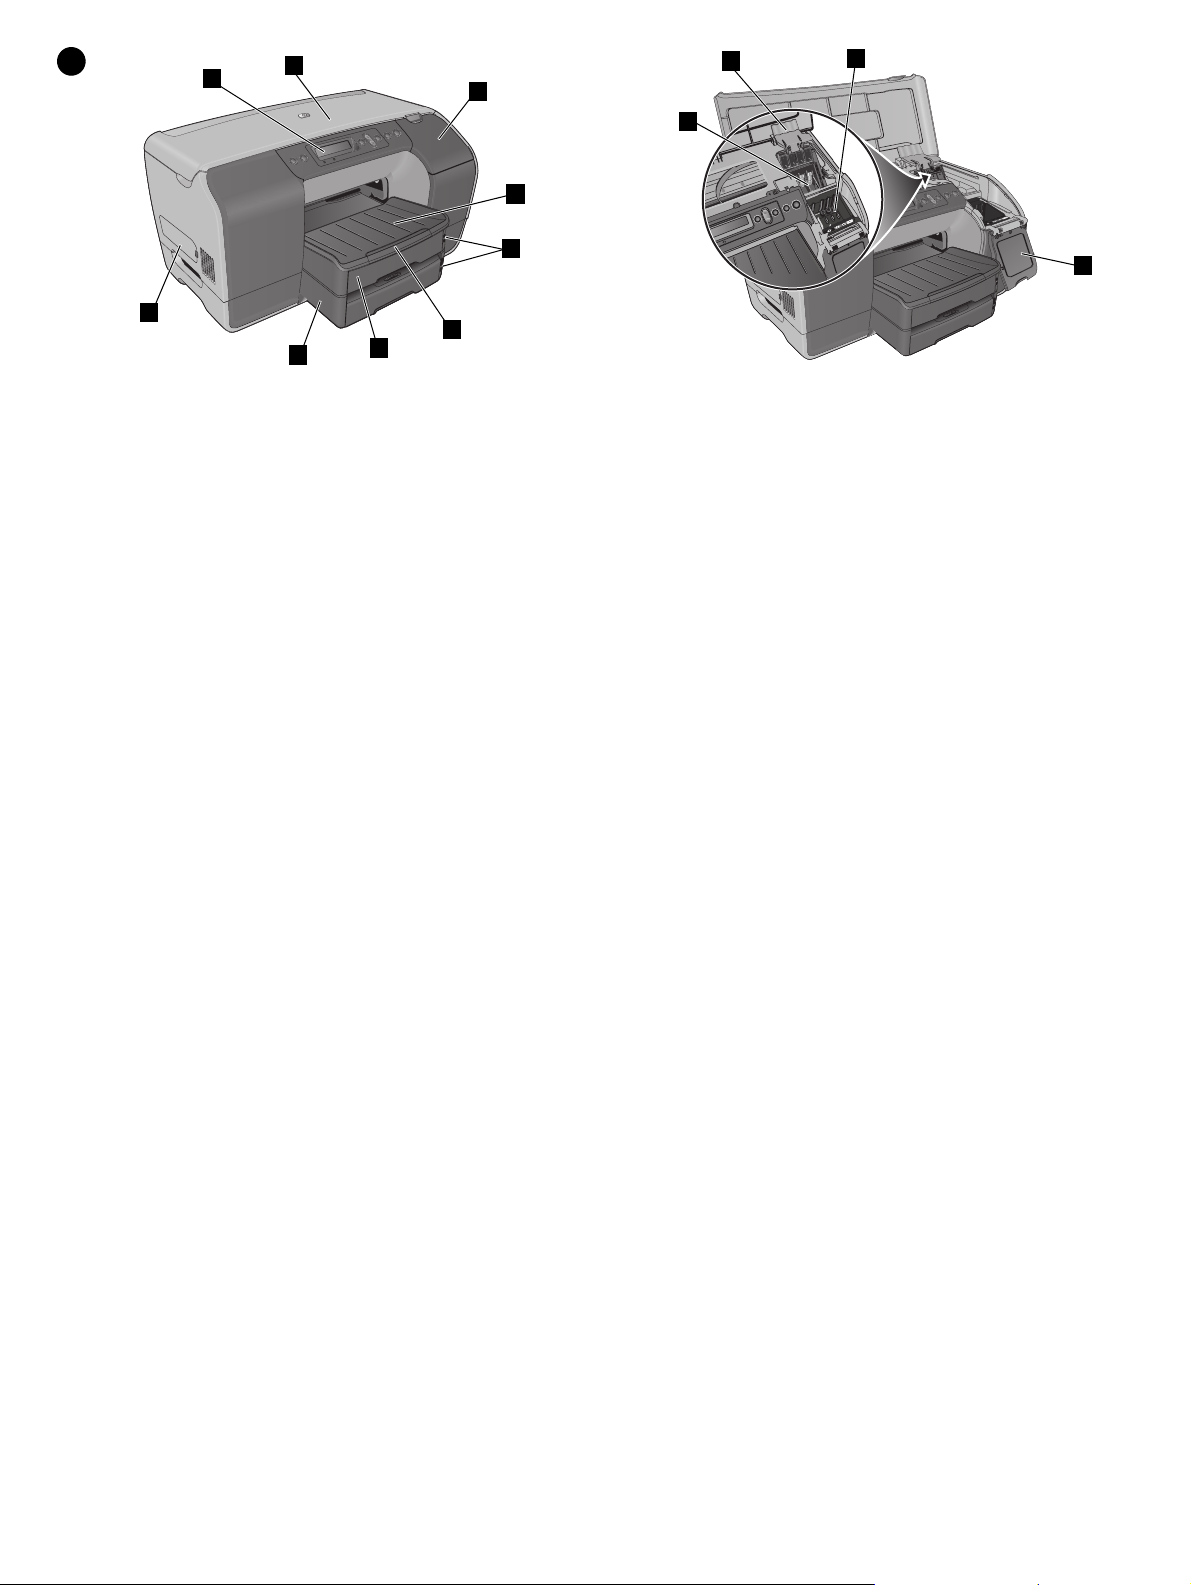
Step 5: Identify printer parts (front).
1) Control panel, 2) top cover, 3) ink cartridge cover, 4) output tray,
5) media level indicators, 6) tray extension, 7) Tr ay 1 , 8) Tr a y 2 ,
9) side cover
Schritt 5: Übersicht der Druckerkomponenten (Vorderseite).
1) Bedienfeld, 2) obere Abdeckung, 3) Abdeckung
des Tintenpatronenfachs, 4) Ausgabefach, 5)
Medienhöhenanzeige, 6) Fachverlängerung, 7) Fach 1,
8) Fach 2, 9) seitliche Abdeckung
4
Identify printer parts (printing supplies area).
1) printhead slots, 2) printhead latch, 3) ink cartridge slots,
4) ink cartridge cover
Übersicht der Druckerkomponenten (Druckzubehör).
1) Druckkopfschächte, 2) Druckkopfverriegelung,
3) Tintenpatronenschächte, 4) Abdeckung des
Tintenpatronenfachs
Etape 5 : Identifiez les éléments de l'imprimante (face avant).
1) Panneau de commande, 2) capot supérieur, 3) couvercle de la
cartouche d'encre, 4) bac de sortie, 5) indicateur de niveau de
support, 6) extension de bac, 7) bac 1, 8) bac 2, 9) capot latéral
Stap 5: Printeronderdelen controleren (voorkant).
1) Bedieningspaneel, 2) bovenste klep, 3) klep van de inktpatroon,
4) uitvoerbak, 5) indicatoren voor papierniveau, 6) verlengstuk op
uitvoerbak, 7) Lade 1, 8) Lade 2, 9) zijklep
Fase 5: Identificare le parti della stampante (lato anteriore).
1) Pannello di controllo, 2) coperchio superiore, 3) coperchio delle
cartucce di inchiostro, 4) vassoio di uscita, 5) indicatori del livello
dei supporti di stampa, 6) estensione del vassoio, 7) vassoio 1,
8) vassoio 2, 9) coperchio laterale
Identification des composants de l'imprimante (zone des
composants d'impression).
1) emplacements des têtes d'impression, 2) loquet d'accès aux
têtes d'impression, 3) emplacements des cartouches d'encre,
4) couvercle des cartouches d'encre
Printeronderdelen controleren (gedeelte met
afdrukbenodigdheden).
1) printkopsleuven, 2) printkopvergrendeling,
3) inktpatroonsleuven, 4) klep van de inktpatroon
Identificare le parti della stampante (area materiali
di consumo).
1) alloggiamenti delle testine di stampa, 2) fermo delle testine di
stampa, 3) alloggiamenti delle cartucce di inchiostro, 4) coperchio
delle cartucce di inchiostro
7
Page 8
1
2
6
5
3
4
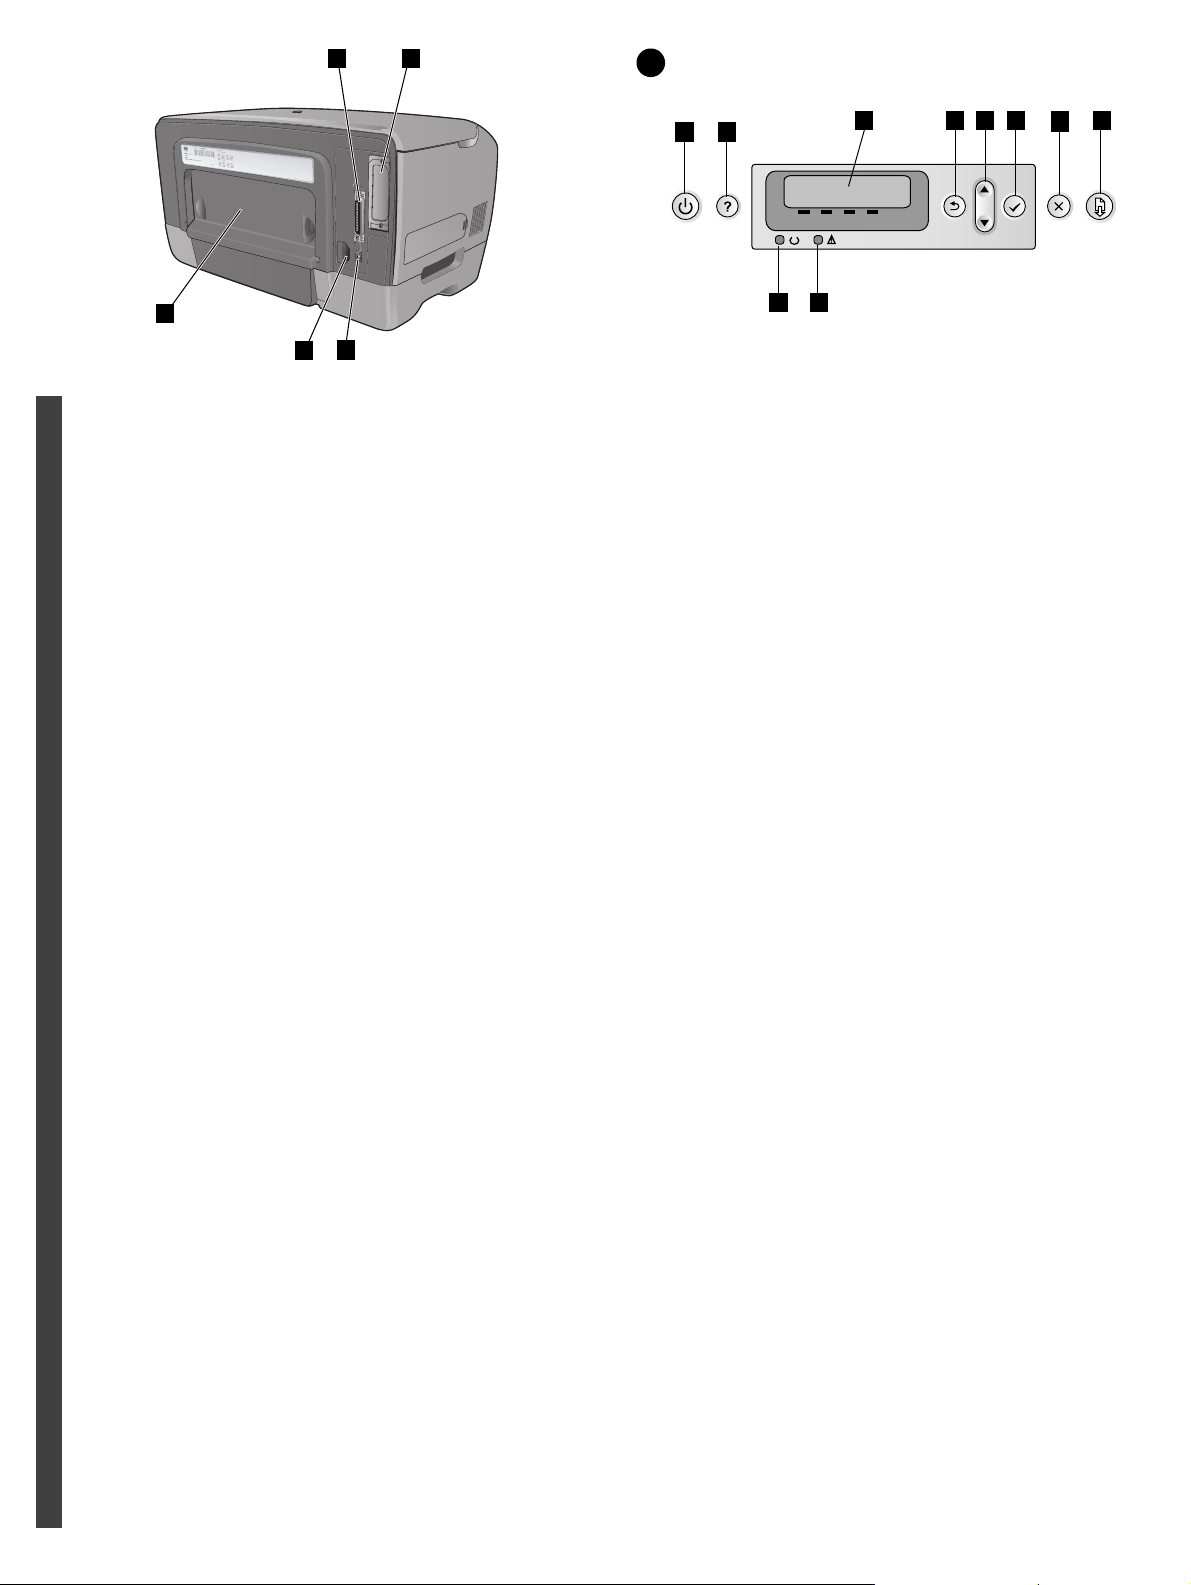
Identify printer parts (back).
1) Parallel port, 2) EIO slot, 3) universal serial bus (USB) port,
4) power input, 5) rear access panel (this panel is removed when
installing the optional auto-duplex unit)
English
Übersicht der Druckerkomponenten (Rückseite).
1) Parallelanschluss, 2) EIO-Steckplatz, 3) USB-Anschluss
(Universal Serial Bus), 4) Netzeingang, 5) hintere Zugangsklappe
(diese Klappe wird entfernt, wenn die optionale
Auto-Duplexeinheit installiert wird)
1 2
3
9
10
84 5 6
7
Step 6: Identify control panel items.
1) Power button, 2) Help button, 3) LCD display, 4) Back button,
5) Up and Down arrow buttons, 6) Select button, 7) Cancel Job
button, 8) Resume button, 9) Ready light, 10) Attention light
Schritt 6: Beschreibung der Bedienfeldteile.
1) Netzschalter, 2) Hilfe-Taste, 3) LCD-Anzeige, 4) Zurück-Taste,
5) Auf- und Abwärtstasten, 6) Auswahl-Taste,
7) Job-Abbrechen-Taste, 8) Wiederaufnahmetaste, 9) Bereit-LED,
10) Warn-LED
DeutschFrançaisNederlandsItaliano
Identifiez les éléments de l'imprimante (face arrière).
1) Port parallèle, 2) logement EIO, 3) port USB (Universal Serial
Bus), 4) entrée d'alimentation, 5) panneau d'accès arrière
(ce panneau est retiré à l'installation de l'unité recto-verso
automatique optionnelle)
Printeronderdelen controleren (achterkant).
1) Parallelle poort, 2) EIO-sleuf, 3) USB-poort,
4) stroomaansluiting, 5) achterpaneel (dit paneel moet worden
verwijderd als u een automatische duplex-eenheid wilt installeren)
Identificare le parti della stampante (lato posteriore).
1) Porta parallela, 2) alloggiamento EIO, 3) porta USB,
4) ingresso alimentazione, 5) pannello di accesso posteriore
(questo pannello viene rimosso quando si installa l'unità duplex
automatico opzionale)
Etape 6 : Identification des composants du panneau
de commande.
1) Interrupteur de marche/arrêt, 2) bouton Aide, 3) écran à
cristaux liquides, 4) bouton Précédent, 5) boutons Flèche vers
le haut et Flèche vers le bas, 6) bouton Select (Sélectionner),
7) bouton Cancel Job (Annuler impression), 8) bouton Reprendre,
9) voyant Prêt, 10) voyant Attention
Stap 6: Onderdelen van het bedieningspaneel controleren.
1) Aan/uit (knop), 2) Help (knop), 3) LCD-scherm, 4) Terug (knop),
5) pijl-omhoog en pijl-omlaag, 6) Selecteren (knop), 7) Ta a k
annuleren (knop), 8) Doorgaan (knop), 9) Klaar (lampje),
10) Attentie (lampje)
Fase 6: Identificare gli elementi del pannello di controllo.
1) pulsante di accensione, 2) pulsante Guida, 3) display a cristalli
liquidi, 4) pulsante Indietro, 5) pulsanti freccia su e giù, 6) pulsante
di selezione, 7) pulsante di annullamento dell'operazione,
8) pulsante di riavvio, 9) spia Pronta, 10) spia Attenzione
8
Page 9
1 2 3 4 5
7
1
2
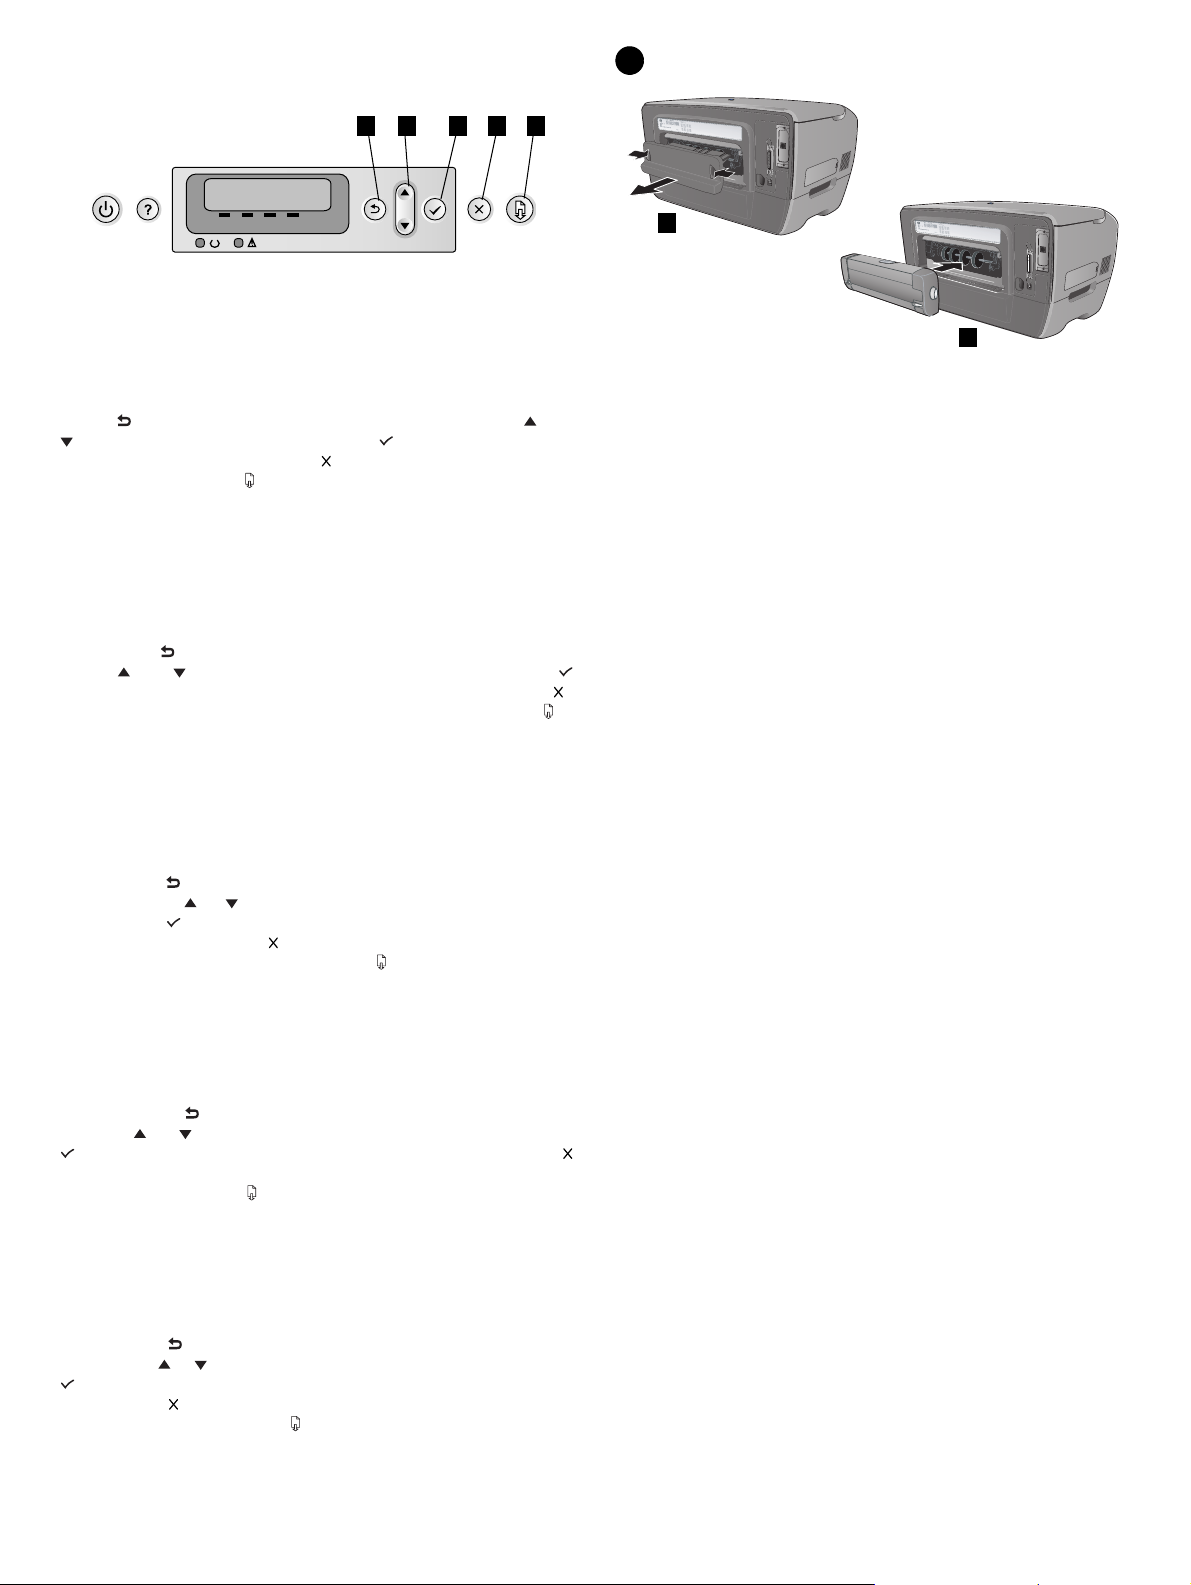
Navigating the control panel menus.
1) The button returns you to the previous menu. 2) The and
buttons scroll through menus. 3) The button enters the
menus and selects items. 4) The button cancels a selection and
exits all menus. 5) The button also exits all menus.
Navigieren in den Menüs des Bedienfelds.
1) Die Taste führt Sie zurück zum vorherigen Menü. 2) Mit den
Tasten und blättern Sie durch die Menüs. 3) Mit der Taste
öffnen Sie Menüs und wählen Sie Elemente aus. 4) Die Taste
bricht eine Auswahl ab und schließt alle Menüs. 5) Die Taste
schließt ebenfalls alle Menüs.
Navigation dans les menus du panneau de commande.
1) Le bouton permet de revenir au menu précédent.
2) Les boutons et permettent de faire défiler les menus.
3) Le bouton permet d'ouvrir les menus et d'y sélectionner
des options. 4) Le bouton permet d'annuler une sélection et
de quitter tous les menus. 5) Le bouton permet également de
quitter tous les menus.
Step 7: Install auto-duplex unit (HP Business Inkjet 2300dtn).
1) Push the buttons on the rear access panel and pull it out of the
printer. 2) Slide the auto-duplex unit into the printer until it locks
into place.
Schritt 7: Installieren der Auto-Duplexeinheit (HP Business
Inkjet 2300dtn).
1) Drücken Sie die Tasten der hinteren Zugangsklappe,
und ziehen Sie sie aus dem Drucker. 2) Schieben Sie die
Auto-Duplexeinheit in den Drucker, bis sie einrastet.
Etape 7 : Installation de l'unité recto-verso automatique
(HP Business Inkjet 2300dtn).
1) Appuyez sur les boutons du panneau d'accès arrière et retirez
le panneau de l'imprimante. 2) Faites glisser l'unité recto verso
automatique dans l'imprimante jusqu'à ce qu'elle s'enclenche.
Menu's op het bedieningspaneel doorbladeren.
1) Met de knop keert u terug naar het vorige menu. 2) Met de
knoppen en kunt u door de menu's bladeren. 3) Met de knop
kunt u menu's openen en opties selecteren. 4) Met de knop
kunt u de geselecteerde opties ongedaan maken en menu's
sluiten. 5) Met de knop kunnen ook alle menu's worden
gesloten.
Menu del pannello di controllo.
1) Il pulsante consente di tornare al menu precedente.
2) I pulsanti e consentono di scorrere i menu. 3) Il pulsante
consente di accedere ai menu e di selezionarne le voci.
4) Il pulsante consente di annullare una selezione e di uscire
da tutti i menu. 5) Il pulsante consente di uscire da tutti i menu.
Stap 7: Automatische duplex-eenheid installeren
(HP Business Inkjet 2300dtn).
1) Druk op de knoppen op het achterpaneel en verwijder het
paneel van de printer. 2) Schuif de automatische duplex-eenheid
in de printer tot deze vastklikt.
Fase 7: Installare l'unità duplex automatico (HP Business
Inkjet 2300dtn).
1) Premere i pulsanti dal pannello di accesso posteriore e
rimuoverlo dalla stampante. 2) Inserire l'unità duplex automatico
nella stampante fino a quando non scatta nella posizione corretta.
9
Page 10
8
3
1
1
2
2
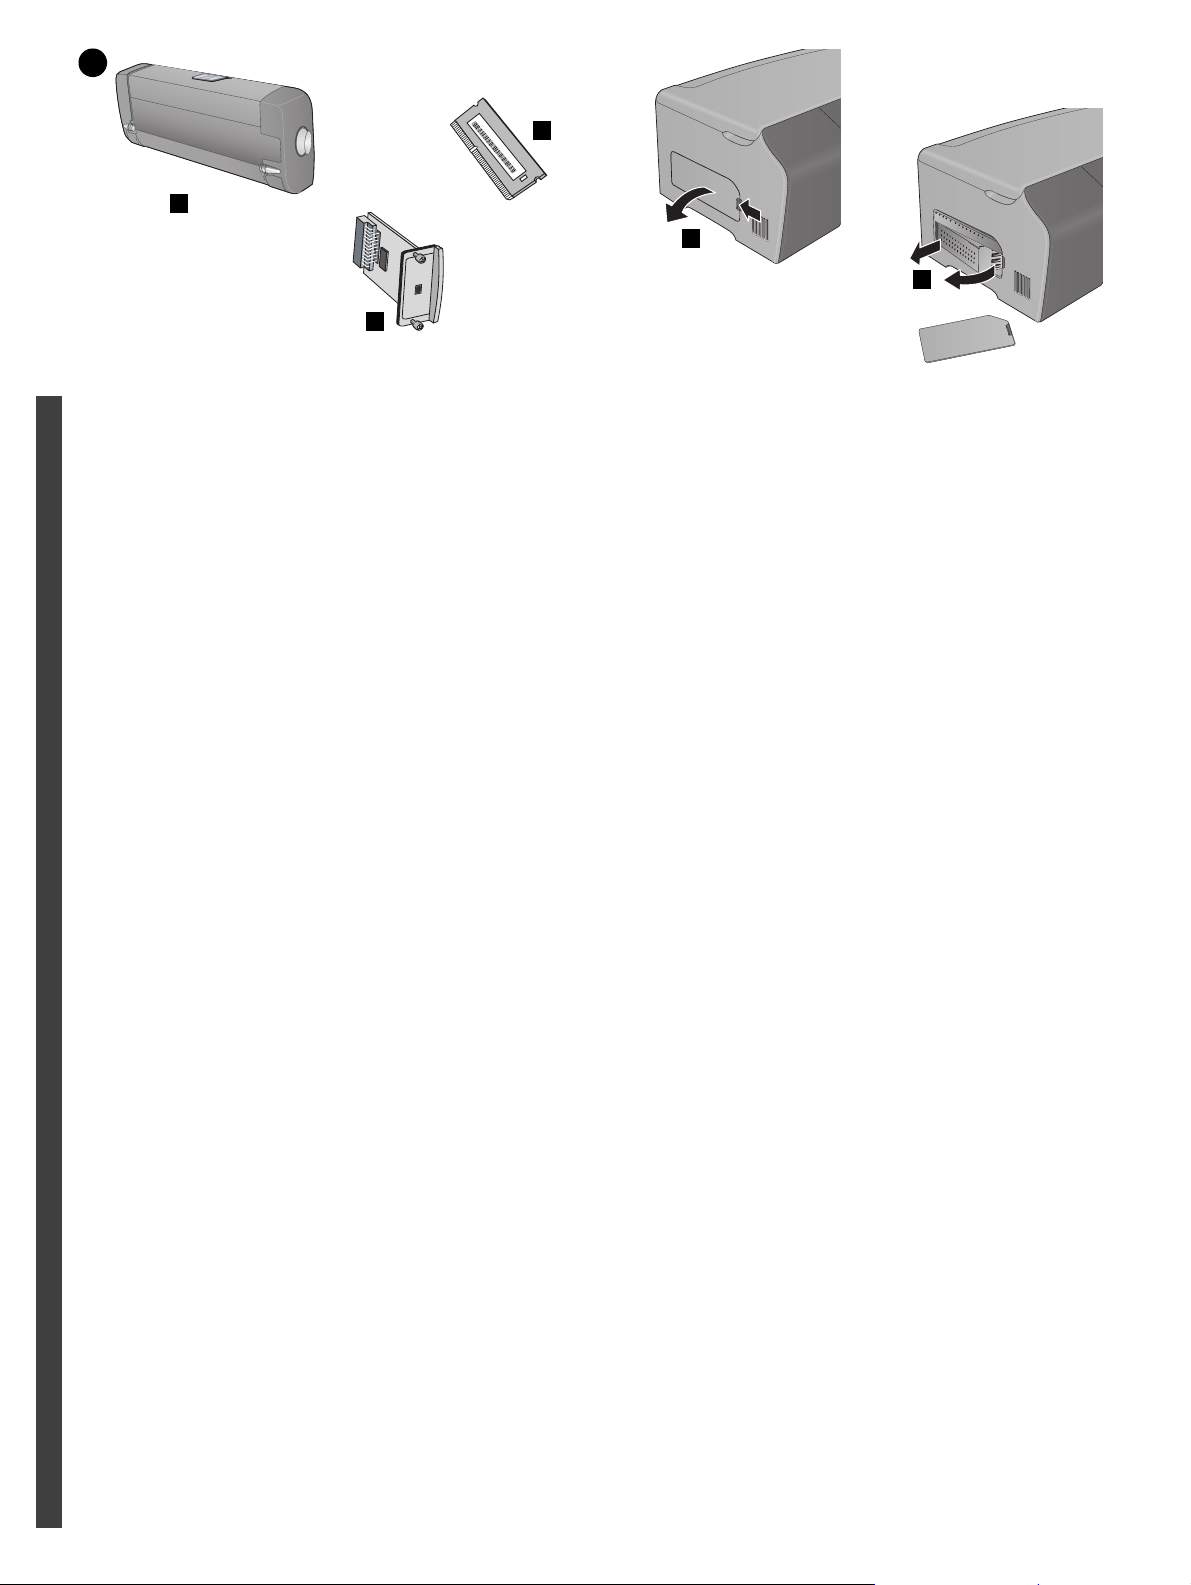
Step 8: Install optional accessories.
If you have purchased other optional accessories* for the printer,
install them at this time.
*1) auto-duplex unit (C8247A), 2) EIO accessories: EIO Jetdirect
print servers (J6057A, J6058A, J4167A), 3) memory modules
(Q1887A, C9121A)
English
Schritt 8: Installieren von optionalem Zubehör.
Wenn Sie weiteres optionales Zubehör* für den Drucker erworben
haben, installieren Sie es jetzt.
*1) Auto-Duplexeinheit (C8247A), 2) EIO-Zubehör:
EIO-Jetdirect-Druckserver (J6057A, J6058A, J4167A),
3) Speichermodule (Q1887A, C9121A)
DeutschFrançaisNederlandsItaliano
Etape 8 : Installation des accessoires optionnels.
Si vous avez acheté d'autres accessoires optionnels* pour
l'imprimante, installez-les maintenant.
*1) Unité recto-verso automatique (C8247A), 2) accessoires EIO :
serveurs d'impression EIO Jetdirect (J6057A, J6058A, J4167A),
3) modules de mémoire (Q1887A, C9121A)
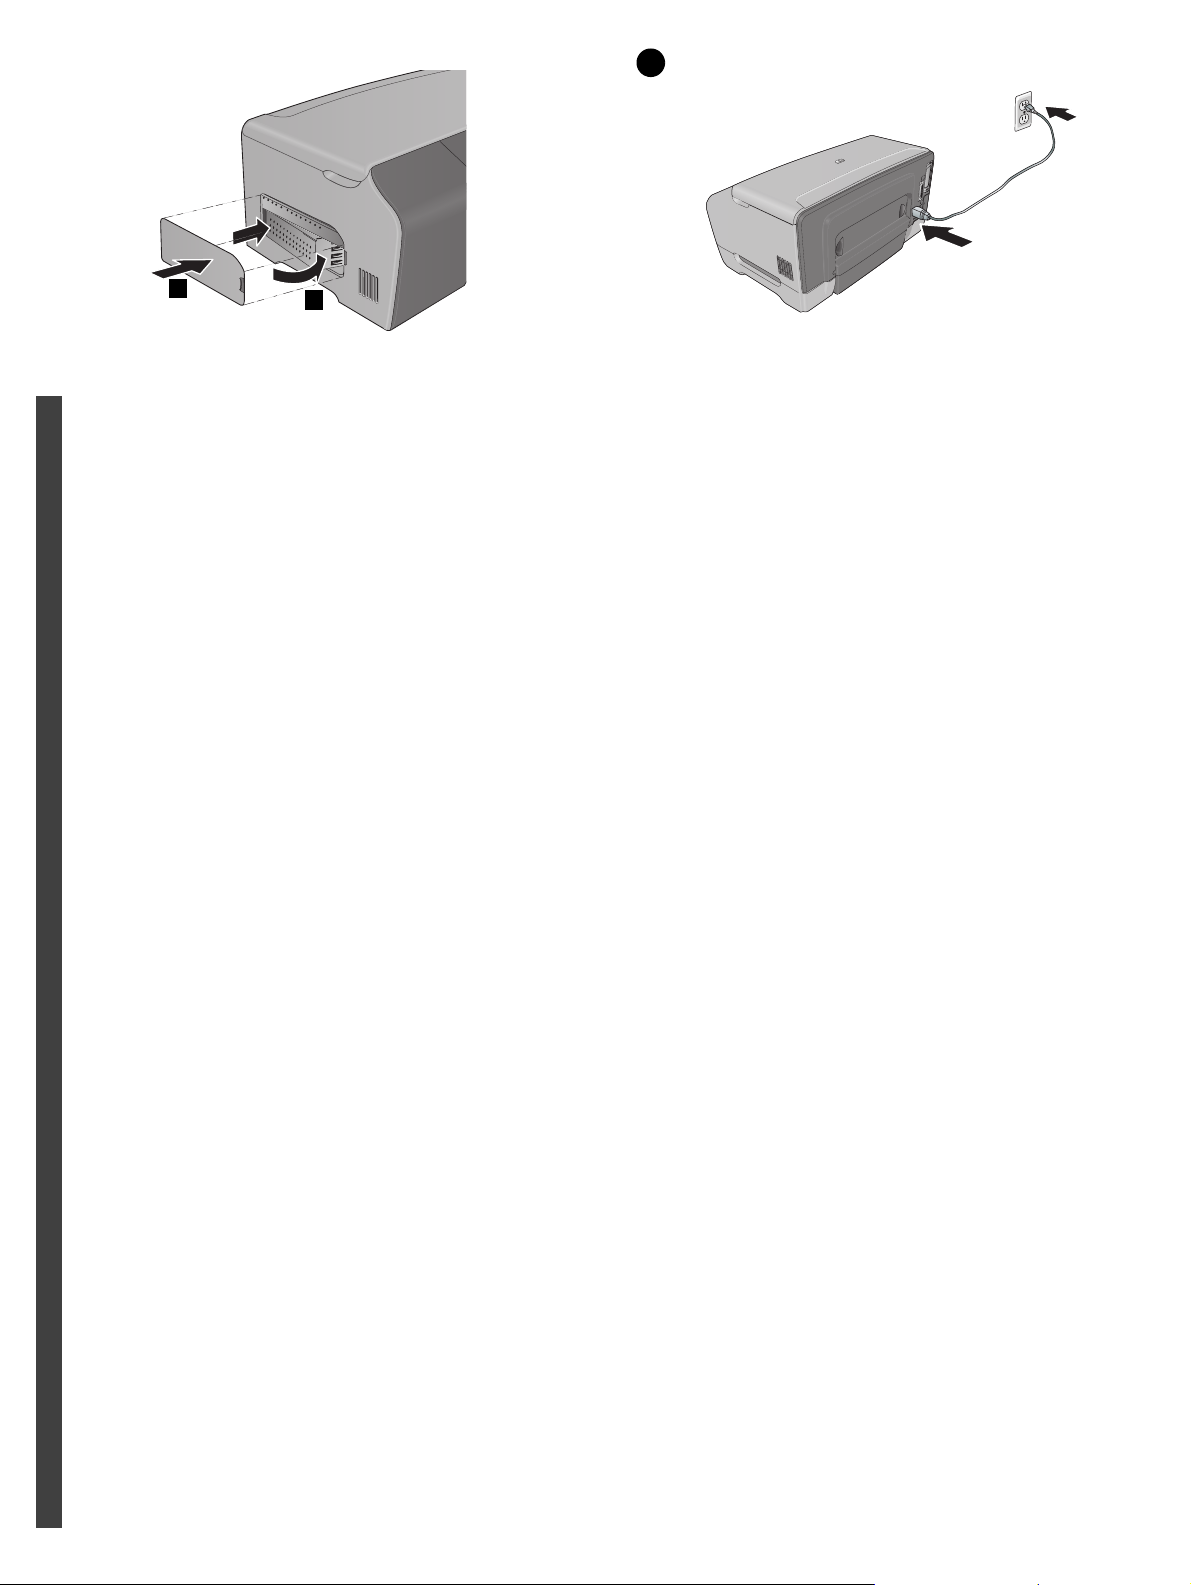
Install memory module (optional).
1) On the left side of the printer, unlatch and remove the side
cover. 2) Remove the DIMM cover.
Installieren des Speichermoduls (optional).
1) Entriegeln und entfernen Sie die seitliche Abdeckung auf der
linken Seite des Druckers. 2) Entfernen Sie die Abdeckung der
DIMMs.
Installation du module de mémoire (optionnel).
1) Retirez le couvercle latéral du côté gauche de l'imprimante.
2) Retirez le capot du module DIMM.
Stap 8: Optionele accessoires installeren.
Als u andere optionele accessoires* voor de printer hebt gekocht,
kunt u deze nu installeren.
*1) automatische duplex-eenheid (C8247A), 2) EIO-accessoires:
EIO Jetdirect-afdrukservers (J6057A, J6058A, J4167A),
3) geheugenmodules (Q1887A, C9121A)
Fase 8: Installare gli accessori opzionali.
Se sono stati acquistati degli accessori* opzionali per la
stampante, installarli in questa fase.
*1) unità duplex automatico (C8247A), 2) accessori EIO: server
di stampa EIO Jetdirect (J6057A, J6058A, J4167A), 3) moduli di
memoria (Q1887A, C9121A)
Geheugenmodule installeren (optioneel).
1) Ontgrendel en verwijder de zijklep aan de linkerkant van de
printer. 2) Verwijder de DIMM-klep.
Installare il modulo di memoria (opzionale).
1) Sbloccare e rimuovere il coperchio laterale sul lato sinistro
della stampante. 2) Rimuovere il coperchio del modulo DIMM.
10
Page 11

5
4
3) Remove the DIMM from the antistatic package.
CAUTION: Always wear a grounding wrist strap (or similar device)
when handling sensitive electronic components. Failure to do so
could result in damage to the parts.
3) Nehmen Sie das DIMM aus der antistatischen Verpackung.
VORSICHT: Tragen Sie beim Umgang mit empfindlichen
elektronischen Bauteilen stets ein Antistatikarmband (oder etwas
ähnliches). Bei Nichtbeachtung dieser Empfehlung droht eine
Beschädigung der Teile.
3) Retirez le module DIMM de son emballage antistatique.
ATTENTION : Portez toujours un bracelet anti-électrostatique
(ou un équipement similaire) lorsque vous manipulez des
composants électroniques sensibles. Dans le cas contraire,
les composants risquent d'être endommagés.
4) Align the DIMM so that the notches on the lower edge line up
with the raised marks in the DIMM slot. 5) Insert and press the
DIMM into the slot until it snaps into place.
4) Richten Sie das DIMM so aus, dass die Kerben an der
Unterkante mit den Erhöhungen im DIMM-Steckplatz
übereinstimmen. 5) Setzen Sie das DIMM in den Steckplatz
ein, und drücken Sie es herunter, bis es einrastet.
4) Alignez la barrette DIMM de sorte que les encoches sur le bord
inférieur soient alignées sur les repères d'alignement dans le
logement de la barrette. 5) Insérez et appuyez sur la barrette
DIMM dans le logement jusqu'à ce qu'elle soit bien en place.
3) Haal de DIMM uit de antistatische verpakking.
LET OP: Draag altijd een geaarde polsband (of een soortgelijk
hulpmiddel) als u gevoelige, elektronische onderdelen aanraakt.
Als u dit niet doet, kunnen de onderdelen beschadigd raken.
3) Rimuovere il modulo DIMM dalla confezione antistatica.
ATTENZIONE: indossare sempre un cinturino con messa a terra
o un dispositivo analogo quando si maneggiano componenti
elettronici sensibili alle cariche elettrostatiche. Se non si prende
questa precauzione, le parti potrebbero subire dei danni.
4) Lijn de DIMM uit zodat de uitsparingen op de onderste
rand evenwijdig staan aan de markeringen op de DIMM-sleuf.
5) Druk de DIMM in de sleuf tot deze vastklikt.
4) Allineare il modulo DIMM in modo che le tacche sul
bordo inferiore corrispondano ai segni in rilievo del relativo
alloggiamento. 5) Inserire e premere il modulo DIMM
nell'alloggiamento finché non scatta in posizione corretta.
11
Page 12
9
7
6
6) Replace the DIMM cover. 7) Replace the side cover. Step 9: Connect the power cord.
Connect the power cord to the printer and an AC power outlet.
Note: Do not connect the printer to the computer at this time.
English
6) Setzen Sie die Abdeckung der DIMMs wieder ein. 7) Bringen
Sie die seitliche Abdeckung wieder an.
Schritt 9: Anschließen des Netzkabels.
Schließen Sie das Netzkabel am Drucker und einer
Wechselstromdose an. Hinweis: Verbinden Sie den Drucker
noch nicht mit dem Computer.
DeutschFrançaisNederlandsItaliano
6) Remettez le capot de la barrette DIMM en place. 7) Remettez
le capot latéral en place.
Etape 9 : Branchez le cordon d'alimentation.
Branchez une extrémité du cordon d'alimentation dans
l'imprimante, puis l'autre l'extrémité dans une prise murale.
Remarque : Ne connectez pas encore l'imprimante à l'ordinateur.
6) Plaats de DIMM-klep terug. 7) Plaats de zijklep terug. Stap 9: Het netsnoer aansluiten.
Sluit het netsnoer aan op de printer en een stopcontact.
Opmerking: Sluit de printer nu nog niet aan op de computer.
6) Richiudere il coperchio del modulo DIMM. 7) Richiudere il
coperchio laterale.
Fase 9: Collegare il cavo di alimentazione.
Collegare il cavo di alimentazione alla stampante e a una presa
di corrente alternata (CA). Nota: non collegare la stampante al
computer in questa fase.
12
Page 13

10
2
Step 10: Load paper in Tray 1 or Tray 2.
1) Pull the tray out of the printer. 2) If you are loading Tray 1, raise
and remove the output tray.
Schritt 10: Einlegen von Papier in Fach 1 oder Fach 2.
1) Ziehen Sie das Fach aus dem Drucker heraus. 2) Wenn Sie in
Fach 1 Papier einlegen wollen, heben Sie das Ausgabefach an,
und entfernen Sie es.
Etape 10 : Chargez le papier dans le bac 1 ou le bac 2.
1) Retirez le bac de l'imprimante. 2) Pour charger le bac 1, relevez
et retirez le bac de sortie.
3
3
3) For paper between 356 mm and 279 mm (11 inches and
14 inches) long, move the latch on the tray to the right and lower
the front of the tray.
3) Bei Papier mit zwischen 356 mm und 279 mm (11 Zoll und
14 Zoll) Länge bewegen Sie die Verriegelung des Fachs nach
rechts, und klappen Sie die Vorderseite des Fachs nach unten.
3) Déplacez la butée du bac vers la droite et abaissez l'avant du
bac pour charger du papier de longueur comprise entre 356 mm
et 279 mm (11 et 14 pouces).
Stap 10: Papier plaatsen in Lade 1 en Lade 2.
1) Trek de lade uit de printer. 2) Als u papier in Lade 1 wilt
plaatsen, tilt u de lade omhoog en verwijdert u de uitvoerbak.
Fase 10: Caricare la carta nel vassoio 1 o nel vassoio 2.
1) Estrarre il vassoio dalla stampante. 2) Per caricare la carta nel
vassoio 1, sollevare e rimuovere il vassoio di uscita.
3) Voor papier met een lengte tussen 279 en 356 mm (11 inch en
14 inch) verplaatst u de vergrendeling op de lade naar rechts en
laat u de voorkant van de lade zakken.
3) Per caricare carta di lunghezza compresa tra 356 mm e
279 mm (da 11 a 14 pollici), spostare il fermo del vassoio
verso destra e abbassare la parte anteriore del vassoio.
13
Page 14

5
6
4
4
7
4) Slide the media length guide and media width guide to the
markings in the tray for the size you are loading. 5) Place up to
150 sheets of paper (or 30 transparencies) into Tray 1 or up to
250 sheets of plain paper into Tray 2*.
*Tray 2 of the HP Business Inkjet 2300dtn can hold up to 500
sheets of plain paper.
English
4) Ziehen Sie die Medienlängenführung und die
Medienbreitenführung zu den Markierungen des Fachs für das
von Ihnen eingelegte Format. 5) Legen Sie bis zu 150 Blatt Papier
(oder 30 Transparentfolien) in Fach 1 oder bis zu 250 Blatt
Normalpapier in Fach 2*.
*Fach 2 des HP Business Inkjet 2300dtn kann bis zu 500 Blatt
Normalpapier aufnehmen.
DeutschFrançaisNederlandsItaliano
4) Faites glisser les guides papier sur la largeur et la longueur du
support en fonction des marques du bac pour le format en cours
de chargement. 5) Placez jusqu'à 150 feuilles de papier (ou 30
transparents) dans le bac 1) ou jusqu'à 250 feuilles de papier
dans le bac 2*.
*Le bac 2 de l'imprimante HP Business Inkjet 2300dtn peut
contenir jusqu'à 500 feuilles de papier ordinateur.
6) If you are loading Tray 1, reattach and close the output tray.
7) Slide the tray into the printer. 8) Pull out the extension on the
output tray.
6) Wenn Sie in Fach 1 Papier eingelegt haben, setzen Sie das
Ausgabefach wieder ein und schließen Sie es. 7) Schieben Sie
das Fach in den Drucker. 8) Ziehen Sie die Verlängerung des
Ausgabefachs heraus.
6) Pour charger le bac 1, remettez le bac de sortie en place et
fermez-le. 7) Faites glisser le bac dans l'imprimante. 8) Tirez les
extensions du bac de sortie.
4) Verschuif de materiaalgeleiders voor de breedte en de lengte
naar de markeringen in de lade voor het materiaalformaat dat u
plaatst. 5) Plaats maximaal 150 vel papier (of 30 transparanten)
in Lade 1 of plaats maximaal 250 vel normaal papier in Lade 2*.
*Lade 2 van de HP Business Inkjet 2300dtn kan maximaal 500 vel
normaal papier bevatten.
4) Fare scorrere le guide di lunghezza e di larghezza del supporto
fino ai contrassegni nel vassoio per il formato di carta che si
desidera caricare. 5) Inserire fino a 150 fogli di carta (o 30 lucidi)
nel vassoio 1 o fino a 250 fogli di carta nel vassoio 2*.
*Il vassoio 2 della stampante HP Business Inkjet 2300dtn può
contenere un massimo di 500 fogli di carta comune.
6) Als u papier in Lade 1 wilt plaatsen, plaatst u de uitvoerbak
terug en sluit u deze. 7) Schuif de bak in de printer. 8) Trek het
verlengstuk op de uitvoerbak uit.
6) Per caricare la carta nel vassoio 1, ricollegare e chiudere
il vassoio di uscita. 7) Inserire il vassoio nella stampante.
8) Estrarre l'estensione del vassoio di uscita.
14
Page 15

11
12
Step 11: Turn on the printer.
Press the power button on the control panel to turn on the printer.
Schritt 11: Schalten Sie den Drucker ein.
Drücken Sie Netztaste auf dem Bedienfeld, um den Drucker
einzuschalten.
Etape 11 : Mettez l'imprimante sous tension.
Appuyez sur l'interrupteur de marche/arrêt, qui se trouve sur le
panneau de commande, pour mettre l'imprimante sous tension.
Step 12: Set the control panel language.
The control panel displays SELECT LANGUAGE: ENGLISH.
To choose another language for the LCD display, press or to
highlight the language, and then press .
Schritt 12: Einstellen der Sprache im Bedienfeld.
Das Bedienfeld zeigt die Meldung SELECT LANGUAGE: ENGLISH
(Sprache wählen: Englisch).
Um eine andere Sprache auf dem LCD-Display einzustellen,
drücken Sie oder , um die Sprache anzuzeigen, und drücken
Sie dann .
Etape 12 : Configurez la langue du panneau de commande.
Le panneau de commande affiche le message SELECT LANGUAGE:
ENGLISH
(Selectionner la langue : Anglais)
.
Pour afficher une autre langue sur l'écran à cristaux liquides,
appuyez sur ou afin de la mettre en évidence, puis appuyez
sur .
Stap 11: De printer aanzetten.
Druk op de aan/uit-knop op het bedieningspaneel om de printer
aan te zetten.
Fase 11: Accendere la stampante.
Premere il pulsante di accensione sul pannello di controllo per
accendere la stampante.
Stap 12: De taal voor het bedieningspaneel instellen.
Het bericht SELECT LANGUAGE: ENGLISH (Selecteer een taal:
Engels) wordt op het bedieningspaneel weergegeven.
Als u een andere taal voor het LCD-scherm wilt kiezen, drukt u
op of om de taal te markeren en drukt u op .
Fase 12: Impostare la lingua del pannello di controllo.
Sul pannello di controllo viene visualizzato il messaggio
SELECT LANGUAGE: ENGLISH (Selezionare lingua: Inglese).
Per scegliere un'altra lingua per il display LD, premere o
per evidenziare la lingua, quindi premere .
15
Page 16

13
4
3
1
Step 13: Install the ink cartridges.
1) Open the ink cartridge cover. 2) Remove each ink cartridge
from its package.
English
Schritt 13: Installieren der Tintenpatronen.
1) Öffnen Sie die Tintenpatronenabdeckung. 2) Entfernen Sie
jede Tintenpatrone aus ihrer Verpackung.
DeutschFrançaisNederlandsItaliano
Etape 13 : Installation des cartouches d'encre.
1) Soulevez le capot des cartouches d'encre. 2) Sortez chaque
cartouche d'encre de son emballage.
3) Align the arrow on each cartridge with the arrow on its
color-coded slot, and then insert the cartridge into the slot.
4) To ensure proper contact, press down firmly on the cartridges
until they snap into place.
Note: All four ink cartridges must be correctly installed for the
printer to work.
3) Richten Sie den Pfeil auf jeder Patrone nach dem Pfeil am
farbcodierten Steckplatz aus und setzen Sie dann die Patrone in
den Steckplatz ein.
4) Drücken Sie zur Gewährleistung des richtigen Kontakts fest
gegen die Patronen, bis diese einrasten.
Hinweis: Alle vier Tintenpatronen müssen für die
ordnungsgemäße Funktion des Druckers richtig installiert sein.
3) Alignez la flèche de chaque cartouche sur la flèche de
l'emplacement de même couleur, puis insérez la cartouche
dans son logement.
4) Pour assurer un bon contact, enfoncez fermement la cartouche
dans son emplacement, jusqu'à son enclenchement.
Remarque : Les quatre cartouches d'encre doivent être mises en
place correctement pour que l'imprimante fonctionne.
Stap 13: De inktpatronen installeren.
1) Open de klep van de inktpatroon. 2) Verwijder de inktpatronen
uit de verpakking.
Fase 13: Installare le cartucce di inchiostro.
1) Aprire il coperchio delle cartucce di inchiostro. 2) Rimuovere
ciascuna cartuccia dalla confezione.
3) Lijn de pijl op de inktpatronen uit met de pijl in de sleuf met de
bijbehorende kleurcode en bevestig de inktpatronen in de sleuf.
4) Duw de inktpatronen stevig vast zodat ze goed contact maken.
Opmerking: De printer werkt alleen als de vier inktpatronen goed
zijn geïnstalleerd.
3) Allineare la freccia stampigliata su ciascuna cartuccia con la
freccia del relativo alloggiamento codificato in colore, quindi
inserire la cartuccia nell'alloggiamento.
4) Per garantire un contatto completo, premere con decisione
sulle cartucce fino alla posizione corretta.
Nota: perché la stampante funzioni, è necessario che tutte le
quattro cartucce siano installate correttamente.
16
Page 17

14
7
3
2
4
6
5
Step 14: Install the printheads.
1) Check that the printer is turned on. 2) Open the top cover.
3) Lift the printhead latch from the rear, and then pull it forward
and down to release the hooks from the metal catch bar. 4) Pull
the latch up and back to uncover the printhead slots. 5) Remove
the packing material from the printhead carriage.
Schritt 14: Druckköpfe installieren.
1) Vergewissern Sie sich, dass der Drucker eingeschaltet ist.
2) Öffnen Sie die obere Abdeckung. 3) Heben Sie die
Druckkopfverriegelung am hinteren Ende an, und ziehen Sie sie
nach vorn, um die Haken von der Metallarretierung zu lösen.
4) Heben Sie die Verriegelung an, und drücken Sie sie zur
Rückseite, um Zugriff auf die Druckkopfschächte zu erhalten.
5) Entfernen Sie das Verpackungsmaterial aus dem
Druckschlitten.
Etape 14 : Installation des têtes d'impression.
1) Vérifiez que l'imprimante est sous tension. 2) Ouvrez le capot
supérieur. 3) Soulevez l'arrière du verrou des têtes d'impression,
tirez-le vers l'avant et le bas pour dégager le crochet de la barre
métallique de maintien. 4) Basculez le verrou vers le haut et
l'arrière pour découvrir le logement des têtes d'impression.
5) Retirez le matériel d'emballage du chariot des têtes
d'impression.
6) Remove each printhead from its package, and then remove the
protective tape from each printhead. 7) Insert each printhead into
its color-coded slot, and then press down firmly on each printhead
to ensure proper contact after installation.
6) Entfernen Sie jeden Druckkopf aus seiner Verpackung,
und entfernen Sie dann die Schutzfolie von jedem Druckkopf.
7) Setzen Sie jeden Druckkopf in den entsprechenden farblich
gekennzeichneten Schacht ein, und drücken Sie jeden Druckkopf
fest an, um optimalen Kontakt zu gewährleisten.
6) Sortez chaque tête d'impression de son emballage, puis retirez
le ruban adhésif de protection de chacune d'elles. 7) Insérez
chaque tête d'impression dans l'emplacement portant la couleur
correspondante, puis enfoncez fermement chaque tête
d'impression pour assurer un bon contact.
Stap 14: De printkoppen installeren.
1) Controleer of de printer is ingeschakeld. 2) Open de bovenklep.
3) Til de printkopvergrendeling aan de achterkant omhoog en trek
de vergrendeling naar voren en naar beneden om de haken uit de
metalen stang te verwijderen. 4) Trek de vergrendeling omhoog
en naar achteren om bij de printkopsleuven te komen.
5) Verwijder het verpakkingsmateriaal uit de wagen van de
printkoppen.
Fase 14: Installare le testine di stampa.
1) Verificare che la stampante sia accesa. 2) Aprire il coperchio
superiore. 3) Sollevare il fermo delle testine di stampa dalla parte
posteriore, quindi spingerlo in avanti e in basso per liberare i ganci
dalla barra di contenimento metallica. 4) Sollevare e tirare indietro
il fermo per scoprire gli alloggiamenti delle testine di stampa.
5) Rimuovere il materiale di imballo dal carrello delle testine di
stampa.
6) Verwijder de printkoppen uit de verpakking en verwijder de
beschermtape van de printkoppen. 7) Plaats de printkoppen in de
sleuven met de bijbehorende kleurcode en duw de printkoppen
stevig vast, zodat ze goed contact maken na de installatie.
6) Rimuovere ciascuna testina di stampa dalla confezione, quindi
rimuovere il nastro protettivo da ciascuna testina. 7) Inserire
ciascuna testina nel relativo alloggiamento codificato in colore,
quindi premere con decisione fino alla posizione corretta.
17
Page 18

9
8
9
8) Pull the printhead latch all the way forward and down, engage
the metal catch bar with the hooks, and then push the latch
towards the back of the printer. Note: You might have to apply
some pressure to close the latch.
English
8) Ziehen Sie die Verriegelung nach vorn und nach unten, rücken
Sie die Haken in die Arretierung ein, und schieben Sie die
Verriegelung dann in Richtung Rückseite des Druckers.
Hinweis: Möglicherweise müssen Sie ein wenig Druck ausüben,
um den Riegel zu schließen.
DeutschFrançaisNederlandsItaliano
8) Tirez le verrou des têtes d'impression vers l'avant et le bas,
enclenchez le crochet sur la barre métallique de maintien,
puis poussez le verrou vers l'arrière de l'imprimante.
Remarque : Il faut appliquer une certaine pression pour fermer
le verrou.
9) Close the top cover and the ink cartridge cover. The printer
automatically aligns the printheads and prints two pages in
about 5 minutes. If the control panel shows an error message,
see “Troubleshooting installation issues” in the onscreen user’s
guide on the Starter CD.
9) Schließen Sie die obere Abdeckung und die Klappe des
Tintenpatronenfachs. Der Drucker richtet die Druckköpfe
automatisch aus und druckt innerhalb der folgenden 5 Minuten
zwei Seiten. Wenn das Bedienfeld eine Fehlermeldung zeigt,
lesen Sie unter „Fehlerbehebung bei Installationsproblemen“
im Onscreen-Benutzerhandbuch auf der Start-CD nach.
9) Fermez le capot supérieur et celui des cartouches d'encre.
L'imprimante aligne automatiquement les têtes d'impression
et imprime deux pages en 5 minutes environ. Si un message
d'erreur s'affiche sur le panneau de commande, reportez-vous à
la section « Troubleshooting installation issues » (Dépannage des
problèmes d'installation) du guide de l'utilisateur en ligne,
disponible sur le CD de mise en route.
8) Trek de printkopvergrendeling helemaal naar voren en naar
beneden, breng de metalen stang met de haken aan en duw de
vergrendeling naar achteren in de printer. Opmerking: Mogelijk
moet u druk uitoefenen om de vergrendeling te sluiten.
8) Tirare il fermo della testina di stampa completamente in avanti
e in basso e incastrare la barra di contenimento metallica nei
ganci, quindi spingere il fermo verso il retro della stampante.
Nota: per chiudere il fermo, potrebbe essere necessario applicare
una leggera pressione.
9) Sluit de bovenste klep en de klep van de inktpatroon.
De printkoppen worden automatisch uitgelijnd en na ongeveer
5 minuten worden er twee pagina's afgedrukt. Raadpleeg
Installatieproblemen oplossen in de gebruikershandleiding op
de installatie-cd-rom als er een foutbericht op het LCD-scherm
verschijnt.
9) Chiudere il coperchio superiore e quello delle cartucce di
inchiostro. La stampante allinea automaticamente le testine
di stampa e stampa due pagine in circa cinque minuti. Se sul
pannello di controllo viene visualizzato un messaggio di errore,
vedere "Risoluzione dei problemi di installazione" nella Guida per
l'utente visualizzabile nel CD di avviamento.
18
Page 19

15
1
2
2
Step 15: Install the software and connect the printer.
Follow the instructions for your connection type. For details,
see the onscreen user’s guide on the Starter CD.
Parallel connection (Windows):
1) Insert the Starter CD into the CD-ROM drive, and then follow
the installation procedure for your operating system and
connection (parallel). 2) When prompted by the installer software,
connect the parallel cable to the printer and to the computer.
Schritt 15: Installieren der Software und Anschließen des
Druckers.
Folgen Sie den Anweisungen für Ihren Verbindungstyp.
Informationen finden Sie im Onscreen-Benutzerhandbuch auf der
Start-CD.
Paralleler Anschluss (Windows):
1)
Legen Sie die Start-CD in das CD-ROM-Laufwerk, und folgen Sie
der Installation für Ihr Betriebssystem und Ihre Verbindung (parallel).
2)
Schließen Sie das Parallelkabel an Drucker und Computer an,
wenn das Installationsprogramm Sie dazu auffordert.
1
2
USB connection (Windows):
1) Insert the Starter CD into the CD-ROM drive, and then follow
the installation procedure for your operating system and
connection (USB). 2) When prompted by the installer software,
connect the USB cable to the printer and to the computer.
USB-Anschluss (Windows):
1) Legen Sie die Start-CD in das CD-ROM-Laufwerk, und folgen
Sie der Installation für Ihr Betriebssystem und Ihre Verbindung
(USB). 2) Schließen Sie das USB-Kabel an Drucker und
Computer an, wenn das Installationsprogramm Sie dazu
auffordert.
2
Etape 15 : installation du logiciel et branchement de l'imprimante.
Suivez les instructions correspondant à votre type de connexion.
Pour plus d'informations, reportez-vous au guide de l'utilisateur en
ligne disponible sur le CD de mise en route.
Connexion parallèle (Windows) :
1) Introduisez le CD de mise en route dans le lecteur de CD-ROM
et suivez les instructions relatives à votre système d'exploitation et
à votre connexion (parallèle). 2) Lorsque le programme
d'installation vous y invite, connectez le câble parallèle à
l'imprimante et à l'ordinateur.
Stap 15: De software installeren en de printer aansluiten.
Volg de instructies voor het gewenste type aansluiting. Raadpleeg
de gebruikershandleiding van de installatie-cd-rom voor meer
informatie.
Parallelle aansluiting (Windows):
1) Plaats de installatie-cd-rom in het cd-rom-station en volg de
installatieprocedure voor het besturingssysteem en de aansluiting
(parallel). 2) Sluit de parallelle kabel aan op de printer en de
computer wanneer dit wordt gevraagd.
Fase 15: Installare il software e collegare la stampante.
Seguire le istruzioni per il tipo di collegamento corretto. Per
ulteriori informazioni, vedere la Guida per l'utente visualizzabile
nel CD di avviamento.
Collegamento parallelo (Windows):
1) Inserire il CD di avviamento nell'unità CD-ROM, quindi seguire
la procedura di installazione relativa al proprio sistema operativo
e al collegamento parallelo. 2) Quando richiesto dal software di
installazione, collegare il cavo parallelo alla stampante e al
computer.
Connexion USB (Windows) :
1) Introduisez le CD de mise en route dans le lecteur de CD-ROM
et suivez les instructions relatives à votre système d'exploitation et
à votre connexion (USB). 2) Lorsque le programme d'installation
vous y invite, connectez le câble USB à l'imprimante et à
l'ordinateur.
USB-aansluiting (Windows):
1) Plaats de installatie-cd-rom in het cd-rom-station en volg
de installatieprocedure voor het besturingssysteem en de
aansluiting (USB). 2) Sluit de USB-kabel aan op de printer
en de computer wanneer dit wordt gevraagd.
Collegamento USB (Windows):
1) Inserire il CD di avviamento nell'unità CD-ROM, quindi seguire
la procedura di installazione relativa al proprio sistema operativo e
al collegamento USB. 2) Quando richiesto dal software di
installazione, collegare il cavo USB alla stampante e al computer.
19
Page 20

1
2
1
1
USB connection (Mac):
1) Connect the USB cable to the printer and the computer.
2) Insert the Starter CD into the CD-ROM drive, and then follow
the appropriate procedure for your operating system and
connection (USB).
English
USB-Anschluss (Mac):
1) Schließen Sie das USB-Kabel an Drucker und Computer an.
2) Legen Sie die Start-CD in das CD-ROM-Laufwerk und folgen
Sie der Installation für Ihr Betriebssystem und Ihre Verbindung
(USB).
DeutschFrançaisNederlandsItaliano
1
2
Network connection:
1) Connect the network cable (included only with the HP Business
Inkjet 2300n and 2300dtn) to the printer and the network. 2) Insert
the Starter CD into the CD-ROM drive, and then follow the
installation procedure for your operating system and connection
(network).
Netzwerkverbindung:
1) Verbinden Sie das Netzwerkkabel (nur bei HP Business
Inkjet 2300n und 2300dtn im Lieferumfang enthalten) mit
Drucker und Netzwerk. 2) Legen Sie die Start-CD in das
CD-ROM-Laufwerk und folgen Sie der Installation für Ihr
Betriebssystem und Ihre Verbindung (Netzwerk).
Connexion USB (Mac) :
1) Connectez le câble USB à l'ordinateur et à l'imprimante.
2) Introduisez le CD de mise en route dans le lecteur de CD-ROM
et suivez les instructions relatives à votre système d'exploitation et
à votre connexion (USB).
USB-aansluiting (Mac):
1) Sluit de USB-kabel aan op de printer en de computer.
2) Plaats de installatie-cd-rom in het cd-rom-station en volg
de installatieprocedure voor het besturingssysteem en de
aansluiting (USB).
Collegamento USB (MAC):
1) Collegare il cavo USB alla stampante e al computer.
2) Inserire il CD di avviamento nell'unità CD-ROM, quindi seguire
la procedura di installazione relativa al proprio sistema operativo e
al collegamento USB.
Connexion réseau :
1) Connectez le câble réseau (fourni uniquement les imprimantes
HP Business Inkjet 2300n et 2300dtn) à l'imprimante et au
réseau. 2) Introduisez le CD de mise en route dans le lecteur
de CD-ROM et suivez les instructions relatives à votre système
d'exploitation et à votre connexion (réseau).
Netwerkaansluiting:
1) Sluit de netwerkkabel (alleen beschikbaar bij de HP Business
Inkjet 2300n en 2300dtn) aan op de printer en het netwerk.
2) Plaats de installatie-cd-rom in het cd-rom-station en volg de
installatieprocedure voor het besturingssysteem en de aansluiting
(netwerk).
Collegamento di rete:
1) Collegare il cavo di rete (fornito solo con le stampanti
HP Business Inkjet 2300n e 2300dtn) alla stampante e alla rete.
2) Inserire il CD di avviamento nell'unità CD-ROM, quindi seguire
la procedura di installazione relativa al proprio sistema operativo e
al collegamento di rete.
20
Page 21

16
17
Step 16: Test the software installation.
After you complete the software installation and connect the
printer to the computer, print a document from an application
you use frequently.
Schritt 16: Softwareinstallation testen.
Wenn Sie die Installation der Software abgeschlossen und den
Drucker mit dem Computer verbunden haben, drucken Sie ein
Dokument in einer Anwendung, die Sie häufig benutzen.
Etape 16 : Testez l'installation du logiciel.
Après avoir terminé d'installer le logiciel et raccordé l'imprimante à
l'ordinateur, imprimez un document à partir d'une application que
vous avez l'habitude d'utiliser.
Step 17: Register the printer.
Register the printer to receive important support and technical
information. If you did not register the printer while installing the
software, you can register later at http://www.register.hp.com.
Schritt 17: Registrieren des Druckers.
Registrieren Sie den Drucker, um wichtige Informationen zu
Support und technischen Daten zu erhalten. Wenn Sie sich nicht
während des Installationsvorgangs registriert haben, können Sie
das später unter http://www.register.hp.com tun.
Etape 17 : Enregistrez l'imprimante.
Enregistrez l'imprimante afin d'obtenir de l'aide et des
informations techniques importantes. Si vous ne l'avez pas
enregistré au cours de l'installation du logiciel, vous pourrez
le faire ultérieurement à l'adresse http://www.register.hp.com.
Stap 16: De installatie van de software testen.
Als u de software hebt geïnstalleerd en de printer hebt
aangesloten op de computer, drukt u een document af vanuit
een toepassing die u vaak gebruikt.
Fase 16: Verificare l'installazione del software.
Dopo aver installato il software e collegato la stampante al
computer, stampare un documento da un'applicazione utilizzata
frequentemente.
Stap 17: De printer registreren.
Registreer de printer om gebruik te kunnen maken van belangrijke
ondersteuning en technische informatie. Als u de printer niet hebt
geregistreerd tijdens de installatie van de software, kunt u de
printer later registreren op http://www.register.hp.com.
Fase 17: Registrare la stampante.
Per ricevere importanti informazioni tecniche e relative
all'assistenza, è necessario effettuare la registrazione della
stampante. Se questa operazioni non viene effettuata durante
l'installazione del software, è possibile effettuarla
successivamente all'indirizzo http://www.register.hp.com.
21
Page 22

G
ett
i
G
n
g
etting S
Sta
Ge
rte
t
ting
d
G
t
ar
ett
G
ted
Starte
u
i
G
n
i
de
g
et
G
Sta
ti
u
d
G
ng
id
e
Gu
r
e
S
ted
t
t
ing S
tarted
ide
p
G
re
par
ui
y
o
tar
u w
e f
de
Gui
or s
ill
t
ed G
a
n
d
eed
e
dre
tup
de
the foll
sses to
1)
u
IP add
i
o
s
de
et up th
wi
2) SM
n
re
g
s
s (ne
TP
e pr
3)
ga
t
w
oduct
L
DA
or
t
eway (e-m
p
k)
P
repar
:
g
a
you w
te
pr
w
e fo
ep
ay (
ai
l
are
s
il
yo
r
l need
di
a
e
s
u w
rver)
ddresse
rectory services)
f
e
t
or
ill n
u
th
a
p
se
dd
1) IP ad
ee
e foll
s to
tup
re
d the fol
s
set up
se
ow
1) IP ad
s
2) SM
dress (network)
in
to s
- option
g
lowing
th
et u
2) SM
TP
e
dres
3) LDAP
prod
ga
p
th
s (network)
al
tew
TP g
e product:
u
3)
ct:
ay (e-m
gatew
ate
L
DA
p
w
P g
r
ay
ep
ay
ail s
a
(e
are
you w
t
e
(directo
-m
erv
way
ail se
fo
er)
i
(
ll need the fol
r
directory
add
se
r
rver)
y
se
tup
r
es
rvices)
ses
1)
service
to set u
IP
- optiona
ad
lowin
2) S
dress
s) - option
pr
p th
g
MTP g
ep
(n
l
e
pro
a
3)
yo
et
r
w
u
e for
atew
L
al
DA
ork)
d
w
uct:
il
P ga
l
a
a
se
ne
y
ddre
(e-m
ed
teway (d
tu
the
sse
p
ai
1) IP
s to set u
l serve
foll
irector
a
ow
d
2) SMTP
r)
dr
ing
e
p th
y
s
s
s
(net
erv
e pro
3) LD
ga
ic
w
es
ork
duct
tew
AP ga
)
prep
- opti
)
a
:
y (e-
a
y
tew
o
ou
re for se
nal
m
ay
a
w
il s
il
(d
l n
add
erve
irecto
ee
tup
r
r
d
ess
)
the
ry
1)
es to
se
fo
IP
rvi
l
set u
low
addre
ces) - o
2)
ing
SM
p
ss
the pro
ptional
(ne
TP gatew
3) LD
tw
ork)
duct:
AP ga
ay
(e-
tew
m
ay
a
il serve
(
d
irectory se
r
)
r
vices) - option
al
Congratulations!
The printer is ready to use. For information about using the printer
and troubleshooting, refer to the following resources:
z onscreen user’s guide on the Starter CD
z HP Instant Support (see the onscreen user’s guide)
z product support site at
English
http://www.hp.com/support/businessinkjet2300
z HP customer support guide (in the box)
Herzlichen Glückwunsch!
Der Drucker ist nun einsatzbereit. Informationen zur Benutzung
des Druckers und zur Fehlerbehebung finden Sie hier:
z Onscreen-Benutzerhandbuch auf der Start-CD
z HP Instant Support (siehe Onscreen-Benutzerhandbuch)
z Website zur Produktunterstützung unter
DeutschFrançaisNederlandsItaliano
http://www.hp.com/support/businessinkjet2300
z HP Kundendienstheft (in der Packung)
Félicitations !
L'imprimante est prête à imprimer. Pour toute information
concernant l'imprimante et son dépannage, reportez-vous :
z au guide de l'utilisateur en ligne disponible sur le CD de mise
en route ;
z à l'assistance immédiate HP (consultez le guide de l'utilisateur
en ligne) ;
z au site de support technique du produit à l'adresse
http://www.hp.com/support/businessinkjet2300 ;
z au guide d'assistance clientèle HP (dans le carton).
Gefeliciteerd!
De printer is klaar voor gebruik. Raadpleeg de volgende bronnen
voor meer informatie over het gebruiken van de printer en het
oplossen van problemen:
z de gebruikershandleiding op de installatie-cd-rom
z HP Instant Support (raadpleeg de gebruikershandleiding)
z de website voor productondersteuning op
http://www.hp.com/support/businessinkjet2300
z de handleiding voor HP-klantenondersteuning (in de doos)
Congratulazioni
La stampante è pronta per l'uso. Per informazioni relative
all'utilizzo della stampante e alla risoluzione dei problemi, fare
riferimento alle seguenti risorse:
z Guida per l'utente visualizzabile nel CD di avviamento
z HP Instant Support (vedere la Guida per l'utente visualizzabile)
z Sito per l'assistenza ai prodotti all'indirizzo
http://www.hp.com/support/businessinkjet2300
z Guida per l'assistenza ai clienti HP (nella confezione)
22
Page 23

Hewlett-Packard Limited Warranty Statement
HP product Duration of Limited Warranty
Software 1 year
Accessories 1 year
Ink cartridges 90 days
Printheads 1 year
Printer peripheral hardware (see below for details) 1 year
Extent of Limited Warranty
Hewlett-Packard warrants to the end-user customer that the HP
1
products specified above will be free from defects in materials and
workmanship for the duration specified above, which duration begins on
the date of purchase by the customer.
For software products, HP’s limited warranty applies only to a failure to
2
execute programming instructions. HP does not warrant that the
operation of any product will be uninterrupted or error free.
HP’s limited warranty covers only those defects that arise as a result of
3
normal use of the product, and does not cover any other problems,
including those that arise as a result of:
Improper maintenance or modification;
a
Software, media, parts, or supplies not provided or supported by HP;
b
Operation outside the product’s specifications;
c
Unauthorized modification or misuse.
d
For HP printer products, the use of a non-HP ink cartridge or a refilled
4
ink cartridge does not affect either the warranty to the customer or any
HP support contract with the customer. However, if printer failure or
damage is attributable to the use of a non-HP or refilled ink cartridge,
HP will charge its standard time and materials charges to service the
printer for the particular failure or damage.
If HP receives, during the applicable warranty period, notice of a defect
5
in any product which is covered by HP’s warranty, HP shall either repair
or replace the product, at HP’s option.
If HP is unable to repair or replace, as applicable, a defective product
6
which is covered by HP’s warranty, HP shall, within a reasonable time
after being notified of the defect, refund the purchase price for the
product.
HP shall have no obligation to repair, replace, or refund until the
7
customer returns the defective product to HP.
Any replacement product may be either new or like new, provided that
8
it has functionality at least equal to that of the product being replaced.
HP products may contain remanufactured parts, components, or
9
materials equivalent to new in performance.
HP’s Limited Warranty Statement is valid in any country/region where
10
the covered HP product is distributed by HP. Contracts for additional
warranty services, such as on-site service, are available from any
authorized HP service facility in countries/regions where the product is
distributed by HP or by an authorized importer.
Limitations of Warranty
TO THE EXTENT ALLOWED BY LOCAL LAW, NEITHER HP NOR ITS
THIRD PARTY SUPPLIERS MAKES ANY OTHER WARRANTY OR
CONDITION OF ANY KIND, WHETHER EXPRESS OR IMPLIED
WARRANTIES OR CONDITIONS OF MERCHANTABILITY,
SATISFACTORY QUALITY, AND FITNESS FOR A PARTICULAR
PURPOSE.
Limitations of Liability
To the extent allowed by local law, the remedies provided in this
1
Warranty Statement are the customer’s sole and exclusive remedies.
TO THE EXTENT ALLOWED BY LOCAL LAW, EXCEPT FOR THE
2
OBLIGATIONS SPECIFICALLY SET FORTH IN THIS WARRANTY
STATEMENT, IN NO EVENT SHALL HP OR ITS THIRD PARTY
SUPPLIERS BE LIABLE FOR DIRECT, INDIRECT, SPECIAL,
INCIDENTAL, OR CONSEQUENTIAL DAMAGES, WHETHER BASED
ON CONTRACT, TORT, OR ANY OTHER LEGAL THEORY AND
WHETHER ADVISED OF THE POSSIBILITY OF SUCH DAMAGES.
Local Law
This Warranty Statement gives the customer specific legal rights. The
1
customer may also have other rights which vary from state to state in
the United States, from province to province in Canada, and from
country/region to country/region elsewhere in the world.
To the extent that this Warranty Statement is inconsistent with local
2
law, this Warranty Statement shall be deemed modified to be
consistent with such local law. Under such local law, certain
disclaimers and limitations of this Warranty Statement may not apply to
the customer. For example, some states in the United States, as well
as some governments outside the United States (including provinces in
Canada), may:
Preclude the disclaimers and limitations in this Warranty Statement
a
from limiting the statutory rights of a customer (e.g. the United
Kingdom);
Otherwise restrict the ability of a manufacturer to enforce such
b
disclaimers or limitations; or
Grant the customer additional warranty rights, specify the duration of
c
implied warranties which the manufacturer cannot disclaim, or allow
limitations on the duration of implied warranties.
FOR CONSUMER TRANSACTIONS IN AUSTRALIA AND NEW
3
ZEALAND, THE TERMS IN THIS WARRANTY STATEMENT,
EXCEPT TO THE EXTENT LAWFULLY PERMITTED, DO NOT
EXCLUDE, RESTRICT, OR MODIFY, AND ARE IN ADDITION TO,
THE MANDATORY STATUTORY RIGHTS APPLICABLE TO THE
SALE OF THE HP PRODUCTS TO SUCH CUSTOMERS.
23
Page 24

Beschränkte Gewährleistung von Hewlett-Packard
HP Produkt Dauer der beschränkten Gewährleistung
Software 1 Jahr
Zubehör 1 Jahr
Tintenpatronen 90 Tage
Druckköpfe 1 Jahr
Drucker-Hardware (Einzelheiten siehe unten) 1 Jahr
Umfang der beschränkten Gewährleistung
Hewlett-Packard (HP) gewährleistet dem Endkunden, dass die
1
obengenannten HP Produkte während des obengenannten
Gewährleitungszeitraums frei von Material- und Verarbeitungsfehlern
sind. Der Gewährleitungszeitraum beginnt mit dem Kaufdatum.
Bei Softwareprodukten gilt die beschränkte HP Gewährleistung
2
ausschließlich für die fehlerhafte Ausführung von
Programmieranweisungen. HP gewährleistet weder einen
unterbrechungs- noch fehlerfreien Betrieb eines Softwareproduktes.
Die beschränkte HP Gewährleistung deckt nur solche Fehler ab,
3
die bei normaler Verwendung des Produkts auftreten. Sie gilt nicht für
andere Probleme, die durch folgende Umstände auftreten:
Unsachgemäße Wartung oder Modifikationen;
a
Verwendung von Software, Druckmedien, Ersatzteilen oder Zubehör,
b
die von HP nicht zur Verfügung gestellt bzw. unterstützt werden;
Betrieb außerhalb der Produktspezifikationen;
c
Unberechtigte Veränderungen oder missbräuchliche Verwendung.
d
HP Druckerprodukte: Die Verwendung von Nicht-HP Tintenpatronen
4
oder nachgefüllten Tintenpatronen hat keine Auswirkung auf die
Gewährleistung oder andere HP Unterstützungsvereinbarungen mit
dem Kunden. Wenn jedoch ein Druckerausfall oder -schaden auf die
Verwendung von Nicht-HP Tintenpatronen oder nachgefüllten
Tintenpatronen zurückgeführt werden kann, berechnet HP die üblichen
Gebühren für Arbeitszeit und Material für in diesem Zusammenhang
am Drucker durchgeführte Wartungsarbeiten.
Wenn Hewlett-Packard während der geltenden Gewährleistungsfrist
5
Kenntnis von einem Fehler erhält, der unter die Gewährleistung durch
Hewlett-Packard fällt, repariert oder ersetzt Hewlett-Packard das
Produkt nach eigenem Ermessen.
Wenn HP sich außer Stande sieht, ein fehlerhaftes Produkt, das unter
6
die HP Gewährleistung fällt, je nach Situation zu reparieren oder zu
ersetzen, dann erstattet HP den Kaufpreis des Produkts innerhalb einer
vertretbaren Zeit, nachdem der Kunde den Schaden an HP gemeldet
hat.
HP trägt keine Verpflichtung für Reparatur, Ersatz oder
7
Kaufpreisrückerstattung, solange der Kunde das defekte Produkt nicht
zurückgesendet hat.
Ersatzprodukte können neu oder neuwertig sein. Voraussetzung ist
8
jedoch, dass sie über mindestens denselben Funktionsumfang
verfügen wie das zu ersetzende Produkt.
HP Produkte können instandgesetzte Teile, Komponenten oder
9
Materialien enthalten, die hinsichtlich ihrer Leistung neuwertigen
gleichgestellt sind.
Die beschränkte Gewährleistung von HP ist in allen Ländern/Regionen
10
gültig, in denen das durch sie gedeckte HP Produkt von HP vertrieben
wird. Vereinbarungen für zusätzliche Gewährleistung, zum Beispiel
Service vor Ort, sind in Ländern, in denen das Produkt durch HP oder
durch einen autorisierten Importeur vertrieben wird, über jede
autorisierten HP Servicestelle verfügbar.
Gewährleistungsausschlüsse
IN DEM NACH GELTENDEM RECHT ZULÄSSIGEN AUSMASS
GEWÄHREN WEDER HP NOCH DIE ZULIEFERER VON HP JEGLICHE
SONSTIGEN GEWÄHRLEISTUNGEN, WEDER AUSDRÜCKLICHE
NOCH STILLSCHWEIGENDE GEWÄHRLEISTUNGEN DER
MARKTGÄNGIGKEIT, ZUFRIEDENSTELLENDEN QUALITÄT ODER
EIGNUNG FÜR EINEN BESTIMMTEN ZWECK.
Haftungsausschlüsse
In dem nach geltendem Recht zulässigen Ausmaß stehen dem
1
Endkunden über die in dieser Gewährleistungsvereinbarung genannten
Ansprüche hinaus keine weiteren Ansprüche an HP zu.
IN DEM NACH GELTENDEM RECHT ZULÄSSIGEN AUSMASS,
2
AUSGENOMMEN DER IN DIESER
GEWÄHRLEISTUNGSVEREINBARUNG FESTGELEGTEN
VERPFLICHTUNGEN, SIND HP ODER DIE ZULIEFERER VON HP IN
KEINEM FALL HAFTBAR FÜR DIREKTE, INDIREKTE, BESONDERE,
ZUFÄLLIGE ODER FOLGESCHÄDEN, UNABHÄNGIG DAVON, OB
DIESE AUF DER BASIS VON VERTRÄGEN, DELIKTRECHT ODER
ANDEREN RECHTSTHEORIEN GELTEND GEMACHT WERDEN
UND UNABHÄNGIG DAVON, OB HP ODER DIE ZULIEFERER VON
HP VON DER MÖGLICHKEIT EINES SOLCHEN SCHADENS
UNTERRICHTET WURDEN.
Geltendes Recht
Diese Gewährleistungsvereinbarung stattet den Endkunden mit
1
bestimmten Rechten aus. Der Endkunde hat möglicherweise noch
weitere Rechte, die in den Vereinigten Staaten von Staat zu Staat, in
Kanada von Provinz zu Provinz bzw. allgemein von Land/Region zu
Land/Region verschieden sein können.
Soweit diese Gewährleistungsvereinbarung nicht dem geltenden Recht
2
entspricht, soll sie als derart abgeändert gelten, dass die hierin
enthaltenen Bestimmungen dem geltenden Recht entsprechen. Es ist
möglich, dass bestimmte Haftungsausschlusserklärungen und
Einschränkungen dieser Gewährleistungsvereinbarung nach
geltendem Recht für den Endkunden nicht zutreffen. Bestimmte
Bundesstaaten der USA und Länder/Regionen außerhalb der USA
(einschließlich einiger kanadischer Provinzen):
beschränken die Rechte des Verbrauchers nicht durch die
a
Haftungsausschlusserklärungen und Einschränkungen dieser
Gewährleistungsvereinbarung (z.B. Großbritannien);
schränken die Möglichkeit des Herstellers, solche Erklärungen und
b
Einschränkungen geltend zu machen, in anderer Weise ein;
gewähren dem Endkunden weitere Gewährleistungsrechte,
c
definieren die Dauer von stillschweigenden Gewährleistungen, die
der Hersteller nicht ausschließen kann, oder gestatten eine
Beschränkung der Dauer von stillschweigenden Gewährleistungen.
FÜR ENDKUNDEN IN AUSTRALIEN UND NEUSEELAND: DURCH
3
DIESE GEWÄHRLEISTUNGSVEREINBARUNG WERDEN DIE
DURCH DAS IN DIESEN LÄNDERN GELTENDE RECHT IM
ZUSAMMENHANG MIT DEM KAUF VON HP PRODUKTEN
GEWÄHRTEN ENDKUNDENANSPRÜCHE NICHT ÜBER DAS
NACH GELTENDEM RECHT ZULÄSSIGE AUSMASS HINAUS
AUSGESCHLOSSEN, EINGESCHRÄNKT ODER GEÄNDERT.
DIE BEDINGUNGEN DIESER
GEWÄHRLEISTUNGSVEREINBARUNG SIND EINE ERWEITERUNG
DER GESETZLICHEN GRUNDRECHTE FÜR ENDKUNDEN.
24
Page 25

Garantie limitée Hewlett-Packard
Produit HP Durée de la garantie limitée
Logiciel 1 an
Accessoires 1 an
Cartouches d'encre 90 jours
Têtes d'impression 1 an
Equipement périphérique de l'imprimante (voir les détails ci-dessous) 1 an
Etendue de la garantie limitée
Hewlett-Packard garantit les produits HP au client final contre tout
1
défaut de fabrication et de main d'œuvre pendant la période désignée
prenant effet à compter de la date d'achat par le client.
Concernant les produits logiciels, cette garantie HP ne s'applique qu'à
2
l'exécution des instructions de programmation. HP ne garantit pas le
fonctionnement ininterrompu ou sans erreur de ses produits.
La garantie limitée de HP ne couvre que les défauts découlant d'un
3
usage normal du produit. Par conséquent, cette garantie ne couvre
pas les suites :
d'un mauvais entretien ou d'un entretien incorrect ;
a
de l'utilisation de logiciels, de supports, de pièces ou de fournitures
b
non fournis ou pris en charge par HP ;
d'une utilisation en dehors des spécifications du produit ;
c
d'une modification non autorisée ou d'une utilisation abusive.
d
En ce qui concerne les imprimantes HP, l'utilisation de cartouches
4
d'impression d'un autre fabricant que HP ou de cartouches
reconditionnées n'affecte ni la garantie au client, ni les contrats de
maintenance HP conclus avec le client. Cependant, si la défectuosité
présentée par l'imprimante ou son endommagement est la
conséquence de l'utilisation de telles cartouches, HP facturera le coût
de la main d'œuvre et des pièces détachées à la réparation.
Si le client signale à HP, pendant la période de garantie applicable,
5
la défectuosité d'un produit couvert par la garantie, HP réparera ou,
à son choix, remplacera le produit défectueux.
Si HP n'est pas en mesure de réparer ou de remplacer le produit
6
défectueux dans un délai raisonnable, HP remboursera le produit
sous garantie au prix d'achat payé par le client.
HP ne s'engage nullement à réparer, à remplacer ou à rembourser tout
7
produit défectueux tant que celui-ci ne lui aura pas été renvoyé.
Tout produit de remplacement sera neuf ou remis à neuf et, dans ce
8
dernier cas, présentera des fonctionnalités au moins égales à celles
du produit remplacé.
Les produits HP contiennent parfois des matériaux, des composants et
9
des pièces remanufacturées présentant des qualités équivalentes aux
produits neufs.
La garantie limitée HP est valide dans tous les pays et régions où
10
les produits HP sont distribués par HP. Des contrats d'extension des
services de garantie sur site peuvent être obtenus auprès de tout
centre d'assistance agréé HP dans tous les pays et régions où les
produits HP sont distribués par Hewlett-Packard ou un
importateur agréé.
Limites de la garantie
HP OU SES FOURNISSEURS TIERS EXCLUENT TOUTE AUTRE
GARANTIE, EXPRESSE OU NON, EN RAPPORT AVEC LES
PRODUITS HP. HP ET SES FOURNISSEURS TIERS EXCLUENT EN
PARTICULIER TOUTE GARANTIE IMPLICITE CONCERNANT SES
CONDITIONS DE MISE SUR LE MARCHÉ ET SON ADEQUATION À
QUELQUE UTILISATION PARTICULIÈRE QUE CE SOIT.
Limites de responsabilité
Dans les limites permises par la législation locale, cette garantie limitée
1
constitue et exprime l'intégralité des droits et prétentions dont bénéficie
le client.
A L'EXCEPTION DES OBLIGATIONS SPÉCIFIÉES DANS CETTE
2
GARANTIE LIMITÉE, HP NE POURRA ÊTRE TENU RESPONSABLE
D'AUCUN DOMMAGE, DIRECT, INDIRECT, NATUREL OU
ADÉQUAT, QUEL QU'IL SOIT, QU'IL SE BASE SUR UN CONTRAT
OU SUR LA LOI OU TOUTE AUTRE THÉORIE JURIDIQUE,
ET CELA MÊME SI HP A ÉTÉ AVERTI DE LA POSSIBILITÉ D'UN
TEL DOMMAGE.
Législation locale
La garantie limitée accorde au consommateur des droits spécifiques.
1
Ce dernier peut cependant bénéficier d'autres droits dont la nature peut
varier en fonction de l'état (aux Etats-Unis), de la province (au Canada)
et du pays/de la région (ailleurs dans le monde).
Si les termes de cette garantie limitée se trouvent en contradiction avec
2
les lois en vigueur localement, ils seront considérés comme modifiés
pour correspondre aux lois en question. Dans ce cas, certains termes
de cette garantie limitée pourraient ne pas s'appliquer à notre clientèle.
Par exemple, certains états des Etats-Unis ainsi que certains pays en
dehors des Etats-Unis (y compris certaines provinces du Canada)
peuvent :
assurer une garantie légale impérative au consommateur
a
(par exemple au Royaume-Uni) ;
limiter la faculté d'un fabricant à restreindre sa responsabilité ou à
b
imposer des limitations ; ou
accorder au client des garanties supplémentaires, stipuler la
c
durée des garanties implicites que le fabricant ne peut décliner,
ou autoriser une limitation de durée pour les garanties implicites.
POUR LES TRANSACTIONS DES CONSOMMATEURS EN
3
AUSTRALIE ET EN NOUVELLE-ZELANDE, LES TERMES DE
CETTE GARANTIE, EN DEHORS DES EXCEPTIONS LEGALEMENT
PERMISES, N'EXCLUENT, NE RESTREIGNENT, NI NE MODIFIENT
LES DROITS IMPERATIVEMENT PREVUS PAR LA LOI, AUXQUELS
ILS S'AJOUTENT, ET QUI SONT APPLICABLES A LA VENTE DES
PRODUITS HP A SES CLIENTS.
25
Page 26

Beperkte garantie van Hewlett-Packard
Product van HP Duur van beperkte garantie
Software 1 jaar
Accessoires 1 jaar
Inktpatronen 90 dagen
Printkoppen 1 jaar
Printerrandapparatuur (zie details hieronder) 1 jaar
Geldigheidsduur van beperkte garantie
Hewlett-Packard verstrekt aan de eindgebruiker de garantie dat de
1
bovenvermelde producten van HP vrij zijn van materiaal- en
fabricagefouten gedurende de bovenvermelde tijdsduur die begint op
de dag van aankoop door de klant.
Voor softwareproducten is de beperkte garantie van HP alleen van
2
toepassing op programmeringsinstructies die niet kunnen worden
uitgevoerd. HP garandeert niet dat de werking van een product
ononderbroken of vrij van fouten is.
De beperkte garantie van HP geldt alleen voor defecten die zich
3
voordoen als resultaat van normaal gebruik van het product en is niet
van toepassing bij andere problemen, met inbegrip van defecten die
het resultaat zijn van:
verkeerd of ondeskundig onderhoud of aanpassing;
a
software, informatiedragers, onderdelen of benodigdheden die niet
b
door HP worden geleverd of ondersteund;
gebruik dat niet in overeenstemming is met de specificaties van het
c
product;
niet-geautoriseerde aanpassing of misbruik.
d
Voor HP-printerproducten is het gebruik van een niet door HP
4
vervaardigde of nagevulde inktpatroon niet van invloed op de garantie
aan de klant of op een contract voor ondersteuning dat tussen de klant
en HP is gesloten. Als defecten of beschadigingen aan de printer
echter kunnen worden toegeschreven aan het gebruik van een niet
door HP vervaardigde of nagevulde inktpatroon, zal HP de
gebruikelijke kosten voor arbeidsuren en materiaal voor het repareren
van de printer voor het betreffende defect of de betreffende
beschadiging in rekening brengen.
Als HP tijdens de garantieperiode op de hoogte wordt gebracht van een
5
defect van een product dat onder de garantie van HP valt, wordt het
defecte product door HP gerepareerd of vervangen.
Als een defect product dat onder de garantie van HP valt, niet door HP
6
gerepareerd of vervangen kan worden, zal HP de aankoopprijs voor
het defecte product terugbetalen binnen een redelijke termijn nadat HP
op de hoogte is gebracht van het defect.
HP is niet verplicht het defecte product te repareren, vervangen of
7
vergoeden totdat het is geretourneerd aan HP.
Een vervangingsproduct mag nieuw of bijna nieuw zijn op voorwaarde
8
dat het ten minste dezelfde functionaliteit bezit als het product dat
vervangen wordt.
Producten van HP kunnen gereviseerde onderdelen, componenten of
9
materialen bevatten, waarvan de prestaties gelijkwaardig zijn aan die
van nieuwe producten.
De beperkte garantie van HP is geldig in elk land/elke regio waar het
10
gegarandeerde product van HP door HP wordt gedistribueerd.
Contracten voor extra garantieservice, zoals service op de locatie van
de klant, zijn verkrijgbaar bij ieder erkend HP servicekantoor in
landen/regio's waar het product door HP of een erkende importeur
wordt gedistribueerd.
Garantiebeperkingen
IN ZOVERRE DOOR DE PLAATSELIJKE WET IS TOEGESTAAN,
VERSTREKKEN NOCH HP, NOCH DERDE LEVERANCIERS ENIGE
ANDERE GARANTIE OF VOORWAARDE, HETZIJ UITDRUKKELIJKE
OF STILZWIJGENDE GARANTIES OF VOORWAARDEN VAN
VERKOOPBAARHEID, BEVREDIGENDE KWALITEIT EN
GESCHIKTHEID VOOR EEN BEPAALD DOEL.
Beperking van aansprakelijkheid
In zoverre dit is toegestaan onder de lokale wetgeving zijn de
1
rechtsmiddelen die in deze garantieverklaring worden verstrekt,
de enige en exclusieve rechtsmiddelen van de klant.
IN ZOVERRE DIT IS TOEGESTAAN ONDER DE LOKALE
2
WETGEVING, MET UITZONDERING VAN DE SPECIFIEKE
BEPALINGEN IN DEZE GARANTIEVERKLARING, ZIJN HP EN
HAAR LEVERANCIERS IN GEEN GEVAL AANSPRAKELIJK VOOR
DIRECTE, INDIRECTE, SPECIALE OF INCIDENTELE SCHADE OF
GEVOLGSCHADE, ZIJ HET OP BASIS VAN CONTRACT, DWANG
OF ENIG ANDERE JURIDISCHE THEORIE, OOK NIET ALS HP EN
HAAR LEVERANCIERS OP DE HOOGTE ZIJN GEBRACHT VAN DE
MOGELIJKHEID VAN DERGELIJKE SCHADE.
Lokale wetgeving
Deze garantieverklaring verleent de klant bepaalde juridische rechten.
1
De klant kan over andere rechten beschikken die in de Verenigde
Staten van staat tot staat, in Canada van provincie tot provincie en
elders van land/regio tot land/regio kunnen verschillen.
In zoverre deze garantieverklaring niet overeenstemt met de lokale
2
wetgeving, zal deze garantieverklaring als aangepast en in
overeenstemming met dergelijke lokale wetgeving worden beschouwd.
Onder deze lokale wetgeving is het mogelijk dat bepaalde afwijzingen
en beperkingen in deze garantieverklaring niet op de klant van
toepassing zijn. Sommige staten in de Verenigde Staten en bepaalde
overheden buiten de Verenigde Staten (inclusief provincies in Canada)
kunnen bijvoorbeeld:
de afwijzingen en beperkingen in deze garantieverklaring als
a
tenietgedaan beschouwen ter bescherming van de wettelijk
voorgeschreven rechten van de klant (bijvoorbeeld in het Verenigd
Koninkrijk);
de mogelijkheid van een fabrikant voor het doen gelden van
b
dergelijke afwijzingen of voorwaarden anderzijds beperken; of
de klant aanvullende rechten onder de garantie bieden, de tijdsduur
c
van stilzwijgende garanties bepalen die niet door de fabrikant
afgewezen kan worden, en beperkingen op de tijdsduur van
stilzwijgende garanties niet toestaan.
MET BETREKKING TOT CONSUMENTENTRANSACTIES IN
3
AUSTRALIË EN NIEUW-ZEELAND WORDEN DE WETTELIJK
VOORGESCHREVEN RECHTEN DIE VAN TOEPASSING ZIJN
OP DE AANKOOP VAN PRODUCTEN VAN HP AAN DERGELIJKE
KLANTEN, DOOR DE VOORWAARDEN IN DEZE
GARANTIEVERKLARING NIET TENIETGEDAAN, BEPERKT OF
VERANDERD, BEHALVE IN ZOVERRE DOOR DE WET IS
TOEGESTAAN, EN VORMEN DE VOORWAARDEN VAN DEZE
GARANTIEVERKLARING EEN AANVULLING OP DEZE RECHTEN.
26
Page 27

Dichiarazione di garanzia limitata Hewlett-Packard
Prodotto HP Durata della garanzia
Software 1 anno
Accessori 1 anno
cartucce di inchiostro 90 giorni
Testine di stampa 1 anno
Hardware della stampante (per informazioni dettagliate, vedere di seguito) 1 anno
Termini della garanzia limitata
La Hewlett-Packard garantisce all'utente finale che i prodotti HP
1
specificati in questa sede sono esenti da difetti di materiale e di
manodopera per il periodo indicato in precedenza, a partire dalla data
di acquisto del prodotto da parte del cliente.
Per i prodotti software, la garanzia limitata di HP viene applicata solo
2
nel caso in cui non sia possibile eseguire le istruzioni di
programmazione. HP non garantisce tuttavia che il funzionamento dei
propri prodotti sarà ininterrotto e privo di errori.
La garanzia limitata di HP copre solo i difetti derivanti dall'utilizzo
3
regolare del prodotto e non prevede altri problemi, inclusi quelli
risultanti da:
Manutenzione o modifiche improprie;
a
Software, supporti, parti o materiali di consumo non provenienti o
b
non supportati dalla HP;
Funzionamento non previsto dalle specifiche del prodotto;
c
Modifica o abuso non autorizzati.
d
Per le stampanti HP, l'uso di una cartuccia di inchiostro non HP o di
4
una cartuccia ricaricata non compromette la garanzia per il cliente o
qualsiasi altro contratto di assistenza HP con il cliente stesso. Tuttavia,
qualora guasti o difetti alla stampante venissero attribuiti all'uso di una
cartuccia non HP o ricaricata, la HP addebiterà i costi standard di
tempo di manutenzione e materiale per eliminare il suddetto guasto o
difetto.
Se, durante il periodo di garanzia, HP riceve avviso di un difetto di uno
5
dei prodotti coperto dalla garanzia, HP riparerà o sostituirà il prodotto a
sua discrezione.
Se HP non è in grado di riparare o sostituire, come di pertinenza,
6
un prodotto difettoso in garanzia, HP provvederà entro un periodo di
tempo ragionevole dal ricevimento dell'avviso del difetto a rimborsare il
prezzo di acquisto del prodotto.
HP non è tenuta in alcun modo a riparare il prodotto, a sostituirlo o a
7
fornire un rimborso finché il cliente non restituisce il prodotto difettoso.
Qualsiasi prodotto sostitutivo potrà essere nuovo o come nuovo, fermo
8
restando che le funzionalità saranno almeno equivalenti a quelle del
prodotto sostituito.
I prodotti HP possono contenere parti, componenti o materiali rigenerati
9
equivalenti per prestazioni a parti nuove.
La Dichiarazione della garanzia limitata di HP è valida in qualsiasi
10
Paese/regione in cui il prodotto HP specifico viene distribuito da HP.
I contratti per servizi di garanzia addizionali, quali l'assistenza in loco,
sono disponibili presso qualsiasi centro di assistenza HP autorizzato
nei Paesi/regioni in cui il prodotto viene distribuito dalla HP o da un
rivenditore autorizzato.
Limitazioni di garanzia
NELLA MISURA PREVISTA DALLE LEGGI LOCALI, NÉ LA HP E NÉ I
FORNITORI DI TERZE PARTI OFFRONO GARANZIA ALCUNA O
CONDIZIONI DI ALCUN TIPO, SIANO ESSE ESPRESSE O IMPLICITE
O CONDIZIONI DI COMMERCIABILITÀ, LIVELLO DI QUALITÀ
SODDISFACENTE ED IDONEITÀ AD UNO SCOPO PARTICOLARE.
Limitazioni di responsabilità
Nella misura prevista dalle leggi locali, i rimedi previsti da questa
1
Dichiarazione di garanzia costituiscono gli unici a disposizione del
cliente.
NELLA MISURA PREVISTA DALLE LEGGI LOCALI, FATTA
2
ECCEZIONE PER LE OBBLIGAZIONI DEFINITE IN MODO
SPECIFICO IN QUESTA DICHIARAZIONE DI GARANZIA, IN
NESSUN CASO LA HP O I SUOI RIVENDITORI DI TERZE PARTI
SARANNO RITENUTI RESPONSABILI PER DANNI DIRETTI,
INDIRETTI, SPECIALI, FORTUITI O DERIVATI, SIA IN BASE A
CONTRATTO, ILLECITO O ALTRA TEORIA LEGALE CHE SU
AVVISO DELL'EVENTUALITÀ DI TALI DANNI.
Leggi locali
Questa Dichiarazione di garanzia offre al cliente diritti legali specifici. Il
1
cliente potrebbe godere di altri diritti che variano da stato a stato negli
Stati Uniti, da provincia a provincia in Canada e da Paese/regione a
Paese/regione nel resto del mondo.
Nella misura in cui questa Dichiarazione di garanzia risultasse in
2
contrasto con le leggi locali, verrà considerata modificata in modo da
renderla conforme a tali leggi. In base alle suddette leggi vigenti,
alcune dichiarazioni e limitazioni di questa Dichiarazione di garanzia
potrebbero non valere per il cliente. Ad esempio, alcuni stati negli Stati
Uniti, così come alcuni governi fuori dagli Stati Uniti (incluse le province
del Canada) potrebbero:
impedire che le esclusioni e le limitazioni di questa Dichiarazione
a
di garanzia limitino i diritti dei consumatori previsti dalla legge
(ad esempio, nel Regno Unito);
limitare altrimenti il diritto del produttore di applicare tali esclusioni e
b
limitazioni; oppure
riconoscere al cliente ulteriori diritti derivanti dalla garanzia,
c
specificare la durata delle garanzie implicite che il produttore
dovrà accettare o consentire limitazioni sulla durata delle garanzie
implicite.
PER LE TRANSAZIONI CON I CLIENTI EFFETTUATE IN AUSTRALIA
3
E IN NUOVA ZELANDA, I TERMINI DELLA PRESENTE
DICHIARAZIONE DI GARANZIA, FATTA ECCEZIONE PER QUANTO
LEGALMENTE CONSENTITO, NON ESCLUDONO, LIMITANO O
MODIFICANO MA INTEGRANO I DIRITTI STATUTARI
OBBLIGATORI APPLICABILI ALLA VENDITA DEI PRODOTTI HP A
TALI CLIENTI.
27
Page 28

Page 29

Page 30

Page 31

Hewlett-Packard ﺔﻛﺮﺷ ﻦﻣ دوﺪﶈا نﺎﻤﻀﻟا نﺎﻴﺑ
HP ﺞﺘﻨﻣدوﺪﶈا نﺎﻤﻀﻟا ةﺪﻣ
ﺞﻣﺎﻧﺮﺒﻟاﺪﺣاو مﺎﻋ
تﺎﻘﺤﻠﻣﺪﺣاو مﺎﻋ
ﺮﺒﳊا ﺶﻴﻃاﺮﺧﺎًﻣﻮﻳ ٩٠
ﺔﻋﺎﺒﻄﻟا سوؤرﺪﺣاو مﺎﻋ
(ﻞﻴﺻﺎﻔﺘﻟا ﻰﻠﻋ لﻮﺼﺤﻠﻟ هﺎﻧدأ ﺮﻈﻧا) ﺔﻌﺑﺎﻄﻠﻟ ﺔﻴﻓﺮﻄﻟا ةﺰﻬﺟﻷاﺪﺣاو مﺎﻋ
نﺎﻤﻀﻟا دﻮﻴﻗ
يأ ﻦﻣ ىﺮﺧأ ﺎًﻃوﺮﺷ وأ تﺎﻧﺎﻤﺿ يأ ﻦﻳﺮﺧﻵا ﺎﻬﻳدرﻮﻣ ﻦﻣ يأ وأ HP ﺔﻛﺮﺷ مﺪﻘﺗ ﻻ
ةدﻮﳉاو ﻖﻳﻮﺴﺘﻟﺎﺑ ﺔﺻﺎﺧ ﺔﻴﻨﻤﺿ مأ ﺔﺤﻳﺮﺻ ﺎًﻃوﺮﺷ وأ ٍتﺎﻧﺎﻤﺿ ﺖﻧﺎﻛ
.ﻲﻠﶈا نﻮﻧﺎﻘﻟا ﻪﺑ ﺢﻤﺴﻳ ىﺪﻣ ﻰﺼﻗﻷ ﺎ
ﺐﺴﺤﻓ ﻞﻴﻤﻌﻟﺎﺑ ﺔﺻﺎﺧ تﺎﻀﻳﻮﻌﺗ ﻲﻫ نﺎﻤﻀﻟا نﺎﻴﺑ ﺎﻬﻴﻠﻋ ﺺﻨﻳ ﻲﺘﻟا تﺎﻀﻳﻮﻌﺘﻟا ١
.ﻲﻠﶈا نﻮﻧﺎﻘﻟا ﻪﺑ ﺢﻤﺴﻳ ىﺪﻣ ﻰﺼﻗﻷ ﺎ
ﻘﻓو ﻚﻟذو ﲔﻌﻣ ضﺮﻐﻟ ﺔﻣءﻼﳌاو ﺔﻴﺿﺮﳌا
ً
ﻘﻓو ﻚﻟذو ،ﻪﻴﻠﻋ ةرﻮﺼﻘﻣو
ً
ءاﻮﺳ ،عﻮﻧ
ً
ﺔﻴﻟﻮﺌﺴﳌا دﻮﻴﻗ
ﻞﻤﺤﺘﺗ ﻻ ،نﺎﻤﻀﻟا نﺎﻴﺑ ﻲﻓ ﺪﻳﺪﺤﺘﻟا ﻪﺟو ﻰﻠﻋ ﺔﺤﺿﻮﳌا تﺎﻣاﺰﺘﻟﻻا ءﺎﻨﺜﺘﺳﺎﺑ ٢
لاﻮﺣﻷا ﻦﻣ لﺎﺣ يأ ﻲﻓ ﺔﻴﻟﻮﺌﺴﻣ يأ ﻦﻳﺮﺧﻵا ﺎﻬﻳدرﻮﻣ ﻦﻣ يأ وأ HP ﺔﻛﺮﺷ
ًءاﻮﺳ ،ﺔﻘﺣﻼﻟا وأ ﺔﻴﺿﺮﻌﻟا وأ ﺔﺻﺎﳋا وأ ةﺮﺷﺎﺒﳌا ﺮﻴﻏ وأ ةﺮﺷﺎﺒﳌا راﺮﺿﻷا ﻦﻋ
ﺔﻳﺮﻈﻧ يأ وأ ﺔﻴﻧﺪﻣ تﺎﻣاﺰﺘﻟا ﻦﻋ ﺔﺌﺷﺎﻧ مأ دﻮﻘﻌﻟا ﻰﻠﻋ ﺔﻤﺋﺎﻗ اًراﺮﺿأ ﺖﻧﺎﻛ
ﻞﺜﻣ عﻮﻗو ﺔﻴﻧﺎﻜﻣﺈﺑ فﺮﻌﺗ ﻢﻟ مأ HP ﺔﻛﺮﺷ فﺮﻌﺗ ﺖﻧﺎﻛ ءاﻮﺳو ىﺮﺧأ ﺔﻴﻧﻮﻧﺎﻗ
.ﻲﻠﶈا نﻮﻧﺎﻘﻟا ﻪﺑ ﺢﻤﺴﻳ ىﺪﻣ ﻰﺼﻗﻷ ﺎًﻘﻓو ﻚﻟذو راﺮﺿﻷا هﺬﻫ
ﻲﻠﶈا نﻮﻧﺎﻘﻟا
نﻮﻜﺗ نأ ﻚﻟﺬﻛ ﻞﻴﻤﻌﻠﻟ زﻮﺠﻳ .ﺔﺻﺎﺧ ﺔﻴﻧﻮﻧﺎﻗ ﺎًﻗﻮﻘﺣ ﻞﻴﻤﻌﻠﻟ نﺎﻤﻀﻟا نﺎﻴﺑ ﻲﻄﻌﻳ ١
ىﺮﺧﻷ ﺔﻌﻃﺎﻘﻣ ﻦﻣو ،ةﺪﺤﺘﳌا تﺎﻳﻻﻮﻟا ﻲﻓ ىﺮﺧﻷ ﺔﻳﻻو ﻦﻣ ﻒﻠﺘﺨﺗ ىﺮﺧأ قﻮﻘﺣ ﻪﻳﺪﻟ
.ﻢﻟﺎﻌﻟا ﻲﻓ ﺔﻌﻘﺑ يأ ﻲﻓ ىﺮﺧأ ﻰﻟإ ﺔﻘﻄﻨﻣ/ﺔﻟود ﻦﻣو ،اﺪﻨﻛ ﻲﻓ
نﺎﻴﺑ فﻼﺘﺧﻻ ﺎ
ﺾﻌﺑ ﻖﻴﺒﻄﺗ زﻮﺠﻳ ﻻ ،ﻲﻠﶈا نﻮﻧﺎﻘﻟا اﺬﻫ ﻞﺜﻣ ﺐﺟﻮﲟو .ﻲﻠﶈا نﻮﻧﺎﻘﻟا ﻦﻋ اﺬﻫ نﺎﻤﻀﻟا
زﻮﺠﻳ ،لﺎﺜﳌا ﻞﻴﺒﺳ ﻰﻠﻋ .ﻞﻴﻤﻌﻟا ﻰﻠﻋ اﺬﻫ نﺎﻤﻀﻟا نﺎﻴﺑ دﻮﻴﻗو ﺔﻴﻟﻮﺌﺴﳌا ءﻼﺧإ دﻮﻨﺑ
ﻲﻓ ﺎﲟ) ةﺪﺤﺘﳌا تﺎﻳﻻﻮﻟا جرﺎﺧ تﺎﻣﻮﻜﳊا ﺾﻌﺑو ةﺪﺤﺘﳌا تﺎﻳﻻﻮﻟا ﻞﺧاد تﺎﻳﻻﻮﻟا ﺾﻌﺒﻟ
ﺔﻴﻨﻤﻀﻟا تﺎﻧﺎﻤﻀﻟا راﺮﻤﺘﺳا ةﺮﺘﻓ ﺪﻳﺪﲢ وأ ﺔﻴﻓﺎﺿإ نﺎﻤﺿ قﻮﻘﺣ ﻞﻴﻤﻌﻟا ﺢﻨﻣ ج
ةﺮﺘﻓ ﻰﻠﻋ دﻮﻴﻗ دﻮﺟﻮﺑ حﺎﻤﺴﻟا وأ ﺎﻬﻨﻋ ﻲﻠﺨﺘﻟا ﺔﺠﺘﻨﳌا ﺔﻛﺮﺸﻟا ﻰﻠﻋ رﺬﻌﺘﻳ ﻲﺘﻟا
ﻘﻓو ﺔﻟود ﻞﻜﻟ ﻲﻠﶈا نﻮﻧﺎﻘﻟا ﻊﻣ ﻖﻓاﻮﺘﻳ ﻲﻜﻟ نﺎﻤﻀﻟا نﺎﻴﺑ ﻞﻳﺪﻌﺗ ﺐﺠﻳ ٢
ً
:ﻲﻠﻳ ﺎﲟ مﺎﻴﻘﻟا (اﺪﻨﻛ ﻲﻓ ةدﻮﺟﻮﳌا تﺎﻌﻃﺎﻘﳌا ﻚﻟذ
نﺎﻣﺮﺣ ﻦﻣ نﺎﻤﻀﻟا نﺎﻴﺑ ﻲﻓ ةدراﻮﻟا ﺔﻨﻴﻌﳌا دﻮﻴﻘﻟاو ﺔﻴﻟﻮﺌﺴﳌا تاءﻼﺧإ ﻊﻨﻣ أ
وأ ،(ةﺪﺤﺘﳌا ﺔﻜﻠﻤﳌا ﻞﺜﻣ) ﺔﻴﻌﻳﺮﺸﺘﻟا ﻪﻗﻮﻘﺣ ﻦﻣ ﻞﻴﻤﻌﻟا
وأ ؛دﻮﻴﻘﻟا وأ تاءﻼﺧﻹا هﺬﻫ ﻞﺜﻣ ﻖﻴﺒﻄﺗ ﻰﻠﻋ ﺔﻌﻨﺼﳌا ﺔﻬﳉا ةرﺪﻗ ﻦﻣ ﺪﳊا ب
.ﺔﻴﻨﻤﻀﻟا تﺎﻧﺎﻤﻀﻟا راﺮﻤﺘﺳا
ﻲﻨﺜﺘﺴﺗ ﻻ ،اﺪﻨﻠﻳزﻮﻴﻧو ﺎﻴﻟاﺮﺘﺳأ ﻲﻓ ﺔﻳرﺎﺠﺘﻟا ءﻼﻤﻌﻟا تﺎﻛﺮﳊ ﺔﺒﺴﻨﻟﺎﺑ ٣
ﺪﻴﻘﺗ وأ - ﺎًﻧﻮﻧﺎﻗ ﻪﺑ حﻮﻤﺴﳌا ىﺪﻤﻠﻟ ﻻإ – نﺎﻤﻀﻟا اﺬﻫ ﻲﻓ ةرﻮﻛﺬﳌا طوﺮﺸﻟا
ﻊﻴﺑ ﻲﻓ ﺎﻬﺑ لﻮﻤﻌﳌا ﺔﻳرﺎﺒﺟﻹا ﺔﻴﻌﻳﺮﺸﺘﻟا قﻮﻘﳊا ﻰﻟإ فﺎﻀﺗ ﺎﳕإو ،لﺪﻌﺗ وأ
.ءﻼﻤﻌﻟا ءﻻﺆﻬﻟ HP تﺎﺠﺘﻨﻣ
دوﺪﶈا نﺎﻤﻀﻟا ىﺪﻣ
ﺔﺤﺿﻮﳌا HP تﺎﺠﺘﻨﻣ ﻮﻠﺧ ﻲﺋﺎﻬﻨﻟا مﺪﺨﺘﺴﻤﻠﻟ Hewlett-Packardﺔﻛﺮﺷ ﻦﻤﻀﺗ ١
أﺪﺒﺗ ﻲﺘﻟاو ،هﻼﻋأ ةرﻮﻛﺬﳌا نﺎﻤﻀﻟا ةﺮﺘﻓ لاﻮﻃ ﺔﻋﺎﻨﺼﻟاو داﻮﳌا ﻲﻓ بﻮﻴﻋ يأ ﻦﻣ هﻼﻋأ
.ﻞﻴﻤﻌﻟا ﻞﺒﻗ ﻦﻣ ﺞﺘﻨﳌا ءاﺮﺷ ﺦﻳرﺎﺗ ﻦﻣ
مﺪﻋ ﺔﻟﺎﺣ ﻲﻓ ﻂﻘﻓ HP ﻦﻣ مﺪﻘﳌا دوﺪﶈا نﺎﻤﻀﻟا يﺮﺴﻳ ،ﺞﻣاﺮﺒﻟا تﺎﺠﺘﻨﳌ ﺔﺒﺴﻨﻟﺎﺑ ٢
ﺞﺘﻨﻣ يأ ﻞﻤﻋ ﻞﻄﻌﺗ مﺪﻋ HP ﺔﻛﺮﺷ ﻦﻤﻀﺗ ﻻو .ﺔﺠﻣﺮﺒﻟا تادﺎﺷرإ ﺬﻴﻔﻨﺗ ﻰﻠﻋ ةرﺪﻘﻟا
.تﻼﻜﺸﳌا ﻦﻣ هﻮﻠﺧ وأ
ﻲﻌﻴﺒﻄﻟا ماﺪﺨﺘﺳﻻا ﻦﻋ ﺔﻤﺟﺎﻨﻟا بﻮﻴﻌﻟا ﻂﻘﻓ HP ﻦﻣ مﺪﻘﳌا دوﺪﶈا نﺎﻤﻀﻟا ﻲﻄﻐﻳ
:ﻦﻋ ﻢﺠﻨﺗ ﻲﺘﻟا تﻼﻜﺸﳌا ﻚﻟذ ﻲﻓ ﺎﲟ ىﺮﺧأ تﻼﻜﺸﻣ ﺔﻳأ ﻲﻄﻐﻳ ﻻو ،ﺞﺘﻨﻤﻠﻟ
؛ﺔﻤﻴﻠﺴﻟا ﺮﻴﻏ ﻞﻳﺪﻌﺘﻟا وأ ﺔﻧﺎﻴﺼﻟا تﺎﻴﻠﻤﻋ أ
وأ HP ﺎﻬﻣﺪﻘﺗ ﻻ ﻲﺘﻟا تﺎﻣﺰﻠﺘﺴﳌا وأ ءاﺰﺟﻷا وأ ﻂﺋﺎﺳﻮﻟا وأ ﺞﻣاﺮﺒﻟا ماﺪﺨﺘﺳا ب
؛ﺎﻬﻤﻋﺪﺗ
؛ﺞﺘﻨﳌا تﺎﻔﺻاﻮﻣ ﻊﻣ ﻖﻔﺘﻳ ﻻ ﺎﲟ ﻞﻴﻐﺸﺘﻟا ج
.ماﺪﺨﺘﺳﻻا ءﻮﺳ وأ ﻪﺑ حﻮﻤﺴﳌا ﺮﻴﻏ ﻞﻳﺪﻌﺘﻟا د
وأ HP جﺎﺘﻧإ ﻦﻣ ﺖﺴﻴﻟ ﺮﺒﺣ ﺔﺷﻮﻃﺮﺧ ماﺪﺨﺘﺳا ﺮﺛﺆﻳ ﻻ HP تﺎﻌﺑﺎﻄﻟ ﺔﺒﺴﻨﻟﺎﺑ ٤
ﻢﻋد ﺪﻘﻋ يأ ﻰﻠﻋ وأ ﻞﻴﻤﻌﻠﻟ مﺪﻘﳌا نﺎﻤﻀﻟا ﻰﻠﻋ ﺎﻬﺘﺌﺒﻌﺗ دﺎﻌﻣ ﺮﺒﺣ ﺔﺷﻮﻃﺮﺧ
ماﺪﺨﺘﺳا ﺔﺠﻴﺘﻧ ﺔﻌﺑﺎﻄﻟﺎﺑ رﺮﺿ وأ ﻞﻄﻋ يأ ثﺪﺣ اذإ ﻦﻜﻟ .ﻞﻴﻤﻌﻟا ﻊﻣ ﻪﻌﻴﻗﻮﺗ ﰎ
ﺐﻠﻄﺗ فﻮﺴﻓ ،ﺎﻬﺘﺌﺒﻌﺗ دﺎﻌﻣ ﺮﺒﺣ ﺔﺷﻮﻃﺮﺧ وأ HP جﺎﺘﻧإ ﻦﻣ ﺖﺴﻴﻟ ﺮﺒﺣ ﺔﺷﻮﻃﺮﺧ
ﺔﺠﻴﺘﻧ ﺔﻌﺑﺎﻄﻟا حﻼﺻﻹ ﲔﻣزﻼﻟا داﻮﳌاو ﺖﻗﻮﻠﻟ ﺔﻴﺳﺎﻴﻘﻟا مﻮﺳﺮﻟا داﺪﺳ HP ﺔﻛﺮﺷ
.دﺪﶈا ﻒﻠﺘﻟا وأ ﻞﻄﻌﻟا اﺬﻬﻟ
ﺞﺘﻨﻣ يأ ﻲﻓ ﺐﻴﻋ دﻮﺟﻮﺑ اًرﺎﻌﺷإ ،ﺔﻳرﺎﺴﻟا نﺎﻤﻀﻟا ةﺮﺘﻓ لﻼﺧ ،HP ﺔﻛﺮﺷ ﺖﻤﻠﺴﺗ اذإ ٥
.ﺎﻬﻟ ىﺮﺗ ﺎﻤﺒﺴﺣ ﻪﻟاﺪﺒﺘﺳا وأ ﺞﺘﻨﳌا حﻼﺻﺈﺑ ﺪﻬﻌﺘﺗ HP ﺔﻛﺮﺷ نﺈﻓ HP نﺎﻤﺿ ﻪﻴﻄﻐﻳ
وأ HP نﺎﻤﺿ ﻪﻴﻄﻐﻳ يﺬﻟا ﺐﻴﻌﳌا ﺞﺘﻨﳌا حﻼﺻإ ﻦﻣ HP ﺔﻛﺮﺷ ﻦﻜﻤﺘﺗ ﻢﻟ اذإ ٦
ﻦﻣ ﺔﻟﻮﻘﻌﻣ ةﺮﺘﻓ لﻼﺧ ،ﺔﻣﺰﻠﻣ HP ﺔﻛﺮﺷ نﺈﻓ ،ﻪﺑ لﻮﻤﻌﳌا ﻮﺤﻨﻟا ﻰﻠﻋ ﻪﻟاﺪﺒﺘﺳا
.ﺞﺘﻨﳌا ءاﺮﺷ ﻎﻠﺒﻣ ةدﺎﻋﺈﺑ ،ﺐﻴﻌﻟﺎﺑ ﺎﻫرﺎﻄﺧإ ﺪﻌﺑ ﺖﻗﻮﻟا
نأ ﺪﻌﺑ ﻻإ عﻮﻓﺪﳌا ﻎﻠﺒﳌا ةدﺎﻋإ وأ ﻪﻟاﺪﺒﺘﺳا وأ ﺞﺘﻨﳌا حﻼﺻﺈﺑ ﺔﻣﺰﻠﻣ ﺮﻴﻏ HP ﺔﻛﺮﺷ ٧
.HP ﺔﻛﺮﺷ ﻰﻟإ ﺐﻴﻌﳌا ﺞﺘﻨﳌا ﻞﻴﻤﻌﻟا ﺪﻴﻌﻳ
ﻞﻘﺗ ﻻأ طﺮﺸﺑ ،ﺪﻳﺪﺟ ﻪﺒﺷ وأ اًﺪﻳﺪﺟ ﺐﻴﻌﳌا ﺞﺘﻨﻤﻠﻟ ﻞﻳﺪﺑ ﺞﺘﻨﻣ يأ نﻮﻜﻳ نأ زﻮﺠﻳ ٨
.لﺪﺒﺘﺴﳌا ﺞﺘﻨﳌا ﻒﺋﺎﻇو ﻦﻋ ﻪﻔﺋﺎﻇو
نأ ﻰﻠﻋ ﺎﻬﻌﻴﻨﺼﺗ ةدﺎﻋإ ﰎ داﻮﻣ وأ تﺎﻧﻮﻜﻣ وأ ءاﺰﺟأ ﻰﻠﻋ HP تﺎﺠﺘﻨﻣ يﻮﺘﲢ نأ زﻮﺠﻳ ٩
.ءادﻷا ﺚﻴﺣ ﻦﻣ ﺎﻬﻨﻣ ةﺪﻳﺪﺠﻠﻟ ﺔﺌﻓﺎﻜﻣ نﻮﻜﺗ
ﺎﻬﻟﻼﺧ ﻢﺘﻳ ﺔﻘﻄﻨﻣ/ﺔﻟود ﺔﻳأ ﻲﻓ لﻮﻌﻔﳌا يرﺎﺳ HP ﻦﻣ مﺪﻘﳌا دوﺪﶈا نﺎﻤﻀﻟا نﺎﻴﺑ ١٠
تﺎﻣﺪﺧ دﻮﻘﻋ ﻰﻠﻋ لﻮﺼﳊا ﻦﻜﳝ .نﺎﻤﻀﻟا ﺔﻴﻄﻐﺗ قﺎﻄﻧ ﺖﲢ ﻊﻗاﻮﻟا HP ﺞﺘﻨﻣ ﻊﻳزﻮﺗ
ﻲﻓ ﺪﻤﺘﻌﻣ HP ﺔﻣﺪﺧ ﺰﻛﺮﻣ يأ ﻦﻣ ،ﻊﻗﻮﳌا ﻲﻓ ﺔﻣﺪﳋا ﱘﺪﻘﺗ ﻞﺜﻣ ،ﺔﻴﻓﺎﺿﻹا نﺎﻤﻀﻟا
.ﺎﻬﻴﻓ ﺞﺘﻨﳌا ﻊﻳزﻮﺘﺑ ﺪﻤﺘﻌﻣ درﻮﺘﺴﻣ يأ وأ HP ﺔﻛﺮﺷ مﻮﻘﺗ ﻲﺘﻟا ﻖﻃﺎﻨﳌا/لوﺪﻟا
٣
Page 32

Get
ting
Get
S
ti
Ge
tar
n
g
ted
tt
Starte
ing
G
et
Gui
St
t
i
d
Ge
ng Start
arted
de
Gui
t
t
i
Ge
ng
de
Gu
St
tt
ed
i
n
i
ar
de
pre
g
G
St
te
pa
u
you w
d
re
ide
art
f
Gu
or
ill n
ed
ad
s
ee
e
dr
ide
tu
d
esse
the
p
G
1)
s to
f
uide
IP
o
l
a
low
se
dd
t
2
i
u
ng
) SM
ress (ne
p
the p
TP
3) LDAP
ga
t
roduct:
w
o
tew
rk
pre
)
a
ga
y (e-m
p
ar
yo
tew
pre
u w
e for s
ay
a
p
il s
are
i
(
yo
ll n
d
a
erv
u w
irec
ddress
eed
e
er
fo
tu
i
to
)
ll n
r s
t
a
p
ry
he f
ddre
1) IP
es to
e
e
se
ed
t
o
u
rvic
the
llo
ss
a
p
set up
1) IP a
e
d
w
es) - optio
s
2
dre
ing
f
to
) SM
oll
ss
the p
owing
s
e
dd
(n
t
2
T
P
up
)
re
3) L
e
gatew
SM
t
n
r
s
wo
oduct:
a
s (
th
DAP
l
TP ga
e p
rk)
ne
3) LD
two
a
r
g
o
y (e
d
a
tew
rk
uct:
AP
t
p
ew
-m
)
re
a
ga
ay (di
a
y
pa
il s
(
yo
te
e-m
r
er
w
u will n
e fo
r
v
ay
a
e
er)
il s
cto
(direc
r s
a
erver)
ry
ddre
eed
e
se
tu
to
rv
sse
p
the
ry
ices
1) IP ad
s to
se
f
ol
)
r
vices
- o
low
s
et
ption
2) SMT
d
ing
up th
ress
) -
p
r
optio
al
e
p
(networ
e
P
ar
yo
3) LDA
pro
g
n
u
e fo
ate
al
du
w
k)
w
ill
ct:
P g
r se
ay
ad
ne
ate
dress
(e-m
ed
tu
w
t
p
he
a
ai
1) IP
es
y
l
s
f
(d
t
o
o
e
llow
a
i
rve
r
s
ec
et u
d
2) S
r)
dre
to
ing
p
ry s
ss (n
M
the
ervices) - op
TP
3)
etw
pr
gat
LD
o
ork
duct:
ew
AP ga
pr
)
a
ep
y
tio
(e-m
are
y
t
ew
ou w
nal
a
ail ser
fo
y (d
il
r
l
a
need the
se
irec
dd
v
er)
tup
ress
to
r
y
1) I
es to s
s
f
ervices)
o
P
ll
a
o
et up
ddress
w
2) SM
ing
- o
the p
p
(n
TP
tio
3) L
et
gatew
nal
rod
w
D
o
rk
uc
AP ga
)
t
a
:
y
(e-m
tew
a
a
y (di
il s
er
re
ve
cto
r)
ry
se
rvic
es
) optiona
l
Page 33

15
1
2
1
1
2
1
1
2
2
1
2
17
2
16
Page 34

13
4
3
1
14
7
3
2
4
6
5
9
8
9
Page 35

10
2
3
6
7
3
5
4
4
12
11
Page 36

8
3
1
1
2
2
5
4
9
7
6
Page 37

2
1
3
5
1
2
3
4
4
9
8
6
1 2
3
9
10
84 5 6
7
5
1
4
7
2
3
5
6
7
1 2 3 4 5
1
2
Page 38

2
290 mm*
(11.4 in)
1
1
8
2
4
3
0
0
2
,
y
n
a
p
m
o
C
d
r
a
r
ck
e
a
p
-P
a
t
p
et
l
d
w
le
e
c
H
y
t
c
h
e
r
g
i
r
n
y
o
p
d
o
te
c
n
i
©
r
p
a
n
i
h
C
n
i
d
e
t
n
ri
p
3
416 mm (16.4 in)
553 mm (21.8 in)
6
7
G
e
tt
in
G
g
e
tt
St
i
G
ng
a
e
rte
S
tt
in
d
G
t
a
g
e
G
rte
S
t
tin
u
d
G
t
i
ar
d
g
e
G
e
S
te
tt
ui
in
d
G
ta
d
G
g
e
rte
e
tti
St
u
d
n
id
a
G
p
g
r
r
e
e
te
p
St
u
a
y
d
ou
re
i
a
d
G
f
wi
r
o
e
a
te
l
r
l
d
n
u
d
s
e
r
d
e
e
e
i
t
ss
1
d
d
u
)
e
p
th
G
IP
e
s
e
a
t
o
fo
u
2
s
d
)
l
d
e
lo
id
S
r
t
e
w
M
u
ss
p
i
3
e
T
n
(
t
P
)
g
L
h
n
g
e
e
D
a
p
t
A
w
te
ro
P
or
w
g
d
k
a
a
u
)
y
c
te
p
t:
(
e
w
r
-m
e
a
p
y
a
a
y
i
(
p
l
d
ou
s
re
r
ir
e
e
e
rv
wi
p
fo
c
e
to
a
a
y
l
r
r
l
o
d
r
r
)
n
y
u
e
d
s
e
r
et
s
w
es
e
fo
er
d
1
a
i
u
ll
se
r
v
t
)
d
n
p
s
i
h
d
IP
c
s
e
e
e
re
e
to
e
s
a
t
fo
2)
s
)
1
d
u
d
s
s
-
)
l
d
e
p
e
l
t
o
o
h
S
IP
s
re
t
u
e
p
w
M
a
t
f
s
o
ti
p
i
3
s
2
T
n
o
o
d
P
s
)
g
)
(n
t
na
ll
d
e
h
o
L
S
ga
r
t
e
e
D
e
w
M
l
u
t
A
ss (
w
p
te
p
in
3
T
ro
P
o
P
w
)
g
th
g
L
r
n
d
k)
g
a
e
e
D
a
u
a
y
p
t
c
A
te
w
(
t
t:
e
r
P
e
w
o
o
w
-
r
m
ga
a
d
k
a
y
u
)
a
y
(
ct
tew
il
p
(
d
:
e
s
r
ir
-m
e
e
a
e
r
p
y
v
c
a
e
t
a
y
il
(d
o
r
o
re
ry
)
s
ire
u
e
w
r
se
f
v
c
o
e
to
a
i
r
ll
r)
r
v
d
n
ry
s
ic
d
e
e
r
e
s
e
ed
s
e
t
s
1
)
u
rv
-
s
t
)
es
o
p
I
i
h
c
P
e
p
e
to
f
ti
s
a
2
)
o
o
s
d
)
n
l
d
e
S
lo
o
a
r
t
e
p
w
M
l
u
s
t
p
in
io
3
s
T
p
t
P
)
g
(n
n
h
g
r
L
a
e
e
et
D
l
a
p
A
w
p
t
e
a
y
r
P
o
o
w
o
re
rk
g
d
u
a
a
u
w
)
y
f
ct
t
e
o
(
a
i
:
e
w
ll
r
d
n
-m
s
a
d
y
e
a
r
e
e
(
ed
il
t
s
1
d
u
s
s
t
)
ir
es
p
e
he
I
e
r
P
v
c
to
e
t
a
o
fo
2
r)
s
d
r
)
l
y
d
e
S
lo
re
t
s
w
M
e
u
ss
rv
p
in
3
T
(
t
P
)
i
g
L
c
h
n
g
e
e
e
D
s)
a
t
A
w
p
t
e
-
ro
P
o
o
w
r
g
d
k
p
a
a
u
)
ti
y
c
te
o
p
t
(e
:
n
w
r
a
-
e
m
a
l
p
y
a
a
y
i
(
l s
di
ou
r
e
e
r
e
r
w
fo
ve
c
to
a
i
ll
r
r
d
ry
)
n
d
s
ee
s
r
e
e
e
t
s
1
d
u
r
se
v
)
p
th
i
I
c
s
P
e
e
t
o
a
s)
fo
2
dd
s
)
-
l
e
lo
o
S
re
t
u
w
p
M
ss (
t
p
i
i
3
T
n
o
P
)
g
th
n
n
LD
a
g
e
e
l
a
tw
A
p
te
r
P
o
o
w
g
r
d
k
a
a
u
)
y
c
t
e
t
(e
:
w
-m
a
y
a
il
(d
s
i
e
r
e
r
v
c
e
to
r
r
)
y
s
e
r
v
i
c
e
s)
o
p
t
i
o
n
a
l
5
4
3
3
0
0
2
y,
n
a
p
m
o
C
d
r
r
a
e
k
c
p
a
a
P
-
p
t
t
d
e
l
e
l
w
c
e
y
c
H
e
t
r
h
n
g
i
o
r
y
d
p
e
o
c
int
r
©
p
a
in
h
C
n
i
d
e
t
n
i
r
p
Page 39

Page 40

printed on
recycled paper
imprimé sur
papier recyclé
© 2003 Copyright
Hewlett-Packard Development Company, L.P.
printed in Germany
imprimé en Allemagne
http://www.hp.com/support/businessinkjet2300
 Loading...