

Page 1
HP ProtectTools 2000
Smart Card Kit
User’s Guide
Page 2

Notice
The information contained in this document is subject to change
without notice.
Hewlett-Packard makes no warranty of any kind with regard to this
material, including, but not limited to, the implied warranties of
merchantability and fitness for a particular purpose. Hewlett-Packard
shall not be liable for errors contained herein or for incidental or
consequential damages in connection with the furnishing, performance,
or use of this material.
This document contains proprietary information that is protected by
copyright. All rights are reserved. No part of this document may be
photocopied, reproduced, or translated to another language without the
prior written consent of Hewlett-Packard Company.
TM
Adobe
Microsoft
registered trademarks of Microsoft Corporation in the United States and
other countries.
and AcrobatTMare trademarks of Adobe Systems Incorporated.
®
,MS®, MS-DOS®, Windows®and Windows NT®are
Hewlett-Packard France
Commercial Computing Division
38053 Grenoble Cedex 9
France
2000 Hewlett-Packard Company
Page 3

User’s Guide
This manual is intended for both the PC administrator and the PC user.
It describes how to:
•
Install and deploy HP ProtectTools 2000 software
•
Set up HP ProtectTools 2000 for use
•
Manage security settings
•
Manage smart cards
•
Troubleshoot problems
•
Find out where to get more information and support.
HP Custom Security Services
HP offers security consulting services and customized security
solutions, including the use of this product and other HP security
products. For more information, please contact your HP sales
representative.
Conventions Used in this Manual
This document describes the installation of software on a range of
Microsoft operating systems. Whenever some information applies only
to one or more operating systems, a small tab appears alongside to
indicate the operating system(s) concerned. See the following
example:
Windows NT 4.0
Windows 2000
1 This indicates that step 1 applies only to PCs running Windows NT
4.0 or Windows 2000. You can ignore this step if your PC is running
a different operating system.
When no such symbol is shown alongside a step or section in the
manual, the information concerns all operating systems:
2 This indicates that step 2 applies to any system running one of the
supported operating systems: Windows 95, Windows 98, Windows
NT 4.0 or Windows 2000.
iii
Page 4

Important Information
Folder Encryption (Windows 95, 98 and NT 4.0 Only)
You are about to install File Encryption software. This software enables
the use of an advanced security feature but it implies at the same time
theriskoflossofaccesstoyourconfidentialfiles.Toreducesucha
risk, HP strongly recommends you prepare in advance a recovery smart
card and/or recovery file that will still give you access to such files in
case you lose your smart card and/or password.
ATTENTION: in case of loss of your smart card and/or password you
may not be able to recover access to those encrypted files.
THE SOFTWARE IS PROVIDED "AS IS" WITHOUT ANY WARRANTIES
OF ANY KIND INCLUDING WARRANTIES OF MERCHANTABILITY,
FITNESS FOR A PARTICULAR PURPOSE, OR NON-INFRINGEMENT
OF INTELLECTUAL PROPERTY. IN NO EVENT WILL HP BE LIABLE
FOR ANY DAMAGES WHATSOEVER (INCLUDING, WITHOUT
LIMITATION, THOSE RESULTING FROM LOST PROFITS, LOST DATA
OR BUSINESS INTERRUPTION) ARISING OUT OF THE USE,
INABILITY TO USE, OR THE RESULTS OF USE OF THIS SOFTWARE,
WHETHER BASED ON WARRANTY, CONTRACT, TORT OR ANY
OTHER LEGAL THEORY AND WHETHER OR NOT ADVISED OF THE
POSSIBILITY OF SUCH DAMAGES. APPLICABLE LAW MAY NOT
ALLOW THE EXCLUSION OR LIMITATION OF INCIDENTAL OR
CONSEQUENTIAL DAMAGES, SO THE ABOVE LIMITATION OR
EXCLUSION MAY NOT APPLY TO YOU.
iv
Page 5

Import/Export Regulations
This computer system includes HP ProtectTools 2000. HP ProtectTools
2000 is made of a smart card (and associated reader and software
driver) and HP Encryption Smart Card Security System software with
the following encryption capabilities.
•
40bit symmetrical encryption algorithm, used for data encryption
(confidentiality) (non-US version);
•
128bit symmetrical encryption algorithm, used for data encryption
(confidentiality) (US version);
•
512/56bit RSA private key algorithm, used for digital signature (nonUS version);
•
1024/128bit RSA private key algorithm, used for digital signature
(US version).
Export of this product is not allowed to the following countries:
Afghanistan, Angola, Cuba, Iraq, Iran, Lybia, Macedonia, Montenegro,
Mozambique, North Korea, Pakistan, Serbia, Slovenia, Somalia, Sudan,
Syria. Export of this product to other countries may be subject to
regulations. For instructions on how to export this product, and
according to the country in which you have purchased this equipment,
please contact: in France: SCSSI (Service Central de la Sécurité des
Systèmes d'Information, www.scssi.gouv.fr); in Germany: BAFA
(Bundesausfuhramt, Exportkontrolle, www.bafa.de); in the UnitedKingdom: DTI (Department of Trade and Industry, www.dti.gov.uk), in
the USA: Department of Commerce (Export Administration
Regulations, www.bxa.doc.gov).
v
Page 6

vi
Page 7

Contents
1 Introduction to HP ProtectTools 2000
Introduction.............................................. 12
WhatisaSmartCard?........................................ 12
SmartCardKitContents...................................... 12
GemSAFESmartCards....................................... 13
PINNumbers ............................................... 13
BeforeYouBegin.......................................... 15
SystemRequirements(HPDesktopPCs) ........................ 15
SystemRequirements(OmniBookNotebookPCs)................. 15
Software Compatibility for PCs Running Windows NT 4.0 . . . . . . . . . . . 16
Features of HP ProtectTools 2000 . . . . . . . . . . .................... 17
Contents of the HP ProtectTools 2000 CD-ROM ................ 18
2 Installing HP ProtectTools 2000 Software
BeforeInstallingtheSoftware............................... 22
SoftwareInstallationProcedure............................. 23
Preparing a PC Running Windows NT 4.0 (HP Desktop PCs) . . . . . . . . 23
Preparing a PC Running Windows NT 4.0 (HP Notebook PCs) . . . . . . . 24
Installing the Drivers, Software and Reader (HP Desktop PCs). . . . . . . 25
Installing the Drivers, Software and Reader (HP Notebook PCs). . . . . . 27
InstallingOptionalItems...................................... 29
Deploying ProtectTools 2000 Using a Network ................. 31
RemoteInstallationUsingaDeploymentTool..................... 31
Automatic Installation of ProtectTools 2000 . . . . . . . . . ............. 31
Uninstalling HP ProtectTools 2000 ........................... 33
English vii
Page 8

UninstallingHPNTLock...................................... 33
UninstallingHPSoftPowerDown .............................. 34
3 Setting up HP ProtectTools 2000
PreparingaSmartCardforUse:Overview.................... 36
InitializingaSmartCard ................................... 37
Updating the PC’sBIOS(OmniBooksOnly)................... 38
EnablingBIOSSmartCardSecurity(OmniBooksOnly) ........ 39
SettingUpaBIOSUserPasswordCard.......................... 39
SettingUpFolderEncryptiononYourPC .................... 40
CreatingaRecoveryFile................................... 41
4 Managing Security and Smart Cards
TheHPSmartCardSecurityManager........................ 44
For Windows NT 4.0 and Windows 2000 Users . . . . . . . . . . . . ........ 44
ForWindows95andWindows98Users ......................... 45
Running the HP Smart Card Security Manager . . . . . . . . . . . . ........ 46
AccessingtheOnlineHelp .................................... 46
ManagingSecurity:ConfigurationSettings.................... 47
Smart Card–AllowInitializationOption.......................... 47
BeeponSmartCardRemovalOption ........................... 48
Win NT–LogonPoliciesOptions................................ 49
Win NT–LogonTextConfigurationOptions....................... 54
Win NT–LogonPowerManagementOptions...................... 54
viii English
Page 9

AccountPolicies............................................. 55
BIOS Password Options (OmniBooks Only) . . . . . . . . . ............. 57
Win95/98Options ........................................... 58
CustomizingSecurityForYourInstalledBaseofPCs............... 59
ManagingSmartCards ..................................... 61
Using Smart Cards under Windows NT and Windows 2000 . . . . . . . . . . 62
InitializingFurtherSmartCards ............................... 63
Changing a Smart Card’sPIN .................................. 63
RestoringaSmartCardfromaRecoveryFile ..................... 64
Restoring a Smart Card Without the Recovery File . . . . . . . . . . . . . . . . . 65
Adding an Account to a Smart Card (Windows NT/Windows 2000). . . . 65
Removing an Account (Windows NT/Windows 2000) . . . . . . . . . . . . . . . 66
Changing an Account Password (Windows NT/Windows 2000) . . . . . . . 66
HPTopTools.............................................. 67
5 Troubleshooting
SmartCardTroubleshootingHelpZone....................... 70
IfYouDisconnecttheSmartCardReader ........................ 70
IfthePCFreezesAfterYouRestartIt ........................... 70
If the Smart Card’sPasswordisNotUpToDate ................... 70
WaitforService ............................................. 71
TroubleshootingTable........................................ 72
HPSmartCardDiagnosticsTool............................. 75
DiagnosticsOnlineHelp....................................... 75
UsingHPSmartCardDiagnostics .............................. 75
Documentation,HelpandSupport........................... 77
English ix
Page 10

x English
Page 11

1
Introduction to HP ProtectTools 2000
This chapter introduces the HP ProtectTools 2000 Smart Card Kit and
provides information about system requirements and compatibility. It
also tells you where you can get more information about ProtectTools
2000 and smart cards.
Page 12

1 Introduction to HP ProtectTools 2000
Introduction
Introduction
The HP ProtectTools 2000 Smart Card Kit can be installed on a range
of HP PCs, OmniBook Notebooks and PC Workstations. It provides
smart card secured access to Microsoft Windows 95, Windows 98,
Windows NT 4.0 and Windows 2000 platforms.
To discover on which PCs you can install Protectools 2000, go to:
www.hp.com/go/support
What is a Smart Card?
Smart cards are small plastic cards the size of a credit card that carry a
microchip containing memory and a microprocessor.
Like personal computers, they have an operating system to manage
input/output, and include security features to resist tampering.
A Personal Identification Number (PIN) is needed to gain access to the
contents of the microchip. This means that you can easily gain access
to a computer protected by a smart card only if you have the- correct
smart card and you know the PIN. See “PIN Numbers” on page 13 for
more information.
.
Smart Card Kit Contents
Your HP Smart Card Security Kit contains:
•
One smart card reader. This is either internal or external depending
on your model of PC:
•
an internal PCMCIA card reader for OmniBook Notebook PCs
•
an external serial card reader for all desktop PC models
•
Two smart cards. One spare card is for backup/recovery purposes.
•
One CD-ROM containing software, drivers and documentation.
12
Page 13

1 Introduction to HP ProtectTools 2000
Introduction
GemSAFE Smart Cards
If your ProtectTools 2000 Smart Card Kit comes with a pair of
GemSAFE GPK 8K smart cards, you can, as well as enjoying secure
Web access, send and receive secure e-mail. GemSAFE cards support
encryption/decryption and signature functions.
For more information on using GemSAFE smart cards, refer to the
GemSAFE User Guide, available by selecting
GemSAFEUser Guide
Gemplus\gemsafe\Doc
on your PC or by looking in the folder
on the HP ProtectTools 2000 CD-ROM.
NOTE Export regulations and national law dictate maximum session key
lengths. The maximum session key length in the United States and
Canada is 128 bits (for example, with Microsoft Internet Explorer). The
maximum session key length for the international version is 40 bits. If
you are sending a message internationally, you may need to change the
session key length (or encryption algorithm) so that the recipient has
the cryptographic capacity to decrypt your message.
StartPrograms
You currently have the international version preloaded on your VL600
Secure Bundle. If you are using this system in the US or in Canada,
downloading the High Encryption Pack directly from Microsoft at
www.microsoft.com will enable you to use the strong key length version.
PIN Numbers
When using smart cards with ProtectTools 2000, the PIN for logging on
to your PC is 8 characters in length. It can contain any letters or
numbers (a-z, A-Z, 0-9) and is case sensitive (“hellojoe” is not the same
as “HelloJoe”). If you fail to enter this PIN code in five successive
attempts, the card will become unusable. For information on changing
this PIN, refer to “Changing a Smart Card’sPIN” on page 63.
In addition to this, GemSAFE smart cards also use a second PIN for
secure e-mail and Web access. The default PIN code for accessing
these features is 1234. However, you may use from four to eight
characters when you set your own PIN. Subsequently, when you use
the card, you have three attempts to type in the correct PIN number. If
13
Page 14

1 Introduction to HP ProtectTools 2000
Introduction
you fail to enter the correct PIN in three successive attempts, you will
no longer be able to use the secure e-mail and Web access features.
The card can be reactivated with a special unblock code by going to
StartProgramsGemSAFECard Details.
The default unblock
code is also 1234, and can be changed from within this application.
14
Page 15

Windows NT 4.0
1 Introduction to HP ProtectTools 2000
Before You Begin
Before You Begin
System Requirements (HP Desktop PCs)
The minimum system requirements are:
•
Onefree9-pinserialport
(If you do not have a free serial port, you can order the
HP Serial/Parallel Interface Card D7503A/T)
•
Windows 95 OSR2, Windows 98, Windows NT 4.0 or Windows 2000.
•
Windows NT 4.0 Service Pack 4 or later is required. Windows NT 4.0
Service Pack 6a is provided on the ProtectTools 2000 CD-ROM
•
Approximately 20 MB of free hard disk space (not including the
space required if you need to install Windows NT 4.0 Service Pack
6a).
Windows NT 4.0
System Requirements (OmniBook Notebook PCs)
The minimum system requirements for OmniBooks are:
•
An OmniBook 900 or 4150 or later with Window s95 OSR2,
Windows 98, Windows NT 4.0 or Windows 2000 (a Smart Card BIOS
is included), or
An OmniBook XE2 with Windows 98 or Windows 2000. BIOS
security features are not supported. Future models may support
other operating systems and BIOS security.
•
A CD-ROM drive installed in your OmniBook or available via a
network (on certain OmniBook models the CD-ROM drive is an
option that must be purchased separately).
•
OnefreePCMCIAslot
•
Windows NT 4.0 Service Pack 4 or later is required. Windows NT 4.0
Service Pack 6a is provided on the ProtectTools 2000 CD-ROM
•
At least 7 megabytes of free hard disk space.
15
Page 16

1 Introduction to HP ProtectTools 2000
Before You Begin
Windows NT 4.0
Software Compatibility for PCs Running Windows NT 4.0
ProtectTools 2000 replaces Windows NT's standard logon library
(MSGINA.DLL). You may experience compatibility problems with
software that replaces the same library (for example Novell Netware
Client or pcAnywhere 32). In order to have HP ProtectTools 2000 work
properly, do NOT install such software along with HP ProtectTools
2000.
If you install Novell Netware Client after ProtectTools 2000, you will
get a message "Novell has detected a GINA difference on this machine.
Do you want to replace it with Netware GINA.DLL?". If you answer Yes,
neither Netware Client nor HP ProtectTools 2000 will work correctly.
16
Page 17

1 Introduction to HP ProtectTools 2000
Features of HP ProtectTools 2000
ProtectTools 2000 can provide several types of security for your PC.
The security you have available depends on your HP hardware,
operating system, your security setup options, and your system BIOS.
Features on Desktop PCs
Windows 95 Windows 98 NT4.0 (SP6a or later) Windows 2000
Folder Encryption (page 40) Microsoft EFS
n/a Logon Authorization (page 49)
Lock at Card Removal (page 50)
Lock at Suspend/Resume (page 58) n/a Lock at
Suspend/Resume
Secure Screen Saver (page 58)
1. Microsoft EFS (Encrypted File System) is the file encryption security system available with Windows 2000.
Since file encryption is already part of the operating system, HP ProtectTools does not offer its file encryption
feature for the Windows 2000 environment. Note that you must have a Windows 2000 NTFS partition on your
hard drive to use Microsoft EFS.
Before You Begin
1
Features on OmniBook Notebook PCs
Windows 95 Windows 98 NT4.0 (SP6a or later) Windows 2000
Folder Encryption (page 40)
BIOS Smart Card Security Feature (page 39)
n/a Logon Authorization (page 49)
Lock at Undock (page 58) n/a
Lock at Card Removal (page 50)
Lock at Suspend/Resume (page 58)
Secure Screen Saver (page 58)
1. Except for OmniBook 800, 2000, 3000 and 5x00 PCs.
2. Microsoft EFS (Encrypted File System) is the file encryption security system available with Windows 2000. Since
file encryption is already part of the operating system, HP ProtectTools does not offer its file encryption feature
for the Windows 2000 environment. Note that you must have a Windows 2000 NTFS partition on your hard
drive to use Microsoft EFS.
3. Except for OmniBook XE2.
1
Microsoft EFS
3
2
17
Page 18

1 Introduction to HP ProtectTools 2000
Contents of the HP ProtectTools 2000 CD-ROM
Contents of the HP ProtectTools 2000 CD-ROM
The CD-ROM provided with your HP ProtectTools 2000 Smart Card Kit
contains:
•
HP smart card reader driver
•
HP Smart Card Security System
This software takes care of the encryption and the secure logon and
logoff features when using the smart card. The software includes the
Smart Card Security Manager, used to configure security and
manage smart cards. Refer to chapter 4 for information about using
the Smart Card Security Manager.
•
HP Smart Card Diagnostics
You can use the diagnostics to ensure that your smart card reader is
working correctly or to help you to troubleshoot problems. Refer to
page 75 for information about using the diagnostics utility.
•
ProtectTools 2000 Documentation
Includes the online help and this manual (in PDF format). The online
help provides information about HP Smart Card Security Manager.
The online help is installed when you install the HP Smart Card
Security System.
Windows 95
Windows 98
Windows NT 4.0
Windows NT 4.0
•
GemSAFE software and documentation.
This software, in conjunction with GemSAFE smart cards, provides
secure e-mail and Web access.
•
Acrobat Reader
Provided so that you can view and print this manual.
•
Microsoft Smart Card Base Components
These components provide operating-system level support for the
ProtectTools 2000 Smart Card components. You must install both
updates 1 and 2.
•
Microsoft Windows NT 4.0 Service Pack 6a
Windows NT 4.0 Service Pack 4 or later is required before installing
any of the ProtectTools 2000 smart card components.
18
Page 19

Windows NT 4.0
1 Introduction to HP ProtectTools 2000
Contents of the HP ProtectTools 2000 CD-ROM
•
HP NTLock (for Vectra and Kayak only)
This utility allows users to lock their PC during short absences to
prevent unauthorized access.
If you use HP NTLock, you must first uninstall any previous version
then install the appropriate latest version.
Only these versions (and later) will work correctly with the
ProtectTools 2000 software.
NOTE
NOTE
Windows NT 4.0
Windows 95
Windows 98
Windows NT 4.0
HP NTLock is NOT supported on HP Vectra VE or VEi series PCs (with
the exception of the HP Vectra VE5 series 4). For the latest information
on supported utilities for your PC, refer to
then click on
•
HP Soft PowerDown (for Vectra and Kayak only)
Utilities
.
www.hp.com/go/support
This utility automatically powers off your HP PC or HP PC
WorkstationwhenyoushutdownWindowsNT.
•
HP TopTools Agent
HP TopTools is a device management tool for HP PCs and other
devices. This version of the Agent is compatible with HP
ProtectTools 2000 Smart Card technology. For more information
about TopTools, connect to HP’swebsite
www.hp.com/toptools
Note that you can obtain a Windows 2000 version of the HP TopTools
agent (when it becomes available) either on your PC’s hard drive or
from HP’swebsite
Please consult the
www.hp.com/toptools
Readme.txt
file provided in the root directory of the
.
CD-ROM. It contains the most up to date information about the drivers
and software provided. The information contained in this file
supersedes any information given in this manual or other
documentation provided with the accessory.
,
.
19
Page 20

1 Introduction to HP ProtectTools 2000
Contents of the HP ProtectTools 2000 CD-ROM
20
Page 21

2
Installing HP ProtectTools 2000 Software
This chapter describes how to install ProtectTools 2000 software
components. This is not necessary for HP Secure Bundle PCs on which
the software is preinstalled. This chapter also has information about
uninstalling ProtectTools 2000.
Page 22

2 Installing HP ProtectTools 2000 Software
Windows NT 4.0
Windows 2000
Before Installing the Software
Before Installing the Software
Before installing any software or drivers, ensure that:
•
You have at least one uninitialized smart card ready. Two
uninitialized cards are provided with the smart card reader. Once the
installation process is complete, you will be asked to insert a smart
card so that you can initialize it.
•
You have logged on as the PC’s Administrator.
HP strongly recommends that:
•
You prepare a formatted blank floppy disk. You will need one if you
want to create a recovery file of the smart card once the smart card
has been initialized.
NOTE For the most up to date information about ProtectTools 2000 software
and drivers, please consult the
directory of the CD-ROM. The information contained in this file
supersedes any information given in this manual or other
documentation provided with the accessory.
Readme.txt
file provided in the root
22
Page 23

2 Installing HP ProtectTools 2000 Software
Software Installation Procedure
Software Installation Procedure
Make sure you have carried out the tasks outlined in “Before Installing
the Software” on page 22 before proceeding with the following:
1 Prepare your PC (PCs running Windows NT 4.0 only).
2 Install the drivers, software and smart card reader.
3 Install other items, if required (TopTools hardware resource
monitoring utility and this manual).
Windows NT 4.0
Preparing a PC Running Windows NT 4.0 (HP Desktop PCs)
1 Install Microsoft Windows NT 4.0 Service Pack 6a from the
ProtectTools 2000 CD-ROM (if you do not already have Service Pack
4 or later installed) and restart the PC.
To find Service Pack 6a, go to the
Microsoft\sp6ai386
open the folder for your language. To install, double-click on the
setup program
sp6i386.exe
.
2 IfyouarecurrentlyusingHPNTLockonyourPC(anditisolderthan
version 2.2) or you want to use it:
a Uninstall the version of HP NTLock currently on the PC using the
Add/Remove Programs
Panel
).
utility in
StartSettingsControl
b Restart the PC.
c Install the appropriate version of HP NTLock provided (or any
later version). Two versions are supplied, one for HP Vectra VL
and VLi PCs only (not for Vectra VE and VEi PCs) and the other
(the light version without power management) for HP Kayak PC
Workstations. The Vectra version is in the folder
ntlock\vectra\disk1
ntlock\kayak\disk1.
and the Kayak version in
folder, then
23
Page 24

2 Installing HP ProtectTools 2000 Software
Software Installation Procedure
3 If you currently use HP Soft PowerDown (and it is older than version
5.08) or you want to use it:
a Uninstall the version of HP Soft PowerDown currently on the PC
using the
Control Panel
Add/Remove Programs
utility in
).
StartSettings
b Restart the PC.
c Install the version of HP Soft PowerDown provided on the CD-
ROM (or a later version that is compatible with HP ProtectTools
2000). The Soft PowerDown software is in the
spd
folder on the
CD-ROM.
4 Restart the PC.
Windows NT 4.0
Preparing a PC Running Windows NT 4.0 (HP Notebook PCs)
1 Install Microsoft Windows NT 4.0 Service Pack 6a from the
ProtectTools 2000 CD-ROM (if you do not already have Service Pack
4 or later installed) and restart your Notebook PC.
To find Service Pack 6a, go to the
Microsoft\sp6ai386
open the folder for your language. To install, double-click on the
setup program
sp6i386.exe
.
2 If Card Executive or APM is installed on your computer, you should
update them with the latest versions using the HP ProtectTools
2000 CD-ROM.
a Uninstall Card Executive or APM using the
Programs
utility in
StartSettingsControl Panel
Add/Remove
b Insert the HP ProtectTools 2000 CD-ROM in the CD-ROM drive.
If your CD-ROM drive is configured to “autorun”,the
ProtectTools 2000 installation screen will appear automatically. If
this screen does not appear, use Windows Explorer to browse the
CD contents and double-click the file
setup.exe
directory to run the installation.
c Install the new versions of Card Executive or APM from the
ProtectTools 2000 installation screen.
folder, then
).
in the root
3 Restart the PC.
24
Page 25

2 Installing HP ProtectTools 2000 Software
Software Installation Procedure
Installing the Drivers, Software and Reader (HP Desktop PCs)
NOTE The following steps describe how to install ProtectTools 2000 on HHHHPPPP
DDDDeeeesssskkkkttttooooppppPPPPCCCCssss on which no smart card software is installed and no smart
card reader is connected.
Take care when following these instructions as different procedures
apply for different operating systems.
Windows NT 4.0
Windows 2000
Windows 95
Windows 98
Windows NT 4.0
Windows 2000
1 If you are installing ProtectTools 2000 on a PC running Windows NT
4.0 or Windows 2000, log on as Administrator.
2 Insert the HP ProtectTools 2000 CD-ROM in your PC’sCD-ROM
drive. If your CD-ROM drive is configured to “autorun”,the
ProtectTools 2000 installation screen will appear automatically. If
this screen does not appear, use Windows Explorer to browse the CD
contents and double-click the file setup.exe in the root directory to
run the installation.
3 Install the Smart Card Base Components from the ProtectTools 2000
installation screen. If you want to install these components manually
from the CD-ROM, go to the
Microsoft/scbase
/scbaseu2
and
folders, then (where applicable) the folder corresponding to your
language, then double-click on the setup program scbase.exe.
Restart the PC.
4 Go directly to step 7 if your PC is running Windows 2000. Windows
2000 requires a different driver installation procedure than other
operating systems.
5 Install the Smart Card Reader Driver from the ProtectTools 2000
installation screen. If you want to install this component manually
from the CD-ROM, go to the
hpscr
folder, then double-click on the
setup program setup.exe.
6 Shut down the PC.
25
Page 26

Windows 2000
2 Installing HP ProtectTools 2000 Software
Software Installation Procedure
7 Plug in the smart card reader to the PC’s keyboard connector and a
free serial port.
8 Restart the PC.
9 To install the Smart Card Reader Driver under Windows 2000,
provide the following path when prompted by the system so that it
canfindthecorrectdriver:
D:\hpscr\win2k
(whereDis the PC’s
CD-ROM drive).
10 Install HP Smart Card Diagnostics from the ProtectTools 2000
installation screen. If you want to install this component manually
from the CD-ROM, go to the
scrdiag
folder, then double-click on
the setup program setup.exe.
11 Install the HP Smart Card Security System from the ProtectTools
2000 installation screen. The accompanying documentation (this
manual) is installed at the same time. If you want to install the HP
Smart Card Security System manually from the CD-ROM, go to the
hpscss
folder, then double-click on the setup program setup.exe.
12 Restart the PC.
13 Run HP Smart Card Diagnostics to check that all software has been
installed correctly (refer to “Using HP Smart Card Diagnostics” on
page 75).
26
Page 27

2 Installing HP ProtectTools 2000 Software
Software Installation Procedure
Installing the Drivers, Software and Reader (HP Notebook PCs)
NOTE The following steps describe how to install ProtectTools 2000 on HHHHPPPP
NNNNooootttteeeebbbbook
ook PPPPCCCCssss on which no smart card software is installed and no smart
ookook
card reader is connected.
Windows 95
Windows 98
Installation on Windows 95 and Windows 98 Systems
1 Insert the HP ProtectTools 2000 CD-ROM in your PC’sCD-ROM
drive. If your CD-ROM drive is configured to “autorun”,the
ProtectTools 2000 installation screen will appear automatically. If
this screen does not appear, use Windows Explorer to browse the CD
contents and double-click the file setup.exe in the root directory to
run the installation.
2 Select ‘Smart Card Reader Driver’ from the ProtectTools 2000
installation screen. This will install the GPR400 reader driver and the
Smart Card Base Components in one step.
3 Shut down the PC.
4 Plug the smart card reader into the PC card slot in the computer.
5 Restart the PC.
6 Windows will detect the GPR400 reader and install the necessary
driver.
7 Restart the PC.
8 Install the HP Smart Card Security System from the ProtectTools
2000 installation screen. The accompanying documentation (this
manual) is installed at the same time. If you want to install the HP
Smart Card Security System manually from the CD-ROM, go to the
hpscss
folder, then double-click on the setup program setup.exe.
Windows 2000
9 Restart the PC.
Installation on Windows 2000 Systems
1 Log on as an administrator.
2 Plug the smart card reader into the PC card slot in the computer.
Windows will automatically detect the GPR400 reader and install the
necessary driver.
27
Page 28

2 Installing HP ProtectTools 2000 Software
Software Installation Procedure
3 Insert the HP ProtectTools 2000 CD-ROM in your PC’sCD-ROM
drive. If your CD-ROM drive is configured to “autorun”,the
ProtectTools 2000 installation screen will appear automatically. If
this screen does appear, select quit.
4 Update the default GPR400 reader driver. Use Windows Explorer to
browse the CD contents and double-click UpdateGPR400.exe in the
\Gemplus\GPR400_Win2000
folder in the HP ProtectTools 2000
CD-ROM.
5 Using Windows Explorer once again, go to the root directory of the
CD-ROM and double-click the file setup.exe.Thiswilldisplaythe
ProtectTools 2000 installation screen.
6 Install the HP Smart Card Security System from the ProtectTools
2000 installation screen. The accompanying documentation (this
manual) is installed at the same time. If you want to install the HP
Smart Card Security System manually from the CD-ROM, go to the
hpscss
folder, then double-click on the setup program setup.exe.
7 Restart the PC.
Windows NT 4.0
Installation on Windows NT 4.0 Systems
1 Log on as an administrator.
2 Insert the HP ProtectTools 2000 CD-ROM in your PC’sCD-ROM
drive. If your CD-ROM drive is configured to “autorun”,the
ProtectTools 2000 installation screen will appear automatically. If
this screen does not appear, use Windows Explorer to browse the CD
contents and double-click the file setup.exe in the root directory to
run the installation.
3 Select ‘Smart Card Reader Driver’ from the ProtectTools 2000
installation screen. This will install the GPR400 reader driver and the
Smart Card Base Components in one step.
4 Shut down the PC.
5 Plug the smart card reader into the PC card slot in the computer.
6 Restart the PC.
28
Page 29

2 Installing HP ProtectTools 2000 Software
Software Installation Procedure
7 Install the HP Smart Card Security System from the ProtectTools
2000 installation screen. The accompanying documentation (this
manual) is installed at the same time. If you want to install the HP
Smart Card Security System manually from the CD-ROM, go to the
hpscss
folder, then double-click on the setup program setup.exe.
8 Restart the PC.
Installing Optional Items
Windows 95
Windows 98
Windows NT 4.0
Install Top Tools
1 Install TopTools from the ProtectTools 2000 installation screen and
follow the on-screen instructions.
2 Restart your computer.
NOTE Note that you can obtain a Windows 2000 version of the HP TopTools
agent (when it becomes available) either on your PC’s hard drive or
from HP’swebsite
Please consult the
www.hp.com/toptools
Readme.txt
file provided in the root directory of the
.
CD-ROM. It contains the most up to date information about the drivers
and software provided. The information contained in this file
supersedes any information given in this manual or other
documentation provided with the accessory.
Install Acrobat Reader
To be able to view and print this manual, you must first install Adobe
Acrobat Reader 3.01 (or later) on your PC, if you have not already done
so. Note that this User’s Guide is automatically installed on your PC
when you install the HP Smart Card Security System.
To install the Acrobat Reader:
1 Using Windows Explorer, click your CD-ROM drive.
doc
2 Double-click the
3 Double-click the setup program
folder.
rs32e301.exe
.
4 Follow the instructions on your screen.
29
Page 30

2 Installing HP ProtectTools 2000 Software
Software Installation Procedure
5 Restart your computer.
30
Page 31

2 Installing HP ProtectTools 2000 Software
Deploying ProtectTools 2000 Using a Network
Deploying ProtectTools 2000 Using a Network
In networked environments, you may want to deploy the ProtectTools
2000 software on several PCs remotely and automatically. This section
provides some basic guidelines for achieving this.
NOTE If you are building a disk image that includes HP ProtectTools 2000
software, make sure that the HP Smart Card Security System
component is installed last.
Remote Installation Using a Deployment Tool
For a remote installation, you need a desktop management tool to
deploy the software. Two such tools are:
•
HP OpenView Desktop Administrator or ManageX
For all information about HP Openview, including features,
instructions for use, and support, refer to HP’swebsiteat
www.hp.com/openview
.
•
Microsoft Systems Management Server (SMS)
For all information about Microsoft SMS, including features,
instructions for use, and support, refer to Microsoft’swebsiteat
www.microsoft.com/smsmgmt
.
For deployment instructions using the desktop management tool, refer
to the information provided with the software.
Automatic Installation of ProtectTools 2000
For a remote installation, the ProtectTools 2000 components must be
installed automatically, without needing user intervention at the
remotePC(thisisalsocalleda“silent” installation). This section
describes the necessary installation parameters needed to perform a
silent installation of some of the ProtectTools 2000 software
components.
31
Page 32

2 Installing HP ProtectTools 2000 Software
Windows NT 4.0
Windows NT 4.0
Deploying ProtectTools 2000 Using a Network
NOTE The ProtectTools 2000 components must always be installed in the
correct order, as described in the section “Software Installation
Procedure” on page 23.
Microsoft Windows NT 4.0 Service Pack 6a
1 Extract the archive file.
Windows 95
Windows 98
Windows NT 4.0
2 Run “
\i386\update\update.exe -q
Microsoft Smart Card Base Components
scbase /q
Run “
” to perform the silent installation.
”.
HP Smart Card Reader Driver, HP Smart Card Security System, HP Smart Card
Diagnostics, and HP NTLock (Windows NT 4.0 only)
NOTE If you want to use HP NTLock in conjunction with ProtectTools 2000,
and you have a version older than 2.2, you should uninstall this version
and replace it with the version provided on the ProtectTools 2000 CD-
ROM.
For each of these components, do the following:
1 Open the DOS window on a test PC.
2 Run “
setup -r
answers to the installation dialog boxes.
3 Copy all the installation files including
target PC.
4 Run “
setup -s
”. This will install the component and record your
SETUP.ISS
to the remote
” to start the silent installation.
NOTE If you want to use HP Soft PowerDown in conjunction with ProtectTools
HP Soft PowerDown
2000, and you have a version older than 5.08, you should uninstall this
version and replace it with the version provided on the ProtectTools
2000 CD-ROM.
setup /s /i
Run “
32
” to perform the silent installation.
Page 33

2 Installing HP ProtectTools 2000 Software
Uninstalling HP ProtectTools 2000
HP TopTools for Desktops Agent
To achieve a silent installation of TopTools, you must configure the
DMISETUP.INI
file. For detailed instructions, refer to the Readme that
is extracted when you execute the TopTools installation file
TT45-14.exe
.
Uninstalling HP ProtectTools 2000
If you want to uninstall ProtectTools 2000, you must uninstall each
component individually and uninstall them in reverse order from the
installation.
The order to uninstall the components is:
1 Uninstall the TopTools Agent (if desired).
2 Uninstall the Smart Card Diagnostics.
3 Uninstall the Smart Card Security System.
4 Uninstall the Smart Card driver.
5 Uninstall the Microsoft Smart Card Base Components if you installed
them earlier.
Windows NT 4.0
6 Uninstall Windows NT Service Pack 6a (if desired).
To uninstall each component:
1 Click
StartSettingsControl Panel
2 Double click the
Add/Remove Programs
.
icon.
3 Select the component you want to uninstall, then click the
Windows NT 4.0
Add/Remove
Uninstalling HP NTLock
button.
NOTE If you want to use HP NTLock in conjunction with ProtectTools 2000,
and you have a version older than 2.2, you should uninstall this version
and replace it with the version provided on the ProtectTools 2000 CD-
ROM.
33
Page 34

2 Installing HP ProtectTools 2000 Software
Windows NT 4.0
Uninstalling HP ProtectTools 2000
To uninstall the HP NTLock utility, follow this procedure:
1 Log on as an Administrator.
2 Using Windows NT Explorer, click your CD-ROM drive.
3 Double-click the
ntlock
folder.
4 Double-click the setup program.
5 Choose the option to remove HP NTLock and follow the instructions
on your screen.
Uninstalling HP Soft PowerDown
To uninstall the HP Soft PowerDown utility, follow this procedure:
1 Log on as an Administrator.
2 Using Windows NT Explorer, click your CD-ROM drive.
spd
3 Double-click the
4 Double-click the setup program.
5 Choose the option to remove HP Soft PowerDown and follow the
instructions on your screen.
folder.
34
Page 35

3
Setting up HP ProtectTools 2000
This chapter describes how to carry out initial setup of ProtectTools
2000 on your PC. For more detailed information, see chapter 4,
Managing Security and Smart Cards.
Page 36

3 Setting up HP ProtectTools 2000
Preparing a Smart Card for Use: Overview
Preparing a Smart Card for Use: Overview
Before starting, you will need:
•
Access to a PC that has the ProtectTools 2000 reader and software
installed.
Windows NT 4.0
Windows 2000
•
The user’s account information (username, password, domain
name).
•
An uninitialized smart card.
To prepare a smart card for use:
1 Initialize the smart card (refer to page 37).
2 Add the person’sname(oridentifier)andaPIN.
(Once set, the smart cardholder name or identifier cannot be
changed. However, the user can change the smart card’sPINif
desired.). See “PIN Numbers” on page 13 for more information.
Windows NT 4.0
Windows 2000
3 Add all the required accounts to give the user access to the required
machines.
4 Create a recovery file on a floppy disk and save it in a safe place (HP
strongly recommends you do this). Refer to page 41.
5 If needed, create a backup smart card and store it in a safe place.
NOTE If you need to create backup smart cards, make sure that the
Removal
option is set to
Continue
. For more information, refer to page
50.
These steps are described in detail in the following pages.
On Card
36
Page 37

3 Setting up HP ProtectTools 2000
Initializing a Smart Card
Initializing a Smart Card
1 If you have just installed the software and the PC has restarted, you
will be asked to insert a smart card in the reader.
2 Insert an uninitialized smart card in the reader with the gold chip
facing up.
Windows 95
Windows 98
3 Enter the cardholder’s name and a PIN (personal identification
number). The PIN must be eight characters long and can contain
both numbers and letters. You must enter the PIN twice for
verification, then click on OK.
NOTE You must carefully memorize your PIN. You will not be able to gain
access to your PC with your smart card without the PIN.
Windows NT 4.0
Windows 2000
4 Enter the cardholder’s logon name, password, followed by the PIN.
Click on OK.
The smart card is now ready for use. To initialize further smart cards,
refer to “Initializing Further Smart Cards” on page 63.
37
Page 38

3 Setting up HP ProtectTools 2000
Updating the PC’s BIOS (OmniBooks Only)
Updating the PC’s BIOS (OmniBooks Only)
For an OmniBook 900 or 4150 with a BIOS version earlier than 2.20, or
for an OmniBook with a Smart Card BIOS available on the OmniBook
website,
security features. To determine your BIOS version, reboot the
computer and press
BIOS Setup shows the BIOS version.
Skip these steps if your BIOS is a Smart Card BIOS or if none is
available for your model.
To update your BIOS:
1 Insert the ProtectTools 2000 CD-ROM in your Omnibook’sCD-ROM
www.hp.com/omnibook
drive.
, update the BIOS to support BIOS
F2
when you see the HP logo—the first screen of
2 Start Windows Explorer and run
setup.exe
.
3 In the Smart Card Setup window, click the “Smart Card BIOS
Update” option.
CAUTION Your OmniBook must be on AC power during BIOS update because a
power loss could completely disable your PC.
4 Follow the displayed instructions to create a BIOS update floppy and
update the BIOS.
38
Page 39

3 Setting up HP ProtectTools 2000
Enabling BIOS Smart Card Security (OmniBooks Only)
Enabling BIOS Smart Card Security (OmniBooks Only)
This step must be performed by the BIOS administrator. Follow these steps
to enable BIOS smart card security on your OmniBook (if it is supported):
1 Click
2 Click the
StartProgramsHP Smart Card Security System
Smart Card Security Manager
BIOS Password
tab.
.
3 Insert a smart card into the reader. Ensure this card is the one you
want to be the BIOS Administrator card. For Window sNT or
Windows 2000, this could be the administrator card.
4 If the
Enable
button is dimmed, BIOS security is not supported. Go
to “Setting Up Folder Encryption on Your PC” on page 40.
5 Click
Enable
to create the BIOS Administrator card.
NOTE For ease of use, HP recommends that you do not enable the option
requiring the PIN at boot. The presence of the card unlocks the
computer.
Setting Up a BIOS User Password Card
To set up a BIOS user password and store it on a smart card:
1 Click
2 Click the
StartProgramsHP Smart Card Security System
Smart Card Security Manager
BIOS Password
tab.
.
3 Click
Set
next to
BIOS User Password
and follow the instructions
tocreateaBIOSuserpasswordcard.YoumusthavetheBIOS
Administrator card available.
4 If you want to use HP TopTools, install the HP TopTools for Mobiles
Agent. At the end of the installation, click Yes to restart the PC.
For more information, refer to “BIOS Password Options (OmniBooks
Only)” on page 57.
39
Page 40

3 Setting up HP ProtectTools 2000
Setting Up Folder Encryption on Your PC
Setting Up Folder Encryption on Your PC
Windows 95
Windows 98
Windows NT 4.0
You can set up a secure encryption folder on your hard drive to hold
files that are automatically encrypted. The encryption key is kept on
the user smart card.
NOTE Since file encryption is already part of the operating system, HP
ProtectTools does not offer its file encryption feature for the Windows
2000 environment. You must have a Windows 2000 NTFS partition on
your hard drive to use this feature (called Microsoft EFS).
To set up a secure folder:
1 Insert your smart card in the reader.
2 Click
3 Click the
4 Click
StartProgramsHP Smart Card Security System
Smart Card Security Manager
Encryption
Generate
tab.
andthenfollowtheinstructions.
.
40
Page 41

3 Setting up HP ProtectTools 2000
Creating a Recovery File
Creating a Recovery File
NOTE HP strongly recommends you make a new encrypted recovery file of
your smart card data now and also whenever you change the contents
of your smart card (for example an encryption key or, where applicable,
a password). This recovery file will allow you to recreate your smart
card (and, more importantly, access your computer) if the card is lost,
stolen, or damaged. You can keep old recovery files in case you need to
create an old card.
1 Click
2 Click the
StartProgramsHP Smart Card Security System
Smart Card Security Manager
Smart Card
tab.
.
3 Insert a formatted floppy in the floppy drive.
4 In the
Recovery
section, click
5 Enter the PIN number of the card and click
Create
.
OK
.
6 Enter a file name if you do not wish to use the default one provided,
leaving the
7 Enter a password twice and click
.KRF
extension
OK
. The recovery file is encrypted
and saved on the floppy.
NOTE Memorize the recovery file password. You will not be able recreate your
smart card from the recovery file if you forget the password. You may
wish to make a note of the password on a piece of paper and keep it in
a safe place, such as a safety deposit box.
Do not save the recovery file on your PC’s hard disk because you will not
be able to access the file without your smart card. Furthermore, the
recoveryfilemaybeaccessibletoothers,whichcanposeasecurityrisk.
For information on restoring a smart card using a recovery file, refer to
“Restoring a Smart Card from a Recovery File” on page 64.
41
Page 42

3 Setting up HP ProtectTools 2000
Creating a Recovery File
42
Page 43

4
Managing Security and Smart Cards
This chapter explains how to do day-to-day smart card security
management tasks, such as initializing further smart cards for use,
backing up smart cards, recovering smart cards, configuring the level
of security provided, and configuring other smart card options. All
these tasks are carried out using the HP Smart Card Security Manager.
Page 44

4 Managing Security and Smart Cards
The HP Smart Card Security Manager
The HP Smart Card Security Manager
NOTE You must have a smart card inserted in the smart card reader in order
to carry out any of the management tasks described in this chapter.
Smart card security management tasks are carried out using the HP
Smart Card Security Manager. The Smart Card Security Manager offers
different security features depending on the operating system installed
on a PC:
Windows NT 4.0
Windows 2000
For Windows NT 4.0 and Windows 2000 Users
For PCs running Windows NT 4.0 or Windows 2000, the Smart Card
Security Manager is provided on two levels:
•
On the User level
The User options are available when you log on to the PC as a user.
•
On the Administrator level
The Administrator options are available when you log on to the PC
as the administrator. The Administrator options allow you to
configure security levels and manage smart cards. These options are
described in this chapter.
Setting or Function User access Administrator access Refer to
General tab:
Smart card reader
Smart Card tab:
Initialize a new smart card
Change PIN
Create a recovery file
Restore smart card
Allow smart card initialization
Win NT tab:
Beep on insertion & removal
Logon Options...
if allowed by Administrator
page 37
page 63
page 41
page 64
page 47
page 48
page 49
44
Page 45

4 Managing Security and Smart Cards
The HP Smart Card Security Manager
Setting or Function User access Administrator access Refer to
Accounts tab:
Add account
Remove account
Change Account Password
page 65
page 66
page 66
Windows 95
Windows 98
Encryption tab (NT 4.0 only):
Create encryption folder
Generate encryption key
Set encryption behavior
page 40
For Windows 95 and Windows 98 Users
For PCs running Windows 95 or Windows 98, the Smart Card Security
Manager offers the following features:
Features Refer to
General tab:
Smart card reader
Smart Card tab:
Initialize a new smart card
Change PIN
Create a recovery file
Restore smart card
Allow smart card initialization
Encryption tab:
Create encryption folder
Generate encryption key
Set encryption behavior
page 37
page 63
page 41
page 64
page 47
page 40
Windows 95/98 tab:
Enable/disable secure screen saver
Set security when docking
page 58
45
Page 46

Windows NT 4.0
Windows 2000
4 Managing Security and Smart Cards
The HP Smart Card Security Manager
Running the HP Smart Card Security Manager
To run the Smart Card Security Manager:
1 Log on as the administrator.
2 Click
StartPrograms HP Smart Card Security System
HP Smart Card Security Manager
. (The exact path will differ
from this if you chose another one during installation.)
Accessing the Online Help
To access the online help, run the Smart Card Security Manager and
F1
press
or click the
information about using and configuring the Smart Card Security
Manager.
Help
button. The online help contains extensive
46
Page 47

4 Managing Security and Smart Cards
Managing Security: Configuration Settings
Managing Security: Configuration Settings
The Smart Card Security Manager has several configuration options
that have an impact on the level of security provided by ProtectTools
2000.
NOTE The “security levels” given in this section are provided as a guideline
only. Determining the real security levels provided by each option
depends on the particular circumstances involved, and is the
responsibility of the administrator or security specialist.
Smart Card–Allow Initialization Option
To see th e
Smart Card
Allow Smart Card Initialization
tab in the Smart Card Security Manager.
option, click the
If you click on this checkbox, the PC user will be able to initialize smart
cards.
Default value:
Potential security impact: Medium
Implications:
Value
ON (checked) Lower Selecting this option allows users to create their own backup smart cards,
OFF (unchecked) Higher If you want to ensure controlover the creation of smart cards, then uncheck
Security Level
Provided
Implications
since they can create recovery files and restore them onto a smart card.
However, this means that the user can potentially create several copies of
their smart card, increasing the security risk.
this option. In this case, when running Windows NT or Windows 2000, only
you (the administrator) will be able to initialize new smart cards. This can
help you keep track of every smart card used in your domain.
47
Page 48

4 Managing Security and Smart Cards
Managing Security: Configuration Settings
BeeponSmartCardRemovalOption
If you click on this checkbox, a beep will be generated every time a
smart card is inserted into the reader or removed from the reader.
Youaccessthischeckboxbyclickingonthe
and Windows 2000 systems and under
Win95/98
WinNT
tab for Windows NT
for Windows 95 and
Windows 98 systems.
Default value:
Potential security impact: Low or none
Implications: When activated, this can be a simple auditory way of
ensuring that the smart card is correctly inserted into the reader, since
a beep will indicate that it has been correctly inserted. Likewise, the
beep will be an auditory confirmation that the card has been removed,
or that, for example, the smart card was slightly dislodged from the
reader by mistake.
48
Page 49

4 Managing Security and Smart Cards
Managing Security: Configuration Settings
Windows NT 4.0
Windows 2000
Win NT–Logon Policies Options
To see these options, click the
Manager, click the
Options...
Win NT
tabintheSmartCardSecurity
button then the
Policies
tab.
Manual logon for...
This option allows you to decide who, if anyone, can log on to the PC by
pressing
The manual logon can only be performed when no one else is logged on
to the PC and the smart card has been removed from the reader at
startup.
Default value: Administrators
Potential security impact: High
Implications:
Administrators Medium The PC can be accessed in two ways only: with a correct smart card and
Ctrl+Alt+Del
Value
Security Level
Provided
and entering their usual Windows password.
Implications
PIN, or with the administrator password.
This setting is recommended since it allows a “back door” entry onto the PC.
A back door entry makes it easy for the administrator to gain access to the
PC (with the administrator password), without needing a valid smart card.
Nobody High The PC can only be accessed with a correct smart card and PIN.
This setting is recommended for very high security environments. Using this
option ensures that only bearers of a smart card and the correct pin
(administrator included) can gain access to the system.
This option leaves no “back door entry” (see above): access can
obtained with a valid smart card.
If you use this option, it is strongly recommended that you have valid, up to
date backup smart cards stored in a safe place, and ready for use.
Everybody Low Any valid Windows user can log on to the PC manually. Essentially, this
means that the user does not need a smart card to get access to the PC.
With this setting, the smart card provides little or no improvement to
security.
This setting is not recommended. It could however be useful during the
deployment phase.
only
be
49
Page 50

4 Managing Security and Smart Cards
Managing Security: Configuration Settings
CAUTION Selecting the option
using a manual logon. This means that the administrator must have their
smart card (and PIN) to gain access to the PC.
Selecting the option
little or no improvement to security. This setting is not recommended,
except during a deployment phase.
On card removal...
This option tells the PC what to do when the smart card is removed
from the reader.
Default value: Lock workstation
Potential security impact: High
Implications:
Value
Continue Low Nothing will happen when the smart card is removed from the reader – the
Security Level
Provided
Nobody
Everybody
leaves no “back door” entry to that PC
means that the smart card provides
Implications
user will still be logged on and the PC can be used as normal. In this case,
the smart card is required only for logging on to the PC and, after that, it is
no longer needed.
The danger with this setting is that the user may forget to lock their PC,
leavingaccessopentointruders.
This setting is not recommended for normal or high security use.
Lock
workstation
50
High The PC automatically locks when the smart card is removed from the reader.
In the Windows NT or Windows 2000 environment, the user will still be
regarded as logged on, even though they are not accessing their PC.
In this case, no other valid smart-card bearing user can access the PC. The
previous user must insert their smart card, enter their PIN, then manually
log off to allow another user to access that PC. (Alternatively, you can
access the PC by using another smart card containing the
account username and password, such as an administrator smart card
created specially for this purpose.)
same
Windows NT
Page 51

4 Managing Security and Smart Cards
Managing Security: Configuration Settings
Value
Logoff Medium The PC automatically logs off the user when the smart card is removed from
Force logoff High The PC automatically logs off the user when the smart card is removed from
Security reader...
Security Level
Provided
Implications
the reader. Another valid smart-card bearing user can then access the PC.
If there are any open applications with unsaved data when the smart card is
removed, the user will be prompted to save the data before the PC logs off.
This, however, can be a security weak point: if the user forgets or does not
see the “Save data?” dialog box (or if the user presses the Cancel button at
this point), then the PC will continue to work as normal, leaving it open to
intruders.
the reader. Another valid smart-card bearing user can then access the PC.
However, if there are any open applications with unsaved data when the
smart card is removed, then all this data will be lost. Although the user can
lose data, this option is more secure than the Logoff option above, since the
PC cannot be unintentionally left accessible when the smart card is removed.
This is ideal for shared PCs with high security requirements.
This option allows you to select the default smart card reader, for use if
more than one reader is attached.
For example, if you are the system administrator, it may be useful to
have two readers connected to your PC. You can use the first reader for
securing access to your PC (with the
Lock workstation,LogofforForce Logoff
On card removal
), and a second reader
option set to
for smart card management (that is, initializing smart cards for users,
managing account information on user smart cards, and so on).
To do this, select the reader you want to use for accessing your PC in
Security reader
the
for user smart card management in the
the
General
page.
option, and select the reader you want to use
Smart Card Reader
option of
You can use a single reader for both securing access to your PC and
smart card management; however, you must set
Continue
(refer to page 50). This will allow you to remove your own
On card removal
smart card after logging on, then insert a user smart card for
initialization or modification.
Potential security impact: None
to
51
Page 52

4 Managing Security and Smart Cards
Managing Security: Configuration Settings
Make screen saver secure
If you select this option, the PC automatically locks when the screen
saver comes on.
Default value:
Potential security impact: Medium
Implications:
Value
ON (checked) Higher The PC automatically locks when the screen saver comes on. This means
OFF (unchecked) Lower If the screen saver comes on, the user or anyone else may be able to gain
Allow unauthenticated shutdown
Security Level
Provided
Implications
that, if the screen saver comes on, the user must enter their PIN to regain
access to the PC (or the Windows screen saver password, if they set a screen
saver password).
Also, if the user removes their smart card when the screen saver is on, no
other valid smart card holders can subsequently gain access to the PC.
This is appropriate for higher security, since the PC will lock automatically
when it is not being used (and possibly unattended).
Note that the Windows screen saver must be set for this to work.
access to the PC simply by moving the cursor or mouse (if there is no
Windows screen saver password).
This setting is perhaps appropriate for environments where the user rarely
leaves their desk, or where ease of use (quicker access to the PC) is more
important.
If you set this option, anybody can shut down the PC, even if they are
not logged on.
Default value:
Potential security impact: Medium
Implications:
Value
ON (checked) Lower Anyone can shut down the PC.
52
Security Level
Provided
Implications
Page 53

4 Managing Security and Smart Cards
Managing Security: Configuration Settings
Value
OFF (unchecked) Higher Only a valid user who is logged on can shut down the PC.
Display smart card owner’s name on logon banner
Security Level
Provided
Implications
This could help prevent unauthorized tampering with the PC during the
startup procedure.
If you select this option, the smart card owner’s name will be displayed
in the banner of the “Enter PIN” dialog box when the user inserts their
smart card.
Default value:
Potential security impact: Low or none
Implications:
Value Implications
ON (checked) This option has little or no impact on security levels.
Display last username on logon prompt
If you select this checkbox, the logon prompt will display the name of
the last person to log on to the PC.
Default value:
Potential security impact: Medium or Low
Implications:
Value Implications
ON (checked) This option can act as a visual confirmation of the PC’s security. For example,
if an intruder gains access to a PC using a stolen card and PIN, the stolen
card’s username will be displayed, providing a valuable clue to the breach in
security.
On a more innocuous level, it may be simply useful to know who last logged
on to a certain PC.
53
Page 54

4 Managing Security and Smart Cards
Managing Security: Configuration Settings
Windows NT 4.0
Windows 2000
Windows NT 4.0
Windows 2000
Win NT–Logon Text Configuration Options
To see these options, click the
Manager, click the
Options
tab.
These options allow you to customize the Smart Card Security
Manager’s text, in particular the logon text. This can be particularly
useful for foreign language users.
Win NT
tab in the Smart Card Security
...buttonthenthe
Text Configuration
Win NT–Logon Power Management Options
To see these options, click the
Manager, click the
Options
These options allow you to:
•
Enable or disable smart card security when the computer resumes
after entering into suspend mode.
•
Enable or disable smart card security when undocking.
Win NT
tab in the Smart Card Security
... button then the
Power Management
tab.
54
Page 55

4 Managing Security and Smart Cards
Managing Security: Configuration Settings
Windows NT 4.0
Windows 2000
Account Policies
To see these options, click the Accounts tab in the Smart Card Security
Manager, then click the
These options allow you to:
•
Let the user add, remove or modify accounts (refer to page 65).
•
Set a random password policy for users. This means that when the
user changes their Windows NT password or adds a Windows NT
account on their smart card, they can be forced to use a random
password, have the option to use a random password or be requested
to choose a password on their own.
Using a randomly generated password means that the Windows NT
password will be hidden from all users. This may provide a higher
security level since it ensures that the only entry to the PC (for
users) is using their smart card
Implications:
Value
Deny Lower This setting means the user cannot randomly generate a password – they
Security Level
Provided
Options
must choose one themselves.
If you have set the Manual Logon option to Everybody (refer to page 49),
this option should be set to Deny. This will ensure the user can type in their
Windows password when doing a manual logon. However, this
configuration provides little or no security improvement.
button.
Implications
Allow Medium The user can ask the system to generate a random password for them, or
choose their own.
For example, in the Change Account Password screen, the user is
encouraged to select a password of their own (since the cursor is in the New
Password box).
Prefer Higher The user can ask the system to generate a random password for them, or
choose their own.
For example, in the Change Account Password screen, the user is
encouraged to ask the system to generate a random password (since this
option is checked by default).
55
Page 56

4 Managing Security and Smart Cards
Managing Security: Configuration Settings
Value
Force Highest The user cannot choose their own password, although they can change it for
Security Level
Provided
CAUTION Selecting the option
password manually (by typing it in) during a manual logon. The option
Force
therefore leaves no “back door” entry to that PC using the
manual logon for all users of that PC.
Furthermore, if the administrator also uses a random password, this will
leave no back door to the PC at all; administrators can only gain access
to the PC using their smart card (and PIN).
Implications
another randomly generated one. This option would ensure the highest
security levels, since the only entry to the PC (for users) is through their
smart card.
Force
means that it will be impossible to enter the
56
Page 57

4 Managing Security and Smart Cards
Managing Security: Configuration Settings
BIOS Password Options (OmniBooks Only)
To see these options, click the
BIOS Password
tab in the Smart Card
Security Manager. This tab appears only on OmniBook Notebook PCs.
These options allow you to:
•
Enable or disable BIOS smart card security. This is a BIOS
administrator option. Note that disabling this option clears all BIOS
passwords.
•
ChangetheBIOSadministratororuserpasswordstoredintheBIOS.
•
Store or change a BIOS password on a smart card.
CAUTION Changing your card’s password will make it unable to unlock your
computer.
•
Change whether the smart card’s PIN must be entered to boot the
OmniBook. For ease of use, leave this option disabled. The PIN is still
required to start Windows NT.
See the online help for more information.
57
Page 58

4 Managing Security and Smart Cards
Managing Security: Configuration Settings
Windows 95
Windows 98
Win 95/98 Options
To see these options, click the
Security Manager. This tab appears only on PCs running Windows 95 or
98.
These options allow you to:
•
Enable or disable the secure screen saver. The secure screen saver
provides smart card security whenever you remove the card and
when the screen saver activates.
•
Enable or disable smart card security when undocking (OmniBooks
only) or when resuming operation after the computer suspends.
See the online help for more information.
Win 95/98
tab in the Smart Card
58
Page 59

4 Managing Security and Smart Cards
Managing Security: Configuration Settings
Example 1
Example 2
Windows NT 4.0
Windows 2000
Customizing Security For Your Installed Base of PCs
Thesesecurityoptionscanbeusedtocustomizethelevelofsecurity
and accessibility provided by each PC, and the installed base as a
whole. Each PC can have its own security settings as appropriate.
You have a shared or communal PC that does not have sensitive data.
ThePConlyreallyneedstobestarteduponceinthemorning,usinga
dummy Windows NT account made for this purpose. This configuration
maybeappropriate:
Manual logon for: Administrators
On card removal: Continue
Make screen savers secure
Allow unauthenticated shutdown
Display smart card owner’s name...
Display last username...
You want to prevent users, as much as possible, from preparing their
own smart cards for a maximum control over smart card management.
This configuration may be appropriate:
Example 3
Allow smart card initialization
Manual logon for: Administrators
Random passwords: Force
Allow unauthenticated shutdown
Display smart card owner’s name...
Display last username...
There is a PC used by only one person who has high security clearance.
Also, the PC contains highly sensitive data and requires maximum
security. This configuration may be appropriate:
Allow smart card initialization
59
Page 60

4 Managing Security and Smart Cards
Managing Security: Configuration Settings
Manual logon for: Nobody
(With this setting, do not forget to
create ready-to-use backup smart cards for the administrator and
user and take care to remember your PIN.)
Random passwords: Force
On card removal: Lock Workstation
Make screen savers secure
Allow unauthenticated shutdown
Display smart card owner’s name...
Display last username...
It is the administrator’s responsibility to decide the best settings to use
for each PC and for the installed base as a whole. The optimum
configuration depends on your individual circumstances, as well as
your security requirements and constraints.
60
Page 61

4 Managing Security and Smart Cards
Managing Smart Cards
Managing Smart Cards
This section describes smart card management tasks, not already
covered in chapter 3, Setting up HP ProtectTools 2000. These tasks
include:
•
Changing a smart card’sPIN
•
Backing up a smart card
•
Restoring a smart card from the recovery file
(for example, when a smart card is lost or stolen, or the user forgets
their PIN)
•
Restoring a smart card when you do not have a recovery file
(or when you have forgotten the recovery file password).
Windows NT 4.0
Windows 2000
Tasks that can be performed by a Windows NT/Windows 2000
administrator:
•
Adding accounts to a smart card
•
Removing accounts from a smart card
•
Changing an account password
CAUTION Do NOT change any user’ s Windows NT/Windows 2000 password
remotely. Doing this would make the user’s smart card unusable, since
it still contains the old password.
All Windows NT/Windows 2000 password changes should be done using
the user’s smart card (refer to page 66 for instructions).
61
Page 62

4 Managing Security and Smart Cards
Managing Smart Cards
Windows NT 4.0
Windows 2000
Using Smart Cards under Windows NT and Windows 2000
Each authorized user should have their own smart card. When
preparing a smart card, you assign a person’s name (or identifier) and a
PIN number to the smart card.
By using their smart card, the user should be able to access any system
resources they need. To allow this, you add user accounts to the user’s
smart card. Each account must have its own valid username, password
and domain name. You can add several accounts to the same smart
card, allowing the user access to several different systems. The user
needs only to remember their smart card’s PIN, rather than the
password for each authorized system.
To be accessible by this means, each PC must also have a smart card
reader and the ProtectTools 2000 software installed.
Youcanaddandremoveaccountsfromtheusers’ smart cards as
needed.
Once you have created a smart card and it is ready for use, it is strongly
recommended that you create a recovery (backup) file of the smart
card. The recovery file can be used to recreate the smart card if the
original is lost or stolen. You do this by restoring the recovery file
contents onto a new smart card.
Also, before giving the user their smart card, it is strongly
recommended you create a duplicate smart card for backup purposes.
Two blank smart cards are provided with ProtectTools 2000 for this
purpose.
CAUTION If you or the user modifies any account information on the smart card,
you should immediately create a new recovery file and store it in a safe
place.
If you keep a backup smart card, you must also update the information
on the backup smart card (by restoring the new recovery file onto the
backup smart card).
62
Page 63

4 Managing Security and Smart Cards
Managing Smart Cards
Initializing Further Smart Cards
You can initialize as many cards as you want. Each authorized user can
have their own smart card with user name and PIN.
Two blank uninitialized smart cards are provided with ProtectTools
2000. HP recommends that you use the second card to create an exact
duplicate of the first (by initializing it in exactly the same way). The
duplicate card can then be stored in a safe place and used if the original
card is lost or stolen.
Once you have initialized the first smart card, you can initialize further
cardsatanytime.Todothis:
1 Log on to your PC using your smart card.
2 Run the Smart Card Security Manager.
•
For Windows NT and Windows 2000, click the
click the
change the
•
For Windows 95 and 98, click the
Launch screen saver on smart card removal
Continue
Options...
On Card Removal
.
button. Click the
setting to
Win 95/98
3 Insert an uninitialized smart card into the reader.
4 Click the
Initialize
button.
5 Follow the instructions to initialize the card.
6 Restore to their original state any settings changed earlier.
NOTE Store any duplicate smart cards in a safe place.
Changing a Smart Card’sPIN
You can change a smart card’s logon PIN (Personal Identification
Number). The PIN must be eight characters long and can contain any
alphanumeric characters (a-z, A-Z, 0-9). To change the PIN:
1 Run the Smart Card Security Manager and click the
2 Click the
Change PIN
button.
Win NT
Policies
Continue
tab, then disable
Smart Card
tab, then
tab then
.
setting to
tab.
3 Enter the old PIN, then the desired PIN (twice) and click
OK
.
63
Page 64

4 Managing Security and Smart Cards
Managing Smart Cards
Anyone can change the PIN of their smart card, provided they know
the current PIN.
Restoring a Smart Card from a Recovery File
You can recreate the smart card data from the recovery file. This is
especially useful if a card was lost or stolen, if the user forgets their
PIN, or if you simply want to create a backup smart card, ready for use.
Before starting, you will need:
•
Access to a PC that has a ProtectTools 2000 reader and the software
installed. You can access the PC either by using a valid smart card
and PIN, or by using the manual logon procedure (if this option is
set).
•
The floppy disk containing the recovery file.
•
The recovery file’s password.
•
A blank smart card.
To restore a smart card:
1 Run the Smart Card Security Manager and click the
Smart Card
tab.
2 Insert the floppy disk containing the recovery file in the floppy drive.
3 Insert the blank smart card in the reader.
4 In the
Recovery
section, click the
Restore
button.
5 Ensure the correct recovery file name is selected, enter the recovery
file’s password (the one you entered when you created the recovery
file), and click
OK
.
The original smart card contents will be restored to the new smart
card.
64
Page 65

4 Managing Security and Smart Cards
Managing Smart Cards
Restoring a Smart Card Without the Recovery File
If you want to restore a smart card and you have no recovery file (or if
you have forgotten the recovery file password), you need to prepare a
new smart card with a new PIN and (if applicable) all the necessary
account information.
If a randomly generated password was used (refer to page 55 for
information), then you, as the administrator, will have to change the
password before preparing the new smart card. You will need to enter
this password when you add the account information to the new smart
card.
For instructions, refer to “Preparing a Smart Card for Use: Overview”
on page 36.
CAUTION If the user enters the PIN incorrectly five times, the smart card will be
automatically locked. Once locked, the smart card is unusable and
should be discarded in an environmentally friendly way.
Windows NT 4.0
Windows 2000
Adding an Account to a Smart Card (Windows NT/Windows
2000)
CAUTION This option can be used if the single owner of the smart card has
different accounts. However, it is strongly recommended that you avoid
sharing smart cards with other people. Sharing smart cards greatly
reduces security levels.
To allow access to a PC, the smart card must contain the account
information for that user. Before you begin, you must have all the
necessary account information for the user, such as username,
password and domain name.
To add an account to a smart card:
1 With the smart card in the reader, run the Smart Card Security
Manager and click the
2 Click the
Add...
Accounts
button.
tab.
3 Follow the instructions on the screen.
65
Page 66

4 Managing Security and Smart Cards
Managing Smart Cards
Windows NT 4.0
Windows 2000
Removing an Account (Windows NT/Windows 2000)
You can remove an account or change the password at any time. To
remove an account or change the password:
1 With the smart card in the reader, run the Smart Card Security
Manager and click the
2 Click the
Remove...
Accounts
button.
tab.
3 Follow the instructions on the screen.
Windows NT 4.0
Windows 2000
Changing an Account Password (Windows NT/Windows 2000)
You can change a password at any time. To change the password:
1 With the smart card in the reader, run the Smart Card Security
Manager and click the
2 Click the
Modify...
Accounts
button.
tab.
3 Follow the instructions on the screen.
NOTE If, for whatever reason, the password on the PC is different from the
password on the smart card, you must re-synchronize the passwords. To
do this, click the “
...
” button in the smart card logon window.
66
Page 67
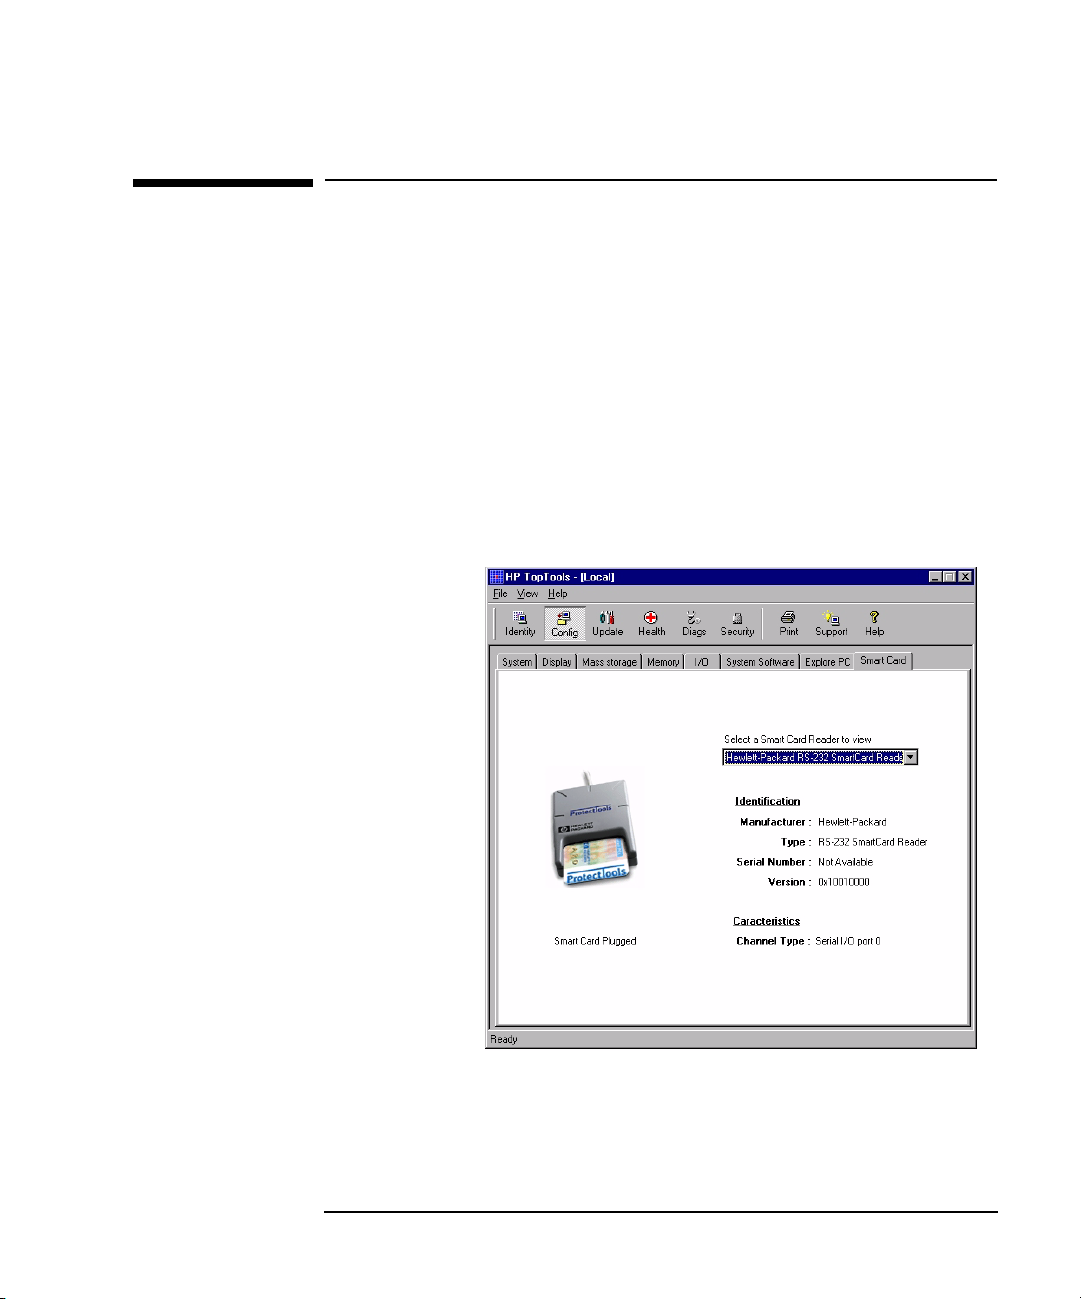
4 Managing Security and Smart Cards
HP TopTools
HP TopTools
HP TopTools is a powerful hardware management tool for network
environments.
The latest version of HP TopTools (the TopTools agent for Desktops or
OmniBooks is provided on the ProtectTools 2000 CD-ROM) provides
full compatibility with your smart card system.
With the TopTools Agent, you can:
•
View smart card reader information:
Click on the
Config
button, then click the
Smart Card
tab.
This window contains information about your smart card reader (or
readers, if you have more than one connected).
Typical screen
(TopTools
Desktop
Agent)
•
Run HP Smart Card Diagnostics:
In the
View
menu, click
Smart Card Diagnostics
.
For more information about HP Smart Card Diagnostics, refer to
page 75.
67
Page 68

4 Managing Security and Smart Cards
HP TopTools
In TopTools Device Manager, the administrator can see the hardware
configuration of any PC in the network, including whether it has a
smart card reader or not. The smart card readers are listed in the “PC
Hardware and Operating System” report. This is useful for hardware
asset management. You can also check whether a smart card is inserted
in a smart card reader or not.
For more information about HP TopTools, connect to HP’swebsiteat:
www.hp.com/toptools
.
68
Page 69

5
Troubleshooting
This chapter can help you solve problems you may have when using HP
ProtectTools 2000. You can also consult the HP Smart Card Security
Manager online help for troubleshooting information.
Page 70

5 Troubleshooting
Smart Card Troubleshooting Help Zone
Smart Card Troubleshooting Help Zone
NOTE If you are experiencing any problems with a PC running Windows NT4.0
or Windows 2000, do not log off or remove your smart card until the
problem has been resolved.
Windows NT 4.0
Windows 2000
Windows NT 4.0
Windows 2000
If You Disconnect the Smart Card Reader
If you disconnect the smart card reader from the PC, you can still log
on manually using the keyboard (Windows NT4.0 or Windows 2000
only), provided this option is set in the Smart Card Security Manager
(refer to page 49 for information about the manual logon option).
However,duringstartup,therewillbeawaitperiodwhilethePC
attempts to communicate with the reader. This is five minutes by
default although it can be reconfigured.
If the PC Freezes After You Restart It
If the PC freezes (blocks) during startup, first ensure that the
networking is working correctly (for example, ensure there are no
duplicate IP addresses) before going on to smart card troubleshooting.
If the Smart Card’s Password is Not Up To Date
If, for whatever reason, the password on the PC is different from the
password on the smart card, you must re-synchronize the passwords.
To do this, click the
window.
Change Password
button in the smart card logon
70
Page 71

5 Troubleshooting
Smart Card Troubleshooting Help Zone
Windows NT 4.0
Windows 2000
Wait for Service
[HKEY_LOCAL_MACHINE\SOFTWARE\Microsoft\Windows
NT\CurrentVersion\Winlogon] "WaitForService"="240"
"SwitchToDefaultOnError"="1"
"WaitForService" is the maximum amount of time (in seconds) you wait
for a service to start. Typically, the service that could fail to start is the
Resource Manager (
working reader attached to the system at boot time. In that particular
case, access is refused to the PC (by stopping the boot process) unless
SwitchToDefaultOnError
the
available at boot time and the
1
, we switch to default logon method (CAD sequence) instead of
to
using a smart card reader.
Manual Logon for ...
If the
SwitchToDefaultOnError
the
ensure that access is refused to the PC even if the reader has been
intentionally removed.
SCARSVR.EXE
entry is set to1. If no reader is
SwitchToDefaultOnError
option (in
WIN NT-Logon Policies
entry will automatically be set to0to
). This would mean that there is no
entry is set
)issetto
Nobody
,then
71
Page 72

5 Troubleshooting
Smart Card Troubleshooting Help Zone
Troubleshooting Table
Problem Explanation What to Do
I lost my smart card. If you are using Windows NT
4.0 or Windows 2000, you will
now be unable to log on to
your account and gain access
to your PC. You will also be
unable to read the files in your
Encryption Folder(Windows NT
only).
If you are using
Windows 95/98, you will be
unable to read the files in your
Encryption Folder and may not
be able to start the computer.
I cannot log on to my account
(Windows NT and Windows 2000
only).
You are not using the correct
card, your smart card is not
inserted correctly in the smart
card reader, or the reader is
not connected correctly to the
PC.
Make a new card on another PC with
ProtectTools 2000 installed using your
recovery file (see page 64).
If you can’t do this, contact your system
administrator to regain access using the
administrator card. If you have an
OmniBook PC that will not unlock, call
HP for assistance in restoring the BIOS
password. Then make a new card using
the recovery file. If no recovery file is
available, encrypted data is not
recoverable.
Make a new card on another PC with a
ProtectTools 2000 installed using your
recovery file (see page 64).
If you have an OmniBook PC that will
not unlock, use an administrator card or
call HP for assistance in restoring the
BIOS password. Then make a new card
using the recovery file. If no recovery
file is available, encrypted data is not
recoverable.
Check your smart card. Check that the
card is correctly inserted in the reader
and the reader is correctly inserted in
the PCMCIA slot.
I could not remember my PIN, I tried
to enter it five times (or three times
for accessing the cryptography
features of the GemSAFE card) and
nowmycardnolongerworks.
72
Asasecuritymeasureto
prevent someone who has
obtained your smart card from
guessing your PIN, you are
allowed a limited number of
attempts at entering the
correct PIN. If you fail to enter
the correct PIN on the last
attempt, your card is locked.
Use the recovery file to create a new
card (see page 64).
Page 73

5 Troubleshooting
Smart Card Troubleshooting Help Zone
Problem Explanation What to Do
Access to your Encryption Folder is
denied (Windows 95, 98 and NT 4.0
only).
Files copied into the Encryption Folder
don’t seem to be encrypted (Windows
95, 98 and NT 4.0 only).
Encrypted text decrypts badly. The card inserted in the reader
Ican’t delete a file in my Encryption
folder using the Delete key (Windows
95, 98 and NT 4.0 only).
The Smart Card Security
Manager is unable to retrieve
information stored on the
smart card.
The smart card you used to
move your files into the
Encryption folder is still
inserted in the reader, and you
still have access to all the files
you moved into the Secure
folder.
is not the one you used to
encrypt your files.
For security reasons, deleting
files using Delete is not
recommended (it would leave a
copy in the Recycle Bin).
Make sure your smart card is properly
inserted in the reader and the correct
PIN has been entered. If this isn’t done,
youwillnotbeabletoaccessthe
Encryption folder.
If you are still unable to access the
Encryption folder, you may have
corrupted information on your smart
card. Use the recovery procedure
detailed on page 64 to restore your
smart card.
Insert a card with a different encryption
key into the reader and check the
content of your files: they should be
unreadable.
Insert the correct card and enter your
PIN to access the Secure folder.
To delete a file from the Encryption
folder use Shift+Delete.
A message tells me that access to the
smart card is denied.
Nothing happens when I insert my
smart card.
The Smart Card Security
Manager is unable to retrieve
information stored on the
smart card.
Your smart card is incorrectly
inserted in the reader.
The smart card reader is
incorrectly installed in the
PCMCIA slot (OmniBooks only).
Check that the smart card is correctly
inserted in the reader and (for an
OmniBook) the reader is correctly
inserted in the PCMCIA slot. Insert the
card face-up and so the end nearest the
gold memory emblem goes in first.
Ensure you have inserted the smart
card correctly. Try removing and
reinserting it, face-up and so the end
nearest the gold memory emblem goes
in first.
Ensure the reader is correctly connected
and fully inserted in your OmniBook’s
PCMCIA slot.
73
Page 74

5 Troubleshooting
Smart Card Troubleshooting Help Zone
Problem Explanation What to Do
At startup, no smart card is detected. The smart card, card reader, or
PCMCIA slot (for an OmniBook)
is bad, or there is a conflict
with another device.
My PIN is not accepted. You are using the wrong smart
card.
Ican’t open Smart Card Security
Manager to disable BIOS security
(OmniBooks only).
The hard disk has a problem. Insert the BIOS administrator card.
Reinsert the card, face-up and so the
end nearest the gold memory emblem
goes in first.
Reinsert the card reader in the slot.
Make sure it is fully inserted.
(for OmniBooks only) Check device
configurations in Windows. The reader
must use I/O address 0300. Change the
address of a LAN card or other device
that uses address 0300.
If another system is available, open
Smart Card Security Manager and
insert your reader and card. Check
whether they are detected properly.
Call HP for repair assistance.
Check the user name displayed at the
PIN prompt.
Reboot the computer and press F2 to
run BIOS setup, then disable BIOS
security.
74
Page 75

5 Troubleshooting
HP Smart Card Diagnostics Tool
HP Smart Card Diagnostics Tool
You can use the smart card diagnostics to ensure that your smart card
reader is working correctly, or to help you troubleshoot problems. You
can use the diagnostics to check that:
•
The ProtectTools 2000 smart card installation is working correctly.
•
The smart card reader is working correctly.
•
Any ProtectTools 2000 smart card is working correctly (not
damaged or corrupted).
Diagnostics Online Help
Troubleshooter in the
Online Help
HP Smart Card Diagnostics includes an online help. This online
information can help you to troubleshoot problems with your smart card
Help
system. To access the online help, click the
button in the Smart
Card Diagnostics window.
Using HP Smart Card Diagnostics
To run the diagnostics:
1 Click
StartProgramsHP Smart Card Security System
HP Smart Card Diagnostic Tool
. (The exact path may differ
from this if you chose another one during installation.)
The diagnostic tool launches and automatically diagnoses your
installation.
2 Click on the
Resource Manager
tab. The global status for the
system smart card resources is shown at the bottom. It should say
correctly installed
and display a green light.
75
Page 76

5 Troubleshooting
HP Smart Card Diagnostics Tool
If it is not OK, the ProtectTools 2000 software installation for the PC
is not working correctly. You should:
a Uninstall all ProtectTools 2000 components (refer to page 33).
b Verify that the PC is working correctly without ProtectTools
2000.
c Re-install ProtectTools 2000 (refer to page 25) and run the
diagnostics again.
3 Click on the
Smart Card
tab. The global status for the smart card
reader is shown at the bottom. It should say OK and display a green
light.
If it is not OK, the smart card reader is not working correctly. You
should:
a Verify that is correctly connected to the PC (refer to the User’s
Guide).
b If it is still not working, the card reader itself may need replacing.
4 Click on the
Smart Card
tab. The global status for the smart card
that is currently inserted in the reader is shown at the bottom. It
should say OK and display a green light.
If it is not OK, you should:
a Ensure that the smart card is correctly inserted in the reader.
b If it is still not working, the smart card may be damaged and need
replacing.
If all of the above components show a green light, the installation is
working correctly.
76
Page 77

5 Troubleshooting
Documentation, Help and Support
Documentation, Help and Support
There are several sources of documentation, help and support for HP
ProtectTools 2000, smart cards, and support in general:
•
Smart Card Security System online help, which contains information
about using and configuring the Smart Card Security System, as well
as troubleshooting information.
To access the Smart Card Security System online help, run the
Smart Card Security Manager and press
•
HP Smart Card Diagnostics online help, which contains information
F1
or click the
about troubleshooting problems with your smart card system.
Help
button.
To access the Smart Card Diagnostics online help, click
Programs Ö HP Smart Card Diagnostic Tool Ö HP Smart
Card Diagnostics Help
(the exact path may differ from this if
Start Ö
you selected another one during installation).
•
ProtectTools 2000 User’sGuide, which is provided for both the PC’s
user and the administrator. It is available in Acrobat (PDF) format on
the ProtectTools 2000 CD-ROM.
•
GemSAFE User’sGuide, which contains information on using
GemSAFE smart cards for secure e-mail and Web access. It is
available in Acrobat (PDF) format on the ProtectTools 2000 CDROM.
•
HP’s web site resources, including:
•
Software and drivers
•
Manuals
•
FAQs (Frequently asked questions)
•
Technical notes
•
DiagTools, a downloadable hardware diagnostic tool
•
Information about HP support in general.
Look in HP’s support web site at:
www.hp.com/go/support
77
Page 78

5 Troubleshooting
Documentation, Help and Support
78
Page 79

Page 80

Created in
France 02/00
 Loading...