

HP Brio 8172, Brio 8178, Brio 8174, Brio 8175, Brio 8177 Upgrade Manual

Upgrade Guide
Online Guide
Date: Autumn1997
2
How to Use this Online Guide
How to Use this Online Guide
Click underlined red text to go to the topic indicated. Underlined red text is text that is “linked”
to another topic in the guide.
Click the Go Back button in the toolbar to go back to your previous place in the guide.
Click the Next Page button in the toolbar to go to the next page in the guide.
Click the Previous Page button in the toolbar to go to the previous page in the guide.
Click the First Page button in the toolbar to go to the opening screen of the guide.
Click a bookmark name (to the left of the screen) to go to the topic corresponding to that
bookmark. Click the small triangle to the left of the bookmark to hide or show subordinate
bookmarks.
Topic
Upgrade Guide
How to use this
Notice
Note
You can print this book; you can only print it in landscape format.

3
Notice
Notice
The information contained in this document is subject to change without notice.
Hewlett-Packard makes no warranty of any kind with regard to this material, including, but not limited to, the implied
warranties of merchantability and fitness for a particular purpose. Hewlett-Packard shall not be liable for errors contained
herein or for incidental or consequential damages in connection with the furnishing, performance, or use of this material.
This document contains proprietary information that is protected by copyright. All rights are reserved. No part of this
document may be photocopied, reproduced, or translated into another language without the prior written consent of
Hewlett-Packard Company.
Microsoft®, MS-DOS® and Windows® are U.S. registered trademarks of Microsoft Corporation.
Hewlett-Packard France
Grenoble Personal Computer Division
Technical Marketing
38053 Grenoble Cedex 9
France
1997 Hewlett-Packard Company

4
Associated Documentation
Associated Documentation
The following HP publications will also be useful to you.
• Advanced Setup Guide - online book giving technical specifications, and setup and configuration information for your
computer.
• Communications - paper book giving guidance on how to set up your communications software.
• Getting Support - paper book explaining how to obtain HP support. The book also contains safety and warranty
information.
• Questions & Answers - paper document that answers the most commonly asked questions.
• Learning About Your HP PC - online help giving information about your computer.
For a list of available documentation, double-click on the icon on the desktop.
If your computer is up and running but you are experiencing problems, refer to the online support center (see page 5
).

5
HP Centers
HP Centers
Double-click on the icon on the desktop, or press the key on your keyboard, to open the HP Centers
window.
Once you have opened the HP Centers window you can access and use the following centers:
• Communications - easily communicate with the outside world
1
. You can set up your fax program, send a fax,
enable/disable fax reception, set up your answering machine, dial a phone number, and listen to your voice messages.
• Data Protection - make sure your data is secure and protected. You can protect your PC from viruses, back up your
data, maintain your hard disk (for example, scan it for errors), and restrict access to your PC.
• Network - easily share and access local network resources
2
. You can share and access printers, folders and files, fax
modems, CD-ROM drives, Internet connections, and so on.
• Welcome - discover what you can do with your PC and how to personalize it. You can register your PC, check your PC
settings, follow a PC tour, and see what documentation is available to you.
• Support - solve computer problems with the support tools and services provided by HP. You can diagnose hardware
problems, recover software applications that were preinstalled on your PC, access HP online support services, and run
Windows 95 troubleshooting tools.
1. Communications features are only available on communications models.
2. To use a local area network (LAN) you need to install a network card and software.


Contents
7
How to Use This Online Guide . . . . . . . . . . . . . . . . . . . . . . . . . . . . . . . . . . . . . . . . . . . . . . . . . . . . . . . . . . . . . . . 2
Notice. . . . . . . . . . . . . . . . . . . . . . . . . . . . . . . . . . . . . . . . . . . . . . . . . . . . . . . . . . . . . . . . . . . . . . . . . . . . . . . . . . . . 3
Associated Documentation . . . . . . . . . . . . . . . . . . . . . . . . . . . . . . . . . . . . . . . . . . . . . . . . . . . . . . . . . . . . . . . . . . 4
HP Centers. . . . . . . . . . . . . . . . . . . . . . . . . . . . . . . . . . . . . . . . . . . . . . . . . . . . . . . . . . . . . . . . . . . . . . . . . . . . . . . . 5
1 Why Upgrade?
Upgrading Your HP PC. . . . . . . . . . . . . . . . . . . . . . . . . . . . . . . . . . . . . . . . . . . . . . . . . . . . . . . . . . . . . . . . . . . . . 10
Upgrading the Main Memory. . . . . . . . . . . . . . . . . . . . . . . . . . . . . . . . . . . . . . . . . . . . . . . . . . . . . . . . . . . . . . . . 12
Upgrading the Video Memory . . . . . . . . . . . . . . . . . . . . . . . . . . . . . . . . . . . . . . . . . . . . . . . . . . . . . . . . . . . . . . . 13
Upgrading the Cache Memory . . . . . . . . . . . . . . . . . . . . . . . . . . . . . . . . . . . . . . . . . . . . . . . . . . . . . . . . . . . . . . 14
Installing Expansion Cards . . . . . . . . . . . . . . . . . . . . . . . . . . . . . . . . . . . . . . . . . . . . . . . . . . . . . . . . . . . . . . . . . 15
Installing Storage Devices . . . . . . . . . . . . . . . . . . . . . . . . . . . . . . . . . . . . . . . . . . . . . . . . . . . . . . . . . . . . . . . . . . 16
Upgrading the Processor . . . . . . . . . . . . . . . . . . . . . . . . . . . . . . . . . . . . . . . . . . . . . . . . . . . . . . . . . . . . . . . . . . . 17
Upgrading the BIOS . . . . . . . . . . . . . . . . . . . . . . . . . . . . . . . . . . . . . . . . . . . . . . . . . . . . . . . . . . . . . . . . . . . . . . . 18
2 Installing Accessories in Your Computer
Supported HP Accessories . . . . . . . . . . . . . . . . . . . . . . . . . . . . . . . . . . . . . . . . . . . . . . . . . . . . . . . . . . . . . . . . . 20

8
Backing Up Your Files. . . . . . . . . . . . . . . . . . . . . . . . . . . . . . . . . . . . . . . . . . . . . . . . . . . . . . . . . . . . . . . . . . . . . 21
Removing and Replacing the Cover . . . . . . . . . . . . . . . . . . . . . . . . . . . . . . . . . . . . . . . . . . . . . . . . . . . . . . . . . 22
Removing the Air Flow Guide . . . . . . . . . . . . . . . . . . . . . . . . . . . . . . . . . . . . . . . . . . . . . . . . . . . . . . . . . . . . . . 24
Installing Main Memory . . . . . . . . . . . . . . . . . . . . . . . . . . . . . . . . . . . . . . . . . . . . . . . . . . . . . . . . . . . . . . . . . . . 25
Installing Video Memory . . . . . . . . . . . . . . . . . . . . . . . . . . . . . . . . . . . . . . . . . . . . . . . . . . . . . . . . . . . . . . . . . . . 28
Installing Video Memory on the System Board . . . . . . . . . . . . . . . . . . . . . . . . . . . . . . . . . . . . . . . . . . . . . 29
Installing Video Memory on the MGA Millennium Card . . . . . . . . . . . . . . . . . . . . . . . . . . . . . . . . . . . . . . 31
Installing Cache Memory . . . . . . . . . . . . . . . . . . . . . . . . . . . . . . . . . . . . . . . . . . . . . . . . . . . . . . . . . . . . . . . . . . 33
Installing Expansion Cards. . . . . . . . . . . . . . . . . . . . . . . . . . . . . . . . . . . . . . . . . . . . . . . . . . . . . . . . . . . . . . . . . 35
Installing an Expansion Card . . . . . . . . . . . . . . . . . . . . . . . . . . . . . . . . . . . . . . . . . . . . . . . . . . . . . . . . . . . 36
Installing a Network Card . . . . . . . . . . . . . . . . . . . . . . . . . . . . . . . . . . . . . . . . . . . . . . . . . . . . . . . . . . . . . . 38
Removing an Expansion Card . . . . . . . . . . . . . . . . . . . . . . . . . . . . . . . . . . . . . . . . . . . . . . . . . . . . . . . . . . . 41
Installing Storage Devices . . . . . . . . . . . . . . . . . . . . . . . . . . . . . . . . . . . . . . . . . . . . . . . . . . . . . . . . . . . . . . . . . 43
Installing an Additional 3.5-inch Hard Disk Drive . . . . . . . . . . . . . . . . . . . . . . . . . . . . . . . . . . . . . . . . . . . 46
Installing a 5.25-inch Hard Disk Drive in the Bottom Shelf. . . . . . . . . . . . . . . . . . . . . . . . . . . . . . . . . . . .49
Installing a Floppy Disk Drive, Zip Drive, or Tape Drive. . . . . . . . . . . . . . . . . . . . . . . . . . . . . . . . . . . . . . 52
Installing a Processor Upgrade . . . . . . . . . . . . . . . . . . . . . . . . . . . . . . . . . . . . . . . . . . . . . . . . . . . . . . . . . . . . . 55
Changing the Battery. . . . . . . . . . . . . . . . . . . . . . . . . . . . . . . . . . . . . . . . . . . . . . . . . . . . . . . . . . . . . . . . . . . . . . 59
Index . . . . . . . . . . . . . . . . . . . . . . . . . . . . . . . . . . . . . . . . . . . . . . . . . . . . . . . . . . . . . . . . . . . . . . . . .61

1
Why Upgrade?

10
1 Why Upgrade?
Upgrading Your HP PC
Upgrading Your HP PC
Your computer uses some of the latest hardware technology to achieve outstanding performance. If required,
performance can be even further enhanced thanks to this computer’s upgradable design.
Main Memory Main memory is the workspace of the computer. It is in this workspace that the processor stores all work in progress. You
can increase the size of the computer’s workspace by adding more main memory.
To find out more about upgrading the main memory, refer to “Upgrading the Main Memory” on page 12.
Video Memory Video memory stores everything that you see on your computer screen. In order to provide a solid image on the screen,
the screen has to be continually refreshed. The computer’s graphics system uses the image stored in video memory to
refresh the screen.
Increasing the amount of video memory enables higher screen resolutions, higher refresh rates and many more colors for
existing resolutions, enhancing and accelerating graphics-intensive applications.
To find out more about upgrading the video memory, refer to “
Upgrading the Video Memory” on page 13.
Cache Memory Cache memory is used by processors to accelerate access times for frequently used data and instructions. For example,
cache memory keeps a copy of the last data read or written by the processor. If the same data is requested again by the
processor, it is supplied from the cache, and not main memory, at a reduced access time.
To find out more about upgrading the cache memory, refer to “
Upgrading the Cache Memory” on page 14.

11
1 Why Upgrade?
Upgrading Your HP PC
Expansion Cards An expansion card, or accessory board, is a component that usually adds some specialized function to a computer. For
example, installing a network card can, in conjunction with the necessary software and cables, connect a computer to a
network.
To find out more about installing expansion cards, refer to “
Installing Expansion Cards” on page 15.
Storage Devices A storage device is a device that stores software (for example, applications, programs, the operating system, data, and so
on). Hard disk drives, CD-ROM drives, zip drives, tape drives, and floppy disk drives are all examples of storage devices.
To find out more about installing storage devices, refer to “Installing Storage Devices” on page 16.
Processor The processor is the primary computational chip inside the computer. It can be thought of as the computer’s brain. It may
be upgraded to provide more power for processor-intensive applications.
To find out more about installing a processor upgrade, refer to “Upgrading the Processor” on page 17.

12
1 Why Upgrade?
Upgrading the Main Memory
Upgrading the Main Memory
How Much Main
Memory Does My
Computer Have?
The amount of main memory that your computer has depends on the particular model that you have. To see how much
main memory is installed, restart your computer and press the key when
F2=Setup is displayed. This displays a
summary screen showing the computer’s configuration. The amount of main memory installed is shown on this screen (in
the System RAM field). Alternatively, you can run PC Doctor for Windows (from within Windows 95) and check the System
Info.
Why Add More
Main Memory?
Adding more memory can improve the performance of your computer. The reason for this is that if your computer does
not have enough memory, it will need to use hard disk space as virtual memory. Using this technique, the operating system
makes the memory seem larger than it physically is, allowing large applications to execute even though the physical
memory is not sufficient. Virtual memory is approximately 200 times slower than main memory. In this case, adding
memory will significantly improve the computer’s performance.
The amount of main memory your computer requires depends on the operating system and the applications you use. You
will need more memory if you use memory-hungry applications (for example, image processing and desktop publishing
applications) or if you run several applications at the same time.
How Much Main
Memory Can I Add?
Your computer is capable of supporting up to 192 MB of main memory, using six memory module sockets on the system
board.
Will Adding Memory
Always Improve
Performance
Adding memory will not always improve performance. If your computer has sufficient memory, installing extra memory
will not improve performance.
For instructions on how to add main memory modules, refer to “
Installing Main Memory” on page 25.

13
1 Why Upgrade?
Upgrading the Video Memory
Upgrading the Video Memory
How Much Video
Memory Does My
Computer Have?
The amount of video memory that your computer has depends on the particular model that you have. You may have 1 MB
of video memory installed on the system board, or 4 MB installed on a video card. To see how much video memory is
installed, restart your computer and press the key when
F2=Setup is displayed. This displays a summary screen
showing the computer’s configuration. The amount of video memory available is shown on this screen (in the Video RAM
field). Alternatively, you can run PC Doctor for Windows (from within Windows 95) and check the System Info.
How Does Video
Memory Work?
The image on the screen is made up of tiny dots called pixels. Each pixel has a color, and every color is represented by a
value. Video memory stores the color value of every pixel.
The screen resolution determines how many pixels make up a displayed screen. The number of pixels required is
typically very large (for example, 300,000 pixels for a standard VGA screen with a resolution of 640 X 480).
Why Increase the
Amount of Video
Memory?
Increasing your display resolution will increase the total number of pixels needed to define an entire screen. Similarly,
increasing the number of displayable colors will increase the amount of data required to display the pixels. Increasing
either of these parameters will increase your requirement for video memory.
More video memory gives support for higher screen resolutions, for higher refresh rates (the frequency at which the
screen’s horizontal lines are recharged), and for many more colors for existing resolutions.
How Much Video
Memory Can I Add?
If your computer has 1 MB of video memory on the system board, you can increase it to 2 MB. If your computer has 4 MB
of video memory on a video card, you can also increase it. Contact your HP-authorized support agent or reseller for more
information.
For instructions on how to upgrade the video memory, refer to “
Installing Video Memory” on page 28.

14
1 Why Upgrade?
Upgrading the Cache Memory
Upgrading the Cache Memory
How Much Cache
Memory Does My
Computer Have?
Your computer has level-one and level-two cache. The cache level refers to the proximity of the cache to the processor.
Level-one cache is integrated in the processor and operates at the same speed as the processor, for example, 200MHz.
Level-two cache is not integrated in the processor but is located on the processor’s local bus (see “
Upgrading the
Processor” on page 17) and so operates at the same speed as the local bus, for example, 66 MHz.
The design of level-two cache makes it faster than conventional main memory (see “
Upgrading the Main Memory” on
page 12), which is also located on the local bus.
In general, level-one cache incorporates 8 or 16 KB of data cache and 8 or 16 KB of instruction cache.
The amount of level-two cache that your computer has depends on the particular model that you have. To see how much
level-two cache memory is installed, restart your computer and press the key when
F2=Setup is displayed. This
displays a summary screen showing the computer’s configuration. The amount of level-two cache memory is shown on
this screen (in the System Cache field).
Why Add More
Cache Memory?
Increasing the amount of cache memory in your computer will improve the performance of your computer.
How Much Cache
Memory Can I Add?
Your computer is capable of supporting up to 512 KB of level-two cache memory, using one cache memory module socket
on the system board. If your computer currently has no level-two cache memory installed, or has 256 KB of level-two cache
memory installed, you can upgrade your computer by installing a new cache memory module. If your computer has no
level-two cache, you can install either a 256-KB module or a 512-KB module.
For instructions on how to install a cache memory module, refer to “
Installing Cache Memory” on page 33.

15
1 Why Upgrade?
Installing Expansion Cards
Installing Expansion Cards
How Many
Expansion Cards
Does My Computer
Have?
The number of expansion cards that your computer has depends on the particular model that you have. You can tell how
many cards are installed by looking at the back of your computer and counting the number of slots that are occupied. This
is the number of expansion cards that are installed.
There are two types of expansion cards that you can install in your computer: Industry-Standard Architecture (ISA)
cards and Peripheral Component Interconnect (PCI) cards. PCI cards use the computer’s PCI bus (information
pathway), and ISA cards use the computer’s ISA bus. The PCI bus is faster than the ISA bus.
Why Add More
Expansion Cards?
Adding more expansion cards will increase the capability of your computer.
How Many
Expansion Cards Can
I Install?
Your computer supports up to six cards.
For instructions on how to add an expansion card, refer to “
Installing Expansion Cards” on page 35.
Expansion Card Slots

16
1 Why Upgrade?
Installing Storage Devices
Installing Storage Devices
How Many Storage
Devices Does My
Computer Have?
Your computer is supplied with one hard disk drive on an internal shelf (either 3.5-inch or 5.25-inch), one 3.5-inch floppy
disk drive, and one CD-ROM drive. Some models are also supplied with a tape drive.
Why Add More
Storage Devices?
Adding additional storage devices is often necessary when, for example, a large amount of information needs to be
frequently accessed.
How Many Storage
Devices Can I Add?
The number of storage devices that you can add to your computer is determined by the number of shelves available.
For instructions on how to add a storage device, refer to “
Installing Storage Devices” on page 43.
Note
The on-system board electronics support up to six devices (two FDD (Flexible Disk Drive) devices and four IDE
(Integrated Drive Electronics) devices). You can install a non-IDE device such as a SCSI drive but you will need to
install an interface card and software for it.
In addition to the 3.5-inch floppy disk drive and the CD-ROM drive, your computer has two front-access device
shelves available for new drives. Note that with some models one of these shelves will be already occupied by a tape
drive.

17
1 Why Upgrade?
Upgrading the Processor
Upgrading the Processor
What Does the
Processor Do?
The processor is the primary computational chip inside the computer. It can be thought of as the computer’s brain. The
processor communicates with other parts of the computer via three buses (information pathways):
• the processor’s local bus
• the PCI (Peripheral Component Interconnect) bus
• the ISA (Industry-Standard Architecture) bus
Each bus connects functional components of the computer which have similar data-handling requirements. The three
buses operate at different speeds and are connected via bridges. (A bridge converts data from one bus into a format that
is suitable for the destination bus.)
Why Upgrade the
Processor?
The speed at which the processor can perform tasks is determined by the processor’s internal speed; the faster the internal
speed, the faster tasks can be performed. Replacing the processor by one with a faster internal speed will improve the
performance of your computer.
What Is the Fastest
Processor I Can
Install?
New, faster processors are being developed all the time. Check with your HP-authorized support agent or reseller to find
out what the fastest processor is that you can install in your computer.
For instructions on how to install a processor upgrade, refer to “
Installing a Processor Upgrade” on page 55.

18
1 Why Upgrade?
Upgrading the BIOS
Upgrading the BIOS
What Is the BIOS? The BIOS (Basic Input/Output System) is the set of programs that automates the computer’s components. The BIOS is
stored in a chip on the system board.
The operating system and programs running on your computer use the BIOS to simplify their instructions and reduce
their size, giving a more efficient system.
Why Upgrade the
BIOS?
Hewlett-Packard is continually improving the BIOS in its computers, introducing new features and making them more
efficient. You can benefit from such progress and keep your own computer up-to-date by upgrading the BIOS.
How Do I Upgrade
the BIOS?
Contact your HP-authorized support agent or reseller for further information on how to upgrade the BIOS in your
computer.

2
Installing Accessories in Your Computer
20
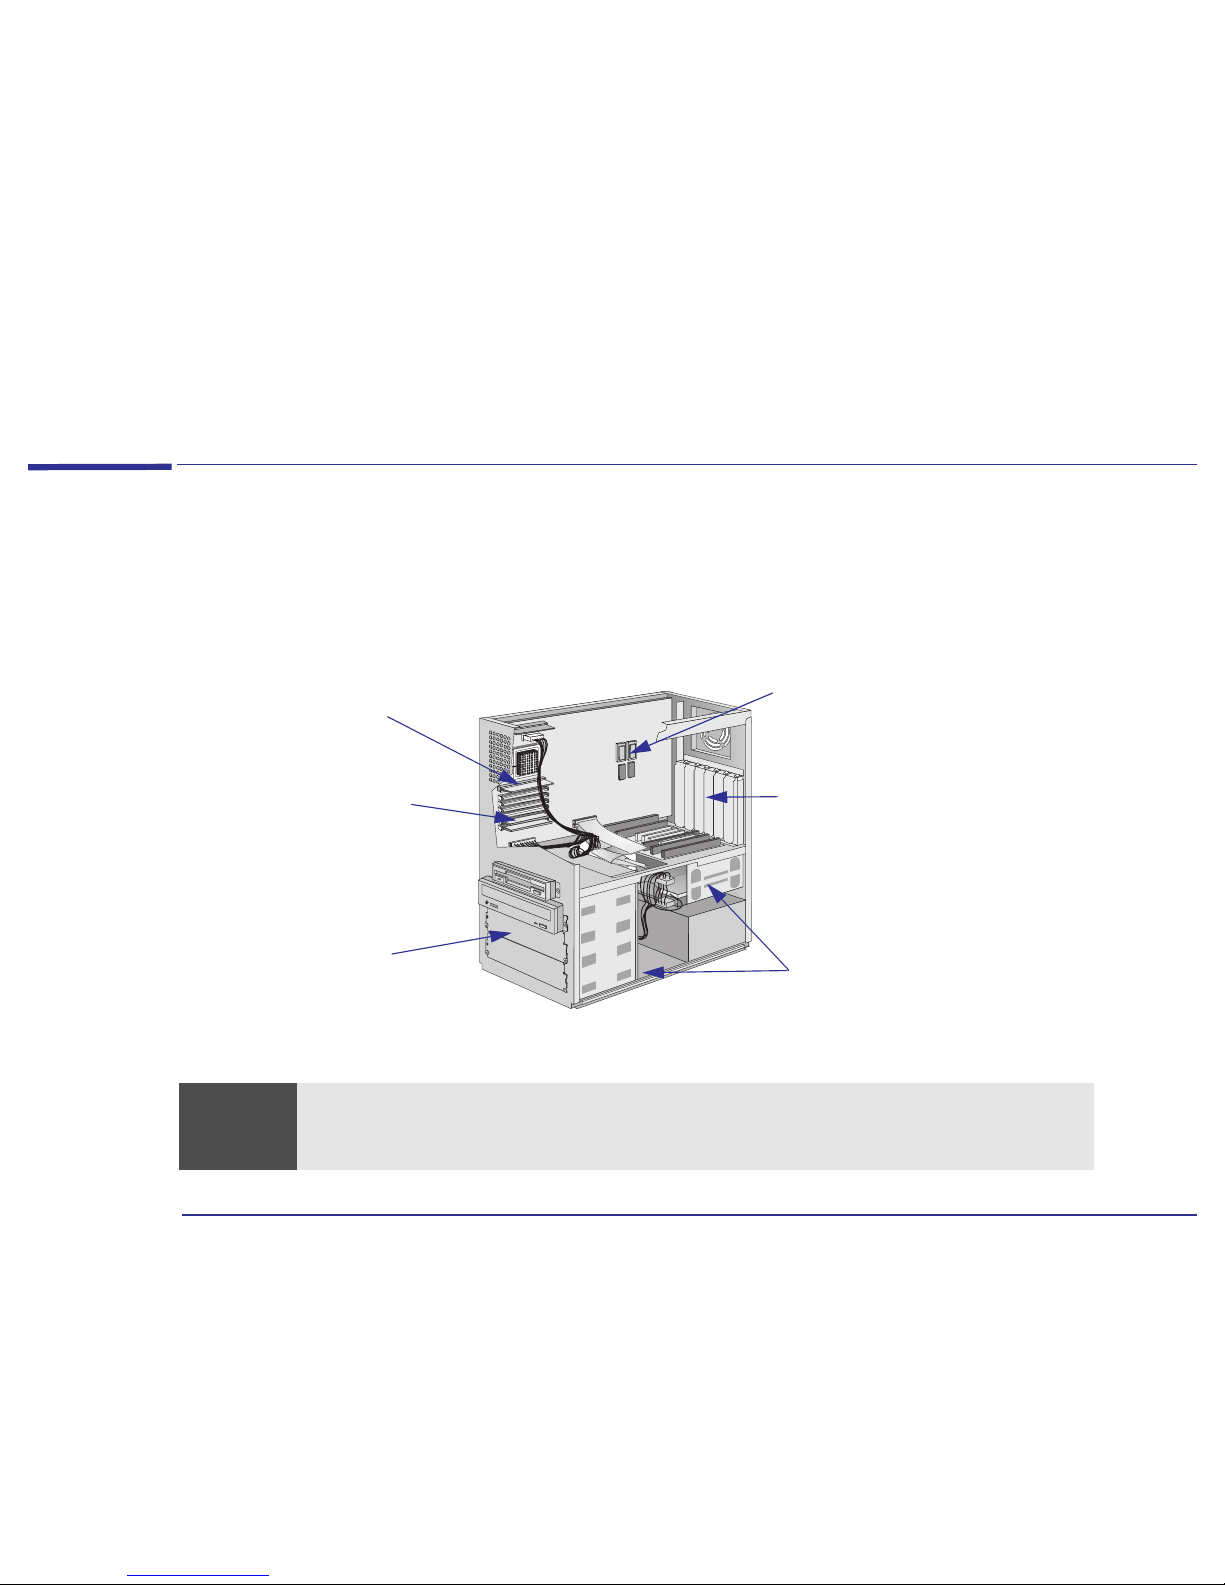
2 Installing Accessories in Your Computer
Supported HP Accessories
Supported HP Accessories
This chapter describes how to install memory, storage devices (such as a hard disk drive, floppy disk drive, zip drive, or
tape drive), and expansion cards in your computer.
Some of the accessories that you can add to your computer are shown here.
Contact your HP-authorized support agent or reseller for HP accessory part numbers.
Front-Access Device Shelves
5.25-inch Floppy Disk Drive
Zip Drive
Tape Drive
Expansion Cards
For example, a LAN card
(Some models already have one or
two cards installed)
Integrated Video Memory
Upgrade Modules
1 MB (2 x 512 KB modules)
(Only for integrated video models)
Main Memory Modules
4 MB, 8 MB, 16 MB, and 32 MB
Pairs of identical modules must be
installed.
Hard Disk Drives
(A 3.5-inch or 5.25-inch drive is
already installed)
Level-Two Cache Memory Module
(A 256-KB or 512-KB module is already
installed in some models)
3.5-inch
5.25-inch
Warning
For your safety, never remove the computer’s cover without first removing the power cord and any connection to a
telecommunications network.
Always replace the cover before turning on the computer.
 Loading...