

Page 1

HP BD-2000
Blu-ray Disc Player
User Manual
HI - SPEED
CERTIFIED
USB
TM
©Copyright 2009, LITE-ON IT Corporation
Page 2
CAUTION: TO REDUCE THE RISK OF ELECTRIC SHOCK, DO NOT REMOVE THE COVER (OR BACK). NO
USER-SERVICEABLE PARTS INSIDE. REFER SERVICING TO QUALIFIED SERVICE PERSONNEL.
This lightning flash with arrowhead symbol within an equilateral triangle is intended
to alert the user to the presence of uninsulated dangerous voltage within the
product’s enclosure that may be of sufficient magnitude to constitute a risk of
electric shock to persons.
The exclamation point within an equilateral triangle is intended to alert the user to
the presence of important operating and maintenance (servicing) instructions in the
literature accompanying the product.
CAUTION
This product is a Class 1 laser product. To
ensure continued safety, do not remove
any covers or attempt to disassemble
the cabinet. Refer servicing to qualified
personnel.
CAUTION
The use of optical instruments with this
product may increase eye hazard.
WARNING
To prevent the risk of fire or electric shock
hazard, do not expose this product to rain
or moisture. Do not place near objects with
liquid, such as a vase.
WARNING
Slots and openings in the cabinet are for
ventilation purposes and to protect the
equipment from heating. Do not cover or
block the openings with items such as a
newspaper, table-cloths or curtains).
Preface
2
Page 3

Regulatory
Important Safety
Information
FCC Statement
This equipment has been tested and found
to comply with the limits for a Class B digital
device, pursuant to Part 15 of the FCC Rules.
These limits are designed to provide
reasonable protection against harmful
interference when the product is operated
in a residential installation. This product
generates, uses, and can radiate radio
frequency energy and, if not installed and
used in accordance with the instruction
manual, may cause harmful interference
to radio communications. However, there
is no guarantee that interference will not
occur in a particular installation. If this
product does cause harmful interference to
radio or television reception, which can be
determined by turning the product off and
on, the user is encouraged to try to correct
the interference by one or more of the
following measures:
Reorient or relocate the receiving antenna.•
Increase the separation between the •
product and receiver.
Connect the product into an outlet on a •
circuit different from that to which the
receiver is connected.
Consult the dealer or an experienced •
radio/TV technician for help.
FCC Warning
This equipment may generate or use radio
frequency energy. Changes or modifications
to this equipment may cause harmful
interference unless the modifications
are expressly approved in this manual.
Alterations or modifications carried out
without appropriate authorization may
invalidate the user’s right to operate this
equipment.
Instructions
1. Read these instructions.
2. Keep these instructions.
3. Heed all warnings.
4 . Follow all instructions.
5. Do not use this apparatus near water.
6. Clean only with dry cloth.
7. Do not block any ventilation openings.
Install in accordance with the
manufacturer’s instructions.
8. Do not install near any heat sources such
as radiators, heat registers, stoves, or
other apparatus (including amplifiers) that
produce heat.
9. Do not defeat the safety purpose of the
polarized or grounding-type plug. A
polarized plug has two blades with one
wider than the other. A grounding type
plug has two blades and a third grounding
prong. The wide blade or the third prong
are provided for your safety. If the
provided plug does not fit into your outlet,
consult an electrician for replacement of
the obsolete outlet.
10. Protect the power cord
from being walked on
or pinched particularly
at plugs, convenience
receptacles, and the
point where they exit
from the apparatus.
11. Only use attachments/accessories
specified by the manufacturer.
12. Use only with the cart, stand, tripod,
bracket, or table specified by the
manufacturer, or sold with the apparatus.
When a cart is used, use caution when
moving the cart/apparatus combination to
avoid injury from tip-over.
Preface
3
Page 4
13. Unplug this apparatus during lightning
storms or when unused for long periods
of time.
14. Refer all servicing to qualified service
personnel. Servicing is required when
the apparatus has been damaged in any
way, such as power-supply cord or plug
is damaged, liquid has been spilled or
objects have fallen into the apparatus,
the apparatus has been exposed to rain
or moisture, does not operate normally, or
has been dropped.
Notes About the
Discs
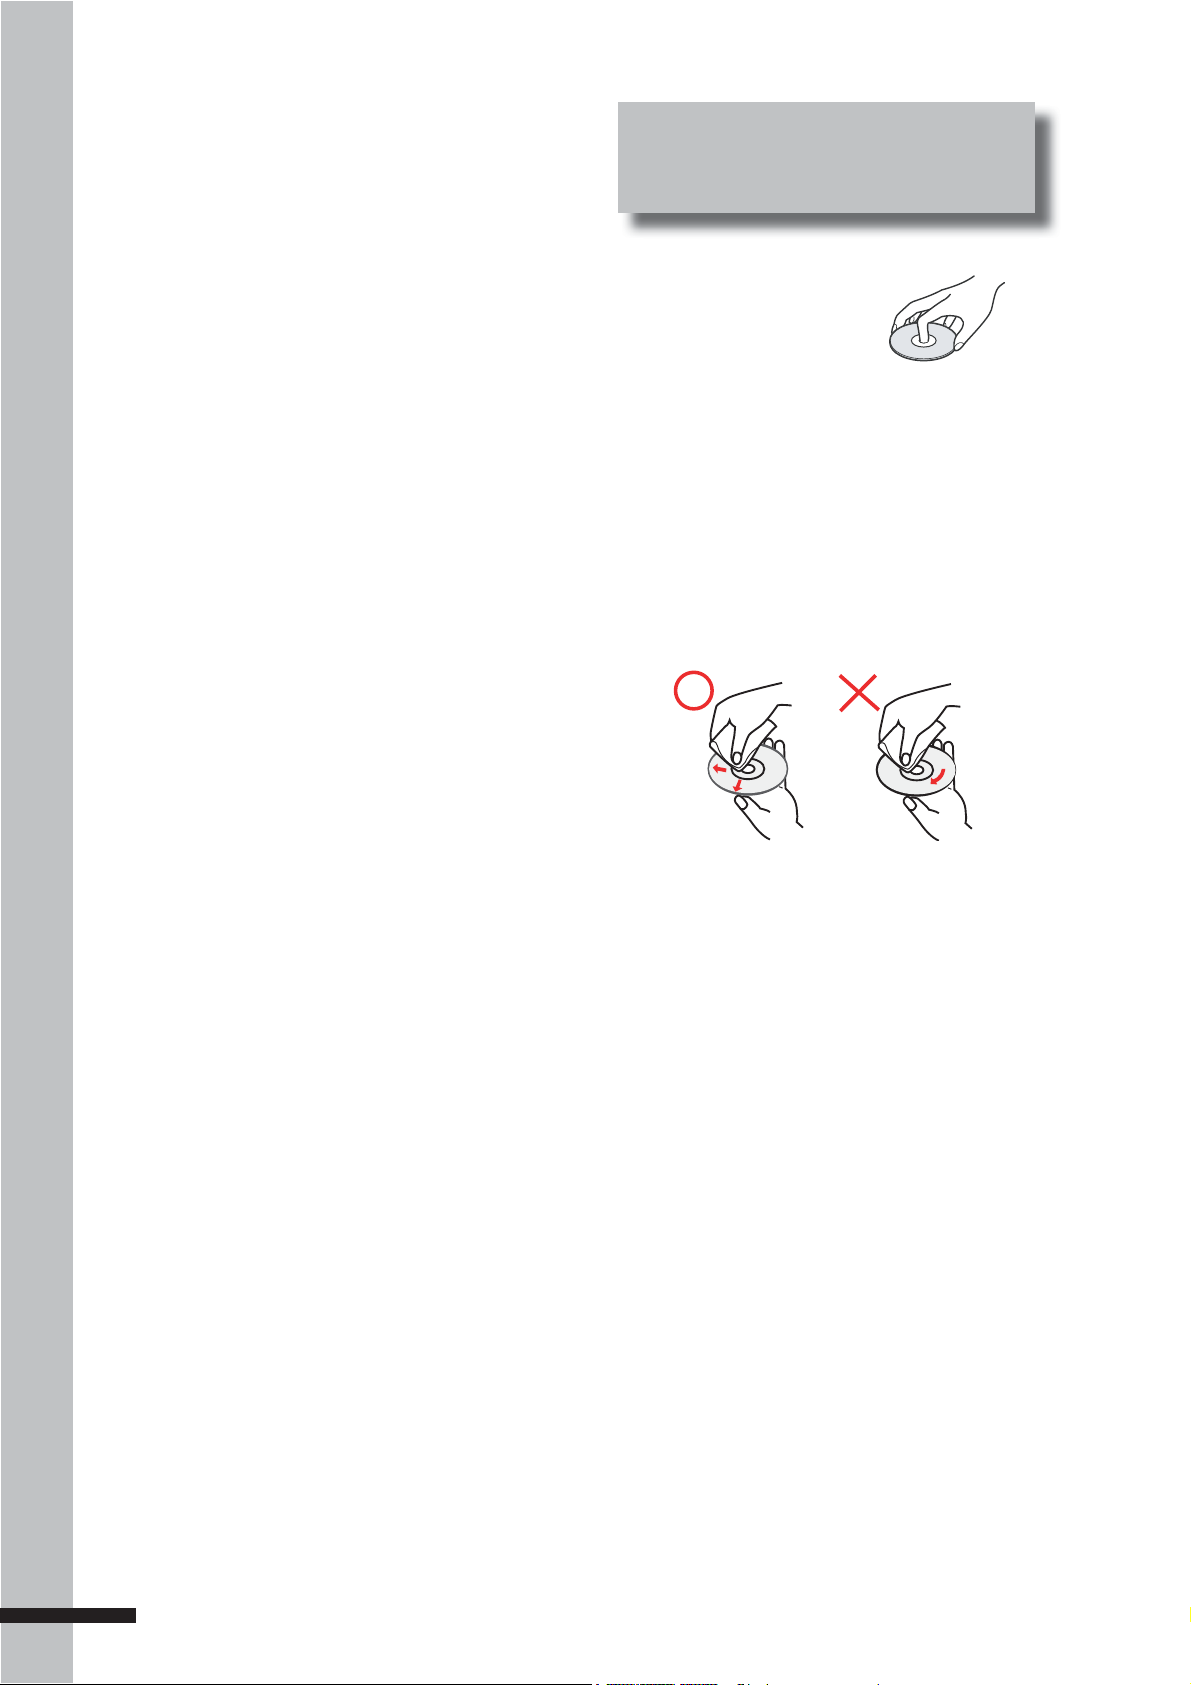
Do not touch the •
playback side of the
disc. Hold the disc by
its edge.
Never stick any paper or tape on the disc.•
After playing, store the disc in its case.•
Do not expose the disc to direct sunlight •
or sources of heat and never leave it in a
parked car as the temperature may rise
considerably inside the car.
Clean the disc with a cleaning cloth.•
Wipe the disc from the center out.•
Do not use strong solvents such as •
benzine, thinner, alcohol, commercially
available cleaners, or anti-static spray
intended for vinyl LPs.
Preface
4
Page 5
Precautions
Safety
To prevent fire or electric shock hazard, do •
not place objects filled with liquids, such
as vases, on the device.
Should liquids spill or solid objects fall into •
the cabinet, have the device checked by a
qualified personnel.
Operation
Before moving the player, remove any •
discs inside the device. Otherwise, the
disc may be damaged.
If the device is moved from a cold to a •
warm location, moisture may form inside
the device. Should this happen, do not
operate the device and leave it for 2 to 3
hours until the moisture evaporates.
Install the device where the power cord •
can be easily connected and disconnected
from the wall outlet.
Keep the device or the discs away from •
equipment with magnets, such as a
microwave open.
About this Manual
The following icons that appear below a
section title indicate the applicable discs or
file types.
Applies to BD, DVD, AVCHD, •
VCD, and CD discs.
BD
DVD
AVCHD
VCD
CD
Power
The device still consumes power when •
connected to a wall outlet even if the
power has been turned off. To completely
cut off the power, unplug the power cord
from the wall outlet.
If the device will not be used for long •
periods of time, disconnect the power cord
from the wall outlet.
When disconnecting the power cord, •
grasp the plug head, never pull the cord.
Placement
Place the device in a well-ventilated •
location to prevent the device from
overheating.
Do not place the device on a soft surface •
such as a rug.
Do not cover the slots and openings in the •
cabinet which are provided for ventilation.
Applies to data discs or USB •
drive that contains video,
music, or photo files.
Video
Music
Photo
Do not place the device near heat sources.•
Do not place the device near liquids.•
Preface
Do not place heavy objects on the device.•
5
Page 6

Table of Contents
Regulatory Information .......................3
Important Safety .................................3
Instructions ........................................... 3
Notes About the Discs ........................4
Precautions ........................................... 5
About this Manual................................5
Chapter 1
Before You Start 9
What’s in the Box? ...............................9
Playable Discs and Files .....................10
Playable Discs ..............................................10
Playing BD Discs .....................................10
Playing DVD Discs ..................................10
Audio Formats ..........................................11
Playable Files ...............................................11
Player Overview ...................................12
Front Panel ....................................................12
Connecting an Amplifier .....................20
Connecting Using Analogue
Audio Cable ..................................................20
Connecting Using Digital Audio Cable .....21
Using a Coaxial Cable .............................21
Using an Optical Cable ...........................21
Connecting to the Internet .................22
Connecting the Power Cable .............23
Turning the Power On ..........................23
Easy Setup Wizard ...............................24
Chapter 3
Playback 25
Playing a Disc .......................................25
Playback Controls ........................................26
Forward or Reverse Playback ...................26
Skipping Content ..........................................27
Slow Rewind or
Slow Forward Playback ..............................27
Preface
Front Panel Display .....................................13
Rear Panel ....................................................13
Remote Control ............................................14
Installing the Remote Control
Batteries ...................................................16
Remote Control Signal ................................16
Chapter 2
Getting Started 17
How to Set up Your BD Player ...........17
Connecting to a TV ..............................18
Connecting Using HDMI Cable ..................18
Connecting Using a Component Video
Cable..............................................................19
Connecting Using a Composite Video
Cable..............................................................19
Step Rewind or Step Forward ..................27
Playing Specific Titles, Chapters,
or Tracks........................................................28
Playing a Specific Section
Repeatedly (A-B) .........................................28
Playing Repeatedly ......................................29
Switching Camera Angles ..........................29
Switching Subtitles .....................................29
Switching Audio Streams ...........................29
Displaying the Disc Information ................30
Using On-Screen Controls (OSC) ......30
BONUSVIEW™ ..................................... 31
BD-Live™ ...............................................32
Setting Up the Player for BD-Live™ .........32
Using BD-Live™ ...........................................33
6
Page 7

Chapter 4
Closed Caption .........................................45
Using Media Center 34
Setting Up Data Disc
and USB Drive ......................................34
Setting Up Data Disc For Playback ...........34
Setting Up the USB Drive For Playback ...35
Playing Files from a Data Disc ...................35
Playing Files From a USB Drive .................35
Media Center Menu ............................36
Viewing Photos ............................................37
Using Photo On-Screen Control ...........37
Slide Show Functions .............................38
Playing Music ...............................................38
Music Playback Status Screen ............39
Playing Videos ..............................................39
Creating a Playlist ........................................40
Playing Files from the Playlist ....................40
Chapter 5
PBC ............................................................45
Security .........................................................46
Change Password ...................................46
Parental Control ......................................46
Country Code ...........................................46
Network .........................................................47
Internet Connection ................................47
BD-Live Connection ................................47
Display Settings....................................48
TV ...................................................................48
TV Screen .................................................48
Resolution .................................................48
TV System .................................................48
HDMI Deep Color ....................................48
HDMI 1080P 24Hz ....................................49
Video Process ..............................................49
Video Adjust .............................................49
Sharpness ................................................49
Settings and Further
Adjustments 41
Using the Home Menu ........................41
General Settings...................................43
System ...........................................................43
Screen Saver ...........................................43
Disc Auto Upgrade ..................................43
Load Default .............................................43
Upgrade ....................................................43
Easy Setup ................................................43
BUDA .........................................................43
Language ......................................................44
OSD ............................................................44
Menu .........................................................44
Audio .........................................................44
Subtitle ......................................................44
Playback ........................................................45
Audio Setting ........................................50
Audio Output .................................................50
Spdif ..........................................................50
HDMI .........................................................50
Down_samp .............................................50
System Information .............................52
Chapter 6
Troubleshooting 53
Chapter 7
Additional
Information 55
Upgrading Your Player ........................55
To upgrade firmware
using a USB drive ....................................55
To upgrade firmware
using a data disc .....................................56
Preface
7
Page 8

Video Output Resolutions ...................57
HDMI Video Output ....................................57
Component Video Outputs ........................57
Composite Video Output .............................57
Language Code Table ..........................58
Region Code Table ...............................59
Specifications ....................................... 60
Chapter 8
Appendix 61
GNU General Public License .............61
Chapter 9
Glossary 66
Chapter 10
INDEX 68
Preface
8
Page 9
Chapter 1
Before
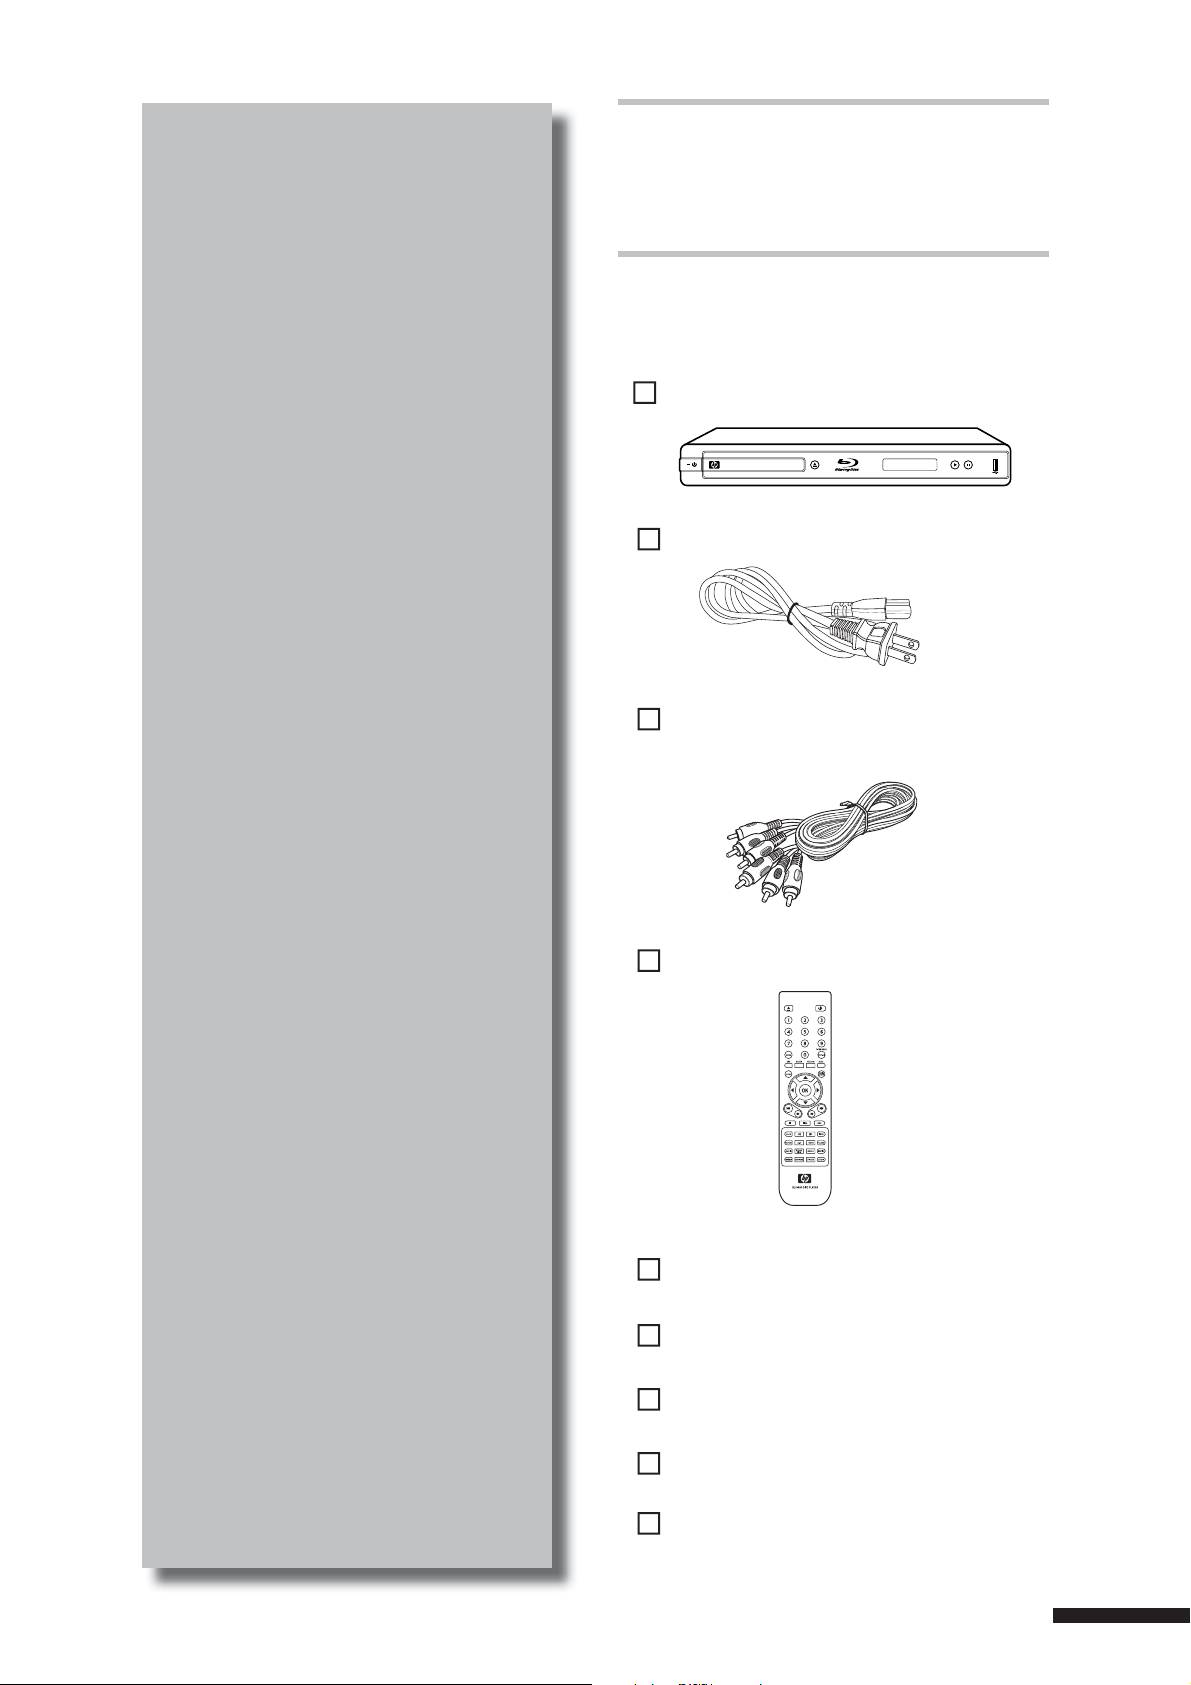
What’s in the
Box?
Check to ensure that the following items
come with your package.
You Start
Please read through this Operating
Manual to operate your device properly
and keep it in a safe place for future
reference.
This chapter will introduce the features,
supported types of discs and files,
and the panel and remote control
descriptions.
BD player
BLU-RAY DISC PLAYER
Power cable x 1
Audio-Video cable x 1
(red/white/yellow)
Remote control x 1
TM
HDMI cable x 1
AAA batteries x 2
Operating manual x 1
Warranty card x 1
Declaration of Conformity card x 1
9
Page 10
Playable Discs and Files
Playable Discs
Your BD player supports playback of the
following discs:
Blu-ray Disc•
DVD-VIDEO•
DVD-R•
DVD-RW•
DVD+R•
DVD+RW•
Playing BD Discs
Features
Supports BD profile 1.0, 1.1, and 2.0.•
Access to BD-Live which allows •
interactive functions when your BD player
is connected to the Internet.
Supports BONUSVIEW functions that •
allows virtual packages or Picture-inPicture functions to be used.
“BONUSVIEW” and its logo are trademarks of
Blu-ray Disc Association.
Playable BD Formats
Blu-ray Disc Read Only (BD-ROM)•
Blu-ray Disc Recordable (BD-R)•
Audio CD•
CD-R•
CD-RW•
CD-DA / CD-DTS•
VCD / SVCD•
“Blu-ray Disc“ and its logo are trademarks .
“DVD Video”, “DVD-R”, “DVD+R”, “DVD-RW”,
“DVD+RW” and their logos are trademarks of DVD
Before You Start
Format/Logo Licensing Corporation.
“CD” and its logo are trademarks.
Blu-ray Disc Rewriteable (BD-RE)•
Playing DVD Discs
DVD-Video can be played.•
DVD-R /RW/+R/+RW disc recorded in DVD-•
Video format can be played
DVD-R /RW/+R/+RW disc recorded in DVD-•
Video and Video Recording (VR) format can
be played.
DVD disc recorded in AVCHD format can •
be played, including discs in x.v.Color
format.
“AVCHD” and its logo are trademarks of
Matsushita Electric Industrial Co., Ltd and Sony
Corporation.
10
“x.v.Color” is a trademark of Sony Corporation.
Dual Layer DVD disc can be played.•
Page 11
Notes:
A DVD disc will not play if it has not been •
fi nalized correctly.
Some DVD and CD discs may not play on •
this BD player due to recording quality or the
physical condition of the disc.
Playable Files
Your BD player supports playback of files
recorded on DVD and CD discs, and USB
drives with the following formats:
Video compression format MPEG•
MPEG-2•
Audio Formats
Your BD player supports the following audio
formats:
Dolby Digital•
Dolby Digital Plus•
Dolby True HD•
DTS 2.0 + Digital Out•
Dolby Digital Sound•
MPEG•
MPEG-2•
Linear PCM•
Media container format *.AVI•
Photo file format JPEG•
Music file format WMA•
MPEG-4 •
*.MKV•
*.MP4•
*.M4A•
*.M4V•
*.WMV•
*.DAT•
*.VOB•
*.ASF•
PNG•
GIF•
(AVC)
For Dolby Digital Plus, Dolby True HD, and
DTS-HD, it is recommended to connect the
BD player to an amplifier or receiver to enjoy
the surround sound quality.
Manufactured under license from Dolby Laboratories.
“Dolby” and the double-D symbol are trademarks of
Dolby Laboratories.
Manufactured under license under under U.S. Patent
#’s: 4,631,603; 4,819,098; 4,907,093; 5,315,448; and
6,516,132 & other U.S. and worldwide patents issued
& pending. DTS is a registered trademark and the DTS
logos and Symbol are trademarks of DTS, Inc.
© 1996-2007 DTS,Inc. All Rights Reserved.
Before You Start
11
Page 12
Player Overview
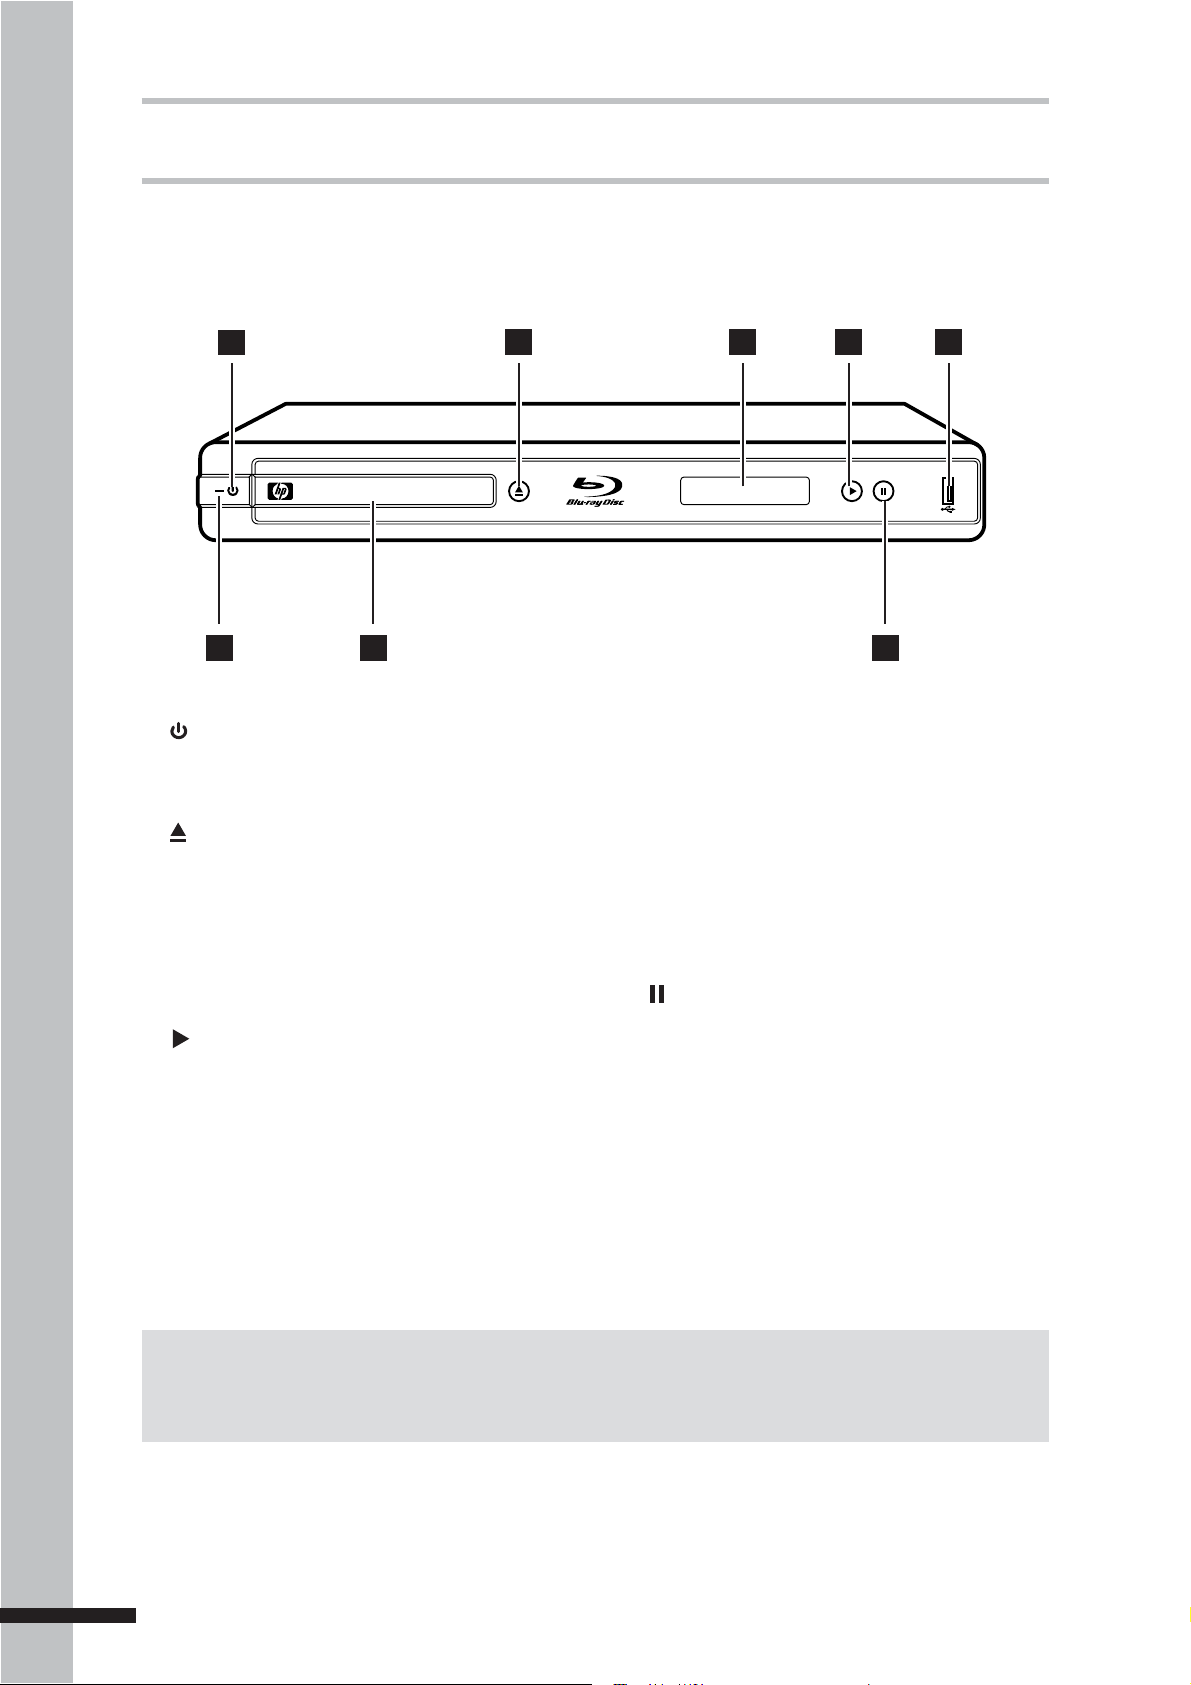
Front Panel
1
BLU-RAY DISC PLAYER
6
7
1 POWER ON/OFF button
Press to switch the BD player on or off.
2 OPEN/CLOSE button
Press to open or close the disc tray.
2 3 4 5
TM
8
6 LED indicator
Indicates BD player status.
Lights red when the BD player is turned
off.
7 Disc tray
3 Front Panel DISPLAY
Shows the current status information.
Holds the disc for playback.
8 PAUSE button
4 PLAY button
Press to start playback.
Press to pause playback.
5 USB port
Use to connect a USB drive to play music
or photo files. It can also be used for BDLive storage.
Note:
Before You Start
The device still consumes power even when the BD player has been switched off. To completely turn
off power, unplug the power cable from the main outlet.
12
Page 13
Front Panel Display
The front panel display shows the operation status of the BD player or the elapsed time of the
discs being played.
Displays playback elapsed time.
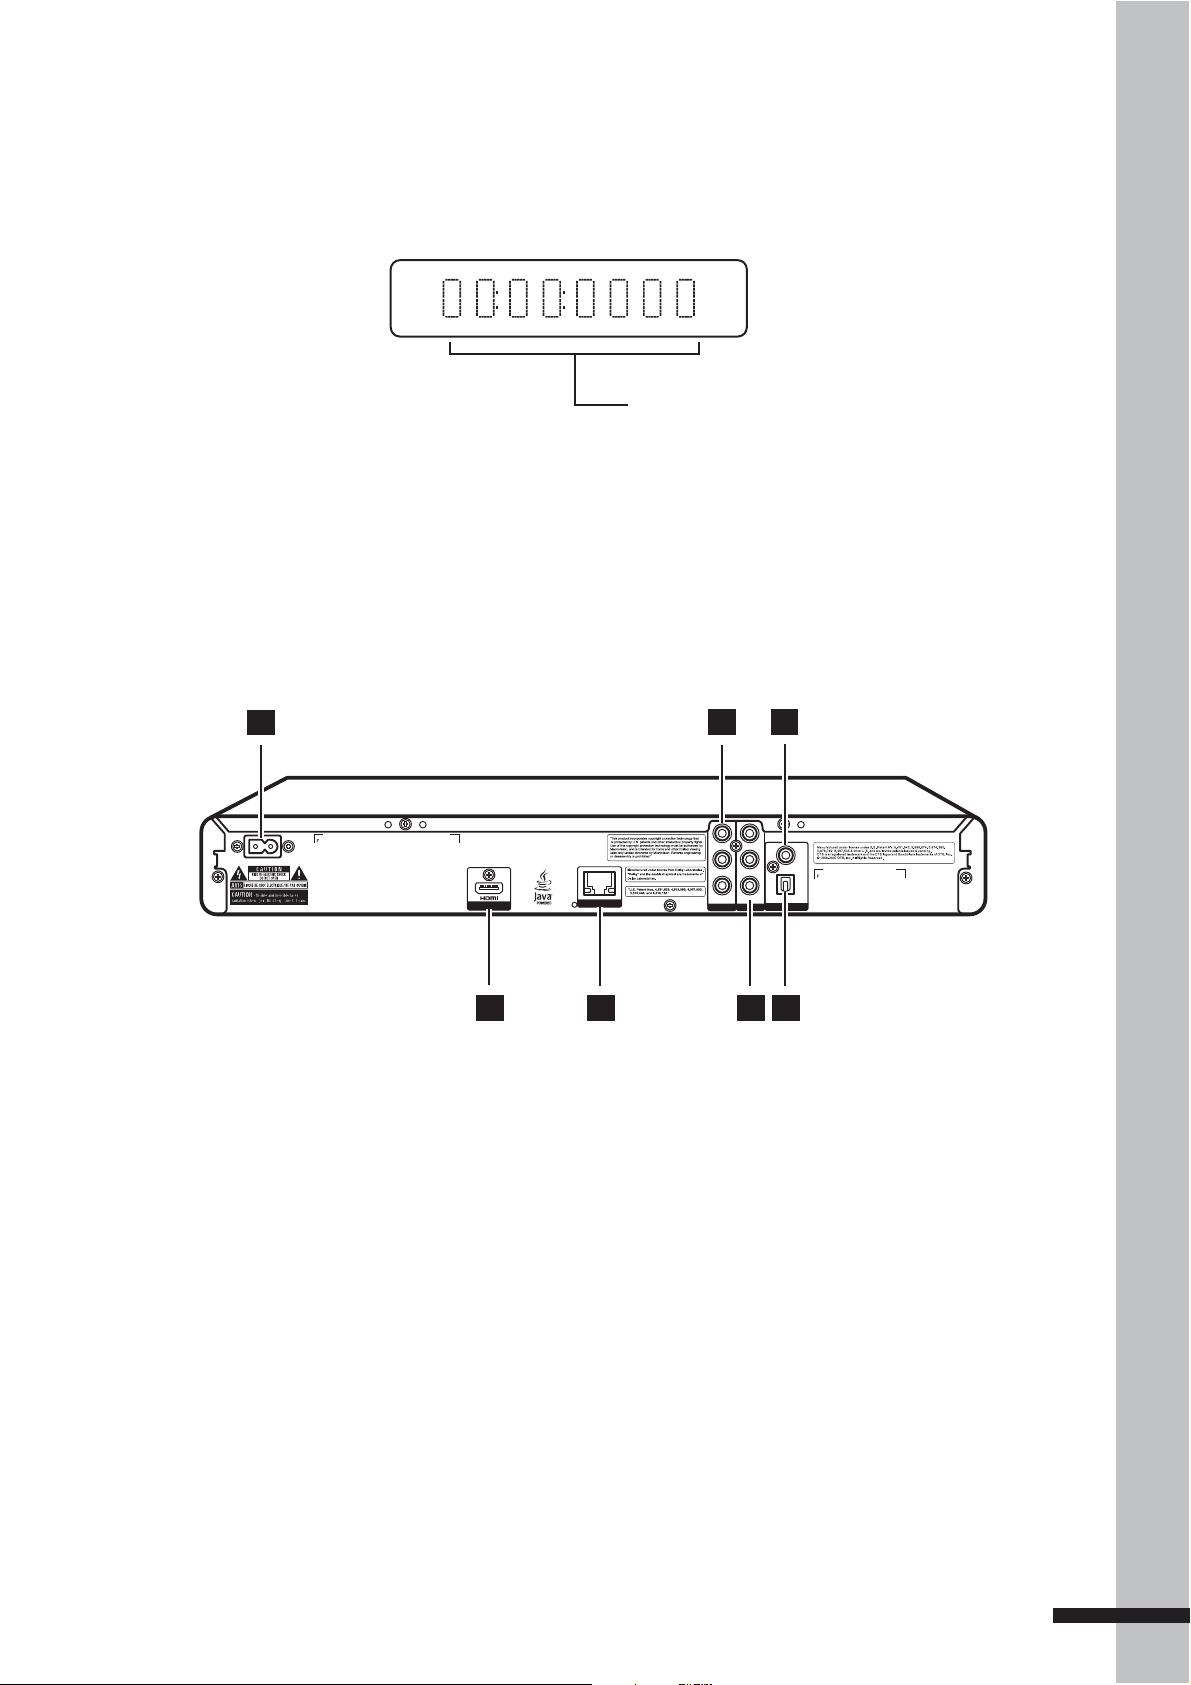
Rear Panel
1
AC IN ~
DIGITAL AV OUTPUT
4
1 AC IN Terminal
Connects the power cable.
2 COMPONENT Video
Connects a TV, amplifier or receiver using
a component video cable.
2
Y
B
P
P
LAN
R
COMP OUT AV OUTPUT
5
3
VIDEO
COAXIAL
L
OPTICAL
R
DIGITAL AUDIO OUT
6
7
5 LAN Port
Connects to a network using an Ethernet
RJ-45 cable.
6 COMPOSITE Video
Connects a TV, amplifier or receiver using
a composite video cable.
3 DIGITAL AUDIO OUT (COAXIAL)
Connects an amplifier or receiver using a
coaxial audio cable.
4 HDMI OUT
Connects HDMI-compatible TV, amplifier
or receiver.
7 DIGITAL AUDIO OUT (OPTICAL)
Connects an amplifier or receiver using
an optical audio cable.
Before You Start
13
Page 14
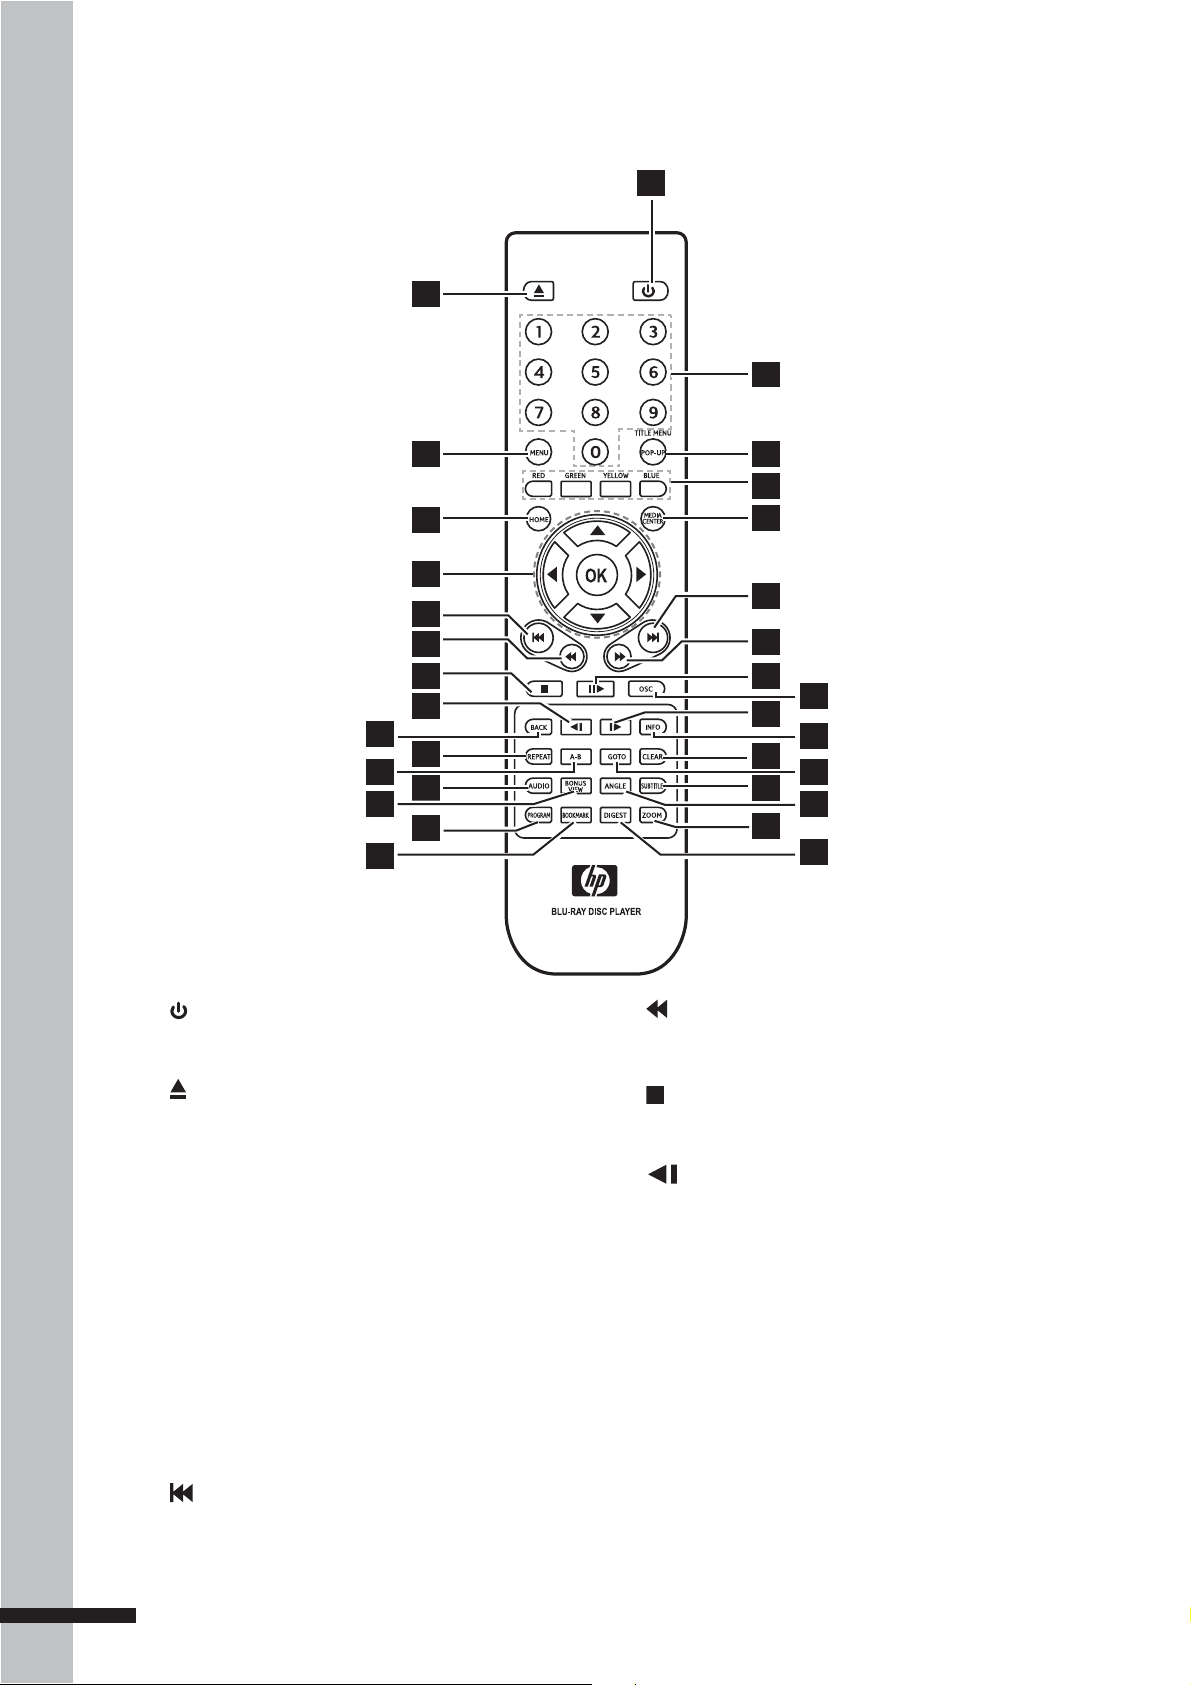
Remote Control
2
1
17
10
12
14
16
1 POWER ON/OFF
Switches the BD player on or off.
11
13
15
3
4
5
6
7
8
9
18
19
20
21
22
23
24
25
26
27
28
29
30
31
32
7 REVERSE
During playback, starts reverse scanning.
2 OPEN/CLOSE
Opens or closes the disc tray.
3 MENU
Displays the disc menu.
4 HOME
8 STOP
Stops playback.
9
SLOW Rewind
Rewinds playback in slow motion.
10 BACK (RETURN)
Displays the Home Menu.
Goes back to the previous screen..
5 Arrows
Before You Start
Select items, change settings or move the
cursor.
OK
Executes the selected item.
6 PREVIOUS
Goes to the previous chapter, title, track,
(▲▼◄►)
11 REPEAT
Repeats playback.
12 A-B Repeat
Repeats playback from A to B.
13 AUDIO
Displays the current audio stream.
or file.
14
Page 15

14 BONUS VIEW
For BONUSVIEW functions.
31 ZOOM
Enlarges or reduces image size.
15 PROGRAM
Displays the program list.
16 BOOKMARK
Bookmarks a point during playback.
17 NUMBERS
18 POP-UP MENU
Displays BD or DVD disc menu.
19 RED / BLUE / YELLOW / GREEN
Navigates BD menus. They are also use
for Photo and Music menu.
20 MEDIA CENTER
Browse and play media files on the data
disc, USB drive, or playlist.
21 NEXT
Goes to the next chapter, title, track, or
file.
32 DIGEST
Displays photos as thumbnails.
22 FORWARD
During playback, starts forward
scanning.
23 PLAY / PAUSE
Starts / pauses playback.
24 OSC
Displays OSC (on-screen controls) menu.
25
SLOW Forward
Forwards playback in slow motion.
26 INFO
Displays disc/file information.
27 CLEAR
Clears the numeric input.
28 GOTO
Goes to the entered chapter, title or track.
Before You Start
29 SUBTITLE
Displays the current subtitle.
30 ANGLE
Displays the current camera angle.
15
Page 16
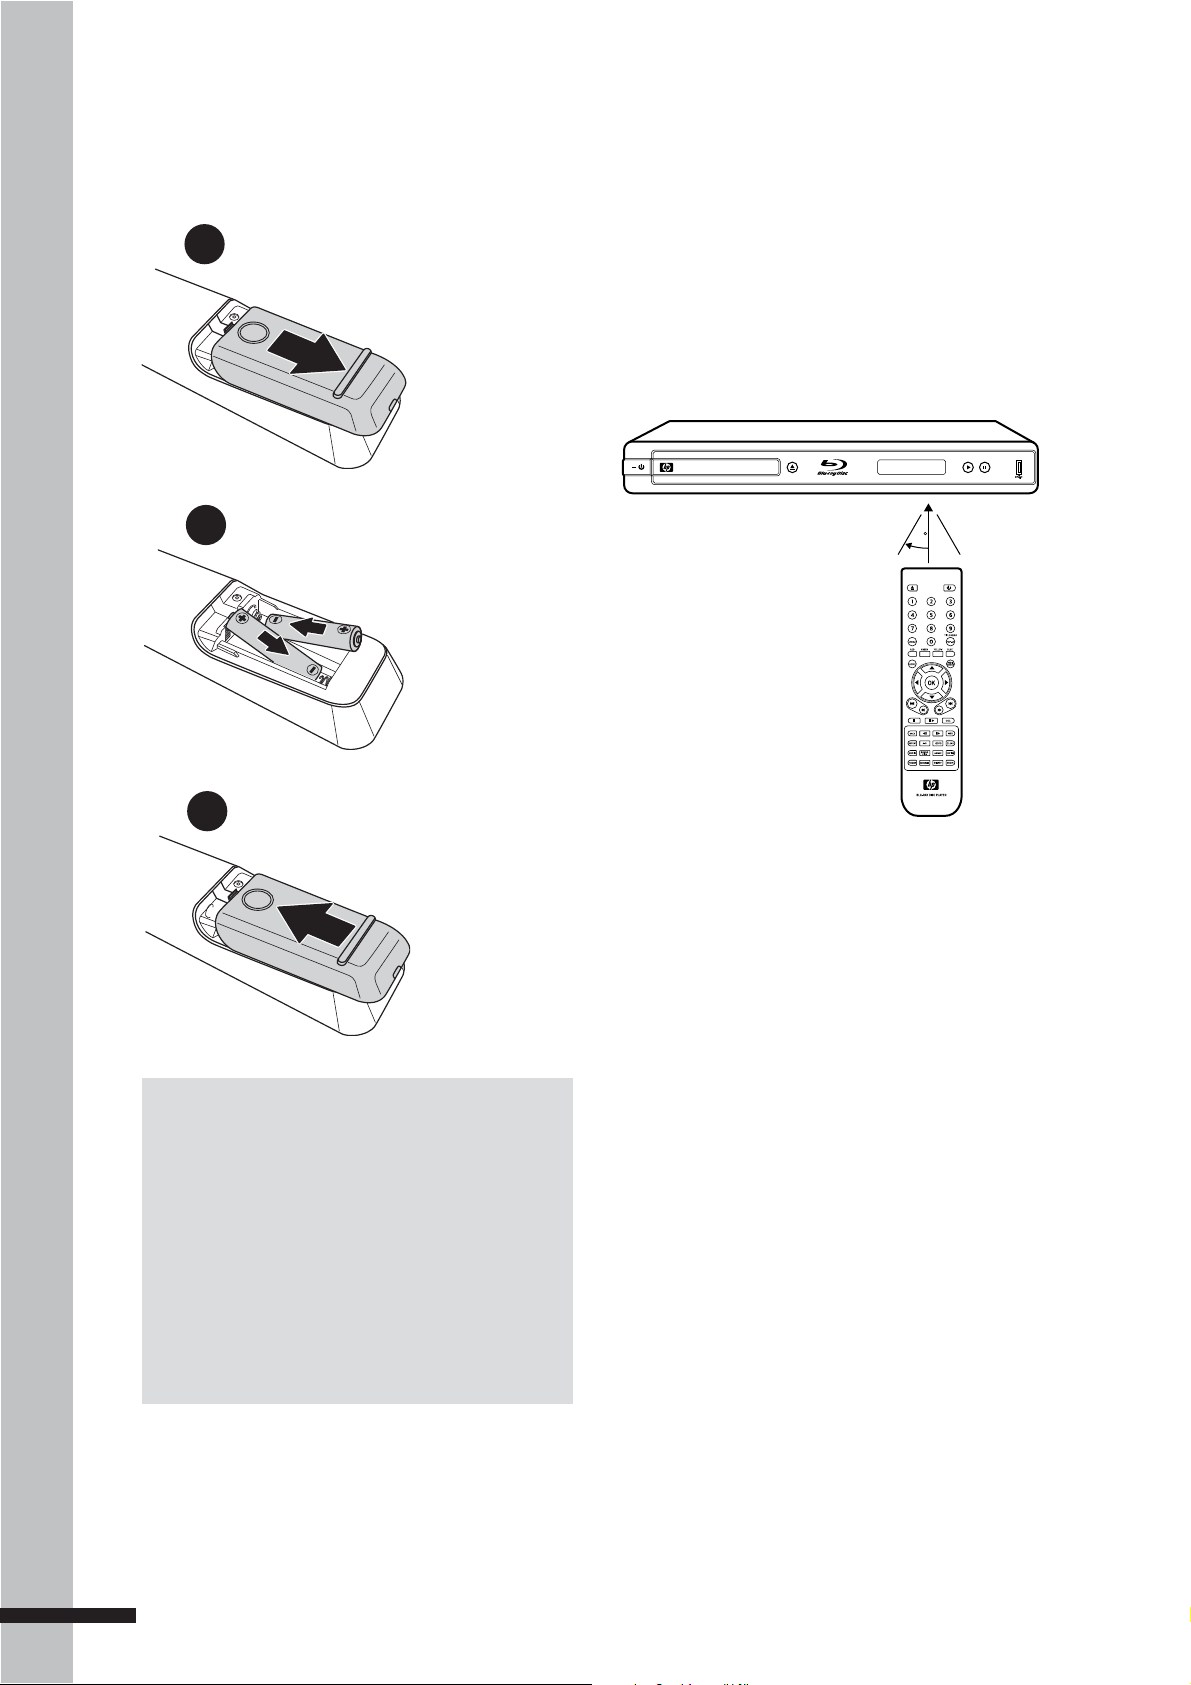
Installing the Remote Control
Batteries
Remote Control
Signal
1
2
3
Slightly push then slide to
remove the battery cover.
Insert two AAA batteries by
matching the + and - ends
of the batteries with the
markings inside
the battery
compartment.
Replace the battery cover.
The remote control has an operating range
of approximately 7.5 m., and works best
when pointed directly at the unit horizontally
at an angle up to 30˚ from the sensor window
of your BD player.
BLU-RAY DISC PLAYER
TM
7.5M
30
Notes:
Do not mix old and new batteries or mix •
different types of batteries.
Do not leave the remote control in an •
extremely hot or humid place.
Do not expose the remote control to direct •
sunlight.
If the remote control will not be used for long •
Before You Start
16
periods of time, remove the batteries.
Page 17

Chapter 2
Getting
How to Set up
Your BD Player
You can set up your BD player in 5 easy
steps:
Started
This chapter covers the following
topics:
Connecting to a TV•
Connecting to an amplifier or receiver•
Connecting a USB drive•
Connecting to the Internet•
Using Easy Setup•
Step 1: Connect the TV
Step 2: Connect the amplifier
Step 3: Connect other peripherals
Step 4: Connect the power
Step 5: Run Easy Setup
WARNING
Before you begin making any connections,
ensure that the BD player is turned off, and
that the power cable is disconnected from
the main outlet.
TIP
It is recommended to connect the VIDEO
OUT jack of your BD player directly to the
VIDEO IN jack of the TV. Connecting a TV
via VCR may cause viewing problems when
playing copy-protected discs.
17
Page 18
Connecting to a TV
Depending on the capabilities of the TV, you can connect your BD player to the TV in various
ways: HDMI, component, or composite video connections.
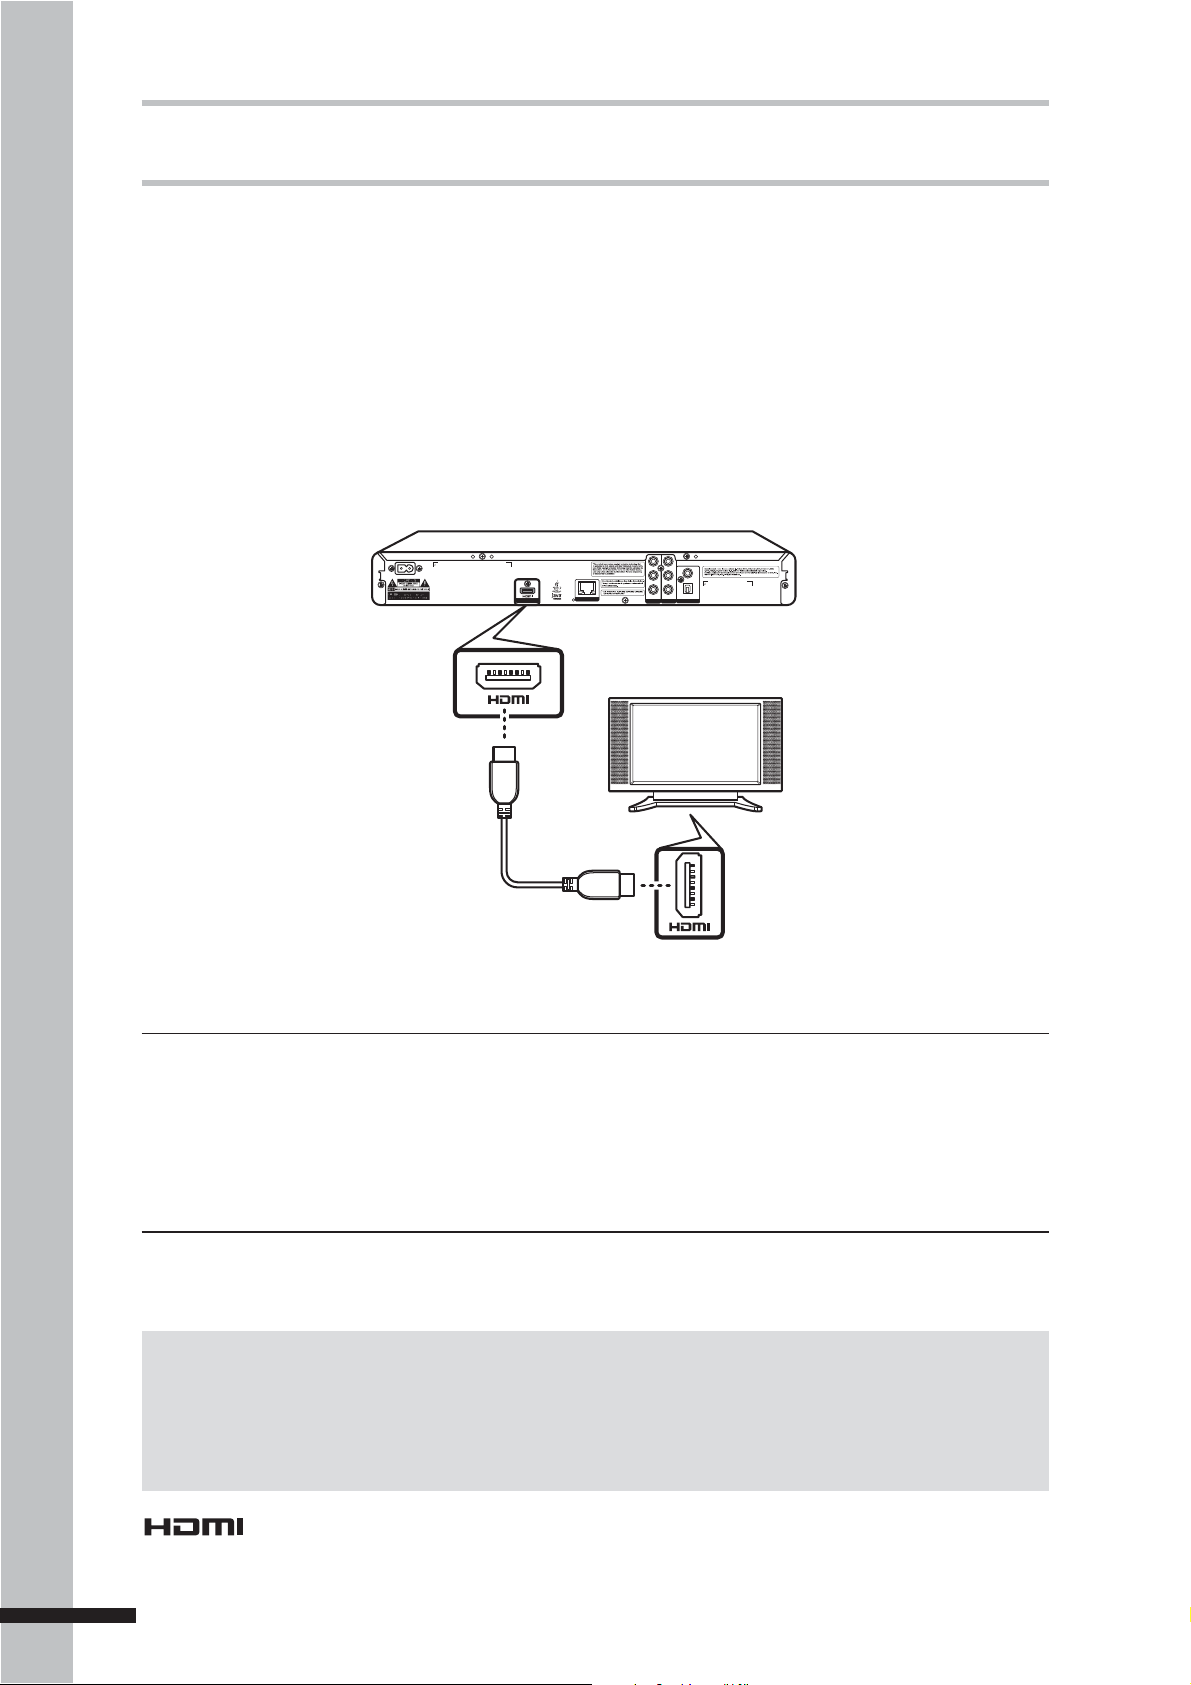
Connecting Using HDMI Cable
HDMI cables can transmit high quality video and audio at the same time. Normally, when you
connect your TV using an HDMI cable, you do not need a separate analogue audio connection.
Connect the HDMI OUT jack on the BD player to the HDMI IN jack on the TV.
BD Player
Y
AC IN ~
HDMI Out
DIGITAL AV OUTPUT
LAN
P
B
P
R
COMP OUT AV OUTPUT
VIDEO
COAXIAL
L
OPTICAL
R
DIGITAL AUDIO OUT
Getting Started
HDMI cable
TV’s HDMI In jack
CAUTION
Hold the plug when connecting and disconnecting the cable.•
Do not force the plug into the HDMI jack. Match the connector’s shape correctly. Make sure •
the connector is not upside down.
Do not place any load on the cable.•
TIP
If you wish to enjoy digital audio sound, connect your player to an amplifi er or receiver using a coaxial or
an optical cable. See ‘Connecting an Amplifier’ (p. 20) for more information.
Notes on HDCP:
Your BD player supports High-bandwidth Digital Content Protection (HDCP) technology. To play back •
HDCP-compliant discs, your TV must also support the HDCP copyright protection system.
If your TV does not support HDCP, the picture will not be displayed properly. •
This BD player incorporates High Definition Multimedia Interface (HDMI) technology.
“HDMI”, “High Definition Multimedia Interface”, and their logo are registered trademarks of HDMI Licensing LLC.
18
Page 19
Connecting Using a Component Video Cable
Use a component video cable (green, blue, red) to connect the COMPONENT OUT jack on the
BD player to the COMPONENT IN jack on the TV.
BD Player
Y
AC IN ~
DIGITAL AV OUTPUT
LAN
P
B
P
R
COMP OUT AV OUTPUT
VIDEO
COAXIAL
L
OPTICAL
R
DIGITAL AUDIO OUT
Green
COMPONENT In COMPONENT Out
Y
Pb
Pr
Blue
Red
Green
Blue
Red
Y
P
B
P
R
Connecting Using a Composite Video Cable
Use a composite video cable to connect the COMPOSITE OUT jack on the BD player to the
COMPOSITE IN jack on the TV.
BD Player
Y
AC IN ~
DIGITAL AV OUTPUT
LAN
VIDEO
COMPOSITE In COMPOSITE Out
L
AUDIO
R
B
P
P
R
COMP OUT AV OUTPUT
VIDEO
COAXIAL
L
OPTICAL
R
DIGITAL AUDIO OUT
VIDEO
L
R
Getting Started
19
Page 20
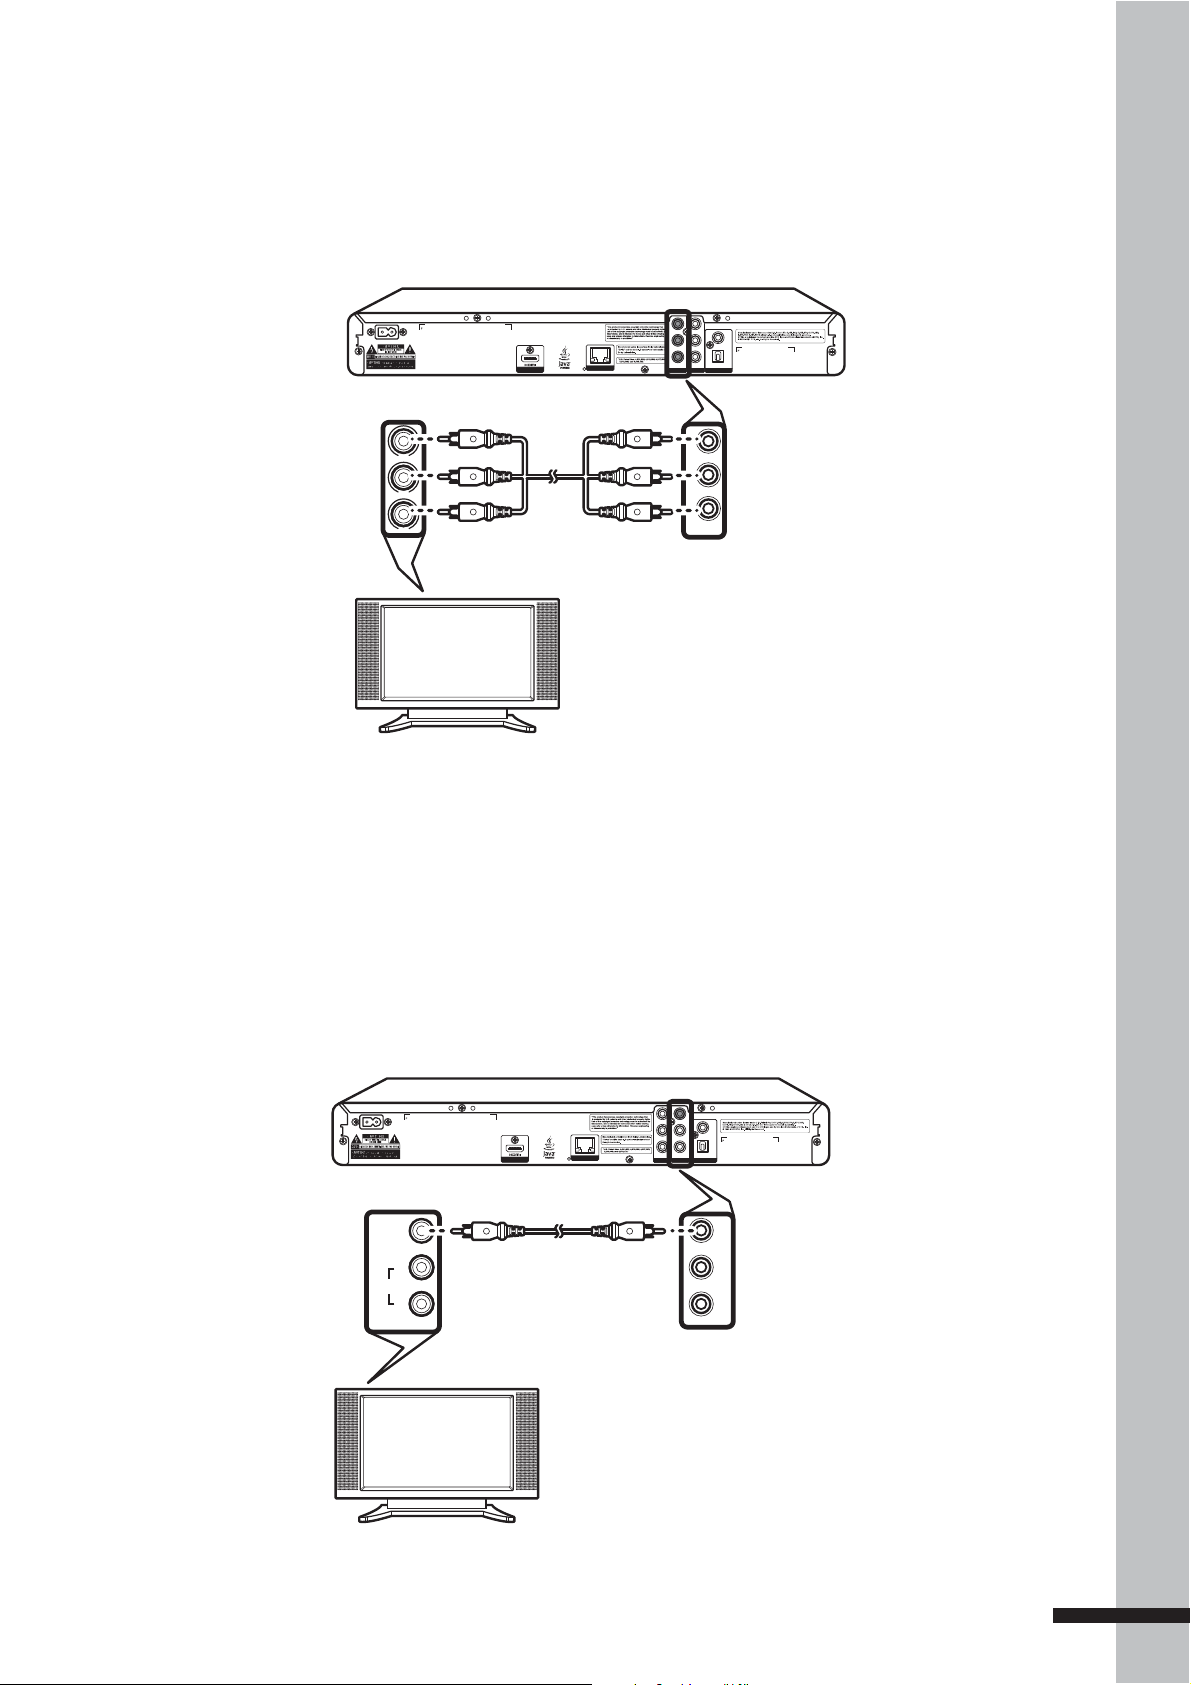
Connecting an Amplifier
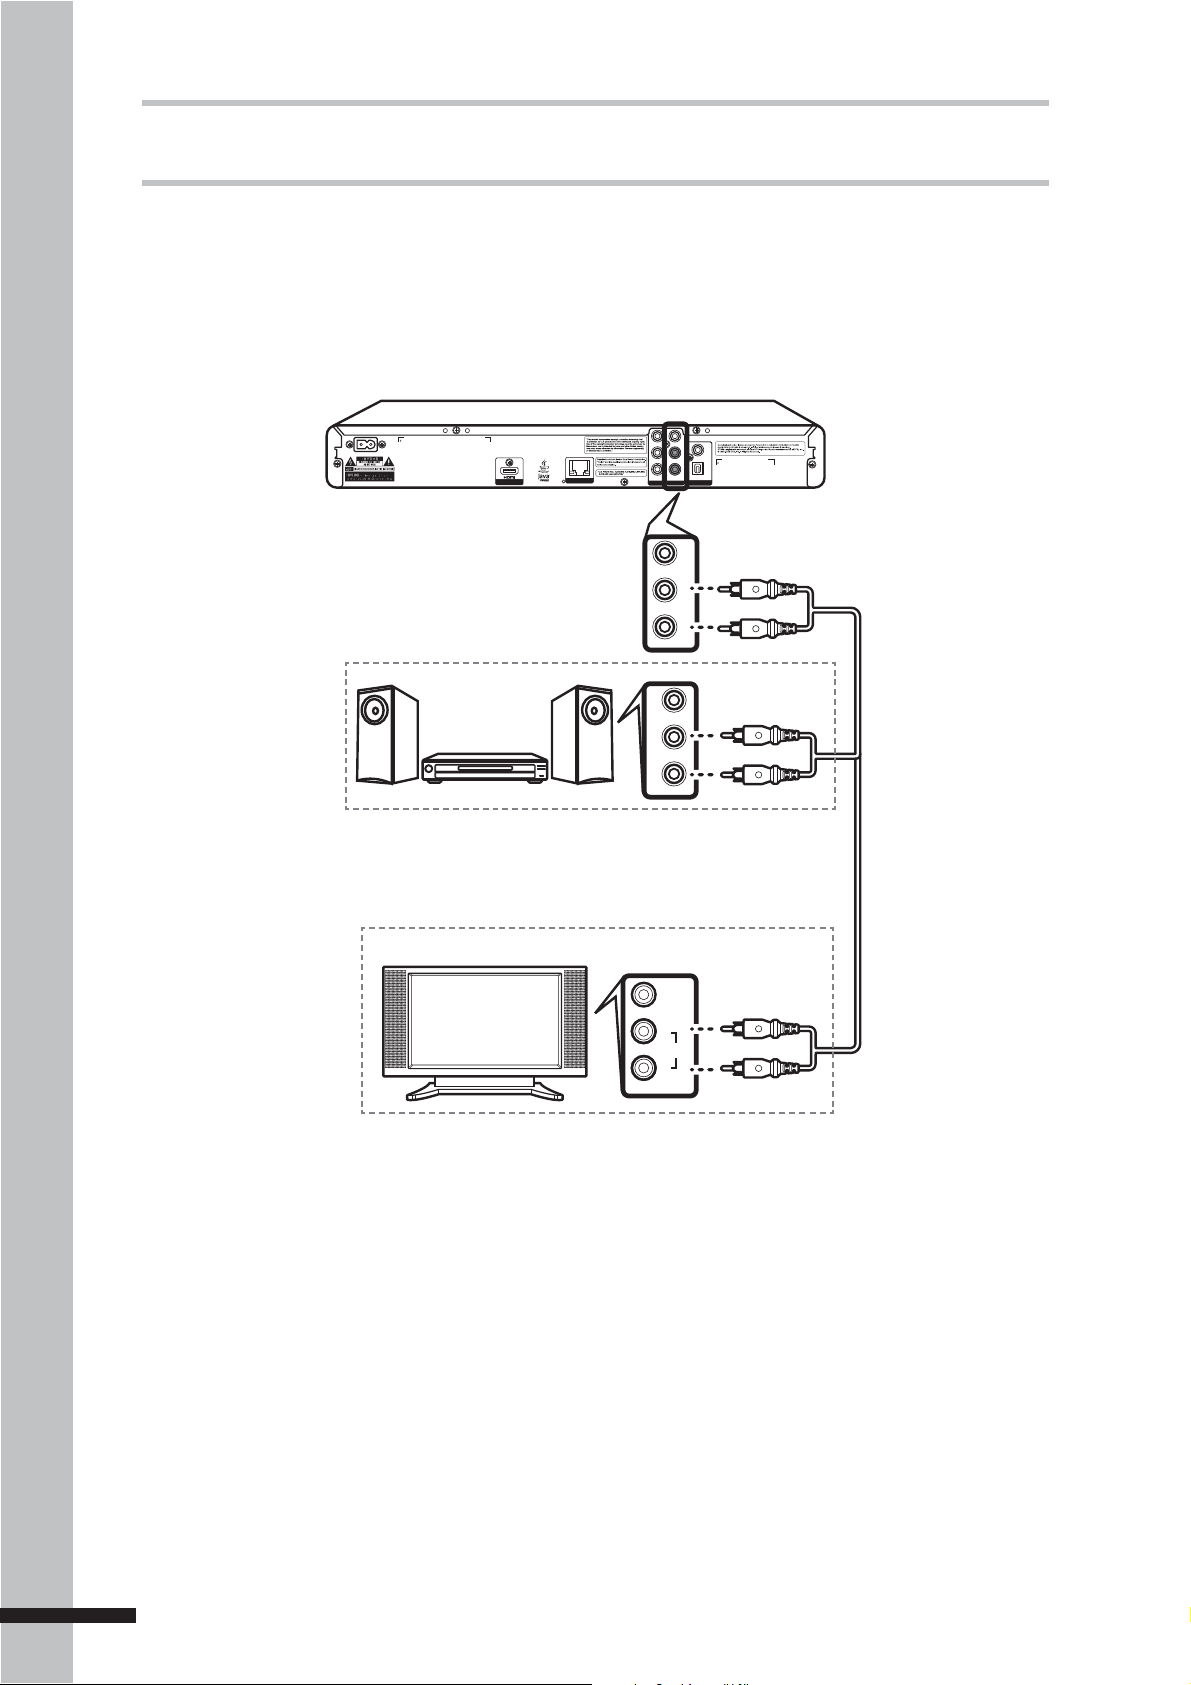
Connecting Using Analogue Audio Cable
Use a composite AV cable or a composite audio cable (red/white) to connect the AUDIO OUT
jack on the BD player to the AUDIO IN jack on the TV, amplifier or receiver.
BD Player
Y
AC IN ~
DIGITAL AV OUTPUT
LAN
P
B
P
R
COMP OUT AV OUTPUT
VIDEO
COAXIAL
L
OPTICAL
R
DIGITAL AUDIO OUT
Stereo Amplifi er
TV
AUDIO Out
Or
VIDEO
VIDEO
L
R
VIDEO
L
AUDIO
R
White
L
R
Red
White
Red
White
Red
Getting Started
20
Page 21
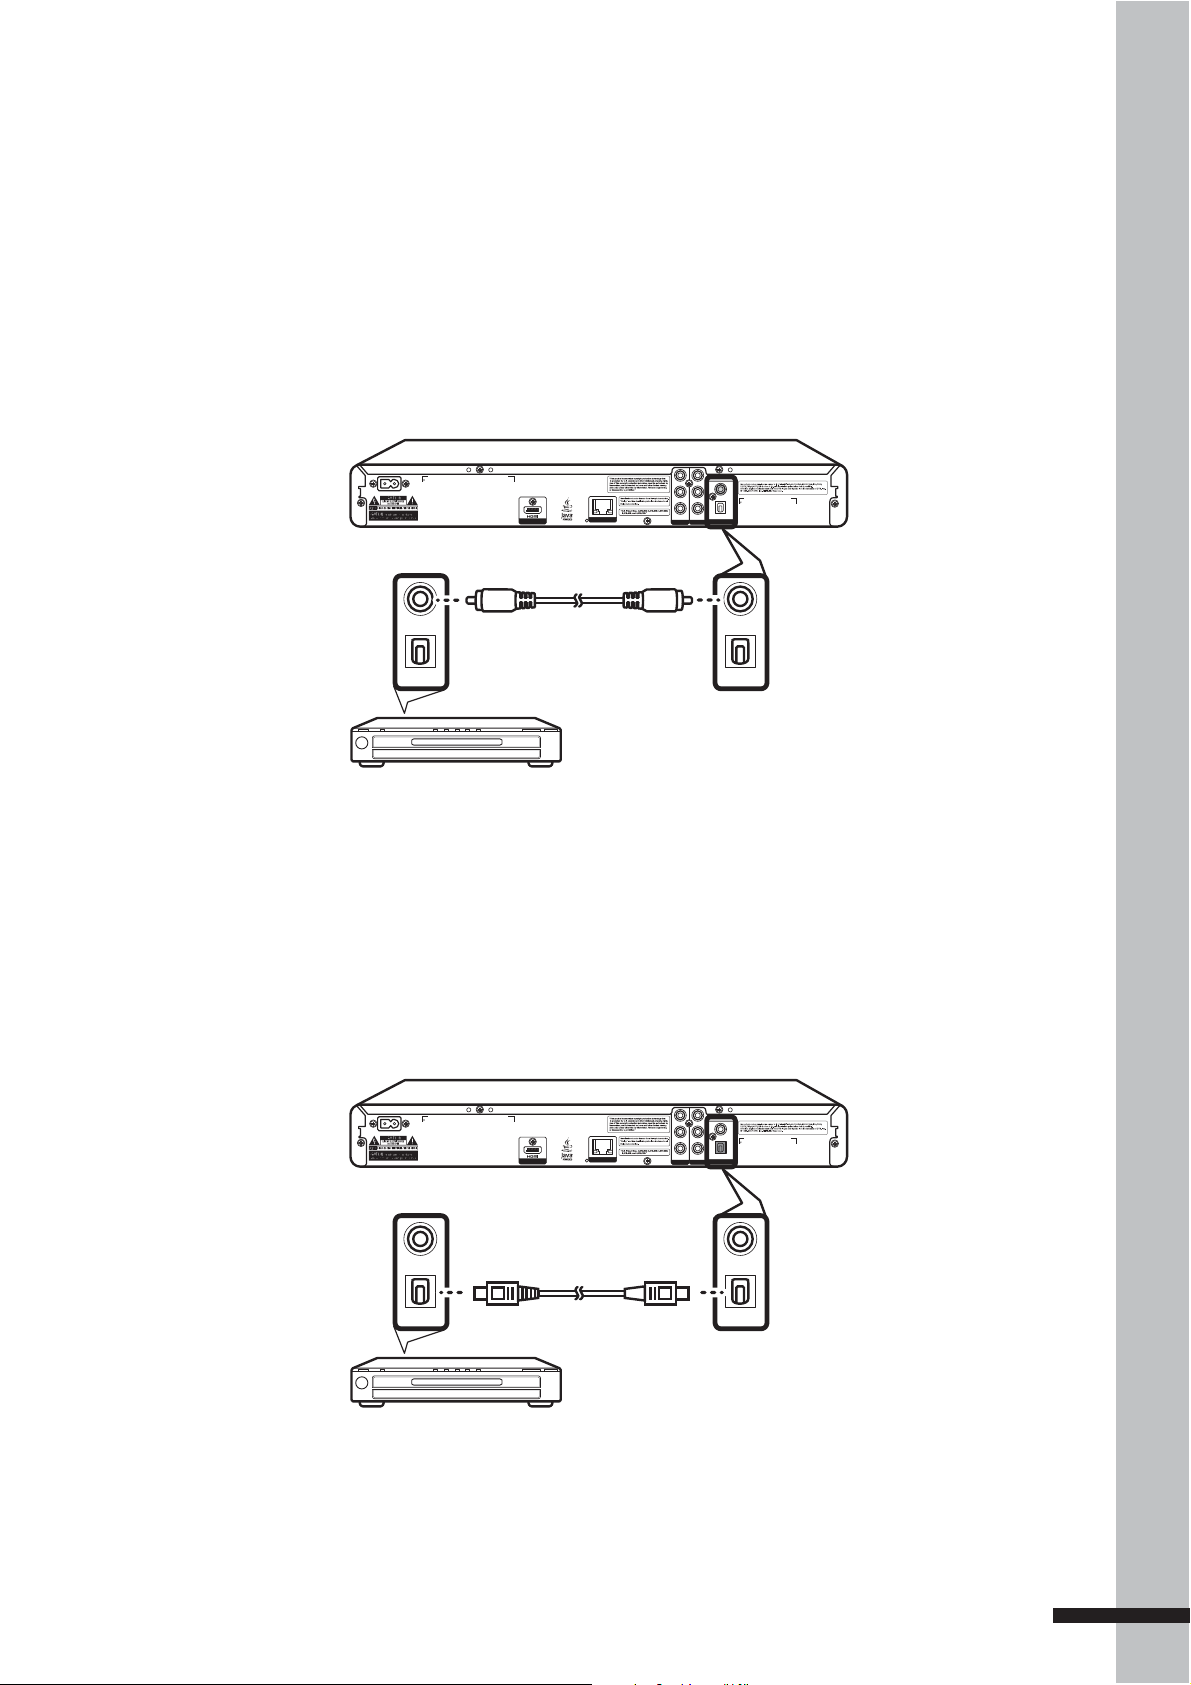
Connecting Using Digital Audio Cable
If you want to enjoy Dolby Digital, or DTS decoder function on your amplifier or receiver, use
either a coaxial or optical audio cable.
Using a Coaxial Cable
Use a coaxial cable to connect the COAXIAL DIGITAL OUT jack on your BD player to the
COAXIAL DIGITAL INPUT on the amplifier or receiver.
BD Player
Y
AC IN ~
DIGITAL AV OUTPUT
LAN
B
P
P
R
COMP OUT AV OUTPUT
VIDEO
COAXIAL
L
OPTICAL
R
DIGITAL AUDIO OUT
COAXIAL
OPTICAL
COAXIAL
OPTICAL
Amplifi er or receiver
Using an Optical Cable
Use an optical cable to connect the OPTICAL DIGITAL OUT jack on your BD player to the
OPTICAL DIGITAL INPUT on the amplifier or receiver.
BD Player
Y
AC IN ~
DIGITAL AV OUTPUT
LAN
B
P
P
R
COMP OUT AV OUTPUT
VIDEO
COAXIAL
L
OPTICAL
R
DIGITAL AUDIO OUT
COAXIAL
OPTICAL
Amplifi er or receiver
COAXIAL
OPTICAL
Getting Started
21
Page 22

Connecting to the Internet
Your BD player can connect to a local area network (LAN) via the LAN port on the rear panel.
By connecting to the Internet, your BD player can use a BD disc that supports BD-Live
function. See ‘Using BD-Live™’ (p. 33).
Use an Ethernet RJ-45 cable to connect the LAN port on the BD player to the LAN port on your
modem or router.
BD Player
Y
B
P
P
R
COMP OUT AV OUTPUT
VIDEO
COAXIAL
L
OPTICAL
R
DIGITAL AUDIO OUT
Router
AC IN ~
DIGITAL AV OUTPUT
LAN
LAN
Getting Started
LAN
Internet Connection
After connecting, configure your BD player for network communication in the Network menu.
See ‘Network’ (p. 47) for further details.
Note:
Depending on the internet service provider (ISP), the number of devices that can receive Internet
connection may be limited. If your ISP limits subscription to one device, your BD player may not be
allowed to connect when a PC is connected. Disconnect the PC fi rst.
22
Page 23

Connecting the Power Cable
After all the required connections are completed, connect the power cable to the AC IN
terminal of your BD player. Then plug the power cable of your BD player into the main outlet.
BD Player
Y
AC IN ~
DIGITAL AV OUTPUT
LAN
P
B
P
R
COMP OUT AV OUTPUT
VIDEO
COAXIAL
L
OPTICAL
R
DIGITAL AUDIO OUT
Main outlet
Turning the Power On
After completing all the required connections, you are now ready to start using your BD player.
1 Turn on the power of the TV first.
2 Press on the front panel of the BD player or on the
remote control to turn on your BD player.
The LED indicator turns off and the front panel displays:
3 Select the input signal source of your TV so that the signal from the BD player appears on
the TV screen.
Getting Started
23
Page 24

Easy Setup
4 Press then OK to select the aspect
ratio.
Wizard
When turning on for the first time, the Easy
Setup Wizard is displayed on screen. Follow
the wizard to configure the basic settings of
your BD player.
1 Press OK to continue.
Page 1/5
Welcome
to the BD Player Setting Wizard!
This wizard will ask you some simple
questions and will help guide you through the
player setup.
ENTER
Easy Setup
Next
Page 4/5
Choose
an aspect ratio that fits your TV
The change will be applied on the next
wizard page. If you like it, you can continue
on, or come back to this screen and modify
the aspect ratio.
Previous
5 Press OK to complete setup.
Page 5/5
Setting
The setup wizard is complete!
Please press the OK button to go to the Home Menu.
16:9 Full
16:9 Normal
4:3 Pan&Scan
4:3 Letterbox
ENTER
Next
Easy Setup
Easy Setup
Getting Started
2 Press then OK to select the
on-screen display (OSD) language.
Page 2/5
Choose
Your language
The selected language will be applied to all
on-screen display functions, including menus, etc.
Previous
English
French
ENTER
Easy Setup
Next
3 Press then OK to select the
resolution.
Page 3/5
Choose
a resolution that is supported by your TV.
Once you make a selection, the resolution will
change and you will be asked to confirm the
chosen setting. If you do not respond within
12 seconds, the resolution will automatically
return to the previous setting.
Easy Setup
Auto
480I/576I
480P/576P
720P
1080I
1080P
Previous
ENTER
Finish
24
Previous
ENTER
Next
Page 25

Chapter 3
Playback
This chapter describes the main
operations of your BD player, such as:
Playing a Disc•
Playing USB drive content•
Using BD-Live™•
Other Playback Functions•
Playing a Disc
BD
DVD
AVCHD
VCD
CD
1 Press to open the disc tray.
2 Place the disc on the disc tray with the
playback side facing down.
The procedures described are remote
control based. Similar buttons can also
be pressed on the front panel of your
BD player.
3 Press to close the disc tray.
The BD player will determine the type of
disc inserted. It may take a short while to
load the disc. The disc type is displayed
on the TV screen.
4 Some discs start playing automatically,
and others do not. In this case, press
to start playback.
25
Page 26

Playback Controls
Forward or Reverse
Some discs start playing automatically after
the BD player loads the disc. If not, use the
remote control to start playback.
1 Press to start playback.
• .
To pause, press
To stop playback, press • .
To resume playback, press
• again.
2 When playback is finished, press to
open the disc tray.
3 Remove the disc, then press to close
the disc tray.
4 Press to turn off the BD player.
Playback
BD
DVD
AVCHD
VCD
1 During playback, press or to reverse
or forward playback.
2 Press the button repeatedly to switch
scanning speed (2x, 4x, 8x, 16x, 32x, 64x,
128x).
Note:
You can also reverse or forward scan by holding
the button down. Normal playback resumes
when the button is released.
»
Resuming playback
Some discs do not support resume •
playback function.
When • is pressed, the point where
it stopped is saved in the BD player’s
memory. When is pressed, playback
resumes from the point where it stopped.
Unless due to the following conditions:
When the disc tray is opened.
•
When the BD player’s power is turned •
off.
To cancel resume playback, press •
WARNING
Do not leave the disc inside the BD player.
twice.
3 To resume to normal playback, press .
Some discs automatically resumes
normal playback when switching to a
new chapter.
Notes:
When scanning BD, DVD, and VCD discs, no •
sound output is produced.
Sound is output during CD disc scanning.•
Playback
26
Page 27

Skipping Content
BD
DVD
AVCHD
CD
1 Press to skip to the beginning of the
next chapter/title/track.
2 Press to skip to the beginning of the
current chapter/title/track.
3 Press twice to skip to the beginning of
the previous chapter/title/track.
Note:
Step Rewind or Step
Forward
BD
DVD
AVCHD
VCD
1 Press to pause playback.
2 Press
playback one step or frame at a time.
or to rewind or forward the
Some discs may not support this function.
Slow Rewind or Slow
Forward Playback
BD
DVD
AVCHD
VCD
1 During playback, press
rewind or forward playback in slow
motion.
or to
3 Press to resume playback at normal
speed.
Note:
Some discs may not support this function.
2 Press the button repeatedly to switch
slow motion speed (1/16, 1/8, 1/4, 1/2).
3 Press to resume playback at normal
speed.
Note:
Some discs may not support this function.
Playback
27
Page 28
Playing Specific
Titles, Chapters, or
Tracks
4 Press OK.
BD
DVD
AVCHD
CD
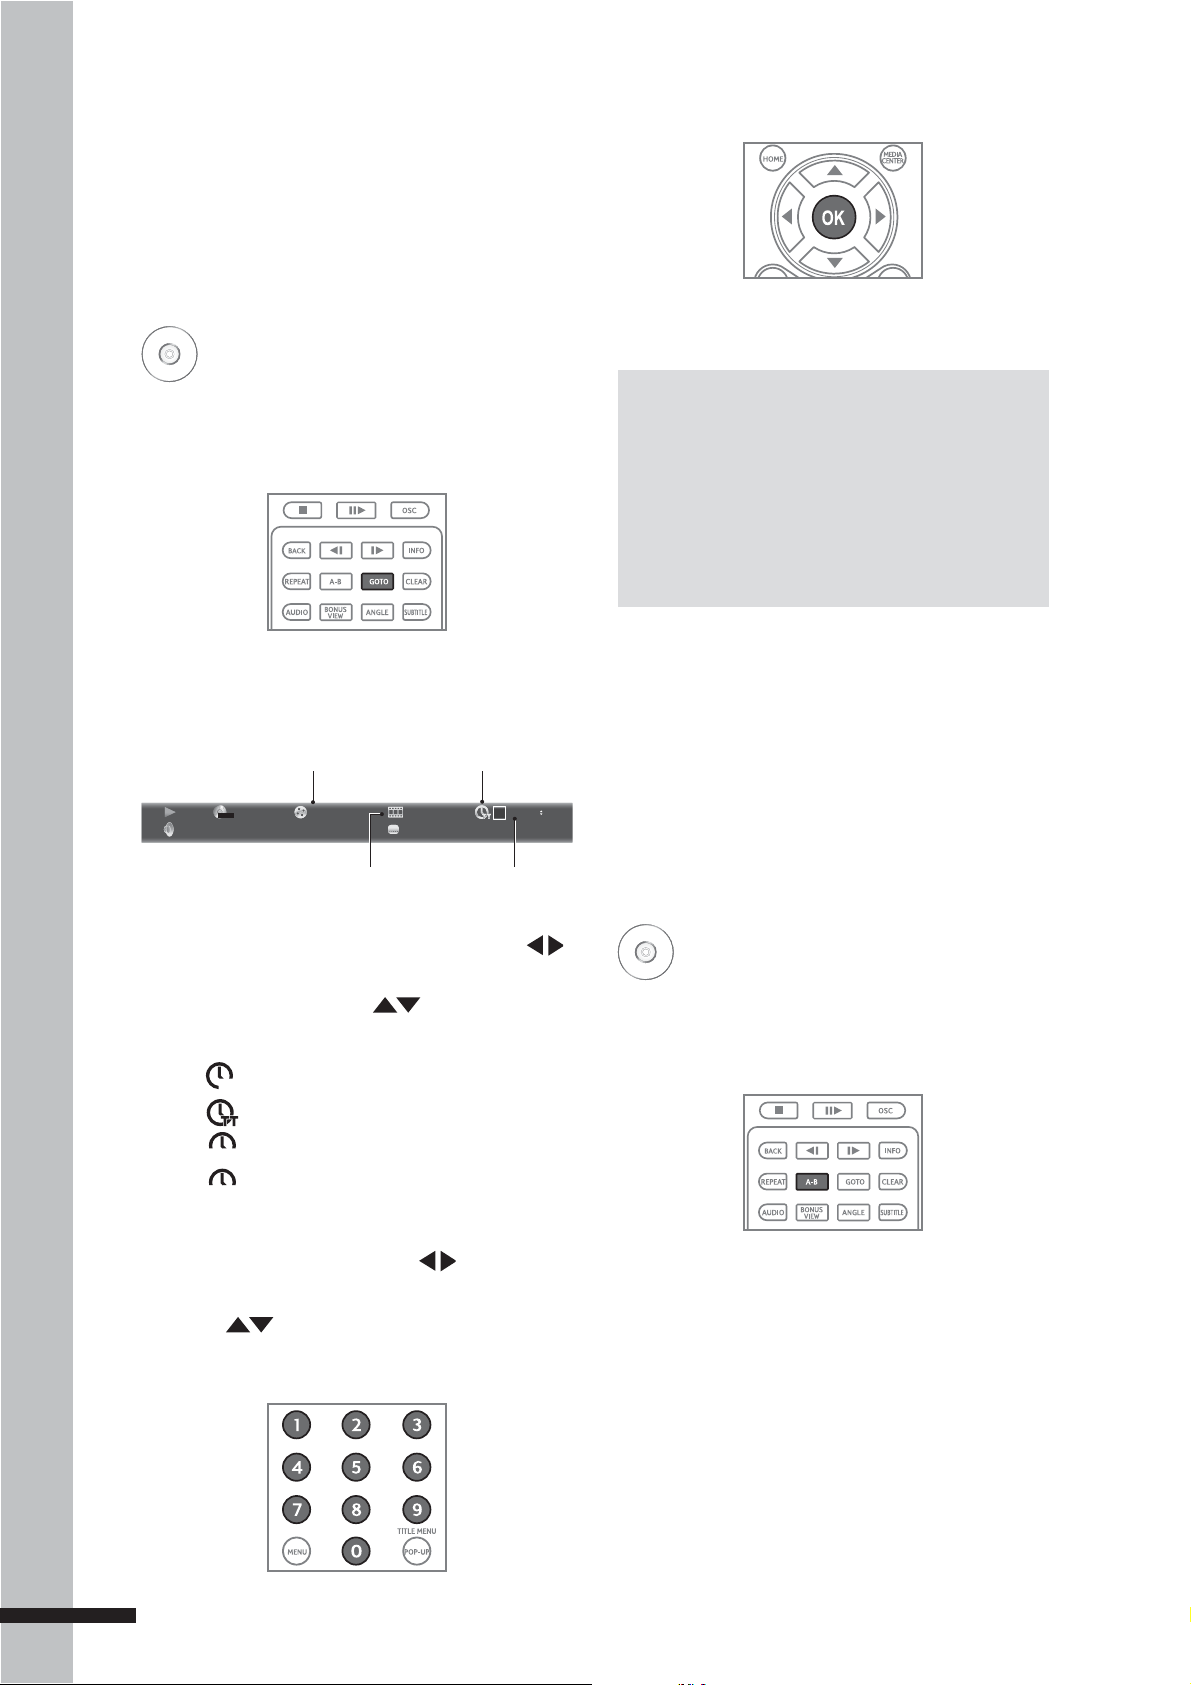
1 Press GOTO to jump to a specific title/
chapter/track/time.
The Info bar appears on the TV screen.
Current title or track number / Total
number of titles or tracks
MPEG
DVD+VIDEO
1/1 English 1/1 ChinesePCM Stereo
2 / 8 3 / 3
Current chapter number/
Total number of chapters
Time Icon
00 :02 :40
Time
2 To select title or chapter/track, press
then OK.
5 Press INFO to close the Info bar.
Notes:
Press • CLEAR to delete the numbers you
have entered.
Displayed items vary depending on the •
inserted disc.
Some discs may not support this function.•
Playing a Specific
Section Repeatedly
(A-B)
BD
DVD
AVCHD
VCD
CD
To select time, press
changes as follows:
CH
TRACK
DISC
Chapter time is selected.
Title time is selected.
Track time is selected.
Disc time is selected.
. The time icon
1 During playback, press A-B to select the
starting point (A).
To select type of time, press OK. To move
between time field, press .
2 Press A-B again to select the end point
(B).
3 Press or the number buttons of the
title/chapter/track/time you wish to jump
to.
3 Press A-B again to cancel A-B Repeat.
Playback
28
Page 29

Playing Repeatedly
Switching Subtitles
BD
DVD
AVCHD
VCD
CD
Use the repeat function to play the current
title, chapter or track repeatedly.
1 During playback, press REPEAT
repeatedly to select repeat mode option:
REPEAT CHAPTER/TRACK REPEAT
ALL REPEAT OFF.
2 Press REPEAT repeatedly again to select
REPEAT OFF.
Note:
BD
DVD
During playback, press SUBTITLE repeatedly
to select subtitle options.
Note:
Some discs may not support this function.
Switching Audio
Repeat function is cancelled when you press .
Switching Camera
Angles
BD
DVD
AVCHD
When you insert a disc that is recorded with
different camera angles, use this function to
switch the angle view.
During playback, press ANGLE repeatedly to
select angle options.
Streams
BD
DVD
AVCHD
VCD
Some discs are recorded with multiple audio
streams. Use this function to switch audio
streams during playback.
During playback, press AUDIO.
Note:
Some discs may not support this function.
Note:
Some discs may not support this function.
Playback
29
Page 30

Displaying the Disc
Information
BD
DVD
AVCHD
VCD
CD
1 During playback, press INFO.
2 The disc information is displayed on the
upper left corner of the screen.
Play mode
indicator
Current title or track number / Total
number of titles or tracks
Using On-Screen
Controls (OSC)
BD
DVD
AVCHD
VCD
CD
1 During playback, press OSC.
2 The OSC menu is displayed on the left of
the screen.
Disc type indicator
DVD+VIDEO
1/1 English 1/1 ChinesePCM
TT
A-B
Repeat
mode
indicator
Repeat A-B
enabled
Current audio stream
MPEG
Stereo
2 / 8 3 / 3
Current chapter number/
Total number of chapters
Time elapsed
00 :02 :40
Subtitle
3 Press INFO again to close disc
information.
Note:
Displayed items vary depending on the inserted
disc.
DVD Video
04 / 08
03 / 08
00:02:24
Normal
English PCM
01 / 01
Title
Selected submenu
Disc type indicator
Current title or track number /
Total number of titles or tracks
Current chapter number /
Total number of chapters
Time elapsed
Playback mode
Audio stream
Current camera angle /
Total number of angles
Next page indicator
3 Press to highlight submenu. The
following submenu may be available:
•
Title/Track
Chapter•
Time•
Playback mode - Select this option to •
choose normal, shuffle, or random play
mode options. During shuffle mode,
each chapter/title will be played only
once. During random mode, titles/
Playback
chapters are randomly cued, repetition
of titles/chapters may also occur.
Available options are: Random ALL,
Random TT, Random CH, Shuffle ALL,
Shuffle TT, Shuffle CH, and Normal.
30
Page 31

Audio stream•
Angle•
Subtitle•
Bitrate•
Still On/Off - Some DVD discs supports •
freezing of video pictures as a still
picture to provide better image view.
Select this option to enable or disable
the Still function. Availability of the Still
submenu depends on the inserted disc.
Instant Search - Forwards playback for
•
10 seconds.
Instant Replay - Rewinds playback from
•
10 seconds ago.
4 Press to enter submenu. The current
option is displayed.
DVD Video
BONUSVIEW™
BD
Your BD player supports BONUSVIEW™.
BONUSVIEW™ allows you to enjoy more
functions such as picture-in-picture,
secondary audio, and virtual packages,
among others with a BD disc that supports
BONUSVIEW™.
1 Insert the BD disc in the disc tray.
2 After the BD disc loads, press
BONUSVIEW to play secondary video.
04 / 08
03 / 08
00:02:24
Normal
English PCM
01 / 01
Title
04 / 08
Indicates button that
can be pressed; other
options are available.
5 Press to select other options.
6 Press OK or to apply selected option.
7 Press OSC to close OSC menu.
Notes:
Some BD discs do not support •
BONUSVIEW features. The availability
of the BONUSVIEW function of your BD
player, depends on the inserted BD disc.
When playing secondary video, some •
playback functions may not be available.
Functions like slow motion or step
forward works only during primary video
playback.
31
Playback
Page 32

BD-Live™
Setting Up the Player
for BD-Live™
BD
Some BD discs contain additional features
that are made available to players that are
connected to the Internet. These additional
features may include things like:
The ability to download new movie trailers•
Additional commentaries by actors or •
directors
Multiple people game and chat•
You can access these features on your BD
player using BD-Live™.
Requirements
»
You need the following:
In order to access BD-Live™, do the
following steps:
1 Connect your BD player to the Internet
connection.
Connect one end of the Ethernet RJ-45 •
cable to the LAN port of your BD player
and the other end to a router or modem.
See ‘Connecting to the Internet’ (p. 22).
2 Allow BD-Live access in the BD player’s
home menu.
Press
• HOME on the remote control to
access the home menu.
Go to • General Setting > Network. Set
BD-Live Connection to ‘Permitted’.
See ‘Network’ (p. 47) for details.
Internet access•
Ethernet RJ-45 cable•
At least 1GB USB memory drive (FAT32 •
formatted)
BD disc that supports BD-Live™ features•
3 Insert the USB drive with at least 100MB
free space in the USB port of your BD
player.
BLU-RAY DISC PLAYER
When a USB drive is inserted, the BD
player automatically assigns it as the BD
storage.
Note:
If there is not at least 100MB of free space on
the USB drive, clear up some space.
TM
Playback
32
Page 33

Using BD-Live™
When you insert a BD disc that supports BDLive, access BD-Live in its Special Features
menu.
You can download contents to your USB
drive. Downloaded contents are stored
under the ‘My Downloads’ folder.
WARNING
Do not remove the USB drive while •
downloading contents or when a BD disc
is still in the disc tray. The USB drive may
be damaged and become unusable with
BD-Live.
Notes:
BD-Live™ may take several minutes to load.•
Depending on the BD disc, BD-Live™ •
function may not be accessible.
Internet connection and speed affect access •
and download time.
33
Playback
Page 34

Chapter 4
Using
Setting Up Data
Disc and USB
Drive
Media
Center
Media Center allows you to browse and
play media files such as videos, photos,
and music files saved in a data disc or a
USB drive.
Video
Music
Photo
Many audio, video, and photo files that can
be viewed on a personal computer can
also be played back on the BD player. This
is accomplished by first putting the audio,
video, or photo files onto a data disc or a
USB drive.
Setting Up Data Disc
For Playback
Use a computer to set up a data disc. A data
disc is a disc where files have been copied
to or “burned” using a computer.
Insert the data disc into a computer and
copy the desired files onto the disc. You can
burn files onto any of the following discs:
CD / -DA / -R / -RW•
VCD•
SVCD•
DVD+R / +RW / Dual Layer•
DVD-R / -RW / Dual Layer•
BD-R•
BD-RE•
BD-ROM•
34
Page 35

Setting Up the USB
Playing Files From a
Drive For Playback
USB Drive Requirements »
USB drive must be formatted as “FAT”.•
Note:
Use only a USB drive or sometimes called a •
thumb drive
Never use an MP3 player or an external hard •
disk drive.
Insert a USB drive into a computer and copy
the desired files onto the USB drive.
.
Playing Files from a
Data Disc
USB Drive
1 If turned on, press to turn off the BD
player.
2 Insert the USB drive into the USB port of
your BD player.
3 Press to turn on the BD player.
4 Press Media Center to display the Media
Center menu. See ‘‘Media Center Menu’
(p.36) for details.
WARNING
Do not insert or remove the USB drive •
when the BD player is turned on. Doing
so may corrupt the data on the USB drive.
Turn off power first before inserting or
removing the USB drive.
1 If turned off, press to turn on the BD
player.
2 Press to open the disc tray.
3 Insert the data disc into the disc tray.
4 Press to close the disc tray.
3 The BD player determines whether files
on the data disc contain music, videos, or
photos.
If the data disc contains supported files,
the Media Browser screen is displayed
on screen. See ‘Media Center Menu’
(p.36) for details.
Note:
Only the fi les with the following extensions are
supported by the BD player:
Video files:• *.WMV, *.AVI, *.MP4, *.M4V,
*.MKV
Music files:• *.WMA, *.AAC
Picture files:• *.JPG, *.JPEG, *.PNG, *.GIF
Playback
35
Page 36

Media Center Menu
1 Press MEDIA CENTER to display the Media Center menu.
The items on the Media Center menu vary depending on the
type of disc inserted, or the type of files that is contained on
the disc or the USB drive.
This icon appears when
supported video files are
saved on an inserted data
disc or USB drive.
This icon appears when a
disc is inserted in the disc
tray. In this case, a DVD
disc is inserted.
Item 1 / 4
USB1
DVD Video
Playlist
2 Press , then OK to select the source device or folder.
3 The Media Browser screen is displayed.
Item 1 / 3
USB1
Media Center
Type:USB
Size:1620.281M
POPUP
Edit Menu
MDEIA
Exit
CENTER
Media Center
Type:Folder...
Photo
Music
Video
POPUP
Edit Menu
MDEIA
Exit
CENTER
4 Press , then OK to select the type of file to browse.
5 To return to the previous screen, press .
Note:
Playback
Even if the inserted data disc or USB drive contains a mix of music, video, and photo fi les, you can only
browse and playback one type of fi le at a time. For example, if you enter the Music folder, only music
fi les can be browsed, added to playlist and played back. To browse photo fi les, go back to the Media
Browser screen and select Photo.
36
Page 37

Viewing Photos
1 From the Media Browser menu, press to highlight Photo.
2 Press OK. The File Selection screen is displayed.
3 Press to choose a subfolder or file.
Item 1 / 14
USB1/Photo/Folder 1
...
P1000001
P1000002
P1000003
P1000004
P1000005
P1000006
Media Center
Type:JPG
Size:0.2MB
Resolution:725x510
POPUP
Edit Menu
MDEIA
Exit
CENTER
4 The thumbnail and information of the highlighted photo file is displayed on the right panel of
the screen.
5 To view slide show of photos in the folder, press OK.
Using Photo On-Screen Control
1 During slide show, press OSC. The Photo on-screen control (OSC) menu is displayed on the
left side of the screen.
Picture File
01 / 14
Normal
Middle
None
File
Selected submenu
File type indicator
Current file number / Total number of files
Playback mode
Slide show speed
Transition
2 Press to highlight submenu. The following submenu may be available:
• Press to enter submenu, then press and OK to select an option.
File Playback mode - • Press to enter submenu, then press and OK to select an option.
Slide show speed - Press
• OK repeatedly to select speed: Slow, Middle, Fast.
Transition - Press
• OK repeatedly to select transition: None, Wipe left/right, Wipe up/down,
Box in/out, Bleeding, Dissolve, Interlace H/V, Split in H/V, Split out H/V.
Playback
3 Press OSC to close OSC menu.
37
Page 38

Slide Show Functions
During slide show, use the following buttons to perform slide show functions:
To rotate an image, press •
To continue slide show after pausing, press •
To stop slide show, press •
.
To adjust slide show speed (Slow, Middle, Fast), press •
To view previous/next image, press •
. Slide show is paused while rotating image.
.
.
.
To set repeat mode (Repeat, Repeat All, Off), press • REPEAT repeatedly.
To zoom in/out an image, press • ZOOM repeatedly.
To view thumbnails, press • DIGEST. To return to slide
show, press DIGEST again.
Playing Music
1 From the Media Browser menu, press to highlight Music.
2 Press OK. The File Selection screen is displayed.
3 Press to choose a subfolder or file.
Item 1 / 8
USB1/Music/Folder 1
...
Get Back
Fillin' Me Up
Everybody
Gimme More
A Song About U
Been A While
Media Center
Type:MP3
Total Time:03:41
Title:Get Back
Artist:Britney Spears
Album:Blackout
Genre:Pop
POPUP
Edit Menu
MDEIA
Exit
CENTER
4 The information of the highlighted music file is displayed on the right panel of the screen.
5 To play the music files in the folder, press OK.
Playback
38
Page 39

Music Playback Status Screen
Once music starts playing, the Music Playback Status screen appears.
Playback mode
indicators
Album art
A-B
1 / 8
Typ e:
Total Time:
Title:
Artist:
Album:
Genre:
MP3
03:41
Get Back
Britney Spears
Blackout
Pop
00 :02 :40
Song Title, Artist
and Album
Progress bar
Press • INFO to view or hide the Music Playback Status screen.
During music playback, you can continue to browse for other music files or view photos. •
Press MEDIA CENTER.
Press • OSC to display music on-screen control menu. See ‘Using On-Screen Controls (OSC)’
(p. 30) for details.
Playing Videos
1 From the Media Browser screen, press to highlight Video.
2 Press OK. The File Selection screen is displayed.
3 Press to choose a subfolder or file.
4 Press to start playing the video file.
5 To stop playback, press .
Playback
39
Page 40

Creating a Playlist
1 From the File Selection screen, press to highlight the file you want.
2 Press to select the file. A check mark before the file name is displayed.
3 Press MENU. A pop-up menu is displayed.
Item 1 / 14
USB1/Photo/Folder 1
...
P1000001
P1000002
P1000003
P1000004
P1000005
P1000006
Add to Playlist
Select all
Clear all
Cancel
Media Center
Type:JPG
Size:0.2MB
Resolution:725x510
POPUP
Edit Menu
MDEIA
Exit
CENTER
4 To select all files, select Select All, then press OK. All files will be checked.
5 To add selected files to playlist, press MENU.
6 Select Add to Playlist, then press OK.
Playing Files from the Playlist
1 From the Media Center menu, press to highlight Playlist.
2 Press OK. The File Selection screen is displayed.
3 Press to select the type of playlist file to browse.
4 Press OK to play playlist.
To remove files from the playlist
»
1 Press to highlight the file to remove.
2 Press MENU to display the pop-up menu.
3 Select Remove from Playlist, then press OK to remove the highlighted file.
4 To select all files, select Select All from the pop-up menu. All files will be checked.
Playback
5 To remove selected files from the playlist, press MENU.
6 Select Remove from Playlist, then press OK.
40
Page 41

Chapter 5
Using the Home
Menu
Settings
1 Press HOME to display the Home Menu.
and Further
Adjustments
2 Press to move up and down the menu
In order to configure the BD player
for proper audio and video output,
configure the required settings in the
Home menu.
selection.
Home Menu
This chapter explains how to configure
your BD player.
--- General Setting ---
System
Language
Playback
Security
Network
Use cursor key to move focus, use
"OK" key to select.
Screen Saver
Load Default
Upgrade
Easy Setup
BUDA
3 Press OK or to enter menu.
--- General Setting ---
System
Language
Playback
Security
Network
Screen Saver
Load Default
Upgrade
Easy Setup
BUDA
On
More...
More...
More...
HOME
Exit
Home Menu
On
Off
Use cursor key to move focus, use
"OK" key to select.
Arrows indicate buttons that
can be pressed.
HOME
Exit
4 Press to move up and down the
submenu.
41
Page 42

5 Press OK or to access the next level
submenu.
Indicates currently
selected setting.
Home Menu
--- General Setting ---
System
Language
Playback
Security
Network
Use cursor key to move focus, use
"OK" key to select.
Screen Saver
Load Default
Upgrade
Easy Setup
BUDA
HOME
On
Off
Exit
6 Press to select desired setting then
press OK to confirm.
7 Press to return to the previous screen
or menu.
8 Press HOME again to exit Home menu.
Settings and Further Adjustments
42
Page 43

General Settings
System
Home Menu
--- General Setting ---
System
Language
Playback
Security
Network
Use cursor key to move focus, use
"OK" key to select.
Screen Saver
Set to ‘On’ to activate the screen saver
capability of the BD player. This function
causes the TV to display a moving logo after
a certain period of time without pressing
any buttons on the front panel or the remote
control when a setup menu or disc title
menu is displayed on the screen.
Screen Saver
Load Default
Upgrade
Easy Setup
BUDA
HOME
On
More...
More...
More...
Exit
Upgrade
Use this option to select the system upgrade
method. Available options are via:
Disc•
USB Storage•
Note:
Ensure that Disc Auto Playback is set to On
when using upgrade via disc.
Disc Auto Upgrade
Set to ‘On’ to automatically upgrade a disc •
that contains an upgrade file package as
soon as it loads.
Set to ‘Off’ to disable auto upgrade.•
Load Default
Use this option to reset the BD player to its
default factory settings.
Easy Setup
Use this option to activate the initial setup
wizard. See ‘Easy Setup Wizard’ (p.24) for
details.
BUDA
Use this option to view BUDA information
and set BUDA mode.
Settings and Further Adjustments
43
Page 44

Language
Home Menu
--- General Setting ---
The Language menu allows you to configure
the language that is displayed for the
following:
OSD
Set the on-screen display (OSD) language.
Available options are English, German,
French, Italian, Spanish, Dutch, Portuguese,
Traditional Chinese, Russian, Turkish, and
Japanese.
Menu
Set the menu language. Available options
are English, French, Chinese, Spanish,
German, Italian, Dutch, Portuguese, Danish,
Swedish, Finnish, Norwegian, Russian,
Settings and Further Adjustments
Korean, and Japanese.
System
Language
Playback
Security
Network
Use cursor key to move focus, use
"OK" key to select.
OSD
Menu
Audio
Subtitle
Audio
Set the audio language. Available options
are English, French, Chinese, Spanish,
German, Italian, Dutch, Portuguese, Danish,
Swedish, Finnish, Norwegian, Russian,
Korean, and Japanese.
Subtitle
Set the subtitle language. Available options
are English, French, Chinese, Spanish,
German, Italian, Dutch, Portuguese, Danish,
Swedish, Finnish, Norwegian, Russian,
Korean, and Japanese.
To disable subtitle, select ‘Off’.
English
English
English
English
HOME
Exit
44
Notes:
Not all the supported languages of the BD player are also available on most discs. •
Some discs may not allow the audio language to be set on the settings menu of the BD player. In •
this case, select the audio language from the menu of the disc.
Page 45

Playback
Home Menu
--- General Setting ---
System
Language
Playback
Security
Network
Use cursor key to move focus, use
"OK" key to select.
Closed Caption
Use this option to enable or disable closed
caption function.
Closed Caption
PBC
HOME
On
On
Exit
PBC
Use this option to display or hide the
playback control (PBC) menu.
Settings and Further Adjustments
45
Page 46

Security
Home Menu
--- General Setting ---
System
Language
Playback
Security
Network
Use cursor key to move focus, use
"OK" key to select.
The Security menu allows you to control the
playback of inappropriate discs.
After parental control is set and a disc
with a higher rating level than the one set
is inserted into the disc tray, you will be
prompted to enter the password first before
playing the disc.
Change Password
Set the 4-digit security password.
Change Password
Parental Control
Country Code
HOME
More...
More...
More...
Exit
Parental Control
Use this option to the restrict playback of
discs encoded with a rating level equal to
or higher than the level you set. Available
settings are:
Off•
KID SAFE•
G•
PG•
PG-13•
1 Press the number buttons to enter the
current password.
2 Press OK.
3 Enter the new password, then press OK.
Settings and Further Adjustments
4 Re-enter the new password, then press
OK.
Once a password has been saved, it must be
entered first before you can change any item
in the security menu.
Note:
The default initial password is 0000.
PGR•
R•
NC-17•
ADULT•
Note:
You will be prompted to enter the password
before being allowed to change this setting.
Country Code
Set the country where you are in.
Note:
You will be prompted to enter the password
before being allowed to change this setting.
46
Page 47

Network
Home Menu
--- General Setting ---
System
Language
Playback
Security
Network
Use cursor key to move focus, use
"OK" key to select.
Internet Connection
Use this option to enable or disable internet
connection.
BD-Live Connection
Use this option to control which websites
the BD player is allowed to access
additional content when connected to BDLive Internet. Available settings are:
Internet Connection
BD-Live Connection
Enable
Permitted
HOME
Exit
Partial Permitted:• Only allow the inserted
BD disc to download content from a
BD-Live website which has a valid online
certificate. This will reduce the changes
of downloading malicious content onto the
BD player.
Prohibited:• Blocks inserted BD disc from
accessing BD-Live content over the
Internet.
Permitted: • Allow the inserted BD disc to
access content from all BD-Live Internet
sites whose Internet address is encoded
onto the disc. There is no danger of
malicious code download from valid
commercial BD discs, but choosing this
option and downloading BD-Live content
via illegally authored BD discs, or discs
obtained from questionable sources, could
result in malicious code being downloaded
onto the BD player.
Settings and Further Adjustments
47
Page 48

Display Settings
TV
Home Menu
--- Display Setting ---
TV Screen
Select this option to set aspect ratio of your
TV. Available settings are:
16:9 Full:• Select when connected to a 16:9
wide TV.
16:9 Normal:• Select when connected to a
16:9 TV.
4:3 Pan&Scan:• Displays when a standard
4:3 TV is connected. Pictures are cropped
to fill the TV screen with both sides cut off.
4• :3 Letterbox: Select when a 4:3 standard
TV is connected. Displays pictures with
black bars on top and below the picture.
Settings and Further Adjustments
TV
Video Processing
Use cursor key to move focus, use
"OK" key to select.
TV Screen
Resolution
TV System
Color Space
HDMI Deep Color
Notes:
Setting the BD player for an output resolution •
that is not supported by your TV will result in
a blank or unreadable TV screen.
To play a BD or DVD disc when connected to •
an HDMI TV, the TV MUST support the HDCP
copyright protection system.
TV System
Select this option to set the TV system in
your area. Available settings are:
NTSC•
PAL•
Multi•
16:9 Full
Auto
NTSC
RGB
Off
HOME
Exit
Resolution
Select the video resolution according to the
maximum resolution of your TV. Check your
TV’s user manual. Available settings are:
Auto•
480I/576I•
480P/576P•
720P•
1080I•
1080P•
48
Note:
TV Type must be set appropriately. Choosing the
wrong type may result in a black screen.
Color Space
Select the color space. Available settings
are:
RGB•
YCbCr•
YCbCr422•
Full RGB•
Page 49

HDMI Deep Color
Select this option to set HDMI deep color.
Available settings are:
30 bits•
36 bits•
Off•
HDMI 1080P 24Hz
Set to ‘On’ if connected to a 1920 x 1080/24P
HDMI TV.
Video Processing
The Video Process menu allows you to
adjust basic display settings such as
brightness, contrast, hue, saturation, and
sharpness.
Video Adjust
Select this option to adjust the video
brightness, contrast, hue, and saturation.
Brightness
Contrast
Hue
Saturation
Change
BACK
Exit
1 Press to move up and down the
selection.
2 Press to adjust the selected setting.
3 Press BACK (Return) to exit the screen.
Sharpness
Select the sharpness level of the video.
Available settings are:
Settings and Further Adjustments
High•
Medium•
Low•
49
Page 50

Audio Setting
The Audio Setting menu allows you to configure the proper audio settings according to the
type of audio system you use.
Home Menu
--- Audio Setting ---
Audio Output
Spdif
SPDIF (Sony Philips Digital InterFace) is a
digital audio format which carries digital
audio signals between devices.
Select this option to set the SPDIF audio
output format if your BD player is connected
to an amplifier or receiver which supports
Dolby Digital or DTS surround sound using a
digital coaxial cable. Available settings are:
Bitstream:• Outputs the orginal bitstream
audio signal without processing.
Settings and Further Adjustments
PCM:• Audio ouput is converted to Linear
PCM.
Reencode:• Select this option if the BD
player is connected to a decoder.
Off•
Note:
To achieve the best audio quality, you must also
set up the menu on the disc to set the highest
quality audio track supported by the receiver or
amplifi er.
Audio Output
Use cursor key to move focus, use
"OK" key to select.
SPDIF
HDMI
Down_samp
HDMI
Select this option to set the audio output
format if your BD player is connected to an
amplifier or receiver which supports Dolby
Digital or DTS surround sound using an
HDMI cable. Available settings are:
Bitstream: • Outputs the original bitstream
audio signal without processing.
PCM:• Audio output is converted to linear
PCM.
Reencode:• Select this option if the BD
player is connected to a decoder.
Off•
Down_samp
Set the PCM capabilities of the connected
surround receiver or amplifier. This setting is
applicable when the BD player is connected
to an amplifier or receiver and has no effect
when connected via HDMI. Check the PCM
sampling rate of your surround receiver
or amplifier to set the appropriate PCM
sampling rate:
48K:• This is the default setting. It is best
to retain this setting in the following
conditions:
HOME
PCM
PCM
48K
Exit
50
Page 51

If the BD player is not connected to a •
surround receiver or amplifier.
If the BD player is connected to a
•
surround receiver or amplifier via HDMI
output.
If you are unsure of the surround
•
receiver or the amplifier’s PCM sampling
rate.
96K:• Select this option if the connected
amplifier or receiver is not capable of
handling 192 kHz signals.
192K: • Select this option if the connected
amplifier or receiver is capable of handling
192 kHz signals.
Note:
Setting an incorrect PCM sampling rate may
result in unpredictable audio playback.
Settings and Further Adjustments
51
Page 52

System Information
The System Information menu displays the software version and the MAC address of your BD
player.
Home Menu
--- System Information ---
Software Version: BDP V2.0
MAC: FF -FF -FF -FF -FF -FF
Settings and Further Adjustments
Use cursor key to move focus, use
"OK" key to select.
HOME
Exit
52
Page 53

No power. »
Chapter 6
Check if the power cord is connected •
securely.
The POWER button is not pressed.•
Troubleshooting
Disc tray opens automatically.
»
The disc is scratched.•
The disc is dirty.•
The disc is not properly fit on the disc tray.•
Use this chapter to find solutions to
some questions that may arise when
using your BD player.
Disc does not play / The front panel
»
display shows “NO DISC”.
The disc is turned over. Re-insert the disc •
with the printed side facing up.
The inserted disc is not supported.•
The region code of the disc does not match •
the BD player.
»
No picture is displayed.
The connection cords are not properly •
connected.
The connection cords are damaged. •
Replace with new ones.
Check the settings in the Display Settings •
menu.
Select the appropriate video input source •
of your TV.
The video output from the BD player goes •
through a VCR before it gets to your TV.
Connect the BD player directly to your TV.
The picture is not displayed properly.
»
Check the settings in the Display Settings •
menu.
Check if the video input signal source of •
your TV is set appropriately.
53
Page 54

There is no sound. »
The remote control does not work. »
The connection cords are not properly •
connected.
The connection cords are damaged. •
Replace with new ones.
The audio setting is not set appropriately.•
Slow motion / step mode is on.•
The playback is paused.•
If connected via optical or coaxial digital •
cable, check if the settings in the Audio
Settings menu is set appropriately.
»
The music file does not play
The data disc is not recorded in MP3 •
format that conforms to UDF (Universal
Disc Format)
The audio file does not have the extension •
*.mp3.
The remote control is not pointed at the •
remote sensor on the BD player.
The remote control batteries are depleted. •
Change with new batteries.
The remote control is too far from the BD •
player.
»
The angles cannot be changed.
The inserted disc is recorded with single •
angle only.
The disc tray does not open. »
Turn off and turn on the BD player again. •
Press the .
Contact your dealer.•
BD-Live feature does not work. »
The photo file cannot be played. »
The data disc is dirty.•
The photo files does not have the •
extension *.jpg / *.jpeg / *.png / *.gif.
The disc does not start playback from »
the beginning.
Random mode is on.•
Repeat mode is on.•
Last memory mode is on.•
»
The BD player does not start playing the
disc automatically.
Disc Auto Playback is set to ‘Off’.•
»
Some function, such as Search, Slow,
Troubleshooting
Step, Repeat, Random, do not work.
Check if the Ethernet RJ-45 cable is •
properly connected.
Internet connection is not established.•
The USB drive is not connected.•
The connected USB drive is not FAT •
formatted.
The connected USB drive is damaged.•
There is no BD disc inserted.•
The inserted disc does not support BD-Live •
features.
Some discs do not support these functions. •
Refer to the disc’s manual.
54
Page 55

Chapter 7
Additional
Information
Upgrading Your
Player
The BD player’s firmware is updated
regularly. Updates are available from the
manufacturer’s website.
To upgrade firmware using a
USB drive
This chapter covers the following topics:
How to upgrade your BD player•
Supported video resolution•
Supported audio output format•
Language code table•
Region code table•
Player specifications•
1 From your computer, connect to the
Internet and visit the manufacturer’s
website.
2 Insert the USB drive into the USB port on
your computer.
3 Copy the firmware upgrade file (*.iso) to
the root directory of the USB drive.
4 Remove any inserted disc or USB drive
from the BD player. And turn off the BD
player.
5 Insert the USB drive into the USB port on
the BD player.
6 Turn on the BD player.
7 Press HOME on the remote control.
8 Press to select General Setting >
System > Upgrade > USB Storage, then
press OK. The firmware begins upgrade.
9 Once completed, a message will appear
on screen.
WARNING
»
DO NOT TURN OFF THE POWER while
upgrading is in progress!
55
Page 56

To upgrade firmware using a
data disc
1 From your computer, connect to the
Internet and visit the manufacturer’s
website.
2 Download the firmware upgrade file
(*.iso) to your computer.
3 Use a commercial software, such as
Nero™, to convert *.iso file to a disc
image.
4 Burn the converted file onto a disc.
5 Remove any inserted disc or USB drive
from the BD player. And turn off the BD
player.
6 Turn the BD player back on.
7 Insert the upgrade disc. The upgrade
screen may take some time to appear.
8 Follow the on-screen instructions to
start upgrade. If the disc does not
automatically upload update, press HOME
on the remote control. Press
to select General Setting > System >
Upgrade > Disc, then press OK. The
firmware begins upgrade.
9 Once completed, a message will appear
on screen.
WARNING
»
Additional Information
DO NOT TURN OFF THE POWER while
upgrading is in progress!
56
Page 57

Video Output
Resolutions
HDMI Video Output
Supported
Resolution
1080p
HDMI Video Output
Resolution
BD - 1080p24
1
Component Video
Outputs
Supported
Resolution
1080p
Film mode
1080p 480p 1080i
1080i 480p 1080i
720p 480p 720p
480p 480p 480p
Commercial Discs
480p 1080i
Non-Commercial
Discs
Film mode
1080p 1080p60
1080i 1080i
720p 720p
480p 480p
480i 480i
HDMI Auto Depends on disc content
Note
This output resolution applies only if the TV •
supports the selected resolution.
1
Applies only if TV supports 1080p24.
Otherwise, the highest resolution supported by
the TV is the output resolution.
DVD - 1080p60
and TV capabilities
480i 480i 480i
HDMI Auto N/A N/A
Note
Applies when video output is not connected •
via HDMI.
Digital Rights Management (DRM) on •
commercial discs prohibits output of
resolution higher than 480p on component
outputs.
Composite Video
Output
Composite output is always 480i (standard
definition).
Additional Information
57
Page 58

Language Abbr. Code
Language Code
Table
Language Abbr. Code
Japanese (ja/jpn) 1001
English (en/eng) 0514
French (fr/fra) 0618
German (de/deu) 0405
Italian (it/ita) 0920
Spanish (es/spa) 0519
Chinese (zh/zho) 2608
Dutch (nl/nld) 1412
Portuguese (pt/por) 1620
Swedish (sv/swe) 1922
Russian (ru/rus) 1821
Korean (ko/kor) 1115
Greek (el/ell) 0512
Afar (aa/aar) 0101
Abkhazian (ab/abk) 0102
Afrikaans (af/afr) 0106
Amharic (am/amh) 0113
Arabic (ar/ara) 0118
Assamese (as/asm) 0119
Aymara (ay/aym) 0125
Azerbaijani (az/aze) 0126
Bashkir (ba/bak) 0201
Belarusian (be/bel) 0205
Bulgarian (bg/bul) 0207
Bihari (bh/bih) 0208
Bislama (bi/bis) 0209
Bengali (bn/ben) 0214
Tibetan (bo/bod) 0215
Breton (br/bre) 0218
Catalan (ca/cat) 0301
Corsican (co/cos) 0315
Czech (cs/ces) 0319
Additional Information
Welsh (cy/cym) 0325
Danish (da/dan) 0401
Dzongkha (dz/dzo) 0426
Esperanto (eo/epo) 0515
Estonian (et/est) 0520
Basque (eu/eus) 0521
Persian (fa/fas) 0601
Finnish (fi/fin) 0609
Fijian (fj/fij) 0610
Faroese (fo/fao) 0615
Frisian (fy/fry) 0625
Irish (ga/gle) 0701
Scots-Gaelic (gd/gla) 0704
Galician (gl/glg) 0712
Guarani (gn/grn) 0714
Gujarati (gu/guj) 0721
Hausa (ha/hau) 0801
Hindi (hi/hin) 0809
Croatian (hr/hrv) 0818
Hungarian (hu/hun) 0821
Armenian (hy/hye) 0825
Interlingua (ia/ina) 0901
Interlingue (ie/ile) 0905
Inupiaq (ik/ipk) 0911
Indonesian (in/ind) 0914
Icelandic (is/isl) 0919
Hebrew (iw/heb) 0923
Yiddish (ji/yid) 1009
Javanese (jw/jav) 1023
Georgian (ka/kat) 1101
Kazakh (kk/kaz) 1111
Kalaallisut (kl/kal) 1112
Khmer (km/khm) 1113
Kannada (kn/kan) 1114
Kashmiri (ks/kas) 1119
Kurdish (ku/kur) 1121
Kirghiz (ky/kir) 1125
Latin (la/lat) 1201
Lingala (ln/lin) 1214
Lao (lo/lao) 1215
Lithuanian (lt/lit) 1220
Latvian (lv/lav) 1222
Malagasy (mg/mlg) 1307
Maori (mi/mri) 1309
Macedonian (mk/mkd) 1311
Malayalam (ml/mal) 1312
Mongolian (mn/mon) 1314
Moldavian (mo/mol) 1315
Marathi (mr/mar) 1318
Malay (ms/msa) 1319
Maltese (mt/mlt) 1320
Burmese (my/mya) 1325
Nauru (na/nau) 1401
Nepali (ne/nep) 1405
Norwegian (no/nor) 1415
Occitan (oc/oci) 1503
Oromo (om/orm) 1513
Oriya (or/ori) 1518
Panjabi (pa/pan) 1601
58
Page 59

Language Abbr. Code
Polish (pl/pol) 1612
Pushto (ps/pus) 1619
Quechua (qu/que) 1721
Rhaeto-Romance (rm/roh) 1813
Rundi (rn/run) 1814
Romanian (ro/ron) 1815
Kinyarwanda (rw/kin) 1823
Sanskrit (sa/san) 1901
Sindhi (sd/snd) 1904
Sango (sg/sag) 1907
Serbo-Croatian (sh/scr) 1908
Sinhalese (si/sin) 1909
Slovak (sk/slk) 1911
Slovenian (sl/slv) 1912
Samoan (sm/smo) 1913
Shona (sn/sna) 1914
Somali (so/som) 1915
Albanian (sq/sqi) 1917
Serbian (sr/srp) 1918
Swati (ss/ssw) 1919
Sotho, Southern (st/sot) 1920
Sundanese (su/sun) 1921
Swahili (sw/swa) 1923
Tamil (ta/tam) 2001
Telugu (te/tel) 2005
Tajik (tg/tgk) 2007
Thai (th/tha) 2008
Tigrinya (ti/tir) 2009
Turkmen (tk/tuk) 2011
Tagalog (tl/tgl) 2012
Tswana (tn/tsn) 2014
Tong (to/ton) 2015
Turkish (tr/tur) 2018
Tsonga (ts/tso) 2019
Tatar (tt/tat) 2020
Twi (tw/twi) 2023
Ukrainian (uk/ukr) 2111
Urdu (ur/urd) 2118
Uzbek (uz/uzb) 2126
Vietnamese (vi/vie) 2209
Volapük (vo/vol) 2215
Wolof (wo/wol) 2315
Xhosa (xh/xho) 2408
Yoruba (yo/yor) 2515
Zulu (zu/zul) 2621
Region Code
Table
Area abbr. Code
Argentina (ar) 0118
Australia (au) 0121
Austria (at) 0120
Belgium (be) 0205
Brazil (br) 0218
Canada (ca) 0301
Chile (cl) 0312
China (cn) 0314
Denmark (dk) 0411
Finland (fi) 0609
France (fr) 0618
Germany (de) 0405
Hong Kong (hk) 0811
India (in) 0914
Indonesia (id) 0904
Italy (it) 0920
Japan (jp) 1016
Korea (kr) 1118
Malaysia (my) 1325
Mexico (mx) 1324
Netherlands (nl) 1412
New Zealand (nz) 1426
Norway (no) 1415
Pakistan (pk) 1611
Philippines (ph) 1608
Portugal (pt) 1620
Russia (ru) 1821
Singapore (sg) 1907
Spain (es) 0519
Switzerland (ch) 0308
Sweden (se) 1905
Taiwan (tw) 2023
Thailand (th) 2008
United Kingdom (gb) 0702
USA (us) 2119
Additional Information
59
Page 60

Specifications
Model BD-2000
Type Blu-ray Disc Player
Product
Dimension
Power
Consumption
Video Outputs HDMI
Audio Outputs Coaxial Digital Audio
Video Disc
Formats
Video
Compression
formats
L 435 mm x W 307.5 mm x H 58 mm
< 0.5 W
Composite
Component
Optical Digital Audio
Composite Audio
Component Audio
HDMI
BD-ROM (DL, SL), BD-R/RE, DVD Digital Video 8cm/12cm, DVD+RW (DL,
SL), DVD+R (DL, SL), DVD-RW (DL, SL), DVD-R (DL, SL), CD Digital Video
8cm/12cm, CD-R/RW
AVI, MEPG-2, MPEG-4 AVC (H.264), SMPTE VC-1, VCD 1.1/2.0, SVCD,
WMV, MKV, MP4, M4V, MPG, DAT, VOB, ASF
Video disc
playback system
Video
Enhancement
Audio
Compression
formats
Multichannel
decoding
Image
Additional Information
Compression
formats
Blu-ray Special Blu-ray Live 1.1/2.0
NTSC/PAL
Progressive Scan
WMA, m4a, WAV, CD Digial Audio, LPCM, Dolby Digital, DTS
Dolby Digital/Dolby Digital Plus, Dolby True HD, DTS 2.0 + Digital Out
JPEG, PNG, GIF
60
Page 61

Chapter 8
GNU General
Public License
Appendix
Version 2, June 1991
Copyright © 1989, 1991 Free Software Foundation,
Inc., 51 Franklin Street, Fifth Floor, Boston, MA 021101301 USA
Everyone is permitted to copy and distribute verbatim
copies of this license document, but changing it is not
allowed.
Preamble
The licenses for most software are designed to
take away your freedom to share and change it. By
contrast, the GNU General Public License is intended
to guarantee your freedom to share and change free
software - to make sure the software is free for all its
users. This General Public License applies to most
of the Free Software Foundation’s software and to
any other program whose authors commit to using it.
(Some other Free Software Foundation software is
covered by the GNU Lesser General Public License
instead.) You can apply it to your programs, too.
When we speak of free software, we are referring to
freedom, not price. Our General Public Licenses are
designed to make sure that you have the freedom to
distribute copies of free software (and charge for this
service if you wish), that you receive source code
or can get it if you want it, that you can change the
software or use pieces of it in new free programs;
and that you know you can do these things.To protect
your rights, we need to make restrictions that forbid
anyone to deny you these rights or to ask you to
surrender the rights. These restrictions translate to
certain responsibilities for you if you distribute copies
of the software, or if you modify it.For example, if you
distribute copies of such a program, whether gratis
or for a fee, you must give the recipients all the rights
that you have. You must make sure that they, too,
receive or can get the source code. And you must
show them these terms so they know their rights.We
protect your rights with two steps: (1) copyright the
software, and (2) offer you this license which gives
you legal permission to copy, distribute and/or modify
the software.
Also, for each author’s protection and ours, we want
to make certain that everyone understands that there
is no warranty for this free software. If the software
is modified by someone else and passed on, we want
its recipients to know that what they have is not the
original, so that any problems introduced by others
will not reflect on the original authors’ reputations.
Finally, any free program is threatened constantly
by software patents. We wish to avoid the danger
that redistributors of a free program will individually
obtain patent licenses, in effect making the program
proprietary. To prevent this, we have made it clear
61
Page 62

that any patent must be licensed for everyone’s free
use or not licensed at all.The precise terms and
conditions for copying, distribution and modification
follow.
TERMS AND CONDITIONS FOR COPYING,
DISTRIBUTION AND MODIFICATION
0. This License applies to any program or other
work which contains a notice placed by the
copyright holder saying it may be distributed under
the terms of this General Public License. The
“Program”, below, refers to any such program or
work, and a “work based on the Program” means
either the Program or any derivative work under
copyright law: that is to say, a work containing
the Program or a portion of it, either verbatim or
with modifications and/or translated into another
language. (Hereinafter, translation is included
without limitation in the term “modification”.) Each
licensee is addressed as “you”.
Activities other than copying, distribution and
modification are not covered by this License;
they are outside its scope. The act of running the
Program is not restricted, and the output from the
Program is covered only if its contents constitute a
work based on the Program (independent of having
been made by running the Program). Whether that
is true depends on what the Program does.
1. You may copy and distribute verbatim copies of
the Program’s source code as you receive it, in
any medium, provided that you conspicuously and
appropriately publish on each copy an appropriate
copyright notice and disclaimer of warranty; keep
intact all the notices that refer to this License and
to the absence of any warranty; and give any other
recipients of the Program a copy of this License
along with the Program. You may charge a fee for
the physical act of transferring a copy, and you
may at your option offer warranty protection in
exchange for a fee.
2. You may modify your copy or copies of the Program
Additional Information
or any portion of it, thus forming a work based
on the Program, and copy and distribute such
modifications or work under the terms of Section
1 above, provided that you also meet all of these
conditions:
a) You must cause the modified files to carry
prominent notices stating that you changed the
files and the date of any change.
b) You must cause any work that you distribute or
publish, that in whole or in part contains or is
derived from the Program or any part thereof, to be
licensed as a whole at no charge to all third parties
under the terms of this License.
c) If the modified program normally reads commands
interactively when run, you must cause it, when
started running for such interactive use in the most
ordinary way, to print or display an announcement
including an appropriate copyright notice and a
notice that there is no warranty (or else, saying
that you provide a warranty) and that users may
redistribute the program under these conditions,
and telling the user how to view a copy of this
License. (Exception: if the Program itself is
interactive but does not normally print such an
announcement, your work based on the Program is
not required to print an announcement.)
These requirements apply to the modified work as
a whole. If identifiable sections of that work are not
derived from the Program, and can be reasonably
considered independent and separate works in
themselves, then this License, and its terms, do
not apply to those sections when you distribute
them as separate works. But when you distribute
the same sections as part of a whole which is a
work based on the Program, the distribution of the
whole must be on the terms of this License, whose
permissions for other licensees extend to the entire
whole, and thus to each and every part regardless
of who wrote it.
Thus, it is not the intent of this section to claim
rights or contest your rights to work written entirely
by you; rather, the intent is to exercise the right to
control the distribution of derivative or collective
works based on the Program.
In addition, mere aggregation of another work not
based on the Program with the Program (or with
a work based on the Program) on a volume of a
storage or distribution medium does not bring the
other work under the scope of this License.
3. You may copy and distribute the Program (or a
work based on it, under Section 2) in object code
or executable form under the terms of Sections 1
and 2 above provided that you also do one of the
following:
a) Accompany it with the complete corresponding
machine-readable source code, which must be
distributed under the terms of Sections 1 and 2
above on a medium customarily used for software
interchange; or,
62
Page 63

b) Accompany it with a written offer, valid for at least
three years, to give any third party, for a charge
no more than your cost of physically performing
source distribution, a complete machine-readable
copy of the corresponding source code, to be
distributed under the terms of Sections 1 and 2
above on a medium customarily used for software
interchange; or,
c) Accompany it with the information you received
as to the offer to distribute corresponding
source code. (This alternative is allowed only for
noncommercial distribution and only if you received
the program in object code or executable form with
such an offer, in accord with Subsection b above.)
The source code for a work means the preferred
form of the work for making modifications to it. For
an executable work, complete source code means
all the source code for all modules it contains, plus
any associated interface definition files, plus the
scripts used to control compilation and installation
of the executable. However, as a special exception,
the source code distributed need not include
anything that is normally distributed (in either
source or binary form) with the major components
(compiler, kernel, and so on) of the operating
system on which the executable runs, unless that
component itself accompanies the executable.
If distribution of executable or object code is made
by offering access to copy from a designated place,
then offering equivalent access to copy the source
code from the same place counts as distribution of
the source code, even though third parties are not
compelled to copy the source along with the object
code.
4. You may not copy, modify, sublicense, or distribute
the Program except as expressly provided under
this License. Any attempt otherwise to copy, modify,
sublicense or distribute the Program is void, and
will automatically terminate your rights under this
License. However, parties who have received
copies, or rights, from you under this License will
not have their licenses terminated so long as such
parties remain in full compliance.
5. You are not required to accept this License, since
you have not signed it. However, nothing else
grants you permission to modify or distribute the
Program or its derivative works. These actions are
prohibited by law if you do not accept this License.
Therefore, by modifying or distributing the Program
(or any work based on the Program), you indicate
your acceptance of this License to do so, and all
its terms and conditions for copying, distributing or
modifying the Program or works based on it.
6. Each time you redistribute the Program (or
any work based on the Program), the recipient
automatically receives a license from the original
licensor to copy, distribute or modify the Program
subject to these terms and conditions. You may not
impose any further restrictions on the recipients’
exercise of the rights granted herein.
You are not responsible for enforcing compliance by
third parties to this License.
7. If, as a consequence of a court judgment or
allegation of patent infringement or for any other
reason (not limited to patent issues), conditions are
imposed on you (whether by court order, agreement
or otherwise) that contradict the conditions of this
License, they do not excuse you from the conditions
of this License. If you cannot distribute so as to
satisfy simultaneously your obligations under this
License and any other pertinent obligations, then as
a consequence you may not distribute the Program
at all. For example, if a patent license would not
permit royalty-free redistribution of the Program by
all those who receive copies directly or indirectly
through you, then the only way you could satisfy
both it and this License would be to refrain entirely
from distribution of the Program.
If any portion of this section is held invalid or
unenforceable under any particular circumstance,
the balance of the section is intended to apply and
the section as a whole is intended to apply in other
circumstances.
It is not the purpose of this section to induce you
to infringe any patents or other property right
claims or to contest validity of any such claims;
this section has the sole purpose of protecting the
integrity of the free software distribution system,
which is implemented by public license practices.
Many people have made generous contributions to
the wide range of software distributed through that
system in reliance on consistent application of that
system; it is up to the author/donor to decide if he
or she is willing to distribute software through any
other system and a licensee cannot impose that
choice.
This section is intended to make thoroughly clear
what is believed to be a consequence of the rest of
Additional Information
63
Page 64

this License.
8. If the distribution and/or use of the Program is
restricted in certain countries either by patents or
by copyrighted interfaces, the original copyright
holder who places the Program under this License
may add an explicit geographical distribution
limitation excluding those countries, so that
distribution is permitted only in or among countries
not thus excluded. In such case, this License
incorporates the limitation as if written in the body
of this License.
9. The Free Software Foundation may publish revised
and/or new versions of the General Public License
from time to time. Such new versions will be similar
in spirit to the present version, but may differ in
detail to address new problems or concerns.
Each version is given a distinguishing version
number. If the Program specifies a version number
of this License which applies to it and “any later
version”, you have the option of following the terms
and conditions either of that version or of any later
version published by the Free Software Foundation.
If the Program does not specify a version number
of this License, you may choose any version ever
published by the Free Software Foundation.
10.If you wish to incorporate parts of the Program
into other free programs whose distribution
conditions are different, write to the author to ask
for permission. For software which is copyrighted
by the Free Software Foundation, write to the
Free Software Foundation; we sometimes make
exceptions for this. Our decision will be guided by
the two goals of preserving the free status of all
derivatives of our free software and of promoting
the sharing and reuse of software generally.
NO WARRANTY
15.BECAUSE THE LIBRARY IS LICENSED FREE
OF CHARGE, THERE IS NO WARRANTY FOR
Additional Information
THE LIBRARY, TO THE EXTENT PERMITTED BY
APPLICABLE LAW. EXCEPT WHEN OTHERWISE
STATED IN WRITING THE COPYRIGHT HOLDERS
AND/OR OTHER PARTIES PROVIDE THE LIBRARY
“AS IS” WITHOUT WARRANTY OF ANY KIND,
EITHER EXPRESSED OR IMPLIED, INCLUDING,
BUT NOT LIMITED TO, THE IMPLIED WARRANTIES
OF MERCHANTABILITY AND FITNESS FOR A
PARTICULAR PURPOSE. THE ENTIRE RISK AS
TO THE QUALITY AND PERFORMANCE OF THE
LIBRARY IS WITH YOU. SHOULD THE LIBRARY
PROVE DEFECTIVE, YOU ASSUME THE COST
OF ALL NECESSARY SERVICING, REPAIR OR
CORRECTION.
16.IN NO EVENT UNLESS REQUIRED BY APPLICABLE
LAW OR AGREED TO IN WRITING WILL ANY
COPYRIGHT HOLDER, OR ANY OTHER PARTY
WHO MAY MODIFY AND/OR REDISTRIBUTE THE
LIBRARY AS PERMITTED ABOVE, BE LIABLE TO
YOU FOR DAMAGES, INCLUDING ANY GENERAL,
SPECIAL, INCIDENTAL OR CONSEQUENTIAL
DAMAGES ARISING OUT OF THE USE OR
INABILITY TO USE THE LIBRARY (INCLUDING BUT
NOT LIMITED TO LOSS OF DATA OR DATA BEING
RENDERED INACCURATE OR LOSSES SUSTAINED
BY YOU OR THIRD PARTIES OR A FAILURE OF
THE LIBRARY TO OPERATE WITH ANY OTHER
SOFTWARE), EVEN IF SUCH HOLDER OR OTHER
PARTY HAS BEEN ADVISED OF THE POSSIBILITY
OF SUCH DAMAGES.
END OF TERMS AND CONDITIONS
How to Apply These Terms to Your New Libraries
If you develop a new library, and you want it to
be of the greatest possible use to the public, we
recommend making it free software that everyone
can redistribute and change. You can do so by
permitting redistribution under these terms (or,
alternatively, under the terms of the ordinary
General Public License).
To apply these terms, attach the following notices
to the library. It is safest to attach them to the start
of each source file to most effectively convey the
exclusion of warranty; and each file should have
at least the “copyright” line and a pointer to where
the full notice is found.
<one line to give the library’s name and a brief idea
of what it does.>
Copyright © <year> <name of author>
This library is free software; you can redistribute
it and/or modify it under the terms of the GNU
Lesser General Public License as published by the
Free Software Foundation; either version 2.1 of the
License, or (at your option) any later version.
This library is distributed in the hope that it will be
useful, but WITHOUT ANY WARRANTY; without
even the implied warranty of MERCHANTABILITY
or FITNESS FOR A PARTICULAR PURPOSE. See
the GNU Lesser General Public License for more
details.
64
Page 65

You should have received a copy of the GNU Lesser
General Public License along with this library; if
not, write to the Free Software Foundation, Inc., 51
Franklin Street, Fifth Floor, Boston, MA 02110-1301
USA
Also add information on how to contact you by
electronic and paper mail.
You should also get your employer (if you work
as a programmer) or your school, if any, to sign a
“copyright disclaimer” for the library, if necessary.
Here is a sample; alter the names:
Yoyodyne, Inc., hereby disclaims all copyright
interest in the library `Frob’ (a library for tweaking
knobs) written by James Random Hacker.
<signature of Ty Coon>, 1 April 1990
Ty Coon, President of Vice
That’s all there is to it!
[Notice on GNU General Public License]
This product include the software licensed for use
under the terms of a GNU General Public License.
A copy of the corresponding source code can be
obtained by being charged the fee for distribution.
To obtain a copy, contact your local Pioneer Customer
Support Center.
See the GNU website (http://www.gnu.org) for details
of the GNU General Public License.
Additional Information
65
Page 66

Aspect ratio »
Chapter 9
Glossary
The ratio of a TV screen’s width to its height.
Standard TVs have an aspect ratio of 4:3,
while high definition (HD) and widescreen
TVs have an aspect ratio of 16:9.
»
AVCHD
(Advanced Video Codec High Definition)
The AVCHD is a high definition (HD) digital
video camera recorder format recording
high-definition onto certain media by using
highly efficient codec technologies.
»
Component video output
This video output terminal provides clearer
pictures when connected to a TV equipped
with component inputs. Component video
signals consist of three signals, Y, PB and
PR.
»
Composite video output
Signals mixing the luminance signal (Y)
and the color signal (C) so they can be
transferred on a single cord are output from
this terminal.
»
Dolby Digital
Dolby Digital is an audio format to record the
sound in up to 5.1 channels with a fraction
of the amount of data as compared to linear
PCM audio signals.
»
Dolby Digital Plus
Dolby Digital Plus is an audio format for
high-definition media. Built on Dolby Digital,
it combines the efficiency and flexibility to
provide high quality multi-channel audio.
With BD-ROMs, up to 7.1 channels of digital
sound can be recorded.
»
Dolby TrueHD
66
Dolby TrueHD is an audio format using
lossless coding. With BD-ROMs, up to 8
channels can be recorded at 96 kHz/24 bits,
or up to 6 channels at 192 kHz/24 bits.
Page 67

DTS 2.0 + Digital Out »
MPEG »
DTS 2.0 + Digital Out denotes the dual ability
to pass the DTS encoded digital bitstream
to an external DTS decoder for playback
as well as fold down the digital surround
soundtrack for playback in a 2-channel
environment through analog outputs.
»
Dynamic range
This refers to the difference between the
maximum and minimum level of the sound.
The dynamic range is measured in units
of decibels (dB). When the dynamic range
is compressed (Audio DRC), the minimum
signal level is increased and the maximum
signal level decreased. This way, the
volume of loud sounds such as explosions is
reduced, while the sounds with a low level,
such as human voices, are easier to listen
to.
(Moving Picture Experts Group)
The name of a family of standards used to
encode video and audio signals in a digital
compressed format. The video encoding
standards include MPEG-1 Video, MPEG-2
Video, MPEG-4 Visual, MPEG-4 AVC, etc. The
audio encoding standards include MPEG-1
Audio, MPEG-2 Audio, MPEG-2 AAC, etc.
»
HDCP
(High-bandwidth Digital Content Protection)
A technology for protecting copyrights that
encrypts digital video signals.
HDMI »
(High-Definition Multimedia Interface)
A digital interface standard for nextgeneration TVs expanding the DVI (Digital
Video Interface) terminal used for example
for computer displays. It allows transfer of
non-compressed digital video and audio
signals (Dolby TrueHD, Dolby Digital Plus,
Dolby Digital, DTS-HD Master Audio, DTSHD High Resolution Audio, DTS Digital
Surround, MPEG-2 AAC, linear PCM, etc.)
with a single connector.
Linear PCM »
This is referred as the audio signals that are
not compressed, frequently used for DVDVideo discs containing musicals or music
concerts. This can also be indicated “48
kHz/16 bit”, “96 kHz”, etc.
Glossary
67
Page 68

A »
Chapter 10
INDEX
Amplifier 20
Angle 29
Audio 44
Analogue 20
Digital, Coaxial 13
Digital, Optical 13
Audio Setting 50
Audio Streams 29
»
B
BD-Live
Connection setting 47
Setting up 32
BONUSVIEW 15, 31
»
C
Closed Caption 45
»
D
Digital Audio
Coaxial 21
Optical 21
Disc Auto Playback 43
Down_samp 50
H
»
HDMI 13, 18, 50
HDMI 1080P 24Hz 49
HDMI Deep Color 48
Home Menu 41
I
»
Internet 22
68
»
L
Language 44
Language Code Table 58
Load Default 43
Page 69

M »
T »
Media Center 36
Menu 44
Music
Playing 38
N
»
Network 47
»
O
OSC 30
OSD 44
P »
Parental Control 46
Password 46
PBC 45
Photo
Slideshow 38
TV 18
menu 48
TV Screen 48
TV System 48
U
»
Upgrade 43, 55
»
V
Video
Component 13, 19
Composite 13, 19
Video Adjust 49
Video Output Resolutions 57
Video Processing 49
Videos
Playing 39
Viewing 37
Playback 25
Controls 26
menu 45
Playlist 40
»
R
Region Code Table 59
Resolution 48
S »
Screen Saver 43
Security 46
Sharpness 49
SPDIF 50
Specifications 60
»
W
Wizard
Setup 24
Subtitle 44
System Information 52
Glossary
69
Page 70

P/N: 7525C00054A
7925000053A
 Loading...