

Page 1

Administrator's Guide
HP Session Allocation Manager (HP SAM) v.2.2
Page 2

© Copyright 2007 Hewlett-Packard
Development Company, L.P. The
information contained herein is subject to
change without notice.
Microsoft and Windows are trademarks of
Microsoft Corporation in the U.S. and other
countries.
The only warranties for HP products and
services are set forth in the express warranty
statements accompanying such products
and services. Nothing herein should be
construed as constituting an additional
warranty. HP shall not be liable for technical
or editorial errors or omissions contained
herein.
This document contains proprietary
information that is protected by copyright. No
part of this document may be photocopied,
reproduced, or translated to another
language without the prior written consent of
Hewlett-Packard Company.
Part of the software embedded in this
product is gSOAP software.
Portions created by gSOAP are Copyright
(C) 2001-2004 Robert A. van Engelen,
Genivia inc. All Rights Reserved.
Second Edition (August 2007)
First Edition (June 2007)
Document Part Number: 453252–003
THE SOFTWARE IN THIS PRODUCT WAS
IN PART PROVIDED BY GENIVIA INC AND
ANY EXPRESS OR IMPLIED
WARRANTIES, INCLUDING, BUT NOT
LIMITED TO, THE IMPLIED WARRANTIES
OF MERCHANTABILITY AND FITNESS
FOR A PARTICULAR PURPOSE ARE
DISCLAIMED. IN NO EVENT SHALL THE
AUTHOR BE LIABLE FOR ANY DIRECT,
INDIRECT, INCIDENTAL, SPECIAL,
EXEMPLARY, OR CONSEQUENTIAL
DAMAGES (INCLUDING, BUT NOT
LIMITED TO, PROCUREMENT OF
SUBSTITUTE GOODS OR SERVICES;
LOSS OF USE, DATA, OR PROFITS; OR
BUSINESS INTERRUPTION) HOWEVER
CAUSED AND ON ANY THEORY OF
LIABILITY, WHETHER IN CONTRACT,
STRICT LIABILITY, OR TORT (INCLUDING
NEGLIGENCE OR OTHERWISE) ARISING
IN ANY WAY OUT OF THE USE OF THIS
SOFTWARE, EVEN IF ADVISED OF THE
POSSIBILITY OF SUCH DAMAGE.
Copyright (c) 1998-2007 The OpenSSL
Project. All rights reserved.
Copyright (C) 1995-1998 Eric Young
(eay@cryptsoft.com). All rights reserved.
Administrator's Guide
Business PCs
Third Edition (December 2007)
Page 3

About This Book
WARNING! Text set off in this manner indicates that failure to follow directions could result in bodily
harm or loss of life.
CAUTION: Text set off in this manner indicates that failure to follow directions could result in damage
to equipment or loss of information.
NOTE: Text set off in this manner provides important supplemental information.
iii
Page 4

iv About This Book
Page 5

Table of contents
1 Introduction
What's New in This Release ................................................................................................................ 2
Multi-Level Administrator ..................................................................................................... 2
Multi-Session – Role Assignment ........................................................................................ 3
Single Location Client Configuration .................................................................................... 3
Blade Service Windows XP 64-bit ....................................................................................... 3
Blade Service PWS Workstation ......................................................................................... 3
USB Session Simplification ................................................................................................. 3
Reconnect All Button ........................................................................................................... 3
Legal Banner ....................................................................................................................... 4
Window Position Enhancements (Easier Moves) ................................................................ 4
Global and Local Client Configuration Files ......................................................................... 4
Ease of Multi-Display Deployment and Web Administrator Setup ....................................... 5
User Resource Management Controls ................................................................................ 6
Enhanced “Add New User” Searches .................................................................................. 6
Key Features ........................................................................................................................................ 6
Overview .............................................................................................................................................. 7
How HP SAM Works ............................................................................................................ 8
HP SAM Software Components .......................................................................................... 9
Remote Graphics Software (RGS) .................................................................................... 10
Common Tasks .................................................................................................................................. 11
Setting up HP SAM ............................................................................................................ 11
Setting up a User with a Dynamic Resource ..................................................................... 12
Setting up a User with Static (Dedicated) Resources ........................................................ 13
Configuring a Monitor Layout for a User ............................................................................ 14
2 Requirements
HP SAM Hardware and Software Requirements ............................................................................... 16
HP SAM Registration Service Requirements ..................................................................................... 23
Access Device Requirements ............................................................................................................ 23
Other requirements ............................................................................................................................ 25
HP SAM Web and SQL Server Requirements .................................................................. 16
Thin Client .......................................................................................................................... 23
Mobile Thin Client .............................................................................................................. 24
Desktop or Notebook PC ................................................................................................... 24
Blade Workstation Clients .................................................................................................. 24
Personal Workstation Clients ............................................................................................. 24
Create a Service Account .................................................................................................. 25
Obtain Administrative Rights ............................................................................................. 25
v
Page 6

3 Installation
Install the HP SAM Web Server and SQL Software ........................................................................... 26
Install and Validate the HP SAM Registration Service Software ........................................................ 28
Install and Validate the HP SAM Client Software ............................................................................... 31
Deploy the HP SAM Registration Service to All HP SAM Computing Resources .............................. 41
Deploy HP SAM Client Software to All HP SAM Access Devices ...................................................... 41
4 Administration
Log In ................................................................................................................................................. 43
General Navigation and User Interface Design .................................................................................. 43
Managing the HP SAM Administrator Access List ............................................................................. 44
HP SAM Administrator Console Tabs ................................................................................................ 46
Setting Up Smart Card Login on the Access Device .......................................................................... 67
Change the Firewall ........................................................................................................... 25
Active Directory .................................................................................................................. 25
Grant Users HP SAM Administrator Access ...................................................................... 28
Configure HP SAM System Settings ................................................................................. 28
Install the HP SAM Registration Service ........................................................................... 28
Create the HP SAM Registration Service Configuration File ............................................. 29
Start/Restart the HP SAM Registration Service ................................................................. 30
Test the HP SAM Registration Service .............................................................................. 31
Internet Explorer-Based Client ........................................................................................... 32
Windows XPe-Based Client ............................................................................................... 32
Windows CE 5.0-Based Client ........................................................................................... 33
HP Blade Workstation Client Series .................................................................................. 34
Configuration Settings ....................................................................................................... 34
Display More (or Fewer) Items Per Page .......................................................................... 43
Move Columns ................................................................................................................... 43
Sort Result List .................................................................................................................. 43
Select More Than One Item ............................................................................................... 43
Add Individual Users to the HP SAM Administrator Group ................................................ 44
Add Security Groups or Organizational Units to the HP SAM Administrator Group .......... 44
Remove Users From the HP SAM Administrator Group .................................................... 45
Home Tab .......................................................................................................................... 46
Users and Roles Tab ......................................................................................................... 46
Resources tab .................................................................................................................... 53
Manage Data Centers ........................................................................................................ 56
Policies Tab ....................................................................................................................... 57
System Settings Tab .......................................................................................................... 60
Reports Tab ....................................................................................................................... 64
Log Tab .............................................................................................................................. 67
Appendix A Firewall Rules
Web Server ........................................................................................................................................ 69
Clients ................................................................................................................................................ 69
Blade .................................................................................................................................................. 69
SQL Server ......................................................................................................................................... 70
vi
Page 7

Appendix B Frequently Asked Questions
Appendix C Registration Service Error Codes
Appendix D Glossary
Index ................................................................................................................................................................... 79
vii
Page 8

viii
Page 9

1 Introduction
HP Remote Client Solutions are designed to support a variety of users’ needs, from the most basic
computing tasks to more demanding professional and technical applications, while giving IT greater
control over technology resources, simplifying desktop management, increasing agility and, in many
cases, reducing total cost of ownership.
Underlying HP Remote Client Solutions is a unified infrastructure that enables client deployment,
session allocation, balancing of computing resources, and supports the business needs of a diverse set
of users though the use of a common set of tools.
The HP Session Allocation Manager (HP SAM) system is the control point in managing an HP Remote
Client Solutions deployment. HP SAM manages the assignment of connections from an end-user's client
access device to desktop sessions running on computing resources in a centralized location (typically,
a data center). HP SAM makes these desktop sessions available to users as they are needed.
For more information about HP Remote Client Solutions, visit
http://www.hp.com/go/rcs.
1
Page 10

What's New in This Release
Multi-Level Administrator
●
Multi-Session – role assignment
●
Single Location Client Configuration
●
Blade Service Windows XP 64-bit
●
Blade Service PWS Workstation
●
USB session simplification
●
Reconnect All Button
●
Legal Banner
●
Window Position Enhancements (Easier Moves)
●
Global and Local Client Configuration Files
●
Ease of Multi-Display Deployment and Web Administrator Setup
●
User Resource Management Controls
●
Enhanced “Add New User” Searches
●
Multi-Level Administrator
The HP SAM administrator or domain administrator has full rights to all Asset Groups in the HP SAM
server. Asset Groups allow focused management of business group assets:
Clients
●
Resources
●
Users, OUs, SGs
●
Roles
●
Monitor Layout IDs
●
Policies
●
Logs
●
Reports
●
The HP SAM administrator or domain administrator also creates the administrative groups.
Administrator groups can be assigned to control one or more asset group.
●
Users within each administrator group can control all assets in the Asset Groups identified.
●
Administrators will only be able to see assets associated with Asset Groups they control.
●
NOTE: The HP SAM administrator or domain administrator has full rights to all Asset Groups in the
HP SAM server.
2 Chapter 1 Introduction
Page 11

Multi-Session – Role Assignment
This feature allows administrators to assign roles in Monitor Layout IDs as they do with static
assignments. Administrators can specify a position on the client device and a resolution for the blade
chosen within the role.
Single Location Client Configuration
This feature allows Administrators to set up sessions on an access device (with resolutions and offsets),
and then save that to the server as a Monitor Layout ID. The Administrator can determine the following:
Static assignments and roles for monitor layout ID
●
Position and resolution of each session
●
Disconnected sessions are not saved back to the database. A disconnected session will be removed if
it is currently in the database for the specified monitor layout ID.
The HP Sam server administrator may make the following changes:
Set up the HP SAM client device to hide the Save button on the HP SAM Connection Bar
●
Change the monitor layout ID of the client device
●
Set up or change the default monitor layout ID based on a monitor layout ID stored in the HP SAM
●
client configuration file
Blade Service Windows XP 64-bit
This feature provides support for HP SAM blade service on Windows XP 64-bit on the HP ProLiant
xw460c Blade Workstation (Intel Pentium Xeon) platform.
Blade Service PWS Workstation
This feature allows HP SAM blade service to be supported on the HP xw8400 Workstation and the HP
xw9400 Workstation. The following operating systems are covered:
Windows XP Professional 32
●
Windows XP Professional 64
●
USB Session Simplification
This feature allows the user to remap USB devices to a selected session from the HP SAM Connection
Bar.
USB enablement is based on policy. The administrator may specify which static resources or roles can
use USB and which cannot.
NOTE: This feature requires RGS 5.1.3 or later.
Reconnect All Button
This is a new feature on the HP SAM Connection Bar. This enhancement allows the user to click
Reconnect All and reconnect to all disconnected sessions. The user must enter a password for each
credential initially used to make the connections.
What's New in This Release 3
Page 12

Legal Banner
This allows a legal disclaimer to be displayed before logon. Name the file disclaimer.<file
type> and copy the file into the appropriate directory (create the folder, if necessary). The following are
the default paths:
Access Device Client: Installing the legal banner on an access device causes the banner to be
●
displayed on that access device only. Name the file disclaimer.<file type> and copy the
file into the following directory (create the folder, if necessary) on the access device:
◦
◦
Web Client: Installing the legal banner on a SAM Web server causes the banner to be displayed
●
to all users connecting via Web Client. Name the file disclaimer.<file type> and copy the
file into the following directory (create the folder, if necessary) on the HP SAM server:
◦
NOTE: Replace $LANG with the appropriate folder name for the language desired: EN for English, JP
for Japanese, FR for French, DE for German, KO for Korean, or CN for Simplified Chinese.
The following file types are supported:
XP: C:\Program Files\Hewlett-Packard\HP Session Allocation Client\$LANG\disclaimer.<file
type>
Workstation Client OS: /opt/hpsam/$LANG/disclaimer.<file type>
Web Client: C:\program files\hewlett-packard\SAM\webclient\images\$LANG
\disclaimer.<file type>
JPG
●
GIF
●
BMP
●
NOTE: This feature is enabled by default if the disclaimer file is found in the correct location.
Window Position Enhancements (Easier Moves)
This feature provides additional enhancements for managing a multi-session environment by using the
HP SAM Connection Bar to identify and adjust window positions.
Global and Local Client Configuration Files
This feature allows administrators to 'lock down' certain options, while allowing other options to be
altered by users.
There are three levels of files:
Global: hprdc_admin.sam
●
Local: hprdc_accessdevice.sam
●
Personal: hprdc.sam
●
4 Chapter 1 Introduction
Page 13

The order of precedence is:
Personal file is read first.
●
XPe: Anywhere on file system (double-click hprdc.sam)
◦
XPe search locations used in this order—when one is found, it stops looking:
◦
%AppData%; Default for XP: C:\Document and Settings\<username>\Application Data
\hprdc.sam. Default for Vista: C:\users\<username>\AppData\Roaming\hprdc.sam
Install directory; Default: C:\Program Files\Hewlett-Packard\HP Session Allocation Client
\hprdc.sam
$SystemRoot%; Default: C:\windows
Workstation Client OS file location:
◦
/root/user/hprdc.sam
/etc/hprdc.sam (/root/writable/etc/hprdc.sam)
Parameters in the local file override the personal parameters
●
XP file location is the install directory. Default: C:\Program Files\Hewlett-Packard\HP Session
◦
Allocation Client\hprdc_accessdevice.sam
Workstation Client OS file location: /opt/hpsam/hprdc_accessdevice.sam (/root/writable/opt/
◦
hpsam/hprdc_accessdevice.sam)
Parameters in the global file override the personal and local parameters
●
XP file location is the install directory. Default: C:\Program Files\Hewlett-Packard\HP Session
◦
Allocation Client\hprdc_admin.sam
Workstation Client OS file location: /opt/hpsam/hprdc_admin.sam (/root/writable/opt/hpsam/
◦
hprdc_admin.sam)
Ease of Multi-Display Deployment and Web Administrator Setup
The administrator now has two new ways to assign resources:
Select a single user as a template and use this template to apply dedicated resources and user
●
attributes to multiple users at once.
Select a role and have dedicated resources automatically assigned to multiple users from the role.
●
This feature can be accessed on the Manage Users page when performing the Assign Resources
operation or on the Add New Users page after clicking Save to add users to SAM.
Attributes assigned by template include the following:
Dedicated resources (including backup resources or roles)
●
Roles
●
Policies
●
What's New in This Release 5
Page 14

Monitor layout IDs
●
Asset Groups
●
NOTE: The Template User must have a dedicated resource in a role and there must be enough
available resources in that role to satisfy the users during automatic assignment of dedicated resources.
NOTE: This feature allows administrators to clone from a single user to many users, but not to clone
to Organizational Units (OUs) or Security Groups (SGs).
User Resource Management Controls
HP SAM now allows a user to perform certain functions from the HP SAM Connection Bar. The
administrator controls end user access to the features.
Logoff of the resource
●
Restart the resource
●
Cycle power on the resource
●
The following requirements must be met for Logoff and Restart:
The server must be set up to accept SSL connections to allow usernames and passwords to be
●
transmitted to the server.
The HP SAM service account must have local administrator privileges on the resource to be granted
●
permissions to reboot or logoff a user from the blade.
The following requirements must be met for Power Cycle:
Version 4.15 or later IA software must be used on the enclosure(s).
●
An HP BladeSystem bc2000 Blade PC or an HP BladeSystem bc2500 Blade PC is required.
●
The IA password must be saved in HP SAM on the Manage Data Centers page.
●
These functions can apply to either individual sessions or to all sessions using the Disconnect or
Disconnect All button, respectively.
Enhanced “Add New User” Searches
The feature is an enhanced way of searching for users, SGs, and OUs in AD. It now shows results as
you type, and it allows expansion of SGs and OUs to see the users in them.
Key Features
Allocation system to assign users to computing resources (such as blade PCs or workstation
●
blades)
Self-registration of computing resources
●
Central management of access device remote connection settings
●
Follow-me roaming and persistence support to enable reconnection to an open session from a
●
different access device
Customizable administration levels
●
6 Chapter 1 Introduction
Page 15
Usage and Capacity Planning reports
●
Dedicated user/display to computing resource mapping
●
HP SAM is logically broken up into three areas:
HP SAM client application running on a thin client or other access device
●
HP SAM registration service running on a computing resource
●
HP SAM server and SQL database
●
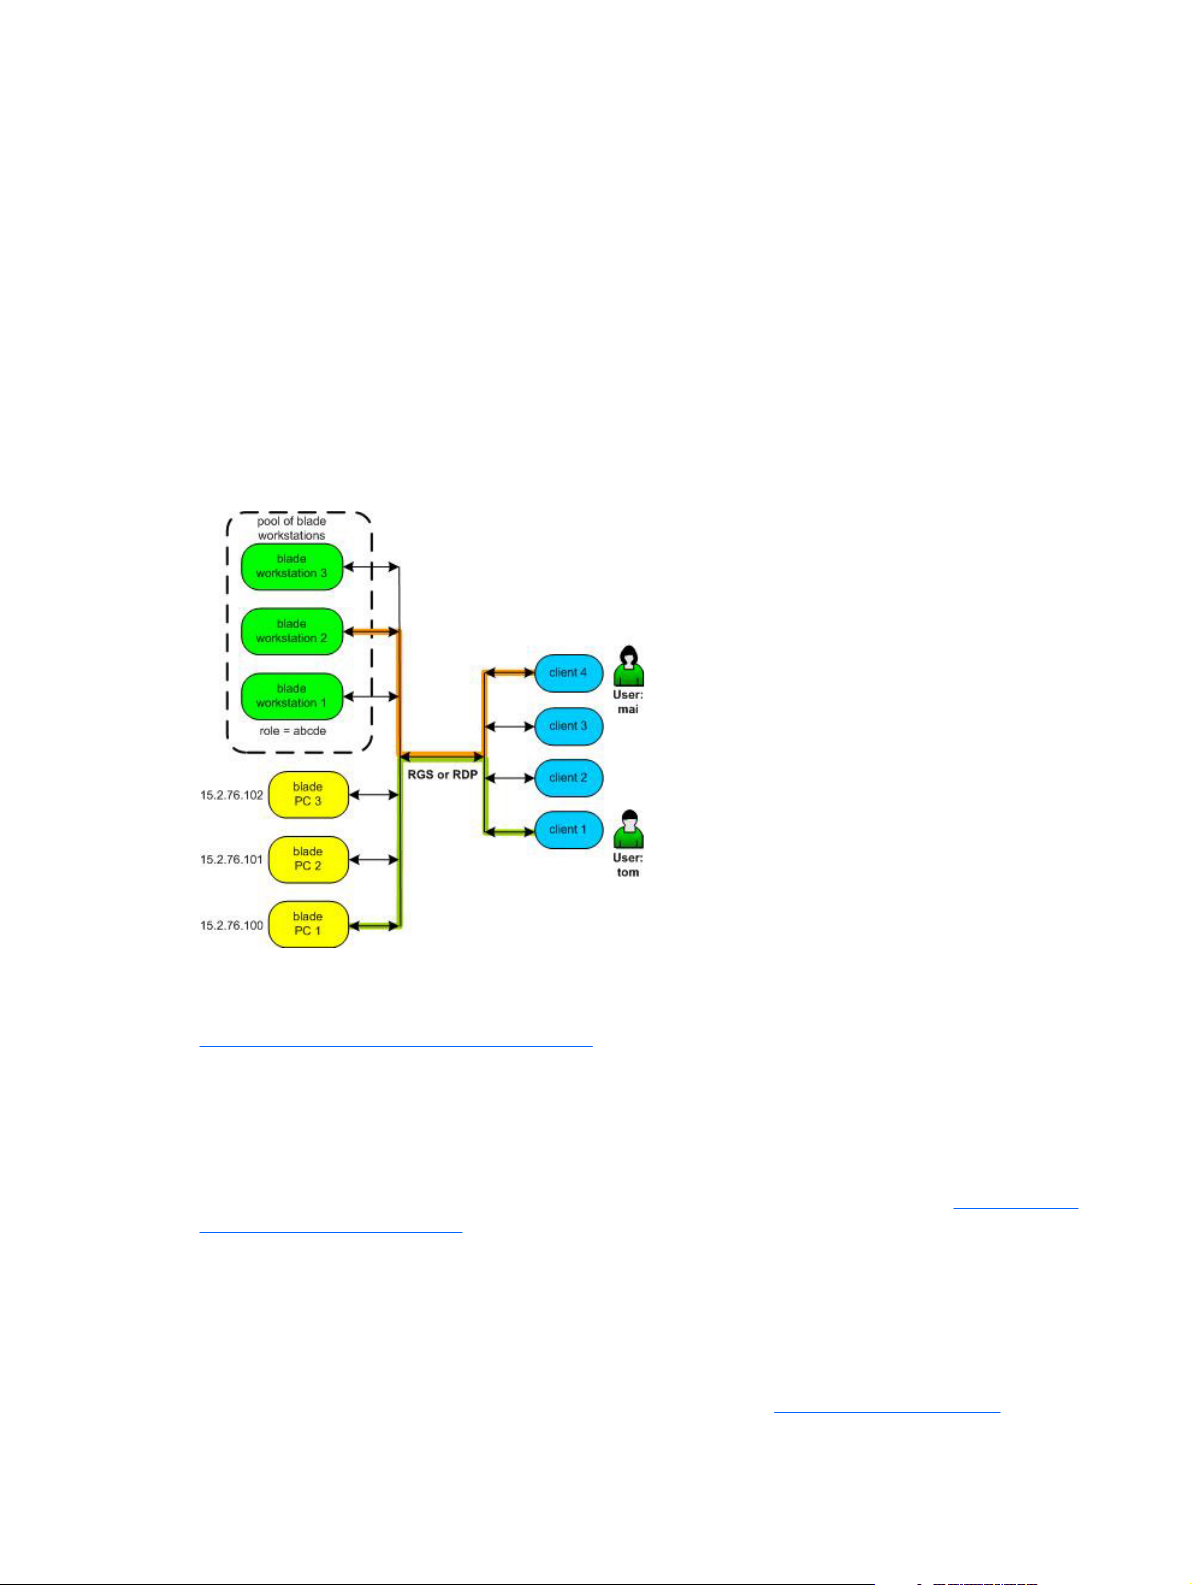
Overview
HP SAM enables automatic provisioning of remote computing resources to users.
Figure 1-1 HP SAM Configuration
HP SAM can be configured to enable a user to connect to the desktop session of a particular remote
computing resource (identified by its hostname or IP address)—this is known as a static connection. In
Figure 1-1 HP SAM Configuration on page 7, HP SAM has been configured to statically connect user
Tom to blade PC 1 with an IP address of 15.2.76.100. Regardless of which access device Tom uses,
he is automatically connected to blade PC 1 at address 15.2.76.100.
HP SAM can also be configured to enable a user to connect to any of a pool of computing resources—
this is known as a dynamic connection. HP SAM allows the administrator to define one or more roles
for each computing resource. A computing resource with a role of “abcde”, for example, might be
configured with applications to conduct stock transactions or accounting functions. In
SAM Configuration on page 7, HP SAM has been configured to allow user Mai to dynamically connect
to one of the three blade workstations supporting the role of “abcde.”
HP SAM uses HP Remote Graphics Software (RGS) or Microsoft® Remote Desktop Protocol (RDP) to
connect between access devices and computing resources.
RGS has features which make it particularly suitable for remote computing. RGS provides extremely
fast capture, compression, and transmission of the desktop image (the actual frame buffer pixels) using
standard TCP/IP networking. For more information on RGS, visit
http://www.hp.com/go/rgs.
Figure 1-1 HP
Overview 7
Page 16

How HP SAM Works
1. When a user on an access device (desktop, notebook, thin client) requests a desktop session, the
HP SAM client sends a request to the HP SAM Web server.
a. If configured, HP SAM supports server failover. If the HP SAM Web server does not respond,
the HP SAM client goes down the list to the next HP SAM Web server.
b. The HP SAM client sends the user name and domain information to the HP SAM server.
2. The HP SAM Web server receives the user name and domain from the HP SAM client. The Web
server validates this information with the Microsoft Active Directory server. The account must be
valid and enabled in Active Directory to continue.
3. The HP SAM Web server returns the appropriate desktop session information to the HP SAM client.
a. The HP SAM Web server determines whether or not the user still has a desktop session
running and, if so, reconnects the user to that same session (i.e., follow-me roaming). If the
user has no existing desktop session, the HP SAM Web server checks its internal database
to see what resources are available and connects the user to an appropriate resource.
b. The data returned to the HP SAM client is an IP address (or Host name, depending on how
it is configured on the HP SAM Web server.)
c. If no computing resource is available, the HP SAM client informs the user.
4. The HP SAM client connects to the appropriate desktop session.
NOTE: HP SAM uses HP Remote Graphics Software (RGS) or Microsoft® Remote Desktop
Protocol (RDP) to connect between access devices and computing resources.
RGS has features which make it particularly suitable for remote computing. RGS provides
extremely fast capture, compression, and transmission of the desktop image (the actual frame
buffer pixels) using standard TCP/IP networking. For more information on RGS, visit
http://www.hp.com/go/rgs.
5. The user is then prompted at the login screen for the password. The user name and domain is
prepopulated by the HP SAM client. This step is omitted if the user has already entered the
password on the HP SAM client and either RDP is used or RGS in Single Sign-on mode is enabled.
NOTE: With RDP or RGS 5.1 or later, HP SAM allows users with expired passwords to log on.
They are then required to update their passwords immediately.
6. Once the user logs in, the HP SAM registration service on the computing resource reports back to
the HP SAM Web server.
7. Once the user disconnects or logs out, the HP SAM registration service updates the HP SAM Web
server with the new information.
8 Chapter 1 Introduction
Page 17
Overview 9
Page 18

HP SAM Software Components
The following are the primary components of HP SAM.
HP SAM Client—The HP SAM Client runs on the access device and displays the graphical
●
interface employed by the user to request a connection from a client computer to a computing
resource. When the user requests a connection, the HP SAM client communicates this request to
the HP SAM Web Server for execution.
HP SAM Web Server—The HP SAM Web Server (web server) runs on Windows Server 2003 and
●
manages the operation of HP SAM. A request is made to the web server when a user on an access
device requests a connection to a computing resource. The web server validates the request, and
then communicates back to the access device to orchestrate the connection. In addition, the web
server supports a browser interface to allow the HP SAM administrator to set up, configure, and
administer HP SAM. The web server also creates and accesses a database in Microsoft SQL
Server.
HP SAM Registration Service—The HP SAM Registration Service (registration service) runs on
●
the computing resource and communicates the status of the computing resource and its
connections to the HP SAM Web Server.
NOTE: Refer to the documentation that shipped with your computing resource and your access device
to determine which of the above components are factory-installed on your hardware and which
components you’ll need to install. For example, the HP SAM Client and the RGS Receiver are both
factory-installed on the HP dc72 Blade Workstation Client. Other RGS software is optional and must be
acquired separately. For more information on RGS, visit
http://www.hp.com/go/rgs.
Remote Graphics Software (RGS)
RGS is a communication protocol similar to Microsoft Remote Desktop Protocol (RDP). HP SAM allows
you to use either RGS or RDP.
RGS has a couple of advantages over RDP:
RGS has advanced graphics capabilities that provide a better video viewing experience that allows
●
users to connect to the desktop of a remote computer over a standard computer network.
RGS supports multiple monitors configured with an offset layout.
●
Thin clients are set to use RGS when possible. If both RGS and RDP are installed on the access device,
RGS is the default. If RGS is installed on both access device and computing resource, RGS is used. If
one or both do not have RGS, then RDP is used.
NOTE: Smart Card log-in using HP SAM client does not work with RGS.
HP RGS is optional and must be acquired separately. For information on HP RGS, visit
http://www.hp.com/go/rgs. To view the HP Remote Graphics Software User Guide, visit
http://www.hp.com/support/rgs_manuals and scroll down to the User guide heading.
10 Chapter 1 Introduction
Page 19

Common Tasks
Setting up HP SAM
1. Install HP SAM. See Installation on page 26.
2. Add users.
a. Add new users. See
b. Create administrative groups, assign users, and customize permissions. See
Administrative Permissions on page 47.
3. Create a policy. See
4. Create a role. See
5. Assign computing resources or roles to the users. See
Manage Resource Roles on page 46.
Add New Users on page 52.
Create or Update a Policy on page 59.
Manage Users on page 48.
Manage
Common Tasks 11
Page 20
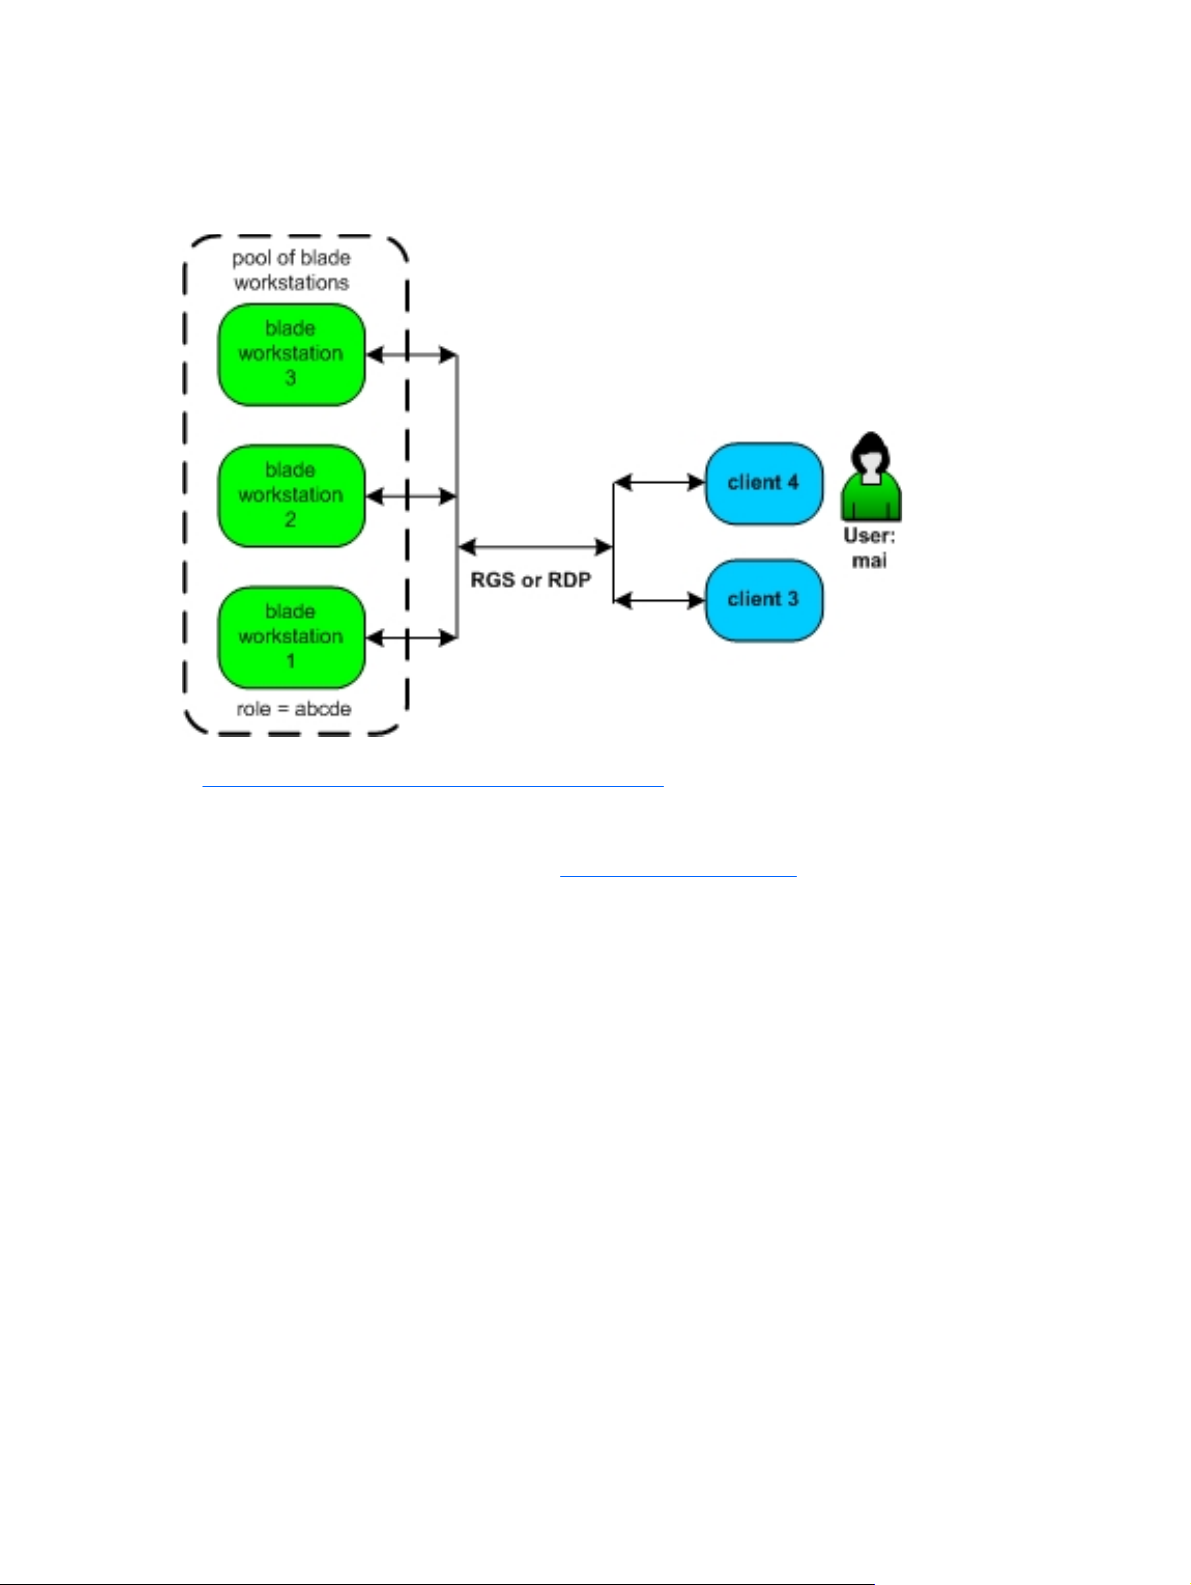
Setting up a User with a Dynamic Resource
HP SAM enables computing resources to be dynamically shared among users.
Figure 1-2 Dynamic Connection Example
In Figure 1-2 Dynamic Connection Example on page 12, we need to grant user Mai access to computing
resources. A pool of three blade workstations has been assembled, each configured to support the role
of “abcde”.
We assign Mai a role of “abcde.” See
▲
This means Mai is now authorized to access any computing resource which supports a role of “abcde.”
Therefore, when Mai requests connection to an “abcde” computing resource, HP SAM automatically
connects her access device to one of the three blade workstations (presuming one is available)
supporting that role.
Manage Users on page 48.
12 Chapter 1 Introduction
Page 21
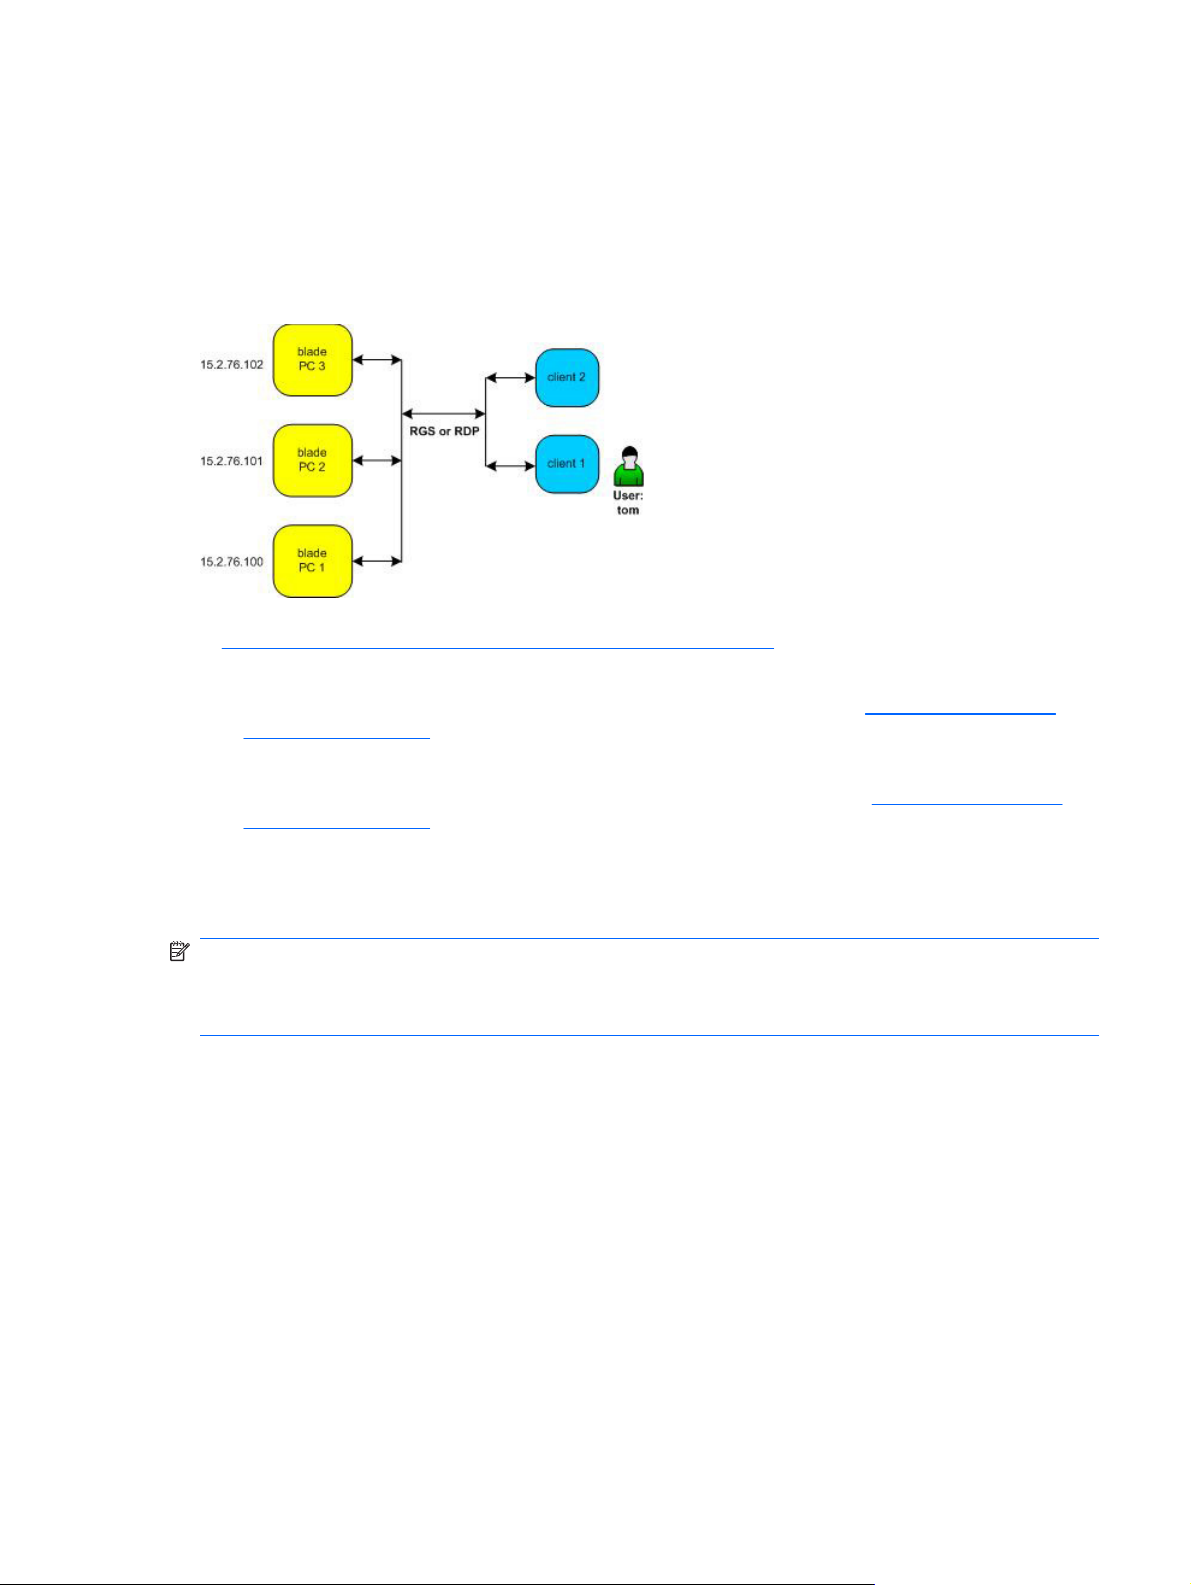
Setting up a User with Static (Dedicated) Resources
Dedicated (static) resource assignment allows one or more specific computing resources to be assigned
to a user and it allows one or more computing resources to be assigned as backup.
Support for Static roaming allows users to work from other locations. The differing display configurations
can be stacked on the client desktop to provide full access with fewer monitors.
Figure 1-3 Static (Dedicated) Connection Example
In Figure 1-3 Static (Dedicated) Connection Example on page 13, we need to grant user Tom access
to a specific computing resource. A blade PC has been configured to support Tom.
1. We assign blade PC 1 with an IP address of 15.2.76.100 to Tom. See
Manually on page 49.
2. To make sure Tom has a computing resource even if blade PC 1 is down, we assign blade PC 3
with an IP address of 15.2.76.102 to act as backup to blade PC 1. See
Manually on page 49.
Now, regardless of what client computer Tom uses, he is automatically connected to blade PC 1 at
address 15.2.76.100. If blade PC 1 fails, Tom clicks Connect and is automatically connected to blade
PC 3.
NOTE: If a blade is in a dynamic role and is reassigned as a dedicated resource to a user, that blade
is no longer available for allocation in the dynamic role to any other user, even if the current status is
Available. It is highly recommended that dedicated resources not be assigned to a dynamic resource
role, which will then help you accurately track the list of Available and In Use resources.
To Assign Resources
To Assign Resources
Common Tasks 13
Page 22
Configuring a Monitor Layout for a User
HP SAM allows a user to connect to multiple computing resources, thus running simultaneous RGS or
RDP sessions. Blades can be made available either by static assignment to the user or by assignment
to roles allocated to the user.
Static user/display ID to computing resource mapping allows a specific combination of user ID and client
ID to be mapped to a specific computing resource or a specific group of computing resources. When
that user logs on to that client using RGS, the preconfigured computing resources are displayed at a
specific location and resolution on the client monitor or monitors.
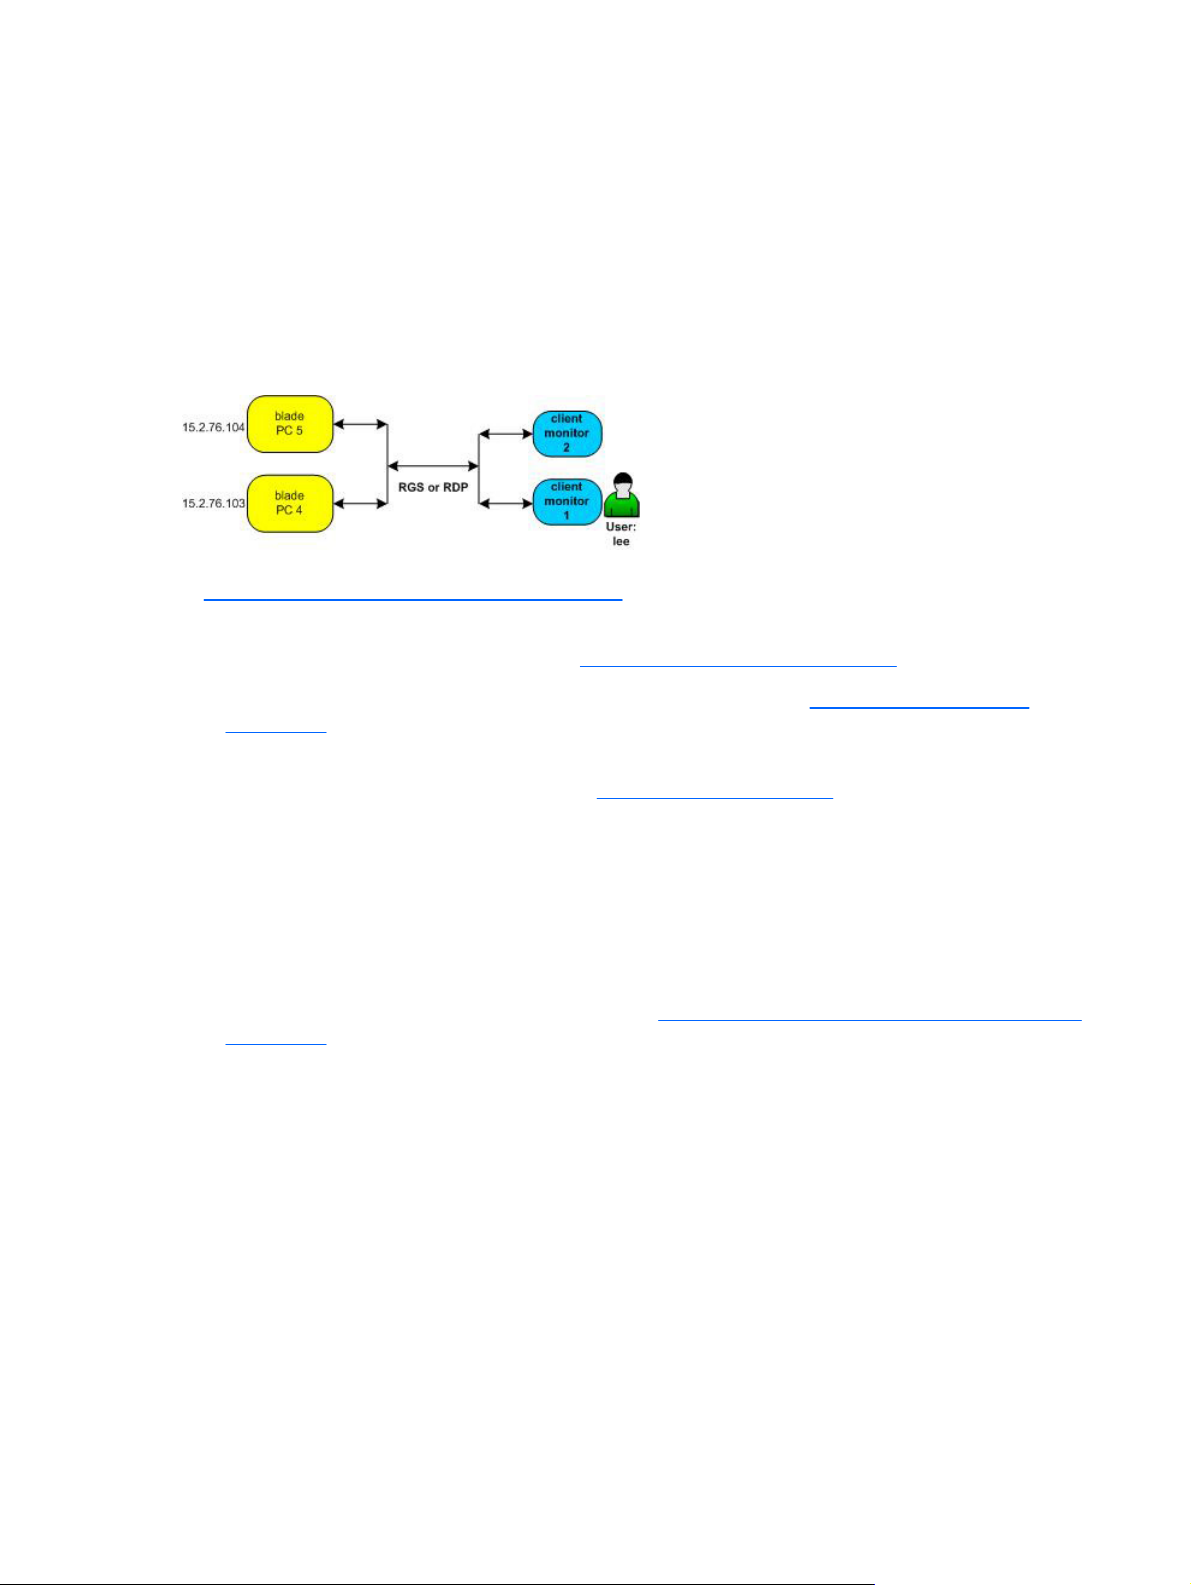
Figure 1-4 Monitor Layout Example
In Figure 1-4 Monitor Layout Example on page 14, user Lee has static access to two blade PCs. HP
SAM needs to be configured to display the information from these blade PCs on Lee's two monitors.
1. We create a monitor layout ID first. See
2. We assign the new monitor layout ID to Lee's access device. See
on page 55.
3. We assign the Monitor Layout ID to Lee and select the two blade PCs already assigned to him as
resources for that Monitor Layout ID. See
Both monitors have the same resolution width and height, so we enter 1280 and 1024, respectively,
next to each blade PC selected.
HP SAM treats the set of monitors as a single unit. To display output from each blade PC on a
different monitor, we have to specify the horizontal and vertical offset, the distance from upper left,
at which the output should appear.
We want output from blade PC 4 to be displayed on Lee's left monitor and output from blade PC
5 to be displayed on his right monitor, as shown in
on page 15. To display output from blade PC 4 on the left monitor, the upper left position, we
set both the horizontal and vertical offsets to 0. To display output from blade PC 5 on the right
monitor, we must set the horizontal offset one monitor resolution over, so we set that horizontal
offset to 1280. The display is not lowered, however, so the vertical offset is still 0.
Support for Static roaming allows users to work from other locations. If Lee logs in from another client,
the differing display configurations can be stacked on the client desktop to provide full access with fewer
monitors.
Manage Monitor Layout on page 56.
Manage Access Devices
Manage Users on page 48.
Figure 1-5 Monitor Offset Configuration Example
14 Chapter 1 Introduction
Page 23
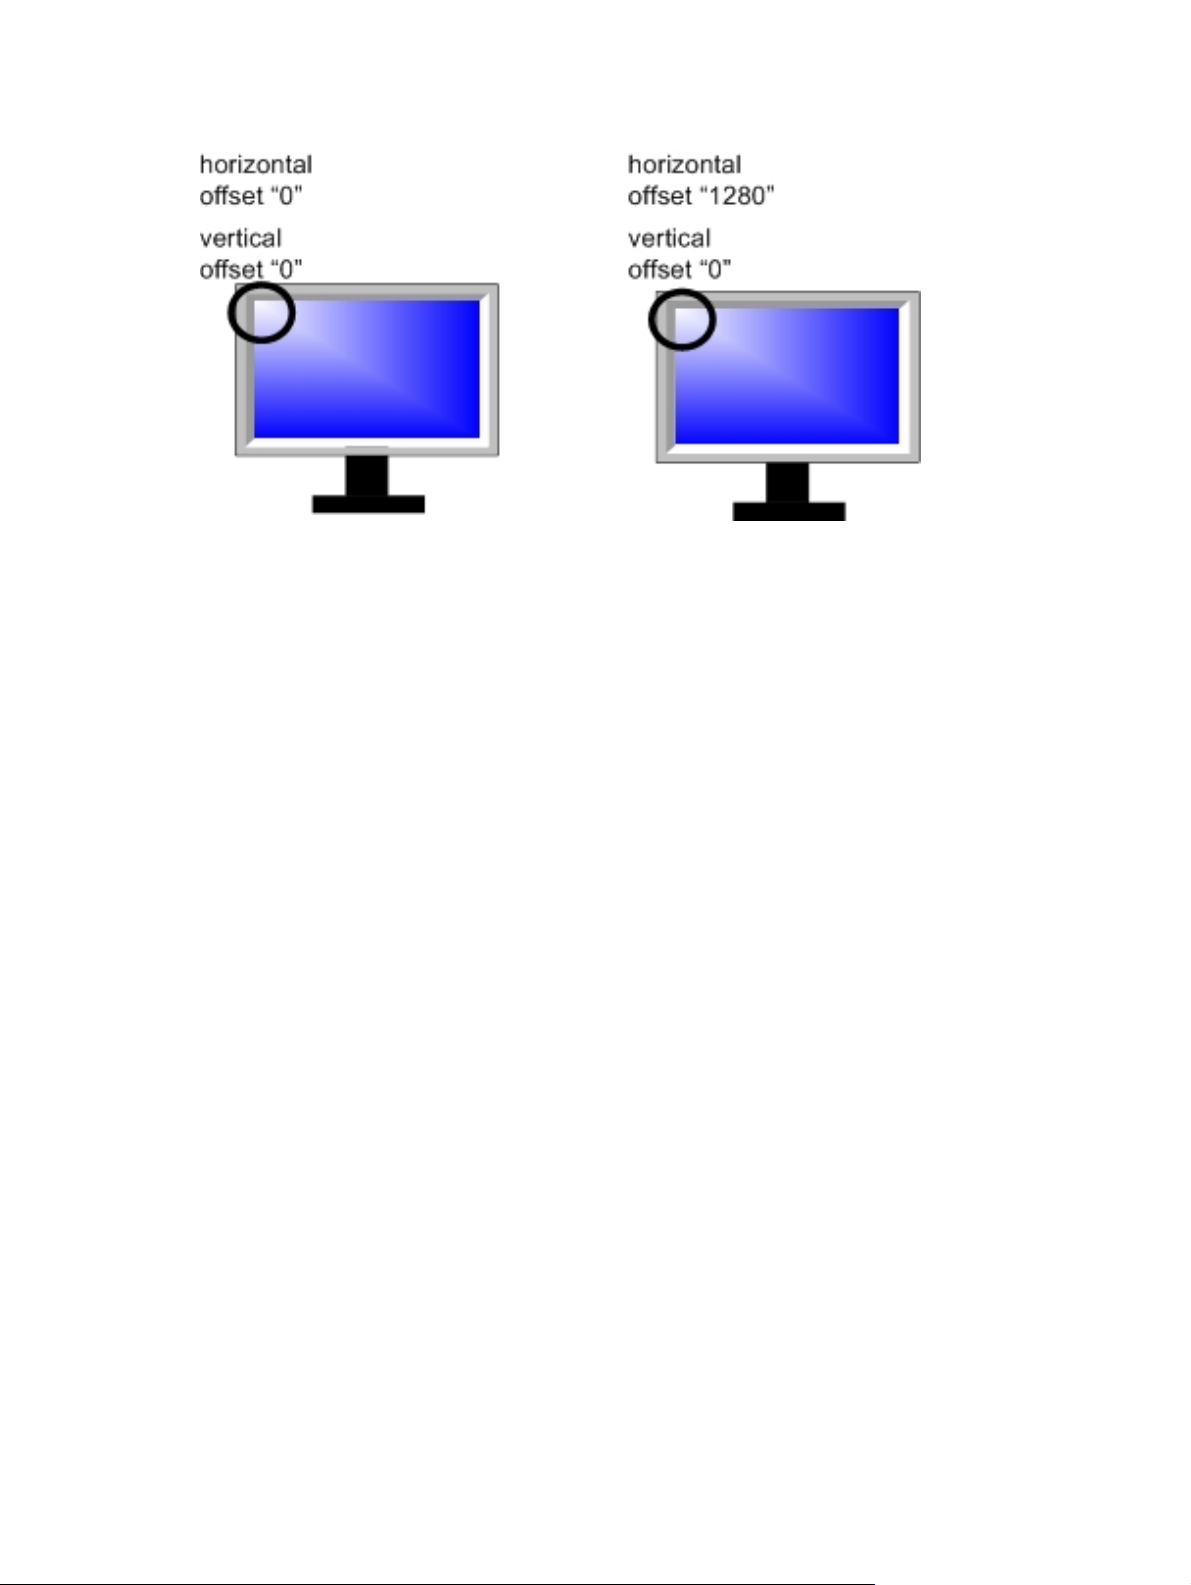
Figure 1-5 Monitor Offset Configuration Example
Common Tasks 15
Page 24

2Requirements
HP SAM Hardware and Software Requirements
HP SAM Web and SQL Server Requirements
You can install HP SAM on one or more failover HP SAM Web servers with one central HP SAM SQL
database. You can also install HP SAM on one server hosting both the HP SAM Web server and SQL
database.
HP SAM Web Server Hardware Requirements
Minimum:
x86-compatible server, such as an HP Proliant server with:
Processor: Pentium 4, 1.0 GHz
●
Hard drive: 10 GB (requires more if hosting both Web server and SQL database)
●
System memory: 1 GB
●
Recommended:
The recommended configuration depends on the scale of deployment:
Number of active users
●
Number of computing resources (such as blade PCs)
●
Geographic location and/or network architecture
●
Fault tolerance decision
●
HP SAM Web Server Software Requirements
Minimum:
One of the following operating systems must be installed:
Windows Server 2003, Standard Edition, with Service Pack 2
●
Windows Server 2003, Enterprise Edition, with Service Pack 2
●
Windows Server 2003 R2, Standard Edition, with Service Pack 2
●
Windows Server 2003 R2, Enterprise Edition, with Service Pack 2
●
16 Chapter 2 Requirements
Page 25

NOTE: You must install Microsoft .NET Framework Version 2.0 for the HP SAM version 2.2 Web
Server to function. It is recommended that Microsoft .NET Framework 2.0 is installed after IIS, for
appropriate asp.net registration.
SSL:
It is recommended that you configure SSL on the HP SAM Web server (which includes installing a
certificate) to encrypt your password and browser session when you log into the HP SAM administrator
console.
Only certain virtual directories under the main HP SAM Web site can be set to Require secure channel
(SSL):
Manage: Access to the Web Administrator console
●
Client: Communication line between client and HP SAM server
●
Resource: Communication line between resource and HP SAM server
●
HP SAM Hardware and Software Requirements 17
Page 26

HP SAM SQL Database Server Hardware Requirements
If you have an existing SQL database server, you can install the HP SAM database on the same server.
However, a separate dedicated HP SAM SQL database server for HP SAM is highly recommended to
support future scaling of environment. See illustrations of possible setups allowing for load distribution
following this procedure.
Minimum:
x86-compatible server, such as an HP Proliant server with:
Processor: Pentium 4, 1.0 GHz
●
Hard drive: 10 GB (requires more if running both Web server and SQL)
●
System memory: 1 GB or more
●
Recommended:
The recommended configuration depends on the scale of deployment:
Number of active users:
●
Number of computing resources (such as blade PCs)
●
Geographic location and/or network architecture
●
Fault tolerance decision
●
18 Chapter 2 Requirements
Page 27
HP SAM Hardware and Software Requirements 19
Page 28
20 Chapter 2 Requirements
Page 29

HP SAM Hardware and Software Requirements 21
Page 30

HP SAM SQL Database Server Software Requirements
Minimum:
One of the following must be installed:
Microsoft SQL Server 2000 Standard or Enterprise Edition, with Service Pack 4
●
Microsoft SQL Server 2005 Enterprise, Standard, or Express Edition, with Service Pack 1 or
●
Service Pack 2
HP recommends using Microsoft SQL Server 2000 or 2005 Standard or Enterprise Edition. However, if
you use SQL Server 2005 Express Edition, which has a 4-GB database size limit, you should either:
Disable history data and/or log collection
●
Limit the number of days the system retains history data and/or log collection
●
22 Chapter 2 Requirements
Page 31

HP SAM Registration Service Requirements
Hardware Requirements
HP blade PC
●
HP blade workstation series
●
HP xw8400 Workstation
●
HP xw9400 Workstation
●
NOTE: If you are running VMware virtual sessions using VMWare 3.X, refer to the VMware
documentation for hardware requirements.
Software Requirements
Install and enable one of the following operating systems:
Windows XP Professional with Service Pack 1 or higher
●
Windows XP 64-bit
●
Windows Vista, 32-bit or 64-bit, as follows:
●
Business
◦
Enterprise
◦
Install and enable one or both of the following:
RGS Sender 5.0 or higher with Single Sign-on enabled
●
Terminal service enabled—RDP
●
Access Device Requirements
The following sections provide information about the requirements for access devices.
Thin Client
Hardware Requirements
HP Compaq t5710 Thin Client (with Windows XP Embedded operating system)
●
HP Compaq t5720 Thin Client (with Windows XP Embedded operating system)
●
HP Compaq t5520 Thin Client (with Windows CE 5.0 embedded operating system)
●
NOTE: Windows CE 6.0 is not supported.
HP Compaq t5530 Thin Client (with Windows CE 5.0 embedded operating system)
●
NOTE: Windows CE 6.0 is not supported.
HP Compaq t5135 Thin Client (with HP ThinConnect embedded operating system)
●
HP SAM Registration Service Requirements 23
Page 32

If the HP SAM client is preinstalled, you need only to configure the HP SAM client to connect to the
appropriate HP SAM Web server. If the HP SAM client is not preinstalled, installation requires that the
access device has at least 3 MB of flash memory available.
Software Requirements
Install and enable one or both of the following:
RGS Receiver 5.0 or later (not on Windows CE)
●
RDP
●
Mobile Thin Client
Hardware Requirements
HP Compaq 6720t Mobile Thin Client (with Windows XP Embedded operating system)
●
Desktop or Notebook PC
Hardware Requirements
Desktop or notebook PC
●
Software Requirements
Install and enable one of the following operating systems:
Windows XP with Service Pack 2
●
Windows Vista, 32-bit or 64-bit
●
Install and enable one or both of the following:
RGS Receiver 5.0 or later
●
RDP
●
Blade Workstation Clients
Hardware Requirements
HP Compaq Blade Workstation Client
●
HP dc72 Blade Workstation Client
●
HP dc73 Blade Workstation Client
●
Software Requirements
Blade Workstation Client series with RGS Receiver in the image
●
Personal Workstation Clients
Hardware Requirements
HP xw8400 Workstation
●
HP xw9400 Workstation
●
24 Chapter 2 Requirements
Page 33

Software Requirements
Windows XP with Service Pack 2
●
Windows Vista, 32-bit or 64-bit
●
Other requirements
Create a Service Account
The HP SAM Web server must run under a domain user account in which it can execute the HP SAM
services on the local server.
Create the account prior to installation of the HP SAM server application.
●
Change this account name and password as infrequently as possible to minimize interruptions to
●
HP SAM.
Add the account to the local server administrator group on all HP SAM Web servers.
●
Add the account to the administrator group on all resources.
●
The account must be trusted in a multi-domain environment.
●
Obtain Administrative Rights
To fully install HP SAM, you must have the following administrative rights:
Administrative rights on all computing resources (such as blade PCs)
●
SQL administrative level account and password—only needed during setup
●
Administrative rights on the HP SAM Web server
●
Change the Firewall
If the network environment uses a hardware and/or software firewall, then you need to make appropriate
changes to the firewall for HP SAM to work. Refer to
Active Directory
While Active Directory is not part of HP SAM, HP SAM requires Active Directory version 2003 to perform
user account management.
NOTE: Active Directory running on Windows Server 2000 Domain controllers is not supported.
Firewall Rules on page 69 for more details.
Other requirements 25
Page 34

3 Installation
For new setup, the recommended order of installation is:
Install the HP SAM Web Server and SQL Software on page 26
●
Install and Validate the HP SAM Registration Service Software on page 28
●
Install and Validate the HP SAM Client Software on page 31
●
Deploy the HP SAM Registration Service to All HP SAM Computing Resources on page 41
●
Deploy HP SAM Client Software to All HP SAM Access Devices on page 41
●
Install the HP SAM Web Server and SQL Software
The installation package installs the HP SAM server application and/or HP SAM database (HP SAM-xx
##.MSI where xx is the language code, and ## is the version of the software you want to install. Language
codes include: EN for English, JP for Japanese, FR for French, DE for German, KO for Korean, ZH-CN
for Simplified Chinese). You may install either the Web server, the SQL database, or both. The language
selected is meant for the installation wizard only. Once the application is installed, the Web application
detects the browser language, and the user interface is shown in that same language, if the application
supports that language. If it does not, the user interface is in English.
NOTE: HP SAM can have one or more HP SAM Web servers. All HP SAM Web servers contain the
same feature set. You can set up HP SAM such that the servers load-balance each other and act as
failover servers. Additionally, each server can independently run an automated task, such as
synchronizing the computing resources or deleting HP SAM system log data from the HP SAM database.
Administration on page 43 for more details on these scheduled events.
See
If you attempt to install the HP SAM Web Administration Package on a MS SQL Server that has collation
of the SQL Server set to case-sensitive, the installation will fail.
To install HP SAM Web server and SQL software:
1. Log in to the server using an account with administrative rights.
2. Run the HP SAM-xx ##.MSI install file (where ## is the software version number). Replace xx with
EN for English, JP for Japanese, FR for French, DE for German, ZH-CN for Simplified Chinese,
KO for Korean.
3. Click Next on the welcome screen.
26 Chapter 3 Installation
Page 35

4. For HP SAM Web server installation, the installer asks for a user account. The user account is the
owner of the HP SAM Web site and the HP SAM server service. The permissions required for this
account are:
Administrative rights on all computing resources (such as blade PCs)
●
Administrative rights on the HP SAM Web server
●
NOTE: HP highly recommends that you type a name and password from a service account, not
from a personal account. You should change this account name and password as infrequently as
possible to minimize interruptions to HP SAM.
5. You have the choice to install the HP SAM Web application only, the HP SAM SQL database only,
or both. The default is both. Click on the pull-down arrow next to HP SAM Web Site or HP SAM
Database to see the list of options.
CAUTION: If you want to keep the HP SAM Web site and the SQL database installed on the
same server, do not clear HP SAM Web Site from the list during installation. Clearing the HP SAM
Web Site will remove the HP SAM Web Site from the server.
6. Leave the default installation folder as is or click the Browse button to change it. Click Next to
continue.
7. Type the SQL server name and either the NT authentication or the SQL authentication User
Name, and Password. The SQL user account needs the ability to create a database on the SQL
server for proper installation of the application. If the HP SAM database does not exist, the
installation creates one. If the database already exists, then the installation links the Web server
to the HP SAM database server.
8. Click Next on the Web Resources Configuration screen.
9. Select New Web Site for new Web installation, or select existing to install on an existing Web site
or to upgrade HP SAM.
10. Click the IP Address list and map the Web site to the appropriate IP address.
11. Click Next to start the installation, or click Cancel to exit.
12. Click Finish when the installation is complete.
13. If your network environment uses a hardware and/or software firewall, then you need to make the
following changes to the firewall for the HP SAM Web server and/or SQL server:
Web server
●
Incoming:
◦
- From access devices (TCP/ANY) to Web server (TCP/80—HTTP)
- From blades (TCP/ANY) to Web server (TCP/80—HTTP)
- From admin_workstation (TCP/ANY) to Web server (TCP/443—HTTPS)
- From blades (TCP/47777) to Web server (TCP/47777—Custom)
Outgoing:
◦
- From Web server (TCP/ANY) to SQL_Server (TCP/1433—MSSQL)), if not running on
the same machine as the Web server
Install the HP SAM Web Server and SQL Software 27
Page 36

- From Web server (TCP/ANY) to blades (TCP/139—RPC)
- From Web server (UDP/47777) to blades (UDP/47777—Custom)
SQL Server (only if not running on the same machine as the Web server)
●
Incoming: From Web server (TCP/ANY) to SQL_Server (TCP/1433)
◦
Outgoing: None
◦
14. On an HP SAM server, ASP.NET 2.0 is required. If other versions are installed as well, check the
Properties of the HP SAM Web site. Click the ASP.NET tab, and then select ASP.NET version
2.0.
Grant Users HP SAM Administrator Access
The Domain Administrator, Domain Users in the Administrators Group on the Domain Controller, and
Domain Users in the HP SAM server local Administrators Group are automatically members of the HP
SAM Administrator Group. HP highly recommends that you update the system by adding security groups
or individual names to the HP SAM Administrator access list, instead of using the Administrator account
to log in. This helps track who did what and when.
To add other users as HP SAM administrators, go to the HP SAM administrator console and add these
users to the Administrator group. See
Users and Roles Tab on page 46 for detailed instructions.
Configure HP SAM System Settings
Log in to the HP SAM administrator console, go to the System Settings tab, and make appropriate
changes. See
System Settings Tab on page 60 for detailed instructions.
Install and Validate the HP SAM Registration Service Software
Manually installing this software consists of these steps:
Install the HP SAM Registration Service on page 28
1.
2.
Create the HP SAM Registration Service Configuration File on page 29
Start/Restart the HP SAM Registration Service on page 30
3.
Test the HP SAM Registration Service on page 31
4.
Install the HP SAM Registration Service
Log in to the blade PC using an account with local administrative rights, and then run the
●
bladeservice_##.exe file (## is the software version).
If necessary, stop the service by going to Control Panel > Administrative Tools > Services, and
●
look for HP SAM Registration Service. If it is running, stop it.
Customize the service CFG file to match HP SAM. Go to the C:\Program Files\Hewlett-Packard
●
\HP SAM Registration Service folder and edit the hpevent.cfg-sample file. For details about how
to customize this file, see
on page 29.
Create the HP SAM Registration Service Configuration File
28 Chapter 3 Installation
Page 37

After you customize the configuration file, rename (or Save As) the sample file to hpevent.cfg.
●
Start the HP SAM registration service by going to Control Panel > Administrative Tools >
●
Services, and start the service under the name HP SAM Registration Service.
If the computing resource has a firewall, enable the ports below.
●
NOTE: Additional ports must be opened for RDP and RGS.
Incoming:
◦
- From Web server (UDP/47777) to blade (UDP/47777)
- From Web server (TCP/ANY) to blade (TCP/139)
- From access devices (TCP/ANY) to blade (TCP/3389)—RDP
- From access devices (TCP/ANY) to blade (TCP/42966)—RGS
Outgoing:
◦
- From blade (TCP/ANY) to Web server (TCP/80—HTTP)
- From blade (UDP/47777) to Web server (UDP/47777)
NOTE: Another way to enable the port is to enable the software service itself. Follow the firewall
instructions to enable the HP SAM Registration Service software.
Create the HP SAM Registration Service Configuration File
The HP SAM registration service configuration file is an INI text file named hpevent.cfg. The HP SAM
registration service tries to locate the configuration file in the order of locations listed below. Once the
service locates the file, the service stops the search and extracts the contents.
In the same directory in which the service resides (usually C:\Program Files\Hewlett-Packard\HP
●
SAM Registration Service)
In %SystemRoot% (usually c:\windows\)
●
In %SystemDrive% (usually c:\)
●
Refer to the following sample template. You must update the [WebServerList] section. The [RolesList]
section is optional. If the [RolesList] section is not populated, it is shown in the HP SAM administrator
console with no role. Roles can be assigned using the Web Administrator console.
[hpEventCfg]
Gateway=WebServerList
Role=RolesList
;ServicePort=47777
[WebServerList]
server1.yourdomain
server2.yourdomain
[RolesList]
Install and Validate the HP SAM Registration Service Software 29
Page 38

sample-role-1
sample-role-2
[WebServerList]
The [WebServerList] section lists one or more HP SAM Web servers. Each HP SAM Web server (primary
and failover) is listed, one per line. The service uses this list in the order provided. The first HP SAM
Web server in the list is the one tried first; if it fails, the service proceeds to try the remaining HP SAM
Web servers in order. If a successful connection is established, the remaining HP SAM Web servers
are not used.
To modify the server line, change just the server1.yourdomain string to the appropriate server name
(use Web server DNS name or static IP address). For example:
HP SAMservername
●
10.1.2.3
●
[RolesList]
NOTE: Assigning roles in the CFG file is optional.
The [RolesList] section lists zero or more roles to which the computing resource can belong. A role is a
functional collection of computing resources (such as blade PCs). The first role in the list is the computing
resource’s primary role. All other roles, if any, are considered non-primary.
When a user requests a resource in a certain role, computing resources are allocated to the user in the
priority order below:
Available computing resource assigned to this role only
●
Available computing resource assigned to multiple roles, with this role being the primary role
●
Available computing resource assigned to multiple roles, with this role being the non-primary role
●
NOTE: If at any time the configuration file is changed on the computing resource, you must restart the
service for the changes to take effect.
Start/Restart the HP SAM Registration Service
You can start or stop the service from the services applet (Control Panel > Administrative Tools >
Services) or from the command line.
Under the services applet, the service displays as HP SAM Registration Service.
●
Additionally, you can start or stop the service from the command line, using the syntax: C:> net
●
start daesvc and C:> net stop daesvc.
You can also start or stop the service using tools such as HP Rapid Deployment Pack. See the HP
Rapid Deployment Pack documentation for instructions.
30 Chapter 3 Installation
Page 39

Test the HP SAM Registration Service
Log into the HP SAM administrator console, click on the Resources tab, and search for the computing
resource within the role it was assigned.
If the computing resource was not found, check the firewall settings and make sure that the service
●
was started on that computing resource.
If the computing resource is found, select the Resources tab and select Synchronize from the
●
Operation list at the lower right of the screen.
NOTE: If the computing resource is marked off-line after the synchronize operation, this typically
means the HP SAM Web server is unable to communicate to the computing resource. Check the firewall
setting on the computing resource to make sure it allows incoming on port 47777 or the HP SAM
registration service. You can find out if the firewall is blocking the necessary traffic by disabling the
firewall temporarily and then enabling it again later.
Install and Validate the HP SAM Client Software
HP SAM includes the following clients:
Internet Explorer-based client
●
Windows XPe-based client
●
Windows CE 5.0-based client
●
Blade Workstation Client series
●
The HP SAM client requires that RGS (on the Windows XPe-based client or Blade Workstation Client
series) and/or Remote Desktop Connection (all clients except the Blade Workstation Client series) be
functional on the access device.
There are differences in features between the various HP SAM clients.
Table 3-1 HP SAM Client Comparison
Features Internet Explorer-
Based
Operating System
support
Communication
protocol
Automatic failover
support
Requires Internet
Explorer browser
Windows XP
Windows XP 64-bit
Windows Vista, 32-bit
Windows XP
Embedded
RDP only RGS or RDP RDP only RGS
X X X
X
Windows XP
Embedded-Based
Windows XP
Windows XP 64-bit
Windows Vista, 32-bit
Windows XP
Embedded
Windows CE 5.0-
Based
Windows CE 5.0 Blade Workstation
Blade Workstation
Client Embedded OS
Client Embedded OS
Requires ActiveX
controls to be
X
Install and Validate the HP SAM Client Software 31
Page 40

Table 3-1 HP SAM Client Comparison (continued)
downloaded in order to
run
Languages English, Japanese,
French, German,
Korean, Simplified
Chinese
Internet Explorer-Based Client
An access device can access HP SAM using Internet Explorer. To use the HP SAM Internet Explorerbased client, type the server name (http://HP SAMservername) in the Internet Explorer address bar.
If the access device is accessing the HP SAM server for the first time, the access device needs to install
two ActiveX controls (HP SAM Web Client Utility Class and Microsoft RDP Client Control). The installed
location for these controls are in the %SystemRoot%\Downloaded Program Files\ folder.
There are other HP SAM Internet Explorer-based client configuration settings that you can control from
the HP SAM server. Refer to the System Settings section for more information.
NOTE: HP recommends that you add the HP SAM Web server to the Trusted Sites list. On the access
device, open Internet Explorer and go to Tools > Internet Options > Security tab.
If a firewall is installed, you need to make appropriate changes to allow the HP SAM server client through.
For example, if HP Sygate Security Agent is installed, add a rule to allow port 3389 for application
IEXPLORE.EXE.
The HP SAM ActiveX controls are stored as source for distribution on the HP SAM Web server during
the Web server installation process.
English, Japanese,
French, German,
Korean, Simplified
Chinese
English English
If the HP SAM ActiveX controls are replaced on the HP SAM Web server during an upgrade, the HP
SAM client is automatically upgraded to the newer version the next time the access device connects to
the HP SAM Web server.
The HP SAM ActiveX controls support RDP 5.0 only, even if RDP 6.0 or RGS is installed.
For the HP thin client running Windows XPe, the installation of the HP SAM ActiveX components may
be repeated every time the access device is rebooted, if it is not saved as part of the thin client image.
If you are using the standalone Web Client Controls installer found in the HP SAM SoftPaq, you do not
need to download and install any controls.
Windows XPe-Based Client
To install the HP SAM client on a Windows XPe-based thin client or on a desktop/notebook PC:
1. Log in to the access device under an account with local administrative rights and run the scw32-
##.exe file (## is the software version) to install the Windows XP-based client.
NOTE: The language is automatically detected.
2. Follow the installation wizard.
3. After the software is installed, verify the program is placed on the start menu (Start > All
Programs > Hewlett-Packard > HP Session Allocation Client).
32 Chapter 3 Installation
Page 41

Customization Steps
(Recommended)
1. Start up the HP SAM client.
2. Type the HP SAM Web server name.
3. Click the Options button.
4. Change appropriate connection settings.
5. Click the Save Settings button.
6. Place the config file (hprdc.sam) on the desktop.
7. Click Save.
You are now able to double-click the HP SAM icon to start the client.
NOTE: You can set additional settings by manually editing the .SAM file. Refer to Configuration
Settings on page 34 for a list of the options available for the Windows XPe-based client.
Windows CE 5.0-Based Client
To install the client on a Windows CE 5.0-based thin client:
1. Log in to the thin client under an account with local administrative rights and run the scwce-en
##.cab file (## is the software version).
2. Follow the installation wizard to install.
3. After installation, click Start > Programs > HP PC Session Allocation Client to run the client.
Customization Steps
(Recommended)
1. Run the client.
2. Type the HP SAM server name.
3. Click the Options button.
4. Change connection settings, if needed.
5. Click the Save Settings button.
6. Select Desktop from the Save in list.
7. Click Save.
You are now able to start the client from the desktop.
NOTE: You can set additional settings by manually editing the .SAM file. Refer to Configuration
Settings on page 34 for a list of the options available for the Windows CE-based client.
Install and Validate the HP SAM Client Software 33
Page 42

HP Blade Workstation Client Series
The HP SAM client is delivered preinstalled on the HP Blade Workstation Client series. To upgrade to
a newer HP SAM client, go to
client, select Workstation Blade Client Embedded OS, and reimage the client.
Customization Steps
(Recommended)
1. Start up the HP SAM client.
2. Type the HP SAM Web server name.
3. Type the username and domain. (This step is optional.)
4. Click the Options button.
5. Change appropriate connection settings.
6. Click the Save Settings button. Click OK in the message confirming that the settings were saved.
7. Select \etc.
8. Click Save.
9. Click the Connect button to connect
www.hp.com, click software & driver downloads, select the appropriate
10. If the HP SAM client is closed, it should start automatically. If it does not start, click the right mouse
button and select Remote Graphics.
NOTE: Additional settings can be set by manually editing the .SAM files (configuration files). The HP
SAM connection client searches first for the user-specific .SAM file, hprdc.sam. It then checks the access
device file, hprdc_accessdevice.sam. Parameters found in the access device file replace or are added
to the merged file. Then, the connection client checks the file, hprdc_admin.sam. Parameters found in
the global file replace or are added to the merged file. Refer to
for a list of the options available for the Blade Workstation Client series.
Configuration Settings
Options
There are additional options to configure the settings. You can set these options by manually editing
the .SAM file. The following list provides supported keys and values within the [HPRDC] section.
Gateways—string value. Points to the section that lists HP SAM Servers.
●
DefaultPolicy—string value. This is the policy that should be selected by default in the client’s
●
Load Predefined Settings list on the Other tab of the Options section.
DefaultDomain—string value. This is a default value to be loaded in the Domain edit box on the
●
client user interface. If this value is not specified, the program attempts to determine the domain
from the user’s login information, which may or may not be accurate.
Configuration Settings on page 34
Policies—string value. Points to the section that lists policies that are loaded in the client’s Load
●
Predefined Settings list on the Other tab of the Options section. This allows the administrator to
pre-define a number of policies associated with various connection types. Refer to
Entries on page 38.
34 Chapter 3 Installation
Policy
Page 43

Autodial—integer value, 0 or 1. If value is set to 1, the program automatically tries to connect on
●
startup, without waiting for the user to type login information. Default value is 0.
DefaultUsername—string value. If value is not specified, the program attempts to determine the
●
user name from the user’s login information, which may or may not be accurate.
DefaultInsecurePassword—string value. You can use this field to pre-populate the password box.
●
This field was intended for automated load testing in an environment where security is not of
importance.
CAUTION: The DefaultInsecurePassword field is in plain text format and should not be used
in a production environment.
Failover—integer value, 0 or 1. When set to 1, enables the failover capability of the access device.
●
If multiple Web servers are defined, the access device fails over to the next available HP SAM Web
Server when a connection fails. Turning this feature on limits the user’s ability to type in a new HP
SAM server; the user still has the ability to choose between Web servers defined in the configuration
file. Default value is 0 (off).
EnablePublicRoles—integer value, 0 or 1. If set to 1, the HP SAM client will show any available
●
public roles for the user to connect to. If set to 0, the HP SAM client will hide public roles. Default
is 1 (show).
ResetAfterSession—integer value, 0 or 1. If set to 1, access device settings are reset back to
●
defaults after each session. This is useful in kiosk mode to clear previous user settings. The default
is 0. Not valid for Windows CE.
KioskMode—integer value. Not valid for Blade Workstation Client series or Windows CE. When
●
set to non-zero, the user interface is altered for use in a kiosk-mode environment. Valid values
include:
Bit 1 – Enable/disable the Cancel button (if 1, disable)
◦
Bit 2 – Enable/disable the Minimize toolbar button (if 1, disable)
◦
Bit 3 – Enable/disable the Close toolbar button (if 1, disable)
◦
Default value is 0 (all features are enabled). For example, to turn off the Cancel and Minimize
buttons and leave the Close button on, set the value to 3.
DisplayShutdown—integer value, 0 or 1. When set to 1, an action button is added to the client
●
user interface to enable the user to shut down the access device. This is the same button created
by the DisplayShutdown, DisplayRestart, and DisplayLogoff options. If the button already
displays from another option setting, the Shutdown option is added to the button drop-down. Not
valid for Blade Workstation Client series or Windows CE. The default value is 0 (do not show).
DisplayRestart—integer value, 0 or 1. When set to 1, an action button is added to the client user
●
interface to enable the user to restart the access device. This is the same action button created by
the DisplayShutdown, DisplayRestart, and DisplayLogoff options. If the button already displays
from another option setting, the Restart option is added to the button drop-down. Not valid for
Blade Workstation Client series or Windows CE. The default value is 0 (do not show).
DisplayLogoff—integer value, 0 or 1. When set to 1, an action button is added to the client user
●
interface to enable the user to log off the access device. This is the same action button created by
the DisplayShutdown, DisplayRestart, and DisplayLogoff options. If the button already displays
from another option setting, the Logoff option is added to the button drop-down. Not valid for Blade
Workstation Client series or Windows CE. The default value is 0 (do not show).
Install and Validate the HP SAM Client Software 35
Page 44

DefaultSessionAction—integer value, 0, 1, or 2. When set to 0, the default session action
●
(pressing the button without dropping down the list) for the button is Shutdown. If set to 1, the
default action is Restart. If set to 2, the default action is Logoff. If only one action is enabled, that
option is the default action, and this setting is ignored. If this value corresponds to an action that
is not enabled, no default action is available. Not valid for Blade Workstation Client series or
Windows CE. The default value is 0.
ConnectionBar.Enable—integer value, 0 or 1. When set to 1, the HP SAM connection bar is
●
enabled. Set this value to 1 to allow the user to manage multiple connections using the HP SAM
connection bar. This also prevents the user from opening multiple instances of the client. Not valid
for CE. The default value is 1 for Blade Workstation Client series and 0 for all others.
ConnectionBar.FollowMouse—integer value, 0 or 1. When set to 1, the connection bar is open
●
on the monitor where the cursor is. Not valid for CE. The default value is 1.
ConnectionBar.Location—integer value. Sets the location of connection bar (if 0, top; if 1, bottom;
●
if 2, left; if 3, right). Not valid for CE. The default value is 0 (top).
ConnectionBar.EnableAddNew—integer value, 0 or 1. When set to 1, enables the “Add New”
●
button on the connection bar. Not valid for CE. The default value is 1.
ConnectionBar.EnableCloseAll—integer value, 0 or 1. When set to 1, enables the “Disconnect
●
All” button on the connection bar. Not valid for CE. The default value is 1.
ConnectionBar.EnableDisconnectInstance—integer value, 0 or 1. When set to 1, enables the
●
“Disconnect” button on the connection bar for each session. Not valid for CE. The default value is 1.
ConnectionBar.ShowDelay—integer value. Specifies delay in milliseconds for connection bar to
●
appear after cursor has been moved to screen edge. Not valid for CE. The default value is 500
milliseconds.
ConnectionBar.ShowOnDisconnect—integer value, 0 or 1. When set to 1, enables connection
●
bar to appear automatically when a session closes. Not valid for CE. The default value is 1.
ConnectionBar.AutoHideTimeout—integer value. Sets time in seconds for connection bar to
●
stay open when cursor is moved off connection bar. 0 = always stays open. Not valid for CE. The
default value is 3.
Resolutions—string value. Specifies another section in the .SAM file that contains a list of
●
resolutions to show on the client UI. Open the default .SAM file to see the required format. Not valid
for CE.
ConnectionBar.ShowLogoff—integer value, 0 or 1. When set to 1, an option to log off the
●
resource is shown when disconnecting. Not valid for CE. Default value is 0.
ConnectionBar.ShowReboot—integer value, 0 or 1. When set to 1, an option to restart the
●
resource is shown when disconnecting. Not valid for CE. Default value is 0.
ConnectionBar.ShowHardReboot—integer value, 0 or 1. When set to 1, an option to cycle power
●
on the resource is shown when disconnecting. Not valid for CE. Default value is 0.
DisclaimerDisplay.Timeout—Time in seconds for the HP SAM client to be idle before the Legal
●
Disclaimer window reappears. Not valid for CE. Default value is 30.
ConnectionBar.SessionWindow.EnableIdentify—integer value, 0 or 1. When set to 1, an RGS
●
session chosen on the HP SAM Connection Bar will be highlighted and can be moved by the user.
This features requires RGS 5.1.3 or later. Not valid for CE. Default value is 1.
36 Chapter 3 Installation
Page 45

Smart Card Settings
NOTE: Smart card settings are not valid for Windows CE-based client or Blade Workstation Client
series.
SmartCardAlways—integer value, 0 or 1. Allows user to use smart card to enter credentials and
●
log in. If UiMode = 0 or 1, user has option of using smart card to log in. If UiMode = 2, user must
log in with smart card. See “UiMode” in
Default is 1 (allow).
SmartCardRequiresClick—integer value, 0 or 1. Set to 1 to require that the user click Connect
●
after a smart card is detected. Changing this to 0 automatically initiates a connection when the user
inserts a recognized smart card. Default is 1.
SmartCardCSP—string value. The CSP to use for accessing the smart card. This must match
●
exactly the name of the CSP installed on the machine. Default is “ActivCard Gold Cryptographic
Service Provider.”
SmartCardUidType—integer value, 1 or 8. The Type field in the smart card certificate properties
●
enumeration, to use for determining the user UPN name. Value of 8 is CERT_NAME_UPN_TYPE.
If set to 8, you must specify SmartCardUidOid. Default is 1 (CERT_NAME_EMAIL_TYPE).
SmartCardUidOid—string value. The OID associated with the entered SmartCardUidType. Not
●
all Types require an OID. An entry is required is SmartCardUidType=8. Default is blank.
SmartCardAutoDisconnect—integer value, 0 or 1. If set to 1, automatically disconnect the
●
connection when the smart card is removed. Note that Active Directory policy settings may affect
the actual behavior of this property. Active Directory options include leave as is, password lock,
and log off. Active Directory does not include a disconnect option, so you must use
SmartCardAutoDisconnect for that functionality. Default is 1.
User Interface Customization Settings on page 37.
User Interface Customization Settings
UiMode—integer value, 0, 1 or 2. Select the type of user interface to display.
●
0 (default)—HP SAM Server, User name, and Domain fields visible in the user interface.
◦
1—show the UPN mode, where the Domain field is not shown. The user must use the format
◦
username@domain.
2—show smart card mode, where both the User Name and Domain fields are hidden, and a
◦
message displays asking that the user insert the smart card. The Connect button is disabled
when no smart card is inserted. For the Blade Workstation Client Embedded OSand Windows
CE, this value (2) is treated as a 1.
Banner—string value, Allows a specified file to load as the banner image on the access device
●
main dialog. The image must be in Windows Bitmap (BMP) format. A fully qualified path is required.
The banner area is 385 x 60 pixels and 24-bit color. If you provide a file of different resolution, it is
resized to fit in the banner area. Not valid for Windows CE.
TitlebarText—string value. Allows overriding the default text in the titlebar with a specified string.
●
By default, language-appropriate text displays.
ShowVersion—integer value, 0 or 1. If set to 1, displays the HP SAM client version text on the
●
main window. Default is 1.
EnableOptionsButton—integer value, 0 or 1. If set to 1, the Options button on the main
●
application dialog is visible. If set to 0, the button is not displayed. Default is 1.
Install and Validate the HP SAM Client Software 37
Page 46

EnablePassword—integer value, 0 or 1. When set to 1, shows the Password box on the access
●
device user interface. When set to 0, the password box is not available. Default is 1.
UILanguage—language identifier. Supported identifiers include:
●
EN = English
◦
FR = French
◦
DE = German
◦
JA = Japanese
◦
KO = Korean
◦
ZH-CN = Simplified Chinese
◦
If the identifier is not supported or the property is not present in the configuration file, the application
defaults to US English. A language support DLL must be present to support the language. Not valid
for Windows CE or the Blade Workstation Client series.
NOTE: The UILanguage specified must either be the same language as the HP SAM client
application that you have installed or English. If you installed the English HP SAM client application,
do not change the value to any other language. To minimize disk space, the English HP SAM client
application does not contain any other HP SAM client language DLL.
EnableServer—integer value, 0 or 1. If set to 1, the HP SAM Server box on the main application
●
dialog is visible. If set to 0, the field is not displayed. If the field is turned off, the value is still required
and must be defined in the configuration file. Default is 1.
Policy Entries
You can set policy entries by manually editing the .SAM file. These settings must be located in the
Policies section of the .SAM file.
Protocol—integer value, 0, 1, or 3. Specify which protocol to use for connection. RDP is 1, RGS
●
is 3. A value of 0 (automatic) uses autodetected settings, with a preference of RGS over RDP. Not
valid for CE. Default is 0.
Mute—0 or 1. If 0, audio is enabled for this connection. If 1, audio is disabled. Default is 0.
●
SoundQuality—integer value, 1, 2, or 3. Set to 1 for lowest 3 for highest sound quality. This value
●
is only supported for RGS connections. Not valid for CE. Default is 2.
SoundStereo—0 or 1. If 1, stereo sound is supported. If 0, mono sound is played. This value is
●
only supported for RGS connections. Not valid for CE. Default is 1.
BordersEnabled—integer value, 0 or 1. If 1, enables normal Windows borders. 0 = no borders.
●
This value is only supported for RGS connections. Not valid for CE. Default is 1.
WindowSnapEnabled—integer value, 0 or 1. If 1, allows window to “snap” to edge of screen when
●
moved. This value is only supported for RGS connections. Not valid for CE. Default is 1.
AudioFollowsFocus—integer value, 0 or 1. If 0, sound from all sessions is audible. If 1, only
●
audible sound is from session that has focus. This value is only supported for RGS connections.
Not valid for CE. Default is 0.
38 Chapter 3 Installation
Page 47

MicrophoneEnabled—integer value, 0 or 1. If 1, microphone input from the access device is sent
●
to RGS sessions. This value is only supported for RGS connections. Ignored by RDP sessions.
This feature requires RGS 5.1.3 or later. Not valid for CE. Default is 0.
KeyRepeatEnabled—integer value, 0 or 1. If 1, disables key repeat suppression normally required
●
by RGS to keep keys in hot key sequences from repeating when held down. This value is only
supported for RGS connections. Not valid for CE. Default is 0.
MapUSB—integer value, 0 or 1. If 1, allows USB redirection. This value is only supported for RGS
●
connections. Not valid for CE. Default is 0.
ImageQuality—integer value, 0–100. Sets image quality; 0 = lowest quality, fastest. 100 = highest
●
quality, slowest. This value is only supported for RGS connections. Not valid for CE. Default is 65.
Compression—0 or 1. If 1, RDP compression is enabled. This value is only supported for RDP
●
connections. Default is 1.
Wallpaper—0 or 1. If 1, the remote desktop wallpaper is displayed. This value is only supported
●
for RDP connections. Default is 0.
Connbar—0 or 1. If 1, a small bar is displayed at the top of the window. This window allows the
●
user to minimize during a full screen session. This value is only supported for RDP connections.
Default is 1.
FullDrag—0 or 1. If 1, window contents are shown while a window is dragged. This value is only
●
supported for RDP connections. Default is 0.
Themes—0 or 1. If 1, Windows XP themes are shown in the session. This value is only supported
●
for RDP connections. Default is 1.
Animation—0 or 1. If 1, menu animation is shown in the session. This value is only supported for
●
RDP connections. Default is 0.
Caching—0 or 1. If 1, RDP bitmap caching is enabled. This value is only supported for RDP
●
connections. Default is 1.
AutoReconnect—0 or 1. If 1, RDP reconnection is enabled. Not recommended for an HP SAM
●
solution. This value is only supported for RDP connections. Default is 0.
MapDrives—0 or 1. If 1, local drives are made available to the remote session. This value is only
●
supported for RDP connections. Default is 0.
MapPorts—0 or 1. If 1, local serial ports are made available to the remote session. This value is
●
only supported for RDP connections. Default is 0.
MapPrinters—0 or 1. If 1, local printers are made available to the remote session. This value is
●
only supported for RDP connections. Default is 0.
MapSmartcards—0 or 1. If 1, local smart cards are made available to the remote session. This
●
value is only supported for RDP connections. Default is 0.
ColorDepth—integer value, 8, 16, 24, or 32. The color depth for the RDP session. This value is
●
only supported for RDP connections. Default is 16.
FullScreen—0 or 1. If 1, a full screen session is created. Default is 1.
●
Keys—integer value, 0, 1, or 2. Indicates how to handle special key combinations (such as Alt +
●
tab) within an RDP session. If 0, the keys are handled on the local machine. If 1, the keys are
Install and Validate the HP SAM Client Software 39
Page 48

handled on the remote machine. If 2, the keys are handled on the remote machine while the session
is full screen. This value is only supported for RDP connections. Default is 2.
Height—integer value. Together with Width, indicates size of the window. Default is 600.
●
Width—integer value. Together with Height, indicates size of the window. Default is 800.
●
RgsWarningTimeout—integer value. The timeout in milliseconds used to detect and notify the
●
user of a network disruption. For more information, see rgreceiver.network.timeout.warning in the
RGS documentation. The default value is the user interface value of 2000 milliseconds - two
seconds. The user interface displays this value in seconds. This value is only supported for RGS
connections. Not valid for CE.
RgsErrorTimeout—integer value. The timeout in milliseconds used to detect and disconnect an
●
inactive connection. For more information, see rgreceiver.network.timeout.error in the RGS
documentation. The default value is the user interface value of 30000 milliseconds - 30 seconds.
The user interface displays this value in seconds. This value is only supported for RGS connections.
Not valid for CE.
RgsDialogTimeout—integer value. The timeout in milliseconds used to display and wait on
●
responses from input dialogs such as the authorization dialog and PAM authentication dialog. For
more information, see rgreceiver.network.timeout.dialog in the RGS documentation. The default
value is the user interface value of 15000 milliseconds - 15 seconds. The user interface displays
this value in seconds. This value is only supported for RGS connections. Not valid for CE.
ClearType—integer value, 0 or 1. When set to 1, support for Font Smoothing is enabled in an
●
RDP6 session. This option is ignored for RDP5 and RGS. Set to 0 to disable. Not valid for CE.
Default value is 0.
ComposedUI—integer value, 0 or 1. When set to 1, support for Vista Aero interface is enabled
●
(Desktop Composition). This requires RDP6 and is ignored for RDP5 and RGS. Additionally,
various hardware and operating system requirements must be met before the Vista Aero interface
can be shown. Set to 0 to disable. Not valid for CE. Default is 1.
Autosize—integer value, 0 or 1. When set to 1, an RDP session is automatically resized to fit when
●
its containing window is resized. When set to 0, the window maximum size is that of the remote
session, and when sized down, scroll bars appear. This value is ignored for RGS and is only valid
in a windowed session. Not valid for CE. Default value is 0.
MapClipboard—integer value, 0 or 1. When set to 1, the clipboard will be made available to remote
●
sessions, and allows limited cut-and-paste functionality from the local machine to the remote
session or vice versa. This option is ignored for RGS. When set to 0, this feature is disabled. Not
valid for CE. Default is 1. Requires RDP6.
NetworkAuthentication—integer value, 0, 1, or 2. When set to 1, the RDP client warns when
●
connecting to a resource that cannot be authenticated. When set to 2, the RDP client refuses to
connect to an unauthenticated resource. When set to 0, the connection succeeds regardless of the
authentication state. This setting requires RDP6 and is ignored for RDP5 or RGS. Not valid for CE.
Default value is 0.
MapDrivesList—string value, RDP6 only. This field is valid only if MapDrives is set to 1. Not valid
●
for CE. For RDP6, this allows control over which logical drives are made available to the remote
session. The list corresponds to the RDP6 configuration file format, and it looks as follows:
MapDrivesList=c:;d:;e:;DrivesDynamic
In this example, the drives c:, d:, and e: are made available, along with the drives connected after
the session is established (DrivesDynamic).
40 Chapter 3 Installation
Page 49

Span—integer value, 0 or 1. When set to 1, specify that the session should span over all available
●
monitors (to the limits of the protocol being used). This setting requires RDP6 or RGS and is ignored
for RDP5. Not valid for CE. The default value for this option is 0 (do not span). Additionally, the
following restrictions apply for RDP6:
Combined monitor resolution can be no greater than 4096x2048 pixels.
◦
All monitors must be at same resolution.
◦
All monitors must be aligned side-by-side.
◦
MatchClientDisplays—integer value, 0 or 1. Setting this parameter to 1 allows RGS to map the
●
sender displays to the client display devices. RGS sessions must line up with the physical display
boundaries on the client desktop in order to set valid display resolutions on the sender. Use this
feature for multi-display clients on senders that have multiple physical displays. Senders that are
configured to use a single logical display will cause RGS to revert to setting a single display instead
of multiple displays. RGS 5.1.3 or later is required. Not valid for CE. Default is 0.
Deploy the HP SAM Registration Service to All HP SAM Computing Resources
For high volume deployment, HP highly recommends that you use a software tool such as HP Rapid
Deployment Pack.
1. Install the service on all computing resources.
2. Create the HP SAM registration service configuration file (hpevent.cfg) on a single blade and save
this file as a template to use later.
3. Start or restart service on a single computing resource and verify that the computing resource self-
registered into the HP SAM Web server.
4. Deploy the HP SAM registration service configuration file (hpevent.cfg) to all appropriate computing
resources and start the service on those units.
Deploy HP SAM Client Software to All HP SAM Access Devices
To deploy the HP SAM Internet Explorer-based client, instruct your users to go to the HP SAM server
Web site(s) that you have set up.
If the access device is accessing the HP SAM server for the first time, the access device needs to install
two ActiveX controls (HP SAM Web Client Utility Class and Microsoft RDP Client Control). The installed
location for these controls are in the %SystemRoot%\Downloaded Program Files\ folder.
Deploy the HP SAM Registration Service to All HP SAM Computing Resources 41
Page 50

Various methods can be used to deploy the Windows XPe-based or Windows CE 5.0-based HP SAM
client to the access devices. Following are two examples.
Use software deployment tools such as HP Rapid Deployment Pack.
●
a. Install the HP SAM client on the access devices.
b. Update the client hprdc.sam file to connect to the HP SAM server and specify desired settings
(see the customization steps for the specific HP SAM client type).
Post the HP SAM Windows XPe-based client installation file and/or the HP SAM Windows CE 5.0-
●
based client installation file on a Web site or fileshare. If you created an hprdc.sam file for your
environment, you should post this file also. Then instruct the users to:
a. Download and install the client software.
b. Place the config file (hprdc.sam) on the desktop.
NOTE: If a firewall is installed, make appropriate changes to allow the HP SAM client through.
Do this at the application level instead of the port.
42 Chapter 3 Installation
Page 51

4 Administration
Log In
In the Internet Explorer Address bar, enter in the HP SAM Web server name with /Manage added to the
URL (for example, https://HP SAMservername/Manage).
If SSL is configured and a certificate-related security pop-up message is displayed, click Yes.
Once you get to the log-in page, enter username, password, and click the Sign In button. You have two
ways to enter in your username. It can be entered as domain\username or your User Principal Name
(UPN) (yourname@yourcompany.com).
General Navigation and User Interface Design
The HP SAM administrator console is designed with tabs and hyperlinks for navigation. Depending on
the tab, there could also be a filter option section. The main work space or result list is at the bottom of
the page.
Display More (or Fewer) Items Per Page
The system defaults to show only a certain number of items per page. Select a new value (10, 25, 50,
100, 250, or 500) in the Show field to change this number. The page will immediately be updated to
reflect this new setting.
Move Columns
The system displays the result data grid in a certain way. You can move the columns by dragging and
dropping the column header to the appropriate place within the grid.
Sort Result List
Whenever there is a result grid, you can sort by any of the column shown. Click on the appropriate
column header to sort by that column. Click on the same column header to toggle between descending
and ascending.
Select More Than One Item
The top left side of the result grid includes a check box.
To select all items on all pages, not just the page shown, select this check box.
●
To clear all boxes on all pages, not just the page shown, clear this check box.
●
Log In 43
Page 52

Managing the HP SAM Administrator Access List
The Domain Administrator, Domain Users in the Administrators group on the domain controller, and
Domain Users in the HP SAM server Local Administrator Group are automatically members of the HP
SAM Administrator Group. To add another user to the HP SAM Administrator group, see
Attributes on page 48.
Add Individual Users to the HP SAM Administrator Group
If you are adding only a few users, add the names directly to the HP SAM Administrator group.
1. Go to the Add New Users page.
2. Set Search By to Users.
3. If you want to filter to a specific domain, in the Domain name list select the domain, or select
Global Catalog for all domains in the same Active Directory forest the HP SAM server is in.
4. Type one or more of the parameters, as shown in the following examples:
a. Last Name: Search is performed by last name when entering characters.
b. First name: Characters entered after a comma is typed initiate a search by first name. You
can also search by first name and last name by entering a space. Characters before the space
initiate a search by first name. Characters after the space initiate a search by last name.
c.
UPN Name: Entering an at sign (@) initiates a search by UPN Name.
To Assign
NOTE: Results are shown as you type starting with the second character.
5. Click Add to add highlighted users to the list.
6. Select the users in the list that you want to add into HP SAM.
7. Click Save.
NOTE: After you have clicked Save, you can set user attributes, including Administrator Groups. You
also have the option of assigning dedicated resources automatically. If a user is already in HP SAM, his
attributes are changed to match what is set here.
Add Security Groups or Organizational Units to the HP SAM Administrator Group
To add many users:
1. Go to the Add New Users page.
2. Leverage Active Directory services by adding the names in Active Directory under a security group
or organizational unit.
3. Add the security group or organizational unit directly to the HP SAM Administrator group.
a. In Search By, select Organizations (OU) or Security Groups.
b. If you want to filter to a specific domain, in the Domain name list select the domain, or select
Global Catalog for all domains in the same Active Directory forest the HP SAM server is in.
44 Chapter 4 Administration
Page 53

c. Search for groups by entering characters in the search field. Results are shown as you type.
You can highlight one group and use the View button to see the users in the group.
d. Click Add to add highlighted groups into the list.
e. Select the groups in the list that you want to add into HP SAM.
f. Click Save.
NOTE: After you have clicked Save, you can set SG or OU attributes, including Administrator
Group. If an SG or OU is already in HP SAM, the attributes are changed to match what is set here.
NOTE: To make future changes, go to Active Directory and add or remove users from those groups.
Remove Users From the HP SAM Administrator Group
To remove users from the HP SAM Administrators list, navigate to the Users and Roles > Manage
users.
1. In the Filter Options section, from the Role list select the [Administrator]. Administrator group
names are encased in square brackets, for example [Admin Group].
2. Click Search.
3. Select the check box next to the appropriate names.
4. If you want to permanently delete the user or users from the system, select Delete in the
Operation list and click Go.
5. If you want to remove the user or users from the HP SAM Administrator Group without deleting
them from the system, perform the following steps:
a. In the Operation list, select Assign Attributes, and then click the Go button.
b. Next to the Administrator Group, select <blank> (or clear).
c. Click Save to save your changes.
Managing the HP SAM Administrator Access List 45
Page 54

HP SAM Administrator Console Tabs
Home Tab
When you log in to HP SAM, the Home tab page defaults. HP SAM shows a snapshot of current resource
status grouped by roles, as a convenience to the administrator.
Users and Roles Tab
The Users and Roles tab facilitates the management of roles and user access list.
Manage Resource Roles
All roles, as created by computing resources when they self-registered or created with the Create button,
are shown.
Role column: A list of all roles.
●
Asset Group column: Shows asset groups that belong to each role.
●
Description column: You can change the description for each role if the name by itself does not
●
clearly explain what it is or to further differentiate it from the other roles. The role name and
description are displayed to the user on the access device during connect phase, if the user has
access privilege to use more than one role.
Policy column: By default, the HP SAM client settings are assigned to the Global Policy. All Global
●
Policy connection forced settings, if any, within that policy are applied to all users. To override the
Global Policy with another policy, create the policy first on the Policies tab, and then reassign the
role to use the appropriate policy here.
Enabled column:
●
If selected, the role is available for allocation.
◦
If there is no check mark, then all blades are unavailable for user connection through HP SAM
◦
within the scope of that role.
To change the setting, click the link for the role, select or clear the check box in the dialog
◦
box, and then click Save.
If the Enabled check box was cleared:
◦
- New user connection requests to this role are denied by the HP SAM Web server.
- Current active connections are left as is.
- Disconnected users are not permitted to reconnect back to their disconnected sessions.
Public column:
●
If selected, the role is available for all users in Active Directory.
◦
If not selected, then the role is only available to user(s) in that particular role access list.
◦
To change the setting, click the link for the role, select or clear the check box in the dialog
◦
box, and then click Save.
46 Chapter 4 Administration
Page 55

Create button: Click to create a new role that you can assign to resources.
●
Delete button: Click to delete selected settings.
●
Manage Asset Groups
Asset Groups allow focused management of business group assets such as Clients, Resources, Users,
OUs, SGs, Roles, Monitor Layout IDs, Policies, Logs, and Reports.
Asset Group column: A list of all asset groups.
●
Description column: You can change the description for each asset group if the name by itself
●
does not clearly explain what it is or to further differentiate it from the other asset groups.
Create button: Click to create a new asset group.
●
You may also remove an asset group by selecting it and clicking Delete.
Manage Administrative Permissions
NOTE: You must have full HP SAM Administrator permissions to:
- Create, modify, or delete an Administrator group.
- Assign users to an Administrator group.
Use this window to customize permissions for differing levels of administrator access. After you create
administrative levels, to grant user access you must add the users to the Administrator groups you
created.
NOTE: If you assign a user to multiple Administrator Groups which have different sets of access
privileges, the user will have all the privileges from the assigned Administrator Groups.
To create a new administrative permission group:
1. Click Create.
2. In the Group Name box, type a name for the administrator group.
3. In the Description box, type a description for the group.
4. In the Asset Group Assignment fields, select the asset group(s) to associate with the new
Administrator group.
5. In the Category list, select the category for which to specify specific permission levels.
6. In the Permissions area, select the permissions to allow for this category for this specific
administrative group.
7. Repeat steps 5 and 6 for each category.
8. Click Save.
To modify an Administrator group:
1. Select the group to modify by clicking the group name hyperlink.
2. Make changes as necessary.
HP SAM Administrator Console Tabs 47
Page 56

3. To change values for the different categories, select a category from the Category list, and in the
Permissions area, change the permissions as necessary. Repeat this process for each category
you want to modify.
4. Click Save.
To delete an Administrator group:
1. Select the group or groups to delete. You can delete more than one group using this procedure.
2. Click Delete and click OK to confirm.
Manage Users
By default, the search shows all users, security groups, and OUs. You can narrow the list of users shown
by using the filter options. The filter option is based on “AND” combinations, so the more boxes you
enter, the narrower the list of users shown.
Search For: Organizations (OU), Security Groups, Users—Select in which group or groups you
●
want to perform the search
Filter Options:
●
◦
◦
Name—Type the name to search for.
Role—Select the role to search within. Names with square brackets ([ ]) around them are
Administrator groups, for example, [Administrator]. Names without brackets are resource
roles.
Asset Group—Show users or groups that belong to a specific asset group.
◦
First Name—Type a first name by which to search.
◦
Domain Name—Type a domain in which to search.
◦
Last Name—Type a last name by which to search.
◦
Operation
To perform any of the operations listed below:
1. Select the appropriate user(s).
2. Select the task to perform from the Operation list.
3. Click the Go button.
To Assign Attributes
On this page, you can modify the roles and asset groups assigned to a user, assign a policy, and assign
an Administrator group to a user.
To assign attributes to a user:
1. Set the appropriate filter options (for example, filter the role from the list).
2. Click Search.
3. Select the check box next to the appropriate name(s).
48 Chapter 4 Administration
Page 57

4. From the Operation list, select Assign Attributes, and then click Go to open the Assign User to
Policy/Role window.
5. If you want to assign a policy to a user, select the policy from the Policy list.
6. If you want to assign the user to an Administrator group, select the group from the Administrator
Group list.
NOTE: Administrator groups are available only for Security Groups and user accounts.
7. Double-click asset groups or use the arrows between the Available and Selected boxes to move
the asset groups. Place all asset groups you want to assign to the selected user in the Selected
box.
8. Double-click roles or use the arrows between the Available and Selected boxes to move the roles.
Place all roles you want to assign to the selected user in the Selected box.
9. Click Save to save your changes.
To Assign Resources
This option allows you to assign a specific resource (such as a blade PC) to a user. You can also assign
a backup to a dedicated resource, as well as assign a user-friendly name to the resource. You have
three ways to assign resources:
Select a single user and assign resources manually.
●
Select one or more users and have their attributes and resources automatically assigned based
●
on a single template user.
Select one or more users and a role and have blades automatically assigned to each user from
●
the role.
NOTE: The Template User must have a statically assigned blade in a role and there must be enough
available resources in that role to satisfy the users during automatic assignment of static resources.
If a blade is in a dynamic role and is reassigned as a dedicated resource to a user, that blade is no
longer available for allocation in the dynamic role to any other user, even if the current status is
Available. With the exception of the template user, it is highly recommended that dedicated resources
not be assigned to a dynamic resource role, which will then help you accurately track Available and In
Use resources.
To Assign Resources Manually
1. Click Manage users.
2. Search for the user from the HP SAM database.
3. Select the check box next to the appropriate name.
NOTE: To assign resources manually, select only one name.
4. Select Assign Resources in the Operations field, and then click the Go button to open the Assign
Resource to User(s) window.
5. Select Manually Assign Resources, and click Continue.
HP SAM Administrator Console Tabs 49
Page 58

6. If you want to assign a dedicated resource to the user:
a. Click Add.
b. Type the IP address or host name of the resource.
c. Click Search to search for resource to assign.
d. Select the resource from the list.
e. Click Save to change the resource assignment.
f. Repeat a–e for each additional resource to be assigned to the user.
7. If you want to change the friendly name for the resource, click the link in the Friendly Name column,
and then type a new friendly name for the resource in the Update Friendly Name window.
The default friendly name is the resource host name.
8. If you want to assign a backup for the dedicated resource, in the Backup column, click either
Role or Resource for the user.
a. To change a role, select a role to assign as a backup for the user, and then click Save.
b. To change a resource, type the IP address or host name of the backup resource, and then
click Search.
c. Select the resource to act as the backup, and then click Save.
9. To remove everything on this row: dedicated resources, role, and backup resources, click
Remove in the Operation column.
10. To remove the backup resource only:
a. Click the backup role or resource in the Backup column.
b. If removing a role, click the Role button, and then clear the check box of the role you want to
remove.
c. Click Save.
d. If removing a resource, click the Resource button, click Search, and then clear the check box
of the resource you want to remove.
e. Click Save.
11. Click Close.
To Assign Resources Automatically from Template User
1. Click Manage users.
2. Search for user(s).
3. Select the check box next to the appropriate name(s).
NOTE: Multiple users may be selected.
4. Select Assign Resources from the Operation list and click Go.
5. Select Assign Resources from Template User.
50 Chapter 4 Administration
Page 59

6. Select the template user from the list.
7. Click Continue.
NOTE: A message will be displayed if you attempt to assign resources to a user who already has
resources or if the primary roles do not have enough resources available.
The template user must have at least one dedicated resource that exists in a role. The selected users
will be assigned dedicated resources from free resources in this role. The selected users will also be
assigned the same Roles, Asset Groups, and Policies as the template user. The selected users will not
be assigned an Administrator group based on the template user.
To Assign Resources Automatically from Role
1. Click Manage users.
2. Search for user(s).
3. Select the check box next to the appropriate name(s).
NOTE: Multiple users may be selected.
4. Select Assign Resources from the Operation list and click Go.
5. Select Assign Resources from Role.
6. Select the role from the list.
7. Click Continue.
NOTE: A message will be displayed if the role does not have enough resources.
To Assign and Configure a Monitor Layout for the User
NOTE: You should create the monitor layout before assigning it to the user. See Manage Monitor
Layout on page 56.
1. Select the check box next to the appropriate name.
2. From the Operation list, select Assign Monitor Layouts, and then click the Go button to open
the Monitor Layouts for <username> window, which shows the monitor layouts, if any, assigned
to the selected user.
3. Click Add.
4. Select the monitor layout to be added from the Monitor Layout ID list.
5. Select the check box next to the computing resource(s) and role(s) you want to assign to the monitor
layout.
6. Type the new resolution width and height and the horizontal and vertical offset.
NOTE: If you do not specify the resolution and offset configuration, the system default parameters
are used.
7. Select the Common Policy, which specifies which session’s policy to use when all sessions are
connected.
HP SAM Administrator Console Tabs 51
Page 60

8. Select the USB Default, which is the session you want RGS to use by default with USB devices
connected to the access device.
9. Click Save.
To Change the Monitor Layout Configuration for the User
1. Select the check box next to the appropriate name.
2. From the Operation list, select Assign Monitor Layouts, and then click the Go button to open
the Monitor Layouts for <username> window, which shows the monitor layouts, if any, assigned
to the selected user.
3. Click the link in the Monitor Layout ID column.
4. Type the new resolution width and height, the horizontal and vertical offset, common policy, and
USB default.
5. Click Save.
To Delete a Monitor Layout ID for the User
1. Select the check box next to the appropriate name.
2. From the Operation list, select Assign Monitor Layouts, and then click the Go button to open
the Monitor Layouts for <username> window, which shows the monitor layouts, if any, assigned
to the selected user.
3. Click Remove in the Operation column.
To Delete a User
Deletes a user from the system.
To delete a user:
1. Select the check box next to the appropriate name(s).
2. From the Operation list, select Delete, and then click the Go button.
Add New Users
For any role that is not public, users must be in the access list to request a computing resource (such
as a blade PC) from that role. You can add the user as an individual, in a security group, or in an
organizational unit. When the system searches for the accounts added, it uses the HP SAM Web server
domain and/or other Active Directory servers that are in the same forest as configured in the System
Settings > Active directory tab.
To Grant Access to Individual Users
1. Go to the Add New Users page.
2. Set Search By to Users.
3. If you want to filter to a specific domain, in the Domain name list select the domain, or select
Global Catalog for all domains in the same Active Directory forest the HP SAM server is in.
52 Chapter 4 Administration
Page 61

4. Type one or more of the parameters, as shown in the following examples:
a. Last Name: Search is performed by last name when entering characters.
b. First name: Characters entered after a comma is typed initiate a search by first name. You
can also search by first name and last name by entering a space. Characters before the space
initiate a search by first name. Characters after the space initiate a search by last name.
UPN Name: Entering an at sign (@) initiates a search by UPN Name.
c.
NOTE: Results are shown as you type starting with the second character.
5. Click Add to add highlighted users to the list.
6. Select the users in the list that you want to add into HP SAM.
7. Click Save.
To Grant Access to Security Groups or Organization Units
To add many users, leverage Active Directory services by adding the user names in Active Directory
under a security group or organization unit. Then add the security group or organization unit directly to
the HP SAM role access list. To change to the access list, go to Active Directory and add/remove users
there instead of the HP SAM administrator console.
1. Go to the Add New Users page.
2. Set Search By to Organizations (OU) or Security Groups.
3. If you want to filter to a specific domain, in the Domain name list select the domain, or select
Global Catalog for all domains in the same Active Directory forest the HP SAM server is in.
4. Type the name of the Organization (OU) or Security Group.
NOTE: Results are shown as you type starting with the second character.
5. Click Add to add highlighted groups to the list.
6. Select the groups in the list that you want to add into HP SAM.
7. Click Save.
Resources tab
The following sections explain what is available under the Resources tab.
Manage Resources
By default, the search shows all computing resources (such as blade PCs). You can narrow the list of
resources shown by using the filter options. The filter option is based on “AND” combinations, so the
more boxes you enter, the narrower the list of resources shown. The following are your filter options:
IP Address/Host Name—Show the list of resources where the IP address or host name matches
●
what you entered (or range or set of computing resources matching what you entered).
Dedicated Resource—Select to narrow the search to resources assigned as dedicated resources.
●
Enabled—Show resources that are manually enabled or disabled only.
●
HP SAM Administrator Console Tabs 53
Page 62

Role—Show resources that belong to a specific role.
●
Asset Group—Show resources that belong to a specific asset group.
●
Available—Show resources that are available for allocation (no users connected).
●
Disconnected—Show resources that have users in a disconnected state.
●
In-Use—Show resources that have users actively connected.
●
Offline—Show resources that are not available for allocation because the registration service is
●
not responding (service is not working properly, the hardware was powered off, etc.).
Auto Refresh Feature
After performing a search and displaying a list of resources, the following features are available.
Auto Refresh (seconds)—This feature allows the Resource tab Web page to automatically refresh.
Doing so, the list of computing resources shown is pulled from the database with the latest information.
NOTE: If this option is turned on, then HP SAM administrator console does not time-out and log you
off the HP SAM administrator console. This could be a security issue, especially if the session is on a
public terminal and the user forgets to shut down the browser or log out.
To use, set the value to 5, 15, 30, or 60 seconds, and then click Apply. To turn off, set the value to
Off, and then click Apply.
View Details
To view detail information regarding a resource, click on the magnifying glass under the Details column.
NOTE: For a quick view to see who is currently connected to or disconnected from a computing
resource, move the mouse slowly to hover over the icon under the State column. This displays the user
account associated with that blade.
Operations
NOTE: Some of the operations below require the account the person logged into the HP SAM
Administrative Console to have administrative privileges on the computing resource (such as a blade
PC). Prior to running the operation, make sure the account has the administrative level privileges on the
appropriate resource.
To perform any of the operations listed below:
1. Select the appropriate resource(s).
2. Select the task to perform in the Operation list.
3. Click the Go button.
Operations
●
Delete—Delete the resource from the system. Do this to clean up the database. You can delete
the computing resource only if its current status is Offline.
Disable—Prevent the resource from further allocation. If In-use, the current user session is
●
unaffected. If Disconnected, the user is not able to log back into the computing resource.
Enable—Allow the resource to be allocated.
●
54 Chapter 4 Administration
Page 63

Logoff User—Force logging off the current user on the resource.
●
Restart—Reboot the resource.
●
Send Message—Send a text message to the user on the resource (a pop-up message).
●
Shutdown—Power down the resource.
●
Synchronize—Send a request directly to the resource for it to send back the current status. In
●
normal situation, this is not needed, since the registration service sends back its status whenever
there is a change in status (power on, power off, user log-in, user disconnect, and user log-off).
This task is to validate that the registration service is functioning. Else, mark the computing resource
offline if it failed to respond.
Assign Roles—Assign new roles to the resource. This setting overrides the configuration file for
●
the resource.
If you select this option, the Resource Role Assignment window opens. Use this window to select
primary and alternate roles for the resource.
You can also create new roles from this window.
NOTE: Once assigned to roles using the HP SAM Web Administrator console, any changes to
roles in the configuration file will be ignored. To revert back to using the configuration file, delete
the resource from the database, and then restart the computing resource.
Assign Asset Groups—Assign new asset group(s) to the resource.
●
Customize View
Use this window to customize the columns that appear for the resources displayed on the Manage
Resource window. You can use the arrows, or you can double-click the items in the Available and
Selected boxes to move them back and forth. The single arrow moves only the selected item, while the
double arrows move all items in the list. You can display a minimum of three and a maximum of six
columns.
Manage Access Devices
To Add an Access Device Manually
NOTE: The Windows XPe-based client and Blade Workstation Client registers access devices
automatically upon connection to the HP SAM server. The XP Embedded OS image on some thin client
access devices lack support needed for this to occur. For these systems, follow the instructions in the
CIMWIN32 folder found in the AddOns folder in the SAM SoftPaq.
1. Click Create.
2. Type the serial number and friendly name.
3. You may select the Asset Groups to which this access device will have access, if you want.
4. You may select a Monitor Layout, if you want.
5. Click Save.
HP SAM Administrator Console Tabs 55
Page 64

To Change an Access Device
1. Type one or more parameters and click Search, or click Search to find all registered access
devices.
2. If you want to change the settings for the access device:
a. Click the Serial Number link, and then change desired settings for the access device in the
dialog box.
b. Click Save.
To Delete an Access Device
NOTE: You cannot delete an access device while it is in use.
1. Type one or more parameters and click Search, or click Search to find all registered access
devices.
2. Select the check box next to the appropriate access device or devices.
3. Click Delete and OK.
Manage Monitor Layout
This allows you to create a new layout or to modify or delete an existing layout.
To Create a Monitor Layout
1. Click Create.
2. Type the monitor layout ID.
3. Type a description of the layout.
4. Select the Asset Groups associated with this monitor layout.
5. Click Save to add the new ID.
To Modify a Monitor Layout
1. If you want to change the name, description, or asset group of the monitor layout, click the link in
the Monitor Layout ID column and then change the desired settings.
2. Click Save to change the monitor layout ID.
To Delete a Monitor Layout
1. Select the check box next to the appropriate monitor layout.
2. Click Delete and then click OK.
Manage Data Centers
Data Centers in SAM are groupings of enclosures. Data centers serve to save enclosure passwords in
order to enable the feature which allows users to power cycle blades from the SAM Connection Bar.
56 Chapter 4 Administration
Page 65

To Create a Data Center
1. Click Create.
2. Type the data center name and enclosure password.
3. Click Save.
To Change a Data Center
1. Click on a link in the Data Center column.
2. Change the Data Center name and/or password.
3. Click Save.
To Add Enclosures into a Data Center
1. Select the check box for the appropriate data center.
2. Choose View Enclosures from the Operation list and click Go.
3. Click Add.
4. Enter search terms (optional) then click Search.
5. Select the check boxes for the enclosures to add, and then click Save.
6. Click Close.
To Delete Enclosures from a Data Center
1. Select the check box for the appropriate data center.
2. Choose View Enclosures from the Operation list and click Go.
3. Select the check boxes for the enclosures to delete.
4. Click Delete.
5. Click Close.
To Delete a Data Center
1. Select the check box for the appropriate data center or data centers.
2. Choose Delete from the Operation list and click Go.
3. Click OK.
Policies Tab
Policy management allows administrator to override the user’s HP SAM client settings. In general, the
user is allowed the flexibility to customize the connection settings on the client side. If there are specific
settings that the user must always connect with, then the administrator may use the Policies tab to
define the forced settings.
HP SAM Administrator Console Tabs 57
Page 66

The HP SAM hierarchical policy has 5 levels:
Global
●
Role
●
OU (organizational unit)
●
Security Group
●
User
●
Steps:
1. Create or update the policy in the Policies tab. To update an existing policy, click the policy name
hyperlink.
2. Assign the policy:
to the role (User and Roles > Manage resource roles)
●
to a user, OU, or Security Group (User and Roles > Manage users)
●
HP SAM always creates the Global Policy. This policy applies to all user connections. The default sets
the Auto Reconnect box to Off. This ensures multiple users do not attempt to log in to the same blade
at the same time. When a network failure or something similar occurs, the user may unknowingly have
been logged off that resource, depending on the network and AD group policy settings. HP SAM may
allocate that computing resource to another user. If the auto-reconnect feature is turned on, the original
user reconnects to this computing resource, which could potentially have been allocated to another
person. If this is not a concern, then change Auto Reconnect to an appropriate value.
Table 4-1 Effective Hierarchical Policy Example
Parameter Global Role OU SG1 SG2 User Effective
P1 ON Not Assigned Not Assigned Not Assigned Not Assigned Not Assigned ON
1
P2
P3 ON OFF ON OFF Not Assigned Not Assigned OFF
2
P4
P5 ON/No
3
P6
1
The order of policy assignment is User (highest) > Security Group > OU > Role > Global Policy (lowest). Individual
parameters assigned at the User level override parameters set at the Group level, and so forth. Note that Parameter P2 is set
at ON at the Global level, but is overridden by the OFF setting at the higher Role level, leaving an effective setting of OFF.
2
No Overrides Allowed can be set at any level to prevent override by parameters set at higher levels. Note that the No
Overrides Allowed setting ON for Parameter P4 at the lowest Global level overrides the OFF setting at the higher Role level.
3
At the Security Group level, HP SAM checks all Security Groups in alphanumeric order and uses the policy, if any, in the first
Security Group encountered. Note that Security Group 1 is the first Security Group encountered, so the OFF setting for Security
Group 1 leaves Parameter P6 with an effective setting of OFF, and the ON setting for Security Group 2 is ignored.
ON OFF Not Assigned Not Assigned Not Assigned Not Assigned OFF
ON/No
Overrides
Allowed
Overrides
Allowed
ON OFF ON OFF ON Not Assigned OFF
OFF Not Assigned Not Assigned Not Assigned Not Assigned ON
OFF/No
Overrides
Allowed
Not Assigned Not Assigned Not Assigned Not Assigned ON
58 Chapter 4 Administration
Page 67

Create or Update a Policy
To create a new policy, click the Create button and type a new policy name. To update or edit an existing
policy, click the policy name hyperlink. When the Update Policy window displays, set the value that you
want or leave the value blank to allow it to inherit a value.
When you update or create policies, you can view all available properties, or you can specify valid
properties for either RGS or RDP. In the Show Properties list, select either ALL, RDP5, RDP6, or
RGS to determine which values are active on-screen.
NOTE: For more information about RGS, refer to your Remote Graphics Software documentation.
View Effective Policy
Use this feature to view the effective policy for a given user. See Table 4-1 Effective Hierarchical Policy
Example on page 58.
1. Click View Effective Policy.
2. Type the UPN name of the user.
3. Click Go.
The hierarchical merge of policies applied to the user is displayed.
NOTE: You may also select a Role for the user to view the effective policy based on that Role, since
the effective policy can be different with each Role to which that user belongs.
HP SAM Administrator Console Tabs 59
Page 68

System Settings Tab
This tab allows the administrator to set how the HP SAM server behaves.
General
This page allows the administrator to define the settings for the entire system. Make the appropriate
change(s) and click Save to apply.
History—If selected, the system records and retains historical data for reports for the number of
●
days selected in the Keep raw data for list. Use this option to limit the history database size.
Microsoft 2005 Express Edition includes a database size limit of 4 GB. Data older than the value
in the Keep raw data for list is summarized into one entry per day. You can view history data from
the Reports tab.
Log—If selected, the system collects audit log data. You can view log data from the Log tab.
●
New Role Settings—When a new role is created (computing resource self-registers with a role
●
that is brand new to the system), the flags are set accordingly based on the value assigned.
Enabled—If selected, when a new role is created, the role's enable flag is set to checked,
◦
which means the role is available immediately for allocation.
Public—If selected, when a new role is created, the public flag is set to checked, which means
◦
the role does not require any user access restriction.
New Resource Setting—When a new computing resource self-registers, the system immediately
●
sets it enabled or disabled for allocation.
Time Zone Synchronization—If selected, the time zone setting on the computing resource is set
●
to the same time zone as the user’s access device.
Synchronization Request Retries—The number of retries the system performs before marking
●
the resources as offline.
Synchronization Time Between Retries—The number of seconds the system waits between the
●
retries for the synchronization operation.
User Sign-in Time Out—The number of seconds allowed for the user to complete the log on
●
process. If time expires without completing a logon, the computing resource is returned to the
available list.
60 Chapter 4 Administration
Page 69

Multi-Session Autoconnection—When enabled, allows the system to autoconnect to all blades
●
when user is on an access device without a monitor layout ID assigned. Select one or more:
Dedicated Resources
◦
Roles with Public Enabled
◦
Roles with Public Disabled
◦
Client-Resource Network—When the access device connects to the computing resource, you
●
can specify which method it uses.
Host Name—If this is chosen, the system passes the resource Computer Name to the access
◦
device in order to connect and relies on the DNS server to resolve the name to the appropriate
IP address.
IP Address—If this is chosen, the system passes the IP address of the computing resource
◦
to the user access device to connect. If the computing resource has more than one network
card, you must specify an option.
- Reported Subnet—The subnet to which the computing resource used to register/
communicate with HP SAM.
- Specified Subnet—If both the HP SAM server and the computing resource each have two
NICs communicating through two independent subnets, then it is necessary to specify which
subnet the access device needs to use to make a connection request.
NOTE: HP SAM allows you to enter in only one subnet range. If the network environment is complex,
then you must use DNS/Computer name instead of IP address.
Web client
This page allows the administrator to define the settings for the Web client. Make the appropriate
changes and click Save to apply.
●
●
●
●
●
●
Enable Access—Select this option to allow users to request a desktop session through the Internet
Explorer-based client.
Cookies—Select User choice so the user has the option to save the user name, domain, and
client settings information on the access device browser cookies. If you have a security concern
(i.e., public terminal access), then select Do not allow so the information is not saved, and the
user must always type in the user name and domain.
Show domain field—Select Enabled to show the domain input field and allow users to specify a
domain. If this option is not selected, users must type a UPN-formatted name.
Show password field—Select Enabled to show the Password field on the log in screen.
Show configuration options—Select Enabled to show the configuration link on the Web client
screen.
Show resolution selection—Select Enabled to show the resolution selection on the Web client
screen.
Default domain—Type the default domain for Web client log in.
●
HP SAM Administrator Console Tabs 61
Page 70

Banner text—Select the language and type the appropriate message in the box to change the
●
customizable message that is displayed to the user on the HP SAM Web client page.
Smart Card
●
Smart card login—Select the value for the type of login you want.
◦
- Disallowed—Select to disable logging in using a smart card. Only the traditional log in
information fields are displayed.
- Optional—Select to make optional the use of a smart card to login. All log-in fields are
displayed.
- Required—Select to require use of a smart card to login. Only the smart card log in
information is displayed.
User name field—Select the appropriate value for the field on the certificate that contains the
◦
user’s login name.
- Email—Select to have SAM look in the Email field on the certificate to find the login name.
The data found in this field must match the user's UPN name.
- UPN—Select to have SAM look in the UPN field on the certificate to find the login name.
Auto-connect—Select Enabled so the client automatically connects when the user inserts
◦
the smart card.
◦
Active Directory
This page sets the system link to Active Directory services to retrieve user account information.
External—Select this option to search all domains.
●
Active Directory Page Size—Type the value for the maximum number of entries cached at one
●
time before a response to an Active Directory query is displayed.
Server Query Time Limit—Type the time-out value for HP SAM to wait while Active Directory
●
server extracts account information. The HP SAM Web server retrieves user account information
as it is returned from Active Directory server within this time limit. Increase the value only if you
have been instructed to do so on the HP SAM administrator console on the Add New User page.
Cryptographic service providers (CSP)—Type the name of the CSP that supports the smart
card solution you select when configuring smart card login. This value represents the identifier
of the cryptographic service provider (CSP) to use. Use the Create, Edit, or Delete buttons
to take the appropriate action for this value.
62 Chapter 4 Administration
Page 71

Synchronization Scheduler
To schedule when to run the synchronize operation task to capture any resources that are offline, set
the timer as instructed below and click Create or Update. In general, you do not need to do this if the
resources are running under normal operation. If you feel more comfortable knowing on a regular basis
that there is a heart-beat from the resource, then schedule the synchronize operation to run at the
appropriate interval (for example, once a day at midnight.)
Auto-Schedule Event—To turn it on, check the Enabled box.
●
Scheduled Start Date—Select the date when event is to start.
●
Scheduled Time—Select the time when the synchronization operation is to run. Check as many
●
times as needed.
Scheduled Day—Select one of the following options:
●
Daily—Enter the number of days after which the event is to recur.
◦
Weekly—Enter the number of weeks after which the event is to recur and on which day(s) of
◦
the week it is to recur.
To run the synchronization operation task manually, click the Resources tab, locate and display a list
of resources, and select the resources to synchronize. Then select the Synchronize option from the
Operation list.
Log Maintenance Scheduler
To schedule when the system needs to run a database cleanup operation, set the timer as instructed
below and click Create or Update. This should be done to help keep the database to a manageable
size and minimize HP SAM performance impact.
Auto-Schedule Event—To turn it on, check the Enabled box.
●
Scheduled Start Date—Select the date when the event is to start.
●
Scheduled Time—Select the time when the synchronize operation is to run. Check as many as
●
appropriate.
Scheduled Day—Pick one of the options below.
●
Daily—Type the number of days after which the event is to recur.
◦
Weekly—Type the number of weeks after which the event is to recur and on which day(s) of
◦
the week it is to recur.
Clear Options
●
Delete entries older than—Type the number days to keep entries and delete if older.
◦
Delete types—Check Information, Warning, and/or Error to delete.
◦
Delete without saving—Select this if it is ok for the data to be permanently deleted.
◦
Save as CSV file and then Delete—Select this to save to an external text file before deleting
◦
the data permanently.
—Type the file path where you want to store the CSV file.
HP SAM Administrator Console Tabs 63
Page 72

Licensing
By default (i.e., no license key entered), you are allowed to run up to 30 resources (such as blade PCs).
This is meant for evaluation purposes only. There is no expiration date for this evaluation software.
Click the Enter New Key button to add a new key to HP SAM. Once entered, the system displays the
information encoded on the key. To delete the key from the system, check the appropriate key(s), and
then click Delete.
If a license message displays on the HP SAM administrator console at any time, go to this area to view
the details of the license message.
Reports Tab
NOTE: You must enable history recording in System Settings > General to populate reports.
Administrators are only able to see reports associated with the Asset Groups they control.
HP SAM provides three reports:
Resource Capacity Consumption Report—See the peak resource usage levels in terms of
●
percentages and highlight if any percentage value exceeds a specified threshold value.
Resource Capacity Consumption Trend Report—See the charting of peak resource usage
●
levels over a time period.
Resource Utilization Report—See the current status of resource usage activities. This report is
●
also posted on the main Home tab.
Resource Capacity Consumption Report
Select the filter options and display options, and click the Generate Report button.
Filters
Time Frame (From/To)—Narrow the data shown to the time period you are interested in
●
Role Enabled—Narrow the data to all roles that are enabled only (Yes), disabled only (No), or
●
ignore this flag by selecting Both.
Role Public—Narrow the data to all roles that have no user access list restriction (Yes), restricted
●
access role (No), or ignore this flag by selecting Both.
Roles—See data for the selected roles only. If you choose this option, the system ignores the Role
●
Enabled and Role Public boxes above.
Display Options
Threshold Percentages—On the report you can highlight the data if it exceeds the number
●
entered here.
Minimum Available—If data is below the value entered, the report highlights it.
◦
Maximum Consumed—If data is above the value entered, the report highlights it.
◦
Open in New Window—If selected, the result data are shown in a new browser window.
●
64 Chapter 4 Administration
Page 73

Output Report
●
●
●
●
●
●
NOTE: In general, the maximum consumed should be opposite of the minimum available. The
exception is when the computing resource is in multiple roles. Then the resource is counted multiple
times, one per role that it is in. If the computing resource is disabled, it is not counted in the overall
number.
Role Name—Name of role.
Minimum Available %—For the time period chosen, the peak value of minimum available is
shown. This value indicates the percentage of computing resources that are still available for
allocation dropped to this lowest value.
Minimum Available—This value complements the percentage number above to show specifically
how many resources within that role are still available.
Maximum Consumed %—This value indicates the highest percentage of resources that were
consumed during the time period chosen.
Maximum Consumed—This value complements the percentage number above to show
specifically how many resources within that role were consumed.
Out of Resource—For the time period chosen, this value indicates how many times the system
encountered the situation where there is no available computing resource to fulfill the connection
request.
Resource Capacity Consumption Trend Report
Select the filter options and display options, and click the Generate Report button.
Filters
Time Frame (From/To)—Narrow the data shown to the time period you are interested in
●
Role Enabled—Narrow the data to all roles that are enabled only (Yes), disabled only (No), or
●
ignore this flag by selecting both.
Role Public—Narrow the data to all roles that have no user access list restriction (Yes), restricted
●
access role (No), or ignore this flag by selecting both.
Roles—See data for the selected roles only. If you choose this option, the system ignores the Role
●
Enabled and Role Public boxes above.
Display Options
Threshold Percentages—On the report you can highlight the data if it exceeds the number
●
entered here.
Minimum Available—If data is below the value entered, the report highlights it.
◦
Maximum Consumed—If data is above the value entered, the report highlights it.
◦
Time Interval—Chart the data where the scale is based on hour, day, week, or month.
●
Include raw data—If the raw data is also wanted in the report, check the Include raw data box.
●
Open in New Window—If selected, the result data are shown in a new browser window.
●
HP SAM Administrator Console Tabs 65
Page 74

Output Report
●
●
●
●
●
●
●
●
Minimum and Maximum Capacity graphs—The graphs show the minimum number of blades
available and the maximum number of blades used for the specified time period. In general, these
values should add up to 100%. However, if a blade supports multiple roles, then the numbers will
not add up because consuming a blade (which is in two or more roles) in one role will also decrease
the minimum available in the other role.
Time Interval—The time interval for which the report was run. This value is based on the selection
in Display Options: Time Interval.
Date—The date of the report.
Role Name—Name of role.
Minimum Available %—For the time period chosen, the peak value of minimum available is
shown. This value indicates the percentage of computing resources that are still available for
allocation dropped to this lowest value.
Minimum Available—This value complements the percentage number above to show specifically
how many resources within that role are still available.
Maximum Consumed %—This value indicates the highest percentage of resources that were
consumed during the time period chosen.
Maximum Consumed—This value complements the percentage number above to show
specifically how many resources within that role were consumed.
Out of Resource—For the time period chosen, this value indicates how many times the system
●
encountered the situation where there are not enough computing resources to fulfill the connection
requests.
Resource Utilization Report
Select the filter options and display options, and click the Generate Report button.
Filters
Total Resources—Physical count is based on unique physical resource (i.e., primary role only).
●
Logical count produces higher numbers because a computing resource is counted multiple times
if it was assigned to multiple roles.
Role Enabled—Narrow the data to all roles that are enabled only (Yes), disabled only (No), or
●
ignore this flag by selecting both.
Role Public—Narrow the data to all roles that have no user access list restriction (Yes), restricted
●
access role (No), or ignore this flag by selecting both.
Roles—See data for the selected roles only. If you choose this option, the system ignores the Role
●
Enabled and Role Public boxes above.
Display Options
Open in New Window—If selected, the result data are shown in a new browser window.
●
66 Chapter 4 Administration
Page 75

Output Report
●
●
●
●
●
●
●
Log Tab
NOTE: Administrators are only able to see log entries associated with the Asset Groups they control.
To view system historical activities, set the filter options to narrow the content to display, and then click
Search.
Filters
●
Role Name—Name of role.
Offline—Number of offline computing resources
Disabled—Number of manually disabled computing resources
Available—Number of available computing resources
Disconnected—Number of computing resources with users disconnected from the session
In-Use—Number of computing resources with users actively using
Total—Number of computing resources that are offline, available, disconnected, and in-use
Category—Default is all or you can narrow to just the category below.
Security—Narrow the data show security related incidents.
◦
Usage Activities—Narrow the data to show user connect/disconnect/log-off type data.
◦
Administration Activities—Narrow the data to show administration type activities.
◦
Type—Narrow the data to the level of the incident. Choices are Information, Warning, and Error.
●
Description—Search for incidents with the Description box containing the text entered.
●
Time Frame—Narrow data to the dates entered.
●
Asset Groups—Narrow data to asset groups selected.
●
You have four operations you can perform:
Save selected
●
Save entire log
●
Delete selected
●
Delete entire log
●
Setting Up Smart Card Login on the Access Device
NOTE: RGS 5.1.3 or later is required. Smart Card log-in does not work if RGS Single Sign-on is
enabled. You must enable Easy Login and set the USB on the RGS Receiver to Remote and Local.
Before you attempt the following procedure for the HP SAM client, refer to this white paper to configure
the smart card on the computing resource: Implementation of an ActivCard® smart card solution on HP
CCI at
http://h20331.www2.hp.com/enterprise/downloads/CCI_V1.3_and_Smart_Cards.pdf.
Setting Up Smart Card Login on the Access Device 67
Page 76

You must successfully configure the smart card on the computing resource before attempting to
configure it on the access device.
Use the following steps to enable the HP SAM client to log in using a smart card.
1. Attach the smart card reader to the access device.
2. Install the smart card reader driver onto the access device.
3. Install the smart card cryptographic service provider (CSP) software onto the access device that
supports your smart card solution. This software is required to read the contents of the smart card.
4. Install the HP SAM client software onto the access device.
5. If using the Internet Explorer-based client, configure the client on the HP SAM administrator console
at System Settings > Web client > Smartcard cryptographic service providers (CSP). For
more information, see
NOTE: If you set the client to read the UPN or Email field, whatever it reads from either of those
fields must match the UPN name.
6. If using the XPe Client, specify the CSP string in the .SAM file. Refer to Smart Card Settings
on page 37.
7. If you want the system to automatically launch the HP SAM client when a users inserts a smart
card, see steps a and b. (NOTE: Step a is the default setting.)
Web client on page 61.
a. For the Windows XPe-based client (default setting), edit the ‘scwatch.cfg’ file with the
following:
[scwatch]
Action=c:\Program Files\Hewlett-Packard\HP Session
Allocation Client\hprdcw32.exe
ActionDir=c:\Program Files\Hewlett-Packard\HP Session
Allocation Client\
— or —
b. For the Internet Explorer-based client, edit the ‘scwatch.cfg’ file with the following:
Action=c:\Program Files\internet explorer\iexplore.exe http://HP
SAMServername
8. Start the service by:
a. Clicking Start > Control Panel > Administrative Tools > Services.
b. Right-clicking HP Smart Card Monitor Service.
c. Selecting Start.
For more information about HP SAM smart card settings, see
You can configure smart card-related settings on the Web client after you complete this procedure. From
the HP SAM administrator console, go to System Settings > Web Client.
68 Chapter 4 Administration
Smart Card Settings on page 37.
Page 77

A Firewall Rules
This appendix lists the rules needed for communication between the various components. The values
in parenthesis represent ports, with ANY meaning any ports on that component.
Web Server
Incoming:
●
From clients (TCP/ANY) to Web server (TCP/80—HTTP)
◦
From blades (TCP/ANY) to Web server (TCP/80—HTTP)
◦
From admin_workstation (TCP/ANY) to Web server (TCP/443—HTTPS)
◦
From blades (TCP/47777) to Web server (TCP/47777—Custom)
◦
●
Clients
●
●
Blade
●
Outgoing:
From Web server (TCP/ANY) to SQL_Server (TCP/1433—MSSQL))
◦
From Web server (TCP/ANY) to blades (TCP/139—RPC)
◦
From Web server (UDP/47777) to blades (UDP/47777—Custom)
◦
Incoming:
None
◦
Outgoing:
From clients (ANY) to Web server (TCP/80—HTTP)
◦
From clients (ANY) to blades (TCP/3389—Remote Desktop)
◦
Incoming:
From Web server (UDP/47777) to blade (UDP/47777—custom)
◦
From Web server (TCP/ANY) to blade (TCP/139—RPC)
◦
From clients (TCP/ANY) to blade (TCP/3389—Remote Desktop)—RDP
◦
Web Server 69
Page 78

- From access devices (TCP/ANY) to blade (TCP/42966)—RGS
◦
- From blade (UDP/47777) to Web server (UDP/47777)
◦
Outgoing:
●
From blade TCP/ANY) to Web server (TCP/80—HTTP)
◦
SQL Server
(only if not running on the same machine as the Web server)
Incoming:
●
From Web server (TCP/ANY) to SQL_Server (TCP/1433)
◦
Outgoing:
●
None
◦
70 Appendix A Firewall Rules
Page 79

B Frequently Asked Questions
Question Answer
Why do some users on the HP SAM client have to select a role
to connect and others do not.
Can the user connect to multiple computing resources from the
same client access device?
Why is my blade being marked offline even though I am able
to connect to it using Remote Desktop Connection?
My user is unable to connect to a computing resource on the
browser-based Web client. What’s going on?
Why is my client not switching to the failover server in my list? Make sure the FAILOVER=1 is defined in your .SAM file
Why are my users being asked to reconnect using the HP SAM
client every time there is a network glitch?
Why are my settings not working as I set them on the client
side?
Users who are in more than one role need to select the role to
connect. Those users who are in only one role do not see this
screen. A user assigned a single dedicated resource does not
have to select a role. Also, when Monitor Layout IDs and when
Multi-Session Autoconnection are used, the user is not
prompted for a role.
Yes. If multiple blades have been assigned to the user, the user
may connect to those blades. Additionally, if the user is in
multiple roles, the user can connect to blades from each role.
Check your firewall settings on the computing resource to
make sure the HP SAM port (47777) is allowed for incoming
connection.
Verify that the server is up and running and your firewall is
enabled to allow port 3389 for IEXPLORE.EXE
The Auto-Reconnect setting is set to OFF. If your network is
set to log your users off when they are disconnected or timed
out, any network glitch that disconnects a user or times the
user out will also log the user off. Another user could then
connect. If the Auto-Reconnect setting is set to On, the original
user might then automatically re-connect and bump off the new
user. HP recommends that you set Auto-Reconnect to OFF.
The settings on the client side may have been overridden by
the forced settings on the HP SAM server in the Policy tab.
Why does my user have to type the password twice every time
to log into a computing resource?
I got an error during registration service upgrade installation. Check to see if the event log is open. If so, you must close the
How do I enable HP Sygate Security Agent on the Windows
XP Embedded-based thin client for the HP SAM client(s)?
This should not happen. The Active Directory policy is requiring
the user to log in to the blade interactively. Either disable this
policy or remove the Password box from the HP SAM client
by setting PasswordEnable=0 in the .SAM file. This could also
be caused by using RGS in Easy Log-in or Default mode.
log so the tool can remove the old executable and upgrade to
the new one.
Go to HP Sygate Security Agent advance rules and create a
new rule for HP SAM. Add IEXPLORE.EXE and/or
hprdcw32.exe to the Application tab. On the Ports and
Protocol tab, set protocol to TCP and type 80,3389 on the
remote port line if you want both clients to work. Otherwise,
make sure port 3389 is set for IEXPLORE. You can set port 80
for the Windows XPe-based client or leave it alone (all). For
advanced methods such as an Altiris script, you can create the
71
Page 80

Question Answer
script similarly here or use the HP Sygate Security Agent Policy
Editor tool (download as a SoftPaq from the HP Web site).
I am unable to view the Japanese characters on the Web client. Check to make sure the Japanese fonts are installed on the
access device.
Can I administer the HP SAM server using another browser
such as Opera and Firefox?
I restored my HP SAM database from tape backup after the
HP SAM SQL server was recovered from an unexpected
failure. Is a synchronize operation enough to get all the latest
status for all computing resources?
How can I change the HP SAM Web server http and/or https
ports to some other value beside the default 80 and 443?
No, these browsers are not supported.
It depends on when the database backup was performed. New
computing resources may be registered after the last backup
was performed. If so, those computing resources do not exist
in the backup data. The synchronize operation works only on
computing resources the system is aware of. If the status of
those computing resources was off-line, disconnected, or online when the SQL server went down, then you must find those
computing resources and add them back to the HP SAM
system. To do that, stop and restart the registration service on
those units. When in doubt, stop and restart the registration
service on all of the computing resources. This action has no
impact on current users active on the computing resources.
After changing the desired value (TCP and/or SSL ports) in
Internet Information Services (IIS) Manager, modify the
CONNECTION.CONFIG file located on the HP SAM Web
server in root of the HP SAM installation directory (usually c:
\Program Files\Hewlett-Packard\HP SAM). Use Notepad to
edit the file. Modify the three lines below:
<!-- add key="ClientServiceURL"
value="http://samservername:80" / -->
<!--add key="ResourceServiceURL"
value="http://samservername:80" / -->
<!--add key="AdministrativeConsoleURL"
value="http://samservername:80" /-->
To:
<add key="ClientServiceURL" value="http://
sam_server_name:port_number" / >
<add key="ResourceServiceURL" value="http://
sam_server_name:port_number" / >
<add key="AdministrativeConsoleURL"
value="http://sam_server_name:port_number"/ >
Where sam_server_name is the name of the HP SAM server
and the http port is the port_number value as set in IIS
Manager (not the SSL Port value).
If you change only the SSL Port value in IIS Manager, you still
need to modify the CONNECTION.CONFIG file as described.
Do not use HTTPS in either of the previous lines.
If you change the TCP Port, you need to update the HP SAM
registration service hpevent.cfg file on all computing resources
to use the new Web server http port (for example, YourHP
SAMservername:8080). You also need to update all of the
access devices to use the same http port.
72 Appendix B Frequently Asked Questions
Page 81

Question Answer
How do I change the HP SAM datagram communication port
to another value beside the default 47777?
Can I use double-byte numbers in the user name? No. HP SAM only supports single-byte numbers.
I get warning messages when I am operating in a double-byte
character set (DBCS) Asian language on the HP SAM
administrator console and I input numeric values in System
Settings tab.
Why I do see line graphs in Resource Capacity Consumption
Report in the HP SAM administrator console in some instances
and not in other instances?
Modify the connection.config file located on the HP SAM
Web server in the HP SAM installation directory (usually c:
\Program Files\Hewlett-Packard\HP SAM). Use Notepad to
edit the file. Add this line in the appSettings section:
<add key="ProtocolChannel" Value="port
number"/>
Where port number is the new HP SAM datagram
communication port you want to use.
You must stop and restart the HP Session Allocation
Management Service on the HP SAM Web server. You must
also update the HP SAM registration service hpevent.cfg file
on all computing resources to use the same HP SAM datagram
communication port, then restart the HP SAM registration
service on all computing resources. Also update the
appropriate firewall rules on the HP SAM Web server and the
computing resources.
HP SAM administrator console accepts only single-byte
numbers as a value.
Make sure the browser language you are viewing the report is
the same as the HP SAM Web server operating system
language. For example, if you are viewing the HP SAM
administrator console in Japanese, the HP SAM Web server
operating system language must be Japanese.
The Internet Explorer AutoComplete window covers up the HP
SAM Add New Users search window. How can I see my search
results?
Disable the Internet Explorer AutoComplete feature for form
fields:
1. In Internet Explorer, click Tools on the menu bar.
2. On the Content tab, click AutoComplete.
3. Clear the Forms check box.
73
Page 82

C Registration Service Error Codes
The following is a list of possible errors which the registration service writes to the event log file on the
computing resource. If you encounter a critical issue on the blade, note the error code and communicate
it to the support team.
BC0001—Internal error accessing WMI. Contact your HP SAM support team.
BC0002—Internal error accessing WMI. Contact your HP SAM support team.
BC0003—Internal error failed to spawn threads, usually due to low memory. Close other applications
or increase memory.
BC0005—Internal error. Contact your HP SAM support team.
BC0006—Internal error, usually due to low memory problems. Close other applications or increase
memory.
BC0007—Update thread failed to spawn. Internal error, possibly due to low memory conditions. Close
other applications or increase memory.
BC0008—Failed to start service (OpenSCManager() error). Make sure the service is running under the
access device account with sufficient permission to start/stop the service.
BC0009—Failed to start service (OpenService() error) Make sure the service is running under the
access device account with sufficient permission to start/stop the service.
BC0010—Failed to start service (StartService() error). Make sure the service is running under the
access device account with sufficient permission to start/stop the service.
BC0011—Failed to start service (status check error). Make sure the service is running under the access
device account with sufficient permission to start/stop the service.
BC0012—Internal error setting up service. Make sure the service is running under the access device
account with sufficient permission to start/stop the service.
BC0013—Service configuration file (tattoo) was not found. See the registration service installation
section above for the list folder where the CFG file must be stored and that the service has read access
to it.
BC0014—Could not find the Gateway section in the configuration file. See the registration service
installation section above on how to create the correct CFG file contents.
BC0015—Internal program error. Contact your HP SAM support team.
BC0016—Internal program error. Contact your HP SAM support team.
BC0017—Internal program error. Contact your HP SAM support team.
74 Appendix C Registration Service Error Codes
Page 83

BC0018—Internal program error. Contact your HP SAM support team.
BC0020—Memory allocation error. Close other applications or increase memory.
BC0021—Memory allocation error. Close other applications or increase memory.
BC0022—Memory allocation error. Close other applications or increase memory.
BC0023—Internal error. Contact your HP SAM support team.
BC0024—Internal error. Contact your HP SAM support team.
BC0025—Internal error. Contact your HP SAM support team.
BC0026—Error communicating with the Terminal Services subsystem. Contact your HP SAM support
team.
BC0028—Failed to set up UDP server port. Check if another program is already using the same UPD
port (usually port 47777 by default).
BC0029—Failed to receive UDP data from network (recvfrom() failed). Check your network and/or
firewall settings.
BC0030—Failed to acknowledge SYNC request from server. This may cause the machine to be marked
offline during a sync. Check your network and/or firewall settings.
BC0032—Failed to acknowledge PRECONNECT request from server. This may cause the machine to
be skipped during allocation. Check your network and/or firewall settings.
BC0035—No gateway/Web server defined. See the registration service installation section above on
how to create the correct CFG file contents.
BC0036—Failed to connect to gateway/Web server. Check the registration service installation section
above on how to create the correct CFG file contents. Make sure the server name is correct and it is
reachable by using that name.
BC0037—Failed to connect to gateway/Web server. Check the registration service installation section
above on how to create the correct CFG file contents. Make sure the server name is correct and it is
reachable by using that name.
BC0038—Japanese support requested, but the dsvc0411.dll which provides the Japanese support is
not there. Reinstall.
BC0039—Internal error. Contact your HP SAM support team.
BC0040—Internal error accessing WMI. Contact your HP SAM support team.
BC0041—Internal error—failed to connect to WMI. Contact your HP SAM support team.
BC0042—Internal error. Contact your HP SAM support team.
BC0043—Failed to read Win32_SystemEnclosure WMI class. Contact your HP SAM support team.
BC0044—Failed to read Win32_ComputerSystem WMI class. Contact your HP SAM support team.
BC0045—Failed to read Win32_BaseBoard WMI class. Contact your HP SAM support team.
BC0046—Failed to read Win32_NetworkAdapterConfiguration WMI class. Contact your HP SAM
support team.
75
Page 84

BC0047—Failed to read Win32_NetworkAdapterConfiguration WMI class. Contact your HP SAM
support team.
BC0048—Failed to query a specific WMI property. Contact your HP SAM support team.
BC0049—Failed to register a WMI event. Contact your HP SAM support team.
BC0050—Problem accessing WMI, possibly related to missing QFE documented in MS KB 828653.
BC0100—Failed to setup timer. Internal error, possibly due to low memory conditions. Close other
applications or increase memory.
BC0101—No gateway/HP SAM server was found in the configuration file. Check the registration service
installation section above on how to create the correct CFG file contents. Make sure the server name
is correct.
BC0104—Failed to set up properties for listening UDP socket. Contact your HP SAM support team.
BC0105—(Warning) this resource has no roles defined. Without a role, the computing resource is not
available for allocation.
BC0106—(Warning) Internal service error in communicating with the SCM. May affect how the Service
Control Manager determines if the service has been started or stopped. Contact your HP SAM support
team.
BC0107—Failed to setup timer. Internal error, possibly due to low memory conditions. Close other
applications or increase memory.
BC0108—Failed to setup timer. Internal error, possibly due to low memory conditions. Close other
applications or increase memory.
BC0110—Failed to synchronize time zone information. Contact your HP SAM support team.
BC0111—Failed to synchronize time zone information. Contact your HP SAM support team.
BC0200—(Informational) service has started.
BC0201—(Informational) service has stopped.
76 Appendix C Registration Service Error Codes
Page 85

D Glossary
Access Device—A device such as a thin client used to access HP SAM to connect to computing
resources.
Active Directory—A Microsoft Windows directory service that stores an enterprise’s information and
settings in a central, organized, accessible database. Active Directory allows administrators to assign
policies, deploy programs, and apply critical updates to an entire organization.
Administrator Group—A group to which you can assign users in order to grant or revoke access to
specific capabilities in the SAM Web Administrator console.
Asset Group—A collection of access devices, users, computing resources, roles, monitor layout IDs,
policies, logs and reports that is under the control of an administrator group.
Client—An access device that sends requests to the HP SAM Web server to get an available computing
resource to which to connect.
CSP—Cryptographic service provider. A software library that provides hardware and software-based
encryption or decryption services.
Computing Resource—A desktop session; a computing resource such as a blade PC or a Blade
Workstation.
Data Center—A grouping of enclosures in SAM which enables saving of enclosure passwords (which
is needed for the client side power cycle feature.)
Dedicated Resource—Specific computing resource(s) assigned to a user. Also referred to as a Static
Assignment.
Description (blade)—Usually given to the blade by the blade manufacturer. It can be changed, if
desired.
Follow-me roaming—Capability for the user to connect and reconnect to the same session while using
different access devices in different locations.
Gateway—See Web server.
Global Policy—Sets all users’ connection environment. It can be overridden by Group or Individual
Policy assignments.
Group Policy—Sets connection environment for a group of users. This policy overrides Global but can
be overridden by individual policy assignment.
Individual Policy—Sets connection environment for a specific user. This policy assignment overrides
group which overrides global policy rules.
Monitor Layout ID—Identification name for a collection of settings that controls how multiple sessions
are mapped onto the display of an access device and other related settings.
77
Page 86

OU—Organizational Unit
Policy—The policy is the user experience as defined by the connection settings. It defines the
appearance of the desktop, taskbar, command access, sound availability, etc. There are five levels of
policy: Global, Role, OU, SG, User (in that order).
Public—A public role is one that is accessible to all users in Active Directory.
Resource—A managed computer inside HP SAM which can be provided to a client for the purpose of
logging in via RGS or RDP. It is also referred to as computing resource or desktop session.
RDP—Microsoft Remote Desktop Protocol. A multi-channel protocol that allows a user to connect to a
computer running Microsoft Terminal Services.
RGS—HP Remote Graphics Software (RGS) is a communication protocol similar to Microsoft Remote
Desktop Protocol (RDP) that allows users to connect to the desktop of a remote computer over a
standard computer network. In addition, RGS has advanced graphics capabilities that provide a better
video viewing experience. HP SAM allows you to use either RGS or RDP for communication.
Roaming profile—Collection of user settings in Active Directory which can be seamlessly shared
between different computing resources. It enables the user to have the same end-user experience when
connecting to different computing resources.
Role—A role is a grouping of users and a grouping of computing resources so that users are matched
to the appropriate resources.
HP SAM—HP Session Allocation Manager. The software system described in this document.
Session Persistence—Ability for the user to connect to the same session without having to log off.
SG—Security Group
Smart card—A pocket-sized card that contains embedded circuits that can provide security services,
such as the ability to securely store password information.
UPN—User Principal Name. A user-friendly name in email address format.
Web server—The HP SAM component responsible for managing the computing resource pool,
providing an administrative user interface, and providing computing resource brokering services to
clients. At the software level, the Web server is composed of an IIS Web server and a SQL database
that may or may not reside on the same physical server.
78 Appendix D Glossary
Page 87

Index
A
access device
adding manually 55
changing 56
deleting 56
requirements 23
access list 44
account, service 25
Active Directory 25, 62
ActiveX controls 32
adding
access device, manually 55
monitor layout 56
organization units to the
Administrator role 44
security groups to Administrator
role 44
users 52
users to Administrator
group 44
adding enclosures into data
centers 57
Administrative
permissions 47
rights required to install 25
Administrator
access list 44
access, granting 28
Console tabs 46
Animation 39
asset groups, managing 47
assigning
attributes 48
backup resources 49
monitor layout 51
resources 49
assigning resources from role 51
assigning resources from template
user 50
assigning resources manually 49
attributes, assigning 48
AudioFollowsFocus 38
auto refresh 54
Auto-connect box 62
Autodial 35
AutoReconnect 39
Autosize 40
B
backup
computing resources 49
resources, assigning 49
resources, removing 49
server 30, 71
Banner 37
Banner text box 62
blade firewall rules 69
blade service PWS Workstation 3
blade service Windows XP 64–
bit 3
Blade Workstation client
hardware requirements 24
software requirements 24
blade, offline 71
BordersEnabled 38
browsers, alternate 72
C
Caching 39
changing
access device 56
monitor layout 56
monitor layout
configuration 52
changing a data center 57
ClearType 40
client
configuration settings 34
firewall rules 69
software, deploying 41
Client-Resource Network box 61
ColorDepth 39
columns 43
common tasks 11
communication port, changing
value 73
comparing clients, table 31
components, software 10
ComposedUI 40
Compression 39
configuration
file 29
options 34
settings 34
configuring
firewall 25, 27
HP SAM system settings 28
smart card login 67
Connbar 39
connect, unable to 71
ConnectionBar.AutoHideTimeou
t36
ConnectionBar.Enable 36
ConnectionBar.EnableAddNe
w36
ConnectionBar.EnableCloseAl
l36
ConnectionBar.EnableDisconnectI
nstance 36
ConnectionBar.FollowMouse 36
ConnectionBar.Location 36
ConnectionBar.ShowDelay 36
ConnectionBar.ShowOnDisconnec
t36
Cookies box 61
creating
monitor layout 56
Index 79
Page 88

policy 59
Registration service
configuration file 29
service account 25
creating a data center 57
Cryptographic service providers
(CSP) box 62
customize view 55
customizing
Administrative permissions 47
HP Blade Workstation
Client 34
Windows CE-based client 33
Windows XPe-based client 33
D
data centers
adding enclosures 57
changing 57
creating 57
deleting 57
deleting enclosures 57
data centers, managing 56
dedicated resource, setting up 13
Default domain box 61
DefaultDomain 34
DefaultInsecurePassword 35
DefaultPolicy 34
DefaultSessionAction 36
DefaultUsername 35
deleting
access device 56
backup resources 49
monitor layout 56
monitor layout ID 52
resources 49
user 52
users from Administrator
group 45
deleting a data center 57
deleting enclosures from data
centers 57
deploying
HP SAM client software 41
Registration service 41
desktop or notebook PC
hardware requirements 24
software requirements 24
displaying items per page 43
DisplayLogoff 35
DisplayRestart 35
DisplayShutdown 35
double-byte numbers, use of 73
dynamic connection 7
dynamic resource, setting up 12
E
easy multi-display deployment and
Web administrator setup 5
Enable Access box 61
EnableOptionsButton 37
EnablePassword 38
EnablePublicRoles 35
EnableServer 38
enhanced “Add New User”
searches 6
F
Failover 35
failover
computing resources 49
server 30, 71
features 6
firewall 25, 27, 32
firewall rules
blades 69
clients 69
SQL server 70
Web server 69
frequently asked questions 71
FullDrag 39
FullScreen 39
G
Gateways 34
general 60
global and local client configuration
files 4
granting access
to security groups 53
to users 52
graphs 66
H
hardware requirements 16
hardware requirements, SQL 18
Height 40
hierarchical policy, table 58
History box 60
Home tab 46
HP Blade Workstation Client 34
HP Remote Graphics Software 7,
8
HP SAM
ActiveX controls 32
client comparison table 31
client software, installing 31
common tasks 11
features 6
installing 26
overview 8
Registration service
requirements 23
setting up 11
SQL database hardware
requirements 18
SQL database software
requirements 22
Web server hardware
requirements 16
Web server software
requirements 16
HP SAM database recovery 72
HP SAM datagram communication
port, changing value 73
HP Sygate Security Agent,
enabling 71
http default port value,
changing 72
https default port value,
changing 72
I
ImageQuality 39
installation error 71
installing
Administrative rights 25
HP Blade Workstation Client
series 34
HP SAM client software 31
HP SAM Registration
service 28
HP SAM Registration service
software 28
HP SAM SQL software 26
HP SAM Web Server 26
Internet Explorer-based
client 32
Windows CE-based client 33
Windows XPe-based client 32
Internet Explorer-based client 32
80 Index
Page 89

IP address list 27
J
Japanese characters 72
K
KeyRepeatEnabled 39
Keys 39
KioskMode 35
L
legal banner 4
Licensing 64
line graphs, availability 73
Log Maintenance Scheduler 63
Log tab 67
logging in 43
M
manage resources 53
managing
Administrative permissions 47
Administrator access list 44
HP SAM users 48
managing asset groups 47
managing resource roles 46
MapClipboard 40
MapDrives 39
MapDrivesList 40
MapPorts 39
MapPrinters 39
MapSmartcards 39
MapUSB 39
Maximum Capacity graph 66
Microsoft Remote Desktop
Protocol 7, 8
Minimum Capacity graph 66
mobile thin client
hardware requirements 24
software requirements 24
modifying monitor layout 56
monitor layout
assigning 51
changing configuration 52
configuring 14
creating 56
deleting 56
modifying 56
removing ID 52
moving columns 43
multi-level administrator 2
multi-session—role assignment 3
Mute 38
N
navigation, HP SAM administrator
console 43
network glitch, reconnect 71
NetworkAuthentication 40
new features
blade service PWS
Workstation 3
blade service Windows XP 64–
bit 3
easy multi-display deployment
and Web administrator
setup 5
enhanced “Add New User”
searches 6
global and local client
configuration files 4
legal banner 4
multi-level administrator 2
multi-session—role
assignment 3
Reconnect All button 3
single location client
configuration 3
USB session simplification 3
user resource management
controls 6
window position
enhancements 4
New Resource Setting box 60
New Roles Settings box 60
O
offline blade 71
operation 54
organization units, granting access
to 53
overview, HP SAM 8
P
password, logging in twice 71
Personal Workstation client
hardware requirements 24
software requirements 24
Policies 34
Policies tab 57
policy
creating or updating 59
effective, viewing 59
policy entries 38
policy, hierarchical, table 58
port value 80 and 443,
changing 72
Protocol 38
R
RDC settings, not working 71
RDP 7, 8
reconnect after network glitch 71
Reconnect All button 3
recovery, HP SAM database 72
Referral Search box 62
Registration service
configuration file 29
configuration file name 29
deploying to all blades 41
error codes 74
hardware requirements 23
installing 28
software requirements 23
software, installing 28
software, validating 28
starting 30
testing 31
registration service installation
error 71
Remote Desktop Protocol 7, 8
Remote Graphics Software 7, 8,
10
removing
access device 56
backup resources 49
monitor layout 56
monitor layout ID 52
resources 49
user 52
users from Administrator
group 45
reports
Resource Capacity
Consumption 64
Resource Capacity
Consumption Trend 65
Resource Utilization 66
Reports tab 64
Index 81
Page 90

requirements
access device 23
Blade Workstation client 24
desktop or notebook PC 24
hardware and software 16
mobile thin client 24
Personal Workstation client 24
Registration service 23
SQL server 16
thin client 23
Web server 16
ResetAfterSession 35
Resolutions 36
Resource Capacity Consumption
report 64
Resource Capacity Consumption
Trend Report 65
resource roles, managing 46
Resource Utilization report 66
resources
assigning 49
removing 49
Resources tab 53
resources, assigning from role 51
resources, assigning from template
user 50
resources, assigning manually 49
RGS 7, 8, 10
RgsDialogTimeout 40
RgsErrorTimeout 40
RgsWarningTimeout 40
role, assigning resources from 51
RolesList 30
S
security groups, granting access
to 53
security, enabling 71
selecting multiple items 43
service account 25
setting up
dedicated resource 13
dynamic resource 12
HP SAM 11
static resource 13
settings
smart card 37
user interface 37
Web client 61
Show configuration options
box 61
Show domain field box 61
Show resolution selection box 61
ShowVersion 37
single location client
configuration 3
smart card
login 67
settings 37
Smart card login list 62
Smartcard Requires Click 37
SmartCardAlways 37
SmartCardAutoDisconnect 37
SmartcardCSP 37
SmartCardUidOid 37
SmartCardUidType 37
software
components 10
deploying client 41
software requirements
Blade Workstation client 24
desktop or notebook PC 24
mobile thin client 24
Personal Workstation client 24
Registration service 23
SQL 22
thin client 23
Web server 16
sorting 43
SoundQuality 38
SoundStereo 38
Span 41
SQL database
hardware requirements 18
software requirements 22
SQP server firewall rules 70
starting Registration service 30
static connection 7
static resource, setting up 13
Synchronization Scheduler 63
System Settings tab 60
T
tabs
Administrator Console 46
Home 46
Log 67
Policies 57
Reports 64
Resources 53
System Settings 60
Users and Roles 46
template user, assigning resources
from 50
testing Registration service 31
Themes 39
thin client
hardware requirements 23
software requirements 23
thin client software
requirements 23
thin client, mobile
hardware requirements 24
software requirements 24
Titlebar Text 37
U
UILanguage 38
UiMode 37
unable to connect 71
updating, policy 59
URL, Internet Explorer-based
client 32
USB session simplification 3
user
deleting 52
interface 43
user interface settings 37
User name field 62
user resource management
controls 6
User Sign-in Time box 60
users
adding 52
managing 48
removing from Administrator
group 45
users and roles 46
V
validating, HP SAM Registration
service software 28
view details 54
W
Wallpaper 39
Web client 61
Web server
firewall rules 69
82 Index
Page 91

hardware requirements 16
software requirements 16
WebServerList 30
Width 40
window position enhancements 4
Windows CE-based client 33
Windows XPe-based client 32
WindowSnapEnabled 38
Index 83
 Loading...